

Page 1

Operating Instructions
for condenser tumble dryer
T 7644 C
To avoid the risk of personal injury or
damage to the appliance, it is
essential that you read these
operating instructions before
installation and use. This maschine
is not approved for use in the
United States.
en-CA
M.-Nr. 07 323 260
Page 2
Caring for the environment
Disposal of packing material
The packing materials protect the dryer
from damage during transport. They
have been selected for environmental
compatibility and efficient disposal and
can therefore be recycled.
To prevent suffocation, ensure that any
plastic wrappings, bags, etc. are
disposed of safely and kept out of the
reach of children.
Disposing of your old
appliance
Old appliances may contain materials
that can be recycled. Please contact
your local recycling authority about the
possibility of recycling these materials.
Ensure that a discarded dryer presents
no danger to children. When being
stored for disposal remove the door to
the drying compartment.
Saving energy
To avoid unnecessarily long drying
times and increased energy use:
Let the wash spin in the washer at
–
maximum spin speed.
You can save about 30% in energy
and time if you spin at 1600 instead
of 800 rpm.
Use the maximum load for each
–
drying program. This gives the
optimum energy consumption in
relation to the total amount of
laundry.
– Ensure that the room where the dryer
is located is sufficiently ventilated.
– Clean the lint screen after every use.
– Check the condenser unit from time
to time and clean it when necessary.
2
Page 3

Contents
Caring for the environment..........................................2
IMPORTANT SAFETY INSTRUCTIONS.................................5
Description .......................................................8
Operating the dryer .................................................8
Function of Miele condenser dryer .....................................8
Operation of Miele condenser dryer ....................................8
Main Features .....................................................8
Operating the dryer ...............................................10
Control panel .....................................................10
Laundry care ....................................................12
Care symbols.....................................................12
Drying tips .......................................................12
Proper drying ....................................................14
Brief instructions ..................................................14
Options/Delay....................................................17
Gentle ..........................................................17
Buzzer ..........................................................17
Delay ...........................................................17
Program Overview ................................................18
Changing the program sequence....................................21
Switching over from a running program ................................21
- Canceling and selecting a new program ............................21
- Interrupting a program and removing laundry ........................21
Loading or removing laundry.........................................21
Time remaining ...................................................21
Electronic lock ...................................................22
Cleaning and care ................................................23
Emptying the condensed water container...............................23
Cleaning the lint filtration components .................................24
Cleaning without water ...........................................24
Cleaning with water .............................................25
Cleaning the dryer .................................................25
Cleaning the condenser (heat exchanger) unit ...........................26
Removing the condenser unit......................................26
Checking the condenser unit ......................................27
Cleaning the condenser unit.......................................27
Replacing the condenser unit......................................28
3
Page 4

Contents
Trouble shooting .................................................29
What to do, if...?.................................................29
Test and fault messages.............................................29
Other problems ...................................................31
Replacing the light bulb.............................................34
Customer service.................................................35
Repairs..........................................................35
Program updates ..................................................35
Warranty conditions and warranty period ...............................35
Optional accessories ...............................................35
Installation and connection ........................................36
Front view........................................................36
Rear view ........................................................37
Installation site ....................................................37
Carrying the dryer to the installation site .............................37
Washer-dryer stack..............................................37
Leveling the dryer ...............................................38
Ventilating the installation area .....................................39
Before transport at a later date.....................................39
Draining condensed water externally ..................................40
Arranging the drain hose .........................................40
Hooking up the drain hose (in sink or floor drain) ......................41
Special installation conditions requiring a non-return valve ...............41
Electrical connections ..............................................43
Technical data ...................................................44
Programmable functions...........................................46
Extending the range of drying levels ...................................46
Adjusting buzzer volume ............................................47
Set memory function ...............................................48
Extending cooldown time ...........................................49
Change function of Filter/Vent indication................................50
Adjust keypad tone ................................................51
Changing water conductivity setting ...................................52
4
Page 5
IMPORTANT SAFETY INSTRUCTIONS
This machine T 7644 C meets all
,
CSA requirements. This machine is
not approved for use in the United
States.
WARNING - To reduce the risk of
,
fire, electric shock, or injury to
persons when using your appliance,
follow basic precautions, including
the following:
It is essential to read all instructions
~
before using the appliance.
The dryer is designed for household
~
use only and only for drying textiles that
have been washed in water and whose
fabric care label states that they can be
tumble dried. Other uses may be
dangerous. Miele will not be held liable
for damage caused by improper use or
incorrect operation.
Do not allow children to play on or in
~
the appliance. Close supervision is
necessary when the appliance is used
near children. Always close the door
after use to prevent child hazards.
This appliance is not intended for
~
use by persons (including children)
with reduced physical, sensory or
mental capabilities, or lack of
experience or knowledge, unless they
are supervised whilst using it or have
been shown how to use it by a person
responsible for their safety.
Before this appliance is removed for
~
service or discarded, remove the door
to the drying compartment.
Do not reach into the dryer if the
~
drum is moving.
Do not install or store this appliance
~
where it will be exposed to the weather.
Do not tamper with the controls.
~
Do not repair or replace any part of
~
the appliance or attempt any servicing
unless specifically recommended in
these operating instructions. Repairs to
electrical appliances should only be
performed by qualified personnel.
Incorrectly repaired machines may
pose a considerable risk to the user.
Do not use fabric softener sheets to
~
eliminate static in this dryer. Best
results are achieved when a liquid
softener is used in the washer. Follow
the manufacturers instructions.
To prevent the risk of fire, the
~
following textiles must not be dried in
this dryer:
–
items which have not been washed.
–
items, such as work-wear, exposed
to grease, oils, or other deposits
(such as lotions or cosmetics) in your
dryer. If these items have not been
thoroughly cleaned there is a danger
that they may contribute to a
chemical reaction that could cause
the laundry to ignite when heated
even after being removed from the
dryer.
5
Page 6
IMPORTANT SAFETY INSTRUCTIONS
items that have been previously
–
cleaned, washed, soaked or spotted
with gasoline, dry-cleaning solvents
or other flammable or explosive
substances. They may give off
vapors that could ignite or explode.
items treated with flammable
–
cleaning agents or items containing
acetone, alcohol, petrol, stain
remover, wax or chemicals from
buffing, etc.
items which have been splashed with
–
hair spray, nail polish remover, etc.
When washing heavily soiled items
ensure that sufficient detergent is
used with a high temperature. If in
doubt wash the item several times.
– items containing foam rubber or
similarly textured rubber-like
materials.
– items with padding or filling (e.g.
pillows or jackets) which have been
damaged. Loose filling could catch
fire.
WARNING – Never stop a tumble
~
dryer before the end of the drying cycle
unless all items are quickly removed
and spread out so that the heat is
dissipated.
Allow the dryer to complete each
~
stage of the program selected,
including the cooling down phase. This
will ensure that the items being
removed are not too hot to handle
Clean the lint filter and lint screens
~
before or after each load.
Keep the area around the air intake
~
(toe kick) and adjacent surrounding
areas free from lint, dust and dirt.
The interior of the machine should
~
be cleaned periodically by qualified
personnel.
This dryer is intended for
residential use only!
GROUNDING INSTRUCTIONS
~
This appliance must be grounded. In
the event of malfunction or breakdown,
grounding will reduce the risk of
electric shock by providing a path of
least resistance for electric current.
This appliance is equipped with a cord
having an equipment grounding
conductor and a grounding plug. The
plug must be plugged into an
appropriate outlet that is properly
installed and grounded in accordance
with all local codes and ordinances.
WARNING – Improper connection of
~
the equipment-grounding conductor
can result in a risk of electric shock.
Contact a qualified electrician if you are
in doubt as to whether the appliance is
properly grounded.
Do not modify the plug provided
~
with the appliance: if it will not fit the
outlet, have a proper outlet installed by
a qualified electrician.
A faulty power cord must be
~
replaced by a genuine Miele power
cord.
Do not use the dryer without lint
~
screens or with damaged lint screens.
Lint screens must be cleaned
~
regularly!
6
Page 7
IMPORTANT SAFETY INSTRUCTIONS
The dryer should not be operated
~
without its condenser unit.
Lint screens and door lint filter must
~
be dried after wet cleaning. Wet
screens may cause faulty dryer
operation!
Do not place the dryer in a room
~
where there is a risk of frost occurring.
Temperatures around the freezing point
affect dryer performance.
Condensed water freezing in the pump
and the drain hose can lead to
damage.
Permissible room temperature musts be
between +2°C and +35°C.
If the condensed water is drained
~
externally, you must secure the drain
hose against slipping off, if for example
it is hanging from a sink.
If the hose slips off, the condensed
water released can cause damage.
Condensed water is not potable.
~
It can endanger the health of people
and pets.
Keep the room in which the dryer is
~
installed free of dust and fluff.
Dirt particles in the incoming cooling air
impair performance.
Do not sit or lean on the door. The
~
dryer might tip over.
Close the door after every drying
~
cycle. In this way you can prevent
children from trying to climb into the
–
dryer or leaving objects inside it.
Pets or small animals from getting
–
into the dryer.
Do not hose down the dryer.
~
Accessories
Accessory parts may only be
~
attached or installed when they have
been expressly approved by Miele.
If other parts are added or installed,
guarantee, performance and/or product
liability claims are invalidated.
The manufacturer will not be held
liable for damage caused by failure
to comply with the safety instructions
and warnings.
SAVE THESE INSTRUCTIONS
7
Page 8

Description
Operating the dryer
Dear Customer,
Thank you for choosing Miele
condenser (heat-exchanger) dryer!
Function of Miele condenser
dryer
The condenser dryer evaporates water
from damp clothes.
The water vapor is then condensed and
collected in a special container.
Operation of Miele condenser
dryer
The condenser dryer circulates air
(trapped with wet laundry inside a
reversibly rotating drum) via lint filters,
heat exchanger and heaters, back into
the drum in a closed loop.
The vapor condenses inside the heat
exchanger and is collected in a
condensed water container.
The heat exchanger (condenser) needs
cooling, so the dryer circulates ambient
air, through separate channels across
heat exchanger, in an open loop. (the
two air flows do not mix).
Returning ambient air warms up the
room with dry heat.
Practically all energy, taken from the
electrical wall outlet, remains in the
room as dry heat.
Main Features
1. No outside venting is required:
The dryer operates on
heat-exchange principle.
Ideal for condominiums – needs
only a regular Canadian dryer wall
outlet and room air for cooling.
Saves space (normally taken by a
vent).
2. No depressurization,
3. No burden on dwelling’s existing
venting system,
4. High energy efficiency:
Axial air flow.
Automatic moisture sensing and
drying stage termination.
No venting to outside = the electrical
energy is not blown outside, but
stays in the room in form of dry heat
(as opposed to a vented dryer).
This dry heat helps to keep a house
warm in cold months.
By helping to heat the house in
winter, condenser dryer lowers
overall energy needs of a house,
thus becoming effectively more
energy efficient than a vented dryer.
8
Page 9

Description
5. Laundry care – anti-crease action
and roll-up prevention:
To limit wrinkling the dryer performs the
following actions:
5.1. Tumble drying with drum reversal
(prevents roll-ups of laundry,
creasing and uneven drying),
5.2. Constantly measures the
temperature of air coming into and
leaving the drum,
5.3. Cycles two heater sections for 0,
half and full power, to control
drum’s temperature,
5.4. Automatic drying stage
termination, after the desired
Dryness level of laundry is
reached,
5.5. Cooling down with tumbling and
drum reversal,
5.6. Anti-crease with drum reversal:
– axial air flow in the drum:
for uniform drying.
To do all this, the dryer is
equipped with systems:
i. water conductivity metering,
ii. sensing of laundry’s residual
moisture,
iii. software,
iv. reversing drum drive.
– smooth stainless steel drum:
for air cushioning of tumbling
laundry and reliable residual
moisture sensing.
9
Page 10
Operating the dryer
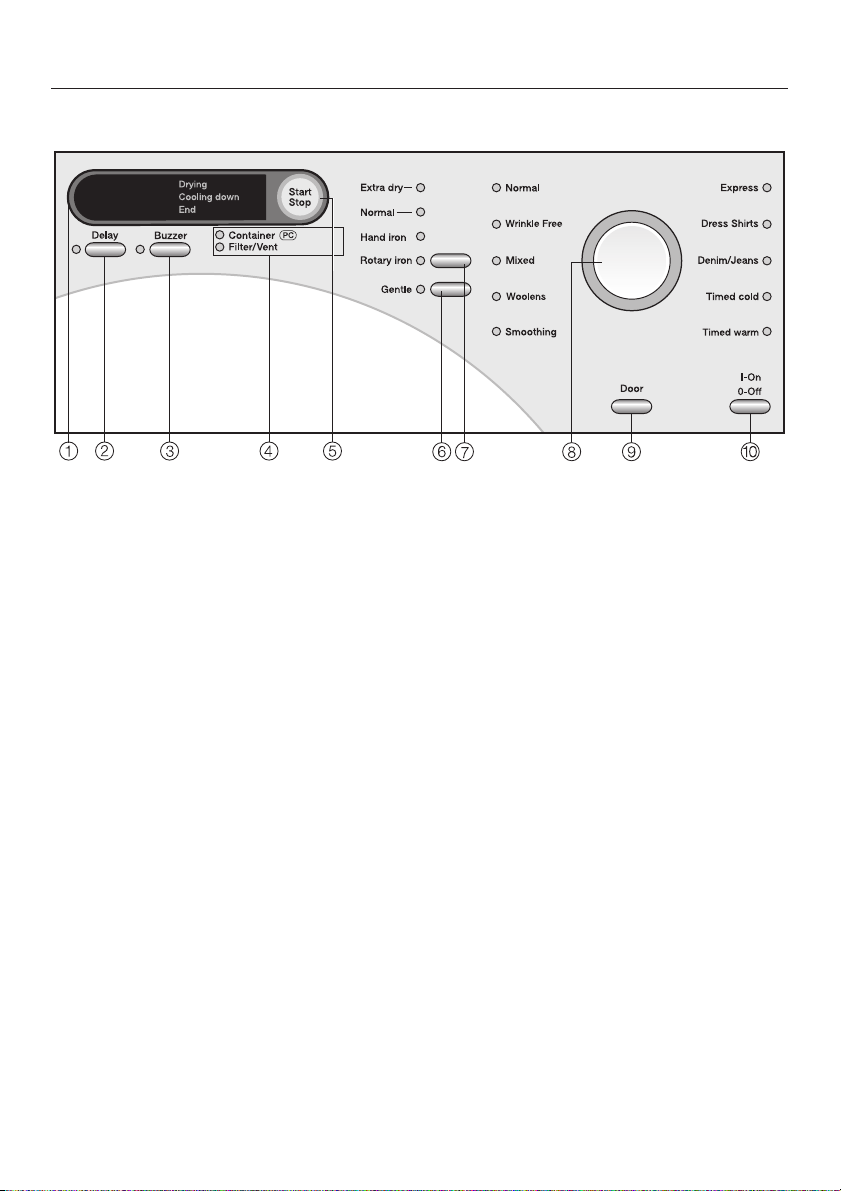
Control panel
a Display
b Delay button
This button has a dual function:
- Selecting the duration of the
Timed cold and Timed warm
programs.
- Pre-selection of start time.
c Buzzer button
The end of the program is signaled
audibly.
d Fault indicator / Optical interface
Description: See "Problem solving /
Customer service" section.
e Start/Stop button
Starts and stops a program.
Interrupts a program when pressed.
Flashes during program selection
and lights once the program starts.
f Gentle button
Delicate fabrics are dried at a lower
temperature.
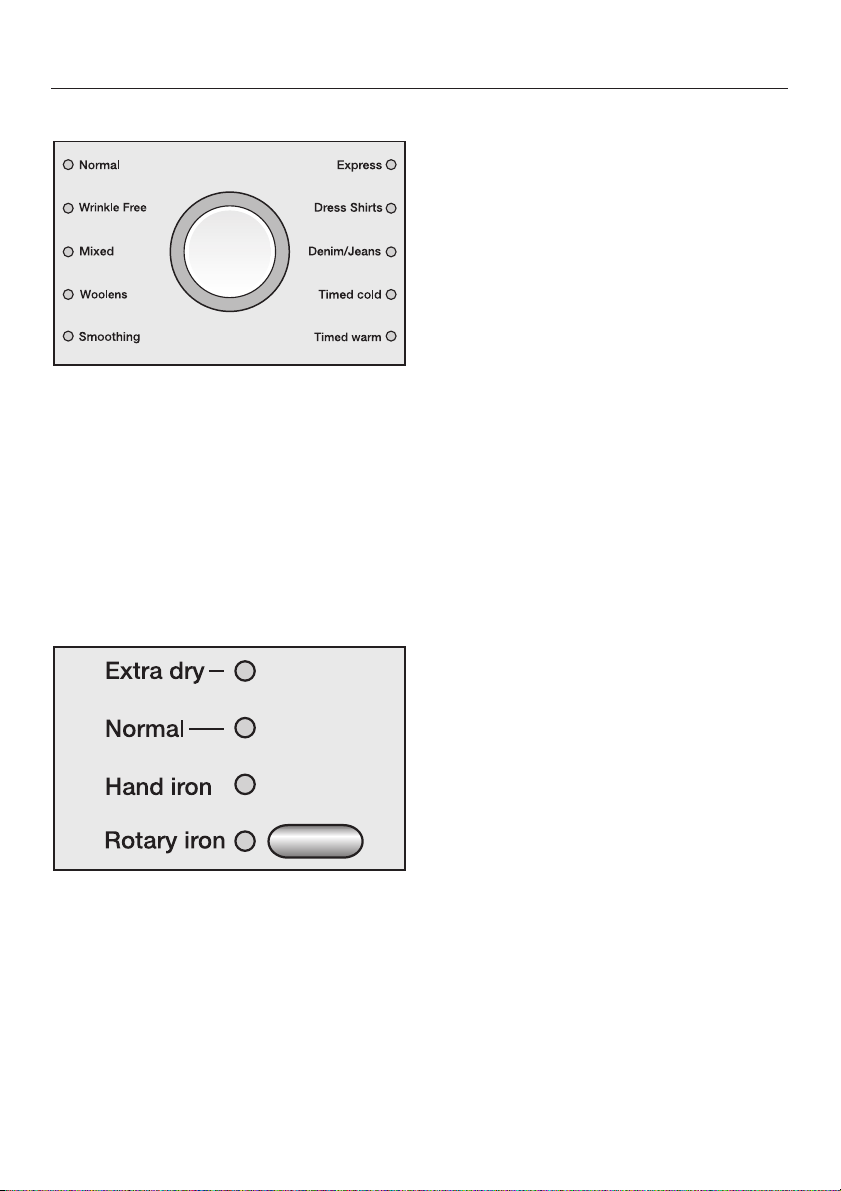
g Dryness button
Indicator lights identify the drying
level selected.
h Program selector
Indicator lights identify the program
selected.
i Door button
This button opens the door
independently of the power supply.
j I-On/0-Off button
For switching the dryer on and off.
10
Page 11

Operating the dryer
Display
The following functions are selected
from the display:
Delay
–
Selecting duration of timed
–
programs.
Programmable functions.
–
The display also shows:
Program duration.
–
Program stage:
–
Drying
Cooling down
End.
– Test and fault messages.
Program duration/ Estimated time
remaining
When a program is selected, the
estimated time remaining will be
displayed. This is to be considered an
estimate only.
In this way, the delicate and smoothing
programs can end earlier, when a
certain temperature is reached. This
can happen with particularly fine
fabrics, very small loads, or if items
have previously been dried.
Delay
The delay time selected will be
displayed.
The delay time countdown begins after
pressing the Start button.
Once the time delay expired, the
estimated program duration will appear
in the display and the drying begins.
Programmable functions
The programmable functions can be
used to adapt the dryer to your
personal requirements. In programming
mode, the display will show the function
selected.
The following factors can lead to
variations in the time remaining
estimate: Residual moisture after
spinning; type of fabric; size of load;
ambient temperature, or fluctuations in
the power supply.
The adaptive electronics constantly
adjusts to the individual wash load to
ensure a more accurate estimate of
time remaining. This estimate is
permanently monitored during drying,
which in some cases can lead to a
change in the estimate.
11
Page 12
Laundry care
Care symbols
Drying
q Normal/higher temperature
r reduced temperature: select
Gentle
(for delicate fabrics)
s Not suitable for dryer
Ironing and rotary ironing
I very hot
H hot
G not very hot
J Do not iron/rotary iron
Drying tips
– Always check the weight
recommendation for maximum loads
as listed in the "Program Overview"
section.
Overloading will cause wear and
tear on the laundry, give a poor
drying result and cause more
creasing.
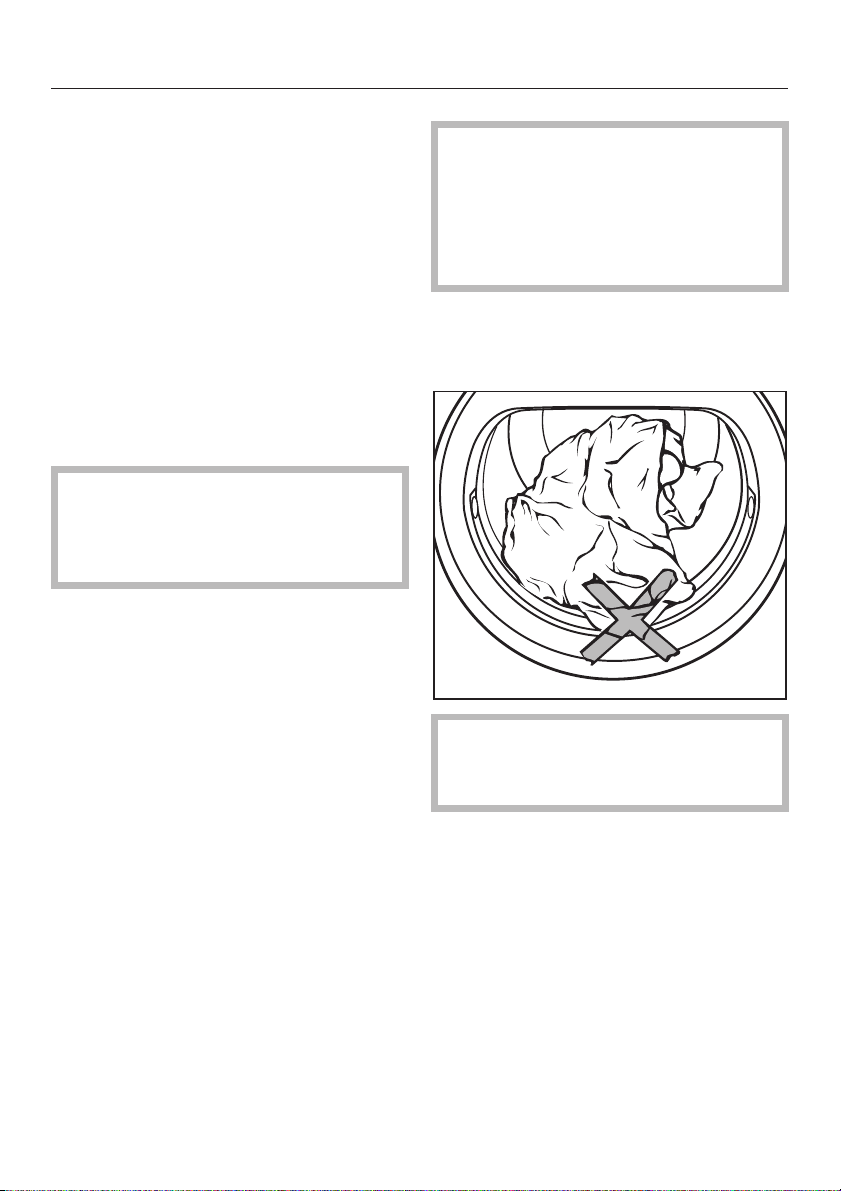
Do not dry fabrics that are still
–
soaking wet! After washing, spin
fabrics for at least 30 seconds.
Dry mixed loads of cottons, colors
–
and easy-care fabrics in the in the
Express program.
Open jackets
–
Woolens and wool blends
–
mat and shrink. Only handle these
fabrics in the Woolens program.
The linings of down-filled garments
–
depending on quality, tend to shrink.
Handle these fabrics only in the
Smoothing program.
– Pure linens
indicated on the care label.
Otherwise the fabric may become
rough. Handle these fabrics only in
the Smoothing program.
– Cottons (such as T-shirts and
underwear) depending on quality,
often shrink at the first wash.
Therefore: to avoid further shrinkage,
do not over-dry these textiles.
so that they dry evenly.
tend to
are dried only when
,
12
–
Starched laundry
achieve the usual finish, however,
use a double amount of starch.
–
Wash new colored fabrics
before the first drying. Do not dry
them together with light-colored
fabrics since their colors may run
and discolor other garments or even
plastic dryer components.
may be dried. To
separately
Page 13

Laundry care
Wrinkling
–
This especially occurs with very fine
fabrics as used in shirts and blouses.
To limit wrinkling the dryer performs the
following actions:
1. Tumble drying with drum reversal
(prevents roll-ups of laundry,
creasing and uneven drying),
2. Constantly measures the
temperature of air coming into and
leaving the drum,
3. Cycles two heater sections for 0, half
and full power,
4. Automatic drying stage termination,
after the desired Dryness level of
laundry is reached. To do this, the
dryer is equipped with systems:
- water conductivity metering,
- sensing of laundry’s residual
moisture,
- software.
5. Cooling down with tumbling and
drum reversal,
increases with larger loads.
6. Anti-crease with drum reversal.
In cases of doubt, reduce the load by
dividing it.
Use the Dress shirts program.
13
Page 14
Proper drying
Brief instructions
The operating steps identified with
numbers(A, B, C, ...) may be used as
short-cut instructions.
A Preparing the laundry
Loosen the washed garments and sort
them by: . .
. . . desired drying level,
. . . type of fabric and finish,
. . . size,
. . . same residual moisture content
after spinning.
This will produce very even drying.
Remove foreign objects like
,
detergent dispensing devices from
the laundry. They can melt and
damage the dryer and the wash.
– Check hems and seams to ensure
that linings don't come out.
Do not exceed maximum loads
specified in the "Program Overview"
Section.
Overloading may cause wear and
tear on the laundry and adversely
affects drying.
Before closing the door, check that
^
the lint filter is properly inserted in the
door casing.
– Close duvet covers and pillowcases
to prevent small items from getting
inside.
–
Fasten hooks and close buttons.
–
Tie fabric belts together.
B Turn on the dryer
You may also switch the dryer on after
loading it, as the drum will not be
illuminated, to save energy.
^
To turn it on, press the I-On/0-Off
button.
C Loading the dryer
^
Press the Door button to open.
^
Place the laundry loosely in the drum.
14
Ensure that no small items are
jammed in the door, because they
might otherwise be damaged.
Page 15
Proper drying
D Select program
Select the desired program.
^
The indicator light for the program
selected lights up.
Other indicator lights for drying levels
or extras may be lit, and drying times
displayed.
Dryness level selection in programs:
– Normal, Wrinkle-free, Express, Dress
shirts, denim/jeans
Woolens and Smoothing programs:
cannot be altered.
–
Timed program
The Delay button flashes when Timed
cold or Timed warm programs are
selected.
Repeatedly press the Delay button
^
until the required duration appears in
the display.
Drying time can be selected in
10-minute increments from 20 minutes
up to 2 hours.
E Extra options/Select Delay
^ Press button to select the following
options:
Gentle, Buzzer, Delay options (see
"Options/Delay").
Anti-Crease action always activates
at program's end (see next page).
Please note: Delay is not possible in
combination with the Timed warm and
Timed cold programs.
^
Press the button repeatedly until the
desired indicator light is lit.
For Normal any dryness level can be
selected, but selection is limited in
other programs.
Note: The estimate of time remaining
shown in the display varies with each
new program selection.
15
Page 16

Proper drying
F Starting the program
The Start/Stop button flashes during
program selection. This means that a
program can be started.
Press the Start/Stop button.
^
The Start/Stop button lights.
Drying appears in the display and the
time remaining is counted down.
Before the end of a program
After the drying phase finished a
cooldown phase follows.
The following programs have no
cooldown phase: Woolens, Smoothing.
G End of program - Remove laundry
0 and End appear in the display to
indicate the program end. The buzzer
sounds at intervals (when selected).
After the program end the drum rotates
reversible in intervals if clothes are not
removed (Anti-crease action). This
helps to prevent creasing for up to 2
hours.
Press the Door button.
^
Open the door.
^
Remove the laundry.
^
Check that the drum is empty.
Laundry left behind may be
damaged if dried again.
To save energy, the drum light turns off
after a few minutes when the dryer is
not operating and the door is open.
^ To shut it off, press the On/Off button.
16
^ Clean the lint filter and lint screens.
^
Close the door.
^
Empty the condensed water
container (if the condensed water is
not drained off externally).
^
The condenser should be checked at
intervals and cleaned as necessary
(See the section on "Dryer Care").
Page 17

Options/Delay
Gentle
Delicate fabrics (with the rsymbol on
the care label, such as acrylics) must
be dried at lower temperatures for
longer durations.
On some programs Gentle is
permanently set and cannot be
deselected.
Buzzer
At the end of the program a buzzer
sounds at intervals, for a maximum of
1 hour.
A continuous warning tone for fault
messages sounds whether the buzzer
is on or off.
Delay
With the Delay option, you can select a
later program start time. Program start
can be delayed by 30 minutes up to a
maximum of 24 hours. This enables
you, for instance, to take advantage of
night electricity rates.
Starting
Press the Start/Stop button.
^
The Delay indicator light comes on.
–
The Delay counts down to program
start as follows:
More than I0^, in whole hours.
–
Less than I0^, in minutes.
–
The drum will turn briefly every hour to
prevent creasing.
Canceling / altering Delay
Press the Start/Stop button.
^
The Delay is cancelled.
^ Repeatedly press the Delay button
until the required duration appears in
the display.
^ Press the Start/Stop button.
The Delay resumes from the beginning.
Adding laundry
You can add laundry while the Delay is
still counting down:
After program selection:
^
Repeatedly press the Delay button
until the required duration appears in
the display.
–
The Delay indicator light flashes.
–
Times of
up to I0^ are selected in 30-minute
steps,
more than I0^ in one-hour steps.
–
If you keep the Delay button pressed
in, the time will continue to increase
up to 24^.
^
Switch off the dryer.
^
Open the door and add the laundry.
^
Close the door and switch on the
dryer.
17
Page 18

Program Overview
Normal
Extra dry, Normal
Fabrics Single- and multi-layered cotton such as: hand towels, T-shirts, baby
clothes.
Note
Gentle To be selected for delicate fabrics with the care symbol r.
Hand iron, Rotary iron
Fabrics Cotton or linen fabrics. For example: Table linens, bed linens,
Note
Gentle To be selected for delicate fabrics with the care symbol r.
Wrinkle-free
Extra dry, Normal, Hand iron
Fabrics Easy-care fabrics in synthetics, cotton or blends. For example:
Note – To reduce creasing even more, select Hand iron and reduce the
Gentle To be selected for delicate fabrics with the care symbol r.
Mixed
Normal, Hand iron
Fabrics Delicate items made of synthetic fibres, blends or cottons such as
Gentle Unavailable.
Select Extra dry for multi-layered and extra thick fabrics.
–
Do not use Extra dry to dry jersey fabrics like T-shirts and baby
–
clothes - they may shrink.
starched laundry.
You can keep laundry moist if you roll it up until ready to iron it.
–
sweaters, dresses, trousers, skirts, tablecloths.
load to 1.5 kg*.
– Fabrics are dried with low creasing with the Hand iron drying
program, depending on fabric type and load.
shirts, blouses, lingerie, appliqué fabrics.
18
Page 19

Program Overview
Woolens
Fabrics Woolens.
Note
Gentle Unavailable.
Smoothing
Fabrics
Note
Gentle Unavailable.
Express
Normal, Hand iron
Fabrics Mixed loads of fabrics for the Normal and Wrinkle-free programs.
Dress shirts
Normal, Hand iron
Fabrics Shirts and blouses.
Gentle To be selected for delicate fabrics with the care symbol r.
Denim / Jeans
Normal, Hand iron
Fabrics Denim material like trousers, jackets, skirts or shirts.
Gentle To be selected for delicate fabrics with the care symbol r.
Remove items immediately after the end of the program while still
–
slightly damp. Allow items to air dry.
Cotton or linen fabrics.
–
Synthetics, cotton or blends. For example: cotton trousers, jackets,
–
shirts.
Program to reduce creases formed during spin cycle in washer.
–
Remove garments immediately the program ends and air-dry
–
19
Page 20

Program Overview
Timed cold
Fabrics
Timed warm
Fabrics
Note To start with, do not select the longest time. Determine the most
Tip: Use Timed warm to remove or reduce unwanted odors from clean
Gentle To be selected for delicate fabrics with the care symbol r.
Any fabric needing airing.
–
Additional drying of multi-layered garments which dry unevenly
–
owing to their design: e.g., jackets, pillows and voluminous fabrics.
Drying individual laundry items: e.g. bath towels, bathing suits, dish
–
cloths.
suitable time by trial.
cotton clothing (duration: 1/2-1 hour). The freshening effect is
reinforced if you moisten the clothing or use a sheet of fabric
conditioner before airing them. Odor reduction will be less for
synthetics.
20
Page 21

Changing the program sequence
Switching over from a running
program
As a protection against unintentional
changes, program selection is no
longer possible.
To be able to choose a new program,
you must cancel the current program.
- Canceling and selecting a new
program
Press the Start/Stop button.
^
The load will be cooled down for a
few minutes, until a specific drying
time and temperature have been
reached.
If you press the Start/Stop button
again, the drum stops, End appears
in the display.
^ Switch the dryer off.
^ Then, switch it on again.
^ Select and start a new program im-
mediately.
Loading or removing laundry
Press the Door button.
^
Open the door.
^
Danger of burning:
,
Do not touch the back of the drum
when adding or removing items.
Temperatures in the drum area can
be high.
Add or remove laundry as needed.
^
Close the door.
^
Press the Start/Stop button.
^
Time remaining
When the program sequence is
changed, the time remaining as shown
by the display may differ from the
actual drying time.
- Interrupting a program and
removing laundry
^
See below: "Loading or removing
laundry".
^
Turn the dryer off after closing the
door.
21
Page 22

Electronic lock
The lock function protects your dryer
against unauthorized use.
You can activate this function whenever
you wish.
It locks the dryer's electronics. It can be
turned on, but no program can be
started.
In such a case, the Gentle indicator
–
light flashes and a key symbol 0-§
appears in the display.
The door may be opened at any time,
as it is not locked.
Activating the lock
Precondition
– The dryer is switched off.
– The door is closed.
A Press the Gentle button and keep it
pressed until Step E.
B Press the I-On/0-Off button in.
The Express indicator light comes on.
C Slowly turn the program selector
step by step through three positions
clockwise.
The three program indicator lights
must light up in succession.
:
C Slowly turn the program selector
step by step through three positions
counterclockwise.
The three program indicator lights
must light up in succession.
TheGentle indicator light flashes and
the key symbol 0-§ appears in the
display.
E Release the Gentle button.
The lock function has been activated.
You may turn off the dryer.
^
Deactivating the lock
Precondition
– The dryer is switched off.
– The door is closed.
^ The procedure is as for "Activating
the Lock". Perform steps A toE.
At step E the indicator light for the
Gentle button no longer flashes and the
0-§ key symbol goes out.
The lock function has been
deactivated.
:
22
Page 23

Emptying the condensed water
container
Water separated from laundry by drying
is collected in the condensed water
container.
Empty the container after every
drying program.
The Container indicator light comes on
when the maximum water level in the
container has been reached.
It will go out when the door has been
opened and closed again.
Close the door completely.
,
Otherwise, the door and the
handgrip panel could be damaged
when the container is pulled out.
Cleaning and care
Empty the condensed water
^
container.
^ Return it to the dryer.
Do not drink condensed water! It
,
could cause health problems for
humans or pets.
^
Pull out the condensed water
container.
^
Carry the container levelly so that
water does not pour out. Hold it by
the handgrip panel and the end.
You may use condensed water for
household uses (for steam ironing, or
for air humidifiers for instance). First
pass the condensed water through a
fine sieve or a coffee filter. The finest
lint, which might otherwise cause
damage, will be filtered from the water.
23
Page 24

Cleaning and care
Cleaning the lint filtration
components
The lint filter in the door casing and lint
screens in the port-hole capture lint
generated by the drying process. Clean
them after every drying*.
Cleaning without water
Tip: You can dispose of the lint without
touching it by using a vacuum cleaner.
Remove the lint from the space in the
^
door casing with a bottle brush or the
vacuum.
Wipe the door casing seal (2) all
^
around with a damp cloth.
Insert the cleaned door lint filter fully
^
into the door casing.
^ Wipe or vacuum the lint from both lint
screens in the port hole.
^
Pull the door lint filter (1) out of the
door casing.
^
Rub or vacuum the lint from the
screen surface.
24
^
Close the door.
* Also check the lint screens and
door lint filter when the Clean out
airways indicator light comes on.
Page 25

Cleaning with water
The lint screens and door lint filter
should be given a wet cleaning only
when severely blocked or plugged.
Open the door and extract the door
^
lint filter from the door casing.
Remove both lint screens from the
port-hole:
Cleaning and care
When inserted, all lint screens
,
must be dry. Wet screens can cause
faulty dryer operation!
Insert the door lint filter fully into the
^
door casing.
Insert the lint screens in the port-hole
^
and push them downwards.
Latch both knobs (until you hear
^
them click).
Cleaning the dryer
Disconnect the dryer from the
electrical supply.
^ Clean the housing, control panel and
door seal only with a slightly damp
cloth and mild detergent or soapy
water.
^ Turn the left and right lint screen
knobs a (until you hear them click).
^
Grasping the knobs, pull the lint
screens out towards the centreb.
^
Clean all screens under running hot
water.
^
Shake the screens thoroughly until
drips are no longer visible.
^
Dry them thoroughly and with care.
^
Also clean the air passages
underneath the screens, using a
vacuum cleaner, for example.
^ Clean stainless steel parts (like the
drum) with a suitable stainless steel
cleaner.
Use no scouring products, cleaners
containing solvents, or glass or
all-purpose cleaners. They can
damage plastic surfaces and other
parts.
^
Dry all parts with a soft cloth.
25
Page 26

Cleaning and care
Cleaning the condenser (heat
exchanger) unit
Detergent residue, hair and fine lint
from the laundry can get through the
lint screen and plug the condenser.
Dust from the room taken in with the
cooling air can also cause blockages.
Check the condenser at least twice
a year and also if the Filter/Vent
indicator light comes on. For
frequent use, no later than
approximately every 100 drying
cycles. Clean it when necessary.
Removing the condenser unit
Turn the locking lever on the inner
^
cover downwards.
^ Tilt the internal cover forwards.
^ Remove it by pulling it diagonally
upwards.
^
Open the outer panel.
^
Remove the panel by pulling it
diagonally upwards and put it aside.
26
^
Rotate the locking lever on the
condenser upward (the locking lever
hook disengages from the groove in
the base).
Page 27

Pull the condenser by its handle out
^
of its housing.
Checking the condenser unit
^ Hold the condenser up to the light in
two directions:
Cleaning and care
If no lint is visible:
Replace the condenser unit (see the
^
next page).
If lint is visible:
Clean the condenser unit as
^
described below.
Cleaning the condenser unit
When rinsing the condenser unit,
^
be sure to position it as shown in
the following two illustrations:
^
Look to see whether there is lint
inside it.
The arrows in the illustration above
indicate where to look.
^
Rinse the unit from the longitudinal
side with a stream of water – as
shown in the top illustration.
27
Page 28

Cleaning and care
Replacing the condenser unit
Rinse the unit from the front with a
^
stream of water.
^ Check the condenser unit once more
for visible fouling (see "Checking the
Condenser Unit"). Rinse as often as
necessary.
^ Ensure that the condenser unit
rubber seals are clean.
Seals should not be removed and
must be free of kinks.
Checking and cleaning the condenser
unit housing
^
Check the condenser unit housing
inside the dryer for visible lint.
Using a damp cloth, wipe it only from
areas you can reach with your hand.
Push the condenser unit fully
^
stop) back into its housing.
The handle
top, the locking lever down.
Rotate the locking lever into the
^
horizontal position so that its hooks
clearly latch down into the groove in
the base of the housing.
When replacing the inner cover,
ensure that the rubber seal is
correctly seated in its groove.
^ Locate the inner cover so that its
latching hooks are down. While doing
so, hold it at an angle and push it
gently downwards.
^ Push against the cover and latch it
with its locking lever.
After latching, the locking lever must
be horizontal.
^ Insert the bottom of the external
panel and press until the upper edge
latches into position.
,
Only a correctly inserted and
latched condenser unit will ensure
the watertightness of the system!
of the unit must be on
(to the
28
Page 29

Trouble shooting
What to do, if...?
You can remedy most problems yourself. In many cases you can save time and
expense, since you will not have to call in customer service.
The following tips should help you locate and remedy the cause of a problem.
However, please note the following:
Repairs to electrical appliances should only be carried out by qualified
,
professionals. Work performed by unqualified persons can place the user at
considerable risk.
Test and fault messages.
Problem Cause Solution
Cancelling a program
0 and Finish appear in
the display
The buzzer sounds.
0-§ appears in the
display.
Gentle indicator light
flashes.
Canceling a program
The buzzer sounds.
Flashing display may
show Cold air or Finish.
This is not a fault.
The electronics
recognizes that there is
no laundry in the drum
and cancels the program.
Drying of single or
already dried laundry
items can also lead to
program cancellation.
The lock function has
been activated.
The cause is not immedi
ately obvious.
In future, dry individual
laundry items with the
warm air program.
Cancelling test
message:
– Open and close door
If you wish to dry, you
must disable the lock
function (see "Electronic
lock function").
-
–
Switch the dryer off
and then on again.
–
Start a program.
If program interruption
and error message occur,
a fault is present. Contact
Miele customer service.
29
Page 30

Trouble shooting
Problem Cause Solution
Filter/Vent indicator
light goes on.
Canceling a program
Filter/Vent indicator
light goes on.
Container indicator light
goes on.
The buzzer sounds.
The indicator light shows
that the dryer is not
operating at its most
efficient or economical.
Possible causes:
Blockage by lint or
detergent residues.
Possible causes and
remedies are described
above.
The condensed water
container is full or there is
a kink in the drain hose.
As a rule, it is sufficient
–
to clean the lint
screens and door filter.
Should that not be
sufficient, then check
all possible causes
listed under "The
drying cycle goes on
too long or even
switches off."
Canceling test
message:
Open and close door
–
You can deactivate the
Filter/Vent indicator light
(see section on
"Programmable
functions").
Canceling the fault
message:
– Open and close door
– Start a program.
–
If the fault message
comes back, call
Customer Service.
–
Empty the condensed
water container.
–
Check the drain hose.
Canceling test
message:
–
Open and close door
30
Page 31

Trouble shooting
Other problems
Problem Cause Solution
The drying
process goes on
too long or even
switches off.
Even after the lint
screen is
cleaned, the
Filter/Vent
indicator come
on.
The laundry was
not satisfactorily
dried.
Please check all possible causes and switch the dryer
off and then on again.
Insufficient ventilation,
perhaps because the
installation space is too
small. As a result, room
temperature may rise.
The ventilation inlets beneath
the door are closed.
Lint screens are plugged
with lint or have been put
back wet after cleaning.
Detergent residues, hair and
fine lint may block the
condenser.
Laundry was insufficiently
spun.
The dryer is overloaded. Verify the maximum load for
Metal components such as
zippers have prevented the
moisture level of the laundry
from being determined
accurately.
The load consists of various
fabrics.
Open the door or window, to
prevent room temperature
from rising.
Remove the blocking
–
objects.
Remove the lint.
–
– Lint screens must be dry.
Inspect and clean the
condenser from time to time.
In future, spin textiles in the
washer at a higher rpm.
each drying program.
–
In future, open the zippers.
If the problem recurs, in
future dry garments with long
zippers using the Warm air
program.
–
Re-dry with warm air.
–
Next time, select a suitable
program.
31
Page 32

Trouble shooting
Problem Cause Solution
Water runs from the
dryer after the
condenser has been
cleaned:
Synthetic laundry items
are statically charged
after drying.
There has been a lint
buildup.
The condenser inner
–
cover and/or the
condenser have not
been properly inserted
and latched.
Lint is sticking in the
–
condenser housing
recess.
Synthetics have a
tendency to static
discharges.
Drying releases fabric lint
formed primarily from
rubbing during wear but
also, in part, from
washing. The stress on
fabrics in the dryer is
minimal in relation to their
strength.
Verify that the internal
–
cover and the
condenser are
correctly and solidly
seated.
Check their rubber
–
seals as well.
Using a cloth, remove
–
all visible lint from the
heat exchanger recess.
Using a fabric softener in
the last rinse cycle can
reduce static charge
when drying.
Lint released is captured
in the lint screen and can
be easily removed (see
"Care and Cleaning").
32
Page 33

Trouble shooting
Problem Cause Solution
The Dress shirts,
Denim/Jeans, and Timed
cold programs will not
start and the indicator
lights for these programs
do not come on.
The dryer will not start
when switched on.
Drum lighting does not
come on.
The cause is not imme
diately obvious.
The cause is not imme
diately obvious.
The lighting switches off
automatically to save
energy.
The bulb may need
changing.
Switch the dryer off and
-
–
then on again.
Select one of the
–
programs.
If the program will still
–
not start, there is a fault.
Contact Miele customer
service.
Meanwhile, use another
–
program.
Is the dryer switched
-
–
on?
– Is it plugged in?
– Is the door closed?
– Check fuses or circuit
breakers.
Switch the dryer off and on
again.
You can replace the bulb:
See the end of this section.
33
Page 34

Trouble shooting
Replacing the light bulb
Disconnect the dryer from the
electrical supply.
The bulb should be of the same type
and maximum wattage indicated on
the data plate and the lighting cover.
Open the door.
^
The hinged cover for the lighting is over
the port-hole.
^ Gently insert an ordinary tool* under
the side of the cover.
* such as a wide slot-type screwdriver
^
Open the cover by pressing lightly
while rotating your wrist.
The cover opens downwards.
Replace the bulb.
^
Fold the cover upwards and press it
^
on the right and left until you hear it
latch.
Ensure that the cover is properly
,
seated. If moisture gets inside it may
cause a short-circuit.
The heat-resistant bulb should be
obtained only from Miele customer ser
vice.
34
-
Page 35

Customer service
Repairs
For faults you cannot correct yourself,
please contact:
the Miele Factory Repair Service.
–
The telephone number for the
Factory Repair Service is listed at
the back of these operating
instructions.
When contacting the Miele Service
Department, you will need to quote the
model and serial number of your
appliance.
These can be found on the data plate,
visible when the door is open.
Program updates
The PC optical interface is used by
Miele customer service to transfer
program updates (PC = Program
Correction) as well as for diagnose and
testing.
In this way, future developments in
fabrics and in the drying procedure can
be integrated into your appliance.
Miele will give timely notification of Program updates.
Warranty conditions and
warranty period
Warranty information can be found in
your warranty booklet.
Optional accessories
Optional accessories for this dryer are
available from Miele customer service.
35
Page 36

Installation and connection
Front view
a Power cord
b Control panel
c Condensed water container
d Door
e Condenser service access
36
f Four height-adjustable screw feet
g Air inlet and outlet vents for cooling
condenser unit
h Condensed water drain hose
(see section "Draining condensed
water externally")
Page 37

Installation and connection
Rear view
a Handgrips under the cover overhang
for moving the appliance (arrows)
b Air inlet vent for cooling condenser
unit
c Power cord
d Condensed water drainage hose
e Accessories for connection to a sink
drain outlet
Installation site
This dryer can be accommodated
under a worktop if there is sufficient
height.
Do not install the dryer in a
,
location where its door could conflict
with room doors.
The appliance top is not
,
removable.
Carrying the dryer to the installation
site
The rear cover overhang provides
handgrips for transport. To carry the
dryer from the packing base to the
installation site, use the appliance front
feet and the rear cover overhang.
Washer-dryer stack
The dryer can be combined with a
Miele automatic washer in a
washer-dryer stack. For this, a "WTV
412" stacking unit* is required.
* Miele accessory available on order
,
Installation of the stacking unit
may be performed only by an
authorized Miele technician.
37
Page 38

Installation and connection
Leveling the dryer
To ensure trouble-free operation, the
dryer must be level.
Do not block the gap between
,
the bottom of the tumble dryer and
the floor with plinth facings, deep
pile carpet etc. This would hinder a
sufficient flow of air to the dryer.
The air inlet/outlet vents on the
,
front and back must NEVER be
covered. Otherwise, sufficient
condenser cooling cannot be
ensured.
^
Compensate for floor irregularities by
turning the threaded feet in or out.
38
Page 39

Installation and connection
Ventilating the installation area
Function of Miele condenser dryer:
The condenser dryer separates the
mixture of water and laundry (the
wet load) into water and dry laundry
itself.
The water is heated / evaporated,
then condensed and collected into
condensed water container.
The remaining dry laundry remains
in the drum.
Operation of Miele condenser dryer:
The dryer circulates some air
(trapped with wet laundry inside a
reversibly rotating drum) via lint
filters, heat exchanger and heaters,
in a closed loop.
The heat exchanger (condenser)
needs cooling, so the dryer
circulates also ambient air, through
separate channels across heat
exchanger, in an open loop. ( these
two loops do not mix).
Returning ambient air warms up the
room with dry heat.
Practically all energy, taken from the
electrical wall outlet, remains in the
room as dry heat.
You must therefore take measures,
especially in small rooms, to provide
sufficient ventilation, by opening
windows for instance. Otherwise,
longer running times may be
expected.
Before transport at a later date
After every drying, a small quantity of
condensed water will collect in the
pump area. This condensed water can
leak out when the dryer is tipped. We
therefore recommend starting the
Timed cold program for about one
minute before transport
condensed water will be drained into
the condensed water container or out
through the drain hose.
. Residual
39
Page 40

Installation and connection
Draining condensed water
externally
General
When drying is in progress, the
condensed water is pumped into the
condensed water container through the
drain hose at the back of the dryer.
You can also drain it off externally
through the drain hose - you will no
longer need to empty the condensed
water container.
Hose length ................1.50 m
Max. delivery height ..........1.50 m
Max. delivery length ..........4.00 m
Pull the drain hose off its connection.
^
^ Allow any residual water to run into
the container.
Under special kinds of
,
connection conditions, this dryer
must be fitted with a non-return
valve (see following pages).
The following optional accessories are
available:
– an extension hose.
–
a non-return valve kit for conversion
to an external water outlet
(includes an extension hose).
Max. delivery head with non-return
valve fitted: 1.00 m
Arranging the drain hose
,
Do not pull on the drain hose,
stretch it or kink it,
as it could get damaged!
^
There will be a small amount of
residual water in the drain hose.
Have a container ready to collect it.
^ Unwind the hose from its coil and pull
it carefully out of the holders.
^
Guide the hose to the right or left side
of the dryer, as necessary.
Leave the hose in the central holder to
prevent it from being inadvertently
kinked.
40
Page 41

Installation and connection
Hooking up the drain hose (in sink or
floor drain)
See front view illustration.
^
If you decide to hook the hose
,
up to a sink, secure it against being
detached, by clamping it, for
example. Otherwise overflowing
water can cause damage.
Use the bow-shaped holder to
^
prevent the drain hose from
becoming kinked.
Special installation conditions
requiring a non-return valve
Under special connection
,
conditions, a non-return valve (kit
available) for external water
disposal (optional accessory) must
be used. This will prevent the
back-flow of water into the dryer and
possible damage.
Example: Connection to a sink drain
outlet
The drain hose with non-return valve
can be connected directly to a special
sink drain outlet.
^ Remove the accessories from the top
of the rear side of the dryer:
Adapter 1 and the hose clip 3 behind
it.
Such special conditions include:
–
Connection to a sink drain outlet (see
following section).
–
Various kinds of connection, to which
an automatic washer or dishwasher
already in use are also connected.
41
Page 42

Installation and connection
1 Adapter
2 Sink coupling nut
3 Hose clip
4 End of hose
5 Non-return valve
6 Dryer drain hose
Fit the adapter to the sink drain outlet
^
1 with the sink coupling nut 2.
Usually the sink coupling nut has a
flat washer, which you must remove.
Fit the end of the hose 4 to the
^
adapter 1.
Using a screwdriver, tighten the hose
^
clip 3 directly behind the sink
coupling nut.
Install the non-return valve 5 so
,
that the arrow points in the direction
of flow (towards the sink). Otherwise,
pumping out will be impossible.
^ Insert the non-return valve 5 into the
dryer drain hose 6 (make sure it is
connected in the right direction,
check the arrow on the non-return
valve!).
^ Attach the non-return valve using the
hose clips.
42
Page 43

Installation and connection
Electrical connections
GROUNDING INSTRUCTIONS
This appliance must be grounded.
In the event of malfunction or
breakdown, grounding will reduce
the risk of electric shock by
providing a path of least resistance
for electric current. This appliance is
equipped with a cord having an
equipment grounding conductor
and a grounding plug. The plug
must be plugged into an appropriate
outlet that is properly installed and
grounded in accordance with all
local codes and ordinances.
WARNING – Improper connection of
the equipment grounding conductor
can result in a risk of electric shock.
Check with a qualified electrician or
service representative or personnel
if you are in doubt as to whether the
appliance is properly grounded.
The dryer comes witha5ftlong,
12/4 AWG cord and a NEMA 14-30 P
plug.
It should be connected to a
120/208-240 V, 30 A, 60 Hz AC power
supply. A 3 pole-4 wire grounding
power outlet (NEMA type 14-30 R) is
necessary.
The dryer is equipped with a power
cable and plug ready for connection.
The plug must always be accessible to
facilitate disconnecting the dryer from
the electrical supply.
To eliminate a potential fire source, the
dryer should NEVER be connected by
means of extension cords, or by
multi-outlet power strips or the like.
The appliance data plate indicates the
nominal power consumption and the
approbiate fuse capacity. Please
compare the information on the data
plate with the electrical network data.
Do not modify the plug provided
with the appliance! If it will not fit the
outlet, have a proper outlet installed
by a qualified electrician.
43
Page 44

Technical data
Height 850 mm
Width 595 mm
Depth 634 mm
Depth with door open 1074 mm
Can be pushed under a worktop
Height
–
Width
–
Suitable for stacking Yes
Weight 52 kg
Drum Volume 111 liters
Volume of condensed water container approx. 3.5 liters
Hose length 1.50 m
Maximum delivery head 1.50 m
Maximum delivery length 4.00 m
Length of power cord 2.00 m
Voltage
Connected load (Watts)
Rated current (Amps) see data plate
Light bulb wattage
Test certifications granted
Yes
850 mm
600 mm
44
Page 45

Programmable functions
for changing
standard values
As needed, you can use
programmable functions to adapt
the dryer electronics to changing
requirements.
You can alter programmable
functions at any time.
45
Page 46

Programmable functions
Extending the range of drying
levels
You can extend the range of the
drying levels for many of the
programs:
Rotary iron+
(dryer than Rotary Iron).
Hand iron+
(dryer than Hand iron).
Normal +
(dryer than Normal).
Additionally, the Extra dry level can
be selected for the Mixed and Denim
Jeans programs.
This programmable function is also
effective in the following programs:
Normal, Wrinkle free*, Mixed*,
Express, Denim/Jeans
(* no Rotary iron+).
For programming and saving in the
memory, follow steps A to E.
The programmable function is
programmed using the buttons.
Precondition:
–
The dryer is switched off.
P and 0 flash alternatively in the
–
display (default setting).
The number appearing alternatively
with P means:
0 Default setting
I Drying range steps added
(Express indicator light also flashes)
D Pressing the Start/Stop button
switches from one to the other.
E Using the I-On/0-Off button, switch
the dryer off.
The programming is now stored in
memory. You can change it again at
any time.
To select the extended drying level:
^ Select a program.
^ Press the drying level button
repeatedly until one or two indicator
lights come on.
– Indicator lights Extra dry and Normal
= Normal+
–
Indicator lights Normal and Hand
iron = Hand iron+
–
The door is closed.
A Press Start/Stop and keep it pressed
it during steps B-C.
B Press the I-On/0-Off button in.
Wait until the Start/Stop button lights up
continuously ...
C . . . then release the Start/Stop
button.
–
The Gentle indicator light flashes
twice briefly.
46
–
Indicator lights Hand iron and Rotary
iron = Rotary iron+
Page 47

Programmable functions
Adjusting buzzer volume
The buzzer has two volumes.
For programming and saving in
memory, follow steps A to E.
This function is programmed using the
buttons.
Precondition:
The dryer is switched off.
–
The door is closed.
–
A Press Start/Stop and keep it pressed
it during steps B-C.
B Press the I-On/0-Off button in.
Wait until the Start/Stop button lights up
continuously ...
C . . . then release the Start/Stop
button.
D Press the Gentle button once.
– The Gentle indicator light flashes
briefly four times.
The number appearing alternatingly
with P means:
0 Buzzer normal
(default setting)
I Buzzer loud
(Express indicator light also flashes)
E Pressing the Start/Stop button
switches from one number to the
other, and you simultaneously hear
the buzzer setting.
F Using the I-On/0-Off button, switch
the dryer off.
The programming is now stored in
memory. You can change it again at
any time.
–
P and 0 flash alternatingly in the
display (default setting).
47
Page 48

Programmable functions
Set memory function
The electronics memorizes any
selected program with extra options.
The duration of a Smoothing program
will also be stored in memory.
These settings will be used for the
next drying. They can be accepted,
or changed by using the buttons.
For programming and saving in
memory, follow steps A to E.
The programmable function is
programmed using the buttons.
Precondition:
– The dryer is switched off.
– The door is closed.
A Press Start/Stop and keep it pressed
it during steps B-C.
B Press the I-On/0-Off button in.
Wait until the Start/Stop button lights up
continuously ...
The number appearing alternatingly
with P means:
I Memory
(Express indicator light also flashes)
0 no Memory
(default setting)
E Pressing the Start/Stop button
switches from one to the other.
F Using the I-On/0-Off button, switch
the dryer off.
The programming is now stored in
memory. You can change it again at
any time.
C . . . then release the Start/Stop
button.
D Press the Gentle button twice.
–
The Gentle indicator light flashes
briefly six times.
–
P and 0 flash alternatingly in the
display (default setting).
48
Page 49

Programmable functions
Extending cooldown time
You can individually lengthen the
cooldown phase the occurs before
the end of a program. Fabrics will be
more completely cooled down.
Cooldown time
can be extended by two stages.
–
it does not function for Smoothing
–
programme.
For programming and saving in
memory, follow steps A to E.
The programmable function is
programmed using the buttons.
Precondition:
– The dryer is switched off.
– The door is closed.
A Press Start/Stop and keep it pressed
it during steps B-C.
B Press the I-On/0-Off button in.
The number appearing alternatingly
with P means:
0 Default setting
I Five minutes longer cooldown time
(Express indicator light will flash
once)
2 Ten minutes longer cooldown time
(Express indicator light will also flash
twice)
E Pressing the Start/Stop button
switches from one to the other.
F Using the I-On/0-Off button, switch
the dryer off.
The programming is now stored in
memory. You can change it again at
any time.
Wait until the Start/Stop button lights up
continuously ...
C . . . then release the Start/Stop
button.
D Press the Gentle button three times.
–
The Gentle indicator light flashes
briefly seven times.
–
P and 0 flash alternatingly in the
display (default setting).
49
Page 50

Programmable functions
Change function of Filter/Vent
indication
Lint should be removed after drying.
At the same time, the Filter/Vent
indicator light reminds you to do so
as soon as a certain degree of lint
has accumulated. You can yourself
decide which degree of lint
accumulation will trigger that
reminder.
Determine by trial and error which of
the four options responds to your
drying practices.
For programming and saving in
memory, follow steps A to E.
The programmable function is
programmed using the buttons.
Precondition:
– The dryer is switched off.
– The door is closed.
A Press Start/Stop and keep it pressed
it during steps B-C.
B Press the I-On/0-Off button in.
Wait until the Start/Stop button lights up
continuously ...
The number appearing alternatingly
with P means:
0 The Filter/Vent indicator is
deactivated
I The Filter/Vent indicator comes on
only when there is a heavy lint
buildup
(Express control light additionally
flashes once)
2 default setting
(the Express indicator light also
flashes twice)
3 The Filter/Vent indicator will come
on when there is only a light lint
buildup
(The Express indicator light also
flashes three times)
E Pressing the Start/Stop button
switches from one to the other.
F Using the I-On/0-Off button, switch
the dryer off.
The programming is now stored in
memory. You can change it again at
any time.
C . . . then release the Start/Stop
button.
D Press the Gentle button four times.
–
The Gentle indicator light flashes
once slowly.
–
P and 2 flash alternatingly in the
display (default setting).
50
Page 51

Programmable functions
Adjust keypad tone
An audible tone sounds every time a
button is pressed.
For programming and saving in
memory, follow steps A to E.
The programmable function is
programmed using the buttons.
Precondition:
The dryer is switched off.
–
The door is closed.
–
A Press Start/Stop and keep it pressed
it during steps B-C.
B Press the I-On/0-Off button in.
Wait until the Start/Stop button lights up
continuously ...
C . . . then release the Start/Stop
button.
D Press the Gentle button five times.
The number appearing alternatingly
with P means:
0 no Keypad tone
(default setting)
I Keypad tone on
(Express indicator light also flashes)
E Pressing the Start/Stop button
switches from one to the other.
F Using the I-On/0-Off button, switch
the dryer off.
The programming is now stored in
memory. You can change it again at
any time.
–
The Gentle indicator light flashes
once slowly and once briefly.
–
P and 0 flash alternatingly in the
display (default setting).
51
Page 52

Programmable functions
Changing water conductivity
setting
This programmable function
,
should be adjusted only when
residual water content is erroneously
determined owing to the extreme
softness of the water.
Important condition
The water in which fabrics are washed
may be extremely soft with a
conductivity value less than 150 μS/cm.
Drinking water conductivity can be
ascertained from your local water
supplier.
Activate this programmable function
only if the above-mentioned
condition applies.
Otherwise the drying result will be
unsatisfactory.
For programming and saving in
memory, follow steps A to E.
D Press the Gentle button six times.
The Gentle indicator light flashes
–
once slowly and twice briefly.
P and 0 flash alternatingly in the
–
display (default setting).
The number appearing alternatingly
with P means:
0 Default setting
I Lower conductivity setting
(Express indicator light also flashes)
E Pressing the Start/Stop button
switches from one to the other.
F Using the I-On/0-Off button, switch
the dryer off.
The programming is now stored in
memory. You can change it again at
any time.
The function is programmed using the
buttons.
Precondition:
–
The dryer is switched off.
–
The door is closed.
A Press Start/Stop and keep it pressed
it during steps B-C.
B Press the I-On/0-Off button in.
Wait until the Start/Stop button lights up
continuously ...
C . . . then release the Start/Stop
button.
525354
Page 53

Page 54

Page 55

55
Page 56

Alteration rights reserved/ 2009
M.-Nr. 07 323 260 / 01
 Loading...