

Page 1
en Operating Instructions Vacuum Cleaner
fr Instructions d'utilisation Aspirateur
Swing H1
HS07
M.-Nr. 10 081 730
Page 2
Only Miele FilterBags, filters and accessories with
the "Original Miele" logo can be used with this
vacuum. Only then can the suction power of the
vacuum cleaner reach its optimum potential creating
the best possible cleaning results.
USE OF NON-MIELE COMPONENTS MAY VOID
THE WARRANTY.
The use of FilterBags made of paper or a similar
,
material, or FilterBags with a cardboard retaining
plate can lead to serious damage to the vacuum
cleaner and may void the warranty, just as with the
use of FilterBags without the "Original Miele" logo.
The "Original Miele" Logo will appear on the
packaging or directly on the FilterBag.
Purchasing new FilterBags and filters
Original Miele FilterBags and filters can be purchased
from an authorized Miele vacuum dealer or by visiting the
Miele store at www.mieleusa.com.
2
Page 3

en - Contents
IMPORTANT SAFETY INSTRUCTIONS
Guide to the vacuum cleaner
Before using the vacuum cleaner
Using the included accessories
Use
Unwinding the power cord . . . . . . . . . . . . . . . . . . . . . . . . . . . . . . . . . . . . . . . . . . . 11
Adjusting the telescopic wand . . . . . . . . . . . . . . . . . . . . . . . . . . . . . . . . . . . . . . . 11
Plugging the vacuum cleaner in . . . . . . . . . . . . . . . . . . . . . . . . . . . . . . . . . . . . . . 11
Turning the vacuum cleaner on and off. . . . . . . . . . . . . . . . . . . . . . . . . . . . . . . . . 11
Adjusting the rug and floor tool to the floor type . . . . . . . . . . . . . . . . . . . . . . . . . . 11
Parking and storing the vacuum cleaner
Maintenance
Purchasing filter bags and filters . . . . . . . . . . . . . . . . . . . . . . . . . . . . . . . . . . . . . . 12
Which filter bags and filters are the right ones? . . . . . . . . . . . . . . . . . . . . . . . . . . 13
When to change the filter bag . . . . . . . . . . . . . . . . . . . . . . . . . . . . . . . . . . . . . . . . 13
How to change the filter bag . . . . . . . . . . . . . . . . . . . . . . . . . . . . . . . . . . . . . . . . . 14
When to change the dust compartment filter (motor protection). . . . . . . . . . . . . . 14
Replacing the dust compartment filter . . . . . . . . . . . . . . . . . . . . . . . . . . . . . . . . . 14
When to change the exhaust filter . . . . . . . . . . . . . . . . . . . . . . . . . . . . . . . . . . . . . 14
Replacing the "AirClean" filter . . . . . . . . . . . . . . . . . . . . . . . . . . . . . . . . . . . . . . . . 14
Replacing the "Active AirClean" filter or the "HEPA" filter. . . . . . . . . . . . . . . . . . . . 15
Exchanging exhaust filters. . . . . . . . . . . . . . . . . . . . . . . . . . . . . . . . . . . . . . . . . . . 15
When to change the thread catcher . . . . . . . . . . . . . . . . . . . . . . . . . . . . . . . . . . . 15
Changing the thread catcher. . . . . . . . . . . . . . . . . . . . . . . . . . . . . . . . . . . . . . . . . 15
Cleaning and care
Frequently asked questions
Technical Service
Optional accessories
Caring for the environment
LIMITED WARRANTY - VACUUM CLEANERS USA
3
Page 4
en - IMPORTANT SAFETY INSTRUCTIONS
When using an electrical appliance, basic precautions should always be followed,
including the following:
READ ALL INSTRUCTIONS BEFORE
USING THIS APPLIANCE
Keep these operating instructions in a safe place and pass them on to any
future user.
WARNING-
To reduce the risk of fire, electric
shock or injury:
Correct Usage
This appliance is intended for
~
household use only.
This vacuum cleaner is not intended
~
for outdoor use.
Use the vacuum cleaner only in
~
normal household situations for
vacuuming dry material. Do not use on
people or animals.Any other use,
modification or alteration of the vacuum
cleaner is not allowed. Miele cannot be
held liable for damage resulting from
incorrect or improper use.
Persons who lack physical, sensory,
~
or mental capabilities or experience
with the machine should not use it
without supervision or instruction by a
responsible person.
Children
Close supervision is necessary
~
when the vacuum cleaner is used near
children. Never let children play with
the vacuum cleaner.
Children may use the vacuum
~
cleaner without supervision only if they
have been shown how to operate it and
can use the vacuum cleaner safely.
Children must be able to recognize the
potential dangers of improper use.
4
Page 5

en - IMPORTANT SAFETY INSTRUCTIONS
Technical safety
Check the voltage rating of the
~
vacuum cleaner before connecting the
power cord to an electrical outlet. Your
power source should correspond with
the voltage rating plate located on the
underside of the vacuum. Use only
household AC outlets. Never use DC
power sources. If you are not sure of
your home’s voltage supply, consult a
qualified electrician. Connecting the
vacuum cleaner to a higher voltage
may result in damage to the vacuum
cleaner or injury.
To reduce the risk of electric shock,
~
this appliance has a polarized plug
(one blade is wider than the other.) This
plug will fit in a polarized outlet only one
way. If the plug does not fit fully in the
outlet, reverse the plug. If it still does
not fit, contact a qualified electrician to
install the proper outlet. Do not alter the
plug in any way.
Before using the vacuum cleaner,
~
check for externally visible damage. Do
not use a damaged vacuum cleaner.
A damaged vacuum cleaner is
~
dangerous for your safety.
Do not use the vacuum cleaner if the
~
power cable is damaged. A damaged
power cable is dangerous to your safety.
Do not pull or carry by the cord, use
~
the cord as a handle to carry the
vacuum cleaner and do not pull the
plug out by pulling on the cord. Do not
pull the cord around sharp edges or
corners, for example under doors.
The power cable, plug and outlet can be
damaged and endanger your safety.
You may not use the vacuum cleaner
then under any circumstances.
Replace a damaged power cord
~
only with a genuine Miele cord. For
safety reasons, the exchange should
be made only by an authorized Miele
technician or the Miele Customer
Service Department.
While the vacuum cleaners under
~
warranty, repairs should only be
performed by a Miele authorized
service technician.
The outlet on the vacuum cleaner
~
(depending on model) must only be
used for the Miele Powerbrush
specified in these operating
instructions.
Never submerge the vacuum
~
cleaner in water. Clean with a dry or
slightly damp cloth. If moisture gets into
the vacuum cleaner there is the risk of
electric shock.
The electrical outlet must be fitted
~
with a 15 A fuse.
Always turn the vacuum cleaner off
~
when you have finished using it, as well
as before any maintenance work and
cleaning. Unplug the vacuum cleaner
from the electrical outlet.
5
Page 6

en - IMPORTANT SAFETY INSTRUCTIONS
Use
Do not use on people or animals.
~
Use only as described in this
~
manual. Use only Miele recommended
accessories described in this manual.
Do not use the vacuum cleaner
~
without a filter bag, dust compartment
filter and exhaust filter. Otherwise it may
be damaged.
If there is no dust bag in place, you
~
cannot close the dust compartment lid.
Do not use any force.
Do not use outdoors or on wet
~
surfaces. Only dry surfaces should be
vacuumed.
Do not use the vacuum cleaner to
~
pick up liquids or damp dirt. This can
lead to significant malfunctions; in
addition it could impair the electrical
safety of the vacuum cleaner. Wait for
freshly shampooed carpets to dry
before vacuuming.
Do not vacuum toner dust. Toner,
~
such as that used in printers and
photocopiers can conduct electricity. In
addition, it may not be completely
filtered out by the filter system of the
vacuum cleaner and can thus be blown
back in the air by the fan.
Do not vacuum flammable or
~
combustible liquids, or vacuum in areas
where they may be present. The
vacuum cleaner could explode.
Do not vacuum items which are
~
heavy, hard or have sharp edges. They
could cause a blockage and damage
the vacuum cleaner.
Unwind the cord completely to aid
~
the vacuum in dissipating heat.
This vacuum should not be used to
~
entrap or retain any hazardous
materials.
Do not pull or carry by the cord, use
~
the cord as a handle, close a door on
the cord, or pull the cord around sharp
edges or corners. Do not run the
appliance over the cord. Keep the
cord away from heated surfaces.
Do not handle the plug or vacuum
~
with wet hands.
Keep hair, loose clothing, fingers,
~
and all parts of body away from
openings and moving parts.
Do not place anything into the
~
openings of the vacuum. Do not use if
any openings are blocked; keep them
free of dust, lint, hair or anything that
may reduce air flow.
Do not vacuum anything that is
~
burning or smoking such as cigarettes,
matches or hot ashes. The vacuum
cleaner could catch fire.
6
Use caution when vacuuming on
~
stairs.
Page 7

en - IMPORTANT SAFETY INSTRUCTIONS
Accessories
When vacuuming with a Miele
~
Powerbrush or Turbobrush do not touch
the rotating roller brush. There is risk of
injury.
Filter bags are disposable. Dispose
~
of full filter bags. Do not reuse. Blocked
pores reduce the suction of the vacuum
cleaner.
Only use Miele filter bags, filters and
~
accessories with the "Original Miele"
logo. The manufacturer can guarantee
safety for these only.
Turn off the vacuum cleaner if you
~
change the accessories; that is
especially important when connecting a
Powerbrush or Turbobrush.
Floor attachments, accessories and
~
wands must not be used at head level
to avoid injury to eyes and ears.
Cleaning, maintenance and
repairs
Monitor the filter bag change
~
indicator and check or change the filter
bag when the change indicator shows a
full filter bag. Inspect or replace the dust
compartment filter and exhaust filter at
this time as well. A full bag or blocked
filter will reduce the vacuum cleaner’s
suction power. A temperature limiter
automatically turns the vacuum cleaner
off if it gets too hot, see “Frequently
asked questions”.
Repairs during the warranty period
~
should only be performed by an
authorized service agent in accordance
with national and local safety
regulations. Unauthorized repairs could
cause injury or machine damage and
may void the warranty.
Disposing of an old appliance
Before discarding an old vacuum
cleaner, please cut off the power cord,
and render the plug useless. Ensure
the appliance presents no danger to
children while being stored for
disposal.
SAVE THESE
INSTRUCTIONS
7
Page 8
en - Guide to the vacuum cleaner
8
Page 9
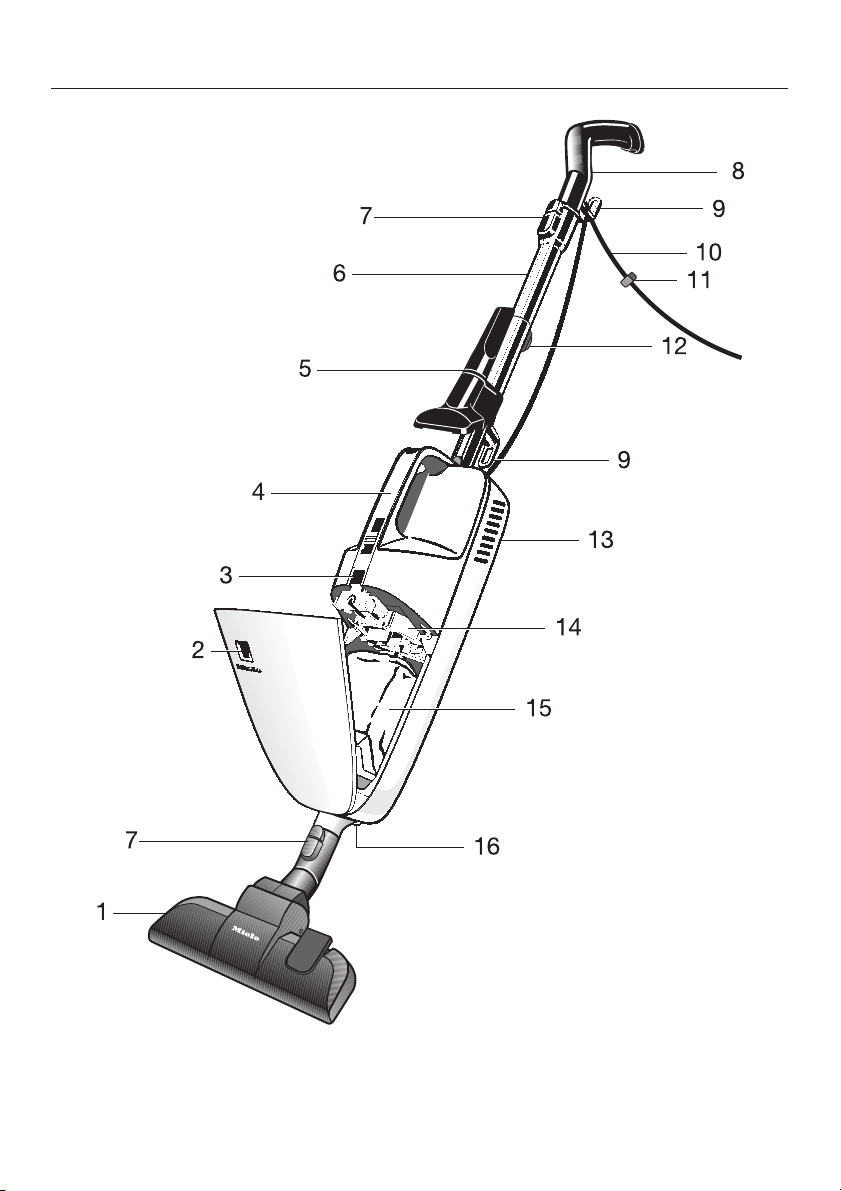
en - Guide to the vacuum cleaner
a Rug and floor tool brush *
b Filter bag change indicator
c Dust compartment lid release button
d Carrying handle with On/Off switch
e Accessory clip *
f Suction wand *
g Locking buttons
h Handpiece with anti-slip grip and hook
i Power cord hook
j Power cord
k Cable clip
l Telescopic wand adjustment button *
m Exhaust filter compartment (on rear)
n Dust compartment filter (motor protection)
o Filter bag
p Powerbrush outlet *
* Features marked with * do not come standard with all vacuum cleaners and may
not be included with your model.
Some models have as standard equipment one of the following accessories that
are not shown in this description of the vacuum cleaner. These vacuum cleaners
come with a separate operating manual for the corresponding accessory.
–
Powerbrush
–
Turbobrush
9
Page 10

en
The illustrations referred to in the text
are shown on the fold-out pages at the
end of these operating instructions.
Before using the vacuum
cleaner
Connecting the suction wand
(see fig. 1)
With the square hole facing the
^
carrying handle, insert the wand into
the top of the vacuum cleaner body.
Gently turn the tube until it locks in
place.
Removing the suction wand
^ Press and hold the release button
(see arrow) while gently turning and
pulling off the handle.
Connecting the handle and suction
wand (see fig. 2)
^ Line up the square hole and the
locking button, insert the handle into
the suction wand. Gently turn the
handle until it locks in place.
^
To detach the two parts, press and
hold the release button while gently
turning and pulling off the handle.
The handle can also be fitted directly to
the vacuum cleaner housing (see fig. 3).
This allows for easier vacuuming of
upholstered furniture, mattresses, etc.
Connecting the standard floor brush
(see fig. 4)
Insert the lower tube of the vacuum
^
cleaner into the standard floor brush
and gently turn until it locks into
place.
To remove the floor brush press and
^
hold the release button (see arrow)
while gently pulling the standard floor
brush off.
You can also attach the suction wand to
the nozzle of the vacuum cleaner (see
fig. 5).
This makes it easier to clean under
furniture that is close to the floor.
Winding up the power cord (see fig. 6)
When the vacuum cleaner is not in use
the power cord can be wound around
the two cord hooks.
To prevent the cord from unwinding,
press the cord into the cable clip (see
detail).
Using the included accessories
(see fig. 7)
The vacuum cleaner includes the
following accessories:
a Accessory clip
(depending on model)
b Crevice nozzle
For cleaning in folds, crevices and
corners.
10
c Upholstery nozzle
For cleaning upholstered furniture,
mattresses, cushions, curtains, etc.
Page 11

en
Accessory clip (see fig 8)
(standard on some models)
If needed attach the accessory clip
^
to the extension / telescopic wand.
Push the accessory clip over the
^
cord hook ring.
The accessory clip stores the supplied
crevice nozzle and upholstery nozzle
(see fig. 9).
Use
Unwinding the power cord (see fig. 10)
The lower cord hook rotates.
^ Turn the cord hook upwards to
remove the power cord.
Adjusting the telescopic wand
(see fig. 11)
(depending on model)
One piece of the telescopic wand is
stored inside the other and can be
adjusted to suit your height for
comfortable vacuum cleaning.
^
Press the telescopic wand release
button (see arrow) to release the
tubes and adjust to the required
height.
Plugging the vacuum cleaner in
(see fig. 12)
^
Plug the vacuum cleaner in.
^
While vacuuming, hang the cord over
the hook on the handle (see insert).
The power cord will be guided so that it
does not hinder vacuuming. It also
prevents it kinking at the connection to
the vacuum cleaner.
Turning the vacuum cleaner on and
off (see fig. 13 + 14)
There are two slide switches located on
the handle to turn the vacuum cleaner
on and off easily whether the vacuum
cleaner is used upright or horizontally.
Either of these slide switches can be
used to operate the vacuum cleaner.
Double slide switch
0 = vacuum cleaner is off
min. = minimum suction
Select min. for vacuuming light
weight items such as throw rugs or
curtains.
max. = maximum suction
The highest setting should be used if
a Turbobrush is connected to the
vacuum cleaner.
^
To turn the vacuum cleaner on, slide
either switch to max.
^
To turn the vacuum cleaner off, push
the slide switch to 0 until it clicks.
Adjusting the rug and floor tool to
the floor type (see fig. 15 + 16)
The rug and floor tool has been
designed to give excellent cleaning
results on either carpeted or smooth
floors. For other floor coverings, we
recommend the use of special Miele
brushes (see "Optional Accessories").
11
Page 12
en
It is important, however, to observe
the cleaning and care instructions of
the floor covering manufacturer.
Vacuum carpets and rugs with
recessed bristle strip:
Press the foot switch marked %.
^
Maintenance
Always turn off and unplug the
,
vacuum cleaner before performing
any maintenance work.
The Miele filter system consists of three
components (see fig. 19).
Vacuum smooth floors with exposed
bristle strip:
Press the foot switch marked ).
^
Always vacuum floors with very
deep seams or gaps with the rug
and floor tool with exposed bristle
strip.
Parking and storing the
vacuum cleaner
There is a non-skid rubber bumper on
the vacuum cleaner handle. This allows
the vacuum cleaner to be leaned
upright against a wall if desired (see
fig. 17).
Before leaving the vacuum cleaner
make sure it is turned off and
leaning against a wall at a safe
angle.
To protect the bristle rings on the rug
and floor tool, we suggest hanging
the vacuum cleaner up.
For storage you can hang up the vacuum
cleaner easily. There is a hole for this
located on the handle (see fig. 18).
a Filter bag
b Dust compartment filter
c Exhaust filter
Each of these components must be
changed periodically to maintain the
vacuum cleaner’s efficiency.
Only use Miele filter bags, filters and
accessories with the "Original Miele"
logo. Only then can the suction
power of the vacuum cleaner reach
its optimum potential creating the
best possible cleaning results.
,
The use of filter bags made of
paper or a similar material, or filter
bags with a cardboard retaining
plate can lead to serious damage to
the vacuum cleaner and possibly
voiding the warranty, just as with the
use of filter bags without the
"Original Miele" logo.
Purchasing filter bags and filters
Original Miele filter bags and filters can
be purchased from an authorized Miele
vacuum dealer or by visiting the Miele
store at http://store.miele.com.
12
Page 13
en
Which filter bags and filters are the
right ones?
Original Miele filter bags with yellow
retaining plate Type K/K and Original
Miele filters, have the "Original Miele"
logo on the packaging or directly on the
filter bags.
An "AirClean" exhaust filter and a dust
compartment filter are supplied with
every box of Miele filter bags.
If you would like to purchase additional
Miele filters separately, contact your
vacuum dealer or Miele, please quote
the model number of your Miele
vacuum cleaner to ensure correct parts
are ordered. These parts are also
available to order from the online Miele
store.
When to change the filter bag
(see fig. 20)
Change the filter bag when the colored
marker in the filter bag change
indicator is completely red.
Miele filter bags are disposable.
Dispose of full filter bags. Do not
attempt to reuse.
Blocked pores reduce the suction of
the vacuum cleaner.
Checking the filter bag change
indicator
Attach the rug and floor tool to the
^
vacuum cleaner. Other attachments
can affect the function of the filter
bag change indicator.
Turn the vacuum cleaner on and
^
select the highest power setting.
Lift the floor brush slightly off the
^
floor. If the marker completely fills
the indicator window, the filter bag
needs to be changed.
How the filter bag change indicator
works
The filter bag change indicator is
designed to show when the bag is full
of common household dust and
measures the amount of air flow
through the filter bag. Normal
household dust is a mixture of dust,
hair, carpet fluff, threads, sand, etc.
However, if fine dust, such as drill dust,
sand, plaster or flour is vacuumed, the
pores of the filter bag may become
blocked. The marker will indicate that
the bag is "full" even when it is not. The
filter bag should be changed as the
suction power is greatly reduced.
If the bag is bulging with pet fur, hair,
carpet fluff, etc. the indicator may not
register "full". This is because the air
flow of the filter bag may still be high
enough not to activate the marker to
show maximum. The filter bag should
still be changed.
13
Page 14
en
How to change the filter bag
(see fig. 21, 22 + 23)
Press the dust compartment release
^
button, raise the lid until it clicks into
place.
Grasp the collar by the two finger
^
holes, move it away from the suction
nozzle and pull it out from the filter
bag holder.
The filter bag has a flap which closes
automatically to prevent dust from
escaping when the filter bag is
removed.
^ Insert the new filter bag as far as it
will go into the yellow filter bag
holder. Do not unfold the filter bag
when taking it out of the box.
^ Unfold the filter bag in the dust
compartment as far as possible.
^ Close the dust compartment lid until
it clicks into place. Take care not to
jam the filter bag in the lid.
,
A no-bag demobilizer blocks the
dust compartment lid from closing if
no filter bag is inserted or if it is not
inserted all the way. Do not force it
closed.
When to change the dust
compartment filter (motor protection)
Whenever you open a new box of Miele
filter bags, a dust compartment filter is
included in every box of genuine Miele
filter bags.
Replacing the dust compartment
filter (see fig. 24)
Open the compartment lid.
^
Open the yellow filter cartridge,
^
remove the old filter
and replace it with a new one.
^
Snap the filter catridge shut and
^
close the dust compartment lid firmly.
^
When to change the exhaust filter
Depending on the model, one of the
following standard exhaust filters is
installed (see fig. 25).
a AirClean
Replace this exhaust filter whenever
you open a new box of Miele filter bags.
An AirClean exhaust filter is included in
every box of genuine Miele filter bags.
b Active AirClean
c HEPA
Replace these exhaust filters about
once a year. You can note the date on
the exhaust filter.
Replacing the "AirClean" filter
(see fig. 26, 27 + 28)
Make sure that only one exhaust
filter is installed.
^
Press the release button for the
exhaust filter compartment on the
rear of the vacuum cleaner and
remove the lid.
^
Remove the used AirClean exhaust
filter by the clean space (see arrow)
14
^
and replace it with a new one.
Page 15

If you would like to use an Active
AirClean or HEPA filter, see
"Exchanging exhaust filters".
en
The exhaust filters have different
features (see "Optional accessories").
When changing the filter
Put the lid back on and close it.
^
Replacing the "Active AirClean" filter
or the "HEPA" filter (see fig. 29 + 30)
Make sure that only one exhaust
filter is installed.
Press the release button for the
^
exhaust filter compartment on the
rear of the vacuum cleaner and
remove the lid (see fig. 26).
^ Remove the used "Active AirClean"
filter or "HEPA" filter.
^ Insert the new "Active AirClean" filter
or "HEPA" filter.
If you would like to use an AirClean filter, see "Exchanging exhaust filters".
^
Put the lid back on and close it.
Exchanging exhaust filters
Depending on the model, one of the
following standard exhaust filters is
installed (see fig. 25).
a AirClean
b Active AirClean (SF-AAC 10)
c HEPA (SF-H 10)
All of the above filters are
interchangeable and the exhaust filter
supplied with the vacuum cleaner can
be exchanged with another type.
Make sure that only one exhaust
filter is installed.
1. If you would like to replace filter a
with filter b or c it is essential that you
also remove the filter frame before
inserting the new type of filter.
2. If you would like to replace exhaust
filter b or c with filter a it is essential that
you install a filter frame * in the lid.
* Filter frame - see "Optional
accessories"
Removing or inserting the filter frame
(see fig. 31)
^ Grasp the sides of the filter frame at
the locations shown (see arrows) and
squeeze. The frame can now be
inserted or removed.
When to change the thread catcher
The thread catcher pads on the bottom
of the rug and floor tool should be
replaced as soon as they appear worn.
Changing the thread catcher
(see fig. 32 + 33)
^
Use a screwdriver or similar object to
remove the thread catcher pads from
the slots.
^
Press the new thread catcher into the
slots.
Spare parts may be obtained from from
any authorized Miele vacuum dealer or
Miele.
15
Page 16

en
Cleaning the floor roller of the floor
brush AllTeQ, see fig. 34
(depending on model)
a Release the roller pin using a coin.
b Push and take out the roller axle.
c Take out the roller.
Remove all threads, hair etc. and
reinstall the roller and lock the roller pin.
Cleaning and care
Turn off the vacuum and unplug
,
it from the outlet before performing
any maintenance work.
Vacuum cleaner and accessories
The vacuum cleaner and other plastic
accessories can be cleaned with a
damp cloth or a cleaner suitable for
plastics.
,
Do not use abrasive, oil-based,
glass or all purpose cleaners!
Dust compartment
The dust compartment can, if
necessary, be cleaned using a dry
cloth, dusting brush or a second
vacuum to remove any dust.
Frequently asked questions
The vacuum cleaner shuts off
automatically.
If the vacuum cleaner has overheated
the temperature limiter will automatically
turn off the vacuum cleaner.
This can occur if, for example, large
articles block the suction tube or when
the filter bag is full or contains particles
of fine dust. A heavily soiled exhaust or
dust compartment filter can also be the
cause of overheating. In this case, turn
off the vacuum cleaner and unplug it
from the outlet.
Once the cause has been addressed,
allow the vacuum cleaner to cool for
approx. 20 - 30 minutes before
resuming vacuuming.
Technical Service
In the event of a fault which you cannot fix
yourself please contact the Miele Service
Department at the phone number listed
on the back of this booklet.
^
Please quote the model type of your
appliance.
This can be found on the data plate on
the bottom of the vacuum.
,
Do not submerge the vacuum in
water. If moisture gets into the
appliance there is the risk of an
electric shock.
16
Page 17

en
Optional accessories
It is important to observe the
cleaning and care instructions of the
floor covering manufacturer.
These and many other products can be
purchased from an authorized Miele
vacuum dealer or by visiting the Miele
store at http://store.miele.com.
Some models are equipped with one or
more of the following accessories.
Powerbrush
The powerbrushes can only be
connected to a vacuum cleaner having
a powerbrush outlet.
Electro Comfort Powerbrush
(SEB 217)
For intensive cleaning of medium-nap
carpeting. It removes firmly packed dirt
and prevents the formation of traffic
patterns in areas subject to hard wear.
Electro Premium Powerbrush
(SEB 236)
In comparison to the SEB 217 this
powerbrush is 2 3/8" (60 mm) wider,
more powerful and recommended for
cleaning large areas.
In comparison to the SEB 217 it also
has:
–
a height adjustment to adapt to
different pile heights
–
LEDs for illuminating the work area
–
a multifunction indicator light.
Floor tools / Brushes
Turbobrush Turbo Comfort (STB 205)
For cleaning short to medium pile
carpeting.
Floor brush Hardfloor (SBB 235)
For vacuuming sturdy hard floors, e.g.
tiles and stone floors.
Floor brush Parquet (SBB Parquet)
Special brush with natural bristles
intended for cleaning floors susceptible
to scratching such as parquet floors.
Other accessories
Hand Turbobrush Turbo Mini
Compact (STB 20)
Intended for vacuuming upholstery,
mattresses or car seats.
Universal brush (SUB 20)
For dusting rows of books, shelves and
the like.
Radiator brush (SHB 10)
For cleaning radiators, narrow shelves
or crevices.
Mattress tool (SMD 10)
Ideal for cleaning tight spaces near
mattresses and in upholstered furniture.
Crevice nozzle, 300 mm (SFD 10)
For cleaning in folds, crevices and
corners.
17
Page 18

en
Flexible crevice nozzle, 560 mm
(SFD 20)
For cleaning hard-to-reach places.
Upholstery nozzle, 190 mm (SPD 10)
For vacuuming upholstered furniture,
mattresses and cushions.
Dusting brush with natural bristles
(SSP 10)
For very delicate items.
Accessory clip
For storage of the supplied accessories
(crevice nozzle and upholstery brush).
Canister vacuum cleaner accessories
Together with the available extension /
telescopic wand you can use the
upright vacuum cleaner as a canister
vacuum cleaner.
For easy cleaning of door frames,
bookshelves, curtains, etc. and for easy
vacuuming under cabinets, beds, etc.
When purchasing canister vacuum
accessories, indicate the model
number of your vacuum cleaner.
HEPA exhaust filter (SF-H 10)
Excellent exhaust air filter for purest
exhaust air. Particularly suitable for
allergy sufferers.
Filter frame
The filter frame is needed if you want to
use an AirClean exhaust filter instead of
a HEPA or Active AirClean filter.
Caring for the environment
Disposal of the packing material
The cardboard box and packaging
protect the vacuum cleaner during
shipping. These materials are
recyclable. Please recycle.
Ensure that any plastic wrappings,
bags etc. are disposed of safely and
kept out of the reach of children.
Danger of suffocation!
Disposal of an old machine
Old vacuum cleaners may contain
materials that can be recycled. Please
contact your local recycling authority
about the possibility of recycling these
materials.
Filters
Active AirClean exhaust filter
(SF-AAC 10)
Absorbs odors caused by the dirt in the
filter bag.
18
Page 19

LIMITED WARRANTY - VACUUM CLEANERS USA
Miele, Inc. (hereinafter "Miele") warrants to the original purchaser of this product, living in the United States of
America, who purchased their vacuum from a Miele authorized distributor or dealer:
a. That this product, including all of its Miele authorized parts is free of defects in material and workmanship.
b. That this product, if found to be defective within the stated warranty period, will be repaired free of charge to the
consumer (both parts and labor) by an authorized Miele service agent.
c. The warranty period for vacuum cleaners (excepting the S8990 and RX1 Scout), and all accessories, excluding
vacuum cleaner motors, power head motors, and vacuum cleaner casings (body), is one (1) year from the date of
purchase. For the S8990, the warranty period is five (5) years from the date of purchase.
d. For vacuum cleaner casings (body), the warranty period will be as follows:
- The structural integrity of the vacuum cleaner casing (body), will be covered for seven (7) years from the date of
purchase against defects in material and workmanship on the S2xxx, S4xxx, S5xxxx, S6xxx, S7xxx, S8xxx, S160
and S190 product series.
- The structural integrity of the vacuum cleaner casing (body) of the S8990 will be covered for ten (10) years from
the date of purchase against defects in material and workmanship.
e. For vacuum cleaner and power head motors, the warranty period will be as follows:
- Vacuum cleaner and power head motors will be covered for seven (7) years from the date of purchase on the
S2xxx, S4xxx, S5xxx, S6xxx, S7xxx, S8xxx, S160 and S190 product series.
- Vacuum cleaner and power head motors for the S8990 will be covered for ten (10) years from the date of purchase.
f. For the RX1 Scout, the warranty period is two (2) years from the date of purchase for the complete vacuum,
except for the battery, which will be warranted for one (1) year from the date of purchase.
Vacuum cleaners other than the RX1 Scout used for commercial purposes, except for their motors, will be warranted
for a period of six (6) months from the date of purchase. The motors of commercially used upright vacuums will be
warranted for one (1) year and the motors of all other commercially used vacuum cleaners, except for the RX 1 Scout
will be warranted for two (2) years. There is no warranty for the RX1 Scout used for commercial purposes. Thereafter
this Limited Warranty shall be null and void.
This warranty only applies while the product remains within the United States, and shall be null and void in any other
US territories, possessions, or foreign countries.
This warranty does not cover damage or defects caused by or resulting from repairs, service or alterations to the
product or any of its parts or accessories which have been performed by service centers or repairmen not authorized
by Miele, or damage or defects caused by negligence, accident, abuse, misuse, improper or abnormal usage or
maintenance of the product, its parts or accessories. Ordinary wear and tear or cosmetic damage (scuffs, scratches,
gouges, dents, etc.) shall not be considered a defect in materials or workmanship.
Except for the limited warranty provided herein, Miele disclaims any and all other express warranties with respect to
the product. Any warranty of merchantability or fitness for a particular purpose is limited in its duration to the term of
the limited warranty provided herein. Some states do not allow limitations on how long an implied warranty lasts, so
the above limitation may not apply to you.
Miele will assume no liability, or other obligation with respect to any personal injury or property damage resulting from
the use of a vacuum cleaner, or its accessories, replacement parts, etc., which has not been purchased from, or serviced
by an Authorized Miele Dealer. Any purchaser who obtains a vacuum cleaner, accessories, replacement parts, etc., from
someone other than an Authorized Miele dealer proceeds at their own risk.
Miele specifically disclaims any and all liability, whether directly or by way of indemnity, for special incidental, consequential
or other damages, whether based on breach of contract, tort, strict or product liability, or any other legal theory.
Some states do not allow the exclusion or limitation of incidental or consequential damages, so the above limitation may
not apply to you.
This Limited Warranty gives you specific legal rights; you may have other rights, which vary, from state to state.
For service under this Limited Warranty, or for information you may need about the product, please contact Miele at
the US address listed on the back of this booklet, or visit us at www.mieleusa.com.
To find an authorized Miele dealer in your area, please visit our website at www.mieleusa.com.
Effective Date: June 1, 2014
©2014 Miele, Inc.
What This Warranty Covers And For What Period The Coverage Extends
What is not covered by this Warranty
Exclusion of Other Warranties
Limitation of Liability for Special, Incidental or Consequential Damages
Special State Laws
Service
Authorized Miele Dealers
19
Page 20

fr - Table des matières
INSTRUCTIONS IMPORTANTES SUR LA SÉCURITÉ ....................22
Guide de l'appareil................................................26
Assemblage de l'aspirateur ........................................28
Utilisationdes accessoires fournis...................................28
Utilisation .......................................................29
Dérouler le cordon d'alimentation .....................................29
Régler la longueur du tube télescopique ...............................29
Brancher l'aspirateur ...............................................29
Mettre en marche et arrêter l’aspirateur ................................29
Régler la brosse à tapis et à planchers en fonction du type de surface........30
Immobilisation et rangement de l'aspirateur...........................30
Entretien ........................................................30
Acheter des sacs à poussière et des filtres .............................31
Sacs à poussière et filtres convenant à votre appareil .....................31
Quand remplacer le sac à poussière ..................................31
Comment remplacer le sac à poussière ................................32
Quand remplacer le filtre du réservoir à poussière (pour protéger le moteur) ...32
Remplacer le filtre du réservoir à poussière .............................32
Quand remplacer le filtre d'évacuation..................................33
Remplacer le filtre "AirClean" .........................................33
Remplacer le filtre "Active AirClean" et le filtre HEPA ......................33
Remplacer un type de filtre par un autre................................33
Quand remplacer les capteurs de fils ..................................34
Remplacer les capteurs de fils .......................................34
Nettoyage et entretien .............................................34
Foire aux questions ...............................................35
Service technique ................................................35
Accessoires offerts en option ......................................35
Protection de l'environnement ......................................37
LIMITED WARRANTY - VACUUM CLEANERS CDN .................38
GARANTIE RESTREINTE - ASPIRATEURS AU CANADA.................40
20
Page 21

Seuls des sacs à poussière, des filtres et des
accessoires portant le logo "Original Miele"
doivent être utilisés avec cet aspirateur.
Ceux-ci permettent de maximiser la puissance d'aspi
ration de l'aspirateur et de produire des résultats de
nettoyage optimaux.
L'UTILISATION DE COMPOSANTES D'UNE AUTRE
MARQUE POURRAIT INVALIDER LA GARANTIE.
Tout comme l'utilisation de sacs à poussière
,
n'arborant pas le logo "Original Miele", l'utilisation de
sacs à poussière faits de papier ou de matériau similaire, ou de sacs à poussière munis d'une plaque de
retenue en carton, peut endommager gravement l'aspirateur et risquer d'en annuler la garantie.
Le logo "Original Miele" se trouve sur l'emballage ou
directement sur le sac à poussière.
Vous pouvez vous procurer des sacs à poussière et
des filtres
Miele d'origine auprès d'un détaillant autorisé d'aspira
teurs Miele ou à notre magasin Miele en ligne, à
www.miele.ca.
-
-
21
Page 22

fr - INSTRUCTIONS IMPORTANTES SUR LA SÉCURITÉ
Lorsque vous utilisez un appareil électrique, respectez toujours les consignes de
sécurité élémentaires :
LISEZ ATTENTIVEMENT TOUTES LES
INSTRUCTIONS AVANT
D'UTILISER L'APPAREIL
Conservez cette brochure en lieu sûr et remettez-la au prochain utilisateur.
AVERTISSEMENT –
Pour diminuer le risque d'incendie,
de choc électrique ou de blessure,
respectez les instructions ci-après.
Utilisation conforme
Cet aspirateur est destiné à un usa-
~
ge domestique seulement.
Cet aspirateur n'est pas conçu pour
~
être utilisé à l'extérieur.
Cet appareil est destiné uniquement
~
à un usage domestique normal pour
aspirer des matières sèches. N'utilisez
pas cet appareil sur des personnes ou
des animaux.Aucune autre utilisation ou
modification de l'aspirateur n'est autori
sée. Miele ne peut être tenu responsa
ble des dommages attribuables à une
utilisation inadéquate de l'aspirateur.
Les personnes qui, en raison de ca
~
pacités physiques, sensorielles ou
mentales réduites, ou d'un manque
d'expérience, ne sont pas en mesure
d'utiliser cet appareil doivent être su
pervisées ou formées par une personne
responsable.
-
-
Enfants
Lorsque l'aspirateur est utilisé en
~
présence d'enfants, une surveillance
étroite doit être exercée. Ne laissez jamais les enfants jouer avec l'aspirateur.
Les enfants peuvent utiliser l'aspira-
~
teur sans surveillance seulement si le
fonctionnement de l'appareil leur a été
expliqué de façon à ce qu'ils puissent
l'utiliser en toute sécurité. Ils doivent
comprendre les dangers liés à une utilisation inadéquate.
-
-
22
Page 23

fr - INSTRUCTIONS IMPORTANTES SUR LA SÉCURITÉ
Sécurité technique
Vérifiez la capacité en voltage de
~
l'aspirateur avant de brancher le cor
don d'alimentation dans une prise de
courant. La tension de votre source
d'alimentation doit correspondre à la
capacité en voltage indiquée sur la pla
que signalétique située sous l'aspira
teur. Utilisez uniquement des prises de
courant alternatif. N'utilisez jamais de
prises de courant continu. Consultez un
électricien qualifié si vous n'êtes pas
certain de connaître la capacité en vol
tage de votre système électrique. Si
vous branchez votre aspirateur à une
source d'alimentation de tension supérieure, vous pourriez vous blesser ou
endommager l'appareil.
Pour réduire le risque de choc élec-
~
trique, cet appareil est muni d'une fiche
polarisée (l'une des broches est plus
large que l'autre). Cette fiche peut être
insérée dans une prise polarisée d'une
seule manière. Si la fiche ne peut être
entièrement insérée dans la prise, re
tournez-la. S'il est encore impossible de
l'insérer, faites appel à un électricien
qualifié qui peut installer une prise ap
propriée. Ne modifiez aucunement la fi
che.
-
-
-
-
La prise de courant doit être équi
~
pée d'un fusible de 15 ampères.
Éteignez toujours l'aspirateur lors
~
que vous avez fini de l'utiliser, ainsi
qu'avant d'effectuer des travaux d'en
tretien ou de le nettoyer. Débranchez
l'aspirateur de la prise de courant.
Ne tirez pas sur le cordon, ne vous
~
en servez pas comme une poignée
pour transporter l'aspirateur et ne dé
branchez pas l'appareil en tirant sur le
cordon. Ne tirez pas sur le cordon pour
contourner des extrémités ou des coins
tranchants, p. ex., sous une porte.
Cela pourrait endommager le câble
d'alimentation, la prise de courant et la
fiche, et compromettre votre sécurité. Si
c'est le cas, n'utilisez l'aspirateur sous
aucun prétexte.
Remplacez un cordon d'alimentation
~
endommagé par un cordon Miele d'origine seulement. Pour des raisons de
sécurité, le cordon ne doit être remplacé que par un technicien autorisé Miele
ou le service à la clientèle de Miele.
Durant la période de garantie de
~
l'appareil, les réparations doivent être
effectuées seulement par un technicien
autorisé de Miele.
-
-
-
-
Avant d'utiliser l'aspirateur, assu
~
rez-vous que l'extérieur n'est pas en
dommagé. N'utilisez pas un aspirateur
endommagé.
Un aspirateur qui est endommagé
~
peut compromettre votre sécurité.
N'utilisez pas l'aspirateur si le câble
~
d'alimentation est endommagé. Un câ
ble d'alimentation qui est endommagé
peut compromettre votre sécurité.
-
-
La prise de l'aspirateur (selon le mo
~
dèle) doit être utilisée uniquement avec
l'électrobrosse Miele présentée dans
ces instructions d'utilisation.
Ne plongez jamais l'aspirateur dans
l'eau. Nettoyez-le avec un chiffon sec
ou légèrement humidifié. Si l’humidité
pénètre dans l’aspirateur, vous risquez
de subir un choc électrique.
-
23
Page 24

fr - INSTRUCTIONS IMPORTANTES SUR LA SÉCURITÉ
Utilisation
N'utilisez pas cet appareil sur des
~
personnes ou des animaux.
Utilisez l'appareil conformément aux
~
instructions du présent manuel. Utilisez
uniquement les accessoires recom
mandés par Miele décrits dans le pré
sent manuel.
N'utilisez pas l'aspirateur sans sac à
~
poussière, filtre du réservoir à poussiè
re et filtre d'évacuation. Vous pourriez
l'endommager.
En l'absence de sac à poussière, vous
~
ne pouvez pas fermer le couvercle du réservoir à poussière. Il est important de ne
pas forcer pour abaisser le couvercle.
N'utilisez pas l'appareil à l'extérieur
~
ou sur des surfaces humides. Utilisez-le
uniquement pour nettoyer des surfaces
sèches.
N'aspirez pas de liquides ou de
~
poussières humides. Cela pourrait mener à d'importants dysfonctionnements
et nuire à la sécurité électrique de
l'aspirateur. Si des moquettes ont été
fraîchement lavées, attendez qu'elles
soient complètement sèches avant de
passer l'aspirateur.
N'aspirez pas de poudre impriman
~
te. Cette poudre, utilisée pour les impri
mantes et les photocopieurs, peut être
conductrice. En outre, il se peut qu'elle
ne soit pas complètement filtrée par le
système de filtrage de l'aspirateur. Elle
pourrait donc être rejetée dans l'air par
le ventilateur.
N'aspirez aucun élément brûlant ou
~
fumant comme des cigarettes, des allu
mettes ou des cendres chaudes.
L'aspirateur pourrait prendre feu.
-
-
-
N'aspirez pas de liquides inflamm
~
ables ou combustibles et n'utilisez pas
l'appareil dans des zones où ces matiè
res pourraient être présentes.
L’aspirateur pourrait exploser.
N'aspirez pas d'éléments lourds,
~
durs ou ayant des bords coupants. Ils
pourraient obstruer et endommager
l'aspirateur.
Déroulez complètement le cordon
~
afin de favoriser l'évacuation de la cha
leur.
N'utilisez pas cet aspirateur pour ra
~
masser ou conserver des matières dan
gereuses.
Ne tirez pas sur le cordon, ne vous
~
en servez pas comme une poignée, ne
le coincez pas dans une porte et ne le
laissez pas en contact avec des extrémités ou des coins tranchants. Ne faites pas passer l'appareil sur le cordon.
Veillez à ce que le cordon n'entre pas
en contact avec des surfaces chaudes.
Ne manipulez pas la fiche ou l'aspi-
~
rateur si vos mains sont mouillées.
Veillez à maintenir vos cheveux, vos
~
vêtements amples, vos doigts ou toute
autre partie de votre corps ainsi que le
cordon à distance des ouvertures et
des parties mobiles de l'appareil.
-
-
Ne placez aucun objet dans les ou
~
vertures de l'aspirateur. N'utilisez pas
l'appareil si l'une des ouvertures est ob
struée; gardez les ouvertures libres de
toute poussière, charpie, cheveu ou de
tout élément qui pourrait limiter la circu
lation d'air.
Soyez prudent lorsque vous passez
~
l'aspirateur dans un escalier.
-
-
-
-
-
-
-
-
24
Page 25

fr - INSTRUCTIONS IMPORTANTES SUR LA SÉCURITÉ
Accessoires
Lorsque vous utilisez l'électrobrosse
~
ou la turbobrosse Miele, ne touchez
pas à la brosse rotative. Vous pourriez
vous blesser.
Les sacs à poussière sont jetables.
~
Jetez les sacs à poussière pleins. Ne
les réutilisez pas. L'obstruction du ma
tériau poreux réduit la puissance
d'aspiration de l'appareil.
Utilisez uniquement des sacs à
~
poussière, des filtres et des accessoi
res portant le logo "Original Miele". Seu
les ces pièces permettent au fabricant
de garantir la sécurité de l'appareil.
Éteignez l'aspirateur avant de chan-
~
ger les accessoires, particulièrement
pour raccorder une électrobrosse ou
une turbobrosse.
Les tubes et les accessoires ne doi-
~
vent pas être utilisés à la hauteur de la
tête afin d'éviter tout risque de blessure
aux yeux et aux oreilles.
-
Nettoyage, entretien et répara
tions
Surveillez le voyant de remplacement
~
du sac à poussière et vérifiez ou rempla
cez le sac à poussière lorsque le voyant
indique que ce dernier est plein. Profi
tez-en aussi pour vérifier ou remplacer
le filtre du réservoir à poussière et le fil
tre d'évacuation. Un sac plein ou un fil
tre obstrué réduit la puissance d'aspira
tion de l'appareil. Un limiteur de tempé
rature éteint automatiquement l'aspira
teur si ce dernier surchauffe. Voir la
-
section “Foire aux questions”.
Les réparations doivent être effec-
~
tuées uniquement par un technicien autorisé, conformément aux normes de
sécurité nationales et locales. Les réparations effectuées par des personnes
non qualifiées pourraient causer des
blessures ou endommager l'appareil et
pourraient invalider la garantie.
Mise au rebut d'un ancien appareil
-
-
-
-
-
-
-
-
Avant de mettre au rebut votre ancien
aspirateur, coupez le cordon d'alimen
tation et rendez la fiche inutilisable. As
surez-vous que votre appareil ne pré
sente aucun danger pour les enfants
jusqu'à ce qu'il soit mis au rebut.
CONSERVEZ CES
INSTRUCTIONS
-
-
-
25
Page 26

fr - Guide de l'appareil
26
Page 27

fr - Guide de l'appareil
a Brosse à tapis et à planchers *
b Voyant de remplacement du sac à poussière
c Bouton d'ouverture du couvercle du réservoir à poussière
d Poignée de transport avec interrupteur marche/arrêt
e Attache pour accessoires *
f Tube d'aspiration *
g Boutons de verrouillage
h Poignée et manche antidérapants
i Crochet pour le cordon d’alimentation
j Cordon d'alimentation
k Serre-câble
l Bouton de réglage du tube télescopique *
m Compartiment du filtre d'évacuation (à l'arrière)
n Filtre du réservoir à poussière (pour protéger le moteur)
o Sac à poussière
p Prise de l'électrobrosse *
* Les options suivies d'un * ne sont pas offertes sur l'ensemble des modèles; il se
peut que votre aspirateur ne présente pas ces options.
Certains modèles sont munis de l'un des accessoires suivants, qui ne sont pas in
diqués dans la présente description de l'aspirateur. Les aspirateurs qui sont as
sortis de ces accessoires disposent pour chacun d'instructions d'utilisation dis
tinctes.
–
Électrobrosse
–
Turbobrosse
Utilisez seulement des sacs à poussière portant le
sceau de qualité Miele et des filtres Miele d'origine.
Vous obtiendrez ainsi une puissance d'aspiration opti
male et une utilisation maximale des sacs.
Le fait d'utiliser des sacs à poussière d'une autre mar
que pourrait endommager l'aspirateur et invalider la ga
rantie.
-
-
-
-
-
-
27
Page 28

fr
Vous trouverez les croquis signalés
dans les différents chapitres dans les
volets, à la fin de ce mode d'emploi.
Assemblage de l'aspirateur
Raccorder le tube d'aspiration
(voir fig. 1)
Dirigez le trou de forme carrée face à
^
la poignée de transport et insérez le
tube dans l'orifice de l'aspirateur.
Tournez ensuite délicatement le tube
jusqu'à ce qu'il soit verrouillé.
Retirer le tube d’aspiration
^ Appuyez sur le bouton d'ouverture et
maintenez-le enfoncé (comme l'indique la flèche) tout en tirant sur la
poignée et en lui imprimant une légère rotation.
Raccorder la poignée au tube d'aspiration (voir fig. 2)
^
Alignez le trou de forme carrée avec
le bouton de verrouillage, puis insé
rez la poignée dans le tube d'aspira
tion. Tournez ensuite délicatement la
poignée jusqu'à ce qu'elle soit ver
rouillée.
^
Pour retirer la poignée, appuyez sur le
bouton d'ouverture et maintenez-le
enfoncé tout en tirant sur la poignée et
en lui imprimant une légère rotation.
La poignée peut aussi être directement
insérée dans l'aspirateur (voir fig. 3)
afin de faciliter le nettoyage des meu
bles rembourrés, des matelas, etc.
-
-
-
Raccorder la brosse à plancher
standard (voir fig. 4)
Insérez la partie inférieure du tube de
^
l'aspirateur dans l'orifice de la brosse
à plancher standard puis imprimez
une légère rotation jusqu'au verrouil
lage.
Pour retirer la brosse à plancher, ap
^
puyez sur le bouton d'ouverture et
maintenez-le enfoncé (comme l'indi
que la flèche) tout en tirant sur la
brosse et en lui imprimant une légère
rotation.
Vous pouvez également raccorder le
tube d'aspiration au suceur de l'aspirateur (voir fig. 5).
Cela facilite le nettoyage du dessous
de meubles lorsqu'il y a peu d'espace
entre ceux-ci et le sol.
Enrouler le cordon d’alimentation
(voir fig. 6)
Lorsque vous n'utilisez pas l'aspirateur,
enroulez le cordon d'alimentation auto
ur des deux crochets prévus à cet effet.
Pour éviter que le cordon ne se dérou
le, enfoncez-le dans le serre-câble (voir
illustration).
Utilisationdes accessoires
fournis (voir fig. 7)
L'aspirateur est muni des accessoires
suivants :
a Attache pour accessoires
(selon les modèles)
b Suceur plat
Pour nettoyer les plis, les fentes et
les recoins.
-
-
-
-
-
28
Page 29

fr
c Suceur pour meubles rembourrés
Pour nettoyer les meubles rembour
rés, les matelas, les coussins, les ri
deaux, etc.
Attache pour accessoires (voir fig. 8)
(présente sur certains modèles)
Le cas échéant, fixez l'attache pour
^
accessoires sur le tube d'aspiration.
Placez l'attache au-dessus du cro
^
chet servant à enrouler le cordon.
L'attache pour accessoires permet de
ranger le suceur plat et le suceur pour
meubles rembourrés fournis (voir fig. 9).
-
-
-
Utilisation
Dérouler le cordon d'alimentation
(voir fig. 10)
Le crochet inférieur qui maintient le cordon en place peut tourner.
^ Faites tourner le crochet pour dérou-
ler le cordon d'alimentation.
Régler la longueur du tube
télescopique (voir fig. 11)
(selon le modèle)
Les deux parties du tube télescopique
s’emboîtent, ce qui vous permet de le
régler à votre taille pour une utilisation
tout en confort.
Brancher l'aspirateur (voir fig. 12)
Branchez l'aspirateur.
^
Durant l'utilisation, faites passer le
^
cordon d'alimentation dans le cro
chet supérieur (voir illustration).
Le cordon sera ainsi maintenu, évitant
toute gêne. Cela lui évitera aussi de se
plier au moment du branchement de
l'aspirateur.
Mettre en marche et arrêter
l’aspirateur (voir fig. 13 + 14)
Deux interrupteurs à glissière situés sur
la poignée permettent de mettre en
marche et d'arrêter facilement l'aspirateur lorsque ce dernier se trouve en position verticale ou horizontale. Utilisez
l'un ou l'autre de ces interrupteurs.
Interrupteur à glissière double
0 = l'aspirateur est arrêté
min. = aspiration minimale
Choisissez l'option min. pour passer
l'aspirateur sur des articles légers
comme des carpettes ou des rideaux.
max.= aspiration maximale
Il faut également utiliser le niveau
d'aspiration maximal si la turbobrosse
est branchée à l'aspirateur.
-
^
Appuyez sur le bouton de dégage
ment du tube télescopique (voir la
flèche) afin de dégager les deux tu
bes et d'en régler la longueur.
^
-
-
Pour mettre en marche l'aspirateur,
faites glisser l'interrupteur sur max.
^
Pour arrêter l'aspirateur, faites glisser
l'interrupteur sur 0 jusqu'à ce qu'il
s'enclenche.
29
Page 30

fr
Régler la brosse à tapis et à
planchers en fonction du type de
surface (voir fig. 15 + 16)
La brosse à tapis et à planchers a été
conçue pour produire d'excellents ré
sultats sur les moquettes et les sols lis
ses. Pour les autres revêtements de sol,
nous recommandons l'utilisation des
brosses spéciales Miele (consultez la
section "Accessoires offerts en option").
-
Avant de laisser l'appareil sans sur
veillance, assurez-vous qu'il est éteint
et qu'il est correctement appuyé con
tre un mur.
-
Il est recommandé de suspendre
l'aspirateur à un crochet mural pour
le ranger afin de protéger les poils de
la brosse à tapis et à planchers.
-
-
Toutefois, il est important de respec
ter les instructions de nettoyage et
d'entretien du fabricant du revête
ment de sol.
Pour nettoyer les moquettes et les tapis
avec la bande de poils rentrée :
^ Basculez l'interrupteur au pied à la
position %.
Pour nettoyer les planchers lisses avec
la bande de poils sortie :
^ Basculez l'interrupteur au pied à la
position ).
Les poils de la brosse à tapis et à
planchers devraient toujours être
sortis pour nettoyer les planchers
qui comportent des fissures ou des
joints profonds.
-
Immobilisation et rangement
de l'aspirateur
La poignée de l'aspirateur est munie
d'une butée en caoutchouc antidéra
pante. Vous pouvez ainsi, au besoin,
appuyer l'aspirateur en position vertica
le contre un mur (voir fig. 17).
-
Vous pouvez facilement suspendre
l'aspirateur pour le ranger. La poignée
de l'appareil est munie d'un orifice à
cet effet (voir fig. 18).
Entretien
Éteignez et débranchez toujours
,
l'aspirateur avant d'effectuer des
travaux d'entretien.
Le système de filtrage Miele comprend
trois composantes (voir fig. 19).
a Sac à poussière
b Filtre du réservoir à poussière
c Filtre d'évacuation
Chacune de ces composantes doit être
remplacée périodiquement afin que
l'aspirateur demeure efficace.
Utilisez uniquement des sacs à
poussière, des filtres et des acces
soires portant le logo "Original
Miele". Ceux-ci permettent de maxi
-
miser la puissance d'aspiration de
l'aspirateur et de produire des résul
tats de nettoyage optimaux.
-
-
-
30
Page 31

Tout comme l'utilisation de sacs
,
à poussière n'arborant pas le logo
"Original Miele", l'utilisation de sacs
à poussière faits de papier ou d'un
matériau similaire, ou de sacs à
poussière munis d'une plaque de
retenue en carton, peut endomma
ger gravement l'aspirateur et risquer
d'en annuler la garantie.
Acheter des sacs à poussière et des
filtres
Vous pouvez vous procurer des sacs à
poussière et des filtres Miele d'origine
auprès d'un détaillant autorisé d'aspirateurs Miele ou en visitant le magasin
Miele en ligne à l'adresse suivante :
http://store.miele.com.
Sacs à poussière et filtres convenant
à votre appareil
Les sacs à poussière Miele d'origine
avec plaque de retenue jaune de type
K/K et les filtres Miele d'origine arbo
rent le logo "Original Miele" sur l'embal
lage ou directement sur les sacs à
poussière.
-
-
Si vous souhaitez acheter des filtres
Miele supplémentaires, communiquez
avec votre détaillant d'aspirateurs ou
avec Miele. Veuillez mentionner le nu
méro de modèle de votre aspirateur
Miele pour vous assurer de commander
les bonnes pièces. Vous pouvez égale
ment vous procurer ces pièces au ma
gasin en ligne de Miele.
Quand remplacer le sac à poussière
(voir fig. 20)
Remplacez le sac à poussière lorsque
l'indicateur de couleur du voyant de
remplacement du sac à poussière est
complètement rouge.
Les sacs à poussière Miele sont jetables.
Jetez les sacs à poussière pleins.
Ne les réutilisez pas.
L'obstruction du matériau poreux
réduit la puissance d'aspiration de
l'appareil.
Vérifier le voyant de remplacement
-
du sac à poussière
^
Fixez la brosse à tapis et à planchers
à l’aspirateur. D'autres accessoires
peuvent modifier le fonctionnement
du voyant de remplacement du sac à
poussière.
fr
-
-
-
Un filtre d'évacuation "AirClean" et un
filtre du réservoir à poussière sont four
nis avec chaque boîte de sacs à pous
sière Miele.
^
Mettez l'aspirateur en marche et sé
lectionnez le niveau de puissance
maximale.
^
Soulevez légèrement la brosse à
plancher du sol. Si l'indicateur rem
plit la fenêtre du voyant, il faut rem
placer le sac à poussière.
-
-
-
31
Page 32

fr
Comment fonctionne le voyant de
remplacement du sac à poussière
Le voyant de remplacement du sac à
poussière indique à quel moment le
sac est rempli de poussière usuelle et
mesure la quantité d'air qui passe dans
le sac à poussière. La poussière que
l'on trouve habituellement dans une
résidence est un mélange de poussiè
res, de cheveux, de poils, de peluches,
de fils de moquette, de grains de sable,
etc.
Cependant, les pores du sac à pous
sière peuvent se boucher si vous aspi
rez une certaine quantité de poussière
fine, comme de la poussière de forage,
du sable, du plâtre ou de la farine.
L'indicateur affiche alors que le sac est
plein, même s'il ne l'est pas. Il faut tout
de même remplacer le sac à poussière,
car la puissance d'aspiration est considérablement réduite.
Si le sac est rempli de poils d'animaux,
de cheveux, de peluches, etc., il est
possible que l'indicateur n'affiche pas
que le sac est plein. Cela est dû au fait
que l'air circule suffisamment dans le
sac à poussière pour que la fenêtre de
l'indicateur ne devienne pas rouge. Né
anmoins, le sac à poussière doit être
changé.
Comment remplacer le sac à
poussière (voir fig. 21, 22 + 23)
^
Appuyez sur le bouton d'ouverture du
réservoir à poussière et levez le cou
vercle jusqu'à ce qu'il s'enclenche.
^
Prenez le sac à poussière par les
trous de doigts se trouvant aux extré
mités, éloignez-le du suceur d'aspira
tion et sortez-le de son support.
32
-
-
-
-
Le sac à poussière est muni d'un rabat
qui se ferme automatiquement pour évi
ter que la poussière se répande au mo
ment où vous le retirez.
Insérez un nouveau sac à poussière
^
et enfoncez-le le plus possible dans
le support jaune. Ne dépliez pas le
sac à poussière lorsque vous le sor
tez de la boîte.
Dépliez-le le plus loin possible dans
^
le réservoir à poussière.
Refermez bien le couvercle du réser
^
voir à poussière. Poussez jusqu'à ce
qu'il s'enclenche. Faites attention que
le sac à poussière ne reste pas coincé dans le couvercle.
Un dispositif spécifique empêche
,
le couvercle du réservoir à poussière
de se refermer si aucun sac à poussière n'est inséré ou si le sac n'est
pas bien enfoncé. Ne forcez pas le
couvercle pour qu'il ferme.
Quand remplacer le filtre du réservoir
à poussière (pour protéger le moteur)
Chaque boîte de sacs à poussière
Miele d'origine contient un filtre de ré
servoir à poussière.
Remplacer le filtre du réservoir à
poussière (voir fig. 24)
^
Ouvrez le couvercle du réservoir.
^
Ouvrez la cartouche du filtre jaune.
Retirez l'ancien filtre
^
et remplacez-le par un neuf.
^
Refermez la cartouche de filtre et
-
^
refermez bien le couvercle du réser
voir à poussière.
-
-
-
-
-
-
Page 33

fr
Quand remplacer le filtre d'évacuation
Selon le modèle, l'un des filtres stan
dard d'évacuation suivants est installé
(voir fig. 25).
a filtre AirClean
Remplacez ce filtre d'évacuation cha
que fois que vous ouvrez une nouvelle
boîte de sacs à poussière Miele.
Un filtre d'évacuation AirClean est four
ni dans chaque boîte de sacs à pous
sière Miele d'origine.
b filtre Active AirClean
c filtre HEPA
Remplacez ces filtres d'évacuation environ une fois par année.
Vous pouvez inscrire la date de remplacement sur le filtre d'évacuation.
Remplacer le filtre "AirClean"
(voir fig. 26, 27 + 28)
Assurez-vous qu'un seul filtre d'évacuation est installé.
^
Appuyez sur le bouton d'ouverture
du compartiment du filtre d'évacuati
on situé à l'arrière de l'aspirateur puis
retirez le couvercle.
^
Retirez le filtre d'évacuation AirClean
usagé en le prenant par le coin pro
pre (voir la flèche)
^
et remplacez-le par un neuf.
Si vous souhaitez utiliser un filtre Ac
tive AirClean ou un filtre HEPA, con
sultez la section " Remplacer un
type de filtre par un autre".
^
Remettez le couvercle en place et re
fermez-le.
-
-
-
-
-
-
Remplacer le filtre "Active AirClean"
et le filtre HEPA (voir fig. 29 + 30)
Assurez-vous qu'un seul filtre d'éva
cuation est installé.
Appuyez sur le bouton d'ouverture
^
du compartiment du filtre d'évacuati
on situé à l'arrière de l'aspirateur puis
retirez le couvercle (voir fig. 26).
Retirez le filtre Active AirClean ou le
^
filtre HEPA usagé.
Insérez le nouveau filtre Active AirCle
^
an ou HEPA.
Si vous souhaitez utiliser un filtre
AirClean, consultez la section "Remplacer un type de filtre par un autre".
^ Remettez le couvercle en place et re-
fermez-le.
Remplacer un type de filtre par un
autre
Selon le modèle, l'un des filtres stan
dard d'évacuation suivants est installé
-
(voir fig. 25).
a filtre AirClean
b filtre Active AirClean (SF-AAC 10)
c filtre HEPA (SF-H 10)
Vous pouvez remplacer le filtre d'éva
cuation fourni avec l'aspirateur et tous
les filtres ci-dessus par d'autres types
de filtres.
Assurez-vous qu'un seul filtre d'éva
cuation est installé.
Les filtres d'évacuation comportent des
-
caractéristiques différentes (voir la sec
tion "Accessoires offerts en option").
-
-
-
-
-
-
-
33
Page 34

fr
Quand changer le filtre
1. Si vous souhaitez remplacer le filtre a
par le filtre b ou le filtre c, vous devez
retirer la grille du filtre avant d'insérer le
nouveau type de filtre.
2. Si vous souhaitez remplacer le filtre
d'évacuation b ou c par le filtre a, vous
devez installer une grille de filtre * dans
le couvercle.
* Grille du filtre - consultez la section
"Accessoires offerts en option".
Retirer ou insérer la grille du filtre
(voir fig. 31)
^ Saisissez la grille aux endroits indi-
qués par les flèches puis pressez les
côtés. La grille peut maintenant être
insérée ou retirée.
Quand remplacer les capteurs de fils
Les coussinets des capteurs de fils
placés dans l’orifice d’aspiration de la
brosse à tapis doivent être remplacés
dès qu'ils semblent usés.
Nettoyer le rouleau de la brosse à
plancher AllTeQ (voir fig. 34)
[selon le modèle]
a Déverrouillez la goupille à l'aide
d'une pièce de monnaie.
b Poussez sur l'axe du rouleau pour le
sortir.
c Enlevez le rouleau.
Enlevez tous les fils, les cheveux,
^
etc., puis remettez le rouleau en pla
ce et verrouillez la goupille.
Nettoyage et entretien
Éteignez l’aspirateur et débran-
,
chez-le avant d’effectuer des travaux d’entretien.
L'aspirateur et ses accessoires
L'aspirateur et les autres accessoires de
plastique peuvent être nettoyés à l'aide
d'un linge humide ou d'un nettoyant
spécialement conçu pour le plastique.
-
Remplacer les capteurs de fils
(voir fig. 32 + 33)
^
Utilisez un couteau ou un objet sem
blable pour retirer les capteurs de fils
des fentes.
^
Enfoncez les nouveaux capteurs de
fils dans les fentes.
Vous pouvez vous procurer des pièces
de rechange auprès d'un détaillant au
torisé d’aspirateurs Miele ou directe
ment auprès de Miele.
34
-
,
N'utilisez pas de nettoyants ab
rasifs, de nettoyants à base d'huile,
de produits pour vitres ni de nettoy
-
ants tout usage.
Réservoir à poussière
Le réservoir à poussière peut être net
toyé, si nécessaire, avec un linge sec,
une brosse à épousseter ou un autre
aspirateur.
-
,
Ne plongez pas l’aspirateur
dans l'eau. Si l’humidité pénètre
dans l’appareil, vous risquez de
subir un choc électrique.
-
-
-
Page 35

fr
Foire aux questions
L'aspirateur s'éteint automatique
ment.
Une sonde thermique éteint l'aspirateur
si ce dernier devient trop chaud.
Ce problème peut se produire, par
exemple, si un objet bloque le tuyau
d'aspiration ou si les pores du sac à
poussière sont bouchés par des parti
cules de poussière fine. Le problème
peut aussi de produire si le filtre d'éva
cuation ou le filtre du réservoir à pous
sière est très sale. Si cela se produit,
éteignez l'aspirateur et débranchez la
fiche de la prise électrique.
Une fois que la cause de la surchauffe
a été corrigée, laissez l'aspirateur refroidir pendant une période d'environ
20 à 30 minutes avant de recommencer
à l'utiliser.
-
-
-
Service technique
Si vous ne pouvez pas résoudre un
problème, veuillez communiquer avec
le Service technique Miele au numéro
de téléphone indiqué au verso de la
présente brochure.
^
Veuillez préciser le modèle de votre
appareil.
Ce renseignement figure sur la plaque
signalétique située en dessous de
l'aspirateur.
Accessoires offerts en option
Il est important de respecter les in
structions de nettoyage et d'entretien
du fabricant du revêtement de sol.
Vous pouvez vous procurer ces pro
duits, et bien d'autres, auprès d'un dé
taillant autorisé d'aspirateurs Miele ou
au magasin Miele en ligne à
http://store.miele.com.
Certains modèles sont équipés d'au
moins un des accessoires suivants :
Électrobrosse
Seul un aspirateur équipé d'une prise
pour électrobrosse peut recevoir une
électrobrosse.
Électrobrosse Confort (SEB 217)
Pour nettoyer en profondeur les moquettes à poils moyens. Elle enlève la
saleté incrustée et aide à prévenir le
feutrage dans les endroits les plus pas
sants.
Électrobrosse Premium (SEB 236)
Comparativement au modèle SEB 217,
cette électrobrosse est plus large de
60 mm (2 3/8 po). Elle est également
plus puissante. On la recommande pour
le nettoyage des grandes surfaces.
Elle possède également les caractéris
tiques suivantes, par rapport au modèle
SEB 217 :
-
-
-
-
-
–
réglage de la hauteur pour s'adapter
aux différentes longueurs de poils;
–
DEL pour éclairer la zone de travail;
–
voyant multifonction.
35
Page 36

fr
Brosses à plancher/brosses
Turbobrosse Turbo Confort (STB 205)
Sert à nettoyer la moquette à poils
courts et moyens.
Brosse à plancher pour sols durs
(SBB 235)
Sert à nettoyer des surfaces dures,
comme les planchers en carrelage ou
en pierres.
Brosse à parquet (SBB Parquet)
Brosse spéciale munie de poils naturels
servant à nettoyer des sols susceptibles d'être rayés, comme le parquet.
Autres accessoires
Mini-turbobrosse (STB 20)
Sert à nettoyer les meubles rembourrés,
les matelas et les sièges de voiture.
Suceur plat de 300 mm (SFD 10)
Pour nettoyer des plis, des fentes et
des recoins.
Suceur plat flexible de 560 mm
(SFD 20)
Sert à nettoyer les endroits difficiles à
atteindre.
Suceur pour meubles rembourrés de
190 mm (SPD 10)
Sert à nettoyer les meubles rembour
rés, les matelas et les coussins.
Brosse à épousseter munie de poils
naturels (SSP 10)
Pour les articles très fragiles.
Attache pour accessoires
Sert à ranger les accessoires fournis
(suceur plat et suceur pour meubles
rembourrés).
-
Brosse universelle (SUB 20)
Pour épousseter des rayonnages de li
vres, des étagères, etc.
Brosse à radiateur (SHB 10)
Sert à nettoyer des radiateurs, des éta
gères étroites ou des fentes.
Brosse à matelas (SMD 10)
Idéale pour nettoyer des interstices
près des matelas ainsi que des meu
bles rembourrés.
36
-
Accessoires pour aspirateur-traîneau
-
Grâce au tuyau de rallonge ou au tube
télescopique disponible, vous pouvez
utiliser l'aspirateur vertical comme un
aspirateur-traîneau.
-
Pour un nettoyage facile des cadres de
porte, des bibliothèques, des rideaux,
etc., et pour aspirer plus facilement
sous les armoires, les lits, etc.
Lorsque vous achetez des acces
soires pour aspirateur-traîneau,
veuillez préciser le numéro du mo
dèle de votre appareil.
-
-
Page 37

Filtres
Filtre d'évacuation Active AirClean
(SF-AAC 10)
Absorbe les odeurs du sac à poussière.
Filtre d'évacuation HEPA
(SF-H 10)
Excellent filtre d'évacuation qui assure
l'évacuation d'un air purifié. Convient
aux personnes souffrant d'allergies.
Grille du filtre
Requise si vous voulez utiliser un filtre
d'évacuation AirClean plutôt qu'un filtre
d'évacuation HEPA ou Active AirClean.
Protection de l'environnement
Élimination des produits d'emballage
fr
La boîte de carton et l'emballage protègent l'appareil durant le transport. Ces
matériaux sont biodégradables et recyclables. Veuillez les recycler.
Débarrassez-vous des emballages,
sacs et autres produits en plastique en
toute sécurité et gardez-les hors de la
portée des enfants. Ces éléments pré
sentent un risque de suffocation.
Mise au rebut de votre ancien appa
reil
Les anciens appareils peuvent contenir
des matériaux recyclables. Veuillez
communiquer avec le centre de recy
clage de votre localité pour savoir com
ment les recycler.
-
-
-
-
37
Page 38

Limited Warranty Canada
Limited WarrantyCanada
The following warranty conditions are valid in Canada only.
Miele Limited, (hereinafter "Miele") warrants to the original purchaser that this product, including all of it’s Miele
authorized parts and accessories, is free of defects in material and workmanship.
1. Duration of Warranty
This warranty is valid during the following time periods:
a) Domestic appliances in normal, non-commercial, household use:
One (1) year. Parts and labour.
–
RemoteVision® Modules: Please refer to Miele's "Limited Warranty - RemoteVision® Module - Canada".
–
Additional 5 and 10 Year Limited Warranty on Sealed Refrigeration Systems: The Warranty for the Sealed
–
Refrigeration System includes all original compressors, condensers, evaporators, driers, the original
refrigerant and the original connecting tubing.
Five (5) Year Warranty - If a claim regarding a defect in material or workmanship relating to the Sealed
–
Refrigeration Systems used in Miele Refrigerators, Wine Coolers, and Freezers is received by Miele within
five (5) years from the date of purchase, then any warranted failures of the Sealed Refrigeration System
shall be repaired at no cost to you (including parts & labour).
Ten (10) Year Warranty - If a claim of such a defect is received at any time during the period starting from
–
the sixth (6th) year and ending on the last day of the tenth (10th) year after the date of purchase, this
Warranty shall cover the replacement or repair of all parts of the Sealed Refrigeration System covered by
the Warranty that is found to be defective in material or workmanship but shall not include labour. Upon
request, such labour shall be provided by Miele and at the customary charge to the Miele Customer.
b) Domestic appliances in commercial use:
Six (6) months, for parts and labour.
–
c) Vacuums in normal, non-commercial, household use:
– One (1) year, upright and canister vacuums. Parts and labour.
– Two (2) years, motor for S170 - S189 upright units. Parts and labour.
– Seven (7) years, Vortex
the motor warranty is two (2) years. Parts and labour.
d) Vacuums in commercial use:
– Six (6) months, for products used commercially. Parts and labour.
– One (1) year for motor for canister and upright models. Parts and labour.
e) Commercial appliances.
– One (1) year. Parts and labour.
2. Commencement Date
Warranty coverage begins on the date of purchase. If a product under warranty is replaced by Miele, the original
warranty period is not extended but continues from the date of original purchase.
3. Warranty Preconditions
3.1 Miele assumes warranty responsibility subject to the following preconditions having been fulfilled:
a) You are the original purchaser and did not obtain the product through resale;
b) The product was purchased from Miele or an authorized Miele dealer in Canada;
c) If applicable, the product was installed by a person designated by Miele as qualified to do so and in
accordance with applicable installation instructions; and
d) The product is located in Canada.
3.2 Warranty claims will only be honoured provided that any failure to conform to this warranty is reported in writing
and the product is returned together with proof of purchase date to Miele or to a Miele authorized dealer, as
applicable, within the time period stated in Section 1 above.
4. Extent of Warranty
In the event of defect in material or workmanship occurring within the time period stated in I. above, Miele will
repair, or at its option replace, within a reasonable period of time, the product or any Miele authorized part or
accessory discovered to be defective in workmanship or materials. Defective products and parts become the
property of Miele upon replacement.
TM
motor for canister and upright units, except S170 - S189 upright units for which
38
Page 39

Limited Warranty Canada
5. Exclusions
Warranty coverage excludes any product, including its parts and accessories, that:
a) was not installed according to Miele's installation instruction;
b) was damaged by negligence, accident, abuse, misuse, improper or abnormal usage, maintenance or transportation;
c) contains non-authentic Miele accessories or replacement parts, including filters, dust bags and other
non-Miele products; and
d) was repaired, serviced, altered or modified by someone other than a Miele authorized service centre or technician.
6. Ordinary Wear and Tear
Ordinary wear and tear shall not be considered a defect in workmanship or materials.
7. Limitation of Liability
7.1 Unless you purchase extended warranty coverage from Miele prior to the expiry of this warranty, this warranty is the sole
warranty offered by Miele to you. Miele disclaims any and all other warranties to the fullest extent permitted by law,
whether express or implied, including any warranty of merchantability or fitness for a particular except as provided herein.
7.2 Your sole remedies under this warranty are those described herein. Unless otherwise stated, Miele's liability for actual
damage from any cause whatsoever is limited to the amount paid by you for the product. Miele disclaims any and all
liability and consequential or other damage whether based on breach of contract, tort (including negligence), product
liability or any other legal theory. In no event will either party be responsible for any lost profits or savings, incidental
damage or other economic damages.
8. Special Provincial laws
This warranty gives the purchaser specific legal rights. The purchaser may also have other rights which may vary
from Province to Province in Canada. Some provinces do not allow limitation or exclusion of implied warranties,
therefore, certain limitations and exclusions may not apply.
9. Customer Care
9.1 For service under this warranty or for further information please contact Miele at:
Miele Limited Toll free: 1-800-565-6435
161 Four Valley Drive E-mail: customercare@miele.ca
Vaughan, Ontario
Canada L4K 4V8
9.2 Service may require that the appliance be removed and taken, by authorized Miele personnel, to an authorized
Miele Service Centre. If service is requested by you in a remote geographical area, as determined by Miele in its
sole discretion from time to time, you will, at Miele's option, be responsible for either:
a) the travel expenses incurred by Miele to attend your premises; or
b) the cost of removal and shipment of the appliance from your premises to the nearest authorized Miele Service Centre.
Miele Limited
Headquarter and Showroom
161 Four Valley Drive
Vaughan, ON L4K 4V8
Canada
Phone: 800-643-5381
Fax: 905-535-2290
www.miele.ca
customercare@miele.ca
professional@miele.ca (commercial enquiries)
MieleCare National Service
Phone: 800-565-6435
Fax: 905-532-2292
customercare@miele.ca (general and technical enquiries)
905-660-9936
905-532-2272
39
Page 40

Garantie Limitée Canada
Garantie LimitéeCanada
Les conditions de la garantie suivante sont valides au Canada seulement.
Miele Limitée, (ci-après nommée "Miele") garantit à l’acheteur original que ce produit, y compris tous ses accessoires
et pièces autorisés par Miele, est libre de tout défaut de matériel et de fabrication.
1. Entrée en vigueur et durée de la garantie
Cette garantie est valide durant la période de temps suivante :
a) Appareils électroménagers aux fins d’utilisation domestique normale et non commerciale :
Un (1) an, pièce et main-d’oeuvre.
–
Modules RemoteVision® : Veuillez vous reporter à la "Garantie restreinte - Module RemoteVision® - Canada"
–
de Miele.
Garantie supplémentaire de 5 et 10 ans sur les systèmes scellés de réfrigération : la garantie sur le
–
système scellé de réfrigération couvre tous les compresseurs, les condensateurs, les évaporateurs et les
déshydrateurs-filtres d'origine, ainsi que le fluide frigorigène et les tuyaux de raccordement d'origine.
Garantie de cinq (5) ans - Si une plainte concernant un matériau défectueux ou un défaut de fabrication
–
lié au système scellé de réfrigération utilisé dans les réfrigérateurs, les caves à vin et les congélateurs
Miele est adressée à Miele dans les cinq (5) ans suivant la date d'achat de l'appareil, les défauts du
système scellé de réfrigération couverts par la garantie seront réparés gratuitement (pièces et
main-d'œuvre comprises).
Garantie de dix (10) ans - Si une plainte concernant les défauts susmentionnés est adressée à Miele à
–
partir de la sixième (6e) année et jusqu'au dernier jour de la dixième (10e) année suivant la date d'achat
de l'appareil, la garantie couvrira le remplacement ou la réparation de tous les éléments du système
scellé de réfrigération présentant un défaut matériel ou un défaut de fabrication couvert par la garantie,
excepté les frais de main-d'œuvre. Si le client en fait la demande, Miele se chargera de la réparation ou
du remplacement des pièces, mais aux frais du client.
b) Appareils électroménagers aux fins d’utilisation commerciale :
– Six (6) mois, pour pièces et main-d’oeuvre.
c) Aspirateurs destinés à une utilisation domestique, non commerciale dans des conditions normales :
– Un (1) an, pour les aspirateurs verticaux et les aspirateurs-traîneaux pièces et main-d’oeuvre.
– Deux (2) ans, pour le moteur des aspirateurs verticaux S170 - S189 pièces et main-d’oeuvre.
– Sept (7) ans, pour le moteur Vortex
verticaux S170-S189 dont le moteur est garanti deux (2) ans pièces et main-d’oeuvre.
d) Aspirateurs aux fins d’utilisation commerciale :
– Six (6) mois, pour les produits à utilisation commerciale. Pièce et main-d’oeuvre.
– Un (1) an, pour le moteur des aspirateurs verticaux et des aspirateurs-traîneaux. Pièces et main-d’oeuvre.
e) Appareils commerciaux.
–
Un (1) an, pièces et main-d’oeuvre.
2. Date d’entrée en vigueur
La garantie entre en vigueur à la date de l'achat. En cas de remplacement par Miele d'un produit couvert par une
garantie, la période de garantie initiale n'est pas prolongée; sa date d'entrée en vigueur correspond à la date de
l'achat initial.
3. Conditions préalables liées à la garantie
3.1 Miele assume la responsabilité en vertu de la garantie à la condition que les conditions suivantes aient été respectées :
a) vous êtes l'acheteur initial et votre produit ne provient pas d'une revente;
b) le produit a été acheté auprès de Miele ou auprès d'un détaillant Miele autorisé au Canada;
c) le cas échéant, le produit a été installé par une personne compétente, autorisée par Miele, conformément aux
instructions d'installation en vigueur;
d) le produit se trouve au Canada.
3.2 Les réclamations en vertu de la garantie seront honorées uniquement si la non-conformité aux dispositions de la
garantie est signalée par écrit et si le produit est retourné à Miele ou à un détaillant Miele autorisé accompagné
d'une preuve de la date d'achat, pendant la période prévue à l'article 1 ci-dessus.
4. Étendue de la garantie
En cas de matériaux défectueux ou de défaut de fabrication pendant la période prévue à l'article 1 ci-dessus,
Miele réparera ou, à son choix, remplacera dans un délai raisonnable le produit ou toute pièce ou tout accessoire
Miele dont la fabrication ou les matériaux sont défectueux. Les produits ou les pièces défectueux deviennent la
propriété de Miele lorsqu'ils sont remplacés.
TM
des aspirateurs-traîneaux, excepté pour les modèles d’aspirateurs
40
Page 41

Garantie Limitée Canada
5. Exclusions de la garantie
La garantie ne couvre pas les produits, y compris les pièces et les accessoires de ces produits, qui :
a) n'ont pas été installés conformément aux instructions d'installation de Miele;
b) ont été endommagés par négligence, à la suite d'un accident ou d'une utilisation mauvaise, inappropriée ou
anormale, ou encore en raison de l'entretien ou du transport inapproprié ou anormal;
c) contiennent des accessoires ou des pièces de rechange non fabriqués par Miele, y compris les filtres, les sacs
à poussière et tout autre produit non fabriqué par Miele;
d) ont été réparés, entretenus ou modifiés par une personne autre qu'une personne du centre de services ou un
technicien autorisé par Miele.
6. Usure normale
L'usure normale ne constitue pas un défaut de fabrication ni un défaut de matériaux.
7. Limitation de responsabilité
7.1 À moins d'acheter une garantie prolongée auprès de Miele avant l'échéance de la présente garantie, celle-ci est
la seule garantie que vous offre Miele. Miele se désiste de toute autre garantie maximale permise par la loi,
expresse ou implicite, y compris toute garantie de qualité marchande ou d'usage à une fin particulière, à
l'exception de la présente garantie.
7.2 Les recours décrits dans le présent document constituent vos seuls recours en vertu de la présente garantie. À
moins d'une autre mention, la responsabilité de Miele pour les dommages réels, quelle que soit leur nature, est
limitée au montant que vous avez payé pour le produit. Miele se dégage de toute responsabilité, de tout
dommage indirect ou de tout autre dommage, qu'il soit attribuable à la violation du contrat, à la responsabilité
délictuelle (y compris la négligence), à la responsabilité du fait du produit ou à toute autre théorie juridique. En
aucun cas les deux parties ne seront tenues responsables de toute perte de bénéfices ou d'économies, de
dommage consécutif ou de tout autre dommage financier.
8. Lois provinciales particulières
La présente garantie accorde à l'acheteur des droits légaux particuliers. L'acheteur peut également exercer d'autres
droits qui peuvent varier d'une province à l'autre au Canada. Certaines provinces interdisent la restriction ou l'exclusion
des garanties implicites. Par conséquent, il est possible que certaines restrictions et exclusions ne s'appliquent pas.
9. Service à la clientèle
9.1 Pour faire exécuter des travaux d'entretien couverts en vertu de la présente garantie ou pour obtenir de plus
amples renseignements, veuillez communiquer avec Miele à l'adresse ou aux numéros suivants :
Miele Limited, No sans frais : 1 800 565-6435
161, Four Valley Drive Adresse électronique : customercare@miele.ca
Vaughan (Ontario)
Canada L4K 4V8
9.2 Si des travaux d'entretien sont nécessaires, l'appareil devra peut-être être déplacé par une personne autorisée
par Miele et emporté à un centre de services Miele autorisé. Si vous demandez un entretien et que vous habitez
une région éloignée, tel qu'il a été déterminé par Miele, à sa seule discrétion, à l'occasion, vous devrez, selon le
choix de Miele, assumer certains frais :
a) soit les frais de déplacement qu'engage Miele pour se présenter à votre lieu de résidence;
b) soit les frais de déplacement et d'envoi de l'appareil, de votre lieu de résidence au centre de
services Miele autorisé le plus près.
Miele Limitée
Siège social au Canada
161 Four Valley Drive
Vaughan, ON L4K 4V8
Canada
Téléphone : (800)-643-5381
Télécopieur : (905)-535-2290
www.miele.ca
customercare@miele.ca
professional@miele.ca (questions commerciales)
Service à la clientèle – MieleCare (Canada)
Téléphone : (800) 565-6435
Télécopieur : (905) 532-2292
customercare@miele.ca (questions générales et Service technique)
(905)-660-9936
(905) 532-2272
41
Page 42

42
Page 43

Page 44

Page 45

Page 46

Page 47

&DQDGD
,PSRUWDWHXU
0LHOH/LPLWpH
6LqJHVRFLDODX&DQDGDHW&HQWUH0LHOH
&OUR6ALLEY$RIVE
6AUGHAN/.,+6
WWWMIELECA
6HUYLFHjODFOLHQWqOH
4ÏLÏPHONE
CUSTOMERCARE MIELECA
$OOHPDJQH
)DEULFDQW
-IELE#IE+'
#ARL-IELE3TRAE
'àTERSLOH
Tous droits réservés
LES RENSEIGNEMENTS FOURNIS PEUVENT ÊTRE MODIFIÉS. VEUILLEZ CONSULTER NOTRE SITE
WEB POUR CONNAÎTRE LES CARACTÉRISTIQUES LES PLUS RÉCENTES DES PRODUITS AINSI
QUE LES DERNIERS RENSEIGNEMENTS TECHNIQUES ET L'INFORMATION MISE À JOUR
ONCERNANT LA GARANTIE.
Page 48

Please have the model and serial number
T
of your appliance available before
contacting Technical Service.
U.S.A.
Miele, Inc.
National Headquarters
9 Independence Way
Princeton, NJ 08540
Phone:
Fax:
www.mieleusa.com
Technical Service & Support
Nationwide
Phone:
Fax:
800-843-7231
609-419-9898
609-419-4298
800-999-1360
888-586-8056
echnicalService@mieleusa.com
Canada
Importer
Miele Limited
Headquarters and Miele Centre
161 Four Valley Drive
Vaughan, ON L4K 4V8
www.miele.ca
Customer Care Centre
Phone:
customercare@miele.ca
Germany
Manufacturer
Miele & Cie. KG
Carl-Miele-Straße 29
33332 Gütersloh
800-565-6435
905-532-2272
Alteration rights reserved Swing H1 / 3714
INFORMATION IS SUBJECT TO CHANGE. PLEASE REFER TO OUR WEBSITE TO OBTAIN THE MOST
CURRENT PRODUCT SPECIFICATIONS, TECHNICAL & WARRANTY INFORMATION.
M.-Nr. 10 081 730 / 00
 Loading...