

en
Operating Instructions
Cordless Stick Vacuum Cleaner
es
fr
Instrucciones de funcionamiento
Aspiradora vertical in-alámbrica
Mode d’emploi
Aspirateur-balai sans fil
SMUL0
SMML0
HS19
M.-Nr. 11 456 520

en - Contents
IMPORTANT SAFETY INSTRUCTIONS ............................................................ 4
Appliance description ....................................................................................... 14
Caring for the environment .............................................................................. 16
References to illustrations................................................................................ 17
Installation and connection .............................................................................. 17
Assembling the vacuum cleaner ........................................................................ 17
Connecting the Comfort handle ......................................................................... 17
Connecting the PowerUnit and the suction wand .............................................. 17
Inserting the battery ........................................................................................... 18
Connecting the Electrobrush .............................................................................. 18
General battery information................................................................................. 18
Charging the battery (without wall mounting) ..................................................... 18
Charging the battery (with wall mounting) .......................................................... 19
Wall mounting ..................................................................................................... 19
Attaching the mounting plate ............................................................................. 19
Attaching the charging cable to the wall bracket ............................................... 19
Connecting the accessories holder (if required) ................................................. 19
Connecting the wall bracket ............................................................................... 19
Battery charging state indicator (while charging) ............................................... 19
Battery charging state indicator (while in use) .................................................... 20
Using the accessories supplied ...................................................................... 20
Electrobrush Multi Floor XXL .............................................................................. 21
Electro Compact handheld brush ...................................................................... 21
Additional battery and charger cradle ................................................................ 21
Use...................................................................................................................... 21
Switching on and off .......................................................................................... 21
Regulating the suction power ............................................................................. 22
Illuminating the work area ................................................................................... 22
Self-standing function for short pauses in vacuuming........................................ 22
Maintenance ...................................................................................................... 22
Emptying the dust container .............................................................................. 22
Cleaning the fine dust filter ................................................................................. 23
Cleaning the pre-filter ......................................................................................... 23
Cleaning the dust container ................................................................................ 24
Cleaning the Electrobrush/handheld brush ........................................................ 24
Replacing the rechargeable battery .................................................................... 25
Frequently Asked Questions ............................................................................ 26
2

en - Contents
Fault messages.................................................................................................. 28
Cleaning and care ............................................................................................. 29
Customer Service.............................................................................................. 29
Contact in case of fault ....................................................................................... 29
Warranty.............................................................................................................. 29
Optional accessories ........................................................................................ 29
Purchasing accessories ...................................................................................... 29
LIMITED WARRANTY - VACUUM CLEANERS USA........................................ 31
3
en - IMPORTANT SAFETY INSTRUCTIONS
This vacuum cleaner complies with all current local and
national safety requirements. Improper use can lead to
personal injury and damage to property.
Please read the operating instructions before using the
vacuum cleaner for the first time. They contain important
information on the safety, use, and maintenance of the
vacuum cleaner. This prevents both personal injury and
damage to the appliance.
Miele expressly and strongly advises that you read and
follow the instructions in the “Installation and connection” chapter as well as the "IMPORTANT SAFETY INSTRUCTIONS".
Miele cannot be held liable for injury or damage caused
by non-compliance with these instructions.
Keep these operating instructions in a safe place and
pass them on to any future user.
Always disconnect the vacuum cleaner from the power
supply when you have finished using it, before changing
any accessories, as well as for maintenance work, cleaning, and troubleshooting. Use the On/Off switch on the
Comfort handle to do this.
Correct use
This vacuum cleaner is intended for cleaning flooring in
domestic households and similar residential environments.
This vacuum cleaner is not suitable for use on construction
sites.
This vacuum cleaner is not intended for outdoor use.
4

en - IMPORTANT SAFETY INSTRUCTIONS
This vacuum cleaner can be used for all normal cleaning
of carpets, rugs and hard flooring.
This vacuum cleaner is intended for use at altitudes of
up to 13000ft (4000m) above sea level.
The vacuum cleaner must only be used to vacuum dry
floor surfaces. Do not vacuum people or animals. Any
other types of use, modifications, or alterations are not
permitted.
Persons which lack physical, sensory or mental abilities
or experience with the machine should not use it without
supervision or instruction by a responsible person.
Use only as described in this manual.
Use only manufacturer's recommended attachments.
The packaging material protects the vacuum cleaner
from transport damage. We recommend you keep the
packaging for transport purposes.
Safety with children
Children must be kept away from the vacuum cleaner
unless they are constantly supervised.
Do not allow the vacuum cleaner to be used as a toy.
Close attention is necessary when used near children.
Danger of suffocation! Ensure that any plastic wrap-
pings, bags, etc. are disposed of safely and kept out of the
reach of children.
5
en - IMPORTANT SAFETY INSTRUCTIONS
WARNING
To reduce the risk of fire, electric shock or injury:
Check the voltage rating of the vacuum cleaner before
connecting the power cord to an electrical outlet. Your
power source should correspond with the voltage rating
plate located on the underside of the vacuum. Use only
household AC outlets. Never use DC power sources. If you
are not sure of your home’s voltage supply, consult a qualified electrician. Connecting the vacuum cleaner to a
higher voltage than indicated in these instructions may result in damage to the vacuum cleaner or injury.
To reduce the risk of electric shock, this appliance has a
polarized plug (one blade is wider than the other.) This plug
will fit in a polarized outlet only one way. If the plug does
not fit fully in the outlet, reverse the plug. If it still does not
fit, contact a qualified electrician to install the proper outlet. Do not alter the plug in any way.
Technical safety
The vacuum cleaner operates at 25.2V.
It is classified as a Class III appliance.
This appliance is supplied by a safety extra-low voltage
(SELV) power source where the voltage is low enough to
protect users from the risk of electrical shock. A Class II
charger is used for supplying power to charge the vacuum
cleaner.
6

en - IMPORTANT SAFETY INSTRUCTIONS
Before using the vacuum cleaner and its accessories,
check for any visible signs of damage. Do not use a damaged appliance.
Compare the connection data on the data plate of the
charger (voltage and frequency) with that of the electricity
supply. This data must match exactly. Without modifications, the charger is suitable for 50Hz and 60Hz.
The electrical outlet must be rated at 15Amps.
The Miele Multi Floor XXL Electrobrush and the Miele
Electro Compact handheld brush (varies according to the
model) are additional motor-driven devices designed specially for this Miele vacuum cleaner. For safety reasons, the
vacuum cleaner must not be used with a different
MieleElectrobrush/handheld brush or an electrobrush/
handheld brush produced by another manufacturer.
Repairs should only be performed by an authorized ser-
vice agent in accordance with national and local safety
regulations. Unauthorized repairs could cause injury or machine damage. Otherwise the warranty may be void.
Repairs should only be carried out by a Miele-authorized
service technician. Repairs and other work by unqualified
persons can cause considerable danger to users.
Miele can only guarantee the safety of the appliance
when genuine Miele replacement parts are used. Faulty
components should only be replaced with genuine Miele
parts.
Store the vacuum cleaner at an ambient temperature be-
tween 32°F and 115°F (0°C and 45°C).
7

en - IMPORTANT SAFETY INSTRUCTIONS
Cleaning
Do not immerse the vacuum cleaner or any accessories
supplied with it in water.
The Electrobrush/handheld brush (depending on the
model), the PowerUnit, the suction wand, the body, and
the Comfort handle contain electrical wires. The plug connectors must not come into contact with water. Danger of
electric shock. They should only be cleaned with a dry
cloth.
Clean the vacuum cleaner and accessories only with a
dry or slightly damp cloth when disconnected from the
power supply.
Exception:
Dust container: empty the dust container and remove the
pre-filter. Clean the dust container using a mild solution of
water and liquid dish soap only. Then dry the dust container carefully. Replace the pre-filter in the dust container.
Proper use
Do not use the vacuum cleaner without the dust con-
tainer, pre-filter, fine dust filter, and motor protection filter
fitted.
Do not use with damaged cord or plug.
If appliance is not working as it should, has been dropped,
damaged, left outdoors, or dropped into water, return it to
a service center.
8

en - IMPORTANT SAFETY INSTRUCTIONS
Do not put any object into openings. Do not use with
any opening blocked; keep free of dust, lint, hair, and anything that may reduce air flow.
Do not vacuum up anything which has been burning or
smoking, e.g., cigarettes, ashes or hot ash, whether glowing or apparently extinguished.
Do not use the vacuum cleaner to vacuum up any water,
liquid or damp dirt. Wait until any freshly cleaned or shampooed rugs or carpets are completely dry before attempting to vacuum.
Do not use the vacuum cleaner to vacuum toner dust.
Toner, such as that used in printers and photocopiers, can
conduct electricity.
Do not vacuum up any flammable or combustible liquids
or gases and do not vacuum in areas where such substances are stored.
Never touch the Electrobrush/handheld brush (varies ac-
cording to the model) while it is rotating.
Do not use the Electrobrush/handheld brush (varies ac-
cording to the model) at head height.
Do not vacuum at head height and do not let the suction
get anywhere near a person's head.
Keep hair, loose clothing, fingers, and all part of body
away from openings and moving parts.
Use extra care when cleaning on stairs.
9

en - IMPORTANT SAFETY INSTRUCTIONS
Accessories
Only use genuine accessories with the “ORIGINAL
Miele” logo on the packaging. The manufacturer cannot
otherwise guarantee the safety of the product.
Safety instructions and warnings for AP01battery,
LG01charger, LS03charger cradle (depending on the
model)
Safety with children
People (including children) with reduced physical, sen-
sory, or mental capabilities, or lack of experience or knowledge, who are unable to use the LG01charger/
LS03charger cradle safely may only use this vacuum
cleaner if they are supervised while using it or have been
shown how to use it in a safe way and understand and recognize the consequences of incorrect operation.
Keep the AP01battery out of the reach of children.
Children must be kept away from the LG01charger/
LS03charger cradle unless they are constantly supervised.
Technical safety
The AP01battery, the LG01charger, and the
LS03charger cradle are designed for use with the
MieleHS19 Vacuum Cleaner. For safety reasons, the vacuum cleaner must not be used with a battery, charger, or
charger cradle produced by another manufacturer.
10
en - IMPORTANT SAFETY INSTRUCTIONS
Only the LG01/xxcharger or the LS03/xxcharger cradle
supplied with the vacuum cleaner can be used to charge
the AP01battery.
xx stands for 01, 02, 03, 04, 05, 06, 07, or 08; these numbers identify the country version of your LG01charger and
your LS03charger cradle:
XX
01 AT, BE, BG, CH, CL, CZ, DE, DK, EE, ES, FI, FR, GR, HR, HU, IT, KZ, LT,
LU, LV, NL, NO, PL, PT, RO, RS, RU, SE, SI, SK, TR, UA, ZA
02 AE, GB, HK, IE, MY, SG
03 CA, MX, US
04 AU, NZ
05 CN
06 KR
07 JP
08 IN
If you are using a plug adapter, make sure that it is ap-
proved for continuous operation.
Reliable and safe operation of this vacuum cleaner can
only be assured if the LG01charger/LS03charger cradle
has been connected to the electricity supply.
Charge the vacuum cleaner at an ambient temperature
between 32°F and 115°F (0°C and 45°C).
11

en - IMPORTANT SAFETY INSTRUCTIONS
Stop using the AP01battery immediately if you notice an
unusual smell from it, if liquid is leaking from it, if it is significantly overheating, or if it is discolored or deformed.
Dispose of the AP01battery immediately (see safety notice
“Disposing of the AP01battery” at the end of this chapter
as well as “Caring for the environment – Disposing of old
batteries”).
Batteries will deplete over time. They can then leak cor-
rosive fluids. Avoid contact with the eyes and skin. In the
event of contact, rinse thoroughly with water and seek
medical advice.
Please contact Technical Service before sending the
AP01battery.
Proper use
Do not drop or throw the AP01battery. For safety rea-
sons, do not continue to use an AP01battery which has
been damaged.
Keep the AP01battery away from naked flames or other
heat sources. Do not heat the AP01battery. Do not expose
the rechargeable battery to direct sunlight.
Do not dismantle the AP01battery.
Do not cause a short circuit by bridging the contacts of
the AP01battery, either unintentionally or deliberately.
Do not allow the AP01battery to come into contact with
liquids.
12
en - IMPORTANT SAFETY INSTRUCTIONS
Disposing of the AP01battery: remove the AP01battery
from the vacuum cleaner. Insulate the metal contacts with
adhesive tape to prevent short circuits. Dispose of the
AP01battery in a municipal recycling facility. Do not dispose of the AP01battery with your household waste.
California Proposition 65
THE FOLLOWING WARNING IS REQUIRED BY THE STATE OF CALIFORNIA
FOR CALIFORNIA RESIDENTS ONLY:
WARNING:
Cancer and Reproductive Harm www.P65Warnings.ca.gov.
SAVE THESE INSTRUCTIONS
13
en - Appliance description
14

en - Appliance description
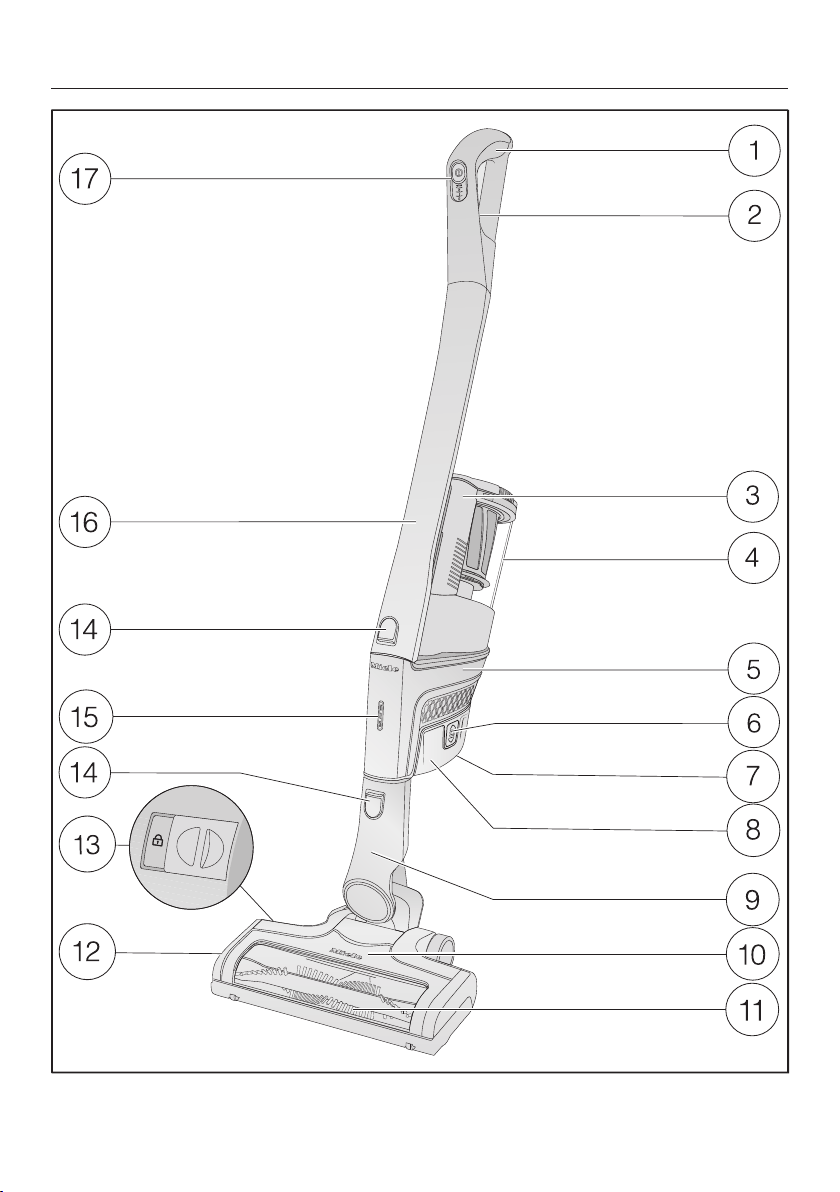
a
Comfort handle
b
Release catch for Comfort handle (on the back)
c
Dust container handle
d
Dust container with pre-filter, fine dust filter, and motor protection filter
e
PowerUnit with battery connection and connections for Comfort handle, suction wand, Electrobrush, and dust container
f
Release catches for battery (on both sides of the battery)
g
Charging socket (at the bottom of the battery)
h
AP01lithium-ion battery
i
Connector
j
Multi Floor XXL Electrobrush (some models feature BrilliantLight lighting)
k
Removable roller brush
l
Flap
m
Release catch for removing the roller brush
n
Release buttons
o
Battery charging state indicator
p
Suction wand
q
On/Off switch with suction power selector
15
en - Caring for the environment
3E&G+J
Disposing of sales packaging
The packaging material protects the
vacuum cleaner from transport damage.
The packaging materials used are selected from materials which are environmentally friendly for disposal and can
therefore be recycled.
Recycling the packaging material reduces the use of raw materials in the
manufacturing process and also reduces the amount of waste in landfill
sites. Make sure the packaging is disposed of in the proper manner for your
area.
Disposing of your old machine
Before disposing of your old vacuum
cleaner, remove the fine dust filter and
dispose of it with your household
waste.
Electronic and electrical appliances
contain many valuable materials. They
also contain certain materials, compounds, and components which were
essential for their correct functioning
and safety. These could be hazardous
to your health and to the environment if
disposed of with general waste or if
handled incorrectly. Please do not,
therefore, dispose of your old vacuum
cleaner with your household waste.
Instead, please make use of officially
designated collection and disposal
points to dispose of and recycle electrical and electronic appliances. Ensure
that your vacuum cleaner presents no
danger to children while being stored
for disposal.
Disposing of old batteries
In many cases, electrical and electronic
appliances contain batteries which
must not be disposed of with household waste after use. You are legally
obliged to remove any old batteries
which are not securely enclosed by the
vacuum cleaner and to take them to a
suitable collection point (e.g., retailer)
where they can be handed in free of
charge. Insulate the metal contacts with
adhesive tape to prevent short circuits.
Batteries may contain substances
which can be hazardous to human
health and the environment.
The labeling on the battery will provide
further information. The bin symbol with
a cross through it means that the batteries must not be disposed of in
household waste. A bin with a cross
through it which also has one or more
chemical symbols on it indicates that
the battery contains lead (Pb), cadmium
(Cd), and/or mercury (Hg).
Old batteries contain valuable raw materials which can be recycled. Disposing of batteries separately makes them
easier to handle and recycle.
16

en-US
References to illustrations
The illustrations referred to in the text
are shown on the fold-out pages at
the end of these Operating Instructions.
Installation and connection
Assembling the vacuum cleaner
(Figs. 01+02)
You can assemble the vacuum cleaner
in 2 different ways.
You can place the suction wand ei-
ther above or below the PowerUnit.
The advantages of placing the
PowerUnit at the bottom of the vacuum cleaner are as follows:
- secure self-standing function possible
(see “Use” – “Self-standing function for
short pauses in vacuuming”)
- ergonomic (reduced strain on the
wrist)
- convenient cleaning of large surfaces
The advantages of placing the
PowerUnit at the top of the vacuum
cleaner are as follows:
– convenient cleaning underneath furniture
– PowerUnit can be removed quickly
PowerUnit solo
The PowerUnit can be used on its own
without the suction wand and Electrobrush as a quick way of vacuuming up
crumbs and lint in specific areas.
Tip: This configuration is particularly
suitable when using the three-piece accessory set (see “Using the accessories
supplied”).
Connecting the Comfort handle
(Figs. 03+04)
Depending on how your vacuum
cleaner is configured, you can connect
the Comfort handle to either the suction
wand or the PowerUnit.
Push the Comfort handle down on to
the suction wand connection from
above until it audibly clicks into place
(left image detail).
Slide the Comfort handle along the
guide line on the dust container handle and down on to the PowerUnit
connector from above until it audibly
clicks into place (right image detail).
Switch off the vacuum cleaner using
the On/Off switch on the front of the
Comfort handle if you want to separate the sections.
Press the release catch and remove
the Comfort handle by pulling upwards.
Connecting the PowerUnit and the
suction wand (Figs. 05+06)
Depending on how your vacuum
cleaner is configured, the suction wand
is located either above or below the
PowerUnit.
Slide the suction wand along the
guide line on the dust container handle and down on to the PowerUnit
connector from above until it audibly
clicks into place (left image detail).
Push the PowerUnit connector down
on to the suction wand from above
until it audibly clicks into place (right
image detail).
17
en-US
Press the release catch to separate
the individual sections from each
other.
Inserting the battery
(Figs. 07, 08+09)
Remove the sticker from the battery.
Push the battery along the guide lines
until it audibly clicks into place in the
PowerUnit.
If you want to separate the sections
again, press both release catches at
the side of the battery to remove the
battery.
Connecting the Electrobrush (Fig. 10)
Depending on how your vacuum
cleaner is configured, you can connect
either the PowerUnit connector or the
suction wand connector to the Electrobrush.
Insert the connector down into the
Electrobrush from above until it audibly clicks into place.
To separate the individual sections
from each other, press the release
catch on the Electrobrush and pull
the connector out of the Electrobrush
(Fig. 06).
General battery information
The rechargeable battery is supplied
not fully charged.
Charge the battery completely before
using it for the first time. Allow approximately 4hours for this.
It is essential to charge each new battery for the first time in the PowerUnit
(Triflex vacuum), in order to deactivate
shipping mode and activate the maximum power in the battery.
Once the battery is fully charged, the
battery charging state indicator
switches off after 10minutes to conserve energy.
You can use the vacuum cleaner for up
to 17minutes if you are using it in its
fully assembled state at the maximum
power level.
If, however, you are using the
PowerUnit on its own and select the
lowest power level, you can vacuum for
up to 60minutes.
Charging the battery (without wall
mounting) (Fig. 11)
You can store the vacuum cleaner upright and charge the battery directly.
Connect the PowerUnit to the Elec-
trobrush to provide a secure base for
the vacuum cleaner.
Swing the vacuum cleaner forwards
until the Electrobrush connector audibly clicks into place.
Plug the supplied charging cable into
the charging socket on the bottom of
the battery.
Plug the charger into an electrical
outlet.
The charging process will start.
18
You can read more about this in “Battery charging state indicator”.
en-US
Charging the battery (with wall
mounting) (Figs. 12+13)
There are 2 ways to store and charge
the vacuum cleaner in the supplied wall
bracket.
You will need a suitable location near
a free electrical outlet for mounting the
appliance on the wall.
Wall mounting (Figs. 14+15)
The supplied wall bracket has a mounting plate with a bag of screws attached
to the back.
Attach the mounting plate to the point
on the wall where you want the wall
mounting to be.
Remove the bag of screws.
Press the release catch at the bottom
of the wall bracket.
Remove the mounting plate from the
wall bracket by sliding it downwards.
Attaching the mounting plate
(Figs. 16+17)
2 plugs and 2 T20TORX screws are
supplied for attaching the mounting
plate to the wall.
You will also need an electric screwdriver or a drill (with a 1/4" drill bit).
Depending on how your vacuum
cleaner is configured, select a distance
of 17 3/4" or 38 1/2" (45cm or 98cm)
between the bottom edge of the mounting plate and the floor.
Attaching the charging cable to the
wall bracket (Figs. 18, 19+20)
A cable compartment is located on the
underside of the wall bracket.
Press both release catches on the un-
derside of the wall bracket and remove the cable compartment cover.
Plug the supplied charging cable into
the opening from above.
Lay the charging cable in its guide.
Refit the cover and close the cable
compartment.
Connecting the accessories holder
(if required) (Fig. 21)
An accessories holder is supplied for
storing the three-piece accessory set
(see “Using the accessories supplied”).
Push the accessories holder on to the
wall bracket as far as it will go.
Connecting the wall bracket
(Figs. 22+23)
Slide the wall bracket down into the
mounting plate from above until it audibly clicks into place.
Slide the PowerUnit of the fully as-
sembled vacuum cleaner, with the
battery inserted, down into the wall
bracket from above.
Plug the charger into the power
socket.
The charging process will start.
Be careful not to damage any electrical in the wall.
Attach the mounting plate to the wall.
Battery charging state indicator
(while charging) (Fig. 24)
The battery charging state is displayed
on the PowerUnit.
19

en-US
Battery life Display
Approx. 0–34% Bottom light
flashes slowly
Approx. 35–69% Bottom light is lit
up; middle light
flashes slowly
Approx. 70–90% Bottom and mid-
dle lights are lit
up;
top light flashes
slowly
Approx. 91–100% Bottom, middle,
and top lights are
lit up
Once the battery is fully charged, the
battery charging state indicator
switches off after 10minutes to conserve energy.
If the battery has not been used for a
long time and has run down, it will go
into safe mode. As a result, the battery
charging state indicator will only respond after approximately 30–60minutes when charging in the PowerUnit.
Battery charging state indicator
(while in use) (Fig. 24)
The battery charging state is displayed
on the PowerUnit.
Battery life Display
Approx. 100–70% Top, middle, and
bottom lights are
lit up
Approx. 69–35% Middle and bot-
tom lights are lit
up
Approx. 34–11% Bottom light is lit
up
Approx. 10–0% Bottom light
flashes slowly
Using the accessories supplied
(Fig. 25)
Upholstery nozzle
Accessory for cleaning upholstery,
mattresses, and cushions.
Crevice nozzle
Accessory for cleaning in folds,
crevices, or corners.
Dusting brush
Accessory for vacuuming skirting
boards, carved furniture, or ornaments.
The head can be swiveled to adjust the angle.
d Accessories holder
For storing the three-piece accessory set.
20
Symbols on the holder show where to
attach the different accessories.
You can fit the accessories holder to the
wall bracket (see “Installation and connection – Connecting the accessories
holder”).
en-US
Electrobrush Multi Floor XXL (Fig. 26)
Follow the flooring manufacturer’s
cleaning and care instructions.
The Electrobrush can be used for all
normal cleaning of carpets, rugs, and
hard flooring.
Tip: The suction wand is not the best
option for cleaning carpeted stairs.
Miele offers a range of suitable accessories for many Special Modes (see
“Optional accessories”).
Electro Compact handheld brush
(Fig. 27)
(depending on model)
Follow the flooring manufacturer’s
cleaning and care instructions.
The handheld brush is particularly suitable for intensive cleaning of upholstery
and car seats.
Tip: The suction wand is not the best
option for cleaning upholstery or car
seats.
Additional battery and charger cradle
(Fig. 28)
(depending on model)
Using the additional battery doubles the
amount of time the vacuum cleaner can
be used for.
Before charging for the first time,
please note the information in “Installation and connection – General battery information”.
After the battery has been fully
charged in the PowerUnit, the charger
cradle can be used to charge it. Push
the battery into the charger cradle until it audibly clicks into place.
Insert the plug into an electrical out-
let.
The charging process will start. The
battery charging state indicator flashes
on the left.
You can find out more about the battery
charging state indicator in “Installation
and connection – Battery charging state
indicator”.
If you place the run-down battery in
the charger cradle straight after use, it
will only start charging once the battery has cooled down.
The cooling process can take up to
60minutes. The battery charging state
indicator on the charger cradle will not
respond during this time.
Use
Switching on and off(Fig. 29)
Pull the charger out of the charging
socket on the battery if you have
charged the battery directly.
If you have charged the battery in the
wall bracket, take the vacuum cleaner
out of the wall bracket.
Press the On/Off switch on the Com-
fort handle.
21
en-US
Regulating the suction power
The suction power can be regulated to
suit the type of flooring being cleaned.
Reducing the suction power reduces
the amount of effort required to maneuver the Electrobrush.
There are 3 power levels to choose from
on the Comfort handle:
1 Lowest power level
for light soiling
2 Medium power level
for normal soiling
Max. Highest power level
for heavy soiling
The floor covering detection function is
activated in the medium and highest
power levels.
The Electrobrush power output is automatically set to the optimum level
based on the type of flooring – this can
lead to a change in the operating noise.
Illuminating the work area
(depending on model)
The Electrobrush on your vacuum
cleaner is equipped with BrilliantLight to
illuminate the work area.
Swing the vacuum cleaner forwards
until the Electrobrush connector audibly clicks into place.
The vacuum cleaner stays securely upright, the Electrobrush switches itself off
and the battery is conserved.
If you then unlock the connector on the
Electrobrush, the Electrobrush will
switch on again.
Maintenance
Risk of injury caused by rotating
roller brush.
You can injure yourself on the rotat-
ing roller brush.
Switch the vacuum cleaner off before
doing any maintenance work. Use
the On/Off switch on the Comfort
handle to do this.
Replacement parts are available from
your Miele dealer or through Miele
Service.
Emptying the dust
container(Fig. 30–34)
Empty the dust container before the
dust has reached the max marking on
the dust container.
Self-standing function for short
pauses in vacuuming
(For safety reasons, this function can
only be used when the PowerUnit is fitted at the bottom of the vacuum
cleaner)
If you are vacuuming with the
PowerUnit fitted at the bottom of the
vacuum cleaner, you can easily interrupt operation while the appliance is
switched on.
22
Turn the lid of the dust container in
the direction of the arrow as far as
the first stop.
Remove the dust container upward.
The contents of the dust compartment
can be disposed of with the normal
household trash, providing it contains
general household dust only.
en-US
Hold the dust container close to the
trash can so that as little dust as possible excapes.
Turn the lid of the dust container in
the direction of the arrow as far as
the next stop.
The flap at the bottom of the dust container will open and the dust will fall out.
Turn the lid of the dust container back
to its original position.
Close the flap firmly. It should click
into place.
Slide the dust container handle along
the guide line and down on to the
PowerUnit connector from above until
it audibly clicks into place.
Cleaning the fine dust filter (Fig. 35)
The fine dust filter is located in the dust
container.
Clean the fine dust filter at least once a
month.
Turn the fine dust filter slightly while
you do this to free the dirt from all of
the crevices.
Once it is clean, replace the fine dust
filter in its position in the dust container.
Replace the dust container on the
PowerUnit connector.
Cleaning the pre-filter (Fig. 36–39)
The pre-filter is located in the dust container.
Clean the pre-filter when required.
Remove the dust container.
Remove the fine dust filter (Fig. 35).
Empty the dust container over a trash
can and lift the pre-filter upwards to
remove it.
Unlock the motor protection filter by
turning it counterclockwise and lift it
upwards to remove it.
Remove the dust container.
Lift the fine dust filter upwards to re-
move it.
Risk of damage caused by incor-
rect cleaning.
The fine dust filter can become dam-
aged and be less effective as a result.
Do not clean the inside of the fine
dust filter. Do not use pointed or
sharp-edged objects to clean the filter. Do not brush the fine dust filter.
Hold the fine dust filter over a bin.
Carefully knock the fine dust filter
with the rubberized lower edge.
Risk of damage caused by incor-
rect cleaning.
The pre-filter can become damaged
and be less effective as a result.
Do not use pointed or sharp-edged
objects to clean the filter.
Carefully knock the dust out of the
pre-filter over a bin.
Tip: Use a tool like a fine cleaning brush
to clean the inside of the pre-filter thoroughly.
You do not need to clean the motor protection filter. It can be removed so that
the inside of the pre-filter is easier to
reach.
23

en-US
After cleaning the pre-filter, place the
motor protection filter back into the
pre-filter securely, making sure it is
properly positioned.
Lock the motor protection filter by
turning it clockwise as far as it will go.
Replace the pre-filter in the dust con-
tainer.
To do this, line up the guide lines on
the two sections and turn the dust
container lid back to its original position.
Close the cover at the bottom of the
dust container, making sure it clicks
into place.
Replace the fine dust filter.
Replace the dust container on the
PowerUnit connector.
Cleaning the dust container
Clean the dust container as required.
Remove the dust container.
Empty the dust container over a trash
can and lift the pre-filter upwards to
remove it (Fig. 36).
Clean the dust container using water
and liquid dish soap.
Dry the dust container carefully.
Replace the pre-filter in the dust con-
tainer.
Replace the dust container on the
PowerUnit connector (Figs. 38+39).
Separate the Electrobrush/handheld
brush from the vacuum cleaner connection.
Removing threads and hairs (Fig. 40)
Place the Electrobrush/handheld
brush upside down on a level, clean
surface.
Use a pair of scissors to cut any
threads or hairs that have wound
themselves around the roller brush.
To guide the scissors, move along the
guide track on the roller brush.
Then run the vacuum cleaner to vacuum up the cut threads and hairs.
Removing the roller brush (Fig. 41)
(Not possible with the handheld brush)
You can take the roller brush out of the
Electrobrush in order to remove stubborn soiling and clean the inside of the
Electrobrush.
Unlock the flap on the side of the
Electrobrush so that the symbol
becomes visible.
Lift the flap up as far as it will go.
Remove the roller brush.
Clean the roller brush and remove
any stubborn dirt inside the Electrobrush.
Reassemble the Electrobrush in re-
verse order.
Cleaning the Electrobrush/handheld
brush (Fig. 06)
(The availability of the handheld brush
depends on the model)
24
Replacing the rechargeable battery
An original MieleAP01 lithium-ion
rechargeable battery (HXLA) is required.
Follow the instructions regarding the
handling and disposal of rechargeable
batteries found in the following sections: “IMPORTANT SAFETY INSTRUCTIONS”, “Caring for the environment”, and “Installation and connection” (“General battery information”).
en-US
25
en-US
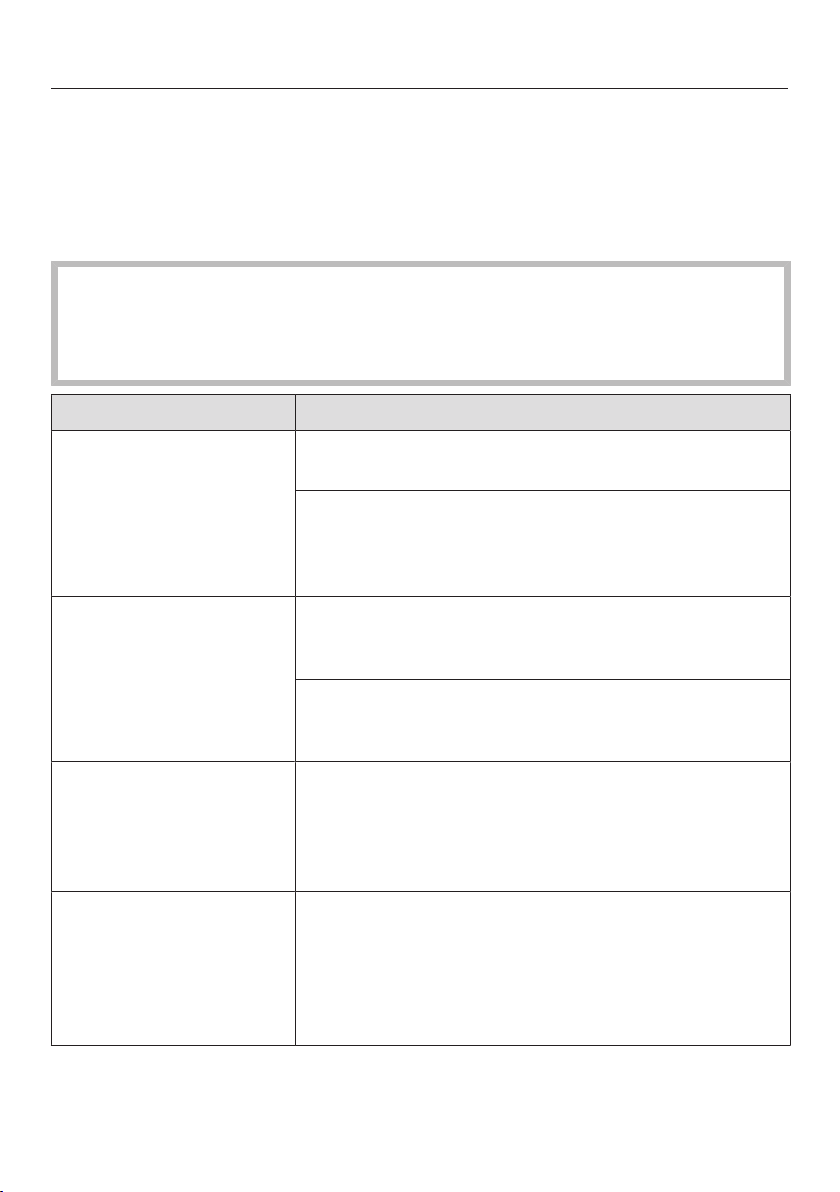
Frequently Asked Questions
With the help of the following guide minor faults in the performance of the machine, some of which may result from incorrect operation, can be remedied without contacting the Service Department.
This guide may help you to find the reason for the fault, and how to correct it.
Risk of injury caused by rotating roller brush.
You can injure yourself on the rotating roller brush.
Switch the vacuum cleaner off before dealing with any problems. Use the On/
Off switch on the Comfort handle to do this.
Problem Possible cause and solution
The cleaning performance is poor.
Cleaning performance
is reduced.
The Electrobrush
switches itself off.
The operating noise is
changing during vacuuming.
The dust container is full.
Empty and clean the dust container.
The Electrobrush is dirty/blocked.
Clean the roller brush and the inside of the Electro-
brush (see “Maintenance – Cleaning the Electrobrush”).
The fine dust filter is dirty.
Clean the fine dust filter (see “Maintenance –
Cleaning the fine dust filter”).
The pre-filter is dirty.
Clean the pre-filter (see “Maintenance – Cleaning
the pre-filter”).
The Electrobrush is overloaded – this can happen on
surfaces like deep-pile carpet.
Switch the vacuum cleaner off and switch it on
again at a reduced suction power level. Use the
On/Off switch on the Comfort handle to do this.
The floor covering detection function is activated in
the medium and highest power levels. The Electrobrush power rating is automatically set to the optimum level based on the type of flooring.
The noise is not unusual – the vacuum cleaner is
functioning normally.
26
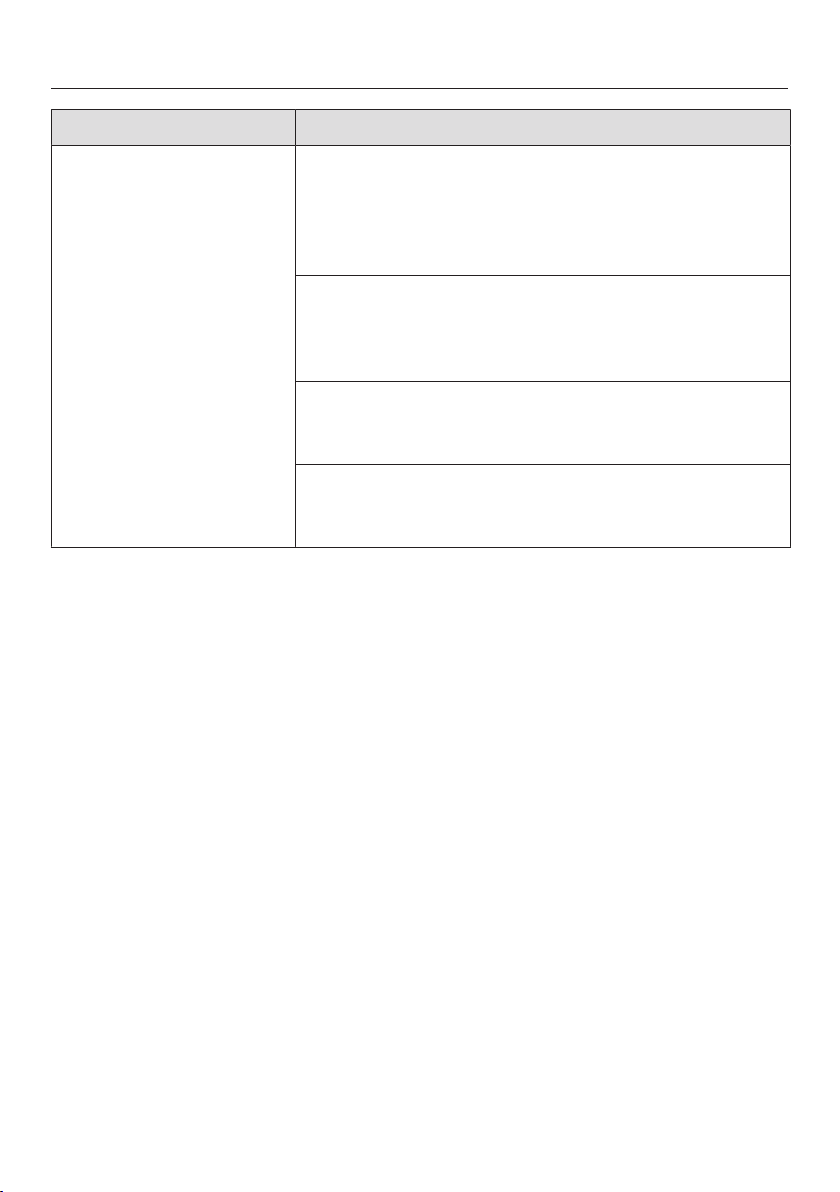
Problem Possible cause and solution
The vacuum cleaner
does not start when it is
switched on.
There is no battery inserted or the battery is inserted
incorrectly.
Insert the battery or check how the battery is posi-
tioned (see “Installation and connection – Inserting
the battery”).
The rechargeable battery is not sufficiently charged.
Charge the battery exactly as described in these
operating instructions (see “Installation and connection – Charging the battery”).
An original Miele battery has not been inserted.
Insert an original MieleAP01 lithium-ion recharge-
able battery (HXLA).
The charger is still plugged in.
Pull the plug out of the charging socket on the bat-
tery.
en-US
27
en-US
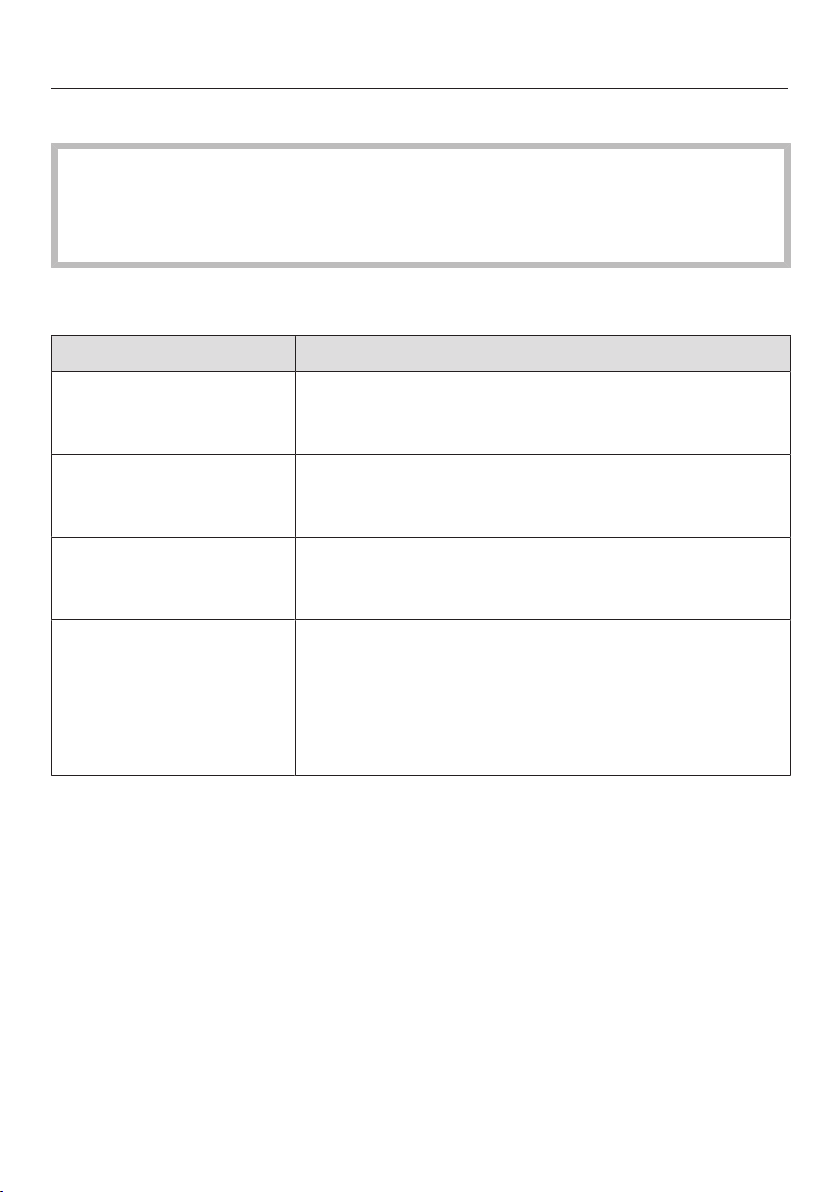
Fault messages
Risk of injury caused by rotating roller brush.
You can injure yourself on the rotating roller brush.
Switch the vacuum cleaner off before dealing with any problems. Use the On/
Off switch on the Comfort handle to do this.
Fault messages are displayed with a quick flashing light on the battery charging
state indicator on the PowerUnit.
Problem Possible cause and solution
Bottom light flashes
quickly
Bottom and middle
lights flash quickly
Middle and top lights
flash quickly
Top light flashes quickly “Comfort handle not recognized” error
Internal system fault
Remove the battery, wait for 10seconds, reinsert
it and charge it.
“Battery overheating” error
Wait for approximately 30minutes before switch-
ing the vacuum cleaner back on again.
“Battery not recognized” error
Insert an original MieleAP01 lithium-ion recharge-
able battery (HXLA).
Remove the Comfort handle and reconnect it (see
“Installation and connection – Connecting the
Comfort handle”).
Remove the battery, wait for 10seconds, then
reinsert it.
28

en-US
Cleaning and care
Risk of injury caused by rotating
roller brush.
You can injure yourself on the rotat-
ing roller brush.
Switch the vacuum cleaner off before
cleaning it. Use the On/Off switch on
the Comfort handle to do this.
Vacuum cleaner and accessories
Risk of electric shock from volt-
age.
If moisture gets into the charger,
there is a risk of electric shock.
Do not let the charger get wet.
Follow the special cleaning instructions for the dust container in the
“Maintenance” section.
The vacuum cleaner and all plastic accessories can be cleaned with a commercially available cleaner suitable for
plastic.
Damage due to unsuitable clean-
ing agents.
All surfaces are susceptible to
scratching. Contact with unsuitable
cleaning agents can alter or discolor
the external surfaces.
Do not use abrasive cleaning agents,
glass cleaning agents, all-purpose
cleaners, or oil-based conditioning
agents.
Customer Service
Contact in case of fault
In the event of a fault which you cannot
remedy yourself, please contact your
Miele dealer or Miele Service.
Contact information for Miele Service
can be found at the end of this document.
Warranty
For more information about warranty
conditions, please contact Miele Service.
Optional accessories
Follow the flooring manufacturer’s
cleaning and care instructions.
It is recommended to use only genuine
Miele accessories bearing the “ORIGINAL Miele” logo on the packaging.
Only these will guarantee the optimum
performance of your vacuum cleaner
and the best possible cleaning results.
Please note that faults and damage
caused by use of accessories which
do not bear the “ORIGINAL Miele”
logo on the packaging are not covered
by the vacuum cleaner warranty.
Purchasing accessories
Original Miele accessories are available
from the Miele Webshop, Miele Service,
and your Miele dealer.
Original Miele accessories are identified
by the “ORIGINAL Miele” logo on the
packaging.
29
en-US
Certain models are supplied as standard with one or more of the following
accessories.
Electro Compact handheld brush
(HXSEB)
For intensive cleaning of upholstery and
car seats.
Radiator brush (SHB 30)
For dusting radiators, narrow shelves
and crevices.
Mattress tool (SMD 10)
For vacuuming upholstery, mattresses,
cushions, curtains, covers, etc.
LS03 (HXLS) charger cradle
For charging the additional battery independently of the appliance, i.e., while
the appliance is in use.
Crevice nozzle, 12" (300mm)
(SFD 10)
Extra long crevice nozzle for cleaning in
folds, crevices and corners.
Crevice nozzle, 22" (560mm)
(SFD 20)
Flexible crevice nozzle for vacuuming
hard to reach places.
AP01additional battery (HXLA)
For doubling the amount of time the
vacuum cleaner can be used for.
30

en - LIMITED WARRANTY - VACUUM CLEANERS USA
What This Warranty Covers and For What Period The Coverage Extends
Miele, Inc. (hereinafter "Miele") warrants to the original purchaser of this product, living in the United States of
America, who purchased their vacuum from a Miele Authorized Dealer:
a. That this product, including all of its Miele authorized parts is free of defects in material and workmanship.
b. That this product, if found to be defective within the stated warranty period, will be repaired free of charge to the
consumer (both parts and labor) by an authorized Miele service agent.
c. The warranty period for vacuum cleaners, with the exception of “HomeCare” sub-models, is as follows:
Vacuum Series Term
Classic Series Canister Vacuums 1 year
Swing Series H1 Vacuums 1 year
Compact Series Canister Vacuums 2 years
Scout Robotic Vacuums 2 years
Triflex HX1 Series Cordless Vacuums 2 years
Complete Series Canister Vacuums 3 years
Dynamic Series Upright Vacuums 3 years
Blizzard Bagless Series Canister Vacuums 3 years
d. The warranty period for all “HomeCare” sub-model types is 5 (five) full years from the date of purchase, while the
Triflex HX1 HomeCare is 3 (three) full years from the date of purchase.
e. This warranty only applies while the product remains within the United States, and is null and void in any other US
territories, possessions, or foreign countries.
Commercial Use
Vacuum cleaners other than the Scout RX1 and Scout RX2 used for commercial purposes will be warranted for a
period of six (6) months from the date of purchase. There is no warranty for the Scout RX1 or Scout RX2 used for
commercial purposes. Thereafter this Limited Warranty shall be null and void.
What is not covered by this Warranty
This warranty does not cover damage or defects caused by or resulting from repairs, service or alterations to the
product or any of its parts or accessories which have been performed by service centers or repairmen not authorized
by Miele, or damage or defects caused by negligence, accident, abuse, misuse, improper or abnormal usage or
maintenance of the product, its parts or accessories, or damages caused by the use or installation of non-genuine
Miele parts Ordinary wear and tear or cosmetic damage (scuffs, scratches, gouges, dents, etc.) shall not be
considered a defect in materials or workmanship.
Exclusion of Other Warranties
Except for the limited warranty provided herein, Miele disclaims any and all other express warranties with respect to
the product. Any warranty of merchantability or fitness for a particular purpose is limited in its duration to the term of
the limited warranty provided herein.
Some states do not allow limitations on how long an implied warranty lasts, so the above limitation may not apply to
you.
Some states do not allow limitations on how long an implied warranty lasts, so the above limitation may not apply to
you.
Limitation of Liability for Special, Incidental or Consequential Damages
Miele will assume no liability, or other obligation with respect to any personal injury or property damage resulting
from the use of a vacuum cleaner, or its accessories, replacement parts, etc., which has not been purchased from,
or serviced by an Authorized Miele Dealer. Any purchaser who obtains a vacuum cleaner, accessories, replacement
parts, etc., from someone other than an Authorized Miele dealer proceeds at their own risk.
Miele specifically disclaims any and all liability, whether directly or by way of indemnity, for special incidental,
consequential or other damages, whether based on breach of contract, tort, strict or product liability, or any other
legal theory.
Some states do not allow the exclusion or limitation of incidental or consequential damages, so the above limitation
may not apply to you.
Special State Laws
This Limited Warranty gives you specific legal rights; you may have other rights, which vary, from state to state.
Service
For service under this Limited Warranty, or to find an Authorized Miele Dealer in your area, please visit the “Find a
Miele Partner Near You” section at Mieleusa.com.
Effective Date: July 20, 2020
©2020 Miele, Inc.
31

es - Indice
INSTRUCCIONES IMPORTANTES DE SEGURIDAD....................................... 34
Medidas para la protección del medioambiente............................................ 45
Descripción del aparato.................................................................................... 46
Referencias de las ilustraciones...................................................................... 48
Instalación y conexión ...................................................................................... 48
Montaje de la aspiradora .................................................................................... 48
Cómo conectar la manija Comfort ..................................................................... 48
Conexión de la unidad de potencia y el mango de succión .............................. 49
Inserción de la batería ........................................................................................ 49
Conexión del cepillo Electrobrush ...................................................................... 49
Información general sobre la batería................................................................... 49
Cómo cargar la batería (sin montaje en la pared) .............................................. 50
Cómo cargar la batería (con montaje en la pared) ............................................. 50
Montaje en la pared ............................................................................................ 50
Fijar la placa de montaje .................................................................................... 50
Fije el cable de carga al soporte de la pared ..................................................... 50
Conexión del soporte de accesorios (si es necesario) ...................................... 51
Conexión del soporte de pared .......................................................................... 51
Indicador del estado de carga de la batería (durante la carga) .......................... 51
Indicador del estado de carga de la batería (mientras se usa) ........................... 52
Uso de accesorios suministrados .................................................................. 52
Cepillo Electrobrush multipisos XXL .................................................................. 52
Cepillo portátil electrocompacto ........................................................................ 52
Batería adicional y base de carga ...................................................................... 53
Uso...................................................................................................................... 53
Encendido y apagado ........................................................................................ 53
Cómo regular la potencia de succión ................................................................. 53
Cómo iluminar el área de trabajo ........................................................................ 5
Función autónoma para pausas breves en la limpieza de la aspiradora............. 54
Mantenimiento................................................................................................... 54
Vaciar el contenedor de polvo............................................................................ 54
Limpieza del filtro de polvo fino ......................................................................... 55
Limpieza del pre-filtro ......................................................................................... 55
Limpiar el contenedor de polvo........................................................................... 56
Cómo limpiar el cepillo Electrobrush/cepillo portátil .......................................... 56
Cómo reemplazar la batería recargable .............................................................. 57
¿Qué hacer si ...?............................................................................................... 58
32
4

es - Indice
Mensajes de error ............................................................................................. 60
Limpieza y cuidado ........................................................................................... 61
Servicio Post-Venta........................................................................................... 61
Contacto en caso de anomalías.......................................................................... 61
Garantía............................................................................................................... 61
Accesorios opcionales...................................................................................... 61
POLIZA DE GARANTIA - Aspiradoras México................................................ 63
33

es - INSTRUCCIONES IMPORTANTES DE SEGURIDAD
Esta aspiradora cumple con todos los requisitos de seguridad nacionales y locales actuales. El uso inapropiado puede causar lesiones personales y daños materiales.
Lea detenidamente las instrucciones de funcionamiento
antes de usar la aspiradora la primera vez. Estas instrucciones incluyen información importante sobre la seguridad, el uso y el mantenimiento de la aspiradora. Esto
previene tanto lesiones personales como daños en el
aparato.
Miele le recomienda expresa y encarecidamente que lea
y siga las instrucciones del capítulo «instalación y conexión», así como las INSTRUCCIONES IMPORTANTES DE
SEGURIDAD.
Miele no se hará responsable por lesiones o daños causados por el incumplimiento de estas instrucciones.
Conserve estas instrucciones de funcionamiento en un
lugar seguro y compártalas con cualquier futuro usuario.
Desconecte siempre la aspiradora del suministro eléctrico cuando termine de utilizarla, antes de cambiar cualquier accesorio y para realizar trabajos de mantenimiento, limpieza y solución de problemas. Use el interruptor
de encendido y apagado de la manija Comfort para hacer esto.
34

es - INSTRUCCIONES IMPORTANTES DE SEGURIDAD
Uso correcto
Esta aspiradora está diseñada para limpiar los pisos del
hogar así como para limpiar entornos residenciales similares. Esta aspiradora no es adecuada para su uso en obras
de construcción.
Esta aspiradora no está diseñada para su uso al aire li-
bre.
La aspiradora puede utilizarse para realizar la limpieza
habitual de alfombras, tapetes y pisos firmes.
Esta aspiradora está diseñada para su uso a altitudes de
hasta 13000 pies (4 000m) por encima del nivel del mar.
La aspiradora solo se debe usar para aspirar superficies
de piso secas. No aspire a personas o animales. No se
permite ningún otro tipo de uso, modificación o alteración.
Las personas que carezcan de capacidades físicas, sen-
soriales o mentales o de experiencia con el aparato no lo
deben utilizar sin la supervisión o las instrucciones de una
persona responsable.
Solo se debe usar como se describe en este manual.
Solo use los accesorios recomendados por el fabricante.
El material de embalaje protege a la aspiradora de los
daños causados por el transporte. Le recomendamos que
guarde el embalaje para el transporte.
Seguridad con los niños
Los niños deben mantenerse alejados de la aspiradora a
menos que sean supervisados constantemente.
35

es - INSTRUCCIONES IMPORTANTES DE SEGURIDAD
Supervise a los niños que se encuentren cerca de la as-
piradora y no les permita que jueguen con ella.
Peligro de asfixia. Asegúrese de que los envoltorios de
plástico, las bolsas, etc. se desechen de manera segura y
se mantengan lejos del alcance de los niños.
ADVERTENCIA
Para reducir el riesgo de incendio, descarga eléctrica o
lesiones:
Verifique el voltaje nominal de la aspiradora antes de co-
nectar el cable eléctrico al tomacorriente. El suministro
eléctrico debe corresponderse con el voltaje nominal de la
placa de información ubicada en la parte inferior de la aspiradora. Utilice únicamente tomacorrientes residenciales
ca . Nunca utilice fuentes de alimentación cc . Utiliza 127 V
ca . Si no está seguro del voltaje del suministro eléctrico
residencial, consulte a un electricista calificado. Conectar
la aspiradora a un voltaje mayor al indicado en estas instrucciones puede causar daños en la aspiradora o lesiones
personales.
Para reducir el riesgo de choque eléctrico, este aparato
cuenta con un enchufe polarizado (una pata es más ancha
que la otra). Este enchufe encajará en un tomacorriente
polarizado en una sola posición. Si el enchufe no encastra
totalmente en el tomacorriente, revierta su posición. Si aún
no encaja, comuníquese con un electricista calificado para
instalar el tomacorriente adecuado. No modifique el enchufe de ningún modo.
36

es - INSTRUCCIONES IMPORTANTES DE SEGURIDAD
Seguridad técnica
La aspiradora funciona a 25,2V ca.
Está clasificada como aparato de Clase III.
Este aparato es alimentado por una fuente de energía de
voltaje de seguridad extra-bajo (SELV), en donde el voltaje
es suficientemente bajo para proteger a los usuarios del
riesgo de descarga eléctrica. Se utiliza un cargador de Clase II para suministrar energía para cargar la aspiradora.
Revise la aspiradora y los accesorios antes de utilizarlos
para detectar algún tipo de desperfecto. No utilice el aparato si nota algún desperfecto.
Compare los datos de conexión que aparecen en la pla-
ca de información del cargador (voltaje y frecuencia) con
los de la red eléctrica. Estos datos deben corresponder
exactamente. Sin modificaciones, el cargador se adapta a
50Hz o 60Hz
El tomacorriente debe usarse con un fusible de 15A y al
voltaje nominal indicado en la placa de información del
equipo.
El Cepillo Electrobrush Multi Piso XXL de Miele y el Ce-
pillo Portátil Electro Compacto de Miele (varía según el
modelo) son dispositivos adicionales accionados por motor diseñados especialmente para esta aspiradora de
Miele. Por razones de seguridad, la aspiradora no debe utilizarse con un cepillo Electrobrush/Cepillo portátil de Miele
diferente o con un cepillo eléctrico/portátil de otro fabricante.
37

es - INSTRUCCIONES IMPORTANTES DE SEGURIDAD
Durante el período de vigencia de la garantía de la aspi-
radora, las reparaciones deben ser realizadas únicamente
por técnicos autorizados por Miele. De lo contrario, se
anulará la garantía.
Las reparaciones solo pueden ser realizadas por un téc-
nico autorizado de Miele. Las reparaciones y los demás
trabajos realizados por personas no autorizadas pueden
causar daños considerables a los usuarios.
Miele solo puede garantizar la seguridad del aparato si
se usan piezas de repuesto originales de Miele. Los componentes defectuosos solo deben sustituirse por partes
originales de Miele.
Guarde la aspiradora a una temperatura ambiente entre
32°F y 115°F (0°C y 45°C).
Limpieza
No permita que se moje la aspiradora o los accesorios.
El Cepillo Electrobrush/cepillo portátil (dependiendo del
modelo), la Unidad de Potencia, la vara de succión, el
cuerpo y el mango Comfort contienen cables eléctricos.
Los conectores del enchufe no deben entrar en contacto
con el agua. Peligro de descarga eléctrica. Solo se deben
limpiar con un paño seco.
Limpie la aspiradora y los accesorios solo con un paño
seco o un paño ligeramente húmedo, cuando se encuentre
desconectada de la red eléctrica.
38

es - INSTRUCCIONES IMPORTANTES DE SEGURIDAD
Excepción:
contenedor de polvo: vacíe el contenedor de polvo y retire
el pre-filtro. Limpie el contenedor de polvo con una solución suave de agua y jabón líquido para platos solamente.
Después seque el contenedor de polvo con cuidado. Vuelva a colocar el pre-filtro en el contenedor de polvo.
Uso correcto
No use la aspiradora sin el contenedor de polvo, el pre-
filtro, el filtro central y el filtro protector del motor instalados.
No utilice con el cable o el enchufe dañado.
Si el aparato no funciona como debería, se ha caído, dañado, se ha dejado al aire libre o se ha caído al agua, devuélvalo a un centro de servicio.
No ponga ningún objeto en las aberturas. No lo utilice
con ninguna abertura bloqueada; manténgalo libre de
polvo, pelusa, pelo y cualquier cosa que reduzca el flujo de
aire.
No aspire nada que haya estado en llamas o que aún se
encuentre encendido, p. ej., cigarrillos, cenizas o brasas,
ya sea que se encuentren encendidos o que parezcan haberse apagado.
No utilice la aspiradora para limpiar agua, líquidos o su-
ciedad que esté húmeda. Espere a que los tapetes o las
alfombras que se hayan limpiado o lavado recientemente
se sequen por completo antes de limpiarlos.
39

es - INSTRUCCIONES IMPORTANTES DE SEGURIDAD
No utilice la aspiradora para aspirar tóner. El tóner, como
el que se usa en las impresoras y fotocopiadoras, puede
conducir electricidad.
No aspire líquidos ni gases inflamables ni combustibles
ni áreas donde se hayan almacenado estas sustancias.
Nunca toque el cepillo Electrobrush/cepillo portátil (varía
dependiendo del modelo) mientras esté girando.
No utilice el cepillo Electrobrush/cepillo portátil (varía
dependiendo del modelo) a la altura del cabezal.
No aspire a la altura de la cabeza y no permita que la
succión se acerque a la cabeza de una persona.
Mantenga el pelo, la ropa suelta, los dedos y todas las
partes del cuerpo alejados de las aberturas y las partes
móviles.
Tome precauciones extra cuando limpie las escaleras.
Accesorios
Utilice solamente accesorios originales que tengan im-
preso el logotipo «Miele ORIGINAL» en el embalaje. De lo
contrario, el fabricante no puede garantizar la seguridad
del producto.
40

es - INSTRUCCIONES IMPORTANTES DE SEGURIDAD
Instrucciones de seguridad y advertencias para la batería AP01, el cargador LG01, la base de carga LS03
(dependiendo del modelo)
Seguridad con los niños
Las personas (incluidos los niños) con capacidades físi-
cas, sensoriales o mentales reducidas, o que carezcan de
experiencia o conocimientos, que no puedan utilizar el cargador LG01 o la base de carga LS03 de forma segura, solo
podrán utilizar esta aspiradora si cuentan con supervisión
mientras la utilizan o si se les ha mostrado cómo utilizarla
de forma segura y comprenden y reconocen las consecuencias de un funcionamiento incorrecto.
Mantenga la batería AP01 fuera del alcance de los ni-
ños.
Los niños deben mantenerse alejados del cargador
LG01 y del cargador LS03 a menos que sean supervisados
constantemente.
Seguridad técnica
La batería AP01, el cargador LG01 y la base de carga
LS03 están diseñados para su uso con el aspirador HS19
de Miele. Por razones de seguridad, la aspiradora no debe
utilizarse con una batería, un cargador o una base de carga de otros fabricantes.
41

es - INSTRUCCIONES IMPORTANTES DE SEGURIDAD
Solo el cargador LG01/xxo la base de carga LS03/xx
que viene con la aspiradora puede usarse para cargar la
batería AP01
xx significa 01, 02, 03, 04, 05, 06, 07, o 08; estos números
identifican la versión del país de su cargador LG01 y su
base de carga LS03:
XX
01 AT, BE, BG, CH, CL, CZ, DE, DK, EE, ES, FI, FR, GR, HR, HU, IT, KZ, LT,
LU, LV, NL, NO, PL, PT, RO, RS, RU, SE, SI, SK, TR, UA, ZA
02 AE, GB, HK, IE, MY, SG
03 CA, MX, US
04 AU, NZ
05 CN
06 KR
07 JP
08 IN
Si utiliza un adaptador de enchufe, verifique que esté
aprobado para el funcionamiento continuo.
El funcionamiento fiable y seguro de la aspiradora solo
puede garantizarse si el cargador LG01/la base de carga
LS03 se ha conectado a la red eléctrica.
Cargue la aspiradora a una temperatura ambiente entre
32°F y 115°F (0°C y 45°C).
42

es - INSTRUCCIONES IMPORTANTES DE SEGURIDAD
Deje de usar la batería AP01 inmediatamente si detecta
un olor atípico en la misma, si presenta fuga de líquido, si
se sobrecalienta significativamente o si se decolora o deforma. Deseche la batería AP01 inmediatamente (véase el
aviso de seguridad «Eliminación de la batería AP01» al final
de este capítulo, así como «Cuidado del medio ambiente –
Eliminación de baterías viejas»).
Las baterías se agotan con el tiempo. Pueden tener fu-
gas de fluidos corrosivos. Evite el contacto con los ojos y
la piel. En caso de contacto, lave profundamente con agua
y consulte un médico.
Póngase en contacto con el Servicio Técnico antes de
enviar la batería AP01.
Uso correcto
No tire ni aviente la batería AP01. Por razones de seguri-
dad, no continúe usando una batería AP01 que se encuentre dañada.
Mantenga la batería AP01 alejada de fuego abierto u
otras fuentes de calor. No caliente la batería AP01. No exponga la batería recargable a la luz solar directa.
No desmantele la batería AP01.
No produzca un cortocircuito puenteando los contactos
de la batería AP01, ni de manera inadvertida ni deliberada.
No permita que la batería AP01 entre en contacto con lí-
quidos.
43

es - INSTRUCCIONES IMPORTANTES DE SEGURIDAD
Desechar la batería AP01: quite la batería AP01 de la as-
piradora. Aísle los contactos de metal con cinta adhesiva
para evitar cortocircuitos. Deseche la batería AP01 en un
centro municipal de reciclaje. No deseche la batería AP01
junto con los desperdicios domésticos habituales.
CONSERVE ESTAS INSTRUCCIONES
44

es - Medidas para la protección del medioambiente
3E&G+J
Eliminación de materiales de
empaque
El empaque está diseñado para proteger el aparato contra daños durante el
transporte. Los materiales utilizados en
el empaque son materiales amigables
con el medio ambiente y deben reciclarse.
Reciclar el empaque disminuye el uso
de materias primas en el proceso de fabricación y además reducen la cantidad
de desperdicios en los vertederos. Asegúrese de que el empaque se elimine
del modo adecuado para su área.
Eliminación de su máquina vieja
Antes de eliminar su aspiradora antigua
retire el filtro para polvo fino y elimínelo
junto con los desperdicios residenciales.
Los aparatos eléctricos y electrónicos
contienen muchos materiales de valor.
También contienen ciertos materiales,
compuestos y componentes esenciales
para su correcto funcionamiento y seguridad. Estos podrían ser peligrosos
para su salud y el medioambiente si se
desechan con los residuos generales o
si se manipulan de forma incorrecta.
Por favor, no deseche su aspiradora antigua con sus desechos domésticos.
su aspiradora no representa peligro alguno para los niños mientras está se
guardado para desecharse.
Eliminación de las baterías antiguas
En muchos casos, los aparatos eléctricos y electrónicos contienen baterías
que no deben eliminarse con los residuos domésticos después de su uso.
Tiene la obligación legal de retirar las
baterías viejas que no estén bien colocadas en la aspiradora y llevarlas a un
punto de recogida adecuado (por ejemplo, un comercio) donde se puedan entregar gratuitamente. Aísle los contactos de metal con cinta adhesiva para
evitar cortocircuitos. Las baterías pueden contener sustancias que pueden
ser dañinas para la salud humana y el
medio ambiente.
La etiqueta de la batería proporcionará
más información. El símbolo del bote
de basura con una cruz significa que
las baterías no deben ser desechadas
en la basura doméstica. Un bote cruzado por una aspa y que también tiene
uno o más símbolos químicos indica
que la batería contiene plomo (Pb), cadmio (Cd) y/o mercurio (Hg).
En lugar de eso, utilice los puntos oficiales designados para la recolección,
eliminación y reciclaje de aparatos eléctricos y electrónicos. Asegúrese de que
Las baterías antiguas contienen valiosas materias primas que pueden ser recicladas. Desechar las baterías por separado hace que sean más fáciles de
manipular y reciclar.
45

es - Descripción del aparato46es - Descripción del aparato

a
Manija Comfort
b
Suelte la manija Comfort (en la parte posterior)
c
Manija del contenedor de polvo
d
El contenedor de polvo, el pre-filtro, el filtro central y el filtro protector del motor
instalados
e
Unidad de potencia con conexión de batería y conexiones para manija Comfort, varilla de succión, cepillo Electrobrush y contenedor de polvo
f
Suelte los cierres de la batería (en ambos lados de la batería)
g
Enchufe de carga (en la parte inferior de la batería)
h
Batería de iones de litio AP01
i
Conector
j
Cepillo Electrobrush para Multi Piso XXL (algunos modelos tienen iluminación
BrilliantLight)
k
Cepillo de rodillo removible
l
Tapa
m
Suelte el cierre para retirar el cepillo de rodillo
n
Botones de liberación
o
Indicador del estado de carga de la batería
p
Mango de succión
q
Interruptor de encendido/apagado con selector de potencia de succión
47

es-MX
Referencias de las ilustraciones
Las ilustraciones mencionadas en el
texto se muestran en las páginas desplegables que se encuentran al final
de estas instrucciones de funcionamiento.
Instalación y conexión
Montaje de la aspiradora
(Figs. 01+02)
Puede montar la aspiradora de 2 maneras diferentes.
Puede colocar el mango de succión
por encima o por debajo de la unidad
de potencia.
Las ventajas de colocar la unidad de
potencia en la parte inferior de la aspiradora son las siguientes:
– es posible una función segura y autónoma (véase «Uso» – «Función autónoma para pausas cortas en la aspiración»)
– ergonómica (menor tensión en la muñeca)
– conveniente limpieza de grandes superficies
Las ventajas de colocar la unidad de
potencia en la parte superior de la aspiradora son las siguientes:
– limpieza cómoda debajo de los muebles
– La unidad de potencia se puede retirar rápidamente
La unidad de potencia puede utilizarse
por sí sola sin el mango de succión y el
cepillo Electrobrush como una forma
rápida de aspirar migas y pelusas en
áreas específicas.
Consejo: Esta configuración es especialmente adecuada cuando se utiliza el
juego de accesorios de tres piezas
(véase «Utilización de los accesorios
proporcionados»).
Cómo conectar la manija Comfort
(Figs. 03+04)
Dependiendo de cómo esté configurada su aspiradora, puede conectar el
mango Comfort al mango de succión o
a la unidad de potencia.
Empuje la manija Comfort hacia aba-
jo en la conexión de la varilla de succión desde arriba hasta que haga un
clic audible en su posición (detalle de
la imagen izquierda).
Deslice la manija Comfort por la línea
de guía del mango del contenedor de
polvo y baje hasta el conector de la
unidad de potencia desde arriba hasta que haga un clic audible en su posición (detalle de la imagen derecha).
Apague la aspiradora con el interrup-
tor de encendido/apagado en la parte
delantera de la manija Comfort si
quiere separar las secciones.
Presione el cierre de liberación y reti-
re la manija Comfort tirando hacia
arriba.
Solo la unidad de potencia
48

es-MX
Conexión de la unidad de potencia y
el mango de succión (Figs. 05+06)
Dependiendo de como esté configurada su aspiradora, el mango de succión
se encuentra por encima o por debajo
de la unidad de potencia.
Deslice el mango de succión por la lí-
nea de guía del mango del contenedor de polvo y baje hasta el conector
de la unidad de potencia desde arriba
hasta que haga un clic audible en su
posición (detalle de la imagen derecha).
Empuje el conector de la unidad de
potencia hacia abajo en la conexión
de la varilla de succión desde arriba
hasta que haga un clic audible en su
posición (detalle de la imagen derecha).
Presione el cierre de liberación para
separar las partes individuales.
Inserción de la batería
(Figs. 07, 08+09)
Retire el adhesivo de la batería.
Empuje la batería a lo largo de las lí-
neas guía hasta que haga un clic audible en su posición en la unidad de
potencia.
Si desea volver a separar las seccio-
nes, presione los dos cierres de liberación que se encuentran en la parte
lateral de la batería para retirarla.
Conexión del cepillo Electrobrush
(Fig. 10)
Dependiendo de como esté configurada su aspiradora, puede conectar el conector de la unidad de potencia o el conector del mango de succión al cepillo
Electrobrush.
Inserte el conector en el Cepillo Elec-
trobrush desde arriba hasta que haga
un clic audible en su posición.
Para separar las secciones individua-
les entre sí, presione el cierre de liberación del cepillo Electrobrush y saque el conector del cepillo Electrobrush (Fig. 06).
Información general sobre la batería
La batería recargable se suministra sin
estar totalmente cargada.
Cargue la batería totalmente antes de
usarla por primera vez. Permita unas
4horas para esto.
Es esencial cargar la batería por primera vez en el PowerUnit (directo a su
aspiradora), para desactivar el modo
de embarque y activar la potencia
máxima de la batería.
Una vez que la batería está completamente cargada, el indicador del estado
de carga de la batería se apaga después de 10minutos para ahorrar energía.
Puede usar la aspiradora hasta 17minutos si la usa en su estado completamente montada a su máximo nivel de
potencia.
Si, sin embargo, usa la unidad de potencia por sí sola y selecciona el nivel
de potencia más bajo, puede aspirar
hasta 60minutos.
49

es-MX
Cómo cargar la batería (sin montaje
en la pared) (Fig. 11)
Puede guardar la aspiradora en posición vertical y cargar la batería directamente.
Conecte la unidad de potencia al ce-
pillo Electrobrush para darle una base
segura a la aspiradora.
Gire la aspiradora hacia adelante has-
ta que el conector del Cepillo Electrobrush haga un clic audible en su posición.
Enchufe el cable de carga suministra-
do en el enchufe de carga en la parte
inferior de la batería.
Enchufe el cargador a un tomaco-
rriente.
El proceso de carga comenzará.
Puede leer más sobre este asunto en
«Indicador del estado de carga de la
batería».
Cómo cargar la batería (con montaje
en la pared) (Figs. 12+13)
Hay 2 maneras de almacenar y cargar
la aspiradora en el soporte de pared suministrado.
Necesitará un lugar adecuado cerca
de un tomacorriente libre para montar
el aparato en la pared.
Montaje en la pared (Figs. 14+15)
El soporte de pared suministrado tiene
una placa de montaje con una bolsa de
tornillos en la parte trasera.
Fije la placa de montaje en el punto de
la pared en el que quiera que esté el
montaje de la pared.
Retire la bolsa de tornillos.
Presione el cierre de liberación en la
parte inferior del soporte de la pared.
Retire la placa de montaje del sopor-
te de la pared deslizándola hacia
abajo.
Fijar la placa de montaje
(Figs. 16+17)
Se suministran 2 enchufes y 2 tornillos
TORX T20 para fijar la placa de montaje
a la pared.
También necesitará un destornillador
eléctrico o un taladro (con una broca de
1/4").
Dependiendo de como esté configurada su aspiradora, seleccione una distancia de 17 3/4" o 38 1/2" (45cm o
98cm) entre el borde inferior de la placa de montaje y el suelo.
Tenga cuidado para no dañar ningún
elemento eléctrico de la pared.
Fije la placa de montaje a la pared.
Fije el cable de carga al soporte de la
pared (Figs. 18, 19+20)
Un compartimento de cables se encuentra en la parte inferior del soporte
de la pared.
Presione los dos cierres de liberación
en la parte inferior del soporte de la
pared y retire la tapa del compartimento de cables.
Enchufe el cable de carga suministra-
do en la abertura desde arriba.
Extienda el cable de carga en su
guía.
50

es-MX
Vuelva a colocar la tapa y cierre el
compartimiento de cables.
Conexión del soporte de accesorios
(si es necesario) (Fig. 21)
Se suministra un soporte de accesorios
para guardar el juego de accesorios de
tres piezas (véase «Utilización de los
accesorios suministrados»).
Empuje el soporte de accesorios en
el soporte de la pared hasta que haga
tope.
Conexión del soporte de pared
(Figs. 22+23)
Deslice el soporte de la pared hacia
abajo en la placa de montaje desde
arriba hasta que haga un clic audible
en su posición.
Deslice la unidad de potencia de la
aspiradora completamente montada,
con la batería insertada, hacia abajo
en el soporte de la pared desde arriba.
Enchufe el cargador en el tomaco-
rriente.
El proceso de carga comenzará.
Indicador del estado de carga de la
batería (durante la carga) (Fig. 24)
El estado de carga de la batería se
muestra en la unidad de potencia.
Vida útil de la
batería
Aprox. 0–34% La luz inferior par-
Aprox. 35–69% La luz inferior está
Aprox. 70–90%
Aprox. 91–100% Las luces inferio-
Una vez que la batería está completamente cargada, el indicador del estado
de carga de la batería se apaga después de 10minutos para ahorrar energía.
Si la batería no se ha usado durante
un tiempo prolongado y se ha descargado, entrará en modo seguro. Como
resultado, el indicador del estado de
carga de la batería solo responderá
después de aproximadamente 30–
60minutos cuando se cargue en la
unidad de potencia.
Pantalla
padea lentamente
encendida; la luz
del medio parpadea lentamente
Las luces de abajo y del centro están encendidas; la
de arriba
luz
parpadea
lentamente
res, centrales y
superiores están
encendidas
51

es-MX
Indicador del estado de carga de la
batería (mientras se usa) (Fig. 24)
El estado de carga de la batería se
muestra en la unidad de potencia.
Vida útil de la
batería
Aprox. 100–70% Las luces superio-
Aprox. 69–35% Las luces centra-
Aprox. 34–11% La luz inferior está
Aprox. 10–0% La luz inferior par-
Pantalla
res, centrales e inferiores están encendidas
les e inferiores están encendidas
encendida
padea lentamente
Uso de accesorios suministrados (Fig. 25)
Tobera para tapicería
Accesorio para limpiar tapicerías,
colchones y cojines.
Tober
Dusting brush
d Sopor
a plana
Accesorio para limpiar en pliegues, grietas y rincones.
Cepillo par
aspirar zócalos, muebles tallados
o adornos.
Se puede girar la cabeza para
ajustar el ángulo.
Para guardar el juego de accesorios de tres piezas.
a polvo Accesorio para
te de accesorios
Los símbolos del soporte muestran
dónde se deben unir los diferentes accesorios.
Puede colocar el soporte de accesorios
en el soporte de pared (véase «Instalación y conexión – Conexión del soporte
de accesorios»).
Cepillo Electrobrush multipisos XXL
(Fig. 26)
Siga las instrucciones de limpieza y
cuidado del fabricante de pisos.
El cepillo Electrobrush puede utilizarse
para realizar la limpieza normal de alfombras, tapetes y pisos firmes.
Consejo: El mango de succión no es la
mejor opción para limpiar escaleras alfombradas.
Miele ofrece una variedad de accesorios adecuados para muchas funciones especiales (consulte «Accesorios
opcionales»).
Cepillo portátil electrocompacto
(Fig. 27)
(según el modelo)
Siga las instrucciones de limpieza y
cuidado del fabricante de pisos.
El cepillo portátil es especialmente adecuado para la limpieza intensiva de tapicerías y asientos de coche.
Consejo: El mango de succión no es la
mejor opción para limpiar la tapicería o
los asientos del coche.
52

es-MX
Batería adicional y base de carga
(Fig. 28)
(según el modelo)
El uso de la batería adicional duplica el
tiempo de uso de la aspiradora.
Antes de cargar por primera vez, por
favor tenga en cuenta la información
en «Instalación y conexión – Información general sobre la batería».
Luego de que la batería ha sido com-
pletamente cargada en el PowerUnit,
es posible recargarla utilizando el soporte de pared. Introduzca la aspiradora en el soporte hasta que emita un
click audible.
Enchufe el aparato en un tomaco-
rriente.
El proceso de carga comenzará. El indicador del estado de carga de la batería
parpadea a la izquierda.
Puede encontrar más información sobre
el indicador de estado de carga de la
batería en «Instalación y conexión – Indicador de estado de carga de la batería».
Si coloca la batería descargada en la
base de carga inmediatamente después de su uso, sólo comenzará a
cargarse una vez que la batería se haya enfriado.
El proceso de enfriamiento puede tardar hasta 60minutos. El indicador del
estado de carga de la batería en la base de carga no responderá durante
este tiempo.
Uso
Encendido y apagado(Fig. 29)
Extraiga el cargador del enchufe de
carga de la batería si ha cargado la
batería directamente.
Si ha cargado la batería en el soporte
de pared, saque la aspiradora del soporte de pared.
Presione el interruptor de encendido
y apagado de la manija Comfort.
Cómo regular la potencia de succión
La potencia de succión se puede regular para adaptarla al tipo de piso que
desea limpiar. Reducir la potencia de
succión reduce el esfuerzo que se necesita para mover el cepillo Electrobrush.
Hay 3 niveles de potencia para elegir en
la manija Comfort:
1 Nivel de potencia más bajo
para la suciedad ligera
2 Nivel de potencia medio pa-
ra la suciedad normal
Máx. Nivel de potencia más alto
para la suciedad ligera
La función de detección del revestimiento del piso se activa en los niveles
de potencia media y alta.
La potencia del cepillo Electrobrush se
ajusta automáticamente al nivel óptimo
según el tipo de piso – esto puede provocar un cambio en el ruido de funcionamiento.
53

es-MX
Cómo iluminar el área de trabajo
(según el modelo)
El cepillo Electrobrush de su aspiradora
está equipado con BrilliantLight para
iluminar el área de trabajo.
Función autónoma para pausas breves en la limpieza de la aspiradora
(Por razones de seguridad, esta función
solo puede utilizarse cuando la unidad
de potencia está instalada en la parte
inferior de la aspiradora)
Si está aspirando con la unidad de potencia instalada en la parte inferior de la
aspiradora, puede interrumpir fácilmente el funcionamiento mientras el aparato
está encendido.
Gire la aspiradora hacia adelante has-
ta que el conector del Cepillo Electrobrush haga un clic audible en su posición.
La aspiradora se mantiene en posición
vertical, el cepillo Electrobrush se apaga y la batería se conserva.
Si posteriormente desbloquea el conector del cepillo Electrobrush, éste se encenderá de nuevo.
Mantenimiento
Riesgo de lesiones causadas por
el cepillo de rodillo giratorio.
Puede lesionarse con el cepillo de
rodillos giratorio.
Apague la aspiradora antes de hacer
cualquier trabajo de mantenimiento.
Use el interruptor de encendido y
apagado de la manija Comfort para
hacer esto.
54
Las piezas de reemplazo están disponibles en su distribuidor Miele o mediante el Servicio Técnico de Miele.
Vaciar el contenedor de
polvo(Fig. 30–34)
Vacíe el contenedor de polvo antes de
que el polvo haya alcanzado la marca
de máx. en el contenedor de polvo.
Gire la tapa del contenedor de polvo
en la dirección de la flecha hasta el
primer tope.
Saque el contenedor de polvo hacia
arriba.
El contenido del compartimento de
polvo se puede desechar con los desperdicios residenciales normales,
siempre que solo contenga polvo residencial general.
Sostenga el contenedor de polvo cer-
ca del bote de basura para que salga
la menor cantidad de polvo posible.
Gire la tapa del contenedor de polvo
en la dirección de la flecha hasta el
próximo tope.
La solapa en la parte inferior del contenedor de polvo se abrirá y el polvo saldrá.
Vuelva a colocar la tapa del contene-
dor de polvo en su posición original.
Cierre la compuerta inferior firme-
mente. Debería hacer clic al encajar.
Deslice la manija del contenedor de
polvo por la línea de guía del mango
del contenedor de polvo y baje hasta
el conector de la unidad de potencia
desde arriba hasta que haga un clic
audible en su posición.

es-MX
Limpieza del filtro de polvo fino
(Fig. 35)
El filtro de polvo fino se encuentra en el
contenedor de polvo.
Limpie el filtro de polvo fino al menos
una vez al mes.
Saque el contenedor de polvo..
Levante el filtro de polvo fino hacia
arriba para sacarlo.
Riesgo de sufrir daños causado
por una limpieza incorrecta.
El filtro de polvo fino puede dañarse
y ser menos efectivo en consecuencia.
No limpie el interior del filtro de polvo
fino. No utilice objetos puntiagudos o
de bordes afilados para limpiar el filtro. No cepille el filtro de polvo fino.
Sostenga el filtro de polvo fino sobre
un bote de basura.
Golpee con cuidado el filtro de polvo
fino con el borde inferior cauchutado.
Gire ligeramente el filtro de polvo fino
mientras lo hace para liberar la suciedad de todas las grietas.
Una vez que esté limpio, reemplace
el filtro de polvo fino en su posición
en el contenedor de polvo.
Vuelva a colocar el contenedor de
polvo en el conector de la unidad de
potencia.
Limpieza del pre-filtro (Fig. 36–39)
El pre-filtro se encuentra en el contenedor de polvo.
Limpie el pre-filtro cuando sea necesario.
Saque el contenedor de polvo..
Retire el filtro de polvo fino (Fig. 35).
Vacíe el contenedor de polvo sobre
un bote de basura y levante el pre-filtro hacia arriba para sacarlo.
Desbloquee el filtro protector del mo-
tor girándolo en sentido contrario a
las agujas del reloj y levántelo para
retirarlo.
Riesgo de sufrir daños causado
por una limpieza incorrecta.
El pre-filtro puede dañarse y ser me-
nos efectivo en consecuencia.
No utilice objetos puntiagudos o de
bordes afilados para limpiar el filtro.
Cuidadosamente, saque el polvo del
prefiltro sobre un bote de basura.
Consejo: Use una herramienta como
un cepillo de limpieza fina para limpiar a
fondo el interior del pre-filtro.
No necesita limpiar el filtro protector del
motor. Se puede retirar para que el interior del pre-filtro sea más fácil de alcanzar.
Después de limpiar el pre-filtro, vuel-
va a colocar el filtro protector del motor en el pre-filtro de forma segura,
asegurándose de que esté bien posicionado.
Bloquee el filtro protector del motor
girándolo en el sentido de las agujas
del reloj hasta el tope.
Vuelva a colocar el pre-filtro en el
contenedor de polvo.
55

es-MX
Para ello, alinee las líneas guía de las
dos secciones y gire la tapa del contenedor de polvo a su posición original.
Cierre la tapa en el fondo del conte-
nedor de polvo, asegurándose de
que encaje en su posición.
Cambie el filtro de polvo fino.
Vuelva a colocar el contenedor de
polvo en el conector de la unidad de
potencia..
Limpiar el contenedor de polvo
Limpie el contenedor de polvo conforme sea necesario.
Saque el contenedor de polvo..
Vacíe el contenedor de polvo sobre
un bote de basura y levante el pre-filtro hacia arriba para sacarlo (Fig. 36).
Limpie el contenedor de polvo con
agua y jabón líquido para platos.
Seque el contenedor de polvo con
cuidado.
Vuelva a colocar el pre-filtro en el
contenedor de polvo.
Vuelva a colocar el contenedor de
polvo en el conector de la unidad de
potencia. (Figs. 38+39).
Cómo limpiar el cepillo Electrobrush/
cepillo portátil (Fig. 06)
(La disponibilidad del cepillo de mano
depende del modelo)
Eliminación de hilos y pelos (Fig. 40)
Coloque el cepillo Electrobrush/cepi-
llo portátil al revés en una superficie
nivelada y limpia.
Use un par de tijeras para cortar hilos
o pelos que se hayan enrollado alrededor del rodillo del cepillo. Para
guiar las tijeras, muévalas a lo largo
del carril guía en el rodillo.
Después encienda la aspiradora para
aspirar los hilos y pelos cortados.
Cómo retirar el cepillo de rodillo
(Fig. 41)
(No es posible con el cepillo portátil)
Puede sacar el cepillo de rodillo del cepillo Electrobrush para eliminar la suciedad más resistente y limpiar el interior
del cepillo Electrobrush.
Desbloquee la solapa de la parte late-
ral del cepillo Electrobrush para que
el símbolo se haga visible.
Levante la solapa hasta lo máximo
posible.
Retire el cepillo de rodillo.
Limpie el cepillo de rodillo y elimine
cualquier suciedad resistente dentro
del cepillo Electrobrush.
Vuelva a montar el cepillo Electro-
brush en orden inverso.
Separe el cepillo Electrobrush/cepillo
portátil de la conexión de la aspiradora.
56

Cómo reemplazar la batería recargable
Se requiere una batería recargable de
iones de litio original Miele AP01 (HX
LA).
Siga las instrucciones sobre el manejo
y la eliminación de las baterías recargables que se encuentran en las siguientes secciones: «INSTRUCCIONES DE SEGURIDAD IMPORTANTES», «Cuidado del medio ambiente»
e «Instalación y conexión» («Información general sobre las baterías»).
es-MX
57

es-MX
¿Qué hacer si ...?
La mayor parte de las anomalías que se producen en el día a día las podrá solucionar usted mismo. En muchos casos se puede ahorrar tiempo y dinero, ya que
evitará la intervención de Servicio Técnico.
Las siguientes tablas le ayudarán a encontrar las causas de un fallo o error, y corregirlo.
Riesgo de lesiones causadas por el cepillo de rodillo giratorio.
Puede lesionarse con el cepillo de rodillos giratorio.
Apague la aspiradora antes de tratar cualquier problema. Use el interruptor de
encendido y apagado de la manija Comfort para hacer esto.
Problema Causa y solución
El rendimiento de la limpieza es deficiente.
El rendimiento de la limpieza se reduce.
El cepillo Electrobrush
se apaga.
El ruido de funcionamiento está cambiando
durante la aspiración.
El contenedor de polvo está lleno.
Vacíe y limpie el contenedor de polvo.
El cepillo Electrobrush está sucio/bloqueado.
Limpie el cepillo de rodillo y el interior del cepillo
Electrobrush (véase «Mantenimiento – Limpieza
del cepillo Electrobrush»).
El filtro de polvo fino está sucio.
Limpie el filtro de polvo fino (véase «Mantenimien-
to – Limpieza del filtro de polvo fino»).
El pre-filtro está sucio.
Limpie el pre-filtro de polvo fino (véase «Manteni-
miento – Limpieza del pre-filtro de polvo fino»).
El cepillo Electrobrush está sobrecargado – esto
puede ocurrir en superficies como la alfombra de pelo largo.
Apaga la aspiradora y enciéndela de nuevo con un
nivel de potencia de succión reducido. Use el interruptor de encendido y apagado de la manija
Comfort para hacer esto.
La función de detección del revestimiento del piso se
activa en los niveles de potencia media y alta. La potencia nominal del cepillo Electrobrush se ajusta automáticamente al nivel óptimo según el tipo de piso.
El ruido no es inusual, la aspiradora funciona nor-
malmente.
58

Problema Causa y solución
La aspiradora no arranca cuando está encendida.
No hay ninguna batería insertada o la batería está insertada incorrectamente.
Inserte la batería o revise la posición de la misma
(véase «Instalación y conexión – Inserción de la
batería»).
La batería recargable no está suficientemente cargada.
Cargue la batería exactamente como se describe
en este manual de instrucciones (véase «Instalación y conexión – Carga de la batería»).
No se ha insertado una batería original de Miele.
Inserte una batería recargable de iones de litio ori-
ginal Miele AP01 (HX LA).
El cargador aún está enchufado.
Saque el enchufe de la base de carga de la bate-
ría.
es-MX
59

es-MX
Mensajes de error
Riesgo de lesiones causadas por el cepillo de rodillo giratorio.
Puede lesionarse con el cepillo de rodillos giratorio.
Apague la aspiradora antes de tratar cualquier problema. Use el interruptor de
encendido y apagado de la manija Comfort para hacer esto.
Los mensajes de error se muestran con una luz intermitente rápida en el indicador
de estado de carga de la batería en la unidad de potencia.
Problema Causa y solución
La luz inferior parpadea
rápidamente
Las luces inferiores y
centrales parpadean rápidamente
Las luces centrales y
superiores parpadean
rápidamente
La luz superior parpadea rápidamente
Falla interna del sistema
Retire la batería, espere 10segundos, vuelva a co-
locarla y cárguela.
Error de «sobrecalentamiento de la batería»
Espere aproximadamente 30minutos antes de vol-
ver a encender la aspiradora.
Error «Batería no reconocida»
Inserte una batería recargable de iones de litio ori-
ginal Miele AP01 (HX LA).
Error «No se reconoce la manija Comfort»
Retire la manija Comfort y vuelva a conectarla
(véase «Instalación y conexión – Conexión de la
manija Comfort»).
Retire la batería, espere 10segundos y vuelva a
colocarla.
60

es-MX
Limpieza y cuidado
Riesgo de lesiones causadas por
el cepillo de rodillo giratorio.
Puede lesionarse con el cepillo de
rodillos giratorio.
Apague la aspiradora antes de lim-
piarla. Use el interruptor de encendido y apagado de la manija Comfort
para hacer esto.
Aspiradora y accesorios
Riesgo de descarga eléctrica de-
bido al voltaje.
Si ingresa humedad en el cargador,
existe el riesgo de recibir una descarga eléctrica.
No permita que el cargador se moje.
Siga las instrucciones especiales de
limpieza del contenedor de polvo en la
sección «Mantenimiento».
La aspiradora y todos los accesorios de
plástico se pueden limpiar con un limpiador comercial patentado apropiado
para plástico.
Daños debidos a agentes limpia-
dores inadecuados.
Todas las superficies pueden sufrir
rayaduras. El contacto con agentes
limpiadores inadecuados puede alterar o decolorar las superficies externas.
No utilice agentes limpiadores abrasivos, limpiadores para vidrio, limpiadores multiusos ni a base de aceite.
Servicio Post-Venta
Contacto en caso de anomalías
En caso de fallas que no pueda solucionar por usted mismo, comuníquese con
su Distribuidor Autorizado Miele o bien,
con Servicio Post-venta de Miele.
Al final de este documento encontrará
el número de teléfono del Servicio
Post-venta de Miele.
Garantía
La duración de la garantía es de 2 años.
Para obtener información adicional so-
bre las condiciones de garantía en su
país, póngase en contacto con Servicio
Post-venta de Miele.
Accesorios opcionales
Siga las instrucciones de limpieza y
cuidado del fabricante de pisos.
Recomendamos que solo se usen accesorios originales de Miele con el logotipo «ORIGINAL Miele» en el embalaje. Solo éstos garantizarán el rendimiento óptimo de su aspiradora y los
mejores resultados de limpieza posibles.
Tenga en cuenta que la garantía de la
aspiradora no cubre las fallas y los daños ocasionados por el uso de accesorios que no tengan el logotipo de
«Miele ORIGINAL».
Comprar accesorios
Los accesorios Miele originales están
disponibles en la tienda web de Miele,
en el SPV de Miele y en su distribuidor
Miele.
61

es-MX
Los accesorios Miele originales están
identificados por el logotipo de “Miele
ORIGINAL” en el empaque.
Algunos modelos vienen de fábrica
con uno o más de los siguientes accesorios.
Cepillo portátil electrocompacto
(HXSEB)
Para la limpieza intensiva de la tapicería
y los asientos del coche.
Cepillo para radiadores (SHB 30)
Para limpiar radiadores, estantes estrechos y grietas.
Tobera para colchón (SMD 10)
Para limpiar tapizados, colchones, almohadones, cortinas, cobertores, etc.
Base de carga LS03 (HX LS)
Para cargar la batería adicional independientemente del aparato, es decir,
mientras el aparato está en uso.
Tobera plana de 30cm (12")
(SFD 10)
Tobera extra larga para grietas para limpiar en pliegues, grietas y esquinas.
Tobera plana de 56cm (22")
(SFD 20)
Tobera para grietas flexible para limpiar
sitios de difícil acceso.
Batería adicional AP01 (HXLA)
Para duplicar el tiempo de uso de la aspiradora.
62

es - POLIZA DE GARANTIA - Aspiradoras México
Lo que cubre la garantía y por qué periodo se extiende:
Miele, S.A. de C.V. garantiza la compra original de este electrodoméstico marca Miele que el comprador con domicilio
en los Estados Unidos Mexicanos haya realizado a un distribuidor autorizado, tienda o a la empresa misma de:
a. Cualquier defecto de fabricación en sus materiales, mano de obra, partes y/o componentes que generen fallas en
el funcionamiento y/o desempeño del equipo con base en las especificaciones técnicas incluídas en el manual de
uso y manejo del mismo.
b. El periodo de garantía para el electrodoméstico, sus accesorios, partes y/o componentes, es de 2 años a partir
de la fecha de instalación.
c. La garantía no cubre daños o defectos en los siguientes casos:
- Cuando el equipo ha sido utilizado en condiciones distintas a las normales.
- Cuando el equipo no ha sido operado con base en las instrucciones y/o manual de uso que lo acompaña.
- Cuando el equipo ha sido instalado, alterado o reparado por terceros no autorizados por Miele México.
- Cuando el equipo ha sido extraído de su empaque original y no cuenta con los sellos de seguridad al
momento de ser realizada su instalación por parte de un Técnico Autorizado Miele.
d. Cualquier desperfecto o falla ocasionada por una instalación deficiente realizada por algún técnico distinto al
Servicio Técnico Autorizado de Miele inválida la garantía. La empresa no se hará responsable por reclamaciones
de Cliente Final derivadas de una instalación deficiente por un tercero no autorizado por Miele México.
e. El Técnico Autorizado Miele, al momento de realizar la instalación, sellará la Póliza de Garantía de cada equipo
instalado con su nombre, firma y fecha de instalación.
f. En caso de equipos "Free-Standing", la tienda o Distribuidor Autorizado Miele sellará la Póliza de Garantía de
cada equipo vendido con su nombre, firma y fecha de venta.
g. Miele México desconoce cualquier otra garantía expresa o implícita en el equipo o cualquier otra garantía que
haya sido ofrecida por un tercero.
h. Miele México no asume ninguna responsabilidad o cualquier otra obligación con respecto a daño a personas
o bienes que resulte del uso de algún equipo de nuestra marca o sus accesorios, partes, componentes,
refacciones, etc., cuando dicho equipo, accesorios, partes, componentes, refacciones, etc., no hayan sido
comprados a algún distribuidor, tienda, etc., autorizado por Miele México.
i. Cualquier compra de equipos, accesorios, partes, componentes, refacciones, etc., de cualquier otro origen,
distribuidor o tienda no autorizados por Miele México será bajo el propio riesgo del comprador.
Procedimiento para hacer efectiva la garantía:
Si este electrodoméstico resulta defectuoso y se encuentra dentro del periodo de garantía, el comprador deberá:
a. Presentar el electrodoméstico defectuoso en el Centro de Servicio abajo indicado y presentar la Póliza de
Garantía debidamente sellada por el técnico que lo instaló. Esta garantía incluye los gastos de transportación del
electrodoméstico razonablemente erogados que deriven de su cumplimiento dentro de la red de servicio de Miele.
b. Los establecimientos en los Estados Unidos Mexicanos donde se puede hacer efectiva la garantía son los siguientes:
Miele, S.A. de C.V.
Miele Service Center
German Center
Av. Santa Fé # 170
Lomas de Santa Fé
C.P. 01210 México, D.F.
Tel.: 01 800 MIELE 00
(01 800 64353 00)
Correo electrónico:
info@miele.com.mx
Exclusión de otras garantías:
Excepto por la garantía limitada ofrecida en este documento, Miele desconoce cualquier otra garantía expresa o
implícita con respecto al electrodoméstico, aparato eléctrico o electrónico. Cualquier garantía de comercialización o
propiedad para un propósito en particular, está limitada en su duración o término a la garantía limitada otorgada en
este documento.
POLIZA DE GARANTIA MÉXICO
63

es - POLIZA DE GARANTIA - Aspiradoras México
Limitantes de responsabilidad para daños especiales, incidentales o consecuenciales:
Miele no asume ninguna responsabilidad o cualquier otra obligación con respecto a daño a personas o bienes que
resulte del uso de algún electrodoméstico de nuestra marca o sus accesorios, partes, componentes, refacciones,
etc., cuando dicho electrodoméstico, accesorios, partes, componentes, refacciones, etc., no hayan sido comprados
a algún distribuidor, tienda, etc., autorizado por Miele. Cualquier compra de un electrodoméstico, accesorios, partes,
componentes, refacciones, etc., de cualquier otro origen, distribuidor o tienda no autorizados será bajo el propio
riesgo del comprador. Miele específicamente no se responsabiliza, directa o indirectamente, y desconoce cualquier
daño incidental, especial o consecuencial o cualquier otro tipo de daño derivado de cualquier incumplimiento,
agravio, falta de responsabilidad o de cualquier otra teoría legal derivado del mal uso de este producto, al no seguir
las indicaciones estipuladas en el manual.
Leyes de los Estados Unidos Mexicanos:
Las limitaciones contendidas en la presente garantía limitada serán válidas en la medida en que lo permitan las leyes
de los Estados Unidos Mexicanos.
Servicios:
Para mayor información sobre cualquier aspecto relacionado con la presente garantía o con el electrodoméstico
amparado por la misma, y para obtener partes, componentes, consumibles y accesorios, favor de contactar a:
Miele, S.A. de C.V.
Miele Experience Center
Arquímedes # 43
Col. Polanco Chapultepec
Delg. Miguel Hidalgo
C.P. 11560 México, D.F.
Servicio post venta:
Tel.: 01 800 MIELE 00
(01 800 64353 00)
Correo electrónico:
info@miele.com.mx
www.miele.com.mx
Miele Service Center
German Center
Av. Santa Fé # 170
Lomas de Santa Fé
C.P. 01210 México, D.F.
Tel.: 01 800 MIELE 00
(01 800 64353 00)
Correo electrónico:
info@miele.com.mx
POLIZA DE GARANTIA MÉXICO
64

fr - Table des matières
CONSIGNES DE SÉCURITÉ IMPORTANTES................................................... 67
Protection de l’environnement......................................................................... 79
Description de l’appareil................................................................................... 80
Références aux illustrations............................................................................. 82
Installation et branchement.............................................................................. 82
Assemblage de l’aspirateur ................................................................................ 82
Raccordement de la poignée Comfort ............................................................... 82
Raccordement du bloc moteur PowerUnit et de la canne d’aspiration ............. 82
Insertion de la batterie ........................................................................................ 83
Raccordement de l’électrobrosse ...................................................................... 83
Renseignements généraux sur la batterie........................................................... 83
Recharge de la batterie (sans fixation murale) ................................................... 83
Recharge de la batterie (avec fixation murale) ................................................... 84
Montage mural ................................................................................................... 84
Fixation de la plaque de montage ...................................................................... 84
Fixation du câble de recharge dans le support mural ........................................ 84
Raccordement du porte-accessoires (si nécessaire) ......................................... 84
Raccordement du support mural ....................................................................... 84
Témoin du niveau de charge de la batterie (pendant la recharge) ..................... 85
Témoin du niveau de charge de la batterie (pendant l’utilisation) ...................... 85
Utilisation des accessoires fournis ................................................................. 86
La brosse électrique Multi Floor XXL ................................................................. 86
Brosse manuelle Electro Compact ..................................................................... 86
Batterie et socle de recharge supplémentaires .................................................. 86
Utilisation ........................................................................................................... 87
Mise en marche et arrêt...................................................................................... 87
Réglage de la puissance d’aspiration ................................................................. 87
Éclairage devant l’aspirateur............................................................................... 87
Fonction de maintien autonome pour les courtes pauses .................................. 87
Entretien............................................................................................................. 88
Vidange du réservoir à poussière ....................................................................... 88
Nettoyage du filtre à poussière fine .................................................................... 88
Nettoyage du pré-filtre ....................................................................................... 89
Nettoyage du réservoir à poussière .................................................................... 89
Nettoyage de l’électrobrosse/la brosse manuelle .............................................. 90
Remplacement de la batterie rechargeable ........................................................ 90
Foire aux questions........................................................................................... 91
65

fr - Table des matières
Messages d’erreur ............................................................................................ 93
Nettoyage et entretien ...................................................................................... 94
Service technique.............................................................................................. 94
Contact en cas d'anomalies................................................................................ 94
Garantie............................................................................................................... 94
Accessoires en option ...................................................................................... 94
Limited Warranty - Vacuums Canada.............................................................. 9
Garantie restreinte – Aspirateurs Canada....................................................... 9
6
8
66

fr - CONSIGNES DE SÉCURITÉ IMPORTANTES
Cet aspirateur est conforme à l’ensemble des exigences
réglementaires locales et nationales en vigueur en matière de sécurité. Une utilisation inappropriée de l’appareil peut entraîner des blessures corporelles et des dommages matériels.
Veuillez lire le mode d’emploi avant d’utiliser l’aspirateur
pour la première fois. Il contient des renseignements importants sur la sécurité, l’utilisation et l’entretien de l’appareil. Vous éviterez ainsi de vous blesser et d’endommager l’appareil.
Miele vous conseille expressément et vivement de lire et
de suivre les instructions du chapitre «Installation et
branchement» ainsi que les CONSIGNES DE SÉCURITÉ
IMPORTANTES.
Miele ne peut pas être tenue pour responsable des blessures et des dommages causés par le non-respect de
ces instructions.
Conservez ce mode d’emploi en lieu sûr afin de pouvoir
le consulter au besoin et remettez-le à tout futur utilisateur.
Débranchez toujours l’aspirateur de l’alimentation électrique après utilisation, avant de changer les accessoires,
ainsi que pour les travaux d’entretien, de nettoyage, et
de réparation. Pour cela, utilisez l’interrupteur marche-arrêt situé sur la poignée Comfort.
67

fr - CONSIGNES DE SÉCURITÉ IMPORTANTES
Utilisation conforme
Conçu pour nettoyer les planchers, cet aspirateur est
prévu pour un usage domestique ou dans un environnement similaire. Cet aspirateur n’est pas adapté à une utilisation sur les chantiers de construction.
Cet aspirateur n’est pas conçu pour être utilisé à l’exté-
rieur.
Cet aspirateur peut être utilisé pour le nettoyage normal
de la moquette, des tapis et des surfaces dures.
Cet aspirateur est conçu pour une utilisation jusqu'à
4000m (13000pi) d'altitude au-dessus du niveau de la
mer.
L’aspirateur ne doit être utilisé que sur les planchers
secs. Ne passez pas l’aspirateur sur les personnes ou les
animaux. Toute autre utilisation, modification ou altération
est interdite.
Les personnes qui ne possèdent pas les capacités phy-
siques, l’expérience ou les connaissances requises pour
utiliser cet appareil doivent être supervisées ou formées
par une personne responsable.
Utilisez-le uniquement comme décrit dans ce mode
d’emploi.
Utilisez exclusivement les accessoires recommandés par le
fabricant.
L’emballage protège l’aspirateur contre d’éventuels dé-
gâts pendant le transport. Il est conseillé de le conserver
pour le transport futur.
68

fr - CONSIGNES DE SÉCURITÉ IMPORTANTES
Sécurité des enfants
Ne laissez pas les enfants s’approcher de l’aspirateur à
moins d’être supervisés en permanence.
Assurez-vous que l’aspirateur n’est pas utilisé comme
un jouet. La vigilance s’impose lorsque l’aspirateur est utilisé en présence d’enfants.
Risque de suffocation! Jetez les emballages, sacs et
autres produits en plastique et gardez-les en tout temps
hors de la portée des enfants.
AVERTISSEMENT
Pour diminuer le risque d'incendie, de décharge électrique ou de blessure, respectez les instructions ciaprès:
Vérifiez la tension nominale de l’aspirateur avant de
brancher le cordon d’alimentation dans une prise électrique. Votre source d’alimentation doit correspondre à la
tension indiquée sur la plaque signalétique située en dessous de l’aspirateur. N’utilisez que les prises de courant
domestiques. N’utilisez jamais de sources d’alimentation
en courant continu. Consultez un électricien professionnel
si vous avez des doutes sur votre source d’alimentation.
Le branchement de l’aspirateur à une tension supérieure à
celle indiquée dans ces instructions peut endommager
l’appareil ou causer des blessures.
69

fr - CONSIGNES DE SÉCURITÉ IMPORTANTES
Pour réduire le risque de décharge électrique, cet appa-
reil est équipé d’une fiche polarisée (une lame est plus
large que l’autre.) Cette fiche ne s’insère dans une prise
polarisée que dans un seul sens. Si elle ne s’insère pas
complètement dans la prise de courant, inversez la fiche.
Si elle ne s’insère toujours pas, appelez un électricien professionnel pour installer la prise appropriée. Ne modifiez en
aucun cas la fiche.
Sécurité technique
L’aspirateur fonctionne sur 25,2V.
Il s’agit d’un appareil de la classe de protection III.
Doté d’une source d’alimentation à très basse tension de
sécurité (TBTS), il protège les utilisateurs des risques de
décharge électrique. Un chargeur de classe II est utilisé
pour recharger l’aspirateur.
Avant d’utiliser l’aspirateur et ses accessoires, vérifiez la
présence de signes visibles de dommages. N’utilisez pas
un appareil endommagé.
Comparez les données de raccordement indiquées sur
la plaque signalétique du chargeur (tension et fréquence
réseau) avec celles du réseau électrique. Elles doivent absolument être les mêmes. Sans modification, le chargeur
convient à une fréquence de 50Hz et 60Hz.
L’intensité nominale de la prise électrique doit être 15A.
70

fr - CONSIGNES DE SÉCURITÉ IMPORTANTES
La brosse électrique Miele Multi Floor XXL et la brosse
manuelle Miele Electro Compact (selon le modèle) sont
des dispositifs motorisés supplémentaires conçus spécialement pour cet aspirateur Miele. L’utilisation de l’aspirateur avec une brosse électrique ou une brosse manuelle
Miele différente ou d’une autre marque n’est pas autorisée
pour des raisons de sécurité.
Les réparations ne doivent être effectuées que par un
technicien autorisé, conformément aux normes de sécurité
nationales et locales. Les réparations non autorisées
peuvent causer des blessures ou endommager l’appareil.
Autrement, la garantie peut être annulée.
Les réparations doivent être effectuées exclusivement
par des techniciens autorisés par Miele. Une réparation ou
des travaux réalisés par une personne non compétente
peut mettre les utilisateurs en danger.
Miele ne peut garantir la sécurité de l’appareil que si des
pièces de rechange d’origine Miele sont utilisées. Les
composants défectueux ne doivent être remplacés que par
des pièces d’origine Miele.
Entreposez l'aspirateur à une température ambiante si-
tuée entre 0°C (32°F) et 45°C (115°F).
71

fr - CONSIGNES DE SÉCURITÉ IMPORTANTES
Nettoyage
Ne plongez pas l’aspirateur ou ses accessoires dans
l’eau.
L’électrobrosse ou la brosse à main (selon le modèle), le
bloc moteur, la canne d’aspiration, le corps et la poignée
Comfort comportent des fils électriques. Les fiches de
connexion ne doivent pas être mises en contact avec de
l’eau. Risque d’électrocution. Pour les nettoyer, utilisez un
linge sec.
Utilisez uniquement un chiffon sec ou légèrement hu-
mide pour nettoyer l’appareil une fois qu’il est débranché,
ainsi que les accessoires.
Exception:
Réservoir à poussière: videz le réservoir à poussière et déposez le pré-filtre. Nettoyez le réservoir à poussière uniquement avec une solution d’eau et de détergent doux.
Ensuite, séchez bien le réservoir à poussière. Reposez le
pré-filtre dans le réservoir à poussière.
72

fr - CONSIGNES DE SÉCURITÉ IMPORTANTES
Utilisation correcte
N’utilisez pas l’aspirateur sans le réservoir à poussière,
le pré-filtre, le filtre à poussières fines et le filtre de protection moteur.
N’utilisez pas si le cordon d’alimentation ou la fiche sont
endommagés.
Si l’appareil ne fonctionne pas comme prévu, s’il a été
échappé, endommagé, laissé à l’extérieur ou submergé
dans l’eau, retournez-le à un centre de réparation.
Ne mettez aucun objet dans les ouvertures. N’utilisez
pas lorsqu’une ouverture est bloquée; gardez à l’abri de la
poussière, des peluches, des cheveux et de tout objet qui
peut réduire l’écoulement de l’air.
N’aspirez rien qui a brûlé ou qui fume, qu’il soit in-
candescent ou apparemment éteint (cigarettes, cendres ou
cendres chaudes, etc.).
N’utilisez pas l’aspirateur pour aspirer l’eau, les liquides
ou la saleté humide. Attendez que les tapis ou moquettes
fraîchement nettoyés ou shampouinés soient complètement secs avant d’essayer de passer l’aspirateur.
N’utilisez pas l’aspirateur pour aspirer les particules
d’encre en poudre. L’encre utilisée dans les imprimantes et
les photocopieurs est conductrice d’électricité.
N’aspirez pas de liquides ou de gaz inflammables ou
combustibles et ne passez pas l’aspirateur dans les zones
où ces substances sont stockées.
73

fr - CONSIGNES DE SÉCURITÉ IMPORTANTES
Ne touchez jamais l’électrobrosse ou la brosse manuelle
(selon le modèle) lorsqu’elle tourne.
N’utilisez pas l’électrobrosse ou la brosse manuelle (se-
lon le modèle) à hauteur de tête.
N’aspirez pas à hauteur de tête et n’approchez pas le
tuyau d’aspiration de la tête d’une personne.
Tenez les cheveux, les vêtements amples, les doigts et
toutes les parties du corps à l’écart des ouvertures et des
parties mobiles.
Soyez particulièrement vigilant lorsque vous nettoyez les
escaliers.
Accessoires
Utilisez uniquement des accessoires d’origine portant le
logo «ORIGINAL Miele» sur l’emballage. Sinon, le fabricant ne peut pas garantir la sécurité de ce produit.
74

fr - CONSIGNES DE SÉCURITÉ IMPORTANTES
Consignes de sécurité et avertissements pour la batterie AP01, le chargeur LG01, le socle de chargeur LS03
(selon le modèle)
Sécurité des enfants
Les personnes (y compris les enfants) dont les capacités
physiques, sensorielles ou mentales sont réduites, ou qui
manquent d’expérience ou de connaissances, et qui ne
sont pas en mesure d’utiliser le chargeur LG01/le socle de
chargeur LS03 en toute sécurité ne peuvent utiliser cet aspirateur que si elles sont surveillées pendant son utilisation
ou si on leur a montré comment l’utiliser en toute sécurité
et qu’elles comprennent et reconnaissent les conséquences d’une utilisation incorrecte.
Gardez la batterie AP01 hors de la portée des enfants.
Ne laissez pas les enfants s’approcher du chargeur
LG01 ou du socle de chargeur LS03 à moins d’être supervisés en permanence.
Sécurité technique
La batterie AP01, le chargeur LG01 et le socle de char-
geur LS03 sont conçus pour être utilisés avec l’aspirateur
HS19 de Miele. L’utilisation de l’aspirateur avec une batterie, un chargeur ou un socle de chargeur d’une autre
marque n’est pas autorisée pour des raisons de sécurité.
75

fr - CONSIGNES DE SÉCURITÉ IMPORTANTES
Seul le chargeur LG01/xx ou le socle de chargeur LS03/
xx fourni avec l’aspirateur peut être utilisé pour charger la
batterie AP01.
xx signifie 01, 02, 03, 04, 05, 06, 07 ou 08 et ces numéros
indiquent le modèle de votre chargeur LG01 et de votre
socle de chargeur LS03 selon le pays:
XX
01 AT, BE, BG, CH, CL, CZ, DE, DK, EE, ES, FI, FR, GR, HR, HU, IT, KZ, LT,
LU, LV, NL, NO, PL, PT, RO, RS, RU, SE, SI, SK, TR, UA, ZA
02 AE, GB, HK, IE, MY, SG
03 CA, MX, US
04 AU, NZ
05 CN
06 KR
07 JP
08 IN
Si vous utilisez un adaptateur de prise, assurez-vous
qu’il est approuvé pour un fonctionnement continu.
Le fonctionnement fiable et en toute sécurité de l’aspira-
teur ne peut être garanti que si le chargeur LG01 (le socle
de chargeur LS03) est raccordé au réseau électrique public.
Chargez l'aspirateur à une température ambiante située
entre 0°C (32°F) et 45°C (115°F).
76

fr - CONSIGNES DE SÉCURITÉ IMPORTANTES
Cessez immédiatement d’utiliser la batterie AP01 si vous
sentez une odeur inhabituelle, si du liquide s’en échappe,
si elle surchauffe considérablement, ou si elle est décolorée ou déformée. Éliminez immédiatement la batterie AP01
(voir l’avis de sécurité «Élimination de la batterie AP01» à
la fin de ce chapitre ainsi que «Protection de l’environnement–Élimination des batteries usagées»).
Les batteries s’épuisent au fil du temps. Le liquide corro-
sif qui s’y trouve est alors susceptible de fuir. Évitez tout
contact de ce liquide avec les yeux et la peau. En cas de
contact avec les yeux, rincez immédiatement à grande eau
et consultez un médecin.
Veuillez communiquer avec le service technique Miele
avant de leur envoyer la batterie AP01.
Utilisation correcte
Ne laissez pas tomber ou ne jetez pas la batterie AP01.
Pour des raisons de sécurité, cessez d’utiliser une batterie
AP01 qui a été endommagée.
Gardez la batterie AP01 à l’abri d’une flamme nue ou de
toute autre source de chaleur. Ne réchauffez pas la batterie
AP01. N’exposez pas la batterie rechargeable aux rayons
directs du soleil.
Ne démontez pas la batterie AP01.
Ne causez pas de court-circuit en faisant le pontage des
contacts de la batterie AP01, de façon accidentelle ou délibérée.
77

fr - CONSIGNES DE SÉCURITÉ IMPORTANTES
Ne laissez pas la batterie AP01 entrer en contact avec
des liquides.
Élimination de la batterie AP01: retirez la batterie AP01
de l’aspirateur. Isolez les contacts métalliques avec du ruban adhésif pour éviter tout court-circuit. Jetez la batterie
AP01 dans un centre de recyclage municipal. Ne jetez pas
la batterieAP01 dans vos ordures ménagères normales.
CONSERVEZ CES INSTRUCTIONS
78

fr - Protection de l’environnement
3E&G+J
Élimination des produits d'emballage
L'emballage est conçu pour protéger
l'appareil des dommages durant le
transport. Les matériaux d'emballage
utilisés sont sélectionnés à partir de
matériaux qui sont écologiques pour
l'élimination et devraient être recyclés.
Recycler l'emballage réduit l'utilisation
de matériel brut dans le processus de
fabrication et réduit également la quantité de déchets dans les sites d'enfouissement. Assurez-vous que l'emballage
est éliminé de la façon appropriée.
Mise au rebut de votre vieil appareil
Avant de mettre au rebut votre vieil aspirateur, retirez le filtre à poussière fine
et jetez-le avec les ordures ménagères.
Les appareils électriques et électroniques contiennent des matériaux précieux. Ils contiennent également des
substances, des composés et des éléments essentiels pour leur fonctionnement adéquat et sécuritaire. Une manipulation ou la mise au rebut inadéquate
de ces matériaux dans vos ordures ménagères peut poser un risque pour votre
santé et l’environnement. Il est donc important de ne pas jeter votre vieil aspirateur avec vos ordures ménagères.
vous que votre aspirateur ne pose pas
un risque pour les enfants lorsqu’il est
entreposé avant sa mise au rebut.
Élimination des batteries usagées
Dans de nombreux cas, les appareils
électriques et électroniques contiennent
des batteries qui ne doivent pas être jetées avec les ordures ménagères après
utilisation. Vous êtes légalement tenu
d’enlever les batteries usagées qui ne
sont pas scellées dans l’aspirateur et
de les remettre gratuitement à un point
de collecte approprié (détaillant, etc.).
Isolez les contacts métalliques avec du
ruban adhésif pour éviter tout court-circuit. Les batteries peuvent contenir des
substances qui peuvent être dangereuses pour la santé et l’environnement.
L’étiquetage de la batterie fournira de
plus amples renseignements. Le symbole de la poubelle barrée signifie que
les batteries ne doivent pas être jetées
avec les ordures ménagères. Une poubelle barrée d’une croix qui porte également un ou plusieurs symboles
chimiques indique que la batterie
contient du plomb (Pb), du cadmium
(Cd) et/ou du mercure (Hg).
Utilisez plutôt des points de collecte et
de mise au rebut officiellement désignés pour jeter et recycler les appareils
électriques et électroniques. Assurez-
Les batteries usagées contiennent des
matières premières précieuses qui
peuvent être recyclées. L’élimination
des batteries de façon séparée facilite
leur manipulation et leur recyclage.
79

fr - Description de l’appareil80fr - Description de l’appareil

a
Poignée Comfort
b
Languette de dégagement pour la poignée Comfort (à l’envers)
c
Poignée du réservoir à poussière
d
Réservoir à poussière avec pré-filtre, filtre à poussière fine et filtre de protection
du moteur
e
Bloc moteur PowerUnit avec connexion de batterie et connexions pour la poignée Comfort, la canne d’aspiration, l’électrobrosse et le réservoir à poussière
f
Languettes de déverrouillage pour la batterie (des deux côtés)
g
Prise de charge (en dessous de la batterie)
h
Batterie lithium-ion AP01
i
Raccord
j
Électrobrosse Multi Floor XXL (certains modèles sont équipés d’un éclairage
BrilliantLight)
k
Brosse cylindrique amovible
l
Clapet
m
Languette de dégagement pour déposer la brosse cylindrique
n
Boutons de dégagement
o
Témoin du niveau de charge de la batterie
p
Canne d’aspiration
q
Interrupteur marche-arrêt avec sélecteur de puissance d’aspiration
81

fr-CA
Références aux illustrations
Les illustrations mentionnées dans le
texte figurent sur les pages dépliantes
à la fin de ce mode d’emploi.
Installation et branchement
Assemblage de l’aspirateur
(figures 01+02)
Vous pouvez assembler l’aspirateur de
2 manières différentes.
Vous pouvez placer la canne d’aspi-
ration au-dessus ou au-dessous du
bloc moteur PowerUnit.
Les avantages d’installer la PowerUnit
dans la partie inférieure de l’aspirateur
sont les suivants:
- possibilité de maintien autonome (voir
«Utilisation»–«Fonction de maintien
autonome pour les courtes pauses»)
- ergonomie (réduction de la tension sur
le poignet)
- nettoyage pratique de grandes surfaces
Les avantages d’installer la PowerUnit
dans la partie supérieure de l’aspirateur sont les suivants:
- nettoyage pratique sous les meubles
- la PowerUnit peut être démonté rapidement
PowerUnit seule
La PowerUnit peut être utilisé seule,
sans la canne d’aspiration et l’électrobrosse, pour aspirer rapidement les
miettes et la poussière d’un endroit particulier.
Conseil : Ce mode est particulièrement
adapté à l’utilisation des accessoires
(voir «Utilisation des accessoires fournis»).
Raccordement de la poignée Comfort (figures 03+04)
Selon la configuration de votre aspirateur, vous pouvez raccorder la poignée
Comfort soit à la canne d’aspiration,
soit au bloc moteur PowerUnit.
Poussez la poignée Comfort vers le
bas sur le raccord de la canne d’aspiration par le haut jusqu’à ce qu’elle
s’enclenche avec un déclic (détail de
l’image de gauche).
Faites glisser la poignée Comfort le
long de la ligne guide de la poignée
du réservoir à poussière et vers le bas
sur le raccord du bloc moteur jusqu’à
ce qu’elle s’enclenche avec un déclic
(détail de l’image de droite).
Éteignez l’aspirateur à l’aide de l’in-
terrupteur marche-arrêt situé à l’avant
de la poignée Comfort si vous souhaitez détacher les sections.
Appuyez sur la languette de dégage-
ment et retirez la poignée Comfort en
tirant vers le haut.
Raccordement du bloc moteur
PowerUnit et de la canne d’aspiration
(figures 05+06)
Selon la configuration de votre aspirateur, la canne d’aspiration se trouve audessus ou au-dessous de la PowerUnit.
Faites glisser la canne d’aspiration le
long de la ligne guide de la poignée
du réservoir à poussière et vers le bas
82

fr-CA
sur le raccord de la PowerUnit
jusqu’à ce qu’il s’enclenche avec un
déclic (détail de l’image de gauche).
Poussez le raccord de la PowerUnit
vers le bas sur la canne d’aspiration
par le haut jusqu’à ce qu’il s’enclenche avec un déclic (détail de
l’image de droite).
Pour séparer les différentes sections,
appuyez sur la languette de dégagement.
Insertion de la batterie
(figures 07, 08+09)
Retirez l’autocollant de la batterie.
Poussez la batterie le long des lignes
guides jusqu’à ce qu’elle s’enclenche
avec un déclic dans le bloc moteur
PowerUnit.
Si vous voulez séparer à nouveau les
sections, appuyez sur les languettes
de dégagement des deux côtés de la
batterie pour la retirer.
Raccordement de l’électrobrosse
(figure10)
Selon la configuration de votre aspirateur, vous pouvez raccorder soit le bloc
moteur ou la canne d’aspiration à
l’électrobrosse.
Insérez le raccord dans l’élec-
trobrosse par le haut jusqu’à ce qu’il
s’enclenche avec un déclic.
Pour séparer les différentes sections,
appuyez sur la languette de dégagement de l’électrobrosse et retirez le
raccord de l’électrobrosse (figure06).
Renseignements généraux sur la batterie
À la livraison, la batterie rechargeable
n’est pas complètement chargée.
Chargez complètement la batterie avant
sa première utilisation. Prévoyez environ
4 heures pour la recharge.
Il est essentiel de charger chaque
nouvelle batterie pour la première fois
dans le bloc moteur PowerUnit (aspirateur Triflex) afin de maximiser la
puissance de la batterie.
Une fois la batterie complètement chargée, le témoin du niveau de charge de
la batterie s’éteint au bout de 10 minutes pour économiser l’énergie.
Vous pouvez utiliser l’aspirateur jusqu’à
17 minutes si vous l’utilisez dans son
état entièrement assemblé au niveau de
puissance maximum.
Cependant, si vous utilisez le bloc moteur seul et que vous choisissez le niveau de puissance le plus bas, vous
pouvez passer l’aspirateur pendant
60 minutes maximum.
Recharge de la batterie (sans fixation
murale) (figure11)
Vous pouvez ranger l’aspirateur à la verticale et charger directement la batterie.
Raccordez le bloc moteur PowerUnit
à l’électrobrosse pour créer une base
sûre pour l’aspirateur.
Faites pivoter l’aspirateur vers l’avant
jusqu’à ce que le raccord de l’électrobrosse s’enclenche avec un déclic.
Branchez le câble de recharge fourni
dans la prise située au bas de la batterie.
83

fr-CA
Branchez le chargeur dans une prise
électrique.
La recharge commence.
Vous pouvez en savoir plus à ce sujet
dans la rubrique «Témoin du niveau
de charge de la batterie».
Recharge de la batterie (avec fixation
murale) (figures 12+13)
Il existe deux manières pour entreposer
et charger l'aspirateur sur la prise murale.
Vous aurez besoin d’un endroit approprié près d’une prise électrique pour le
montage mural de l’appareil.
Montage mural (figures 14+15)
Le support mural fourni comporte une
plaque de montage et un sac de vis fixé
à l’arrière.
Fixez la plaque de montage sur le mur à
l’endroit qui vous convient.
Détachez le sac de vis.
Appuyez sur la languette de dégage-
ment située au bas du support mural.
Retirez la plaque de montage du sup-
port mural en la faisant glisser vers le
bas.
Fixation de la plaque de montage
(figures 16+17)
2 chevilles et 2 vis T20 TORX sont fournies pour fixer la plaque de montage au
mur.
Vous aurez également besoin d’un
tournevis électrique ou d’une perceuse
(avec une mèche de 1/4po).
En fonction de la configuration de votre
aspirateur, choisissez une distance de
45cm (17 3/4") ou 98cm (38 1/2") entre
le bord inférieure de la plaque de montage et le plancher.
Faites attention à ne pas percer un fil
électrique dans le mur.
Fixez la plaque de montage au mur.
Fixation du câble de recharge dans le
support mural (figures 18, 19+20)
Un compartiment à câbles est situé
sous le support mural.
Appuyez sur les deux languettes de
dégagement situées sous le support
mural et retirez le couvercle du compartiment à câbles.
Branchez le câble de recharge fourni
dans l’ouverture par le haut.
Faites glisser le câble de recharge
dans la rainure.
Remettez le couvercle en place et fer-
mez le compartiment à câbles.
Raccordement du porte-accessoires
(si nécessaire) (figure21)
Un porte-accessoires est fourni pour le
rangement des trois accessoires (voir
«Utilisation des accessoires fournis»).
Poussez le porte-accessoires sur le
support mural jusqu’à la butée.
Raccordement du support mural
(figures 22+23)
Faites glisser le support mural vers le
bas dans la plaque de montage par le
haut jusqu’à ce qu’il s’enclenche
avec un déclic.
84

fr-CA
Faites glisser le bloc moteur de l’aspi-
rateur entièrement assemblé, avec la
batterie insérée, vers le bas dans le
support mural.
Branchez le chargeur dans la prise de
courant.
La recharge commence.
Témoin du niveau de charge de la
batterie (pendant la recharge)
(figure24)
Le niveau de charge de la batterie est
affiché sur le bloc moteur PowerUnit.
Durée de vie de
la batterie
Environ 0 à 34% Le voyant du bas
Environ 35 à 69% Le voyant du bas
Environ 70 à 90% Les voyants du
Indication
clignote lentement
est allumé; celui
du milieu clignote
lentement
bas et du milieu
sont allumés;
le voyant du haut
clignote lentement
Si la batterie n’a pas été utilisée pendant longtemps et qu’elle est déchargée, elle passe en mode de sécurité.
Par conséquent, le témoin du niveau
de charge de la batterie ne réagit
qu’après environ 30 à 60 minutes lorsqu’elle est chargée dans le bloc moteur PowerUnit.
Témoin du niveau de charge de la
batterie (pendant l’utilisation)
(figure24)
Le niveau de charge de la batterie est
affiché sur le bloc moteur PowerUnit.
Durée de vie de
la batterie
Environ 100 à
70%
Environ 69 à 35% Les voyants du
Environ 34 à 11% Le voyant du bas
Environ 10 à 0% Le voyant du bas
Indication
Tous les voyants
sont allumés
milieu et du bas
sont allumés
est allumé
clignote lentement
Environ 91 à
100%
Une fois la batterie complètement chargée, le témoin du niveau de charge de
la batterie s’éteint au bout de 10 minutes pour économiser l’énergie.
Tous les voyants
sont allumés
85

fr-CA
Utilisation des accessoires
fournis (figure25)
Suceur à coussins
Pour nettoyer meubles rembourrés, matelas et coussins.
Suceur long à interstices
Pour nettoyer plis, fentes et recoins.
Brosse à meubles avec tête
pivotante
Pour aspirer plinthes, meubles
sculptés ou objets de décoration.
La tête de la brosse pivote et
s’adapte à la forme des objets.
d Porte-accessoires
Pour le rangement des trois accessoires.
Placez les différents accessoires
comme l’indiquent les symboles sur le
porte-accessoires.
Vous pouvez fixer le support d’accessoires sur le support mural (voir «Installation et branchement–Raccordement
du porte-accessoires»).
La brosse électrique Multi Floor XXL
(figure26)
Veuillez suivre les consignes de nettoyage et d’entretien des revêtements
de sol du fabricant.
La brosse électrique peut être utilisé
pour le nettoyage normal de la moquette, des tapis et des surfaces dures.
Conseil : La canne d’aspiration n’est
pas la meilleure solution pour nettoyer
des escaliers recouverts de moquette.
Miele propose une gamme d’accessoires adaptés à de nombreux modes
spéciaux (voir «Accessoires en option»).
Brosse manuelle Electro Compact
(figure27)
(selon le modèle)
Veuillez suivre les consignes de nettoyage et d’entretien des revêtements
de sol du fabricant.
La brosse manuelle est particulièrement
adaptée au nettoyage intensif des
sièges capitonnés et des sièges de voiture.
Conseil : La canne d’aspiration n’est
pas la meilleure solution pour nettoyer
des meubles rembourrés ou des sièges
de voitures.
Batterie et socle de recharge supplémentaires (figure28)
(selon le modèle)
L’utilisation de la batterie supplémentai-
re permet de doubler la durée d’utilisation de l’aspirateur.
Avant de recharger pour la première
fois, veuillez lire les informations figurant dans la section «Installation et
branchement–Renseignements généraux sur la batterie».
Une fois que la batterie a été complè-
tement chargée dans le bloc moteur
PowerUnit, le socle de chargement
peut être utilisé pour recharger la batterie. Placer la batterie dans le socle
de chargement jusqu'à ce qu'elle
s'enclenche avec un clic audible.
86

fr-CA
Insérez la fiche dans une prise de
courant.
La recharge commence. Le témoin du
niveau de charge de la batterie clignote
à gauche.
Vous pouvez en savoir plus sur le témoin du niveau de charge de la batterie
dans «Installation et branchement–Témoin du niveau de charge de la batterie».
Si vous placez la batterie déchargée
dans le socle de recharge juste après
l’avoir utilisée, elle ne commence à se
charger que lorsqu’elle aura refroidi.
Le processus de refroidissement peut
durer jusqu’à 60 minutes. Le témoin
du niveau de charge de la batterie sur
le socle de recharge ne réagit pas
pendant ce temps.
Utilisation
Mise en marche et arrêt(figure29)
Retirez le chargeur de la prise de
charge de la batterie si vous avez directement chargé la batterie.
Si vous avez chargé la batterie dans
le support mural, retirez l’aspirateur
du support mural.
Appuyez sur l’interrupteur marche-ar-
rêt situé sur la poignée Comfort .
Réglage de la puissance d’aspiration
La puissance d’aspiration peut être réglée selon le type de sol à nettoyer.
Lorsque vous réduisez le niveau de
puissance d’aspiration, l’électrobrosse
glisse plus facilement.
1 Niveau de puissance le plus
bas degré de saleté léger
2 Niveau de puissance moyen
degré de saleté normal
Max. Niveau de puissance le plus
élevé degré de saleté très
important
La fonction de détection des revêtements de sol est activée aux niveaux de
puissance moyen et élevé.
La puissance de l’électrobrosse est automatiquement réglée au niveau optimal
en fonction du type de revêtement de
sol, ce qui peut entraîner une modification du bruit de fonctionnement.
Éclairage devant l’aspirateur
(selon le modèle)
L’électrobrosse de votre appareil est
doté de BrilliantLight pour éclairer la
zone devant l’aspirateur.
Fonction de maintien autonome pour
les courtes pauses
(Pour des raisons de sécurité, cette
fonction ne peut être utilisée que
lorsque le bloc moteur PowerUnit est
installé dans la partie inférieure de l’aspirateur)
Si vous passez l’aspirateur avec la
PowerUnit installée dans la partie inférieure de l’aspirateur, vous pouvez facilement interrompre le fonctionnement
lorsque l’appareil est allumé.
Faites pivoter l’aspirateur vers l’avant
jusqu’à ce que le raccord de l’électrobrosse s’enclenche avec un déclic.
Vous pouvez choisir 3 niveaux de puissance sur la poignée Comfort:
87

fr-CA
L’aspirateur reste bien en place, l’électrobrosse s’éteint et l’autonomie de la
batterie est préservée.
Si vous déclenchez ensuite le raccord
de l’électrobrosse, celle-ci se remettra
en marche.
Entretien
Risque de blessures dues à la
rotation de la brosse cylindrique.
Vous pouvez vous blesser sur la
brosse cylindrique qui tourne.
Mettez l’aspirateur hors tension
avant d’effectuer tout travail d’entretien. Pour cela, utilisez l’interrupteur
marche-arrêt situé sur la poignée
Comfort.
Vous pouvez vous procurer des pièces
de rechange auprès de Miele, de votre
revendeur Miele ou du Service Miele.
Vidange du réservoir à poussière
(figures 30 à 34)
Videz le réservoir avant que la poussière atteigne le repère max dans le réservoir.
Tournez le couvercle du réservoir à
poussière dans le sens de la flèche
jusqu’à la première butée.
Sortez le réservoir par le haut.
Le contenu du réservoir à poussière
peut être jeté avec les ordures ménagères, tant qu’il ne contient pas de
substances interdites.
Positionnez le réservoir au-dessus de
la poubelle pour contrôler autant que
possible la dispersion de la poussière.
Tournez le couvercle du réservoir à
poussière dans le sens de la flèche
jusqu’à la prochaine butée.
Le couvercle au-dessous du réservoir
s’ouvre et la poussière tombe.
Remettez le couvercle du réservoir
sur sa position d’origine.
Refermez bien le couvercle. Il doit
s’enclencher.
Faites glisser la poignée du réservoir
à poussière le long de la ligne guide
et vers le bas sur le raccord du bloc
moteur PowerUnit jusqu’à ce qu’il
s’enclenche avec un déclic.
Nettoyage du filtre à poussière fine
(figure35)
Le filtre à poussière fine se trouve dans
le réservoir à poussière.
Nettoyez ce filtre au moins une fois par
mois.
Sortez le réservoir à poussière.
Soulevez le filtre à poussière fine pour
l’enlever.
Risque de dommages dus à un
nettoyage incorrect.
Le filtre à poussière fine peut être en-
dommagé et donc moins efficace.
Ne nettoyez pas l’intérieur du filtre à
poussière fine. N’utilisez pas d’objets
pointus ou tranchants pour nettoyer
le filtre. Ne brossez pas le filtre à
poussière fine.
Tenez le filtre à poussière fine au-des-
sus d’une poubelle.
Tapez délicatement le bord inférieur
caoutchouté du filtre à poussière fine.
88

fr-CA
Tournez légèrement le filtre pendant
que vous faites cela pour dégager la
saleté de toutes les crevasses.
Une fois qu’il est propre, replacez le
filtre dans le réservoir à poussière.
Replacez le réservoir à poussière sur
le raccord du bloc moteur.
Nettoyage du pré-filtre
(figures 36 à 39)
Le pré-filtre se trouve dans le réservoir
à poussière.
Nettoyez le pré-filtre au besoin.
Sortez le réservoir à poussière.
Enlevez le filtre à poussière fine (fi-
gure35).
Videz le réservoir à poussière au-des-
sus d’une poubelle et soulevez le préfiltre pour le retirer.
Débloquez le filtre de protection mo-
teur en le tournant à gauche et soulevez-le pour le retirer.
Risque de dommages dus à un
nettoyage incorrect.
Le pré-filtre peut être endommagé et
donc moins efficace.
N’utilisez pas d’objets pointus ou
tranchants pour nettoyer le filtre.
Tapez le pré-filtre délicatement sur
une poubelle pour en faire tomber la
poussière.
Conseil : Utilisez un outil comme une
fine brosse de nettoyage pour bien nettoyer l’intérieur du pré-filtre.
Il n’est pas nécessaire de nettoyer le
filtre de protection moteur. Vous pouvez
l’enlever pour accéder plus facilement à
l’intérieur du pré-filtre.
Après avoir nettoyé le pré-filtre, repla-
cez le filtre de protection moteur dans
le pré-filtre en vous assurant qu’il est
bien positionné.
Bloquez le filtre de protection moteur
en le tournant à droite jusqu’à la butée.
Reposez le pré-filtre dans le réservoir
à poussière.
Pour cela, alignez les lignes guides
sur les deux sections et remettez le
couvercle du réservoir à poussière
dans sa position initiale.
Refermez le couvercle au bas du ré-
servoir à poussière, en vous assurant
qu’il s’enclenche.
Reposez le filtre à poussière fine.
Reposez le réservoir à poussière sur
le raccord du bloc moteur.
Nettoyage du réservoir à poussière
Nettoyez au besoin le réservoir à poussière.
Sortez le réservoir à poussière.
Videz le réservoir à poussière au-des-
sus d’une poubelle et soulevez le préfiltre pour le retirer (figure36).
Nettoyez le réservoir à poussière
avec de l’eau et un détergent doux.
Séchez bien le réservoir à poussière.
Reposez le pré-filtre dans le réservoir
à poussière.
Reposez le réservoir à poussière sur
le raccord du bloc moteur (figures
38+39).
89

fr-CA
Nettoyage de l’électrobrosse/la
brosse manuelle (figure06)
(La brosse manuelle est offerte selon le
modèle)
Séparez l’électrobrosse/la brosse ma-
nuelle du raccord de l’aspirateur.
Élimination des fils et des cheveux
(figure40)
Placez l’électrobrosse/la brosse ma-
nuelle à l’envers sur une surface
plane et propre.
À l’aide d’une paire de ciseaux cou-
pez les fils ou les cheveux enroulés
autour de la brosse cylindrique. Pour
guider les ciseaux, déplacez-les le
long de la rainure sur la brosse cylindrique.
Utilisez ensuite l’aspirateur pour aspirer
les fils et cheveux coupés.
Dépose de la brosse cylindrique
(figure41)
(Pas possible avec la brosse manuelle)
Remplacement de la batterie rechargeable
Il est nécessaire d’utiliser une batterie
rechargeable au lithium-ion Miele AP01
d’origine (HX LA).
Suivez les consignes concernant la
manipulation et l’élimination des batteries rechargeables qui figurent dans
les sections suivantes: «CONSIGNES
IMPORTANTES DE SÉCURITÉ»,
«Protection de l’environnement», et
«Installation et branchement» («Renseignements généraux sur la batterie»).
Vous pouvez sortir la brosse cylindrique
de l’électrobrosse pour enlever les salissures tenaces et nettoyer l’intérieur
de l’électrobrosse.
Ouvrez le rabat sur le côté de l’élec-
trobrosse pour que le symbole
devienne visible.
Soulevez le rabat jusqu’au maximum.
Déposez la brosse cylindrique.
Nettoyez la brosse cylindrique et en-
levez toute saleté tenace de l’intérieur
de l’électrobrosse.
Remontez l’électrobrosse dans l’ordre
inverse.
90

fr-CA
Foire aux questions
Vous pouvez régler la plupart des défauts ou anomalies courants par vous-même.
Dans bon nombre de cas, vous économiserez ainsi du temps et de l'argent car
vous n'aurez pas besoin de faire appel au service technique.
Les tableaux suivants vous aideront à déceler la cause d'un défaut ou d'une anomalie et à y remédier.
Risque de blessures dues à la rotation de la brosse cylindrique.
Vous pouvez vous blesser sur la brosse cylindrique qui tourne.
Mettez l’aspirateur hors tension avant de résoudre une anomalie quelconque.
Pour cela, utilisez l’interrupteur marche-arrêt situé sur la poignée Comfort.
Problème Cause et solution possibles
Nettoyage non efficace. Le réservoir à poussière est plein.
Videz et nettoyez le réservoir à poussière.
L’électrobrosse est sale ou bloquée.
Nettoyez la brosse cylindrique et l’intérieur de
l’électrobrosse (voir «Entretien–Nettoyage de
l’électrobrosse»).
Qualité de nettoyage réduite.
L’électrobrosse s’arrête. L’électrobrosse est surchargée–cela peut arriver sur
Le bruit de fonctionnement change pendant
l’aspiration.
Le filtre à poussière fine est sale.
Nettoyez le filtre à poussière fine (voir «Entretien–
Nettoyage du filtre à poussière fine»).
Le pré-filtre est sale.
Nettoyez le pré-filtre (voir «Entretien–Nettoyage
du pré-filtre»).
certains revêtements, comme les tapis à poils longs.
Éteindre l’aspirateur et le rallumer à un niveau de
puissance d’aspiration réduit. Pour cela, utilisez
l’interrupteur marche-arrêt situé sur la poignée
Comfort.
La fonction de détection des revêtements de sol est
activée aux niveaux de puissance moyen et élevé. La
puissance de l’électrobrosse est automatiquement
réglée au niveau optimal en fonction du type de revêtement de sol.
Le bruit n’est pas inhabituel–l’aspirateur fonc-
tionne normalement.
91

fr-CA
Problème Cause et solution possibles
L’aspirateur ne démarre
pas lorsqu’il est allumé.
Il n’y a pas de batterie ou la batterie est mal insérée.
Insérez la batterie ou vérifiez sa position (voir «Ins-
tallation et branchement–Insertion de la batterie»).
La batterie rechargeable n’est pas suffisamment
chargée.
Rechargez la batterie exactement comme décrit
dans ce mode d’emploi (voir «Installation et branchement- Chargement de la batterie»).
La batterie utilisée n’est pas d’origine Miele.
Insérez une batterie rechargeable au lithium-ion
Miele AP01 d’origine (HX LA).
Le chargeur est toujours branché.
Retirez la fiche de la prise de charge de la batterie.
92

fr-CA
Messages d’erreur
Risque de blessures dues à la rotation de la brosse cylindrique.
Vous pouvez vous blesser sur la brosse cylindrique qui tourne.
Mettez l’aspirateur hors tension avant de résoudre une anomalie quelconque.
Pour cela, utilisez l’interrupteur marche-arrêt situé sur la poignée Comfort.
Les messages d’erreur sont affichés par un clignotement rapide du témoin du niveau de charge de la batterie sur le bloc moteur PowerUnit.
Problème Cause et solution possibles
Le voyant du bas clignote rapidement
Les voyants du bas et
du milieu clignotent rapidement
Les voyants du milieu et
du haut clignotent rapidement
Le voyant du haut clignote rapidement
Erreur interne au système
Retirez la batterie, attendez 10 secondes, réinsé-
rez-la et rechargez-la.
Erreur de «Surchauffe de la batterie»
Attendez environ 30minutes avant de remettre
l’aspirateur en marche.
Erreur «Batterie non reconnue»
Insérez une batterie rechargeable au lithium-ion
Miele AP01 d’origine (HX LA).
Erreur «Poignée Comfort non reconnue»
Retirez la poignée Comfort et remettez-la (voir
«Installation et branchement–Raccordement de
la poignée Comfort»).
Retirez la batterie, attendez 10 secondes, puis ré-
insérez-la.
93

fr-CA
Nettoyage et entretien
Risque de blessures dues à la
rotation de la brosse cylindrique.
Vous pouvez vous blesser sur la
brosse cylindrique qui tourne.
Mettez l’aspirateur hors tension
avant de le nettoyer. Pour cela, utilisez l’interrupteur marche-arrêt situé
sur la poignée Comfort.
Aspirateur et accessoires
Risque de décharge électrique
due à la tension.
La présence d’humidité dans le char-
geur peut provoquer des décharges
électriques.
Assurez-vous de pas mouiller le
chargeur.
Respectez les consignes de nettoyage
spéciales pour le réservoir à poussière
à la section «Entretien».
L’aspirateur et tous les accessoires en
plastique peuvent être nettoyés à l’aide
d’un nettoyant pour le plastique disponible dans le commerce.
Dommages dus à des produits
de nettoyage inappropriés.
Toutes les surfaces se rayent facile-
ment. Le contact avec des produits
de nettoyage inappropriés peut altérer ou décolorer les surfaces.
N’utilisez pas d’agents nettoyants
abrasifs, de produits pour vitres, de
nettoyants tout usage ni de nettoyants à base d’huile.
Service technique
Contact en cas d'anomalies
Vous n'arrivez pas à résoudre la panne
par vous même? Contactez le service
après-vente Miele ou votre revendeur
Miele.
Les coordonnées du service aprèsvente Miele figurent en fin de notice.
Garantie
Pour plus d'informations reportez-vous
aux conditions de garantie fournies auprès du service après-vente Miele.
Accessoires en option
Veuillez suivre les consignes de nettoyage et d’entretien des revêtements
de sol du fabricant.
Nous recommandons l’utilisation exclusive d’accessoires d’origine portant
le logo «ORIGINAL Miele» sur l’emballage. Seuls ces accessoires vous
garantissent l’efficacité optimale de
votre aspirateur et les meilleurs résultats de nettoyage possibles.
Veuillez noter que les erreurs et dommages résultant de l’utilisation d’accessoires qui ne portent pas le logo
«Original Miele» ne seront pas couverts par la garantie de l’aspirateur.
Achat d’accessoires
Vous pouvez commander les accessoires Miele d’origine auprès de la boutique en ligne Miele, du service aprèsvente Miele et chez votre revendeur
agréé.
94

fr-CA
Les accessoires Miele d’origine sont reconnaissables par le logo «ORIGINAL
Miele» sur l’emballage.
Certains modèles sont équipés de série d’au moins un des accessoires suivants.
Brosse manuelle Electro Compact
(HX SEB)
Adaptée au nettoyage intensif des
sièges capitonnés et des sièges de voiture.
Brosse pour radiateur (SHB 30)
Pour épousseter les radiateurs, les étagères étroites et les fentes.
Batterie supplémentaire AP01 (HX
LA)
Permet de doubler la durée d’utilisation
de l’aspirateur.
Socle de recharge LS03 (HX LS)
Pour charger la batterie supplémentaire
indépendamment de l’appareil, c.-à-d.
pendant que l’aspirateur est utilisé.
Brosse pour matelas (SMD 10)
Pour nettoyer des meubles rembourrés,
des matelas, des coussins, des rideaux,
des housses, etc.
Suceur long à interstices,
12" (300mm)
(SFD 10)
Suceur très long à interstices pour nettoyer les plis, les fentes et les recoins.
Suceur très long à interstices,
22" (560mm)
(SFD 20)
Suceur long à interstices flexible pour
aspirer les endroits difficiles d’accès.
95

- Limited Warranty - Vacuums Canada
The following warranty conditions are valid in Canada only.
Miele Limited, (hereinafter "Miele") warrants to the original purchaser that this product, including all of it’s Miele
authorized parts and accessories, is free of defects in material and workmanship.
1. Duration of Warranty
This warranty is valid during the following time periods:
a) Domestic appliances in normal, non-commercial, household use:
– One (1) year. Parts and labour.
– RemoteVision® Modules: Please refer to Miele's "Limited Warranty - RemoteVision® Module - Canada".
– Additional 5 and 10 Year Limited Warranty on Sealed Refrigeration Systems: The Warranty for the Sealed
Refrigeration System includes all original compressors, condensers, evaporators, driers, the original
refrigerant and the original connecting tubing.
– Five (5) Year Warranty - If a claim regarding a defect in material or workmanship relating to the Sealed
Refrigeration Systems used in Miele Refrigerators, Wine Coolers, and Freezers is received by Miele within
five (5) years from the date of purchase, then any warranted failures of the Sealed Refrigeration System
shall be repaired at no cost to you (including parts & labour).
– Ten (10) Year Warranty - If a claim of such a defect is received at any time during the period starting from
the sixth (6th) year and ending on the last day of the tenth (10th) year after the date of purchase, this
Warranty shall cover the replacement or repair of all parts of the Sealed Refrigeration System covered by
the Warranty that is found to be defective in material or workmanship but shall not include labour. Upon
request, such labour shall be provided by Miele and at the customary charge to the Miele Customer.
b) Domestic appliances in commercial use:
– Six (6) months, for parts and labour.
c) Vacuums in normal, non-commercial, household use:
– One (1) year, upright, cordless stick and canister vacuums. Parts and labour.
– Two (2) years, motor for S170 - S189 upright units. Parts and labour.
– Two (2) years, Varta battery on cordless stick vacuums. Parts and labour.
– Seven (7) years, VortexTM motor for canister, cordless stick and upright units, except S170 - S189 upright
units for which the motor warranty is two (2) years. Parts and labour.
d) Vacuums in commercial use:
– Six (6) months, for products used commercially. Parts and labour.
– One (1) year for motor for canister and upright models. Parts and labour.
e) Commercial appliances.
– One (1) year, parts and labour within Miele Direct Service Area (MDSA).
– One (1) year, parts only outside Miele Direct Service Area (MDSA).
Contact Miele Professional to determine if you are within a MDSA.
2. Commencement Date
Warranty coverage begins on the date of purchase. If a product under warranty is replaced by Miele, the original
warranty period is not extended but continues from the date of original purchase.
3. Warranty Preconditions
3.1 Miele assumes warranty responsibility subject to the following preconditions having been fulfilled:
a) You are the original purchaser and did not obtain the product through resale;
b) The product was purchased from Miele or an authorized Miele dealer in Canada;
c) If applicable, the product was installed by a person designated by Miele as qualified to do so and in
accordance with applicable installation instructions; and
d) The product is located in Canada.
3.2 Warranty claims will only be honoured provided that any failure to conform to this warranty is reported in
writing and the product is returned together with proof of purchase date to Miele or to a Miele authorized
dealer, as applicable, within the time period stated in Section 1 above.
4. Extent of Warranty
In the event of defect in material or workmanship occurring within the time period stated in I. above, Miele will
repair, or at its option replace, within a reasonable period of time, the product or any Miele authorized part or
accessory discovered to be defective in workmanship or materials. Defective products and parts become the
property of Miele upon replacement.
en
96

- Limited Warranty - Vacuums Canada
5. Exclusions
Warranty coverage excludes any product, including its parts and accessories, that:
a) was not installed according to Miele's installation instruction;
b) was damaged by negligence, accident, abuse, misuse, improper or abnormal usage, maintenance or
transportation;
c) contains non-authentic Miele accessories or replacement parts, including filters, dust bags and other non-
Miele products; and
d) was repaired, serviced, altered or modified by someone other than a Miele authorized service centre or
technician.
6. Ordinary Wear and Tear
Ordinary wear and tear shall not be considered a defect in workmanship or materials.
7. Limitation of Liability
7.1 Unless you purchase extended warranty coverage from Miele prior to the expiry of this warranty, this warranty
is the sole warranty offered by Miele to you. Miele disclaims any and all other warranties to the fullest extent
permitted by law, whether express or implied, including any warranty of merchantability or fitness for a
particular except as provided herein.
7.2 Your sole remedies under this warranty are those described herein. Unless otherwise stated, Miele's liability for
actual damage from any cause whatsoever is limited to the amount paid by you for the product. Miele disclaims
any and all liability and consequential or other damage whether based on breach of contract, tort (including
negligence), product liability or any other legal theory. In no event will either party be responsible for any lost profits
or savings, incidental damage or other economic damages.
8. Special Provincial laws
This warranty gives the purchaser specific legal rights. The purchaser may also have other rights which may vary
from Province to Province in Canada. Some provinces do not allow limitation or exclusion of implied warranties,
therefore, certain limitations and exclusions may not apply.
9. Customer Care
9.1 For service under this warranty or for further information please contact Miele at:
Miele Limited Toll free: 1-800-565-6435
161 Four Valley Drive E-mail: customercare@miele.ca
Vaughan, Ontario
Canada L4K 4V8
9.2 Service may require that the appliance be removed and taken, by authorized Miele personnel, to an
authorized Miele Service Centre. If service is requested by you in a remote geographical area, as determined
by Miele in its sole discretion from time to time, you will, at Miele's option, be responsible for either:
a) the travel expenses incurred by Miele to attend your premises; or
b) the cost of removal and shipment of the appliance from your premises to the nearest authorized Miele
Service Centre.
Miele Limited
Headquarter and Miele Centre
161 Four Valley Drive
Vaughan, ON L4K 4V8
Canada
www.miele.ca
customercare@miele.ca
professional@miele.ca (commercial enquiries)
Customer Care Centre
Phone: 800-565-6435
customercare@miele.ca (general and technical enquiries)
en
97

fr - Garantie restreinte – Aspirateurs Canada
Les conditions de la garantie suivante sont valides au Canada seulement.
Miele Limitée, (ci-après nommée "Miele") garantit à l’acheteur original que ce produit, y compris tous ses accessoires
et pièces autorisés par Miele, est libre de tout défaut de matériel et de fabrication.
1. Entrée en vigueur et durée de la garantie
Cette garantie est valide durant la période de temps suivante :
a) Appareils électroménagers aux fins d’utilisation domestique normale et non commerciale :
– Un (1) an, pièce et main-d’œuvre.
– Modules RemoteVision® : Veuillez vous reporter à la "Garantie restreinte - Module RemoteVision® -
Canada" de Miele.
– Garantie supplémentaire de 5 et 10 ans sur les systèmes scellés de réfrigération : la garantie sur le
système scellé de réfrigération couvre tous les compresseurs, les condensateurs, les évaporateurs et les
déshydrateurs-filtres d'origine, ainsi que le fluide frigorigène et les tuyaux de raccordement d'origine.
– Garantie de cinq (5) ans - Si une plainte concernant un matériau défectueux ou un défaut de fabrication lié
au système scellé de réfrigération utilisé dans les réfrigérateurs, les caves à vin et les congélateurs Miele est
adressée à Miele dans les cinq (5) ans suivant la date d'achat de l'appareil, les défauts du système scellé de
réfrigération couverts par la garantie seront réparés gratuitement (pièces et main-d'œuvre comprises).
– Garantie de dix (10) ans - Si une plainte concernant les défauts susmentionnés est adressée à Miele à
partir de la sixième (6e) année et jusqu'au dernier jour de la dixième (10e) année suivant la date d'achat
de l'appareil, la garantie couvrira le remplacement ou la réparation de tous les éléments du système
scellé de réfrigération présentant un défaut matériel ou un défaut de fabrication couvert par la garantie,
excepté les frais de main-d'œuvre. Si le client en fait la demande, Miele se chargera de la réparation ou du
remplacement des pièces, mais aux frais du client.
b) Appareils électroménagers aux fins d’utilisation commerciale :
– Six (6) mois, pour pièces et main-d’œuvre.
c) Aspirateurs destinés à une utilisation domestique, non commerciale dans des conditions normales :
– Un (1) an, pour les aspirateurs verticaules aspirateur-balais sans fil et les aspirateurs-traîneaux pièces et
main-d’œuvre.
– Deux (2) ans, pour le moteur des aspirateurs verticaux S170 - S189 pièces et main-d’œuvre.
– Deux (2) ans, pour la batterie Varta des aspirateurs-balais sans fil pièces et main-d'oeuvre.
– Sept (7) ans, pour le moteur VortexTM des aspirateurs-chariots, aspirateurs verticaux et aspirateurs-balais
sans fil, excepté pour les modèles d’aspirateurs verticaux S170-S189 dont le moteur est garanti deux (2)
ans pièces et main-d’œuvre.
d) Aspirateurs aux fins d’utilisation commerciale :
– Six (6) mois, pour les produits à utilisation commerciale. Pièce et main-d’œuvre.
– Un (1) an, pour le moteur des aspirateurs verticaux et des aspirateurs-traîneaux. Pièces et main-d’œuvre.
e) Appareils commerciaux.
– Un (1) an, pièces et main d’œuvre dans la zone de service direct Miele.
– Un (1) an, pièces uniquement dehors la zone de service direct Miele.
Contactez Miele Professional pour déterminer si vous êtes dans la zone de service direct Miele.
2. Date d’entrée en vigueur
La garantie entre en vigueur à la date de l'achat. En cas de remplacement par Miele d'un produit couvert par une
garantie, la période de garantie initiale n'est pas prolongée; sa date d'entrée en vigueur correspond à la date de
l'achat initial.
3. Conditions préalables liées à la garantie
3.1 Miele assume la responsabilité en vertu de la garantie à la condition que les conditions suivantes aient été
respectées :
a) vous êtes l'acheteur initial et votre produit ne provient pas d'une revente;
b) le produit a été acheté auprès de Miele ou auprès d'un détaillant Miele autorisé au Canada;
c) le cas échéant, le produit a été installé par une personne compétente, autorisée par Miele, conformément
aux instructions d'installation en vigueur;
d) le produit se trouve au Canada.
3.2 Les réclamations en vertu de la garantie seront honorées uniquement si la non-conformité aux dispositions
de la garantie est signalée par écrit et si le produit est retourné à Miele ou à un détaillant Miele autorisé
accompagné d'une preuve de la date d'achat, pendant la période prévue à l'article 1 ci-dessus.
98

fr - Garantie restreinte – Aspirateurs Canada
4. Étendue de la garantie
En cas de matériaux défectueux ou de défaut de fabrication pendant la période prévue à l'article 1 ci-dessus, Miele
réparera ou, à son choix, remplacera dans un délai raisonnable le produit ou toute pièce ou tout accessoire Miele
dont la fabrication ou les matériaux sont défectueux. Les produits ou les pièces défectueux deviennent la propriété de
Miele lorsqu'ils sont remplacés.
5. Exclusions de la garantie
La garantie ne couvre pas les produits, y compris les pièces et les accessoires de ces produits, qui :
a) n'ont pas été installés conformément aux instructions d'installation de Miele;
b) ont été endommagés par négligence, à la suite d'un accident ou d'une utilisation mauvaise, inappropriée ou
anormale, ou encore en raison de l'entretien ou du transport inapproprié ou anormal;
c) contiennent des accessoires ou des pièces de rechange non fabriqués par Miele, y compris les filtres, les
sacs à poussière et tout autre produit non fabriqué par Miele;
d) ont été réparés, entretenus ou modifiés par une personne autre qu'une personne du centre de services ou un
technicien autorisé par Miele.
6. Usure normale
L'usure normale ne constitue pas un défaut de fabrication ni un défaut de matériaux.
7. Limitation de responsabilité
7.1 À moins d'acheter une garantie prolongée auprès de Miele avant l'échéance de la présente garantie, celle-ci
est la seule garantie que vous offre Miele. Miele se désiste de toute autre garantie maximale permise par la
loi, expresse ou implicite, y compris toute garantie de qualité marchande ou d'usage à une fin particulière, à
l'exception de la présente garantie.
7.2 Les recours décrits dans le présent document constituent vos seuls recours en vertu de la présente garantie. À
moins d'une autre mention, la responsabilité de Miele pour les dommages réels, quelle que soit leur nature, est
limitée au montant que vous avez payé pour le produit. Miele se dégage de toute responsabilité, de tout dommage
indirect ou de tout autre dommage, qu'il soit attribuable à la violation du contrat, à la responsabilité délictuelle (y
compris la négligence), à la responsabilité du fait du produit ou à toute autre théorie juridique. En aucun cas les deux
parties ne seront tenues responsables de toute perte de bénéfices ou d'économies, de dommage consécutif ou de
tout autre dommage financier.
8. Lois provinciales particulières
La présente garantie accorde à l'acheteur des droits légaux particuliers. L'acheteur peut également exercer d'autres
droits qui peuvent varier d'une province à l'autre au Canada. Certaines provinces interdisent la restriction ou l'exclusion
des garanties implicites. Par conséquent, il est possible que certaines restrictions et exclusions ne s'appliquent pas.
9. Service à la clientèle
9.1 Pour faire exécuter des travaux d'entretien couverts en vertu de la présente garantie ou pour obtenir de plus
amples renseignements, veuillez communiquer avec Miele à l'adresse ou aux numéros suivants :
Miele Limited, No sans frais : 1 800 565-6435
161, Four Valley Drive Adresse électronique : customercare@miele.ca
Vaughan (Ontario)
Canada L4K 4V8
9.2 Si des travaux d'entretien sont nécessaires, l'appareil devra peut-être être déplacé par une personne
autorisée par Miele et emporté à un centre de services Miele autorisé. Si vous demandez un entretien et que
vous habitez une région éloignée, tel qu'il a été déterminé par Miele, à sa seule discrétion, à l'occasion, vous
devrez, selon le choix de Miele, assumer certains frais :
a) soit les frais de déplacement qu'engage Miele pour se présenter à votre lieu de résidence;
b) soit les frais de déplacement et d'envoi de l'appareil, de votre lieu de résidence au centre de services
Miele autorisé le plus près.
Miele Limitée
Siège social au Canada et Centre Miele
161 Four Valley Drive
Vaughan, ON L4K 4V8
Canada
www.miele.ca
customercare@miele.ca
professional@miele.ca (questions commerciales)
Service à la clientèle
Téléphone : (800) 565-6435
customercare@miele.ca (questions générales et Service technique)
99

 Loading...