


S 500 Series
Miele S 500 Series, S 600 Series, S 516, S 518, S 524 Technical Information
...
TECHNICAL INFORMATION
S 500 and S 600 Canister Vacuums
© 2011 Miele USA

S 500 & S 600 Canister Vacuums
Technical Information
Table of Contents
A Warning and Safety Instructions ........................................................................ 6
1 General Information .............................................................................................. 6
2 Cleaning and Care ................................................................................................ 6
2.1 Vacuums and Accessories ..................................................................................... 6
2.2 Dust Compartment ................................................................................................. 6
B Modification History ............................................................................................ 7
C Technical Data ..................................................................................................... 7
D Layout of Electrical Components ..................................................................... 11
1 S 51x Models ...................................................................................................... 11
2 S 52x and S 53x Models ..................................................................................... 12
3 S 54x and S 55x Models ..................................................................................... 13
4 S 62x Models ...................................................................................................... 14
5 S 65x Models ...................................................................................................... 15
6 Accessories ........................................................................................................ 15
6.1 Accessory Holder ................................................................................................. 16
010 Casing Bottom ................................................................................................... 17
2 Function .............................................................................................................. 18
2.1 Dustbags .............................................................................................................. 18
2.2 Filters .................................................................................................................... 18
4 Service ................................................................................................................ 19
4.1 Storage Slot Removal .......................................................................................... 19
4.2 Bumper Strip Removal ......................................................................................... 19
4.3 Seal and Sealing Ring Removal .......................................................................... 19
4.4 Caster Removal ................................................................................................... 20
4.5 Bag Holder Removal ............................................................................................ 21
4.6 Changing the Bag ................................................................................................ 22
4.7 Replacing the Super Air Clean Filter .................................................................... 22
4.8 Replacing the Active Air Clean or Active HEPA Filter ......................................... 22
4.9 Replacing One Type of Filter with Another .......................................................... 23
4.10 Changing the Dust Compartment (Motor Protection) Filter ................................. 23
4.11 Vacuum Pressure Monitor Removal .................................................................... 24
020 Casing Top ......................................................................................................... 25
3 Fault Repair ........................................................................................................ 26
3.1 Bag Change Indicator Reacts Too Late ............................................................... 26
3.2 Bag Change Indicator Reacts Too Early .............................................................. 26
3.3 Accessory Compartment Lid Difficult to Close ..................................................... 27
3.4 Accessory Compartment Lid Difficult to Open ..................................................... 27
3.5 Accessory Compartment Lid Rocks Back and Forth ........................................... 28
4 Service ................................................................................................................ 28
4.1 Accessory Compartment Lid Removal ................................................................. 28
4.2 Casing Top Removal ............................................................................................ 29
4.3 Casing Top Installation ......................................................................................... 30
4.4 Casing Top Replacement ..................................................................................... 30
4.5 Cover Frame Removal ......................................................................................... 31
4.6 Bag Change Indicator Removal ........................................................................... 31
4.7 Slide Sleeve and Dust Channel Removal ............................................................ 32
4.8 Slide Sleeve and Dust Channel Installation ......................................................... 33
4.9 Slide Shutter Replacement .................................................................................. 35
4.10 Casing Top Catch Removal (S 500 Models) ........................................................ 35
2

500 & S 600 Canister Vacuums
Technical Information
4.11
Casing Top Catch Removal (S 600 Models) ........................................................ 35
4.12 Casing Top Catch Installation (S 500 Models) ..................................................... 36
4.13 Casing Top Catch Installation (S 600 Models) ..................................................... 36
4.14 Built-In Socket Removal ....................................................................................... 37
4.15 Built-In Socket Installation .................................................................................... 40
030 Operating Unit .................................................................................................... 42
3 Fault Repair ........................................................................................................ 43
3.1 Vacuum Cleaner Cannot Be Switched On ........................................................... 43
3.2 Vacuum Cleaner Shuts Itself Off or Overheating Indicator LED Lights Up ......... 43
3.3 Fuse Trips ............................................................................................................ 44
3.4 Cord Is Not Fully Rewound .................................................................................. 44
3.5 Autoreverse Slide Blocked ................................................................................... 44
3.6 Electronics Troubleshooting ................................................................................. 45
4 Service ................................................................................................................ 49
4.1 Cap Removal ....................................................................................................... 49
4.2 Cap Installation .................................................................................................... 49
4.3 Cord Reel Removal .............................................................................................. 50
4.4 Cord Removal ...................................................................................................... 50
4.5 On/Off Switch Removal ........................................................................................ 52
4.6 Foot Switch Removal ........................................................................................... 52
4.7 Plug Housing Removal ......................................................................................... 53
4.8 Potentiometer (and Indicator Light) Removal (S 51x) .......................................... 54
4.9 Potentiometer and Indicator Light Removal (S 52x, S 62x) ................................. 55
4.10 Gear Rack Removal and Installation (S 52x, S 62x) ........................................... 56
4.11 Park System Switch Removal .............................................................................. 57
4.12 Cap Electronic Replacement ................................................................................ 57
040 Motor ................................................................................................................... 58
4 Service ................................................................................................................ 59
4.1 Motor Removal ..................................................................................................... 59
4.2 Damping Plate Removal ...................................................................................... 59
4.3 Carbon Brush Removal ........................................................................................ 59
4.4 Motor Electronic Replacement ............................................................................. 60
050 Suction Hose ...................................................................................................... 61
3 Fault Repair ........................................................................................................ 62
3.1 Suction Power Is Too Low ................................................................................... 62
3.2 Elbow Not Seated Correctly in the Suction Opening ........................................... 62
3.3 Elbow Blocked ...................................................................................................... 62
055 Electro Suction Hose ......................................................................................... 63
3 Fault Repair ........................................................................................................ 64
3.1 Suction Power Is Too Low ................................................................................... 64
3.2 Elbow Not Seated Correctly in the Suction Opening ........................................... 64
3.3 Elbow Blocked ...................................................................................................... 64
3.4 Appliance Always Operates at Full Power ........................................................... 64
3.5 Appliance Cannot Be Switched On ...................................................................... 65
3.6 Power Level Cannot Be Adjusted ........................................................................ 65
3.7 Electrobrush Cannot Be Selected ........................................................................ 65
4 Service ................................................................................................................ 65
4.1 Replacing the Suction Hose with Electronic ........................................................ 65
3

S 500 & S 600 Canister Vacuums
Technical Information
List of Figures
Figure D-1: S 51x Component Layout .............................................................................. 11
Figure D-2: S 52x and S 53x Component Layout ............................................................. 12
Figure D-3: S 54x and S 55x Component Layout ............................................................. 13
Figure D-4: S 62x Component Layout .............................................................................. 14
Figure D-5: S 65x Component Layout .............................................................................. 15
Figure D-6: Accessories ................................................................................................... 15
Figure D-7: Accessory Holder .......................................................................................... 16
Figure 010-1: Overheat Indicator ...................................................................................... 18
Figure 010-2: Filter Types ................................................................................................ 18
Figure 010-3: Storage Slot Removal ................................................................................ 19
Figure 010-4: Seal and Sealing Ring Removal ................................................................ 20
Figure 010-5: Levering Out the Support Roller ................................................................. 20
Figure 010-6: Bag Holder Removal .................................................................................. 21
Figure 010-7: Spring Position ........................................................................................... 21
Figure 010-8: Changing the Bag ...................................................................................... 22
Figure 010-9: Replacing the Super Air Clean Filter .......................................................... 22
Figure 010-10: Replacing the Active Air Clean or Active HEPA Filter .............................. 23
Figure 010-11: Removing/Inserting Grill ........................................................................... 23
Figure 010-12: Changing the Dust Compartment Filter .................................................... 24
Figure 010-13: Vacuum Pressure Monitor Removal ........................................................ 24
Figure 020-1: Turning the Adjustment Screw Clockwise .................................................. 26
Figure 020-2: Turning the Adjustment Screw Counterclockwise ...................................... 27
Figure 020-3: Shortening the Lid Catch Lugs ................................................................... 28
Figure 020-4: Accessory Compartment Lid Removal ....................................................... 29
Figure 020-5: Casing Top Removal .................................................................................. 29
Figure 020-6: Casing Top Installation ............................................................................... 30
Figure 020-7: Cover Frame Screws ................................................................................. 31
Figure 020-8: Dust Channel Holder Screws ..................................................................... 32
Figure 020-9: Connection Piece Removal ........................................................................ 33
Figure 020-10: Slide Sleeve and Dust Channel Pre-Assembly ........................................ 34
Figure 020-11: Slide Sleeve and Dust Channel Installation ............................................. 34
Figure 020-12: Bending the Slide Shutter ........................................................................ 35
Figure 020-13: Installing the Slide Shutter ....................................................................... 35
Figure 020-14: Releasing the Catch ................................................................................. 36
Figure 020-15: Spring Position (S 500 Models) ................................................................ 36
Figure 020-16: Spring Position (S 600 Models) ................................................................ 37
Figure 020-17: Cover Strip Removal ................................................................................ 37
Figure 020-18: Removing the Cover Strip from Its Guide ................................................ 38
Figure 020-19: Hinge Removal ......................................................................................... 38
Figure 020-20: Cord Guide with Cover Removal .............................................................. 39
Figure 020-21: Hinge Removal through Casing Top Opening ......................................... 39
Figure 020-22: Built-In Socket Installation ........................................................................ 40
Figure 020-23: Slide Sleeve Installation ........................................................................... 40
Figure 020-24: Install the Cover on the Cord Guide ......................................................... 41
Figure 020-25: Laying the Wires in the Cord Guide ......................................................... 41
Figure 030-1: Electronic Connections .............................................................................. 46
Figure 030-2: Direct-Connect Hose Connection ............................................................... 47
4

500 & S 600 Canister Vacuums
Technical Information
Figure 030-3: Direct-Connect Hinge Connections ............................................................ 47
Figure 030-4: Electronic (Side View) ................................................................................ 48
Figure 030-5: Electronic (Top View) ................................................................................. 48
Figure 030-6: Cap Removal ............................................................................................. 49
Figure 030-7: Cap Installation .......................................................................................... 49
Figure 030-8: Cord Reel Removal .................................................................................... 50
Figure 030-9: Cord Reel, Unwound .................................................................................. 51
Figure 030-10: Cord Reel Clamped to Reel Assembly Body ........................................... 51
Figure 030-11: Screws Securing Cord Reel ..................................................................... 51
Figure 030-12: Cord Reel Tabs ........................................................................................ 52
Figure 030-13: Levering Out the Foot Switch ................................................................... 53
Figure 030-14: Plug Housing Removal ............................................................................. 53
Figure 030-15: Potentiometer & Indicator Light Removal (S 51x) .................................... 54
Figure 030-16: Plug Housing (S51x) ................................................................................ 54
Figure 030-17: Indicator Light and Bracket (S 52x, S 62x) ............................................... 55
Figure 030-18: Plug Housing (S 52x, S 62x) .................................................................... 56
Figure 030-19: Position of Gear Rack and Cog Wheel (S 52x, S 62x) ............................. 56
Figure 030-20: Gear Rack Removal (S 52x, S 62x) ......................................................... 57
Figure 030-21: Park System Switch Removal .................................................................. 57
Figure 040-1: Motor Removal ........................................................................................... 59
Figure 040-2: Carbon Brushes and Electronic ................................................................. 60
List of Tables
Table C-1: S 51x, S 52x and S 53x Data Sheet ................................................................. 8
Table C-2: S 54x, S 55x, S 62x and S 65x Data Sheet .................................................... 10
5

S 500 & S 600 Canister Vacuums
Technical Information
A Warning and Safety Instructions
1 General Information
All repairs should be performed by a trained technician in strict accordance
with national, state and local codes. Any repairs or maintenance performed
by unqualified personnel could be dangerous.
When servicing, modifying, testing or maintaining appliances, all applicable
laws, regulations and accident prevention guidelines must be observed.
All regulations of the appropriate utility supply companies and standards
relating to safety (not limited to electrical safety) are to be complied with.
Before any service work is started, the vacuum cleaner must be
disconnected from the power supply.
Even with the vacuum switched off, supply voltage may be applied to
some components.
Do not leave the vacuum unattended when it is plugged in. Turn off and
unplug the vacuum before opening the cover.
After work has been completed, a visual as well as an operational check
should always be performed.
2 Cleaning and Care
2.1 Vacuums and Accessories
The vacuum cleaner and other plastic components can be cleaned using a
damp cloth or a cleaner made especially for plastics.
Warning!
Do not use abrasive, glass or all-purpose cleaning solutions, as these can
cause considerable damage to the plastic components of the vacuum or its
accessories.
2.2 Dust Compartment
The dust compartment can be cleaned using another vacuum, if available, or a
dry cloth or brush.
Monitor the bag change indicator and inspect all filters regularly. Replace them
when necessary according to the maintenance instructions.
6

500 & S 600 Canister Vacuums
B Modification History
When? Who? What?
8/17/2011 Jessica Naples Compilation for Website
C Technical Data
Model S 514 S 516 S 518 S 524 S 528 S 538
Weight [lbs] 20.9 17.4 17.4 17.4 17.4 17.4
Radius of operation [ft] 36 36 36 36 36 36
Bag capacity (qts) 4.2 4.2 4.2 4.2 4.2 4.2
Required clearance with furniture
depth of 24”
Required clearance with furniture
depth of 40”
Non-vacuumed gap at skirting
board
Right 0.0” 0.0” 0.0” 0.0” 0.0” 0.0”
Left 0.0” 0.0” 0.0” 0.0” 0.0” 0.0”
Front 0.7” 0.7” 0.7” 0.7” 0.7” 0.7”
Operating width of floor
attachment
Suction power adjustment
Mechanical Yes Yes Yes Yes Yes Yes
Electronic Yes Yes Yes Yes Yes Yes
Automatic No No No No No No
On/off switch for Park System No No Yes Yes Yes Yes
Bag type M M F/J/M M M M
Textile bag No No No No No No
Super Air Clean filter Yes No No Yes No Yes
Active Air Clean filter No Yes Yes No Yes No
HEPA filter No No No No No No
Active HEPA filter No No No No No No
Bag change indicator Yes Yes Yes Yes Yes Yes
Electric exhaust filter change
indicator
Overheating indicator light Yes Yes Yes Yes Yes Yes
Exhaust plate / Filter grille No/Yes No/Yes No/Yes No/Yes No/Loose No/Yes
Hygienic slide shutter Yes Yes Yes Yes Yes Yes
Automatic cord rewind Yes Yes Yes Yes Yes Yes
Autoreverse function No No No No No No
Connection for electrical
attachment
Telescopic suction tube/handle Yes/No Yes/No Yes/No Yes/No Yes/No Yes/No
2-part sectioned suction tube No No No No No No
Suction tube holder Yes Yes Yes Yes Yes Yes
2.8” 2.8” 2.8” 2.8” 2.8”
2.8”
2.8” 2.8” 2.8” 2.8” 2.8”
2.8”
11.0” 11.0” 11.0” 11.0” 11.0”
11.0”
No No No No No Yes
Yes No Yes Yes
Technical Information
Yes Yes
7
Technical Information
Model S 514 S 516 S 518 S 524 S 528 S 538
Electrical/Mechanical brush
attachments
Suction hose Yes Yes Yes Yes Yes Yes
Universal floor attachment Yes Yes Yes Yes Yes Yes
Upholstery nozzle/ Dusting brush Yes/Yes Yes/Yes Yes/Yes Yes/Yes Yes/Yes Yes/Yes
Crevice nozzle/ Extended crevice
nozzle
Accessory storage on/in unit No/Yes No/Yes No/Yes No/Yes No/Yes No/Yes
Power rating 1100W 1100W 1100W 1100W 1100W 1100W
Voltage 120V 120V 120V 120V 120V 120V
Fuse rating 15A 15A 15A 15A 15A 15A
Complies with German safety
regulations
Interference suppression Yes Yes Yes Yes Yes Yes
Operating instructions Yes Yes Yes Yes Yes Yes
Optional extras available at additional charge
Electrobrush SEB 216 with clip
cord
Electrobrush SEB 217with direct
contact
Hand turbobrush STB
101 TURBO MINI
Turbobrush STB 205 Yes Yes Yes Yes Yes Yes
Floor brush SBB 235 Yes Yes Yes Yes Yes Yes
Floor brush Parquet/Parquet-2 Yes Yes Yes No No No
Multi-purpose brush No No No Yes Yes Yes
MicroSet Yes Yes Yes
CarClean Set Plus Yes Yes Yes
Universal floor brush/ Natural-
bristle dusting brush
Mattress brush/ Radiator brush Yes/Yes Yes/Yes Yes/Yes Yes/Yes Yes/Yes Yes/Yes
Upholstery nozzle/ Dusting brush
Crevice nozzle (300mm)/Extended
crevice nozzle
Textile filter bag
Super Air Clean filter Supplied Supplied Yes Supplied Yes Supplied
Active Air Clean filter Yes Yes Supplied Yes Supplied Yes
HEPA filter No No No No No No
Active HEPA filter Yes Yes Yes Yes Yes Yes
Suction hose extension No No Yes No No No
Table C-1: S 51x, S 52x and S 53x Data Sheet
S 500 & S 600 Canister Vacuums
Yes/No No/No No/No No/No No/No No/No
Yes/No Yes/No Yes/No Yes/No Yes/No
Yes/No
Yes Yes Yes Yes Yes
Yes
Supplied No No Yes
No No No No No No
Yes Yes Yes Yes
Yes/Yes Yes/Yes Yes/Yes Yes/Yes Yes/Yes Yes/Yes
Supplied/
Supplied
Supplied/
Yes
No No No
Supplied/
Supplied
Supplied/
Yes
Supplied/
Supplied
Yes/Yes
Yes Yes
Yes Yes
Yes
Yes Yes
Yes
Yes Yes
Supplied/
Supplied
Supplied/
Yes
No No No
Supplied/
Supplied
Supplied/
Yes
Supplied/
Supplied
Supplied/
Yes
8
500 & S 600 Canister Vacuums
Model S 544 S 548 S 558 S 624 S 658
Weight [lbs] 17.4 17.4 24.0 19.6 26.2
Radius of operation [ft] 36 36 36 43 43
Bag capacity (qts) 4.2 4.2 4.2 6.1 6.1
Required clearance with furniture
depth 24”
Required clearance with furniture
depth 40”
Non-vacuumed gap at skirting
board
Right 0.0” 0.0” 0.0” 0.0” 0.0”
Left 0.0” 0.0” 0.0” 0.0” 0.0”
Front 0.7” 0.7” 0.7” 0.7” 0.7”
Operating width of floor
attachment
Suction power adjustment
Mechanical Yes Yes No Yes No
Electronic Yes Yes On handle Yes On handle
Automatic Yes Yes No No No
On/off switch for Park System Yes Yes No Yes No
Bag type M M M N N
Textile bag No No No No No
Super Air Clean filter Yes No No Yes No
Active Air Clean filter No No No No No
HEPA filter No No No No No
Active HEPA filter No Yes Yes No Yes
Bag change indicator Yes Yes Yes Yes Yes
Electric exhaust filter change
indicator
Overheating indicator light Yes Yes Yes Yes Yes
Exhaust plate / Filter grille No/Yes No/Loose No/Loose
Hygienic slide shutter Yes Yes Yes Yes Yes
Automatic cord rewind Yes Yes Yes Yes Yes
Autoreverse function Yes Yes Yes No Yes
Connection for electrical
attachment
Telescopic suction tube/handle Yes/No Yes/No Electro-/No Yes/No Electro-/No
2-part sectioned suction tube No No No No No
Suction tube holder Yes Yes Yes Yes Yes
Electrical/Mechanical brush
attachments
Suction hose Yes Yes Yes Yes Yes
Universal floor attachment Yes Yes Yes Yes Yes
Upholstery nozzle/ Dusting brush Yes/Yes Yes/Yes Yes/Yes Yes/Yes Yes/Yes
Technical Information
2.8” 2.8” 2.8” 2.8”
2.8”
2.8” 2.8” 2.8” 2.8”
2.8”
11.0” 11.0” 11.0” 11.0”
11.0”
Yes Yes No Yes
Yes
Loose/
Yes
Yes Yes Yes Yes
Yes
No/No No/No Yes/No No/No Yes/No
Loose/
Loose
9
Technical Information
Model S 544 S 548 S 558 S 624 S 658
Crevice nozzle/ Extended crevice
nozzle
Accessory storage on/in unit No/Yes No/Yes No/Yes No/Yes No/Yes
Power rating 1100W 1100W 1100W 1100W 1100W
Voltage 120V 120V 120V 120V 120V
Fuse rating 15A 15A 15A 15A 15A
Complies with German safety
regulations
Interference suppression Yes Yes Yes Yes Yes
Operating instructions Yes Yes Yes Yes Yes
Optional extras available at additional charge
Electrobrush SEB 216 with clip
cord
Electrobrush SEB 217 with direct
contact
Hand turbobrush STB
101 TURBO MINI
Turbobrush STB 205 Yes Yes Yes Yes Yes
Floor brush SBB 235 Yes Yes Yes Yes1 Yes
Multi-purpose brush Yes Yes Yes Yes Supplied
Upholstery nozzle/ Dusting brush
Crevice nozzle/ Extended crevice
nozzle
Textile filter bag No No No No No
Suction hose extension No No No No Yes
Super Air Clean filter Yes Yes Yes Supplied Yes
Active Air Clean filter Yes Yes Yes Yes No
HEPA filter No No No No Supplied
Active HEPA filter No Supplied Supplied Yes No
Table C-2: S 54x, S 55x, S 62x and S 65x Data Sheet
1
Supplied for Parquet models.
S 500 & S 600 Canister Vacuums
Yes/No Yes/No Yes/No
Yes Yes Yes Yes
Yes
Yes No Yes Supplied
Yes
No No Supplied No Yes
Yes Yes Yes Yes
Yes
Supplied/
Supplied
Supplied/
Yes
Supplied/
Supplied
Supplied/
Yes
Yes/Yes Yes/Yes
Supplied/
Supplied
Supplied/Yes
Supplied/
Supplied
Supplied/
Supplied
Supplied/
Supplied
No
10
500 & S 600 Canister Vacuums
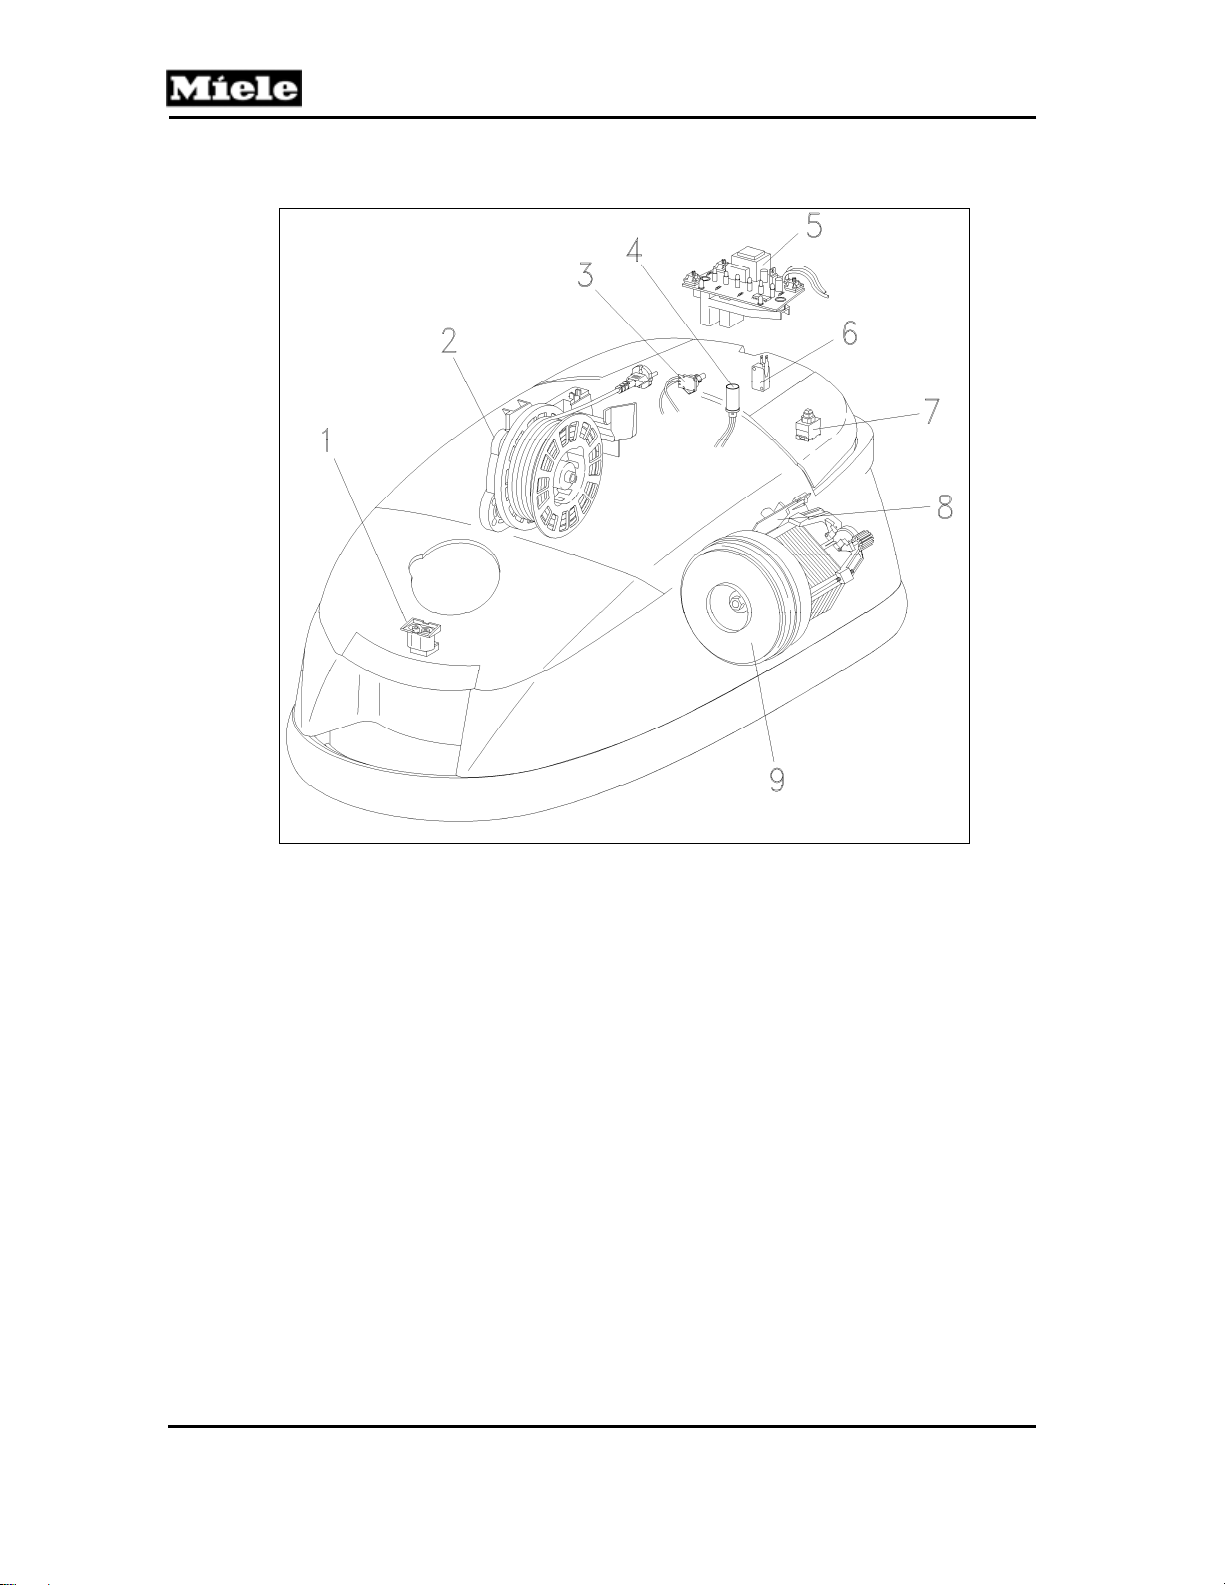
D Layout of Electrical Components
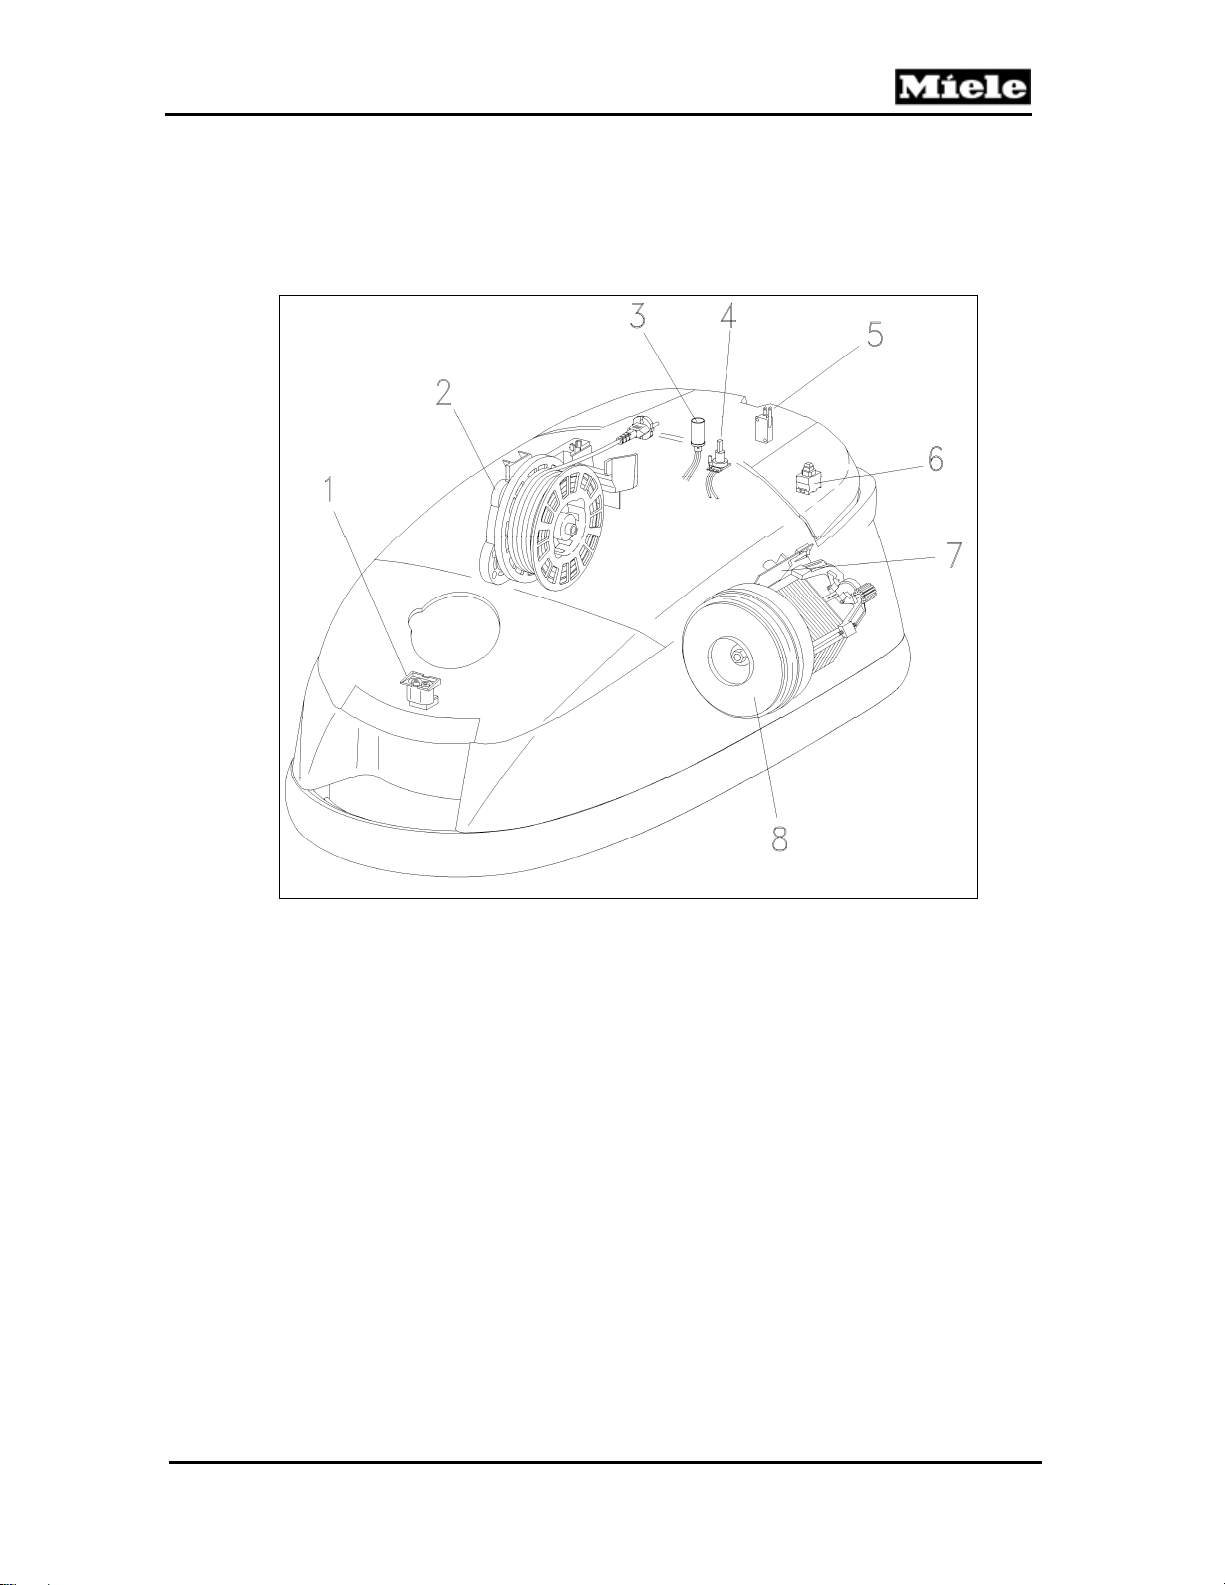
1 S 51x Models
Technical Information
Figure D-1: S 51x Component Layout
1
Accessory socket X1/7
2
Cord reel W16
3
Fault indicator H1/3
4
Motor speed control potentiometer R32/1
5
Park System switch Q2 (not US models)
6
Main switch Q1
7
Motor electronic N2
8
Motor M2
11
Technical Information
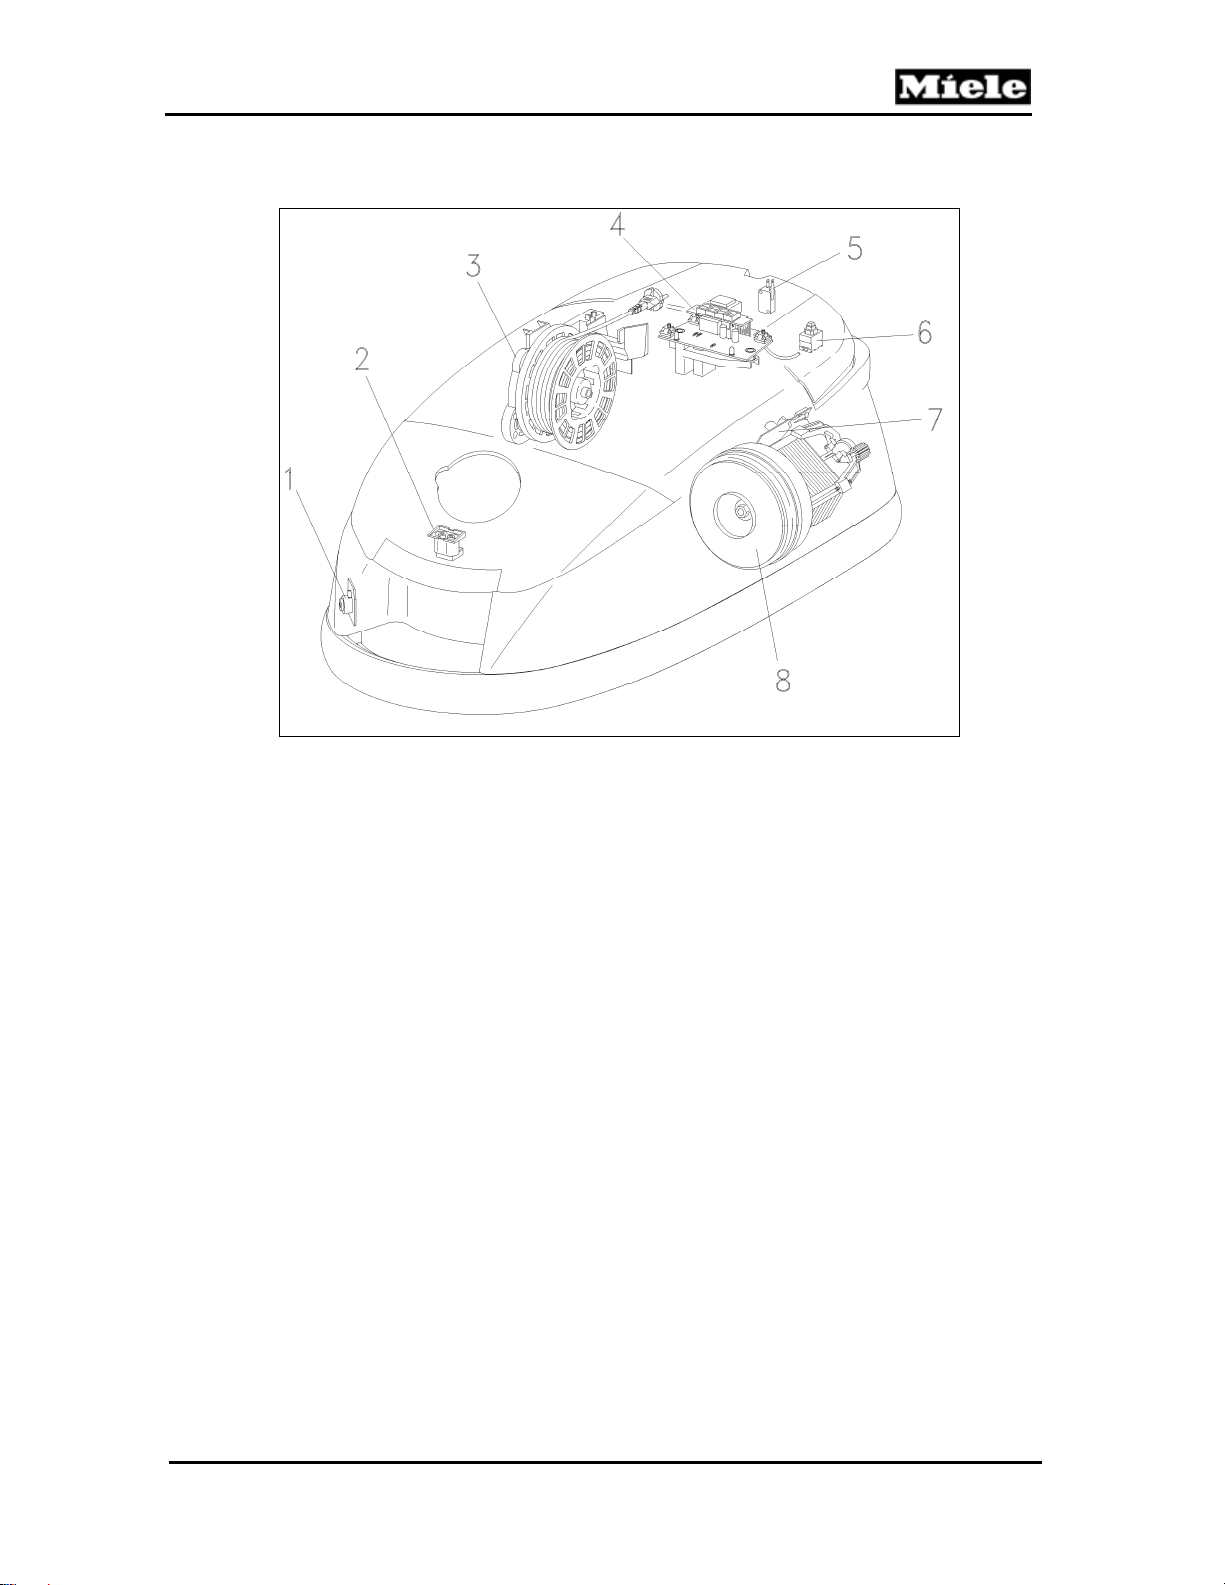
2 S 52x and S 53x Models
S 500 & S 600 Canister Vacuums
Figure D-2: S 52x and S 53x Component Layout
1
Accessory socket X1/7
2
Cord reel W16
3
Motor speed control potentiometer R32/1
(S 52x only)
4
Fault indicator H1/3
5
Electronic control 1N1 (not US models)
6
Park System switch Q2
7
Main switch Q1
8
Motor electronic 1N2
9
Motor M2
12
500 & S 600 Canister Vacuums
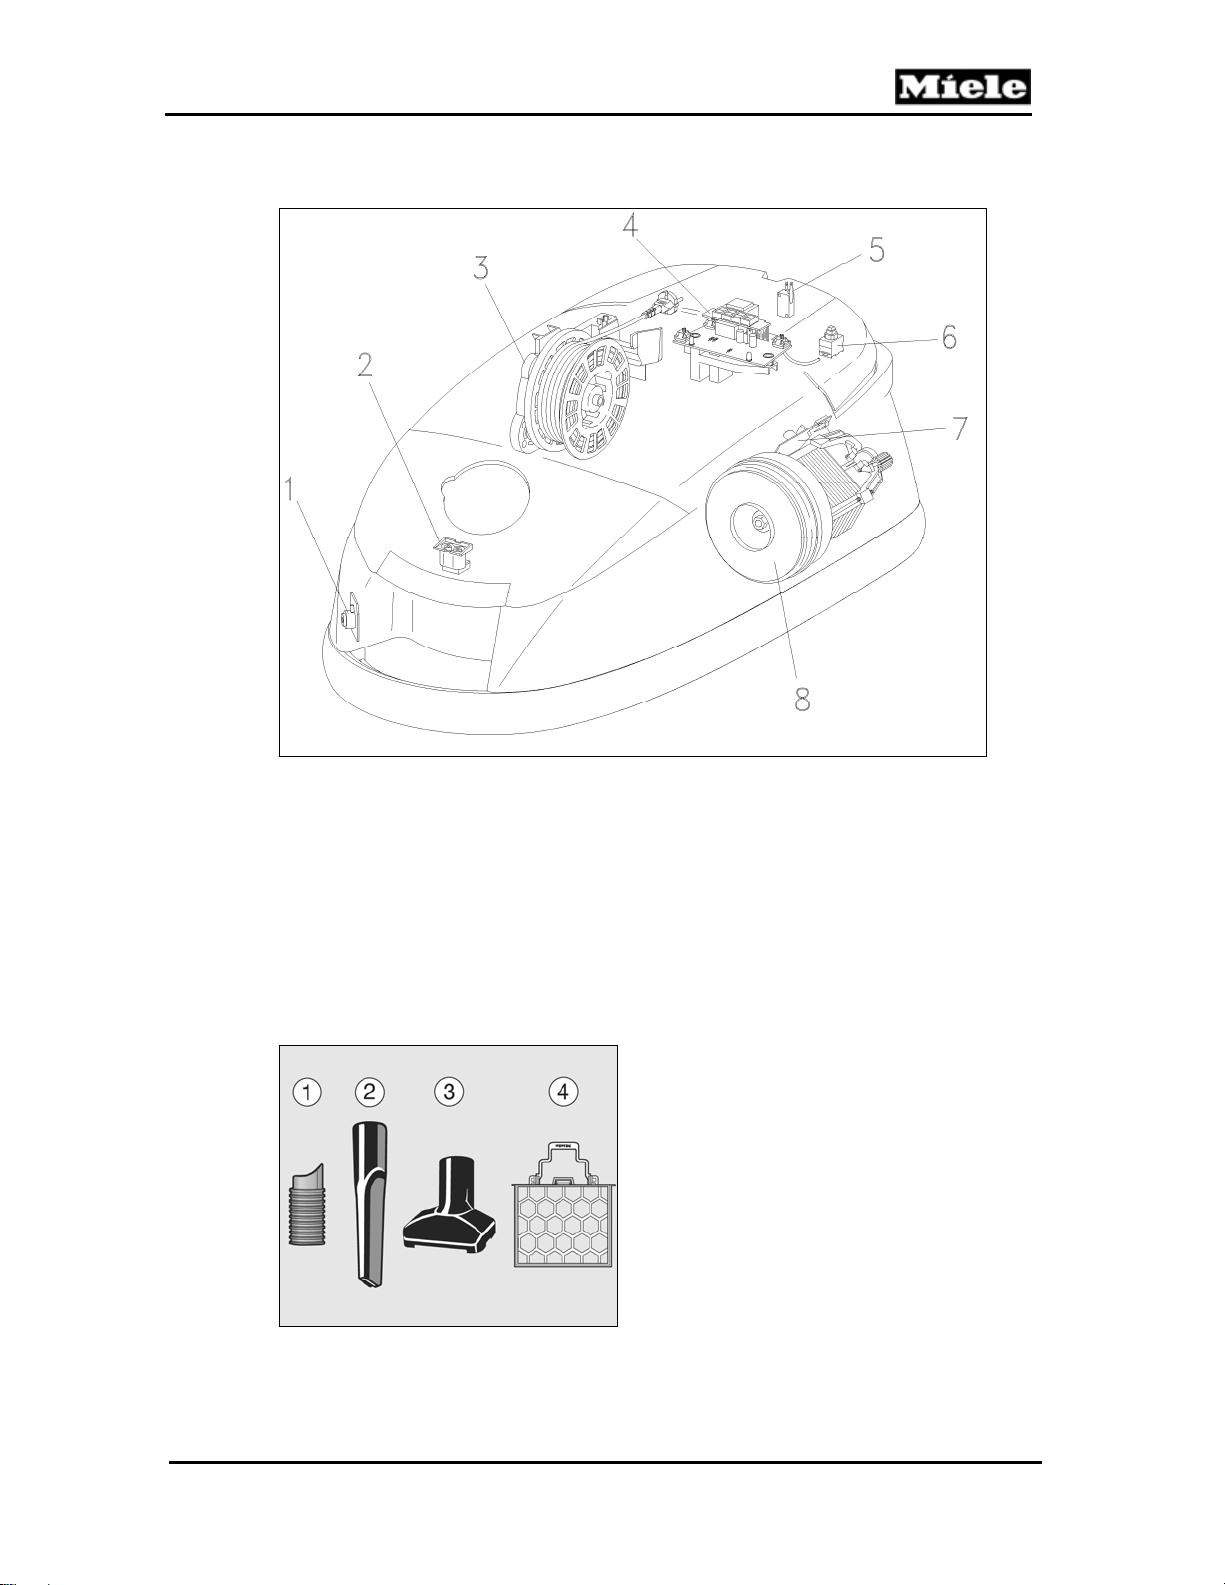
3 S 54x and S 55x Models
Technical Information
Figure D-3: S 54x and S 55x Component Layout
1
Vacuum pressure monitor B9/2
(S 544, S 548 only)
2
Accessory socket X1/7
3
Cord reel W16
4
Electronic control 1N1
5
Park System switch Q2
6
Main switch Q1
7
Motor electronic 1N2
8
Motor M2
13

Technical Information
4 S 62x Models
S 500 & S 600 Canister Vacuums
Figure D-4: S 62x Component Layout
1
Accessory socket X1/7
2
Cord reel W16
3
Motor speed control potentiometer R32/1
4
Fault indicator H1/3
5
Electronic control 1N1 (not US models)
6
Park System switch Q2
7
Main switch Q1
8
Electronic power control 1N2
9
Motor M2
14
500 & S 600 Canister Vacuums
5 S 65x Models
Technical Information
Figure D-5: S 65x Component Layout
1
Vacuum pressure monitor B9/2
(not US models)
2
Accessory socket X1/7
3
Cord reel W16
4
Electronic control 1N1
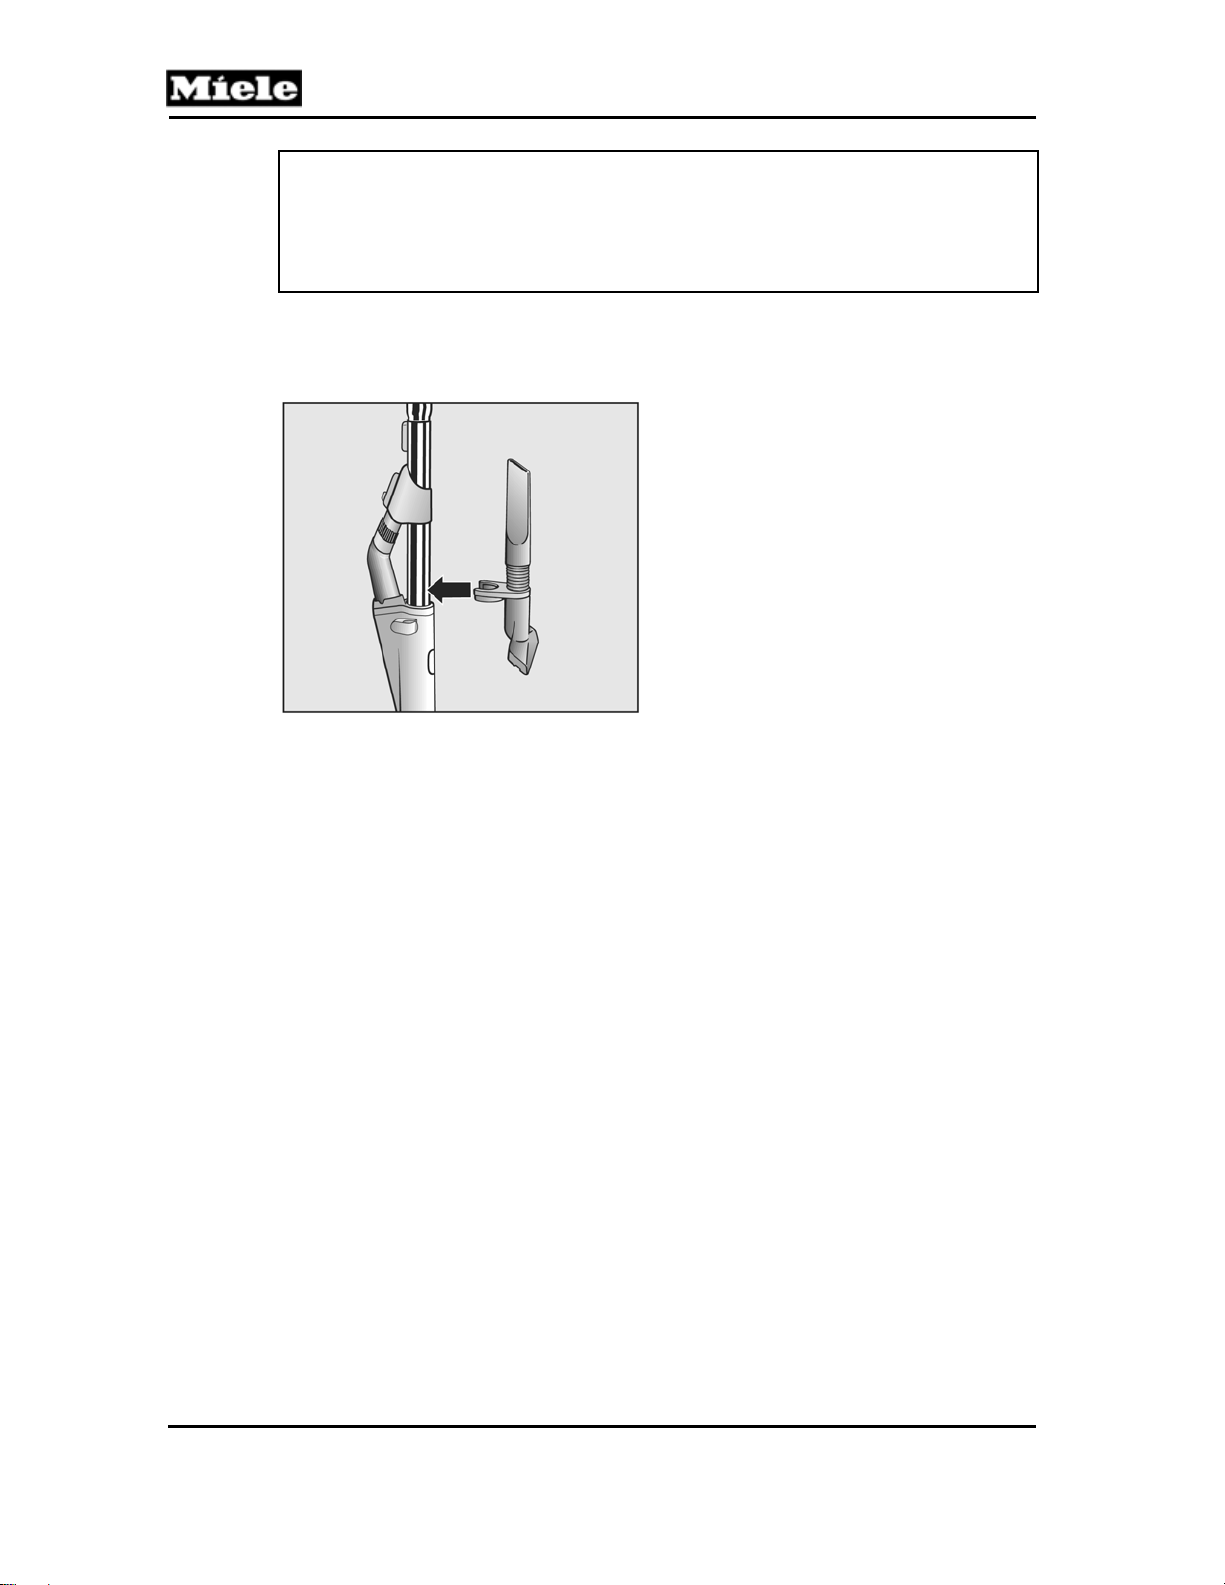
6 Accessories
The items shown in Figure D-6 are included with the vacuum cleaner.
Figure D-6: Accessories
5
Park System switch Q2
6
Main switch Q1
7
Electronic power control 1N2
8
Motor M2
1 Accessory adapter
2 Crevice nozzle
3 Upholstery tool
4 Filter frame
15
Technical Information
Note:
The filter frame is only supplied with select models fitted with an Active Air
Clean or HEPA exhaust filter as standard. This filter frame is required
should the customer wish to replace one of these filters with a Super Air
Clean filter.
6.1 Accessory Holder
The accessory holder (Figure D-7) stores the accessories on the vacuum
cleaner.
S 500 & S 600 Canister Vacuums
Figure D-7: Accessory Holder
16
500 & S 600 Canister Vacuums
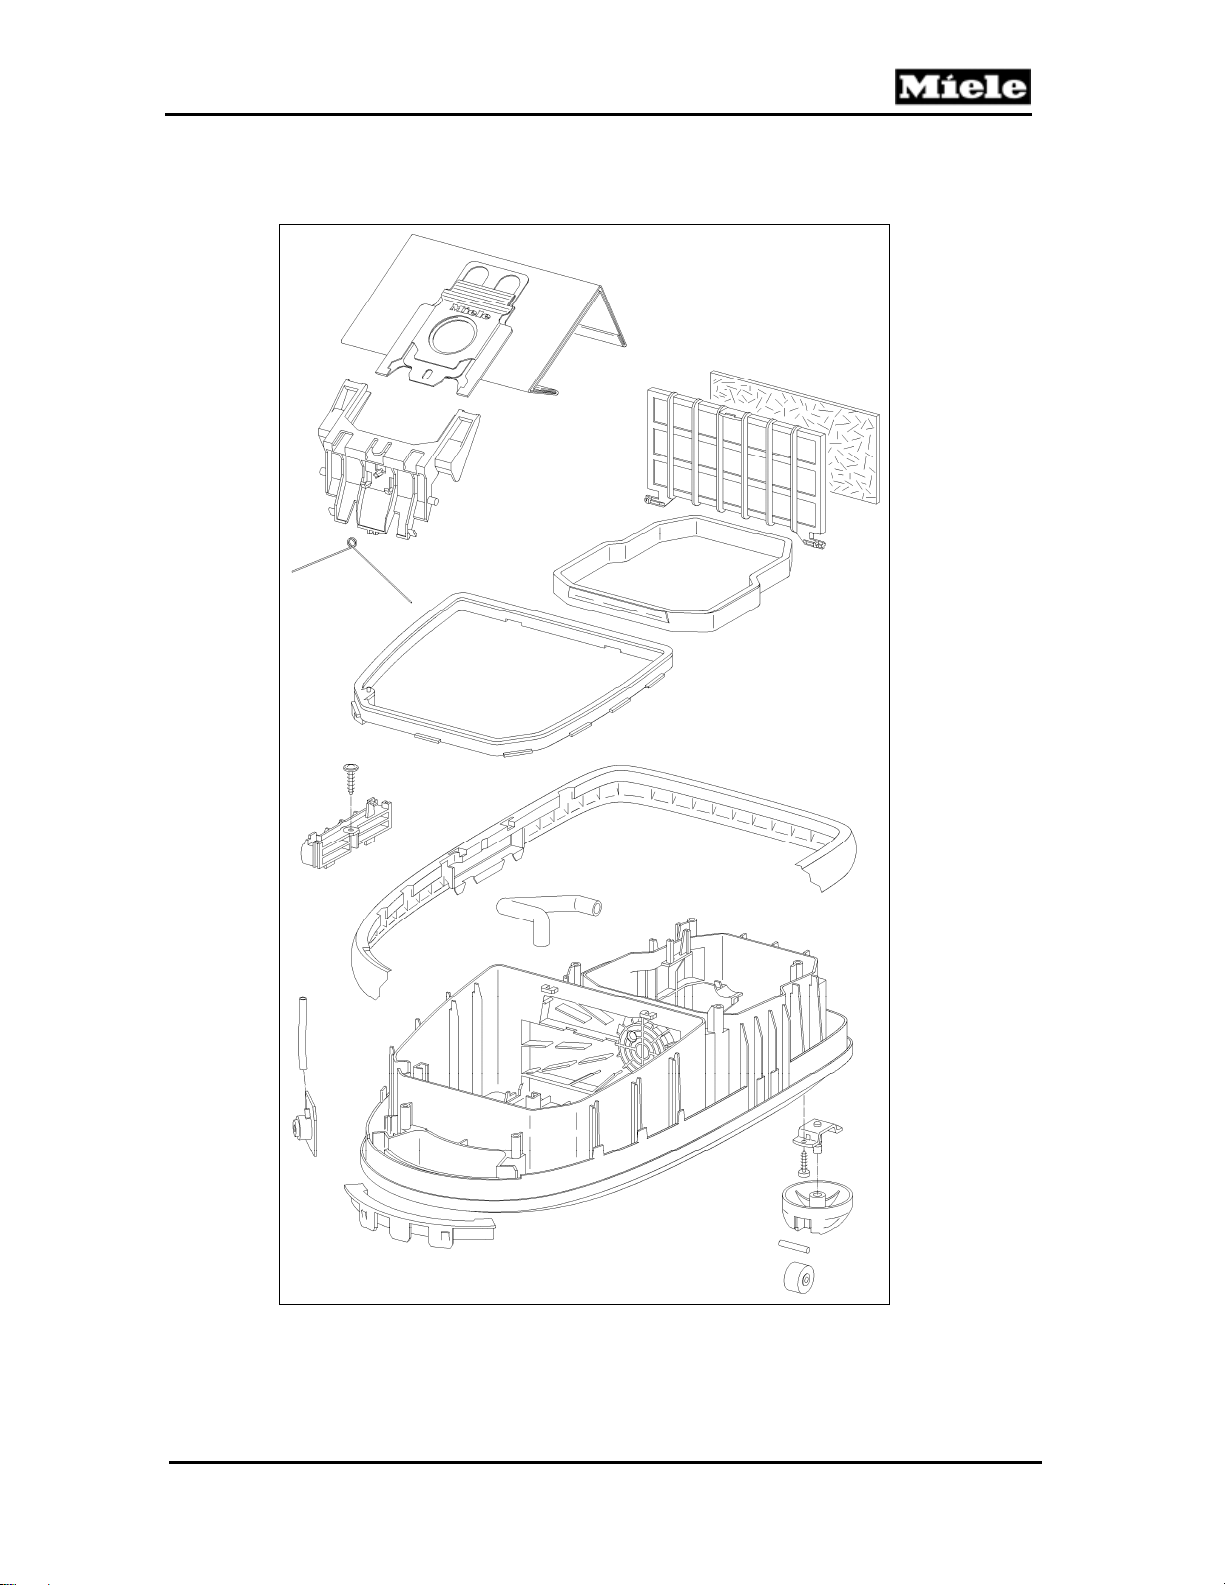
010 Casing Bottom
Technical Information
17
Technical Information
2 Function
2.1 Dustbags
A clean bag is essential to the maximum efficiency of the vacuum. A clogged
bag can cause restricted airflow resulting in poor suction or, in extreme cases,
an overheat condition can occur resulting in the vacuum shutting off. An
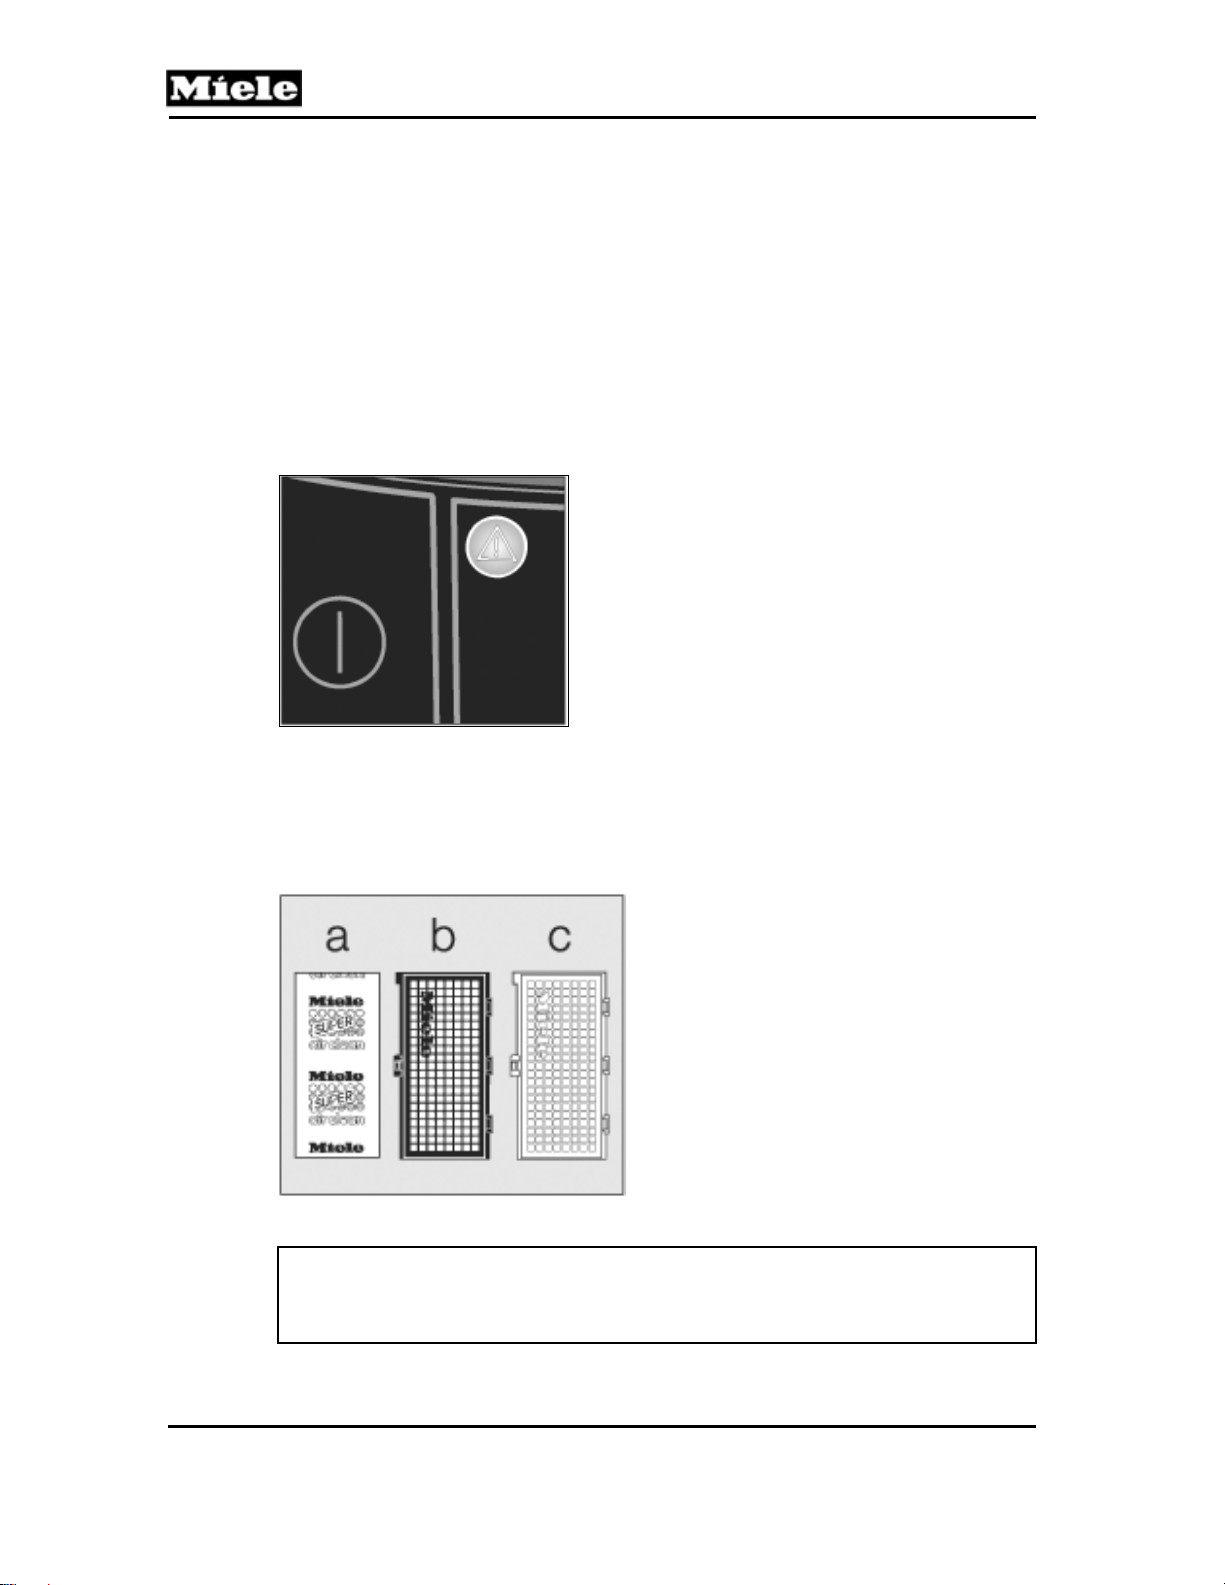
ORANGE indicator light next to the tool access button identifies a bag filled to
capacity. An overheat condition is identified by a TRIANGULAR LIGHT on the
control panel. See Figure 010-1. Changing the bag is relatively easy; the most
important thing to remember is to use the correct bag. A list of dustbags and
the models in which they are used can be found in the product line information
in the operating manual.
S 500 & S 600 Canister Vacuums
Figure 010-1: Overheat Indicator
2.2 Filters
Miele canister vacuums use several types of filters (Super Air Clean, Active Air
Clean, Active HEPA) to provide a clean, healthy environment. See Figure 010-
2. Vacuum model will dictate filter(s) type; refer to Tables C-1 and C-2.
Figure 010-2: Filter Types
Note:
Changing from one type of filter to another type is permitted. (e.g., Active Air
Clean to Active HEPA). See Section 010-4.9 for instructions.
a Super Air Clean
b Active Air Clean
c Active HEPA (High Efficiency Particulate Air)
18
500 & S 600 Canister Vacuums
4 Service
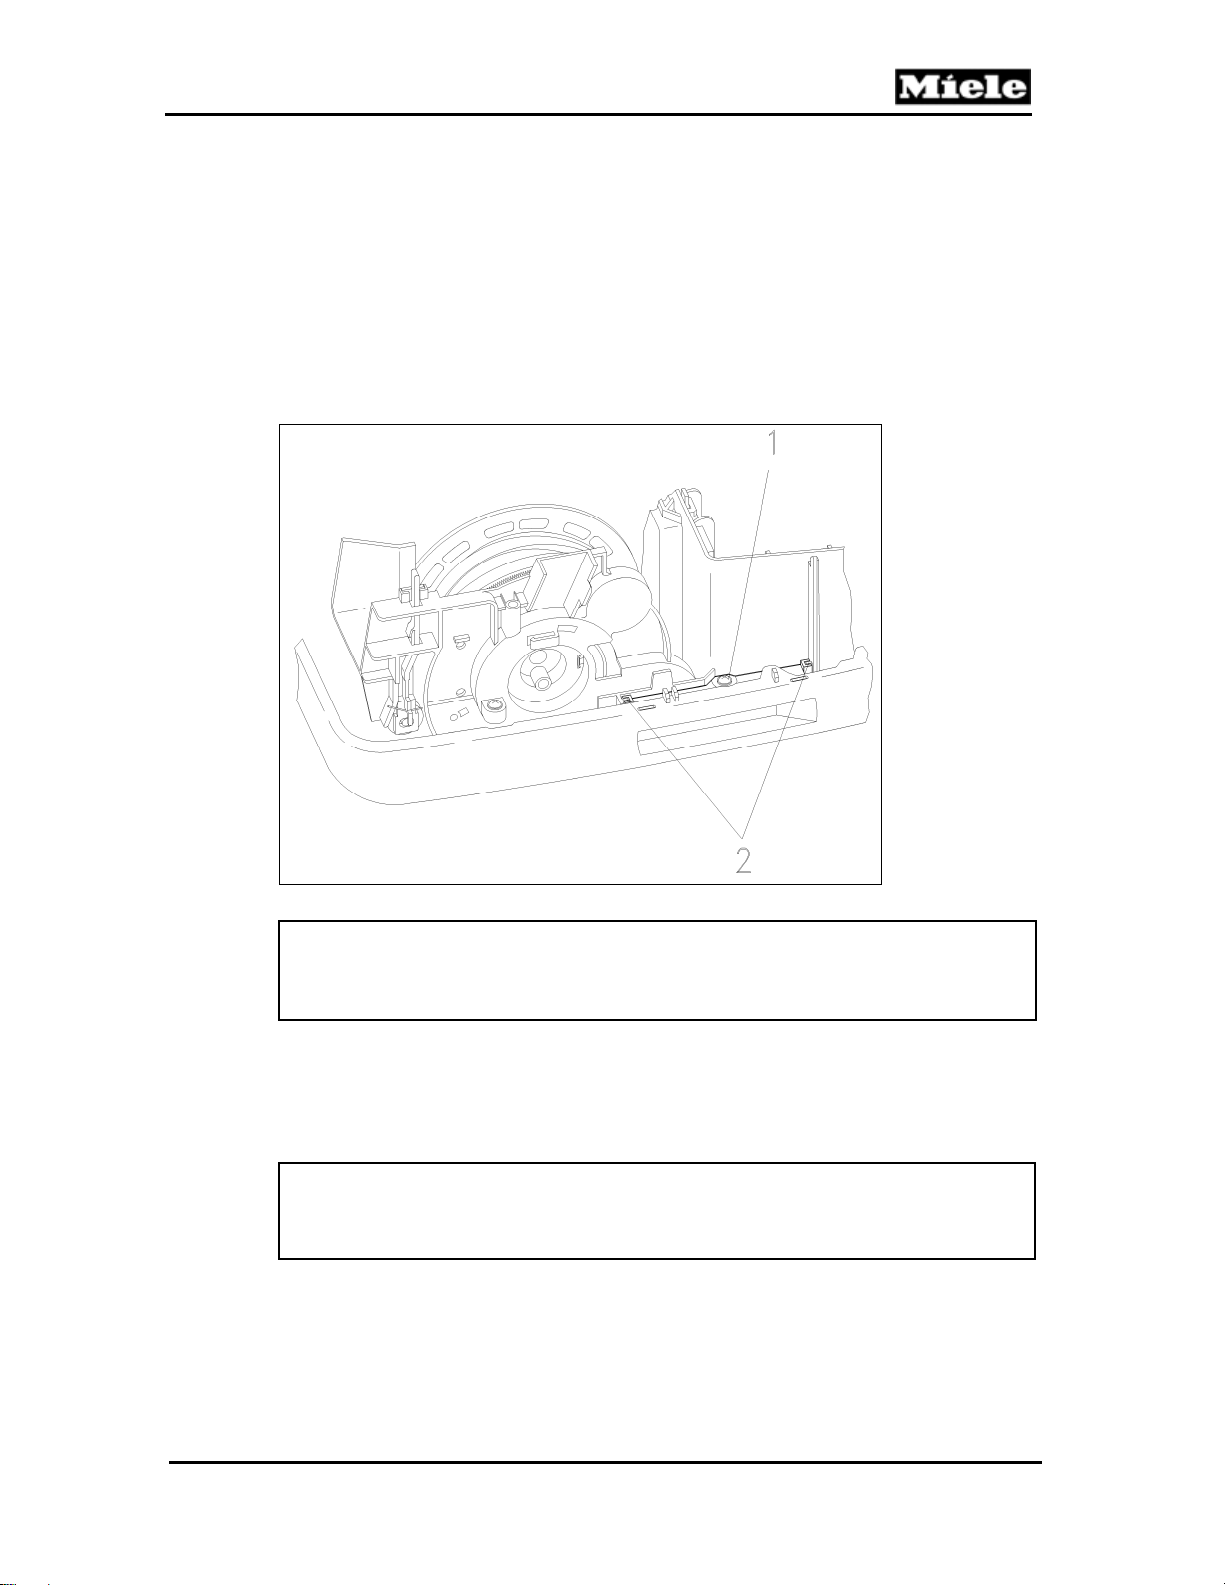
4.1 Storage Slot Removal
1. Remove the casing top. See Section 020-4.2.
2. Remove the cap. See Section 030-4.1.
3. Remove the cover frame. See Section 020-4.5.
4. Remove the retaining screw (Figure 010-3, Item 1) from the storage slot.
5. Remove the storage slot with bumper strip from its holder; see Figure 010-3,
Item 2.
6. Remove the storage slot from the bumper strip.
Technical Information
Figure 010-3: Storage Slot Removal
Note:
When re-installing, ensure that the storage slot and the bumper strip are
seated correctly.
4.2 Bumper Strip Removal
1. Remove the storage slot. See Section 010-4.1.
2. Remove the handle strip.
3. Remove the bumper strip.
Note:
When re-installing, ensure that the bumper strip (and storage slot) are
seated correctly.
4.3 Seal and Sealing Ring Removal
1. Remove the casing top. See Section 020-4.2.
2. Remove the cap. See Section 030-4.1.
3. Remove the cover frame. See Section 020-4.5.
4. Remove the motor wiring harness (Figure 010-4, Item 3) from its holder.
19
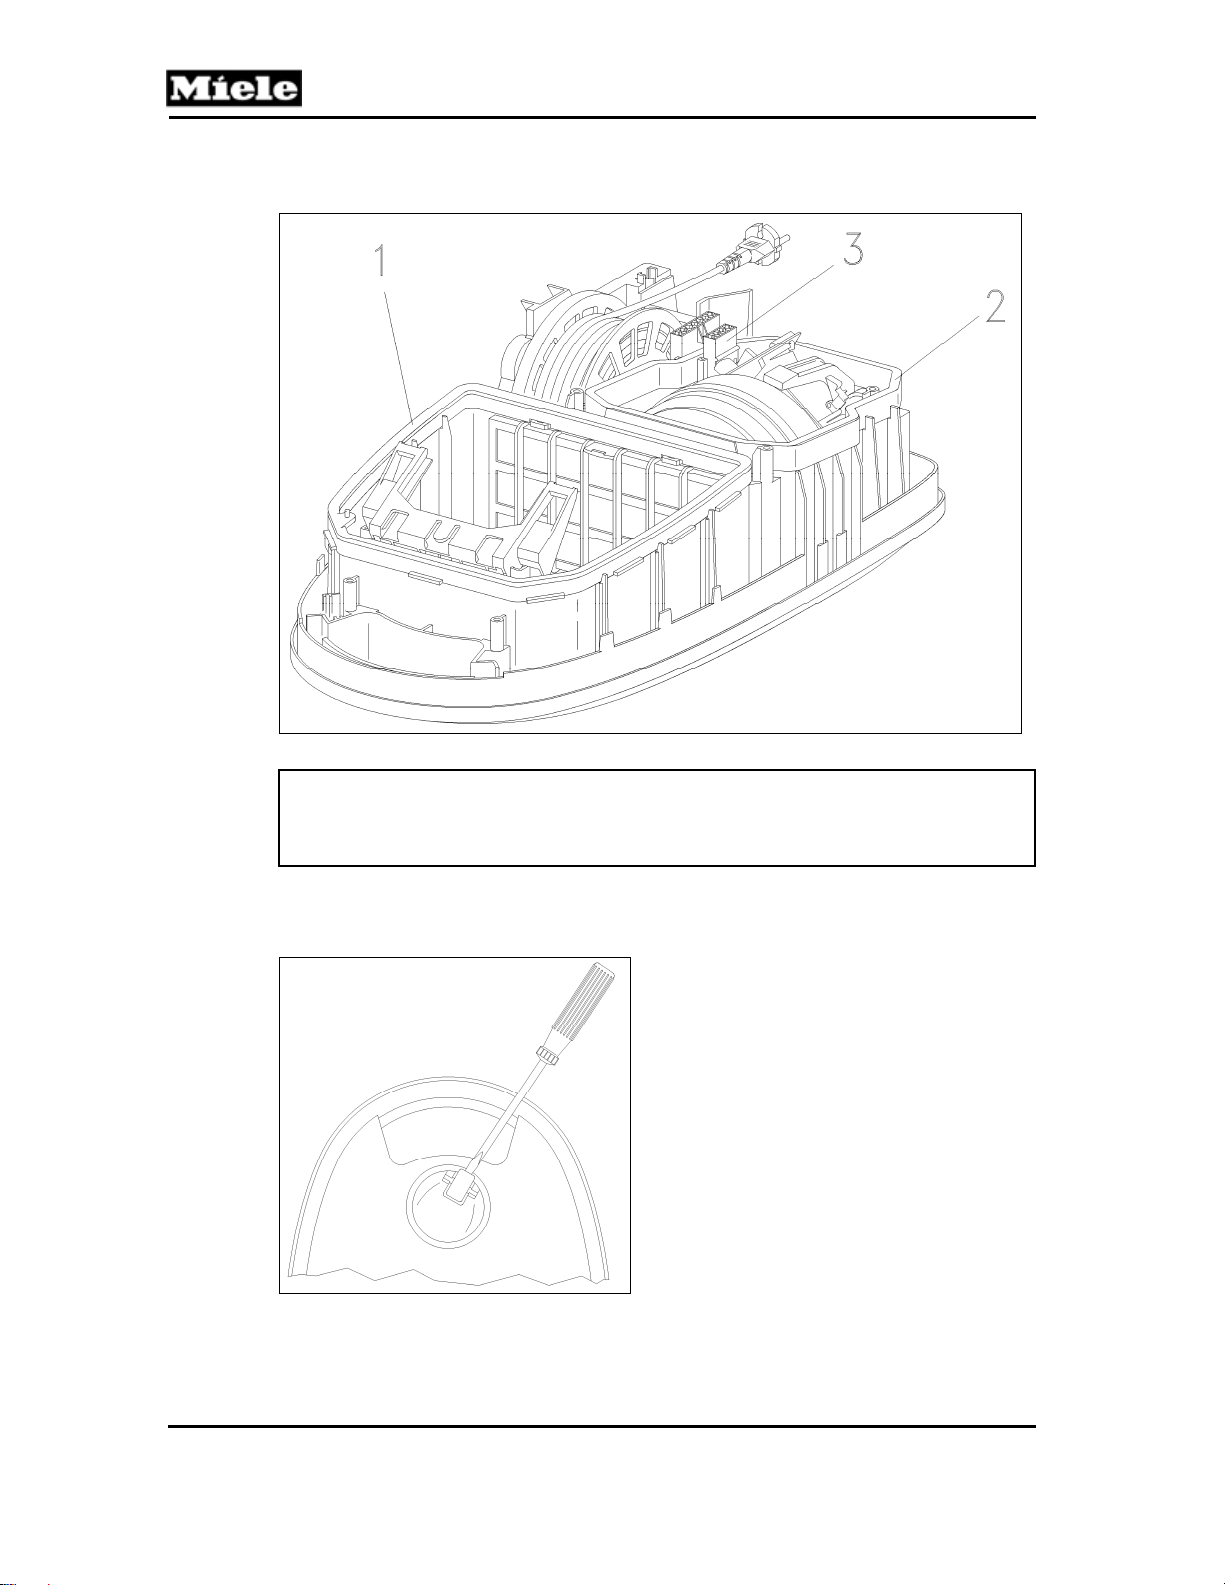
Technical Information
5. Remove the seal (Figure 010-4, Item 2) and sealing ring (Figure 010-4,
Item 1).
S 500 & S 600 Canister Vacuums
Figure 010-4: Seal and Sealing Ring Removal
Note:
When re-installing, ensure that the seal and sealing ring are seated
correctly.
4.4 Caster Removal
1. Lever out the support roller with a screwdriver. See Figure 010-5.
Figure 010-5: Levering Out the Support Roller
2. Remove the 2 shaft screws.
20
 Loading...