

Page 1
Operating instructions
Stick vacuum cleaners
@ä
M.-Nr. 05 118 470
Page 2

Contents
Contents
Description of the appliance. . . . . . . . . . . . . . . . . . . . . . . . . . . . . . . . . . . . . . . . . 3
Help to protect our environment . . . . . . . . . . . . . . . . . . . . . . . . . . . . . . . . . . . . . 4
Warning and safety instructions . . . . . . . . . . . . . . . . . . . . . . . . . . . . . . . . . . . . . 5
Preparing for use . . . . . . . . . . . . . . . . . . . . . . . . . . . . . . . . . . . . . . . . . . . . . . . . . . 8
Connecting the extension tube . . . . . . . . . . . . . . . . . . . . . . . . . . . . . . . . . . . . . . . . 8
Connecting the telescopic handle . . . . . . . . . . . . . . . . . . . . . . . . . . . . . . . . . . . . . . 8
Connecting the floor attachment . . . . . . . . . . . . . . . . . . . . . . . . . . . . . . . . . . . . . . . 9
Rewinding the cable . . . . . . . . . . . . . . . . . . . . . . . . . . . . . . . . . . . . . . . . . . . . . . . . 9
Accessories . . . . . . . . . . . . . . . . . . . . . . . . . . . . . . . . . . . . . . . . . . . . . . . . . . . . . 10
Crevice nozzle . . . . . . . . . . . . . . . . . . . . . . . . . . . . . . . . . . . . . . . . . . . . . . . . . . . . 10
Upholstery nozzle . . . . . . . . . . . . . . . . . . . . . . . . . . . . . . . . . . . . . . . . . . . . . . . . . 10
Operation . . . . . . . . . . . . . . . . . . . . . . . . . . . . . . . . . . . . . . . . . . . . . . . . . . . . . . . 11
Unwinding the supply cable . . . . . . . . . . . . . . . . . . . . . . . . . . . . . . . . . . . . . . . . . 11
Adjusting the telescopic handle. . . . . . . . . . . . . . . . . . . . . . . . . . . . . . . . . . . . . . . 12
Switching on and off. . . . . . . . . . . . . . . . . . . . . . . . . . . . . . . . . . . . . . . . . . . . . . . . 13
Adjusting the suction (depending on model). . . . . . . . . . . . . . . . . . . . . . . . . . . . . 13
Adjusting the floor attachment to the type of floor covering . . . . . . . . . . . . . . . . . 14
Parking and storing the vacuum cleaner. . . . . . . . . . . . . . . . . . . . . . . . . . . . . . 15
Maintenance and care . . . . . . . . . . . . . . . . . . . . . . . . . . . . . . . . . . . . . . . . . . . . . 16
Dustbag change indicator . . . . . . . . . . . . . . . . . . . . . . . . . . . . . . . . . . . . . . . . . . . 16
When should the dustbag and filter be changed?. . . . . . . . . . . . . . . . . . . . . . . . . 18
Purchasing new dustbags and filters. . . . . . . . . . . . . . . . . . . . . . . . . . . . . . . . . . . 18
Replacing the dustbag. . . . . . . . . . . . . . . . . . . . . . . . . . . . . . . . . . . . . . . . . . . . . . 19
Replacing the dust compartment filter (motor protection). . . . . . . . . . . . . . . . . . . 20
Replacing the SUPER Air Clean filter. . . . . . . . . . . . . . . . . . . . . . . . . . . . . . . . . . . 21
Replacing the ACTIVE Air Clean and S-CLASS filters . . . . . . . . . . . . . . . . . . . . . . 22
Changing the thread catcher pads . . . . . . . . . . . . . . . . . . . . . . . . . . . . . . . . . . . . 23
Exchanging exhaust filters . . . . . . . . . . . . . . . . . . . . . . . . . . . . . . . . . . . . . . . . . 24
Cleaning and care . . . . . . . . . . . . . . . . . . . . . . . . . . . . . . . . . . . . . . . . . . . . . . . . 25
Optional extras. . . . . . . . . . . . . . . . . . . . . . . . . . . . . . . . . . . . . . . . . . . . . . . . . . . 26
Problem solving guide. . . . . . . . . . . . . . . . . . . . . . . . . . . . . . . . . . . . . . . . . . . . . 30
Electrical connection. . . . . . . . . . . . . . . . . . . . . . . . . . . . . . . . . . . . . . . . . . . . . . 31
2
Page 3
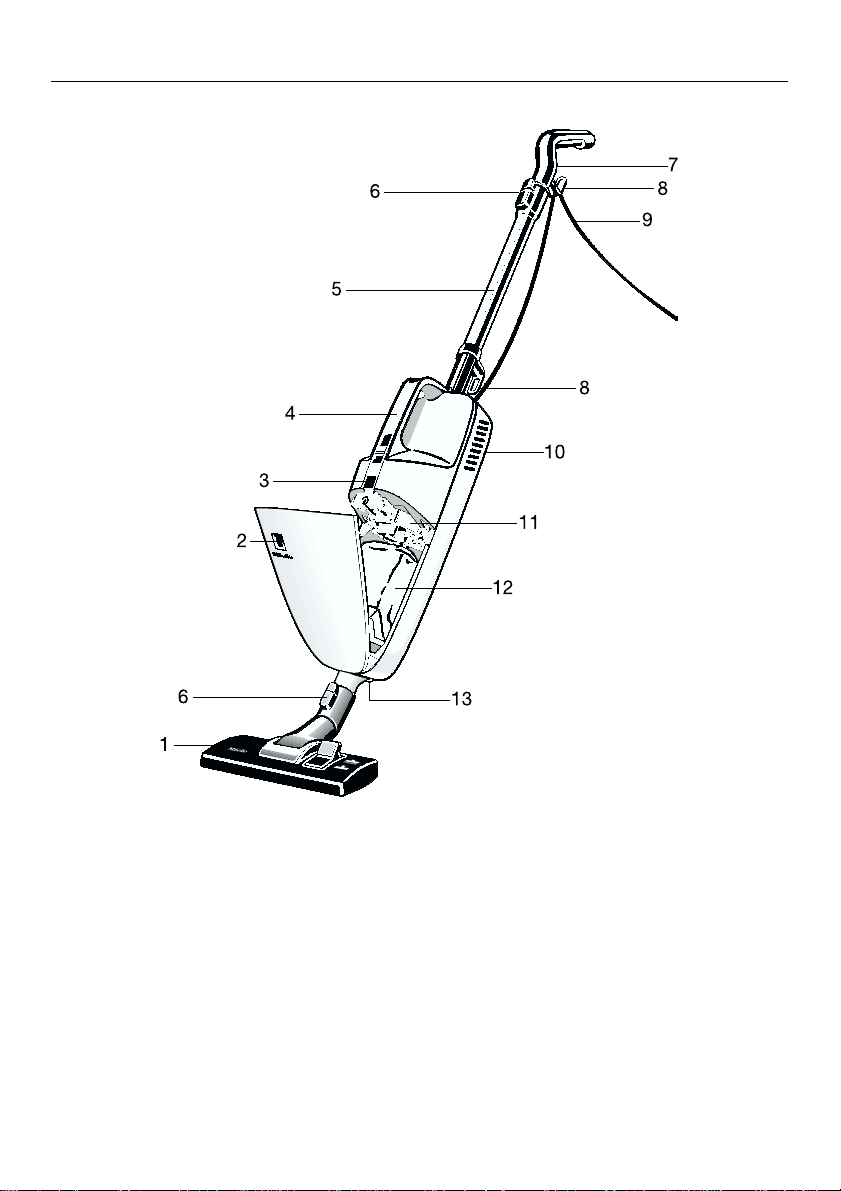
Description of the appliance
Description of the appliance
1 Floor attachment
2 Dustbag change indicator
3 Dust compartment retainer button
4 Carrying handle with On/Off switch
5 Combi tube
(Can also be used as a suction tube
extension)
6 Locking button
7 Telescopic handle with wall-hook
grommet and anti-slip device
8 Cable hook for mains cable
9 Mains cable
10 Exhaust filter compartment (on rear)
11 Dust compartment filter (for motor
protection)
12 Dustbag
13 Socket for Electrobrush
(depending on model)
3
Page 4

Help to protect our environment
Help to protect our environment
Disposal of packing material
The transport and protective packing
has been selected from materials
which are environmentally friendly for
disposal and can be recycled.
Rather than just throwing these materials away, please ensure they are offered for recycling.
Disposal of your old appliance
Old appliances may contain material
which can be reclaimed or recycled.
Please contact your dealer or your
local waste collection authority about
potential recycling. Ensure that the appliance presents no danger to children
while being stored for disposal.
Disposing of the dustbag and
filters
These are made from environmentally
friendly materials and can be disposed
of with normal household waste. The
dustbag should only be disposed of in
this way if it has been used exclusively
for general household dust.
4
Page 5

Warning and safety instructions
Warning and safety instructions
This appliance meets statutory
safety requirements. Incorrect use
can lead to injury and damage to
the appliance.
Before using the appliance for the
first time read these operating instructions carefully. They give information on the safety, operation and
care of the appliance.
Please keep these operating instructions in a safe place for reference
and pass them on to any future
users.
Correct usage
This vacuum cleaner must only be
used for household purposes. It is
only intended for use in a dry situation.
Do not use on people or animals.
The manufacturer cannot accept responsibility for damage caused when
the appliance is not used according to
the instructions, or for uses other than
those for which it was intended.
For households with children
The appliance should only be
used by children under adult
supervision.
Technical safety
To avoid the danger of damaging
the appliance, before using it for
the first time make sure that the electrical connection in the house and the details on the appliance data plate correspond (mains voltage and frequency).
Never operate the appliance if it
shows any signs of damage, particularly to the cable. A damaged appliance could be dangerous.
If the cable is damaged it should be
replaced by a genuine Miele vacuum
cleaner cable.
Always disconnect from the mains
supply for cleaning or maintenance work (switch off at the wall socket
and remove the plug).
Repairs to the appliance should
only be carried out by a suitably
qualified and competent person. Repairs by unqualified persons could be
dangerous.
Clean only with a dry or slightly
damp cloth when disconnected
from the mains supply. Never immerse
the vacuum cleaner in water. If water
gets into the appliance there is the risk
of an electric shock.
5
Page 6

Warning and safety instructions
Warning and safety instructions
A temperature limiter switches the
vacuum cleaner off automatically if
it gets too hot.
This can occur if, for instance, large articles block the suction tube or when
the dustbag is full or clogged. A heavily
soiled exhaust or dust compartment filter can also be the cause of overheating. In this case, please switch off the
vacuum cleaner.
After remedying the cause wait for approx. 20 - 30 minutes so that the appliance can cool down. It can then be
switched on again.
Using the appliance
Floor attachments, accessories
and tubes must not be used at
head level to avoid the risk of injury,
e.g. to eyes and ears.
Do not vacuum up glowing ashes
or coal.
The cleaner might catch fire.
Do not vacuum up any inflamm-
able or combustible materials or
gases.
The cleaner might explode.
damp dirt, as this will cause major
faults and could seriously impair the
electrical safety of the appliance.
This also applies to freshly shampooed
carpets. Wait until they are completely
dry.
out the dustbag, dust compartment filter and exhaust filter in place.
sharp edges and do not let it be
trapped at all, for example under the
door.
not by the cable.
This could damage the cable.
and clean or replace them when
necessary according to the operating
instructions.
Do not use the vacuum cleaner to
suck up water or other liquids or
To avoid the risk of damage, do
not use the vacuum cleaner with-
Do not carry the appliance by the
cable. Keep the cable away from
When disconnecting from the
mains socket pull by the plug and
Monitor the change dustbag indicator. Regularly inspect all filters
Do not vacuum up items which are
heavy, hard or have sharp edges.
They could block the cleaner and
cause damage.
6
Page 7

Warning and safety instructions
Warning and safety instructions
Using accessories
The socket on the appliance (de-
pending on model) must only be
used for the Miele Electrobrush mentioned in these operating instructions.
To avoid the risk of injury when va-
cuuming with a Miele Electro- or
Turbobrush do not touch the rotating roller brush.
Miele dustbags are disposable
and intended to be used only
once. Do not attempt to re-use.
Use only genuine Miele dustbags,
filters, accessories and optional
extras. This ensures optimum vacuum
cleaner performance and full utilisation
of dustbag capacity.
Disposing of an old appliance
When disposing of an old ap-
pliance first make it unusable. Disconnect from the mains, cut off the
cable and the plug from the cable.
Make appropriate arrangements for the
safe disposal of the appliance.
The manufacturer cannot accept responsibility for damage caused by
non-observance of the warning and
safety instructions.
7
Page 8

Preparing for use
Preparing for use
Connecting the extension tube
With the square hole facing upwards, insert the extension tube into
the top of the vacuum cleaner casing. Gently twist the tube until it engages.
To remove the extension tube:
Press the locking button (shown in
inset) and pull, turning slightly.
Connecting the telescopic
handle
With the square hole on the extension tube facing upwards, insert the
telescopic handle into the Combi
tube. Gently twist the handle until the
locking mechanism engages.
To remove the telescopic handle:
Press the locking button and pull the
handle, turning slightly.
The telescopic handle can also be inserted directly into the vacuum cleaner
casing, in which case the extension
sleeve must be inserted in the lower position as the casing cannot accept the
full length of the handle (see chapter
“Operation” - “Adjusting the telescopic
handle”).
The appliance is then much easier to
use, e.g. for vacuuming mattresses
and upholstery.
In addition...
(see next page)
8
Page 9
Preparing for use
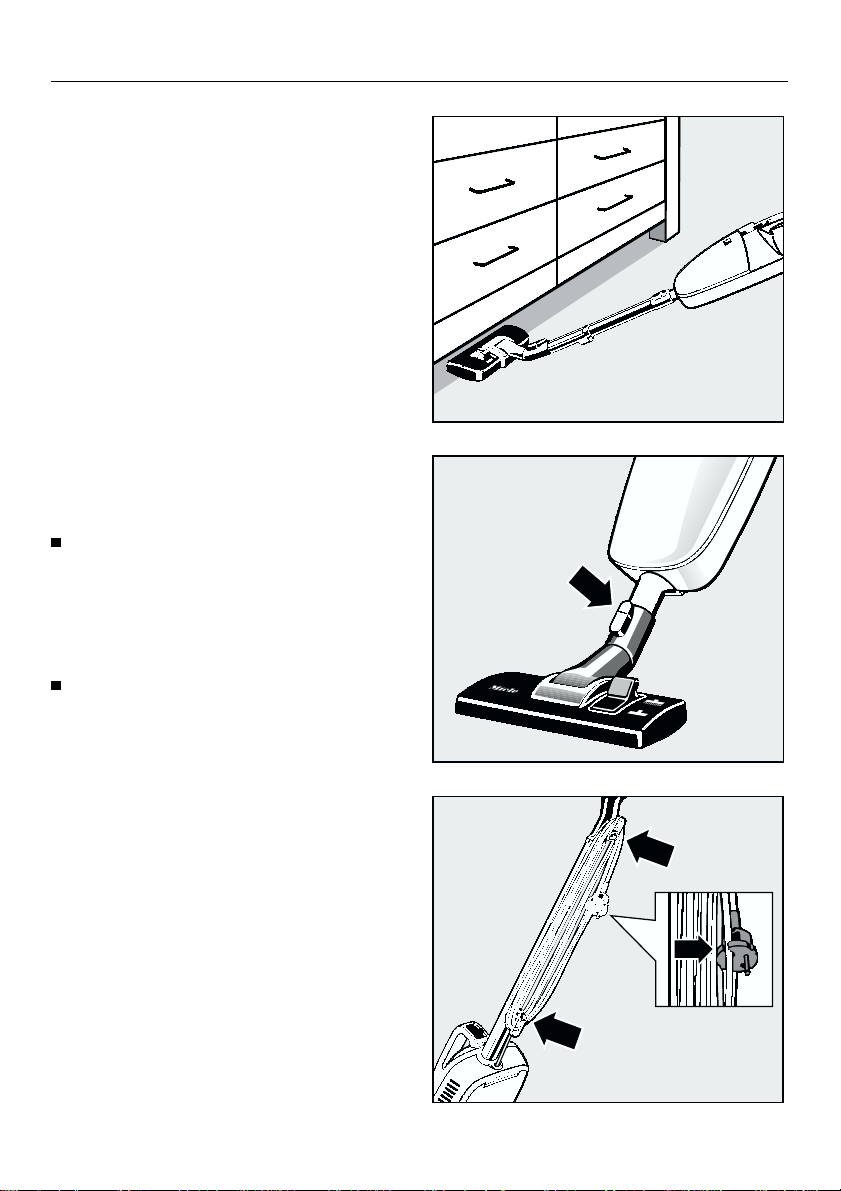
...the extension tube can be used as a
suction tube.
This extends the reach of the vacuum
cleaner, making it easier to clean underneath low furniture.
Connecting the floor attachment
Fit the floor attachment to the vacuum cleaner connection stub or
suction tube and twist gently until
the locking mechanism engages.
Preparing for use
To remove the floor attachment:
Press the locking button (see arrow)
and pull, turning slightly.
Rewinding the cable
When the vacuum cleaner is not in use,
the cable can be wound around the
two cable hooks attached to the handle
and extension tube.
To prevent the chord from unwinding,
press it into the locking groove of the
plug (see inset).
9
Page 10

Accessories
Accessories
The vacuum cleaner includes the following accessories:
– Crevice nozzle
– Upholstery nozzle
– Filter frame
The filter frame is only included with
models that come equipped with an
ACTIVE Air Clean or S-CLASS filter. It
needs to be used if a SUPER Air Clean
filter is installed at a future date (see
chapter “Changing exhaust filters”).
Crevice nozzle
For cleaning in folds, crevices or corners.
Upholstery nozzle
For cleaning upholstery,
mattresses, cushions, curtains, etc.
10
Page 11

Operation
Unwinding the supply cable
The lower cable hook has a swivel connection:
Release the supply cable by simply
turning the lower cable hook upwards.
Insert the plug into a socket with a
fuse rating of at least 10 A.
To prevent the cable from getting in
the way whilst you are vacuuming,
hang the unwound cable over the
cable hook in the telescopic handle
(see inset).
This also takes the strain off the
cable-entry bush.
Operation
11
Page 12

Operation
Operation
Adjusting the telescopic
handle
The telescopic hand-piece allows the
length of the handle to be adjusted in
three stages by max. 15 cm to suit the
body height of the user.
Remove the telescopic handle from
the extension tube by pressing the
locking button, pulling up the handle
and twisting it slightly.
Turn the extension sleeve on the telescopic handle slightly in the direction
of the arrow
in the guide track to the desired set-
c.
ting
b and slide the sleeve
Engage the extension sleeve into the
appropriate notch
Re-insert the telescopic handle into
the extension tube with the square
hole facing upwards and twist
slightly to ensure that the locking
mechanism engages.
12
d.
Page 13

Operation
Switching on and off
To enable the switch on the vacuum
cleaner to be conveniently operated
in any vacuum-cleaning situation, two
separate switches have been integrated
into the unit’s handle.
Either of the switches can be used to
operate the vacuum cleaner.
Double slide switch
0 = Appliance is switched off
min = Reduced suction
max = Maximum suction
To turn the appliance on, slide either
switch to either the min or max posi-
tion.
To turn the appliance off, slide either
switch to the 0 position.
Select min for vacuuming lightweight
items such as rugs or curtains.
Operation
Adjusting the suction
(depending on model)
On some models suction control can
be adjusted to suit individual requirements.
Select the suction setting to suit the
amount of dirt and the type of material
to be vacuumed.
Slightly soiled and smooth floor coverings can be cleaned at an energy-saving medium setting, whereas thick-pile
and fitted carpets require the highest
setting to ensure deep-seated dirt is
thoroughly removed.
The highest setting should also be selected if a Turbobrush is used.
13
Page 14

Operation
Operation
Adjusting the floor attachment
to the type of floor covering
The floor attachment is suitable for vacuuming all carpets, rugs and hard and
smooth floor coverings.
Vacuum carpets and rugs with the brush
retracted:
Press the foot switch marked g.
Clean hard and smooth floor coverings
with the brush protruding:
Press the foot switch marked h.
14
Page 15

Parking and storing the vacuum cleaner
Parking and storing the vacuum cleaner
The end cap on the telescopic handpiece is made from slip-proof plastic.
During short vacuuming breaks, the appliance can be leaned upright against
a wall or furniture.
Before leaving the vacuum cleaner,
make sure it is switched off and
leaning against the wall at a safe
angle.
For longer term storage, the vacuum
cleaner can also be hung on a wall
hook by using the grommet integrated
in the telescopic handle.
15
Page 16

Maintenance and care
Maintenance and care
Dustbag change indicator
This indicates when the paper dustbag
needs to be changed.
The attachment used can affect the
function of the dustbag change indicator. Therefore only test with the
floor attachment fitted.
Switch on the appliance and set the
suction power control (according to
model) to the highest setting.
Lift the floor attachment off the floor.
If the red marker completely fills the
indicator window, the dustbag must
be changed,
pletely full.
Please note:
This indicator measures the air permeability of the dustbag.
Even if just a few grammes of flour, fine
cement or brick dust are sucked up,
these fine particles can also effect the
permeability of the dustbag, thus causing the red scale indicator to show that
the bag is “full”, although it is virtually
empty. The dustbag should, however,
be changed in this case, as the suction
power is greatly reduced. On the other
hand the bag may be bulging with wool
or carpet fluff, but the air permeability
may still be high enough not to activate
the red indicator to maximum. The dustbag should, however, still be changed.
even if it is not com-
Both these extremes can occur. Normally, however, common household
dust is composed of carpet fluff, hair
and grit, i.e. a mixture.
The Miele dustbag change indicator is
designed prinicpally to deal with this
kind of use.
We recommend:
1. When you vacuum up a lot of fine
dust or sand:
Change the dustbag as soon as the
red scale fills the window, even if the
bag is not full.
2. When you have vacuumed up a lot
of carpet fluff and hair and the dustbag is full although the indicator only
shows half full (please check regularly):
Change the dustbag.
16
Page 17

Maintenance and care
The Miele filter system consists of three
components:
b Dustbag
c Dust compartment filter (for motor
protection)
d Exhaust filter
These filters must be replaced from
time to time in order to guarantee optimum suction efficiency.
Note concerning exhaust filters d:
There are different exhaust filters, depending on model. Your model could
have either:
a a SUPER Air Clean filter,
b an ACTIVE Air Clean filter
c or an S-CLASS filter
Maintenance and care
17
Page 18

Maintenance and care
Maintenance and care
When should the dustbag and
filter be changed?
Dustbag:
When the red marker completely fills
the indicator window (please note the
information on “Dustbag change indicator”).
Dust compartment filter (for motor
protection):
Change this filter every time you start a
new packet of genuine Miele dustbags.
A dust compartment filter is included
with every packet of Miele dustbags.
Exhaust filter
(see note on previous page):
SUPER Air Clean filter:
Change this filter every time you start a
new packet of genuine Miele dustbags.
A SUPER Air Clean filter is included
with every packet of Miele dustbags.
Purchasing new dustbags and
filters
Replacement filters and dustbags are
available from your local Miele specialist dealer or from the Miele Spare Parts
Department.
Use only genuine Miele dustbags and
filters, making sure they are the correct
ones for your vacuum cleaner, in this
case marked with the letter K.
This ensures optimum suction performance and that the dustbag is used to
capacity.
ACTIVE Air Clean filter:
About once a year or as soon as the filter no longer absorbs unpleasant
odours. Make sure that you purchase a
replacement in good time.
S-CLASS filter:
Every 18 months or as soon as air permeability is reduced to an unsatisfactory level.
Make sure that you purchase a replacement in good time.
18
Page 19

Maintenance and care
Replacing the dustbag
Press the dust compartment retainer
button and open the compartment
lid until it clicks into place.
The dustbag has a cardboard collar
which closes automatically when the
dustbag is removed to prevent any
dust escaping.
To remove the dustbag grasp the
cardboard collar by the two holes
and pull it out of the compartment.
The dustbag can be disposed of
with the normal household waste as
long as it has only been used for vacuuming up normal household dust
and not hazardous materials.
Maintenance and care
Slide the collar of the new dustbag
into the empty holder until it is secured in position.
Close the compartment lid until it engages. When the lid is closed the
holder automatically draws the bag
collar over the inlet stub.
Please note:
If there is no dustbag in the holder,
or the dustbag has not been inserted correctly, the compartment
lid will not close properly.
Do not attempt to force the lid shut.
19
Page 20

Maintenance and care
Maintenance and care
Replacing the dust compartment filter (motor protection)
Press the dust compartment retainer
button and open the compartment
lid until it clicks into position.
A new dust compartment filter is included with every pack of genuine
Miele dustbags.
Unclip the filter frame, remove the filter and replace with a new one.
Close the filter frame until it engages
in position.
Close the compartment lid until it engages.
20
Page 21

Maintenance and care
Replacing the
SUPER Air Clean filter
Press the retainer button for the exhaust filter compartment lid located
on the rear of the vacuum cleaner
and remove the lid.
Remove the used filter, holding by
the clean, unsoiled section, and replace it with a new one.
Maintenance and care
Replace the lid and close it again.
21
Page 22

Maintenance and care
Maintenance and care
Replacing the ACTIVE Air
Clean and S-CLASS filters
Press the retainer button for the exhaust filter compartment lid located
on the rear of the vacuum cleaner
and remove the lid.
Remove the used filter from the lid
and replace it with a new one.
Make a note of the replacement date
on the label of the new filter.
Replace the lid and close it again.
22
Page 23

Maintenance and care
Changing the thread catcher
pads
The thread catcher pads on the suction
aperture of the floor attachment should
be checked from time to time.
Replace the pads if the pile is worn.
Use a knife or similar object to
remove the thread catcher pads
from their slots.
Replace the worn pads with new
ones.
New thread catcher pads can be purchased from your local Miele specialist
dealer or from the Miele Spare Parts Department.
Maintenance and care
23
Page 24

Exchanging exhaust filters
Exchanging exhaust filters
There are different exhaust filters, depending on model. Your model could
have either:
a a SUPER Air Clean filter
b an ACTIVE Air Clean filter or
c an S-CLASS filter.
All of the above-named filters are interchangeable with one another.
The difference in the filter types is explained in the “Optional extras” section
of these operating instructions.
Please note:
1. If you want to replace filter a with filter b or c, the filter frame in the lid of
the exhaust filter compartment must be
removed. The new filter should be installed in its place.
2. If you want to replace filter b or c
with filter a, the filter frame must be in-
stalled in the lid of the exhaust filter
compartment.
To remove or insert the filter frame
Grasp the sides of the filter frame in
the positions shown by the arrows
and squeeze. The frame can then be
inserted or removed as desired.
24
Page 25

Cleaning and care
Vacuum cleaner and accessories
The vacuum cleaner and all plastic accessories can be cleaned with a
cleaner suitable for plastic.
Do not use an abrasive cleaner,
a glass cleaner or an all-purpose
cleaning agent.
Due to their chemical composition
they could cause serious damage
to the plastic casing.
Dust compartment
The dust compartment can be cleaned,
if necessary, by using a second vacuum cleaner, if available, or using a
duster or dusting brush.
Never immerse the vacuum cleaner
in water!
dry
Cleaning and care
25
Page 26

Optional extras
Optional extras
Turbobrush
The Turbobrush is suitable for gentle
brushing and cleaning of short-pile carpeting.
The brush is operated by the suction
power of the vacuum cleaner and
needs no extra electrical connection.
Electrobrush SEB 217
(standard on some models)
(only for models with the Electrobrush
connection socket)
The Electrobrush is suitable for cleaning heavy duty carpets which are subject to hard wear, especially those
areas which are most frequently trodden on.
Floor brush
Special brush for cleaning scratch-sensitive hard floor coverings (parquet,
stone, PVC).
26
Page 27

Optional extras
Dusting brush
For cornices, carvings or ornate items.
The head of the dusting brush swivels
and can be turned to the angle best
suited to the items you are cleaning.
Universal brush
For dusting books, shelves, etc.
Optional extras
Radiator brush
For cleaning radiators, narrow shelves
or crevices:
Fit the radiator brush to the crevice
nozzle.
27
Page 28

Optional extras
Optional extras
Cloth dustbag
If a paper dustbag is not available, a reusable cloth bag can be used.
It can easily be emptied by removing
the clamp at the bottom of the bag.
The cloth dustbag should not be
washed, as this will damage bag permeability.
Cylinder vacuum cleaner accessories
By attaching a hose to the extension
tube (Combi tube) of the vacuum
cleaner, the stick model can be used
as a cylinder vacuum cleaner.
This allows easy cleaning of taller items
such as book shelves, door frames, curtains, etc.
Vacuuming under cupboards and beds
is also made easier.
Important:
When ordering cylinder vacuum
cleaner accessories, make sure you
give the correct model number of your
stick cleaner.
28
Page 29

Optional extras
ACTIVE Air Clean filter
(standard on some models)
This is a special active charcoal filter
which absorbs odours from the dust
collected in the dustbag. It helps, therefore, to prevent the build up of odours.
The ACTIVE Air Clean filter is used in
place of the SUPER Air Clean filter.
There is no difference in filtration level
between the ACTIVE Air Clean filter
and the SUPER Air Clean filter.
S-CLASS filter
(standard on some models)
The S-CLASS filter is a submicron particulate air filter and has been designated an S-class filter according to
DIN 24184. This filter has exceptional
filtration properties.
At least 99.97% of even the smallest airborne particles with a diameter of
0.3 m are retained. The filtration level is
even higher for larger particles. Vacuum cleaners equipped with this exhaust filter are particularly suitable for
allergy sufferers and those concerned
with high levels of hygiene. The
S-CLASS filter is installed instead of the
existing exhaust filter.
Optional extras
29
Page 30

Problem solving guide
Problem solving guide
If the appliance switches itself off:
A temperature limiter switches the vacuum cleaner off automatically if it gets
too hot.
This can occur if, for instance, large articles block the suction tube or when
the filter bag is full or clogged.
A heavily soiled exhaust or dust compartment filter can also be the cause of
overheating.
In this case, please switch the vacuum
cleaner off!
After remedying the cause, wait for a
period of approx. 20 - 30 minutes, so
that the appliance can cool down. It
can then be switched on again.
30
Page 31

Electrical connection
The appliance must be connected to a
230-240 V/50 Hz a.c. single phase supply via a 10 A plug. The wires in the
mains lead of this appliance are coloured in accordance with the following
code:
Blue = Neutral
Brown = Live
As the colours of the wires may not
correspond with the markings identifying the terminals in your plug, proceed
as follows: The wire coloured blue must
be connected to the terminal marked
with the letter “N” or coloured black.
The wire coloured brown must be connected to the terminal marked with the
letter “A” or coloured red. Neither core
is to be connected to the earth terminal
of a three-pin plug.
Electrical connection
Test marks Electrical safety, C-Tick Mark
Electrically suppressed according to AS/NZS 1044
31
Page 32

Alteration rights reserved / 000 (S 140) 4098
This paper consists of cellulose which has been bleached without the use of chlorine.
 Loading...