

Page 1
Operating instructions
Washer-Extractor
PW 6101
PW 6131
To avoid the risk of accidents or damage to the machine it is
essential to read these instructions before installing,
commissioning and using it for the first time.
en - GB
M.-Nr. 06 533 414
Page 2

Gas-heated appliances
Safety precautions to take if you smell gas
ß Turn off the gas emergency control valve immediately.
This is usually located near the gas meter.
ß Eliminate all sources of ignition in a safe manner.
Do not smoke, light cigarette lighters or matches.
ß Do not operate electrical lights or switches, i.e. do not switch them "On" or "Off".
ß Open all doors and windows to ventilate the area.
ß If the smell of gas persists, evacuate the building.
In the UK you must now:
ß Call the Gas Emergency Contact Centre (Tel: 0 800 111 999)
For any gas work in the UK always use a Gas Safe registered engineer.
In other countries please follow relevant country specific procedures on gas.
2 M.-Nr. 06 533 414
Page 3

Contents
Warning and Safety instructions . . . . . . . . . . . . . . . . . . . . . . . . . . . . . . . . . . . . . . . . . . . . . . . 4
Caring for the environment . . . . . . . . . . . . . . . . . . . . . . . . . . . . . . . . . . . . . . . . . . . . . . . . . . . . 8
Description of the machine . . . . . . . . . . . . . . . . . . . . . . . . . . . . . . . . . . . . . . . . . . . . . . . . . . . 9
Control elements . . . . . . . . . . . . . . . . . . . . . . . . . . . . . . . . . . . . . . . . . . . . . . . . . . . . . . . . . . . . 10
How to wash correctly . . . . . . . . . . . . . . . . . . . . . . . . . . . . . . . . . . . . . . . . . . . . . . . . . . . . . . . 12
Sort the laundry . . . . . . . . . . . . . . . . . . . . . . . . . . . . . . . . . . . . . . . . . . . . . . . . . . . . . . . . . . . . . 12
Maximum loads for the standard programmes . . . . . . . . . . . . . . . . . . . . . . . . . . . . . . . . . . . . . . . 13
Add cleaning agent . . . . . . . . . . . . . . . . . . . . . . . . . . . . . . . . . . . . . . . . . . . . . . . . . . . . . . . . . . 13
Detergent dispensing. . . . . . . . . . . . . . . . . . . . . . . . . . . . . . . . . . . . . . . . . . . . . . . . . . . . . . . . . 14
Select a programme. . . . . . . . . . . . . . . . . . . . . . . . . . . . . . . . . . . . . . . . . . . . . . . . . . . . . . . . . . 15
Open the door at the end of the programme . . . . . . . . . . . . . . . . . . . . . . . . . . . . . . . . . . . . . . . 17
Card operation . . . . . . . . . . . . . . . . . . . . . . . . . . . . . . . . . . . . . . . . . . . . . . . . . . . . . . . . . . . . . 19
Card access operation. . . . . . . . . . . . . . . . . . . . . . . . . . . . . . . . . . . . . . . . . . . . . . . . . . . . . . . . 19
Additional options . . . . . . . . . . . . . . . . . . . . . . . . . . . . . . . . . . . . . . . . . . . . . . . . . . . . . . . . . . 20
Language selection . . . . . . . . . . . . . . . . . . . . . . . . . . . . . . . . . . . . . . . . . . . . . . . . . . . . . . . . . . 20
Start date and time. . . . . . . . . . . . . . . . . . . . . . . . . . . . . . . . . . . . . . . . . . . . . . . . . . . . . . . . . . . 20
Programme stop. . . . . . . . . . . . . . . . . . . . . . . . . . . . . . . . . . . . . . . . . . . . . . . . . . . . . . . . . . . . . 22
Programme cancellation . . . . . . . . . . . . . . . . . . . . . . . . . . . . . . . . . . . . . . . . . . . . . . . . . . . . . .22
Changing the programme order . . . . . . . . . . . . . . . . . . . . . . . . . . . . . . . . . . . . . . . . . . . . . . . . 23
Standard programme overview. . . . . . . . . . . . . . . . . . . . . . . . . . . . . . . . . . . . . . . . . . . . . . . . 24
Optional modules . . . . . . . . . . . . . . . . . . . . . . . . . . . . . . . . . . . . . . . . . . . . . . . . . . . . . . . . . . . 26
Liquid dispensers. . . . . . . . . . . . . . . . . . . . . . . . . . . . . . . . . . . . . . . . . . . . . . . . . . . . . . . . . . . . 26
Peak load cut-out . . . . . . . . . . . . . . . . . . . . . . . . . . . . . . . . . . . . . . . . . . . . . . . . . . . . . . . . . . . . 28
Communication module . . . . . . . . . . . . . . . . . . . . . . . . . . . . . . . . . . . . . . . . . . . . . . . . . . . . . . .28
Operating data . . . . . . . . . . . . . . . . . . . . . . . . . . . . . . . . . . . . . . . . . . . . . . . . . . . . . . . . . . . . . . 28
Weighing sytem . . . . . . . . . . . . . . . . . . . . . . . . . . . . . . . . . . . . . . . . . . . . . . . . . . . . . . . . . . . . . 30
Problem solving guide. . . . . . . . . . . . . . . . . . . . . . . . . . . . . . . . . . . . . . . . . . . . . . . . . . . . . . . 31
The door will not open . . . . . . . . . . . . . . . . . . . . . . . . . . . . . . . . . . . . . . . . . . . . . . . . . . . . . . . . 31
Power cut during a wash programme - Emergency door release . . . . . . . . . . . . . . . . . . . . . . . 31
Error messages . . . . . . . . . . . . . . . . . . . . . . . . . . . . . . . . . . . . . . . . . . . . . . . . . . . . . . . . . . . . . 33
After sales service . . . . . . . . . . . . . . . . . . . . . . . . . . . . . . . . . . . . . . . . . . . . . . . . . . . . . . . . . . . 35
Cleaning and care . . . . . . . . . . . . . . . . . . . . . . . . . . . . . . . . . . . . . . . . . . . . . . . . . . . . . . . . . . 36
Explanation of symbols on the data plate . . . . . . . . . . . . . . . . . . . . . . . . . . . . . . . . . . . . . . . 38
Notes for the installer. . . . . . . . . . . . . . . . . . . . . . . . . . . . . . . . . . . . . . . . . . . . . . . . . . . . . . . . 39
Transit fittings . . . . . . . . . . . . . . . . . . . . . . . . . . . . . . . . . . . . . . . . . . . . . . . . . . . . . . . . . . . . . . . 39
Plumbing . . . . . . . . . . . . . . . . . . . . . . . . . . . . . . . . . . . . . . . . . . . . . . . . . . . . . . . . . . . . . . . . . . 40
Dispenser system connections . . . . . . . . . . . . . . . . . . . . . . . . . . . . . . . . . . . . . . . . . . . . . . . . . 41
Electrical connection . . . . . . . . . . . . . . . . . . . . . . . . . . . . . . . . . . . . . . . . . . . . . . . . . . . . . . . . . 41
Connecting the dispenser pumps . . . . . . . . . . . . . . . . . . . . . . . . . . . . . . . . . . . . . . . . . . . . . . . 42
Steam connection . . . . . . . . . . . . . . . . . . . . . . . . . . . . . . . . . . . . . . . . . . . . . . . . . . . . . . . . . . . 42
Gas connection . . . . . . . . . . . . . . . . . . . . . . . . . . . . . . . . . . . . . . . . . . . . . . . . . . . . . . . . . . . . . 42
Abbreviated operating instructions PW 6101, PW 6131 . . . . . . . . . . . . . . . . . . . . . . . . . . . . 43
Guarantee . . . . . . . . . . . . . . . . . . . . . . . . . . . . . . . . . . . . . . . . . . . . . . . . . . . . . . . . . . . . . . . . .45
M.-Nr. 06 533 414 3
Page 4
Warning and Safety instructions
Explanation of the Warning and
Safety symbols on the machine
It is essential to read these
operating instructions.
Please refer to specific
instructions, e.g. Installation
instructions
Caution, hot surfaces.
Caution, voltage up to 1000 volts.
Earthing
Petrol, paraffin, or any easily flammable
liquid must not be stored or used near
the machine. Do not use the machine lid as
a storage shelf.
Fire and explosion hazard.
Do not store any chemicals on the
machine lid (liquid detergent, fabric
conditioners etc). They could discolour the
lid and also damage the surface finish. If
any chemicals should come in contact with
the surface, wipe them away immediately
with clean water. Then dry with a soft cloth.
When used in a commercial environment
ensure that all operators are trained to
use the machine correctly.
If the machine is used in a publically
accessible room, please ensure that
operators are able to use it safely.
To avoid the risk of accidents and
damage to the machine read the
operating instructions carefully before
using it for the first time. They contain
important information about the
installation, safety, use and maintenance
of the machine. Keep these operating
instructions in a safe place and ensure
that new users are familiar with the
content. Pass them on to any future owner
of the machine.
Correct application
This machine is not designed for
washing items which have been treated
with dangerous or flammable substances.
Only use the machine to wash items
which are specified by the manufacturer
to be machine-washable on the wash-care
label.
Any other applications may be dangerous.
The manufacturer is not liable for damage
resulting from improper use or operation.
Technical and electrical safety
The electrical safety of this machine can
only be guaranteed if connected to a
correctly installed earthing system on site. It
is most important that this basic safety
requirement is present and tested regularly,
and where there is any doubt, the on-site
electrical wiring should be inspected by a
qualified electrician. The manufacturer
cannot be held liable for the consequences
of an inadequate earthing system (e.g.
electric shock).
Do not damage, remove or bypass the
safety features, fixtures and control
elements of this machine.
Do not use a machine with damaged
controls or cables. These must be
repaired before it is used again.
Any removable outer panels must be
back in place, and all moving or
electrical parts shielded before the machine
is switched on.
The machine is only completely isolated
from the electricity supply either when it
is switched off at the isolator switch or the
mains fuse has been withdrawn.
Chemical dry cleaning agents must not
be used in this machine. Most dry
cleaning agents, e.g. benzine, pose a fire
and explosion hazard.
4 M.-Nr. 06 533 414
Page 5

Warning and Safety instructions
Repairs to electrical, gas or steam
operated machines may only be carried
out by a suitably qualified person in
accordance with national and local safety
regulations, e.g. a Gas Safe registered
service technician in the U.K.
Repairs and other work by unqualified
persons could be dangerous.
The manufacturer cannot be held liable for
unauthorised work.
Do not force the drum door open. The
door handle is fitted with an safety
device to ensure that the door lock functions
correctly.
Faulty components must only be
replaced by genuine Miele original spare
parts. Only when these parts are fitted can
the safety standards of the machine be
guaranteed.
Testing must be carried out with the burner
switched on and switched off.
Using the washer-extractor
This machine is not intended for use by
persons (including children) with
reduced physical, sensory or mental
capabilities, or lack of experience and
knowledge, unless they are supervised
whilst using it or have been shown how to
use it correctly by a person responsible for
their safety.
This machine is not a toy! To avoid the
risk of injury never allow children to play
on or near the machine, or to operate it
themselves.
Remember that the porthole glass will be
hot when washing at very high
temperatures. Do not let children touch it.
Always close the door after use. This
way you will avoid the danger of:
– children climbing onto or into the dryer or
hiding things in it.
– pets or other small animals climbing into it.
The best materials are used in the
manufacture of this machine, and every
care is taken to check all parts. However,
with time, deterioration of parts can occur,
especially with such components as hoses,
giving rise to leaks. Check the inlet hoses
regularly for signs of wear and tear. Change
in good time to avoid the risk of leaks and
subsequent damage.
Local regulations regarding regular
inspection and maintenance of this
machine must be observed. A log book
should be kept with the machine.
Gas-heated washer-extractors
Important After installation, maintenance,
conversion, repairs and before using for the
first time it is essential that a test for possible
leakages is carried out. All components
which carry gas must be checked, including
the gas valve and burner jets.
Particular attention must be paid to the test
nipple on the gas valve.
Always make sure that the drum is
stationary before reaching into the
machine to remove laundry. Reaching into a
moving drum is extremely dangerous.
Take care in the area of the hinges of the
drum door. Danger of injury.
The drum door must be able to be
opened to its fullest extent. This area
must not be restricted by doors or structural
features.
The water used for washing is a suds
solution and is not drinking water.
The suds solution must be drained away via
an appropriate drainage system.
The washer-extractor may only be
operated without supervision if there is a
floor drain (gully) in the immediate vacinity.
M.-Nr. 06 533 414 5
Page 6

Warning and Safety instructions
It is the operator's responsiblity to ensure
that the standard of disinfection in thermal
as well as chemo thermal procedures is
maintained (in accordance with § 18 IFSG and
national health and safety regulations) by
carrying out suitable validation tests. These
procedures should be checked on a regular
basis, either thermo-electrically using loggers,
or bacteriologically with bio indicators. The
operator must pay particular attention to
maintaining the correct parameters in the
procedure, including temperature and with
chemo thermal programmes, the chemical
concentration used. Disinfection programmes
must not be interrupted, as this can have a
limiting effect on the disinfection result.
It is particularly important to observe
manufacturer's instructions when using a
combination of cleaning agents and special
application products. Only use the product
for the application described by the
manufacturer, to avoid any material damage
or the occurrence of strong chemical
reactions.
Confirm with the detergent manufacturer that
their product can be used in combination
with another type of product.
Only use dyes, colour run and dye
removers specified as being suitable for
use in washing machines. Always observe
the manufacturer's instructions carefully.
Laundry that was soiled with biological
oils or fat should be washed using a
suitable detergent and /or wash programme.
It must also be inspected after washing. If
oils or fat are not sufficiently removed they
could cause the laundry to self ignite during
the drying process. This type of soiling
should be removed using specialist
detergents and/or programmes.
Do not use a pressure washer or hose to
clean the machine.
Further notes
Cleaning and disinfecting agents often
contain chlorine-based substances. Do
not let such agents come into contact with
the stainless steel surfaces, as the chlorine
can have a corrosive effect. Use
chlorine-free agents for washing and
disinfecting and also for cleaning stainless
steel surfaces to protect them from
corrosion.
If in doubt, confirm with the manufacturer
that their product is suitable. If any agent
containing chlorine comes into contact with
the stainless steel surfaces, wipe it away
immediately with clean water. Then dry with
a soft cloth.
The manufacturer cannot be held liable
for the effect of a chemical cleaning
agent on laundry or the machine, even when
the use of such agents is recommended.
Please note that changes to the product
which have not been made known by the
manufacturer can affect the quality of the
wash result.
Using accessories
Accessory parts may only be fitted when
expressly approved by Miele. If spare
parts or accessories from other
manufacturers are used, this will invalidate
the guarantee, and Miele cannot accept
liability.
Any additional components used, e.g.
suction devices for liquid agents,
electronic water meters or dispenser
monitors, must conform to Safety Class II.
If connected to an external PC,
this must conform to
EN 60950-1:2001 (IEC 60950-1:2001).
6 M.-Nr. 06 533 414
Page 7

Warning and Safety instructions
Chlorine and component damage
Notes on using chlorine bleach and
perchlorethylene
Frequent use of chlorine increases the
risk of component damage.
The use of agents containing chlorine, such
as sodium hypochlorite and chlorine bleach
in powder form, can damage the protective
upper surface of stainless steel and cause
corrosion to components. Factors affecting
this are chlorine concentration levels,
contact time and temperature. It is therefore
advisable to avoid the use of such agents.
Oxygen based bleaching agents should be
used instead.
If, however, chlorine based bleaching
agents have to be used for particular types
of soiling, then anti-chlorine measures must
also be carried out. If this is not done
irreparable damage can occur to
components in the machine and to laundry.
Disposing of your old machine
Before disposing of an old machine, first
make the door lock unusable. This way
you will prevent children from accidentally
locking themselves in and endangering their
lives.
All personnel working with this machine
must be fully trained in all aspects of its
use and safety.
Keep these instructions in a safe and
accessible place.
Anti-chlorine treatment
Anti-chlorine treatment has to be carried out
immediately after chlorine bleach has been
used. The use of hydrogen peroxide or an
oxygen based cleaning or bleaching agent
is recommended and the laundry should not
be drained in between.
With thiosulfate, especially when used with
hard water, gypsum can form, which can
lead to incrustations on laundry or deposits
in the machine. The use of hydrogen
peroxide is preferable as it aids the chorline
neutralising process.
The exact quantity of additives and the
treatment temperatures required must be set
and tested on site in accordance with the
dosage recommendations of the detergent
and additive manufacturers. The laundry
must also be tested to check whether it
contains any active chlorine residues.
M.-Nr. 06 533 414 7
Page 8
Caring for the environment
Disposing of the packing material
The packaging is designed to protect the
machine during transportation. The materials
used are environmentally friendly for
disposal.
Rather than just throwing these materials
away, please ensure that they are recycled.
Packaging materials such as plastic
,
film and bags must be kept out of the
reach of babies and children. Danger of
suffocation.
Disposing of your old machine
Electrical and electronic machines often
contain materials which, if handled or
disposed of incorrectly could be potentially
hazardous to human health and to the
environment. They are, however, essential
for the correct functioning of your machine.
Please do not dispose of your old it with your
general waste.
Tips on saving energy
To save energy and water, try to load the
maximum for the programme selected.
Underloading is uneconomical. Overloading
gives a poorer quality of wash result and
may cause unnecessary creasing.
Make sure that your laundry is thoroughly
spun before drying. This saves time and
energy.
Carrying out the final rinse with hot water
helps to reduce the residual moisture level,
and the residual heat in the laundry will help
keep processing time down in the dryer,
thus saving energy.
Follow detergent manufacturer's advice
regarding the right amount of detergent to
use.
This will depend on the size of the load, the
water hardness level and the amount of
soiling in the laundry.
Chose the correct programme (with
pre-wash or intensive options selected) and
the correct temperature.
Please dispose of it at your local community
waste collection/recycling centre.
Please contact your dealer, your local waste
collection centre or scrap merchant about
recycling schemes.
Please store it out of the reach of children
whilst awaiting disposal.
8 M.-Nr. 06 533 414
Page 9
Description of the machine
d
e
c
b
a
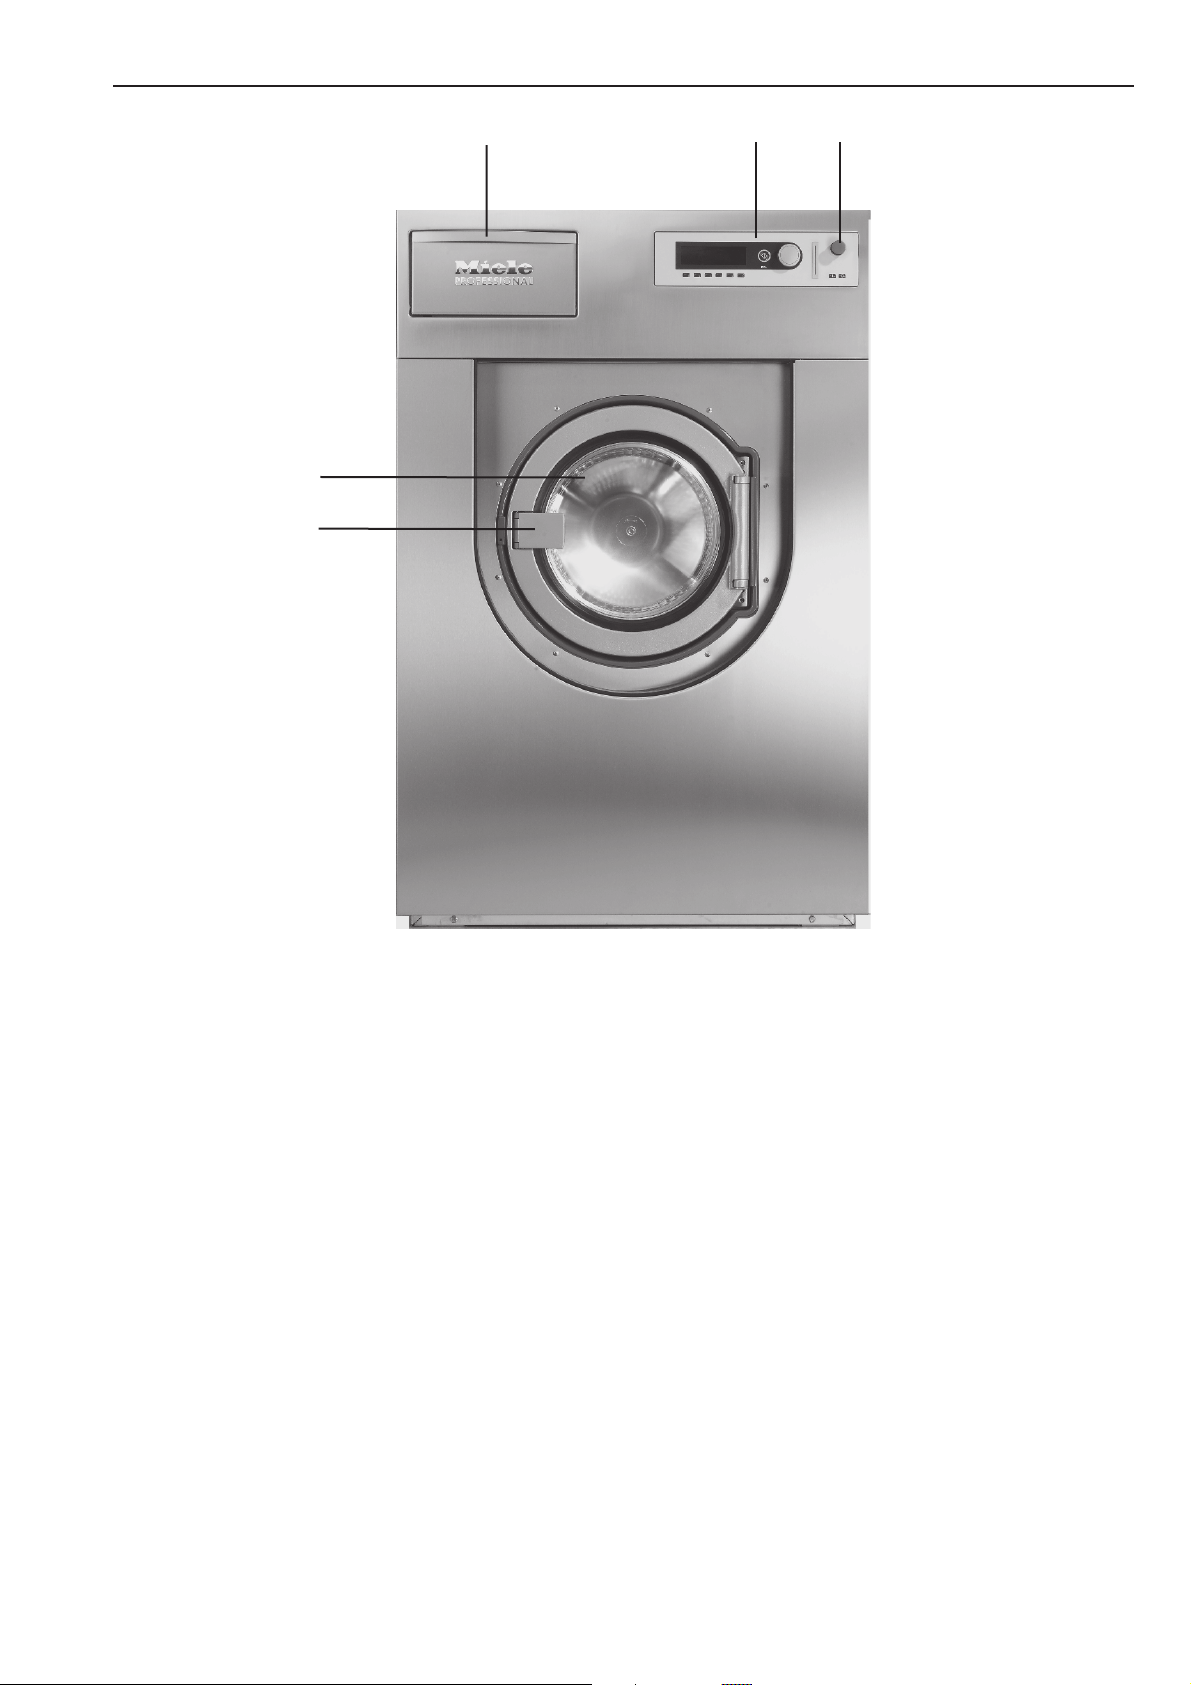
a Emergency stop switch
Press the red button to switch the machine
off.
b Control panel
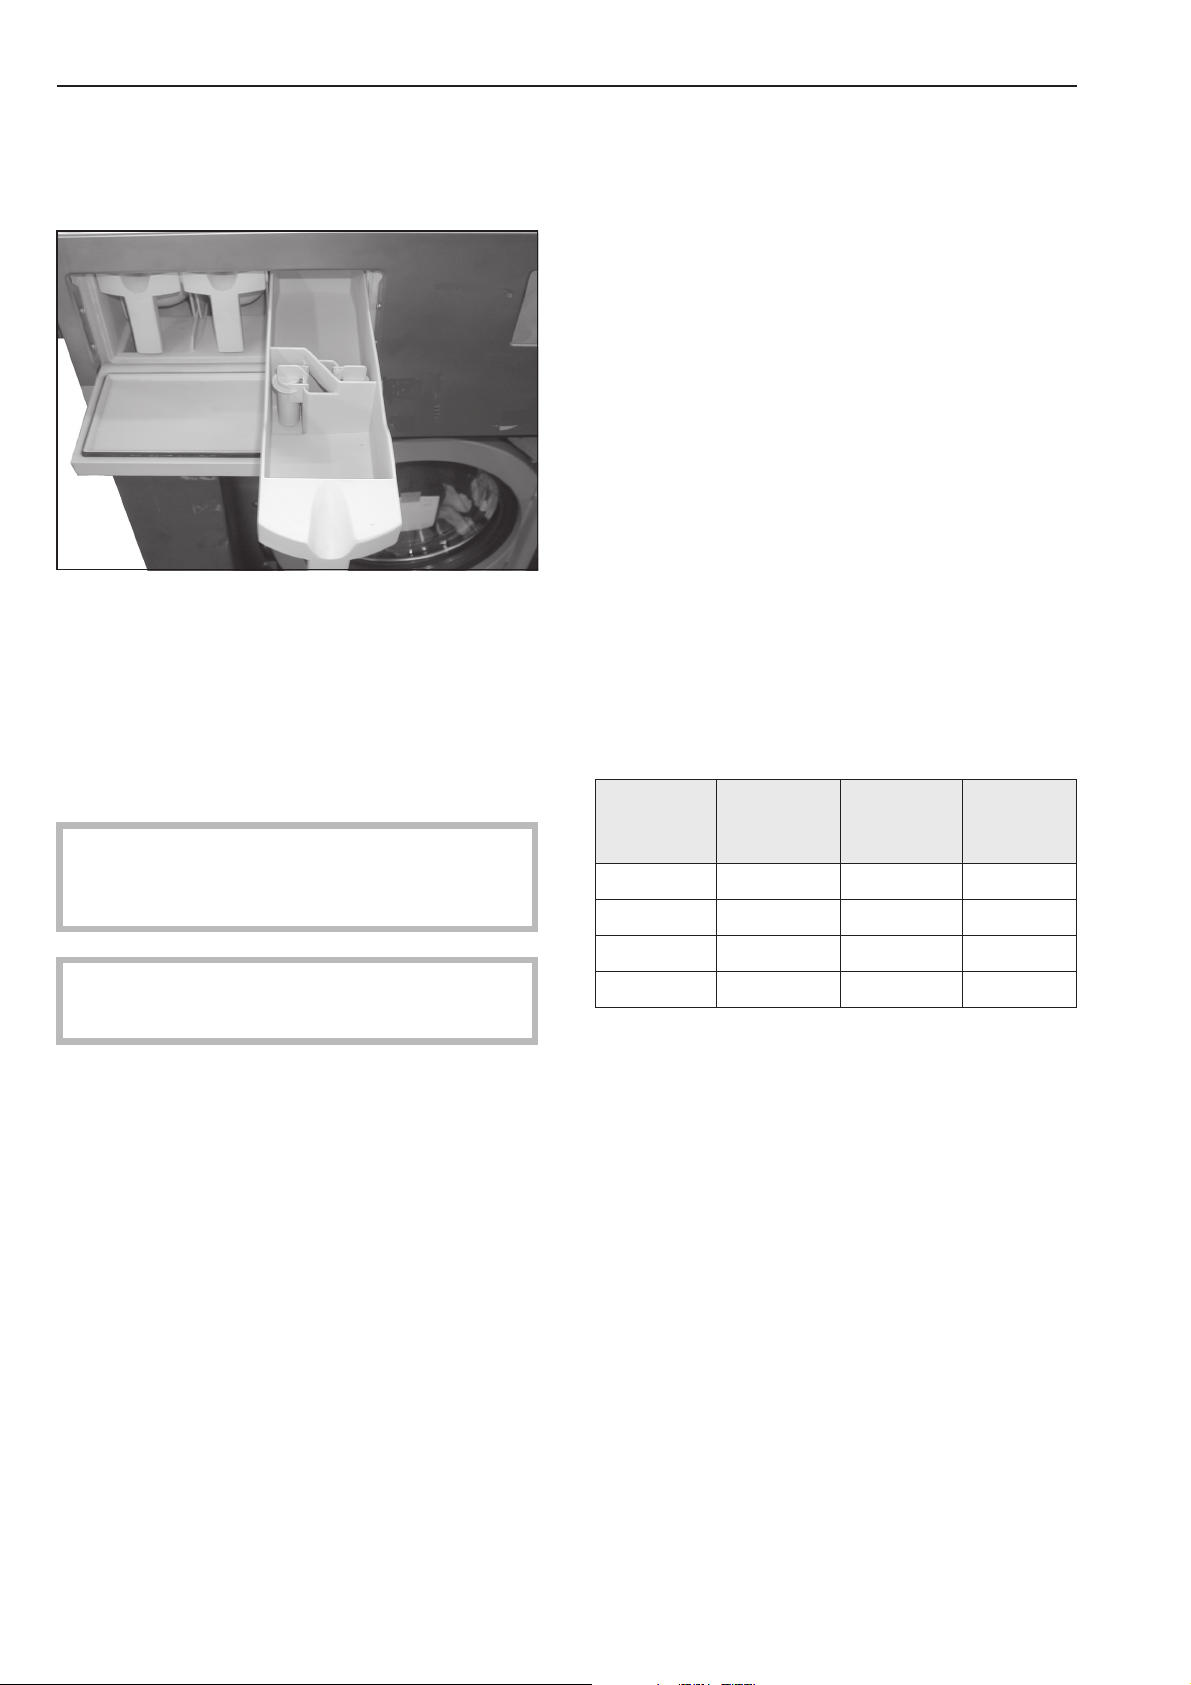
c Detergent dispenser drawer
Pull the handle to open the compartment.
d Drum door
Pull the door handle to open the drum door.
Do not use force to open it.
e Door handle
The door handle is fitted with a safety device
to ensure that the door lock functions
correctly (see page 31).
M.-Nr. 06 533 414 9
Page 10
Description of the machine
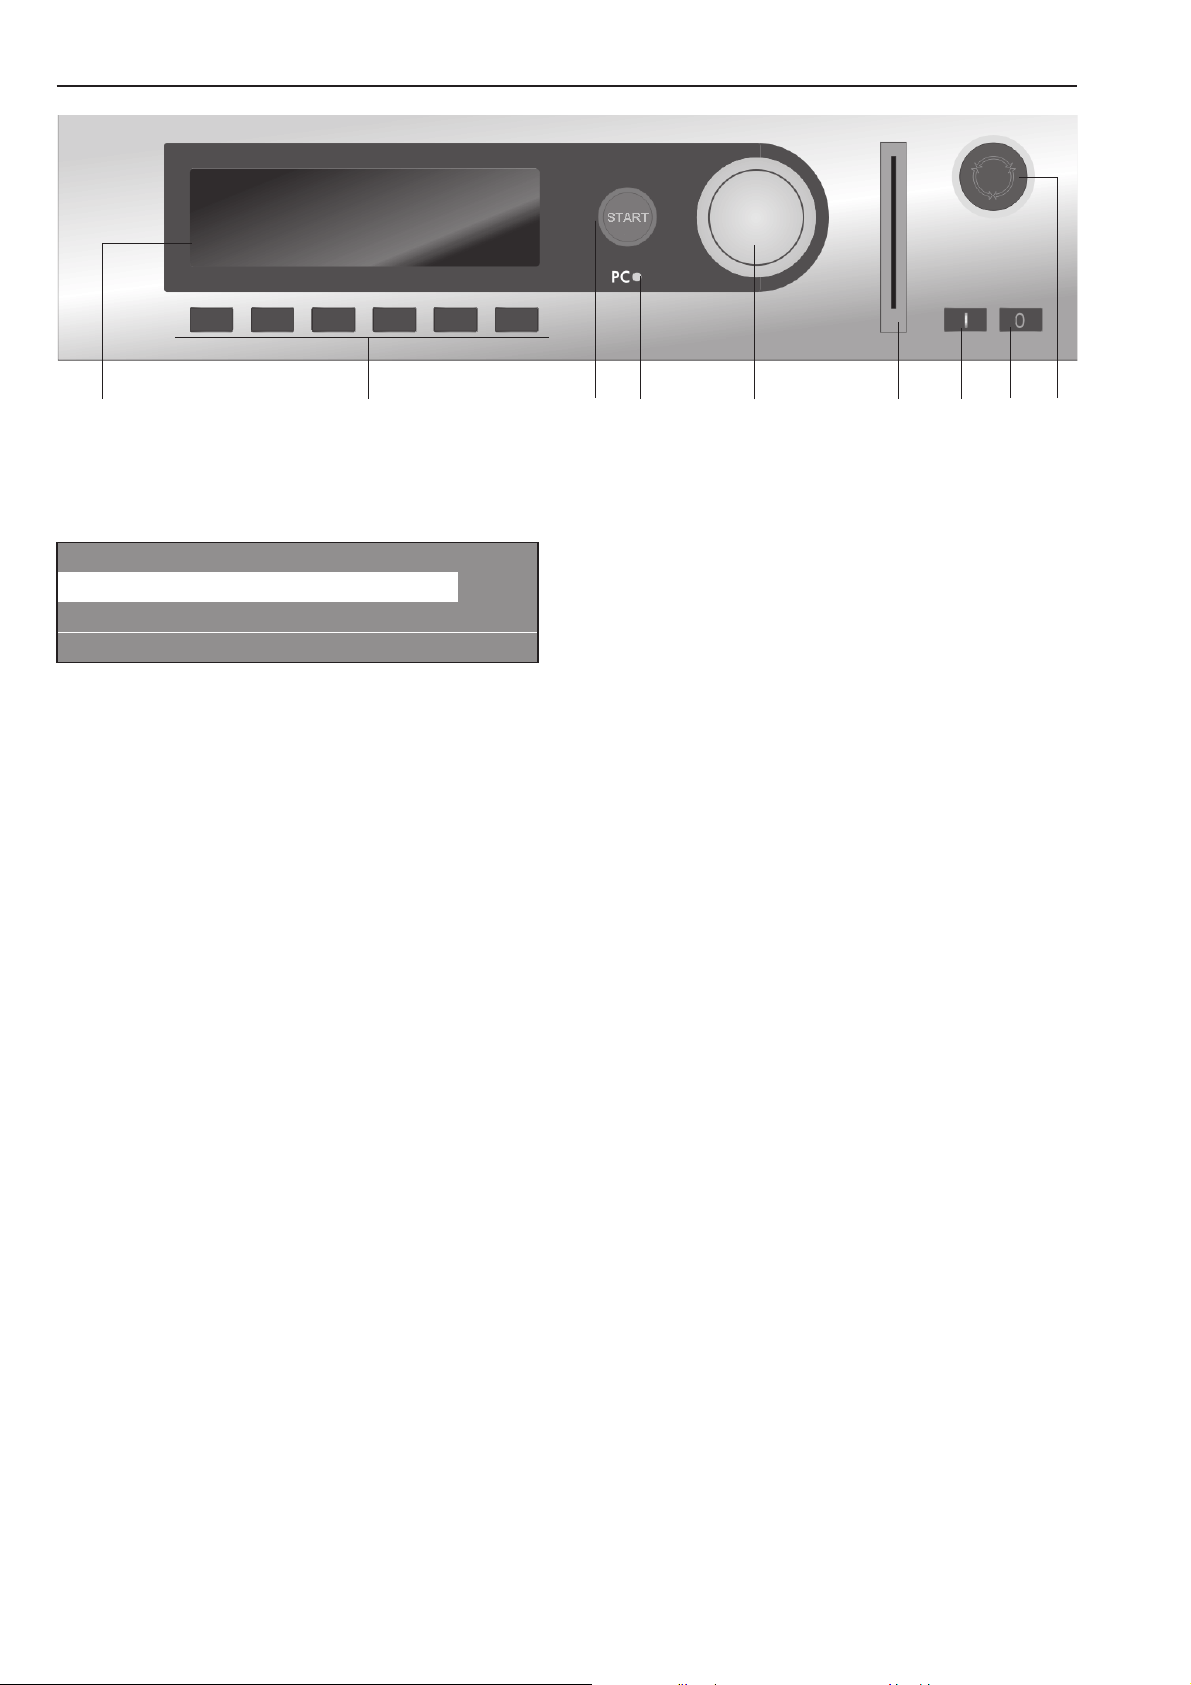
a b c d e f g h i
Control elements
a Display
1 Cottons 90 °C
2 Cottons 60 °C
3 Cottons intensive 60 °C
i FC A
After switching on the "Welcome" display will
appear for a short time followed by the
programme list. The most recently used
programme is highlighted.
b Function buttons
The six buttons underneath the display are
the function buttons. These buttons have
specific functions depending on the status
of the machine.
These functions will be listed in the display
above the buttons and will be highlighted
once selected.
If the machine is reprogrammed to "Direct
button allocation" the first 6 programmes
listed in the display can be selected directly
via these buttons.
c START button
The lightring will flash when a selected
programme can be started. Pressing the
Start button will start the programme. After a
programme has started, pressing this button
will show the display as it was before the
start of the programme.
d PC / Optical interface
This interface is used for transferring data to
the control unit from a PC and vice versa.
e Rotary selector
Turning the selector brings up options and
menus in the display.
Pressing the selector confirms your
selection.
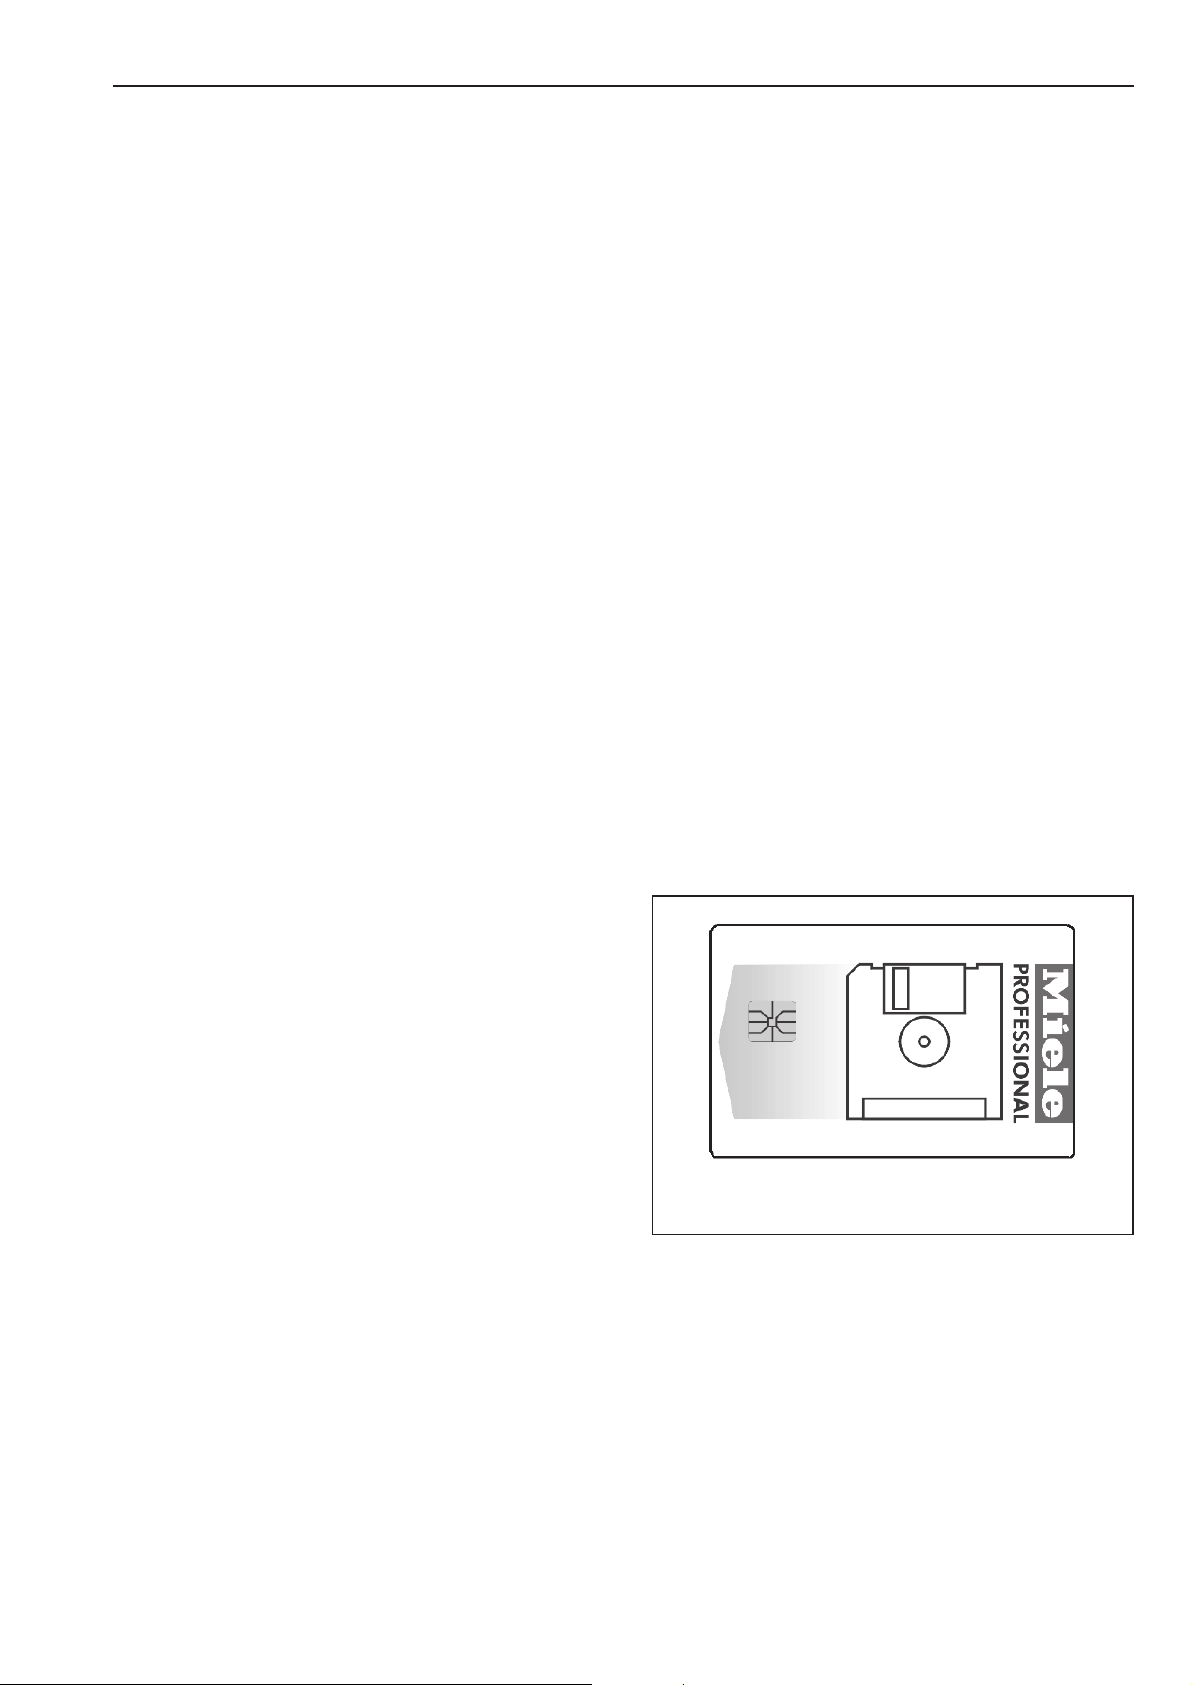
f Chip card reader
When a chip card is inserted, the
programmes on the chip card can be used.
Insert the card in the direction of the arrow
(on the card).
g I Mains on switch
Switches the machine on.
h 0 Mains off switch
Switches the machine off.
i Emergency stop switch
Only for use in an emergency.
Press the red button to switch the machine
off. After the problem has been resolved,
turn the red dial clockwise to release it. Then
press the Start button to continue the
interrupted programme.
10 M.-Nr. 06 533 414
Page 11
Description of the machine
Function buttons
Pressing the button activates the function
and pressing the button again deactivates it.
f Stop/End
The function button on the right-hand side is
used to stop a programme after it has
started.
Pressing it again finishes the programme.
+i Block plus
The relevant programme block (e.g.
Pre-wash) is added to the programme.
m Starch stop
Press this button if you wish to laundry to be
starched.
k Without spin
Press this button if you do not want the
laundry to be spun after being rinsed.
FC Settings
Press this button to switch to another
language temporarily.
m Start time
Press this button before the start of a
programme to display the message that a
start time can be selected.
$ Programme locked
Once a locked programme has been
started, the End button can only be used to
stop and cancel it during the first minute.
) Programme unlocked
ß Dispensing
ä Dispensing switched off
\ Operating data
> I < 0- Setting (calibration)
If the display does not show 00.0 when the
drum is empty press this button to reset it.
D Data transfer
Chip card operation
A chip card is available to order as an
optional extra. It is supplied wtihout any
programmes.
See the programming instruction booklet for
information on transferring data from the
control unit to the chip card and vice versa.
K Information
Press this button to call up programme
information in the display.
q Water drainage
i Manual control
See the programming instruction booklet.
ü Change order
The order of the programme in progress can
be changed or programme blocks can be
repeated.
A Back
Takes you back to the previous display.
e/- Indicates more information on the
next / previous line
S Save
See the programming instruction booklet.
The chip card can store a maximum of 30
programmes, each with 6 blocks. The back
of the chip card can be labelled.
M.-Nr. 06 533 414 11
Page 12
How to wash correctly
The machine must be commissioned by a
Miele service technician or a dealer
authorised by the manufacturer before it is
used for the first time. For gas heated
machines in the U.K. this must be carried
out by a Gas Safe registered technician.
Open the on-site stopcocks for water and
^
depending on the type of heating, gas or
steam.
Switch on the on-site mains switch.
^
Press the "On" I switch to switch the
^
machine on.
Sort the laundry
Miele
PROFESSIONAL
PW 61x1
Welcome
A "Welcome" message will appear in the
display.
1 Cottons 90 °C
2 Cottons 60 °C
3 Cottons intensive 60 °C
i äFC A
This is followed by the programme list (with
the most recently used programme
highlighted).
Turn the selector dial to highlight the
programme you want. The programme can
be then started by simply pressing the
START button.
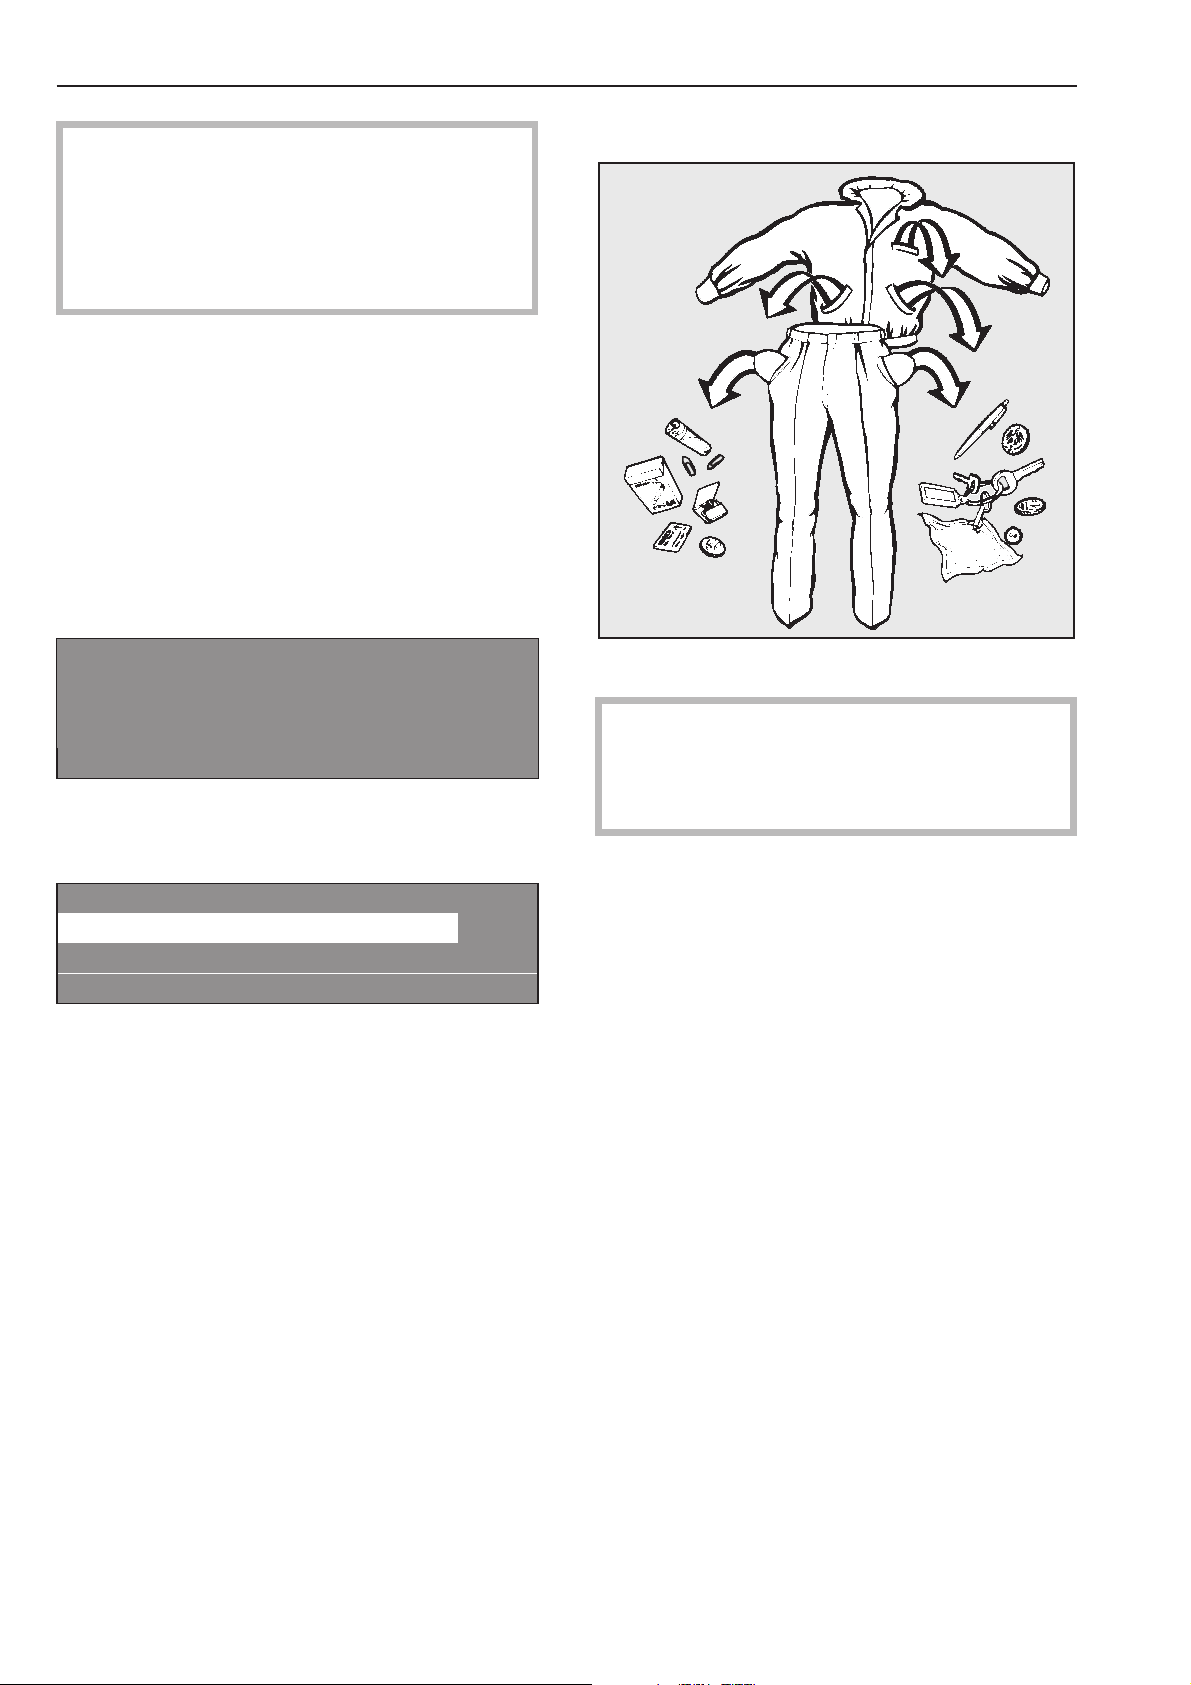
Empty any pockets.
^
Foreign objects (e.g. nails, coins, paper
clips, etc.) can cause damage to
garments and components in the
machine.
12 M.-Nr. 06 533 414
Page 13
How to wash correctly
Maximum loads for the standard
programmes
(Dry weight of laundry)
PW 6101 PW 6131
1 Cottons 90°C
2 Cottons 60°C
3 Cottons intensive 60°C
4 Cottons 30°C
5 Cottons intensive 30°C
13 Linen/towels 90°C
14 Linen/towels 60°C
max. 10 kg max. 13 kg
6 Minimum iron 60°C
7 Minimum iron intensive 60°C
8 Minimum iron 30°C
9 Minimum iron intensive 30°C
max. 5 kg max. 6.6 kg
10 Delicates
max. 2 kg max. 2.6 kg
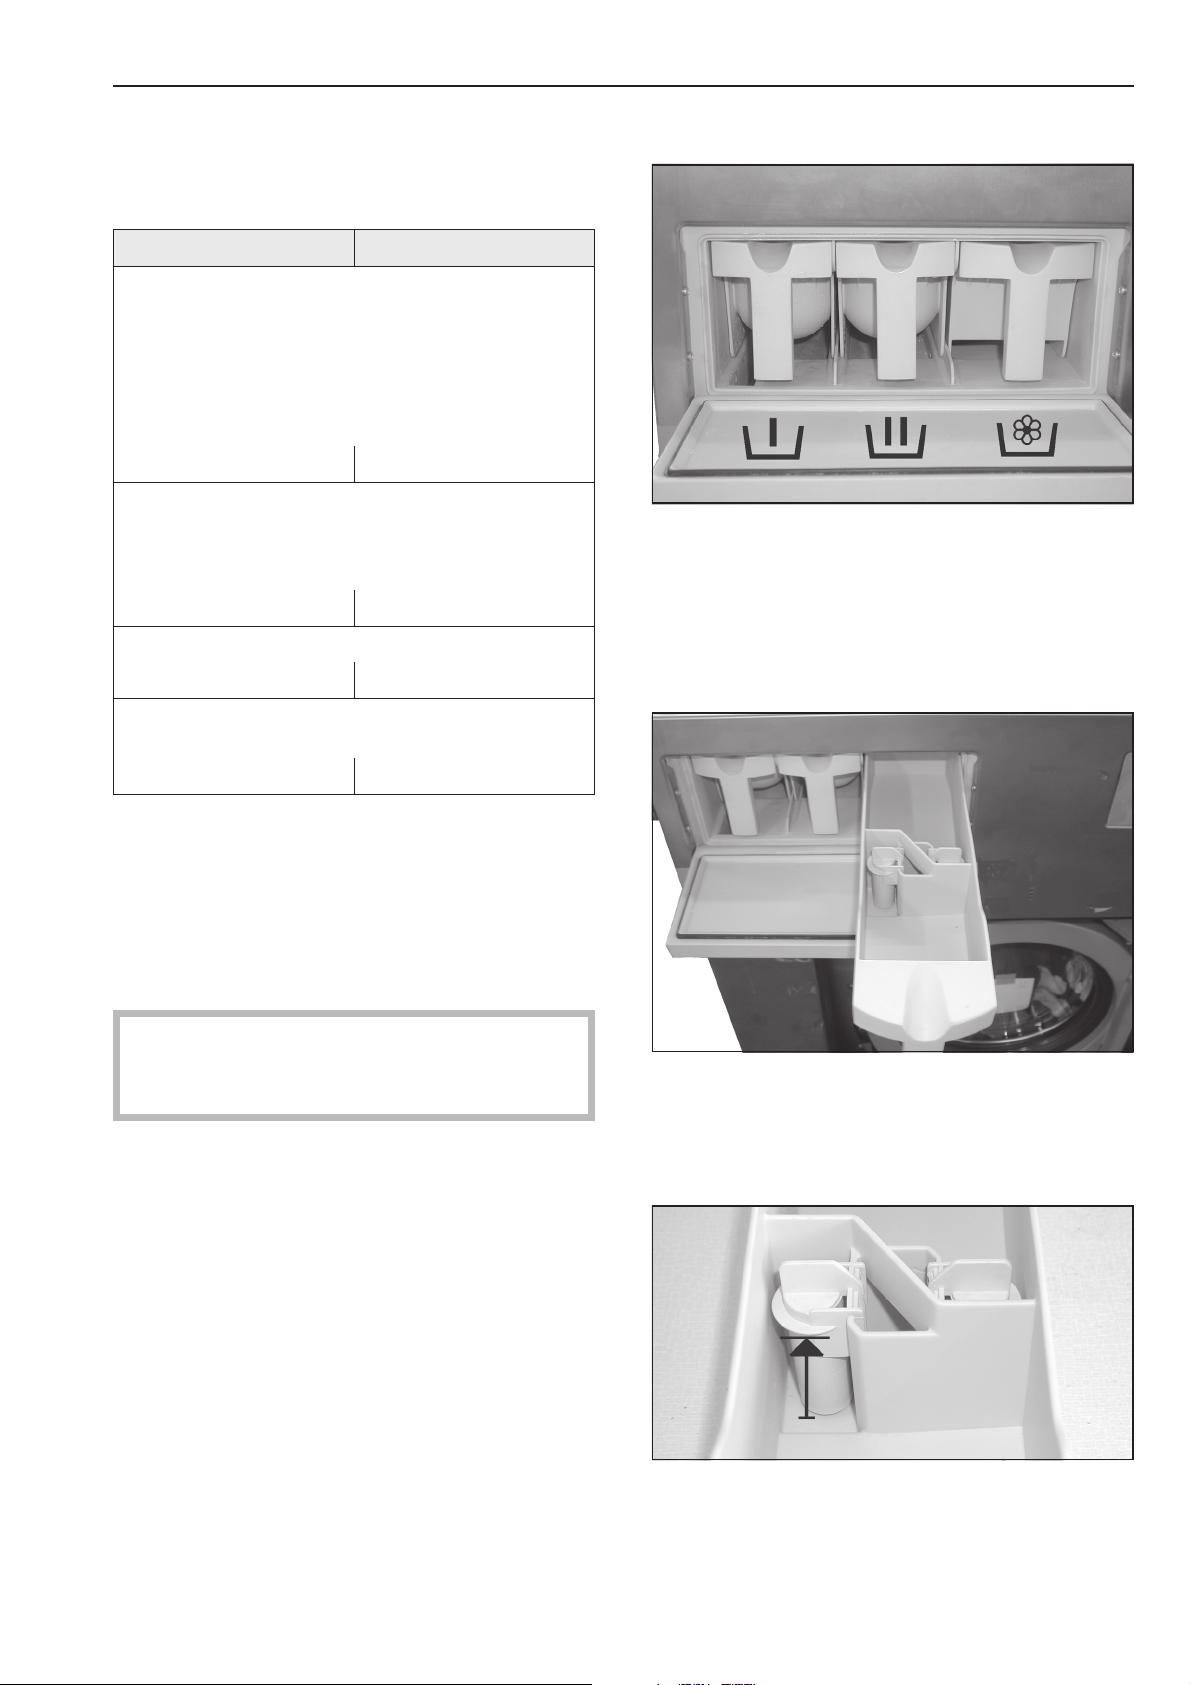
Add cleaning agent
With the standard programmes, place
^
detergent for the main wash in
compartment j and if wished, detergent
for the Pre-wash in compartment i.
Place fabric conditioner in the front section
of compartment p
11 Woollens 30°C
12 Handwashable woollens 30°C
max. 4 kg max. 5.2 kg
The maximum load for other programmes is
given in the relevant programme overview.
^ Load the laundry
^ Close the drum door with the door handle.
Do not slam it shut.
Make sure that no garments are caught
between the drum door and the drum
opening.
^
Place other liquid washing additives, e.g.
liquid starch, in the rear section of the
compartment p (only if the machine has
been programmed for this function).
^
Do not exceed the level marker in
compartment p. Otherwise the agent will
run through the siphon into the suds
container.
M.-Nr. 06 533 414 13
Page 14
How to wash correctly
Bleaching agents
Only use bleaching agents on textiles with
the x symbol on the wash care label.
?
Liquid bleaching agents may only be placed
in the compartment designated for them.
This is to ensure that the agent is added
automatically at the second rinse. Liquid
bleaching agents should only be used with
coloureds if the textile manufacturer's wash
care label states that the textile is colour fast
and suitable for bleaching.
A 3rd rinse cycle must be programmed in
if bleach is to be used (see Profitronic
programming manual).
Detergent dispensing
It is important to avoid adding too much
detergent as this causes excessive foam.
Do not use detergents which create a lot
–
of foam.
Follow the detergent manufacturer's
–
instructions for use.
The right amount to dispense will depend on
the following:
The amount of laundry
–
The water hardness level
–
The soiling level of the laundry
–
The amount to dispense
Take the water hardness into account and
follow the detergent manufacturer's
instructions on the packaging.
Water hardness levels
Hardness
range
I soft 0 - 1.3 0 - 7
II medium 1.3 - 2.5 7 - 14
Water
properties
Hardness
level in
mmol/l
German
scale
°d
,
Frequent use of chlorine increases the
risk of component damage.
Only use dyes, colour run, dye removers
and descaling agents which are specified
as being suitable for use in washing
machines. Always observe the
manufacturer's instructions carefully.
III hard 2.5 - 3.8 14 - 21
IV very hard above 3.8 above 21
Check with your local water supplier if you
do not know the hardness level in your area.
Gas heated machines
On gas heated machines the suds solution
is pumped around the heater elements. This
additional agitation of the suds solution
creates foam. It is therefore important to use
a low-foaming detergent and not to use too
much detergent.
If over-foaming occurs use a reduced foam
detergent or call in a detergent application
specialist.
14 M.-Nr. 06 533 414
Page 15

How to wash correctly
Select a programme
Standard programmes:
1 Cottons 90°C
2 Cottons 60°C
3 Cottons intensive 60°C
4 Cottons 30°C
5 Cottons intensive 30°C
6 Minimum iron 60°C
7 Minimum iron intensive 60°C
8 Minimum iron 30°C
9 Minimum iron intensive 30°C
10 Delicates
11 Woollens 30°C
12 Handwashable woollens 30°C
13 Linen/towels 90°C
Select the Pre-wash, Starch stop or
Without spin additional option
Confirm the selection of the programme by
^
pressing the rotary selector.
For this example, the following will appear in
the display:
1 Cottons 10.0 / 10.0 kg
90 °C Main wash
Rinses 1100 rpm
+im k m A
If wished you can now select the Pre-wash
^
programme block, by pressing the +i
function button.
When the +i function button is pressed,
the following will appear in the display:
1 Cottons 10.0 / 10.0 kg
40 °C Pre-wash
90 °C Main wash 1100 rpm
+i mk m A
14 Linen/towels 60°C
15 Separate Starch
16 Separate rinse and spin
17 Separate spin
18 Separate drain
^
Turn the rotary dial to select a programme
(e.g. Programme 1 Cottons).
For this example, the following will appear in
the display:
18 Separate drain
1 Cottons 90 °C
2 Cottons 60 °C
i äFC A
"+i" is highlighted.
Press the function button again to deselect
the function.
Press the m Starch stop button if the
laundry is to be starched.
Press the k Without spin button if you do
not want the laundry to be spun after being
rinsed.
If you do not wish to make any further
alterations to the programme:
^
Press the START button. The programme
will start.
M.-Nr. 06 533 414 15
Page 16

How to wash correctly
If you wish to make alterations before the
start of the programme, e.g. to the load
size, temperature or spin speed:
Load weight
You can enter the weight of the load
manually before the start of the programme.
1 Cottons 10.0 10.0 kg
40 °C Pre-wash
90 °C Main wash e
+im k m A
Turn the rotary dial until "Load" (10.0 /
^
13.00 kg) is highlighted. Press the dial to
confirm your selection. Turn the dial to
alter the weight and confirm your selection
by pressing it.
Temperature in 1 °C increments from cold,
15 to max. 95 °C .
^ Turn the rotary dial to select the
"Temperature" field (40°C for pre-wash)
and press it to confirm your selection.
Spin speed in 25 rpm increments from 0,
300 to max. 1200 (PW 6101) or 1100 rpm
(PW 6131).
Turn the rotary dial to select the "Spin
^
speed" field (1100 rpm for the final spin)
and press it to confirm your selection.
1 Cottons 10.0 / 10.0 kg
90 °C Main wash
Rinses 1100 rpm
+im k m A
Turn the rotary dial to alter the spin speed
^
and then press it to confirm your selection.
Maximum spin speeds
PW 6101 PW 6131
1200 rpm 1100 rpm
^ Press the START button. The programme
will start.
1 Cottons 10.0 / 10.0 kg
40 °C Pre-wash
90 °C Main wash e
+im k m A
^
Turn the rotary dial to alter the temperature
value and then press it to confirm your
selection.
16 M.-Nr. 06 533 414
Page 17

Once a programme has started the
programme sequence will appear in the
display.
1 Cottons
40 °C Pre-wash 20 °C
Main wash Ready at 12:35
+im k mKf
In the 2nd line of the display, pre-wash in
this example, the actual suds temperature
will also be shown.
1 Cottons
90 °C Main wash 60 °C
Rinse 1 Cold Ready at 12:35
+im k mKf
Once the pre-wash programme block has
finished the programme block for the main
wash will appear in the 2nd line of the
display together with the actual suds
temperature. Under that the following
programme block will be listed. Rinse 1 in
this example.
The time that the programme will finish is
shown on the right hand side of the display.
1 Cottons
90 °C Main wash 60 °C
Rinse 1 Cold Ready at 12:35
+im k m K f
Pressing the K "Information" button will call
up further information about the programme
e.g.:
How to wash correctly
Block 2: Rinse 2
Block step: Wash time 1
Actual level: 22 mm e
Rqrd. level: 60 mm
Actual temperature: 35 °C
Rqrd. temperature: 60 °C e
1 Cottons
Spin speed: 40 rpm
Rhythm: 12 / 3 -
A
Press the A "Back" button to return to the
^
programme sequence display.
Open the door at the end of the
programme
The following message will appear in the
display at the end of the programme as long
as there is no water in the machine and the
drum is stationary:
1 Cottons
Programme finished
The door can be opened.
m FC A
At the same time an acoustic buzzer will
sound for 5 seconds to let you know that the
programme has finished.
^
Pull the door handle to open the drum
door.
1 Cottons
Start date and time: 10.7.2003
Start time: 9:47 e
A
Time after start: 0h 23 min
Time left: 0h 11min
Time after start: 0h 23 min e
Time left: 0h 11min
Repeat: No
Area 3: rinse e
Important: If the door will not open press
against it and then pull on the handle again.
Do not use force to open it.
^
Unload the drum.
M.-Nr. 06 533 414 17
Page 18

How to wash correctly
If the programme was interrupted with water
in the drum, or if the programme was
stopped, for example, during the spin the
following message will appear in the display:
1 Cottons
Programme finished. Water in the drum.
m FC A
or
1 Cottons
Programme finished. Drum still rotating.
m FC A
The machine door is locked. Never
,
use force to try and open the door.
^ Press the q "Water drainage" function
button or select the Separate spin
programme and press the START button.
Open the door at the end of the
programme.
If no more laundry is to be processed:
^ Leave the drum door open to air the
machine.
^
Switch the machine off by pressing the
"Off" 0 button and then switch off at the
on-site mains switch.
^
Close all stopcocks for water, gas and
steam as applicable.
18 M.-Nr. 06 533 414
Page 19

Card operation
Cards on which a programme has been
saved can only be used on the machine
type for which they have been written.
Unwritten cards can be used universally.
Press the "On" I button to switch the
^
machine on.
The Welcome screen will appear.
If the card if inserted the wrong way round
the following message will appear in the
display:
Card fault
§
Insert the card the right way round in the
^
Card incorrectly inserted in card reader.
A
card reader.
If the card is not the right one for the
machine it is being used in the following
message will appear in the display:
Card operation
Programmes on the card are only suitable
for machine type PW 6161.
A
^ Insert the card in the reader.
The programmes listed on the card will
appear in the display.
Card operation
17 Masks 45 °C
18 Minimum iron 60 °C
i ßFC A
^
Use the rotary dial to highlight the
programme you want to use. Press the
rotary dial to select the programme you
have highlighted.
^
Press the START button. The programme
will start.
^ Insert the correct card for the machine in
the card reader.
Card access operation
Programmes requiring special procedures
are written on to a card which is then used to
run the programme.
"Card access" has to be activated via the
supervisor level in the machine.
The machine will then only run programmes
by using a card (on which one programme
has been saved). Programmes in the
machine's control unit cannot then be
accessed.
After pressing the START button you can
remove the card from the reader. The
programme is deleted from the machine's
memory once it has finished.
,
Never insert any other type of card or
object into the card reader!
M.-Nr. 06 533 414 19
Page 20

Additional options
Language selection
The language shown in the display can be
changed briefly before starting a
programme if you wish. To do so use the
button underneath the flag symbol.
The language will revert back to the default
setting 5 minutes after the end of a
programme with the door open.
1 Cottons 90 °C
2 Cottons 60 °C
3 Cottons intensive 60 °C
i FC A
If you press the FC button the following will
appear in the display:
Settings Back <Main menu Language
Supervisor level
FC A
^ Press the rotary dial to confirm your
selection of the "Language" menu.
Settings deutsch
Language F english (GB)
español
FC A
^
Turn the rotary dial to highlight the
language you want and then press the dial
to confirm your selection.
Start date and time
If you want a programme to start at a later
time use the m button for "Start date and
time".
To set a date and time
After selecting your programme, e.g.
Cottons in the example here, the following
will appear in the display:
1 Cottons 10.0 / 16.0 kg
90 °C Main wash
Rinses 1000 rpm
+im k m A
Press the m "Start date and time" button.
^
The following (example) will appear in the
display:
1 Cottons 10.0 /16.0 kg
Start time: 16 : 10 Start date: 2.4.2003
After selection press the start button.
A
The actual time and date will then appear.
The input field for hours will be highlighted.
^ Press the rotary dial to change the hour.
Turn the rotary dial to alter the hour and
then press it to confirm your selection.
^
Then turn the rotary dial to select the
"Minutes" field and press it to confirm your
selection.
Turn the dial to alter the minutes and then
press it to confirm your selection.
^
Then turn the rotary dial to select the "Start
date" field and press it to confirm your
selection.
Turn the dial to alter the date and then
press it to confirm your selection.
^
Do the same for the month and the year.
20 M.-Nr. 06 533 414
Page 21

Additional options
After setting the required start date and time:
Press the START button and the
^
programme selected will commence at the
time specified.
The display will now contain the following
information:
1 Cottons 10.0 / 16.0 kg
90 °C Main wash
16:15 -2.4.2003 Start 6:00 -3.4.2003
+im k m A
The current time and date as well as the
start time will be displayed.
If the door is opened again you will have to
^
press the START button again.
To cancel the start time and date function
Press the m "Start date and time" button
again or press the A"Back", and any
changes will be rejected.
With pre-wash
Starch
Starching via the dispenser drawer
Starch can be selected with all the standard
programmes (except for Separate spin and
Separate drain) before starting a programme
by selecting the m "Starch stop" option.
The m field will be highlighted in the
display.
Pressing the button again deselects the
option.
1 Cottons
mProg. stopped. Starch stop pressed.
The door can be opened.
i ü f
Once the "Starch stop" programme stage is
reached the words "Starch stop" will start
flashing in the display.
Make up the starch solution following the
manufacturer's instructions on the
packaging and then add it to the front
section of compartment p. If necessary
dilute the starch with water. The wash time is
automatically increased by 4 minutes.
For heavily soiled laundry the standard
programmes 1 to 9, 13, 14, can have a
pre-wash added. To do so press the
"Block+" button i.
Pressing the button again deselects the
option.
When the "Blockplus" + i button is
pressed, the following will appear in the
display:
1 Cottons 14.0 / 16.0 kg
40 °C Pre-wash
Main wash e
+i mk m A
The "+i" field will be highlighted in the
display.
Press the START button to continue the
programme.
Dispensing directly into the drum
Make the starch up following the
manufacturer's instructions on the
packaging. Once the "Starch stop"
programme stage has been reached open
the door and add the starch. Close the drum
door
The following message will appear in the
display again:
1 Cottons
mProg. stopped. Starch stop pressed.
The door can be opened.
i ü f
Press the START button and the programme
selected will commence
M.-Nr. 06 533 414 21
Page 22

Additional options
Without spin
"Without spin" can be selected with all the
standard programmes (except for Separate
spin) before starting a programme by
selecting the k "Without spin" option.
The k field will be highlighted in the display.
Pressing the button again deselects the
option.
1 Cottons
kProg. stopped. Without spin pressed.
i ü f
Once the "Without spin" programme stage is
reached the words "Without spin" will start
flashing in the display.
To finish the programme without spinning
and with water left in the drum press the f
button.
To continue with a spin press the START
button.
Programme stop
To halt the programme press the f button.
The programme remains stationary.
1 Cottons
Programme stop
i ü f
To continue the programme press the START
button.
Programme cancellation
Press the f button twice in succession to
cancel a programme.
If there is still water in the machine or if it
was cancelled during spinning the following
(example) will appear in the display:
1 Cottons
Programme finished. Water in the drum.
i ü f
or:
1 Cottons
Programme stopped. Drum rotating.
i ü f
To open the door press the q "Water
drainage" button or select the Separate spin
programme and press the START button.
22 M.-Nr. 06 533 414
Page 23

Additional options
Programme cancelled with a locked
programme
It is not possible to stop or cancel a
programme if the programme is locked.
1 Cottons
90 °C Main wash
Locked Ready at 12:35
) A
The display will show that the machine is
locked if you try to cancel the programme
with the f button.
To cancel the programme you will first have
to select the ) "Unlocked" function and
then enter a password to unlock the
programme.
After entering the password the following will
show in the display:
Unlock programme?
Changing the programme order
The order of the programme in progress can
be changed or programme blocks can be
repeated.
Press the f button and the programme
^
will stop.
1 Cottons
Programme stop
i ü f
After pressing the ü button the current
^
area, block or step will appear in the
display.
See also "Programme structure" in the
Progamming Manual.
Reorganise -> 1 Cottons
Programme stop
Area 2: Main wash e
S A
S A
Press the S "Save" button to return to the
normal display and the programme can now
be cancelled.
1 Cottons
90 °C Main wash 60 °C
Rinse 1 Ready at 12:35
mKf
Area: 2 Main wash
Block 1: Main wash
Step: Wash time 2 -
S A
^ Turn the rotary dial to alter the area and
then press it to confirm your selection.
Area: Select 1 Pre-wash, 2 Main wash or 3
Rinses and confirm your selection.
^
Turn the rotary dial to alter the block and
then press it to confirm your selection.
Block: Select Pre-wash 1-10, Main wash
1-10 or Rinses 1-10 and confirm your
selection.
^
Turn the rotary dial to alter the step and
then press it to confirm your selection.
Select the required programme step and
confirm your selection.
^
Press the S "Save" button and then press
START to reorganise the programme order
or press the A "Back" button to override
the programme stop and not change the
programme order.
M.-Nr. 06 533 414 23
Page 24

Standard programme overview
Programme Fabric Programme sequence
Cottons 90°C Cotton, linen and mixed
fibre bed linen and
towelling
Pre-wash 40°C optional
Main wash 90°C
2 x Rinses
Final rinse with hot water*
Final spin
Cottons 60°C Lightly soiled cotton, linen
and mixed fibre bed linen
and towelling
Pre-wash 30°C optional
Main wash 60°C
2 x Rinses
Final rinse with hot water*
Final spin
Cottons
intensive 60°C
Cotton, linen and mixed
fibre bed linen and
towelling
Pre-wash 30°C optional
Main wash 60°C
2 x Rinses
Final rinse with hot water*
Final spin
Cottons 30°C Lightly soiled cotton, linen
and mixed fibre bed linen
and towelling
Pre-wash 30°C optional
Main wash 30°C
2 x Rinses
Final spin
Cottons
intensive 30°C
Cotton, linen and mixed
fibre bed linen and
towelling
Pre-wash 30°C optional
Main wash 30°C
2 x Rinses
Final spin
Additional
functions
+i
m
k
+i
m
k
+i
m
k
+i
m
k
+i
m
k
Minimum iron 60°C Lightly soiled synthetic and
mixed fibres
Minimum iron
Synthetic and mixed fibres Pre-wash 30°C optional
intensive 60°C
Minimum iron 30°C Lightly soiled synthetic and
mixed fibres
Minimum iron
Synthetic and mixed fibres Pre-wash 30°C optional
intensive 30°C
Delicates Synthetic and artificial
fibres
Woollens 30°C Machine washable
woollens and wool
mixtures
Pre-wash 30°C optional
Main wash 60°C
2 x Rinses
Final spin 1 min.
Main wash 60°C
2 x Rinses
Final spin 1 min.
Pre-wash 30°C optional
Main wash 30°C
2 x Rinses
Final spin 1 min.
Main wash 30°C
2 x Rinses
Final spin 1 min.
Pre-wash optional
Main wash 60°C
Drum rhythm "gentle"
2 x Rinses
Final spin 1 min.
Main wash limited to max. 40°C
Wash rhythm "Gentle +"
2 x Rinses
Final spin 1 min.
+i
m
k
+i
m
k
+i
m
k
+i
m
k
+i
m
k
m
k
Handwashable
woollens 30°C
Washable woollens and
wool mixtures
Main wash limited to max. 30°C
Wash rhythm "Gentle +"
m
k
2 x Rinses
Final spin 1 min.
24 M.-Nr. 06 533 414
Page 25

Standard programme overview
Linen/towels 90°C White cotton, linen and
mixed fibre bed linen and
towelling
Linen/towels 60°C Colourfast cotton, linen
and mixed fibre bed linen
and towelling
Separate starch
Separate rinse
and spin
Separate spin For articles which have
Separate drain Drainage
* Hot water rinse
The 1 Cottons 90°C, 2 Cottons 60°C and 3 Cottons 60°C intensive standard programmes are
programmed for hot water rinses. If the machine is connected to an on-site hot water supply it
is advisable to carry out the final rinse with hot water.
The residual water in the laundry will be lower after spinning.
- The laundry will be warm.
This will lead to savings in both time and energy if the laundry is then dried in a tumble dryer or
passed through a rotary ironer immediately after washing.
To deselect the hot water rinse please read the Programming manual.
Articles which have been
washed by hand and only
need to be rinsed and
spun in the machine.
been washed and only
need to be spun
Pre-wash 40°C
Main wash 90°C
2 Rinses
Pre-wash 40°C
Main wash 60°C
2 Rinses
Rinse
Final spin m
Final spin
+i
m
k
+i
m
k
k
M.-Nr. 06 533 414 25
Page 26
Optional modules
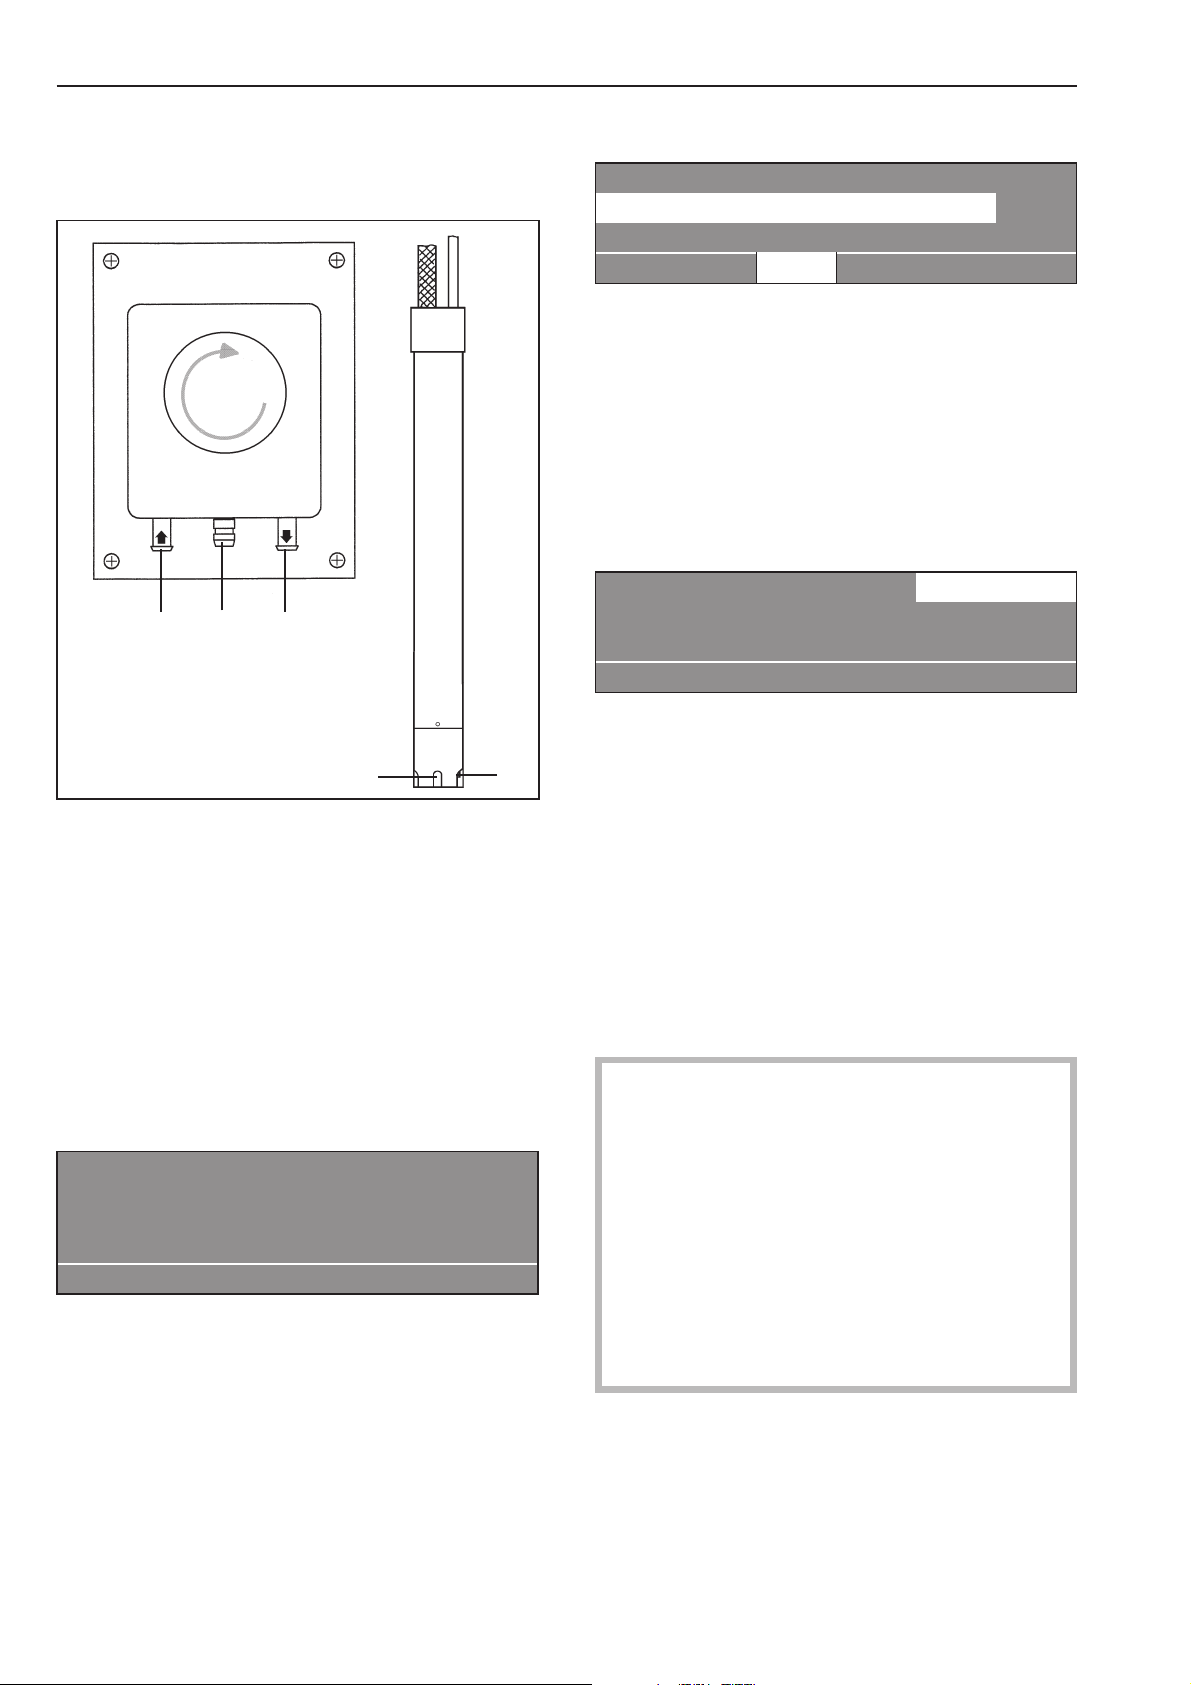
Liquid dispensers
Dispenser pump Suction pipe
a
c
b
To deselect the liquid dispensing system
1 Cottons 90 °C
2 Cottons 60 °C
3 Cottons intensive 60 °C
i ä FC A
You can switch off the liquid dispensing
system manually before starting a
programme by setting the ä "Dispensing"
system to off.
Once the programme has started
dispensing will not take place via the
dispenser pumps and the following will
appear in the display:
1 Cottons 10.0/10.0 kg
90 °C Main wash
Rinses 1000 rpm
+im k m A
d
e
Gas heated machines have a multi-function
module and are pre-equipped for operation
a Hose connection socket (suction side)
using 6 Miele dispenser pumps.
b Hose connection socket (pressure side)
c Leakage outlet (in case of damaged
Dispensing amount
hose)
d Suction inlet
e Level checker for empty indicator. The
Please follow the manufacturer's instructions
on the packaging for dispensing
requirements.
pump and the machine will switch off
,
automatically if a liquid agent container is
empty.
This is particularly important when
using a combination of cleaning agents
and special application products. Only
Dispensing system fault
ö
Fill dispenser 1
Press the start button
if
use the product for the application
described by the manufacturer, to avoid
any material damage or the occurrence of
strong chemical reactions. Confirm with
the detergent manufacturer that their
The machine will warn you that the liquid
dispensing agent level is insufficient.
product can be used in combination with
another type of product.
The programme can be restarted after
refilling the liquid agent container by
pressing the START button.
Liquid agents should be allowed to settle to
room temperature before use to ensure that
their viscosity level is correct and thus
ensure the correct amount is dispensed.
26 M.-Nr. 06 533 414
Page 27

Commissioning the dispensing pumps
Before the liquid dispensing pumps can be
used the liquid agent must be drawn up into
the system and the amount to be dispensed
set.
Dispenser calibration
Optional modules
Dispenser calibration ~ Main menu
Dispenser pump 1
Dispenser pump 2 e
Select dispenser pump.
^
A
The dispensers need to be calibrated to
ensure the dispenser pumps supply the
correct amount of liquid agent.
To calibrate the dispensers with the machine
switched off:
Press and hold the rotary dial in.
^
Then switch the machine on with the "On"
^
switch.
Dispenser calibration ~ Main menu
Dispenser pump 1
Dispenser pump 2 e
A
Selection choice: Dispenser pumps 1 to 13
After selecting a dispenser pump the
following message will appear in the display:
Dispenser calibration ~ Dispenser pump 1
V: 100ml t: 0s no
Dispenser calibration ~ Dispenser pump 1
V: 100ml t: 0s no
0/1 S A
Press multi-function button 0/1.
^
To stop the pump press the 0/1 button
again, or it will switch off automatically
after a period of 60 seconds.
Measure the amount collected in the
^
measuring flask.
Dispenser calibration ~ Dispenser pump 1
V: 100ml t: 30s P: 200.0 ml/min
0/1 S A
^ Enter this value in field "V:". Flow rate P in
ml/min will be calculated electronically.
^ Press the S "Save" button to save the
values measured in memory.
0/1 S A
The amount to dispense can be set between
0 and 9999 ml in 1 ml increments.
^
Press the 0/1 multi-function button and the
dispenser hose will start to fill. Press the
0/1 button again to stop filling the hose.
^
Direct the hose of the dispenser pump
being calibrated into a suitable measuring
flask.
,
Avoid contact with the skin and eyes,
and wear suitable protective clothing.
^
Press the A "Back" button to return to the
main menu.
^
Reconnect the hose.
Cleaning and maintaining the dispensing
system
The dispensing system should be flushed
through with clean warm water every two
weeks and before any longer down-times to
prevent the risk of blockages and corrosion.
^
The suction pipes should be cleaned
through with water.
^
Place the suction pipes in a container of
hot water (40 - 50°C).
^
Then use the dispenser calibration system
to operate each pump until the dispensing
system is thoroughly flushed through.
^
After reconnecting all parts check all
connections, hoses, dispensers and seals
for leakages.
M.-Nr. 06 533 414 27
Page 28

Optional modules
Peak load cut-out
If the peak-load cut out function is activated
the heating will switch itself off and any
programme running will be stopped. The
following message will appear in the display:
1 Cottons
Prog. stopped. Peak load cut-out.
Programme will continue.
i ü f
Once the peak load has finished the
programme will continue automatically as
before.
Communication module
This machine can be linked to a PC via a
communication module.
The shaft for the communication module is
located at the rear of the machine.
An editor programme is available from Miele.
Selection choice:
Total data
–
In this option all programme data is collated
and summarised.
Programme data
–
Programme data contains all the data called
up during a programme.
Delete data
–
- Module (Total data including programme
data)
- Total data (only delete total data)
- Programme data (only delete programme
data)
Pressing the button again deselects the \
"Operating data" option.
If there is no more memory available in the
operating data module a message will
appear after pressing the START button to
say that the operating data will be
overwritten.
Operating data
By pressing the \ "Operating data" button
the operating data module can be used to
read or delete operating data either before
the start of a programme, or after it has
finished.
1 Cottons 90 °C
2 Cottons 60 °C
3 Cottons intensive 60 °C
i \ FC A
After pressing the \ button the following
will appear in the display:
Operating data module
Total data
Programme data e
\ A
If you press the A "Back" button or do not
press the START button within 30 seconds
the display will revert to the way it was
before starting the programme.
28 M.-Nr. 06 533 414
Page 29

Total data
Operating data module
Total data
Programme data e
\ A
After selecting Total data the following
(example) will appear in the display:
Optional modules
Programme data ~ 1 Cottons
Date: 21.05.2004 Start time: 11:30
Date: 21.05.2004 Start time: 12:30 e
\ A
Select the required programme start from
the list for programme 1 Cottons and confirm
your choice by pressing the rotary dial.
Operating data module ~ Total data
Total time power on: 200,987 h
Operating hours: 123456 h e
\ A
Other options:
Total time power on: 200,987 h
Operating hours: 123,456 h
Duration heating active: 123,456 h
Duration drive motor active: 93,456 h
Programme starts: 23,456
Programme stops: 567
Programme cancellations: 67
Water volume: 1,234,567 l
Amount of laundry: 1,234,567 kg
Liquid agent: 2,345 l
Energy: 12,345,678 kWh
Programme data
Operating data module
Programme data
Delete data e
\ A
After selecting Programme data the
following (example) will appear in the
display:
Operating data module~ Programme data
1 Cottons 90 °C
2 Cottons 60 °C e
\ A
Select the programme you want from the list
and press the rotary dial to call up a list of all
programme starts including date and start
time for that programme (Cottons 90°C in the
example).
Programme data ~ 1 Cottons
Date: 21.05.2004 Start time: 11:30
Name: Smith e
\ A
Other options:
Town: Abingdon
Serial number: 12345678
Machine type: PW 6131
Amount of laundry: 13 kg
+ Button: Activated
Starch stop button: Activated
Without spin button: Not activated
Programme start: 11:30
Programme finished: 12:05
Total operating time: 0 h 35 min
Electrical energy: 12.5 kWh
Gas energy: 0 kWh
Steam energy: 0 kWh
Total volume of water: 140 l
Max. water temperature: 95 °C
Max. drain temperature: 45 °C
Programme change: 2
and pressing the rotary dial only the last 3 stops and starts
will be displayed.)
(after making your selection
Programme fault: None (only the last 3 faults are
saved.)
Area 1: Pre-wash (after making your selection and
pressing the rotary dial you can display the area or the
block.)
Operating time: 6 min
Water volume: 20 l
Dispensing phase 1: Amount ml (after making
your selection and pressing the rotary dial 6 dispensings
are displayed.)
Max. temperature: 12 °C
Holding time: 6 min
Dispensing phase 2: No
M.-Nr. 06 533 414 29
Page 30

Optional modules
Delete data
Operating data module
Programme data
Delete data e
\ A
After selecting Delete data the following
message will appear in the display:
Operating data module~ Delete data
Module: 21.02.2004
Total data: 12.07.2004 e
\ A
The module menu option can be used to
delete the total data and programme data
from the operating data memory.
The total data option can only be used to
delete the total data from the operating data.
The programme data option can only be
used to delete programme data from the
operating data.
After making your selection and pressing the
rotary dial you will be prompted to enter your
password.
Weighing sytem
If the machine has been equipped with a
weighing system module the weight of the
laundry in the machine will be displayed in
0.2 kg increments. The maximum load for
the programme selected will show next to
the actual weight in the drum.
If when the drum is empty the load display is
not showing "00,0", you will need to press
the -> I <- " to reset it
1 Cottons 00,0/ 16.0 kg
60 °C Main wash
Rinses e
+im k m -> I <- A
If after calibrating the sensor to 0 there was
still laundry in the drum the following will
appear in the display:
1 Cottons —,- / 16.0 kg
60 °C Main wash
Rinses e
+im k m -> I <- A
Press the -> I <- button again to set it to 0.
Password:____
ABCDEFGHIJKLMNOPQRSTUVWXYZ
0123456789
KSA
After keying in your password or inserting
your supervisor level key card in the reader
the following security prompt will appear in
the display:
Delete operating data?
S A
After pressing the S button the data will be
deleted!
If there is too much laundry in the drum, e.g.
because it is wet, a nominal load will be
calculated after starting the programme and
this value will also be saved by the operating
data module.
At the end of the programme when the drum
has stopped rotating the display will show
the residual moisture content of the laundry.
1 Cottons
Programme finished Residual moisture 60 %
The door can be opened.
m FC A
30 M.-Nr. 06 533 414
Page 31
Problem solving guide
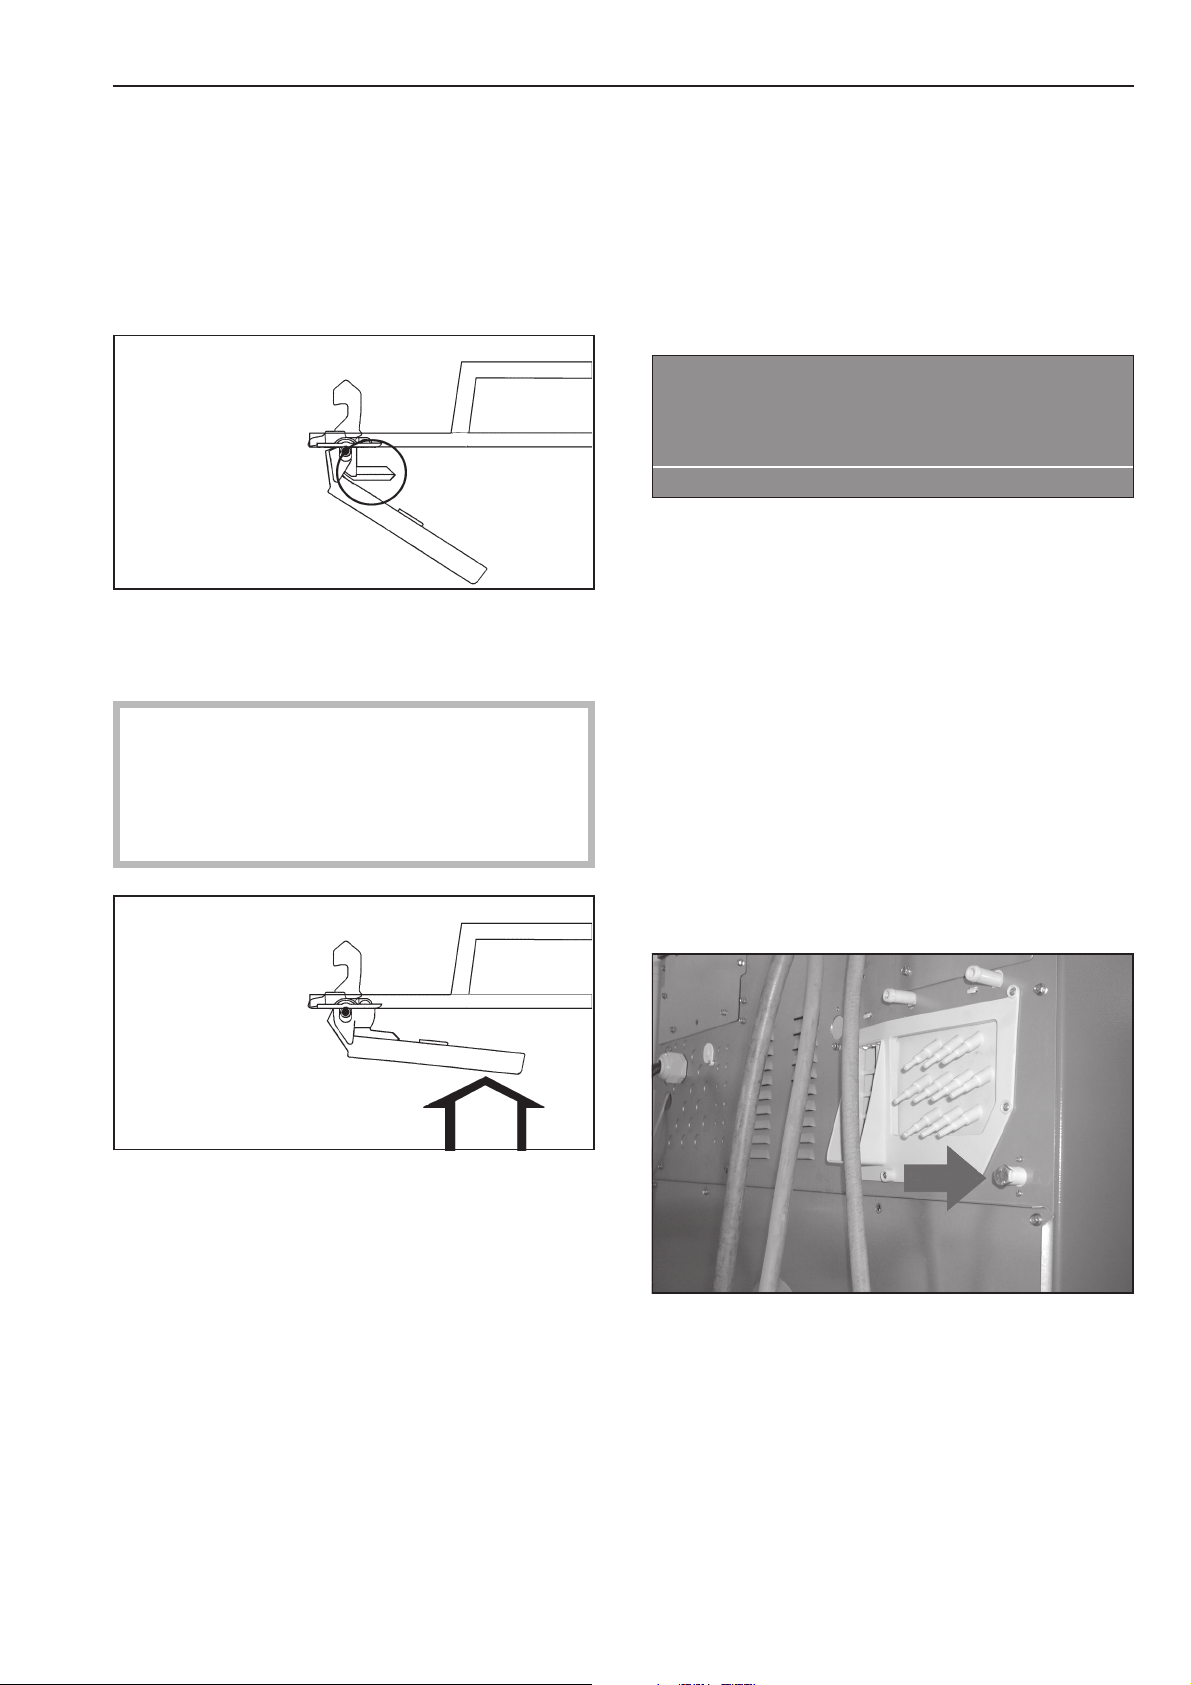
The door will not open
Press against the door handle and at the
^
same time switch the machine off and then
on again. Then try to open the door again.
If you still cannot open the door:
The door handle safety mechanism has
disingaged itself. The door handle cannot be
opened or closed.
Power cut during a wash
programme - Emergency door
release
With a short power cut:
The programme remains in the last position,
and when power is restored the following
message appears in the display:
Power cut
y
Programme stop
Press the start button.
f
Press the START button and the
^
programme selected will continue.
With an extended power cut:
Switch the machine off.
^
The safety mechanism is designed to
protect the handle and the lock from
damage, for instance, if too much force is
being used in an attempt to open the
door.
^
Press firmly against the door handle until
you clearly hear the safety mechanism
engage.
You will now be able to open and close the
door again (as long as there is no water in
the machine).
^ Switch off the mains supply at the on-site
mains switch.
^ Close all stopcocks for water, gas and
steam as applicable.
To remove the laundry the drain valve will
need to be opened manually and the drum
door unlocked manually.
^
Open the drain valve by partially opening
the venting screw (spanner size 17 mm) at
the rear of the machine. Do not unscrew it
completely. Drain off the suds. Take care
as some water will seep out of the screw
opening (approx. 100 mm). This should be
collected in a suitable container.
M.-Nr. 06 533 414 31
Page 32
Problem solving guide
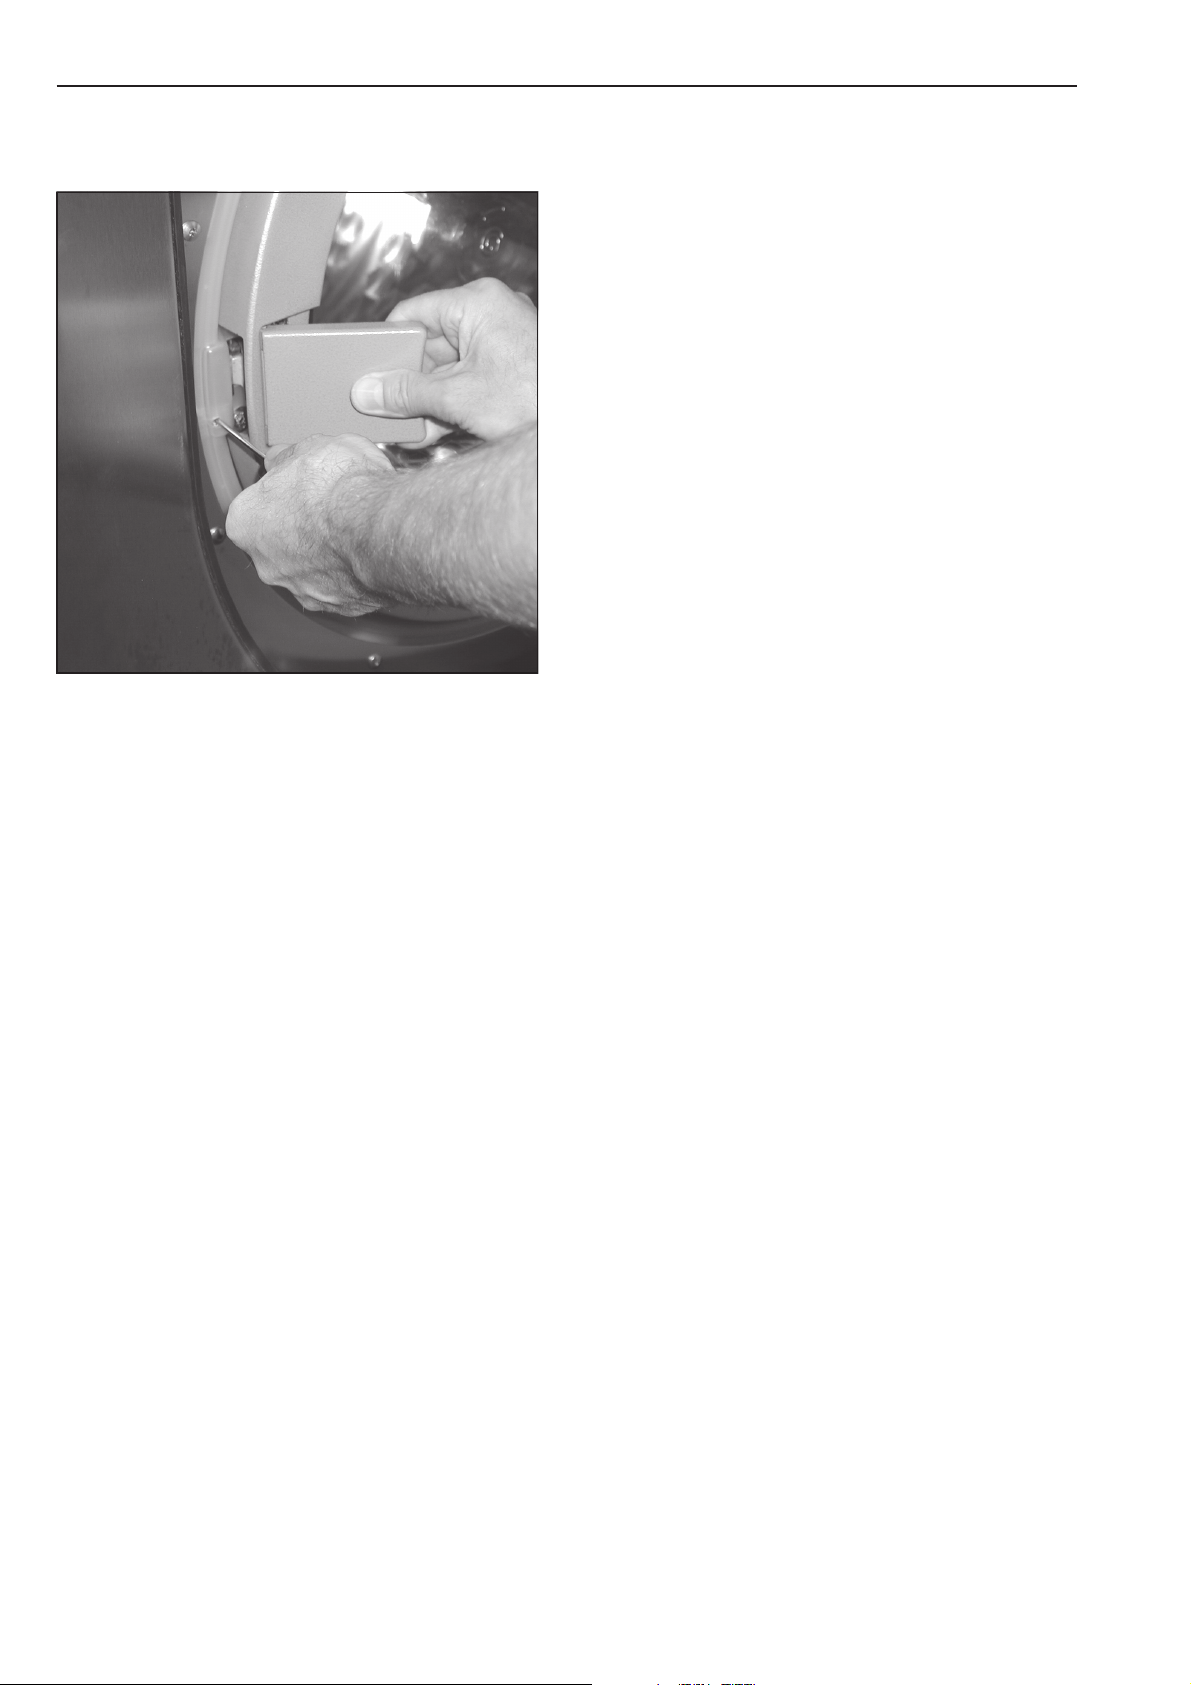
Tighten up the venting screw again and
^
check that there is no leak.
^ First position the screwdriver in the
opening, then push it in and hold it
securely.
Press against the door handle with your
right hand, and then pull on the door
handle to open the door.
Never use force to open the door!
^ Remove the laundry
Very soft water
–
In areas with very soft water (hardness
^
level 1) dispense less detergent as
specified by the detergent manufacturer.
Soiling level of the laundry
–
For lightly soiled laundry dispense less
^
detergent in accordance with the
detergent manufacturer's instructions.
Residues e.g. detergent on the laundry
–
Run a pre-wash without detergent and
^
without selecting a temperature.
Laundry which has been soaked before
washing must be thoroughly rinsed before
running a wash programme.
Small loads
–
Reduce the amount of detergent
^
dispensed according to the size of the
load.
– Drum speed too high during the wash
(Profitronic controls)
^ Reduce the drum speed and the wash
rhythm.
– Gas-heated washer-extractors
On gas heated machines the suds solution
is pumped around the heater elements. This
additional movement of the suds can
produce extra foam.
Possible reasons for increased
levels of foaming
–
Detergent type
^
Only use detergents formulated for
commercial washer-extractors. Domestic
laundry detergents are not suitable.
–
Using too much detergent
^
Follow the manufacturer's dosage
recommendations on the packaging and
take local water hardness levels into
account.
–
Heavy foaming detergent
^
Use a low foaming detergent or contact
your detergent supplier for advice.
^
Follow the dispensing instructions given
above.
^
Use a low lather detergent.
^
On Profitronic controlled machines and in
special circumstances it is possible to
reduce the drum speed and the wash
rhythm during the heating-up phase.
32 M.-Nr. 06 533 414
Page 33

Large articles of laundry stretching
during the spin cycle
Large articles of laundry (e.g. table cloths)
can stretch during the spin cycle. This can
generally be prevented by reprogramming
the machine.
Please contact the Miele Service
Department.
Service interval
Problem solving guide
Power cut
y
Programme stop
Press the start button.
Once power has been restored press the
^
START button.
This error message can also indicate that
the winding on the motor has overheated.
f
If after switching the machine on the
following message appears in the display
the machine will need to be serviced by the
Miele Service Department.
Service interval 1
§
The display will go out after 5 minutes.
Call the Service Department
A
Error messages
,
Repairs to electrical, gas or steam
operated machines may only be carried
out by a suitably qualified person in
accordance with national and local safety
regulations. In the U.K. repairs to gas
heated machines must only be carried out
by a Gas Safe registered technician.
Allow the motor to cool down.
^
Water inlet fault
M
Call the Service Department
if restart does not work.
if
^ Check the stopcock and then press the
START button.
Door lock fault
a
Call the Service Department
if restart does not work.
if
^ Push firmly on the door handle until you
hear the lock engaging. Confirm by
pressing START.
A message will appear in the display if there
is a problem either before starting a
programme or once it has started:
The display remains dark.
There is no power to the machine.
^
Check the mains switch and the on-site
fuses.
M.-Nr. 06 533 414 33
Page 34

Problem solving guide
Heating system fault
§
To continue the programme with heating
^
Programme stop
Press the start button.
if
press the START button. If a disinfection
§
If the programme still will not start please
^
call the Service Department.
Gas system fault
Call the Service Department
if restart does not work.
if
programme was running the programme
will be cancelled if this message appears.
Call the Service Department.
§
Drive motor fault
m
Programme stopped. Press the start button.
Motor overheating.
if
Clean the lint filter as described in "Cleaning
and care" and then press the START button.
Gas system fault
Clean the lint filter.
Press the start button.
if
On gas heated machines heavy foaming can
Allow the motor to cool down.
^
lead to a fault.
Drain valve fault
Imbalance fault
§
Call the Service Department
if restart does not work.
i A
q
Call the Service Department
if restart does not work.
if
^ Check the on-site drainage system and
The imbalance is too great and the
then press the START button.
imbalance switch has been activated.
A defective drain valve must be repaired by
^ Switch the machine off and on again. Then
a Miele Service technician only.
press the START button.
Dispensing system fault
Gas system fault
§
Open the gas tap.
Press the start button.
if
ö
Replace the empty container with a full one.
Fill dispenser 1
Press the start button.
if
If this message appears before a
programme has been started:
^
Open the gas tap and then press the
§
Card fault
Card incorrectly inserted in card reader.
START button.
If this message appears during a
if
programme the pressure in the gas supply
^
has dropped because of other gas heated
appliances operating at the same time.
Insert the card the right way round in the
card reader.
^
Press the START button.
34 M.-Nr. 06 533 414
Page 35
After sales service
In the event of any faults please contact your
Dealer or the nearest Service Department.
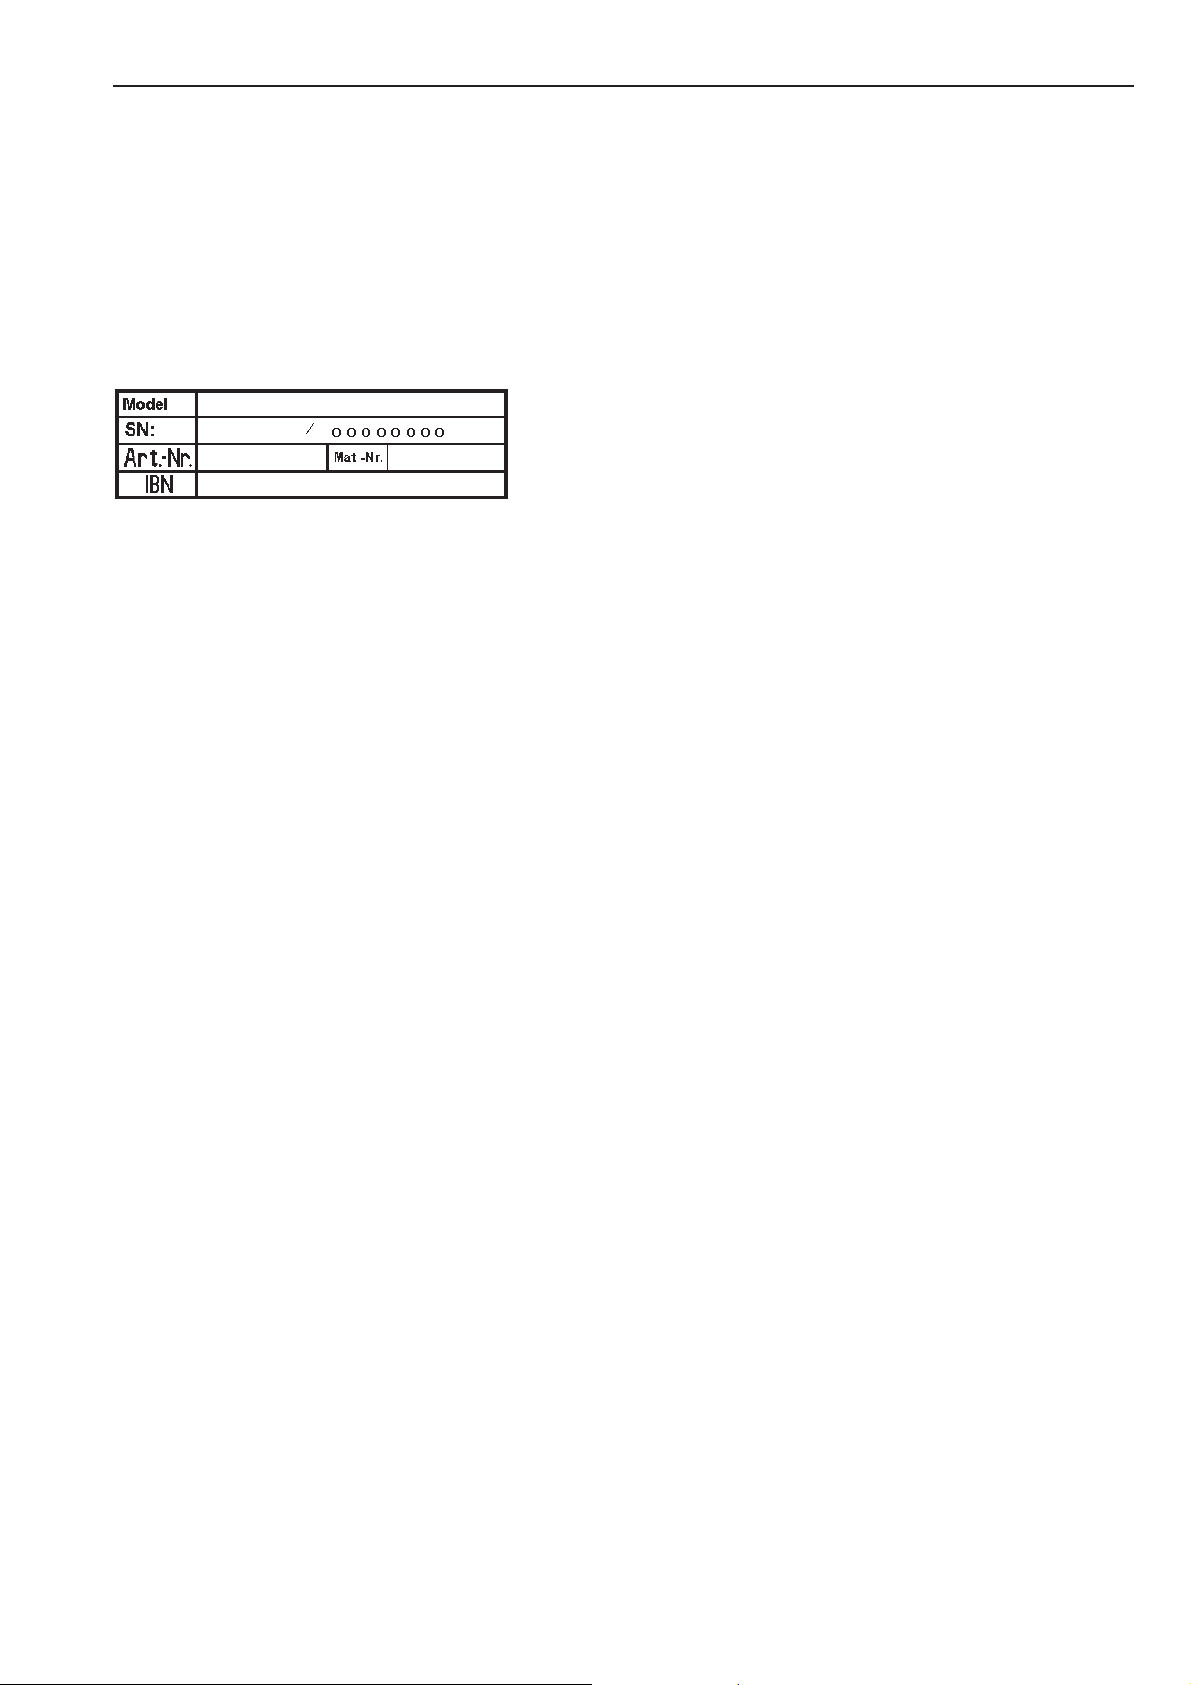
When contacting the Service Department,
please quote the Model, Serial number (SN)
and Material number (M.Nr) of your
machine. These are shown on the data
plate.
This is visible above the door aperture or at
the back of the machine.
Please let the Service Department know any
error message that has appeared in the
display.
Problem solving guide
Should you require spare parts ensure that
you only use original Miele Spare Parts
(and remember to let the Spare Parts
Department know the model, serial number
and material number of your machine).
M.-Nr. 06 533 414 35
Page 36

Cleaning and care
The machine should be cleaned and
checked over immediately after use where
possible.
Do not use a pressure washer or hose
,
to clean the machine.
The housing, control panel and any
plastic components should be cleaned
using a suitable mild cleaning agent,
applied with a soft damp cloth. Rub dry with
a soft cloth after cleaning.
Do not use abrasive cleaning agents as
they will damage the surface material.
Parts of the housing made from stainless
steel can be cleaned using a suitable
proprietary stainless steel cleaning agent.
Any deposits on the door seals should be
wiped off using a damp cloth.
To clean the drip channel and the siphons in
the detergent dispenser remove the
detergent dispenser cover. If a siphon is
blocked a bottle brush can be used.
The grille over the cooling fan at the back of
the machine should be checked for soiling
from time to time and cleaned if necessary.
Clean the detergent dispenser, dispenser
compartments and siphons
The detergent dispenser, dispenser
compartments and siphons must be cleaned
after each use with warm water to thoroughly
remove any residues of detergents or other
agents. If the machine is not going to be
used for a while the detergent dispenser
should be left open to air the compartment.
The siphon in the dispenser compartment
for fabric conditioner should also be
cleaned.
Rust
The drum and suds container are
manufactured from rust free stainless steel.
Water with a very high iron content, or
foreign objects such as paper clips, metal
buttons etc. which get into the drum with the
laundry can cause superficial rusting in the
drum and suds container.
To prevent this happening the drum and
suds container should be checked and
cleaned regularly and if rusting does occur it
should be removed using a proprietary
cleaning agent for stainless steel.
The door seals should be checked for
foreign objects regularly and cleaned as
described above.
Leave the door ajar after cleaning to allow
the machine to dry.
Remove the siphon and clean with hot water.
Then put it back in place.
36 M.-Nr. 06 533 414
Page 37
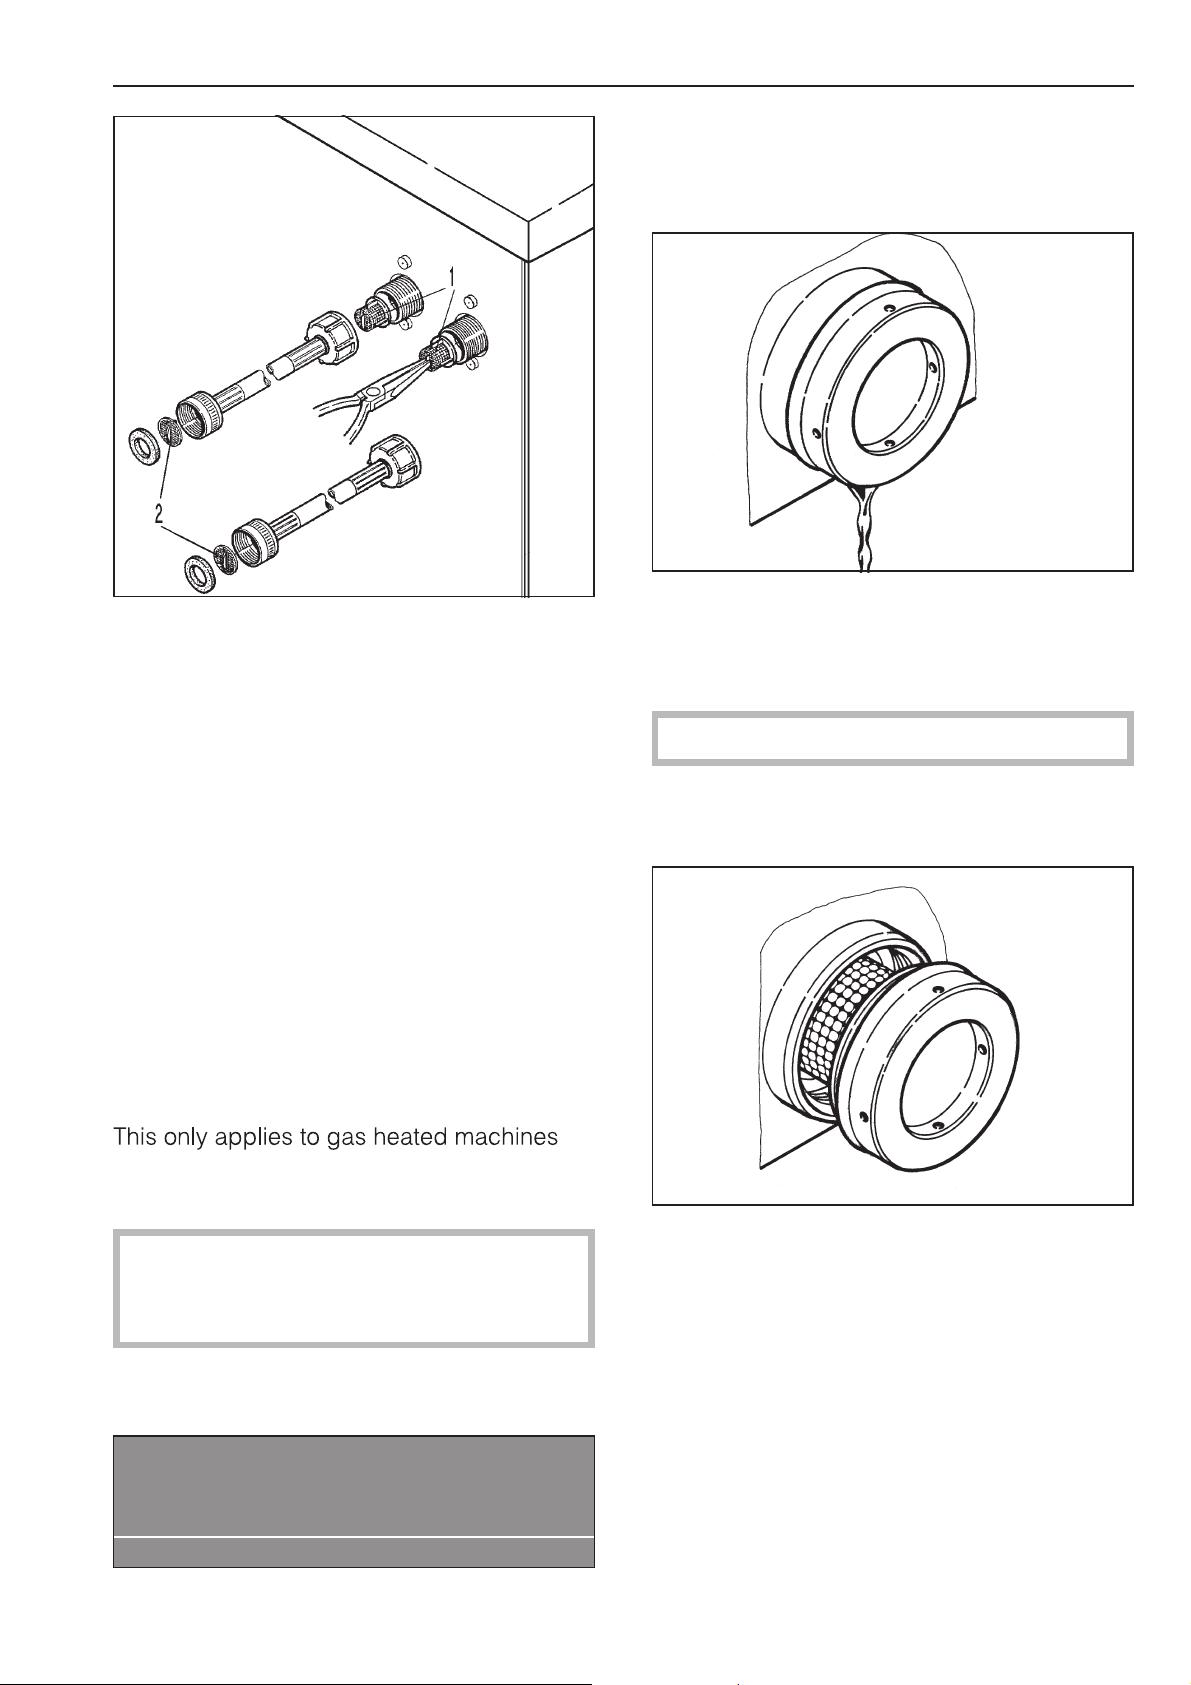
The filters in the water inlet valve (1) and in
the inlet hoses (2) should be checked from
time to time for soiling and cleaned if
necessary.
Cleaning and care
Clean the filter as follows:
Place a suitable 2 litre capacity container
^
below the filter.
Turn the lid a half to a full turn
^
anti-clockwise to open the filter.
Any water in the filter housing will then
drain out.
Warning - the water may be hot.
When the machine is not in use
If the machine is not going to be used for a
longer period of time (4 weeks or more) the
drum should be rotated several times after
the last use. The drum should then be
rotated every 4 weeks to prevent damage to
the bearings.
Cleaning the filter
The filter should be checked regularly for
and cleaned when necessary.
,
Carry out this check only after a
programme has finished and the suds
container has been emptied.
A blocked filter is indicated by a flashing
fault message in the display.
Gas system fault
^ Empty the dish and repeat as many times
as is necessary.
^
When no more water runs out, unscrew the
lid completely. The filter is attached to the
lid.
^
Clean the filter and the inner housing of the
filter compartment.
^
Replace the filter and tighten the lid
making sure it is secure.
§
Clean the filter.
Press the start button.
if
M.-Nr. 06 533 414 37
Page 38

Explanation of symbols on the data plate
a
b opq
c
drs
e
ft
g
u
i
hj v
k
lw
m
n
1 Machine type
2 Serial number
3 Article number
4 Material number
5 Voltage/Frequency
6 Control fuse
7 Drive motor
8 Drum data
9 Drum diameter/Drum depth
10 Spin speed
11 Drum volume/Laundry dry weight
12 Kinetic energy
13 Run-up time
14 Braking time
15 Heating
16 Indentification/Year of manufacture
17 Commissioning date
18 Electric heating
19 Fuse rating (on-site)
20 Indirect steam heating
21 Direct steam heating
22 Gas heating
23 Area for test certification labels
Noise emission
Registered on the A scale
Washing Spinning
PW 6101 60 dB 73 dB
PW 6131 61 dB 72 dB
Measured in Germany in accordance with
EN ISO 9614-2
38 M.-Nr. 06 533 414
Page 39
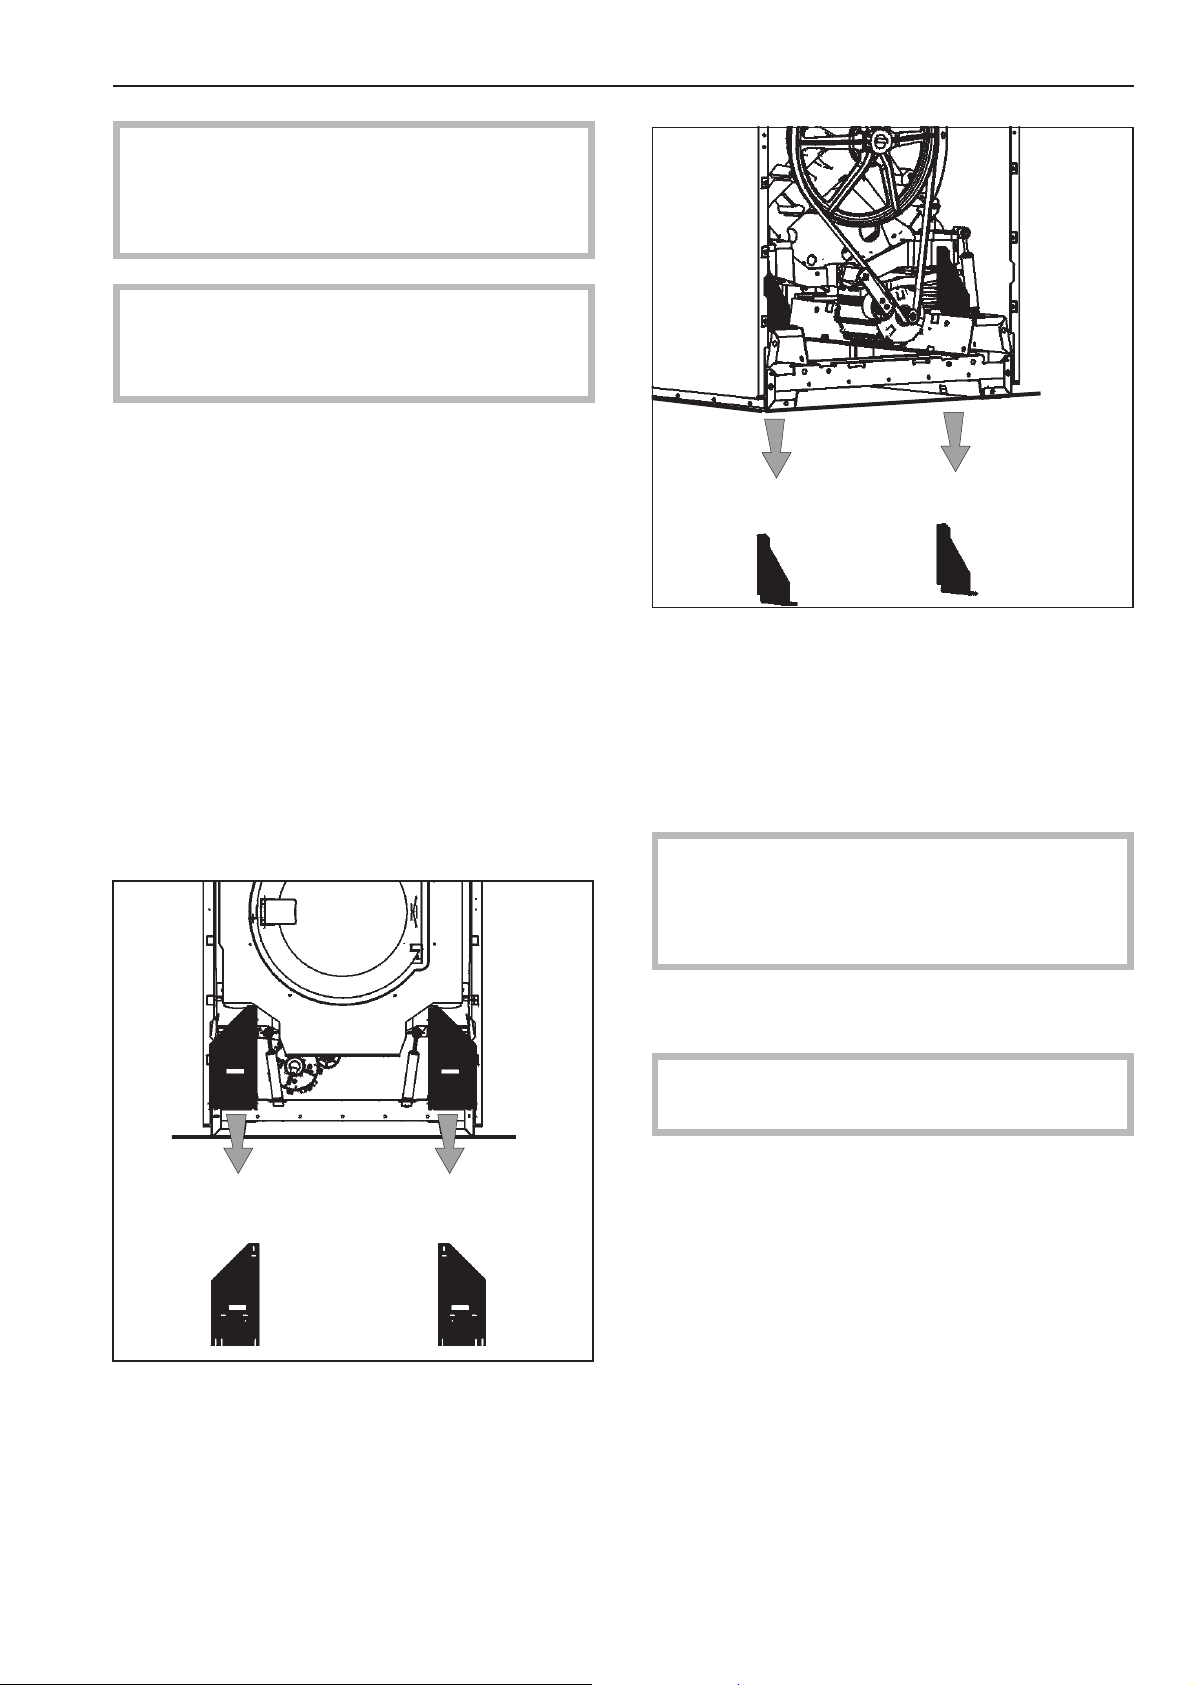
This machine must be installed by an
authorised technician only. In the UK any
gas heated machines must be installed
by a Gas Safe registered engineer.
This machine is not designed for
,
washing items which have been treated
with dangerous or flammable substances.
Transport packaging must be carefully
removed using suitable tools.
The machine must be level and secure after
installation (see installation diagram
supplied with the machine).
To avoid the risk of frost damage do not
install this machine in a room where there is
a risk of frost occuring.
Do not install the machine on carpeted
flooring as the carpet pile can hinder the
free flow of air into the ventilation gaps at the
bottom of the machine.
Notes for the installer
To do so the front panel and the rear panel
of the machine have to be removed.
Unscrew the screws from the bottom edge of
the front panel and then take the front panel
off.
Unscrew the screws from the back panel
and then take the back panel off.
Transit fittings
The transit fittings, 2 at the front and 2 at the
back are each secured in position with 3 hex
screws. These have to be removed on-site
before the machine can be commissioned.
Store the transit fittings in a safe place for
future use. They will need to be refitted
should the machine every need to be
moved to another location.
Use a pallet lifter to move the machine
around the room.
The machine must not be moved without
all the outer panels in place.
M.-Nr. 06 533 414 39
Page 40
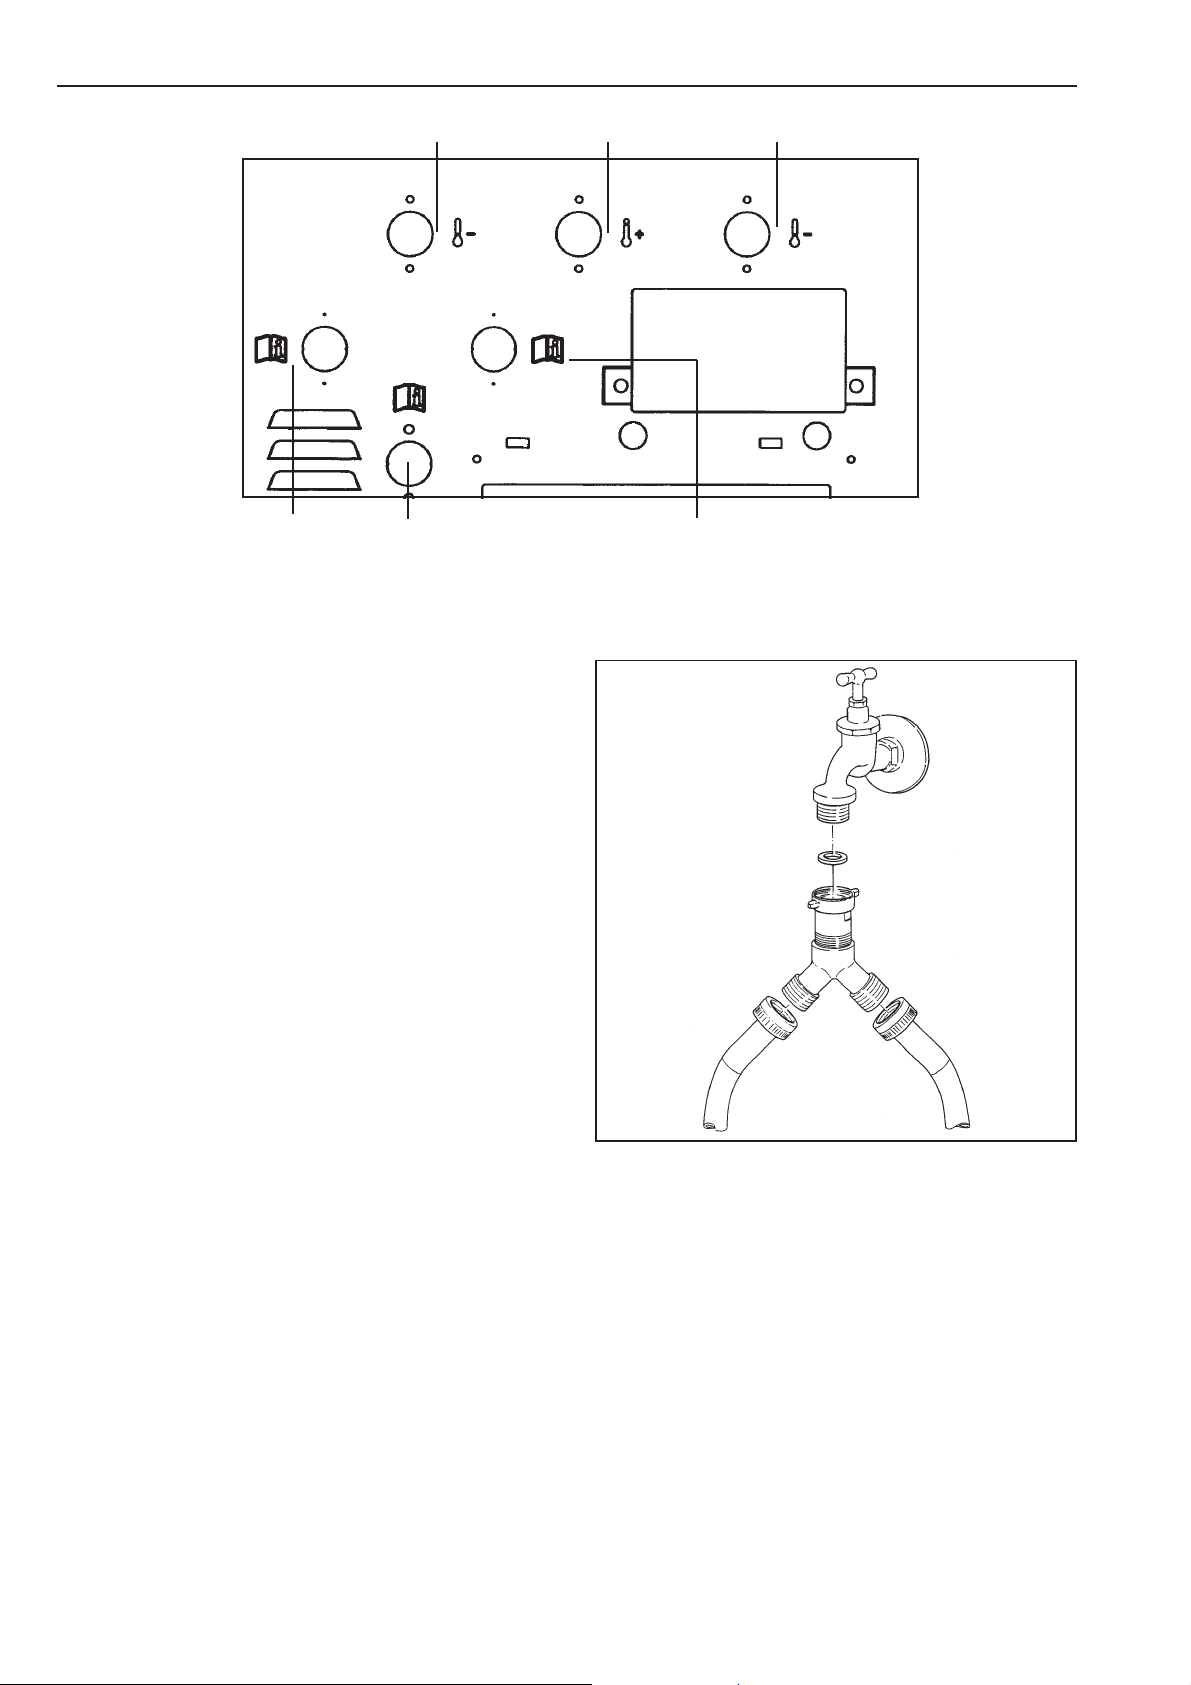
Notes for the installer
Cold water Hot water Cold water
Optional: Hard water Liquid dispensers Hard water
Plumbing
Connection must be made to the water
supply via a stopcock which conforms to
local and national regulations. This work
must be carried out by an authorised person
in accordance with local and national
regulations.
Water inlet / drainage
See the enclosed installation diagram.
To ensure trouble free operation of the
machine the flow pressure must be at least
100 kPa (1 bar) and not exceed 1000 kPa
(10 bar).
The inlet pressure tested hoses supplied
with the machine must be used for
connection to the water supply.
If replacing an inlet hose only use a hose
tested to at least 7000 kPa (70 bar)
pressure, and for a water temperature of at
least 90 °C.
This also applies to all fittings. Genuine
Miele original parts fulfil these requirements.
Cold water supply
1"
3/4"
See the enclosed installation diagram.
Water taken into the machine must not
exceed a temperature of 70°C.
40 M.-Nr. 06 533 414
Page 41
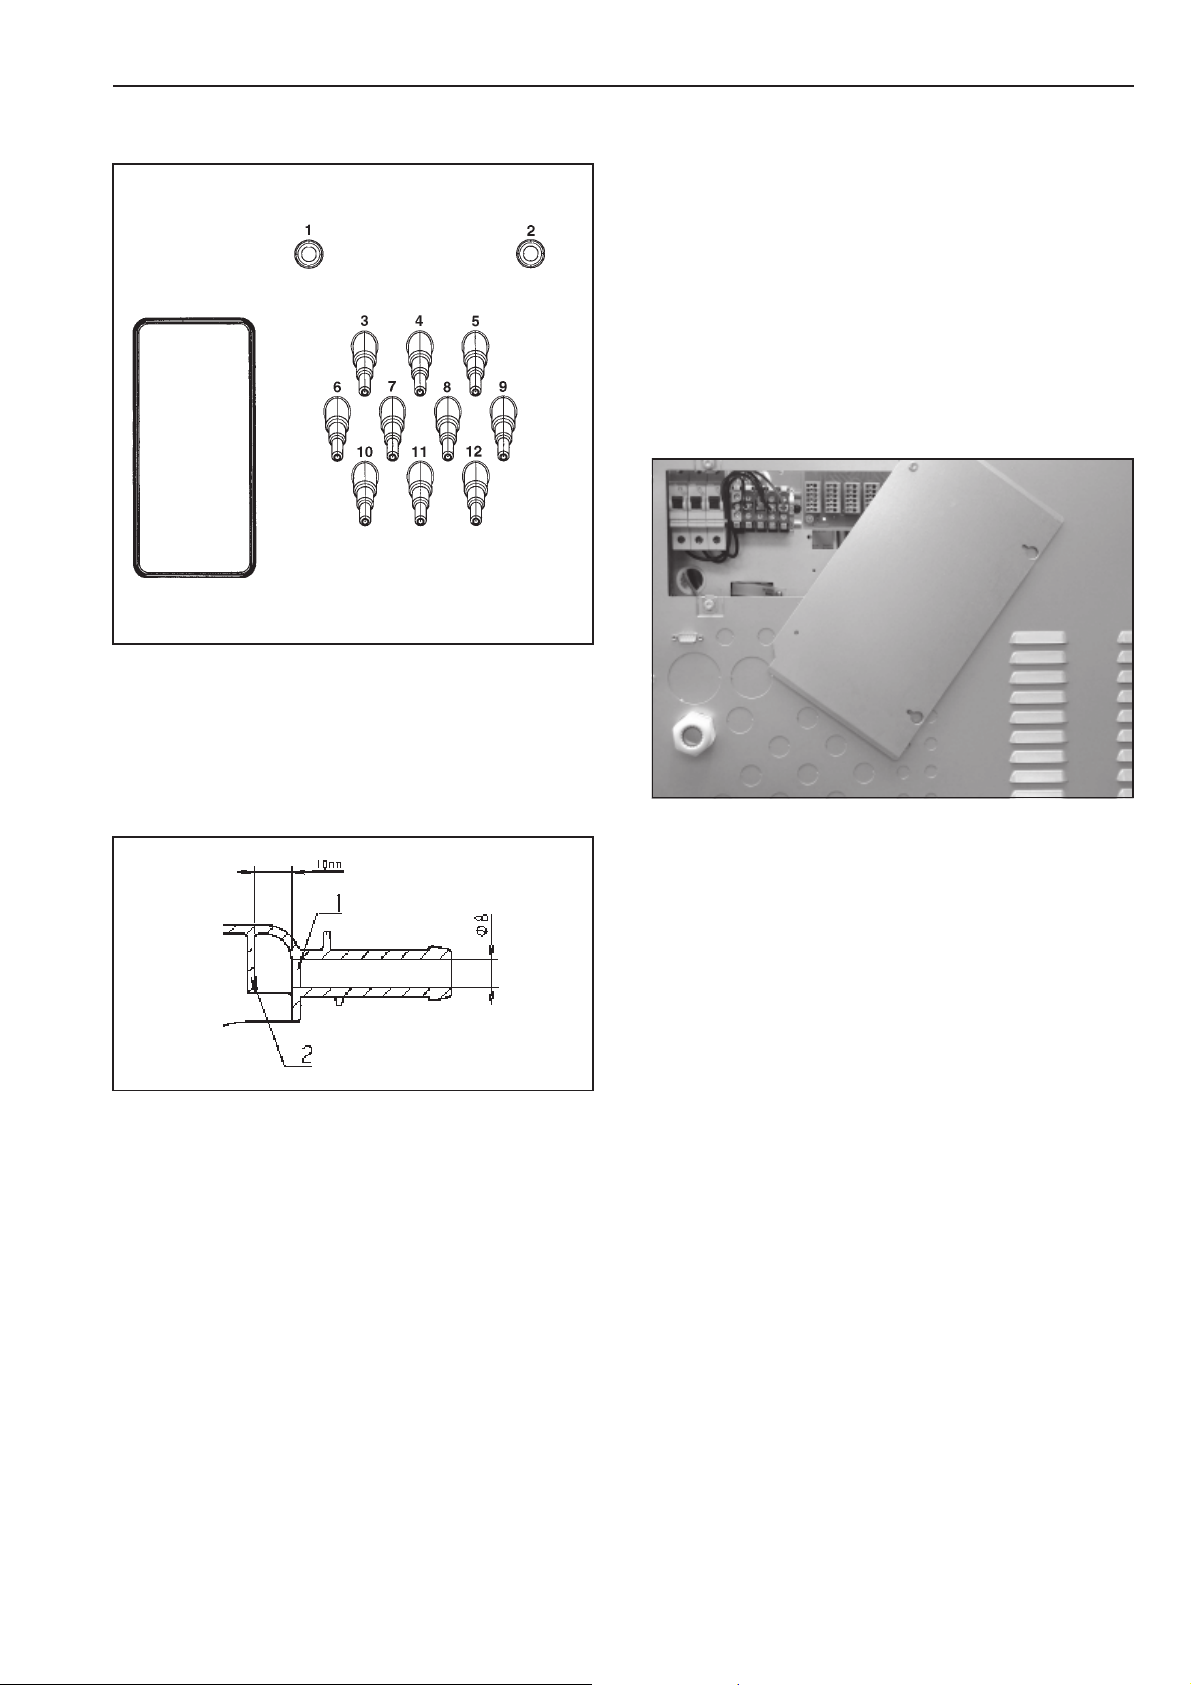
Notes for the installer
Dispenser system connections
Connections 1 and 2 are for viscous agents
only. These connections are sealed and
have to be drilled open with an 8 mm drill
bit.
Electrical connection
The electrical connection must only be
carried out by a suitably qualified electrician
in accordance with local and national safety
regulations (BS 7671 in the UK).
The electrical components of machines
PW 6101 and PW 6131 comply with IEC EN
60335-1 and EN 60335-2-7.
The connection points are located behind a
cover.
Be carefull to only drill through the first wall
(1). There is a second one located 10 mm
behind it to deflect the agent and this must
not be drilled into.
Any connections that have been drilled open
must be resealed if they are subsequently
not required.
Connections 3 to 12 are for liquid agents
only. These connections are also sealed and
have to be trimmed to the correct diameter
for the hoses being used with a suitable
small saw.
Any connections that have been opened
must be resealed if they are subsequently
not required.
The machine is supplied ex-works for 3N AC
50-60 Hz. See data plate for details.
It is also available in the following
versions: 3 N AC 380-415 V 50-60 Hz
3 AC 220-240 V 50-60 Hz
Connection should be made via a suitable
isolator which complies with local and
national safety regulations and which is
easily accesible for disconnecting the
machine from the electricity supply.
Provision must be made on site to switch off
all poles. Switches with a minimum all-pole
contact gap greater than 3 mm are suitable
for isolating the machine. These include
circuit breakers, fuses and relays (IEC/EN
60947).
The isolator switch should be easily
accessible for servicing work.
If the machine is disconnected from the
electricity supply ensure adequate measures
are taken to ensure that the machine cannot
be reconnected to the electricity supply until
all work has been carried out.
M.-Nr. 06 533 414 41
Page 42

Notes for the installer
Equipotential bonding
Equipotential bonding must be carried out if
required.
The electric heating is set ex-works to
9 kW (PW 6101),
15 kW (PW 6131).
The heating will only be activated with a
minimum suds levels of 50 mm column of
water.
The motor is protected by a winding to
prevent it overheating.
Connection should be made in accordance
with the wiring diagram and the installation
diagram to a suitable isolator, with an on-off
switch which is easily accessible for
servicing. The wiring and installation
diagrams are important for the correct
electrical functioning of the machine.
Connecting the dispenser pumps
Connection points for 4 time controlled
dispenser pumps which can be operated
without the multi-function module are located
behind the cover next to the electrical
connection point. See the wiring diagram
supplied.
Steam connection
Steam connection must only be carried out
by an authorised installer. See the
installation diagram and instructions
supplied.
A steam valve and condensate trap are
available to order from your Miele Dealer or
the Miele Spare Parts Department.
Gas connection
This work must be carried out by an
authorised person in accordance with local
and national safety regulations. This must be
a Gas Safe registered technician in the UK.
See installation diagram and installation
instructions supplied with the machine.
The gas group to which the machine has
been set at the factory is given on the Gas
Data label on the rear of the machine.
If the machine is converted for a different
gas group, or to liquid gas, a conversion kit
is required. This is available from the Spare
Parts Department. When ordering please
quote the model and serial number of the
machine, as well as the gas type, group and
connection pressure in the country of
installation.
Please follow the installation instructions
carefully. To ensure safety, any conversion
work must only be carried out by an
authorised technician, e.g. Gas Safe
registered in the UK.
,
Do not attempt to repair or work on
gas-heated machines yourself. Repairs
must only be carried out by an authorised
technician to ensure safety. In the event of
a fault please contact the Miele Service
Department.
After setting up and connecting the
machine successfully ensure that all
removable outer panels are correctly fitted
back into position.
42 M.-Nr. 06 533 414
Page 43
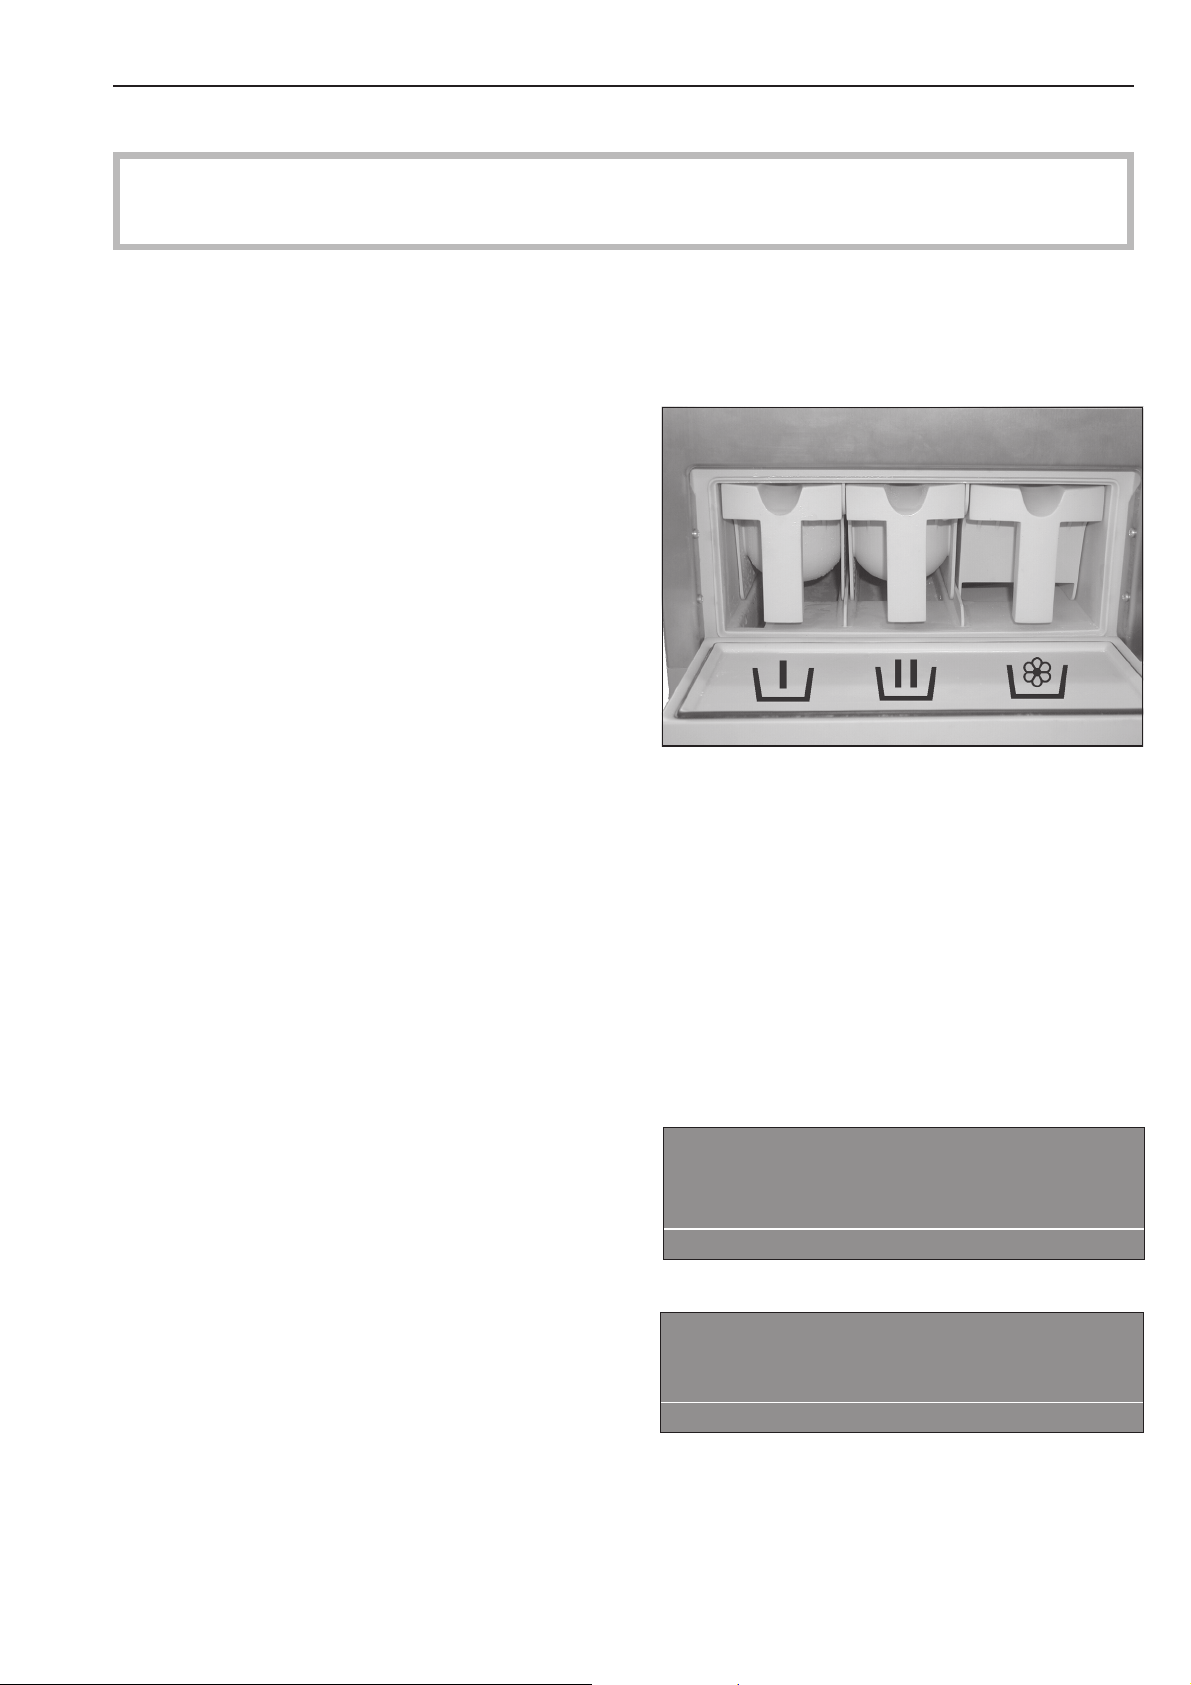
Abbreviated operating instructions PW 6101, PW 6131
1. Sort the laundry
Only use this machine to wash items which are specified by the manufacturer to be
machine-washable on the wash-care label. Any other applications may be dangerous. The
manufacturer is not liable for damage resulting from improper use or operation.
Empty any pockets.
^
2. Switch the machine on and load the drum
Press the "On" button I in
^
Open the drum door and load the laundry
^
Close the drum door
^
3. Add cleaning agent
Dispense agents as follows:
^
Detergent for the main wash into compartment
j, Detergent for the pre-wash into
compartment i, Fabric conditioner into
compartment p. Any additional liquid agents
into the compartment at the back of the fabric
conditioner p compartment (if this facility has
been programmed into the machine).
4. Select a programme using the rotary selector
Standard programmes:
1 Cottons 90°C 7 Minimum iron intensive 60°C 13 Linen/towels 90°C
2 Cottons 60°C 8 Minimum iron 30°C 14 Linen/towels 60°C
3 Cottons intensive 60°C 9 Minimum iron intensive 30°C 15 Separate starch
4 Cottons 30°C 10 Delicates 16 Separate rinse and spin
5 Cottons intensive 30°C 11 Woollens 30°C 17 Separate spin
6 Minimum iron 60°C 12 Handwashable woollens 30°C 18 Separate drain
5. Press the START button and the programme selected will commence
If the message "Door lock fault" comes up in the display:
^
Push firmly on the door handle until you hear the
lock engaging. Confirm by pressing START
a
Door lock fault
Call the Service Department
if restart does not work.
if
6. The following message will appear in the display when the programme
has finished
^
To open the door pull on the handle and
then unload the drum
1 Cottons
Programme finished
The door can be opened.
m FC A
7. If no more laundry is to be processed:
^
Leave the drum open to air the machine
^
Switch the machine off by pressing the "Off" 0 button
M.-Nr. 06 533 414 43
Page 44

44 M.-Nr. 06 533 414
Page 45

Guarantee
Please contact your Miele Sales Office for
details concerning guarantee terms and
conditions. See the back cover for contact
details.
M.-Nr. 06 533 414 45
Page 46

Alteration rights reserved/1210
M.-Nr. 06 533 414 / 00
 Loading...