

Page 1
Operating and Installation Instructions
30", 36", 48" Rangetop
To prevent accidents and damage to the range, you must read all in‐
structions supplied before installing or using the appliance.
en-US M.-Nr. 10 004 330
Page 2
IMPORTANT SAFETY INSTRUCTIONS
®
®
WARNING: If the information in this manual is not followed exactly, a fire or
explosion may result causing property damage, personal injury, or death.
– Do not use or store gasoline or other combustible liquids or vapors in the vicini‐
ty of this or any other appliance.
– WHAT TO DO IF YOU SMELL GAS
– Do not try to light any appliance.
– Do not touch any electric switches.
– Do not use any phones inside your building.
– Immediately call your gas supplier from a neighbor's phone. Follow the gas
supplier's instructions.
– If you are unable to reach your gas provider, call the fire department.
– Installation and service must be performed by a qualified installer, qualified
service agency or your gas provider.
(In Massachusetts, installation must be performed by a licensed installer / gas
fitter.)
– Note to the installer:
Please give these installation instructions to the consumer for the local electri‐
cal/gas inspector.
2
Page 3

Contents
IMPORTANT SAFETY INSTRUCTIONS................................................................. 2
IMPORTANT SAFETY INSTRUCTIONS................................................................. 5
Guide to the Rangetop ........................................................................................ 15
KMR 1124 G/LP..................................................................................................... 15
KMR 1134 G/LP..................................................................................................... 16
KMR 1135 G/LP..................................................................................................... 17
KMR 1136 G/LP..................................................................................................... 18
KMR 1354 G/LP..................................................................................................... 19
KMR 1355 G/LP..................................................................................................... 20
KMR 1356 G/LP..................................................................................................... 21
Operation tips....................................................................................................... 22
Automatic re-ignition.............................................................................................. 22
Before using for the first time............................................................................. 23
Cleaning the rangetop for the first time ................................................................. 23
Seasoning the griddle plate ................................................................................... 23
Operation of the burners..................................................................................... 24
Turning on .............................................................................................................. 24
Adjusting the flame ................................................................................................ 25
Visual characteristics gas flames...................................................................... 25
Turning off .............................................................................................................. 25
Cookware.............................................................................................................. 26
Energy saving tips ............................................................................................... 27
Operation of the grill............................................................................................ 28
Assembling the grill................................................................................................ 28
Turning on the grill.................................................................................................. 29
Tips for grilling ....................................................................................................... 30
Operation of the griddle ...................................................................................... 31
Turning on the griddle ............................................................................................ 31
Settings.................................................................................................................. 32
Tips for frying ......................................................................................................... 32
Cleaning and care................................................................................................ 33
Rangetop ............................................................................................................... 34
Dishwasher-safe grates .................................................................................... 34
Burner control knobs with stainless steel finish................................................ 34
Simmer burner / Power burners ....................................................................... 34
3
Page 4

Contents
Cleaning the dishwasher-safe grilling grate........................................................... 35
Cleaning the griddle plate...................................................................................... 35
Frequently asked questions................................................................................ 36
Notes on installation............................................................................................ 38
Distance to the range hood.................................................................................... 38
Weights .................................................................................................................. 39
Dimensional drawings ......................................................................................... 40
Electrical connection........................................................................................... 46
Gas connection .................................................................................................... 47
Burner ratings....................................................................................................... 49
KMR 1124 G/LP..................................................................................................... 49
KMR 1134 G/LP..................................................................................................... 49
KMR 1135 G/LP..................................................................................................... 50
KMR 1136 G/LP..................................................................................................... 50
KMR 1354 G/LP..................................................................................................... 51
KMR 1355 G/LP..................................................................................................... 51
KMR 1356 G/LP..................................................................................................... 52
Miele service, data plate, warranty .................................................................... 53
Caring for the environment................................................................................. 54
4
Page 5
IMPORTANT SAFETY INSTRUCTIONS
When using the appliance, follow basic safety precautions, including the fol‐
lowing:
Read all instructions before installation and use of the rangetop to prevent
accidents and machine damage.
This appliance conforms to current safety requirements. Inappro‐
priate use can, however, lead to personal injury and damage to
property.
To avoid the risk of accidents and damage to the appliance,
please read these instructions carefully before installing or using it
for the first time. They contain important notes on installation,
safety, use and maintenance.
Miele cannot be held responsible for damage caused by the nonobservance of these instructions.
Keep these instructions in a safe place and pass them on to any
future owner.
5
Page 6

IMPORTANT SAFETY INSTRUCTIONS
Use
This rangetop is intended for residential use and use in other simi‐
lar environments.
This appliance is not intended for outdoor use.
The rangetop is intended for residential use only to prepare food
and keep it warm. Any other use occurs at the owner's own risk and
may be dangerous.
Persons who are unable to safely operate the range due to limited
physical, sensory or mental capabilities, or because of a lack of ex‐
perience or knowledge, may only use the appliance if they are su‐
pervised while doing so. These persons may only use the appliance
without supervision if they have been shown how to use it in a safe
manner, and if they are able to recognize and understand the poten‐
tial risks of improper use.
6
Page 7

IMPORTANT SAFETY INSTRUCTIONS
Children
Do not leave children unattended: Children should not be alone or
unsupervised in the area where the rangetop is installed. Do not al‐
low them to sit or stand on the appliance.
All children must be kept away from the rangetop.
Please supervise any children in the vicinity of the rangetop and
do not let them play with the appliance.
The rangetop gets hot when in use and remains hot for some time
after being turned off. Keep children away from the appliance until it
has cooled down and is no longer a burn hazard.
Danger of suffocation! Ensure that any plastic wrappings, bags,
etc. are disposed of safely and kept out of the reach of children.
Burn hazard!
Keep the spaces above and behind the rangetop clear of any items
that could draw the attention of children. Otherwise, they can be
tempted into climbing onto the appliance.
Danger of burning or scalding!
Turn all handles away from the front of the cooktop so that children
cannot pull pots and pans down and burn themselves.
7
Page 8

IMPORTANT SAFETY INSTRUCTIONS
Technical safety
Installation, repair and maintenance work should be performed by
a Miele authorized service technician in accordance with national
and local safety regulations and the provided installation instruc‐
tions. Contact Miele’s Technical Service Department for examina‐
tion, repair or adjustment. Repairs and other work by unauthorized
persons could be dangerous and may void the warranty.
Maintenance by the user: Never repair or replace any part of the
appliance unless the instructions specifically recommend doing so.
Service work may only be performed by a qualified technician.
A damaged rangetop can be dangerous. Always check for visible
signs of damage. Never use a damaged appliance.
Reliable and safe operation of the rangetop can only be guaran‐
teed if it is connected to the public power supply.
The electrical safety of the rangetop can only be guaranteed when
it is properly grounded. Compliance with this essential safety re‐
quirement is absolutely mandatory. If in any doubt, please have the
building's wiring system inspected by a qualified electrician.
Proper installation: Make sure that your appliance has been instal‐
led correctly and that it has been grounded by a qualified technician.
Do not operate the appliance until it has been properly installed.
To avoid damaging the rangetop, make sure that the information
(voltage and frequency) on the data plate correspond to the buil‐
ding's power supply before connecting the appliance.
When in doubt, consult a qualified electrician.
Installation and maintenance of the gas connection must be per‐
formed by qualified installers, service agencies or gas providers.
Do not use a power strip or extension cord to connect the range‐
top to electricity (risk of fire).
8
Page 9

IMPORTANT SAFETY INSTRUCTIONS
This appliance must not be installed and operated in non-station‐
ary locations (e.g., on a ship).
Any contact with live connections or tampering with the electrical
or mechanical components of the rangetop will endanger your safety
and may lead to appliance malfunctions.
Do not open the appliance housing under any circumstances.
Any repairs not performed by a Miele authorized service techni‐
cian will void the warranty.
Defective components should be replaced by Miele original parts
only. Only with these parts can the manufacturer guarantee the safe‐
ty of the appliance.
During installation, maintenance, and repair work, the rangetop
must be completely disconnected from the household electricity
supply. The gas supply must be shut off. Ensure that this is the case
by:
– removing the fuse,
– "tripping" the circuit breaker, or
– unplugging the unit. Pull the plug not the cord.
– Shut off the gas supply and disconnect the rangetop from the gas
supply. Installation and maintenance of the gas connection must
be performed by qualified installers, service agencies or gas pro‐
viders.
Risk of electric shock!
If the rangetop is defective, immediately turn the appliance off and
discontinue use. Disconnect the range from the gas and power sup‐
ply and call Miele Service.
If the rangetop is installed behind a cabinet door, do not close the
door while the range is in operation. Heat and moisture can build up
behind the closed door and cause damage to the range, cabinetry,
and flooring. Do not close the door until the range has completely
cooled down.
9
Page 10

IMPORTANT SAFETY INSTRUCTIONS
Reaching over a hot stovetop to access the cabinets can result in
burns. You can reduce the risk of burns by installing a range hood
that extends at least 4³/₄" (12 cm) past the bottom of the cabinets.
10
Page 11

IMPORTANT SAFETY INSTRUCTIONS
Proper use
Do not leave the rangetop unattended when cooking on high
power. Spilled food will begin to smoke and cause grease splatter,
which can ignite on the range.
Oil and fat can catch fire if overheated. Never leave the appliance
unattended when cooking with oil and fat. If the oil or fat catches
fire, do not attempt to put the flames out with water.
Turn off the rangetop and smother the flames using a lid or a suita‐
ble fire blanket.
Smother the fire or flames, or use a dry chemical extinguishing
agent or foam fire extinguisher.
Storage in or on the appliance: Flammable materials should not
be stored in an oven or in the vicinity of the rangetop.
The flames could set the grease filters of a ventilation hood on
fire. Do not flambé under a ventilation hood.
Never heat empty cookware.
Do not heat up food in closed containers, as pressure will build up
in the container, causing them to explode. Do not use the rangetop
to boil or heat up cans.
If the rangetop is covered, there is a risk that the material of the
cover will ignite, explode or if the range is still hot or if turned on in‐
advertently. Never cover the range with a board, cloth, or protective
sheet.
When using an electrical appliance, e.g., a hand mixer, near the
rangetop, make sure that the power cable does not come into con‐
tact with the hot range. The cable's insulation could become dam‐
aged.
Cookware made of plastic or aluminum foil will melt at high tem‐
peratures. Do not use any plastic or aluminum foil cookware.
11
Page 12

IMPORTANT SAFETY INSTRUCTIONS
The rangetop gets hot when in use and remains hot for some time
after being turned off. Do not touch the appliance if there is a possi‐
bility that it could still be hot.
You can burn yourself on a hot rangetop. When cooking on the
appliance, protect your hands by using heat-resistant pot holders or
oven mitts. Only use dry pot holders or gloves. Wet or damp textiles
conduct heat more effectively and produce steam, which poses a
burn hazard. Be sure to keep all textiles away from the gas flames.
Do not use oversized cloths, dish towels or other similar materials.
If the rangetop is accidentally turned on or is still hot, metal ob‐
jects on the appliance can heat up. Other items may melt or catch
fire. Do not place unused items on the range for storage!
A range hood installed above the range can become damaged or
catch fire as a result of intense heat. Do not use the gas burners
without cookware.
The high temperatures radiated could cause objects near the ran‐
getop to catch fire.
Do not use the range to heat the room.
Only light the gas burners after all burner parts have been proper‐
ly assembled.
If the cookware is too small, it will not sit properly on the burner. If
the cookware is too large, heat emitted from the bottom of the cook‐
ware may damage the counter, walls with poor heat resistance (e.g.,
paneled walls), or portions of the rangetop.
Make sure that the burner flames do not extend beyond the bot‐
tom of the cookware and rise up its sides.
Only use cookware with a thick enough bottom. Failure to do so
may result in damage to the rangetop.
Always use the burner grates supplied with the cooktop. Never
place cookware directly on the burner.
12
Page 13

IMPORTANT SAFETY INSTRUCTIONS
Remove all grease splatters and other flammable (food) residues
on the rangetop. They are a fire hazard.
Install the burner grates in an upright position to avoid scratching
the cooktop.
Do not use roasting dishes, pans, or grilling stones that are large
enough to cover several burners. The resulting heat buildup can
damage the appliance.
If the rangetop has not been used for a long period of time, be
sure to thoroughly clean it and have it inspected by an authorized
technician before using it again.
The use of the rangetop creates heat, moisture and combustion
products in the room where it is installed. Make sure that the appli‐
ance is installed in location with sufficient ventilation. Natural ventila‐
tion openings should not be blocked. Alternatively, a mechanical
ventilation device (e.g. a range hood) can be installed.
Prolonged intensive use of the appliance may require additional
ventilation of the room, e.g., by opening a window, or by turning the
range hood to a higher setting.
Ask your installer to show you the location of your gas shutoff
valve and fuses or circuit breaker panel in your apartment or home.
Be sure that you know how and where to disconnect the gas and
power supply to your rangetop.
Ensure that the igniters are clean and dry to allow the burners to
ignite and burn properly.
Fire hazard! Loose-fitting or hanging garments can catch fire. Be
sure to wear appropriately fitting clothing when cooking. Never allow
loose clothing or flammable materials to come into contact with the
burners while the burners are in use.
When you have finished cooking, make sure that the burners are
turned off by checking the position of the knobs.
13
Page 14
IMPORTANT SAFETY INSTRUCTIONS
The grates, burner cap, bottom parts of the burner, and any other
parts located near the burner flame, can still be very hot after cook‐
ing and cause burns. Do not touch these components when using
the rangetop.
Wind can blow curtains over the rangetop, causing them to catch
fire. If the range is installed near a window, do not use long curtains.
Only certain types of glass, ceramic or other enamel cookware
can be used on a gas rangetop without breaking as a result of sud‐
den temperature changes.
Wet sponges or clothes can cause burns due to hot steam if they
are used to wipe spilled food off a hot burner. Some cleansers can
emit hazardous vapors if they are applied to a hot surface. Be care‐
ful when cleaning the cooktop.
Cleaning and care
Do not use a steam cleaner to clean this appliance.
Steam could penetrate electrical components and cause a short cir‐
cuit.
SAVE THESE INSTRUCTIONS AND REVIEW THEM PERIODICALLY
14
Page 15

KMR 1124 G/LP
Guide to the Rangetop
a
Backlit burner control knob for rear left burner
b
Backlit burner control knob for front left burner
c
Backlit burner control knob for front right burner
d
Backlit burner control knob for rear right burner
e
Power burners
f
ComfortClean Dishwasher-safe grates
g
Simmer burner
15
Page 16
Guide to the Rangetop
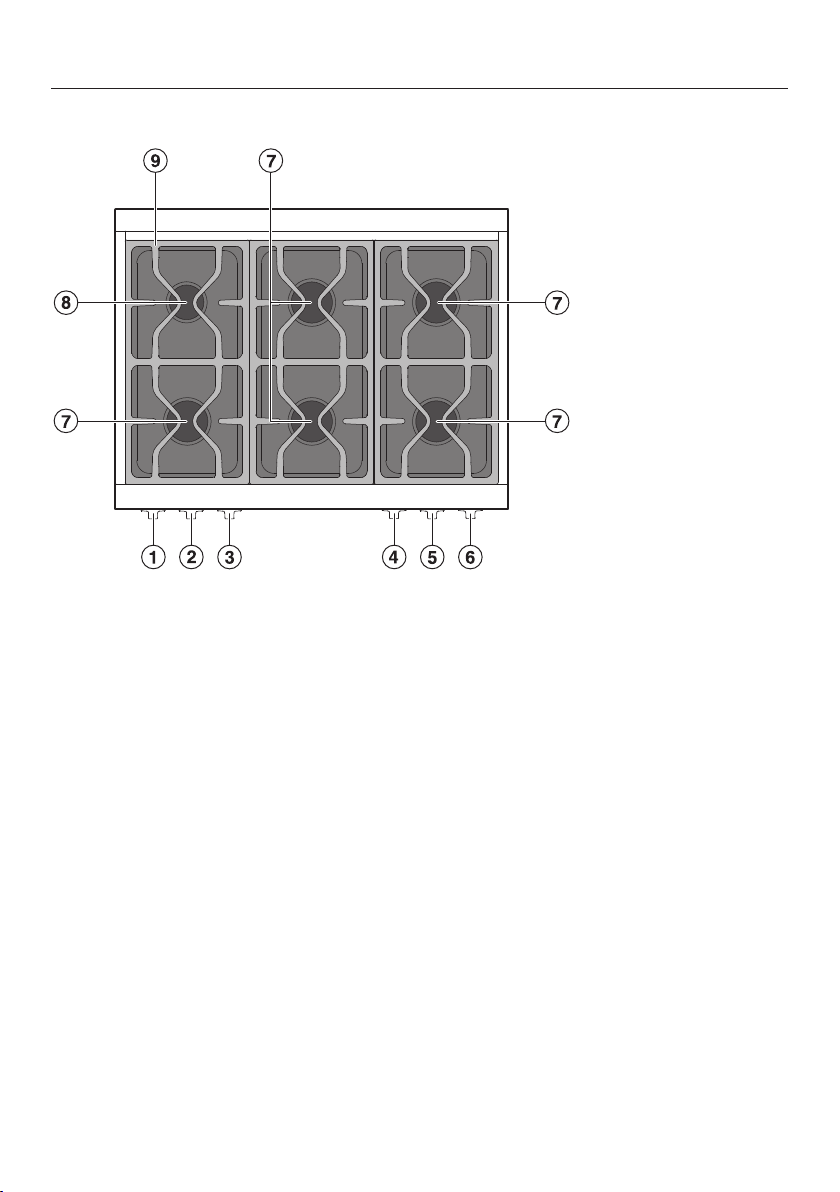
KMR 1134 G/LP
a
Backlit burner control knob for rear left burner
b
Backlit burner control knob for front left burner
c
Backlit burner control knob for front center burner
d
Backlit burner control knob for rear center burner
e
Backlit burner control knob for front right burner
f
Backlit burner control knob for rear right burner
g
Power burners
h
Simmer burner
i
ComfortClean dishwasher-safe grates
16
Page 17

KMR 1135 G/LP
a
Backlit burner control knob for rear left burner
b
Backlit burner control knob for front left burner
c
Backlit grill control knob
d
Backlit burner control knob for front right burner
e
Backlit burner control knob for rear right burner
f
Power burners
g
Ceramic burner
h
ComfortClean Dishwasher-safe grilling grate
i
ComfortClean dishwasher-safe grates
j
Simmer burner
Guide to the Rangetop
17
Page 18

Guide to the Rangetop
KMR 1136 G/LP
a
Backlit burner control knob for rear left burner
b
Backlit burner control knob for front left burner
c
Backlit griddle control knob
d
Backlit burner control knob for front right burner
e
Backlit burner control knob for rear right burner
f
Power burners
g
Griddle plate
h
Thermostatically controlled ceramic infrared burner
i
Dishwasher-safe stainless steel grease drip tray
j
ComfortClean dishwasher-safe grates
k
Simmer burner
18
Page 19

Guide to the Rangetop
KMR 1354 G/LP
a
Backlit burner control knob for rear left burner
b
Backlit burner control knob for front left burner
c
Backlit burner control knob for rear left center burner
d
Backlit burner control knob for front left center burner
e
Backlit burner control knob for front right center burner
f
Backlit burner control knob for rear right center burner
g
Backlit burner control knob for front right burner
h
Backlit burner control knob for rear right burner
i
Power burners
j
Simmer burners
k
ConfortClean dishwasher-safe grates
19
Page 20

Guide to the Rangetop
KMR 1355 G/LP
a
Backlit burner control knob for rear left burner
b
Backlit burner control knob for front left burner
c
Backlit grill control knob
d
Backlit burner control knob for front center burner
e
Backlit burner control knob for rear center burner
f
Backlit burner control knob for front right burner
g
Backlit burner control knob for rear right burner
h
Power burners
i
Simmer burners
j
Ceramic burner
k
ComfortClean dishwasher-safe grilling grate
l
ComfortClean dishwasher-safe grates
20
Page 21

KMR 1356 G/LP
a
Backlit burner control knob for rear left burner
b
Backlit burner control knob for front left burner
c
Backlit griddle control knob
d
Backlit burner control knob for front center burner
e
Backlit burner control knob for rear center burner
f
Backlit burner control knob for front right burner
g
Backlit burner control knob for rear right burner
h
Power burners
i
Simmer burners
j
Griddle plate
k
Thermostatically controlled ceramic infrared burner
l
Dishwasher-safe stainless steel grease drip tray
m
ComfortClean dishwasher-safe grates
Guide to the Rangetop
21
Page 22

Operation tips
Fire hazard!
Do not leave the appliance unattend‐
ed while cooking!
To not turn the control knobs to the
right beyond "Off."
It can occur that a brief re-ignition oc‐
curs during activation (clicking 1–2 x),
e.g., in case of a draft.
Activating a control knob automatical‐
ly produces a spark on all of the burn‐
ers. This is normal and does not indi‐
cate a fault.
Automatic re-ignition
Your rangetop is equipped with an au‐
tomatic re-ignition function. If the flame
goes out, e.g. because food has
cooked over or there has been an air
draft, the flame is automatically re-ignit‐
ed.
If there has been a loss of pow‐
er, the automatic re-ignition feature
will not work properly. Do not use
the rangetop during a power outage.
Turn the burner control knob to the
"Off" position.
22
Page 23

Before using for the first time
Cleaning the rangetop for the first time
Remove any protective foil and stick‐
ers.
Using a soft sponge, clean all remov‐
able burner parts with a solution of
warm water and a small amount of
liquid dish soap. Dry the parts thor‐
oughly after cleaning and reassemble
the burners (see "Cleaning and
care").
Remove the grilling grate and, using a
soft sponge, clean it with a solution
of warm water and a small amount of
dishwashing liquid. Dry it thoroughly
after cleaning.
The griddle plate is oiled for protec‐
tion against corrosion. Clean the grid‐
dle plate with a soft sponge, a small
amount of dishwashing liquid, and
warm water, and dry it.
Before first use, wipe down the appli‐
ance with a damp cloth and dry it.
Seasoning the griddle plate
You must season the griddle plate be‐
fore cooking food on it the first time.
This process prevents food from stick‐
ing and protects the surface from
moisture.
Set the griddle plate on "High" for
30 minutes.
Turn off the griddle plate after 30 mi‐
nutes and let it cool down.
During heating, the griddle plate con‐
stantly changes color. The discolora‐
tion may become more intensive over
time. The properties of the griddle
plate, however, are not impaired in this
manner.
Pour 1 teaspoon of vegetable oil that
can be heated to a high temperature
in the middle of the cooled griddle
plate and distribute it with a paper
towel, leaving out the corners of the
plate.
Metal components are protected by a
conditioning agent. Smells and vapor
may occur when the appliance is used
for the first time.
The smell and any vapors do not indi‐
cate a faulty connection or a defective
appliance and are not harmful to your
health.
Do not use too much oil. Excess oil
leaves a rubbery substance on the
plate that has to be removed.
Remove any excess oil with a paper
towel.
Heat the griddle plate on "High" until
it starts to smoke.
Turn off the griddle plate.
When the griddle plate has cooled
down to a safe temperature, wash off
the excess oil.
Repeat the process once the griddle
plate has cooled down completely.
23
Page 24

Operation of the burners
Turning on
To ignite a burner, push the appropri‐
ate control knob and turn it counter‐
clockwise to the "High" position. The
ignitor "clicks" and ignites the gas.
If the burner fails to light, turn the
control knob to the "Off" position. Air
the room or wait at least 1 minute be‐
fore trying again.
If the second attempt also fails to
light the burner, turn the control knob
to the "Off" position and refer to the
"Frequently asked questions" sec‐
tion.
Control Knob
Off Gas supply is off:
Burner off
High Strongest flame setting:
Maximum power of upper
and lower flame rings
Simmer Weakest flame setting:
Upper flame ring off
Minimum power of lower
flame ring
Turning on during a power outage
In case of a power failure, the flame
can be ignited manually.
Press in the burner knob and turn it
counterclockwise to "High."
Light the emerging gas/air mixture
with a match.
24
Page 25

Operation of the burners
Adjusting the flame
The burners can be variably adjusted
between the lowest and highest flame
settings.
Because the edges of the flame are
much hotter than its center, the flame
tips should stay beneath the bottom
of the cookware. Flame tips which ex‐
tend beyond the sides of the cook‐
ware emit unnecessary heat into the
room and can also damage cookware
handles, which increases the risk of
injury.
Adjust the flame so that it never ex‐
tends up the sides of the cookware.
Visual characteristics gas flames
Yellow flames
Contact the Miele
Service Depart‐
ment.
Turning off
Do not turn the control knob clock‐
wise past the "Off" position.
Turn the control knob to the right until
it reaches the "Off" position.
This stops the flow of gas, and the
flame goes out.
Yellow tips on
outer cones
Normal for pro‐
pane gas
Soft blue flames
yellow colour is
only allowed at
the tip of the inner
cone
Normal for natural
gas
25
Page 26

Cookware
– Select cookware that fits the size of
the burner:
Large diameter = large burner
Small diameter = small burner
– Using cookware that is too large can
cause the flames to spread out and
damage the surrounding countertop
or other appliances. Choosing the
right cookware size improves effi‐
ciency.
– Any cookware that has a diameter
smaller than the burner grate or
which does not rest in a stable posi‐
tion on the grate (without wobbling) is
dangerous and should not be used.
– Unlike cookware that is used on an
electric cooktop, the bottom of cook‐
ware used on a rangetop does not
have to be flat to deliver effective
cooking performance.
– When purchasing pots and pans,
keep in mind that the diameter indi‐
cated is typically the top diameter,
not the bottom diameter.
– Do not use pots or pans that have
bottoms with pronounced edges.
– All heat-resistant cookware is suita‐
ble for use.
– Cookware with a thick bottom is pref‐
erable, as it distributes heat more
evenly. Cookware with a thin bottom
may cause food to overheat in certain
spots. To avoid this, stir the food fre‐
quently.
– Always place cookware on the burner
grate supplied with the rangetop.
Never place it directly on the burner.
– Position the cookware on the burner
grate so that it cannot tip. There is al‐
ways a possibility of a slight tilt, de‐
spite the proper position.
26
Page 27

– Whenever possible, keep pots and
pans covered while cooking. Doing
so will prevent unnecessary heat
loss.
– Wide, shallow cookware heats up
faster and is therefore preferable to
tall, narrow cookware.
– Cook with as little water as possible.
– Reduce the power setting once the
water has come to a boil or the oil/fat
is hot enough for frying.
– Use a pressure cooker to reduce the
cooking time.
Energy saving tips
27
Page 28

Operation of the grill
3
1
2
The grill has a ceramic burner that
transfers intense heat to food, searing
the outside to seal the juices. Full flexi‐
bility, depending on the food, from
"Low" to "High" as power settings.
Assembling the grill
Burn hazard!
The burners must be turned off and
allowed to cool completely.
Risk of injury!
The cast-iron grill is heavy.
Carry the grill carefully and place it
securely on a soft base so that it lies
flat.
Using a soft sponge, clean drip tray
and grease tray with a solution
of warm water and a small amount of
liquid dish soap. Dry the parts thor‐
oughly after cleaning.
Remove the grill from the gas
cooktop.
Place the drip tray centrally on the
edge of the frame .
Place the grease tray on top of the
frame .
Place the grill into position.
Cleaning and care
Tip: All parts can be disassembled in
the reverse order. You can also remove
the frame for cleaning.
a
Grill
b
Grease tray
c
Drip tray
d
Frame
e
Edge
28
Page 29

Operation of the grill
Do not use cooking utensils on the
grill.
Turning on the grill
Always follow USDA guidelines on
food safety.
Press the control knob of the grill and
turn it counterclockwise to "High."
If the burner fails to light, turn the
control knob to the "Off" position. Air
the room or wait at least 1 minute be‐
fore trying again.
If the second attempt also fails to
light the burner, turn the control knob
to the "Off" position and refer to the
"Frequently asked questions" sec‐
tion.
Pre-heat the grill with the grate in
place for approx. 20 minutes.
Set the desired power level.
Turning on during a power outage
Danger of injury due to the man‐
ual ignition of the flat burner during a
power failure!
Never operate the grill during a pow‐
er failure.
Turn off the grill control knob.
Control knob
Off Gas supply is off:
Grill off
High Maximum power
Low Minimum power
29
Page 30

Operation of the grill
Tips for grilling
Fire hazard!
Do not leave the appliance unattend‐
ed while cooking!
– Pat down wet food items with paper
towel to prevent splatters during grill‐
ing.
– Do not salt meat until after grilling, or
it will be too dry.
– Select lean mean or cut off fat before
grilling. Dripping fat can catch on fire.
– If dripping fat catches on fire, use
grilling tongs to move the meat to an‐
other spot or remove it entirely.
– Remove chicken skin to prevent
sparking.
– Halfway through cooking, brush mari‐
nade onto the food.
– Leave the grill on for another 10 mi‐
nutes after you have finished grilling.
This makes cleaning easier after
cooking.
30
Page 31

Operation of the griddle
The griddle is thermostatically control‐
led to maintain a consistent tempera‐
ture. To prevent food from sticking, it is
necessary to "season" the griddle prior
to use (see "Before using for the first
time"). Full flexibility, depending on the
food, from "Low", "Medium" and "High"
as power settings.
Turning on the griddle
Always follow USDA guidelines on
food safety.
Press the control knob of the griddle
and turn it counterclockwise to
"Low."
If the burner fails to light, turn the
control knob to the "Off" position. Air
the room or wait at least 1 minute be‐
fore trying again.
If the second attempt also fails to
light the burner, turn the control knob
to the "Off" position and refer to the
"Frequently asked questions" sec‐
tion.
Turning on during a power outage
The griddle plate cannot be operated
in case of a power failure.
Turn off the control knob for the grid‐
dle plate.
Preheat the griddle plate for about
20 minutes.
Set the desired power level.
Control knob
Off Gas supply is off:
Griddle off
Low Minimum power
Medium Medium power
High Maximum power
31
Page 32

Operation of the griddle
Settings
Settings Food
Low Simmering Sauce
Holding food tem‐
perature
Medium Eggs
Bacon
French Toast
Medium–High Fish
Pancakes
Sausage
Hash Browns
Vegetables
High Burgers
Steaks
Stir-fry
Tips for frying
Before each use, wipe the griddle
with a damp cloth to remove dust or
other residue.
– Pre-heat the griddle plate thoroughly
for 8–10 minutes at the power level
that you are going to be using for
cooking.
– Pat down wet food items with paper
towel to prevent splatters during grill‐
ing.
– Do not salt meat until after grilling, or
it will be too dry.
– For cooking with the griddle plate,
you need only a little fat or none in
the case of marinated food. If you
use cooking fat, do not put it on the
griddle plate until it is hot.
– Only use fats/oils that can tolerate
high temperatures.
– Marinating often improves the flavor
of food to be cooked.
32
Page 33

Cleaning and care
Danger of burns!
The burners must be turned off and
the rangetop must be cooled.
Danger of injury!
The steam from a steam cleaner
could reach electrical components
and cause a short circuit.
Do not use a steam cleaner to clean
the rangetop.
All rangetop surfaces can become
discolored or damaged if unsuitable
cleaning agents are used.
All surfaces are susceptible to
scratching.
Remove any cleaning agent residues
immediately.
Always clean the rangetop after each
use. Allow it to cool down before clean‐
ing.
To better maintain your appliance avoid
the following:
– cleaners containing soda, ammonia,
thinners, or chlorides
– descaling agents
– Stain or rust removers
– Abrasive cleaning agents (e.g., pow‐
der or cream cleansers, pumice
stones)
– solvent-based cleaners
– dishwasher detergent
– grill and oven sprays
– glass cleaning agents
– hard, abrasive brushes or sponges
(e.g. pot scrubbers or scrub spong‐
es, sponges which have previously
been used with abrasive cleaning
agents)
– sharp objects
(these could damage the seals be‐
tween the ceramic and the frame or
between the frame and the counter‐
top).
33
Page 34

Cleaning and care
Rangetop
The surfaces of the burner compo‐
nents and grates will slightly lose their
luster over time. This is completely
normal and does not indicate damage
to the material.
Clean the entire rangetop after each
use with a soft sponge, warm water
and a small amount of liquid dish
soap.
Pre-soak any stubborn dirt or grime
before cleaning.
Dry the rangetop after using water to
clean it. This helps prevent lime de‐
posits.
Tip: Food that has cooked over onto a
hot rangetop can cause the burner
components to become discolored. Im‐
mediately remove all spilled food and
all salt or sugar splatters!
Dishwasher-safe grates
Remove the burner grates.
Clean the grates in the dishwasher or
using a soft sponge with warm water
and a small amount of liquid dish
soap.
Burner control knobs with stainless steel finish
The burner control knobs may be‐
come discolored if they are not
cleaned regularly.
Do not clean the burner control
knobs in a dishwasher or with a
stainless steel cleaner.
Clean the knobs with a soft sponge,
warm water and a small amount of
liquid dish soap.
Simmer burner / Power burners
The burner cap is not dishwashersafe.
Make sure that the flame holes are
completely dry after cleaning.
Remove the burner cap.
Clean the burner cap using a soft
sponge, warm water and a small
amount of liquid dish soap.
All parts of the burner which cannot
be removed should be wiped down
with a damp cloth.
Ignitor
If necessary, the rough side of a
kitchen sponge can be used.
34
Do not allow the ignitor to become
wet. If it is wet, it will not spark.
Gently wipe down the ignitor clean
using a damp cloth.
Page 35

Cleaning and care
Cleaning the dishwasher-safe grilling grate
Clean the grilling grate in the dish‐
washer or with warm water and liquid
dish soap. When the grilling rack is
strongly soiled, soak it and then re‐
move the soiling with a brush. After
that, let the rack dry thoroughly.
Cleaning the griddle plate
Burn hazard!
Allow the griddle plate to cool down
sufficiently before cleaning it.
Fire hazard!
Clean the grease catch pan after ev‐
ery use of the griddle plate.
Loosen coarse soiling immediately
with a spatula and scratch grease
and residue into the grease catch
pan.
Clean the grease catch pan with a
soft sponge, dishwashing liquid, and
warm water. Dry it thoroughly after
cleaning.
Wipe off the griddle plate with clean
water and dry it with a clean, dry
cloth.
Rub some vegetable oil into the grid‐
dle plate after every cleaning.
Put the grease catch pan back into
place.
Remove any excess grease with a
paper towel.
Then let the griddle plate cool until it
is safe to the touch, add some hot,
soapy dishwater, and let the grime
soak.
Remove any soiling and water with a
sponge.
You can clean stubborn soiling off the
griddle plate with the rough side of a
dish sponge and a few drops of Miele
ceramic and stainless steel cleaner
(see "Optional accessories").
Remove the grease catch pan and
empty it.
35
Page 36

Frequently asked questions
The following faults can be corrected without contacting the Miele Service Depart‐
ment. If in doubt, please contact Miele.
Danger of injury! Unauthorized installation work and repairs could cause
personal injury or machine damage, for which Miele is not responsible.
Installation, repair and maintenance work should be performed by a Miele au‐
thorized service technician.
Never open the housing of the rangetop yourself.
Problem Possible cause and solution
The burners do not ig‐
nite when the cooktop
is being used for the
first time or after it has
been out of use for a
longer period.
The burner does not
light after several at‐
tempts.
There may be air in the gas line.
Try to light the burner again, making several at‐
tempts if necessary.
The burner is not properly assembled.
Assemble the burner correctly.
The gas shutoff valve is closed.
Open the gas shut-off valve.
The burner is wet and/or dirty.
Clean and dry the burner.
The gas flame goes out
after being lit.
The shape/color of the
gas flame changes.
The gas flame goes out
during use.
36
The flame holes are clogged and/or wet.
Clean and dry the flame holes.
The burner parts are not in the proper position.
Position the burner parts correctly.
The ignitor is dirty.
Remove any dirt or grime.
The burner parts are not in the proper position.
Position the burner parts correctly.
The burner cap itself or the holes in the burner cap
are dirty.
Remove any dirt or grime.
The burner parts are not in the proper position.
Position the burner parts correctly.
Page 37

Frequently asked questions
Problem Possible cause and solution
The ignitor does not
function properly.
The fuse in the building's wiring system was tripped.
If necessary, contact a qualified electrician or Cus‐
tomer Service for assistance.
There is food debris stuck between the ignitor and
the burner cap.
Remove the debris. (See "Cleaning and care" for
more information.)
37
Page 38

Notes on installation
Distance to the range hood
The minimum clearance between the
appliance and a range hood above will
be listed by the hood manufacturer.
If there is more than one appliance in‐
stalled below the range hood, each with
a different safety clearance, the largest
clearance must be used.
38
Page 39

Notes on installation
Weights
The net weight of the rangetop with accessories is as follows:
Model Width Net weight incl. acces‐
KMR 1124 G/LP 29 ¹⁵/₁₆" approx. 100 lbs / 45 kg
sories:
KMR 1134 G/LP
KMR 1135 G/LP
KMR 1136 G/LP
KMR 1354 G/LP
KMR 1355 G/LP
KMR 1356 G/LP
35 ¹⁵/₁₆"
47 ¹⁵/₁₆"
approx.120 lbs / 55 kg
approx. 130 lbs / 60 kg
approx. 151 lbs / 68.5 kg
approx. 150 lbs / 68 kg
approx. 160 lbs / 73 kg
approx. 170 lbs / 78 kg
39
Page 40

Dimensional drawings
In case of the presence of combustible material an additional minimum clear‐
ance of 6“ (each side) is necessary. Ensure local codes are observed.
Position Dimension Description
13" (330 mm) Maximum depth of top cabinet
18" (457 mm) Minimum distance to bottom edge
of top cabinet
7¹/₂" (190.5 mm) Distance top edge of worktop to
top edge of platform
10" (254 mm) Minimum distance to flammable
surfaces
1) The Platform must be ³/₄" (19.05 mm) thick.
It must include a cut-out of 5¹/₈" x 3¹/₈" (130 mm x 80 mm) (gas connection) at the rear right
and a cut-out of 4³/₄" x 1⁹/₁₆" (120 mm x 40 mm) (elctrical connection) at the rear left.
Platform
1)
40
Page 41

Dimensional drawings
KMR 1124
Position Dimension Description
min. 30"
(762 mm)
6“ + + 6"
(150 mm + + 150 mm)
37" (940 mm) Minimum distance between the top
30" (762 mm) Minimum distance between the top
For all other Hoods, please consult with manufacturer's instructions
for required distances.
Width of cabinet opening
In case of the presence of com‐
bustible material an additional min‐
imum clearance of 6“ (each side) is
necessary. Ensure local codes are
observed.
of the cooking area and the bottom
of an unprotected combustible sur‐
face.
of the cooking area and the bottom
of the Miele Range Hood (DAR
model with DRxB XL Blower).
41
Page 42

Dimensional drawings
KMR 1134
Position Dimension Description
min. 36"
(914 mm)
6“ + + 6"
(150 mm + + 150 mm)
37" (940 mm) Minimum distance between the top
36" (914 mm) Minimum distance between the top
30" (762 mm) Minimum distance between the top
For all other Hoods, please consult with manufacturer's instructions
for required distances.
Width of cabinet opening.
In case of the presence of com‐
bustible material an additional min‐
imum clearance of 6“ (each side) is
necessary. Ensure local codes are
observed.
of the cooking area and the bottom
of an unprotected combustible sur‐
face.
of the cooking area and the bottom
of the Miele Range Hood (DAR
model with DRxB XL Blower).
of the cooking area and the bottom
of the Miele Range Hood (DAR
model with DRxB XXL Blower).
42
Page 43

Dimensional drawings
KMR 1135 / KMR 1136
Position Dimension Description
min. 36"
(914 mm)
6“ + + 6"
(150 mm + + 150 mm)
37" (940 mm) Minimum distance between the top
30" (762 mm) Minimum distance between the top
For all other Hoods, please consult with manufacturer's instructions
for required distances.
Width of cabinet opening
In case of the presence of com‐
bustible material an additional min‐
imum clearance of 6“ (each side) is
necessary. Ensure local codes are
observed.
of the cooking area and the bottom
of an unprotected combustible sur‐
face.
of the cooking area and the bottom
of the Miele Range Hood (DAR
model with DRxB XL or DRxB XXL
Blower).
43
Page 44

Dimensional drawings
KMR 1354 / KMR 1355 / KMR 1356
Position Dimension Description
(150 mm + + 150 mm)
For all other Hoods, please consult with manufacturer's instructions
for required distances.
12" (305 mm) minimum distance is necessary from back of range to combustible rear wall
above countertop.
min. 48"
(1219 mm)
6“ + + 6"
37" (940 mm) Minimum distance between the top
36" (914 mm) Minimum distance between the top
Width of cabinet opening
In case of the presence of com‐
bustible material an additional min‐
imum clearance of 6“ (each side) is
necessary. Ensure local codes are
observed.
of the cooking area and the bottom
of an unprotected combustible sur‐
face.
of the cooking area and the bottom
of the Miele Range Hood (DAR
model with DRxB XXL Blower).
44
Page 45

Dimensional drawings
a
Side view
b
Front views
c
Rear view
d
Electrical connection
e
Gas connection
45
Page 46

Electrical connection
ATTENTION:
During installation, maintenance and
repair work, the rangetop must be
disconnected from the electricity
supply. It is only completely isolated
from the electricity supply if the plug
fuses have been fully unscrewed
(where applicable), the main circuit
breaker has been tripped or the
power cable has been unplugged
from the wall outlet.
Do not cut off the plug on the power
cord. If the plug does not fit in the
outlet, have an electrician install an
appropriate outlet.
The socket must be easily accessi‐
ble after the rangetop has been in‐
stalled.
Installation, repair and maintenance
work should only be performed by a
Miele authorized service technician.
Work by unqualified persons can
cause considerable danger to users.
Miele cannot be held liable for any
damage arising as a result of such
work.
WARNING: THIS APPLIANCE MUST
BE GROUNDED
Installer: Please pass these instruc‐
tions on to the customer.
Electrical connection
The rangetop is equipped with an ap‐
prox. 4 ft. long power cord with a plug
for connection to the electrical supply
with:
– 120 V, 15 A, 60 Hz
SAVE THESE INSTRUCTIONS FOR
THE ELECTRICAL INSPECTOR'S
USE.
This appliance must be grounded in
compliance with all applicable local
and national regulations.
Installation, repair and maintenance
work should only be performed by a
Miele authorized service technician
in compliance with local regulations
and the ANSI National Electrical
Code / NFPA 70 in the United States
or the Canadian Electrical Code, Part
I in Canada (CSA standard C22.1).
To avoid damaging the rangetop,
make sure that the information (volt‐
age and frequency) on the data plate
correspond to the building's power
supply before connecting the appli‐
ance.
When in doubt, consult a qualified
electrician.
The power cable plug must be in‐
serted into a suitable outlet that has
been installed and grounded in com‐
pliance with all applicable local regu‐
lations.
46
Page 47

Gas connection
Connection to the gas supply
and any switchover to a different gas
type may only be performed by a du‐
ly authorized gas company techni‐
cian. This technician is responsible
for proper function at the installation
site.
In Massachusetts installation must
be performed by a licensed
plumber/gas fitter.
The rangetop must be connected
with its own shut-off valve.
The shut-off valve must be accessi‐
ble and visible, after the opening of a
cabinet door, if necessary.
The gas connection of the rangetop
can be to natural gas or liquid gas
(propane) according to the model.
Ask your gas company what kind of
gas is used and compare it with the
specifications on the data plate.
The rangetop is not connected to an
exhaust vent.
During the setup and connection of
the rangetop, observe the applicable
installation conditions, especially
suitable ventilation measures.
The gas connections must be ar‐
ranged in such a way that they are
not heated and damaged by the op‐
eration of the range.
In particular, make sure that the gas
hose lines and connection fittings on
the rangetop do not come into con‐
tact with hot exhaust gases.
The gas hose and power cord could
be damaged by hot spots on the
rangetop.
Make sure that the gas hose and
power cord do not come into con‐
tact with hot spots on the rangetop.
Flexible connection lines can be
damaged by incorrect routing.
Attach flexible connecting lines in
such a way so that they do not come
into contact with any moving kitchen
parts (e.g., a drawer) and are not ex‐
posed to mechanical stress.
The rangetop and the shut-off valve
must be disconnected from the gas
supply during gas pressure tests.
Disconnect the rangetop and the
shut-off valve from the gas supply
before performing a gas pressure
test at a pressure of more than
1/2 psi (3.5 kPA). Close the shut-off
valve of the gas supply before per‐
forming a gas pressure test at a
pressure of less than or equal to
1/2 psi (3.5 kPA).
Incorrectly sealed gas lines can lead
to a gas leak and thus to an explo‐
sion.
Seal all gas lines with a suitable
thread sealant.
Seal tightness tests on the rangetop
must be performed according to
manufacturer specifications.
47
Page 48

Gas connection
The gas connection must be made in
accordance with local codes or, in
the absence of local codes, with:
the National Fuel Gas Code,
ANSI Z223.1 / NFPA 54 for the USA
or the current Can / CGA B 149.1
and .2 Installation Codes for gas
burning appliances for Canada.
The gas pressure may not under‐
shoot or exceed certain values.
Make sure that the maximum gas
pressure upstream of the gas pres‐
sure controller does not amount to
more than 1/2 psi (3.5 kPA) for natu‐
ral and propane gas.
Make sure that the minimum gas
pressure amounts to a 6" water head
in the case of natural gas and a 11"
water head in the case of propane
gas.
The gas connection of the rangetop is
designed for natural gas or liquid gas
(propane) according to the ordered
model.
If the rangetop is not equipped with the
correct connection for the gas type in
your household, contact your Miele
dealer.
Miele gas rangetops will function up to
an altitude of 10,000' (3000 m). If the in‐
stallation exceeds these elevations, the
appliance must be converted. Contact
your Miele dealer.
48
Page 49

Burner ratings
KMR 1124 G/LP
Gas type Btu/hr kW
Max Max
Simmer burner Natural gas 12,500 3.70
Propane gas 12,500 3.70
Power burners Natural gas 19,500 5.70
Propane gas 19,500 5.70
Total output Natural gas 71,000 20.80
Propane gas 71,000 20.80
KMR 1134 G/LP
Gas type Btu/hr kW
Max Max
Simmer burner Natural gas 12,500 3.70
Propane gas 12,500 3.70
Power burners Natural gas 19,500 5.70
Propane gas 19,500 5.70
Total output Natural gas 110,000 32.20
Propane gas 110,000 32.20
49
Page 50

Burner ratings
KMR 1135 G/LP
Gas type Btu/hr kW
Max Max
Simmer burner Natural gas 12,500 3.70
Propane gas 12,500 3.70
Power burners Natural gas 19,500 5.70
Propane gas 19,500 5.70
Grill Natural gas 19,000 5.50
Propane gas 15,500 4.50
Total output Natural gas 90,000 26.30
Propane gas 86,500 25.30
KMR 1136 G/LP
Gas type Btu/hr kW
Max Max
Simmer burner Natural gas 12,500 3.70
Propane gas 12,500 3.70
Power burners Natural gas 19,500 5.70
Propane gas 19,500 5.70
Griddle Natural gas 13,000 3.80
Propane gas 14,300 4.20
Total output Natural gas 84,000 24.60
Propane gas 85,300 25.00
50
Page 51

Burner ratings
KMR 1354 G/LP
Gas type Btu/hr kW
Max Max
Simmer burners Natural gas 12,500 3.70
Propane gas 12,500 3.70
Power burners Natural gas 19,500 5.70
Propane gas 19,500 5.70
Total output Natural gas 142,000 41.60
Propane gas 142,000 41.60
KMR 1355 G/LP
Gas type Btu/hr kW
Max Max
Simmer burners Natural gas 12,500 3.70
Propane gas 12,500 3.70
Power burners Natural gas 19,500 5.70
Propane gas 19,500 5.70
Grill Natural gas 19,000 5.50
Propane gas 15,500 4.50
Total output Natural gas 122,000 35.70
Propane gas 118,500 34.70
51
Page 52

Burner ratings
KMR 1356 G/LP
Gas type Btu/hr kW
Max Max
Simmer burners Natural gas 12,500 3.70
Propane gas 12,500 3.70
Power burners Natural gas 19,500 5.70
Propane gas 19,500 5.70
Griddle Natural gas 13,000 3.80
Propane gas 14,300 4.20
Total output Natural gas 116,000 34.00
Propane gas 117,300 34.40
52
Page 53

Miele service, data plate, warranty
After sales service
In the event of a fault which you cannot easily correct yourself, please contact:
– your Miele dealer, or
– the Miele Technical Service Department.
See back cover for contact details.
Please quote the model and serial number of your appliance when contacting
Miele.
Data plate
Adhere the extra data plate supplied with the appliance here. Ensure that the mod‐
el number is the same as the one on the back of these operating instructions.
Warranty
For further information, please refer to your warranty booklet.
53
Page 54

Caring for the environment
Disposal of the packing mate‐
rial
The cardboard box and packing materi‐
als protect the appliance during ship‐
ping. They have been designed to be
biodegradable and recyclable.
Ensure that any plastic wrappings,
bags, etc. are disposed of safely and
kept out of the reach of children. Dan‐
ger of suffocation!
Disposal of your old appliance
Old electrical and electronic appliances
often still contain valuable materials.
However, they also contain harmful
substances that were essential for the
proper functioning and safe use of the
equipment. Handling these materials
improperly or disposing of them in your
household waste can be harmful to
your health and the environment.
Therefore, please do not dispose of
your old appliance with regular house‐
hold waste.
Old appliances may contain materials
that can be recycled. Please contact
your local recycling authority about the
possibility of recycling these materials.
Please be sure that your old appliance
does not pose a danger to children
while being stored for disposal.
54
Page 55

9 Independence Way
Princeton, NJ 08540
Phone:
Fax:
www.mieleusa.com
U.S.A.
Miele, Inc.
National Headquarters
Please have the model and serial number
of your appliance available before
contacting Technical Service.
Canada
Importer
Miele Limited
Headquarters and Miele Centre
800-843-7231
609-419-9898
609-419-4298
Technical Service & Support
Nationwide
Phone:
Fax:
TechnicalService@mieleusa.com
161 Four Valley Drive
Vaughan, ON L4K 4V8
www.miele.ca
800-999-1360
888-586-8056
Customer Care Centre
Phone:
customercare@miele.ca
800-565-6435
905-532-2272
Germany
Manufacturer
Miele & Cie. KG
Carl-Miele-Straße 29
33332 Gütersloh
55
Page 56

KMR 1124 / KM 1134 / KMR 1135 / KMR 1136 / KM 1354 / KMR
1355 / KMR 1356
M.-Nr. 10 004 330 / 02en-US
 Loading...