

Page 1
Operating Instructions
48" Dual Fuel Range
(Convection Oven)
To prevent accidents and damage to the range, you must r
instructions supplied before installing or using the appliance.
en–US, CA M.-Nr. 09 898 080
ead all
Page 2

IMPORTANT SAFETY INSTRUCTIONS
WARNING
Children and adults can tip over the range if has not been
sec
ured. This may lead to fatal injuries.
This r
device according to the installation instructions.
If
tip device until you feel it lock into place.
Do not use the r
installed and engaged.
F
instructions can lead to serious or fatal injuries for children and
adults.
ange must be secured and connected using the anti-tip
you have moved the range, slide the locking latch onto the anti-
ange if the anti-tip device has not been properly
ailure to observe the information contained in the installation
2
Page 3

Contents
IMPORTANT SAFETY INSTRUCTIONS................................................................. 2
IMPORTANT SAFETY INSTRUCTIONS.................................................................
Guide to the range ...............................................................................................
8
20
HR 1954 ................................................................................................................. 20
HR 1955, HR 1956................................................................................................. 20
Control panel........................................................................................................
22
HR 1954 ................................................................................................................. 22
HR 1955, HR 1956................................................................................................. 22
Sensor buttons....................................................................................................... 23
M Touch display..................................................................................................... 24
Symbols............................................................................................................ 25
Basic operation...................................................................................................... 26
Features ................................................................................................................
28
Model numbers ..................................................................................................... 28
Data plate .............................................................................................................. 28
Items included with this range............................................................................... 28
Standard and optional accessories ....................................................................... 28
Shelf runners..................................................................................................... 29
Universal tray and wire oven rack with safety notches..................................... 29
FlexiClip telescopic runners HFC92 ................................................................. 30
Rotisserie HDGR30+......................................................................................... 33
Oven controls ........................................................................................................ 34
Oven safety features.............................................................................................. 34
System lock for the oven
.............................................................................. 34
Safety shut-off .................................................................................................. 34
Cooling fan........................................................................................................ 34
Vented oven door.............................................................................................. 34
Safety Door Lock for Self Clean ....................................................................... 34
PerfectClean surfaces............................................................................................ 35
Self Clean ready accessories................................................................................. 35
Before using for the first time.............................................................................
36
Before using for the first time................................................................................. 36
Heating up the oven for the first time and rinsing the steam injection system...... 38
Operating the oven ..............................................................................................
39
Energy saving tips.................................................................................................. 39
Quick Guide ........................................................................................................... 40
Cooling fan ............................................................................................................ 40
3
Page 4

Contents
Settings.................................................................................................................
Accessing the "Settings" menu ............................................................................. 41
Changing and saving settings .......................................................................... 41
Settings overview................................................................................................... 42
Language ............................................................................................................
Time of day ............................................................................................................ 44
Display .............................................................................................................. 44
Clock Type ........................................................................................................ 44
Clock Format .................................................................................................... 44
Set..................................................................................................................... 44
Date........................................................................................................................ 45
Lighting .................................................................................................................. 45
Start screen............................................................................................................ 45
Brightness.............................................................................................................. 45
Volume ................................................................................................................... 46
Buzzer tones..................................................................................................... 46
Keypad tone...................................................................................................... 46
Welcome melody .............................................................................................. 46
Units of measurement............................................................................................ 46
Weight............................................................................................................... 46
Temperature...................................................................................................... 46
Cooling fan............................................................................................................. 47
Default temperatures.............................................................................................. 47
Self Clean............................................................................................................... 48
Safety..................................................................................................................... 48
System lock .................................................................................................. 48
Sensor lock ...................................................................................................... 49
Catalyzer ................................................................................................................ 49
Electrical Version.................................................................................................... 50
Sensor group ......................................................................................................... 50
Calibrate temperature ............................................................................................ 50
Showroom Program............................................................................................... 51
Demo Mode ...................................................................................................... 51
Factory default....................................................................................................... 51
Lift panel ................................................................................................................ 51
41
44
MyMiele.................................................................................................................
To add an entry...................................................................................................... 52
Editing MyMiele ..................................................................................................... 53
Deleting entries................................................................................................. 53
Sorting entries................................................................................................... 53
4
52
Page 5

Contents
Alarm + Timer.......................................................................................................
Using the Alarm .................................................................................................
Setting the alarm............................................................................................... 54
Changing an alarm............................................................................................ 54
Deleting an alarm.............................................................................................. 54
Using the Timer ................................................................................................. 55
Setting the timer ............................................................................................... 55
Resetting the timer............................................................................................ 56
Canceling the timer........................................................................................... 56
Guide to the modes..............................................................................................
Additional functions.............................................................................................
Changing the temperature..................................................................................... 60
Rapid PreHeat........................................................................................................ 61
Rapid PreHeat................................................................................................... 61
Using the Crisp function (Moisture Reduction)...................................................... 62
Changing the oven mode....................................................................................... 62
Setting additional durations................................................................................... 63
Turning off automatically................................................................................... 64
Turning on and off automatically....................................................................... 64
Sequence of a cooking program that turns on and off automatically .............. 65
Changing the set time....................................................................................... 65
Canceling cooking ............................................................................................ 65
Moisture Plus .................................................................................................
Cooking with the Moisture Plus function
Setting the temperature.................................................................................... 67
Setting the number of steam bursts ................................................................. 67
Timing the bursts of steam ............................................................................... 67
Changing the type of heating ........................................................................... 68
Injecting bursts of steam .................................................................................. 69
Automatic burst of steam ................................................................................. 69
1, 2 or 3 Bursts of steam .................................................................................. 69
Evaporating residual moisture................................................................................ 70
Starting residual water evaporation immediately.............................................. 71
Skipping residual moisture evaporation............................................................ 71
........................................................ 67
54
54
57
60
66
Gourmet Center ...................................................................................................
List of food types ................................................................................................... 72
MasterChef Plus..................................................................................................... 72
Using MasterChef and MasterChef Plus programs............................................... 73
Notes on using these programs........................................................................ 73
Search.................................................................................................................... 74
72
5
Page 6

Contents
Favorites ...............................................................................................................
Creating a Favorite................................................................................................. 75
Starting a Favorite.................................................................................................. 76
Changing Favorites................................................................................................ 77
Changing cooking stages ................................................................................. 77
Changing the name........................................................................................... 78
Deleting a Favorite ................................................................................................. 78
Bake ......................................................................................................................
Roast .....................................................................................................................
Wireless roast probe.............................................................................................. 82
How it works..................................................................................................... 82
When to use the wireless roast probe .............................................................. 83
Important notes on using the wireless roast probe .......................................... 83
Using the wireless roast probe ......................................................................... 85
Time left display................................................................................................ 86
Using residual heat ........................................................................................... 87
Slow Roasting ......................................................................................................
Using the Slow Roasting function.......................................................................... 89
Adjusting the Slow Roasting temperature ............................................................. 90
Broil .......................................................................................................................
Special Modes......................................................................................................
Defrost ................................................................................................................... 96
Dehydrate............................................................................................................... 97
Reheat.................................................................................................................... 98
Warm-up Cookware............................................................................................... 98
Proof....................................................................................................................... 99
Pizza....................................................................................................................... 99
Sabbath Program................................................................................................. 100
Gentle Bake ......................................................................................................... 101
Canning................................................................................................................ 102
Frozen food .......................................................................................................... 103
75
79
81
88
91
95
Cleaning and care..............................................................................................
Unsuitable cleaning agents.................................................................................. 104
Tips ...................................................................................................................... 105
Normal soiling ...................................................................................................... 105
Wireless Roast Probe...................................................................................... 105
Stubborn soiling................................................................................................... 106
6
104
Page 7

Contents
Cleaning the oven interior with Self Clean ....................................................
Preparing for the Self Clean program ............................................................. 107
Starting the Self Clean program ..................................................................... 108
Starting the Self Clean program ..................................................................... 108
Delaying the start of the Self Clean program.................................................. 108
At the end of the Self Clean program ............................................................. 109
The Self Clean program is canceled............................................................... 110
Removing the door .............................................................................................. 111
Reinstalling the door ............................................................................................ 112
Removing the shelf runners ................................................................................. 113
Frequently asked questions..............................................................................
Technical Service ...............................................................................................
Copyright and licenses......................................................................................
107
114
119
120
7
Page 8

IMPORTANT SAFETY INSTRUCTIONS
When using the appliance, follow basic safety precautions, including the
following:
Read all instructions before installation and use of the range to prevent
accidents and machine damage.
This appliance complies with current safety requirements.
Impr
oper use of the appliance can lead to personal injury and
material damage.
Read all instructions before installing or using the oven for the first
time. Only use the appliance for its intended purpose.
Keep these operating instructions in a safe place and pass them
on to any future user.
Use
This appliance
is intended for residential use only. Use only as
described in these operating instructions.
This applianc
Only use this oven for r
e is not intended for outdoor use.
esidential cooking, and the purposes
described in this manual.
Other uses are not permitted and can be dangerous.
Risk of Fir
e! Do not use this oven to store or dry flammable
materials.
ersons who lack physical, sensory or mental abilities, or
P
experience with the appliance should not use it without supervision
or instruction by a responsible person.
8
Page 9

Children
IMPORTANT SAFETY INSTRUCTIONS
As w
by children.
Do not lea
unsupervised in the area where the oven is installed. Do not allow
them to sit or stand on the appliance.
As w
by children.
Chil
they have been shown how to use it safely and recognize and
understand the consequences of incorrect operation.
Chil
unsupervised.
Chil
an oven is in use. Never allow children to operate, sit or stand on
any part of the oven. Caution: Do not store items of interest to
children in cabinets above an oven. Children climbing on the oven to
reach these items could be injured.
ith any appliance, close supervision is necessary when used
ve children unattended: Children should not be alone or
ith any appliance, close supervision is necessary when used
dren 8 years and older may only use the oven unsupervised if
dren must not be allowed to clean or maintain the appliance
dren should not be left alone or unattended in an area where
Danger of burns. The oven gets hot at the oven door glass, the
vapor vent, the handle and the oper
children to touch or play in, on or near the oven.
ating controls. Do not allow
Danger of burns.
dren's skin is more sensitive to high temperatures than that of
Chil
adults. The oven becomes hotter during self-cleaning than it does in
normal use. Do not let children touch the oven while the Self Clean
program is running.
Burn Hazar
so can result in severe burns or serious injury.
Dange
etc. are disposed of safely and kept out of the reach of children.
d - Do not allow children to use the oven. Failure to do
r of suffocation! Ensure that any plastic wrappings, bags,
9
Page 10

IMPORTANT SAFETY INSTRUCTIONS
Burn hazar
Keep the spaces above and behind the range clear of any items that
could draw the attention of children. Otherwise, they can be tempted
into climbing onto the appliance.
Dange
of the appliance.
d!
r of injury. Never allow children to hang or lean on any part
10
Page 11

Technical safety
IMPORTANT SAFETY INSTRUCTIONS
Installatio
a Miele authorized service technician in accordance with national
and local safety regulations and the provided installation
instructions. Contact Miele’s Technical Service Department for
examination, repair or adjustment. Repairs and other work by
unauthorized persons could be dangerous and may void the
warranty.
n, repair and maintenance work should be performed by
Do not carry or lift the range by the oven door handle or the
control panel!
Maint
appliance unless the instructions specifically recommend doing so.
Service work may only be performed by a qualified technician.
Chang
void the user's authority to operate the oven.
enance by the user: Never repair or replace any part of the
es or modifications not expressly approved by Miele may
A damaged range can be dangerous. Always check for visible
signs of damage. Never use a damaged appliance.
Reliable
it is connected to the public power supply.
and safe operation of the range can only be guaranteed if
The electrical safety of the range can only be guaranteed when it
is properly grounded. Compliance with this essential safety
requirement is absolutely mandatory. If in any doubt, please have
the building's wiring system inspected by a qualified electrician.
P
roper installation: Make sure that your appliance has been
installed correctly and that it has been grounded by a qualified
technician.
The ove
within cabinetry.
n is not to be operated until it has been properly installed
11
Page 12

IMPORTANT SAFETY INSTRUCTIONS
o avoid damaging the range, make sure that the connection data
T
(voltage and frequency) on the data plate correspond to the
building's power supply before connecting the appliance.
When in doubt, consult a qualified electrician.
Do not use a power strip or e
to electricity. These are a fire hazard and do not guarantee the
required level of appliance safety.
This applianc
installations (e.g. on a ship).
e must not be installed and operated in mobile
xtension cord to connect the range
Danger of electric shock!
Under no ci
Do not r
specifically recommended in the operating instructions. All other
servicing should be referred to a qualified technician.
Defective co
only. Only with these parts can the manufacturer guarantee the
safety of the appliance.
During
lighting is broken (see "Frequently asked questions"), the range must
be completely disconnected from the household electricity supply.
The gas supply must be shut off. Ensure that this is the case by:
– removing the fuse,
rcumstances open the outer casing of the appliance.
epair or replace any part of the appliance unless
mponents should be replaced by Miele original parts
installation, maintenance and repair work, e.g. if the oven
– "tripping" the circuit breaker, or
– unplugging the unit. Pull the plug not the cord.
– Shut off the gas supply and, if necessary, disconnect the range
fr
om the gas line. Installation and maintenance of the gas
connection must be performed by qualified installers, service
agencies or gas providers.
12
Page 13

IMPORTANT SAFETY INSTRUCTIONS
the range is installed behind a cabinet door, do not close the
If
door while the appliance is in operation. Heat and moisture can build
up behind the closed door and cause damage to the range and to
the surrounding cabinets and flooring. Do not close the door until
the appliance has completely cooled down.
Do not insta
over a hot stovetop to access the cabinets can result in burns. If it is
necessary to install cabinets, you can reduce the risk of burns by
installing a range hood that extends at least 4 3/4" (12 cm) past the
bottom of the cabinets.
The wat
been installed.
ll kitchen cabinets above the range, since reaching
er shutoff valve must be accessible after the range has
The protective sleeve of the water intake hose must not be
damaged or become kinked. This will cause it to leak.
The int
damage if the following conditions are met:
– The range is properly installed (connected to electric and water
supply).
– The range is repaired immediately whenever damage is detected.
– The water supply is shut off during extended periods of non-use
(e.g. vacation).
Har
osmosis filtering systems can damage the range. Only use filtered,
softened and demineralized water from the building's plumbing to
supply the range.
egrated Waterproof System offers protection against water
d water, water containing minerals and water from reverse
13
Page 14

IMPORTANT SAFETY INSTRUCTIONS
Proper use
he oven becomes very hot while in use. Use caution to
T
ensure that you are not burned on the heating elements or interior
surfaces of the oven. Use pot holders when placing food in the
oven, adjusting the racks, etc. in a hot oven.
aution: Heating elements may be hot even though they are not
C
glowing. Interior surfaces of an oven become hot enough to cause
burns. External parts of the oven such as the door glass, vents, and
the control panel can become hot. During and after use, do not
touch, or let clothing or other flammable materials come into contact
with heating elements or interior surfaces of the oven until they have
had sufficient time to cool.
Do not let foo
after cooking. Doing so can result in food poisoning or sickness.
Use onl
used on hot surfaces may result in steam burns. Do not let
potholders come in contact with oil or grease. Do not substitute dish
towels or other bulky items for potholders. Do not let potholders
touch hot heating elements.
oose fitting or hanging garments present a fire hazard. Wear
L
proper apparel while operating the appliance.
y dry, heat-resistant potholders. Moist or damp potholders
d sit in the oven for more than one hour before or
Do not heat unopened containers of food in the oven, pressure
may cause the containers to burst and result in injury.
Never pour col
The steam created could cause serious burns or scalding and the
sudden change in temperature can damage the enamel in the oven.
T
o prevent burns, always place oven racks at their desired height
while the oven is cool. If the rack must be moved while the oven is
hot, do not let pot holders touch hot heating elements.
d water onto hot surfaces in a hot oven.
14
Page 15

IMPORTANT SAFETY INSTRUCTIONS
Op
placing or removing food.
T
cleaning by hand.
en the door carefully to allow hot air or steam to escape before
o prevent burns, allow the heating elements to cool before
Do not leave the oven door open unnecessarily as someone may
trip over it or be injured by it.
Never leave
fat. They can ignite if overheated. Do not use water on grease
fires.Turn off the oven immediately and suffocate the flames by
keeping the oven door closed.
Smother the fir
agent or foam fire extinguisher.
Never st
oven, or near cooking surfaces.
Do not use the o
radiated could cause objects near the oven to catch fire.
Br
oiling food for an excessively long time can cause it to dry out
and may result in the food catching fire.
Do not exceed recommended broiling times.
the appliance unattended when cooking with oil or
e or flames, or use a dry chemical extinguishing
ore flammable liquids and materials in, above or under an
ven to heat the room. The high temperatures
Some foods dr
broiling temperatures. Do not use broiling modes for crisping rolls or
bread, or to dry flowers or herbs. Instead use the Convection Bake
or Surround modes.
Use cautio
evaporates at high temperatures but may, in rare circumstances,
combust on the hot heating elements.
Plastic con
ignite at high temperatures and can damage the oven. Use only
plastic containers that are indicated by the manufacturer as being
suitable for use in ovens.
y out very quickly and can be ignited by high
n when using alcohol in your recipes. Alcohol
tainers, which are not heat-resistant, melt and may
15
Page 16

IMPORTANT SAFETY INSTRUCTIONS
When r
humidity and condensation can cause damage in the oven. The
control panel, countertop or cabinetry may also be damaged.
Do not switch the oven off completely while food is inside it, but
select the lowest possible temperature for the oven mode you are
using. This will ensure the fan will automatically continue to run.
It
to be kept warm. This will prevent moisture from condensing on the
interior of the oven.
T
o avoid damage, do not place aluminum foil, pots, pans or
baking sheets directly on the oven floor. This can cause a build up of
heat that will damage the oven floor.
esidual heat is used to keep food warm, the high level of
is recommended to cover all cooked food that is left in the oven
Do not slide pots or pans on the oven floor. This could scratch
and damage the surface.
The door can
sit on or lean against an open door, and do not place heavy objects
on it. Also make sure that nothing can get trapped between the door
and the oven cavity. The oven could get damaged.
support a maximum weight of 33 lbs (15 kg). Do not
This ove
heat given off by glues, plastics or flammable liquids and materials
could be hazardous. Do not use it as a dryer, kiln, dehumidifier, etc.
n must only be used for cooking food. Fumes, vapors or
Do not cover or block any vent openings.
Do not let metal objects (aluminum foil, pans) come in contact
with the heating element.
Mak
come in contact with or get caught in the oven door.
16
e certain that the power cords of small appliances do not
Page 17

IMPORTANT SAFETY INSTRUCTIONS
When baking fr
lined with parchment paper. Do not use the baking tray or the
roasting pan for frozen foods with a large surface area. The tray or
pan could become warped and difficult to remove from the oven
when hot. Frozen foods like french fries, chicken nuggets, etc. can
be baked on the baking tray.
ozen pizzas or pies, place them on the wire rack
17
Page 18

IMPORTANT SAFETY INSTRUCTIONS
Cleaning and care
Do not use a st
Steam could penetrate electrical components and cause a short
circuit.
Only clean par
Instructions.
Scr
Do not use abrasive cleaners, hard sponges, brushes or sharp metal
tools to clean the door glass.
The shel
"Cleaning and care"). Ensure they are correctly fitted after cleaning
and never operate the oven without the shelf runners inserted.
Ther
the door. Take care not to rub, damage or move the gasket.
atches on the door glass can cause the glass to break.
f runners can be removed for cleaning purposes (see
e is a seal around the oven interior which seals the inside of
Do not use ove
liners of any kind should not be used in or around any part of the
oven.
Debris shoul
If not removed this debris can smoke causing the self-cleaning
program to turn itself off.
eam cleaner to clean this oven.
ts listed in these Operating and Installation
n cleaners. Commercial oven cleaners or oven
d be removed before running the Self Clean program.
18
Page 19

Accessories
IMPORTANT SAFETY INSTRUCTIONS
Use only ge
other manufacturers are used, the warranty will become void.
Only use the Miele
faulty, it must only be replaced with a Miele genuine roast probe.
V
ery high temperatures can damage the wireless roast probe and
cause the silicon to melt. Do not keep the roast probe in the oven.
Do not use the roast probe in Broil modes (except for Convection
Broil).
This ove
standard(s) and part 15 of the FCC Rules. Operation is subject to the
following two conditions: (1) This device may not cause harmful
interference, and (2) this device must accept any interference
received, including interference that may cause undesired operation.
The hig
accessories that are not designed for cleaning in the Self Clean
program. Please remove these accessories from the oven before
starting the Self Clean program. This also applies to accessories
purchased separately (see "Cleaning and care").
nuine original Miele parts. If parts or accessories from
roast probe supplied with this oven. If it is
n complies with Industry Canada licence-exempt RSS
h temperatures used during self-cleaning will damage
Preparing your appliance for an extended vacation
you elect to turn off the water to your home for an extended
If
period of time, please note that this may not be enough to reduce
the risk of a leak. To be completely safe, you must turn off the water
supply to each individual appliance.
SAVE THESE INSTRUCTIONS AND REVIEW THEM PERIODICALLY
19
Page 20
Guide to the range
HR 1954
HR 1955, HR 1956
20
Page 21

Guide to the range
a
Controls for Speed Oven, oven and cooktop
b
Door lock with contact switch for Self Clean
This switch ensures that the heating elements and convection fans turn off
when the door is opened during use.
c
Browning/Broiling element
d
Oven interior lighting
e
Rotisserie motor
f
TwinPower convection fan with heating element
g
Shelf runners with 5 levels
h
Door
i
Storage for wireless roast probe
The wireless roast probe for the oven is located on the right side of the
warming
j
Data plate
The data plate is located behind the toe kick.
k
Warming Drawer
l
Speed Oven
drawer.
21
Page 22
Control panel
HR 1954
HR 1955, HR 1956
a
Sensor button for lift panel
To lift up the control panel
b
On / Off b
To turn the appliance on and off
c
Display
To display time of day and
informa
d
"Back" sensor button
To go back one step at a time
22
utton in the cut-out
tion for operation
e
"Light" sensor button
To turn the oven cavity lighting on
and off
f
"Timer" sensor button
To set the timer
g
Optical interface
(for service technician use only)
Page 23

Control panel
Sensor buttons
The sensors react to touch. Each touch is confirmed with an audible tone. This
one can be turned off (see "Settings – Volume - Keypad tone").
t
Sensor
utton
b
Lift
panel
Back To go back a step
Light For turning the
Timer For activating and
Function Notes
For raising and
lowering the
contr
ol panel for
the oven
oven int
lighting on and off
deactivating timer /
alarm
erior
You can lift up and put down the control panel for
the oven automatically or manually (see "Settings
– Lift panel").
As soon as you start the self-cleaning cycle, the
lift panel goes down aut
If a menu appears in the display or if a cooking
pr
ocess is running, touching "Light" will turn the
interior light on or off.
If the time of day display is turned off, the "Light"
sensor will no
The oven interior lighting turns off after 15
seconds during a co
constantly turned on, depending on the setting
selected.
If a list of options is shown in the display, or if a
g process is running, you can enter a timer
cookin
duration (e.g. when boiling eggs on the cooktop)
or an alarm time, i.e. a specific time, at any point
(see "Alarm + Timer").
If the time of day display is turned off, the "Timer"
sensor will no
t react until the oven is turned on.
t react until the oven is turned on.
omatically.
oking process or remains
23
Page 24
Control panel
MyMiele
*
Operating
Modes
*
Gourmet Center
*
Special
Modes
*
Favorites
12:00
Main Menu
M Touch display
The touch screen can be scratched by hard objects, e.g. pens and pencils.
Only touch the display with your fingers.
Touching the display with your finger emits a small electrical charge, which in turn
trigg
ers an electrical pulse that is detected by the surface of the touch display.
The display is divided into three sections:
The top line shows what menu level you are currently in. Options within a menu
e separated by a vertical line. If there is not enough space to show the whole
ar
path, additional options are indicated by … . The Time of Day, Alarm and
Timer are shown in the top right-hand corner of the display.
The middle row shows the current menu and options. You can scroll to the right or
left by sw
The and arr
right. The number of small squares between the arrows indicates the number of
pages available and your position within the current menu.
24
iping your finger across the display.
ows at the bottom of the screen are used for scrolling to the left or
Page 25

Symbols
The following symbols may appear in the display:
Symbol Description
Some settings, e.g. display brightness and buzzer volume, are
lected using a bar chart.
se
This symbol indicates that there is additional information and
a
dvice about using the oven. Select OK to access the
information.
The system lock or sensor lock is active (see "Settings - System
Lock "). The oven cannot be operated.
Alarm
Timer
Core temperature when using the wireless roast probe
Control panel
25
Page 26

Control panel
Basic operation
Each time you touch a possible option, the corresponding field will light up amber.
Selecting or opening a menu
T
ouch the desired field to select it.
Scrolling
You can scroll left or right.
Swipe th
desired direction.
Or: Using your finger you can tap the and
Exiting a menu
T
ouch "Back", tap an option in the menu path at the top of the screen, or tap …
.
Depending on the current menu, this will take you back one level or return you to
the Main Menu.
e screen, i.e., place your finger on the touch display and move it in the
arrows to scroll left or right.
26
Page 27
Control panel
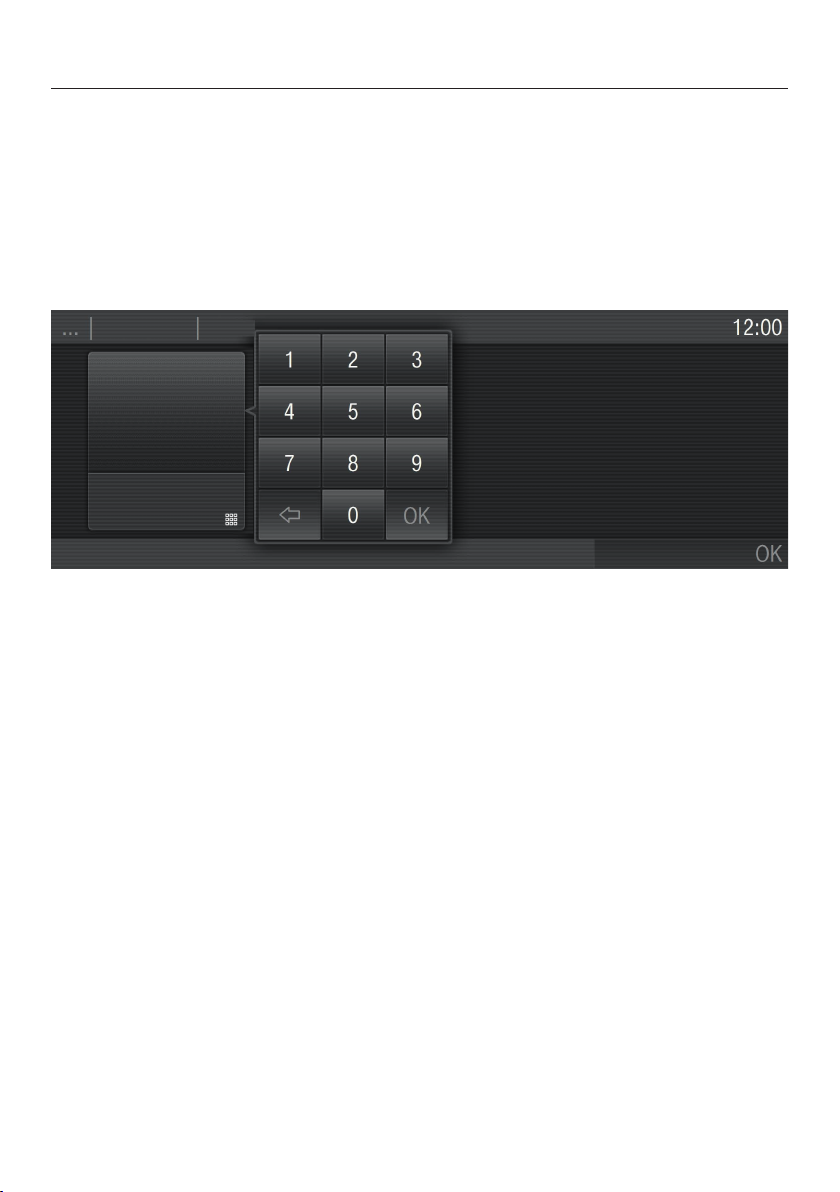
Entering numbers
You can enter numbers by scrolling through the roller and touching the desired
value
, or by using the numerical keypad.
To enter numbers using the roller:
Swipe the r
To enter numbers using the numerical keypad:
T
ouch in the bottom right of the input field.
The numerical keypad appears.
oller up or down to select the desired number.
T
ouch the required numbers.
Once you have entered a valid value, the OK sensor will light up green.
The last figure entered can be deleted using the arrow.
ouch "OK".
T
Entering letters
Enter a name using a keyboard. Try to use short, concise names.
Selec
T
t the required letters or characters.
ouch Save.
27
Page 28

Features
Model numbers
A list of the ovens described in these
ating instructions can be found on
oper
the back page.
Data plate
The data plate is behind the toe-kick.
oe-kick cover is attached to the
The t
base of the range by magnets so it can
be removed and put back again easily.
There you can find the model number,
the serial number and the connection
data (voltage/fr
load) for your range.
Have this information available when
cting Miele Technical Service.
conta
equency/maximum rated
Items included with this range
The following items are included with
this appliance:
– Installation instructions for the range
– The operating instructions for the
r
ange:
Standard and optional accessories
Accessories vary depending on
model. All o
shelf runners, a universal tray and a
wire oven rack. Depending on the
model, your oven may also come with
the additional accessories listed.
All accessories and cleaning and care
pr
oducts in these instructions are
designed to be used with Miele ovens.
They can be ordered from the
Miel
eusa.com website or Miele.
When ordering, please have ready the
model number of your oven and of the
desir
ed accessories.
vens are supplied with
– Gas Top Part
– Convection Oven
– Speed Oven
– Warming Drawer
– An anti-tip device, including screws
for fast
– Various accessories
28
ening the range
Page 29
Features
Shelf runners
The shelf runners are located on the
ri
ght and left sides of the oven interior
and provide the levels for inserting
accessories.
The shelf level numbers are indicated
on the fr
Each shelf level has two rails, one
above the other:
– Slide the accessories (e.g. wire oven
– Attach the telescopic runners and
The shelf runners can be removed for
cleaning purposes. (See "Cleaning and
car
ont of the oven frame.
r
ack) into the oven between the rails.
wir
e oven rack (if available) to the
bottom rail.
e".)
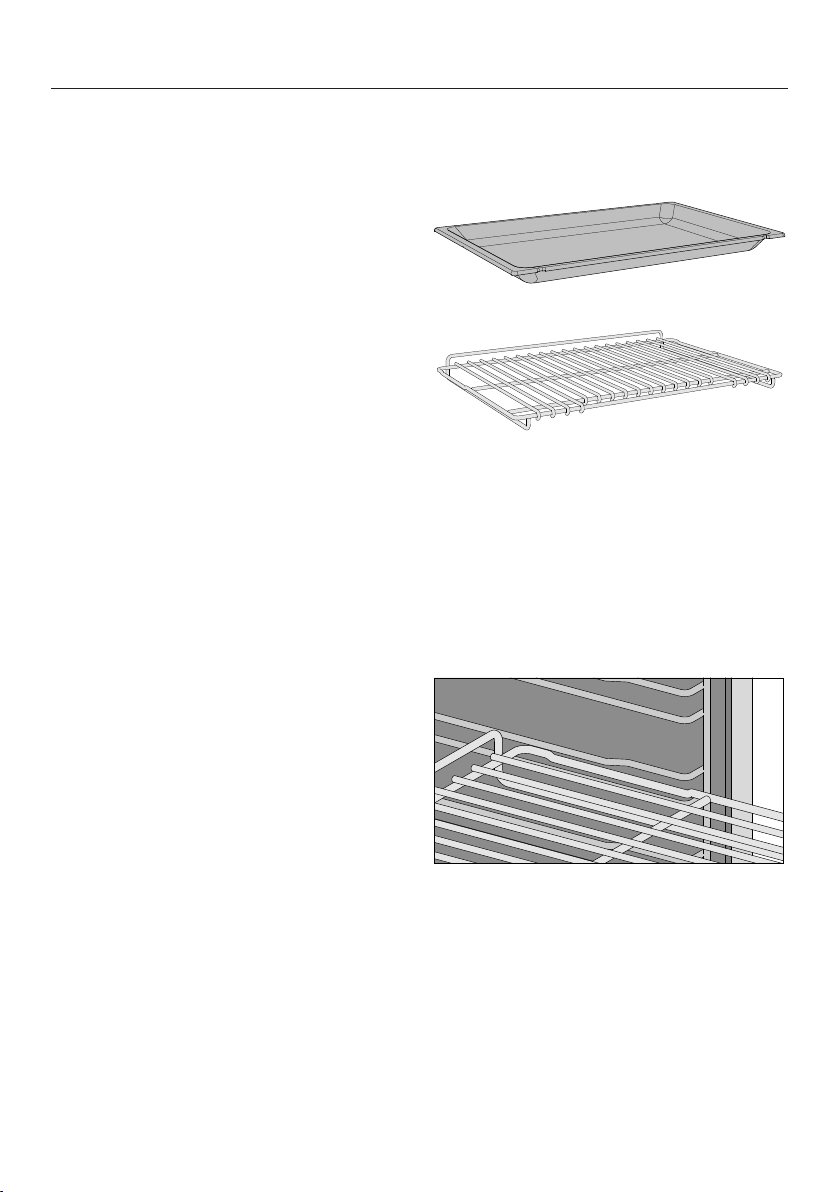
Universal tray and wire oven rack with safety notches
Universal tray HUBB30-1
Wire oven rack HBBR48-2:
These accessories are inserted into the
oven between the two r
runner.
Safety notches are located on the
ter sides of the wire oven rack.
shor
These catches prevent the rack from
being fully pulled out of the side
runners when you only wish to pull it
out partway.
:
ails of a side
Always slide the wire oven rack into the
r
ails on the shelf runner with the
catches facing down.
29
Page 30
Features
FlexiClip telescopic runners HFC92
The FlexiClip telescopic runners can be
attached
Push the FlexiClip telescopic runners
a
ll the way into the oven before
placing accessories on them.
The accessories will then
automatically sit securely in between
the stoppers at either end of each
runner and be prevented from sliding
off.
to any shelf level.
Installing and removing the FlexiClip
elescopic runners
t
Danger of burns! Make sure the
heating elements are turned off and
that the oven cavity is cool.
The FlexiClip telescopic runners are
inser
ted in between the two rails that
make up a shelf level.
The telescopic runner with the Miele
log
o must be inserted on the right.
When inserting or removing the
t
elescopic runners, do not extend
them.
The FlexiClip runners can support a
maximum load of 33 lbs (15 kg).
30
ok the FlexiClip runner onto the
Ho
front of the lower rail of a side runner
(1.) and then push it along the rail into
the oven compartment (2.).
Page 31

The
n secure the FlexiClip runner to
the bottom of the two rails as
illustrated (3).
If the telescopic runners are difficult
t
o pull out after inserting, you may
need to pull firmly to release them.
To remove a FlexiClip telescopic runner:
ush the FlexiClip runner in all the
P
way.
Features
Perforated baking tray HBBL71
The perforated baking tray has been
specially d
of baked goods.
The tiny perforations assist in browning
the underside of baked goods.
The tray can also be used for
dehydrating or drying food.
The surface has been treated with
P
erfectClean enamel for easy cleaning.
The perforated baking tray can be
placed on t
Grilling and Roasting insert
HGBB30-1
eveloped for the preparation
he rack.
Remo
ve the FlexiClip telescopic
runner by raising it at the front (1)
then pulling it forwards along the rail
and out (2).
The grilling and roasting insert is placed
in the universal
The drippings from the meat or poultry
are collected under the insert reducing
spattering in the oven. The drippings
can then be used for gravy and sauces.
The surface has been treated with
erfectClean enamel for easy cleaning.
P
tray.
31
Page 32

Features
Round baking form HBF27-1
This circular form is suitable for cooking
fr
esh or frozen pizzas, flat cakes, tarts
and baked goods.
The surface has been treated with
erfectClean enamel.
P
Gourmet Baking Stone HBS60
The baking stone is ideal for baking
dishes
pizza and bread.
The baking stone is made from a heat
retaining stone and is glazed. Place the
stone directly on the wire rack.
A wooden peel is supplied with it for
placing food on and off the stone.
with a crisp bottom such as
Gourmet Casserole Dishes HUB and Lids HBD
Miele Gourmet Casserole Dishes can
be place
rack. They have an anti-stick coating.
The oven dishes have depths of 8 1/2"
(22 cm) or 13 3/4" (35 cm). They have
the same width and height.
Matching lids are also available
separ
Depth: 8 1/2"
(22 cm)
HUB61-22 HUB61-35
HBD60-22 HBD60-35
d directly on the wire oven
ately.
Depth: 13 3/4"
(35 cm)
32
Page 33

Features
Wireless Roast Probe
The wireless roast probe allows you to
accur
ately monitor the food's internal
temperature during the cooking
process (see "Roast - Wireless roast
probe").
It is located in the storage sleeve on the
fr
ont right of the Cup & Plate Warming
Drawer.
Rotisserie HDGR30+
Opener
The opener allows you to open the
cover of the over light.
Miele Oven Cleaner
Miele oven cleaner is suitable for
emoving stubborn soiling. It is not
r
necessary to preheat the oven before
use.
The rotisserie is ideal for broiled foods
such as r
food browns evenly on all sides as it
rotates (see "Broiling - Using the
rotisserie to broil").
The rotisserie is placed on the universal
tr
ay and connected to the motors in the
back wall of the oven.
The rotisserie can support a maximum
weight of 11 lbs (5 kg).
Use of kebab device as well as meat
clamps possible.
olled roasts or poultry. The
33
Page 34

Features
Oven controls
The oven controls allow you to use the
us cooking modes to bake, roast
vario
and broil.
It also allows you to access:
– the time of day display,
– a timer,
– a timer to automatically turn cooking
pr
ograms on and off,
– Moisture Plus cooking,
– the MasterChef programs,
– the MasterChef Plus programs,
– the creating of a Favorite program,
– settings that can be customized.
Oven safety features
System lock for the oven
The system lock prevents the oven from
bei
ng used unintentionally (see "System
lock ").
The system lock will remain activated
even aft
Safety shut-off
The oven automatically turns itself off if
it is used f
period. The length of time depends on
the oven mode being used.
er a power failure.
or an exceedingly long
Cooling fan
The cooling fan comes on automatically
when a co
cooling fan mixes hot air from the oven
cavity with cool room air before venting
it out into the kitchen through vents
located between the appliance door
and the control panel.
The cooling fan will continue to run for
a whil
prevent moisture from building up in the
oven, on the control panel or
surrounding cabinetry.
When the temperature in the oven has
fallen sufficiently, the cooling fan will
tur
n off automatically.
Vented oven door
The oven door is made of glass panes
that have a heatpart of their surface.
During operation, air is also circulated
through the door to keep the outer
panel cool.
The door can be removed and
disassembled for cleaning purposes
(see "Cleanin
Safety Door Lock for Self Clean
For safety reasons, the door is locked
as soon
started. After the self-cleaning program
has finished, the door will remain
locked until the temperature in the oven
has fallen below 535°F (280°C).
oking program is started. The
e after a program is complete to
reflective coating on
g and care").
as the Self Clean program is
34
Page 35

Features
PerfectClean surfaces
The revolutionary PerfectClean finish is
a smooth, no
exceptionally easy to clean.
Food and grime from baking or roasting
e easily removed.
ar
Do not use ceramic knives, as these
scratch the PerfectClean surface.
will
Follow the instructions in the "Cleaning
are" section of this manual so the
and C
anti-stick and easy cleaning properties
are retained.
n-stick surface that is
The following have all been treated with
P
erfectClean:
– Universal tray
– Grilling and Roasting insert
– Perforated baking tray
– Round baking form
Self Clean ready accessories
The following accessories can be left in
the oven
– Shelf runners
– FlexiClip telescopic runners
– Wire oven rack
See "Cleaning and care" for more
information.
during the Self Clean program.
35
Page 36

Before using for the first time
Before using for the first time
The r
after it has been installed properly.
Read the Installation Instructions
car
Read the Operating Instructions
car
The range will turn on automatically
when it is conn
supply.
Welcome screen
A welcome greeting is displayed. You
will then
settings which are needed before the
appliance can be used.
F
ollow the instructions on the display.
Setting the language
Sel
Confirm with OK.
ange may only be operated
efully before installing the range.
efully before using the range.
ected to the power
be asked to select some basic
ect the desired language.
Setting the voltage (electrical version)
The voltage set must match that
of the house as to not damage the
oven.
Confirm the voltage before setting. If
in doubt contact a qualified
t
echnician.
Select the voltage.
Confirm with OK.
Setting the date
You can enter numbers by scrolling
ough and touching the roller, or by
thr
using the numerical keypad.
Set the day, month and year.
Confirm with OK.
Setting the country
Selec
Confirm with OK.
36
t the desired country.
Page 37

Before using for the first time
Set the time of day
You can enter numbers by scrolling
thr
ough and touching the roller, or by
using the numerical keypad.
Set the time of day in hours and
min
utes.
Confirm with OK.
The time of day can be displayed in a
12 hour or 24 hour format (see
"Settings - T
format").
Time of day display
You will then be asked when you want
the time of day t
when the oven is turned off (see
"Settings - Time - Display"):
– On
The time is always visible in the
display
– Off
ime of day - Clock
o show in the display
.
Set-up Successfully Completed is
displayed.
Confirm with OK.
The oven is now ready to use.
If you accidentally select the wrong
language, follow the instructions
described in "Settings - Language ".
The display appears dark to save
gy. Some modes are limited.
ener
– Night Dimming
The time only shows in the display
between 5:00 am and 11:00 pm. It
turns off at night t
Selec
Confirm with OK.
Information regarding energy
consu
Confirm with OK.
F
t the desired option.
mption will appear in the display.
ollow further instructions in the
display.
o save energy.
37
Page 38

Before using for the first time
Heating up the oven for the
first
time and rinsing the steam
injection system
New ovens can give off an unpleasant
odor on first use. Heating up the oven
for at least 1 hour with nothing in it will
get rid of this smell. It is a good idea t
rinse the steam injection system at the
same time.
Ensure that the kitchen is well
venti
lated while the appliance is
being heated up for the first time.
Close doors to other rooms to
prevent the smell spreading
throughout the house.
Remo
Befor
Inser
T
The main menu will appear.
Select Operating Modes .
Selec
The default temperature is displayed
(350 °F/160 °C).
ve any protective wrapping and
sticky labels from the oven.
e heating the oven up, wipe the
interior with a damp cloth to remove
any dust or bits of packaging that
may have accumulated in the oven
cavity during storage and unpacking.
t the FlexiClips with wire rack
(available to order) to the shelf
runners and insert all trays and the
rack.
urn on the oven.
t Moisture Plus .
Confirm with OK.
Select Automatic burst of steam.
After a short time, a burst of steam is
inje
cted automatically.
Risk of injur
o
Steam can cause scalding.
Do not open the door during a steam
burst.
Heat up the oven for at least an hour.
After at least one hour:
Turn the oven off.
After heating up for the first time
y!
Danger of burns! Allow the oven
to cool before cleaning.
Turn on the oven.
Selec
T
Cle
Dr
T
t Light to turn on the oven light.
ake all accessories out of the oven
and clean them by hand (see
"Cleaning and care").
an the oven interior with warm
water and liquid dish soap, applied
with a soft sponge or cloth.
y all surfaces with a soft cloth.
urn the lighting and the oven off.
Leave the oven door open until the
ove
n interior is completely dry.
The oven heating, lighting and cooling
fan will turn on.
Set the hig
(475 °F/250 °C).
38
hest possible temperature
Page 39

Energy saving tips
– Remove any accessories from the
that you do not require for
oven
cooking.
– Try not to open the door when
cooking.
– If a temperature range is given, it is
o select the lower temperature
best t
and check the food after the shortest
cooking time given.
– The default setting for the Time of
Day display Time - Display - Off will
con
sume the least amount of energy.
– With the factory default setting
Lighting
interior lighting turns off automatically
after 15 seconds. It can be turned on
again at any time by touching "Light".
– When cooking with automatic shut-
off or the wir
oven heating will turn off
automatically shortly before the end
of cooking. The residual heat is
sufficient to finish the cooking
process. Energy Save will appear in
the display. The cooling fan or hot air
fan (depending on mode used) will
remain on.
- On for 15 seconds the oven
eless roast probe, the
Operating the oven
– The oven turns off automatically if a
on is not pressed to save power.
butt
The amount of time before the oven
turns off depends on the selected
settings, e.g. mode, temperature,
cooking duration, etc.
39
Page 40

Operating the oven
Quick Guide
urn on the oven.
T
The main menu will appear.
Place the food in the oven.
Select Operating Modes.
Selec
The oven mode and default
t
emperature will appear.
The oven heating, lighting and cooling
fan will turn on.
Adjust the default t
The default temperature will be
aut
seconds. If necessary, select Change
to go back to the temperature setting
(see "Additional functions - Changing
the temperature").
Confirm with OK.
t the desired mode.
emperature if
necessary.
omatically accepted within a few
Cooling fan
After the cooking process the cooling
will continue to run for a while after
fan
a program is complete to prevent
moisture from building up in the oven,
on the control panel or surrounding
cabinetry.
When the temperature in the oven has
fallen sufficiently the cooling fan will
turn off aut
The default setting can be changed if
desir
omatically.
ed (see "Settings - Cooling Fan").
The required and the actual
emperatures will appear.
t
You will see the temperature rising in
the display
the oven temperature is reached if this
option is selected (see "Settings Volume - Buzzer tone").
After the cooking process:
ake the food out of the oven.
T
T
urn the oven off.
40
. A buzzer will sound when
Page 41

Settings
Accessing the "Settings" menu
From the main menu:
Select Settings.
They can be checked and changed, if
needed.
Settings cannot be altered while a
coo
king program is in progress.
Changing and saving settings
Select Settings.
Swipe acr
desired setting appears, then touch it
to select.
The settings which are currently
selected will have a colored frame
around them.
Swipe acr
desired option appears, then touch it
to select it.
Confirm with OK.
The setting is now saved.
oss the screen until the
oss the screen until the
41
Page 42

Settings
Settings overview
Option Available settings
Language ... / deutsch / english / ...
Country
Time Display
/ Off * / Night Dimming
On
Clock Type
Analog
Clock Format
24 h / 12 h (am/pm) *
Set
Date
Lighting On
Start Screen Main Menu
Brightness
Volume Buzzer tones
Units of Measurement Weight
Cooling Fan Temperature Controlled *
/ On for 15 seconds *
Operating Modes
Gourmet Center
Special Modes
MyMiele
Favorites
Keypad tone
Welcome Melody
g
Temperature
°C / °F *
Time Controlled
* / Digital
/ lb/oz *
* Factory default
42
Page 43

Option Available settings
Self Clean With reminder
Without reminder *
Default temperatures
Safety System Lock
/ Off *
On
Sensor Lock
/ Off *
On
Catalyzer
Electrical Version 208V / 60Hz
Sensor group Sensor group 0 – 9
Calibrate Temperature
Showroom Program Demo Mode
Factory default Settings
Lift-up control panel Automatically
220V / 60Hz
240V / 60Hz
/ Off *
On
Favorites
Default temperatures
MyMiele
Manual *
Settings
* Factory default
43
Page 44

Settings
Language
The desired country and language can
be set.
After selecting and confirming your
ce, the language selected will
choi
appear in the display.
Tip: If you accidentally select a
language you do not understand, select
the symb
submenu.
ol to return to the
Time of day
Display
Select how you would like the time of
day
to appear in the display when the
oven is turned off:
– On
The time of day will always appears
in the display
and off or use the "Timer" touch the
relevant sensor.
– Off
. To turn the "Light" on
Clock Type
You can choose from an analogue
cloc
k face or a digital (h:min) display.
The date will also appear in the digital
cloc
k display.
Clock Format
You can select the clock format for the
time of day:
– 24 h
The time of day is shown in a 24 hour
clock format.
– 12 h (am/pm)
The time of day is shown in a 12 hour
clock format.
Set
Set the hours and the minutes.
If there is a power failure, the current
time of day
power has been restored. The time is
stored in memory for about 200 hours.
will reappear once the
The display is turned off to save
gy. The oven has be to be turned
ener
on before you can use it. This also
applies when using the Alarm +
Timer and the oven light.
– Night Dimming
To save energy, the time is only
visible in the display between 5:00
am and 11:00 pm.
time it is not visible.
44
The rest of the
Page 45

Settings
Date
Set the date.
When the oven is turned off, the date
y appears if the oven is set to
onl
"Time – Clock Type – Digital".
Lighting
– On
The interior lighting is turned on
during the enti
– On for 15 seconds
The oven lighting turns off 15
seconds aft
Touching "Light" turns it on for
another 15 seconds.
re cooking period.
er a program starts.
Start screen
The main menu will appear in the
display when the oven is turne
can change this default setting so that,
for instance, the oven modes or
MyMiele settings appear in the display.
d on. You
Brightness
The display brightness is represented
by a bar with seven segments.
Select Darker or Lighter,
brightness of the display.
to change the
45
Page 46

Settings
Volume
Buzzer tones
The volume is represented by a bar with
seven segments.
Maximum volume is selected when all
segmen
segments are filled, the volume is
turned off.
Select Quieter or Louder,
Select On
Keypad tone
The volume is represented by a bar with
seven segments.
Maximum volume is selected when all
segmen
segments are filled, the volume is
turned off.
ts are filled. If none of the
to adjust the
volume.
or Off to turn the buzzer
tones on or off.
ts are filled. If none of the
Units of measurement
Weight
– g
The weight of food in MasterChef
pr
ograms is shown in grams.
– lb
/oz
The weight of food in MasterChef
ograms is shown in pounds and
pr
ounces.
Temperature
– °C
The temperature is displayed in
Celsius.
– °F
The temperature is displayed in
F
ahrenheit.
Select Quieter or Louder, to adjust the
volume.
Select On
tone on or off.
Welcome melody
You can turn the welcome melody on or
t sounds when the On / Off button
off. I
is touched.
46
or Off, to turn the keypad
Page 47

Settings
Cooling fan
The cooling fan will continue to run for
some ti
turned off to prevent humidity from
building up in the oven, on the control
panel or in the surrounding cabinetry.
– Temperature Controlled
– Time Controlled
me after the oven has been
The cooling fan turns off when the
t
emperature in the oven drops below
160°F (70°C).
The cooling fan will turn off after
appr
ox. 25 minutes.
Condensation can cause the
cabin
etry and the countertop to be
damaged. This could lead to
corrosion of the appliance.
When keeping food warm in the
ove
n, increases to the Time Controlled
setting can lead to condensation of
the control panel, moisture on the
countertop and on the cabinetry.
Do not adjust the Time Controlled
setting and tr
the warm oven.
y not to leave food in
Default temperatures
If you often cook with temperatures that
differ fr
to change the default temperatures.
After selecting this option, a list of oven
modes will appear in the display
Selec
The default temperature is displayed
alon
range.
Cha
Confirm with OK.
om the default, it makes sense
.
t the desired mode.
g with the available temperature
nge the default temperature.
47
Page 48

Settings
Self Clean
– With reminder
A reminder to run the Self Program
pr
ogram will appear in the display.
– Without reminder
You will not be reminded to run the
Self Clean
program.
Safety
System lock
The system lock prevents the oven
being t
Select On to activate the system lock.
– On
– Off
urned on inadvertently.
The system lock will remain activated
en after a power failure.
ev
The timer can still be used when the
system lock is active.
The system lock is now active. If you
o use the oven, touch for at
want t
least 6 seconds.
The system lock is not active. The
oven can be used as normal.
48
Page 49

Settings
Sensor lock
The sensor button lock prevents you
fr
om accidently turning the oven off or
changing a cooking program.
– On
Before you can use a mode, touch
for at least 6 seconds.
– Off
The buttons respond immediately to
a finger t
ouch.
Catalyzer
The level of odor reduction is
epresented by a bar with seven
r
segments.
Maximum odor reduction is selected
when all
the segments are filled the catalyzer is
turned off.
Select Minimum or Maximum t
Select On
segments are filled. If none of
o
change the level of odor reduction.
or Off to turn the catalyzer
on and off.
49
Page 50

Settings
Electrical Version
Setting the voltage (electrical version)
Selec
Confirm with OK.
t the desired voltage and
corresponding frequency.
Sensor group
Your oven was set at the factory to
aut
omatically detect the wireless roast
probe supplied. If you have purchased
a new Miele roast probe, you will need
to reset the sensor group (e.g. to P1D01-0000001).
Selec
The sensor group is the second digit
of the twelve-digit code (P0 – P9).
Confirm with OK.
t the sensor group that is
printed on the metal tip of the
wireless roast probe.
Calibrate temperature
Using temperature calibration the
emperature can be modified, in all
t
modes and Gourmet Center (oven) and
MasterChef (speed oven) programs, so
that it is slightly higher or lower than
shown.
The temperature calibration is
represented by a bar with seven
segments.
If all of the segments are filled the oven
emperature is much higher than
t
indicated in the display. If no segment
is filled the oven temperature is much
lower than indicated.
Select
temperature calibration.
Confirm with OK.
or , to adjust the
50
Page 51

Settings
Showroom Program
This mode enables the oven to be
demonstr
heating up. It should not be set for
domestic use.
Demo Mode
If you have demo mode activated
Demo Mode is active. The appliance will
not heat up will appear when you turn
on the oven.
– On
Touch OK for at least 4 secon
activate demo mode.
– Off
Touch for at least 4 seconds to
deactivat
can then be used as normal.
ated in showrooms without
ds to
e demo mode. The oven
Factory default
– Settings
Any settings that have been altered
will be r
setting.
– Favorites
All Favorites will be deleted.
– Default temperatures
Any default temperatures that have
been chang
factory default settings.
– MyMiele
All MyMiele entries will be deleted.
eset to the factory default
ed will reset to the
Lift panel
Regardless of the setting selected, as
n as you start the self-cleaning
soo
cycle, the lift panel goes down
automatically.
– Automatically
The lift panel lifts up automatically as
soon as you switch the oven on.
The lift panel goes down
automatically as soon as you switch
the oven off.
– Manual
Touch the lift panel sensor button to
lift the contr
down.
ol panel up and put it
51
Page 52

MyMiele
You can personalize your oven using
the MyMiele function by inputting
fr
equently used processes.
It is particularly useful with Gourmet
Cent
er (oven) and MasterChef (speed
oven) programs as you do not need to
work through every screen in order to
start your program.
You can also set processes that you
have ent
the Start screen (see "Settings – Start
screen").
ered into MyMiele to appear in
To add an entry
You can add up to 20 entries.
Select MyMiele.
Select Add entry.
You can select options from the
follo
wing categories:
– Operating Modes
– Gourmet Center
– Special Modes
– Favorites
Confirm by touching OK.
The option selected appears in the list
ogether with the corresponding
t
symbol.
roceed as described above for any
P
other entries. You will only be able to
choose from options which have not
already been selected.
52
Page 53

MyMiele
Editing MyMiele
After selecting Edit you can
– add entries as long as MyMiele
contains fewer than 20 entries,
– delete entries,
– sort entries as long as MyMiele
con
tains more than 4 entries.
Deleting entries
Select MyMiele.
Select Edit.
Select Delete entry.
Selec
Confirm with OK.
The entry will then be removed from the
list.
t the entry that you want to
delete.
Sorting entries
The order can be rearranged as long as
ther
e are more than 4 entries.
Select MyMiele.
Select Edit.
Select Sort entry.
Selec
Selec
Confirm with OK.
The entry will now appear in the
position
t the entry.
t the position you want to move
it to.
selected.
53
Page 54

Alarm + Timer
Using "Timer", you can set an alarm for
a specific time or set the timer dur
to time an activity in the kitchen e.g.
boiling eggs.
Two alarms can be set simultaneously,
two timer dur
kitchen timer duration.
ations or an alarm and a
ation
Using the Alarm
The alarm can be used to set a specific
at which the oven buzzer will
time
sound.
Setting the alarm
If the setting Time - Display - Off is
ed, you will need to turn the
select
oven off before setting the alarm. The
alarm time will then appear in the
display when the oven is turned off.
Selec
Select New Alarm.
Set the time for the alarm.
Confirm with OK.
When the oven is switched off, the
alarm time and will appear inst
the time of day.
If you are cooking at the same time or if
you ar
time and will appear in the top righthand corner of the display.
t "Timer".
ead of
e in a different menu, the alarm
At the set alarm time
– the Alarm symbol will flash
the time in the display.
– a buzzer will sound if turned on (see
"Settings - V
Select "Timer" or the alarm in the
upper right of the display.
The buzzer will turn off and the symbols
in the display will go out.
Changing an alarm
Select the alarm in the upper right of
the display or selec
desired alarm.
The alarm selected appears.
Set the new time for the alarm.
Confirm with OK.
The adjusted alarm time is now saved
and will appear in the display
Deleting an alarm
Select the alarm in the upper right of
the display or selec
desired alarm.
The alarm selected appears.
Select Reset.
The alarm will be deleted.
olume - Buzzer tones").
t "Timer" and the
t "Timer" and the
next to
.
54
Page 55

Alarm + Timer
Using the Timer
The timer can be used to time any
activity in the kitchen , e.g. boiling
eggs.
The timer can also be used at the same
time as a cooking program if a start and
finish time have been set, e.g. a
reminder to stir the dish or add
seasoning.
A maximum time of 9 hours and 59
tes can be set for the timer.
minu
Tip: Use the time
to remind you to inject the bursts of
steam at the desired time.
r in Moisture Plus
Setting the timer
When the setting Time - Display - Off
set the oven must be turned on to set
the timer. The timer can then be seen
counting down in the display when the
oven is turned off.
Boiling eggs and setting the timer for 6
tes and 20 seconds
minu
Selec
Select New Timer Time.
Set the timer for the r
Confirm with OK.
When the oven is turned off, the timer
dur
and appears instead of the time of
day.
If you are cooking at the same time or if
you are in a different menu, the timer
duration and will appear in the top
right-hand corner of the display.
t "Timer".
equired time.
ation counts down in the display
is
55
Page 56

Alarm + Timer
At the end of the timer
– the Timer symbol
– the time starts counting upwards,
– A buzzer will sound if turned on (see
"Settings - V
Select "Timer" or the timer in the
upper right of the display.
The buzzer will turn off and the symbols
in the display will go out.
olume - Buzzer tones").
flashes,
Resetting the timer
Select the timer in the upper right of
the display, or select "T
desired timer.
The time previously set appears.
Set a new timer dur
Confirm with OK.
The changed time is saved and will
count down in seconds.
Canceling the timer
Select the timer in the upper right of
the display, or select "T
desired time.
The time previously set appears.
Select Reset.
The timer has been canceled.
imer" and the
ation.
imer" and the
56
Page 57

Guide to the modes
The oven has a wide range of modes for preparing a variety of foods.
Due to country-specific preferences for preparation of food, default temperatures
emperature ranges in °F and C° do not correspond. The temperature values
and t
have been defined as given in the chart.
Oven modes Default
t
emperature
Convection Bake
Use this mode for baking and roasting on several
level
s at the same time. You can cook at lower
temperatures than with the Surround mode
because the fan distributes the heat evenly
throughout the cavity for a consistent baking
temperature.
Surround
This premium baking mode uses heat from the
upp
er and lower elements to create perfect results
on all baking recipes.
Moisture Plus
Infuse up to 3 bursts of moisture, either manually or
time driven, thr
ensure a soft, moist interior with a crispy crust.
MasterChef Plus programs use Moisture Plus during
the cooking/baking process.
Intensive
This mode gently circulates heated air from the
lower heatin
oven environment. Ideal for baking pizza, focaccia,
pies and tarts that require a crisp base and moist
toppings.
Auto Roast
For a premium result, the meat is seared at a high
t
emperature keeping meat tender and juicy.
oughout the cooking program to
g element using the fan to create a brick
350°F
(160°C)
350°F
(180°C)
350°F
(160°C)
400°F
(170°C)
375°F
(160°C)
Temperature
r
ange
125–475°F
(25-275°C)
175–525°F
(30-280°C)
275-475°F
(130-250°C)
125-475°F
(50-250°C)
200-450°F
(100-230°C)
57
Page 58

Guide to the modes
Oven modes Default
t
emperature
Surround Roast
For roasting traditional recipes, e.g. pot roast, and
br
aising or cooking at low temperatures.
Convection Roast
This mode uses the convection fan to circulate
heat
ed air throughout the oven. Ideal for cooking
delicate cuts of meat, fish and crispy poultry.
Bake
This mode uses traditional baking techniques to
per
fect pies and biscuits.
Browning
For a perfectly browned topping, for example when
making a gr
Maxi Broil
The entire upper heating element is used for intense
heating
browning and searing results. Perfect grilling large
quantities of steak, chops, kebabs, etc.
Broil
For grilling smaller quantities of steak, chops,
k
ebabs, etc.
atin or browning the top of a casserole.
from above. This function gives excellent
400°F
(180°C)
375°F
(160°C)
375°F
(190°C)
350°F
(190°C)
500°F
(240°C)
500°F
(240°C)
Temperature
r
ange
75–525°F
(30–280°C)
75–475°F
(30–250°C)
200-525°F
(50-225°C)
200–475°F
(100–250°C)
400–575°F
(200–300°C)
400–575°F
(200–300°C)
58
Page 59

Guide to the modes
Oven modes Default
t
emperature
Convection Broil
This mode distributes hot air from the Browning/
Br
oiling element over the food using the fan. This
allows for a lower temperature to be used then when
using Broil . Ideal for broiling thicker cuts of meat
(e.g. chicken, roulades).
Rotisserie
The rotisserie evenly broils and adds a finishing
t
ouch to items such as stuffed meat, tied roasts,
poultry, vegetables and kabobs.
Gentle Bake
A combination of different heating elements ensures
e
xcellent baked good, gratins and lasagna.
400°F
(200°C)
400°F
(200°C)
350°F
(190°C)
Temperature
r
ange
200-500°F
(100-250°C)
200-500°F
(200-300°C)
200-475°F
(100-250°C)
59
Page 60

Additional functions
You have placed the food in the oven,
select
ed a mode and set the
temperature.
By selecting Additional Settings you can
adjust cooking times and adjust
additional settings.
Select Change.
Select Additional Settings.
Additional options will appear in the
display for you t
o select for change if
desired.
– Duration
– Core temperature
(This will only appear
if you are using the wireless roast
probe. You cannot set a cooking
duration when using the roast probe.)
– Ready at
– Start at (This will appear if a Duration
or Ready at time has been set.)
– Rapid PreHeat
(This only appears if a
temperature of more than 210°F
(100°C) has been set for Convection
Bake / Convection Roast , Auto
Roast , Surround / Surround
Roast or Moisture Plus ).
– Crisp function
(This moisture reduction
feature will allow surfaces to crisp on
the outside.)
Changing the temperature
As soon as a cooking mode is selected,
a default t
display together with its possible range
(see "Guide to the modes").
If the d
for your recipe, confirm it with "OK".
If it is not suitable for your r
can change it for this particular
cooking program.
You can also permanently reset the
default t
personal cooking habits (See
"Settings - Default temperatures").
Example: You have selected
Con
(170°C) and can see the temperature
increasing.
You want to reduce the target
t
emperature to 310°F (155°C).
Select Change.
Cha
Confirm with OK.
The adjusted target temperature is
saved. The tar
temperatures are displayed.
emperature will appear in the
efault temperature is suitable
ecipe, you
emperature to suit your
vection Bake and 350°F
nge the temperature.
get and actual
– Change type of heating
(This option will
only appear with Moisture Plus .
You can combine bursts of steam
with another type of heating.)
– Change Operating Mode
(You can
change the cooking mode during
operation.)
60
Page 61

Additional functions
Rapid PreHeat
Rapid PreHeat can be used to speed
up the pr
The Rapid heat-up function switches on
aut
of more than 212°F (100°C) for
Convection Bake / Convection Roast
, Auto Roast , Surround Roast /
Surround and Moisture Plus .
You can turn-off Rapid PreHeat for a
elevant cooking process.
r
eheating phase.
omatically if you set a temperature
Rapid PreHeat
– On
The Browning / Broiling and
convection heating elements turn on
t
ogether with the fan to enable the
oven to reach the required
temperature as quickly as possible.
– Off
Only the heating elements
associa
are turned on.
To turn the Rapid PreHeat function off:
Select Change.
Select Additional Settings.
Select Rapid PreHeat.
In Rapid PreHeat, Off will appear.
Confirm with OK.
Rapid PreHeat has been deactivated.
Instead of Rapid PreHeat, Preheating will
appear in the display
ted with the cooking program
.
Select the required oven mode and
temperature.
ait for the preheating phase to
W
complete.
A buzzer will sound when the set
emperature is reached, if the buzzer is
t
set (see "Settings").
Place the food in the oven.
61
Page 62

Additional functions
Using the Crisp function
(M
oisture Reduction)
It is a good idea to use this function
hen cooking items which are moist on
w
the inside but which should be crispy
on the outside, e.g. french fries.
It is also suitable for fruit cakes, such as
apple cak
You have placed the food in the oven,
select
temperature.
You can activate the "Crisp function"
with any oven mode. It must be
activat
process. For best results, activate it at
the beginning of the cooking process.
Select Change.
Select Additional Settings.
Select Crisp function.
In Crisp function, On will appear
e.
ed a mode and set the
ed separately for a cooking
.
Changing the oven mode
You can change the oven mode during
peration.
o
Select Change.
Select Additional Settings.
Select Change Operating Mode.
Selec
The new mode will appear in the
display t
temperature.
Cha
Confirm with OK.
The oven mode has been changed.
The times entered will be kept.
t the desired mode.
ogether with its default
nge the temperature, if
necessary.
Confirm with OK.
Moisture reduction is now activated.
62
Page 63

Additional functions
Setting additional durations
You have placed the food in the oven,
ed a mode and set the
select
temperature.
By entering Duration, Ready at or Start at
you can aut
program on or off.
– Duration
Enter the cooking duration required.
Once the dur
the heating will turn off automatically.
The maximum duration that can be
set is 12:00 hours.
A cooking duration cannot be
ent
roast probe. When using the roast
probe, the cooking duration is
determined by when the set core
temperature is reached.
– Ready at
You can specify when you would like
the cooki
The oven will turn off automatically at
the time set.
A Ready at time canno
you are using the wireless roast
probe. When using the roast probe
the end time is determined by when
the set core temperature is reached.
omatically turn the cooking
ation set has elapsed,
ered if you are using the wireless
ng program to complete.
t be entered if
– Start at
Set the time you would like cooking
o start at. The oven will turn on
t
automatically at the time set.
Start at
with Duration or Ready at, except
when using the wireless roast probe.
can only be used together
63
Page 64

Additional functions
Turning off automatically
It is now 11:45. The food takes 30
minu
tes to cook and should be ready at
12:15.
Select Duration and set 00:30 h or select
Ready at and set the time for 12:15.
The oven will turn off automatically after
this dur
ation has elapsed or the time
set has been reached.
Setting the duration
Select Change.
Select Additional Settings.
Set the coo
king duration.
Confirm with OK.
Setting the "Ready at" time
Select Change.
Select Additional Settings.
In the Ready at
field, set the time at
which the food should be ready.
Turning on and off automatically
It is recommended to use the
aut
omatic On/Off feature when
roasting. Do not delay the start of the
program for too long when baking.
Cake mixtures and doughs will dry
out, and the leavening agents will lose
their effectiveness.
To turn a cooking program on and off
aut
omatically, you have a choice of
how to enter the time parameters:
– Duration
– Duration
– Ready at
and Ready at
and Start at
and Start at
It is now 11:30. The food takes 30
tes to cook and should be ready at
minu
12:30.
Select Change.
Select Additional Settings.
In the Duration
field, set 0:30 h.
Confirm with OK.
64
In the Ready at
field, set 12:30 h.
Confirm with OK.
The Start at time will be aut
omatically
calculated. Start at 12:00 will appear in
the display.
The oven will turn on automatically
when this time is r
eached.
Page 65

Additional functions
Sequence of a cooking program that
turns on
Up until the start time the mode, the
select
start time will appear in the display.
After the program has started you
can foll
display until the required temperature
has been reached.
Once this temperature is reached, a
buzz
"Settings - Volume - Buzzer tone").
After the preheating phase the
r
emaining time will appear in the
display.
The time will count down in the display.
The la
seconds.
At the end of the cooking process a
buzz
"Settings - Volume - Buzzer tones").
The oven heating and lighting are
turned on. Program Finished appears in
the display
and off automatically
ed temperature, Start at and the
ow the preheating phase in the
er will sound if turned on (see
st minute counts down in
er will sound if turned on (see
.
Changing the set time
Select Change.
All options that can be changed will
appear
Cha
Confirm with OK.
Canceling cooking
Touch "Back" twice.
Cancel Cooking? appears in the display
Select Yes.
The oven heating and lighting will turn
off, and any d
deleted.
.
nge the desired time.
These settings will be deleted in the
event of a power failur
urations set will be
e.
.
You have the option to save the
ogram as a Favorite (see "Favorites")
pr
or to increase the cooking duration
using Change. Select "Back" to go back
to the main menu.
During the cooling down phase the
oling fan will continue to run.
co
65
Page 66

Moisture Plus
Your oven is equipped with a steam
inje
ction system for cooking with
moisture. Baking, roasting and cooking
with Moisture Plus guarantees
optimized steam and air conduction for
excellent cooking and browning results.
After selecting Moisture Plus you
need t
o set the temperature and the
number of bursts of steam.
Available options are:
– Automatic burst of steam
equires enough water for one
This r
burst of steam. The burst of steam
will be injected into the oven
automatically after the heating-up
phase.
– 1 Burst of steam
2 Bursts of steam
3 Bursts of steam
Y
ou have to release the bursts of
steam yourself.
The steam bursts are injected into the
oven cavity during the cooking
pr
ogram. The steam inlet is located on
the ceiling of the oven interior in the
rear left corner.
– When r
oasting meat with a high fat
content, injecting steam at the
beginning of roasting will help render
the fat.
Moisture Plus is not suitable for
es which contain a lot of
mixtur
moisture, such as choux pastry and
meringues, as the addition of steam
does not allow them to dry out
sufficiently.
One burst of steam takes approx. 5–8
es. The number of bursts of steam
minut
and when they are injected will depend
on the type of food being cooked:
– Y
east doughs will rise better if steam
is injected at the beginning of the
program.
– Br
ead and rolls will also rise better if
exposed to steam at the start.
Injecting a burst of steam at the end
of the program will give the bread
and rolls a shiny crust.
66
Page 67

Moisture Plus
Cooking with the Moisture
Plus function
It is normal for condensation to form
on
the inside of the door during steam
injection. This will dissipate during the
course of the cooking program.
repare the food and place in the
P
oven if no preheating is required.
Select Operating Modes.
Selec
The default temperature (350°F/160°C)
is displayed
The oven heating, lighting and cooling
fan will turn on.
Setting the temperature
Set the r
Confirm with OK.
Setting the number of steam bursts
The oven will draw in water
aut
and then release the steam at the
specified times. You will hear some
pumping noises during the water
intake process.
t Moisture Plus .
equired temperature.
omatically from the water supply
Timing the bursts of steam
This option will only appear in the
display aft
3 bursts of steam.
Tip: If you have selec
burst of steam, the second burst should
be released at least 10 minutes after
starting the program.
Manual bursts of steam
T
o inject the bursts of steam yourself,
select Manual.
Time-controlled steam
If you want t
the bursts of steam, select Time
Controlled.
Set the desir
steam. The oven will then release the
steam at the specified times. The
time begins counting down when the
program is started.
Co
er you have selected 1, 2 or
ted more than one
o set a time for injecting
ed time for each burst of
nfirm by touching OK.
If you would lik
be automatically injected into the
oven after the heating-up phase,
select Automatic burst of steam.
If you would lik
bursts of steam manually at specific
times, select 1 Burst of steam, 2 Bursts
of steam or 3 Bursts of steam.
e a burst of steam to
e to inject one or more
67
Page 68

Moisture Plus
Changing the type of heating
You can combine Moisture Plus
with fou
(Convection Bake, Surround, Intensive
and Auto Roast). The default setting is
Convection Bake.
Select Change.
Select Change type of heating.
r different heating types
Selec
Co
The cooking program will then continue
using
selected.
t the desired mode.
nfirm by touching OK.
the different type of heating
68
Page 69

Moisture Plus
Injecting bursts of steam
Steam can cause scalding.
Do not open the door during bursts
of st
eam. Also, condensation on the
sensors will cause then to have a
slow reaction time.
Automatic burst of steam
Automatic burst of steam appears in the
display
.
Once the preheating phase has been
complet
ed, the automatic burst of
steam is injected.
The water will vaporize in the oven
while steam is being released and Burst
of steam active will appear in the display.
After the burst of steam Burst of steam,
completed will appear in the display
.
Continue cooking until the end of the
king duration.
coo
1, 2 or 3 Bursts of steam
Manual bursts of steam
When Manual
has been selected, you
can trigger bursts of steam once Start
Manual burst of steam appears.
Please wait until the preheating phase
is complet
ed to allow the steam to be
distributed evenly by the warm air in
the oven.
Tip: Set the "T
imer" as a reminder.
Select Start Manual burst of steam.
The burst of steam will be released and
Burst of steam active will appear in the
display
P
.
roceed as described to inject further
bursts of steam.
Burst of steam, completed will appear in
the display aft
er each burst of steam.
Continue cooking until the end of the
king duration.
coo
Time-controlled steam
The oven will release the steam after
the specified amount of time.
69
Page 70

Moisture Plus
Evaporating residual moisture
When cooking with added moisture, the
er will be equally distributed
wat
between the number of steam bursts
and completely used up, as long as the
program is not interrupted.
However, if a program that uses added
moistu
or due to a loss of power) before all the
bursts of steam have been injected, the
unused water will remain in the
evaporation system.
The next time the Moisture Plus
mode or a Mast
used, Evaporate Residual Moisture? will
appear in the display with the options
Skip and Yes.
re is interrupted (either manually
erChef Plus program is
It is best to start the residual water
ation right away so that only
evapor
fresh water is steamed onto the food
during the next cooking program.
The residual moisture evaporation
ocess
pr
The oven will heat up and the residual
er in the oven compartment will
wat
evaporate.
Depending on the amount of water, this
can tak
minutes.
e up to approximately 30
Steam can cause scalding.
Do not open the door.
The moisture will condense on the
door and in the oven
and needs to be wiped off after the
oven has cooled down.
compartment
70
Page 71

Moisture Plus
Starting residual water evaporation
ediately
imm
Steam can cause scalding.
Do not open the door while the
esidual water is being evaporated.
r
Selec
t the Moisture Plus mode or
a MasterChef Plus program.
Evaporate Residual Moisture? will appear
in
the display.
Select Yes
Evaporate Residual Moisture and a time
n appear in the display.
the
.
The evaporation process will start. You
can mon
itor the remaining time in the
display.
The time displayed depends on the
nt of water in the evaporation
amou
system. This time may be corrected
during the evaporation process to
reflect the actual amount of water left in
the system.
Skipping residual moisture
evapor
ation
Skipping the residual moisture
evaporation process can cause
water to overflow into the oven
cavity.
Do not cancel the evaporation
ocess.
pr
Selec
Evaporate Residual Moisture? appears.
Select Skip.
A cooking process using Moisture Plus
or a Mast
now be carried out.
You will be prompted to carry out the
evapor
process the next time you select the
Moisture Plus function or a
MasterChef Plus program and when
you turn the oven off.
t the Moisture Plus function
or a MasterChef Plus program.
erChef Plus program can
ation of the residual moisture
At the end of the residual water
evapor
ation process, Program Finished
appears in the display.
ouch the "Back" sensor.
T
A cooking process using Moisture Plus
or a Mast
erChef Plus program can
now be carried out.
During residual water evaporation,
moistu
re will condense on the door
and in the oven interior. Be sure to
wipe away the condensation once the
interior has cooled down.
71
Page 72

Gourmet Center
Your oven has a wide range of
erChef, and MasterChef Plus
Mast
programs that enable you to achieve
excellent cooking results with ease.
Simply select the appropriate program
for the type of food you are cooking
and follow the instructions in the
display.
In the Gourmet Center you will find:
– MasterChef programs for the
eparation of cakes, meats, fish
pr
dishes, desserts, etc.
– MasterChef Plus program for the
eparation of bread with Moisture
pr
Plus.
List of food types
The MasterChef programs can be found
under Gourmet Center – MasterChef.
– Baked Goods
– Fish
MasterChef Plus
In MasterChef Plus a variety of br
programs are available. These
MasterChef programs work with
Moisture Plus.
These programs were created to use
with our own Mie
type of bread. We strongly
recommend using them to achieve the
best results. They can be found at
mieleusa.com/support/product
information/brochures download or on
each specific product page under
downloads.
le recipes for each
ead
– Meat
– Pizza
– Potatoes
– Poultry
72
Page 73

Gourmet Center
Using MasterChef and
Mas
terChef Plus programs
From the Main Menu:
Select Gourmet Center.
Select MasterChef or MasterChef Plus.
A list of food types will appear in the
display
Selec
The MasterChef or MasterChef Plus
pr
selected will then appear.
Selec
The individual steps that must be
complet
appear as a list in the display.
Depending on the program selected,
the following information or instruction
will appear in the display:
.
t the desired type (there is only
one type for MasterChef Plus).
ograms available for the food type
t the desired MasterChef or
MasterChef Plus program.
ed before starting the program
Notes on using these programs
– After cooking, allow the oven interior
t
o cool down to room temperature
again before starting a MasterChef or
MasterChef Plus program.
– Some programs require a preheating
phase befor
the oven. A prompt will appear
indicating when to add the food.
– The duration quoted for MasterChef
pr
ograms is an estimate. It may
increase or decrease depending on
the program. When using the roast
probe, the duration will be
determined by when the core
temperature is reached. The duration,
in particular with meat, will vary
depending on the initial temperature
of the food.
e food can be placed in
– Type of cookware
– Shelf level
– Use of the wireless roast probe
– Cooking time
F
ollow the instructions on the display
73
Page 74

Gourmet Center
Search
You can search the Gourmet Center by
the name of the food type and
Mast
erChef program.
This search is a full-text search and can
be used to search for parts of
also
words.
From the Main Menu:
Select Gourmet Center.
A list of food types will appear in the
display.
Select Search.
Use the k
search text, e.g. "bread".
The number of hits will be shown in the
bott
om right of the display.
If no match is found, or if there are
mor
e than 40 matches, the hits field
will be deactivated and you will need
to modify the search text.
Select hits.
The matching food types and programs
will then
Selec
the food type and then the desired
program.
The program will begin.
F
ollow the instructions on the display.
eyboard to enter the desired
appear.
t the desired program, or select
74
Page 75

Favorites
You can create and save up to 20 of
your own pr
– Each one can have up to 10 cooking
stage
your most frequently used recipes
very accurately. Each stage contains
a mode, temperature and duration or
core temperature.
– You can specify the shelf level(s) for
the food.
– You can enter a program name for
you
When you next select the program, it
will star
There are different ways of creating a
F
avorite:
– At the end of running a MasterChef
P
rogram, save it as a separate
program.
– After running a program with a set
dur
Then name the program.
ograms.
s. This enables you to save
r recipe.
t automatically.
ation, select Save.
Creating a Favorite
Select Favorites.
Select Create Program.
You can now specify the settings for
cooking stage 1.
Follow the instructions in the display:
Select and confirm the cooking
mode, t
core temperature.
Depending on the mode selected you
can add the functions Rapid PreHeat
and Crisp function
Settings for the 1st cooking stage have
now been set.
More cooking stages can be added, for
e
xample, if you would like to add
another cooking mode to follow the
first.
If add
required, select Add and proceed as
you did for the 1st cooking stage.
emperature and duration or
in Additional Settings.
itional cooking stages are
When you
the cooking stages. select Finish.
Set the shelf level(s) to be used:
Selec
Confirm with OK.
A summary of your settings will appear
in the display
Che
confirm, or select Change to correct
the settings.
Select Save.
Ent
keyboard.
have completed setting
t the desired level(s).
.
ck the settings and select OK to
er the program name using the
75
Page 76

Favorites
You can add a line break for longer
ogram names using the symbol.
pr
Once you ha
name select Save.
A message will appear in the display
confirming that the name has been
saved.
Confirm with OK.
You can start the saved program
immediat
the cooking stages.
More information regarding Change
Cooking Stages
"Changing favorites".
ve entered the program
ely, delay the start or change
can be found in
Starting a Favorite
Place the food in the oven.
Select Favorites.
The program names will appear in the
display
Selec
You can start the saved program
immediat
cooking stages.
– Start Now
– Start Later
– Ready at
.
t the desired program.
ely, delay the start or show the
The program will start right away and
the oven heating will turn on.
This option will only appear if you are
the wireless roast probe. You
using
can specify when you would like the
program to start. The oven heating
will turn on automatically at the time
set.
76
You can specify when you would like
the cooki
The oven will turn off automatically at
the time set.
– Start at
You can specify when you want the
pr
ogram to start. The oven heating
will turn on automatically at the time
you set.
ng program to complete.
Page 77

Favorites
– Display Stages
A summary of your settings will
appear in this display
the setting under Change (see
"Changing Favorites").
Selec
Co
The selected program will begin
aut
set.
t the desired menu item.
nfirm the message regarding
which shelf level to use with OK.
omatically right away or at the time
. You can adjust
Changing Favorites
Changing cooking stages
Cooking stages in a MasterChef
ogram that have been saved under
pr
a different name cannot be changed.
Select Favorites.
The program names will appear in the
display
Select Edit.
Select Change Program.
Selec
Select Change Cooking Stages.
The setting specified for a cooking
stage can be changed or more cooking
stages can be added to the program.
Cha
Che
.
t the desired program.
nge the program as desired (see
"Creating a Favorite").
ck the settings and select OK to
confirm.
Select Save.
If necessar
"Creating a Favorite") and select
Save.
The changes made to the program will
be saved.
y, change the name (see
77
Page 78

Favorites
Changing the name
Select Favorites.
The program names will appear in the
display
Select Edit.
Select Change Program.
Selec
Select Change name.
Cha
A message will appear in the display
confirming that the name has been
saved.
Confirm with OK.
The new program name will be saved.
.
t the desired program.
nge the name (see "Creating a
Favorite") and select Save.
Deleting a Favorite
Select Favorites.
The program names will appear in the
display
Select Edit.
Select Delete Program.
Selec
Select Yes.
The program is deleted.
You can delete all of your Favorites at
the same time (see "Settings - F
Default - Favorites").
.
t the desired program.
actory
78
Page 79

Bake
Eating food which has been cooked
correctly is important for good
health.
Only bake cakes, pizza, french fries,
etc. until they are golden brown. Do
not overcook them.
Oven modes
Depending on how you would like the
fo
od prepared, you can use Convection
Bake , Intensive , Moisture Plus
or Surround .
Bakeware
The bakeware used depends on the
oven mode chosen and how the food is
pr
epared.
– Convection Bake , Int
Moisture Plus :
Baking tray, universal tray, any heatresistant baking dishes.
– Surround :
Dark metal, enamel or aluminum
baking
tins with a matte finish, as
well as heat-resistant glass, ceramic
and coated dishes can be used.
Avoid bright, shiny metal tins as they
result in uneven or poor browning,
and in some cases cakes might not
cook properly.
ensive ,
– Always place baking pans on the
wir
e rack.
Position rectangular pans with the
longer side across the width of the
rack. This will allow for optimum heat
distribution and even baking results.
– When baking cakes with fruit
t
oppings or deep cakes, place the tin
in the universal tray to catch any
spillages.
Parchment paper / Greasing the pan
All Miele accessories (baking tray,
rsal tray, perforated baking tray
unive
and round baking dish) are treated with
PerfectClean finish.
Surfaces treated with PerfectClean
finish
generally do not need to be
greased or covered with parchment
paper.
Parchment paper is only needed with:
– anything with a high salt content (e.g.
pr
etzels, bread sticks), because
sodium can damage the
PerfectClean surface;
– meringues or dishes with a high egg-
e content, because they are
whit
more likely to stick,
– frozen food cooked on the wire oven
ack.
r
79
Page 80

Bake
Temperature
As a general rule, select the lower
emperature given in the chart.
t
Choosing a baking temperature higher
than tho
the cooking time, but will lead to
uneven browning, and unsatisfactory
cooking results.
se recommended may reduce
Baking duration
Check if the food is cooked at the end
of the shor
check if a cake is ready insert a
wooden skewer or toothpick into the
center, it should come out clean.
test duration quoted. To
Shelf levels
The shelf level on which you place your
o bake will depend on the oven
food t
mode and the number of trays being
used.
– Convection Bak
1 tray: level 2
2 trays: levels 1+3 / 2+4
3 trays: levels 1+3+5
– Moisture Plus
1 tray: level 2
ensive
– Int
1 tray: level 1 or 2
– Surr
ound
1 tray: level 1 or 2
If using both the universal tray and
other bakin
bake on multiple levels, position the
universal tray below the baking trays.
Bake moist baked goods and cakes/
pies on no mo
same time.
g trays to simultaneously
e
re than two levels at the
80
Page 81

Roast
Always follow USDA guidelines on
food safety
.
Oven modes
Depending on how you would like the
food cooked, you can use Convection
Bake / Convection Roast , Moisture
Plus , Auto Roast , Surround /
Surround Roast or a MasterChef
program.
Cookware
Any heat-resistant cookware can be
used:
Wire oven rack, grilling and roasting
t (if available) on the universal tray,
inser
roasting pans, heat-resistant glass/
earthen/cast iron dishes, roasting bags
Temperature
As a general rule, select the lower
t
emperature provided in the chart.
If higher temperatures are used, the
meat will brown on the outside, but will
not be properly cooked through.
Tips
– Resting time: At the end of the
ogram, take the roast out of the
pr
oven, cover with aluminum foil and
let stand for about 10 minutes. This
helps retain the juices when the meat
is sliced.
– The larger the cut of meat, the lower
the temperature setting should be.
– Use a roast probe for accurate
king temperatures and best
coo
results.
When cooking with Convection Bake /
Convection Roast , Moistu
or Auto Roast , select a
temperature that is approx. 25°F (20°C)
lower than the temperature for
Surround / Surround Roast .
re Plus
Shelf level
As a general rule, use level 2.
81
Page 82

Roast
Wireless roast probe
The wireless roast probe allows you to
ately monitor the food's internal
accur
temperature during the cooking
process. It is dishwasher safe.
How it works
The metal part of the wireless roast
pr
obe is inserted into the food. There is
a temperature sensor in the metal tip
which measures the core temperature
of the food during cooking.
The temperature sensor is located
ox. 3/4" (2 cm) from the tip. Insert
appr
the metal part so that the temperature
sensor is positioned in the middle of
the food (see "Important notes on
using the wireless roast probe").
The maximum core temperature setting
is 210°F
roasting chart and the "Slow roasting"
section for information about the types
of meat and the corresponding core
temperatures.
(99°C). Please refer to the
The core temperature value is sent via
r
adio signal from the transmitter in the
handle of the wireless roast probe via
the antenna in the back wall of the oven
to the electronic module of the
appliance as soon as the food is put in
the oven with the roast probe inserted.
Uninterrupted transmission of the radio
signal is only possible when the door is
closed. If the oven door is opened
during the
baste the meat, the radio signal will be
interrupted. It will only resume after the
door has been closed. It will take a few
seconds for the current core
temperature to once again appear in
the display.
The temperature sensor will be
destr
212°F (100°C). As long as it
remains inserted in the food, there
is no risk of damage, since the
maximum core temperature
setting is 210°F (99°C).
If you are not using the wireless roast
obe do not keep it in the oven
pr
during cooking. Always put it back
into the storage sleeve on the front
right of the Cup & Plate Warming
Drawer (see the "Guide to the oven"
chapter).
cooking program, e.g., to
oyed at temperatures above
82
Page 83

Roast
When to use the wireless roast probe
Apart from MasterChef programs,
Special Mo
wireless roast probe can be used with
the following functions:
– Auto Roast
– Convection Bake
– Intensive
– Surround
– Moisture Plus
– Convection Broil
des and Favorites, the
Important notes on using the
eless roast probe
wir
To ensure that the probe works
corr
ectly, please observe the
instructions below.
– Do not use deep, narrow cooking
containers made of metal, as these
will weak
– Do not place any metal objects, such
as lids or aluminum foil, above the
wir
wire oven rack and universal tray on
a shelf level above the food
containing the roast probe. Glass lids
may be used.
– Do not use another standard metal
coo
wireless roast probe.
– Do not allow the handle of the
wir
sauce or cooking liquid, or to rest on
the food or the edge of the cooking
container.
en the radio signal.
eless roast probe. Do not use the
king thermometer when using the
eless roast probe to sit in any
Risk of breakage!
Do not use the wireless roast probe
t
o lift or carry the food.
83
Page 84

Roast
Please also note the following
information:
– The meat can be placed in a pot or
the universal tray and wire oven
on
rack.
– The metal part of the wireless roast
probe must be fully inserted into the
center of the food. The handle should
be angled upwards. Make sure that
the handle is not horizontal, facing
the door or the corners of the oven
interior.
– When cooking poultry, insert the
part into the thickest part of
metal
the breast. You can find the thickest
part of the breast by pressing the
area with your thumb and index
finger.
– When using roasting bags or
alu
minum foil, insert the probe
through the bag or foil into the center
of the meat. You can also place meat
inside the bag/foil with the probe
already inserted. Be sure to follow
the instructions provided by the
manufacturer of the roasting bag /
aluminum foil.
– The wireless roast probe can only be
inse
rted horizontally into flat foods,
such as fish. Therefore, place flat
food in glass or ceramic cooking
containers, since the walls of a metal
container will interfere with the radio
signals.
If the wireless roast probe is no longer
r
ecognized during cooking, a
message will appear in the display.
Change the position of the probe in
the food.
– Do not let the metal part touch any
bones, and do not inser
particularly fatty area of the meat.
The oven may turn off too early if the
tip comes into contact with the
probe.
– If the meat contains heavy marbling,
select the highest core temperature
stated in the roasting chart.
84
t it into a
Page 85

Roast
Using the wireless roast probe
When cooking in the oven, use the
eless roast probe.
wir
It is located in the storage sleeve on
the front right of the Cup & Plate
Warming Drawer (see the "Guide to
the oven" chapter).
Remove the wireless roast probe
from the storage sleeve.
Inser
t the metal part of the wireless
roast probe fully into the food. Make
sure that the handle is angled
upwards.
P
ut the food in the oven.
se the door.
Clo
Selec
t an oven mode or MasterChef
program.
The message Continue cooking with roast
probe?
will appear.
Select Yes.
You can also start the process at a later
time. Select Additional Settings and set a
time in the Start at
Duration
and Ready at cannot be set
field.
because the total time depends on how
long it takes for the core temperature to
be reached.
Adjust the default t
emperature if
necessary.
Cha
nge the default core temperature
if necessary.
The core temperatures cannot be
ged for the MasterChef
chan
programs.
85
Page 86

Roast
Time left display
After a certain time, the estimated
dur
ation of the cooking process
remaining (time left) will appear in the
display.
The time left is calculated from the
king temperature selected, the
coo
required core temperature and the
pattern of the increasing core
temperature.
The time left first shown is an estimate.
As the cooki
time is revised continuously, and a
more accurate figure is shown.
The time left will be deleted if the
coo
king or core temperature is changed
or if a different mode is selected. If the
door is opened for a longer time, the
time left will be recalculated.
ng process continues, the
Displaying the core temperature
As soon as the time remaining appears,
you can
temperature.
Select Change.
Select Display core temperature.
Select On.
Confirm with OK.
The actual core temperature will also
appear in the display
also display the actual core
.
86
Page 87

Using residual heat
Shortly before the end of the cooking
pr
ogram the oven heating will turn off.
The residual heat in the oven is
sufficient to complete the cooking
process.
Using the residual heat in the oven
saves ener
Energy Save Phase will appear in the
display t
energy save mode. The measured core
temperature is no longer visible.
The cooling fan and hot air fan (if turned
on) will con
When the selected core temperature
has been r
gy.
o show that the oven is in
tinue to run.
eached,
Roast
– Program Finished
display,
– A buzzer will sound if turned on (see
"Settings - V
Tip: If the food is not sufficiently
coo
ked, insert the probe into another
place and repeat the program.
appears in the
olume - Buzzer tones").
87
Page 88

Slow Roasting
This cooking method is ideal for
cooking beef, pork, veal or lamb when
a t
ender result is desired.
First, using a cooktop sear the meat on
all sides t
Then place the meat in a preheated
oven. It will be cooked at a low
temperature for an extended time
allowing the meat to become very
tender.
The meat will rest and the juices start to
culate evenly throughout.
cir
This gives the meat a very tender and
juicy result.
Tips
– Use fresh, lean meat that has been
trimmed. Remove the bones befor
cooking.
– When searing, use a suitable cooking
oil or fat that can withstand high
t
vegetable oil).
– Do not cover the meat during
cooking.
o seal in the juices.
e
emperatures (e.g. clarified butter,
Cooking time / Cor
e
temperatures
Always observe USDA food safety
guidelines.
Meat
Beef Tenderloin 80–100 138/59
Sirloin
– rare
– medium
– well done
Pork tenderloin 80–100 145/63
Smoked pork
chop *
Filet of veal 80–100 140/60
Veal loin * 100–130 145/63
Saddle of lamb * 50–80 140/60
*
boneless
[min]
50–70
100–130
160–190
140–170 154/68
°F / °C
118/48
135/57
156/69
After cooking:
Because the cooking temperatures are
ver
y low:
Cooking will take approx. 2-4 hours,
depending on the siz
the meat, as well as the desired
degree of doneness and browning.
88
e and weight of
– The meat can be carved immediately.
No
resting time is required.
– The cooking result will not be
ed if the meat is left in the oven
affect
after the program is complete. It can
be kept warm until you serve it.
– The meat is at an ideal temperature
t
o be eaten right away. Serve on prewarmed plates with a hot sauce or
gravy to keep warm.
Page 89

Slow Roasting
Using the Slow Roasting function
Select Special Modes.
Select Slow Roasting.
Set the r
Set the cor
ollow the instructions in the display.
F
Let the wire oven rack and universal
tray preheat in the oven.
While
meat on all sides on the cooktop.
equired temperature.
e temperature.
the oven is preheating, sear the
Danger of burns!
When the oven is hot use pot
ho
lders to insert, remove or turn the
food, or when adjusting the oven
shelves, etc.
Once Use the roast probe appears in
the display, place the seared meat on
the rack and insert the wireless roast
probe, so that the metal tip is fully in
the center of the meat.
When the program is completed
Program Finished will appear in the
display and
turned on (see Settings - Volume Buzzer tone").
If the meat is not cooked to your
satisfactio
cooking time.
a buzzer will sound, if
n you can extend the
For more information see "Roasting W
ireless roast probe".
Place
the universal tray on the rack
and then place the rack into the oven
on the shelf level indicated.
Use Caution!
The Browning / Broiling element will
be hot. Danger of burns!
Clo
se the door.
89
Page 90

Slow Roasting
Adjusting the Slow Roasting
t
emperature
Use the wire oven rack with the
versal tray positioned on top.
uni
Do not use the Rapid PreHeat
function to preheat the oven.
ide the universal tray and rack onto
Sl
shelf level 2.
Select Operating Modes.
Selec
T
P
While
Place the seared meat on the wire
Select Change.
Reduce the t
t the Surround mode and
set the temperature to 265°F (130°C).
urn off the Rapid PreHeat function
by selecting Change – Additional
Settings – Rapid PreHeat – Off.
reheat the oven with the universal
tray and wire oven rack for approx.
15 minutes.
the oven is preheating, sear the
meat on all sides on the cooktop.
Burn hazar
Use pot holders when inserting,
r
emoving or turning hot food, or
when adjusting shelves, etc. in a hot
oven.
oven rack.
(100°C).
d!
emperature to 210°F
Allow the meat to finish cooking.
You can set the cooking program to
switch off aut
"Additional functions - Setting the
cooking time").
90
omatically (see
Page 91

Broil
Danger of burns!
Br
oil with the oven door closed. If
you broil with the door open the hot
air will escape from the oven before
it has been cooled by the cooling
fan.
The controls will get hot.
Oven modes
Maxi Broil
This mode delivers excellent browning
nd broiling results when cooking larger
a
amounts of food. Use to broil chops,
ribs and large quantities of meat and for
browning large dishes.
The entire Browning/Broiling element
ll become red hot to produce the
wi
necessary heat.
Broil
This mode delivers excellent browning
a
nd broiling results when cooking
smaller amounts of food. Use to broil
chops, ribs and small quantities of meat
and for browning small dishes.
Cookware
Use the universal tray with the grilling
and roasting insert (if available), and
place the tray in the oven. The insert
prevents any collected meat juices from
burning, allowing them to be used for
gravy and sauces.
Temperature
As a general rule, select the lower
t
emperature provided in the chart.
If higher temperatures are used, the
meat will brown on the outside, but will
not be properly cooked through.
Preheating
Always preheat the oven for about
5 minut
Broiling.
es with the door closed before
Only the center of the Browning/
oiling element will become red hot to
Br
produce the necessary heat.
Convection Broil
For broiling thicker items, e.g. poultry or
L
ondon broil.
The Browning/Broiling element and the
fan switch on in alternating phases.
91
Page 92

Broil
Shelf levels
Select the shelf level according to the
thickness of the food.
– Thin cuts: Shelf level 3 or 4
– Thick cuts: Shelf level 1 or 2
Broiling time
Flat pieces of fish and meat usually
tak
e 6–8 minutes per side.
When broiling thicker pieces, each side
will take a bit longer. Make sure that the
pieces have roughly the same thickness
so that their broiling times do not vary
too greatly.
92
Page 93

Broil
Testing doneness
Always observe USDA food safety
guidelines.
Preparing food for broiling
Rinse the meat under cold water and
ry. Do not season the meat with
pat d
salt before broiling, this will draw out
the juices.
Brush the meat with oil, if necessary.
Do not use other types of fat as they
can easi
Clean fish as usual. To enhance the
flavor
ly burn and cause smoke.
, salt or lemon can be added.
Broil
Place
Place
Selec
P
the grilling and roasting insert
(if available) in the universal tray.
the food on top.
t the required oven mode and
temperature.
reheat the Browning/Broiling
element for approx. 5 minutes with
the door closed.
Danger of burns!
When the oven is hot use pot
lders to insert, remove or turn the
ho
food, or when adjusting the oven
shelves, etc.
Place
Clo
T
the food on the appropriate
shelf level (see the "Broiling chart").
se the door.
urn the food halfway through
cooking.
93
Page 94

Broil
Using the rotisserie to broil
The rotisserie is an optional accessory
for use with the Rotisserie mode.
The rotisserie can support a maximum
weight of 11 lbs (5 kg).
Slide the wir
FlexiClips and wire rack onto level 1.
Slide the latch
the notches of the universal tray.
Secur
rotisserie spit using clips.
e oven rack or the
es on the rotisserie into
e the meat at the middle of the
Slide the uni
onto the wire oven rack or onto the
FlexiClips and wire oven rack. Insert
the drive shaft for the rotisserie motor
into the slot at the back of the oven.
Clo
se the door.
Select the Rotisserie mode.
Set the t
time.
The rotisserie motor will switch on after
a slight delay. The rotation browns the
food evenly on all sides.
After cooking:
Remo
T
urn the oven off.
versal tray and rotisserie
emperature and cooking
ve the food from the oven.
Inser
94
t the pointed end of the spit into
the rotisserie (1) and place the roller
in the holder (2) as illustrated.
Page 95

Special Modes
In addition to the MasterChef programs
your oven has a variety of Special
Modes.
Select Special Modes.
The following Special Modes are
available:
– Defrost
– Dehydrate
– Reheat
(t
o reheat plated meals)
– Warm-up Cookware
– Proof
– Slow Roasting
Slow Roasting" for more
See "
information.
– Pizza
– Sabbath Program
This section also gives information on
the following applications:
– Gentle Bake
– Canning
– Frozen food
95
Page 96

Special Modes
Defrost
Use the Defrost mode to gently defrost
ozen food.
fr
The temperature can be set between
75-150°F (25-50°C).
Select Special Modes.
Select Defrost.
If necessar
temperature and set the duration.
F
ollow the instructions in the display.
Air is circulated throughout the cabinet
o gently defrost the food.
t
y, adjust the default
Risk of salmonella poisoning!
sure to strictly observe proper
Be
hygiene rules when defrosting
poultry.
Do not use the liquid from the
defrosted poultry.
Tips
– Remove the packaging and place the
fr
ozen food on the universal tray or in
a suitable bowl or dish.
– When defrosting poultry, place it on
the wir
e oven rack and position the
rack on the universal tray so that the
poultry does not sit in the defrosting
liquid.
96
Page 97

Special Modes
Dehydrate
This program is designed for traditional
ying of food to preserve it.
dr
The temperature can be set between
75-250°F (80-100°C).
It is important that fruit and vegetables
ar
e ripe and not bruised before they are
dehydrated.
P
repare the food for dehydrating.
– Peel and core apples, and cut into
slices 1/4" (.5 cm) thick.
– Core plums if necessary.
– Peel, core and cut pears into
wedges.
– Peel and slice bananas.
– Clean mushrooms, then either halve
or slice them.
– Remove parsley and dill from the
st
em.
Distri
bute the food evenly over the
roasting pan.
You could also use the rack or
per
forated baking tray, if available.
Select Special Modes.
Select Dehydrate.
If necessar
y, adjust the default
temperature and set the duration.
ollow the instructions in the display.
F
Food Approx. dehydrating
time
Fruit 2–8 hours
Vegetables 3–8 hours
Herbs* 50–60 minutes
*
Bec
ause this program uses the fan, it is
recommended that you use Surround
with a temperature of 75-250°F
(80-100°C) for drying herbs.
Reduce the t
emperature if
condensation begins to form in the
oven.
Danger of burns!
Use pot holders when removing the
dehydrated food from the oven.
Allo
w the fruit or vegetables to cool
down after dehydrating.
Dried fruit must be completely dry, but
also soft and elastic. Juice should not
escape when cut.
S
tore in sealed glass jars or tins.
97
Page 98

Special Modes
Reheat
This program is designed for reheating
ed meals and uses added moisture.
plat
The available options are:
– Pizza
– Large roasting pan
– Bakes
Use heat-resistant cookware.
Place the food to be reheated in a
dish on the rack. Do not cover.
Select Special Modes .
Select Reheat.
Selec
F
t the desired dish and adjust the
power level.
ollow the instructions on the display
Burn hazar
Use pot holders when removing
dishes fr
may accumulate on the bottom of
the dish.
d!
om the oven. Condensation
Warm-up Cookware
This program is designed to warm your
kware.
coo
The temperature can be set between
75-175°F (50-80°C).
Use heat-resistant cookware.
Place the rack on shelf level 2 and
place the cookware to be heated on
it.
Select Special Modes.
Select Warm-up Cookware.
If necessar
temperature and set the duration.
Follow the instructions in the display.
y, adjust the default
Danger of burns!
Use pot holders when removing
dishes fr
may accumulate on the bottom of
the dish.
om the oven. Condensation
98
Page 99

Special Modes
Proof
This program was designed to proof
without humidity.
dough
The temperature can be set between
75-125°F (30-50°C).
Select Special Modes.
Select Proof.
If necessar
temperature and set the duration.
F
ollow the instructions in the display.
If you would like to proof dough with
the addition of moi
appropriate MasterChef program.
y, adjust the default
sture, select the
Pizza
This program is designed specifically
for baking pizza.
The temperature can be set between
300-475°F (160-250°C).
Select Special Modes.
Select Pizza.
If necessar
temperature and set the duration.
F
ollow the instructions in the display.
y, adjust the default
99
Page 100

Special Modes
Sabbath Program
This program is designed for religious
vance.
obser
Select the Sabbath Program and then
select the o
The program will only start once the
door is opened and closed:
– The cooking process will start after
about 5 min
or Bake .
– The oven will heat up to the
t
emperature you have set and will
maintain this temperature for a
maximum of 72 hours.
– The interior lighting does not come
on, even when the door is opened.
If Settings
selected, the lighting will remain
turned on throughout the program.
– Sabbath Program appears in the
display constantly.
– The time of day is turned off.
Once the Sabbath Program has started
it cannot be changed or saved as a
Favorites.
ven mode and temperature.
utes using Surround
- Lighting - On has been
Using the Sabbath Program
The program can only be canceled by
turnng the oven off.
Select Special Modes.
Select Sabbath Program.
Selec
t the desired mode.
The Sabbath Program cannot be
star
ted if the timer is being used.
Set the r
equired temperature.
Confirm with OK.
The oven is now ready for use.
Sabbath Program and the
t
emperature set will appear.
Open the door t
o start the program.
Place the food in the oven.
Clo
se the door.
The oven heating will turn on after 5
tes.
minu
To end the program early:
urn the oven off.
T
100
 Loading...