

Miele HR 1956 DF GD, HR 1954 DF, HR 1936 DF GD, HR 1934 DF, HR 1935 DF GR Operating and Installation Instructions
...Page 1

Operating Instructions
30", 36", 48" Ranges
(Gas Co
oktop)
To prevent accidents and damage to the range, you must
instructions supplied before installing or using the appliance.
en–US, CA M.-Nr. 09 898 141
read all
Page 2
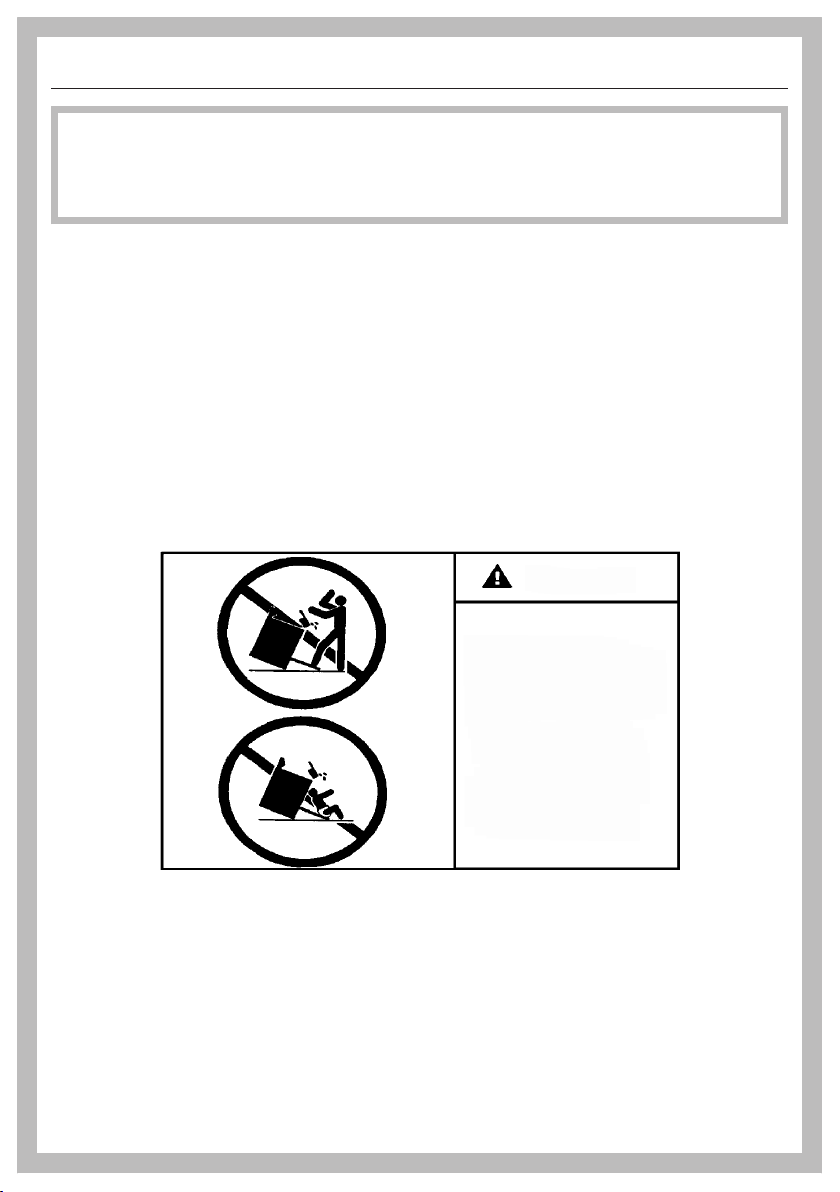
IMPORTANT SAFETY INSTRUCTIONS
All ranges can tip
Injury to persons
could result
Install anti-tip devices
packed with range
See installation
instructions
WARNING
WARNING
Children and adults can tip over the range if has not been
sec
ured. This may lead to fatal injuries.
This r
ange must be secured and connected using the anti-tip
device according to the installation instructions.
you have moved the range, slide the locking latch onto the anti-
If
tip device until you feel it lock into place.
Do not use the r
ange if the anti-tip device has not been properly
installed and engaged.
ailure to observe the information contained in the installation
F
instructions can lead to serious or fatal injuries for children and
adults.
2
Page 3
IMPORTANT SAFETY INSTRUCTIONS
®
®
W
ARNING: If the information in this manual is not followed exactly, a fire or
explosion may result causing property damage, personal injury, or death.
– Do not use or store gasoline or other combustible liquids or vapors in the
vicinity of this or any other appliance.
– WHAT TO DO IF YOU SMELL GAS
– Do not try to light any appliance.
– Do not touch any electric switches.
– Do not use any phones inside your building.
– Immediately call your gas supplier from a neighbor's phone. Follow the gas
supplier's instructions.
– If you are unable to reach your gas provider, call the fire department.
– Installation and service must be performed by a qualified installer, qualified
ser
vice agency or your gas provider.
(In Massachusetts, installation must be performed by a licensed installer / gas
fitter.)
– Note to the installer:
se give these installation instructions to the consumer for the local
Plea
electrical/gas inspector.
3
Page 4

Contents
IMPORTANT SAFETY INSTRUCTIONS................................................................. 2
IMPORTANT SAFETY INSTRUCTIONS.................................................................
Guide to the range ...............................................................................................
6
16
HR 1124 ................................................................................................................. 16
Cooktop ........................................................................................................... 16
Controls ............................................................................................................ 17
HR 1134 ................................................................................................................. 18
Cooktop ............................................................................................................ 18
Controls ............................................................................................................ 19
HR 1135 ................................................................................................................. 20
Cooktop ............................................................................................................ 20
Controls ............................................................................................................ 21
HR 1136 ................................................................................................................. 22
Cooktop ............................................................................................................ 22
Controls ............................................................................................................ 23
HR 1924 ................................................................................................................. 24
Cooktop ............................................................................................................ 24
Controls ............................................................................................................ 25
HR 1934 ................................................................................................................. 26
Cooktop ............................................................................................................ 26
Controls ............................................................................................................ 27
HR 1935 ................................................................................................................. 28
Cooktop ............................................................................................................ 28
Controls ............................................................................................................ 29
HR 1936 ................................................................................................................. 30
Cooktop ............................................................................................................ 30
Controls ............................................................................................................ 31
HR 1954 ................................................................................................................. 32
Cooktop ............................................................................................................ 32
Controls ............................................................................................................ 33
HR 1955 ................................................................................................................. 34
Cooktop ............................................................................................................ 34
Controls ............................................................................................................ 35
HR 1956 ................................................................................................................. 36
Cooktop ............................................................................................................ 36
Controls ............................................................................................................ 37
Control panel........................................................................................................
38
Burner knob ........................................................................................................... 38
4
Page 5

Contents
Features ................................................................................................................
Model numbers ..................................................................................................... 39
Data plate .............................................................................................................. 39
Items included with this range............................................................................... 39
Cooktop safety feature .......................................................................................... 39
Automatic re-ignition......................................................................................... 39
Before using for the first time.............................................................................
Cleaning the cooktop for the first time .................................................................. 40
"Burning in" the griddle plate................................................................................. 40
Operating the cooktop ........................................................................................
Turning on .............................................................................................................. 41
Switching on during a power outage..................................................................... 41
Adjusting the flame ................................................................................................ 41
Visual characteristics gas flames...................................................................... 42
Turning off .............................................................................................................. 42
Cookware..............................................................................................................
Energy saving tips ...............................................................................................
Operating the grill ................................................................................................
Assembling the grill................................................................................................ 46
Turning on the grill.................................................................................................. 47
Grilling tips ............................................................................................................. 47
39
40
41
44
45
46
Operation of the griddle ......................................................................................
Turning on the griddle ............................................................................................ 48
Settings.................................................................................................................. 48
Tips for frying ......................................................................................................... 49
Cleaning and care................................................................................................
Gas cooktop .......................................................................................................... 51
Dishwasher-safe grates .................................................................................... 51
Burner control knobs with stainless steel finish................................................ 51
Simmer burner / Power burners ....................................................................... 51
Cleaning the grill grate...................................................................................... 52
Cleaning the griddle plate................................................................................. 52
Frequently asked questions................................................................................
Technical Service .................................................................................................
48
50
53
55
5
Page 6
IMPORTANT SAFETY INSTRUCTIONS
When using the appliance, follow basic safety precautions, including the
following:
Read all instructions before installation and use of the range to prevent
accidents and machine damage.
This cooktop conforms to current safety requirements. Improper
use
can, however, lead to personal injury and damage to property.
To avoid the risk of accidents and damage to the appliance,
please read these instructions carefully before using the appliance
for the first time. They contain important notes on installation,
safety, use and maintenance.
Miele cannot be held liable for damage occurring as a result of
non-compliance with these instructions.
Keep these instructions in a safe place and pass them on to any
future owners.
6
Page 7

Use
IMPORTANT SAFETY INSTRUCTIONS
This coo
environments.
This co
ktop is intended for domestic use and use in other similar
oktop is not intended for outdoor use.
The cooktop is intended for domestic use only to prepare food
and keep it warm. Any other use may be dangerous.
ersons who lack physical, sensory or mental abilities, or
P
experience with the appliance should not use it without supervision
or instruction by a responsible person.
7
Page 8

IMPORTANT SAFETY INSTRUCTIONS
Children
As w
by children.
Do not lea
unsupervised in the area where the oven is installed. Do not allow
them to sit or stand on the appliance.
Chil
cooktop unless they are constantly supervised.
Chil
supervision if they have been shown how to use it in a safe manner,
and if they are able to recognize and understand the potential risks
of improper use.
Chil
supervision.
Be sur
and do not let them play with it.
The co
after being turned off. Keep children away from the appliance until it
has cooled down and is no longer a burn hazard.
ith any appliance, close supervision is necessary when used
ve children unattended: Children should not be alone or
dren under eight years of age must be kept away from the
dren ages eight and up may only use the cooktop without
dren must not be allowed to clean the cooktop without
e to supervise any children in the vicinity of the cooktop,
oktop gets hot when in use and remains hot for some time
Dange
etc. are disposed of safely and kept out of the reach of children.
Burn hazar
Keep the spaces above and behind the range clear of any items that
could draw the attention of children. Otherwise, they can be tempted
into climbing onto the appliance.
r of suffocation! Ensure that any plastic wrappings, bags,
d!
Danger of burning or scalding!
urn all handles away from the front of the cooktop so that children
T
cannot pull pots and pans down and burn themselves.
8
Page 9

Technical safety
IMPORTANT SAFETY INSTRUCTIONS
Installatio
a Miele authorized service technician in accordance with national
and local safety regulations and the provided installation
instructions. Contact Miele’s Technical Service Department for
examination, repair or adjustment. Repairs and other work by
unauthorized persons could be dangerous and may void the
warranty.
n, repair and maintenance work should be performed by
Do not carry or lift the range by the oven door handle or the
control panel!
Maint
appliance unless the instructions specifically recommend doing so.
Service work may only be performed by a qualified technician.
A d
signs of damage. Never use a damaged appliance.
enance by the user: Never repair or replace any part of the
amaged cooktop can be dangerous. Always check for visible
Reliable and safe operation of the cooktop can only be
guaranteed if it is connected to the public power supply.
The ele
is properly grounded. Compliance with this essential safety
requirement is absolutely mandatory. If in any doubt, please have
the building's wiring system inspected by a qualified electrician.
ctrical safety of the range can only be guaranteed when it
roper installation: Make sure that your appliance has been
P
installed correctly and that it has been grounded by a qualified
technician.
or safety reasons, the cooktop may only be used when it has
F
been fully installed.
T
o avoid damaging the range, make sure that the connection data
(voltage and frequency) on the data plate correspond to the
building's power supply before connecting the appliance.
When in doubt, consult a qualified electrician.
9
Page 10

IMPORTANT SAFETY INSTRUCTIONS
Installatio
performed by qualified installers, service agencies or gas providers.
Do not use a power strip or e
to electricity. These are a fire hazard and do not guarantee the
required level of appliance safety.
This applianc
installations (e.g. on a ship).
n and maintenance of the gas connection must be
xtension cord to connect the range
e must not be installed and operated in mobile
Any contact with live connections or tampering with the electrical
or mecha
and may lead to appliance malfunctions.
Do not open the casing of the cooktop under any circumstances.
Any r
technician will void the warranty.
Defective co
only. Only with these parts can the manufacturer guarantee the
safety of the appliance.
During
lighting is broken (see "Frequently asked questions"), the range must
be completely disconnected from the household electricity supply.
The gas supply must be shut off. Ensure that this is the case by:
nical components of the cooktop will endanger your safety
epairs not performed by a Miele authorized service
mponents should be replaced by Miele original parts
installation, maintenance and repair work, e.g. if the oven
– removing the fuse,
– "tripping" the circuit breaker, or
– unplugging the unit. Pull the plug not the cord.
– Shut off the gas supply and, if necessary, disconnect the range
om the gas line. Installation and maintenance of the gas
fr
connection must be performed by qualified installers, service
agencies or gas providers.
Risk of electric shock!
he cooktop is defective, immediately turn the appliance off and
If t
discontinue use. Disconnect the range from the gas and power
supply and contact Miele.
10
Page 11

IMPORTANT SAFETY INSTRUCTIONS
the range is installed behind a cabinet door, do not close the
If
door while the appliance is in operation. Heat and moisture can build
up behind the closed door and cause damage to the range and to
the surrounding cabinets and flooring. Do not close the door until
the appliance has completely cooled down.
Do not insta
over a hot stovetop to access the cabinets can result in burns. If it is
necessary to install cabinets, you can reduce the risk of burns by
installing a range hood that extends at least 4 3/4" (12 cm) past the
bottom of the cabinets.
ll kitchen cabinets above the range, since reaching
11
Page 12

IMPORTANT SAFETY INSTRUCTIONS
Proper use
Do not lea
power. Spilled food will begin to smoke and cause grease splatter,
which can ignite on the cooktop.
Oil and fat
unattended when cooking with oil and fat. If the oil or fat catches
fire, do not attempt to put the flames out with water.
Turn off the cooktop and smother the flames using a lid or a suitable
fire blanket.
Smother the fir
agent or foam fire extinguisher.
Never st
oven, or near cooking surfaces.
The flames co
fire. Do not flambé under a ventilation hood.
Never heat empty cook
ve the cooktop unattended when cooking on high
can catch fire if overheated. Never leave the appliance
e or flames, or use a dry chemical extinguishing
ore flammable liquids and materials in, above or under an
uld set the grease filters of a ventilation hood on
ware.
Do not heat or can food in closed containers, such as tins or
sealed jars, on the co
and cause it to explode.
oktop, as pressure will build up in the container
the cooktop is covered, there is a risk that the material of the
If
cover will ignite, explode or melt if the range is still hot or if turned on
inadvertently. Never cover the cooktop with a board, cloth or
protective sheet.
When using
cooktop, make sure that the power cable does not come into
contact with the hot cooktop. The cable's insulation could become
damaged.
Cook
temperatures. Do not use any plastic or aluminum foil cookware.
12
ware made of plastic or aluminum foil will melt at high
an electrical appliance, e.g. a hand mixer, near the
Page 13

IMPORTANT SAFETY INSTRUCTIONS
The co
after being turned off. Do not touch the appliance if there is a
possibility that it could still be hot.
ou can burn yourself on a hot cooktop. When cooking on the
Y
appliance, protect your hands by using heat-resistant pot holders or
oven mitts. Only use dry pot holders or gloves. Wet or damp textiles
conduct heat more effectively and produce steam, which poses a
burn hazard. Be sure to keep all textiles away from the gas flames.
Do not use oversized cloths, dish towels or other similar materials.
If
objects on the appliance can heat up. Other items may melt or catch
fire. Do not place unused items on the cooktop for storage!
oktop gets hot when in use and remains hot for some time
the cooktop is accidentally turned on or is still hot, metal
A range hood installed above the cooktop can become damaged
or catch fire as a result of intense heat. Do not use the gas burners
without cookware.
When in use, the cooktop emits a significant amount of heat,
which can cause objects in the vicinity to catch fire.
Never use the cooktop to heat the room.
Only light the g
properly assembled.
If
the cookware is too small, it will not sit properly on the burner
grate. If the cookware is too large, heat emitted from the bottom of
the cookware may damage the countertop, walls with poor heatresistance (e.g. paneled walls) or portions of the cooktop.
Mak
bottom of the cookware and rise up its sides.
e sure that the burner flames do not extend beyond the
Only use cookwar
may result in damage to the cooktop.
Always use the burner gr
place cookware directly on the burner.
as burners after all burner parts have been
e with a thick enough bottom. Failure to do so
ates supplied with the cooktop. Never
13
Page 14

IMPORTANT SAFETY INSTRUCTIONS
Remove all
on the cooktop. They are a fire hazard.
Install the burner gr
the cooktop.
grease splatters and other flammable (food) residues
ates in an upright position to avoid scratching
Do not use roasting dishes, pans, or grilling stones that are large
enough to cover several burners. The resulting heat buildup can
damage the appliance.
the cooktop has not been used for a long period of time, be
If
sure to thoroughly clean it and have it inspected by an authorized
technician before using it again.
The use of the co
products in the room where it is installed. Make sure that the
appliance is installed in location with sufficient ventilation. Natural
ventilation openings should not be blocked. Alternatively, a
mechanical ventilation device (e.g. a range hood) can be installed.
rolonged intensive use of the appliance may require additional
P
ventilation of the room, e.g., by opening a window, or by turning the
range hood to a higher setting.
oktop creates heat, moisture and combustion
Ask your install
valve and fuses or circuit breaker panel in your apartment or home.
Be sure that you know how and where to disconnect the gas and
power supply to your cooktop.
er to show you the location of your gas shutoff
Ensure that the igniters are clean and dry to allow the burners to
ignite and burn properly.
Fir
e hazard! Loose-fitting or hanging garments can catch fire. Be
sure to wear appropriately fitting clothing when cooking. Never allow
loose clothing or flammable materials to come into contact with the
burners while the burners are in use.
When you have fin
oven are turned off by checking the position of the knobs.
14
ished cooking, make sure that the burners and
Page 15
IMPORTANT SAFETY INSTRUCTIONS
The gr
parts located near the burner flame, can still be very hot after
cooking and cause burns. Do not touch these components when
using the cooktop.
W
fire. If the cooktop is installed near a window, do not use long
curtains.
Only cer
can be used on a gas cooktop without breaking as a result of
sudden temperature changes.
Do not use co
W
are used to wipe spilled food off a hot burner. Some cleansers can
emit hazardous vapors if they are applied to a hot surface. Be
careful when cleaning the cooktop.
ates, burner cap, bottom parts of the burner, and any other
ind can blow curtains over the cooktop, causing them to catch
tain types of glass, ceramic or other enamel cookware
oking utensils on the grill.
et sponges or clothes can cause burns due to hot steam if they
Cleaning and care
Do not use a steam cleaner to clean the cooktop.
The steam may reach electrical components and cause a short
circuit.
SAVE THESE INSTRUCTIONS AND REVIEW THEM PERIODICALLY
15
Page 16
Guide to the range
HR 1124
Cooktop
a
Burner knob for rear left burner
b
Burner knob for front left burner
c
Burner knob for front right burner
d
Burner knob for rear right burner
16
e
Power burners
f
Dishwasher-safe grates
g
SImmer burner
Page 17
Controls
Guide to the range
a
Burner knob for rear left burner
b
Burner knob for front left burner
c
Burner knob for front right burner
d
Burner knob for rear right burner
e
Oven controls
17
Page 18
Guide to the range
HR 1134
Cooktop
a
Burner knob for rear left burner
b
Burner knob for front left burner
c
Burner knob for front center burner
d
Burner knob for rear center burner
e
Burner knob for front right burner
18
f
Burner knob for rear right burner
g
Power burners
h
SImmer burner
i
Dishwasher-safe grates
Page 19

Controls
Guide to the range
a
Burner knob for rear left burner
b
Burner knob for front left burner
c
Burner knob for front center burner
d
Burner knob for rear center burner
e
Burner knob for front right burner
f
Burner knob for rear right burner
g
Oven controls
19
Page 20

Guide to the range
HR 1135
Cooktop
a
Burner knob for rear left burner
b
Burner knob for front left burner
c
Grill control knob
d
Burner knob for front right burner
e
Burner knob for rear right burner
20
f
Power burners
g
Thermostatically controlled ceramic
burners
h
Dishwasher-safe grill grate
i
Dishwasher-safe grates
j
SImmer burner
Page 21

Controls
Guide to the range
a
Burner knob for rear left burner
b
Burner knob for front left burner
c
Grill control knob
d
Burner knob for front right burner
e
Burner knob for rear right burner
f
Oven controls
21
Page 22

Guide to the range
HR 1136
Cooktop
a
Burner knob for rear left burner
b
Burner knob for front left burner
c
Control knob for griddle plate
d
Burner knob for front right burner
e
Burner knob for rear right burner
f
Power burners
22
g
Griddle plate
h
Thermostatically controlled ceramic
burners
i
Dishwasher-safe stainless steel
gr
ease drip tray
j
Dishwasher-safe grates
k
SImmer burner
Page 23

Controls
Guide to the range
a
Burner knob for rear left burner
b
Burner knob for front left burner
c
Control knob for griddle plate
d
Burner knob for front right burner
e
Burner knob for rear right burner
f
Oven controls
23
Page 24

Guide to the range
HR 1924
Cooktop
a
Backlit burner control knob for rear
left burner
b
Backlit burner control knob for front
left burner
c
Backlit burner control knob for front
right burner
d
Backlit burner control knob for rear
right burner
24
e
Power burners
f
Dishwasher-safe grates
g
SImmer burner
Page 25

Controls
Guide to the range
a
Backlit burner control knob for rear
left burner
b
Backlit burner control knob for front
left burner
c
Backlit burner control knob for front
right burner
d
Backlit burner control knob for rear
right burner
e
Oven controls
25
Page 26

Guide to the range
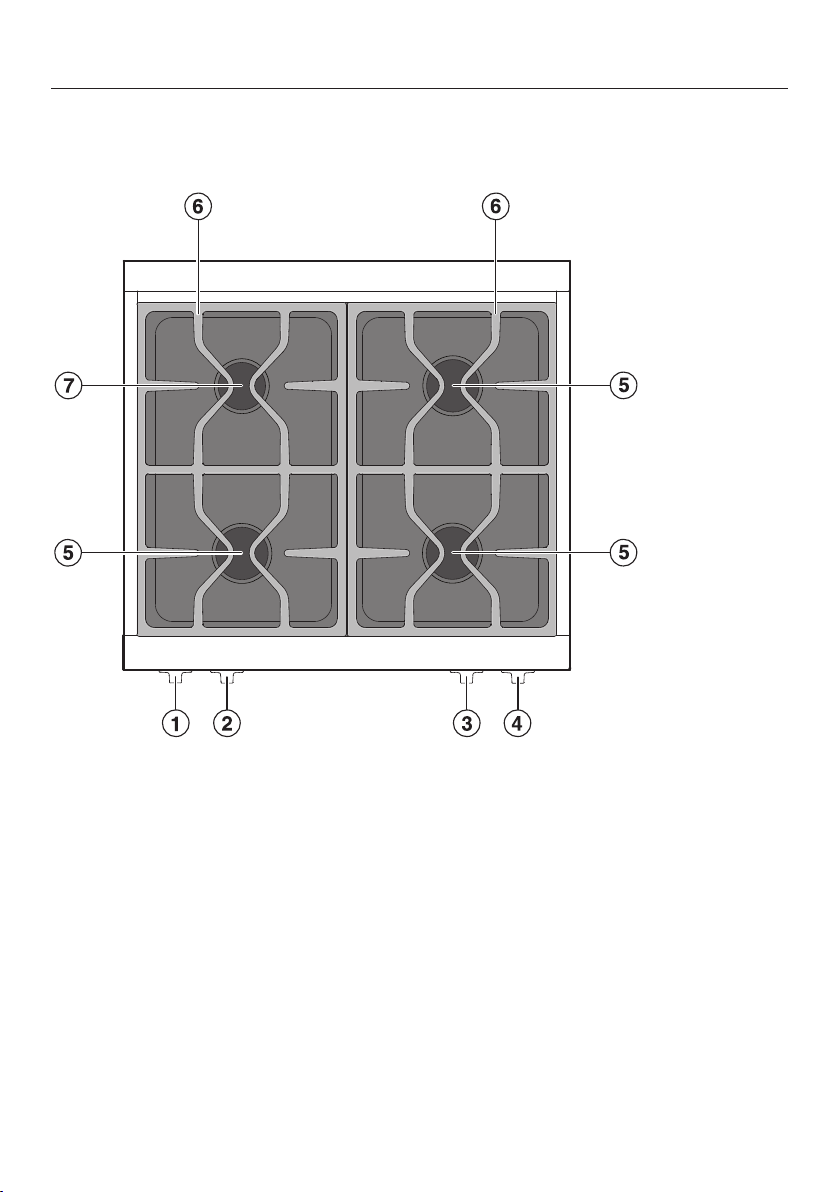
HR 1934
Cooktop
a
Backlit burner control knob for rear
left burner
b
Backlit burner control knob for front
left burner
c
Backlit burner control knob for front
er burner
cent
d
Backlit burner control knob for rear
er burner
cent
e
Backlit burner control knob for front
right burner
26
f
Backlit burner control knob for rear
right burner
g
Power burners
h
SImmer burner
i
Dishwasher-safe grates
Page 27

Controls
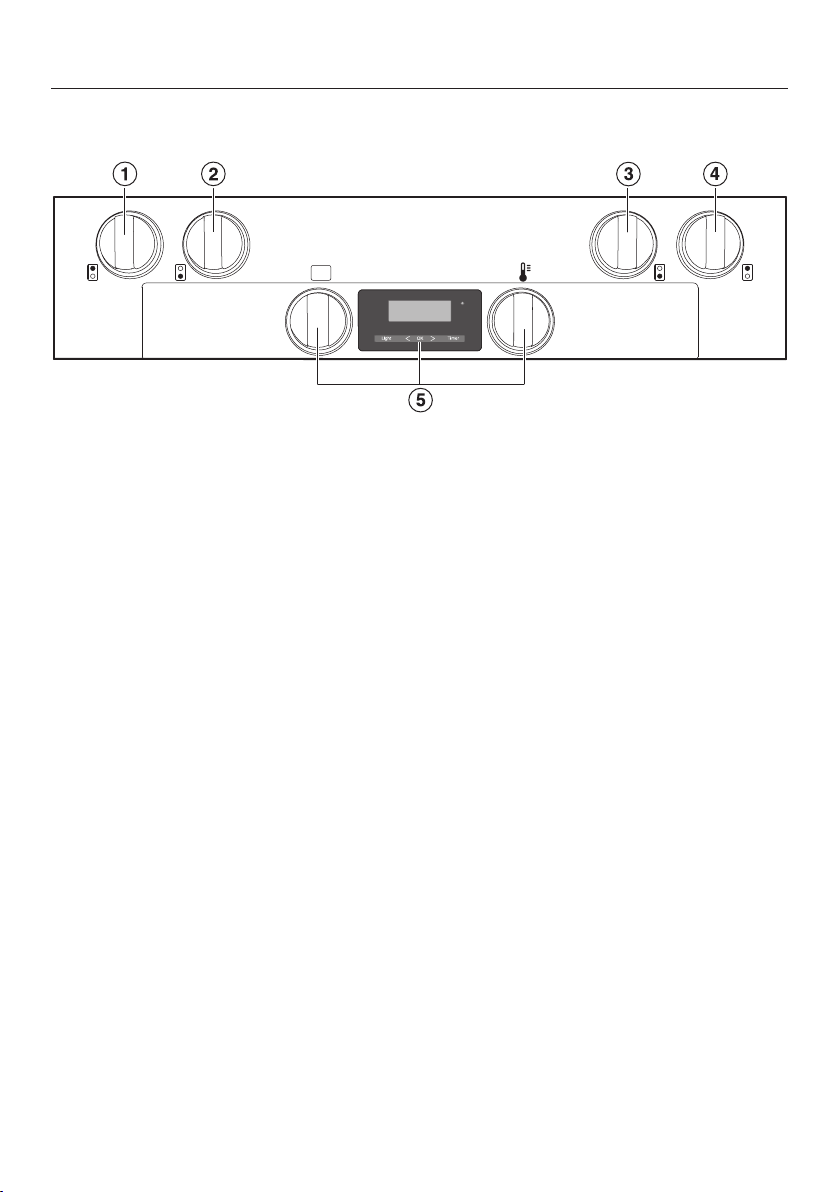
Guide to the range
a
Backlit burner control knob for rear
left burner
b
Backlit burner control knob for front
left burner
c
Backlit burner control knob for front
er burner
cent
d
Backlit burner control knob for rear
er burner
cent
e
Backlit burner control knob for front
right burner
f
Backlit burner control knob for rear
right burner
g
Oven controls
27
Page 28

Guide to the range
HR 1935
Cooktop
a
Backlit burner control knob for rear
left burner
b
Backlit burner control knob for front
left burner
c
Backlit control knob for the grill
d
Backlit burner control knob for front
right burner
e
Backlit burner control knob for rear
right burner
28
f
Power burners
g
Thermostatically controlled ceramic
burners
h
Dishwasher-safe grill grate
i
Dishwasher-safe grates
j
SImmer burner
Page 29

Controls
Guide to the range
a
Backlit burner control knob for rear
left burner
b
Backlit burner control knob for front
left burner
c
Backlit control knob for the grill
d
Backlit burner control knob for front
right burner
e
Backlit burner control knob for rear
right burner
f
Oven controls
29
Page 30

Guide to the range
HR 1936
Cooktop
a
Backlit burner control knob for rear
left burner
b
Backlit burner control knob for front
left burner
c
Backlit burner control knob for
griddle plat
d
Backlit burner control knob for front
right burner
e
Backlit burner control knob for rear
right burner
f
Power burners
30
e
g
Griddle plate
h
Thermostatically controlled ceramic
burners
i
Dishwasher-safe stainless steel
gr
ease drip tray
j
Dishwasher-safe grates
k
SImmer burner
Page 31

Controls
Guide to the range
a
Backlit burner control knob for rear
left burner
b
Backlit burner control knob for front
left burner
c
Backlit burner control knob for
griddle plat
e
d
Backlit burner control knob for front
right burner
e
Backlit burner control knob for rear
right burner
f
Oven controls
31
Page 32

Guide to the range
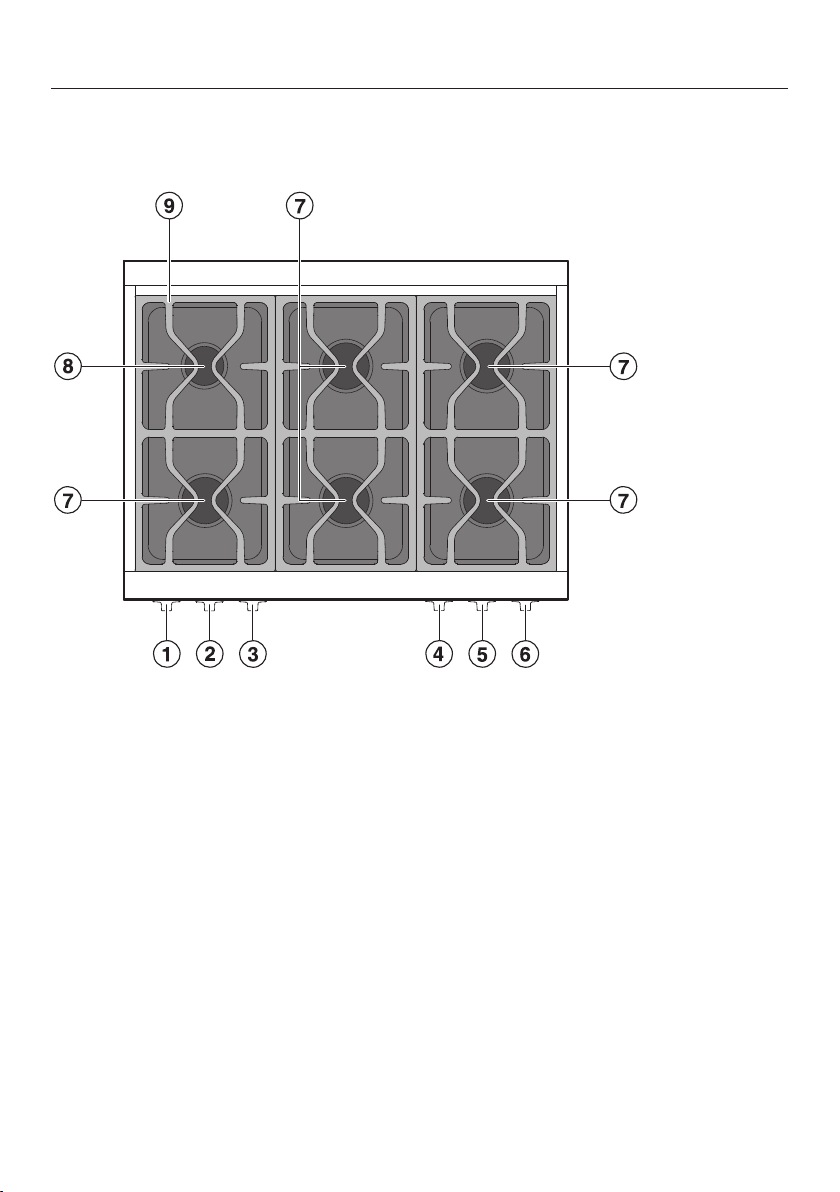
HR 1954
Cooktop
a
Backlit burner control knob for rear
left burner
b
Backlit burner control knob for front
left burner
c
Backlit burner control knob for rear
left center burner
d
Backlit burner control knob for front
left center burner
e
Backlit burner control knob for front
right center burner
f
Backlit burner control knob for rear
right center burner
32
g
Backlit burner control knob for front
right burner
h
Backlit burner control knob for rear
right burner
i
Power burners
j
SImmer burner
k
Dishwasher-safe grates
Page 33

Controls
Guide to the range
a
Backlit burner control knob for rear
left burner
b
Backlit burner control knob for front
left burner
c
Backlit burner control knob for rear
left cent
d
Backlit burner control knob for front
left cent
e
Backlit burner control knob for front
righ
f
Backlit burner control knob for rear
righ
er burner
er burner
t center burner
t center burner
g
Backlit burner control knob for front
right burner
h
Backlit burner control knob for rear
right burner
i
Oven controls
j
Sensor button for lift panel
k
Speed Oven controls
33
Page 34

Guide to the range
HR 1955
Cooktop
a
Backlit burner control knob for rear
left burner
b
Backlit burner control knob for front
left burner
c
Backlit control knob for the grill
d
Backlit burner control knob for front
er burner
cent
e
Backlit burner control knob for rear
er burner
cent
f
Backlit burner control knob for front
right burner
34
g
Backlit burner control knob for rear
right burner
h
Power burners
i
SImmer burner
j
Thermostatically controlled ceramic
burners
k
Dishwasher-safe grill grate
l
Dishwasher-safe grates
Page 35

Controls
Guide to the range
a
Backlit burner control knob for rear
left burner
b
Backlit burner control knob for front
left burner
c
Backlit control knob for the grill
d
Backlit burner control knob for front
cent
er burner
e
Backlit burner control knob for rear
cent
er burner
f
Backlit burner control knob for front
right burner
g
Backlit burner control knob for rear
right burner
h
Oven controls
i
Sensor button for lift panel
j
Speed Oven controls
35
Page 36

Guide to the range
HR 1956
Cooktop
a
Backlit burner control knob for rear
left burner
b
Backlit burner control knob for front
left burner
c
Backlit burner control knob for
griddle plate
d
Backlit burner control knob for front
center burner
e
Backlit burner control knob for rear
center burner
f
Backlit burner control knob for front
right burner
g
Backlit burner control knob for rear
right burner
36
h
Power burners
i
SImmer burner
j
Griddle plate
k
Thermostatically controlled ceramic
burners
l
Dishwasher-safe stainless steel
grease drip tray
m
Dishwasher-safe grates
Page 37

Controls
Guide to the range
a
Backlit burner control knob for rear
left burner
b
Backlit burner control knob for front
left burner
c
Backlit burner control knob for
griddle plat
d
Backlit burner control knob for front
cent
er burner
e
Backlit burner control knob for rear
cent
er burner
e
f
Backlit burner control knob for front
right burner
g
Backlit burner control knob for rear
right burner
h
Oven controls
i
Sensor button for lift panel
j
Speed Oven controls
37
Page 38

Control panel
Burner knob
With the burner knob, you can ignite
burner and regulate the flame. The
the
burners can be variably adjusted
between the lowest and highest
settings.
Depending on the model, the range will
be equipp
knobs.
ed with Backlit burner control
38
Page 39

Features
Model numbers
A list of the ovens described in these
ating instructions can be found on
oper
the back page.
Data plate
The data plate is behind the toe-kick.
oe-kick cover is attached to the
The t
base of the range by magnets so it can
be removed and put back again easily.
There you can find the model number,
the serial number and the connection
data (voltage/fr
load) for your range.
Have this information available when
cting Miele Technical Service.
conta
equency/maximum rated
Items included with this range
The following items are included with
this appliance:
– Installation instructions for the range
– Multiple operating instructions
(depending on the range model) for:
– Gas Cooktop
– Gas Oven
– Convection Oven
– Speed Oven
– Warming Drawer
– An anti-tip device, including screws
for fast
– Various accessories
ening the range
Cooktop safety feature
Automatic re-ignition
Your gas cooktop is equipped with an
omatic re-ignition function. If the
aut
flame goes out, e.g. because food has
cooked over or there has been an air
draft, the flame is automatically reignited.
39
Page 40

Before using for the first time
Cleaning the cooktop for the first time
Remo
Using a soft sponge, clean all
Remo
The
Befor
Metal components are protected by a
conditioning agent. Smells and vapor
may occur when the appliance is used
for the first time.
The smell and any vapors do not
indicat
defective appliance and are not harmful
to your health.
ve any protective foil and
stickers.
r
emovable burner parts with a
solution of warm water and a small
amount of liquid dish soap. Dry the
parts thoroughly after cleaning and
reassemble the burners (see
"Cleaning and care").
ve the grilling grate and, using a
soft sponge, clean it with a solution
of warm water and a small amount of
dishwashing liquid. Dry it thoroughly
after cleaning.
griddle plate is oiled for
protection against corrosion. Clean
the griddle plate with a soft sponge, a
small amount of dishwashing liquid,
and warm water, and dry it.
e first use, wipe down the
appliance with a damp cloth and dry
it.
e a faulty connection or a
"Burning in" the griddle plate
You must "burn in" the griddle plate
e cooking food on it the first
befor
time. This process prevents food from
sticking and protects the surface from
moisture.
Set the griddle plate on "High" for 30
minutes.
Switch off the griddle plat
minutes and let it cool down.
During heating, the griddle plate
consta
discoloration may become more
intensive over time. The properties of
the griddle plate, however, are not
impaired in this manner.
Pour 1 teaspoon of vegetable oil that
Do not use too much oil. Excess oil
leaves a rubber
plate that has to be removed.
Remo
Hea
Switch off the griddle plat
ntly changes color. The
can be heated to a high temperature
in the middle of the cooled griddle
plate and distribute it with a paper
towel, leaving out the corners of the
plate.
y substance on the
ve any excess oil with a paper
towel.
t the griddle plate on "High" until
it starts to smoke.
e after 30
e.
40
When the gri
down to a hand-warm temperature,
wash off the excess oil.
Repeat the pr
plate has cooled down completely.
ddle plate had cooled
ocess once the griddle
Page 41

Operating the cooktop
Fir
e hazard!
Do not leave the appliance
attended while cooking!
un
Turning on
Do not turn the control knob
clockwise past the "Off" position.
Activating a control knob
omatically produces a spark on all
aut
of the burners. This is normal and
does not indicate a fault.
You may notice a brief re-ignition
(1-2 clicks) when turning on the
appliance, e.g. because of a dr
To ignite a burner, push the
appropriate control knob and turn it
counterclockwise to the "High"
position. The ignitor "clicks" and
ignites the gas.
If the b
control knob to the "Off" position.
Vent the room or wait at least 1
minute before trying again.
If the second att
light the burner, turn the control knob
to the "Off" position and refer to the
"Frequently asked questions"
section.
urner fails to light, turn the
empt also fails to
aft.
Switching on during a power outage
f there has been a power failure,
I
the automatic re-ignition feature will
not work properly.
Operate the cooktop only under
super
vision. If the burner has not
ignited or the flame goes out, turn off
the burner knob.
Simmer and power burners
In case of a power failure, the flame
an be ignited manually.
c
P
ress in the burner knob and turn it
counterclockwise to "High."
Light the emerging gas/air mixture
with a match.
Grill
Dang
manual ignition of the ceramic burner
during a power failure!
Never operate the grill during a
powe
urn off the grill control knob.
T
Griddle plate
The griddle plate cannot be operated
in case of a power failure.
er of injury due to the
r failure.
T
urn off the control knob for the
griddle plate.
Adjusting the flame
The burners can be variably adjusted
between the lowest and highest flame
settings.
41
Page 42

Operating the cooktop
Because the edges of the flame are
much ho
tips should stay beneath the bottom
of the cookware. Flame tips which
extend beyond the sides of the
cookware emit unnecessary heat into
the room and can also damage
cookware handles, which increases
the risk of injury.
Adjust the flame so that it never
e
cookware.
Visual characteristics gas flames
tter than its center, the flame
xtends up the sides of the
Yellow flames
Contact the Miele
Ser
vice
Department.
Turning off
Do not turn the control knob
clockwise past the "Off" position.
Turn the control knob to the right until
it reaches the "Off" position.
This stops the flow of gas, and the
flame goes out.
42
Yellow tips on
outer cones
Normal for LP gas
Soft blue flames
yellow colour is
only allowed at
the tip of the inner
cone
Normal for natural
gas
Page 43

Simmer/Power burner
Knob label Description
Off Gas supply is off:
Burner off
High Strongest flame setting:
Maximum power of upper and lower flame rings
Simmer Weakest flame setting:
Upper flame ring off
Minimum power of lower flame ring
Grill: Ceramic burner
According to the model, the range has a grill.
Knob label Description
Off Gas supply is off:
Grill off
High Maximum power
Low Minimum power
Operating the cooktop
Griddle plate: Ceramic burner
According to the model, the range has a griddle.
Knob label Description
Off Gas supply is off:
Griddle off
Low Minimum power
Medium Medium power
High Maximum power
43
Page 44

Cookware
– Select cookware that fits the size of
the burner:
Lar
ge diameter = large burner
Small diameter = small burner
– Using cookware that is too large can
se the flames to spread out and
cau
damage the surrounding countertop
or other appliances. Choosing the
right cookware size improves
efficiency.
– Any cookware that has a diameter
er than the burner grate or
small
which does not rest in a stable
position on the grate (without
wobbling) is dangerous and should
not be used.
– Unlike cookware that is used on an
ctric cooktop, the bottom of
ele
cookware used on a gas cooktop
does not have to be flat to deliver
effective cooking performance.
– When purchasing pots and pans,
eep in mind that the diameter
k
indicated is typically the top
diameter, not the bottom diameter.
– Position the cookware on the burner
gr
ate so that it cannot tip. There is
always a possibility of a slight tilt,
despite the proper position.
– Do not use pots or pans that have
oms with pronounced edges.
bott
– All heat-resistant cookware is
suitable
– Cookware with a thick bottom is
pr
evenly. Cookware with a thin bottom
may cause food to overheat in certain
spots. To avoid this, stir the food
frequently.
– Always place cookware on the burner
gr
Never place it directly on the burner.
44
for use on the gas cooktop.
eferable, as it distributes heat more
ate supplied with the cooktop.
Page 45

– Whenever possible, keep pots and
pans cover
so will prevent unnecessary heat
loss.
– Wide, shallow cookware heats up
er and is therefore preferable to
fast
tall, narrow cookware.
– Cook with as little water as possible.
– Reduce the power setting once the
water has come to a boil or the oil/fat
is hot enough for frying.
– Use a pressure cooker to reduce the
cooking time.
ed while cooking. Doing
Energy saving tips
45
Page 46

Operating the grill
3
1
2
Once you start the Self Clean
program, the grill and the griddle will
be turned off.
During the Self Clean program, the
grill and the griddle cannot be turned
on.
The grill has a ceramic burner that
ansfers intense heat to food, searing
tr
the outside to seal the juices. Full
flexibility, depending on the food, from
"Low" to "High" as power settings.
Do not use cooking utensils on the
grill.
Assembling the grill
Burn h
The burners must be turned off and
allowed to cool completely.
Risk of injur
The cast-iron grill is heavy.
Carry the grill carefully and place it
secu
flat.
azard!
y!
rely on a soft base so that it lies
46
a
Grill
b
Grease tray
c
Frame
Usin
g a soft sponge, clean grease
tray with a solution of warm water
and a small amount of liquid dish
soap. Dry the parts thoroughly after
cleaning.
Remove the grill fr
cooktop.
Place
the grease tray on top of the
frame .
om the gas
Page 47

Place the grill int
Cleaning and care
Tip: All par
the reverse order. You can also remove
the frame for cleaning.
ts can be disassembled in
o position.
Turning on the grill
ress the control knob of the grill and
P
turn it counterclockwise to "High."
If the b
control knob to the "Off" position. Air
the room or wait at least 1 minute
before trying again.
If the second attempt also fails to
light the burner, turn the control knob
to the "Off" position and refer to the
"Frequently asked questions"
section.
P
dishwasher-safe grill grate in place
for approx. 20 minutes.
urner fails to light, turn the
re-heat the grill with the
Operating the grill
Grilling tips
Fir
e hazard!
Do not leave the appliance
attended while cooking!
un
– Pat down wet food items with paper
owel to prevent splatters during
t
broiling.
– Do not salt meat until after broiling, or
it will be t
– Select lean mean or cut off fat before
oiling. Dripping fat can catch on
br
fire.
– If dripping fat catches on fire, use
lling tongs to move the meat to
gri
another spot or remove it entirely.
– Remove chicken skin to prevent
sparking.
– Halfway through cooking, brush
marin
– Leave the grill on for another 10
minu
this way, it is easier to clean after
cooling.
oo dry.
ade onto the food.
tes after you have finished. In
Set the desir
ed power level.
47
Page 48

Operation of the griddle
Once you start the Self Clean
program, the grill and the griddle will
be turned off.
During the Self Clean program, the
grill and the griddle cannot be turned
on.
The griddle is thermostatically
olled to maintain a consistent
contr
temperature. To prevent food from
sticking, it is necessary to "season" the
griddle prior to use (see "Before using
for the first time"). Full flexibility,
depending on the food, from "Low",
"Medium" and "High" as power
settings.
Turning on the griddle
ress the control knob of the griddle
P
and turn it counterclockwise to
"Low."
If the b
control knob to the "Off" position. Air
the room or wait at least 1 minute
before trying again.
urner fails to light, turn the
Settings
Settings Food
Low Simmering Sauce
Holding food
t
emperature
Medium Eggs
Bacon
French Toast
Medium–High Fish
Pancakes
Sausage
Hash Browns
Vegetables
High Burgers
Steaks
Stir-fry
If the second att
light the burner, turn the control knob
to the "Off" position and refer to the
"Frequently asked questions"
section.
reheat the griddle plate for about 20
P
minutes.
Set the desir
48
empt also fails to
ed power level.
Page 49

Tips for frying
Before each use, wipe the griddle
with a damp cloth t
other residue.
– Pre-heat the griddle plate thoroughly
for 8 -10
that you are going to be using for
cooking.
– Pat down wet food items with paper
owel to prevent splatters during
t
grilling.
– Do not salt meat until after grilling, or
it will be too dry.
– For cooking with the griddle plate,
you need only a little fat or none in
the case o
use cooking fat, do not put it on the
griddle plate until it is hot.
– Only use fats/oils that can tolerate
hig
minutes at the power level
f marinated food. If you
h temperatures.
o remove dust or
Operation of the griddle
– Marinating often improves the flavor
of food t
o be cooked.
49
Page 50

Cleaning and care
Burn hazar
The burners must be turned off and
owed to cool completely.
all
Risk of injur
The steam from a steam cleaner
could reach electrical components
and cause a short circuit.
Do not use a steam cleaner to clean
the co
oktop.
All cooktop surfaces can become
discol
ored or damaged if unsuitable
cleaning agents are used.
The outer surfaces of the cooktop
e susceptible to scratching.
ar
Immediately remove any residues left
by cleaning agents.
d!
y!
Always clean the cooktop after each
use. Allow it t
cleaning.
To avoid damaging the surfaces of your
appliance, do not use:
– Cleaners containing soda, ammonia,
acids or chlorides
– Lime removers
– Stain or rust removers
– Abrasive cleaning agents (e.g.,
powder or cr
stones)
– Solvent-based cleaners
– Dishwasher cleaner
– Grill and oven sprays
– Glass cleaners
– Hard, abrasive brushes or sponges
(e.g. pot scrubbers or scrub
sponges, sponges which have
pr
eviously been used with abrasive
cleaning agents)
o cool down before
eam cleansers, pumice
50
– Sharp objects
(these could damage the seals
between the cer
or between the frame and the
countertop).
amic and the frame
Page 51

Cleaning and care
Gas cooktop
The surfaces of the burner
compon
lose their luster over time. This is
completely normal and does not
indicate damage to the material.
Clean the cooktop after each use
with a soft sponge, warm water and a
small amount of liquid dish soap.
P
before cleaning.
Dr
clean it. This helps prevent lime
deposits.
Tip: Food that has cooked over onto a
hot cooktop can cause the burner
components to become discolored.
Immediately remove all spilled food and
all salt or sugar splatters!
Dishwasher-safe grates
Remove the burner grates.
Cle
using a soft sponge with warm water
and a small amount of liquid dish
soap.
If necessary, the rough side of a
kitchen sponge can be used.
ents and grates will slightly
re-soak any stubborn dirt or grime
y the appliance after using water to
an the grates in the dishwasher or
Burner control knobs with stainless
eel finish
st
The burner control knobs may
become discol
cleaned regularly.
Do not clean the burner control
knobs in a dishwasher or with a
stain
less steel cleaner.
Clean the knobs with a soft sponge,
warm wat
liquid dish soap.
Simmer burner / Power burners
The burner cap is not dishwashersafe.
Make sure that the flame holes are
complet
Remove the burner cap.
Clean the burner cap using a soft
sponge
amount of liquid dish soap.
All par
Ignitor
Do not allow the ignitor to become
wet. If it is wet, it will not spark.
ts of the burner which cannot
be removed should be wiped down
with a damp cloth.
ored if they are not
er and a small amount of
ely dry after cleaning.
, warm water and a small
Gently wipe down the ignit
using a damp cloth.
or clean
51
Page 52

Cleaning and care
Cleaning the grill grate
Cle
an the grill grate after use using
hot water and some dishwashing
liquid. When the grill grate is strongly
soiled, soak it and then remove the
soiling with a brush. After that, let the
rack dry thoroughly.
Cleaning the griddle plate
Burn hazard!
Allow the griddle plate to cool down
ently before cleaning it.
suffici
e hazard!
Fir
Clean the grease catch pan after
ever
y use of the griddle plate.
L
oosen coarse soiling immediately
with a spatula and scratch grease
and residue into the grease catch
pan.
Remo
ve any excess grease with a
paper towel.
Cle
an the grease catch pan with a
soft sponge, dishwashing liquid, and
warm water. Dry it thoroughly after
cleaning.
ipe off the griddle plate with clean
W
water and dry it with a clean, dry
cloth.
Rub some vege
griddle plate after every cleaning.
P
ut the grease catch pan back into
place.
table oil into the
The
n let the griddle plate cool until it
is safe to the touch, add some hot,
soapy dishwater, and let the grime
soak.
Remo
You can clean stubborn soiling off the
griddle plat
dish sponge and a few drops of Miele
ceramic and stainless steel cleaner
(see "Optional accessories").
Remo
52
ve any soiling and water with a
sponge.
e with the rough side of a
ve the grease catch pan and
empty it.
Page 53

Frequently asked questions
The following guide is intended to help you resolve problems that occur during
norma
l operation of the appliance.
If you are unable to identify or remedy the cause of the problem on your own,
please contact Miele Service (see back cover for details).
Risk of injur
work can pose a serious danger to users of the appliance.
Installation, maintenance and repairs may only be carried out by Miele
authorized technicians.
Do not attempt to open the cooktop casing yourself.
Problem Possible cause and solution
The burners do not
e when the cooktop
ignit
is being used for the
first time or after it has
been out of use for a
longer period.
The burner does not
light aft
attempts.
The gas flame goes out
aft
er several
er being lit.
y! Improperly performed installation, maintenance or repair
There may be air in the gas line.
ry to light the burner again, making several
T
attempts if necessary.
The burner is not properly assembled.
Assemble the burner corr
The gas shutoff valve is closed.
Open the gas shut-off valve.
The burner is wet and/or dirty.
Clean
The flame holes are clogged and/or wet.
Clean
The burner parts are not in the proper position.
P
and dry the burner.
and dry the flame holes.
osition the burner parts correctly.
ectly.
The shape/color of the
gas flame changes.
The gas flame goes out
during use.
The ignitor is dirty.
Remove any dir
The burner parts are not in the proper position.
osition the burner parts correctly.
P
The burner cap itself or the holes in the burner cap
e dirty.
ar
Remove any dir
The burner parts are not in the proper position.
osition the burner parts correctly.
P
t or grime.
t or grime.
53
Page 54

Frequently asked questions
Problem Possible cause and solution
The ignitor does not
functio
Grill and griddle are
turned off/cannot be
turned on
n properly.
The fuse in the building's wiring system was tripped.
necessary, contact a qualified electrician or
If
Customer Service for assistance.
There is food debris stuck between the ignitor and
the burner cap.
Remove the debris. (S
more information.)
Once you start the self cleaning program, grill and
griddle will be turned off.
This is not an error. The Safety cut-out feature has
been activat
At 1-minute intervals, a maximum of 5 ignition tests
will be performed.
T
urn the grill and griddle control knob to the right
until it reaches the "Off" position.
At the end of the self clean program, you can turn
rill and griddle on again.
During the self cleaning program, grill and griddle
cannot be turned on.
This is not an error. The Safety cut-out feature has
been activat
At 1-minute intervals, a maximum of 5 ignition tests
will be performed.
T
urn the grill and griddle control knob to the right
until it reaches the "Off" position.
At the end of the self clean program, you can turn
grill and griddle on again.
ed.
ed.
ee "Cleaning and care" for
54
Page 55

Technical Service
After sales service
In the event of a fault which you cannot
y correct yourself, please contact:
easil
– your Miele dealer, or
– the Miele Technical Service
Department.
See back cover for contact details.
Please quote the model and serial
number of your appliance when
contacting Miele.
You will find this information on the
data plat
cover.
e, which is behind the toe-kick
Warranty
For further information, please refer to
your warr
anty booklet.
55
Page 56

Page 57

Page 58

Page 59

9 Independence Way
Princeton, NJ 08540
Phone:
Fax:
www.mieleusa.com
U.S.A.
Miele, Inc.
National Headquarters
Please have the model and serial number
of your appliance available before
contacting Technical Service.
Canada
Importer
Miele Limited
Headquarters and Miele Centre
800-843-7231
609-419-9898
609-419-4298
Technical Service & Support
Nationwide
Phone:
Fax:
TechnicalService@mieleusa.com
161 Four Valley Drive
Vaughan, ON L4K 4V8
www.miele.ca
800-999-1360
888-586-8056
Customer Care Centre
Phone:
customercare@miele.ca
800-565-6435
905-532-2272
Germany
Manufacturer
Miele & Cie. KG
Carl-Miele-Straße 29
33332 Gütersloh
56
Page 60

All Gas: HR1124; HR1134; HR1135; HR1136; Dual Fuel: HR1924;
HR1934; HR1935; HR1936; HR1954; HR1955; HR1956
M.-Nr. 09 898 141 / 00en–US, CA
 Loading...