

Miele HR1924DFLP Instruction Manual
Operating Instructions
30" Dual Fuel Range
(Convection Oven)
To prevent accidents and damage to the range, you must r
instructions supplied before installing or using the appliance.
en–US, CA M.-Nr. 09 898 041
ead all
IMPORTANT SAFETY INSTRUCTIONS
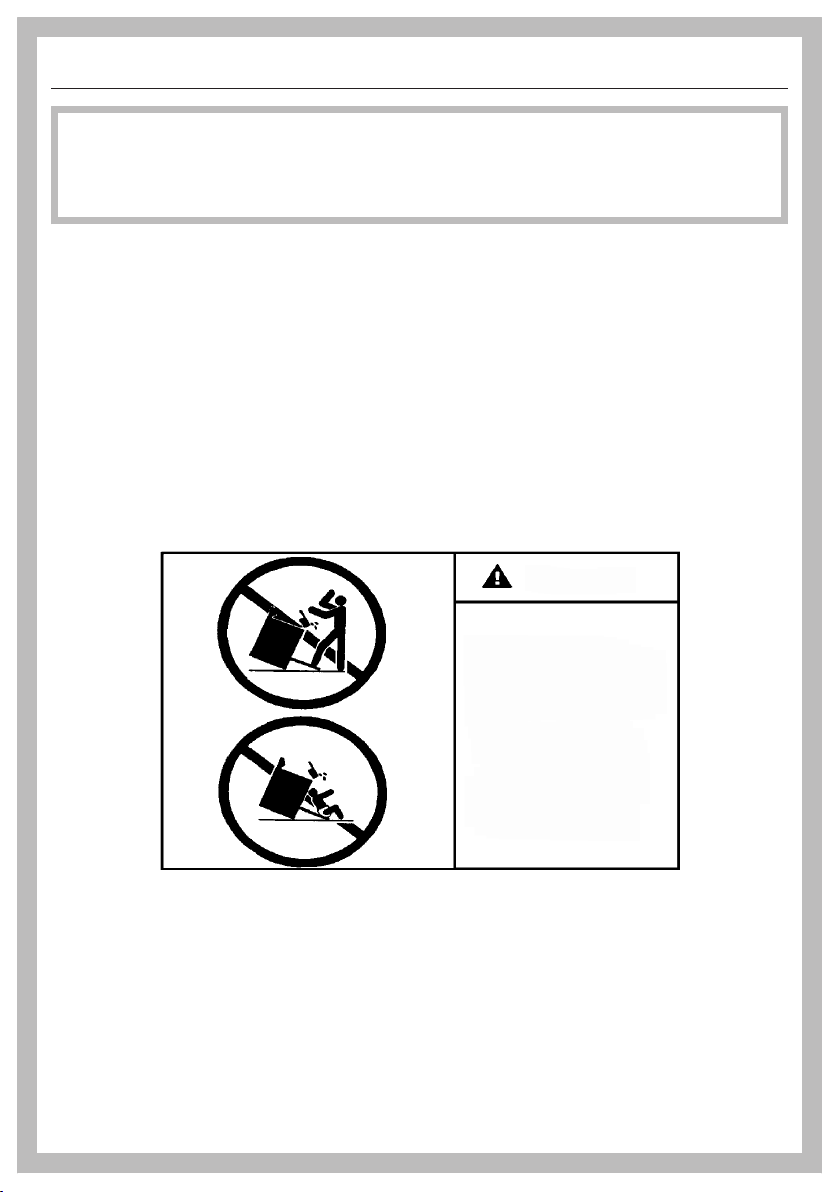
All ranges can tip
Injury to persons
could result
Install anti-tip devices
packed with range
See installation
instructions
WARNING
WARNING
Children and adults can tip over the range if has not been
sec
ured. This may lead to fatal injuries.
This r
ange must be secured and connected using the anti-tip
device according to the installation instructions.
you have moved the range, slide the locking latch onto the anti-
If
tip device until you feel it lock into place.
Do not use the r
ange if the anti-tip device has not been properly
installed and engaged.
ailure to observe the information contained in the installation
F
instructions can lead to serious or fatal injuries for children and
adults.
2

Contents
IMPORTANT SAFETY INSTRUCTIONS................................................................. 2
IMPORTANT SAFETY INSTRUCTIONS.................................................................
Guide to the range ...............................................................................................
8
20
Oven....................................................................................................................... 20
Control panel........................................................................................................
21
Burner knob ........................................................................................................... 22
Sensor buttons....................................................................................................... 23
M Touch display..................................................................................................... 24
Symbols............................................................................................................ 25
Basic operation...................................................................................................... 26
Features ................................................................................................................
28
Model numbers ..................................................................................................... 28
Data plate .............................................................................................................. 28
Items included with this range............................................................................... 28
Standard and optional accessories ....................................................................... 28
Shelf runners..................................................................................................... 29
Universal tray and Wire oven rack.................................................................... 29
FlexiClips with wire rack HFCBBR30-2 ............................................................ 30
Rotisserie HDGR30+......................................................................................... 33
Oven controls ........................................................................................................ 34
Oven safety features.............................................................................................. 34
System lock for the oven
.............................................................................. 34
Safety shut-off .................................................................................................. 34
Cooling fan........................................................................................................ 34
Vented oven door.............................................................................................. 34
Safety Door Lock for Self Clean ....................................................................... 34
PerfectClean surfaces............................................................................................ 35
Self Clean ready accessories................................................................................. 35
Before using for the first time.............................................................................
36
Before using for the first time................................................................................. 36
Heating up the oven for the first time and rinsing the steam injection system...... 38
Operating the oven ..............................................................................................
40
Energy saving tips.................................................................................................. 40
Quick Guide ........................................................................................................... 41
Cooling fan ............................................................................................................ 41
3

Contents
Settings.................................................................................................................
Accessing the "Settings" menu ............................................................................. 42
Changing and saving settings .......................................................................... 42
Settings overview................................................................................................... 43
Language ............................................................................................................
Time of day ............................................................................................................ 45
Display .............................................................................................................. 45
Clock Type ........................................................................................................ 45
Clock Format .................................................................................................... 45
Set..................................................................................................................... 45
Date........................................................................................................................ 46
Lighting .................................................................................................................. 46
Start screen............................................................................................................ 46
Brightness.............................................................................................................. 46
Volume ................................................................................................................... 47
Buzzer tones..................................................................................................... 47
Keypad tone...................................................................................................... 47
Welcome melody .............................................................................................. 47
Units of measurement............................................................................................ 47
Weight............................................................................................................... 47
Temperature...................................................................................................... 47
Cooling fan............................................................................................................. 48
Default temperatures.............................................................................................. 48
Self Clean............................................................................................................... 49
Safety..................................................................................................................... 49
System lock .................................................................................................. 49
Sensor lock ...................................................................................................... 49
Catalyzer ................................................................................................................ 50
Voltage................................................................................................................... 50
Sensor group ......................................................................................................... 50
Calibrate temperature ............................................................................................ 51
Showroom Program............................................................................................... 51
Demo Mode ...................................................................................................... 51
Factory default....................................................................................................... 52
Lift panel ................................................................................................................ 52
42
45
MyMiele.................................................................................................................
To add an entry...................................................................................................... 53
Editing MyMiele ..................................................................................................... 54
Deleting entries................................................................................................. 54
Sorting entries................................................................................................... 54
4
53

Contents
Alarm + Timer.......................................................................................................
Using the Alarm .................................................................................................
Setting the alarm............................................................................................... 55
Changing an alarm............................................................................................ 55
Deleting an alarm.............................................................................................. 55
Using the Timer ................................................................................................. 56
Setting the timer ............................................................................................... 56
Resetting the timer............................................................................................ 57
Canceling the timer........................................................................................... 57
Guide to the modes..............................................................................................
Additional functions.............................................................................................
Changing the temperature..................................................................................... 61
Rapid PreHeat........................................................................................................ 62
Rapid PreHeat................................................................................................... 62
Using the Crisp function (Moisture Reduction)...................................................... 63
Changing the oven mode....................................................................................... 63
Setting additional durations................................................................................... 64
Turning off automatically................................................................................... 65
Turning on and off automatically....................................................................... 65
Sequence of a cooking program that turns on and off automatically .............. 66
Changing the set time....................................................................................... 66
Canceling cooking ............................................................................................ 66
Moisture Plus .................................................................................................
Cooking with the Moisture Plus function
Setting the temperature.................................................................................... 68
Setting the number of steam bursts ................................................................. 68
Timing the bursts of steam ............................................................................... 68
Changing the type of heating ........................................................................... 69
Injecting bursts of steam .................................................................................. 70
Automatic burst of steam ................................................................................. 70
1, 2 or 3 Bursts of steam .................................................................................. 70
Evaporating residual moisture................................................................................ 71
Starting residual water evaporation immediately.............................................. 72
Skipping residual moisture evaporation............................................................ 72
........................................................ 68
55
55
58
61
67
Gourmet Center ...................................................................................................
List of food types ................................................................................................... 73
MasterChef Plus..................................................................................................... 73
Using MasterChef and MasterChef Plus programs............................................... 74
Notes on using these programs........................................................................ 74
Search.................................................................................................................... 75
73
5

Contents
MasterChef Plus Recipes....................................................................................... 75
Baguette ........................................................................................................... 76
Banana Bread ................................................................................................... 77
Brioche.............................................................................................................. 78
Ciabatta ............................................................................................................ 79
Cinnamon Raisin Bread .................................................................................... 80
French Bread..................................................................................................... 81
Italian Bread...................................................................................................... 82
Jalapeño Cheese Bread.................................................................................... 83
Multigrain Bread................................................................................................ 84
Rolls .................................................................................................................. 85
Rye Bread ......................................................................................................... 86
San Francisco Sourdough ................................................................................ 87
Walnut Bread .................................................................................................... 88
White Bread ...................................................................................................... 89
Whole Grain Bread............................................................................................ 90
Favorites ...............................................................................................................
Creating a Favorite................................................................................................. 91
Starting a Favorite.................................................................................................. 92
Changing Favorites................................................................................................ 93
Changing cooking stages ................................................................................. 93
Changing the name........................................................................................... 94
Deleting a Favorite ................................................................................................. 94
Bake ...................................................................................................................... 95
Roast .....................................................................................................................
Wireless roast probe.............................................................................................. 98
How it works..................................................................................................... 98
When to use the wireless roast probe .............................................................. 99
Important notes on using the wireless roast probe .......................................... 99
Using the wireless roast probe ....................................................................... 101
Time left display.............................................................................................. 102
Using residual heat ......................................................................................... 103
Slow Roasting .................................................................................................... 104
Using the Slow Roasting function........................................................................ 105
Adjusting the Slow Roasting temperature ........................................................... 106
Broil ..................................................................................................................... 107
Special Modes....................................................................................................
Defrost ................................................................................................................. 112
91
97
111
6

Contents
Dehydrate............................................................................................................. 113
Reheat.................................................................................................................. 114
Warm-up Cookware............................................................................................. 114
Proof..................................................................................................................... 115
Pizza..................................................................................................................... 115
Sabbath Program................................................................................................. 116
Gentle Bake ......................................................................................................... 117
Canning................................................................................................................ 118
Frozen food .......................................................................................................... 119
Cleaning and care..............................................................................................
Unsuitable cleaning agents.................................................................................. 120
Tips ...................................................................................................................... 121
Normal soiling ...................................................................................................... 121
Wireless Roast Probe...................................................................................... 121
Stubborn soiling................................................................................................... 122
Cleaning the oven interior with Self Clean ....................................................
Preparing for the Self Clean program ............................................................. 123
Starting the Self Clean program ..................................................................... 124
Starting the Self Clean program ..................................................................... 124
Delaying the start of the Self Clean program.................................................. 124
At the end of the Self Clean program ............................................................. 125
The Self Clean program is canceled............................................................... 126
Removing the door .............................................................................................. 127
Reinstalling the door ............................................................................................ 128
Removing the shelf runners ................................................................................. 129
Frequently asked questions..............................................................................
Technical Service ...............................................................................................
Copyright and licenses......................................................................................
120
123
130
135
136
7

IMPORTANT SAFETY INSTRUCTIONS
When using the appliance, follow basic safety precautions, including the
following:
Read all instructions before installation and use of the range to prevent
accidents and machine damage.
This appliance complies with current safety requirements.
Impr
oper use of the appliance can lead to personal injury and
material damage.
Read all instructions before installing or using the oven for the first
time. Only use the appliance for its intended purpose.
Keep these operating instructions in a safe place and pass them
on to any future user.
Use
This appliance
is intended for residential use only. Use only as
described in these operating instructions.
This applianc
Only use this oven for r
e is not intended for outdoor use.
esidential cooking, and the purposes
described in this manual.
Other uses are not permitted and can be dangerous.
Risk of Fir
e! Do not use this oven to store or dry flammable
materials.
ersons who lack physical, sensory or mental abilities, or
P
experience with the appliance should not use it without supervision
or instruction by a responsible person.
8

Children
IMPORTANT SAFETY INSTRUCTIONS
As w
by children.
Do not lea
unsupervised in the area where the oven is installed. Do not allow
them to sit or stand on the appliance.
As w
by children.
Chil
they have been shown how to use it safely and recognize and
understand the consequences of incorrect operation.
Chil
unsupervised.
Chil
an oven is in use. Never allow children to operate, sit or stand on
any part of the oven. Caution: Do not store items of interest to
children in cabinets above an oven. Children climbing on the oven to
reach these items could be injured.
ith any appliance, close supervision is necessary when used
ve children unattended: Children should not be alone or
ith any appliance, close supervision is necessary when used
dren 8 years and older may only use the oven unsupervised if
dren must not be allowed to clean or maintain the appliance
dren should not be left alone or unattended in an area where
Danger of burns. The oven gets hot at the oven door glass, the
vapor vent, the handle and the oper
children to touch or play in, on or near the oven.
ating controls. Do not allow
Danger of burns.
dren's skin is more sensitive to high temperatures than that of
Chil
adults. The oven becomes hotter during self-cleaning than it does in
normal use. Do not let children touch the oven while the Self Clean
program is running.
Burn Hazar
so can result in severe burns or serious injury.
Dange
etc. are disposed of safely and kept out of the reach of children.
d - Do not allow children to use the oven. Failure to do
r of suffocation! Ensure that any plastic wrappings, bags,
9

IMPORTANT SAFETY INSTRUCTIONS
Burn hazar
Keep the spaces above and behind the range clear of any items that
could draw the attention of children. Otherwise, they can be tempted
into climbing onto the appliance.
Dange
of the appliance.
d!
r of injury. Never allow children to hang or lean on any part
10

Technical safety
IMPORTANT SAFETY INSTRUCTIONS
Installatio
a Miele authorized service technician in accordance with national
and local safety regulations and the provided installation
instructions. Contact Miele’s Technical Service Department for
examination, repair or adjustment. Repairs and other work by
unauthorized persons could be dangerous and may void the
warranty.
n, repair and maintenance work should be performed by
Do not carry or lift the range by the oven door handle or the
control panel!
Maint
appliance unless the instructions specifically recommend doing so.
Service work may only be performed by a qualified technician.
Chang
void the user's authority to operate the oven.
enance by the user: Never repair or replace any part of the
es or modifications not expressly approved by Miele may
A damaged range can be dangerous. Always check for visible
signs of damage. Never use a damaged appliance.
Reliable
it is connected to the public power supply.
and safe operation of the range can only be guaranteed if
The electrical safety of the range can only be guaranteed when it
is properly grounded. Compliance with this essential safety
requirement is absolutely mandatory. If in any doubt, please have
the building's wiring system inspected by a qualified electrician.
P
roper installation: Make sure that your appliance has been
installed correctly and that it has been grounded by a qualified
technician.
The ove
within cabinetry.
n is not to be operated until it has been properly installed
11

IMPORTANT SAFETY INSTRUCTIONS
o avoid damaging the range, make sure that the connection data
T
(voltage and frequency) on the data plate correspond to the
building's power supply before connecting the appliance.
When in doubt, consult a qualified electrician.
Do not use a power strip or e
to electricity. These are a fire hazard and do not guarantee the
required level of appliance safety.
This applianc
installations (e.g. on a ship).
e must not be installed and operated in mobile
xtension cord to connect the range
Danger of electric shock!
Under no ci
Do not r
specifically recommended in the operating instructions. All other
servicing should be referred to a qualified technician.
Defective co
only. Only with these parts can the manufacturer guarantee the
safety of the appliance.
During
lighting is broken (see "Frequently asked questions"), the range must
be completely disconnected from the household electricity supply.
The gas supply must be shut off. Ensure that this is the case by:
– removing the fuse,
rcumstances open the outer casing of the appliance.
epair or replace any part of the appliance unless
mponents should be replaced by Miele original parts
installation, maintenance and repair work, e.g. if the oven
– "tripping" the circuit breaker, or
– unplugging the unit. Pull the plug not the cord.
– Shut off the gas supply and, if necessary, disconnect the range
fr
om the gas line. Installation and maintenance of the gas
connection must be performed by qualified installers, service
agencies or gas providers.
12

IMPORTANT SAFETY INSTRUCTIONS
the range is installed behind a cabinet door, do not close the
If
door while the appliance is in operation. Heat and moisture can build
up behind the closed door and cause damage to the range and to
the surrounding cabinets and flooring. Do not close the door until
the appliance has completely cooled down.
Do not insta
over a hot stovetop to access the cabinets can result in burns. If it is
necessary to install cabinets, you can reduce the risk of burns by
installing a range hood that extends at least 4 3/4" (12 cm) past the
bottom of the cabinets.
The wat
been installed.
ll kitchen cabinets above the range, since reaching
er shutoff valve must be accessible after the range has
The protective sleeve of the water intake hose must not be
damaged or become kinked. This will cause it to leak.
The int
damage if the following conditions are met:
– The range is properly installed (connected to electric and water
supply).
– The range is repaired immediately whenever damage is detected.
– The water supply is shut off during extended periods of non-use
(e.g. vacation).
Har
osmosis filtering systems can damage the range. Only use filtered,
softened and demineralized water from the building's plumbing to
supply the range.
egrated Waterproof System offers protection against water
d water, water containing minerals and water from reverse
13

IMPORTANT SAFETY INSTRUCTIONS
Proper use
he oven becomes very hot while in use. Use caution to
T
ensure that you are not burned on the heating elements or interior
surfaces of the oven. Use pot holders when placing food in the
oven, adjusting the racks, etc. in a hot oven.
aution: Heating elements may be hot even though they are not
C
glowing. Interior surfaces of an oven become hot enough to cause
burns. External parts of the oven such as the door glass, vents, and
the control panel can become hot. During and after use, do not
touch, or let clothing or other flammable materials come into contact
with heating elements or interior surfaces of the oven until they have
had sufficient time to cool.
Do not let foo
after cooking. Doing so can result in food poisoning or sickness.
Use onl
used on hot surfaces may result in steam burns. Do not let
potholders come in contact with oil or grease. Do not substitute dish
towels or other bulky items for potholders. Do not let potholders
touch hot heating elements.
oose fitting or hanging garments present a fire hazard. Wear
L
proper apparel while operating the appliance.
y dry, heat-resistant potholders. Moist or damp potholders
d sit in the oven for more than one hour before or
Do not heat unopened containers of food in the oven, pressure
may cause the containers to burst and result in injury.
Never pour col
The steam created could cause serious burns or scalding and the
sudden change in temperature can damage the enamel in the oven.
T
o prevent burns, always place oven racks at their desired height
while the oven is cool. If the rack must be moved while the oven is
hot, do not let pot holders touch hot heating elements.
d water onto hot surfaces in a hot oven.
14

IMPORTANT SAFETY INSTRUCTIONS
Op
placing or removing food.
T
cleaning by hand.
en the door carefully to allow hot air or steam to escape before
o prevent burns, allow the heating elements to cool before
Do not leave the oven door open unnecessarily as someone may
trip over it or be injured by it.
Never leave
fat. They can ignite if overheated. Do not use water on grease
fires.Turn off the oven immediately and suffocate the flames by
keeping the oven door closed.
Smother the fir
agent or foam fire extinguisher.
Never st
oven, or near cooking surfaces.
Do not use the o
radiated could cause objects near the oven to catch fire.
W
ARNING
the appliance unattended when cooking with oil or
e or flames, or use a dry chemical extinguishing
ore flammable liquids and materials in, above or under an
ven to heat the room. The high temperatures
NEVER use this appliance as a space heater to heat or warm the
r
oom. Doing so may result in carbon monoxide poisoning and
overheating of the oven.
W
NEVER use this appliance as storage space. Doing so may result
in carbon monoxide poisoning and overheating of the oven.
ARNING
15

IMPORTANT SAFETY INSTRUCTIONS
WARNING
NEVER cover any slots, holes or passages in the oven bottom or
co
ver an entire rack with materials such as aluminum foil. Doing
so blocks air flow through the oven and may cause carbon
monoxide poisoning. Aluminum foil linings may also trap heat,
causing a fire hazard.
oiling food for an excessively long time can cause it to dry out
Br
and may result in the food catching fire.
Do not exceed recommended broiling times.
Some foods dr
broiling temperatures. Do not use broiling modes for crisping rolls or
bread, or to dry flowers or herbs. Instead use the Convection Bake
or Surround modes.
y out very quickly and can be ignited by high
Use caution when using alcohol in your recipes. Alcohol
evaporates at high temperatures but may, in rare circumstances,
combust on the hot heating elements.
Plastic con
ignite at high temperatures and can damage the oven. Use only
plastic containers that are indicated by the manufacturer as being
suitable for use in ovens.
When r
humidity and condensation can cause damage in the oven. The
control panel, countertop or cabinetry may also be damaged.
Do not switch the oven off completely while food is inside it, but
select the lowest possible temperature for the oven mode you are
using. This will ensure the fan will automatically continue to run.
It
is recommended to cover all cooked food that is left in the oven
to be kept warm. This will prevent moisture from condensing on the
interior of the oven.
tainers, which are not heat-resistant, melt and may
esidual heat is used to keep food warm, the high level of
16

IMPORTANT SAFETY INSTRUCTIONS
o avoid damage, do not place aluminum foil, pots, pans or
T
baking sheets directly on the oven floor. This can cause a build up of
heat that will damage the oven floor.
Do not slide pots or pans on the oven
and damage the surface.
The door can
sit on or lean against an open door, and do not place heavy objects
on it. Also make sure that nothing can get trapped between the door
and the oven cavity. The oven could get damaged.
This ove
heat given off by glues, plastics or flammable liquids and materials
could be hazardous. Do not use it as a dryer, kiln, dehumidifier, etc.
support a maximum weight of 33 lbs (15 kg). Do not
n must only be used for cooking food. Fumes, vapors or
Do not obstruct the flow of combustio
floor. This could scratch
n and ventilation air.
Do not let metal objects (aluminum foil, pans) come in contact
with the heating element.
Mak
come in contact with or get caught in the oven door.
When baking fr
lined with parchment paper. Do not use the baking tray or the
roasting pan for frozen foods with a large surface area. The tray or
pan could become warped and difficult to remove from the oven
when hot. Frozen foods like french fries, chicken nuggets, etc. can
be baked on the baking tray.
e certain that the power cords of small appliances do not
ozen pizzas or pies, place them on the wire rack
17

IMPORTANT SAFETY INSTRUCTIONS
Cleaning and care
Do not use a st
Steam could penetrate electrical components and cause a short
circuit.
Only clean par
Instructions.
Scr
Do not use abrasive cleaners, hard sponges, brushes or sharp metal
tools to clean the door glass.
The shel
"Cleaning and care"). Ensure they are correctly fitted after cleaning
and never operate the oven without the shelf runners inserted.
Ther
the door. Take care not to rub, damage or move the gasket.
atches on the door glass can cause the glass to break.
f runners can be removed for cleaning purposes (see
e is a seal around the oven interior which seals the inside of
Do not use ove
liners of any kind should not be used in or around any part of the
oven.
Debris shoul
If not removed this debris can smoke causing the self-cleaning
program to turn itself off.
eam cleaner to clean this oven.
ts listed in these Operating and Installation
n cleaners. Commercial oven cleaners or oven
d be removed before running the Self Clean program.
18

Accessories
IMPORTANT SAFETY INSTRUCTIONS
Use only ge
other manufacturers are used, the warranty will become void.
Only use the Miele
faulty, it must only be replaced with a Miele genuine roast probe.
V
ery high temperatures can damage the wireless roast probe and
cause the silicon to melt. Do not keep the roast probe in the oven.
Do not use the roast probe in Broil modes (except for Convection
Broil).
This ove
standard(s) and part 15 of the FCC Rules. Operation is subject to the
following two conditions: (1) This device may not cause harmful
interference, and (2) this device must accept any interference
received, including interference that may cause undesired operation.
The hig
accessories that are not designed for cleaning in the Self Clean
program. Please remove these accessories from the oven before
starting the Self Clean program. This also applies to accessories
purchased separately (see "Cleaning and care").
nuine original Miele parts. If parts or accessories from
roast probe supplied with this oven. If it is
n complies with Industry Canada licence-exempt RSS
h temperatures used during self-cleaning will damage
Preparing your appliance for an extended vacation
you elect to turn off the water to your home for an extended
If
period of time, please note that this may not be enough to reduce
the risk of a leak. To be completely safe, you must turn off the water
supply to each individual appliance.
SAVE THESE INSTRUCTIONS AND REVIEW THEM PERIODICALLY
19
Guide to the range
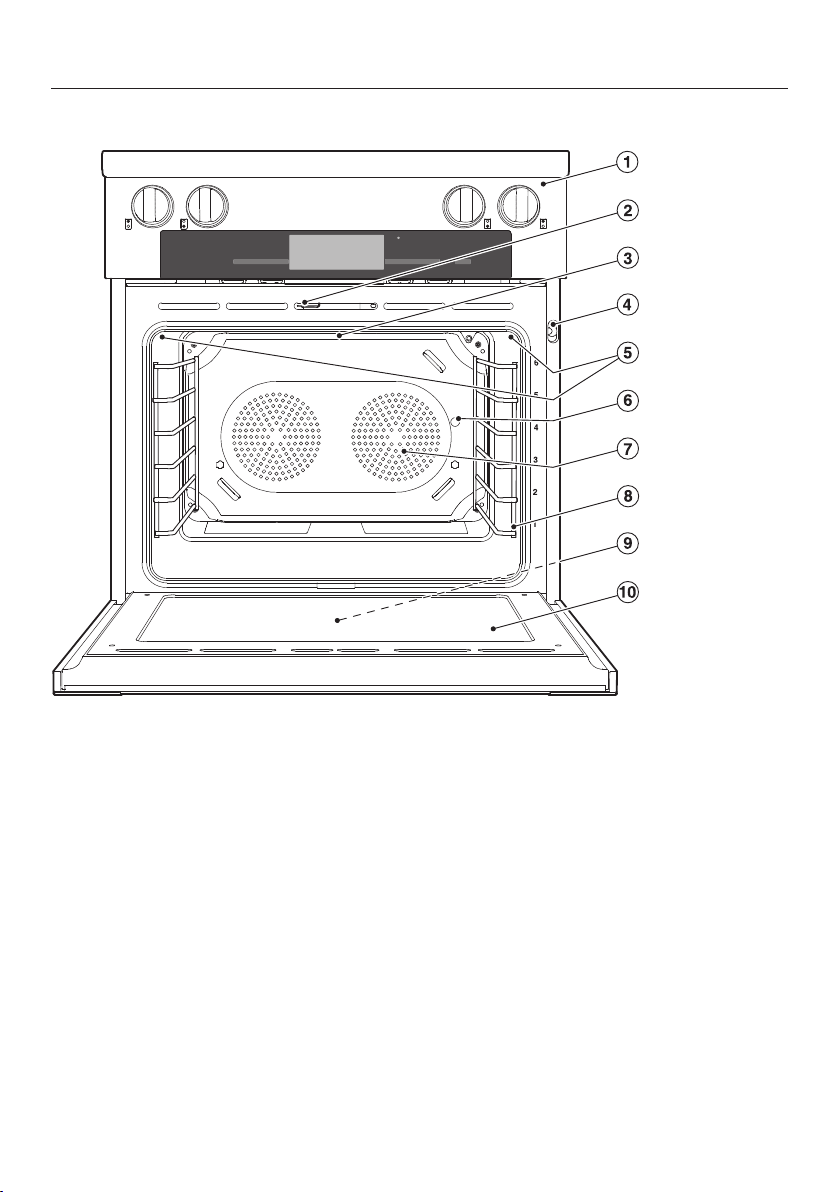
Oven
a
Oven and cooktop controls
b
Door lock with contact switch for Self
Clean
This switch ensures that the heater
elements and convection fan turn off
when the door is opened during use.
c
Browning / Broiling element
d
Storage for wireless roast probe
e
Oven interior lighting
20
f
Rotisserie motor
g
TwinPower convection fan with
heating element
h
Shelf runners with 6 levels
i
Data plate
The data plate is located behind the
oe-kick.
t
j
Door
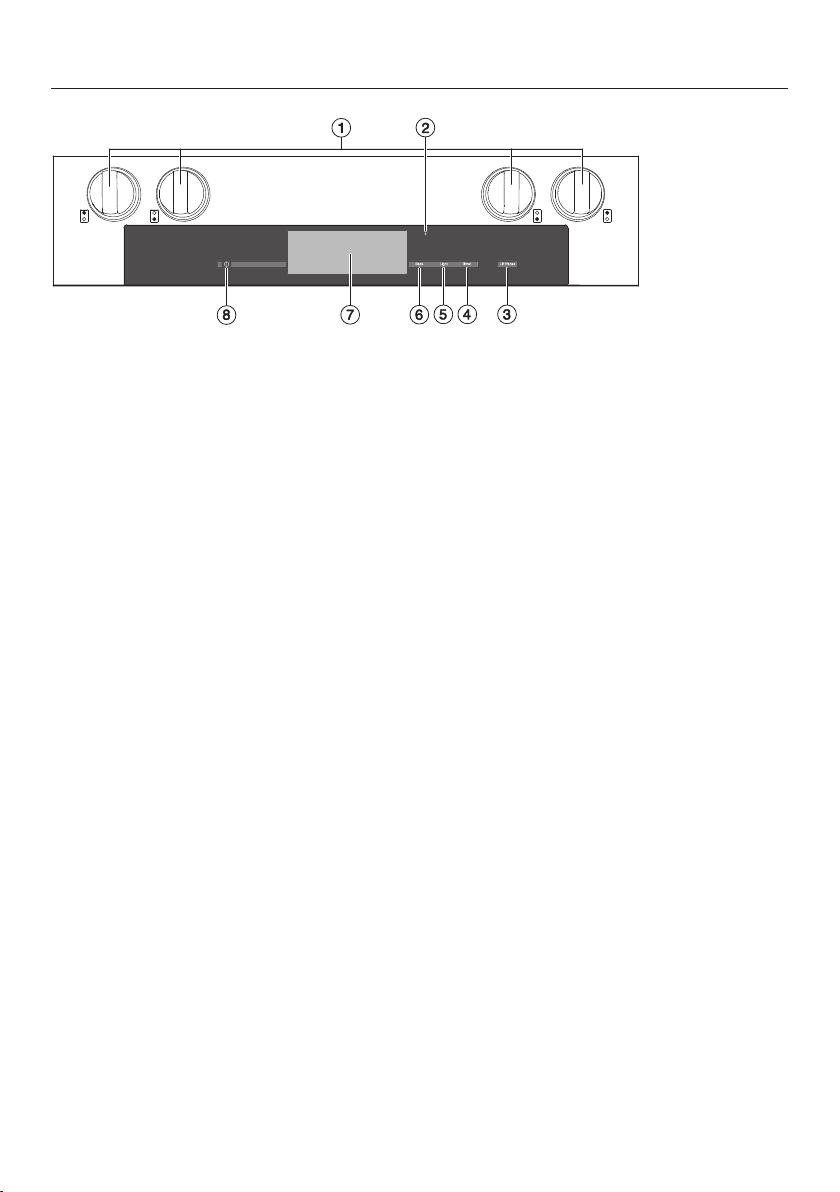
Control panel
a
Backlit burner control knobs
b
Optical interface
(for service technician use only)
c
"Lift Panel" sensor button
To lift up the control panel
d
"Timer" sensor button
To set the timer
e
"Light" sensor button
To turn the oven cavity lighting on
and off
f
"Back" sensor button
To go back one step at a time
g
Display
To display time of day and
informa
h
On / Off b
To turn the appliance on and off
tion for operation
utton in the cut-out
21

Control panel
Burner knob
With the burner knob, you can ignite the burner and regulate the flame. The
urners can be variably adjusted between the lowest and highest settings.
b
The burner knobs are backlit with an illuminated ring.
22

Control panel
Sensor buttons
The sensors react to touch. Each touch is confirmed with an audible tone. This
one can be turned off (see "Settings – Volume - Keypad tone").
t
Sensor
utton
b
Lift
panel
Timer For activating and
Light For turning the
Back To go back a step
Function Notes
For raising and
lowering the
contr
ol panel for
the oven
deactivating timer /
alarm
oven int
lighting on and off
erior
You can lift up and put down the control panel for
the oven automatically or manually (see "Settings
– Lift panel").
As soon as you start the self-cleaning cycle, the
lift panel goes down aut
If a list of options is shown in the display, or if a
cookin
g process is running, you can enter a timer
duration (e.g. when boiling eggs on the cooktop)
or an alarm time, i.e. a specific time, at any point
(see "Alarm + Timer").
If the time of day display is turned off, the "Timer"
sensor will no
If a menu appears in the display or if a cooking
pr
ocess is running, touching "Light" will turn the
interior light on or off.
If the time of day display is turned off, the "Light"
sensor will no
The oven interior lighting turns off after 15
seconds during a co
constantly turned on, depending on the setting
selected.
t react until the oven is turned on.
t react until the oven is turned on.
omatically.
oking process or remains
23
Control panel
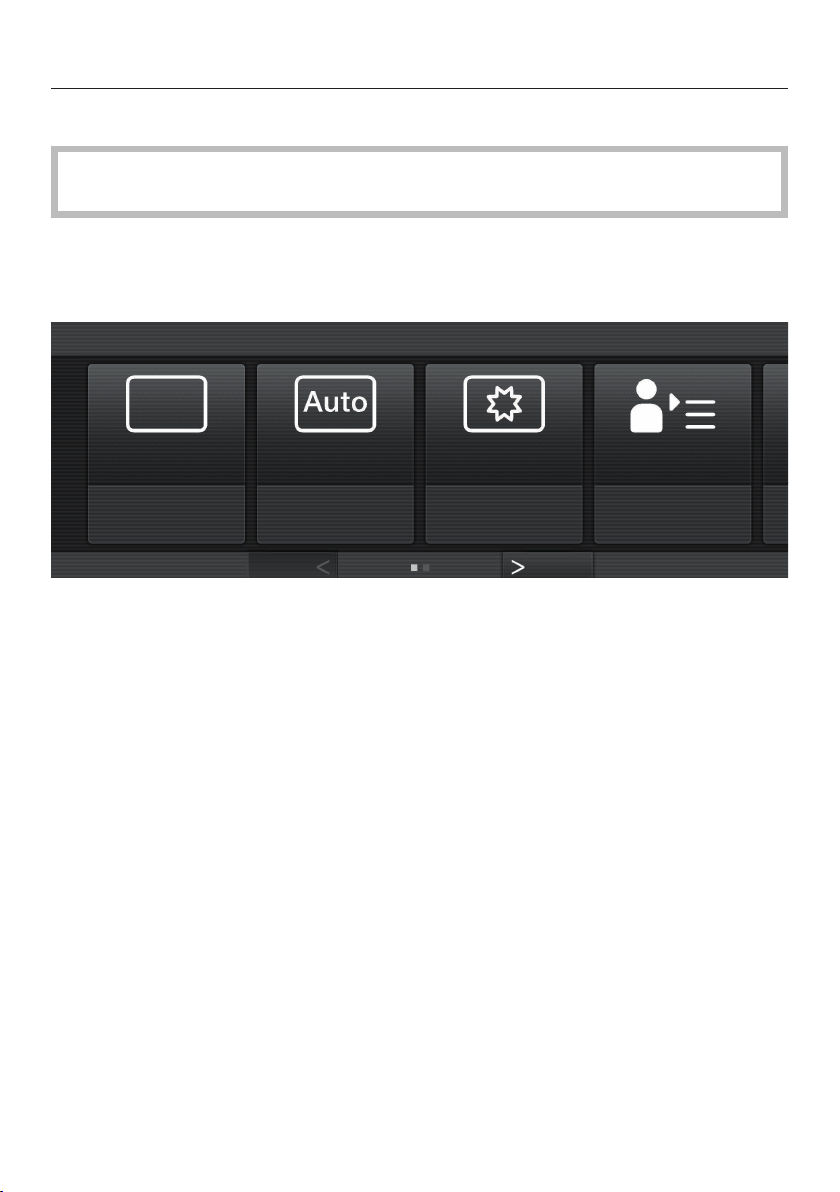
MyMiele
*
Operating
Modes
Gourmet Center
*
Special
Modes
*
Favorites
12:00
Main Menu
Main Menu 12:00
M Touch display
The touch screen can be scratched by hard objects, e.g. pens and pencils.
Only touch the display with your fingers.
Touching the display with your finger emits a small electrical charge, which in turn
trigg
ers an electrical pulse that is detected by the surface of the touch display.
The display is divided into three sections:
The top line shows what menu level you are currently in. Options within a menu
e separated by a vertical line. If there is not enough space to show the whole
ar
path, additional options are indicated by … . The Time of Day, Alarm and
Timer are shown in the top right-hand corner of the display.
The middle row shows the current menu and options. You can scroll to the right or
left by sw
The and arr
right. The number of small squares between the arrows indicates the number of
pages available and your position within the current menu.
24
iping your finger across the display.
ows at the bottom of the screen are used for scrolling to the left or

Symbols
The following symbols may appear in the display:
Symbol Description
Some settings, e.g. display brightness and buzzer volume, are
lected using a bar chart.
se
This symbol indicates that there is additional information and
a
dvice about using the oven. Select OK to access the
information.
The system lock or sensor lock is active (see "Settings - System
Lock "). The oven cannot be operated.
Alarm
Timer
Core temperature when using the wireless roast probe
Control panel
25

Control panel
Basic operation
Each time you touch a possible option, the corresponding field will light up amber.
Selecting or opening a menu
T
ouch the desired field to select it.
Scrolling
You can scroll left or right.
Swipe th
desired direction.
Or: Using your finger you can tap the and
Exiting a menu
T
ouch "Back", tap an option in the menu path at the top of the screen, or tap …
.
Depending on the current menu, this will take you back one level or return you to
the Main Menu.
e screen, i.e., place your finger on the touch display and move it in the
arrows to scroll left or right.
26

Control panel
Entering numbers
You can enter numbers by scrolling through the roller and touching the desired
value
, or by using the numerical keypad.
To enter numbers using the roller:
Swipe the r
To enter numbers using the numerical keypad:
T
ouch in the bottom right of the input field.
The numerical keypad appears.
oller up or down to select the desired number.
T
ouch the required numbers.
Once you have entered a valid value, the OK sensor will light up green.
The last figure entered can be deleted using the arrow.
ouch "OK".
T
Entering letters
Enter a name using a keyboard. Try to use short, concise names.
Selec
T
t the required letters or characters.
ouch Save.
27

Features
Model numbers
A list of the ovens described in these
ating instructions can be found on
oper
the back page.
Data plate
The data plate is behind the toe-kick.
oe-kick cover is attached to the
The t
base of the range by magnets so it can
be removed and put back again easily.
There you can find the model number,
the serial number and the connection
data (voltage/fr
load) for your range.
Have this information available when
cting Miele Technical Service.
conta
equency/maximum rated
Items included with this range
The following items are included with
this appliance:
– Installation instructions for the range
– The operating instructions for the
r
ange:
Standard and optional accessories
Accessories vary depending on
model. All o
shelf runners, a universal tray and a
wire oven rack. Depending on the
model, your oven may also come with
the additional accessories listed.
All accessories and cleaning and care
pr
oducts in these instructions are
designed to be used with Miele ovens.
They can be ordered from the
Miel
eusa.com website or Miele.
When ordering, please have ready the
model number of your oven and of the
desir
ed accessories.
vens are supplied with
– Gas Cooktop
– Convection Oven
– An anti-tip device, including screws
for fast
– Various accessories
28
ening the range
Features
Shelf runners
The shelf runners are located on the
right and left-hand sides of the oven
with the leve
The shelf level numbers are indicated
on the fr
Each level consists of a strut on which
you can
example.
The runners can be removed for
cleaning purposes. See "Cleaning and
C
are".
ls for inserting accessories.
ont of the oven frame.
place the wire oven rack, for
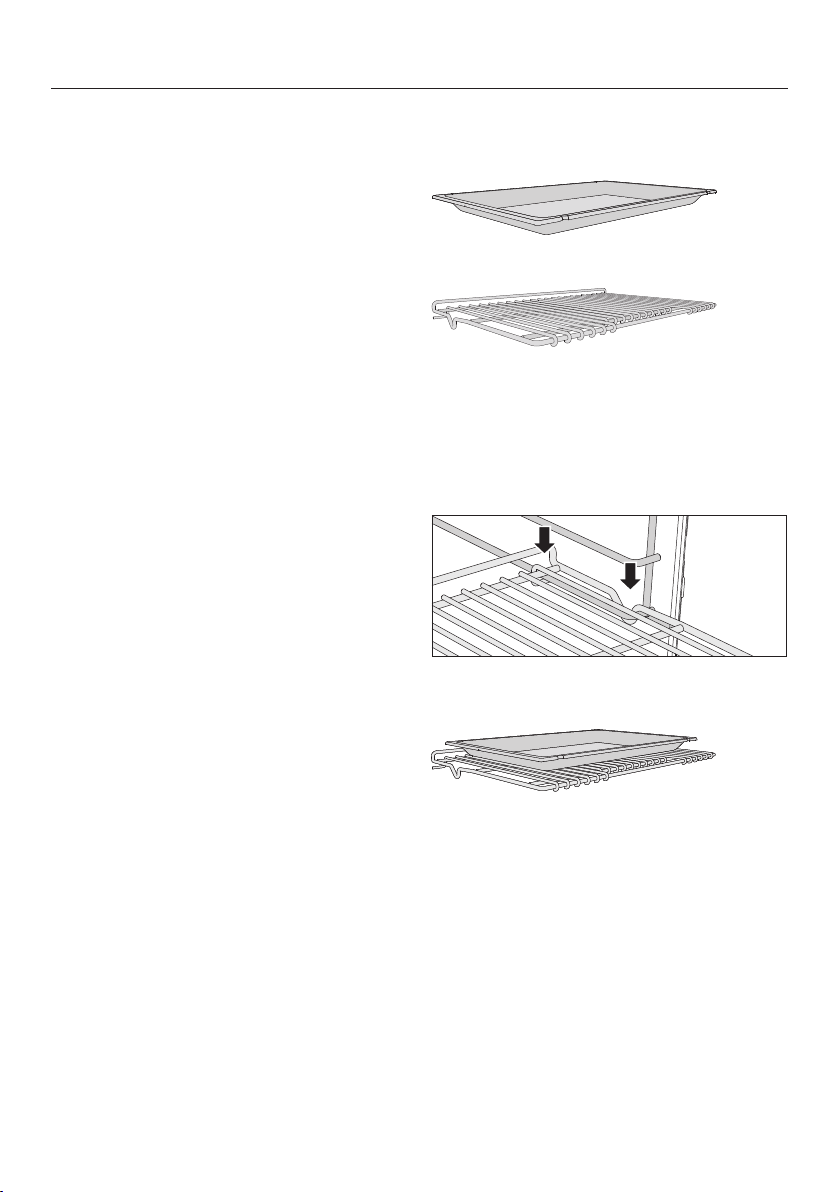
Universal tray and Wire oven rack
Universal tray HUBB30-1
Wire oven rack HBBR30-2
Non-tip safety notches are located on
the shor
accessories.These prevent the trays
being pulled completely out of the side
runners when you only wish to pull
them out partially.
Always place the wire oven rack on the
runner with the notch facing down.
ter sides of these
When using the universal tray, place it
ectly on the wire oven rack.
dir
29
Features
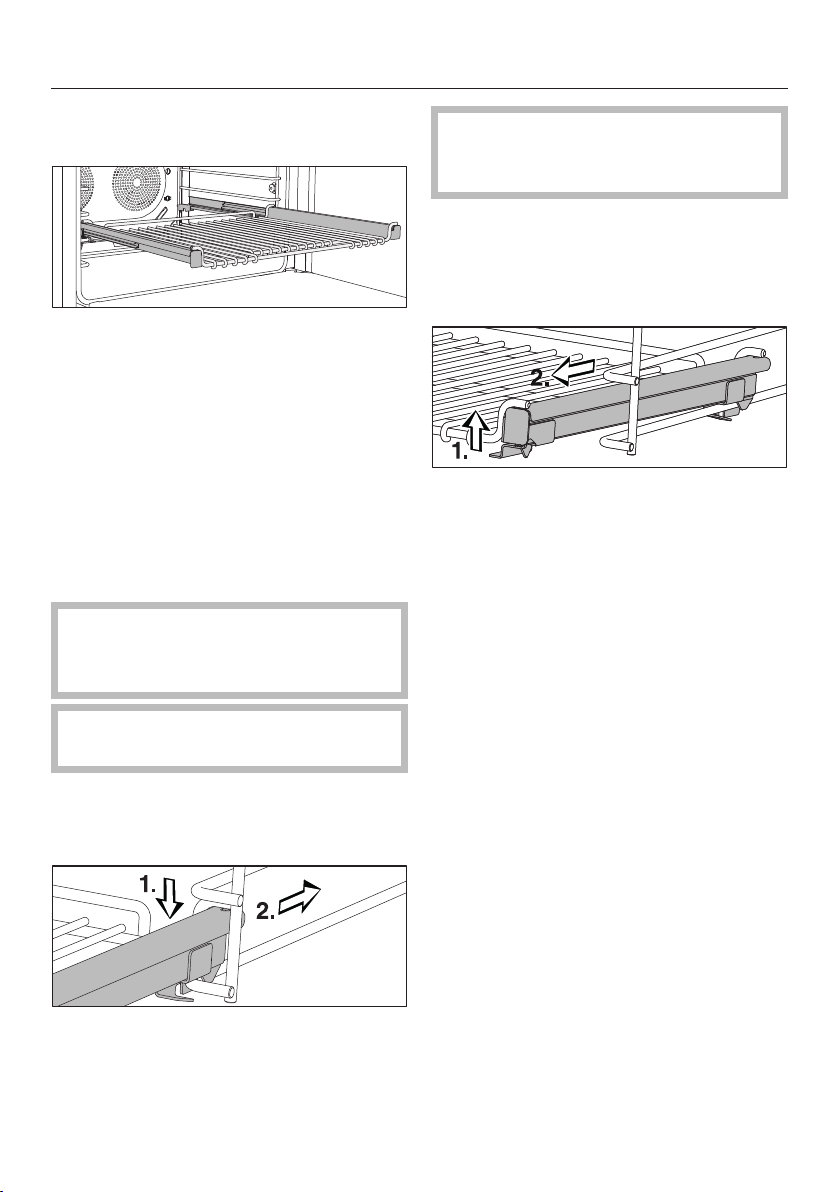
FlexiClips with wire rack
HFCBBR30-2
The FlexiClips with wire rack can be
nted on any shelf level and pulled
mou
completely out of the oven This allows
you to see the food easily.
The FlexiClips with wire rack is pushed
in and
The rack can hold a maximum of 33 lbs
(15 kg).
Installing and removing the FlexiClips
with
then locked onto a level.
wire rack
Danger of burns! Mak
heating elements are turned off and
that the oven cavity is cool.
e sure the
If the FlexiClips with wire rack jams
when sliding it onto the level, pull it
out using some force and reinsert.
To removing the FlexiClips with wire
r
ack:
P
ush the FlexiClips with wire rack in
all the way.
Usin
g both hands lift the front of the
FlexiClips with wire rack on both
sides (1.) and pull it out of the level
(2.).
Using the universal tray
When usin
it directly on the FlexiClips with wire
rack.
g the universal tray, place
Do not pull the Fl
during installation or removal.
ld the FlexiClips with wire rack
Ho
with both hands and position it in
front of the desired level.
Inser
30
t the FlexiClips with wire rack
onto the level (1.) and slide it along
the struts of the level (2.) until it clicks
into place.
exiClips apart
 Loading...