

Page 1
Operating Instructions
30Inch Dual Fuel Range
(electric oven and gas cooktop)
To prevent accidents and damage to the range, you must read all
instructions supplied before installing or using the appliance.
en-US, CA M.-Nr. 11 919 010
Page 2
IMPORTANT SAFETY INSTRUCTIONS
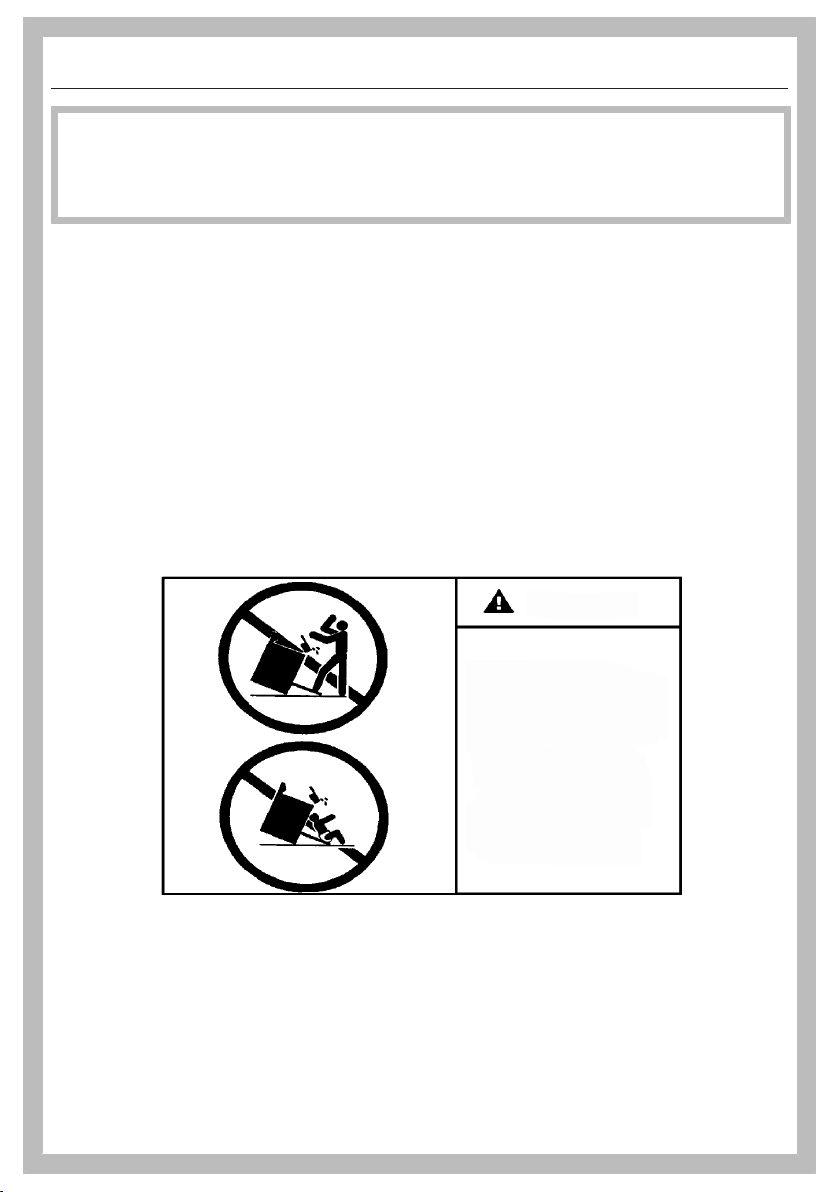
All ranges can tip
Injury to persons
could result
Install anti-tip devices
packed with range
See installation
instructions
WARNING
WARNING
Children and adults can tip over the range if has not been secured.
This may lead to fatal injuries.
This range must be secured and connected using the anti-tip
device according to the installation instructions.
If you have moved the range, slide the locking latch onto the anti-
tip device until you feel it lock into place.
Do not use the range if the anti-tip device has not been properly
installed and engaged.
Failure to observe the information contained in the installation
instructions can lead to serious or fatal injuries for children and
adults.
2
Page 3
IMPORTANT SAFETY INSTRUCTIONS
®
®
WARNING: If the information in this manual is not followed exactly, a fire or
explosion may result causing property damage, personal injury, or death.
- Do not use or store gasoline or other combustible liquids or vapors in the
vicinity of this or any other appliance.
- WHAT TO DO IF YOU SMELL GAS
– Do not try to light any appliance.
– Do not touch any electric switches.
– Do not use any phones inside your building.
– Immediately call your gas supplier from a neighbor's phone. Follow the gas
supplier's instructions.
– If you are unable to reach your gas provider, call the fire department.
- Installation and service must be performed by a qualified installer, qualified
service agency or your gas provider.
(In Massachusetts, installation must be performed by a licensed installer / gas
fitter.)
- Note to the installer:
Please give these installation instructions to the consumer for the local
electrical/gas inspector.
3
Page 4

Contents
IMPORTANT SAFETY INSTRUCTIONS ............................................................ 2
IMPORTANT SAFETY INSTRUCTIONS ............................................................ 8
Guide to the range............................................................................................. 23
Gas cooktop........................................................................................................ 23
Oven .................................................................................................................... 24
Controls for the range....................................................................................... 25
Controls for the gas cooktop............................................................................... 25
Oven controls ...................................................................................................... 27
On/Off button ................................................................................................. 28
Proximity sensor (MotionReact) ..................................................................... 28
Sensor buttons............................................................................................... 29
Touch display ................................................................................................. 30
Symbols ......................................................................................................... 31
Using the appliance........................................................................................... 32
Selecting a menu option ..................................................................................... 32
Scrolling............................................................................................................... 32
Exiting a menu..................................................................................................... 32
Changing a value or setting................................................................................. 32
Changing a setting in a list............................................................................. 32
Entering numbers with the roller .................................................................... 32
Entering numbers using the numerical keypad.............................................. 32
Changing the setting with a segment bar ...................................................... 32
Entering letters .................................................................................................... 33
Displaying the context menu............................................................................... 33
Moving entries..................................................................................................... 33
Displaying the pull-down menu........................................................................... 33
Displaying Help ................................................................................................... 33
Activating MobileStart ......................................................................................... 33
Features.............................................................................................................. 34
Data plate ............................................................................................................ 34
Extra data plate .............................................................................................. 34
Scope of delivery................................................................................................. 34
Standard and optional accessories..................................................................... 34
Gas cooktop safety features ............................................................................... 38
Oven safety features ........................................................................................... 38
PerfectClean treated surfaces ............................................................................. 38
Self-Clean-ready accessories ............................................................................. 38
Before first use .................................................................................................. 39
Miele@home ........................................................................................................ 39
Basic settings...................................................................................................... 40
Cleaning the cooktop before heating it up for the first time................................ 41
Heating up the oven for the first time and rinsing the steam injection system ... 41
4
Page 5

Contents
Using the gas cooktop...................................................................................... 43
Energy-saving tips............................................................................................... 43
Suitable cookware............................................................................................... 43
Switching on the burner ...................................................................................... 44
Switching on during a power failure.................................................................... 44
Adjusting the flame.............................................................................................. 45
Switching off the burner ...................................................................................... 45
Using the oven................................................................................................... 46
Energy-saving tips............................................................................................... 46
Changing values and settings for a cooking program......................................... 48
Changing the temperature and core temperature.......................................... 48
Setting additional durations ........................................................................... 49
Changing set durations .................................................................................. 49
Deleting the set cooking durations................................................................. 49
Canceling a cooking program ............................................................................. 49
Preheating the oven ............................................................................................ 50
Booster........................................................................................................... 50
Preheat........................................................................................................... 51
Crisp function ...................................................................................................... 52
Changing the operating mode............................................................................. 52
Settings .............................................................................................................. 53
Settings overview ................................................................................................ 53
Opening the “Settings” menu.............................................................................. 56
Language ......................................................................................................... 56
Time..................................................................................................................... 56
Date ..................................................................................................................... 57
Lighting................................................................................................................ 57
Start screen ......................................................................................................... 57
Display................................................................................................................. 57
Volume................................................................................................................. 58
Units of Measurement ......................................................................................... 58
Booster................................................................................................................ 58
Recommended temperatures.............................................................................. 58
Self clean............................................................................................................. 59
Cooling fan run-on .............................................................................................. 59
Proximity sensor (MotionReact) .......................................................................... 59
Safety .................................................................................................................. 60
Miele@home ........................................................................................................ 60
Remote Control ................................................................................................... 61
Activating MobileStart.................................................................................... 61
SuperVision ......................................................................................................... 61
RemoteUpdate .................................................................................................... 62
Lift-up panel ........................................................................................................ 63
5
Page 6

Contents
Electrical version ................................................................................................. 63
Probe................................................................................................................... 63
Calibrate temperature.......................................................................................... 63
Software version.................................................................................................. 64
Legal information................................................................................................. 64
Showroom Program ............................................................................................ 64
Factory default..................................................................................................... 64
Operating hours (total)......................................................................................... 64
Alarm + Timer .................................................................................................... 65
Using the Alarmfunction..................................................................................... 65
Using the Timerfunction ..................................................................................... 66
Main and submenus .......................................................................................... 67
Moisture Plus ..................................................................................................... 69
Starting a cooking program with Moisture Plus.................................................. 70
Automatic Programs ......................................................................................... 72
Categories ........................................................................................................... 72
Using automatic programs.................................................................................. 72
Usage notes ........................................................................................................ 72
Search ................................................................................................................. 73
Special Modes ................................................................................................... 74
Defrost................................................................................................................. 74
Dehydrate............................................................................................................ 75
Warm-up Cookware ............................................................................................ 76
Proof.................................................................................................................... 76
Keep warm .......................................................................................................... 76
Slow Roasting ..................................................................................................... 77
Sabbath Program ................................................................................................ 80
Canning ............................................................................................................... 82
Frozen food/ready meals..................................................................................... 84
MyMiele .............................................................................................................. 85
Favorites............................................................................................................. 86
Baking................................................................................................................. 89
Tips for baking..................................................................................................... 89
Notes on the operating modes............................................................................ 90
Roasting ............................................................................................................. 91
Tips for roasting .................................................................................................. 91
Notes on the operating modes............................................................................ 92
Probe................................................................................................................... 93
Broiling ............................................................................................................... 96
Tips for broiling.................................................................................................... 96
Notes on the operating modes............................................................................ 97
Gas cooktop cleaning and care ....................................................................... 98
6
Page 7

Contents
Cleaning and care of the oven ......................................................................... 100
Unsuitable cleaning agents ................................................................................. 100
Removing normal soiling..................................................................................... 101
Removing stubborn soiling.................................................................................. 101
Cleaning the oven compartment with Self clean................................................. 102
Removing the door.............................................................................................. 105
Installing the door................................................................................................ 106
Side rack removal................................................................................................ 107
Frequently asked questions ............................................................................. 108
Customer Service.............................................................................................. 114
Contact in the event of a fault ............................................................................. 114
Data plate ............................................................................................................ 114
Appliance warranty and product registration ...................................................... 114
Caring for the environment .............................................................................. 115
Declaration of conformity................................................................................. 116
Copyrights and licenses ................................................................................... 117
Copyrights and licenses for the communication module.............................. 118
7
Page 8

IMPORTANT SAFETY INSTRUCTIONS
When using the Range, please comply with the basic safety requirements,
including the following instructions:
Read all instructions before installation and use of the Range to prevent
accidents and damage to the appliance.
This range complies with current safety requirements. However,
improper use of the appliance can result in personal injury or
damage to property.
Please read the installation instructions carefully before installing
and connecting the appliance.
Read the operating instructions before using the range for the first
time. To prevent accidents and damage to the appliance, always
observe both the installation instructions and operating
instructions. Both documents contain important information about
installation, safety, use and maintenance.
Miele cannot be held liable for damage occurring as a result of
non-compliance with the instructions.
Keep these installation instructions and operating instructions in a
safe place and pass them on to any future owner.
Appropriate use
This range is intended for domestic use and use in other similar
environments.
This appliance is not intended for outdoor use.
Use the range exclusively under normal domestic conditions:
- Use the oven for baking, roasting, broiling, defrosting, canning
and drying food.
- Use the cooktop to prepare food and keep it warm.
Any other use is not permitted.
Risk of Fire! Do not use this oven to store or dry combustible
materials.
Persons who lack physical, sensory or mental abilities, or
experience with the appliance should not use it without supervision
or instruction by a responsible person.
8
Page 9

IMPORTANT SAFETY INSTRUCTIONS
The oven compartment is equipped with special bulbs to cope
with particular conditions (e.g., temperature, moisture, chemical
resistance, abrasion resistance, and vibration). These special bulbs
must only be used for the purpose for which they are intended. They
are not suitable for room lighting.
Safety with children
Activate the system lock to ensure that children cannot switch on
the oven inadvertently.
Children should be supervised in the vicinity of the range. Never
allow children to play with the range.
Children must be kept away from the range unless they are
constantly supervised.
Risk of burns due to improper use. Do not allow children to
operate the range.
Burn Hazard - Do not allow children to use the oven. Failure to do
so can result in severe burns or serious injury.
Burn Hazard - Do not allow children to use the cooktop. Failure to
do so can result in severe burns or serious injury.
Risk of suffocation from packaging material. While playing, children
may become entangled in packaging material (such as plastic
wrapping) or pull it over their head, presenting the risk of suffocation.
Keep packaging material away from children.
Risk of injury caused by hot surfaces. Children’s skin is far more
sensitive to high temperatures than that of adults. External parts of the
oven such as the door glass, control panel, and the vent become quite hot.
Do not let children touch the oven when it is in operation.
Risk of injury caused by hot surfaces. Children’s skin is far more
sensitive to high temperatures than that of adults. The oven gets
much hotter during the Self Clean program than during normal use.
Do not let children touch the oven during the Self Clean program.
9
Page 10

IMPORTANT SAFETY INSTRUCTIONS
The cooktop gets hot when in use and remains hot for some time
after being turned off. Keep children away from the appliance until it
has cooled down and is no longer a burn hazard.
Burn hazard!
Keep the spaces above and behind the cooktop clear of any items
that could draw the attention of children. Otherwise, they can be
tempted into climbing onto the appliance.
Risk of injury from the open door. The oven door can support a
maximum weight of 33lbs (15kg). Children could injure themselves
on an open door.
Do not let children sit on the door, lean against it, or swing on it.
Risk of burning or scalding.
Turn pot and pan handles inward, so children cannot pull them down
and be burned.
Technical safety
This appliance must be installed and connected in compliance
with the installation instructions.
Unauthorized installation, maintenance, and repairs can cause
considerable danger for the user. Installation, maintenance, and
repairs should only be carried out by a Miele authorized technician.
Do not carry or lift the range by the oven door handle or the
control panel!
Changes or modifications not expressly approved by Miele may
void the user's authority to operate the oven.
Maintenance by the user: Never repair or replace any part of the
appliance unless the instructions specifically recommend doing so.
Service work should only be performed by a qualified technician.
A damaged range can be dangerous. Always check for visible
signs of damage. Never use a damaged appliance.
10
Page 11

IMPORTANT SAFETY INSTRUCTIONS
Temporary or permanent operation on an autonomous power supply
system or a power supply system that is not synchronized with the grid
power supply (e.g., island networks, back-up systems) is possible. A
prerequisite for operation is that the power supply system complies
with national and local codes.
The function and operation of the protective measures provided in the
domestic electrical installation and in this Miele product must also be
maintained in isolated operation or in operation that is not synchronized
with the grid power supply, or these measures must be replaced by
equivalent measures in the installation.
The electrical safety of the range can only be guaranteed when it
is properly grounded. Compliance with this essential safety
requirement is absolutely mandatory. If in any doubt, please have the
building's wiring system inspected by a qualified electrician.
Proper installation: Make sure that your appliance has been installed
correctly and that it has been grounded by a qualified technician.
To avoid damaging the range, make sure that the connection data
(voltage and frequency) on the data plate correspond to the
building's power supply before connecting the appliance.
When in doubt, consult a qualified electrician.
Installation and maintenance of the gas connection must be
performed by qualified installers, service agencies or gas providers.
During installation, maintenance and repair work, e.g. if the oven
lighting is broken, the range must be completely disconnected from the
power supply (see “Frequently asked questions”). The gas inlet valve
must be closed. It is only completely isolated from the supply when:
- The circuit breakers have been switched off, or
- the fuses of the electrical installation have been completely
removed, or
- the plug (if present) is removed from the outlet. To do this, pull the
plug not the cord.
-
Shut off the gas supply and disconnect the range from the gas
supply. Installation and maintenance of the gas connection must be
performed by qualified installers, service agencies or gas providers.
11
Page 12

IMPORTANT SAFETY INSTRUCTIONS
Do not use a power strip or extension cord to connect the range
to electricity. These are a fire hazard and do not guarantee the
required level of appliance safety.
For safety reasons, only use the range when it has been fully installed.
This range must not be installed and operated in non-stationary
installations (e.g., on a ship).
Risk of injury due to electric shock. Any contact with live
connections or tampering with the electrical or mechanical
components of the range will endanger your safety and may lead to
appliance malfunctions.
Do not open the range housing under any circumstances.
Any repairs not performed by a Miele authorized service
technician will void the warranty.
Miele can only guarantee the safety of the appliance when original
Miele parts are used. Faulty components must only be replaced with
genuine Miele parts.
If the power cord is damaged, it must be replaced with a special
power cord by a Miele authorized technician (see “Installation –
Electrical connection”).
Danger of electric shock.
If the cooktop is defective, immediately turn the appliance off and
discontinue use. Disconnect it from the electricity and gas supply.
Contact Customer Service.
The range requires a sufficient supply of cool air for efficient operation.
Make sure that the supply of cool air is not hindered in any way (e.g., by
installing heat insulation strips in the cabinet niche). In addition, the required
supply of cool air must not be excessively heated by other heat sources.
Reaching over a hot cooktop to access the cabinets can result in
burns. You can reduce the risk of burns by installing a range hood
that extends at least 4 3/4" (12 cm) past the bottom of the cabinets.
The water shut-off valves must be accessible when the appliance
is installed.
12
Page 13

IMPORTANT SAFETY INSTRUCTIONS
The protective sleeve of the water intake hose must not be
damaged or become kinked.
The integrated water protection system offers protection from
water damage, provided the following conditions are met:
- The appliance is properly installed (electric and water).
- A damaged appliance is dangerous. Contact Miele to have it
repaired immediately.
- Turn off the water supply when the appliance is not in use for an
extended period (e.g., vacation).
The water quality must conform to the requirements for drinking
water in the country in which the oven is being used.
Correct use
Caution: Heating elements may be hot even though they are not
glowing. Interior surfaces of an oven become hot enough to cause
burns. External parts of the oven such as the door glass, vents, and
the control panel can become hot. During and after use, do not
touch, or let clothing or other flammable materials come into contact
with heating elements or interior surfaces of the oven until they have
had sufficient time to cool.
Do not let food sit in the oven for an extended period of time before
or after cooking. Doing so can result in food poisoning or sickness.
Loose fitting or hanging garments present a fire hazard. Wear
proper apparel while operating the appliance.
Use only dry, heat-resistant potholders. Moist or damp potholders used
on hot surfaces may result in steam burns. Do not let potholders come in
contact with oil or grease. Do not substitute dish towels or other bulky
items for potholders. Do not let potholders touch hot heating elements.
Open the door carefully to allow hot air or steam to escape before
placing or removing food.
To prevent burns, always place oven racks at their desired height
while the oven is cool. If the rack must be moved while the oven is
hot, do not let pot holders touch hot heating elements.
13
Page 14

IMPORTANT SAFETY INSTRUCTIONS
To prevent burns, allow the heating elements to cool before
cleaning by hand.
Smother the fire or flames, or use a dry chemical extinguishing
agent or foam fire extinguisher.
Never store flammable liquids and materials in, above or under an
oven, or near cooking surfaces.
WARNING
NEVER use this appliance as a space heater to heat or warm the
room. Doing so may result in carbon monoxide poisoning and
overheating of the oven.
WARNING
NEVER use this appliance as storage space. Doing so may result
in carbon monoxide poisoning and overheating of the oven.
WARNING
NEVER cover any slots, holes or openings in the oven bottom or cover
an entire rack with materials such as aluminum foil. Doing so blocks air
flow through the oven and may cause carbon monoxide poisoning.
Aluminum foil linings may also trap heat, causing a fire hazard.
Do not obstruct the flow of combustion and ventilation air.
This oven must only be used for cooking food. Corrosive
chemicals and vapors as well as fumes, vapors or heat given off by
glues, plastics or flammable liquids and materials could be
hazardous. Do not use it as a dryer, kiln, dehumidifier, etc.
Do not let metal objects (aluminum foil, pans) come in contact
with the heating element.
Make certain that the power cords of small appliances do not
come in contact with or get caught in the oven door.
14
Page 15

IMPORTANT SAFETY INSTRUCTIONS
When baking frozen pizzas or pies, place them on the wire rack
lined with parchment paper. Do not use the baking tray or the
roasting pan for frozen foods with a large surface area. The tray or
pan could become warped and difficult to remove from the oven
when hot. Frozen foods like french fries, chicken nuggets, etc. can
be baked on the baking tray.
Risk of injury caused by hot surfaces. The oven gets hot during
operation. You could burn yourself on the heating elements, oven
compartment, accessories, or food.
When the oven is hot, use pot holders to insert, remove, or turn food,
as well as when adjusting the oven shelves, etc.
To avoid fueling any flames, do not open the oven door if smoke
appears inside the appliance. Interrupt the process by turning the
appliance off and disconnecting it from the power. Do not open the
door until the smoke has dissipated.
The high temperatures radiated could cause objects near the oven
to catch fire.
Do not use the oven to heat the room.
Oils and fats are a fire hazard if allowed to overheat. Never leave
the oven unattended when cooking with oil or fats. Never attempt to
put out oil or fat fires with water. Turn the oven off and extinguish the
flames by leaving the door closed.
Do not use water on cooktop grease fires. Turn the cooktop off.
Smother or use a dry chemical or foam-type extinguisher on any fire
or flame.
Broiling food for excessively long cooking durations can cause it
to dry out with the risk of catching fire. Do not exceed the
recommended cooking durations.
Some foods dry out very quickly and can be ignited by high
broiling temperatures. Do not use broiling modes for crisping rolls or
bread, or to dry flowers or herbs. Instead use the Convection Bake/
Convection Roast or Surround modes.
15
Page 16

IMPORTANT SAFETY INSTRUCTIONS
If using alcohol in your recipes, please be aware that high
temperatures can cause the alcohol to evaporate. The vapor can
catch fire on hot heating elements.
Plastic or aluminum foil cookware melts at high temperatures and
can damage the range or start to burn. Do not use any plastic or
aluminum foil cookware.
Exception: You can use oven-safe plastic cookware in the oven.
Heed the cookware manufacturer's instructions.
When using residual heat to keep food warm, corrosion from high air
humidity and condensation can occur in the oven. This can cause
damage to the control panel, countertop, and cabinet carcase. Keep
the oven on and select the lowest temperature available for the selected
operating mode. The cooling fan will then continue to run automatically.
Food which is stored in the oven compartment or left in it to be kept
warm can dry out and the moisture released can lead to corrosion damage
in the oven. Always cover food that is left in the oven to keep warm.
A buildup of heat can cause the enamel on the floor of the oven to
crack or flake off.
Never line the floor of the oven with aluminum foil or oven liners.
If you wish to place dishware on the floor of the oven during the
cooking process, or place dishware on the floor of the oven to heat it
up, you can do so, but only with the Convection Bake/Convection
Roastoperating mode, without the Boosterfunction.
The oven floor can become damaged by items being pushed
around on it. When placing pots, pans, or dishware on the oven floor,
do not push them around.
Risk of injury caused by steam. Pouring a cold liquid onto a hot
surface creates steam, which can cause severe scalding. The
sudden temperature change can also cause damage to hot surfaces.
Never pour cold liquids directly onto hot enameled surfaces.
Risk of injury caused by steam. During cooking processes with
moisture injection and during the residual moisture evaporation
process, steam is produced, which can lead to severe scalding.
Never open the door when bursts of steam are being injected.
16
Page 17

IMPORTANT SAFETY INSTRUCTIONS
It is important that the temperature in the food being cooked is
evenly distributed and sufficiently high. You can ensure this by
stirring or turning the food.
Canning food and heating it up in closed containers results in an
increase in pressure which can cause them to explode. Do not use
cans for canning or reheating food.
Risk of injury from the open door. You could bang into the open
door or trip over it. Do not leave the door open unnecessarily.
The door can support a maximum load of 33lbs (15kg). Do not
lean or sit on an open door, or place heavy items on it. Make sure
that nothing gets trapped between the door and the oven
compartment. This could damage the oven.
The flames could set the grease filters of a ventilation hood on fire.
Do not flambé under a ventilation hood.
Never heat empty cookware.
If the cooktop is covered, there is a risk that the material of the
cover will ignite, explode or melt if the cooktop is still hot or if turned
on inadvertently. Never cover the cooktop with a board, cloth or
protective sheet.
When using an electric appliance, e.g. a hand mixer, near the
cooktop, make sure that the power cable does not come into contact
with the hot cooktop. The cable's insulation could become damaged.
The cooktop gets hot when in use and remains hot for some time
after being turned off. Do not touch the appliance if there is a
possibility that it could still be hot.
When the appliance is turned on inadvertently or by mistake, or
when there is residual heat present, there is a risk of the metal items
heating up. Other materials can melt or catch fire when the appliance
is switched on. Do not store items on the cooktop.
Metallic objects such as knives, forks, spoons and lids should not
be placed on the cooktop surface since they can get hot.
17
Page 18

IMPORTANT SAFETY INSTRUCTIONS
Wet sponges or clothes can cause burns due to hot steam if they
are used to wipe spilled food off a hot burner. Some cleansers can
emit hazardous vapors if they are applied to a hot surface. Be careful
when cleaning the cooktop.
Spilled food can cause odors and the spraying of grease, which
can ignite on the cooktop. Never leave the cooktop unsupervised at
high power.
If the handles of a pot or pan extend across an adjacent burner,
this can cause burns, the ignition of flammable materials and the
spilling of food due to inadvertent contact with the cookware. Turn
the pot or pan so that the handles point toward the inside and do not
extend across an adjacent burner.
Ensure that the igniters are clean and dry to allow the burners to
ignite and burn properly.
A range hood installed above the cooktop can become damaged
or catch fire as a result of intense heat. Do not use the gas burners
without cookware.
Only light the gas burners after all burner parts have been properly
assembled.
If the cookware is too small, it will not sit properly on the burner
grate. If the cookware is too large, heat emitted from the bottom of
the cookware may damage the countertop, walls with poor heatresistance (e.g. paneled walls) or portions of the cooktop.
Make sure that the burner flames do not extend beyond the
bottom of the cookware and rise up its sides.
Only use cookware with a thick enough bottom. Failure to do so
may result in damage to the cooktop.
Always use the burner grates supplied with the cooktop. Never
place cookware directly on the burner.
Install the burner grates in an upright position to avoid scratching
the cooktop.
Remove all grease splatters and other flammable (food) residues
on the cooktop. They are a fire hazard.
18
Page 19

IMPORTANT SAFETY INSTRUCTIONS
Using of a gas cooktop causes heat, moisture and products of
combustion to build up in the room in which it is installed. Make sure
that your kitchen is well ventilated, especially when the appliance is
in use: keep any natural means of ventilation open or install a
mechanical ventilation system (e.g. a ventilation hood).
If the cooktop is used for very long periods of time, additional
ventilation of the room may be necessary, e.g. by opening windows
or doors, or running the ventilation on the highest setting.
Do not use pots or pans that are large enough to cover several
burners. The resulting heat buildup can damage the appliance.
If the cooktop has not been used for a long period of time, be sure
to thoroughly clean it and have it inspected by an authorized
technician before using it again.
When you have finished cooking, make sure that the burners and
oven are turned off by checking the position of the knobs.
Only certain types of glass, ceramic or other enamel cookware
can be used on a gas cooktop without breaking as a result of
sudden temperature changes.
Ask your installer to show you the location of your gas shutoff
valve and fuses or circuit breaker panel in your apartment or home.
Be sure that you know how and where to disconnect the gas and
power supply to your cooktop.
The grates, burner cap, bottom parts of the burner, and any other
parts located near the burner flame, can still be very hot after
cooking and cause burns. Do not touch these components when
using the cooktop.
Wind can blow curtains over the cooktop, causing them to catch
fire. If the cooktop is installed near a window, do not use long
curtains.
Not any cookware of glass, glass ceramic, ceramic, clay or other
glass cookware is suitable for use on a burner. It can be damaged
due to sudden temperature change.
19
Page 20

IMPORTANT SAFETY INSTRUCTIONS
The wireless roast probe antenna on the top right of the oven
interior is at risk of damage when sliding in accessories. When
sliding in accessories, take care not to bang them against the
wireless roast probe.
The wireless roast probe antenna on the top right of the oven
interior is at risk of damage when sliding the FlexiClips with wire rack
in at level6. Only use the FlexiClips with wire rack at levels 1 to 5.
The following applies to stainless steel surfaces:
Adhesives will damage the coated stainless steel surface and cause
it to lose its dirt-repellent protective coating. Do not use sticky notes,
adhesive tape, or other types of adhesive on the stainless steel surface.
Magnets can cause scratches. Do not use the stainless steel
surface as a magnetic notice board.
Cleaning and care
Only clean parts listed in these operating and installation instructions.
There is a delicate fiberglass seal around front of the oven
compartment provide a seal for the glass on the inside of the oven
door. This can be damaged by rubbing or scouring. If possible,
refrain from cleaning this.
Do not use oven cleaners. Do not use standard oven cleaners in
the oven compartment or on the front of the oven. Never line the
oven with oven liners.
Risk of injury due to electric shock. The steam from a steam
cleaning appliance could reach live electrical components and cause
a short circuit. Never use a steam cleaner for cleaning.
Scratches on the door glass can cause the glass to break. Do not
use abrasive cleaners, hard sponges, brushes, or sharp metal tools
to clean the door glass.
The side runners can be removed (see “Cleaning and care of the
oven – Removing the side runners”). Reinstall the side runners correctly.
20
Page 21

IMPORTANT SAFETY INSTRUCTIONS
Coarse soiling in the oven compartment can cause thick smoke to
develop. Remove coarse soiling from the oven compartment before
running the Self Clean program.
Risk of injury caused by hazardous steam. During the Self Clean
program, steam can be released.
During the Self Clean program, do not stay in the kitchen for longer
periods of time and do not let children and pets enter the kitchen. It
is important to ensure that the kitchen is well ventilated during the
Self Clean program. Close doors to other rooms to prevent the odor
spreading throughout the house.
In warm, moist environments, there is a higher probability of pest
infestations. Ensure the oven and the area surrounding it are always
kept clean.
Damage caused by pests is not covered by the warranty.
Accessories
Only use original Miele accessories. Using parts or accessories
from other manufacturers will invalidate the warranty, and Miele
cannot accept liability.
Only use the Miele probe supplied with the appliance. If it is faulty,
it must be replaced with a new original Miele probe.
The plastic on the probe can melt at very high temperatures. Do
not use the probe when using the broiling operating modes. Do not
store the probe in the oven compartment when it is not being used.
Accessories that are not suitable for the Self Clean program will
be damaged by the high temperatures. Remove all accessories that
are not suitable for the Self Clean program from the oven
compartment before starting the Self Clean process. This also
applies to optional accessories that are not suitable for the Self
Clean program (see “Cleaning and care of the oven”).
21
Page 22

IMPORTANT SAFETY INSTRUCTIONS
Preparing for a long period of absence
If you turn off your domestic water connection when you’re going
to be away for a long period of time, please note that this may not be
enough to prevent water damage. To eliminate the risk of water
damage, close the faucet at each individual appliance.
KEEP THE OPERATING AND INSTALLATION INSTRUCTIONS IN A SAFE
PLACE AND REVIEW THEM PERIODICALLY.
22
Page 23
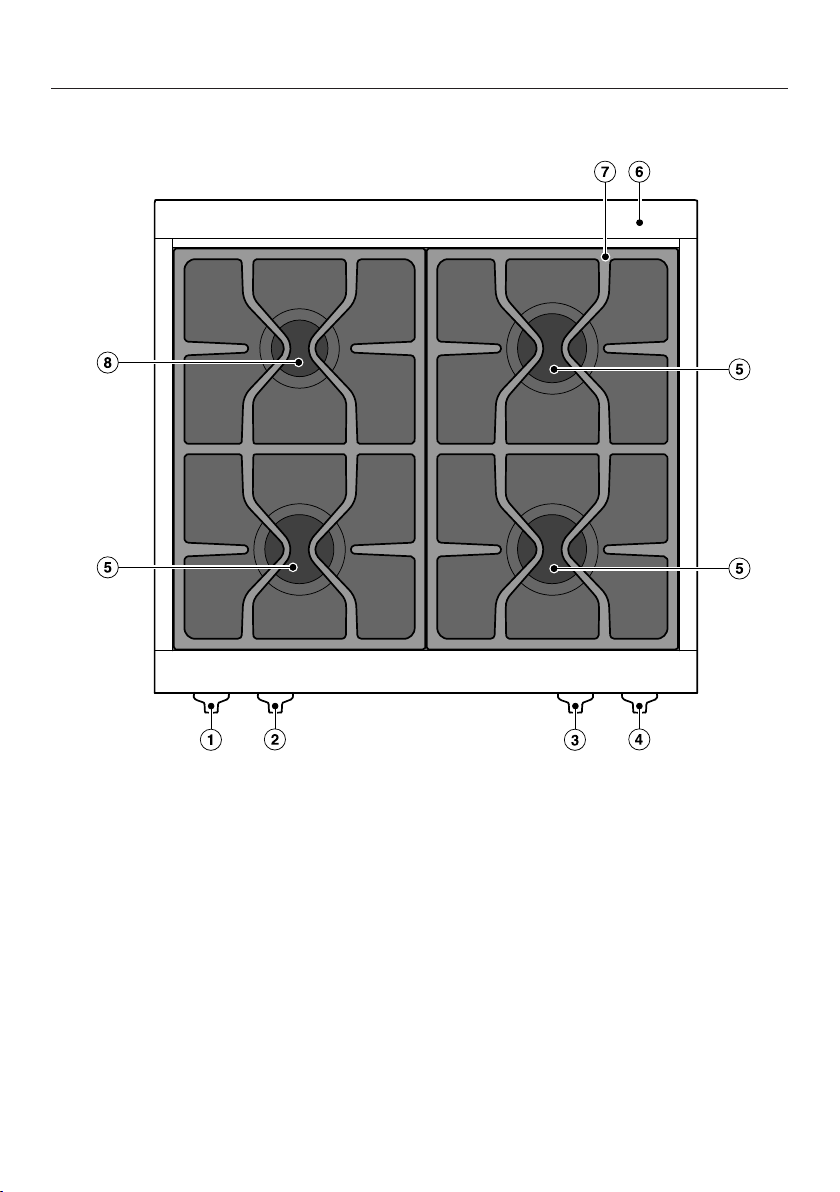
Gas cooktop
Guide to the range
a
Control knob
Rear left burner
b
Control knob
Front left burner
c
Control knob
Front right burner
d
Control knob
Rear right burner
e
Extra large burner
f
Island trim
g
Grates
h
Power burner
23
Page 24
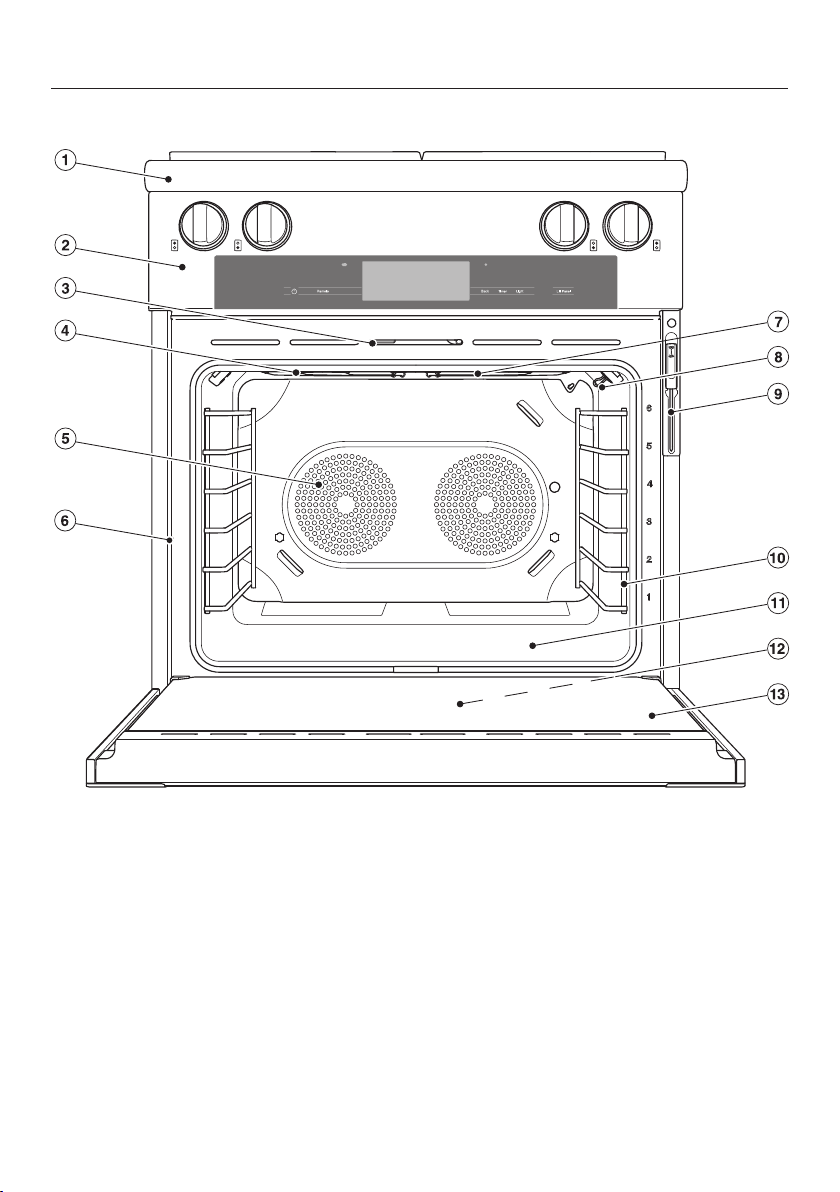
Guide to the range
Oven
a
Gas cooktop
b
Controls
c
Door lock
d
Steam inlet openings
e
Air inlets for the blowers with ring
heating elements behind them
f
Extra data plate
For connecting the oven to your WiFi
g
Browning/Broiling element
h
Wireless precision probe antenna
24
i
Wireless precision probe
j
Side runners with 6shelf levels
k
Oven floor with bottom heat element
underneath it
l
Data plate
The data plate is located behind the
toe-kick panel
m
Door
Page 25
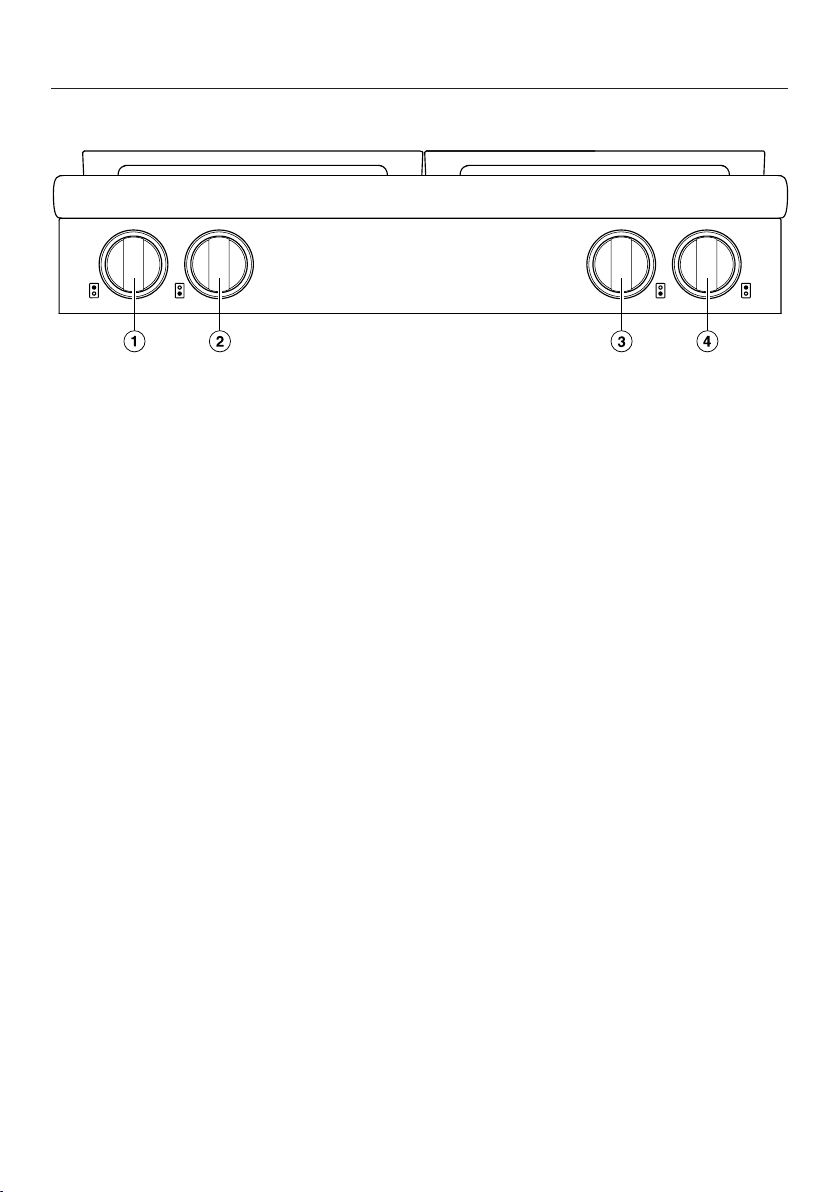
Controls for the gas cooktop
a
Control knob
Rear left burner
b
Control knob
Front left burner
c
Control knob
Front right burner
d
Control knob
Rear right burner
Controls for the range
25
Page 26

Controls for the range
The knobs are illuminated with a light ring.
The control knob for each burner is used to ignite the burner and regulate the
strength of the flame. The burners can be variably adjusted between the lowest
and highest flame settings.
Control knobs for normal and power burners
Label Description
Off Gas supply off: burner off
High Strongest flame setting:
Maximum power of upper and lower flame rings
Simmer Weakest flame setting:
Upper flame ring off
Minimum power of lower flame ring
26
Page 27
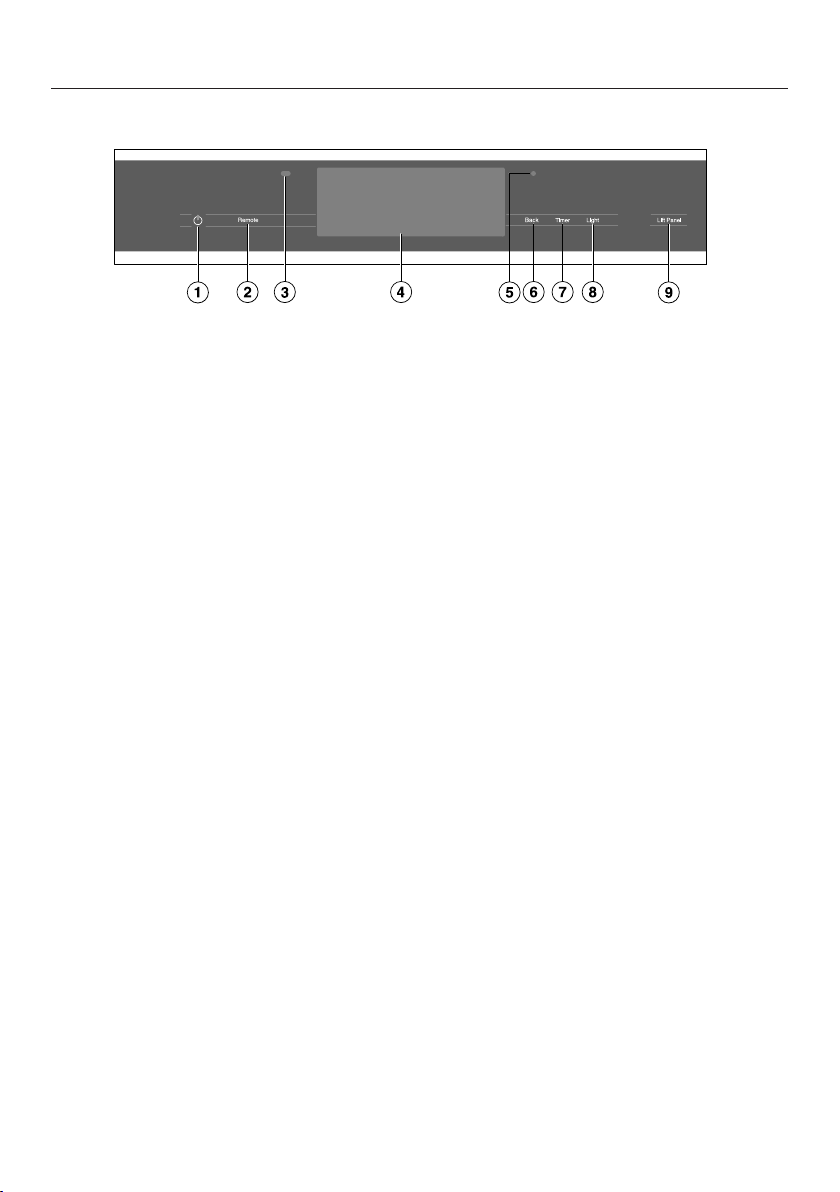
Oven controls
Controls for the range
a
Recessed On/Off button
For turning the oven on and off
b
Remotesensor button
For controlling the oven via your
mobile device
c
Proximity sensor (MotionReact)
For turning on the oven interior
lighting and the display when
approached, and to dismiss the
audible signal when movement is
detected
d
Touch display
For displaying information and for
operation
e
Optical interface
(for Miele Service only)
f
Backsensor button
To go back a step
g
Timersensor button
To activate or deactivate timers or
alarms
h
Lightsensor button
For switching the oven interior
lighting on and off
i
Lift Panelsensor button
For raising and lowering the control
panel
27
Page 28

Controls for the range
On/Off button
The On/Off button is recessed and
reacts to touch.
Use this button to turn the oven on and
off.
Proximity sensor (MotionReact)
The proximity sensor is located under
the touch display next to the
Backsensor button. The proximity
sensor detects when you approach the
touch display, e.g., with your hand or
body.
If you have activated the corresponding
settings, you can turn on the oven
interior lighting, turn on the oven, or
acknowledge the audible signals (see
“Settings – Proximity sensor
(MotionReact)”).
28
Page 29

Controls for the range
Sensor buttons
The sensor buttons react to touch. Every tap of a sensor button is confirmed with
an audible keypad tone. You can turn this keypad tone off by selecting theVolume|
Keypad Tone| Offsetting.
If you want the sensor buttons to respond even when the oven is turned off,
select the Display| QuickTouch| Onsetting.
Sensor button Function
Remote If you want to control the oven from your mobile device, you
must have the Miele@home system, turn on the Remote Control
setting, and tap this sensor button. The sensor button then lights
up and the MobileStart function is available.
As long as this sensor button is illuminated, you can control the
oven via your mobile device (see “Settings – Miele@home”).
Back Depending on which menu you are in, this will take you back a
level or back to the main menu.
Timer If a menu appears on the display or if a cooking process is in
progress, you can use this sensor button to set a timer (e.g.,
when boiling eggs) or an alarm (a specific time) at any point (see
“Alarm + timer”).
Light Select this sensor button to turn the oven interior lighting on and
off.
Depending on the setting selected, the oven interior lighting
turns off after 15seconds or remains constantly turned on or off.
Lift Panel You can lift up and put down the control panel for the range
automatically or manually (see “Settings – Lift-up panel”).
The control panel closes automatically as soon as a Self Clean
program is started.
29
Page 30

Controls for the range
Operating
Modes
12:00
Automatic
Programs
Special
Modes
MyMiele
Touch display
The sensitive surface of the touch display can be scratched by pointed or sharp
objects, e.g., pens.
Only touch the display with your fingers.
Make sure that water cannot get behind the touch display.
The touch display is split into multiple areas.
The menu path appears on the left of the header. The individual menu options are
separated by a vertical line. … indicates that there are more menu options
available if the menu path can no longer be displayed because there is not enough
space on the display.
If you tap a menu name in the header, the display will switch to that menu. To
switch to the start screen, tap.
The time of day is shown on the right of the header. You can set the time of day by
tapping the display.
Additional symbols may also appear, e.g., SuperVision.
At the top of the header, there is an orange line where you can drag down the pulldown menu. This allows you to turn settings on or off during a cooking process.
The current menu and menu options are shown in the center of the display. You
can scroll to the right or left by swiping your finger across the display to the right
or left. Tap a menu option to select it (see “Using the appliance”).
The operation fields that appear in the footer vary according to the menu that is
selected; e.g.,Timer, Save or OK.
30
Page 31

Controls for the range
Symbols
The following symbols may appear on the display:
Symbol Meaning
This symbol indicates that there is additional information and
advice about using the appliance. Select OK to confirm the
information.
… This indicates that there are more menu options available, which
are not visible because there is not enough space on the display.
Alarm
Timer
Some settings, e.g., display brightness and signal tone volume,
are selected using a segment bar.
The system lock or sensor lock is on (see “Settings – Safety”).
The controls are locked.
Core temperature when using the probe
Remote control (only appears if you are in the Miele@home
system and have selected the Remote Control| Onsetting)
SuperVision (only appears if you are in the Miele@home system
and have selected the SuperVision| SuperVision display| Onsetting)
31
Page 32

Using the appliance
You operate the oven via the touch
display by tapping the menu option you
want.
Each time you tap a possible option,
the relevant characters (word and/or
symbol) will light up orange.
Fields for confirming an operating step
are highlighted in green (e.g., OK).
Selecting a menu option
Tap the field or value you want on the
display.
Scrolling
You can scroll left or right.
Swipe across the screen. To do this,
place your finger on the touch display
and swipe it in the desired direction.
The bar at the bottom shows you where
you are in the current menu.
Exiting a menu
Tap the Backsensor button or tap the
… symbol in the menu path.
Tap the symbol to switch to the
start screen.
Entries made before this which have not
been confirmed with OK will not be
saved.
Changing a value or setting
Changing a setting in a list
The current setting is highlighted in
orange.
Tap the desired setting.
The setting is now saved. This will take
you back to the previous menu.
Entering numbers with the roller
Swipe the roller up or down until the
desired value is displayed in the
center.
Confirm with OK.
The changed number is now saved.
Entering numbers using the numerical keypad
Tap on the value that is in the middle
of the numerical keypad.
The numerical keypad appears.
Tap the required numbers.
As soon as you enter a valid value, OK
will turn green.
Use the arrow to delete the last entered
number.
Confirm with OK.
The changed number is now saved.
Changing the setting with a segment bar
Some settings are represented by a
bar made up of segments.
If all of the segments are illuminated,
the maximum value is selected.
If none of the segments are illuminated
or if only one is, the minimum value is
selected or the setting is turned off
altogether (e.g., audible signals).
Tap the corresponding segment on
the segment bar to change the
setting.
Select On or Off to turn the setting on
or off.
Confirm your selection withOK.
The setting is now saved. This will take
you back to the previous menu.
32
Page 33

Using the appliance
Entering letters
Letters are entered using a display
keyboard. It is best to select short
names.
Tap the letters or characters you
want.
Tip: You can add a line break for longer
program names using the symbol.
TapSave.
The name is now saved.
Displaying the context menu
In some menus you can display a
context menu, e.g., to rename Favorites
or to move entries underMyMiele.
For example, tap a Favorite and keep
your finger on it until the context
menu opens.
To close the context menu, tap an
area of the display located outside of
the menu window.
Moving entries
You can change the order of Favorites
or entries under MyMiele.
For example, tap a Favorite and keep
your finger on it until the context
menu opens.
Select Move.
Keep your finger on the highlighted
field and drag it to the location you
want.
Displaying the pull-down menu
During a cooking program, you can turn
settings such asBooster orPreheat and
the WiFi function on or off.
Use the orange line under the header
to drag the pull-down menu down.
Select the setting you want to
change.
Active settings are highlighted in
orange. Depending on the selected
color scheme, inactive settings are
highlighted either in black or white
(see “Settings – Display”).
To close the pull-down menu, drag it
back up to the top or tap an area of
the display located outside of the
menu window.
Displaying Help
Context-sensitive help is available for
certain functions. In this case, Help
appears in the bottom line.
TapHelp to display information in text
and pictures.
TapClose to return to the previous
menu.
Activating MobileStart
Select the Remotesensor button to
activate MobileStart.
The Remotesensor button lights up.
You can operate your oven remotely
with the Miele app.
Directly operating on the oven takes
priority over operating it via the remote
control function on the app.
You can use MobileStart as long as
the Remotesensor button is lit up.
33
Page 34

Features
The models described in these
operating instructions can be found at
the end.
Data plate
The data plate is located behind the toe
kick panel. The toe kick panel is
attached to the toe kick of the Range by
magnets so it can be removed and put
back again easily.
There you can find the model number,
serial number and the connection data
(voltage/frequency/maximum rated
load) for your Range.
Have this information available if you
need to contact Miele so that any
issues can be rectified as quickly as
possible.
Extra data plate
The extra data plate for connecting the
oven to your WiFi is located on the front
frame of the oven.
Scope of delivery
- Installation instructions for the range
- Operating instructions for the range,
for using the cooktop and oven
functions
- Precision probe
- Anti-tip device including screws for
securing the range
- Various accessories
Standard and optional accessories
Features will vary depending on
model.
The side runners, universal tray, and
wire rack (or “rack” for short) are
supplied as standard with the oven.
Depending on the model, your oven
may also come supplied with some of
the accessories listed here.
All the accessories listed as well as the
cleaning and care products are
designed for Miele Ranges.
These can be ordered from the Miele
web store, Miele Customer Service, or
from your Miele dealer.
When ordering, please quote the model
number of your range and the reference
number of the accessories required.
Side racks
Side racks for accessories are installed
on either side of the oven compartment
for shelf levels.
The shelf level numbers are indicated
on the front of the oven frame.
Each level consists of a rail on which
you can place the wire rack, for
example.
You can remove the side racks (see
“Cleaning and care of the oven – Side
rack removal”).
34
Page 35
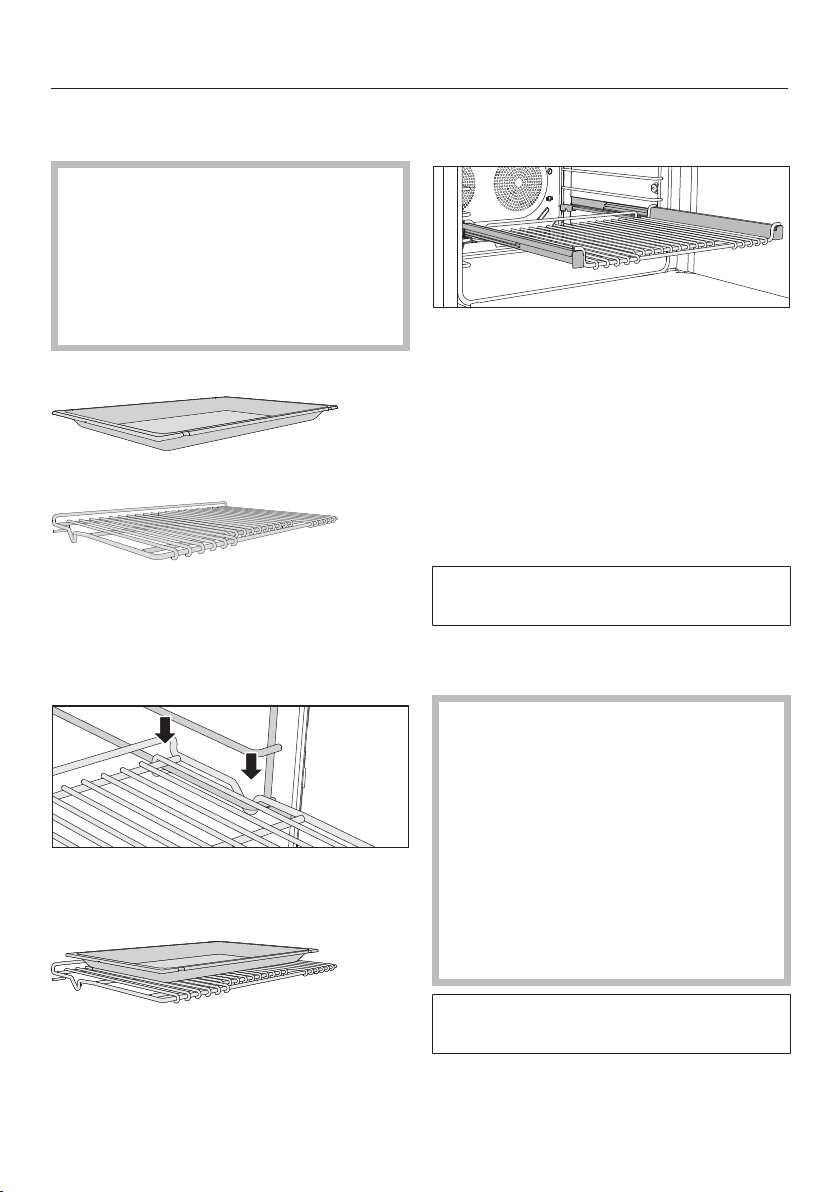
Features
Universal tray and Wire Rack with anti-tip safety notches
The wireless roast probe antenna on
the top right of the oven interior is at
risk of damage when sliding in
accessories.
When sliding in accessories, take
care not to bang them against the
wireless roast probe.
Universal tray HUBB30-1:
Wire Rack HBBR30-2:
Safety notches are located on the short
edges of the wire rack. These prevent
the wire rack from being fully pulled out
of the side racks when it only needs to
be pulled partially out.
FlexiClips with Wire Rack
HFCBBR30-3
The FlexiClips with Wire Rack are
mounted on the side racks and can be
pulled completely out of the oven. This
allows you to see the food easily.
The FlexiClips with Wire Rack are
pushed onto the rails of a level and then
locked into place.
The FlexiClips can support a maximum
load of 33lb (15kg).
The FlexiClips with Wire Rack can be
mounted on any shelf level.
Installing and removing the FlexiClips with Wire Rack
Always slide the wire rack into the rails
of the side racks with the catches
facing down.
Tip: When using the universal tray,
place it directly on the wire rack.
Danger of injury caused by hot
surfaces.
The oven gets hot during operation.
You could burn yourself on the
heater elements, oven compartment,
or accessories.
Allow the heating elements, oven
compartment, and the accessories to
cool down before installing or
removing the FlexiClips with Wire
Rack.
When installing or removing the
FlexiClips, do not extend them.
Hold the FlexiClips with Wire Rack
with both hands and position them in
front of the desired level.
35
Page 36
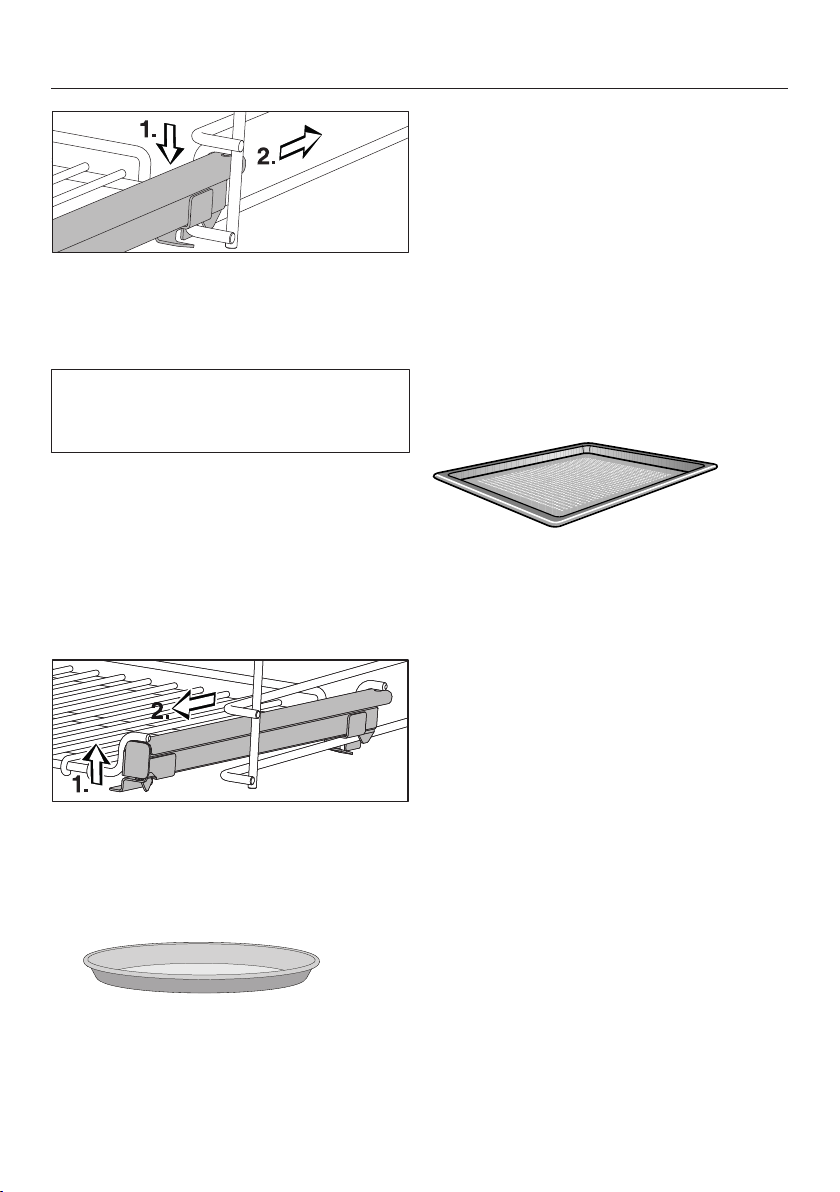
Features
Insert the FlexiClips with Wire Rack
onto the level (1.) and slide them
along the struts of the level (2.) until
they click into place.
If the FlexiClips are difficult to pull out
after installing, you may need to pull
firmly on them once to release them.
Tip: When using the universal tray,
place it directly on the FlexiClips with
Wire Rack.
To remove the FlexiClips with Wire
Rack, proceed as follows:
Push the FlexiClips with Wire Rack in
all the way.
The round perforated baking and
AirFry pan HBFP27-1 can be used for
the same purposes as the Gourmet
baking and AirFry tray, perforated
HBBL71.
The enameled surface of both
bakeware pans has been treated with
PerfectClean.
Insert the wire rack and place the
round baking pan on the wire rack.
Gourmet baking and AirFry tray,
perforatedHBBL71
The fine perforations of the perforated
Gourmet baking and AirFry tray,
optimize cooking processes:
- Browning on the underside of baked
goods made from fresh yeast and
quark doughs as well as bread and
rolls is improved.
Lift the front of the FlexiClips with
Wire Rack on both sides (1.) and pull
them out of the level (2.).
Round baking pans
The solid round baking pan HBF27-1
is suitable for cooking pizzas, flat
cakes, sweet and savory tarts, baked
desserts, flat bread, and can also be
used for frozen cakes.
36
- French fries, croquettes, or similar
items can be deep-fried in a low-fat
air flow (AirFrying).
- During dehydrating/drying, the air
circulation around the food for drying
is optimized.
The enameled surface has been treated
with PerfectClean.
The round perforated baking and
AirFry pan HBFP27-1 can be used for
these purposes.
Insert the wire rack and place the
perforated gourmet baking and Airfry
tray on the wire rack.
Page 37
Features
Broiling and roasting
insertHGBB30-1
The broiling and roasting insert fits in
the universal tray.
When broiling, roasting, or AirFrying, the
tray will collect meat juices and stop
them from burning so that they can be
used for making gravy and sauces.
The enameled surface has been treated
with PerfectClean.
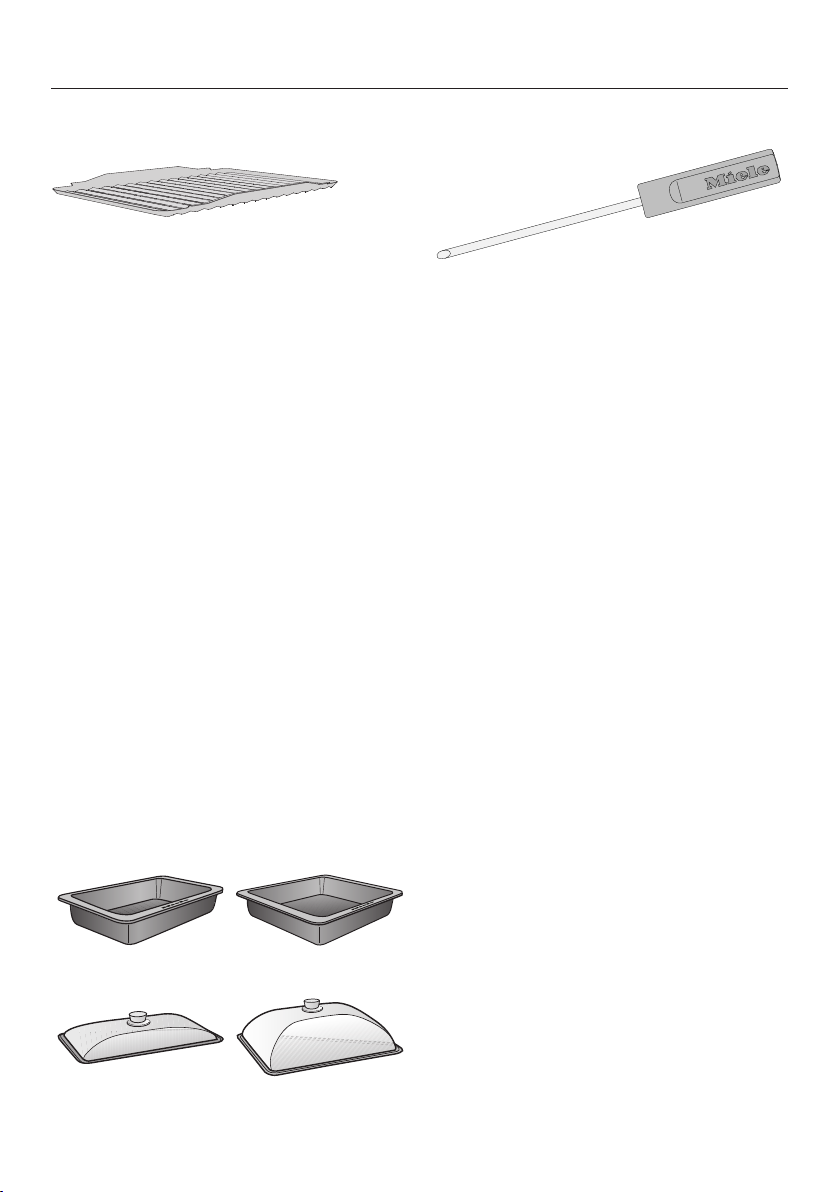
HUB Gourmet Casserole Dishes HBD Gourmet Casserole Dish lids
Miele Gourmet Casserole Dishes can be
placed directly on the wire rack. The
surface of the casserole dishes has a
non-stick coating.
Gourmet Casserole Dishes are available
in different depths. The width and the
height are the same.
Wireless precision probe
Your oven is supplied with a wireless
precision probe which enables you to
accurately monitor the temperature
during cooking processes (see
“Roasting – Probe”). The probe is
stored in a storage sleeve in the front
frame when not in use.
Accessories for cleaning and care
- Opener
The opener is used for removing the
cover from the oven lighting.
Suitable lids are available separately.
Please quote the model designation
when ordering.
Depth:
81/2"(22cm)
HUB62-22* HUB62-35*
HBD60-22 HBD60-35
* Suitable for use on induction cooktops
Depth:
133/4"(35cm)
37
Page 38

Features
Gas cooktop safety features
Automatic re-ignition
Your gas cooktop features automatic
re-ignition. If a gas flame is
extinguished, e.g., by food boiling over
or by a draft, the flame automatically reignites.
Oven safety features
- System lock
(see “Settings – Safety”)
- Sensor lock
(see “Settings – Safety”)
- Cooling fan
(see “Settings – Cooling fan run-on”)
- Safety shut-off
This safety shut-off is activated
automatically if the oven has been
operating for an unusually long
period of time. The period of time will
depend on the particular operating
mode being used.
- Ventilated door
The oven door is made of glass
panes that have a heat-reflective
coating on part of their surface.
When the oven is operating, air is
passed through the door to keep the
outer pane cool.
You can remove the door for cleaning
purposes (see “Cleaning and care of
the oven”).
- Door locking for Self Clean
At the beginning of a Self Clean
program, the door will lock for safety
reasons. The door will only unlock
when the temperature in the oven
compartment has dropped to below
535°F (280°C).
PerfectClean treated surfaces
PerfectClean surfaces have very good
non-stick properties making them
exceptionally easy to clean.
Food can be easily removed from these
surfaces. Soiling from baking and
roasting can also be easily removed
from these surfaces.
However, do not use ceramic knives
as these will scratch the
PerfectClean surface.
Read the instructions in “Cleaning and
care of the oven” to retain the benefits
of the non-stick properties and easy
cleaning.
PerfectClean treated surfaces:
- Universal tray
- Broiling and roasting insert
- Gourmet baking and AirFry tray,
perforated
- Round baking pan
- Round baking and AirFry pan,
perforated
Self-Clean-ready accessories
See “Cleaning and care of the oven” for
more information.
The following accessories can be left in
the oven compartment during the Self
Clean program:
- Side runners
- FlexiClips with Wire Rack
- Wire rack
38
Page 39
Before first use
Miele@home
Your oven is equipped with an
integrated WiFi module.
To use this feature, you will need:
- a Wi-Fi network
- the Miele app
- a Miele user account You can create
a user account via the Miele app.
The Miele app will guide you as you
connect your oven to your home WiFi
network.
The extra data plate for connecting the
oven to your WiFi is located on the front
frame of the oven.
Once your oven is connected to your
WiFi network, you can use the app to
carry out various activities, such as:
- Call up information on the operating
status of your oven
- Retrieve information on cooking
processes that are in progress
Availability of the Wi-Fi connection
The Wi-Fi connection shares a
frequency range with other appliances
(including microwave ovens and remote
control toys). This can cause sporadic
or even complete connection failures.
Therefore, the availability of featured
functions cannot be guaranteed.
Miele@home availability
The ability to use the Miele app
depends on the availability of the
Miele@home service in your country.
The Miele@home service is not
available in every country.
For information about availability,
please visit www.miele.com.
Miele App
The Miele App is available to download
free of charge from the Apple App
Store® or from the Google Play Store™.
- Stop cooking programs that are in
progress
Connecting your oven to your WiFi
network will increase energy
consumption, even when the oven is
turned off.
Make sure that the signal of your WiFi network is sufficiently strong in the
place where your range is installed.
39
Page 40

Before first use
Basic settings
You must make the following settings
before starting up for the first time. You
can change these settings again at a
later time (see “Settings”).
Danger of injury caused by hot
surfaces.
The range gets hot during operation.
For safety reasons, only use the range
when it has been fully installed.
The range will turn on automatically
when it is connected to the power
supply.
Setting the language
Select the desired language.
If you have accidentally selected a
language that you don’t understand,
proceed as described in “Settings –
Language”.
Setting the location
Select the required location.
Setting up Miele@home
Set up Miele@home? will appear on the
display.
Setting the date
Set the day, then the month, and
finally the year.
Confirm with OK.
Setting the time
Set the time of day in hours and
minutes.
Confirm with OK.
Setting the voltage
The set voltage variant must
match the voltage of the domestic
electrical supply in order to avoid the
risk of damage to the oven.
Confirm the voltage before setting. If
in any doubt, consult a qualified
electrician.
Select the voltage variant.
Confirm with OK.
Completing the commissioning process
Follow any further instructions on the
display.
The appliance is now ready for use.
To set up Miele@home immediately,
select Continue.
To set it up at a later date, select Skip.
See “Settings – Miele@home” for
information on setting up at a later
date.
To set up Miele@home immediately,
select the connection method you
want to use.
You will then be guided by the display
and the Miele app.
40
Page 41

Before first use
Cleaning the cooktop before heating it up for the first time
The metal components have a
protective coating. The cooktop may
have a slight odor and give off vapor
when heated up for the first time.
Any odors or vapors given off do not
indicate a faulty connection or
appliance and they are not hazardous
to health.
Remove any adhesive labels or
protective films from the cooktop.
Before heating the cooktop up, wipe
with a damp cloth to remove any dust
or bits of packaging and then dry the
surface.
Clean all removable parts of the
burners with a solution of warm water
and a little liquid dish soap applied
with a soft sponge. Dry all parts
thoroughly after cleaning and then
reassemble the burners (see “Gas
cooktop cleaning and care”).
Heating up the oven for the first time and rinsing the steam injection system
New ovens may have a slight odor
when they are heated up for the first
time. Heating up the oven for at least an
hour with nothing in it will eliminate the
odor. It is a good idea to rinse out the
steam injection system at the same
time.
Ensure that the kitchen is well
ventilated while the appliance is being
heated up for the first time.
Close doors to other rooms to prevent
the odor spreading throughout the
house.
Remove any adhesive labels or
protective films from the ovens and
accessories.
Before heating the oven up, wipe the
interior with a damp cloth to remove
any dust or bits of packaging that
may have accumulated in the oven
compartment.
Insert the FlexiClips with Wire Rack
into the side racks and place all trays
and wire racks in the oven.
Turn the oven on using the On/Off
button.
The main menu will appear.
Select Operating Modes.
Select Moisture Plus.
Select Moisture Plus + Conv Bake.
350°F (160°C) will appear as a
recommended value.
41
Page 42

Before first use
Set the highest possible temperature.
Select Continue.
Select Automatic.
Select Continue.
The oven heating, lighting, and cooling
fan will turn on.
After a short time, a burst of steam will
be released automatically.
Risk of injury caused by steam.
The steam escaping is very hot.
Do not open the door when the burst
of steam is being released.
Heat up the oven for at least an hour.
After at least an hour, turn the oven
off with the On/Off button.
Cleaning the oven compartment after heating it up for the first time
Risk of injury caused by hot
surfaces.
The oven gets hot during operation.
You could burn yourself on the
heating elements, oven
compartment, or accessories.
Allow the heating elements, oven
compartment, and accessories to
cool before manual cleaning.
Take all accessories out of the oven
compartment and clean it by hand
(see “Cleaning and care of the oven”).
Clean the oven compartment with
warm water and liquid dish soap,
applied with a soft sponge or
microfiber cloth.
Dry all surfaces with a soft cloth.
Leave the oven door open until the
oven compartment is completely dry.
42
Page 43
Using the gas cooktop
Energy-saving tips
- Cook in covered pots and pans if
possible. Doing so will prevent
unnecessary heat loss.
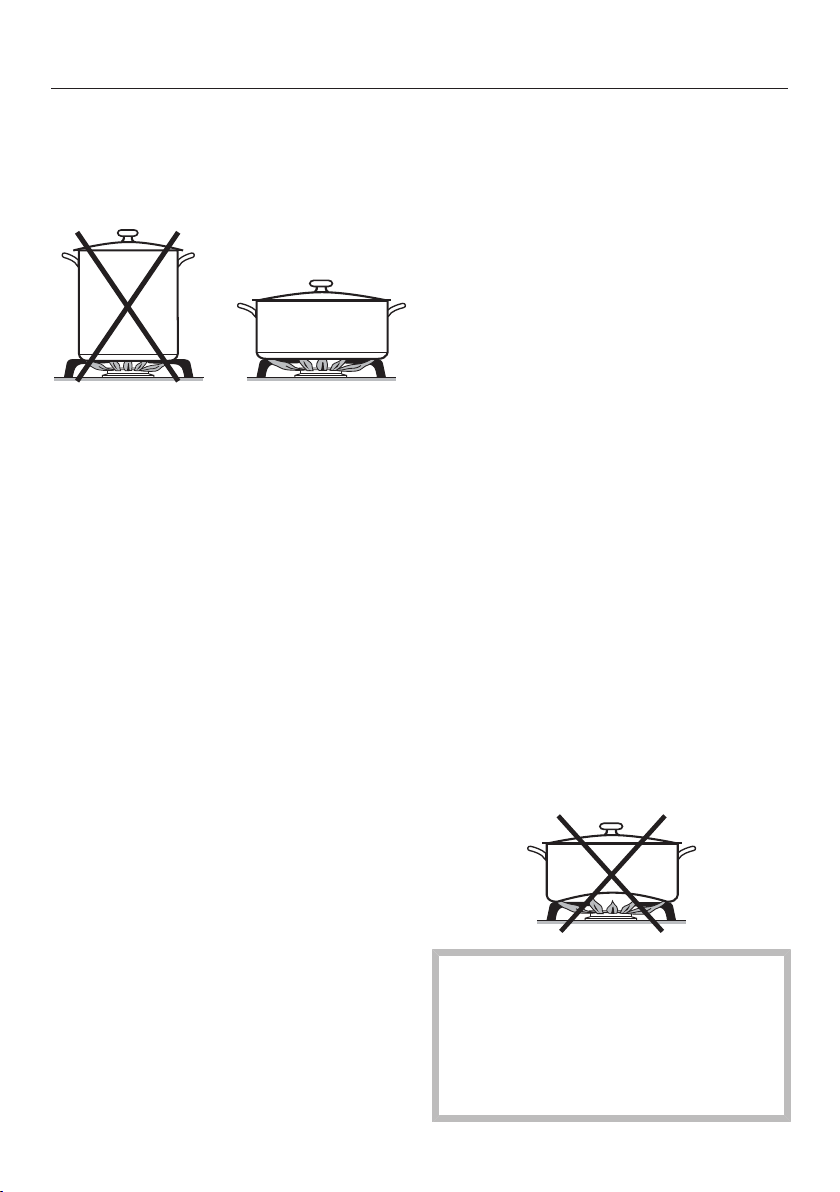
- Wide, shallow pots are preferable to
tall, narrow ones. They will heat up
faster.
- Cook with as little water as possible.
- Once food has come to a boil or the
pan is hot for frying, reduce the heat
to a lower power setting.
- Use a pressure cooker to reduce
cooking durations.
Suitable cookware
- Select cookware that fits the size of
the burner:
Large diameter = large burner
Small diameter = small burner
- Unlike cookware that is used on an
electric cooktop, the bottom of
cookware used on a gas cooktop
does not have to be flat to deliver
effective cooking performance.
- When purchasing pots and pans,
keep in mind that the diameter
indicated is typically the top diameter,
not the bottom diameter.
- All heat-resistant cookware is suitable
for use.
- Cookware with a thick bottom is
preferable, as it distributes heat more
evenly. Cookware with a thin bottom
may cause food to overheat in certain
spots. To avoid this, stir the food
frequently.
- Always place the cookware on the
grates supplied. Do not place
cookware directly on the burners.
- Position the cookware on the burner
grate so that it cannot tip. There is
always a possibility of a slight tilt,
despite the proper position.
- Do not use pots or pans that have
bottoms with pronounced edges.
- Using cookware that is too large can
cause the flames to spread out and
damage the surrounding countertop
or other appliances. Choosing the
right cookware size improves
efficiency.
- Any cookware that has a diameter
smaller than the burner grate or
which does not rest in a stable
position on the grate (without
wobbling) is dangerous and should
not be used.
Fire hazard due to overheated
food.
Unattended food can overheat and
ignite.
Do not leave the cooktop unattended
whilst it is being used.
43
Page 44

Using the gas cooktop
Switching on the burner
Do not turn the control knob clockwise
past the Off position.
When a control knob is activated, a
spark is developed automatically on all
burners. This is normal and does not
indicate a fault.
You may notice a brief re-ignition (1–
2clicks) when turning on the
appliance, e.g., because of a draft.
Push in the control knob for the
burner required and turn it
counterclockwise to High.
The ignitor “clicks” and ignites the gas.
If the burner fails to ignite, turn the
control knob to the Off position.
Aerate the room or wait at least
1minute before trying again.
If the burner does not ignite the
second time, turn the control knob
back to Off and see “Frequently
asked questions”.
Switching on during a power failure
If there has been a power failure,
the automatic re-ignition feature will
not work properly.
Operate the cooktop only under
supervision. If the burner has not
ignited or the flame goes out, turn
the control knob to Off.
Normal and power burners
In case of a power failure, the flame
can be ignited manually.
Push in the control knob and turn it
counterclockwise to High.
Light the emerging gas/air mixture
with a match.
44
Page 45
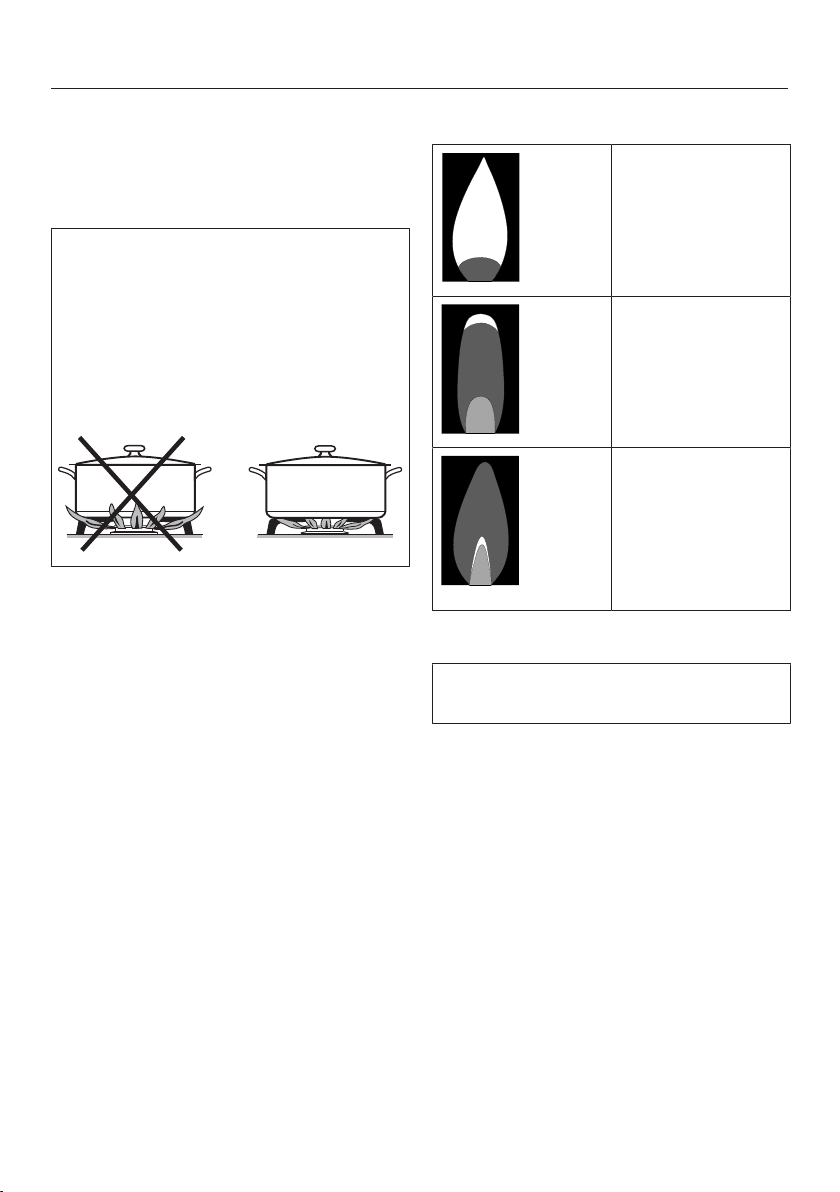
Using the gas cooktop
Adjusting the flame
The burners can be variably adjusted
between the lowest and highest flame
settings.
As the outer part of the flame is much
hotter than the center, the tips of the
flames should stay beneath the pan
base. Flame tips which extend beyond
the sides of the pan merely warm up
the air in the room and can damage
pan handles and increase the risk of
injury.
Adjust the flame so that it does not
spread out beyond the sides of the
pan.
Appearance of the gas flames
Yellow flames
Contact
Customer
Service.
Yellow tips on
the outer cone
Normal for LP gas
Pale blue flames
possibly with
yellow tips on the
inner cone
Normal for natural
gas
Switching off the burner
Do not turn the control knob clockwise
past the Off position.
Turn the control knob clockwise to
the Off position.
This stops the flow of gas and the flame
goes out.
45
Page 46

Using the oven
Energy-saving tips
Cooking programs
- If possible, use the automatic
programs for cooking food.
- Remove all accessories from the
oven that are not required for a
cooking process.
- If a temperature range is given, it is
best to select the lower temperature
and check the food after the shortest
cooking time given.
- Preheat the oven only if instructed to
do so in the recipe.
- Try not to open the door when
cooking.
- It is best to use dark bakeware and
cooking containers with a matte
finish made of non-reflective
materials (enameled steel, heatresistant glass, non-stick coated cast
aluminum). Shiny materials such as
stainless steel or aluminum reflect the
heat and therefore can give a more
uneven result. Do not cover the oven
floor or the wire rack with heatreflecting aluminum foil.
- Most food can be cooked using
Convection Bake/Convection Roast.
Because the blower distributes the
heat in the oven compartment
straight away, it allows you to use a
lower temperature than you would
with Surround. It also enables you
to cook on multiple shelf levels at the
same time.
- Convection Broil is the best
operating mode for broiled dishes.
Lower temperatures can be used
than with other broil modes that use
the maximum temperature setting.
- Whenever possible you should cook
several dishes at the same time.
Place them next to each other in the
oven or on different shelf levels.
- Dishes which you are unable to
prepare at the same time should, if
possible, be cooked one after the
other in order to make use of existing
heat in the oven.
- Monitor cooking durations to avoid
wasting energy when cooking.
Set the cooking duration, or use a
probe if you have one.
46
Page 47

Using the oven
Residual heat utilization
- The temperature in cooking programs
using temperatures above 285°F
(140°C) which take longer than
30minutes to cook can be turned
down to the lowest possible
temperature about 5minutes before
the end of cooking. The residual heat
in the oven is sufficient for cooking
the food until it is done. However, do
not turn the oven off (see
“IMPORTANT SAFETY
INSTRUCTIONS”).
- If you have set a cooking duration for
a cooking program, the oven heating
elements will turn off automatically
shortly before the end of cooking.
The residual heat in the oven is
sufficient to complete the cooking
process.
- It is best to start the Self Clean
program immediately after a cooking
program. The residual heat in the
oven will help reduce the amount of
energy required.
Settings
- Select the Display| QuickTouch|
Offsetting for the control elements in
order to reduce energy consumption.
- Select the Lighting| Off or “On” for 15
secondssetting for the oven interior
lighting. You can turn the oven
interior lighting on again at any time
by tapping the Lightsensor button.
Energy-saving mode
The oven will turn itself off automatically
to save energy if a program is not being
run and no controls have been
operated. The time of day will appear
on the display or the display will remain
dark (see “Settings”).
47
Page 48

Using the oven
Turn the oven on.
The main menu will appear.
Place the food in the oven
compartment.
Select Operating Modes.
Select the operating mode you want
to use.
The operating mode and recommended
temperature will appear.
Adjust the recommended
temperature, if necessary.
Otherwise, the recommended
temperature will be accepted within a
few seconds. You can change the
temperature later by selecting the
temperature indicator.
Confirm with OK.
The required and the actual temperature
will appear and the heating-up phase
will begin.
You will see the temperature rising on
the display. An audible signal will sound
when the set temperature is reached for
the first time.
After the cooking process, select
Finish.
Take the food out of the oven
compartment.
Turn the oven off.
Changing values and settings for a cooking program
Depending on the operating mode, as
soon as a cooking program is in
progress, you can change the values or
settings for this program.
Depending on the operating mode, you
can change the following settings:
- Temperature
- Duration
- Ready at
- Start at
- Booster
- Preheat
- Crisp function
Changing the temperature and core
temperature
Via Settings| Recommended
temperatures, you can permanently
adjust the recommended temperature
to suit your cooking preferences.
The core temperature only
appears if you are using the probe
(see “Roasting – Probe”).
Tap the temperature display.
Change the temperature and the
core temperature as required.
Confirm with OK.
48
The cooking program will resume with
the new target temperatures.
Page 49

Using the oven
Setting additional durations
Cooking results can be adversely
affected if there is a long delay
between the food being placed in the
oven and the start of cooking. Fresh
food can change color and even
spoil.
When baking, the cake mixture or
dough can dry out, and the raising
agents can lose their effectiveness.
Select as short a time as possible
until the start of the cooking process.
You have placed the food in the oven
compartment, selected an operating
mode and the required settings such as
the temperature.
By entering Duration, Ready at or Start at,
you can automatically turn the cooking
process off or on and off.
- Duration
Enter the required cooking duration
for the food. The oven heating will
turn off automatically once the
cooking duration has elapsed. The
maximum cooking duration that can
be set depends on the operating
mode that you have selected.
Select or Timer.
Set the required times.
Confirm with OK.
Changing set durations
Select, the duration, or Timer.
Select the time you want and change
it.
Confirm with OK.
These settings will be deleted in the
event of a power failure.
Deleting the set cooking durations
Select, the duration, or Timer.
Select the time you want.
Select Delete.
Confirm with OK.
If you delete Duration, the set durations
for Ready at and Start at are also
deleted.
If you delete Ready atorStart at, the
cooking program will start using the
cooking duration set.
- Ready at
Specify when you want the cooking
process to finish. The oven will turn
off automatically at the time you have
set.
- Start at
This function will only appear in the
menu if you have set a Duration or
Ready at time. With Start at, you have
to specify when you want the
cooking process to start. The oven
will turn on automatically at the time
you have set.
Canceling a cooking program
If you cancel a cooking program, the
oven heating and lighting will turn off.
Any cooking durations set will be
deleted.
Canceling a cooking program without a set cooking duration
Select Finish.
The main menu will appear.
49
Page 50

Using the oven
Canceling a cooking program with a set cooking duration
Select Cancel.
Cancel program? will appear.
Select Yes.
The main menu will appear.
Preheating the oven
The Boosterfunction is used to quickly
preheat the oven compartment in some
operating modes.
The Preheatfunction can be used with
any operating mode and has to be
turned on separately for each cooking
program.
If you have set a cooking duration, it will
only start to count down when the
target temperature is reached and you
have placed the food in the oven.
The appliance only needs to be
preheated in a few cases.
You can place most dishes in the
cold oven compartment to make use
of the heat produced during the
preheating phase.
Preheat the oven when cooking the
following food with the following
operating modes:
- Dark bread dough, as well as Roast
Beef and fillets with the Convection
Bake/Convection Roast, Moisture
Plus, and Surround operating
modes
- Cakes and pastries with a short
cooking duration (approx. 30minutes
or less) as well as delicate items (e.g.,
sponge) with the Surround
operating mode (without the
Boosterfunction)
Booster
The Boosterfunction is used to quickly
preheat the oven.
This function is turned on as the factory
default setting for the following
operating modes (Settings| Booster| On):
- Convection Bake
- Convection Roast
- Surround
- Auto Roast
- Moisture Plus
If you set a temperature above 210°F
(100°C) and the Booster function is
turned on, a rapid preheating phase
heats the oven compartment to the set
temperature. The browning/broiling
element and the ring heating element
come on together with the fan.
Delicate items (e.g., sponge or
cookies) will brown too quickly on
the top if the Booster function is
used.
Turn off the Booster function for these
items.
50
Page 51

Using the oven
Turning Booster on or off for a cooking program
If you have selected the Booster|
Onsetting, you can turn the function off
separately for a cooking program.
On the other hand, you can also turn on
the function separately for a cooking
program if you have selected the
Booster| Offsetting.
Example: You have selected an
operating mode and the required
settings such as the temperature.
You want to turn off the Boosterfunction
for this cooking program.
Drag down the pull-down menu.
Booster is highlighted in orange.
Select Booster.
Depending on the color scheme,
Booster is highlighted in either black or
white.
Close the pull-down menu.
The Boosterfunction is turned off during
the preheating phase. Only the heating
elements for the selected operating
mode are used to preheat the oven
compartment.
Preheat
The oven compartment only needs to
be preheated in a few cases.
You can place most dishes in the cold
oven compartment to make use of the
heat produced during the preheating
phase.
If you have set a cooking duration, it
will only start to count down when the
target temperature is reached and you
have placed the food in the oven.
Start the cooking process immediately
without delaying the start time.
Turning Preheat on
The Preheatfunction can be used with
any operating mode and has to be
turned on separately for each cooking
program.
Example: You have selected an
operating mode and the required
settings such as the temperature.
You want to turn on the Preheatfunction
for this cooking program.
Drag down the pull-down menu.
Depending on the color scheme,
Preheat is highlighted in either black or
white.
Select Preheat.
Preheat is highlighted in orange.
Close the pull-down menu.
The following message will be
displayed with a time: Place food in oven
at . The oven compartment is heated to
the set temperature.
As soon as you are prompted to do
so, place the food in the oven.
Confirm with OK.
51
Page 52

Using the oven
Crisp function
It is a good idea to use the Crisp
functionfunction (moisture reduction)
when cooking food which has a moist
topping, e.g., quiche, pizza, tray bakes
with fresh fruit toppings, or muffins.
Poultry in particular gets a nice crisp
skin with this function.
Turning Crisp function on
The Crisp function function can be used
with any operating mode and has to be
turned on separately for each cooking
program.
You have selected an operating mode
and the required settings such as the
temperature.
You want to turn on the Crisp function
function for this cooking program.
Drag down the pull-down menu.
Depending on the color scheme, Crisp
function is highlighted in either black or
white.
Changing the operating mode
You can change to another operating
mode during a cooking program.
Tap the symbol for the selected
operating mode.
If you have set a cooking duration,
confirm the Cancel program?message
with Yes.
Select the new operating mode.
The new operating mode will appear on
the display with its corresponding
recommended values.
Set the values for the cooking
program and confirm with OK.
Select Crisp function.
Crisp function is highlighted in orange.
Close the pull-down menu.
The Crisp function function is turned on.
52
Page 53

Settings overview
Menu option Available settings
Language ...| deutsch| english| ...
Location
Time Display
On*| Off| Night dimming
Clock type
Analog*| Digital
Clock format
24 h| 12 h (am/pm)*
Set
Date
Lighting On
“On” for 15 seconds*
Off
Start screen Main menu*
Operating modes
Automatic Programs
Special Modes
Favorites
MyMiele
Display Brightness
Color scheme
Bright| Dark*
QuickTouch
On| Off*
Volume Buzzer Tones
Keypad Tone
Welcome Melody
On*| Off
Units of Measurement Temperature
°C| °F*
Settings
* Factory default
53
Page 54

Settings
Menu option Available settings
Booster On*
Off
Recommended
temperatures
Self clean With reminder
Without reminder*
Cooling fan run-on Time controlled
Temperature controlled*
MotionReact Switch the light on
during cooking program*| always on| Off
Switch the appliance on
On| Off*
Acknowledge buzzer
On*| Off
Safety System Lock
On| Off*
Sensor Lock
On| Off*
Miele@home Activate
Deactivate
Connection status
Set up again
Reset
Set up
Remote Control On*
Off
SuperVision SuperVision display
On| Off*
Display in standby
On*| Only if there is a fault
Appliance list
Display this Appliance| Buzzer Tones
RemoteUpdate On*
Off
* Factory default
54
Page 55

Menu option Available settings
Lift-up panel Automatic
Manual*
Electrical version 208V / 60Hz
220V / 60Hz
240V / 60Hz
Probe
Calibrate temperature
Software version
Legal information Open Source Licenses
Showroom Program Demo Mode
On| Off*
Factory default Appliance settings
Favorites
MyMiele
Recommended temperatures
Operating hours (total)
* Factory default
Settings
55
Page 56

Settings
Opening the “Settings” menu
In theSettingsmenu, you can
personalize your oven by adapting the
factory default settings to suit your
requirements.
From the main menu:
Select Settings.
Select the setting you want.
You can check settings or change them.
You cannot change settings while a
cooking process is in progress.
Language
You can set your language and location.
After selecting and confirming your
choice, the language you have selected
will appear on the display.
Tip: If you have accidentally selected a language that you don’t understand, select in the main menu. Follow the symbol to get back to the Language
submenu.
Time
If you also select the Display|
QuickTouch| Offsetting, the oven has
to be turned on before it can be
used.
- Off
The display appears dark to save
energy. The oven has to be turned on
before you can use it.
- Night dimming
To save energy, the time only shows
on the display between 5:00a.m. and
11:00p.m. The display remains dark
at all other times.
Clock type
The time of day can be displayed as
Analog (with a clock face) or Digital
(h:min) format.
With the digital display, the date is also
shown.
Clock format
The time of day can be displayed in the 24
or 12-hour format (24 hor12 h (am/pm)).
Set
Set the hours and the minutes.
Display
Select how you want the time of day to
show on the display when the oven is
turned off:
- On
The time is always visible on the
display.
If you also select the Display|
QuickTouch| Onsetting, all sensor
buttons will react to touch straight
away and the proximity sensor will
automatically detect when you
approach the display.
56
Tip: If no cooking program is in progress,
tap the time in the header to change it.
If there is a power failure, the current
time of day will reappear once the
power has been restored. The time of
day is saved for approx. 150hours.
If the oven has been connected to a
WiFi network and signed into the
Miele app, the time will be
synchronized based on the location
setting in the Miele app.
Page 57

Settings
Date
Set the date.
When the oven is turned off, the date
will only appear on the display if the
Time| Clock type| Digitalsetting has
been selected.
Lighting
- On
The oven interior lighting is turned on
during the entire cooking process.
- “On” for 15 seconds
The oven interior lighting turns off
15seconds after a cooking process
has begun. Press the Lightsensor
button to turn the oven interior
lighting on again for 15seconds.
- Off
The oven interior lighting is turned
off. Press the Lightsensor button to
turn the oven interior lighting on for
15seconds.
Start screen
The oven is set at the factory for the
main menu to appear when the oven is
turned on. You can change this default
setting so that, for instance, the
operating modes or MyMiele settings
appear on the start screen (see
“MyMiele”).
This new start screen will then appear
when the oven is next turned on.
Select the Backsensor button or
follow the path in the header to get to
the main menu.
Display
Brightness
The display brightness is represented
by a segment bar.
-
Maximum brightness
-
Minimum brightness
Color scheme
Choose between a light or dark color
scheme for the display.
- Bright
The display has a light background
with dark characters.
- Dark
The display has a dark background
with light characters.
QuickTouch
Select how the sensor buttons and the
proximity sensor should respond when
the oven is turned off:
- On
If you have also selected the Time|
Display| On or Night dimmingsetting,
the sensor buttons and the proximity
sensor will also respond when the
oven is turned off.
- Off
Regardless of the Time|
Displaysetting, the sensor buttons
and the proximity sensor only
respond when the oven is turned on,
as well as for a certain amount of
time after turning it off.
57
Page 58

Settings
Volume
Buzzer Tones
If audible signals are turned on, an
audible signal will sound when the set
temperature is reached and at the end
of a set time.
The volume of the audible signals is
represented by a segment bar.
-
Maximum volume
-
Audible signals are switched off
Keypad Tone
The volume of the tone that sounds
each time you tap a sensor button is
represented by a segment bar.
-
Maximum volume
-
Keypad tone is turned off
Welcome Melody
The melody that sounds when you tap
the On/Off button can be turned on
or off.
- On
The Boosterfunction is automatically
turned on during the preheating
phase of a cooking program. The
browning/broiling element, ring
heating element, and fan all preheat
the oven compartment to the
required temperature at the same
time.
- Off
The Boosterfunction is turned off
during the preheating phase of a
cooking program. Only the heating
elements for the selected operating
mode are used to preheat the oven
compartment.
You can also use the pull-down menu
to turn the Boosterfunction on or off
for a cooking program.
Recommended temperatures
If you often cook with temperatures that
differ from the default, the
recommended temperatures can be
changed.
After you select this menu option, a list
of operating modes will appear on the
display.
Units of Measurement
Temperature
You can set the temperature in Celsius
(°C) or Fahrenheit (°F).
Booster
The Boosterfunction is used to quickly
preheat the oven.
58
Select the operating mode you want
to use.
The recommended temperature will
appear together with the range within
which it can be changed.
Change the recommended
temperature.
Confirm with OK.
Page 59

Settings
You can also change the
recommended temperature for the
Keep warmfunction.
Self clean
You can set whether the
recommendation for carrying out the
Self Clean function will appear (With
reminder) or will not appear (Without
reminder).
Cooling fan run-on
The cooling fan will continue to run for a
while after the oven has been turned off
to prevent any humidity building up in
the oven, on the control panel, or in the
cabinet carcase.
- Temperature controlled
The cooling fan turns off when the
temperature in the oven drops below
approx. 160°F (70°C).
- Time controlled
The cooling fan turns off after a
period of about 25minutes.
Condensation can damage the
cabinet carcase and the countertop.
This could lead to corrosion of the
oven.
When keeping food warm in the
oven, increases to the Time controlled
setting can lead to condensation in
the control panel.
Do not adjust the Time controlled
setting and try not to leave food in
the warm oven.
Proximity sensor (MotionReact)
The proximity sensor detects when you
approach the touch display, e.g., with
your hand or body.
If you want the proximity sensor to
respond even when the oven is turned
off, select the Display| QuickTouch|
Onsetting.
Switch the light on
- during cooking program
As soon as you approach the touch
display during a cooking process, the
oven interior lighting turns on. The
oven interior lighting automatically
turns off again after 15seconds.
- always on
As soon as you approach the touch
display, the oven interior lighting
turns on. The oven interior lighting
automatically turns off again after
15seconds.
- Off
The proximity sensor does not
respond when you approach the
touch display. Press the Lightsensor
button to turn the oven interior
lighting on for 15seconds.
Switch the appliance on
- On
If the time is displayed, the oven
willturn on and the main menu will
appear as you approach the touch
display.
- Off
The proximity sensor does not
respond when you approach the
touch display. Turn the oven on using
the On/Off button.
59
Page 60

Settings
Acknowledge buzzer
- On
As soon as you approach the touch
display, the audible signals turn off.
- Off
The proximity sensor does not
respond when you approach the
touch display. Turn the audible
signals off manually.
Safety
System Lock
The system lock prevents the oven from
being turned on inadvertently.
You can still set an alarm and a timer,
as well as use the MobileStart function
when the system lock is active.
The system lock will remain activated
even after a power failure.
- On
The system lock is now active. If you
want to use the oven, touch for at
least 6seconds.
- Off
The system lock is now deactivated.
You can use the oven as normal.
Sensor Lock
The sensor lock prevents the cooking
program from being turned off by
mistake or settings from being
changed. Once activated, the sensor
lock prevents the sensor buttons and
fields on the display from working for a
few seconds after a program has been
started, with the exception of the On/
Off button.
- On
The sensor lock is active. TouchOK
for at least 6seconds to deactivate
the sensor lock for a short period of
time.
- Off
The sensor lock is not active. All
sensor buttons react to touch as
normal.
Miele@home
The oven is a Miele@home-compatible
domestic appliance with SuperVision
functionality.
Your oven is equipped ex-works with a
WiFi communication module and is
suitable for wireless communication.
There are a number of ways of
connecting your oven to your WiFi
network. We recommend connecting
your oven to your WiFi network with the
help of the Miele app or via WPS.
- Activate
This setting is only visible if
Miele@home is deactivated. The WiFi
function is reactivated.
- Deactivate
This setting is only visible if
Miele@home is activated.
Miele@home remains set up; the WiFi
function is turned off.
- Connection status
This setting is only visible if
Miele@home is activated. The display
shows information such as the WiFi
reception quality, network name, and
IP address.
60
Page 61

Settings
- Set up again
This setting is only visible if a WiFi
network has already been set up.
Reset the network settings and set
up a new network connection straight
away.
- Reset
This setting is only visible if a WiFi
network has already been set up. The
WiFi function is deactivated and the
connection to the WiFi network will
be reset to the factory default. You
must set up a new connection to the
WiFi network to be able to use
Miele@home.
Reset the network settings if you are
disposing of or selling your oven, or if
you are putting a used oven into
operation. This is the only way to
ensure that all personal data has
been removed and the previous
owner will no longer be able to
access the oven.
- Set up
This setting is only visible if no
connection to the WiFi network has
been set up yet. You must set up a
new connection to the WiFi network
to be able to use Miele@home.
Remote Control
If you have installed the Miele app on
your mobile device, have access to the
Miele@home system, and have
activated the remote control function
(On), you can use the MobileStart
function to retrieve information on oven
cooking programs that are in progress
or to end a program in progress.
Activating MobileStart
Select the Remotesensor button to
activate MobileStart.
The Remotesensor button lights up.
You can operate your oven remotely
with the Miele app.
Directly operating on the oven takes
priority over operating it via the remote
control function on the app.
You can use MobileStart as long as
the Remotesensor button is lit up.
SuperVision
The oven is a Miele@home-compatible
appliance with SuperVisionfunctionality
for monitoring other domestic
appliances in the Miele@home system.
The SuperVisionfunction cannot be
activated until the Miele@home system
has been set up.
SuperVision display
- On
The SuperVisionfunction is turned on.
The symbol will appear in the top
right-hand corner of the display.
- Off
The SuperVisionfunction is turned off.
61
Page 62

Settings
Display in standby
The SuperVisionfunction is also
available when the oven is in standby.
However, the time-of-day display must
be turned on (Settings| Time| Display|
On).
- On
Active domestic appliances that are
signed on to the Miele@home system
are always displayed.
- Only if there is a fault
Only faults on active domestic
appliances are displayed.
Appliance list
All domestic appliances signed on to
the Miele@home System are displayed.
Once you have selected an appliance,
you can access further settings:
- Display this Appliance
– On
The SuperVisionfunction for this
appliance is turned on.
– Off
The SuperVisionfunction for this
appliance is turned off. The
appliance is still signed on to the
Miele@home system. Faults are
displayed, even if the
SuperVisionfunction for the
appliance has been turned off.
- Buzzer Tones
You can select whether the audible
signals are turned on (On) or turned
off (Off) for this appliance.
RemoteUpdate
The RemoteUpdatemenu option is only
displayed and can only be selected if
the requirements for using
Miele@home have been met (see
“Before using for the first time –
Miele@home”).
The RemoteUpdate function is used for
updating the software in your oven. If
an update is available for your oven, it
will automatically download it. Updates
will not be installed automatically. They
must be initiated manually.
If you do not install an update, you can
continue to use your oven as usual.
However, Miele recommends installing
updates.
Activating/deactivating
The RemoteUpdate function is
activated as standard. Available
updates will be downloaded
automatically but will only be installed if
you initiate installation manually.
Deactivate RemoteUpdate if you do not
want any updates to be downloaded
automatically.
Running a RemoteUpdate
Information about the content and
scope of an update is provided in the
Miele app.
A message will appear on your oven
display if a software update is available.
You can install the update immediately
or postpone this until later. When the
oven is turned on again, you will be
reminded about the update.
62
Page 63

Settings
Deactivate RemoteUpdate if you do not
want to install the update.
The update may take several minutes.
Please note the following information
about the RemoteUpdate function:
- You will only receive a message when
an update is available.
- Once an update has been installed, it
cannot be undone.
- Do not turn the oven off during the
update. Otherwise, the update will be
aborted and will not be installed.
- Some software updates can only be
carried out by Miele Customer
Service.
Lift-up panel
Regardless of the setting selected, as
soon as you start the Self Clean
program the lift panel will go down
automatically.
- Automatic
The lift panel raises automatically as
soon as you turn the range on.
The lift panel goes down
automatically as soon as you turn the
range off.
- Manual
Touch the Lift Panel sensor button to
raise and lower the lift panel.
Electrical version
You can set the voltage variant. The
setting must correspond to the voltage
of your domestic electrical supply.
Probe
The oven is factory set to automatically
detect the probe.
If you have purchased a new Miele
probe, you must enter a 12-digit code
for this setting. You can then start using
the probe.
Follow the description supplied with
the replacement part.
Calibrate temperature
You can change the temperature in
increments in all operating modes and
automatic programs so that it is higher
or lower in the oven compartment than
displayed.
The temperature calibration is
represented by a bar with seven
segments.
If all of the segments are filled, the oven
compartment temperature is much
higher than displayed. If one segment is
filled, the oven compartment
temperature is much lower than
displayed.
63
Page 64

Settings
Software version
The software version menu option is for
use by Miele Technical Service. You do
not need this information for domestic
use.
Confirm with OK.
Legal information
You can find an overview of the
integrated open-source components
under Open Source Licenses.
Confirm with OK.
Showroom Program
This function enables the oven to be
demonstrated in dealer showrooms
without heating up. Do not activate this
setting for domestic use.
Demo Mode
If you have Demo mode activated,
Demo mode is active. The appliance will
not heat up will appear when you turn
on the oven.
Factory default
- Appliance settings
Any settings that have been altered
will be reset to the factory default
settings.
- Favorites
All Favorites will be deleted.
- MyMiele
All MyMiele entries will be deleted.
- Recommended temperatures
Any recommended temperatures that
have been changed will be reset to
the factory default settings.
Operating hours (total)
Select Operating hours (total) to query the
total number of operating hours of your
oven.
- On
Touch OK for at least 4seconds to
activate Demo mode.
- Off
Touch OK for at least 4seconds to
deactivate Demo mode. You can use
the oven as normal.
64
Page 65

Alarm + Timer
Using the Timersensor button, you can
set a timer (e.g., for boiling eggs) or an
alarm for a specific time.
Two alarms, two timers, or an alarm
and a timer can be set simultaneously.
Using the Alarmfunction
The alarm can be used to specify a
particular time for an audible signal to
sound.
Setting the alarm
If the Display| QuickTouch| Offsetting is
selected, you will need to turn the
oven on before setting the alarm. The
alarm time will then appear on the
display when the oven is turned off.
Select the Timersensor button.
Select Alarm.
Set the time for the alarm.
TapClose to confirm.
Changing an alarm
Select the alarm on the display or
select the Timersensor button and
the alarm you want.
The set alarm time will appear on the
display.
Set the new time for the alarm.
TapClose to confirm.
The adjusted alarm time is now saved
and will appear on the display.
Deleting an alarm
Select the alarm on the display or
select the Timersensor button and
the alarm you want.
The set alarm time will appear on the
display.
Select Delete.
TapClose to confirm.
The alarm is deleted.
When the oven is turned off, the alarm
time and will appear instead of the
time of day.
If you are cooking at the same time or if
you are in a different menu, the alarm
time and will appear in the top righthand corner of the display.
At the specified time for the alarm,
will flash on the display next to the
time and an audible signal will sound.
Select the Timersensor button or the
set alarm time on the display.
The audible signal will stop and the
symbols on the display will go out.
65
Page 66

Alarm + Timer
Using the Timerfunction
The timer can be used to time other
activities in the kitchen, e.g.,boiling
eggs.
The timer can also be used at the same
time as a cooking program for which
the start and finish times have been set
(e.g., as a reminder to stir the food or
add seasoning, etc.).
The maximum timer duration that can
be set is 59minutes and 59seconds.
Tip: When using an operating mode
with moisture injection, use the timer to
remind you to inject steam manually at
the required time.
Setting the timer
If you have selected the Display|
QuickTouch| Off setting, you will need
to turn the oven on before setting the
timer. The timer can then be seen
counting down on the display when
the oven is turned off.
Example: you want to boil some eggs
and set a timer of 6minutes and
20seconds.
Select the Timersensor button.
Select Timer.
Set the required timer duration.
TapClose to confirm.
When the oven is turned off, the timer
duration counts down on the display
and appears instead of the time of
day.
If you are cooking at the same time or if
you are in a different menu, the timer
duration and will appear in the top
right-hand corner of the display.
At the end of the timer duration, will
flash, the time will start counting up,
and an audible signal will sound.
Select the Timersensor button or the
required timer on the display.
The audible signal will stop and the
symbols on the display will go out.
Changing the timer
Select the timer on the display or
select the Timersensor button and
then the timer duration you want.
The set timer duration will appear.
Set a new timer duration.
TapClose to confirm.
The changed timer duration is now
saved and will count down in minutes.
Timer durations of less than 10minutes
will count down in seconds.
Deleting the timer
Select the timer on the display or
select the Timersensor button and
then the timer duration you want.
The set timer duration will appear.
Select Delete.
TapClose to confirm.
The timer is deleted.
66
Page 67

Main and submenus
As different countries have different preferences when it comes to preparing food,
the temperatures in °F and °C may not match. The temperatures are defined as
they are specified in the table.
Menu Recommended
Range
temp.
Operating Modes
Convection Bake
Convection Roast
Surround 400°F (180°C) 85–525°F
Moisture Plus
Moisture Plus + Auto Roast 350°F (160°C) 275–475°F
Moisture Plus + Conv Bake/
Moisture Plus + Conv Roast
Moisture Plus + Intensive 350°F (170°C) 275–475°F
Moisture Plus + Surround 350°F (180°C) 275–525°F
Intensive 400°F (170°C) 125–475°F
350°F (160°C)
375°F (170°C)
350°F (160°C) 275–475°F
85–475°F
(30–250°C)
85–475°F
(30–250°C)
(30–280°C)
(130–230°C)
(130–250°C)
(130–250°C)
(130–280°C)
(50–250°C)
Auto Roast 375°F (160°C) 200–450°F
(100–230°C)
Bake 375°F (190°C) 200–525°F
(100–280°C)
Browning 350°F (190°C) 200–475°F
(100–250°C)
Maxi Broil 500°F (240°C) 400–575°F
(200–300°C)
Broil 500°F (240°C) 400–575°F
(200–300°C)
Convection Broil 400°F (200°C) 200–500°F
(100–260°C)
67
Page 68

Main and submenus
Menu Recommended
Range
temp.
Automatic Programs
Special Modes
Defrost 100°F (25°C) 75–125°F
(25–50°C)
Dehydrate 150°F (60°C) 85–175°F
(30–70°C)
Warm-up Cookware 175°F (80°C) 125–225°F
(50–100°C)
Proof
Proof for 15 minutes – –
Proof for 30 minutes – –
Proof for 45 minutes – –
Slow Roasting 225°F (100°C) 175–250°F
(80–120°C)
Sabbath Program
Surround 350 °F (180 °C) 120–475°F
(50–250°C)
Bake 350 °F (180 °C) 120–475°F
(50–250°C)
Keep warm 175°F (75°C) 125–200°F
(60–90°C)
MyMiele
Favorites
Settings
Self clean
68
Page 69

Moisture Plus
Your oven is equipped with a steam
injection system for cooking with
moisture. When baking, roasting, and
cooking with the Moisture
Plusoperating mode, optimized
steam supply and air flow guarantee
even cooking and browning results.
You can also use moisture injection with
various types of heating:
- Moisture Plus + Auto Roast
- Moisture Plus + Conv Bake/Moisture Plus
+ Conv Roast
- Moisture Plus + Intensive
- Moisture Plus + Surround
After selecting the operating mode you
want, set the temperature and the
number and type of bursts of steam
(Automatic, Manual, or With timer).
The water is injected as bursts of steam
into the oven compartment during the
cooking program. The steam openings
are located in the rear left corner of the
ceiling of the oven.
Suitable food
One burst of steam takes about 5–
8minutes. The number of bursts of
steam and when they are injected will
depend on the type of food being
cooked:
- Yeast doughs will rise better if steam
is injected at the beginning of the
program.
- Bread and bread rolls rise better if
steam is released at the start.
Another burst of steam at the end of
the program will give the bread and
rolls a glistening crust.
- When roasting meat with a high fat
content, injecting steam at the
beginning of roasting will help render
the fat.
Moisture injection is not suitable for
mixtures which already contain a lot of
moisture, such as meringues. These
need to dry out during the baking
process.
69
Page 70

Moisture Plus
Starting a cooking program with Moisture Plus
It is normal for condensation to form
on the inside of the door during steam
injection. This will dissipate during the
course of the cooking program.
Prepare the food and place it in the
oven.
Select Operating Modes.
Select Moisture Plus.
Select the operating mode you want
with moisture injection.
The cooking programs proceed in the
same way for all heating types.
The recommended temperature will
appear.
Setting the temperature
Adjust the recommended
temperature, if necessary.
Select Continue.
If necessary, turn on the
Preheatfunction via the pull-down
menu.
The selection display for releasing the
bursts of steam will then appear.
Selecting the bursts of steam
The oven automatically draws in water
and triggers the bursts of steam at
specific times. You will hear the pump
briefly during this process.
Select Automatic, Manual, or With timer.
- Automatic
1burst of steam will be injected into
the oven automatically after the
preheating phase.
- Manual
You can release 1, 2, or 3bursts of
steam manually using the touch
display.
- With timer
You can set the times for the bursts
of steam to be released. The oven
will inject 1, 2, or 3bursts of steam at
the set times.
If you are cooking food such as bread
or bread rolls in a preheated oven, it is
best to release the bursts of steam
manually and turn on the
Preheatfunction. The first burst of
steam should be released as soon as
you have placed the food in the oven.
If you select more than one burst of
steam, the second burst of steam
cannot be released before the
temperature in the oven compartment
has reached at least 265°F (130°C).
70
If you want to use the Preheatfunction,
take the preheating phase into
account for the manual and timecontrolled bursts of steam (see
“Operating the oven – Preheat”).
Select the number of bursts of steam
(for Manual and With timer only).
Page 71

Moisture Plus
Set the times for the bursts of steam
as required.
Select Continue.
The oven heating and cooling fan will
turn on. The required and the actual
temperature will appear.
You will see the temperature rising on
the display. An audible signal will sound
when the set temperature is reached for
the first time.
If you have selected With timer, you
can check the time before steam is
released by selecting Info.
Injecting bursts of steam
Risk of injury caused by steam.
Steam can cause severe scalding.
In addition, steam condensing on the
control panel will cause the sensor
buttons and the touch display to
react more slowly.
Do not open the door while bursts of
steam are being released.
Automatic
Once the preheating phase is complete,
the burst of steam is injected
automatically.
The water will evaporate in the oven
compartment and Burst of steam will
appear on the display.
After the steam has been released,
Burst of steam will disappear.
Manual
You can release the bursts of steam as
soon as Burst of steam appears and Start
is shown in green.
Please wait until the preheating phase
is completed to allow the steam to be
distributed evenly by the warm air in
the oven.
Tip: Use the Timerfunction as a
reminder.
Select Start.
The burst of steam will be released.
Start is deactivated.
Proceed as described to release
further bursts of steam once Start is
shown in green.
After the final burst of steam, Start is
deactivated.
Continue cooking until the end of the
cooking duration.
With timer
The oven will release the bursts of
steam automatically at the specified
times.
Burst of steam appears when the burst of
steam is being released.
After the final burst of steam, Burst of
steam will disappear.
Continue cooking until the end of the
cooking duration.
Continue cooking until the end of the
cooking duration.
71
Page 72

Automatic Programs
With the wide range of automatic
programs, you can achieve excellent
results with ease.
Categories
The automatic programs are sorted
into categories to provide a better
overview. Simply select the appropriate
automatic program for the type of food
you are cooking and follow the
instructions on the display.
Using automatic programs
Select Automatic Programs.
A list will appear.
Select the food category you want.
The automatic programs available for
the category selected will then appear.
Select the automatic program that
you want to use.
Follow the instructions on the display.
Some automatic programs will prompt
you to use the probe. Read the
information under “Roasting – Probe”.
Core temperatures cannot be changed
for automatic programs.
Tip: Use Info to display information
such as how to place or turn the food
depending on the cooking program.
Usage notes
- After cooking, allow the oven
compartment to cool down to room
temperature again before starting a
automatic program.
- Some automatic programs require a
preheating phase before food can be
placed in the oven. A prompt will
appear on the display indicating
when this needs to be done.
- Some automatic programs require
liquid to be added during the cooking
process. You will be prompted by a
message on the display when this
needs to be done (e.g., for adding
liquid).
- The duration quoted for automatic
programs is an estimate. It may
increase or decrease depending on
the program. The duration, in
particular with meat, will vary
depending on the initial temperature
of the food.
- When you use the probe, the cooking
duration will depend on when the
core temperature is reached.
- If by the end of a automatic program
the food is not cooked enough for
your taste, select Continue cooking or
Continue baking. Conventional heating
will then be used for 3minutes to
continue cooking or baking the food.
72
Page 73

Search
(Depending on language)
Under Automatic Programs, you can
search by the name of the categories
and the automatic programs.
This search is a full-text search and can
also be used to search for parts of
words.
From the main menu:
Select Automatic Programs.
The category list will appear on the
display.
Select Search.
Use the keyboard to type in the
search text, e.g., “Bread”.
The number of hits will be shown in the
footer.
If no match is found or if there are
more than 40 matches, the hits field
will be deactivated and you will need
to change the search text.
Automatic Programs
SelectXX hits.
The categories and automatic programs
found will then appear.
Select the automatic program you
want, or the category and then the
automatic program you want.
The automatic program will start.
Follow the instructions on the display.
73
Page 74
Special Modes
This section provides information on the
following applications:
- Defrost
- Dehydrate
- Warm-up Cookware
- Proof
- Slow Roasting
- Sabbath Program
- Keep warm
- Canning
- Frozen food/ready meals
Defrost
Gentle defrosting of frozen goods
means that the vitamins and minerals
are generally retained.
Select Special Modes.
Select Defrost.
If necessary, adjust the recommended
temperature and set the duration.
Air is circulated throughout the oven
compartment to gently defrost the food.
Always observe USDA/CFIA food
safety guidelines.
Risk of infection from bacteria.
Bacteria such as salmonella can
cause life-threatening food
poisoning.
It is particularly important to observe
food hygiene rules when defrosting
fish and meat, and in particular when
defrosting poultry.
Do not use the liquid produced
during defrosting.
Process the food as required as soon
as it has been defrosted.
Tips
- Remove the packaging and place the
frozen food on the universal tray or in
a suitable bowl or dish.
- Use the universal tray with the wire
rack placed on top of it for defrosting
poultry. This way the food will not be
lying in the defrosted liquid.
- Fish does not need to be fully
defrosted before cooking. Defrost
until the food has started to thaw.
The surface will then be sufficiently
thawed to take herbs and seasoning.
Defrosting durations
The duration needed for defrosting
depends on the type and weight of the
frozen food:
Frozen food
[oz/g][min]
Chicken 28/800 90–120
Meat
Sausage 17.5/500 30–50
Fish 35/1000 60–90
Strawberries 10.5/300 30–40
Pound cake
Bread 17.5/500 30–50
Weight/defrosting duration
17.5/500 60–90
35/1000 90–120
17.5/500 20–30
74
Page 75

Special Modes
Dehydrate
Dehydrating or drying is a traditional
method of preserving fruit, certain
vegetables, and herbs.
It is important to check that fruit and
vegetables are fresh, ripe and
unbruised before they are dehydrated.
Prepare the food for drying by cutting
it up, and peeling and coring it if
necessary.
Depending on how big it is, distribute
the food for drying as evenly as
possible over the rack or universal
tray in a single layer.
Tip: You can also use the perforated
Gourmet baking and AirFry tray, if you
have one.
Dry on a maximum of 2levels at the
same time.
Place the food for drying on shelf
levels1+3.
If using the rack and universal tray,
place the universal tray below the
rack.
Select Special Modes.
Select Dehydrate.
Alter the recommended temperature
if necessary and then set the time.
Follow the instructions on the display.
Turn the food being dried on the
universal tray at regular intervals.
The drying times are longer for whole
or halved food.
Food for
drying
Fruit
Vegetables
Mushrooms
Herbs*
special mode/operating mode,
temperature, drying time,
special modeDehydrate,
operating modeSurround
* When drying herbs, always use the universal
tray on shelf level2 and use the
Surround operating mode, as the fan is
switched on in the Dehydrate special mode.
°F [°C] [h]
140-160
(60–70)
130-150
(55–65)
115-125
(45–50)
85-95
(30–35)
2–8
4–12
5–10
4–8
Reduce the temperature if
condensation begins to form in the
oven.
Removing the dried food
Risk of injury caused by hot
surfaces.
The oven gets hot during operation.
You could burn yourself on the
heating elements, oven
compartment, or accessories.
Use pot holders when removing the
food from the oven.
Allow the fruit or vegetables to cool
down after dehydrating.
Dried fruit must be completely dry, but
also soft and elastic. Juice should not
escape when cut.
Store dried food in sealed glass jars
or cans.
75
Page 76

Special Modes
Warm-up Cookware
By preheating the dishware, the food
does not cool down as quickly.
Use heat-resistant dishware.
Place the wire rack on shelf level3
and place the dishware to be heated
on it. Depending on the size of the
dishware, you can also place the rack
on the oven floor and take the side
runners out to make more room.
Select Special Modes.
Select Warm-up Cookware.
Alter the recommended temperature
if necessary and then set the time.
Follow the instructions on the display.
Risk of injury caused by hot
surfaces.
The oven gets hot during operation.
You could burn yourself on the
heating elements, oven
compartment, or accessories.
Condensation may accumulate on
the bottom of the dishware.
Use oven mitts when removing
dishware.
Proof
This mode is designed specifically for
proofing dough.
Select Special Modes.
Select Proof.
Select the proving time.
Follow the instructions on the display.
Keep warm
You can keep food warm in the oven for
several hours.
In order to maintain the quality of
food, select the shortest possible
time.
Select Special Modes.
Select Keep warm.
Place the food to be kept warm in the
oven and confirm with OK.
Alter the recommended temperature
if necessary and then set the time.
Follow the instructions on the display.
76
Page 77

Special Modes
Slow Roasting
The Slow Roastingmethod is ideal for
cooking beef, pork, veal, or lamb when
you want a tender result.
Always observe USDA/CFIA food
safety guidelines.
First briefly sear the meat on all sides at
a high temperature on the cooktop in
order to seal it.
Then place the meat in the preheated
oven compartment where the low
temperature and long cooking duration
will cook it to perfection and ensure it is
very tender.
The meat will relax. The juices inside
will start to circulate evenly throughout
the meat to reach the outer layers.
This gives very tender and succulent
results.
Only use lean meat which has been
correctly seasoned and trimmed.
Bones should be removed before
cooking.
You can leave the meat in the oven to
keep warm until you serve it. This will
not affect results in any way.
Serve on preheated plates with very
hot sauce or gravy to prevent it
cooling down too quickly. The meat is
at an ideal temperature to eat straight
away.
Tip: Using the pull-down menu, turn on
the Keep warmfunction to keep the food
warm without inadvertently cooking it
further.
For searing, use a suitable cooking oil
or fat that can withstand high
temperatures (e.g., clarified butter,
vegetable oil).
Do not cover meat during the cooking
process.
The cooking duration takes approx.
2–4hours depending on the weight
and size of the meat and how well you
want it cooked.
As soon as the cooking process has
finished, you can carve the meat
straight from the oven. It does not
need to rest.
77
Page 78

Special Modes
Using the Slow RoastingSpecial
Mode
Observe the information under
“Roasting – Precision Probe”.
Select Special Modes.
Select Slow Roasting.
Follow the instructions on the display.
Place the necessary accessories in
the oven compartment for the
preheating phase.
Set the temperature and the core
temperature.
While the oven is preheating, sear the
meat on all sides on the cooktop.
Danger of burning due to hot
surfaces.
The oven gets hot during operation.
You could burn yourself on the
heating elements, oven
compartment, or accessories.
When the oven is hot, use pot
holders to insert, remove, or turn
food, as well as when adjusting the
oven shelves, etc.
Once Insert the probe and place food in
the oven appears on the display, place
the seared meat on the wire rack and
insert the probe so that the metal tip
is fully in the center of the meat.
Close the door.
Using the Surroundoperating mode
Use the universal tray with the wire
rack placed on top of it.
Turn off the Boosterfunction for the
preheating phase.
Place the wire rack with the universal
tray on shelf level 3.
Select Operating Modes.
Select the Surroundoperating
mode and a temperature of 250°F
(120°C).
Turn off the Boosterfunction via the
pull-down menu.
Preheat the oven together with the
universal tray and wire rack for
approx. 15minutes.
While the oven is preheating, sear the
meat on all sides on the cooktop.
Danger of burning due to hot
surfaces.
The oven gets hot during operation.
You could burn yourself on the
heating elements, oven
compartment, or accessories.
When the oven is hot, use pot
holders to insert, remove, or turn
food, as well as when adjusting the
oven shelves, etc.
Place the seared meat on the wire
rack.
At the end of the program, Readywill
appear on the display and an audible
signal will sound.
78
Reduce the temperature to 210°F
(100°C).
Continue cooking until the end of the
cooking duration.
Page 79

Cooking durations/core temperatures
Always observe USDA/CFIA food safety guidelines.
Special Modes
Meat Cooking
Core temperature
duration
Beef tenderloin, approx. 2.2lbs
(1kg)
- rare
- medium
- well done
60–80min
75–85min
110–130min
113–119°F (45–48°C)
129–135°F (54–57°C)
145–151°F (63–66°C)
Prime rib, approx. 2.2lbs (1kg)
- rare
- medium
- well done
Pork tenderloin, approx. 0.75lbs
70–80min
105–115min
130–140min
113–119°F (45–48°C)
129–135°F (54–57°C)
145–151°F (63–66°C)
70–90min 145–156°F (63–69°C)
(350g)
Gammon joint*, approx. 2.2lbs
140–160min 145–151°F (63–66°C)
(1kg)
Veal tenderloin, approx. 2.2lbs
(1kg)
- pink
- medium
- well done
45–55min
75–85min
90–100min
113–119°F (45–48°C)
129–135°F (54–57°C)
145–151°F (63–66°C)
Saddle of veal*, approx. 2.2lbs
(1kg)
- pink
- medium
- well done
75–85min
100–130min
130–140min
113–119°F (45–48°C)
129–135°F (54–57°C)
145–151°F (63–66°C)
Saddle of lamb* 40–60min 129–151°F (54–66°C)
*
Boneless
79
Page 80

Special Modes
Sabbath Program
The Sabbath Program and Yom-Tov
Special Modes help to support religious
observance.
To comply with the Sabbath
regulations, follow the instructions on
the display.
The oven heats up to the temperature
you have set and maintains this
temperature for a maximum of 24hours
(Sabbath Program) or 76hours (YomTov). In both Special Modes, the oven
turns off automatically after 76hours.
Turn off cabinet door front
recognition.
Place the food in the oven.
Select Special Modes.
Select Sabbath Program.
Select the Special Mode you want
(Sabbath Program or Yom-Tov).
Select the operating mode you want
to use.
The Special Mode will be canceled in
the event of a power failure. After a
power failure, the oven will only
remain in compliance with Sabbath
regulations for as long as it continues
to be disconnected from the power
supply. As soon as the connection is
restored, Power failure -Program
cancelled is displayed.
Using Sabbath Program
This Special Mode is suitable for the
weekly Sabbath (Shabbat). You can use
it to keep food warm for up to 24hours,
until after the first door opening.
Set the temperature.
Select Start.
Sabbath Program and the set
temperature will appear in the display.
The oven heating will turn on around
30seconds after you have closed the
door. The oven interior lighting will
remain on during the entire cooking
process.
You will not be able to start the
Special Mode if you have set a timer
or alarm.
Once a Special Mode has started, it
cannot be changed or saved under
Favorites.
80
The time of day will not appear. The
motion sensor will not respond, and
neither will any of the sensor buttons
(except for the On/Off switch).
The following message is displayed:
Sabbath - Do not open the door. This
message disappears after approx.
45minutes and is displayed again from
time to time after that.
Page 81

Special Modes
If the message is not displayed, the
oven is not heating up and you can
open the door and close it again.
As soon as you have opened the door
for the first time, the oven heating
remains turned off until the end of
the Special Mode.
If you leave the door closed until the
end of the Special Mode, the oven
heating will only turn off after
24hours. The oven remains turned on.
If you want to end the Special Mode
prematurely, turn off the oven using
the On/Off switch.
After the end of the Special Mode, the
notification Sabbath - Do not open the
door disappears and the oven heating
turns off. The rest of the notifications
remain visible in the display until the
oven turns off automatically after
76hours.
Using Yom-Tov
This Special Mode is suitable for days
of observance spanning several days
across the week. You can use it to keep
food warm for up to 76hours. You can
open and close the door multiple times
during this time.
Set the temperature.
Select Start.
Yom-Tov and the set temperature will
appear in the display.
The oven heating will turn on around
30seconds after you have closed the
door. The oven interior lighting will
remain on during the entire cooking
process.
The time of day will not appear. The
motion sensor will not respond, and
neither will any of the sensor buttons
(except for the On/Off switch).
The following message is displayed:
Sabbath - Do not open the door. This
message disappears after approx.
45minutes and is displayed again from
time to time after that.
If the message is not displayed, you
can open and close the door multiple
times. The oven heating remains on.
If you want to end the Special Mode
prematurely, turn off the oven using
the On/Off switch.
The oven heating remains turned on
until the end of the Special Mode. The
oven will turn off automatically after
76hours.
81
Page 82

Special Modes
Canning
Risk of infection from bacteria.
The spores of the botulinum
bacterium are not sufficiently killed
by canning legumes and meat only
once. Toxins may form which can
lead to serious poisoning. These
spores are only destroyed by
canning the food again.
After they have cooled down, always
reheat legumes and meat a second
time within 2days.
Risk of injury from increased
pressure in sealed cans.
Canning food and heating it up in
closed containers results in an
increase in pressure which can
cause them to explode.
Do not use cans for canning or
reheating food.
Always observe USDA/CFIA food
safety guidelines.
Preparing fruit and vegetables
The instructions are for 6 jars with a
capacity of 1L each.
Only use jars that are specifically
designed for canning (preserving jars
or jars with a screw cap). Only use
undamaged jars and rubber rings.
Rinse the jars with hot water before
canning and fill them up to a
maximum of 3/4" (2cm) below the
rim.
After filling the jars, clean the outside
of the rims with a clean cloth and hot
water, and then seal the jars.
Slide the universal tray onto shelf
level3. Place the jars on the tray.
Select the Convection
Bakeoperating mode and a
temperature of
320–340°F (160–170°C).
Wait until bubbles rise evenly in the
jars.
82
Then reduce the temperature to
prevent the contents from boiling over.
Page 83

Special Modes
Canning fruit and vegetables
Set the specified post-canning
warming temperature as soon as
bubbles are visible in the jars, then
leave the jars in the warm oven for
the time specified.
Canning vegetables
As soon as bubbles are visible in the
jars, set the specified canning
temperature and cook the vegetables
for the time specified.
After canning, set the specified post-
canning warming temperature, then
leave the jars in the warm oven for
the time specified.
/ /
85°F
Fruit –/–
Pickling
cucumbers
Red beets
Beans (green
or yellow)
–/–
250°F
(120°C)
30–40min
250°F
(120°C)
90–120min
(30°C)
25–35min
85°F
(30°C)
25–30min
85°F
(30°C)
25–30min
85°F
(30°C)
25–30min
Removing the jars after canning
Risk of injury caused by hot
surfaces.
The jars will be very hot after
canning.
Use oven mitts when removing the
jars from the oven.
Take the jars out of the oven.
Cover the jars with a towel and leave
to set for approx. 24hours in a draftfree area.
After they have cooled down, always
reheat beans and meat a second time
within 2days.
Remove the fasteners from the jars
and make sure all jars are closed
properly when storing them.
Either boil open jars again or store
them in a cool place and consume the
preserved fruit or vegetables
immediately.
Check the jars during storage. If jars
have opened during storage or if the
screw cap is bulging and does not
make a popping noise when opened,
dispose of the contents.
/Canning temperature and time once
bubbles are visible in the jars
/Post-canning warming temperature
and time
83
Page 84

Special Modes
Frozen food/ready meals
Tips for cakes, pizza, and baguettes
- Bake cakes, pizza, and baguettes on
parchment paper on the wire rack.
- Use the lowest temperature
recommended by the manufacturer.
Tips for French fries, croquettes, and similar items
- Cook frozen food items on parchment
paper placed on a baking tray or the
universal tray.
- Use the lowest temperature
recommended by the manufacturer.
- Turn several times during cooking.
Preparing frozen food/ready meals
Handling and cooking food correctly
is essential for maintaining good
health.
Cakes, pizzas, and French fries
should be cooked until golden, not
dark brown.
Select the operating mode and
temperatures recommended on the
food’s packaging.
Preheat the oven.
Place the food in the preheated oven
on the shelf level recommended on
the packaging.
Check the food at the end of the
shortest time recommended on the
packaging.
84
Page 85

MyMiele
Under MyMiele, you can save
frequently used applications.
It is particularly useful with the
automatic programs as you do not need
to work through every menu level in
order to start a program.
Tip: You can also set menu options that
you have entered in MyMiele to appear
on the start screen (see “Settings –
Start screen”).
Adding entries
You can add up to 20entries.
Select MyMiele.
Select Add entry.
You can select options from the
following categories:
- Operating modes
- Automatic Programs
- Special Modes
- Favorites
Deleting entries
Select MyMiele.
Touch the entry you want to delete
and keep your finger on it until the
context menu appears.
Select Delete.
The entry will then be removed from the
list.
Moving entries
Select MyMiele.
Touch the entry you want to move
and keep your finger on it until the
context menu appears.
Select Move.
An orange border will appear around
the entry.
Move the entry.
The entry will now appear in the
position you want it in.
- Maintenance
Confirm with OK.
The selected subitem and its respective
symbol will appear in the list.
Proceed as described for further
entries. Only options that have not
yet been selected are available for
selection.
85
Page 86

Favorites
You can create and save up to 20 of
your own programs.
- You can combine up to 10cooking
stages to accurately program your
favorite or most frequently used
recipes. In each cooking stage, you
can select settings such as the
operating mode, temperature, and
cooking duration or core
temperature.
- You can specify the shelf level(s) for
the food.
- You can enter a program name for
your recipe.
When you next select the program, it
will start automatically.
There are different ways of creating a
Favorite:
- When a automatic program finishes
running, save it as a separate
program.
- After running a program with a set
duration, save it.
Then name the program.
Creating a Favorite
Select Favorites.
Select Create program.
You can now specify the settings for the
first cooking stage.
Follow the instructions on the display:
Select and confirm the settings.
If you select the Preheatfunction, use
Add to add another cooking stage
where you set a cooking duration.
Only then can you save or start the
program.
All settings for the first cooking stage
have now been set.
More cooking stages can be added, for
example, if you would like to add
another operating mode to follow the
first.
If additional cooking stages are
required, selectAdd and proceed as
for the first cooking stage.
When you have finished setting the
cooking stages, select Set shelf level.
Select the level(s) you want.
Confirm with OK.
If you want to check the settings or to
change them at a later stage, tap the
cooking stage in question.
Select Save.
Enter the program name using the
keyboard.
You can add a line break for longer
program names using the symbol.
Once you have entered the program
name, select Save.
A message will appear on the display
confirming that the name has been
saved.
Confirm with OK.
86
You can start the saved program
immediately, delay the start, or change
the cooking stages.
Page 87

Favorites
Starting Favorites
Place the food in the oven cavity.
Select Favorites.
Select the program you want to use.
Depending on the program settings, the
following menu options will appear on
the display:
- Start now
The program will start immediately.
The oven heating will turn on
immediately.
- Ready at
You can set the time at which the
cooking program should end. The
oven will turn off automatically at the
time you have set.
- Start at
You can set the time at which the
cooking program should start. The
oven will turn on automatically at the
time you have set.
- Display cooking stages
A summary of your settings will
appear on the display.
- Display actions
The required actions, e.g., placing the
food in the oven, will appear on the
display.
Use Info to display information such
as how to place or turn the food
depending on the cooking process.
At the end of the program, select
Close.
Changing cooking stages
Cooking stages in an automatic
program that have been saved under a
different name cannot be changed.
Select Favorites.
Touch the program you want to
change and keep your finger on it
until the context menu appears.
Select Change.
Select the cooking stage that you
want to change or Add to add another
cooking stage.
Select and confirm the settings.
If you want to start the modified
program without changing it,
selectStart.
SelectSave when you have changed
all the settings.
A message will appear on the display
confirming that the name has been
saved.
Select the menu option you want.
Confirm the message regarding
which shelf level to use with OK.
The selected program will begin
automatically right away or at the time
set.
Confirm with OK.
The saved program has been changed
and you can start it immediately or
delay the start.
87
Page 88

Favorites
Renaming Favorites
Select Favorites.
Touch the program you want to
change and keep your finger on it
until the context menu appears.
Select Rename.
Change the program name using the
keyboard.
You can add a line break for longer
program names using the symbol.
Once you have changed the program
name, selectSave.
A message will appear on the display
confirming that the name has been
saved.
Confirm with OK.
The program has now been renamed.
Deleting a Favorite
Select Favorites.
Moving Favorites
Select Favorites.
Touch the program you want to move
and keep your finger on it until the
context menu appears.
Select Move.
An orange border will appear around
the entry.
Move the program.
The program will now appear in the
position you want it in.
Touch the program you want to delete
and keep your finger on it until the
context menu appears.
Select Delete.
Confirm the query with Yes.
The program is deleted.
Go to Settings| Factory default| Favorites
to delete all Favorites at the same
time.
88
Page 89

Baking
Handling and cooking food correctly
is essential for maintaining good
health.
Cakes, pizzas, and French fries
should be cooked until golden, not
dark brown.
Always observe USDA/CFIA food
safety guidelines.
Tips for baking
- Set a cooking duration. If used for
baking, do not delay the start for too
long. Otherwise the cake mixture or
dough will dry out, and the raising
agents will lose their effectiveness.
- Generally speaking, you can use wire
racks, baking trays, universal trays,
and any type of bakeware made of
heat-resistant material.
- Avoid using bright, thin-walled pans
made from a shiny material as they
give an uneven or poor browning
result. In certain unfavorable
conditions, the food will not cook
properly.
- Place cakes in rectangular bakeware
on the wire rack with the longer side
across the width of the oven for
optimum heat distribution and even
results.
- Always place bakeware on the wire
rack.
- When baking cakes with fruit
toppings or deep cakes, place the
pan on the universal tray to catch any
spillages.
Using parchment paper
Miele accessories, e.g., the universal
tray, are treated with PerfectClean (see
“Features”). Surfaces treated with
PerfectClean generally do not need to
be greased or covered with parchment
paper.
Use parchment paper when baking
lye mixtures (e.g., pretzels) because
the sodium hydroxide can damage
the PerfectClean treated surface.
Use parchment paper when baking
sponge cake, meringue, macaroons,
or similar items. These are more likely
to stick due to their high egg white
content.
Use parchment paper when cooking
frozen food on the wire rack.
Selecting the temperature
Select the suggested temperature in
general.
Choosing a baking temperature higher
than those recommended may reduce
the cooking time, but will lead to
uneven browning and unsatisfactory
cooking results.
Selecting the cooking duration
Check whether the food is cooked
shortly before the end of the specified
cooking duration. Stick a wooden
skewer into the food.
If it comes out clean without any batter/
dough on it, the food is done.
89
Page 90

Baking
Notes on the operating modes
You can find an overview of all the
operating modes with their
recommended values in “Main and
submenus”.
Using Automatic Programs
Follow the instructions on the display.
Using Convection Bake
Because the blower distributes the heat
around the oven compartment straight
away, you can use a lower temperature
than you would with the
Surroundoperating mode.
Use this operating mode if you are
baking on multiple shelf levels at the
same time.
1shelf: Place the food on shelf
level2.
2shelves: Place the food on shelf
levels1+3 or 2+4.
3shelves: Place the food on shelf
levels1+3+5.
Tips
- If you are cooking on multiple shelf
levels at the same time, slide the
universal tray in on the lowest level.
Using Moisture Plus
Use this operating mode with your
preferred type of heating for cooking
with moisture injection.
Place the food on shelf level2.
Using Intensive
Use this operating mode for baking
cakes with moist toppings.
Do not use this operating mode for
baking thin biscuits.
Place cakes on shelf level1 or 2.
Using Surround
Dark metal, enamel, or aluminum
bakeware with a matte finish, as well as
heat-resistant glass, ceramic, and
coated bakeware can be used.
Use this operating mode for cooking
traditional recipes. If using an older
recipe or cookbook, set the oven
temperature 25°F (10°C) lower than that
recommended. This will not change the
cooking duration.
Place the food on shelf level1 or 2.
- For moist cookies and cakes, bake on
a maximum of 2shelf levels at once.
90
Page 91

Roasting
Always observe USDA/CFIA food
safety guidelines.
Tips for roasting
- You can use all dishware made from
temperature-resistant materials, e.g.,
roasting dishes, roasting pans with
lid, ovenproof glass dishes, roasting
bags, dishes made from earthenware
or cast iron, the universal tray, wire
rack, and/or anti-splash insert (if
available) on top of the universal tray.
- Preheating the oven is only required
when preparing roast beef and fillets.
Preheating is generally not necessary.
- Use a closed cooking container for
roasting meat, such as a roasting
dish. The meat will stay succulent.
The oven compartment will also stay
cleaner than when roasting on the
wire rack. It ensures that enough
stock remains for making gravy.
- If you are using a roasting bag,
follow the instructions on the
packaging.
- If you are using the wire rack or an
open cooking container for roasting,
you can add a little fat or oil to very
lean meat or place a few strips of
bacon on the top.
- Season the meat and place in the
cooking container. Dot with butter or
brush with oil or cooking fat. For large
lean cuts of meat (4–6lb/2–3kg) and
fatty poultry, add about 1/2cup
(1/8liter) of water to the dish.
- Do not add too much liquid during
cooking as this will hinder the
browning process. Browning only
occurs towards the end of the
cooking duration. Remove the lid
about halfway through the cooking
duration if you want a more intensive
browning result.
- At the end of the program, take the
food out of the oven, cover it, and
leave to stand for about 10minutes.
This helps retain the juices when the
meat is sliced.
- For a crisp finish, baste poultry
10minutes before the end of the
cooking duration with slightly salted
water.
Selecting the temperature
As a general rule, select the
temperature given in the
corresponding recipe.
For large pieces of meat, do not
choose a temperature that is too
high. The roasting process will take
longer, but the meat will cook through
evenly and the skin or crackling will
not be too thick.
When cooking with Convection
Roast, Moisture Plus or Auto
Roast, select a temperature which
is approx. 50°F (20°C) lower than with
Surround.
When roasting on the wire rack, set a
temperature approx. 25°F (10°C)
lower than for roasting in a covered
cooking container.
91
Page 92

Roasting
Selecting the cooking duration
Check whether the food is cooked
shortly before the end of the specified
cooking duration.
Tips
- For frozen meat, increase the cooking
duration by approx. 10minutes per lb
(20minutes per kg).
- Frozen meat weighing less than
approx. 3.3 lb (1.5kg) does not need
to be defrosted before roasting.
Notes on the operating modes
You can find an overview of all the
operating modes with their
recommended values in “Main and
submenus”.
Use the Bakeoperating mode
towards the end of the cooking
duration to brown the base of the
food.
Do not use the Intensiveoperating
mode for roasting as the juices will
become too dark.
Using Automatic Programs
Follow the instructions on the display.
UsingConvection Roast orAuto
Roast
These operating modes are suitable for
roasting meat, fish, and poultry that
needs to be well browned, as well as
sirloin and fillet.
The Convection Roastoperating
mode allows you to use a lower
temperature than you would with the
Surroundoperating mode, because
the heat is immediately distributed
throughout the oven compartment.
With the Auto Roastoperating
mode, the oven compartment heats
initially the highest temperature in this
operating mode for searing. As soon as
this temperature has been reached, the
oven automatically drops the
temperature back down to the
preselected cooking temperature
(continued roasting temperature).
Place the food on shelf level3.
Using Moisture Plus
Use this operating mode with your
preferred type of heating for cooking
with moisture injection.
Place the food on shelf level2.
Using Surround
Use this operating mode for cooking
traditional recipes. If using an older
recipe or cookbook, set the oven
temperature 50°F (10°C) lower than
that recommended. This will not change
the cooking duration.
Place the food on shelf level2.
92
Page 93

Roasting
Probe
Risk of injury. The metal tip of the
probe can cause injury.
The wireless probe enables the roasting
process to be monitored simply and
reliably. The wireless probe can be
cleaned in the dishwasher.
How it works
The metal tip of the probe must be fully
inserted into the center of the food. It
contains four temperature sensors. The
sensors measure the core temperature
inside the food during the cooking
process.
They are designed to monitor the rise
in temperature in the coldest part of
the food. The coldest part is usually in
the center (core) of the food. The four
temperature sensors are arranged in
the metal tip so that the measured
values they provide can be used to
calculate the temperature in the
coldest part of the food. This is still
possible even if the metal tip is not
located exactly in the core of the food.
The core temperature can be set up to
210°F (99°C). Information on food and
respective core temperatures can be
found in “Special Modes – Slow
Roasting”.
The cooking duration will be similar for
cooking processes with or without the
probe.
The core temperature value is sent via
radio signal from the transmitter in the
handle of the wireless probe via the
antenna in the top right of the oven to
the electronic of the appliance as soon
as the food is put in the oven with the
probe inserted.
Efficient radio transmission is only
guaranteed if the oven door is closed. If
the door is opened during a cooking
process, e.g., to baste the food, radio
signal transmission is interrupted. It will
only resume when the door is closed. It
will take a few seconds before the
current core temperature appears again
in the display.
If you do not intend to use the wireless
probe, do not leave it in the oven while
cooking. Always put it in the storage
sleeve.
The rise in the core temperature reflects
the extent to which the food is cooked.
You can program the core temperature
to be lower or higher, depending on
whether you want your meat to be rare,
medium, or well done.
93
Page 94
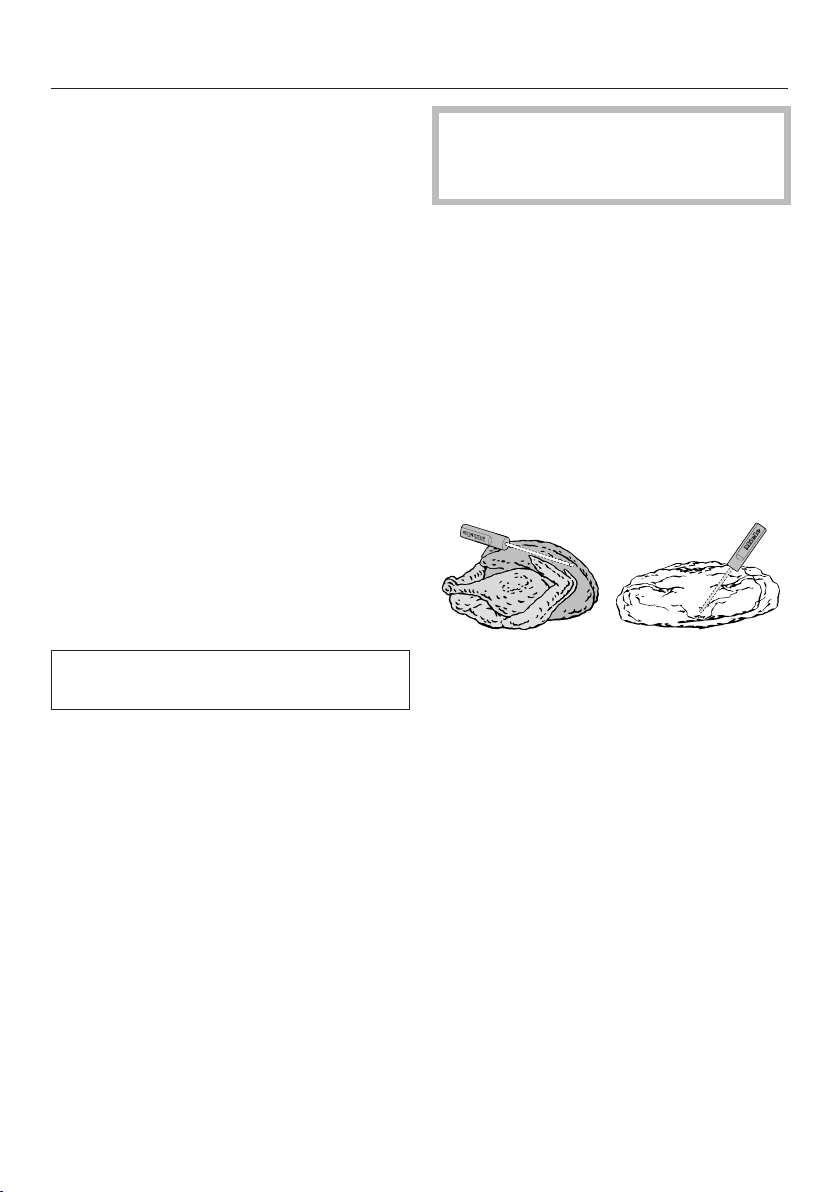
Roasting
When to use the probe
Some automatic programs and Special
Modes will prompt you to use the
probe.
You can also use the probe with
Favorites and with the following
operating modes:
- Auto Roast
- Convection Roast
- Intensive
- Surround
- Moisture Plus + Auto Roast
- Moisture Plus + Conv Bake/
Moisture Plus + Conv Roast
- Moisture Plus + Intensive
- Moisture Plus + Surround
Important usage notes
To ensure the probe works correctly,
please observe the following instructions.
- Do not use deep, narrow, metal
cooking containers, as these will
weaken the radio signal.
- Do not place any metal objects such
as lids or aluminum foil above the
wireless probe. Do not use the wire
rack or universal tray on a shelf level
above the food containing the probe.
Glass lids may be used.
- Do not use another standard metal
cooking thermometer when using the
wireless probe.
- Do not allow the handle of the
wireless probe to sit in any sauce or
cooking liquid, or to rest on the food
or the edge of the cooking container.
94
Risk of breakage!
Do not use the wireless probe to lift
or carry the food.
In addition please note:
- The meat can be placed in a pot or
on the universal tray and wire rack.
- The metal tip of the probe must be
inserted into the center of the food so
that the temperature sensors reach
the core. The handle should be
angled upward. Make sure that the
handle is not horizontal, facing the
door, or the corners of the oven
interior.
- When cooking poultry, insert the
metal part into the thickest part of the
breast. You can find the thickest part
of the breast by pressing the area
with your thumb and index finger.
- The metal tip must not touch any
bone or be inserted in areas with a lot
of fat. Fatty tissue and bones can
cause the probe to turn off early.
- When using roasting bags or
aluminum foil, insert the probe
through the bag or foil into the center
of the food. You can also place meat
inside the bag or foil with the probe
already inserted. Be sure to follow the
instructions provided by the
manufacturer of the roasting bag or
aluminum foil.
Page 95

Roasting
- The wireless probe can only be
inserted horizontally into flat foods
such as fish.
If the wireless probe is no longer
recognized during cooking, a message
will appear in the display. Reposition
the probe in the food.
In some cases, reception interference
can even be caused by a microwave
operating in the vicinity of the oven,
because the microwave uses a similar
frequency range to that of the wireless
probe. Turn off the microwave when
you are using the wireless probe.
Using the probe
Risk of injury. The metal tip of the
probe can cause injury.
Remove the wireless probe from the
storage sleeve.
Insert the metal tip of the probe into
the food. The handle should be
pointing up diagonally.
Place the food in the oven.
Close the door.
Select an operating mode or
automatic program.
Set the temperature and the core
temperature if necessary.
Danger of injury caused by hot
surfaces.
The handle of the probe can get hot.
You can burn yourself on the handle.
Wear pot holders when removing the
probe from its socket.
Tip: If the food is not cooked
sufficiently when the core temperature
is reached, insert the probe into another
place or increase the core temperature
and repeat the program.
Time-left display
If the temperature set for a cooking
process is above 285°F (140°C), the
estimated duration remaining (time left)
will appear on the display.
The time left is calculated from the
cooking temperature selected, the set
core temperature, and the progress of
the core temperature as it rises.
The time left first shown is an estimate.
As the cooking process continues, the
time left is revised continuously, and a
more accurate figure is shown.
The time left will be deleted if the
cooking temperature or core
temperature is changed or if a different
operating mode is selected. If the door
is opened for a longer time, the time left
will be recalculated.
Core temperatures cannot be changed
for automatic programs.
Follow the instructions on the display.
The cooking program finishes as soon
as the core temperature is reached.
95
Page 96
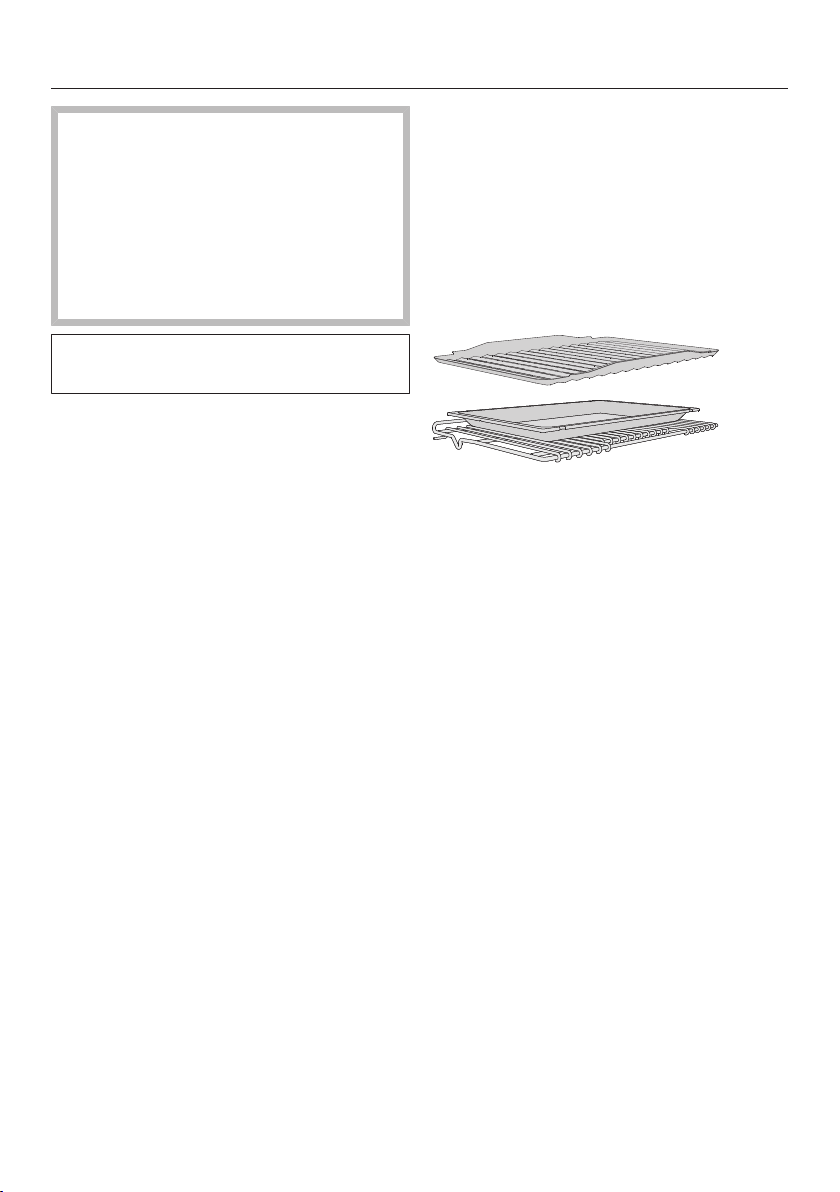
Broiling
Risk of injury caused by hot
surfaces.
If you broil with the door open, the
hot air will escape from the oven
before it has been cooled by the
cooling fan. The control elements will
get hot.
Broil with the oven door closed.
Always observe USDA/CFIA food
safety guidelines.
Tips for broiling
- Preheating is necessary when
broiling. Preheat the browning/
broiling element for approx. 5minutes
with the door closed.
- Quickly rinse meat under cold
running water and pat dry. Do not
season the meat with salt before
broiling, as this will draw out the
juices.
- Add a little oil to lean meat if
necessary. Do not use other types of
fat as they can easily burn and cause
smoke.
- Clean fish in the normal way. To
enhance the flavor, season with a
little salt. You can also drizzle the fish
with lemon juice.
- Use the universal tray with the
broiling and roasting insert (if present)
on top and place the universal tray on
the wire rack.
- The tray under the insert will collect
the meat juices and stop them from
burning so that they can be used for
making gravy and sauces. Brush the
wire rack or the broiling and roasting
insert with oil and then place the food
on top. Using the broiling and
roasting insert can reduce the
amount of smoke produced.
Selecting the temperature
As a general rule, select the
temperature given in the
corresponding recipe.
For large pieces of meat, do not
choose a temperature that is too
high. The roasting process will take
longer, but the meat will cook through
evenly and the skin or crackling will
not be too thick.
Choosing a shelf level
Select the shelf level depending on
the thickness of the food to be
cooked.
Place flat food on shelf level4 or 5.
Place thicker food on shelf level2 or
3.
96
Page 97

Broiling
Selecting the cooking duration
Broil thinner cuts of meat/slices of
fish for approx. 6–8minutes per side.
It is best to broil food of a similar
thickness at the same time so that
the cooking durations do not vary too
much.
Check whether the food is cooked
shortly before the end of the specified
cooking duration.
Tip: If the surface of a thicker cut of
meat is browned but the center is still
raw, move the food to a lower level or
reduce the temperature and continue
broiling. This will stop the surface from
becoming too dark.
Notes on the operating modes
You can find an overview of all the
operating modes with their
recommended values in “Main and
submenus”.
The plastic on the probe can melt at
very high temperatures.
Do not use the probe when using the
broiling operating modes.
Do not store the probe in the oven
compartment when it is not being
used.
Using Maxi Broil
Use this operating mode to broil flat thin
cuts in large quantities and for browning
large baked dishes.
The entire browning/broiling element
will become red hot to produce the
necessary heat.
Using Broil
Use this operating mode to broil flat thin
cuts in smaller quantities and for
browning small baked dishes.
Only the center of the browning/broiling
element glows red to generate the
required heat.
Using Convection Broil
This operating mode is suitable for
broiling thicker food, such as chicken.
We generally recommend a temperature
setting of 425°F (220°C) for thinner
types of food and 350-400°F (180–
200°C) for thicker cuts.
97
Page 98

Gas cooktop cleaning and care
Danger of injury caused by hot
burners.
The burners will be hot after use.
Turn off the cooktop.
Allow the burners to cool down
before cleaning the cooktop.
Risk of injury due to electric
shock.
The steam from a steam cleaning
appliance could reach live electrical
components and cause a short
circuit.
Never use a steam cleaner for
cleaning.
All surfaces could be discolored or
damaged if unsuitable cleaning
agents are used. All surfaces are
susceptible to scratching.
Remove any residual cleaning agent
immediately.
Do not clean with any abrasive or
sharp pointed objects.
Unsuitable cleaning agents
To avoid damaging the surfaces of your
appliance, do not use:
- cleaning agents containing soda,
alkali, ammonia, acids, or chlorides
- cleaning agents containing descaling
agents
- stain or rust removers
- abrasive cleaning agents
(e.g.,powder cleaners and cream
cleaners)
- solvent-based cleaning agents
- dishwasher cleaning agents
- grill and oven sprays
- glass cleaners
- hard, abrasive brushes or sponges
(e.g.,pot scourers, brushes, or
sponges which have been previously
used with abrasive cleaning agents)
- sharp objects
- eraser sponges
98
The surfaces of the burners and grates
will become more matte in the course
of time. This is quite normal and does
not indicate damage to the material.
Clean the cooktop after each use
with a soft sponge, warm water and a
small amount of liquid dish soap.
Soften any stubborn soiling
beforehand.
Dry the cooktop after using water to
clean it. This helps prevent lime
deposits.
Page 99

Gas cooktop cleaning and care
Tip: Food which boils over on a hot
cooktop can cause discoloration of the
burner components. Remove any
soiling and salt and sugar splashes
immediately.
Cleaning the grates
Remove the grates.
Clean the grates in a dishwasher or
with a solution of warm water and a
little liquid dish soap applied with a
soft sponge.
If necessary, the rough side of a
kitchen sponge can be used.
Control knobs in stainless steel color
Do not clean the control knobs in the
dishwasher or with a stainless steel
cleaning agent.
Clean the control knobs using a
solution of warm water and a little
liquid dish soap applied with a soft
sponge.
Cleaning the normal/power burners
The burner cap is not dishwashersafe.
Make sure that the flame holes are
completely dry after cleaning.
Remove the burner cap.
Clean the burner cap using a soft
sponge, warm water and a small
amount of liquid dish soap.
Clean all non-removable parts of the
burner with a damp cloth.
Ignitor
Do not let the ignitor get wet. If it gets
wet, it will not spark.
Clean the ignitor carefully with a well
wrung-out cloth.
The control knobs may become
discolored if they are not cleaned
regularly.
Clean the control knobs using a
solution of warm water and a little
liquid dish soap applied with a soft
sponge.
99
Page 100

Cleaning and care of the oven
Risk of injury caused by hot
surfaces.
The oven gets hot during operation.
You could burn yourself on the
heating elements, oven
compartment, or accessories.
Allow the heating elements, oven
compartment, and accessories to
cool before manual cleaning.
Risk of injury due to electric
shock.
The steam from a steam cleaning
appliance could reach live electrical
components and cause a short
circuit.
Never use a steam cleaner for
cleaning.
All surfaces could be discolored or
damaged if unsuitable cleaning
agents are used. The oven front is
particularly susceptible to damage
from oven cleaners or descaling
agents.
All surfaces are susceptible to
scratching. Scratches on glass can
lead to breakage in some
circumstances.
Remove all cleaning agent residues
immediately.
Unsuitable cleaning agents
To avoid damaging the surfaces of your
appliance, do not use:
- Cleaning agents containing soda,
ammonia, acids, or chlorides
- Abrasive cleaning agents
(e.g.,powder cleaners and cream
cleaners)
- Solvent-based cleaning agents
- Stainless steel cleaning agents
- Dishwasher cleaner
- Glass cleaners
- Cleaning agents for ceramic
cooktops
- Hard, abrasive brushes or sponges
(e.g.,pot scourers, brushes, or
sponges which have been previously
used with abrasive cleaning agents)
- Eraser sponges
- Sharp metal scrapers
- Steel wool
- Spot cleaning with mechanical
cleaning agents
- Oven cleaners
- Stainless-steel spiral pads
If soiling is allowed to sit for any
length of time, it may become
impossible to remove. If items are
used frequently without being
cleaned, it may become very difficult
to clean them.
It is therefore best to remove any
soiling immediately.
The accessories are not
dishwasher-safe.
- Cleaning agents containing descaling
agents on the front
100
 Loading...