

Page 1
Operating and installation instructions
Ovens
H 4402 B
H 4312 B, H 4412 B
To avoid the risk of accidents or
damage to the appliance, it is
essential to read these instructions
before it is installed and used for the
first time.
en - AU, NZ
M.-Nr. 07 784 890
Page 2

Contents
Warning and safety instructions .....................................5
Caring for the environment.........................................10
Description of the appliance........................................11
H 4312 B, H 4412 B, H 4402 B .......................................11
Features .........................................................12
Oven controls ..................................................12
Cooling fan ....................................................12
PerfectClean treated surfaces .....................................12
Catalytic enamelled surfaces ......................................12
Retractable controls .............................................12
Energy efficiency rating according to EN 50304..........................12
Accessories ......................................................13
Universal tray and rack...........................................13
Anti-splash insert ...............................................13
Handle .......................................................13
Controls ........................................................14
Function selector ..................................................14
Temperature selector ..............................................14
Temperature indicator light y .....................................14
Oven functions...................................................15
Clock/Timer .....................................................16
Controls .........................................................16
Operation ........................................................16
To set the time of day for the first time..................................17
Changing the time of day .........................................17
To change the sound of the buzzer....................................17
Using the minute minder ............................................18
To set the minute minder .........................................18
To check and change an entered minute minder time...................18
To cancel the time set for the minute minder ..........................18
Before using for the first time.......................................19
Operation .......................................................20
Using the oven....................................................20
Pre-heating ......................................................20
Programming cooking durations (automatic switch-off) ......................21
To check and change an entered duration ...........................21
To delete a cooking duration ......................................21
2
Page 3

Contents
Baking tips ......................................................22
Temperature, baking duration ........................................22
Bakeware ........................................................22
Baking paper ..................................................22
Universal tray ..................................................23
Retangular tins .................................................23
Shelf levels.......................................................23
Frozen food ......................................................23
Baking chart .....................................................24
Fan Plus U ......................................................24
Conventional V ..................................................25
Intensive Bake O .................................................26
Roasting tips ....................................................27
Useful tips .......................................................28
Browning......................................................28
Standing time ..................................................28
Roasting poultry ................................................28
Frozen meat ...................................................28
Roasting chart ...................................................29
Grilling tips ......................................................30
Preparing food for grilling ...........................................31
Grilling on the rack.................................................31
Useful tips .......................................................31
Fan Grilling guide (Fan Grill \)......................................32
Grilling guide (Grill Y).............................................33
Defrosting .......................................................34
Cooking.........................................................35
Cooking ready meals...............................................35
Gentle Bake ......................................................35
Cleaning and care ................................................36
Appliance front ...................................................36
Accessories ......................................................37
Universal tray, anti-splash insert....................................37
Rack, runners ..................................................37
Oven interior .....................................................37
Seal and inside of the oven door ...................................37
PerfectClean .....................................................38
3
Page 4

Contents
Catalytic enamel surfaces ...........................................40
Removing the oven door ............................................41
Dismantling the oven door ........................................42
To refit the door ...................................................45
To remove the runners..............................................46
To remove the catalytic enamelled back panel...........................46
To lower the top heat/grill element.....................................47
Problem solving guide ............................................48
After sales service ................................................50
Optional accessories..............................................51
Electrical connection..............................................53
Installing the oven ................................................54
4
Page 5

Warning and safety instructions
This appliance conforms to current
safety requirements. Inappropriate
use can, however, lead to personal
injury and damage to property.
To avoid the risk of accidents and
damage to the appliance, please
read these instructions carefully
before using it for the first time.
They contain important notes on
installation, safety, use and
maintenance.
Keep these instructions in a safe
place and ensure that new users are
familiar with the content. Pass them
on to any future owner.
Correct application
This oven is designed for domestic
~
use and for use in similar environments
by guests in hotel or motel rooms, bed
& breakfasts and other typical living
quarters. This does not include
common/shared facilities or commercial
facilities within hotels, motels or bed &
breakfasts.
This oven is designed to bake,
~
roast, grill, cook, defrost, dry fruit etc.
Any other usage is at the owner's risk.
Miele cannot be held liable for damage
resulting from incorrect or improper use
or operation.
This oven is not intended for use by
~
persons (including children) with
reduced physical, sensory or mental
capabilities, or lack of experience and
knowledge, unless they are supervised
whilst using it or have been given
instruction concerning its use by a
person responsible for their safety.
5
Page 6

Warning and safety instructions
Safety with children
Children should be supervised to
~
ensure that they do not play with the
appliance. This appliance is not a toy!
Older children may only use the
~
oven when its operation has been
clearly explained to them and they are
able to use it safely, recognising the
dangers of misuse. They must be
aware of the potential dangers caused
by incorrect operation.
Great care should be taken to
~
ensure that children do not touch the
appliance when it is being used.
External parts of the oven such as the
door glass, control panel and the vent
become quite hot. Children's skin is far
more sensitive to high temperatures
than that of adults. Danger of burning.
The cooking zones of the oven become
very hot.
Children could also burn themselves by
pulling out cooking containers.
WARNING - Accessible parts may
~
become hot during use. To avoid
burns, young children should be kept
away.
Technical safety
Installation, maintenance and
~
repairs may only be carried out by a
suitably qualified and competent
person in strict accordance with current
national and local safety regulations.
Repairs and other work by unqualified
persons could be dangerous. The
manufacturer cannot be held liable for
unauthorised work.
Before installation, check the
~
appliance for visible signs of damage.
Do not install and use a damaged
appliance. A damaged appliance could
be dangerous.
The electrical safety of this
~
appliance can only be guaranteed
when continuity is complete between it
and an effective earthing system. It is
most important that this basic safety
requirement is present and tested
regularly and, where there is any doubt,
the household wiring system should be
inspected by a qualified electrician.
The manufacturer cannot be held liable
for the consequences of an inadequate
earthing system (e.g. electric shock).
6
Page 7

Warning and safety instructions
Before connecting the appliance to
~
the mains supply, make sure that the
voltage and frequency details given on
the data plate correspond with the
on-site electricity supply, otherwise the
appliance could be damaged. Consult
a competent person if in doubt.
Do not connect the appliance to the
~
mains electricity supply by a
multi-socket unit or an extension lead.
These do not guarantee the required
safety of the appliance (e.g. danger of
overheating).
For safety reasons, this appliance
~
may only be used when it has been
built in.
Never open the housing of the
~
appliance.
Tampering with electrical connections
or components and mechanical parts is
highly dangerous to the user and can
cause operational faults.
While the appliance is under
~
warranty, repairs should only be
undertaken by a service technician
authorised by the manufacturer.
Otherwise the warranty will be
invalidated.
During installation, maintenance and
~
repair work, the appliance must be
disconnected from the mains electricity
supply. It is only completely isolated
from the electricity supply when:
it is switched off at the isolator,
–
the screw-out fuse is removed (in
–
countries where this is applicable),
it is switched off at the isolator.
–
Ensure that current is not supplied to
the appliance until after maintenance
or repair work has been carried out.
Faulty components must only be
~
replaced by genuine Miele original
spare parts. The manufacturer can only
guarantee the safety of the appliance
when Miele replacement parts are
used.
If the supply cord is damaged, it
~
must be replaced by a Miele approved
service technician to avoid a hazard.
This appliance may only be used in
~
mobile installations such as ships if a
risk assessment of the installation has
been carried out by a suitably qualified
engineer.
7
Page 8

Warning and safety instructions
Correct use
Danger of burning.
,
High temperatures are produced by
the oven.
Use oven gloves when placing food
~
in the oven, turning or removing it and
when adjusting oven shelves etc. in a
hot oven. Be very careful that you do
not burn yourself on the top heating /
grill element. Danger of burning.
Never leave the appliance
~
unattended when cooking with oil or
fats, as these are a fire hazard if
allowed to overheat.
Fire hazard!
Do not exceed the recommended
~
grilling times when using the "Full
Grill Y" / "Fan Grill \" functions.
Excessively long cooking times can
lead to food drying out and burning, or
could even cause it to catch fire. Fire
hazard!
Do not use "Full Grill Y" / "Fan
~
Grill \" to finish baking part-cooked
rolls or bread or to dry flowers or herbs.
Fire hazard!
Use "Fan Plus U" or "Conventional V"
instead.
If using alcohol in your recipes, high
~
temperatures can cause the alcohol to
vaporise and even to ignite on the hot
heating elements.
Alcohol should be burnt off before the
dish is placed in the oven to avoid this
danger.
Cover any food which is left in the
~
oven to be kept hot. Any moisture in the
food could lead to corrosion damage in
the oven. This also prevents the food
from drying out.
If you wish to complete a cooking
~
process using the residual heat in the
oven, leave the function selector at the
position set and turn the temperature
selector to the lowest setting. Do not
switch the appliance off until the food
has been removed. Increased moisture
in the oven could cause condensation
to form which could lead to
– corrosion in the oven compartment.
– damage to the control panel, worktop
and surrounding kitchen furniture.
Never cover the floor of the oven
~
with aluminium foil when using the oven
on "Conventional V" / "Intensiv
Bake O" / "Gentle Bake K" / "Rapid
Heat-up S".
This would cause concentrations of
heat which could cause damage to the
floor of the oven.
For this reason, do not place a dish, tin
or baking tray directly on the oven floor.
If using a tray made by a different
manufacturer, make sure that there is a
gap of at least 6 cm between the
bottom of the tray and the floor of the
oven.
8
Page 9

Warning and safety instructions
Never add water to food on a hot
~
baking tray or directly onto food in a hot
oven. The steam created could cause
serious burns or scalding and the
sudden change in temperature can
damage the enamel.
Always ensure that food is suitably
~
cooked or reheated.
Some foods may contain
micro-organisms which are only
destroyed by thorough cooking at
temperatures over 70 °C for a minimum
of 10 minutes. Therefore when cooking
or reheating foods, e.g. poultry, it is
particularly important that food is fully
cooked through. If in doubt, select a
longer cooking or reheating time.
It is important that the heat is allowed to
spread evenly throughout the food
being cooked. This can be achieved
by stirring and/or turning the food
during cooking.
Only plastic containers which are
~
declared by the manufacturer as being
suitable for use in an oven may be
used.
Other types of plastic containers melt at
high temperatures, and could damage
the oven.
Do not lean or sit on an open oven
~
door, or place heavy items on it. Make
sure that nothing gets trapped between
the door and the oven compartment.
This could damage the oven.
The oven door can support a maximum
load of 15 kg.
Do not use the appliance to heat up
~
the room. Due to the high temperatures
radiated, objects near the appliance
could catch fire.
Accessories
Only use genuine Miele spare parts
~
and accessories. If spare parts or
accessories from other manufacturers
are used, this will invalidate the
warranty, and Miele cannot accept
liability.
The manufacturer cannot be held
liable for damage caused by
non-compliance with these Warning
and Safety instructions.
Do not heat up unopened tins or jars
~
of food in the oven. Pressure can build
up and they may explode, resulting in
injury or damage.
Do not push pots and pans around
~
on the oven floor, as this could damage
the surface.
9
Page 10
Caring for the environment
Disposal of the packing
material
The transport and protective packing
has been selected from materials which
are environmentally friendly for disposal
and can normally be recycled.
Ensure that any plastic wrappings, bags
etc. are disposed of safely and kept out
of the reach of babies and young
children. Danger of suffocation!
Rather than just throwing these materials
away, please ensure they are offered for
recycling.
Disposal of your old appliance
Electrical and electronic appliances
often contain materials which, if
handled or disposed of incorrectly,
could be potentially hazardous to
human health and to the environment.
They are, however, essential for the
correct functioning of your appliance.
Please do not therefore dispose of it
with your household waste.
Please dispose of it at your local
community waste collection / recycling
centre or contact your dealer for
advice. Ensure that it presents no
danger to children while being stored
for disposal.
10
It should be unplugged or disconnected
from the mains electricity supply by a
competent person.
Page 11
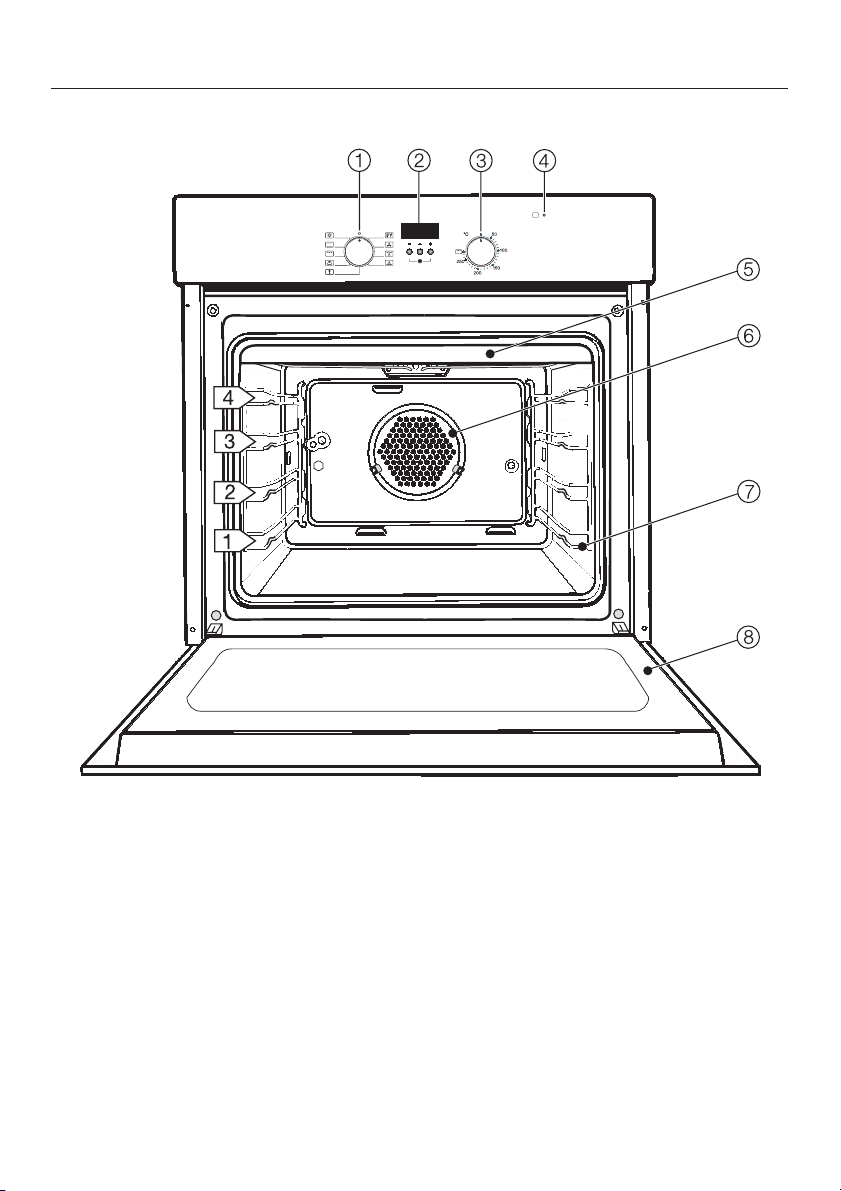
H 4312 B, H 4412 B, H 4402 B
Description of the appliance
a Function selector
b Clock timer with sensors O, Q and P *
c Temperature selector
d Temperature indicator y
e Top heat/grill element
f Catalytic coated back panel with air inlet for the fan
g Side runners with four shelf levels
h Door
* H 4402 B: without Clock timer
11
Page 12

Description of the appliance
Features
Oven controls
The controls offer various cooking
programmes to bake, roast and grill.
Appliances with a clock timer also offer
a time of day display,
–
a minute minder,
–
a timer to automatically switch
–
cooking programmes off.
Cooling fan
A cooling fan will come on
automatically when a cooking
programme is started. The cooling fan
mixes hot air from the oven cavity with
cool room air before venting it out into
the kitchen through vents located
between the appliance door and the
control panel.
The cooling fan will continue to run for a
while after the oven has been switched
off to prevent any humidity building up
in the oven, on the control panel or on
the oven housing unit.
When the temperature in the oven has
fallen sufficiently, the cooling fan will
switch off automatically.
PerfectClean treated surfaces
The following surfaces have been
treated with PerfectClean enamel:
much easier to keep clean than
conventional enamel, if cleaned
regularly.
See "Cleaning and care" for more
information.
Catalytic enamelled surfaces
The back panel is coated with dark
grey catalytic enamel. Soiling from oil
and fat is burnt off these surfaces when
very high temperatures are used in the
oven.
See "Cleaning and care" for more
information.
Retractable controls
The controls are retractable.
Pressing the controls will release or
retract them.
Only retract the controls when at "0",
otherwise they will be damaged.
Energy efficiency rating
according to EN 50304
This appliance is rated energy
efficiency class A in accordance with
EN 50304.
It refers to the programme "Fan
Plus U".
–
Oven interior
–
Universal tray
–
Anti-splash insert (if available)
PerfectClean enamelled surfaces have
very good anti-stick properties and are
12
Page 13
Description of the appliance
Accessories
The following accessories are supplied
with this oven.
These and other accessories are also
available to order from Miele or your
Chartered Agent. See "Optional
accessories" for more information.
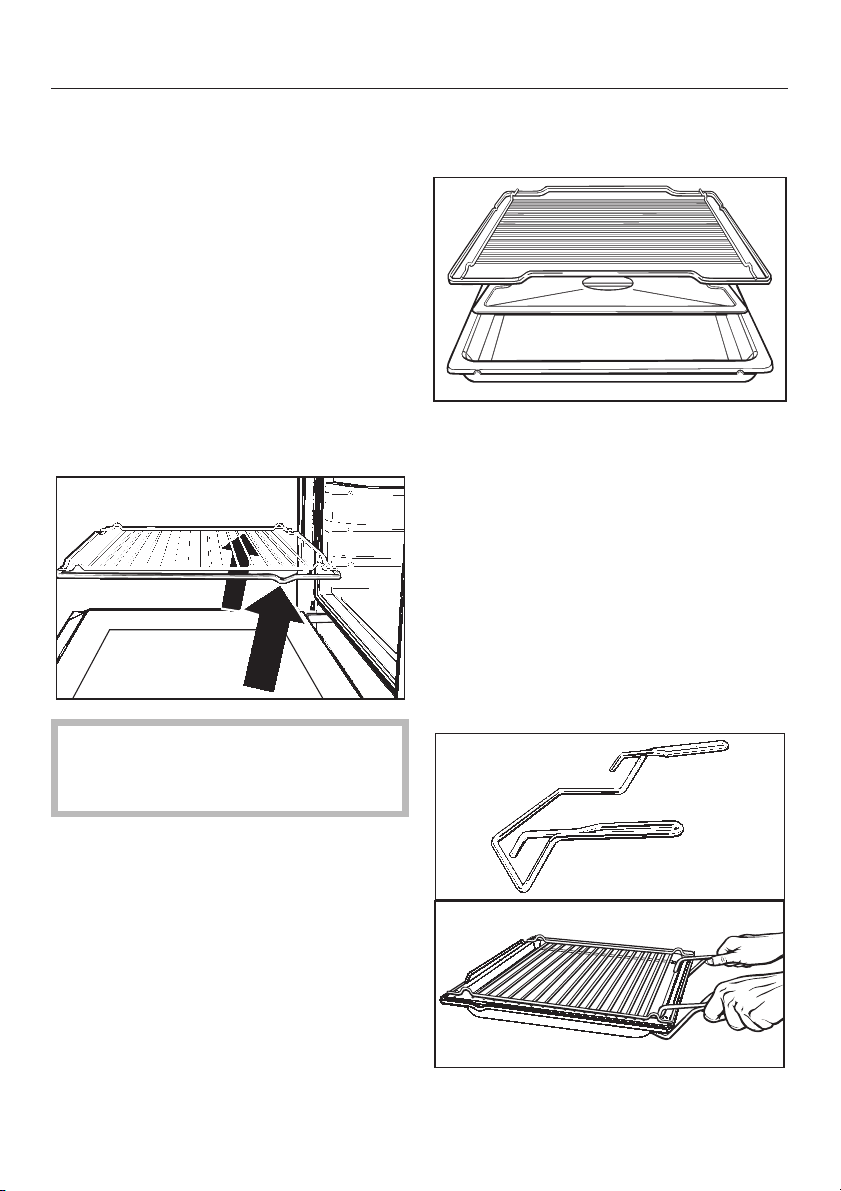
Universal tray and rack
The universal tray and rack have safety
notches that prevent them being pulled
right out when they only need to be
partially pulled out.
Anti-splash insert
(depending on model)
The anti-splash insert should be placed
in the universal tray when grilling or
roasting.
The juices from the food being cooked
collect under the anti-splash tray. This
prevents them from spitting and making
the oven dirty. The juices can then be
used for making gravy and sauces.
Handle
When pushing the rack back in,
always ensure that the safety
notches are at the rear of the oven.
They can then only be taken out of the
oven by raising them upwards and then
pulling them out.
(depending on model)
The handle makes it easier to take the
trays and rack out of the oven.
13
Page 14
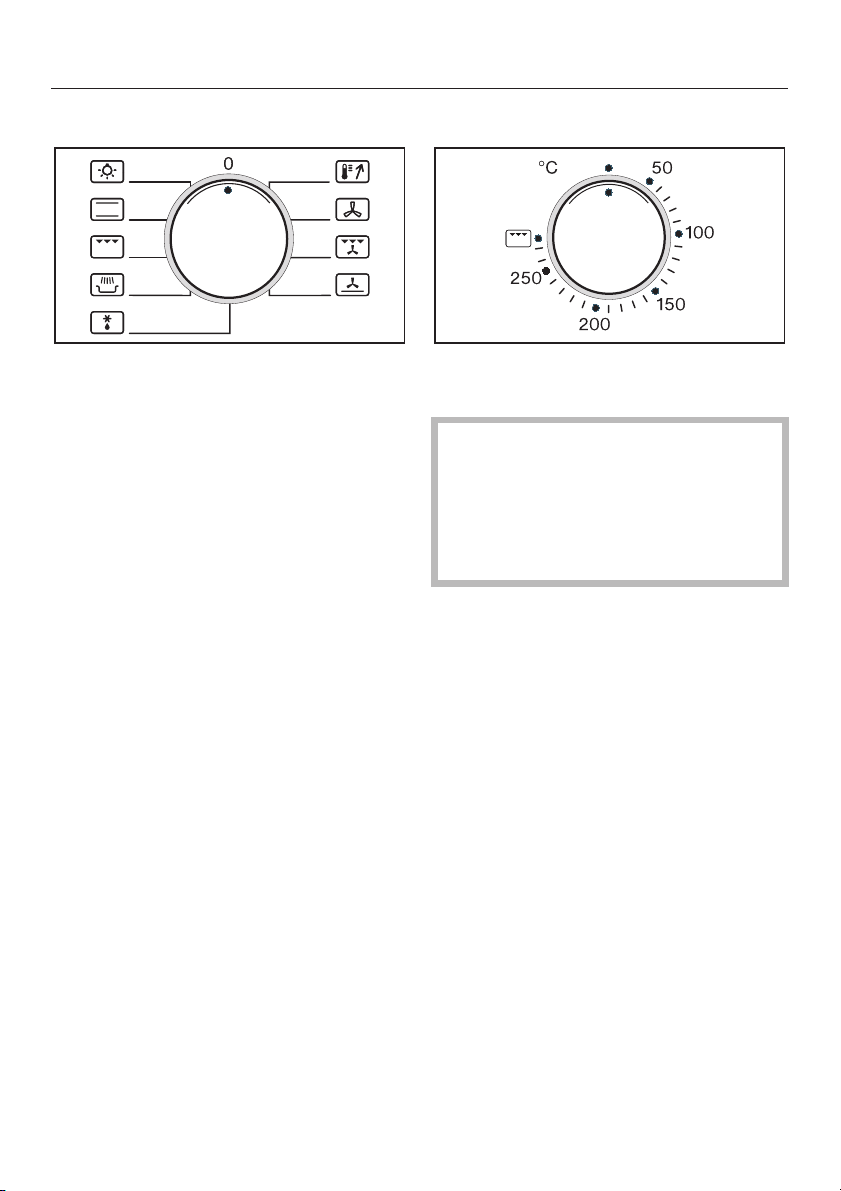
Controls
Function selector
The function selector is used for
selecting your cooking function.
It can be turned clockwise or
anti-clockwise.
V Conventional
Y Grill
K Gentle Bake
P Defrost
S Rapid Heat-up
U Fan Plus
\ Fan Grill
O Intensive Bake
T Light
For switching on the oven light
independently. This can be useful
when cleaning the oven.
Temperature selector
The temperature can be freely selected
within the given range.
The temperature selector must only
be turned in a clockwise direction as
far as it will go, and then back again.
Do not force it right round in a
clockwise direction, as this would
damage the selector.
Temperature indicator light y
The oven starts heating up as soon as a
temperature is selected. The
temperature indicator light y will
come on.
When the pre-selected temperature is
reached, the heating element switches
itself off and the temperature indicator
light goes out. If the temperature falls
below that selected, the heating
element switches on again
automatically.
14
Page 15

Oven functions
Your oven has a range of oven functions for preparing a wide variety of recipes.
Oven function Notes
U Fan Plus
O Intensive Bake
V Conventional
K Gentle Bake – Suitable for bakes and gratins where a cripsy finish is
Y Grill – For grilling thin cuts and for browning food.
\ Fan Grill
P Defrost
S Rapid Heat-up
For baking and roasting.
–
You can bake and roast on different levels at the
–
same time.
Lower temperatures can be used than with
–
"Conventional V" as the Fan plus system distributes
the heated air around the food.
For cooking dishes which require a moist topping and
–
a crisp base such as pizza and quiche lorraine.
Intensive Bake is not suitable for baking biscuits or for
–
roasting as the juices will become too dark.
For baking traditional recipes, e.g. fruit cake,
–
casseroles.
– Also ideal for soufflés.
– If using an older recipe or cookbook, set the oven
temperature for Conventional, 10°C lower than that
recommended.
The cooking duration does not need to be changed.
required.
–
For grilling larger items, e.g. rolled meat, poultry.
–
The hot air from the grill is distributed over the food by
the fan. This enables a lower temperature to be
selected than when using "Grill Y".
–
For the gentle defrosting of frozen food.
–
For pre-heating the oven compartment.
The oven function required must then be selected.
15
Page 16
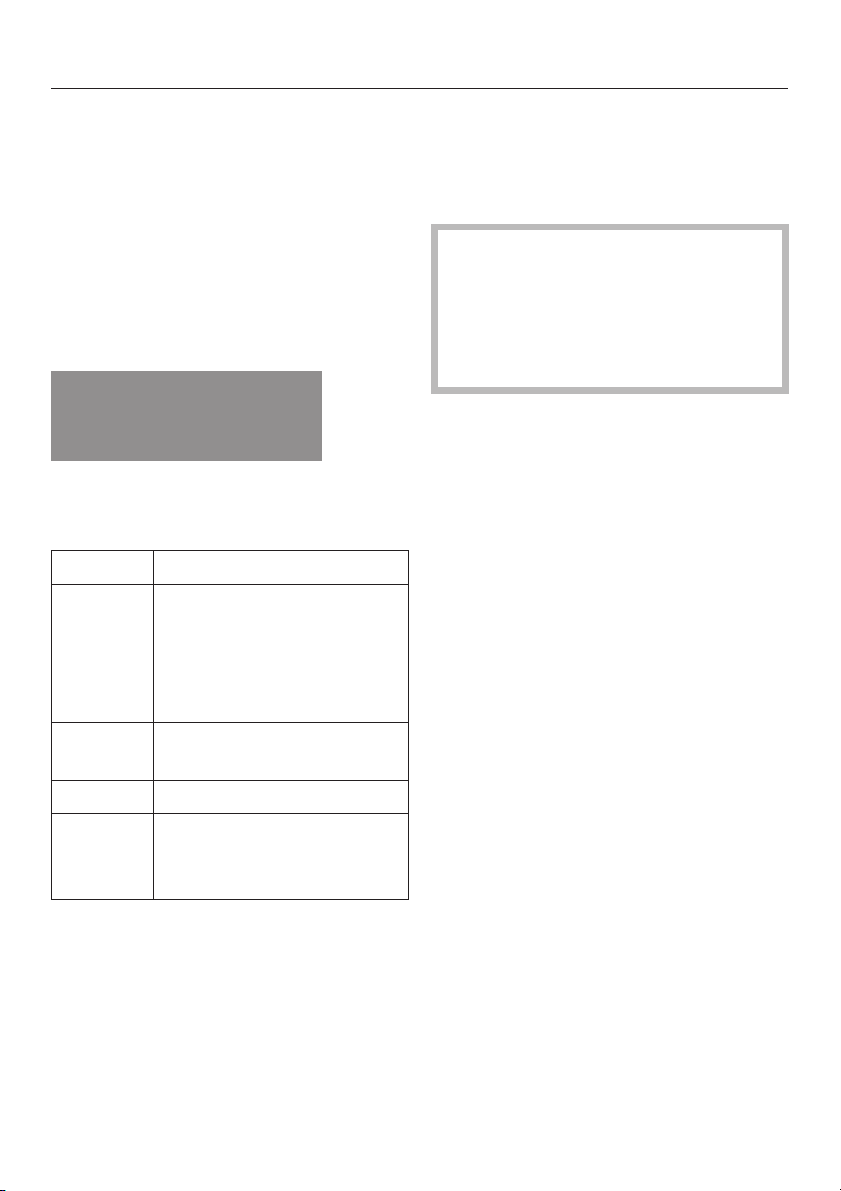
Clock/Timer
The clock/timer (depending on model)
can
display the time of day.
–
be used as a minute minder.
–
be used to switch the oven off
–
automatically at the end of a cooking
process.
Controls
l
ß
I3
The clock/timer is operated using the
Q, P and O buttons together with the
display.
Button Function
Q – To select the "Minute
P and O–To select the "Time of
P
O
00
l
minder l" function
– To select the "Cooking
duration l" function
– To save an entry
day ß" function
–
To increase the time
–
To reduce the time
–
To change the sound of
the buzzer
Operation
When you select a function its symbol
will flash in the display, e.g. "l", "l"or
"ß".
You can only enter a time/duration
while the symbol is flashing
(7 seconds approx.). If you fail to
make an entry during these
7 seconds, you will have to call up
the symbol in the display again.
Each press of the P or O button alters
the time in one minute increments.
Holding one of these buttons in will
speed up the process.
The time you set is automatically saved
to memory after about 7 seconds and
the symbol will stop flashing and light
up constantly.
Pressing the Q button is another way of
saving your setting.
16
Page 17

Clock/Timer
To set the time of day for the
first time
On models with a clock/timer you
have to set the time of day before the
oven can be used.
ß
000
After connecting the appliance to the
mains electricity supply "0k00" will start
flashing in the display.
Press the P and O buttons at the
^
same time.
^ Whilst the "ß" dot is flashing in the
display, use the P or O buttons to
enter the time.
The clock has a 24-hour display.
The time you set is automatically saved
to memory after about 7 seconds and
the "ß" dot will stop flashing.
The time then counts down in minutes
To change the sound of the
buzzer
There is a choice of 3 different tones.
Press the O button until the audible
^
tone is heard.
Each press of button O calls up a
different tone.
The last tone selected will automatically
be saved to memory after about 7
seconds.
If there is a power cut, the audible tone
will automatically revert to the factory
default setting and will need to be
reset.
Changing the time of day
^
Press the P and O buttons at the
same time.
^
Whilst the "ß" dot is flashing in the
display, use the P or O buttons to
enter the time.
The clock has a 24-hour display.
The time then counts down in minutes
If there has been a power cut the time
of day has to be re-entered.
17
Page 18

Clock/Timer
Using the minute minder
The minute minder can be used to time
any activity in the kitchen, e.g. boiling
eggs.
You can set the minute minder at the
same time as another timed
programme, e.g. as a reminder to baste
your roast or add seasoning etc.
A minute minder time can be entered
between 1 minute and 23 hours 59
minutes.
To set the minute minder
^ Press the Q button repeatedly until
the l symbol starts to flash in the
display.
ß
000
l
0k00 will appear in the display.
^ Enter the time required for the minute
minder whilst the bell symbol l is
flashing.
Once the time entered has been
accepted, the display will revert to
showing the time of day. The l symbol
continues to be visible as a reminder
that the minute minder is working.
The buzzer will stop and the symbols in
the display will go out.
To check and change an entered
minute minder time
Press the Q button repeatedly until
^
the l symbol starts to flash in the
display.
The time remaining will appear in the
display. The time entered counts down
in minutes until the last minute, which
counts down in seconds.
The minute minder time set can be
^
changed as long as the bell symbol
l is flashing.
To cancel the time set for the minute
minder
^ Press the Q button repeatedly until
the l symbol starts to flash in the
display.
^ Whilst l is flashing in the display use
the O button to set the minute minder
time to 0k00 or press the P and O
buttons at the same time.
The minute minder time is now deleted
and the time of day reappears in the
display.
At the end of the time set for the
minute minder
–
the bell symbol l will start flashing,
–
the buzzer will sound for approx.
7 minutes.
^
Press the Q button.
18
Page 19

If the controls are pushed in when
the oven is delivered, they will have
to be released before the oven can
be used.
On ovens with a clock/timer you also
have to set the time of day before
the oven can be used.
Before using for the first time
Press and release the function
^
selector and the temperature
selector.
Select "Fan Plus U".
^
Select the highest temperature.
^
Heat the empty oven for at least an
^
hour.
Before use, please remove
– any stickers from the floor of the
oven, accessories.
– any cork spacers at the sides
above the oven cavity.
– any protective foil from the
oven front.
See "Cleaning and care" for more
information.
Before using the oven for the first time
– take all accessories out of the oven
and wash them.
– then heat the oven up once with
nothing in it. New ovens can give off
a slight smell on first use. Doing this
will dissipate the smells before you
use it to cook food.
^
Before heating it up, it is a good idea
to wipe the oven out with a damp
cloth first. This way any dust or bits of
packaging that may have
accumulated in the oven cavity
during storage and unpacking will be
removed.
Please ensure the room is well
ventilated during this operation.
Close doors to other rooms to
prevent the smell spreading
throughout the house.
^ Wait until the oven has cooled down.
^ Then wipe out the oven cavity with a
solution of hot water and a mild
detergent and then dry it thoroughly
with a clean cloth.
Leave the oven door open until the
oven interior is completely dry.
On models with a clock/timer, you can
set this procedure to finish
automatically. See "Programming
cooking durations".
19
Page 20

Operation
Using the oven
Place the food in the oven.
^
Use the function selector to set the
^
function.
The oven interior light comes on.
Set the temperature with the
^
temperature selector.
The oven heating and cooling fan will
switch on.
Take the food out of the oven when it
^
is ready.
Turn the function selector and the
temperature selector back to the "0"
position.
The cooling fan will continue to run for a
while after the oven has been switched
off to dispel any moisture from the oven
and prevent it settling on the control
panel or surrounding furniture.
When the temperature in the oven has
fallen sufficiently, the cooling fan will
switch off automatically.
Pre-heating
Most dishes can be placed in a cold
oven. They will then make use of the
heat produced during the heating-up
phase.
It is only necessary to pre-heat the oven
in a few instances:
U
V
V – It is usually necessary to
Do not use Rapid Heat-up S to
pre-heat the oven when baking
pizzas or biscuits and small cakes.
They will brown too quickly.
To pre-heat the oven:
Pre-heating may be
–
necessary for foods which
cook in less than 20 minutes
and for foods such as puff
pastries and yeast mixtures
where instant heat is required
to make them rise quickly.
– for roasting beef/fillet.
pre-heat the oven on
Conventional.
20
^
Select Rapid Heat-up S.
^
Set a temperature.
The oven will start to heat up.
^
When the temperature indicator light
y goes out for the first time, set the
oven function you require for
continued cooking or baking, and
place the food in the oven.
Page 21

Operation
Programming cooking durations
(automatic switch-off)
You can enter a cooking duration and
programme the oven to switch itself off
automatically.
Place the food in the oven.
^
Select the required function and set
^
the temperature.
You can enter a cooking duration of up
to a maximum of 10 hours.
Press the Q button repeatedly until
^
the l symbol starts to flash in the
display.
l
ß
0
0k00 will appear in the display.
^ Enter the cooking duration with the P
and O buttons whilst the l symbol
is flashing.
00
Press the Q button.
^
The buzzer will stop sounding and the
symbol will stop flashing.
Important: please note that pressing
the Q button will cause the oven
heating to come on again. Switch
the oven off if you no longer need it.
To check and change an entered
duration
Press the Q button repeatedly until
^
the l symbol starts to flash in the
display.
The cooking duration remaining
appears in the display.
^ The cooking duration set can be
changed as long as the symbol l is
flashing in the display.
Once the duration entered has been
accepted, the display will revert to
showing the time of day. The l symbol
continues to be visible as a reminder
that a cooking duration has been
entered.
At the end of the cooking duration
–
the oven heating switches off
automatically.
–
the cooling fan will continue to run for
a while.
–
the buzzer will sound for approx.
7 minutes.
–
the l will start flashing.
To delete a cooking duration
^
Press the Q button repeatedly until
the l symbol starts to flash in the
display.
^
Whilst l is flashing in the display,
use the O button to set the duration
to 0k00 or press the P and O
buttons at the same time.
The oven will start to heat up as
soon as a programme is deleted.
Switch the oven off if you no longer
need it.
21
Page 22

Baking tips
Please refer to the baking chart for
recommended temperature ranges,
shelf levels and durations.
Handling and preparing food
correctly is essential for maintaining
good health.
Only bake cakes, pizza, chips etc.
until they are golden brown. Do not
overcook them.
Temperature, baking duration
Bakeware
Material
UOMost types of heat-resistant tins
or dishes are suitable.
V Use baking tins made from dark
metal or enamel or from
aluminium with a matt finish.
Heat resistant glass and
ceramic dishes can also be
used.
Bright, shiny metal tins result in
uneven or poor browning and in
some cases cakes might not
cook properly.
To achieve even results without
over-browning the food
– always select the lowest
temperature given in the chart.
Do not set a temperature higher than
that recommended. Do not set a
temperature higher than that
recommended. Increasing the
temperature may reduce the cooking
time, but will lead to uneven
browning, and unsatisfactory
cooking results.
–
check if the food is cooked at the
end of the shortest time quoted.
To check if a cake is ready, insert a
wooden skewer into the centre.
It is ready if the skewer comes out
clean, without dough or crumbs
sticking to it.
Baking paper
Because of its PerfectClean anti-stick
surface, the universal tray does not
need to be greased or lined with baking
parchment for baking.
Baked goods are easily removed when
done.
Baking paper is only necessary when
baking:
–
Anything with a high salt content
(e. g. pretzels, bread sticks),
because sodium can damage the
PerfectClean surface.
–
Meringues or biscuits with a high
egg-white content, because they
are more likely to stick.
22
Page 23
Baking tips
Universal tray
When baking cakes with fresh fruit
toppings and tall sponge cakes place
the tin in the universal tray to catch any
spillages and keep the oven cleaner.
Retangular tins
Place cakes in rectangular tins with the
longer side across the width of the oven
for optimum heat distribution and even
results.
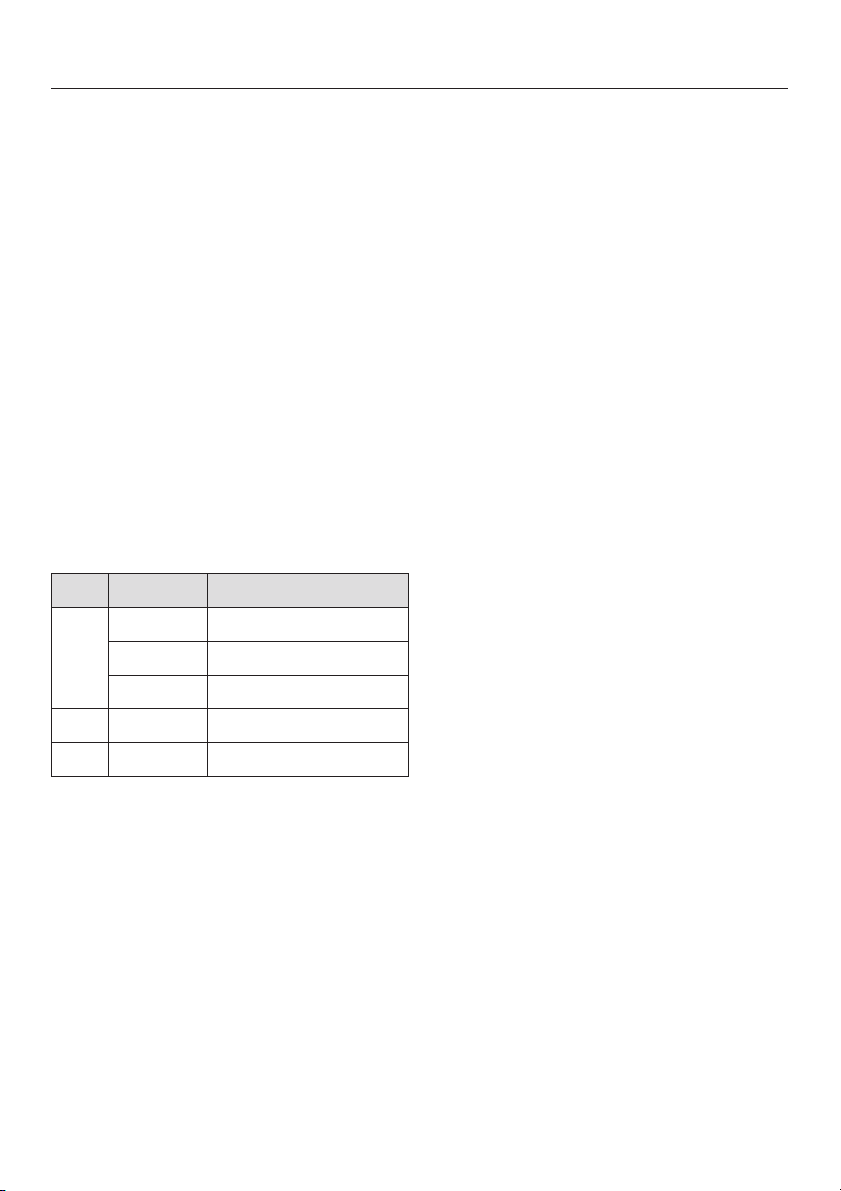
Shelf levels
The shelf levels are counted from the
bottom of the oven upwards (1 =
lowest, 4 = highest).
Trays Shelf levels *
U 11
2 1 and 3
3 1,2and4**
O 1 1 or 2
V 1 1 or 2
Frozen food
When baking frozen products such as
cakes, pizza and baguettes, use the
lowest temperature quoted on the
manufacturer's packaging.
Place them on baking paper on the
rack itself or in the pizza pan (see
"Extra accessories"). Placing them on
the universal tray can cause the metal
to distort. This distortion would increase
with subsequent use.
Small items of frozen food such as
oven chips or potato croquettes can
be cooked on the universal tray. Place
them on baking parchment and select
the lowest temperature quoted on the
manufacturer's packaging. Turn several
times during cooking.
* Always use the rack on shelf level 1
for cakes in tins.
** When baking moist cakes, bread etc
do use more than two trays at the
same time.
If you are using the universal tray and
baking trays for baking on more than
one shelf level at the same time, the
universal tray should be placed below
the baking trays.
23
Page 24

Baking chart
Fan Plus U
Cakes / biscuits Temperature
in °C
Creamed mixture
Sponge cake
Ring cake
Foam cake (tray)
Marble, nut cake (tin)
Fresh fruit cake, with filling (tray)
Fresh fruit cake (tray)
Fresh fruit cake (tin)
Flan base
Biscuits3)(tray)
Sponge mix
Sponge cake (3 to 6 eggs)
Sponge cake (2 eggs)
Swiss roll
3)
3)
3)
3)
2)
150 – 170
150 – 170
150 – 170
150 – 170
150 – 170
150 – 170
150 – 170
150 – 170
150 – 170
160 – 180
160 – 180
160 – 180
Rubbed in mixture
Tart / flan base
Streusel cake
Biscuits
3)
Cheesecake
Apple pie
Apricot tart with topping
Swiss apple pie
2)
150 – 170
150 – 170
150 – 170
150 – 170
150 – 170
150 – 170
190 – 210
Yeast mixtures and quark dough
To prove dough
Guglhupf
Streusel cake
Fresh fruit cake (tray)
White bread
Wholegrain bread
Pizza (tray)
2)
3)
Onion tart
Apple turnovers
50
150 – 170
150 – 170
160 – 180
160 – 180
170 – 190
170 – 190
170 – 190
150 – 170
Choux pastry3), Eclairs 160 – 180 1, 3
Flaky pastry 170 – 190 1, 3
Meringues, Macaroons 120 – 140 1, 3
1) Unless otherwise stated, the times given are for an oven which has not been pre-heated.
With a pre-heated oven, shorten times by up to 10 minutes.
2) Pre-heat the oven.
3) Do not use Rapid Heat-up S during the heating-up phase.
4) Take baking trays out of the oven at different times if the food is sufficiently browned before
the specified time has elapsed.
5) Place the rack on the floor of the oven, and stand the bowl containing the dough on the rack.
Recommended
shelf level
1
1
1
1
1
1
1
1
4)
1, 3
1
1
1
1
1
4)
1, 3
1
1
1
1
Oven floor
5)
1
1
1
1
1
1
1
4)
1, 3
4)
4)
4)
Duration
in min.
60–70
65–80
25–40
60–80
45–50
35–45
55–65
25–30
20–25
25–35
20–25
20–25
20–25
45–55
15–25
70–90
50–70
55–75
25–35
15–30
50–60
35–45
40–50
40–50
50–60
35–45
35–45
25–30
30–40
20–25
25–50
1)
The information given in this chart is intended only as a guide.
24
Page 25

Baking chart
Conventional V
Cakes / biscuits Temperature
Creamed mixture
Sponge cake
Ring cake
Foam cake (tray)
Marble, nut cake (tin)
Fresh fruit cake, with filling (tray)
Fresh fruit cake (tray)
Fresh fruit cake (tin)
Flan base
Biscuits3)(tray)
Sponge mix
Sponge cake (3 to 6 eggs)
Sponge cake (2 eggs)
Swiss roll
Rubbed in mixture
Tart / flan base
Streusel cake
Biscuits
Cheesecake
Apple pie
Apricot tart, with filling
Swiss apple pie
Yeast mixtures and quark dough
To prove dough
Guglhupf
Streusel cake
Fresh fruit cake (tray)
White bread
Wholegrain bread
Pizza (tray)
Onion tart
Apple turnovers
Choux pastry3), Eclairs 180 – 200 2 25 – 35
Puff pastry 190 – 210 2 15 – 25
Meringues, Macaroons 120 – 140 2 25 – 50
1) Pre-heat the oven.
2) Unless otherwise stated, the times given are for an oven which has not been pre-heated.
3) Do not use Rapid Heat-up S during the heating-up phase.
4) Place the rack on the floor of the oven, and stand the bowl containing the dough on the rack.
3)
3)
3)
3)
3)
(tray)
3)
With a pre-heated oven, shorten times by up to 10 minutes.
3)
1)
in °C
150 – 170
170 – 190
170 – 190
150 – 170
170 – 190
170 – 190
160 – 180
170 – 190
170 – 190
170 – 190
170 – 190
180 – 200
170 – 190
170 – 190
170 – 190
170 – 190
170 – 190
170 – 190
220 – 240
50
160 – 180
170 – 190
180 – 200
180 – 200
190 – 210
190 – 210
180 – 200
160 – 180
Recommended
shelf level
1
1
2
1
2
2
1
1
2
1
1
2
2
2
2
1
1
1
1
Oven floor
4)
1
2
2
1
2
1
1
2
Duration
in min.
60–70
65–80
25–40
60–80
45–50
35–45
55–65
20–25
12–20
20–35
15–20
12–16
15–20
45–55
10–20
70–90
45–65
55–75
25–35
15–30
50–60
35–45
40–50
40–50
50–60
30–40
25–35
25–30
2)
The information given in this chart is intended only as a guide.
25
Page 26
Baking chart
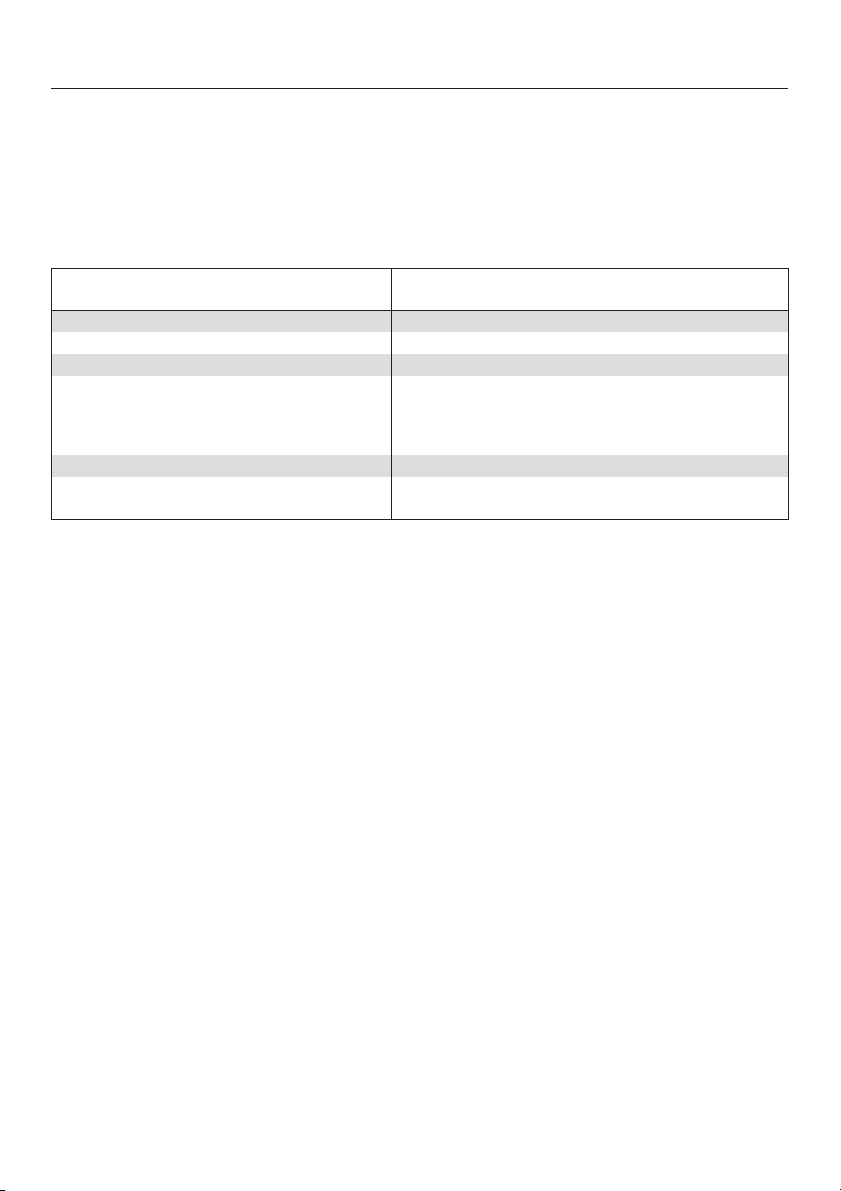
Intensive Bake O
Particularly suitable for
dishes that require a moist topping and crisp base like pizza and quiche
–
lorraine.
cakes with filling where the base has not been pre-baked.
–
Cakes / biscuits Temperature
Creamed mixture
Fresh fruit cake, with filling (tray) 150 – 170 1 30 – 35
Rubbed in mixture
Cheesecake
Apple pie
Apricot tart, with filling
Swiss apple pie
Yeast mixtures and quark dough
Pizza (tray)
Onion tart
1) Unless otherwise stated, the times given are for an oven which has not been pre-heated.
With a pre-heated oven, shorten times by up to 10 minutes.
2) Do not use Rapid Heat-up S during the heating-up phase.
The information given in this chart is intended only as a guide.
2)
in °C
150 – 170
150 – 170
150 – 170
190 – 210
170 – 190
170 – 190
Recommended
shelf level
1
1
1
1
1
1
Duration
in min.
65–75
50–60
50–60
25–30
40–50
25–35
1)
26
Page 27

Roasting tips
Recommendations Notes
Function
Fan Plus U You can also use "Conventional V".
Containers
Any heat-proof containers
can be used:
the Miele Gourmet oven
dish, roasting pans with a
lid, made from
earthenware, cast iron,
ovenproof china or glass,
roasting bags, the rack in
the universal tray.
Shelf level
1st shelf level from the
bottom
Pre-heating
Generally not required Place the pot on the rack in a cold oven.
Temperature
Please refer to the roasting
chart.
Roasting time
Please refer to the roasting
chart
We recommend roasting in a covered pot, as
this ensures that sufficient stock remains for
–
making gravy.
the oven stays cleaner than with open roasting.
–
When using Conventional V for poultry up to 1 kg,
beef/fillet, and fish, use shelf level 2.
Pre-heating is only required when roasting beef/fillet.
– Do not select a higher temperature than that
suggested. The meat will become brown, but will
not be cooked properly.
– With Fan Plus U, a temperature of 20 °C less than
for Conventional is sufficient.
–
For cuts which weigh 3 kg or more, select a
temperature approx. 10 °C lower than that given in
the roasting chart.
Roasting will take longer at the lower temperature,
but will be more even.
–
For roasting directly on the rack, select a
temperature that is about 20°C lower than for
roasting in a covered pot.
To calculate the roasting time: The traditional method
is to allow 15 to 20 minutes per lb/454 grams,
according to type of meat, plus approx. 20 minutes,
adjusting the length of time as roasting proceeds to
obtain the required result.
27
Page 28

Roasting tips
Useful tips
Browning
Browning only occurs towards the end
of the roasting time. Remove the lid
about halfway through the roasting time
if a more intensive browning result is
desired.
Standing time
At the end of the programme, take the
roast out of the oven, wrap in aluminium
foil and leave to stand for about
10 minutes. This helps retain juices
when the meat is carved.
Roasting poultry
For a crisp finish, baste the poultry ten
minutes before the end of cooking time
with slightly salted water.
Frozen meat
Do not roast deep frozen meat. Meat
should be thoroughly defrosted before
roasting.
28
Page 29
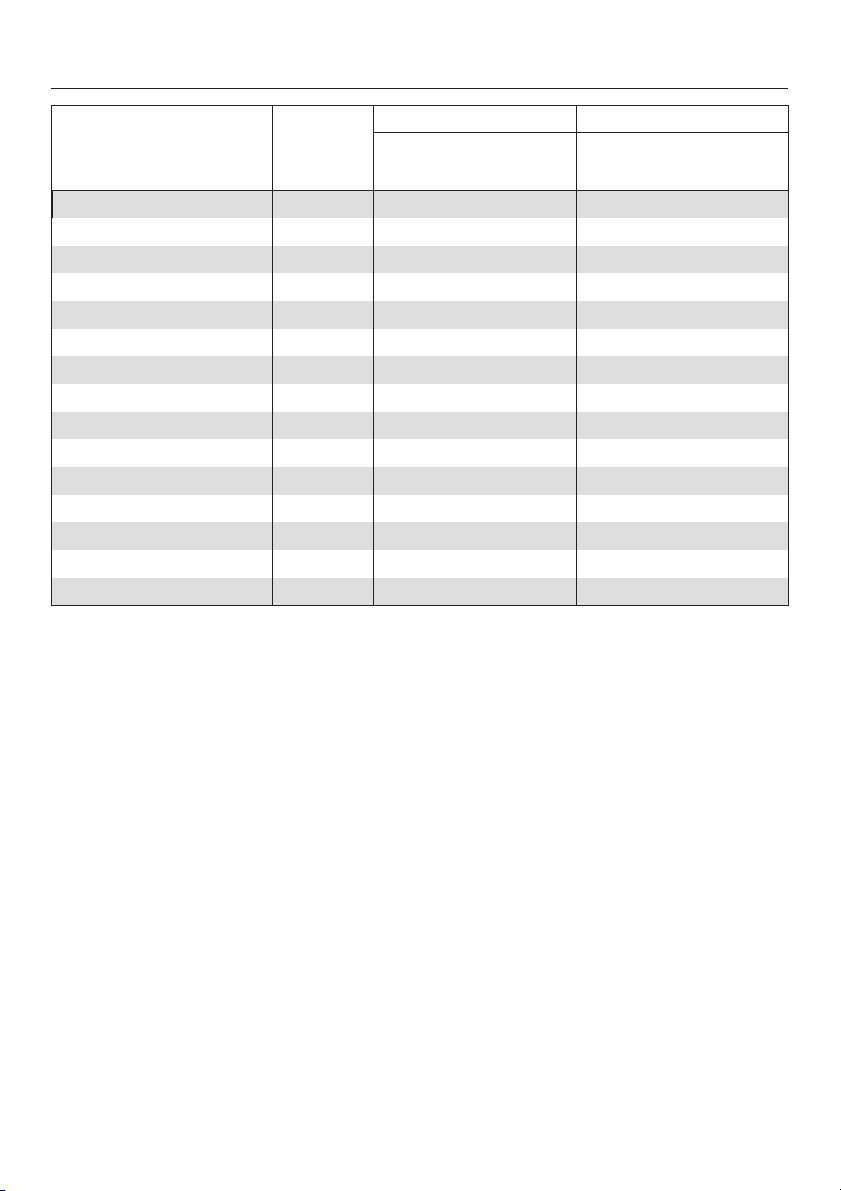
Roasting chart
Food Recom-
mended
shelf
level
Fan Plus U Conventional V
Temperature
in °C
3)
Time
in min.
Temperature
4)
in °C
3)
1)2)
Time
in min.
Roast beef, approx. 1 kg 1 170 – 190 100 – 120 190 – 210 100 – 120
Beef fillet, approx. 1 kg 1 190 – 210 45 – 55 200 – 220 45 – 55
Venison, approx. 1 kg 1
5)
180 – 200 90 – 120 190 – 210 90 – 120
Pork joint, approx. 1 kg 1 170 – 190 100 – 120 200 – 220 100 – 120
Pork joint, approx. 2 kg 1 150 – 170 160 – 180 180 – 200 120 – 150
Ham joint, approx. 1 kg 1 170 – 190 60 – 70 200 – 220 60 – 70
Meat loaf, approx. 1 kg 1 160 – 180 70 – 80 190 – 210 70 – 80
Veal, approx. 1.5 kg 1
5)
170 – 190 100 – 120 190 – 210 100 – 120
Leg of lamb, approx. 1.5 kg 1 170 – 190 90 – 120 200 – 220 90 – 120
Rack of lamb, approx. 1.5 kg 1 170 – 190 50 – 60 190 – 210 50 – 60
Poultry, 0.8–1kg 1
5)
170 – 190 60 – 70 190 – 210 60 – 70
Poultry, approx. 2 kg 1 170 – 190 90 – 110 190 – 210 90 – 110
Poultry, stuffed, approx. 2 kg 1 170 – 190 110 – 130 190 – 210 110 – 130
Poultry, approx. 4 kg 1 160 – 180 150 – 180 180 – 200 150 – 180
Fish, whole, approx. 1.5 kg 1
5)
160 – 180 35 – 55 190 – 210 35 – 55
1) We recommend Fan Plus U for roasting, however, Conventional V can also be used.
2) Pre-heat the oven.
3) Temperature in a covered pot.
If open roasting, set the temperatures 20 °C lower.
4) Unless otherwise stated, the times given are calculated on the
basis of an oven which has not been pre-heated.
5) Use the 2nd shelf level from the bottom for Conventional V.
4)
The information given in this chart is intended only as a guide.
29
Page 30
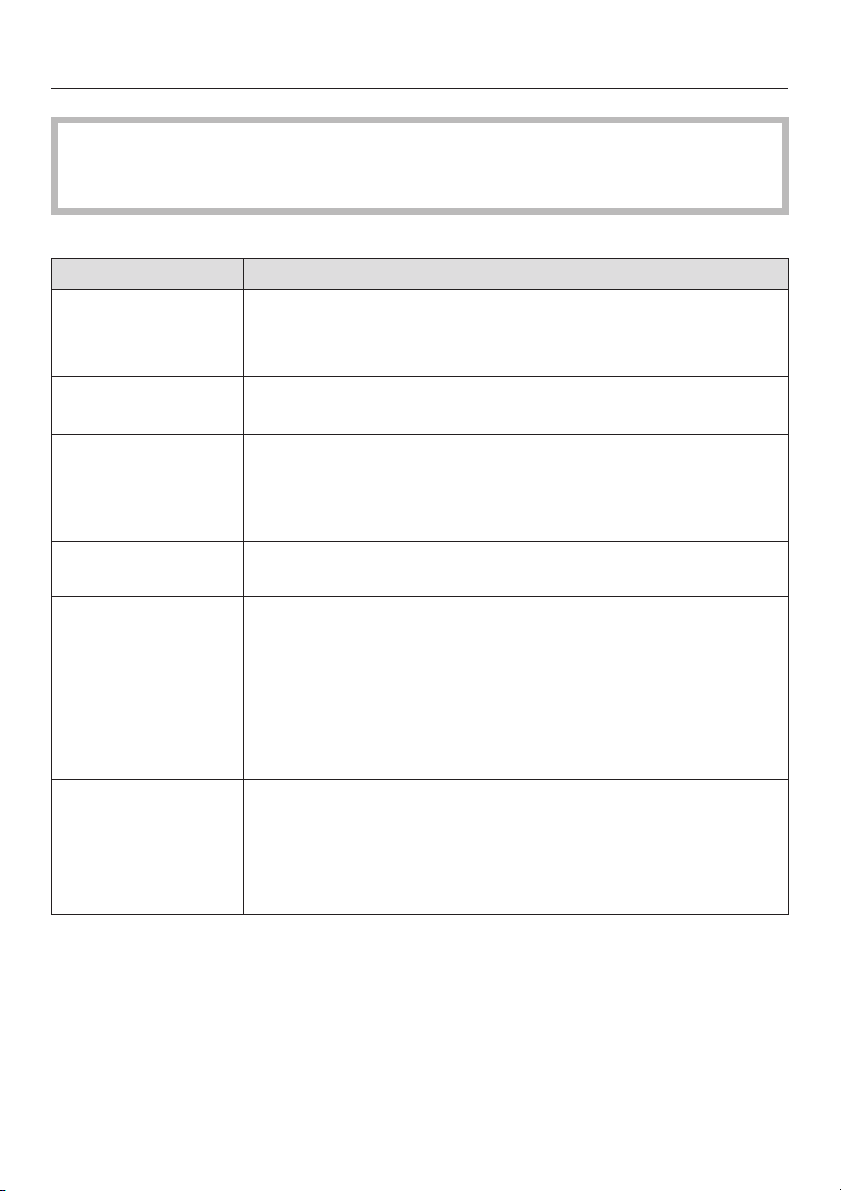
Grilling tips
Grill with the oven door closed.
,
If you grill with the door open, hot air will escape from the oven instead of being
cooled by the cooling fan. The controls will get hot. Danger of burning.
Recommendations Notes
Function
Grill Y:
Fan Grill \:
Containers Rack and anti-splash tray on the universal tray.
Shelf level
from the bottom
Please refer to the
Grill chart.
Pre-heating Pre-heat the grill for at least 5 minutes with the door shut
Temperature
Please refer to the
Fan Grilling chart.
Grilling time
Please refer to the
Fan Grilling chart.
For grilling thin cuts and for browning food.
For grilling larger items, e.g. rolled meat, poultry.
Do not use a baking tray, if fitted.
For thin cuts use shelf level 3 or 4
For thicker cuts use shelf level 1 or 2
before grilling.
– For thin cuts of meat
(e. g. chops or steak) maximum (Y)
– For grilling larger items,
(e. g. rolled meat, poultry) 240 °C
–
Do not select a higher temperature than that suggested.
The meat will become brown, but will not be cooked
properly.
–
Flat pieces of fish and meat usually take6–8 minutes
per side. Thicker pieces take a little longer.
–
With rolled meats allow approx. 10 minutes per cm
diameter.
–
Most items should be turned half way through cooking.
30
Page 31
Grilling tips
Preparing food for grilling
Clean, wipe dry and season with
pepper and herbs. Do not season meat
with salt before grilling as this draws
the juices out.
Add a little oil if necessary. Do not use
other types of fat as they can get too
dark, burn and cause smoke.
Clean fish in the normal way. To
enhance the taste, add a little salt or
squeeze a little lemon juice over the
fish.
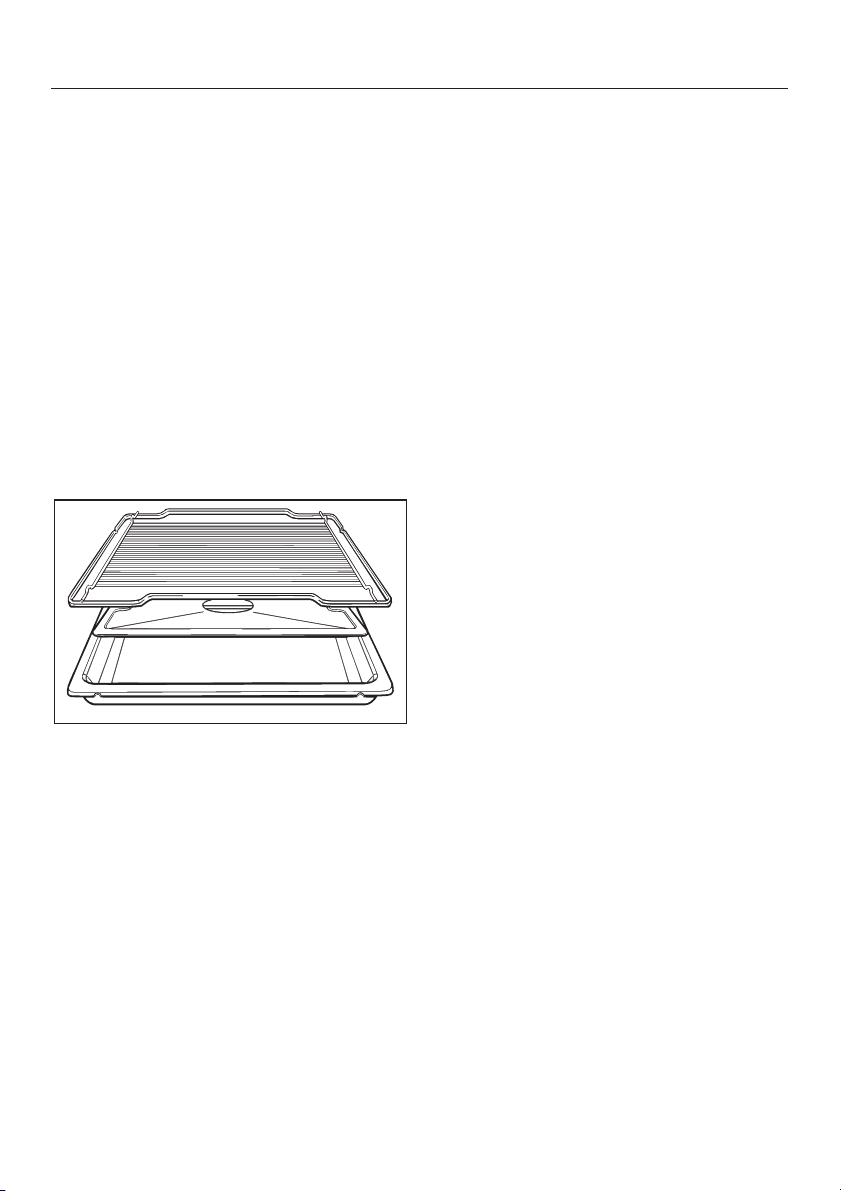
Grilling on the rack
Useful tips
It is best to grill food of a similar
thickness at the same time so that the
grilling time for each item does not vary
too greatly.
To grill thicker pieces of food more
gradually after an initial high
temperature, continue grilling at a lower
temperature setting or use a lower shelf
runner to allow the food to cook through
to the centre.
One way of finding out how far through
a piece of meat has been cooked is to
press down on it with a spoon:
– If there is very little resistance to the
pressure of the spoon, it is still red on
the inside ("rare").
– If there is some resistance the inside
will be pink ("medium").
– If there is great resistance, it is
thoroughly cooked through ("well
done").
^
Assemble rack, anti-splash insert (if
available) and the universal tray as
illustrated.
^
Place the food on the rack.
^
Select the required function and set
the temperature.
^
Pre-heat the grill for at least
5 minutes with the door shut before
grilling.
^
Place under the grill and shut the
door.
^
Most items should be turned half-way
through cooking.
31
Page 32
Grilling tips
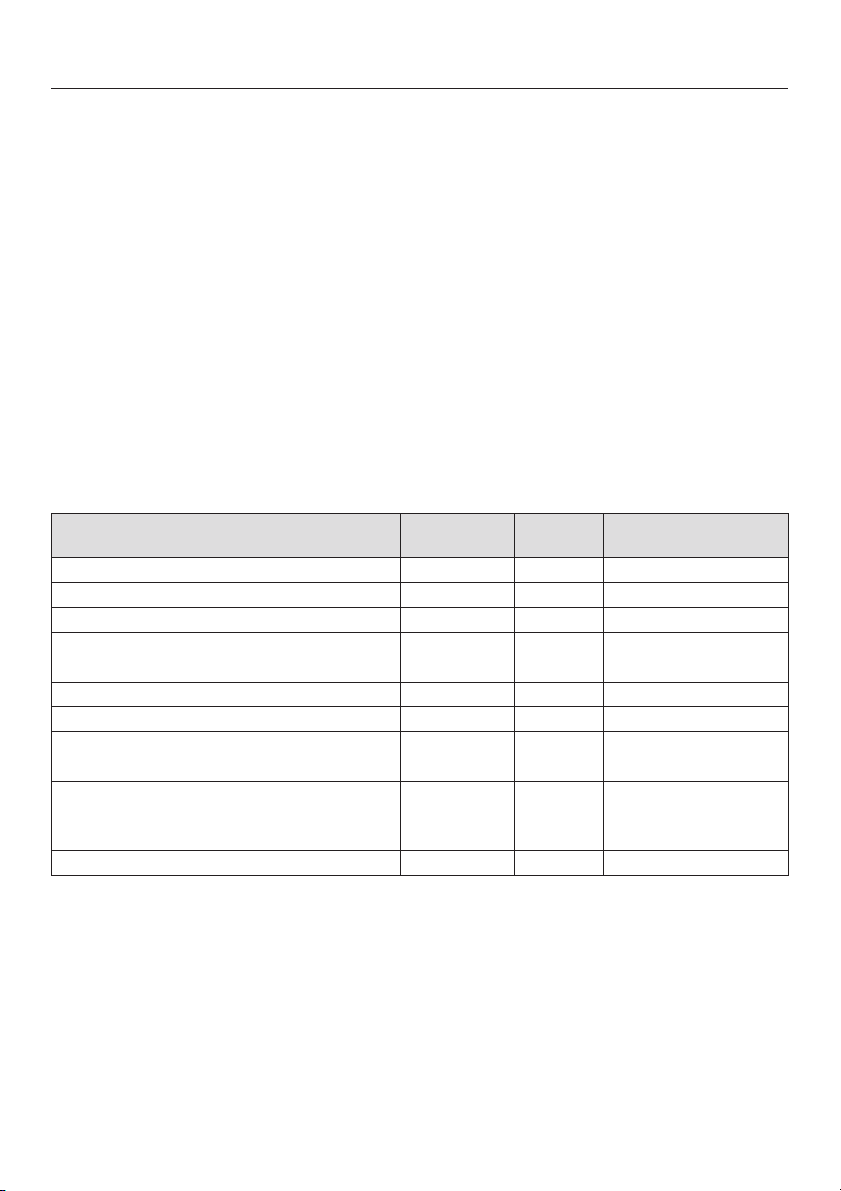
Fan Grilling guide (Fan Grill \)
Use the Fan Grill function for meat, fish, poultry and vegetables.
–
Always pre-heat for at least 5 minutes before Fan Grilling.
–
It is not necessary to turn food when Fan Grilling.
–
The door must be closed during Fan Grilling.
–
When using red meat, pat the meat dry before Fan Grilling as this encourages a
–
richer colour.
Most Fan Grills are cooked on shelf position 4 (top shelf position) Thicker cuts
–
of meat and sausages can be cooked on shelf position 3.
Note: all temperatures are approximations and must be varied according to the
–
thickness and preparation of the meat. The chart below is a suggested guide
only. Personal taste and size of serves will vary times and temperatures. We
recommend you monitor cooking results for best outcomes.
Food Temperature
Lean thin sausages 190 4 10-12
Thick sausages 190 3 15-20
Lean scotch fillet steak 230 4 6-12
Chicken breast fillet 180 4 14-18
Whole butterflied chicken 200 2 30-35
White fish fillets (in grill tray) 220 4 6-10
Thick fish fillets, oily fish (on rack over grill tray) 200 4 6-10
Lamb loin chops 190 4 12-14
Lamb back straps 200 4 8-10
Vegetables, capsicum, zucchini, sweet potato,
eggplant
Potato wedges or small roast potatoes 200 2 15-25
Kebabs and satays (red meat) 200 4 12-15
in °C
190 4 12-15
Shelf level Total grilling time
in min.
1)
Fan grilling can be used for small roasts but is only recommended for tender cuts
of meat, eg lamb racks, rump roasts, and beef fillet. Fan Grill at 200 °C on shelf
position 2, approx 25 minutes depending on thickness.
32
Page 33

Grilling tips
Grilling guide (Grill Y)
Use for thick toasts, muffins, cheese on toast, foccacia, bruschetta and bacon.
–
Pre-heat grill for at least 5 minutes on 200 °C - 220 °C.
–
Select the appropriate shelf level for the thickness of the food.
–
The door must be closed for Grilling.
–
This is a suggested guide only. Personal taste and size of serves will vary times
and temperatures.
33
Page 34

Defrosting
The Defrost P function uses the fan to
circulate air at room temperature.
Please note:
Where possible, remove the
–
packaging and put the food to be
defrosted on the universal tray or into
a suitable dish.
When defrosting poultry, put it on the
–
rack over the universal tray to catch
the defrosted liquid so that the meat
is not lying in this liquid.
It is particularly important to
,
observe food hygiene rules when
defrosting poultry. Do not use the
liquid from the defrosted poultry.
Pour it away, and wash the tray, the
sink and your hands. Danger of
salmonella poisoning.
– Fish does not need to be fully
defrosted before cooking. Defrost so
that the surface is sufficiently soft to
take herbs and seasoning.
Defrosting times
The time needed for defrosting
depends on the type and weight of the
food, and at what temperature it was
deep frozen. The following chart is for
guidance only. It is important to
manually check the food to ensure it is
thoroughly defrosted.
Chicken, 800 g ..........90-120 min.
Meat, 500 g..............60-90 min.
Meat, 1,000 g ...........90-120 min.
Sausage, 500 g ..........30-50 min.
Fish, 1000 g .............60-90 min.
Strawberries, 300 g .......30-40 min.
Cake, 500 g .............20-30 min.
Bread, 500 g.............30-50 min.
,
Do not refreeze food once it has
thawed.
34
Page 35
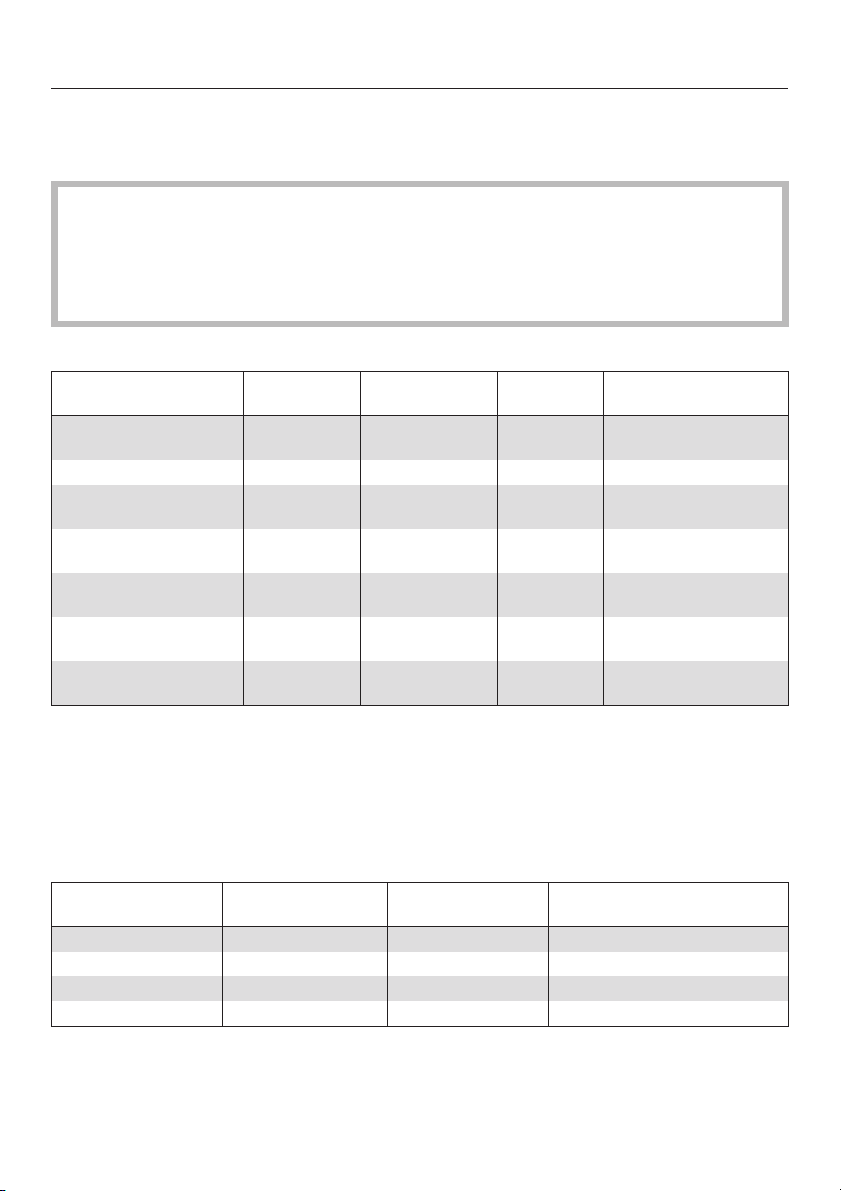
Cooking
Cooking ready meals
We recommend using Fan Plus U.
Cook frozen desserts and pizza on baking paper on the rack rather than in the
universal tray. Cooking large frozen items on the universal tray can cause the
metal to distort. This distortion will increase with each subsequent use.
Frozen food such as oven chips or croquette potatoes can, however, be
cooked on the universal tray.
Examples of ready-meals
Food Temperature
Potato, pasta or
vegetable bake
Lasagne, cannelloni 180 1 or 2 35 – 40 Remove the lid
Filled baguette, Panino 200 1 or 2 12 – 15 Place on baking paper,
Pre-cooked pizza 200 1 or 2 12 – 20 Place on baking paper,
Pre-cooked mini pizza 220 1 or 2 8 – 10 Place on baking paper,
Potato pancakes,
Rösti, croquettes
Pretzels 220 1 or 2 12 – 15 Place on baking paper,
in °C *
180 1 or 2 20 – 25 Place in a suitable dish
220 1 or 2 12 – 20 Place on baking paper,
Shelf level from
the bottom
Time
in min.*
Notes
directly on the rack
directly on the rack
directly on the rack
directly on the rack
directly on the rack
* Generally reduce temperatures by 20ºC from the manufacturer's instructions on
the packaging.
Gentle Bake
The Gentle Bake function is ideal for bakes and gratins which require a crispy
finish.
Food Temp.
in °C
Lasagne 200 45 – 60 1
Potato gratin 190 55 – 65 1
Vegetable bake 190 55 – 65 1
Pasta bake 190 40 – 50 1
For other recipes, use the temperature and time settings given for Conventional
V.
Time in min. Recommended shelf level,
from the bottom
35
Page 36

Cleaning and care
Do not use a steam cleaner to
,
clean the appliance. The steam
could reach electrical components
and cause a short circuit.
Appliance front
Remove any soiling immediately.
If not, it might become impossible to
remove and could cause the surface
to alter or discolour.
Clean the front using a microfibre cloth
or with a solution of warm water and a
little washing-up liquid applied with a
soft sponge. Wipe the surfaces dry
using a soft cloth.
For cleaning, you can also use a clean,
damp microfibre cloth without any
cleaning agent.
The external surfaces of this
appliance are all susceptible to
scratching. Scratches on glass
surfaces could even cause a
breakage in certain circumstances.
Contact with unsuitable cleaning
agents can alter or discolour the
external surfaces.
Avoid damage to the surface.
To prevent damage to your appliance
when cleaning, do not use:
Cleaning agents containing soda,
–
ammonia, acids or chlorides
– Cleaning agents containing
descaling agents
– Abrasive cleaning agents, e.g.
powder cleaners and cream cleaners
– Solvent-based cleaning agents
– Stainless steel cleaners
– Dishwasher detergent
36
–
Oven sprays
–
Glass cleaning agents
–
Hard, abrasive sponges and
brushes, e.g. pot scourers
–
Dirt erasers
–
Sharp metal scrapers
Page 37

Cleaning and care
Accessories
Universal tray, anti-splash insert
The surface has been treated with
PerfectClean.
Please refer to the section on
"PerfectClean" for information on
cleaning and care.
Rack, runners
Use warm water and washing-up liquid
or non-abrasive stainless steel cleaning
agents.
Oven interior
Danger of burning.
Allow the oven to cool down before
cleaning by hand.
It is best to clean the oven interior
each time the oven is used. If this is
not done, subsequent soiling from
baking and roasting will become
worse and make cleaning harder.
In extreme cases this can cause
damage to the surface material.
The removable back panel is coated
with a dark grey catalytic enamel.
See "Cleaning and care" for information
on cleaning catalytic enamelled panels.
To make cleaning easier,
remove the oven door,
–
dismantle the door,
–
take out the side runners,
–
remove the catalytic back panel,
–
lower the top heating/grill element.
–
Instructions for doing so are given
further on in this section.
Seal and inside of the oven door
Grease desposits on the seal between
the inside of the oven door and the
oven interior can cause it to become
brittle and cracked.
It is best to clean the seal and the
inside of the door after each
programme with a cloth or a clean
sponge and a solution of hot water with
a little washing up liquid. Wipe dry
using a soft cloth.
For cleaning, you can also use a clean,
damp microfibre cloth without any
cleaning agent.
The oven interior has been treated
with a special type of enamelling called
PerfectClean.
Please refer to the section on
"PerfectClean" for information on
cleaning and care.
37
Page 38

Cleaning and care
PerfectClean
PerfectClean treated surfaces
Oven interior
–
Universal tray
–
Anti-splash insert
–
This surface has very good anti-stick
properties and is much easier to keep
clean than conventional oven enamel, if
cleaned regularly.
Food can be taken off it more easily,
and soiling from baking and roasting is
easier to remove.
Allow the oven to cool down
,
before cleaning by hand.
Danger of burning!
For optimum performance of
PerfectClean enamel, it is important to
clean the oven and accessories after
each use.
The surfaces will become harder to
clean and the anti-stick properties will
deteriorate if soiling is not removed
after each use and allowed to build up.
In extreme cases cleaning may
become impossible.
The following notes on cleaning and
care should ensure that the anti-stick
and easy clean properties of
PerfectClean last for many years.
PerfectClean surfaces can be treated
as you would treat glass.
Food can be sliced or cut up on the
PerfectClean surface in the same way
as on a baking tray with conventional
enamel.
Do not use a ceramic knife on
PerfectClean surfaces as it could
cause scratching.
The following cause lasting damage
to the surface structure and reduce
the anti-stick effect and must not be
used on PerfectClean surfaces:
– Abrasive cleaning agents, e.g.
powder cleaners and cream
cleaners,
– Cleaning agents for ceramic
cooktops,
–
Steel wool or metal scourers,
–
Abrasive sponges, e.g. pot scourers
or sponges which have been
previously used with abrasive
cleaning agents,
–
Oven spray must not be used in a
hot oven or left on for too long,
–
PerfectClean enamelled items must
not be washed in a dishwasher,
–
Selective cleaning with mechanical
cleaning agents.
38
Page 39

Remove any residual cleaning
agents with clean water as these will
also hinder the anti-stick effect.
Normal soiling
Cleaning and care
Stubborn soiling, e.g. from roasting,
may need to be soaked first with a
damp sponge to loosen it and, if
necessary, a non-abrasive stainless
steel spiral pad or a scraper suitable for
glass can be used to remove it.
Clean as soon as possible after each
use with a dishcloth, soft sponge or a
soft nylon brush, and a solution of hot
water and a little washing-up liquid.
If necessary, the reverse of a
non-scratching washing-up sponge can
be used.
Cleaning is made easier if soiling is first
dampened with a solution of
washing-up liquid.
Stubborn soiling
Remove the catalytic back panel
before using oven spray. The
chemicals used in oven sprays will
damage catalytic enamel, rendering
it ineffective.
Allow the PerfectClean surfaces to cool
down to room temperature before
cleaning. Apply a proprietary oven
cleaning spray (such as the Original
Miele oven cleaner) and leave to take
effect for approx. ten minutes.
When using the Original Miele oven
cleaner, the time stated on the
packaging can be slightly extended if
needed.
If necessary, the scouring pad on the
back of a non-scratching washing-up
sponge or a soft nylon brush can be
used to loosen the soiling.
These cleaning tips will help to ensure
that the surface is cleaned thoroughly.
Should the PerfectClean surface be
damaged by any of the above
measures not being heeded, it will still
retain the anti-stick qualities of standard
enamel and be as easy to keep clean
as standard enamel.
Note:
– Soiling such as spilt juices and cake
mixtures is best removed whilst the
oven or tray is still warm. Exercise
caution, make sure the oven is not
too hot - danger of burning.
– Spilt fruit juices or roasting residues
may cause lasting discolouration to
the surfaces and can cause matt
areas to appear.
This discolouration is permanent but
will not affect the efficiency of the
enamel. Clean these following the
instructions given above and do not
use force to remove them.
Repeat the process if necessary.
After cleaning, rinse thoroughly with
clean water and then dry thoroughly.
39
Page 40

Cleaning and care
Catalytic enamel surfaces
The back panel is coated with dark
grey catalytic enamel.
Soiling from oil and fat is burnt off this
surface when very high temperatures
are used in the oven. The higher the
temperature, the more effective the
process.
The catalytic coating becomes
ineffective through using
– abrasive agents,
– hard brushes or abrasive
sponges
– oven sprays.
Remove catalytic enamel parts from
the oven before cleaning the
PerfectClean oven surfaces with
oven spray.
Note that deposits of spices, syrups
and similar substances are not
removed from the catalytic coating by
this process. These should be removed
by hand whilst still fresh, using a mild
solution of hot water and washing-up
liquid applied with a soft sponge or
brush. Remove the panels from the
oven to do this.
Soiling caused by oil and grease
splashes are removed from catalytic
coated surfaces when the oven is
heated to a high temperature. To do
this:
Select Fan Plus U.
^
Set the highest temperature setting.
^
Run the oven interior for
^
approx. 1 hour. The length of time will
depend on the level of soiling.
If the catalytic coated panel is very
heavily soiled with oil and grease, a
film will develop on the oven surface
during the cleaning process which
can be wiped off with warm water
and a little washing-up liquid once
cool.
^ Finally, clean the PerfectClean
surfaces and the inside of the door.
The timer can also be used to set the
finish time. See "Entering the duration,
start time or finish".
Any remaining soiling will gradually
disappear with each subsequent use of
the oven at high temperatures.
Should the catalytic coating on the
back panel become ineffective
through improper use or heavy
soiling, a replacement can be
obtained from Miele.
^
Take all accessories out of the oven.
^
Wipe large deposits of soiling from
the oven interior and the inside of the
door before starting the cleaning
process to avoid them baking onto
PerfectClean surfaces and becoming
impossible to remove.
40
Page 41
Cleaning and care
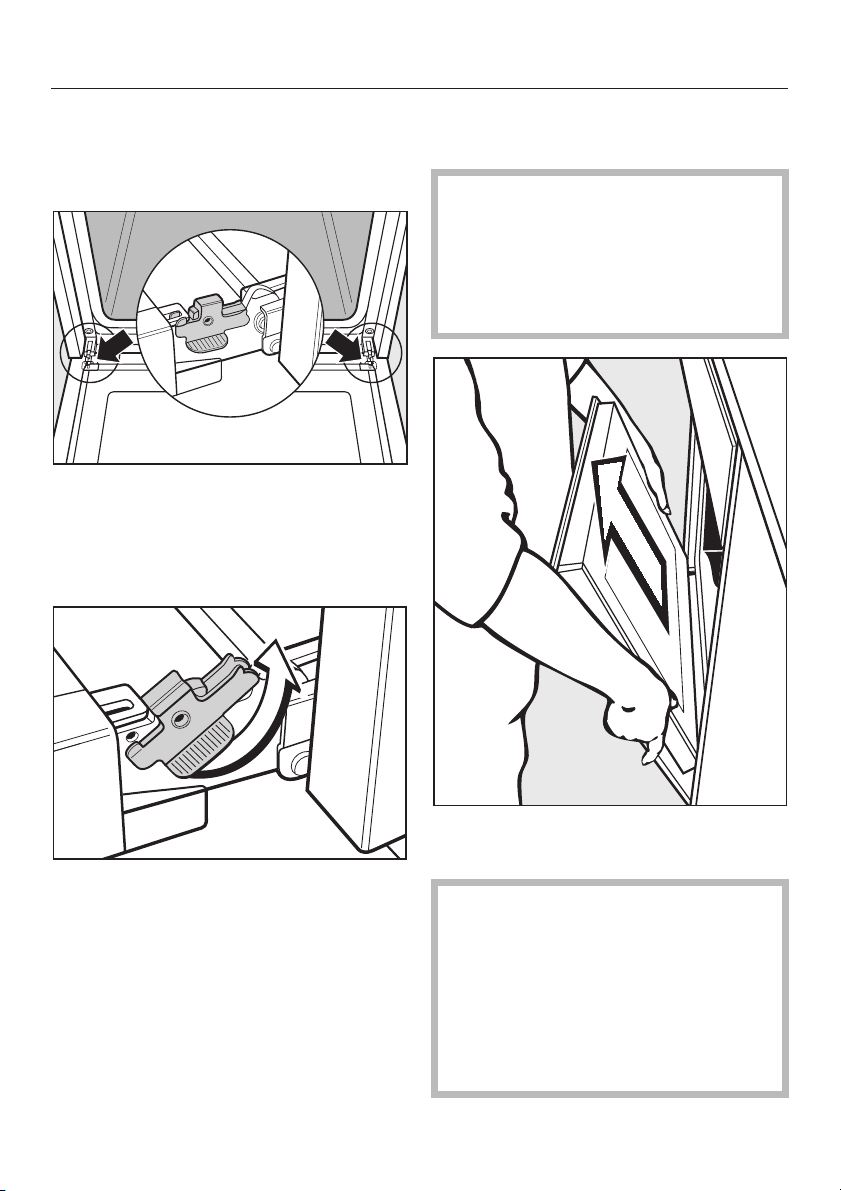
Removing the oven door
The oven door is connected to the oven
by hinges.
Before removing the door, the locking
clamps on both hinges have to be
released.
^ Open the door fully.
Return the door to an almost vertical
^
position.
Never attempt to pull the door off the
hinge guides from a horizontal
position. The hinges can flip back
and cause damage to the
appliance.
Danger of injury!
^
To release the locking clamps on the
hinges, turn them upwards as far as
they will go until they are at an angle.
^
Hold the door securely at both sides
and lift upwards off the hinge guides.
The door should be gripped firmly at
the sides and not at the handle
when being removed. The handle
could break off and damage the
door.
Make sure that you lift the door off
evenly on both sides.
41
Page 42
Cleaning and care
Dismantling the oven door
The oven door has seals on all sides to
prevent vapours from getting in.
If condensate has worked its way in
between the glass panes, the door can
be dismantled in order to clean in
between the panes.
Clean the glass in the same way as
you would clean the appliance front.
Do not use abrasive cleaners, hard
sponges, brushes or sharp metal
tools to clean glass as these can
scratch the surface. Scratches can
cause the glass to break.
Do not use an oven spray. This will
damage the surface of the
aluminium surrounds.
To avoid the risk of breakage, it is
advisable to place the panes on a
table protected by a soft cloth (e.g.
a towel).
You need to remove the door before
it can be dismantled.
Place the door on a protective
^
surface (e.g. on a table cloth) to
prevent it getting scratched. The
door handle should line up with the
edge of the table. Make sure the
glass lies flat and does not get
broken during cleaning.
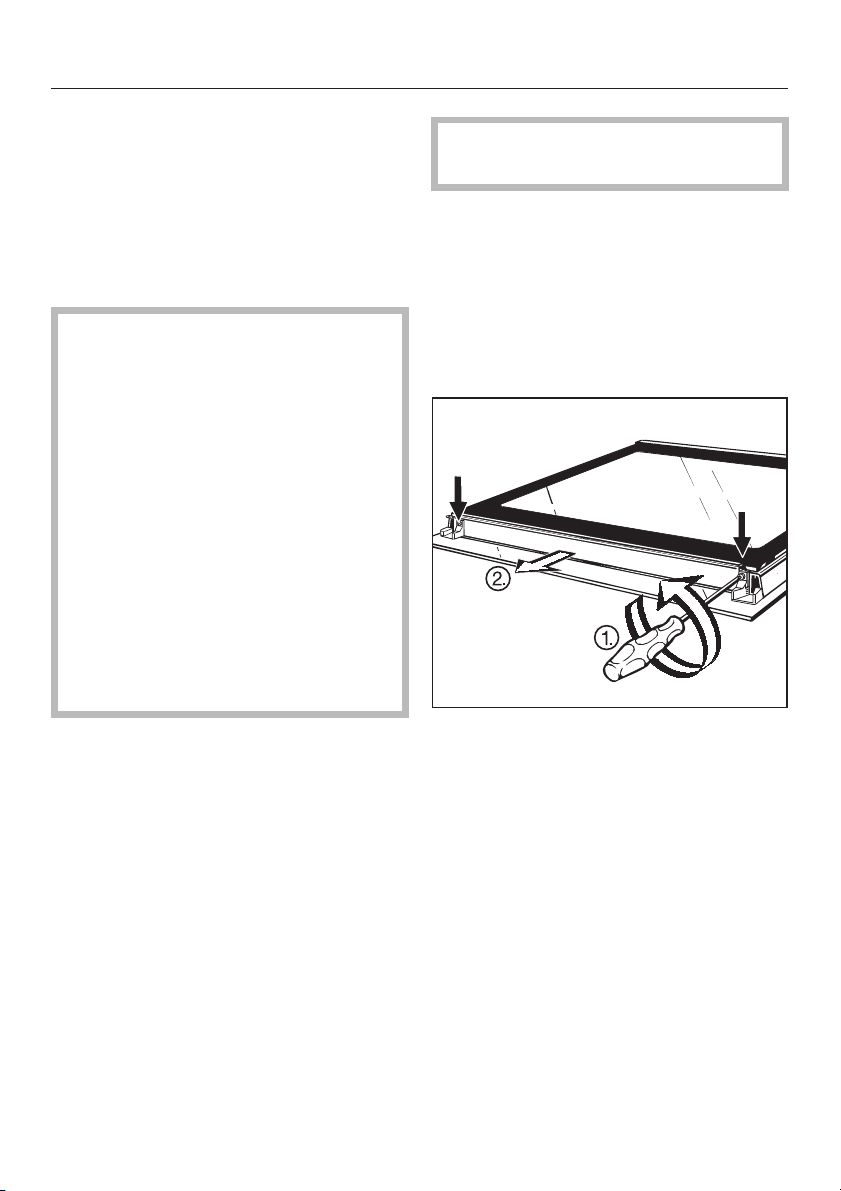
42
^
Unscrew the Torx screws and
remove the guides along with the trim
and seal.
^
You can now remove the inner and
middle panels.
Page 43
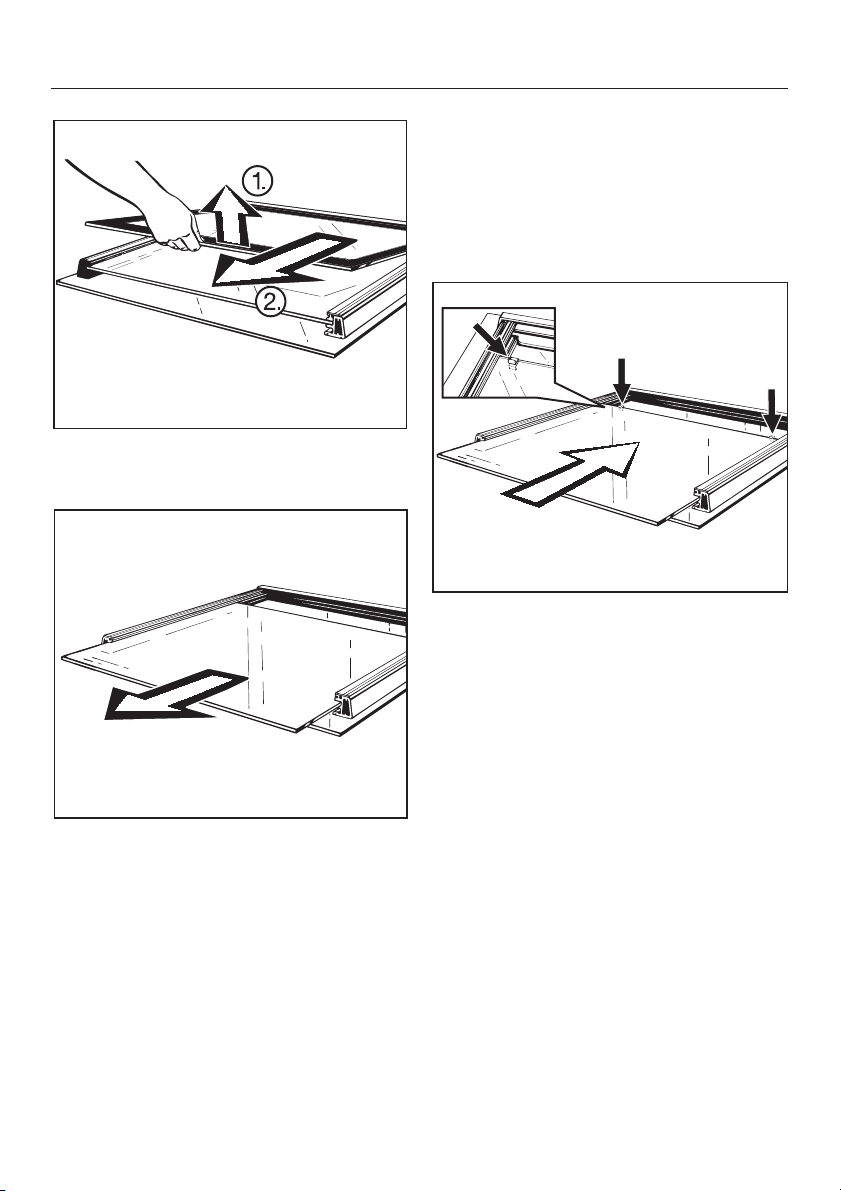
Lift the inner panel slightly and take
^
it out.
Cleaning and care
Clean the glass panes and other
^
parts with a damp microfibre cloth or
a clean sponge and a solution of hot
water with a little washing-up liquid.
Dry all parts with a soft cloth.
Reassemble the door again:
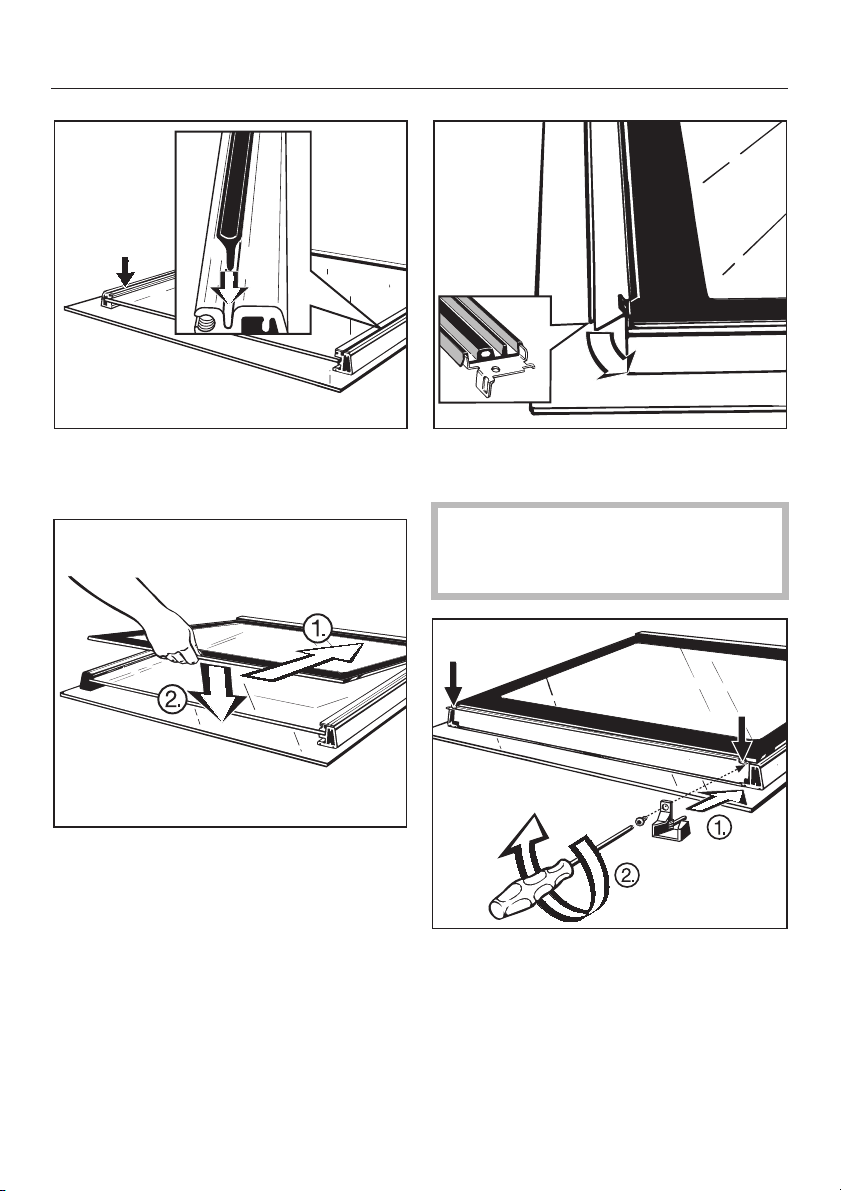
^ Insert the middle panel. Clip the
sealing strip back on and insert the
panel.
^
Pull out the panel towards the front.
The sealing strips may become loose
that are clipped onto the upper end of
the pane of glass to the right and left of
the guide runners. These strips stop the
panes of glass from slipping in the
frame.
43
Page 44
Cleaning and care
Place the side seals for the inner
^
panel in the grooves provided.
^
Insert the inner panel with the print
facing downwards.
Make sure that the side seals do not
slip and that the panel is inserted as
far as it will go.
^ Place the trim and the seal on the
pane of glass.
The correct position of the seals
guarantees that no vapours can
enter the oven during cooking.
^
Attach the guide runners and screw
tight the trim.
44
Page 45
Cleaning and care
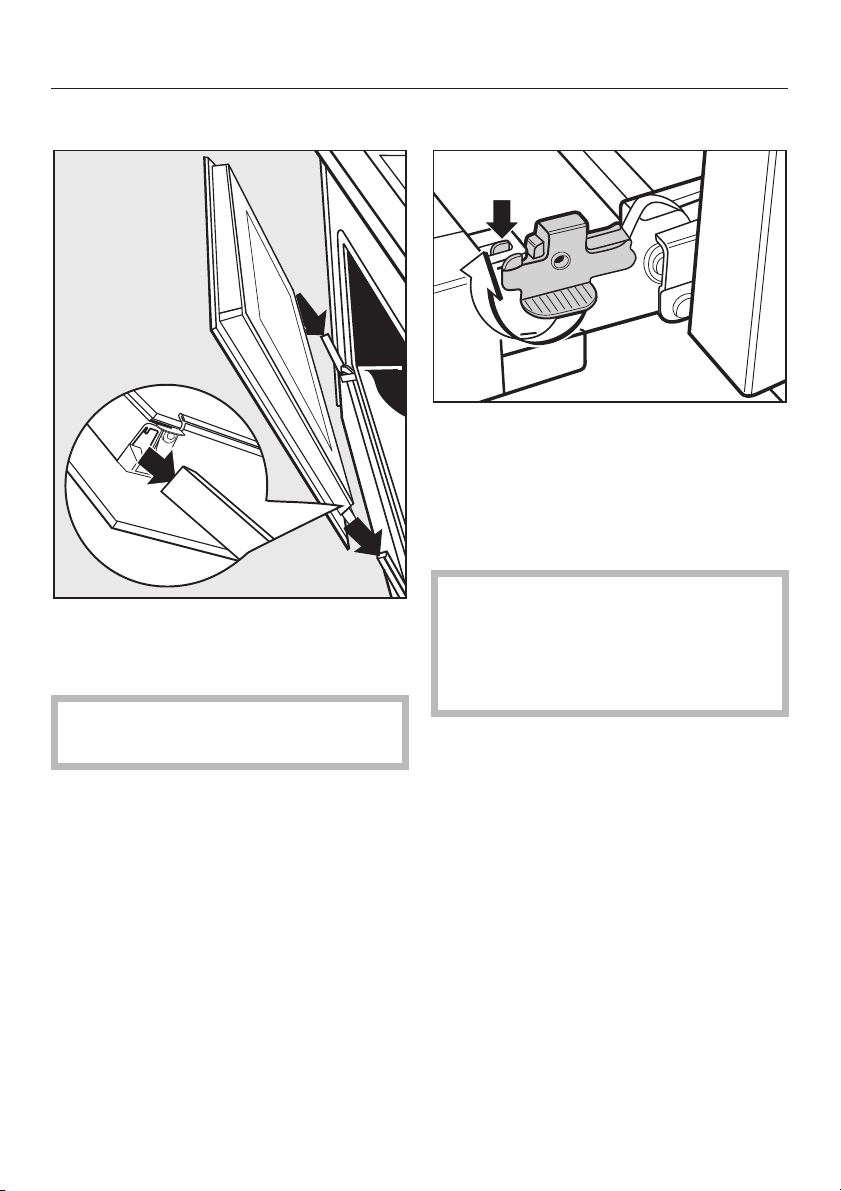
To refit the door
^ Hold the door securely at both sides
and carefully fit it back onto the hinge
guides.
Make sure that the door goes back
on straight.
Open the door fully.
^
Flip both locking clamps back up as
^
far as they will go into a horizontal
position.
The stoppers on the locking clamps
need to clip onto the lugs on the
door.
It is essential that the clamps are
locked after refitting the door.
Otherwise the hinges could work
loose, resulting in damage to the
door.
45
Page 46
Cleaning and care
To remove the runners
Make sure the oven heating
,
elements are switched off and cool.
Danger of burning.
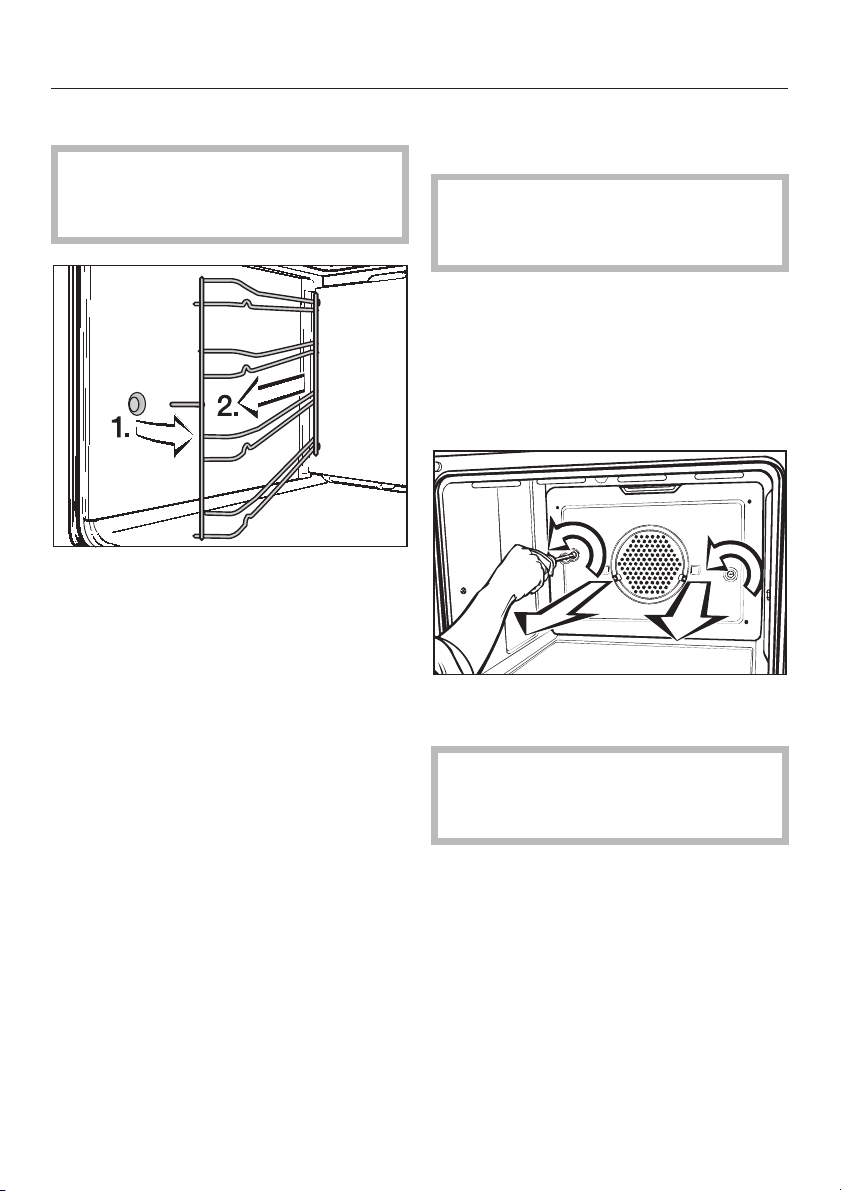
^ Pull the runners forwards out of the
holder (1.) and remove (2.).
Reassemble in the reverse order,
carefully ensuring all parts are correctly
in place.
To remove the catalytic
enamelled back panel
Make sure the oven heating
,
elements are switched off and cool.
Danger of burning.
The back panel can be removed for
cleaning if necessary.
See "Cleaning and care" for information
on cleaning catalytic enamelled panels.
Remove the runners.
^
^ Remove the screws and the back
panel.
46
,
Do not use the appliance without
the back panel installed.
Danger of injury.
Reassemble in the reverse order,
carefully ensuring all parts are correctly
in place.
Page 47
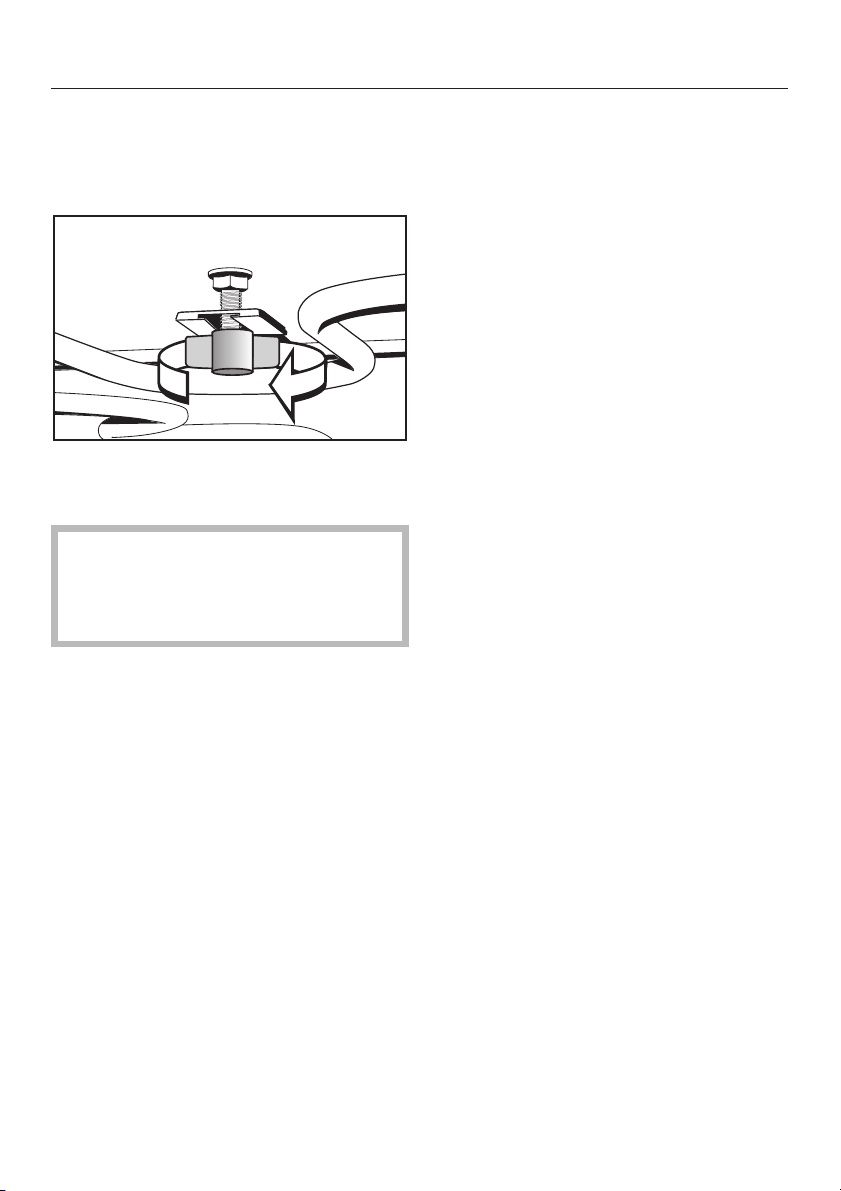
To lower the top heat/grill
element
Remove the runners.
^
^ Unscrew the wing nut.
^ Gently lower the top heating element.
Lower the top heating element
carefully. Do not use force to pull it
down as this can cause the element
to break.
Cleaning and care
^ Reassemble in the reverse order,
carefully ensuring all parts are
correctly in place.
47
Page 48
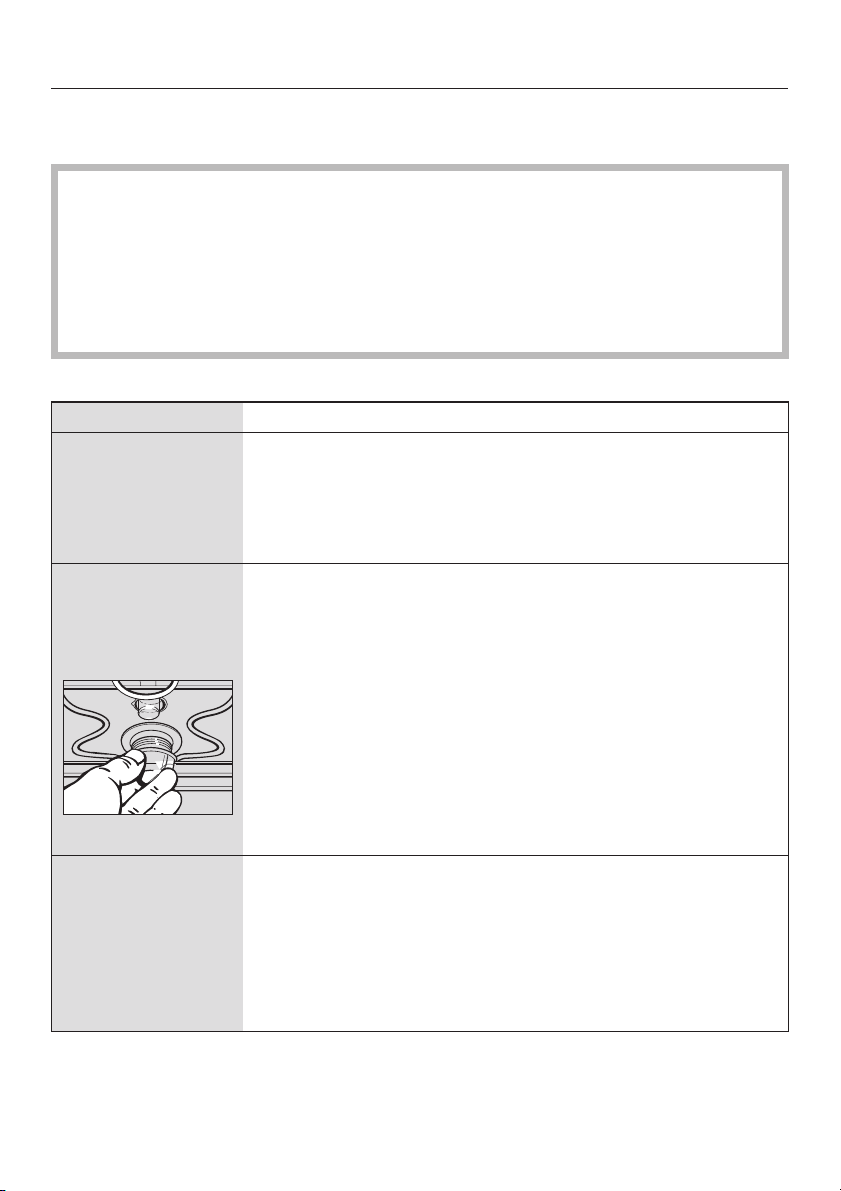
Problem solving guide
With the aid of the following guide, minor problems can be easily corrected
without contacting Miele.
Installation, maintenance and repairs may only be carried out by a suitably
,
qualified and competent person in strict accordance with current national and
local safety regulations.
Repairs and other work by unqualified persons could be dangerous. The
manufacturer cannot be held liable for unauthorised work.
Ensure current is not supplied until after maintenance or repair work has been
carried out.
Problem Possible cause and remedy
The oven does not
heat up.
The heating works
but not the oven
lighting.
Check that the function selector and the temperature
–
selector have been set at the function and temperature
required.
– Check whether the mains fuse has tripped. If it has not,
contact a qualified electrician or Miele.
The lamp needs changing.
^ Disconnect the appliance from the electricity supply.
Switch off and unplug at the socket, or disconnect the
mains fuse, or switch off at the isolator as appropriate.
A noise can be
heard after a
cooking process.
48
^ Unscrew the lamp cover and the seal.
^
Change the lamp.
When purchasing a new lamp, take the old one with you
to make sure you obtain the correct replacement (230 V,
25 W, E 14, heat resistant to 300 °C).
^
Screw the lamp cover and the seal back on again.
This is not a fault.
The cooling fan continues to run for a while after the oven
has been switched off to prevent any humidity building up
in the oven, on the control panel or on the oven housing
unit. When the temperature has fallen sufficiently, the fan
switches off automatically.
The temperature will fall faster with the oven door open.
Page 49

Problem solving guide
Problem Possible cause and remedy
Cakes and biscuits
are not cooked
properly after
following the times
given in the chart.
Browning is uneven. There will always be a slight unevenness. If browning is
There are spots like
rust on the catalytic
surfaces.
"0k00" is flashing in
the display.
Check that the correct temperature has been set.
–
Check whether there has been a change to the recipe.
–
The addition of more liquid or more eggs makes a
moister mix which would need longer to cook.
very uneven, check
with Fan Plus U:
Whether the temperature was set too high.
–
Whether the correct shelf level was used.
–
with Conventional V:
The colour and material of the baking tins being used.
–
Light coloured, shiny, or thin walled tins are less suitable.
– Whether the correct shelf level was used.
When roasting on the rack, the circulating air sometimes
picks up spices, which are then deposited on the oven
interior walls. These residues are not removed by catalytic
cleaning, and should be removed while fresh with a mild
solution of hot water and washing up liquid applied with a
soft brush.
All pre-set times have been lost because of a power cut.
The buzzer will also have been reset to the default tone.
Reset the time and the buzzer tone.
49
Page 50

After sales service
In the event of any faults which you
cannot remedy yourself, or if the
appliance is under warranty, please
contact
your Miele Chartered Agent
–
or
Miele (see back cover for address)
–
Please note that telephone calls may
be monitored and recorded to
improve our service.
When contacting Miele, please quote
the model and serial number of your
appliance.
These are shown on the data plate,
visible below the oven interior, with the
door fully open.
50
Page 51
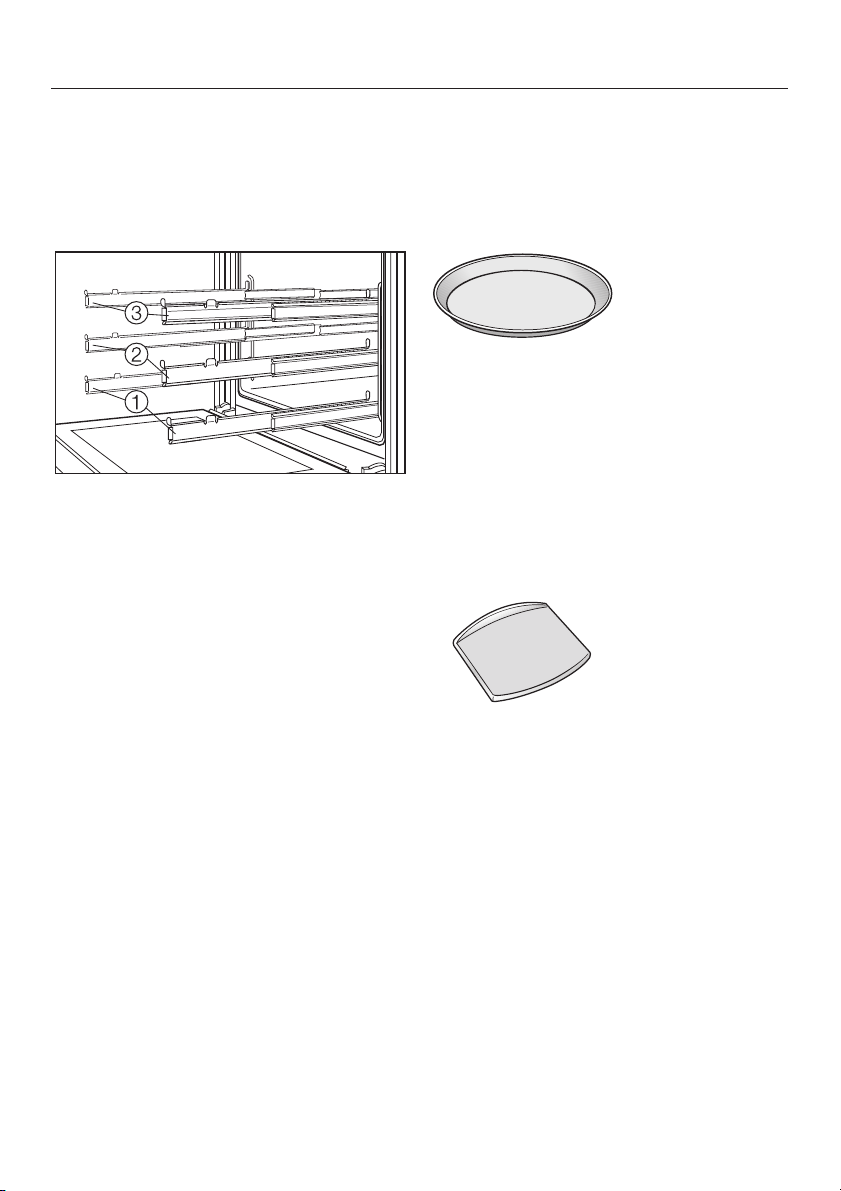
Optional accessories
The following accessories may come as standard with some models.
They are also available to order from Miele or your Miele Chartered Agent.
Telescopic runners HCE 62
The telescopic runners provide three
shelf levels.
Each shelf level can be drawn right out
of the oven individually to give a good
overview of cooking in progress.
Baking tray, universal tray and rack
These items, supplied with your oven,
are also available to order.
When ordering, please quote the model
number of your oven.
Pizza dish
This circular pan is suitable for cooking
pizzas, flat cakes made with yeast or
whisked mixtures, sweet and savoury
tarts, baked desserts, and can also be
used for frozen cakes and pizzas.
The surface has been refined as
PerfectClean enamel.
Pizza stone
The pizza stone is ideal for items which
need a well-baked base such as pizza,
quiche, bread, bread rolls and savoury
snacks.
The baking stone is made from
heat-retaining fire brick and is glazed.
Place it directly on the rack.
A paddle made of untreated wood is
supplied with it for placing food on the
pizza stone and taking it off.
51
Page 52
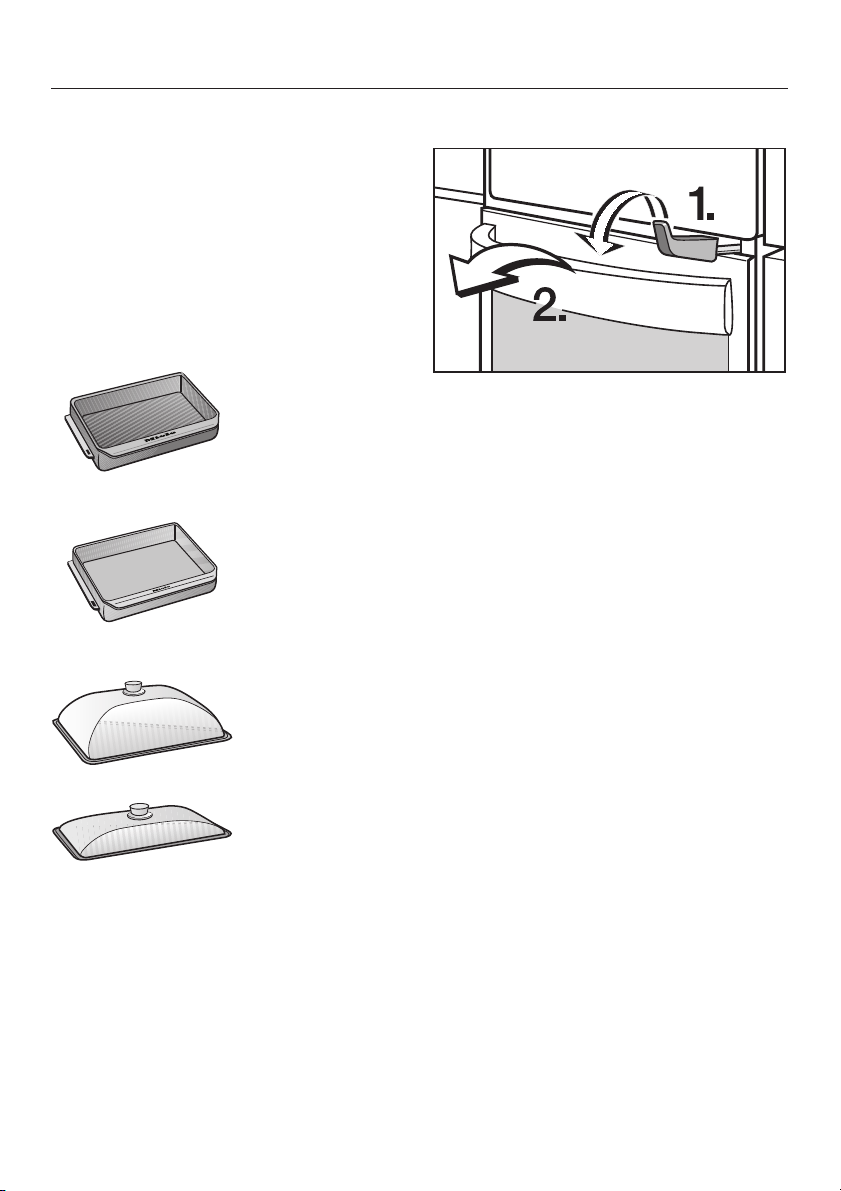
Optional accessories
Gourmet oven dish
The gourmet oven dish can be placed
in the oven directly on the runners. It
has non-tip safety notches like the
universal tray to prevent it being pulled
out too far.
It has an anti-stick coating.
It is available in two sizes:
HUB 61-22 (Depth: 22 cm)
–
– HUB 61-35 (Depth: 35 cm)
Gourmet oven dish lid
Child safety lock
The lock is fitted beneath the control
panel to prevent the door from being
opened. The door can only then be
opened by pressing the lever.
Original Miele all-purpose microfibre
cloth
Light soiling and fingerprints can be
easily removed with the microfibre
cloth.
A lid is available separately.
When ordering a lid, please specify the
gourmet oven dish it is to be used with
(22 or 35 cm deep).
52
Original Miele oven cleaner
Suitable for removing stubborn soiling.
It is not necessary to pre-heat the oven
beforehand.
Page 53

All electrical work should be
undertaken by a suitably qualified
and competent person in strict
accordance with current national
and local safety regulations.
Installation, repairs and other work
by unqualified persons could be
dangerous. The manufacturer
cannot be held liable for
unauthorised work.
Ensure power is not supplied to the
appliance until after installation or
repair work has been carried out.
The voltage and rated load are given
on the data plate, visible below the
oven interior, with the door open.
Ensure that these match the household
mains supply. Please quote these data,
and the model and serial number when
contacting Miele.
Electrical connection
Important
The appliance is supplied for
connection to a 230 V, 50 Hz electricity
supply.
The wires in the mains lead are
coloured in accordance with the
following code:
Green/yellow = earth
Blue = neutral
Brown = live
WARNING
THIS APPLIANCE MUST BE
EARTHED
Connection of this appliance should be
made via a fused connection unit or a
suitable isolator, which complies with
national and local safety regulations,
and the on/off switch should be easily
accessible after the appliance has
been built in.
If the switch is not accessible after
installation (depending on country) an
additional means of disconnection must
be provided for all poles.
For extra safety, it is advisable to install
a residual current device (RCD). Please
contact a qualified electrician for
advice.
When replacing the cable supplied
with another cable or changing the
connection, only cable type
H 05 VV-F or H 05 RR-F with a
suitable cross-sectional area (CSA)
may be used (available from Miele).
Test marks ..........Electrical safety
......................C-Tick Mark
Electrically suppressed
according to...........AS/NZS 1044
53
Page 54
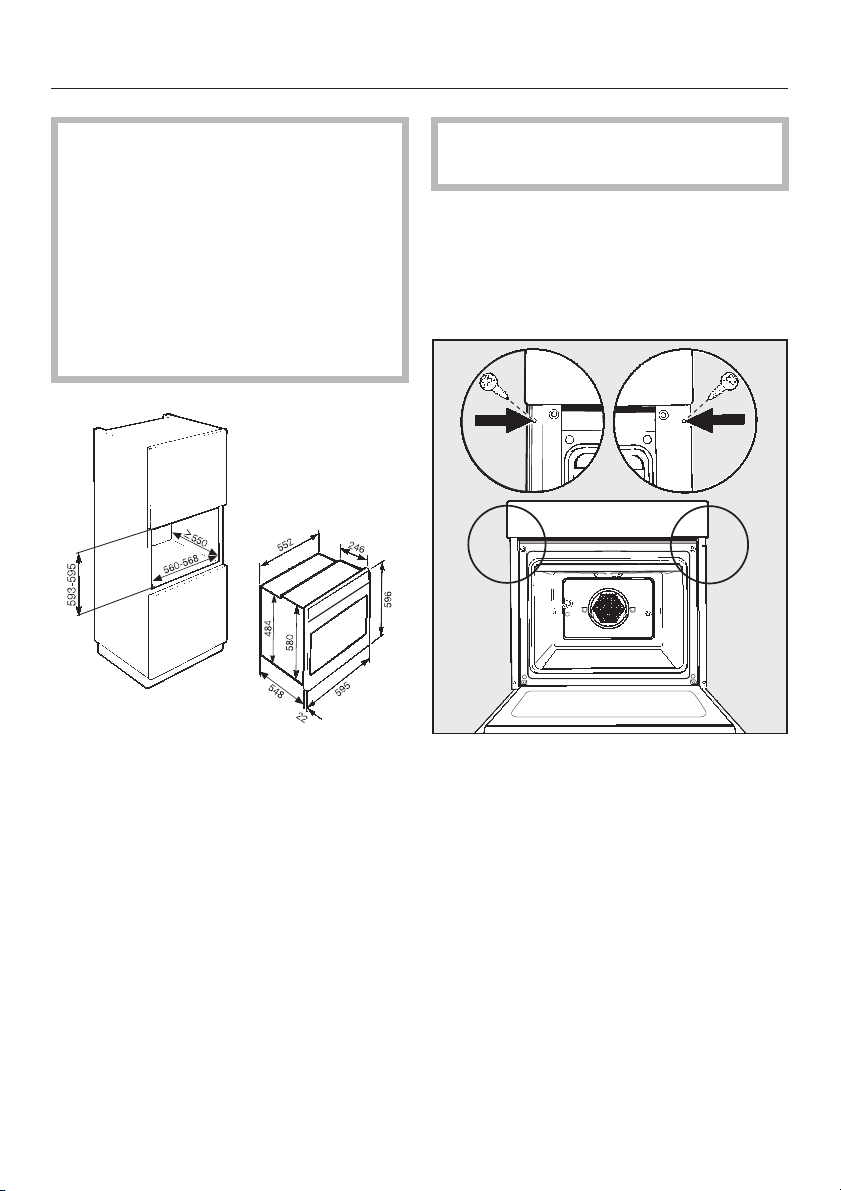
Installing the oven
The appliance must not be
,
operated until it has been correctly
installed in its housing unit.
Otherwise it poses an electric shock
hazard.
Important. Do not fit insulation
material inside the housing unit.
This would hinder the intake of air to
the appliance.
Turn off the mains electricity supply
to the isolator.
Connect the mains cable from the
^
oven to the isolator.
Push the appliance into the oven
^
housing unit and align it.
54
^
Open the oven door and, using two
screws, secure it to the side walls of
the housing unit through the holes in
the oven trim.
^
Reconnect the power supply to the
isolater switch.
Page 55

55
Page 56

Alteration rights reserved / 22 / 4710
(H 4312 B/H 4412 B/H 4402 B)
M.-Nr. 07 784 890 / 03
 Loading...