

Miele G690, G890 Operating instructions
Operating Instructions
Dishwasher
It is essential to read these
operating instructions before
installing or using the machine,
to avoid the risk of accident
or damage to the machine. M.-Nr. 04 936 870
@ä

2

Contents
Contents
Guide to the appliance . . . . . . . . . . . . . . . . . . . . . . . . . . . . . . . . . . . . . . . . . . . . . 5
View of the machine. . . . . . . . . . . . . . . . . . . . . . . . . . . . . . . . . . . . . . . . . . . . . . . . . 6
Control panel (facia). . . . . . . . . . . . . . . . . . . . . . . . . . . . . . . . . . . . . . . . . . . . . . . . . 6
Warning and safety instructions. . . . . . . . . . . . . . . . . . . . . . . . . . . . . . . . . . . . . . 8
Caring for the environment. . . . . . . . . . . . . . . . . . . . . . . . . . . . . . . . . . . . . . . . . 11
Before using for the first time. . . . . . . . . . . . . . . . . . . . . . . . . . . . . . . . . . . . . . . 12
Opening and closing the door . . . . . . . . . . . . . . . . . . . . . . . . . . . . . . . . . . . . . . 13
Child safety lock. . . . . . . . . . . . . . . . . . . . . . . . . . . . . . . . . . . . . . . . . . . . . . . . . . . 13
Water softener . . . . . . . . . . . . . . . . . . . . . . . . . . . . . . . . . . . . . . . . . . . . . . . . . . . 14
To set the water softener . . . . . . . . . . . . . . . . . . . . . . . . . . . . . . . . . . . . . . . . . . . . 15
Hardness level 20-630 mg/l (1 - 35 °d German scale) . . . . . . . . . . . . . . . . . . . 15
Hardness level 650 - 1260 mg/l (36 - 70 °d German scale) . . . . . . . . . . . . . . . 16
Filling the salt reservoir . . . . . . . . . . . . . . . . . . . . . . . . . . . . . . . . . . . . . . . . . . . . . 17
Salt indicator . . . . . . . . . . . . . . . . . . . . . . . . . . . . . . . . . . . . . . . . . . . . . . . . . . . . . 18
Adding rinse aid. . . . . . . . . . . . . . . . . . . . . . . . . . . . . . . . . . . . . . . . . . . . . . . . . . 19
Setting the dosage. . . . . . . . . . . . . . . . . . . . . . . . . . . . . . . . . . . . . . . . . . . . . . . . . 20
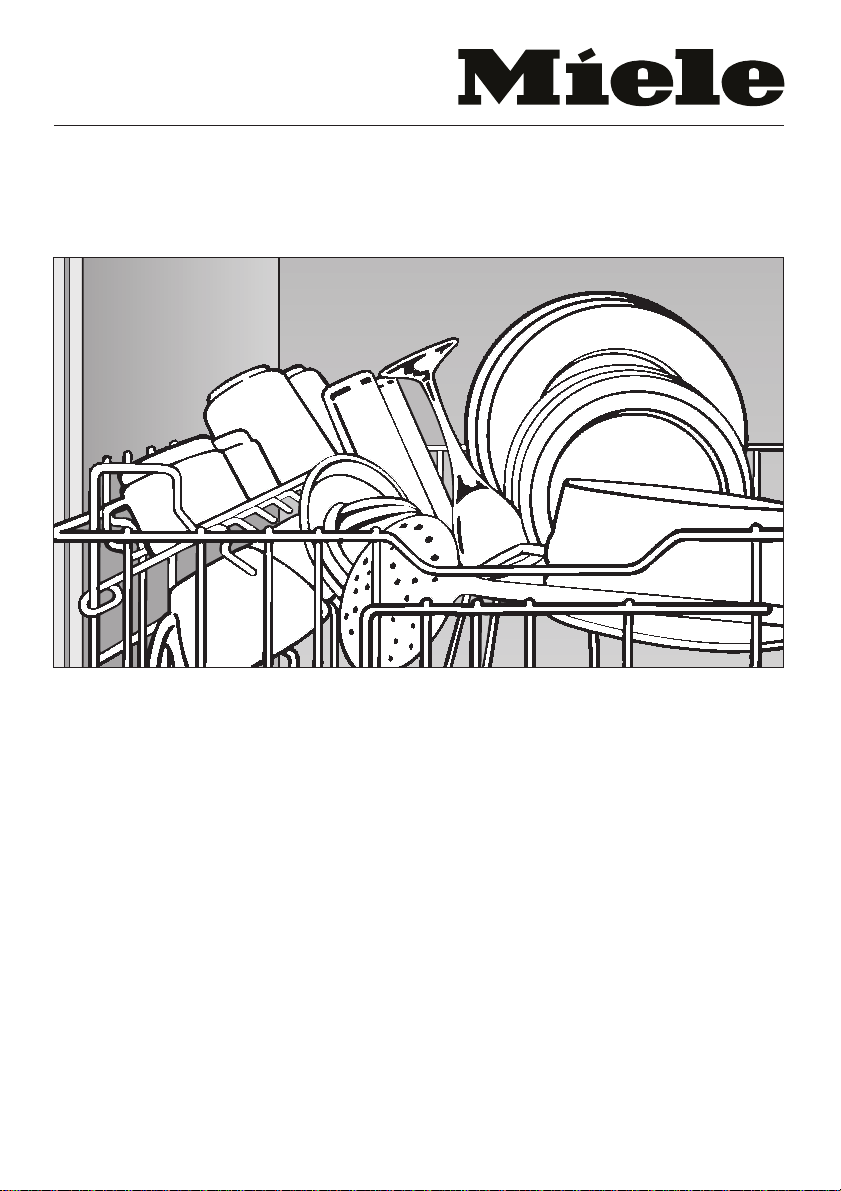
Loading the dishwasher . . . . . . . . . . . . . . . . . . . . . . . . . . . . . . . . . . . . . . . . . . . 21
Loading examples . . . . . . . . . . . . . . . . . . . . . . . . . . . . . . . . . . . . . . . . . . . . . . . . . 22
Bottom basket. . . . . . . . . . . . . . . . . . . . . . . . . . . . . . . . . . . . . . . . . . . . . . . . . . 22
Upper basket . . . . . . . . . . . . . . . . . . . . . . . . . . . . . . . . . . . . . . . . . . . . . . . . . . 23
Cutlery. . . . . . . . . . . . . . . . . . . . . . . . . . . . . . . . . . . . . . . . . . . . . . . . . . . . . . . . 24
Flap up racks . . . . . . . . . . . . . . . . . . . . . . . . . . . . . . . . . . . . . . . . . . . . . . . . . . . . . 27
Positioning rail . . . . . . . . . . . . . . . . . . . . . . . . . . . . . . . . . . . . . . . . . . . . . . . . . . . . 27
Adjusting the upper basket . . . . . . . . . . . . . . . . . . . . . . . . . . . . . . . . . . . . . . . . . . 28
Items not suitable for dishwashers . . . . . . . . . . . . . . . . . . . . . . . . . . . . . . . . . . 29
Adding detergent . . . . . . . . . . . . . . . . . . . . . . . . . . . . . . . . . . . . . . . . . . . . . . . . . 30
Choosing a programme. . . . . . . . . . . . . . . . . . . . . . . . . . . . . . . . . . . . . . . . . . . . 33
Programme chart . . . . . . . . . . . . . . . . . . . . . . . . . . . . . . . . . . . . . . . . . . . . . . . . . 34
Switching on and off . . . . . . . . . . . . . . . . . . . . . . . . . . . . . . . . . . . . . . . . . . . . . . 36
Starting a programme . . . . . . . . . . . . . . . . . . . . . . . . . . . . . . . . . . . . . . . . . . . . . . 36
Sequence indication . . . . . . . . . . . . . . . . . . . . . . . . . . . . . . . . . . . . . . . . . . . . . . . 36
Time display. . . . . . . . . . . . . . . . . . . . . . . . . . . . . . . . . . . . . . . . . . . . . . . . . . . . . . 37
End of a programme . . . . . . . . . . . . . . . . . . . . . . . . . . . . . . . . . . . . . . . . . . . . . . . 37
Interrupting a programme . . . . . . . . . . . . . . . . . . . . . . . . . . . . . . . . . . . . . . . . . . . 38
Programme change . . . . . . . . . . . . . . . . . . . . . . . . . . . . . . . . . . . . . . . . . . . . . . . . 38
3

Contents
Additional options and functions. . . . . . . . . . . . . . . . . . . . . . . . . . . . . . . . . . . . 39
Delay start . . . . . . . . . . . . . . . . . . . . . . . . . . . . . . . . . . . . . . . . . . . . . . . . . . . . . . . 39
Top Solo . . . . . . . . . . . . . . . . . . . . . . . . . . . . . . . . . . . . . . . . . . . . . . . . . . . . . . . . . 41
Removing the load. . . . . . . . . . . . . . . . . . . . . . . . . . . . . . . . . . . . . . . . . . . . . . . . 42
Cleaning and care . . . . . . . . . . . . . . . . . . . . . . . . . . . . . . . . . . . . . . . . . . . . . . . . 43
Cleaning the filters in the wash cabinet. . . . . . . . . . . . . . . . . . . . . . . . . . . . . . . . . 43
Cleaning the spray arms . . . . . . . . . . . . . . . . . . . . . . . . . . . . . . . . . . . . . . . . . . . . 45
Cleaning the drain pump and non-return valve. . . . . . . . . . . . . . . . . . . . . . . . . . . 46
Cleaning the filter in the water inlet . . . . . . . . . . . . . . . . . . . . . . . . . . . . . . . . . . . . 47
Cleaning the wash cabinet. . . . . . . . . . . . . . . . . . . . . . . . . . . . . . . . . . . . . . . . . . . 48
Cleaning the door and the door seal . . . . . . . . . . . . . . . . . . . . . . . . . . . . . . . . . . . 48
The facia panel. . . . . . . . . . . . . . . . . . . . . . . . . . . . . . . . . . . . . . . . . . . . . . . . . . . . 48
The front of the dishwasher . . . . . . . . . . . . . . . . . . . . . . . . . . . . . . . . . . . . . . . . . . 48
Problem solving guide. . . . . . . . . . . . . . . . . . . . . . . . . . . . . . . . . . . . . . . . . . . . . 49
After sales service . . . . . . . . . . . . . . . . . . . . . . . . . . . . . . . . . . . . . . . . . . . . . . . . 52
Special accessories. . . . . . . . . . . . . . . . . . . . . . . . . . . . . . . . . . . . . . . . . . . . . . . 53
InfoControl unit. . . . . . . . . . . . . . . . . . . . . . . . . . . . . . . . . . . . . . . . . . . . . . . . . . . . 54
Comparison tests. . . . . . . . . . . . . . . . . . . . . . . . . . . . . . . . . . . . . . . . . . . . . . . . . 55
Installation instructions. . . . . . . . . . . . . . . . . . . . . . . . . . . . . . . . . . . . . . . . . . . . 59
Technical Data . . . . . . . . . . . . . . . . . . . . . . . . . . . . . . . . . . . . . . . . . . . . . . . . . . . 79
4

Guide to the appliance
Miele dishwashers are available in
three versions:
1. “Freestanding“ dishwashers
“Freestanding“ dishwashers do not require any special installation fixings in
the kitchen, (except for plumbing).
A decor frame can be added to take a
panel for matching the dishwasher to
the kitchen fronts, (with some models
this is already fitted).
2. Integrated (“i“) dishwashers
“i“ dishwashers are specially designed
for building under a continuous worktop.
The control panel with its accessories
is included with the “i“ dishwasher in a
separate package for on-site fixing.
The front is designed to be fitted with a
base unit "door" front to match the kitchen furniture.
Guide to the appliance
3. “U“ dishwashers
The built-under(“U“) dishwashers use
the integrated (“i“)-dishwashers as the
basic machine.
By using a decor set (GDU) the “i“ dishwasher can be converted into a “U“
model dishwasher.
GDU installation instructions are included in a separate installation leaflet
supplied with the decor set.
The dishwasher does not have a plinth
facia. The plinth area can be covered
either with facia to match your kitchen
furniture if available, or another facia.
The separate plinth facia can be fitted
to match the height of adjacent plinths.
The plinth return is freely adjustable.
All notes on installation are described
in the chapter on "Installation instructions".
5
Guide to the appliance
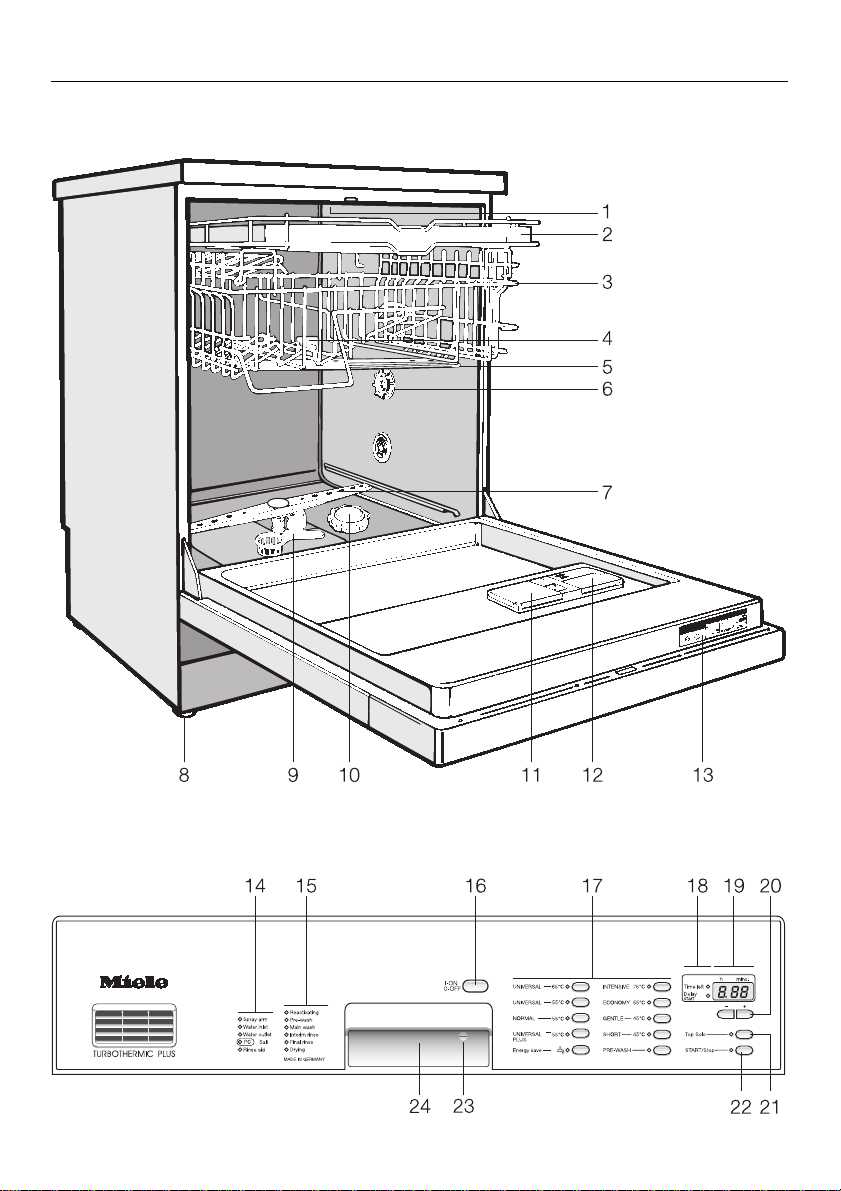
View of the machine
Control panel (facia)
6

Guide to the appliance
1 Upper spray arm (not visible)
2 Cutlery tray
(standard depending on model)
3 Upper basket, (design varies
according to model, and may not
match the one shown).
4 Water guide duct for the middle
spray arm
5 Middle spray arm
6 Water hardness selector
7 Lower spray arm
8 Four height adjustable screw feet
9 Filter combination
10 Salt reservoir
11 Dual compartment detergent
dispenser
12 Rinse aid reservoir
(with dosage selector)
13 Data plate
There are various models for different countries. The model number of
your dishwasher (e. g. G 690) is
listed on the data plate (13).
Throughout this booklet the G 690
(SC) (i) will be referred to generally
as G 6XX.
Similarly the G 890 SCi will be
referred to as G 8XX.
See the Technical Data section for
details of height and capacity.
14 Indicator lights
15 Programme sequence display
16 ON / OFF button
17 Programme selector buttons
18 Time left / Delay start indicator lights
19 Time display
20 Delay start button
21 Top Solo button
22 START/Stop button
23 Child safety lock
24 Door opener
7

Warning and safety instructions
Warning and safety instructions
This appliance conforms to current
safety requirements. Inappropriate
use can however lead to personal
injury and damage to property.
Read the operating instructions
carefully before starting to use this
machine. This way you will avoid
the risk of accidents, and damage
to the machine. Keep these instructions in a safe place for reference,
and pass them on to any future user.
Appropriate usage
This dishwasher is intended exclu-
sively for cleaning domestic crockery and cutlery in a domestic household. Do not use for purposes other
than those for which it was designed.
Any other applications may be dangerous.
The manufacturer cannot be held responsible for any damage caused by
improper use or for uses other than
those for which the appliance is
intended.
The following notes are to help avoid
personal injury
To ensure stability integrated and
built-under models must be installed under a continuous worktop
which has been firmly screwed to
neighbouring units.
fied electrician. The manufacturer cannot be held responsible for damage
caused by the lack or inadequacy of
an effective earthing system, (electric
shock for example).
For safety reasons do not operate
this appliance on an extension
cable. Danger of overheating.
A damaged appliance is dangerous.
Switch off at the mains and call the
Service Department for assistance.
Repairs may only be carried out by
suitably qualified and competent
engineers to ensure safety. Repairs by
unqualified persons could be dangerous.
With the “Waterproof system”, the
plastic housing of the water inlet
connection contains an electrical component. It must not be dipped in water.
Do not let small children play with
the dishwasher and its controls or
operate it.
There is a danger that children playing
might shut themselves in the dishwasher. Please supervise its use by the
elderly or infirm.
Do not use solvents in the dish-
washer. Danger of explosion!
Avoid inhalation of powder deter-
gents.
The electrical safety of this ap-
pliance can only be guaranteed
when continuity is complete between
the appliance and an effective earthing
system. It is imperative that this basic
safety requirement is tested and where
there is any doubt the electrical system
in the house is checked out by a quali-
8

Warning and safety instructions
Dishwasher detergents contain irri-
tant or corrosive ingredients. They
can cause burning in the mouth and
throat if swallowed, or inhibit breathing.
Keep children away from detergents
and from the dishwasher when the
door is open. There could be detergent
residues in the appliance.
To avoid the danger of children
coming into contact with the dishwasher detergent: Only put it into the
detergent dispenser
the programme, and then secure the
door with the child safety lock.
For models with “Delay Start” option
make sure the detergent dispenser is
dry before putting in detergent. Wipe
dry if necessary. Detergent will clog if
poured into a damp dispenser and may
not be thoroughly dispensed. If the
door is open at the end of a programme, children may come into contact with this residue.
Water in the dishwasher must not
be used as drinking water.
Appliances with a cutlery basket:
items of cutlery are cleaned and
dried more efficiently if placed in the
basket handles downwards. You may
however, prefer to place cutlery with
sharp points with the handles upwards.
Always disconnect the appliance
from the electrical supply for maintenance work (switch off at wall socket
and remove plug, screw out fuse in
countries where this is applicable).
just before starting
The following notes should help to
avoid material damage
The voltage and frequency shown
on the data plate must match the
mains supply in the house.
Only use detergents formulated for
domestic dishwashers. Do not use
washing-up liquid.
Do not use commercial or indus-
trial detergents as these may damage material and there is a risk of
severe chemical reaction.
Inadvertently filling the salt reser-
voir with dishwasher detergent always leads to damage to the water softener. Make sure that you have picked
up the right packet of dishwasher salt
before filling the salt reservoir.
Inadvertently filling the rinse aid
reservoir with powder or liquid
detergent always leads to serious damage to the reservoir. Only use rinse aid
formulated for domestic dishwashers.
Do not sit or lean on the opened
door. This could cause the dishwasher to tip and be damaged.
Plastic items which cannot with-
stand being washed in hot water,
e.g. disposable plastic containers, or
plastic cutlery should not be cleaned in
the dishwasher. The high temperatures
could cause the material to distort.
9

Warning and safety instructions
The Miele Waterproof System of-
fers protection from water damage,
provided the following conditions are
met:
– the dishwasher is correctly installed
and plumbed in
– the dishwasher is properly main-
tained and parts are replaced where
it can be seen that this is necessary
– the stopcock has been turned off
when the machine is not used for a
longer period of time (e.g. during
holidays).
In countries where there are areas
which may be subject to infestation by cockroaches or other vermin,
pay particular attention to keeping the
appliance and its surroundings in a
clean condition at all times. Any damage which may be caused by cockroaches or other vermin will not be
covered by the appliance guarantee.
Dishwashers with visible heating elements
For appliances with the heating ele-
ment in the wash cabinet do not
touch the element during or directly
after the end of a programme, you
could burn yourself.
Disposal of your old machine
When disposing of an old dish-
washer first make it unusable. Disconnect, cut off the cable and the plug
from the cable.
Make the door lock inoperative, so that
children cannot accidentally shut themselves in. Make appropriate arrangements for the safe disposal of the appliance.
The manufacturer can not be held
responsible for any damage caused
by non-observance of the Warning
and Safety instructions.
Some plastic items could melt or
catch fire if they were to come into
contact with the heating element.
Therefore always place plastic items or
any other items which may not be completely heat resistant in the upper basket and ensure they cannot drop
through. Any items which are too small
to be lodged securely in the upper basket should not be cleaned in the dishwasher.
10

Caring for the environment
Disposal of the packing material
The transport and protective packing
has been selected from materials
which are environmentally friendly for
disposal and can normally be recycled.
Caring for the environment
Energy saving washing
These dishwashers are exceptionally efficient in their use of water and electricity. You can make the most of your
appliance by following these tips:
Rather than just throwing these materials away, please ensure they are offered for recycling.
Disposal of your old machine
Old machines contain materials which
can be re-cycled. Please contact your
local authorities or scrap merchant
about potential recycling schemes, before disposing of the appliance.
Ensure that the machine presents no
danger to children while being stored
for disposal. See the appropriate section in the Warning and Safety instructions.
If your household water system is
suitable, this dishwasher can be connected to a hot water supply, for further economies.
However, if your water is heated by
electricity we would still recommend
connection to cold water.
In the UNIVERSAL 55° programme,
depending on the capacity of the
dishwasher, when connected to hot
water 55°C up to 0.7 kWh of electrical energy is saved. The hot water
provides this energy, and the approx. 0.13 l oil or 0.14 m
needed to heat the water might be
considerably more cost effective.
Although all stages of the wash then
take place with hot water, savings
are made in cost, time and energy.
Make full use of the baskets without
overloading the dishwasher for most
economical washing.
For small loads:
Select the additional “Top Solo” option (see chapter “Additional options
and functions”)
3
natural gas
Choose the programme to suit the
type of crockery being washed and
the degree of soiling.
If baskets are only half full use the
ECONOMY programme.
Use the correct dosages of detergent.
11

Before using for the first time
Before using for the first time
Before using for the first time please
note the following points:
See the relevant chapters for detailed
information on the points below.
Setting the water softener
The water softener unit must be set to
deal with the water hardness level in
your area.
The salt reservoir must also
filled with water and then with dishwasher salt. Never fill with dishwasher
powder detergent.
Filling the salt reservoir with detergent by mistake will always damage
the water softener. Please check
every time before refilling that the
package contains dishwasher salt.
Add rinse aid
Only use rinse aid formulated for domestic dishwashers.
Inadvertently filling the rinse aid reservoir
with powder or liquid detergent, or washing up liquid, will damage the reservoir.
Do not use washing up liquid
Only use detergent formulated for domestic dishwashers.
first be
Add the correct amount of detergent
Follow the detergent manufacturer’s
recommendations on how much detergent to use. Not using enough will lead
to poor wash results.
The amount to dispense will depend on
the type of detergent and programme
selected.
Read the notes on dosage given in the
programme chart.
Cleaning results may vary from brand
to brand. If you are not satisfied with
the results from one brand try another
quality brand before contacting the
Customer Service department for advice.
It is important to choose the correct
programme
The NORMAL programme and the
UNIVERSAL programmes are ideally
suited to everyday loads. See the programme chart for descriptions of other
programmes.
When the dishwasher is run for the
first time the programme selected
will not start for
During these 7 minutes the “Reactivate” (Regenerate) programme step
is carried out and the “Reactivate”
indicator light illuminates.
approx. 7 minutes.
Load the crockery correctly
Load the crockery so that water will come
into contact with all surfaces. This ensures that they will be properly cleaned.
The spray arms must not be blocked
by items which are too tall for the basket or which hang through. If necessary
manually rotate the spray arms to test.
12
The filter combination in the base of
the wash cabinet and the spray arms
must be kept clean.
These should be regularly inspected
and cleaned if necessary.
Opening and closing the door
To open the door
Opening and closing the door
Child safety lock
Press the release catch inside the
door grip.
If the door is opened during operation
all functions are automatically interrupted.
To close the door
Push the baskets right in
Lift the door upwards and push until
it clicks into position
The child safety lock is designed to
deter children from opening the dishwasher door.
Use the key provided to turn the
child safety lock to the required setting.
Horizontal setting = The door is
locked.
Vertical setting = The door can
be opened.
13
Water softener
Water softener
To avoid the build-up of calcium deposits on crockery and cutlery, and in
the dishwasher, the water needs to be
softened.
To ensure a steady supply of soft water
the built-in water softener must be:
1. correctly set (programmed) and
2. the salt reservoir must be filled with
dishwasher salt for reactivation.
(With very soft water (under 70 mg/l
(4° dH) no dishwasher salt needs to
be added).
The dishwasher is set at the factory to
operate up to a hardness level of
400 mg/l (22 °d German scale)
If your water hardness level is different from this (including under 70
mg/l (4° dH)) the factory setting will
need to be changed according to
the chart on this page.
Your local water authority will advise
you on the water hardness of your area.
Where the hardness level fluctuates
(e.g. 140-310 mg/l, 8 - 17 °d German
scale) always take the highest value
(value 17 °d in this example)!
Should you require a service visit, it is
useful for the technician to know the
water hardness.
Please make a note of the water
hardness level here:
Water hardness:
mg/l
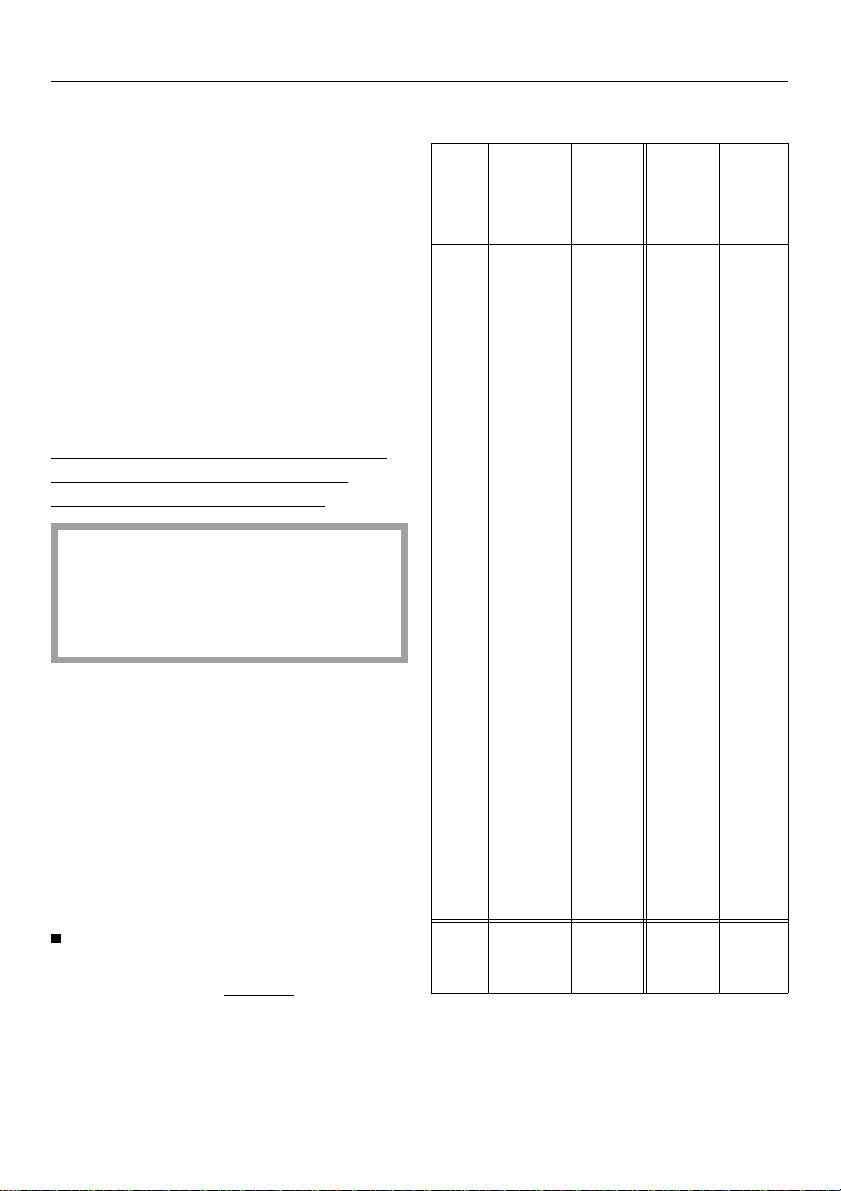
Settings
°d mg/l °f
1
2
3
4
5
6
7
8
9
10
11
12
13
14
15
16
17
18
19
20
21
22 *)
23
24
25
26
27
28
29
30
31
32
33
34
35
36-47 650- 850 65- 85 36 4
48-65 860-1170 86-117 36 5
66-70 1190-1260 119-126 36 6
*) factory setting
20
40
50
70
90
110
130
140
160
180
200
220
230
250
270
290
310
320
340
360
380
400
410
430
450
470
490
500
520
540
560
580
590
610
630
11
13
14
16
18
20
22
23
25
27
29
31
32
34
36
38
40
41
43
45
47
49
50
52
54
56
58
59
61
63
Value
for
Pro-
gram-
ming
2
4
5
7
9
1
2
3
4
5
6
7
8
9
10
11
12
13
14
15
16
17
18
19
20
21
22
23
24
25
26
27
28
29
30
31
32
33
34
35
Water-
hard-
ness
select.
(Setting)
6
6
6
6
6
6
6
6
6
6
6
6
6
6
6
6
6
6
6
6
6
6
6
6
6
6
6
6
6
6
6
6
6
6
6
14
Water softener
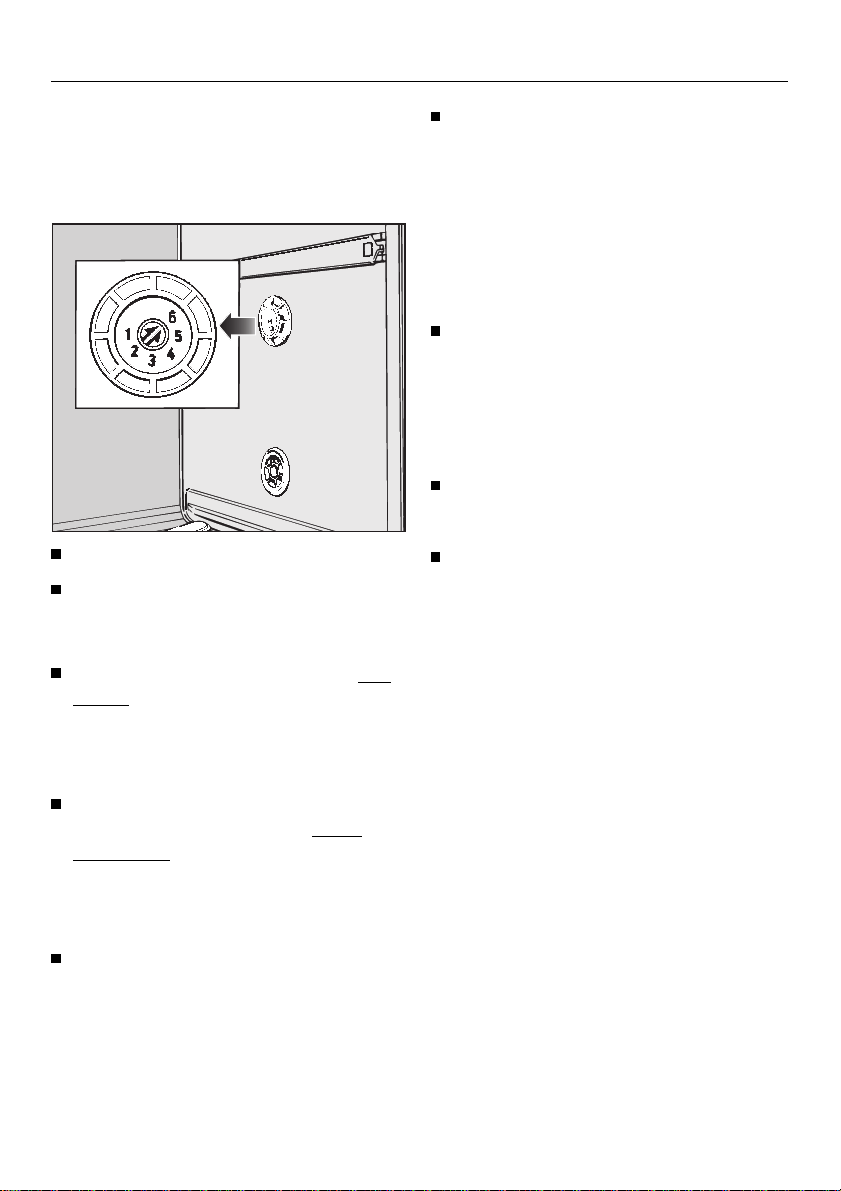
To set the water softener
Hardness level 20-630 mg/l
(1 - 35 °d German scale)
Switch the dishwasher off.
Use a screwdriver to remove the lid of
the water hardness level selector in
the wash cabinet.
Check that the selector is set to setting 6 (factory setting). If not, use a
flat blade screwdriver or a coin to
turn the selector until it clicks on setting 6.
Press the "Top Solo" button as many
times as necessary until the water
hardness value required (measured
in °dH) appears in the display.
Example:
For a water hardness level of 540 mg/l
(30 °d German scale).
Keep pressing the "Top Solo" button
until "30" appears in the display.
Once the figure "36" is reached the
counter returns to "1".
Press the “START/Stop” button.
“SP” appears in the time display.
Press the “START/Stop” button again.
All the control lights next to the programme selection buttons and the decimal point in the time display light up.
The change to water hardness recognition is now stored in memory.
Press and hold in the "+" and
"START/Stop" buttons, and
same time switch on the dishwasher
with the "ON/OFF " button.
"P" and two figures appear in the
time display.
Press the "UNIVERSAL 55 °" programme button.
A figure appears in the display corresponding to the water hardness level
already set, e.g. "22" – the water softener is set to a water hardness level
of 400 mg/l (22 °d German scale).
at the
15

Water softener
Hardness level 650 - 1260 mg/l
(36 - 70 °d German scale)
Switch off the dishwasher.
Press and hold in the "+" and
"START/Stop" buttons, and
at the
same time switch on the dishwasher
with the "ON/OFF " button.
"P" and two figures appear in the
time display.
Press the "UNIVERSAL 55 °" programme button.
A figure appears in the display corresponding to the water hardness level
already set, e.g. "22" – the water softener is set to a water hardness level
of 400 mg/l (22 °d German scale).
Keep pressing the "Top Solo" button
until "36" appears in the display.
Once the figure "36" is reached the
counter returns to "1".
Press the “START/Stop” button.
°d mgl/l °f
36-47 650-850 65-85 36 4
48-65 860-1170 86-117 36 5
66-70 1190-1260 119-126 36 6 *)
*) factory setting
Value for
program-
ming
Waterhardness
selector
(Settings)
Example:
Water hardness is 920 mg/l (52 °d).
The water hardness selector must be
turned to setting 5 (48 - 65 °d).
“SP” appears in the time display.
Press the “START/Stop” button again.
All the control lights next to the programme selection buttons and the decimal point in the time display light up.
The change to water hardness recognition is now stored in memory.
In addition the water hardness selector
in the wash cabinet must be set according to the chart.
16
Switch the dishwasher off.
Use a screwdriver to remove the lid
of the water hardness level selector
in the wash cabinet.
Check that the selector is set to setting 6 (factory setting). If not, use a
flat blade screwdriver or a coin to
turn the selector until it clicks on setting 6.
For technical reasons do not set the
selector to setting 1 - 3.
Water softener
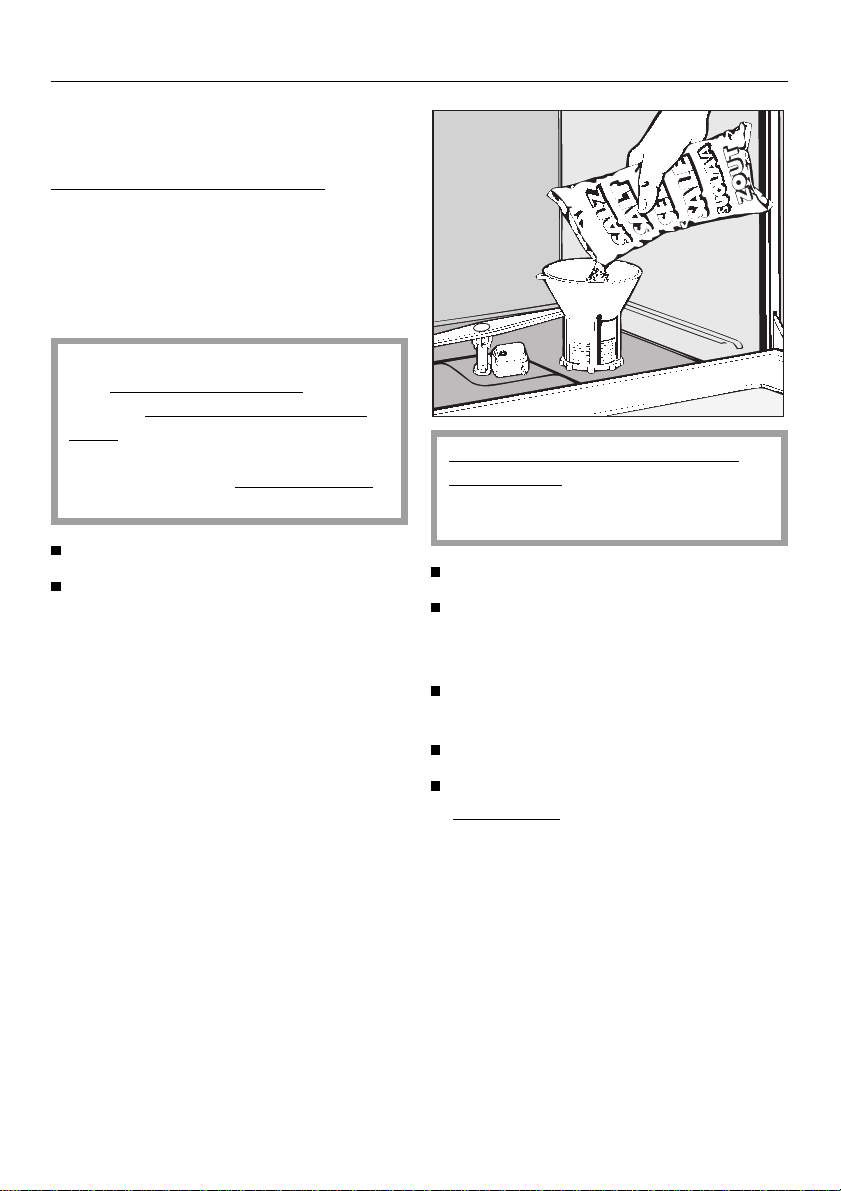
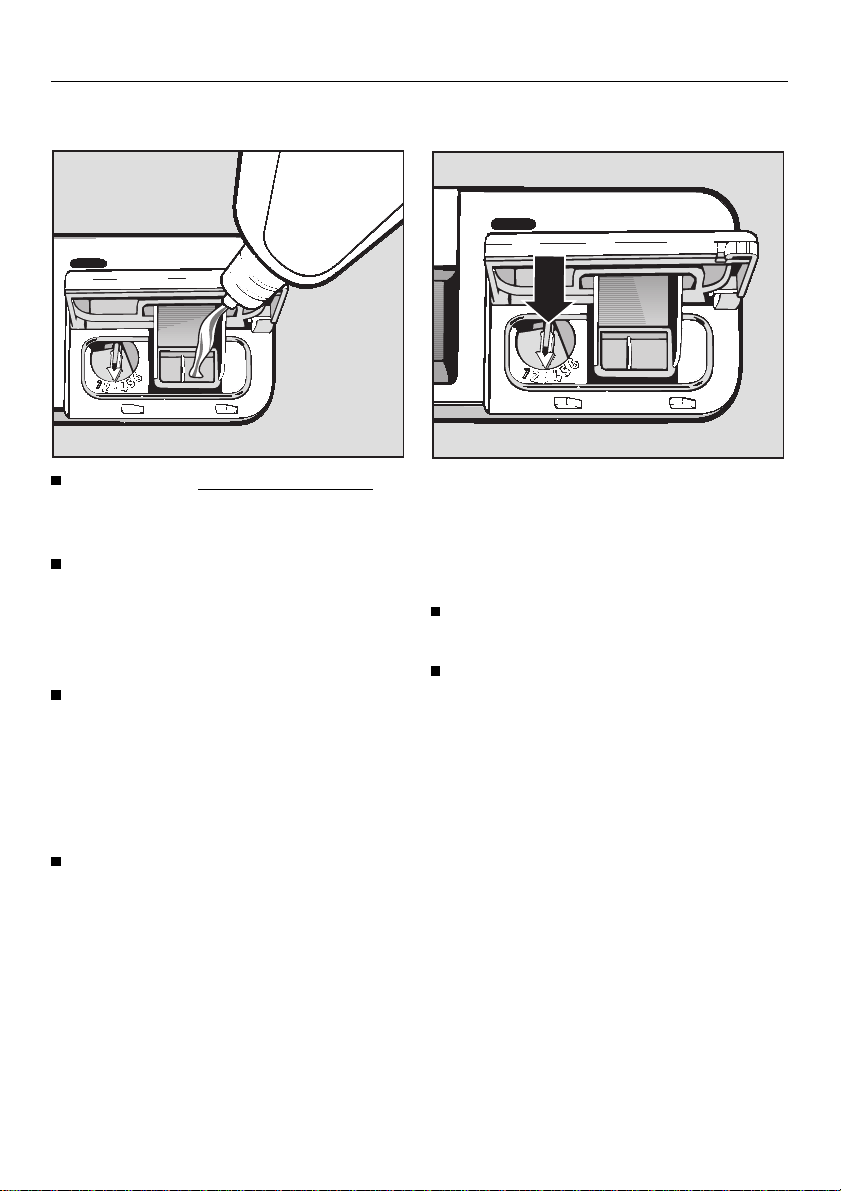
Filling the salt reservoir
Please only use special coarse grained
dishwasher salt for reactivation, as
other salts may contain insoluble additives which can impair the functioning
of the softener.
The salt reservoir holds approx. 2 kg of
salt.
Inadvertently filling the salt reservoir
dishwasher detergent always
with
leads to
tener.
Make sure that you have picked up
the right packet of
before filling the salt reservoir.
Remove the bottom basket.
Unscrew the salt reservoir cap.
damage to the water sof-
dishwasher salt
Water softener
Before filling the salt reservoir for
the first time:
Fill the salt reservoir with approx.
2 litres of water.
Place the funnel (provided) in place.
Fill carefully with salt
(As it is filled displaced water will run
out).
Clean salt from the screw threads of
the socket.
Screw the cap on firmly.
Run the “PRE-WASH” programme
immediately. This removes any
traces of salt from the cabinet. This
is not necessary if a “UNIVERSAL”
or “UNIVERSAL PLUS” programme
is run straight away.
17
Water softener
Water softener
Salt indicator
When the salt reservoir is empty the
“Salt” indicator light comes on. The
reservoir should be refilled with dishwasher salt for reactivation.
After the reservoir has been refilled with
salt the water softener is automatically
reactivated either the next time the dishwasher is run or the time after that.
Note
With water that is very soft, i.e. at a
level constantly below 70 mg/l (4 °d),
no reactivation salt needs to be added.
As the salt reservoir is empty the salt indicator light will come on. In this case
the light is of no significance.
The "Salt" indicator light has also been
designated for future programme updates, (see "After Sales Service").
The “Reactivate” indicator light illuminates during this process.
18
Adding rinse aid
Rinse aid is necessary to ensure that
water does not cling and leave marks
on crockery during the drying phase.
Rinse aid is poured into the storage
reservoir and the amount set is dispensed automatically.
The rinse aid reservoir holds approx.
130 cm
3
.
Inadvertently filling the rinse aid
reservoir with
liquid detergent) always causes
serious damage to the reservoir.
Only pour
domestic dishwashers into the reservoir.
powder detergent (or
rinse aid formulated for
Adding rinse aid
Add rinse aid when the indicator
light “Rinse aid” on the control panel
comes on.
Although it is possible to use
hold vinegar with a max. 5% acid
content, or liquid citric acid up to
50% acid as an alternative, the resulting rinsing and drying quality
will not be as good as when rinse
aid is used.
Do not use vinegar with a high acid
content (e.g. vinegar essence 25%
acid). This must
use would damage the dishwasher.
not be used as its
house-
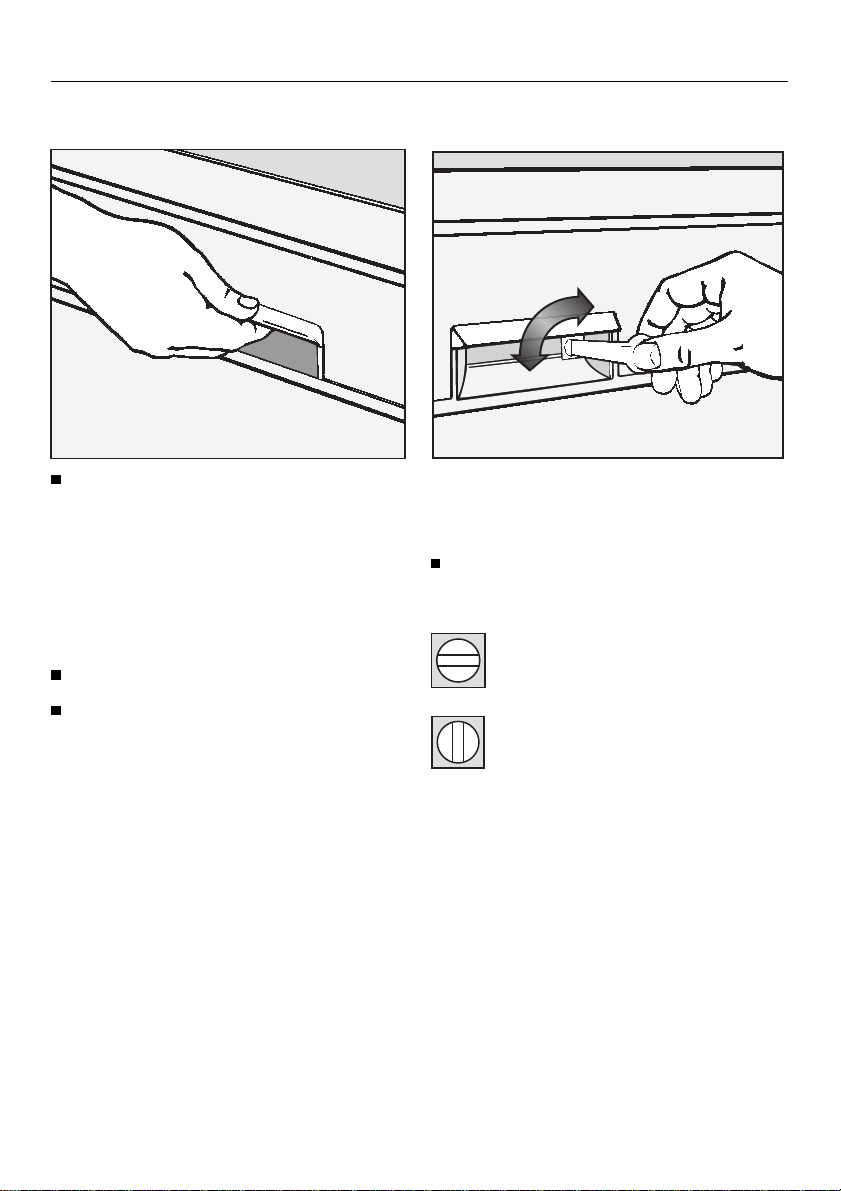
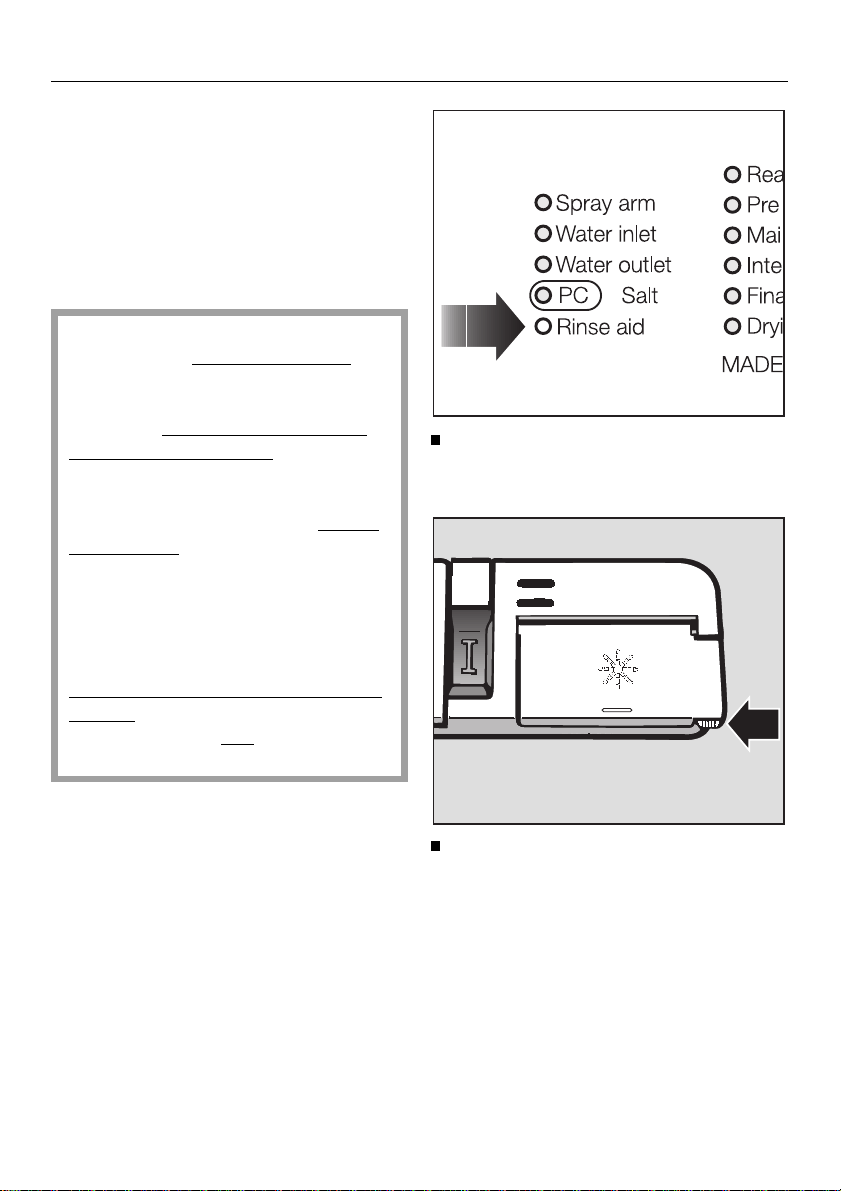
Press the button (in the direction of
the arrow) until the flap springs open.
19
Adding rinse aid
Setting the dosage
Add rinse aid only until it is visible on
the surface of the filter in the opening.
Close the flap firmly.
The flap must audibly engage, otherwise water could get into the rinse
aid storage container during the programme.
Mop up any split rinse aid. This prevents over-forming occuring during
the next programme.
The flap should normally remain
closed. Only open it for adding more
rinse aid!
Wait until the “Rinse aid” indicator on
the control panel lights up before adding more rinse aid.
The dosage adjuster (see arrow) in the
opening has settings from 1 to 6. It is
set to 3 at the factory, as the recommended dose.This setting dispenses
approx. 3 ml rinse aid per programme.
If there are flecks on glasses after
drying use a higher setting.
If smearing appears on crockery use
a lower setting.
20

Loading the dishwasher
Loading the dishwasher
Note
Load the crockery so that water will
come into contact with all surfaces.
This ensures that they will be
properly cleaned.
Do not place crockery and cutlery inside other pieces where they may be
concealed.
Hollow items e.g. cups, glasses etc.
must be inverted in the basket.
Deep based items should be placed
at an angle such that water runs off
them freely.
Tall narrow hollow pieces should be
placed in the centre of the basket,
rather than in the corners, to ensure
good coverage of water.
Small pieces should be placed on the
cup racks. Cups should be on the
lower rack and bowls on the top rack
so that water reaches all pieces.
Some foodstuffs may contain natural
dyes, e.g. carrots, tomatoes or ketchup. Plastic items in the dishwasher may discolour if large quantities of these foodstuffs find their
way into the appliance on the crockery.
The stability of the plastic items is
not affected by this discolouration.
The spray arms must not be blocked
by items which are too tall for the
basket or which hang through.
If necessary manually rotate the
spray arms to test.
21
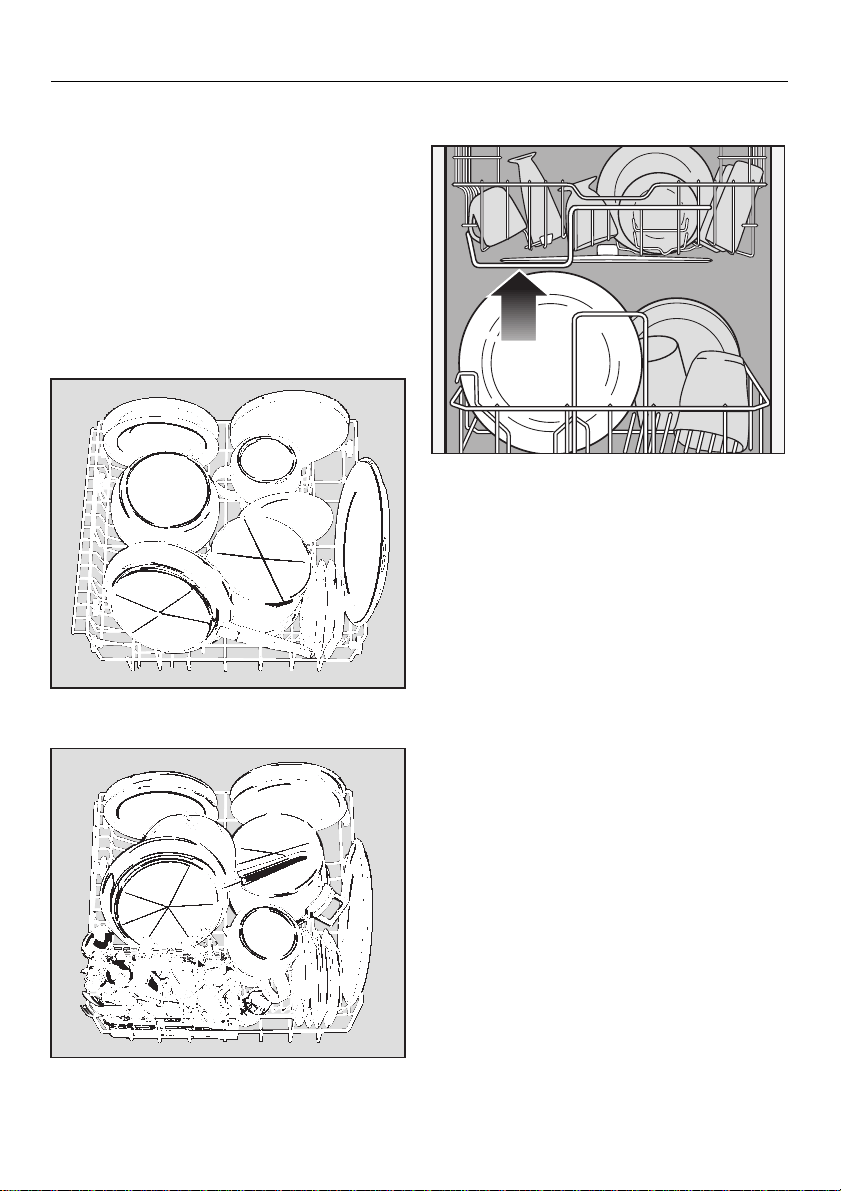
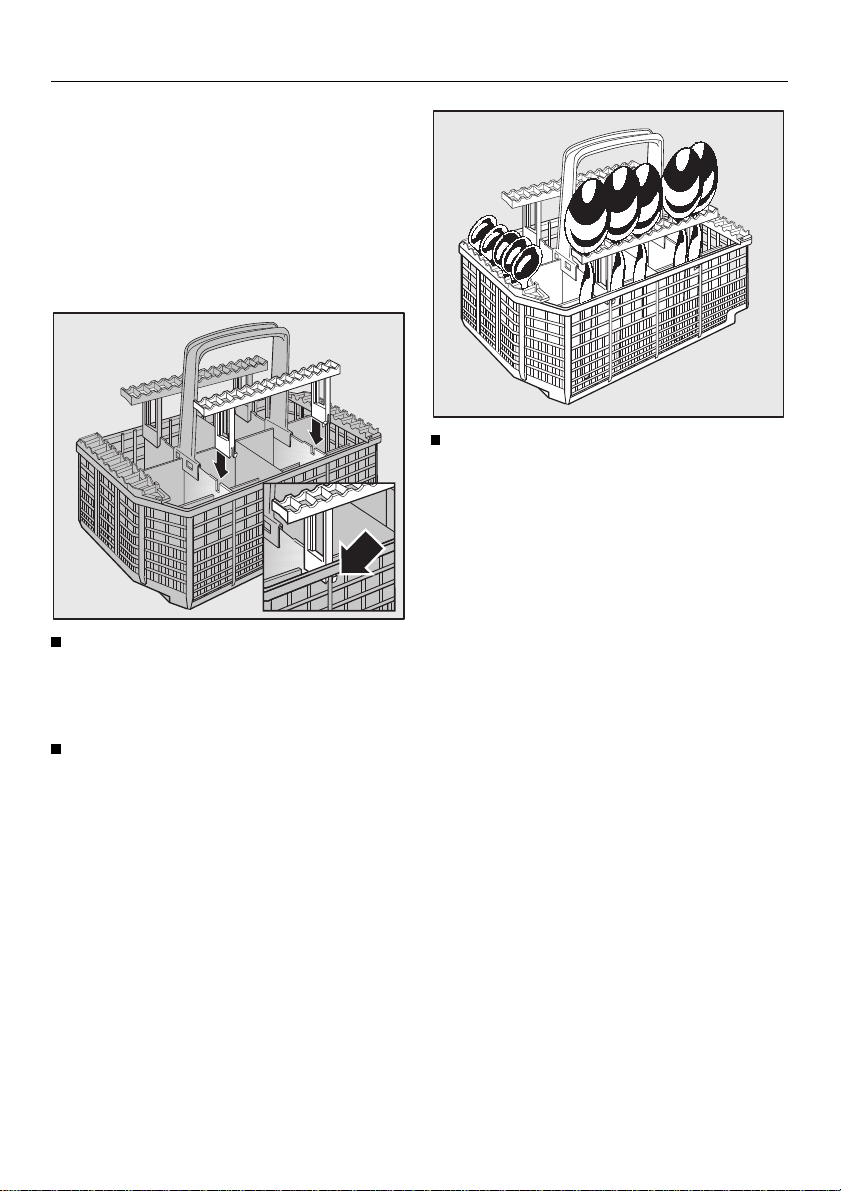
Loading the dishwasher
Loading the dishwasher
Loading examples
Bottom basket
Larger and heavier items such as
plates, serving platters, saucepans,
bowls. Depending on the dishwasher
model glasses may only be cleaned in
the bottom basket if it is fitted with a
special glassware insert or if there is a
special bottom basket.
Height limit
The height guard at the base of the
upper basket is there to protect the
middle spray arm. No object placed in
the lower basket should stand higher
than this guard.
Dishwashers with cutlery tray
Dishwashers with cutlery basket
22
Loading the dishwasher
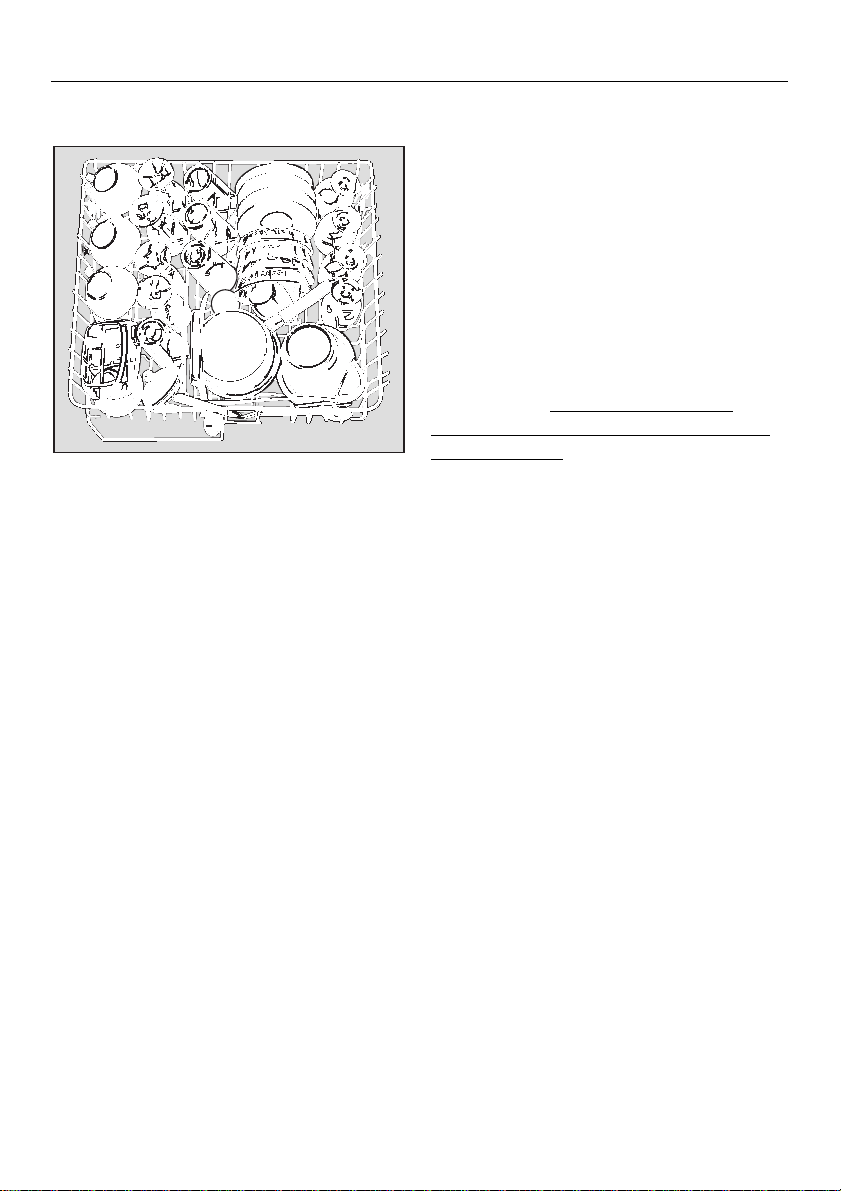
Upper basket
Small, lightweight, delicate items such
as cups, saucers, glasses, dessert
bowls, etc.
Note for “Top Solo”
If a wash programme has been selected with the additional option “Top
Solo”, all crockery must be loaded into
the upper basket and cutlery tray. See
the “Additional options” chapter for further information.
As the middle spray arm also directs
water downwards, lightly soiled plates
or platters can be placed in the bottom
basket if there are large spaces between them.
bowls or other hollow containers in the
bottom basket. See Section on “Additional option - Top Solo”.
For dishwashers with a cutlery basket,
spread the cutlery out.
See also the Section on “Additional options Top Solo”.
Do not place dishes,
23
Loading the dishwasher
Loading the dishwasher
Cutlery
Dishwashers with cutlery basket:
Unsorted cutlery should be placed in
the cutlery basket, handles facing
downwards.
You may, however, prefer to place
cutlery with sharp points with the
handles upwards.
Place small spoons in the individual
slots to either side of the cutlery basket.
Larger items like soup ladles, long
knives and mixing spoons should be
placed lying down across the front of
the upper basket. Do not arrange such
items at the back of the upper basket.
24
Spoon inserts for cutlery basket
Use the inserts supplied when washing
heavily soiled spoons, e.g. tablespoons
and serving spoons.
The inserts separate the spoons to
allow a space between them, for the
water jets to reach the entire surface.
Loading the dishwasher
Place the spoons into the inserts with
the handles facing downwards. Only
use alternate slots.
When needed place one insert at the
front and one at the back of the cutlery basket.
Removing the inserts:
Press the catches (which are already
clicked in) inwards (if necessary use
a spoon handle) and pull the inserts
upwards and out.
25
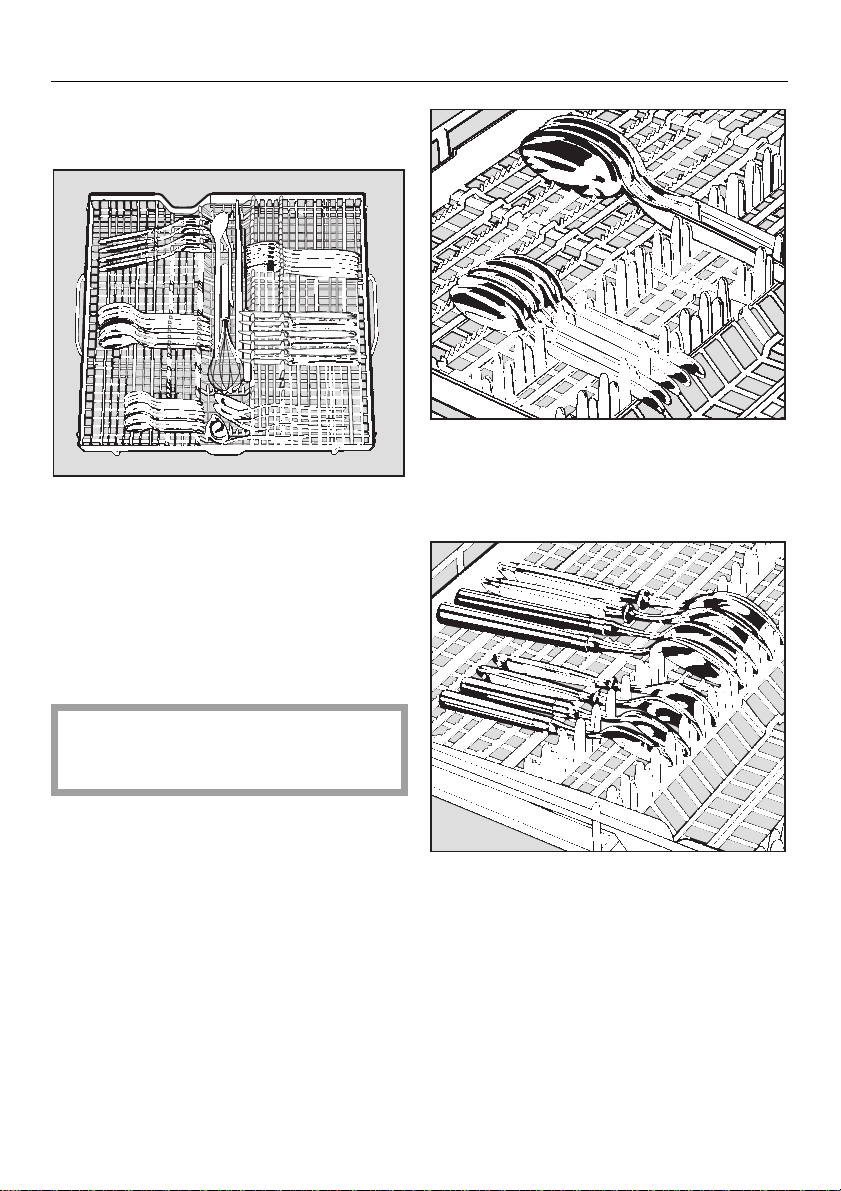
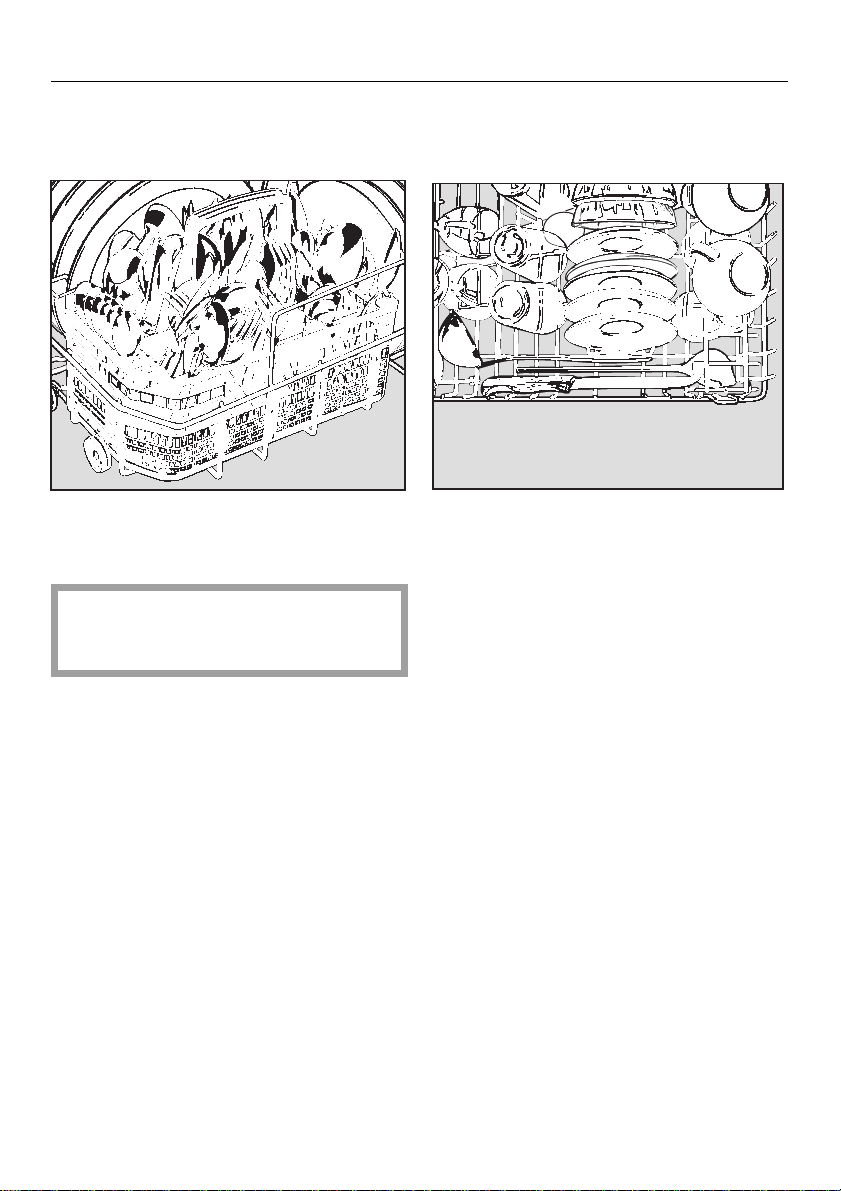
Loading the dishwasher
Loading the dishwasher
Dishwasher with cutlery tray
(SC models):
For best results cutlery should be
grouped in zones, one for knives, one
for forks, one for spoons etc. This
makes unloading much easier.
Larger items like sauce ladles, cake
slices, long knives and mixing spoons
can be placed lengthwise in the trough
in the centre of the tray.
Ensure that spoon heads are in contact
with at least one of the grips in the cutlery tray. This way they cannot collect
water.
The upper spray arm must not be
blocked by items which are too big,
e.g. cake slices.
The cutlery tray insert is removable (depending on model).
26
Cutlery with round or oval handles
should be placed with the heads in the
grips as this prevents item slipping.
If putting the spoons this way round,
make sure the spoon heads touch at
least one of the strips on the floor of the
tray, so that the water still runs off.
 Loading...