

Page 1
Operating Instructions
Inspi
ra Series
G 2120
To prevent accidents
and machine damage
read these instructions
fore
be
installation or use.
UV
M.-Nr. t e m p 06 696 010
Page 2

Contents
IMPORTANT SAFETY INSTRUCTIONS. . . . . . . . . . . . . . . . . . . . . . . . . . . . . . . . . 4
Guide to the dishwasher . . . . . . . . . . . . . . . . . . . . . . . . . . . . . . . . . . . . . . . . . . . . 7
Control panel . . . . . . . . . . . . . . . . . . . . . . . . . . . . . . . . . . . . . . . . . . . . . . . . . . . . . . 8
Caring for the environment . . . . . . . . . . . . . . . . . . . . . . . . . . . . . . . . . . . . . . . . . . 9
Before using for the first time. . . . . . . . . . . . . . . . . . . . . . . . . . . . . . . . . . . . . . . 10
To open the door . . . . . . . . . . . . . . . . . . . . . . . . . . . . . . . . . . . . . . . . . . . . . . . . . . 10
To close the door . . . . . . . . . . . . . . . . . . . . . . . . . . . . . . . . . . . . . . . . . . . . . . . . . . 10
Child Safety Lock. . . . . . . . . . . . . . . . . . . . . . . . . . . . . . . . . . . . . . . . . . . . . . . . . . 10
Rinse aid . . . . . . . . . . . . . . . . . . . . . . . . . . . . . . . . . . . . . . . . . . . . . . . . . . . . . . . . 11
Adding rinse aid . . . . . . . . . . . . . . . . . . . . . . . . . . . . . . . . . . . . . . . . . . . . . . . . . . 11
Rinse aid indicator . . . . . . . . . . . . . . . . . . . . . . . . . . . . . . . . . . . . . . . . . . . . . . . . . 12
Adjusting the dosage. . . . . . . . . . . . . . . . . . . . . . . . . . . . . . . . . . . . . . . . . . . . . . . 12
Loading the dishwasher . . . . . . . . . . . . . . . . . . . . . . . . . . . . . . . . . . . . . . . . . . . 14
Items not recommended for dishwashing . . . . . . . . . . . . . . . . . . . . . . . . . . . . . . . 15
Cutlery tray. . . . . . . . . . . . . . . . . . . . . . . . . . . . . . . . . . . . . . . . . . . . . . . . . . . . . . . 16
Cutlery basket . . . . . . . . . . . . . . . . . . . . . . . . . . . . . . . . . . . . . . . . . . . . . . . . . . . . 17
Upper basket . . . . . . . . . . . . . . . . . . . . . . . . . . . . . . . . . . . . . . . . . . . . . . . . . . . . . 18
Adjusting the upper basket . . . . . . . . . . . . . . . . . . . . . . . . . . . . . . . . . . . . . . . . . . 19
Lower basket . . . . . . . . . . . . . . . . . . . . . . . . . . . . . . . . . . . . . . . . . . . . . . . . . . . . . 20
Basket accessories . . . . . . . . . . . . . . . . . . . . . . . . . . . . . . . . . . . . . . . . . . . . . . . 22
Use . . . . . . . . . . . . . . . . . . . . . . . . . . . . . . . . . . . . . . . . . . . . . . . . . . . . . . . . . . . . 23
Adding detergent. . . . . . . . . . . . . . . . . . . . . . . . . . . . . . . . . . . . . . . . . . . . . . . . . . 24
Turning on . . . . . . . . . . . . . . . . . . . . . . . . . . . . . . . . . . . . . . . . . . . . . . . . . . . . . . . 25
Selecting a program . . . . . . . . . . . . . . . . . . . . . . . . . . . . . . . . . . . . . . . . . . . . . . . 25
Starting a program. . . . . . . . . . . . . . . . . . . . . . . . . . . . . . . . . . . . . . . . . . . . . . . . . 25
Program sequence display . . . . . . . . . . . . . . . . . . . . . . . . . . . . . . . . . . . . . . . . . . 25
Program guide . . . . . . . . . . . . . . . . . . . . . . . . . . . . . . . . . . . . . . . . . . . . . . . . . . . 26
Use . . . . . . . . . . . . . . . . . . . . . . . . . . . . . . . . . . . . . . . . . . . . . . . . . . . . . . . . . . . . 27
At the end of a program. . . . . . . . . . . . . . . . . . . . . . . . . . . . . . . . . . . . . . . . . . . . . 27
Interrupting a program. . . . . . . . . . . . . . . . . . . . . . . . . . . . . . . . . . . . . . . . . . . . . . 27
Changing a program . . . . . . . . . . . . . . . . . . . . . . . . . . . . . . . . . . . . . . . . . . . . . . . 27
Additional functions . . . . . . . . . . . . . . . . . . . . . . . . . . . . . . . . . . . . . . . . . . . . . . 28
2
Page 3

Contents
Frequently asked questions . . . . . . . . . . . . . . . . . . . . . . . . . . . . . . . . . . . . . . . . 29
Technical faults . . . . . . . . . . . . . . . . . . . . . . . . . . . . . . . . . . . . . . . . . . . . . . . . . . . 29
Problems water intake/drain . . . . . . . . . . . . . . . . . . . . . . . . . . . . . . . . . . . . . . . . . 30
General problems with the dishwasher . . . . . . . . . . . . . . . . . . . . . . . . . . . . . . . . . 31
Sounds. . . . . . . . . . . . . . . . . . . . . . . . . . . . . . . . . . . . . . . . . . . . . . . . . . . . . . . . . . 32
Poor cleaning results . . . . . . . . . . . . . . . . . . . . . . . . . . . . . . . . . . . . . . . . . . . . . . . 33
After sales service . . . . . . . . . . . . . . . . . . . . . . . . . . . . . . . . . . . . . . . . . . . . . . . . 36
Transport . . . . . . . . . . . . . . . . . . . . . . . . . . . . . . . . . . . . . . . . . . . . . . . . . . . . . . . 37
User Maintenance Instructions. . . . . . . . . . . . . . . . . . . . . . . . . . . . . . . . . . . . . . 39
Cleaning and Care . . . . . . . . . . . . . . . . . . . . . . . . . . . . . . . . . . . . . . . . . . . . . . . . 40
Triple filter system . . . . . . . . . . . . . . . . . . . . . . . . . . . . . . . . . . . . . . . . . . . . . . . . . 41
Cleaning the spray arms . . . . . . . . . . . . . . . . . . . . . . . . . . . . . . . . . . . . . . . . . . . . 43
Cleaning the water inlet filter . . . . . . . . . . . . . . . . . . . . . . . . . . . . . . . . . . . . . . . . . 44
Cleaning the drain pump and non-return valve. . . . . . . . . . . . . . . . . . . . . . . . . . . 45
Installation instructions . . . . . . . . . . . . . . . . . . . . . . . . . . . . . . . . . . . . . . . . . . . 47
Help to protect the environment . . . . . . . . . . . . . . . . . . . . . . . . . . . . . . . . . . . . . 48
Electrical connection. . . . . . . . . . . . . . . . . . . . . . . . . . . . . . . . . . . . . . . . . . . . . . 49
Plumbing. . . . . . . . . . . . . . . . . . . . . . . . . . . . . . . . . . . . . . . . . . . . . . . . . . . . . . . . 50
Connection to the water supply . . . . . . . . . . . . . . . . . . . . . . . . . . . . . . . . . . . . . . . 50
Drainage . . . . . . . . . . . . . . . . . . . . . . . . . . . . . . . . . . . . . . . . . . . . . . . . . . . . . . . . 51
3
Page 4

IMPORTANT SAFETY INSTRUCTIONS
WARNING –
When using your dishwasher, follow
basic precautions, including the
following:
Read all instructions before
installation or use of the dishwasher
to prevent injury and machine
damage.
The manufacturer cannot be held
responsible for damage or injury
caused by improper use of this
appliance.
Use the dishwasher only for its
intended purpose. This appliance is
intended for residential use only.
Keep these operating instructions in
a safe place and pass them on to
any future user.
Electrical Safety
Before installation, make sure that
the voltage and frequency listed on
the data plate correspond with the
household electrical supply. This data
must correspond to prevent injury and
machine damage. Consult a qualified
electrician if in doubt.
Before installation or service,
disconnect the power supply to the
work area by unplugging the unit,
"tripping" the circuit breaker or
removing the fuse.
Do not use an extension cord to
connect this appliance to
electricity. Extension cords do not
guarantee the required safety of the
appliance (e.g. danger of overheating).
Be certain your appliance is
properly installed and grounded by
a qualified technician. To guarantee the
electrical safety of this appliance
continuity must exist between the
appliance and an effective grounding
system. It is imperative that this basic
safety requirement be met. If there is
any doubt, have the electrical system of
the house checked by a qualified
electrician. The manufacturer cannot be
held responsible for damages caused
by the lack, or inadequacy, of an
effective grounding system.
4
Page 5

IMPORTANT SAFETY INSTRUCTIONS
Installation
The dishwasher must be installed
and connected in compliance with
the installation instructions.
Installation and repair work should
be performed by a Miele
authorized service technician. Work by
unqualified persons could be
dangerous and may void the warranty.
Do not install or use a damaged
dishwasher. A damaged appliance
is dangerous. Unplug the machine and
call your Miele dealer or the Miele
Technical Service Department.
Ensure that any plastic wrappings,
bags, etc. are disposed of safely
and kept out of the reach of children.
Danger of suffocation!
This equipment is not designed for
maritime use or for use in mobile
installations such as recreational
vehicles or aircraft. However, under
certain conditions it may be possible for
an installation in these applications.
Please contact the nearest Miele dealer
or the Miele Technical Service
Department with specific requirements.
It is recommended that the
dishwasher only be connected to
the mains with the plug (no
hard-wiring). The outlet must be
accessible at all times after installation
to disconnect the dishwasher.
, WARNING - Fire hazard
Do not cover or crush the plug of
the appliance. Ensure that the cabinet
opening for the dishwasher provides
ample space for the plug. Installing the
dishwasher in a tight space may crimp
the power cord or put pressure on the
plug which could cause overheating.
This dishwasher should only be
installed under a continuous
counter top secured to adjacent
cabinetry.
Do not install this dishwasher
beneath a cooking surface, oven or
any appliance that radiates heat.
High temperatures from these units may
damage the dishwasher.
When installing the dishwasher
under a counter top and removing
the toekick, a build-under toekick must
be installed. Use the respective
installation kit. Danger of injuries.
Do not cut the intake hose or
submerge it in liquid. This hose
contains electrical components that
could cause injury or property damage
if cut or submerged.
Only connect the dishwasher to the
mains when all installation and
plumbing work is complete.
5
Page 6

IMPORTANT SAFETY INSTRUCTIONS
Use
To reduce the risk of injury, do not
allow children to play in, on or near
the dishwasher.
Only use the dishwasher if all
panels are properly in place.
Do not tamper
with the controls.
Do not damage, sit or stand on the
door or baskets of the dishwasher.
Close the door when not in use.
Under certain conditions, hydrogen
gas may be produced in a hot
water system that has not been used
for two weeks or more. HYDROGEN
GAS IS EXPLOSIVE. If the hot water
system has not been used for such a
period, turn on all hot water faucets and
let water flow from each for several
minutes before using the dishwasher.
This will release any accumulated
hydrogen gas. Do not smoke or use an
open flame during this time.
Be sure that all items placed in the
dishwasher are "dishwasher safe".
For items not labeled, check the
manufacturer’s recommendations.
When loading tableware, place
sharp items away from the door to
prevent damage to the seal. Load
sharp items pointing downwards to
prevent injuries.
Only use detergents and rinse aids
recommended for residential
dishwashers. Keep all detergents and
rinse aids out of the reach of children.
Do not inhale or swallow
detergents. Dishwasher detergents
contain irritant and corrosive
ingredients. They can cause burning in
the mouth and throat if swallowed, or
inhibit breathing. Consult a doctor
immediately if detergent has been
swallowed or inhaled.
Do not drink water from the
dishwasher! Harmful residues
could be present.
Do not fill the rinse aid reservoir
with detergent. It will damage the
rinse aid compartment.
If the power cord is damaged it
must only be replaced by a Miele
Service technician with a genuine Miele
power cord.
Disposal of an appliance
If the appliance is removed from its
installation site and will not be
used, remove the doorlock to the wash
cabinet to prevent children from locking
themselves in the machine.
SAVE THESE
INSTRUCTIONS
6
Page 7
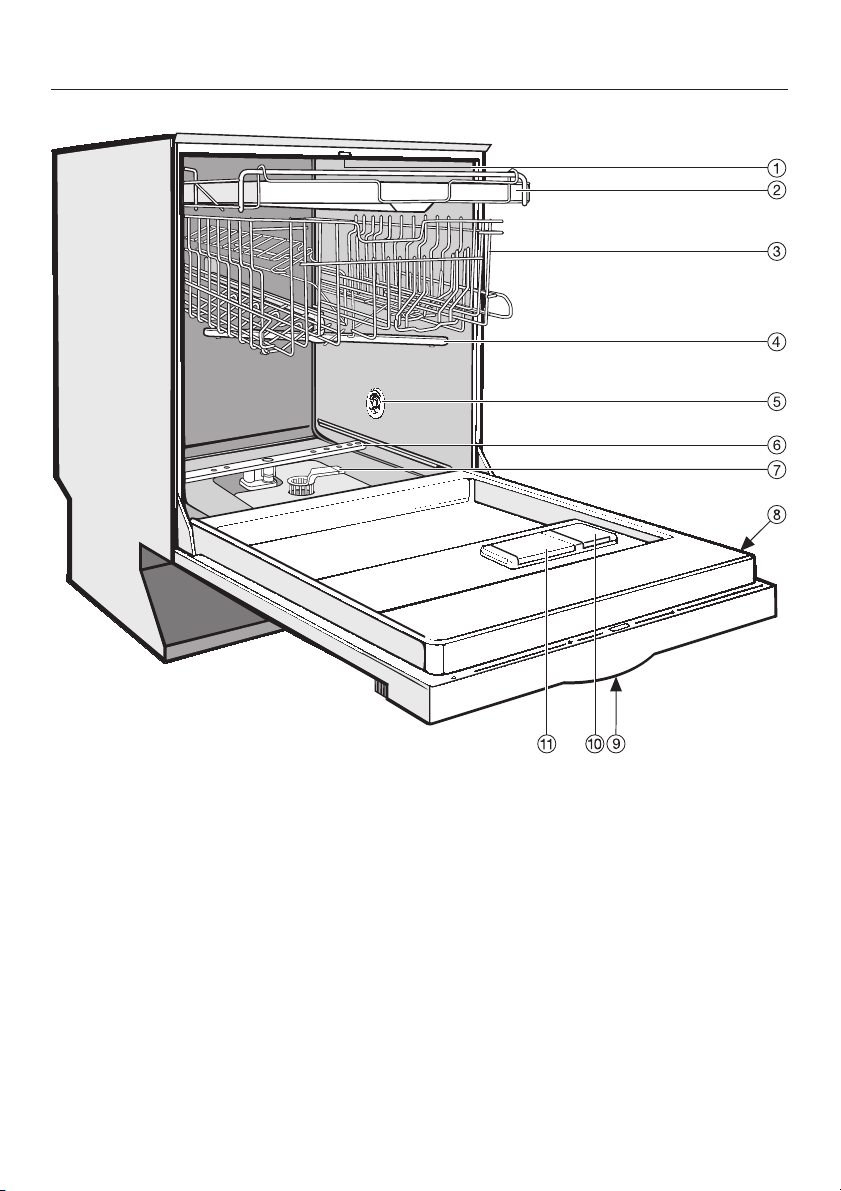
Guide to the dishwasher
a Upper spray arm (not visible)
b Cutlery tray (depending on model)
c Upper basket
d Middle spray arm
e Air inlet for drying
(depending on model)
f Lower spray arm
g Filter combination
h Data plate
i Child Safety Lock in the door handle
(not visible)
j Rinse aid reservoir
k Dual compartment detergent
dispenser
7
Page 8
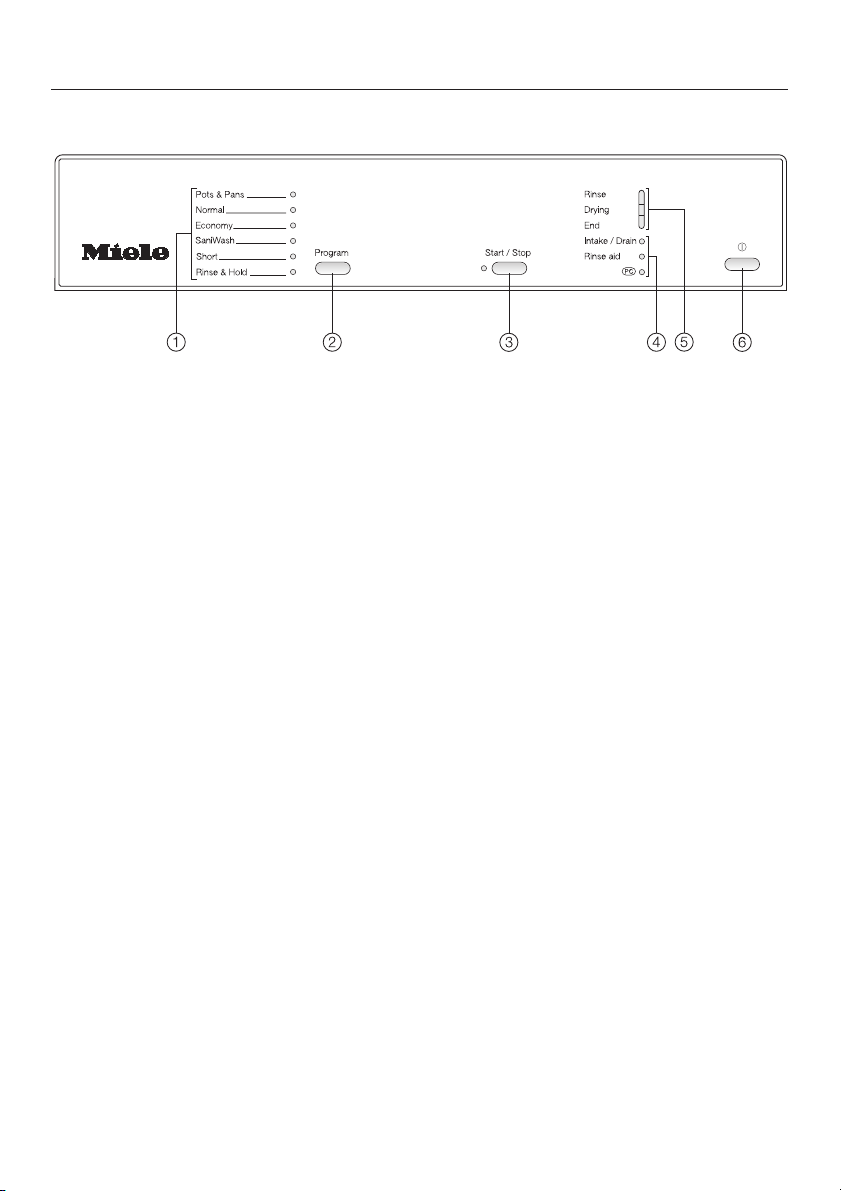
Guide to the dishwasher
Control panel
a Program selection
b Program button
c Start/Stop button with indicator
d Check / Refill indicators
e Program cycle indicators
f s button (On/Off button)
8
Page 9

Energy saving washing
This dishwasher is exceptionally
economical in the use of water and
electricity. For best results follow these
tips:
^ For lowest energy consumption and
the gentlest washing of china and
crystal, connect the dishwasher to a
cold water source.
^ For fastest possible wash times, yet
higher energy consumption, connect
the dishwasher to a hot water source.
^ Make full use of the baskets without
overloading for the most economical
washing.
^ Use the correct amount of detergent
and rinse aid.
Caring for the environment
^ When using powder or gel detergent,
reduce the amount to
normal amount when washing a small
load.
^ Choose a program that best suits the
degree of soiling and the type of
dishes being washed.
^ For small loads select "Short".
2
/3of the
9
Page 10
Before using for the first time
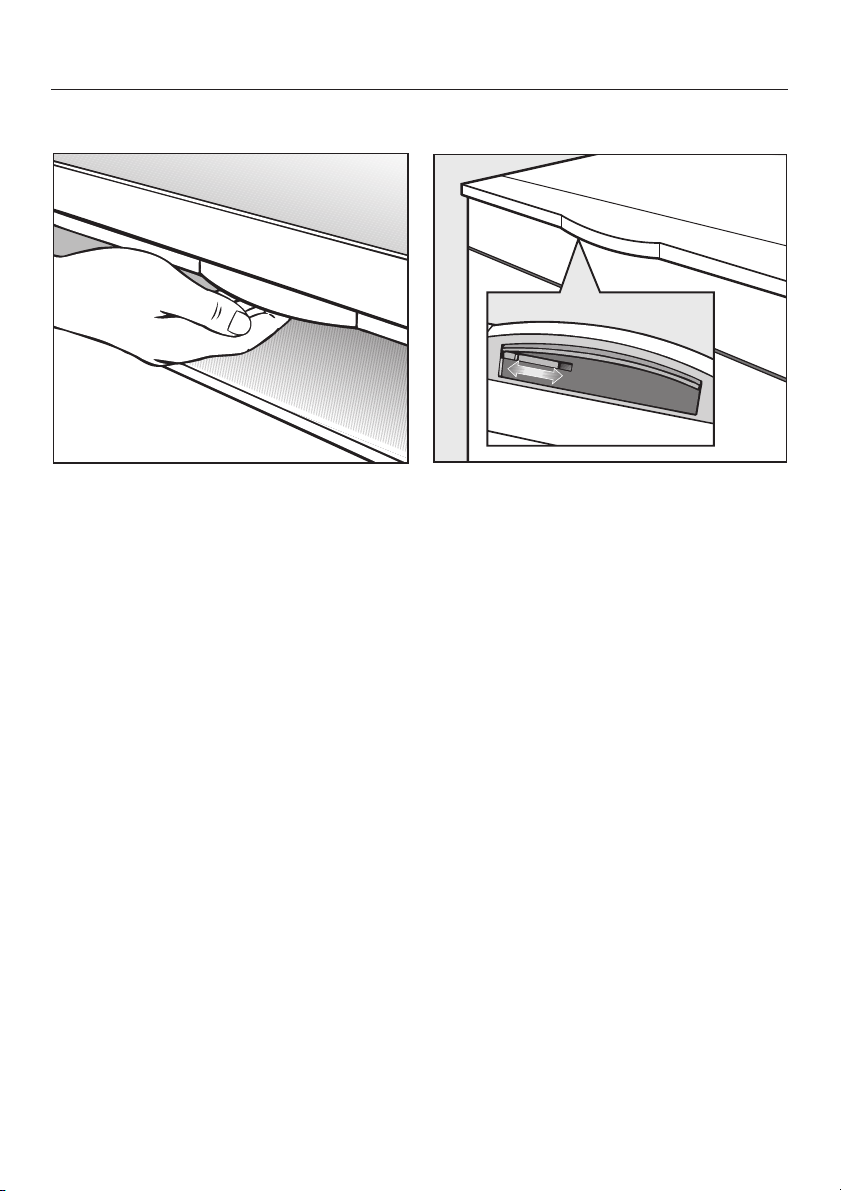
To open the door
^ Press the release catch inside the
door grip.
If the door is opened during operation,
the dishwasher will stop running. Once
the door is closed the program will
restart.
To close the door
Child Safety Lock
The Child Safety Lock is designed to
prevent children from opening the
dishwasher.
^ To lock the door, push the slider
below the door grip to the right.
^ To unlock the door, push the slider to
the left.
^ Push the baskets in.
^ Lift the door and push until it clicks
into place.
10
Page 11
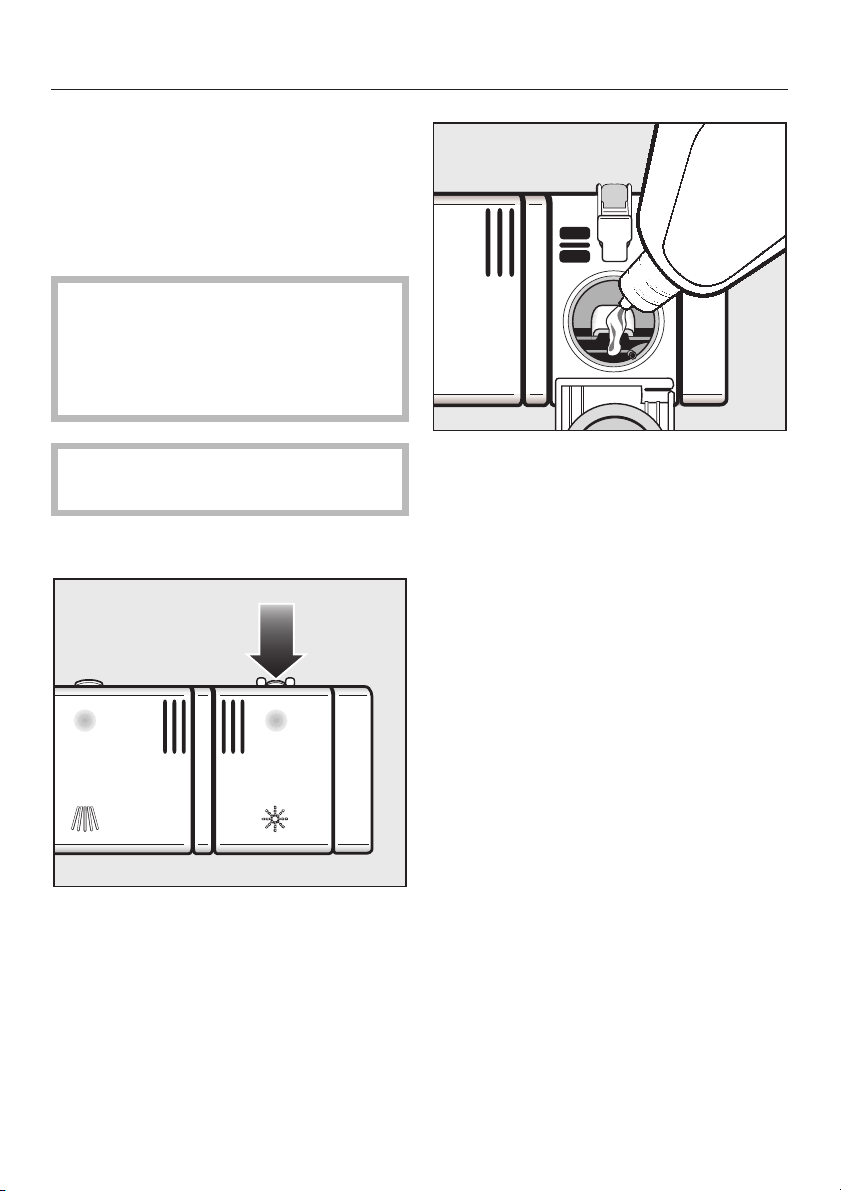
Rinse aid
Rinse aid is needed to prevent spotting
on dishes and glassware.
The rinse aid is filled in the reservoir
and the set amount will be
automatically dosed.
Filling the rinse aid reservoir with
,
detergent will damage the reservoir.
Only pour rinse aid formulated for
residential dishwashers into the
reservoir.
Before using for the first time
When using "2 in 1" detergents rinse
aid is not needed.
Adding rinse aid
^ Press the button in the direction of
the arrow until the flap springs open.
^ Pour liquid rinse aid into the reservoir
until it its visible on the surface of the
screen.
The rinse aid reservoir holds approx.
3.7 oz (110 ml).
^ Press on the flap until you hear it
click shut. Failure to close it all the
way allows water to enter the
reservoir during the wash program.
^ Clean any spilled rinse aid. The flap
will remain closed during normal
operation.
11
Page 12
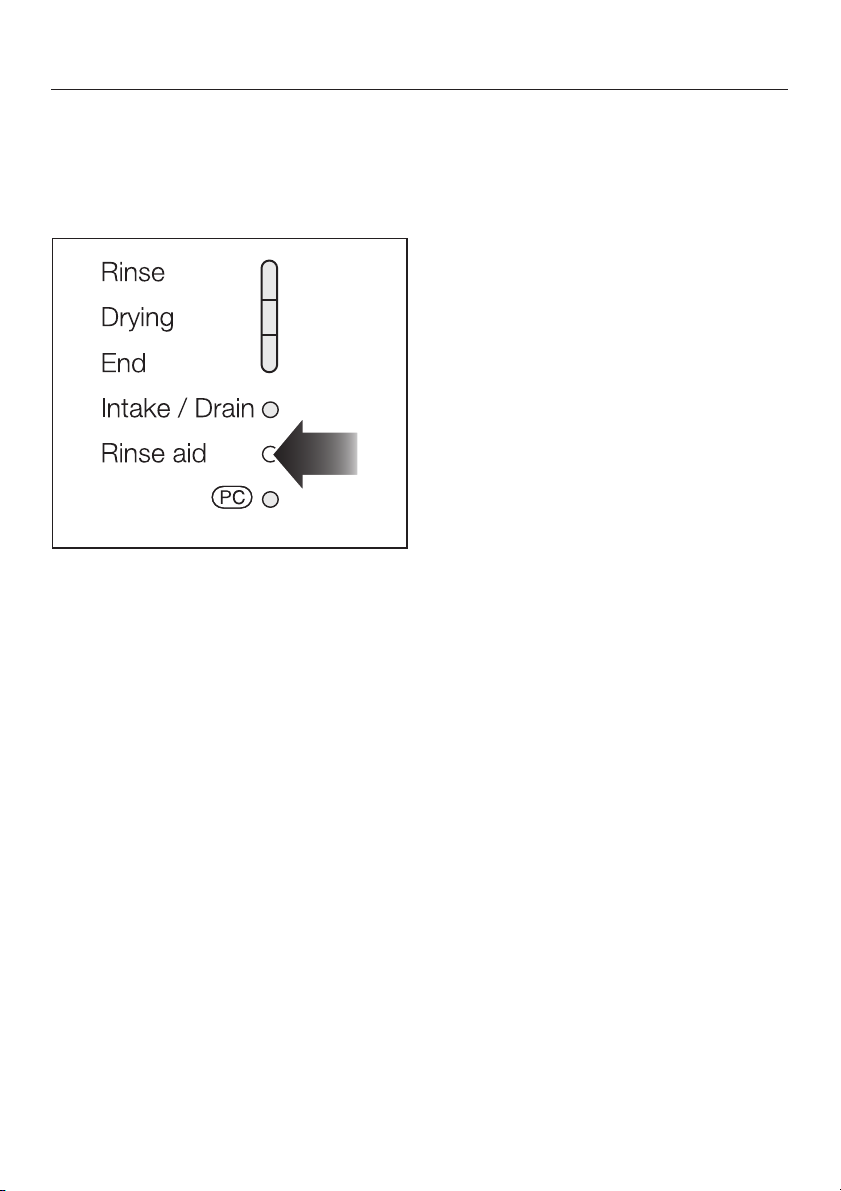
Before using for the first time
Rinse aid indicator
When the Rinse aid indicator first
comes on, there will be enough rinse
aid left for 2 - 3 washes.
^ The rinse aid indicator on the control
panel will light when the rinse aid
reservoir needs refilling.
Adjusting the dosage
The dosage selector is preset to 3. This
dispenses approximately 3 ml of rinse
aid per program. It can be adjusted
from 1 to 6.
– Use a higher setting if spots appear
on dry glassware.
– Use a lower setting if streaking
appears on dishes or glasses.
^ Turn the dishwasher off "s".
^ Press the "Start/Stop" button and at
the same time turn the dishwasher on
s. Hold the "Start/Stop" button until
the "Start/Stop" indicator comes on.
If it doesn’t come on, start over.
12
Page 13

^ Press the program button three times.
The lowest program indicator flashes
three times in intervals.
The "Rinse" indicator flashes three times
in intervals.
A rinse aid amount of 3 ml is set by
default.
The amount set can be recognized by
the flashing rhythm of the "Rinse"
indicator (see table).
Before using for the first time
Rinse aid
amount in ml
0–
1 Once
2 Twice
3 Three times
4 Four times
5 Five times
6 Six times
^ Select the desired setting with the
"Start/Stop" button. Every touch of the
button increases the level.
The programmed dosage is saved.
^ Turn the dishwasher off "s".
Flashing
rhythm
13
Page 14

Loading the dishwasher
Do not wash items soiled with
,
ash, sand, wax, grease or paint in
the dishwasher.
Ash and sand do not dissolve and
will be distributed throughout the
inside of the dishwasher.
Wax, grease and paint will cause
permanent discoloration and
damage to the dishwasher.
^ Scrape food from dishes before
placing them in the dishwasher,
rinsing is not necessary.
^ Some foods contain natural dyes,
e.g. carrots or tomatoes. Plastic items
may discolor permanently if they
come in contact with food dyes.
^ All items can be placed anywhere in
the baskets.
^ Load dishes so that water can reach
all surfaces. Do not place dishes or
cutlery inside other pieces.
^ The spray arms must not be blocked
by items that are too tall or hang
through the baskets. Check
clearance by manually rotating the
spray arms.
^ Place very small items in the cutlery
tray or basket so they do not fall to
the bottom of the wash cabinet.
^ Food residue and spilled liquids
should be cleaned from the sides of
the dishwasher door. These are
outside of the wash cabinet and are
not cleaned by water from the spray
arms.
^ Make sure that all items are securely
positioned.
^ Hollow items such as cups and
glasses should be placed upside
down in the baskets.
^ To ensure good water coverage,
tall, narrow and hollow items,
i.e. vases or champagne glasses,
should be placed in the center of the
basket rather than in the corners.
^ Concave based items such as mugs
or bowls, should be placed at an
angle so that water does not pool.
14
Page 15

Loading the dishwasher
Items not recommended for
dishwashing
– Cutlery with wooden handles
– Wooden cutting boards
– Glued items such as old knives with
handles glued together around the
shank of the blade
– Handmade craft items, antique,
metal trimmed or decorative
glassware
– Plastic items that are not heat
resistant
– Copper, brass, tin or aluminum
– Dishes with color painted over the
glaze. These dishes may fade over
time
– Fine glassware and crystal items
should only be washed using the
"China & Crystal" program*.
Otherwise clouding or etching may
occur after frequent washing.
– Cast iron pots and pans
* depending on model
Glassware:
– There are no standard guidelines for
washing glassware, when in doubt
wash by hand.
– When purchasing new dishes,
glasses and cutlery, make sure they
are dishwasher safe. Only wash
items marked "dishwasher safe" in
the dishwasher.
– If fine glassware is washed in the
dishwasher select the "China &
Crystal" program*. This will reduce
the risk of clouding.
Silver and aluminum:
– Silver or aluminum items may tarnish.
– Silverware previously cleaned with a
silver polish may be damp or spotted
at the end of a program where water
has adhered to the polish. This can
be rubbed off with a soft, dry cloth.
Silver that has been cleaned in an
immersion dip is usually dry at the
end of a program, but may tarnish.
– If left to dry, foods containing sulfur
can discolor silver. These include
egg yolk, onions, mayonnaise,
mustard, fish and marinades.
– Silverware may tarnish or pit if
washed next to stainless steel.
Leave space between these metals.
– Clean aluminum items, e.g. grease
filters, with domestic dishwasher
detergent only.
15
Page 16

Loading the dishwasher
Cutlery tray
(depending on model)
^ Arrange the cutlery as shown in the
cutlery tray.
For easier unloading cutlery should be
grouped in zones, one for knives, one
for forks, one for spoons, etc.
Spoons with thick handles may have to
be placed as knives and forks with their
heads in the holders
Place knives with the cutting edge
down and forks with the prongs
between the holders. Spoons should be
placed in the opposite direction with
the handles between the holders.
The upper spray arm must not be
blocked by tall cutlery items.
The cutlery tray insert is removable.
16
Page 17

Loading the dishwasher
Cutlery basket
(depending on model)
^ For best cleaning results, cutlery
should be placed in the basket with
the handles down. Knives and forks
should be loaded with the pointed
end down to prevent injuries.
^ Place small spoons in the individual
slots to either side of the cutlery
basket.
Spoon inserts for the cutlery basket
The supplied insert is designed to wash
heavily soiled spoons. The individual
slots allow the water to better reach the
surface of each spoon.
^ Attach the insert when needed to the
cutlery basket.
^ Insert the cutlery with the handles
down into the insert. Arrange the
cutlery evenly.
17
Page 18

Loading the dishwasher
Upper basket
Always use the dishwasher with
,
the upper and lower basket inserted.
^ Load the upper basket with small,
lightweight, or delicate items such as
cups, saucers, glasses, dessert
bowls and flat pans.
^ Long items such as soup ladles,
mixing spoons and long knives
should be placed lying down across
the front of the upper basket.
Cup racks
^ Raise the rack to make room for tall
glasses. Lower it to double stack
smaller pieces.
Coffee bar
(depending on model)
Glasses can be leaned against the
coffee bar for a secure stand.
^ The bar can also be used to separate
two rows of glasses.
To stack wide items, flip the bar to the
right.
18
Page 19

Loading the dishwasher
Adjusting the upper basket
The upper basket can be raised or
lowered to accommodate tall items.
The basket can also be angled to fit tall
items in both, the upper and lower
baskets. The angles should not be set
to opposite extremes. This will block the
middle spray arm. Take care when
sliding the basket in and out in this
position.
^ Slide out the upper basket.
Depending on the setting of the upper
basket, a variety of plate dimensions
can be accommodated.
For example: If the upper basket is in
its highest position a plate with a
diameter of 12
the lower basket.
3
/16" (31 cm) can be fit in
^ Pull up the levers at the sides of the
upper basket and adjust the basket
height.
^ Release the levers and the basket will
lock in place.
19
Page 20

Loading the dishwasher
Lower basket
^ For larger and heavier items such as
plates, serving platters, saucepans,
bowls, etc.
Dishwashers with cutlery tray
Dishwashers with cutlery basket
Foldable spikes
Two rows of spikes can be folded
down, to create more room for larger
dishware, e.g. pots, pans and bowls.
^ Lift the spike rows and fold them
down on one another.
20
Page 21

Vase/Bottle holder
(depending on model)
The vase/bottle holder, e.g. for vases
and baby bottles, can be inserted into
the lower basket as shown in the
illustration.
If placed anywhere else, water will not
reach all surfaces. The bottle will not be
properly cleaned.
Loading the dishwasher
21
Page 22

Basket accessories
Additional inserts for the upper and lower baskets may be purchased from your
Miele dealer or Miele. Depending on the model some accessories come standard
with the machine.
Glassware insert GGO To wash long stemmed glassware
attaches to the upper basket
Vase / Bottle holder GF To wash baby bottles or vases
Cappuccinatore insert GCEO To wash the parts of the
Cappuccinatore
22
Page 23

Use
Detergent
Dishwasher detergents contain
,
irritant and corrosive ingredients.
Avoid inhaling or swallowing
dishwasher detergent.
Keep children away from detergent.
Fill the detergent dispenser only
when you are ready to start the
dishwasher.
Only use detergents formulated
,
for domestic dishwashers.
Use only the recommended amount
of detergent. Continued use of too
much detergent may cause machine
damage.
You can use powder, gel or tab
detergents. Follow the dosage
information on the detergent
packaging.
Detergent tabs are not recommended
for use with the program "Short". The
tabs may not dissolve completely.
23
Page 24

Use
Adding detergent
^ To open, press the latch on the
detergent dispenser. The flap will
spring open.
The flap is always open at the end of a
program.
^ Add detergent to compartment II and
close the flap.
^ If a Pre-rinse is desired, and available
for your chosen program, add
1 teaspoon (5 ml) of detergent to
compartment I.
The horizontal marks in compartment II
indicate the levels of approximately 1 ¼
and 2 tablespoons (20 and 30 ml)
respectively. Compartment I holds a
maximum of 2 teaspoons (10 ml).
24
Page 25

Use
Turning on
^ Make sure the spray arms can rotate
freely.
^ Close the door.
^ Open the water supply, if it is closed.
^ Turn the dishwasher on s.
The "Start/Stop" indicator flashes and
the indicator of the last set program
lights.
Selecting a program
Choose your program according to the
type of load and soiling.
The "Program guide" describes the
programs and use.
Starting a program
^ Select the desired program with the
program selector button.
The indicator of the selected program
lights.
^ Press the "Start/Stop" button.
The program starts. The indicators
"Start/Stop", "Rinse" and the last
selected program light.
Cancel a program only in the first
5 minutes. Otherwise important
program steps could be interrupted.
Program sequence display
After a program has been started the
current stage of the program is
indicated by the program cycle
indicator.
25
Page 26

Program guide
Program When to use Program sequence
Pots &
Pans
Normal
Economy
SaniWash
Short
Rinse &
Hold
For normally soiled pots and
pans with dried on food, also for
heavily soiled dishware, use 120%
of normal detergent dose
Run-time 125 min
For normally soiled dishware
Run-time 129 min
For normally soiled dishware,
energy saving program with a long
soaking time and a low
temperature
Run-time 95 min
Extended wash time,
for sanitizing normally soiled
dishware with dried on food
Run-time 115 min
"Quick program" for lightly soiled
dishware, e.g. party dishware
includes sensor controlled
Glasscare, not suitable for
detergent tabs
Run-time 30 min
To rinse dishes when a complete
program is not needed
detergent is not recommended
Run-time 13 min
Pre-
rinse
12
xxx x x x
Main
wash
Interim
rinse
12
xx x x x
xx x x
xxx x x
xx x
x
Final
rinse
Drying
Usage:
Electric: 0.01 - 1.23 kWh
Water: 1.3 - 6.3 gal (5 - 24 l)
26
Page 27

Use
At the end of a program
When the program has finished the
"End" indicator lights.
Dishes tends to chip if removed still hot
from the dishwasher.
^ Let the dishware cool by opening the
door slightly.
The dishes will cool much faster.
^ Open the dishwasher and unload the
dishes.
^ Turn the dishwasher off s.
The dishwasher continues to use
electricity until turned off with the
s button.
^ If the dishwasher is not used for a
longer period of time,
e.g. vacationing, turn off the water
supply.
Interrupting a program
A program is interrupted as soon as the
door is opened. If the door is closed,
the program will continue from where it
was interrupted.
Open the door with care. The
,
water in the dishwasher is hot.
Danger of scalding. Before closing
the door again, leave it ajar for
approx. 20 secs. This will enable the
temperature in the wash cabinet to
settle. Close the door firmly until it
clicks into place.
Changing a program
If the detergent flap is already open
do not change the program.
If a program has already started and
you wish to change it:
^ Press the "Start/Stop" button for at
least one second.
The program is cancelled. The
"Start/Stop" indicator lights.
^ Select and start the desired program.
27
Page 28

Additional functions
Factory default
All settings can be reset to the factory
default.
^ Turn the dishwasher off s.
^ Press the "Start/Stop" button and at
the same time turn the dishwasher on
s. Hold the "Start/Stop" button until
the "Start/Stop" indicator comes on.
If it does not come on, start over.
^ Press the program button 12 times.
The bottom program indicator flashes
once long and twice short in intervals.
The "Rinse" indicator shows if a setting
was changed.
– The "Rinse" indicator flashes:
All settings are the factory default.
– The "Rinse" indicator is off:
At least one setting was changed.
^ To reset the dishwasher to the default
settings, press the "Start/Stop" button.
^ Turn the dishwasher off s.
28
Page 29

Frequently asked questions
With the aid of the following guide, minor problems can be fixed without a service
call.
Repairs should only be carried out by a qualified and trained person in
,
accordance with local and national safety regulations. Unauthorized repairs
could cause personal injury or machine damage.
Technical faults
Issue Possible fault Solution
The Start/Stop indicator
does not flash after the
dishwasher is turned on
with s.
The dishwasher stops
during a program.
The program cycle
indicators "Rinse",
"Drying" and "End"
flash at the same time.
The drain pump is
running when the door
is open.
The machine is not
plugged in.
The fuse has tripped. Reset the circuit breaker.
The fuse has tripped. Reset the circuit breaker.
There may be a technical
fault.
The waterproof system
has activated.
Insert the plug.
Make sure it is a 15 A
breaker.
Make sure it is a 15 A
breaker.
– Turn the dishwasher off
s.
After a few seconds:
– Turn the dishwasher
on.
– Select the desired
program with the
program selector
button.
– Press the "Start/Stop"
button.
If the problem persists,
call Technical Service.
– Turn off the water
supply.
– Call Miele Technical
Service.
29
Page 30

Frequently asked questions
Problems water intake/drain
Issue Possible fault Solution
The "Intake/Drain"
indicator flashes and
lights alternately.
The dishwasher stops
running.
The "Intake/Drain"
indicator flashes.
The water supply is
closed.
Fault in the water
intake.
Fault in the water
drain.
There may be water in
the wash cabinet.
Open the water supply all the
way.
Before fixing the fault:
– Turn the dishwasher off s.
– Open the water supply all the
way.
– Clean the water intake filter,
see "User Maintenance
Instructions".
– The water pressure at the
water connection is lower
than 4.35 psi. Consult a
plumber.
– Clean the triple filter.
– Clean the drain pump and
the non-return valve.
See "User Maintenance
Instructions" for more
information on the above.
– Remove any kinks in the
drain hose.
30
Page 31

Frequently asked questions
General problems with the dishwasher
Issue Possible fault Solution
Detergent is left in the
dispenser at the end of
a program.
The detergent lid
cannot be closed
properly.
The door and the
interior walls are still
wet after a program has
finished.
Water remains in the
wash cabinet at the end
of a program.
The dispenser was damp
when detergent was
added.
Detergent residue is
blocking the catch.
This is not a fault!
It is the normal operating
mode of the drying
system.
The triple filter in the
wash cabinet is clogged.
The drain pump or the
non-return valve may be
blocked.
The drain hose is kinked. Remove any kinks from the
Dry the dispenser before
adding detergent.
Remove the residue.
The moisture will evaporate
after a short time.
Before fixing the fault:
– Turn the dishwasher off
s.
Clean the triple filter. See
"User Maintenance
Instructions".
Clean the drain pump and
the non-return valve, see
maintenance instructions.
drain hose.
31
Page 32

Frequently asked questions
Sounds
Issue Possible fault Solution
There is a knocking
noise in the wash
cabinet.
There is a rattling noise
in the wash cabinet.
There is a knocking
noise in the water
pipes.
The spray arm is hitting an
item in the basket.
Items are not secure in the
wash cabinet.
This may be caused by
the installation or the
diameter of the pipe.
Interrupt the program,
rearrange items blocking
the spray arms.
Interrupt the program and
rearrange loose pieces.
This has no effect on the
dishwasher. If in doubt
contact a plumber.
32
Page 33

Frequently asked questions
Poor cleaning results
Issue Possible fault Solution
The dishes are not
clean.
Glasses and
cutlery show
streaks. There is a
bluish sheen on
the surface of
glasses and a film
that can eb wiped
off.
The dishes were not loaded
correctly.
The program was not
powerful enough.
Not enough detergent was
dispensed.
The spray arms are blocked
by items.
The triple filter in the base of
the wash cabinet is not clean
or not correctly inserted. The
spray arm jets might be
clogged.
The drain pump or the
non-return valve is blocked.
Wash water will run back into
the wash cabinet.
The rinse aid dosage is set
too high.
See "Loading the
dishwasher".
Select a more intensive
program, see "Program
Guide".
Use more detergent, see
"Adding detergent".
Turn the spray arm and
rearrange the dishes if
necessary.
Clean the filter and insert it
correctly.
Clean the spray arm jets.
See "User Maintenance
Instructions".
Clean the drain pump and
the non-return valve, see
maintenance instructions.
Reduce the dosage, see
"Before using for the first
time".
33
Page 34

Frequently asked questions
Issue Possible fault Solution
Dishes are still
wet, glasses and
cutlery are
spotted.
White residue is
visible on cutlery
and dishes.
clouding occurs
on glassware and
film can be wiped
off.
The rinse aid setting may
be too low, or the rinse aid
reservoir is empty.
Dishes were taken out too
soon.
"2 in 1" products were used.
These products have a low
drying effect.
Not enough rinse aid was
used.
Unsuitable "2 in 1" or "3 in 1"
products were used.
Increase the dosage, refill the
reservoir or switch the rinse
aid product when refilling, see
"Before using for the first time".
Leave dishes in longer, see
"Use".
Use powder detergent and
add rinse aid.
Increase the dosage, see
"Before using for the first time".
Use a different detergent,
normal tabs or normal powder
detergent.
34
Page 35

Frequently asked questions
Issue Possible fault Solution
Glasses are
discolored and the
film cannot be wiped
off.
Glasses are dull and
discolored, film
cannot be wiped off.
Tea or lipstick stains
have not been
completely removed.
Plastics are
discolored.
There are rust stains
on cutlery.
Detergent ingredients have
been deposited on the
glassware.
Glasses are not
dishwasher safe.
The wash temperature of
the selected program was
too low.
The detergent has a low
bleaching effect.
Natural dyes e.g. from
vegetables may be the
cause. Not enough
detergent was used to
break down natural dyes.
The affected items are not
corrosion resistant.
Use a different detergent.
There is no remedy. Only
wash dishwasher safe
glasses in the dishwasher.
Select the "Economy" or
"Sani Wash" program.
Use a different detergent.
Use more detergent, see
"Adding detergent".
Discoloration is permanent.
There is no remedy. Only
wash dishwasher safe
cutlery in the dishwasher.
35
Page 36

After sales service
Repairs
In the event of a fault which you cannot
correct yourself please contact the
Miele Service Department at the phone
number on the back of this booklet.
^ Please quote the model type and
number of your appliance.
These can be found on the data plate
along the right edge of the door.
PC Update
The Program Correction (PC) allows a
technician to update the dishwasher to
make use of new technology.
When, for example, technological
developments offer advanced
modifications to your existing program
cycles a service technician will be able
to input these into your machine
controls via the indicator light marked
PC. Miele will provide information when
such possibilities become available.
MieleCare
MieleCare, our Extended Service
Contract program, gives you the
assurance of knowing that your
appliance investment is covered by
5 years of worry free ownership.
MieleCare is the only Extended Service
Contract in the industry that guarantees
repairs by a Miele Authorized Service
Provider using genuine Miele parts.
Only genuine Miele parts installed by
factory trained professionals can
guarantee the safety, reliability, and
longevity of your Miele appliance.
Please note that unless expressly
approved in writing by Miele’s Service
department, Extended Service
Contracts offered by other providers for
Miele products will not be recognized
by Miele. Our goal is to prevent
unauthorized (and untrained) service
personnel from working on your Miele
products, possibly doing further
damage to them, you and/or your
home.
36
To learn more about MieleCare
Extended Service Contracts, please
contact your appliance dealer or visit
us online at:
www.store.miele.com
Page 37

To transport the dishwasher, e.g. when
moving to a new home, note the
following:
– Empty the dishwasher.
– Secure any loose parts, e.g. hoses,
cables, cutlery baskets.
– Transport the dishwasher in the
upright position. If unavoidable it
may be transported on its back. Do
not transport it on its side or on the
door. Residual water in the machine
could leak and cause electrical
damage.
Transport
37
Page 38

38
Page 39

User Maintenance Instructions
To prevent accidents
and machine damage,
read these instructions
before installation or use.
Page 40

Cleaning and Care
Check and clean your dishwasher
regularly (approx. every 4-6
months). This will help avoid
problems and faults.
Exterior
^ Only use a conditioner suitable for
your kitchen cabinetry.
^ Clean wood only with a damp cloth
and wipe dry.
Abrasive cleaning agents, glass
,
cleaning agents, all-purpose
cleaners, thinner or ammonium
cleaners should not be used on the
dishwasher. They will damage the
surface.
Wash cabinet
Generally, the wash cabinet is self
cleaning if the correct amount of
detergent is used.
The wash cabinet can be cleaned with
a dishwasher cleaner such as "Dis
Cleaner" available from your Miele
dealer, Miele or online at
www.store.miele.com.
Door and the door seal
^ Wipe the door seals regularly with a
damp cloth to remove food deposits.
^ Food residue and spilled liquids
should be wiped from the sides of the
dishwasher door. These are outside
of the wash cabinet and are not
cleaned by water from the spray
arms.
^ Stainless steel surfaces can be
cleaned using a non-abrasive
stainless steel cleaner or with
dishwashing detergent and warm
water.
^ To help prevent resoiling, a
conditioner for stainless steel can
also be used. Apply sparingly with
even pressure.
Control panel
^ Plastic control panel should only be
wiped with a damp cloth or suitable
cleaning agent designed for use on
plastic.
^ For stainless steel panels see
information above.
,
The stainless steel surfaces and
controls may become discolored or
damaged if not cleaned regularly.
The appliance front and controls are
not scratch proof.
Remove spills immediately.
40
Page 41

Triple filter system
The triple filter system in the base of the
wash cabinet prevents food from being
redeposited on dishes. It also protects
the circulation pump from damage
caused by foreign objects (e.g. broken
glass, bones).
The machine must not be used
,
without all the filters in place!
^ Check and clean the filter system
every 4-6 months or whenever a
foreign object is trapped.
The level of soiling and time it takes
before the filters need cleaning will vary
depending on your household.
^ Turn off the dishwasher before
cleaning.
Cleaning and Care
^ Turn the handle counterclockwise to
release the triple filter system.
^ Lift the filter combination out of the
machine. Remove any solid particles
and rinse under running water. Scrub
with a nylon brush if necessary.
41
Page 42

Cleaning and Care
To clean the inside of the filter, the flap
must be opened.
^ Push the clips together a and open
the flap b.
^ Rinse under running water.
^ Close the flap so that the clip
engages.
^ Return the filter so it lies flat in the
base of the wash cabinet.
^ Lock the filter by turning the handle
clockwise.
,The triple filter system must be
inserted and locked. Large particles
could get in the circulation system
and cause a blockage.
42
Page 43

Cleaning the spray arms
Sometimes particles of food get stuck
in the spray arm jets. The spray arms
should be inspected and cleaned every
4 - 6 months.
^ Turn off the dishwasher before
cleaning.
Removing the spray arms
^ Remove the cutlery tray (if present).
^ Press the top spray arm up to
engage the inner ratchet and
unscrew the spray arm.
Cleaning and Care
^ Pull the lower spray arm firmly
upwards to remove.
^ Lift up the middle spray arm, a, to
engage the ratchet and unscrew the
spray arm, b.
^ Remove the lower basket.
^ Use a pointed object such as a
toothpick to push food particles into
the spray arm jets.
^ Rinse thoroughly under running
water.
^ Return the spray arms and check
that they rotate freely.
43
Page 44

Cleaning and Care
Cleaning the water inlet filter
A filter is incorporated into the intake
hose attached to the dishwasher’s shut
off valve. If your water is hard or the
pipes contain sediment, this filter may
clog and prevent enough water from
entering the wash cabinet.
The plastic housing of the water
,
connection contains electrical
wiring. Do not submerge the
housing in liquid.
Do not cut the intake hose or
submerge it in liquid.
^ Carefully remove the rubber seal.
Installing an in-line water filter
If your water contains a large number of
insoluble substances, a filter between
the water valve and the intake hose
connection is recommended. These
filters can be purchased from Miele.
Cleaning the filter
^ Turn off the dishwasher and pull the
plug.
^ Turn off the water supply.
^ Unscrew the intake hose.
^ Remove the filter using needle nose
pliers and rinse it under running
water.
^ Reinsert the filter and seal. Make sure
they are seated correctly.
^ Screw the intake hose back on the
water valve, checking that it is not
cross-threaded.
^ Slowly turn on the water supply and
test for leaks.
44
Page 45

Cleaning the drain pump and
non-return valve
If the dishwasher is not completely
drained at the end of a program, the
drain pump or non-return valve may be
blocked.
^ Turn off the dishwasher and pull the
plug.
^ Remove the triple filter (see "Triple
filter system").
^ Use a jug or bowl to scoop water out
of the wash cabinet.
Cleaning and Care
The drain pump is beneath the
non-return valve (see arrow).
^ Remove all foreign objects from the
drain pump (glass or bone splinters).
^ Before returning the non-return valve,
check that the drain pump is not
blocked. Spin the propeller several
times in both directions to check for
obstructions.
^ Tilt the locking clamp to the side a.
^ Pull out the non-return valve b and
rinse it under running water.
^ Remove all foreign objects from the
non-return valve.
^ Carefully reinsert the non-return valve
and secure it with the locking clamp.
,
Make sure the locking clamp
clicks into place!
45
Page 46

46
Page 47

Installation Instructions
For installation of the dishwasher
please refer to the Installation Sheet
supplied with these instructions.
Page 48

Help to protect the environment
Disposal of the packing
material
The cardboard box and packaging
protect the appliance during shipping.
These materials are biodegradable and
recyclable. Please recycle.
Ensure that any plastic wrappings,
bags etc. are disposed of safely and
kept out of the reach of children.
Danger of suffocation!
Disposal of an old machine
Old appliances may contain materials
that can be recycled. Please contact
your local recycling authority about the
possibility of recycling these materials.
Ensure that the appliance presents no
danger to children while being stored
for disposal. Before discarding an old
appliance, unplug it from the outlet, cut
off its power cord and remove any
doors to prevent hazards.
48
Page 49

Electrical connection
Installation, repairs and other
,
work by unqualified persons could
be dangerous. The manufacturer
cannot be held responsible for
unauthorized work.
Check that the voltage, frequency
and fuse rating shown on the data
plate match the household mains
supply.
The power outlet must be accessible
after installation. Do not use an
extension cord to connect the
dishwasher to the mains. Danger of
overheating! See data plate on the
right side of the door.
A damaged power cord must only
be replaced with a genuine Miele
cord by a Miele service technician.
GROUNDING INSTRUCTIONS
THIS APPLIANCE MUST BE
GROUNDED.
Improper connection of the
,
equipment grounding conductor
can result in electric shock. Do
not modify the plug provided with
the appliance; if it will not fit the
outlet, have a proper outlet
installed by a qualified electrician.
If there is any question
concerning the proper electrical
connection or grounding of this
appliance to the power supply,
please consult a licensed
electrician or call Miele’s
Technical Service Department:
U 1-800-999-1360
V 1-800-565-6435
Specifications
The dishwasher comes equipped with a
4 ft (1.2 m) power cord with a molded
plug for connection to 120 V, 60 Hz,
15 A grounded receptacle.
In the event of a malfunction or
breakdown, grounding will reduce the
risk of electric shock by providing a
path of least resistance for the electrical
current. This appliance is equipped
with a cord having an equipment
grounding conductor and a grounding
plug. The plug must be plugged into an
appropriate outlet that is installed and
grounded in accordance with all local
codes and ordinances.
49
Page 50

Plumbing
Connection to the water supply
Do not drink water from the
,
dishwasher!
– The dishwasher can heat its own
water to the temperature required by
the wash program. This allows for
connection of the machine to either a
hot or cold water source. For lowest
energy consumption connect the
dishwasher to a cold water source.
For fastest possible wash times, with
slightly higher energy consumption,
connect the dishwasher to a hot
water source. All programs use hot
water in the rinse cycles.
– The inlet hose is approximately 5 ft.
(1.5
m) long. A 5 ft. (1.5 m) extension
hose is available from the Technical
Service Parts Department at the
phone number listed on the back of
this manual.
Do not cut the intake hose. It
,
contains electrical wiring. If the hose
is cut, the dishwasher will not work.
There will be a waterleak and you
could be injured. If the hose is too
long, coil it neatly and place it
behind the machine.
– The water inlet hose comes
equipped with a 3/4" female hose
thread connector. This can be
directly connected to a water supply
with 3/4" MHT (male hose thread
ends).
– Water pressure: Must be between
4.5 - 145 psi (0.3 - 10 bar).
50
Page 51

Plumbing
Drainage
– The machine comes equipped with a
built-in non-return valve on the
discharge side to prevent waste
water from flowing back into the
dishwasher.
– The dishwasher is equipped with a
5 ft (1.5 m) flexible drain hose with an
internal diameter of 7/8" (22 mm).
– Drain hose extensions and adapters
can be ordered from Miele.
The maximum drain hose length is
13 ft. (4 m), max. drain height: 39"
(1 m).
– If the hose is to be directly fitted to
the drainage outlet on site, use the
supplied hose clip.
– The hose can be installed to the left
or right side.
– The existing drain pipe for the drain
hose is designed for various hose
diameters. The drain pipe must be
shortened if the drain pipe extends
too far into the drain hose. The drain
hose could get clogged.
– The drain hose must not be
shortened.
– Make sure the hose is installed
without kinking, pressure or being
pulled.
Venting the drainage system
If the dishwasher drain hose is
connected to a floor drain or to a drain
pipe that is less than 8" (20 cm) above
the floor, the drain must be vented.
Otherwise the water inside the
dishwasher may siphon out during the
wash program.
^ Open the dishwasher door and
remove the lower basket.
^ Pull the lower spray arm firmly
upwards to remove.
^ Cut off the vent cap located at the
right rear of the triple filter system, as
illustrated.
51
Page 52

Alterations reserved/4906
G 2140 / G 2150
M.-Nr. 06 696 010 / 04
en - US / CDN
 Loading...