

Operating and installation instructions
Built-in food warming drawer
ESW 47.2
ESW 48.2
To avoid the risk of accidents or
damage to the appliance it is
essential to read these
instructions before it is installed
and used for the first time.
en-GB
M.-Nr. 07 462 960

Contents
Guide to the appliance .............................................4
Front view.........................................................4
Control panel ......................................................5
Accessories supplied ...............................................6
Warning and Safety instructions .....................................7
Caring for the environment.........................................11
Before using for the first time.......................................12
Operation .......................................................14
Functions ........................................................14
Temperature settings...............................................15
Duration .........................................................15
Sabbath mode ....................................................17
Capacity ........................................................18
Keeping food warm ...............................................19
Settings .........................................................20
Warming crockery ................................................21
Heating up times ..................................................21
Other uses ......................................................22
Cleaning and care ................................................25
General notes ....................................................25
Appliance front and interior ..........................................25
Anti-slip mat ......................................................26
Problem solving guide ............................................27
Optional accessories..............................................29
2

Contents
Safety instructions for installation...................................30
Building-in dimensions ESW 47*2 ...................................31
Building-in dimensions ESW 48*2 ...................................33
Installing the appliance ............................................34
Aligning the front of the food warming drawer.........................35
Fixing the furniture front ...........................................36
Electrical connection..............................................38
After sales service, data plate ......................................40
3
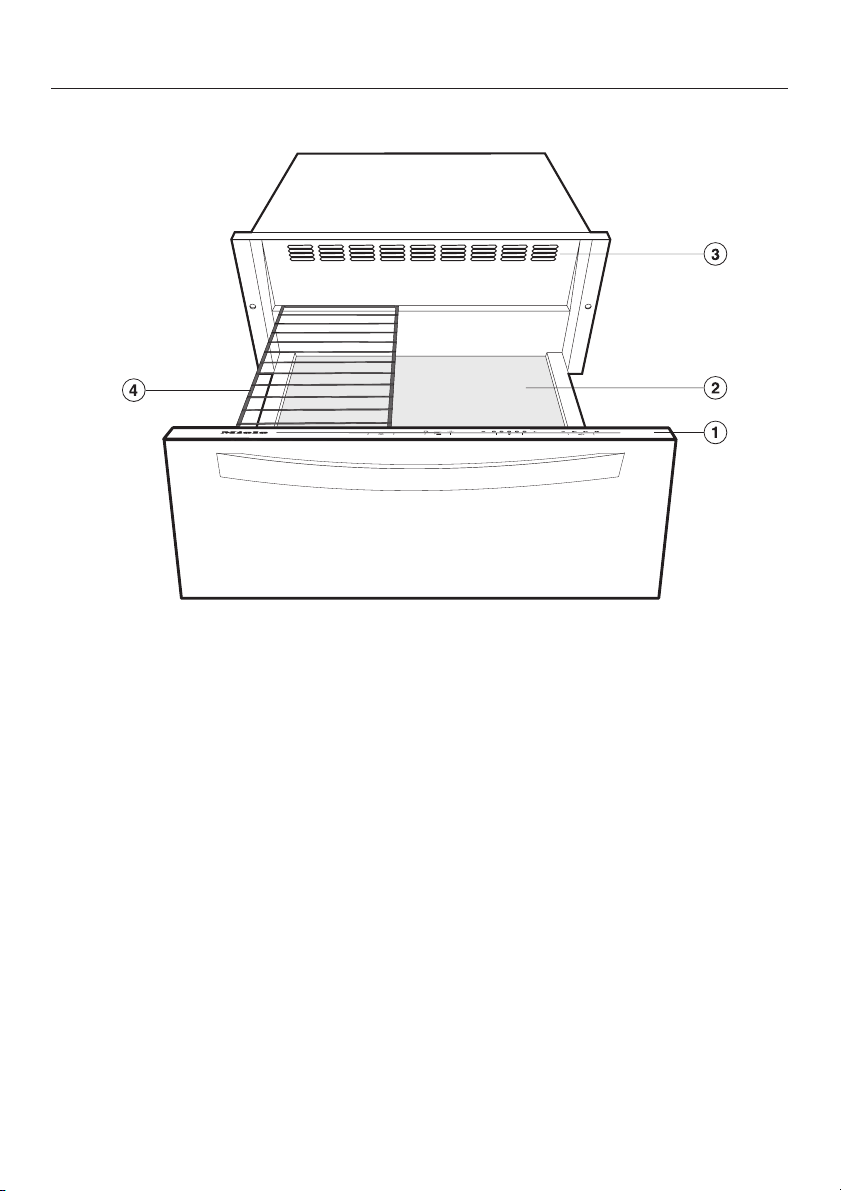
Guide to the appliance
Front view
a Control panel
b Anti-slip mat
c Air vents
d Rack
4

Control panel
Sensor switches
Displays
Guide to the appliance
s On/Off switch for the appliance
Menu For selecting the function
Temp. For setting the temperature
Timer For setting the duration
Functions:
/ For warming cups and glasses
H For warming plates and dishes
2 For keeping food warm
Temperature:
]^^^^
Duration:
1h 1 hour
2h 2 hours
3h 3 hours
4h 4 hours
5
Guide to the appliance
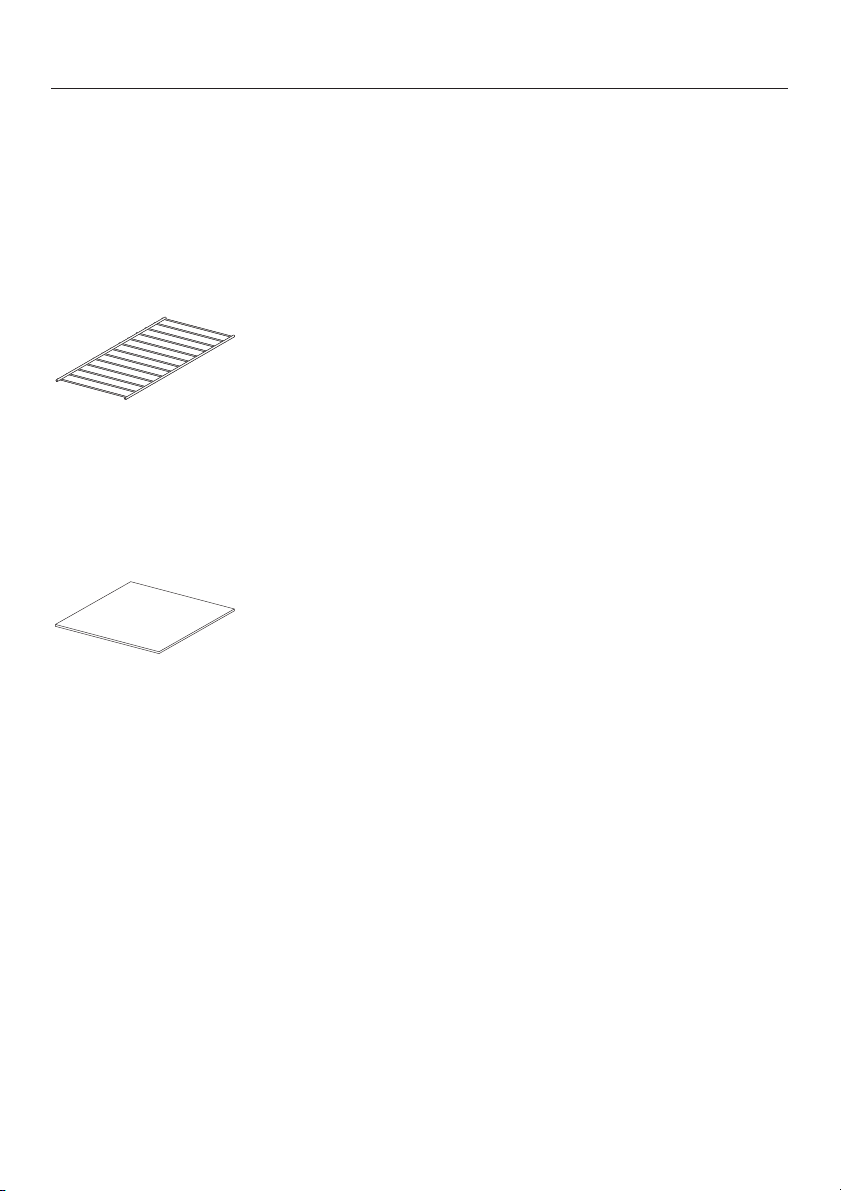
Accessories supplied
The accessories supplied with your drawer as well as a range
of optional ones are available to order (see "Optional
accessories").
Rack
For increasing the loading area
Anti-slip mat
For keeping crockery secure
6
Warning and Safety instructions
This appliance complies with all
relevant local and national safety
requirements. Inappropriate use
can, however, lead to personal injury
and damage to property.
To avoid the risk of accidents and
damage to the appliance, please
read these instructions carefully
before using it for the first time.
They contain important notes on the
installation, safety, operation and
care of the appliance.
Keep these instructions in a safe
place and ensure that all users are
familiar with the contents. Pass them
on to any future owner of the
appliance.
Correct application
This appliance is intended for
~
domestic use only, and must only be
used as described in these instructions.
Any other usage is at the owner's risk
and could be dangerous. The
manufacturer cannot be held liable for
damage resulting from incorrect or
improper use or operation.
Safety with children
This appliance is only intended for
~
use by adults who have read these
instructions. The appliance is not a toy!
To avoid the risk of injury, keep children
away from it at all times, and do not let
them play with it or use the controls.
They will not understand the potential
dangers posed by it. They should be
supervised whenever you are working
in the kitchen.
Older children may only use the
~
appliance after its operation has been
clearly explained to them and they are
able to use it safely, recognising the
dangers of misuse.
The appliance gets hot when in use
~
and remains hot for quite a while after
being switched off. To safeguard
against burning, keep children well
away from the appliance at all times.
Packaging, e.g. cling film,
~
polystyrene and plastic wrappings,
must be kept out of the reach of babies
and young children. Danger of
suffocation. Dispose of or recycle all
packaging safely as soon as possible.
This appliance is not intended for
~
use by persons (including children)
with reduced physical, sensory or
mental capabilities, or lack of
experience or knowledge, unless they
are supervised whilst using it, or have
been shown how to use it correctly by a
person responsible for their safety.
7

Warning and Safety instructions
Technical safety
Before installation, check the
~
appliance for visible signs of damage.
Under no circumstances should you
use it if it has been damaged. A
damaged appliance is dangerous.
Before connecting the appliance to
~
the mains supply, make sure that the
connection data on the data plate
(voltage and connected load)
correspond with the mains electricity
supply, otherwise the appliance could
be damaged. If in any doubt, consult a
qualified electrician.
The electrical safety of this
~
appliance can only be guaranteed
when continuity is complete between it
and an effective earthing system. It is
most important that this basic safety
requirement is present and regularly
tested, and where there is any doubt,
the household wiring system should be
inspected by a qualified electrician.
The manufacturer cannot be held liable
for the consequences of an inadequate
earthing system (e.g. electric shock).
This appliance may be connected
~
via a fused plug and switched socket. If
you wish to connect it to a fused spur
connection unit, or if the appliance is
supplied without a plug, it must be
installed and connected by a suitably
qualified and competent person in strict
accordance with current local and
national safety regulations. The
manufacturer cannot be held liable for
damage caused by incorrect
installation or connection.
For safety reasons, this appliance
~
may only be used when it has been
built in.
Never open the housing of the
~
appliance.
Tampering with electrical connections
or components and mechanical parts is
highly dangerous to the user and can
cause operational faults.
Installation, maintenance and
~
repairs may only be carried out by a
suitably qualified and competent
person in strict accordance with current
national and local safety regulations.
Repairs and other work by unqualified
persons could be dangerous. The
manufacturer cannot be held liable for
unauthorised work.
If the connection cable is damaged,
~
it must be replaced by a suitably
qualified electrician with a specialist
connection cable of type H 05 V V-F
(pvc insulated), available from the Miele
Service Department.
Faulty components must only be
~
replaced by genuine Miele original
parts. The manufacturer can only
guarantee the safety of the appliance
when Miele replacement parts are
used.
8

Warning and Safety instructions
During installation, maintenance and
~
repair work, the appliance must be
disconnected from the mains electricity
supply. It is only completely isolated
from the electricity supply when:
the mains fuse is disconnected,
–
the screw-out fuse is removed (in
–
countries where this is applicable),
it is switched off at the wall socket
–
and the plug is withdrawn from the
socket, or
it is switched off at the fused spur
–
connection unit.
Do not connect the appliance to the
~
mains electricity supply by a
multi-socket unit or an extension lead.
These do not guarantee the required
safety of the appliance (e.g. danger of
overheating).
In countries where there are areas
~
which may be subject to infestation by
cockroaches or other vermin, pay
particular attention to keeping the
appliance and its surroundings in a
clean condition at all times. Any
damage caused by cockroaches or
other vermin will not be covered by the
guarantee.
Correct use
For added protection, it is advisable
~
to use heat-resistant pot holders or
gloves when using the appliance. Do
not let them get damp or wet, as this
causes heat to transfer through the
material more quickly with the risk of
scalding or burning yourself.
The underside of the drawer gets
~
hot when switched on. Be careful not to
touch it when the drawer is open.
Do not store any plastic containers
~
or inflammable objects in the warming
drawer. They could melt or catch fire
when the appliance is switched on,
causing a fire hazard.
Take care when opening and
~
closing the loaded drawer, that liquids
do not spill over and get into the
appliance through the vents. This can
cause lingering odours and the
appliance to short circuit.
Do not heat up unopened tins or jars
~
of food in the drawer, as pressure will
build up in the tin or jar, causing it to
explode. This could result in injury and
scalding or damage.
Ensure food is really hot when
~
placed inside the warming drawer. The
drawer is designed to keep hot food
warm, and not to warm food up.
Make sure that the vents inside the
~
drawer are not covered. Otherwise,
food and crockery will not heat up
evenly.
9

Warning and Safety instructions
Do not use the appliance to heat up
~
the room. Due to the high temperatures
radiated, objects near the appliance
could catch fire. The life of the
appliance could also be reduced.
Never replace the anti-slip mat
~
supplied with the appliance with paper
kitchen towel or similar.
Do not overload the drawer. The
~
maximum load bearing capacity of the
drawer is 25 kg.
Only place heat-resistant crockery in
~
the drawer. Never place plastic or
aluminium foil items in the drawer.
These melt at high temperatures, and
could catch fire.
Do not sit or lean on the opened
~
drawer. This can damage the
telescopic runners.
Make sure that you select a high
~
enough temperature setting to keep
food warm. Bacteria can develop in the
food if the temperature is too low.
Never use a steam cleaner to clean
~
the appliance. The steam could reach
electrical components and cause a
short circuit.
While the appliance is under
~
guarantee, repairs should only be
undertaken by a service technician
authorised by the manufacturer.
Otherwise the guarantee is invalidated.
The manufacturer cannot be held
liable for damage caused by
non-compliance with these Warning
and Safety instructions.
10
Caring for the environment
Disposal of the packing
material
The transport and protective packing
has been selected from materials which
are environmentally friendly for
disposal, and can normally be
recycled.
Ensure that any plastic wrappings,
bags, etc. are disposed of safely and
kept out of the reach of babies and
young children. Danger of suffocation.
Rather than just throwing these
materials away, please ensure that they
are recycled.
Disposal of your old appliance
Electrical and electronic appliances
often contain materials which, if
handled or disposed of incorrectly,
could be potentially hazardous to
human health and to the environment.
They are, however, essential for the
correct functioning of your appliance.
Please do not therefore dispose of it
with your household waste.
Please dispose of it at your local
community waste collection/recycling
centre or contact your dealer for
advice. Please ensure that it presents
no danger to children while being
stored for disposal.
11

Before using for the first time
A display test is carried out for 10 seconds after the
appliance has been switched on at the mains and after a
power cut. The fan comes on at the same time. The appliance
cannot be used during this time.
Please stick the extra data plate for the appliance supplied
with this documentation in the space provided in the "After
sales service" section of this booklet.
Cleaning and heating up for the first time
Remove any protective foil and sticky labels.
^
Remove the anti-slip mat and, if applicable, the rack from
^
the drawer, and sponge both with warm water and a little
washing-up liquid. Dry using a soft cloth.
^ Wipe the appliance inside and out with a damp cloth only,
and then dry with a soft cloth.
^ Replace the anti-slip mat and the rack (if applicable) in the
drawer.
Then heat the empty drawer for at least two hours.
^ Switch the appliance on by touching On/Off s sensor.
12
^ Touch the Menu sensor repeatedly until the 2 symbol
lights up in the display.
^
Touch the Temp. sensor repeatedly until the LED on the far
right lights up.
^
Touch the Timer sensor repeatedly until 2h lights up.
^
Close the drawer.
The warming drawer is fitted with a softclose self-closing
mechanism.
The drawer is fitted with a contact switch, which ensures
that the heating element and fan in the appliance only work
when the drawer is closed.

Before using for the first time
The appliance switches itself off automatically when the
selected duration has elapsed.
Metal components have a protective coating which may give
off a slight smell when heated up for the first time.
The smell and any vapours will dissipate after a short time,
and do not indicate a faulty connection or appliance.
Ensure that the kitchen is well ventilated whilst the appliance
is being heated up for the first time.
13

Operation
Functions
Use the Menu sensor to select the function you want. The
applicable symbol lights up as follows:
/
–
For warming cups and glasses.
H
–
For warming plates and dishes.
2
–
For keeping food warm.
The last function selected is automatically activated the next
time the drawer is switched on, and this is shown in the
display.
The appliance has a fan which distributes the warm air evenly
through the drawer. The fan runs continuously when the
drawer is operating on the cups/glasses or plates/dishes
functions. It runs at intervals on the "keep food warm"
function.
The appliance can be used to keep food warm at the same
time as warming plates and dishes.
Use the "Keeping food warm" function for this.
Take care. The plates and dishes will take longer to warm
up, but can get very hot on this function.
14
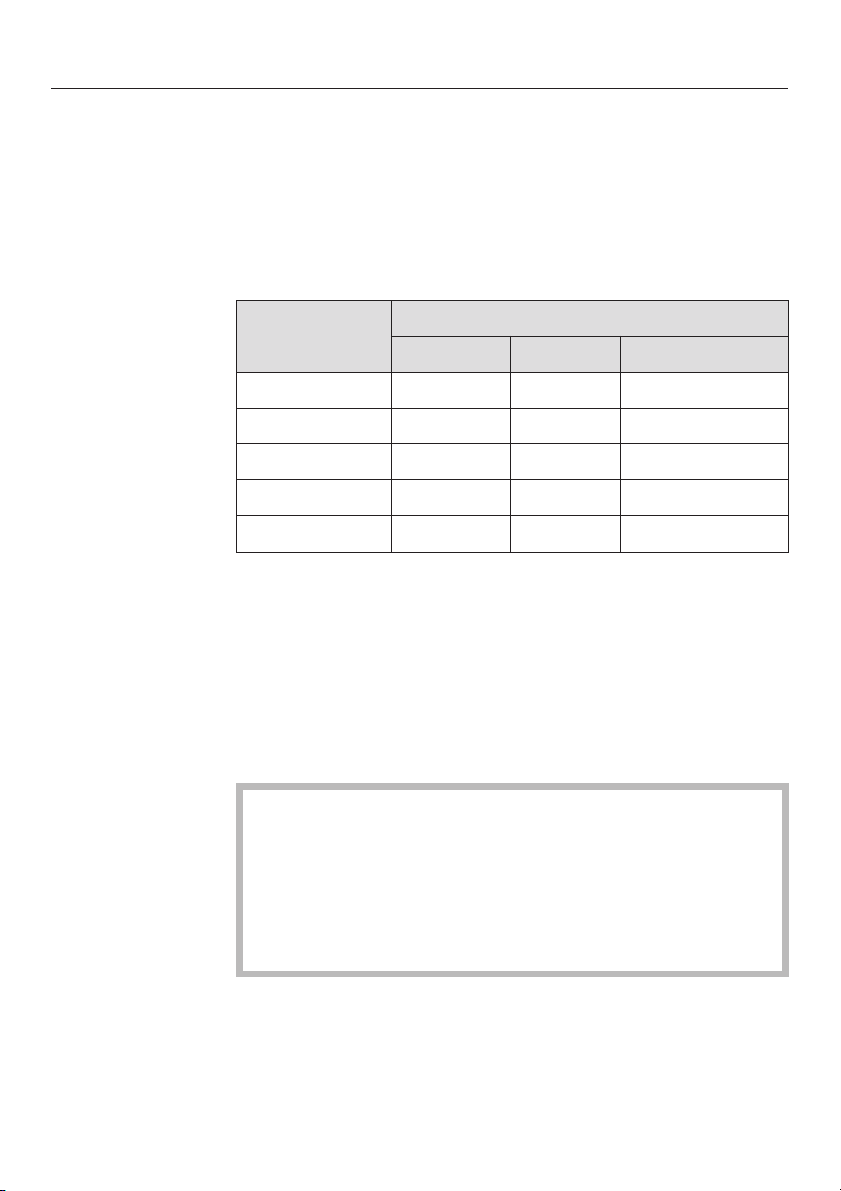
Temperature settings
Each function has its own temperature range. The factory-set
recommended temperatures are printed in bold. The
temperature can be altered in 5° steps by touching the
Temp. sensor. The last temperature selected is automatically
activated the next time the drawer is switched on, and this is
shown in the display.
Operation
Duration
Temperature
display
] ^ ^ ^ ^ 40 60 65
^ ] ^ ^ ^ 45 65 70
^ ^ ] ^ ^ 50 70 75
^ ^ ^ ] ^ 55 75 80
^ ^ ^ ^ ] 60 80 85
* Approximate temperature, measured in the middle of the
drawer when empty
The appliance is set for continuous operation. A limited
duration can be selected by touching the Timer sensor. One
touch for 1 hour (1h), two touches for 2 hours (2h) etc, up to a
maximum of 4 hours. Continuous operation is restored by
touching the sensor a fifth time.
Do not leave the drawer unattended for too long in
continuous operation. Keeping food warm for a long time
can result in it drying out or even self-igniting.
/ H 2
Temperature °C*
Your appliance is fitted with a safety switch-off mechanism
which switches the appliance off after a maximum of
12 hours' continuous operation.
15

Operation
Switching on
Open the drawer.
^
Switch the appliance on by touching the On/Off s sensor.
^
Touch the Menu sensor until the function required lights up
^
in the display.
If you wish to alter the temperature, touch the Temp.
^
sensor until the LED for the temperature required lights up.
The appliance is set for continuous operation.
If you wish to limit the duration, touch the Timer sensor until
^
the duration (in hours) required lights up.
Close the drawer.
^
The drawer can be loaded once the necessary pre-heating
time has elapsed. If crockery has been warmed during the
pre-heating phase, use oven gloves to remove it.
Take care when opening and shutting the loaded drawer
that liquids do not spill over.
Switch the appliance off before removing food from the
drawer.
16

Sabbath mode
To activate
To deactivate
Operation
For religious observance, the appliance can be set for the
duration of the Sabbath. In Sabbath mode the timer is
deactivated and the sensors have to be touched longer than
usual. If Sabbath mode is activated, the appliance will turn off
after about 72 hours, then automatically reset to normal
operation.
Touch and hold the Timer sensor.
^
At the same time touch and hold the On/Off s sensor.
^
Continue to touch both sensors until all 4 timer indicators
^
light up at once.
^ If desired, select the function and temperature.
^ Touch and hold the On/Off s sensor until all indicators go
out.
The appliance is reset for normal operation.
17

Capacity
The quantity that can be loaded will depend to a great
extent on the size and weight of your own crockery.
Do not overload the drawer. The maximum load bearing
capacity of the drawer is 25 kg.
The loading examples shown here are suggestions only.
– 12 place settings:
12 dinner plates C 26 cm
12 soup bowls C 23cm
12 dessert plates C 19 cm
1 oval serving dish 32 cm
1 serving dish C 19 cm
1 serving dish C 16 cm
1 serving dish C 13 cm
18
or alternatively:
- 40 dinner plates C 26 cm
- 60 soup bowls C 23 cm
- 45 soup cups C 10 cm
- 20 dinner plates C 26 cm
20 soup bowls C 23 cm
- 20 pizza plates C 36 cm
- 142 espresso cups C 5.9 cm
- 90 cappuccino cups C 8.8 cm
- 30 punch glasses C 6.7 cm / 8.5 cm high
You can increase the load area by using the rack supplied
with the appliance. Position the rack to suit.
With a second rack you can increase the load area even
more by placing one rack on the left and the other on the
right. Another rack can be obtained from Miele or from your
Miele dealer (see "Optional accessories").

Keeping food warm
This function is for keeping food warm that has just been
cooked, i.e. food that is still hot. It is not for reheating food
that has gone cold.
To ensure that the temperature does not drop below the
–
minimum required for keeping food warm (65°C), select
the 2 function only.
Pre-heat the drawer thoroughly for 15 minutes to ensure
–
that it has reached the required temperature.
Whilst the appliance is heating up, place the empty dishes
–
in it to warm them up. Then place the hot food into the
pre-heated dishes.
Do not cover roast or fried foods which you want to keep
–
crisp. These types of food need to be kept warm at a
higher temperature.
– Cover food with a high moisture content, liquids and foods
which can develop a skin, with aluminium foil or a plate.
– To avoid spillages, do not overfill dishes.
– Freshly cooked food is hotter than food which is being kept
warm. Serve food which is being kept warm on pre-heated
plates.
– Nutrients are lost when food is cooked, and continue to
diminish when food is kept warm. The longer food is kept
warm for, the greater the loss of nutrients.
–
We do not recommend food being kept warm for too long,
as it will continue to cook.
–
Do not slam the drawer open or shut. Liquids could spill
over and get into the vents.
–
Food may cool down if the drawer is opened and shut too
often.
19
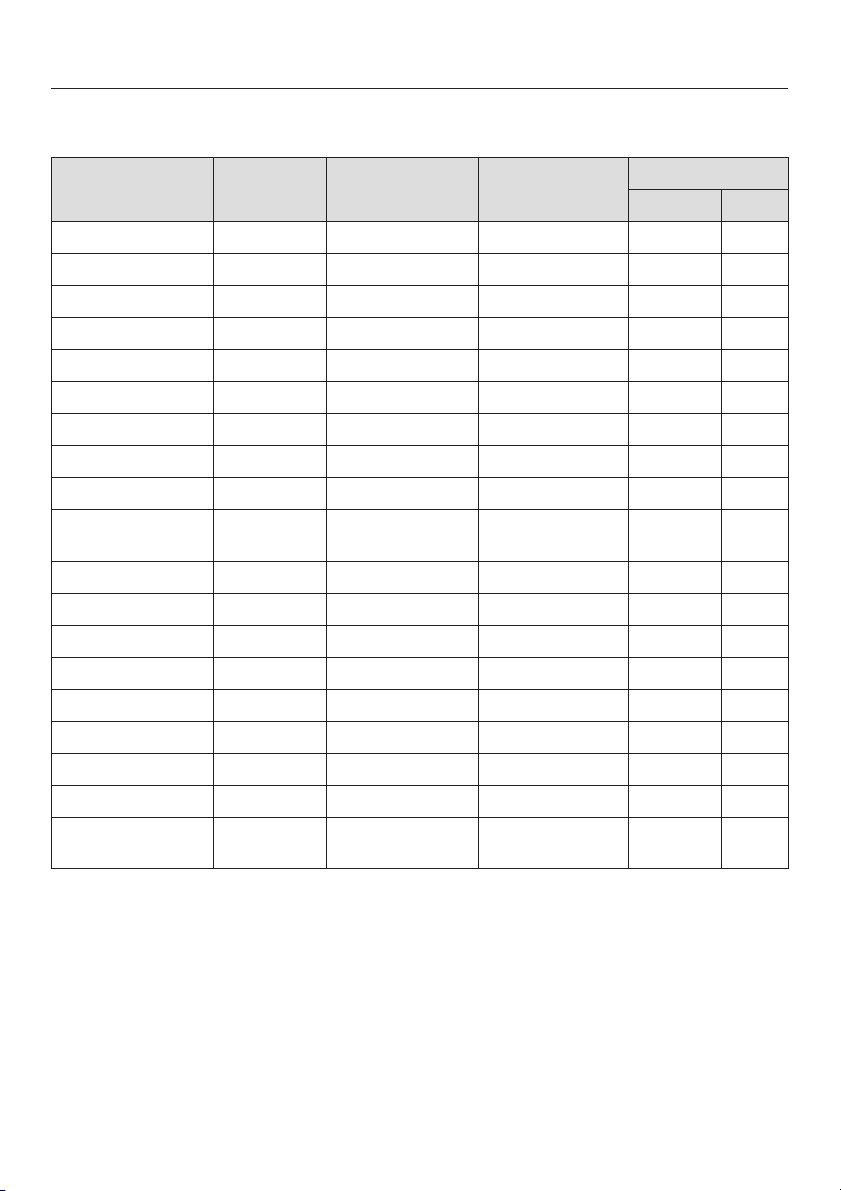
Keeping food warm
Settings
Food Container Container cover? Temperature
To warm bread - No ] ^ ^ ^ ^ xx
To warm rolls - No ] ^ ^ ^ ^ xx
Steak (rare) Plate No ] ^ ^ ^ ^ xx
New potatoes Plate/dish Yes ^ ^ ] ^ ^ x
Mashed potato Dish Yes ^ ^ ] ^ ^ x
Roast meat Plate Yes ^ ^ ] ^ ^ x
Meat in a sauce Dish Yes ^ ^ ^ ] ^ x
Stew Dish Yes ^ ^ ^ ] ^ x
Casserole Dish Yes ^ ^ ^ ] ^ x
Vegetables in a
sauce
Plated meal Plate Yes ^ ^ ^ ] ^ x
Boiled potatoes Dish Yes ^ ^ ^ ] ^ x
Gravy Dish Yes ^ ^ ^ ] ^ x
Strudel Plate No ^ ^ ^ ] ^ x
Bake/gratin Shallow dish Yes ^ ^ ^ ] ^ x
Fish fingers Pan No ^ ^ ^ ^ ] x
Breaded escalope Pan No ^ ^ ^ ^ ] x
Pizza Plate No ^ ^ ^ ^ ] x
Pancakes/
potato pancakes
Dish Yes ^ ^ ^ ] ^ x
Plate No ^ ^ ^ ^ ] xx
for 2 setting
Position in drawer
Floor Rack*
* Depending on model
20

Heating up times
Warming crockery
Distribute the crockery over the whole area of the drawer.
–
Stacks of plates heat up more slowly than individual pieces
of crockery. If large stacks of plates are unavoidable,
place them at the front of the drawer. Use the rack
(depending on model).
Do not place large serving dishes right up against the
–
vents. They will cover the warm air outlets, and the
crockery will not heat up evenly.
For cups and glasses, only select the / function to ensure
–
that the maximum temperature (60°C) is not exceeded.
Heated crockery cools down very quickly. Do not remove it
–
from the drawer until just before you need it.
Various factors will affect the heating up times:
– The material and thickness of the crockery
– The amount of crockery
– How the crockery is arranged
– The temperature setting.
It is therefore not possible to state precise times.
However, the following information can be used as a guide:
On the H setting, it takes approx.
–
30 to 35 minutes for 6 place settings to heat up evenly.
–
40 to 45 minutes for 12 place settings to heat up evenly.
As you use the warming drawer, you will get to know which
setting suits your own needs best.
21
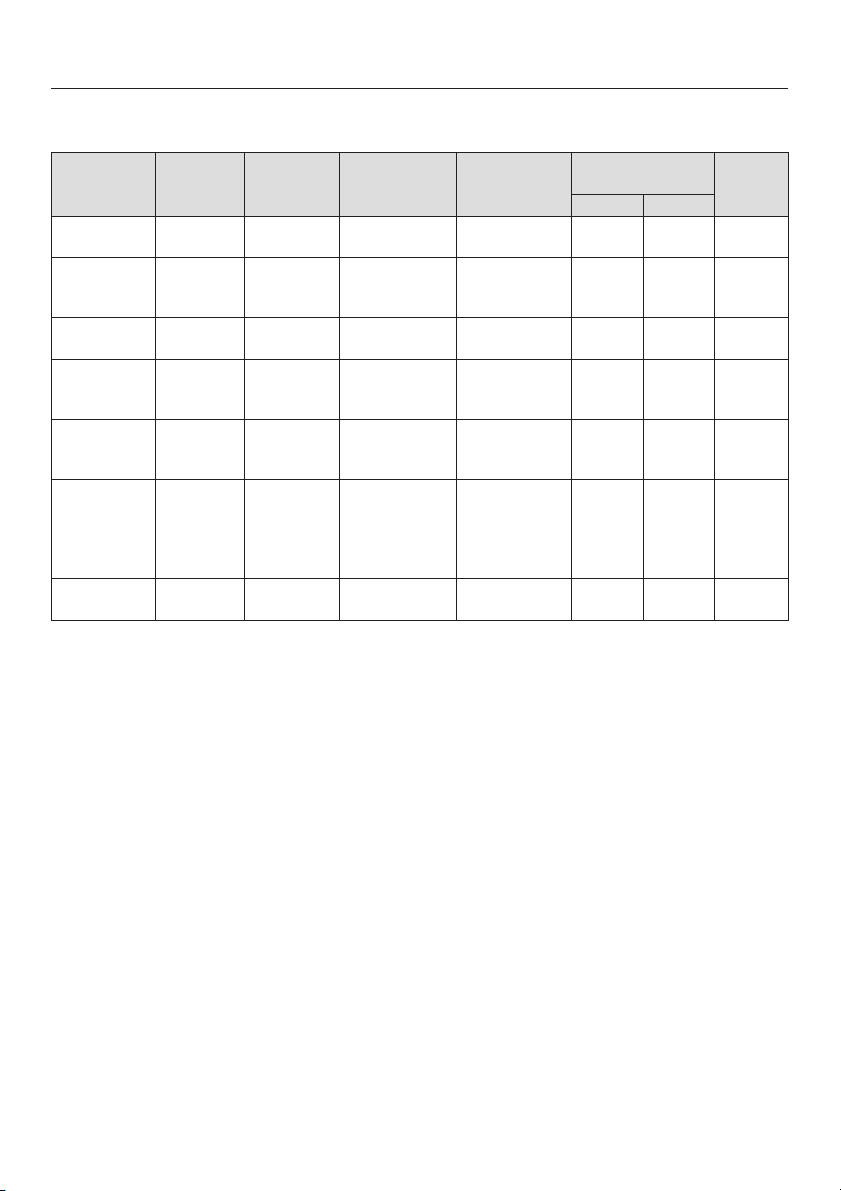
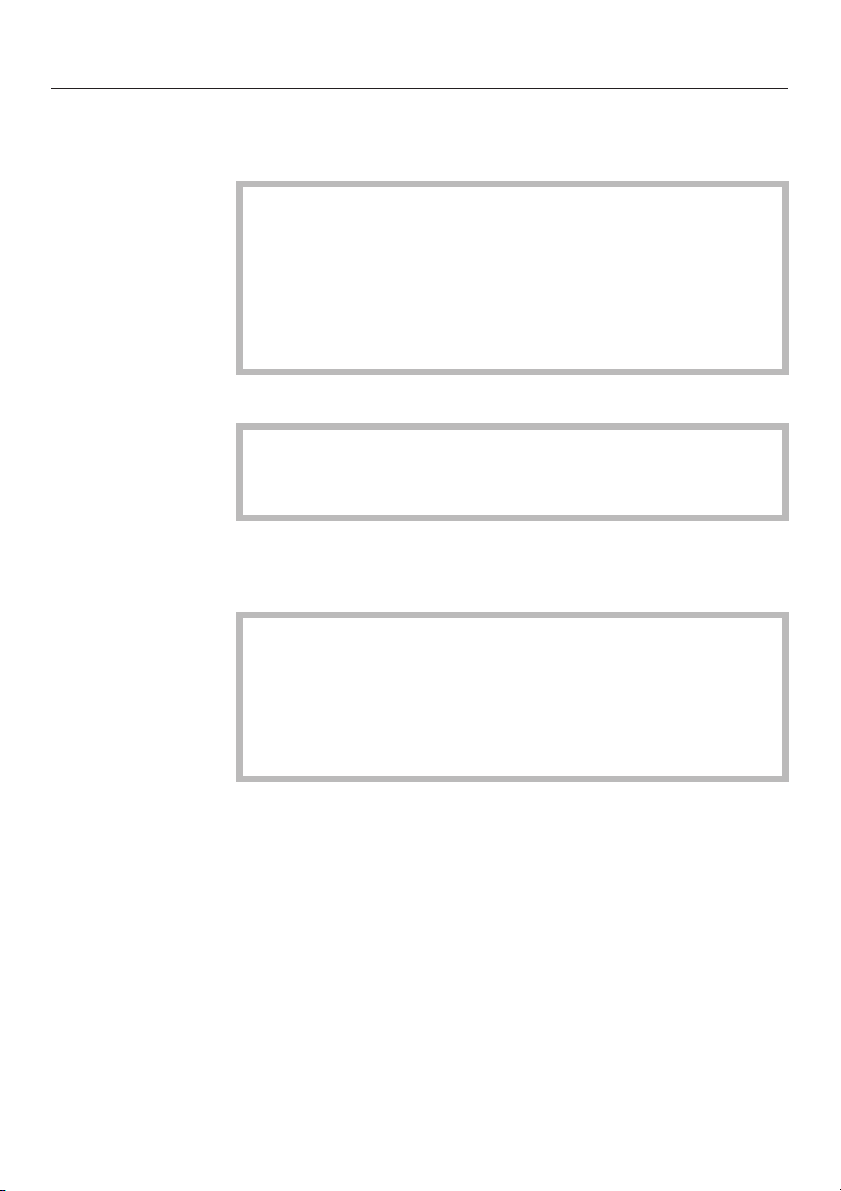
Other uses
Type of
food
preparation
Proving
dough
Making
yoghurt
Defrosting
berries
Defrosting
frozen
vegetables
Dissolving
gelatine
Rice
pudding
(to finish off
the cooking
process)
Melting
chocolate
Container Cover
Bowl Yes, with
Yoghurt
jars with
lid
Bowl/dish No ] ^ ^ ^ ^ x 0:50
Bowl No ^ ^ ] ^ ^ x 1:00
Dish
(max. 7
cm deep)
Pan with
lid
Bowl No ^ ^ ^ ^ ] x x 0:20
* Depending on model
container?
plate
- ^ ] ^ ^ ^ x 5:00
No ^ ^ ^ ^ ] x x 0:15
- ^ ^ ^ ^ ] x x 0:40
Temperature
for 2
setting
Temperature
for /
setting
] ^ ^ ^ ^ x 0:30
Position
in drawer
Floor Rack*
Time in
hours:
minutes
22

Low-temperature cooking
Meat can be cooked at a constant low temperature over a
longer period of time, with very tender results.
It is possible to use the food warming drawer to cook meat at
a low temperature. This is only suitable where the core
temperature does not exceed 65°C. The meat must be
seared first.
Cooking duration/core temperature
The cooking duration depends on the size of the individual
pieces of meat, and can be between 1 and 6 hours.
The core temperature is important for a good cooking result.
The higher the core temperature, the drier the meat will
become. At a lower core temperature, the meat retains its
succulence. It is essential to maintain a constant temperature.
A meat thermometer can be used to monitor the core
temperature.
To cook meat in the food warming drawer
^ Pre-heat the warming drawer.
Other uses
^ Sear the meat on all sides over a high heat on the hob. The
heat closes the pores of the meat, and seals in the juices.
^
Arrange the meat in a roasting pan or on a plate, and cover
with aluminium foil. Place the roasting pan or plate in the
floor of the drawer. See the following table for temperature
settings.
^
Serve the meat on warm plates to stop it cooling too
quickly.
23
Other uses
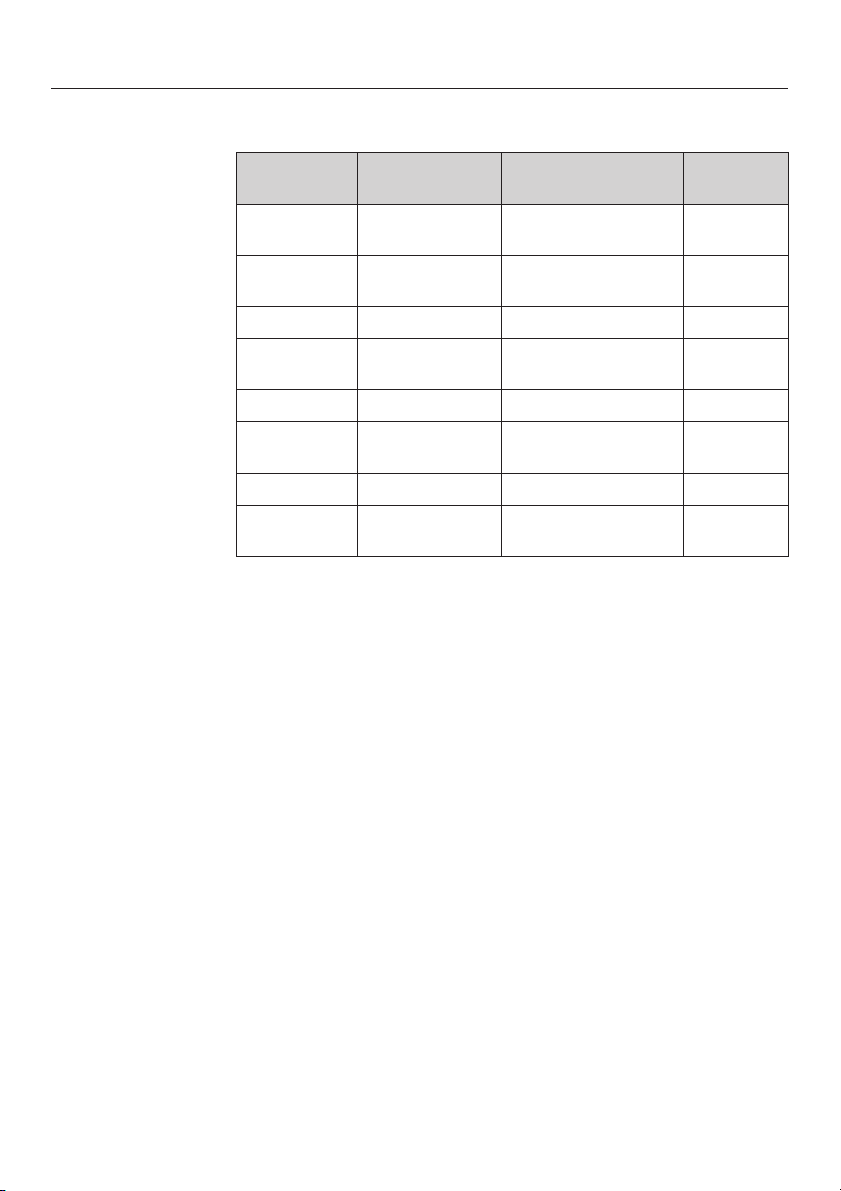
Setting
Type of meat Degree of
doneness
Roast beef Rare ] ^ ^ ^ ^ Roasting
Roast beef Medium to well
done
Pork fillet Medium ] ^ ^ ^ ^ Plate
Pork fillet Well done ] ^ ^ ^ ^ Roasting
Rack of lamb Medium ] ^ ^ ^ ^ Plate
Rack of lamb Well done ] ^ ^ ^ ^ Roasting
Duck breasts Medium ] ^ ^ ^ ^ Plate
Duck breasts Well done ] ^ ^ ^ ^ Roasting
Temperature range
in 2 setting
^ ^ ^ ^ ] Roasting
Cooking
container
pan
pan
pan
pan
pan
24
General notes
Always allow the appliance to cool down before cleaning.
Under no circumstances use a steam cleaning appliance
to clean this appliance. The steam could attack the
electrical components and cause a short circuit.
Only use domestic washing-up liquid to clean this
appliance; commercial cleaning products are not suitable,
and may damage the appliance.
Appliance front and interior
Remove any soiling immediately.
If not, it might become impossible to remove and could
cause the external surfaces to alter or discolour.
Clean the front using a Miele microfibre E-cloth or with a
clean sponge and a solution of hot water and washing-up
liquid. Then dry with a soft cloth.
The external surfaces of this appliance are all susceptible
to scratching. Scratches on glass surfaces could even
cause a breakage.
Cleaning and care
Contact with unsuitable cleaning agents can alter or
discolour the external surfaces.
25

Cleaning and care
To avoid damaging the surface of your appliance, do not
use:
cleaning agents containing soda, ammonia, acids or
–
chlorides,
cleaning agents containing descaling agents,
–
abrasive cleaning agents, e.g. powder cleaners and cream
–
cleaners,
solvent-based cleaning agents,
–
stainless steel cleaning agents,
–
dishwasher cleaner,
–
oven sprays,
–
– glass cleaning agents,
– hard, abrasive sponges and brushes, e.g. pot scourers,
– sharp metal scrapers.
Anti-slip mat
The anti-slip mat can be removed for cleaning.
26
^ Clean the anti-slip mat by hand only, using warm water and
a little washing-up liquid, and then dry with a cloth.
Do not put the anti-slip mat back into the drawer until it is
completely dry.
Do not wash the anti-slip mat in a dishwasher or washing
machine.
Never place the anti-slip mat in the oven to dry.

What to do if...
Problem solving guide
Installation work and repairs to electrical appliances
,
must only be carried out by a suitably qualified and
competent person in strict accordance with current local
and national safety regulations (BS 7671 in the UK).
Repairs and other work by unqualified persons could be
dangerous. The manufacturer cannot be held liable for
unauthorised work.
. . . the appliance does not heat up.
Check whether
– the appliance is correctly plugged in at the mains socket
and switched on.
– the mains fuse has tripped.
If the mains fuse has tripped, call an electrician or the Miele
Service Department.
. . . the food is not hot enough
Check whether
–
the correct temperature setting has been selected.
–
the vents have been covered up.
. . . the food is too hot
Check whether
–
the correct temperature setting has been selected.
27

Problem solving guide
. . . crockery is not warm enough
Check whether
the correct temperature setting has been selected.
–
the vents have been covered up.
–
the crockery has been allowed to heat up for a sufficiently
–
long time.
Various factors will affect how long the crockery will take to
heat up, for example:
The material and thickness of the crockery
–
The amount of crockery
–
How the crockery is arranged
–
– The temperature setting.
. . . the crockery is too hot
Check that the correct temperature has been set.
28
...anoise can be heard when the drawer is being used
This is not a fault. The noise is caused by the fan, which
distributes the heat evenly through the drawer. The fan works
at intervals on the "Keeping food warm" function.

Rack
For increasing the loading area.
Anti-slip mat
The anti-slip mat keeps crockery securely in place.
E-Cloth (microfibre cloth)
Removes finger marks and light soiling.
Optional accessories
A range of Miele branded accessories and cleaning products
is available for your appliance from your local retailer, the
Miele Spare Parts Department or via the internet on
www.miele-shop.com.
See the back cover of this booklet for contact details.
29

Safety instructions for installation
Before connecting the appliance to the mains supply
~
make sure that the connection data on the data plate (voltage
and connected load) correspond with the mains electricity
supply, otherwise the appliance could be damaged. Consult
a qualified electrician if in any doubt.
The socket and on-off switch should be easily accessible
~
after the appliance has been built in.
The food warming drawer may only be built in in
~
combination with those appliances quoted by the
manufacturer as being suitable. The manufacturer cannot
guarantee trouble-free operation if the appliance is operated
in combination with appliances other than those quoted by
the manufacturer as being suitable.
When building in the food warming drawer in combination
~
with another suitable appliance, the food warming drawer
must be fitted above a fixed interim shelf in the housing unit
to ensure that the housing unit can suport both its weight and
that of the other appliance.
As the combination appliance is placed directly on top of
~
the food warming drawer once it is built in, an interim shelf is
not necessary between the two appliances.
30
The appliance must be built in so that the contents of the
~
drawer can be seen. This is to avoid scalding from hot food
spilling over. There must be enough space for the drawer to
be pulled out fully.
This appliance may only be installed in mobile installations
~
such as ships, caravans, aircraft etc. if a risk assessment of
the installation has been carried out by a suitably qualified
engineer.
All dimensions in this instruction booklet are given in mm.

Installation with an oven
Building-in dimensions ESW 47*2
Side view with oven
31

Building-in dimensions ESW 47*2
Solo installation
32
Side view
a An interim / fixed shelf is required
above the appliance for solo
installation
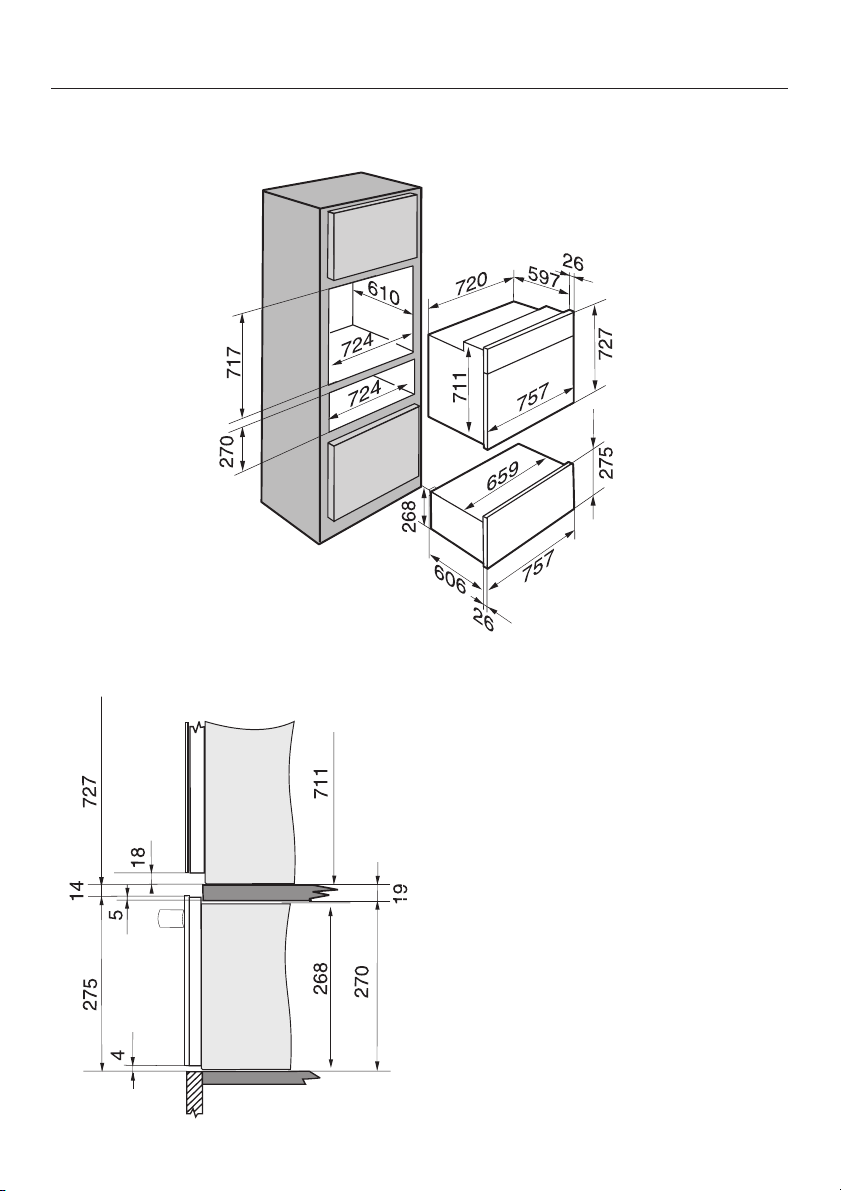
Installation with an oven
Building-in dimensions ESW 48*2
Side view with oven
33

Installing the appliance
Check that the base of the drawer is clean and that it is
level (use a spirit level). This is important for the appliance
to function correctly.
To avoid the risk of injury wear protective gloves when
installing the appliance in its housing unit.
Push the appliance into the housing unit, and align it.
^
Open the drawer, and use the 4 screws supplied to secure
^
the appliance to the side walls of the housing unit.
34
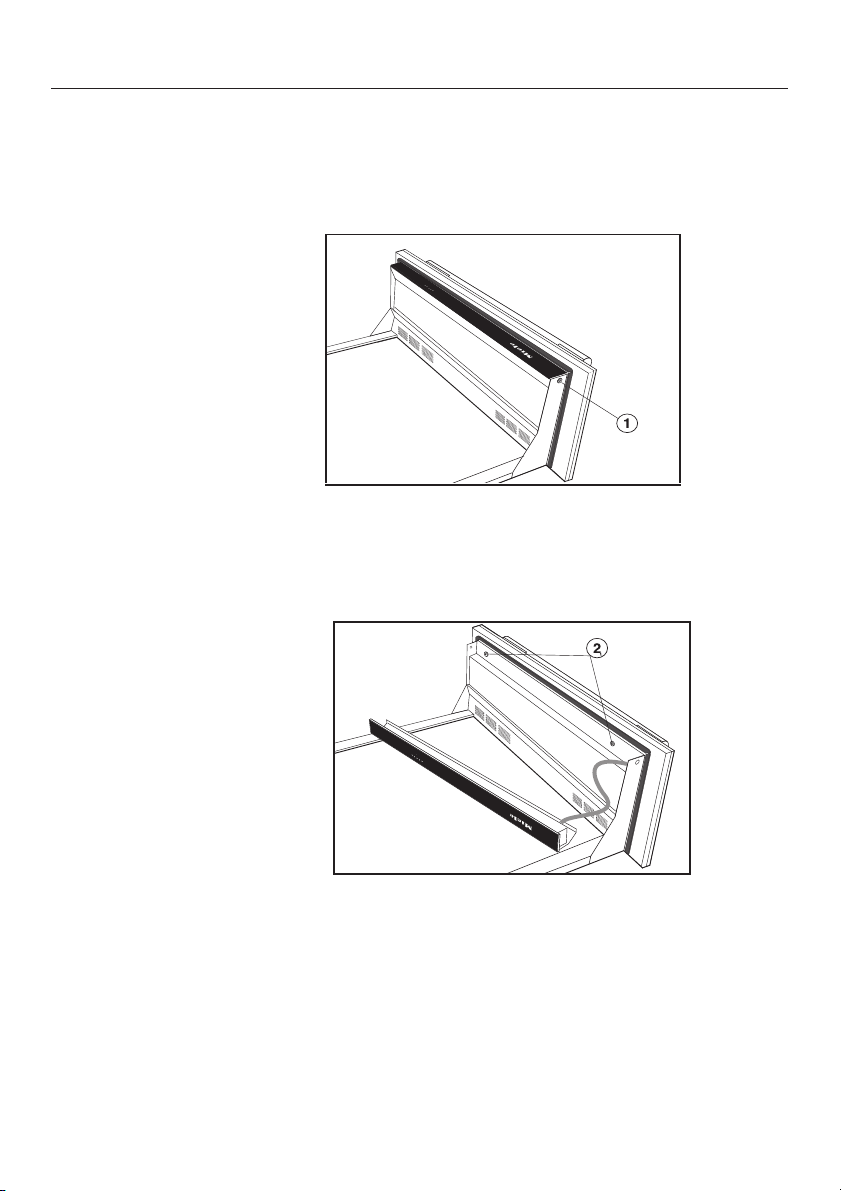
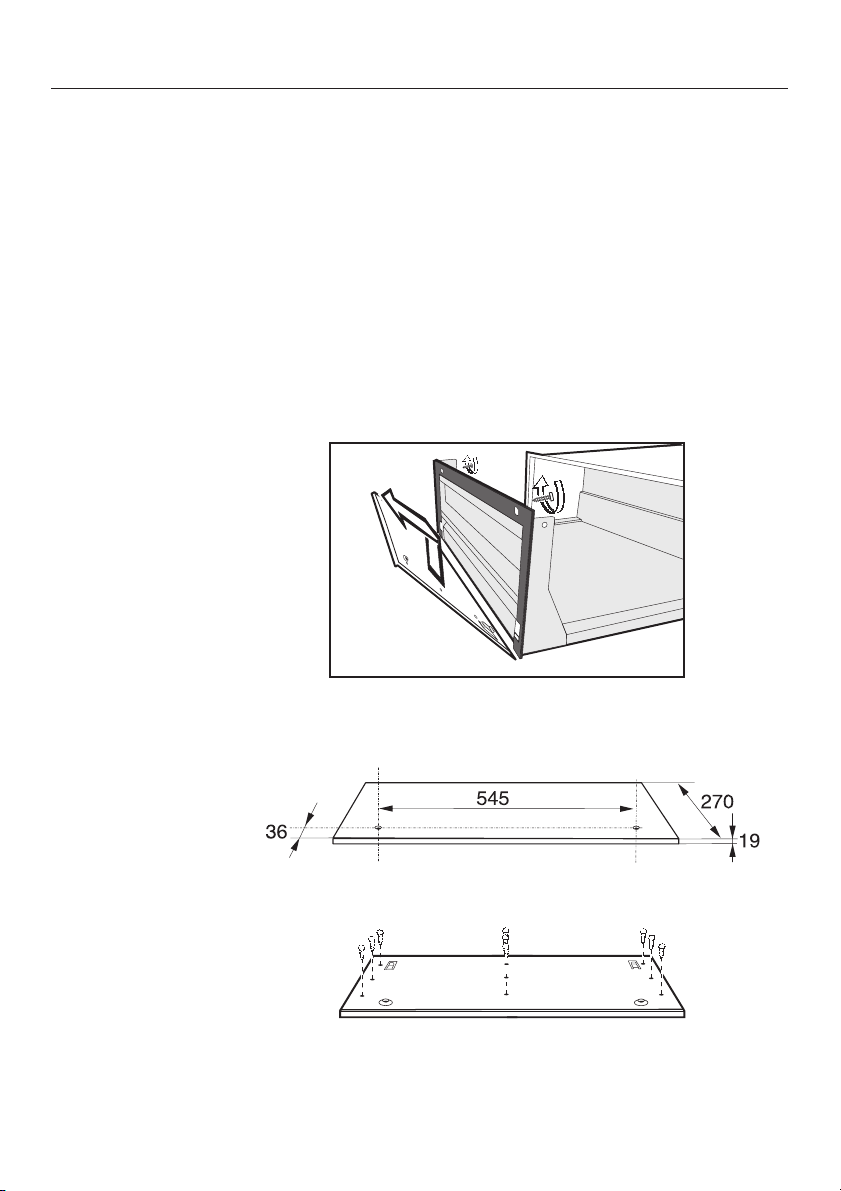
Aligning the front of the food warming drawer
After building in, it may be necessary to align the front of the
food warming drawer.
Remove screws a from the left and right side of the drawer
^
front.
^ Carefully lift the control panel out, taking care not to
damage or pull on the cable, and place it on the floor of the
drawer.
^ Loosen the 2 screws b on the inside of the drawer front.
^
Align the drawer front.
^
Tighten the screws on the inside of the drawer front.
^
Carefully replace the control panel, taking care not to
damage or pull on the cable.
^
Replace the 2 screws in the left and right side of the drawer
front.
35
Fixing the furniture front
The furniture front must be at least 10 mm thick, and be able
to withstand temperatures of at least 60 °C. The furniture front
including handle must not exceed 5.0 kg in weight.
Attach the handle to the furniture front using counter sunk
^
screws.
Remove the screws from the left and right side of the
^
drawer front. Carefully lift the control panel out, taking care
not to damage or pull on the cable, and place it on the floor
of the drawer (see "Aligning the front of the food warming
drawer").
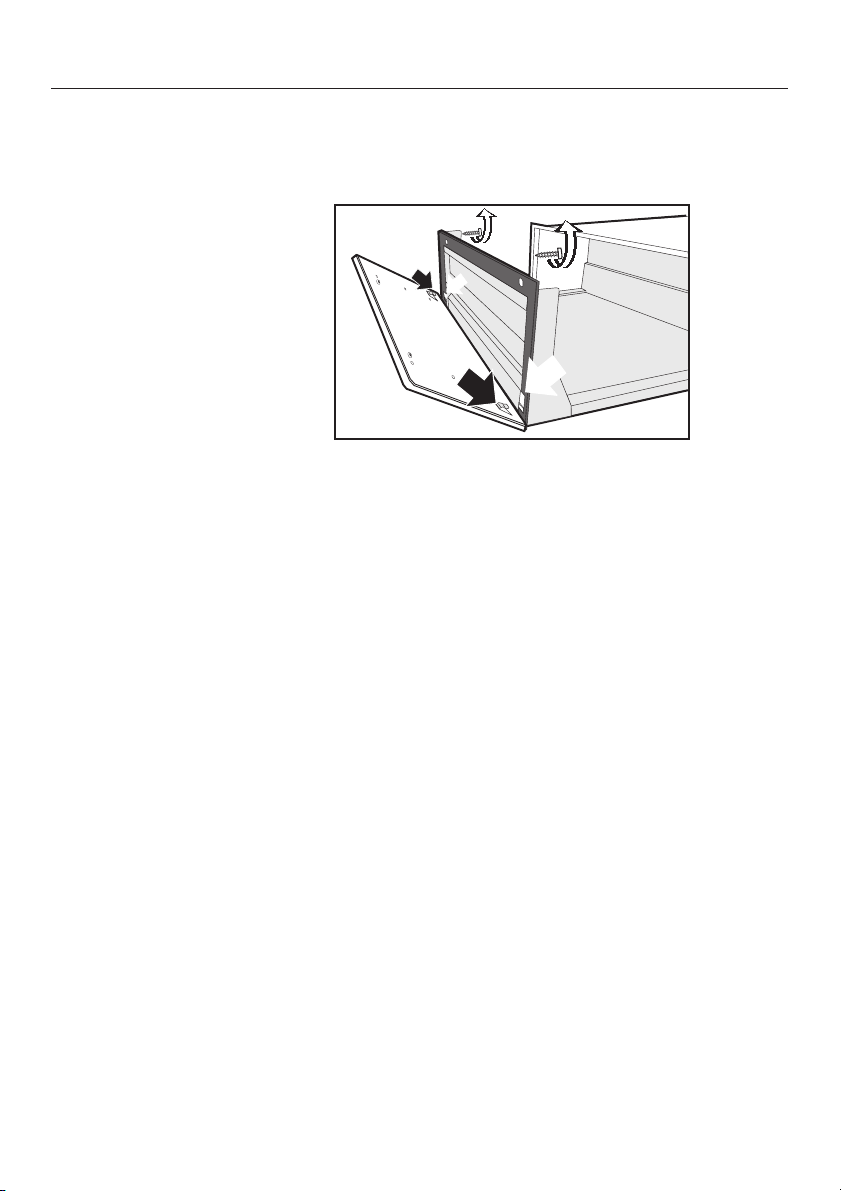
Loosen the two screws inside the drawer, and remove the
^
fixing panel from the front of the drawer.
36
^ Pre-drill the furniture front (see illustration).
C 10mm,D=10mm
^
Secure the fixing panel to the furniture front (see illustration)
Fixing the furniture front
Hang the fixing panel into the front of the drawer. Make
^
sure that the seal is in the correct position.
Secure with 2 screws from inside the drawer front.
^
Align the drawer front.
^
^ Tighten the screws on the inside of the drawer front.
^ Carefully replace the control panel, taking care not to
damage or pull on the cable.
^ Replace the 2 screws in the left and right side of the drawer
front.
37

Electrical connection
All electrical work should be carried out by a suitably
qualified and competent person, in strict accordance with
current local and national safety regulations (BS 7671 in
the UK).
Installation, repairs and other work by unqualified persons
could be dangerous. The manufacturer cannot be held
liable for unauthorised work.
Ensure power is not supplied to the appliance until after
installation work has been carried out.
The appliance must only be operated when built-in. This is
to ensure that all electrical parts are shielded. Live parts
must not be exposed.
Do not connect the appliance to the mains electricity
supply via an extension lead. These do not guarantee the
required safety of the appliance.
Please ensure that the connection data quoted on the data
plate match the household mains supply.
38
This appliance is supplied with a cable and moulded plug for
connection to a suitable switched socket which should be
easily accessible after installation.
It can, if necessary, be connected to a suitable isolator or a
double pole fused spur connection unit which complies with
national and local safety regulations by a suitably qualified
electrician.
If the switch is not accessible after installation (depending on
country) an additional means of disconnection must be
provided for all poles.
For extra safety it is advisable to install a suitable residual
current device.
When switched off there must be an all-pole contact gap of
3 mm in the isolator switch (including switch, fuses and
relays).

Important U.K.
This appliance is supplied for connection to a single phase
230-240 V 50 Hz supply with a 3-core cable.
The wires in the mains lead are coloured in accordance with
the following code:
Green/yellow = earth
Blue = neutral
Brown = live
WARNING: THIS APPLIANCE MUST BE
EARTHED
Non-rewireable plugs BS 1363
The fuse cover must be refitted when changing the fuse, and
if the fuse cover is lost, the plug must not be used until a
suitable replacement is obtained. The colour of the correct
replacement cover is that of the coloured insert in the base of
the plug, or the colour that is embossed in words on the base
of the plug (as applicable to the design of plug fitted).
Electrical connection
Important
Replacement fuses should be ASTA approved to BS 1362
and have the correct rating. Replacement fuses and fuse
covers may be purchased from your local electrical supplier.
The electrical safety of this appliance can only be guaranteed
when continuity is complete between the appliance and an
effective earthing system, which complies with local and
national regulations. It is most important that this basic safety
requirement is tested regularly and where there is any doubt
the household wiring should be inspected by a qualified
electrician. The manufacturer cannot be held liable for the
consequences of an inadequate earthing system such as
electric shock.
The manufacturer cannot be held liable for damage
caused by incorrect installation or connection.
39
After sales service, data plate
In the event of any faults which you cannot remedy yourself, or if the appliance is
under guarantee, please contact:
your Miele Dealer
–
or
the Miele Customer Contact Centre (see back cover for address).
–
Please note that telephone calls may be monitored and recorded to improve
our service.
When contacting Miele, please quote the model and serial number of your
appliance, which are given on the data plate.
N.B. A call-out charge will be applied for unnecessary service visits where the
problem could have been rectified as described in these instructions.
Space in which to stick the extra data plate supplied with the appliance. Ensure
that the model number is the same as the one on the front of these instructions.
404142


43

Alteration rights reserved/ 3109
M.-Nr. 07 462 960 / 02
 Loading...