

Page 1
Operating and Installation
Instructions
Built-in Warming Drawer
ESW 4700 / ESW 4710 / ESW 4720
ESW 4800 / ESW 4810 / ESW 4820
To prevent accidents
and machine damages,
read these instructions
before installation or use.
UV
M.-Nr. 06 543 320
Page 2

2
Page 3

Contents
IMPORTANT SAFETY INSTRUCTIONS. . . . . . . . . . . . . . . . . . . . . . . . . . . . . . . . . 4
Guide to the warming drawer . . . . . . . . . . . . . . . . . . . . . . . . . . . . . . . . . . . . . . . . 8
Guide to the controls. . . . . . . . . . . . . . . . . . . . . . . . . . . . . . . . . . . . . . . . . . . . . . . 9
Timer . . . . . . . . . . . . . . . . . . . . . . . . . . . . . . . . . . . . . . . . . . . . . . . . . . . . . . . . . . . . 9
Temperature selector. . . . . . . . . . . . . . . . . . . . . . . . . . . . . . . . . . . . . . . . . . . . . . . 10
Humidity control. . . . . . . . . . . . . . . . . . . . . . . . . . . . . . . . . . . . . . . . . . . . . . . . . . . 11
Temperature and Humidity Suggestions . . . . . . . . . . . . . . . . . . . . . . . . . . . . . . . . 12
Loading the warming drawer . . . . . . . . . . . . . . . . . . . . . . . . . . . . . . . . . . . . . . . 13
Tips . . . . . . . . . . . . . . . . . . . . . . . . . . . . . . . . . . . . . . . . . . . . . . . . . . . . . . . . . . . . 14
Using the warming drawer . . . . . . . . . . . . . . . . . . . . . . . . . . . . . . . . . . . . . . . . . 15
Keeping food warm . . . . . . . . . . . . . . . . . . . . . . . . . . . . . . . . . . . . . . . . . . . . . . . . 15
Warming dishes . . . . . . . . . . . . . . . . . . . . . . . . . . . . . . . . . . . . . . . . . . . . . . . . . . . 16
Warming drawer care. . . . . . . . . . . . . . . . . . . . . . . . . . . . . . . . . . . . . . . . . . . . . . 17
Appliance front and control panel . . . . . . . . . . . . . . . . . . . . . . . . . . . . . . . . . . . . . 17
Glass . . . . . . . . . . . . . . . . . . . . . . . . . . . . . . . . . . . . . . . . . . . . . . . . . . . . . . . . . . . 17
Stainless steel . . . . . . . . . . . . . . . . . . . . . . . . . . . . . . . . . . . . . . . . . . . . . . . . . . . . 17
Drawer . . . . . . . . . . . . . . . . . . . . . . . . . . . . . . . . . . . . . . . . . . . . . . . . . . . . . . . . . . 18
Non-slip mat. . . . . . . . . . . . . . . . . . . . . . . . . . . . . . . . . . . . . . . . . . . . . . . . . . . . . . 18
Rack. . . . . . . . . . . . . . . . . . . . . . . . . . . . . . . . . . . . . . . . . . . . . . . . . . . . . . . . . . . . 18
Frequently asked questions . . . . . . . . . . . . . . . . . . . . . . . . . . . . . . . . . . . . . . . . 19
Technical Service. . . . . . . . . . . . . . . . . . . . . . . . . . . . . . . . . . . . . . . . . . . . . . . . . 21
Installation instructions . . . . . . . . . . . . . . . . . . . . . . . . . . . . . . . . . . . . . . . . . . . 23
Help protect our environment. . . . . . . . . . . . . . . . . . . . . . . . . . . . . . . . . . . . . . . 24
Disposal of the packing materials . . . . . . . . . . . . . . . . . . . . . . . . . . . . . . . . . . . . . 24
Disposal of an old appliance . . . . . . . . . . . . . . . . . . . . . . . . . . . . . . . . . . . . . . . . . 24
Electrical connection. . . . . . . . . . . . . . . . . . . . . . . . . . . . . . . . . . . . . . . . . . . . . . 25
Installation . . . . . . . . . . . . . . . . . . . . . . . . . . . . . . . . . . . . . . . . . . . . . . . . . . . . . . 26
Installing the warming drawer . . . . . . . . . . . . . . . . . . . . . . . . . . . . . . . . . . . . . . . . 31
Removing the drawer . . . . . . . . . . . . . . . . . . . . . . . . . . . . . . . . . . . . . . . . . . . . 31
Inserting the drawer . . . . . . . . . . . . . . . . . . . . . . . . . . . . . . . . . . . . . . . . . . . . . 31
Integrated installations Models 4700 FB and 4800 FB . . . . . . . . . . . . . . . . . . . . . 32
3
Page 4

IMPORTANT SAFETY INSTRUCTIONS
Technical safety
WARNING- When using the warming
drawer follow basic precautions,
including the following:
Read all instructions before instal
lation or use of the warming drawer
to prevent injury and machine
damage.
This appliance is only intended for
domestic use to hold cooked food at
serving temperature. Any other use
is at the operator’s own risk and
could be dangerous.
This appliance conforms to all
uniform safety codes and regulations. The manufacturer cannot be
held responsible for damage or
injury caused by improper use of
this appliance.
Keep these operating instructions in
a safe place and pass them on to
any future user.
SAVE THESE INSTRUCTIONS!
-
Before installation make sure that
the voltage and frequency listed on
the data plate correspond with the
household electrical supply. This data
must correspond to prevent injury and
machine damage. Consult a qualified
electrician if in doubt.
To guarantee the electrical safety
of this appliance, continuity must
exist between the appliance and an
effective grounding system. It is
imperative that this basic safety
requirement be met. If there is any
doubt, have the electrical system of the
house checked by a qualified
electrician.
The manufacturer cannot be held
responsible for damages caused by the
lack, or inadequacy, of an effective
grounding system.
Installation, repair and mainten-
ance work should be performed by
a Miele authorized service technician.
Work by unqualified persons could be
dangerous and may void the warranty.
Before installation or service,
disconnect the power supply to the
work area by removing the fuse,
"tripping" the circuit breaker, or
unplugging the unit.
4
Page 5

IMPORTANT SAFETY INSTRUCTIONS
This appliance must only be used
after it has been installed in cabin
etry to ensure all electrical components
are shielded.
Never open the outer casing of the
appliance.
Tampering with electrical connections
or components and mechanical parts is
dangerous and can cause machine
damage.
Do not operate any appliance with
a damaged cord or plug, after the
appliance malfunctions or has been
damaged in any manner. Return the
appliance to the nearest authorized
service facility for service.
Do not connect the appliance to
the electrical supply with an
extension cord. Extension cords do not
guarantee the required safety of the
appliance, e.g danger of overheating.
This equipment has not been
designed for maritime use or for
use in mobile installations such as
aircraft or recreational vehicles.
However, under certain circumstances
it may be possible for installation in
these applications. Please contact the
nearest Miele Dealer or the Miele
Technical Service Department with
specific requirements.
Use
To prevent burns do not touch hot
surfaces, use handles or knobs.
Use only dry, heat resistant pot
holders. Moist or damp pot holders
used on hot surfaces may result in
steam burns. Do not substitute towels
or other bulky items for pot holders.
Do not touch or let flammable
materials, e.g. clothing, come in
contact with the top mounted heating
element or other interior surfaces of the
warming drawer until they have had
sufficient time to cool. Heating elements
may be hot even though they are not
glowing.
Keep children away from the appliance and its controls. Supervise
its use by the elderly or infirm. The
appliance can get very hot during use.
Danger of burns!
Do not store anything in the
warming drawer. Forgotten items
could melt or catch fire when the
appliance is turned on. Flammable
liquids and materials should never be
stored in or above the warming drawer.
Food warmed for a long period will
dry out and could ignite. Make sure
food is not forgotten in the warming
drawer.
5
Page 6

IMPORTANT SAFETY INSTRUCTIONS
Do not replace the non-slip mat of
the warming drawer with any other
type of mat.
It is possible that some bacterial
growth may occur in foods kept for
lengthy periods of time at low
temperature levels.
Before serving, be sure food is at a
safe temperature.
This is particularly important when
preparing food for babies and children.
Never warm undiluted alcohol in
the warming drawer, this can easily
ignite.
Exercise caution when warming
food with a high sugar content. If
heated for too long the sugar may
caramelize or ignite.
Only use heat resistant
dishes.
Do not place food in unopened
containers in the warming drawer.
Pressure may build up and cause them
to explode.
Do not use plastic containers or
plastic wrap in the warming
drawer. These items may melt and
cause damage to the warming drawer
or injury.
Close the drawer after removing
food. An opened drawer can be a
trip or burn hazard.
Always open the drawer carefully.
Allow hot air or steam to escape
before placing or removing food.
Do not lean or sit on the drawer.
This will damage the drawer which
can only hold a maximum of 33 lbs
(15 kg).
Use a food thermometer to check
the temperature of food.
Only use the warming drawer with
the non-slip mat in place to prevent
injuries and machine damage.
To prevent injuries, do not use
accessories not recommended by
Miele.
Before cleaning the appliance, trip
the circuit breaker and allow the
appliance to cool.
Do not use a steam cleaner to
clean the drawer. Steam could
penetrate electrical components and
cause a short circuit.
6
Page 7

IMPORTANT SAFETY INSTRUCTIONS
General notes
Children should not be left alone or
unattended in an area where an
appliance is in use. They should never
be allowed to sit or stand on any part of
the appliance.
Caution: Do not store items of interest
to children in cabinets above or in the
warming drawer. Children climbing on
the appliance to reach these items
could be seriously injured.
Be aware of loose-fitting or
hanging garments while using the
warming drawer. They may present a
fire hazard.
Do not leave the warming drawer
unattended while in use.
Do not use water on grease fires!
A violent steam explosion may
result. Smother the fire with a dry
chemical or foam fire extinguisher.
Never add water to food in a hot
drawer. The steam created could
cause serious burns or scalds.
Do not use the warming drawer to
heat the room. Due to the high
temperatures radiated, objects left near
the appliance could be damaged.
When using kitchen appliances
near the warming drawer, make
certain that the power cords do not
come in contact with or get caught in
the drawer.
Do not install
outdoors.
7
Page 8
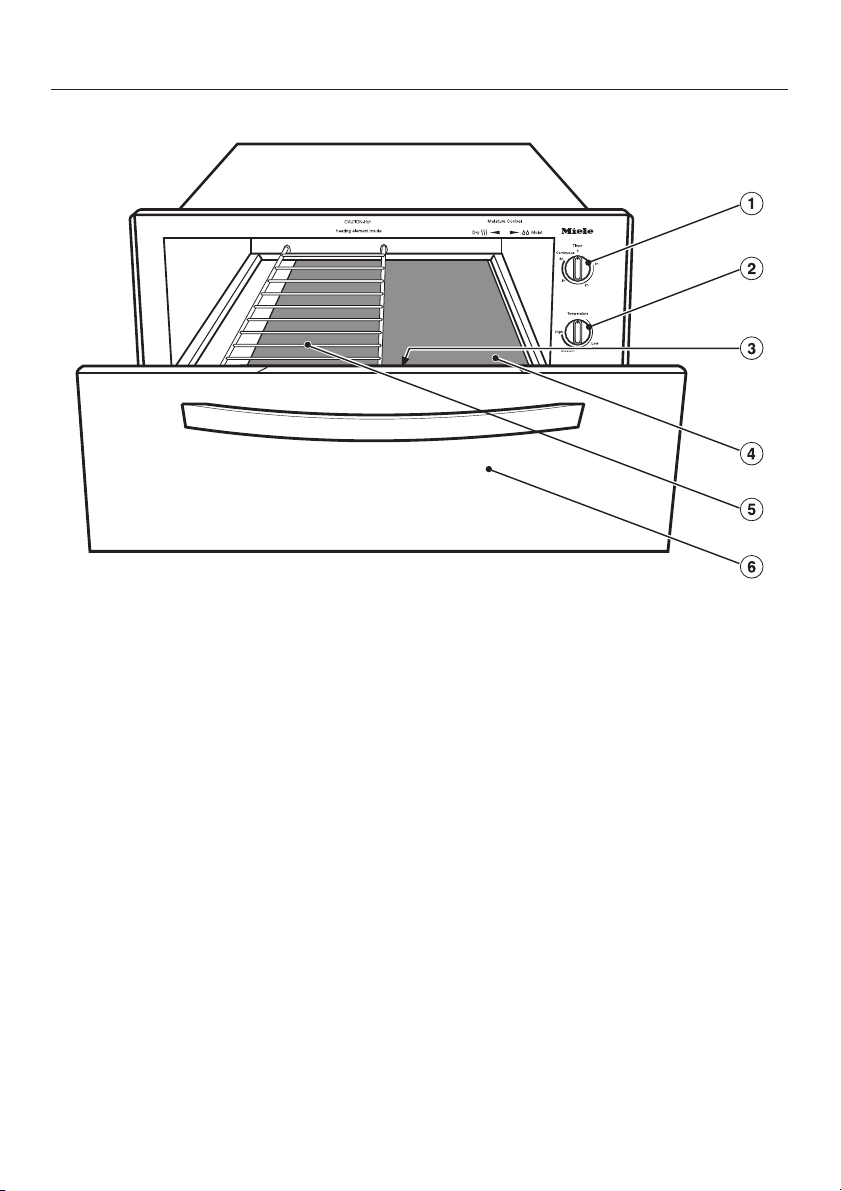
Guide to the warming drawer
a Timer
b Temperature selector
c Humidity control
d Non-slip mat
e Rack
f Drawer
8
Page 9
The warming drawer is operated by the
timer, the temperature selector, and the
humidity control.
The controls are only visible when the
drawer is open.
Once the warming drawer begins to
heat the circulation fan will turn on to
evenly heat the drawer. When the
selected temperature is reached, the
heat and the fan will shut off to prevent
food from drying out.
If the temperature drops below the
selected temperature, the heat will turn
back on.
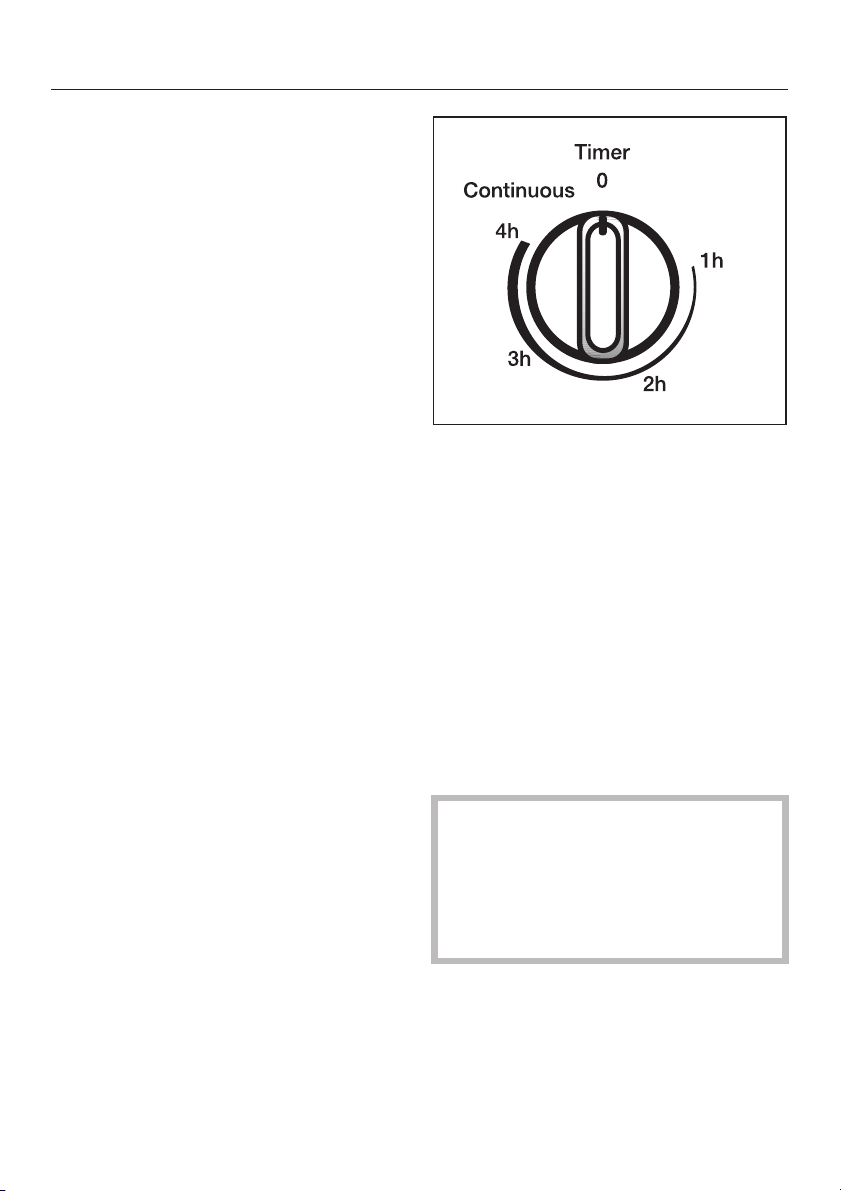
Timer
The timer activates the heating
elements and circulation fan. To warm
food the timer must be turned to an
appropriate time setting. A time setting
of 1 - 4 hours or "Continuous" can be
selected.
Guide to the controls
To set a limited time:
–
Turn the timer clockwise from "0" to
the desired time (up to 4 hours.)
– To set an unlimited time:
Turn the timer counterclockwise from
"0" to "Continuous". The knob can
not be turned past "4 h" to
"Continuous".
– The warming drawer is turned off at
the "0" setting.
–
The "Continuous" setting will warm
the drawer until the knob is turned to
"0".
Please note, the "Continuous" setting
requires close supervision to prevent
fires. Forgotten food will dry out and
could ignite.
The appliance starts to heat once a
duration is set.
9
Page 10
Guide to the controls
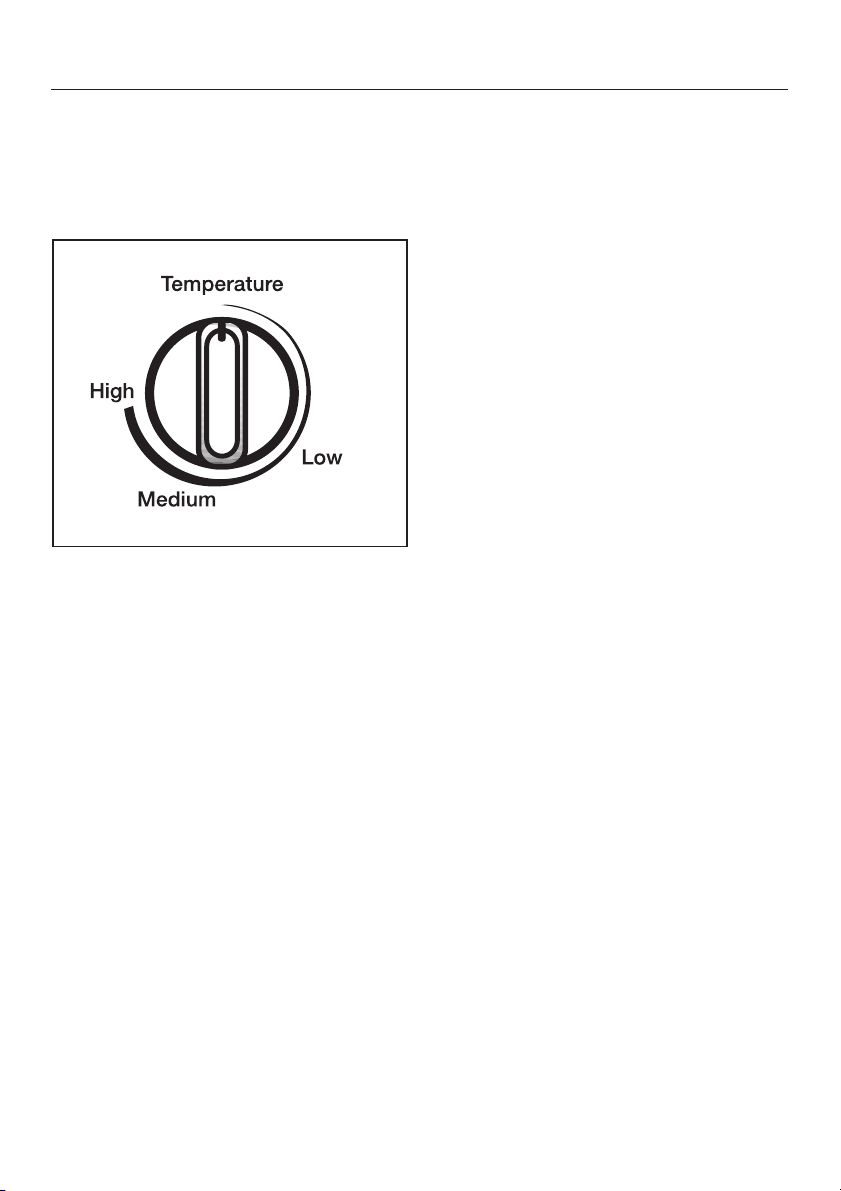
Temperature selector
The temperature is infinitely variable
between the basic setting (see
illustration) and the "High" setting.
The temperature settings:
– Basic setting: 97°F (36 °C)
– Low: 140 °F (60 °C)
– Medium: 176 °F (80 °C)
–
High: 203 °F (95 °C)
10
Page 11
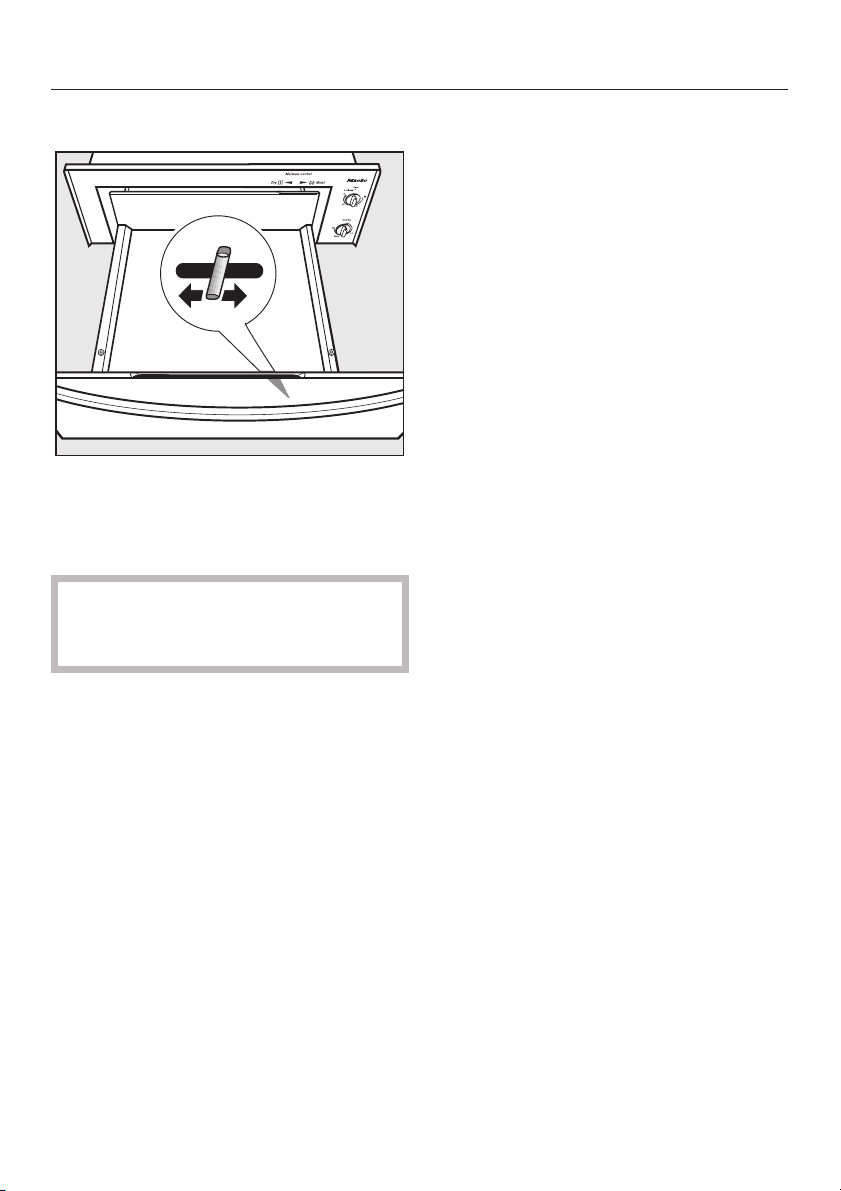
Guide to the controls
Humidity control
The humidity control adjusts the
humidity within the drawer. The humidity
control can be set anywhere between
"Moist" and "Dry".
Use oven mitts when adjusting the
humidity control. The control may
become hot during use.
"Moist": This position closes the
–
vents and seals the moisture in the
drawer to keep food moist and soft.
Condensation may occur around the
inside edge of the drawer.
"Dry": This position opens the vents
–
for maximum airflow to keep food
crisp.
This setting is ideal for keeping both
dry and liquid foods warm, e.g. soup
and bread. Cover liquids to prevent
evaporation. In this setting moisture
may collect on surfaces above the
warming drawer.
– "Center": This position is between
"Moist" and "Dry" and partially opens
the vents to keep food warm and
slightly moist, e.g. pizza.
11
Page 12

Guide to the controls
Temperature and Humidity Suggestions
Food Temperature Humidity control Covered1/ Uncovered
2
Bacon
Beef Medium / Well Medium Moist Covered
Beef Rare Low Moist Covered
Bread hard roles Medium Dry Uncovered
Bread soft rolls Medium Moist Covered
Bread proofing Basic setting Moist Damp Towel
Casserole, crisp top
Casserole, moist High Moist Covered
Eggs Medium Moist Covered
Fish / Seafood Medium Moist Covered
Fish sticks
Fried foods
Fruit Medium Moist Covered
Gravy, cream sauces Medium Moist Covered
Ham Medium Moist Covered
Lamb Medium Moist Covered
Oatmeal Medium Moist Uncovered
Pancakes High Moist Covered
Pies - Single Crust Medium Moist Uncovered
Pies - Double Crust Medium Dry Uncovered
Pizza High Center Covered
Pork Medium Moist Covered
Potatoes - baked High Center Damp towel
Potatoes - mashed Medium Moist Covered
Poultry High Moist Uncovered
Rice Medium Moist Covered
Serving dishes Low Moist Uncovered
Vegetables High Moist Covered
2
2
2
Medium Dry Uncovered
Medium Center Uncovered
High Dry Uncovered
High Center Uncovered
1
Cover the food with aluminum foil or a lid.
2
Do not cover crispy foods.
12
Page 13

Loading the warming drawer
The drawer load will depend on the
type and size of your dishes.
The maximum load is 33 lbs (15 kg).
Do not rest heavy items on the
drawer.
Use the supplied rack to increase the
load space.
The rack can be inserted in three
positions: middle, left or right.
^ Insert the rack into the slots of the
rear wall in the drawer and then slide
the front of the rack into position.
Additional racks are available for
purchase from Miele.
13
Page 14

Loading the warming drawer
Tips
To keep different foods hot, set the
–
temperature for the food requiring
the highest temperature setting.
Place the food needing the highest
setting on the rack and the other
food on the floor of the drawer.
For large quantities of food, it may be
–
necessary to use a higher temp
erature and humidity level.
When warming food and dishes at
–
the same time, place the dishes on
the floor of the drawer and the food
on the rack.
– Food in heat resistant glass and
ceramic containers may require
higher temperatures than food in
metal dishes.
– Allow extra time for the temperature
to adjust after adding or checking on
food or dishes.
-
Please note: Be careful not to place
food too close to the upper heating
element. Increased temperature and
proximity may cause a fire!
– Do not block the vents on the inside
of the drawer. This will prevent food
and dishes from warming evenly.
14
Page 15

Using the warming drawer
Keeping food warm
For best results, preheat the warming
drawer before warming food.
Open the drawer.
^
Turn the timer to the desired time
^
setting.
Turn the temperature selector to the
^
desired temperature setting.
Slide the humidity control to the
^
desired humidity level. Use the
"Moist" setting when preheating.
Close the drawer.
^
Preheating times:
– "Low": 6 minutes
– "Medium": 10 minutes
– "High": 14 minutes
^ Once the preheating time has
elapsed, place the hot food in the
warming drawer.
If necessary adjust the settings.
^
Close the drawer.
^
Keep the drawer closed while in use to
prevent food from drying out. Remem
ber, food may continue to cook while
being warmed in the drawer.
The warming drawer can be turned
^
off at any time by turning the timer to
the "0" setting.
When warming is complete keep the
drawer open for a few minutes to
allow the humidity to evaporate.
-
Never place food directly on the
non-slip mat or the racks. Always
warm food on a dish.
Do not add water to food or place a
container with water in the warming
drawer. Additional water will make
food soggy and may cause machine
damage.
Take care when opening and closing
the loaded drawer to prevent spills.
15
Page 16

Using the warming drawer
Warming dishes
The warming drawer can also be used
to warm dishes. Do not preheat the
drawer before warming dishes.
Only use heat resistant dishes.
Open the drawer.
^
Place the dishes in the drawer.
^
Arrange dishes evenly in the drawer
and on the rack. Limit stacks to 2 plates
for better warming.
Turn the timer to 30 minutes (halfway
^
to "1 h").
^ Turn the temperature selector to:
- "Low" if dishes are on the rack or
are light weight.
- "High" if dishes are on the floor
of the drawer or are heavy or
thick.
^ Slide the humidity control to "Moist".
Food and dishes can also be warmed
simultaneously.
Keep in mind that the temperature
setting to keep food warm may be
higher than the temperature required to
warm dishes.
When warming food and dishes at the
same time, place the dishes on the floor
of the drawer and the food on the rack.
^ Close the drawer.
^
After 30 minutes the drawer will shut
off.
Caution, dishes may be hot!
^
Carefully remove dishes using oven
mitts.
16
Page 17

, CAUTION: Before servicing,
disconnect the power supply by
either removing the fuse, shutting off
the power main or manually
"tripping" the circuit breaker.
Do not clean or remove the warming
drawer until it has cooled.
Danger of burns!
Warming drawer care
Appliance front and control
panel
All external surfaces and controls can
^
be cleaned with warm water and
liquid dish soap applied with a
sponge.
Wipe dry using a soft cloth.
^
Glass
Glass surfaces can be cleaned with a
glass cleaner.
Stainless steel
Stainless steel surfaces can be cleaned
using a non-abrasive stainless steel
cleaner.
Avoid the following on all surfaces:
- abrasive cleaning agents,
e.g. powder or cream cleansers,
- abrasive sponges,
e.g. pot scourers or sponges that
were used with abrasive cleaning
agents, and
- oven sprays.
17
Page 18

Warming drawer care
Drawer
The drawer can be removed for easier
cleaning.
Removing the drawer
^ Pull the drawer completely out and
loosen the nuts.
^ Carefully lift the drawer and pull it
slowly out.
Set the drawer down on a flat, stable
surface.
Non-slip mat
Clean the non-slip mat by hand with
^
warm water and liquid dish soap.
Only put the non-slip mat back in the
drawer when it is completely dry.
Rack
Clean the rack with warm water and
^
liquid dish soap or a non-abrasive
stainless steel cleaner.
Be careful when removing the heavy
drawer.
^
Remove the non-slip mat.
^
Clean all surfaces of the drawer and
the non-slip mat with a solution of
warm water and liquid dish soap.
^
Wipe dry with a soft cloth.
^
Replace the drawer in reverse order.
18
Page 19

Frequently asked questions
,Repairs should only be carried out by a qualified and trained person in
accordance with local and national safety regulations. Unauthorized repairs
could cause an injury or machine damage. Some minor problems can be fixed
without a service call.
What if the drawer does not heat?
Possible fault Fix
There is no power to the warming
drawer.
The circuit breaker has tripped. Reset the circuit breaker.
The timer is set to "0" or a temperature
was not selected.
What if the food is not warm enough?
Adjust the temperature setting. Check that the vents have not been blocked by
large plates or dishes.
What if the food or dishes are too hot?
Check the temperature setting and make sure the food is not too close to the
heating element.
What if the food is extremely dry or moist?
Adjust the humidity control setting.
What if the dishes are not warm enough?
Possible fault Fix
The wrong temperature was selected. Check the temperature setting.
The vents were blocked by dishes. Reload the dishes.
The dishes need more time to warm. Increase the timer setting.
Insert the plug into the outlet.
Turn the timer to a time and/or
temperature setting.
Why is a noise is heard during use?
This is not a fault. This is the circulation fan which distributes the heated air. The
fan should shut off automatically after 30 minutes of use.
19
Page 20

Frequently asked questions
What if the drawer cannot be closed properly?
– Check that the drawer is correctly installed on the runners.
– Check if the hooks on the underside of the drawer, on the left and right sides,
are in the correct position. If a hook has slipped off the track, push it towards the
rear of the drawer and up until it clicks into place.
20
Page 21

Technical Service
In the event of a fault which you cannot
easily fix yourself, please contact the
Miele Technical Service Department at
the address on the back of this booklet.
When contacting Technical Service
please quote the serial number and
model of the warming drawer.
Adhere data plate sticker below.
MieleCare
(only USA)
MieleCare, our Extended Service
Contract program, gives you the
assurance of knowing that your
appliance investment is covered by
5 years of worry free ownership.
MieleCare is the only Extended Service
Contract in the industry that guarantees
repairs by a Miele Authorized Service
Provider using genuine Miele parts.
Only genuine Miele parts installed by
factory trained professionals can
guarantee the safety, reliability, and
longevity of your Miele appliance.
Please note that unless expressly
approved in writing by Miele’s Service
department, Extended Service
Contracts offered by other providers for
Miele products will not be recognized
by Miele. Our goal is to prevent
unauthorized (and untrained) service
personnel from working on your Miele
products, possibly doing further
damage to them, you and/or your
home.
To learn more about MieleCare
Extended Service Contracts, please
contact your appliance dealer or visit
us online at:
www.store.miele.com
21
Page 22

22
Page 23

Installation Instructions
Page 24

Help protect our environment
Disposal of the packing
materials
The cardboard box and packing
materials protect the appliance during
shipping. They have been designed to
be biodegradable and recyclable.
Ensure that any plastic wrappings,
bags, etc. are disposed of safely and
kept out of the reach of children.
Danger of suffocation!
Disposal of an old appliance
Old appliances may contain materials
that can be recycled. Please contact
your local recycling authority about the
possibility of recycling these materials.
Ensure that the appliance presents no
danger to children while being stored
for disposal. Before discarding an old
appliance, unplug it from the outlet and
cut off its power cord. Remove any
doors to prevent trapping hazards.
24
Page 25

CAUTION: Before servicing,
,
disconnect the power supply by
either removing the fuse, shutting off
the power main or manually
"tripping" the circuit breaker.
Electrical connection
Power supply
This appliance is equipped with a 5 ft
(1.5 m) long power cord with a
three-prong grounding plug ready for
connection to a 120 V, 15 A, 60 Hz
power supply.
Installation work and repairs should
only be performed by a qualified
technician in accordance with all
applicable codes and standards.
Repairs and service by unqualified
persons could be dangerous and
the manufacturer will not be held
responsible.
Before connecting the appliance to
the power supply, make sure that the
voltage and frequency listed on the
data plate correspond with the
household electrical supply. This
data must correspond to prevent
machine damage. Consult an
electrician if in doubt.
Only operate the warming drawer
after it has been installed into the
countertop.
Installer:
Please leave these instructions with
the consumer.
Further installation details are on the
wiring diagram.
25
Page 26

Installation
Installation tips
The warming drawer should be
–
placed at a convenient height for
easy access.
Steam from the vents can damage
the cabinetry surrounding the
warming drawer.
The drawer should be installed clear
–
of drafts caused by open doors and
windows.
Proper clearance must be allowed
–
for the warming drawer to open with
out interference.
The warming drawer must be
–
secured to cabinetry to prevent the
drawer from tipping when loaded.
– The warming drawer should be level
to prevent the drawer from sliding
open or closing on its own.
The drawer cannot be leveled after it
has been installed.
If necessary install a shelf within the
cabinetry to support the drawer.
Solo Installation:
A minimum gap of 2" (5 cm) must be
present between the upper edge of
the warming drawer and the
cabinetry.
Installation in combination with an
oven:
A minimum gap of 1" (2.5 cm) must
be present between the upper edge
of the warming drawer and the oven.
This gap should be sealed with a
moisture resistant sealing material.
26
Page 27

Dimensions for Solo Installation
ESW 47x0
Installation
a Material must be moisture resistant
27
Page 28

Installation
ESW 48x0
a
24"
(610)
1/2"
28
26"-
3/4"
9
(660-724)
(248)
22
(582)
15/16"
25
(26)
15/16"
(659)
1"
29
(757)
13/16"
11"
(280)
2"
(51)
1/8"
(257)
10
a Material must be moisture resistant
28
Page 29

Dimensions for a combination installation with an oven
ESW 47x0
Installation
1"
a
(25)
7/16"
23
11"
(596)
11/16"
(280)
3/16"
(18)
(5)
1/8"
3/8"
(2,8)
(10)
13/16"
22
1/8"
10
(580)
11/16"
1
(257)
a Material must be moisture resistant
(43)
29
Page 30

Installation
ESW 48x0
30
a Material must be moisture resistant
Page 31

Installation
Installing the warming drawer
Remove the drawer from the casing
^
before installing the appliance into
the cabinetry.
Removing the drawer
^ Pull the drawer completely out and
loosen the nuts.
^ Carefully lift the drawer and pull it
slowly out.
Set the drawer down on a flat, stable
surface.
Push the casing in the cabinetry.
^
^ Secure the casing in the cabinetry
with the six screws.
Inserting the drawer
^ Pull out the telescopic skis from the
casing.
^ Set the drawer on the telescopic skis
and secure with the two nuts.
31
Page 32

Installation
Integrated installations
Models 4700 FB and 4800 FB
Custom made front panels can be
installed with models 4700 FB and
4800 FB.
Panel dimensions
4700 FB
Width 27
Height 11" (279 mm)
4800 FB
Width 29
Height 11" (279 mm)
The custom panel must be atleast
(10 mm) thick and made of heat resistant material140 °F (60 °C).
3
/8" (695 mm)
13
/16" (757mm)
3
/8"
a Install a handle to the custom front
panel using counter sunk screws.
b Remove the drawer from the casing.
See "Removing the drawer".
The panel attached to the warming
drawer front can be used as the drilling
template for the custom panel.
c Loosen the two screws on the inner
side of the drawer and remove the
panel from the appliance front.
32
d Place the panel on a firm surface
with the adhesive tape facing up.
Peel the backing from the adhesive
tape.
e Position the custom panel over the
removed panel using the tape to hold
it in place.
Page 33

Installation
f Press the custom panel tightly onto
the removed panel.
g Screw the removed panel to the
custom panel with the eight screws.
h Hook the panels into the bottom on
and secure at the top with two
screws making sure the seal is
seated correctly.
333435
Page 34

Page 35

Page 36

Alteration rights reserved / 3206
M.-Nr. 06 543 320 / 06
en-US
 Loading...