

Miele WW 656, DWW 650, DWW 756, DWW 750, DWW 956 Operating And Installation Manual
...
Operating and Installation Instructions
..............................................................................................................................
Cooker Hoods
DWW 656 (EX) DWW 650 (EX)
DWW 756 (EX) DWW 750 (EX)
DWW 956 (EX) DWW 950 (EX)
DWW 1256 (EX) DWW 1250 (EX)
Q

Contents
Caring for the environment . . . . . . . . . . . . . . . . . . . . . . . . . . . . . . . . . . . . . . . . . . 3
Warning and Safety instructions . . . . . . . . . . . . . . . . . . . . . . . . . . . . . . . . . . . . . 4
Guide to the appliance . . . . . . . . . . . . . . . . . . . . . . . . . . . . . . . . . . . . . . . . . . . . . 8
Description of the functions . . . . . . . . . . . . . . . . . . . . . . . . . . . . . . . . . . . . . . . . 10
Operation
Main switch . . . . . . . . . . . . . . . . . . . . . . . . . . . . . . . . . . . . . . . . . . . . . . . . . . . . . . 11
Switching on. . . . . . . . . . . . . . . . . . . . . . . . . . . . . . . . . . . . . . . . . . . . . . . . . . . . . . 11
Selecting the power level. . . . . . . . . . . . . . . . . . . . . . . . . . . . . . . . . . . . . . . . . . . . 11
Run-on option . . . . . . . . . . . . . . . . . . . . . . . . . . . . . . . . . . . . . . . . . . . . . . . . . . . . 12
Switching off. . . . . . . . . . . . . . . . . . . . . . . . . . . . . . . . . . . . . . . . . . . . . . . . . . . . . . 12
Switching the lighting on or off. . . . . . . . . . . . . . . . . . . . . . . . . . . . . . . . . . . . . . . . 12
Filter operating hours counter . . . . . . . . . . . . . . . . . . . . . . . . . . . . . . . . . . . . . . . . 13
Cleaning and care
Housing . . . . . . . . . . . . . . . . . . . . . . . . . . . . . . . . . . . . . . . . . . . . . . . . . . . . . . . . . 16
Grease filters . . . . . . . . . . . . . . . . . . . . . . . . . . . . . . . . . . . . . . . . . . . . . . . . . . . . . 16
Fitting / replacing the recirculation micro-filters. . . . . . . . . . . . . . . . . . . . . . . . . . . 17
Changing a halogen light bulb. . . . . . . . . . . . . . . . . . . . . . . . . . . . . . . . . . . . . . . . 18
After sales service . . . . . . . . . . . . . . . . . . . . . . . . . . . . . . . . . . . . . . . . . . . . . . . . 19
Appliance dimensions. . . . . . . . . . . . . . . . . . . . . . . . . . . . . . . . . . . . . . . . . . . . . 20
Installation
Retaining plates . . . . . . . . . . . . . . . . . . . . . . . . . . . . . . . . . . . . . . . . . . . . . . . . . . . 22
Vapour canopy. . . . . . . . . . . . . . . . . . . . . . . . . . . . . . . . . . . . . . . . . . . . . . . . . . . . 24
Motor unit . . . . . . . . . . . . . . . . . . . . . . . . . . . . . . . . . . . . . . . . . . . . . . . . . . . . . . . 25
Exhaust socket and control unit. . . . . . . . . . . . . . . . . . . . . . . . . . . . . . . . . . . . . . . 25
Air extraction connection. . . . . . . . . . . . . . . . . . . . . . . . . . . . . . . . . . . . . . . . . . . . 26
Recirculation connection . . . . . . . . . . . . . . . . . . . . . . . . . . . . . . . . . . . . . . . . . . . . 27
Extension piece . . . . . . . . . . . . . . . . . . . . . . . . . . . . . . . . . . . . . . . . . . . . . . . . . . . 27
Fitting the tower . . . . . . . . . . . . . . . . . . . . . . . . . . . . . . . . . . . . . . . . . . . . . . . . . . . 29
Installation - extraction. . . . . . . . . . . . . . . . . . . . . . . . . . . . . . . . . . . . . . . . . . . . 30
Connection for extraction. . . . . . . . . . . . . . . . . . . . . . . . . . . . . . . . . . . . . . . . . . . . 30
Condensate trap. . . . . . . . . . . . . . . . . . . . . . . . . . . . . . . . . . . . . . . . . . . . . . . . 31
Electrical connection. . . . . . . . . . . . . . . . . . . . . . . . . . . . . . . . . . . . . . . . . . . . . . 32
T echnical data. . . . . . . . . . . . . . . . . . . . . . . . . . . . . . . . . . . . . . . . . . . . . . . . . . . . 34
External fans. . . . . . . . . . . . . . . . . . . . . . . . . . . . . . . . . . . . . . . . . . . . . . . . . . . . . 35
Contents

Caring for the environment
Disposal of packing material
The transport and protective packaging has been selected from materials
which are environmentally friendly for
disposal and can normally be recycled.
Rather than just throwing these materials away, please ensure they are offered for recycling.
Disposal of your old appliance
Old appliances contain materials which
can be reclaimed or recycled. Please
contact your dealer, your waste collection centre or scrap merchant about
potential recycling schemes.
Ensure that the appliance presents no
danger to children while being stored
for disposal.
See the appropriate section in the
Warning and Safety instructions.
Caring for the environment
3
Warning and Safety instructions
This appliance co n forms to cur rent
safety requirements. Inappropriate
use could, however lead to risk of
accidents to the user and damage
to the appliance.
Before using this appliance for the
first time read the operating instructions carefully. They contain important information on safety, use and
maintenance of the appliance. Th is
way you will avoid the risk of accidents and damage to the appliance.
Keep these operating instructions in
a safe place and ensure that new
users are familiar with the content.
Pass them on to any future owner.
Appropriate use
The appliance is intended for do-
mestic use only.
The manufacturer cannot be held responsible for any damage caused by
improper use or by non-observance of
these instructions.
T echnical safety
Before connecting the cooker
hood to the mains supply make
sure that the voltage and frequency details given on the data plate correspond with the on-site electricity supply, otherwise the appliance could be
damaged. If in doubt consult a qualified electrician.
The electrical safety of this ap-
pliance can only be guaranteed
when continuity is complete between
the appliance and an effective earthing
system which complies with local and
national regulations. It is most important that this basic safety requirem e nt is
tested by a qualified electrician.
The manufacturer cannot be held responsible for the consequences of an
inadequate earthing system. (e.g. electric shock).
Installation work and repairs may
only be carried out by suitably
qualified and competent persons to ensure safety. Repairs and other work by
unqualified persons could be dangerous and the manufacturer will not
be held responsible.
Warning and Safety instructions
4

The appliance is only completely
isolated from the mains supply
when:
– it is switched of f at the fu se d spu r
connection, or
– it is switched of f at the wal l soc ke t
and the plug has been withdrawn
(do not pull on the cable, only on the
plug), or
– the mains fuse is withdrawn.
Ensure current is not supplied to the ap-
pliance while maintenance or repair
work is being carried out.
Do not connect the appliance to
the mains electricity supply by an
extension lead. Extension leads do not
guarantee the required safety of the appliance.(e.g. danger of overhe ating).
Use of the appliance
Do not let small children play with
the appliance or its controls. Supervise its use by the elderly or infirm.
When fitted above an open grill the
cooker hood must not be used in
recirculation mode.
Never use an open flame beneath
the cooker hood. To avoid the
danger of fire do not flambé or grill over
an open flame. When switched on the
cooker hood could draw flames into the
filters. Fat particles drawn into the
cooker hood present a fire hazard.
When using the cooker hood over
a gas hob ensure that any burners
in use are always covered by a pan.
Otherwise flames could be drawn up
by the suction of the cooker hood,
parts of which could then be damaged.
Always switch the cooker hood on
when a cooking zone is in use,
otherwise conden sa ti o n ma y collect in
the hood, which could ca us e corrosion.
When cooking with oil or fat, chip
pans and deep fat fry ers etc, do
not leave the pans unattended. Never
leave an open grill unattended when
grilling. Overheated oil and fat can ignite and could set the cooker hood on
fire.
Do not use the cooker hood with-
out the grease filter in place.
This way you will avoid the risk of
grease and dirt getting into the appliance and hindering its smooth operation.
Clean or change the filter regularly.
An over-greasy filter is a fire hazard.
Under no circumstances use a
steam cleaner to clean this appliance. Pressurised steam could reach
the electrical components and cause a
short circuit.
Warning and Safety instructions
5

Installation
The distance between the top of
the cooker/hob and the bottom of
the cooker hood must measure at least:
– 45 cm above electric cookers/hobs
– 65 cm above gas cookers/hobs.
– 65 cm above an open grill.
For other manufacturer’s cooking appliances maintain the safety distance
as recommended in their Installation
and Operating instructions.
If more than one appliance is fitted beneath the cooker hood and they have
different minimum safety distances to
the cooker hood, select the higher distance.
Safety regulations prohibit the fitting of a cooker hood over solid
fuel stoves.
All ducting, pipework and fittings
must be of non-flammable material. These can be obtained f rom the
Spare Parts department or from builders’ merchants.
The appliance must not be con-
nected to a chimney or vent flue
which is in use. Neither should it be
connected to ducting which ventilates
rooms with fireplaces.
If exhaust air is to be extracted into
a chimney or ventilation duct no
longer used for other purposes, take
professional advice.
When using the cooker hood at the
same time as another heating appliance which depends on the air in the
room, (e.g. gas, oil or coal fired
heaters, continuous flow or other water
heaters, gas cooker, gas hob or gas
oven) special care must be taken, as
the action of the cooker hood extracts
air from the room, which these types of
heater need for comb u sti o n .
In order to ensure safe operation, and
to prevent the gases given off by the
heating appliances from being drawn
back into the room when the extractor
and the heater are in operation simultaneously, an underpressure in the room
of 0.04 mbar (4 pa) is the maximu m
permissible.
Ventilation can be maintained by air inlets which cannot be blocked, in windows, doors and outside wall vents, or
by other technical measures, such as
ensuring that the extractor can only be
switched on when the heating appliance is switched off or vice-versa.
N.B.: The overall ventilation condition of
the dwelling must be taken into account.
If in any doubt, the advice of a competent builder or, for gas, a “Corgi” installer must be sought.
If the cooker hood is used in recirculation mode (with the recirculation MicroFil te r ) , there are no restrictions.
Warning and Safety instructions
6
In countries where there are areas
which may be subject to infest ation by cockroaches or other vermin,
pay particular attention to keeping the
appliance and its surroundings in a
clean condition at all times. Any damage which might be caused by cockroaches or other vermin will not be
covered by the appliance guarantee.
Appliances with external fans
For appliances with an external fan
motor fitted (EX models) the conn ection
of the two units must be made using
the connection cable and the plug co nnectors. Make sure the correct combination of the two appliances has been
selected.
Separate fitting instructions are supplied with the external fan.
Disposal of your old appliance
Before discarding an old ap-
pliance switch off and disconnect
it from the power supply. Cut off and
render any plug useless. Cut off the
cable directly behind the appliance to
prevent misuse. This should be done
by a competent person.
The manufacturer cannot be held responsible for any damage caused
by non-observance of thes e in str u c tions.
Warning and Safety instructions
7
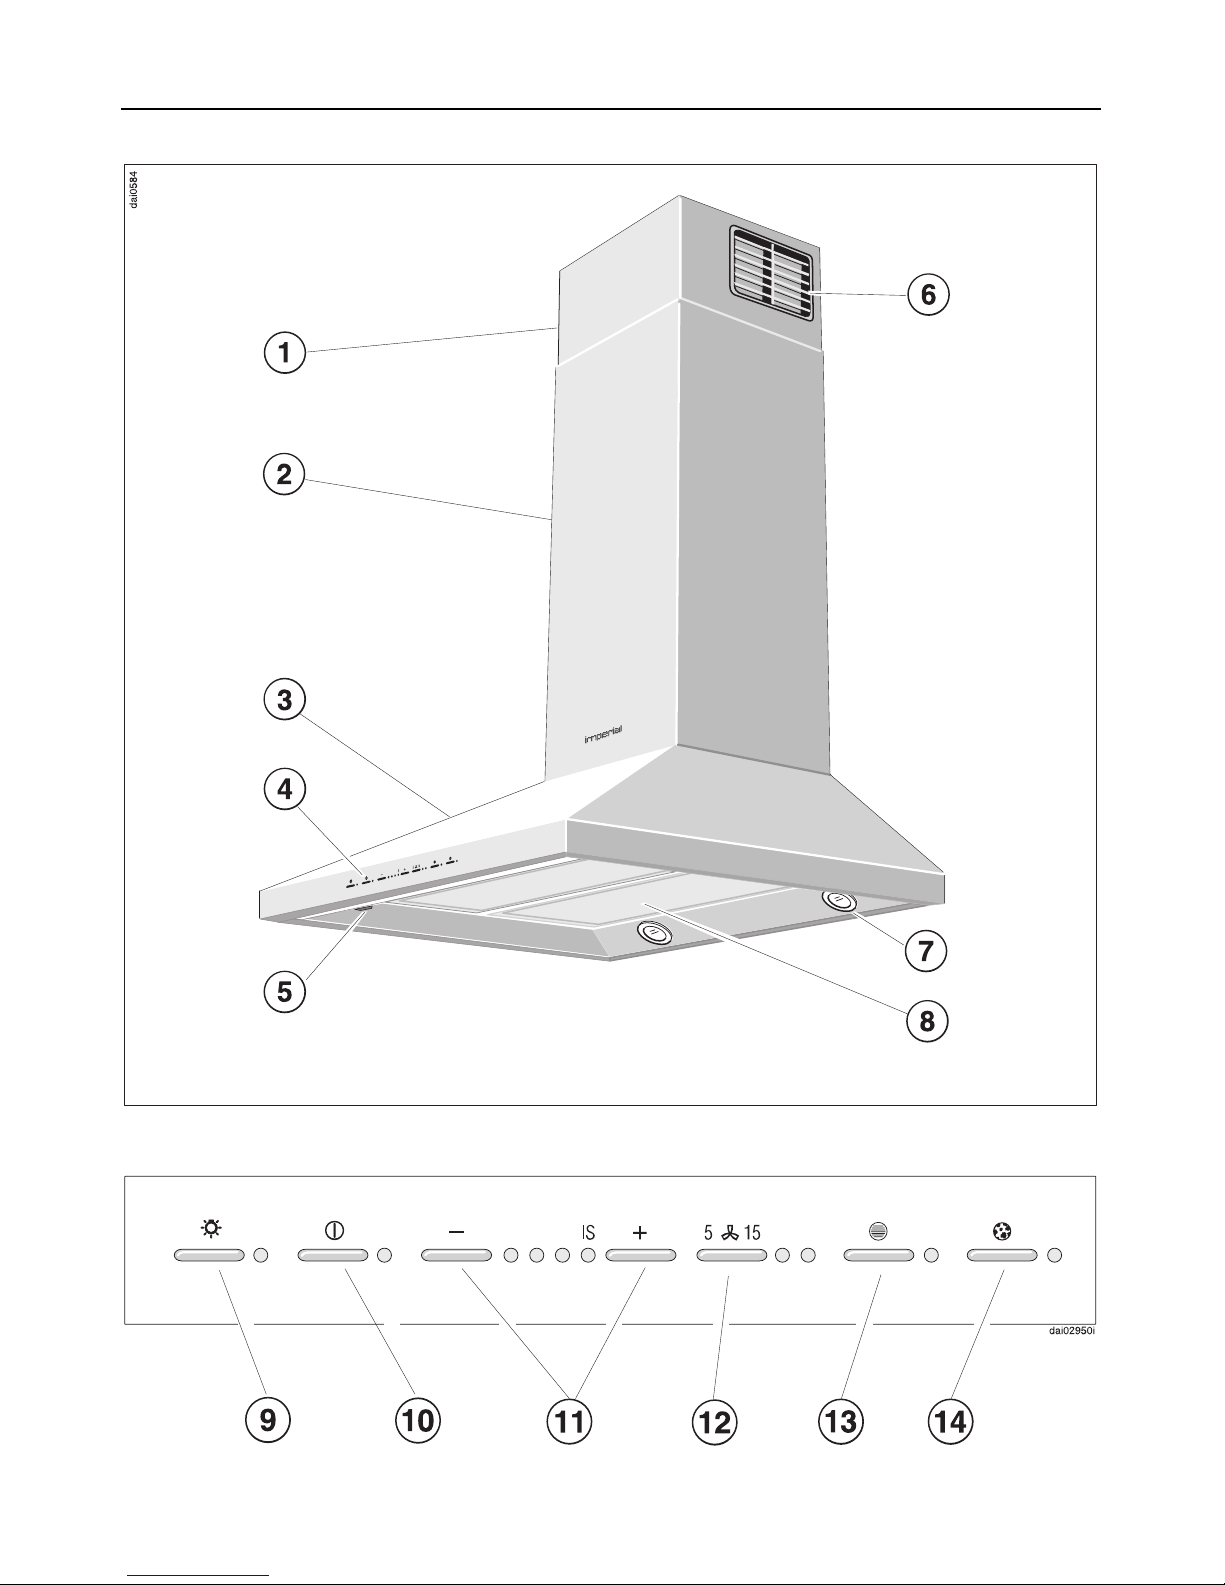
Guide to the appliance
Guide to the appliance
8

b
T elescopic
extension piece
c T ower
d Vapour canopy
e Control panel
f Main switch
If the cooker hood is not to be used for
a longer period of time (e.g. over night
or during holidays), switch it off using
the main switch.
g Recirculation grille / vent
h Halogen lighting
i Grease filter
j
Lighting touch control
k On/Off touch control f or
the fan
l Power level touch contr ols
You can select one of three power levels or an intensive level, depending on
how much the air needs to be filtered.
m T ouch control for the
run-on option
This control activates the run-on option.
The fan is switched off automatically
after either 5 or 15 minutes.
n Touch control for the
grease filter
The indicator lamp next to the grease filter touch control lights up when the
grease filter needs to be cleaned.
The touch control is used
– to show how long the grease filter
has been in use (see section on
"Operation / Filter operating hours
counter").
– together with the run-on option touch
control to al te r th e nu mber of hours
counted by the filter operating hours
counter (see section "Operation / Altering the filter operating h ours
counter").
o Micro-filter touch control
The indicator lamp next to the micro-filter touch control lights up when the
micro-filter used in recirculation mode
needs to be replaced.
The touch control is used
– to show how long the micro-filter has
been in use (see section on "Operation / Filter operating hours counter")
– together with the run-on option touch
control to al te r th e nu mber of hours
counted by the filter operating hours
counter (see section "Operation / Altering the filter operating h ours
counter").
Guide to the appliance
9
Description of the funct ions
The cooker hood works
. . . by air extraction:
The air is drawn in, cleaned by th e
grease filters and directed outside.
The cooker hood is fitted with a
non-return flap, (see "Installation").
This flap is closed when the cooker
hood is switched off. No exchange of
room air and outside air can take
place. When the cooker hood is
switched on the non-return flap opens
for the cooking smells to be blown directly outside.
. . . by air recirculaton:
The air is drawn in and cleaned first by
the grease filters. In addition it is then
cleaned by the Recirculation Micro-
Filters. The cleaned air is then recirculated back into the kitchen through a
vent in the top of the cooker hood.
Before using the cooker hood for
the first time in recirculation mode,
ensure that the recirculation microfilters are in place. See Section on
"Cleaning and care".
. . . with an external fan
The EX models are designed to be connected to an external fan located outside the room.
The external fan is connected to the
cooker hood by a control cable and is
operated by the control panel on the
cooker hood.
Description of the functions
10

Operation
Main switch
When the main switch is set to “I” the
cooker hood is ready for operation.
When the cooker hood is switched off
using the main switch, it will retain the
most recent setting when next switched
on.
Switching on
– Press the On/Off touch contr o l.
The indicator lamp for this touch control
lights up and at the same time the
motor switches on. The motor runs at
power level “lI”.
Selecting the power level
Depending on how much the air needs
to be filtered, there are four power levels available. For normal cooking a
low to medium level is usually sufficient. For frying or cooking food with a
strong aroma the highest level marked
IS (Intensive Setting) is recommended.
– Use the – /+ controls to select the
power level required.
Touch control + = higher setting
Touch control – = lower setting
The indicator lamps show which power
level has been chosen.
Operation
11
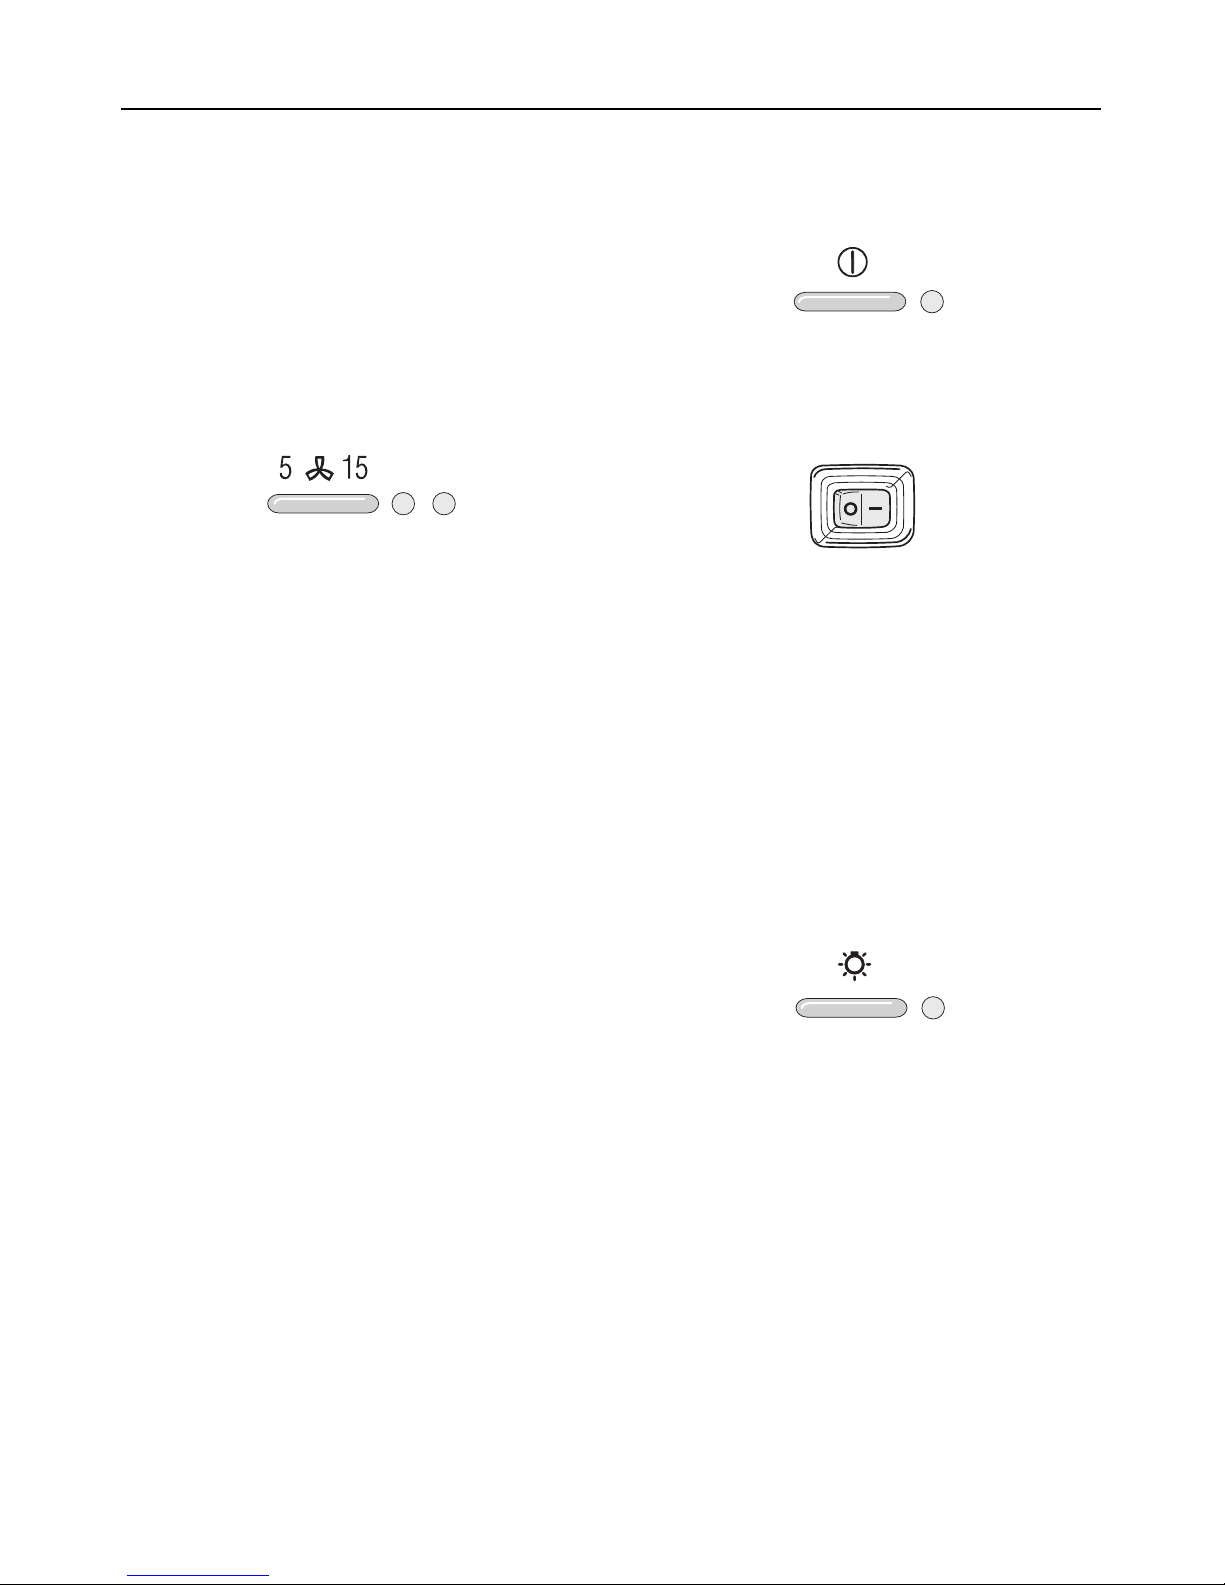
Run-on option
If the air still needs to be cleared after
cooking, the cooker hood can be set to
continue running.
The fan motor will then switch off automatically after a further 5 or 15 minutes.
– Press the run-on option touch control.
Press once = 5 minutes run-on time
Press twice = 15 minutes run-on time
Press three time s = fan is switched off
The relevant indicator lamp glows to
confirm the time selected.
If no run-on time is selected neither
lamp lights up.
To deact ivate the run-on option time,
press the run-on option touch control
until both indicator lamps go out.
Switching off
– Use the On/Off touc h con trol to
switch the fan off.
If the cooker hood is not to be used for
a longer period of time (e.g. overnight
or during holidays), switch it off using
the main switch.
Switching the lighting on or off
The lighting for illuminating the hob can
be switched on or off independently of
the fan.
– Press the lighting touch control.
– When the lighting is switched on the
lamp next to the lighting touch control glows.
Operation
12
 Loading...