

Page 1
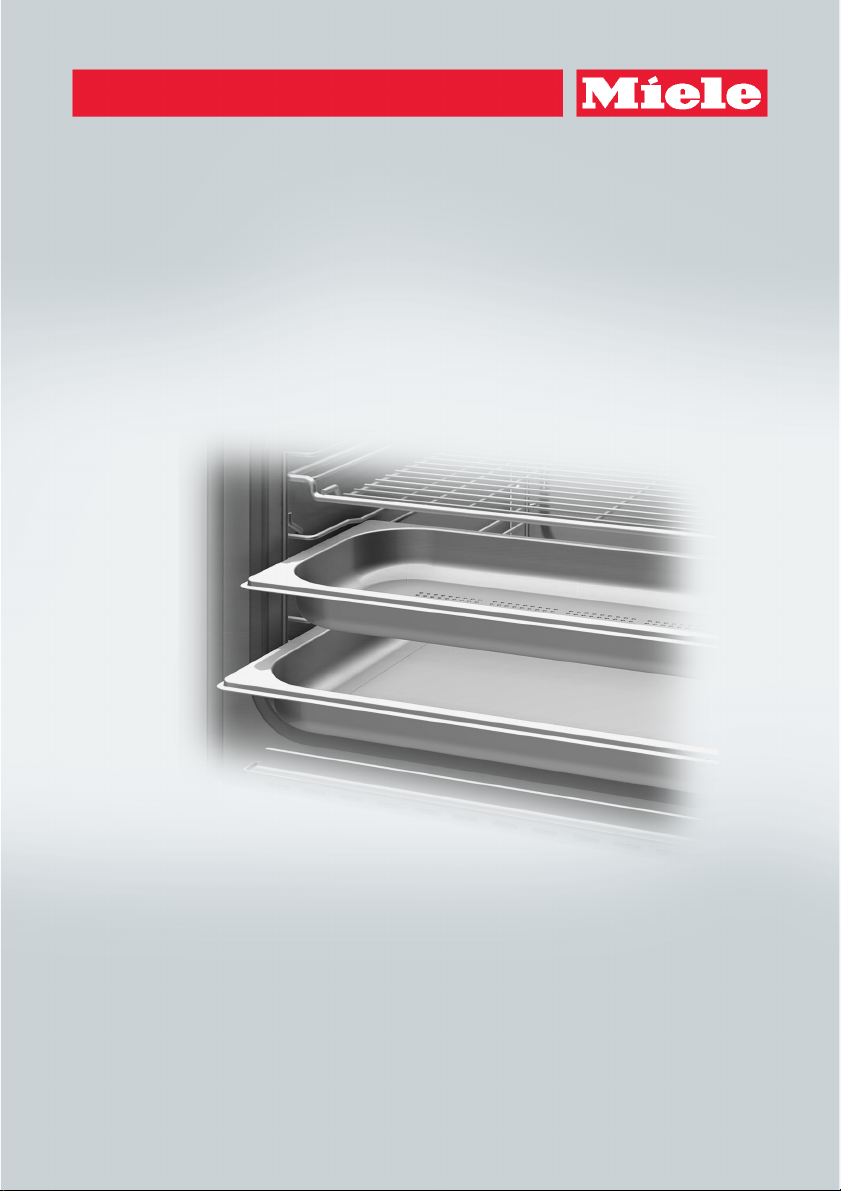
Operating and Installation Instructions
Combi Steam Oven
To prevent accidents and machine damage, read these instructions
before installation or use.
M.-Nr. 09 855 480en - US, CA
Page 2

Contents
IMPORTANT SAFETY INSTRUCTIONS.................................7
Guide to the appliance ............................................14
Front view........................................................14
Accessories supplied ..............................................16
Functional description ............................................18
Control panel .....................................................18
Sensor buttons....................................................18
Touch display ....................................................19
Control panel .....................................................21
Water container ...................................................21
Grease filter ......................................................21
Roast probe ......................................................21
Temperature / Core Temperature .....................................21
Cooking duration ..................................................22
Moisture .........................................................22
Noise ...........................................................22
Preheating phase..................................................23
Steam reduction...................................................23
Keeping warm ....................................................23
Interior lighting ....................................................24
Before using for the first time.......................................25
Basic settings ....................................................25
Cleaning for the first time............................................27
Setting the water hardness level ......................................27
Setting the correct boiling point for water ...............................28
Heating the appliance ..............................................28
Modes / Programs / Menus .........................................29
Quick Guide .....................................................32
Selecting a mode..................................................32
Setting the temperature .............................................32
Setting a cooking duration...........................................32
Setting the moisture level............................................32
End of cooking time ................................................33
Rinse ...........................................................33
2
Page 3

Contents
Operation .......................................................34
During operation ..................................................34
Interrupting operation ............................................34
Changing a setting ..............................................34
Saving settings .................................................35
Steam Cooking ...................................................36
Defrost ..........................................................36
Reheat ..........................................................36
Combi Steam .....................................................37
Convection Bake/ Surround / Browning / Bake / Broil / Convection Broil / Maxi Broil
/ Intensive / Humidity Plus ...........................................39
Favorites ........................................................40
Create a Favorite ...............................................40
Changing a Favorite .............................................41
Delete a Favorite................................................41
MyMiele .........................................................42
Adding entries .................................................42
Editing MyMiele ................................................43
Deleting entries.................................................43
Sorting entries..................................................43
Additional functions ..............................................44
Start time / Finish time ..............................................44
Timer / Alarm .....................................................45
System lock ......................................................47
Sensor lock ......................................................48
General notes when cooking with Steam .............................49
Steam Cooking ...................................................49
The advantages of cooking with steam ..............................49
Suitable cooking utensils ............................................49
Cooking pans ..................................................49
Using your own pans ............................................49
Shelf level .....................................................50
Temperature ...................................................50
Cooking time (duration) ..........................................51
Cooking with liquid .............................................51
Your own recipes ...............................................51
3
Page 4

Contents
Steam Cooking...................................................52
Vegetables.......................................................52
Meat ............................................................56
Sausage.........................................................58
Fish ............................................................59
Menu Cooking - Manual.............................................62
Special Modes ...................................................64
Reheating........................................................64
Defrost ..........................................................66
Canning .........................................................70
Juicing ..........................................................72
Menu Cooking ....................................................73
Dehydrate .......................................................74
Pizza ...........................................................75
Making Yogurt ....................................................76
Proofing .........................................................78
Dissolving Gelatin .................................................78
Melting Chocolate .................................................79
Skinning Fruits and Vegetables .......................................80
Preserving Apples .................................................81
Blanching........................................................81
Sweating Onions ..................................................82
Rendering Fat ....................................................82
Sanitizing Cookware ...............................................83
Heating Damp Towels ..............................................84
Decrystallize honey ................................................84
Making Jam ......................................................85
Sabbath Program..................................................86
Roast probe .....................................................87
Roast ...........................................................90
Baking ..........................................................97
Broiling ........................................................103
Using the MasterChef programs ...................................105
Miele MasterChef Gourmet ........................................107
Gourmet cooking programs ......................................107
4
Page 5

Contents
Miele MasterChef Gourmet Recipes.................................108
Gourmet Chicken.................................................108
Gourmet Turkey ..................................................108
Gourmet Baby Back Ribs ..........................................109
Gourmet Beef Tenderloin...........................................109
Gourmet Salmon .................................................109
Settings........................................................110
Cleaning and Care ...............................................113
Appliance front ..................................................114
Accessories .....................................................115
Universal Tray, Wire Oven Rack, Shelf Runners.......................115
Cooking pans .................................................115
Roast probe ..................................................115
Grease filter ..................................................116
Drain filter ....................................................116
Water container................................................116
Oven interior ....................................................117
PerfectClean ....................................................118
Maintenance ....................................................120
Soak ........................................................120
Drying .......................................................120
Rinse ........................................................120
Descaling ....................................................121
Oven door ......................................................123
Frequently asked questions .......................................125
Optional accessories.............................................132
Cooking pans....................................................132
Other: ..........................................................135
Cleaning and care products ........................................137
IMPORTANT SAFETY INSTRUCTIONS...............................140
Installation reference.............................................141
Connecting the water intake / drain .................................143
Appliance and installation dimensions ..............................144
Wall cabinet installation ............................................144
Undercounter installation...........................................146
5
Page 6

Contents
Installation in combination with an oven ...............................148
Installation in combination with ESW 6x14 .............................150
Installation and connection .......................................152
Water connection................................................154
Notes on water supply connection .................................154
Connecting to the water supply ...................................156
Connection to the drainage system ................................157
Connecting the drain hose .......................................157
Electrical connection.............................................158
After sales service ...............................................159
Copyrights and Licenses .........................................160
Caring for our environment .......................................161
6
Page 7

IMPORTANT SAFETY INSTRUCTIONS
WARNING- When using your
appliance follow basic precautions,
including the following:
Intended use
This Combi Steam Oven is intended
~
for use in households and similar
residential environments.
Read all instructions before
installation or use of the Combi
Steam Oven to prevent injury and
appliance damage.
Use the Combi Steam Oven only for
its intended purpose. This appliance
is intended for residential cooking
only.
This appliance conforms to all
uniform safety codes and
regulations.
Keep these operating instructions in
a safe place and pass them on to
any future user.
SAVE THESE INSTRUCTIONS
This Combi Steam Oven is not
~
intended for outdoor use.
Only use the Combi Steam Oven for
~
residential cooking, and the purposes
described in this manual.
Other uses are not permitted and can
be dangerous.
Persons who lack physical, sensory
~
or mental abilities, or experience with
the appliance should not use it without
supervision or instruction by a
responsible person.
7
Page 8

IMPORTANT SAFETY INSTRUCTIONS
Children
Use the Child Safety Lock to prevent
~
children from turning on the Combi
Steam Oven.
Close supervision is necessary
~
when the Combi Steam Oven is used
near children. Do not allow children to
play with the Combi Steam Oven.
Do not allow children to open the
~
appliance door when in use. Keep
children away from the appliance until it
has cooled down. Danger of burns.
Packing materials (e.g. plastic wrap,
~
styrofoam) can be hazardous for
children. Danger of suffocation. Ensure
that any packing material is disposed of
safely and kept out of the reach of
children.
Risk of burns!
~
The skin of children is more sensitive to
high temperatures than that of adults.
The Combi Steam Oven heats up the
glass door, the control panel and the air
outlet openings in the oven interior. Do
not allow children to touch the Combi
Steam Oven during operation.
Risk of injury! The door can support
~
a maximum of 10. Children could hurt
themselves on the open door.
Do not allow children to stand, sit or
hang on the open door.
Children should not be left alone or
~
unattended in the area where the
applinace is in use. They should never
be allowed sit or stand on any part of
the oven.
8
Page 9

IMPORTANT SAFETY INSTRUCTIONS
Technical safety
Installation, repair and maintenance
~
work should only be performed by a
Miele authorized service technician to
avoid potential hazards. Installation,
repair and maintenance work should be
performed only by a Miele authorized
service technician.
Before installation make sure that
~
the voltage and frequency listed on the
data plate correspond to the household
electrical supply.
This data must match in order to avoid
damage to the appliance. If in doubt,
consult a qualified electrician.
Before installing the Combi Steam
~
Oven, check for externally visible
damage. Do not operate a damaged
appliance. A damaged appliance is
dangerous to your safety.
Be certain your appliance is
~
properly installed and grounded by a
qualified technician. To guarantee the
electrical safety of this appliance,
continuity must exist between the
appliance and an effective grounding
system. It is imperative that this basic
safety requirement be met. If there is
any doubt, have the electrical system of
the house checked by a qualified
electrician.
Multiple power outlets or extension
~
cords are not safe (risk of fire). Do not
use them to connect the Combi Steam
Oven to the electrical power supply.
Do not use the appliance until it has
~
been properly installed into cabinetry.
Do not operate any appliance with a
~
damaged cord or plug, or if the
appliance has been damaged in any
manner. Contact Miele’s Technical Ser
vice Department.
This Combi Steam Oven is not to be
~
used in mobile locations such as ships.
Never open the outer casing of the
~
appliance. Tampering with electrical
connections or components and
mechanical parts is dangerous and
could cause machine damage.
Defective components should be
~
replaced by Miele original spare parts
only. Only with these parts can the
manufacturer guarantee the safety of
the appliance.
The Combi Steam Oven must be
~
connected to the power supply by a
qualified electrician if the plug has
been removed from the power cord or if
there is no plug attached to the power
cord. A damaged power cord must be
replaced with a special cable. See
"Electrical connection".
Repairs should only be performed
~
by an authorized service technician.
Otherwise the warranty is void.
Do not repair or replace any part of
~
the appliance unless specifically
recommended in the manual. All other
servicing should be reffered to a
qualified technician.
Before installation or service,
~
disconnect the appliance from the
power supply by either removing the
fuse, "tripping" the circuit breaker or
unplugging the unit. Pull the plug not
the cord.
-
9
Page 10

IMPORTANT SAFETY INSTRUCTIONS
The appliance must be connected
~
to the water supply by a qualified
professional.
The Combi Steam Oven should only
~
be connected to the cold water line.
The shut-off valve for the water
~
supply must be easily accessible after
the appliance has been installed.
Before installation, check the water
~
hose for externally visible damage.
The integrated Waterproof System
~
offers protection from water damage,
provided the following conditions are
met:
– Water supply and drainage are
properly installed,
– The Combi Steam Oven is properly
maintained and parts are replaced
where it can be seen that this is
necessary.
– Closing of the water valve during
longer absences (for example
vacation).
User safety
Danger of burns!
~
The Combi Steam Oven becomes hot
during use.
You can get burned by the heating
elements, oven interior, cooked food,
accessories and hot steam.
Protect your hands with oven mitts or
potholders when using the appliance.
Use only dry, heat resistant potholders.
Moist or damp potholders used on hot
surfaces can result in steam burns.
Do not heat unopened food
~
containers. Pressure can build up
causing an explosion that will damage
the cooking compartment. There is also
a danger of personal injury and
scalding.
Use care when opening the door -
~
let hot air or steam escape before
removing or replacing food.
Do not store items on the appliance
~
when not in use. Items could melt or
catch fire from residual heat or if the
appliance is turned on inadvertently.
10
Flammable materials should not be
~
stored in an oven or near surface units.
You could hurt yourself on the open
~
door of the Combi Steam Oven or
stumble over it.
Do not leave the door open
unnecessarily.
Wear proper apparel - Loose-fitting
~
or hanging grments should never be
worn while using the appliance.
Page 11

IMPORTANT SAFETY INSTRUCTIONS
Do not leave the appliance
~
unattended when cooking with oil or
grease. These items may ignite if
overheated. Danger of burns.
Do Not Use Water on Grease Fires –
~
Smother fire or flame or use dry
chemical or foam-type extinguisher.
Do not use the oven to heat the
~
room.
Keep the oven vent ducts open.
~
Excessive cooking times result in
~
the drying out and possibly
spontaneous combustion of the food.
Maintain the recommended cooking
times.
Some foods dry out quickly and can
~
ignite due to the high grill temperatures.
Never use broil modes for baking rolls
or bread and for drying flowers or
herbs. Use the "Convection Bake" or
"Surround" modes.
Leave the oven door closed when
~
food in the oven interior starts to smoke
so as to smother any flames. Cancel
the operation by turning the Combi
Steam Oven off and unplugging the
power cord. Open the door only after
the smoke has dissipated.
Be careful when using alcoholic
~
beverages like rum, whiskey, wine etc.
for baking or roasting. The alcohol
evaporates at high temperatures but
may in rare circumstances combust on
the hot heating elements.
Always place oven racks and pans
~
in desired location while the oven is
cool. If they must be removed while the
oven is hot, do not let the potholders
contact hot heating elements in the
oven.
When handling cooking pans take
~
care not to let the contents spill, and
that you do not come into contact with
either hot steam or the hot oven walls.
Danger of scalding and burns.
Pans must be heat resistant up to
~
212°F (100°C). Otherwise they may
melt at high temperatures in the oven.
Do not leave cooked foods in the
~
cooking compartment. Do not use items
in the steam oven which may rust. This
could lead to the corrosion of the
appliance.
Do not use silicone baking pans in
~
the Combi Steam/Convection Bake,
they are not steam-resistant.
Do not place pots, pans, baking
~
sheets or cooking pans directly on the
oven floor.
Never line the oven floor with
~
aluminum foil and do not use protective
foil coverings available in retail stores to
protect the oven from soiling. They
affect the cooking and baking
performance significantly and block the
steam inlet.
11
Page 12

IMPORTANT SAFETY INSTRUCTIONS
The door can support a maximum of
~
22 lbs (10 kg).
Do not stand or sit on the open door,
and do not place heavy items on it.
Make sure that nothing gets caught
between the oven door and the oven
interior. This could damage the Combi
Steam Oven.
Coarse food particles can clog the
~
drain and the pump. Make sure that the
drain filter is always in place.
Do not keep the roast probe in the
~
oven interior, it could become
damaged the next time the oven heats
up.
Make certain that the power cords of
~
small appliances do not come in
contact with or get caught in the oven
door.
Do not operate the appliance
~
without the lamp cover in place, steam
can come into contact with live parts
and cause a short circuit. Electric
components could be destroyed.
Do not touch heating elements or
~
interior surfaces of oven – Heating
elements may be hot even though they
are dark in color. Interior surfaces of an
oven become hot enough to cause
burns. During and after use, do not
touch, or let clothing or other flammable
materials contact heating elements or
interior surfaces of oven until they have
had sufficient time to cool. Other
surfaces of the appliance may become
hot enough to cause burns – among
these surfaces are oven vent openings
and surfaces near these openings,
oven doors, and windows of oven
doors.
If the appliance is installed behind a
~
cabinet door, it must be operated with
the cabinet door open.
Close the cabinet door only when the
unit is completely dry.
12
Page 13

IMPORTANT SAFETY INSTRUCTIONS
Cleaning and Care
Do not use a steam cleaner to clean
~
the Combi Steam Oven.
The steam could reach the electrical
components and cause a short circuit.
Scratches on the glass of the door
~
panel can cause a breakage.
Do not use abrasive cleaners, hard
sponges or brushes or sharp metal
scrapers for cleaning the glass surface
of the door.
The side runners can be removed
~
for cleaning (see "Cleaning and Care").
Replace them correctly and do not use
the Combi Steam Oven without the side
runners racks installed.
Accessories
Use only the special Miele roast
~
probe. If the roast probe needs to be
replaced, it should be by an original
Miele roast probe. You can obtain it
from your Miele dealer or from Miele
Customer Service.
SAVE THESE INSTRUCTIONS
AND REVIEW THEM
PERIODICALLY
13
Page 14
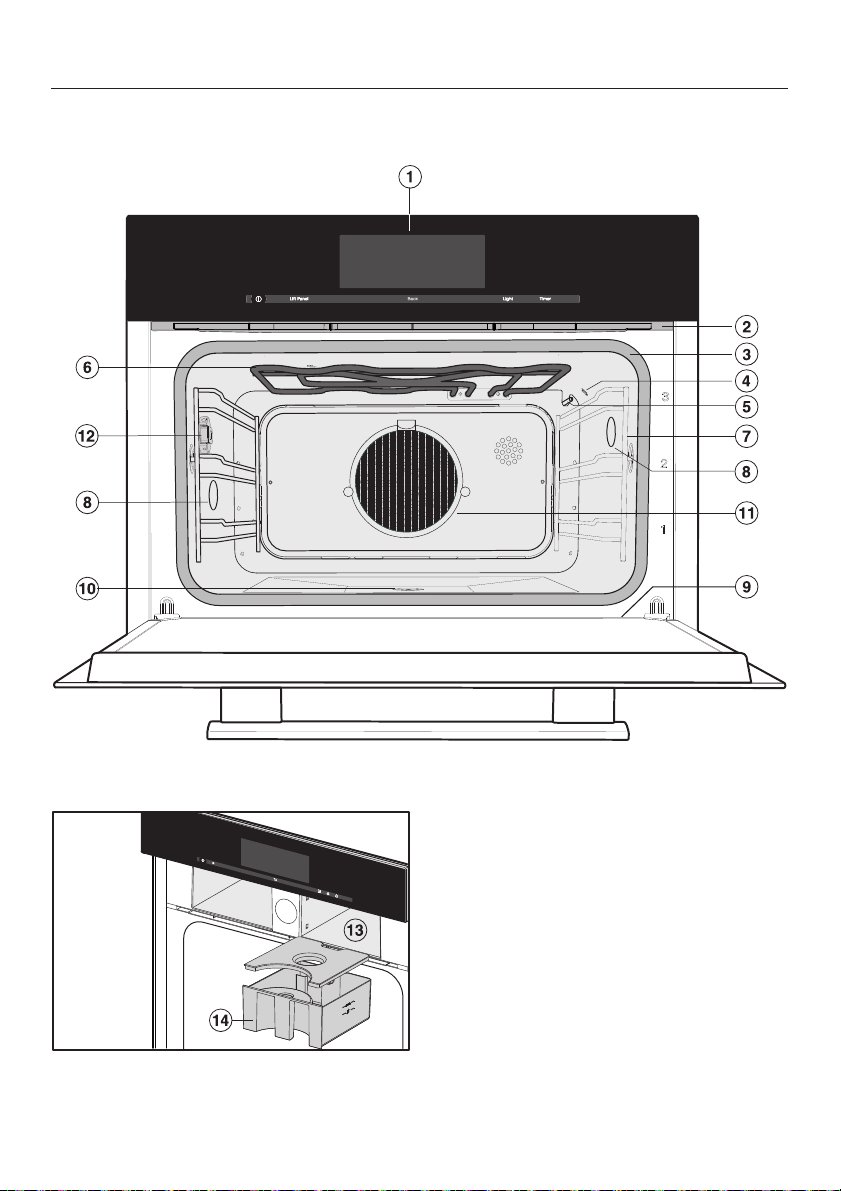
Guide to the appliance
Front view
14
Page 15

a Control panel
b Vent
c Door gasket
d Moisture sensor
e Temperature sensor
f Browning / Broiling element
g Side runners with 3 shelf levels
h Oven interior lighting
i Drip channel
j Drain with drain filter
k Grease filter
l Socket for Roast Probe
Guide to the appliance
m Slide-in compartment for water container
n Water container
15
Page 16

Guide to the appliance
Accessories supplied
All standard and additional accessories can be reordered if
necessary (see "Optional accessories").
DGGL 20
1 perforated cooking pan
17 11/16"x7½"x19/16" (WxDxH)
450 x 190 x 40 mm (WxDxH)
- It is inserted in the runners between the rails of a shelf level -
DGG 20
1 solid cooking pan
17 11/16"x7½"x19/16" (WxDxH)
450 x 190 x 40 mm (WxDxH)
- It is inserted in the runners between the rails of a shelf level -
DGGL 12
1 perforated cooking pan
17 11/16" x 15 3/8" x 1 9/16" (WxDxH)
450 x 390 x 40 mm (WxDxH)
- It is inserted in the runners between the rails of a shelf level -
Universal tray
Wire Oven Rack
16
1 Universal tray
- It is inserted in the runners between the rails of a shelf level -
1 Rack
- It is inserted in the runners between the rails of a shelf level -
Page 17

Roast probe
Grease filter
Guide to the appliance
To roast to the exact temperature
Measures the temperature inside the meat (internal
temperature)
See the "Functional description - Grease filter" section of this
manual for more information.
17
Page 18

Functional description
Control panel
Sensor buttons
The sensors respond to finger contact. An audible tone will
sound each time a sensor is touched.
You can adjust the volume of the tone in the Settings menu
(see "Settings / Volume").
Button Function
On / Off For turning the appliance on and off
Back To return to the previous level.
Clear the last entry.
18
Lift
Panel
Light Lighting
Timer Turns the timer and alarm on and off.
To open and close the control panel
Timer / alarm selection.
Page 19

Touch display
Functional description
The touch display is operated by a finger touch.
If your fingers are cold, the touch display may not react to
your finger contact .
Do not use pointed or sharp objects, e.g. pens, to operate
the touch display. This can damage the surface! The
touch display will not react if you tap it with such objects.
Do not let water get behind the display.
The top line shows you where you are in a menu. If you are in
a submenu, you can return to the previous menu level by
tapping on the desired menu name or on the boxes. The time
of day, alarm, and short-term appear at the top right.
The current menu with its menu items is displayed in the
center. Swipe the display to scroll right or left.
In the bottom line, you can use the arrows V and W to scroll
left or right. The number of boxes in the middle shows the
number of pages available and your position in the current
menu
19
Page 20

Functional description
Selecting, setting or calling up a menu.
Select the desired action, setting, or menu.
^
Scrolling
Swipe the screen, i.e. place your finger on the touch
^
display and swipe it in the desired direction.
You can scroll to the right or the left. Some menu options
allow you to scroll up and down too.
or
Tap the arrow keys
^
r and s, to scroll sideways.
Entering numbers using the numeric keypad z
You can enter numbers by swiping and tapping or using the
numeric keypad.
^ Touch z.
The numeric keypad is displayed.
^ Select the desired numbers with a finger tap.
As soon as you have entered a valid value, the OK button
turns green.
^ Touch the OK button.
Entering letters
Enter your own program names using a keyboard.
^
Touch the desired letter or character.
^
Touch "Save".
20
Page 21

Control panel
Water container
Grease filter
Functional description
The water container is located behind the lift-up control
panel. The control panel is opened and closed by touching
the "Lift Panel" sensor button and confirming the selection.
The panel is equipped with a finger pinch protection. If it
encounters resistance when opening/closing, the process is
interrupted. Make sure you do not touch the the appliance
door handle while the panel is opening or closing.
The water is pumped into the water container and from there
to the evaporator.
Do not close the opening in the front of the water
container.
The grease filter must be inserted for every roasting program.
It should be removed when using steam programs.
It must be removed when baking, as otherwise results can be
uneven (exception: deep fresh fruit pies, pizza with many
toppings).
Roast probe
The roast probe measures the temperature in the interior of
the food being cooked, the core temperature. The roast
probe allows you to monitor cooking programs at the precise
temperature.
Temperature / Core Temperature
Some functions have default temperatures and may have a
core temperature set for the roast probe. The default
temperature can be altered within a given range (see
"Functions") for an individual cooking program or permanently
(see "Settings") You can change the core temperature within
a given range for an individual cooking program or a cooking
stage.
21
Page 22

Functional description
Cooking duration
You can set a cooking duration of between 1 minute and 10
or 12 hours, depending on the duration.
The duration of the MasterChef, Maintenance and Menu
Cooking functions is set at the factory and cannot be
changed.
With functions and programs that use steam only, the cooking
duration does not start to count down until the set
temperature has been reached; on all other functions and
programs, it begins immediately.
Moisture
Combi Steam and Reheat modes use a combination of
convection heat and moisture. You can change the
moisture/humidity level within a given range for an individual
cooking program or a cooking stage.
Depending on the humidity setting, moisture or fresh air is fed
into the oven interior. With the humidity setting at 0%, the
maximum fresh air supply is provided and no moisture is fed
in. With the humidity setting at 100%, no fresh air supply is
provided and the moisture content is at maximum.
Noise
22
The humidity sensor determines the moisture content in the
oven interior. The type of food has an influence on the
moisture content and this will be taken into account by the
appliance.
Keep in mind that there are foods that give off moisture
during a cooking program. This natural moisture of the food is
also used to regulate the humidity. This means that the steam
generator may not be activated for low humidity values set.
You can hear a noise (humming) when the appliance is
turned on, when it is operating, and after it has been turned
off.
This noise does not indicate a malfunction or a defect. It
occurs when water is being pumped in and out.
You can hear the fan noise when the appliance is operating.
Page 23

Preheating phase
Steam reduction
Functional description
While the appliance is heating up to the set temperature, the
display will show the rising temperature inside the oven
together with the words "Preheating Phase" (Exceptions:
MasterChef, Menu Cooking, Reheating, Maintenance).
Steam cooking
When cooking with steam, the duration of the preheating
phase will depend on the quantity and the temperature of the
food. The duration will be longer if you are preparing
refrigerated or frozen food.
With steam modes
If the cooking temperature is higher than 158°F (70 °C),
steam reduction is automatically turned on at the end of the
cooking duration. The function reduces the amount of steam
escaping from the appliance when the door is opened. The
display shows "Steam reduction" in addition to "Program
finished".
Keeping warm
You can turn the function off (see "Settings - Keeping warm").
With steam modes
If you wish to use this feature, you must first alter the factory
setting (see "Programming").
If the appliance is not turned off at the end of a cooking
program, it will switch to the keeping warm function after a
short time. The food will be kept warm for a maximum of 15
minutes.
Please note that delicate food, especially fish, can continue
cooking while being kept warm.
23
Page 24

Functional description
Interior lighting
For energy saving reasons, the oven compartment lighting
has been factory set to go out after the program has begun.
If you would like the oven interior to be illuminated the whole
time the oven is operating, the factory default setting must be
changed (see "Settings - Lighting").
If the door is left open at the end of a cooking program the
oven lighting will turn off automatically after 5 minutes.
The lighting radiates heat. If you are working with
temperatures below 122°F (50°C), the oven light switches off
automatically.
If the "Light" button is pressed, the lighting will come on for
15 seconds.
Detailed information on use as well as tips for using your
appliance can be found in "Steam Modes" and "Special
Modes"
24
Page 25

Basic settings
The appliance will turn on automatically when it is connected
to the power supply.
A welcome screen will appear in the display and you will then
be asked to select some basic settings which are needed to
set the appliance up for first time use.
Setting the language and country
The welcome screen will be replaced by the request to set a
language:
Swipe left or right until your language appears on the
^
display.
Touch the language you want and then "OK".
^
^ Touch the desired country and then on "OK".
The setting is now saved.
Set the date
^ Swipe the "Day" field in the display until the current day
appears.
Before using for the first time
^ Repeat this for "Month" and "Year" until the current date is
^
The setting is now saved.
To set the time of day
^
^
The setting is now saved.
set.
Touch "OK".
Swipe the display in the field "Time of Day", until the current
time of day is set.
Touch "OK".
25
Page 26

Before using for the first time
Time of day display
You can choose between the following options:
On: The time of day is always displayed even when the
–
appliance is turned off.
Off: The time of day is not displayed when the appliance is
–
turned off.
Night Dimming: The time will be displayed between
–
5:00 a.m. and 11:00 p.m.
Touch the desired display and then "OK".
^
The setting is now saved.
"Set-up successfully completed" will now appear in the
display.
26
Page 27

A functional test is carried out on the appliance at the
factory, making it possible that some water may drip from
the lines into the oven compartment during transport.
Cleaning for the first time
Remove any protective wrappings.
^
Water container
Take the water container out of the appliance and rinse it
^
by hand or in the dishwasher.
Accessories / Oven interior
Remove all accessories.
^
^ Clean the cooking pans in the dishwasher or by hand.
The Universal tray and the wire oven rack are PerfectClean
coated and should only be cleaned by hand. Please refer to
the "PerfectClean" section.
^ Clean the universal tray and the wire oven rack with a clean
sponge, liquid dish soap and warm water.
Before using for the first time
^ Wipe the interior with a damp cloth to remove any dust or
bits of packaging that may be in the oven.
Setting the water hardness level
The Combi Steam Oven is factory set to the "Hard" water
hardness setting. To ensure that it is functioning properly and
descaled at the right time, you must set the local water
hardness. The harder the water, the more often the appliance
will require descaling.
^
Check which water hardness is set, and if necessary, set
the correct water hardness (see "Settings").
27
Page 28

Before using for the first time
Setting the correct boiling point for water
Before you cook food for the first time, adjust the device to
the boiling temperature of water, which varies depending on
the altitude of the installation location. In this process, the
water-carrying components are rinsed.
You must carry out this operation as it is essential to
ensure proper functioning.
Run the Steam (212°F / 100°C) mode for 15 minutes.
^
Proceed as described in "Quick Guide".
If you move the appliance to a new location, it will need to be
re-set for the new altitude if this differs from the old one by
more than 984 ft. (300 m). To do this, run the descale
program (see "Cleaning and care - Descale").
Heating the appliance
To remove grease from the convection heating element, heat
the Combi Steam Oven up with nothing in it at 400°F (200°C)
using the Convection Bake Mode for 30 minutes. Proceed as
described in "Operation".
28
There will be a slight smell the first time the heating element is
heated.
The smell and any vapors will dissipate after a short time, and
do not indicate a faulty connection or appliance. It is
important to ensure that the room is well ventilated during this
process.
Page 29

Modes / Programs / Menus
Main Menu Default
Temperature
Operating Modes
Convection Bake
For baking on several levels at the same
time. The fan distributes the heat evenly
throughout the cavity for a consistent baking
temperature.
Surround
Heat is used from both the upper and lower
heating elements to create perfect results of
all baking recipes.
Combi Steam with Convection Bake
Adds moisture to the traditional Convection
Bake mode for excellent results on baked
goods.
Combi Steam with Surround
Adds moisture to the traditional Surround
mode. Utilizes heat from the top and bottom,
ideal for baked goods.
Combi Steam with Broil
Adds moisture to the traditional Broil mode,
ideal for fish and poultry.
320 °F /
160°C
355 °F /
180°C
340 °F /
170°C
355 °F /
180°C
Level 3 Level1-3
Temperature
Range
85 - 435 °F /
30 - 225°C
85 - 435 °F /
30 - 225°C
85 - 435 °F /
30 - 225°C
85 - 435 °F /
30 - 225°C
Steam Cooking
Retains the flavor and nutrients of the food
without added fats or oils.
Intensive
This mode gently circulates heated air from
the lower heating element using the fan to
create a brick oven environment.
Bake
Use this at the end of the baking time to
brown the bottom of the food.
212 °F /
100°C
355 °F /
180°C
375 °F /
190°C
105 - 212 °F /
40 - 100°C
120 - 435 °F /
50 - 225°C
210 - 435 °F /
100 - 225°C
29
Page 30

Modes / Programs / Menus
Main Menu Default
Temperature
Operating Modes
Browning
For a perfectly browned topping, for
example when making a gratin or
browning the top of a casserole.
Maxi Broil
The entire upper heating element is
used for intense heating from above.
Excellent browning and searing results
can be achieved.
Broil
For broiling smaller quantities of steak,
chops, kebabs, etc.
Convection Broil
This mode distributes hot air from the
Browning/Broiling element over the food
using the fan.
Humidity Plus
A special baking program for light
pastries, cakes and baked goods.
375 °F /
190°C
Level 3 Level1-3
Level 3 Level1-3
395 °F /
200°C
320 °F/
160°C
Temperature
Range
210 - 435 °F /
100 - 225°C
120 - 435 °F /
50 - 225°C
85 - 435 °F /
30 - 225°C
MasterChef
The list of available MasterChef programs is
displayed
MasterChef Gourmet
5 separate automatic slow cooking
programs that create tender and juicy
results.
Special Modes
Menu Cooking
Simultaneous cooking of various foods
Pizza 355 °F /
30
--
--
--
355 - 435 °F /
180°C
180 - 225°C
Page 31

Modes / Programs / Menus
Main Menu Default
Temperature
Special Modes
Defrost
For gentle thawing of frozen foods
Reheat
To gently reheat already cooked
foods
Blanching --
Canning 195 °F / 90°C 175 - 212 °F /
Sanitize Cookware --
Drying 140 °F / 60°C 140 - 160 °F /
Proof --
Sabbath Program 355 °F / 180°C 85 - 435 °F /
My Miele
You can personalize your steam oven with
MyMiele by entering frequently used
applications there.
140 °F /
60°C
265 °F /
130°C
Temperature
Range
120 - 140 °F /
50 - 60°C
250 - 285 °F /
120 - 140°C
80 - 100°C
60 - 70°C
30 - 225°C
Favorites
Create and save your favorite dishes
Settings
Changing the factory settings
Maintenance
Descaling --
Soak --
Drying --
Rinse --
--
--
31
Page 32

Quick Guide
Before each cooking process check that the drain filter is
fitted correctly (with pin up), coarse food particles can
clog the drain.
Selecting a mode
Turn the appliance on "On / Off".
^
Select "Operating mode".
^
If the desired mode is not displayed, use the < and >
^
arrows until the function you want appears.
Touch the desired operating mode.
^
Setting the temperature
^ Swipe the display in the "Temperature" field until the
desired temperature appears.
Setting a cooking duration
^ Swipe the display in the "Duration" field until the desired
cooking duration appears.
^ Confirm with "OK".
Setting the moisture level
(with Combi Steam and Reheat)
^
Swipe the display in the "Moisture" field until the desired
setting appears.
32
Page 33

End of cooking time
At the end of the duration an audible tone will sound and
"Program Finished" will appear in the display.
With some programs, "Steam Reduction" will also appear.
Wait until "Steam Reduction" goes out in the display before
opening the door and removing the food.
Turn the appliance off.
^
Be careful not to spill the contents of the cooking pans or
touch the hot walls of the oven when removing items. Use
pot holders.
Danger of scalding and burns.
Rinse
After turning off the appliance when using a steam function,
"Appliance Rinsing" appears in the display after steam
cooking. This is to flush any existing residue from the system.
Follow the instructions in the display.
After use
Quick Guide
^ Remove the water and condensate containers and empty
them. Push the containers slightly upwards to remove.
^ Clean and dry the whole appliance after each use as
described in "Cleaning and care".
Make sure the appliance is completely dry before closing
the door.
33
Page 34

Operation
During operation
Interrupting operation
Operations are interrupted as soon as the door is opened.
The heating will be turned off and the cooking duration
remaining stored in memory.
When you close the door, the operation will be continued.
The oven will preheat again. The rising oven temperature will
appear in the display. Once the set temperature has been
reached again the display will change and the remaining time
will appear in the display and count down as usual.
Steam will escape when the door is opened. Step back
from the combi steam oven and wait until the steam has
dissipated.
Be careful not to spill the contents of the cooking pans or
touch the hot walls of the oven when removing items. Use
pot holders.
Danger of scalding and burns.
Changing a setting
34
If the cooking operation is interrupted by opening the door
55 seconds or less before the cooking operation is
completed, "Program Finished" will appear in the display.
The operation will not continue.
You can change the selected settings during operation.
^
Touch "Change".
^
Select the setting you wish to change, e.g. "Temperature",
and then enter the change.
^
Confirm with "OK".
Page 35

Saving settings
Operation
You can save the settings for a cooking mode, so that you
can call it up from the "Favorites" menu at a later date.
At the end of a cooking mode the display shows "Save".
Touch "Save".
^
A summary will appear in the display.
Confirm with "Accept".
^
The process can be stored under a name selected by you.
Type the desired name on the keyboard.
^
Touch "Save".
^
Information on the stored mode appears in the display.
^ Confirm with "OK".
35
Page 36

Operation
Steam Cooking
Defrost
Reheat
Turn the appliance on.
^
Place the food in the appliance.
^
Select the desired mode.
^
Select the desired temperature and cooking duration.
^
Confirm with "OK".
^
If the Keep Warm function is activated, the appliance will
not turn off at the end of the cooking duration.
Turn the appliance on.
^
^ Place the food in the appliance.
^ Select "Special Modes > Defrost".
^ Select the desired temperature and cooking duration.
^ Confirm with "OK".
36
^ Turn the appliance on.
^ Place the food in the appliance.
^
Select "Special Modes > Reheat".
^
Select the desired temperature, cooking duration and
moisture level.
^
Confirm with "OK".
Page 37

Combi Steam
Operation
Combi steam works by combining dry heat and steam. You
can combine up to ten cooking stages in the Combi Steam
mode. You can set the temperature, moisture level and
duration or internal temperature for each cooking stage.
The cooking program will be carried out in the order in which
the individual stages are entered.
In the operating mode "Combi Steam with Broil" the roast
probe cannot be used.
After a cooking stage with the broil function the internal
temperature cannot be used.
The following example describes a cooking program with 3
cooking stages.
^ Turn the appliance on "On / Off".
^ Place the meat in the oven.
Place the universal tray on the lowest side runner to catch
any drippings if the meat is being roasted on the rack.
^ Select "Combi Steam".
Cooking stage 1
^ Select the desired heating mode.
Convection Bake / Surround
^
Select Set cooking duration.
^
Set temperature, cooking duration and moisture level.
^
Confirm with "OK".
or
^
Select internal temperature.
^
Set temperature, internal temperature and moisture level.
^
Confirm with "OK".
37
Page 38

Operation
Cooking stage 2
Cooking stage 3
Broil
Set stage, cooking duration and moisture level.
^
Confirm with "OK".
^
The display shows a message.
Select "Add" .
^
Select the desired heating mode.
^
Select the settings as described in step one.
^
The display shows a message.
Select "Add" .
^
^ Select the desired heating mode.
^ Select the settings as described in step one.
The display shows a message.
^ Select "Finish".
38
A summary of the three individual cooking stages will appear
in the display. If you do not want to add any more cooking
stages, confirm with "OK".
Start the cooking program right away or enter a start time or
end time (see applicable section). You can save the selected
cooking stages under "Favorites".
^
Touch "Save".
^
Type the desired name on the keyboard.
^
Touch "Save".
Page 39

Operation
Convection Bake/ Surround / Browning / Bake / Broil /
Convection Broil / Maxi Broil / Intensive / Humidity Plus
The grease filter must be removed during baking.
Exception: if you bake deep fresh fruit pies or pizza with lots
of toppings, the grease filter must be used.
The appliance will start automatically after the temperature
has been confirmed.
You do not need to enter a cooking duration. In "Additional
Settings" you can make the following settings: Duration - Start
at - Ready at.
Any time between 1 minute and 12 hours can be selected. If
a duration is entered, this will begin to count down when the
appliance starts to operate.
If no cooking duration is entered, the appliance turns itself off
automatically after 12 hours.
You can choose to inject steam with these functions (display
shows "Burst of steam"). The steam is released immediately
after the selection and last about one minute. There is no limit
on how many times you can inject a burst of steam.
^ Remove the grease filter on the back wall if present.
^ Turn the appliance on "On / Off".
^
Select the desired operating mode.
^
Select the desired temperature (or internal temperature)
and confirm.
39
Page 40

Operation
Favorites
You can save up to 20 cooking programs that you use often,
under names of your choice, in the "Favorites" menu.
If you have not saved any programs yet, the display shows:
Create program
You can create your favorite program
If you have already saved Favorites, the display shows: You
can choose from the following options:
Edit a program
A Favorite program can be edited.
Create
You can create Favorites.
Change
Existing programs are displayed and can
be changed.
Delete
Existing programs can be deleted.
Create a Favorite
40
^
On the main menu select "Favorites".
^
Touch "Create program".
^
Enter the settings as normal and confirm with "Continue".
If you want to add another cooking stage, select "Add" and
proceed as described above.
^
Touch "Finish" to save the Favorite.
A summary will appear in the display.
^
Confirm with "OK".
Page 41

Changing a Favorite
Delete a Favorite
Operation
The cooking program can now be saved. The process can be
stored under a name selected by you.
Touch "Save".
^
Type the desired name on the keyboard.
^
Touch "Save".
^
A summary will appear in the display.
Confirm with "OK".
^
On the main menu select "Favorites".
^
Touch "Edit".
^
^ Touch "Change program".
^ Touch the desired Favorite.
You can now change the cooking stages or the program
name. Enter the settings as usual.
^ On the main menu select "Favorites".
^ Touch "Edit".
^
Touch "Delete program".
^
Touch the desired Favorite.
41
Page 42

Operation
MyMiele
Adding entries
With MyMiele you can personalize your Combi Steam
Oven by entering frequently used applications there.
You will then no longer need to navigate all menu levels to
start a program, especially with automatic programs.
You can also set menu items entered in MyMiele as your
home screen (see chapter "Settings - Start Screen").
You can add up to 20 entries.
Select "MyMiele ".
^
Select "Add entry".
^
You can select sub-items from the following categories:
– Operating Modes
– MasterChef c
– Special Modes
– Favorites ~
42
^ Confirm your selection with "OK".
In the list, you will see a tile with the selected sub-item and
the symbol of the category from which you have selected it.
^
Follow this procedure with additional entries. Only
sub-items that have not been added yet will be available
for selection.
Page 43

Editing MyMiele
Operation
After selecting "Edit", you can
Add entries if MyMiele contains less than 20 entries,
–
Delete entries,
–
Sort entries if MyMiele contains more than 4 entries.
–
Deleting entries
Select "MyMiele ".
^
Select "Edit".
^
Select "Delete Entry".
^
Select the entry you wish to delete.
^
^ Confirm your selection with "OK".
The entry will be deleted from the list.
Sorting entries
If you have more than 4 entries, you can change the order of
entries.
^ Select "MyMiele ".
^ Select "Edit".
^
Select "Sort Entry".
^
Select the entry you wish to move.
^
Select the position where you want the entry to appear.
^
Confirm your selection with "OK".
The entry will appear in the desired position.
43
Page 44

Additional functions
Start time / Finish time
You can delay the start time. The appliance will turn on
automatically at the selected time.
For "Descaling" this is not possible.
Using "Start at" you can enter the time when you would like
the cooking program to start. Using "Ready at" you can enter
the time when you would like the cooking program to end.
The difference between start time and end is the cooking
duration entered plus the preheating time calculated by the
appliance.
This function cannot be used if the oven interior is too hot,
e.g. at the end of a cooking program. "Start at - Ready at"
are not indicated in this case.
Leave the door open to let the oven interior cool off.
Cooking results can be impaired if there is a long delay
between the food being placed in the oven and the start of
cooking.
Setting the Start time / Finish time
^
Select the desired operating mode, temperature and
cooking duration.
^
Touch "Additional settings".
^
After you have entered the settings for the desired
program, select "Start at" or "Ready at" and enter the time
you would like the cooking program to begin or end
^
Confirm with "OK".
Change
^
Touch "Change".
^
Select "Start at" or "Ready at".
44
Page 45

Delete
Timer / Alarm
Additional functions
Touch "Change".
^
Select "Start at" or "Ready at".
^
Select ——.
^
The timer can be used to manage kitchen activities or set an
alarm.
These functions can also be used during an ongoing cooking
program.
2 timers can be set. The set timer time and alarm time appear
in the status bar.
Timer
A time can be set between 1 second and 9 hours 59 minutes,
59 seconds.
At the end of the set time you will hear an audible tone.
Alarm
A time can be set. The alarm feature works like an alarm
clock. At the end of the set time you will hear an audible tone.
45
Page 46

Additional functions
Setting the Start time / Finish time
If the time display is turned off (see "Settings - Time"), you
will need to turn the appliance on to set the timer / alarm.
Touch the button "Timer".
^
Touch "New timer" / "New alarm".
^
Swipe across the display to set the desired timer / time
^
(alarm).
Touch "OK". The setting is now saved.
^
Change
Touch button "Timer" or the timer / alarm in the upper right
^
corner of the display.
^ Touch "Alarm" or "Timer".
^ Swipe across the display to set the desired timer / time
(alarm).
^ Touch "OK". The setting is now saved.
Delete
46
^ Touch the "Timer" button or the timer / alarm in the upper
right corner of the display.
^
Touch "Alarm" or "Timer".
^
Touch "Clear".
Page 47

System lock
Deactivate
Additional functions
The system lock prevents the oven from being turned on
unintentionally.
The factory setting for the system lock is deactivated. Before
this feature can be activated, you will need to change the
factory default (see "Settings - Safety").
If the system lock is switched on, the display shows the
symbol $ as soon as you turn on the appliance.
Turn the appliance on.
^
The display shows a message.
^ Hold your finger for about 6 sec on the $ symbol to unlock
the appliance.
Then you can work with the appliance as usual.
The system lock is automatically activated a few seconds
after the appliance has been turned off.
47
Page 48

Additional functions
Sensor lock
Your device is equipped with a sensor lock so that the
settings of a running program cannot be changed
unintentionally.
When the sensor lock is turned on, all buttons except for the
On/Off button are locked. An elapsed timer can be
confirmed.
The factory setting for the sensor lock is deactivated. Before
this feature can be activated, you will need to change the
factory default (see "Settings - Safety").
Deactivate
Press and hold any button for about 6 sec on the $ symbol
^
to unlock the appliance.
The appliance will now work as usual.
The sensor lock is automatically activated a few seconds
after the last entry.
48
Page 49

General notes when cooking with Steam
Steam Cooking
The advantages of cooking with steam
Vitamins and minerals are better retained, as the food is not
immersed in water.
When cooked with steam, food retains its natural taste better
than with conventional cooking. We therefore recommend not
to season the food at all or only after it has been cooked.
Food retains its fresh, natural color.
Suitable cooking utensils
Cooking pans
Included with the appliance are stainless steel cooking pans.
In addition, further cooking pans of different sizes are
available, which can be supplied either perforated or solid
(see "Optional accessories"). This allows the most suitable
cooking pans to be selected for a particular food.
It is best to use perforated pans for steam cooking if
possible. This enables the steam to reach the food from all
sides allowing the dish to be evenly cooked.
Using your own pans
You can also use your own pans. But please note the
following:
–
–
Pans must be heat-resistant to 212°F / 100°C and able to
withstand hot steam. Plastic pans can only be used for
Steam Cooking if the manufacturer specifies that they are
suitable for such use.
Thick-sided pans made of porcelain, china or stoneware,
for example, are less suitable for Steam Cooking. They do
not conduct heat well, thus cooking times will be
considerably longer than those given in the charts.
49
Page 50

General notes when cooking with Steam
Place the cooking pans on the inserted rack, not on the
–
oven floor.
Ensure that there is a gap between the upper rim of the
–
pan and the top of the cooking compartment to allow
sufficient steam into the pan.
Shelf level
You can select any shelf level and also cook on several
levels.
If you simultaneously use several high cooking pans for
steam cooking, insert the cooking pans offset to each other. If
possible, leave a level between the cooking pans.
Temperature
The maximum temperature in the steam oven is 212° F /
100° C. Most types of food can be cooked at this
temperature. Some more delicate types of food, such as
berries, must be cooked at lower temperatures, otherwise
they will burst. More information is provided in the relevant
chapters.
50
Page 51

General notes when cooking with Steam
Cooking time (duration)
In general, the cooking times for cooking with steam are the
same as for cooking food on a cooktop. More information
about any factors which may affect the cooking duration is
given in the relevant sections of this manual.
The quantity of food does not affect the cooking time. 2 lbs
(1 kg) potatoes will take the same time to cook as 1 lb (500 g)
potatoes.
The cooking times given in the tables are guidelines only.
Select a shorter cooking time, additional time can be added if
necessary.
Cooking with liquid
When cooking with liquid only fill the cooking pan
prevent the liquid spilling when the cooking pan is removed
from the oven.
Your own recipes
Any food and recipes which are prepared in a pot or a pan
can also be cooked in the steam mode. The cooking times
will be the same. Please note that food will not brown when
cooked with steam.
2
/3full to
51
Page 52

Steam Cooking
Vegetables
Fresh vegetables
Prepare fresh vegetables in the usual way, i.e. wash, clean
and chop.
Frozen vegetables
Frozen vegetables do not need to be defrosted beforehand.
Exception: Vegetables that have been frozen in a block.
Frozen and fresh vegetables with the same cooking time can
be cooked together.
If vegetables have frozen together in clumps, break them up.
Cooking pans
For even cooking of smaller items, it is best to use a shallow
pan for these types of foods and only fill it to a depth of 1 1/4"
- 2" (3 - 5 cm). Distribute large quantities of food between
several shallow cooking pans.
Use solid pans for vegetables which are cooked in liquid,
such as cabbage.
Shelf level
Cooking duration
52
When cooking vegetables with a distinctive color (e.g. beets)
in a perforated pan, do not place any other foods beneath
this pan. This will prevent any discoloration from dripping
liquid.
When cooking vegetables with steam, the cooking duration
will depend on the size and desired degree of doneness.
Page 53

Settings
Steam Cooking
MasterChef > Vegetables >...
or
Operating Mode > Steam Cooking
Temperature: 212°F/100° C
Cooking time: See chart
The cooking times given in the table are guidelines for fresh
vegetables. We recommend selecting the shorter cooking
duration to start with. You can cook it longer if necessary.
Duration in minutes
Artichokes 32-38
Cauliflower, whole 27-28
Cauliflower, florets 8
Green Beans 10-12
Broccoli, florets 3-4
Carrots, whole 7-8
Carrots, halved 6-7
Carrots, chopped 4
Endive, halved 4-5
Bok Choy, cut 3
Peas 3
Fennel, halved 10-12
Fennel, cut in strips 4-5
Kale, cut 23-26
Potatoes - firm, peeled
whole
halved
quartered
27-29
21-22
16-18
53
Page 54

Steam Cooking
Duration in
minutes
Potatoes - moderately firm, peeled
whole
halved
quartered
Potatoes - floury, peeled
whole
halved
quartered
Kohlrabi, cut into sticks 6-7
Pumpkin, diced 2-4
Corn on the Cob 30-35
Swiss Chard, cut 2-3
Peppers, diced/strips 2
Mushrooms 2
Baking Potatoes, firm-cooking 30-32
25-27
19-21
17-18
26-28
19-20
15-16
54
Leeks, cut 4-5
Leeks, halved stalks 6
Romanesco, whole 22-25
Romanesco, florets 5-7
Brussels Sprouts 10-12
Beets, whole 53-57
Red Cabbage, cut 23-26
Black Salsify, whole, thumb thickness 9-10
Celeriac, cut into sticks 6-7
Asparagus, green 7
Asparagus, white, thumb thickness 9-10
Page 55

Steam Cooking
Duration in minutes
Carrots, minced 6
Spinach 1-2
Pointed Cabbage, cut 10-11
Celery, cut 4-5
Turnip, cut 6-7
White Cabbage, cut 12
Savoy Cabbage, cut 10-11
Zucchini, slices 2-3
Sugar Snap Peas 5-7
55
Page 56

Steam Cooking
Meat
Fresh
Prepare the meat in the usual way.
Frozen
Defrost frozen meats before cooking (see "Defrosting").
Preparation
For meat which needs to be seared before being cooked.
Cooking duration
The cooking time depends on the thickness and consistency
of the food. The thicker the food, the longer the cooking time.
Tips
Use a perforated pan to retain the flavors when cooking
meat. Place a solid pan underneath to catch the juices.
You can use them to make a gravy or freeze them for later
use.
56
Page 57

Settings
Steam Cooking
MasterChef > Meat >...
or
Operating Mode > Steam Cooking > ...
Temperature: 212°F/100° C
Duration: see table
The cooking times given in the table are guidelines only. We
recommend selecting the shorter cooking duration to start
with. You can cook it longer if necessary.
Meat Temperature
in °F / °C
Beef Flank,
covered with water
Pork Knuckle 212 / 100 135-145
Chicken Breast 212 / 100 8-10
Shank 212 / 100 105-115
Chuck,
covered with water
Veal Strips 212 / 100 3-4
Smoked Pork Chops 212 / 100 6-8
Lamb Stew 212 / 100 12-16
Poularde 212 / 100 60-70
Turkey Roulade 212 / 100 12-15
Turkey Cutlet 212 / 100 4-6
Short Ribs,
covered with water
Beef Stew 212 / 100 105-115
212 / 100 110-120
212 / 100 110-120
212 / 100 130-140
Duration
in minutes
Whole Chicken,
covered with water
Top Round 212 / 100 110-120
212 / 100 80-90
57
Page 58

Steam Cooking
Sausage
Settings
MasterChef > Sausage >...
or
Operating Mode > Steam Cooking > ...
Temperature: 194°C (90°C)
Duration: see table
Sausage products Duration in minutes
Boiled Sausage 6-8
Pork Sausage 6-8
Veal Sausage 6-8
58
Page 59

Fish
Fresh
Frozen
Preparation
Cooking pans
Shelf level
Steam Cooking
Prepare fresh fish as usual, i.e. clean, gut and filet.
Fish should be thoroughly defrosted before steaming (see
"Defrosting").
Add some lemon or lime juice to fish before cooking. The
citric acid helps the flesh stay firm.
It is not necessary to salt fish when cooking with steam as this
method retains the minerals which give the fish its unique
flavor.
Use perforated pans to cook fish, grease them beforehand.
Slide the universal tray onto the bottom shelf level.
When cooking fish in a perforated pan, and at the same time
cook other foods in other pans, it is recommended to place
the universal tray directly underneath the pan with the fish to
catch any liquid, avoiding any transfer of tastes.
Temperature
185°F- 194°F (85°C - 90°C)
For gentle cooking of delicate types of fish, such as Sole.
212°F (100°C)
For cooking firmer types of fish, e.g. Cod and Salmon.
Also for cooking fish in sauce or stock.
59
Page 60

Steam Cooking
Cooking duration
The cooking time depends on the thickness and consistency
of the food.
The longer fish cooks, the firmer its flesh will become. Use
the cooking times given in the table.
If you find that the fish is not cooked sufficiently, cook it for
only a few more minutes.
When cooking fish in sauce or stock, we recommend that you
increase the indicated cooking time by a few minutes.
Tips
Cook larger fish on its belly (swimming position). So that you
get the necessary stability, place a small cup or similar item
upside down in the cooking pan. Set the fish with the opened
belly side on that.
60
Page 61

Settings
Steam Cooking
MasterChef > Fish >...
or
Operating Mode > Steam Cooking
Temperature: see table
Duration: see table
The cooking times given in the table are guidelines for fresh
fish. We recommend selecting the shorter cooking duration to
start with. You can cook it longer if necessary.
Temperature
in °F / °C
Eel 212 / 100 5-7
Perch Filet 212 / 100 8-10
Seabream Filet 185 / 85 3
Trout, ½ lb (250 g) 194 / 90 10-13
Halibut Filet 185 / 85 4-6
Atlantic Cod Filet 212 / 100 6
Carp, 3.3 lbs (1.5 kg) 212 / 100 18-25
Salmon Filet 212 / 100 6-8
Salmon Steak 212 / 100 8-10
Rainbow Trout 194 / 90 14-17
Pangasius Filet 185 / 85 3
Ocean Perch Filet 212 / 100 6-8
Haddock Filet 212 / 100 4-6
Plaice Filet 185 / 85 4-5
Monk Fish Filet 185 / 85 8-10
Duration in
minutes
Sole Filet 185 / 85 3
Turbot Filet 185 / 85 5-8
Tuna Filet 212 / 100 6-8
Pike Perch Filet 185 / 85 4
61
Page 62

Steam Cooking
Menu Cooking - Manual
Turn the steam reduction off when Menu Cooking (see
"Settings").
With Menu Cooking you can cook a whole meal containing
types of food which have different cooking times, e.g. tilapia
filet with rice and broccoli. The food is placed in the oven at
the appropriate time so that the whole meal is ready at the
same time.
Shelf level
When cooking dripping food (e.g. fish) or food with a
distinctive color (e.g. beets) in a perforated pan, place the
drip tray / universal tray underneath. This avoids any transfer
of flavors from dripping liquid.
Temperature
The temperature for Menu Cooking should be 212°F /100°C,
as this is the temperature required to cook the majority of
foods.
Do not cook a whole meal at the lowest temperature when
different temperatures are required for different types of food,
e.g. 185°F / 85°C for sea bream and 212°F / 100°C for
potatoes.
Cooking duration
62
If the default cooking temperature for the food is 185°F /
85°C, for example, try cooking it at 212°F / 100°C and testing
the result. Some delicate types of fish with a soft structure,
e.g. sole and plaice, will become very firm when cooked at
212°F / 100°C.
If you increase the default temperature, shorten the cooking
duration by approx.
1
/3.
Page 63

Example
Steam Cooking
Rice 20 minutes
Tilapia Filets 6 minutes
Broccoli 4 minutes
20 minutes minus 6 minutes =
14 minutes (first cooking duration: rice)
6 minutes minus 4 minutes =
2 minutes (second cooking duration: tilapia filet)
remainder =
4 minutes (third cooking duration: broccoli)
Cooking
Times
Setting 14 minutes 2
^ Check that steam reduction has been turned off.
^ Place the rice in the oven first.
^ Set the first cooking time: 14 minutes.
^
After 14 minutes, place the tilapia filet in the oven.
^
Set the second cooking time: 2 minutes.
^
After 2 minutes, place the broccoli in the oven.
^
Set the third cooking time: 4 minutes.
20 min. Rice
6 min. Tilapia Filet
4 min. Broccoli
4 minutes
minutes
63
Page 64

Special Modes
Reheating
Cooking utensils
Duration
Always follow USDA guidelines on food safety.
The Combi Steam Oven is very effective at reheating food
gently, without drying it out or cooking it further. The food will
reheat evenly and does not need to be stirred during the
reheating process.
You can reheat individual dishes or plated meals which have
been prepared previously (e.g. meat, vegetables and potatoes).
Small quantities can be reheated on a plate, larger quantities
should be placed in an appropriate cooking pan.
10 - 15 minutes are usually sufficient to reheat one plated
meal. Several plates will take a bit longer.
If you want to reheat multiple items one after the other,
reduce the times for the second and all following actions by
approx. 10 minutes as the oven is still warm.
Moisture
Tips
Settings
64
The more moist the food is, the less moisture needs to be
added.
Food does not need to be covered for reheating.
Compact items, such as stuffed bell peppers or roulades,
should be cut in half.
Please note that breaded items will not retain their crispness
when they are reheated.
Reheat sauce separately.
Exceptions: Dishes prepared in sauces, such as stew.
Special Modes > Reheat or
Operating Modes > Combi Steam > Convection Bake
Temperature: see table
Moisture Level: see table
Duration: see table
Page 65

Special Modes
Food Temperature
in °F / °C
Vegetables
Carrots
Cauliflower
Kohlrabi
Beans
Side dishes
Noodles
Rice
Potatoes, halved lengthwise
Dumplings
Mashed Potatoes
Meat and poultry
Roast, sliced, ½" (1 1/2 cm) thick
Roulades, sliced
Beef Stew
Lamb Ragout
Meatballs
Chicken Cutlet
Turkey Breast, sliced
250 / 120 70 8–10
250 / 120 70 8–10
285 / 140 70 18-20
285 / 140 70 11-13
Moisture
Level
in %
Duration
in minutes
Fish
Fish Filet
Fish Roulade, sliced in 2
Plated dishes
Spaghetti, Tomato Sauce
Roast Pork, potatoes, vegetables
Stuffed Peppers (halved), rice
Chicken Fricassee, rice
Vegetable Soup
Cream Soup
Clear Soup
Stew
285 / 140 70 10-12
250 / 120 70 10-12
65
Page 66

Special Modes
Defrost
Always follow USDA guidelines on food safety.
Defrosting in the appliance is significantly shorter than
defrosting at room temperature.
Temperature
The optimal defrosting temperature is 140°F / 60°C.
Exceptions: Ground meat and game 122°F / 50°C
Before and after defrosting
Remove all packaging before defrosting.
Exceptions:
Leave bread and baked goods in their packaging as
otherwise they will absorb moisture and become soft.
Cooking pans
Use a perforated cooking pan when defrosting food which
will drip, such as poultry. This way the defrosted food is not in
the defrosting liquid.
66
,
Dispose of the liquid from defrosting poultry - Do not
use! Danger of salmonella poisoning.
Food that does not drip can be defrosted in a solid cooking
pan.
Page 67

Tips
Settings
Special Modes
When defrosting food which has frozen together, e.g. berries
or pieces of meat, separate these about half-way through the
defrosting time.
Do not refreeze food once it has thawed.
Special Modes> Defrost
or
Operating Modes > Steam Cooking >
Temperature: see table
Duration: see table
67
Page 68

Special Modes
Food to be
defrosted
Fruit
Apple Sauce 8.8 / 250 140 / 60 20–25 10-15
Apple Pieces 8.8 / 250 140 / 60 20–25 10-15
Apricots 1 lb / 500 140 / 60 25-28 15-20
Strawberries 10 / 300 140 / 60 8-10 10-12
Raspberries/
Currants
Cherries 5 / 150 140 / 60 15 10-15
Peaches 1 lb / 500 140 / 60 25-28 15-20
Plums 8.8 / 250 140 / 60 20–25 10-15
Gooseberries 8.8 / 250 140 / 60 20-22 10-15
Vegetables
Frozen in a Block 10 / 300 140 / 60 20–25 10-15
Fish
Fish Filets 14 / 400 140 / 60 15 10-15
Trout 1 lb / 500 140 / 60 15-18 10-15
Lobster 10 / 300 140 / 60 25-30 10-15
Crab 10 / 300 140 / 60 4-6 5
Weight
in oz / g
10 / 300 140 / 60 8 10-12
Temperature
in °F / °C
Defrosting
time
in minutes
Standing time
in minutes
68
Page 69

Special Modes
Food to be
defrosted
Meat
Roast sliced 140 / 60 8-10 15-20
Ground Meat 8.8 / 250 122 / 50 15-20 10-15
Ground Meat 1 lb / 500 122 / 50 20-30 10-15
Stew 1 lb / 500 140 / 60 30-40 10-15
Stew 2 lbs / 1000 140 / 60 50-60 10-15
Liver 8.8 / 250 140 / 60 20–25 10-15
Cutlets / Chops /
Sausages
Poultry
Chicken 2 lbs / 1000 140 / 60 40 15-20
Chicken Drumsticks 5 / 150 140 / 60 20–25 10-15
Chicken Cutlets 1 lb / 500 140 / 60 25-30 10-15
Turkey Drumsticks 1 lb / 500 140 / 60 40-45 10-15
Pastry
Puff Pastry/
Yeast Dough Pastry
Muffins/
Sponge Cake
Bread / Bread Rolls
Bread Roll 140 / 60 30 2
Brown Bread, sliced 8.8 / 250 140 / 60 40 15
Whole-grain Bread,
sliced
White Bread, sliced 5 / 150 140 / 60 30 20
Weight
in oz / g
1.75 lbs /
800
14 / 400 140 / 60 15 10-15
8.8 / 250 140 / 60 65 15
Temperature
in °F / °C
140 / 60 25-35 15-20
140 / 60 10-12 10-15
Defrosting
time
in minutes
Standing time
in minutes
69
Page 70

Special Modes
Canning
Always follow USDA guidelines on food safety.
Fruit and Vegetables
Only use fresh produce that is ripe and in good condition for
canning.
Glass jars
Only use clean glass jars and accessories and check them
for any defects. Glass jars with twist-off lids or glass lids with
a rubber seal are suitable.
Make sure that all the glass jars are the same size so that
canning is completed evenly.
After you have filled the jars, clean the glass rims with a clean
cloth and hot water and then seal the jars.
Fruit
Sort and rinse the fruit. Allow it to drain completely. Wash
berries very carefully, they are very fragile and easily
crushed.
Remove skins, stalks, seeds or pits.
Chop larger fruit. For example, cut apples into slices.
If you are canning fruit with pits (e.g. plums, apricots) without
removing the pits, pierce the fruit several times with a fork or
wooden skewer as otherwise they will burst.
Vegetables
Filling volume
70
Rinse, clean and cut up vegetables.
Vegetables should be blanched before canning to help them
retain their color (see "Blanching").
Fill the glass jars up to a maximum of 1 1/4" (3 cm) below the
rim. Do not pack down as this would damage the
fruit/vegetable. Tap the jar gently on a cloth to help distribute
the contents evenly under the edge.
Page 71

Tips
Procedure
Settings
Special Modes
Fill the jars with liquid. The canned produce must be
completely covered.
Make use of residual heat by leaving the jars in the oven for
30 minutes after it has turned off.
Then let the jars covered with a cloth cool slowly for
approximately 24 hours.
Place the equally sized glass jars in a perforated cooking
^
pan. Make sure that they do not touch one another.
Slide the pan into the lowest shelf level.
^
Special Modes > Canning, or
Operating Modes > Steam Cooking
71
Page 72

Special Modes
Juicing
Preparation
Tips
You can extract soft fruit juice in your appliance, e.g. berries
and cherries.
Overripe fruit is ideal for extracting juice; the more mature the
fruit, the more juice will be productive and aromatic.
Sort and wash the fruit to be juiced. Remove any damaged
areas.
Remove the stems of grapes and sour cherries, because they
contain bitter compounds. Stalks of berries do not need to be
removed.
Mix mild fruit with tangy fruit to round off the taste.
The juice quantity and aroma are improved if sugar is added
to the fruit and is allowed to soak in for several hours. We
recommend 1/4 - ½ cup (50-100 g) sugar per 2 lbs (1 kg) of
sweet fruit and ½ - 3/4 cup (100-150 g) sugar for 2 lbs (1 kg)
tangy fruit.
Procedure
Settings
72
If you want to save the extracted juice, fill it hot into clean
bottles and seal them immediately.
^
Place the prepared fruit in a perforated cooking pan.
^
Place under that a solid cooked pan or the universal tray in
order to catch the juice.
Steam Cooking
Temperature: 212°F / 100°C
Duration: 40–70 Minutes
Page 73

Menu Cooking
Special Modes
You can select up to three ingredients, e.g. fish, rice and
vegetables.
The various components can be selected in any order. The
Steam Oven uses cooking duration for its calculations so that
food with the longest cooking duration must be placed in the
oven first.
Turn the oven on "On / Off".
^
Then place the drip tray in the oven.
^
Select "Special Modes > Menu Cooking".
^
Select the type of food.
^
Depending on the type of food selected, the display will
prompt you to enter the size and how well done you want the
food.
^ Select or enter the values you want and confirm with
"Continue".
^ Select "Add food".
^ Select the food you want and proceed in the same way as
with the first one.
^
Repeat the process for the third food type, if applicable.
After you have confirmed "Start Menu Cooking", the display
will tell you which food to put in the oven.
At the end of the heating-up phase, the display will show
when the next food type is to be placed in the oven. This
process will be repeated for the third food type, if applicable.
You can also cook a menu using types of food which do
not appear in the display list. See "Menu Cooking - Manual"
for details on how to do this.
73
Page 74

Special Modes
Dehydrate
Procedure
Tip:
Settings
Only use the Convection Bake function to dehydrate food so
that moisture can be dissipated.
Cut the food into pieces of the same size.
^
Spread the pieces evenly on the rack lined with parchment
^
paper.
Bananas and pineapple are not suitable for dehydration.
Special Modes > Dehydrate
or
Special Modes> Combi Steam with Convection Bake
Temperature: see table
Duration: see table
Humidity: 0%
74
Food Temperature
in °F / °C
Apple Slices 125-160 / 50-70 5–8
Apricots,
halved and pitted
Pear Slices 160-175 / 70-80 7–8
Herbs 105-140 / 40-60 1.5-2.5
Mushrooms 125-160 / 50-70 3-4
Tomatoes, quartered 140-160 / 60-70 7-9
Citrus Fruit, sliced 160-175 / 70-80 8-9
Plums, pitted 140-160 / 60-70 10-12
140-160 / 60-70 10-12
Duration in
hours
Page 75

Pizza
Settings
Special Modes
Special Modes > Pizza
Temperature: 350 - 440°F / 180°C - 225°C
Duration: 1-20 Minutes
or
Operating Mode > Convection Bake
Temperature: 350 - 440°F / 180°C - 225°C
Duration: 1-20 Minutes
75
Page 76

Special Modes
Making Yogurt
Always follow USDA guidelines on food safety.
To make yogurt, you will need milk and either fresh live yogurt
or a yogurt culture, obtainable from health food stores.
Use natural yogurt with live culture and without additives.
Heat-treated yogurt is not suitable.
The yogurt must be fresh (short storage time).
You can use either pasteurized or fresh whole milk.
Pasteurized milk can be used without any further treatment.
Fresh milk must first be heated to 194° F / 90° C (not boiled!)
and then cooled down to 95° F / 35° C. Fresh milk will give a
firmer yogurt than long-life milk.
The yogurt and the milk should have the same percentage of
fat.
Do not move or shake the jars while the yogurt is thickening.
Immediately after preparation leave the yogurt to cool in the
fridge.
76
How firm home-made yogurt is will depend on the
consistency, fat content and the cultures used in the starter
yogurt. Not all yogurts are suitable for use as starter yogurt.
Possible reasons for unsatisfactory results
Yogurt is not firm:
Incorrect storage of starter yogurt, too much time out of the
refrigerator (e.g. in transportation), damaged packaging, milk
not sufficiently heated.
Liquid has separated:
The jars were moved, yogurt was not cooled down quickly
enough.
Yogurt is gritty:
Milk was overheated or in poor condition, milk and starter
yogurt not evenly stirred.
Page 77

Tip:
Procedure
Settings
Special Modes
If you are using yogurt starter powder, you can prepare the
yogurt from a mixture of milk and cream. Mix 3 cups (3/4 liter)
milk with 1 cup (1/4 liter) of cream.
Mix ½ cup (100 g) yogurt with 4 cups (1 liter) of milk or
^
make up the mixture with yogurt starter powder, following
the instructions on the packaging.
Pour the mixture into glass jars and seal them.
^
Place the sealed jars in a cooking pan or on the rack. Make
^
sure that they do not touch one another.
Place the jars in the refrigerator immediately after
^
completion of the process. Avoid moving the jars
unnecessarily.
MasterChef > Special > Making yogurt
or
Steam Cooking
Temperature: 104° F / 40° C
Duration: 5:00 hours
77
Page 78

Special Modes
Proofing
Procedure
^
^
Settings
Special Modes > Proof
Duration: according to the recipe
or
Operating Mode > Combi Steam
Temperature: 85°F / 30°C
Humidity: 100%
Duration: according to the recipe
Dissolving Gelatin
Procedure
^ Soak gelatin sheets for five minutes in a bowl with cold
Prepare the dough according to the recipe.
Place the open bowl of dough in a perforated cooking pan
or on the rack.
water. The gelatin sheets have to be completely covered
with water. Remove the gelatin sheets from the bowl and
squeeze them out. Empty the bowl. Place the squeezed
gelatin sheets back in the bowl.
Settings
78
^
Place the gelatin powder in a bowl and add water
according to the instructions on the packaging.
^
Cover the bowl and place in a perforated cooking pan.
MasterChef > Special > Dissolve Gelatin
or
Operating Mode > Steam Cooking
Temperature: 195°F / 90°C
Duration: 1 minute
Page 79

Melting Chocolate
You can melt any type of chocolate in the appliance.
Procedure
^
^
^
^
Settings
MasterChef > Special > Melt Chocolate
or
Operating Mode > Steam Cooking
Temperature: 150°F / 65°C
Duration: 20 Minutes
Special Modes
Break the chocolate into small pieces.
Place large quantities in a non-perforated pan and small
quantities in a cup or a dish
Cover the pan or the dish with temperature resistant foil (up
to 212°F / 100°C) and steam resistant plastic wrap or a lid.
Stir large quantities once during cooking.
79
Page 80

Special Modes
Skinning Fruits and Vegetables
Procedure
Cut a cross at the stem end of tomatoes, nectarines, etc.
^
This will allow the skin to be removed more easily.
Place the food in a perforated pan if cooking with steam or
^
a universal tray if using the rack.
To blanch almonds, it is important to plunge them into cold
^
water as soon as they are taken out of the oven. Otherwise
the skin cannot be removed.
Settings
Operating Mode > Maxi Broil
Level 3
Duration: see table
Food Duration in minutes
Peppers, halved 10
Tomatoes 7
80
Operating Mode > Steam Cooking
Temperature: 212°F / 100°C
Duration: see table
Food Duration in minutes
Apricots 1
Almonds 1
Nectarines 1
Peppers 4
Peaches 1
Tomatoes 1
Page 81

Preserving Apples
Apples can be preserved in the steam oven to increase the
length of time you can store them. The apples will keep for 5
to 6 months when optimally stored in a dry, cool and
well-ventilated place. This method is only suitable for apples
and not for other types of fruit.
Settings
Operating Mode > Steam Cooking
Temperature: 125°F / 50°C
Duration: 5 Minutes
or
MasterChef > Fruit > Apples > Whole > Preserving
Blanching
Blanch fruit and vegetables before freezing them. Blanching
helps maintain the quality of the produce when it is frozen.
Blanching vegetables also helps them retain their original
color.
Special Modes
Procedure
Settings
^
Put the prepared vegetables or fruit into a perforated
cooking pan
^
Once blanched, plunge the vegetables or fruit into an ice
bath to cool them down quickly. Drain them well.
Special Modes > Blanching
or
Operating Mode > Steam Cooking
Temperature: 212°F / 100°C
Duration: 1 minute
81
Page 82

Special Modes
Sweating Onions
Procedure
Settings
Rendering Fat
Sweating means cooking the onions in their own juices, with
the addition of a little fat if necessary.
Cut the onions into small pieces and place them in a solid
^
cooking pan with a little butter.
Cover the pan or the dish with temperature resistant foil (up
^
to 212°F / 100°C) and steam resistant plastic wrap or a lid.
MasterChef > Special > Sweat Onions
or
Operating Mode > Steam Cooking
Temperature: 212°F / 100°C
Duration: 4 Minutes
Bacon will not brown.
Procedure
Settings
82
^
Place bacon (diced or sliced) in a solid cooking pan.
^
Cover the pan with temperature- (up to 212° F / 100 °C)
and steam-resistant cling wrap or a lid.
MasterChef > Special > Sweat Onions
or
Operating Mode > Steam Cooking
Temperature: 212° F / 100 °C
Duration: 4 Minutes
Page 83

Sanitizing Cookware
The steam oven will sanitize baby bottles and other
cookware. Check beforehand that the manufacturer
guarantees all components are to be heat resistant to 212° F /
100 °C and also steam resistant follow manufacturers
instructions.
Procedure
Dismantle the baby bottles into their individual
^
components.
Place the bottle parts and cookware on the rack or in a
perforated cooking pan, making sure that they do not touch
one another (on their sides or with the opening facing
downwards) to allow hot steam to reach them from all
sides.
^ Slide the pan into the lowest shelf level.
Settings
Special Modes> Sanitize Cookware
Duration: 1 minute to 10 hours
or
Special Modes
Operating Mode > Steam Cooking
Temperature: 212°F / 100°C
Duration: 15 Minutes
83
Page 84

Special Modes
Heating Damp Towels
Procedure
Moisten hand towels and then roll them up tightly.
^
Place them beside one another in a perforated cooking
^
pan.
Settings
MasterChef > Special > Heat Damp Towels
or
Operating Mode > Steam Cooking
Temperature: 160°F / 70°C
Duration: 2 Minutes
Decrystallize honey
Procedure
^ Loosen the lid and place the jar (glass only) of honey in a
perforated cooking pan.
Settings
84
^ Stir the honey once during the cooking process.
MasterChef > Special > Decrystallize Honey
or
Operating Mode > Steam Cooking
Temperature: 140°F / 60°C
Duration: 90 Minutes (regardless of the size of jar or the
amount of honey in the jar)
Page 85

Making Jam
Glass jars
Preparation
Procedure
Special Modes
Only use fresh, ripe produce in good condition for canning.
Use only clean, glass jars with twist-off lids up to max. ½ pint
(250 ml) capacity.
After you have filled the jars, clean the glass rims with a clean
cloth and hot water and then seal the jars.
Sort and rinse the fruit. Allow it to drain completely. Wash
berries very carefully, they are very fragile and easily
crushed.
Remove skins, stalks, seeds or pits.
Purée the fruit, otherwise the jam will not set.
Add the required quantity of preserving sugar (see
manufacturer's recommendation). Stir well.
If you use sweet fruits or berries, we recommend the addition
of citric acid.
Settings
^ Fill the jars to a maximum of two-thirds.
^ Place the open jars in a perforated cooking pan or on the
rack.
^
As soon as the cooking process has ended, remove the
jars from the appliance using pot holders. Let the jars stand
for1-2minutes and then screw on the lids and let them
cool.
Operating Mode > Convection Bake
Temperature: 300°F / 150°C
Duration: 35 Minutes
85
Page 86

Special Modes
Sabbath Program
For supporting religious customs, this program is ready to
use for 72 hours.
The program works with the "Surround" operating mode, it
cannot be changed. If the Sabbath program is selected,
there is no daytime indication on the display. The oven
lighting does not turn on, even when the door is opened.
The oven heating only starts after the door has been opened
and closed.
If a short time is selected, the Sabbath program cannot be
started.
Select "Special Modes".
^
Select "Sabbath Program".
^
^ Select a temperature.
^ Open the door.
^ Place the food in the oven.
^ Close the door.
The program starts after 5 minutes. Once the Sabbath
Program has started, it cannot be changed or saved under
"Favorites". The program can only be ended by turning off the
appliance.
86
Page 87

Roast probe
The probe inserted into the meat, measures the internal
temperature of the meat.
The internal temperature to be set depends on the desired
cooking level and type of meat. It is selectable in the range
from 86-210°F / 30-99°C.
The cooking time depends on the oven temperature and
thickness of the meat. The higher the oven temperature and
the thinner the meat, the faster the internal temperature will
be reached.
The cooking process is terminated automatically when the
internal temperature reaches the set value.
Exception: with the Combi Steam operating mode a further
cooking stage is set, i.e. for browning.
After use, pull the roast probe from the socket. Be careful,
it may still be hot.
Do not leave the roast probe in the appliance, as it is only
protected against overheating when inserted.
87
Page 88

Roast probe
Application options
The roast probe can be used in the following operating
modes:
Combi Steam with Convection Bake
Combi Steam with Surround
Convection Bake
Convection Broil
Surround
Intensive
Humidity Plus
Steam Cooking
Important notes on use
The metal tip of the roast probe must be inserted completely
into the cooked food and reach the core.
The metal tip should not touch any bone and not be inserted
in particularly fatty areas. Fat and bone can lead to incorrect
temperature readings.
Select the higher value of the internal temperature range
indicated in the table for heavily marbled meat.
88
Page 89

Procedure
Tips
Roast probe
Prepare the meat in the usual way.
^
Completely insert the metal tip of the roast probe into the
^
food being cooked.
Place the meat in the oven.
^
Open the connection socket for the roast probe and plug it
^
into the receptacle until it clicks.
Select the desired Operating Mode.
^
If necessary, change the default and/or internal
^
temperature.
If you want to cook several pieces of meat at the same time,
insert the roast probe in the thickest piece of meat.
If after the internal temperature of the meat has been
reached, but the meat is not cooked according to your
wishes, insert the roast probe in a different spot in the meat,
and repeat the process.
89
Page 90

Roast
We recommend the Roast modes - Convection Bake and
Combi Steam with Surround.
Be sure that the grease filter is in place.
Never roast meat in frozen state, it will dry out. Defrost it
before cooking.
Do not preheat the oven for roasting. The prepared meat will
be placed into the cold oven.
Clean the meat before roasting. Season the meat as desired
and cover it with dabs of butter.
If you want to cook several pieces of meat at the same time,
use pieces with the same thickness if possible.
Let the finished roast stand about 10 minutes before cutting
so that the meat juices can be redistributed.
90
Page 91

Combi Steam
Roast
The lower the oven temperature is, the longer the cooking
process takes and the more tender the meat is.
Roast meat on the rack with the universal tray placed
underneath. You can then use the collected meat juices for
sauces.
The surface of lean meat will not dry out because of the
supplement of steam.
It will become especially delicate if you cook it in 5 to 6
cooking stages:
In the 1st cooking stage the oven cavity and the rack with the
universal tray underneath are preheated.
In the 2nd cooking stage the meat is browned.
In the 3rd cooking stage the oven cavity is adjusted to the
appropriate temperature for the meat.
In the 4th A tenderizing stage is carried out which makes the
meat tender.
In the 5th cooking stage the meat is cooked to the desired
degree of doneness.
Cook fatty meat with crust in the 1st cooking stage at high
temperature in order to remove the fat and brown the crust. In
the 2nd cooking stage the temperature is reduced and the
humidity increased. In the 3rd cooking stage the temperature
is raised, so that the crust is crispy and bubbly.
With stews in the 1st cooking stage the oven interior and the
rack with the universal tray underneath are preheated.
In the 2nd cooking stage the meat is browned.
In the 3rd cooking stage the meat is braised at a cooking
temperature of 212°F / 100°C and 84% humidity.
Cook poultry in the 1st cooking stage at high temperature
and high humidity, to remove the fat.
In the 2nd cooking stage the temperature is increased.
In the 3rd stage the poultry is browned
Details about the settings are in the following roasting table.
91
Page 92

Roast
Roasting table
The times and temperatures given in the tables are recommendations only.
Always follow USDA guidelines on food safety.
Type of Meat Operating Mode Stage Temp. in
Poultry
Duck up to 4.5 lbs
(2 kg), stuffed
Duck up to 4.5 lbs
(2 kg), unstuffed
Duck Breast,
medium
Duck Breast,
well-done
Goose up to 10 lbs
(4.5 kg)
Whole Chicken Combi Steam with
Chicken Thighs Combi Steam with
Turkey Roulade,
stuffed or unstuffed
Combi Steam with
Convection Bake
Combi Steam with
Convection Bake
Convection Broil 3 375 / 190 - 23
Combi Steam with
Convection Bake
Combi Steam with
Convection Bake
Convection Broil 3 375 / 190 - 23
Combi Steam with Broil 1 Level 3 0 15
Combi Steam with
Convection Bake
Combi Steam with Broil 3 Level 3 0 7-13
Combi Steam with Broil 1 Level 3 0 15
Combi Steam with
Convection Bake
Combi Steam with Broil 3 Level 3 0 7-13
Combi Steam with
Convection Bake
Combi Steam with
Convection Bake
Combi Steam with
Convection Bake
Convection Broil 3 375 / 190 - 23
Convection Bake
Combi Steam with
Convection Bake
Combi Steam with Broil 3 Level 3 0 0-12
Convection Bake
Combi Steam with
Convection Bake
Combi Steam with Broil 3 Level 3 0 0-17
Combi Steam with
Convection Bake
Combi Steam with
Convection Bake
Convection Broil 3 212 / 100 - 4-8
1 375 / 190 40 20
2 212 / 100 80 140
1 375 / 190 40 20
2 212 / 100 80 100
2 85/30 0 20
2 85/30 0 20
4 85/30 0 5
1 375 / 190 40 30
2 212 / 100 80 270
1 395 / 200 95 50
2 440 / 225 0 8-10
1 395 / 200 95 30-25
2 440 / 225 0 13-18
1 375 / 190 40 20
2 285 / 140 75 100
°F/°C
Moisture
Level in %
Duration in
Minutes
92
Page 93

Roast
Type of Meat Operating Mode Stage Temp. in
Poultry
Turkey Breast Combi Steam with Convection
Veal
Tenderloin (Roast),
rare Convection Broil 350 / 175 - -
Tenderloin (Roast),
medium Convection Broil 330 / 165 - -
Tenderloin (Roast),
well done Convection Broil 320 / 160 - -
Tenderloin (Roast
with Moisture),
rare*
Tenderloin
(Roast with
Moisture),
medium*
Tenderloin
(Roast with
Moisture), well
done*
Saddle
(Roast with
Moisture), well
done*
Shank Combi Steam with Surround
Braised veal* Maxi Broil 1 Level 3 0 10
Bake
Maxi Broil 2 Level 3 - 0-9
Combi Steam with Broil 1 Level 3 0 10
Combi Steam with Broil 2 Level 3 0 8
Combi Steam with Surround 3 140 / 60 0 30
Combi Steam with Surround 4 140 / 60 49 31
Combi Steam with Broil 1 Level 3 0 10
Combi Steam with Broil 2 Level 3 0 10
Combi Steam with Surround 3 212 / 100 0 20
Combi Steam with Surround 4 150 / 65 49 60
Combi Steam with Surround 5 160 / 70 51 60
Combi Steam with Broil 1 Level 3 0 10
Combi Steam with Broil 2 Level 3 0 10
Combi Steam with Surround 3 212 / 100 0 20
Combi Steam with Surround 4 150 / 65 49 60
Combi Steam with Surround 5 195 / 90 68 50
Convection Broil 6 395 / 200 - 5
Combi Steam with Broil
Combi Steam with Broil
Combi Steam with Surround
Combi Steam with Surround
Combi Steam with Surround
Convection Broil
Convection Broil
Maxi Broil 2 Level 3 0 10
Combi Steam with Surround 3 212 / 100 84 165
1 340 / 170 65 85
1
2
3
4
5
6
1
2
°F/°C
Level 3
Level 3
212 / 100
150/65
195/90
395 / 200
212 / 100
375 / 190
Moisture
Level in %
0
0
0
49
68
-
84
-
Duration
in Minutes
10
10
20
60
80
155
17
5
93
Page 94

Roast
Type of Meat Operating Mode Stage Temp.
Lamb
Thighs Maxi Broil 1 Level 3 - 18
Combi Steam with Surround 2 212 / 100 57 190
Loin/Crown,
medium*
Loin/Crown, well
done*
Beef
Tenderloin
(Roast), rare
Tenderloin
(Roast), medium
Tenderloin
(Roast), well
done
Tenderloin
(Roast with
Moisture), rare*
Filet
(Roast with
Moisture),
medium*
Filet
(Roast with
Moisture), well
done*
Sirloin (Roast),
rare
Sirloin (Roast),
medium
Sirloin (Roast),
well done
Maxi Broil 1 Level 3 - 10
Maxi Broil 2 Level 3 - 8
Combi Steam with Surround 3 212 / 100 0 30
Combi Steam with Surround 4 170 / 75 47 40
Maxi Broil 1 Level 3 - 10
Maxi Broil 2 Level 3 - 10
Combi Steam with Surround 3 85 / 30 0 30
Combi Steam with Surround 4 212 / 100 57 100
Convection Broil 350 / 175 -
Convection Broil 340 / 170 -
Convection Broil 330 / 165 -
Combi Steam with Broil 1 Level 3 0 10
Combi Steam with Broil 2 Level 3 0 10
Combi Steam with Surround 3 140 / 60 0 30
Combi Steam with Surround 4 140 / 60 49 31
Combi Steam with Broil 1 Level 3 0 10
Combi Steam with Broil 2 Level 3 0 10
Combi Steam with Surround 3 212 / 100 0 20
Combi Steam with Surround 4 150 / 65 49 60
Combi Steam with Surround 5 160 / 70 51 60
Combi Steam with Broil 1 Level 3 0 10
Combi Steam with Broil 2 Level 3 0 10
Combi Steam with Surround 3 212 / 100 0 20
Combi Steam with Surround 4 150 / 65 49 60
Combi Steam with Surround 5 195 / 90 68 105
Convection Broil 6 395 / 200 - 8
Convection Broil 347 / 175 - -
Convection Broil 340 / 170 - -
Convection Broil 330 / 165 - -
in °F / °C
Moisture
Level in %
Duration in
Minutes
94
Page 95

Roast
Type of Meat Operating Mode Stage Temp.
Beef
SIrloin
(Roast with
Moisture), rare*
Sirloin
(Roast with
Moisture) ,
medium*
Sirloin
(Roast with
Moisture), well
done*
Roulades* Combi Steam with Broil 1 Level 3 0 10
Pot Roast* Combi Steam with Broil 1 Level 3 0 10
Pork
Tenderloin Convection Broil 395 / 200 - Smoked Pork
Chop
Crispy Pork Combi Steam with
Pork Loin Combi Steam with Surround 1 355 / 180 50 30
Combi Steam with Broil 1 Level 3 0 10
Combi Steam with Broil 2 Level 3 0 10
Combi Steam with Surround 3 140 / 60 0 30
Combi Steam with Surround 4 140 / 60 49 31
Combi Steam with Broil 1 Level 3 0 10
Combi Steam with Broil 2 Level 3 0 10
Combi Steam with Surround 3 212 / 100 0 20
Combi Steam with Surround 4 150 / 65 49 60
Combi Steam with Surround 5 160 / 70 51 60
Combi Steam with Broil 1 Level 3 0 10
Combi Steam with Broil 2 Level 3 0 10
Combi Steam with Surround 3 212 / 100 0 20
Combi Steam with Surround 4 150 / 65 49 60
Combi Steam with Surround 5 194 / 90 68 135
Convection Broil 6 395 / 200 - 8
Combi Steam with Broil 2 Level 3 0 10
Combi Steam with Surround 3 212 / 100 84 120
Combi Steam with Broil 2 Level 3 0 10
Combi Steam with Surround 3 212 / 100 84 205
Combi Steam with
Convection Bake
Combi Steam with
Convection Bake
Convection Bake
Combi Steam with Surround 2 212 / 100 84 30
Convection Broil 3 330-365 /
Combi Steam with Surround 2 265 / 130 30 -
in °F / °C
1 395 / 200 0 30
2 265 / 130 100 -
1 440 / 225 54 40
165-185
Moisture
Level in %
- 20-25
Duration in
Minutes
95
Page 96

Roast
Type of Meat Operating Mode Stage Temp.
Game
Venison Saddle,
medium*
Venison Saddle,
well done*
* In the first stage place the universal tray into the 1st lower level runner and the rack in the 2nd level
runner from the bottom
(Exception: for rack of lamb place it on the universal tray on the 1st level), insert without meat,
and preheat. With the start of the second stage place the meat on the preheated rack.
Maxi Broil 1 Level 3 - 10
Maxi Broil 2 Level 3 - 7
Combi Steam with Surround 3 85 / 30 0 30
Combi Steam with Surround 4 165 / 75 52 40
Maxi Broil 1 Level 3 - 10
Maxi Broil 2 Level 3 - 13
Combi Steam with Surround 3 85 / 30 0 30
Combi Steam with Surround 4 212 / 100 47 107
in °F / °C
Moisture
Level in %
Duration in
Minutes
96
Page 97

Convection Bake
Surround
Browning
Bake
Baking
For baking on multiple levels
When using Convection Bake, reduce the temperatures given
for Surround by about 20°F / 20°C.
For the baking of traditional recipes and preparing soufflé.
Only bake on one level.
Bake sheet cakes on the center shelf level.
If using older cookbooks or recipes, set the temperature
10°F / 10°C lower then given in the recipe. The cooking time
will not change.
For browning, baking casseroles or layer cakes.
Use this at the end of the baking time to brown the bottom of
the food some more.
Intensive
Humidity Plus
When baking cakes with a moist topping such as cheese
cakes, tarts, quiches, pizza, etc.
Bake these in the bottom shelf level.
For sponge cakes, choux pastry (e.g. cream puffs) and
frozen pretzels
97
Page 98

Baking
Combi Steam
Notes for baking
Baking pans
Universal tray
The shiny finish on bread, bread rolls and puff pastry is
achieved by cooking it with steam (maximum moisture, low
temperature) in cooking stage 1. Browning takes place with
high moisture and high temperature. The baking will become
dryer with low moisture and high temperature.
Bake pre-baked bread rolls with 90% moisture at the
temperature given by the manufacturer on the packaging.
Remove the grease filter from the back wall. Otherwise results
can be uneven. (Exception: Fruit tarts, pizza with extra
toppings).
Dark-colored pans conduct heat more quickly to the mixture.
Shiny metal pans reflect heat. Therefore cakes take longer to
bake in these pans.
Thanks to the anti-stick properties of the surface with the
"PerfectClean" finish, the universal tray does not require
greasing before baking.
Parchment paper
98
Parchment paper is required for:
–
pretzels, the baking soda (or bakers lye) used may
damage the "PerfectClean" surface.
–
batters that may quickly stick due to their high egg white
content, such as biscuits, meringues or macaroons.
Page 99

Frozen products
Shelf level
Baking
When baking frozen products such as French fries,
croquettes, cakes, pizza and baguettes, use the lowest
temperature quoted by the manufacturer on the packaging.
Bake frozen cakes, pizzas or baguettes on the rack covered
with parchment paper. With frozen products, the baking or
universal tray may warp so that they cannot be removed
when hot.
Frozen products such as French fries, croquettes or similar
items can be baked on the universal tray. For gentle baking
of these products, place parchment paper under them on the
tray. Turn the food several times during baking.
Use only one shelf level when preparing moist cakes.
Bake on a maximum of two shelf levels at the same time.
If you are baking on two shelf levels at the same time, use
levels 1 and 2.
Notes about the baking table
Select the lower temperature shown on the table.
Do not set the temperature higher than indicated. Higher
temperatures may shorten the baking times but will frequently
result in uneven browning and may even prevent the food
from being baked through.
After the end of the shortest baking time, check whether the
baked goods are done. Insert a toothpick into the dough, if
no moist pieces of the baked good adhere to the toothpick,
the baked goods are done.
99
Page 100

Baking
Baking table
The times and temperatures given in the tables are recommendations only.
Baked goods Operating mode Stage Temp.
Sponge
Baking Tray Convection Bake 300-355 / 150-180 - 25
Spring Form Pan Surround 320-340 / 160-170 - 25-35
Puff Pastry
Filled Combi Steam with
Small Pastry* Surround - 355 / 180 - 15
Choux Pastry
Cream Puffs / Eclairs Combi Steam with
Yeast Dough
Bagels Combi Steam with
Baguettes /
Spelt Bread
Croissants Combi Steam with
Multi-grain Bread Combi Steam with
Flatbread Combi Steam with
Braided Loaf Combi Steam with
White Bread Combi Steam with
Convection Bake
Convection Bake
Convection Bake
Combi Steam with
Convection Bake
Convection Bake
Convection Bake
Surround
Surround
Convection Bake
1 212 / 100 100 7
2 375-410 / 190-210 90 10
3 375-410 / 190-210 75 5
4 375-410 / 190-210 0 6
1 212 / 100 100 10
2 395 / 200 0 24
1 105 / 40 100 8
2 125 / 50 100 4
3 410 / 210 50 6
4 355-410 / 180-210 0 30
1 195 / 90 100 2
2 320 / 160 90 10
3 320-410 / 160-190 0 27
1 85 / 30 100 15
2 300 / 150 50 10
3 300 / 150 0 100
1 105 / 40 100 10
2 125 / 50 100 2
3 410 / 210 0 6
4 310-375 / 155-190 0 25
1 105 / 40 100 8
2 125 / 50 100 2
3 395 / 200 50 10
4 320-395 / 160-200 0 12
1
2
3
4
in °F / °C
300-365 / 150-185 - 50
105/40
125/50
410 / 210
430 / 220
Moisture
Level in %
100
100
50
0
Duration
in
minutes
8
4
6
25-50
100
 Loading...