

Page 1
Operating and Installation
Instructions
Combi Steam Oven
To prevent accidents and machine damage, read these instructions
before installation or use.
en-US, CA M.-Nr. 10 357 781
Page 2

Contents
IMPORTANT SAFETY INSTRUCTIONS ................................................................ 7
Overview............................................................................................................... 18
Front view.............................................................................................................. 18
Included accessories............................................................................................. 20
Control panel .......................................................................................................21
Sensor buttons...................................................................................................... 22
Display................................................................................................................... 23
Symbols............................................................................................................23
Description of functions .....................................................................................24
Control panel......................................................................................................... 24
Water container..................................................................................................... 24
Condensate container........................................................................................... 24
Grease filter ........................................................................................................... 24
Roast probe........................................................................................................... 24
Temperature / Core temperature ........................................................................... 24
Moisture content ................................................................................................... 25
Cooking duration................................................................................................... 25
Noises.................................................................................................................... 25
Preheating phase................................................................................................... 26
Cooking phase ...................................................................................................... 26
Steam reduction.................................................................................................... 26
Oven interior lighting ............................................................................................. 26
Before using for the first time ............................................................................ 27
General settings .................................................................................................... 27
Cleaning for the first time ...................................................................................... 28
Setting the water hardness level ........................................................................... 29
Setting the correct boiling point for water............................................................. 30
Heating up the steam oven ................................................................................... 30
Modes / Programs / Menus................................................................................ 31
Operation: Steam cooking.................................................................................. 34
Quck guide ............................................................................................................ 34
Interrupting operation............................................................................................ 36
Additional functions............................................................................................... 37
Switching on and off automatically ..................................................................38
Sequence of an automatic cooking process.................................................... 38
Changing settings during a cooking process................................................... 39
Canceling cooking................................................................................................. 39
2
Page 3

Contents
Operation: Combination cooking mode ............................................................ 40
Quck guide ............................................................................................................ 41
Interrupting operation............................................................................................ 43
Additional functions............................................................................................... 44
Switching on and off automatically ..................................................................44
Sequence of an automatic cooking process.................................................... 45
Changing settings during a cooking process................................................... 45
Canceling cooking................................................................................................. 45
Operation: Functions without steam ................................................................. 46
Quick guide ........................................................................................................... 47
Interrupting operation............................................................................................ 48
Additional functions............................................................................................... 49
Turning off automatically .................................................................................. 50
Switching on and off automatically ..................................................................50
Sequence of an automatic cooking process.................................................... 51
Rapid PreHeat.................................................................................................. 51
Changing the operating mode..........................................................................52
Changing settings during a cooking process................................................... 52
Canceling cooking................................................................................................. 53
MasterChef ..........................................................................................................54
List of automatic programs ................................................................................... 54
Using the MasterChef programs........................................................................... 55
Favorites............................................................................................................... 56
Creating a Favorite ................................................................................................ 56
Starting a Favorite ................................................................................................. 57
Changing Favorites................................................................................................ 58
Changing cooking stages................................................................................. 58
Changing the name ..........................................................................................59
Deleting a Favorite................................................................................................. 59
Timer..................................................................................................................... 60
Setting the timer.................................................................................................... 60
Resetting the timer ................................................................................................ 60
Canceling the timer ............................................................................................... 60
General notes....................................................................................................... 61
The advantages of cooking with steam ................................................................ 61
Suitable containers................................................................................................ 61
Cooking pans ................................................................................................... 61
Using your own cookware................................................................................ 61
Shelf level .............................................................................................................. 62
3
Page 4

Contents
Frozen food............................................................................................................ 62
Temperature .......................................................................................................... 62
Cooking duration................................................................................................... 62
Cooking with liquid................................................................................................ 62
Your own recipes - Steam cooking ....................................................................... 62
Wire oven rack / universal tray.............................................................................. 63
Steam cooking..................................................................................................... 64
Vegetables............................................................................................................. 64
Meat ...................................................................................................................... 67
Sausage................................................................................................................. 69
Fish........................................................................................................................ 69
Shellfish................................................................................................................. 72
Mussels ................................................................................................................. 73
Rice ....................................................................................................................... 74
Pasta ..................................................................................................................... 75
Dumplings ............................................................................................................. 76
Grains .................................................................................................................... 77
Legumes................................................................................................................ 78
Eggs ...................................................................................................................... 80
Fruit ....................................................................................................................... 81
Menu Cooking - Manual........................................................................................ 82
Sous-vide (vacuum) cooking .............................................................................. 84
Reheating .............................................................................................................. 90
Special modes .....................................................................................................92
Reheat ................................................................................................................... 92
Defrost................................................................................................................... 94
Canning ................................................................................................................. 97
Juicing ................................................................................................................... 98
Menu Cooking....................................................................................................... 99
Dehydrate............................................................................................................ 100
Making Yogurt ..................................................................................................... 101
Proofing............................................................................................................... 102
Dissolving Gelatine.............................................................................................. 103
Melting Chocolate ............................................................................................... 103
Skinning Fruits and Vegetables ........................................................................... 104
Preserving Apples .............................................................................................. 105
Blanching............................................................................................................. 105
Sweating Onions ................................................................................................. 106
Rendering Fat...................................................................................................... 106
Sanitizing Cookware ........................................................................................... 107
Heating Damp Towels ......................................................................................... 107
4
Page 5

Contents
Decrystallizing Honey.......................................................................................... 108
Pizza.................................................................................................................... 108
Making jam.......................................................................................................... 109
Sabbath Program ................................................................................................ 109
Roast probe .......................................................................................................111
Roast ..................................................................................................................114
Bake.................................................................................................................... 121
Broil..................................................................................................................... 128
Settings ..............................................................................................................130
Accessing the "Settings" menu........................................................................... 130
Changing and saving settings........................................................................ 130
Settings overview ................................................................................................ 131
Language ......................................................................................................... 132
Time of day.......................................................................................................... 132
Display............................................................................................................ 132
Clock format...................................................................................................132
Setting the time ..............................................................................................132
Date..................................................................................................................... 132
Lighting................................................................................................................ 133
Display brightness............................................................................................... 133
Acoustic tone information ................................................................................... 133
Melody............................................................................................................ 133
Solo tone ........................................................................................................133
Keypad tone ........................................................................................................ 134
Units of measurement ......................................................................................... 134
Weight ............................................................................................................ 134
Temperature ...................................................................................................134
Keeping Warm..................................................................................................... 135
Automatic rinsing ................................................................................................ 135
Recommended temperatures.............................................................................. 136
Safety .................................................................................................................. 136
System lock ...............................................................................................136
Sensor lock ....................................................................................................137
Water hardness ................................................................................................... 137
Showroom Program ............................................................................................ 138
Demo Mode.................................................................................................... 138
Factory default..................................................................................................... 138
5
Page 6

Contents
Cleaning and care .............................................................................................139
Important information on cleaning and care ....................................................... 139
Appliance front .................................................................................................... 140
PerfectClean........................................................................................................ 141
Oven interior........................................................................................................ 142
Water container and condensate container ........................................................ 144
Accessories......................................................................................................... 144
Shelf runners ....................................................................................................... 145
Mainentance........................................................................................................ 146
Soak ...............................................................................................................146
Drying .............................................................................................................146
Rinsing............................................................................................................ 146
Descaling........................................................................................................ 146
Door..................................................................................................................... 148
Frequently asked questions ............................................................................. 150
Optional accessories ........................................................................................155
Cooking pan........................................................................................................ 155
Cleaning and care products................................................................................ 157
Additional accessories ........................................................................................ 158
IMPORTANT SAFETY INSTRUCTIONS - INSTALLATION ............................... 160
Detailed dimensions of oven front................................................................... 161
Installation dimensions..................................................................................... 163
Installation into a tall cabinet............................................................................... 163
Undercounter installation .................................................................................... 165
Installation in combination with an oven ............................................................. 167
Installation.......................................................................................................... 169
Electrical connection ........................................................................................170
Power Supply .................................................................................................170
Caring for the environment ..............................................................................171
Technical service, data plate, warranty........................................................... 172
MieleCare ........................................................................................................... 173
6
Page 7

IMPORTANT SAFETY INSTRUCTIONS
The Combi Steam oven is referred to in the following instructions as steam oven.
This appliance conforms to current safety requirements. Inappropriate use can, however, lead to personal injury and damage to
property.
To avoid the risk of accidents and damage to the appliance,
please read these instructions carefully before installing or using it
for the first time.They contain important notes on installation,
safety, use and maintenance.
Keep these instructions in a safe place and pass them on to any
future owner.
SAVE THESE INSTRUCTIONS
7
Page 8

IMPORTANT SAFETY INSTRUCTIONS
Use
This appliance is intended for residential use only.
The steam oven is not suitable for outdoor use.
This steam oven is intended for domestic use only as described in
these operating instructions.
Any other usage is not supported by the manufacturer and could be
dangerous.
Persons who lack physical, sensory or mental abilities, or experi-
ence with the appliance should not use it without supervision or instruction by a responsible person.
This steam oven is supplied with a special bulb to cope with par-
ticular conditions (e.g. temperature, moisture, chemical resistance,
abrasion resistance and vibration). This special bulb must only be
used for the purpose for which it is intended. It is not suitable for
room lighting. Replacement of bulbs may only be carried out by a
Miele authorized technician.
8
Page 9

IMPORTANT SAFETY INSTRUCTIONS
Children
Activate the system lock to ensure that children cannot switch on
the steam oven inadvertently.
Children must not be allowed to clean the steam oven unsuper-
vised.
Please supervise children in the vicinity of the steam oven and do
not let them play with it.
As with any other appliance, you must constantly keep an eye on
children while the steam oven is in operation.
Danger of suffocation! Ensure that any plastic wrappings, bags,
etc. are disposed of safely and kept out of the reach of children.
Danger of burning. Children's skin is far more sensitive to high
temperatures than that of adults. The door, control panel and the
ventilation cut-outs for oven compartment ventilation all get hot.
Make sure that children do not touch the steam oven or attempt to
open the door when it is in operation. Keep children well away from
the appliance until it has cooled down and there is no danger of
burning.
Risk of injury! The maximum allowable weight on the door is
22lbs (10 kg).
Do not allow children to hang, lean or sit on the door when open.
9
Page 10

IMPORTANT SAFETY INSTRUCTIONS
Technical safety
Installation, repair and maintenance work should be performed by
a Miele authorized service technician in accordance with national
and local safety regulations and the provided installation instructions. Contact Miele’s Technical Service Department for examination,
repair or adjustment. Repairs and other work by unauthorized persons could be dangerous and may void the warranty.
A damaged appliance is dangerous. Check the appliance for any
visible damage. Never install or attempt to use a damaged appliance.
Reliable and safe operation of this steam oven can only be as-
sured if it has been connected to the power supply.
Be certain your appliance is properly installed and grounded by a
qualified technician. To guarantee the electrical safety of this appliance, continuity must exist between the appliance and an effective
grounding system. It is imperative that this basic safety requirement
be met. If there is any doubt, have the electrical system of the house
checked by a qualified electrician.
Before connecting the appliance to the power supply, ensure that
the connection data on the data plate (voltage and frequency) match
the power supply.
This data must correspond in order to avoid the risk of damage to
the appliance. Consult a qualified electrician if in any doubt.
Do not use an extension cord to connect this appliance to the
power supply. Extension cords do not guarantee the required safety
of the appliance.
For safety reasons, this appliance may only be used after it has
been built in.
This steam oven must not be used in a non-stationary location
(e.g. on a ship).
10
Page 11

IMPORTANT SAFETY INSTRUCTIONS
Tampering with electrical connections or components and me-
chanical parts is highly dangerous to the user and can cause operational faults. Do not open the outer casing of the appliance.
While the appliance is under warranty, repairs should only be per-
formed by a Miele-authorized service technicians. Work by unqualified persons could be dangerous and may void the warranty.
Defective components should be replaced by Miele original parts
only. Only with these parts can the manufacturer guarantee the
safety of the appliance.
If the plug has been removed or the power cord is not supplied
with a plug, the steam oven must be connected to the power supply
by a suitably qualified electrician.
If the power cord is damaged, it must be replaced with a special
connection cable typeH05VV-F (PVC insulated). See "Electrical
connection."
Before installation, maintenance, and repair work, the steam oven
must be disconnected from the electrical supply. It is only completely isolated from the electrical supply if: the fuse has been removed (where applicable), the main circuit breaker has been tripped,
or the power cord has been unplugged from the wall outlet. Always
be sure to pull the plug not the cord.
If the steam oven is installed behind a cabinet door, do not close
the door while the appliance is in operation. Heat and moisture can
build up behind the closed door and cause damage to the range and
to the surrounding cabinets and flooring. Do not close the door until
the appliance has completely cooled down.
Do not repair or replace any part of the appliance unless specifi-
cally recommended in the manual. All other servicing should be reffered to a qualified technician.
11
Page 12

IMPORTANT SAFETY INSTRUCTIONS
Do not operate any appliance with a damaged cord or plug, or if
the appliance has been damaged in any manner. Contact Miele’s
Technical Service Department.
12
Page 13

IMPORTANT SAFETY INSTRUCTIONS
Proper use
Danger of burning. The steam oven becomes hot when in use.
You could burn yourself on the heating elements, oven interior,
cooked food, oven accessories or hot steam. Use pot holders when
placing food in the oven or removing it and when adjusting oven
shelves etc. in a hot oven. Take care when putting cooking pans into
the oven or removing them not to spill the contents.
Use only dry, heat-resistant potholders. Moist or damp potholders
used on hot surfaces may result in steam burns. Do not let potholders come in contact with oil or grease. Do not substitute dish towels
or other bulky items for potholders. Do not let potholders touch hot
heating elements.
Do not heat up food in closed containers e.g. tins or sealed jars in
the steam oven, as pressure will build up in the container, causing it
to explode.
Plastic containers which are not suitable for use in an oven can
melt at high temperatures and can even damage the steam oven or
catch fire.
Only use plastic containers which are declared by the manufacturer
as being suitable for use in a steam oven. Follow the manufacturer's
instructions on use. If you want to use plastic containers for steaming food make sure that they are temperature resistant to 210°F /
100°C and steam resistant. Any other plastic containers could melt,
become brittle or break when subjected to heat.
Food which is left in the oven to be kept hot can dry out and the
moisture released can lead to corrosion damage in the appliance. Do
not use the steam oven for keeping food warm and do not use utensils in the appliance which could corrode.
Do not leave the appliance door open unnecessarily as someone
may trip over it or be injured by it.
13
Page 14

IMPORTANT SAFETY INSTRUCTIONS
The door can support a maximum weight of 22lbs (10kg). Do not
sit, lean or place heavy items on the open oven door. Also be sure
nothing can get trapped between the door and the oven cavity. The
steam oven could get damaged.
Oil and fat can ignite if overheated. Never leave the steam oven
unattended when cooking with oil and fat.
If it does ignite do not put the flames out with water. Switch the
steam oven off immediately and then suffocate the flames by keeping the oven door closed.
Smother the fire or flames, or use a dry chemical extinguishing
agent or foam fire extinguisher.
Due to the high temperatures radiated, objects left near the steam
oven when it is in use could catch fire.
Do not use the steam oven to heat up the room.
Broiling food for an excessively long time can cause it to dry out
with the risk of catching fire.
Do not exceed recommended broiling times.
Some foods dry out very quickly and can be ignited by high broil-
ing temperatures. Do not use broiling functions for crisping rolls or
bread or to dry flowers or herbs. Instead use the Convection
Plus or Surround functions.
To avoid fueling any flames, do not open the appliance door if you
see smoke coming from the food in the oven interior. Interrupt the
current process by turning off the appliance and disconnecting it
from the power. Do not open the door until the smoke has dissipated.
Use caution when using alcohol in your recipes. Alcohol evapo-
rates at high temperatures but may, in rare circumstances, combust
on the hot heating elements.
Never cover the floor of the oven with aluminum foil, or place oven
dishes, pans, saucepans or trays directly onto the floor of the oven.
14
Page 15

IMPORTANT SAFETY INSTRUCTIONS
Never use the steam oven without a drain filter as large food
residues may block the drain and the pump.
To prevent the risk of damage, do not leave the roast probe in the
oven cavity when it is not being used.
When using an electrical appliance, e.g., a hand-held mixer, near
the steam oven, make sure that the power cord does not get caught
in the door. The insulation on the cord could become damaged, giving rise to an electric shock hazard.
Do not operate the appliance without the lamp cover. Steam could
attack the electrical components and cause a short circuit. Steam
could also damage the electrical components.
The steam oven should be installed at a safe height for users to
safely access all cooking levels and pans. Otherwise spills could
cause burns or scalding and children may be put at risk by the hot
appliance door.
Flammable materials should not be stored in an oven or in the
vicinity of the cooktop.
Open the door carefully to allow hot air or steam to escape before
placing or removing food.
Keep the oven vent ducts open.
Wear proper apparel - Loose-fitting or hanging garments should
never be worn while using the appliance.
To prevent burns, always place oven racks at their desired height
while the steam oven is cool. If the rack must be moved while the
oven is hot, do not let pot holders touch hot heating elements.
15
Page 16

IMPORTANT SAFETY INSTRUCTIONS
Caution: Heating elements may be hot even though they are not
glowing. Interior surfaces of an steam oven become hot enough to
cause burns. External parts of the steam oven such as the door
glass, vents, and the control panel can become hot. During and after
use, do not touch, or let clothing or other flammable materials come
into contact with heating elements or interior surfaces of the steam
oven until they have had sufficient time to cool.
16
Page 17

IMPORTANT SAFETY INSTRUCTIONS
Cleaning and care
Do not use a steam cleaner to clean this oven.
Steam could penetrate electrical components and cause a short circuit.
Scratches on the door glass can cause the glass to break.
Do not use abrasive cleaners, hard sponges, brushes or sharp metal
tools to clean the door glass.
The side runners can be removed for cleaning purposes (see
"Cleaning and care").
Ensure that they are replaced correctly and do not use the oven
without them in place.
To avoid corrosion on the stainless steel surfaces of the Speed
Oven, remove any splashes on the interior walls of the oven from
food or liquids containing salt.
Accessories
Use only genuine original Miele parts. If parts or accessories from
other manufacturers are used, the warranty will become void.
Only use the Miele roast probe supplied with this oven. If it is
faulty, it must only be replaced with a Miele genuine roast probe.
The plastic on the roast probe can melt at very high temperatures.
Do not use the roast probe when using the broil functions (exception:
Convection Broil). Do not store the roast probe in the oven if it is
not in use.
The perforated and solid cooking pans will be damaged by high
temperatures! Use them only in modes and programs that work exclusively with steam.
17
Page 18
Overview
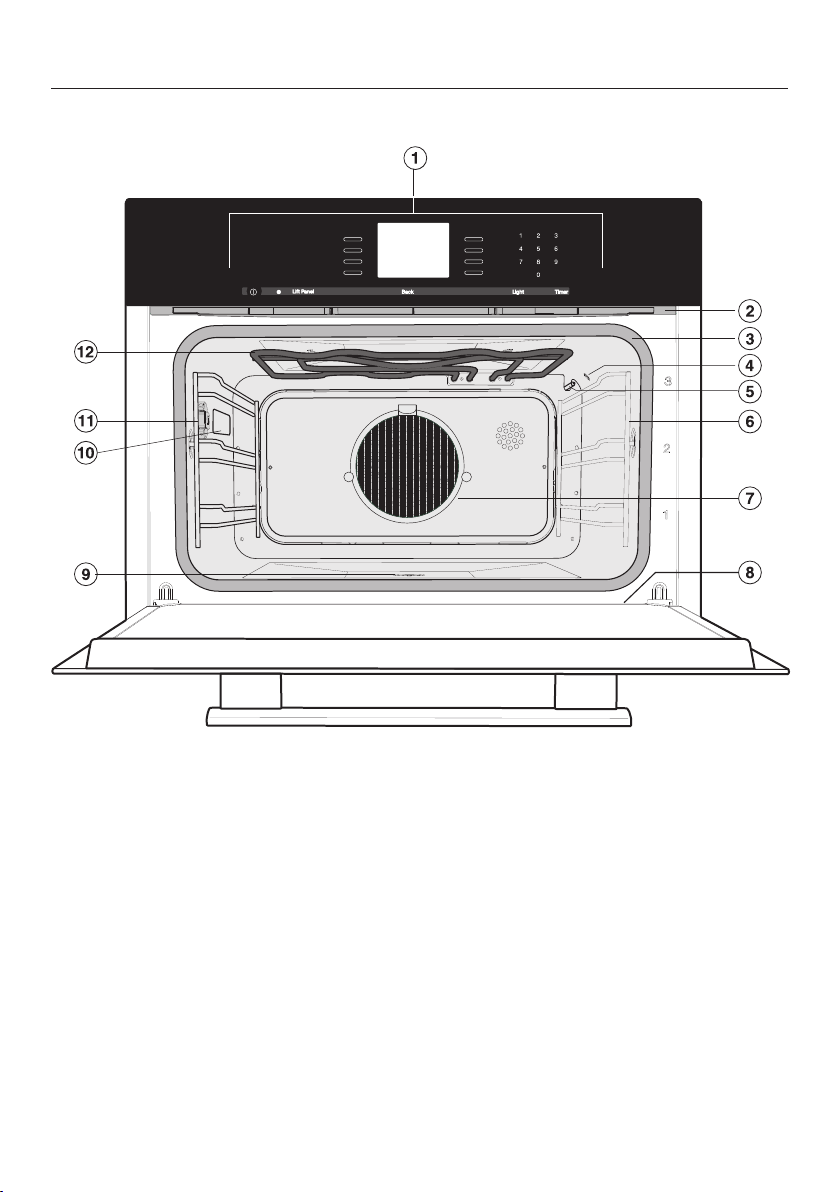
Front view
a
Control panel
b
Vent
c
Door gasket
d
Moisture sensor
e
Temperature sensor
f
Side runners with 3 shelf levels
18
g
Grease filter
h
Drip channel
i
Drain
j
Oven interior lighting
k
Connection socket for the roast
probe
l
Browning / Broiling element
Page 19
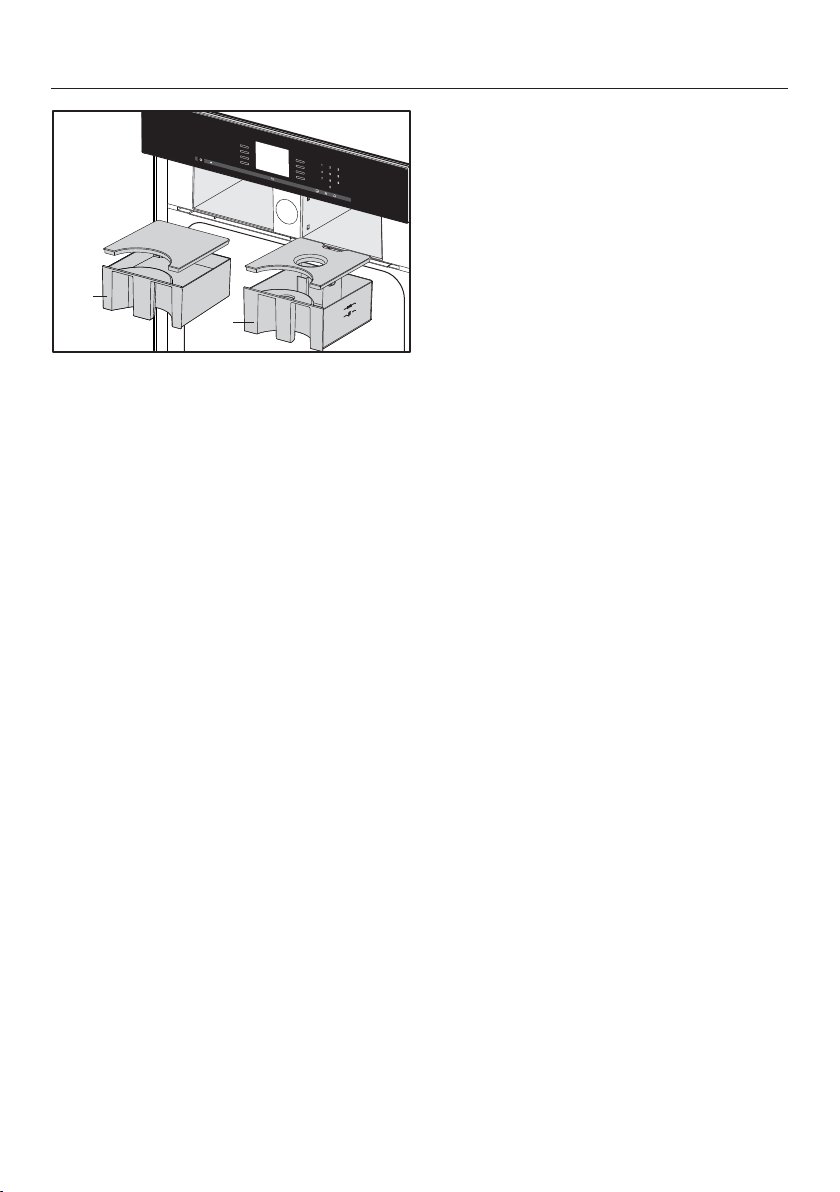
m
o
n
p
m
Slide-in compartment for condensate container
n
Condensate container
o
Slide-in compartment for water container
p
Water container
Overview
19
Page 20
Overview
Included accessories
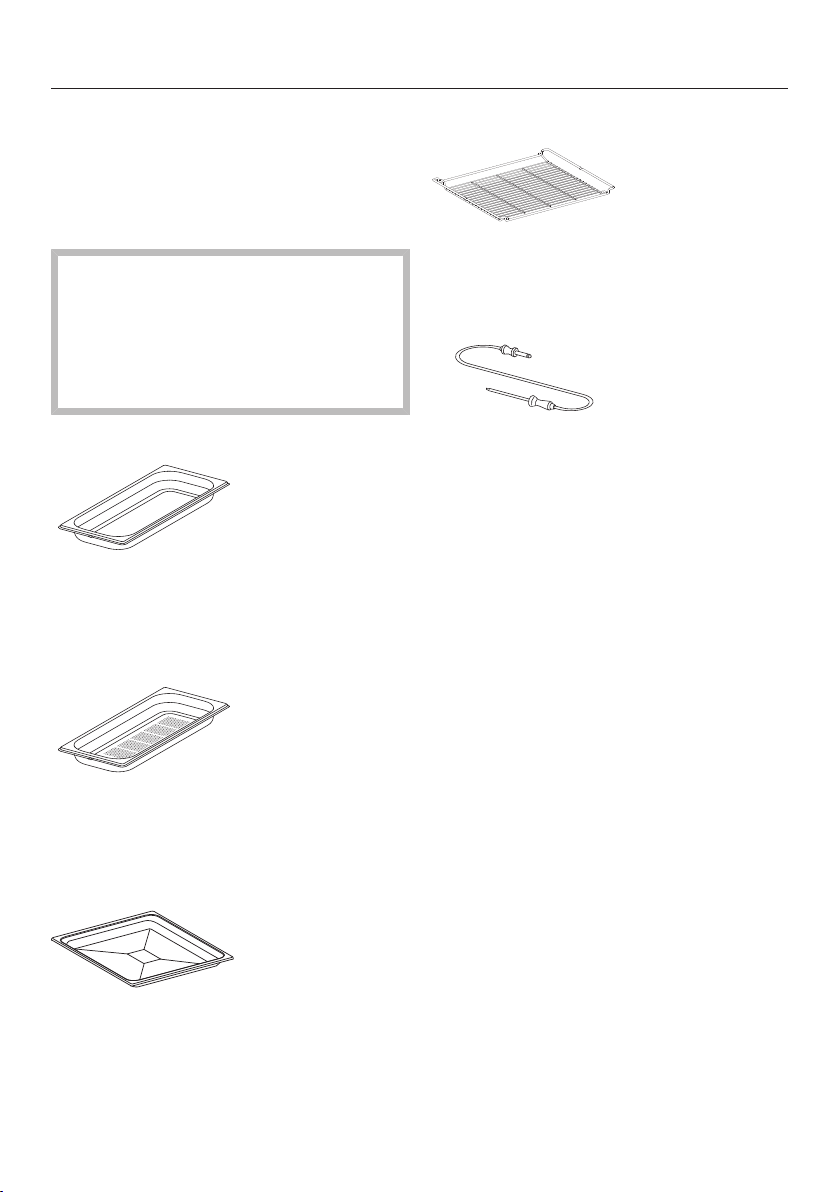
The accessories supplied with your appliance, as well as a range of optional
ones, are available to order from Miele
(see "Optional accessories").
The perforated and solid cooking
pans will be damaged by high temperatures!
Use them only in modes and programs that work exclusively with
steam.
DGG 20
1solid cooking pan
17 11/16" x 7 1/2" x 1 9/16" (WxDxH)
450x190x40mm (WxDxH)
DGGL 20
Wire oven rack
1 wire oven rack for baking, roasting
and broiling
Roast probe
1 roast probe for precise temperature
controlled cooking, which monitors the
internal temperature of the meat (core
temperature).
1perforated cooking pan
17 11/16" x 7 1/2" x 1 9/16" (WxDxH)
450x190x40mm (WxDxH)
Universal tray
1 universal tray for baking, roasting and
broiling
20
Page 21
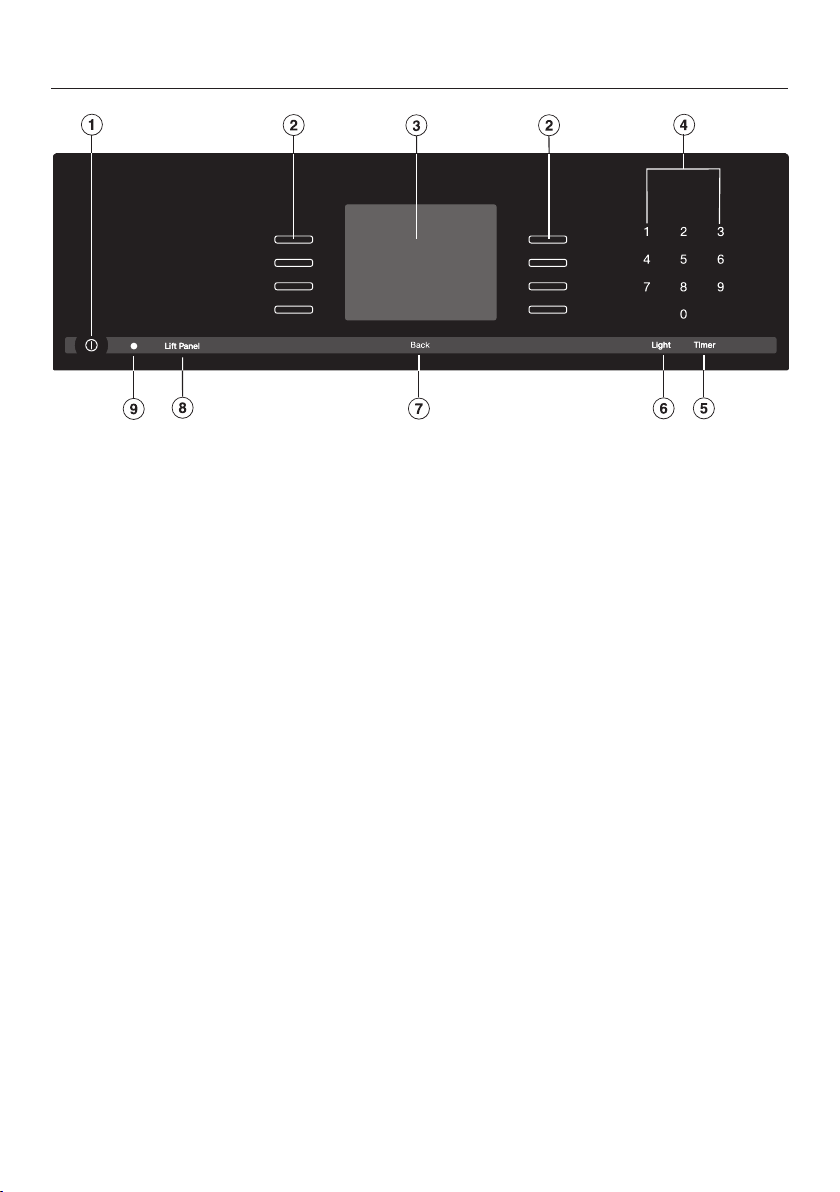
a
Recessed On / Off button
To turn the appliance on and off
b
Sensor buttons
To select operating modes, settings and menu items
c
Display
Displays the time of day and information on operation
d
Sensor buttons 0-9
Numeric keypad to enter values
Control panel
e
"Timer" sensor button
To set the timer
f
"Light" sensor button
To turn the oven interior lighting on and off
g
"Back" sensor button
To go back one step at a time
h
"Lift Panel" sensor button
For opening/closing the control panel
i
Optical interface
(for service technician use only)
21
Page 22

Control panel
Sensor buttons
The sensors react to touch. Each touch is confirmed with an audible tone. This
tone can be turned off (see "Settings – Keypad tone").
Sensor
button
For selecting op-
0–9 Numerical keypad
Lift
Panel
Back To go back a step
Function Notes
tions and scrolling
through the list of
options
for setting values
For setting the
timer
For switching the
oven interior lighting on and off
For opening/closing the control
panel
A menu option can be selected by touching the illuminated sensor next to it.
The numerical keypad is used to set values, e.g.
temperatures and durations.
If a list of options is showing in the display or if a
cooking program is running, you can enter a timer
duration (e.g. when boiling eggs) at any point (see
"Timer").
If the display is dark, this sensor will not react until
the steam oven is switched on.
If a list of options is showing in the display or if a
cooking process is running, touching will switch
the oven interior lighting on or off.
If the display is dark, this sensor will not react until
the steam oven is switched on.
The oven interior lighting switches off after 15seconds during cooking or remains on continuously,
depending on the setting selected.
22
Page 23

Control panel
Display
The display is used for showing the time of day or information about modes, temperatures, cooking durations, MasterChef programs and settings. Information or a
list of options is shown on the display depending on the function selected.
After switching the oven on with the On/Off sensor button, the main menu will
appear.
If a cooking process is running, selecting Change will call up a list of options which
can be set or changed for the cooking process in progress.
Touch the illuminated sensor button beside the option to select it.
Options can then be accessed by tapping the illuminated sensor button next
to OK.
Symbols
The following symbols may appear in the display:
Symbol Description
Allocates an illuminated Sensor button to an option and indi-
cates that the option can be selected.
If more than four options are available a bar will appear on the
The end of a list is indicated by a dotted line. By scrolling down
/ These only appear when an entry is possible or necessary (e.g.
A check indicates the currently active setting. will not be dis-
This symbol indicates that there is additional information and ad-
/ / Water level indicator
Program finished
Timer
Some settings, e.g. display brightness and buzzer volume, are
right-hand side of the display. Use the allocated sensors to scroll
through the list.
further, you will reach the beginning of the list again.
entering the date).
played and the corresponding sensor will not be illuminated.
vice about using the oven. Select OK to access the information.
selected using a bar chart.
23
Page 24

Description of functions
Control panel
The water container and condensate
container are located behind the control
panel. The control panel is opened and
closed using the "Lift Panel" sensor.
The panel is equipped with a device
which will automatically stop it moving
if it meets an obstruction while opening
or closing. Do not touch the door handle while the panel is opening or closing.
Water container
The maximum water level is 3 pints
(1.4liters), the minimum 1 quart (1liter).
These levels are indicated on the container. Do not exceed the maximum
level.
The amount of water depends on the
type of food and the duration of cooking. You may need to refill the water
container during the cooking procedure.
Opening the door will increase the
amount used.
Fill the water container to the maximum
level before each use.
Condensate container
Condensate that collects in the appliance from cooking is pumped into the
condensate container. The container
has a maximum capacity of 3 pints
(1.4liters).
Grease filter
Insert the grease filter in the back wall
for all roasting programs.
It should be removed when using steam
programs.
It must also be removed when baking,
as otherwise results can be uneven (exception: deep fresh fruit pies, pizza with
extra toppings).
Roast probe
The roast probe measures the core
temperature in the food, enabling the
temperature during the cooking process
to be monitored simply and accurately.
Temperature / Core temperature
Some modes offer a recommended
temperature. The recommended temperature can be changed for a single
cooking program or cooking step, or
permanently within a specific area (see
"Settings – Recommended temperatures").
It is also possible to change the core
temperature for a single cooking program or cooking step within the specified area.
24
Page 25

Description of functions
Moisture content
The Combi Steam and Reheat modes use
a combination of oven heat and moisture. You can alter the moisture/humidity level within a given range for an individual cooking program or a cooking
stage.
Depending on the setting for the program, either moisture or fresh air is injected into the oven. If the humidity
level is set to 0%, the maximum
amount of air will be injected and no
moisture. If the level is set to 100%, air
will not be injected into the oven and
the maximum amount of moisture will
be injected.
Some food gives off moisture during
the cooking process. This moisture
from the food also controls the amount
of moisture needed. If the required
amount of moisture is very low and the
food already contains a lot of water the
steam generator may not be activated
at all.
Cooking duration
Depending on the function, you can set
a cooking duration of between 1 minute
and 6, 10 or 12 hours.
The duration of the MasterChef, Maintenance and Menu Cooking programs is
set at the factory and cannot be altered.
With the Steam Cooking function and
programs that use steam alone, the
cooking duration does not start to
count down until the set temperature
has been reached. It begins immediately with all other functions and programs.
Noises
You will hear a pumping sound when
the appliance is turned on, during use
and after turning it off. This is the sound
of water being pumped through the
system and is quite normal.
When the steam oven is in use, you will
hear a fan noise.
25
Page 26

Description of functions
Preheating phase
During the preheating phase the display
will show the temperature in the cooking compartment as it rises and Pre-
Heating in all programs except for MasterChef, Menu Cooking, and Maintenance.
During steam cooking, the duration of
the preheating phase will depend on the
quantity and the temperature of the
food. In general this phase will last for
approx. 5 minutes. The duration will be
longer if you are preparing refrigerated
or frozen food.
Cooking phase
The cooking phase begins when the set
temperature is reached. During the
cooking phase, the time left will be
shown on the display.
Steam reduction
If cooking is performed in a certain temperature range during steam cooking
and combination cooking, the steam reduction function switches on automatically at the end of the cooking program.
This reduces the amount of steam
which escapes from the appliance
when the door is opened at the end of
the cooking duration. Steam Reduction
will appear in the display in addition to
Program Finished.
Oven interior lighting
The oven light has been set at the factory to go out when cooking starts.
If you want it to stay on all the time the
oven is on you will need to alter the default setting (see "Settings - Lighting").
If the door is left open at the end of a
cooking program, the oven lighting will
turn off automatically after 5minutes.
The oven lighting gives off heat. If you
are operating the combi steam oven at
a temperature below 125°F (50°C), the
oven compartment lighting switches off
automatically.
If the "Light" button on the control
panel is pressed, the oven compartment lighting will come on for 15seconds.
This function can be switched off if you
wish (see "Settings - Steam reduction").
26
Page 27

Before using for the first time
General settings
The steam oven must not be op-
erated until it has been correctly installed.
The steam oven will turn on automatically when it is connected to the
power supply.
Welcome screen
A welcome screen is displayed. You will
then be asked to select some basic settings which are needed before the appliance can be used.
Follow the instructions on the display.
Set the language
Scroll through the list until the desired
language appears.
Touch the illuminated sensor but-
ton next to the language you want to
select.
Set the location
Scroll through the list until the desired
location appears.
Touch the illuminated sensor but-
ton next to the location you want to
select.
Confirm with OK.
Set the date
Use or to set the year, month
and day.
Confirm with OK.
Set the time of day
Use the numerical keypad to set the
time of day in hours and minutes (e.g.
1-2-1-5 for 12:15).
Confirm with OK.
The time of day can be displayed in
12-hour format (see "Settings - Time
of Day - Clock Format").
Confirm with OK.
27
Page 28

Before using for the first time
Time of day format
You will then be asked when you want
the time of day to show on the display
when the steam oven is turned off (see
"Settings - Time of Day - Display"):
– On
The time is always visible on the display.
– Off
The display appears dark to save energy. Some modes are limited.
– Night Dimming
The time only shows on the display
between 5:00 am and 11:00 pm. It
turns off at night to save energy.
Select the desired option.
Confirm with OK.
Information regarding energy consumption will appear on the display.
Confirm with OK.
Set up Successfully Completed is dis-
played.
Confirm with OK.
The steam oven is ready for use.
Please adhere the extra data plate for
the appliance supplied with this documentation in the space provided in
the "Technical service, data plate,
warranty" section of this manual.
Remove any protective foil and stick-
ers.
The appliance has undergone a function test in the factory. Residual water
from this testing may have dripped
from the lines into the oven cavity during transportation.
Cleaning for the first time
Water container and condensate container
Danger!
Do not touch the door handle when
opening the control panel. Your fingers could be pinched.
Tap "Lift Panel" to open the control
panel.
Remove the water container and con-
densate container. Push upwards
slightly as you take them out of the
appliance.
If you accidentally select the wrong
language, follow the instructions described in "Settings - Language ."
28
Rinse the water container / conden-
sate container by hand or in the dishwasher.
Page 29

Before using for the first time
Accessories / Oven interior
Remove all accessories from the
steam oven.
Wash them by hand using hot water
and a soft clean sponge and a mild
solution of warm water and liquid
dish soap or in the dishwasher.
Risk of damage to the surfaces of
the universal tray and the wire oven
rack.
The universal tray and wire oven rack
are treated with PerfectClean and
must only be cleaned by hand.
See "Cleaning and care - PerfectClean" for more information.
Clean the universal tray and wire
oven rack with a solution of warm
water and liquid dish soap applied
with a soft sponge.
The interior of the steam oven has
been treated at the factory with a conditioning agent.
Setting the water hardness level
The steam oven is factory set for Hard
water. It must be adjusted local water
hardness to ensure trouble-free operation and to ensure that descaling is carried out at the correct interval. The
harder the water, the more often it will
need to be descaled.
Check the hardness of your local wa-
ter supply and adjust the water hardness as necessary (see "Settings Water hardness").
To remove this, clean the oven inte-
rior with warm water and liquid dish
soap and then dry thoroughly with a
soft cloth.
29
Page 30

Before using for the first time
Setting the correct boiling point for water
Before cooking food for the first time,
you must set the boiling point for water,
as this varies depending on the altitude
of the installation location of the appliance. This procedure also flushes out
the waterways.
This procedure must be carried out
to ensure efficient functioning of your
appliance.
Only use cold tap water (less than
68°F / 20°C). Never use distilled or
mineral water or other liquids.
Remove the water container and fill it
to the "max" marker.
Push the water container into the ap-
pliance until it engages.
You should then run the Steam Cook-
ing program at 210°F / 100°C for
15minutes. Proceed as described in
"Operation ‒ Steam cooking."
Heating up the steam oven
To remove the grease from the ring
heating element, heat the appliance
up with nothing in it at 400°F / 200°C
using the Convection Bake function for
30minutes.
Proceed as described in "Operation ‒
Functions without steam."
There will be a slight smell the first
time the heating element is heated up.
The smell and any vapors will dissipate after a short time, and do not indicate a faulty connection or appliance.
It is important to ensure that the
kitchen is well ventilated during this
operation.
Resetting the correct boiling point for water
If you move, the appliance will need to
be re-set for the new altitude if this differs from the old one by 984 ft (300m)
or more. To do this, descale the appliance (see "Cleaning and care – Maintenance – Descaling").
30
Page 31

Modes / Programs / Menus
Operating Modes
Convection Bake
For baking on several levels at the same
time. The fan distributes the heat evenly
throughout the cavity for a consistent baking temperature.
Surround
Heat is used from both the upper and lower
heating elements to create perfect results of
all baking recipes.
Combi Steam
For baking, roasting and broiling.
For more information see "Operation: Combination cooking mode", "Roast", "Bake"
Convection Bake
Surround
Maxi Broil
Default tem-
perature/
Temperature
range
Setting
320°F / 160°C 85-435°F /
30–225°C
350°F / 180°C 85-435°F /
30–225°C
340°F / 170°C 85-435°F /
30–225°C
350°F / 180°C 85-435°F /
30–225°C
Level 3 Levels1–3
Steam Cooking
For cooking all types of food, bottling, extracting juice with steam, special applications
Sous-vide (vacuum) cooking
For cooking food in a vacuum bag
Intensive
This mode gently circulates heated air from
the lower heating element using the fan to
create a brick oven environment.
Bake
Use this at the end of the baking time to
brown the bottom of the food.
Browning
For a perfectly browned topping, for example when making a gratin or browning the
top of a casserole.
210°F (100°C) 105-210°F /
40–100°C
149°F / 65°C 115-195°F /
45–90°C
350°F / 180°C 120-435°F /
50–225°C
375°F / 190°C 210-435°F /
100–225°C
375°F / 190°C 210-435°F /
100–225°C
31
Page 32
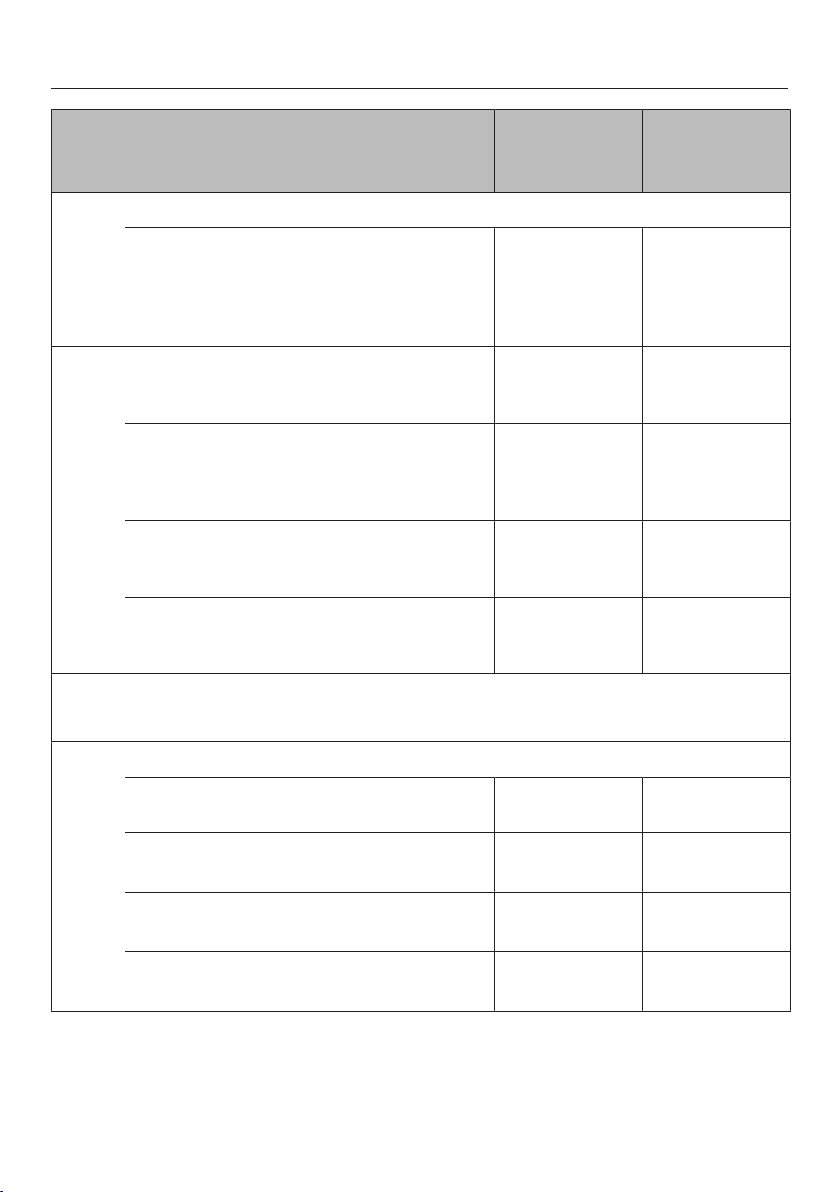
Modes / Programs / Menus
Default tem-
perature/
Operating Modes
Maxi Broil
The entire upper heating element is used for
intense heating from above. Excellent
browning and searing results can be
achieved.
Broil
For broiling smaller quantities of steak,
chops, kebabs, etc.
Convection Broil
This mode distributes hot air from the
Browning/Broiling element over the food using the fan.
Humidity Plus
A special baking program for light pastries,
cakes and baked goods.
Gentle Bake
For cooking sweet and succulent bakes and
gratins
MasterChef
400°F / 200°C 120-435°F /
320°F / 160°C 85-435°F /
320°F / 160°C 85-435°F /
The list of available MasterChef programs is displayed.
Temperature
range
Setting
Level 3 Level 1-3
Level 3 Level 1-3
50–225°C
30–225°C
30–225°C
Special Modes
Menu Cooking
Simultaneous cooking of various foods
Pizza
Defrost
For gentle thawing of frozen foods
Reheat
To gently reheat already cooked foods
32
– –
350°F / 180°C 350-435°F /
180–225°C
140°F / 60°C 120-140°F /
50–60°C
265°F / 130°C 248-284°F /
120–140°C
Page 33
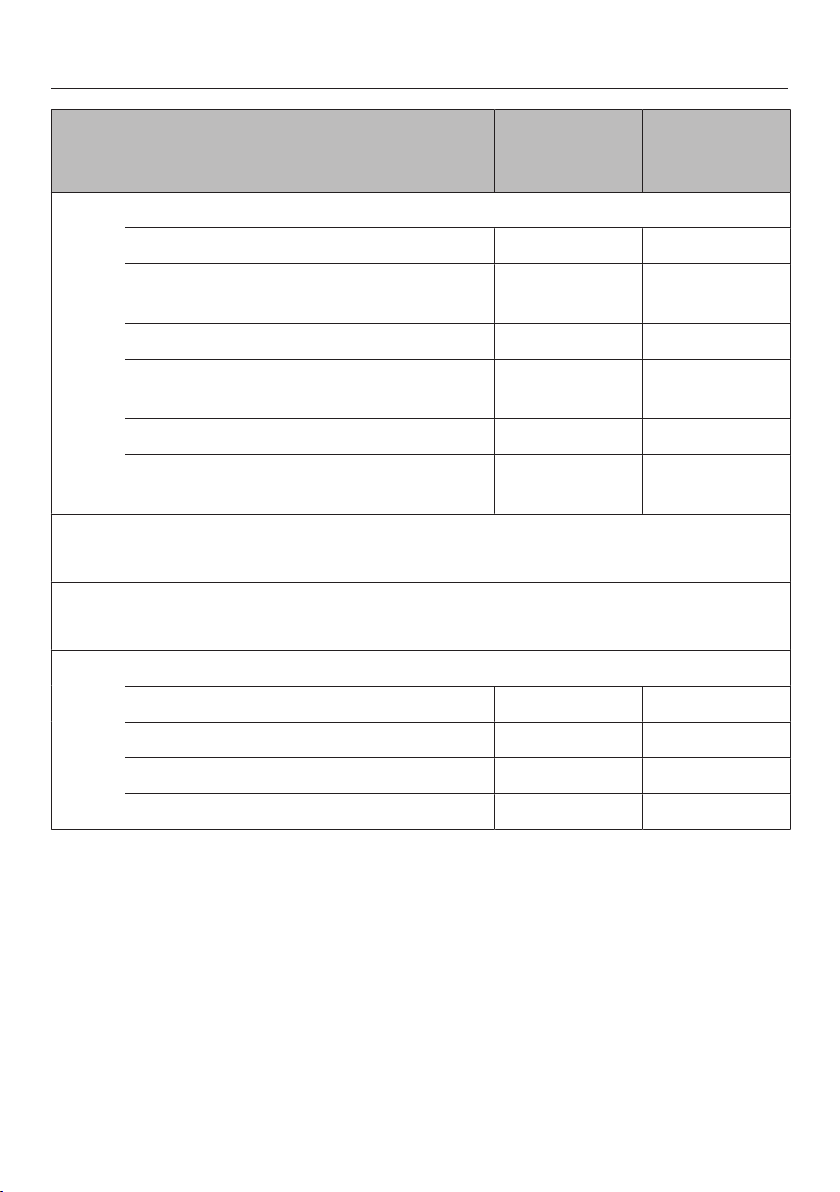
Modes / Programs / Menus
Special Modes
Blanching
Canning
Sanitize Cookware
Dehydrate
Proof
Sabbath Program
Favorites
Create and save your favorite dishes
Settings
Changing the factory default settings
Maintenance
Descale
Default tem-
perature/
Temperature
range
Setting
– –
195°F / 90°C 175-210°F /
80–100°C
– –
140°F / 60°C 140-160°F /
60–70°C
– –
350°F / 180°C 85-435°F /
30–225°C
– –
Soak
Drying
Rinses
– –
– –
– –
33
Page 34

Operation: Steam cooking
A fault can occur if the drain is
blocked.
Check that the drain filter is correctly
in place before each program as
large food residues can clog the
drain.
Quck guide
Turn the steam oven on with .
The main menu appears on the display.
Only use cold tap water (less than
70°F / 20°C). Never use distilled or
mineral water or other liquids.
Fill the water container and push it
back in so that it engages.
Put the food in the oven.
Select Operating Modes.
Select Steam Cooking.
Set the Temperature appears on the dis-
play.
Set the Duration appears on the display.
Set the cooking duration. Any time
between 1minute and 10hours can
be set.
Confirm with OK.
The cooking process begins. The steam
condenser, lighting, and fan turn on.
Set further settings as necessary (see
"Additional functions")
Adjust the recommended tempera-
ture if necessary.
Confirm with OK.
The recommended temperature will be
automatically accepted within a few
seconds.
If necessary, select "Back" to go back
to the temperature setting (see "Additional functions - Changing the temperature").
34
Page 35

Operation: Steam cooking
At the end of the cooking duration
– Steam Reduction (with temperatures
over approx. 175°F / 80°C) and Pro-
gram Finished will appear in the dis-
play,
– The fan remains on.
– A buzzer or melody will sound (see
"Settings - Acoustic information").
You have the option to save the program as a Favorite (see "Favorites") or
to increase the cooking duration using
Change. Tap "Back" to go back to the
main menu.
Burn hazard!
You could burn yourself on the oven
interior walls, spilled food and accessories
Use pot holders when removing hot
food from the oven.
Wait until Steam Reduction goes out
on the display before opening the
door and removing the food.
After use
Remove and empty the water con-
tainer and condensate container.
Push upwards slightly as you take
them out of the appliance.
Switch the steam oven off .
Following a cooking program with
steam, Appliance Rinsing will appear in
the display after the steam oven has
been switched off.
This process should be carried out
every time to flush any remaining
food deposits out of the system.
Follow the instructions in the display.
After each use, clean and dry the
whole appliance as described in
"Cleaning and care."
Leave the appliance door open until
the oven compartment is completely
dry.
Insufficient water
If the steam oven runs out of water during operation, an audible tone will
sound and the display will prompt you
to fill the water container with fresh tap
water.
Remove the water container and fill it
with fresh tap water.
Push the water container into the ap-
pliance until it engages.
Operation will continue.
35
Page 36

Operation: Steam cooking
Interrupting operation
Operation is interrupted as soon as the
door is opened. The heating will be
turned off and the cooking duration remaining stored in memory.
Burn hazard!
Steam can escape when the door is
opened.
Step back and wait until the steam
has dissipated.
Burn hazard!
You could burn yourself on the oven
interior walls, spilled food and hot
steam.
Use pot holders when inserting, removing or turning hot food, or when
adjusting shelves, etc. in a hot oven.
Operation will resume when the door is
closed.
The oven will heat up again and the display will show the temperature of the
cooking compartment as it rises.
Once the set temperature has been
reached, the display will change to
show the cooking duration remaining as
it counts down.
The cooking process will be ended
early if the door is opened during the
last minute of cooking (55 seconds
standing time).
36
Page 37

Operation: Steam cooking
Additional functions
Setting additional cooking durations
You have placed the food in the oven,
selected a temperature and a cooking
time.
Select Change.
Additional menu options will appear.
You can select or change these options
for the cooking program:
– Ready at
– Start at
– Change Mode
(see "Changing settings during a
cooking process - Change mode")
You can set the program to switch off or
on automatically by entering Ready at or
Start at.
– Ready at
You specify the time you want cooking to stop.
– Start at
If the temperature in the oven is too
high, e.g. directly after another program, you will not be able to use this
function. Ready at and Start at will not
appear in the display if this is the
case. Open the oven door until the appliance has cooled down.
A Ready at time cannot be entered if
you are using the roast probe. When
using the roast probe, the end of the
cooking process is determined by
when the set core temperature is
reached. Only Start at can be selected.
You specify the time you want cooking to start.
Cooking results can be impaired if
there is a long delay between the
food being placed in the oven and
the start of cooking. Fresh food can
change its color and even deteriorate.
37
Page 38

Operation: Steam cooking
Switching on and off automatically
To switch a cooking program on and off
automatically, you have a choice of how
to enter the time parameters:
– Duration and Ready at
– Duration and Start at
Example: It is now 11:45 am. The food
takes 5 minutes to cook and needs to
be ready at 12:30 pm.
Select Change.
Select Duration and set a duration of
"00:05."
Confirm with OK.
Select Ready at and set "12:30."
Confirm with OK.
Start at is calculated automatically. The
cooking duration entered is added to
the preheating time calculated by the
steam oven.
Start at12:18 appears in the display.
The cooking process will start automatically at this time.
Sequence of an automatic cooking process
Up until the start time the operating
mode, the selected temperature, Start at
and the start time will appear in the display.
After the start time, you can see the
temperature increasing in the display
during the preheating phase until the
set temperature is reached. Once this
temperature is reached a buzzer will
sound.
After the preheating phase, the cooking duration (time left) will count down
in the display. The last minute counts
down in seconds.
At the end of the cooking process the
steam generator will switch off. A
buzzer or a melody will sound (see
"Settings - Acoustic information").
Steam Reduction (only with temperatures
of approx. 175°F / 80°C) and Program
Finished will appear in the display.
You have the option to save the program as a Favorite (see "Favorites") or
to increase the cooking duration using
Change. Touch to go back to the
main menu.
38
Page 39

Operation: Steam cooking
Changing settings during a cooking process
Select Change.
The following will appear on the display:
– Temperature
– Duration
– Ready at
– Start at
If the temperature in the oven is too
high Ready at and Start at are not displayed.
– Change Mode
Changing the temperature
Select Temperature.
Change the temperature.
Confirm with OK.
The cooking program will restart with
the new temperature.
You can also permanently reset the
recommended temperature to suit
your personal cooking habits (See
"Settings - Recommended Temperatures").
Changing the cooking duration
Select Duration.
Change the duration.
Deleting a finish time
Select Ready at.
Select Reset.
The finish time is now deleted.
The program will start using the dura-
tion set.
Changing the oven mode
Select Change Mode.
Select the desired mode.
The new mode will appear on the display together with its recommended
temperature.
Change the temperature, if neces-
sary.
Confirm with OK.
Set a different cooking duration if
necessary.
Confirm with OK.
The oven mode has been changed.
Canceling cooking
Select .
Cancel Cooking? appears on the display.
Select Yes.
The Main Menu will appear. Any cook-
ing durations set will be deleted.
Confirm with OK.
The program will restart using the new
duration.
39
Page 40

Operation: Combination cooking mode
Combi Steam works by combining dry
heat and steam. You can combine up to
ten cooking stages in a combination
mode program. You can set the temperature, moisture level, and duration or
core temperature (when using the roast
probe) for each cooking stage.
The cooking program will be carried out
in the order in which the individual
stages are entered.
The following operating modes are
available:
– Convection Bake
– Surround
– Maxi Broil
The roast probe cannot be used with
Maxi Broil.
You cannot cook with a core temperature after a cooking stage using Maxi
Broil.
40
Page 41

Operation: Combination cooking mode
A fault can occur if the drain is
blocked.
Check that the drain filter is correctly
in place before each program as
large food residues can clog the
drain.
Quck guide
The following example describes a
cooking program with 3 cooking stages.
Turn the steam oven on .
The main menu appears on the display.
Only use cold tap water (less than
68°F / 20°C). Never use distilled or
mineral water or other liquids.
Fill the water container and push it
back in so that it engages.
Insert the roast probe if required into
the food (see "Roast probe").
Put the food in the oven.
When cooking on the rack, insert the
universal tray underneath it.
Select Operating Modes.
Select Combi Steam.
Cooking stage 1
Convection Bake / Surround
Set the required temperature.
Confirm with OK.
Set the required moisture.
Confirm with OK.
Select Set the Duration or Set Core
Temperature.
Set the cooking duration or core tem-
perature. Any time between 1minute
and 12hours can be set.
Confirm with OK.
Select Add Cooking Stage.
Maxi Broil
Set the broil level.
Confirm with OK.
Set the required moisture.
Confirm with OK.
Set the cooking duration. Any time
between 1minute and 6hours can be
set.
Confirm with OK.
Select Add Cooking Stage.
Cooking stage2
Select the desired mode.
Select the required settings (see
cooking stage 1).
Confirm with OK.
Select Add Cooking Stage.
41
Page 42

Operation: Combination cooking mode
Cooking stage 3
Select the desired mode.
Select the required settings (see
cooking stage 1).
Confirm with OK.
Select Complete Combi Steam.
A summary of your settings will appear
on the display.
Check the settings and confirm with
Accept or select Change to correct the
settings or to add further cooking
stages.
When you have confirmed the settings,
the following will appear in the display:
– Start Now
– Save
– Ready at
– Start at
A Ready at time cannot be entered if
you are using the roast probe. When
using the roast probe, the end of the
cooking duration is determined by
when the set core temperature is
reached. Only Start Later can be selected.
At the end of the cooking time
– Steam Reduction (only with tempera-
tures of approx. 175-210°F /
80-100°C and 100% moisture) and
Program Finished will appear in the dis-
play.
– The fan remains on.
– A buzzer or melody will sound (see
"Settings - Audible information").
You have the option of saving the program as a Favorite (see "Favorites").
Touch twice to go to the main
menu.
Danger of burning!
You could burn yourself on the oven
interior walls, spilled food and accessories.
Use pot holders when removing hot
food from the oven.
Wait until Steam Reduction goes out in
the display before opening the door
and removing the food.
– Change Cooking Stages
If you wish to save your settings as a
user program select Save and enter a
program name (see "User programs").
Start the cooking process immedi-
ately or alter further settings as necessary (see "Additional functions").
42
Page 43

Operation: Combination cooking mode
After use
Remove and empty the water con-
tainer and condensate container.
Push upwards slightly as you take
them out of the appliance.
Switch the steam oven off .
Following a cooking program with
steam, Appliance Rinsing will appear in
the display after the steam oven has
been switched off.
This process should be carried out
every time to flush any remaining
food deposits out of the system.
Follow the instructions in the display.
After each use, clean and dry the
whole appliance as described in
"Cleaning and care."
Leave the appliance door open until
the oven compartment is completely
dry.
Insufficient water
If the steam oven runs out of water during operation, an audible tone will
sound and the display will prompt you
to fill the water container with fresh tap
water.
Remove the water container and fill it
with fresh tap water.
Push the water container into the ap-
pliance until it engages.
Operation will continue.
Interrupting operation
Operation is interrupted as soon as the
door is opened. The heating will be
turned off and the cooking duration remaining stored in memory.
Burn hazard!
Steam can escape when the door is
opened.
Step back and wait until the steam
has dissipated.
Burn hazard!
You could burn yourself on the oven
interior walls, spilled food and hot
steam.
Use pot holders when inserting, removing or turning hot food, or when
adjusting shelves, etc. in a hot oven.
Operation will resume when the door is
closed.
The oven will heat up again and the display will show the temperature of the
cooking compartment as it rises. Once
the set temperature has been reached,
the display will change to show the
cooking duration remaining as it counts
down.
For cooking processes with a 100%
humidity setting and temperatures up
to 210°F / 100°C:
The cooking process will be ended
early if the door is opened during the
last minute of cooking (55 seconds
standing time).
43
Page 44

Operation: Combination cooking mode
Additional functions
Setting additional durations
You have placed the food in the oven
and selected the settings for the cooking process.
You can set the program to turn off or
on and off automatically by entering
Ready at or Start at.
– Ready at
You specify the time you want cooking to stop.
– Start at
You specify the time you want cooking to start.
Cooking results can be impaired if
there is a long delay between the
food being placed in the oven and
the start of cooking. Fresh food can
change its color and even deteriorate.
If the temperature in the oven is too
high, e.g. directly after another program, you will not be able to use this
function. Ready at and Start at will not
appear on the display if this is the
case. Open the oven door until the appliance has cooled down.
Switching on and off automatically
To switch a cooking program on and off
automatically, you have a choice of how
to enter the time parameters:
– Duration and Ready at
– Duration and Start at
Example: It is now 11:45 am. The food
takes 5 minutes to cook and needs to
be ready at 12:30 pm.
In cooking stage 1, set a cooking du-
ration of 5 minutes (see "Quick
guide").
When you have selected the settings for
the cooking process:
Select Ready at and set "12:30."
Confirm with OK.
Start at is calculated automatically.
Start at12:25 appears in the display.
The cooking process will start automatically at this time.
A Ready at time cannot be entered if
you are using the roast probe. When
using the roast probe, the end of the
cooking duration is determined by
when the set core temperature is
reached. Only Start Later can be selected.
44
Page 45

Operation: Combination cooking mode
Sequence of an automatic cooking process
Up until the start time the operating
mode, the selected temperature and
moisture level, Start at and the start time
will appear in the display.
After the start time, you can see the
temperature increasing in the display
during the preheating phase until the
set temperature is reached. Once this
temperature is reached a buzzer will
sound.
After the preheating phase you can
follow the time counting down in the
display (time remaining). The last minute
counts down in seconds.
At the end of the cooking process the
steam generator and oven compartment lighting will switch off. A buzzer or
a melody will sound (see "Settings Acoustic information").
Steam Reduction (only with temperatures
of approx. 175-210°F / 80-100°C and
100% moisture) and Program Finished
will appear in the display.
You have the option of saving the program as a Favorite (see "Favorites").
Touch to go to the main menu.
Changing settings during a cooking process
Select Change.
The following will appear on the display:
– all individual cooking stages
– Add Cooking Stage
The setting specified for a cooking
stage can be changed or more cooking
stages can be added to the program.
Select the desired cooking stage or
Add Cooking Stage.
Alter the cooking stages as you wish
(see "Simple operation") and confirm
with OK.
A summary of your settings will appear
on the display.
Check the settings and confirm with
Accept or select Change to correct the
settings or to add further cooking
stages.
Canceling cooking
Tap "Back".
Cancel Cooking? appears on the display.
Select Yes.
The list of operating modes will appear.
Any cooking durations set will be
deleted.
If you tap again, the main menu will
appear.
45
Page 46

Operation: Functions without steam
You do not necessarily need to enter a
cooking duration for operating modes
which do not use steam. If no duration
is entered, operation starts automatically as soon as the temperature has
been confirmed or after 15seconds.
The steam oven will switch off automatically after a maximum 12 hours of operation, or after a maximum 6hours for
grill modes.
If a cooking duration is entered, it starts
to count down when the preheating
phase begins.
You can choose to inject steam. The
steam will be injected as soon as you
have selected this option, will appear
in the display. It takes about 1minute.
There is no limit to the number of times
you can inject a burst of steam.
The following operating modes are
available:
– Convection Bake
– Surround
– Intensive
– Bake
– Browning
– Maxi Broil
– Broil
– Convection Broil
– Humidity Plus
– Gentle Bake
The roast probe cannot be used with
the Maxi Broil and Broil modes.
46
Page 47

Operation: Functions without steam
The grease filter must be removed
for baking as otherwise this can result in uneven browning. Exception:
Fit the grease filter in the back wall
when baking deep fresh fruit pies or
pizza with extra toppings.
Quick guide
Remove the grease filter from the
back wall.
Switch the steam oven on using .
The main menu appears in the display.
If you wish to cook with bursts of
steam, fill the water container and
push it back in so that it engages.
Insert the roast probe into the food if
required (see "Roast probe").
Put the food in the oven.
Select Operating Modes.
Select the desired operating mode.
Change the recommended / core
temperature or broil level, if necessary.
Confirm with OK.
The recommended temperature will be
automatically adopted within a few
seconds.
If required, select Change | Temperature
to go back to the temperature selection option.
The cooking program will start. The
oven heating, lighting, and fan will
switch on.
Make additional settings as neces-
sary, e.g. setting a cooking duration
(see "Additional functions").
After the cooking program
Danger of burning!
You could burn yourself on the oven
interior walls, spilled food and accessories.
Use pot holders when removing hot
food from the oven.
Remove the food from the oven.
Switch the steam oven off .
After each use, clean and dry the
whole appliance as described in
"Cleaning and care."
Leave the appliance door open until
the oven compartment is completely
dry.
47
Page 48

Operation: Functions without steam
Interrupting operation
Operation is interrupted as soon as the
door is opened. The heating will be
switched off.
Burn hazard!
You could burn yourself on the oven
interior walls, spilled food and accessories
Use pot holders when inserting, removing or turning hot food, or when
adjusting shelves, etc. in a hot oven.
Operation will resume when the door is
closed.
The steam oven will heat up again and
the display will show the temperature in
the oven compartment as it rises.
48
Page 49

Operation: Functions without steam
Additional functions
You have placed the food in the oven,
selected a function, and set the temperature or broil level.
Select Change.
Additional menu items will appear. You
can select or change these options for
the cooking program:
– Duration
– Ready at
A Duration and Ready at time cannot be
entered if you are using the roast
probe. When using the roast probe,
the end of the cooking duration is determined by when the set core temperature is reached.
– Start at
Only appears when either Duration or
Ready at have been set or if you are
using the roast probe.
– PreHeating
Only appears if you have set a temperature of more than 210°F / 100°C
in Convection Bake and Surround.
– Change Mode
Setting additional durations
By entering Duration, Ready at or Start at
you can automatically turn the cooking
program on or off.
– Duration
Enter the cooking duration required.
You can select a duration of between
1minute and 12hours, or 1minute
and 6hours for grill modes.
– Ready at
You specify the time you want cook-
ing to stop.
– Start at
You specify the time you want cook-
ing to start.
When baking, the oven should not be
set to start a long time off. Otherwise
the cake mixture or dough will dry
out, and the raising agents will lose
their effectiveness.
Cooking results can be impaired if
there is a long delay between the
food being placed in the oven and
the start of cooking. Fresh food can
change its color and even deteriorate.
49
Page 50

Operation: Functions without steam
Turning off automatically
To switch off a cooking process automatically, you can set either Duration or
Ready at.
Example: It is now 11:45 am. The food
takes 30 minutes to cook and needs to
be ready at 12:15 pm.
Select Change.
Select Duration and set "00:30."
Confirm with OK.
or
Select Change.
Select Ready at and set "12:15."
Confirm with OK.
The oven will switch off automatically
after this duration has elapsed or the
time set has been reached.
Switching on and off automatically
We recommend having the oven
switch on and switch off automatically
when roasting.
To switch a cooking program on and off
automatically, you have a choice of how
to enter the time parameters:
– Duration and Ready at
– Duration and Start at
– Ready at and Start at
Example: It is now 11:30 am. The food
takes 30 minutes to cook and needs to
be ready at 12:30 pm.
Select Change.
Select Duration and set a duration of
"00:30."
Confirm with OK.
Select Ready at and set "12:30."
Confirm with OK.
50
Start at is calculated automatically.
Start at 12:00 appears in the display.
The cooking process will start automatically at this time.
Page 51

Operation: Functions without steam
Sequence of an automatic cooking process
Up until the start time the operating
mode, the selected temperature, Start at
and the start time will appear in the display.
After the start time, you can see the
temperature increasing in the display
during the preheating phase until the
set temperature is reached. Once this
temperature is reached a buzzer will
sound.
After the preheating phase you can
follow the time counting down in the
display (time remaining). The last minute
counts down in seconds.
At the end of the cooking process the
oven compartment heating will switch
off. A buzzer or melody will sound (see
"Settings - Acoustic information").
Program Finished will appear in the dis-
play.
You have the option to save the program as a Favorite (see "Favorites") or
to increase the cooking duration using
Change. Touch to go back to the
main menu.
Rapid PreHeat
"Rapid PreHeat" can be used to speed
up the preheating phase.
This function switches on automatically
if you set the temperature above
210°F / 100°C for Convection Bake and
Surround.
Rapid heat-up should be switched
off when cooking pizza and delicate
items (e.g. sponge or pastry).
These will get brown too quickly on
the top.
You can switch off Rapid PreHeat for a
relevant cooking process via the Pre-
Heating option.
Menu option PreHeating
– Rapid
The Browning / Broiling and convec-
tion heating elements turn on to-
gether with the fan to enable the
steam oven to reach the required
temperature as quickly as possible.
– Normal
Only the heating elements associated
with the cooking mode are turned on.
51
Page 52

Operation: Functions without steam
Switching off Rapid PreHeat
Select Change.
Select PreHeating.
Select Normal.
Confirm with OK.
Rapid PreHeat has been switched off.
PreHeating appears in the display.
Changing the operating mode
You can change the operating mode
during operation.
Select Change.
Select Change Mode.
Select the desired operating mode.
The new mode and the relevant recommended temperature will appear in the
display.
Change the temperature, if neces-
sary.
Confirm with OK.
Any cooking durations set will be
adopted. Exception: If you change to
Combi Steam, Steam Cooking or Sousvide, you must enter another duration.
Change the cooking duration, if nec-
essary.
Changing settings during a cooking process
Select Change.
The following will appear on the display:
– Temperature or Broil Setting
– Duration
– Core Temp.
This option only appears when you
are using the roast probe.
– Ready at
A Duration and Ready at time cannot be
entered if you are using the roast
probe. When using the roast probe,
the end of the cooking duration is determined by when the set core temperature is reached.
– Start at
Only appears if you have set Duration
or Ready at or when using the roast
probe.
– PreHeating
Only appears if you have set a tem-
perature of more than 210°F / 100°C
in Convection Bake and Surround.
– Change Mode
Confirm with OK.
The oven mode has been changed.
52
Page 53

Operation: Functions without steam
Changing the temperature
Select Temperature.
Change the temperature.
Confirm with OK.
The steam oven will be heated up or
cooled down until the altered temperature is reached.
You can also permanently reset the
default temperature to suit your personal cooking habits (See "Settings Default temperatures").
Changing the core temperature
Select Core Temp.
Change the core temperature.
Confirm with OK.
Changing the broil level
Select Broil Setting.
Change the level.
Confirm with OK.
The program will restart with the new
broil level.
Changing the cooking duration
Select Duration.
Deleting a cooking duration
Select Duration.
Select Reset.
The program will continue with the set
temperature.
Deleting a finish time
Select Ready at.
Select Reset.
The finish time is now deleted.
The program will start using the dura-
tion set.
Canceling cooking
If you have not set a cooking dura-
tion, tap "Back".
The main menu will appear.
If you have set a cooking duration or
are using the roast probe, tap "Back".
Cancel Cooking? appears on the display.
Select Yes.
The main menu will appear. Any cook-
ing durations or core temperature set
will be deleted.
Change the duration.
Confirm with OK.
The program will restart using the new
duration.
53
Page 54

MasterChef
Your steam oven has a number of MasterChef programs that enable you to
achieve excellent cooking results with
ease. Simply select the appropriate program for the type of food you are cooking and follow the instructions on the
display.
List of automatic programs
The programs can be found under Mas-
terChef.
– Vegetables
– Fish
– Meat
– Bread
– Rolls
– Cakes/Pastries
– Pizza & Quiche
– Rice
– Grain
– Pasta
– Legumes
– Eggs
– Fruit
– Mushrooms
54
– Sausage
– Mussels
– Special
Page 55

MasterChef
Using the MasterChef programs
Select MasterChef.
A list of food types will appear on the
display.
Select the desired food category.
The MasterChef programs available for
the food category selected will appear.
Select the desired MasterChef pro-
gram.
Each step you need to take before
starting the MasterChef program will
appear on the display.
In some programs, you will be
prompted on when to add food to the
oven. Follow and confirm these instructions.
Notes on using these programs
– The degree of doneness and brown-
ing levels are represented by a bar
with seven segments. The factory
setting is a medium doneness and
browning. It will be highlighted. To
change the setting simply move the
highlighting to the left or the right.
cape. Step back from the steam oven
and wait until the steam has dissi-
pated. When putting cooking pans or
the drip tray into the oven or taking
them out, take care not to spill the
contents. Avoid contact with hot
steam, and do not touch the hot oven
interior walls. Danger of burning and
scalding.
– Please refer to recipes for information
on suitable baking containers.
– For some MasterChef programs, the
start time can be delayed using Start
at or Ready at.
– To end a MasterChef automatic pro-
gram early, turn the steam oven off
completely by touching "Back".
Cancel Cooking? will appear on the
display. If Yes is selected, the main
menu will be shown again.
– If the food is not cooked enough by
the end of an MasterChef program,
select Cont. Cooking or Continue Bak-
ing.
– MasterChef programs can also be
saved as Favorites.
– The weights shown refer to the
weight per piece. You can cook a
piece of salmon with a weight of ½ lb
(250 g) or 10 pieces of salmon with a
weight of ½ lb (250 g) at the same
time.
– The oven interior needs to be at room
temperature before starting a MasterChef program.
– When placing food in an already hot
steam oven, be very careful when
opening the door. Hot steam can es-
55
Page 56

Favorites
You can create and save up to 20 of
your own programs.
– Each one can have up to 10 cooking
stages. This enables you to save your
favorite or most frequently used
recipes very accurately. You can
make individual settings for each
stage.
– You can enter a program name for
your recipe.
When you next select the program, it
will start automatically.
There are different ways of creating a
Favorite:
– At the end of running a MasterChef
Program, save it as a separate program.
– After running a program with a set
duration, select Save.
Then name the program.
Creating a Favorite
Select Favorites.
When creating a program for the first
time, Create Program will appear in the
display.
Confirm with OK.
If the Favorite already exists, the pro-
gram name will appear with Edit Program
underneath.
Select Edit Program.
Select Create Program.
You can now specify the settings for
cooking stage1.
Follow the instructions in the display:
Select and confirm the operating
mode, temperature, broil level, the
moisture level, if necessary, and the
duration or core temperature.
With Convection Bake and Surround you
can specify whether you wish to use
PreHeat for this cooking stage via Ad-
ditional Parameters (see "Operation:
Modes without steam - PreHeat").
56
The settings for the first cooking stage
have now been set.
You can add more cooking stages, for
example, if you want to add another
cooking mode to follow after the first:
Select Add Cooking Stage and proceed
as for the first cooking stage.
When you have completed setting the
cooking stages. select Complete Pro-
gram.
A summary of your settings will appear
in the display.
Page 57
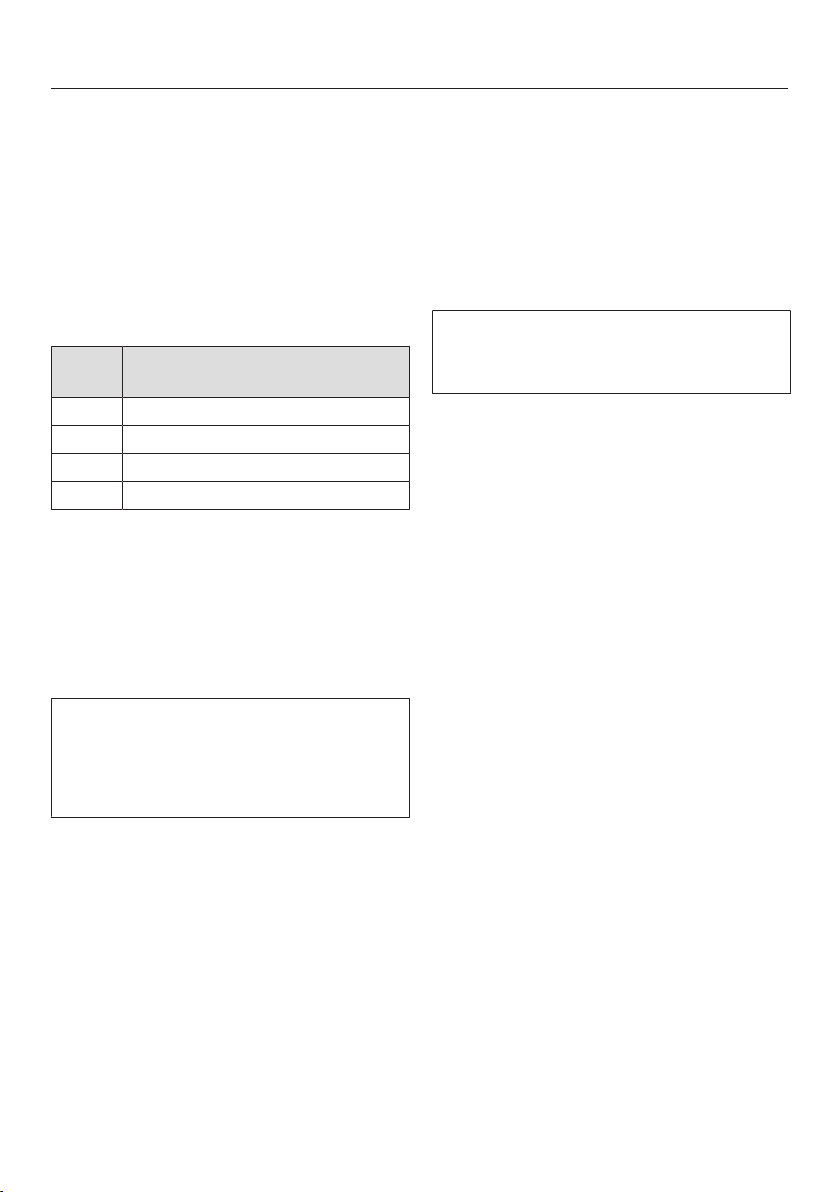
Favorites
Check the settings and confirm with
Accept or select Change to correct the
settings or to add further cooking
stages.
Select Save.
Enter the program name.
The following symbols appear next to
the alphabet:
Sym-
Description
bol
␣ Space characters
Alphabet in upper case
Alphabet in lower case
Numbers 0 to 9 and hyphen -
Touch the sensors next to the sym-
bols to highlight the desired character.
Select Select.
The letter or number you have selected
will appear in the top line of the display.
A maximum of 10characters can be
used.
You can delete the characters one at a
time using .
Finish creating the program name.
Once you have entered the program
name, select Save.
A message will appear in the display
confirming that the program has been
saved.
Confirm with OK.
You can start the saved program imme-
diately, delay the start or change the
cooking stages.
More information regarding Change
Cooking Stages can be found in
"Changing Favorites".
Starting a Favorite
Put the food in the oven.
Select Favorites.
The display shows the program names
and Edit Program at the bottom.
Select the desired program.
You can start the saved program imme-
diately, delay the start or change the
cooking stages.
– Start Now
The program will start. The oven
compartment lighting and the steam
generator will switch on immediately.
– Start Later
This option only appears if you are
using the roast probe. You can spec-
ify when you want the program to
start.
– Ready at
You can set the time at which the
cooking program should end.
– Start at
You can set the time at which the
cooking program should start.
57
Page 58

Favorites
– Change Cooking Stages
The setting specified for a cooking
stage can be corrected (see "Changing Favorites") or more cooking
stages can be added to the program.
Select the desired function.
The program will start according to the
specified start or finish time.
Changing Favorites
Changing cooking stages
Cooking stages in a MasterChef program that have been saved under a
different name cannot be changed.
Select Favorites.
The display shows the program names
and Edit Program at the bottom.
Select Edit Program.
Select Change Program.
Select the desired program.
Select Change Cooking Stages.
The setting specified for a cooking
stage can be changed or more cooking
stages can be added to the program.
Select the desired cooking stage or
Add Cooking Stage.
Change the program as desired (see
"Creating a Favorite") and confirm by
touching OK.
58
A summary of your settings will appear
in the display.
Confirm the settings and then select
Save.
The changes or added cooking steps in
your program will be saved.
Change the name, if necessary (see
"Creating a Favorite").
Page 59

Changing the name
Select Favorites.
The display shows the program names
and Edit Program at the bottom.
Select Edit Program.
Select Change Program.
Select the desired program.
Select Change Name.
Change the name (see "Creating a
Favorite") and select Save.
A message will appear in the display
confirming that the program has been
saved.
Confirm with OK.
Deleting a Favorite
Select Favorites.
The display shows the program names
and Edit Program at the bottom.
Favorites
Select Edit Program.
Select Delete Program.
Select the desired program.
If you wish to delete the program,
confirm with Yes.
The program is deleted.
You can delete all of your Favorites at
the same time (see "Settings - Factory
Default - Favorites").
59
Page 60

Timer
The timer can be used to time any activity in the kitchen, e.g. boiling eggs.
The timer can also be used at the same
time as a cooking program if a start and
finish time have been set, e.g. a reminder to stir the dish or add seasoning.
A maximum timer duration of 9hours,
59minutes and 59seconds can be set.
Setting the timer
If you want to use the timer and Time|
Show| Off has been set, you will need
to switch the steam oven on before
you can set the timer. The timer can
then be seen counting down on the
display when the steam oven is
switched off.
Example: You are boiling eggs so you
set the timer for 6 minutes and 20 seconds.
Tap "Timer".
"0 : 00 : 00" (h : min : sec) will appear
on the display.
Use the numeric keypad to enter a
different duration (6-2-0).
Confirm with OK.
The duration counts down on the dis-
play when the steam oven is turned off.
If a cooking program is running at the
same time, the timer duration will appear at the bottom of the display.
At the end of the timer
– "Timer" flashes in the display.
– The time starts counting upwards.
– A buzzer or melody will sound (see
"Settings - Acoustic tone informa-
tion").
Select"Timer" or the illuminated sen-
sor button next to the timer to turn off
the acoustic and optical signals.
Resetting the timer
Tap "Timer" or the illuminated sensor
button next to the timer duration that
is counting down.
The set timer appears on the display.
Set the new timer duration using the
numeric keypad.
Confirm with OK.
The altered timer duration will start to
count down immediately.
Canceling the timer
Tap "Timer" or the illuminated sensor
button next to the timer duration that
is counting down.
The set timer appears on the display.
Select Reset.
The timer duration is now cancelled.
60
Page 61

General notes
The "General Notes" section contains
general information. You will find more
detailed information about particular
foods and how to cook them in the
other sections.
The advantages of cooking with steam
Almost all vitamins and minerals are retained as the food is not immersed in
water.
Cooking with steam also retains the
true taste of the food better than conventional cooking. We therefore recommend seasoning the food after it has
been cooked. Food also retains its
fresh, original color.
Suitable containers
Cooking pans
This steam oven is supplied with stainless steel cooking pans. Other containers, in a variety of sizes, both perforated
and solid, are available as optional extras (see "Optional accessories"). This
enables you to choose the most suitable container for the food you are preparing.
Using your own cookware
You can also use your own cookware.
However, please note the following:
– It must be suitable for using in an
oven and must be steam resistant.
Plastic cookware can only be used
for steam cooking if the manufacturer
has stated that they are suitable for
such use.
– Thick-sided dishes made from porce-
lain, china or stoneware, for example,
are not as suitable for steam cooking.
They do not conduct heat well and as
a result cooking durations will be
considerably longer than those given
in the charts.
– Place the cookware on the rack or in
a suitable cooking container and not
on the oven floor.
– Ensure that there is a gap between
the upper rim of the dish and the top
of the cooking compartment to allow
sufficient steam into the container.
It is best to use perforated pans for
Steam Cooking. The steam can reach
the food from all sides and the food is
cooked evenly.
61
Page 62

General notes
Shelf level
You can select any shelf level. You can
also cook on several levels at the same
time. This will not alter the cooking duration.
When using more than one deep cooking container at the same time, it is best
to offset them on their runners and to
leave at least one level free in between
them.
Always insert cooking containers and
the rack between the rails of the shelf
level supports so that they cannot tip.
Frozen food
The heating up phase for frozen food is
longer than for fresh food. The greater
the quantity of frozen food, the longer
the preheating phase.
Temperature
A maximum temperature of 210°F /
100°C is reached when steam cooking
is taking place. Most types of food will
cook at this temperature. Some more
delicate types of food, such as soft
fruit, must be cooked at lower temperatures as otherwise they will burst. More
information is given in the relevant section.
Cooking duration
In general, the cooking durations for
cooking with steam are the same as for
cooking food in a saucepan. More information about any factors which may affect the cooking duration is given in the
relevant sections.
The quantity of food does not affect the
cooking time. 1 lb of potatoes will take
the same time to cook as ½ lb.
The durations given in the charts are
guidelines only. We recommend selecting the shorter cooking duration quoted
to start with. If food is not cooked sufficiently after the shorter time it can be
put back in the oven and cooked for
longer.
Cooking with liquid
When cooking with liquid only fill the
cooking pan ²/₃full to prevent the liquid
spilling when the cooking pan is removed from the oven.
Your own recipes - Steam cooking
Food and recipes which are prepared in
pot or a pan can also be cooked in the
steam oven. The cooking times in the
steam oven will be the same. Please
note that food will not be brown or crisp
when cooking with steam.
62
Page 63

Wire oven rack / universal tray
Use the rack above the universal tray
when roasting or broiling. The cooking
liquids will collect in the tray and can
then be used to make a gravy or sauce.
If you are using the universal tray with
the rack on top, e.g. for broiling, insert
the tray between the rails of the side
runners and the rack will automatically
slide in above them. When removing
them from the oven pull both parts out
together.
Non-tip safety notches
The wire oven rack and universal tray
have non-tip safety notches in the middle which prevent them being pulled
right out when they only need to be partially pulled out. The tray and rack can
then only be taken out of the oven by
raising them upwards and then pulling
them out.
General notes
63
Page 64

Steam cooking
Vegetables
Fresh food
Prepare fresh vegetables in the usual
way, i.e. wash, clean and cut them up.
Frozen food
Frozen vegetables do not need to be
defrosted beforehand unless the vegetables have been frozen together in a
block.
To cook frozen vegetables, program the
same time as for fresh ones.
Break up the larger, frozen together
pieces. Please refer to the cooking
times on the packaging.
Cooking pan
Food such as peas or asparagus
spears, which have little or no space
between them, will take longer to cook
because the steam has less space to
work in. For an even result, it is best to
use a shallow container for these types
of food, and only fill it about
1-2" (3-5cm) deep. When cooking large
quantities divide the food between 2 or
3 shallow containers rather than using
one deep one.
Shelf level
When cooking vegetables with a distinctive color (e.g. beets) in a perforated
container at the same time as cooking
other foods in other containers, place
the drip tray directly underneath the
perforated container to catch any drips
and therefore avoid any color transfer.
Cooking duration
As with conventional methods, when
cooking vegetables with steam, the
cooking duration will depend on the
size and also whether you want the
vegetables to be al dente or soft/well
done. Example:
firm potatoes, cut into quarters
= approx. 17minutes
firm potatoes, cut in half
= approx. 21minutes
Settings
MasterChef | Vegetables | ... | Steam Cooking
or
Operating Modes | Steam Cooking
Temperature: 210°F / 100°C
Duration: see chart
Different types of vegetables which take
the same length of time to cook can be
cooked together in one cooking pan.
Use solid containers for vegetables
which are cooked in liquid, e.g. cabbage.
64
Page 65
Steam cooking
The durations given in the charts for fresh vegetables are guidelines only. We recommend selecting the shorter cooking duration quoted to start with. If vegetables
are not cooked sufficiently after the shorter time, they can be put back in the
steam oven and cooked some more.
Vegetables [min]
Artichokes 32–38
Cauliflower, whole 27–28
Cauliflower, florets 8
Beans, green 10–12
Broccoli, florets 3–4
Carrots, whole 7–8
Carrots, halved 6–7
Carrots, chopped 4
Chicory, halved 4–5
Chinese cabbage, chopped 3
Peas 3
Fennel, halved 10–12
Fennel, cut into strips 4–5
Kale, chopped 23–26
Waxy potatoes, peeled
whole
halved
quartered
Fairly waxy potatoes, peeled
whole
halved
quartered
Floury potatoes, peeled
whole
halved
quartered
Kohlrabi, cut into sticks 6–7
27–29
21–22
16–18
25–27
19–21
17–18
26–28
19–20
15–16
65
Page 66

Steam cooking
Vegetables [min]
Pumpkin, diced 2–4
Corn on the cob 30–35
Swiss chard, chopped 2–3
Peppers, diced / cut into strips 2
Potatoes cooked in skins, firm 30–32
Mushrooms 2
Leeks, chopped 4–5
Leek, halved lengthwise 6
Romanesco, whole 22–25
Romanesco, florets 5–7
Brussels sprouts 10–12
Red beets, whole 53–57
Red cabbage, chopped 23–26
Black salsify, whole 9–10
Celery root, cut into batons 6–7
Green asparagus 7
White asparagus, whole 9–10
Carrots, chopped 6
Spinach 1–2
Pointed cabbage, chopped 10–11
Celery, chopped 4–5
Rutabaga, chopped 6–7
White cabbage, chopped 12
Savoy cabbage, chopped 10–11
Zucchini, sliced 2–3
Snap peas 5–7
Cooking duration
66
Page 67

Steam cooking
Meat
Fresh food
Prepare the meat as usual.
Frozen food
Meat should be thoroughly defrosted
before cooking in the steam oven (see
"Defrosting").
Preparation
For meat which needs to be seared before being cooked, e.g. for a stew, sear
the meat in a pan on the cooktop first.
Cooking duration
The cooking time depends on the thickness and consistency of the food. The
thicker the meat, the longer the cooking
time.
Tips – Use a perforated pan to retain the fla-
vor when cooking meat. Place a solid
pan or universal tray underneath to
catch the juices. You can use these to
make a gravy or freeze them for later
use.
– Boiling chicken, pork rind, meat, ribs
and meat bones can be used to make
stock. Place the meat together with
some mixed vegetables in a solid
cooking pan and add cold water. The
longer the cooking duration, the
stronger the stock.
Settings
MasterChef | Meat | ... | Steam Cooking
or
Operating Modes | Steam Cooking
Temperature: 210°F / 100°C
Duration: see chart
67
Page 68

Steam cooking
The cooking times given in the chart are guidelines only. We recommend selecting
the shorter cooking time to start, additional time can be added if necessary.
Meat [min]
Shank, covered with water 110–120
Pork knuckle 135–140
Chicken breast filet 8–10
Leg (Joint) 105–115
Prime rib, covered with water 110–120
Veal strips 3–4
Smoked pork chops 6–8
Lamb stew 12–16
Spring chicken 60–70
Roulade of turkey 12–15
Turkey breast 4–6
Cross rib, covered with water 130–140
Beef stew 105–115
Whole chicken, covered with water 80–90
Boiled beef 110–120
Cooking duration
68
Page 69

Steam cooking
Sausage
Settings
MasterChef | Sausage |...| Steam Cooking
or
Operating Modes | Steam Cooking
Temperature: 194°F / 90°C
Duration: see chart
Sausage [min]
Boiled sausage 6–8
Pork sausage 6–8
Veal sausage 6–8
Cooking duration
Fish
Fresh food
Prepare fresh fish in the usual way, i.e.
clean, gut and filet.
Frozen food
Frozen fish should be slightly defrosted
before cooking.
Preparing for use
Add some lemon or lime juice to fish
before cooking. The citric acid helps the
flesh stay firm.
It is not necessary to season fish when
cooking with steam as this method retains the minerals which give the fish its
unique flavor.
Cooking pans
If using a perforated pan, grease it first.
Shelf level
When cooking fish in a perforated container at the same time as cooking
other types of food in other containers,
place the container with the fish directly
above the tray to catch any liquid and
so avoid any transfer of tastes to other
food.
69
Page 70

Steam cooking
Temperature
185° F – 195° F / 85° C – 90° C
For gently cooking delicate types of
fish, such as sole.
212° F / 100 °C
For cooking firmer types of fish, e.g.
cod and salmon.
Also for cooking fish in sauce or stock.
Cooking duration
The cooking duration depends on the
thickness and the consistency of the
food, and not on the weight.
The longer fish cooks, the firmer its
flesh will become. Use the cooking durations given in the chart. If you find
that the fish is not cooked sufficiently
only cook it for a few minutes more.
When cooking fish in sauce or stock,
we recommend that you increase the
cooking duration quoted by a few minutes.
– You can use any fish scraps, e.g. fish
heads, bones, tails etc to make a fish
stock. Place the fish scraps together
with some mixed vegetables in a
solid cooking pan and add cold water. Cook at 212°F / 100°C for 60 to
90 minutes. The longer the cooking
duration, the stronger the stock.
Settings
MasterChef | Fish | ... | Steam Cooking
or
Operating Modes | Steam Cooking
Temperature: see chart
Duration: see chart
Tips
– Adding herbs and spices, such as
dill, will help bring out the full flavor of
the fish.
– Cook large fish in the swimming posi-
tion. To help maintain the shape of
the fish, place a small cup or similar
upside down in the cooking pan, and
arrange the fish bellyside down over
the cup.
70
Page 71
Steam cooking
The durations given in the chart are guidelines for fresh fish. We recommend selecting the shorter cooking duration quoted to start with. If the fish is not cooked
sufficiently after the shorter time, it can be put back in the steam oven and cooked
some more.
Fish [°F / °C] [min]
Eel 212 / 100 5–7
Perch filet 212 / 100 8–10
Mahi Mahi filet 185 / 85 3
Trout, 1/2 lb (250 g) 195 / 90 10–13
Halibut filet 185 / 85 4–6
Cod filet 212 / 100 6
Carp, 3 lbs (1.5 kg) 212 / 100 18–25
Salmon filet 212 / 100 6–8
Salmon steak 212 / 100 8–10
Rainbow trout 195 / 90 14–17
Pangasius filet 185 / 85 3
Ocean Perch filet 212 / 100 6–8
Haddock filet 212 / 100 4–6
Flounder filet 185 / 85 4–5
Monkfish filet 185 / 85 8–10
Sole filet 185 / 85 3
Turbot filet 185 / 85 5–8
Tuna filet 185 / 85 5–10
Pike Perch filet 185 / 85 4
Temperature / Cooking duration
71
Page 72
Steam cooking
Shellfish
Preparation
Defrost frozen shellfish before cooking with steam.
Peel, clean and wash the shellfish.
Cooking pan
If using a perforated pan, grease it first.
Cooking duration
The longer shellfish are cooked, the tougher they become. Use the cooking durations given in the chart.
When cooking shellfish in sauce or stock, we recommend that you increase the
cooking duration quoted by a few minutes.
Settings
MasterChef | Shellfish | ... | Steam Cooking
or
Operating Modes | Steam Cooking
Temperature: see chart
Duration: see chart
[°F / °C] [min]
Shrimp 195 / 90 3
Small shrimp 195 / 90 3
King prawns 195 / 90 4
Crayfish 200 / 95 10–15
Large shrimp 195 / 90 3
Temperature / Cooking duration
72
Page 73
Steam cooking
Mussels
Fresh food
Warning - danger of food poisoning.
Only cook mussels which are closed. Do not eat mussels which have not
opened after being cooked.
Steep fresh mussels in water for a few hours before cooking to rinse out any sand.
Then scrub the mussels thoroughly to clean them.
Frozen food
Defrost frozen mussels before cooking.
Cooking duration
The longer mussels are cooked, the tougher they become. Use the cooking durations given in the chart.
Settings
MasterChef | Mussels | ... | Steam Cooking
or
Operating Modes | Steam Cooking
Temperature: see chart
Duration: see chart
[°F / °C] [min]
Barnacles 212 / 100 2
Cockles 212 / 100 2
Bearded mussels 195 / 90 12
Scallops 195 / 90 5
Razor clams 212 / 100 2–4
Clams 195 / 90 4
Temperature / Cooking duration
73
Page 74
Steam cooking
Rice
Rice swells when cooked and needs to be cooked in liquid. The proportion of rice
to liquid will vary depending on the type of rice.
The rice absorbs all the liquid. Therefore none of the nutrients are lost.
Settings
MasterChef | Rice | ... | Steam Cooking
or
Operating Modes | Steam Cooking
Temperature: 210°F / 100°C
Duration: see chart
Ratio
[min]
Rice to liquid
Basmati rice 1:1.5 15
Parboiled rice 1:1.5 23–25
Round grain rice
Pudding rice
Risotto rice
1:2.5
1:2.5
30
18–19
Brown rice 1:1.5 26–29
Wild rice 1:1.5 26–29
Cooking duration
74
Page 75

Steam cooking
Pasta
Dry pasta
Dry pasta swell when cooked and needs to be cooked in liquid. The liquid must
cover the pasta. Using hot liquid gives better results.
Increase the cooking time stated by the manufacturer by approx.¹/₃.
Fresh food
Fresh noodles and pasta, for example, from the store refrigerator, do not swell.
Fresh pasta should be cooked in a greased perforated pan.
Separate any pieces of pasta which have stuck together and spread them out in
the cooking pan.
Settings
MasterChef | Pasta | ... | Steam Cooking
or
Operating Modes | Steam Cooking
Temperature: 210°F / 100°C
Duration: see chart
Fresh food [min]
Gnocchi 2
Round Knoepfli 1
Ravioli 2
Spaetzle 1
Tortellini 2
Dry pasta,
covered with water
Flat pasta 14
Soup pasta 8
Cooking duration
75
Page 76
Steam cooking
Dumplings
Ready-made dumplings in wrappers need to be covered completely with water.
Otherwise they will not absorb enough water and will fall apart, even if steeped in
water prior to cooking.
Cook fresh dumplings in a greased, perforated container.
Settings
MasterChef | Pasta | ... | Steam Cooking
or
Operating Modes | Steam Cooking
Temperature: 210°F / 100°C
Duration: see chart
[min]
Steamed dumplings 30
Yeast dumplings 20
Boil-in-the-bag potato dumplings 20
Boil-in-the-bag bread dumplings 18–20
Cooking duration
76
Page 77
Steam cooking
Grains
Grain swells when cooked and needs to be cooked in liquid. The proportion of
grain to liquid will vary depending on the type of grain.
Grain can be cooked whole or cracked.
Settings
MasterChef | Grain | ... | Steam Cooking
or
Operating Modes | Steam Cooking
Temperature: 210°F / 100°C
Duration: see chart
Ratio
[min]
Grain to liquid
Amaranth 1:1.5 15–17
Bulgur 1:1.5 9
Green spelt, whole 1:1 18–20
Green spelt, cracked 1:1 7
Oats, whole 1:1 18
Oats, cracked 1:1 7
Millet 1:1.5 10
Polenta 1:3 10
Quinoa 1:1.5 15
Rye, whole 1:1 35
Rye, cracked 1:1 10
Wheat, whole 1:1 30
Wheat, cracked 1:1 8
Cooking duration
77
Page 78
Steam cooking
Legumes
Soak legumes for at least 10 hours in cold water before cooking. Soaking makes
the legumes more digestible and shortens the cooking duration required. Soaked
legumes must be covered with liquid during cooking.
Lentils do not need to be soaked before cooking.
With unsoaked legumes, a certain ratio of pulses to liquid is required depending on
type.
Settings
MasterChef | Legumes | ... | Steam Cooking
or
Operating Modes | Steam Cooking
Temperature: 210°F / 100°C
Duration: see chart
Soaked
[min]
Beans
Kidney beans 55–65
Azuki beans 20–25
Black beans 55–60
Pinto beans 55–65
White beans 34–36
Peas
Yellow peas 40–50
Green peas, shelled 27
Cooking duration
78
Page 79
Unsoaked
Steam cooking
Ratio
Legumes to liquid
Beans
Kidney beans 1:3 130–140
Azuki beans 1:3 95–105
Black beans 1:3 100–120
Pinto beans 1:3 115–135
White beans 1:3 80–90
Lentils
Brown lentils 1:2 13–14
Red lentils 1:2 7
Peas
Yellow peas 1:3 110–130
Green peas, shelled 1:3 60–70
Cooking duration
[min]
79
Page 80

Steam cooking
Eggs
Use a perforated container to prepare boiled eggs in the steam oven.
The eggs do not need to be pierced before cooking as they are gradually warmed
during the preheating phase and so do not burst when they are cooked with
steam.
When using a solid container for making egg dishes such as scrambled eggs, remember to grease it first.
Settings
MasterChef | Eggs | ... | Steam Cooking
or
Operating Modes | Steam Cooking
Temperature: 210°F / 100°C
80
Page 81
Steam cooking
Fruit
Cook fruit in a solid container so that none of the juice is lost. If you wish to cook
fruit in a perforated container, place a solid container directly underneath it to collect the juice.
Tip: You can use the collected juice to prepare a glaze.
Settings
MasterChef | Fruit | ... | Steam Cooking
or
Operating Modes | Steam Cooking
Temperature: 210°F / 100°C
Duration: see chart
[min]
Apple chunks 1–3
Pears chunks 1–3
Cherries 2–4
Mirabelle plums 1–2
Nectarine / Peach chunks 1–2
Plums 1–3
Quince, diced 6–8
Rhubarb pieces 1–2
Gooseberries 2–3
Cooking duration
81
Page 82
Steam cooking
Menu Cooking - Manual
Before cooking meals with the "Menu
Cooking" function, turn off the steam
reduction system (see "Settings").
"Menu Cooking" is intended for cooking
a whole meal containing types of food
which have different cooking durations,
e.g., fish filet with rice and broccoli.
Each dish is placed in the oven at different times so that they are all ready at
the same time.
Shelf level
When cooking fish or food with a distinctive color (e.g. beetroot) in a perforated container, place the perforated
container directly above the drip tray /
universal tray (depending on model) to
avoid any transfer of flavor or color to
other food and to prevent liquid dripping onto food below it.
Temperature
Whole meals should be cooked at a
temperature of 212°F / 100°C as this is
the temperature required to cook the
majority of foods.
Do not cook a whole meal at the lowest
temperature when different temperatures are required for different types of
food, e.g. 185°F / 85°C for seabream
and 212°F / 100°C for potatoes.
Cooking duration
If you are increasing the recommended
temperature, shorten the cooking duration by approx. ¹/₃.
Example
Rice 20 minutes
Tilapia filet 6 minutes
Broccoli 4 minutes
20minutes minus 6 minutes=14minutes (first cooking duration: rice)
6minutes minus 4minutes=2minutes
(second cooking duration: tilapia filet)
Time left=4minutes (third cooking duration: broccoli)
Cooking durations
Setting 14 min. 2 min. 4 min.
20 min. - rice
6 min. - tilapia
filet
4 min. -
broccoli
If the recommended cooking temperature for the food is 185°F / 85°C, for example, try cooking it at 212°F / 100°C
and testing the result. Some delicate
types of fish with a soft structure, e.g.
sole and plaice will become very firm
when cooked at 212°F / 100°C.
82
Page 83

Method
Place the rice in the steam oven first.
Set the first cooking duration: 14 min-
utes.
After 14 minutes, place the tilapia in
the steam oven.
Set the second cooking duration: 2
minutes.
After 2 minutes, place the broccoli in
the steam oven.
Set the third cooking duration: 4 min-
utes.
Steam cooking
83
Page 84

Sous-vide (vacuum) cooking
Always follow USDA guidelines on
food safety.
This gentle cooking method allows food
to be cooked slowly at a low, constant
temperature in vacuum packaging.
With vacuum cooking, moisture does
not evaporate and all nutrients and flavors are retained.
The result is flavorful and cooked
evenly.
Only use food that is fresh and in
good condition.
Ensure hygienic conditions and that
food has not been out of the refrigerator too long, e.g. during transportation.
Use only heat-stable, boiling-resistant vacuum bags.
Do not cook food in the manufacturers packaging, such as vacuumpacked frozen food. It is possible
that an unsuitable vacuum bag was
used.
Use the vacuum bag only once.
Vacuum-seal the food in a chamber
system vacuum sealer only.
84
Page 85

Sous-vide (vacuum) cooking
Important information on use
To obtain an optimum cooking result,
observe the following information:
– Use fewer herbs and spices than for
conventional cooking, since the influence on the taste of the food is more
intense.
You can also prepare the food unseasoned and add seasonings after
cooking.
– The cooking duration reduces when
salt, sugar, and liquids are added.
– The food becomes firmer with the
addition of acidic ingredients, such
as lemon or vinegar.
– Do not use alcohol or garlic, as an
unpleasant taste may result.
– Only use vacuum bags that match
the size of the food. If the vacuum
bag is too big, too much air may remain inside.
– If you want to cook several foods in
one vacuum bag, put the food in the
bag one next to the other.
– Information on temperature and dura-
tion from sous-vide recipes cannot
always be adopted 1:1. Adjust these
settings according to the desired
level of doneness.
– If you want to cook food in several
vacuum bags at once, put the bags
on the shelf one next to the other.
– Cooking durations will depend on the
thickness of the food.
– In case of higher temperatures and/or
longer cooking durations, the appliance may run out of water. Check the
display from time to time.
– Keep the door closed during the
cooking process. Opening the door
extends the cooking process and can
affect the cooking result.
85
Page 86

Sous-vide (vacuum) cooking
Tips
– To shorten the preparation times, you
can vacuum food 1–2days before
the cooking procedure. Store the
vacuumed food in the refrigerator at a
maximum of 41°F / 5°C. To maintain
quality and taste, the food must be
cooked after 2 days at the latest.
– Freeze liquids such as marinades be-
fore vacuum-sealing to prevent them
from escaping from the vacuum bag.
– Fold the edges of the vacuum bag
outwards for filling in order to obtain
clean, perfect weld seams.
– If you do not want to eat the food di-
rectly after cooking, put it in an ice
bath and then store it at a maximum
of 41°F / 5°C.
In this way, you can maintain quality
and taste while extending the life of
the food.
Exception: Eat poultry immediately
after cooking.
– Extra marinade can be used to pre-
pare a sauce.
– Serve the food on preheated plates.
– After cooking, cut the vacuum bag on
all sides to access the food better.
– Briefly fry meat and firm types of fish
(such as salmon) before serving for a
roasted aroma.
86
Page 87

Sous-vide (vacuum) cooking
Method
Rinse the food under cold water and
dry it.
Put the food in a vacuum bag and
add spices or liquid if desired.
Vacuum-seal the food in a chamber
system vacuum sealer.
For optimum cooking results, insert
the rack on shelf level2.
Lay the vacuum-sealed food on the
shelf (next to each other in the case
of several bags).
Select Operating Modes.
Select Sous-vide.
Adjust the recommended tempera-
ture, if necessary.
Confirm with OK.
Set the cooking duration. Any time
between 1minute and 10hours can
be set.
Confirm with OK.
Possible causes for poor results
The vacuum bag has opened:
– The weld seam was not clean or sta-
ble enough and dissolved.
– The bag was damaged by a sharp
bone.
The food has an unpleasant or strange
taste:
– Incorrect storage of the food; the
food was kept out of the refrigerator
for too long.
– The food was contaminated with
bacteria before it was vacuum
sealed.
– Too much spice was used.
– The bag or weld seam were dam-
aged.
– The vacuum was insufficient.
– The food was not immediately eaten
or cooled after cooking.
Select additional settings if required
(see "Operation: Steam cooking - Additional functions").
87
Page 88
Sous-vide (vacuum) cooking
Food Added in ad-
vance
Sugar Salt
Fish
Cod filet, 1" (2.5cm) thick x 130 / 54 35
Salmon filet, 1 1/4" (3 cm) thick x 125 / 52 30
Monkfish filet x 145 / 62 18
Pikeperch filet, 3/4" (2 cm) thick x 130 / 55 30
Vegetables
Cauliflower florets, medium to large x 185 / 85 40
Squash in slices x 185 / 85 15
Kohlrabi in slices x 185 / 85 30
Asparagus, white, whole x x 185 / 85 22–27
Sweet potatoes in slices x 185 / 85 18
Fruit
Pineapple in slices x 185 / 85 75
Apple in slices x 175 / 80 20
Bananas, whole 145 / 62 10
Peaches, halved x 145 / 62 25–30
Rhubarb pieces 167/75 13
Plums, halved x 160 / 70 10–12
Miscellaneous
Beans, white, soaked at a 1:2 ratio
(beans to liquid)
Shrimp, peeled and deveined x 135 / 56 19–21
Egg, whole 149 - 151 /
Scallops, removed from shell 125 / 52 25
Shallot, whole x x 185 / 85 45–60
[°F / °C] [min]
x 195 / 90 240
60
65–66
Temperature / Cooking duration
88
Page 89
Sous-vide (vacuum) cooking
Food Added in ad-
vance
Sugar Salt Medium* Well done*
Meat
Duck breast, whole x 151 / 66 162 / 72 35
Rack of lamb 136 / 58 144 / 62 50
Beef tenderloin, 1 3/4" (4
cm) thick
Beef filet, 1" (2.5cm) thick 133 / 56 – 120
Pork tenderloin, whole x 145 / 63 153 / 67 60
Temperature / Cooking duration
* Degree of doneness
The "well done" degree of doneness has a higher core temperature than "medium," but is
not cooked through in the traditional sense.
[°F / °C] [min]
133 / 56 142 / 61 120
89
Page 90

Sous-vide (vacuum) cooking
Reheating
Reheat brassicas (e.g., kohlrabi and
cauliflower) only in combination with a
sauce. Without sauce, an unpleasant
cabbage-like taste and gray-brown
color may develop.
Food with a short cooking time and
food whose degree of cooking
changes during reheating, e.g., fish,
are fundamentally not suited for reheating.
Preparation
Place the cooked food into ice water for
about an hour directly after cooking.
The fast cooling prevents the food from
continuing to cook. The optimum cooking condition is thus retained.
Then store the food in the refrigerator at
a maximum of 41°F / 5°C.
Please note that the quality of the
food decreases the longer it is
stored.
We recommend that you do not store
the food in the refrigerator for longer
than 5 days before reheating.
Settings
Operating Modes|Sous-vide
Temperature: see chart
Duration: see chart
90
Page 91
Sous-vide (vacuum) cooking
Table for the reheating of food cooked with the sous-vide method
Food [°F / °C]
Medium
1
Well-
done
1
2 [min]
Meat
Rack of lamb 136 / 58 144 / 62 30
Beef filet steak, 1 3/4" (4 cm) thick 133 / 56 142 / 61 30
Beef rump steak, 1" (2.5cm) thick 133 / 56 – 30
Pork tenderloin, whole 145 / 63 153 / 67 30
Vegetables
Cauliflower florets, medium to large
Kohlrabi in slices
3
3
185 / 85 15
185 / 85 10
Fruit
Pineapple in slices 185 / 85 10
Other food
Beans, white, soaked at a 1:2 ratio
194 / 90 10
(beans to liquid)
Shallot, whole 185 / 85 10
Temperature / time
1
Degree of doneness
The "done" degree of doneness has a higher core temperature than "medium," but is not
cooked through in the classical sense.
2
The times apply for food with a starting temperature about 41°F / 5°C (refrigerator temper-
ature).
3
Reheat only cooked in sauce.
91
Page 92

Special modes
Reheat
Always follow USDA guidelines on
food safety.
To reheat food cooked with the sousvide method, use the "Sous-vide"
mode (see the "Sous-vide – Reheating" chapter).
The steam oven is very effective at reheating food gently, without drying it
out or cooking it further. The food reheats evenly and does not need to be
stirred during the reheating process.
You can reheat individual dishes or
plated meals which have been prepared
previously (e.g. meat, vegetables and
potatoes).
Suitable containers
Small quantities can be reheated on a
plate, larger quantities should be placed
in a cooking pan.
Duration
10-15 minutes are usually sufficient for
one plate of food. More than one plate
will need a little longer.
If you are reheating several plated
meals one after the other, the reheating
time can be reduced by around 5 minutes for the second and subsequent
plates as the oven will still be hot.
Tips
– Food does not need to be covered
before it is reheated.
– Do not reheat large items whole. Di-
vide it into portions and reheat these
as plated meals.
– Compact items, such as stuffed pep-
pers or roulades, should be cut in
half.
– Please note that breaded items will
not retain their crispness when they
are reheated.
– Reheat sauces separately, except for
dishes such as stew and casseroles
where the sauce is part of the dish.
Settings
Special Modes | Reheat
or
Operating Modes | Combi Steam | Convection Bake
Temperature: see chart
Moisture: see chart
Duration: see chart
Moisture content
The more moist the food, the less moisture that needs to be added.
92
Page 93

Special modes
Food [°F / °C] [%] [min]
Vegetables
Carrots
Cauliflower
Kohlrabi
Beans
Side dishes
Pasta
Rice
Potatoes, halved lengthways
Dumplings
Mashed potato
Meat and poultry
Sliced meat, 1/2" / 1 ¹/₂cm thick
Roulades, sliced
Beef stew
Lamb ragout
Chicken cutlets
Turkey cutlets, sliced
Fish
Fish fillet
Fish roulade, halved
Plated meals
250 / 120 70 8–10
250 / 120 70 8–10
285 / 140 70 18–20
285 / 140 70 11–13
285 / 140 70 10–12
Spaghetti, tomato sauce
Roast pork, potatoes and vegetables
Stuffed peppers (halved), rice
Chicken fricassee, rice
Vegetable soup
Creamy soup
Clear soup
Stew
Temperature / Moisture / Duration
250 / 120 70 10–12
93
Page 94

Special modes
Defrost
Always follow USDA guidelines on
food safety.
It is much quicker to defrost food in the
steam oven than at room temperature.
Temperature
140°F / 60°C is the best temperature for
defrosting.
Exception: 122°F / 50°C for minced
meat and game
Before and after defrosting
Remove all packaging before defrosting.
Exceptions: Leave bread and baked
goods in their packaging as otherwise
they will absorb moisture and become
soft.
Allow defrosted food to stand at room
temperature after removing it from the
oven. The standing time is necessary to
allow the even distribution of heat.
Tips
– Fish does not need to be fully de-
frosted before cooking. Defrost so
that the surface is sufficiently thawed
to take herbs and seasoning. Depending on the thickness of the fish,
2–5 minutes should be enough.
– When defrosting food which has
frozen together, e.g. berries, chops,
fish filets etc. separate it about halfway through the defrosting time.
– Do not refreeze food once it has
thawed.
– Defrost frozen ready meals according
to the instructions on the packaging.
Settings
Special Modes | Defrost
or
Operating Modes | Steam Cooking
Temperature: see chart
Defrosting duration: see chart
Cooking pan
Danger of salmonella poisoning.
Do not use the liquid from defrosted
meat or poultry. Dispose and wash
the container, the sink and your
hands.
Use a perforated container with a solid
container underneath it when defrosting
food which will drip, such as poultry.
This way food will not be lying in defrosted liquid.
Foods which don't drip can be defrosted in a solid cooking pan.
94
Page 95
Special modes
Food to be defrosted Quantity [°F / °C] [min] [min]
Fruit
Apple sauce 1/2 lb / 250 g 140 / 60 20–25 10–15
Apple chunks 1/2 lb / 250 g 140 / 60 20–25 10–15
Apricots 1 lb / 500 g 140 / 60 25–28 15–20
Strawberries 10.6 oz / 300g 140 / 60 8–10 10–12
Raspberries / Black currants 10.6 oz / 300g 140 / 60 8 10–12
Cherries 5.3 oz / 150g 140 / 60 15 10–15
Peaches 1 lb / 500 g 140 / 60 25–28 15–20
Plums 1/2 lb / 250 g 140 / 60 20–25 10–15
Gooseberries 1/2 lb / 250 g 140 / 60 20–22 10–15
Vegetables
Frozen in a block 10.6 oz / 300g 140 / 60 20–25 10–15
Fish
Fish filets 14 oz / 400g 140 / 60 15 10–15
Trout 1 lb / 500 g 140 / 60 15–18 10–15
Lobster 300g/10.6 oz. 140 / 60 25–30 10–15
Shrimp 10.6 oz / 300g 140 / 60 4–6 5
Ready meals
Meat, vegetables, side
dishes / stew / soup
Meat
Roast meat, sliced 4.4-5.3 oz. /
Ground meat 1/2 lb / 250 g 125 / 50 15–20 10–15
Ground meat 1 lb / 500 g 125 / 50 20–30 10–15
Stew 1 lb / 500 g 140 / 60 30–40 10–15
Stew 2 lbs / 1000g 140 / 60 50–60 10–15
Liver 1/2 lb / 250 g 140 / 60 20–25 10–15
Cutlets / chops / sausage 28 oz / 800 g 140 / 60 25–35 15–20
Poultry
17 oz / 480g 140 / 60 20–25 10–15
140 / 60 8–10 15–20
125–150g each
95
Page 96
Special modes
Food to be defrosted Quantity [°F / °C] [min] [min]
Chicken 2 lbs / 1000g 140 / 60 40 15–20
Chicken thighs 5.3 oz / 150g 140 / 60 20–25 10–15
Chicken filet 1 lb / 500 g 140 / 60 25–30 10–15
Turkey drumsticks 1 lb / 500 g 140 / 60 40–45 10–15
Baked goods
Puff pastries / Yeast baked
goods
Cakes and cookies 14 oz / 400g 140 / 60 15 10–15
Bread / Rolls
Rolls – 140 / 60 30 2
Rye bread, sliced 1/2 lb / 250 g 140 / 60 40 15
Whole grain bread, sliced 1/2 lb / 250 g 140 / 60 65 15
White bread, sliced 5.3 oz / 150g 140 / 60 30 20
Temperature / Duration / Standing time
– 140 / 60 10–12 10–15
96
Page 97

Special modes
Canning
Always follow USDA guidelines on
food safety.
Only use unblemished, fresh produce
which is in good condition.
Glass jars
Use clean glass jars and accessories
and check them for any defects. Glass
jars with twist off lids or glass lids with a
rubber seal are suitable.
Make sure that all the glass jars are the
same size so that bottling is carried out
evenly.
After you have filled the jars with the
bottled produce, clean the glass rims
with a clean cloth and hot water and
then seal the jars.
Fruit
Sort fruit carefully, rinse it briefly but
thoroughly and allow it to drain. Take
great care when cleaning soft fruit as it
is very delicate.
Remove any peel, stalks, cores or pits.
Cut up large fruit. For example, cut apples into slices.
Fill volume
Fill the glass jars with produce up to a
maximum of 1 1/4" (3 cm) below the
rim. Do not pack down as this would
damage the cell walls of the produce.
Bang the jar gently on a cloth to help
distribute the contents evenly.
Use a sugar solution for fruit and a salt
or vinegar solution for vegetables.
Tips
– Make use of residual heat by leaving
the jars in the oven for 30 minutes after it has switched off.
– Then cover the jars with a cloth and
allow to cool for approx. 24 hours.
Method
Place a perforated pan on the lowest
shelf level.
Place the jars (all the same size) in
the perforated cooking pan. Ensure
that they do not touch one another.
Settings
Special Modes | Canning
or
Operating Modes | Steam Cooking
If you are bottling fruit with pits (e.g.
plums, apricots) without removing the
pits, pierce the fruit several times with a
fork or wooden skewer as otherwise it
will burst.
Vegetables
Rinse, clean and cut up vegetables.
Vegetables should be blanched before
bottling to help them retain their color
(see "Blanching").
97
Page 98

Special modes
Juicing
This appliance is ideal for extracting
juice from soft, firm and hard fruit.
It is best to use overripe fruit, as the
riper the fruit the greater the quantity of
juice produced. Very ripe fruit will also
produce a more intense flavor.
Preparation
Sort and rinse the fruit. Cut out any
blemishes.
Remove the stalks from grapes and
cherries as these are bitter. The stalks
do not need to be removed from
berries.
Cut larger fruit into chunks approx.
1" (2cm) in size. The harder the fruit the
smaller the pieces should be.
Tips
– Try experimenting with mild and tart
flavors.
Method
Put the prepared fruit (cleaned,
washed, chopped etc.) into a perforated cooking pan.
Place a solid container or the univer-
sal tray underneath to catch the juice.
Settings
Operating Modes | Steam Cooking
Temperature: 210°F / 100°C
Duration: 40–70 minutes
– The juice quantity and aroma are im-
proved if sugar is added to the fruit
and is allowed to soak in for several
hours. We recommend ¼–½ cup (50–
100 g) sugar per 2lbs (1kg) of sweet
fruit and ½–¾ cup (100–150g) sugar
for 2lbs (1kg) tangy fruit.
– If you wish to bottle the juice rather
than consume it straight away, while
still hot pour it into clean bottles and
seal immediately.
98
Page 99

Special modes
Menu Cooking
You can cook up to three different types
of food, e.g. fish with a side dish and
vegetables.
The food can be selected in any order
you like. The appliance will automatically sort them out in order of cooking
duration required. The one with the
longest duration goes in the oven first.
The Ready at and Start at functions are
not available for "Menu Cooking."
Method
Turn the steam oven on.
Fill the water container and push it
back in so that it engages.
Then place the drip tray / universal
tray (depending on model) in the appliance.
Select Special Modes | Menu Cooking.
Select the type of food.
After you have confirmed Start Menu
Cooking, the display will tell you which
food to put in the oven. At the end of
the preheating phase, the display will
show when the next food type is to be
placed in the oven. When the time for
the next food type to be placed in the
oven is reached, the display will show
the food type and the shelf runner. This
process will be repeated for the third
food type.
You can still cook food types not listed
on the display together. See "Menu
Cooking - Manually" for details on
how to do this.
Depending on the food, you will be
asked about the size and the degree of
doneness.
Select or enter the values required
and then confirm your selection with
OK.
Select Add next ingredient.
Select the food you want and pro-
ceed in the same way as with the first
ingredient.
Repeat the procedure, if necessary,
for the third ingredient.
99
Page 100

Special modes
Dehydrate
Only use the special application Dehydrate or the Combi Steam| Convection Bake
mode to dry food so that moisture can be dissipated.
Method
Cut the food into similar sized pieces.
Place the pieces on the rack covered with baking paper.
Tip: Bananas and pineapple are not suitable for drying in a combi steam oven.
Settings
Special Modes | Dehydrate
Temperature: see chart
Drying time: see chart
or
Operating Modes | Combi Steam | Convection Bake
Temperature: see chart
Drying time: see chart
Moisture: 0%
Food [°F / °C] [h]
Apple, rings 160 / 70 6–8
Apricots, halved, pitted 140-160 / 60–
10–12
70
Pears, sliced 160 / 70 7–9
Herbs 140 / 60 1.5–2.5
Mushrooms 160 / 70 3–5
Tomatoes, sliced 160 / 70 7–9
Citrus fruit, sliced 160 / 70 8–9
Plums, pitted 140-160 / 60–
10–12
70
Temperature / Time (hours)
100
 Loading...