

Page 1

Operating and Installation
Instructions
Commercial Dishwasher
G 7856
To prevent accidents
and machine damage
read these instructions
before
installation or use.
en-US
M.-Nr. 06 868 521
Page 2

2
Page 3

Contents
IMPORTANT SAFETY INSTRUCTIONS. . . . . . . . . . . . . . . . . . . . . . . . . . . . . . . . . 4
Guide to the machine . . . . . . . . . . . . . . . . . . . . . . . . . . . . . . . . . . . . . . . . . . . . . . 8
Description of the machine. . . . . . . . . . . . . . . . . . . . . . . . . . . . . . . . . . . . . . . . . 10
Opening and closing the door . . . . . . . . . . . . . . . . . . . . . . . . . . . . . . . . . . . . . . 11
Water softener . . . . . . . . . . . . . . . . . . . . . . . . . . . . . . . . . . . . . . . . . . . . . . . . . . . 12
Setting the water softener ...........................................12
Filling the salt reservoir .............................................14
Salt indicator .....................................................15
Rinse aid . . . . . . . . . . . . . . . . . . . . . . . . . . . . . . . . . . . . . . . . . . . . . . . . . . . . . . . . 16
Adding rinse aid ..................................................16
Setting the dosage . . . . . . . . . . . . . . . . . . . . . . . . . . . . . . . . . . . . . . . . . . . . . . . . . 17
Loading the machine . . . . . . . . . . . . . . . . . . . . . . . . . . . . . . . . . . . . . . . . . . . . . . 18
Items not suitable for dishwashers ....................................19
Adjusting the upper basket ..........................................21
Adding cleaning agent . . . . . . . . . . . . . . . . . . . . . . . . . . . . . . . . . . . . . . . . . . . . 22
Use . . . . . . . . . . . . . . . . . . . . . . . . . . . . . . . . . . . . . . . . . . . . . . . . . . . . . . . . . . . . 24
Turning on .......................................................24
Starting a program.................................................24
Selecting an additional function ......................................25
Program sequence display ..........................................25
At the end of a program.............................................25
Turning off .......................................................25
Changing a program ...............................................26
Canceling a program...............................................26
Program guide . . . . . . . . . . . . . . . . . . . . . . . . . . . . . . . . . . . . . . . . . . . . . . . . . . . 27
Programming special functions . . . . . . . . . . . . . . . . . . . . . . . . . . . . . . . . . . . . . 29
Machine care . . . . . . . . . . . . . . . . . . . . . . . . . . . . . . . . . . . . . . . . . . . . . . . . . . . . 37
Correcting minor faults . . . . . . . . . . . . . . . . . . . . . . . . . . . . . . . . . . . . . . . . . . . . 41
After Sales Service . . . . . . . . . . . . . . . . . . . . . . . . . . . . . . . . . . . . . . . . . . . . . . . 43
INSTALLATION INSTRUCTIONS. . . . . . . . . . . . . . . . . . . . . . . . . . . . . . . . . . . . . 45
Caring for the environment. . . . . . . . . . . . . . . . . . . . . . . . . . . . . . . . . . . . . . . . . 46
Installation . . . . . . . . . . . . . . . . . . . . . . . . . . . . . . . . . . . . . . . . . . . . . . . . . . . . . . 47
Electrical connection. . . . . . . . . . . . . . . . . . . . . . . . . . . . . . . . . . . . . . . . . . . . . . 49
Plumbing. . . . . . . . . . . . . . . . . . . . . . . . . . . . . . . . . . . . . . . . . . . . . . . . . . . . . . . . 51
Technical data . . . . . . . . . . . . . . . . . . . . . . . . . . . . . . . . . . . . . . . . . . . . . . . . . . . 53
3
Page 4
IMPORTANT SAFETY INSTRUCTIONS
WARNING When using your dishwasher
follow basic precautions,
including the following:
This dishwasher is only intended for
specialized applications. Only use
the machine for its intended
purpose. Any other use, conversion
or modification is dangerous. The
manufacturer cannot be held
responsible for damages caused by
improper use of this machine.
This dishwasher complies with
current safety requirements.
Improper use of the machine can
lead to personal injury and material
damage.
Read all instructions before installing
or using this machine.
Keep these operating instructions in
a safe place and pass them on to
any future user.
Installation and service
Installation and repair work should
~
be performed by a Miele authorized
service technician. Work by unqualified
persons could be dangerous and may
void the warranty.
The installation of this unit in
~
non-stationary locations (e.g. ships)
must be performed by a qualified
installer or service agency, in strict
accordance with national and local
safety regulations and standards.
Before installation, make sure that
~
the voltage and frequency listed on the
data plate correspond with the
household electrical supply. This data
must correspond to prevent injury and
machine damage. Consult a qualified
electrician if in doubt.
Be certain this machine is properly
~
installed and grounded by an
authorized technician. To guarantee the
electrical safety of this machine,
continuity must exist between the
machine and an effective grounding
system. It is imperative that this basic
safety requirement be met. If there is
any doubt, have the electrical system
checked by a qualified technician. The
manufacturer cannot be held
responsible for damage or injury, such
as electric shock, caused by missing or
defective grounding.
Do not install or use a damaged
~
dishwasher. A damaged machine is
dangerous. Unplug the machine and
call your Miele dealer or the Miele
Technical Service Department.
Do not use the machine until
~
properly installed.
Do not install the machine in an area
~
where a danger of explosion or of
freezing temperatures may be present.
4
Page 5

IMPORTANT SAFETY INSTRUCTIONS
If the power cord is damaged it
~
must only be replaced by a Miele
Service technician with a genuine Miele
power cord.
Do not use an extension cord to
~
connect this machine to electricity.
Extension cords do not guarantee the
required safety of the machine (e.g.
danger of overheating).
Defective components should be
~
replaced by Miele original parts only.
Only with these parts does the
manufacturer guarantee that they
comply with safety requirements.
Before installation or service,
~
disconnect the power supply to the
work area by unplugging the unit,
"tripping" the circuit breaker or
removing the fuse.
When work has been performed on
~
the supply plumbing, the supply line to
the commercial dishwasher must be
bled.
Otherwise, the water softening system
may be damaged.
Use
Please follow the advice on
~
installation in this manual and in the
separate Installation Instructions.
Personnel operating the machine
~
should be trained regularly.
Persons who lack physical, sensory
~
or mental abilities, or experience with
the machine should not use it without
supervision or instruction by a
responsible person.
Do not allow children to play in or
~
around the dishwasher, or to operate it.
Do not tamper with the controls.
~
BURN AND SCALD HAZARD
~
This dishwasher reaches very high
temperatures. Take care when
unloading the unit. Let baskets and
inserts cool before touching them. Any
water which may remain in containers
will be very hot and should be emptied
into the wash cabinet.
BURN HAZARD
~
The heating elements become
extremely hot during use. Do not touch
the heating elements during or directly
after the end of a program.
Take care when handling liquids
~
such as detergent, rinsing, wetting, or
neutralizing agents. These may contain
irritant or caustic ingredients. Do not
use any organic solvents. Danger of
explosion!
Follow the instructions and relevant
safety procedures carefully. Wear
protective gloves and goggles. The
manufacturer’s safety conditions must
be observed with all chemical agents.
5
Page 6

IMPORTANT SAFETY INSTRUCTIONS
Under certain conditions, hydrogen
~
gas may be produced in a hot water
system that has not been used for two
weeks or more. HYDROGEN GAS IS
EXPLOSIVE. If the hot water system has
not been used for such a period, turn
on all hot water faucets and let water
flow from each for several minutes
before using the dishwasher. This will
release any accumulated hydrogen
gas. Do not smoke or use an open
flame during this time.
Avoid inhaling detergent. If
~
swallowed, it can cause burning in the
mouth and throat or inhibit breathing.
Be careful when sorting and loading
~
items to be washed: locate sharp items
so that they are not likely to damage the
door seal; and load sharp knives with
the handles up to reduce the risk of
injuries.
The water in the machine must not
~
be used as drinking water.
Do not sit or lean on the open door.
~
This could cause the machine to tip or
be damaged.
Never clean the machine or near its
~
vicinity with a water or high pressure
hose.
Only use cleaning agents
~
formulated for special processes and
approved by Miele for use with this
machine. Keep all cleaning agents out
of the reach of children. Use of
unsuitable cleaning agents could
adversely affect the
components of the machine.
Use only rinse agents for
~
commercial dishwashers. When other
rinse agents are used, there is the
danger that the rinse load and the
dishwasher might be damaged.
Pre-treatments with detergents can
~
create suds, as can certain rinsing
agents. For pre-treatment and / or
cleaning only, use low-sudsing
detergents which have been approved
by Miele. Suds can have an adverse
effect on the cleaning process.
When a chemical additive is
~
recommended on technical application
grounds (e.g. with a detergent), this
does not imply that the manufacturer of
the dishwasher takes responsibility for
the affect of the chemical on the
material of the items being cleaned.
Please be aware that changes in
formulation, storage conditions, etc.,
which may not be publicized by the
chemical producer, can have a
negative effect on the cleaning result.
Always follow the instructions of the
~
chemical manufacturer when using
detergents and special application
chemicals. Only use such chemicals for
the purpose and in the situation
specified to avoid such dangers as
chemical reactions and material
damage.
The dishwasher is designed only for
~
operation with water and additive
cleaning agents. Organic solvents must
not be used in the machine. An
explosion or machine corrosion could
occur with the use of organic solvents.
6
Page 7
IMPORTANT SAFETY INSTRUCTIONS
In critical applications where very
~
stringent requirements must be met, it
is highly recommended that all relevant
factors for the process, such as
cleaning agent, quality of water, etc.,
be discussed with a Miele Application
Specialist.
The special inserts should only be
~
used for their specific application.
Do not wash plastic items unless
~
they are marked "dishwasher safe" or
the equivalent. If in doubt follow the
manufacturers recommendations.
Empty any containers or utensils
~
before arranging them in the machine.
Do not allow any remains of acids or
~
solvents, particularly hydrochloric acid
or chloride solutions, to get into the
wash cabinet. The presence of any
solvents should be minimized
(especially those in hazard class A1).
To avoid corrosion damage ensure
~
that solutions or steam containing
hydrochloric acid do not come into
contact with the steel outer casing of
the machine.
Disposal of the old machine
When disposing of your old
~
dishwasher first make it unusable.
Disconnect it from the mains power
supply, cut off the cable and plug from
the cable.
For environmental and safety
~
reasons ensure the machine is
completely drained of any residual
water and detergent. (Observe safety
regulations and wear safety goggles
and gloves).
Remove the door to the washing
~
compartment, so that children cannot
accidentally shut themselves in. Make
appropriate arrangements for the safe
and environmentally responsible
disposal of the machine.
For tank system machines ensure
~
that all water is emptied out the tank.
The manufacturer cannot be held
responsible for any damage caused
by non-observance of these
Important Safety Instructions.
Accessories
Only specific additional equipment,
~
made by Miele or approved by Miele,
should be connected to this machine.
Consult Miele on the type and
application of such equipment.
SAVE THESE
INSTRUCTIONS
7
Page 8
Guide to the machine
a Connection for DOS unit G 60
Dosage pump for liquid detergents optional
(located on the rear side of the
machine)
b Filter combination
c Salt reservoir
(water softener)
8
d Compartment for powder detergent
e Rinse aid reservoir
(with dosage selector)
Page 9
Guide to the machine
a On/Off button (I-0)
b Door button
c Display
d Delay Start indicator
(see "Programming special
functions")
e Extra drying indicator
f Start indicator
g Start button
h Extra drying button
i Display button to toggle between
"Actual time" and "Elapsed wash
time"
j Serial interface
(for use by Service Technicians)
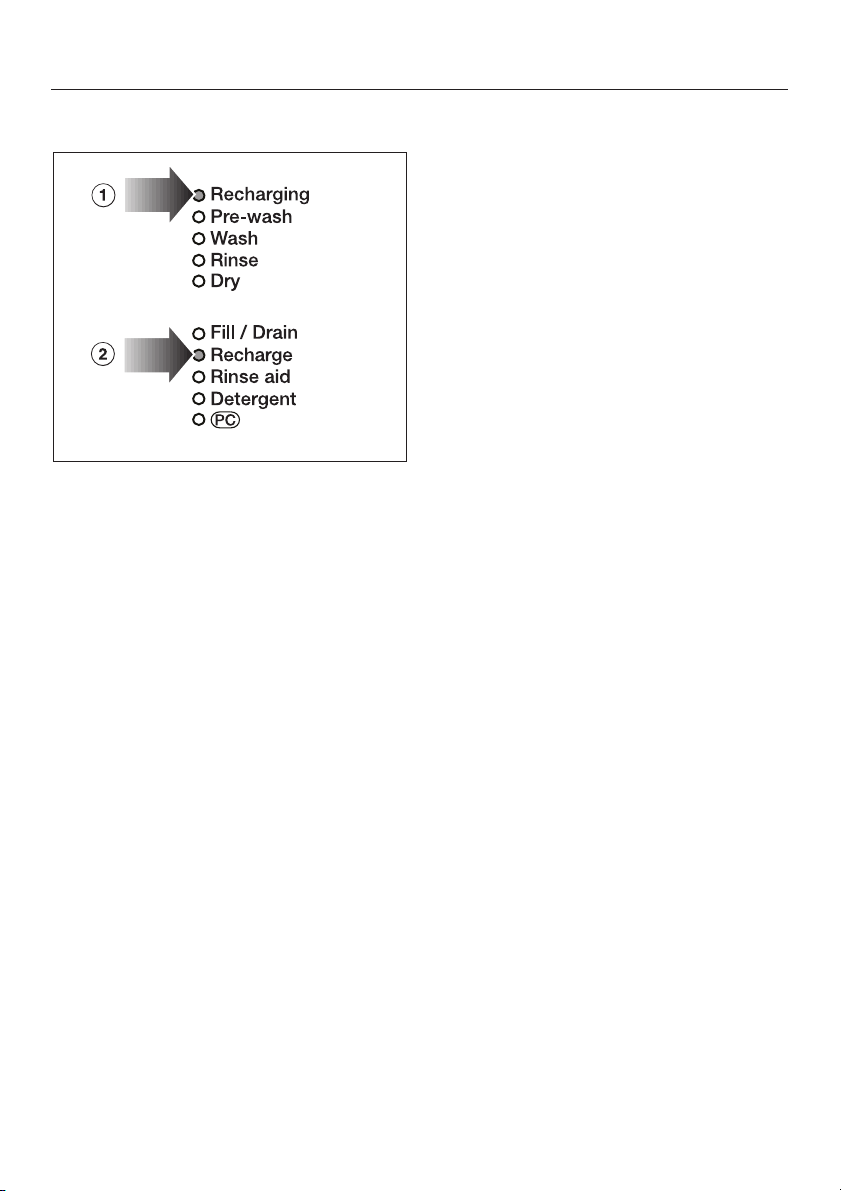
k Add liquid cleaning agent indicator
(only applies to machines equipped
with an optional external DOS
module)
l Add rinse aid indicator
m Add salt indicator
n Check water inlet/drain indicator
o Program sequence indicator
p Program selector
9
Page 10

Description of the machine
This Miele machine is a commercial
dishwasher with fresh water wash
system and short batch times. It is
especially suitable for use where quick
turn-around flexible wash programs,
and commercial durability are of the
utmost importance.
The dishwasher is equipped with a
water softener as a standard.
10
Page 11

Opening and closing the door
To open the door
Press the door button, hold the door
^
grip and pull open the door at the
same time.
The door should only be opened during
operation for emergencies, e.g. if items
are knocking together or if a program
fault is indicated in the display. See
"Canceling a program".
Do not touch the heating
,
elements during or directly after the
end of a program, you could burn
yourself. They remain hot for some
time after the end of the program.
When using the "Rapid" program the
door must be kept closed between
loads. The condensed water which
builds up in the machine could cause
corrosion or damage to surrounding
countertops or furniture. See advice on
installation locations in the "Installation"
section of this manual.
To close the door
Lift the door upwards and push until
^
it clicks shut. Do not press the door
button while shutting the door.
11
Page 12

Water softener
Water Softener
To avoid the build-up of calcium
deposits on items being cleaned and in
the machine the water needs to be
softened.
To ensure a steady supply of soft water
the water softener unit must always be:
1. correctly set for the water hardness
level in your area.
2. the salt reservoir must be filled.
(If the water hardness level is below
4 gr/gal (4 °d - German scale) the
water does not need to be softened.)
The machine is set at the factory for a
water hardness level of 19 gr/gal
(19°d).
If the water supply is harder or softer
than this (including below 4 gr/gal or
4 °d) the factory setting will need to
be changed. For settings see chart.
Your local water authority will advise
you of the water hardness in your area.
Setting the water softener
Turn the machine off.
^
Turn the program selector to "STOP".
^
Press and hold the "Display" and
^
"Start" buttons, and turn on the
machine with the "On / Off" button.
The actual program status "P..." is
displayed.
The "Fill/Drain" indicator lights.
Press the "Extra Drying" button once.
^
"E01" (program level 1) appears in
the display.
^ Turn the program selector to the
6 o’clock position.
The number "19" is displayed (the
factory water hardness setting in °d,
equivalent to 19 gr/gal).
^ Press and hold the "Display" button
until the required value (water
hardness in °d) is displayed.
The counter returns to "0" after
reaching "60".
^
Press the "Start" button. "SP" appears.
For fluctuating levels (e.g.8-17gr/gal
or8-17°d)setthewater softener to
the highest setting (in this example to
17 gr/gal or 17°d).
The built-in water softener has settings
from1-62gr/gal or 1 °d - 60 °d.
^
Enter your water hardness level here:
°d / gr/gal
12
^
Press the "Start" button once more.
The setting will now be stored. The
display clears.
The machine is now ready for
operation.
Page 13
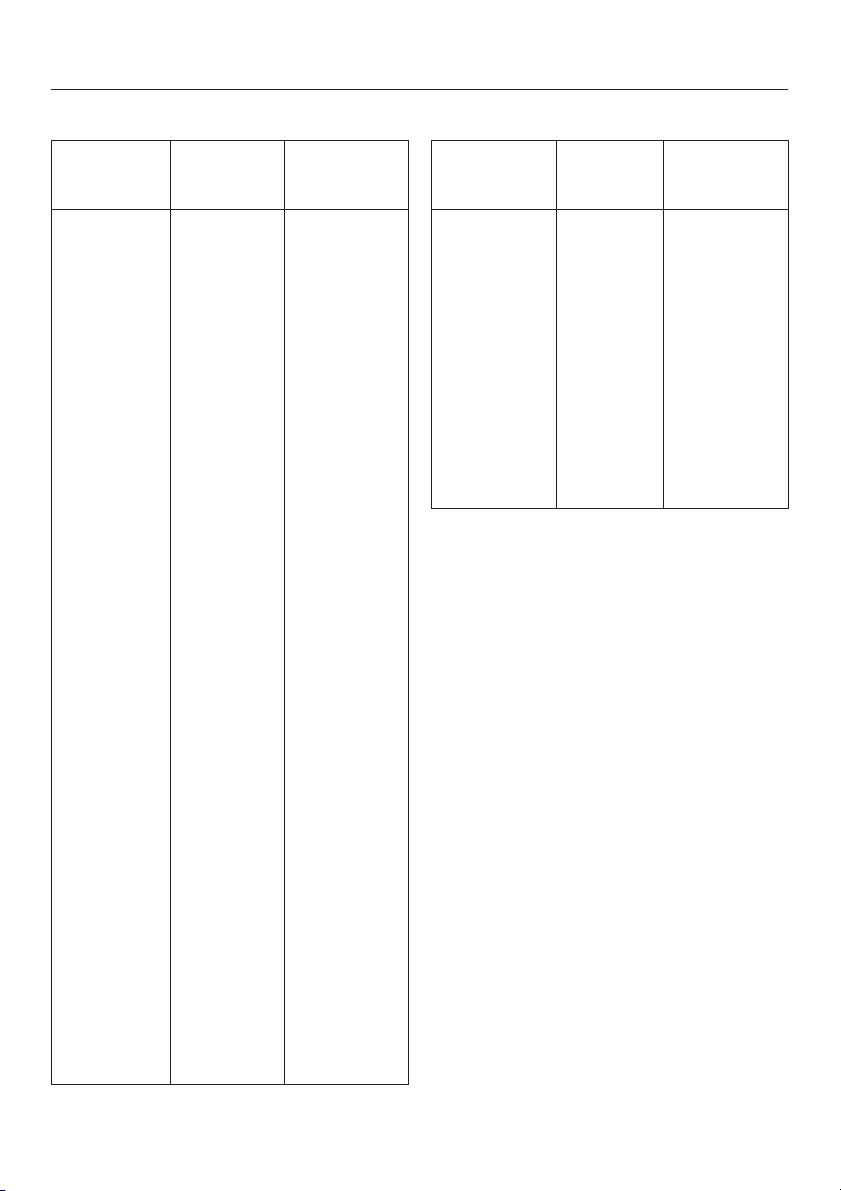
Table of settings
Water softener
°d
(German
scale)
1
2
3
4
5
6
7
8
9
10
11
12
13
14
15
16
17
18
19 *)
20
21
22
23
24
25
26
27
28
29
30
31
32
33
34
35
36
37
38
39
40
41
42
43
44
45
gr/gal Setting
1
2
3
4
5
6
7
8
9
10
11
12
13
14
15
16
17
18
19
20
21
22
23
25
26
27
28
29
30
31
32
33
34
35
36
37
38
39
40
41
42
43
44
45
46
1
2
3
4
5
6
7
8
9
10
11
12
13
14
15
16
17
18
19
20
21
22
23
24
25
26
27
28
29
30
31
32
33
34
35
36
37
38
39
40
41
42
43
44
45
°d
(German
scale)
46
47
48
49
50
51
52
53
54
55
56
57
58
59
60
*) factory setting
gr/gal Setting
47
49
50
51
52
53
54
55
56
57
58
59
60
61
62
46
47
48
49
50
51
52
53
54
55
56
57
58
59
60
13
Page 14
Water softener
Filling the salt reservoir
Only special, coarse-grained
reactivation salt* should be used in
this machine.
*Available from Miele. Please see
back page for contact information.
Do not use other types of salt, e.g. table
salt, agricultural or gritting salt. These
could contain components which are
insoluble in water and could damage
the water softener. If in doubt, consult
Miele’s Professional Department.
The salt reservoir holds approximately
5.5 lbs (2.5 kg) of salt.
Inadvertently filling the salt
,
reservoir with detergent will damage
the water softener.
Before filling, make sure you are
using reactivation salt.
^
Remove the bottom basket from the
machine.
^
Unscrew the salt reservoir cap.
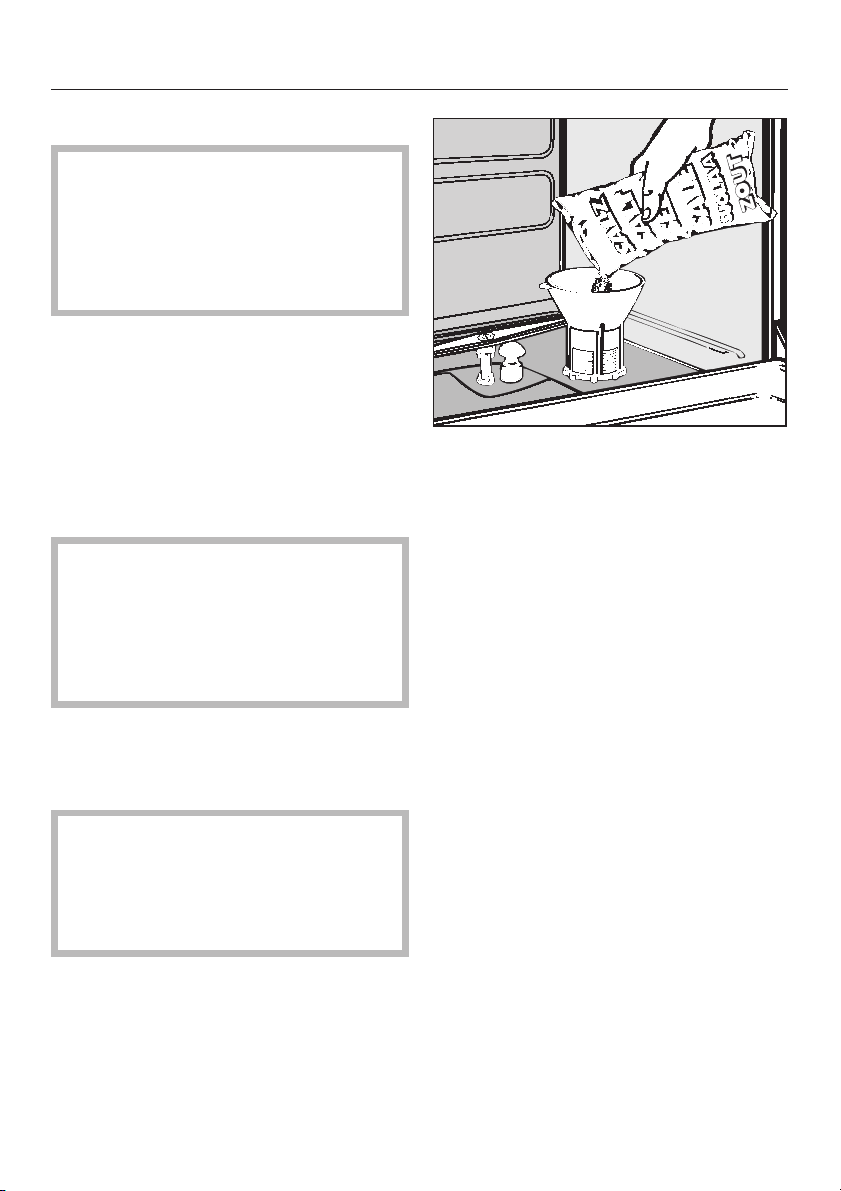
Carefully fill the reservoir with salt.
^
Displaced water will run out as it is
being filled.
^ Wipe any residual salt off the screw
threads.
^ Screw the cap on firmly.
^ Immediately after this step: Run the
"Rinse" program to remove any traces
of salt from the cabinet.
Note: There may be a delay before the
"Rinse" program starts due to the
reactivation of the water softener.
Important: The salt container must
be filled with 0.6 gal (2.5 l) of water
before adding salt for the first
time. Water does not have to be
added with subsequent refills.
^
Place the funnel (provided) in place.
14
Page 15
Salt indicator
When the salt reservoir is empty the
"Recharge" indicator, b, lights as a
reminder to fill the reservoir.
Reactivation takes place automatically
during a program. The "Recharging"
indicator, a, lights while this is
occurring.
Water softener
15
Page 16

Rinse aid
Rinse aid is needed to prevent spotting
on dishes and glassware.
The rinse aid is filled in the reservoir
and the set amount will be
automatically dispensed during the final
rinse. The reservoir holds about 125 ml.
Inadvertently filling the rinse aid
,
reservoir with detergent (liquid or
powder detergent) will damage the
reservoir!
Only use rinse aid approved for
this dishwasher.
Adding rinse aid
If the "Rinse aid" indicator lights, the
rinse aid reservoir must be refilled.
^ Open the door fully.
16
^
Press the button in the direction of
the arrow until the flap springs open.
Page 17
Add rinse aid until it is visible on the
^
surface of the filter in the opening.
^ Close the flap until it clicks into place.
Make sure it is firmly shut, otherwise
water could get into the rinse aid
reservoir during the program.
^ Clean up any spilled rinse aid to
prevent over-foaming during the next
program.
The flap should always remain closed.
Only open it to add more rinse aid.
Rinse aid
Setting the dosage
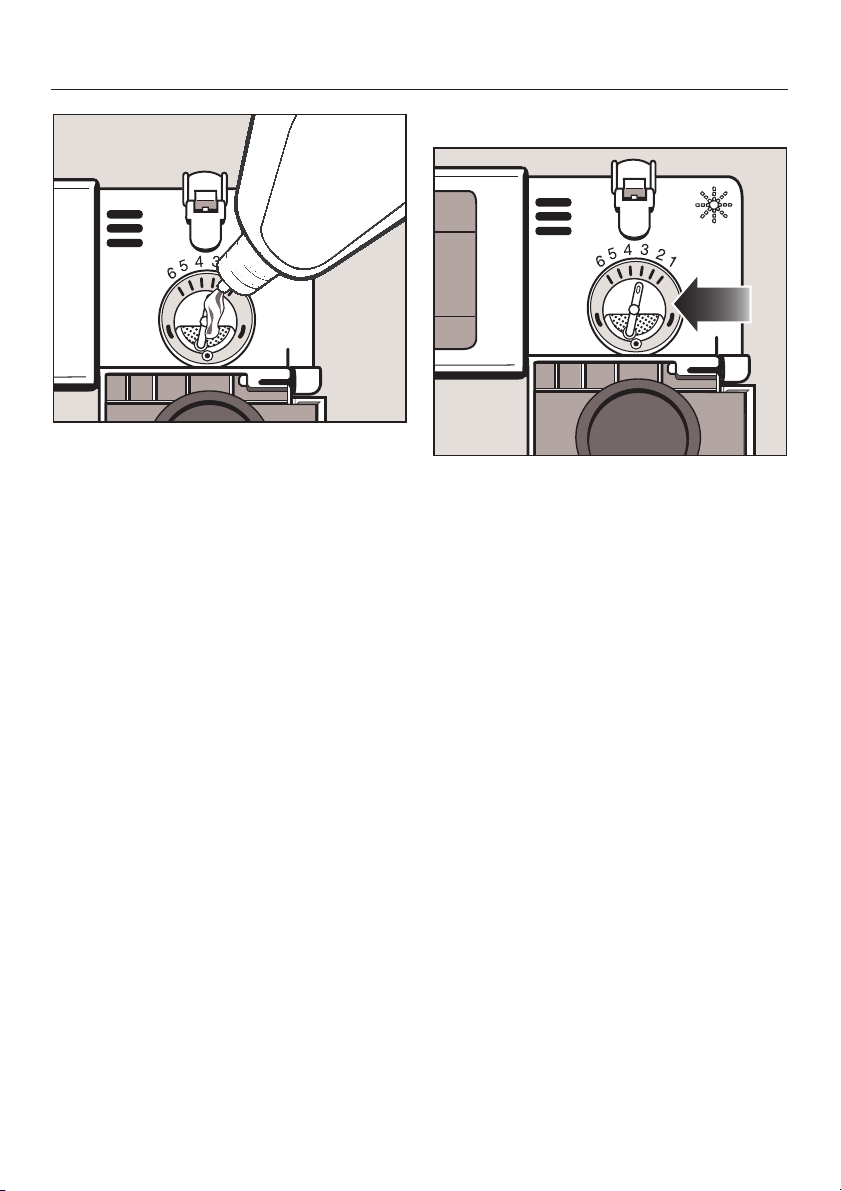
The dosage selector (see arrow) is
preset to 3. This dispenses
approximately 3 ml of rinse aid per
program. It can be adjusted from 1 to 6.
^ Use a higher setting if spots appear
on dry glassware.
^ Use a lower setting if streaking
appears on dishes or glasses.
^
Only add rinse aid when the rinse aid
indicator comes on.
17
Page 18

Loading the machine
Loading the machine
Preparation
Empty all containers before loading
^
them into the machine.
Ensure that no acid or solvent
,
residues, especially hydrochloric
acid or chlorides get into the wash
cabinet.
Notes
Load items so that water will come
^
into contact with all surfaces. This
ensures that they will be properly
cleaned.
Do not place items to be cleaned
^
inside other pieces where they may
be concealed.
Hollow vessels such as cups,
^
glasses, pots, etc. should be inverted
and placed in the correct inserts.
Deep based items should be placed
^
at an angle to ensure that water runs
off them freely.
^ Tall, narrow, hollow pieces should be
placed in the center of the basket to
ensure good water coverage.
^ Small pieces should be placed on
the cup racks in the upper basket.
Do not obscure them by larger items
below. Cups should be on the lower
rack and bowls on the top rack so
that water reaches all pieces.
18
^
The spray arms must not be blocked
by items which are too tall or which
hang down in their path. Check if
they rotate freely.
^
Do not place tall items in the front
right area of the lower basket. They
could prevent the detergent
compartment flap from opening.
Page 19

Loading the machine
Items not suitable for
dishwashers
Cutlery with wooden or horn handles
^
Wooden or plastic cutting boards
^
Glued items, e.g. old knives with
^
handles which have been glued on
Hand-made craft items
^
Copper or tin items
^
Plastic items which are not heat
^
resistant
Please note
Silver and aluminum items may
^
slightly discolor.
Colors painted over a glaze may fade
^
after a number of washes.
Clouding may occur on glasses after
^
frequent washing.
Our recommendations
Wash delicate glassware by hand.
^
Only wash dishwasher safe
^
glassware, dishes and cutlery.
19
Page 20

Loading the machine
Upper basket
Ideal for small, lightweight, delicate
^
items such as cups, saucers,
glasses, dessert bowls, etc. as well
as lightweight heat resistant plastic
items.
Bottom basket
Ideal for larger and heavier items
^
such as plates, serving platters,
saucepans, bowls, etc. Glasses may
only be cleaned in the bottom basket
if it is fitted with a special glassware
insert or if there is a special bottom
basket.
Cutlery
^ Unsorted cutlery should be placed in
the cutlery holders with the handles
facing downwards.
Select baskets and inserts which are
appropriate for the application.
Loading examples
O 881 Upper basket:
for 20 cups, 24 saucers or 12 dessert
plates
20
U 880 Bottom basket:
with2xE216half inserts each for
15 platesØ9½"(240 mm) and
2 x E 165 cutlery baskets for mixed
cutlery
Page 21

Loading the machine
Adjusting the upper basket
The upper basket can be adjusted
above and below the middle position
by 1" (2.5 cm). It is set in the middle
position on delivery.
Depending on the position of the upper
basket, a variety of plate dimensions
can be accommodated in the baskets.
For example: If the upper basket is in
its highest position, a plate with a
diameter of 9 ½" (24 cm) can be fit in
the lower basket.
To adjust the upper basket
Pull the upper basket out until
^
resistance is felt, lift from the runners
and remove.
Unscrew the knurled nuts (roller
^
bearings) on both sides of the basket
with a suitable wrench and reposition
as required.
21
Page 22

Adding cleaning agent
Only use cleaning agents
,
formulated for this machine.
Do not use detergents formulated
for domestic dishwashers.
Powder cleaning agent is dispensed
via the compartment for powder
cleaning agents in the door.
Liquid cleaning agents are dispensed
via the DOS-Module (available as an
optional accessory).
If liquid cleaning agent is not being
used, powder detergent must be
placed in the detergent container prior
to every program (with the exception of
"Rapid" and "Rinse"). See the "Program
guide" for more information.
Add powder cleaning agent to
^
compartment II.
Dosage: approx. 3 g/l, it is equivalent
to 1 ½ tablespoons (20 g) per program
cycle.
In the program cycle "Wash" the water
intake is approx. 7 l.
Follow manufacturer's instructions if
they differ.
^
Press the opening catch in the
direction of the arrow. The flap will
spring open. The flap is always open
at the end of a program.
22
^ Close the dispenser lid.
Page 23

Adding cleaning agent
"Rapid" program
^ If liquid cleaning agent is not being
used, add powder detergent directly
to the inside of the door for this
program.
A different combination of cleaning
agents and other additives may be
necessary for special soiling. Contact
Miele fore more information.
Maintenance of the dispensing
systems
The following maintenance should be
carried out by a Miele Service
Technician to ensure trouble-free
operation.
Every 12-18 months:
Replace the dispensing hoses in the
^
DOS module.
CAUTION when handling liquid
,
agents and additives! They may
contain irritant or caustic
ingredients.
Please follow the manufacturer's
safety instructions.
Wear protective gloves and
goggles.
Note
This machine can be equipped with a
dispenser pump for liquid cleaning
agent (DOS-Module G 60) as an
optional accessory. This is connected
externally.
To vent the dosage system and set the
dosage concentration see,
"Programming special functions".
The DOS module comes with a
separate Installation Manual.
23
Page 24

Use
Turning on
Close the door.
^
Open the water supply (if closed).
^
Press the On / Off (I-0) button.
^
If the program selector is turned to
"Stop" a dot lights in the display.
Starting a program
^ Turn the program selector clockwise
or counterclockwise to the required
program. See the "Program guide" for
information on the programs.
The display shows the first wash
temperature of the selected program
(except "Rinse" and "Drain"). The "Start"
indicator flashes.
^
If required select the additional
feature "Extra Drying" . See "Selecting
an additional feature".
^
Press the "Start" button. The running
time is displayed in ascending
minutes.
Once the program has started all other
programs are blocked. If the program
selector is turned to another program
during the running program, the values
shown in the display will go out. The
values appear again if the program
selector is turned back to the running
program.
^ Press the "Display" button to alternate
between the elapsed time and actual
temperature in the display during the
program.
Note: during the heating stage in "Main
wash" and "Final rinse" the required end
temperature is shown in the "time run"
display field.
The "Start" indicator lights.
24
Page 25

Use
Selecting an additional
function
"Extra drying" can be selected as an
additional function.
Select the drying function directly
^
after a program has been selected
(not with "Rapid", "Rinse" and "Drain").
Drying is phased over 10 minutes. The
total running time of the program
lengthens accordingly.
Program sequence display
The indicator for the active program
sequence lights up during the program.
Recharging
Pre-wash
Wash
Rinse
Dry (optional function)
At the end of a program
At the end of a program the program
sequence indicators and the "Start"
indicator go out. The display shows "0"
and a buzzer sounds for 30 seconds
(factory setting). The buzzer can be
changed (see "Programming special
functions").
If desired use the "Display" button to
^
see the total running time of a
program or the actual temperature.
To turn the buzzer off
^ Turn the program selector to "STOP".
or
^ Open the door.
Turning off
^ Press and release the "On / Off"
button.
25
Page 26

Use
Changing a program
If the "Start" button has not yet been
pressed, the selected program can be
changed.
Turn the program selector to the
^
desired program.
If required select the additional
^
function "Extra Drying" again. See
"Selecting an additional function".
Press the "Start" button.
^
Canceling a program
Once a program is running it should
only be canceled in extreme cases,
e.g. when items in the machine are
moving and need to be arranged
securely.
Turn the program selector to "Stop".
^
The program is canceled after
2 seconds.
Open the door.
^
Caution! Water and items in the
,
machine may be hot. Danger of
burning or scalding!
^ Rearrange the items securely.
Observe appropriate health and
safety regulations - wear protective
gloves when necessary.
^ Replenish powder detergent if
necessary.
^ Close the door.
26
^
Select the "Drain" program. The
waste water is drained.
^
Select and start the program again.
Page 27

Program guide
Program When to use Program cycle
Pre-
Main
Interim
rinse
1)
123
X X (X) X (X)
X (X)
CHINA +
CRYSTAL
120°F
RAPID
130°F
SHORT
130°F
For temperature sensitive glassware
and lightly soiled dishware.
Run-time: ~ 12 minutes*
(plus 10 minutes for optional drying)
Rapid program for continuously used
dishes.**)
Powder detergent: Place detergent
directly on the right hand side of the
door interior, NOT in the detergent cup.
Run-time: ~ 10 minutes*
Quick program for lightly soiled
dishware, e.g. party dishware or to
remove salt traces from the wash
cabinet after refilling salt.
Run-time: ~ 15 minutes*
(plus 10 minutes for optional drying)
wash
wash
12
X (X) X (X)
Powder detergent dosage: 1 ½ tablespoons (20 grams) in the detergent
dispenser. Follow manufacturers instructions if they differ.
Final
rinse
1)
3)
2)
X **)
Drying
(Option.
funct.)
*) Run times dependent on incoming water pressure and temperatures
**) Important information for the "Rapid" program
At the end of the program, the final rinse water is not drained away. It is used for
the following "Rapid" program as wash water. If the operation is interrupted for a
longer time or another program is desired:
^
Select the program "DRAIN". The final rinse water is drained away.
X = Sections included in the program (with temperature/temperature holding time)
1)
Temperature or temperature holding time adjustment
(see "Programming special functions").
Important: To clean dishes with soiling it is recommended to program a
wash temperature of 140°F (60°C).
2)
To select an economy interim rinse see "Programming special functions".
3)
To select a second interim rinse see "Programming special functions".
27
Page 28

Program guide
Program When to use Program cycle
Pre-
Main
1)
Interim
rinse
123
X
3)
NORMAL
130°F
NORMAL
PLUS
140°F
INTENSIVE
150°F
RINSE
DRAIN
For normally soiled items.
Run-time: ~ 24 minutes*
(plus 10 minutes for optional drying)
For normally soiled items. Higher wash
temperature to remove starchy foods.
Run-time: ~ 25 minutes*
(plus 10 minutes for optional drying)
For heavily soiled items. Most of the
soiling is removed in an intensive cold
water pre-rinse.
Run-time: ~ 30 minutes*
(plus 10 minutes for optional drying)
To rinse heavily soiled items (e.g. for
removing soiling or to prevent soiling
from drying onto dishes when a full
program does not need to be run).
To drain waste water, e.g. when a
program has been interrupted (to
interrupt a program, the program selector
must be in the “STOP” position).
wash
wash
12
X X X (X) X (X)
X X X (X) X (X)
X X X X (X) X (X)
Final
rinse
1)
Drying
(Option.
funct.)
Powder detergent dosage: 1 ½ tablespoons (20 grams) in the detergent
dispenser. Follow manufacturers instructions if they differ.
*) Run times dependent on incoming water pressure and temperatures
X = Sections included in the program (with temperature/temperature holding time)
1)
Temperature or temperature holding time adjustment
(see "Programming special functions").
Important: To clean dishes with soiling it is recommended to program a
wash temperature of 140°F (60°C).
2)
To select an economy interim rinse see "Programming special functions".
3)
To select a second interim rinse see "Programming special functions".
28
Page 29

Programming special functions
Every change of the factory setting
should be documented in case of
possible technical service.
Record any changes in the field
"Adjusted value___________".
1. Setting the cold water inlet from:
"Nominal water intake" to "Nominal
water intake+1l".
The amount of water taken into the
machine at each intake can be
increased by 1 liter to a maximum of
9.5 liters.
^ Turn the program selector to "STOP".
^ Turn the machine off.
^ Press and hold the "Display" and "Start"
buttons, at the same time turn the
machine on with the "On / Off button".
The displays shows the current
program status "P...".
The "Fill/Drain" indicator lights.
^ Press the "Extra Drying" button once.
"E01" (programming level 1) is
displayed.
^
Turn the program selector to "China &
Crystal".
Either "10" or "11" is displayed.
"10" = Nominal water intake
"11" = Nominal water intake + 1 liter
^
Press "Display" to change from "10" to
"11" or vice versa.
2. Selecting a second interim rinse
A second interim rinse "Interim rinse II"
can be programmed to improve interim
rinsing in all programs (except for
"Rinse" and "Rapid").
Turn the program selector to "STOP".
^
Turn the machine off.
^
Press and hold the "Display" and
^
"Start" buttons, at the same time turn
the machine on with the "On / Off"
button.
The display shows the current
program status "P...".
The "Fill/Drain" indicator lights.
^ Press the "Extra Drying" button once.
"E01" (programming level 1) is
displayed.
^ Turn the program selector to "Rapid".
"30" or "31" is displayed.
"30" = without interim rinse II
"31" = with interim rinse II.
^ Press "Display" to change from "30" to
"31" or vice versa.
^
Press the "Start" button. "SP" is
displayed.
^
Press the "Start" button again. The
change has been saved.
Value set:
^
Press the "Start" button. "SP" is
displayed.
^
Press the "Start" button again. The
change has been saved.
Value set:
29
Page 30

Programming special functions
3. Selecting an economy interim
rinse (only for "Rapid" program)
Turn the program selector to "STOP".
^
Turn the machine off.
^
Press and hold the "Display" and
^
"Start" buttons, at the same time turn
the machine on with the "On / Off"
button.
The display shows the current
program status "P...".
The "Fill/Drain" indicator lights.
Press the "Extra Drying" button once.
^
"E01" (programming level 1) is
displayed.
^ Turn the program selector to "Rinse".
"40" or "41" is displayed.
"40" = without economy interim rinse
"41" = with economy interim rinse
^ Press "Display" to change from "40" to
"41" or vice versa.
^ Press the "Start" button. "SP" is
displayed.
^
Press the "Start" button again. The
change has been saved.
Value set:
4. Venting and setting the dosage on
"DOS modules G 60 and C 60"
(optional extra)
Set the dosage selector on the
^
DOS-Module to the "10" position (on
DOS Module C 60 only).
Turn the program selector to "STOP".
^
Turn the machine off.
^
Press and hold the "Display" and
^
"Start" buttons, at the same time turn
the machine on with the "On / Off"
button.
The display shows the current
program status "P...".
The "Fill/Drain" indicator lights.
^ Press "Extra Drying" twice. "E02"
(programming level 2) is displayed.
Venting the dispensing system:
^ Turn the program selector to "Rinse".
"do1" is displayed.
^ Press "Display" for 90 secs.
The dosage system is vented.
If only venting is required:
^
Turn the machine off with On / Off
(I-0) button.
30
Immediately: Start the "Rinse" program,
so that after venting any agents in the
wash cabinet are diluted before being
drained away.
Page 31

Programming special functions
Setting the dosage
Set the dispensing amount according
to the detergent manufacturer's
recommendations and the
applications.
The machine needs 7 liters of water in
the program cycle "Main wash".
Example:
The detergent manufacturer
recommends 4 ml of detergent per liter
water.
7lx4ml/l = 28 ml.
2 ml per 1 sec dispensing time;
i.e. programming to 14 secs.
^ Turn the program selector to "Short"
the dispensing time in seconds is
displayed, e.g "10".
^ Press and hold "Display" until "14" is
displayed (dispensing time 14 secs
per 28 ml, see example above).
The dosage time / dosage amount is
set.
Having changed a value or all values:
Press the "Start" button. "SP" is
^
displayed.
Press the "Start" button again. The
^
change has been saved.
Value set:
If the dispensing system was also
vented:
Start the "Rinse" program, so that
^
after venting any agents in the wash
cabinet are diluted before being
drained away.
31
Page 32

Programming special functions
5. Altering the cleaning temperature
and/or the temperature holding time
in the "Main Wash" and "Final
rinse"stage of the program cycle
Any changes to the wash
temperature and/or the temperature
holding time should be recorded in
the program chart.
The main wash and final rinse
temperatures can be changed from
86°F - 158°F (30 °C - 70 °C) and the
temperature holding time from
1 - 10 mins.
Important: To wash dishes with
soiling, program to 140°F (60°C).
^ Turn the program selector to "STOP".
The programming level is displayed
in this position only.
^ Turn the machine off.
^ Press and hold the "Display" and
"Start" buttons, and at the same time
turn the machine on with the "On /
Off" button.
The displays shows the current
program status "P...".
The "Fill/Drain" indicator lights.
Temperature "Main wash":
^
Press "Extra Drying" three times.
"E03" (programming level 3) is
displayed.
Turn the program selector to the
^
program to be changed. The current
value is displayed after °F.
Press and hold "Display" until the
^
desired value is displayed.
Temperature holding time "Main
^
wash":
Turn the program selector to the
"STOP" position (the programming
level is displayed in this position
only).
^ Press "Extra Drying" again. "E04"
(programming level 4) is displayed.
^ Turn the program selector to the
program to be changed. The current
value is displayed after min.
^ Press "Display" until the required
value is displayed.
32
Page 33

Programming special functions
Temperature "Final rinse":
^
Turn the program selector to the
"STOP" position (the programming
level is displayed in this position
only).
Press "Extra Drying" again. "E05"
^
(programming level 5) is displayed
field.
Turn the program selector to the
^
program to be changed. The actual
value is displayed after °F.
Press and hold "Display", until the
^
desired value is displayed.
Temperature holding time "Final
^
rinse":
Turn the program selector to the
"STOP" position (the programming
level is displayed in this position
only).
Press "Extra Drying" again. "E06"
^
(programming level 6) is displayed
field.
Turn the program selector to the
^
program to be changed. The actual
value is displayed after min.
Press "Display" until the required
^
value is displayed.
^ Having changed a value or all
values:
^ Press the "Start" button. "SP" is
displayed.
^ Press the "Start" button again. The
change has been saved.
33
Page 34

Programming special functions
6. Delay start and setting the delay
start time
The start of a wash program can be
delayed up to 9 hours and 30 minutes
in 30 minute increments.
Delay start should only be selected with
the "Normal" and "Intensive" programs.
The short programs cannot guarantee
satisfying cleaning results when the
residues are allowed to dry on because
the start time is delayed.
a) To activate Delay Start
^ Turn the program selector to "STOP".
^ Turn the machine off.
^ Press and hold the "Display" and
"Start" buttons, at the same time turn
the machine on with the "On / Off"
button.
The display shows the current
program status "P...".
The "Fill/Drain" indicator lights.
b) Setting the delay start period
The delay start period (from 30 minutes
to 9 hours 30 mins) must be set before
a program is started.
After selecting a program (see
^
"Turning on") press or hold the
"Display" button it until the required
value is displayed. The "Delay Start"
indicator lights.
After the "Start" button is pressed the
delay start period will count down in the
display until the program automatically
starts.
^
Press the "Extra Drying" button once.
"E01" (programming level 1) is
displayed.
^
Turn the program selector to "Drain"
either "80" or "81" is displayed.
"80" = No Delay Start
"11" = Delay Start active
^
Press "Display" to change from "80" to
"81" or vice versa.
^
Press the "Start" button. "SP" is
displayed.
^
Press the "Start" button again. The
change has been saved.
Value set:
34
Page 35

Programming special functions
7. Buzzer
A buzzer (30 secs) can be set for the
following functions:
End of program = Buzzer constantly
–
Error = Buzzer sounds every other
–
second
Turn the program selector to "STOP".
^
Turn the machine off.
^
Press and hold the "Display" and
^
"Start" buttons, at the same time turn
the machine on with the "On / Off"
button.
The display shows the current
program status "P...".
The "Fill/Drain" indicator lights.
^ Press the "Extra Drying" button once.
"E01" (programming level 1) is
displayed.
^ Turn the program selector to
"Intensive".
The display shows a figure between
"90" and "93".
"90" = Buzzer turned off
"91" = End of program
"92" = Fault
"93" = All functions / End of program /
Fault (default)
Press "Display" until the desired
^
function is displayed.
Press the "Start" button. "SP" is
^
displayed.
Press the "Start" button again. The
^
change has been saved.
Value set:
35
Page 36

Programming special functions
8. Re-setting all changes back to the
factory default
Turn the program selector to "STOP".
^
Turn the machine off.
^
Press and hold the "Display" and
^
"Start" buttons, at the same time turn
the machine on with the"On / Off"
button.
The display shows the current
program status "P...".
The "Fill/Drain" indicator lights.
Press "Extra Drying" seven times.
^
"E07" (programming level 7) is
displayed.
^ Turn the program selector to any
position (except "STOP").
The display shows either "00" or "PP".
"00" = factory setting
(electronic was not reset).
"PP" = Electronic was reset.
^ If "PP" is displayed press "Display" to
change from "PP" to "00".
^
Press the "Start" button. "SP" is
displayed.
^
Press the "Start" button again. Values
which had been changed are now
reset.
If the hardness level setting in the
water softener had been changed
this will reset to the factory setting of
19 gr/gal (19 °d). This will need to
be adjusted back to the hardness
level in your area.
36
Page 37

Machine care
Filter combination
The machine must not be used
,
without all filters in place. The filters
protect the circulation pump from
damage caused by foreign objects.
The filter combination in the base of
the wash cabinet should be
inspected regularly and cleaned if
necessary.
Caution:
Watch out for sharp objects which
could cause injury.
Cleaning the coarse filter
Cleaning the fine, flat and micro-fine
filters
Remove the coarse filter.
^
Remove the fine filter (if fitted) from bet
^
ween the flat and micro-fine filters.
^ To unscrew the micro-fine filter,
grasp the two tabs and turn
counter-clockwise twice.
-
^
Press the two tabs together. Remove
and clean the coarse filter.
^
Put the clean filter back in position
and press until it clicks in place.
^
Remove both filters together.
^
Clean the filters.
^
Replace the filter combination in the
reverse order. The flat filter must lie
flat in the base of the wash cabinet.
37
Page 38

Machine care
Cleaning the spray arms
From time to time, particles may
become trapped in the spray arm jets.
The spray arms should be inspected
and cleaned every4-6months.
Remove the spray arms as follows:
Unscrew the upper spray arm.
^
Unscrew the middle spray arm
^
(under the upper basket) clockwise
at the knurled nut.
The knurled nut has a left hand thread.
To unscrew the spray arm turn the nut
and the spray arm to the right.
Use a sharp pointed object to push
^
particles into the spray arm jets and
rinse thoroughly under running water.
^ Open the cap of the lower spray
arm, by turning it clockwise, to rinse
out particles.
^ After cleaning close the cap tightly.
^
Remove the lower basket. Pull the
lower spray arm firmly upwards to
remove.
38
^ After replacing the spray arms check
that they rotate freely.
Page 39

Cleaning the non-return valve
and drain pump
If water has not been pumped away at
the end of a program, the drain pump
or non-return valve may be blocked.
Turn off the washer.
^
Remove the filter combination from
^
the wash cabinet.
Machine care
The drain pump is located beneath the
non-return valve (see arrow).
^ Before returning the non-return valve,
check that the drain pump is not
blocked. Spin the propeller several
times in both directions to check for
obstructions.
^ Tilt the locking clamp to the side.
^
Pull out the non-return valve and
rinse under running water.
^ Carefully refit the non-return valve
and secure it with the locking clamp.
Refit and lock the filter in place.
39
Page 40

Machine care
Cleaning the filters in the water
inlet
Filters are incorporated in the screw
connection of the water inlet hose to
protect the water inlet valve. If these
filters become dirty they need to be
cleaned, otherwise insufficient water
flows into the wash cabinet.
The plastic housing of the water
,
connection contains an electrical
component. It must not be
submerged in water.
To clean the filters
^ Disconnect the machine from the
main electrical supply.
^ Turn off the water supply.
^ Unscrew the water inlet hose.
Replace the filters and seal. Make
^
sure they are sitting correctly.
Reconnect the hose to the water inlet,
^
making sure that is not
cross-threaded.
Open the water tap carefully.
^
If there is a leak, tighten the
connections.
Cleaning the control panel
The control panel should only be
^
cleaned with a damp cloth or a
cleaner suitable for use on plastics.
Do not use abrasive cleaners,
,
glass cleaners or all-purpose
cleaners. They will damage the
control panel.
Cleaning the front of the
machine
^ Use a cleaner suitable for the type of
material the machine front is fitted
with.
^
Clean the large area filter, 1, and fine
filter, 2. Replace with new filters if
necessary.
40
,
Do not use detergents
containing ammonia or thinners.
Page 41

Correcting minor faults
With the aid of the following notes,
minor faults can be corrected without
contacting the Miele Service
Department.
Any work on the electrical
components of the machine should
only be carried out by a qualified
and trained person in accordance
with local and national safety
regulations. Unauthorized repairs
could cause personal injury or
machine damage.
Faults / possible causes
The machine does not start
the door is not properly closed
–
the plug is not properly inserted
–
the fuse is defective or has blown
–
A few minutes after turning on, the
"Fill/Drain" indicator flashes (fault
code F..E is displayed)
the valves are closed
–
the filters in the water inlet hose are
–
dirty
– water pressure is too low
^ Turn the program selector to the
"STOP" position (the fault code goes
out).
^ Turn the machine off.
^ Open the valves or clean the filters
(see "Machine care").
^
Turn on the machine again and
re-select the program.
The wash cycle finishes too early
and the"Fill/Drain" indicator flashes
(fault codeFAisdisplayed)
–
the drain hose is kinked
–
the drain pump is blocked
^
Turn the program selector to the
"STOP" position (the fault code goes
out).
^
Correct the fault.
^
Drain the water and start the program
again (see the drain program and
"Turning on").
41
Page 42

Correcting minor faults
Water in the wash cabinet is not
heated / the program sequence lasts
too long
This machine has a resettable heater
limiter which will switch off the heaters
in the case of over-heating. This could
be caused, for example, by large
articles obscuring the heating elements
or when the filters in the wash cabinet
are blocked.
Remove the cause of the fault.
^
Take off the service panel (see
^
"Electrical connection").
^
Press the reset button on the heater
limiter (yellow) located on the lefthand side of the plastic cover.
If this switch trips again, please
contact the Miele Technical Service
Department.
42
Page 43

In the event of a fault which you cannot
correct yourself or if the fault code "F..."
shows in the display please contact the
Miele Service Department at the phone
number on the back of these
instructions.
Please quote the model and serial
^
number of your machine.
This information can be found on the
data plate (see also "Electrical
connection").
After Sales Service
43
Page 44

44
Page 45

Installation Instructions
To prevent accidents
and machine damage
read these instructions
before
installation or use.
Page 46

Caring for the environment
Disposal of the packing
material
The protective packing materials are
environmentally safe and can be
recycled.
Ensure that any plastic wrappings,
bags, etc. are disposed of safely and
kept out of the reach of children.
Danger of suffocation!
Disposal of the appliance
Appliances contain materials which can
be recycled. Please contact your local
authorities about recycling in your area.
Ensure that the machine presents no
danger to children while being stored
for disposal. See "Important Safety
Instructions".
46
Page 47

Installation
Please refer to the installation
diagram supplied with the machine.
Furniture and fittings installed
,
near the machine must be of a
commercial standard, able to
withstand the effects of steam and
condensed water.
Installation options
Free-standing
–
Undercounter
–
The machine should be positioned
under a continuous worktop or sink
drainer.
The opening must be at least 23 5/8"
(60 cm) wide, 23 5/8" (60 cm) deep and
34 1/4" (82 cm) high.
If necessary, the machine lid can be
removed as follows:
Open the door.
^
^ Remove the fixing screws on both
sides using a Phillips screwdriver.
^ Pull the machine lid approx. ¼"
(5 mm) forwards, lift and remove.
47
Page 48

Installation
Leveling the machine
Any unevenness in the floor can be
compensated for.
Adjust the four screw feet to raise or
^
lower the height of the machine.
Position and secure the
machine
To ensure stability the machine must
first be aligned and then screwed to the
countertop.
Open the door.
^
^ Through each of the two holes in the
front trim, left and right, screw the
machine to the front edge of the
continuous countertop.
^ Do not use silicone sealant to seal
the gaps between the machine and
any neighboring units, this would
hinder ventilation to the circulation
pump.
Depending on the requirements for
installation, the following "kits" can be
ordered from the Miele.
Cover plate (protects the countertop)
The underside of the countertop is
protected from steam damage by a
"niro" stainless steel plate.
Stainless steel toe kick
A stainless steel toe kick is included for
easing undercounter installations.
Please refer to installation directions
included with the toe kick.
48
Page 49

All electrical work must be
,
carried out by a suitably qualified
person in compliance with local and
national safety regulations.
Electrical connection
WARNING
THIS APPLIANCE MUST BE
GROUNDED
Grounding the machine
A damaged power cord must only
be replaced with a genuine Miele
cord by a Miele Service Technician.
For technical data see the data plate
^
or wiring diagram supplied.
The machine must only be operated
with the voltage, frequency and fusing
shown on the data plate.
The data plate is located on the rear of
the machine and behind the service
panel on the upper left side.
The dishwasher can be converted
according to the supplied converting
diagram and wiring diagram.
The wiring diagram is located behind
the operating panel.
The conversion diagram is located
behind the service panel.
^
See also the supplied installation
diagram.
A connection screw with the grounding
symbol (
the machine for grounding.
8) is provided on the back of
PLEASE NOTE:
The G 7856 is available as two
separate versions:
a 240V version,
a 208V version.
To avoid machine damage, please
ensure proper outlet voltage prior to
installation.
49
Page 50

Electrical connection
Removing the service panel and the
protective plastic cover
Isolate the machine from the
,
power supply.
Holding the service panel on both
^
sides, pull gently outwards from
beneath, a, and remove it, b.
Remove the protective plastic cover
^
and unscrew the 2 screws (left and
right), c.
To reassemble:
^
Refit the protective plastic cover and
the service panel in the reverse
order.
^
See also the supplied installation
diagram.
50
Page 51

Connection to the water inlet
Water in the machine is not
,
suitable for drinking.
The machine must be connected to
^
the water supply in accordance with
local and national regulations.
The machine is constructed to
^
comply with Canada regulations, and
may be connected to a suitable
supply without an extra non-return
valve provided that national
regulations allow this.
^ The water pressure (flow rate) must
be a minimum of 7.25 - 145 psi.
If the water pressure (flow rate) is
below 29 psi the fill time is
automatically extended.
The maximum permitted static
pressure is 145 psi.
If the water pressure is not in the
range of 7.25 - 145 psi the "Fill/Drain"
indicator may come on and the fault
code "F2 E" will show in the display.
Please contact the Miele Service
Department.
Plumbing
Valves with 3/4 inch male threads are
^
to be provided on site. They should
be easily accessible so that the water
supply can be turned off when the
machine is not in use.
The DN 10 inlet hose is approx. 5' 7 "
^
(1.7 m) long ending in a 3/4 inch
female thread. Do not remove the
inlet filters.
Large surface area filters are
^
enclosed in the kit supplied with the
machine for installation between the
valve and the inlet hose
(see illustration in "Machine Care Cleaning the filters in the Water
inlet").
^
The machine is supplied as standard
for connection to a cold (coded blue)
and a hot (coded red) water supply
up to a max. temperature of 158°F
(70 °C).
The inlet hoses should be connected
to the cold and hot water supplies.
If there is no hot water connection the
hot water inlet hose marked red
should also be connected to a cold
water supply.
,
The inlet hose must not be
shortened or damaged in any way.
^
See also the supplied installation
diagram.
51
Page 52

Plumbing
Drainage
The drainage system is fitted with a
^
non-return valve which prevents dirty
water from flowing back into the
machine via the drain hose.
The machine should preferably be
^
connected to a separate drainage
system onsite.
If separate drainage is not available
contact your Miele application
specialist for advice.
The onsite drain connection point
should be located between 1 ft.
(0.3 m) and 3 ft. (1 m) above the
lower edge of the machine.
If it is lower than 1 ft. (0.3 m), lay the
hose in a curve at a height of at least
1 ft. (0.3 m).
The drainage system must be able to
take a minimum drainage flow of
16 l/min.
^ The drain hose is approx. 5 ft. (1.5 m)
long, is flexible and has an internal
diameter of 7/8 in. (22 mm). It must
not be shortened. Hose clamps are
supplied for securing it in position.
^
A longer drain hose (up to 13 ft. [4 m]
long) is available to order from Miele.
^
The drainage system must not
exceed 13 ft. (4 meters).
^
See the supplied installation diagram.
52
Page 53

Technical data
English Metric
Height: 33
Width: 23
Depth: 23
Voltage: see data plate
Rate load: see data plate
Fuse rating: see data plate
Connection cable: approx. 5' 10" 1.8 m
Water pressure
(flow pressure): 7.25 - 145 PSI 50 - 1000 kPa
Cold or
hot water connection: up to max. 158° 70 °C
Drainage length: max. 13’ 4 m
½
" (321/4") 85 (82) cm
5
/8"60cm
5
/8"60cm
Delivery head: min. 12" 0.3 m
max. 39
3
/8"1m
Inlet hose: approx. 5’ 7" 1.7 m
Drain hose: approx. 4’ 7" 1.4 m
Noise level in dB (A): Built under: 61
535455
Page 54

Page 55

Page 56

All rights reserved / 3807
M.-Nr. 06 868 521 / 00
 Loading...