

Page 1

XT C Wea rabl e Vi deo Came ra
XTC300
Owner’s Manual
Mid la nd Rad io C or po ra ti on
590 0 Pa rret ta D ri ve
Kan sa s City, MO . 6412 0
Ph: 81 6-24 1-85 00
w ww. M id XT C . c om
XTC300
Owner’s Manual
02092011
XTC300 Manual Cover.indd 1 2/11/11 3:14:40 PM
Page 2

INDEX
Quick Start Guide ..................................................................................................................................................................................2
Welcome to XTC Action Camera Experience .......................................................................................................................................2
What’s in the Box ..................................................................................................................................................................................2
XTC-300 Features and Controls ...........................................................................................................................................................2
Getting to Know the XTC-300 ...............................................................................................................................................................3
Battery .............................................................................................................................................................................................3
Micro SD Card .................................................................................................................................................................................3
Recording ........................................................................................................................................................................................3
Camera Mounting and Aiming ...............................................................................................................................................................4
Reformatting the Micro SD card ............................................................................................................................................................4
Downloading Videos .............................................................................................................................................................................5
Compatible Systems .............................................................................................................................................................................5
Minimum System Requirements ...........................................................................................................................................................5
Tips and Tricks ......................................................................................................................................................................................6
Service and Support ..............................................................................................................................................................................7
FCC Information ....................................................................................................................................................................................7
Limited Warranty ...................................................................................................................................................................................7
Accessories .....................................................................................................................................................................................24
Accessories Order Form..................................................................................................................................................................25
Other Midland Products ...................................................................................................................................................................26
English François Español
www.midxtc.com
1
Page 3

1. On the back, press the button downwards then open the door.
2. Insert the battery and micro SD card observing proper
direction. Close cover.
3. To start recording, move RECORD switch fully forward
4. To stop recording, slide switch back to the off position.
5. Plug in camera to computer and download video.
Welcome to the XTC Action
Camera Experience
Quick Start Guide
Thank you for your purchase of the XTC-300 Action Camera. As some-
one who seeks adventure, we are proud to offer you the ultimate tool in
capturing and recording your adventures. With easy to use one switch
operation, 127 degree angle lens and 4 hour battery life you never miss
a minute of the action. Once captured, simply connect to your computer
and upload the videos to share with friends. It is that simple. Enjoy!
What’s in the Box
XTC-300 Package Includes:
1. Midland XTC-300 Camera
2. USB Cable
3. Lithium-Ion Battery Pack
4. Goggle Mount
5. Helmet Strap Mount
6. Helmet Adhesive Mount
(includes 2 3M adhesive pads)
7. Bicycle Handlebar Mount
8. USB DC adapter
9. USB AC adapter
10. Submersible Case
XTC-350 Package Includes:
1. Midland XTC-350 Camera
2. USB Cable
3. Lithium-Ion Battery Pack
4. Visor Mount
5. Tree Mount
6. Bow Mount
7. Bicycle Handlebar Mount
8. USB DC adapter
9. USB AC adapter
10. Submersible Case
*XTC-350 accessories not shown
XTC-300 Features and Controls
Battery LED
- 60 frames per second
- 170 degree angle
- 16:9 aspect ratio
- 1280 x 720 resolution
- Records as mp4
Micro SD Card Slot
- 30 frames per second
- 127 degree angle
- 16:9 aspect ratio
- 1920 x 1080 resolution
- Records as mp4
Lens
Microphone
RECORD Switch
Forward On/ Record
Record LED
Flashes RED when
Camera is Recording
SD card
Reformat Button
HD/SD Mode
Switch
480 Features:720p Features:1080p Features:
- 60 frames per second
- 170 degree angle
- 16:9 aspect ratio
- 848 x 480 resolution
- Records as mp4
Track for Mounting
Accessories
RECORD Switch
Backward Stop
Recording/OFF
SD Card LED
Mini USB
Connector
2
www.midxtc.com
Page 4

Getting to Know the XTC-300
Battery
1. To insert the battery, push down the battery door latch on the back of
the camera.
2. Pull battery door backwards to open.
3. Install Lithium-Ion battery, observing proper direction.
4. Return battery door and click into place.
Battery Status
Indicator
Solid Green Indicates full battery life
Blinking Green Battery is charging
Solid Orange Medium battery life
Solid Red Indicates low battery life
Blinking Red* Too low to operate
No Light Batteries are depleted.
*Note: When the red battery LED begins blinking, be prepared
to charge the battery because the camera will stop recording
at this point.
Micro SD Card
1. Lift latch on back to open the door
2. Insert Micro SD card into slot observing proper direction (shown below).
3. Close door until it clicks shut
Meaning
Getting to Know the XTC-300
Recording
1. Move the RECORD switch forward. This turns the camera on.
2. The battery indicator will light from red to green. The SD card
indicator will illuminate. The camera is capturing audio and video when
the REC indicator is ashing.
3. To stop recording, move the RECORD switch back to the off position.
SD card LED
Status
Green 75% more available.
Orange 34% - 75% available.
Red
Flashing Red Cannot read the card.
Flashing Green
Memory Size
Note:
1. The camera automatically splits the video into 2 GB segments.
2. HD video requires class 4 micro SD card to record and
1080p Record
512 MB 7.5 Minutes 6.5 Minutes 10 Minutes
1 GB 15 Minutes 13 Minutes 20 Minutes
2 GB 30 Minutes 26 Minutes 40 Minutes
4 GB 60 Minutes 52 Minutes 80 Minutes
8 GB 120 Minutes 104 Minutes 160 Minutes
16 GB 240 Minutes 208 Minutes 360 Minutes
32 GB 480 Minutes 416 Minutes 720 Minutes
playback
Time
Meaning
Less than 34%
or no Micro SD
card installed.
Indicates card is being
reformatted.
720p Record
Time
480p Record
Time
English François Español
www.midxtc.com
3
Page 5
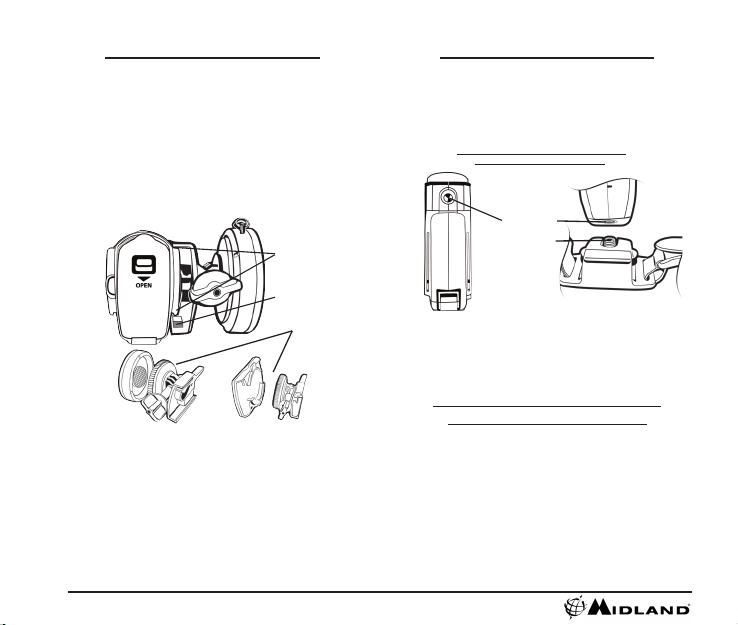
Camera Mounting and Aiming
Mount on Dual Track System
The XTC-300 was innovatively designed with an identical dual track
mount system on either side of the camera. This allows you to mount it
on both sides of a helmet with ease. In addition, the main mount piece is
interchangeable and can be moved from the helmet mount to the goggle
mount. This eliminates the hassle of having to remount the camera
every time.
To mount the camera on the main mount piece, slide the camera onto
the dual track system with the two notches on the mount facing towards
the back of the camera.
To detach the camera from the main mount, hold the camera with the
lens facing away from you. Press down the mount release switch and pull
the mount towards yourself.
Dual Track
Mounting System
Mount Release
Switch
Interchangeable
Mount
Aiming the Camera when mounted with the dual track mount:
When mounting the camera on a helmet, you must do the following:
1. Consider what you would like to shoot and mount the camera
accordingly- left side, right side or top.
2. Find a at surface and ensure the area is clean of dirt and debris.
Remove the cover of the adhesive pad and adhere to the helmet.
3. Once attached, adjust the camera to be sure you are not lming the
sky or the ground.
Camera Mounting and Aiming
Mount using the Thread Mount
On the bottom of the XTC-300 is a standard thread mount that al-
lows the camera to be mounted to a tripod or other xture with a 1/4-20
(1/4” diameter, 20 threads per inch) 5/16 deep thread. The vented
helmet strap mount is a screw type mount. To afx the camera, insert
the screw on the mount into the camera thread and rotate the camera
clockwise to tighten down onto the screw.
Over tightening may cause damage
to the mount and/or camera
Thread Mount
Screw Mount
Aiming the Camera when mounted with the thread mount:
When mounting the camera on the handlebars of a bike or with the
vented helmet strap mount follow these steps:
1. Consider what you would like to shoot and mount accordingly.
2. Ensure once attached that the camera is aimed straight and not
towards the ground or at the sky.
Reformatting the Micro SD card
Ensure battery is fully charged before formatting
The micro SD card can be reformatted while in the camera. This allows
you to delete all the videos at one time. Follow these steps:
1. Press and hold the micro SD reformat button.
2. Move the RECORD switch to the on position
3. Keep the micro SD card reformat button down until the SD card indicator
begins blinking green.
4. Formatting is complete when the SD card indicator turns on solid.
5. Move the RECORD switch to the off position.
Note: The camera cannot reformat the micro SD card if the low
battery light is on.
4
www.midxtc.com
Page 6

Downloading Videos
There is no need to install any software with the XTC-300. It is a plug
and play device. With this, follow the below instructions depending upon
whether you have a PC or a MAC.
Downloading Videos on a PC with a WINDOWS Operating System
1. Connect the camera to the USB port using the included cable.
2. Turn the camera on by moving the RECORD switch to the
record position.
3. The device should automatically install.
4. Operating system
a. Windows XP
i. Open “My Computer”. The camera will be
listed under devices with removable storage.
b. Windows Vista
i. Open “Computer”. The camera will be
listed under devices with removable storage.
c. Windows 7
i. Open “Computer”. The camera will be
listed under devices with removable storage.
5. Click on the device.
6. Open DCIM Folder.
7. Open 100MEDIA folder.
8. Your videos will be in this folder.
Downloading Video on a MAC
1. Connect the camera to the USB port using the included cable.
2. Turn the camera on by moving the RECORD switch to the record
position.
3. MAC will automatically recognize the camera external hard drive.
4. Click on the icon on the desktop.
5. Open DCIM Folder.
6. Open 100MEDIA folder.
7. Your videos will be in this folder.
8. Drag video les to your hard drive or double click to view.
Minimum System Requirements
Processor 2.8 GHz or faster 3.5 GHz or faster
Ram 512 MB or greater 1 GB or greater
Video Card 128 MB or greater 256 MB or greater
Video playback requires H.264 codec. To obtain more information
go to http://www.midxtc.com/
SD video HD video
Compatible Systems
The XTC-300 can be used on both a PC or MAC. Below are the compatible
operating systems:
Windows XP SP2
Windows Vista
Windows 7
Macintosh OSX 10.4 and higher
For Windows we recommend Windows Media Player 10 or higher.
For Macintosh we recommend Quick Time 6.5 or higher.
English François Español
www.midxtc.com
5
Page 7

Tips and Tricks
Problem Solution
Batteries
Camera not turning on Make sure battery is fully charged.
Recording
Camera not recording
Micro SD card
Micro SD card not reading
Video Playback
Slow or choppy video
Make sure the switch is pushed all the
way forward. If the record LED does
not come on, turn off the device and
reinstall the battery.
Verify available memory.
Ensure the Micro SD card is inserted
properly.
Plug camera into the computer to
verify it has available storage.
Attempt formatting process.
Verify the camera is plugged into a
USB 2.0 device.
Remove other unused USB devices.
Transfer video to computer before
viewing.
Verify computer meets minimum
requirements.
Verify proper codec is installed.
Tips and Tricks
Problem Solution
Video Downloading
Slow data transfer
Computer does not
recognize camera
File won’t transfer off
memory card
Sound
Excessive Wind Noise
Verify the camera is plugged into a USB
2.0 device. If registering as 1.1, unplug
and the re-plug the device.
Remove other unused USB devices.
Ensure record switch is in the record
position while connected to computer.
Ensure the Micro SD card is inserted
properly.
Micro SD card may be corrupted.
Attempt formatting process.
Using Windows, run Check Disk
In the run command type:
chkdsk volume:/f
then press enter
Place piece of tape over microphone
hole.
Try using the submersible case
6
www.midxtc.com
Page 8

Service and Technical Support
*If you have a problem which you believe requires service, please call
rst and speak with a service technician. Many problems can be
remedied over the phone without returning the unit for service.
If after talking with technical support you still feel your unit
needs to be returned for service, follow the below
instructions:
1. Pack the unit in its original box and packing. Then pack the
original box in a suitable shipping carton.
Caution: Improper packing may result in damage during
shipment.
2. Include the following:
a. Full description of any problems
b. Daytime telephone number, name & address
3. For warranty service include a photocopy of the bill of sale from an
authorized dealer or other proof of purchase showing the date of sale.
4. You do not need to return accessory items (USB Cable,
Various Mounts, Batteries and Owners Guide) unless they might be
directly related to the problem.
5. A at rate of $40.00 will apply to repairs not covered by warranty or
units that are over one year old. Send only cashier’s check, money
order, Master Card or Visa card number.
For Technical Support Contact:
Midland Radio Corporation
5900 Parretta Drive
Kansas City, Missouri 64120
Phone: (816) 241-8500
Fax: (816) 241-5713
E-mail: mail@midlandradio.com
Web site: www.midlandradio.com
This device complies with part 15 of the FCC Rules. Operation is
subject to the following two conditions: (1) This device may not cause
harmful interference, and (2) this device must accept any interference
received, including interference that may cause undesired operation.
Warning: Changes or modications to this unit not expressly approved
by party responsible for compliance could void the user’s authority to
operate the equipment. Note: This equipment has been tested and
found to comply with the limits for a Class B digital device, pursuant
to Part 15 of the FCC Rules. These limits are designed to provide
reasonable protection against harmful interference in a residential
installation. This equipment generates, uses and can radiate radio
frequency energy and if not installed and used in accordance with
instructions, it may cause harmful interference to radio
communications. There is no guarantee that interference will not
occur in a particular installation. If this equipment does cause harmful
interference to radio or television reception, which can be determined
by turning the equipment off and on, the user is encouraged to try to
correct the interference by one or more of the following measures:
FCC Information
Reorient or relocate the receiving antenna.
Increase separation between equipment and receiver.
Connect the equipment into an outlet on a circuit
different from that to which the receiver is
connected.
Consult the dealer or an experienced radio/TV
technician for help
Limited Warranty
Midland Radio Corporation will repair or replace, at its option without charge, any Midland XTC-300/350 action camera which fails due to a defect in
material or workmanship within ONE Year following the initial consumer purchase. This warranty does not apply to accidents of any kind, exposure
to pressure, extreme temperatures, and submersion water damage as this product is water resistant but not waterproof, battery leak or abuse.
Accessories have a 90 day warranty from date of purchase, including any mounts and cables. This warranty does not include the cost of labor for
removal or re-installation of the product in a vehicle or other mounting. This warranty gives you specic legal rights, and you may also have other
rights, which vary from state to state.
Note : The above warranty applies only to merchandise purchased in the United States of America or any of the territories or possessions thereof, or
from a U.S. Military exchange.
English François Español
www.midxtc.com
7
Page 9

Page 10

INDEX
Guide de Démarrage Rapide...........................................................................................................................................................10
Bienvenue à l’Expérience Caméra Action XTC ...............................................................................................................................10
Ce qui est contenu dans la Boîte.....................................................................................................................................................10
Options et Fonctions du XTC-300 ...................................................................................................................................................10
Apprendre à Connaître le XTC-300 .................................................................................................................................................11
Pile...................................................................................................................................................................................................11
Carte Micro SD ................................................................................................................................................................................11
Enregistrement ................................................................................................................................................................................11
Fixations et Mise au Point ..............................................................................................................................................................12
Reformatage de la carte Micro SD ..................................................................................................................................................12
Systèmes Compatibles ....................................................................................................................................................................13
Téléchargement de Vidéos ..............................................................................................................................................................13
Conguration Système Minimale Requise.......................................................................................................................................13
Trucs et Astuces ..............................................................................................................................................................................14
Service et Fixation ...........................................................................................................................................................................15
Informations FCC ............................................................................................................................................................................15
Garantie Limitée ..............................................................................................................................................................................15
Accessoires .....................................................................................................................................................................................24
Formulaire de Commande d’Accessoires........................................................................................................................................25
Autres Produits Midland ..................................................................................................................................................................30
English François Español
www.midxtc.com
9
Page 11

Guide de Démarrage Rapide
1. À l’arrière, appuyez sur le bouton vers le bas, puis ouvrez la portière.
2. Insérez la pile et la carte micro SD en observant la bonne direction.
Fermer le couvercle.
3. Pour débuter l’enregistrement, avancez le bouton ENREGISTRER
complètement vers l’avant.
4. Pour arrêter d’enregistrer, glissez le bouton à nouveau dans la
position arrêt.
5. Branchez la caméra dans l’ordinateur et transférez la vidéo.
Bienvenue à l’Expérience
Merci pour votre achat d’une Caméra Action XTC-300. En tant que
personnes recherchant l’aventure, nous sommes ers de vous offrir
l’outil ultime pour la capture et l’enregistrement de vos aventures. À
l’aide de son utilisation simple à touche unique, sa lentille 127 degrés et
une durée de pile de 4 heures, ne ratez plus une seule minute d’action.
Une fois lmées, branchez-vous simplement à votre ordinateur et
transférez les vidéos à partager avec vos amis. C’est aussi simple que
ça. Amusez-vous!
L’Ensemble XTC-300 Comprend:
1. Caméra XTC-300 de Midland
2. Fil USB
3. Paquet de Piles au Lithium-Ion
4. Montage Optique
5. Fixation de Casque avec Courroie
6. Fixation de Casque Adhésif
(comprend 2 feuilles d’adhésif 3M)
7. Fixation pour Guidon Vélo
8. Adaptateur USB DC
9. Adaptateur USB AC
10. Boîtier Submersible
Caméra Action XTC
Contenu de la boîte
L’Ensemble XTC-300 Comprend:
1. Caméra XTC-300 de Midland
2. Fil USB
3. Paquet de Piles au Lithium-Ion
4. Fixation à Visière
5. Fixation pour Arbre
6. Fixation pour Proues
7. Fixation pour Guidon Vélo
8. Adaptateur USB DC
9. Adaptateur USB AC
10. Boîtier Submersible
*Accessoires XTC-350 non démontrées
Options et Fonctions du XTC-300
Caractéristiques
1080p:
- 30 images par seconde
- 127 degrés
- Format d’image 16:9
- Résolution 1920 x 1080
- Enregistre sous
format mp4
Lentille
Microphone
Bouton RECORD
Vers l’avant : ON /
Enregistrer
DEL d’Enregistrement
Clignote en ROUGE lorsque
la caméra enregistre
DEL de la Pile
Bouton Reformatage
Bouton Mode
HD/SD
Caractéristiques
720p:
- 30 images par seconde
- 170 degrés
- Format d’image 16:9
- Résolution 1280 x 720
- Enregistre sous
format mp4
Caractéristiques
- 60 images par seconde
- 170 degrés
- Rapport d’aspect 16:9
- Résolution 848 x 480
- Enregistre sous le
format mp4
accessoires de monture
Bouton ENREGISTREMENT
Avant Marche/Enregistrement
DEL de la carte SD
Mini Connecteur
Fente Carte
Micro SD
480p:
Support pour
Arrière Arrêt
USB
10
www.midxtc.com
Page 12

Apprendre à Connaître le XTC-300
Pile
1. Pour insérer la pile, pesez sur la petite portière de
l’emplacement à pile sur le derrière de la caméra.
2. Tirez la portière vers l’arrière pour l’ouvrir.
3. Installez la pile à Lithium-Ion en observant la bonne direction.
4. Replacez la portière de la pile bien en place.
État de la Pile
Indicateur
Vert Indique une vie de pile pleine
Rouge Indique une vie de pile faible
Rouge Clignotant* Trop faible pour fonctionner
Pas de Lumière Pile n’est épuisée.
*Note: Lorsque le LED rouge de la pile commence à clignoter,
soyez prêts à changer la pile car la caméra cessera d’enregistrer à ce moment.
Carte Micro SD
1. Soulevez le loquet en arrière pour ouvrir la portière.
2. Insérez la carte Micro SD dans la fente en observant la bonne direction
(démontrée ci-dessous).
3. Fermez la portière jusqu’à temps qu’elle soit bien enclenchée.
Signication
Apprendre à Connaître le XTC-300
Enregistrement
1. Avancez le bouton ENREGISTRER vers l’avant. Ceci allumera votre
caméra.
2. L’indicateur de pile s’illuminera rouge et ensuite vert. L’indicateur de
carte SD s’illuminera. La caméra enregistre en audio et vidéo lorsque
l’indicateur REC clignote.
3. Pour arrêter d’enregistrer, glissez le bouton ENREGISTRER à nouveau
dans la position arrêt.
Statut DEL
de la carte SD
Vert 75% et plus disponible
Orange 34% à 75% disponible
Rouge
Clignotant Rouge Ne peut lire la carte
Clignotant Vert
Taille de
Mémoire
512 Mo 7.5 Minutes 6.5 Minutes 10 Minutes
Durée
d’enregistrement
1080p
1 Go 15 Minutes 13 Minutes 20 Minutes
2 Go 30 Minutes 26 Minutes 40 Minutes
4 Go 60 Minutes 52 Minutes 80 Minutes
8 Go 120 Minutes 104 Minutes 160 Minutes
16 Go 240 Minutes 208 Minutes 320 Minutes
32 Go 480 Minutes 416 Minutes 640 Minutes
Note: La caméra divisera automatiquement la vidéo en segments
de 2 Go.
Signication
Moins de 34% de disponible ou
aucune carte Micro SD d’installé
Indique que la carte se fait
formater
Durée
d’enregistrement
720p
Durée
d’enregistrement
480p
English François Español
www.midxtc.com
11
Page 13

Fixations et Mise au Point
Fixer sur Système Double Piste
Le XTC-300 a été spécialement conçu avec un système de xation à
double piste identique de chaque côté de la caméra. Ceci vous permet
de le xer des deux côtés de votre casque avec facilité. De plus, la pièce
de xation principale est interchangeable et peut être déplacée de la
xation de casque à la xation de lunette. Ceci élimine le tracas de devoir
réassembler la caméra à chaque fois.
Pour xer la caméra sur la xation principale, glissez la caméra sur le
système à double piste avec les deux encoches de la xation qui pointent
vers l’arrière de la caméra.
Pour détacher la caméra de la xation principale, tenez la caméra avec
la lentille qui pointe à l’opposé de vous. Pesez sur le bouton de relâche-
ment de la xation et tirez la xation vers vous.
Fixations et Mise au Point
Fixer à l’aide de la Fixation à Filets
Sur le bas du XTC-300 se trouve une xation à lets standard qui
permet à la caméra d’être xée à un trépied ou toute autre xation
avec letage de 1/4»-20 (soit 1/4 de pouce de diamètre et 20 lets par
pouce) 5/16 de profond. La xation de courroie ventilée du casque
est une xation de type vis. Pour xer la caméra, insérez la vis sur la
xation dans la caméra et tournez-la dans le sens des aiguilles d’une
montre pour la serrer sur la vis.
Le fait de trop serrer peut causer des
dommages à la xation et/ou la caméra
Piste Double
Système de Fixation
Déclenchement de
Fixation Bouton
Interchangeable
Fixation
Mise au Point de la caméra lorsqu’elle est xée dans le système à
double piste :
Lorsque la caméra est xée sur un casque, vous devez effectuer ce
qui suit:
1. Considérez ce que vous voulez lmer et xer la caméra en
conséquence – du côté gauche, droite ou sur le dessus.
2. Trouvez une surface plate et assurez-vous que la surface soit propre
et sans débris. Enlevez le dessus protecteur de la feuille d’adhésif et
collez celle-ci sur le casque.
3. Une fois collée, ajustez la caméra pour vous assurer de ne pas lmer
le ciel ou le sol.
12
www.midxtc.com
Fixation à Filets
Fixation Vissée
Mise au Point de la caméra lorsqu’elle est xée à l’aide de la
xation à lets:
Lors de l’installation sur le guidon d’un vélo ou à l’aide de la courroie
ventilée pour casque, suivez ces étapes.
1. Considérez ce que vous voulez lmer et xez la caméra en
conséquence.
2. Une fois xée, assurez-vous que la caméra soit droite et non en
direction du ciel ou du sol.
Reformatage de la carte Micro SD
Assurez-vous que la pile soit pleinement
La carte micro SD peut être reformatée à l’intérieur de la caméra. Ceci
vous permet de supprimer toutes les vidéos en même temps. Suivez
ces étapes :
1. Tenez enfoncé le bouton de reformatage micro SD.
2. Mettez le bouton ENREGISTRER à la position Marche.
3. Tenez le bouton de reformatage micro SD enfoncé jusqu’à ce que
l’indicateur de carte SD se mette à clignoter vert.
4. Mettez le bouton ENREGISTRER à la position Arrêt.
Note: La caméra ne peut pas reformater la carte micro SD si
l’indicateur de pile faible est allumé.
rechargée avant de formater.
Page 14

Le XTC-300 peut être utilisé sur un PC ou un MAC. Vous trouverez les
Système Compatibles
systèmes d’exploitation compatibles ci-dessous :
Windows XP SP2
Windows Vista
Windows 7
Macintosh OSX 10.4 ou version supérieure
Pour Windows nous suggérons Windows Media Player 10 ou version
supérieure.
Pour Macintosh nous suggérons Quick Time 6.5 ou version supérieure.
Vous n’avez pas besoin d’installer de logiciel pour le XTC-300. Il s’agit
d’un appareil prêt à être utilisé. Ceci étant dit, suivez les instructions
suivantes, dépendant si vous avez un PC ou un MAC.
Transfert de Vidéos sur PC avec système d’exploitation WINDOWS
1. Branchez la caméra au port USB en utilisant le l fourni.
2. Allumez la caméra en mettant le bouton à la position
ENREGISTRER.
3. L’appareil devrait automatiquement installer le pilote.
4. Système d’exploitation
5. Cliquez sur le périphérique.
6. Ouvrez le dossier DCIM.
7. Ouvrez le dossier 100MEDIA.
8. Vos vidéos seront dans ce dossier.
Transfert de Vidéos
a. Windows XP
i. Allez à “Poste de Travail”. La caméra s’y trouvera sous les
périphériques utilisant des supports amovibles.
b. Windows Vista
i. Allez à “Poste de Travail”. La caméra s’y trouvera sous les
périphériques utilisant des supports amovibles.
c. Windows 7
i. Allez à “Poste de Travail”. La caméra s’y trouvera sous les
périphériques utilisant des supports amovibles.
Transfert de Vidéo vers un MAC
1. Branchez la caméra au port USB en utilisant le l fourni.
2. Allumez la caméra en mettant le bouton à la position ENREGISTRER.
3. Votre MAC reconnaîtra automatiquement le disque dur externe de la
caméra.
4. Cliquez sur l’icône sur le bureau.
5. Ouvrez le dossier DCIM.
6. Ouvrez le dossier 100MEDIA.
7. Vos vidéos seront dans ce dossier.
8. Glissez les chiers vidéo sur votre disque dur ou double cliquez pour
les visionner.
Conguration Minimum du Système
Transfert de Vidéos
Processeur 2.8 GHz ou plus rapide 3.5 GHz ou plus rapide
Mémoire Vive 512 Mo ou plus 1 Go ou plus
Carte Vidéo 128 Mo ou plus 256 Mo ou plus
Lecture Vidéo nécessite codec H.264. Pour plus d’informations,
visitez http://www.midxtc.com/
Vidéo SD Vidéo HD
English François Español
www.midxtc.com
13
Page 15

Trucs et Astuces
Problème Résolution
Piles
Caméra ne s’allume pas
Enregistrement
Caméra n’enregistre pas
Carte Micro SD
La lecture de la carte
Micro SD ne
s’effectue pas
Lecture Vidéo
Image lente ou coupée
Assurez-vous que la pile soit sufsam-
ment rechargée.
Assurez-vous que le bouton soit
complètement poussé vers l’avant.
Si la lumière LED d’enregistrement
ne s’allume pas, fermez l’appareil et
réinstallez la pile.
Vériez l’espace mémoire disponible.
Assurez que la carte Micro SD soit
correctement installée.
Branchez la caméra à l’ordinateur
an de vérier si la carte contient
sufsamment d’espace mémoire.
Essayez le processus de formatage
Vériez que la caméra soit branchée
dans un périphérique USB 2.0
Enlevez les autres périphériques USB
inutilisés
Transférez les vidéos sur l’ordinateur
avant de les visionner.
Vériez que l’ordinateur rencontre les
exigences minimales.
Vériez que le codec approprié soit
installé.
Trucs et Astuces
Problème Résolution
Transfert de Vidéos
Transfert lent des
données
L’ordinateur ne recon-
naît pas la caméra
Les chiers ne se
transfèrent pas de la
carte mémoire
Son
Son de Vent Excessif
Vériez que la caméra soit branchée
dans un périphérique USB 2.0. Si elle
s’inscrit comme 1.1, débranchez-la et
rebranchez-la.
Enlevez les autres périphériques USB
inutilisés.
Assurez que le bouton d’enregistrement
se trouve dans la position ENREGISTRER lorsque la caméra est branchée
à l’ordinateur.
Assurez-vous que la carte Micro SD soit
correctement installée.
La carte Micro SD peut être corrompue.
Essayez le processus de formatage.
En utilisant Windows, exécutez la
Vérication du disque
Dans la Commande Exécuter tapez:
chkdsk volume:/f et pesez sur ENTRÉE
Placez du ruban adhésif sur le trou du
microphone.
Essayez d’utiliser le boîtier submersible
14
www.midxtc.com
Page 16

Service et Soutien Technique
Si vous avez un problème qui selon vous nécessite du service, veuillez
d’abord nous appeler et discuter avec un technicien. Plusieurs
problèmes peuvent être remédié au téléphone sans retourner l’unité
pour du service.
Si après avoir parlé au support technique vous pensez toujours que votre
unité devrait être retournée pour du service, suivez les instructions
suivantes:
1. Mettre en paquet l’unité dans sa boîte et emballage d’origine. Ensuite,
emballez la boîte d’origine dans un carton d’expédition approprié.
Attention: Un paquet incorrectement emballé pourrait résulter en des
dommages pendant l’expédition.
2. Inclure les éléments suivants:
a. description complète de tous les problèmes
b. numéro de téléphone de jour, nom et adresse
3. Pour le service de garantie, inclure une photocopie de la facture de
vente ou autre preuve d’achat montrant la date de la vente.
4. Vous n’avez pas besoin de retourner les accessoires (Câble USB,
Montures, Piles et Guide d’Utilisateur) sauf s’ils sont directement liés
au problème.
5. Un taux xe de 40.00$ s’appliquera aux réparations non couvertes
par la garantie ou sur les unités datant de plus d’un an. Envoyer
seulement un chèque de banque, mandat poste ou numéro de carte
Master Card ou Visa
Pour Contacter le Soutien Technique:
Midland Radio Corporation
5900 Parretta Drive
Kansas City, Missouri 64120
Téléphone: (816) 241-8500
Fax: (816) 241-5713
Courriel: mail@midlandradio.com
Site Web: www.midlandradio.com
Cet appareil est conforme avec la partie 15 des Règles du FCC. Son opération
Information du FCC
est sujette aux deux conditions suivantes: (1) Cet appareil ne doit pas causer
d’interférence nuisible, et (2) cet appareil doit accepter toute interférence reçue,
incluant de l’interférence pouvant causer des opérations non désirées.
Avertissement: Tout changement et modication à cette unité non approuvée
expressément par le parti responsable de la conformité pourrait violer l’autorité
de l’utilisateur d’opérer cet équipement. Note: Cet équipement à été testé et
reconnu comme conforme aux limites d’un appareil numérique de Classe B,
conformément à la Partie 15 des Règles du FCC. Ces limites sont désignées
pour fournir une protection raisonnable contre des interférences nuisibles dans
une installation résidentielle. Cet équipement génère, utilise et peut irradier
de l’énergie de fréquence radio et s’il n’est pas installé et utilisé conformément
aux instructions, il peut causer de l’interférence nuisible aux communications
radios. Il n’y a aucune garantie que de l’interférence ne se produira pas dans
une installation en particulier. Si cet équipement cause en effet de l’interférence
nuisible à la réception radio et télévision, qui peut être déterminé en éteignant
et allumant l’équipement de nouveau, l’utilisateur est encouragé d’essayer de
corriger l’interférence par une ou plusieurs des mesures suivantes:
Réorienter ou relocaliser l’antenne de réception.
Augmenter la séparation entre l’équipement et le récepteur.
Connecter l’équipement dans un prise sur un circuit différent
de celui sur lequel le récepteur est connecté.
Consulter le marchand ou technicien expérimenté en radio/TV
pour de l’aide.
English François Español
Midland Radio Corporation réparera ou remplacera, à sa discrétion et sans charge, toute Midland XTC-300 action camera échouant en raison d’un
Garantie Limitée
défaut matériel ou de main d’oeuvre à l’intérieur d’UN an de l’achat initial du consommateur. Cette garantie ne s’applique pas aux accidents tel
que l’exposition à la pression, températures extrêmes, et dommage par submersion dans l’eau comme ce produit est résistant à l’eau mais pas
imperméable, fuite de batterie ou abus. Les accessoires ont une garantie de 90 jours à partir de la date d’achat, incluant toutes montures et câbles.
Cette garantie n’inclut pas les coûts de main d’oeuvre pour l’enlèvement ou à la réinstallation du produit dans un véhicule ou autre monture. Cette
garantie vous donne des droits légaux spéciques, et vous pourrez aussi avoir d’autres droits, variant d’un État à l’autre.
Note : La garantie ci-haut s’applique seulement à la marchandise achetée aux États-Unis d’Amérique ou n’importe quel de ses territoires ou posses-
sions, ou centres militaires américains.
www.midxtc.com
15
Page 17

Page 18

ÍNDICE
Guía rápida de inicio ...........................................................................................................................................................................18
Bienvenido a XTC Action Camera Experience ...................................................................................................................................18
Qué hay en la Caja .............................................................................................................................................................................18
Funciones y controles de la XTC-300 .................................................................................................................................................18
Comenzando a Conocer la XTC-300 ..................................................................................................................................................19
Batería ...........................................................................................................................................................................................19
Tarjeta Micro SD ............................................................................................................................................................................19
Grabación ......................................................................................................................................................................................19
Montar y apuntar la Cámara ...............................................................................................................................................................20
Cómo Re-formatear la Tarjeta Micro SD ............................................................................................................................................. 20
Cómo Descargar Videos .....................................................................................................................................................................21
Sistemas Compatibles ........................................................................................................................................................................21
Requerimientos Mínimos del sistema .................................................................................................................................................21
Consejos y Trucos ...............................................................................................................................................................................22
Servicio y Soporte ...............................................................................................................................................................................23
Información de FCC ............................................................................................................................................................................23
Garantía Limitada ................................................................................................................................................................................23
Accesorios .......................................................................................................................................................................................24
Formulario para Ordenar Accesorios...............................................................................................................................................25
Otros Productos Midland .................................................................................................................................................................26
English François Español
www.midxtc.com
17
Page 19

1. En la parte de atrás, presione el botón hacia abajo y luego abra la
2. Insertar la batería y la tarjeta micro SD observando la posición
3. Para comenzar a grabar, mueva el interruptor de Grabación (RE-
4. Para detener la grabación, deslice el interruptor de nuevo a la posición
5. Conecte la cámara a la computadora y descargue el video.
Guía rápida de inicio
cubierta.
correcta. Cierre la cubierta.
CORD) completamente hacia adelante
OFF (APAGADO).
Bienvenido a XTC Action
Camera Experience
Gracias por su compra de la Cámara XTC-300 Action. Como alguien
que busca aventura, estamos orgullosos de ofrecerle la mejor herramienta para capturar y grabar sus aventuras. Con una operación fácil
de usar mediante un interruptor, lentes de 127 grados y una batería con
una duración de 4 horas nunca perderá un minuto de acción. Una vez
capturada, simplemente conecte a su computadora y suba los videos
para compartir con amigos. Así de simple. ¡Disfrute!
Que Se Encuentran en la Caja
Funciones y Controles de XTC-300
Prestaciones
1080p
- 30 cuadros por segundo
- 127 grados
- Ratio de aspecto 16:9
- Resolución 1920 x 1080
- Filma como mp4
Lente
Micrófono
Mando FILMAR (RECORD)
Adelantar / Filmar
LED de Filmación
Parpadea en ROJO
cuando la Cámara Filma
LED de Batería
Prestaciones
720p
- 60 cuadros por segundo
- 170 grados
- Ratio de aspecto 16:9
- Resolución 1280 x 720
- Filma como mp4
Prestaciones
- 60 cuadros por segundo
- 170 grados
- Ratio de aspecto 16:9
- Resolución 848 x 480
- Filma como mp4
Surco de Montaje
Mando FILMAR (RECORD)
Atrasar Detener Filmación/
APAGADO (OFF)
LED de Tarjeta SD
480p
El Paquete XTC-300 Incluye:
1. Cámara Midland XTC-300
2. Cable USB
3. Batería de Litio-Ion
4. Soporte para Gafas de Esqu
5. Soporte de Correa para Casco
6. Soporte Adhesivo para Casco
(incluye 2 almohadillas
adhesivas 3M)
7. Soporte para Manillar de
Bicicleta
8. Adaptador DC USB
9. Adaptador AC USB
10. Caja Sumergible
18
El Paquete XTC-350 Incluye:
1. Cámara Midland XTC-350
2. Cable USB
3. Batería de Litio-Ion
4. Montaje Para Visor
5. Montaje Para Arboles
6. Montaje Para Arcos
7. Barra de Montaje Para
Bicicletas
8. Adaptador DC USB
9. Adaptador AC USB
10. Caja Sumergible
*XTC-350 Accessories nos
mostrados
www.midxtc.com
Tarjeta SD
Botón de Formateo
Interruptor de
Modo HD/SD
Conector
Mini USB
Ranura Tarjeta Micro SD
Page 20

Comenzando a Conocer el XTC-300
Batería
1. Para insertar la batería, empujar hacia abajo el enganche de la compuerta de la batería en la parte posterior de la cámara.
2. Tirar la compuerta de la batería hacia atrás para abrir.
3. Instalar la batería de Litio-Ion, respetando la dirección correcta.
4. Volver a la compuerta de batería y trabar en su lugar.
Indicador Estado
de la Batería
Verde Fijo Batería cargada
Rojo Fijo Batería a media carga
Rojo Intermitente* Demasiado baja para funcionar
Sin Luz Baterías están agotadas.
*Nota: cuando el LED rojo de la batería comienza a parpadear,
prepárese para cargar la batería porque la cámara detendrá la
grabación en este punto.
Tarjeta Micro SD
1. Levantar el enganche en la parte posterior para abrir la puerta
2. Insertar la tarjeta Micro SD dentro de la ranura respetando la dirección
correcta (mostrada abajo).
3. Cerrar la puerta hasta que trabe
Signicado
Comenzando a Conocer el XTC-300
Grabación
1. Mover el interruptor Grabación (RECORD) hacia adelante. Esto
enciende la cámara.
2. El indicador de batería se encenderá de rojo a verde. El indicador de
tarjeta SD se encenderá. La cámara está capturando audio y video
cuando el indicador REC está parpadeando.
3. Para detener la grabación, mover el interruptor Grabación (RECORD)
de Nuevo a la posición OFF (Apagado).
Estado Signicado
Verde Más del 75% disponible.
Naranja 34% - 75% disponible.
Rojo
Rojo Parpadeante No puede leer la tarjeta.
Verde
Parpadeante
Tamaño de
1080p tiempo
Memoria
de Grabación
512 MB 7.5 Minutos 6.5 Minutos 10 Minutos
1 GB 15 Minutos 13 Minutos 20 Minutos
2 GB 30 Minutos 26 Minutos 40 Minutos
4 GB 60 Minutos 52 Minutos 80 Minutos
8 GB 120 Minutos 104 Minutos 160 Minutos
16 GB 240 Minutos 208 Minutos 320 Minutos
32 GB 480 Minutos 416 Minutos 640 Minutos
Nota: La cámara automáticamente divide el video en
segmentos de 2 GB.
Menos del 34%
O sin tarjeta Micro SD instalada
Indica que la tarjeta se está
formateando
720p tiempo
de Grabación
480p tiempo
de Grabación
English François Español
www.midxtc.com
19
Page 21

Montar y Apuntar la Cámara
Montaje sobre Sistema de Doble Surco
La XTC-300 fue diseñada de forma innovadora con un sistema de
montaje de doble surco idéntico en ambos lados de la cámara. Esto le
permite montarla en ambos lados del casco con facilidad. Además, la
pieza principal de montaje es intercambiable y puede moverse desde el
montaje de casco al montaje de los anteojos. Esto elimina el fastidio de
tener que volver a montar la cámara cada vez.
Para montar la cámara sobre la pieza de montaje, deslizar la cámara
dentro del sistema de surcos dobles con las dos muescas en el montaje
mirando hacia la parte trasera de la cámara.
Para separar la cámara del montaje principal, sostenga la cámara con
los lentes mirando hacia afuera suyo. Al presionar hacia abajo el montaje
libera el interruptor y tire el montaje hacia usted.
Montar y Apuntar la Cámara
Montaje usando la Montura de Rosca
En la parte inferior de la XTC-300 hay un montaje roscado estándar
que permite que la cámara se monte sobre un trípode u otro dispositivo con una rosca de 1/4-20 (1/4” de diámetro, 20 roscas por pulgada)
5/16 de profundidad de rosca. El montaje de tira de casco ventilado es
un montaje de tipo tornillo. Para jar la cámara, insertar el tornillo en
el montaje dentro de la rosca de cámara y girar la cámara en sentido
horario para ajustarla dentro del tornillo.
El apretar demasiado podría causar daño al montaje y/o cámara
Ranura Doble
Sistema de Montaje
Liberación de
Montaje Interruptor
Intercambiable
Montaje
Apuntar la cámara cuando está montada con el montaje de surco
doble:
Cuando monta la cámara sobre un casco, debe hacer lo siguiente:
1. Considere que le gustaría lmar y monte la cámara de acuerdo con
esto- lado izquierdo, lado derecho o arriba.
2. Busque una supercie plana y asegúrese que el área está limpia de
polvo y partículas. Quitar la cubierta de la almohadilla adhesiva y
péguela al casco.
3. Una vez adosada, ajuste la cámara para estar seguro que no está
lmando el cielo o la tierra.
20
www.midxtc.com
Montaje A Rosca
Montaje A
Tornillo
Cómo apuntar la Cámara cuando está montada con el montaje a
rosca:
Cuando monta la cámara en el manubrio de una bicicleta o con las tiras
del casco ventilado montar siguiendo estos pasos:
1. Considere que le gustaría lmar y monte la cámara de acuerdo a esto.
2. Asegúrese que una vez adosada la cámara está apuntada hacia el
objetivo y no hacía en cielo o la tierra.
Cómo reformatear la tarjeta Micro SD
Asegurarse que la batería está totalmente cargada antes de formatear
La tarjeta micro SD puede reformatearse mientras está en la cámara. Esto
le permite borrar todos los videos de una vez. Siga estos pasos:
1. Presione y mantenga el botón de reformatear micro SD.
2. Mover el interruptor RECORD a la posición ON
3. Mantener presionado el botón de reformatear la tarjeta micro SD hasta
que el indicador de tarjeta SD comience a parpadear en verde.
4. Mover el interruptor RECORD a la posición OFF.
Nota: La cámara no puede reformatear la tarjeta micro SD si está
encendida la luz de batería baja.
Page 22

Cómo Descargar Videos
No hay necesidad de instalar ningún software con la XTC-300. es un
dispositivo “plug and play”. Con esto, siga las instrucciones a continuación
dependiendo de si tiene una PC o una MAC.
Cómo descargar Videos en una PC con un Sistema Operativo WINDOWS
1. Conectar la cámara al Puerto USB usando el cable incluido.
2. Encender la cámara moviendo el interruptor Grabación (RECORD) a la
posición de grabar.
3. El dispositivo debería instalarse automáticamente.
4. Sistema Operativo
a. Windows XP
i. Abrir “Mi PC”. La cámara estará listada bajo dispositivos con
almacenamiento removible.
b. Windows Vista
i. Abrir “PC”. La cámara estará listada bajo dispositivos con almace-
namiento removible.
c. Windows 7
i. Abrir “PC”. La cámara estará listada bajo dispositivos con almace-
namiento removible.
5. Pulsar sobre el dispositivo.
6. Abrir la Carpeta DCIM.
7. Abrir la Carpeta 100MEDIA.
8. Sus videos estarán en esta carpeta.
Cómo descargar Video en una MAC
1. Conectar la cámara al Puerto USB usando el cable incluido.
2. Encienda la cámara moviendo el interruptor Grabación (RECORD) a la
posición grabar.
3. MAC reconocerá automáticamente el disco duro externo de cámara.
4. Pulsar sobre el ícono en el escritorio.
5. Abrir la carpeta DCIM .
6. Abrir la carpeta 100MEDIA.
7. Sus videos estarán en esta carpeta.
8. Arrastrar los archivos de video a su disco duro o pulse dos veces
para ver.
La XTC-300 puede ser usada en PC o MAC. A continuación se encuentran
los sistemas operativos compatibles:
Windows XP SP2
Windows Vista
Windows 7
Macintosh OSX 10.4 y superiores
Para Windows recomendamos Windows Media Player 9 o superior.
Para Macintosh recomendamos Quick Time 6.5 o superior.
Requerimientos Mínimos de Sistema
Sistemas Compatibles
Procesador 2.8 GHz o superior 3.5 GHz o superior
Ram 512 MB o mayor 1 GB o mayor
Tarjeta de Video 128 MB o mayor 256 MB o mayor
La reproducción de Vídeo requiere el códec H.264. Para obtener
más información vaya al http://www.midxtc.com/
Video SD Video HD
English François Español
www.midxtc.com
21
Page 23

Consejos y Trucos
Problema Resolución
Baterías
Cámara no enciende
Grabación
Cámara no graba
Tarjeta Micro SD
Tarjeta Micro SD no lee
Reproducción de Vídeo
Video lento o cortado
Asegurarse que la batería está
totalmente cargada.
Asegurarse que el interruptor esta
deslizado completamente hacia
adelante. Si el LED de grabación no
enciende. Apague el dispositivo y
reinstale la batería.
Vericar memoria disponible.
Asegurarse que la tarjeta Micro SD
está insertada correctamente.
Conectar la cámara dentro de la
computadora para vericar si hay
memoria disponible.
Intentar el proceso de formateo.
Vericar que la cámara está
enchufada dentro de un dispositivo
USB 2.0.
Quitar otros dispositivos USB no
usados.
Transferir video a la computadora
antes de ver.
Vericar que la computadora cumple
con los requerimientos mínimos.
Vericar que el códec adecuado está
instalado.
Consejos y Trucos
Problema Resolución
Descarga de Vídeo
Transferencia de datos
lenta.
La computadora no
reconoce la cámara
El archivo no puede
sacarse de la tarjeta
de memoria
Sonido
Excesivo ruido de
viento
Vericar que la cámara está enchu-
fada a un dispositivo USB 2.0. si está
registrado como 1.1, desenchufar y
re-enchufar el dispositivo.
Quitar otros dispositivos USB no usados.
Asegurarse que el interruptor de
grabación está en la posición
grabar mientras está conectado a la
computadora.
Asegurarse que la tarjeta Micro SD está
insertada correctamente.
La tarjeta Micro SD podría estar
corrompida. Intentar el proceso de
formateo.
Usando Windows, ejecute Check Disk
En el comando Ejecutar escribir: chkdsk
volume:/f luego presionar Intro
Colocar un trozo de cinta sobre el
agujero del micrófono.
Intente utilizar la carcasa sumergible.
22
www.midxtc.com
Page 24

Servicio y Soporte Técnico
*Si tiene un problema que crea que necesita reparación, por favor
llame primero y hable con un técnico de servicio. Muchos problemas
pueden solucionarse a través del teléfono sin necesidad de devolver
la unidad para su reparación.
Si tras hablar con el soporte técnico aún cree que la unidad necesita
retornarse para una reparación, siga las instrucciones siguientes:
1. Empaque la unidad en su caja original y ciérrela. A continuación
empaque la caja original en una caja de envío adecuada.
Precaución: un empaque inadecuado puede producir daños durante
el envío.
2. Incluya lo siguiente:
a. Descripción completa de cualquier problema
b. Número de teléfono, nombre y dirección
3. Para el servicio de garantía, incluya una fotocopia de la factura de
compra de un vendedor autorizado u otra prueba de compra mostrando la fecha de venta.
4. No necesita incluir los accesorios (Cable USB, Monturas Varias,
Baterías y Manual de Instrucciones) a no ser que estén relacionados
directamente con el problema.
5. Una tasa ja de $40.00 se aplicará para reparaciones no cubiertas
por la garantía o para unidades que tienen más de un año. Envíe
únicamente cheque bancario, giro postal o número de tarjeta Master
Card o Visa.
Para Soporte Técnico Contacte
Midland Radio Corporation
5900 Parretta Drive
Kansas City, Missouri 64120
Teléfono: (816) 241-8500
Fax: (816) 241-5713
E-mail: mail@midlandradio.com
Página Web: www.midlandradio.com
Este dispositivo cumple con la parte 15 de las Reglas FCC. El funciona-
miento está sujeto a las siguientes condiciones: (1) Este dispositivo
no causa interferencias dañinas; (2) Este dispositivo debe aceptar
cualquier interferencia recibida incluyendo aquellas que puedan
causar un funcionamiento no deseado.
Atención: Los cambios o modicaciones en esta unidad no aprobados
expresamente por la parte responsable de su cumplimiento podría
anular la autoridad del usuario para utilizar este equipo. Nota: El
resultado de las pruebas realizadas a este equipo indica que éste
cumple con los límites sobre dispositivos digitales de Clase B, según
el Artículo 15 del Reglamento de la FCC. Estos límites han sido
diseñados para ofrecer una protección razonable contra interferencias
dañinas en áreas residenciales. Este equipo genera, usa e irradia
energía de radio frecuencia y, si no se instala y se utiliza según sus
instrucciones, podría causas interferencias dañinas en comunicaciones de radio. No existe garantía de que estas interferencias no
ocurran en instalaciones particulares. Es posible que este equipo
cause interferencias en receptores de radio o televisión, y puede
determinarse encendiendo y apagando el equipo; se insta al usuario
a corregir estas interferencias siguiendo al menos una de las medidas
especicadas a continuación:
• Reorientar o reubicar la antena de recepción.
• Incrementar la separación entre el equipo y el receptor.
• Conectar el equipo en una salida o circuito diferente de aquel que
necesita el receptor.
• Si necesita ayuda, consulte con su distribuidor o con algún técnico de
radio/TV experimentado.
Información FCC
Garantía Limitada
Midland Radio Corporation reparará o reemplazará, según su opción sin cargo, cualquier cámara deportiva Midland XTC-300 que falle debido a un
defecto en sus materiales o mano de obra dentro de UN Año a partir del momento de compra por parte del consumidor. Esta garantía no se aplica
a accidentes de ningún tipo, exposición a altas presiones, temperaturas extremas, así como el daño por inmersión en agua ya que este producto es
resistente al agua pero no impermeable, fugas de batería o abuso. Los accesorios tienen una garantía de 90 días a partir del momento de la compra, incluyendo cualquier montura y cables. Esta garantía no incluye el coste de mano de obra para retirar o reinstalar el producto en un vehículo u
otra montura. Esta garantía le da a usted derechos legales especícos, y puede que tenga además otros derechos, que varían de un estado a otro.
Nota: La garantía anterior se aplica sólo para mercancías compradas en los Estados Unidos de América y para cualquier territorio o posesión de los
mismos, o de un intercambio Militar de los Estados Unidos.
English François Español
www.midxtc.com
23
Page 25

Accessories
Accessories can be purchased at www.midlandradio.com or ll in
the form on the following page and mail it to our address.
XTA101
XTA102
XTA103
XTA104
XTA105
Windshield Suction
Cup Mount
• Durable suction cup sticks
to anything smooth and
stays in place.
• $29.99
Handlebar Mount
• Durable strap mount ts
all sizes of handlebars.
• $19.99
Standard Mount
• Heavy duty adhesive
mount for helmets.
• $19.99
Vented Helmet Strap
Mount
• Velcro strap mounts on
vented helmets.
• $14.99
Goggle Mount
• Mounts on the strap of
goggles.
• $19.99
XTA106
XTA107
XTA108
XTA302
BATT11L
Tree Mount
• Mount can be screwed into
a tree at many different
angles.
• $19.99
Visor Mount
• Clips onto the bill of a hat.
• $19.99
Bow Mount
• Screws into the stabilizer
on a bow.
• $19.99
Submersible Case
• Watertight case allows for
under water use of the
camera.
• Has double track mount
system so camera
can still be used with
accessories.
• $29.99
XTC-300 Battery
• 1100mA Lithium-Ion
Battery pack.
• $29.99
Accessories Value Packs
XTAVP1
Includes:
• Window Suction cup
Mount
• Handlebar Mount
• DC Adapter
• Threaded to Slide Adapter
• $59.99
XTAVP2
Includes:
• Goggle Mount
• Helmet Mount
• Strap Mount
• Threaded to Slide Adapter
• $49.99
XTAVP3
Includes:
• Visor Mount
• Bow Mount
• Tree Mount
• Threaded to Slide Adapter
• $49.99
XTAVP4
Includes:
• USB cable
• DC adapter (Car Charger)
• AC adapter (Wall Charger)
• $49.99
24
www.midxtc.com
Page 26

Please send Money Order or ll in the Visa/Master Card information and mail to the address
below. Please DO NOT send cash or checks. Make Money Order to Midland Radio Corporation.
Accessories Order Form
Name:_________________________________________________________________________________________________
Address:_______________________________________________________________________________________________
City:__________________________________________________________________State:_________Zip Code:__________
Telephone:____________________________________________________________Email:____________________________
Credit Card#__________________________________________________________ Type:_________Exp:________________
QTY ITEM PRICE TOTAL
Mail To:
Midland Radio Corporation
Consumer Dept.
5900 Parretta Drive
Kansas City, MO 64120
______________________________
Or Call 816.241.8500
______________________________
To order online go to
www.midlandradio.com
XTA101 $29.99
XTA102 $19.99
XTA103 $19.99
XTA104 $14.99
XTA105 $19.99
XTA106 $19.99
XTA107 $19.99
XTA108 $19.99
XTA302 $29.99
XTAVP1 $59.99
XTAVP2 $49.99
XTAVP3 $49.99
XTAVP4 $49.99
BATT11L $29.99
Sub-total ______________________
Tax (MO, CO, IL, FL Only) ______________________
S&H $14.95
(Applies to Domestic US only. For Hawaii, Alaska, and Puerto Rico S&H will
be $38.25 for 1 lb. and $64.25 for 2 lb. or more).
Total $
Page 27

26
www.midxtc.com
Page 28

MIDLAND RADIO CORPORATION
5900 Parretta Drive
Kansas City, MO 64120
Call 816.241.8500
visit us at http://www.midlandradio.com
 Loading...