

Page 1
MANUALE D’USO
INSTRUCTION GUIDE
BEDIENUNGSANLEITUNG
MANUAL DE INSTRUCCIONES
GUIDE D’UTILISATION
MANUAL DE INSTRUÇÕES
ΟΔΗΓΊΕΣ ΧΡΗΣΗΣ
GEBRUIKERS HANDLEIDING
РУКОВОДСТВО ПОЛЬЗОВАТЕЛЯ
HD ACTION VIDEO CAMERA
270
Page 2

INFORMAZIONE AGLI UTENTI Ai sensi dell’art. 13 del decreto legislativo 25 lu-
glio 2005, n.151 “Attuazione delle Direttive
2002/95/CE, 2002/96/CE e 2003/108/CE, relative alla
riduzione dell’uso di sostanze pericolose nelle apparecchiature elettriche ed elettroniche, nonché allo
smaltimento dei rifiuti”. Il simbolo del cassonetto barrato riportato sull’apparecchiatura indica che il prodotto
alla ne della propria vita utile deve essere raccolto separatamente dagli altri riuti. L’utente dovrà, pertanto,
conferire l’apparecchiatura giunta a ne vita agli idonei
centri di raccolta differenziata dei riuti elettronici ed
elettrotecnici, oppure riconsegnarla al rivenditore al
momento dell’acquisto di una nuova apparecchiatura
di tipo equivalente, in ragione di uno a uno. L’adeguata
raccolta differenziata per l’avvio successivo dell’apparecchiatura dismessa al riciclaggio, al trattamento e
allo smaltimento ambientalmente compatibile contribuisce ad evitare possibili effetti negativi sull’ambiente
e sulla salute e favorisce il riciclo dei materiali di cui
è composta l’apparecchiatura. Lo smaltimento abusivo del prodotto da parte dell’utente comporta l’applicazione delle sanzioni amministrative di cui al dlgs.
n.22/1997 (articolo 50 e seguenti del dlgs. n.22/1997).
All articles displaying this symbol on the body,
packaging or instruction manual of same, must not
be thrown away into normal disposal bins but brought
to specialised waste disposal centres. Here, the
various materials will be divided by characteristics
and recycles, thus making an important contribution to
environmental protection.
Alle Artikel, die auf der Verpackung oder der
Gebrauchanweisung dieses Symbol tragen, dürfen
nicht in den normalen Mülltonnen entsorgt werden,
sondern müssen an gesonderten Sammelstellen
abgegeben werden. Dort werden die Materialien
entsprechend ihrer Eigenschaften getrennt und,
um einen Beitrag zum Umweltschutz zu liefern,
wiederverwertet.
Todos los artículos que exhiban este símbolo en el
cuerpo del producto, en el embalaje o en el manual
de instrucciones del mismo, no deben ser desechados
junto a los residuos urbanos normales sino que
deben ser depositados en los centros de recogida
especializados. En estos centros, los materiales
se dividirán en base a sus características y serán
reciclados, para así poder contribuir de manera
importante a la protección y conservación del medio
ambiente.
Tous les articles présentant ce symbole sur le corps,
l'emballage ou le manuel d'utilisation de celui-ci ne
doivent pas être jetés dans des poubelles normales
mais être amenés dans des centres de traitement
spécialisés. Là, les différents matériaux seront
séparés par caractéristiques et recyclés, permettant
ainsi de contribuer à la protection de l'environnement.
Todos os artigos que apresentem este símbolo no
seu corpo, embalagem ou manual de instruções,
não devem ser eliminados juntamente com o lixo
normal mas sim conduzidos para contentores de
eliminação de resíduos especializados. Aqui, os
diversos materiais serão divididos por características
e reciclados, realizando assim uma importante
contribuição para a protecção ambiental.
Όλα τα προϊόντα στα οποία εμφανίζεται το ακόλουθο
σύμβολο στο σώμα, τη συσκευασία ή το εγχειρίδιο
χρήσης τους, δεν πρέπει να εναποθέτονται στους
κοινούς κάδους απορριμάτων αλλά να προσκομίζονται
στα ειδικά κέντρα αποκομιδής. Εκεί, τα διάφορα
υλικά θα πρέπει να διαχωρίζονται ανάλογα με τα
χαρακτηριστικά και τα ανακυκλούμενα υκλικά,
συμμετέχοντας έτσι ουσιαστικά στην προστασία του
περιβάλλοντος.
Alle artikels die dit symbool weergeven op de behuizing,
verpakking of instructiehandleiding ervan, mogen
niet weggegooid worden in normale vuilnisemmers
maar moeten naar speciale afvalverwerkingscentra
gebracht worden. Hier worden de verschillende
materialen verdeeld volgens eigenschappen en
recyclage waardoor een belangrijke bijdrage aan de
milieubescherming wordt geleverd.
Page 3

I
1
Sommario
XTC-270 Action Camera .....................................................................................................................2
Contenuto della confezione ............................................................................................................................................... 2
Caratteristiche e pulsanti del XTC-270 ...............................................................................................................................2
Guida rapida all’uso ..........................................................................................................................4
Imparando a conoscere XTC-270 ........................................................................................................4
Batteria..............................................................................................................................................................................4
Micro SD Card.....................................................................................................................................................................5
Registrazione .....................................................................................................................................................................5
Supporti di montaggio ...................................................................................................................... 6
Supporti a slitta ................................................................................................................................................................. 6
Supporti a vite ................................................................................................................................................................... 6
Sistemi compatibili ...........................................................................................................................7
Download dei video ..........................................................................................................................7
Come riformattare la Micro SD card .................................................................................................... 7
Problemi & Soluzioni ......................................................................................................................... 8
Garanzia ........................................................................................................................................... 9
Page 4

I
2
XTC-270 Action Camera
Grazie per aver acquistato Action camera XTC-270. XTC-270 è la nuovissima videocamera grandangolo in grado di registrare ed immortalare i vostri momenti più importanti e divertenti in FULL HD! Facile da utilizzare con il suo unico comando (on-off/record),
grandangolo con una visuale di 130° e due modalità di registrazione: Standard HD Ready (SD:1280x720) e alta definizione FULL HD
(HD: 1920x1080). Grazie al pacco batteria al litio in dotazione è possibile registrare fino a 2 ore. Terminata la registrazione, collegate
semplicemente la videocamera al vostro computer e scaricate i video registrati. Più facile di così! Buon divertimento!
Contenuto della confezione
› Midland XTC-270 Action camera
› Pacco batteria al litio da 900mAh
› Cavo USB
› Custodia impermeabile 60mt
› 1 sistema di montaggio per casco
Caratteristiche e pulsanti del XTC-270
Caratteristiche:
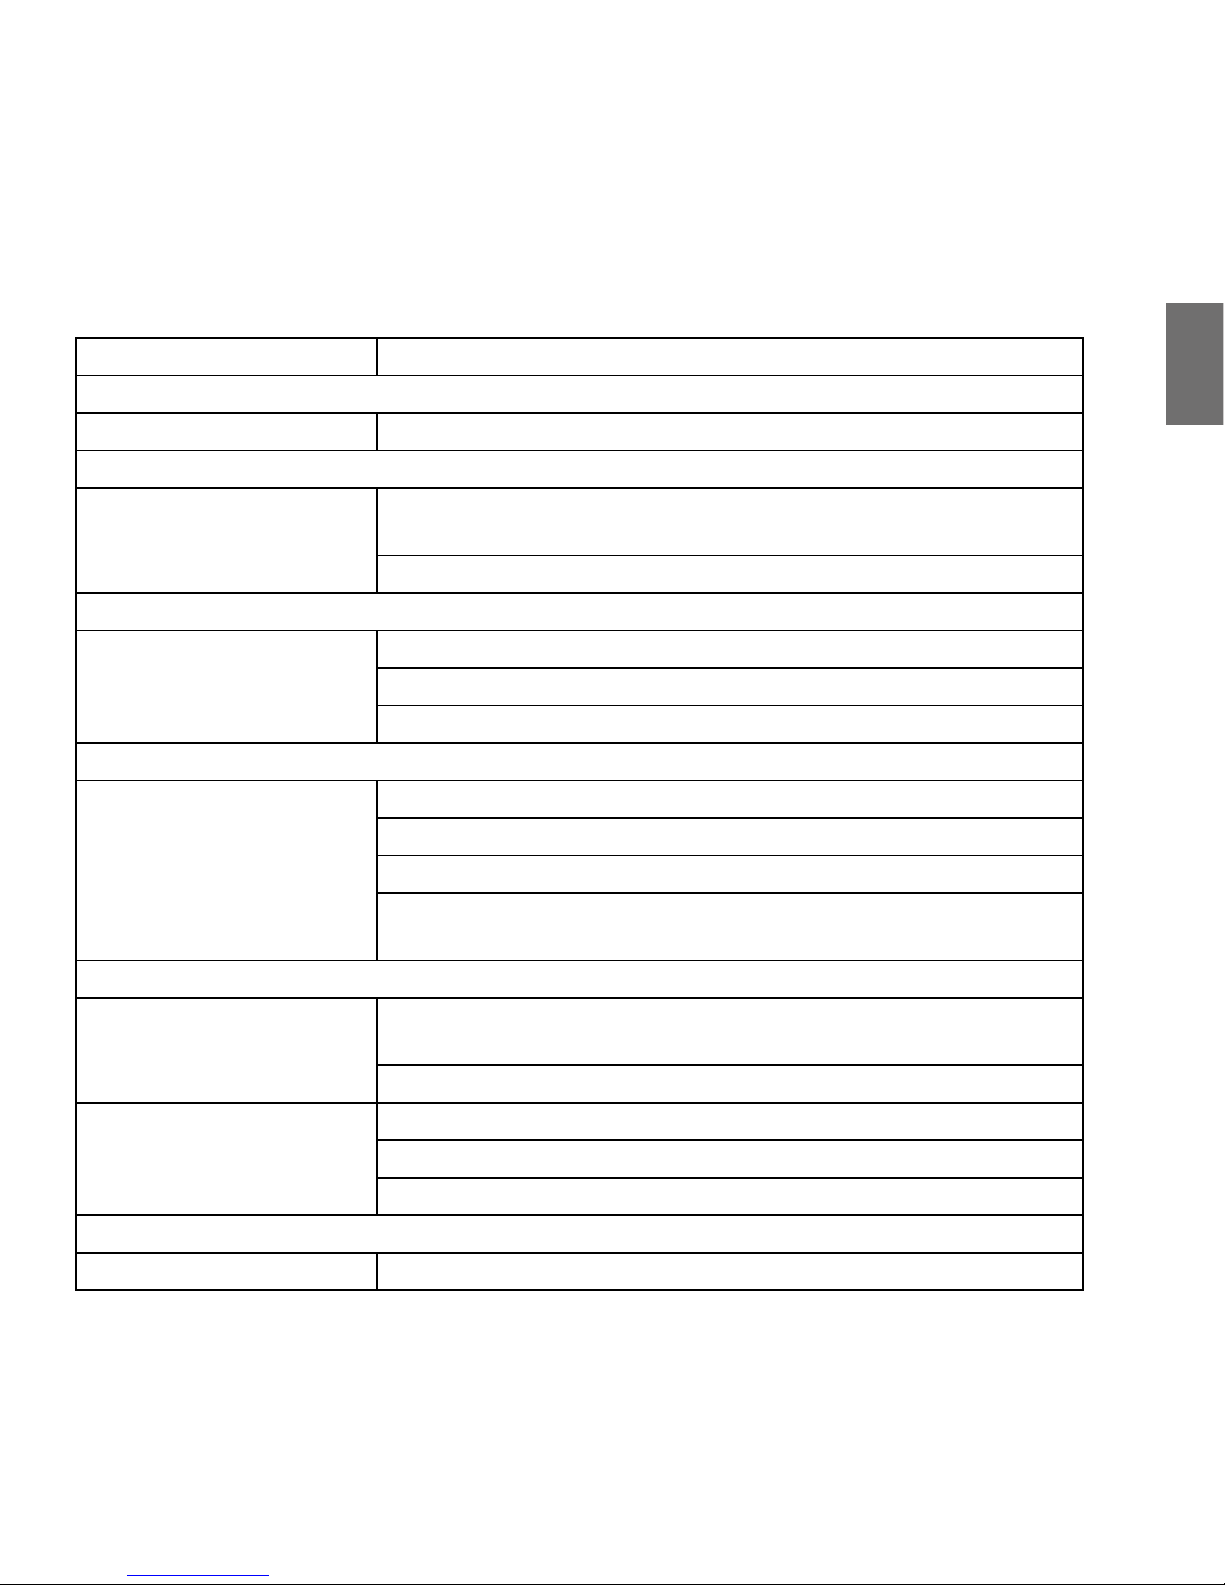
Caratteristiche in HD Caratteristiche in SD
30 frames per secondo 60 frames per secondo
Grandangolo di 130° Grandangolo di 90°
Aspect ratio 16:9 Aspect ratio 16:9
Risoluzione 1920x1080 Risoluzione 1280x720
Filmati in H264 (.mp4) Filmati in H264 (.mp4)
Page 5
I
3
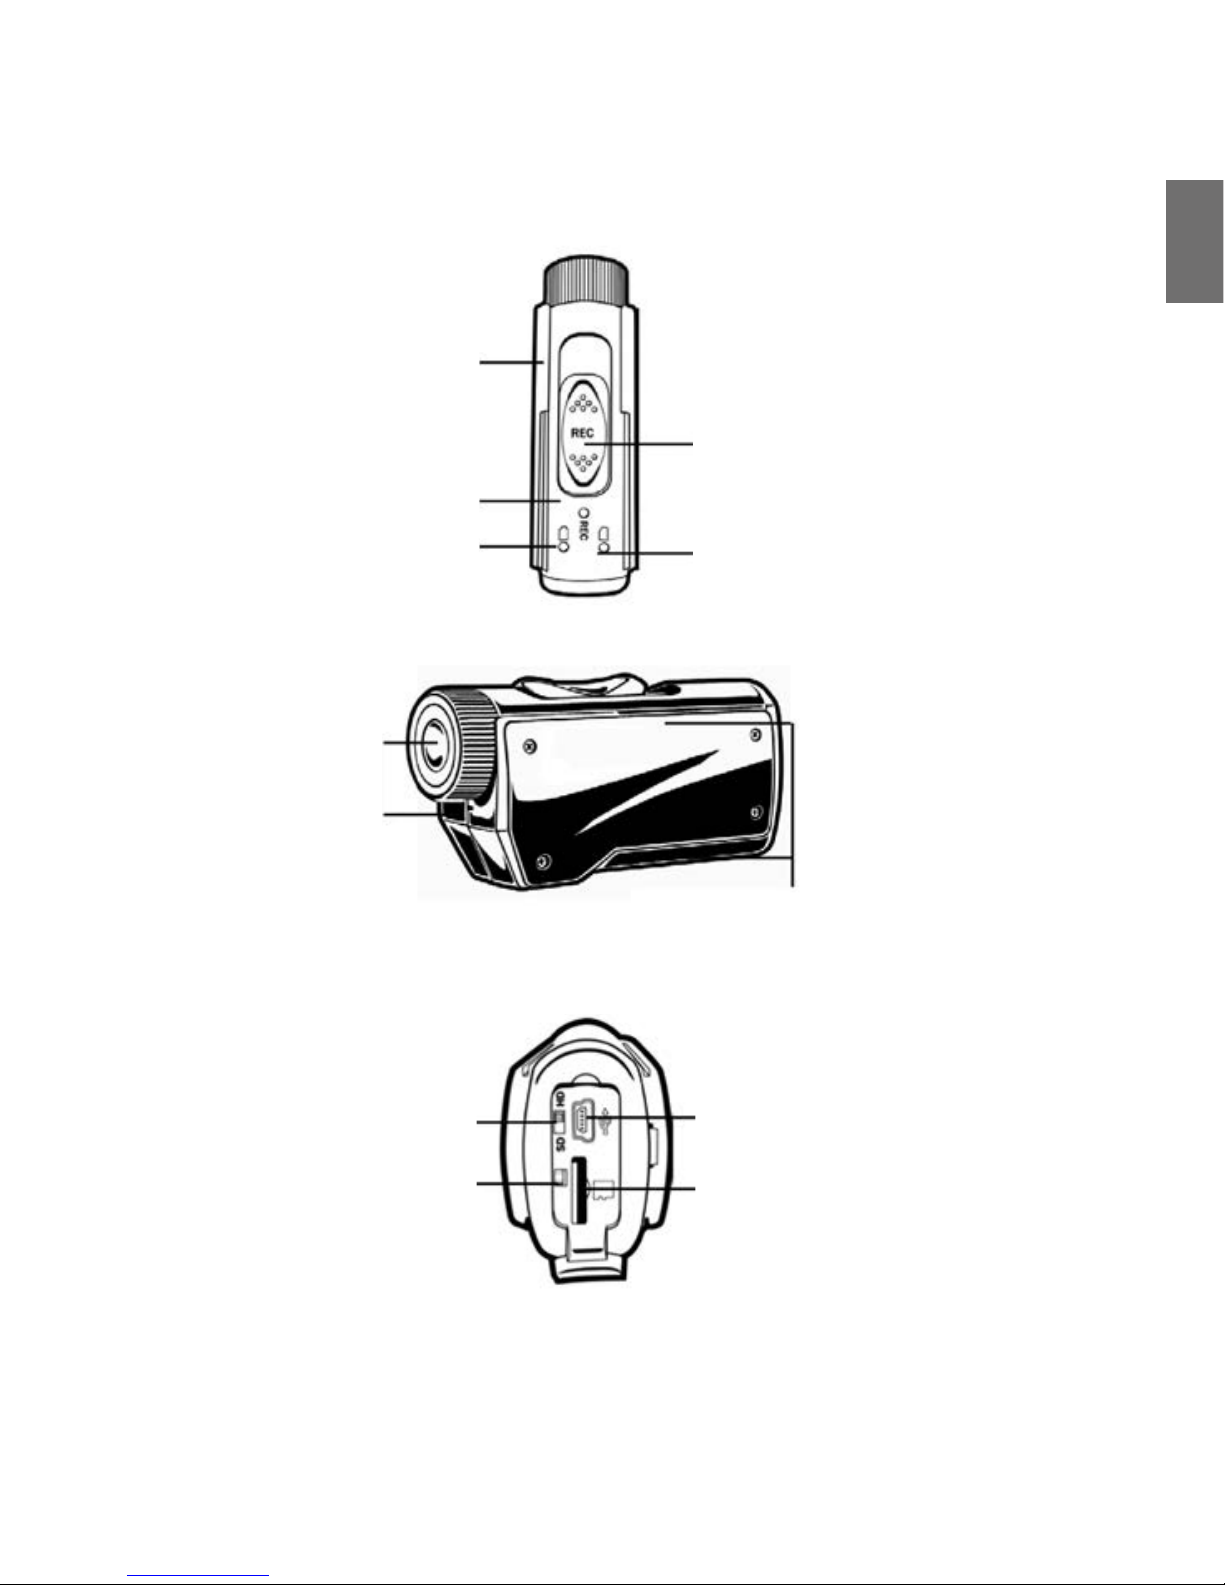
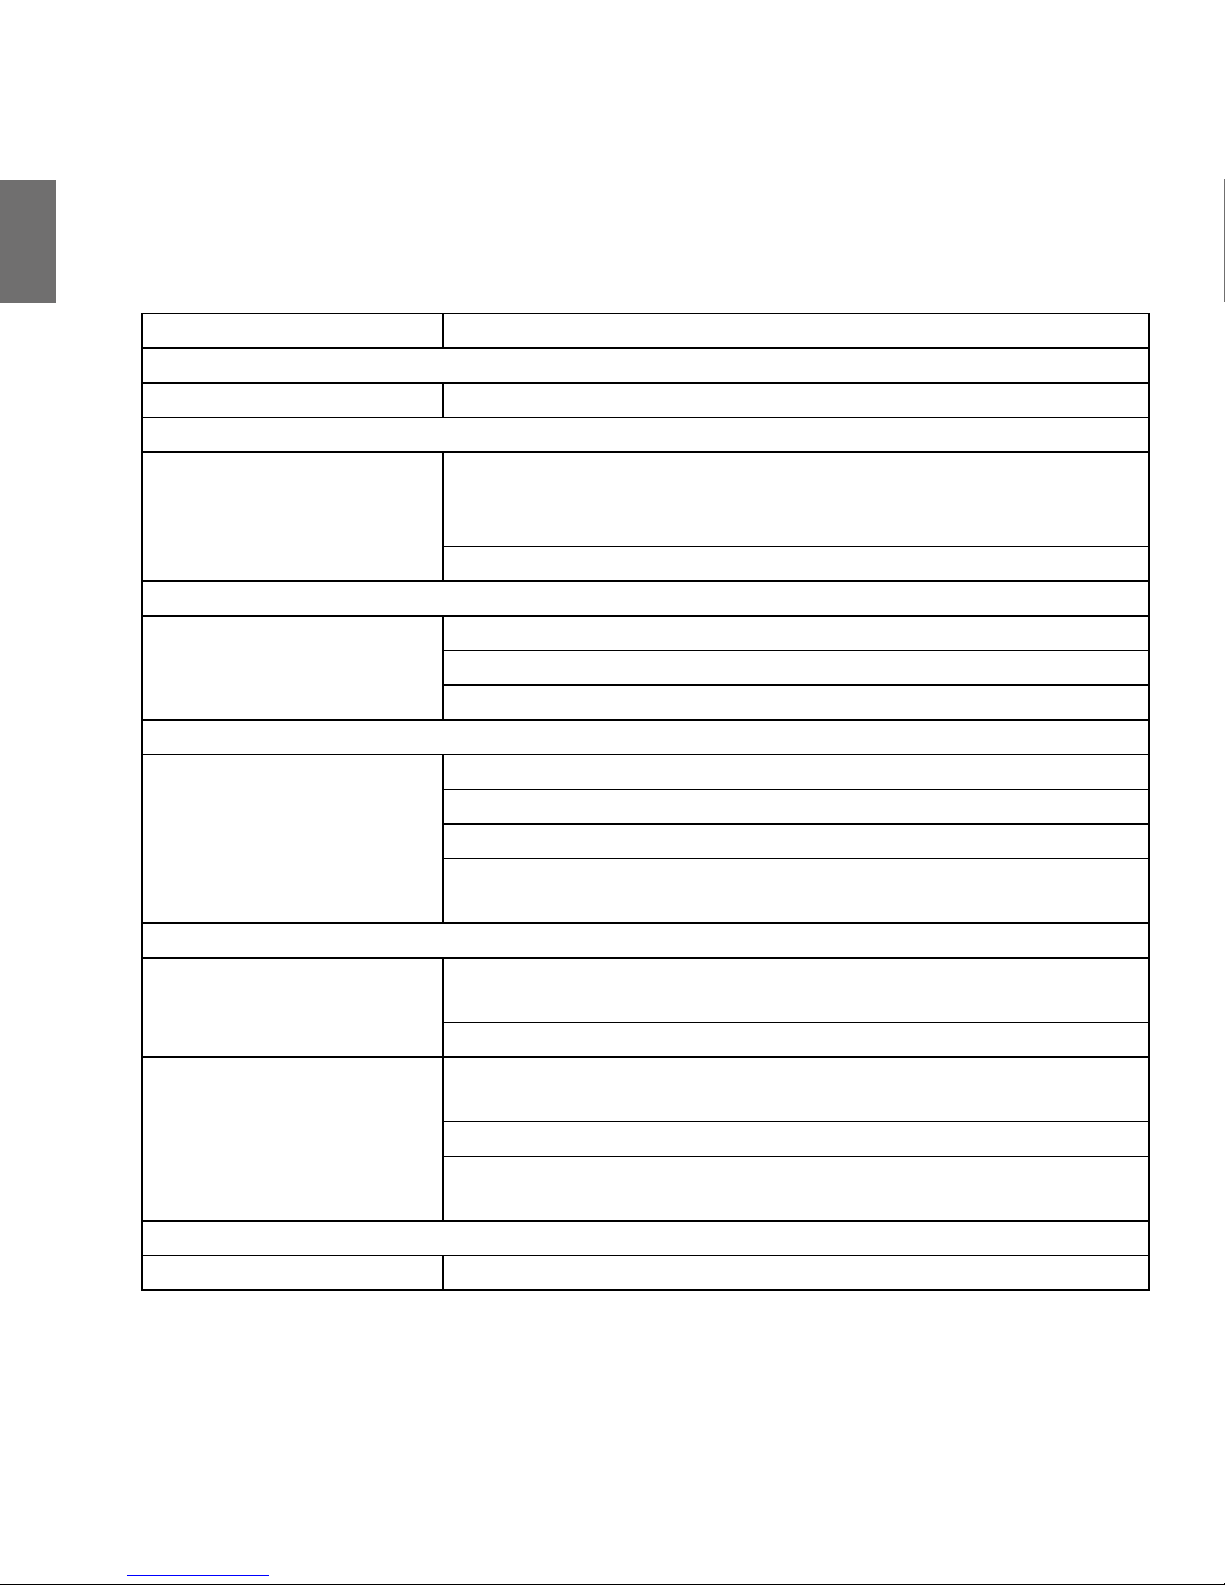
Grandangolo 130°
Microfono
Scanalature per montaggio del supporto a slitta
Selettore Record
In avanti: on/registrazione
Led di registrazione
lampeggia rosso mentre registra
Led batteria
Selettore Record
Indietro: Off/Stop registrazione
Led SD Card
Pulsante selezione SD/HD
Pulsante per riformattazione SD Card
Connettore Mini USB
Vano inserimento Mini SD Card
Page 6
I
4
Guida rapida all’uso
N.B. Al primo utilizzo di una nuova Memory card si consiglia di formattarla seguendo la procedura descritta nel relativo
paragrafo
1. Aprite il coperchio del vano batteria ed inserite il pacco batteria. Riposizionate il coperchio del vano batterie.
2. Aprite la cover di gomma della parte posteriore del dispositivo. Inserite la Micro SD card nell’opportuna direzione
3. Selezionate la qualità desiderata (SD: HD Ready - HD: Full HD). Chiudete la piccola cover gommosa.
4. Spostate il selettore RECORD in avanti. La registrazione inizierà dopo 4 secondi circa.
5. Per fermare la registrazione slittate il selettore verso il basso in posizione “off”.
6. Collegate la videocamera al computer e scaricate il video.
Imparando a conoscere XTC-270
Batteria
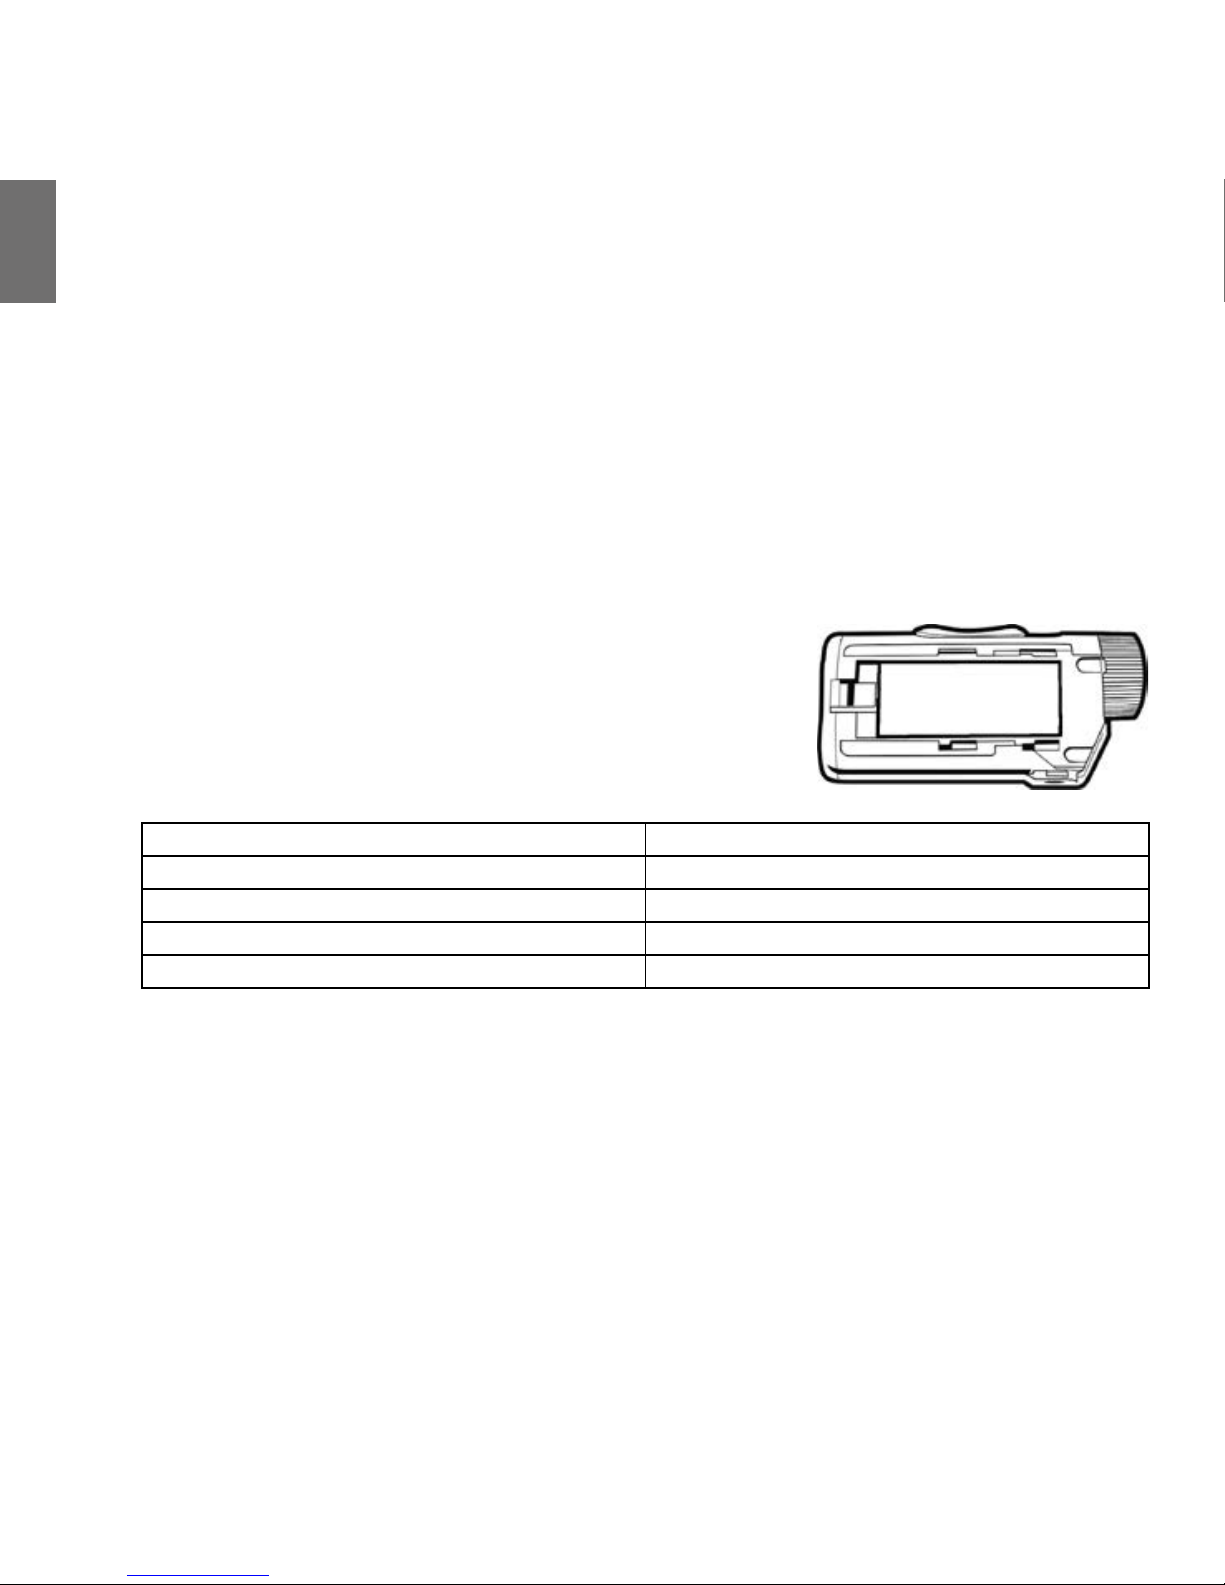
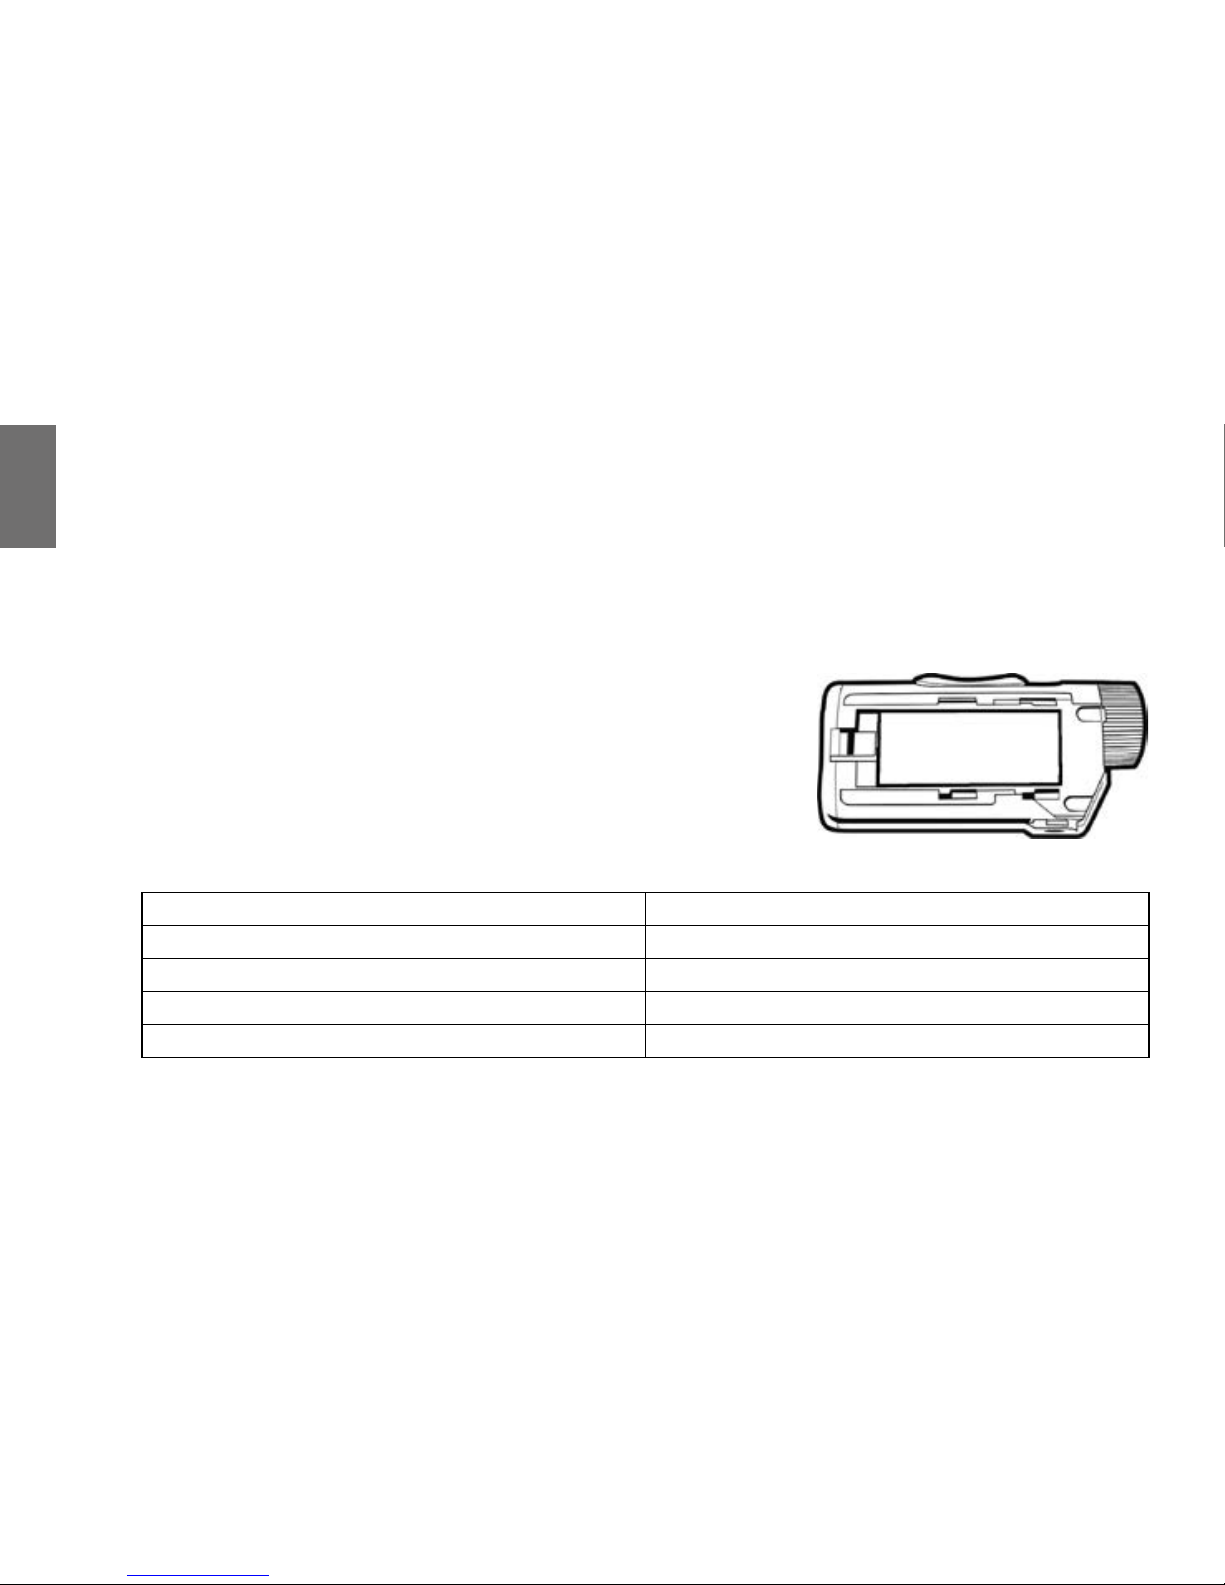
1. Per inserire il pacco batteria, premete il pulsante posto sul lato destro della videocamera e rimuovete il coperchio del vano batteria facendolo slittare in avanti.
2. Inserite il pacco batteria al litio.
3. Riposizionate il coperchio del vano batterie
Indicatore stato batteria Significato
Verde fisso Batteria carica
Rosso fisso Batteria parzialmente carica
Rosso lampeggiante Batteria quasi scarica
Led spento Batteria scarica
Nota: quando l’indicatore di batteria inizia a lampeggiare rosso, sarebbe opportuno ricaricare il dispositivo in quanto la telecamera si spegnerà a breve.
Page 7

I
5
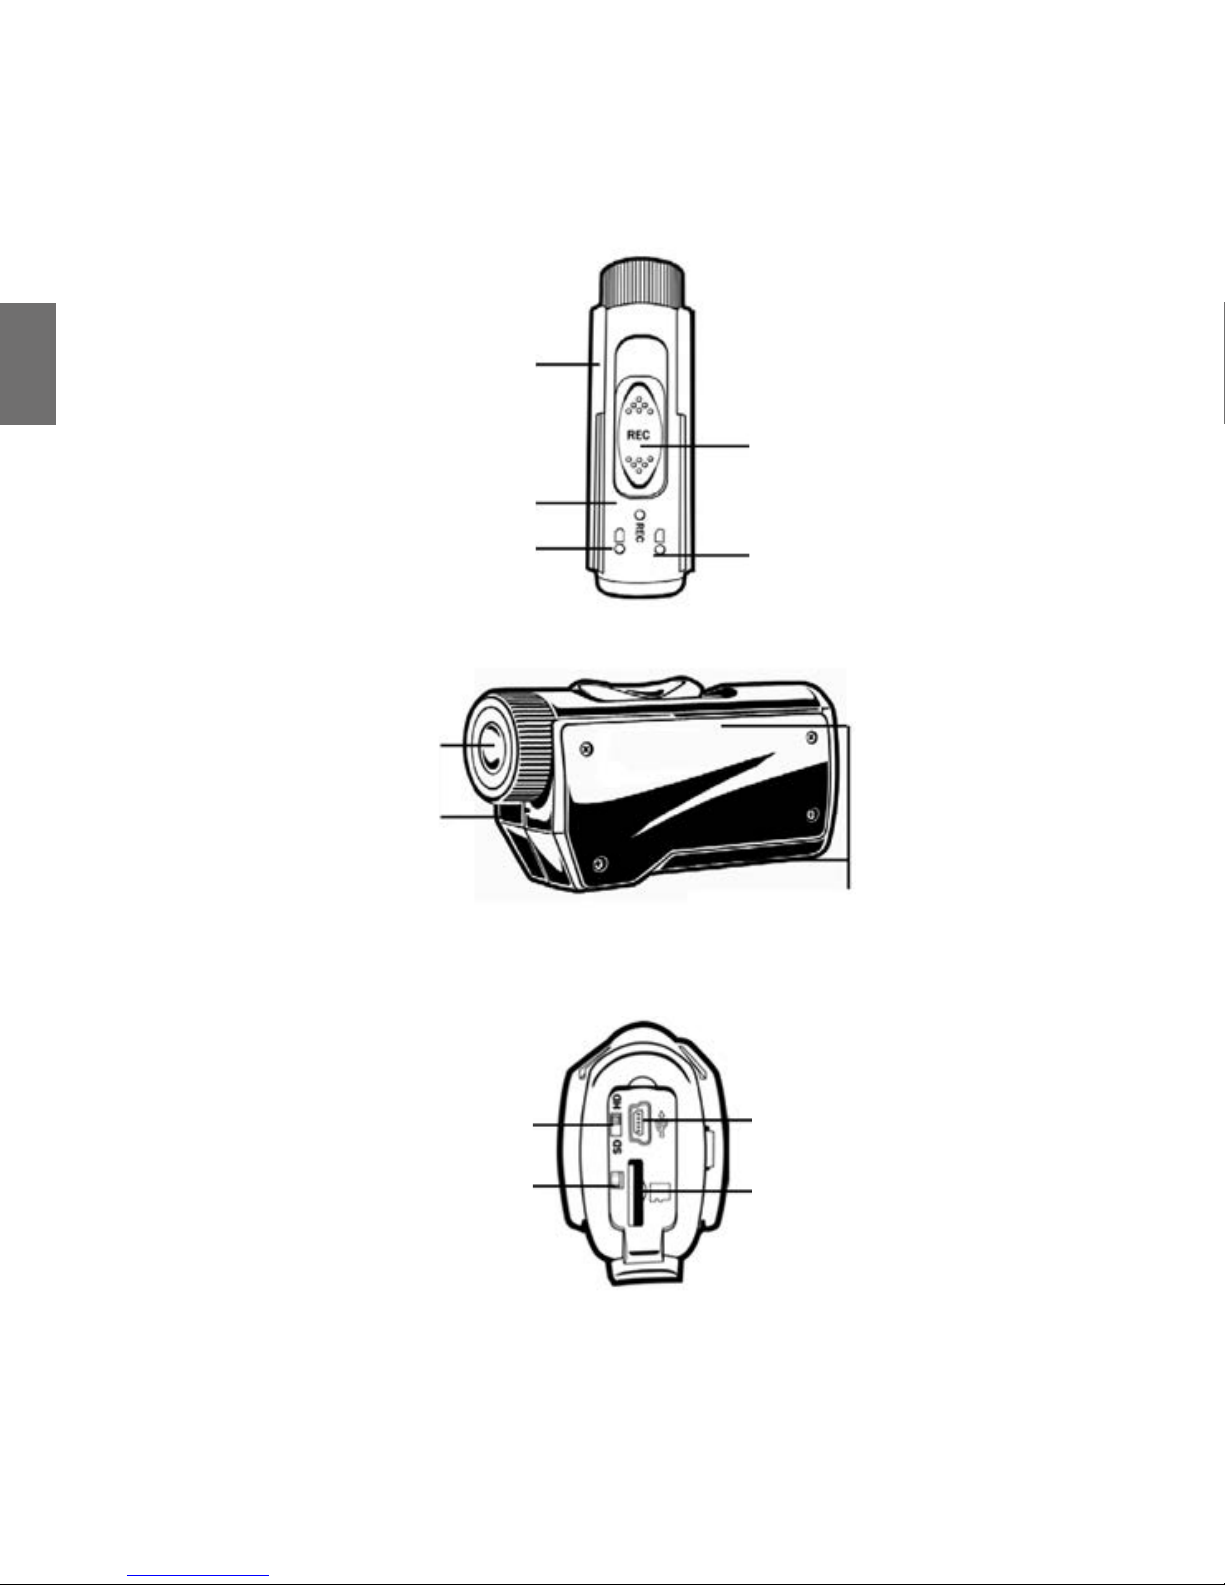
Micro SD Card
1. Aprite la cover di gomma posta sulla parte posteriore della videocamera
2. Inserite la Micro SD nell’apposita fessura come mostrato nell’immagine a lato.
3. Chiudete la cover di gomma.
NOTA: XTC-270 supporta fino ad un massimo di 32 GB di memoria.
Registrazione
1. Slittate il selettore di registrazione in avanti per accendere la videocamera.
2. Si illuminerà prima l’indicatore della batteria, poi l’indicatore della Micro SD card (i colori dipendono dallo status della batteria e
della memoria). Dopo circa 4 secondi l’indicatore di registrazione inizierà a lampeggiare rosso, indicando che la registrazio-
ne è iniziata. (Sonoro: 1 singolo Beep)
3. Per fermare la registrazione, spostate il selettore “record” in posizione “off”. (3 Beep per lo spegnimento 2 Beep per il corretto
salvataggio del filmato)
Nota: non rimuovere la batteria durante la registrazione per spegnere la telecamera in quanto il file potrebbe non essere finalizzato e risultare pertanto illeggibile.
Indicatore stato SD card Significato
Verde Più di 1GB di spazio disponibile
Arancione Da 512 MB a1 GB di spazio disponibile
Rosso Meno di 512 MB di spazio disponibile o Micro SD card non inserita.
Rosso lampeggiante Micro SD card non letta correttamente
Verde lampeggiante Indica che la Micro SD card è stata riformattata
Spazio di memoria Tempo di registrazione HD Tempo di registrazione SD
1 GB 11 minuti 13 minuti
2 GB 22 minuti 26 minuti.
4 GB 45 minuti 52 minuti
8 GB 90 minuti 105 minuti
16 GB 175 minuti 210 minuti
32 GB 350 minuti 410 minuti
Nota: La videocamera dividerà automaticamente i video in documenti da 10 minuti (circa 900mb)
Page 8
I
6
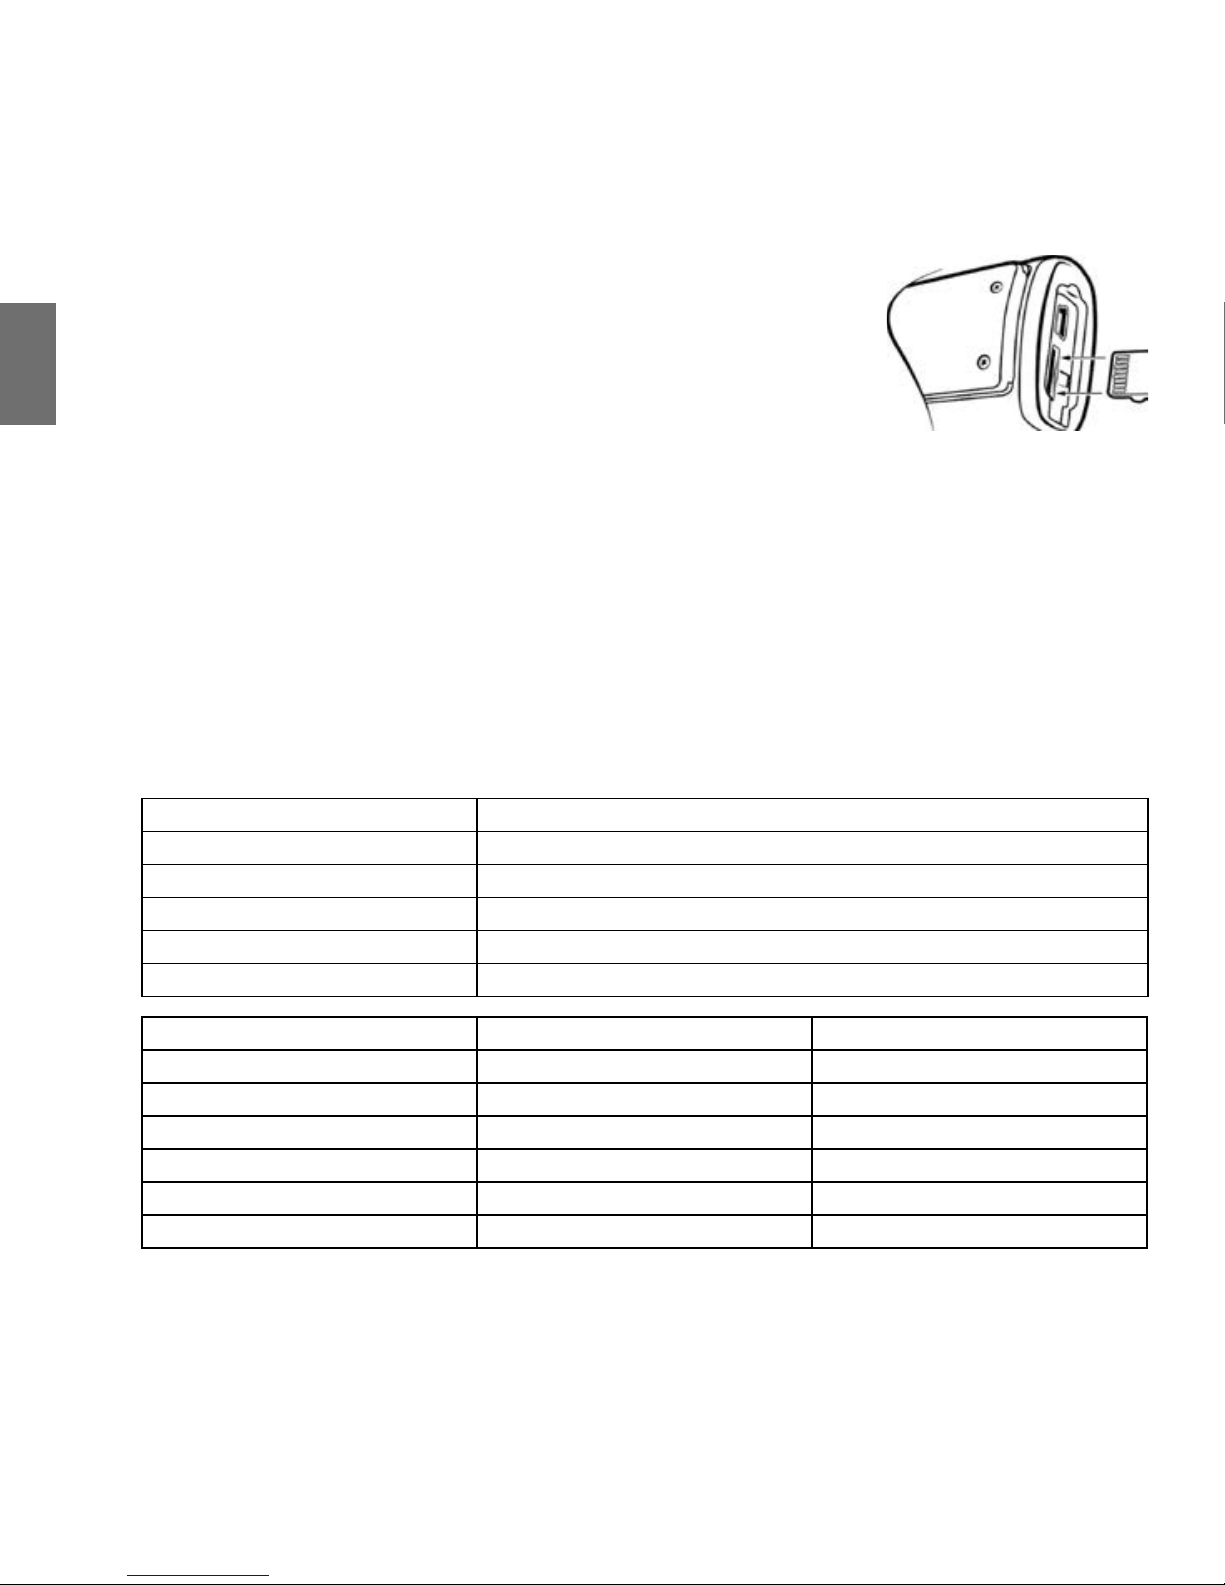
Supporti di montaggio
Supporti a slitta
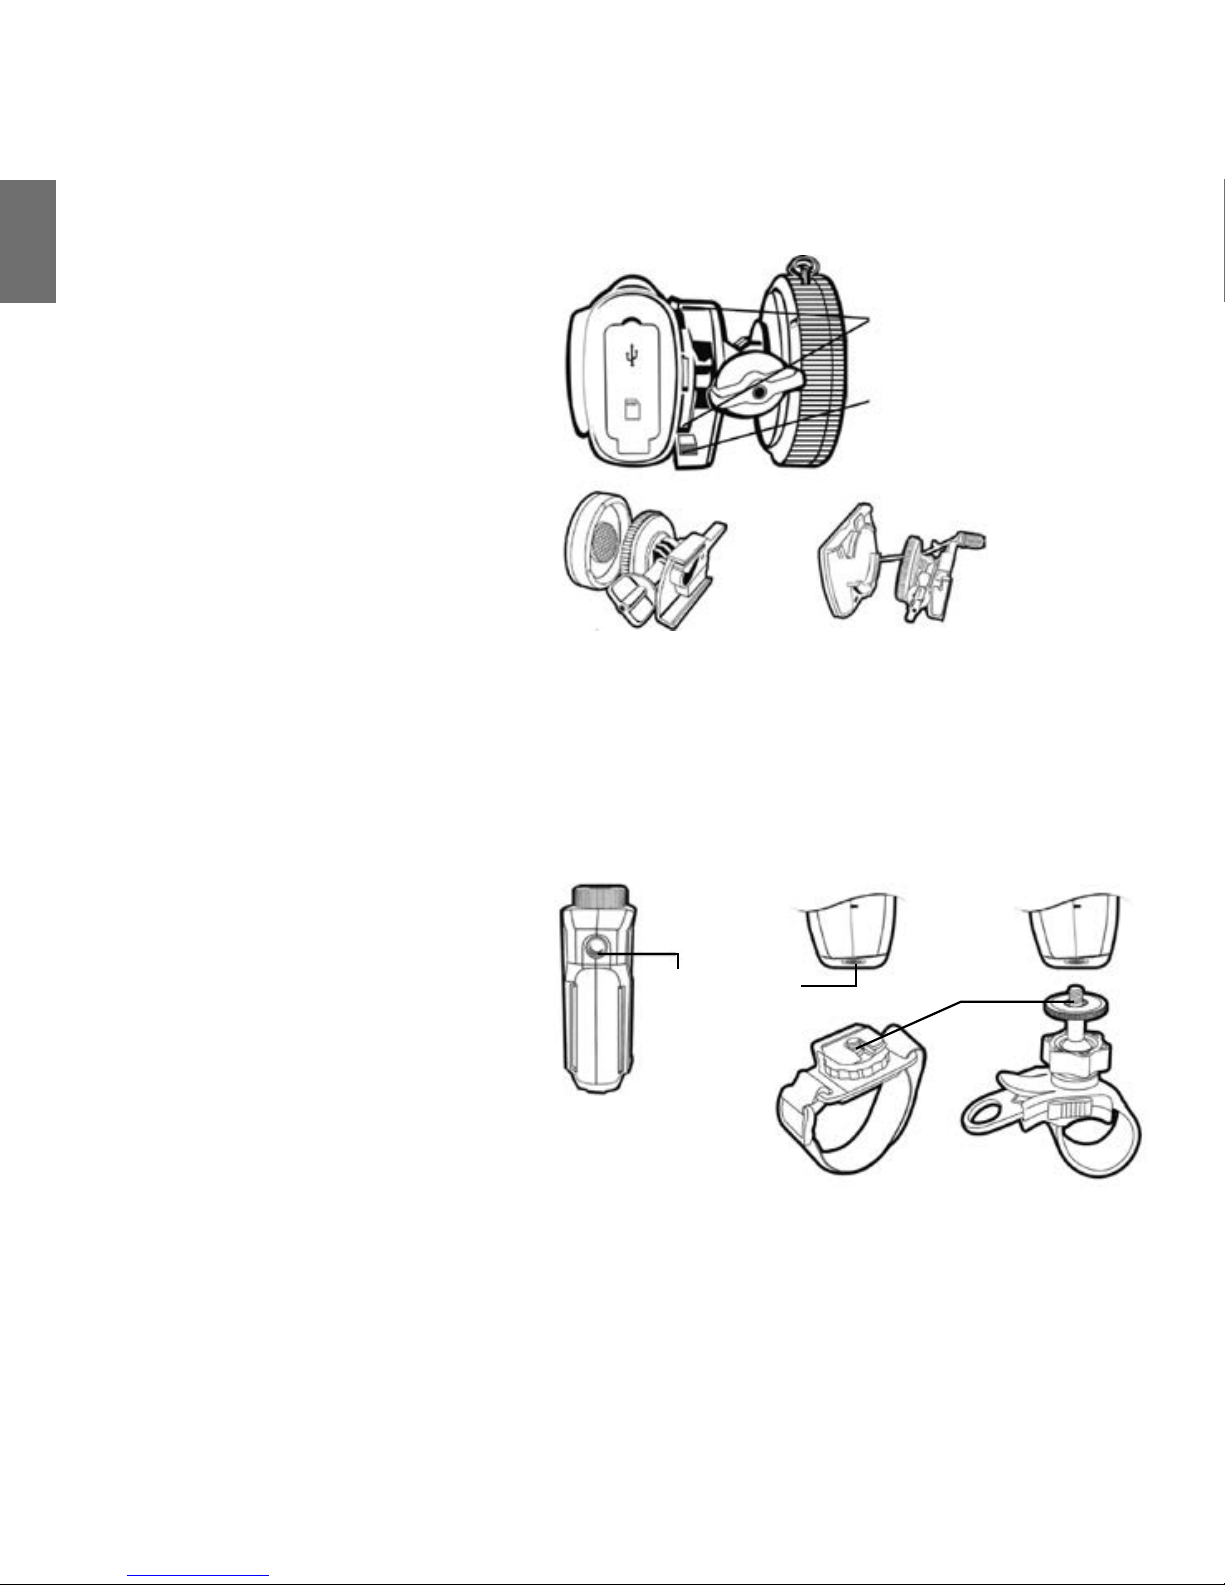
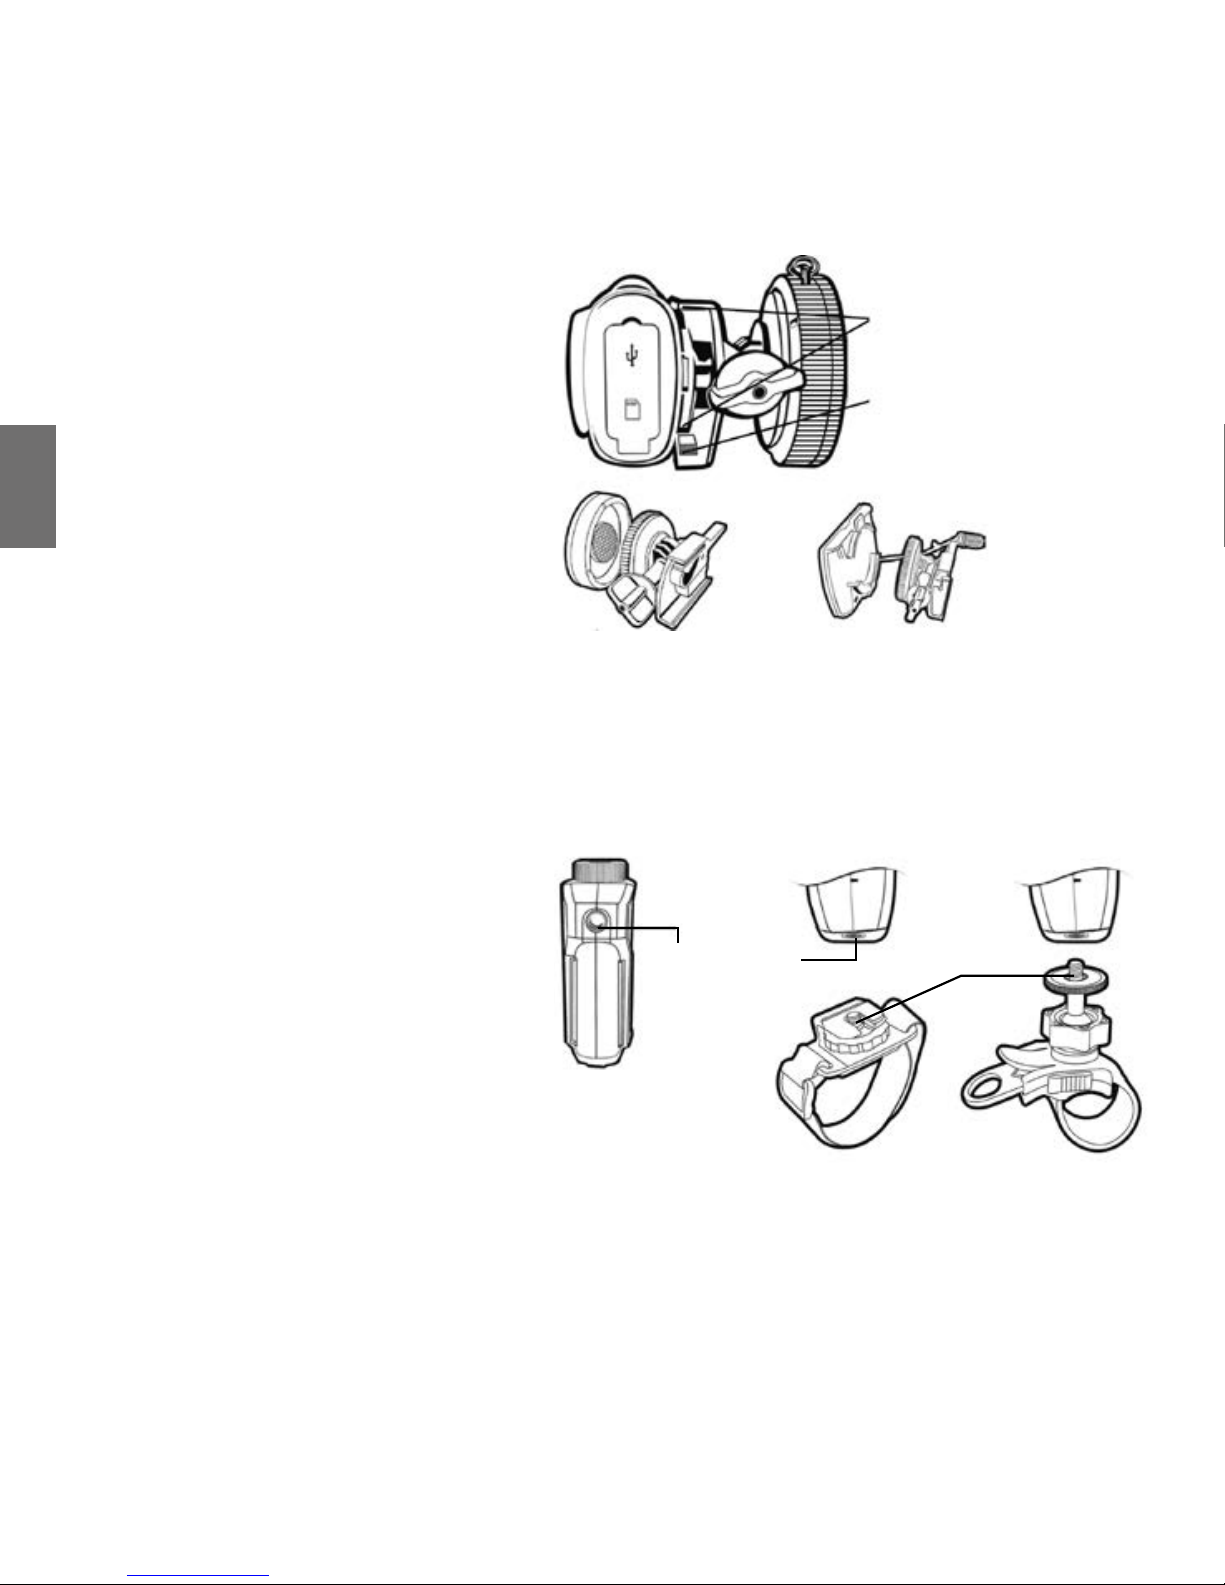
XTC-270, con il suo innovativo design a scanalature
può essere facilmente montata su uno speciale supporto a slitta. Tale supporto permette una più facile
ed efficace installazione del dispositivo.
Per montare la telecamera al supporto, posizionatela nell’apposita scanalatura e fatela slittare.
Per staccare la telecamera dal supporto a slitta,
tenete la telecamera con la lente distante da voi e
premendo il pulsante di rilascio tirate il supporto
verso di voi.
Questo supporto a slitta può essere abbinato sia ai
supporti bi-adesivi da casco che a tutti i supporti
opzionali che adottano questo tipo di slitta.
Una volta montata la telecamera al supporto a slitta occorre:
1. Montare la telecamera al supporto intercambiabile più adatto in base a ciò che si desidera filmare.
2. Aggiustare l’inquadratura della videocamera in modo che non filmi il cielo o il terreno.
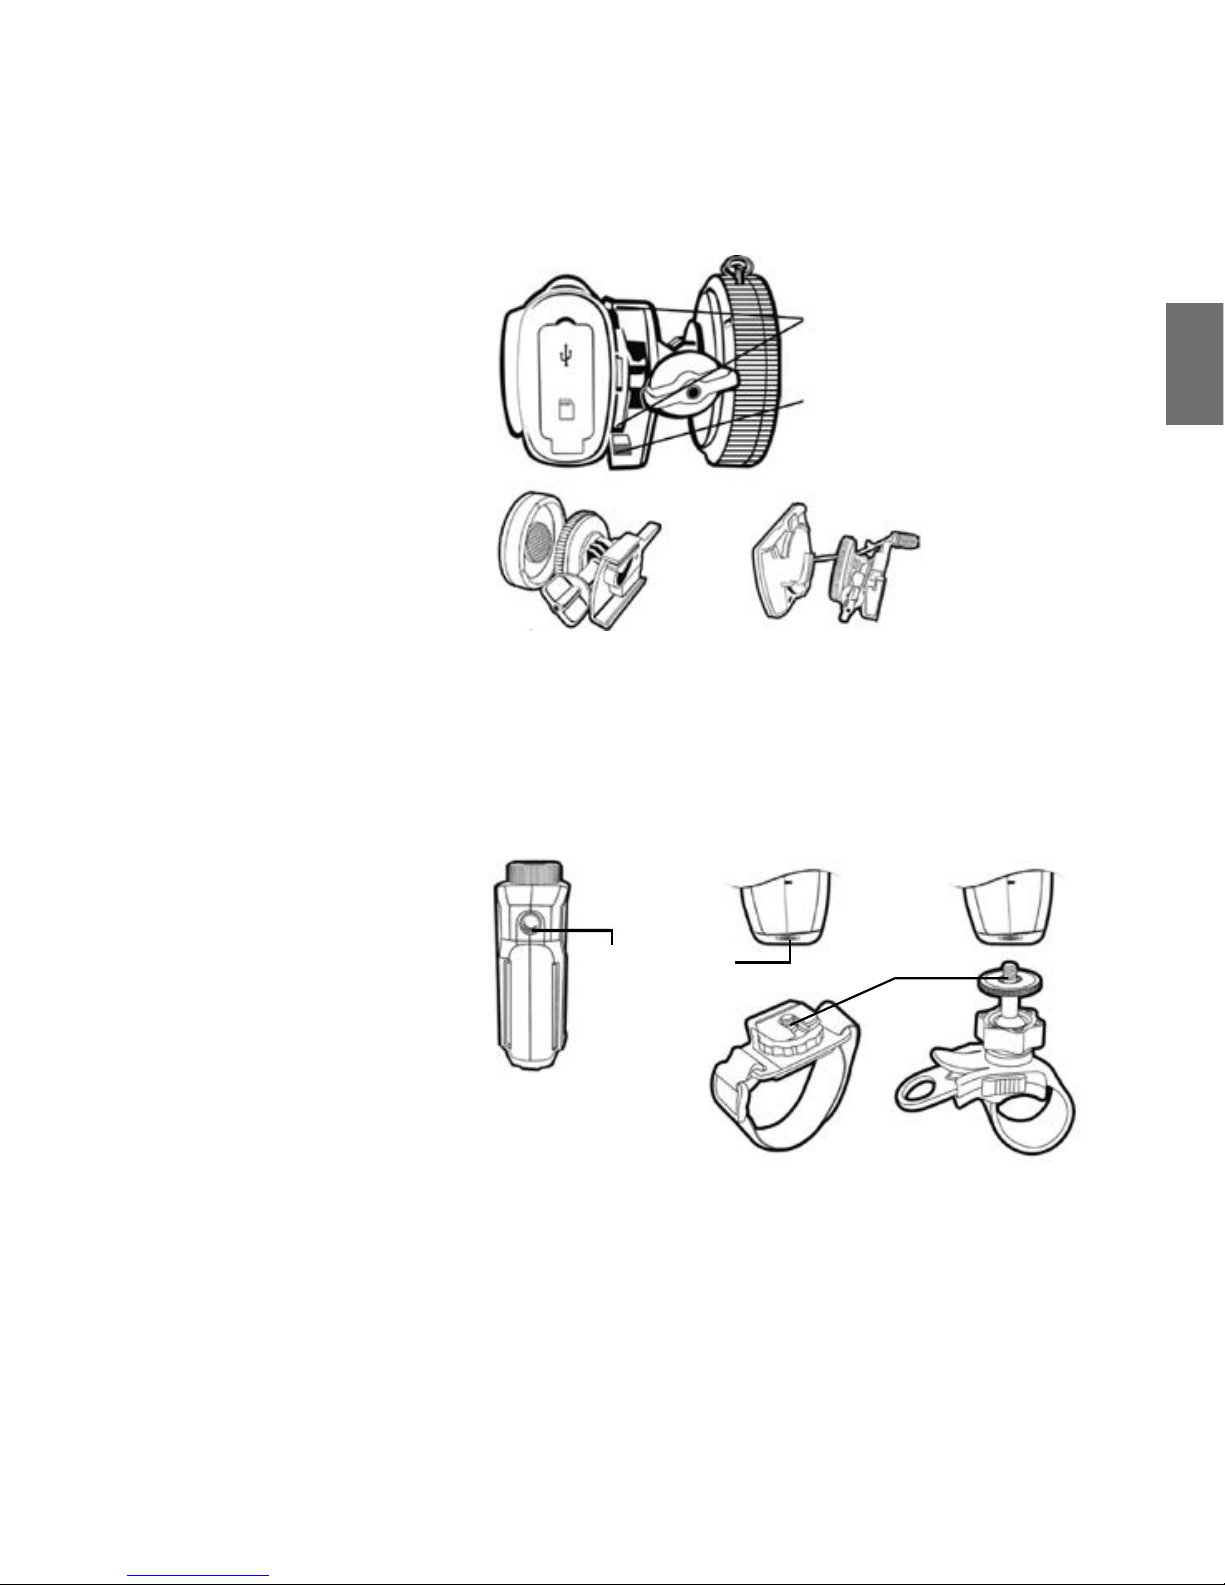
Supporti a vite
XTC-270 può essere montata anche utilizzando supporti opzionali muniti di vite standard per macchine
fotografiche.Nella parte inferiore di XTC-270 vi è
infatti un foro di fissaggio che permette di montare
la telecamera su tali supporti, inserendo semplicemente la vite di fissaggio nell’apposito foro e ruotando la telecamera in senso orario.
Se volete fissare la telecamera al manubrio della vostra bicicletta o montarla sul casco tramite supporto
a cinghia, dovete:
1. Montare la telecamera sul supporto a vite più
adatto a ciò che si desidera filmare.
2. Assicurarsi che la telecamera sia posizionata nel modo corretto e che non inquadri cielo o terra.
Supporto a slitta con regolazione
dell’inclinazione
Pulsante di rilascio
Supporto adesivo per casco Supporto per maschera da sci
Foro di fissaggio Vite di fissaggio
Supporto a cinghia per casco da bici Supporto al manubrio
Page 9

I
7
Sistemi compatibili
XTC-270 è compatibile sia con sistemi operativi Windows che con MAC.
Il formato video è H264, il formato dei file è MP4
Download dei video
Non c’è bisogno di installare ulteriori software per il collegamento con XTC-270.
1. Prima di scaricare i video, assicuratevi che il pacco batteria sia completamente carico.
2. Connettete la telecamera alla porta USB usando il cavo in dotazione e accenderla portando il selettore “record” in posizione On.
3. La telecamera viene vista dal PC come una normalissima memoria esterna (chiavetta USB), ma con solo la possibilità di scaricare
i filmati sul vostro PC; non è possibile caricare alcun dato sulla memoria SD (secondo le vigenti norme EU).
4. Troverete i vostri video salvati nella cartella “DC IM” > “100Media”
Come riformattare la Micro SD card
N.B. Si consiglia di formattare le nuove micro SD al loro primo utilizzo. La formattazione della Micro SD card permette di cancellare
tutti i file video in un unico istante.
Per far ciò occorre che la micro SD card sia all’interno della stessa telecamera.
1. Spegnere la telecamera portando il selettore “record” in posizione Off.
2. Tenere premuto il pulsante di riformattazione presente nel retro della camera aiutandosi con un oggetto sottile.
3. Tenendo premuto il tasto al punto 2, accendere la telecamera portando il selettore “record” in posizione di registrazione.
4. Tenere premuto il tasto di riformattazione fino a quando il led della memoria lampeggia verde.
5. Spostate il selettore “record” in posizione off.
6. La formattazione è avvenuta correttamente se si avvertono 2 Beep
7. Estrarre la Micro SD Card e formattare utilizzando un PC prima di utilizzarla nuovamente all’interno della telecamera. (Nota:
XTC270 non è in grado di cancellare autonomamente il file di upgrade)
Nota: la Micro SD card non può essere riformattata se l’indicatore di batteria quasi scarica si accende (rosso lampeggiante). Assicuratevi che le batterie siano completamente cariche o nuove prima di iniziare il processo di riformattazione.
Nota: XTC-270 è progettata per massimizzare la durata della batteria per essere la compagnia ideale delle vostre avventure, la
CPU viene quindi spenta e non alimentata quando il selettore di registrazione è in posizione “OFF”. A causa di ciò NON É POSSIBILE
impostare la data.
Page 10
I
8
Problemi & Soluzioni
Problemi Soluzioni
Batteria
La telecamera non si accende Assicuratevi che il pacco batteria sia installato correttamente e che sia carico.
Registrazione
La telecamera non registra Assicuratevi di aver spostato correttamente il selettore “record” (totalmente in avanti). Se
l’indicatore di registrazione non si accende spegnete il dispositivo e re-installate il pacco
batteria.
Verificate che ci sia abbastanza memoria nella Micro SD card.
Micro SD card
La Micro SD card non viene letta Assicuratevi che la Micro SD card sia stata inserita correttamente.
Connettete la telecamera al computer per verificare che ci sia abbastanza spazio di memoria
Attendete che si concluda il processo di formattazione
Visualizzazione Video
Il video è lento e si inceppa Verificate che il cavo USB sia stato inserito correttamente nella presa della telecamera
Rimuovete dispositivi USB al momento non utilizzati
Trasferite i file video sul computer prima di vederli
Accertarsi che il proprio media player sia aggiornato e che il proprio computer rispetti i requi-
siti minimi richiesti (vedere sopra)
Download del Video
Trasferimento dati lento Verificate che il cavo USB sia stato inserito correttamente nella presa della telecamera. Scol-
legate e ricollegate il cavo USB
Rimuovete dispositivi USB al momento non utilizzati
Il computer non riconosce la telecamera
Assicuratevi che la telecamera collegata al computer abbia il selettore “record” posizionato
su ON
Assicuratevi che la Micro SD card sia stata inserita correttamente
La Micro SD card potrebbe essere corrotta. Attendete che si concluda il processo di format-
tazione
Audio
Disturbi causati dal vento Applicate un filtro, ad esempio del nastro adesivo, sul foro del microfono.
Page 11

I
9
Garanzia
La durata della garanzia è di 24 mesi per l’apparato e di 6 mesi per gli accessori (batterie, caricatori, microfoni, antenne, auricolari).
Per maggiori informazioni visitate il sito www.midlandeurope.com
Page 12

UK
10
XTC-270 Action Camera ................................................................................................................... 11
What’s in the box ............................................................................................................................................................. 11
XTC-270 Features and Controls ........................................................................................................................................11
Quick Start Guide ............................................................................................................................ 13
Getting to Know the XTC-270 ........................................................................................................... 13
Battery ............................................................................................................................................................................ 13
Micro SD Card...................................................................................................................................................................14
Recording ........................................................................................................................................................................ 14
Camera Mounting ........................................................................................................................... 15
Mount on Dual Track System ........................................................................................................................................... 15
Mount using the Thread Mount ......................................................................................................................................15
Compatible Systems ........................................................................................................................ 16
Downloading Videos .......................................................................................................................16
Reformatting the Micro SD card ....................................................................................................... 16
Tips and Tricks ................................................................................................................................. 17
Limited Warranty ...........................................................................................................................18
Page 13

UK
11
XTC-270 Action Camera
Thank you for your purchase of the XTC-270 Action Camera. As someone who seeks adventure, we are proud to offer you the ultimate
tool in capturing and recording your adventures. With easy to use one switch operation, 130 degree angle lens and 2 recording modes:
Standard HD Ready (SD: 1280x720) and Full HD (HD: 1920x1080). Thanks to the equipped Lithium battery pack it is possible to record
up to 2 hours. Once captured, simply connect to your computer and upload the videos to share with friends. It is that simple! Enjoy!
What’s in the box
› Midland XTC-270 Action camera
› 900mAh Lithium battery pack
› USB cable
› Submersible case up to 60 meters
› One mounting kit for helmet
XTC-270 Features and Controls
Features:
HD features SD features
30 frames per second 60 frames per second
130 degree angle lens 90 degree angle lens
16:9 aspect ratio 16:9 aspect ratio
1920 x 1080 resolution 1280x720 resolution
Codec H.264 (.mp4 files) Codec H.264 (.mp4 files)
Page 14
UK
12
130° degree
glass lens
Microphone
Dual track mounting system
Record switch
forward: on/record
Record led
flashes red whencamera is recording
Battery led
Record switch
backward: Off/Stop recording
SD Card led
SD/HD Mode switch SD Card
Reformat button
Mini USB connector
Mini SD Card slot
Page 15

UK
13
Quick Start Guide
N.B. Format the micro SD memory card before the first usage directly from the camera following the indication in related
paragraph.
1. Open battery door and install the battery pack. Replace battery cover.
2. Open and fold down back rubber cover. Insert micro SD card observing proper direction.
3. Choose the desired quality definition (SD: HD Ready; HD: FULL HD). Close the cover.
4. Move RECORD switch forward, recording will start in 4 seconds.
5. To stop recording, slide switch back to the off position.
6. Plug in camera to computer and download video.
Getting to Know the XTC-270
Battery
1. To insert the battery pack, push down the battery door latch on the right side of
the camera. Door will release. Push forward to remove.
2. Install the Lithium battery pack.
3. Return battery door and click into place.
Battery Status Indicator Meaning
Solid Green Indicates full battery life
Solid Red Indicates half battery life
Blinking Red* Indicates low battery life
No Light Batteries are dead
Note: When the red battery LED begins blinking, be prepared to charge the battery because the camera will stop recording at this
point.
Page 16
UK
14
Micro SD Card
1. Open and fold down the back rubber cover.
2. Insert Micro SD card into slot observing proper direction (shown sideways).
3. Return rubber flap into place.
NOTE: XTC-270 supports up to 32GB memory card size.
Recording
1. Move the RECORD switch forward. This turns the camera on.
2. The battery and the memory card indicator will turn on showing the status of the camera. The record indicator will begin
flashing red after 4 seconds. This indicates the camera is capturing video. (1 single Beep)
3. To stop recording, move the RECORD switch back to the off position. (3 Beeps indicate “stop recording”, 2 Beeps to indicate “correct
video saving”)
Note: Don’t remove the battery while recording because the file can be damaged
SD card LED Status Meaning
Green 1 GB or more avai lable
Orange 512 MB to1 GB available
Red Below 512 MB available or no MicroSD card installed.
Flashing Red Cannot read the card
Flashing Green Indicates card has been reformatted.
Memory Size HD Record Time SD Record Time
1 GB 11 minutes 13 minutes
2 GB 22 minutes 26 minutes
4 GB 45 minutes 52 minutes
8 GB 90 minutes 105 minutes
16 GB 175 minutes 210 minutes
32 GB 350 minutes 410 minutes
Note: The camera will divide the video in files of 10 minutes each (approximately 900Mb)
Page 17
UK
15
Camera Mounting
Mount on Dual Track System
The XTC-270 was innovatively designed with an
identical dual track mount system on either side of
the camera. This allows an ease of installation. To
mount the camera on the dual track mount, slide
the camera onto the dual track system with the
two notches on the mount facing towards the back
of the camera.
To detach the camera from the dual track mount,
hold the camera with the lens facing away from
you. Press down the mount release switch and pull
the mount towards yourself.
The dual track mount allows the camera to be easily mounted on the helmet mount and on all other optional accessories with same type of slides. When mounting the camera on the
dual track mount, you must do the following:
1. Consider what you would like to shoot and use the helmet mount or goggle mount accordingly.
2. Ensure, once attached, that the camera is aimed straight and not towards the ground or at the sky.
Mount using the Thread Mount
On the bottom of the XTC-270 there is a standard thread mount that allows the camera to be
mounted on optional accessories that has standard
camera screw.
To fix the camera, insert the screw on the mount
into the camera thread and rotate the camera
clockwise to tighten down onto the screw.
When mounting the camera on the handlebars of a
bike or with the vented helmet strap mount follow
these steps:
1. Consider what you would like to shoot and
mount accordingly.
2. Ensure, once attached, that the camera is aimed straight and not towards the ground or at the sky.
dual track system mount
Release button
Helmet adhesive mount Goggle mount
Camera thread Mounting screw
Helmet strap mount Bicycle handle bar mount
Page 18

UK
16
Compatible Systems
The XTC-270 can be used on both Windows operating system and MAC.
The video codec is H.264, the file format is .MP4.
Downloading Videos
There is no need to install any software with the XTC-270. It is a plug and play device.
1. Before downloading videos, ensure batteries are fully charged.
2. Connect the camera to the USB port using the included cable.
3. Turn on the camera by sliding the “Record” switch in ON position.
4. The camera will be automatically recognized as an external hard drive (USB key) but videos could only be download; it is not
possible upload any data on your SD card based on current EU law.
5. All your videos will be saved into the “DC IM” > “100Media”.
Reformatting the Micro SD card
Note: Format the micro SD card from the camera before the first usage.
The Micro SD card can be reformatted while in the camera. This allows you to delete all the videos at one time. Follow these steps:
1. Turn OFF the camera, sliding the RECORD switch to the OFF position.
2. Press and HOLD the Micro SD card reformat button.
3. Move the RECORD switch to the record position holding the reformatting button.
4. Release the reformatting button when the memory card LED is blinking green.
5. Turn OFF the camera, sliding the RECORD switch to the OFF position.
6. You will hear two beeps if the formatting process is successful.
7. Take out the Micro SD Card and use other device to format the card before using it again in the camera (Note: XTC270 cannot
delete the upgrade software)
Note: The camera cannot reformat the Micro SD card if the low battery light is on. Ensure new batteries are installed in the camera
before attempting the reformat process.
Note: XTC-270 is designed to be your ideal partner during all your adventures, so the CPU is totally turned OFF when the record
button is in OFF position to maximize the battery last. Due to this IT IS NOT POSSIBLE to set time and data.
Page 19
UK
17
Tips and Tricks
Problem Solution
Battery
Camera not turning on Ensure the battery pack is installed properly and fully charged.
Recording
Camera not recording Make sure the switch is pushed all the way forward. If the record LED does not come on, turn
off the device and reinstall the battery.
Verify available memory.
Micro SD card
Micro SD card not reading Ensure the Micro SD card is inserted properly.
Plug camera into the computer to verify it has available storage.
Attempt formatting process.
Video Playback
Slow or choppy video Verify the camera is plugged into a USB 2.0 device.
Remove other unused USB devices.
Transfer video to computer before viewing.
Make sure the media player you are using is updated and your computer respects the mi-
nimum requirements.
Video Downloading
Slow data transfer Verify the camera is plugged into a USB 2.0 device. If registering as 1.1, unplug and the
re-plug the device.
Remove other unused USB devices.
Computer does not recognize camera Ensure record switch is in the record position while connected to computer.
Ensure the Micro SD card is inserted properly.
Micro SD card may be corrupted. Attempt formatting process.
Sound
Excessive Wind Noise Place piece of tape over microphone hole.
Page 20

UK
18
Limited Warranty
The warranty lasts 24 months for the main device and 6 months for the accessories (batteries, chargers, antennas, microphones,
headsets).
For further information about the warranty, please visit www.midlandeurope.com
Page 21

D
19
XTC-270 Actionkamera .................................................................................................................... 20
Lieferumfang ...................................................................................................................................................................20
XTC-270 Ausstattungsmerkmale und Bedienelemente ....................................................................................................20
Schnellanleitung ............................................................................................................................. 22
XTC-270 Wissenswertes ................................................................................................................... 22
Batterie............................................................................................................................................................................22
MicroSD-Karte ................................................................................................................................................................. 23
Aufnahme........................................................................................................................................................................ 23
Kamerahalterung ............................................................................................................................ 24
Montage auf Doppelschienensystem .............................................................................................................................. 24
Montage mit Schraubhalterung ......................................................................................................................................24
Kompatible Systeme .......................................................................................................................25
Videos herunterladen ......................................................................................................................25
MicroSD-Karte neu formatieren ....................................................................................................... 25
Problembehebung .......................................................................................................................... 26
Gewährleistung/Garantie ................................................................................................................ 27
Page 22

D
20
XTC-270 Actionkamera
Vielen Dank, dass Sie sich für die XTC-270 Actionkamera entschieden haben. Wir sind stolz, Ihnen als Abenteurer dieses ultimative
Gerät zur Aufzeichnung Ihrer Abenteuer anbieten zu können. Mit einfacher Einknopfbedienung, 130° Weitwinkel Sichtfeld und 2
Aufnahmeformaten: Standard HD Ready (SD: 1280 x 720) und FULL HD (HD: 1920 x 1080). Dank des beigefügten Lithiumakkus ist eine
Aufnahmezeit von bis zu 2 Stunden möglich. Nach der Aufzeichnung schließen Sie das Gerät einfach an Ihren Computer an und laden
die Videos zur gemeinsamen Betrachtung mit Freunden herunter. So einfach ist das! Viel Spaß!
Lieferumfang
› Midland XTC-270 Action Videokamera
› USB-Kabel
› 900mAh Lithium Akku
› Wasserdichtes Schutzgehäuse 60m
› Ein Halterung für den Helm
XTC-270 Ausstattungsmerkmale und Bedienelemente
Ausstattungsmerkmale:
HD Merkmale SD Merkmale
30 Bilder pro Sekunde 60 Bilder pro Sekunde
Weitwinkel 130° Weitwinkel 90°
16:9 Bildformat 16:9 Bildformat
1920 x 1080 Auflösung 1280 x 720 Auflösung
Codec H.264 (MP4 Aufnahme) Codec H.264 (MP4 Aufnahme)
Page 23

D
21
130-Grad-Objektiv
Mikrofon
Doppelschienenhalterungssystem
Aufnahmeschalter
vorn:Ein/Aufnahme
Aufnahme-LED
blinkt grün bei Aufnahme mit Kamera
Batterie-LED
Aufnahmeschalter
hinten: Aus/Aufnahme beenden
SD-Karten-LED
HD/SD Modus Schaltung
SD-Karte Formatierungstaste
Mini-USB-Port
miniSD-Kartenleser
Page 24
D
22
Schnellanleitung
Achtung: Formatieren Sie die Mikro SD Speicherkarte vor dem ersten Gebrauch direkt von der Kamera aus. Folgen Sie hierfür den
Anweisungen aus dem späteren Abschnitt in dieser Anleitung
1. Das Batteriefach öffnen und den Akku einsetzen. Den Deckel wieder schließen.
2. Den hinteren Gummideckel öffnen und herunterklappen. Legen Sie nun die Micro SD-Karte ein, achten Sie hierbei auf die richtige
Ausrichtung der Karte.
3. Wählen Sie die gewünschte Qualität (SD: HD Ready; HD: FULL HD). Schließen Sie den Deckel.
4. Schieben Sie den Aufnahmeschalter REC nach vorn, die Aufnahme beginnt nach 4 Sekunden.
5. Zur Beendigung der Aufnahme schieben Sie den Aufnahmeschalter REC wieder zurück.
6. Schließen Sie die Kamera am Computer an und laden Sie das Video herunter.
XTC-270 Wissenswertes
Batterie
1. Um den Akku einzulegen, drücken Sie den Riegel der Batteriefachklappe auf der
rechten Seite der Kamera und schieben Sie die Klappe vorwärts.
2. Legen Sie den Lithium Akku ein.
3. Setzen Sie den Deckel des Batteriefachs zurück und achten Sie darauf, dass er
einrastet.
Batterie-Statusanzeige Bedeutung
Leuchtet grün Batterien voll
Leuchtet rot Batterien halb voll
Blinkt rot* Batterien leer
Keine Anzeige Batterien völlig erschöpft
Wichtig: Wenn die rote Batterie LED anfängt zu blinken, wird die Kamera die Aufnahme stoppen. Um weitere Aufnahmen machen
zu können, müssen Sie die Batterie zuerst wieder laden.
Page 25

D
23
MicroSD-Karte
1. Öffnen Sie die hintere Gummiabdeckung.
2. Setzen Sie eine microSD-Karte richtig herum ein (Seitenansicht).
3. Schließen Sie die Abdeckung wieder.
Achtung: Die XTC-270 unterstützt Speicherkarten bis zu 32 GB
Aufnahme
1. Schieben Sie den Aufnahmeschalter REC nach vorn. Zeigt den Status der Kamera an.
2. Die Batterie- und SD-Kartenanzeige zeigt den Status der Kamera an. Die Aufnahmeanzeige beginnt nach 4 Sekunden rot zu
blinken. Hiermit wird angezeigt, dass die Kamera jetzt ein Video aufzeichnet. (1 einfaches piepen)
3. Zur Beendigung der Aufnahme schieben Sie den Aufnahmeschalter REC wieder zurück. (3 faches Piepen signalisiert den
„Aufnahmestopp“, gefolgt von einem 2 fachen Piepen, welches bedeutet: „Das Video wurde fehlerlos gespeichert.“)
Bitte beachten Sie: Nicht die Batterie während der Aufnahme entfernen. Dies kann zu beschädigten Dateien führen.
SD-Karte LED-Status Bedeutung
Grün 1 GB oder mehr verfügbar
Orange 512 MB bis 1 GB verfügbar
Rot Weniger als 512 MB verfügbar oder keine microSD-Karte eingesteckt
Blinkt rot Karte kann nicht gelesen werden
Blinkt grün Karte wurde neu formatiert.
Speichergröße HD Aufnahmezeit SD Aufnahmezeit
1 GB 11 Minuten 13 Minuten
2 GB 22 Minuten 26 Minuten
4 GB 45 Minuten 52 Minuten
8 GB 90 Minuten 105 Minuten
16 GB 175 Minuten 210 Minuten
32 GB 350 Minuten 410 Minuten
Bitte beachten Sie: Die Kamera unterteilt das Video automatisch in Segmente von 10 Minuten (ca. 900 Mb).
Page 26
D
24
Kamerahalterung
Montage auf Doppelschienensystem
Die XTC-270 hat ein innovatives Design mit identischen Doppelschienenhalterungen auf beiden
Seiten der Kamera. Dies vereinfacht die Installation.
Zur Montage schieben Sie die Kamera auf das Doppelschienensystem. Zum Abnehmen der Kamera
von der Doppelschienenhalterung halten Sie die
Kamera mit dem Objektiv von Ihnen weg gerichtet.
Drücken Sie den Entriegelungsschalter für die Halterung und ziehen Sie die Halterung auf sich zu. Die
Doppelschienenhalterung ermöglicht eine einfache
Montage der Kamera auf der Helmhalterung und
auf allem anderen optionalen Zubehör mit der gleichen Schienenführung. Bei der Montage der Kamera auf der Doppelschienenhalterung gehen Sie wie folgt vor:
1. Denken Sie zunächst darüber nach, was Sie aufnehmen möchten und ob Sie die Helm- oder Brillenhalterung benutzen.
2. Nach der Montage achten Sie darauf, dass die Kamera gerade ausgerichtet ist und nicht den Boden oder den Himmel aufnimmt.
Montage mit Schraubhalterung
Unter der XTC-270 befindet sich ein Norm-Stativgewinde. Es ermöglicht die Befestigung der
Kamera an jedem Zubehör (optional), das eine
passende Schraube besitzt Zur Befestigung der Kamera setzen Sie die Schraube der Halterung in das
Kameragewinde ein und drehen Sie die Kamera
nach rechts. Zur Befestigung der Kamera am Lenker
oder mit dem Helmgurt folgen Sie den nachstehenden Schritten:
1. Denken Sie zunächst darüber nach, was Sie
aufnehmen möchten und montieren Sie
entsprechend.
2. Nach der Montage achten Sie darauf, dass die Kamera gerade ausgerichtet ist und nicht den Boden oder den Himmel aufnimmt.
Doppelschienen-systemhalterung
Entsperrtaste
Helm-Klebehalterung Brillenhalterung
Kameragewinde Befestigungsschraube
Helm-Befestigungsgurt Fahrradlenkerhalterung
Page 27

D
25
Kompatible Systeme
Die XTC-270 kann sowohl mit Windows wie auch MAC benutzt werden. Die Kamera nimmt im MP4-Format auf (Codec H.264).
Videos herunterladen
Für die XTC-270 muss keine zusätzliche Software installiert werden. Die Kamera muss vor dem Anschließen angeschaltet werden.
Dies ist ein Plug-and-play-Gerät. Vor dem Herunterladen des Videos vergewissern Sie sich, dass die Batterien vollständig geladen sind.
1. Schließen Sie die Kamera mit dem beiliegenden Kabel an den USB-Anschluss an. Schalten Sie die Kamera ein, indem Sie den
“Record” Schalter auf “ON” stellen
2. Die Kamera wird automatisch als externes Laufwerk erkannt. Videos können ausschließlich von der Kamera auf den PC geladen
werden. Es ist nicht möglich Dateien vom PC auf die SD-Karte in der Kamera zu kopieren, basierend auf die aktuellen EU Gesetze.
Ihre Videos werden im Ordner DCIM gespeichert > “100Media”.
MicroSD-Karte neu formatieren
Achtung: Formatieren Sie die Mikro SD Speicherkarte der Kamera vor dem ersten Gebrauch
Die microSD-Karte kann in der Kamera neu formatiert werden. Hiermit können Sie alle Videos gleichzeitig löschen. Bitte folgen Sie
den nachstehenden Schritten:
1. Schalten Sie die Kamera aus, schieben Sie dafür den Aufnahmeschalter auf die Position OFF.
2. Halten Sie die Formatierungstaste gedrückt.
3. Schieben Sie den Aufnahmeschalter in die Aufnahmeposition während die Formatierungstaste gedrückt bleibt.
4. Sobald die Speicherkartenanzeige grün leuchtet, lassen Sie die Formatierungstaste los.
5. Schalten Sie die Kamera aus, schieben Sie dafür den Aufnahmeschalter auf die Position OFF.
6. Wenn die Formatierung erfolgreich beendet wurde, sind zwei Pieptöne zu hören.
7. Entnehmen Sie die Micro SD-Karte und formatieren Sie diese mit einem anderen Gerät, bevor Sie Karten wieder mit der Kamera
verwenden (Achtung: die XTC270 kann die Upgrade-Software nicht löschen)
Bitte beachten Sie: Die Kamera kann die microSD-Karte nicht neu formatieren, wenn die Anzeige für geringe Batteriekapazität
leuchtet. Setzen Sie vor der Formatierung einen frischen Akku in die Kamera ein oder laden Sie ihn.
Achtung: XTC-270 wurde dafür entwickelt Ihr idealer Partner bei Ihren Abenteuern zu sein. Um die Batteriedauer voll nutzen
zu können, ist der Prozessor während der Aufnahmeschalter in der OFF Position ist, ausgestellt. Deswegen ist es NICHT möglich
Uhrzeit und Datum einzustellen.
Page 28

D
26
Problembehebung
Problem Lösungsvorschlag
Batterie
Kamera schaltet sich nicht ein. Überprüfen Sie den richtigen Sitz des vollständig geladenen Akkus.
Aufnahme
Kamera zeichnet nicht auf. Achten Sie darauf, dass der Schalter bis ganz nach vorn geschoben ist. Leuchtet die
Aufnahme-LED nicht auf, so schalten Sie das Gerät aus und setzen Sie einen geladenen
Akku ein..
Überprüfen Sie die verfügbare Speicherkapazität.
microSD-Karte
microSD-Karte wird nicht gelesen. Achten Sie darauf, dass die microSD-Karte korrekt eingesetzt ist.
Schließen Sie die Kamera am Computer an, um die Speicherkapazität zu überprüfen.
Formatieren Sie sie neu.
Videowiedergabe
Langsames oder abgehacktes Video. Achten Sie darauf, dass die Kamera an einem USB 2.0 Gerät angeschlossen ist.
Trennen Sie andere, nicht genutzte USB-Geräte ab.
Übertragen Sie das Video vor dem Betrachten auf den Computer.
Vergewissern Sie sich, dass Ihr Mediaplayer auf dem aktuellsten Stand ist und der Compu-
ter den Mindestanforderungen entspricht.
Video-Download
Langsame Datenübertragung. Achten Sie darauf, dass die Kamera an einem USB 2.0 Gerät angeschlossen ist. Wird sie als
Version 1.1 registriert, abtrennen und neu anschließen.
Trennen Sie andere, nicht genutzte USB-Geräte ab.
Computer erkennt die Kamera nicht. Achten Sie darauf, dass der Schalter beim Anschluss am Computer bis ganz nach vorn
geschoben ist.
Achten Sie darauf, dass die microSD-Karte korrekt eingesetzt ist.
Die microSD-Karte ist möglicherweise beschädigt. Formatieren Sie sie neu.
Ton
Übermäßige Windgeräusche. Decken Sie die Öffnung des Mikrofons mit einem Klebestreifen ab.
Page 29

D
27
Gewährleistung/Garantie
Gewährleistungsfrist beträgt 24 Monate ab Kauf-/Lieferdatum (bei Teilen mit beschränkter Lebensdauer wie,
Akkus, Ladegeräte, Headsets, Mikrofonen und Antennen 6 Monate).
Für allen Informationen über die Garantie der Artikel, besuchen Sie bitte unsere www.midlandeurope.com
Page 30

E
28
XTC-270 Action Camera ................................................................................................................... 29
Que hay en la caja ............................................................................................................................................................29
XTC-270 Características y Controles ..................................................................................................................................29
Guía Rápida .................................................................................................................................... 31
Conozca la XTC-270 ..........................................................................................................................31
Batería .............................................................................................................................................................................31
Trajeta Micro SD ............................................................................................................................................................... 32
Grabando .........................................................................................................................................................................32
Instalación de la Cámara ................................................................................................................. 33
Soportes deslizantes ....................................................................................................................................................... 33
Soportes a tornillo ........................................................................................................................................................... 33
Compatibilidad de Sistemas Operativos ...........................................................................................34
Descarga de los vídeos ..................................................................................................................... 34
Formateado de la tarjeta SD ............................................................................................................34
Problemas & Soluciones .................................................................................................................. 35
Garantía ......................................................................................................................................... 36
Page 31

E
29
XTC-270 Action Camera
Gracias por haber adquirido la Action Cam XTC-270. Nos complace ofrecerte la última herramienta para grabar tus aventuras en FULL
HD!. Sistema patentado de accionamiento con un solo mando, lente gran angular de 130º y dos modos de grabación: SD (HD ready
1280x720) y HD (FULL HD 1920x1080). Gracias a la batería de litio incorporada, dispone de hasta 2 horas de autonomía. Solo grabar,
conectar a tu ordenador y descargar los vídeos para compartir con tus amigos y familiares. ¡Es así de simple, Disfrútala!
Que hay en la caja
› Midland XTC-270 Action camera
› Cable USB
› Batería de litio 900mAh
› Funda waterproof 60m
› 1 kit de montaje para casco montaje en casco
XTC-270 Características y Controles
Características:
Especificaciones HD Especificaciones SD
30 fps 60 fps
Lente gran angular 130º Lente gran angular 90º
Relación aspecto 16:9 Relación aspecto 16:9
Resolución 1920 x 1080 Resolución 1280 x 720
Grabación en H.264 (mp4) Grabación en H.264 (mp4)
Page 32

E
30
Lente vidrio130°
Micrófono
Guia para soporte deslizante
Mando REC
delante: encendido/grabar
Led Grabación
rojo intermitente cuando la cámara graba
Led Batería
Mando REC
detrás: Apagado/Paro grabación
Led tarjeta Micro SD
Selector modo HD/SD
Pulsador formateo Tarjeta SD
Conector Mini USB
Slot tarjeta Micro SD
Page 33

E
31
Guía Rápida
Nota: la primera vez que utilice una nueva tarjeta Micro SD, le aconsejamos que la formatee siguiendo el procedimiento indicado
en el párrafo “Formateado de la tarjeta SD”
1. Abra la tapa del compartimento de la batería e instálela. Cierre la tapa.
2. Abra la tapa de goma de la parte posterior de la cámara. Inserte la tarjeta micro SD observando la indicación marcada. Escoja la
calidad de definición deseada (SD=HD ready; HD=FULL HD). Coloque de nuevo la protección.
3. Deslice hacia adelante el mando REC, la grabación se iniciará en 4 segundos.
4. Para detener la grabación, devuelva el mando a la posición Off.
5. Conecte la cámara al ordenador, enciéndala para que la detecte y descargue el vídeo.
Conozca la XTC-270
Batería
Para instalar la batería, presione hacia abajo la lengüeta situada en el lado derecho de la cámara y retire la tapa haciéndola deslizar hacia delante.
Instale la batería de litio y vuelva a colocar la tapa.
Indicador Estado Baterías Significa
Verde fijo Batería totalmente cargada
Rojo fijo Batería a media carga
Rojo intermitente* Batería baja
Sin luz Batería agotada
Nota: Cuando el led rojo de la batería empiece a parpadear, deberá recargar la batería ya que la cámara parará la grabación en
breve.
Page 34

E
32
Trajeta Micro SD
Importante: cada vez que utilice por primera vez una tarjeta Micro SD, es recomendable formatearla tal y como se indica en el apartado “Formatear tarjeta Micro SD”
1. Abra el protector de goma situado en la parte posterior de la cámara.
2. Inserte la tarjeta Micro SD observando la dirección marcada.
3. Vuelva a colocar el protector de goma en su lugar.
Nota: XTC-270 soporta tarjetas de hasta 32 GB.
Grabando
1. Deslice hacia delante el mando REC para encender la cámara.
2. Primero se iluminará el indicador de la batería, después se encenderá el indicador de la tarjeta Micro SD (los colores dependen del
estado de la batería y de la memoria). Después de 4 segundos, el indicador de grabación parpadeará en color rojo, lo que indica
que la grabación ha comenzado [oirá 1 solo BIP].
3. Para detener la grabación, deslice nuevamente el botón de grabación hacia atrás. [3 BIP para apagado, 2 BIP para el correcto
salvado de la grabación]
Nota: No retire la batería durante la grabación para apagar la cámara porque el archivo no podrá ser finalizado y se perderá
LED estatus tarjeta SD Significa
Verde 1 GB o más disponible
Naranja 512 MB-1 GB disponible
Rojo Menos de 512 MB disponibles o tarjeta MicroSD no instalada.
Rojo intermitente No puede leer la tarjeta
Verde intermitente Tarjeta formateada.
Memoria Tiempo de grabación HD Tiempo de grabación SD
1 GB 11 minutos 13 minutos
2 GB 22 minutos 26 minutos
4 GB 45 minutos 50 minutos
8 GB 90 minutos 105 minutos
16 GB 175 minutos 210 minutos
32 GB 350 minutos 410 minutos
Nota: La cámara divide automáticamente el video en documentos de 10 minutos (±900 Mb).
Page 35

E
33
Instalación de la Cámara
Soportes deslizantes
XTC-270 tiene un innovador diseño con un doble
sistema de montaje mediante soporte deslizante,
uno en cada lado de la cámara. Esto permite que se
adapte a cualquier tipo de instalación.
Para montar la cámara en el soporte, colóquela en
la guía y deslícela. Para quitar la cámara del soporte,
sujete la cámara con la parte trasera mirando hacia
Usted, pulse hacia arriba la pestaña aseguradora
situada en la guía y deslice la cámara. Este soporte
deslizante se puede adaptar a los soportes adhesivos de doble cara para casco y a todos los soportes
opcionales que llevan este tipo de guía.
Una vez montada la cámara al soporte deslizante podrá:
1. Montar la cámara al soporte intercambiable que se adapte mejor a lo que desea filmar.
2. Ajustar el encuadre de la cámara
Soportes a tornillo
XTC-270 se puede montar en soportes opcionales
equipados con tornillo estándar de fotografía.
En la parte inferior de la XTC-270 hay una rosca
hembra de acero que permite montar la cámara
en estos soportes, con solo introducir el tornillo de
fijación en la hembra de la cámara y girándola en
sentido horario. Si quiere fijar la cámara al manillar
o montarla en el casco mediante el soporte con cinta
velcro, deberá:
1. Montar la cámara en el soporte a tornillo escogido.
2. Asegurarse de que el encuadre sea correcto para no filmar el cielo o la tierra.
soporte deslizante ajustable
Pestaña aseguradora
Soporte adhesivo para casco Soporte para gafas de esquí
Rosca cámara Tornillo montaje
Soporte cinta para casco Soporte manillar
Page 36

E
34
Compatibilidad de Sistemas Operativos
XTC-270 es compatible con Windows y Mac. El formato de vídeo es H.264, un formato de archivo MP4
El formato vídeo es MP4.
Descarga de los vídeos
No es necesario instalar ningún tipo de software para conectar la XTC-270.Antes de descargar el vídeo, asegúrese de que la batería
esté totalmente cargada.
1. Conecte la cámara al puerto USB mediante el cable USB incluido y enciéndala deslizando el selector “Grabación” a la posición “ON”
2. La cámara será vista por el PC como un dispositivo de almacenamiento masivo (USB flah drive) pero sólo podrá descargar vídeos,
nunca podrá cargar nada en la Micro SD.
3. Encontrará sus vídeos grabados en la carpeta “DC IM” -> “100 MEDIA”.
Formateado de la tarjeta SD
Nota: Se recomienda formatear cada vez que utilice por primera vez una tarjeta Micro SD. Si formatea la tarjeta Micro SD, se borrarán todos los archivos almacenados. Para ello es necesario que la tarjeta esté insertada correctamente en la cámara.
1. Apague la cámara deslizando hacia atrás el mando REC.
2. Presione y mantenga presionado el botón de formateo ublicado en la parte posterior de la cámara ayudándose de un objeto fino.
3. Mientras mantiene presionado el botón en el paso 2, deslice al mismo tiempo el botón de grabación hacia adelante.
4. Mantenga pulsado el botón de formateo hasta que el LED de la memoria parpadee verde.
5. Deslice el botón de grabación a la posición “OFF”.
6. El formateo se habrá realizado correctamente si escucha 2 BIP
7. Quite la tarjeta Micro SD y formateela a través del PC antes de usarla nuevamente.. (Nota: XTC270 no puede borrar el fichero de
actualización)
Nota: la tarjeta Micro SD no se podrá formatear si el indicador de batería descargada se enciende (rojo intermitente). Asegúrese de
las baterías estén completamente cargadas antes de iniziar el proceso de formateo.
NOTA: XTC-270 ha sido diseñada para maximizar la duración de la batería y ser la compañía perfecta para sus aventuras. La CPU
permanece apagada cuando el selector de grabación está en posición “OFF”. Debido a esto, NO SE PUEDE INTRODUCIR la fecha o
la hora.
Page 37

E
35
Problemas & Soluciones
Problemas Soluciones
Batería
La XTC-270 no se enciende Asegúrese de que la batería está correctamente instalada y totalmente cargada.
Grabaciones
La cámara no graba Asegúrese de haber deslizado correctamente el mando REC (totalmente hacia delante). Si
el indicador de grabación no se enciende, apague la cámara y re-instale la batería.
Verifique que haya suficiente memoria en la Micro SD.
Tarjeta Micro SD
La Micro SD no e puede leer Asegúrese de que esté correctamente instalada (vea el dibujo).
Conecte la cámara al ordenador para verificar que hay suficiente espacio en memoria
Espere a que concluya el proceso de formateo
Visualización del Vídeo
El vídeo es lento y se interrumpe Verifique que el cable USB esté correctamente conectado a la cámara
Quite dispositivos USB que no esté utilizando
Trasfiera el fichero al ordenador antes de visualizarlo
Descarga del Vídeo
Transferencia datos lenta Verifique que el cable USB esté correctamente conectado a la cámara. Desconéctelo y
vuelva a conectarlo
Quite dispositivos USB que no esté usando
El ordenador no reconoce
la cámara
Asegúrese de que la cámara esté encnedida
Verifique la correcta instalación de la Micro SD
La tarjeta Micro SD card podría estar corrompida. Espere a que concluya el proceso de
formateo
Audio
Ruidos causados por el viento Coloque cinta adhesiva en el agujero del micrófono
Page 38

E
36
Garantía
GARANTÍA LIMITADA
Esta garantía no limita los derechos del usuario reconocidos en las normativas españolas y europeas aplicables en materia de venta
de bienes de consumo.
Durante el periodo de garantía se reparará, en un periodo de tiempo razonable, cualquier avería
imputable a defectos en materiales, diseño o fabricación, libre de cualquier cargo por reparación. En el caso de que la reparación no sea
posible, se facilitará al usuário un equipo o accesorio similar o de mejores características.
Esta garantía sólo es válida en el país donde se ha adquirido el producto.
La garantía comienza en el momento de la compra por parte del primer usuario final.
La garantía es por un período de :
› 24 meses para el equipo o unidad principal
› 6 meses para accesorios (baterías, cargadores, antenas, auriculares, cables)
Cualquier reclamación por el producto afectado, debe de comunicarse dentro de un tiempo razonable desde que se apreció el defecto
y, en ningún caso, después de que expire el periodo de garantía.
La garantía no cubre:
› El deterioro del producto por el uso habitual
› Defectos causados por el uso o conexión del Producto con accesorios y/o software no original Midland
La garantía quedará invalidada:
› En caso de apertura, modificación o reparación por personas no autorizadas por Midland o por el uso de recambios no originales
› Si el producto ha sido expuesto a condiciones ambientales para las que no ha sido diseñado
› En el caso de corrosión, oxidación o derrame de líquido de las baterías
› Si el número de serie ha sido retirado, borrado, alterado o es ilegible
Nada se deberá al comprador por el tiempo durante el cual, el equipo esté inactivo, ni podrá solicitar resarcimiento o indemnización
por gastos soportados, así como por daños directos o indirectos derivados del uso impropio o diferente pal que ha sido diseñado y
comercializado.
Para tener acceso a esta garantía, es necesario enviar a nuestro servicio técnico (SAT MIDLAND – C/Cobalt, 48 -08940 Cornellà de Llobregat) el producto afectado (equipo y/o accesorio) con una nota explicativa de la anomalía detectada y la factura original de compra,
con el nombre, dirección del distribuidor y la fecha de compra.
Encontrará información actualizada en www.midland.es
Page 39

F
37
XTC-270 Caméra d’Action ................................................................................................................ 38
Ce qu’il y a dans la boite ................................................................................................................................................... 38
Caractéristiques et controls de l’XTC-270 ......................................................................................................................... 38
Guide de démarrage rapide ............................................................................................................. 40
Apprendre à connaitre l’XTC-270 ......................................................................................................40
Batterie............................................................................................................................................................................40
Carte Micro SD ................................................................................................................................................................. 41
Enregistrement ................................................................................................................................................................ 41
Montage de la caméra .................................................................................................................... 42
Montage sur un système double glissière
......................................................................................................................... 42
Montage utilisant le filetage ...........................................................................................................................................42
Systèmes Compatibles .....................................................................................................................43
Télécharger les Vidéos ..................................................................................................................... 43
Reformater la carte Micro SD ........................................................................................................... 43
Conseilles et asstuces ...................................................................................................................... 44
Garantie ......................................................................................................................................... 45
Page 40

F
38
XTC-270 Caméra d’Action
Merci d’avoir acheté la caméra d’action MIDLAND XTC-270. Comme quelqu’un qui cherche l’aventure, nous sommes fiers de vous offrir
l’outil ultime de capture et d’enregistrement de vos aventures. Facile à utiliser grâce à seule touche, un objectif à grand angle de 130
degrés et 2 modes d’enregistrement: Standard (SD : 1280x720) et haute définition (HD : 1920x1080). Grâce à la batterie au lithium, il
est possible d’enregistrer jusqu’à 2 heures. Une fois capturé, connecté là simplement à votre ordinateur et télécharger les vidéos pour
pouvoir les partager avec vos amis! C’est si simple!
Ce qu’il y a dans la boite
› Caméra Midland XTC-270 Action
› Câble USB
› Batterie au Lithium 900mAh
› Caisson étanche 60m
› 1 kit de montage sur casques
Caractéristiques et controls de l’XTC-270
Caractéristiques:
Fonctionnalités de la HD Fonctionnalités de la SD
30 Images par seconde 60 Images par seconde
Objectif à grand angle de 130 degrés Objectif à grand angle de 90 degrés
Format d’image 16:9 Format d’image 16:9
Résolution de 1920 x 1080 Résolution de 1280 x 720
Enregistrement en MP4 codec H.264 Enregistrement en MP4 codec H.264
Page 41

F
39
Lentille de 130°
Microphone
Système double glissière
Interrupteur d’enregistrement
avant: on/record
Voyant d’enregistrement
clignote rouge pendant l’enregistrement
Voyant batterie
Interrupteur d’enregistrement
arrière: Off/Stop enregistrement
Voyant de la Carte SD
Touche mode HD/SD
Bouton de reformatage de carte Micro SD
Connecteur Mini USB
Fente pour Mini SD Card
Page 42

F
40
Guide de démarrage rapide
Note: A la première utilisation d’une nouvelle Micro SD, nous vous conseillons de reformater-la en suivant la procedure décrit dans
le paragraphe “Reformater la carte “Micro SD”
1. Ouvrez la porte de la batterie et installez la batterie. Remettez le couvercle de la batterie.
2. Ouvrez le couvercle en caoutchouc rabattable. Insérez la carte micro SD en respectant la bonne orientation.
3. Choisissez la définition souhaitée (SD: haute définition ; HD: Full HD). Fermez le couvercle.
4. Déplacez l’interrupteur d’enregistrement vers l’avant, l’enregistrement débute après 4 secondes.
5. Pour terminer l’enregistrement, déplacez l’interrupteur vers l’arrière en position OFF.
6. Connectez la caméra à l’ordinateur et téléchargez la vidéo.
Apprendre à connaitre l’XTC-270
Batterie
Pour insérer la batterie, poussez vers le bas le loquet de verrouillage de la porte de la
batterie situé sur le côté droit de la caméra. La porte se débloque. Poussez vers l’avant
pour la retirer.
Installez la batterie au lithium.
Replacez le couvercle et verrouillez le en place.
Voyant d’état Batterie Signification
Vert fixe Batterie totalement chargée
Rouge fixe Batterie faible
Rouge clignotant* Batterie trop faible pour fonctionner
Pas d’indication Batterie totalement vide
Remarque: Lorsque le témoin rouge de la batterie commence à clignoter, il faut recharger la batterie car la caméra n’enregistre
plus à partir de cet instant.
Page 43

F
41
Carte Micro SD
1. Ouvrez et baissez le capuchon en caoutchouc à l’arrière.
2. Inserez la carte Micro SD dans la fente en respectant le sens (comme montré ici).
3. Replacez le capuchon.
NOTE: L’ XTC-270 supporte des cartes mémoires jusqu’à 32GB.
Enregistrement
1. Déplacez l’interrupteur d’enregistrement vers l’avant. Cela allume la caméra.
2. Le voyant batterie et le voyant de la carte SD s’allument. Le voyant d’enregistrement commence à clignoter rouge après 4
secondes. Cela signifie que la caméra capture une vidéo. (1 beep single)
3. Pour terminer l’enregistrement, déplacez l’interrupteur vers l’arrière en position OFF. (3 beep indiquent stop enregistrement; 2
beep indiquent le correct sauvage du video)
Note: Ne retirez pas la batterie pendant l’enregistrement pour éteindre la caméra, le file peut être endommagé.
Voyant d’état carte SD Signification
Vert 1Gb ou plus disponible
Orange 512Mb - 1 Gb disponible
Rouge Moins de 512 disponible ou pas de carte SD
Rouge clignotant Impossible de lire la carte
Vert clignotant La carte à été formaté
Taille mémoire Temps d’enregistrement HD Temps d’enregistrement SD
1 GB 11 Minutes 13 Minutes
2 GB 22 Minutes 26 Minutes
4 GB 45 Minutes 52 Minutes
8 GB 90 Minutes 105 Minutes
16 GB 175 Minutes 210 Minutes
32 GB 350 Minutes 410 Minutes
Note: La caméra sépare automatiquement la vidéo en segments de 10 min environ 900 Mb.
Page 44

F
42
Montage de la caméra
Montage sur un système double glissière
L’XTC-270 a été conçu de manière innovante avec
un système double glissières sur les deux cotés de la
caméra. Ce qui permet une installation facile. Pour
monter la caméra sur le système double glissière,
bloquez la caméra dans le système double glissière
avec les deux molettes orientées vers l’arrière de la
caméra. Pour détacher la caméra du système double
glissière, tenez la caméra avec la lentille à l’opposé.
Appuyez sur la languette de déverrouillage et tirez
vers vous le support. Le double système de fixation
permet à la caméra d’être facilement monté sur un casque ou des lunettes. Ceci évite l’inconvénient de devoir à chaque fois remonter
la caméra.
Quand vous montez la caméra sur le système double crochet, suivez les points ci-dessous:
1. En fonction de ce que vous souhaitez filmer choisissez entre le support casque ou lunette.
2. Assurez vous qu’une fois attaché la caméra regarde bien droit devant et non pas vers le sol ou le ciel.
Montage utilisant le filetage
En dessous de l’XTC-270 il y a un pas de vis standard
qui permet de monter la caméra sur la bande pour
casque ou sur le support de guidon (en option). Pour
fixer la caméra, insérez la vis sur support dans le pas
de vis de la caméra et tournez la caméra dans le sens
horaire pour serrer fermement la vis. Lors de l’installation de la caméra sur le guidon ou sur la lanière
d’un casque suivez les points suivants:
1. Prenez en compte ce que vous souhaitez filmé
et faite l’installation en conséquence.
2. Une fois montée, assurez vous que la caméra soit orienté vers l’avant et non pas vers le ciel ou le sol.
Système double glissière
Languette de déverrouillage
Support casque Lunette
Pas de vis de la
caméra
Vis de fixation
Bande pour casque Support de guidon
Page 45

F
43
Systèmes Compatibles
L’XTC-270 peut être utilisé avec les systèmes d’exploitation Windows et MAC.
Les enregistrements de la caméra sont au format MP4 codec H264.
Télécharger les Vidéos
Il n’est pas nécessaire d’installer un logiciel avec l’XTC-270. C’est un périphérique plug and play.
S’assurer que la batterie est complètement chargée avant de télécharger les séquences vidéo.
La caméra est automatiquement reconnue et installé.
1. Connectez la caméra à l’aide du câble USB fournit.
2. Allumez la caméra en glissant le commutateur “Record” sur la position ON.
3. La caméra est automatiquement reconnue comme un disque externe (clef USB) mais les vidéos peuvent uniquement est
téléchargées. Il n’est pas possible d’enregistrer des données sur la carte SD comme indiqué de la loi europienne.
4. Toutes vos vidéos seront sauvegardées dans le répertoire “DC IM” > “100Media”.
Reformater la carte Micro SD
Note: Formatez la carte micro SD depuis la camera avant la première utilisation
La carte Micro SD peut être reformatée pendant qu’elle est dans la caméra. Ceci vous permet de supprimer toutes les vidéos en une
fois. Suivez ces étapes:
1. Eteignez la caméra d’action en glissant le commutateur RECORD sur la position OFF.
2. Maintenez appuyé le bouton de reformatage de carte Micro SD et placez l’interrupteur en position ENREGISTREMENT.
3. Relâchez le bouton de reformatage de la carte Micro SD quand le voyant clignote vert.
4. Placez l’interrupteur en position OFF.
5. Deux Beep confirme que l’opération c’est bien déroulé.
6. Extraire la carte Micro SD Card. Avant d’utiliser de nouveau la carte Micro SD dans la caméra, formatez la carte en utilisant un
ordinateur. (Note: XTC270 ne peut pas effacer le file d’upgrade).
Note: La caméra ne peut pas reformater la carte Micro SD si le voyant batterie faible est allumée. Assurez-vous que des batteries
suffisamment chargé soit en place avant un reformatage.
Note: XTC-270 à été conçue pour être votre partenaire d’aventure, c’est pourquoi le CPU est totalement éteint lorsque le bouton est
en position afin d’économiser au maximum la batterie. Ce qui rend impossible l’utilisation de la datation des vidéos
Page 46

F
44
Conseilles et asstuces
Problème Solution
Batteries
La caméra ne s’allume pas Vérifiez que les batteries soient installées en respectant la polarité
Vérifiez si les batteries sont neuves ou totalement chargées.
Enregistrement
La caméra n’enregistre pas Vérifiez que l’interrupteur est poussé au maximum vers l’avant. Si la LED d’enregistrement
ne s’allume pas, éteignez la caméra et réinstallé les batteries.
Vérifiez la mémoire disponible.
Carte Micro SD
Ne lit pas la carte Micro SD Vérifiez que la carte Micro SD card est correctement en place.
Branchez la caméra sur l’ordianteur et vérifiez qu’il reste de la place.
Essayez une procédure de formatage.
Lecture Video
Vidéo lente ou de mauvaise qualité Vérifiez que la caméra est connecté à port USB 2.0.
Retirez les autres périphériques USB non utilisés.
Transferez la vidéo sur l’ordinateur avant de la regarder.
Assurez-vous que le lecteur média que vous utilisez est mis à jour et que votre ordinateur
respecte les exigences minimales.
Téléchargement Video
Transfert de données lent Vérifiez que la caméra est connecté à port USB 2.0. S’il est affiché en tant que version 1.1,
débranchez et rebranchez la caméra.
Retirez les autres périphériques USB non utilisés.
Mettez à jour votre lecteur vidéo
L’ordinateur ne reconnait pas la
caméra
Vérifiez que l’nterrupteur est en position enregistrement pendant que la caméra est con-
necté à l’ordinateur.
Vérifiez que la carte Micro SD card est correctement en place.
La carte Micro SD est corrompue. Essayez une procédure de formatage.
Son
Vent excessif Placez un bout de sctoch par dessus le trou du micro
Monté le caisson étanche.
Page 47

F
45
Garantie
La garantie a une durée de 24 mois pour l’équipement et de 6 mois pour les accessoires (batteries, chargeurs, microphones et oreillettes).
Pour plus d’informations sur la garantie s’il vous plaît visitez www.midlandeurope.com
Page 48

P
46
XTC-270 Action Camera.................................................................................................................... 47
O conteúdo da embalagem ..............................................................................................................................................47
Controlos e Características da XTC-270 .............................................................................................................................47
Manual de Início Rápido .................................................................................................................. 49
Conhecer a XTC-270 ......................................................................................................................... 49
Bateria .............................................................................................................................................................................49
Cartão Micro SD ............................................................................................................................................................... 50
Gravar .............................................................................................................................................................................. 50
Montagem da Câmara ..................................................................................................................... 51
Montagem no sistema de estrutura dual ......................................................................................................................... 51
Montagem utilizando a estrutura com encaixes
......................................................................................................................... 51
Sistemas Compatíveis ......................................................................................................................52
Descarregar Vídeos ..........................................................................................................................52
Reformatar o cartão Micro SD .......................................................................................................... 52
Sugestões e Truques ........................................................................................................................ 53
Garantia ......................................................................................................................................... 54
Page 49

P
47
XTC-270 Action Camera
Agradecemos ter adquirido a Câmara XTC-270 Action. Do mesmo modo que aqueles que procuram a aventura, estamos orgulhosos
em poder oferecer a ferramenta mais avançada para captar e gravar as suas aventuras. Com um interruptor de funcionamento fácil de
usar, lentes com ângulo de 130 graus e 2 modos de gravação: Standard (SD: 1280x720) e Alta definição (HD: 1920x1080). Graças ao
conjunto de baterias de lítio com o qual está equipado é possível gravar até 2 horas. Uma vez captada a imagem, basta ligar ao seu
computador e descarregar os vídeos para partilhar com os amigos. É tão simples quanto isso! Aproveite!
O conteúdo da embalagem
› Câmara Midland XTC-270 Action
› Cabo USB
› Conjunto de baterias de Lítio 900mAh
› Estojo Submersivel 60m
› 1 kit de montagem por capacete
Controlos e Características da XTC-270
Características
Características HD Características SD
30 imagens por segundo 60 imagens por segundo
Lentes com ângulo 130 graus Lentes com ângulo 90 graus
Formato 16:9 Formato 16:9
Resolução 1920x1080 Resolução 1280x720
Grava como H264 (.mp4) Grava como H264 (.mp4)
Page 50

P
48
Lentes de vidro de 130º graus
Microfone
Sistema de montagem dual
Interruptor de gravação
avançar: Ligado/gravar
Led gravação
Vermelho a piscar quando câmara está a gravar
Led bateria
Interruptor de gravação
retroceder Desligado/Parar gravação
Led Cartão SD
Interruptor modo HD/SD
Botão reformatar Cartão SD
Mini USB Conector
Ranhura Micro Cartão SD
Page 51

P
49
Manual de Início Rápido
NB: Formate o cartão de memória micro SD antes da primeira utilização directamente a partir da câmara de acordo com a
indicação no respectivo parágrafo
1. Abrir a porta da bateria e instalar o conjunto de baterias. Tornar a colocar a tampa da bateria.
2. Abrir e dobrar para trás a tampa de borracha. Introduzir o micro cartão SD tendo em atenção o sentido correcto de inserção.
3. Escolher a qualidade de definição pretendida (SD: HD Ready; HD: Full HD). Fechar a tampa.
4. Movimente o interruptor RECORD(GRAVAR) para a frente, a gravação começará dentro de 4 segundos.
5. Para parar a gravação, corra o interruptor para a posição Off(desligado).
6. Ligue a câmara ao computador e descarregue o vídeo.
Conhecer a XTC-270
Bateria
1. Para introduzir o conjunto de baterias, pressionar o fecho da porta da bateria para
baixo no lado direito da câmara. A porta será solta. Empurre para a frente para
remover.
2. Instalar o conjunto de baterias de Lítio.
3. Coloque a porta da bateria de novo no lugar.
Indicador do estado da Bateria Significado
Verde Sólido Indica bateria carregada na totalidade
Vermelho Sólido Indica bateria com meia carga
A piscar Indica bateria fraca
Sem luz Baterias sem carga
Nota: Quando o LED vermelho da bateria começar a piscar, deve estar preparado para carregar a bateria porque a câmara parará
de gravar neste momento.
Page 52

P
50
Cartão Micro SD
1. Abra e dobre para baixo a tampa de borracha na parte de trás.
2. Introduza o cartão Micro SD na ranhura na posição correcta (com os lados visíveis)
3. Volte a colocar no lugar a tampa de borracha.
NOTA: XTC-270 suporta cartão de memória com capacidade até 32GB
Gravar
1. Movimente a partilha RECORD para a frente. Assim, a câmara liga-se.
2. O indicador da bacteria e do cartão de memória irá acender-se mostrando o estado da câmara. O indicador de gravação irá
começar a piscar com uma luz vermelha após 4 segundos. Isto indica que a câmara está a capturar vídeo. [1 só sinal sonoro]
3. Para parar de gravar, movimente a partilha RECORD para a posição OFF. [3 sinais sonoros indicam “parar de gravar”, 2 sinais
indicam “gravação de vídeo correcta”]
Nota: A câmara continuará a gravar durante 3 segundos após ter colocado o interruptor na posição off (desligado).
Estado do LED do cartão SD Significado
Verde 1 GB ou mais disponível
Laranja 512 MB a 1 GB disponível
Vermelho Abaixo de 512 MB disponíveis ou cartão Micro SD instalado.
Vermelho a piscar Não pode ler o cartão
Verde a piscar Indica que o cartão foi reformatado.
Tamanho da Memória Tempo de Gravação HD Tempo de Gravação SD
1 GB 11 minutos 13 minutos
2 GB 22 minutos 26 minutos
4 GB 45 minutos 52 minutos
8 GB 90 minutos 105 minutos
16 GB 175 minutos 210 minutos
32 GB 350 minutos 410 minutos
Nota: A câmara irá dividir o vídeo em ficheiros de 10 minutos (aproximadamente 900 Mb)
Page 53

P
51
Montagem da Câmara
Montagem no sistema de estrutura dual
A XTC-270 foi desenhada duma forma inovadora,
com um sistema de estrutura dual em ambos os
lados da câmara. Isto permite uma fácil instalação.
Para montar a câmara na estrutura dual de montagem, faça deslizar a câmara no sistema de estrutura
dual com os dois encaixes na montagem de frente
para a parte de trás da câmara.
Para desmontar a câmara da estrutura de montagem
dual, segure na câmara com as lentes de costas para
si. Pressione para baixo o interruptor de libertação
de montagem e puxe a estrutura de montagem para
si. O sistema dual track permite que a câmara seja
facilmente montada tanto na estrutura do capacete como na estrutura dos óculos de protecção. Isto elimina o inconveniente de ter
que remontar a câmara todas as vezes. Quando for para montar a câmara na estrutura de montagem dual, deve fazer o seguinte:
1. Ter em consideração o que gostaria de filmar e utilizar a estrutura de montagem do capacete ou dos óculos de protecção em
conformidade com isso.
2. Assegure-se, uma vez ligada, que a câmara está colocada direita e não voltada para o chão ou para o céu.
Montagem utilizando a estrutura com encaixes
No cimo do XTC-280/XTC há um suporte roscado
que permite que a câmara seja montada em todos
os acessórios opcionais que possuam um parafuso
standard para câmara. Para fixar a câmara, introduza o parafuso na estrutura do encaixe da câmara
e rode a câmara no sentido dos ponteiros do relógio
para apertar bem o parafuso.
Quando da montagem da câmara no punho da bicicleta ou com a faixa de ventilação do capacete siga
estes passos:
1. Classifique o que pretende filmar e monte em
conformidade com isso.
Sistema de montagem estrutura
dual
Botão de libertação
Montagem adesiva do capacete Montagem óculos de protecção
Encaixe da câmara Parafuso de montagem
Estrutura faixa do capacete Montagem Punho da Bicicleta
Page 54

P
52
2. Assegure, uma vez ligado, que a câmara está direita e não voltada para o chão ou para o céu.
Sistemas Compatíveis
O XTC – 200 pode tanto ser utilizado com sistema operativo Windows como com MAC.
O codec de vídeo é H.264, o formato de ficheiro é .MP4.
Descarregar Vídeos
Não há necessidade de instalar qualquer software com a XTC-270. É um dispositivo de ligar e usar.
1. Antes de baixar os vídeos, assegure-se que as baterias estão completamente carregadas.
2. Conecte a câmera à porta USB usando o cabo fornecido.
3. Ligue a câmera deslizando a partilha RECORD para a posição ON. A câmara será automaticamente reconhecida como um disco
rígido externo (tecla USB) mas só podem ser descarregados vídeos, não é possível carregar dados no seu cartão SD com base na
actual lei EU.
4. Todos os seus vídeos serão guardados na pasta “DC IM” > “100Media”.
Reformatar o cartão Micro SD
Nota: Formate o cartão de memória SD a partir da câmara antes da primeira utilização
O cartão Micro SD pode ser reformatado enquanto estiver na câmara. Isto permite-lhe apagar todos os vídeos duma só vez. Siga estes
passos:
1. Desligue a câmara, deslizando a partilha RECORD para a posição OFF.
2. Quando o indicador da bateria ficar verde, pressione e mantenha pressionado o botão de reformatar cartão Micro SD.
3. Movimente a partilha RECORD para a posição de gravação pressionando o botão de reformatação.
4. Solte o botão de reformatação quando o LED do cartão de memória piscar uma luz verde.
5. Desligue a câmara, deslizando a partilha RECORD para a posição OFF
6. Dois sinais sonoros se o processo de formatação for executado com êxito.
7. Remova o cartão Micro SD. Antes de utilizar novamente o cartão Micro SD dentro da câmera, formate-o com um PC. (Nota: XTC270
não pode excluir o file de upgrade).
Nota: A câmara não pode reformatar o cartão Micro-SD se estiver acesa a luz indicadora de bateria fraca. Assegure que são instaladas novas barreiras antes de tentar o processo de reformatação.
Nota: XTC-270 foi concebido para ser o parceiro ideal nas suas aventuras. Assim, a CPU está totalmente desligada quando o botão
de gravação está na posição OFF para maximizar a duração da bateria. Devido a esta questão, NÃO É POSSÍVEL definir hora e data
Page 55

P
53
Sugestões e Truques
Problema Solução
Bateria
Câmara não liga Assegurar que o conjunto das baterias está correctamente instalado e completamente
carregado.
A gravar
Câmara não está a gravar Verifique se o interruptor está todo empurrado para a frente. Se o LED de gravação não
acender, desligue o dispositivo e reinstale a bateria.
Verificar memória disponível.
Cartão Micro SD
Cartão Micro SD não está a ler Verifique se o cartão Micro SD está introduzido correctamente
Ligue a câmara ao computador para verificar o espaço disponível.
Tente o processo de formatação.
Leitura do vídeo
Vídeo lento ou intermitente Verificar se a câmara está ligada a um dispositivo USB 2.0.
Retire outros dispositivos USB que não estiverem a ser utilizados
Transferir o vídeo para o computador antes de o visualizar.
Certifique-se de que o reprodutor multimédia que está a utilizar está actualizado e que o
seu computador cumpre os requisitos mínimos
Descarregar Vídeo
Transferência de dados lenta Verificar se a câmara está ligada a um dispositivo USB 2.0. Se registar 1.1.desligue e volte
a ligar o dispositivo.
Retire outros dispositivos USB não utilizados..
Computador não reconhece a câmara Verifique se o interruptor de gravação está na posição de gravar enquanto está ligado ao
computador.
Assegure-se que o cartão Micro SD está correctamente introduzido
O cartão Micro SD pode estar corrompido. Tente o processo de formatação.
Som
Ruído excessivo do Vento Coloque um pedaço de fita cola no orifício do microfone.
Page 56

P
54
Garantia
A garantia dura 24 meses para o equipamento e 6 meses para os acessórios (baterias, carregadores, fones de ouvido, microfones,
antenas). Para informações sobre a garantia, por favor visite o site www.midlandeurope.com
Page 57

GR
55
XTC-270 Action Camera.................................................................................................................... 56
Περιεχόμενα συσκευασίας ...............................................................................................................................................56
Χαρακτηριστικά και Χειριστήρια της XTC-270 .................................................................................................................. 56
Οδηγός Γρήγορης Εκκίνησης ............................................................................................................ 58
Μαθαίνοντας την XTC-270 ................................................................................................................ 58
Μπαταρίες ....................................................................................................................................................................... 58
Κάρτα μνήμης Micro SD.................................................................................................................................................... 59
Εγγραφή .......................................................................................................................................................................... 59
Τοποθέτηση της Βιντεοκάμερας ....................................................................................................... 60
Τοποθέτηση σε Σύστημα Διπλής Βάσης στήριξης ............................................................................................................. 60
Τοποθέτηση χρησιμοποιώντας τη Βάση Thread ................................................................................................................60
Συμβατά Συστήματα ........................................................................................................................ 61
“Κατεβάζοντας” Βίντεο .................................................................................................................... 61
Ανασχεδιασμός (Reformat) της κάρτας Micro SD ............................................................................... 61
Συμβουλές και Κόλπα....................................................................................................................... 62
Εγγύηση ......................................................................................................................................... 63
Page 58

GR
56
XTC-270 Action Camera
Ευχαριστούμε που αγοράσατε την βιντεοκάμερα XTC-270. Είμαστε περήφανοι που μπορούμε να προσφέρουμε, σε όσους αναζητούν
την περιπέτεια, το απόλυτο εργαλείο για την απαθανάτιση και καταγραφή των δραστηριοτήτων σας. Με εύκολο χειρισμό με ένα μόνο
πλήκτρο, 130 μοίρες φακό γωνιακής θέασης και 2 τρόπους καταγραφής: Standard HD (SD:1280x720) και FULL HD (HD:1920x1080).
Χάρη στο πακ μπαταριών λιθίου είναι εφικτή η συνεχής καταγραφή βίντεο έως και 2 ώρες. Μόλις ολοκληρώσετε την καταγραφή, απλά
συνδέστε την κάμερα με τον υπολογιστή σας και “ανεβάστε” τα βίντεο για να τα μοιραστείτε με τους φίλους σας. Είναι τόσο απλό! Καλή
διασκέδαση!
Περιεχόμενα συσκευασίας
› Action κάμερα Midland XTC-270
› Πακ μπαταριών Li-Ion 900mAh
› Καλώδιο USB
› 1 Βάση στήριξης κράνους
› Αδιάβροχη θήκη για βάθος έως 60m
Χαρακτηριστικά και Χειριστήρια της XTC-270
Χαρακτηριστικά:
Χαρακτηριστικά Υψηλής Ανάλυσης (HD) Στάνταρ Χαρακτηριστικά (SD)
30 πλαίσια το δευτερόλεπτο 60 πλαίσια το δευτερόλεπτο
130° φακός γωνιακής θέασης 90ο φακός γωνιακής θέασης
16:9 aspect ratio 16:9 aspect ratio
Ανάλυση 1920x1080 Ανάλυση 1280x720
Κωδικοποίηση H.264(.mp4 αρχεία) Κωδικοποίηση H.264(.mp4 αρχεία)
Page 59

GR
57
Φακός 130° μοιρών
Μικρόφωνο
Διπλό σύστημα στήριξης
Διακόπτης Record
forward: on/εγγραφή
Ένδειξη Record
ανάβει κόκκινο όταν η κάμερα κάνει εγγραφή
Ένδειξη μπαταρίας
Διακόπτης Record
backward: Off/Διακοπή εγγραφής
Ένδειξη κάρτας SD
Διακόπτης επιλογής HD/SD
Κάρτα SD πλήκτρο ανασχεδιασμού
Κονέκτορας Mini USB
Πλήκτρο κάρτας Mini SD
Page 60

GR
58
Οδηγός Γρήγορης Εκκίνησης
Σημείωση: Κάντε ανασχεδιασμό (format) της κάρτας μνήμης SD πριν χρησιμοποιήσετε την κάμερα για πρώτη φορά απευθείας από
την κάμερα ακολουθώντας τα βήματα όπως αναγράφονται στη σχετική παράγραφο.
1. Ανοίξτε το πορτάκι της μπαταρίας και τοποθετήστε το πακ μπαταριών. Κλείστε το πορτάκι.
2. Ανοίξτε και σύρετε προς τα κάτω το λαστιχένιο κάλυμμα. Εισάγετε την κάρτα micro SD παρατηρώντας ότι την τοποθετείτε από
την σωστή πλευρά.
3. Επιλέξτε την επιθυμητή ανάλυση εικόνας (SD: HD Ready; HD: FULL HD). Κλείστε τo κάλυμμα.
4. Μετακινείστε τον διακόπτη RECORD προς τα εμπρός, η εγγραφή θα ξεκινήσει σε 4 δευτερόλεπτα.
5. Για να σταματήσετε την εγγραφή βίντεο, σύρετε το διακόπτη πίσω στην θέση απενεργοποίησης off.
6. Συνδέστε την κάμερα με τον υπολογιστή και “κατεβάστε” το βίντεο
Μαθαίνοντας την XTC-270
Μπαταρίες
1. Για να τοποθετήσετε το πακ μπαταριών, σπρώξτε προς τα κάτω το σύρτη του
καλύμματος της μπαταρίας που βρίσκεται στη δεξιά πλευρά της κάμερας. Το
κάλυμμα θα ανοίξει. Πιέστε προς τα εμπρός για να το αφαιρέσετε.
2. Τοποθετήστε το Li-Ion πακ μπαταριών.
3. Γυρίστε το πορτάκι της μπαταρίας και κλείστε το στην θέση του ακούγοντας τον
ήχο κλικ ασφάλισης
Ένδειξη Επιπέδου Μπαταρίας Σημασία
Μόνιμα Πράσινη Υποδεικνύει πλήρως φορτισμένη μπαταρία
Μόνιμα Κόκκινη Υποδεικνύει μέση αυτονομία μπαταρίας
Αναβοσβήνει Κόκκινη* Υποδεικνύει χαμηλή μπαταρία
Χωρίς φωτισμό Οι μπαταρίες είναι τελείως ξεφόρτιστες
Σημείωση: Όταν η κόκκινη λυχνία της μπαταρίας αρχίσει να αναβοσβήνει, ετοιμαστείτε να φορτίσετε την μπαταρία γιατί η κάμερα
θα σταματήσει αμέσως την εγγραφή βίντεο.
Page 61

GR
59
Κάρτα μνήμης Micro SD
1. Ανοίξτε. και σύρετε προς τα κάτω το πίσω λαστιχένιο κάλυμμα.
2. Εισάγετε την κάρτα μνήμης Micro SD στην υποδοχή προσέχοντας ότι την τοποθετείτε με τη
σωστή κατεύθυνση.
3. Τοποθετήστε το κάλυμμα στη θέση του.
ΣΗΜΕΙΩΣΗ: Η κάμερα XTC-270 υποστηρίζει κάρτα μνήμης έως 32GB.
Εγγραφή
1. Μετακινήστε τον διακόπτη RECORD προς τα εμπρός. Αυτο ενεργοποιεί την βιντεοκάμερα.
2. Οι ενδείξεις μπαταρίας και κάρτας μνήμης θα ενεργοποιηθούν δείχνοντας την τρέχουσα κατάσταση της κάμερας. Η ένδειξη
εγγραφής βίντεο θα αρχίσει να αναβοσβήνει κόκκινο μετά από 4 δευτερόλεπτα. Αυτό υποδεικνύει ότι η κάμερα πραγματοποιεί
εγγραφή. ( 1 μόνο ήχος μπιπ θα ακουστεί – μόνο για την κάμερα XTC-270).
3. Για να σταματήσετε την εγγραφή, σύρετε το διακόπτη RECORD στην αρχική θέση απενεργοποίησης off. (3 ήχοι μπιπ υποδεικνύουν
τη διακοπή εγγραφής και 2 ήχοι μπιπ την ορθή αποθήκευση του βίντεο - μόνο για την κάμερα XTC-270).
Σημείωση: Μην αφαιρείτε την μπαταρία κατά τη λήψη βίντεο γιατί μπορεί να καταστραφεί το αρχείο που έχετε δημιουργήσει.
Ένδειξη Επιπέδου Κάρτας Μνήμης SD Σημασία
Πράσινη Διαθέσιμα 1 GB ή περισσότερο
Πορτοκαλί Διαθέσιμα 512 MB έως 1 GB
Κόκκινη Κάτω από 512 MB διαθέσιμα ή δεν υπάρχει κάρτα MicroSD.
Αναβοσβήνει κόκκινη Δεν μπορεί να διαβάσει την κάρτα
Αναβοσβήνει πρασινη Υποδεικνύει ότι η κάρτα έχει ανασχεδιαστεί.
Χωρητικότητα Μνήμης HD χρονος εγγραφης SD χρονος εγγραφης
1 GB 11 Λεπτά 13 Λεπτά
2 GB 22 Λεπτά 26 Λεπτά
4 GB 45 Λεπτά 52 Λεπτά
8 GB 90 Λεπτά 105 Λεπτά
16 GB 175 Λεπτά 210 Λεπτά
32 GB 350 Λεπτά 410 Λεπτά
Σημείωση: Η βιντεοκάμερα χωρίζει το βίντεο σε τμήματα των 10 λεπτών το καθένα (περίπου 900 ΜΒ).
Page 62

GR
60
Τοποθέτηση της Βιντεοκάμερας
Τοποθέτηση σε Σύστημα Διπλής
Βάσης στήριξης
Η XTC-270 δημιουργήθηκε με καινοτόμο σχεδιασμό
ώστε να χρησιμοποιεί ένα σύστημα διπλής
βάσης στήριξης σε οποιαδήποτε πλευρά της
βιντεοκάμερας. Αυτό επιτρέπει την ευκολία της
εγκατάστασης. Για να εγκαταστήσετε την κάμερα
στη διπλή βάση στήριξης, σύρετε την κάμερα στο
σύστημα διπλής βάσης με τις δύο εγκοπές κοιτώντας
το πίσω μέρος της κάμερας . Για να αφαιρέσετε
την βιντεοκάμερα από τη διπλή βάση στήριξης,
κρατήστε την κάμερα με την πλευρά του φακού
προς το μέρος σας. Πιέστε προς τα κάτω το διακόπτη
της βάσης και τραβήξτε τη βάση προς το μέρος σας. Η διπλή βάση στήριξης επιτρέπει στην βιντεοκάμερα να τοποθετηθεί πολύ εύκολα
στη βάση στήριξης κράνους και σε όλα τα άλλα προαιρετικά αξεσουάρ με το ίδιο τρόπο στήριξης. Όταν τοποθετείτε την βιντεοκάμερα
στη διπλή βάση στήριξης, θα πρέπει να κάνετε τα παρακάτω:
1. Αναλογιστείτε τί θέλετε να απαθανατίσετε και χρησιμοποιήστε ανάλογα τη βάση στήριξης για το κράνος ή τη βάση στήριξης σε
μάσκα.
2. Βεβαιωθείτε, μόλις την τοποθετήσετε, ότι η
κάμερα κοιτάζει ευθεία και όχι προς το έδαφος
ή τον ουρανό.
Τοποθέτηση χρησιμοποιώντας τη
Βάση Thread
Στο κάτω μέρος της XTC-270 υπάρχει μια στάνταρ
βάση thread που επιτρέπει στη βιντεοκάμερα να
τοποθετηθεί στα αξεσουάρ (προαιρετικά) που
διαθέτουν βίδα στήριξης της κάμερας.
Για να στηρίξετε την βιντεοκάμερα, βάλτε τη βίδα
πάνω στη βάση στην υποδοχή της βιντεοκάμερας και
περιστρέψτε την δεξιόστροφα για να τη σφίξετε πάνω στη βίδα.
Όταν στηρίζετε την βιντεοκάμερα στις λαβές του ποδηλάτου ή με την αυτοκόλλητη βάση για το κράνος ακολουθήστε αυτά τα βήματα:
dual track system mount
Απελευθέρωση Πλήκτρου
Διπλής όψης βάση στήριξης
κράνους
Goggle mount
Camera thread
Βίδα Στήριξης
Αυτοκόλλητη ταινία στήριξης για το κράνος Βάση στήριξης στη λαβή
ποδηλάτου
Page 63

GR
61
1. Αναλογιστείτε τί θέλετε να απαθανατίσετε και τοποθετήστε την βιντεοκάμερα κατάλληλα.
2. Βεβαιωθείτε, μόλις την τοποθετήσετε, ότι η κάμερα κοιτάζει ευθεία και όχι προς το έδαφος ή τον ουρανό.
Συμβατά Συστήματα
Η XTC-270 μπορεί να χρησιμοποιηθεί και στα δύο λειτουργικά συστήματα, των Windows και MAC. Η βιντεοκάμερα καταγράφει σε
μορφή MP4 με κωδικοποίηση Η.264.
“Κατεβάζοντας” Βίντεο
Δεν χρειάζεται να εγκαταστήσετε κάποιο λογισμικό για την XTC-270. Είναι μια συσκευή που τη συνδέεις και αναπαράγει βίντεο.
1. Προτού “κατεβάσετε” (download) τα βίντεο σας, βεβαιωθείτε ότι οι μπαταρίες είναι πλήρως φορτισμένες και οτι ο Διακόπτης
Record βρίσκεται στη θέση εγγραφής (REC).
2. Συνδέστε την βιντεοκάμερα στη θύρα USB χρησιμοποιώντας το παρεχόμενο καλώδιο.
3. Ενεργοποιήστε την κάμερα σύροντας το πλήκτρο εγγραφής “Record” στην θέση ΟΝ.
4. Η κάμερα αναγνωρίζεται αυτόματα ως εξωτερικός σκληρός δίσκος (USB) αλλά μπορείτε μόνο να “κατεβάσετε” τα βίντεο.
5. Δεν είναι εφικτό το “ανέβασμα” δεδομένων στην κάρτα SD.
6. Όλα σας τα βίντεο θα αποθηκευτούν στον φάκελο DCIM.
Ανασχεδιασμός (Reformat) της κάρτας Micro SD
Σημείωση: Κάντε ανασχεδιασμό (format) της κάρτας μνήμης micro SD από την κάμερα πριν την πρώτη χρήση
Η κάρτα Micro SD μπορεί να ανασχεδιαστεί ενώ βρίσκεται μέσα στην βιντεοκάμερα. Με αυτό τον τρόπο μπορείτε να σβήσετε μονομιάς
όλα σας τα βίντεο. Ακολουθήστε αυτά τα βήματα:
1. Απενεργοποιήστε την κάμερα, μετακινώντας το διακόπτη RECORD στη θέση απενεργοποίησης off.
2. Πιέστε και κρατήστε πατημένο το κουμπί ανασχεδιασμού της κάρτας Micro SD.
3. Μετακινείστε τον διακόπτη RECORD στη θέση εγγραφής κρατώντας πατημένο το κουμπί ανασχεδιασμού.
4. Αφήστε το κουμπί ανασχεδιασμού όταν η ένδειξη της κάρτας αρχίσει να αναβοσβήνει πράσινη.
5. Απενεργοποιήστε την κάμερα, μετακινώντας το διακόπτη RECORD στη θέση απενεργοποίησης off.
6. Θα ακούσετε δύο ήχους μπιπ σε επιτυχή ανασχεδιασμό.
7. Αφαιρέστε την κάρτα Micro SD και χρησιμοποιήστε άλλη συσκευή για τον ανασχεδιασμό (format) της κάρτας προτού
χρησιμοποιήσετε ξανά την κάμερα. (Σημείωση: η XTC 270 δεν μπορεί να διαγράψει την αναβάθμιση λογισμικού).
Σημείωση: Η βιντεοκάμερα δεν μπορεί να ανασχεδιάσει την κάρτα Micro SD αν είναι αναμμένη η λυχνία χαμηλής μπαταρίας.
Βεβαιωθείτε ότι έχετε τοποθετήσει καινούριες μπαταρίες προτού επιχειρήσετε την διαδικασία ανασχεδιασμού.
Σημείωση: Η XTC-270 έχει σχεδιαστεί ως ο ιδανικός σύντροφος στις περιπέτειές σας. Η κεντρική μονάδα επεξεργασίας CPU
απενεργοποιείται πλήρως όταν ο διακόπτης εγγραφής RECORD είναι στη θέση απενεργοποίησης OFF για την μεγιστοποίηση της
αυτονομίας μπαταρίας. Εξαιτίας αυτού, δεν είναι εφικτό να ρυθμίσετε την ώρα και δεδομένα
Page 64

GR
62
Συμβουλές και Κόλπα
Πρόβλημα Λύση
Μπαταρίες
Δεν ανοίγει η βιντεοκάμερα Βεβαιωθείτε ότι το πακ μπαταριών έχει τοποθετηθεί σωστά και ότι είναι πλήρως
φορτισμένο.
Εγγραφή
Η βιντεοκάμερα δεν κάνει εγγραφή Βεβαιωθείτε οτι ο διακόπτης έχει τεθεί τελείως προς τα εμπρός. Αν η ένδειξη
εγγραφής ακόμη δεν ανάβει, κλείστε την συσκευή και τοποθετήστε πάλι τις
μπαταρίες
Ελέγξτε τη διαθέσιμη μνήμη.
Κάρτα Micro SD
Δεν διαβάζει την κάρτα Micro SD Βεβαιωθείτε ότι η κάρτα Micro SD έχει τοποθετηθεί κατάλληλα.
Συνδέστε την βιντεοκάμερα με τον υπολογιστή για να βεβαιωθείτε ότι έχει διαθέτει
χωρητικότητα.
Δοκιμή της διαδικασίας ανασχεδιασμού.
Αναπαραγωγή Βίντεο
Αργό ή γρήγορο βίντεο Βεβαιωθείτε ότι η βιντεοκάμερα είναι συνδεδεμένη σε συσκευή USB 2.0.
Αφαιρέστε τις υπόλοιπες συσκευές USB που δεν χρησιμοποιούνται.
Μεταφέρετε το βίντεο στον υπολογιστή πριν το αναπαράγετε.
Βεβαιωθείτε ότι το πρόγραμμα αναπαραγωγής βίντεο που χρησιμοποιείτε είναι
αναβαθμισμένο και ότι ο υπολογιστής σας διαθέτει τις ελάχιστες προϋποθέσεις
Video Downloading
Αργή μεταφορά δεδομένων Βεβαιωθείτε ότι η κάμερα είναι συνδεδεμένη σε συσκευή USB 2.0. Αν συνδεθείτε ως
1.1, αποσυνδέστε και συνδέστε πάλι τη συσκευή.
Αφαιρέστε τις υπόλοιπες συσκευές USB που δεν χρησιμοποιούνται.
Ο υπολογιστής δεν αναγνωρίζει την
βιντεοκάμερα
Βεβαιωθείτε ότι ο διακόπτης record είναι στη θέση εγγραφής κατά τη σύνδεση με
τον υπολογιστή.
Βεβαιωθείτε ότι η κάρτα Micro SD έχει τοποθετηθεί κατάλληλα.
Η κάρτα Micro SD μπορεί να χρειάζεται ανασχεδιασμό. Δοκιμάστε τη διαδικασία
ανασχεδιασμού.
Ήχος
Έντονος Θόρυβος Ανέμου Τοποθετήσετε κομμάτι ταινίας στην ωπή του μικροφώνου.
Page 65

GR
63
Εγγύηση
H εγγύηση λειτουργίας ανέρχεται στους 24 μήνες για την βασική μονάδα και στους 6 μήνες για τα παρελκόμενα (μπαταρίες, φορτιστές,
κεραίες, ακουστικά).
Για περισσότερες πληροφορίες σχετικά με τους όρους εγγύησης, παρακαλούμε επισκεφτείτε την ιστοσελίδα www.midlandradio.eu
Page 66

NL
64
XTC-270 Action Camera.................................................................................................................... 65
Wat zit er in de box? ........................................................................................................................................................65
XTC-270 Eigenschappen en Bedieningen .........................................................................................................................65
Korte Starthandleiding ................................................................................................................... 67
Alles over de XTC-270 ......................................................................................................................67
Micro SD Kaart ................................................................................................................................................................. 68
Opnemen .........................................................................................................................................................................68
Cameramontage ............................................................................................................................. 69
Montage op Dual Track Systeem ...................................................................................................................................... 69
Montage m.b.v. Draadmontage ....................................................................................................................................... 69
Compatibele Systemen ....................................................................................................................70
Video’s Downloaden ........................................................................................................................ 70
De Micro SD Kaart Herformatteren ...................................................................................................70
Tips en Truukjes...............................................................................................................................71
Garantie ......................................................................................................................................... 72
Page 67

NL
65
XTC-270 Action Camera
Hartelijk bedankt voor het aanschaffen van de XTC-270 Action Camera. U kunt nu als een echte avonturier al uw spannende momenten met deze ultieme camera vastleggen. Gebruiksvriendelijke bediening met slechts één schakelaar, 130 graden hoeklens en twee
opnamemodi: Standaard (SD: 1280x720) en Hoge definitie (HD: 1920x1080). Opnametijden van tot op 2 uur zijn mogelijk dankzij het
inbegrepen Lithium batterijblok. U hoeft de camera slechts op uw computer aan te sluiten om de genomen video’s te uploaden en
vervolgens met vrienden te delen. Dat is alles! Geniet ervan!
Wat zit er in de box?
› Midland XTC-270 Action camera
› USB kabel
› 900mAh Lithium batterijblok
› Onderwaterbehuizing 60m
› Helmmontage
XTC-270 Eigenschappen en Bedieningen
Eigenschappen:
HD eigenschappen SD eigenschappen
30 frames per seconde 60 frames per seconde
130 graden hoeklens 90 graden hoeklens
16:9 aspectverhouding 16:9 aspectverhouding
1920x1080 resolutie 1280 x 720 resolutie
Neemt op als H.264 (.mp4) Neemt op als H.264 (.mp4)
Page 68

NL
66
Glazen lens met 130° hoek
Micorfoon
Dual Track Montagesysteem
RECORD schakelaar
vooruit: aan/opnemen
Opname LED
Knippert rood wanneer camera opneemt
Batterij LED
RECORD schakelaar
terug: Uit/Opname stoppen
SD Kaart LED
HD/SD modusschakelaar
SD Kaartformatteertoets
Mini USB aansluiting
SD Kaart formatteertoets
Page 69

NL
67
Korte Starthandleiding
Formateer de micro SD geheugenkaart vóór het eerste gebruik rechstreeks vanaf de camera volgens de aanwijzing in de desbetreffende paragraaf
1. Open het batterijklepje en installeer het batterijblok. Sluit het batterijklepje weer.
2. Open en vouw de rubberen achterafdekking omlaag.
3. Sluit de micro SD kaart aan en let daarbij op de juiste richting.
4. Selecteer de gewenste definitiekwaliteit (SD: HD Ready; HD: Full HD). Sluit de afdekking.
5. Beweeg de RECORD schakelaar naar voren, de opname zal na 4 seconden starten.
6. Schuif de schakelaar terug naar stand “uit” om de opname te stoppen.
7. Sluit de camera aan op de computer en download de video.
Alles over de XTC-270
Batterij
1. Om het batterijblok te installeren, dient u het palletje van het batterijklepje op de
rechterzijde van de camera omlaag te drukken. Het klepje zal losklikken en u kunt
het naar voren duwen om het te verwijderen.
2. Installeer het Lithium batterijblok.
3. Plaats het batterijklepje weer terug en klik het vast.
Batterijstatus Indicator Betekenis
Constant Groen Volledige batterijcapaciteit
Constant Rood Halve batterijcapaciteit
Knipperend Rood* Vrijwel Uitgeputte Batterijen
Geen Licht Uitgeputte Batterijen
Opmerking: Wanneer de rode batterij-LED begint te knipperen, dient u de batterij op te laden, anders zal de camera op dat punt
de opname stoppen.
Page 70

NL
68
Micro SD Kaart
1. Open en klap het rubberen achterklepje omlaag.
2. Steek de micro SD kaart in de gleuf volgens de juiste polariteit (zijdelings aangegeven)
3. Plaats het rubberen klepje weer terug.
OPMERKING: XTC-270 ondersteunt geheugenkaarten van tot op 32GB.
Opnemen
1. Beweeg de OPNAME-schakelaar naar voren. Dit schakelt de camera in.
2. De batterij en de geheugenkaartaanwijzer zullen aangaan en de status van de camera tonen. De opname-aanwijzer zal na 4
seconden rood beginnen knipperen. Dit geeft aan dat de camera videobeelden vastlegt. [1 enkelvoudige biep]
3. Om de opname te stoppen, beweeg de OPNAME-schakelaar terug naar de uit-positie. [3 bieps wijst op “stop opnemen”, 2 bieps
wijst op “juiste video opslag”]
Opmerking: Verwijder de batterij niet terwijl u aan het opnemen bent, omdat het bestand beschadigd kan worden].
SD kaart LED Status Betekenis
Groen 1 GB of meer beschikbaar
Oranje 512 MB tot1 GB beschikbaar
Rood Minder dan 512 MB beschikbaar og geen MicroSD kaart geïnstalleerd.
Knipperend Rood Kaart niet leesbaar
Knipperend Groen Geeft aan dat de kaart opnieuw geformatteerd is.
Geheugencapaciteit HD opnametijd SD opnametijd
1 GB 11 Minuten 13 Minuten
2 GB 22 Minuten 26 Minuten
4 GB 45 Minuten 52 Minuten
8 GB 90 Minuten 105 Minuten
16 GB 175 Minuten 210 Minuten
32 GB 350 Minuten 410 Minuten
Opmerking: De camera zal de video verdelen in bestanden van 10 minuten elk (bij benadering 900 Mb).
Page 71

NL
69
Cameramontage
Montage op Dual Track Systeem
De XTC-270 is zeer innovatief ontwikkeld met een
identiek dual track montagesysteem op beide zijden
van de camera. Dit maakt installatie zeer eenvoudig.
Monteer de camera op de dual track montage door
de camera op het dual track systeem te schuiven
met de twee inkepingen op de montage gericht op
de achterzijde van de camera.
Koppel de camera weer los van de dual track montage door de camera vast te houden met de lens naar
uw lichaam gericht. Druk de ontkoppelschakelaar
van de montage omlaag en trek de montagesteun
naar u toe. Dankzij de dual track montage kan de camera eenvoudig op beide de helmmontage en veiligheidsbrilmontage worden
geïnstalleerd. Hierdoor hoeft u de camera niet telkens opnieuw te monteren.
De tweespoormontage laat toe om de camera gemakkelijk te monteren op de helmmontage en alle andere optionele accessoires met
hetzelfde type slides.
Wanneer u de camera op de dual track montage installeert, dient u het volgende te overwegen:
1. Bepaal wat u wilt gaan opnemen en gebruik de veiligheidsbril –of helmmontage dienovereenkomstig.
2. Zorg ervoor dat de camera na installatie recht vooruit is gericht en niet naar de grond of lucht.
Montage m.b.v. Draadmontage
Onderaan de XTC-270 is er een standaard draadmontage die toelaat om de camera te monteren
op elk accessoire dat een standaard cameraschroef
heeft.
Bevestig de camera door de schroef op de montage
in de cameradraad te steken en de camera rechtsom
te draaien om het vast te zetten op de schroef.
Wanneer u de camera op de handvatten van een
fietsstuur of met de geventileerde helmriemmontage installeert, dient u het volgende te overwegen:
Dual Track montagesysteem
Ontgrendeltoets
Zelfklevende helmmontage Veiligheidsbrilmontage
Cameradraad Montageschroef
Montage voor helmriem Montage voor fietsstuur
Page 72

NL
70
1. Bepaal wat u wilt gaan opnemen en monteer dienovereenkomstig.
2. Zorg ervoor dat de camera na installatie recht vooruit is gericht en niet naar de grond of lucht.
Compatibele Systemen
U kunt de XTC-270 beide op een Windows en MAC besturingssysteem gebruiken.
De video codec is H.264, het bestandsformaat is .MP4.
Video’s Downloaden
U hoeft geen enkele software met de XTC-270 te installeren. Het is een simpel plug&play apparaat.
Voor het download van de videos, controleer of the batterijen volledig opgeladen zijn. Sluit de camera aan op de USB poort via
de meegeleverde kabel. Beweeg de OPNAME-schakelaar naar voren. Dit schakelt de camera in. De camera zal automatisch worden
herkend als een externe harddrive (USB sleutel), maar alleen video’s kunnen worden gedownload; het is niet mogelijk om gegevens
te uploaden op uw SD-kaart op basis van de huidige EU-wetgeving. Al uw video’s worden opgeslagen in de “DC IM” > “100Media”.
De Micro SD Kaart Herformatteren
Opmerking: Formateer de micro SD-geheugenkaart vanaf de camera vóór het eerste gebruik.
U kunt de Micro SD kaart herformatteren terwijl het in de camera zit. U kunt met deze functie alle video’s gelijktijdig wissen. Ga als
volgt te werk:
1. Schakel de camera UIT door de OPNAME-schakelaar naar de UIT positie te schuiven.
2. Houd de Micro SD-kaart formatteren knop.
3. Beweeg de OPNAME-schakelaar naar de opnamepositie en hou de herformatteer-knop.
4. Laat de herformatteer-knop los wanneer de geheugenkaart LED groen flikkert
5. Schakel de camera UIT door de OPNAME-schakelaar naar de UIT positie te schuiven.
6. Twee bieps als het formatteerproces geslaagd is].
7. Verwijder de Micro SD-kaart. Voordat opnieuw met behulp van de Micro SD-kaart in de camera, formattar de kaart met behulp
van een pc.
Opmerking: XTC270 kunt uzelf niet verwijderen het file upgrade.
Opmerking: De camera kan de Micro SD kaart niet herformatteren wanneer de LED een lage batterijcapaciteit aangeeft. Zorg
ervoor nieuwe batterijen in de camera te installeren voordat u het formattteerproces probeert uit te voeren.
Opmerking: XTC-270 is ontworpen om uw ideale partner te zijn tijdens al uw avonturen, dus de CPU is volledig UITGESCHAKELD
wanneer de opnameknop zich in de UIT positie bevindt om de batterijduur te maximaliseren. Daardoor IS HET NIET MOGELIJK de
tijd en datum in te stellen
Page 73

NL
71
Tips en Truukjes
Probleem Oplossing
Batterij
Camera schakelt niet in Controleer of het batterijblok correct geïnstalleerd en volledig opgeladen is.
Opname
Camera neemt niet op Controleer of de schakelaar geheel naar voren is geschoven. Indien de opname LED niet
inschakelt, kunt u proberen het apparaat uit te schakelen en de batterijen opnieuw te installeren.
Controleer de beschikbare geheugencapaciteit.
Micro SD kaart
Micro SD kaart niet leesbaar Controleer of de Micro SD kaart correct is aangesloten.
Sluit de camera aan op de computer om de beschikbare geheugencapaciteit ervan te controleren.
Probeer het formatteerproces.
Video Afspelen
Trage of schokkerige video Controleer of de camera is aangesloten op een USB 2.0 apparaat.
Verwijder andere ongebruikte USB apparaten.
Kopieer de video naar de computer voordat u het afspeelt.
Zorg ervoor dat media player die u gebruikt geüpdatet is en uw computer de minimumve-
reisten in acht neemt
Video Downloaden
Trage gegevensoverdracht Controleer of de camera is aangesloten op een USB 2.0 apparaat. Indien het 1.1 is, koppel
het apparaat los en sluit weer aan.
Verwijder andere ongebruikte USB apparaten.
Computer herkent de camera niet Controleer of de RECORD schakelaar ingesteld is op de opnamepositie wanneer aangesloten
op de computer.
Controleer of de Micro SD kaart correct is aangesloten.
De Micro SD kaart is eventueel corrupt. Probeer het formatteerproces.
Audio
Extreem windlawaai Plak een stukje tap over de microfoonopening.
Page 74

NL
72
Garantie
De garantie duurt 24 maanden voor het apparaat en 6 maanden voor de accessoires (batterijen, opladers, headsets, microfoons,
antennes).
Voor informatie over de garantie van dit product, verzoeken wij u om naar www.midlandeurope.com
Page 75

RU
73
XTC-270 Action Camera ................................................................................................................... 74
Комплектация: .............................................................................................................................................................. 74
Характеристики видеокамеры и элементы управления ............................................................................................ 74
Краткое руководство .................................................................................................................... 76
Установка аккумулятора ............................................................................................................................................... 76
Установка Micro SD карты памяти .................................................................................................................................77
Установка видеокамеры .............................................................................................................. 78
Держатель для установки видеокамеры на шлем или очки ...................................................................................... 78
Винтовая система соединения камеры с крепежом ................................................................................................... 79
Совместимость видеокамеры с операционными системами персонального компьютера ......... 79
Загрузка видеозаписей на персональный компьютер .................................................................79
Форматирование Micro SD карты памяти......................................................................................79
Правила эксплуатации и ухода. .................................................................................................... 82
Гарантия ........................................................................................................................................ 82
Page 76

RU
74
XTC-270 Action Camera
Благодарим Вас за приобретение видеокамеры XTC-270, которая позволит любителям острых ощущений делать видеозаписи
своих приключений. Простота в использовании, широкий угол обзора 130 градусов и 2 режима записи (стандартный
HD:1280x720; высокой четкости FULL HD: 1920x1080), 2 часа в режиме записи гарантируют то, что вы не пропустите ни одной
секунды, наполненной адреналином.
Сделав запись, подключите камеру к компьютеру, загрузите видеоролик в Интернет и разделите свои эмоции с друзьями!
Комплектация:
› видеокамера XTC-270
› Li-Ion аккумулятор 900 мА/ч
› кабель USB
› водонепроницаемый чехол (60 метров)
› набор креплений на шлем
Характеристики видеокамеры и элементы управления
Характеристики:
HD - характеристики: SD- характеристики:
30 кадров в секунду 60 кадров в секунду
угол обзора 130° угол обзора 90°
разрешение 1920х1280 (Размер кадра 16:9) разрешение 1280x720 (Размер кадра 16:9)
Кодек H.264 (.mp4 files) Кодек H.264 (.mp4 files)
Page 77

RU
75
угол обзора 130°
микрофон
направляющие крепления камеры на держателе
ползунок записи (Rec) в верхней позиции -
включение камеры/запись ролика
индикатор записи (Rec) - мигает красным
светом во время записи ролика
индикатор батареи
ползунок записи (Rec)в нижней позиции остановка записи/выключение камеры
индикатор карты памяти
Установка режима SD/HD
кнопка форматирования карты памяти
Mini USB разъем
отсек Mini SD карты памяти
Page 78

RU
76
Краткое руководство
Внимание: Перед первым использованием Micro SD-карты отформатируйте ее непосредственно с камеры, следуя
указаниям в соответствующем пункте инструкции
1. Откройте крышку батарейного отсека и установите аккумулятор. Закройте крышку батарейного отсека.
2. Откройте резиновую крышку отсека карты памяти и установите карту памяти, затем установите желаемое разрешение
(SD: HD Ready; HD: FULL HD). Закройте крышку отсека карты памяти.
3. Установите ползунок записи (Rec) в верхней позиции – запись начнется через 4 секунды.
4. Для остановки записи переместите ползунок (Rec) в нижнюю позицию (off).
5. Подключите камеру к персональному компьютеру и скопируйте видеоролик.
Установка аккумулятора
1. Отсек для аккумулятора расположен с правой стороны камеры. Нажмите на
фиксатор батарейного отсека, сдвиньте крышку в сторону объектива, затем
можно ее снять.
2. Установите аккумулятор.
3. Установите крышку батарейного отсека (при правильной установке вы
услышите щелчок).
Индикация уровня разряда аккумулятора
Индикатор разряда аккумулятора Соответствующее значение
Постоянно горит зеленым светом Полный заряд аккумулятора
Постоянно горит красным светом аккумулятор наполовину разряжен
Мигает красным светом Низкий уровень заряда аккумулятора
Не горит Аккумулятор разряжен
Внимание! Низкий заряд аккумулятора отображается миганием индикатора красным цветом, при этом камера
прекращает запись ролика. В этот момент необходимо произвести замену аккумулятора.
Page 79

RU
77
Установка Micro SD карты памяти
1. Откройте отсек карты памяти, расположенный на задней поверхности видеокамеры.
2. Установите карту памяти.
3. Закройте крышку отсека.
Внимание! XTC-270 камера поддерживает Micro SD карту памяти емкостью до 32ГБ.
Запись ролика
1. Для включения видеокамеры переместите ползунок записи (Rec) ближе к объективу до щелчка.
2. Аккумулятор и индикатор разряда батареи загорятся зеленым или красным светом. Через 4 секунды индикатор
записи (Rec) начнет мигать красным светом – осуществляется запись ролика. (Вы услышите один тональный сигнал,
подтверждающий начало записи).
ВНИМАНИЕ! Данная функция есть только у камеры XTC-270.
3. Для остановки записи переместите ползунок (Rec) в нижнюю позицию (off). (Вы услышите: 3 тональных сигнала «Остановка видео», 2 тональных сигнала - «Сохранение видео»).
ВНИМАНИЕ! Данная функция есть только у камеры XTC-270.
Индикатор состояния Micro SD карты Свободный объем памяти
Горит зеленым светом 1Гб (или больше)
Горит оранжевым светом 512 Мб – 1Гб
Горит красным светом < 512 Мб или карта не установлена
Мигает красным светом Карта не читается
Мигает зеленым светом Карта была отформатирована
Объем памяти HD (доступное время записи) SD (доступное время записи)
1 Гб 11 минут 13 минут
2 Гб 22 минут 26 минут
4 Гб 45 минут 52 минут
8 Гб 90 минут 105 минут
16 Гб 175 минут 210 минут
32 Гб 350 минут 410 минут
Внимание: видеокамера автоматически разделяет запись на 10 минутные фрагменты размером 900 Мб
Page 80

RU
78
Установка видеокамеры
В комплекте вы найдете следующие варианты
крепежей видеокамеры, характеризующиеся
различным назначением и вариантами
соединения с видеокамерой:
1. 2 крепежа на шлем: на липучке –
соединение с камерой осуществляется
посредством держателя (см. следующий
раздел), на ремешке – винтовая система
соединения с камерой;
2. крепеж на очки – соединение с камерой
осуществляется посредством держателя
(см. следующий раздел);
3. крепеж на руль мотоцикла / велосипеда – в
интовая система соединения с камерой.
Держатель для установки видеокамеры на шлем или очки
Данный держатель предназначен для фиксации видеокамеры XTC-270 на крепеж шлема или очков (а также на другие
аналогичные крепления), позволяет быстро и просто сменить положение видеокамеры (шлем-очки) в зависимости от цели
/ объекта съемки.
Для установки видеокамеры на держатель
вставьте направляющие выступы видеокамеры
в соответствующие бороздки держателя и
плавно двигайте камеру вдоль бороздок. Теперь
достаточно зафиксировать держатель с камерой
на крепеже шлема (на липучке) или очков в
необходимой позиции (направлении), учитывая
объект предстоящей съемки, и удостовериться,
что объектив видеокамеры направлен строго
вперед, а не на землю или небо. Камера готова
к использованию!
Для отсоединения видеокамеры от крепежа,
зафиксируйте видеокамеру в руке (объектив направлен от вас), нажмите на рычажок (см. рисунок сверху) и тяните
держатель на себя.
бороздки держателя
рычажок
крепеж на шлем (на липучке) крепеж на очки
резьбовое
соединение
винт крепежа
крепеж на шлем (на ремешке) крепеж на руль
Page 81

RU
79
Винтовая система соединения камеры с крепежом
Крепеж на шлем (на ремешке) и рулевой крепеж имеют винтовую систему соединения видеокамеры с крепежом. Данная
система соединения позволяет видеокамере быть установленной на дополнительные аксессуары имеющие стандартный
винтовой крепеж. Для фиксации видеокамеры на данном крепеже вставьте винт крепежа в резьбовое соединение
видеокамеры, расположенное на нижней поверхности ее корпуса, и вращайте видеокамеру по часовой стрелке. Установите
видеокамеру в необходимом направлении, учитывая объект предстоящей съемки, и удостоверьтесь, что объектив
видеокамеры направлен строго вперед, а не на землю или небо.
Камера готова к использованию
Совместимость видеокамеры с операционными системами персонального
компьютера
Видеокамера XTC-270 совместима с операционной системой Windows и MAC.
Видео кодек H.264, видеозаписи сохраняются в формате MP4.
Загрузка видеозаписей на персональный компьютер
Для загрузки видеоролика на персональный компьютер (ПК) установка какой-либо программы не требуется. Перед тем
как скачать видеоролик на ПК убедитесь, что аккумулятор камеры полностью заряжен и ползунок записи “REC” находится
в верхней позиции (камера включена). Подключите видеокамеру к персональному компьютеру через разъем USB
посредством кабеля, поставляемого в комплекте. ПК автоматически распознает видео камеру как внешнее USB устройство.
Вы можете копировать видео ролики на ПК, но не можете записывать какую-либо информацию на карту памяти с ПК.
Все видеоролики сохраняются в папке DCIM.
Форматирование Micro SD карты памяти
Внимание: Отформатируйте Micro SD карту памяти непосредственно с камеры перед первым использованием
Форматируя Micro SD карту памяти, вы можете просто и быстро удалить все видеозаписи.
Для этого:
1. Выключите камеру, переместив ползунок записи (Rec) в позицию «OFF».
2. Нажмите и удерживайте кнопку форматирования карты памяти.
3. Переместите ползунок записи (Rec) в верхнюю позицию, удерживая при этом кнопку форматирования карты памяти.
4. Когда процесс форматирования карты памяти завершён, индикатор карты памяти начнет мигать зеленым светом.
5. Выключите камеру, переместив ползунок записи в нижнюю позицию (off).
Page 82

RU
80
6. Если процедура форматирования прошла успешно, Вы услышите два тональных сигнала.
7. Извлеките Micro SD карту памяти из камеры. Используя другое устройство, отформатируйте карту перед повторным
использованием в видеокамере. (Внимание: XTC-270 не может удалять обновленное программное обеспечение).
Внимание: в случае, если горит индикатор низкого уровня заряда аккумулятора, невозможно осуществить
форматирование карты памяти. Таким образом, перед началом форматирования удостоверьтесь, что
аккумулятор видеокамеры полностью заряжен.
Внимание: XTC-270 камера разработана специально для того, чтобы стать Вашим идеальным спутником во всех
Ваших приключениях, поэтому CPU (Центральный процессор) полностью выключен, когда кнопка записи находится
в положении (OFF), чтобы увеличить срок службы аккумулятора. В связи с этим, НЕВОЗМОЖНО установить время
и дату.
Page 83

RU
81
Проблемы и неполадки
Проблема Решение
Аккумулятор
Камера не включается Удостоверьтесь, что аккумулятор полностью заряжен
Запись
Камера не осуществляет запись Удостоверьтесь, что ползунок записи расположен в верхней позиции (до щелчка).
Если индикатор записи не загорается, то выключите камеру и переустановите
аккумулятор.
Проверьте объем доступной памяти.
Карта памяти Micro SD
Карта памяти не читается Удостоверьтесь, что карта памяти установлена должным образом.
Посредством ПК проверьте доступный объем памяти.
Отформатируйте карту памяти.
Просмотр записи
Медленное или прерывистое
воспроизведение видео файлов
Удостоверьтесь, что камера подключена к устройству, поддерживающему USB 2.0.
Отсоедините другие USB устройства от ПК.
Перед просмотром записи сохраните её на ПК.
Удостоверьтесь, что используемый Вами компьютер или медиа плеер имеет
последние обновления и отвечает минимальным требованиям.
Загрузка видео файла на ПК
Медленная передача данных Удостоверьтесь, что камера подключена к устройству, поддерживающему USB 2.0.
Если камера регистрируется как устройство USB 1.1, то отсоедините камеру и снова
подключите к ПК.
Отсоедините другие USB устройства от ПК.
Персональный компьютер
не распознает камеру, как внешнее
USB устройство
Удостоверьтесь, что ползунок записи видеокамеры расположен в верхней позиции
(позиция записи).
Удостоверьтесь, что карта памяти установлена должным образом.
Отформатируйте карту памяти.
Звук
Чрезмерный шум, задувание ветра Прикройте отверстие микрофона.
Page 84

RU
82
Правила эксплуатации и ухода.
! Не пользуйтесь содержащими алкоголь жидкостями и чистящими средствами для очистки видеокамеры.
! Не погружайте видеокамеру в воду.
! Протирайте видеокамеру мягким влажным кусочком ткани.
! На время длительного хранения выключите видеокамеру и удалите из нее аккумулятор..
Внимание! Не вскрывайте корпус видеокамеры самостоятельно!
Несанкционированное вскрытие изделия лишит вас гарантии на устройство!
Гарантия
На данный товар гарантия выдается сроком на один год, считая со дня приобретения товара. Гарантийное обслуживание
осуществляется только при условии строгого соблюдения правил эксплуатации и требований безопасности, указанных в
руководстве пользователя.
Произведено или импортировано:
СТЕ Интернешнл с.р.л. Ул. Р. Севарди 7- 42010
Манкасаль, Реджио Эмилия, Италия
Импортер в России: ЗАО «Алан-Связь»
Интернет-сайт: www.midland.ru
105187, г. Москва, Фортунатовская, 31А, стр. 2
Page 85

Page 86

Prodotto o importato da:
CTE INTERNATIONAL s.r.l.
Via. R.Sevardi 7- 42124 Reggio Emilia Italia
www.midlandeurope.com
Prima dell’uso leggere attentamente le istruzioni. Se il prodotto contiene batterie: non gettare nel
fuoco, non disperdere nell’ambiente dopo l’uso, usare gli appositi contenitori per la raccolta.
Produced or imported by:
CTE INTERNATIONAL s.r.l.
Via. R.Sevardi 7 42124 Mancasale Reggio Emilia Italy
Importado por:
ALAN COMMUNICATIONS, SA
C/Cobalt, 48 - 08940 Cornellà de Llobregat - España
www.midland.es
Lea atentamente las instrucciones antes de usar el equipo. si el producto contiene pilas o
baterías no las tire al fuego ni las disperse en el ambiente después de su uso, utilice los
contenedores apropiados para su reciclaje.
Vertrieb durch:
ALAN ELECTRONICS GmbH
Daimlerstraße 1K - D-63303 Dreieich Deutschland
www.alan-electronics.de
Vor Benutzung Bedienungsanleitung beachten. Bei Verwendung von Batterien beachten Sie
bitte die Umweltbestimmungen. Batterien niemals ins offene Feuer werfen, und nur in dafür
vorgesehene Sammelbehälter entsorgen.
Импортер в России:
ЗАО “Алан-Связь”
Москва, 105187, Фортунатовская, д.31 А, стр.2
www.midland.ru
WWW.MIDLANDEUROPE.COM |
 Loading...