

Page 1
Page 2

Your new MIDLAND Weather Monitor (WR-300) is
the latest advance in Weather monitoring technology providing
you with the information you need for your greatest safety from
the effects of weather and other external hazards. The Midland
Weather Monitor has a special receiver that tunes to the 24/7
broadcasts issued by the National Weather Service. The
combined All Hazards/Weather Alert broadcast network is the
single, most immediate source for comprehensive weather and
emergency information available instantaneously to the public, in
advance of TV and radio bulletins.
This MIDLAND Weather Monitor has an innovative automatic
alert system. In the event of special warning broadcasts, the radio
is automatically activated along with a loud tone, a flashing LED
indicator, and an “alert” message in the LCD. Emergency
weather bulletins include alerts about: Tornadoes, Hurricanes,
Floods, Ice/Snow Storms and other Severe Weather. Other
emergencies might include: Amber Alert, Hazardous Explosions,
Fires, Chemical Spills, and other civil emergencies.
We encourage you to read this Owner’s Manual thoroughly
before operating this unit. This manual is a valuable part of your
new Midland Weather Monitor. See the “Quick Start” section of
this manual for the initial Weather Monitor setup and
programming. The quick & easy programming menus are
designed to meet your radio operation needs. After this Weather
Monitor is programmed and operating properly, store the manual
in a safe place.
Midland Radio Corporation
1120 Clay Street
North Kansas City, Missouri 64116
Phone: (816) 241-8500
Fax: (816) 241-5713
E-mail: mail@midlandradio.com
1
Page 3

URL: www.midlandradio.com
2
Page 4
(See “Controls” & “Quick Start” sections in this manual.)
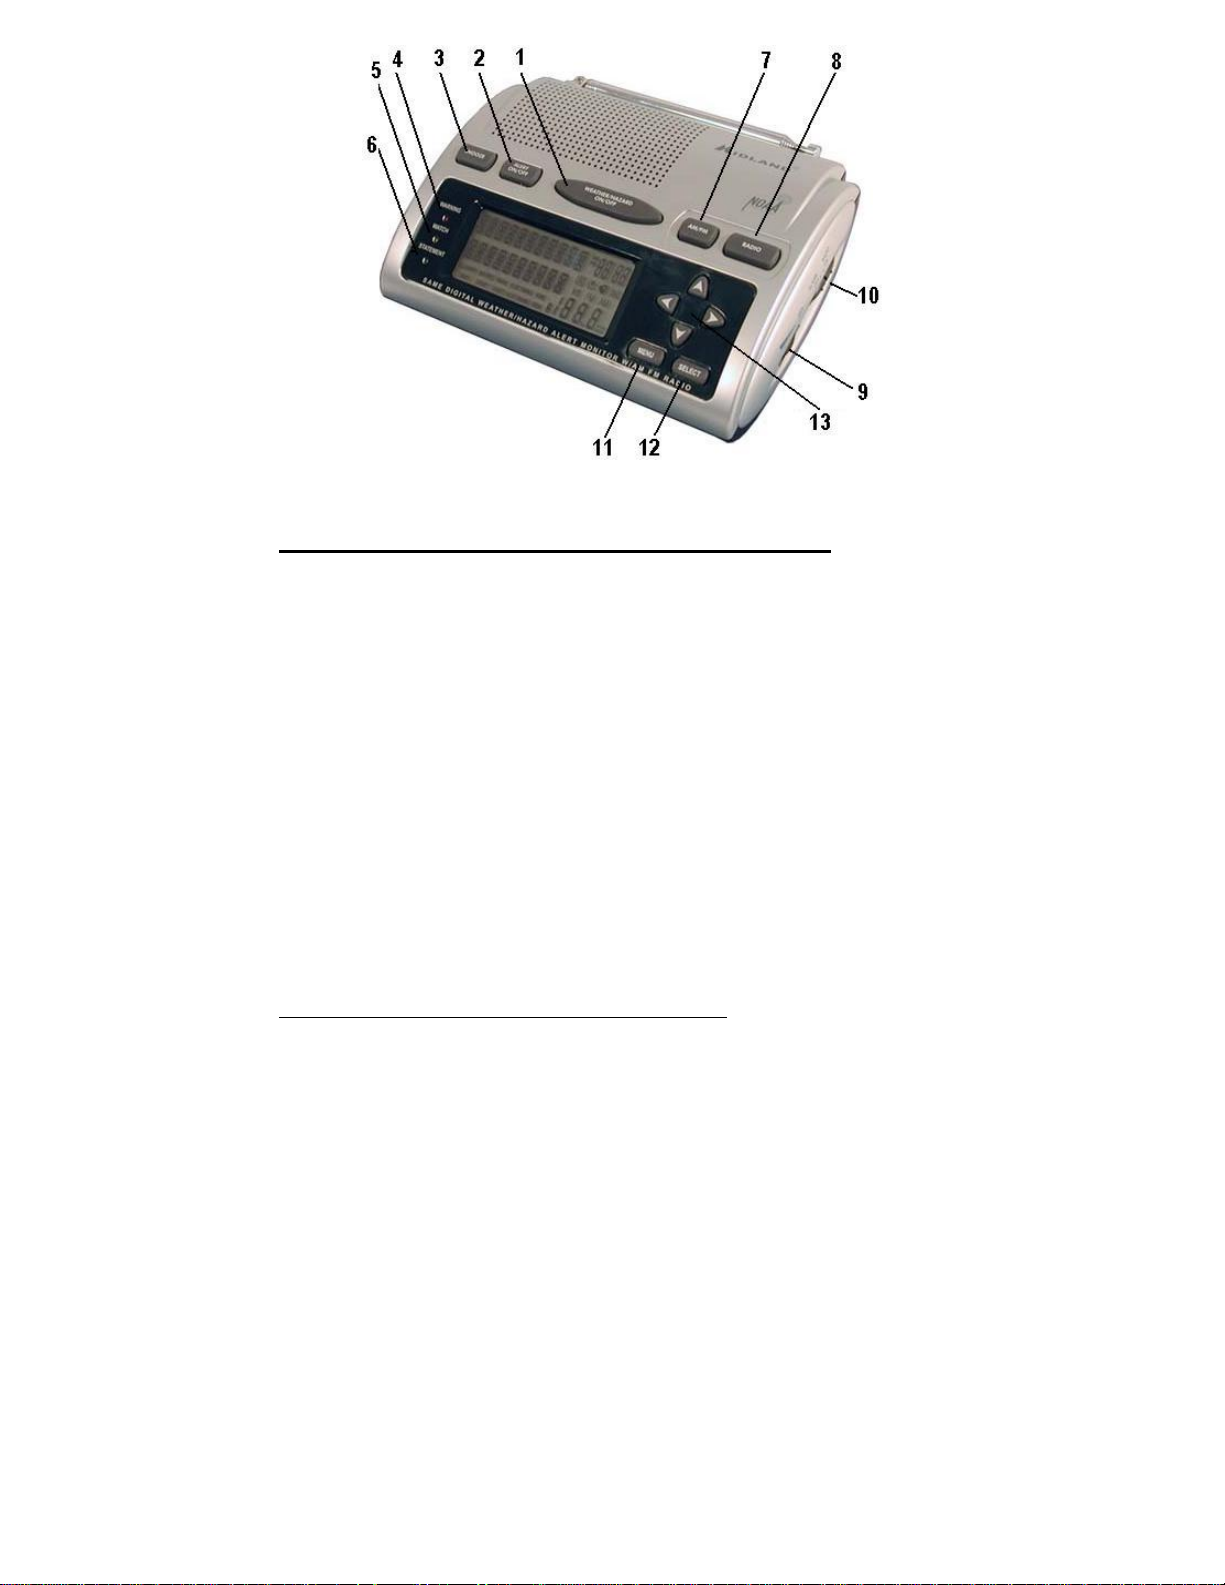
DIAGRAM OF THE WEATHER MONITOR:
1. WEATHER/HAZARD ON/OFF standby mode button
2. ALERT ON/OFF button
3. SNOOZE clock alarm snooze button
4. “WARNING” Alert Status light
5. “WATCH” Alert Status light
6. “ADVISORY” Alert Status light
7. AM/FM radio AM or FM selector button
8. RADIO AM/FM radio on/off button
9. OFF Weather Monitor unit on/off dial & volume control
10. ALARM OFF/ON switch
11. MENU (programming) menu mode activation button
12. SELECT (programming) select & confirm option button
13. Arrows (programming) buttons – up, down, right & left
Note: This unit programs with menus similar to a TV remote control.
Features located on back of unit are not shown: DC jack (also for
AC Power Adapter), and jacks for optional external alert, external
antenna & earphone.
3
Page 5

TABLE OF CONTENTS:
Your new MIDLAND Weather Monitor (WR-300)
Diagram of the Weather Monitor..................................... 2
Product Information.......................................................... 5
Features............................................................................. 5
Controls ............................................................................ 8
Quick Start Instructions
1. Batteries .................................................................. 10
2. AC Power Adapter.................................................. 10
3. Antenna................................................................... 10
4. Setting the AM/FM Clock Radio
a. Time...................................................................11
b. Date.................................................................... 11
c. Alarm (for AM/FM Clock Radio....................... 12
5. Program the Weather Channel for Your Area ........ 13
6. About S.A.M.E. & the County Codes..................... 13
Programming Your Weather Monitor.............................. 14
NWR, NOAA, NWS, & SAME....................................... 14
Emergency Power (connecting power & reception) ........ 15
What is a FIPS Code?....................................................... 16
Acquiring FIPS codes for Your Area............................... 17
Adjusting the Weather Frequency.................................... 18
Changing the Alert Pattern............................................... 19
FIPS Code Programming.................................................. 20
Using the Alert Function.................................................. 22
Testing Siren & External Alert Devices........................... 23
NWR Alert Descriptions (chart)....................................... 23
Reviewing Overlapping Alerts......................................... 26
When a Test of Demo Alert Occurs................................. 26
Defeat Siren Alert Option................................................. 27
Adding Future SAME Event Codes................................. 27
Backlight of the Display................................................... 28
AM/FM Radio Use........................................................... 28
AM/FM Memory Channels.............................................. 29
Programming Memory Channels ..................................... 29
........ 1
4
Page 6

Button Press Beeps........................................................... 29
Troubleshooting & Help................................................... 30
Notes & Maintenance....................................................... 31
12 Volt Operation............................................................. 32
FCC Compliance Information.......................................... 32
FIPS Code Form............................................................... 34
Service.............................................................................. 35
One Year Limited Warranty............................................. 36
Specifications ................................................................... 37
Glossary............................................................................ 38
5
Page 7

PRODUCT INFORMATION:
The WR-300 N.W.R./ S.A.M.E. (National Weather
Monitor/Specific Area Message Encoding) Weather / All Hazard
Monitor provides you with constant monitoring of your local
National Weather Service broadcast for messages warning you of
hazardous conditions. The NWR/SAME decoding allows you to
hear only messages concerning the area concerning you. You
now have a choice as to what information will be brought to you.
No more will you be awakened to hear of a problem many miles
from your home that will not affect you. A clock with alarm and
AM/FM radio are also featured.
The WR-300 has an emergency battery backup system for use if
you lose power. It will provide up to thirty hours of operation if
power fails.
The WR-300 NWR/SAME Weather / All Hazard Monitor is the
latest advance in Weather monitoring technology providing you
with the information you need for your greatest safety from the
effects of weather and other external hazards.
FEATURES:
• VHF Weather Monitor with seven different National
Weather Service channels in the 162 MHz FM band –
Provides 24-hour-a-day National Weather Service
information from seven different channels for maximum
reception possible (in areas where available)
6
Page 8

• Alert monitor system receives NWR/SAME codes
transmitted by National Weather Service stations
warning of dangerous weather conditions and other
general hazards. The SAME codes designate which
counties or parts of counties are affected by the
individual message. When the alert feature is activated,
the receiver remains in a standby mode. As SAME coded
messages are received, the receiver automatically
activates to warn you of dangerous weather conditions.
• User-selectable warning system – Your choice of siren
alarm, voice or visual flasher.
• Weather Command Button – large touch bar turns unit
from alert mode to full time monitoring.
• High Performance Chassis – Receives weather
broadcasts up to 50 miles from transmitter.
• Large Top-Firing Speaker – Directs alerts and audio
toward listener.
• Eleven-character LCD display for viewing alert type.
• Clock displays time and date and has alarm and snooze
functions.
• AM/FM radio for listening or wake-up alarm.
• Emergency Powered from 4 type AA batteries (optional).
• Telescopic Antenna – Provides maximum range
reception-up to 50 miles. Antenna folds down for easy
transport.
• Fully Variable Volume Control – Adjusts audio output.
• Alert siren volume adjustable for maximum flexibility.
7
Page 9

• External Alert jack to operate external warning devices.
(optional)
• Earphone Jack – Allows private listening or remote
speaker location. (optional)
• External Antenna Jack – Permits use of an optional
extended range base antenna or a mobile antenna.
• External Power Jack – Allows use of AC adapter
(included) or DC cigarette lighter power cord (optional)
to run off a car or boat battery.
• Compact, Ultra Modern Styling – Small enough to take
along – looks good anywhere.
8
Page 10

CONTROLS:
Note: The MIDLAND Weather
Monitor volume control and the main power switch (# 9 above)
must be turned on to activate the following controls unless
otherwise noted by an asterisk.
1. WEATHER/HAZARD ON/OFF standby mode button.
The Weather/Hazard broadcast & alert receiver is active
whenever the Weather Monitor unit is turned on. Press this
button to put the weather/hazard receiver into standby mode
(alert monitor mode.) Press button again to return to
hearing National Weather Service weather/hazard reports.
2. ALERT ON/OFF button. Press this button to cancel alert
siren sounds and any external alert features when alert
active. Press and hold button to enable and disable alert
siren and external alert signals (see Page 20).
When Alert is off, only the LED indicator lights
(“Warning”, “Watch”, & “ADVISORY”) are active.
3. SNOOZE clock alarm snooze button. Press to advance the
clock alarm time by 9 minutes each time the clock alarm
sounds.
4. “WARNING” Alert Status light. This red LED Indicator
light tells you that a warning has been issued for your area
by the National Weather Service.
5. “WATCH” Alert Status Light. This orange LED Indicator
9
Page 11

light tells you that a watch has been issued for your area by
the National Weather Service.
6. “ADVISORY” Alert Status Light. This yellow LED
Indicator light tells you that a statement or emergency has
been issued for your area by the National Weather Service.
7. AM/FM radio Am or FM selector button. Switches
between AM & FM bands of the broadcast radio. (Weather
Monitor and AM/FM radio must both be turned on.)
8. RADIO AM/FM radio on/off button. Turns FM/AM
(broadcast) radio on & off. (The weather service channel is
monitored for alerts whether or not the FM/AM radio is on.)
9. OFF Weather Monitor unit on/off dial & volume control.
This is the MIDLAND Weather Monitor volume control
and the main power switch. Click unit on & adjust to
desired listening level. (Only the clock is active when this
dial is set to off.)
10. ALARM OFF/ON switch. Enables and disables clock
alarm function.
11.* MENU (programming) menu mode activation button. Press
to activate programming mode. (Use directional arrows to
move through programming menu options.)
12.* SELECT (programming) select & confirm option button.
Press to confirm your selection.
13.* Arrows (programming) buttons – up, down, right & left.
Use directional arrows to program the MIDLAND Weather
Monitor menus. (This unit programs with menus similar to
a TV remote control.) Note: you can also use the arrows to
review previous alerts when in normal display mode.
10
Page 12

QUICK START INSTRUCTIONS:
After reading the “Features” & “Controls” sections in this
manual set up your MIDLAND Weather Monitor as follows:
1. BATTERIES. This Weather Monitor operates on AC
power or 4 AA battery backup. (Batteries are not included.) It is
recommended that you install emergency backup batteries: (4)
type AA alkaline batteries (not supplied). First, be sure the unit is
disconnected from the AC power adapter. Then, remove the
battery compartment cover on the underside of the unit by
pressing the battery compartment door latch in the direction of the
arrow and lifting. Observe the battery polarity indicators (+ and ) as you install the batteries. Replace the battery compartment
cover. (Rechargeable batteries are not recommended because the
WR-300 will not charge the batteries.)
2. AC POWER ADAPTER. Plug the AC Power Adapter into
a 110-115 Volt AC power outlet (standard house current). Plug
AC Power Adapter into DC jack on back of the Weather Monitor.
3. ANTENNA. Position telescoping antenna vertical and
extend to its full length above the Weather Monitor. In most
cases, this antenna will provide good reception. In some remote
areas an external antenna may be used to improve weak reception.
11
Page 13

4. SETTING THE AM/FM CLOCK RADIO.
a. Set the TIME
then:
Press and release the “MENU” button. Press the “DOWN” arrow
button until “SET UP TIME” is displayed in the left side of the
display. Press the “SELECT” button, hour setting will begin
flashing. (Note and adjust A.M./P.M. indicator located to left of
the flashing hour setting.) Press and release the “UP” buttons to
adjust the hour setting. Press and release the “RIGHT” arrow to
adjust minutes. Press and release the “UP” buttons to adjust the
minute setting. Press the “SELECT” button to store the time
setting.
b. Set the DATE. First turn on the Weather Monitor unit,
then:
Press and release the “MENU” button. Press the “DOWN” arrow
. First turn on the Weather Monitor unit,
until “SET UP DATE” is displayed in the left side of the display.
Press and release “SELECT”. Press and release the “UP” arrow
to adjust the day. Press and release the “RIGHT” arrow to choose
setting the month. Press and release the “UP” arrow to adjust the
month. Press and release the “RIGHT” arrow to select the year.
Press and release the “UP” arrow to adjust the Year. Press and
release the “SELECT” button to store DAY/MONTH/YEAR.
c. Set the ALARM (for the AM/FM Clock Radio). First turn
on the Weather Monitor unit, then:
Press and release the “MENU” button. Press the “DOWN” arrow
until “SET UP ALARM” is displayed in the left side of the
12
Page 14

display. Press and release the SELECT button. The alarm hour
setting will begin flashing. (Note and adjust A.M./P.M. indicator
located to left of the flashing alarm hour setting.) Press and
release the “UP” arrow to adjust the alarm hour setting. Press and
release the “RIGHT” arrow to choose setting alarm minutes.
Press and release the “UP” arrow to adjust the alarm minute
setting. Press the “SELECT” button to store the Alarm settings.
Choose type of alarm. Press and Release “MENU”. Use “UP”
arrow to choose radio or sound for clock alarm. (The
icons are located below the clock display.) Press “SELECT” to
store the type of alarm setting.
To activate the alarm, set the “ALARM OFF/ON” switch to the
“ON” position. The clock face icon will appear. To cancel
the alarm when sounding, press a button other than “SNOOZE”.
The “SNOOZE” button on the top of the WR-300 is for
advancing the alarm time by 9 minutes each time the alarm
sounds. The “SNZ” icon will be displayed.
(Turn alarm off with the ”ALARM OFF/ON” switch on side of
unit.)
5. PROGRAM THE WEATHER CHANNEL FOR YOUR
AREA. After you select the weather channel in your area, your
Weather Monitor will receive all alerts issued by the National
Weather Service. Program your Weather Monitor with the
weather channel in your area as follows:
13
Page 15

a. Turn on Weather Monitor unit.
b. Press “MENU”.
c. Press up (or down) directional arrow until “WEATHER
CHANNEL” is displayed on the LCD.
d. Press “SELECT”.
e. Press up (or down) directional arrow until you hear the
broadcast of your station. Be Sure Weather Monitor Unit
volume is turned up sufficiently for you to hear broadcast.
f. Press “SELECT”.
5. ABOUT S.A.M.E. & THE COUNTY CODES.
S.A.M.E. - Is a feature in MIDLAND Weather Monitors that
allows you to program in your county code or counties codes.
This will eliminate any Alerts that are not within your
programmed Specific Area. For example, if you only want to be
informed for alerts within your county just program in your
county code. But, if you want to be informed about counties that
are North, South, East and West of you, you can do so. Find the
county codes you want on the internet web site of National
Weather Radio-County by County Coverage @
www.nws.noaa.gov/nwr/indexnw.htm.
You can also restrict what you hear on your Weather Monitor to
alerts in which you have an interest. Program your Weather
Monitor as explained in the “Programming” section in this
manual.
14
Page 16

PROGRAMMING YOUR WEATHER MONITOR.
NWR, NOAA, NWS, & SAME
NOAA Weather Monitor (NWR) is a service of the National
Oceanic and Atmospheric Administration (NOAA). As the
"Voice of the National Weather Service", it provides continuous
broadcasts of the latest weather information from your local
National Weather Service (NWS) office.
In 1994, the National Oceanic and Atmospheric Administration
began broadcasting coded emergency signals that identify the
specific geographic area (such as a county) affected by an
emergency. Until that time such specific emergency weather
information was sent in other ways to broadcast stations and
others then relayed to the public.
NOAA transmits the coded weather emergency signals using a
:
technique called SAME (Specific Area Message Encoding). The
Midland WR-300 7-channel weather/ all hazards monitor is
designed to receive these SAME transmissions.
Your Midland WR-300 can be programmed with up to 30
predefined state/county codes that will determine which notices
broadcast by your NOAA weather station will cause the radio to
alert you. Warnings, watches and advisories of weather and other
area emergencies, about 50 different types- will activate the radio
if one or more location code programmed into your unit is
included in the SAME message.
15
Page 17

Also included in the SAME message is the amount of time for
which the message is effective. The WR-300 will continue to
display the alert until its time expires.
You don’t need to wait for the WR-300 to give you an alert. Just
find the NWR station broadcasting to your area from the 7
available channels. You can listen at any time, day or night to the
latest weather information from the National Weather Service.
EMERGENCY POWER
Connecting power –
The AC power adapter is required for normal operation if the
radio is to be in service for more than a few hours. Plug the wall
adapter into a 110-115 Volt AC (standard house current) outlet.
Connect the cord end to the DC JACK12Volt power jack on the
back of the unit.
A backup battery as stated above is also recommended. The
condition of the battery is monitored by the radio. When
BATTTERY icon flashes on the display, the battery has been
discharged and should be replaced. Do not leave a dead or weak
battery in the radio. Do not leave a battery in the radio when it is
not in use. The battery may leak and possibly damage your unit.
Dispose of batteries properly.
The clock will run for at least 10 days on batteries when
the radio is turned off with the VOLUME / OFF control.
16
Page 18

Reception NOTE: The National Weather Radio service operates
Weather Broadcast systems covering a large area of the
United States. A very few areas are not currently included.
Your WR-300 can receive broadcasts from the Weather Stations
up to 50 miles. Hills and certain terrain can reduce reception. An
external antenna can improve range. If your city is listed as
having a Weather Service Station but you do not receive it please
call your local Weather Service to confirm they are broadcasting
(Sometimes these stations are shut down for maintenance). If your
local Weather Service is transmitting and you are not receiving
the broadcasts, you may need an outdoor antenna.
What is a FIPS Code:
The NWR divides the United States and territories by state and county (or
parish) and assigns a six digit code number called a FIPS (Federal Information
Processing System) code or also known as a NWR/SAME county code. The
first digit identifies subdivision. The next two identify the state or territory, and
the last three identify the county. For example the code for Clay county
Missouri is 029047. The“047” indicates the county, the “29” indicates the state,
and the “0” indicates the subdivision of the county. In this case and most cases
the code will have a zero for the first digit, indicating that no subdivision is in
use. The NWS plans to introduce subdivisions of some counties in the future,
assigning digits 1 through 9 to the parts resulting in codes like 529047.
You
may also program your WR-100 with a code that will alert to any
code for a state. That code is 0ss000 where “ss” designates the
two digits used for all codes in the state.
17
Page 19

Acquiring FIPS codes for Your Area:
The FIPS codes can be found by calling the NWS toll free
number
1-888-NWS-SAME
(1-888-697-7263)
Automated instructions will guide you to the numbers you
need.
The FIPS codes and much more information can be found
by way of the Internet at www.nws.noaa.gov/nwr/indexnw.htm
Note: You might want to obtain the codes for other counties
close to you or those you might frequently travel
through. The counties still must be within the coverage
area of your NWS broadcast.
This is what to expect when you call the NWS number.
You will be prompted to enter your state. We suggest
entering the entire state to expedite the process. Next you
will be prompted to enter the county. Again spell the entire
county. We suggest you locate several counties surrounding
you especially the county in the direction most of the storms
will be coming from. When you have entered the county,
the system will ask you to confirm what you entered is
correct. Be ready to write the number. The system tells you
the number fairly quick but you have the option to have it
18
Page 20

read back to you so you can get the whole number.
Remember the number will be six digits long.
Adjusting the Weather Frequency
Adjust your Weather Monitor for the weather frequency for your
local area as follows:
Go to the Internet web site of NOAA Weather Radio - County by
County Coverage @ www.nws.noaa.gov/nwr/indexnw.htm.
Note the frequency for your local area. Find the channel number
that corresponds to your frequency. Turn on the WR-300 unit.
Press and release the “MENU” button. Press the “UP” arrow
until “WEATHER CHANNEL” is displayed. (This will
temporarily switch the WR-300 from standby to listen for
Weather Transmissions.)
To set the frequency channel. Press and release “SELECT” to
make the channel display flash, then press the “UP” button until
the channel of your NOAA Weather Radio station shows on the
display. You should now hear the voice of the broadcast. If you
find there is more than one broadcast station in your area, be sure
that station will broadcast your county code. To confirm this
listen to the broadcast associated with the weekly test. During the
broadcast they will give a list of counties covered by the
transmitter.
19
Page 21

Channel Frequency
(MHz)
1 162.400
2 162.425
3 162.450
4 162.475
5 162.500
6 162.525
7 162.550
When you have selected the correct frequency channel, press and
release the SELECT button to continue programming. Press and
release the MENU button to end programming.
NOTE: If no program keys are pressed for about one minute the
WR-300 will exit the menu mode.
Changing the Alert Pattern
The alert tone is a high low alternating sound. The speed of the
tones depends on if the WR-300 received a watch or warning.
The alert pattern has two options available through the program
button, VOICE and SIREN. If VOICE is chosen, the alert will
sound for about 8 seconds then the voice weather broadcast will
be heard for about 5 minutes when an alert message is received. If
you desire to listen to the broadcast longer, press the
“WEATHER/HAZARD” bar on the front the WR-300.
If SIREN is chosen, alert tones will sound for five minutes or
until the ALERT ON/OFF button is pressed. To change the
20
Page 22

pattern, press and release “MENU” button. Press the UP or
DOWN arrow button until “ALERT MODE ” is displayed in the
left side of the display. Press and release the “SELECT” button
then “UP or DOWN arrows” to display the choice of alert pattern.
Press and release the “SELECT” button to keep that pattern and
continue with programming. Press and release the “MENU”
button to return the radio to alert mode.
NOTE: Remember if there are no buttons pressed for one minute
the WR-300 will exit menu mode.
Voice and siren alerts can be turned off for all events leaving only
the text message and LED light to indicate the event. Press and
hold the ALERT ON/OFF button for 5 seconds to see the display
“ALERT ON(0FF)". While continuing to hold the ALERT
ON/OFF button, press the up or down arrow key to change the
setting. Release the buttons then press the ENTER key to
confirm.
FIPS Code programming:
NOTE: The WR-300 has enough memory to store 30 “FIPS”
codes. To store or change the codes, press and release “MENU”
button. Press the UP or DOWN arrow button until “COUNTY
CODE ” is displayed in the left side of the display. Press and
release the “SELECT” button then “UP or DOWN arrows to
choose from three options in how your radio responds to the
county (FIPS) codes is receives. Choose “SINGLE” if you want
to hear only alerts sent to one county or FIPS code. Choose
“MULTIPLE” if you want to hear alerts from all FIPS codes you
have programmed. Select “ALL” to listen to all alerts your
station sends without regard to FIPS codes. If you chose
21
Page 23

“SINGLE” or “MULTIPLE”, press SELECT to proceed to
programming codes. The next display will display “CODExx”
above six numbers or dashes for numbers. If “SINGLE” was
chosen, only the CODE01 setting will be used. These numbers
will determine the areas or counties that your WR-300 will be set
to respond to SAME messages. See “Acquiring FIPS Codes for
Your Area” for how and where to find the codes for your area.
To change the first code displayed, press and release the
SELECT button to change the code displayed or the UP arrow
key to select another code position. If you pressed SELECT the
display will now flash the first digit of the six digit code. Press
and release the UP or DOWN buttons to set the FIPS code digit
you want. Use the LEFT and RIGHT arrow buttons to change
digits. When the display shows the correct number press and
release the SELECT button. This accepts the code you entered.
The code number now will flash. If you wish to program another
county code, press the UP button to go to the next code location.
When you have entered all the desired codes, press and release
the “MENU” button to store your settings.
Reviewing stored “FIPS” codes
Enter the program mode as described earlier. press and release
“MENU” button. Press the UP or DOWN arrow button until
“COUNTY CODE ” is displayed in the left side of the display.
When the “FIPS” codes are displayed, press and release the “UP
or DOWN arrow” keys repeatedly to review all memory locations
you desire. All empty memory locations will be “------”. When
finished reviewing the “FIPS” codes press and release the MENU
button.
ALL County Codes option
To cause the WR-300 to receive all SAME messages without
regard to area, choose ALL when COUNTY CODE is selected in
the programming menu. If you have not selected a weather
22
Page 24

channel frequency for your local area, follow the instructions in
“Adjusting Weather Frequency”. To listen to the weather
broadcast, press and release the “WEATHER” bar on the front of
the WR-300. Adjust the volume for your best listening level.
Press and release the “WEATHER” bar again to mute the voice
broadcast.
USING THE ALERT FUNCTION:
Setting the Alert Volume
To store or change the siren volume, press and release “MENU”
button. Press the UP or DOWN arrow button until “SIREN
LEVEL HI or LO ” is displayed in the left side of the
display. Press and release the “SELECT” button then “UP
or DOWN arrows to choose HI or LO volume. You will
hear beeps at the volume you select.
Connecting the External Alert Output to an External Device
You may need to turn on or off another device when an alert is
received. The WR-300 provides both a switch closure to signal
other devices at the EXT. ALERT jack when the radio receives an
alert. The output is compatible with home automation devices
from suppliers like X-10 and others. Connect the positive lead of
the interface to the tip of the 1/8 inch (3.5mm) phone plug and the
negative lead to the body of the plug.
A DC powered device using 12 Volts or less and requiring less
than 200mA of current can be switched directly using the EXT.
23
Page 25

ALERT jack. Observe the polarity of the jack so that the negative
side of the external power source is connected to the body of the
1
/8 inch (3.5mm) phone plug and the device is connected to the
positive source and to the tip of the phone plug.
The internal switch is closed when an alert is received. Pressing
the ALERT ON/OFF button on the front of the radio will open the
switch.
Testing Siren and External Alert devices
If you need to test the sound of the siren alert or the function of an
external alerting device press MENU then the UP/down arrows
until you see SIREN TEST on the display. Press SELECT to
sound the siren and close the switch controlling the external alert
device. The siren will sound and the external device will be
active until SELECT key is pressed again.
NWR Alert Descriptions
This table contains the NWR descriptions of all the types of alerts
that your WR-300 will display. The display text and type of alert
sound are shown for each type of alert
What You See Alert Description Alert Sound
*(see Defeat Siren)
TORNADO
WATCH
TORNADO
WARNING
SEVERE
THUNDERSTORM
WATCH
SEVERE
THUNDERSTORM
WARNING
FLASH FLOOD
WATCH
Tornado watch
Tornado warning
Severe thunderstorm
Watch
Severe thunderstorm
warning
Flash flood watch
24
Fast siren *
Very fast siren
Fast siren *
Very fast siren *
Fast siren *
Page 26

FLASH FLOOD
WARNING
FLOOD
WATCH
FLOOD
WARNING
WINTER STORM
WATCH
WINTER STORM
WARNING
BLIZZARD
WARNING
FREEZE WARNING
HIGHWIND
WARNING
HIGH WIND
WATCH
DUST STORM
WARNING
HURRICANE
WATCH
HURRICANE
WARNING
TROPICAL STORM
WARNING
TROPICAL STORM
WATCH
COASTAL FLOOD
WATCH
COASTAL FLOOD
WARNING
SPECIAL MARINE
WARNING
AVALANCH
WATCH
AVALANCH
WARNING
VOLCANO
WARNING
EARTHQUAKE
WARNING
Flash flood warning
Flood watch
Flood warning
Winter storm watch
Winter storm warning
Blizzard warning
Freeze warning
High wind warning
High wind watch
Dust storm warning
Hurricane watch
Hurricane warning
Tropical storm warning
Tropical storm watch
Coastal flood watch
Coastal flood warning
Special marine warning
Avalanche watch
Avalanche warning
Volcano warning
Earthquake warning
Very fast siren *
Fast siren *
Very fast siren *
Fast siren *
Very fast siren *
Very fast siren *
Very fast siren *
Very fast siren *
Fast siren *
Very fast siren *
Fast siren *
Very fast siren
Very fast siren
fast siren *
Fast siren *
Very fast siren *
Very fast siren *
Fast siren *
Very fast siren *
Very fast siren
Very fast siren
25
Page 27

TSUNAMI
WATCH
TSUNAMI
WARNING
IMMEDIATE
EVACUATION
SHELTER
IN PLACE
WARNING
CIVIL DANGER
WARNING
CIVIL EMERGENCY
MESSAGE
RADIATION
HAZARD
WARNING
HAZARDOUS
MATERIALS
WARNING
NUCLEAR
POWERPLANT
WARNING
LAW
ENFORCEMENT
WARNING
FIRE
WARNING
CHILD ABDUCTION
EMERGENCY
911 TELEPHONE
OUTAGE
EMERGENCY
TUNE TV
WATCH
TUNE TV
WARNING
ADMINITRATIVE
MESSAGE
LOCAL AREA
EMERGNCY
Tsunami watch
Tsunami warning
Immediate evacuation
warning
Shelter in place warning
Civil danger warning
Civil emergency
message
Radiation hazard
warning
Hazardous materials
warning
Nuclear power plant
warning
Law enforcement
warning
Fire warning
Amber Alert-Child
abduction emergency
911 Telephone service
outage emergency
Other Watch message
not defined
Other warning message
not defined
Administrative message
Local area emergency
Fast siren
Very fast siren
Very fast siren
Very fast siren
Very fast siren
Very fast siren
Very fast siren
Very fast siren
Very fast siren
Very fast siren
Very fast siren *
Low siren *
Low siren *
Fast siren *
Very fast siren
Low siren *
Low siren
26
Page 28

EMERGENCY
ACTION
NOTIFICATION
EMERGENCY
ACTION
TERMINATION
SEVERE WEATHER
STATEMENT
SPECIAL WEATHER
STATEMENT
FLASH FLOOD
STATEMENT
FLOOD
STATEMENT
HURRICANE
STATEMENT
Emergency action
notification
Emergency action
termination
Severe weather
statement
Special weather
statement
Flash flood statement
Flood statement
Hurricane statement
Very fast siren
Low siren
Low siren *
Low siren *
Low siren *
Low siren *
Low siren *
The SAME message the NWR sends contains information, which
tells the radio the time period for which the alert is valid. The
time can be set from 15 minutes up to 6 hours. When the
designated time has passed the display message and light will be
reset to their normal state.
Environment Canada is developing a warning system using
SAME technology. Some added events not currently used by
NWS are used in the Canadian system. These are also decoded
according to this table.
What You See Alert Description Alert Sound
*(see Defeat Siren)
BIOLOGICAL HAZARD
WARNING
BOIL WATER
WARNING
CHEMICAL HAZARD
WARNING
DAM WATCH Dam Break Watch Fast tone *
DAM BREAK WARNING Dam Break Warning Very fast tone
CONTAGIOUS DISEASE
WARNING
Biological Hazard
Warning
Boil Water warning Very fast tone *
Chemical Hazard
warning
Contagious Disease
Warning
Very fast tone
Very fast tone
Very fast tone
27
Page 29

FOOD
CONTAMINATION
WARNING
FLASH FREEZE
WARNING
ICEBERG WARNING Iceberg Warning Very fast tone *
INDUSTRIAL FIRE
WARNING
LAND SLIDE WARNING Land Slide Warning Very fast tone
POWER OUTAGE
ADVISORY
WILD FIRE WARNING Wild Fire Warning Very fast tone
WILD FIRE WATCH Wild Fire Watch Fast tone *
Food Contamination
Warning
Flash Freeze Warning Very fast tone *
Industrial Fire
Warning
Power Outage
Warning
Very fast tone
Very fast tone
Low tone *
Reviewing Overlapping Alerts
The WR-300 radio can store up to TEN different alerts (with
overlapping effective times) in its memory. If the radio receives a
new alert while a previous alert is still in effect, is automatically
displays the alert description and sounds the alert for the new alert
message. To scroll backward and forward through the radio’s
memory and review all the effective alerts, press the UP arrow
key to view the latest alert or the DOWN key to review the last 10
active alerts. Those alerts which have expired will be shown with
“EXP” below the alert name.
When a Test or Demo Alert Occurs
NWR sends out weekly test and occasional demonstration signals
to let everyone with weather monitor receivers verify the
operation of their equipment.
To find out the test schedule of for your area, contact the local
NOAA or NWS office. Look for the number under US
Government, Department of Commerce.
28
Page 30

The following alert descriptions are for testing only.
What You See What You Hear
REQUIRED WEEKLY
TEST
REQUIRED MONTHLY
TEST
SYSTEM
DEMO
NATIONAL PERIODIC
TEST
Beeps *
Beeps *
Beeps *
Beeps *
As the NWS adds new alert capabilities your radio is set to
receive them and alert you automatically with no modifications.
Defeat Siren Alert Option
This function is to set the Weather Monitor, when receiving some
types of weather emergency messages, not to generate the siren or
voice alert but only display the message in order not to annoy
you. The responses followed by an asterisk in the above table can
be silenced.
To choose message types to be silenced press the MENU key and
the up or down arrow keys to find “DEFEAT SIREN” displayed.
Press SELECT key and use up or down arrow keys to find the
event type you wish to silence. Press the left or right arrow key to
change the status of the event. The status is shown by the
“ALERT ENABLE” or “ALERT DISABLE” icons at the bottom
of the display. Press the up or down key to find another event
type or press MENU key to exit this function.
Adding Future SAME Event Codes
If the NWS finds it necessary to add alert codes in the future
your WR- 300 will allow you to add five new SAME message
29
Page 31

codes. The new SAME message code is divided into three (3)
categories. They are:
a). Event code (PIL code);
b). Display text message on LCD
c). severity status.
You must enter all of them to make the new SAME message
function correctly.
, Remember that this is for future needs. No additional codes exist at press time.
To add the new SAME message code, follow the steps below:
To add an event type press the MENU key and the up or down
arrow keys to display “ADD ALERTS”. Press SELECT to
display “NEW ALERT 1”. Press up or down arrow keys to
choose a different number new alert or press ENTER key to
activate the first of three characters below “NEW ALERT’.
Use the up and down arrow keys and left and right arrow keys
to select the alphabet characters to spell the three character
event code of the new alert. Press SELECT key to display the
line which will be shown on the display when this message is
received. Eleven character spaces are available. Use the arrow
keys to choose the letters and move from one space to the next
on the line. The character selection which shows all segments
of the display will make a blank in the spot where it is placed.
When you have completed the description line press SELECT
key to choose the level of the event. All event codes ending in
A should be entered as WATCH. Those codes ending in W
should be entered as WARNING. Those codes ending in S or E
should be entered as ADVISORY.
30
Page 32

Backlight of the Display
Pressing and releasing a button will turn on the back light for
about 5 seconds. For continuous backlight, press MENU, then
select LIGHT. After pressing the “Select” button, press the Up or
Down arrows to change from “Normal” to “Continuous” and
press select to save your changes.
AM/FM radio use
The AM/FM radio built into the WR-300 can be used for listening
any time without interrupting the Weather Monitor functions. If
an alert is received, the unit automatically switches off the
AM/FM sound and operates the Weather Monitor alert functions
you have programmed. Press the RADIO button to turn on or off
the radio. Press the AM/FM button to switch between AM and
FM.
AM/FM memory channels
You can program 3 AM and 3 FM memories for your favorite
stations. Use the UP and DOWN buttons to move between
memory channels. To tune to another station, use the LEFT or
RIGHT arrow buttons while the radio is on. You will see the
frequency display change as you hold the button or press it once
for each step of frequency.
Programming memory channels
To set the channel frequency of a memory channel, turn on the
radio and use the LEFT or RIGHT arrow buttons to adjust the
frequency to the channel you desire. Next, press the MENU
button. The MEMORY # will flash on the display. Use the UP
or DOWN buttons to find the memory channel you wish to
31
Page 33

program. Press SELECT button to set the memory channel to the
frequency you selected.
Button press Beeps
When a button is pressed with the “Max / Volume / Off” switch
ON, the WR-300 emits a beep sound. One beep represents that the
WR-300 has received a command and has taken effective action.
Two beeps represents the command is not valid (wrong button
pressed) and no action is taken.
TROUBLESHOOTING & HELP:
Problem Suggestion(s)
No power. Ensure that the wall power
adapter is connected to AC
power, that the cord to the radio
is securely seated in the radio
and that a fresh back-up battery
is installed (if AC power has
failed).
No sound. Check VOLUME setting
No weather broadcast when
you press WEATHER
Ensure that telescoping antenna
is fully extended.
If you are using an external
antenna, ensure that it is
connected properly.
Ensure that the radio is set to
the NOAA weather channel in
32
Page 34

use in your area. Contact
NOAA to ensure they are
presently broadcasting.
The radio is not responding
properly to NWS weather alert
broadcasts
If you desire to hear the alert or
For HELP, contact Midland Radio Corporation.
(See the “Service” section in this manual for return instructions.)
Ensure that you have
programmed the correct FIPS
code(s) into the radio’s
memory.
operate a device from
EXT.ALERT jack ensure that
display shows SIREN or
VOICE icon.
Midland Radio Corporation
1120 Clay Street
North Kansas City, Missouri 64116
Phone: (816) 241-8500
Fax: (816) 241-5713
E-mail: mail@midlandradio.com
URL: www.midlandradio.com
NOTES AND MAINTENANCE:
1. The typical weather (162MHz) reception distance will
range from 25-50 miles depending on your location and
conditions of weather, terrain, etc. Also, some Weather Stations
operate at much higher power levels than others and have their
33
Page 35

transmitting towers on the top of high buildings or hills. For better
reception from greater distances, an external antenna can be used.
To use an external antenna, you must have an antenna with an
RCA phono plug or an adapter to RCA phono plug to connect
into the back of the WR-300. If reception in your area is not good,
check with your local dealer for assistance and ask about typical
reception range in your area. Also try different locations in your
home or office to find a place of good reception. A location near a
window is a good starting place.
2. If Weather Stations cannot be heard on any channel,
contact your local National Weather Service office to verify that
the station is on the air and also verify the CHANNEL
(Frequency) and location of the weather station.
3. All National Weather Service stations periodically
transmit an Alert test signal. Some broadcast only once a week
and others more often. You can always find out when the test
signal is broadcast by calling the U.S. Weather Service's phone
number for your local NOAA station.
4. Mobile home reception is difficult due to the metallic
structure preventing reception. Put your WR-300 near a window.
If this doesn't provide reasonable reception, an outside antenna
must be used. One suggested antenna is the Midland 18-259W
VHF through-glass antenna. This antenna works best on single
pane windows but can improve reception when applied to double
pane windows as well.
34
Page 36

12 VOLT OPERATION
Your WR-300 can be powered from any 12-Volt CAR-TRUCKRV or BOAT battery. An optional (Model 18-235) power cord
adapter is available from Midland or your local dealer.
FCC COMPLIANCE INFORMATION:
Midland NWR-SAME Weather Monitor
Model WR-300
This device complies with part 15 of the FCC Rules. Operation is
subject to the following two conditions:
This device may not cause harmful interference.
This device must accept any interference received including
interference that may cause undesired operation.
For compliance information contact:
Midland Radio Corporation
1120 Clay Street
North Kansas City, Missouri 64116
Phone: (816) 241-8500
Fax: (816) 241-5713
E-mail: mail@midlandradio.com
URL: www.midlandradio.com
35
Page 37

FIPS CODE FORM:
Use this space to record the FIPS codes you have programmed
into your WR-300-weather monitor.
1._____________
2._____________
3._____________
4._____________
5._____________
6._____________
7._____________
8._____________
9._____________
10.____________
11.____________
12.____________
13.____________
14.____________
15.____________
36
Page 38

SERVICE:
If your MIDLAND Weather Monitor fails to operate properly,
check the “Troubleshooting” section in this manual before
returning it for service. If necessary, return as follows:
1. Pack the unit in its original box and packing. Then pack the
original box in a suitable shipping carton. Caution: Improper
packing may result in damage during shipment.
2. Include the following:
a. full description of any problems
b. money order for $7.50 to cover shipping and handling
(this may not be required in some states)
c. daytime telephone number
3. For warranty service include a photocopy of the bill of sale or
other proof of purchase showing the date of sale.
4. You do not need to return accessory items (AC/DC Adapter,
Owners Guide) unless they might be directly related to the
problem.
5. A flat rate of $45.00 will apply to repairs not covered by
warranty or units that are over one year old. Send only
cashiers check, money order or Master Card or Visa card
number.
Midland Radio Corporation
1120 Clay Street
North Kansas City, Missouri 64116
Phone: (816) 241-8500
Fax: (816) 241-5713
E-mail: mail@midlandradio.com
URL: www.midlandradio.com
37
Page 39

ONE YEAR LIMITED WARRANTY:
MIDLAND Radio Corporation will repair or replace, at its
option without charge, your WR-300 weather alert radio which
fails due to a defect in material or workmanship within one year
following the initial consumer purchase.
This warranty does not include any antennas, which may be a part
of or included with the warranted product, or the cost of labor for
removal or re-installation of the product in a vehicle or other
mounting.
Performance of any obligation under this warranty may be
obtained by returning the warranted product, freight prepaid,
along with a copy
of the original sales receipt, to Midland Radio
Corporation, Warranty Service Department, 1120 Clay St., N.
Kansas City, Missouri 64116.
This warranty gives you specific legal rights, and you may also
have other rights, which vary, from state to state.
Note: The above warranty applies only to merchandise purchased
in the United States of America or any of the territories or
possessions thereof, or from a U.S. Military exchange. For
warranty coverage on merchandise purchased elsewhere ask your
dealer.
Midland Radio Corporation
1120 Clay Street
North Kansas City, Missouri 64116
Phone: (816) 241-8500
Fax: (816) 241-5713
E-mail: mail@midlandradio.com
URL: www.midlandradio.com
38
Page 40

SPECIFICATIONS:
Specifications are nominal and subject to change.
GENERAL
Frequency Range AM 520-1710KHz
FM 87.5-108.5MHz
WX 162MHz
(162.4O, 162.425, 162.45, 162.475, 162.50, 162.525,
162.55MHz)
Number of WX Channels …………….7
Input Voltage .........................................9-14 Volts DC
Dimensions ….. 180MM W x 65MM H x 140MM D
(7 1/8 x 2 1/2 x 5 1/2 in.)
RECEIVER
20 dB Quieting Sensitivity…………...…..0.5 uV
FIPS Code Sensitivity @5kHz Dev..…….0.5uV
Channel Selectivity ………..................±25kHz, 60dB
Speaker Impedance ……………......…..8 ohms
Power Output @10%THD........................250 mW max.
EXT. ALERT OUTPUT
Sinking Current………………………200mA DC max.
States…….Alarm: pull down,……Normal: open
39
Page 41

GLOSSARY:
AM/FM........... Amplitude Modulated / Frequency Modulated.
Band................ A specific range of wavelengths or frequencies
where radio stations are located. The AM band is
530-1600 kHz, the FM band is 88-108 kHz.
dB ................... Decibel. A unit used to express relative
difference in power or intensity.
FCC................. Federal Communications Commission
Agency charged with regulating interstate and
international communications by radio,
television, wire, satellite and cable. www.fcc.gov
FIPS................ Federal Information Processing System.
kHz ................. Kilohertz. A unit of frequency equal to 1000 hertz.
LCD................ Liquid Crystal Display.
LED ................ Light Emitting Diode.
NOAA.............
Environmental data services, and provides a
NWR/ SAME.. National Weather Radio / Specific Area Message Encoding.
NWS............... National Weather Service.
Current weather conditions, forecasts, warnings,
ohm................. A unit of electrical resistance equal to that of a
SAME............. Specific Area Message Encoding.
WR-300 .......... Weather Alert Radio 300.
WX channels .. Weather channels.
National Oceanic and Atmospheric Administration.
reference library for students, teachers, and
researchers. www.noaa.gov
and weather safety. Offers maps, radar and
satellite images, numerical models, and
educational resources. www.nws.noaa.gov
conductor in which a current of one ampere is
produced by a potential of one volt across its
terminals.
40
Page 42

41
 Loading...