

Midland Radio MXT115 Owners Manual

MXT115

Model MXT115
Table of Contents....................................................................
WELCOME TO THE WORLD OF MIDLAND RADIO.......................................................
FEATURES.....................................................................................................................
FCC NOTICE...................................................................................................................
Exposure To Radio Frequency Energy............................................................................
INSTALLING YOUR RADIO.............................................................................................
Preparation for Installation.....................................................................................
Installing the Mounting Bracket..............................................................................
Installing the Antenna.............................................................................................
Electrical and Rear Panel Connections.................................................................
Connecting the Microphone...................................................................................
Using an External Speaker....................................................................................
CONTROLS AND INDICATORS......................................................................................
Operating Controls.................................................................................................
Microphone Controls..............................................................................................
Rear Panel Connections........................................................................................
LCD Display...........................................................................................................
OPERATING YOUR RADIO............................................................................................
About Range..........................................................................................................
Power On/O.........................................................................................................
Selecting the Active Channel.................................................................................
Adjusting the Volume.............................................................................................
Transmitting and Receiving a Call.........................................................................
UTILITY FUNCTIONS......................................................................................................
Locking the Keypad...............................................................................................
Using Monitor Mode..............................................................................................
Scanning for Active Channels................................................................................
NOAA Weather Radio/Scan..................................................................................
To Manually Set the Weather Channel..................................................................
To Enable Weather Alert........................................................................................
MENU MODE FUNCTIONS.............................................................................................
MXT115 Menu Mode Quick Reference Chart........................................................
Selecting a Privacy Code......................................................................................
Selecting the Transmit (TX) Power Level..............................................................
Adjusting Squelch Sensitivity.................................................................................
Roger Beep...........................................................................................................
Call Alert Tone.......................................................................................................
Silent Operation.....................................................................................................
Repeater Channels................................................................................................
Selecting the LCD Display Background Color.......................................................
RESTORING THE DEFAULT SETTINGS........................................................................
CARE AND MAINTENANCE............................................................................................
TROUBLESHOOTING GUIDE........................................................................................
Page 2
midlandusa.com
Model MXT115
2
SPECIFICATIONS........................................................................................................
3
3
4
4
5
5
6
7
8
8
9
9
9
10
10
11
12
12
13
13
13
13
14
14
15
16
16
17
17
18
18
18
20
20
21
22
22
23
23
24
25
25
GMRS Frequency Chart.....................................................................................
Wx Band Chart...................................................................................................
CTCSS Privacy Codes Frequency Chart...........................................................
DCS Privacy Codes Chart..................................................................................
LIMITED WARRANTY (United States and Canada)....................................................
WELCOME TO THE WORLD OF MIDLAND RADIO
Congratulations on your purchase of a high quality MIDLAND product.Your
MXT115 2-way radio represents state-of-the-art high tech engineering.
Designed for General Mobile radio Service (GMRS) operation, this
compact package is big on performance. It is a quality piece of electronic
equipment, skillfully constructed with the nest components. The circuitry
is all solid-state and mounted on a rugged printed circuit board. Your
MXT115 radio is designed for reliable and trouble-free performance for
years to come.
FEATURES
– 15 GMRS Channels
– 10 NOAA Weather Channels
– 8 Repeater Channels
– 142 Privacy Codes (38 CTCSS / 104 DCS)
– Monitor Function
– Keypad Lock
– Power Hi/Lo Settings
– External Speaker Jack
IMPORTANT!
Changes or modications to this unit not expressly approved by
MIDLAND RADIO CORPORATION could void your right to operate this
unit. Your radio is set up to transmit a regulated signal on an assigned
frequency. It is against the law to alter or adjust the settings inside the
COMMUNICATOR to exceed those limitations. Any adjustment to your
radio must be made by qualied technicians.
midlandusa.com
Page 3
26
26
26
27
27
30
Model MXT115
Model MXT115
FCC NOTICE
The MXT115 operates on GMRS (General Mobile Radio Service)
frequencies, which require a Federal Communications Commission (FCC)
license. You must be licensed prior to operating on channels 1-7, 15-22
and repeater channels 15-22, which comprise the GMRS channels of
the MXT115. Serious penalties may result from unlicensed use of GMRS
channels, in violation of FCC rules, as stipulated in the Communications
Act’s Sections 501 and 502 (amended). You will be issued a call sign
by the FCC that should be used for station identication when operating
your radio on GMRS channels. You should also cooperate by engaging in
permissible transmissions only, avoiding channel interference with other
GMRS users, and being prudent with the length of your transmission time.
To obtain a license or ask questions about the license application, contact
the FCC at 1-888-CALL FCC or go to the FCC’s website:
http:// www.fcc.gov and request form 605.
Exposure To Radio Frequency Energy
Your Midland radio is designed to comply with the following national and
international standards and guidelines regarding exposure of human
beings to radio frequency electromagnetic energy.
▪ United States Federal Communications Commission, Code of Federal Regula-
tions: 47 CFR part 2 sub-part J
▪ American National Standards Institute (ANSI)/Institute of Electrical & Electronics
Engineers (IEEE) C95. 1-1992
▪ Institute of Electrical and Electronics Engineers (IEEE) C95. 1-1999 Edition
▪ National Council on Radiation Protection and Measurements (NCRP) of the United
States, Report 86, 1986
▪ International Commission on Non-lonizing Radiation Protection (ICNIRP) 1998
▪ To control your exposure and ensure compliance with the general population or
uncontrolled environment exposure limits, transmit no more than 50% of the time.
The radio generates measurable RF energy exposure only when transmitting.
▪ The consumer must maintain a minimum safe separation distance of 26.37 inches
(67 cm) from the antenna when transmitting.
Page 4
midlandusa.com
INSTALLING YOUR RADIO
Preparation for Installation
This radio may be installed in any 12-volt negative ground system vehicle.
Most current U.S. and Foreign vehicles use a negative ground system,
but some older models and some newer large trucks may have a positive
ground. Check the specications for your vehicle before beginning
installation. Generally, you have a negative-ground system if the negative
(-) battery terminal is connected to the motor block. Contact your dealer if
you are unable to determine your vehicle’s polarity system.
1. Read these instructions completely before beginning installation
2. Read and follow all safety precautions in your vehicle’s Service Manual.
3. Make sure all necessary tools, materials, and parts are on hand.
4. Disconnect the negative (-) battery cable before installing your radio. Be
sure to reconnect the cable when installation is complete.
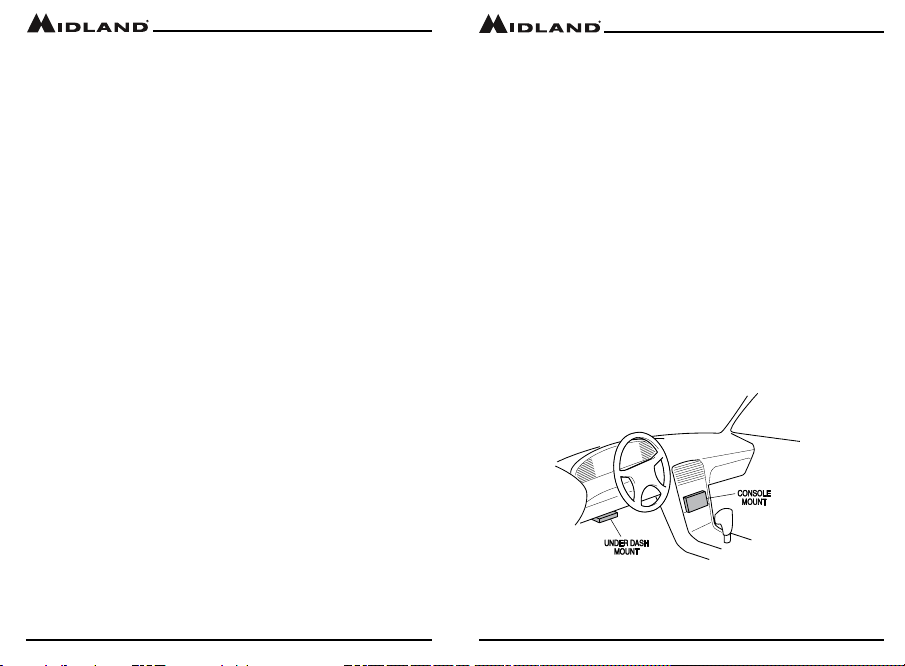
5. Determine a mounting location for your radio. The MXT115 is designed
to be installed under the dash or vertically on the center console. Choose
a location that does not impair visibility or interfere with driving. Also take
into consideration the routing and length of the lead wires and cables to
the power source, antenna, and/or optional external speaker.
CAUTION: Extreme care should be exercised when drilling into
the dash to avoid damage to under dash electronic ignition,
cruise control, instrument and/or accessory wiring.
midlandusa.com
Page 5

Model MXT115
Model MXT115
Installing the Mounting Bracket
1. Using the mounting bracket as a
template, mark the location of each
screw hole under the dash. Use a
nail or other sharp pointed object to
mark the hole locations.
2. Attach the bracket to the dash with
the Phillips head sheet metal screws
provided. Tighten the screws
securely. DO NOT OVER-TIGHTEN.
3. Slide the radio into the mounting
bracket. BE SURE the mounting
bracket retainers engage the slots
in the sides of the radio to prevent
movement while driving.
Page 6
midlandusa.com
Installing the Antenna
The MXT115 includes a “magnetic mount” antenna, intended to be
attached to the vehicle’s roof, trunk or similar location. Specic installation
requirements vary between vehicles. Use the following guidelines to install
the antenna.
*Where you locate your antenna does make a dierence.*
Some general rules for antenna location that can aid radio
performance.
1. Metal surfaces covered by berglass or vinyl may aect radio range.
Avoid these locations.
2. Mount the antenna as high on the vehicle as possible. The higher the
better.
3. If possible, mount the antenna in the center of whatever surface you
choose.
4. The antenna cable is 19.7 feet (6 meters) long. Be sure the mounting
location will allow for connection of the cable to the radio.
5. Be sure the mounting location is clean and dry before installing the
antenna.
6. Route the antenna cable through an accessible entry point, such as a
rear door or trunk opening.
7. When routing the antenna cable inside the vehicle, keep the cable
away from noise sources, such as the ignition system, gauges, etc.
8. Exercise care to prevent cable damage. Make use of existing gaskets,
grommets and weather stripping to protect the cable along its route.
midlandusa.com
Page 7

Model MXT115
Model MXT115
Electrical and Rear Panel Connections
Refer to Rear Panel Connections for rear panel connector locations.
NOTE: Radio antenna is installed separately.
1. The power cord supplied with the MXT115 is equipped with a cigarette
lighter adapter for easy installation. Simply plug the connector into the
vehicle’s cigarette lighter. If a “hard-wired” installation is desired, connect
the power cord to the vehicle’s electrical system as follows:
▪ Cut the power cord just after the cigarette lighter adapter.
▪ Connect the positive lead (RED wire with in-line fuse holder) to
either (a) the fuse block or (b) directly to the positive post of the
vehicle’s battery.
NOTE: The fuse block is usually the most convenient connection
point. The power cord positive lead can also be connected to the
accessory terminal on the fuse block or ignition switch, so the radio
automatically turns o when the ignition is turned o.
▪ Securely connect the ground lead (BLACK wire) directly to the
vehicle’s metal frame. A good direct metal-to-metal ground is
essential for optimum performance.
2. Attach the antenna cable to the ANT jack on the rear panel.
3. If desired, an optional external speaker (purchased separately) can be
connected to the EXT SPKR jack (see Using an External Speaker).
Connecting the Microphone
Insert the RJ11 connector into the front of the MXT115. The microphone
mounting bracket can be attached to the vehicle dash or other convienent
location in a manner similar to the radio’s mounting bracket..
Page 8
midlandusa.com
Using an External Speaker
The MXT115 provides a rear-panel jack for connection of an optional
external speaker (purchased separately).
When selecting an external speaker, ensure the speaker has 8-ohm
impedance and is rated for 4.0 watts.
NOTE: When an external speaker is connected, the radio’s internal
speaker is automatically disabled.
CONTROLS AND INDICATORS
Operating Controls
1. LCD Display
2. On/O Volume
3. Microphone Jack
4. USB Charging Jack
5. Menu - Press to access menu
6. Weather - Press to access weather mode
7. Call /
keypad
8.
monitor mode
midlandusa.com
Lock - Press to send a call signal, or long press to lock the
Monitor / Scan - Press to enter scan mode, or long press to enter
Page 9

Model MXT115
EXT SP
ANT
Model MXT115
Microphone Controls
1. Channel Up
2. Channel Down
Rear Panel Connections
1. ANT Jack - SO-239 UHF connector for external antenna (included)
2. EXT SPKR Jack - 3.5mm Audio connector for optional external speaker
(purchased separately) (see Using an External Speaker for
specications).
3. 13.8V DC Cable - 2-wire DC connector for 12V DC nominal input power
connection
Page 10
midlandusa.com
LCD Display
12
1. Transmitting Icon - Indicates the radio is transmitting to another
user.
2. Monitor Icon - Indicates when the radio is in monitor mode
3. Channel Icon - Shows the selected transmit/receive channel.
4. Key Lock Icon - Indicates KEY LOCK mode is on
5. NOAA Weather Band Icon - Indicates when the radio is in the
Weather Band mode
6. DCS Icon - Indicates a Digitally Coded Squelch Privacy Code has
been enabled for the currently selected channel
7. Scanning Icon - Indicates the “auto-scan” function is active.
8. Repeater Icon - Shows the selected transmit/recieve repeater
channel
9. CTCSS Icon - Indicates a Continuous Tone Coded Squelch System
Code has been enabled for the currently selected channel.
10. Signal Strength - Indicates the strength of the current transmit or
receive signal.
11. Transmit Power Level Icon - Indicates the transmit power setting
12. Recieving Icon - Indicates the radio is recieving a transmission
from another user.
midlandusa.com
Page 11
 Loading...