

Page 1

M X - 1 1 1 1
■ automatic digital/analog
network mode
■ 199 name and number memory
■ 56 X 105 full graphic display
■ easy to use feature menu
■ supports voice mail alert and
calling number identification
■ call timers
■ one - touch dialing
■ scratch pad
■ in call budget timer
■ call list and missed call
indicator
■ own number display
■ SMS ( short message service )
Issue:Draft 6/00
support
■ DTMF tones
■ dimensions 115 X 45 X 17.8mm
■ flip type design
800Mhz Cellular
Dual Mode
Page 2

A n t e n n a .
Buzzer for ringing signal.
Ear piee.
Visual Alert indicator.
Hands free jack.
Volume adjustment.
M i c r o p o n e
Go back to previous menu or Clear
entry or exit a feature.
Select menu or set current feature
and exit.
Dial a displayed number.
Power On/Off plus End a call and
exit feature menu.
Clear entry or Go back to previous
menu or Exit a feature.
Contents
Introduction
Security
Safety
The Networks
Getting Started
Making Calls
Customizing
The Feature Menu
The Phone Book
1
2
2
10.2
3
4
5
6
7
8
9
(Flip not shown for carity)
Select menu or access Mails.
Scroll up or Upward search.
Scroll down or Downward search.
Display Icon’s:
Digital mode indicator.
Analog Mode indicator.
Service available.
No service.
Battery power level.
Signal strength indicator.
Mail indicator.
Roam indicator.
Alarm mode indicator.
The Data/Fax Services
Network Features
Troubleshooting
Glossary
Accessories
Index
10
11
12
13
14
15
Page 3

Introduction
Security
Congratulations on choosing the Maxon MX-1111 dual
Mode Cellular mobile phone.
1
The MX-1111 Phone has been designed to operate on
both the digital CDMA Cellular network and the analog
1.1
AMPS network.
To help you understand the features of the MX-1111
and how it operates on a cellular networks, we have
included a glossary of common terms in Section 13 of
this guide and have provided information about the
cellular networks on pages 4.1 and 5.7.
Your mobile phone is intended for use with the
supplied rechargeable battery, charger and any of the
approved accessories shown in section 14 of this user
guide. Usage of devices and accessories not approved
for this unit may invalidate any approval given to this
equipment and may be dangerous.
The MX-1111 conforms to IS-95A, IS-96A and IS-98 A
standards for cellular dual mode mobile phones.
Maxon reserves the right to make changes and
improvements to any of the products described in this
guide without prior notice.
If your phone is lost or stolen, you must report it to your
network operator or service provider so that they can
restrict the phone from use.
This is important, as you may be liable for the cost of
unauthorized calls until the equipment is restricted.
You can help prevent mobile phone crime by taking the
following precautions:
- set the phone in lock mode.
- set call restrictions.
- don’t leave your phone visible in a vehicle when you
leave it. Take the phone with you or lock it in the
trunk or glove compartment of your car.
2
2.1
Page 4

Safety
Personal
■ Operation of any radio equipment including mobile
3
3.1
phones, may interfere with the function of
inadequately shielded medical devices such as
hearing aids and pacemakers. You must consult the
manufacturer of these device or your physician,
before use
■ Do not switch on your mobile phone in hospitals
(unless areas where mobiles can be used are clearly
marked) as mobile phone can cause interference to
medical equipment.
■ Observe restrictions on the use of radio equipment
in fuel depots, chemical plants, in areas where
explosive gases are present or where blasting
operations are in progress. Your mobile phone will
continue to transmit call responses if left in stand-by
mode. You must switch off when requested to do so
■ Do not move the antenna close to, or touching any
exposed part of the body when making a call, a
damaged antenna may cause a minor burn
Mobile Phone Use
■ Your mobile phone produces magnetic fields. Do not
place next to magnetic storage media such as
computer diskettes, credit cards.
■ Operating your mobile phone close to other electrical
equipment such as televisions, phones, radios and
personal computers, may cause interference
■ Do not expose your mobile phone to strong sunlight,
direct heat or liquids (such as water)
Battery Use
■ Do not short-circuit the battery terminals. This will
damage the battery, produce heat and may cause a
fire
■ Never dispose of batteries in a fire as it can cause
them to explode. Return dead batteries to your
supplier or an approved recycling centre. DO NOT
dispose along with household waste
W A R N I N G : If the battery case breaks, avoid contact
with the contents. Wash contaminated skin with lots
of water and seek medical attention.
On the Road
■ Before making or receiving calls acquaint yourself
thoroughly with the applicable local laws and
guidelines regarding the use of mobile radio
telephones and observe them at all times
■ Air safety bags, anti-lock brakes, speed control and
fuel injection systems are normally immune to radio
transmissions but if you experience problems,
consult your vehicle dealer.
■ Switch off your mobile phone when refueling or
where there are signs restricting the use of 2-way
radio equipment. Do not store or carry flammable or
explosive materials in the same compartment as
your mobile phone, internal sparks could cause
ignition.
Inside Aircraft
■ Switch off your mobile phone when in an aircraft.
The use of mobile phones in an aircraft may be
dangerous to the operation of the aircraft, disrupt the
cellular network and is illegal.
3
3.2
Page 5

The Networks
Getting Started
Your phone can operate on two different cellular
systems(networks) and will automatically switch
4
between the two to provide you with the best service.
4.1
The Analog AMPS Network
■ This is the original cellular system for mobile phones
which provides excellent call quality in areas of good
coverage. However, at peak times and in high user
areas, the network can become ‘overloaded’ and
you may have to wait before you can get a ‘line’ to
make a call. Dropped calls can also be a problem in
hilly terrains and where there are a number of large
structures.
The Digital CDMA Network
■ CDMA is a new system that takes advantage of
digital technology to provide superior management
of the available radio spectrum. Unlike analog and
other digital systems, CDMA assigns a unique code
to each call then spreads it across a wide segment
of the cellular band, enabling a large numbers of
calls to be transmitted at the same time. You are
therefore more likely to make a successful call first
time, there is less interference and all your
conversations are encrypted to prevent
‘eavesdropping’ CDMA also offers advanced
features such as:
- text messaging
- digital paging
- Caller number identifications
- Low power transmission significantly increasing talk
and stand-by times
- soft hand-off
Read this section before attempting to use your
phone. It tells you how to attach, charge and care
for the phone’s battery. We have also included
information about the wake-up and stand-by screen
displays, how to turn the phone ON and OFF, and
what to do if you are having difficulty in connecting
to a network.
The Battery 5.1
Fully Charge The Battery 5.1
Attaching and Removing
the Battery 5.1
Charging the Battery 5.1
Battery Performance 5.3
Battery Power Level 5.3
Usable TIme for Battery 5.3
Switching ON and OFF 5.4
Switching ON 5.4
Wake-up Screen 5.4
Stand-by Screen 5.5
Switching OFF 5.6
Network Connection 5.7
5
Page 6

The Battery
Fully Charger The Battery
5
Failure to do this will affect the life of the battery and
reduced operating times between recharges. Best
5.1
battery performance will be achieved after fully
charging and discharging the battery two or three
times.
Attaching and Removing the Battery
■ To remove battery, switch the phone OFF, press the
release catch in and slide battery downwards .
■ To fit place battery as shown and slide upwards
until the battery clicks into position.
Charging the Battery
■ Connecting the TRC(Traveler Charger) plug in to
charger jack of phone.
■ While the phone is under charging mode, the red
LED light on the TRC will be on.
■ Battery charging time takes approximately 1-3hours
depending on battery size and type .
Charge times as follows:
- Slim Li-Ion (MBL0600) : 1 hour.
- Standard NiMH (MBN0600) : 1 hour.
- Standard Li-Ion (MBL0930) : 2 hours.
- Extended Li-Ion (MBL1450) : 3 hours.
5
5.2
WARNING: Charge the battery in a well-ventilated
area between 0°C and +45°C using the supplied
or approved charger. The use of a non approved
chargers could result in a fire or injury through an
electrical shock.
Page 7

Battery Performance
Any quoted stand-by or talk times are subject to
network conditions.
Switching ON and OFF
Battery Power Level
The battery power level is shown in the top right corner
5
of the display when you switch the phone ON. Four
levels are displayed from full (all black) to empty.
5.3
■ fully charged
■ fully discharged
Usable Time for Battery
C o n d i t i o n s C o n t i n u o u s C o n t i n u o u s
T y p e s Talk Time Stand-by Time
MBL0600 (Slim Li-Ion) Approx. 1.5 hours. Approx. 50 hours
MBN0600 (STD. NiMH) Approx. 1.5 hours. Approx. 50 hours
MBL0930 (STD. Li-Ion)
M B L 1 4 5 0 ( E X T . L i - I o n ) Approx. 3.5 hours Approx. 130 hours
(Talk time and stand-by times are based on use of
digital mode and slot cycle index 2 without voice
activity).
■ Above times are talk only and stand-by times in
normal use the time shall be lower because a large
amount of battery power shall be consumedby
initiating and receivig calls between standby.
■ Times may vary, depending on the system condition
set by base station.
■ Usable time of battery may vary, depending on
usage circumstances such as charge conditions,
temperature, user’s habit or the location’s raio wave
conditions.
■ Usable time of battery shall decrease over time as
they aged.
Approx. 2.5 hours Approx. 80 hours
When the phone is switched ON, the phone will wakeup and a stand-by screen will be displayed. Following
pages explain the displayed message and symbols.
Switching ON
■ hold until the back light lamps come on also you’ll hear
a beep if the key beep volume setting is active).
Wake-up Screen
■ after power-up, the wake-up screen appears briefly
and will last about a seconds.
B a n n e r - you can change the top line message
using the “Banner”menu feature. Refer to
Customizing for instructions
Network Name - an abbreviation of your current
network operator.
Mobile telephone number including area
code.
5
5.4
Page 8
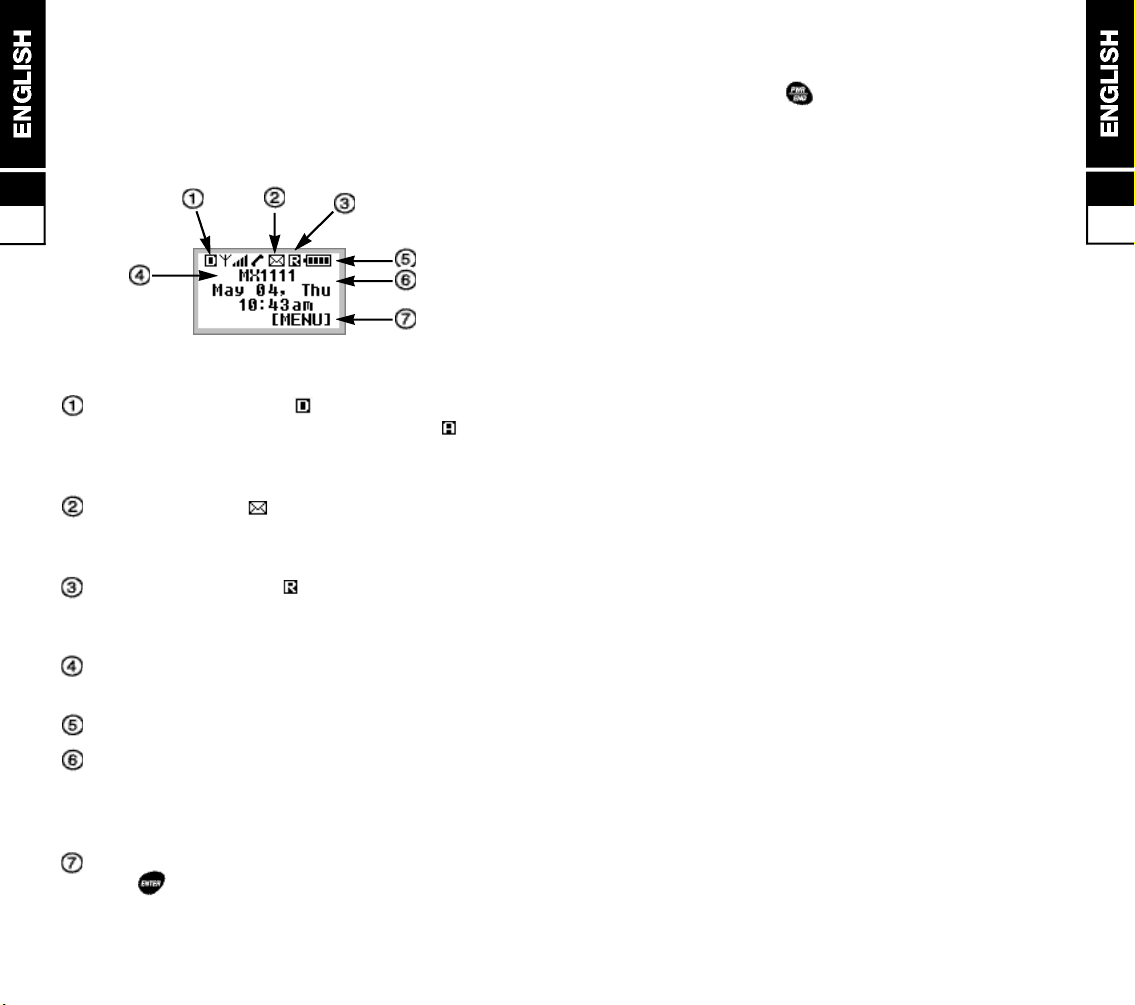
Stand-by Display
■ when the stand-by display appears the phone is
ready to make and receive call subject to network
coverage (see below). It also provides a starting
point to enter the feature menu and phone book
5
Switching OFF
■ press and hold button until the screen clears
(approximately 1.5 seconds)
■ the phone must be switched OFF before removing
the battery
5
5.5
5.6
Network Indicator - if icon appears, you are
connected to the CDMA digital network. If icon
appears, you are connected to the AMPS analog
network.
Mail Indicator - icon appears if there is a
voice/text/email message that needs to be checked
by the owner of the phone.
Roaming Indicator - icon appears and blinks
if the phone is operating on an out-of-home
area(Roaming area). Additional chares may apply.
Banner - this is a same message that appears on
the wake-up screen
Battery Power Level - battery level indicator.
Date and Time display - appears when the
phone connects to the CDMA network and remains
displayed until power is switched OFF, even if the
phone switches to the AMPS network.
Menu key indicator - the button right under this
icon “ “ will act as the MENU button.
Page 9

Network Connection
The MX-1111 Phone is initially programmed to search
5
for the digital CDMA network each time it is switched
ON. If you are in an area of poor CDMA coverage, it
5.7
will automatically search for the analog AMPS network
to enable you to continue to making and receive calls.
While the phone is connected to the AMPS network,
the phone periodically searches for CDMA coverage
and will switch networks as soon as there is sufficient
CDMA signal strength.
In areas of known good coverage, you can lock the
phone to either network(CDMA or AMPS), overriding
the automatic feature, although this is not
recommended.
Calls
After setting up the phone and understanding the
stand-by screen, you’ll want to make and receive
calls. This section gives you all the basic
information you will need.
Making Calls 6.1
Manual Calls 6.1
Last Number Redial 6.1
Auto Redial 6.1
Call List 6.2
Set Call 6.2
Privacy Mode 6.3
6
If you are having difficulties in making or receiving
calls, it could been caused by the phone locking on to
a network with poor coverage in your present location.
■ to check for the Automatic network connect mode
setting;
[ m e n u ] + [setup] + [system]
+ [force call]
■ to change settings
[ m e n u ] + [setup] + [system]
+ [force call] + / [choose one]
+ [select and exit] or [select without exit]
Emergency Calls 6.3
Answering Calls 6.4
Auto Answering 6.4
Missed Calls 6.4
In Call Features 6.5
Ear Piece Volume 6.5
Send Own Number 6.5
Scratch Pad 6.5
Microphone Mute 6.6
Storage of Phone Number 6.6
Call Hold 6.6
Call Waiting 6.6
Page 10

Making Calls
Before making a call, FULLY EXTEND THE ANTENNA
then check the stand-by screen for signal strength. If the
6
Antenna Icon not appear in the top left corner of the
display, you cannot make or receive calls.
6.1
Call quality can be affected by physical
obstructions, so moving only a few metres(or a foot)
may significantly improve signal strength.
Manual Calls
■ if the country you are operating in uses area codes,
they must be included even when making local calls.
■ Hyphens are automatically inserted (refer to section
7.5) to make the number easier to read and conform
to telephone number patterns used in some countries.
Use or keys to clear an error.
AREA CODE (if used) + Telephone number +
Icon appears during dialing and the call time is
displayed on LCD screen.
■ to hang up at the end of the call, press
Last Number Redial
■ press to recall the last number dialed, if correct,
■ press again to dial the number.
Auto Redial
■ the phone can be set to make up to 5 redial attempts
of an engaged (busy) number at a specified time
delay between each retry. A tone sounds at each
redial and when the call is connected.
[menu] + [set up] + [auto redial]
+ / [choose one] + [select and exit]
or [select without exit]
There are choices from “OFF” to 60 seconds.
■ to stop re-dialing at any time, press
Call List
■ calls made and received from scratch pad numbers
are stored in a list with the last entered number
appearing at the first. Old numbers are automatically
deleted when the list is full (10 entries).
■ to recall the list, view number details and make a call
using the number that displayed on the LCD screen;
button to get in to call list retrieve mode
+ continue to depress or to explore desired
numbers that you looking for
and depress [view] for view it’s contents or
depress for make a call
■ each number is identified by its type when viewed
CALLED BY- Incoming call number if available(refer
to section 10 for details)
CALLED TO - Outgoing dialed number
ADDED - number entered during a call. (refer to
scratch pad page 6.6)
M I S S E D - Missed (unanswered) incomming call if
number available (refer to section 11.2
for details)
■ to dial a displayed number on the list press
■ to copy a displayed number into the phone book press
[ s a v e ]
Please refer to section 9 for instructions on how to
dial numbers stored in the phone book.
6
6.2
Page 11

Privacy Mode
Answering Calls
■ if supported by your service provider, this feature will
further encrypt calls made on the CDMA
6
6.3
network(when ‘Enhanced’ is selected)
[menu] + [security]
*Phone will ask for LOCK CODE.
press + + + or
the four digit lock code if you programmed into the
p h o n e .
that you programmed on to the phone.
press [privacy] + / [choose setting]
+ [select and exit] or [select whitout exit]
Emergency Calls
■ your national emergency services numbers are stored
in a special memory in the phone to enable the calls to
be made even when the phone is locked or the restrict
feature is set.
■ ignore any phone locked or restricted messages and
dial as normal. The call should be successful if you are
within network coverage and there is sufficient signal
s t r e n g t h
Dial Emergency Number and press send button.
For example if the Emergency number is 911;
+ + +
■ when an incoming call is received the phone rings,
visual alert LED flashes, “ Incoming Call “ appears on
the display and vibrator (if fitted and enabled)
intermittently turns on.
■ to answer the call, fully extend the antenna for best
performance then open the Flip to answer.
■ during the ring tone, the caller’s number and name
may be displayed if supported by the network (refer
section 11.2 for details)
■ to hang up at the end of the call, press or close to
F l i p
Auto Call Answering
■ you can set the phone to automatically answer to
incoming calls after a specified numbers of rings.
[menu] + [setup] + [AutoAnswer]
+ / [choose one] + [select and exit]
or [select without exit]
There are choices from “OFF” to 1.3.5 rings
WARNING: If you use this feature when the ringer is
switched off (set to “ silent” ) you may receive a call
without your knowledge.
Missed Calls
■ missed (unanswered) incoming calls are entered onto
the Call List if the callerr’s number is available. The
phone also displays the message ‘Missed (number)
Call’ and the time of the last missed call if connected to
the CDMA network
■ to clear the message on screen, press or
6
6.4
Page 12
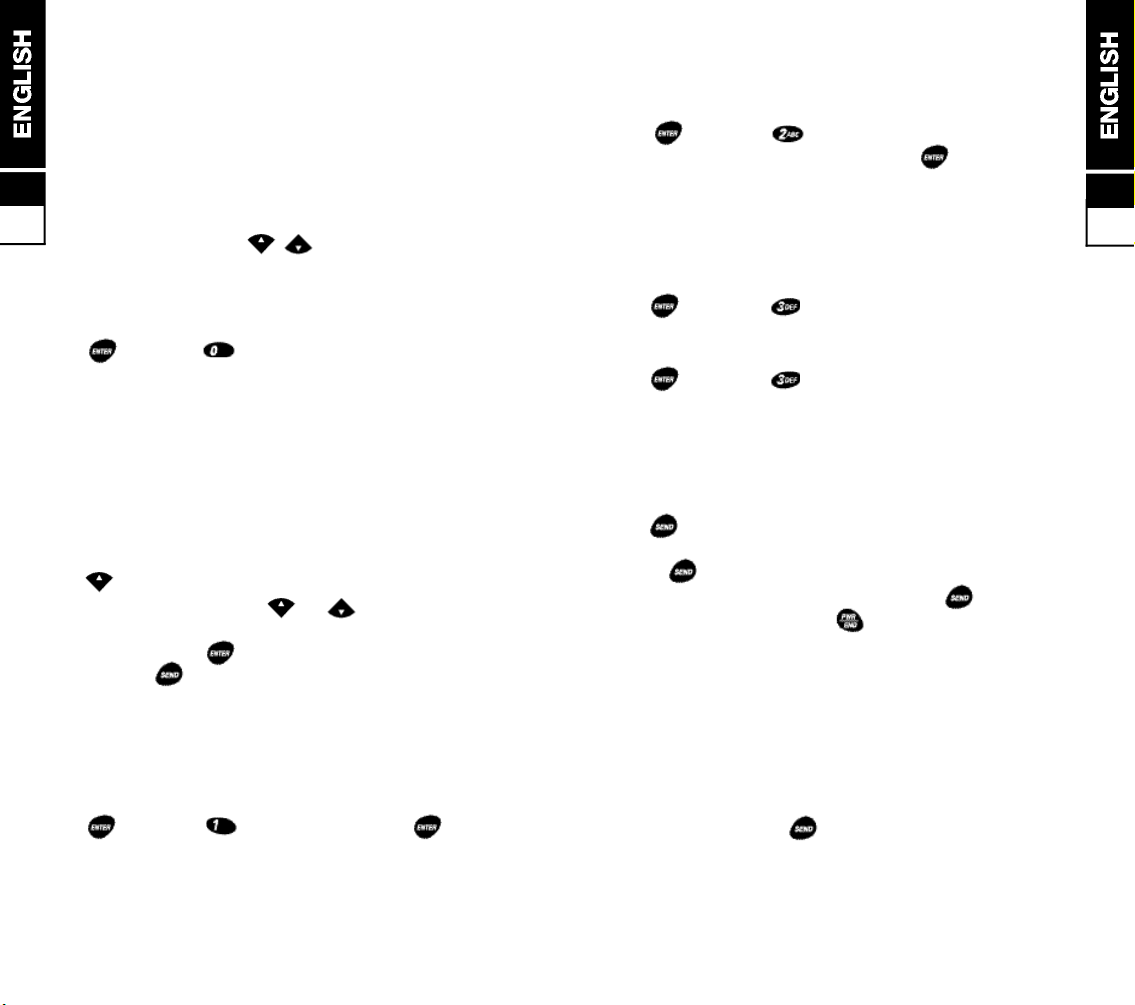
In Call Features
During a call, you have following options;
6
Ear piece Volume
■ to adjust the ear piece volume, press the buttons on a
6.5
side of the phone or / on the keypad
Send Own Telephone Number.
■ call own number automatically.
[menu] +
Scratch Pad
■ if you press any button from 0 ~ 9, *, # while your
phone is in conversation mode, the number will stay
on display screen even after the call has ended unless
anoher key is pressed.
■ scratch pad numbers are automatically entered on the
Call list and are identified by the word ‘ADDED’. Also
refer to page 6.2 to view the Call list
button to get in to call list retrieve mode
+ continue to depress or to explore desired
numbers that you looking for
and depress [view] for view it’s contents or
depress for make a call
■ also you can save the number after you select [view].
Send My Number
■ you can send your phone number including area code
while you are in conversation mode.
[menu] + [Send My Number] + [send]
■ you can store up to 199 scratch pad messages and
telephone numbers in menu memory while you are in
conversation mode.
[menu] + [Scratch Pad]
+ Enter Numbers up to 32 digits + [save]
Microphone Mute
■ you can switch the phone’s microphone off (mute
voice) during a call to enable a private ‘out of call’
c o n v e r s a t i o n .
[menu] + [mute MIC]
(the LCD screen will display “MIC MUTE”)
■ to cancel the Microphone Mute,
[menu] + [Unmute MIC]
Call Hold
■ if the feature is supported by the network, your phone
gives you the facility to put the current call on hold,
make a seconds call then switch between the two.
[first call hold]
+ Dial a telephone number you wish to reach]
+ [make a call for dialed number]
■ to switch between the two calls, press
■ to end both calls press . If one caller ends their
call from their end, you will be automatically connected
to the other call.
Call Waiting
■ if the feature is supported by the network, you will hear
a soft ringing tone in the ear piece when a second
caller is trying to contact you. You can put the current
call on hold, answer the new call then switch between
the two by press each time.
6
6.6
Storage of Phone No.
Page 13

6
6.7
Customizing
This section shows you how to customize your
phone for your own use.
7
Customizing 7.1
Ringer Volume 7.1
Ringer Mode 7.1
Ringer Type 7.1
Key Beep Volume 7.1
Ear Piece Volume 7.2
Minute Alert 7.2
Service Area Alert 7.2
Roam Alert 7.2
SMS/E-mail Alert 7.3
Call Start Alert 7.3
Call End Alert 7.3
DTMF Beep Length 7.3
Display Contrast 7.3
Back light 7.4
Menu Type 7.4
Auto Hyphen 7.4
Banner 7.4
Show Time 7.5
Language 7.5
Security 7.5
Page 14
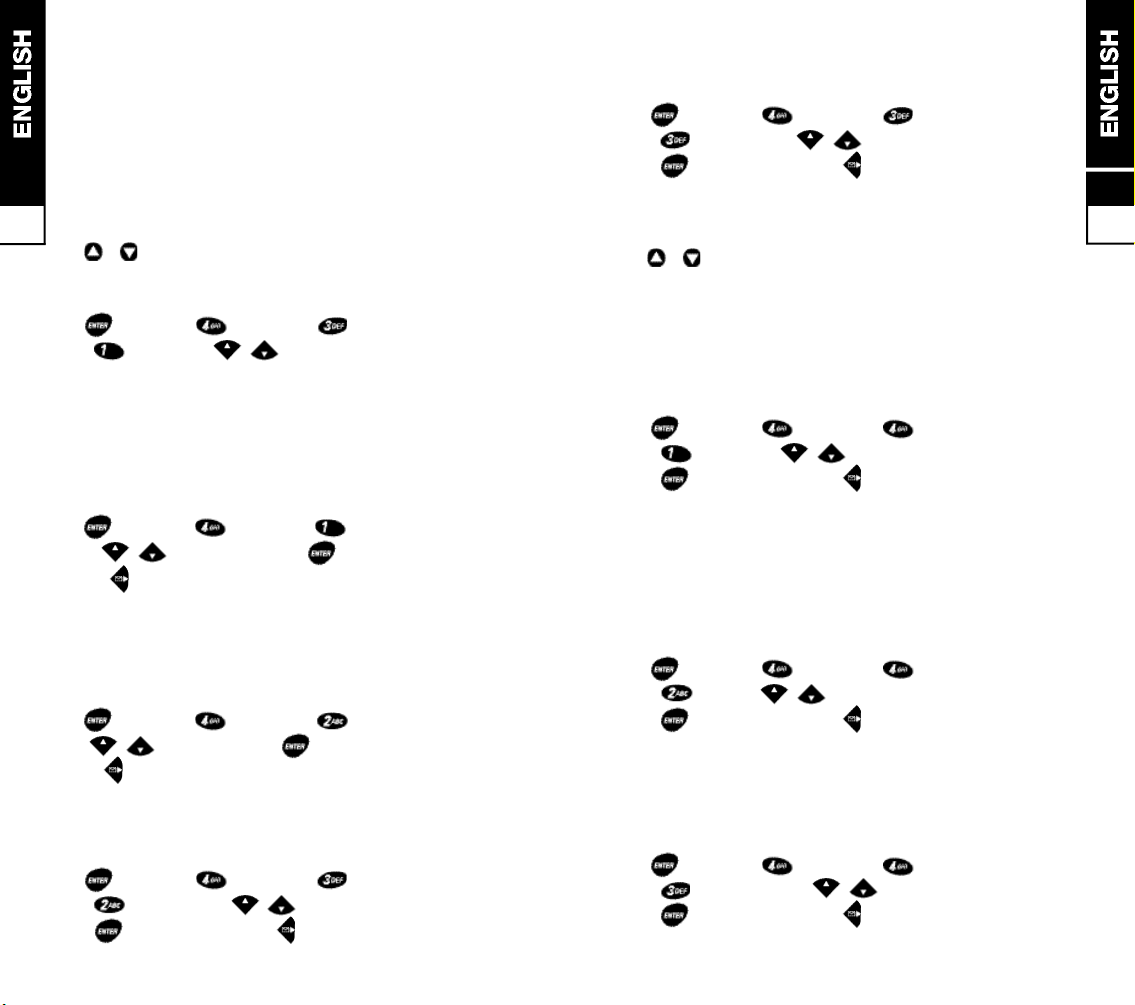
Customizing
Ringer Volume
■ you can change the volume of the ringer volume or
7
7.1
switch it off, by choosing the silent or vibration option.
-When the phone is in Standby Mode:
/ for adjust ringer volume.
Silent < > Vibrator < > low < > med < > high < > max.
-Using feature menu:
[menu] + [sound] + [volume]
+ [ringer] + / [volume up/down]
Silent < > Vibrator < > low < > med < > high < > max.
Ringer Mode
■ you can change the ringer mode to one of the
f o l l o w i n g ;
Bell / Vibrator / LED Lamp / Vibrator & Bell
[menu] + [sound] + [Ring Mode]
+ / [choose one] + [select and exit]
or [select without exit]
Ringer Type
■ you can change the type of incoming call alert to one
of 20 different Ringer sounds and musical incoming
call alerts.
[menu] + [sound] + [Ring Type]
+ / [choose one] + [select and exit]
or [select without exit]
Key Beep Volume
■ the volume of the keypad press tones can be changed
or switched off (silent)
[menu] + [sound] + [volume]
+ [key beep] + / [volume up/down]
+ [select and exit] or [select without exit]
Ear Piece Volume
■ to adjust the ear piece volume level out of call,
[menu] + [sound] + [volume]
+ [key beep] + / [volume up/down]
+ [select and exit] or [select without exit]
O R
■ you also can use the volume keys on the side of the
handset during a call.
/ to for adjust ear piece volume
(in conversation mode only).
Minute Alert
■ to help budget your calls, the minute alert can be set to
sound a tone 10 seconds before the end of each
minute of conversation.
[menu] + [sound] + [alerts]
+ [minute] + / [on/off]
+ [select and exit] or [select without exit]
Service Area Alert
■ when this feature is switched on, the phone will sound
two short tones when the phone moves into another
service area or is connecting to a different cellular
system(i.e. switch from CDMA service area to AMPS
service area for instance)
[menu] + [sound] + [alerts]
+ [alert] + / [on/off]
+ [select and exit] or [select without exit]
Roam Alert
■ when this feature is switched on, the phone will sound
two short tones when moving into, or out of, a roaming
a r e a
[menu] + [sound] + [alerts]
+ [Roam Alert] + / [on/off]
+ [select and exit] or [select without exit]
7
7.2
Page 15
SMS/E-mail Alert.
■ when this feature is switched on, the phone will sound
four short tones upon a reception of SMS text
message or E-mail.
[menu] + [sound] + [alerts]
7
7.3
+ [SMS/Email] + / [on/off]
+ [select and exit] or [select without exit]
Call Start Alert.
■ when this feature is switched on, the phone will sound
a call start tone.
[menu] + [sound] + [alerts]
+ [call start] + / [on/off]
+ [select and exit] or [select without exit]
Call End Alert
■ when this feature is switched on, the phone will sound
a call end tone.
[menu] + [sound] + [alerts]
+ [call end] + / [on/off]
+ [select and exit] or [select without exit]
DTMF Beep Length
■ to change the DTMF beep length(normal or long),
[menu] + [sound] + [Beep Length]
+ / [normal/long]
+ [select and exit] or [select without exit]
Back light
■ to change the LCD back light control,
[menu] + [setup] + [display]
+ [back light] + / [choose one]
+ [select and exit] or [select without exit]
10s < > 30s < > on with flip open < > always on < > always off
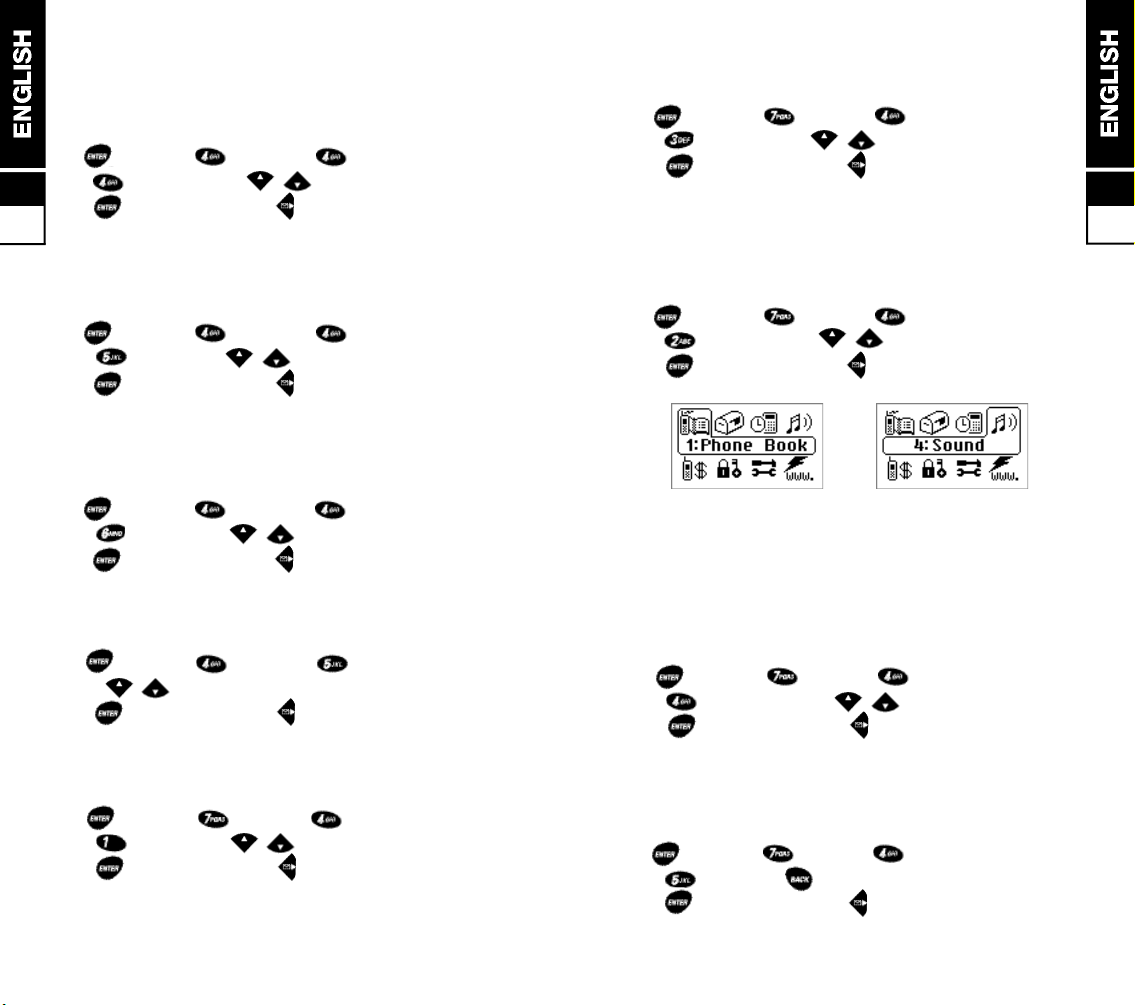
Menu Type
■ you can choose the main menu screen display
type(“icon” ans “list”)
[menu] + [setup] + [display]
+ [menu type] + / [icons/list]
+ [select and exit] or [select without exit]
Icon main menu List main menu
Auto Hyphen
■ hyphens apper when you input a number onto the
display. This makes long numbers easier to see and
also conforms to telephone number patterns in some
countries. The feature can be switched on and off.
[menu] + [setup] + [display]
+ [auto hyphen] + / [on/off]
+ [select and exit] or [select without exit]
7
7.4
Display Contrast
■ to change the LCD screen contrast(dark or light),
[menu] + [setup] + [display]
+ [contrast] + / [darker/lighter]
+ [select and exit] or [select without exit]
Banner
■ you can enter your own top line wake-up and stand-by
screen display message.
[menu] + [setup] + [display]
+ [banner] + [edit] + Enter Your Banner
+ [select and exit] or [select without exit]
Page 16
■ refer to the “Phone Book” section for help with entering
w o r d s .
Show Time
■ the time and date automatically appear on the display
screen when your phone connects to the CDMA
7
7.5
network. You can choose not to have this information
d i s p l a y e d .
[menu] + [setup] + [display]
+ [show time] + / [on/off]
+ [select and exit] or [select without exit]
Language
■ you can change a language option between
E n g l i s h / P o r t u g u e s e / S p a n i s h
[menu] + [setup] + [display]
+ [language] + / [choose one]
+ [select and exit] or [select without exit]
Security
■ your phone has several security features to prevent or
restrict dialling. Please refer to section 8 for details.
The Feature Menu
This section will help you to get to know the phone’s
feature menu and shows you how to use the basic
operating features.
The Feature Menu 8.1
Menu Controls 8.1
Selecting a Feature by Number 8.2
Selecting a Feature by Nav i g a t i o n 8.2
Feature Menu Structure 8.3
Scheduler Function 8.7
View Calender 8.7
Calculator Function 8.7
Setting Alarm Funtion 8.7
World Time Function 8.7
International Country Code 8.8
Call Info Menu 8.9
Last Call 8.9
Home Calls 8.9
Roam Calls 8.9
All Calls 8.9
8
Security Menu 8.10
Lock Mode 8.10
Restrict 8.10
Send PIN 8.11
Change Code 8.11
Clear Call 8.11
Privacy 8.11
Emergency # 8.12
Page 17
The Feature Menu
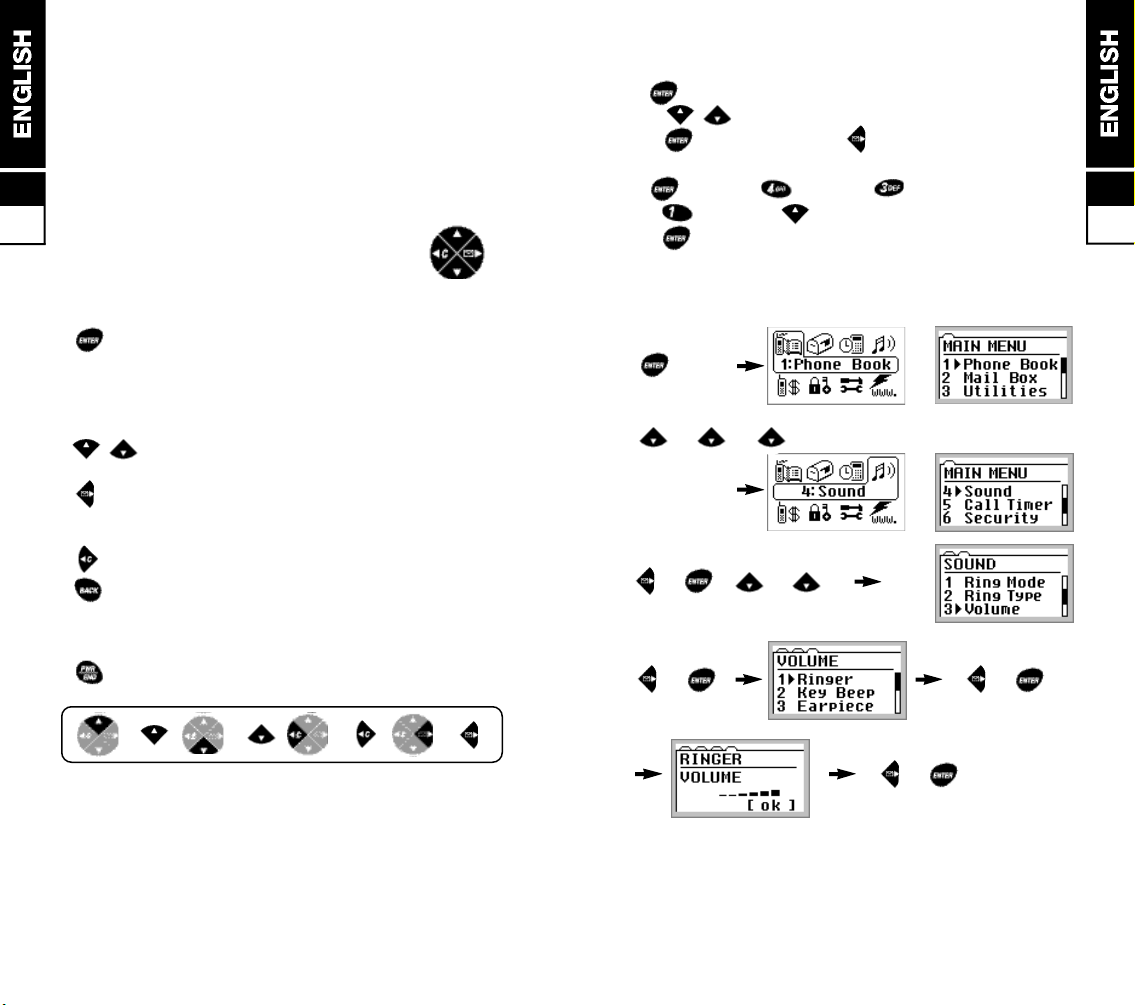
All the operating features of the MX-1111 is stored in the
easy to use menu. A feature can be selected directly by
8
it’s feature number or you can work through the menu.
Press the number of the feature you want at
8.1
each level or navigate using the four
directional switch.
Menu controls
[ m e n u ] -enter the feature menu, also serves as
soft key (key function will be displayed
on lower right corner of the LCD,
mostly [ok], save and exit the feature
m e n u )
/ -search though the groups, features and
feature options
-move one step forward or select current
setting without exiting from the feature
m e n u
-go back one step or cancel
-same as above in menu screen but
also acts as soft key (key function will
be displayed on lower left cornerof the
L C D )
-exit the feature menu without saving
Selecting a Feature by Number
[menu] + FEATURE NUMBER
+ / [choose one]
+ [select and exit] or [select without exit]
(example: increase ringer volume by one step)
[menu] + [sound] + [volume]
+ [ringer] + [volume up]
+ [ok-select and exit-]
Selecting a Feature by Navigation
[menu] o r
+ +
o r
or + +
or or
8
8.2
= = = =
o r
Page 18
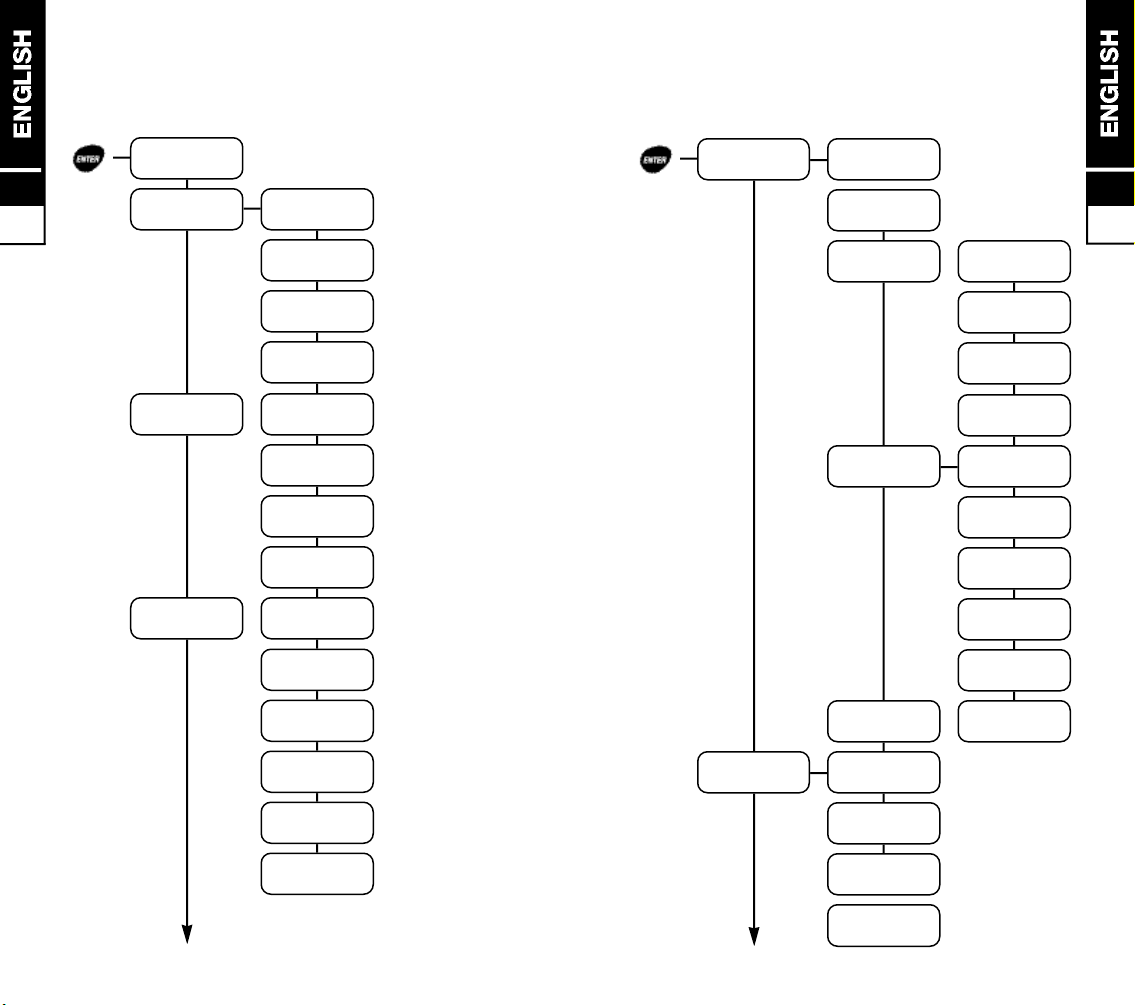
F e a t u re Menu Stru c t u re
F e a t u re Menu Stru c t u re
8
8.3
[ m e n u ]
0
My Phone#
1
Phone Book
21
Voice Mail
31
Scheduler
11
Find List
12
Find Name
13
Find Entry
14
My Phone#
21
Voice Mail
22
Page/Msg
23
E-mail
24
Broadcast
31
Scheduler
32
Calendar
33
Calculator
34
Alarms
35
World Time
36
Country Codes
[ m e n u ]
4
Sound
5
Call Timer
41
Ring Mode
42
Ring Type
43
Volume
44
Alerts
45
Beep Length
51
Last Call
52
Home Calls
53
Roam Calls
54
All Calls
8
8.4
431
Ringer
432
Key Beep
433
Ear Piece
434
Car KIt
441
Minute
442
Service Area
443
Roam Alert
444
SMS/E-mail
445
Call Start
446
Call End
Page 19
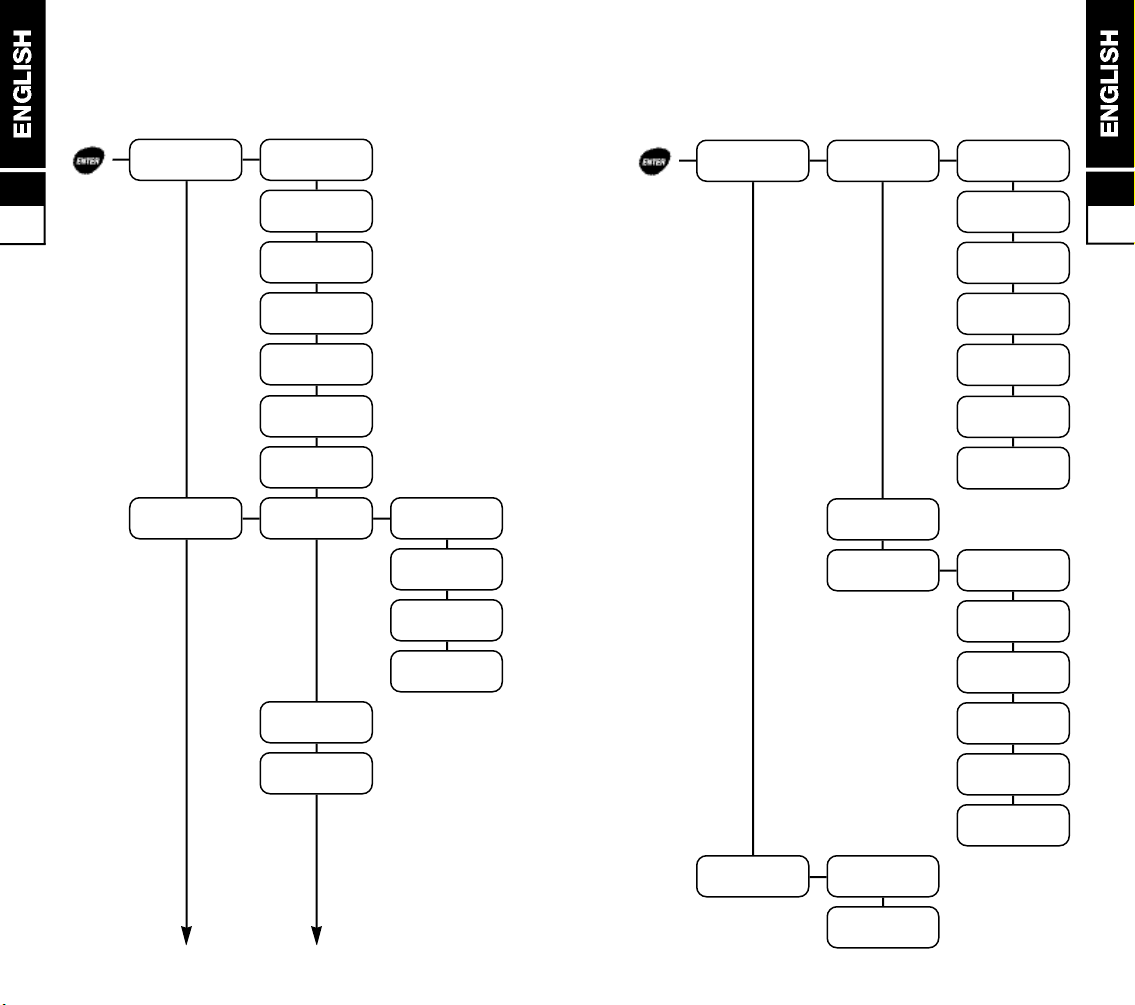
F e a t u re Menu Stru c t u re
F e a t u re Menu Stru c t u re
8
8.5
[ m e n u ]
6
Security
7
Setup
6-[lock code]-1
Lock Mode
6-[lock code]-2
Restrict
6-[lock code]-3
Send PIN
6-[lock code]-4
Change Code
6-[lock code]-5
Clear Calls
6-[lock code]-6
P r i v a c y
6-[lock code]-7
E m e r g e n c y #
71
Voice Dial
72
Auto Answer
73
Auto Redial
711
Train
712
Play Back
713
Delete
714
Auto Dial
[ m e n u ]
7
Sound
8
Web Browes
74
Display
75
One Touch Dial
76
System
81,82,83
Web Services
84
Fax Reception
741
Contrast
742
Mute Type
743
Back Light
744
Auto Hyphen
745
Banner
746
Show Time
747
Language
761
Select
762
Force Call
763
Set NAM
764
Auto NAM
765
Voice SO.
766
Version
8
8.6
Page 20
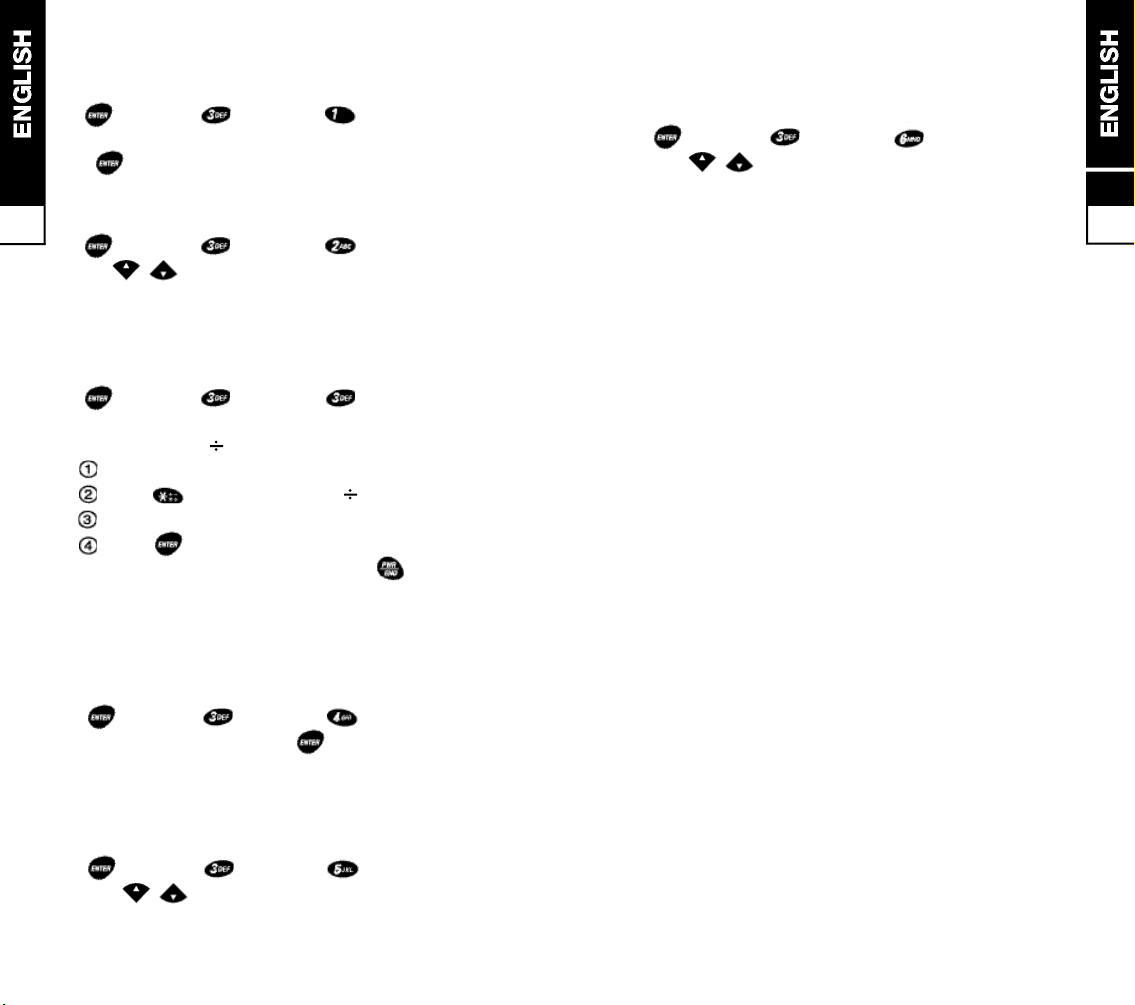
Scheduler Function
■ manage your future schedule
[menu] + [Utilities] + [scheduler]
+ ENTER YOUR SCHEDULE and MARK ALARM
+ [ok]
8
View Calendar
8.7
[menu] + [Utilities] + [calendar]
use / for previous and next months
Calculator Function
■ can do simple four rules of arithmetic up tp 9 digits
including a decimal point.
[menu] + [Utilities] + [calendar]
■ input figures for calculation.
Example) 8,500 55 = 154.545454
enter 8500
press button 4 times to select
enter 55
press [ = ] to get answer
■ to terminate calculator function, press
Setting Alarm Function
■ after setting the alarm clock, the alarm will ring at the
designated alarm time. The directions below illustrates
the alarm tim set procedure.
[menu] + [utilities] + [Alarms]
+ Enter a Time for Alarm + [set]
C o u n t r y Codes for International Dialling
■ The telephone shows country codes for 29 major
countries around the world
[menu] + [utilities] + [country code]
use / for browse different country.
8
8.8
World Time Function
■ This function is available for checking the time in 33
major cities around the world.
[menu] + [utilities] + [world time]
use / for browse different cities.
Page 21
Call Info Menu
Security Menu
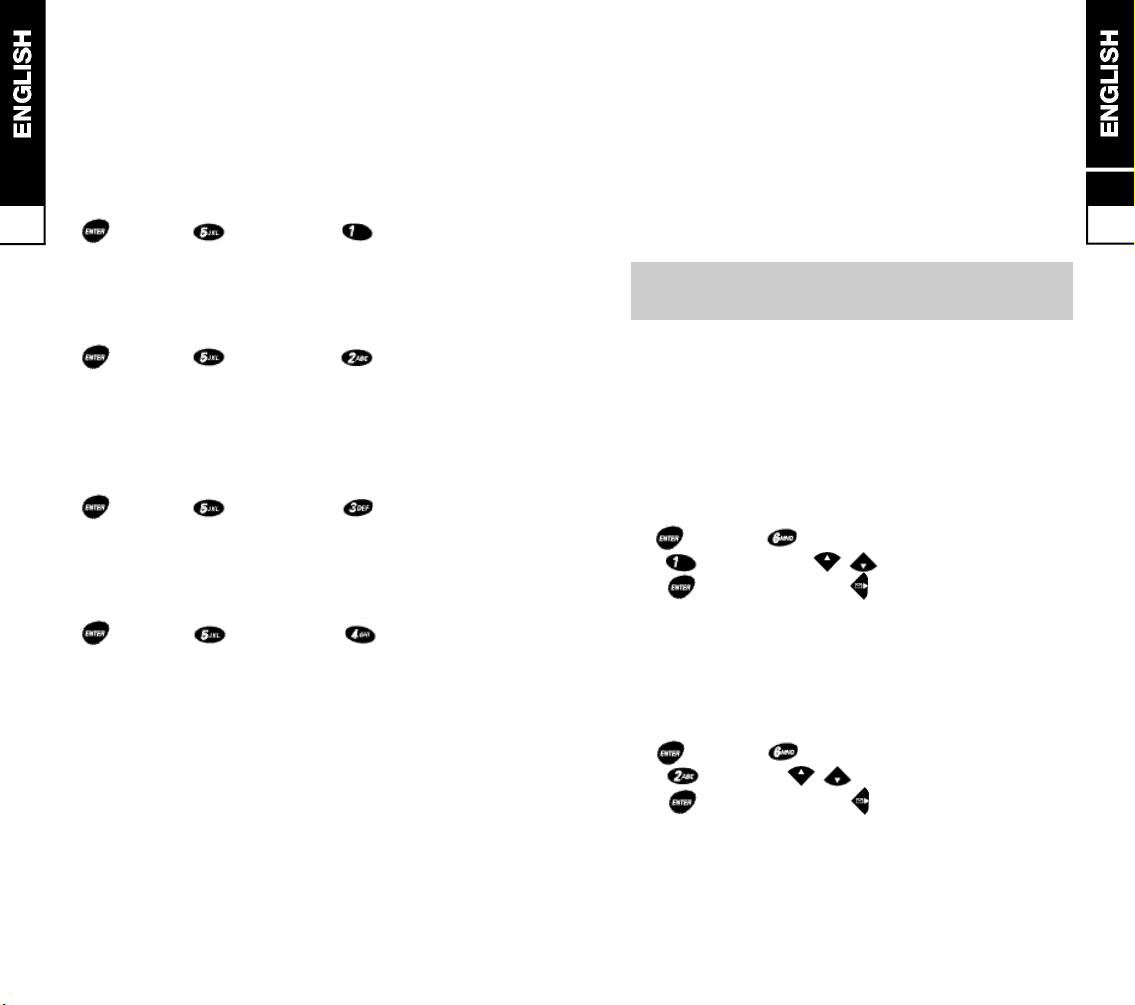
Last Call
■ to display the duration of the last outgoing call in
8
8.9
minutes and seconds
[menu] + [Call Timer] + [last call]
Home Calls
■ the phone has a resettable timer which displays the
total number of calls and the cumulative call time on
the home network since the last reset
[menu] + [Call Timer] + [home calls]
Roam Calls
■ the phone has a second resettable timer which will
display the total number of calls and the cumulative
total for calls made on a second (roam) network
[menu] + [Call Timer] + [roam calls]
All Calls
■ to display the total number of calls and the total call
time since the phone was registered on the network
[menu] + [Call Timer] + [all calls]
The security features of your phone are protected by a
lock code which is initially set to 0000 or the last four
digits of your phone number. To prevent other people
using the security features, you should change the code
to a four digit number of your choice.
Emergency calls can still be made when the phone
is locked or the restrict feature is set.
Lock Mode
■ set the phone lock to prevent unauthorized calls. You
can choose to lock the phone now (remains locked
until the lock code is entered), at power up (locks each
time the phone is switched on until the feature is
cancelled) or never. When locked, the phone can only
make emergency calls and calls to two other
‘emergency’ numbers of your choice (refer to
Emergency feature)
[menu] + [security] + Lock Code
+ [lock mode] + / [choose one]
+ [select and exit] or [select without exit]
■ to unlock the phone, enter the lock code at the display
p r o m p t
Restrict
■ when set, this feature only allows calls to numbers
stored in locations 1 to 9 in the phone book
[menu] + [security] + Lock Code
+ [restrict] + / [choose no/yes]
+ [select and exit] or [select without exit]
8
8.10
Page 22
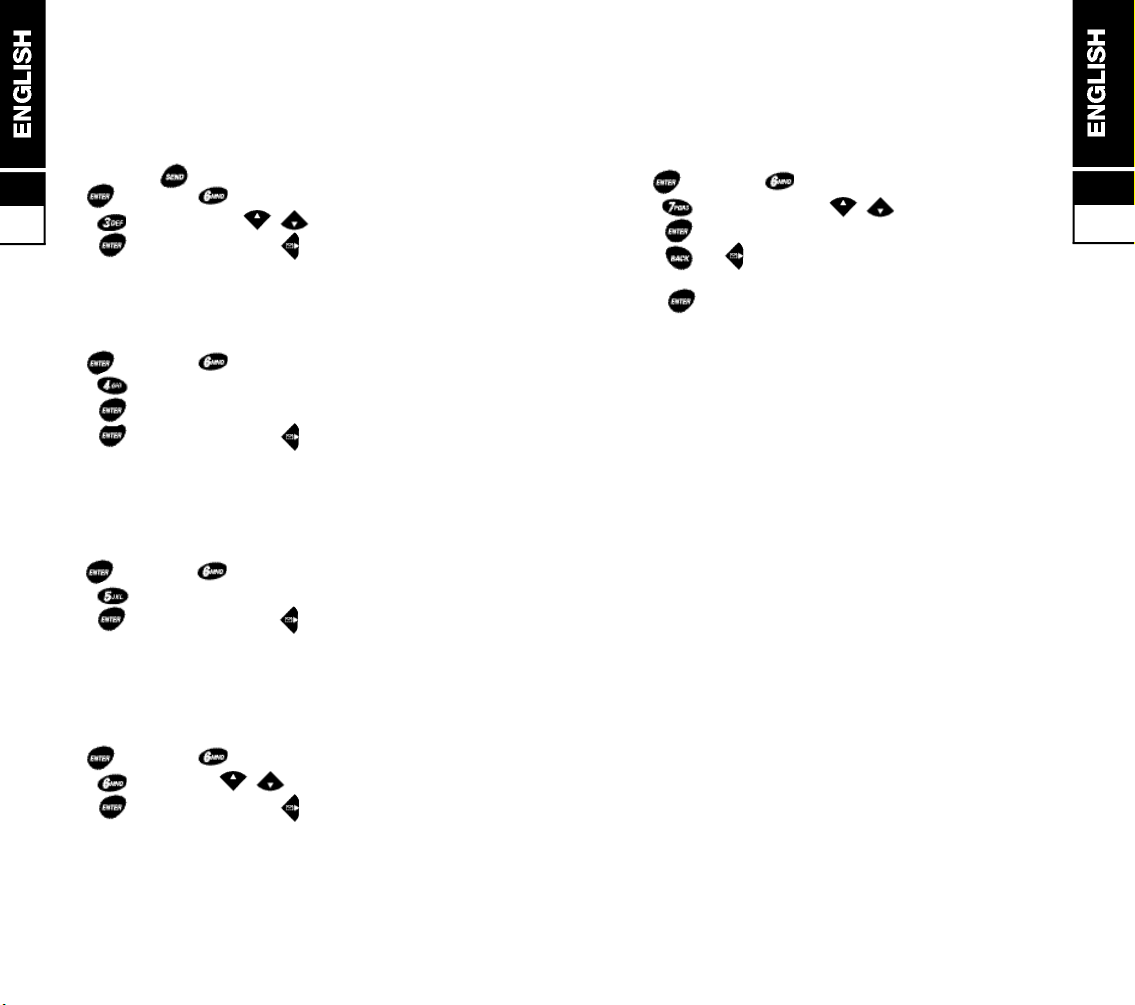
Send PIN
■ as a security check, your operator or service provider
may ask you to send the phone’s PIN before allowing
calls. Switching the ‘Send PIN’ prompt ON allows
you to send the PIN at the right time by simply
8
8.11
pressing key
[menu] + [security] + Lock Code
+ [lock mode] + / [choose one]
+ [select and exit] or [select without exit]
Changing Code
■ to change the lock code (4 digit number)
[menu] + [security] + Lock Code
+ [change code] + New Lock Code
+ [ok] + Re- Enter New Lock Code
+ [select and exit] or [select without exit]
Clear Call
■ for security, you may wish to clear the call list(refer to
page 6.2)
[menu] + [security] + Lock Code
+ [clear calls]
+ [select and exit] or [select without exit]
Emergency #
■ the phone is pre-programmed with three emergency
numbers for your country which can be changed by
the end user.
■ to change the emergency number
[menu] + [security] + Lock Code
+ [emergency#] + / [choose one]
+ [edit]
+ or to erase existing number if necessary.
+Enter new Emergency #
+ [save and exit]
8
8.12
Privacy
■ if it is supported by the network, you can encrypt your
voice even further by enabling this option.
[menu] + [security] + Lock Code
+ [privacy] + / [choose one]
+ [select and exit] or [select without exit]
Page 23

8
8 . 1 3
The Phone Book
Everything you need to know about the phone book
has been grouped together in this section, from
storing names and numbers to recalling and dialling.
The Phone Book 9.1
Storing Information 9.1
Storing Number and Name 9.2
Help with Storing 9.2
Recalling a Number and Name 9.3
Help with Recalling 9.4
To Edit 9.4
To Erase 9.4
To Add a Prefix 9.5
Speed Dialling 9.5
One-Touch Dialling 9.5
9
Page 24
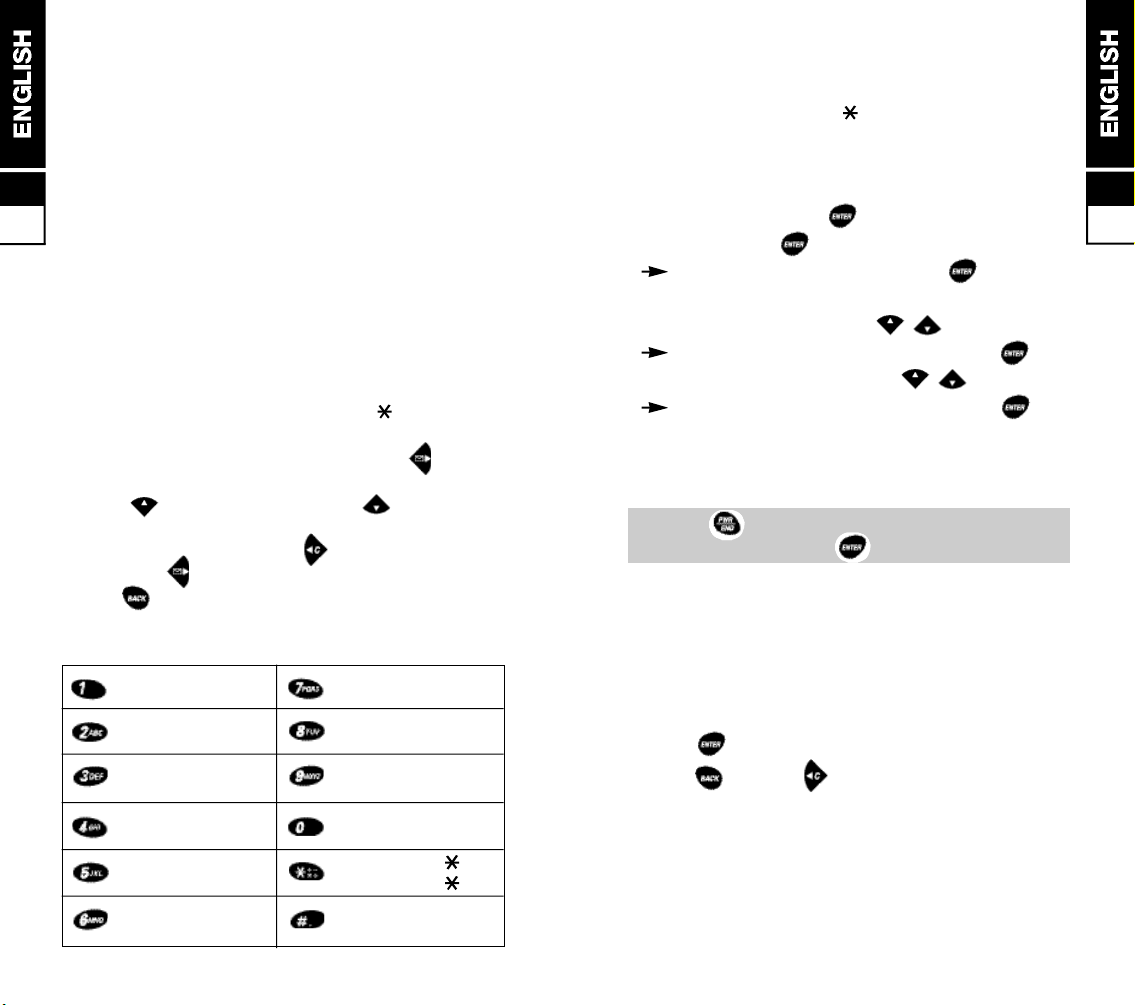
The Phone Book
■ if you need . - , / @, during name entry, press #
■ if you need extended special characters(punctuation)
during name entry, press
The MX-1111 has a large phone book memory. It can
store 199 telephone numbers of up to 32 digits, each
9
with a 16 character long name. Recalling of entries is by
location number, by name, or by browsing through the
9.1
phone book one by one
Storing Information
■ each keypad number is also used to enter several
alpha characters (see below). For name entry,
repeatedly press the key that shows the character that
you want until it appears on display. Wait for the cursor
to move before entering the next character
■ the telephone number can include and # , and
numbers can be used in the name
■ when you need a space in a name, press once
■ to change from upper (A) to lower (a) case characters
press for upper caseand press for lower case
after you place cursor under a character that you wish to
change the case by using [move cursor to right
column] or [move cursor to left column]
■ use for clearing errors, a short press for the last
character clear and a press and hold to cancel entry
and return to standby screen.
1
1
ABC 2
abc 2
DEF 3
def 3
GHI 4
ghi 4
JKL 5
jkl 5
MNO 6
mno 6
PQRS 7
pqrs 7
TUV 8
tuv 8
WXYZ 9
wxyz 9
Punct
uation
. - , / @ #
# #
Storing a Number and Name
■ to store a telephone number
Telephone Number + [save]
+ Enter Name + [ok]
accept displayed location and save [ok]
Or enter own location[1-199]
Or find empty location using /
accept displayed secrete option and save [ok]
Or change secrete option using /
accept displayed secrete option and save [ok]
an acceptance message to confirm storage will briefly
appear followed by the status of the memory then the phone
returns to stand-byscreen
Press to cancel number and name storage at
anytime before the last [ o k ] p r e s s .
9
9.2
Help with Storing
■ n a m e : if you don’ t want to include a name, press save
twice after entering the telephone number
■ overwrite protection:if you choose a location which is
already used, phone will display ‘Overwrite?’ and the
exiting entry appears.
press [ok] to overwrite (store new entry) or
press [quit] or then enter a new location.
0
0
■ secret numbers: if you make an entry ‘secret’ the
telephone number won’ t be displayed when recalled,
only the name appears. You can make a maximum of
10 secret entries.
Page 25
Recalling a Number and Name
there are 3 recall options
■ browse phone book one by one(easiest)
you can use this feature only when the phone is in
9
9.3
standby screen.
press to get in to the browse phone book mode
and press again to browse the next telephone
n u m b e r s
■ recall by location number
if you know the memory location number, you can find
the telephone number by entering the memory location
n u m b e r .
-use short key
press to get in to browse phone book mode and
enter location number to find the telephone number.
you also can use / to browse phone number
if the memory location that you entered is empty.
O R
-use feature menu
press [menu] + [phone book]
+ [find entry]
then enter location number to find the telephone
number that you wish to find.
you also can use / to browse phone number if
the memory location that you entered is empty.
■ recall by name
press [menu] + [phone book]
+ [find name]
then enter first few characters of the name you wish to
f i n d .
the character count can be as small as one character.
Helps with Recalling
■ n a m e : when you recalling by name, you only need to
enter enough letters to identify the name.
for example; if you only have one entry with the initial
letter ‘J’, just enter ’J’ to look up John
■ memory location: when you are recalling phone
numbers using memory location number, you must
enter 0 in front of the location number 1-9.
for example: if you wish to recall a telephone number
that is stored in memory location ‘2’, you have to enter
‘ 0 2 ’
■ o p t i o n s : after recalling a telephone number, you have
the choices to:
-edit, press [edit]
-erase, press [erase]
-end or exit, press [end]
To Edit
■ recall the entry, press [edit] then follow the storage
instructions (refer to page 9.2 Storing a Number and
N a m e ) .
■ press [end] at each option if you don’t want to
make changes.
To Erase
■ recall the entry, press [erase] + [ok]
■ you have to enter the phone’s lock code before you
can erase a ‘Secret’ entry. If you don’t know what the
lock code is, refer to section 8.10
9
9.4
Press to exit recall at any time.
Page 26
To Add a Prefix
■ when a number is recalled, you can add area code to
the beginning of the telephone number if they are
saved without proper area code but you are out of
your home town.
■ the prefix is temporary and does not add to the stored
9
9.51010.2
n u m b e r .
Recall the stored number + enter the area code +
Speed Dialling
■ if you know a stored location number of a telephone
number you wish to dial,
Enter Location Number (i.e. 12) +
O n e - T ouch Dialling
■ if you enable this feature, you can dial a stored
number by simply entering the location number (press
and hold the second digit until ‘ ‘ icon appears)
■ to activate the feature
[menu] + [setup] + [one-touch]
+ / [enable/disable] + [ok]
The Data/Fax Serv i c e s
There are mainly three types of data services available
with MX-1111 phone.
Mini Web Browser
■ You can browse text versions of certain Web sites
using he built in phone.com mini browser if your
system provider support it.
[menu] + [web browse]
+ / for select one of following
1. Surf WEB
2. Surf Cache
3. Bookmarks
+ [select] or [select] to start Web surfing.
Receive Fax using your computor(note book)
■ Connect the phone to your computer’s serial
port(usually DB-9, RS-232 port) using the data cable
accessary (see section 14, Accessories for detail)
■ You have to know when to expect an incomming fax.
If you know the next incomming call will be a fax,
[menu] + [web browse] + [fax]
+ / for select one of following
1. 1 Fax Call
2. 10 Fax Calls
3. Fax Always
+ [select] or [select] to start Web surfing
10
10.1
Page 27

Web surfing, E-mail, and send Fax using
your computer(note book)
■ You can treat the MX-1111 phone like an external
modem for these purposes.
■ Hook up the phone with your computer’s serial port
(usually DB-9, RS-232 port) using the data cable
accessary (see section 14, Accessories for detail)
■ Make a data or fax call using your computer’s dial-up
network or Fax software.
Network Features
In addition to making and receiving calls, the digital
CDMA network offers other advanced benefits
detailed in this section. Some of the features may not
be supported by your network operator or by a
foreign network when roaming.
DTMF Signaling 1 1 . 1
C o n s t ructing a Pause Dial Sequence 1 1 . 1
N o rmal and Long DTMF To n e s 1 1 . 2
Caller Identification Number 1 1 . 2
Text and Voice Mail Message in
G e n e r a l 1 1 . 3
Receiving Messages 1 1 . 3
M e m o ry Capacity 1 1 . 3
Text Messa 1 1 . 4
Reading Messages 11.4
11
Voice Mail Messages 1 1 . 5
Reading Messages 11.5
Deleting Message 11.6
System Selection 1 1 . 7
Preferred Service Provide 11.7
Auto NAM 11.7
Network Selection 1 1 . 8
Preferred Mode 11.8
Page 28
DTMF Signaling
The 1-9, and keys on your phone generate a unique
tone when pressed. These are known as DTMF tones
11
and are used to operate advanced facilities such as
home banking, voice mail and paging services. A series
11.1
of numbers are normally required to operate the facility,
for example; a contact number, security PIN and option
code. You can construct a pause dial sequence on the
display then send the numbers at once or automatically.
A sequence can be up to 32 digits long (a pause counts
as one digit) and can be stored in the phone book as a
normal number.
N o rmal and Long DTMF T o n e s
■ the phone can generate tones of different duration
according to the needs of the facility
normal - a short burst tone of about one tenth of a
second which is sufficient to operate most devices
l o n g - a tone that lasts for as long as the key is
pressed (use when you have trouble with n o r m a l)
■ if you regularly use a paging service, we recommend
that you leave the phone on the normal setting
■ to change settings
[menu] + [sound] + [Beep Length]
+ / [normal / long] + [ok]
11
11.2
C o n s t r ucting a Pause Dial Sequence
■ each number in a sequence must be separated by one
of the following:
hard pause ‘H’ - this stops dialling after the first
number, you’ll need to press at the facility request
to send each number in the sequence
time pause ‘T’ - the phone will insert a 2 second
pause between dialling all the numbers in the
sequence. This setting is particularly useful if you
regularly dial the same facility since you won’t need to
hear the facility prompts
■ you also have an option to insert hyphens in long
numbers to make them easier to read. The hyphens
are ignored during dialling so you still need to input
pause commands if you need pause(s).
■ to construct a sequence
Enter number(s) +
+ [H] or [T] or [-]
+Continue to enter number(s)
Do not end the sequence with a pause
Caller Identification
N u m b e r
This feature enables you to see a caller’s telephone
number on the display during the ringing tone. You’ll then
have the option to answer or reject the call. The caller’s
name will also appear if the name and number are
stored in the phone book.
Caller Identification Number only works when the caller
is using a network supporting Caller ID service. They
may also have asked the facility to withhold their number
from being transmitted.
Page 29
Text and Voice Mail
Messages in General
11
Your phone has an ability to receive short text messages
when switched ON. The messages are automatically
11.3
stored in the phone’s memory and are retained even
when the phone is switched OFF. While reading a
message, you can dial any callback number by simply
pressing .
The text and voice mail services are normally subject to
a subscription charge, check with your service provider
regarding the cost and availability.
Receiving Messages
■ when a new message is received, ‘ M e s s a g e !’
appears in a middle of the display. You’ll hear 5 short
beeps and the message stays until cleared.
■ if a message is marked ‘ U r g e n t ’ by the sender,
‘ M e s s a g e ! ’ will flash with an asterisk ( ) appearing
on both sides of message header
M e m o r y Capacity
Text Messages
Text messages are sent directly to your phone (subject
to network support) and may contain a time stamp, a
callback number and the name of the caller (if the
callback number matches a phone number that is stored
in the phone book).
Reading Messages
■ to read new text messages
Press + select Voice or Page/Msg using
or then press or [ok]
read message (also you can browse the message with
/ )
select [next] or [erase]
■ upon select [next] or [erase] the phone will
display saved message on the display.
browse them with / , press [view] or
[erase] if needed.
■ you always exit message menu by press anytime.
■ if you want to call back to the message while you are
reading a text message, press
11
11.4
■ your phone can store up to 20 messages, each
containing on average of 80 characters.
■ the phone will alert you when the amount of available
message memory is low. You should erase older
messages that are no longer needed to avoid running
out of memory.
Page 30
Voice Mail Messages
If you have a voice mailbox, the service will send a
message to your phone each time a new message is
11
received. You must call your voice mail service to listen
to these messages(airtime charges may apply).
11.51111.7
Reading Messages
■ to read a new voice mail alert message
Press + select Voice or Page/Msg using
or then press or [ok]
read message (also you can browse the message with
/ )
■ at the end of the message, you have the choice of
[calling] or [quit]
■ you also can access your voice mail system by press
and holding for 2 seconds if you are in standby
mode (stand-by screen) and the display shows icon
■ depending on the system setup, you may have to dial
a specific number to access your voice mail such as
(your own number + + )
Voice mail message indicator shows you that you
have a voice message. The actual voice message is
at the service provider’s message center(not in the
phone). As the provider will periodically send a
“voice mail” indication, the number of voice
message indications does not necessarily
correspond to the actual number of voice
messages. This is because one voice mail
indication may include more than one voice
m e s s a g e .
Deleting Message
■ to erase a new voice mail alert message
Press + select Voice or Page/Msg using
or then press or [ok]
+ [erase] + [yes]
This will erase the voice message indication to the
phone only. In order to erase the voice message
stored on your service provider’s message center
you have to access the voice mail and follow their
i n s t r u c t i o n s .
11
11.6
Page 31
System Selection
Network Selection
You may have the option to use your phone on two
different cellular systems. If this is the case, you can
specify which system and which service provider to use
in a particular area or situation.
P re f e r red Service Pr o v i d e r
■ each service provider assigns a unique mobile number
for your phone (this is known as the NAM). You can
specify which mobile number (NAM) your phone will
u s e
[menu] + [setup] + [system]
+ [Set NAM] + / [choose NAM#1 or
NAM#2] + [ok]
Auto NAM
■ switching this feature ON will enable your phone to
change service providers if the phone loses service in
the current cellular areas
[menu] + [setup] + [system]
+ [Autot NAM] + / [on/off] + [ok]
Your phone is designed to operate on the Digital CDMA
and analog AMPS networks. While connected to the
preferred CDMA network, you can force the phone to
stay on an analog AMPS network. This feature can be
useful if you are operating in an area of low digital signal
strength (ie you have difficulty in making calls or a call
has been dropped) and you want to try the other network
without changing the phone’s settings permanently.
As an alternative to a forced call, you can change the
preferred network mode if you have services from two
different system providers.
P re f e r red Mode(Forcing a call)
■ the preferred mode is factory set to A u t o m a t i c. You
can change this to one of the other options listed
below but this is not recommended as you may loose
the advantages of the CDMA network and experience
difficulty in making and receiving calls.
■ The preferred operating mode options are:
Automatic(CDMA then Analog)
CDMA only
Analog only
Temp Analog
■ to change the preferred mode
[menu] + [setup] + [system]
+ [force call] + / [choose one]
+ [select and exit] or [select without exit]
11
11.8
Page 32

Tro u b l e s h o o t i n g
G l o s s a ry
The Phone Will Not Switch ON
■ the phone has shut down because the battery power
12
12.1
level is too low to make calls. Fully recharge the
b a t t e r y
Dialled Calls Are Not Pr o c e s s e d
■ the phone is locked, the restrict feature is set or you
have not pressed the key
Display Messages
During use of your phone, the phone may display an
error message as follows:
‘FEATURE CURRENTLY UNAVAILABLE’
■ you are attempting to select a feature that is only
available during a call or the feature is not supported
by your network operator/service provider or by the
p h o n e .
‘ENTER THE LOCK CODE’
■ the phone lock has been set, you must enter the four
digit lock code before you can proceed with your call
attempt (refer to page 8.10)
C D M A - Code Division Multiple Access,
preferred digital cellular system
A M P S - Advanced Mobile Phone System (an
analog cellular system)
N A M - Number Assignment Module. The
system identification for your mobile
number. Some countries may allow you
to have more than one mobile number,
in which case they would be identified by
NAM1, NAM2 etc
H O M E - the service provider that issues
N e t w o r k your mobile number (NAM 1)
R O A M - a second service provider that offers
N e t w o r k service when you are away from the
home home network
S M S - Short Message Service(also known as
text message service)
V M S Voice Mail Service
13
13.1
Page 33
Accessories
Quick Travel Char g e r
■ charges an extended MBL-1450 Li-Ion battery to its full
14
14.1
capacity in approximately 3 hours.
■ extraordinarily light and compact battery charger.
■ available with four different wall plugs.
C i g a r ette Lighter Char g e r s
■ suitable for 12 Volts operation.
■ available in two different designs, suitable for a wide
variety of automobiles.
S p a r e Batteries
■ M B L 0 6 0 0 : 600mAH Li-Ion slim battery
■ M B N 0 6 0 0 : 600mAH Ni-MH standard battery
■ M B L 0 9 3 0 : 930mAH Li-Ion standard battery
■ M B L 1 4 5 0 : 1450mAH Li-Ion standard battery
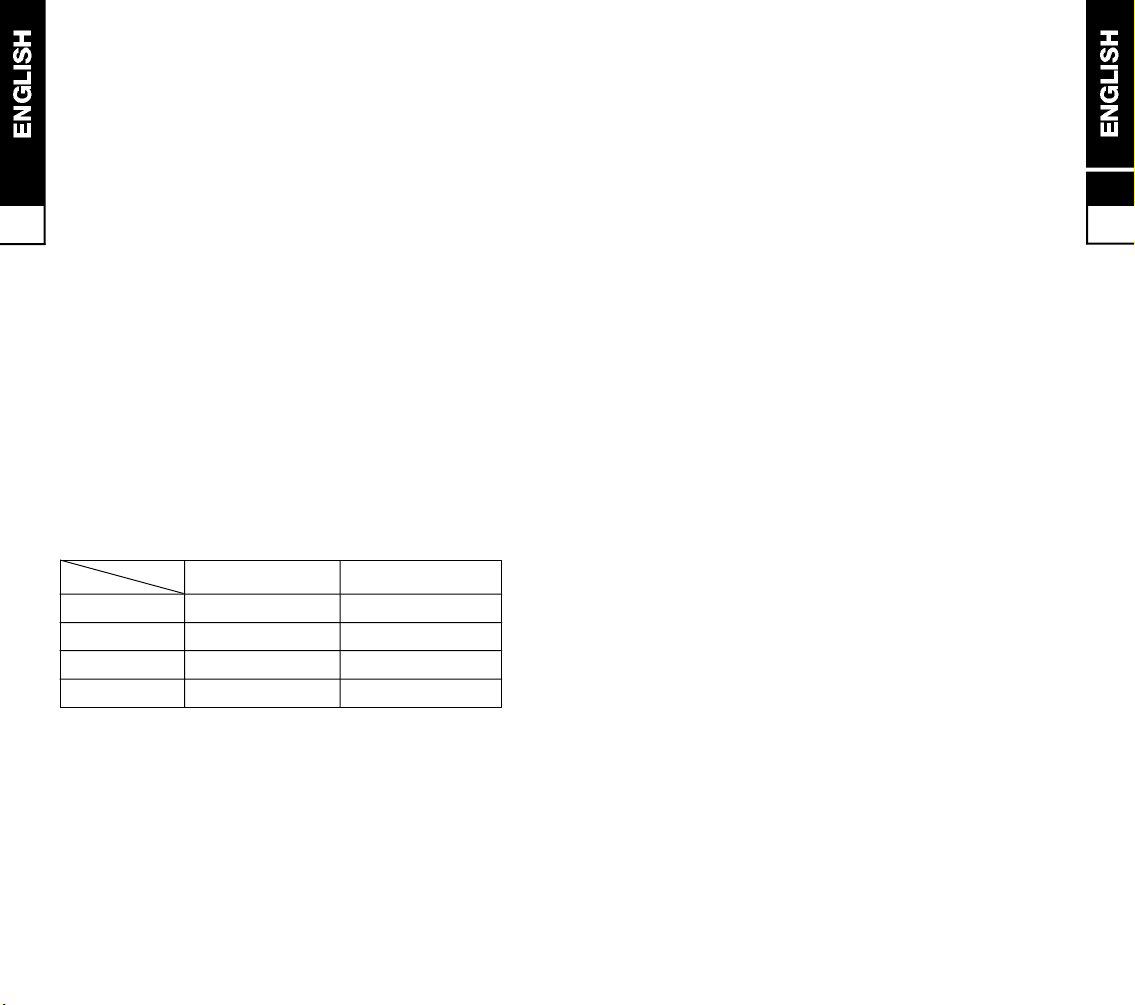
■ Usable Time for Batteries
C o n d i t i o n s C o n t i n u o u s C o n t i n u o u s
T y p e s Talk Time Stand-by Time
MBL0600 (Slim Li-Ion) Approx. 1.5 hours. Approx. 50 hours
MBN0600 (STD. NiMH) Approx. 1.5 hours. Approx. 50 hours
MBL0930 (STD. Li-Ion)
M B L 1 4 5 0 ( E X T . L i - I o n ) Approx. 3.5 hours Approx. 130 hours
Approx. 2.5 hours Approx. 80 hours
Hands Free Car Kit
■ provides for Hands Free operation of the MX-1111
phone in your vehicle.
■ consist of a cradle, hands free system unit that plugs
on to your cigarette lighter port.
14
14.2
Data Cable
■ connects the phone to your computer serial port for
data services (i.e. web surfing,PC Fax and etc.)
Leather Carry Case
■ elegant case which protects the phone from scratches,
knocks, water stains etc
■ built-in belt clip
Page 34

Index
A c c e s s o r i e s 1 4 . 1
A l e r t s 7 . 2
- minute alert 7 . 2
15
- service area alert 7 . 2
- Roam alert 7 . 2
15.1
- S M S / E - m a i l 7 . 3
- call start alert 7 . 3
- call end alert 7 . 3
All Calls 8 . 9
Auto Answer 6 . 4
Auto Hyphen 7 . 4
Auto NAM 1 0 . 6
Auto Redial 6 . 1
Back Light 7 . 4
B a n n e r 7 . 4
B a t t e r y 5 . 1
- a t t a c h i n g 5 . 1
- c h a r g i n g 5 . 1
- p e r f o r m a n c e 5 . 3
- power level 5 . 3
- r e m o v i n g 5 . 1
C a l l s 6
- a n s w e r i n g 6 . 4
- e m e r g e n c y 6 . 3
- call hold 6 . 6
- call waiting 6 . 6
- caller identification1 1 . 2
- call list 6 . 2
- last number redial 6 . 1
- manual calls 6 . 1
- making calls 6 . 1
- missed calls 6.4
- privacy mode 6 . 3
- r e - d i a l i n g 6 . 1
- call timer 8 . 9
C a l c u l a t o r 8 . 7
C a l e n d e r 8 . 7
Caller Identification1 1 . 2
N u m b e r
Change Code 8 . 1 1
Clear Call 8 . 1 1
C u s t o m i z i n g 7
Display Contrast 7 . 3
DTMF Beep Length 7 . 3
DTMF signaling 1 1 . 1
Ear Piece volume 6 . 5
Emergency # 8 . 1 2
Home Calls 8 . 9
International 8 . 8
Country Code
Key Beep Volume 7 . 2
L a n g u a g e 7 . 5
Last Call 8 . 9
Lock Mode 8 . 1 0
Lock Code 8 . 1 1
Menu Type 7 . 4
N A M 1 3 . 1
Network Connection 5.7
One-Touch Dialing 9 . 5
Phone book 9
Preferred Mode 11.8
R e s t r i c t 8 . 1 0
Ringer 7.1
- Ringer Mode 7.1
- Ringer Type 7.1
- Ringer 7.1
Roam Calls 8.9
Scratch pad 6.5
Scheduler 8.7
Security 8.10
Send Own Number 6.5
Send PIN 8.11
Maxon Electronics. Reserve the right to make changes
and improvements to any products described in this
guide without prior notice.
In the event of a product recall, the manufacturer will not
be liable for any claims for loss, damage whether arising
directly or indirectly. Your statutory rights are not
a f f e c t e d .
Show Time 7.5
SMS 13.1
Speed Dialing 9.5
Stand-by Screen 5.5
Storage of Phone 6.6
Number
Switching OFF 5.6
Switching ON 5.4
Text messages 11.4
To Add a Prefix 9.5
To Edit 9.4
To Erase 9.4
VMS 13.1
Voice Message 11.5
Wake-up Screen 5.4
World Time 8.7
15
15.2
 Loading...