

Page 1

1
Grazie per aver scelto i prodotti Midland! Gli apparati
M24, M48 e M99 sono ricetrasmettitori PMR 446 che
si possono utilizzare senza licenza, in tutta Europa. Per
ulteriori informazioni, consultate la tabella “Restrizioni
all’uso”.
Come previsto da dl 259 del 01/08/2003 e da nota 101C del PNF, gli
apparati PMR446 sono soggetti ad una dichiarazione di utilizzo e ad
un contributo annuo. Per ottenere la modulistica e le modalità di ottenimento dell’autorizzazione generale per l’utilizzo di apparecchiature
PMR446, contattate l’Ispettorato Territoriale nel vostro capoluogo di
regione o visitate il sito web del Ministero delle Comunicazioni (www.
urpcomunicazioni.it oppure www.urpcomunicazioni.it/ispettorati.
htm <http://www.urpcomunicazioni.it/ispettorati.htm>).
L’utilizzo dell’apparato è consentito solamente dopo aver inviato la
pratica all’Ispettorato Territoriale. Raccomandiamo di conservare
una copia di tale pratica.
Caratteristiche principali:
Frequenza: 446.00625 – 446.09375 ›
Canali: ›
M24: 24 canali (8+16 pre-programmati)
M48: 48 canali (8+40 pre-programmati)
M99: 99 canali (8+91 pre-programmati)
38 toni CTCSS ›
Potenza: 500mW ERP ›
Vox incorporato regolabile su 2 livelli ›
Display LCD alfanumerico ›
Tasto di chiamata ›
Funzione “scan” ›
Autonomia tipica no a 12 ore ›
Temperatura di funzionamento da -20° a +55° ›
Peso: 95 gr (batterie escluse) ›
Dimensioni: 58x160x28mm ›
Presa accessori MC/CHG: 2 pin per accessori audio ›
/ caricatore da muro
Le funzioni e le speciche sono soggette a modiche senza
preavviso.
Dotazione modello M24
2 ricetrasmettitori 24 canali ›
2 ganci per cintura ›
manuale istruzioni ›
Dotazione modello M48
2 ricetrasmettitori 48 canali ›
2 ganci per cintura ›
2 pacchi batterie 600mAh ricaricabili ›
2 auricolari ›
caricatore da muro a doppia prese ›
manuale istruzioni ›
Dotazione modello M99
2 ricetrasmettitori 99 canali ›
2 ganci per cintura ›
2 pacchi batterie 600mAh ricaricabili ›
caricatore doppio da tavolo ›
adattatore da muro ›
2 auricolari “professionali” ›
2 custodie con collarino ›
manuale istruzioni ›
Copertura/portata
Le prestazioni dei ricetrasmettitori dipendono dalle condizioni ambientali ed atmosferiche. Fattori ambientali
quali alture, edici, alberi, fogliame possono diminuire la
copertura. Le prestazioni ottimali si ottengono in campo
aperto mentre la portata si potrà ridurre, per esempio
all’interno di un’automobile o di un edicio. Tipicamente
la copertura in città, in presenza di edici è di 1 o 2
Km. In campo aperto, ma con presenza di alberi, case,
fogliame, la copertura è di 4-6 Km. In campo aperto,
a vista e senza nessun tipo di interferenza, come per
esempio in montagna, la copertura può essere anche
superiore ai 10 Km.
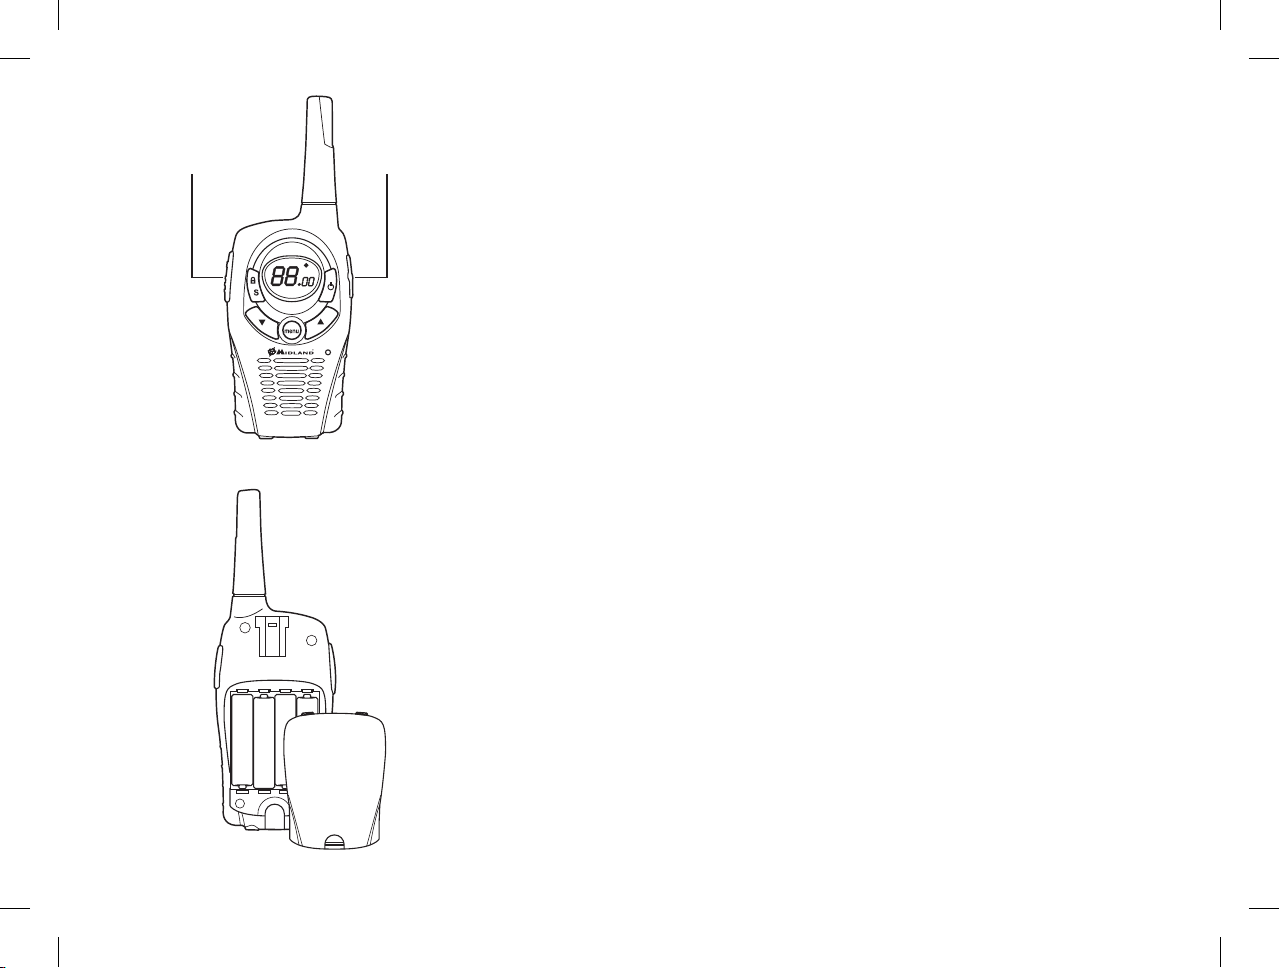
Batterie e vano batteria
E’ possibile utilizzare il pacco batteria ricaricabile fornito
con gli apparati (solo nei modelli M48 o M99) oppure 4
batterie AAA alcaline o ricaricabili. Per aprire il vano
batteria, spingere la linguetta verso il basso, e rimuovere il coperchio sollevandolo. Dopo aver inserito il pacco
batteria o le batterie richiudere il vano batteria e riportate la linguetta nella posizione di chiusura.
Attenzione, nel caso si utilizzi il pacco batteria ricaricabile è opportuno porre le radio in ricarica prima dell’utilizzo (vedi la sezione “Ricarica”).
tasto
PTT
plug
MIC/CHG
uolki tolkiTM Midland M24, M48 e M99
RICETRASMETTITORE PMR446
Page 2

2
ED ORA, PRONTI A COMUNICARE!
Accensione
Premere e tenere premuto il tasto
per circa 3 secondi.
Selezione canali
Premere una volta il tasto “menu” e di seguito i tasti p/q per selezionare il canale
desiderato. Premere PTT per confermare la selezione effettuata. Attenzione entrambe
le radio devono essere sullo stesso canale per poter comunicare.
Parlare (trasmettere)
Tenere premuto il tasto PTT. Parlare ad una distanza di circa 4/10cm, con un tono di
voce normale. Il display visualizza ‘Tx’. Rilasciare il tasto PTT al termine della conver-
sazione, una nota di ne trasmissione (Roger Beep) sarà inviata al vs interlocutore
(per disbilitare la funzione vedi paragrafo ‘Roger Beep’).
Ascoltare (ricezione)
Al rilascio del tasto PTT la radio rimane in modalità di ascolto. La ricezione di un segnale verrà indicata con la scritta ‘RX’.
Regolazione volume
Per regolare il volume al livello ottimale, premere i tasti p/q nché si ottiene il livello
desiderato.
Funzione CALL
Invio segnale audio
Premendo rapidamente 2 volte il tasto PTT, verrà inviato un segnale sonoro di avviso
di chiamata a tutti gli utenti sullo stesso canale.
Tasto funzione “menu”
Le seguenti funzioni si selezionano premendo il tasto “menu”:
Funzione VOX ›
Abilitazione/disabilitazione Roger Beep ›
Impostazione canali ›
Impostazione toni CTCSS ›
Funzione Monitor ›
› Attivazione funzione VOX e sensibilità
La funzione VOX permette di attivare la trasmissione via voce, senza dover premere
il tasto PTT. E’ possibile scegliere tra due livelli di sensibilità:
• 1altasensibilità (per ambienti non molto rumorosi o se parlate con un tono di
voce basso)
• 2bassasensibilità (per luoghi in cui il rumore di fondo è alto o se parlate con
tono di voce alto).
Premere il tasto “menu” nchè sul display lampeggia la scritta ‘VOX’. Tramite i tasti
p/q selezionare uno dei due livelli di sensibilità disponibili e premere il tasto PTT
per confermare la scelta. Sul display comparirà quindi la scritta “VOX”.
Disattivazione funzione VOX
Premere il tasto “menu” nchè sul display lampeggia la scritta ‘VOX’. Tramite i tasti
pq selezionare ‘OF’ e premere il tasto PTT per confermare la scelta
Attenzione: il VOX non può essere utilizzato con inserito l’auricolare fornito insieme
al modello M48. Per utilizzare il VOX con l’auricolare fornito con il modello M99,
spostate in posizione “VOX” la levetta presente sul pulsante PTT dell’auricolare
stesso. Riportate la levetta in posizione “PTT” quando non utilizzate il VOX.
› RogerBeep:Tonalitàdiconfermaneconversazione
Al rilascio del tasto PTT, quindi alla ne di ogni trasmissione, viene emessa una
tonalità che indica al vostro interlocutore che può iniziare a parlare. Questa
funzione è attivata di default ed è indicata sul display dall’icona
.
Disattivazione:
1. Premere più volte il tasto “menu” nchè sul display compare il simbolo
2. Con i tasti p/q selezionare “OF”.
3. Premere il tasto PTT per confermare la scelta
› Impostazione canali
Premere una volta il tasto “menu” e di seguito i tasti p/q per selezionare il canale
desiderato. Premere PTT per confermare la selezione effettuata.
› Impostazione toni CTCSS
I toni CTCSS sono dei codici (da 1 a 38) che possono essere aggiunti ai canali per
creare un proprio canale personale. Possono essere aggiunti no a 38 codici diversi,
agli 8 canali identicati da P1 a P8, per creare no a 308 canali personalizzati. Per
esempio se aggiungete al canale P3 il tono CTCSS 27 otterrete il canale P327 che
potrà comunicare solo con quelle radio che avranno impostato lo stesso canale e
tono.
Procedimento per attivazione 38 toni CTCSS:
1. Accendere l’apparato.
2. Sezionare il canale desiderato da P1 a P8, premendo il pulsante “menu” e i tasti
p/q
3. Premere 2 volte il tasto “menu” nchè il display mostra il canale selezionato (da
P1 a P8) con l’attuale tono CTCSS lampeggiante.
4. Selezionare il tono CTCSS premendo i tasti p/q (da 1 a 38).
5. Per confermare l’impostazione, premere PTT.
Ora la radio trasmette e riceve utilizzando il tono CTCSS impostato. Se si vuole
togliere il tono CTCSS, ripetete la stessa procedura e selezionare “00” come
tono CTCSS.
Visualizzazione dei toni CTCSS sul display
Se avete aggiunto i toni CTCSS ai canali da P1 a P8, questi saranno visualizzati
direttamente sullo schermo LCD afanco al canale. Tutti gli altri canali dal 9 in
poi, hanno i toni CTCSS pre-programmati e “nascosti”. E’ possibile visualizzare
momentaneamente quale canale e quale tono è stato pre-programmato mantenendo
premuto il tasto “Menu” per più di 3 secondi.
Page 3
3
› Funzione Monitor
Questa funzione se attivata permette la ricezione di qualsiasi segnale radio anche
se molto basso e debole. In questo modo se la conversazione è al limite della
portata, attivando il “monitor” è possibile estendere la portata della radio. La contro
indicazione di questa funzione è che vengono ricevuti anche notevoli rumori di
fondo.
Attivazione /Disattivazione:
1. Premere il tasto “menu” nchè sul display compare il simbolo
2. Con i tasti p/q selezionare “On” per attivare la funzione.
3. Premere il tasto PTT per confermare la scelta
Per disattivare la funzione monitor premere il tasto “menu”
Tasto “ /S”
Blocco tastiera
Questa funzione risulta molto comoda per evitare che i tasti siano premuti accidentalmente. Mantenere premuto il tasto “
/S” per più di 3 secondi. Il simbolo indica che
il blocco tastiera è stato attivato. Solo i tasti PTT e
rimangono attivi.
Per disattivarlo, premerlo nuovamente per più di 3 secondi.
Funzione SCAN
SCAN esegue la scansione di tutti i canali e in presenza di un segnale su un canale
(quindi di una conversazione), si arresta. La scansione riprenderà dopo 5 secondi dal
cessare del segnale. Questa funzione è utile per controllare quali canali sono liberi.
Attivazione funzione SCAN
Premere il tasto “ /S”: sul display viene visualizzata la scritta SCAN.
Disattivazione funzione SCAN
Premere il tasto “ /S” o PTT.
Illuminazione display
Alla pressione del tasto e di uno dei 5 tasti frontali, il display si illumina per circa 10
secondi. (solo per i modelli M48 e M99)
Ricarica
Quando le batterie o il pacco batteria è scarico, l’icona inizia a lampeggiare
sul display: occorre quindi procede, prima possibile, alla sostituzione delle batterie o alla loro ricarica. Se la radio è spenta l’icona non viene visualizzata.
Attenzione: le batterie alcaline non possono essere ricaricate.
Attenzione: non porre le radio in carica senza aver inserito le batterie ricaricabili o il
pacco batteria.
Attenzione: la prima volta è opportuno caricare il pacco batteria per 8 ore complete
(solo per i modelli M48 e M99).
Modello M24
Questo modello è fornito senza batterie e senza accessori per la ricarica
Modello M48
Dopo aver inserito il pacco batteria, utilizzate il caricatore da muro presente nella
confezione inserendolo nella presa laterale MIC/CHG dell’apparato. Il caritatore
da muro è del tipo a “doppia presa”, quindi può ricaricare entrambe le radio
contemporaneamente. Se le radio sono state poste in carica accese, l’icona
lampeggerà indicando che la fase di ricarica è attiva. Questa segnalazione non
dipende dallo stato della carica e non si spegne se le batterie sono completamente cariche.
Modello M99
Nella confezione del modello M99 trovate il caricatore da tavolo doppio ed il caricatore
da muro. Collegate il caricatore da muro nella presa presente sul retro del caricatore
da tavolo e dopo aver inserito il pacco batteria nelle radio, posizionate le due radio
nel caricatore da tavolo. Se la radio è stata inserita correttamente il LED rosso di
segnalazione si accenderà. Se le radio sono state poste in carica accese, l’icona
lampeggerà indicando che la fase di ricarica è attiva.
Il LED rosso posto sul caricatore da tavolo identica solo l’iserimento della
radio e l’attivazione della fase di ricarica non lo stato della carica. Queste segnalazioni (LED rosso e l’icona
) non dipendono dallo stato della carica, quindi
non si spengono quando le batterie sono completamente cariche.
Auto power save
Tutti i modelli sono dotati del dispositivo automatico di risparmio batterie che consente
diridurre i consumidellebatterie no al50%. Quando la radio non riceve alcun
segnale per più di 10 secondi la funzione di risparmio energia viene attivata.
Utilizzo degli accessori
Tutti i modelli sono dotati della presa laterale MIC/CHG per l’utilizzo di accessori,
quali microfoni ed auricolari. Questa presa è compatibile con gli eventuali accessori già presenti nella confezione e con tutti gli accessori Midland a presa
“2 pin”.
Per utilizzare l’auricolare fornito insieme al modello M99, vericate che la
levetta sia in posizione corretta:
PTT per uso manuale
VOX per trasmissione via voce (una volta attivata la funzione su menu)
Page 4
4
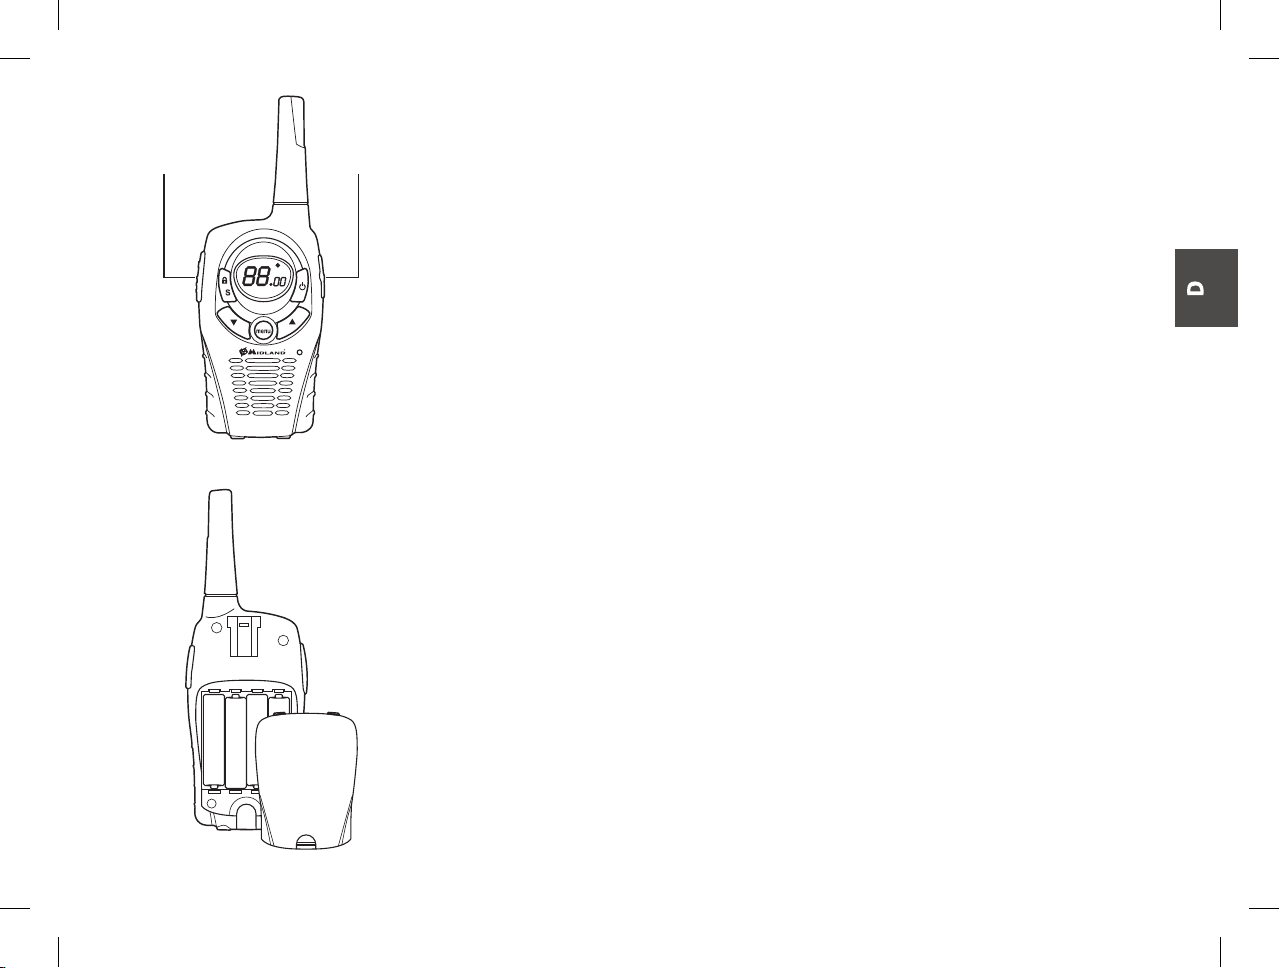
PTT MIC/CHG
Congratulations on your purchase!
The family of radio M24, M48 and M99 are PMR 446
transceiver which may be used, without license, all
over Europe. Please consult the “Restrictions on the
use” charts for information regarding country specic
limitations.
Main features:
Fre q. 446. 00625 ÷ 446.09 375 M Hz ›
Channels; ›
M24: 24 channels (8+16 pre-programmed)
M48: 48 channels (8+40 pre-programmed)
M99: 99 channels (8+91 pre-programmed)
38 CTCSS-Sub-Tones ›
Power: 500 mW ERP ›
VOX sensitivity adjustable in 2 levels ›
Battery pack: 600mAh 4,8V NiMH ›
Alphanumeric LCD Display ›
Battery life up to 12 hours ›
Operating temperature –20° +55° ›
Weight 95 gr (batteries excluded) ›
Size 58x160x28 mm ›
Jack MIC CHG: 2 pins for audio accessories, wall ›
charger
Specications are subject to change without notice.
Content model M24
2 transceivers with 24 channels ›
2 belt clips ›
Instruction manual ›
Content model M48
2 transceivers with 48 channels ›
2 belt clips ›
2 600mAh rechargeable battery packs ›
2 headsets ›
wall adaptor double plug ›
Instruction manual ›
Content model M99
2 transceivers with 99 channels ›
2 belt clips ›
2 600mAh rechargeable battery packs ›
1 double desktop charger ›
wall adaptor ›
2 “professional” headsets ›
2 carry cases with neck collars ›
Instruction manual ›
Coverage
The maximum range depends on terrain condition and
is obtained during use in an open space.
The only limitation to maximum possible range are en-
vironmental factors such as blockage caused by trees,
buildings, or other obstructions. Inside a car or a metallic
constructions, the range can be reduced. Normally the
coverage in the city, with buidings or other obstructions
is about 1 or 2 Km. In open space but with obstructions
like trees, leafs or houses the maximum possible range
is about 4-6 Km. In open space, without obstructions
and in sight, like for example in mountain, the coverage
can be more than 10 Km.
Battery and battery compartment
The transceiver accepts the rechargeable battery pack
(included only in the M48 and M99 models) or 4AAA
alkaline/ rechargeable batteries. To open the battery
compartment, hold the unit face down and unhook the
battery holder in the lower part of the radio and gently
slide the cover.
Attention: the battery pack provided with the M48 and
M99 models, must be recharged before the rst use
(see the section “Recharging” for more info).
Midland M24, M48 and M99
PMR446 TRANSCEIVER
Page 5

5
LET’S COMMUNICATE!
To turn radio on/off
Hold down the
for 3 seconds.
Channel selection
Press once the “menu” button and then select the desired channel by the p/q buttons. Press PTT to conrm the selection. Remember in order to communicate, both
radios must be set on the same channel.
Transmission
Keep the PTT button pressed and speak into the unit. Hold the radio 4/10cm away
from your mouth. The display shows ‘TX’. When the PTT is released, the radio beeps
to conrm to other users that your transmission has nished (Roger beep. See the
paragraph).
Reception
Simply release the PTT button. When you receive a signal, ‘RX’ is displayed.
Volume adjustment
Use the p/q buttons to adjust the volume to the desired level.
CALL function
Sending audio signal
By pressing rapidly the PTT button twice, you will send an audio signal to other users
on the same channel.
“Menu” button
Following functions can be selected by pressing the “menu” button:
VOX ›
Roger Beep activation ›
Channel setting ›
CTCSS Tones setting ›
Monitor ›
› VOX function and its sensitivity
The VOX function lets you open the transmission by voice without the use of the
PTT button. To get the most use from the VOX feature you must rst determine what
sensitivity (noise level) is needed to activate the VOX.
Push the “menu” button till ‘VOX’ blinks on the display. Select the desired VOX
level (1 or 2) by means of the p/q buttons and then press the PTT button to
conrm.
VOX can be adjusted in 2 positions:
• 1: high sensitivity (normal voice with no background noise)
• 2: low sensitivity (useful in very noisy areas or if you talk loudly)
To disable the VOX mode, press the “menu” button till ‘VOX’ blinks on the
display. Select ‘OF’ by means of the p/q buttons and then push PTT to conrm.
Attention: the VOX function can not be used with the M48 provided headset
inserted. To use the VOX with the headset provided with the model M99, the small
switch on the headset’s PTT must be in the VOX position. Move it back on PTT
position if you don’t use the VOX function.
› Roger Beep: end transmission tone
When PTT is released the radio will beep to conrm to other users that your
transmission has nished. This feature is enabled by default and it is displayed with
the
icon.
To disable the Roger Beep
1. Push the “menu” until the display shows the symbol
2. Select ‘OF’ by means of the p/q buttons
3. Conrm the selection by pushing the PTT button.
› Channel setting
Press once the “menu” button and then select the desired channel by the p/q
buttons. Press PTT to conrm the selection.
› CTCSS-sub-tone setting
The CTCSS sub-tones, are code numbers (from 1 to 38) to be added to the rst
8 channels in order to create a new private channel. You can add up to 38 codes
to the channels named from P1 to P8, that means you can create up to 308 new
channels. For example if you add the CTCSS sub-tone “27” to the channel “P3”
you will obtain the new channel “P327” that will be able to communicate to other
transceivers only if they will be set on the same channel and sub tone.
To activate 38 different CTCSS sub-tones follow these steps:
1. Turn on the radio.
2. Press the “Menu” button and select with the p/q buttons one of the 8 channels
(from P1 to P8).
3. Press twice the “menu” button until the display shows the selected channel with
the ashing two digits CTCSS sub-tone (on the right of the channel)
4. Select with the p/q buttons the desired CTCSS sub-tone (from 1 to 38).
5. To conrm the setting press PTT.
Now the radio transmits and receives using the programmed CTCSS sub-tone. If
you don’t want to use any CTCSS tone, select “00”.
Show the CTCSS-sub-tone on the LCD
When you activate a CTCSS sub-tone, from P1 to P8, the tone is visible just on the
right side of the channel. For the other channels (from 9 up) the CTCSS sub-code is
pre-programmed and then “hidden”. To temporary show a pre-programmed channel
and his CTCSS sub-tone, press the “menu” button for more than 3 seconds.
Page 6
6
› Monitor function
This feature if activated, allows the possibility to receive very low and weak radio
signals. This is very useful when you need to talk but the distance is as far as the
maximum range possible. The disadvantage of this feature is the receipt of loud
background noise.
1. Push the “menu” until the display shows the symbol
2. To activate, select ‘On’ by means of the p/q buttons
3. Conrm the selection by pushing the PTT button.
To switch off the monitor simply press the menu button
/S” button
Keypad lock
This feature is very useful to avoid pressing the buttons by chance. Press and hold
the “ /S” button for more than 3 seconds. The icon conrms that the keypad lock
is activated. Only PTT and will still be active. Repeat the same procedure to unlock
the keypad.
SCAN-mode
The SCAN mode monitors the busy channels.
It is used to check the trafc radio on all the channels before transmitting and allows
the unit to stop on a channel that someone is talking on. When the radio stops on a
busy channel, the scan will resume after about 5 seconds.
To activate the SCAN function: Press the “ /S” button and you will see ‘SCAN’ on
the display.
To deactivate it: push the “ /S” or PTT button.
Display backlight
When you push or one of the 5 controls on the front side, the display lights up for
approx. 10 seconds (only on the M48 and M99 models).
Recharging
When the battery pack or the batteries are discharged, the icon starts blinking:
it is necessary to change the batteries or to recharge it as soon as possible.
The icon blinks only if the radio is turned on.
Attention: alkaline batteries cannot be recharged.
Attention: do not recharge the radio without the rechargeable batteries or without the
battery pack.
Attention: for the very rst recharge of the battery pack allow not less than 8 hours
(only for M48 and M99 models).
M24 model
This model is not provided with batteries or accessories for recharging.
M48 model
This model is provided with battery packs and wall adapter. Insert the battery packs
and plug the wall adapter into the MIC/CHG jack on the side of the transceiver. The
wall adapter is a double plug type, so you can recharge both transceivers at the
same time. Only if the transceiver is left on during the charging, the
icon on the LCD
display will blink indicating that the radio is in charging. This indication will not turn off
when the batteries are fully charged.
M99 model
This model is provided with battery packs, desktop charger and wall adapter. Insert the
battery packs, connect the wall adapter plug to the back of the desktop charger and
insert the transceivers into the desktop charger cradles. If the transceivers have been
inserted correctly, the red LED light on the desktop charger will turn on, indicating that
the radio is being charged. Only if the transceiver is left on during the charging, the
icon on the LCD display will blink indicating that the radio is being charged. Both
indications will not turn off when the batteries are fully charged.
Automatic power save
All the models are supplied with an automatic current economy circuit. If the transceiver receives no signal for more than 10 seconds, the “power save function” automatically activates. Thebatterylifemayincreasebyupto50%.
Accessories
All the models are provided with the MIC/CHG jack for connection to accessories
such as mikes and headsets. This plug is a “2 pin type” and is compatible with all the
Midland’s range of accessories.
To use the headset provided with M99 model, be sure the micro-switch is
in the correct position:
PTT: for manual activation
VOX: for voice activation
Page 7
7
PTT MIC/CHG
Mit unseren Geräten haben Sie eine gute Wahl getroffen!
Die Funkgeräte unserer Serien M24, M48 und M99 sind
nach dem PMR 446 Funkstandard überall in Europa
(EU und EWR) anmelde- und gebührenfrei benutzbar.
Bitte lesen Sie auch unsere Informationen zu evtl. Einschränkungen.
Die wichtigsten Eigenschaften:
Frequenzbereich 446.00625 bis 446.09375 MHz ›
schaltbare Kanalkombinationen ›
M24: 24 Kanäle (8+16 vorprogrammiert)
M48: 48 Kanäle (8+40 pre-programmed)
M99: 99 channels (8+91 pre-programmed)
38 CTCSS-Sub-Töne (Tonsquelch) ›
Sendeleistung max. 500 mW ERP ›
VOX Empndlichkeit: 2 Stufen ›
Betrieb mit Akkupack: 600mAh 4,8V NiMH oder 4 ›
Standard-AAA-Einzelzellen
Alphanumerisches LCD Display ›
Batteriestandzeit bis zu 12 Stunden ›
Arbeitstemperaturbereich –20° bis +55° C ›
Gewicht 95 gr (ohne Batterien/ Akkus) ›
Abmessungen 58 x160 x 28 mm ›
MIC CHG Buchse : Duo-Klinkenbuchse für Audiozu- ›
behör und Steckerlader
Änderungen im Rahmen der Produktpege vorbehalten.
Lieferumfang M24
2 Funkgeräte mit 24 Kanälen ›
2 Gürtelclips ›
Bedienungsanleitung ›
Lieferumfang M48
2 Funkgeräte mit 48 Kanälen ›
2 Gürtelclips ›
2 Akkupacks 600mAh ›
2 Headsets ›
Steckerlader mit 2 Ladesteckern ›
Bedienungsanleitung ›
Lieferumfang M99
2 Funkgeräte mit 99 Kanälen ›
2 Gürtelclips ›
2 Akkupacks 600mAh ›
1 Doppelstandlader mit 230 V Netzteil ›
2 Headsets in professioneller Qualität ›
2 Tragetaschen mit Tragebändern ›
Bedienungsanleitung ›
Funkreichweite
Die maximal erzielbare Reichweite hängt wesentlich
von den Umbegungsbedingungen ab. Auf freiem Feld
oder von Bergen oder hohen Gebäuden aus ist die Reichweite am größten.
Die Reichweite wird im wesentlichen nur durch Hindernisse im Ausbreitungsweg begrenzt, wie Gebäude,
Baumbestand, Hügel oder grössere Metallkonstruktionen. Innerhalb von Fahrzeugen oder Stahlbetonkonstruktionen kann die Reichweite geringer werden. Nor-
malerweise erreicht man in städtischer Umgebung mit
Gebäuden und ähnlichen Hindernissen 1 bis 2 Km. Im
Freien mit wenigen Bäumen, Büschen oder kleineren
Häusern kann man maximal 4-6 Km erzielen. In offenem
Gelände, ohne Hindernisse in der Sichtverbindung, z.B.
von Bergen, Türmen oder Brücken aus sind bei guten
Bedingungen auch mehr als 10 Km möglich.
Batteriebestückung und Batteriefach
Das Funkgerät kann sowohl mit einem Akkublock (bei M
48 und M 99 im Lieferumfang) als auch mit 4 einzelnen
AAA Alkalinebatterien oder auadbaren NiMH Akkus
bestückt werden. Zum Öffnen des Batteriefachs halten
Sie das Gerät mit der Frontseite nach unten, haken den
Verschluss aus und schieben den Batteriefachdeckel
vorsichtig nach unten weg.
Achtung: die bei M48 und M99 mitgelieferten Akkupacks müssen vor Inbetriebnahme erst aufgeladen
werden, denn alle NiMH Akkus werden nur teilgeladen
geliefert (siehe auch den Abschnitt “Akku laden”).
Midland M24, M48 und M99
PMR446 Funkhandy
Page 8

8
So geht’s los!
Funkhandy ein / ausschalten
Taste
für 3 Sekunden gedrückt halten.
Kanalwahl
Einmal auf den “Menu” Knopf drücken und dann mit den p/q Tasten den Kanal
aussuchen. Jetzt tippen Sie einmal auf die Sendetaste PTT (das bestätigt jeweils
Ihre Auswahl). Denken Sie daran: Alle Geräte, die miteinander in Verbindung treten
sollen, müssen auf die gleiche Kanalnummer im Display eingestellt werden.
Senden
Drücken Sie die Sendetaste (PTT) und halten Sie die Taste gedrückt, solange Sie
sprechen. Halten Sie beim Sprechen einen Abstand vom Funkgerät von ca. 4-10 cm
zum Mund. Beim Senden erscheint im Display ‘TX’. Nach dem Loslassen der PTT
Taste sendet das Gerät einen Bestätigungston (allgemein als “Roger Beep” bekannt).
Empfang
Einfach PTT Taste loslassen. Bei Empfang erscheint im Display “RX’”.
Lautstärke einstellen
Mit den p/q Tasten kann die Lautstärke eingestellt werden.
CALL Funktion (Rufmelodie)
Rufmelodie aussenden
Kurz hintereinander 2 x PTT drücken, löst den Rufton aus, ein akustisches Signal
was zu anderen Funkgeräten gesendet wird, sofern diese innerhalb der Reichweite
sind und auf dem gleichen Kanal hören.
“Menu” Taste
Die folgenden Funktionen können nacheinander duch mehrfaches Drücken der
“menu” Taste aufgerufen werden:
VOX (Sprachsteuerung, Freisprechen) ›
Roger Beep Aktivierung ›
Kanalwahl ›
CTCSS Töne einstellen ›
Monitorfunktion (Mithörfunktion unter Umgehung der Rauschsperre) ›
› VOX Sprachsteuerung / Freisprechen
Die Freisprechfunktion erlaubt das automatische Senden, sobald Sie anfangen zu
sprechen, ohne dass Sie eine PTT Taste drücken müssen. Allerdings müssen Sie
sicherstellen, dass keine Umgebungsgeräusche versehentlich den Sender anstelle
Ihrer Sprache einschalten. Daher gibt es zwei Empndlichkeitsstufen für die VOX
Aktivierung.
Taste “menu” drücken; ‘VOX’ blinkt im Display. Gewünschte VOX Empndlichkeit
(1 oder 2) mittels p/q einstellen und mit einem kurzen Druck auf PTT bestätigen.
• 1: hohe Empndlichkeit (normale Sprechlautstärke ohne wesentliche
Hintergrund Geräusche)
• 2:niedrigeEmpndlichkeit(nützlich, wo Sie wegen starker Geräuschentwicklung
sowieso lauter sprechen müssen)
Zum Abschalten des VOX Modes: die “menu” Taste mehrfach antippen, bis
‘VOX’ blinkt; jetzt die Anzeige ‘OF’ mit p/q auswählen und mit PTT bestätigen.
Hinweis: Beim M 48 kann die VOX Funktion nicht mit dem mitgelieferten externen
Headset benutzt werden, da das Headset nur für PTT -Betrieb geeignet ist.
Beim M 99 Headset bendet sich ein Umschalter am Headset, den Sie vor
Benutzung einstellen sollten. Zum Senden mit Sprechtaste muss dieser Umschalter
auf “PTT” stehen. Bei VOX Betrieb stellen Sie bitte zuerst das Funkgerät auf VOX
um und anschliessend den Schalter am Headset auf “VOX”.
› Roger Beep: Übergabeton am Ende einer Sendung
Bei Loslassen der PTT Taste wird anderen Benutzern mit einem Übergabeton
signalisiert, dass Sie aufgehört haben zu senden. Diese Funktion kann ein- oder
ausgeschaltet werden. Sofern aktiviert (Lieferzustand = ein), ist im Display
zu
sehen.
Roger Beep abschalten
1. “menu” mehrfach antippen, bis
erscheint
2. ‘OF’ mit Hilfe der p/q Tasten auswählen
3. Bestätigen durch kurzes Drücken der PTT Taste.
› Kanal auswählen
1 x “menu” drücken und Kanal mit den p/q Tasten auswählen. Mit PTT
bestätigen.
› CTCSS-Tonsquelch (Pilotton) einstellen
CTCSS Töne sind als Codes zu verstehen, die es erlauben, einen Kanal für mehrere
Benutzergruppen zu benutzen, ohne dass eine Gruppe die Gespräche der anderen
Gruppen mithören muss. Es gibt Code Nummern 1 bis 38, die man den Kanälen
P1 bis P 8 hinzufügen und damit einen neuen Unterkanal erzeugen kann. Bei
bis zu 38 verschiedenen Subcodes ergibt das maximal 308 Kanalkombinationen.
Beispiel: Fügen Sie zum Kanal P3 den Subton 27 hinzu, das ergibt den neuen Kanal
“P327” Wenn Sie mit Ihren Partnerstationen sprechen möchten, dann müssen alle
Stationen diese Kanalnummern-Kombination eingestellt haben.
Zum Aktivieren der 38 verschiedenen CTCSS Sub-Codes:
1. Gerät einschalten.
2. 1 x “menu” drücken und mit p/q einen der 8 Kanäle aussuchen.
3. 2 x “menu” drücken , das Display blinkt jetzt mit zwei Stellen rechts neben der
Kanalnummer
4. Mit p/q einen der Subtöne 1 bis 38 wählen
5. Bestätigen wieder mit kurzem Druck auf PTT.
Nun sendet und empfänglt das Gerät auf dem gewählten Kanal mit der jeweiligen
CTCSS Nummer. Die Codierung “00” wählen Sie, wenn Sie keine CTCSS
Codierung wünschen.
Anzeige der Subtöne im Display
Immer dann, wenn ein Kanal mit Subton ausgewählt wird, erscheint dieser Kanal
bei den Kanälen P1 bis P 8 rechts neben der Kanalnummer. Bei Kanalnummern
über 9 sind auch Subtöne werkseitig eingestellt, aber normalerweise ist der Subton
Page 9
9
hier nicht sichtbar. Wollen Sie trotzdem die Daten von Kanälen über Nr. 9 einsehen,
drücken Sie einfach mehr als 3 Sekunden lang die “menu” Taste.
› Monitor Funktion
Diese Funktion erlaubt Ihnen, die normalerweise automatisch arbeitende
Rauschunterdrückung zu überbrücken. Das kann sinnvoll sein, wenn ein Signal
so schwach hereinkommt, dass es sonst zerhackt hörbar wäre. Nachteilig ist dabei
das Hintergrundrauschen, was Sie hören, wenn niemand sendet.
1. Taste “menu” mehrfach antippen, bis
erscheint
2. Zum Aktivieren ‘On’ mittels p/q aussuchen
3. Einstellung mit PTT bestätigen.
Zurückkehren auf Normalbetrieb: Menu drücken
/S” Taste
Tastensperre
Nützlich wenn man das Gerät in der Kleidung trägt und versehentliches Drücken einer
Taste verhindern will. Halten Sie dazu den Knopf “
/S” für etwas länger als 3 Sekun-
den gedrückt. Das
Symbol zeigt Ihnen jetzt, dass die Tatatur gesperrt ist. Nur PTT
und
sind jetzt noch zu bedienen. Zum Wieder-Freischalten verfahren Sie genauso.
SCAN-Suchlauf
Im Suchlauf können Sie nach belegten Kanälen suchen lassen und diesen Funkbetrieb auch mithören.
Der Suchlauf ist auch nütztlich, wenn Sie sich informieren wollen, wieviel Betrieb auf
den einzelnen Kanälen herrscht, bevor Sie selbst senden wollen und ggf. jemanden
stören könnten. Der Suchlauf sucht alle Kanäle nacheinander ab. Wo Funkbetrieb entdeckt wird, bleibt der Suchlauf stehen und Sie hören einige Sekunden lang mit. Nach
ca. 5 Sekunden startet der Suchlauf jeweils wieder erneut.
Suchlauf starten: “
/S” drücken, im Display erscheint ‘SCAN’ .
Suchlauf stoppen: nochmals “
/S” oder kurz die PTT Taste drücken.
Display Hintergrundbeleuchtung
Bei jedem Druck auf oder eine andere der 5 Tasten auf der Frontseite schaltet sich
die Beleuchtung für jeweils rund 10 Sekunden ein (nur bei M48 und M99).
Akkusauaden
Bei entladenem Akku oder Batteriesatz fängt das Symbol an zu blinken: es ist
nun Zeit, den Akku aufzuladen oder den Batteriesatz zu wechseln.
Das
Symbol blinkt nur bei eingeschaltetem Gerät.
Vorsicht: Niemals Alkalibatterien laden, diese können und dürfen nicht geladen werden. Bei Ladeversuchen können solche Batterien platzen, ggf. besteht Explosionsge-
fahr.
Wichtig: Starten Sie niemals einen Ladevorgang, wenn Sie keine auadbaren Akkus
im Batteriefach haben, oder wenn keine Batterien eingesetzt sind! Bei solchen Versu-
chen könnte das Gerät durch fehlende Belastung und erhöhte Spannungen aus dem
Ladegerät beschädigt werden! Prüfen Sie regelmässig, ob die Kontakte der Akkus in
Ordnung sind.
Hinweis zur Ladezeit: für ein erstes Auaden sollten Sie mit einer Ladezeit von nicht
weniger als 8 Stunden rechnen (nur bei M 48 und M 99). Ansonsten laden die Akkus
in etwa 8 bis 10 Stunden voll auf.
M24
Dieses Gerät ist nicht für Akkus bzw. Laden vorgesehen. Evtl. benutzte Einzelakkus
müssen zum Laden herausgenommen und extern geladen werden.
M48
Dieses Gerät wird mit Akkupacks und Steckerladegerät geliefert. Stecken Sie das Ladekabel des Steckerladers in die kombinierte MIC/CHG Buchse an der Seite des
Geräts. Das Steckerladegerät hat zwei Anschlusskabel und erlaubt paarweises
Auaden.Eine Ladeanzeige erfolgt nur, wenn beim Laden die Geräte eingeschaltet
bleiben. In diesem Fall blinkt das
Symbol als Ladeanzeige. Diese Anzeige zeigt
lediglich an, dass Verbindung zum Ladegerät besteht und geladen wird, die Anzeige
erlischt nicht, wenn die Akkus vollgeladen sind.
M99
Bei diesem Modell gibt es Akkupacks und einen Doppel-Standlader, in den Sie die
Funkgeräte zum Auaden hineinstellen können. Bei korrektem Einstecken leuchtet die
rote LED am Standlader auf. Die Anzeige beim Funkgerät
leuchtet nur, wenn das
Funkgerät beim Laden eingeschaltet bleibt. Beide Anzeigen erlöschen nicht bei voller Ladung, sondern bleiben eingeschaltet, solange das Funkgerät in der Ladeeinheit
steht und Strom ießt.
Automatische Stromsparschaltung
Alle Geräte haben eine CPU-gesteuerte Stromsparschaltung, die immer dann, wenn
das Gerät mehr als 10 Sekunden lang nichts empfängt, automatisch aktiviert wird. Die
Stromsparschaltung schaltet dann nicht unbedingt gebrauchte Baugruppen vorübergehend ab und spart so bis zu 50 % Batteriestrom ein.
Zubehör
Alle Geräte haben eine Zubehörbuchse MIC/CHG für Audiozubehör wie Mikrofone
oder Headsets mit Duo-Klinken-Normstecker 2.5 / 3.5 mm. Die meisten Midland Zubehör-Artikel passen an diese Buchsenkombination.
Bei VOX Betrieb stellen Sie bitte zuerst das Funkgerät auf VOX um und
anschliessend den Schalter am Headset auf “VOX”.
PTT : für Betrieb mit Sendetaste
VOX : für automatische Sprachsteuerung
Page 10

10
PTT MIC/CHG
¡Enhorabuena por su compra!
Los equipos M24, M48 y M99 son transceptores que
pueden utilizarse sin licencia en toda Europa. Por favor
consulte la tabla “Restricciones al uso” para más información referente a las limitaciones en cada país.
CTE International SRL, declara, bajo su responsabilidad, que este
aparato cumple con lo dispuesto en la Directiva 99/05/CE, del Parlamento Europeo y del Consejo de 9 de marzo de 1999, transpuesta
a la legislación española mediante el Real Decreto 1890/2000, de
20 de noviembre”
Características principales:
Frecuencia 446.00625 ÷ 446.09375 MHz ›
Canales; ›
M24: 24 canales (8+16 pre-programados)
M48: 48 canales (8+40 pre-programados)
M99: 99 canales (8+91 pre-programados)
38 subtonos CTCSS ›
Potencia: 500 mW ERP ›
VOX regulable con 2 niveles de sensibilidad ›
Display LCD alfanumérico retroiluminado ›
Temperatura de funcionamiento: –20 a +55°C ›
Peso 95 gr. (sin baterías) ›
Dimensiones 58x160x28 mm ›
Conector MIC/CHG: 2 pin para accesorios de audio ›
y cargador de pared
Las funciones y especicaciones están sujetas a cambios sin
previo aviso
Contenido del modelo M24
2 transceptores con 24 canales ›
2 clips de cinturón ›
Manual de instrucciones ›
Contenido del modelo M48
2 transceptores con 48 canales ›
2 clips de cinturón ›
2 pack de baterías recargables de 600mAh ›
2 micro-auriculares ›
Cargador de pared de doble salida ›
Manual de instrucciones ›
Contenido del modelo M99
2 transceptores con 99 canales ›
2 clips de cinturón ›
2 pack de baterías recargables de 600mAh ›
1 cargador doble de sobremesa ›
Adaptador-alimentador de pared ›
2 micro-auriculares “profesionales” ›
2 fundas con cinta para el cuello ›
Manual de instrucciones ›
Alcance
El máximo alcance se obtiene utilizando los equipos
al aire libre y dependiendo de las características del
terreno.
Factores ambientales como árboles, edicios y otros
obstáculos pueden hacer que disminuya el rango de
cobertura. Así mismo dentro de un coche o bajo estructuras metálicas, el alcance puede disminuir. Normal-
mente la cobertura en la ciudad, con edicios y otros
obstáculos es entre 1 y 2 Km. En espacios abiertos con
algún tipo de obstáculo, el alcance puede estar entre
4-6 Km. y, sin ningún tipo de obstáculo, por ejemplo
entre dos montes, al alcance podría ser superior a los
10 Km.
Baterías y compartimento de baterías
El transceptor admite un pack de baterías recargables
(incluido sólo en los modelos M48 y M99) o 4 pilas alcalinas o baterías recargables del tipo AAA. Para abrir
el compartimento de las baterías, ponga la radio cara
abajo y desbloquee la lengüeta en la parte baja de la
radio y deslice suavemente la tapa.
Atención: el pack de baterías suministrado con los
modelos M48 y M99, debe de ser recargado antes de
su primer uso (vea la sección “Recarga” para más información).
Midland M24, M48 y M99
TRANSCEPTOR PMR446
Page 11

11
Y AHORA, ¡LISTO PARA COMUNICARSE!
Encender/apagar la radio
Mantenga pulsada la tecla
durante 3 segundos.
Selección de canal
Pulse una vez la tecla “menu” y seleccione el canal deseado mediante las teclas
p/q. Pulse PTT para conrmar la selección. Recuerde que para poder comunicarse,
las dos radios deben de estar sintonizadas en el mismo canal.
Hablar (transmitir)
Mantenga pulsada el pulsador PTT y hable hacia la radio a una distancia de unos
4/10cm con un tono de voz normal. El display muestra ‘Tx’. Cuando se suelta el PTT,
la radio emite un pitido para indicar al otro usuario que ha terminado la transmisión
(Vea el párrafo Roger beep).
Escuchar (recepción)
Simplemente suelte o no pulse el PTT. Cuando se recibe una señal, el display indica
‘Rx’.
Ajuste del Volumen
Utilice las teclas p/q para ajustar el nivel de volumen deseado.
Tecla CALL
Envío de una señal de audio
Pulsando dos veces rápidamente el PTT, enviará una señal de aviso a otra radio que
esté en el mismo canal
Tecla FUNCIÓN “menu”
Pulsando la tecla menu, se pueden seleccionar las siguientes funciones:
Función VOX ›
Activación/desactivación Roger Beep ›
Ajuste de canales ›
Selección subtonos CTCSS ›
Activar/desactivar silenciador automático (Squelch) ›
› Función VOX - Ajuste y sensibilidad
La función VOX le permite transmitir mediante su voz, sin necesidad de pulsar el
PTT. Para un uso óptimo del VOX, primero debe de ajustar el nivel de sensibilidad
(nivel de ruido) necesario para activarlo.
Pulse la tecla “menu” más veces, ‘VOX’ parpadea en el display. Seleccione el nivel
de VOX deseado (1 ó 2) mediante las teclas p/q y después pulse la tecla PTT para
conrmar.
El VOX tiene 2 niveles de ajuste:
1: sensibilidad alta (voz normal sin ruido de fondo)
2: sensibilidad baja (ambientes ruidosos o si habla muy alto)
Para desactivar el modo VOX, pulse la tecla “menu” más veces hasta que ‘VOX’
parpadea en el display. Seleccione ‘OF’ mediante las teclas p/q y pulse PTT para
conrmar.
Atención: el VOX no se puede usar si conecta el micro-auricular incluido en la
dotación del M48. Si desea utilizar el VOX con el micro-auricular incluido en la
dotación del M99, cambie a posición “VOX” la lengüeta situada en la caja del
pulsador PTT del mismo. Cambie a posición “PTT” cuando no desee utilizar el
VOX.
› ROGERBEEP:tonodeconrmaciónndetransmisión
Cuando se libera el PTT la radio emitirá un pitido para conrmar al otro usuario que
la transmisión se ha terminado. Esta función está activada por defecto y se indica
en el display con el icono
.
Para desactivar el Roger Beep
1. Pulse la tecla “menu” hasta que en el display aparezca el símbolo
.
2. Seleccione ‘OF’ mediante las teclas p/q.
3. Conrme la selección pulsando el PTT.
› Selección de canal
Pulse una vez la tecla “menu” y seleccione el canal deseado con las teclas
p/q.
Pulse PTT para conrmar la selección.
› Ajuste del subtono CTCSS
Los subtonos CTCSS, son códigos (del 1 al 38) que se pueden ajustar en los
8 primeros canales para crear un nuevo canal privado. Puede añadir hasta 38
códigos en los canales denominados P1 a P8, lo que quiere decir que puede crear
hasta 304 nuevos canales. Por ejemplo si ajusta el subtono “27” al canal “P3”
obtendrá el Nuevo canal “P327” que le permitirá comunicarse con otras radios
ajustadas en el mismo canal y subtono.
Para activar uno de los 38 subtonos diferentes CTCSS, siga los siguientes
pasos
1. Encienda la radio.
2. Seleccione con las teclas
p/q uno de los 8 canales (P1 a P8).
3. Pulse dos veces la tecla “menu” hasta que el display muestre el canal
seleccionado con el subtono ajustado parpadeando a su derecha.
4. Seleccione mediante las teclas
p/q el subtono CTCSS deseado (del 01 al 38).
5. Para conrmar el ajuste, pulse el PTT.
Ahora la radio transmite y recibe usando el subtono ajustado. Si no quiere usar
ningún tono, al realizar el ajuste seleccione “00”.
Indicación del subtono CTCSS en el display
Cuando activa un subtono CTCSS, de P1 a P8, el ajuste es visible justo a la
derecha del canal. Para el resto de canales (del 9 en adelante) el subtono está
preprogramado y “oculto”. Para ver temporalmente el canal y el subtono ajustado,
Page 12

12
pulse la tecla “menu” durante tres segundos.
› Eliminación del ruido de fondo (squelch)/extensión de la cobertura
El ltro de eliminación de ruido (squelch) está activado. Para quitarlo, mantenga
pulsada la tecla “menu“ hasta que aparezca
. Seleccione “On” a través de
las teclas p/q. Conrme la selección pulsando el PTT. Si existen señales muy
débiles, podrá escucharlas ahora. Para desactivar esta función, simplemente pulse
la tecla “menu”
Tecla “ /S”
Bloqueo del teclado
Esta función es muy útil para evitar pulsaciones accidentales en el teclado. Mantenga
pulsada la tecla “
/S” durante mas de 3 segundos. El icono conrma que el bloqueo
del teclado está activado. Solamente estará activo el PTT. Repita el mismo proceso
para desbloquear el teclado.
Función SCAN
La función SCAN explora todos los canales y se detiene en los canales ocupados.
La exploración se detendrá cuando encuentre alguna señal en uno de los canales y
reanudará la exploración 5 segundos después de nalizar la recepción de señal.
Para activar la función SCAN: Pulse la tecla “
/S” y en el display aparece ‘SCAN’.
Para desactivarla: pulse la tecla “
/S” o el PTT
Retroiluminación del display
Cuando pulsa una de las cinco teclas de la parte frontal, el display se ilumina durante
10 segundos aprox. (solo en los modelos M48 y M99).
Recarga
Cuando las baterías o el pack de baterías están descargadas, el icono comienza a parpadear en el display: en ese momento será necesario cambiar las
pilas o recargar las baterías lo antes posible.
El icono
solamente parpadea si la radio está encendida.
Atención: las pilas alcalinas no se pueden recargar.
Atención: la primera carga de las baterías o del pack, no debe ser inferior a 8 horas
(modelos M48 y M99).
Modelo M24
Este modelo se suministra sin baterías ni accesorios de recarga.
Modelo M48
Este modelo se suministra con pack de baterías y cargador de pared. Inserte las
baterías y conecte el cargador en la toma MIC/CHG en el costado de la radio. El
cargador es del tipo de 2 salidas, de manera que puede recargar las dos radios
al mismo tiempo. Solamente si la radio está encendida durante la carga, en el display aparecerá el icono
parpadeando, indicando el modo de carga. Esta
indicación no se apagará cuando la carga se haya completado y las baterías
estén totalmente cargadas.
Modelo M99
Este modelo se suministra con pack de baterías, cargador de sobremesa y adaptador
de pared. Inserte los packs de baterías en las radios, conecte el adaptador de red el
la parte posterior del cargador de sobremesa y coloque las radios en los habitáculos
de carga. Si las radios se han colocado correctamente, se encenderá un LED rojo en
el cargador, indicando que las radios están en carga. Solamente si las radios están
encendidas durante la carga, en los displays aparecerá el icono
parpadeando, indicando el modo de carga. Estas indicaciones no se apagarán cuando la
carga se haya completado y las baterías estén totalmente cargadas.
Ahorro de baterías automático
Todos los modelos disponen de un circuito automático de ahorro de batería. Si la radio
no recibe ninguna señal durante 10 segundos, la función de ahorro de baterías se
activa automáticamente. La duración de las baterías se puede incrementar hasta
un50%.
Accesorios
Todos los modelos disponen de un conector MIC/CHG para la conexión de accesorios tales como micrófonos y auriculares. Este conector es del tipo “2 pin” y es
compatible con todos los accesorios Midland 2 pin.
Para usar el microauricular incluido en la dotación del M99, verique que la
lengüeta situada en la caja del PTT esté situada en la posición correcta:
PTT para uso manual
VOX para activación vocal
Page 13

13
PTT MIC/CHG
Félicitations pour votre achat!
La famille des radios M24, M48 et M99 son des émetteurs-récepteurs PMR 446 qui peuvent être utilisé sur
toute l’Europe sans licence. S’il vous plait lisez le paragraphe “Restriction d’utilisation” pour plus d’information
sur l’utilisation dans les différents pays.
Caractéristiques principales:
Fre q. 446. 00625 ÷ 446.09 375 M Hz ›
Canaux; ›
M24: 24 canaux (8+16 préprogrammé)
M48: 48 canaux (8+40 préprogrammé)
M99: 99 canaux (8+91 préprogrammé)
38 codes CTCSS ›
Puissance: 500 mW PAR ›
Sensibilité VOX réglable sur 2 niveaux ›
Bloque batteries: 600mAh 4,8V NiMH ›
Afcheur LCD alphanumérique ›
Autonomie batterie jusqu’a 12 heures ›
Température de fonctionnement –20° +55° ›
Poids 95 gr (Sans batteries) ›
Dimensions 58x160x28 mm ›
Jack MIC CHG: 2 broches pour accessoires audio ›
et chargeur mural
Ces caractéristiques peuvent changer sans préavis.
Contenu du M24
2 émetteur-récepteurs avec 24 canaux ›
2 clips ceintures ›
Manuel d’utilisation ›
Contenu du M48
2 émetteur-récepteurs avec 48 canaux ›
2 clips ceintures ›
2 Bloques batteries rechargeable de 600mAh ›
2 oreillettes ›
Chargeur mural double connecteur ›
Manuel d’utilisation ›
Contenu du M99
2 émetteur-récepteurs avec 99 canaux ›
2 clips ceintures ›
2 Bloques batteries rechargeable de 600mAh ›
1 Chargeur double de bureau ›
1 adaptateur mural ›
2 Oreillettes “professionnel” ›
2 Housses avec tour de cou ›
Manuel d’utilisation ›
Couverture
La couverture maximale dépend du terrain et s’obtient
pendant une utilisant en champ libre.
La seul limitation de la couverture maximal sont des
facteurs environnementaux, tel que des arbres, des
immeubles et autres constructions. De même dans une
voiture ou une construction métallique la portée peut
être réduite. Normalement la couverture en ville avec
des immeubles ou autre obstacles est de environ 1 à 2
Km. Dans grand espace mais avec des arbres, des feu-
illes ou des maisons la portée est d’environ 4 à 6 Km.
Dans uns espace sans obstacle et à vue, par exemple
en montagne, la couverture peut allez jusqu’a 10 Km.
Compartiment batterie et batteries
L’émetteur-récepteur accepte des bloques batteries rechargeable (inclus uniquement dans le model M48 et
M99) ou 4 batteries AAA alcaline/rechargeable. Pour
ouvrir le compartiment des batteries, tournez la radio
face avant vers le bas et ouvrez le verrouillage du couvercle qui se trouve en bas du poste et faire le glisser.
Attention: Le bloques batterie fournit avec les models
M48 et M99, doivent être rechargés avant la première utilisation (Voir le paragraphe “Rechargement” pour
plus d’information).
Midland M24, M48 et M99
EMETTEUR-RECEPTEUR PMR446
Page 14

14
Communicon!
Allumer et eteindre la radio
Garder la touche
appuyé pendant 3 secondes.
Sélection du canal
Appuyez une fois sur la touche “menu” et sélectionnez le canal désiré à l’aide des
touches p/q . Appuyez sur PTT pour conrmer la sélection. Gardez à l’esprit que
pour communiquer les deux radios doivent être sur le même canal.
Emission
Gardez appuyé la touche PTT et parlé. Gardez la radio à une distance de 4 à 10 cm
de votre bouche. L’afcheur indique ‘TX’. Quand la touche PTT est relaché, la radio
emet un beep pour conrmer au autre utlisateur que l’emission est terminée (Voir le
paragraphe Roger Beep).
Réception
Relachez simplement la touche PTT. Quand la radio reçoit un signal ‘RX’ est afché.
Réglage du volume
Utilisez les touches p/q pour régler le volume au niveau désiré.
Fonction CALL
Envoie d’un signal sonore
En appuyant deux fois rapidement sur la touche PTT, vous envoyé un signal sonore
aux autres utilisateur pour leur indiquer que vous êtes sur le même canal.
Touche “menu”
Les fonctions suivantes peuvents être sélectionné en appuyant sur la touche
“menu”:
VOX ›
Roger Beep ›
Raglage canal ›
Code CTCSS ›
Moniteur ›
› Fonction VOX et sa sensibilité
La fonction VOX vous permet d’émettre à l’aide de la parole sans utiliser la touche
PTT. Pour avoir le meilleur de la fonction VOX il faut déterminer quel sensibilité est
adapté (Niveau sonore) pour activer le VOX.
Appuyez plus fois sur la touche “menu”,‘VOX’ clignote sur l’afcheur. Sélectionnez
le niveau VOX (1 ou 2) à l’aide des touchesp/q et appuyez sur la touche PTT pour
conrmer.
Le VOX peut être réglé sur 2 positions:
1: haute sensibilité (voie normal sans bruit de fond)
2: basse sensibilité (util en milieu bruyant ou si vous parlez fort)
Pour désactiver le mode VOX, appuyez plus fois sur la touche “menu”jusqu’a ce
que sur l’afcheur clignote ‘VOX’ . Sélectionnez ‘OF’ à l’aide des touches p/q et
appuyez sur PTT pour conrmer.
Attention: La fonction VOX ne peut pas être utilisé quand l’oreillette pour le M48
est connecté à la radio. Pour utiliser la fonction VOX avec l’oreillette fournit avec le
M99, basculez l’interrupteur du micro cravate de la position PTT en position VOX.
Rebasculez le en position PTT si vous n’utilisé pas la fonction VOX.
› RogerBeep:tonalitédend’émission
Quand la touche PTT est relaché la radio émet un beep vers les autres radio pour
indiquer que votre émission est terminé. Cette fonction est activé par défaut et est
afché avec
.
Pour désactiver le Roger Beep
1. Appuyez sur la touche “menu” jusqu’a ce que l’afcheur afche le symbol
2. Selectionnez ‘OF’ à l’aide des touches p/q.
3. Conrmez la sélection en appuyant sur la touche PTT.
› Réglage du canal
Appuyez une fois sur la touche “menu” et sélectionnez le canal désiré à l’aide des
touches p/q . Appuyez sur la touche PTT pour conrmer votre sélection.
› Réglage du code CTCSS
Le code CTCSS est un nombre (de 1 à 38) qui peut être ajouté au 8 premier canaux
pour créer un nouveau canal privé. Vous pouvez ajouter jusqu’a 38 codes aux
canaux nomé P1 à P8, cela signie que vous pouvez créer jusqu’a 308 nouveau
canaux. Par exemple si vous ajoutez le code CTCSS “27” au canal “P3” vous
obtenez un nouveau canal “P327” qui ne poura communiquer avec d’autre radio
que si elles ont le même canal et le même code.
Pour activer 38 code CTCSS différent suivez ces étapes:
1. Allumez la radio.
2. Appuyez sur la touche “Menu” et sélectionnez avec les touches p/q un des 8
canaux (de P1 à P8).
3. Appuyez deux fois sur la touche “menu” jusqu’a ce que sur l’afcheur clignote le
canal et le code CTCSS (à droite du canal)
4. Sélectionnez à l’aide des touches p/q le code CTCSS désiré (de 1 à 38).
5. Conrmez en appuyant sur la touche PTT.
Maintenant la radio émet et reçoit en utilisant le code CTCSS programmé. Si
vous ne voulez pas utiliser un code CTCSS, sélectionnez “00”.
AfcherlecodeCTCSSàl’écran
Quand vous activez le code CTCSS, de P1 à P8 le code est visible juste sur la
droite du canal. Pour les autres canaux (du canal 9 et au-dela) le code CTCSS
est pré-programmé et donc “caché”. Pour afcher temporairement les informations
d’un canal, appuyez sur la touche “menu” pendant plus de 3 secondes.
Page 15

15
› Fonction moniteur
Cette fonction si elle est activé permet de recevoir des signaux radio très faible.
Cela est très utile lorsque vous devez communiquer alors que la distance est
supérieur à la portée maxiaml. L’inconvenien est que vous entendez également le
bruit de fond.
1. Appuyez sur la touche “menu” jusqu’a ce que le symbol soit afché
2. Selectionnez ‘On’ à l’aide des touches p/q pour l’activer ou selectionnez “OF”
pour le désactiver
3. Conrmez votre sélection en appuyant sur la touche PTT.
“ /S” Button
Verouillage clavier
Cette fonction est utile contre des changement accidentel. Appuyez la touche “
/S”
pendant plus de 3 secondes. L’icone conrme que le vérouillage clavier est actif. Seul
la touche PTT reste active. Répétez l’opération pour dévérouiller le clavier.
Mode SCAN
Le mode SCAN surveille les canaux occupés.
Il est utilisé pour vérier le trac sur tous les canaux avant la transmission et permet à
la radio de s’arrêter sur un canal sur lequel quelqu’un parle. Quand la radio s’arrête sur
un canal occupé, le balayage reprendra après environ 5 secondes.
Pour activer la fonction SCAN: appuyez sur la touche “
/S” et l’insciption ‘SCAN’
apparait à l’écran.
Pour le désactiver: appuyez sur la touche “
/S” .
Rétro éclairage
Quand appuyez sur une des 5 touches de control sur l’avant de l’appareil, l’éclairage
de l’afcheur s’allume pour une durée approximative de 10 secondes (Seulement sur
les models M48 et M99).
Chargement
Quand le pack batterie ou les batteries sont déchargé, l’icon commence à
clignoté. Il est alors nécessaire de les recharger le plus vite possible.
l’ icone
clignote uniquement quand la radio est allumé.
Attention: Les piles alcalines ne peuvent pas être rechargés.
Attention: Ne recharger pas la radio sans le pack batteries ou sans les batteries
rechargeable.
Attention: Pour la première charge du bloque batterie, le temps de charge est d’au
moin 8 heures (seulement pour les modèls M48 et M99).
M24 model
Ce model n’est pas vendu avec des batteries ou chargeur.
M48 model
Ce model est vendu avec pack batterie et chargeur mural. Insérrez le pack batterie et
branchez le chargeur dan la prise MIC/CHG sur le coté de l’appareil. Le chargeur
mural a un double connecteur, de sorte que vous pouvez charger deux radio en
même temps. Seulement si l’émetteur récepteur est laissé dessus pendant le char-
gement, l’icône
surl’afchageàcristauxliquidesclignoteraindiquantquela
radio est en charge. Cette indication ne s’éteindra pas avant que les batteries
soient entièrement chargées.
M99 model
Ce modèle est équipé d’un bloque batterie, de chargeur de bureau et d’un adaptateur
de mural. Insérer le bloque de batterie, relier la prise à l’adaptateur mural au dos du
chargeur de bureau et insérer les émetteurs récepteurs dans les berceaux du chargeur de bureau. Si les émetteurs récepteurs ont été insérés correctement, la LED
rouge sur le chargeur de bureau s’allumera, indiquant que la radio est en chargement.
Seulement si l’émetteur récepteur est laissé dessus pendant le chargement,
l’icône
surl’afchageàcristauxliquidesclignoteraindiquantquelaradioest
en charge. Les deux indications ne s’éteindront pas avant que les batteries sont
entièrement chargées.
Economie d’énergie automatique
Tous les modèls sont équipé d’une economie d’énergie automatique. Si la radio ne
reçoit pas de signal pendant plus de 10 secondes, la fonction “power save” s’active
automatiquement.L’autonomieestaugnementjusqu’a50%.
Accessoires
Tous les models on la prise MIC/CHG pour connecter les accessoires come un micro
déporté ou une oreillette. Ce connecteur est de type “double jack” et compatible avec
toute la gamme d’accessoire Midland.
Pour utiliser l’oreillette avec le model M99, assurez vous que l’oreillette
est en bonne position:
PTT: pour un déclenchement manuel
VOX: pour un déclenchement à la voix
Page 16

16
PTT MIC/CHG
Parabéns pela sua aquisição!
A família de rádios M24, M48 e M99 são emissores-
receptores PMR 446 que podem ser utilizados, sem
licença em toda a Europa. Consulte as tabelas “Restri-
ções de utilização” para mais informação sobre limites
especícos de cada país.
Características principais:
Fre q. 446. 00625 ÷ 446.09 375 M Hz ›
Canais; ›
M24: 24 canais (8+16 pré-programados)
M48: 48 canais (8+40 pré-programados)
M99: 99 canais (8+91 pré-programados)
38 sub-tons CTCSS ›
Alimentação: 500 mW ERP ›
Sensibilidade VOX ajustável em 2 níveis ›
Bateria: 600mAh 4,8V NiMH ›
Visor LCD alfanumérico ›
Duração da bateria até 12 horas ›
Temperatura de funcionamento –20° a +55° ›
Peso: 95 g (pilhas não incluídas) ›
Tamanho: 58x160x28 mm ›
Tomada MIC/CHG (microfone/carregador): 2 pinos ›
para acessórios áudio, carregador de parede
Conteúdo modelo M24
2 emissores-receptores com 24 canais ›
2 prendedores para cinto ›
Manual de instruções ›
Conteúdo modelo M48
2 emissores-receptores com 48 canais ›
2 prendedores para cinto ›
2 baterias recarregáveis 600mAh ›
2 auscultadores ›
adaptador de parede de cha dupla ›
Manual de instruções ›
Conteúdo modelo M99
2 emissores-receptores com 99 canais ›
2 prendedores para cinto ›
2 baterias recarregáveis 600mAh ›
1 carregador de secretária duplo ›
adaptador de parede ›
2 auscultadores “prossionais” ›
2 estojos de transportes com ta para o pescoço ›
Manual de instruções ›
Cobertura
O alcance máximo depende das condições do terreno e
pode ser obtido durante utilização num espaço aberto.
A única limitação em relação ao alcance máximo possí-
vel deve-se a factores ambientais como, por exemplo,
bloqueios provocados por árvores, edifícios, ou outros
obstáculos. No interior de um automóvel ou de uma
construção metálica, o alcance poderá ser mais reduzido. Normalmente, a cobertura na cidade, com edifícios
ou outras obstruções é de cerca de 1 ou 2 Km. Num
espaço aberto mas com obstáculos, tais como árvores,
folhas ou casas, o alcance máximo possível é de cerca de 4-6 Km. Num espaço aberto, sem obstáculos e
à vista como, por exemplo, em montanha, a cobertura
pode ser de mais de 10 Km.
Bateria e compartimento da bateria
O emissor-receptor aceita uma bateria recarregável
(incluída apenas nos modelos M48 e M99) ou 4 pilhas
alcalinas/recarregáveis tipo AAA. Para abrir o compartimento da bateria, segure o aparelho com a face virada
para baixo e desprenda o suporte da bateria na parte
inferior do rádio e deslize suavemente a tampa para
fora.
Atenção: a bateria fornecida com os modelos M48 e
M99 tem de ser recarregada antes da primeira utilização (consulte a secção “Recarregar” para mais informações).
Midland M24, M48 e M99
EMISSOR-RECEPTOR PMR446
Page 17

17
VAMOS COMUNICAR!
Para ligar/desligar o rádio
Mantenha pressionado
durante 3 segundos.
Selecção de canal
Pressione o botão “menu” uma vez e depois seleccione o canal pretendido através
dos botões p/q. Pressione PTT para conrmar a selecção. Lembre-se de que,
para comunicar, ambos os rádios têm de estar no mesmo canal.
Transmissão
Mantenha o botão PTT pressionado e fale para o aparelho. Segure o rádio a cerca de
4 a 10 cm de distância da boca. O visor mostra a indicação. Quando o botão PTT à
libertado, o rádio emite um sinal sonoro para conrmar aos outros utilizadores que a
sua transmissão terminou (Roger beep - aviso de m de transmissão. Ver o respectivo
parágrafo).
Recepção
Basta libertar o botão PTT. Quando recebe um sinal, é apresentada a indicação no
visor.
Regulação do volume
Utilize os botões p/q para ajustar o volume para o nível pretendido.
Função CALL (chamar)
Enviar sinal de áudio
Ao pressionar rapidamente o botão PTT duas vezes, irá enviar um sinal de áudio a
outros utilizadores no mesmo canal.
BOTÃO “menu”
Ao pressionar o botão “menu” pode seleccionar as seguintes funções:
VOX ›
Activaçãodeavisodemdetransmissão ›
Deniçãodecanal ›
DeniçãodetonsCTCSS ›
Monitor ›
› Função VOX e a sua sensibilidade
A função VOX permite-lhe abrir a transmissão através da voz sem ser necessário
utilizar o botão PTT. Para conseguir obter o máximo desempenho da função VOX
primeiro tem de determinar qual a sensibilidade (nível de ruído) é necessária para
activar o circuito VOX.
Pressione o botão “menu” mais vezes; a indicação pisca no visor. Seleccione o
nível VOX pretendido VOX (1 ou 2) através dos botões p/q e depois pressione o
botão PTT para conrmar.
A função VOX pode ser ajustada em 2 posições:
1: sensibilidade elevada (voz normal sem nenhum ruído de fundo)
2: sensibilidade baixa (útil em áreas muito ruidosas ou se falar muito alto)
Para desactivar o modo VOX, pressione o botão “menu” mais vezes o visor
apresentar o simbolo Vox. Seleccione com os botões p/q e depois pressione
PTT para conrmar.
Atenção: a função VOX não pode ser utilizada quando o auscultador fornecido
com o M48 está ligado ao rádio. Para utilizar a função VOX com o auscultador
fornecido com o M99, movimente o pequeno interruptor do auscultador da posição
PTT para a posição VOX. Movimente-o novamente para a posição PTT se não
utilizar a função VOX.
› RogerBeep(avisodemdetransmissão):tomdemdetransmissão
Quando o botão PTT é libertado o rádio emite um sinal sonoro para conrmar aos
outros utilizadores que a sua transmissão terminou. Esta função está activada por
defeito e é apresentada com o ícone
.
Paradesactivarafunçãodeavisodemdetransmissão
1. Pressione o botão “menu” até o visor apresentar o símbolo
2. Seleccione através do botões p/q
3. Conrme a selecção pressionando o botão PTT.
› Deniçãodecanal
Pressione o botão “menu” uma vez e depois seleccione o canal pretendido através
dos botões p/q. Pressione PTT para conrmar a selecção.
Deniçãodesub-tomCTCSS
Os sub-tons CTCSS, são números de código (de 1 a 38) que se adicionam aos
primeiros 8 canais de forma a criar um novo canal privado. Pode adicionar até 38
códigos aos canais, denominados de P1 a P8, o que signica que pode criar até
308 novos canais. Por exemplo, se adicionar o sub-tom CTCSS “27” ao canal “P3”,
irá obter o novo canal “P327” que permitirá a comunicação com outros emissores-
receptores se estes se encontrarem denidos no mesmo canal e sub-tom.
Para activar 38 sub-tons CTCSS diferentes, efectue os seguintes passos:
1. Ligue o rádio.
2. Pressione o botão “Menu” e seleccione um dos 8 canais (de P1 a P8) com os
botões p/q.
3. Pressione o botão “menu” duas vezes até o visor apresentar o canal
seleccionado com os o sub-tom CTCSS de dois dígitos a piscar (à direita do
canal)
4. Seleccione o sub-tom CTCSS pretendido (de 1 a 38) com os botões p/q.
5. Para conrmar a denição, pressione PTT.
Agora o rádio realiza a transmissão e recepção utilizando o sub-tom CTCSS
programado. Se não pretender utilizar nenhum tom CTCSS, seleccione “00”.
Apresentar o sub-tom CTCSS no LCD
Quando activa um sub-tom CTCSS, de P1 a P8, o tom é visível apenas no lado
direito do canal. Para os outros canais (a partir de 9), o sub-código CTCSS é pré-
Page 18

18
programado e depois “ocultado”. Para visualizar temporariamente um canal préprogramada e o respectivo sub-tom CTCSS, pressione o botão “menu” durante
mais de 3 segundos.
› Função Monitor
Se esta função estiver activada, permite receber sinais de rádio muito baixos e
fracos. É muito útil quando necessita de comunicar mas a distância é tão longe
quanto o alcance máximo possível. A desvantagem desta função é a recepção de
um ruído de fundo muito elevado.
1. Pressione o botão “menu” até o visor apresentar o símbolo
2. Para activar, seleccione através dos botões p/q
3. Conrme a selecção pressionando o botão PTT. Para desligar o monitor basta
pressionar o botão “menu”
Botão /S”
Bloqueio de teclado
Esta função é muito útil para evitar pressionar involuntariamente os botões. Pressione
e mantenha pressionado o botão “
/S” durante mais de 3 segundos. O ícone conr-
ma que o bloqueio do teclado está activado. Apenas PTT e
estarão activos. Repita
o mesmo procedimento para desbloquear o teclado.
Modo SCAN (varrimento)
O modo SCAN (varrimento) monitoriza os canais ocupados.
É utilizado para vericar o tráfego de rádio em todos os canais antes de transmitir e
permite ao aparelho parar num canal no qual esteja alguém a falar. Quando o rádio
pára num canal ocupado, o varrimento recomeça após cerca de 5 segundos.
Para activar a função SCAN (varrimento): Pressione o botão “
/S” e irá ver a indi-
cação “SCAN” (varrimento) no visor.
Para a desactivar: pressione o botão “
/S” ou o botão PTT.
Luz de fundo do visor
Quando pressionar ou um dos 5 controlos na parte frontal, o visor acende-se durante cerca de 10 segundos (apenas nos modelos M48 e M99).
Recarregar
Quando a bateria ou as pilhas se encontrarem descarregadas, o ícone começa a piscar: é necessário substituir as pilhas ou recarregar a bateria assim que
possível.
O ícone
só pisca se o rádio estiver ligado.
Atenção: as pilhas alcalinas não podem ser recarregadas.
Atenção: não recarregue o rádio sem as pilhas recarregáveis ou a bateria.
Atenção: quando carregar a bateria pela primeira vez, deixe-a carregar pelo menos 8
horas (apenas para os modelos M48 e M99).
Modelo M24
Este modelo não é fornecido com pilhas ou acessórios para recarga.
Modelo M48
Este modelo é fornecido com baterias e um adaptador de parede. Introduza as baterias e ligue o adaptador de parede à cha MIC/CHG na parte lateral do emissor-re-
ceptor.Oadaptadordeparedeédotipodechadupla,peloquepoderecarregar
ambos os emissores-receptores ao mesmo tempo. Apenas se o emissor-receptor
for deixado ligado durante o carregamento, é que o ícone
no ecrã LCD irá piscar
indicando que o rádio se encontra a carregar. Esta indicação não se irá desligar quan-
do as baterias estiverem totalmente carregadas.
Modelo M99
Este modelo é fornecido com baterias, um carregador de secretária e um adaptador
de parede. Introduza as baterias, ligue a cha do adaptador de parede à parte pos-
terior do carregador de secretária e introduza os emissores-receptores nos suportes
do carregador de secretária. Se os emissores-receptores tiverem sido introduzidos
correctamente, a luz vermelha do LED no carregador de secretária irá acender-se,
indicando que o rádio está a carregar. Apenas se o emissor-receptor for deixado liga-
do durante o carregamento, é que o ícone
no ecrã LCD irá piscar indicando que
o rádio se encontra a carregar. Ambas as indicações não irão desligar-se quando as
baterias estiverem totalmente carregadas.
Poupança de energia automática
Todos os modelos são fornecidos com um circuito de economia de corrente automático. Se o emissor-receptor não receber nenhum sinal durante mais de 10 segun-
dos, a “função de poupança de energia” é activada automaticamente. (poupança de
energia) surge a piscar no visor. Avidaútildabateriapodeaumentarematé50%.
Acessórios
Todos os modelos são fornecidos com a cha MIC/CHG para permitir a ligação a
acessórios como microfones e auscultadores. Esta cha é de um “tipo de 2 pinos” e é
compatível com a completa gama de acessórios da Midland.
Para utilizar o auscultador fornecido com o modelo M99, certique-se de
que o micro-interruptor se encontra na posição correcta:
PTT: para activação manual
VOX: para activação por voz
Page 19

19
PTT MIC/CHG
Συγχαρητήρια για την αγορά σας!
Η οικογένεια ασυρμάτων M24, M48 και M99
είναι πομποδέκτες PMR 446 που μπορούν να
χρησιμοποιηθούν , χωρίς άδεια σε όλη την Ευρώπη.
Παρακαλώ συμβουλευτείτε τους πίνακες στους
“περιορισμούς χρήσης ” για πληροφορίες σχετικά με
περιορισμους συγκεκριμένα στη χώρα σας.
Κύριαχαρακτηριστικά
Συχνοτητα 446.00625+446.09375 ›
Κανάλια ›
M24: 24 κανάλια (8+16 προ προγραμματισμένα)
Μ48: 48 κανάλια (8+40 προ προγραμματισμένα)
M99: 99 κανάλια (8+91 προ προγραμματισμένα)
38 CTCSS Υπότονοι ›
Ισχύς: 500 mW ERP ›
Ευαισθησία VOX προσαρμόσιμη σε 2 επίπεδα ›
Pack μπαταριών: 600 mAh 4,8 V NiMH ›
Αλφαριθμητική LCD οθόνη ›
Διάρκεια μπαταρίας μέχρι 12 ώρες ›
Θερμοκρασία λειτουργίας -20° +55° ›
Βάρος περίπου 95 gr (εκτος μπαταριών) ›
Μέγεθος 58x160x28 mm ›
Υποδοχή MIC CHG: 2 pin για αξεσουάρ ήχου, ›
επιτοίχιο φορτιστή
Τα ειδικά χαρακτηριστικά υπόκεινται σε αλλαγές χωρίς
ειδοποίηση.
ΠεριεχόμεναμοντέλουM24
2 πομποδέκτες με 24 κανάλια ›
2 κλίπ ζώνης ›
Εγχειρίδιο χρήσης ›
ΠεριεχόμεναμοντέλουM48
2 πομποδέκτες με 48 κανάλια ›
2 κλίπ ζώνης ›
2 επαναφορτιζόμενα pack μπαταριών 600 mAh ›
2 μικροακουστικά ›
Διπλός επιτοίχιος φορτιστής ›
Εγχειρίδιο χρήσης ›
ΠεριεχόμενομοντέλουM99
2 πομποδέκτες με 99 κανάλια ›
2 κλίπ ζώνης ›
2 επαναφορτιζόμενα pack μπαταριών 600 mAh ›
Διπλή επιτραπέζια βάση φορτιστή ›
Επιτοίχιος φορτιστής ›
2 “επαγγελματικά” μίκροακουστικά ›
2 θήκες μεταφοράς με λουράκι λαιμού ›
Εγχειριδιο χρήσης ›
Κάλυψη
Το μέγιστο εύρος κάλυψης εξαρτάται από την κατάσταση
του εδάφους και εξασφαλίζεται κατά την διάρκεια
χρήσης σε ανοιχτο χώρο.
Ο μόνος περιορισμος στο μέγιστο πιθανό εύρος είναι
περιβαντολλογικοί παράγοντες όπως εμπόδια από
δέντρα, κτήρια ή άλλα εμπόδια. Μέσα σε ένα αμάξι ή
μέσα σε μεταλλικές κατασκευές, το εύρος μπορεί να
μειωθεί. Φυσιολογικά, η κάλυψη στη πόλη, με τα κτήρια,
ή άλλα εμπόδια είναι περίπου 1 ή 2 Χλμ. Σε ανοιχτό
χώρο, αλλα με εμπόδια όπως δέντρα, φυλλωσιές ή
σπίτια, το μέγιστο πιθανό εύρος είναι περίπου 4-6 χλμ.
Σε ανοιχτό χώρο, χωρίς εμπόδια και με οπτική επαφή,
όπως παράδειγμα σε βουνό ή θάλασσσα, η κάλυψη
μπορείναείναιπαραπάνωαπό10Χλμ.
Μπαταρίακαιθήκημπαταριων
Ο πομποδέκτης δέχεται το επαναφορτιζόμενο pack
μπαταριων (συμπεριλαμβανόμενο μόνο στα μοντέλα
M48 και M99) ή 4 ΑΑΑ αλκαλικές/ επαναφορτιζόμενες
μπαταρίες . Για ν’ ανοίξουμε τη θήκη της μπαταρίας,
κρατήστε τη συσκευή με τη πρόσοψη προς τα κάτω
και «ξεκουμπώστε » κομβίο απεγκλωβισμού στο κάτω
μέρος του ασυρμάτου και προσεκτικά γλιστρήστε το
κάλυμμα.
Προσοχή: Το pack μπαταριών που παρέχεται με τα
μοντέλα M48 και M99, πρέπει να επαναφορτιστεί πρίν
τη πρώτη χρήση (δείτε τον τομέα «Επαναφόρτιση» για
περισσότερες πληροφορίες)
MidlandM24,M48kαiM99
ΠομποδέκτηςPMR446
Page 20

20
Αςεπικοινωνήσουμε!
Για να ενεργοποίήσετε ή απενεργοποιήσετε τον ασύρματο
Πιέστε το
για 3 δευτερόλεπτα
Επιλογήκαναλιών
Πατήστε μία φορά το πλήκτρο “menu” και έπειτα επιλέξτε το επιθυμητό κανάλι μεσω των
κουμπιών p/q.Πιέστε το κουμπί PTT για να επιβεβαιώσετε την επιλογή. Θυμηθείτε ότι για
να επικοινωνήσετε, και οι δύο ασύρματοι πρέπει να είναι συντονισμένα στο ίδιο κανάλι.
Εκπομπή
Κρατήστε το κουμπί PTT πατημένο και μιλήστε στη συσκευή. Κρατήστε τον ασύρματο
4/10 cm μακρυά από το στόμα σας. Η οθόνη δείχνει “TX” . Όταν το PTT απελευθερώθεί,
ο ασύρματος παράγει έναν ήχο μπίπ για να επιβεβαιώσει στους άλλους χρήστες ότι η
εκπομπή σας έχει τελειώσει (Roger Beep. Δείτε παράγραφο).
Λήψη
Απελευθερώστε απλά το κουμπί PTT. Όταν λαμβάνετε ένα σήμα, στην οθόνη εμφανίζεται
“RX”.
Ρύθμισηέντασης
Χρησιμοποιήστε τα κουμπιά p/qγια να ρυθμίσετε την ένταση στο επιθυμητό επίπεδο.
ΛειτουργίαΚΛΗΣΗΣ(“CALL”).
Αποστολήηχητικούσήματος
Πιέζοντας γρήγορα το κουμπί του PTT δύο φορές, θα στείλετε ένα ηχητικό σήμα σε όλους
τους άλλους χρήστες που είναι στο ίδιο κανάλι.
ΤοΚΟΥΜΠΙ“menu”
Οι ακόλουθες λειτουργίες μπορούν να επιλεγούν πιέζοντας το κουμπί “menu”:
VOX
›
ΕνεργοποίησηRogerBeep ›
Ρύθμισηκαναλιών ›
ΡύθμισητόνωνCTCSS ›
Οργανοελέγχου(Απενεργοποίησηφίλτρουθορύβου“monitor”) ›
› ΗλειτουργίαVOXκαιηευαισθησίατου
Η λειτουργία VOX σας επιτρέπει να κάνετε εκπομπή μέσω της φωνής χωρίς τη
χρήση του κουμπιού PTT. Για να επιτευχθεί η καλύτερη δυνατή λειτουργία του VOX
πρέπει πρώτα να ρυθμίσετε την ευαισθησία (επίπεδο θορύβου) που απαιτείται για να
ενεργοποιηθεί το VOX.
Πιέστε το κουμπί “menu” . Στην οθόνη αναβοσβήνει η ένδειξη “VOX” . Επιλέξτε το
επιθυμητό επίπεδο VOX (1 ή 2) μέσω των κουμπιών p/qκαι πιέστε έπειτα το κουμπί
PTT για να επιβεβαιώσετε.
To VOX μπορεί να ρυθμιστεί σε 2 θέσεις:
1:υψηλήευαισθησία(κανονική φωνή χωρίς παρασιτικό θόρυβο)
2:χαμηλήευαισθησία (χρήσιμη στις πολύ θορυβώδεις χώρους ή εάν εσείς συζητάτε
δυνατά)
Γιανα ενεργοποιήσετετη λειτουργίαVOX, Πιέστε το κουμπί “menu”. Στην οθόνη
αναβοσβήνει η ένδειξη “VOX”. Επιλέξτε “ON” μέσω των κουμπιών p/q και έπειτα
πιέστε το PTT για να επιβεβαιώσετε. ΓιανααπενεργοποιήσετετηλειτουργίαVOX,
πιέστε το κουμπί “menu”:
1. Πιέστε το “menu” έως ότου στην οθόνη εμφανιστεί “VOX”
2. Επιλέξτε “OF” μέσω των κουμπιών p/q
3. Επιβεβαιώστε την επιλογή πιέζοντας το κουμπί PTT.
› RogerBeep:τόνοςτερματισμούεκπομπής
Όταν το PTT απελευθερωθεί ο ασύρματος θα παράγει έναν ήχο μπίπ για να
επιβεβαιώσει στους άλλους χρήστες ότι η εκπομπή σας έχει τελειώσει. Αυτή
η λειτουργία είναι ενεργοποιημένη αυτόματα και εμφανίζεται με το εικονίδιο
Για να ενεργοποιήσετε το Roger Beep
1. Πιέστε το “menu” έως ότου στην οθόνη εμφανιστεί το σύμβολο
2.Επιλέξτε “ON” μέσω των κουμπιών p/q
3. Επιβεβαιώστε την επιλογή πιέζοντας το κουμπί PTT.
Για να απενεργοποιήσετε το Roger Beep
1. Πιέστε το “menu” έως ότου στην οθόνη εμφανιστεί το σύμβολο
2. Επιλέξτε “OF” μέσω των κουμπιών p/q
3. Επιβεβαιώστε την επιλογή πιέζοντας το κουμπί PTT.
Προσοχή: η λειτουργία VOX δεν μπορεί να χρησιμοποιηθεί όταν το μίκροακουστικό που
παρέχεται με το M48 είναι συνδεδεμένο με τον ασύρματο. Για να χρησιμοποιήσετε
το VOX με το μίκροακουστικό που παρέχεται με το M99, μετακινήστε το μικρό
PTT
διακόπτη του ακουστικού στη θέση VOX. Μετακινήστε το πίσω στη θέση
PTT εάν δεν
χρησιμοποιείτε τη λειτουργία VOX.
›Ρύθμισηκαναλιών
Πιέστε μιά φορά το κουμπί “menu” και επιλέξτε έπειτα το επιθυμητό κανάλι με τα
κουμπιά p/q.
Πιέστε το κουμπί PTT για να επιβεβαιώσετε την επιλογή
› ΡύθμισηCTCSSυπότονων
Οι CTCSS υπότονοι είναι κωδικοί αριθμοί (από 1 έως 38) που μπορούν να προστεθούν
στα πρώτα 8 κανάλια με σκοπό τη δημιουργία ενός νέου ιδιωτικού καναλιού. Μπορείτε
να προσθέσετε μέχρι 38 κωδικούς στα κανάλια από P1έως P8, που σημαίνει πως
μπορείτε να δημιουργήσετε μέχρι 308 νέα κανάλια. Για παράδειγμα, εάν προσθέσετε
τον CTCSS υπότονο “27” στο κανάλι “P3” θα έχετε το νέο κανάλι P327 το οποίο θα
είναι ικανό να επικοινωνεί με άλλους πομποδέκτες μόνο αν είναι συντονισμένοι στο ίδιο
κανάλι και υπότονο
Γιανα ενεργοποιήσετε38 διαφορετικούςCTCSS υποτόνουςακολουθήστεαυτά
ταβήματα:
1. Ενεργοποιήστε τον ασύρματο.
2. Πιέστε το κουμπί “Menu” και επιλέξτε με τα κουμπιά p/q ένα από τα 8 κανάλια (από
P1 έως P8).
3. Πιέστε δύο φορές το κουμπί “menu” μέχρι η οθόνη να δείχνει το επιλεγμένο
κανάλι και τα δύο ψηφία του CTCSS υπότονου να αναβοσβήνουν (στα δεξιά του
καναλιού)
4.Επιλέξτε με τα κουμπιά p/q το επιθυμητό υπότόνο CTCSS (από 1 έως 38).
5. Για να επιβεβαιώσετε τη ρύθμιση πιέστε το κουμπί PTT
Τώρα ο ασύρματος εκπέμπει και λαμβάνει χρησιμοποιώντας το προγραμματισμένο
Page 21

21
υπότονο CTCSS. Εάν δεν θέλετε να χρησιμοποιήσετε οποιοδήποτε τόνο CTCSS,
επιλέξτε “00”.
ΈνδειξητουCTCSS-υποτόνουστοLCD
Όταν ενεργοποιείτε έναν υπότονο CTCSS, από P1 έως P8, ο τόνος είναι ορατός
ακριβώς στη δεξιά πλευρά του καναλιού. Για τα άλλα κανάλια (από 9 και επάνω) ο
υποκώδικας CTCSS προγραμματίζεται εκ των πρότερων και έπειτα “κρύβεται” Για
τη προσωρινή εμφάνιση ενός προ προγραμματισμένου καναλιού και του CTCSS
υποτόνου του, πιέστε το κουμπί “menu” για πάνω από 3 δευτερόλεπτα.
› Λειτουργίαοργάνουελέγχου(Απενεργοποίησηφίλτρουθορύβου“monitor”)
Εάν αυτή η λειτουργία ενεργοποιηθεί επιτρέπει τη δυνατότητα να λάβετε πολύ χαμηλά
και αδύναμα ραδιοσήματα. Αυτό είναι πολύ χρήσιμο όταν πρέπει να μιλήσετε αλλά η
απόσταση είναι στο μέγιστο δυνατό εύρος. Το μειονέκτημα αυτού του χαρακτηριστικού
είναι η λήψη δυνατών παράσιτων.
1. Πιέστε το κουμπί “menu” μέχρι η οθόνη να εμφανίσει το σύμβολο
2. Για να ενεργοποιήθεί η λειτουργία, επιλέξτε “On” μέσω των κουμπιών p/q
3. Επιβεβαιώστε την επιλογή πιέζοντας το κουμπί PTT.
Για να απενεργοποιήσετε το όργανο ελέγχου πιέστε απλά το κουμπί επιλογών
/SΠλήκτρο
Κλείδωμαπληκτρολογίου
Αυτό το χαρακτηριστικό γνώρισμα είναι πολύ χρήσιμο για να αποφευχθεί το πάτημα
των κουμπιών κατά τύχη. Πιέστε και κρατήστε το κουμπί
/S για περισσότερο από
3 δευτερόλεπτα. Το εικονίδιο
επιβεβαιώνει ότι το κλείδωμα πληκτρολογίου είναι
ενεργοποιημένο. Μόνο το PTT και το
θα είναι ακόμα ενεργά. Επαναλάβετε την ίδια
διαδικασία για να ξεκλειδώσετε το πληκτρολόγιο.
Σεκατάστασηανίχνευσης“SCAN”
Η κατάσταση ανίχνευσης ελέγχει τα απασχολημένα κανάλια.
Χρησιμοποιείται για να ελέγξει τη χρήση του ασυρμάτου σε όλα τα κανάλια πριν την
εκπομπή και επιτρέπει στη συσκευή να σταματήσει σε ένα κανάλι στο οποίο κάποιος μιλά.
Όταν ο ασύρματος σταματήσει σε ένα απασχολημένο κανάλι, η ανίχνευση θα συνεχιστεί
μετά από περίπου 5 δευτερόλεπτα.
ΓιαναενεργοποιήσετετηλειτουργίαSCAN: Πιέστε το κουμπί
/S και θα δείτε “SCAN”
στην οθόνη.
Για να την απενεργοποιήσετε: πιέστε το κουμπί
/S ή το PTT.
Backlightοθόνης
Όταν πιέζετε ή ένα από τα 5 σημεία ελέγχου στο μπροστινό πλαίσιο, η οθόνη φωτίζεται
για περίπου 10 δευτερόλεπτα (μόνο στα μοντέλα M48 και M99).
Επαναφορτιση
Όταντοpackμπαταριώνήοιμπαταρίεςαποφορτίζονται,τοεικονίδιο αρχίζεινα
αναβοσβήνει:είναιαπαραίτητονααλλαχτούνοι μπαταρίεςήναεπαναφορτιστούν
τοσυντομότεροδυνατόν.
Το εικονίδιο
αναβοσβήνει μόνο εάν ο ασύρματος είναι ενεργοποιημένος.
Προσοχή: οι αλκαλικές μπαταρίες δεν μπορούν να επαναφορτιστούν.
Προσοχή: μην φορτίζετε τον ασύρματο χωρίς τις επαναφορτιζόμενες μπαταρίες ή χωρίς
το πακέτο μπαταριών.
Προσοχή: Για τη πρώτη φόρτιση του pack μπαταριών αφήστε το για περισσότερο από 8
ώρες (μόνο για μοντέλα M48 και M99 )
ΜοντέλοM24
Με αυτό το μοντέλο δεν παρέχονται οι μπαταρίες ή τα εξαρτήματα για την επαναφόρτιση.
ΜοντέλοM48
Με αυτό το μοντέλο παρέχονται pack μπαταριών και επιτοίχιος φορτιστής. Εισάγετε
τα pack μπαταριών και συνδέστε τον επιτοίχιο φορτιστή στην υποδοχή MIC/CHG στο
πλάι του πομποδέκτη. Ο επιτοίχιος φορτιστής είναι τύπου διπλού βύσματος έτσι μπορείτε
να επαναφορτίσετε και τους δύο πομποδέκτες συγχρόνως. Μόνο εάν ο πομποδέκτης
αφήνεται ενεργοποιημένος κατά τη διάρκεια της φόρτισης, το εικονίδιο στην οθόνη LCD θα
αναβοσβήνει δηλώνοντας ότι ο ασύρματος φορτίζεται. Αυτή η ένδειξη δεν θα σβήσει όταν
φορτιστούν πλήρως οι μπαταρίες.
ΜοντέλοM99
Με αυτό το μοντέλο παρέχονται pack μπαταριών επιτραπέζιος και επιτοίχιος φορτιστής.
Εισάγετε τα pack μπαταριών και συνδέστε το βύσμα του επιτοίχιου φορτιστή στη πλάτη
της επιτραπέζιας βάσης φόρτισης και τοποθετείστε τους πομποδέκτες στις υποδοχές της.
Εάν οι πομποδέκτες έχουν τοποθετηθεί σωστά, η κόκκινη ενδεικτική λυχνία LED στον
επιτραπέζιο φορτιστή θα ανάψει δηλώνοντας ότι ο ασύρματος φορτίζεται. Μόνο εάν ο
πομποδέκτης αφήνεται ενεργοποιημένος κατά τη διάρκεια της φόρτισης, το εικονίδιο στην
οθόνη LCD θα αναβοσβήνει δείχνοντας ότι ο ασύρματος φορτίζεται. Και οι δύο ενδείξεις
δεν θα σβήσουν όταν φορτιστούν πλήρως οι μπαταρίες.
Αυτόματηεξοικονόμησηενέργειας
Όλα τα μοντέλα είναι εφοδιασμένα με ένα κύκλωμα αυτόματης εξοικονόμησης
ρεύματος. Εάν ο πομποδέκτης δεν λαμβάνει κανένα σήμα για περισσότερο από 10
δευτερόλεπτα, η “λειτουργία εξοικονόμησης ενέργειας” αυτόματα ενεργοποιείται. Η
διάρκειατηςμπαταρίαςμπορείνααυξηθείμέχρικαι50%.
Αξεσουάρ
Όλα τα μοντέλα είναι εφοδιασμένα με υποδοχή MIC/CHG για σύνδεση με τα εξαρτήματα
όπως τα μικρόφωνα και τα κεφαλακουστικά. Αυτό η υποδοχή είναι τύπος 2 pin» και είναι
συμβατό με τη σειρά όλων των αξεσουάρ της Midland
Εάν το προϊόν περιέχει μπαταρία ξηρού τύπου ή επαναφορτιζόμενες μπαταρίες μην ρίξετε
τις μπαταρίες στην φωτιά. Οταν τις πετάξετε μετά τη χρήση , ρίξτε τις στα κατάλληλα
εμπορευματοκιβώτια ανακύκλωσης.
Για να χρησιμοποιήσετε το μίκροακουστικό που παρέχεται με το μοντέλο M99,
βεβαιωθείτε ότι ο μικροδιακόπτης είναι στη σωστή θέση:
PTT:γιαχειροκίνητηενεργοποίηση
VOX:γιαενεργοποίησημέσωφωνής
Page 22

22
PTT MIC/CHG
Gefeliciteerd met uw aankoop!
De familie van radio M24, M48 en M99 zijn PMR 446
zendontvangers die zonder licentie in heel Europa kunnen worden gebruikt. Raadpleeg de tabellen “Gebruiksbeperkingen” voor informatie betreffende landspecieke beperkingen.
Hoofdkenmerken:
Fre q. 446 .00625 ÷ 446.0 937 5 M Hz ›
Kanalen; ›
M24: 24 kanalen (8+16 voorgeprogrammeerd)
M48: 48 kanalen (8+40 voorgeprogrammeerd)
M99: 99 kanalen (8+91 voorgeprogrammeerd)
38 CTCSS-Subtonen ›
Vermogen: 500 mW ERP ›
VOX gevoeligheid aanpasbaar in 2 niveaus ›
Batterij: 600mAh 4,8V NiMH ›
Alfanumeriek LCD-scherm ›
Batterijlevensduur tot 12 uur ›
Bedrijfstemperatuur –20° +55° ›
Gewicht 95 gr (batterijen niet inbegrepen) ›
Grootte 58x160x28 mm ›
Jack MIC CHG: 2 pinnen voor audio-accessoires, ›
muuroplader
De specicaties kunnen zonder kennisgeving worden gewijzigd.
Inhoud model M24
2 zendontvangers met 24 kanalen ›
2 riemclips ›
Instructiehandleiding ›
Inhoud model M48
2 zendontvangers met 48 kanalen ›
2 riemclips ›
2 600mAh herlaadbare batterijen ›
2 headsets ›
muuradaptor dubbele plug ›
Instructiehandleiding ›
Inhoud model M99
2 zendontvangers met 99 kanalen ›
2 riemclips ›
2 600mAh herlaadbare batterijen ›
1 dubbele desktoplader ›
muuradaptor ›
2 “professionele” headsets ›
2 draagtassen met steunkragen ›
Instructiehandleiding ›
Dekking
Het maximum bereik hangt af van de terreinconditie en
wordt verkregen bij gebruik in een open ruimte.
De enige beperkingen voor het maximum mogelijk bereik zijn milieufactoren zoals het blokkeren door bomen,
gebouwen of andere obstructies. Binnenin een auto of
een metalen constructie kan het bereik gereduceerd
zijn. Normaal bedraagt de dekking in de stad, met ge-
bouwen en andere obstructies, ongeveer 1 of 2 Km.
In een open ruimte maar met obstructies zoals bomen,
bladeren of huizen, is het maximum bereik ongeveer
4--6 Km. In een open ruimte zonder obstructies en in
zicht, bijvoorbeeld in de bergen, kan de dekking meer
dan 10 Km bedragen.
Batterij en batterijvak
De zendontvanger accepteert de herlaadbare batterij
(enkel inbegrepen in de modellen M48 en M99) of 4
AAA alkaline/herlaadbare batterijen. Om het batterijvak
te openen, houd de eenheid met de voorkant naar beneden en maak de batterijhouder los in het onderste
deel van de radio en schuif het deksel zachtjes.
Opgepast: de batterij geleverd bij de modellen M48 en
M99, moet worden opgeladen voor het eerste gebruik
(zie het deel “Herladen” voor meer informatie).
Midland M24, M48 en M99
PMR446 ZENDONTVANGER
Page 23

23
LATEN WE COMMUNICEREN!
Om de radio in/uit te schakelen
Houd de
gedurende 3 seconden ingedrukt.
Kanaalselectie
Druk eenmaal op de “menu” -knop en selecteer vervolgens het gewenste kanaal via
de knoppen p/q. Druk op PTT om de selectie te bevestigen. Vergeet niet dat om te
kunnen communiceren de beide radio’s op hetzelfde kanaal moeten worden ingesteld.
Transmissie
Houd de PTT -knop ingedrukt en spreek in de eenheid. Houd de radio op een afstand
van 4/10 cm van de mond. Het scherm geeft ‘TX’ weer. Wanneer de PTT wordt los-
gelaten, piept de radio om aan andere gebruikers te bevestigen dat uw transmissie
beëindigd is (Roger-pieptoon. Zie de paragraaf).
Ontvangst
Laat gewoon de PTT -knop los. Wanneer u een signaal ontvangt, wordt‘RX’ weergegeven.
Volumeregeling
Gebruik de knoppenp/q om het volume naar het gewenste niveau te brengen.
BEL functie
Verzenden van een audiosignaal
Door snel tweemaal de knop PTT in te drukken, zal u een audiosignaal zenden naar
andere gebruikers op hetzelfde kanaal.
“Menu” -KNOP
De volgende functies kunnen worden geselecteerd door op de knop “menu” te drukken:
VOX ›
Roger-pieptoon activeren ›
Kanaal instellen ›
CTCSS Tonen instellen ›
Monitor ›
› VOX-functie en zijn gevoeligheid
De VOX-functie laat u de transmissie via stem openen zonder het gebruik van de PTT-
knop.
Druk op de knop “menu”; ‘VOX’ knippert op het scherm. Selecteer het gewenste
VOX-niveau (1 of 2) via de knoppen p/q en druk op de knop PTT om te
bevestigen.
VOX kan in 2 posities worden ingesteld:
1: hoge gevoeligheid (normale stem met geen achtergrondruis)
2: lage gevoeligheid (nuttig in zeer luide gebieden of als u luid praat)
Om de VOX-modus uit te schakelen:
1. Druk op de “menu” -knop tot het scherm het ‘VOX’
2. Selecteer ‘UIT’ via de knoppen p/q
3. Bevestig de selectie door te drukken op de knop PTT.
Opgepast: de VOX-functie kan niet worden gebruikt wanneer de headset die bij de
M48 geleverd is, wordt aangesloten op de radio. Om de VOX te gebruiken met de
headset die geleverd is bij de M99, verplaats de kleine schakelaar op de headset
van de positie PTT naar VOX. Verplaats terug naar de positie PTT wanneer u de
VOX-functie niet gebruikt.
› Roger-pieptoon activeren: einde transmissie-toon
Wanneer de PTT wordt losgelaten, piept de radio om aan andere gebruikers te
bevestigen dat uw transmissie beëindigd is. Deze functie is standaard geactiveerd
en wordt weergegeven met het pictogram
.
Om de Roger-pieptoon te deactiveren
1. Druk op de “menu” -knop tot het scherm het symbool
2. Selecteer ‘UIT’ via de knoppen p/q
3. Bevestig de selectie door te drukken op de knop PTT.
› Kanaal instellen
Druk eenmaal op de “menu” -knop en selecteer vervolgens het gewenste kanaal
via de knoppen p/q. Druk op PTT om de selectie te bevestigen.
› CTCSS-subtoon instellen
De CTCSS subtonen zijn codenummers (van 1 tot 38) om te worden toegevoegd
aan de eerste 8 kanalen ten einde een nieuw privé-kanaal te creëren. U kunt tot 38
codes toevoegen aan de kanalen genaamd van P1 tot P8, dat betekent dat u tot 308
nieuwe kanalen kunt creëren. Als u bijvoorbeeld de CTCSS subtoon “27” toevoegt
aan kanaal “P3” krijgt u het nieuwe kanaal “P327” dat met andere zendontvangers
zal communiceren indien deze staan ingesteld op hetzelfde kanaal en subtoon.
Om 38 verschillende CTCSS subtones te activeren, volg deze stappen:
1. Schakel de radio in.
2. Druk op de knop “Menu” en selecteer met de knoppen p/q één van de acht
kanalen (van P1 tot P8).
3. Druk tweemaal op de knop “menu” tot het scherm het gewenste kanaal
weergeeft met de knipperende tweecijferige CTCSS subtoon (rechts van het
kanaal)
4. Selecteer via de knoppen p/q de gewenste CTCSS toon. (van 1 tot 38).
5. Om de instelling te bevestigen, druk op PTT.
De radio zendt nu uit en ontvangt via de geprogrammeerde CTCSS toon. Indien u
geen CTCSS toon wilt gebruiken, selecteer “00”.
De CTCSS subtoon weergeven op de LCD
Wanneer u een CTCSS subtoon activeert, van P1 tot P8, is de toon zichtbaar aan
Page 24

24
de rechterkant van het kanaal. Voor de andere kanalen (vanaf 9), is de CTCSS
subcode vooraf geprogrammeerd en vervolgens “verborgen”. Om tijdelijk een
vooraf geprogrammeerd kanaal en zijn CTCSS subtoon weer te geven, druk
gedurende meer dan 3 seconden op de knop “menu”.
› Monitorfunctie
Deze functie indien geactiveerd laat de mogelijkheid toe om zeer lage en zwakke
radiosignalen te ontvangen. Dit is zeer nuttig wanneer u moet spreken maar de
afstand is zover als het maximum mogelijk bereik. Het nadeel van deze functie is
de ontvangst van luid achtergrondgeluid.
1. Druk op de “menu” -knop tot het scherm het symbool
2. Om te activeren, selecteer ‘Aan’ via de knoppen p/q
3. Bevestig de selectie door te drukken op de knop PTT. Om de monitor uit te
schakelen, druk op de menu-knop
/S” KNOP
Toetsenblokvergrendeling
Deze functie is zeer nuttig om te vermijden dat knoppen per ongeluk worden ingedrukt.
Druk en houd de knop “
/S” gedurende meer dan 3 seconden ingedrukt. Het picto-
gram
bevestigt dat de toetsenblokvergrendeling geactiveerd is. Enkel PTT en zul-
len nog actief zijn. Herhaal dezelfde procedure om het toetsenblok te ontgrendelen.
SCAN-modus
De SCAN-modus controleert de drukke kanalen.
Deze wordt gebruikt om het radioverkeer te controleren op alle kanalen voor het uitzenden en laat de eenheid stoppen op een kanaal waarop iemand aan het praten
is. Wanneer de radio stopt op een druk kanaal, zal de scan hervatten na ongeveer 5
seconden.
Om de SCAN-functie te activeren: Druk op de knop “
/S” en ‘SCAN’ verschijnt op
het scherm.
Om deze te deactiveren: druk op de knop “
/S” of PTT.
Backlight weergeven
Wanneer u drukt op of een van de 5 knoppen aan de voorkant, brandt de schermverlichting gedurende ongev. 10 seconden (enkel op de modellen M48 en M99).
HERLADEN
Wanneer de batterij of batterijen laag zijn, begint het pictogram te knipperen:
Het is dan nodig om de batterijen te vervangen of deze zo snel mogelijk te herladen.
Het pictogram
knippert alleen als de radio ingeschakeld is.
Opgepast: alkaline batterijen kunnen niet worden herladen.
Opgepast: herlaad de radio niet zonder de herlaadbare batterijen of zonder de batterij.
Opgepast: laat de batterij voor het eerste gebruik minstens 8 uur opladen (enkel voor
de modellen M48 en M99).
M24 model
Dit model wordt niet geleverd met batterijen of accessoires voor het herladen.
M48 model
Dit model wordt geleverd met batterijen en muuradapter. Plaats de batterijen en plug
de muuradapter in de MIC/CHG aansluiting aan de zijkant van de zendontvanger.
De muuradapter is een dubbele plug type zodat u de beide zendontvangers tegelijkertijd kunt herladen. Enkel indien de zendontvanger ingeschakeld blijft tijdens het
herladen, zal het pictogram
van het LCD-scherm knipperen om aan te geven dat de
radio aan het herladen is. Deze aanduiding zal niet worden uitgeschakeld wanneer de
batterijen volledig herladen is.
M99 model
Dit model wordt geleverd met batterijen, desktoplader en muuradapter. Plaats de batterijen, sluit de muuradapterplug aan de de achterkant van de desktoplader en plaats
de zendontvanger in de desktopladerhouders. Indien de zendontvangers correct geplaatst werden, zal het rode LED lampje op de desktoplader beginnen te branden, wat
aangeeft dat de radio aan het herladen is. Enkel indien de zendontvanger ingeschakeld blijft tijdens het herladen, zal het pictogram
op het LCD-scherm knipperen om
aan te geven dat de radio aan het herladen is. Deze aanduidingen zullen niet worden
uitgeschakeld wanneer de batterijen volledig herladen is.
Automatische energiebesparing
Alle modellen zijn uitgerust met een automatisch stroombesparingscircuit. Als de
zendontvanger gedurende meer dan 10 seconden geen signaal ontvangt, wordt de
energiebesparingsfunctie automatisch geactiveerd. De batterijlevensduur kan met
tot50%stijgen.
Accessoires
Alle modellen zijn uitgerust met een MIC/CHG aansluiting voor verbinding met acces-
soires zoals microfoons en headsets. Deze plug is een “2 pin type” en is compatibel
met alle accessoires uit het gamma van Midland.
Om de headset te gebruiken die geleverd is bij het model M99, zorg
ervoor dat de microschakelaar in de juiste positie staat:
PTT: voor manuele activering
VOX: voor stemactivering
Page 25

25
PTT MIC/CHG
Grattis till ditt köp!
Radiofamiljen med enheterna M24, M48 och M99 heter
sändtagare PMR 446, och kan användas utan i licens
i hela Europa. I tabellerna under ”Användningsrestriktioner” nns information om specika begränsningar i
olika länder.
Huvudfunktioner:
Fr ekv. 446, 00625 ÷ 446,09375 MHz ›
Kanaler; ›
M24: 24 kanaler (8+16 förprogrammerade)
M48: 48 kanaler (8+40 förprogrammerade)
M99: 99 kanaler (8+91 förprogrammerade)
38 CTCSS-underkanaler ›
Effekt: 500 mW ERP ›
VOX-känslighet kan justeras i två nivåer ›
Batteri: 600 mAh, 4,8 V NiMH ›
Alfanumerisk LCD-skärm ›
Batteriet klarar upp till 12 timmars drift ›
Driftstemperatur –20° - +55° ›
Vikt 95 g (exklusive batterier) ›
Storlek 58 x 160 x 28 mm ›
Utgång MIC CHG: Två stift för ljudtillbehör, nätlad- ›
dare
Specikationer kan ändras utan att detta meddelas
separat.
Innehåll modell M24
2 sändtagare med 24 kanaler ›
2 bältesklämmor ›
Bruksanvisning ›
›
Innehåll modell M48
2 sändtagare med 48 kanaler ›
2 bältesklämmor ›
2 600 mAh laddningsbart batteri ›
2 headset ›
nätadapter med dubbelkontakt ›
Bruksanvisning ›
Innehåll modell M99
2 sändtagare med 99 kanaler ›
2 bältesklämmor ›
2 600 mAh laddningsbart batteri ›
1 dubbel skrivbordsladdare ›
nätadapter ›
2 ”professionella” headset ›
2 bärväskor med halsremmar ›
Bruksanvisning ›
›
Täckning
Maximal räckvidd varierar med terrängen och är uppmätt vid användning på öppen plats.
Det enda som begränsar maximal räckvidd är miljömässiga faktorer som t ex träd, byggnader eller andra
konstruktioner. Räckvidden kan minska i en bil eller annan metallkonstruktion. Normal är räckvidden i en stad
med dess byggnader och andra hinder omkring 1 eller
2 km. I öppen terräng men med hinder som träd, löv
eller hus ligger den maximala räckvidden på ungefär
4-6 km. I öppen terräng utan hinder och med fri sikt,
exempelvis bland bergen, kan räckvidden vara längre
än 10 km.
Batteri och batterifack
Sändtagaren accepterar det laddningsbara batteriet
(medföljer enbart modellerna M48 och M99) eller fyra
alkaliska AAA-/laddningsbara batterier. För att öppna
batterifacket håller du enheten med fronten vänd nedåt
och krokar av batterihållaren på radions nedre del, varefter du försiktigt skjuter av locket.
Observera!: Det batteri som levereras tillsammans
med modellerna M48 och M99 måste laddas innan det
kan användas för första gången (se avsnittet ”Ladda”
för mer information).
Midland M24, M48 och M99
PMR446 SÄNDTAGARE
Page 26

26
LÅT OSS KOMMUNICERA!
Starta och stänga av radion
Håll
intryckt i tre sekunder.
Val av kanal
Tryck en gång på knappen ”menu” och välj sedan önskad kanal med knapparna p/q.
Tryck på PTT för att bekräfta valet. Kom ihåg att båda radioenheterna måste ha samma kanal inställd för att kommunikationen ska fungera.
Sändning
Håll knappen PTT intryckt och tala in i enheten. Håll radion 4-10 cm från munnen.
Bildskärmen visar ”TX”. När man släpper PTT ger radion ifrån sig en ljudsignal för
att bekräfta till de andra användarna att din sändning är slutförd (uppfattat-signal. Se
punkten).
Mottagning
Släpp bara PTT-knappen. När du tar emot en signal visas ”RX”.
Volymjustering
Använd knapparna p/q för att justera volymen till önskad nivå.
ANROP-funktion
Skicka ljudsignal
Genom att trycka snabbt på PTT-knappen två gånger skickar du en ljudsignal till andra
användare på samma kanal.
”Menu”-KNAPP
Följande funktioner kan väljas när man trycker på knappen ”menu”:
VOX ›
Aktivering av Uppfattat-signal ›
Kanalinställning ›
Inställning av CTCSS-underkanaler ›
Bildskärm ›
› VOX-funktionen och dess känslighet
Med VOX-funktionen kan du starta sändningen med din röst utan att PTT-knappen
behöver användas. För att få ut så mycket som möjligt av VOX-funktionen måste du
först bestämma vilken känslighet (bullernivå) som behövs för att aktivera VOX.
Tryck på knappen ”menu”; ”VOX” blinkar på bildskärmen. Välj önskad VOX-nivå
(1 eller 2) med hjälp av knapparna p/q och tryck därefter på knappen PTT för att
bekräfta.
VOX kan justeras i två lägen:
1: hög känslighet (normal röst utan bakgrundsbuller)
2: låg känslighet (användbart i bullrig omgivning eller om du talar högt)
Vill du stänga av VOX-läget:
1. Tryck på ”menu” tills bildskärmen visar ”VOX”
2. Välj ”OF” med knapparna p/q
3. Bekräfta valet genom att trycka på knappen PTT.
Observera! Man kan inte använda VOX-funktionen när det headset som medföljer
M48 är anslutet till radion. För att kunna använda VOX tillsammans med det
headset som medföljer M99, ska den lilla omkopplaren på ditt headsets PTT ställas
i VOX-läget. Flytta tillbaka den till PTT-läget när du inte använder VOX-funktionen.
› Uppfattat-signal: ton för avslutad sändning
När man släpper PTT ger radion ifrån sig en ljudsignal för att bekräfta till de andra
användarna att din sändning är slutförd. Denna funktion är aktiverad som standard
och visas med ikonen
.
Stänga av Uppfattat-signalen
1. Tryck på ”menu” tills bildskärmen visar symbolen
2. Välj ”OF” med knapparna p/q
3. Bekräfta valet genom att trycka på knappen PTT.
› Kanalinställning
Tryck en gång på knappen ”menu” och välj sedan önskad kanal med knapparna
p/q. Tryck på PTT för att bekräfta valet.
› Inställning av CTCSS-underkanaler
CTCSS-underkanalerna är kodsiffror (från 1 till 38) som läggs till efter de första 8
kanalerna, för att på så sätt skapa en ny och privat kanal. Du kan lägga till upp till
38 koder för kanalerna från P1 till P8, vilket betyder att du kan skapa upp till 308 nya
kanaler. Om du exempelvis lägger till CTCSS-underkanalen ”27” efter kanalen ”P3”,
får du den nya kanalen ”P327”. Du kan då kommunicera med andra sändtagare
som har samma kanal och underkanal inställda.
Följ dessa steg för att aktivera 38 olika CTCSS-underkanaler:
1. Starta radion.
2. Tryck på knappen ”Menu” och välj en av de 8 kanalerna (från P1 till P8) med
knapparna p/q.
3. Tryck två gånger på knappen ”menu” till bildskärmen visar den kanal som valts
med de två blinkande siffrorna för CTCSS-underkanalen (till höger om kanalen)
4. Välj önskad CTCSS-underkanal (från 1 till 38) med knapparna p/q.
5. Bekräfta inställningen genom att trycka på PTT.
Nu sänder radion och tar emot med den programmerade CTCSS-underkanalen.
Om du inte vill använda någon CTCSS-kanal väljer du ”00”.
Visa CTCSS-underkanalen på LCD:n
När du aktiverar en CTCSS-underkanal från P1 till P8, visas underkanalen precis
till höger om kanalen. För övriga kanaler (från 9 och uppåt) programmeras CTCSS-
Page 27

27
underkanalen, varefter den ”döljs”. För att visa en programmerad kanal och dess
CTCSS-underkanal tillfälligt, ska du hålla knappen ”menu” intryckt i minst tre
sekunder.
› Bildskärmsfunktion
När denna funktion är aktiverad kan man ta emot mycket låga och svaga
radiosignaler. Detta är mycket användbart när du behöver prata med någon då
avståndet mellan er ligger i närheten av den maximala räckvidden. Nackdelen med
denna funktion är mottagningen av högt bakgrundsbuller.
1. Tryck på ”menu” tills bildskärmen visar symbolen
2. Aktivera genom att välja ”On” med knapparna p/q
3. Bekräfta valet genom att trycka på knappen PTT. Om du vill stänga av
bildskärmen klickar du bara på ”Menu”-knappen
” /S”-KNAPP
Tangentlås
Denna funktion är mycket användbar när man vill undvika oavsiktliga knapptryckningar. Håll knappen ”
/S” intryckt i mer än tre sekunder. Ikonen bekräftar att tangentlå-
set är aktiverat. Bara PTT och
fortsätter vara aktiva. Upprepa samma förfarande för
att låsa upp tangenterna.
SCAN-läge
SCAN-läget övervakar de upptagna kanalerna.
Den används för att kontrollera radiotraken på alla kanaler före sändning och ger
enheten möjlighet att stanna vid en kanal som någon talar över. När radion stannar vid
en upptagen kanal återupptas sökningen efter ungefär fem sekunder.
Aktivera SCAN-funktionen: Tryck på knappen ”
/S” så visas ”SCAN” på skärmen.
Avaktivera den: Tryck på knappen ”
/S” eller PTT.
Tända bakgrundsbelysningen
När du trycker på eller på någon av de fem kontrollerna på framsidan, tänds bildskärmen i ungefär 10 sekunder (endast modellerna M48 och M99).
Laddning
När det medföljande batteriet eller de lösa batterierna tagit slut börjar ikonen
att blinka: Det är nödvändigt att byta eller ladda batterierna så fort som möjligt.
Ikonen
blinkar bara om radion är påslagen.
Observera!: Alkaliska batterier kan inte laddas på nytt.
Observera!: Ladda inte radion utan de laddningsbara batterierna eller det medföl-
jande batteriet.
Observera!: Ladda batteriet minst åtta timmar första gången (endast modellerna M48
och M99).
Modell M24
Denna modell inkluderar inte batterier eller tillbehör för laddning.
Modell M48
Denna modell levereras med batteri och nätadapter. Sätt i batteriet och anslut nätadaptern i MIC/CHG-uttaget på sidan av sändtagaren. Nätadaptern är en dubbelkon-
takt, så du kan ladda båda sändtagarna samtidigt. Enbart om sändtagaren är påslagen under laddningen visas ikonen
blinkande på LCD-skärmen och indikerar att
radion laddas. Denna indikation försvinner när batterierna är fulladdade.
Modell M99
Denna modell levereras med batteri, skrivbordsladdare och nätadapter. Sätt i batterierna, anslut nätadapterns kontakt i skrivbordsladdarens baksida och sätt sändtagarna
i skrivbordsladdarens vaggor. Om sändtagarna satts i på rätt sätt tänds den röda lysdioden på skrivbordsladdaren och anger att radion laddas. Enbart om sändtagaren är
påslagen under laddningen visas ikonen
blinkande på LCD-skärmen och indikerar
att radion laddas. Båda indikationerna försvinner inte när batterierna är fulladdade.
Automatisk energibesparing
Alla modeller levereras med en automatisk strömbesparingskrets. Om sändtaga-
ren inte tar emot någon signal på 10 sekunder eller mer aktiveras den automatiska
”energisparfunktionen”. Batterietslivslängdkanökamedupptill50%.
Tillbehör
Alla modeller levereras med MIC/CHG-uttag för anslutning av tillbehör såsom mikrofo-
ner och headset. Denna kontakt är en ”2-stiftstyp” och passar alla Midlands tillbehör.
För att använda det headset som medföljer modell M99 måste mikrobryta-
ren vara placerad i rätt läge:
PTT: För manuell aktivering
VOX: För röstaktivering
Page 28

28
PTT MIC/CHG
Onnittelut ostoksesi johdosta!
M24, M48 ja M99 -radioiden perhe ovat PMR 446
lähetin-vastaanotin, jota voidaan käyttää ilman lupaa
kaikkialla Euroopassa. Katso ”Käyttörajoitukset” -taulukoista tiedot maakohtaisista rajoituksista.
Pääominaisuudet:
Taaj. 446.00625 ÷ 446.09375 MHz ›
Kanavat; ›
M24: 24 kanavaa (8+16 esiasennettua)
M48: 48 kanavaa (8+40 esiasennettua)
M99: 99 kanavaa (8+91 esiasennettua)
38 CTCSS-aliääntä ›
Säteilyteho: 500 mW ERP ›
VOX-herkkyys säädettävissä kahdessa tasossa ›
Akku: 600mAh 4,8V NiMH ›
Alfanumeerinen LCD-näyttö ›
Akun maksimikesto 12 tuntia ›
Käyttölämpötila –20° +55° ›
Paino 95g (ilman akkua) ›
Mitat 58x160x28 mm ›
Ulkoiset liitännät: 2 liitäntää audiolisälaitteille, ›
seinälaturi
Laitetietoja voidaan muuttaa ilman ennakkoilmoitusta.
Sisältö malli M24
2 lähetin-vastaanotinta 24 kanavalla ›
2 vyöklippiä ›
Käyttöopas ›
Sisältö malli M48
2 lähetin-vastaanotinta 48 kanavalla ›
2 vyöklippiä ›
2 600mAh ladattavaa akkua ›
2 kuulokkeet ›
Seinäadapteri kaksoisliittimellä ›
Käyttöopas ›
Sisältö malli M99
2 lähetin-vastaanotinta 99 kanavalla ›
2 vyöklippiä ›
2 600mAh ladattavaa akkua ›
1 kaksoispöytälaturi ›
seinäadapteri ›
2 “ammattilaiskuulokkeet” ›
2 kantokoteloa kantahihnoilla ›
Käyttöopas ›
Peitto
Maksimikantama riippuu maasto-olosuhteista ja saavutetaan käytettäessä avoimessa tilassa.
Ainoa rajoitus suurimalle mahdollisella kantamalle ovat
ympäristötekijät, kuten puiden, rakennusten tai muiden
esteiden aiheuttamat katkokset. Autojen tai muiden metallirakenteiden sisällä kantama voi pienentyä. Normaalisti peitto kaupunkialueella rakennukset ja muut esteet
huomioiden on noin 1 tai 2 km. Avoimissa tiloissa mut-
ta puiden, lehtien tai talojen kaltaiset esteet huomioiden
suurin mahdollinen kantama on noin 4-6 km. Avoimes-
sa tilassa ilman esteitä ja näkyvissä, kuten esimerkiksi
vuorilla, kantama voi olla yli 10 km.
Akku ja akkulokero
Lähetin-vastaanotin käyttää ladattavaa akkua (toimitetaan ainoastaan malleissa M48 ja M99) tai 4 AAA
-alkaliparistoa/ladattavaa akkuparistoa. Akkulokeron
avaamiseksi pidä laitetta väärinpäin ja irrota akkupidike radion alaosasta ja liu’uta kansi irti varovasti.
Huomio: Mallien M48 ja M99 mukana toimitettu akku
pitää ladata ennen ensimmäistä käyttöä (katso lisätiedot kappaleesta ”Lataaminen”).
Midland M24, M48 ja M99
PMR446 -lähetin-vastaanotin
Page 29

29
ALETAAN KOMMUNIKOIDA!
Kytkeäksesi radion päälle/päältä
Pidä
alaspainettuna 3 sekunnin ajan.
Kanavan valinta
Paina kerran “menu” -nappia ja valitse sitten haluttu kanava p/q -napeilla. Paina
PTT:tä vahvistaaksesi valinnan. Muista, että voidakseen kommunikoida keskenään,
molempien radioiden tulee olla samalla kanavalla.
Lähetys
Pidä PTT-nappi painettuna ja puhu yksikköön. Pidä radiota 4-10 cm etäisyydellä
suustasi. Näytössä lukee ‘TX’. Kun PTT:stä päästetään irti, radio piippaa vahvis-
taakseen muille käyttäjille, että lähetyksesi on päättynyt (Roger-piippaus. Katso
kappale).
Vastaanotto
Päästä yksinkertaisesti irti PTT-napista. Kun saat signaalin, näytöllä näkyy ‘RX’.
Äänenvoimakkuuden säätö
Käytä p/q -nappeja säätääksesi äänenvoimakkuuden halutulle tasolle.
CALL-toiminto (KUTSU)
Äänisignaalin lähettäminen
Painamalla PTT-nappia nopeasti kaksi kertaa voit lähettää äänisignaalin muille
samalla kanavalla oleville käyttäjille.
“Menu”-NAPPI
Seuraavia toimintoja voidaan valita painamalla “menu” -nappia:
VOX ›
Roger-piippauksen aktivointi ›
Kanava-asetukset ›
CTCSS-ääniasetukset ›
Monitori ›
› VOX-toiminto ja sen herkkyys
VOX-toiminnon avulla voit avata lähetyksen äänesi avulla, käyttämättä PTT-
nappia. Hyötyäksesi eniten VOX-toiminnosta sinun tulee ensin määrittää
tarvittava herkkyys (melutaso) VOX:n aktivoimiseksi.
Paina “menu” -nappia; ‘VOX’ -vilkkuu näytöllä. Valitse haluttu VOX-taso (1
tai 2) p/q -nappien avulla ja paina sitten PTT-nappia vahvistukseksi.
VOX voidaan säätää 2 asentoon:
1: korkea herkkyys (normaali ääni ilman taustamelua)
2: matala herkkyys (kätevä meluisilla alueilla tai jos puhut kovalla äänellä)
Kytkeäksesi VOX-tilan pois päältä:
1. Paina “menu”, kunnes näytössä näkyy ‘VOX’
2. Valitse ‘OFF’ p/q -nappien avulla
3. Vahvista valinta painamalla PTT-nappia.
Huomio: VOX-toimintoa ei voida käyttää mallin M48:n mukana toimitettujen
kuulokkeiden ollessa liitettynä radioon. Käyttääksesi VOX-toimintoa mallin M99
mukana toimitettujen kuulokkeiden kanssa, siirrä kuulokkeiden PTT:n pieni kytkin
asentoon VOX. Siirrä se takaisin asentoon PTT, jos et käytä VOX-toimintoa.
› Roger-piippaus: lähetyksen lopetusääni
Kun PTT:stä päästetään irti, radio piippaa vahvistaakseen muille käyttäjille,
että lähetyksesi on päättynyt. Tämä toiminto on oletusarvoisesti käytössä ja se
ilmaistaan
-ikonilla.
Roger-piippauksen poistaminen käytöstä
1. Paina “menu”, kunnes näytössä näkyy symboli
2. Valitse ‘OFF’ p/q -nappien avulla
3. Vahvista valinta painamalla PTT-nappia.
› Kanava-asetukset
Paina kerran “menu” -nappia ja valitse sitten haluttu kanava p/q -napeilla. Paina
PTT:tä vahvistaaksesi valinnan.
› CTCSS-aliäänten asetukset
CTCSS-aliäänet ovat koodinumeroita (1 - 38), jotka lisätään ensimmäisiin 8
kanavaan uusien yksityiskanavien luomiseksi. Voit lisätä 38 koodia kanaviin P1 - P8,
mikä tarkoittaa että voit luoda 308 uutta kanavaa. Esimerkiksi, jos lisäät CTCSSaliääni “27:n” kanavaan “P3”, saat uuden kanavan “P327”, joka voi kommunikoida
muiden lähetin-vastaanotinten kanssa ainoastaan, mikäli ne on asetettu samalle
kanavalle ja aliäänelle.
Aktivoidaksesi 38 eri CTCSS-aliääntä noudata näitä vaiheita:
1. Kytke radio päälle.
2. Paina “Menu” -nappia ja valitse p/q-napeilla yksi 8 kanavasta (P1 - P8).
3. Paina kahdesti “menu” -nappia, kunnes näytöllä näkyy valittu kanava ja kaksi
välkkyvää CTCss-aliääninumeroa (kanavan oikella puolella)
4. Valitse p/q -nappien avulla haluttu CTCSS-aliääni (1 - 38).
5. Vahvista asetus painamalla PTT:tä.
Nyt radio lähettää ja vastaanottaa käyttäen ohjelmoitua TCSS-aliääntä. Jos et
halua käyttää mitään CTCSS-ääntä, valitse “00”.
Näytä CTCSS-aliääni LCD-näytöllä
Aktivoidessasi CTCSS-aliäänen kanaville P1 - P8 ääni on näkyvissä kanavan
oikealla puolella. Muille kanaville (9:stä ylöspäin) CTCSS-alikoodi on esiohjelmoitu
ja sitten ”piilotettu”. Näyttääksesi väliaikaisesti esiohjelmoidun kanavan ja sen
CTCSS-aliäänen, press the “menu” -nappia yli 3 sekunnin ajan.
Page 30

30
› Monitoritoiminto
Tämän toiminnon aktivoinnin ansiosta voit vastaanottaa hyvin matalia ja
heikkoja radiosignaaleja. Se on hyvin kätevä, kun sinun tarvitsee puhua mutta
etäisyys on maksimikantamalla. Tämän toiminnon haittana on vastaanoton
äänekäs taustamelu.
1. Paina “menu”, kunnes näytössä näkyy symboli
2. Aktivoidaksesi valitse ‘On’ p/q -nappien avulla
3. Vahvista valinta painamalla PTT-nappia. Kytkeäksesi monitorin pois päältä,
paina vain menu-nappia
/S” -NAPPI
Näppäimistölukko
Tämä ominaisuus on erittäin hyödyllinen välttääksesi painamasta nappeja vahingossa. Paina ja pidä alas painettuna “ /S” -nappi yli 3 sekunnin ajan. -ikoni vahvistaa,
että näppäinlukko on aktivoitu. Ainoastaan PTT ja ovat yhä aktiivisia. Toista sama
toiminta avataksesi näppäinlukituksen.
SCAN-tila
SCAN-tila valvoo varattuja kanavia.
Sitä käytetään tarkistamaan radioliikenne kaikilla kanavilla, ennen lähetystä ja sen
ansiosta yksikkö voi pysähtyä kanavalle, jolla joku puhuu. Kun radio pysähtyy varatulle
kanavalle, selaus jatkuu noin 5 sekunnin kuluttua.
Aktivoidaksesi SCAN-toiminnon: Paina “ /S” -nappia, kunnes näytöllä näkyy
‘SCAN’.
Kytkeäksesi sen pois päältä: paina “ /S” tai PTT-nappia.
Näytön taustavalo
Painaessasi tai yhtä 5:stä etupuolen hallintalaitteista näyttö valaistuu noin 10 sekunnin ajaksi (ainoastaan mallit M48 ja M99).
Lataaminen
Kun akku tai paristot ovat tyhjentyneet, -ikoni alkaa vilkkua: on välttämätöntä
vaihtaa paristot tai ladata akut niin pian kuin mahdollista.
ikoni vilkkuu ainoastaan radion ollessa päällä.
Huomio: alkaliparistoja ei saa ladata.
Huomio: älä lataa radiota ilman ladattavia paristoja tai akkua.
Huomio: Ensimmäisellä latauskerralla lataa akkuja ainakin 8 tunnin ajan (ainoastaan
mallit M48 ja M99).
Malli M24
Tämän mallin mukana ei toimiteta akkua tai latauslisätarvikkeita.
Malli M48
Tämän mallin mukana toimitetaan akut ja seinäadapteri. Aseta akut seinäadapteriin ja
kytke se MIC/CHG-liittimeen lähetin-vahvistimen sivussa. Seinäadapteri on kak-
soisliitintyyppiä, joten voit ladata molemmat lähetin-vahvistimet samalla aikaa.
Ainoastaan mikäli lähetin-vahvistin jätetään päälle latauksen ajaksi, vilkkuu
-ikoni
LCD-näytöllä, osoittaen että radio latautuu edelleen. Tämä osoitin ei poistu päältä, kun
akut on täysin ladattuna.
Malli M99
Tämän mallin mukana toimitetaan akut, pöytälaturi ja seinäadapteri. Aseta akut paikalleen ja kytke seinäadapteri pöytälaturin takaosaan, ja aseta lähetin-vahvistimet
pöytälaturin telineisiin. Mikäli lähetin-vahvistimet on asetettu oikein, punainen LED-
valo syttyy palamaan pöytälaturissa, osoittaen että radio on latautumassa. Ainoastaan
mikäli lähetin-vahvistin jätetään päälle latauksen ajaksi, vilkkuu -ikoni LCD-näytöllä,
osoittaen että radio latautuu edelleen. Kumpikaan osoitin ei poistu päältä, kun akut on
täysin ladattuna.
Automaattinen virransäästö
Kaikki mallit on varustettu automaattisella virransäästöpiirillä. Mikäli lähetin-vastaanotin ei saa signaalia 10 sekunnin aikana, aktivoituu “virransäästötoiminto” auto-
maattisesti. Akkujenkestovoikasvaajopa50%.
Lisälaitteet
Kaikki mallit toimitetaan MIC/CHG-liittimillä mikrofonien ja kuulokkeiden kaltaisten
lisälaitteiden liittämiseksi laitteeseen. Tämä liitin on “2-piikkinen” ja yhteensopiva kaikkien Midland-lisälaitteiden kanssa.
Käyttääksesi mallin M99 mukana toimitettuja kuulokkeita, varmista että
mikrokytkin on oikeassa asennossa:
PTT: manuaalinen aktivointi
VOX: ääniaktivointi
 Loading...