Midland BASE CAMP User guide [ml]

MIDLAND BASE CAMP PMR446

Ricetrasmettitore PMR446 multiuso

MIDLAND BASE CAMP è un ricetrasmettitore PMR446 con ricevitore in Banda VHF marina e Radio AM/FM integrati. Nasce dall’idea di poter offrire un prodotto dalle molteplici funzionalità, dal suo impiego come radio a quello come ricetrasmittente per comunicare con altri apparati sulla stessa frequenza.

La BASE CAMP è ideale per un impiego quotidiano, per tutte le attività out door, nel tempo libero e perché no anche in situazioni di emergenza e sicurezza. Infatti è dotata di torcia a led, e con la funzione SOS segnali Morse permette di inviare dei messaggi in codice. L’inserimento della dinamo ne consente la ricarica in caso di mancanza delle batterie di ricambio ed attraverso la presa USB è possibile caricare anche altri apparati come ad esempio il cellulare. Le sue dimensioni ridotte e compatte consentono all’utilizzatore di effettuare delle comunicazioni radio anche in movimento.

La BASE CAMP ha in dotazione anche un microfono palmare per un uso immediato e pratico.

Principali funzioni e caratteristiche:

Ricetrasmettitore PMR446

Ricevitore banda VHF marina

Radio-sveglia con ricevitore AM/FM

SOS segnali Morse

Microfono palmare in dotazione

Torcia a Led

Dinamo di ricarica

Presa USB per ricarica

Pacco batterie 6V ricaricabile in dotazione

Funziona anche con batterie Alcaline

Presa accessori a 2 PIN

Come previsto da dl 259 del 01/08/2003 e da nota 101C del PNF, gli apparati PMR446 sono soggetti ad una dichiarazione d’utilizzo e ad un contributo annuo.

Per ottenere la modulistica (Allegato 19) e le modalità di ottenimento dell’autorizzazione generale contattate l’Ispettorato Territoriale nel vostro capoluogo di regione o visitate il sito web del Ministero delle Comunicazioni (www.comunicazioni.it).

L’utilizzo dell’apparato è consentito solamente dopo aver inviato la pratica all’Ispettorato Territoriale.

Raccomandiamo di conservare una copia di tale pratica.

DESCRIZIONE DELLE PARTI

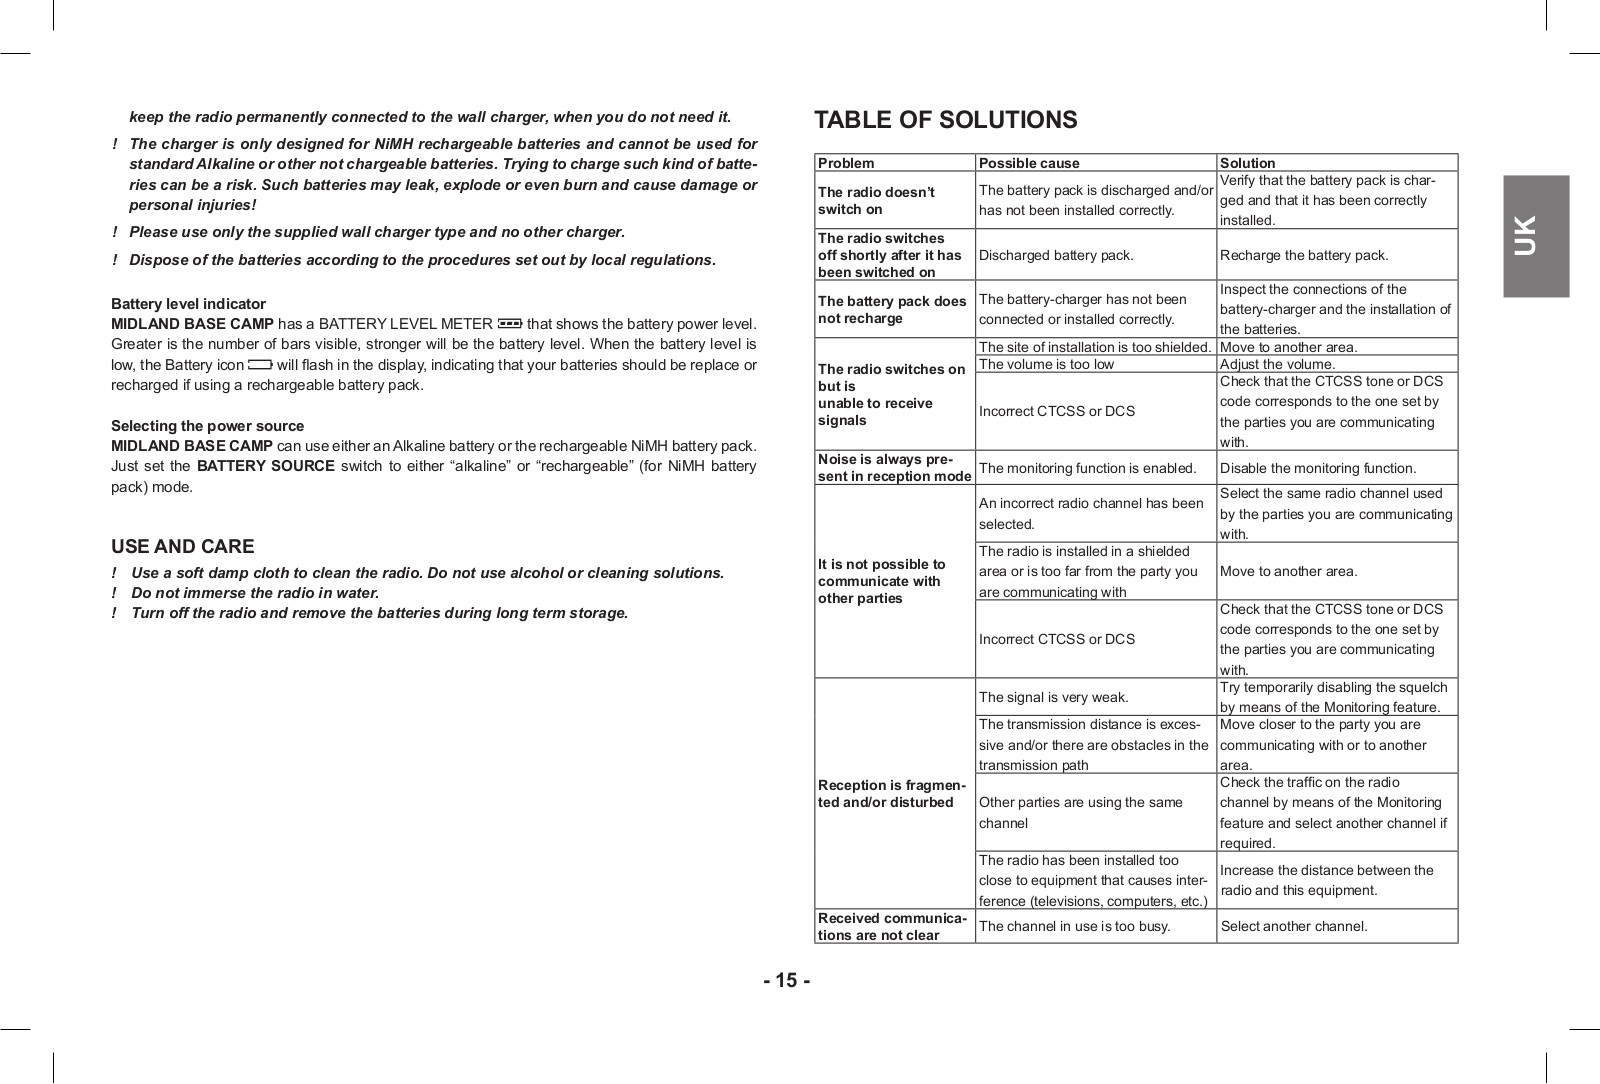
DISPLAY

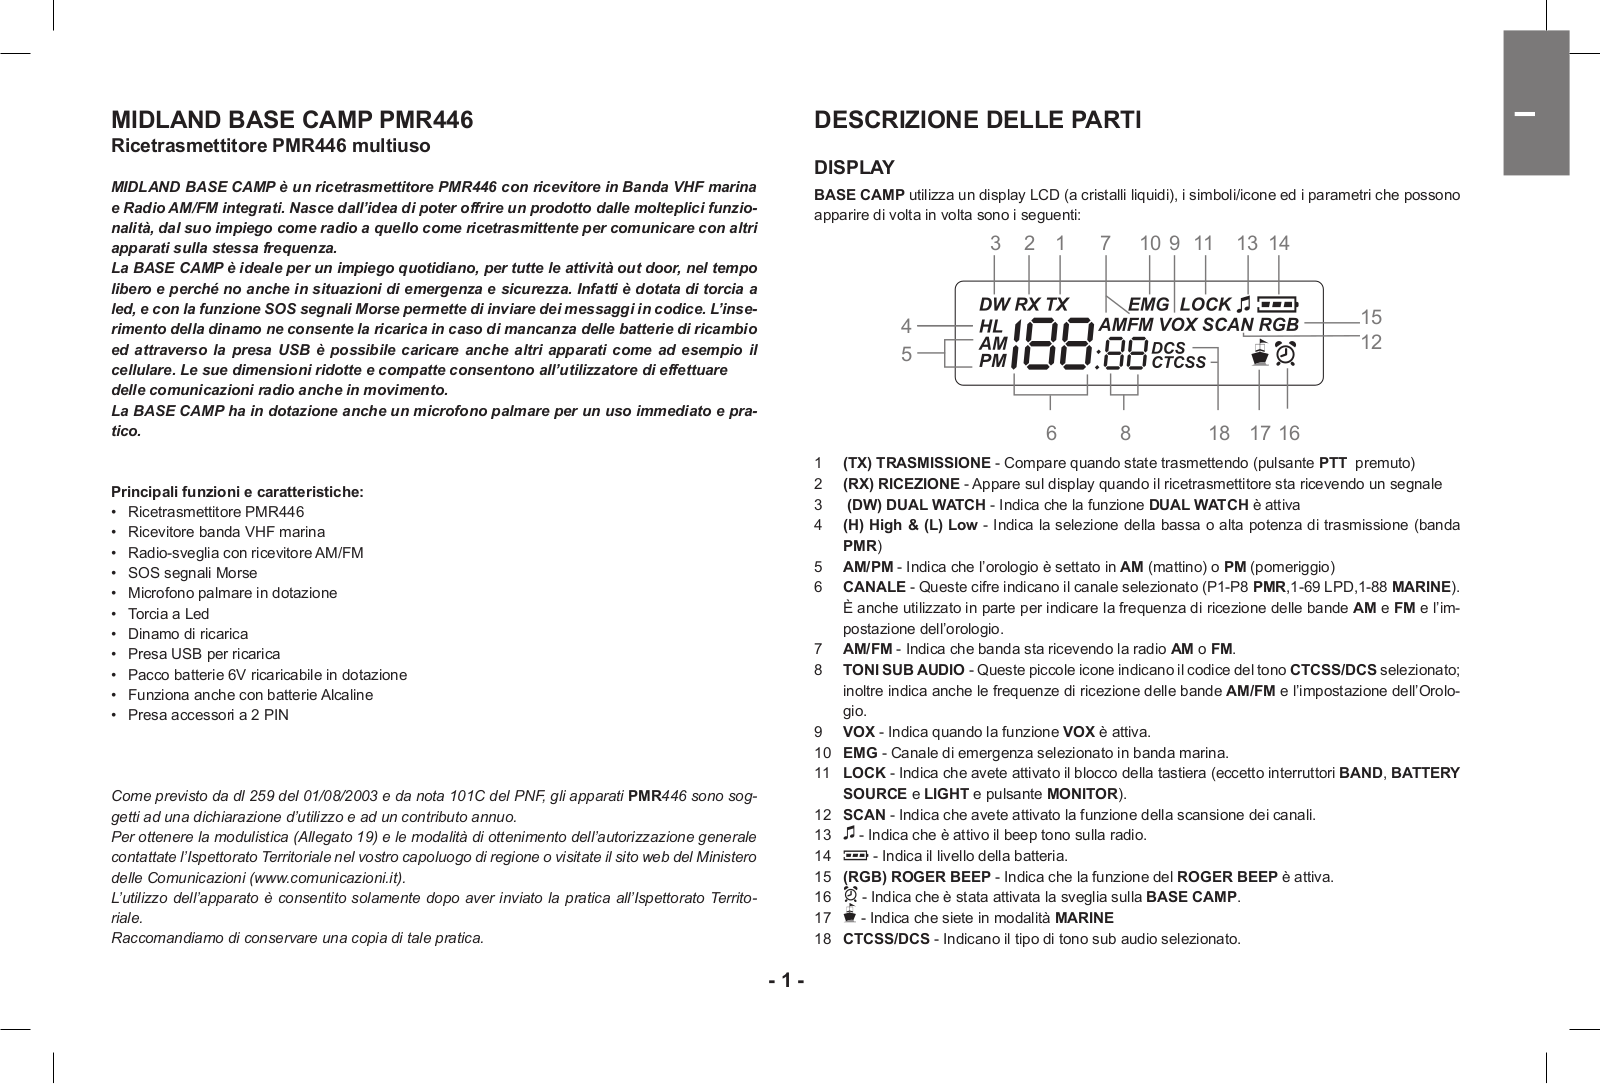
BASE CAMP utilizza un display LCD (a cristalli liquidi), i simboli/icone ed i parametri che possono apparire di volta in volta sono i seguenti:

3

2

1

7

10 9

11

13 14

4


15


12

5


6


8

18

17 16

1(TX) TRASMISSIONE - Compare quando state trasmettendo (pulsante PTT premuto)

2 (RX) RICEZIONE - Appare sul display quando il ricetrasmettitore sta ricevendo un segnale

3(DW) DUAL WATCH - Indica che la funzione DUAL WATCH è attiva

4(H) High & (L) Low - Indica la selezione della bassa o alta potenza di trasmissione (banda

PMR)

5AM/PM - Indica che l’orologio è settato in AM (mattino) o PM (pomeriggio)

6CANALE - Queste cifre indicano il canale selezionato (P1-P8 PMR,1-69 LPD,1-88 MARINE). È anche utilizzato in parte per indicare la frequenza di ricezione delle bande AM e FM e l’impostazione dell’orologio.

7AM/FM - Indica che banda sta ricevendo la radio AM o FM.

8TONI SUB AUDIO - Queste piccole icone indicano il codice del tono CTCSS/DCS selezionato; inoltre indica anche le frequenze di ricezione delle bande AM/FM e l’impostazione dell’Orologio.

9VOX - Indica quando la funzione VOX è attiva.

10EMG - Canale di emergenza selezionato in banda marina.

11LOCK - Indica che avete attivato il blocco della tastiera (eccetto interruttori BAND, BATTERY SOURCE e LIGHT e pulsante MONITOR).

12SCAN - Indica che avete attivato la funzione della scansione dei canali.

13 - Indica che è attivo il beep tono sulla radio.

14 - Indica il livello della batteria.

15(RGB) ROGER BEEP - Indica che la funzione del ROGER BEEP è attiva.

16 - Indica che è stata attivata la sveglia sulla BASE CAMP.

17 - Indica che siete in modalità MARINE

18CTCSS/DCS - Indicano il tipo di tono sub audio selezionato.

<![if ! IE]>

<![endif]>I

- 1 -

Midland BASE CAMP User guide

DESCRIZIONE DELL’APPARATO

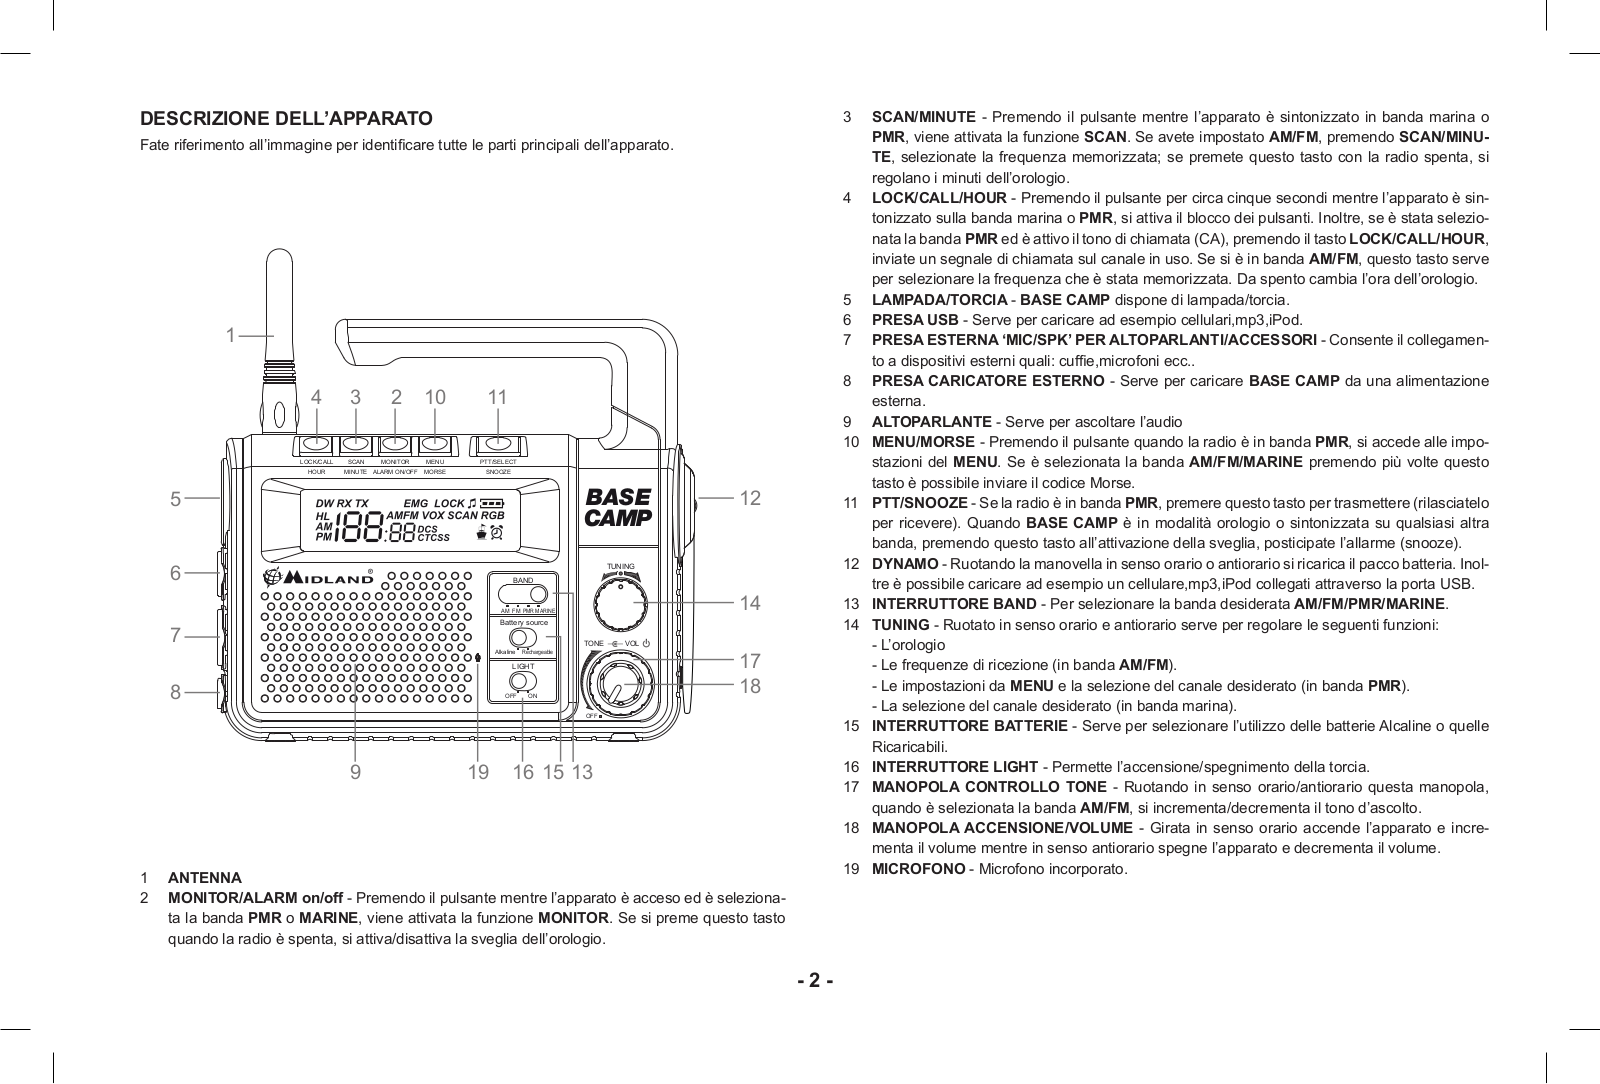
Fate riferimento all’immagine per identificare tutte le parti principali dell’apparato.

1


4

3

2

10

11


LOCK/CALL

SCAN

MONITOR

MENU

PTT/SELECT


HOUR

MINUTE ALARM ON/OFF MORSE

SNOOZE


5


BASE

12


CAMP


6


TUNING


BAND


AM FM PMR MARINE


14

7


Battery source


TONE

VOL

17


Alkaline

Rechargeable


LIGHT


8


OFF

ON


18


OFF


9


19

16 15 13


1ANTENNA

2MONITOR/ALARM on/off - Premendo il pulsante mentre l’apparato è acceso ed è selezionata la banda PMR o MARINE, viene attivata la funzione MONITOR. Se si preme questo tasto quando la radio è spenta, si attiva/disattiva la sveglia dell’orologio.

3SCAN/MINUTE - Premendo il pulsante mentre l’apparato è sintonizzato in banda marina o PMR, viene attivata la funzione SCAN. Se avete impostato AM/FM, premendo SCAN/MINUTE, selezionate la frequenza memorizzata; se premete questo tasto con la radio spenta, si regolano i minuti dell’orologio.

4LOCK/CALL/HOUR - Premendo il pulsante per circa cinque secondi mentre l’apparato è sintonizzato sulla banda marina o PMR, si attiva il blocco dei pulsanti. Inoltre, se è stata selezionata la banda PMR ed è attivo il tono di chiamata (CA), premendo il tasto LOCK/CALL/HOUR,

inviate un segnale di chiamata sul canale in uso. Se si è in banda AM/FM, questo tasto serve per selezionare la frequenza che è stata memorizzata. Da spento cambia l’ora dell’orologio.

5 LAMPADA/TORCIA - BASE CAMP dispone di lampada/torcia.

6PRESA USB - Serve per caricare ad esempio cellulari,mp3,iPod.

7PRESA ESTERNA ‘MIC/SPK’ PER ALTOPARLANTI/ACCESSORI - Consente il collegamento a dispositivi esterni quali: cuffie,microfoni ecc..

8PRESA CARICATORE ESTERNO - Serve per caricare BASE CAMP da una alimentazione esterna.

9ALTOPARLANTE - Serve per ascoltare l’audio

10MENU/MORSE - Premendo il pulsante quando la radio è in banda PMR, si accede alle impostazioni del MENU. Se è selezionata la banda AM/FM/MARINE premendo più volte questo tasto è possibile inviare il codice Morse.

11PTT/SNOOZE - Se la radio è in banda PMR, premere questo tasto per trasmettere (rilasciatelo per ricevere). Quando BASE CAMP è in modalità orologio o sintonizzata su qualsiasi altra banda, premendo questo tasto all’attivazione della sveglia, posticipate l’allarme (snooze).

12DYNAMO - Ruotando la manovella in senso orario o antiorario si ricarica il pacco batteria. Inoltre è possibile caricare ad esempio un cellulare,mp3,iPod collegati attraverso la porta USB.

13INTERRUTTORE BAND - Per selezionare la banda desiderata AM/FM/PMR/MARINE.

14TUNING - Ruotato in senso orario e antiorario serve per regolare le seguenti funzioni:

-L’orologio

-Le frequenze di ricezione (in banda AM/FM).

-Le impostazioni da MENU e la selezione del canale desiderato (in banda PMR).

-La selezione del canale desiderato (in banda marina).

15INTERRUTTORE BATTERIE - Serve per selezionare l’utilizzo delle batterie Alcaline o quelle Ricaricabili.

16INTERRUTTORE LIGHT - Permette l’accensione/spegnimento della torcia.

17MANOPOLA CONTROLLO TONE - Ruotando in senso orario/antiorario questa manopola, quando è selezionata la banda AM/FM, si incrementa/decrementa il tono d’ascolto.

18MANOPOLA ACCENSIONE/VOLUME - Girata in senso orario accende l’apparato e incrementa il volume mentre in senso antiorario spegne l’apparato e decrementa il volume.

19MICROFONO - Microfono incorporato.

- 2 -

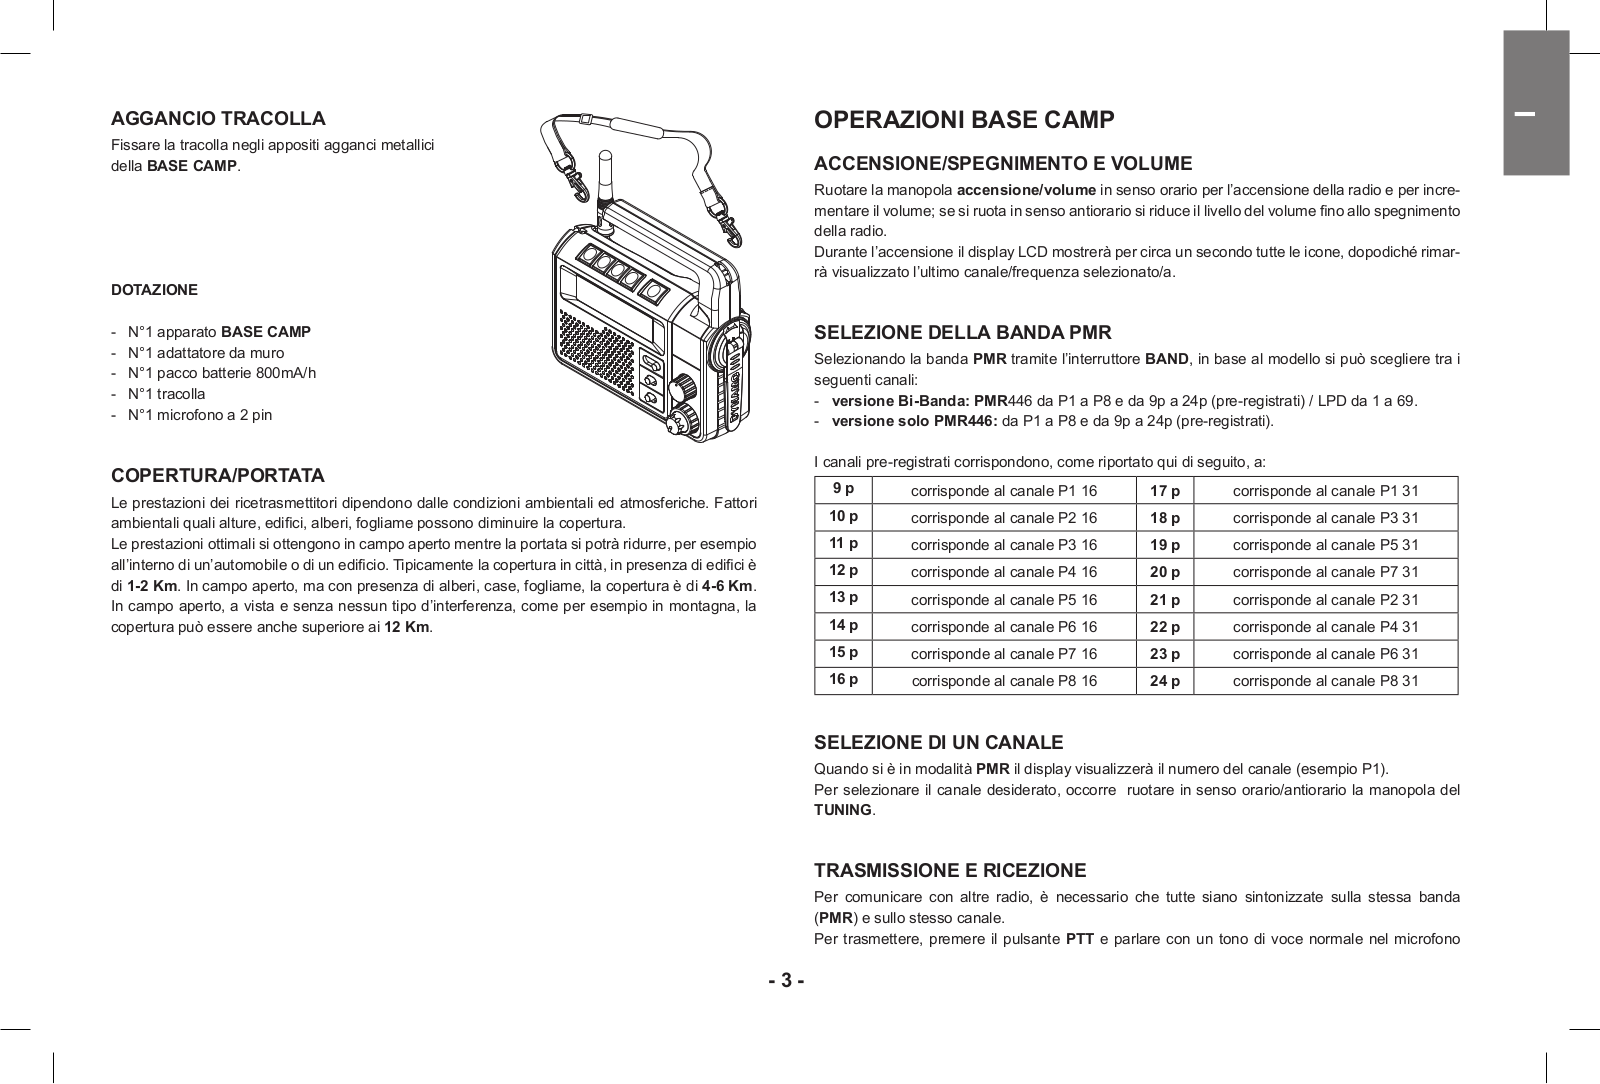
AGGANCIO TRACOLLA

Fissare la tracolla negli appositi agganci metallici della BASE CAMP.

DOTAZIONE

- N°1 apparato BASE CAMP - N°1 adattatore da muro

- N°1 pacco batterie 800mA/h - N°1 tracolla

- N°1 microfono a 2 pin

COPERTURA/PORTATA

Le prestazioni dei ricetrasmettitori dipendono dalle condizioni ambientali ed atmosferiche. Fattori ambientali quali alture, edifici, alberi, fogliame possono diminuire la copertura.

Le prestazioni ottimali si ottengono in campo aperto mentre la portata si potrà ridurre, per esempio all’interno di un’automobile o di un edificio. Tipicamente la copertura in città, in presenza di edifici è di 1-2 Km. In campo aperto, ma con presenza di alberi, case, fogliame, la copertura è di 4-6 Km. In campo aperto, a vista e senza nessun tipo d’interferenza, come per esempio in montagna, la copertura può essere anche superiore ai 12 Km.

OPERAZIONI BASE CAMP

ACCENSIONE/SPEGNIMENTO E VOLUME

Ruotare la manopola accensione/volume in senso orario per l’accensione della radio e per incrementare il volume; se si ruota in senso antiorario si riduce il livello del volume fino allo spegnimento della radio.

Durante l’accensione il display LCD mostrerà per circa un secondo tutte le icone, dopodiché rimarrà visualizzato l’ultimo canale/frequenza selezionato/a.

SELEZIONE DELLA BANDA PMR

Selezionando la banda PMR tramite l’interruttore BAND, in base al modello si può scegliere tra i seguenti canali:

-versione Bi-Banda: PMR446 da P1 a P8 e da 9p a 24p (pre-registrati) / LPD da 1 a 69.

-versione solo PMR446: da P1 a P8 e da 9p a 24p (pre-registrati).

I canali pre-registrati corrispondono, come riportato qui di seguito, a:

9 p

corrisponde al canale P1 16

17 p

corrisponde al canale P1 31

10 p

corrisponde al canale P2 16

18 p

corrisponde al canale P3 31

11 p

corrisponde al canale P3 16

19 p

corrisponde al canale P5 31

12 p

corrisponde al canale P4 16

20 p

corrisponde al canale P7 31

13 p

corrisponde al canale P5 16

21 p

corrisponde al canale P2 31

14 p

corrisponde al canale P6 16

22 p

corrisponde al canale P4 31

15 p

corrisponde al canale P7 16

23 p

corrisponde al canale P6 31

16 p

corrisponde al canale P8 16

24 p

corrisponde al canale P8 31

SELEZIONE DI UN CANALE

Quando si è in modalità PMR il display visualizzerà il numero del canale (esempio P1).

Per selezionare il canale desiderato, occorre ruotare in senso orario/antiorario la manopola del

TUNING.

TRASMISSIONE E RICEZIONE

Per comunicare con altre radio, è necessario che tutte siano sintonizzate sulla stessa banda (PMR) e sullo stesso canale.

Per trasmettere, premere il pulsante PTT e parlare con un tono di voce normale nel microfono

<![if ! IE]>

<![endif]>I

- 3 -

(mic). L’icona “TX” apparirà sul display durante la trasmissione.

E’ possibile comunicare anche usando un accessorio esterno o un microfono palmare tenendo premuto l’apposito pulsante del PTT. Per una massima chiarezza della voce tenere il microfono distante dalla bocca 2/3 centimetri.

Per poter ricevere, rilasciare il pulsante PTT.

Quando la radio è in ricezione sul display apparirà l’icona “RX”.

MONITOR

La funzione MONITOR consente di escludere temporaneamente lo squelch automatico per ricevere eventuali segnali estremamente deboli che altrimenti non sarebbero stati ricevuti.

Per attivare il MONITOR, premere il pulsante “MONITOR”.

Questa funzione può essere attivata solamente in banda PMR e MARINE.

SCAN

Esegue la scansione di tutti i canali. In presenza di un segnale in ricezione, la scansione si arresta e riprende dopo cinque secondi dal cessare del segnale. Questa funzione è utile per controllare quali canali sono liberi.

Alla pressione del pulsante PTT la radio trasmette sul canale attivo e la scansione si interrompe. Per eseguire e interrompere la scansione dei canali, premere il pulsante SCAN.

Questa funzione è utilizzabile in banda PMR e MARINE.

LOCK

Premendo per circa 5 secondi il pulsante LOCK/CALL, sul display apparirà l’icona LOCK.

In questo modo si attiva la funzione LOCK e vengono così disattivati i pulsanti, MENU e SCAN. Questa funzione è selezionabile in modalità MARINE o PMR.

Ripetere la procedura di attivazione per disabilitare la funzione.

ILLUMINAZIONE DISPLAY

Quando la BASE CAMP è spenta, ed è attiva quindi solo la funzione orologio, l’illuminazione del display può essere attivata tramite i pulsante MENU o girando la manopola TUNING.

Quando avviene l’accensione, il display si illumina per circa 5 secondi. L’illuminazione avviene anche con la pressione della maggior parte dei tasti (radio accesa).

TONI CTCSS/DCS

I toni CTCSS e DCS sono dei codici che possono essere aggiunti ai canali per crearne uno personale. Per ogni canale, si possono scegliere fino a 38 codici CTCSS e 83 codici DCS diversi. L’implementazione di questi codici può essere fatta sui seguenti canali:

PMR 446: solo sugli 8 canali principali PMR 446 (da P1 a P8). I canali pre-registrati da 9p a 24p non possono essere modificati. Per attivare i codici CTCSS premere una volta sola il pulsante MENU, poi tramite la manopola TUNING selezionare il tono desiderato, che viene visualizzato sul display.

Per confermare premere il pulsante PTT o attendere cinque secondi.

Per attivare i codici DCS premere due volte il pulsante MENU, poi tramite la manopola del TUNING selezionare il tono desiderato, che viene visualizzato sul display.

Per confermare premere il pulsante PTT o attendere cinque secondi.

PerdisabilitarelefunzioniCTCSS/DCS selezionareilcanaledesiderato,premereilpulsanteMENU sino a visualizzare sul display il codice del tono CTCSS lampeggiante a destra, e selezionare “off” tramite la manopola TUNING (sul display compare off). Per confermare premere PTT.

Note: Se si seleziona il tono CTCSS viene disabilitato il DCS e viceversa. Per poter comunicare con le altre radio le impostazioni dei toni devono essere le stesse.

TRASMISSIONE (TX) SELEZIONE LIVELLO DI POTENZA

BASE CAMP ha 2 livelli di potenza selezionabili.

Per selezionare il livello della potenza la radio deve essere in modalità PMR sui canali P1-P8. Premere il tasto MENU fino a visualizzare sul display l’icona “Pr”, con la manopola TUNING selezionare il livello della potenza high (H) o low (L). Nel display comparirà H o L a seconda della potenza selezionata.

Per confermare premere il tasto PTT o attendere cinque secondi.

Con le batterie completamente cariche, la potenza massima é di 500 mW (ERP), mentre quella minima é di 10mW (ERP).

Grazie a questa funzione, se non dovete coprire grandi distanze, potete selezionare la modalità “Bassa potenza” e aumentare notevolmente la durata della batteria.

!Quando la batteria inizierà a scaricarsi, sul display compare . In TX la potenza passerà automaticamente da Hi (H) a Lo (L)

VOX

BASE CAMP ha 4 livelli di VOX (off,1,2,3,4). Questa funzione permette di attivare la comunicazione senza premere il tasto PTT. E’ sufficiente parlare e la comunicazione viene attivata.

La sensibilità è regolabile su 3 livelli e attivabile con o senza accessori. Il quarto livello disponibile attiva la funzione VOX con Talkback: nel caso in cui uno dei due apparati trasmette ininterrotta-

- 4 -

mente per più di 20 secondi, il VOX Talkback ne interrompe la trasmissione per dieci secondi, liberando il canale e concedendo così all’altro utente la possibilità di parlare.

Per attivare i vari livelli del VOX premere il pulsante MENU fino a visualizzare sul display “Vo”, dopodiché tramite la manopola TUNING è possibile selezionare “1”,”2”,”3” o “4” . Per confermare premere il tasto PTT o attendere cinque secondi.

Per disattivare la funzione VOX seguire le indicazioni sopra indicate selezionando la voce “off”.

CALL

BASE CAMP consente di inviare un segnale sonoro di avviso chiamata a tutti gli utenti sullo stesso canale; sul display appare l’icona “TX” e il tono può essere sentito sul proprio altoparlante per la conferma. Sono disponibili cinque suonerie differenti (off/1-5).

Per inviare la chiamata occorre premere il tasto LOCK/CALL.

Per selezionare i toni premere il tasto MENU fino a visualizzare sul display “CA” con il numero del tono attivo.

Tramite la manopola TUNING si possono ascoltare/selezionare le 5 melodie pre-impostate. Confermare premendo PTT oppure attendere 5 secondi.

In modalità AM/FM, premendo il pulsante CALL/LOCK per circa 5 secondi, è possibile memorizzare una sezione radio desiderata.

ROGER BEEP (Tonalità di conferma fine conversazione)

Al rilascio del tasto PTT, quindi alla fine di ogni trasmissione, viene emessa una tonalità, che indica al vostro interlocutore che può iniziare a parlare.

NellaBASE CAMP questafunzionesiattivapremendoiltastoMENU,sinoavisualizzaresuldisplay “rb of”; con la manopola TUNINIG selezionare “on” e sul display comparirà l’icona “RGB”. Premere il tasto PTT oppure attendere 5 secondi per confermare la programmazione.

Per disattivarlo ripetere la procedura indicata selezionando “rb of” sul display sparirà l’icona

“RGB”.

BEEP TASTIERA

Questa funzione, se attiva, genera un beep audio ogni volta che si preme un tasto.

Nel caso si desideri escludere il beep audio, è possibile farlo premendo il tasto MENU, sino a visualizzare sul display “bP on”, e poi selezionare tramite la manopola TUNING “bP of”. Confermare premendo il tasto PTT oppure attendere 5 secondi. Sul display sparirà l’icona .

In questo modo, alla pressione di un tasto non si sentirà alcun suono. Per riattivarla ripetere la procedura indicata selezionando “bP on”.

DUAL WATCH

Questa funzione permette di monitorare, costantemente in ricezione, un secondo canale oltre a quello in uso.

Per attivare questa funzione premere il tasto MENU ripetutamente sino a visualizzare sul display

“DW of”.

Con la manopola TUNING selezionare il secondo canale che si desidera monitorare; se inoltre si vuole impostare un tono CTCSS/DCS premere ancora MENU e selezionarlo tramite la manopola

TUNING.

Premere il tasto PTT o MENU oppure attendere 5 secondi per conferma. Il display mostrerà “DW” e alternativamente il canale in uso e il secondo canale selezionato.

Per interrompere il DUAL WATCH, è sufficiente premere il tasto SCAN o MENU.

Quando la radio riceverà un segnale su uno dei due canali monitorati, la funzione “DUAL WATCH” viene momentaneamente sospesa, permettendo la trasmissione e la ricezione sul canale in quel momento in uso. Dopo 5 secondi, se non viene effettuata nessuna attività di trasmissione o ricezione, la funzione DUAL WATCH riprende.

BANDA MARINA

Selezionando la banda marina tramite l’interruttore BAND il display mostrerà l’ultimo canale selezionato e l’icona . In questa banda non è possibile comunicare e trasmettere ma solamente ricevere.

Quando si è in modalità MARINE il display visualizzerà il numero del canale esempio (1 d).

Per selezionare il canale desiderato ruotare in senso orario/antiorario la manopola TUNING. Inoltre, possono essere attivate le funzioni SCAN,MONITOR,LOCK.

BANDA RADIO AM/FM

BASE CAMP può ricevere le frequenze AM e FM selezionando tramite l’interruttore BAND la modalità desiderata. Il display visualizzerà la banda selezionata AM/FM e l’attuale frequenza.

Selezione della frequenza della banda AM/FM

Per selezionare la frequenza AM/FM ruotare in senso orario/antiorario la manopola TUNING; se si mantiene la manopola per circa due secondi, viene effettuata la scansione delle frequenze fino alla ricezione di un segnale forte e pulito. Se la manopola viene mantenuta in senso orario/antiorario per circa cinque secondi la scansione delle frequenze è continua.

Quando si è raggiunta la frequenza desiderata, per interrompere la scansione girare appena la manopola TUNING o premere il pulsante PTT.

<![if ! IE]>

<![endif]>I

- 5 -

Memorizzazione delle frequenze

BASE CAMP ha la possibilità di memorizzare due frequenze a vostro piacimento in banda AM e due in FM. Per memorizzare la prima frequenza desiderata premere per circa cinque secondi il pulsante LOCK/CALL mentre per la seconda tenere premuto il pulsante SCAN.

MODALITA’ OROLOGIO

Quando BASE CAMP è spenta, è impostata la funzione orologio. Il display visualizzerà quindi l’orario.

Per visualizzare l’orario quando la radio è accesa, basta ruotare la manopola POWER/VOL su off.

Impostazione ore

Per cambiare l’ora:

-- premere il pulsante LOCK/CALL/HOUR e sul display lampeggia l’ora attuale; -- attraverso la manopola TUNING selezionare l’ora desiderata;

-- per confermare premere il pulsante PTT/SNOOZE o attendere cinque secondi circa.

Impostazione minuti

Per cambiare i minuti:

-- premere il pulsante SCAN/MINUTE e sul display lampeggiano i minuti; -- attraverso la manopola del TUNING selezionare i minuti desiderati;

-- per confermare premere il pulsante PTT/SNOOZE o attendere cinque secondi circa.

IMPOSTAZIONE SVEGLIA

Sulla BASE CAMP è possibile impostare la funzione sveglia.

Attivazione:

premere il pulsante MONITOR/ALARM ON/OFF- sul display apparirà l’icona .

Per selezionare l’ora premere il pulsante LOCK/CALL/HOUR. Il display visualizzerà l’ora attuale e l’icona della sveglia lampeggiante;

attraverso la manopola TUNING selezionare l’ora desiderata;

per confermare premere il pulsante PTT/SNOOZE o attendere cinque secondi circa.

Per selezionare i minuti premere il pulsante SCAN/MINUTE e sul display lampeggiano i minuti e l’icona ;

attraverso la manopola TUNING, selezionare i minuti desiderati;

per confermare premere il pulsante PTT/SNOOZE o attendere cinque secondi circa.

Disattivazione:

Per disattivare l’allarme, premere il pulsante MONITOR ALARM ON/OFF e l’icona sparirà dal display.

Se invece si disattiva l’allarme con i pulsanti MENU/MONITOR/SCAN-LOCK-CALL l’icona rimarrà visualizzata sul display e l’allarme tornerà a suonare dopo che sono passate le 24 ore dall’orario della sveglia impostato precedentemente.

Impostazione snooze

Quando l’allarme della sveglia è attivo è possibile attivare la funzione SNOOZE premendo il pulsante PTT/SNOOZE. Tutte le volte che viene premuto questo pulsante l’allarme della sveglia suonerà ogni 8 minuti.

TORCIA

BASE CAMP ha incorporata la torcia.

L’accensione della luce è possibile selezionando l’interruttore LIGHT su “on”; mentre la luce verrà spenta selezionando l’interruttore LIGHT su “off”.

CODICE MORSE

BASE CAMP ha la funzione di poter inviare il codice MORSE.

Quando è in BANDA AM/FM/MARINE premendo più volte il pulsante MENU è possibile inviare il codice morse.

PRESA USB

BASE CAMP consente di caricare e utilizzare cellulari, mp3, iPod collegandoli alla presa USB, attraverso la dinamo,al pacco batteria o al caricatore da muro.

-Collegare il cavo (opzionale) USB alla presa USB della BASE CAMP;

-Connettere la parte opposta del cavo al cellulare, mp3, iPod;

-Ricaricare il cellulare, mp3, iPod attraverso la dinamo, il pacco batteria o il caricatore da muro (presa 9VDC della BASE CAMP).

RICARICA PACCO BATTERIA

BASE CAMP ha in dotazione un pacco batteria ricaricabile del tipo NI-MH da 6V, che può essere ricaricato usando il suo caricatore da muro AC/DC incluso nella confezione.

Il tempo consigliato per la prima ricarica completa del pacco batteria è di 12 ore; per le seguenti saranno necessarie 8/10 ore.

Ricordiamo e raccomandiamo che per un rendimento migliore, la carica va effettuata con la BASE CAMP spenta e quando il pacco batteria è completamente scarico. Il display mostrerà l’icona Low Battery () prima dello spegnimento completo.

Per caricare il pacco batteria occorre inserire la spina del cavo di ricarica in una presa di alimenta-

- 6 -

zione di rete CA e l’altra estremità nella presa della BASE CAMP 9VDC.

Scollegare la radio dall’alimentazione di rete solamente quando la carica è completata.

Si può anche caricare il pacco batteria NI-MH tramite la dinamo; la carica viene effettuata ruotando rapidamente la dinamo in senso orario o antiorario.

ATTENZIONE:

!L’adattatore da muro in dotazione utilizza il metodo di ricarica standard. La corrente di ricarica utilizzata è quindi circa il 10% della capacità. Il tempo di ricarica consigliato è di 10-14 ore. Quando le batterie sono completamente cariche, il processo di carica non si blocca automaticamente.

!E’ consigliato non tenere l’apparecchio perennemente connesso al caricatore; se non necessario, staccare il ricetrasmettitore dal caricabatteria non appena é trascorso il tempo necessario di ricarica.

!Il caricatore è stato progettato per caricare esclusivamente batterie ricaricabili NiHM e non può essere utilizzato per caricare batterie Alcaline o altre batterie non ricaricabili. Batterie non idonee potrebbero perdere liquido, esplodere, bruciare e causare danni o lesioni personali!

!Per la ricarica, utilizzate il caricatore in dotazione. L’utilizzo di un caricabatterie non originale può causare danni al vostro apparecchio o causare esplosioni e lesioni personali.

!Smaltite le batterie esclusivamente seguendo le normative locali.

Indicazione livello pacco batteria

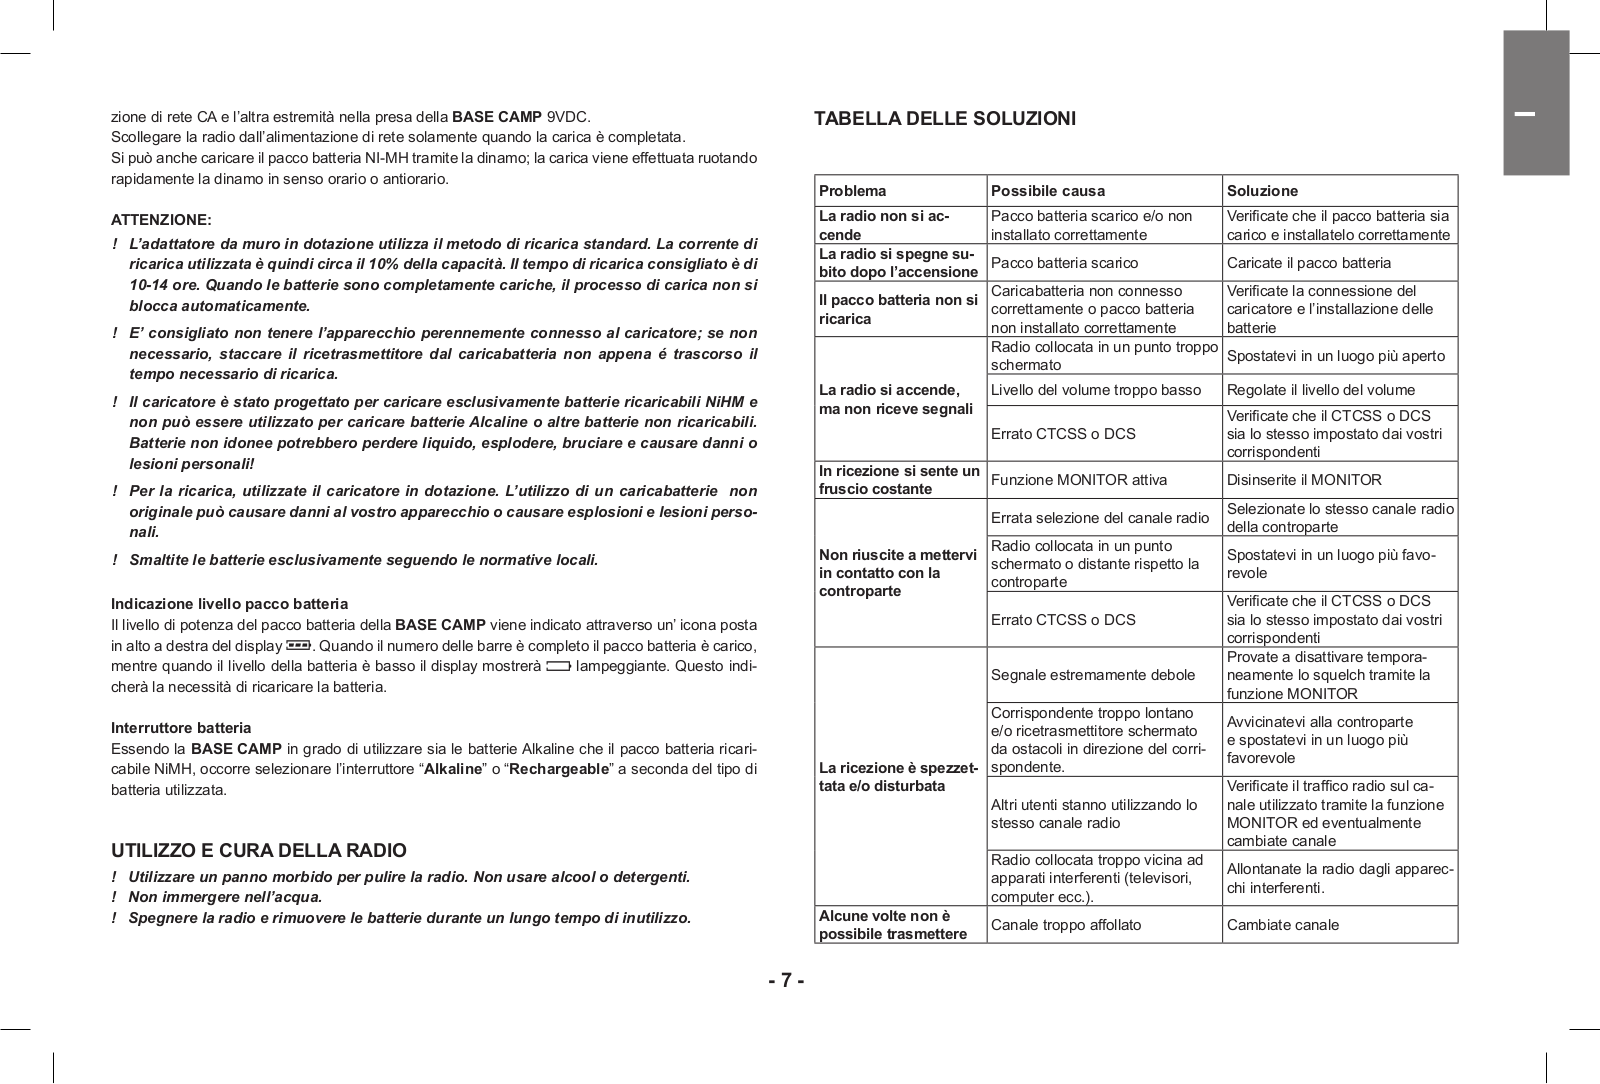
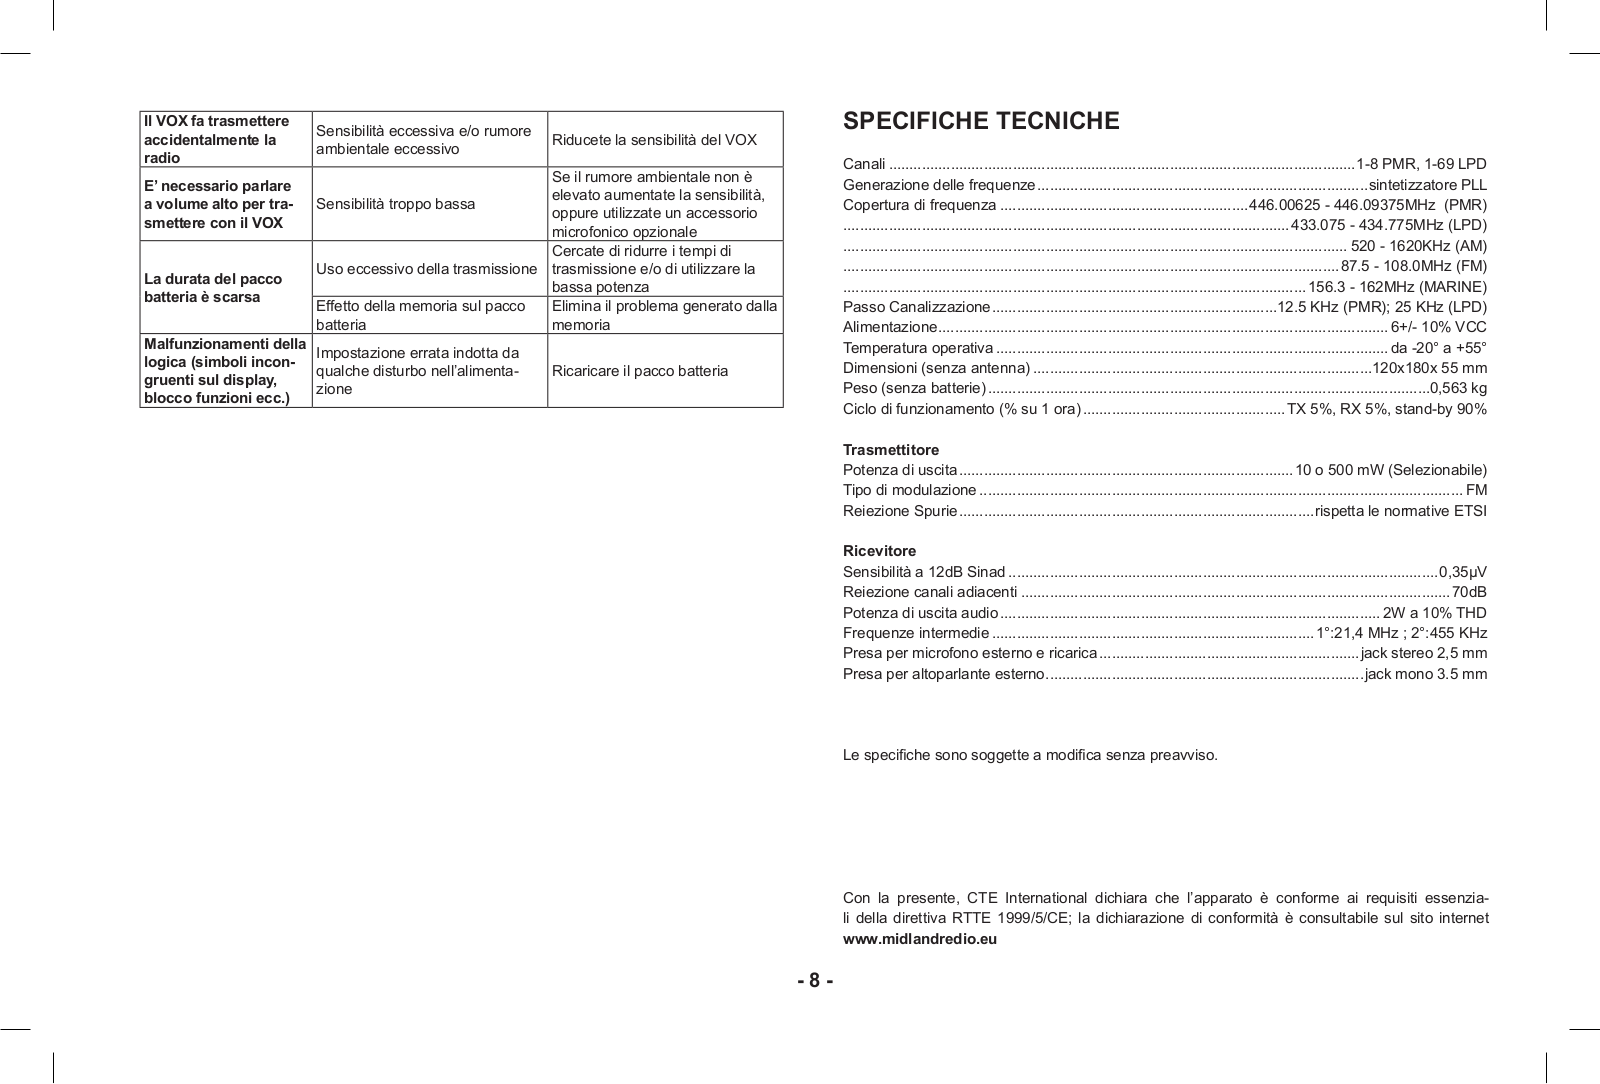
Il livello di potenza del pacco batteria della BASE CAMP viene indicato attraverso un’ icona posta in alto a destra del display . Quando il numero delle barre è completo il pacco batteria è carico, mentre quando il livello della batteria è basso il display mostrerà lampeggiante. Questo indicherà la necessità di ricaricare la batteria.

Interruttore batteria

Essendo la BASE CAMP in grado di utilizzare sia le batterie Alkaline che il pacco batteria ricaricabile NiMH, occorre selezionare l’interruttore “Alkaline” o “Rechargeable” a seconda del tipo di batteria utilizzata.

UTILIZZO E CURA DELLA RADIO

!Utilizzare un panno morbido per pulire la radio. Non usare alcool o detergenti.

!Non immergere nell’acqua.

!Spegnere la radio e rimuovere le batterie durante un lungo tempo di inutilizzo.

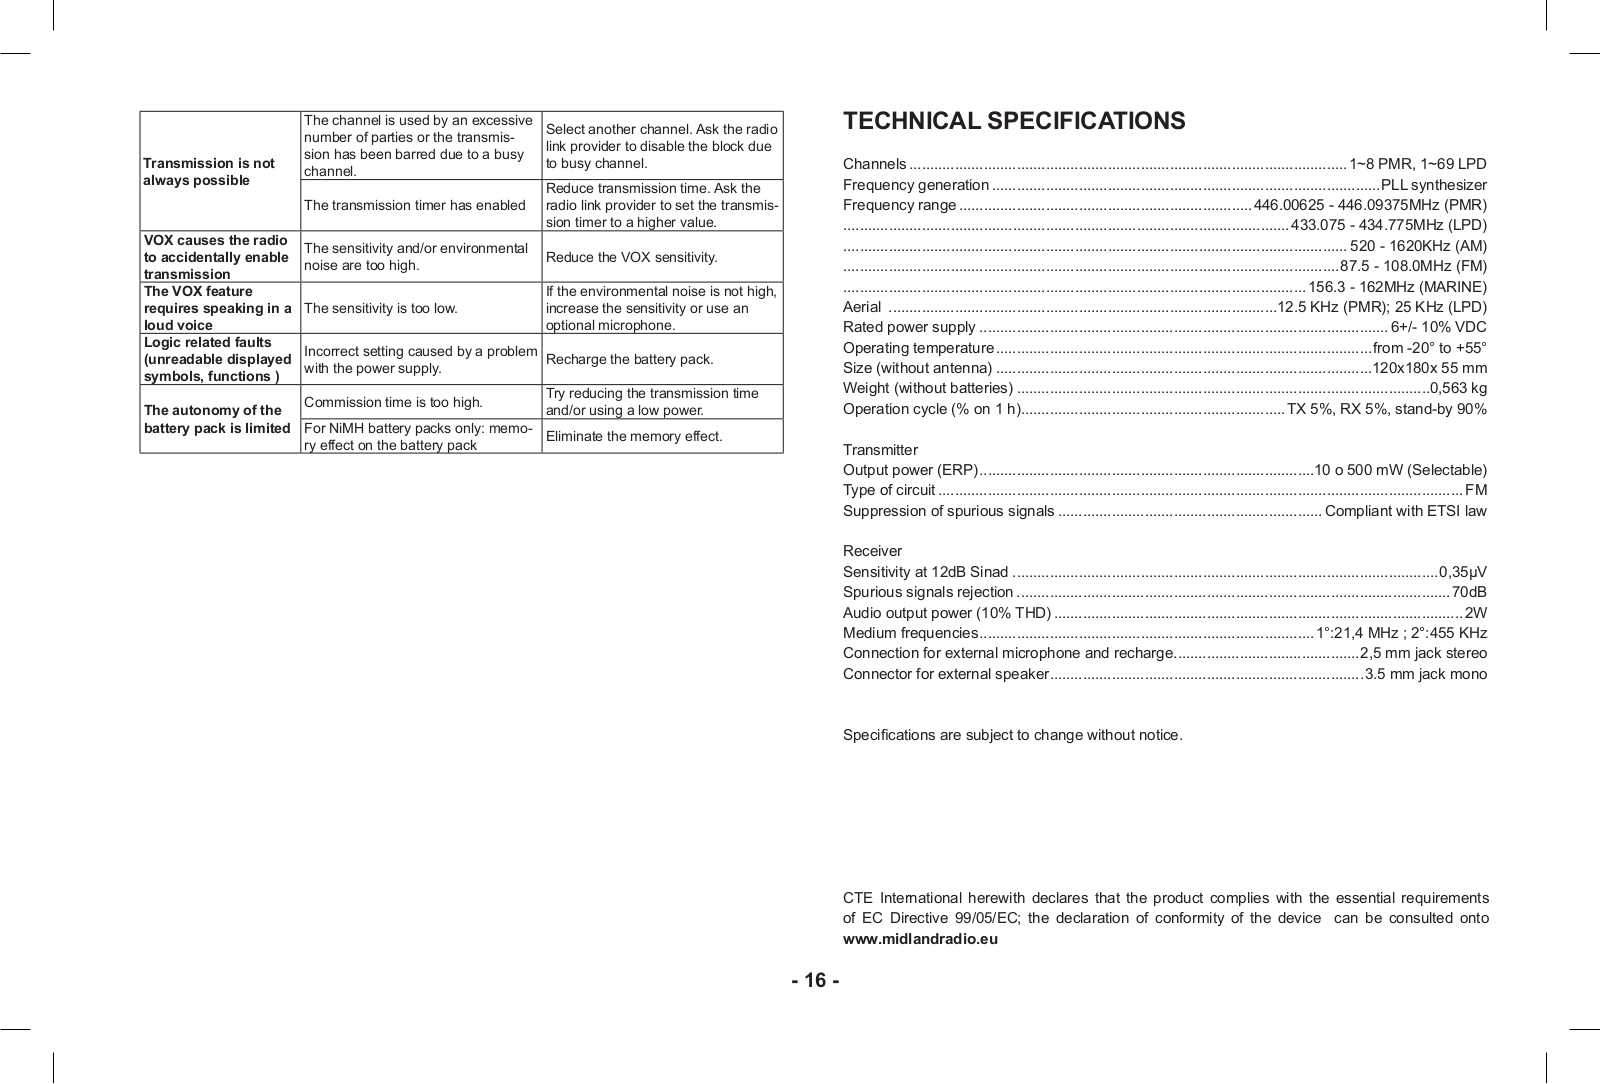
TABELLA DELLE SOLUZIONI

Problema

Possibile causa

Soluzione


La radio non si ac-

Pacco batteria scarico e/o non

Verificate che il pacco batteria sia

cende

installato correttamente

carico e installatelo correttamente

La radio si spegne su-

Pacco batteria scarico

Caricate il pacco batteria

bito dopo l’accensione


Il pacco batteria non si

Caricabatteria non connesso

Verificate la connessione del

correttamente o pacco batteria

caricatore e l’installazione delle

ricarica

non installato correttamente

batterie


Radio collocata in un punto troppo

Spostatevi in un luogo più aperto


schermato


La radio si accende,

Livello del volume troppo basso

Regolate il livello del volume

ma non riceve segnali


Verificate che il CTCSS o DCS


Errato CTCSS o DCS

sia lo stesso impostato dai vostri


corrispondenti

In ricezione si sente un

Funzione MONITOR attiva

Disinserite il MONITOR

fruscio costante


Errata selezione del canale radio

Selezionate lo stesso canale radio


della controparte

Non riuscite a mettervi

Radio collocata in un punto

Spostatevi in un luogo più favo-

schermato o distante rispetto la

in contatto con la

controparte

revole

controparte


Verificate che il CTCSS o DCS


Errato CTCSS o DCS

sia lo stesso impostato dai vostri


corrispondenti


Provate a disattivare tempora-


Segnale estremamente debole

neamente lo squelch tramite la


funzione MONITOR


Corrispondente troppo lontano

Avvicinatevi alla controparte


e/o ricetrasmettitore schermato


e spostatevi in un luogo più


da ostacoli in direzione del corri-

La ricezione è spezzet-

favorevole

spondente.


tata e/o disturbata


Verificate il traffico radio sul ca-


Altri utenti stanno utilizzando lo

nale utilizzato tramite la funzione


stesso canale radio

MONITOR ed eventualmente


cambiate canale


Radio collocata troppo vicina ad

Allontanate la radio dagli apparec-


apparati interferenti (televisori,

chi interferenti.


computer ecc.).


Alcune volte non è

Canale troppo affollato

Cambiate canale

possibile trasmettere

<![if ! IE]>

<![endif]>I

- 7 -

Il VOX fa trasmettere

Sensibilità eccessiva e/o rumore


accidentalmente la

Riducete la sensibilità del VOX

radio

ambientale eccessivo


E’ necessario parlare


Se il rumore ambientale non è


elevato aumentate la sensibilità,

a volume alto per tra-

Sensibilità troppo bassa

oppure utilizzate un accessorio

smettere con il VOX


microfonico opzionale


Cercate di ridurre i tempi di

La durata del pacco

Uso eccessivo della trasmissione

trasmissione e/o di utilizzare la


bassa potenza

batteria è scarsa


Effetto della memoria sul pacco

Elimina il problema generato dalla


batteria

memoria

Malfunzionamenti della

Impostazione errata indotta da


logica (simboli incon-

qualche disturbo nell’alimenta-

Ricaricare il pacco batteria

gruenti sul display,

zione


blocco funzioni ecc.)


SPECIFICHE TECNICHE

Canali..................................................................................................................

1-8 PMR, 1-69 LPD

Generazione delle frequenze.................................................................................

sintetizzatore PLL

Copertura di frequenza.............................................................

446.00625 - 446.09375MHz (PMR)

............................................................................................................

433.075 - 434.775MHz (LPD)

..........................................................................................................................

520 - 1620KHz (AM)

........................................................................................................................

87.5 - 108.0MHz (FM)

................................................................................................................

156.3 - 162MHz (MARINE)

Passo Canalizzazione.....................................................................

12.5 KHz (PMR); 25 KHz (LPD)

Alimentazione.............................................................................................................

6+/- 10% VCC

Temperatura operativa................................................................................................

da -20° a +55°

Dimensioni (senza antenna)...................................................................................

120x180x 55 mm

Peso (senza batterie)............................................................................................................

0,563 kg

Ciclo di funzionamento (% su 1 ora)..................................................

TX 5%, RX 5%, stand-by 90%

Trasmettitore


Potenza di uscita..................................................................................

10 o 500 mW (Selezionabile)

Tipo di modulazione......................................................................................................................

FM

Reiezione Spurie......................................................................................

rispetta le normative ETSI

Ricevitore


Sensibilità a 12dB Sinad.........................................................................................................

0,35µV

Reiezione canali adiacenti.........................................................................................................

70dB

Potenza di uscita audio.............................................................................................

2W a 10% THD

Frequenze intermedie...............................................................................

1°:21,4 MHz ; 2°:455 KHz

Presa per microfono esterno e ricarica................................................................

jack stereo 2,5 mm

Presa per altoparlante esterno.............................................................................

jack mono 3.5 mm

Le specifiche sono soggette a modifica senza preavviso.


Con la presente, CTE International dichiara che l’apparato è conforme ai requisiti essenziali della direttiva RTTE 1999/5/CE; la dichiarazione di conformità è consultabile sul sito internet www.midlandredio.eu

- 8 -

MIDLAND BASE CAMP PMR446

A multi-task PMR446 transceiver

MIDLAND BASE CAMP is a PMR446 transceiver including the VHF MARINE BAND receiver and AM/FM radio. MIDLAND BASE CAMP as been designed for being a multi-task equipment, radio and transceiver, for communicating with other devices set to the same channel.

MIDLAND BASE CAMP is the ideal and daily time solution for all the outdoor activities, the free time and why not, also for emergency and safety situations. As a matter of fact, BASE

CAMPhas a built-in flashlight, and a built-in SOS Morse signal function, that allows the transceiver to send messages in code; moreover, the dynamo crank allows you to recharge the radio during a power outage or anytime away from a power source. Through the USB jack it is possible to recharge also other devices (mobile phone, iPod, mp3 players) by the dynamo crank, AC or DC Adapter.

Its small size allows the user to realize radio communications also on the go.

MIDLAND BASE CAMP is equipped also with a handheld microphone for an easy and practical use.

Main features:

PMR446 transceiver

Vhf MARINE BAND receiver

Alarm clock/AM/FM radio included

Sos morse signals

Handheld microphone

Flashlight

Dynamo crank battery charge capability

Recharge usb jack

Supplied with a 6v ni-mh rechargeable battery pack

Working with alkaline batteries

2 Pin accessories jack

DESCRIPTION

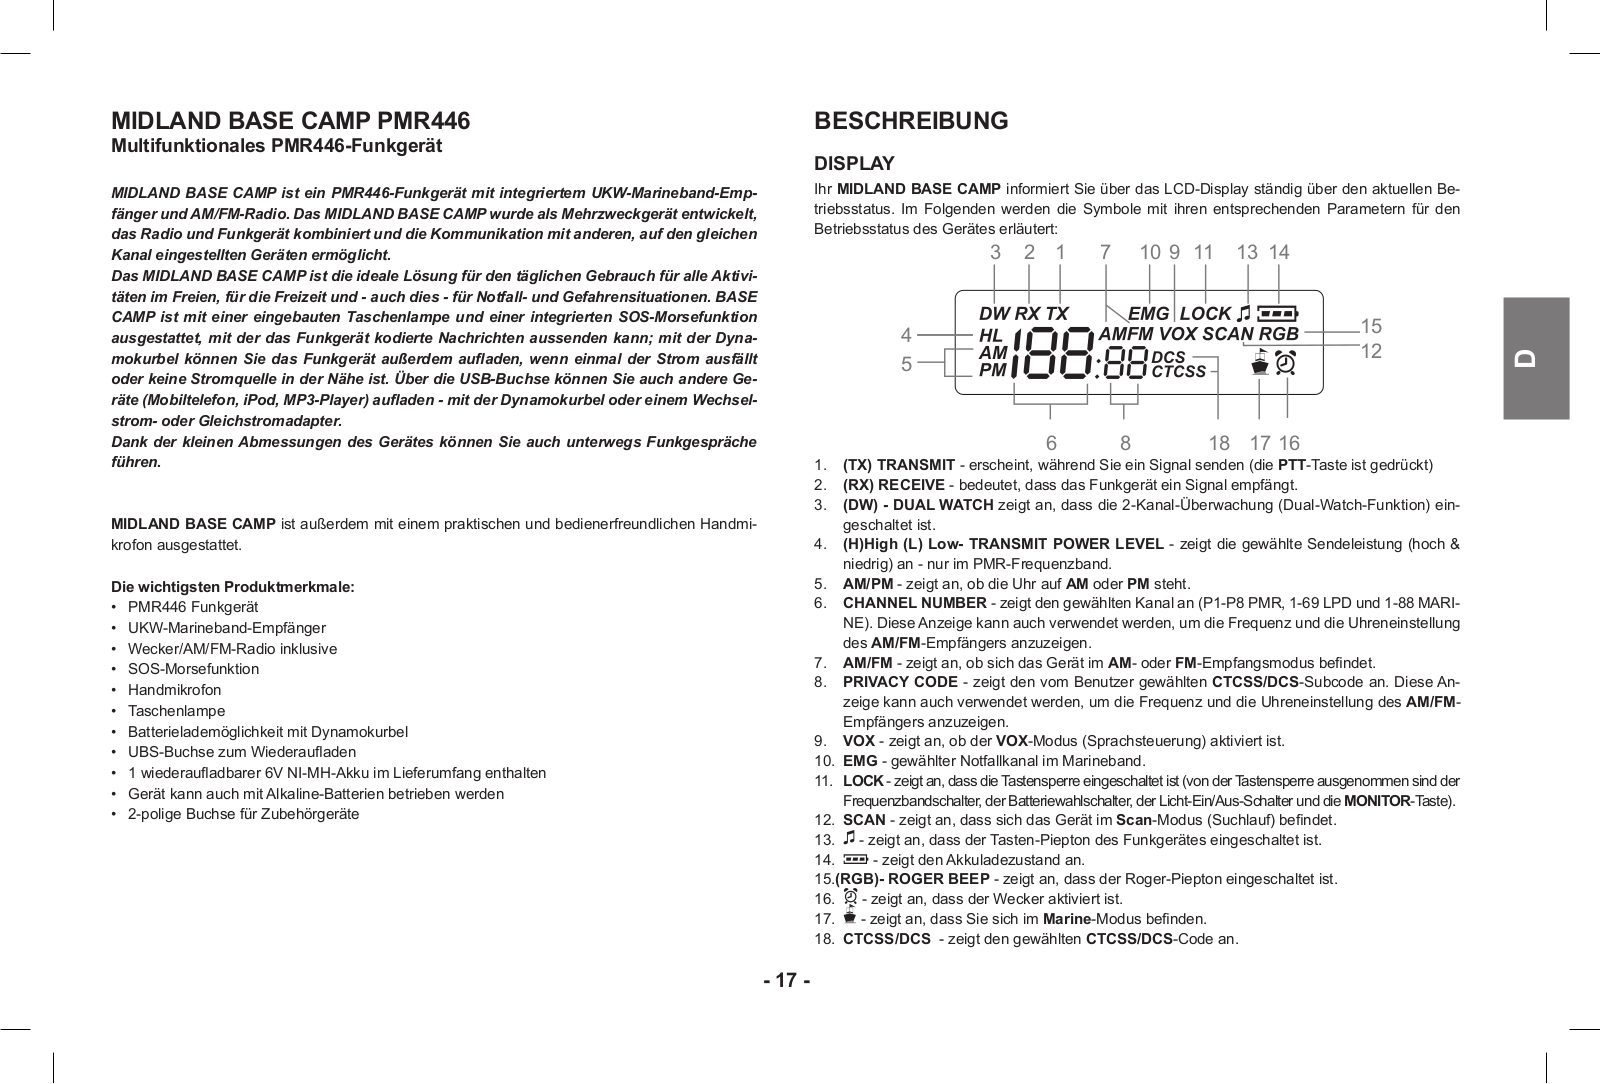
DISPLAY

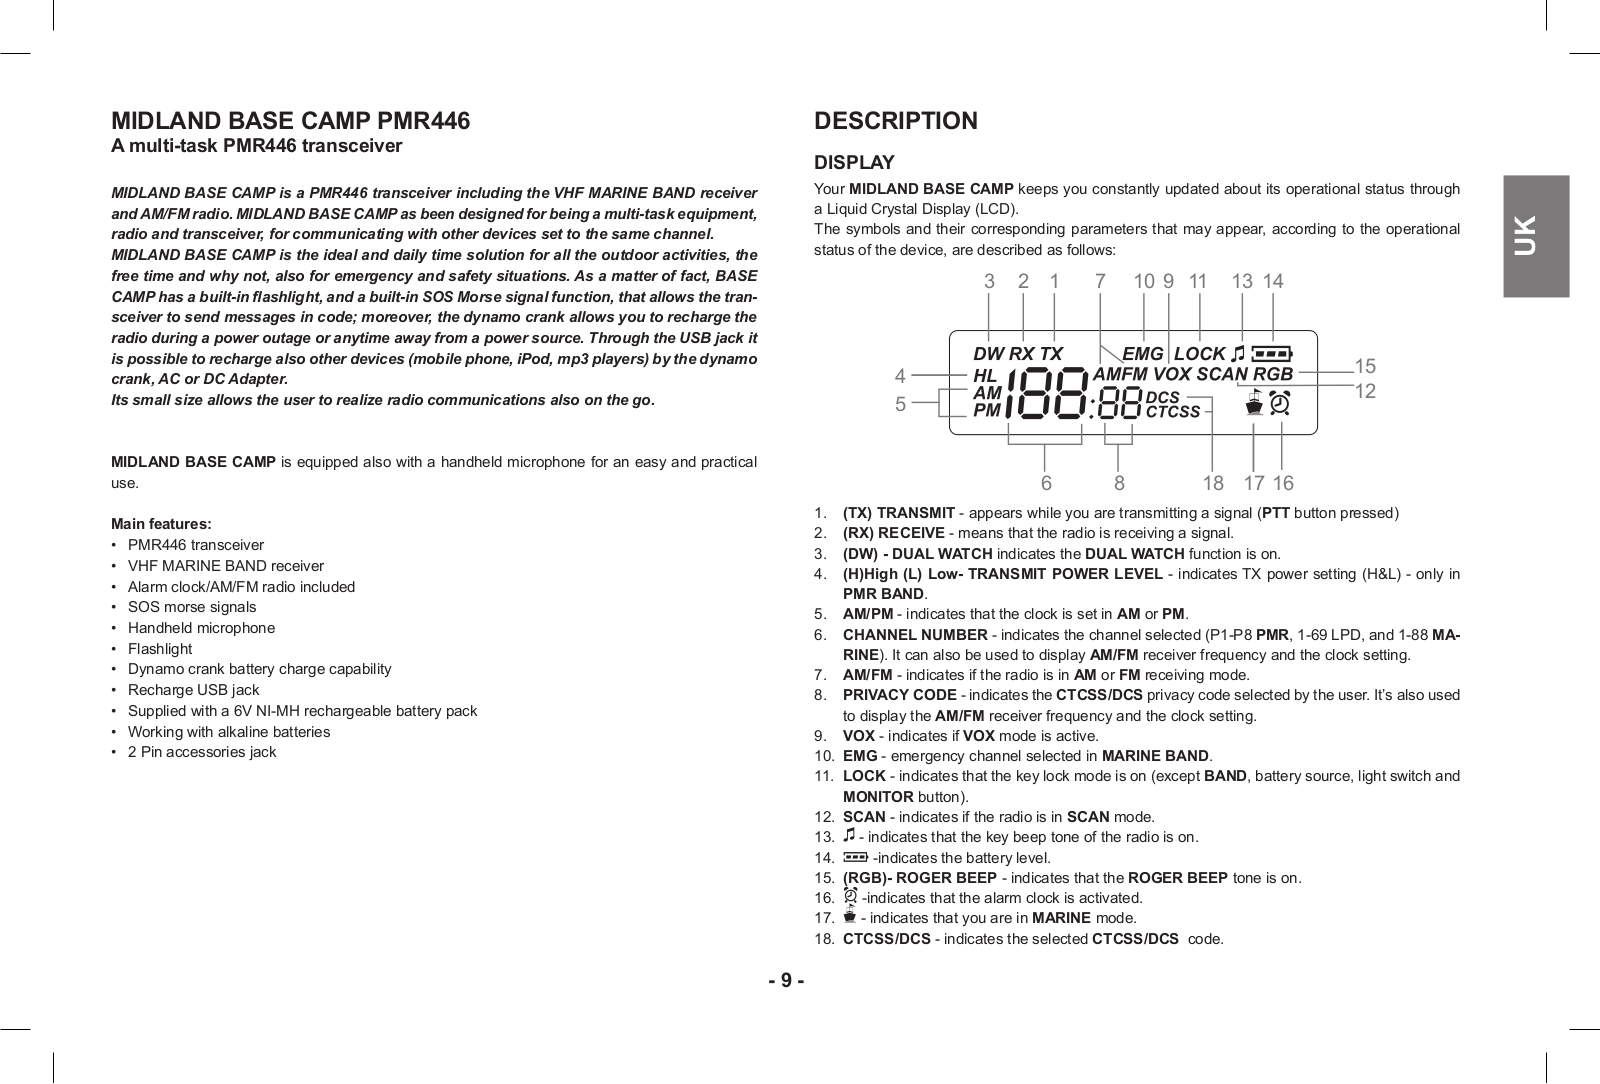
Your MIDLAND BASE CAMP keeps you constantly updated about its operational status through a Liquid Crystal Display (LCD).

The symbols and their corresponding parameters that may appear, according to the operational status of the device, are described as follows:

3

2

1

7

10 9

11

13 14


4


15


12

5


68 18 17 16

1.(TX) TRANSMIT - appears while you are transmitting a signal (PTT button pressed)

2.(RX) RECEIVE - means that the radio is receiving a signal.

3.(DW) - DUAL WATCH indicates the DUAL WATCH function is on.

4.(H)High (L) LowTRANSMIT POWER LEVEL - indicates TX power setting (H&L) - only in

PMR BAND.

5.AM/PM - indicates that the clock is set in AM or PM.

6.CHANNEL NUMBER - indicates the channel selected (P1-P8 PMR, 1-69 LPD, and 1-88 MARINE). It can also be used to display AM/FM receiver frequency and the clock setting.

7.AM/FM - indicates if the radio is in AM or FM receiving mode.

8.PRIVACY CODE - indicates the CTCSS/DCS privacy code selected by the user. It’s also used to display the AM/FM receiver frequency and the clock setting.

9.VOX - indicates if VOX mode is active.

10.EMG - emergency channel selected in MARINE BAND.

11.LOCK - indicates that the key lock mode is on (except BAND, battery source, light switch and MONITOR button).

12.SCAN - indicates if the radio is in SCAN mode.

13. - indicates that the key beep tone of the radio is on.

14. -indicates the battery level.

15.(RGB)- ROGER BEEP - indicates that the ROGER BEEP tone is on.

16. -indicates that the alarm clock is activated.

17. - indicates that you are in MARINE mode.

18.CTCSS/DCS - indicates the selected CTCSS/DCS code.

<![if ! IE]>

<![endif]>UK

- 9 -

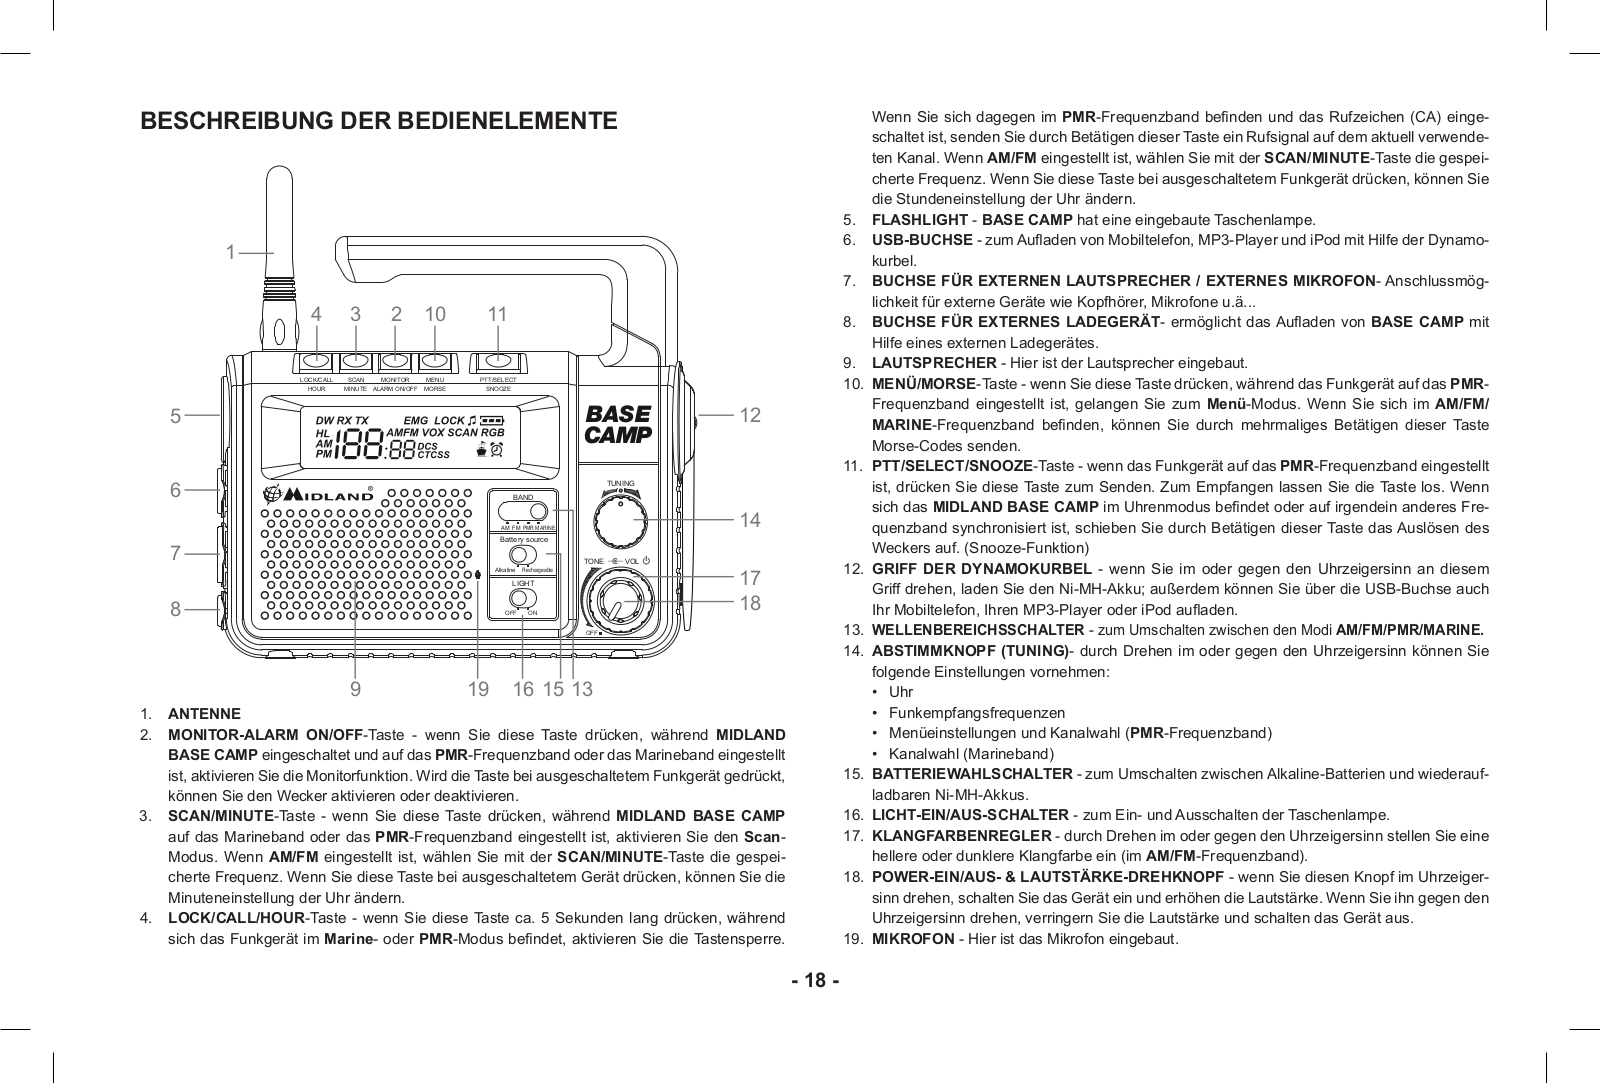
DESCRIPTION OF THE CONTROLS

1


4

3

2

10

11


LOCK/CALL

SCAN

MONITOR

MENU

PTT/SELECT


HOUR

MINUTE ALARM ON/OFF MORSE

SNOOZE


5


BASE

12


CAMP


6


TUNING


BAND


AM FM PMR MARINE


14

7


Battery source


TONE

VOL

17


Alkaline

Rechargeable


LIGHT


8


OFF

ON


18


OFF


9


19

16 15 13


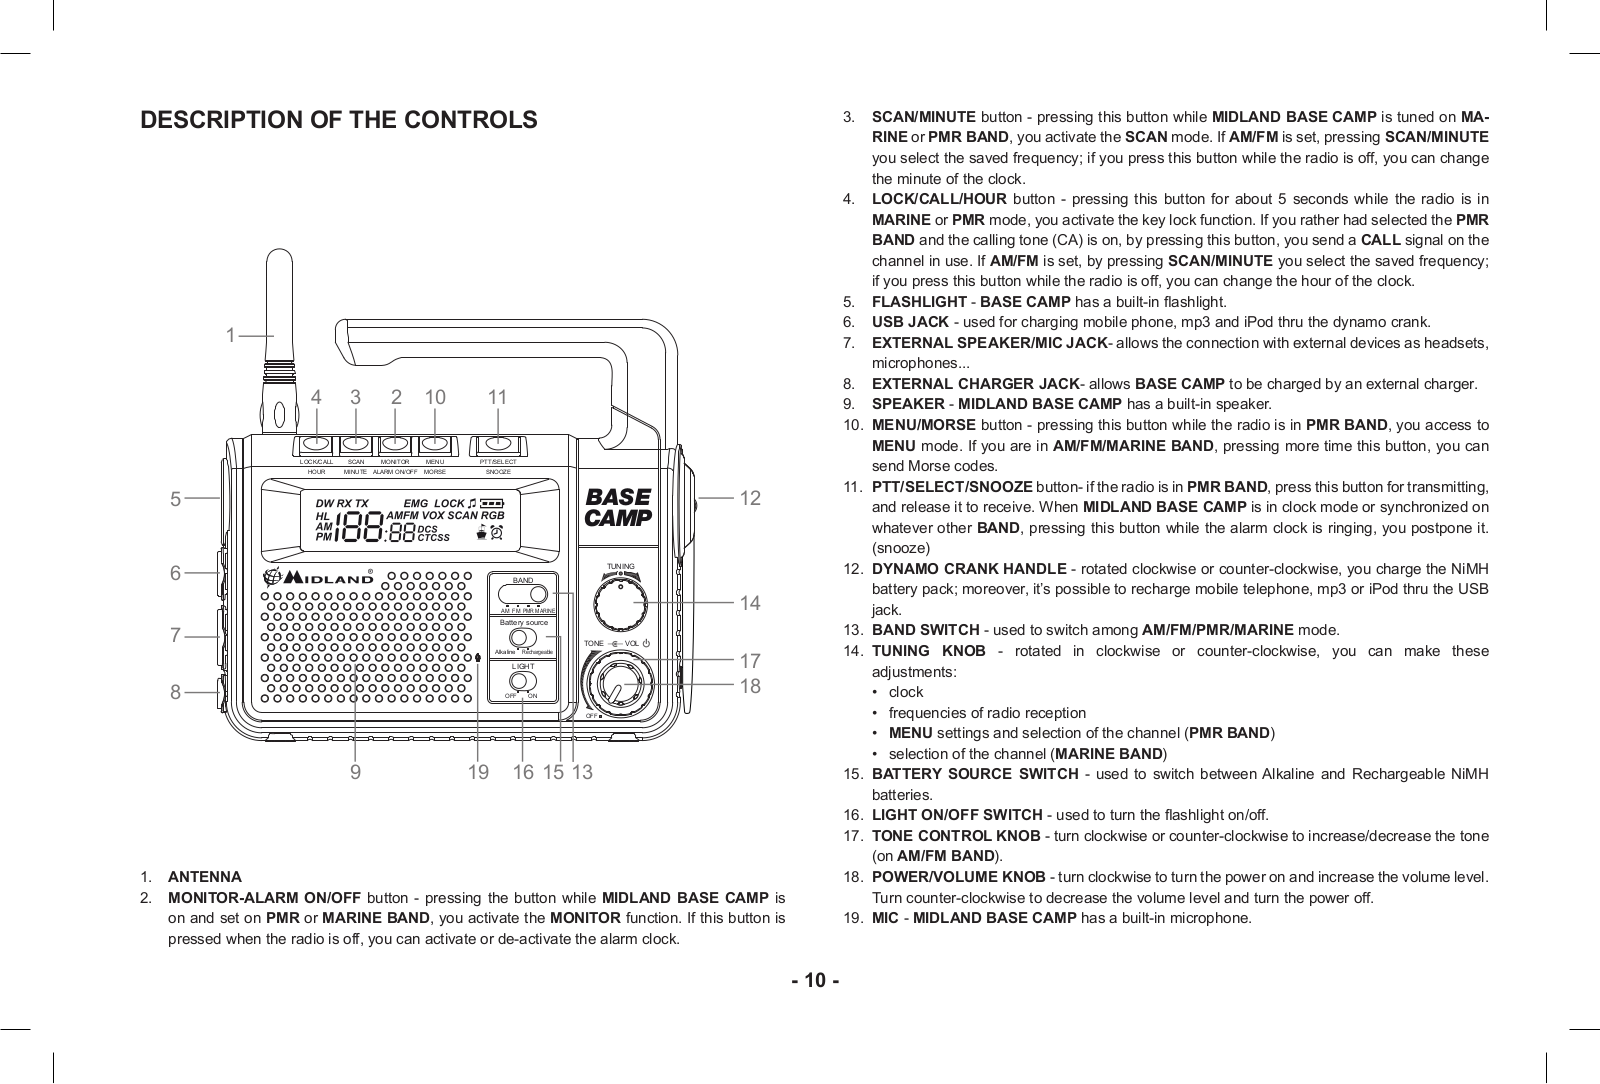
1.ANTENNA

2.MONITOR-ALARM ON/OFF button - pressing the button while MIDLAND BASE CAMP is on and set on PMR or MARINE BAND, you activate the MONITOR function. If this button is pressed when the radio is off, you can activate or de-activate the alarm clock.

3.SCAN/MINUTE button - pressing this button while MIDLAND BASE CAMP is tuned on MARINE or PMR BAND, you activate the SCAN mode. If AM/FM is set, pressing SCAN/MINUTE you select the saved frequency; if you press this button while the radio is off, you can change the minute of the clock.

4.LOCK/CALL/HOUR button - pressing this button for about 5 seconds while the radio is in MARINE or PMR mode, you activate the key lock function. If you rather had selected the PMR BAND and the calling tone (CA) is on, by pressing this button, you send a CALL signal on the channel in use. If AM/FM is set, by pressing SCAN/MINUTE you select the saved frequency; if you press this button while the radio is off, you can change the hour of the clock.

5.FLASHLIGHT - BASE CAMP has a built-in flashlight.

6.USB JACK - used for charging mobile phone, mp3 and iPod thru the dynamo crank.

7.EXTERNAL SPEAKER/MIC JACK- allows the connection with external devices as headsets, microphones...

8.EXTERNAL CHARGER JACK- allows BASE CAMP to be charged by an external charger.

9.SPEAKER - MIDLAND BASE CAMP has a built-in speaker.

10.MENU/MORSE button - pressing this button while the radio is in PMR BAND, you access to MENU mode. If you are in AM/FM/MARINE BAND, pressing more time this button, you can send Morse codes.

11.PTT/SELECT/SNOOZE buttonif the radio is in PMR BAND, press this button for transmitting, and release it to receive. When MIDLAND BASE CAMP is in clock mode or synchronized on whatever other BAND, pressing this button while the alarm clock is ringing, you postpone it. (snooze)

12.DYNAMO CRANK HANDLE - rotated clockwise or counter-clockwise, you charge the NiMH battery pack; moreover, it’s possible to recharge mobile telephone, mp3 or iPod thru the USB jack.

13.BAND SWITCH - used to switch among AM/FM/PMR/MARINE mode.

14.TUNING KNOB - rotated in clockwise or counter-clockwise, you can make these adjustments:

clock

frequencies of radio reception

MENU settings and selection of the channel (PMR BAND)

selection of the channel (MARINE BAND)

15.BATTERY SOURCE SWITCH - used to switch between Alkaline and Rechargeable NiMH batteries.

16.LIGHT ON/OFF SWITCH - used to turn the flashlight on/off.

17.TONE CONTROL KNOB - turn clockwise or counter-clockwise to increase/decrease the tone (on AM/FM BAND).

18.POWER/VOLUME KNOB - turn clockwise to turn the power on and increase the volume level. Turn counter-clockwise to decrease the volume level and turn the power off.

19.MIC - MIDLAND BASE CAMP has a built-in microphone.

- 10 -

INSTALLING THE SHOULDER STRAP

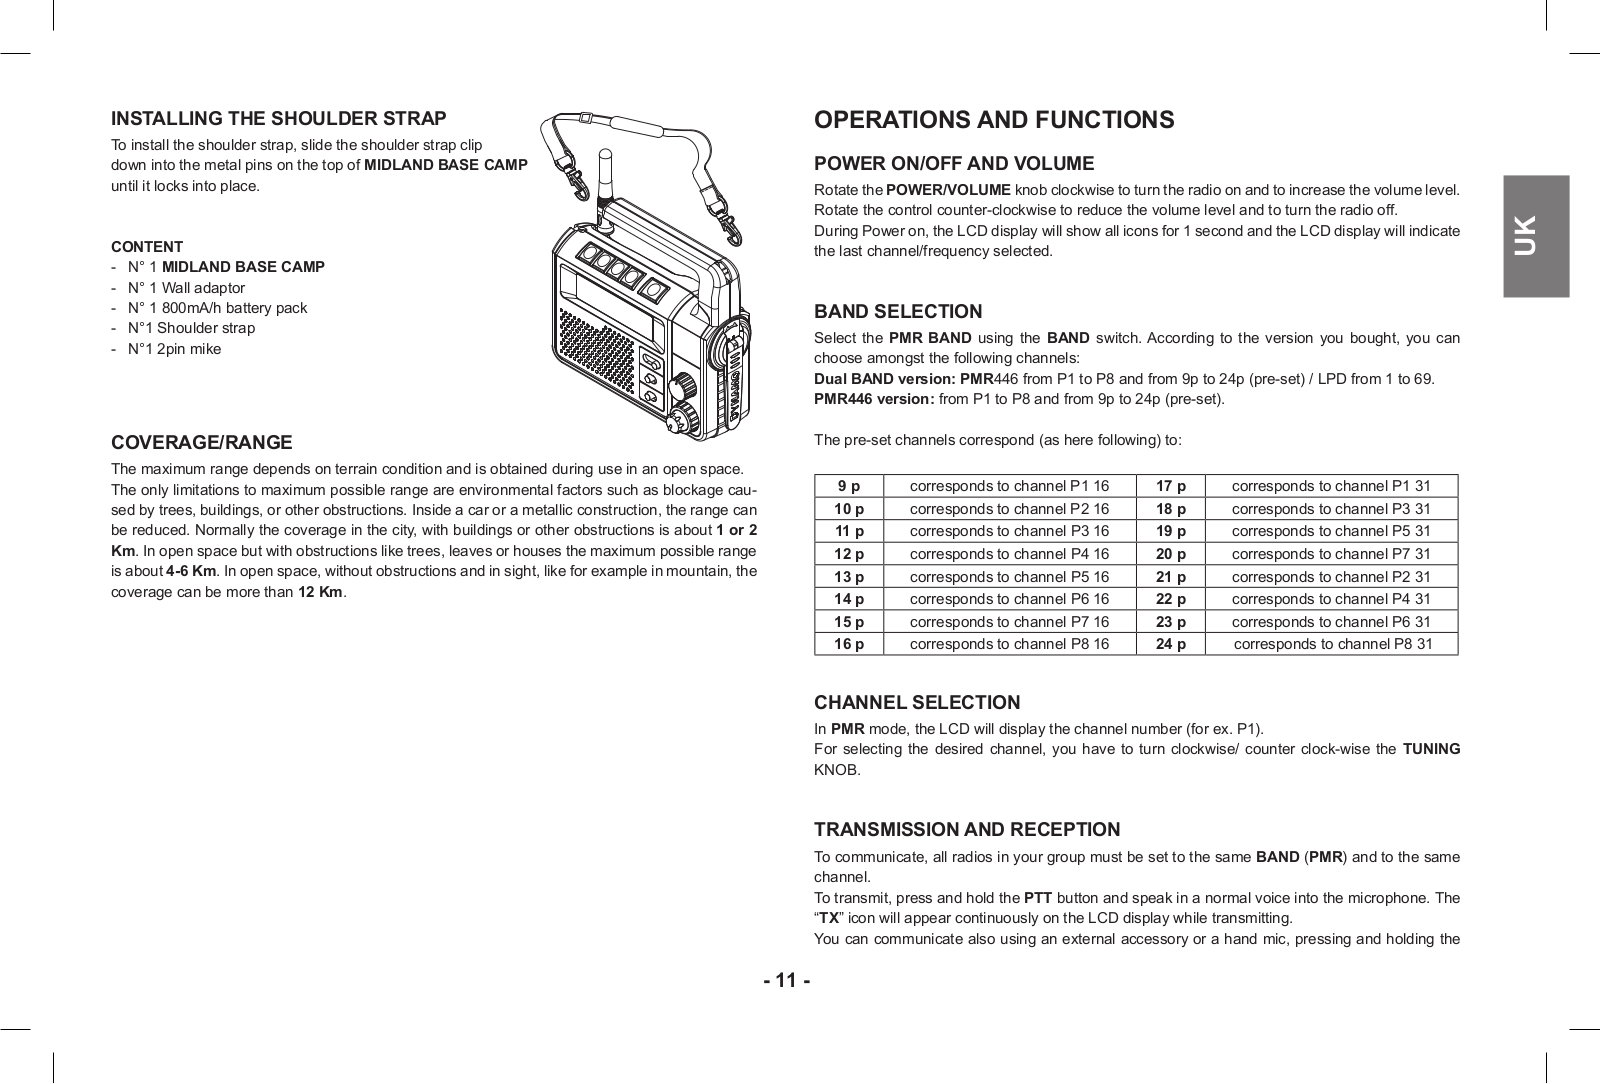
To install the shoulder strap, slide the shoulder strap clip down into the metal pins on the top of MIDLAND BASE CAMP until it locks into place.

CONTENT

-- N° 1 MIDLAND BASE CAMP

-- N° 1 Wall adaptor

-- N° 1 800mA/h battery pack -- N°1 Shoulder strap

-- N°1 2pin mike

COVERAGE/RANGE

The maximum range depends on terrain condition and is obtained during use in an open space. The only limitations to maximum possible range are environmental factors such as blockage caused by trees, buildings, or other obstructions. Inside a car or a metallic construction, the range can be reduced. Normally the coverage in the city, with buildings or other obstructions is about 1 or 2 Km. In open space but with obstructions like trees, leaves or houses the maximum possible range is about 4-6 Km. In open space, without obstructions and in sight, like for example in mountain, the coverage can be more than 12 Km.

OPERATIONS AND FUNCTIONS

POWER ON/OFF AND VOLUME

Rotate the POWER/VOLUME knob clockwise to turn the radio on and to increase the volume level. Rotate the control counter-clockwise to reduce the volume level and to turn the radio off.

During Power on, the LCD display will show all icons for 1 second and the LCD display will indicate the last channel/frequency selected.

BAND SELECTION

Select the PMR BAND using the BAND switch. According to the version you bought, you can choose amongst the following channels:

Dual BAND version: PMR446 from P1 to P8 and from 9p to 24p (pre-set) / LPD from 1 to 69. PMR446 version: from P1 to P8 and from 9p to 24p (pre-set).

The pre-set channels correspond (as here following) to:

9 p

corresponds to channel P1 16

17 p

corresponds to channel P1 31

10 p

corresponds to channel P2 16

18 p

corresponds to channel P3 31

11 p

corresponds to channel P3 16

19 p

corresponds to channel P5 31

12 p

corresponds to channel P4 16

20 p

corresponds to channel P7 31

13 p

corresponds to channel P5 16

21 p

corresponds to channel P2 31

14 p

corresponds to channel P6 16

22 p

corresponds to channel P4 31

15 p

corresponds to channel P7 16

23 p

corresponds to channel P6 31

16 p

corresponds to channel P8 16

24 p

corresponds to channel P8 31

CHANNEL SELECTION

In PMR mode, the LCD will display the channel number (for ex. P1).

For selecting the desired channel, you have to turn clockwise/ counter clock-wise the TUNING KNOB.

TRANSMISSION AND RECEPTION

To communicate, all radios in your group must be set to the same BAND (PMR) and to the same channel.

To transmit, press and hold the PTT button and speak in a normal voice into the microphone. The “TX” icon will appear continuously on the LCD display while transmitting.

You can communicate also using an external accessory or a hand mic, pressing and holding the

<![if ! IE]>

<![endif]>UK

- 11 -

PTT button on the side of the hand mic. For a maximum clarity, hold the device at a distance of about 2/3 cm.

To receive a CALL, release the PTT button. The “RX” icon will appear on the display when your radio is receiving a transmission.

MONITOR

The MONITOR function allows you to exclude temporarily the automatic squelch for receiving potential weak signals, which wouldn’t be received.

To activate the MONITOR, press the “MONITOR” button.

This function can be activated exclusively in PMR/MARINE BAND.

SCAN

MIDLAND BASE CAMP can SCAN all channels for any activity. When the radio is in receiving mode, the SCAN function will stop, and will resume scanning 5 seconds after the signal is no longer present. This function is useful to control which channels are free.

When you press the PTT button to transmit on an active channel, the scanning function will stop and remain on the active channel.

To resume scanning, quickly press the SCAN button. This function can be used only in PMR/MARINE BAND.

KEYPAD LOCK

Press for about 5 seconds the LOCK/CALL button; the KEY LOCK icon will appear on the display. In this way, the lock function is activated and the MENU and SCAN button will be disable.

This function can work only in PMR/MARINE BAND. Repeat the same procedure to unlock the keypad.

DISPLAY ILLUMINATION

In clock mode (power off) the display illumination can be activated by pressing the MENU button, or turning the TUNING KNOB.

During power on, the display illumination will activate for approx. 5 seconds. The display illumination can also be activated pressing the majority of the buttons. (Power on)

CTCSS/DCS TONES

The CTCSS/DCS tones are codes that can be added to the pre-set channel for creating new private ones. For each channel you can choose until 38 CTCSS codes and 83 DCS codes.

The addiction of these codes can be made on these following channels:

PMR446only on the main PMR channels (from P1 to P8). The pre-set channels from 9p to 24p can not be modified.

To select a privacy code for the current channel press the MENU button once, then turn the TUNING knob to select the chose code. The Privacy selected Code will appear on the display.

To confirm the selection, press the PTT button or wait for 5 seconds.

To activate the DCS codes, press the MENU button twice, then turn the TUNING knob to select the desired code. The Privacy selected Code will appear on the display.

To confirm the selection, press the PTT button or wait for 5 seconds.

To disable the CTCSS/DCS functions, select the private code and then press the MENU button, until visualize the flashing CTCSS Privacy Code on the right of the display. Select then “off”, turning the TUNING knob. (It will appear “off” on the display)

To confirm, press PTT.

Note: if you select any CTCSS Privacy Code, any pre-selected DCS Privacy Code will be deleted and vice-versa. To communicate with other radios, they must be set to the same channel and Privacy Code selections.

TRANSMIT (TX) POWER LEVEL SELECTION

MIDLAND BASE CAMP has 2 power level settings. To select the power level, the radio must be on PMR mode on P1-P8 channels. Press the MENU button until a “Pr” icon will appear on the display, then turn the TUNING knob to select the TRANSMIT POWER LEVEL High (H) or Low (L). On the display it will appear H or L according to the power selected.

To confirm, press the PTT button or wait 5 seconds.

When the battery is completely charged, the maximum power is 500 mW (ERP), while the lowest one is 10mW (ERP).

Thanks to this function, if you don’t have to cover wide distances, you can select the “low power” mode and so, increase the battery life.

!When the battery Meter drops to 1 bar , the TX Power will automatically switch from Hi (H) to Lo (L) level.

VOX

MIDLAND BASE CAMP has 4 VOX levels (off, 1, 2, 3, and 4). This function allows the user to activate the communication without pressing the PTT button. You just have to speak and the communication is on.

You can set the VOX on 3 levels, with or without accessories.

The fourth level activates the VOX with Talkback function: when one of the two devices transmit for more than 20 seconds, the VOX Talkback stops the transmission for 10 seconds; so the other user has himself the opportunity to talk.

- 12 -

To set the VOX level, press the MENU button, until the display shows “VO”. After that, turning the TUNING knob, you can choose “1”,”2”,”3” or “4”. To confirm, press the PTT button or wait for 5 seconds.

To disable the VOX function, by turning the TUNING knob, select “oF” and then push the PTT key.

CALL ALERT SELECTION

MIDLAND BASE CAMP allows to send a CALL alert signal to all the users of the same channel; on the display it appear the “TX” icon and the tone of confirmation can be heard by your own speaker. MIDLAND BASE CAMP has 5 selectable CALL alerts (oF, 1, 2, 3, 4, and 5).

To CALL, press the LOCK/CALL button.

To select, press the MENU button until a “CA” icon with the current CALL ALERT setting is displayed.

Turn the TUNING knob to make the CALL alert selections; the radio will emit a corresponding tone for each selection. To confirm, press the PTT button or wait for 5 seconds.

The pressure of the CALL/LOCK button for 5 seconds in AM/FM mode, allows the user to store a desired radio station.

ROGER BEEP (end of transmission tone)

When the PTT button is released, the radio will beep to confirm to other users that you’ve finished your transmission and that they can begin to speak.

To turn the ROGER BEEP on, press the MENU button till the display shows “rb of”; than by the TUNING knob, select “rb on”. The display will show the icon “RGB”.

To confirm, push the PTT button or wait for 5 seconds.

To disable this function, repeat the procedure selecting the “rb of” and on the display will disappear the icon “RGB”.

BEEP TONE

This function permit you to produce a beep tone every time you press a button.

If you want to enable this function, press the MENU button until the display shows “bp on”, then select by the TUNING knob “bp of”.

To confirm, press the PTT button or wait for 5 seconds. The icon will desapper.

In this way, all “beeps” and “tones” are disabled.

To re-able this function, repeat the procedure selecting the “bp on” by turning the TUNING knob and confirm by pressing the PTT button or wait for 5 seconds.

DUAL WATCH

The DUAL WATCH function enables users to MONITOR, only in reception, 2 selected channels for any activity.

To turn on the DUAL WATCH function, press the MENU button until the display shows “DW of”. Select the second channel by turning the TUNING knob. To select one of the 38 CTCSS/DCS Privacy Codes for the second channel press again the MENU button and select the privacy code turning the TUNING knob.

To confirm press the PTT button or wait for 5 seconds.

The display will show “DW” alternatively the channel in use and the second one selected. To turn off the DUAL WATCH function, you can just press the SCAN button or the MENU one.

When the radio will receive a signal on one of the two channels selected, the “DUAL WATCH” function will temporarily stop, allowing the transmission and the reception of the active signal on the channel in use.

MIDLAND BASE CAMP will stay in the active channel as long as the signal is present and will resume scanning 5 seconds after the signal is no longer present.

MARINE BAND

Select the MARINE BAND using the BAND switch, the display will show the least selected channel and the MARINE icon. MARINE BAND can not transmit, but only receive signals.

When you are in MARINE mode, the display will show the number of the channel (for ex. 1 d). To select the desired channel, turn clockwise or counter-clockwise the TUNING knob.

In MARINE BAND, you can activate also the SCAN, MONITOR and LOCK functions.

AM/FM RECEIVER MODE

BASE CAMP can receive AM/FM frequencies, by selecting through the BAND switch the desired mode. The display will show the selected AM/FM BAND and the active frequency.

Selecting the frequency on AM/FM BAND

To select the AM/FM frequency, turn clockwise and counter-clockwise the TUNING knob. Holding the knob for 2 seconds, the radio will SCAN for the frequencies until it receives a strong and clear signal; if you keep holding the knob clockwise or counter-clockwise for 5 seconds, the SCAN function is continuous, until you stop it just turning slightly the TUNING knob or pushing the PTT button.

Memorizing the frequency

BASE CAMP can store 2 selected frequencies in AM and 2 in FM BAND. To memorize the first frequency, press for 5 seconds the LOCK/CALL button while for the second one keep pressing the SCAN button.

<![if ! IE]>

<![endif]>UK

- 13 -

SETTING THE CLOCK MODE

When BASE CAMP is off, the display shows the current time setting.

To visualize the clock while the radio is on, just turn the POWER/VOL knob on off.

To change the hour setting of the clock:

-- Press the LOCK/CALL/HOUR button, and the hour digit of the clock will blink. -- Turn the TUNING knob to change the hour setting.

-- To confirm, press the PTT/SELECT button or wait for 5 seconds.

To change the minute setting of the clock:

-- Press the SCAN/MINUTE button while in CLOCK mode and the minute digit of the clock will blink.

-- Turn the TUNING knob to change the hour setting.

-- To confirm, press the PTT/SELECT button or wait for 5 seconds.

SETTING THE ALARM CLOCK

BASE CAMP can also function as an ALARM CLOCK.

To turn the ALARM CLOCK on:

Press the MONITOR/ALARM ON/OFF button while in CLOCK mode, the ALARM CLOCK icon will appear on the display.

To set the hour setting of the ALARM, press the LOCK/CALL/HOUR button while in CLOCK mode and the hour digit of the clock will blink. Turn the TUNING knob to change the hour setting. To confirm, press the PTT/SELECT button or wait for 5 seconds.

To set the minute setting of the ALARM, press the SCAN/MINUTE button while in CLOCK mode, and the minute digit of the clock will blink. Turn the TUNING knob to change the minute setting. To confirm, press the PTT/SELECT button or wait for 5 seconds.

To turn the ALARM CLOCK off:

To disable the alarm clock, press the MONITOR/ALARM ON/OFF button while in CLOCK mode. will disappear.

Instead, if you press the MENU/MONITOR/SCAN-LOCK-CALL button, the alarm clock icon will still be displayed, but the alarm will ring the day after at the same time, that is, after 24 hours from the pre-setting alarm time.

Setting the alarm clock snooze

When the ALARM CLOCK goes off, you can activate the SNOOZE function by pressing the PTT/ SNOOZE button. Every time the SNOOZE button is pressed the ALARM CLOCK will go off again after 8 minutes.

USING THE FLASHLIGHT

BASE CAMP has a built-in FLASHLIGHT.

To turn the FLASHLIGHT ON, set the LIGHT switch to “on”.

To turn the FLASHLIGHT OFF, set the LIGHT switch to “off”.

MORSE CODE

BASE CAMP can send Morse code.

When the radio is on AM/FM/MARINE BAND, pressing the MENU button more time it’s possible to send Morse signals.

USB JACK

MIDLAND BASE CAMP can be used to charge a mobile phone, iPod, mp3 player by the DYNAMO CRANK, AC or DC Adapter thru the USB jack.

Attach a USB charging cable (optional) to the USB jack of the MIDLAND BASE CAMP;

Connect the other end of the USB charging cable to the mobile phone, mp3 or iPod;

Recharge the mobile phone battery, the mp3 or the iPod by turning rapidly the DYNAMO CRANK, or by connecting the AC or DC Adapter into the Charging jack.

RECHARGING THE BATTERY PACK

MIDLAND BASE CAMP is equipped for using a 6V NiMH rechargeable battery pack which can be recharged using an AC wall adapter (included) or a DC adapter (included).

Initial charge time is 12 hours with a charge time of 8/10 hours thereafter.

For maximum battery life, we recommend charging the battery pack when the BASE CAMP is off and the low battery icon comes on.

To recharge the battery pack you need to connect the socket of the wall adaptor to a mains power socket and insert the jack of the wall adaptor into the charging jack of the BASE CAMP. Remove MIDLAND BASE CAMP from the charger only when the charge time expires.

You can also charge the rechargeable NiMH battery pack using the Dynamo crank.To charge using the Dynamo Crank rotate rapidly the Dynamo Crank handle clockwise or counter-clockwise.

WARNING

!The supplied wall charger is using “standard charging” method. This is a method, where the charging current is about 10 % of the capacity and the batteries will be charged over night or within 10-14 hours. Using this method, chargers do not automatically disconnect charging when batteries are fully charged. It does not matter if you let the charger connected from time to time longer than necessary, but you should avoid to

- 14 -

keep the radio permanently connected to the wall charger, when you do not need it.

!The charger is only designed for NiMH rechargeable batteries and cannot be used for standard Alkaline or other not chargeable batteries. Trying to charge such kind of batteries can be a risk. Such batteries may leak, explode or even burn and cause damage or personal injuries!

!Please use only the supplied wall charger type and no other charger.

!Dispose of the batteries according to the procedures set out by local regulations.

Battery level indicator

MIDLAND BASE CAMP has a BATTERY LEVEL METER that shows the battery power level. Greater is the number of bars visible, stronger will be the battery level. When the battery level is low, the Battery icon will flash in the display, indicating that your batteries should be replace or recharged if using a rechargeable battery pack.

Selecting the power source

MIDLAND BASE CAMP can use either anAlkaline battery or the rechargeable NiMH battery pack. Just set the BATTERY SOURCE switch to either “alkaline” or “rechargeable” (for NiMH battery pack) mode.

USE AND CARE

!Use a soft damp cloth to clean the radio. Do not use alcohol or cleaning solutions.

!Do not immerse the radio in water.

!Turn off the radio and remove the batteries during long term storage.

TABLE OF SOLUTIONS

Problem

Possible cause

Solution


The radio doesn’t

The battery pack is discharged and/or

Verify that the battery pack is char-


switch on

has not been installed correctly.

ged and that it has been correctly


<![if ! IE]>

<![endif]>UK

installed.


The radio switches


off shortly after it has

Discharged battery pack.

Recharge the battery pack.


been switched on


The battery pack does

The battery-charger has not been

Inspect the connections of the


battery-charger and the installation of


not recharge

connected or installed correctly.


the batteries.


The site of installation is too shielded.

Move to another area.


The radio switches on

The volume is too low

Adjust the volume.


Check that the CTCSS tone or DCS


but is


unable to receive

Incorrect CTCSS or DCS

code corresponds to the one set by


signals

the parties you are communicating


with.


Noise is always pre-

The monitoring function is enabled.

Disable the monitoring function.


sent in reception mode


An incorrect radio channel has been

Select the same radio channel used


selected.

by the parties you are communicating


with.


It is not possible to

The radio is installed in a shielded


area or is too far from the party you

Move to another area.


communicate with


are communicating with


other parties


Check that the CTCSS tone or DCS


Incorrect CTCSS or DCS

code corresponds to the one set by


the parties you are communicating


with.


The signal is very weak.

Try temporarily disabling the squelch


by means of the Monitoring feature.


The transmission distance is exces-

Move closer to the party you are


sive and/or there are obstacles in the

communicating with or to another


transmission path

area.


Reception is fragmen-


Check the traffic on the radio


ted and/or disturbed

Other parties are using the same

channel by means of the Monitoring


channel

feature and select another channel if


required.


The radio has been installed too

Increase the distance between the


close to equipment that causes inter-


ference (televisions, computers, etc.)

radio and this equipment.


Received communica-

The channel in use is too busy.

Select another channel.


tions are not clear


- 15 -


The channel is used by an excessive

Select another channel. Ask the radio


number of parties or the transmis-

link provider to disable the block due


sion has been barred due to a busy

Transmission is not

to busy channel.

always possible

channel.


Reduce transmission time. Ask the


The transmission timer has enabled

radio link provider to set the transmis-


sion timer to a higher value.

VOX causes the radio

The sensitivity and/or environmental

Reduce the VOX sensitivity.

to accidentally enable

noise are too high.

transmission


The VOX feature


If the environmental noise is not high,

requires speaking in a

The sensitivity is too low.

increase the sensitivity or use an

loud voice


optional microphone.

Logic related faults

Incorrect setting caused by a problem


(unreadable displayed

Recharge the battery pack.

with the power supply.

symbols, functions )


Commission time is too high.

Try reducing the transmission time

The autonomy of the

and/or using a low power.

battery pack is limited

For NiMH battery packs only: memo-

Eliminate the memory effect.


ry effect on the battery pack


TECHNICAL SPECIFICATIONS

Channels...........................................................................................................

1~8 PMR, 1~69 LPD

Frequency generation...............................................................................................

PLL synthesizer

Frequency range........................................................................

446.00625 - 446.09375MHz (PMR)

............................................................................................................

433.075 - 434.775MHz (LPD)

..........................................................................................................................

520 - 1620KHz (AM)

........................................................................................................................

87.5 - 108.0MHz (FM)

................................................................................................................

156.3 - 162MHz (MARINE)

Aerial ...............................................................................................

12.5 KHz (PMR); 25 KHz (LPD)

Rated power supply....................................................................................................

6+/- 10% VDC

Operating temperature............................................................................................

from -20° to +55°

Size (without antenna)............................................................................................

120x180x 55 mm

Weight (without batteries).....................................................................................................

0,563 kg

Operation cycle (% on 1 h)................................................................

TX 5%, RX 5%, stand-by 90%

Transmitter


Output power (ERP).................................................................................

10 o 500 mW (Selectable)

Type of circuit................................................................................................................................

FM

Suppression of spurious signals.................................................................

Compliant with ETSI law

Receiver


Sensitivity at 12dB Sinad........................................................................................................

0,35µV

Spurious signals rejection..........................................................................................................

70dB

Audio output power (10% THD)....................................................................................................

2W

Medium frequencies.................................................................................

1°:21,4 MHz ; 2°:455 KHz

Connection for external microphone and recharge.............................................

2,5 mm jack stereo

Connector for external speaker............................................................................

3.5 mm jack mono

Specifications are subject to change without notice.


CTE International herewith declares that the product complies with the essential requirements of EC Directive 99/05/EC; the declaration of conformity of the device can be consulted onto www.midlandradio.eu

- 16 -

MIDLAND BASE CAMP PMR446

Multifunktionales PMR446-Funkgerät

MIDLAND BASE CAMP ist ein PMR446-Funkgerät mit integriertem UKW-Marineband-Emp- fänger und AM/FM-Radio. Das MIDLAND BASE CAMP wurde als Mehrzweckgerät entwickelt, das Radio und Funkgerät kombiniert und die Kommunikation mit anderen, auf den gleichen Kanal eingestellten Geräten ermöglicht.

Das MIDLAND BASE CAMP ist die ideale Lösung für den täglichen Gebrauch für alle Aktivitäten im Freien, für die Freizeit und - auch dies - für Notfallund Gefahrensituationen. BASE CAMP ist mit einer eingebauten Taschenlampe und einer integrierten SOS-Morsefunktion ausgestattet, mit der das Funkgerät kodierte Nachrichten aussenden kann; mit der Dynamokurbel können Sie das Funkgerät außerdem aufladen, wenn einmal der Strom ausfällt oder keine Stromquelle in der Nähe ist. Über die USB-Buchse können Sie auch andere Geräte (Mobiltelefon, iPod, MP3-Player) aufladen - mit der Dynamokurbel oder einem Wechselstromoder Gleichstromadapter.

Dank der kleinen Abmessungen des Gerätes können Sie auch unterwegs Funkgespräche führen.

MIDLAND BASE CAMP ist außerdem mit einem praktischen und bedienerfreundlichen Handmikrofon ausgestattet.

Die wichtigsten Produktmerkmale:

PMR446 Funkgerät

UKW-Marineband-Empfänger

Wecker/AM/FM-Radio inklusive

SOS-Morsefunktion

Handmikrofon

Taschenlampe

Batterielademöglichkeit mit Dynamokurbel

UBS-Buchse zum Wiederaufladen

1 wiederaufladbarer 6V Ni-MH-Akku im Lieferumfang enthalten

Gerät kann auch mit Alkaline-Batterien betrieben werden

2-polige Buchse für Zubehörgeräte

BESCHREIBUNG

DISPLAY

Ihr MIDLAND BASE CAMP informiert Sie über das LCD-Display ständig über den aktuellen Betriebsstatus. Im Folgenden werden die Symbole mit ihren entsprechenden Parametern für den Betriebsstatus des Gerätes erläutert:

3

2

1

7

10 9

11

13 14


4


15


12

5


68 18 17 16

1.(TX) TRANSMIT - erscheint, während Sie ein Signal senden (die PTT-Taste ist gedrückt)

2.(RX) RECEIVE - bedeutet, dass das Funkgerät ein Signal empfängt.

3.(DW) - DUAL WATCH zeigt an, dass die 2-Kanal-Überwachung (Dual-Watch-Funktion) eingeschaltet ist.

4.(H)High (L) LowTRANSMIT POWER LEVEL - zeigt die gewählte Sendeleistung (hoch & niedrig) an - nur im PMR-Frequenzband.

5.AM/PM - zeigt an, ob die Uhr auf AM oder PM steht.

6.CHANNEL NUMBER - zeigt den gewählten Kanal an (P1-P8 PMR, 1-69 LPD und 1-88 MARINE). DieseAnzeige kann auch verwendet werden, um die Frequenz und die Uhreneinstellung des AM/FM-Empfängers anzuzeigen.

7.AM/FM - zeigt an, ob sich das Gerät im AM- oder FM-Empfangsmodus befindet.

8.PRIVACY CODE - zeigt den vom Benutzer gewählten CTCSS/DCS-Subcode an. Diese Anzeige kann auch verwendet werden, um die Frequenz und die Uhreneinstellung des AM/FM- Empfängers anzuzeigen.

9.VOX - zeigt an, ob der VOX-Modus (Sprachsteuerung) aktiviert ist.

10.EMG - gewählter Notfallkanal im Marineband.

11.LOCK -zeigtan,dassdieTastensperreeingeschaltetist(vonderTastensperreausgenommensindder Frequenzbandschalter,derBatteriewahlschalter,derLicht-Ein/Aus-SchalterunddieMONITOR-Taste).

12.SCAN - zeigt an, dass sich das Gerät im Scan-Modus (Suchlauf) befindet.

13. - zeigt an, dass der Tasten-Piepton des Funkgerätes eingeschaltet ist.

14. - zeigt den Akkuladezustand an.

15.(RGB)- ROGER BEEP - zeigt an, dass der Roger-Piepton eingeschaltet ist.

16. - zeigt an, dass der Wecker aktiviert ist.

17. - zeigt an, dass Sie sich im Marine-Modus befinden.

18.CTCSS/DCS - zeigt den gewählten CTCSS/DCS-Code an.

<![if ! IE]>

<![endif]>D

- 17 -

BESCHREIBUNG DER BEDIENELEMENTE

1


4

3

2

10

11


LOCK/CALL

SCAN

MONITOR

MENU

PTT/SELECT


HOUR

MINUTE ALARM ON/OFF MORSE

SNOOZE


5


BASE

12


CAMP


6


TUNING


BAND


AM FM PMR MARINE


14

7


Battery source


TONE

VOL

17


Alkaline

Rechargeable


LIGHT


8


OFF

ON


18


OFF


9


19

16 15 13


1.ANTENNE

2.MONITOR-ALARM ON/OFF-Taste - wenn Sie diese Taste drücken, während MIDLAND BASE CAMP eingeschaltet und auf das PMR-Frequenzband oder das Marineband eingestellt ist, aktivieren Sie die Monitorfunktion. Wird dieTaste bei ausgeschaltetem Funkgerät gedrückt, können Sie den Wecker aktivieren oder deaktivieren.

3.SCAN/MINUTE-Taste - wenn Sie diese Taste drücken, während MIDLAND BASE CAMP auf das Marineband oder das PMR-Frequenzband eingestellt ist, aktivieren Sie den Scan- Modus. Wenn AM/FM eingestellt ist, wählen Sie mit der SCAN/MINUTE-Taste die gespeicherte Frequenz. Wenn Sie diese Taste bei ausgeschaltetem Gerät drücken, können Sie die Minuteneinstellung der Uhr ändern.

4.LOCK/CALL/HOUR-Taste - wenn Sie diese Taste ca. 5 Sekunden lang drücken, während sich das Funkgerät im Marine- oder PMR-Modus befindet, aktivieren Sie die Tastensperre.

Wenn Sie sich dagegen im PMR-Frequenzband befinden und das Rufzeichen (CA) eingeschaltet ist, senden Sie durch Betätigen dieser Taste ein Rufsignal auf dem aktuell verwendeten Kanal. Wenn AM/FM eingestellt ist, wählen Sie mit der SCAN/MINUTE-Taste die gespeicherte Frequenz. Wenn Sie diese Taste bei ausgeschaltetem Funkgerät drücken, können Sie die Stundeneinstellung der Uhr ändern.

5.FLASHLIGHT - BASE CAMP hat eine eingebaute Taschenlampe.

6.USB-BUCHSE - zumAufladen von Mobiltelefon, MP3-Player und iPod mit Hilfe der Dynamokurbel.

7.BUCHSE FÜR EXTERNEN LAUTSPRECHER / EXTERNES MIKROFON- Anschlussmöglichkeit für externe Geräte wie Kopfhörer, Mikrofone u.ä...

8.BUCHSE FÜR EXTERNES LADEGERÄT- ermöglicht das Aufladen von BASE CAMP mit Hilfe eines externen Ladegerätes.

9.LAUTSPRECHER - Hier ist der Lautsprecher eingebaut.

10.MENÜ/MORSE-Taste - wenn Sie diese Taste drücken, während das Funkgerät auf das PMR- Frequenzband eingestellt ist, gelangen Sie zum Menü-Modus. Wenn Sie sich im AM/FM/ MARINE-Frequenzband befinden, können Sie durch mehrmaliges Betätigen dieser Taste Morse-Codes senden.

11.PTT/SELECT/SNOOZE-Taste - wenn das Funkgerät auf das PMR-Frequenzband eingestellt ist, drücken Sie diese Taste zum Senden. Zum Empfangen lassen Sie die Taste los. Wenn sich das MIDLAND BASE CAMP im Uhrenmodus befindet oder auf irgendein anderes Frequenzband synchronisiert ist, schieben Sie durch Betätigen dieser Taste das Auslösen des Weckers auf. (Snooze-Funktion)

12.GRIFF DER DYNAMOKURBEL - wenn Sie im oder gegen den Uhrzeigersinn an diesem Griff drehen, laden Sie den Ni-MH-Akku; außerdem können Sie über die USB-Buchse auch Ihr Mobiltelefon, Ihren MP3-Player oder iPod aufladen.

13.WELLENBEREICHSSCHALTER - zum Umschalten zwischen den Modi AM/FM/PMR/MARINE.

14.ABSTIMMKNOPF (TUNING)- durch Drehen im oder gegen den Uhrzeigersinn können Sie folgende Einstellungen vornehmen:

Uhr

Funkempfangsfrequenzen

Menüeinstellungen und Kanalwahl (PMR-Frequenzband)

Kanalwahl (Marineband)

15.BATTERIEWAHLSCHALTER - zum Umschalten zwischenAlkaline-Batterien und wiederaufladbaren Ni-MH-Akkus.

16.LICHT-EIN/AUS-SCHALTER - zum Einund Ausschalten der Taschenlampe.

17.KLANGFARBENREGLER - durch Drehen im oder gegen den Uhrzeigersinn stellen Sie eine hellere oder dunklere Klangfarbe ein (im AM/FM-Frequenzband).

18.POWER-EIN/AUS- & LAUTSTÄRKE-DREHKNOPF - wenn Sie diesen Knopf im Uhrzeigersinn drehen, schalten Sie das Gerät ein und erhöhen die Lautstärke. Wenn Sie ihn gegen den Uhrzeigersinn drehen, verringern Sie die Lautstärke und schalten das Gerät aus.

19.MIKROFON - Hier ist das Mikrofon eingebaut.

- 18 -

BEFESTIGEN DES SCHULTERRIEMENS

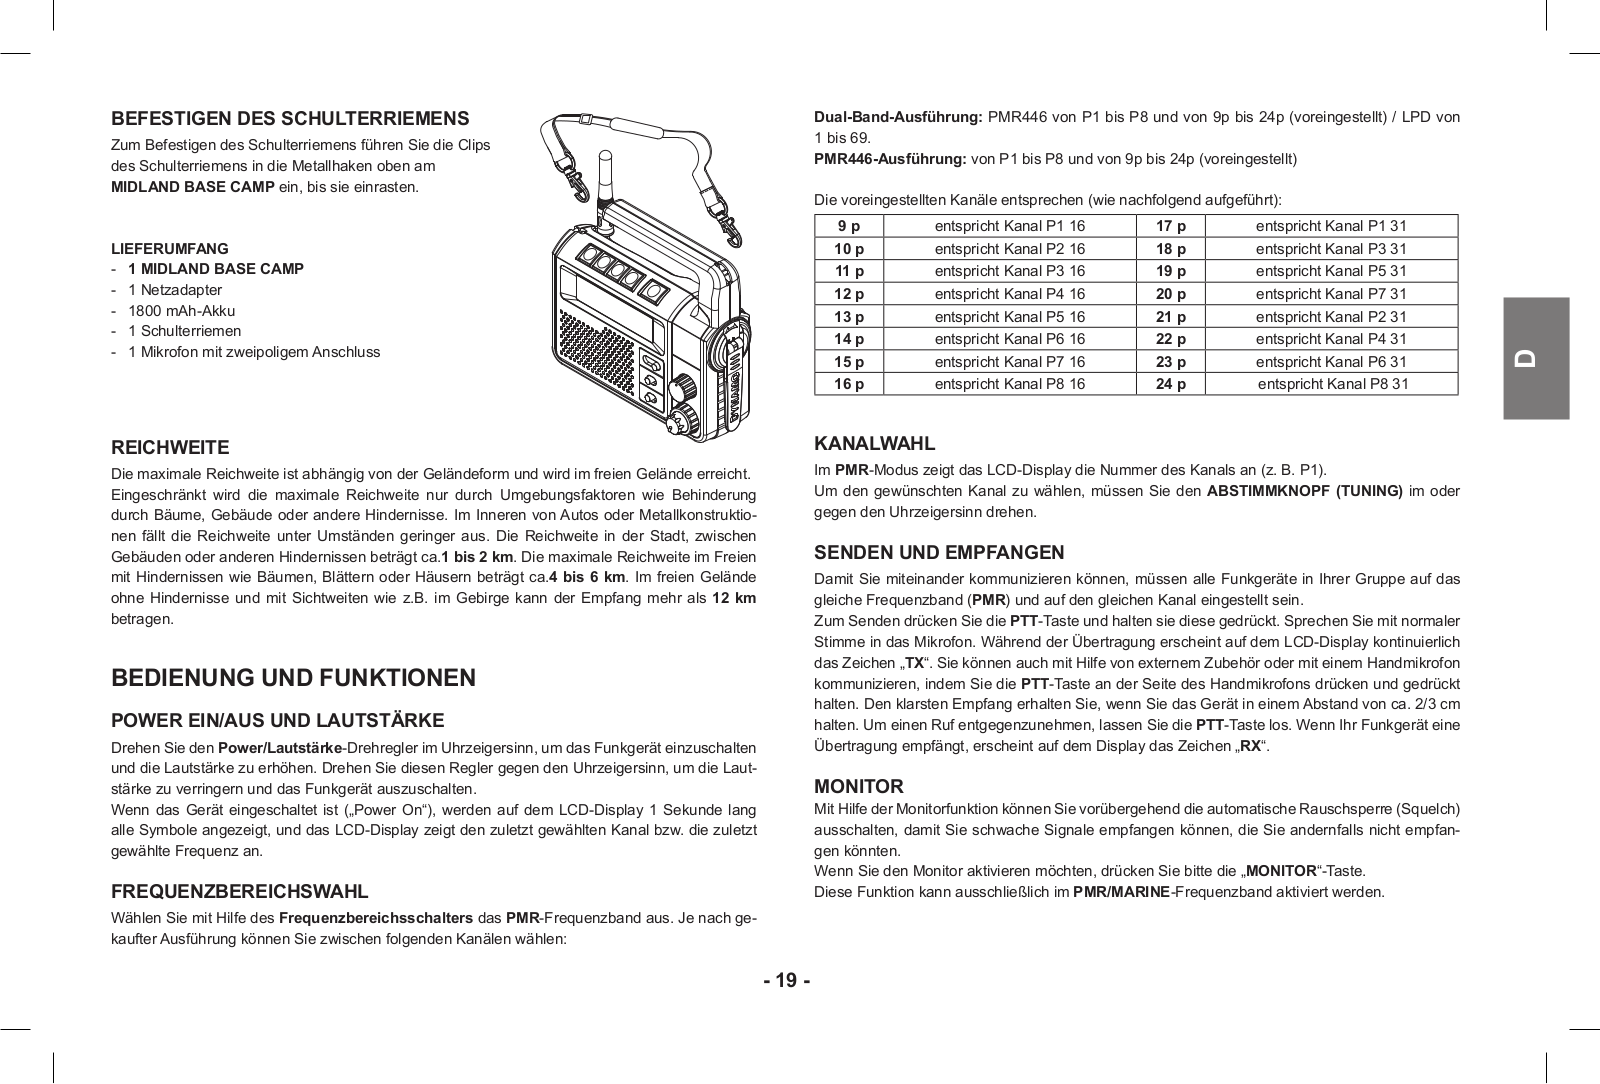
Zum Befestigen des Schulterriemens führen Sie die Clips des Schulterriemens in die Metallhaken oben am MIDLAND BASE CAMP ein, bis sie einrasten.

LIEFERUMFANG

-- 1 MIDLAND BASE CAMP

-- 1 Netzadapter -- 1800 mAh-Akku -- 1 Schulterriemen

-- 1 Mikrofon mit zweipoligem Anschluss

REICHWEITE

Die maximale Reichweite ist abhängig von der Geländeform und wird im freien Gelände erreicht. Eingeschränkt wird die maximale Reichweite nur durch Umgebungsfaktoren wie Behinderung durch Bäume, Gebäude oder andere Hindernisse. Im Inneren von Autos oder Metallkonstruktionen fällt die Reichweite unter Umständen geringer aus. Die Reichweite in der Stadt, zwischen Gebäuden oder anderen Hindernissen beträgt ca.1 bis 2 km. Die maximale Reichweite im Freien mit Hindernissen wie Bäumen, Blättern oder Häusern beträgt ca.4 bis 6 km. Im freien Gelände ohne Hindernisse und mit Sichtweiten wie z.B. im Gebirge kann der Empfang mehr als 12 km betragen.

BEDIENUNG UND FUNKTIONEN

POWER EIN/AUS UND LAUTSTÄRKE

Drehen Sie den Power/Lautstärke-Drehregler im Uhrzeigersinn, um das Funkgerät einzuschalten und die Lautstärke zu erhöhen. Drehen Sie diesen Regler gegen den Uhrzeigersinn, um die Lautstärke zu verringern und das Funkgerät auszuschalten.

Wenn das Gerät eingeschaltet ist („Power On“), werden auf dem LCD-Display 1 Sekunde lang alle Symbole angezeigt, und das LCD-Display zeigt den zuletzt gewählten Kanal bzw. die zuletzt gewählte Frequenz an.

FREQUENZBEREICHSWAHL

Wählen Sie mit Hilfe des Frequenzbereichsschalters das PMR-Frequenzband aus. Je nach gekaufter Ausführung können Sie zwischen folgenden Kanälen wählen:

Dual-Band-Ausführung: PMR446 von P1 bis P8 und von 9p bis 24p (voreingestellt) / LPD von 1 bis 69.

PMR446-Ausführung: von P1 bis P8 und von 9p bis 24p (voreingestellt)

Die voreingestellten Kanäle entsprechen (wie nachfolgend aufgeführt):

9 p

entspricht Kanal P1 16

17 p

entspricht Kanal P1 31


10 p

entspricht Kanal P2 16

18 p

entspricht Kanal P3 31


11 p

entspricht Kanal P3 16

19 p

entspricht Kanal P5 31


12 p

entspricht Kanal P4 16

20 p

entspricht Kanal P7 31


13 p

entspricht Kanal P5 16

21 p

entspricht Kanal P2 31


14 p

entspricht Kanal P6 16

22 p

entspricht Kanal P4 31


<![if ! IE]>

<![endif]>D

15 p

entspricht Kanal P7 16

23 p

entspricht Kanal P6 31


16 p

entspricht Kanal P8 16

24 p

entspricht Kanal P8 31


KANALWAHL

Im PMR-Modus zeigt das LCD-Display die Nummer des Kanals an (z. B. P1).

Um den gewünschten Kanal zu wählen, müssen Sie den ABSTIMMKNOPF (TUNING) im oder gegen den Uhrzeigersinn drehen.

SENDEN UND EMPFANGEN

Damit Sie miteinander kommunizieren können, müssen alle Funkgeräte in Ihrer Gruppe auf das gleiche Frequenzband (PMR) und auf den gleichen Kanal eingestellt sein.

Zum Senden drücken Sie die PTT-Taste und halten sie diese gedrückt. Sprechen Sie mit normaler Stimme in das Mikrofon. Während der Übertragung erscheint auf dem LCD-Display kontinuierlich das Zeichen „TX“. Sie können auch mit Hilfe von externem Zubehör oder mit einem Handmikrofon kommunizieren, indem Sie die PTT-Taste an der Seite des Handmikrofons drücken und gedrückt halten. Den klarsten Empfang erhalten Sie, wenn Sie das Gerät in einem Abstand von ca. 2/3 cm halten. Um einen Ruf entgegenzunehmen, lassen Sie die PTT-Taste los. Wenn Ihr Funkgerät eine Übertragung empfängt, erscheint auf dem Display das Zeichen „RX“.

MONITOR

Mit Hilfe der Monitorfunktion können Sie vorübergehend die automatische Rauschsperre (Squelch) ausschalten, damit Sie schwache Signale empfangen können, die Sie andernfalls nicht empfangen könnten.

Wenn Sie den Monitor aktivieren möchten, drücken Sie bitte die „MONITOR“-Taste. Diese Funktion kann ausschließlich im PMR/MARINE-Frequenzband aktiviert werden.

- 19 -

Suchlauf (SCAN)

MIDLAND BASE CAMP kann alle Kanäle auf Aktivität absuchen. Befindet sich das Funkgerät im Empfangsmodus, stoppt die Suchlauffunktion und nimmt, nachdem das Signal nicht mehr vorhanden ist, nach 5 Sekunden die Suche wieder auf. Diese Funktion ist hilfreich, wenn Sie feststellen möchten, welche Kanäle frei sind. Wenn Sie die PTT-Taste drücken, um auf einem aktiven Kanal zu senden, hält die Suchlauffunktion an und bleibt auf dem aktiven Kanal.

Um den Suchlauf fortzusetzen, drücken Sie rasch die SCAN-Taste.

Diese Funktion kann nur im PMR/MARINE-Frequenzband verwendet werden.

TASTENSPERRE

Drücken Sie die LOCK/CALL-Taste ca. 5 Sekunden lang; auf dem Display erscheint daraufhin das Tastensperrensymbol KEY LOCK. Damit ist die Sperrfunktion aktiviert. Die Tasten MENU und SCAN sind deaktiviert.

Diese Funktion steht nur im PMR/MARINE-Frequenzband zur Verfügung. Wiederholen Sie den gleichen Vorgang, um die Tastensperre aufzuheben.

DISPLAYBELEUCHTUNG

Im Uhrenmodus (Power Off) kann die Displaybeleuchtung durch Betätigen der MENU-Taste oder durch Drehen des ABSTIMMKNOPFES (TUNING) aktiviert werden.

Bei eingeschaltetem Gerät bleibt die Displaybeleuchtung ca. 5 Sekunden aktiv. Die Displaybeleuchtung kann auch durch Betätigen der meisten anderen Tasten aktiviert werden. (Power On)

CTCSS/DCS-TÖNE

Die CTCSS/DCS-Töne sind Codes, die dem voreingestellten Kanal hinzugefügt werden können, um das Mithören fremder Gespräche zu verhindern. Für jeden Kanal können Sie bis zu 38 CTCSS- Codes und 83 DCS-Codes wählen. Eingerichtet werden können diese Codes auf den folgenden Kanälen:

PMR446 - nur auf den PMR446 Hauptkanälen (von P1 bis P8). Die voreingestellten Kanäle 9p bis 24p können nicht verändert werden. Wenn Sie einen Subcode für den aktuellen Kanal wählen möchten, drücken Sie einmal die MENU-Taste und drehen Sie dann den ABSTIMMKNOPF (TUNING), um den betreffenden Code auszuwählen. Der ausgewählte Subcode erscheint auf dem Display. Zur Bestätigung drücken Sie die PTT-Taste oder warten 5 Sekunden.

Zum Aktivieren der DCS-Codes drücken Sie zweimal die MENU-Taste und drehen dann den ABSTIMMKNOPF (TUNING), um den gewünschten Code auszuwählen. Der ausgewählte Subcode erscheint auf dem Display. Zur Bestätigung drücken Sie die PTT-Taste oder warten 5 Sekunden. Um die Funktionen CTCSS/DCS zu deaktivieren, wählen Sie den Subcode aus und drücken dann die MENÜ-Taste, bis rechts auf dem Display der blinkende CTCSS-Subcode angezeigt wird. Wählen Sie dann „Off“, indem Sie den ABSTIMMKNOPF (TUNING) drehen. (Auf dem Display erscheint daraufhin die Information „Off“)

Drücken Sie zum Bestätigen die PTT-Taste.

Hinweis: Wenn Sie einen CTCSS-Subcodes wählen, werden alle zuvor gewählten DCS-Subco- des gelöscht. Dies gilt auch umgekehrt. Um mit anderen Funkgeräten kommunizieren zu können, müssen der gleiche Kanal eingestellt und die gleichen Subcodes ausgewählt sein.

WAHL DES SENDELEISTUNGSPEGELS (TRANSMIT POWER LEVEL)

MIDLAND BASE CAMP verfügt über 2 Sendeleistungseinstellungen. Damit Sie den Leistungspegel wählen können, muss sich das Funkgerät im PMR-Modus auf den Kanälen P1-P8 befinden. Drücken Sie die MENÜ-Taste, bis auf dem Display das Zeichen „Pr“ erscheint. Drehen Sie dann den ABSTIMMKNOPF (TUNING), um den Sendeleistungspegel TRANSMIT POWER LEVEL High (H) oder Low (L) zu wählen. Je nachdem, welchen Leistungspegel Sie gewählt haben, erscheint auf dem Display H oder L.

Zum Bestätigen drücken Sie die PTT-Taste oder warten 5 Sekunden.

Bei vollständig geladener Batterie betragen der hohe Leistungspegel 500 mW (ERP) und der niedrige Leistungspegel 10 mW (ERP).

Dank dieser Funktionen können Sie, wenn Sie keine großen Entfernungen überbrücken müssen, durch Wahl des niedrigen Leistungspegels die Batterielebensdauer verlängern.

!Sinkt die Batteriestatusanzeige auf 1 -Balken, wird die Sendeleistung automatisch von Hi (H) auf Lo (L) umgeschaltet.

SPRACHSTEUERUNG (VOX)

MIDLAND BASE CAMP verfügt über 4 VOX-Pegel (Off, 1, 2, 3 und 4). Mit dieser Funktion können Sie die Kommunikation aktivieren, ohne die PTT-Taste zu drücken. Sobald Sie sprechen, läuft die Kommunikation. Sie können die VOX-Funktion auf 3 Pegel einstellen - mit oder ohne Zubehör.

Der vierte Pegel aktiviert die Sprachsteuerung mit Talk-Back-Funktion: Wenn eines der beiden Geräte länger als 20 Sekunden sendet, hält die Vox-Talk-Back-Funktion die Übertragung für 10 Sekunden an, damit der andere Gesprächsteilnehmer seinerseits sprechen kann.

Um den Vox-Pegel auszuwählen, drücken Sie die MENÜ-Taste, bis auf dem Display „VO“ erscheint. Drehen Sie dann den ABSTIMMKNOPF (TUNING). Sie können „1“,“2“,“3“ oder „4“ wählen. Zum Bestätigen drücken Sie die PTT-Taste oder warten 5 Sekunden.

Wenn Sie die Vox-Funktion deaktivieren möchten, wählen Sie durch Drehen des ABSTIMMKNOPFES (TUNING)“OFF““ und drücken anschließend diePTT-Taste.

RUFTONWAHL

MIDLAND BASE CAMP bietet die Möglichkeit, allen Nutzern des gleichen Kanals ein Ruftonsignal zu senden; auf dem Display erscheint das Zeichen „TX“, und der Bestätigungston ist über den eigenen Lautsprecher zu hören. MIDLAND BASE CAMP bietet Ihnen 5 Ruftöne zur Auswahl (Off und 1 - 5).

Zum Rufen drücken Sie die LOCK/CALL-Taste.

Zum Auswählen drücken Sie die MENÜ-Taste, bis ein „CA“-Zeichen mit der aktuellen Ruftoneinstellung angezeigt wird.

- 20 -

Wählen Sie durch Drehen des ABSTIMMKNOPFES (TUNING) den gewünschten Rufton; das Funkgerät gibt daraufhin für jedeAuswahl einen entsprechenden Ton ab. Zum Bestätigen drücken Sie die PTT-Taste oder warten 5 Sekunden.

Wenn Sie die CALL/LOCK-Taste 5 Sekunden lang im AM/FM-Modus drücken, können Sie einen Radiosender Ihrer Wahl einspeichern.

ROGER Piepton (Ton für Übertragungsende)

Wenn die PTT-Taste losgelassen wird sendet das Funkgerät dem Gesprächspartner ein Bestäti- gungs-Piepton, der anzeigt, dass die Übertragung beendet ist.

Beime BASE CAMP ist diese Funktion werksseitig deaktiviert. Diese Funktion aktivieren:

Drücken Sie die MENÜ-Taste, bis auf dem Display “rb of” erscheint;

wählen Sie mit den Abstimmknopt (TUNING) “rb on” und “RGB” wird angezeigt;

zum Bestätigen derAktivierung des Roger Pieptons drücken Sie PTT oder warten Sie 5 Sekunden.

Um diese Funktion auszuschalten verfahren Sie nach der oben beschriebenen Weise und wählen Sie “rb of”.

TASTATUR-PIEPTON

Bei jedem Tastendruck ertönt ein Piepton.

Deaktivieren des Pieptons:

Drücken Sie die MENÜ-Taste, bis auf dem Display “bp on” erscheint.

Wählen Sie mit den Abstimmknopt (TUNING) “bp of

Zur Bestätigung drücken Sie PTT oder warten 5 Sekunden.

Dadurch werden alle Pieptöne deaktiviert.

Zum aktivieren der Pieptöne wiederholen diesen Vorgang und wählen „bP on

Dual Watch (2-Kanalüberwachung)

Dank der DUAL WATCH-Funktion können die Benutzer - dies jedoch nur im Empfangsmodus - zwei Kanäle ihrer Wahl überwachen, um festzustellen, ob auf diesen Kanälen Aktivitäten vorhanden sind.

Wenn Sie den zweiten Kanal wählen möchten, drücken Sie einmal die MENÜ-Taste und drehen Sie anschließend am ABSTIMMKNOPF (TUNING). Um einen der 38 CTCSS/DCS-Subcodes zu wählen, drücken Sie erneut die MENÜ-Taste und wählen Sie anschliessend durch Drehen des

ABSTIMMKNOPFES (TUNING) den Subcode.

Zum Bestätigen drücken Sie die PTT-Taste oder warten Sie 5 Sekunden.

Das Display zeigt „DW“, abwechselnd den aktuell benutzten Kanal und den zweiten ausgewählten Kanal an.

Zum Abschalten der DUAL WATCH-Funktion drücken Sie entweder die SCAN-Taste oder die MENÜ-Taste.

Sobald das Funkgerät auf einem der beiden ausgewählten Kanäle ein Signal empfängt, setzt die „Dual Watch“-Funktion vorübergehend aus, damit auf dem aktuell verwendeten Kanal das aktive Signal gesendet und empfangen werden kann.

MIDLAND BASE CAMP bleibt so lange auf dem aktiven Kanal, wie das Signal vorhanden ist, und nimmt 5 Sekunden nach dem Ende des Signals die Überwachung wieder auf.

MARINEBAND

Das Marineband wählen Sie mit dem Frequenzbereichsschalter. Das Display zeigt den zuletzt gewählten Kanal und das Marine-Symbol . Im Marineband kann das Gerät nicht senden, sondern nur Signale empfangen.

Wenn Sie sich im MARINE-Modus befinden, wird auf dem Display die Nummer des Kanals angezeigt (zum Beispiel 1 d).

Um den gewünschten Kanal auszuwählen, drehen Sie den ABSTIMMKNOPF (TUNING) im oder gegen den Uhrzeigersinn.

Im Marineband können Sie auch die Funktionen SCAN (Suchlauf), MONITOR und LOCK aktivieren.

AM/FM-EMPFÄNGER-MODUS

BASE CAMP kann AM/FM-Frequenzen (MWund UKW-Frequenzen) empfangen. Hierzu muss der Frequenzbereichssschalter auf den gewünschten Modus eingestellt werden. Auf dem Display werden der gewählte AM/FM-Frequenzbereich und die aktive Frequenz angezeigt.

Frequenzwahl im AM/FM-Frequenzband

Um die AM/FM-Frequenz zu wählen, drehen Sie den ABSTIMMKNOPF (TUNING) im oder gegen den Uhrzeigersinn. Wenn Sie den Knopf 2 Sekunden lang halten, sucht das Gerät nach den Frequenzen, bis es ein starkes und klares Signal empfängt. Wenn Sie den Knopf weiterhin 5 Sekunden lang im oder gegen den Uhrzeigersinn halten, läuft die Suchlauffunktion kontinuierlich weiter, bis Sie sie durch leichtes Drehen des ABSTIMMKNOPFES (TUNING) oder durch Betätigen der PTT-Taste beenden.

Frequenz speichern

BASE CAMP kann im AM-Frequenzbereich (MW) und im FM-Frequenzbereich (UKW) jeweils zwei Frequenzen speichern. Um die erste Frequenz zu speichern, drücken Sie 5 Sekunden lang die LOCK/CALL-Taste. Zum Speichern der zweiten Frequenz halten Sie die SCAN-Taste weiterhin gedrückt.

EINSTELLEN DES UHRENMODUS

Wenn BASE CAMP ausgeschaltet ist, wird auf dem Display die aktuelle Zeiteinstellung angezeigt. Wenn Sie bei eingeschaltetem Funkgerät die Uhr anzeigen möchten, drehen Sie einfach den PO- WER/VOL-Drehknopf auf „Off“.

<![if ! IE]>

<![endif]>D

- 21 -

Zum Ändern der Stundeneinstellung:

-- Drücken Sie die LOCK/CALL/HOUR-Taste. Die Stundenziffern der Uhr beginnen zu blinken. -- Ändern Sie die Stundeneinstellung, indem Sie den ABSTIMMKNOPF (TUNING) drehen.

-- Zum Bestätigen drücken Sie die PTT/SELECT-Taste oder warten Sie 5 Sekunden.

Zum Ändern der Minuteneinstellung:

-- Drücken Sie, während Sie sich im Uhrenmodus (CLOCK) befinden, die SCAN/MINUTE-Taste. Die Minutenziffern der Uhr beginnen zu blinken.

-- Ändern Sie die Stundeneinstellung, indem Sie den ABSTIMMKNOPF (TUNING) drehen. -- Zum Bestätigen drücken Sie die PTT/SELECT-Taste oder warten Sie 5 Sekunden.

WECKER STELLEN

Base Camp kann auch als WECKER verwendet werden.

Zum Einschalten der WECKFUNKTION:

Drücken Sie, während Sie sich im Uhrenmodus befinden, die Taste MONITOR/ALARM ON/OFF. Auf dem Display erscheint das WECKER-Symbol .

Um die Stundeneinstellung des WECKERS vorzunehmen, drücken Sie, während Sie sich im Uhrenmodus befinden, die LOCK/CALL/HOUR-Taste. Die Stundenziffern der Uhr beginnen zu blinken. Ändern Sie die Stundeneinstellung, indem Sie den ABSTIMMKNOPF (TUNING) drehen. Zum Bestätigen drücken Sie die PTT/SELECT-Taste oder warten Sie 5 Sekunden.

Um die Minuteneinstellung des Weckers vorzunehmen, drücken Sie, während Sie sich im Uhrenmodus befinden, die SCAN/MINUTE-Taste. Die Minutenziffern der Uhr beginnen zu blinken. Ändern Sie die Stundeneinstellung, indem Sie den ABSTIMMKNOPF (TUNING) drehen.

Zum Bestätigen drücken Sie die PTT/SELECT-Taste oder warten Sie 5 Sekunden.

Zum Ausschalten der WECKFUNKTION:

Wenn Sie den Wecker deaktivieren möchten, drücken Sie, während Sie sich im Uhrenmodus befinden, die MONITOR/ALARM ON/OFF-Taste. Das Symbol verschwindet.

Wenn Sie stattdessen die Taste MENU/MONITOR/SCAN-LOCK-CALL drücken, wird das Weckersymbol weiterhin angezeigt, aber der Wecker klingelt dann am Folgetag zur gleichen Uhrzeit, als 24 Stunden nach der eingestellten Weckzeit.

Schlummerfunktion (Snooze-Funktion) des Weckers einstellen

Wenn der WECKER auslöst, können Sie durch Drücken der PTT/SNOOZE-Taste die SNOOZEFunktion (Schlummerfunktion) aktivieren. Mit jedem Drücken der SNOOZE-Taste sorgen Sie dafür, dass der WECKER nach 8 Minuten erneut auslöst.

VERWENDUNG DER TASCHENLAMPE

BASE CAMP ist mit einer eingebauten TASCHENLAMPE ausgestattet.

Wenn Sie die TASCHENLAMPE AUSSCHALTEN möchten, stellen Sie den LICHT EIN/AUS- Schalter auf „On“.

Wenn Sie die TASCHENLAMPE AUSSCHALTEN möchten, stellen Sie den LICHT EIN/AUS- Schalter auf „Off“.

MORSE-CODE

BASE CAMP kann Morse-Codes senden.

Wenn sich das Funkgerät im Frequenzbereich AM/FM/MARINE befindet, können durch mehrmaliges Drücken der MENÜ-Taste Morsezeichen gesendet werden.

USB-BUCHSE

Mit MIDLAND BASE CAMP können Sie mit Hilfe der DYNAMOKURBEL bzw. des Wechseloder Gleichstromadapters oder über die USB-Buchse Ihr Mobiltelefon, Ihre iPod oder Ihren MP3-Player aufladen.

Schließen Sie ein (optional erhältliches) USB-Ladekabel an die USB-Buchse des MIDLAND BASE CAMP an;

Schließen Sie das andere Ende des USB-Ladekabels an das Mobiltelefon, den MP3-Player oder den iPod an;

Laden Sie das Akku des Mobiltelefons, des MP3-Players oder der iPods auf, indem Sie die

DYNAMOKURBEL schnell drehen oder indem Sie den Wechselstrom- oder Gleichstrom -Adapter in die Ladebuchse stecken.

AUFLADEN DES AKKUS

MIDLAND BASE CAMP kann mit einem wiederaufladbaren 6V Ni-MH-Akku betrieben werden, den Sie mit einem (im Lieferumfang enthaltenen) Wechselstrom-Netzadapter oder einem (ebenfalls im Lieferumfang enthaltenen) Gleichstrom-Netzadapter wieder aufladen können.

Die Erstladezeit beträgt 12 Stunden. Alle weiteren Ladevorgänge dauern jeweils 8/10 Stunden. Im Interesse einer möglichst langen Akkulebensdauer empfehlen wir, den Akku aufzuladen, wenn das BASE CAMP ausgeschaltet ist und das Symbol für einen niedrigen Akkuladezustand angezeigt wird.

Zum Wiederaufladen des Akkus müssen Sie den Netzstecker des Adapters in eine Netzsteckdose und den Klinkenstecker desAdapters in die Ladebuchse des BASE CAMP stecken.

Trennen Sie das MIDLAND BASE CAMP erst dann vom Ladegerät, wenn die Ladezeit vollständig abgelaufen ist. Sie können den wiederaufladbaren Ni-MH-Akku auch mit Hilfe der Dynamokurbel aufladen. Drehen Sie hierfür den Griff der Dynamokurbel schnell im oder gegen den Uhrzeigersinn.

!Das mitgelieferte Steckerladegerät ist für die „Standard-Lademethode“ gedacht. Dabei fließt ein für verschiedene NiMH Akkus geeigneter Ladestrom von etwa 10 % der Kapazität, und ein Akku ist damit über Nacht oder innerhalb 10...14 Stunden vollgeladen. Ladegeräte nach dieser Methode schalten danach nicht automatisch ab, es ist aber unbedenklich, wenn das Ladegerät nach dem Aufladen gelegentlich länger als notwendig angeschlossen bleibt. Sie sollten allerdings vermeiden, ein Ladegerät permanent angeschlossen zu lassen, besonders wenn das Gerät länger nicht benutzt wird. Das könnte den Akku dann doch überladen.

!Das Ladegerät ist ausschließlich für NiMH Akkus verwendbar und darf keineswegs dazu

- 22 -

Loading...
+ 49 hidden pages