

ARCTIC
’ USER MANUAL
VHF MARINE TRANSCEIVER
|

INDEX
INTRODUCTION 1
WHAT’S IN THE BOX 2
MAIN FEATURES 2
WARNINGS 3
PROGRAMMING SOFTWARE OPTIONAL 3
DESCRIPTION OF THE PARTS 4
RADIO 4
LCD DISPLAY 6
BATTERY RECHARGE 7
FUNCTIONS 8
POWER ON/OFF AND VOLUME ADJUSTMENT 8
SELECTION OF THE OPERATIONAL CHANNEL 8
TRANSMISSION AND RECEPTION 8
PF3 MULTIFUNCTION BUTTON 9
POW SETTING THE TRANSMISSION POWER 9
LED BACKLIGHT 9
INSTANT SELECTION OF CHANNEL 16 10
POWER SAVE 10
SQUELCH 10
PRIORITY CHANNEL 11
KEYPAD BEEP ON/OFF 11
TO CHANGE THE BAND “BAND” 11
ADVANCED FUNCTIONS 12
SCANNING ALL CHANNELS BY MEANS OF THE OPTIONAL
PROGRAMMING SOFTWARE 12
VOX 12
KEYPAD LOCK KEYBO 13
DUAL WATCH 13
ACTIVE BAND 14
PRIVATE CHANNELS: PROGRAMMING AND SELECTION 14
TROUBLESHOOTING 16
SOLUTION TABLE 16
TECHNICAL SPECIFICATIONS 18
INTERNATIONAL CHANNEL INT 20
Arctic user manual Arctic user manual

INTRODUCTION
The new handheld marine transceiver ARCTIC is able to satisfy communication
requirements for all types of navigation whether professional or hobbyist.
ARCTIC is a robust equipment with professional design, electronically advanced
that enables clear and reliable communications on the VHF nautical band for all
international channels assigned by ITU.
It oers security for all navigation requirements also thanks to a dedicated button
that gives instant access to the emergency channel N.16.
ARCTIC boasts 57 channels and guarantees best performances in all situations,
also thanks to the keypad lock that prevents accidental pushing of buttons while
handling the device. Besides the LCD backlit display lets you use the transceiver in
darkness or poor visibility.
Arctic user manual | 1Arctic user manual

WHAT’S IN THE BOX
• 1 ARCTIC transceiver
• 1600mAh Li-Ion battery pack
• Belt clip
• Desktop charger
• Wall adaptor
MAIN FEATURES:
• Backlit LCD display - constantly displays radio’s parameters and settings.
The backlight enables you to view the screen even in poor light conditions.
• Automatic squelch - while in standby, this function automatically elimina-
tes bothersome background noise and reduces the battery drain.
• Channel 16 Recall button - for instant access to channel 16 (the most used
marine channel and mainly used for emergency situations).
• High/low power selection - reduces transmission power in short-distance
communication, allowing the radio to save energy.
• Keypad lock - locks the transceiver keypad to avoid the accidental activa-
tion of buttons or settings.
• Low battery icon - alerts you when the batteries are low.
• Sockets (Motorola type) for speaker and microphone - these sockets ena-
ble the use of optional external accessories (headphones, microphone/speakers, etc), for a more comfortable use, particularly in noisy environments.
• Channel scanning - automatically searches for signals on the marine band
channels.
Note: The manufacturer, with its eort to constantly improve product quality, reserves the right to change characteristics and features without prior notice.
WARNINGS
! Do not transmit with the damaged antenna or without the antenna con-
nected - although the radio is protected, this may seriously damage its R.F.
power stages. Do not use your transceiver if the antenna is damaged.
! Do not keep the antenna too close to your head and body during transmis-
sion.
! Do not hold the transceiver by the antenna! This is a delicate part of the
device and is vital for the proper functioning of the radio.
! Pay attention to environmental conditions - although the radio was desi-
gned to operate under the most severe conditions it is important to avoid
exposure to environments that are excessively humid or dusty, or to temperatures outside the -15° to +55°C° range. Also avoid exposure to direct
sunlight.
! Avoid strong mechanical shocks and excessive vibrations, the radio is de-
signed to bear mechanical shocks and vibrations, provided that they’re the
normal ones borne by any electrical equipment.
! Do not use the radio and its accessories in potentially explosive envi-
ronments. A single spark may cause an explosion.
! Do not open the radio for any reason! The radio’s precision mechanics and
electronics require experience and specialized equipment; for the same reason, the radio should under no circumstances be realigned as it has already
been calibrated for maximum performance. Unauthorized opening of the
transceiver will void the warranty.
! Do not use detergents, alcohol, solvents, or abrasives to clean the
equipment. Just use a soft, clean cloth. If the radio is very dirty, slightly
dampen the cloth with a mixture of water and a neutral soap.
! Your VHF marine handheld transceiver has a built-in VHF radio transmit-
ter. Be aware that, when you press the PTT button, the radio emits radio
frequency (R.F.) energy.
PROGRAMMING SOFTWARE OPTIONAL
Thanks to Midland Programming software PRG-G15, it is possible to increase
the performance of your radio or to reduce its functionality by enabling or
disabling some features (Power Save, VOX, SQUELCH, VOICE, SCAN).
For further information, please consult the Programming software manual.
Any attempt to change frequencies or output power of the radio invalidates
the approval.
2 | Arctic user manual Arctic user manual | 3
DW
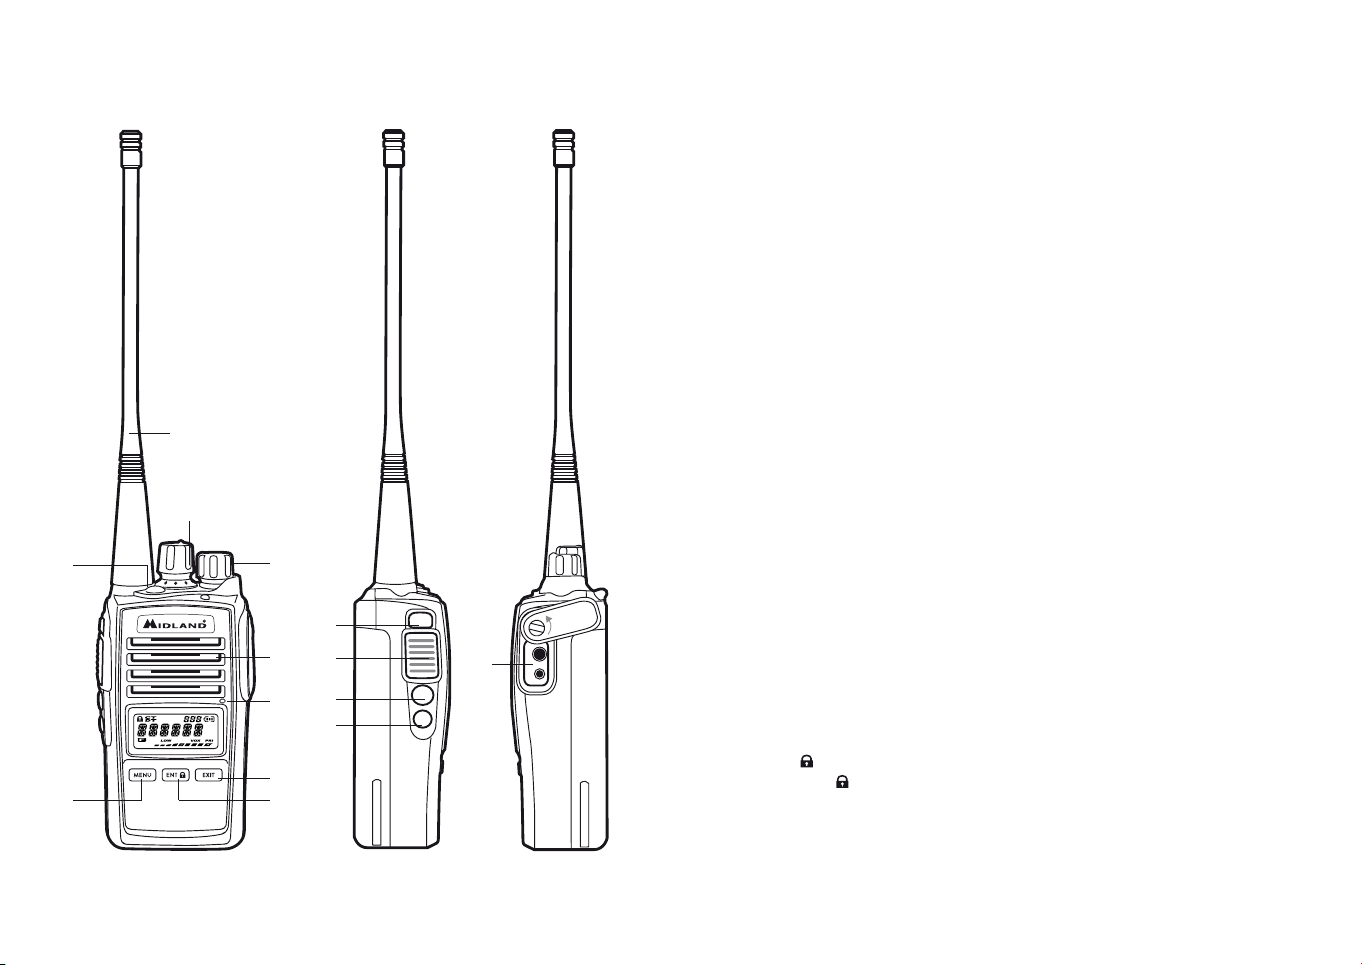
DESCRIPTION OF THE PARTS
RADIO
6
10
3
ARCTIC
1
12
5
2
9
4
11
14
138
VOLUME knob- Rotate it to switch on/o the transceiver and to adjust the
volume in rx.
1. PTT (push to talk) – Press this button to switch to transmission.
2. Button 16 – Press it for instant access to channel 16.
3. Built-in microphone – Here is where sound is picked up by the micro-
phone.
4. Built-in speaker – Here is where the speaker is housed.
5. ANTENNA – Receives and transmits radio signals.
6. MIC socket (under protective cover) – To connect to external audio de-
vices (headphones, microphones, etc.) and to the optional programming
cable.
7. MENU – Press this button to display the device’s menu.
8. PF3 (Multi-function key) – If you briefly press this button you activate
the MON function that temporarily cuts o the squelch to receive very
weak signals. A long pressure of this button activates the Triple Watch
function. With the optional programming software you can match further
functions to this button.
9. Encoder/channel knob – To select the channel number and to change
7
the setting in the menu.
10. PF4 (Multifunction) – Press PF4 for 5 seconds and the Dual Watch
function will be activated. It is possible to match other functions to this
button by the optional programming software.
11. FUN key – Push it to activate the Function mode; then if you press ENT
the keypad lock is activated.
12. ENT
– This button must be pressed to confirm your selections within
the menu of the radio.
13. EXIT – Push this control to exit the menu of the radio without any con-
firmation.
4 | Arctic user manual Arctic user manual | 5
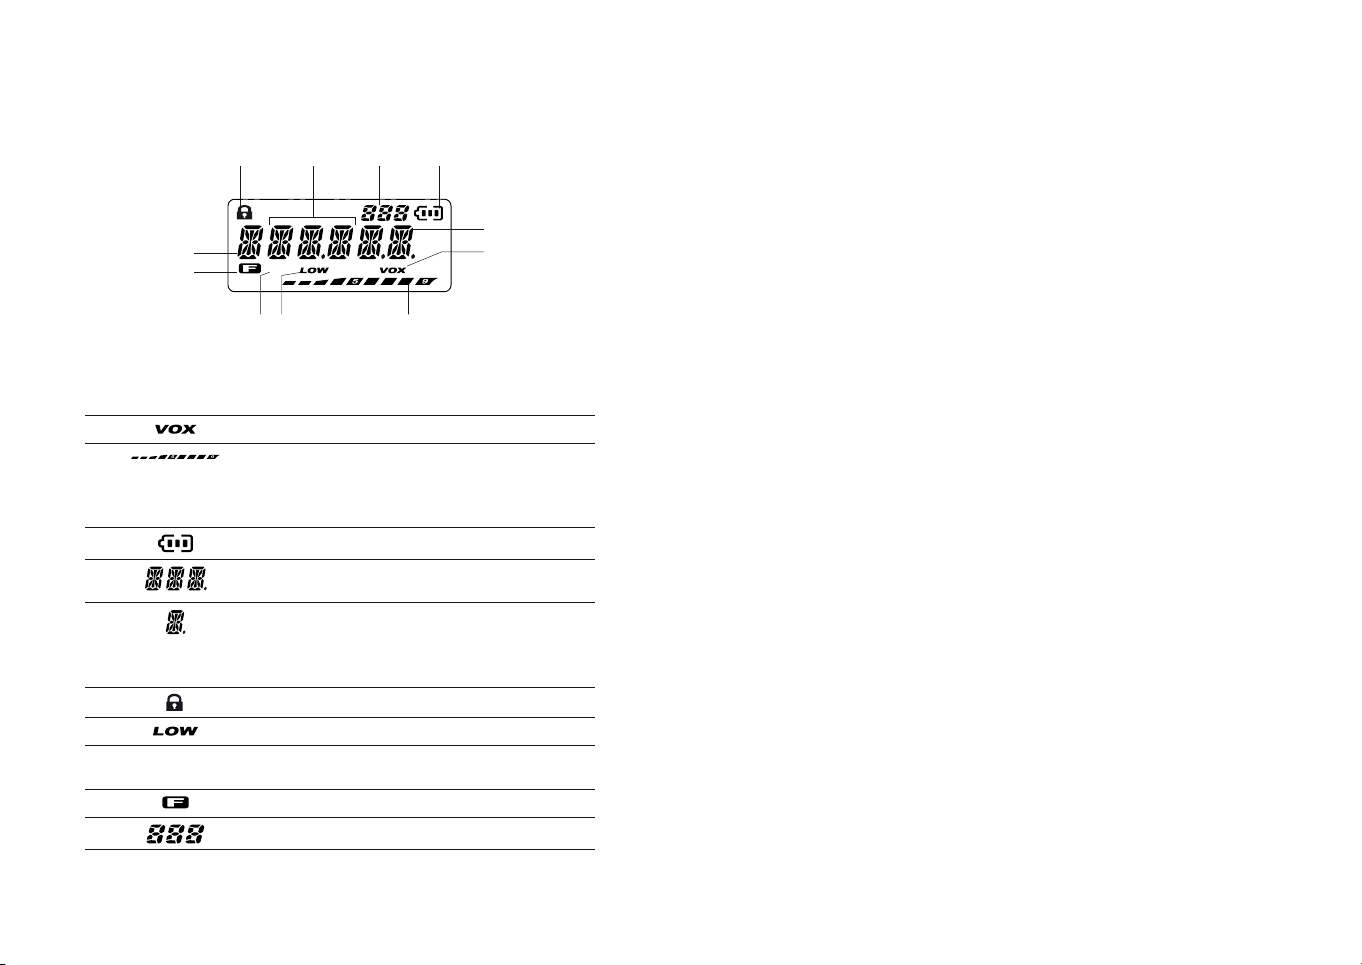
LCD DISPLAY
DW
DW
DW
DW
11
9
2
7
12
DW
A.
B.
C.
D.
E.
F.
G.
I.
L
M.
F
E
L
D M C
DW
BGI
Activation of the VOX function.
This symbol appears during transmission (when you press
the PTT button) or reception. When the radio is in rx
mode, the led will light up green, while in tx mode it will
be red (high power) or orange (low power).
warns you about the battery status.
These three large digits show the selected marine channel.
Indicates the operative band USA / INTERNATIONAL /
CANADA. It can be activated through the optional programmimg software PRG-G15 , but it is suitable only for
extra EU countries.
Appears when the keypad lock is activated.
LO (Low) / Hi (High) - shows the selected power level.
DW – Appears when you activate the Dual Watch function (steady icon) or Triple Watch (blinking).
FUN (Function) activated.
They give indications about the menu of the radio.
BATTERY RECHARGE
ARCTIC is equipped for using a 7,4V Li-ion rechargeable battery pack, which
can be recharged by connecting the socket of the AC/DC wall adaptor to a
mains power socket and inserting the jack of the wall adaptor into the desktop
charger plug.
It takes 4 hours to fully recharge the radio.
E
A
The led of the desktop charger indicates the status of the recharge:
Red = charging,
Green = full charge
For maximum battery life, we recommend you to charge the battery pack
when ARCTIC is o and the battery pack is fully discharged.
! Using a dierent battery charger other than the one specified can cause da-
mage to your device or may even cause explosions and personal injuries.
The Battery power saving feature enables a reduction in consumption and saves the
battery life. If it has been set, it automatically activates when the transceiver does
not receive any signal for more than 5 seconds. Power saving can be disabled only
through the Programming software.
6 | Arctic user manual Arctic user manual | 7

FUNCTIONS
DW
POWER ON/OFF AND VOLUME ADJUSTMENT
Rotate the Power/Volume knob clockwise to turn the radio on.
Rotate the control clockwise /counter-clockwise to adjust the volume level as
you prefer.
To turn the radio o, rotate the control counter-clockwise till you hear a mechanical “click”.
SELECTION OF THE OPERATIONAL CHANNEL
Rotate the Encoder/channel knob to scroll up or down the channel list till you
select the desired channel.
Refer to the table of frequencies. Moreover, the reception frequency could be
dierent (duplex channels) from the transmission frequency or it could be the
same (simplex channels). Normally communications among vessels can only
take place on simplex channels.
TRANSMISSION AND RECEPTION
The PTT button is located on the left side of the device. To transmit:
1. Make sure that the selected channel is not enabled to reception only,
(otherwise the transmission will be disabled) and that no one else is currently talking;
2. Keep the PTT firmly pressed:
and the status led will blink red or orange, according to the power level
that you selected;
3. Before you start talking wait for a fraction of a second then speak normally, in the direction of the microphone.
4. When you have finished release the PTT button;
5. When the button is in reception mode (PTT not pressed) you will automatically receive any communication;
2 During transmission and reception try to keep the antenna in vertical position
and to avoid obstacles towards the direction of the other party.
will appear on the display
PF3 MULTIFUNCTION BUTTON
The PF3 button is for excluding (opening) the squelch in order to listen to
signals that are too weak to keep the squelch permanently opened.
By excluding the squelch you will avoid listening the communication “chopped”.
To activate the Monitor function, briefly press the PF3 button for 2 seconds to
listen to all signals on the selected channel.
To disable this function press PF3 again.
This key has also another function: if you keep it pressed for 5 seconds you will
activate the Triple Watch function (DW blinking) that allows the simultaneous
monitoring of 3 channels: channel 16, the priority channel and the channel
where you activated the Triple Watch. If you want to change this channel you
have to rotate the Encoder/channel knob.
POW SETTING THE TRANSMISSION POWER
ARCTIC has 2 power levels.
To select the desired level:
1. Press the MENU button;
2. Rotate the Encoder knob till the display shows “POW”;
3. Press ENT
4. Rotate the Encoder knob and select the desired power level;
5. Press ENT
show “LOW”
Note: the high power cannot be selected on some channels.
;
to confirm. If you selected the low power, the display will
LED BACKLIGHT
To enable/disable the LCD backlight:
1. Press the MENU button;
2. Turn the Encoder knob until “LED” is displayed;
3. Push ENT
4. Turn the Encoder knob to activate/deactivate the Backlight.
There are 3 available options: “ON”, “OFF” and “AUTO”.
AUTO: the display backlight activates when you press any key and lasts
a few seconds.
OFF: back light o.
ON: backlight always on. Attention: in this mode the power save is o,
therefore the battery consumption will increase.
5. Confirm your selection with ENT
to enter the function;
.
8 | Arctic user manual Arctic user manual | 9

INSTANT SELECTION OF CHANNEL 16
Channel 16 is the marine channel most frequently used for emergency. Your
transceiver is equipped with a button that provides instant access to this channel. To recall rapidly channel 16 press the CH 16 button. No matter what mode
the device is operating, channel 16 will be immediately selected. To go back to
the previously selected channel press again the CH 16 button.
POWER SAVE
The battery power saving feature enables a reduction in the consumption; power saving comes on automatically when the transceiver does not receive any
signal for more than seven seconds.
This parameter can be changed by means of the optional programming software.
SQUELCH
The Squelch function suppresses noises on free channels and allows to receive
even weak signals.
ARCTIC has 10 (0-9) dierent Squelch levels:
0 means that the Squelch is turned o; from level 1 to level 9 you will have
dierent levels of noise reduction. The higher is the level, the louder will be
the Squelch.
By default, the Squelch level is set on level 5 but it can be changed by the
programming software or Menu.
To select the Squelch level:
1. Press the MENU button;
1. Turn the Encoder knob until “SQL” is displayed;
1. Press the ENT
1. Turn the Encoder knob and select the desired Squelch level (the levels
available are 10);
1. Confirm your selection with ENT
button;
.
PRIORITY CHANNEL
When the priority channel is set, it will be monitored in the Triple Watch function.
Press the MENU button, select “PRI”, press ENT
coder knob to select the desired channel.
Press again ENT
Now the priority channel is set.
to confirm your selection.
and then rotate the En-
KEYPAD BEEP ON/OFF
Every time a button is pressed, you will hear a Beep tone. The keypad beep
tone is activated by default.
To disable the beeps, follow this procedure:
1. Press the MENU button;
2. Turn the Encoder knob until “BEEP” is displayed;
3. Push ENT
4. Turn the Encoder knob to activate/deactivate the Beep tones: “ON” (to
activate it), or “OFF” (to deactivate it);
5. Confirm your selection with ENT
to enter the function;
.
TO CHANGE THE BAND “BAND”
This function can be activated and used only in the extra EU version.
By means of the optional programming software the operative band can be
changed from the International band (default) to USA or Canada.
• Press MENU and rotate the Encoder knob to select “BAND”.
• Press ENT
rative band.
; rotate the Encoder/channel knob to select the desired ope-
Make sure you do not set an excessively high squelch level because in this case
you may not be able to receive weaker signals. On the other hand an excessively low Squelch value could enable the Squelch even when no signals are
present.
Squelch must always be adjusted when no signals are present.
10 | Arctic user manual Arctic user manual | 11

ADVANCED FUNCTIONS
SCANNING ALL CHANNELS BY MEANS OF THE OPTIONAL
PROGRAMMING SOFTWARE
ARCTIC can automatically search for signals throughout the marine band by
scanning, i.e. selecting the channels in rapid sequence. When a signal is detected, the scanning pauses on that channel and remains blocked for 5 seconds before automatically starting again the scanning to give you the chance to
find other communication.
Once you are tuned in the communication you were looking for, press PTT to
talk on the selected channel.
If you press PTT during scanning you can transmit on the channel from which
the scanning started. The Encoder/Channel knob allows you to change the
direction of scanning (from lower channels to higher ones or viceversa) and
therefore to skip communications which are of no interest.
To activate this function please refer to the user manual of the programming
software.
VOX
The VOX feature enables hands free conversations without using PTT: just
speak in the direction of the microphone and the communication will be automatically activated.
The VOX sensitivity can be adjusted in 10 dierent levels (0,1,2,3…9) through
the Menu or programming software :
OFF means that the VOX is turned o, level 1 is set by default and has the
lowest VOX sensitivity, 9 is the highest one.
To activate the VOX levels, follow these steps:
1. Press the MENU button;
2. Turn the Encoder knob until the display shows “VOX”;
3. Press the ENT
4. Turn again the Encoder knob and select the desired VOX level: 1= low
sensitivity; 9= highest sensitivity.
5. Confirm your selection with the ENT
key;
key.
KEYPAD LOCK KEYBO
It is possible to choose between two types of Lock Mode:
1. Press the MENU button;
2. Turn the Encoder knob until “KEYBO” is displayed;
3. Push ENT
4. Turn the Encoder knob and choose between “MANUAL” or ”AUTO”.
5. Confirm your selection with ENT
As previously mentioned, there are two ways to lock the keypad:
“MANUAL”: to lock the keypad, simply press FUN and ENT
displayed.
“AUTO”: the keypad will be automatically locked after 20 seconds. To unlock
the radio, press FUN and ENT
to enter the function;
keys.
.
keys.
will be
DUAL WATCH
This function allows the monitoring of 2 channels of your choice by selecting
the channels in rapid sequence.
Procedure:
1. Select the channel you want to monitor.
2. Keep pressed PF4 key for almost 5 seconds.
3. Select another channel to monitor.
4. Now the Dual Watch is enabled: the display shows only the two monito-
red channels and the steady “DW” icon. If you transmit when the Dual
Watch is activated, the communication remains blocked on that channel
for about 5 seconds to let you listening to the other party. Then, it will
begin scanning the two channels again.
5. To disable the Dual Watch keep pressed PF4 for about 5 seconds.
12 | Arctic user manual Arctic user manual | 13

ACTIVE BAND
The channel selection can be changed according to the rules of USA, Canada
or International regulations.
INT (international) – used in Italy and in most countries of the world
USA – used in the United States
CAN – used in Canada
These bands let your transceiver properly operate according to the area where
you are.
! USA and CAN bands: for extra EU area only.
! It is your own responsibility to choose the correct band (by means of the optio-
nal programming software PRG-G15), otherwise you may cause interferences
with other services or you may not be able to communicate.
PRIVATE CHANNELS: PROGRAMMING AND SELECTION
Only authorized customers are allowed to use private channels. For detailed
information contact your local radio communication authorities.
To program the private channels, it is necessary to connect the optional programming kit PRG-G15 or ask for information to your dealer.
14 | Arctic user manual Arctic user manual | 15

TROUBLESHOOTING
Your ARCTIC is designed to provide you with years of optimal performance. If for some reasons problems arise, refer to this chapter before contacting a service centre in your area.
SOLUTION TABLE
Problem Possible cause Solution
The radio does not turn on The batteries are not charged Charge the batteries are charged
The radio turns on but does not receive signals The volume is too low Adjust the volume level
You cannot establish contact with your party Incorrect selection of marine channel Check the channel and you can also change it!
Reception is broken and/or noisy Signal is extremely weak Keep pressed PF3 key or decrease the squelch level
Your party is too far and or transceiver antenna is shielded
by obstacles in the direction of your party
Other users are using the same radio channel Check the radio trac on the selected channel and change
ARCTIC is positioned too close to other electronic devices
(televisions, computer, transmitters etc.)
Wrong selection of the squelch level Adjust the squelch to a lower level
Battery life is short Excessive use of the display backlight Use less display backlight
Excessive use of the transmission Try to reduce transmission times and/or use low tx power
Low Power save Change the power save setting by the optional programming
Move closer to your party and/or move the transceiver to a
less shielded area
channels if necessary
Move ARCTIC away from these devices
software
16 | Arctic user manual Arctic user manual | 17

TECHNICAL SPECIFICATIONS
Channels ..........................................................................................57 International
Frequency generation ....................................................................PLL synthesizer
Frequency range (International band) ....................TX 156,025 - 157,425 MHz
.................................................................................. RX 156,300 - 162,000 MHz
Antenna impedance .................................................................................. 50 Ohm
Power supply................................................................................7.4 VDC +/- 10%
Operating temperature ...........................................................from -15° to +55°C
Dimensions ...................................................................... 115x55x37 mm (HxLxD)
Weight (with battery) ..................................................................................... 230 g
Duty cycle ..............................................................TX 5%, RX 5%, Stand-by 90%
TRANSMITTER
Output power ....................................................................1 or 5 Watt (Selectable)
Modulation type ...................................................................................................FM
Residual noise attenuation ..............................................................................40dB
Audio distortion .....................................................................................................3%
Adjacent channel power ................................................................................ <70dB
RECEIVER
Sensitivity @ 20dB Sinad ...........................................................................≤ 0,3μV
Squelch sensitivity. ......................................................................................... 12dBV
Adjacent channel rejection ............................................................................. 70dB
Audio output power ............................................................ 300mW @ 10% THD
Spurious rejection .........................................................................................- 40dB
Residual noise attenuation ..............................................................................40dB
Socket (Motorola type) for ext. mic/programming ..............2,5 mm stereo jack
Socket (Motorola type) for external speaker ..........................3,5mm mono jack
Specifications are subject to change without notice.
WARNING
Direct plug-in ac/dc power supply must be used for disconnecting the transceiver
from the mains; the desktop charger must be positioned close to the unit and easily
accessible.
18 | Arctic user manual Arctic user manual | 19

INTERNATIONAL CHANNEL INT
Channel ID Ship Station
Tx Frequency Rx Frequency
01 156,050 MHz 160,650 MHz
02 156,100 MHz 160,700 MHz
03 156,150 MHz 160,750 MHz
04 156,200 MHz 160,800 MHz
05 156,250 MHz 160,850 MHz
06 156,300 MHz 156,300 MHz
07 156,350 MHz 160,950 MHz
08 156,400 MHz 156,400 MHz
09 156,450 MHz 156,450 MHz
10 156,500 MHz 156,500 MHz
11 156,550 MHz 156,550 MHz
12 156,600 MHz 156,600 MHz
13 156,650 MHz 156,650 MHz
14 156,700 MHz 156,700 MHz
15 156,750 MHz 156,750 MHz
16 156,800 MHz 156,800 MHz
17 156,850 MHz 156,850 MHz
18 156,900 MHz 161,500 MHz
19 156,950 MHz 161,550 MHz
20 157,000 MHz 161,600 MHz
21 157,050 MHz 161,650 MHz
22 157,100 MHz 161,700 MHz
23 157,150 MHz 161,750 MHz
24 157,200 MHz 161,800 MHz
25 157,250 MHz 161,850 MHz
26 157,300 MHz 161,900 MHz
27 157,350 MHz 161,950 MHz
28 157,400 MHz 162,000 MHz
60 156,025 MHz 160,625 MHz
61 156,075 MHz 160,675 MHz
62 156,125 MHz 160,725 MHz
63 156,175 MHz 160,775 MHz
64 156,225 MHz 160,825 MHz
65 156,275 MHz 160,875 MHz
66 156,325 MHz 160,925 MHz
67 156,375 MHz 156,375 MHz
68 156,425 MHz 156,425 MHz
69 156,475 MHz 156,475 MHz
70 156,525 MHz
71 156,575 MHz 156,575 MHz
72 156,625 MHz 156,625 MHz
73 156,675 MHz 156,675 MHz
74 156,725 MHz 156,725 MHz
75 156,775 MHz 156,775 MHz
76 156,825 MHz 156,825 MHz
77 156,875 MHz 156,875 MHz
78 156,925 MHz 161,525 MHz
79 156,975 MHz 161,575 MHz
80 157,025 MHz 161,625 MHz
81 157,075 MHz 161,675 MHz
82 157,125 MHz 161,725 MHz
83 157,175 MHz 161,775 MHz
84 157,225 MHz 161,825 MHz
85 157,275 MHz 161,875 MHz
86 157,325 MHz 161,925 MHz
87 157,375 MHz 157,375 MHz
88 157,425 MHz 157,425 MHz
Arctic user manual20 | Arctic user manual

RTTE
I/RSM Cte International Srl dichiara che il prodotto è conforme ai
UK/CY/M Hereby Cte International Srl declares that this product is in
A/D/CH/FL Hiermit erklärt Cte International Srl, dass das Produkt die
E CTE International SRL. declara, bajo su responsabilidad, que
F/LUX/CH Par la présente Cte International Srl déclare que le
P A CTE INTERNATIONAL declara que este aparelho cumpre
GR
NL Hierbij verklaard CTE International Srl dat dit model (-naam)
BE CTE INTERNATIONAL Srl verklaart dat het product
requisiti essenziali e alle disposizioni della Direttiva 1999/5/
CE. La Dichiarazione di conformità si può scaricare dal sito
www.midlandeurope.com
compliance with the essential requirements and other relevant
provisions of Directive 1999/5/EC. The declaration of conformity
is available on the web site www.midlandeurope.com
grundlegenden Anforderungen und anderen relevanten
Bestimmungen der Richtlinie 1999/5/EC erfüllt. Die
Konformitätserklärung ist unter folgendem Link verfügbar:
www.midlandeurope.com
este aparato cumple con lo dispuesto en la Directiva 99/05/
CE, del Parlamento Europeo y del Consejo de 9 de marzo de
1999, transpuesta a la legislación española mediante el Real
Decreto 1890/2000, de 20 de noviembre. La Declaración de
Conformidad está disponible en www.midlandeurope.com
modèle est conforme aux exigences essentielles et autres
dispositions pertinentes de la directive 1999/5/EC. La
déclaration de conformité est disponible sur le site internet
www.midlandeurope.com
com o disposto na Directiva 1999/5/CE do Parlamento Europeu
e do Conselho de 9 de Março de 1999, transposta para a
legislação nacional pelo Decreto-Lei n.º 192/2000, de 18 de
Agosto. A Declaração de Conformidade está disponível no sitio
na Internet em www.midlandeurope.com
Με το παρών, η Cte International Srl δηλώνει οτι το όνομα του
μοντέλου συμμορφώνεται ως προς τις βασικές απαιτήσεις
και άλλες σχετικές διατάξεις του Κανονισμού 1999/5/EC.
Η δήλωση συμμόρφωσης είναι διαθέσιμη στην ιστοσελίδα
www.midlandeurope.com
voldoet aan de essentiële eisen en andere relevante bepalingen
van richtlijn 1999/5/EG. De verklaring van conformiteit is
beschikbaar op de website www.midlandeurope.com
overeenstemt met de voorschriften en andere bepalingen van de
richtlijn 1999/5/EC. De conformiteitsverklaring is voorhanden
op de website www.midlandeurope.com
PL CTE International Srl deklaruje, że ten model jest zgodny z
RO Cte International Srl declara ca acest model este in conformitate
BG
N CTE INTERNATIONAL Srl erklærer at produktet er i
DK Hermed erklærer Cte International Srl , at dette apperat er i
SE CTE INTERNATIONAL Srl förkunnar att produkten
FIN CTE INTERNATIONAL Srl vakuuttaa, että tuote täyttää
HR Cte International Srl ovime izjavljuje da je ime ovog modela
ES Käesolevaga kinnitab Cte International Srl selle mudeli
LT CTE International patvirtina, kad šis modelis atitinka visus
wymaganiami zasadniczymi i innymi istotnymi postanowieniami
Dyrektywy 1999/5/EC. Deklaracja Zgodności jest dostepna na
stronie www.midlandeurope.com
cu cerintele esentiale si alte prevederi ale Directivei 1999/5/
EC. Declaratia de confomitate este disponibila si pe site-ul
www.midlandeurope.com.
С настоящото CTE international Srl декларира, че продукта е в
съответствие с основните изисквания и съответните модификации
на Директива 1999/5/EC. Декларацията за съвместимост е
налична на сайта:
overensstemmelse med de viktigste kravene og andre relevante
betingelser i Direktivet 1999/5/EF. Samsvarserklæringen finnes
tilgjengelig på nettstedet www.midlandeurope.com
overensstemmelse med kravene og andre relevante bestemmelser
i direktiv 1999/5 / EF. Overensstemmelseserklæringen findes på
webstedet www.midlandeurope.com
överensstämmer med de väsentliga kraven och
övriga bestämmelser i direktiv 1999/5/EG. Denna
försäkran om överensstämmelse finns på webbplatsen
www.midlandeurope.com
direktiivin 1999/5/EY asettamat olennaiset vaatimukset ja muut
asiaa koskevat määräykset. Vaatimuksenmukaisuusvakuutus on
saatavilla www.midlandeurope.com –verkkosivuilla.
u suglasnosti sa bitnim zahtjevima te ostalim relevantnim
odredbama Propisa 1999/5/EC. Ova Izjava o suglasnosti je
dostupna na web stranici www.midlandeurope.com.
vastavust direktiivi 1999/5/EC olulistele nõuetele
ja teistele asjakohastele sätetele. Vastavusdeklaratsioon on
kättesaadav veebilehel www.midlandeurope.com
esminius Direktyvos 1999/5/EC bei su ja susijusių dokumentų
www.midlandeurope.com
22 | Arctic user manual Arctic user manual | 23

reikalavinus.Atitikties deklaracija yra pateikiama internetinėje
svetainėje www.midlandeurope.com
LV CTE INTERNATIONAL Srl deklarē, ka produkts atbilst
SK Týmto Cte International Srl prehlasuje, že tento názov model
SL Cte International Srl deklarira da je ta model skladen z bistvenimi
CZ CTE INTERNATIONAL SRL prohlašuje, že výrobek je v souladu
H Mi, a CTE International Srl. saját felelősségre kijelentjük,
pamatprasībām un citiem ar to saistītajiem Direktīvas 1999/5/
EK noteikumiem. Atbilstības deklarācija ir pieejama mājas lapā:
www.midlandeurope.com
je v zhode so základnými požiadavkami a ďalšími príslušnými
ustanoveniami smernice 1999/5 / ES. Vyhlásenie o zhode je k
dispozícii na webových stránkach www.midlandeurope.com
zahtevami in drugimi relevantnimi določili EU direktive 1999/5/
EC. Deklaracija o skladnosti je na voljo na spletni strani
www.midlandeurope.com
s 1999/5 / ES. Prohlášení o shodě je k dispozici na webových
stránkách www.midlandeurope.com
hogy ezen elnevezésű termék megfelel az 1999/5/EC
alapvető követelményeinek és egyéb releváns előírásoknak.
A megfelelőségi nyilatkozat elérhető weboldalunkon a
www.midlandeurope.comcímen.
SAR
I/RSM Importante: L’apparato deve essere utilizzato ad una distanza
UK/CY/IRL/M Important: The equipment must be used at a distance greater
A/D/CH/FL Wichtig: BeiVerwendung des Gerätes muss ein Abstand von
BE Belangrijk: De apparatuur moet gebruikt worden op een afstand
BG
CZ Důležité: Zařízení nesmí být používáno ve vzdálenosti méně
DK Vigtigt: Udstyret skal skal være mindst 20cm fra kroppen under
E El equipo debe usarse a una distancia superior a 20cm del
EST Märkus: Seade tuleb kasutada kaugemal kui 20cm kehast
superiore a 20 cm dal corpo
than 20cm from the body.
mehr als 20 cm zum Körper eingehalten werden.
van het lichaam die groter is dan 20cm
ВАЖНО: Оборудването трябва да се използва на дистанция не
по-малка от 20 см от тялото.
než20 cmod těla.
anvendelse
cuerpo.
F/LUX/CH Important: l’appareil doit être utilisé à une distance supérieure à
FIN Tärkeää: Laitetta on käytettävä etäisyydellä yli 20cm kehosta
GR
HR Važno: Oprema se mora koristiti na udaljenosti većoj od 20 cm
U Fontos! Használat közben győződjön meg arról, hogy az eszköz
IS Búnaðurinn verður að nota í arlægð sem er meiri en 20cm úr
LT SVARBU: Įranga turi būti naudojama ne mažiau kaip 20cm
LV Aparāts jāizmanto attālumā vairāk nekā 20 cm no organisma
N Viktig: Apparatet må brukes i en avstand på mer enn 20cm fra
NL Belangrijk: Het apparaat moet op een afstand van minimaal 20
P Importante: O equipamento tem de ser usado a uma distância do
PL Uwaga: Urządzenie podczas pracy nie może znajdować się bliżej
RO Important: produsul trebuie utilizat la o distanta mai mare de
SE Viktigt: Apparaten måste användas på ett avstånd av mer än
SK Dôležité:Pri použití prístroja musí byť dodržaná minimálna
SL Pomembno: Napravo se mora uporabljati vsaj 20 cm oddaljeno
20cm du corps.
Σημαντικό: Ο εξοπλισμός θα πρέπει να χρησιμοποιείται σε
απόσταση μεγαλύτερη των 20cm από το σώμα σας.
od tijela
legalább 20cm-re a testétől van.
líkamanum
atstumu nuo kūno.
kroppen
cm van het lichaam gebruikt worden.
corpo superior a 20cm.
niż 20cm od ciała.
20cm fata de corp.
20 cm från kroppen
vzdialenosť od tela 20 cm!
od človeškega telesa
24 | Arctic user manual

• INFORMAZIONE AGLI UTENTI: i sensi dell’art. 13 del decreto legislativo 25
luglio 2005, n.151 “Attuazione delle Direttive 2002/95/CE, 2002/96/CE e
2003/108/CE, relative alla riduzione dell’uso di sostanze pericolose nelle apparecchiature elettriche ed elettroniche, nonché allo smaltimento dei rifiuti”.
Il simbolo del cassonetto barrato riportato sull’apparecchiatura indica che il pro-
dotto alla fine della propria vita utile deve essere raccolto separatamente dagli
altri rifiuti. L’utente dovrà, pertanto, conferire l’apparecchiatura giunta a fine vita
agli idonei centri di raccolta dierenziata dei rifiuti elettronici ed elettrotecnici,
oppure riconsegnarla al rivenditore al momento dell’acquisto di una nuova apparecchiatura di tipo equivalente, in ragione di uno a uno. L’adeguata raccolta
dierenziata per l’avvio successivo dell’apparecchiatura dismessa al riciclaggio,
al trattamento e allo smaltimento ambientalmente compatibile contribuisce ad
evitare possibili eetti negativi sull’ambiente e sulla salute e favorisce il riciclo dei
materiali di cui è composta l’apparecchiatura. Lo smaltimento abusivo del prodotto da parte dell’utente comporta l’applicazione delle sanzioni amministrative
di cui al dlgs. n.22/1997 (articolo 50 e seguenti del dlgs. n.22/1997).
• All articles displaying this symbol on the body, packaging or instruction manual
of same, must not be thrown away into normal disposal bins but brought to
specialised waste disposal centres. Here, the various materials will be divided
by characteristics and recycles, thus making an important contribution to environmental protection.
• Alle Artikel, die auf der Verpackung oder der Gebrauchanweisung dieses Symbol
tragen, dürfen nicht in den normalen Mülltonnen entsorgt werden, sondern
müssen an gesonderten Sammelstellen abgegeben werden. Dort werden die
Materialien entsprechend ihrer Eigenschaften getrennt und, um einen Beitrag
zum Umweltschutz zu liefern, wiederverwertet.
• Todos los artículos que exhiban este símbolo en el cuerpo del producto, en el
embalaje o en el manual de instrucciones del mismo, no deben ser desechados
junto a los residuos urbanos normales sino que deben ser depositados en los
centros de recogida especializados. En estos centros, los materiales se dividirán
en base a sus características y serán reciclados, para así poder contribuir de manera importante a la protección y conservación del medio ambiente.
• Tous les articles présentant ce symbole sur le corps, l’emballage ou le manuel
d’utilisation de celui-ci ne doivent pas être jetés dans des poubelles normales
mais être amenés dans des centres de traitement spécialisés. Là, les diérents
matériaux seront séparés par caractéristiques et recyclés, permettant ainsi de
contribuer à la protection de l’environnement.
•
Όλα τα προϊόντα στα οποία εμφανίζεται το ακόλουθο σύμβολο στο σώμα, τη
συσκευασία ή το εγχειρίδιο χρήσης τους, δεν πρέπει να εναποθέτονται στους κοινούς
κάδους απορριμάτων αλλά να προσκομίζονται στα ειδικά κέντρα αποκομιδής. Εκεί,
τα διάφορα υλικά θα πρέπει να διαχωρίζονται ανάλογα με τα χαρακτηριστικά και
τα ανακυκλούμενα υκλικά, συμμετέχοντας έτσι ουσιαστικά στην προστασία του
περιβάλλοντος.
Arctic user manual Arctic user manual

Prodotto o importato da:
CTE INTERNATIONAL s.r.l.
Via. R.Sevardi 7- 42124 Reggio Emilia Italia
www.midlandeurope.com
L’uso di questo prodotto può essere soggetto a
restrizioni nazionali. Prima dell’uso leggere attentamente le istruzioni. Se il prodotto contiene batterie:
non gettare nel fuoco, non disperdere nell’ambiente
dopo l’uso, usare gli appositi contenitori per la
raccolta.
Produced or imported by:
CTE INTERNATIONAL s.r.l.
Via. R.Sevardi 7 42124 Reggio Emilia Italy
Imported by:
ALAN - NEVADA UK
Unit 1 Fitzherbert Spur Farlington Portsmouth
Hants.
P06 1TT - United Kingdom
www.nevada.co.uk
The use of this transceiver can be subject to national
restrictions. Read the instructions carefully before
installation and use. If the product contains batteries:
do not throw the battery into fire. To disperse after
use, throw into the appropriate containers.
Importado por:
ALAN COMMUNICATIONS, SA
C/Cobalt, 48 - 08940 Cornellà de Llobregat
(Barcelona - España)
Tel: +34 902 384878 Fax: +34 933 779155
www.midland.es
El uso de este equipo puede estar sujeto a la obtención de la correspondiente autorización administrativa.
Lea atentamente las instrucciones antes de usar el
equipo. si el producto contiene pilas o baterías no las
tire al fuego ni las disperse en el ambiente después
de su uso, utilice los contenedores apropiados para
su reciclaje.
Vertrieb durch:
ALAN ELECTRONICS GmbH
Daimlerstraße 1K - D-63303 Dreieich Deutschland
www.alan-electronics.de
Die Benutzung dieses Handfunkgerätes ist von
den landesspezifischen Bestimmungen abhängig.
Vor Benutzung Bedienungsanleitung beachten.
Bei Verwendung von Batterien beachten Sie bitte
die Umweltbestimmungen. Batterien niemals ins
oene Feuer werfen, und nur in dafür vorgesehene
Sammelbehälter entsorgen.
WWW.MIDLANDEUROPE.COM
|
 Loading...