

Page 1
French-Door
Bottom Mount
Refrigerator
Power supply: 115 V
Frequency: 60 Hz
Capacity: 21.6 cu. ft.
en
USER MANUAL
Warning:
Before using this product,
please read this manual carefully
and keep it for future reference.
The design and specifications
are subject to change without
prior notice for product
improvement. Consult with your
dealer or manufacturer for
details.
version A - 08 - 2020
Free 3 months
extension of the
original limited warranty
period!* Simply text a
picture of your proof of
purchase to:
1-844-224-1614
*The warranty extension is for the
three months immediately following
the completion of the product’s
original warranty period.
MODEL NUMBER MRQ22D7AST
www.midea.com
Page 2

Dear user
Thank you for letting Midea help you "make yourself at home."
This manual is part of our commitment to your total satisfaction.
Please read this manual carefully before use and keep it in a
convenient place for future reference.
To help us serve you better, please consider registering your
product using our convenient Midea app MSmartlife, by visiting
http://www.midea.com, or by texting a picture of your proof of
purchase to 1-844-224-1614.
By using the text option you will earn an additional 3 month
warranty extension immediately following the completion of the
product's original warranty.
REFRIGERATOR SAFETY .................................................................3
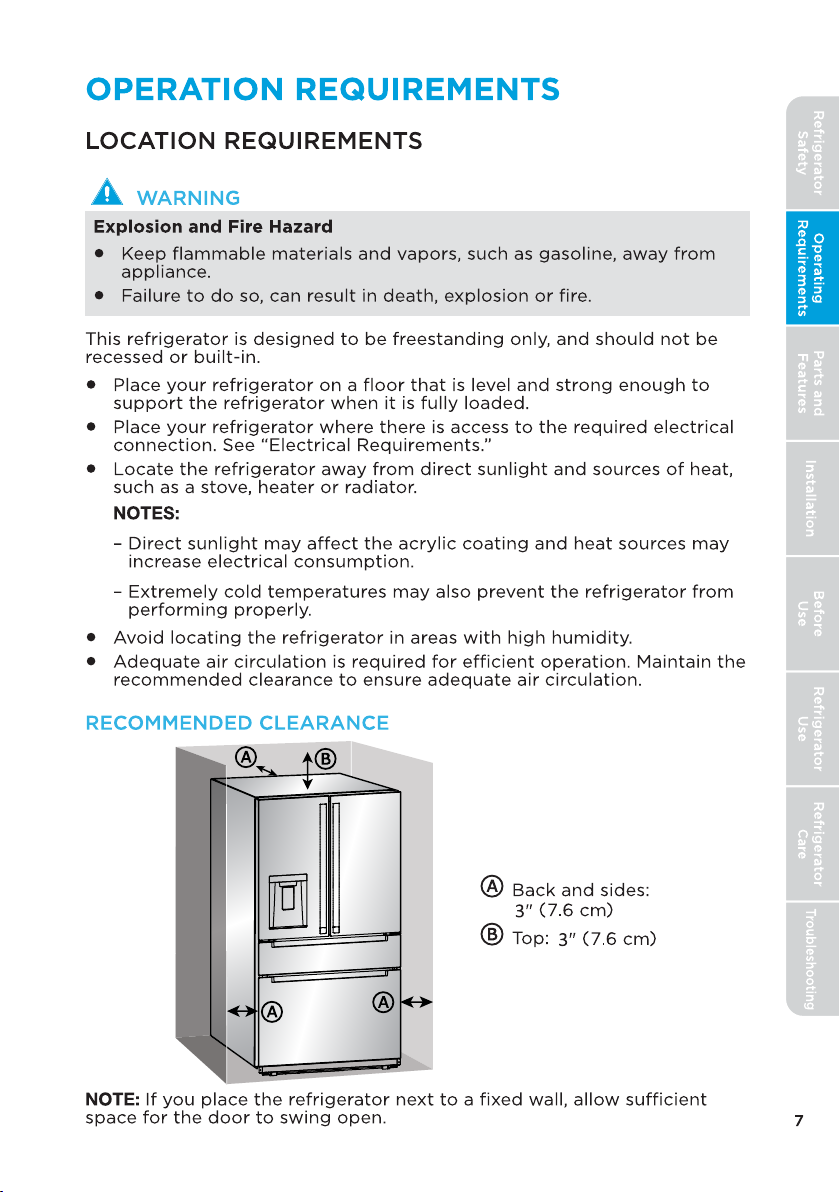
OPERATION REQUIREMENTS .........................................................7
Location Requirements ..........................................................................7
Electrical Requirements .........................................................................8
Water Supply Requirements ................................................................9
PARTS AND FEATURES ..................................................................10
INSTALLATION ..................................................................................11
Unpack ......................................................................................................... 1 1
Door Removal (only if needed) ..........................................................11
Connect to Water ................................................................................... 16
Move to Final Location ......................................................................... 18
Install Handles ......................................................................................... 19
Install Water Filter ................................................................................. 2
Align Doors (if needed) ...................................................................... 22
Level Refrigerator ..................................................................................23
BEFORE USE ....................................................................................23
Waiting Period ........................................................................................ 23
Cleaning .................................................................................................... 23
REFRIGERATOR USE...................................................................... 24
General ...................................................................................................... 24
Controls ..................................................................................................... 25
Ice Maker ................................................................................................... 28
Dispenser .................................................................................................. 29
0
Page 3

Drip Tray ....................................................................................................3
WARNING
Wifi .............................................................................................................. 3
FCC/IC Compliance Statement: ....................................................... 32
Industry Canada Statement............................................................... 32
Refrigerator Features ........................................................................... 33
PerfectChill Flex Drawer ..................................................................... 35
Freezer Features .................................................................................... 36
REFRIGERATOR CARE ....................................................................37
Cleaning .................................................................................................... 37
Moving ....................................................................................................... 38
Storage ...................................................................................................... 38
Replacing Lights .................................................................................... 38
TROUBLESHOOTING ..................................................................... 39
General ...................................................................................................... 39
Ice and Water .......................................................................................... 42
Error Codes ..............................................................................................45
PERFORMANCE DATA SHEET ...................................................... 46
WARRANTY ..................................................................................... 47
REFRIGERATOR SAFETY
YOUR SAFETY AND THE SAFETY OF OTHERS ARE VERY
IMPORTANT
To prevent injury to the user or other people and property damage, the
instructions shown here must be followed. Incorrect operation due to
ignoring of instructions may cause harm or damage, including death.
The level of risk is shown by the following indications.
This symbol indicates the possibility of death or serious
WARNINGWARNING
CAUTION
injury.
This symbol indicates the possibility of injury or damage to
property.
This symbol indicates the possibility of dangerous voltage
constituting a risk of electrical shock is present that could
result in death or serious injury.
0
0
Refrigerator
Safety
Requirements
Operating
Parts and
Features
Installation
Before
Use
Refrigerator
Use
Refrigerator
Care
Troubleshooting
3
Page 4

Refrigerator
Safety
Requirements
Operating
Parts and
Features
Installation
Before
Use
Refrigerator
Use
IMPORTANT SAFETY INSTRUCTIONS
WARNING
GENERAL APPLIANCE SAFETY
Read all safety warnings, instructions, illustrations and specifications
•
provided with this appliance. Failure to follow all instructions listed
below may result in electric shock, fire and/or serious injury.
Save all warnings and instructions for future reference.
•
ELECTRICAL SAFETY
Plug into a grounded 3 prong outlet.
•
Do not remove ground prong.
•
Do not use an adapter.
•
Unplug the power cord by holding the plug, never by pulling the
•
cord.
Do not turn the appliance on or off by plugging in or unplugging the
•
power cord.
Do not use an extension cord.
•
Unplug the refrigerator before cleaning or defrosting.
•
NOTE: Power to the refrigerator cannot be disconnected by pressing
a control on the control panel.
Grounding requirement
This refrigerator must be grounded. This refrigerator is equipped with
•
a grounding plug. The plug must be inserted into an outlet that is
properly installed and grounded.
Improper use of the grounding plug can result in a risk of electric
•
shock. Consult a qualified electrician or service person if the
grounding instructions are not completely understood or if doubt
exists as to whether the refrigerator is properly grounded.
Refrigerator
Care
Troubleshooting
4
LOCATION SAFETY
This refrigerator is intended to be used in household and similar
•
environments.
Install in accordance with the manufacturer’s instructions.
•
This refrigerator should not be recessed or built-in an enclosed
•
cabinet. It is designed for freestanding installation only.
WARNING - Keep ventilation openings, in the refrigerator, clear of
obstruction.
When moving the refrigerator, do not roll over or damage the power
•
supply cord.
Do not install near any heat sources, such as radiators, heat registers,
•
stoves, other cooking appliances or in direct sunlight.
Keep flammable materials and vapors, such as gasoline, away from
•
refrigerator.
Page 5

USE AND CARE SAFETY
Flammable refrigerant used. Follow handling instructions carefully.
•
Risk of fire or explosion due to puncture of refrigerant tubing.
Flammable refrigerant used. Do not use mechanical devices to
•
defrost freezer. Do not puncture refrigerant tubing.
Do not store or use gasoline or any flammable liquids inside or in the
•
vicinity of this refrigerator.
Use two or more people to move and install refrigerator.
•
Connect refrigerator to a potable water supply only for ice maker
•
and dispenser use.
This appliance is not intended for use by persons (including children)
•
with reduced physical, sensory or mental capabilities, or lack of
experience and knowledge, unless they have been given supervision
or instruction concerning use of the appliance by a person
responsible for their safety.
Children should be supervised to ensure that they do not play with
•
the appliance.
Keep fingers out of the “pinch point” areas; clearances between the
•
doors and between the doors and cabinet are necessarily small. Be
careful closing doors when children are in the area.
Do not use electrical appliances inside the food storage
•
compartments of the appliance, unless they are of the type
recommended by the manufacturer.
Do not touch the interior of the freezer with wet hands. This could
•
result in frostbite.
Use nonflammable cleaner. Clean only with a damp cloth.
•
In refrigerators with automatic icemakers, avoid contact with the
•
moving parts of the ejector mechanism, or with the heating element
that releases the cubes. Do not place fingers or hands on the
automatic ice making mechanism while the refrigerator is plugged in.
Do not use electrical appliances on the top of the refrigerator, unless
•
they are of the type recommended by the manufacturer.
Do not place heavy objects on the top of the refrigerator considering
•
that objects may fall when doors are opened and closed.
Do not store beer, beverages or other fluid contained in bottles or
•
enclosed containers in the freezer. The bottles or containers may
crack due to freezing.
Refrigerator
Safety
Requirements
Operating
Parts and
Features
Installation
Before
Use
Refrigerator
Use
Refrigerator
Care
SERVICE SAFETY
Disconnect power before servicing.
•
Flammable refrigerant used. To be repaired only by trained service
•
personnel. Do not puncture refrigerant tubing.
Troubleshooting
5
Page 6
Refrigerator
Safety
Requirements
Operating
Parts and
Features
Refer all servicing to qualified service personnel. Do not repair or
•
replace any part of this appliance unless specifically recommended
in this manual. Servicing is required when the appliance has been
damaged in any way, such as the power supply cord or plug is
damaged, liquid has been spilled or objects have fallen into the
appliance, the appliance has been exposed to rain or moisture, does
not operate normally, or has been dropped.
If the supply cord is damaged, it must be replaced by the
•
manufacturer, its service agent, or similarly qualified person, in order
to avoid a hazard.
If component part is damaged, it must be replaced by the
•
manufacturer, its service agent or similarly qualified persons in order
to avoid a hazard.
Replace all parts and panels before operating.
•
SAVE THESE INSTRUCTIONS
Installation
State of California Proposition 65 Warnings:
Before
Use
PROPER DISPOSAL
Refrigerator
Use
Refrigerator
Care
Troubleshooting
THIS APPLIANCE IS FOR HOUSEHOLD USE ONLY
WARNING: Cancer and Reproductive Harm
-www.P65Warnings.ca.gov.
WARNING
Suffocation Hazard
Before you throw away your old refrigerator:
Remove the doors and drawers so that children cannot hide or get
•
trapped inside your old appliance.
Leave any shelves in place so that children may not easily climb
•
inside.
Failure to follow these instructions can result in death or brain
•
damage.
IMPORTANT: Refrigerant and cyclopentane foaming material used
for the appliance are flammable. It is the consumer’s responsibility
to comply with Federal and Local regulations when disposing of this
product. Refrigerants must be evacuated by a licensed, EPA certified
refrigerant technician in accordance with established procedures.
6
Page 7
Page 8
Refrigerator
Safety
Requirements
Operating
Parts and
Features
Installation
Before
Use
Refrigerator
Use
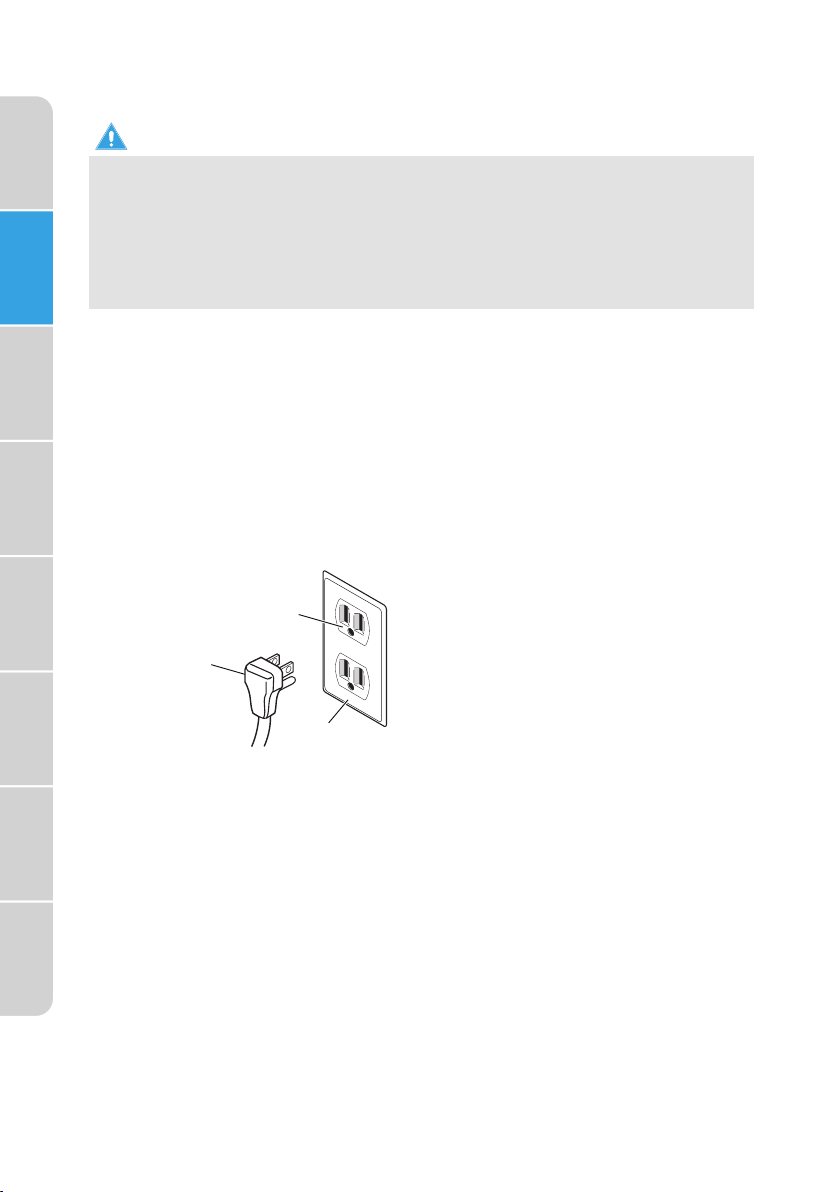
ELECTRICAL REQUIREMENTS
WARNING
Electrical Shock Hazard
Plug into a grounded 3 prong outlet.
•
Do not remove the ground prong from the power cord plug.
•
Do not use an adapter.
•
Do not use an extension cord.
•
Failure to do so can result in death, fire or electrical shock.
•
IMPORTANT: A 115 Volt, 60 Hz., AC only, 15-amp fused, grounded electrical
supply is required.
Use an electrical outlet that accepts the grounding prong.
•
NOTE: The power cord is equipped with a 3-prong (grounding) plug
which mates with a standard 3-prong (grounding) electrical outlet.
We recommend that the refrigerator be plugged into an electrical
•
circuit serving ONLY this appliance.
Use an electrical outlet that cannot be turned off with a switch or pull-
•
chain.
DO NOT use an extension cord.
•
b
a
a 3-prong plug
b 3-prong receptacle
c Receptacle box cover
c
Refrigerator
Care
Troubleshooting
8
Page 9

WATER SUPPLY REQUIREMENTS
A cold water supply with water pressure between 30 and 100 psi (207 and
689 kPa) is required to operate the water dispenser and ice maker. If
you have questions about your water pressure, call a licensed, qualified
plumber.
IMPORTANT: Operation outside the water pressure range may cause
malfunction and severe, damaging water leaks.
NOTE: If the water pressure is less than what is required, the flow of water
from the water dispenser could decrease or ice cubes could be hollow or
irregularly shaped.
Refrigerator
Safety
Requirements
Operating
Reverse Osmosis Water Supply (if applicable)
IMPORTANT: The pressure of the water supply coming out of a reverse
osmosis system going to the water inlet valve of the refrigerator needs to
be between 30 and 100 psi (207 and 689 kPa).
If water pressure is too low:
Check to see whether the sediment filter in the reverse osmosis system is
blocked. Replace the filter if necessary.
Allow the storage tank on the reverse osmosis system to refill after
heavy use. The tank capacity could be too small to keep up with the
requirements of the refrigerator.
If your refrigerator has a water filter, it may further reduce the water
pressure when used in conjunction with a reverse osmosis system.
Remove the water filter.
Parts and
Features
Installation
Before
Use
Refrigerator
Use
Refrigerator
Care
Troubleshooting
9
Page 10
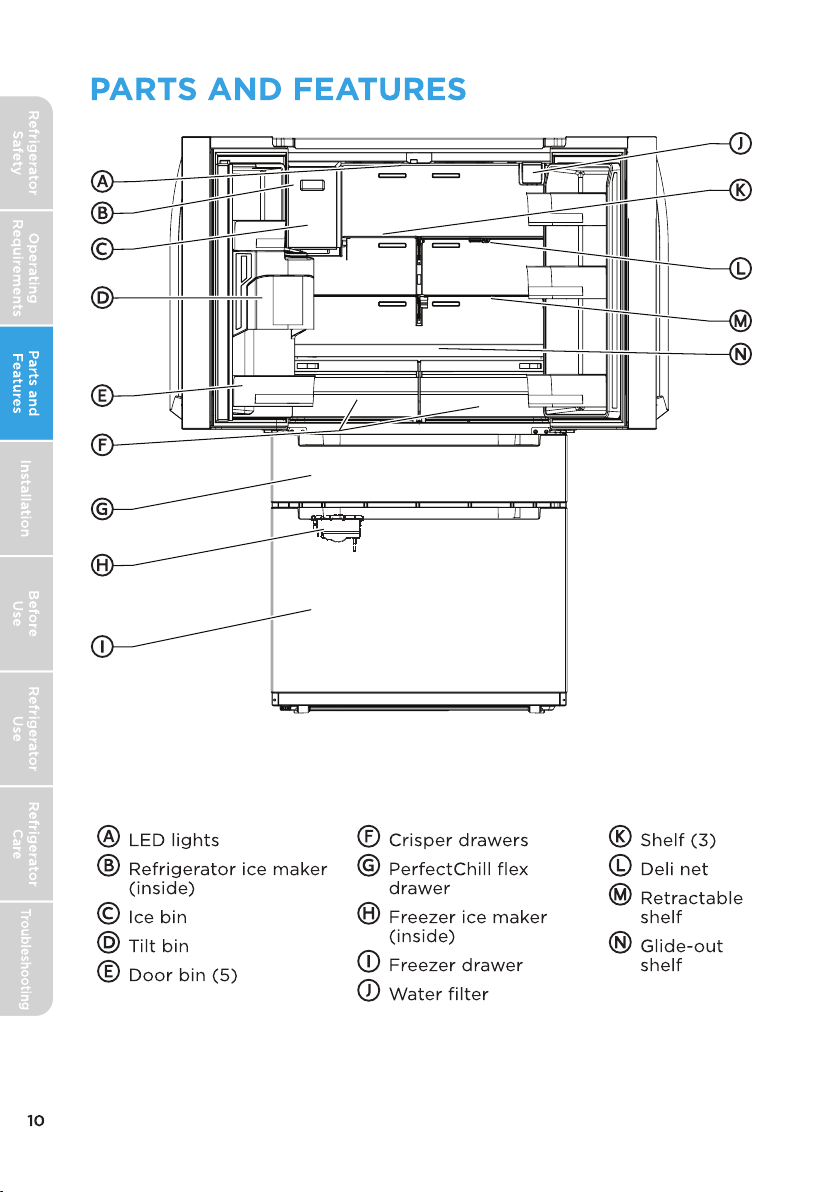
(The picture above is only for reference. The actual configuration will
depend on the physical product.)
Page 11

SPECIFICATIONS
Dimension (WxDxH) 35.8" x 31.2" x 69.9"
(91 x 79 x 178 cm)
Width with door open 90° 44.2" (112 cm)
Width with door open 135° 64.4" (164 cm)
Weight 379 lbs. (172 kg)
Power requirements 115 V ~ 60 Hz, 15A minimum requirement
Power cord length 66.9" (170 cm)
INSTALLATION
UNPACK
Refrigerator
Safety
Requirements
Operating
Parts and
Features
WARNING
Fire or Explosion Hazard
Do not puncture refrigerant tubing.
•
Follow handling instructions carefully.
•
Flammable refrigerant used.
•
Failure to do so can result in death, explosion or fire.
•
IMPORTANT: Remove ALL exterior and interior packing materials
including the foam packing between the exterior condenser and the
refrigerator cabinet.
DOOR REMOVAL
(ONLY IF NEEDED)
Measure the refrigerator to make sure it will fit through the doorway.
If the refrigerator cannot pass easily through the doorway, follow the
instructions to remove the two refrigerator compartment doors and the
front panels of the flex temperature and freezer drawers.
WARNING
Electrical Shock Hazard
Disconnect power before removing doors.
•
Reconnect ground wire before operating.
•
Failure to do so could result in death or electric shock.
•
Installation
Use
Use
Care
Troubleshooting
Before
Refrigerator
Refrigerator
11
Page 12
Refrigerator
a
Safety
Requirements
Operating
Parts and
Features
Installation
Before
Use
TOOLS NEEDED
Phillips screwdriver
•
8 mm Socket wrench
•
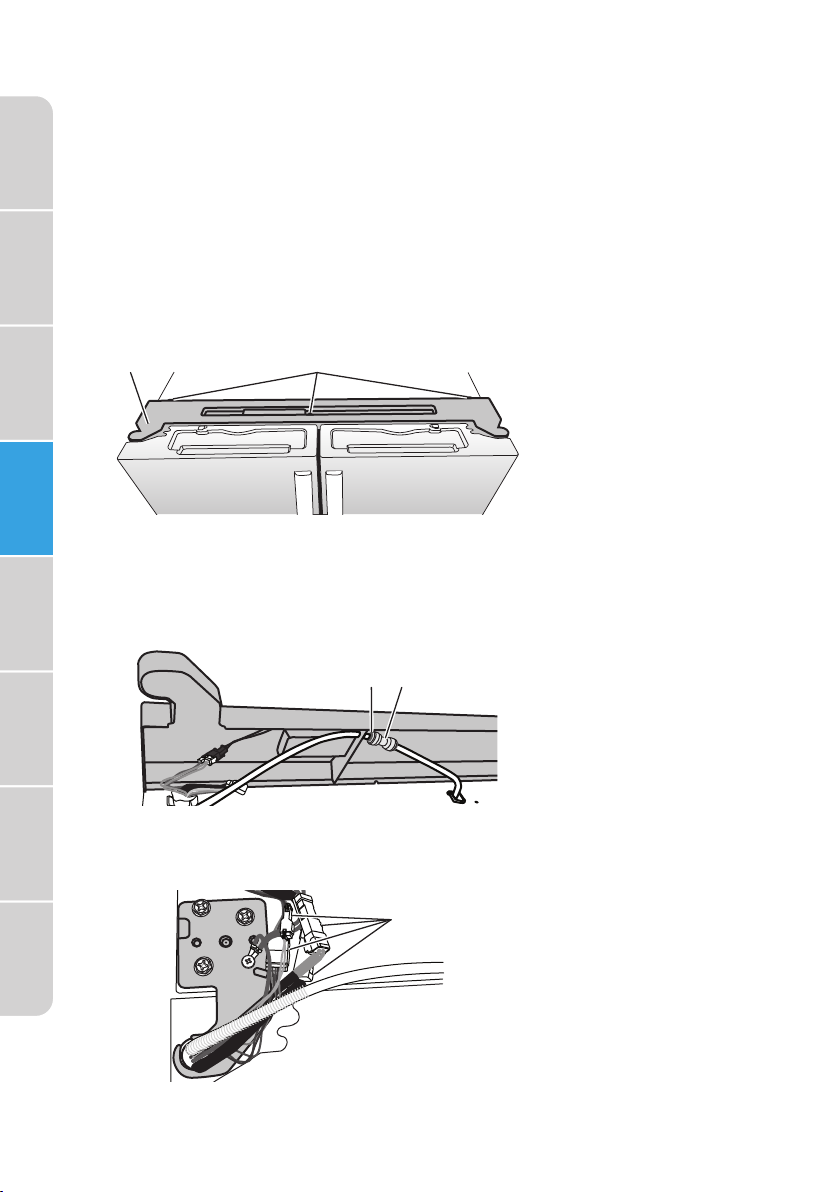
REMOVE DOORS
IMPORTANT: Keep the refrigerator doors closed until you are ready to lift
them from the cabinet.
1. Unplug refrigerator or disconnect power.
2. Using a Phillips screwdriver, remove the three screws attaching the
hinge cover to the top of the cabinet.
b
a Hinge cover
b Screws
3. Slowly lift the hinge cover, keeping the wire harnesses and water line
attached.
4. Holding the section of water line closest to the door, squeeze the
collar to the connector to release the line. Pull the water line from the
connector.
Refrigerator
Use
Refrigerator
Care
Troubleshooting
12
ba
a Collar
b Water line
connector
5. Disconnect the four wiring harnesses by pressing the release catch
on each wire harness connector, and then pulling the ends apart (lefthand door hinge only).
a
a
Wiring harnesses
Page 13
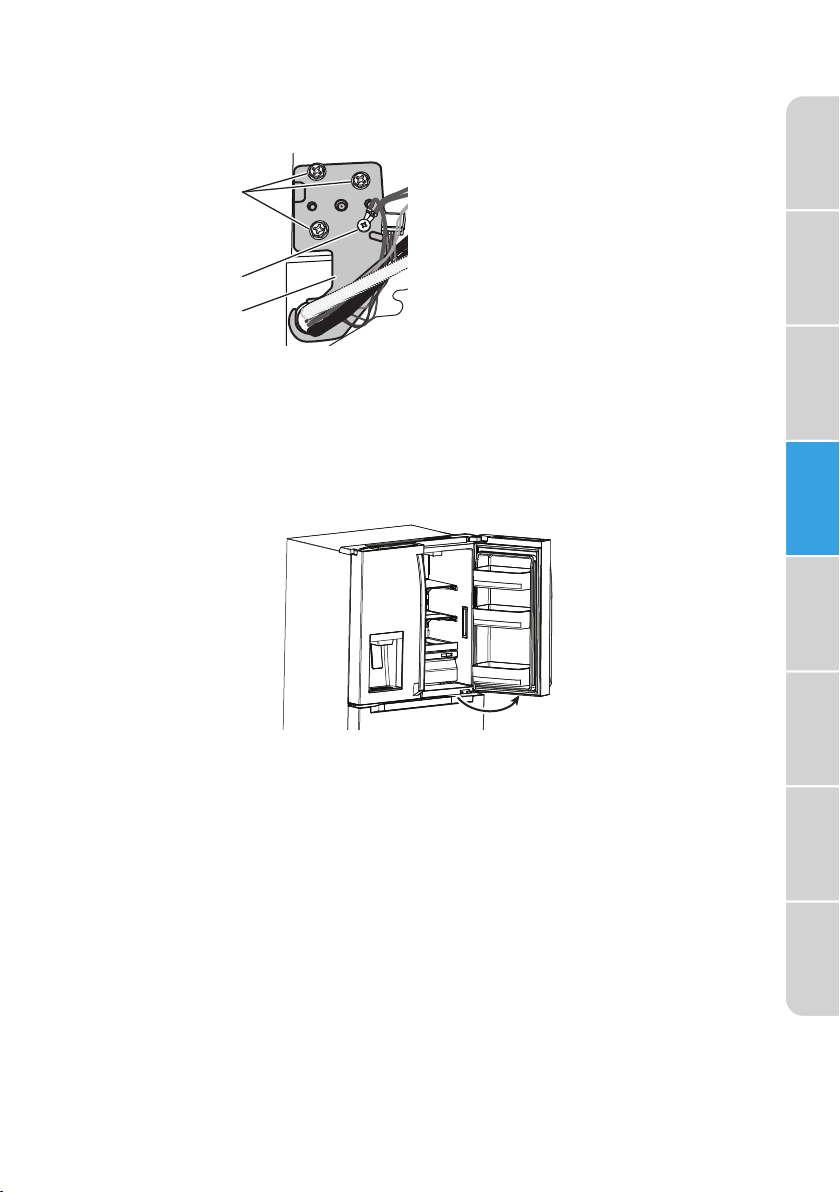
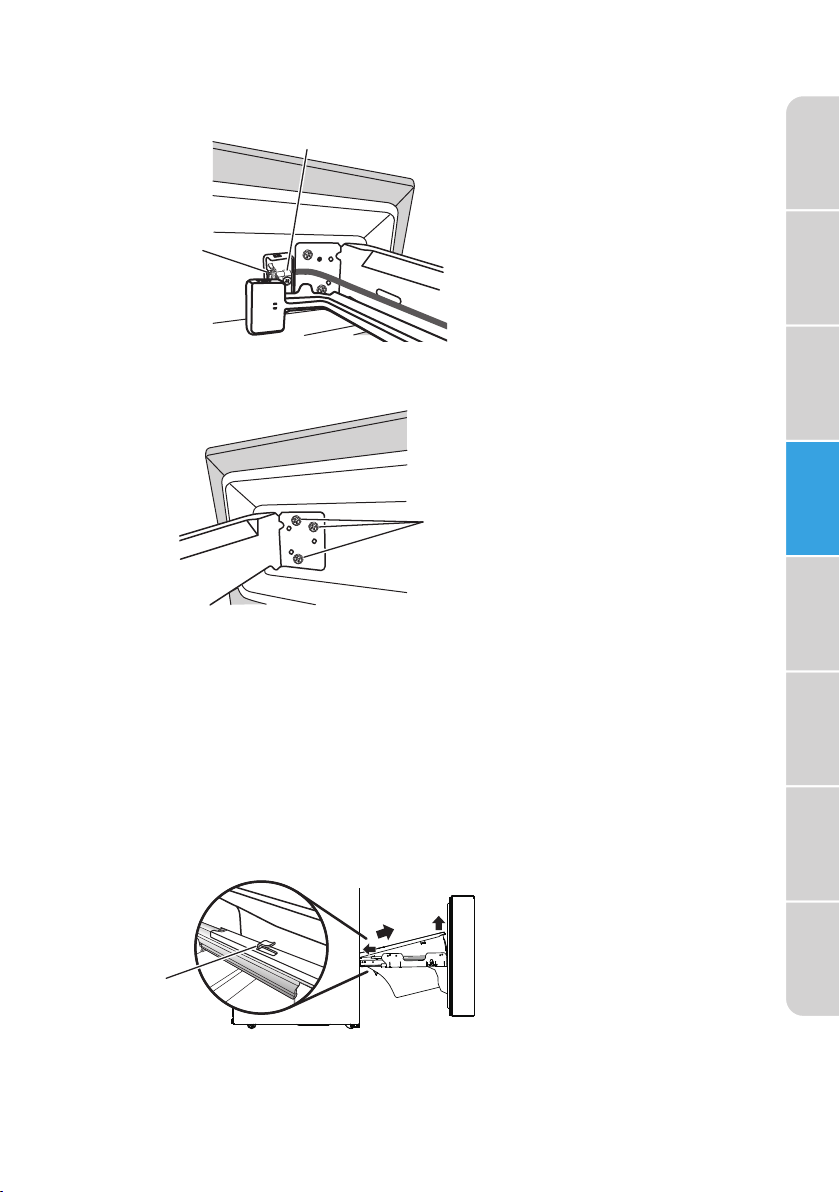
6. Using an 8 mm socket wrench, remove the three hinge screws.
90°
7. Using a Phillips screwdriver, remove the ground screw (left-hand door
hinge only).
Refrigerator
Safety
a
a Hinge screws
b Ground screw
b
c Top hinge
c
NOTE: Provide additional support for the door while the hinge is being
removed. Do not depend on the door gasket magnets to hold the door
in place while you are working.
8. Remove the top door hinge.
9. Using both hands, slowly swing the door until it is open to a 90° angle
to the cabinet, and then lift the door off the bottom hinge. Set the
door onto a soft surface to protect the finish.
10. Repeat this procedure to remove the right-hand refrigerator door.
REPLACE DOORS
NOTE: The hinge pin extends from the bottom edge of the door.
1. Insert the hinge pin into the opening in the bottom hinge.
2. Insert the top hinge into the top of the door.
3. Using the hinge screws removed earlier, fasten the top hinge to the top
of the cabinet.
4. Replace the ground screw (left-hand door only).
5. Reconnect the four wiring harnesses (left-hand door only).
6. Reconnect the water line (left-hand door only).
7. Replace the right-hand door following steps 1 through 3.
8. Using the three screws removed earlier, fasten the hinge cover to the
top of the cabinet.
Requirements
Operating
Parts and
Features
Installation
Before
Use
Refrigerator
Use
Refrigerator
Care
Troubleshooting
13
Page 14
Refrigerator
Safety
Requirements
Operating
Parts and
Features
Installation
Before
Use
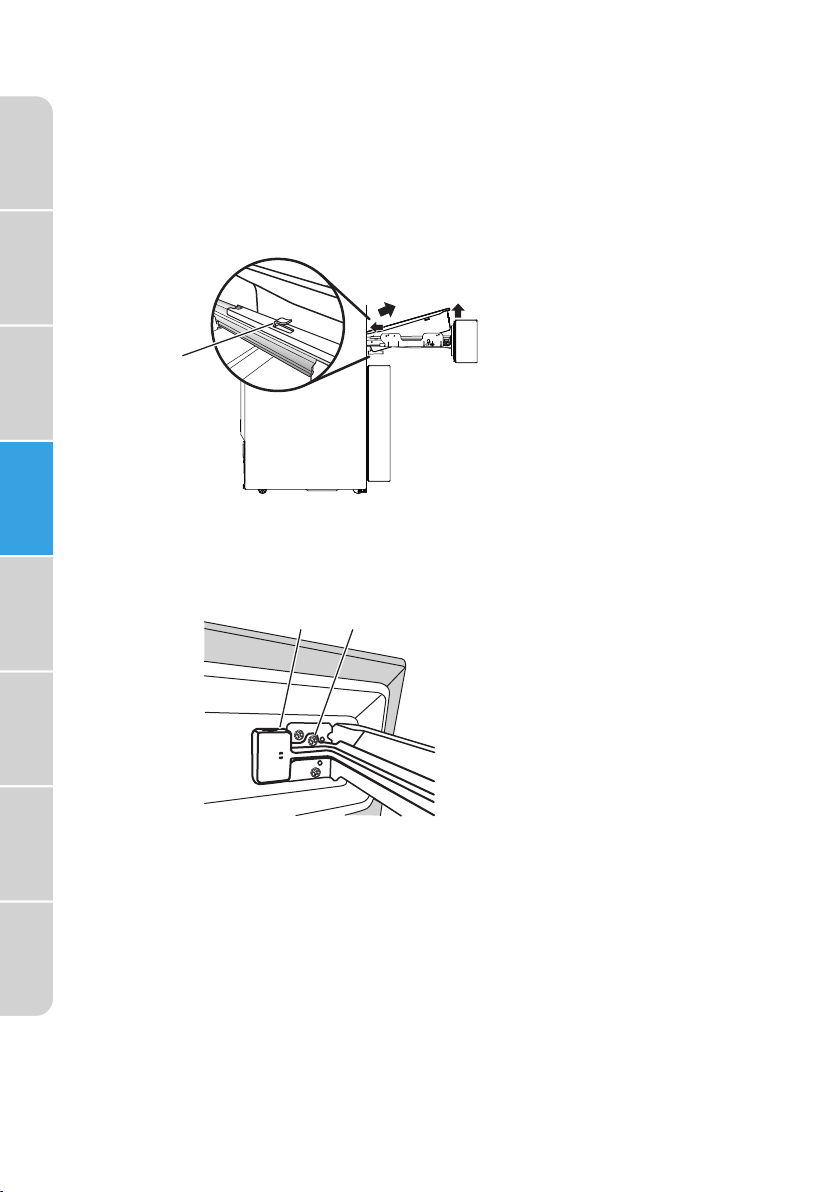
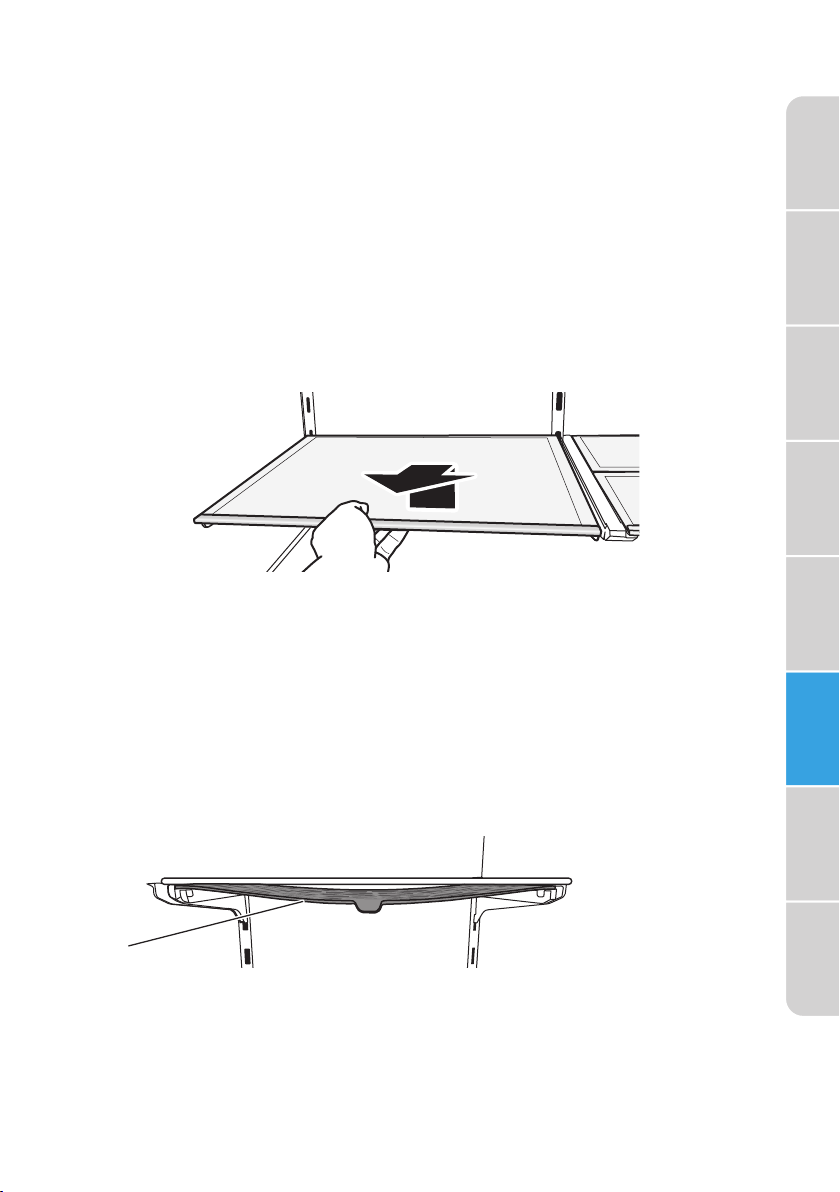
REMOVE PERFECTCHILL FLEX DRAWER
1. Pull out the exterior drawer to its full extension.
2. Using both hands, grasp the left-hand and right-hand sides of the inner
drawer tray.
3. Lift up on the front end of the tray.
4. Pull the tray slightly toward you to disengage the slots from the hooks
on the slide rails.
a
a
Slide rail hook
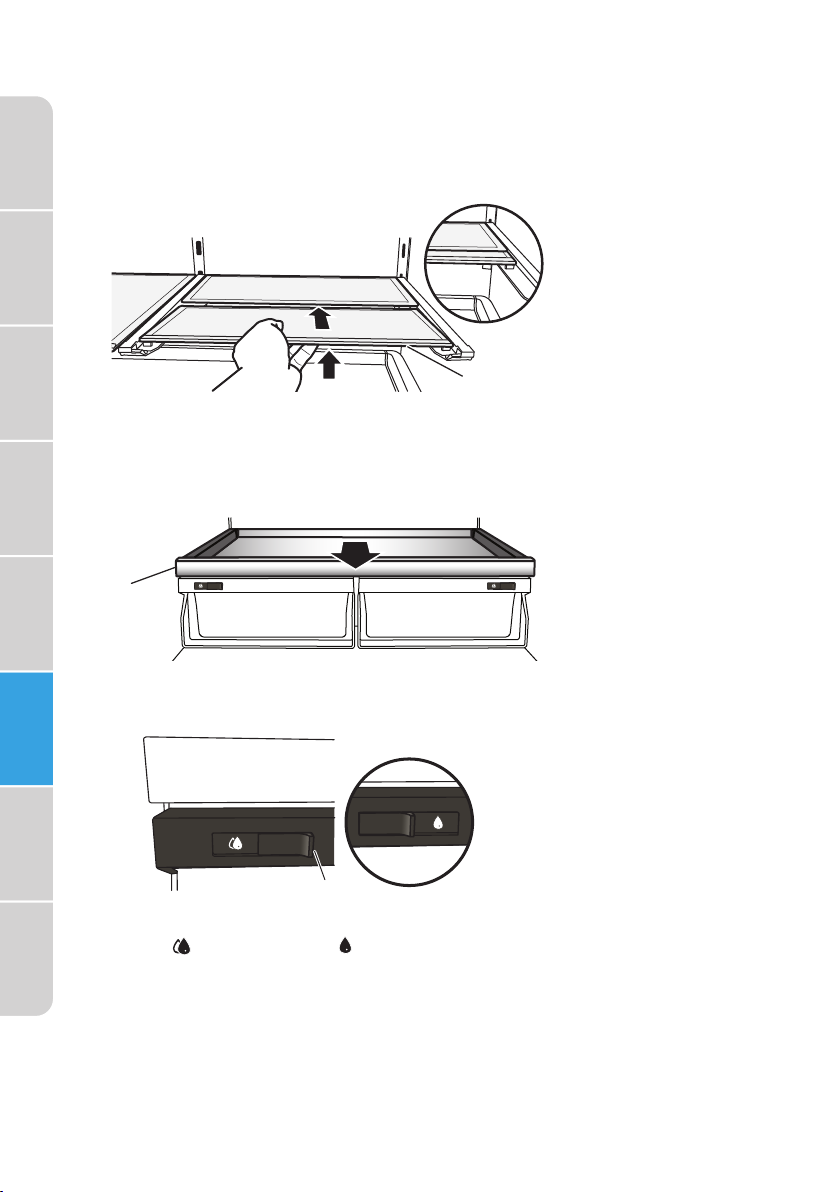
5. Once the tray is disengaged, push it slightly back into the opening until
the edge clears the outer drawer lip, and then lift the tray up and out.
6. Using a Phillips screwdriver, remove the screw fastening the wiring
cover to the interior of the drawer front.
a b
Refrigerator
Use
Refrigerator
Care
7. Push upward on the bottom edge of the wiring cover until the cover
Troubleshooting
14
Wiring cover
a
b Wiring cover
screw
slot clears the clasp, and then pull the cover away from the drawer
front.
Page 15
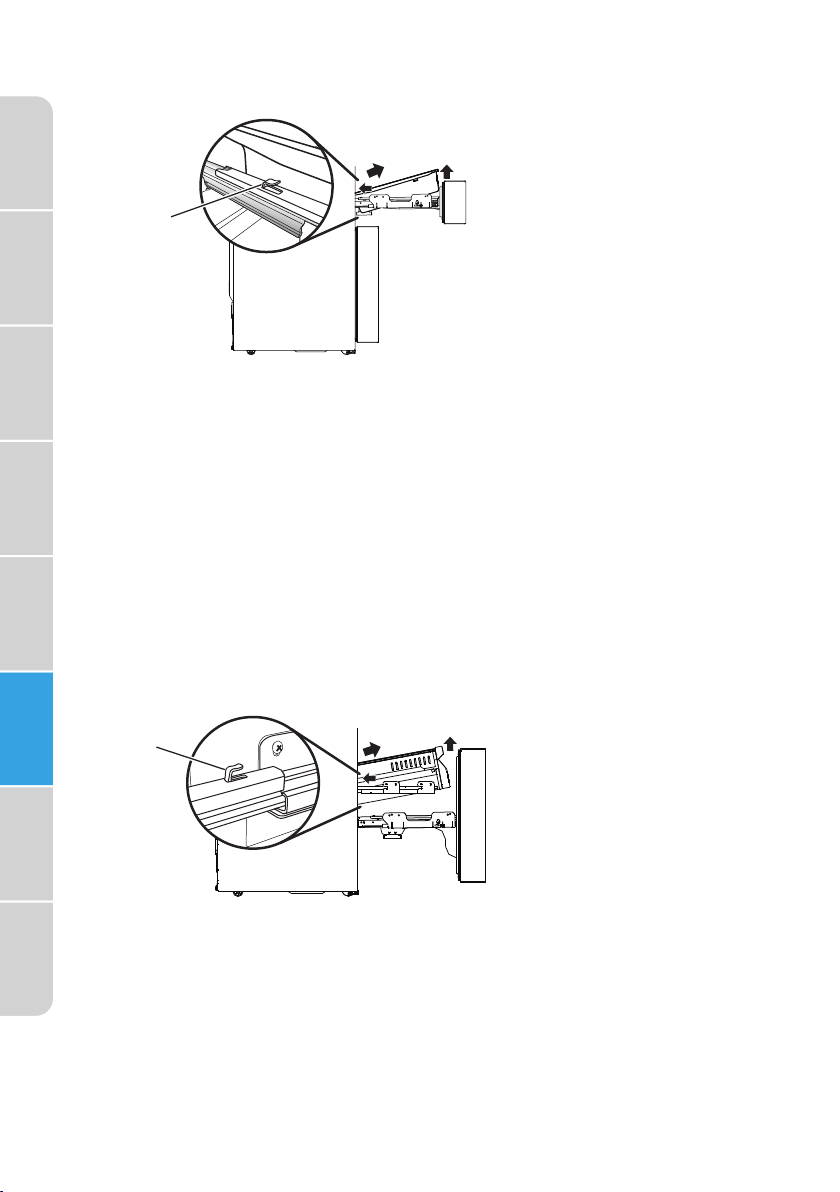
8. Using a screwdriver, remove the wiring clamp, and then unplug the
a
wiring terminal.
b
Refrigerator
Safety
a
Wiring terminal
b Wiring clamp
9. While one person supports the drawer front, remove the screws
fastening the front to the left-hand and right-hand glide rails.
a
10. Set the drawer front onto a soft surface to protect the finish. Slide the
rails back into the cabinet.
11. Perform the previous steps in reverse order to replace the flex drawer
front.
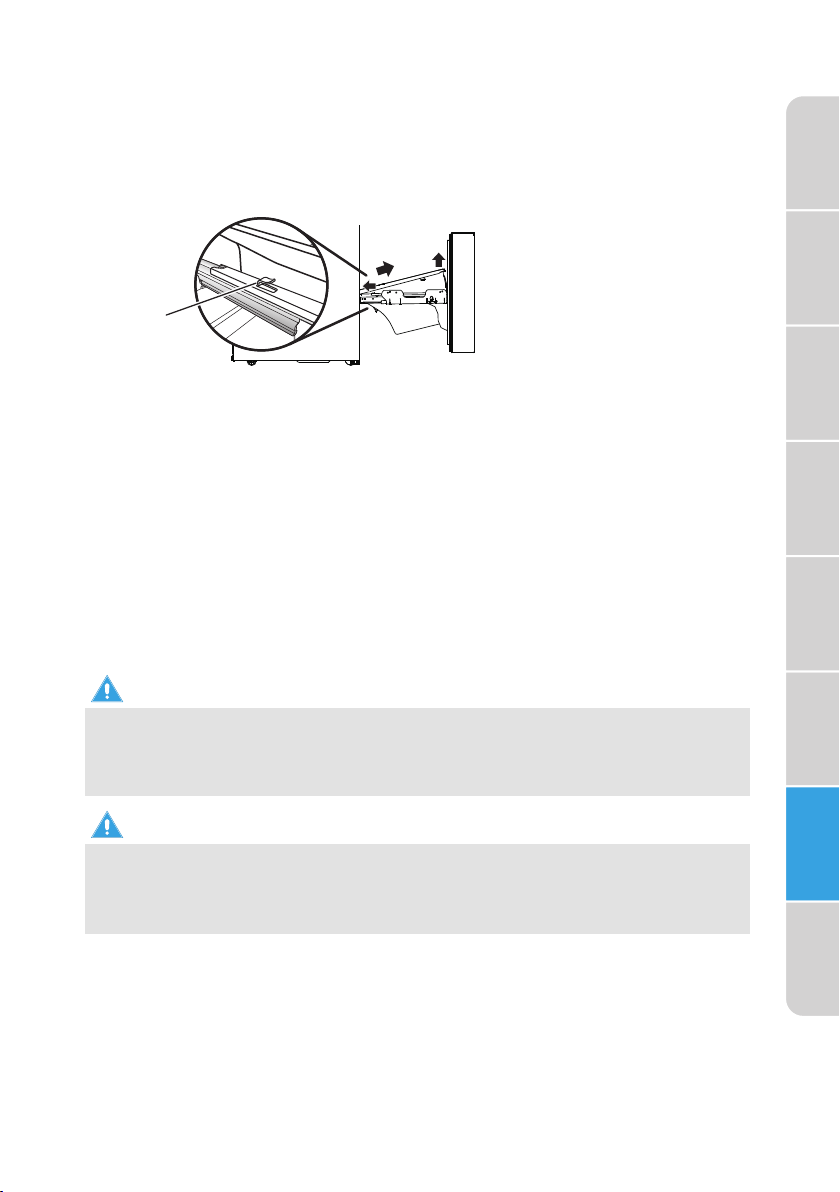
REMOVE FREEZER DRAWER
1. Pull out the exterior freezer drawer to its full extension.
2. Lift upward on the front end of the lower storage compartment.
3. Pull the compartment slightly toward you to disengage the slots from
the hooks on the slide rails.
a Screws
Requirements
Operating
Parts and
Features
Installation
Before
Use
Refrigerator
Use
Refrigerator
Care
Troubleshooting
a Slide rail hook
a
4. Once the compartment is disengaged, push it slightly back into
the opening until the edge clears the outer drawer lip, and then lift
compartment up and out.
15
Page 16

Refrigerator
Safety
Requirements
Operating
Parts and
Features
5. With one person supporting the drawer front, use an 8 mm socket
wrench to remove the ten screws (5 on each bracket) fastening the
drawer front to the left-hand and right-hand glide rails.
Screws
a
a
6. Set the drawer front onto a soft surface to protect the finish. Slide the
rails back into the cabinet.
7. Perform the previous steps in reverse order to replace the freezer
drawer front.
Installation
Use
CONNECT TO WATER
A cold water supply with water pressure of between 30 and 100 psi
(207 and 689 kPa) is required to operate the water dispenser and ice
maker. If you have questions about your water pressure, call a licensed,
qualified plumber.
Before
IMPORTANT:
•
•
Refrigerator
Use
Connect to Water Line
Gather the required tools and parts before starting installation.
•
•
Refrigerator
Care
Troubleshooting
•
1. Find a
2. Determine the length of copper tubing you need. Measure from the
Connect only to a drinking (potable) water supply.
Plumbing shall be installed in accordance with the International
Plumbing Code and any local codes and ordinances.
Flat-blade screwdriver
1/2 " Wrench or 2 Adjustable
wrenches
Cordless drill
1/4 " Drill bit
•
1/4 " Compression nut
•
Ferrule (sleeve)
•
1/2 " to 11/4 " (12.7 mm to 31.8 mm) vertical cold water pipe near the
refrigerator.
IMPORTANT: Make sure it is a cold water pipe.
NOTE: Horizontal pipe will work; however, you must drill on the top
side of the pipe, not the bottom. Drilling on the top side will keep
water away from the drill and keep normal sediment from collecting in
the valve.
connection on the back of the refrigerator to the water pipe. Add 7 ft
(2.1 m) to allow for cleaning. Use
copper tubing. Be sure both ends of copper tubing are cut square.
1/4 " (6.35 mm) O.D. (outside diameter)
16
Page 17
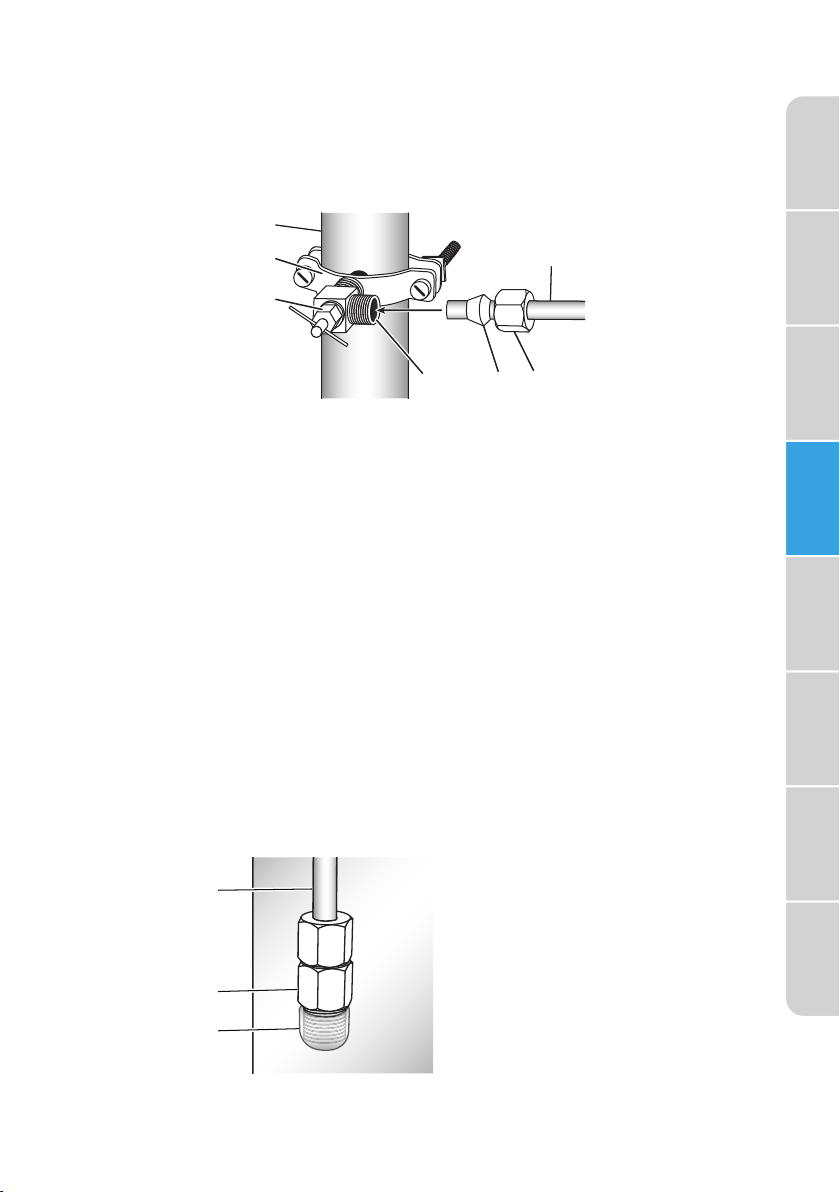
3. Using a cordless drill, drill a 1/4 " (6.35 mm) hole in the cold water pipe.
4. Fasten the shutoff valve to the cold water pipe with the pipe clamp.
Be sure the outlet end is solidly in the
water pipe and that the washer is under the pipe clamp.
5. Tighten the packing nut. Tighten the pipe clamp screws slowly and
evenly so the washer makes a watertight seal. Do not overtighten.
1/4 " (6.35 mm) drilled hole in the
a
b
g
c
d e f
Refrigerator
Safety
Requirements
Operating
Parts and
Features
a Household supply line
b Saddle valve
c Packing nut
e Ferrule (sleeve)
f Compression nut
g 1/4 " Water line
d Shutoff valve
6. Slip the compression sleeve and compression nut on the copper tubing
as shown. Insert the end of the tubing into the outlet end squarely as
far as it will go. Screw compression nut onto outlet end with adjustable
wrench. Do not overtighten or you may crush the water line.
7. Place the free end of the tubing in a container or sink, and then turn
ON the main water supply. Flush the tubing until water is clear. Turn
OFF the shutoff valve on the water pipe.
Connect to Refrigerator
1. Unplug refrigerator or disconnect power.
2. Close shut-off valve.
3. Thread a brass compression nut and ferrule (sleeve) onto the free end
of the water line.
4. Remove the plastic cap from the end of the refrigerator water line.
a
a
Refrigerator
water line
b Compression
b
c
nut
c Plastic cap
Installation
Before
Use
Refrigerator
Use
Refrigerator
Care
Troubleshooting
17
Page 18

Refrigerator
Safety
Requirements
Operating
Parts and
Features
Installation
Before
Use
5. Insert the water line directly into the fitting on the end of the
refrigerator water line. Tighten the compression nut. Do not
overtighten.
6. Confirm connection is secure by gently pulling on the water line.
7. Turn on the water supply to refrigerator and check for leaks. Correct
any leaks.
Complete the Installation
WARNING
Electrical Shock Hazard
Plug into a grounded 3 prong outlet.
•
Do not remove the ground prong from the power cord plug.
•
Do not use an adapter.
•
Do not use an extension cord.
•
Failure to do so can result in death, fire or electrical shock.
•
1. Plug into a grounded 3 prong outlet.
NOTE: This refrigerator begins operating as soon as it is connected to
the power supply.
2. Move the refrigerator into its final location, making sure to maintain the
recommended clearance.
MOVE TO FINAL LOCATION
Refrigerator
Use
Refrigerator
Care
IMPORTANT:
Troubleshooting
•
•
•
18
WARNING
Fire or Explosion Hazard
Do not puncture refrigerant tubing.
•
Follow handling instructions carefully.
•
Flammable refrigerant used.
•
Failure to do so can result in death, explosion or fire.
•
If the refrigerator has been in a horizontal position for any period of
time, wait 24 hours to allow the refrigerant to settle before plugging in
the refrigerator.
When moving the refrigerator, DO NOT tilt it beyond 45° from upright.
NOTE: Tilting the refrigerator more than 45° could damage the
compressor and the sealed system.
Avoid placing excessive stress on the doors or top when moving the
refrigerator.
Page 19

INSTALL HANDLES
1. Locate and remove the shoulder screws from the parts bag.
2. Using a Phillips screwdriver, install the shoulder screws to the door
front, as shown.
3. Remove the door handle from the refrigerator compartment.
4. Place the ends of the handle over the shoulder screws.
Refrigerator
Safety
Requirements
Operating
Parts and
Features
Installation
a
b
c
a Handle
b Setscrews
c Shoulder screws
5. Using the hex-head wrench (provided), tighten the setscrews
(embedded in each end of the handle) to the shoulder screws. Do not
overtighten.
Before
Use
Refrigerator
Use
Refrigerator
Care
Troubleshooting
19
Page 20

Refrigerator
Safety
Requirements
Operating
Parts and
Features
Installation
Before
Use
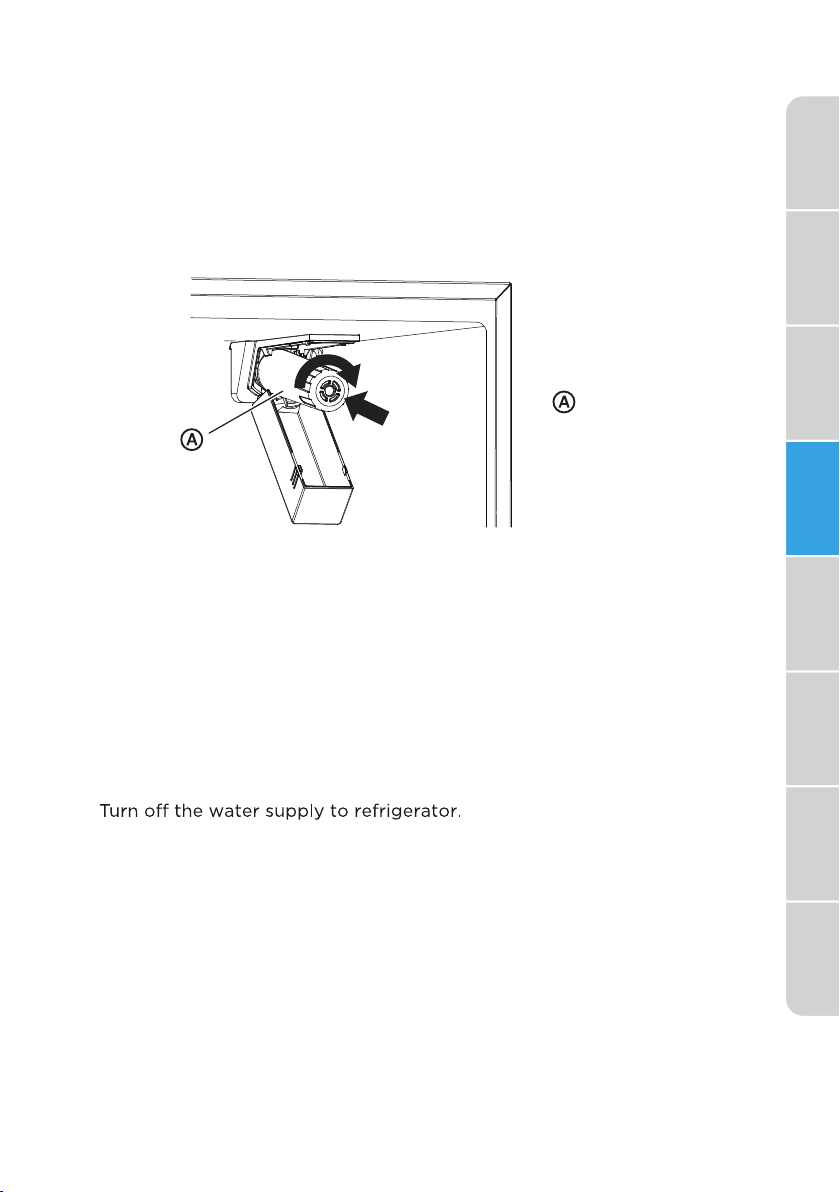
INSTALL WATER FILTER
REMOVE BYPASS PLUG
1. Turn o the water supply to refrigerator.
2. Squeeze the sides of the filter cover where marked, and then pull
downward to open the cover.
Filter cover
Turn the bypass plug counterclockwise, and then pull out to remove.
3.
IMPORTANT: Keep the bypass plug for later use. The ice maker and
dispenser will not operate unless either a water filter or the bypass
plug is properly installed.
Use
Care
Troubleshooting
20
Refrigerator
Refrigerator
Bypass plug
Page 21
INSTALL WATER FILTER
4. Remove the water filter from its packaging, and then remove the clear,
plastic cap from the filter head.
5. Align the tabs on the filter head with the notches in the opening, and
then insert the water filter into the opening. Press inward, while turning
the filter clockwise to install.
NOTE: The housing allows the filter to move slightly upward and
downward.
Water filter
Refrigerator
Safety
Requirements
Operating
Parts and
Features
Installation
6. Turn on the water supply to refrigerator.
7. Close the filter cover.
REPLACE WATER FILTER
The Water Filter icon on the control panel will illuminate after 150+ days to
indicate that it is time to order a replacement water filter. After 180+ days
the icon will illuminate and flash to indicate it is time to replace the water
filter.
1.
Turn the water filter counterclockwise, and then pull out to remove.
2.
Install a new water filter following steps 4 to 7 in the previous section.
3.
Press and hold the Water Filter control for 3 seconds to clear and reset
4.
the filter status clock.
NOTE:
The light will turn o and 3 beeps will sound.
.
21
Use
Use
Care
Troubleshooting
Before
Refrigerator
Refrigerator
Page 22

Refrigerator
Safety
Requirements
Operating
Parts and
Features
FLUSH THE WATER SYSTEM
After installing the replacement water filter it is important to flush air from
the water line so that water will not drip from the water dispenser.
1. Turn on the main water supply.
2. Dispense 2.5 gallons of water (flush for approximately 5 minutes) to
remove trapped air and contaminants from the system.
NOTE: Do not dispense the entire 2.5 gallon amount continuously.
Depress and release the dispenser pad for cycles of 30 seconds ON
and 60 seconds OFF. In some homes, additional flushing may be
required.
3. Open the refrigerator door to make sure there are no water leaks
coming from the water filter.
ALIGN DOORS (IF NEEDED)
Installation
Use
Use
Care
Troubleshooting
If the top edges of the refrigerator doors are not aligned, adjust the height
of the lower door.
Before
Refrigerator
1. Raise the lower door so that the top edge is level with the higher door.
Refrigerator
2. Using pliers, insert a snap ring (provided) into the gap between the
hinge-grommet and the lower door hinge.
NOTE: The number of snap rings used will depend on the size of the
gap.
Snap ring
a
b Door hinge
a
b
22
Page 23
LEVEL REFRIGERATOR
IMPORTANT: Level the refrigerator for proper operation and to avoid
cooling, frost and moisture problems that can occur if the doors do not
close completely.
1. Move the refrigerator to its final location. See “Move to Final Location.”
2. Place a carpenter's level on the top of the cabinet to check that the
refrigerator is level from side to side and tilted slightly downward
toward the back. If the refrigerator is not level, go to steps 3 and 4 to
adjust.
NOTE: The doors will close easier when the front of the refrigerator is
slightly higher than the back of the refrigerator.
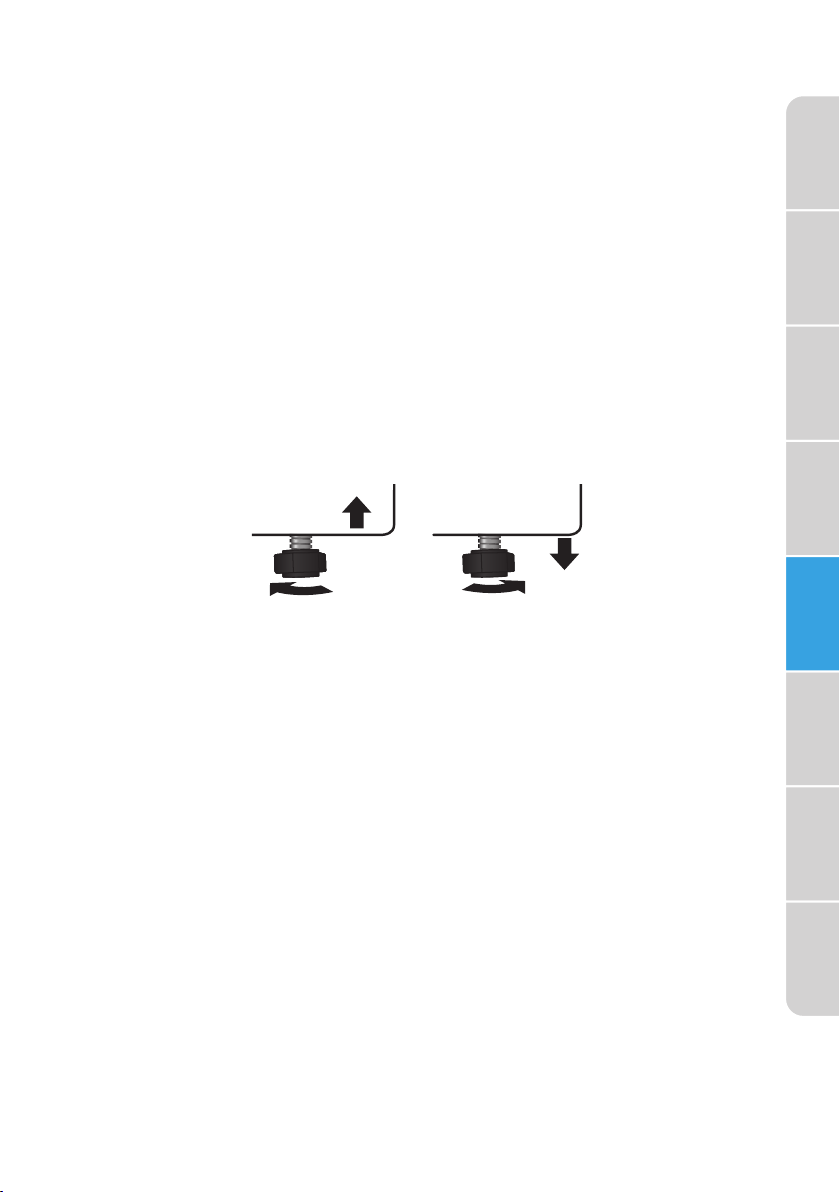
3. Using two or more people, adjust the leveling feet (one foot located at
each of the two front corners of the refrigerator cabinet).
4. With one person pressing against the top front of the refrigerator to
take weight off the leveling feet, the other(s) can then turn the leveling
feet to adjust the height of each side.
5. Use the carpenter's level to check the level and tilt.
To Raise - Turn the leveling feet clockwise.
To Lower - Turn the leveling feet counterclockwise.
BEFORE USE
Refrigerator
Safety
Requirements
Operating
Parts and
Features
Installation
Before
Use
Refrigerator
Use
WAITING PERIOD
Before plugging the refrigerator into a grounded 3-prong electrical
•
outlet, allow it to stand upright for approximately 2 hours.
NOTE: This reduces the possibility of a malfunction in the cooling
system caused by improper handling during transportation.
Allow the refrigerator to cool for 2 to 3 hours before adding food.
•
CLEANING
1. Wash the refrigerator interior using a soft cloth dampened with a
baking soda solution (2 tablespoons baking soda mixed with 1 quart of
warm water).
2. Using a soft cloth, thoroughly dry all surfaces.
Refrigerator
Care
Troubleshooting
23
Page 24

REFRIGERATOR USE
Refrigerator
Safety
GENERAL
•
Requirements
Operating
•
•
Parts and
Features
Installation
1. Plug refrigerator into a grounded 3 prong outlet.
2. Wait 30 minutes, and then open the refrigerator door to determine if
3. Load items into the refrigerator and freezer compartments.
Before
Use
ENERGY SAVING TIPS
•
Refrigerator
Use
•
•
Refrigerator
Care
Troubleshooting
•
•
The storage life of frozen foods varies and the recommended storage
time should not be exceeded.
Place frozen food into the freezer as quickly as possible after purchase.
Do not refreeze frozen foods which have thawed completely.
WARNING
Electrical Shock Hazard
Plug into a grounded 3 prong outlet.
•
Do not remove the ground prong from the power cord plug.
•
Do not use an adapter.
•
Do not use an extension cord.
•
Failure to do so can result in death, fire or electrical shock.
•
the refrigerator is cooling.
Allow hot foods to cool to room temperature before placing them in
the freezer. Foods that freeze too slowly may lose quality or spoil.
Do not overload the refrigerator with a large amount of unfrozen food.
Overloading forces the compressor to run longer, which decreases the
cooling efficiency of the refrigerator.
Wrap foods properly and wipe containers dry before placing them in
the refrigerator. This decreases frost build-up inside the refrigerator.
Do not line refrigerator storage shelves with aluminum foil, wax paper
or paper toweling. Liners interfere with cold air circulation, making the
refrigerator less efficient.
Organize and label food to reduce the number of door openings, and
length of time the door or drawer is open. Remove the items needed at
one time, and then close the door as soon as possible.
24
Page 25

Page 26
Refrigerator
Safety
Requirements
Operating
Parts and
Features
Installation
Before
Use
Refrigerator
Use
To adjust the temperature of the refrigerator and/or freezer
compartments:
1. Select the compartment by pressing either the Fridge Temp button or
the Freezer Temp button.
2. Press the + or – button to either raise or lower the temperature in
increments of 1° until the desired temperature is reached.
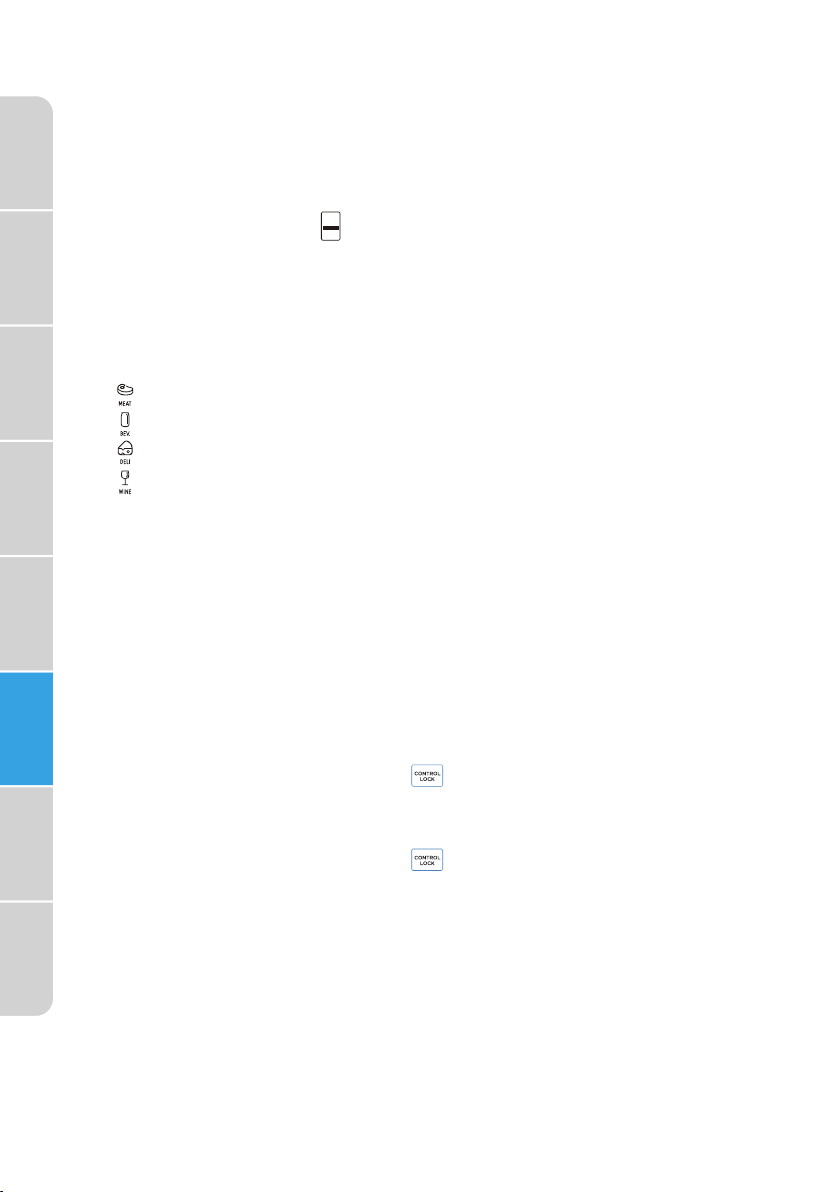
PerfectChill Flex Drawer
Select the internal temperature of the drawer from a menu of 4 preset
temperature options.
1. Press the Flex Drawer button repeatedly to toggle among the options
until the desired icon is illuminated.
NOTE: Select the temperature appropriate for the items being stored in
the drawer.
Temperature setting 30°F (-1°C): to store fresh meat
•
Temperature setting 34°F (1°C): to store beverages
•
Temperature setting 37°F (3°C) (DEFAULT): to store deli items
•
Temperature setting 41°F (5°C): to store wine
•
TEMPERATURE UNIT DISPLAY
The compartment temperatures can be viewed in either degrees
Fahrenheit (°F) or degrees Celsius (°C).
Press and hold the + and - controls at the same time for 3 seconds to
change the unit display from degrees Fahrenheit (°F) to degrees Celsius
(°C) or vice versa.
LOCK/UNLOCK CONTROLS
To Unlock the Controls:
Press and hold the Wake Up button for 3 seconds. A tone will sound,
Refrigerator
and the display will illuminate.
Care
To Lock the Controls:
Press and hold the Wake Up button for 3 seconds. A tone will sound,
and the display will turn o.
Troubleshooting
NOTE: After 30 seconds, if no control is pressed, the controls will
automatically lock.
26
Page 27

QUICK COOL MODE
Press and hold the Fridge Temp button for 3 seconds to enter Quick Cool
mode.
The Refrigerator Compartment icon will illuminate blue and
the temperature in the compartment will lower to 34°F (1°C).
Press and hold the Fridge Temp button again for 3 seconds to exit the
Quick Cool mode. The light will turn off, and the refrigerator compartment
temperature will return to the previously set temperature.
QUICK FREEZE MODE
Refrigerator
Safety
Requirements
Operating
Press and hold the Freezer Temp button for 3 seconds to enter the Quick
Freeze mode.
The Freezer Compartment icon will illuminate blue and the
temperature in the compartment will lower to -7°F (-22°C).
Press and hold the Freezer Temp button again for 3 seconds to exit the
Quick Freeze mode. The light will turn off, and the freezer compartment
temperature will return to the previously set temperature.
ENERGY SAVING MODE
Press the Energy Saving button to enter and exit Energy Saving mode.
Energy Saving will illuminate to indicate the mode is activated and turn
off when it is not activated.
When Energy Saving mode is activated, the refrigerator compartment
temperature is 44°F (7°C) and the freezer compartment temperature is
7°F (-14°C).
When Energy Saving mode is turned off, the refrigerator and freezer
compartment temperatures will revert to the previously set temperatures.
NOTE: If a temperature was set to either Quick Freeze or Quick Cool
mode, it will be automatically cancelled.
Parts and
Features
Installation
Before
Use
Refrigerator
Use
Refrigerator
Care
Troubleshooting
27
Page 28
Refrigerator
a
Safety
Requirements
Operating
Parts and
Features
Installation
Before
Use
Refrigerator
Use
ICE MAKER
Refrigerator Ice Maker
Press the REF-ICE button to turn ON/OFF the refrigerator
compartment ice maker. When the refrigerator ice maker is on, the control
will be illuminated.
Freezer Ice Maker
Press the FRZ-ICE button
to turn ON/OFF the freezer compartment ice
maker. When the freezer ice maker is on, the control will be illuminated.
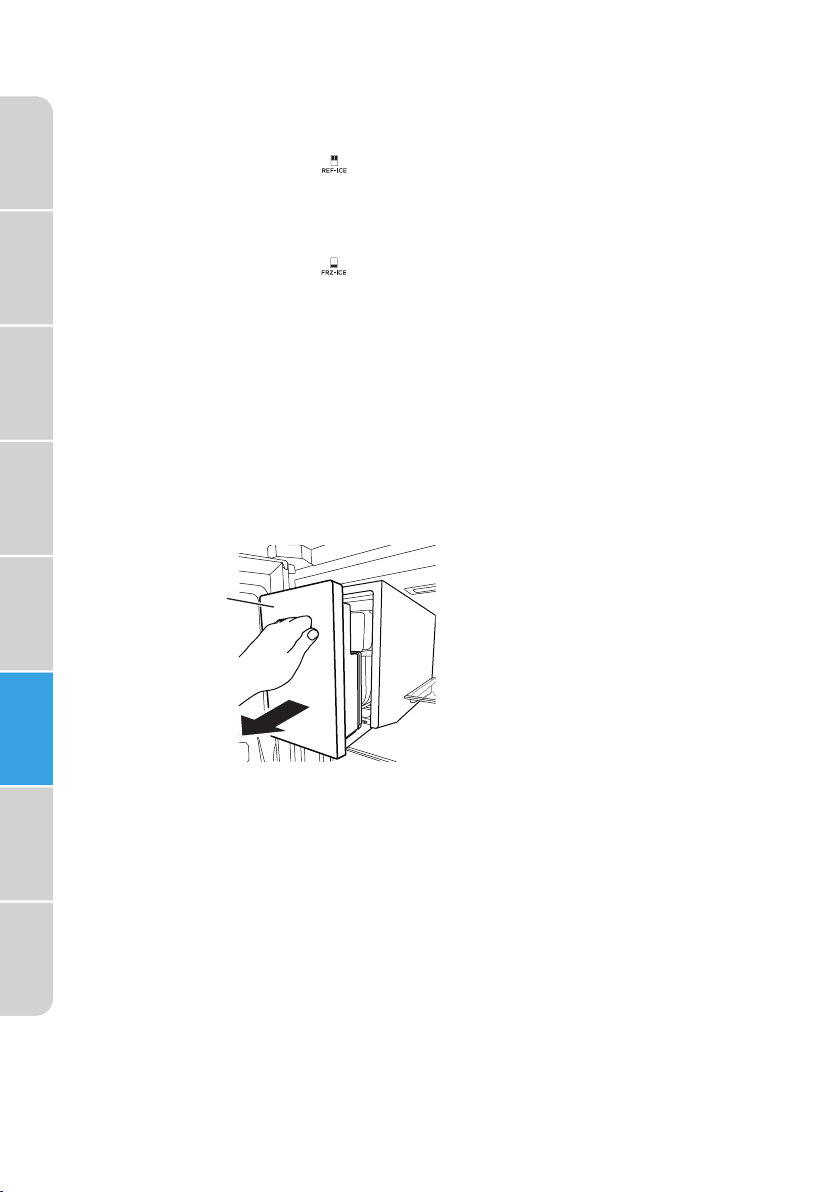
Refrigerator Ice Bin
The refrigerator compartment ice bin is removable for cleaning or
emptying when a large amount of cubed ice is needed.
After emptying and/or cleaning, replace the ice bin immediately. The
ice maker will continue to make ice, and the cubes will drop into the ice
making compartment if the ice bin is not properly installed.
To Remove the Ice Bin:
1. Open the left-hand refrigerator door as far as possible.
2. Grasp the ice bin handle and pull the bin out of the compartment.
a Ice bin
Refrigerator
Care
Troubleshooting
28
To Replace the Ice Bin:
1. Remove any ice cubes that may have fallen into the ice compartment.
2. Slide the ice bin into the compartment.
Page 29
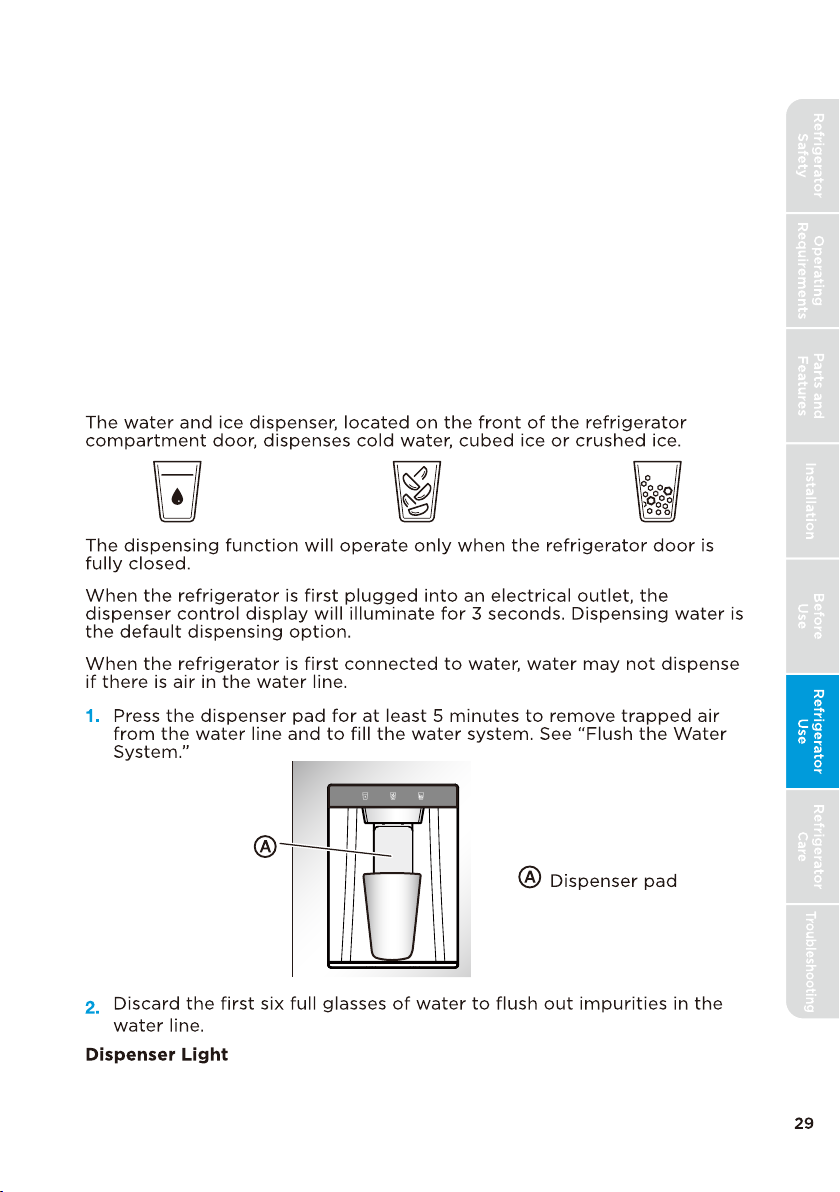
Dispenser Control Modes
The dispenser control incorporates backlit LED icons to designate the
operating mode of the dispenser. There are two display modes that you
can choose between, Standby Mode and Active Mode. You can switch
the modes by following the instruction in below. As the factory default,
the dispense control is in Standby Mode.
In Standby Mode, the dispenser icons are hidden until activated.
The icons can be activated by swiping your finger across the control
surface. The dispenser icons will turn off after 120 seconds automatically.
Standby Mode provides a minimalist look which some users prefer.
In Active Mode, the dispenser icons (Cubed, Water, Crushed) are always
on. The control uses brighter LED icon to indicate what dispensing mode
is selected.
Switching between Active Mode and Standby Mode: Press and hold
WATER and CRUSHED icons for 3 seconds. The dispenser control will
flash for 2 seconds, confirming the mode is changed.
Dispenser light turns on when dispensing water and ice. The LED light
will turn off after 3 seconds.
Page 30
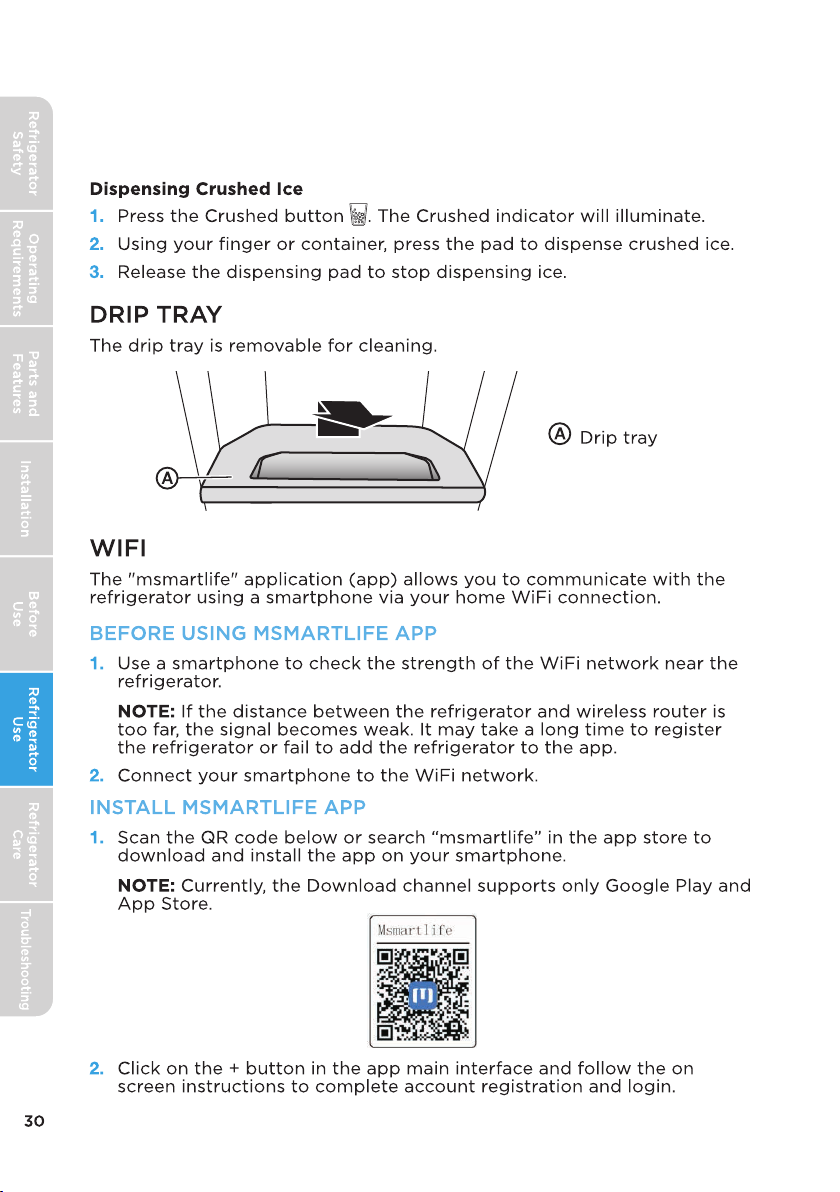
To use as a night light or extend the duration that the dispenser light is
on, press and hold Water and Cubed icons together for 3 seconds. The
dispenser light will turn off automatically after 12 hours. To turn off, hold
the same buttons again for 3 seconds.
Page 31

CONNECT SMARTPHONE TO REFRIGERATOR WIFI
1. Select "Add device."
2. Follow the on screen prompts in the app to then connect the
refrigerator to the WiFi network.
Refrigerator
Safety
Requirements
Operating
Parts and
Features
3. Follow the on screen prompts to add the refrigerator by first selecting
the appliance category, and then the refrigerator model number.
4. Press and hold the Wake Up button for 3 seconds to unlock the control
panel.
5. Press and hold the WiFi button for 4 seconds to enter the WiFi
network mode. "AP" will appear on the display.
6. Press and hold the Wake Up button for 3 seconds to complete the
setting.
NOTES:
If networking fails, refer to the prompts in the app. If it still does not
•
connect, unplug the refrigerator, wait a minute or longer, plug the
refrigerator back into the electrical outlet and try again.
When the pairing is completed, the WiFi icon on the control
•
panel will be illuminated.
7. To disable the WiFi function, press and hold the WiFi control for
4 seconds. The WiFi icon will turn off.
Installation
Before
Use
Refrigerator
Use
Refrigerator
Care
Troubleshooting
31
Page 32

NOTES
Refrigerator
Safety
•
•
•
Requirements
Operating
•
•
Parts and
Features
Installation
Use
FCC/IC COMPLIANCE STATEMENT:
This equipment has been tested and found to comply with the limits
for a Class B digital device, pursuant to Part 15 of the FCC Rules. These
limits are designed to provide reasonable protection against harmful
interference in a residential installation. This equipment generates uses
and can radiate radio frequency energy and, if not installed and used in
accordance with the instructions, may cause harmful interference to radio
communications. However,there is no guarantee that interference will not
occur in a particular installation. If this equipment does cause harmful
interference to radio or television reception, which can be determined by
turning the equipment off and on, the user is encouraged to try to correct
the interference by one or more of the following measures:
Before
•
•
•
Refrigerator
Use
Care
Troubleshooting
•
This device complies with Part 15 of the FCC Rules. Operation is subject to
the following two conditions:
1. This device may not cause harmful interference.
Refrigerator
2. This device must accept any interference received, including
Any changes or modifications to this unit not expressly approved by the
manufacturer could void the user’s authority to operate the equipment.
When connecting the device to the network, make sure the mobile
phone is as close as possible to the product.
Use an English letter combination only for the router WiFi name.
To avoid the impact of signal instability on the network, the number of
connected devices under the same router should not exceed ten.
If the router or WiFi name or passwords change, delete the registered
appliance, and repeat the Download and Install process and reconnect.
As the product technology is updated, the content of “msmartlife” may
be changed. For the most current information refer to the “msmartlife”
presentation guide.
Reorient or relocate the receiving antenna.
Increase the separation between the equipment and receiver.
Connect the equipment into an outlet on a circuit different from that to
which the receiver is connected.
Consult the dealer or an experienced radio/television technician for
help.
interference that may cause undesired operation.
32
INDUSTRY CANADA STATEMENT
This device contains licence-exempt transmitter(s)/receiver(s) that comply
with Innovation, Science and Economic Development Canada’s licence
exempt RSS(s). Operation is subject to the following two conditions:
1. This device may not cause interference.
2. This device must accept any interference, including interference that
may cause undesired operation of the device.
Page 33
REFRIGERATOR FEATURES
For flexible storage and ease of cleaning many refrigerator parts are
adjustable or removable.
Refrigerator
Safety
REMOVABLE SHELVES
The refrigerator shelves are removable and adjustable.
To Remove:
1. Remove all items from the shelf.
2. Tilt the front of the shelf upward.
3. Lift the back of the shelf up and pull the shelf bracket out of the
support.
To Replace:
1. Insert the upper ends of the shelf brackets into the desired support
slot.
2. Tilt the front of the shelf downward.
3. Insert the lower ends of the shelf brackets into the corresponding
support slots.
DELI NET
The deli net optimizes storage by allowing you to use the open area under
the shelf. The net holds a maximum load of 6 lb (3 kg).
Requirements
Operating
Parts and
Features
Installation
Before
Use
Refrigerator
Use
Refrigerator
Care
a
Pull
Deli net
a
Troubleshooting
33
Page 34
Refrigerator
a
Safety
Requirements
Operating
Parts and
Features
Installation
RETRACTABLE SHELF
The front section of the shelf can slide under the back section of the shelf
to accommodate taller items on the shelf below.
1. Pull up on the outer edge of the shelf, and then lower the back edge
under and push it in.
a
Retractable
shelf
a
GLIDE-OUT SHELF
1. Open both refrigerator doors as far as possible.
2. Grasp the sliding shelf and pull the shelf outward.
Before
Use
Refrigerator
Use
Refrigerator
Care
Troubleshooting
34
a Glide-out
shelf
CRISPER DRAWERS
a Humidity control
a
Slide the control to adjust the humidity level in the crisper drawer
between
LOW Humidity - Best storage of fruits and vegetables with skins.
HIGH Humidity - Best storage of fresh, leafy vegetables.
LOW (open) to HIGH (closed).
Page 35

REMOVABLE DOOR BINS
The door bins are removable for easier cleaning.
To Remove:
1. Remove all items from the door bin.
2. Grasp the sides of the bin, lift the bin up and pull it outward.
To Replace:
1. Insert bin into the door liner above the support, and then press
downward to engage.
TILT-OUT DOOR BIN
To Remove:
1. Tilt the bin fully outward and lift up.
Refrigerator
Safety
Requirements
Operating
Parts and
Features
Installation
Before
Use
To Replace:
1. Insert the bin into its compartment, and then press down to engage.
PERFECTCHILL FLEX DRAWER
For ease of cleaning, the inner drawer tray is removable.
1. Pull out the exterior drawer to its full extension.
2. Using both hands, grasp the left and right sides of the inner drawer
tray.
3. Lift up on the front end of the tray.
Refrigerator
Use
Refrigerator
Care
Troubleshooting
35
Page 36
Safety
a
4. Pull the tray slightly toward you to disengage the slots from the hooks
Refrigerator
on the slide rails.
Requirements
Operating
Parts and
Features
Installation
Before
Use
Refrigerator
Use
a
Slide rail hook
a
5. Once the tray is disengaged, push it slightly back into the opening until
the edge clears the outer drawer lip, and then lift the tray up and out.
FREEZER FEATURES
For flexible storage and ease of cleaning the interior compartments are
removable.
INTERIOR UPPER DRAWER
1. Pull out the exterior freezer drawer to its full extension.
2. Pull out the upper drawer to its full extension.
3. Lift upward on the front end of the drawer.
4. Pull the drawer slightly toward you to disengage the slots from the
hooks on the slide rails.
Refrigerator
Care
Troubleshooting
36
a Slide rail hook
5. Once the drawer is disengaged, push it slightly back into the opening
until the edge clears the outer drawer lip, and then lift the drawer up
and out.
Page 37
INTERIOR LOWER COMPARTMENT
1. Pull out the exterior freezer drawer to its full extension.
2. Lift upward on the front end of the lower storage compartment.
3. Pull the compartment slightly toward you to disengage the slots from
the hooks on the slide rails.
a Slide rail hook
a
4. Once the compartment is disengaged, push it slightly back into
the opening until the edge clears the outer drawer lip, and then lift
compartment up and out.
REFRIGERATOR CARE
Both the refrigerator and freezer compartments defrost automatically
and require minimal cleaning and maintenance. To keep your refrigerator
running efficiently and odor free, we recommend that you wipe up spills
immediately and clean the refrigerator regularly.
CLEANING
Refrigerator
Safety
Requirements
Operating
Parts and
Features
Installation
Before
Use
WARNING
Electrical Shock Hazard
Unplug your appliance or disconnect power before cleaning.
•
Failure to do so can result in death, electric shock or personal injury.
•
WARNING
Explosion Hazard
Use nonflammable cleaner.
•
Failure to do so can result in death, explosion or fire.
•
IMPORTANT: To prevent damage to the finish, DO NOT use gasoline,
benzine, thinner or other solvents, and DO NOT use abrasive cleaners.
1. Unplug the refrigerator from the electrical outlet.
2. Remove all food.
3. Remove and wash the shelves with a mild detergent solution.
Refrigerator
Use
Refrigerator
Care
Troubleshooting
37
Page 38

Refrigerator
Safety
Requirements
Operating
Parts and
Features
Installation
Before
Use
Refrigerator
Use
4. Wash the refrigerator interior using a soft cloth dampened with a
baking soda solution (2 tablespoons baking soda mixed with 1 quart of
warm water).
5. Clean the gasket around the door. Gently wipe the gasket using a soft
cloth dampened with a mild detergent solution.
NOTE: Gaskets must be kept clean and pliable to assure a proper seal.
6. Using a soft cloth, thoroughly dry all surfaces.
7. Plug in or reconnect power.
MOVING
IMPORTANT: When moving your refrigerator, DO NOT tilt it beyond 45°
from upright.
1. Unplug your refrigerator from the wall outlet.
2. Remove all food.
3. Securely tape down all loose items inside your refrigerator.
4. Tape the door shut.
STORAGE
IMPORTANT: Do not store refrigerator in a location that is accessible to
children.
1. Unplug your refrigerator from the electrical outlet.
2. Remove all food.
3. Clean the refrigerator.
4. Leave the door open slightly to avoid possible formation of
condensation, mold or odor.
REPLACING LIGHTS
Refrigerator
Care
Any replacement or maintenance of the LED lights is intended to be made
by the manufacturer, its service agent or similarly qualified person.
Troubleshooting
38
Page 39

TROUBLESHOOTING
IMPORTANT: DO NOT try to repair your refrigerator yourself. Doing so
invalidates the warranty.
Refrigerator
Safety
GENERAL
PROBLEM POSSIBLE CAUSE SOLUTION
The
refrigerator
is not on or is
not cooling
The
refrigerator
door does
not close
completely
The LED
lights do not
come on
The refrigerator is
unplugged.
Make sure that the
refrigerator power cord
is fully plugged into the
electrical outlet.
The fuse on the circuit
is blown or the circuit
breaker is tripped.
Check the house fuse /
circuit breaker box and
replace the fuse or reset
the circuit breaker.
Power failure. If a power failure occurs,
the refrigerator turns off.
Wait until the power is
restored.
Temperature control is not
set to correct temperature.
The clearance between
the refrigerator and
surrounding cabinets or
wall is insufficient.
Adjust the temperature to
a lower setting.
Make sure there is
adequate clearance
around the refrigerator,
and remove all items
from the top of the
refrigerator to maximize air
circulation. See “Location
Requirements.”
Food packages are
interfering with the door.
Move or remove some food
items.
The door gaskets are dirty. Clean the door gaskets.
The refrigerator may not
Level the refrigerator.
be level.
The refrigerator is
unplugged.
Plug refrigerator into a
grounded 3 prong outlet.
LED light is burned out. Contact a qualified
technician to replace the
burned out LED.
Requirements
Operating
Parts and
Features
Installation
Before
Use
Refrigerator
Use
Refrigerator
Care
Troubleshooting
39
Page 40

Refrigerator
Safety
Requirements
Operating
Parts and
Features
Installation
PROBLEM POSSIBLE CAUSE SOLUTION
Food in the
refrigerator is
not cold
The door has been opened
too often or was not closed
properly.
A large amount of food
was recently added.
Make sure that the door is
closed properly.
Allow time for the recently
added food to cool, and
then check again.
The door is not closed
completely.
Check the door gasket
and food distribution, and
make sure that the door
closes completely.
The refrigerator has been
disconnected for a period
of time.
Allow 4 hours for the
refrigerator to cool
completely before adding
food.
Items in the
refrigerator
compartment
are freezing
The temperature control is
set too warm.
The air vents are blocked. Place large items on the
Set the temperature
control to a colder setting.
sides of the top shelf so
that they are not blocking
the air circulating from the
vent in the center.
Before
Use
Refrigerator
Use
Refrigerator
Care
Troubleshooting
40
The
refrigerator
makes
unusual
noises or
vibrations
Moisture
is building
up in the
interior of the
refrigerator
The refrigerator may not
be level.
The refrigerator cabinet is
touching a wall.
Metal parts undergo
expansion and contraction.
Refrigerant is circulating
throughout the system.
The door has been opened
too often or was not closed
properly.
The refrigerator is located
in a humid area.
The weather is hot and
humid.
Adjust the leveling feet
located on the front
corners of the refrigerator
until the refrigerator is
level.
Move the refrigerator away
from the wall.
This is normal.
This is normal.
Make sure that the door is
closed properly.
Move the refrigerator to a
drier location.
This is normal.
Page 41

PROBLEM POSSIBLE CAUSE SOLUTION
The
compressor
turns on and
off frequently.
The room temperature is
hotter than normal.
A large amount of food
was recently added.
This is normal.
Allow time for the recently
added food to cool, and
then check again.
The door is not closed
completely or was opened
too often.
Check the door gasket and
food distribution to make
sure the door will close
completely.
The refrigerator has been
disconnected for a period
of time.
Allow 4 hours for the
refrigerator to cool
completely before adding
food.
The temperature control
was not set correctly.
Set the temperature
control to the correct
setting.
Refrigerator
has an odor
Refrigerator needs
cleaning.
Improperly wrapped food
is giving off an odor.
Clean the refrigerator. See,
“Cleaning.”
Wrap food tightly or seal
before storing it in the
refrigerator.
Refrigerator
Safety
Requirements
Operating
Parts and
Features
Installation
Before
Use
Refrigerator
Use
Refrigerator
Care
Troubleshooting
41
Page 42

Refrigerator
Safety
Requirements
Operating
Parts and
Features
Installation
Before
Use
Refrigerator
Use
Refrigerator
Care
ICE AND WATER
PROBLEM POSSIBLE CAUSE SOLUTION
The ice
maker is not
producing
ice or is not
producing
enough ice
The ice cubes
are hollow or
small
NOTE: This is
an indication
of low water
pressure.
The refrigerator is not
connected to a water
supply or the water supply
shutoff valve is not turned
on.
The ice maker(s) are
turned off.
The refrigerator has just
been installed.
The ice storage bin is not
in place.
A large amount of ice was
recently removed.
An ice cube is jammed in
the ice maker ejector arm.
The water shutoff valve is
not fully open.
There is a kink in the water
source line.
A water filter is installed
on the refrigerator.
Connect refrigerator to
water supply and turn
water shutoff valve fully
open.
Turn on the ice maker(s).
See “Controls.”
Wait 12 hours after ice
maker installation for ice
production to begin.
Make sure the ice storage
bin is correctly installed.
Allow sufficient time for
ice maker to produce more
ice.
Remove ice from the
ejector arm with a plastic
utensil.
Turn the water shutoff
valve fully open.
A kink in the line can
reduce water flow.
Straighten the water
source line.
Remove the water filter
and operate the ice maker.
If ice volume improves,
then the filter may be
clogged or incorrectly
installed. Replace filter or
reinstall it correctly.
Troubleshooting
42
Page 43

PROBLEM POSSIBLE CAUSE SOLUTION
The water
and ice
dispenser do
not operate
properly
The refrigerator is not
connected to a water
supply or the water supply
shutoff valve is not turned
on.
There is a kink in the water
source line.
Connect the refrigerator to
the water supply and turn
the water shutoff valve
fully open.
A kink in the line can
reduce water flow.
Straighten the water
source line.
Inadequate water pressure
to the house.
The water pressure to
the house determines the
flow from the dispenser.
See “Water Supply
Requirements.”
A refrigerator door is not
closed completely.
Make sure both doors
to the refrigerator
compartment are
completely closed.
The water filter or bypass
plug is not installed
properly.
Water cannot be
dispensed without a water
filter or the bypass plug
correctly installed. See
“Water Filter.”
Ice is blocking the ice
delivery chute.
Remove the ice bin
from the upper ice
compartment. Check the
delivery chute and remove
jammed ice using a plastic
utensil, if necessary. Clean
the ice delivery chute and
the ice bin using a warm,
damp cloth, and then dry
both thoroughly.
To avoid ice jams and to
maintain a fresh supply of
ice, empty the ice bin and
clean both the bin and
delivery chute regularly.
Ice bin is not properly
seated in the ice maker
Check the position of the
ice bin.
compartment.
Refrigerator
Safety
Requirements
Operating
Parts and
Features
Installation
Before
Use
Refrigerator
Use
Refrigerator
Care
Troubleshooting
43
Page 44

Refrigerator
Safety
Requirements
Operating
Parts and
Features
Installation
Before
Use
Refrigerator
Use
Refrigerator
Care
Troubleshooting
PROBLEM POSSIBLE CAUSE SOLUTION
Water is
leaking or
dripping from
the dispenser
system
NOTE: A
few drops of
water after
dispensing is
normal.
The glass was not held
under the dispenser long
enough.
The water filter was
recently installed or
replaced.
Hold the glass under the
dispenser 2 to 3 seconds
after releasing the
dispenser pad.
Flushing the water system
removes the air from the
lines which causes the
water dispenser to drip.
Flush the water system.
See “Flush the Water
System.”
The water
from the
dispenser
tastes bad
Water from
the dispenser
is warm
Water has not been
dispensed recently
(approx. 4 days).
The water filter needs to
be replaced.
The refrigerator has just
been installed.
The refrigerator is not
connected to a cold water
pipe.
A large amount of water
was recently dispensed.
Water has not been
recently dispensed.
Dispense and discard at
least 1 gallon of water.
Replace the water filter
when indicated.
Allow 24 hours after
installation for the water
supply to cool completely.
Make sure the refrigerator
is connected to a cold
water pipe.
Allow 3 hours for the water
supply to cool completely.
The first glass of water
may not be cool. Discard
the first glass of water
dispensed.
Water is
leaking
The water line connections
were not fully tightened.
See “Connect to Water.”
from the
back of the
refrigerator
Water is
leaking from
the pan under
the freezer
drawer
The refrigerator is
automatically defrosting
more frequently.
Empty the drip pan. Make
sure the refrigerator is
not overcrowded and that
stored food with a high
liquid content, such as
soups, are tightly sealed.
The doors or drawers are
not closed completely
allowing warm air to enter.
Make sure all doors
and drawers are closed
completely.
44
Page 45

ERROR CODES
Error codes appear in the Temperature Display area of the control panel.
Refrigerator
Safety
Error
Code
EH
F5
F4
CC
C9
CA
F6
E0
E1
E2
E3
E4
E5
E6
E7
EE
EP
Error Description
Humidity sensor failure
Refrigerator ice maker fails to turn
Refrigerator ice maker sensor failure
Defrost sensor in ice maker compartment failure
Ice maker compartment sensor failure
Communication failure between main board and ice maker
board
Refrigerator ice maker initialization failure
Freezer ice maker initialization failure
Refrigerator compartment temperature sensor failure
Freezer compartment temperature sensor failure
PerfectChill flex drawer sensor failure
Refrigerator compartment frost sensor failure
Freezer compartment frost sensor failure
Communication failure between main board and display board
Ambient temperature sensor failure
Freezer ice maker sensor failure
Freezer ice maker fails to turn
Requirements
Operating
Parts and
Features
Installation
Before
Use
Refrigerator
Use
Refrigerator
Care
Troubleshooting
45
Page 46

PERFORMANCE DATA SHEET
WATER FILTRATION SYSTEM
MODEL MF-2008-R2 CAPACITY 200 GALLONS (757 LITERS)
System tested and certified by NSF International against
NSF/ANSI Standards 42 and 53 for the reduction of contaminants
specified on the Performance Data Sheet.
This system has been tested according to NSF/ANSI Standards 42 and 53 for the reduction
of the substances listed below. The concentration of the indicated substances in water
entering the system was reduced to a concentration less than or equal to the permissible
limit for water leaving the system, as specified in NSF/ANSI Standards 42 and 53.
Substance Reduction Influent challenge
Chlorine Reduction
Particulate
Reduction, Class I*
Lead Reduction
Live Cysts†
Test Parameters: pH = 7.69 ± 0.5 unless otherwise noted. Flow = 0.52 gpm (1.89 Lpm).
Pressure = 60 psig (413.7 kPa).
Temp. = 68°F to 71.6°F (20°C to 22°C). Rated service capacity = 200 gallons (757 liters).
It is important that operational,
•
maintenance, and filter replacement
requirements be carried out for the
product to perform as advertised.
Property damage can occur if all
instructions are not followed.
The disposable cartridge must be
•
changed at least every 6 months.
Use replacement filter MF-2008-R2.
•
The filter monitor system measures the
•
amount of water that passes through
the filter and alerts you when it is time
to replace the filter. See “Using the
Controls.”
After changing the water filter, flush the
•
water system. See “Dispenser.”
These contaminants are not necessarily
•
in your water supply. While testing was
performed under standard laboratory
conditions, actual performance may
vary.
The product is for cold water use only.
•
The water system must be installed in
•
compliance with state and local laws
and regulations.
46
concentration
(mg/L)
2.0 mg/L ± 10% NA 93.7% 50%
≥10000/ml NA >99.9% ≥85%
0.15mg/L ± 10% ≤0.010 99.60% NA
50000/L NA >99.99% 99.95%
Maximum permissible
product water
concentration (mg/L)
Do not use with water that is
•
microbiologically unsafe or of unknown
quality without adequate disinfection
before or after the system. Systems
certified for cyst reduction may be used
on disinfected waters that may contain
filterable cysts. EPA Est. No. 10350-MN-
005.
Refer to the “Warranty” section for the
•
Manufacturer’s limited warranty, name
and telephone number.
Application Guidelines/
Water Supply Parameters
Water Supply Potable City or Well
Water Pressure 35 - 120 psi
Water
Temperature
Service Flow
Rate
* Class I particle size: >0.5 to <1 µm.
†
Based on the use of Cryptosporidium parvum
oocysts.
®
NSF is a registered trademark of NSF
International.
Avg %
Reduction
(241 - 827 kPa)
33° - 100°F
(1° - 38°C)
0.52 gpm (1.89 L/min.)
@ 60 psi
NSF
Reduction
Requirements
Page 47

ATTACH YOUR RECEIPT HERE. PROOF OF PURCHASE
IS REQUIRED TO OBTAIN WARRANTY SERVICE.
MIDEA
REFRIGERATOR
LIMITED
WARRANTY
Please have the following information available when you
call the Customer Service Center:
■ Name, address and telephone number
■ Model number and serial number
■ A clear, detailed description of the problem
■ Proof of purchase including dealer or retailer
name and address
IF YOU NEED SERVICE:
1. Before contacting us to arrange service, please determine whether your product requires repair.
Some questions can be addressed without service. Please take a few minutes to review the
Troubleshooting section of the User Manual, or visit http://us.Midea.com/support
2. All warranty service is provided exclusively by our authorized Midea Service Providers, in the
U.S. and Canada.
In the U.S.A. or Canada, call 1-866-646-4332.
If outside the 50 States of the United States or Canada, contact your authorized Midea dealer to
determine whether another warranty applies.
FIRST YEAR LIMITED WARRANTY (PARTS AND LABOR)
Midea will repair or replace, without charge, any defects due to faulty materials or workmanship for
one full year from the date of purchase. For further detail of warranty coverage and warranty repair
information, visit www.midea.com or call 1-866-646-4332.
Consumer will be responsible for:
■ Diagnostics, removal, transportation and reinstallation cost required because of service.
■ Costs of service calls that are a result of items listed under NORMAL RESPONSIBILITIES
OF THE CONSUMER**
NORMAL RESPONSIBILITIES OF THE CONSUMER**
This warranty applies only to products in ordinary household use, and the consumer is
responsible for the items listed below:
1. Proper use of the appliance in accordance with the instructions provided with the product.
2. Routine maintenance and cleaning necessary to keep the good working condition.
3. Proper installation by an authorized service professional in accordance with instructions provided
with the appliance and in accordance with all local plumbing, electrical and / or gas codes.
4. Proper connection to a grounded power supply of sufficient voltage, replacement of blown
fuses, repair of loosened connections or defects in house wiring.
5. Expenses for making the appliance accessible for servicing.
6. Damages to finish after installation.
YOUR SOLE AND EXCLUSIVE REMEDY UNDER THIS LIMITED WARRANTY SHALL BE PRODUCT
REPAIR OR REPLACEMENT AS PROVIDED HEREIN. Service must be provided by a Midea designated
service company. This limited warranty is valid only in the 50 States of the United States or Canada
and applies only when the major appliance is used in the country in which it was purchased. This
limited warranty is effective from the date of original consumer purchase. Proof of original purchase
date is required to obtain service under this limited warranty.
Midea Customer Service
1 YEAR PARTS AND LABOR
WHAT IS COVERED
47
Page 48

WHAT IS NOT COVERED
1. Failure caused by damage to the unit while in your possession (other than damage caused
by defect or malfunction), by its improper installation, or by unreasonable use of the product,
including without limitation, failure to provide reasonable and necessary maintenance or to
follow the written Installation and Instruction Manual.
2. Products purchased “as-is” or refurbished are not covered by this warranty.
3. Food loss caused by refrigerator or freezer failure.
4. Service calls to repair or replace consumables such as water filters, light bulbs airfilters etc., or
handles, knobs and other cosmetic parts.
5. Product that has been transferred from its original owner.
6. Interior or exterior rust on the unit.
7. Damages caused by services performed by persons other than authorized Midea servicers; use
of parts other than Midea replacement parts; obtained from persons other than such Midea
customer service; or external causes such as abuse, misuse, inadequate power supply or acts of
God.
8. Service calls resulting from improper installation of your product.
9. Service calls to instruct you on the use of your product.
10. Surcharges including, but not limited to, any after hour, weekend, or holiday service calls, tolls,
ferry trip charges, or mileage expense for service calls to remote areas, including the state of
Alaska.
11. If the unit is put to commercial, business, rental, or other use or application other than for
consumer use, we make no warranties, express or implied, including but not limited to, any
implied warranty of merchantablility or fitness for particular use or purpose.
12. Product that has been removed outside the USA or Canada.
13. Products without original serial numbers or products that have serial numbers which have been
altered or cannot be readily determined.
NOTE: Some states do not allow the exclusion or limitation of incidental or consequential damages.
So this limitation or exclusion may not apply to you.
The cost of repair or replacement under these excluded circumstances shall be borne by the
customer.
DISCLAIMER OF IMPLIED WARRANTIES
IMPLIED WARRANTIES, INCLUDING ANY IMPLIED WARRANTY OF MERCHANTABILITY OR
IMPLIED WARRANTY OF FITNESS FOR A PARTICULAR PURPOSE, ARE LIMITED TO ONE
YEAR OR THE SHORTEST PERIOD ALLOWED BY LAW. Some states and provinces do not allow
limitations on the duration of implied warranties of merchantability or fitness, so this limitation may
not apply to you. This warranty gives you specific legal rights, and you also may have other rights
that vary from state to state or province to province.
DISCLAIMER OF REPRESENTATIONS OUTSIDE OF WARRANTY
Midea makes no representations about the quality, durability, or need for service or repair of this
major appliance other than the representations contained in this warranty. If you want a longer or
more comprehensive warranty than the limited warranty that comes with this major appliance, you
should ask Midea or your retailer about buying an extended warranty.
LIMITATION OF REMEDIES; EXCLUSION OF INCIDENTAL AND CONSEQUENTIAL DAMAGES
YOUR SOLE AND EXCLUSIVE REMEDY UNDER THIS LIMITED WARRANTY SHALL BE
PRODUCT REPAIR AS PROVIDED HEREIN. MIDEA SHALL NOT BE LIABLE FOR INCIDENTAL OR
CONSEQUENTIAL DAMAGES. Some states and provinces do not allow the exclusion or limitation of
incidental or consequential damages, so these limitations and exclusions may not apply to you. This
warranty gives you specific legal rights, and you also may have other rights that vary from state to
state or province to province.
05/19
48
Page 49

Réfrigérateur à
double porte à
congélateur inférieur
Alimentation en électricité :
115 V
Fréquence : 60 Hz
Capacité : 21.6 cu. ft.
fr
GUIDE DE L’UTILISATEUR
Avertissement :
Avant d’utiliser ce produit,
veuillez lire le présent guide
avec soin et le conserver aux
fins de consultation ultérieure.
Le concept et les spécifications
peuvent changer sans préavis à
titre d’amélioration de produit.
Consultez votre concessionnaire
ou fabricant pour obtenir des
précisions.
version A - 08 - 2020
Extension gratuite
de 3 mois de la période
de garantie limitée initiale!*
Envoyez simplement une
photo de votre preuve d’achat
par message texte au :
1-844-224-1614
*L’extension de garantie porte sur
les trois mois suivant immédiatement
la fin de la période de garantie
initiale du produit.
MODÈLE NUMÉRO MRQ22D7AST
www.midea.com
Page 50

Cher utilisateur
Mercide laisser Midea vous aider à « vous sentir comme chez vous ».
Ce manuel fait partie de notre engagement envers votre entière
satisfaction. Veuillez lire le présent manuel attentivement avant
d’utiliser le produit et le conserver dans un endroit pratique pour
consultation ultérieure.
Pour nous aider à mieux vous servir, veuillez envisager d’enregistrer
votre produit en utilisant notre application pratique MSmartlife de
Midea, en consultant la page http://www.midea.com, ou en envoyant
une photo de votre preuve d’achat par message texte au
1-844-224-1614.
En utilisant l’option de texte, vous obtiendrez une prolongation
de garantie supplémentaire de trois mois immédiatement après
l’achèvement de la garantie originale du produit.
SÉCURITÉ DE RÉFRIGÉRATEUR .....................................................3
EXIGENCES EN MATIÈRE DE FONCTIONNEMENT ......................7
Exigences en matière d’emplacement .............................................7
Exigences électriques .............................................................................8
Exigences relatives à l’alimentation en eau ....................................9
PIÈCES ET CARACTÉRISTIQUES ..................................................10
INSTALLATION ..................................................................................11
Déballage .................................................................................................... 1 1
Dépose des portes (au besoin seulement)....................................11
Raccordement à l’eau ........................................................................... 16
Déplacez à sa destination finale ....................................................... 18
Installation des poignées ..................................................................... 19
Installation du filtre à eau ................................................................... 2
Aligner les portes (au besoin) .......................................................... 22
Mettez le réfrigérateur de niveau .................................................... 22
AVANT L’UTILISATION ....................................................................23
Période d’attente ................................................................................... 23
Nettoyage ................................................................................................. 23
UTILISATION DU RÉFRIGÉRATEUR ............................................. 24
Généralités ............................................................................................... 24
Commandes ............................................................................................. 25
Machine à glaçons ................................................................................. 28
Distributeur .............................................................................................. 29
0
Page 51

Bac de récupération ............................................................................. 3
AVERTISSEMENT
Wifi .............................................................................................................. 3
Déclaration de conformité aux normes FCC/IC : ...................... 32
Déclaration d'industrie Canada ........................................................ 33
Caractéristiques du réfrigérateur .................................................... 33
Préréglées perfectchill ......................................................................... 35
Caractéristiques du congélateur .....................................................36
ENTRETIEN DU RÉFRIGÉRATEUR ................................................37
Nettoyage ................................................................................................. 37
Déplacement ........................................................................................... 38
Emplacement .......................................................................................... 38
Remplacement des ampoules .......................................................... 38
DÉPANNAGE ................................................................................... 39
Généralités ............................................................................................... 39
Glaçons et eau ........................................................................................ 42
Codes d’erreur ........................................................................................ 45
FEUILLE DE DONNÉES SUR LA PERFORMANCE ...................... 46
GARANTIE ....................................................................................... 47
SÉCURITÉ DE RÉFRIGÉRATEUR
0
réfrigérateur
0
Sécurité de
Fonctionnement
Exigences en
Matière de
Caractéristiques
Pièces et
Installation
l’utilisation
Avant
VOTRE SÉCURITÉ PERSONNELLE ET CELLE DES AUTRES
PERSONNES SONT D’UNE IMPORTANCE CAPITALE
Pour éviter toutes blessures de l’utilisateur ou d’autres personnes et tous
dommages matériels, il est impératif de suivre les instructions dans le
présent guide. Une utilisation incorrecte de l’appareil en raison du nonrespect des instructions peut causer des blessures ou des dommages, et
même la mort.
Les indications suivantes illustrent le niveau de risque.
Ce symbole signale la possibilité de mort ou de blessure
AVERTISSEMENT
ATTENTION
grave.
Ce symbole signale la possibilité de blessure ou de
dommages matériels.
Ce symbole signale la possibilité d’une tension dangereuse
constituant un risque de choc électrique susceptible
d’entraîner la mort ou une blessure grave.
Utilisation du
réfrigérateur
réfrigérateur
Entretien du
Dépannage
3
Page 52

réfrigérateur
Sécurité de
Fonctionnement
Exigences en
Matière de
Caractéristiques
Pièces et
Installation
l’utilisation
Avant
Utilisation du
réfrigérateur
réfrigérateur
Entretien du
CONSIGNES DE SÉCURITÉ
IMPORTANTES
AVERTISSEMENT
SÉCURITÉ EN MATIÈRE D’ÉLECTROMÉNAGERS
Lisez tous les avertissements en matière de sécurité, les directives et
•
les spécifications fournies avec cet appareil. Le défaut de lire toutes
les directives pourrait entraîner une décharge électrique, un incendie
et/ou une blessure grave.
Conservez tous les avertissements et les directives pour référence
•
future.
SÉCURITÉ ÉLECTRIQUE
Branchez dans une prise à 3 fiches mise à la terre.
•
Ne retirez pas la fiche de mise à la terre.
•
N’utilisez pas d’adaptateur.
•
Débranchez le cordon d’alimentation en tenant la prise, jamais en
•
tirant sur le cordon.
Ne jamais activer ou désactiver l’appareil en branchant ou en
•
débranchant le cordon d’alimentation.
Ne jamais utiliser de rallonge.
•
Débranchez le réfrigérateur avant de le nettoyer ou de le dégivrer.
•
REMARQUE : La mise hors tension du réfrigérateur ne peut pas être
effectuée à partir du panneau de commande.
Exigences de mise à la masse
Ce réfrigérateur doit être mis à la masse. Ce réfrigérateur est doté
•
d’une fiche de mise à la masse. La fiche doit être insérée dans une
prise qui a été installée et mise à la masse de façon appropriée.
L’utilisation inappropriée de la fiche de mise à la masse peut
•
provoquer une décharge électrique. Consultez un électricien certifié
ou un préposé à l’entretien si vous ne comprenez pas les directives
de mise à la masse ou si vous croyez que le réfrigérateur ne fait pas
l’objet d’une mise à la masse appropriée.
Dépannage
4
SÉCURITÉ DE L’EMPLACEMENT
Ce réfrigérateur a été conçu pour une utilisation résidentielle ou
•
l’équivalent.
Installez-le en respectant les consignes du fabricant.
•
Le réfrigérateur ne doit pas être encastré dans un endroit
•
restreignant. Il est conçu pour se retrouver à aire ouverte seulement.
AVERTISSEMENT — Gardez les ouvertures de ventilation du
réfrigérateur à l’écart des obstructions.
Page 53

Lors du déplacement du réfrigérateur, veiller à ne pas rouler sur le
•
cordon d’alimentation ou l’endommager.
Ne jamais installer près d’une source de chaleur comme une plinthe,
•
un radiateur, un poêle ou autre appareil de cuisson ou en plein soleil.
Tenir les matériaux et vapeurs inflammables, comme l’essence,
•
éloignés du réfrigérateur.
SÉCURITÉ — UTILISATION ET SOINS
Fluide frigorigène inflammable utilisé. Suivez attentivement les
•
directives de manutention. Risque d’incendie ou d’explosion si le tube
de fluide frigorigène est perforé.
Fluide frigorigène inflammable utilisé. N’utilisez pas de dispositif
•
mécanique pour dégivrer le congélateur. Ne perforez pas le tube du
fluide frigorigène.
Ne jamais remiser ou utiliser d’essence ou autre liquides inflammables
•
près de ce réfrigérateur.
Deux personnes ou plus sont nécessaires pour déplacer ou installer le
•
réfrigérateur.
Raccorder le réfrigérateur à une source d’alimentation en eau potable
•
pour la machine à glaçons et le distributeur d’eau.
Cet appareil n’est pas destiné à des personnes (y compris des
•
enfants) à capacités réduites, tant physiques que sensorielles ou
mentales, ou qui n’ont aucune expérience ou connaissance, à moins
d’être sous la supervision ou d’avoir obtenu des directives d’une
personne responsable et qualifiée.
Les enfants doivent faire l’objet d’une supervision afin de s’assurer
•
qu’ils ne tentent PAS de jouer avec l’appareil.
Garder les doigts éloignés des zones avec “points de pincement”.
•
Les dégagements entre les portes et entre les portes et la caisse sont
forcément petits. Attention lors de la fermeture des portes si des
enfants se trouvent à proximité.
Ne pas utiliser d’appareils électriques à l’intérieur des compartiments
•
de l’appareil destinés aux denrées alimentaires, à moins qu’ils ne
soient du type recommandé par le fabricant.
NE JAMAIS toucher à l’intérieur du congélateur alors que vos mains
•
sont mouillées. Ceci pourrait provoquer une engelure.
Utilisez un nettoyant non inflammable. Nettoyez uniquement avec un
•
linge humide.
Pour tous les réfrigérateurs dotés d’une machine à glaçons, éviter
•
tout contact avec les pièces mobiles du mécanisme d’éjection ou
avec l’élément chauffant qui libère les glaçons. Ne pas mettre les
doigts ou les mains sur le mécanisme de fabrication de glaçons
lorsque le réfrigérateur est branché.
Ne pas utiliser d’appareils électriques sur le dessus du réfrigérateur, à
•
moins qu’ils ne soient du type recommandé par le fabricant.
réfrigérateur
Sécurité de
Fonctionnement
Exigences en
Matière de
Caractéristiques
Pièces et
Installation
l’utilisation
Avant
Utilisation du
réfrigérateur
réfrigérateur
Entretien du
Dépannage
5
Page 54

réfrigérateur
Sécurité de
Fonctionnement
Exigences en
Matière de
Caractéristiques
Pièces et
Installation
l’utilisation
Avant
Utilisation du
réfrigérateur
Ne pas placer d’objets lourds sur le dessus du réfrigérateur, sachant
•
que ces objets peuvent tomber lorsque les portes sont ouvertes ou
fermées.
Ne pas stocker de bières, boissons ou autres liquides contenus
•
dans des bouteilles ni de contenants fermés dans le congélateur.
Les bouteilles et les contenants peuvent se briser en raison de la
congélation.
SÉCURITÉ — ENTRETIEN
Débranchez l’appareil avant d’effectuer l’entretien.
•
Fluide frigorigène inflammable utilisé. Doit être réparé uniquement
•
par une personne formée. Ne perforez PAS le tube du fluide
frigorigène.
Faites appel à une personne d’entretien qualifiée. Ne réparez pas
•
ou ne remplacez pas de pièces sur cet appareil à moins qu’il ne le
soit recommandé dans le manuel. L’appareil doit faire l’objet d’un
entretien s’il a été endommagé au niveau du cordon d’alimentation
ou de la fiche, si le fluide s’est échappé ou si des objets sont tombés
dans l’appareil, ou encore si ce dernier a été exposé à la pluie ou à
l’humidité, ne fonctionne pas normalement ou a fait l’objet d’une
chute.
Si le cordon d’alimentation est endommagé, il doit être remplacé
•
par le fabricant, l’agent responsable de son entretien, ou toute autre
personne qualifiée, afin d’éviter tout danger.
Si un composant est endommagé, il doit être remplacé par le
•
fabricant, l’agent responsable de son entretien, ou toute autre
personne qualifiée, afin d’éviter tout danger.
Remplacez toutes les pièces et les panneaux avant de faire
•
fonctionner.
réfrigérateur
Entretien du
Dépannage
6
CONSERVER CES CONSIGNES
CET APPAREIL EST UNIQUEMENT DESTINÉ À
UN USAGE DOMESTIQUE
Avertissement - Proposition 65 de l’État de Californie:
AVERTISSEMENT : Cancer et effets nocifs sur la reproduction
-www.P65Warnings.ca.gov.
Page 55

MISE AU REBUT APPROPRIÉE
AVERTISSEMENT
Dangers de suffocation
Avant de mettre au rebut votre ancien réfrigérateur:
Déposez les portes et les tiroirs de sorte que les enfants ne puissent
•
se cacher ou s’emprisonner dans l’ancien appareil.
Laissez les étagères en place, faisant en sorte que les enfants ne
•
puissent y pénétrer.
Le défaut de respecter ces directives peut entraîner la mort ou des
•
dommages au cerveau.
IMPORTANT : Le réfrigérant et la mousse de cyclopentane utilisés pour
l’appareil sont inflammables. Il en revient au consommateur de respecter
les règlements fédéraux et municipaux lors de la mise au rebut de ce
produit. Les fluides frigorigènes doivent être évacués par un technicien
certifié et agréé de l’EPA en matière de fluide frigorigène, selon les
procédures établies.
EXIGENCES EN MATIÈRE DE
FONCTIONNEMENT
EXIGENCES EN MATIÈRE D’EMPLACEMENT
réfrigérateur
Sécurité de
Fonctionnement
Exigences en
Matière de
Caractéristiques
Pièces et
Installation
l’utilisation
Avant
AVERTISSEMENT
Danger d’explosion et d’incendie
Gardez les matériaux et vapeurs inflammables, comme de l’essence, à
•
l’écart de cet appareil.
Le non-respect de cette directive peut entraîner la mort, une
•
explosion ou un incendie.
Le réfrigérateur est conçu pour se retrouver à aire ouverte et ne doit pas
être encastré.
Placez votre appareil sur un plancher de niveau, capable de supporter
•
le réfrigérateur lorsqu’il est rempli.
Placez votre réfrigérateur près d’une fiche électrique décrite dans les
•
directives. Consultez “Exigences électriques.”
Placez le réfrigérateur à l’écart du soleil et autre source de chaleur,
•
comme un poêle, un radiateur ou une plinthe.
REMARQUES :
– Le plein soleil peut endommager le revêtement en acrylique et les
sources de chaleur peuvent augmenter la consommation électrique.
– Les températures extrêmement froides peuvent également affecter le
fonctionnement du réfrigérateur.
Utilisation du
réfrigérateur
réfrigérateur
Entretien du
Dépannage
7
Page 56

Page 57

Nous recommandons que le réfrigérateur soit branché dans un circuit
a
•
électrique réservé UNIQUEMENT pour cet appareil.
Utilisez une prise électrique qui ne peut être fermée par un interrupteur
•
ou une chaînette à tirer.
NE JAMAIS utiliser de rallonge.
•
b
a Prise à 3 fiches
b Prise de charge à
3 fiches
c Couvercle de boîtier de
prise de charge
c
EXIGENCES RELATIVES À L’ALIMENTATION EN EAU
Une alimentation en eau froide avec une pression comprise entre 30
et 100 lb/po2 (207 et 689 kPa) est nécessaire pour faire fonctionner le
distributeur d’eau et la machine à glaçons. En cas de questions sur la
pression de l’eau, contacter un plombier qualifié agréé.
IMPORTANT : Un fonctionnement en dehors de la plage de pressions de
l’eau recommandée peut donner lieu à des défaillances et des fuites d’eau
importantes pouvant provoquer des dégâts.
REMARQUE : Si la pression de l’eau est inférieure aux exigences, le
débit de l’eau sortant du distributeur pourrait diminuer ou les glaçons
pourraient être creux ou de forme irrégulière.
Alimentation en eau par osmose inverse (le cas échéant)
IMPORTANT : La pression de l’alimentation en eau entre le système
d’osmose inverse et la vanne d'arrivée d'eau du réfrigérateur doit être
comprise entre 30 et 100 lb/po
2
(207 et 689 kPa).
réfrigérateur
Sécurité de
Fonctionnement
Exigences en
Matière de
Caractéristiques
Pièces et
Installation
l’utilisation
Avant
Utilisation du
réfrigérateur
Si la pression d’eau est trop basse :
Vérifier pour voir si le filtre à sédiments du système d’osmose inverse est
obstrué. Remplacer le filtre au besoin.
Après chaque utilisation, laisser le réservoir du système d’osmose inverse
se remplir. La capacité du réservoir ne devrait pas être trop petite afin de
satisfaire aux exigences du réfrigérateur.
Si le réfrigérateur est doté d’un filtre à eau, ce dernier peut alors réduire
la pression de l’eau lorsqu’il est utilisé avec un système d'osmose inverse.
Retirer le filtre à eau.
réfrigérateur
Entretien du
Dépannage
9
Page 58

(L’illustration ci-dessus n’est fournie qu’à des fins de référence. La
configuration réelle dépendra du produit physique.)
Page 59

SPECIFICATIONS
Dimensions (LxPxH) : 35,8 po x 31,2 po x 69,9 po
Largeur avec porte ouverte à 90° 44,2 po (112 cm)
Largeur avec porte ouverte à 135° 64,4 po (164 cm)
Poids 379 lbs. (172 kg)
Exigences d’alimentation 115 V ~ 60 Hz, 15A minimum requis
Longueur de cordon
d’alimentation
(91 x 79 x 178 cm)
66.9 po (170 cm)
INSTALLATION
DÉBALLAGE
AVERTISSEMENT
Incendie ou Risque d’explosion
Ne perforez pas le tube du fluide frigorigène.
•
Suivez attentivement les directives de manutention.
•
Fluide frigorigène inflammable utilisé.
•
Le non-respect de cette directive peut entraîner la mort, une
•
explosion ou un incendie.
réfrigérateur
Sécurité de
Fonctionnement
Exigences en
Matière de
Caractéristiques
Pièces et
Installation
l’utilisation
Avant
IMPORTANT : Retirez TOUT le matériel d’emballage extérieur et intérieur,
y compris l’emballage en mousse situé entre le condenseur extérieur et le
réfrigérateur.
DÉPOSE DES PORTES
(AU BESOIN SEULEMENT)
Mesurer le réfrigérateur pour s’assurer qu’il passera dans l’ouverture de
la porte. Si le réfrigérateur ne passe pas facilement dans l’ouverture de la
porte, suivre les instructions pour retirer les deux portes du compartiment
de réfrigération et les panneaux avant des tiroirs du congélateur et du
tiroir avec choix de températures préréglées.
WARNING
Electrical Shock Hazard
Débrancher l’appareil avant de retirer les portes.
•
Rebrancher le fil de mise à terre avant utilisation.
•
Le non-respect de ces instructions peut entraîner un décès ou un
•
choc électrique.
réfrigérateur
réfrigérateur
Dépannage
11
Utilisation du
Entretien du
Page 60

réfrigérateur
a
Sécurité de
OUTILS NÉCESSAIRES
Tournevis Phillips
•
Clé à douille de 8 mm
•
Fonctionnement
Matière de
Caractéristiques
Installation
l’utilisation
réfrigérateur
réfrigérateur
DÉPOSE DES PORTES
Exigences en
IMPORTANT : Garder les portes du réfrigérateur fermées jusqu’au moment
de les soulever pour les dégager de la caisse.
1. Débrancher le réfrigérateur ou déconnecter la source de courant
2. À l’aide d’un tournevis Phillips, retirer les trois vis fixant le couvre-
Pièces et
3. Soulever délicatement le couvre-charnière, en gardant les faisceaux de
Avant
4. En maintenant la section du tuyau d'alimentation en eau au plus près
Utilisation du
Entretien du
électrique.
charnière au haut de la caisse.
b
a Couvercle de
charnière
b Vis
câbles et le tuyau d'alimentation en eau attachés.
de la porte, presser le collier sur du raccord pour dégager le tuyau.
Tirer sur le tuyau d'alimentation en eau pour le dégager du raccord.
ba
a Bague
b Raccord du tuyau
d'alimentation en eau
Dépannage
12
5. Débrancher les quatre faisceaux de câbles en pressant sur le
mécanisme de libération sur chaque raccord de faisceau de câbles,
puis en tirant sur les extrémités (charnière de porte gauche seulement).
a
a
Faisceaux de câbles
Page 61

6. À l’aide d’une clé à douille de 8 mm, enlever les trois vis de charnière.
90°
7. À l’aide d’un tournevis Phillips, enlever la vis de mise à la terre
(charnière de porte gauche seulement).
réfrigérateur
Sécurité de
a
a Vis de
charnière
b Vis de terre
b
c
REMARQUE : Prévoir un support additionnel des portes pendant le
démontage des charnières. Ne pas compter sur les aimants du joint de
porte pour maintenir la porte en place pendant le travail.
8. Retirer la charnière de porte supérieure.
9. À deux mains, ouvrir délicatement la porte qu’à obtenir un angle
de 90° avec la caisse, puis soulever la porte pour la dégager de la
charnière inférieure. Poser la porte sur une surface douce afin d’en
protéger le revêtement.
c Charnière
supérieure
Fonctionnement
Exigences en
Matière de
Caractéristiques
Pièces et
Installation
l’utilisation
Avant
Utilisation du
réfrigérateur
10. Répéter ces étapes pour retirer la porte du réfrigérateur droite.
RÉINSTALLATION DES PORTES
REMARQUE : L’axe de la charnière descend plus bas que le bord inférieur
de la porte.
1. Insérer l’axe de la charnière dans l’ouverture de la charnière inférieure.
2. Insérer la charnière supérieure sur le haut de la porte.
3. Au moyen des vis de charnière enlevées précédemment, serrer la
charnière supérieure sur la partie supérieure de la caisse.
4. Réinstaller la vis de mise à la terre (porte gauche seulement).
5. Rebrancher les quatre faisceaux de câbles (porte gauche seulement).
6. Rebrancher le tuyau d’alimentation en eau (porte gauche seulement).
réfrigérateur
Entretien du
Dépannage
13
Page 62

réfrigérateur
a b
7. Réinstaller la porte droite en suivant les étapes 1 à 3.
Sécurité de
8. Au moyen des trois vis enlevées précédemment, serrer le couvre-
DÉPOSE DU TIROIR AVEC CHOIX DE TEMPÉRATURES
Fonctionnement
Matière de
Caractéristiques
Installation
l’utilisation
réfrigérateur
PRÉRÉGLÉES PERFECTCHILL
Exigences en
1. Tirer le tiroir extérieur au maximum.
2. À deux mains, tenir les côtés gauche et droit du plateau interne du
3. Soulever la partie avant du plateau.
4. Tirer légèrement le plateau vers soi pour dégager les trous des
Pièces et
Avant
5. Une fois le plateau dégagé, le repousser légèrement dans l’ouverture
Utilisation du
6. À l’aide d’un tournevis Phillips, retirer les vis fixant le couvercle d'accès
charnière sur la partie supérieure de la caisse.
tiroir.
crochets des glissières.
a
jusqu’à ce que le bord se dégage du rebord extérieur du tiroir, puis
soulever le plateau pour le retirer.
au câblage à l’intérieur de la façade du tiroir.
Crochet de
a
glissière
réfrigérateur
Entretien du
Dépannage
14
a Couvercle d'accès au
câblage
b Vis de couvercle
d'accès au câblage
7. Pousser vers le haut sur le bord inférieur du couvercle d'accès au
câblage jusqu’à ce que le trou du couvercle se dégage de l’attache,
puis tirer sur le couvercle pour le retirer de la façade du tiroir.
Page 63

8. À l’aide d’un tournevis, retirer l’attache du câblage, puis débrancher la
a
borne de câblage.
b
a
Borne de câblage
b Attache du câblage
9. Pendant qu’une personne soutient la façade du tiroir, retirer les vis
fixant la façade aux rails gauche et droit.
réfrigérateur
Sécurité de
Fonctionnement
Exigences en
Matière de
Caractéristiques
Pièces et
Installation
a
10. Poser la façade du tiroir sur une surface douce afin d’en protéger le
revêtement. Rentrer les rails dans la caisse.
11. Pour réinstaller la façade du tiroir avec choix de températures
préréglées, suivre ces mêmes étapes dans le sens inverse.
a Vis
DÉPOSE DU TIROIR DU CONGÉLATEUR
1. Sortir le tiroir extérieur du congélateur au maximum.
2. Soulever l’extrémité avant du compartiment de stockage inférieur.
3. Tirer légèrement le compartiment vers soi pour dégager les trous des
crochets des glissières.
a Crochet de glissière
a
4. Une fois le compartiment dégagé, le repousser légèrement dans
l’ouverture jusqu’à ce que le bord se dégage du rebord extérieur du
tiroir, puis soulever le compartiment pour le retirer.
l’utilisation
Avant
Utilisation du
réfrigérateur
réfrigérateur
Entretien du
Dépannage
15
Page 64

réfrigérateur
Sécurité de
5. Pendant qu’une personne soutient la façade du tiroir, utiliser une clé à
douille de 8 mm pour retirer les dix vis (5 sur chaque support) fixant la
façade du tiroir aux rails gauche et droit.
Fonctionnement
Exigences en
Matière de
Caractéristiques
Installation
l’utilisation
6. Poser la façade du tiroir sur une surface douce afin d’en protéger le
Pièces et
7. Pour réinstaller la façade du tiroir du congélateur, suivre ces mêmes
RACCORDEMENT À L’EAU
Une alimentation en eau froide, avec une pression comprise entre
30 et 100 lb/po2 (207 et 689 kPa) est requise pour faire fonctionner le
distributeur et la machine à glaçons. En cas de questions sur la pression
de l’eau, contacter un plombier qualifié agréé.
Avant
IMPORTANT :
•
•
Utilisation du
réfrigérateur
Raccordement à la canalisation d’eau
Rassembler tous les outils et pièces requis avant de commencer
l’installation.
réfrigérateur
•
Entretien du
•
•
a
Vis
a
revêtement. Rentrer les rails dans la caisse.
étapes dans le sens inverse.
Ne raccorder l’appareil qu’à une source d’alimentation en eau potable.
Plumbing shall be installed in accordance with the International
Plumbing Code and any local codes and ordinances.
Tournevis à lame plate
Clé de 1/2 po ou 2 clés à molette
Perceuse sans fil
Mèche de 1/4 po
•
Écrou à compression de 1/4 po
•
Bague d’extrémité
•
Dépannage
16
1. Trouver une canalisation d’eau froide verticale de
(12,7 mm à 31,8 mm) près du réfrigérateur.
IMPORTANT : S’assurer qu’il s’agit d’un conduit d’eau froide.
REMARQUE : Un conduit horizontal fonctionnera, mais le procédé
suivant doit être suivi : percer par le dessus de la canalisation et non
pas par le dessous. Ainsi, l’eau ne risquera pas d’arroser la perceuse.
Ceci empêche également que les sédiments qu’on trouve normalement
dans l’eau ne s’accumulent dans le robinet.
1/2 po à 11/4 po
Page 65

2. Déterminer la longueur de tube en cuivre nécessaire. Il faut mesurer
la distance entre l’arrière du réfrigérateur et la canalisation. Ajouter
une longueur de 7 pi pour permettre le déplacement du réfrigérateur
pour le nettoyage. Utiliser un tuyau en cuivre de 1/4 po (6,35 mm) de
diamètre extérieur. Veiller à ce que le tube soit coupé d’équerre aux
deux extrémités.
3. À l’aide d’une perceuse sans fil, percer un trou de
le tuyau de canalisation d’eau froide.
4. Fixer le robinet d’arrêt sur la canalisation d’eau froide avec la bride de
tuyau. Vérifier que le raccord du robinet est bien engagé dans le trou
1/4 po percé dans la canalisation et que la rondelle d’étanchéité est
de
placée sous la bride de tuyau.
5. Serrer l’écrou de serrage. Serrer lentement et uniformément les vis de
la bride de tuyau afin que la rondelle forme une jonction étanche. Ne
pas serrer de manière excessive.
1/4 po (6,35 mm) dans
a
b
g
c
réfrigérateur
Sécurité de
Fonctionnement
Exigences en
Matière de
Caractéristiques
Pièces et
Installation
d e f
a Conduite d'alimentation
domestique
b Valve de selle
c Écrou de serrage
e Bague d’extrémité
f Écrou à compression
g Canalisation d’eau
1/4 po
de
d Robinet d’arrêt
6. Enfiler l’écrou et la bague à compression du raccord sur le tube
en cuivre comme illustré. Insérer l’extrémité du tube aussi loin
que possible dans l’ouverture de sortie du robinet. Visser l’écrou à
compression sur le raccord de sortie à l’aide d’une clé à molette. Ne
pas serrer excessivement car ceci pourrait provoquer l’écrasement du
tube de la canalisation d’eau.
7. Placer le bout libre du tube dans un contenant ou évier et OUVRIR
le robinet principal d’arrivée d’eau. Laisser l’eau s’écouler par le tube
jusqu’à ce que l’eau soit limpide. FERMER le robinet d’arrivée d’eau sur
la canalisation.
Raccordement au réfrigérateur
1. Débrancher le réfrigérateur ou déconnecter la source de courant
électrique.
2. Fermer le robinet d’arrivée d’eau.
3. Visser un écrou à compression en laiton et une bague d’extrémité sur
l’extrémité libre du tuyau d’alimentation en eau.
l’utilisation
Avant
Utilisation du
réfrigérateur
réfrigérateur
Entretien du
Dépannage
17
Page 66
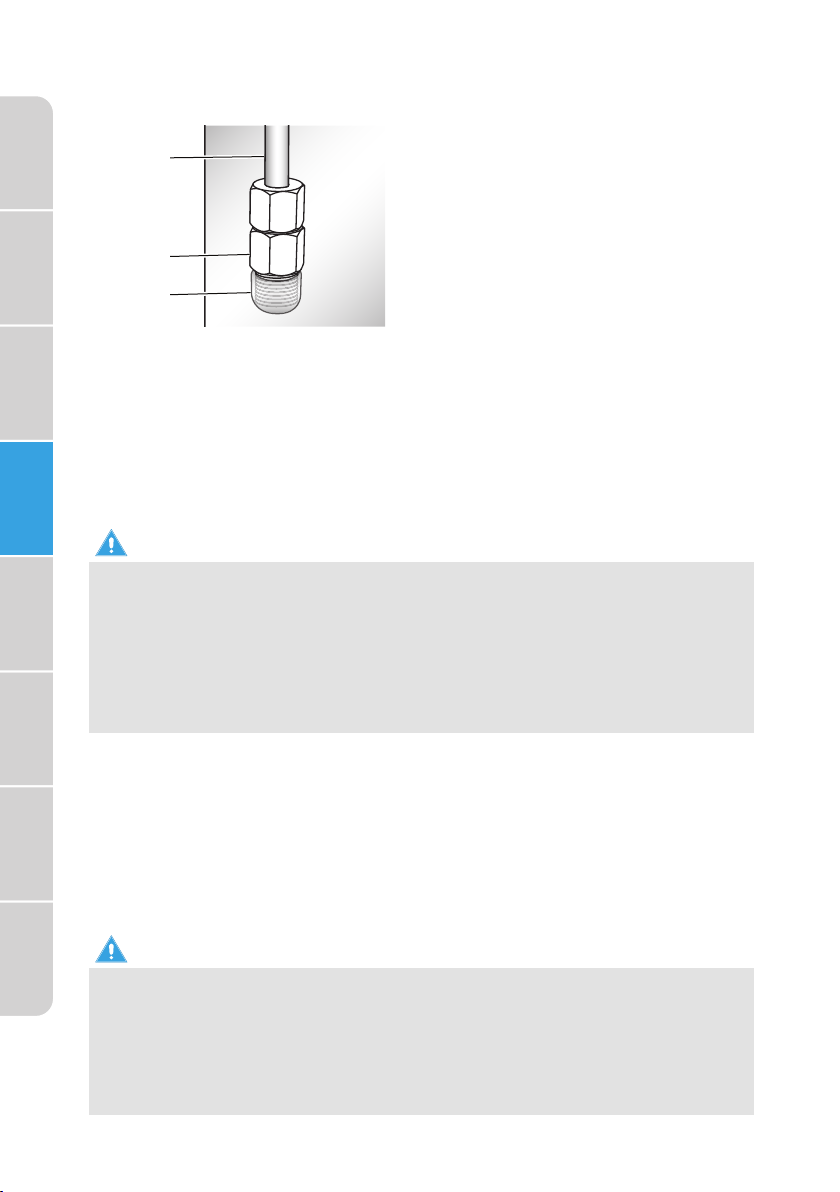
réfrigérateur
Fonctionnement
Matière de
Caractéristiques
Installation
4. Retirer le capuchon en plastique de l’extrémité du tuyau d’alimentation
Sécurité de
Exigences en
5. Insérer le tuyau d’alimentation en eau directement dans le raccord,
Pièces et
6. Vérifier la solidité du raccordement en tirant délicatement sur le tuyau
7. Ouvrir l’arrivée d’eau au réfrigérateur et vérifier s’il y a des fuites.
Achever l’installation
en eau du réfrigérateur.
a
a Tuyau d’alimentation en
eau du réfrigérateur
b Écrou à compression
b
c Capuchon en plastique
c
à l’extrémité du tuyau d’alimentation en eau du réfrigérateur. Serrer
l'écrou à compression. Ne pas serrer de manière excessive.
d’alimentation en eau.
Corriger toute fuite.
l’utilisation
Avant
Utilisation du
réfrigérateur
réfrigérateur
Entretien du
Dépannage
18
AVERTISSEMENT
Risque de choc électrique
Branchez dans une prise à 3 fiches mise à la masse.
•
Ne retirez pas la fiche de mise à la masse sur le cordon d’alimentation.
•
N’utilisez pas d’adaptateur.
•
N’utilisez pas de rallonge.
•
Le non-respect de cette directive peut entraîner la mort, un incendie
•
ou une décharge électrique.
1. Branchez dans une prise à 3 fiches mise à la masse.
REMARQUE : Le réfrigérateur commence à fonctionner dès qu’il est
branché à la source d’alimentation électrique.
2. Déplacer le réfrigérateur à son emplacement définitif, en s’assurant de
respecter les dégagements recommandés.
DÉPLACEZ À SA DESTINATION FINALE
AVERTISSEMENT
Incendie ou Risque d’explosion
Ne perforez pas le tube du fluide frigorigène.
•
Suivez attentivement les directives de manutention.
•
Fluide frigorigène inflammable utilisé.
•
Le non-respect de cette directive peut entraîner la mort, une
•
explosion ou un incendie.
Page 67
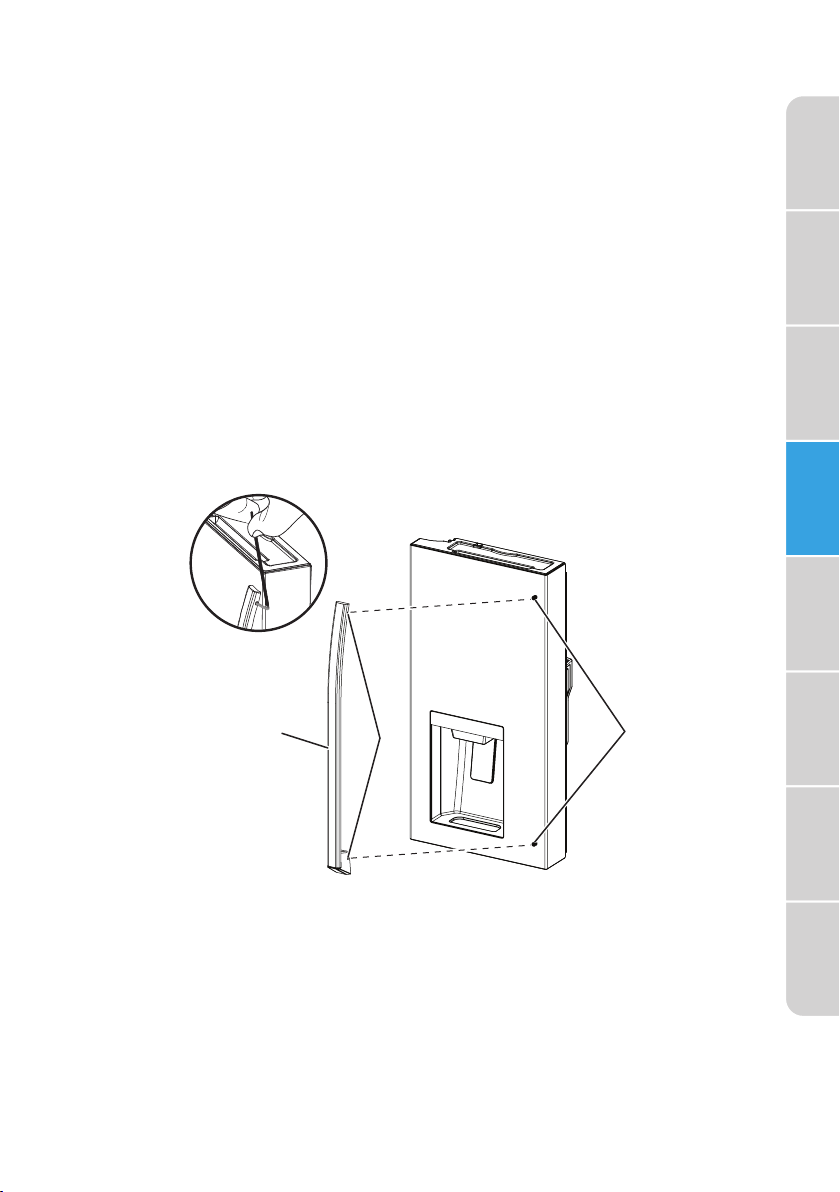
IMPORTANT :
Si le réfrigérateur se trouvait à l’horizontale pendant une certaine
•
période, attendez 24 heures avant de brancher le réfrigérateur pour
laisser le fluide frigorigène reprendre sa place.
En déplaçant le réfrigérateur, n’inclinez PAS ce dernier plus de 45° de
•
la position verticale.
REMARQUE : Ce faisant, vous pourriez endommager le compresseur et
le système scellé.
Éviter d’exercer trop de pression sur les portes ou le dessus de
•
l’appareil lors du déplacement du réfrigérateur.
réfrigérateur
Sécurité de
Fonctionnement
Exigences en
Matière de
INSTALLATION DES POIGNÉES
1. Sortir des vis épaulées du sachet de pièces.
2. À l’aide d’un tournevis Phillips, installer les vis épaulées sur la façade de
la porte, comme illustré.
3. Retirer la poignée de porte du compartiment de réfrigération.
4. Placer les extrémités de la poignée sur les vis épaulées.
a
b
c
Caractéristiques
Pièces et
Installation
l’utilisation
Avant
Utilisation du
réfrigérateur
réfrigérateur
Entretien du
a Poignée
b Vis sans tête
c Vis épaulées
5. À l’aide de la clé à tête hexagonale (fournie), serrer les vis sans
tête (incorporées dans chaque extrémité de la poignée) sur les vis
épaulées. Ne pas serrer de manière excessive.
Dépannage
19
Page 68
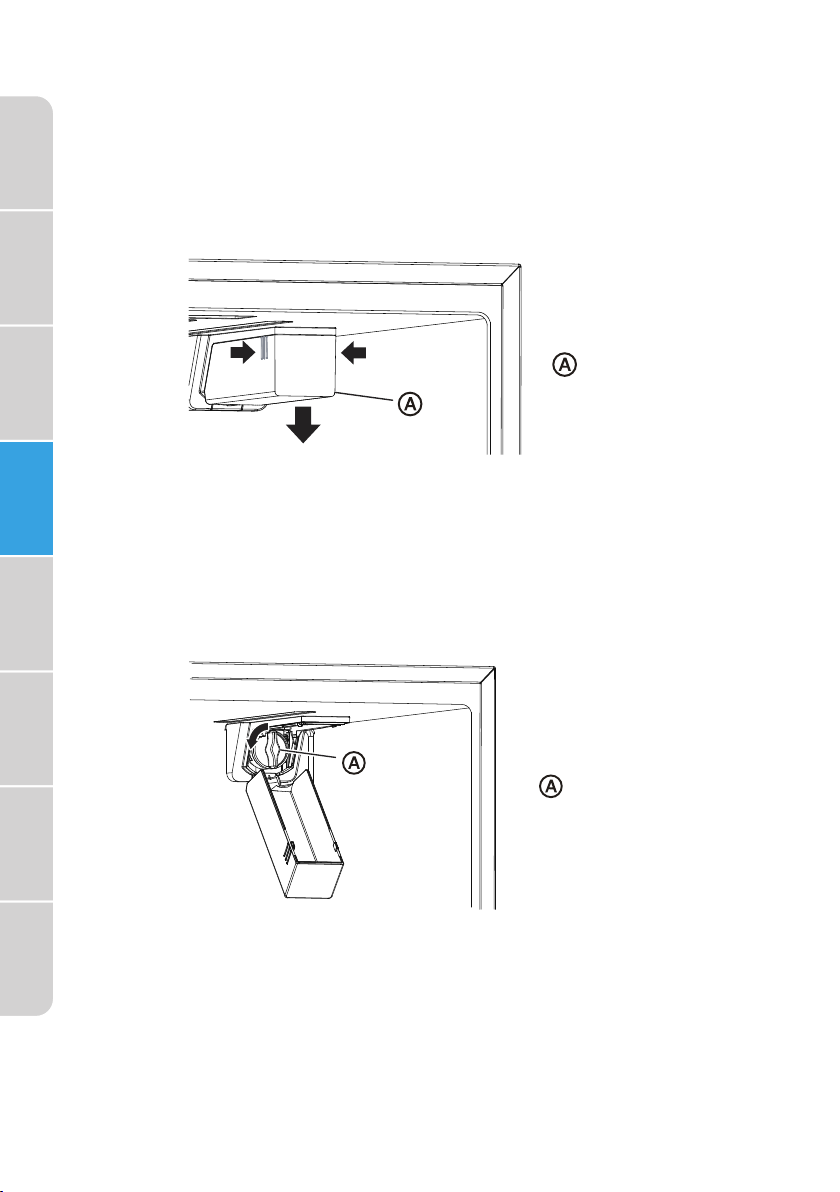
réfrigérateur
Sécurité de
Fonctionnement
Exigences en
Matière de
Caractéristiques
Pièces et
Installation
l’utilisation
Avant
INSTALLATION DU FILTRE À EAU
RETRAIT DU BOUCHON DE DÉRIVATION
1. Fermez l'alimentation en eau du réfrigérateur.
2. Serrer les côtés du couvercle du filtre (aux endroits indiqués), puis tirer
vers le bas pour ouvrir le couvercle.
Couvercle
du filtre
3. Tourner le bouchon de dérivation dans le sens antihoraire, puis tirer
pour enlever.
IMPORTANT : Conserver le bouchon de dérivation pour une
utilisation ultérieure. La machine à glaçons et le distributeur d’eau ne
fonctionneront pas tant que le filtre à eau ou le bouchon de dérivation
n’est pas correctement installé.
Utilisation du
réfrigérateur
réfrigérateur
Entretien du
Dépannage
20
Bouchon de
dérivation
INSTALLATION DU FILTRE À EAU
4. Sortir le filtre à eau de son emballage, puis enlever le capuchon en
plastique transparent de la tête du filtre.
5. Aligner les languettes de la tête du filtre avec les encoches de
l’ouverture, puis insérer le filtre à eau dans l’ouverture. Enfoncer, tout
en tournant le filtre dans le sens horaire pour qu’il se mette en place.
Page 69
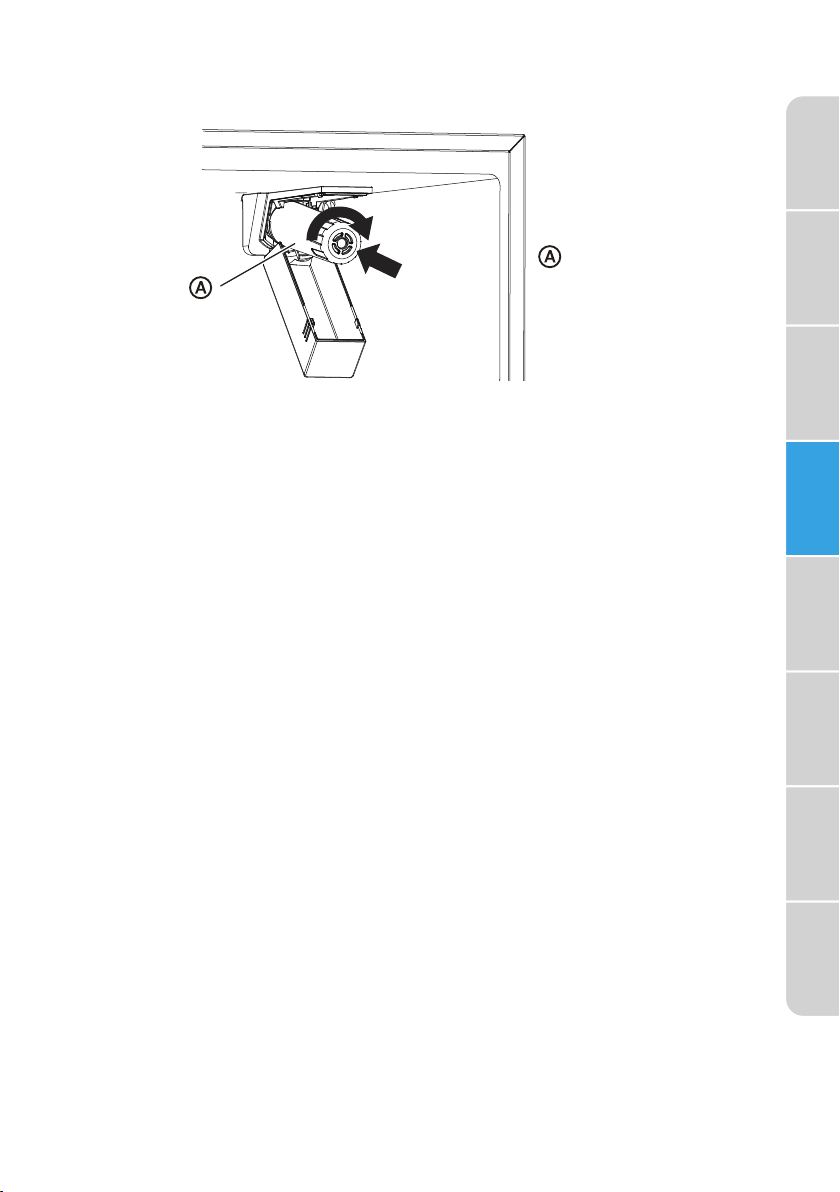
REMARQUE : Le logement permet au filtre de bouger légèrement vers
le haut et vers le bas.
Filtre à eau
Ouvrez l'alimentation en eau du réfrigérateur.
7.6.Refermer le couvercle du filtre.
REMPLACEMENT DU FILTRE À EAU
L’icône du filtre à eau sur le panneau de commande s’illuminera après
environ 150 jours, pour indiquer que le moment est venu de commander
un filtre de rechange. Après 180 jours, l’icône s’illuminera et clignotera
pour indiquer que le moment est venu de remplacer le filtre.
1. Fermez l'alimentation en eau du réfrigérateur.
2. Tourner le filtre à eau dans le sens antihoraire, puis tirer pour enlever.
3. Installer le nouveau filtre à eau en suivant les étapes 4 à 7 de la section
précédente.
4. Maintenir enfoncée la commande du filtre à eau pendant 3 secondes
afin d’eacer et réinitialiser l’affichage de l’état du filtre.
réfrigérateur
Sécurité de
Fonctionnement
Exigences en
Matière de
Caractéristiques
Pièces et
Installation
l’utilisation
Avant
Utilisation du
réfrigérateur
REMARQUE : Le voyant s’éteindra et 3 signaux sonores retentiront.
PURGE DU SYSTÈME DE DISTRIBUTION D’EAU
Après avoir installé le filtre à eau de rechange, il est important d’évacuer
l’air piégé dans le tuyau d’alimentation en eau de sorte que l’eau ne
s’écoule pas du distributeur d’eau.
1. Ouvrir le robinet principal d’arrivée d’eau.
2. Verser 2,5 gallons d’eau (rincer pendant environ 5 minutes) pour
éliminer l’air piégé et les contaminants du système.
REMARQUE : Ne pas verser les 2,5 gallons de manière continuelle.
Appuyer sur le levier du distributeur et puis relâcher pendant des
cycles de 30 secondes de marche et 60 secondes d’arrêt. Une purge
supplémentaire peut être nécessaire dans certains domiciles.
3. Ouvrir la porte du réfrigérateur pour vérifier l’absence de fuites au
niveau du filtre à eau.
21
réfrigérateur
Entretien du
Dépannage
Page 70
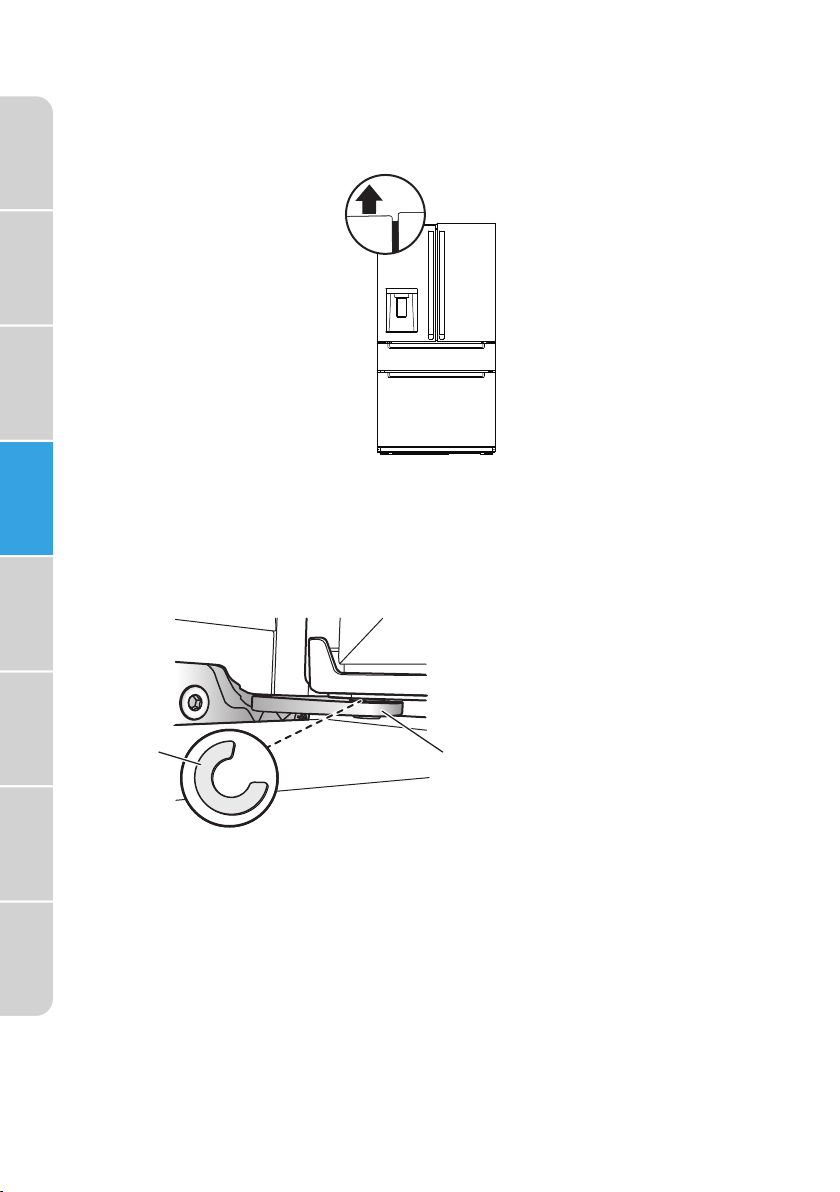
réfrigérateur
ALIGNER LES PORTES (AU BESOIN)
Sécurité de
Si les bords supérieurs des portes du réfrigérateur ne sont pas alignés,
régler la hauteur de la porte la plus basse.
Fonctionnement
Exigences en
Matière de
Caractéristiques
Pièces et
Installation
1. Élever la porte la plus basse de sorte que le bord supérieur soit de
2. À l’aide d’une pince, insérer un circlip (fourni) dans l’espace entre
l’utilisation
Avant
niveau avec la porte plus relevée.
l'œillet de la charnière et la charnière de la porte la plus basse.
REMARQUE : Le nombre de circlips utilisés dépendra de l’importance
de l’écart.
Utilisation du
réfrigérateur
réfrigérateur
Entretien du
Dépannage
22
Circlip
a
b Charnière de porte
a
METTEZ LE RÉFRIGÉRATEUR DE NIVEAU
IMPORTANT : Mettez le réfrigérateur de niveau afin d’assurer son bon
fonctionnement et éviter des problèmes de refroidissement, de givrage
et d’humidité pouvant survenir si la porte ne se referme pas de façon
appropriée.
1. Déplacez le réfrigérateur à sa destination finale. Consultez “Déplacez à
sa destination finale.”
b
Page 71
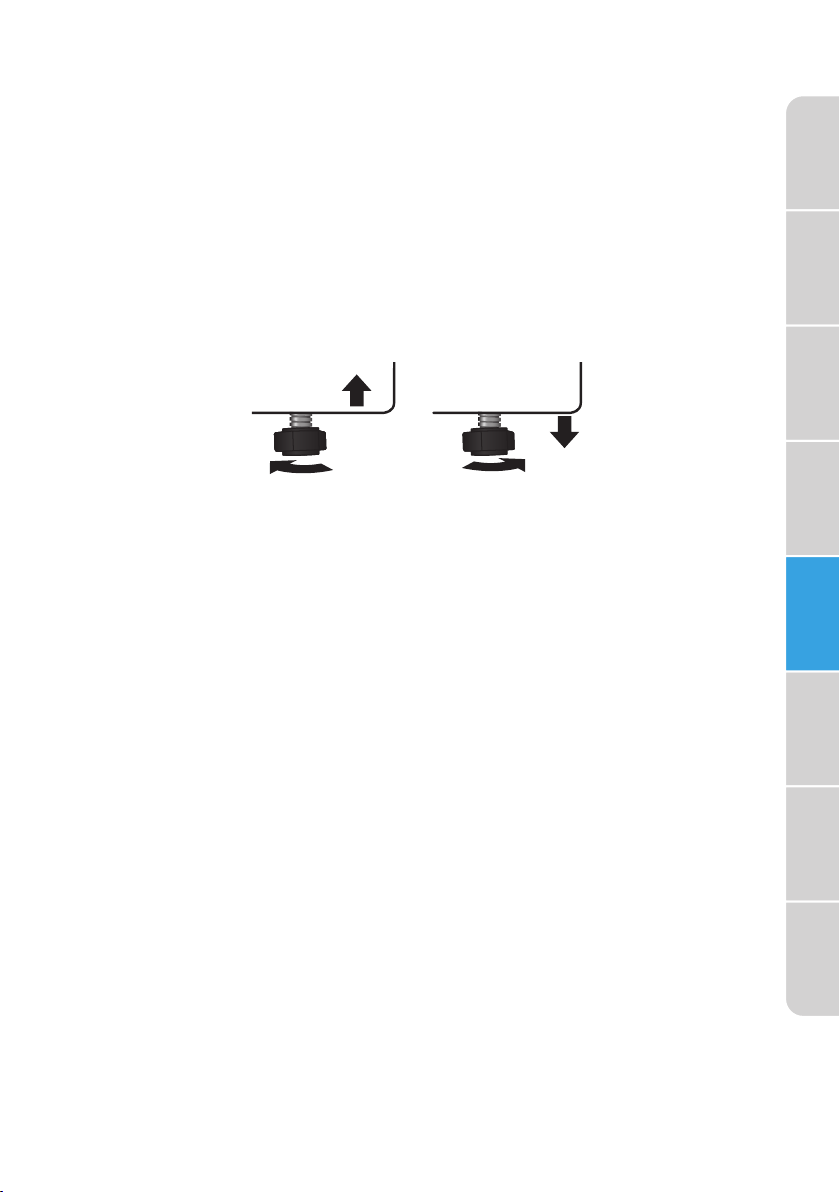
2. Placez un niveau de menuisier sur le dessus de l'armoire pour vérifier
que le réfrigérateur est de niveau d'un côté à l'autre et légèrement
incliné vers le bas vers l'arrière. Si le réfrigérateur n'est pas de niveau,
passez aux étapes 3 et 4 pour régler.
REMARQUE: Les portes se fermeront plus facilement lorsque l'avant du
réfrigérateur est légèrement plus haut que l'arrière du réfrigérateur.
3. Réglez les deux pieds de réglage (un pied situé à chaque coin avant du
réfrigérateur) jusqu’à ce qu’il soit de niveau.
4. Avec une personne appuyant contre l'avant supérieur du réfrigérateur
pour enlever le poids des pieds de nivellement, l'autre ou les autres
peuvent alors tourner les pieds de nivellement pour régler la hauteur
de chaque côté.
5. Utilisez le niveau du menuisier pour vérifier le niveau et l'inclinaison.
Pour soulever - Tournez le pied de réglage dans le sens horaire.
Pour abaisser - Tournez le pied de réglage dans le sens antihoraire.
AVANT L’UTILISATION
PÉRIODE D’ATTENTE
réfrigérateur
Sécurité de
Fonctionnement
Exigences en
Matière de
Caractéristiques
Pièces et
Installation
l’utilisation
Avant
Avant de brancher le réfrigérateur dans la prise électrique à 3 fiches
•
mises à la masse, laissez-le au repos dans sa position verticale pendant
environ 2 heures.
REMARQUE : Ceci diminue les risques de défectuosité dans le système
de refroidissement dans le cas d’une manutention inappropriée lors du
transport.
Laisser le réfrigérateur refroidir pendant 2 à 3 heures avant d’ajouter
•
de la nourriture.
NETTOYAGE
1. lavez l’intérieur du réfrigérateur à l’aide d’un linge doux et humide et
d’une solution de bicarbonate de soude (2 c. à table de bicarbonate de
soude dans 1 pinte d’eau tiède).
2. Utilisez un linge doux pour essorer toutes les surfaces.
Utilisation du
réfrigérateur
réfrigérateur
Entretien du
Dépannage
23
Page 72

réfrigérateur
UTILISATION DU RÉFRIGÉRATEUR
Sécurité de
GÉNÉRALITÉS
•
Fonctionnement
Exigences en
Matière de
•
•
La durée de vie des aliments surgelés peut varier et la durée
recommandée ne doit pas être dépassée.
Placer les aliments congelés dans le congélateur dès que possible
après l’achat.
Ne pas recongeler des aliments qui ont été complètement décongelés.
Caractéristiques
Pièces et
Installation
l’utilisation
Avant
Utilisation du
réfrigérateur
réfrigérateur
Entretien du
Dépannage
AVERTISSEMENT
Risque de choc électrique
Branchez dans une prise à 3 fiches mise à la masse.
•
Ne retirez pas la fiche de mise à la masse sur le cordon
•
d’alimentation.
N’utilisez pas d’adaptateur.
•
N’utilisez pas de rallonge.
•
Le non-respect de cette directive peut entraîner la mort, un incendie
•
ou une décharge électrique.
1. Branchez le réfrigérateur dans une prise à 3 fiches mise à la masse.
2. Attendez 30 minutes, puis ouvrez la porte du réfrigérateur pour voir si
ce dernier fonctionne de façon appropriée.
3. Ranger les aliments dans les compartiments de réfrigération et de
congélation.
CONSEILS DE CONSERVATION D’ÉNERGIE
Laissez les aliments chauds se refroidir à la température de la pièce
•
avant de les placer dans le réfrigérateur. Les aliments mettant du
temps à surgeler peuvent se dégrader ou se gâter.
N’ajoutez PAS en même temps de grandes quantités d’aliments non
•
surgelés dans le réfrigérateur. La surcharge du réfrigérateur fait en
sorte que le compresseur fonctionne plus longtemps, ceci affectera
l’efficacité de refroidissement du réfrigérateur.
Emballez les aliments de façon appropriée et essuyez bien les
•
récipients avant de les mettre dans le réfrigérateur. Ceci réduit
l’accumulation de givre dans le réfrigérateur.
Ne placez pas de papier aluminium, de papier ciré ou d’essuie-tout sur
•
les étagères. Ces derniers nuisent à la circulation d’air froid, diminuant
le rendement du réfrigérateur.
Organisez et étiquetez vos aliments afin de diminuer les occasions
•
d’ouverture de porte et la recherche sur une période prolongée. Sortez
le plus d’articles possible, puis refermez la porte aussitôt.
24
Page 73

Page 74

réfrigérateur
Sécurité de
Fonctionnement
Exigences en
Matière de
Compartiment de réfrigération
Réglage de la température par défaut : 39 °F (4 °C).
La plage de températures pour le compartiment de réfrigération est de
34 °F à 44 °F (1 °C à 7 °C).
Compartiment de congélation
Default temperature setting : 0 °F (-18 °C).
La plage de températures pour le compartiment de congélation est de
-7 °F à 7 °F (-22 °C à -14 °C).
Caractéristiques
Pièces et
Installation
l’utilisation
Avant
Utilisation du
réfrigérateur
réfrigérateur
Entretien du
Dépannage
Pour régler la température des compartiments de réfrigération et de
congélation :
1. Sélectionner le compartiment en appuyant sur la touche Fridge Temp
(température du réfrigérateur) ou Freezer Temp (température du
congélateur).
2. Appuyer sur les touches + ou - pour élever ou abaisser la température
par incréments de 1°, jusqu’à ce que la température désirée soit
atteinte.
Tiroir avec choix de températures préréglées PerfectChill
Sélectionner la température interne du tiroir à partir du menu à
4 préréglages de température.
1. Appuyer sur la touche Flex Drawer (tiroir avec choix de températures
préréglées) à plusieurs reprises pour passer d’une option à l’autre
jusqu’à ce que l’icône souhaitée s’illumine.
REMARQUE : Sélectionner la température appropriée pour les articles
conservés dans le tiroir.
Réglage à 30 °F (-1 °C) : pour les viandes fraîches
•
Réglage à 34 °F (1 °C) : pour les boissons
•
Réglage à 37 °F (3 °C) (PAR DÉFAUT) : pour la charcuterie
•
Réglage à 41°F (5 °C) : pour les vins
•
AFFICHAGE DE L’UNITÉ DE TEMPÉRATURE
Les températures des compartiments peuvent être affichées en degrés
Fahrenheit (°F) ou en degrés Celsius (°C).
Appuyer sur les touches (+) ou (-) en même temps pendant 3 secondes
pour changer l’unité de la température, des degrés Fahrenheit (°F) en
degrés Celsius (°C) ou inversement.
26
VERROUILLAGE / DÉVERROUILLAGE DES COMMANDES
Pour déverrouiller les commandes :
Maintenir la touche (réveil) enfoncée pendant 3 secondes. Un signal
sonore retentira et l’écran d’affichage s’illuminera.
Page 75
Pour verrouiller les commandes :
Maintenir la touche (réveil) enfoncée pendant 3 secondes. Un signal
sonore retentira et l’écran d’affichage s’éteindra.
REMARQUE : Après 30 secondes, si aucune touche n’est enfoncée, les
commandes se verrouilleront automatiquement.
MODE DE REFROIDISSEMENT RAPIDE
Maintenir la touche Fridge Temp (température du réfrigérateur) enfoncée
pendant 3 secondes pour entrer dans le mode de refroidissement rapide.
L’icône du compartiment de réfrigération s’illuminera en bleu et
la température du compartiment descendra à 34 °F (1 °C).
Maintenir à nouveau la touche Fridge Temp (température du réfrigérateur)
enfoncée pendant 3 secondes pour quitter le mode de refroidissement
rapide. L’éclairage s’éteindra et la température du compartiment de
réfrigération sera réinitialisée à la température précédemment réglée.
réfrigérateur
Sécurité de
Fonctionnement
Exigences en
Matière de
Caractéristiques
Pièces et
MODE DE CONGÉLATION RAPIDE
Maintenir la touche Freezer Temp (température du congélateur) enfoncée
pendant 3 secondes pour entrer dans le mode de congélation rapide.
L’icône du compartiment de congélation s’illuminera en bleu et
la température du compartiment descendra à -7 °F (- 22 °C).
Maintenir à nouveau la touche Freezer Temp (température du congélateur)
enfoncée pendant 3 secondes pour quitter le mode de congélation rapide.
L’éclairage s’éteindra et la température du compartiment de congélation
sera réinitialisée à la température précédemment réglée.
MODE D’ÉCONOMIE D’ÉNERGIE
Appuyer sur la touche Energy Saving (économie d’énergie) pour entrer
dans le mode d’économie d’énergie et le quitter. Energy Saving (économie
d’énergie) s’illumine pour indiquer que le mode est activé et s’éteint
lorsqu’il n’est pas activé.
Lorsque le mode d’économie d’énergie est activé, la température
du compartiment de réfrigération est de 44 °F (7 °C) et celle du
compartiment de congélation de 7 °F (-14 °C).
Lorsque le mode d’économie d’énergie est désactivé, les températures
des compartiments de réfrigération et de congélation reviendront aux
températures précédemment réglées.
REMARQUE : Si une température a été réglée au mode de
refroidissement rapide ou au mode de congélation rapide, elle sera
alors automatiquement annulée.
Installation
l’utilisation
Avant
Utilisation du
réfrigérateur
réfrigérateur
Entretien du
Dépannage
27
Page 76

Modes du panneau de commande du distributeur
Le panneau de commande du distributeur comporte des icônes à DEL
rétroéclairées pour indiquer le mode de fonctionnement du distributeur.
Vous pouvez choisir entre deux modes d'affichage, le mode “Veille” et le
mode “Actif”.Vous pouvez changer de mode en suivant les instructions
ci-dessous. Par défaut, la commande du distributeur est en mode “Veille”.
Page 77

En mode “Veille”, les icônes du distributeur sont dissimulées jusqu'à ce
qu'elles soient activées. Les icônes peuvent être activées en faisant glisser
votre doigt sur la surface du panneau de commande. Les icônes du
distributeur s'éteignent automatiquement après 120 secondes. Le mode
“Veille” donne à l’appareil un aspect minimaliste que certains utilisateurs
préfèrent.
En mode “Actif”, les icônes du distributeur (glaçons, eau, glace pilée) restent
toujours all
lumineuse pour indiq
umées. Le panneau de commande utilise une icône à DEL plus
uer le mode de distribution sélectionné.
Permutation entre le mode “Actif” et le mode “Veille” : Restez appuyé sur les
icônes EAU et GLACE PILÉE pendant 3 secondes. La commande du distributeur
clignotera pendant 2 secondes, confirmant ainsi le changement de mode.
Le distributeur d’eau et de glaçons, situé sur la partie frontale de la porte
du réfrigérateur, distribue de l’eau froide, des glaçons et de la glace pilée.
réfrigérateur
Sécurité de
Fonctionnement
Exigences en
Matière de
Caractéristiques
Pièces et
La fonction de distribution ne fonctionnera que si la porte du réfrigérateur
est bien fermée.
La première fois que le réfrigérateur est branché dans la prise de
courant, l’affichage de la commande du distributeur s’illuminera pendant
3 secondes. La distribution d’eau est l’option de distribution par défaut.
La première fois que le réfrigérateur est raccordé à l’alimentation en eau,
il se peut que l’eau ne s’écoule pas en raison de la présence d’air dans le
tuyau d’alimentation en eau.
1. Appuyer sur le levier du distributeur pendant au moins 5 minutes
afin de faire sortir l’air piégé dans le tuyau et remplir le système
d’alimentation en eau. Voir la section “Purger le système d’alimentation
en eau”.
2. Jeter les six premiers verres d’eau afin d’évacuer les impuretés du
tuyau d’alimentation en eau.
Éclairage du distributeur
L’éclairage du distributeur s'allume lorsque vous distribuez de l'eau et
des glaçons. L’éclairage à DEL s'éteint après 3 secondes.
Pour l'utiliser comme veilleuse ou prolonger la durée d'allumage de
l’éclairage du distributeur, restez appuyé sur les icônes EAU et GLAÇONS
en même temps pendant 3 secondes. L’éclairage du distributeur s'éteindra
automatiquement après 12 heures. Pour l'éteindre, maintenez à nouveau les
mêmes boutons enfoncés pendant 3 secondes.
Installation
l’utilisation
réfrigérateur
réfrigérateur
Dépannage
29
Avant
Utilisation du
Entretien du
Page 78

réfrigérateur
Sécurité de
Fonctionnement
Exigences en
Matière de
Caractéristiques
Pièces et
Installation
Distribution d’eau
1. Appuyer sur la touche Water (eau)
. Le voyant de l’eau s’illumine.
2. À l’aide du doigt ou d’un contenant, appuyer sur le levier pour
distribuer de l’eau.
3. Relâcher le levier pour mettre fin à la distribution d’eau.
Distribution de glaçons
1. Appuyer sur la touche Cubed (glaçons)
. Le voyant des glaçons
s’illumine.
2. À l’aide du doigt ou d’un contenant, appuyer sur le levier pour
distribuer des glaçons.
3. Relâcher le levier pour mettre fin à la distribution de glaçons.
Distribution de glace pilée
1. Appuyer sur la touche Crushed (glace pilée)
. Le voyant de la glace
pilée s’illumine.
2. À l’aide du doigt ou d’un contenant, appuyer sur le levier pour
distribuer de la glace pilée.
3. Relâcher le levier pour mettre fin à la distribution de glace pilée.
BAC DE RÉCUPÉRATION
Le bac de récupération est amovible à des fins de nettoyage.
l’utilisation
Avant
Utilisation du
réfrigérateur
réfrigérateur
Entretien du
Dépannage
30
Bac de récupération
WIFI
L’application (appli) “msmartlife” permet de communiquer avec le
réfrigérateur au moyen d’un téléphone intelligent par connexion WiFi au
domicile.
AVANT D’UTILISER L’APPLI MSMARTLIFE
1. Utiliser un téléphone intelligent pour vérifier la puissance du réseau
WiFi à proximité du réfrigérateur.
REMARQUE : Si le réfrigérateur et le routeur sans fil sont trop éloignés,
alors le signal perd en puissance. Un certain temps peut être nécessaire
pour enregistrer le réfrigérateur ou l’ajout du réfrigérateur à l’appli peut
échouer.
2. Connecter le téléphone intelligent au réseau WiFi.
INSTALLER L’APPLI MSMARTLIFE
1. Balayer le code QR ci-dessous ou chercher “msmartlife” dans App
Store pour télécharger et installer l’appli sur le téléphone.
REMARQUE : Actuellement, le canal de téléchargement ne prend en
charge que Google Play et App Store.
Page 79

2. Cliquer sur le bouton (+) sur l’interface principale de l’appli et suivre les
instructions à l’écran pour créer un compte et se connecter.
ÉTABLIR UNE CONNEXION WIFI ENTRE LE TÉLÉPHONE ET LE
RÉFRIGÉRATEUR
réfrigérateur
Sécurité de
1. Sélectionner “Add device” (ajouter un appareil).
2. Suivre les instructions à l’écran de l’appli pour connecter le
réfrigérateur au réseau WiFi.
3. Suivre les instructions à l’écran pour ajouter le réfrigérateur en
sélectionnant d’abord la catégorie d’appareil, puis le numéro de
modèle du réfrigérateur.
Fonctionnement
Exigences en
Matière de
Caractéristiques
Pièces et
Installation
l’utilisation
Avant
Utilisation du
réfrigérateur
4. Maintenir la touche Wake Up (réveil) enfoncée pendant 3 secondes
pour déverrouiller le panneau de commande.
5. Maintenir la touche WiFi enfoncée pendant 4 secondes pour entrer
dans le mode de réseau WiFi. Le message (AP) s'affiche.
6. Maintenir la touche Wake Up (réveil) enfoncée pendant 3 secondes
pour finaliser le réglage.
réfrigérateur
Entretien du
Dépannage
31
Page 80

réfrigérateur
Sécurité de
Fonctionnement
Exigences en
Matière de
7. Pour désactiver la fonction WiFi, maintenir la commande enfoncée
REMARQUES
Caractéristiques
•
Pièces et
•
•
Installation
•
•
l’utilisation
Avant
DÉCLARATION DE CONFORMITÉ AUX NORMES
FCC/IC :
Utilisation du
réfrigérateur
réfrigérateur
Dépannage
Cet appareil a été testé et déclaré conforme aux limites pour appareils
numériques de classe B, selon la section 15 des règlements de la FCC
(Federal Communications Commission). Ces limites sont conçues dans
le but d’assurer une protection raisonnable contre des interférences
nuisibles dans une installation résidentielle. Cet appareil génère, utilise et
peut émettre l’énergie de fréquence radio et, s’il n’est pas installé ni utilisé
conformément aux instructions, peut causer des interférences nuisibles
Entretien du
aux communications radio. Cependant, il se peut que des interférences
se produisent dans une installation particulière. Si cet appareil cause
des interférences nuisibles à la réception radio ou télévision, pouvant
être déterminées par le fait d’allumer et d’éteindre l’appareil, l’utilisateur
est encouragé à essayer de corriger les interférences en suivant l'un ou
plusieurs des conseils suivants :
•
•
•
•
Cet appareil est conforme à la norme FCC, Partie 15. Le bon
fonctionnement de l’appareil est assujetti aux deux conditions suivantes :
32
1. Cet appareil ne doit causer aucune interférence.
REMARQUES :
Si la connexion échoue, se référer aux instructions affichées dans
•
l’appli. Si la connexion reste impossible, débrancher le réfrigérateur,
attendre au moins une (1) minute, rebrancher le réfrigérateur dans la
prise de courant, puis réessayer.
Une fois le jumelage réalisé, l’icône WiFi s’illuminera sur l’écran
•
d’affichage.
pendant 4 secondes. L’icône WiFi s’éteindra.
Lors de la connexion de l’appareil au réseau, s’assurer que le téléphone
se trouve aussi près que possible de l’appareil.
N’utiliser qu’une combinaison de lettres en anglais pour le nom du
routeur WiFi.
Pour éviter toute incidence de l’instabilité du signal sur le réseau, le
nombre d’appareils connectés sur le même routeur ne devrait pas
excéder dix appareils.
Si le nom ou mot de passe du routeur ou du réseau WiFi change,
supprimer l’appareil enregistré et répéter le téléchargement et
l’installation, puis établir à nouveau une connexion.
Lorsque la technologie du produit est actualisée, le contenu de l’appli
“msmartlife” peut changer. Pour obtenir les informations les plus
actuelles, consulter le guide de présentation de l’appli “msmartlife”.
Réorienter ou déplacer l’antenne de réception.
Augmenter la distance séparant l’appareil du récepteur.
Brancher l’appareil sur un circuit différent de celui où le récepteur est
branché.
Contacter un revendeur ou un technicien radio/télévision qualifié pour
obtenir de l’aide.
Page 81

2. Cet appareil doit tolérer toute interférence reçue, y compris les
interférences susceptibles de perturber le fonctionnement de l’appareil.
Tout changement ou modification apporté(e) à cet appareil, sans
l'approbation expresse du fabricant, risque d'annuler le droit de
l'utilisateur de faire fonctionner l'appareil.
DÉCLARATION D'INDUSTRIE CANADA
L'émetteur/récepteur exempt de licence contenu dans le présent
appareil est conforme aux CNR d'Innovation, Sciences et Développement
économique Canada. Le bon fonctionnement de l’appareil est assujetti aux
deux conditions suivantes :
1. Cet appareil ne doit causer aucune interférence.
2. Cet appareil doit tolérer toute interférence, y compris les interférences
susceptibles de perturber le fonctionnement de l’appareil.
réfrigérateur
Sécurité de
Fonctionnement
Exigences en
Matière de
Caractéristiques
Pièces et
CARACTÉRISTIQUES DU RÉFRIGÉRATEUR
Pour offrir plus de possibilités de rangement et faciliter le nettoyage, de
nombreuses pièces du réfrigérateur sont réglables et amovibles.
CLAYETTES AMOVIBLES
Les clayettes du réfrigérateur sont réglables et amovibles.
Dépose :
1. Enlever tous les articles de la clayette.
2. Incliner l’avant de la clayette vers le haut.
3. Soulever l’arrière de la clayette et sortir le support de la clayette de son
logement.
Réinstallation :
1. Insérer les extrémités supérieures des supports de la clayette dans le
logement souhaité.
2. Incliner l’avant de la clayette vers le bas.
3. Insérer les extrémités inférieures des supports de la clayette dans les
logements correspondants.
Installation
l’utilisation
Avant
Utilisation du
réfrigérateur
réfrigérateur
Entretien du
Dépannage
33
Page 82

réfrigérateur
a
FILET À CHARCUTERIE
Sécurité de
Le filet à charcuterie optimise le rangement en permettant d’utiliser
l’espace ouvert sous la clayette. Le filet peut contenir une charge de 6 lb
(3 kg) max.
Fonctionnement
Exigences en
Matière de
a
Pull
Filet à
a
charcuterie
Caractéristiques
Pièces et
Installation
l’utilisation
Avant
Utilisation du
réfrigérateur
réfrigérateur
Entretien du
CLAYETTE ESCAMOTABLE
La partie avant de la clayette peut coulisser sous la partie arrière, afin de
pouvoir faire de la place pour des articles plus grands sur la clayette du
dessous.
1. Tirer le bord extérieur de la clayette vers le haut, puis abaisser le bord
arrière dessous, puis pousser.
a
Clayette
escamotable
a
CLAYETTE COULISSANTE
1. Ouvrir les deux portes du réfrigérateur au maximum.
2. Saisir la clayette coulissante, puis tirer la clayette vers soi.
a Clayette
coulissante
Dépannage
34
BACS À FRUITS ET À LÉGUMES
a Contrôle de
l’humidité
a
Page 83
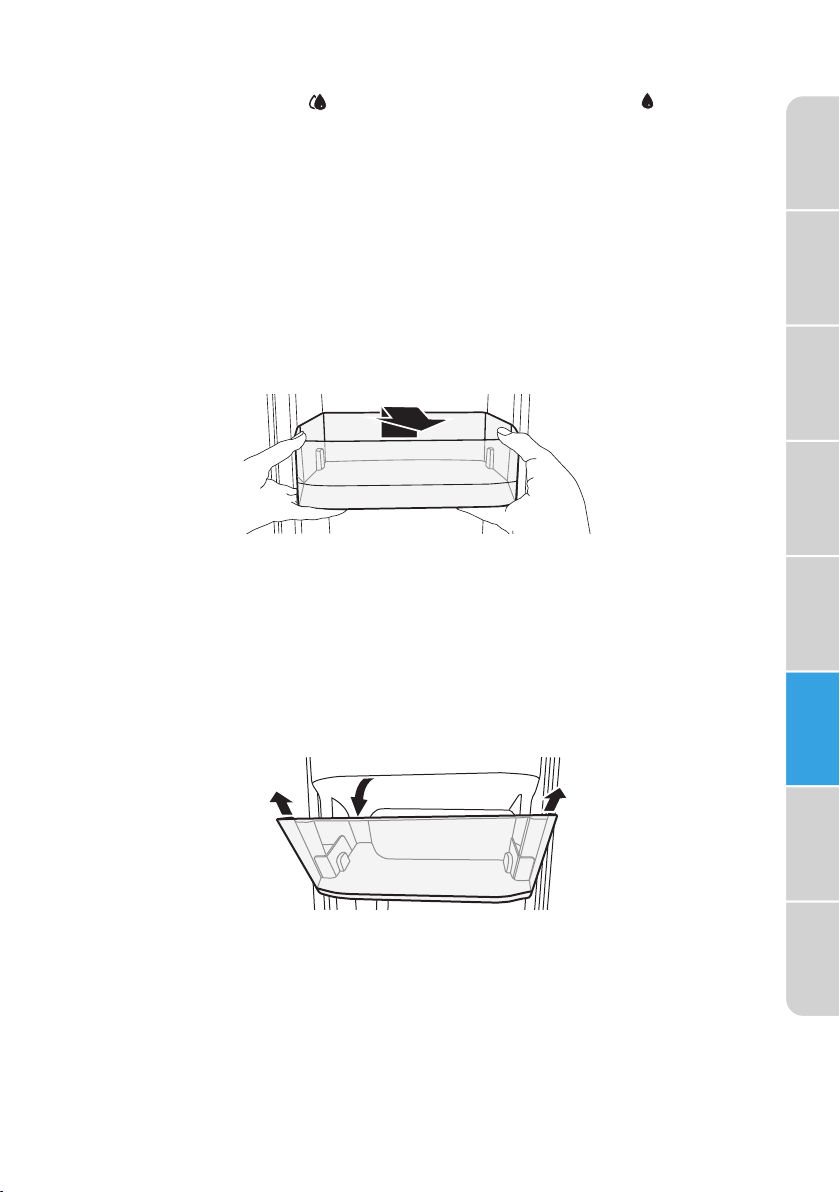
Faire coulisser la commande pour régler le degré d’humidité du bac à
fruits et à légumes entre LOW (humidité faible [ouvert]) et HIGH
(humidité élevée [fermé]).
Humidité FAIBLE - Idéal pour conserver les fruits et les légumes à peau.
Humidité ÉLEVÉE - Idéal pour conserver les légumes frais à feuilles.
BALCONNETS AMOVIBLES
Les balconnets sont amovibles pour faciliter le nettoyage.
réfrigérateur
Sécurité de
Fonctionnement
Exigences en
Matière de
Dépose :
1. Enlever tous les articles du balconnet.
2. Saisir les côtés du balconnet, soulever, puis tirer vers l’extérieur.
Réinstallation :
1. Insérer le balconnet dans le revêtement intérieur de la porte, au-dessus
du support, puis appuyer vers le bas pour qu’il se bloque en position.
BALCONNET BASCULANT
Dépose :
1. Incliner entièrement le balconnet vers l’extérieur, puis soulever.
Caractéristiques
Pièces et
Installation
l’utilisation
Avant
Utilisation du
réfrigérateur
réfrigérateur
Entretien du
Réinstallation :
1. Insérer le balconnet dans son compartiment, puis l’enfoncer.
PRÉRÉGLÉES PERFECTCHILL
Pour faciliter le nettoyage, le plateau intérieur du tiroir est amovible.
1. Tirer le tiroir extérieur au maximum.
Dépannage
35
Page 84
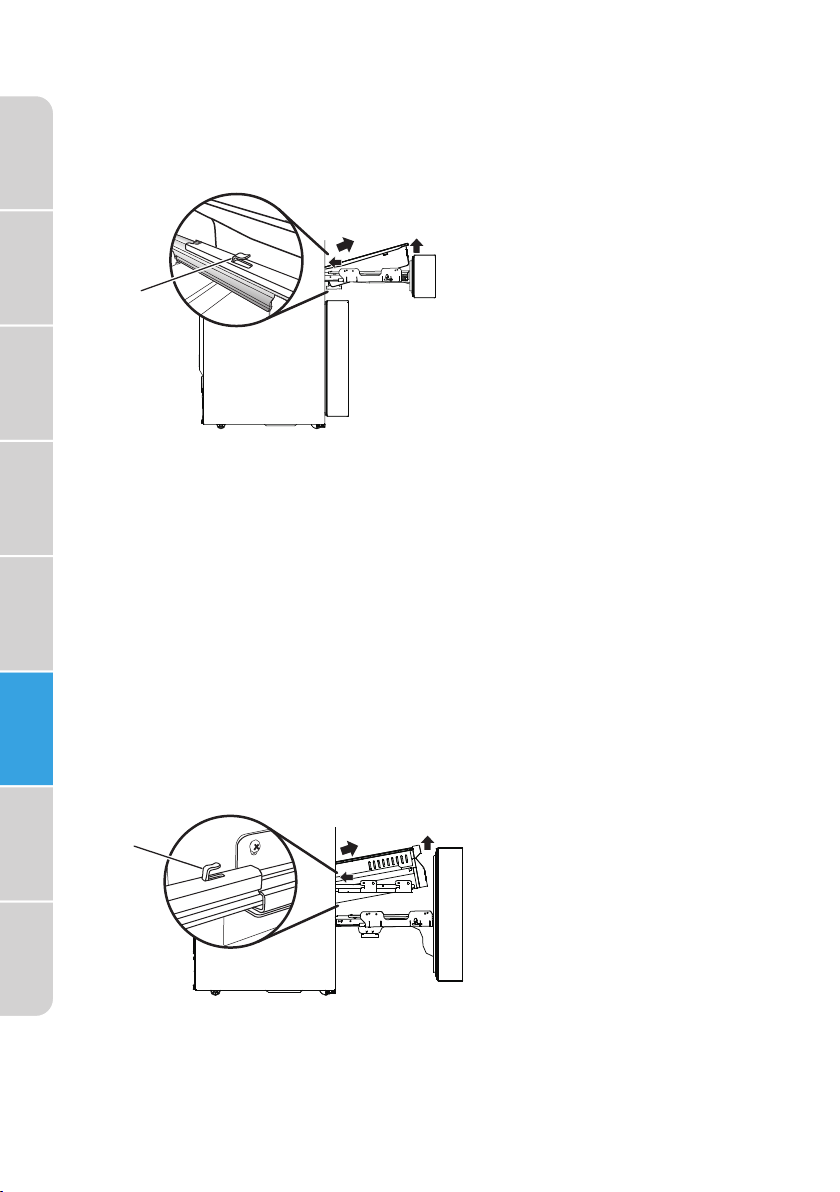
réfrigérateur
Sécurité de
3. Soulever la partie avant du plateau.
4. Tirer légèrement le plateau vers soi pour dégager les trous des
Fonctionnement
Exigences en
Matière de
2. À deux mains, tenir les côtés gauche et droit du plateau interne du
tiroir.
crochets des glissières.
Caractéristiques
Pièces et
Installation
l’utilisation
Avant
Utilisation du
réfrigérateur
réfrigérateur
Entretien du
a
Crochet de glissière
a
5. Une fois le plateau dégagé, le repousser légèrement dans l’ouverture
jusqu’à ce que le bord se dégage du rebord extérieur du tiroir, puis
soulever le plateau pour le retirer.
CARACTÉRISTIQUES DU CONGÉLATEUR
Pour offrir plus de possibilités de rangement et faciliter le nettoyage, les
compartiments internes sont amovibles.
TIROIR INTÉRIEUR SUPÉRIEUR
1. Sortir le tiroir extérieur du congélateur au maximum.
2. Sortir le tiroir supérieur au maximum.
3. Soulever l’extrémité avant du tiroir.
4. Tirer légèrement le tiroir vers soi pour dégager les trous des crochets
des glissières.
a
Dépannage
36
a Crochet de glissière
5. Une fois le tiroir dégagé, le repousser légèrement dans l’ouverture
jusqu’à ce que le bord se dégage du rebord du tiroir, puis soulever le
tiroir pour le retirer.
Page 85

COMPARTIMENT INTÉRIEUR INFÉRIEUR
1. Sortir le tiroir extérieur du congélateur au maximum.
2. Soulever l’extrémité avant du compartiment de stockage inférieur.
3. Tirer légèrement le compartiment vers soi pour dégager les trous des
crochets des glissières.
a Crochet de glissière
a
4. Une fois le compartiment dégagé, le repousser légèrement dans
l’ouverture jusqu’à ce que le bord se dégage du rebord extérieur du
tiroir, puis soulever le compartiment pour le retirer.
ENTRETIEN DU RÉFRIGÉRATEUR
Votre réfrigérateur est conçu pour une utilisation soutenue et
n’exige qu’un nettoyage et un entretien minimal. Pour assurer le bon
fonctionnement de votre réfrigérateur, libre de toute odeur, nous
recommandons un nettoyage régulier.
NETTOYAGE
AVERTISSEMENT
Risque de choc électrique
Débranchez votre appareil ou coupez l’alimentation avant de
•
procéder au nettoyage.
Le non-respect de cette directive peut entraîner la mort, une
•
décharge électrique ou des blessures corporelles.
réfrigérateur
Sécurité de
Fonctionnement
Exigences en
Matière de
Caractéristiques
Pièces et
Installation
l’utilisation
Avant
Utilisation du
réfrigérateur
réfrigérateur
Entretien du
AVERTISSEMENT
Risque d’explosion
Utilisez un nettoyant non inflammable.
•
Le non-respect de cette directive peut entraîner la mort, une
•
explosion ou un incendie.
IMPORTANT : Pour empêcher d’endommager le revêtement, n’utilisez PAS
d’essence, de benzène, de diluant ou autre solvant, et n’utilisez PAS de
nettoyants abrasifs.
1. Débranchez le réfrigérateur de la prise électrique.
2. Retirez tous les aliments.
Dépannage
37
Page 86

réfrigérateur
Sécurité de
4. Lavez l’intérieur du réfrigérateur à l’aide d’un linge doux et humide et
5. Nettoyez le joint d’étanchéité autour de la porte. Essuyez délicatement
3. Retirez et lavez toutes les étagères avec un détergent doux.
Fonctionnement
Exigences en
Matière de
6. Utilisez un linge doux pour essorer toutes les surfaces.
Caractéristiques
7. Branchez de nouveau l’appareil.
Pièces et
DÉPLACEMENT
IMPORTANT : En déplaçant votre réfrigérateur, n’inclinez PAS ce dernier
plus de 45° de la position verticale.
Installation
1. Débranchez le réfrigérateur de la prise électrique.
2. Retirez tous les aliments.
3. Fixez du ruban sur tous les articles amovibles à l’intérieur du
l’utilisation
4. Fixez du ruban sur la porte.
Avant
EMPLACEMENT
IMPORTANT : Ne placez pas le réfrigérateur dans un endroit accessible
Utilisation du
réfrigérateur
réfrigérateur
aux enfants.
1. Débranchez le réfrigérateur de la prise électrique.
2. Retirez tous les aliments.
3. Nettoyez le réfrigérateur.
4. Laissez la porte entrouverte pour éviter la formation de condensation,
Entretien du
d’une solution de bicarbonate de soude (2 c. à table de bicarbonate de
soude dans 1 pinte d’eau tiède).
le joint à l’aide d’un linge humide doux et d’une solution de détergent
doux.
REMARQUE : Les joints doivent être propres et flexibles pour assurer
une bonne étanchéité.
réfrigérateur.
de moisissure ou d’odeurs.
Dépannage
38
REMPLACEMENT DES AMPOULES
Tout remplacement ou entretien des ampoules à DEL doit être effectué
par le fabricant, son prestataire de services ou toute autre personne
qualifiée.
Page 87

DÉPANNAGE
IMPORTANT : NE TENTEZ PAS de réparer votre réfrigérateur vous-même.
Ce faisant, vous annulerez votre garantie.
réfrigérateur
Sécurité de
GÉNÉRALITÉS
PROBLÈME CAUSE POSSIBLE SOLUTION
Le réfrigérateur
ne fonctionne
pas
La porte du
réfrigérateur ne
se referme pas
complètement.
Les voyants
LED ne
s'allument pas
Le réfrigérateur est
débranché.
Assurez-vous que le cordon
d’alimentation soit bien inséré
dans la prise électrique.
Le fusible dans le
circuit est brûlé ou
le disjoncteur est
déclenché.
Vérifiez la boîte à fusible/
le disjoncteur et remplacez
le fusible ou rétablissez le
disjoncteur.
Panne él ectrique. Lors d’une panne électrique,
le réfrigérateur se désactive.
Attendez le retour du courant.
Le contrôle de la
température n'est
Ajustez la température à un
réglage plus bas.
pas réglé sur la
température correcte.
Le jeu entre le
réfrigérateur et les
armoires ou le mur
environnants est
insuffisant.
Assurez-vous qu'il y a
suffisamment d'espace
autour du réfrigérateur et
retirez tous les articles du
haut du réfrigérateur pour
maximiser la circulation de
l'air. Voir “Exigences relatives à
l'emplacement”.
Des emballages
obstruent la
Déplacez ou retirez des
aliments.
fermeture de la porte.
Les joints
d’étanchéité de la
Nettoyez les joints
d’étanchéité de la porte.
porte sont souillés.
Le réfrigérateur n’est
peut-être pas de
Mettez le réfrigérateur de
niveau.
niveau.
Le réfrigérateur est
débranché.
La lumière LED est
grillée.
Branchez dans une prise à
3 fiches mise à la masse.
Contactez un technicien
qualifié pour remplacer la LED
grillée.
Fonctionnement
Exigences en
Matière de
Caractéristiques
Pièces et
Installation
l’utilisation
Avant
Utilisation du
réfrigérateur
réfrigérateur
Entretien du
Dépannage
39
Page 88

réfrigérateur
Sécurité de
Fonctionnement
Exigences en
Matière de
Caractéristiques
Pièces et
Installation
l’utilisation
Avant
Utilisation du
réfrigérateur
réfrigérateur
Entretien du
Dépannage
PROBLÈME CAUSE POSSIBLE SOLUTION
Les aliments
dans le
réfrigérateur ne
sont pas froids
La porte a été
ouverte trop souvent
ou est mal fermée.
Une grande quantité
d’aliments vient
d’être ajoutée au
réfrigérateur.
La porte n’est
pas fermée
complètement.
Assurez-vous que la porte soit
fermée de façon appropriée.
Allouez assez de temps pour
permettre à ces nouveaux
aliments de se refroidir, puis
vérifiez de nouveau.
Vérifiez le joint d’étanchéité
de la porte et la disposition
des aliments, et assurezvous que la porte se referme
correctement.
Le réfrigérateur a été
débranché sur une
période prolongée.
Allouez 4 heures avant
d’ajouter des aliments pour
permettre au réfrigérateur de
se refroidir.
Le réglage de la
température est trop
Réglez la température à un
niveau plus froid.
chaud.
Les articles
dans le
compartiment
réfrigérateur
gèlent
Le réfrigérateur
émet des
bruits ou des
vibrations
inhabituels
Les bouches
d'aération sont
obstruées.
Le réfrigérateur n’est
peut-être pas de
niveau.
Le réfrigérateur
touche à un mur.
Les pièces de métal
Placez les gros articles sur les
côtés de l'étagère supérieure
de façon à ce qu'ils ne
bloquent pas l'air circulant à
partir de l'évent au centre.
Réglez les pieds de réglage
situés à chaque coin avant du
réfrigérateur, jusqu’à ce qu’il
soit de niveau.
Éloignez le réfrigérateur du
mur.
Ceci est normal.
font l’objet d’une
expansion et d’une
contraction.
Le fluide frigorigène
Ceci est normal.
circule dans tout le
système.
L’humidité
s’accumule à
l’intérieur du
réfrigérateur
La porte a été
ouverte trop souvent
ou est mal fermée.
Le réfrigérateur est
situé dans une zone
Assurez-vous que la porte soit
fermée de façon appropriée.
Déplacez le réfrigérateur dans
un endroit plus sec.
humide.
La température est
Ceci est normal.
élevée et humide.
40
Page 89

PROBLÈME CAUSE POSSIBLE SOLUTION
Le compresseur
s’active et
se désactive
fréquemment
La température de la
pièce est plus élevée
qu’en temps normal.
Une grande quantité
d’aliments vient
d’être ajoutée au
réfrigérateur.
La porte n’est pas
fermée correctement
ou a été ouverte trop
souvent.
Ceci est normal.
Allouez assez de temps pour
permettre à ces nouveaux
aliments de se refroidir, puis
vérifiez de nouveau.
Vérifiez le joint d’étanchéité
de la porte et la disposition
des aliments, et assurezvous que la porte se referme
correctement.
Le réfrigérateur a été
débranché sur une
période prolongée.
Allouez 4 heures avant
d’ajouter des aliments pour
permettre au réfrigérateur de
se refroidir.
La température
n’a pas été réglée
Réglez la température au
niveau approprié.
correctement.
Le réfrigérateur
dégage une
odeur
Le réfrigérateur a
besoin d’être nettoyé.
Les aliments mal
emballés dégagent
une odeur.
Nettoyez le réfrigérateur.
Consultez “Nettoyage.”
Emballez les aliments de façon
adéquate avant de les placer
dans le réfrigérateur.
réfrigérateur
Sécurité de
Fonctionnement
Exigences en
Matière de
Caractéristiques
Pièces et
Installation
l’utilisation
Avant
Utilisation du
réfrigérateur
réfrigérateur
Entretien du
Dépannage
41
Page 90

réfrigérateur
Fonctionnement
Matière de
Caractéristiques
Installation
l’utilisation
réfrigérateur
réfrigérateur
Dépannage
GLAÇONS ET EAU
Sécurité de
Exigences en
Pièces et
Avant
Utilisation du
Entretien du
PROBLÈME CAUSE POSSIBLE SOLUTION
La machine
à glaçons ne
produit pas
de glaçons
ou pas
suffisamment
de glaçons
Le réfrigérateur n’est
pas raccordé à une
alimentation en eau ou
le robinet d’arrêt de
l’alimentation en eau
est fermé.
La ou les machines à
glaçons sont éteintes.
Raccorder le réfrigérateur à
l’alimentation en eau et ouvrir
complètement le robinet
d’arrêt de l’alimentation en
eau.
Mettre la ou les machines à
glaçons en marche. Voir la
section “Commandes”.
Le réfrigérateur vient
d’être installé.
Attendre 12 heures après
l’installation de la machine
à glaçons pour que la
production de glaçons
commence.
Les glaçons
sont creux ou
petits
REMARQUE :
This is an
indication
of low water
pressure.
Le bac à glaçons n’est
pas en place.
Une grande quantité
de glaçons vient d’être
enlevée.
Un glaçon est coincé
dans le bras éjecteur de
la machine à glaçons.
Le robinet d’arrêt de
l’alimentation en eau
n’est pas complètement
ouvert.
La conduite
d’alimentation en eau
est déformée.
Vérifier que le bac à glaçons
est bien en place.
Laisser suffisamment de
temps à la machine à glaçons
pour produire de la glace.
Enlever le glaçon du bras
éjecteur à l’aide d’un ustensile
en plastique.
Ouvrir complètement
le robinet d’arrêt de
l’alimentation en eau.
Une déformation de la
conduite peut réduire le débit
d’eau. Redresser la conduite
de la source d’alimentation en
eau.
Un filtre à eau
est installé sur le
réfrigérateur.
Enlever le filtre à eau et faire
fonctionner la machine à
glaçons. Si la quantité de
glaçons augmente, cela
signifie alors que le filtre doit
être obstrué ou mal installé.
Remplacer le filtre ou le
remettre bien en place.
42
Page 91

PROBLÈME CAUSE POSSIBLE SOLUTION
Le
distributeur
d’eau et de
glaçons ne
fonctionne
pas
correctement
Le réfrigérateur n’est
pas raccordé à une
alimentation en eau ou
le robinet d’arrêt de
l’alimentation en eau
est fermé.
La conduite
d’alimentation en eau
est déformée.
Raccorder le réfrigérateur à
l’alimentation en eau et ouvrir
complètement le robinet
d’arrêt de l’alimentation en
eau.
Une déformation de la
conduite peut réduire le débit
d’eau. Redresser la conduite
de la source d’alimentation en
eau.
Pression d’eau
inadéquate jusqu’au
domicile.
La pression d’eau du domicile
détermine le débit du
distributeur. Voir la section
“Exigences relatives à
l’alimentation en eau”.
Une porte du
réfrigérateur n’est pas
bien fermée.
S’assurer que les deux
portes du compartiment
de réfrigération sont
complètement fermées.
Le filtre à eau ou le
bouchon de dérivation
n’est pas correctement
installé.
L’eau ne peut pas être
distribuée si le filtre à eau
ou le bouchon de dérivation
n’est pas bien en place. Voir la
section “Filtre à eau”.
Un glaçon bloque
la goulotte de
distribution.
Sortir le bac à glaçons du
compartiment à glaçons
supérieur. Vérifier la goulotte
de distribution et retirer tout
glaçon resté coincé à l’aide
d’un ustensile en plastique au
besoin. Nettoyer la goulotte
de distribution et le bac
à glaçons avec un chiffon
mouillé à l’eau chaude, puis
sécher à fond.
Pour éviter que les glaçons
ne restent coincés et pour
obtenir des glaçons au goût
frais, vider le bac à glaçons et
nettoyer le bac et la goulotte
régulièrement.
Le bac à glaçons n’est
pas bien en place dans
Vérifier la position du bac à
glaçons.
le compartiment de
fabrication.
réfrigérateur
Sécurité de
Fonctionnement
Exigences en
Matière de
Caractéristiques
Pièces et
Installation
l’utilisation
Avant
Utilisation du
réfrigérateur
réfrigérateur
Entretien du
Dépannage
43
Page 92

réfrigérateur
Sécurité de
Fonctionnement
Exigences en
Matière de
Caractéristiques
Pièces et
Installation
l’utilisation
Avant
Utilisation du
réfrigérateur
réfrigérateur
Entretien du
PROBLÈME CAUSE POSSIBLE SOLUTION
De l’eau
coule du
système de
distribution
REMARQUE :
Quelques
gouttes d’eau
après une
distribution
sont normales.
Le verre n’a pas été
maintenu suffisamment
longtemps sous le
distributeur.
Le filtre à eau a
récemment été installé
ou remplacé.
Tenir le verre sous le
distributeur pendant 2 à 3
secondes après avoir relâché
le levier.
Purger le système
d’alimentation en eau
permet de faire sortir l’air
des conduites qui provoque
l’égouttement du distributeur
d’eau. Purger le système
d’alimentation en eau. Voir la
section “Purger le système
d’alimentation en eau”.
L’eau
distribuée a
mauvais goût
L’eau
distribuée est
tiède
De l’eau n’a pas été
distribuée récemment
(environ 4 jours).
Le filtre à eau doit être
remplacé.
Le réfrigérateur vient
d’être installé.
Faire couler et jeter au moins
1 gallon d’eau.
Remplacer le filtre à eau au
moment indiqué.
Attendre 24 heures après
l’installation pour permettre
à l’alimentation en eau de
refroidir complètement.
Le réfrigérateur n’est
pas raccordé à une
canalisation d’eau
Vérifier que le réfrigérateur
est bien raccordé à une
canalisation d’eau froide.
froide.
Une grande quantité
d’eau vient d’être
distribuée.
De l’eau n’a pas été
récemment distribuée.
Attendre 3 heures pour
permettre à l’alimentation en
eau de refroidir complètement.
Le premier verre d’eau peut
ne pas être froid. Jeter le
premier verre d’eau distribué.
De l’eau
s’écoule à
l’arrière du
Les raccords de la
canalisation d’eau n’ont
pas bien été serrés.
Voir la section “Raccordement
à la canalisation d’eau”.
réfrigérateur
Dépannage
44
De l’eau
s’écoule du
plateau, sous
le tiroir du
congélateur
Le réfrigérateur
se dégivre
automatiquement plus
souvent.
Les portes ou les
tiroirs ne sont pas bien
fermé(e)s, ce qui laisse
entrer l’air chaud dans
le réfrigérateur.
Vider le bac d’égouttement.
S’assurer que le réfrigérateur
n’est pas surchargé et que
les contenants d’aliments
liquides, comme les soupes,
sont hermétiquement fermés.
S’assurer que toutes les
portes et tous les tiroirs sont
bien fermés.
Page 93

CODES D’ERREUR
Des codes d’erreur s’affichent sur l’écran d’affichage de la température du
panneau de commande.
réfrigérateur
Sécurité de
Code
d’erreur
EH
F5
F4
CC
C9
CA
F6
E0
E1
E2
E3
E4
E5
E6
E7
EE
EP
Description de l’erreur
Défaillance du capteur d’humidité
La machine à glaçons du réfrigérateur ne se met pas en
marche
Défaillance du capteur de la machine à glaçons du
réfrigérateur
Défaillance de la sonde de dégivrage dans le compartiment
de la machine à glaçons
Défaillance du capteur du compartiment de la machine à
glaçons
Défaillance de communication entre la carte mère et la carte
de la machine à glaçons
Échec d’initialisation de la machine à glaçons du réfrigérateur
Échec d’initialisation de la machine à glaçons du congélateur
Défaillance de la sonde de température du compartiment de
réfrigération
Défaillance de la sonde de température du compartiment de
congélation
Défaillance du capteur du tiroir avec choix de températures
préréglées PerfectChill
Défaillance de la sonde de détection du givre du
compartiment de réfrigération
Défaillance de la sonde de détection du givre du
compartiment de congélation
Défaillance de communication entre la carte mère et du
panneau d'affichage
Défaillance de la sonde de température ambiante
Défaillance du capteur de la machine à glaçons du
congélateur
La machine à glaçons du congélateur ne se met pas en
marche
Fonctionnement
Exigences en
Matière de
Caractéristiques
Pièces et
Installation
l’utilisation
Avant
Utilisation du
réfrigérateur
réfrigérateur
Entretien du
Dépannage
45
Page 94

FEUILLE DE DONNÉES SUR LA
PERFORMANCE
SYSTÈME DE FILTRATION D’EAU INTÉRIEUR
MODÈLE MF-2008-R2 CAPACITÉ 200 GALLONS (757 LITRES)
Système mis à l'épreuve et homologué par NSF International selon les
normes NSF/ANSI 42 et 53 pour la réduction des contaminants indiquée
sur la fiche de données sur la performance.
Ce système a été testé selon les normes NSF/ANSI 42 et 53 pour la réduction des
substances énumérées ci-dessous. La concentration des substances énumérées contenues
dans l’eau entrant dans le système a été réduite à une valeur inférieure ou égale à la limite
admissible pour l’eau en sortant, comme mentionné par les normes NSF/ANSI 42 et 53.
Réduction de
la teneur des
substances
Réduction de la
teneur en chlore
Réduction des
particules, Classe I*
Réduction de la
teneur en plomb
Kystes vivants†
Paramètres de test : pH = 7,69 ± 0,5 à moins d’indications contraires. Débit = 0,52 gal/min
(1,89 L/min). Pression = 60 lb/po
Temp. = 68 °F à 71.6 °F (20 °C à 22 °C). Capacité de service évaluée = 200 gallons (757 litres).
Il est essentiel que les exigences de
•
fonctionnement, d’entretien et de
remplacement de filtre soient respectées pour
que ce produit donne le rendement annoncé.
Des dommages aux biens peuvent se produire
si toutes les instructions ne sont pas respectées.
La cartouche jetable doit être remplacée au
•
moins tous les 6 mois.
Utiliser le filtre de remplacement MF-2008-R2.
•
Le système de contrôle du filtre mesure la
•
quantité d’eau qui passe par le filtre et vous
alerte lorsqu’il faut remplacer le filtre. Voir la
section “Utilisation des commandes”.
Après avoir remplacé le filtre à eau, purger le
•
système d’alimentation en eau. Voir la section
“Distributeur”.
Ces contaminants ne sont pas nécessairement
•
présents dans votre approvisionnement d’eau.
Bien que les tests aient été réalisés sous
des conditions standard en laboratoire, la
performance réelle peut varier.
Ce produit est destiné à une alimentation en
•
eau froide seulement.
Le système d’alimentation en eau doit
•
être installé conformément aux lois et
réglementations nationales et locales en
vigueur.
46
Concentration
dans l’eau à
traiter (mg/L)
2,0 mg/L ± 10% ND 93,7% 50%
≥10000/ml ND >99,9% ≥85%
0,15mg/L ± 10% ≤0,010 99,60% ND
50000/L ND >99,99% 99,95%
2
Concentration
maximale admissible
dans l’eau (mg/L)
(413,7 kPa).
Réduction du
pourcentage
moyen
Ne pas utiliser pour le filtrage d’une eau
•
microbiologiquement polluée ou de qualité
inconnue en l’absence d'un dispositif de
désinfection adéquat avant ou après le
système. Les systèmes certifiés pour la
réduction des kystes peuvent être utilisés pour
l’eau désinfectée qui peut contenir des kystes
filtrables. Numéro d'établissement de l’EPA
10350-MN-005.
Voir la section “Garantie” pour des informations
•
sur la garantie limitée du fabricant, ainsi que
son nom et numéro de téléphone.
Directives d’application/Paramètres
d’approvisionnement en eau
Approvisionnement
en eau
Pression de l’eau 35 - 120 psi
Température de
l’eau
Débit nominal 0,52 gpm (1,89 L/min.)
* Classe I - taille des particules : >0,5 à <1 µm.
† Cas de la filtration de kystes de Cryptosporidium
parvum.
® NSF est une marque déposée de NSF International.
Exigences de la
NSF en matière
de réduction
Pression d’eau
(241 - 827 kPa)
33° - 100°F
(1° - 38°C)
@ 60 psi
Page 95

ATTACHEZ VOTRE REÇU AUX PRÉSENTES. UNE
PREUVE D’ACHAT EST REQUISE POUR OBTENIR UN
SERVICE TECHNIQUE COUVERT PAR LA GARANTIE.
GARANTIE
LIMITÉE
RÉFRIGÉRATEUR
MIDEA
Veuillez disposer des renseignements suivants lorsque vous
appelez le Centre des services à la clientèle :
■ Vos nom, adresse et numéro de téléphone
■ Le numéro de modèle et le numéro de série de votre
appareil
■ Une description claire et détaillée du problème
■ Une preuve d’achat, notamment le nom et l’adresse du
concessionnaire ou du détaillant
SI VOUS AVEZ BESOIN D’UN SERVICE TECHNIQUE :
1. Avant de communiquer avec nous pour organiser un service technique, déterminez si votre produit
doit être réparé. Quelques problèmes peuvent être résolus sans service technique. Prenez quelques
minutes pour revoir la section du Diagnostic de pannes du guide de l’utilisateur, ou consultez
http://us.Midea.com/support.
2. Tout service technique couvert par la garantie est assuré exclusivement par nos prestataires de service
technique Midea autorisés, aux États-Unis et au Canada.
Services à la clientèle Midea
Aux États-Unis ou au Canada, appelez le 1-866-646-4332.
Si vous résidez hors des 50 États des États-Unis ou hors du Canada, communiquez avec votre
concessionnaire Midea autorisé pour déterminer si une autre garantie s’applique.
1 AN PIÈCES ET SERVICE
CE QUE LA GARANTIE COUVRE
GARANTIE LIMITÉE POUR LA PREMIÈRE ANNÉE (PIÈCES ET MAIN-D’ŒUVRE)
Midea réparera ou remplacera, sans frais, toute défaillance provoquée par une fabrication ou des matériaux
défectueux, pendant un an à compter de la date d’achat. Pour de plus amples renseignements sur la
couverture de la garantie et les réparations sous garantie, visitez www.midea.com ou composez
1 866 646-4332.
Le consommateur sera responsable des :
■ Coûts associés aux diagnostics, à la dépose, au transport et à la réinstallation suite à l’entretien.
■ Coûts d’entretien résultant des points figurant sous RESPONSABILITÉS NORMALES DU
CONSOMMATEUR**
RESPONSABILITÉS NORMALES DU CONSOMMATEUR**
Cette garantie s’applique uniquement aux produits faisant l’objet d’une utilisation
résidentielle normale, et le consommateur est responsable des points suivants :
1. Utilisation appropriée de l’appareil, respectant les directives fournies avec le produit.
2. Entretien périodique et nettoyage requis pour maintenir l’appareil en bon état de fonctionnement.
3. Installation appropriée par un professionnel agréé, respectant les directives fournies avec l’appareil et
les codes municipaux en matière de plomberie, électricité et/ou gaz.
4. Branchement approprié à une prise électrique mise à la masse, fournissant un courant suffisant;
remplacement des fusibles brûlés; réparation des connexions desserrées ou des défectuosités au
niveau des installations électriques.
5. Dépenses requises pour rendre l’appareil accessible pour l’entretien.
6. Dommages sur le revêtement suite à l’installation.
VOTRE REMÈDE UNIQUE ET EXCLUSIF EN VERTU DE LA PRÉSENTE GARANTIE LIMITÉE EST LA
RÉPARATION OU LE REMPLACEMENT DU PRODUIT, COMME PRÉVU AUX PRÉSENTES. Le service
technique doit être assuré par une entreprise d’entretien désignée par Midea. La garantie limitée est
valide uniquement dans les 50 États des États-Unis ou au Canada et s’applique uniquement si l’appareil
ménager est utilisé dans le pays où il a été acheté. La présente garantie limitée entre en vigueur à compter
de la date de l’achat original de l’appareil ménager par le consommateur. Une preuve de la date de l’achat
original doit être présentée pour obtenir un service technique en vertu de la présente garantie limitée.
47
Page 96

CE QUE LA GARANTIE NE COUVRE PAS
1. Une défectuosité causée par un dommage survenu depuis que l’appareil est en votre possession
(autre que les dommages causés par un défaut ou un mauvais fonctionnement), par une installation
inadéquate, ou par une utilisation non raisonnable du produit, incluant et sans s’y limiter, le défaut
d’assurer un entretien raisonnable et nécessaire ou de suivre les directives écrites et de lire le manuel
d’instructions.
2. Les produits achetés “tels quels” ou les produits réusinés ne sont pas couverts par cette garantie.
3. La perte de nourriture suite à une défectuosité du réfrigérateur ou du congélateur.
4. Les visites d’entretien pour réparer ou remplacer les pièces consommables comme les filtres
hydrauliques, les ampoules, les filtres pneumatiques, etc., ou les poignées, les boutons ou autres pièces
cosmétiques.
5. Les produits ayant été transférés de leur propriétaire original.
6. La rouille à l’extérieur ou à l’intérieur de l’unité.
7. Les dommages causés par l’entretien effectué par une personne autre qu’un professionnel agréé
Midea; l’utilisation de pièces autres que les pièces de rechange Midea ou obtenues par des personnes
autres que le service à la clientèle Midea; les causes externes comme l’abus, la mauvaise utilisation,
l’alimentation inadéquate ou tout événement de force majeure.
8. L’entretien résultant d’une installation inappropriée de votre produit.
9. La visite servant à vous enseigner l’utilisation de votre produit.
10. Les suppléments, incluant, mais sans s’y limiter, tout appel de service après les heures normales, les
week-ends ou les jours fériés, les péages, les frais de transport, le kilométrage pour tout appel de
service dans une région éloignée, y compris en Alaska.
11. Si cette unité est utilisée pour des raisons commerciales, locatives ou autre application qui n’est pas
vouée à une utilisation résidentielle, nous ne formulons aucune garantie, explicite ou implicite de valeur
marchande ou d’adéquation à un usage particulier.
12. Si le produit a été déplacé hors des États-Unis ou du Canada.
13. Si le produit n’affiche pas le numéro de série original ou si ce dernier a été altéré ou ne peut être
facilement reconnu.
REMARQUE : Certains états n’acceptent pas l’exclusion ou la restriction des dommages indirects ou
accessoires. Ainsi, cette exclusion ou restriction pourrait ne pas s’appliquer à vous.
Dans ces circonstances exclues, le coût des réparations ou du remplacement du produit sera
assumé par le client.
DÉNÉGATION DE GARANTIES IMPLICITES
LES GARANTIES IMPLICITES, Y COMPRIS TOUTE GARANTIE IMPLICITE DE QUALITÉ MARCHANDE
OU GARANTIE IMPLICITE D’APTITUDE À UN EMPLOI PARTICULIER, SONT LIMITÉES À UNE PÉRIODE
D’UN AN OU À LA PÉRIODE LA PLUS COURTE PERMISE PAR LA LOI. Quelques états et provinces ne
permettent pas l’imposition d’une limite à la durée des garanties implicites de qualité marchande ou
d’aptitude à l’emploi et, par conséquent, il est possible que cette limitation ne vous concerne pas. La
présente garantie vous confère certains droits légaux. Vous pouvez également jouir d’autres droits, lesquels
varient d’un état à l’autre ou d’une province à l’autre.
DÉNÉGATION DE DÉCLARATIONS NE RELEVANT PAS DE LA GARANTIE
Midea ne fait aucune déclaration concernant la qualité ou la durabilité de cet appareil ménager, ni son
besoin de service technique ou de réparation, à part les déclarations formulées dans la présente garantie.
Si vous souhaitez une garantie plus longue ou plus complète que la garantie limitée qui accompagne
cet appareil ménager, veuillez communiquer avec Midea ou votre détaillant au sujet de l’achat d’une
prolongation de garantie.
LIMITATION DES REMÈDES; EXCLUSION DES DOMMAGES ACCESSOIRES
ET DES DOMMAGES INDIRECTS
VOTRE REMÈDE UNIQUE ET EXCLUSIF EN VERTU DE LA PRÉSENTE GARANTIE LIMITÉE EST
LA RÉPARATION DU PRODUIT PAR MIDEA, COMME PRÉVU AUX PRÉSENTES. MIDEA N’EST PAS
RESPONSABLE DES DOMMAGES ACCESSOIRES ET INDIRECTS. Quelques états et provinces ne
permettent pas l’exclusion ou la limitation de dommages accessoires ou indirects et, par conséquent, il est
possible que ces limitations et ces exclusions ne vous concernent pas. La présente garantie vous confère
certains droits légaux. Vous pouvez également jouir d’autres droits, lesquels varient d’un état à l’autre ou
d’une province à l’autre.
48
05/19
Page 97

Refrigerador de dos
puertas de montaje
inferior
Fuente de lamientación: 115 V
Frecuencia: 60 Hz
Capacidad: 21.6 cu. ft.
sp
MANUAL DE USUARIO
Advertencia:
Antes de utilizar este producto,
lea atentamente este manual
y guárdelo para consultarlo
posteriormente. El diseño y las
especificaciones están sujetos
a cambios sin previo aviso
para mejoras de los productos.
Consulte con su distribuidor o
fabricante para obtener detalles.
version A - 08 - 2020
¡Extensión gratuita
de 3 meses del período
original de la garantía
limitada! *Simplemente envíe
una foto de su comprobante
de compra al:
1-844-224-1614
*La extensión de la garantía es por los
tres meses inmediatamente posteriores
a la finalización del período de la
garantía original del producto.
NÚMERO DE MODELO MRQ22D7AST
www.midea.com
Page 98

Estimado usuario
Gracias por permitir que Midea le ayude a "hacer que se sienta
en casa". Este manual es parte de nuestro compromiso con su
satisfacción total. Lea detenidamente este manual antes de
utilizar este producto, y guárdelo en un lugar conveniente para su
consulta futura.
Para ayudarnos a brindarle un mejor servicio, considere registrar
su producto con nuestra práctica aplicación Midea MSmartlife,
visitando http://www.midea.com, o enviando por mensaje de
texto una foto de su comprobante de compra al 1-844-224-1614.
Al utilizar la opción de texto, obtendrá una extensión de la garantía
adicional de 3 meses inmediatamente después de completar la
garantía original del producto.
SEGURIDAD DEL REFRIGERADOR .................................................3
REQUISITOS OPERATIVOS ..............................................................7
Requisitos de Ubicación ........................................................................7
Requisitos eléctricos ...............................................................................8
Requisitos del Suministro de Agua ..................................................9
PIEZAS Y CARACTERÍSTICAS ....................................................... 10
INSTALACIÓN ...................................................................................11
Desempacar ............................................................................................... 11
Desmontaje de la Puerta (solo si es necesario) ...........................11
Conexión al agua .................................................................................... 16
Mover a la ubicación final .................................................................... 19
Instalación de las manijas ................................................................... 2
Instalación del filtro de agua .............................................................. 2 1
Alineado de las puertas (en caso de necesitarlo) ..................... 23
Nivelar el refrigerador .......................................................................... 24
ANTES DE USAR ............................................................................. 24
Período de espera ................................................................................. 24
Limpieza .................................................................................................... 25
USO DEL REFRIGERADOR .............................................................25
General ...................................................................................................... 25
Controles .................................................................................................. 26
Máquina de hielo .................................................................................... 29
Dispensador ............................................................................................. 3
0
0
Page 99

Bandeja antigoteo ..................................................................................31
ADVERTENCIA
WiFi ..............................................................................................................31
Declaración de cumplimiento de la FCC/IC: ............................... 33
Declaración del Ministerio de Industria de Canadá ..................34
Características del refrigerador ....................................................... 34
Cajón flexible PerfectChill .................................................................. 37
Características del congelador.........................................................38
CUIDADO DEL CONGELADOR ..................................................... 39
Limpieza .................................................................................................... 39
Mudanza ....................................................................................................4
Almacenamiento ....................................................................................4
Reemplazo de luces ............................................................................. 4
0
0
0
SOLUCIÓN DE PROBLEMAS ..........................................................41
General .......................................................................................................41
Hielo y agua .............................................................................................44
Códigos de error .................................................................................... 47
HOJA DE DATOS DE RENDIMIENTO............................................ 48
GARANTÍA ....................................................................................... 49
SEGURIDAD DEL REFRIGERADOR
SU SEGURIDAD Y LA SEGURIDAD DE LOS DEMÁS SON MUY
IMPORTANTES
Para prevenir lesiones del usuario y otras personas y daños materiales, se
deben seguir las instrucciones que se muestran debajo. El funcionamiento
incorrecto por ignorar las instrucciones puede causar daños o heridas, e
incluso la muerte.
El nivel de riesgo se muestra según las siguientes indicaciones.
Seguridad del
Refrigerador
Operativos
Requisitos
Características
Piezas y
Instalación
Antes de
Usar
Refrigerador
Uso del
Cuidado del
Congelador
ADVERTENCIA
PRECAUCIÓN
Este símbolo indica la posibilidad de muerte o heridas
graves.
Este símbolo indica la posibilidad de lesiones o daños a
la propiedad.
Este símbolo indica que existe la posibilidad de voltaje
peligroso con un riesgo de descarga eléctrica, lo que
puede provocar la muerte o heridas graves.
Solución de
Problemas
3
Page 100

Seguridad del
Refrigerador
Operativos
Requisitos
Características
Piezas y
Instalación
Antes de
Usar
Refrigerador
Uso del
Cuidado del
Congelador
Solución de
Problemas
INSTRUCCIONES IMPORTANTES DE
SEGURIDAD
ADVERTENCIA
SEGURIDAD GENERAL DEL ELECTRODOMÉSTICO
Lea todas las advertencias de seguridad, instrucciones, ilustraciones
•
y especificaciones provistas con este electrodoméstico. El
incumplimiento de todas las instrucciones que se enumeran a
continuación puede provocar descargas eléctricas, incendios y/o
lesiones graves.
Guarde todas las advertencias e instrucciones para futuras
•
referencias.
SEGURIDAD ELÉCTRICA
Enchufe en un tomacorriente de 3 clavijas con conexión a tierra.
•
No quite el enchufe de conexión a tierra.
•
No use un adaptador.
•
Desconecte el cable de alimentación sujetando el enchufe, nunca
•
tirando del cable.
No encienda ni apague el electrodoméstico enchufando o
•
desenchufando el cable de alimentación.
No utilice un cable de extensión.
•
Desconecte el refrigerador antes de limpiarlo o descongelarlo.
•
NOTA: No es posible desconectar la alimentación del refrigerador a
través de ninguno de los ajustes del panel de control.
Requisito de conexión a tierra
Este refrigerador debe estar conectado a tierra. Este refrigerador
•
está equipado con un enchufe de conexión a tierra. El enchufe debe
insertarse en un tomacorriente que esté correctamente instalado y
conectado a tierra.
El uso incorrecto del enchufe de conexión a tierra puede provocar
•
un riesgo de descarga eléctrica. Consulte a un electricista o técnico
calificado si las instrucciones de conexión a tierra no se entienden
completamente o si existen dudas sobre si el refrigerador está
conectado a tierra correctamente.
SEGURIDAD DE LA UBICACIÓN
Este refrigerador está diseñado para usarse en entornos domésticos
•
y similares.
Haga la instalación conforme a las instrucciones del fabricante.
•
4
 Loading...