

Page 1
Operations manual
MiniLink® Data 900 and 2400 MHz Series
25691 Atlantic Ocean Drive, Suite B-3; Lake Forest, CA 92630
MicroTek Electronics, Inc.
Technical Support: 888-366-4276
www.microtekelectronics.com
Page 2

FCC NOTICE
This equipment has been tested and found to comply with the limits of a Class B device,
pursuant to PART 15 of the FCC Rules. These limits are designed to provide reasonable
protection against harmful interference.
This equipment generates, uses and can radiate radio frequency energy, and, if not
installed and used in accordance with the instructions, may cause harmful interference to
radio communications. However, there is no guarantee that interference will not occur in
a particular installation. If this equipment does cause harmful interference to radio or
television reception, which can be determined by turning the equipment off and on, the
user is encouraged to try to correct the interference by one or more of the following
measures:
• Reorient or relocate the receiving antenna.
• Increase the separation between the equipment and receiver.
• Connect the equipment into an outlet on a circuit different from that to which the
receiver is connected.
• Consult your dealer or an experienced radio/TV technician for help.
Any changes or modifications not expressly approved by the manufacturer could void the
user’s authority to operate the equipment.
RF EXPOSURE NOTICE
This equipment is approved only for mobile and base station transmitting devices,
separation distances of (i) 20 centimeters or more for antennas with gains < 6 dBi or (ii) 2
meters or more for antennas with gains
> 6 dBi should be maintained between the
antenna of this device and nearby persons during operation. To ensure compliance,
operation at distances closer than this is not recommended.
INDUSTRY CANADA NOTICE
The term “IC:” before the certification/registration number only signifies that the
Industry Canada technical specifications were met.
Operation is subject to the following two conditions: (1) this device may not cause
interference, and (2) this device must accept any interference, including interference that
may cause undesired operation of the device.
( i )
Page 3

INDEX
SECTION PAGE #
FCC NOTICE ----------------------------------------------------------------- ( i )
INDUSTRY CANADA NOTICE ----------------------------------------- ( i )
QUICK START GUIDE ---------------------------------------------------- 2
PRE-INSTALLATION REMINDER, RETURN POLICY --------- 3
TRANSCEIVER DESCRIPTION---------------------------------------- 4
FRONT VIEW ---------------------------------------------------------------- 4
SIDE VIEW ------------------------------------------------------------------- 4
DATA CONNECTIONS----------------------------------------------------- 4
TRANSCEIVER OPERATION ------------------------------------------ 5 – 7
TRANSCEIVER SETUP ------------- -------------------------------------- 5
CTU SOFTWARE------------------------------------------------------------ 5 – 6
TRANSCEIVER MAINTENANCE--------------------------------------- 7
TRANSCEIVER SPECIFICATIONS ---------------------------------- 8
RF SECTION ----------------------------------------------------------------- 8
DATA SECTION ------------------------------------------------------------- 8
POWER ------------------------------------------------------------------------ 8
RANGES ---------------------------------------------------------------------- 8
WARRANTY INFORMATION------------------------------------------ 9
__________________________________________________________________
- 1 -
Page 4

QUICK START GUIDE
MicroTek Electronics, Inc. recommends that all equipment be bench tested before being
installed onsite. This test will ensure that all components of your application are
functioning properly.
DATA TRANSCEIVER SET-UP
1. Remove each Transceiver from the box and attach its omni-directional dipole antenna.
2. If the device in use operates at a different Baud Rate than the factory setting of 4800, the
radio must be changed to the desired Baud rate using the Software. See Pages 5 and 6 for
information on changing the radio’s Baud Rate.
3. Select the correct mode of operation; either RS-232 or RS-422/485. Factory set to RS-
422/485.
4. For RS-422/485, determine whether a 2-wire or 4-wire set-up is required and wire into
TX +/- at the control panel and RX +/- at the camera (Pan / Tilt / Zoom Camera
applications).
5. Perform a bench test to make sure all PTZ functions can be controlled wirelessly.
6. Mount each Transceiver in an area that has clear, wide-open line of sight to the other
Transceiver. A weatherproof enclosure must be used if mounted outdoors or in a harsh
environment. If our weatherproof enclosure is used, mount using the double-sided tape.
There is enough room in our weatherproof housing for the video transmitter/receiver and
Data transceiver.
7. The red LED will light up when power has been connected and applied. One 12 VDC
power supply is included in the system for each Transceiver.
Trouble Shooting: If you cannot control the PTZ functions wirelessly or if you are
having other operational difficulties, please visit the trouble shooting section in this
operations manual or contact MicroTek toll free at (888) 366-4276 for technical
assistance. MicroTek’s toll-free technical assistance is available weekdays from 8 am to 5
pm Pacific Time.
- 2 -
Page 5

PRE-INSTALLATION REMINDERS
The information on the Quick Start Guide is intended for ease of use and application, the
following reminders will help to ensure your satisfaction with MicroTek products and service.
1. Read through this manual before bench testing and installation
2. Make sure that you set the Data radios to the Baud Rate that will match your Control
and/or Camera
3. Perform a bench test incorporating all components of the application
4. Install your MiniLink Data 900 or 2400 MHz System
5. Toll-free technical assistance is available Monday through Friday (8-5pm PST) at 1-888-
366-4276
MICROTEK ELECTRONICS RETURN POLICY
All MicroTek Electronics equipment comes with a 2-year limited warranty for repair or
replacement (see the last page for warranty information). In addition to the 2-year warranty, all
products can be returned within the first thirty days for credit. Products may be returned within
30-days of shipment provided the products are in like new condition and in the original
packaging. Contact your MicroTek Electronics dealer or distributor to obtain an authorization to
return the merchandise for credit.
Return authorizations for repair can be sent directly to MicroTek Electronics with a valid RA
number. Call our technical assistance line, 1-888-366-4276, to obtain an RA number for repair.
- 3 -
Page 6

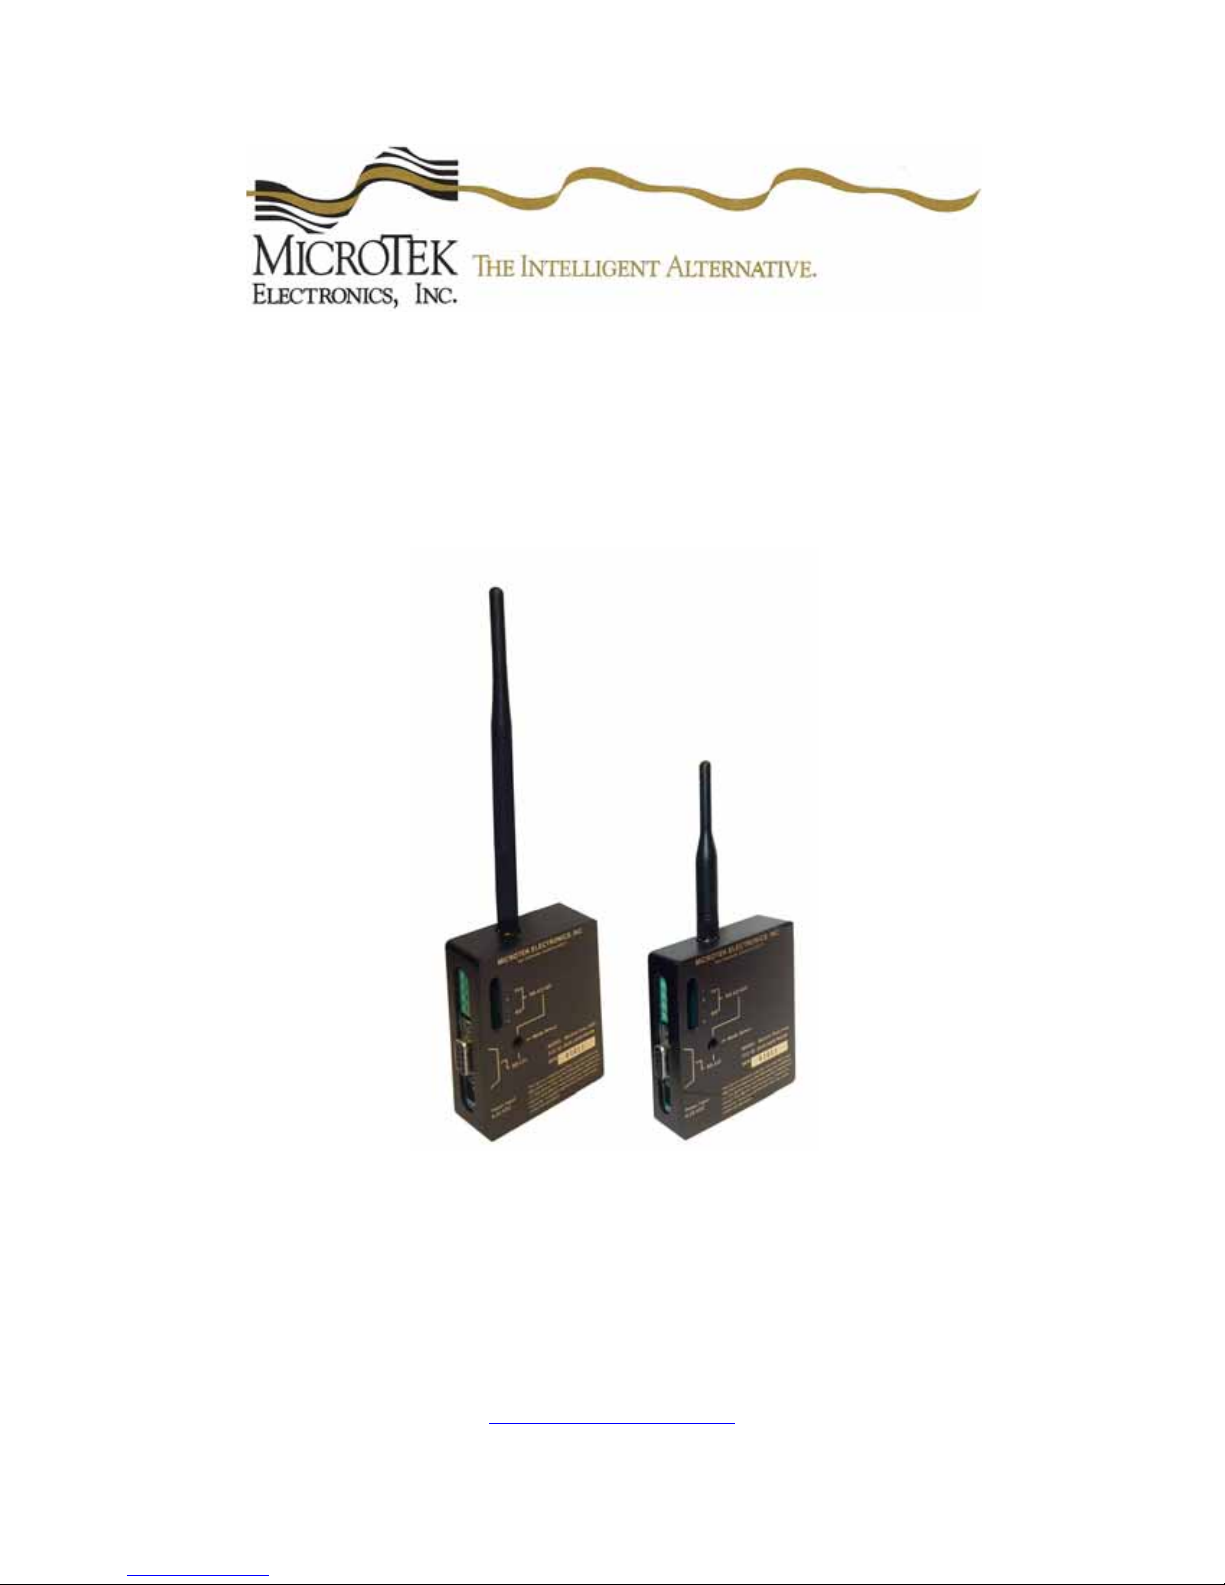
MINILINK 900 AND 2400 MHZ DATA TRANSCEIVERS
5
9
_
TRANSCEIVER DESCRIPTION
The MiniLink Data 900/2400 transceivers are either point-to-point or point-to-multi-point units.
Software is provided to configure each radio to match the configurations of your camera and
controlling device. If the Baud Rate is not set correctly, the control functions will not transmit and
the camera will not move accordingly. MiniLink Data 900/2400 transceivers are designed for line
of sight operation and will transmit in varying ranges up to 20 miles depending on antenna
configuration.
A. FRONT VIEW B. SIDE VIEW
C. DATA CONNECTIONS
1
1
2
3
3
4
4
1. SMA Connector 1. SMA Connector
2. RS-422/485 4-Pin Screw Terminal 2. RS-422/485 4-Pin Screw Terminal
3. Mode Select 3. RS-232 DB9 Connector
4. RS-232 DB9 Connector 4. Power Input
1. RS-232
DB-9
Pin
1 RLSD Not Used
2 RXD Received Data
3 TXD Transmitted Data
4 DTR Data Terminal Ready
5 GND Signal Ground
6 DSR Data Set Ready
7 RTS Request to Send
8 CTS Clear to Send
9 RI Not Used
RS-232
Name
Description
Pin
Pin 1 Pin
Pin 6
2. RS-485 (Half Duplex / 2-wire)
3. RS-485/422 (Simulated Full Duplex/4-wire)
- 4 -
+
+
+
TX - Transmit
TX - Transmit
RX - Receive
Page 7

TRANSCEIVER OPERATION
HOW TO SET UP EACH TRANSCEIVER
1. LOCATION
Each Transceiver is designed to be placed on a flat surface for stability. The
transceivers are not weatherproof and should be placed indoors or in an
environmental enclosure if used outdoors or in a harsh environment. Included in
each of MicroTek’s environmental enclosure is a piece of double-sided tape that
can be used to mount the transceiver inside the housing.
2. POWER
The MiniLink Data unit is powered by a 6-20 VDC power supply connected
through the power jack at the side of the transceiver. Each transceiver
incorporates reverse voltage protection and will draw 200 mA of power.
3. SOFTWARE CONFIGURATION
MiniLink Data 900 or 2400 MHz Transceivers are preprogrammed at the factory
with the following settings:
Baud 4800
Flow Control None
Data Bits 8
Parity None
Stop Bits 1
If your system is using the above listed protocol, there is no need to install the
supplied MiniLink CTU Software. Identify the type of data configuration your
system will be using and make the data connection using the RS-232 DB9
connector or RS-485/422 4-position screw terminal. See section C “DATA
CONNECTIONS” above for the different connection types.
4. MINILINK CTU SOFTWARE
The MiniLink-CTU Software included with the MiniLink Data 900 or 2400 MHz
Transceiver is provided in case it is necessary to change the parameters of the
transceiver for a particular application.
• To install the MiniLink-CTU Software double-click on the
“minilinkctu.exe” located on the media included with your transceiver.
Follow the prompts of the installation screens.
• To use the MiniLink-CTU Software, connect the MiniLink Data
transceiver from the DB9 connector on the unit to the COM1 serial port of
a PC using the supplied straight through DB9 Serial Cable. Remember that
the Baud Rates of the COM1 serial port and the transceiver must match,
and 4800 is the factory setting. Also make sure that the mode select switch
is in the RS-232 position.
• The MiniLink-CTU Software is organized into 3 tabs:
i. Set-up
ii. Com Test
iii. Configuration
- 5 -
Page 8

TRANSCEIVER OPERATION (Continued)
1. Set-up Tab
This screen is used to set the PC Serial Port to interface with the MiniLink Data 900
or 2400 MHz Transceiver. The parameters in this tab must match the PC Serial Port
Parameters for communication to be established.
2. Com Test Tab
This screen is used to test the MiniLink Data transceiver and monitor
communications once the two transceivers are both set to match the parameters of
your system.
Running a Com Test: (See Notes and instructions on the CTU Software below before testing)
1. Two Data transceivers must be in RS-232 mode, powered up, and antennas attached in
order to communicate with one another.
2. One transceiver must be connected to a PC or laptop using the 9-pin DBP Serial Cable
to the PC’s Com Port A, with the CTU Software loaded and running. The other unit must
have pins 2 and 3 grounded with a paper clip.
3. Click on the “Com Test” tab & click “Start”. Test results should appear on the screen
(Either “Good” or “bad”). You can click “Stop” when you like. Click “Clear Results”
and switch the units to make sure they pass the test as a transmitter and as a receiver.
3. Configuration Tab
This screen is used to configure the MiniLink Data 900 or 2400 MHz Transceiver parameters.
• To establish communication between the MiniLink Data Transceiver and the
MiniLink-CTU Software, click on the configuration tab, and select “Show Advanced
Set-up” then click on the “Get Parameters Using Com Port A” tab. The AT
command mode, Sleep, Radio Set-up and Network field will populate if the Baud
Rate on the “Set-up” tab and the Baud Rate of the radio match. (Factory set to 4800).
If the fields do not populate, check the Com Port A setup parameters and retry.
• To change parameters, click on the field or drop down arrow you wish to change and
enter the desired value. Click “Program Module” to send the new parameters to the
MiniLink Data Transceiver. In most cases, only the Baud Rate will need to be
changed.
• To verify that the radio is now configured to the desired parameters, click on the
“Set-up” tab and set all applicable fields to the new setting and click on the
“Configuration” tab. Then click on “Get Parameters Using Com Port A” and all
fields should populate and represent your desired settings.
- 6 -
Page 9

TRANSCEIVER OPERATION (Continued)
• Avoid clicking on “Restore Module Defaults” as Multiple Default-Resets could
result in a software lockout, requiring a factory reset of the Transceiver unit(s). If
you are experiencing software difficulty, try refreshing by clicking on a separate file
tab such as “Set-up” and re-click “Configuration” then try the command again.
NOTE: All transceivers communicating with one another in a system must be configured identically.
If the parameters are changed and the MiniLink transceiver is disconnected from the PC, the com port
parameters of the PC will need to be changed to match the transceiver to re-establish communication.
5. ORDER OF SETUP AND OPERATION
1. Connect Power. A red light, or an LED, will be viewable near the RS-485 Connector
inside of the case once power is applied.
2. Connect Data input. (See page 4)
3. Set the Mode Select switch to the data protocol used by the device being controlled.
4. Make sure the antenna is attached to the SMA connector.
a. Data 900 Transceivers use a 7” omni-directional dipole antenna that flexes at
its base.
b. A Data 900 20-Mile System will use one 7” omni-directional dipole antenna
on one transceiver and the other transceiver will use a 30” Yagi directional
antenna with a 10’ cable that connects to the SMA connector.
c. Data 2400 Transceivers use a 4” omni-directional dipole antenna that does
not flex at the base.
d. A Data 2400 10-Mile System will use one 3” omni-directional dipole antenna
on one transceiver and the other transceiver will use a 12” x 12” Patch
directional antenna with a 10’ cable that connects to the SMA connector.
6. MAINTENANCE
Your MicroTek Electronics MiniLink Data Transceiver is an example of superior design
and craftsmanship. The following suggestions will help to ensure maximum operational
life.
• Keep the product dry. If it does get wet, wipe it dry immediately. Liquids may
contain minerals that corrode electronic circuits.
• Use the system only within the environmental specifications indicated. High
temperatures can shorten the life of electronic devices and melt plastic parts.
• Excessive mechanical shock can damage the case, connectors, cable or internal
circuit board.
Moving or tampering with the system’s internal components can cause a malfunction and
will void the systems warranty as well as the FCC authorization to operate it. If you
cannot control your system wirelessly or if you are having any other problem, contact
your dealer and/or MicroTek for service.
- 7 -
Page 10

TRANSCEIVER SPECIFICATIONS
RF SECTION
Power Output 140 mW (900 MHz),
50 mW (2.4 GHz)
Transmitting Frequency 900 to 928 MHz
2.4000 to 2.4835 GHz
Modulation Frequency Hopping Spread Spectrum
Channel Capacity 7 hop sequences share 25 frequencies
Over Air Baud Rate Up to 19200 bps
FCC ID OUR9XSTREAM (900 MHz)
OUR-24XSTREAM (2.4 GHz)
Industry Canada 4214A-9XSTREAM (900 MHz)
4214A 12008 (2.4 GHz)
Europe ETSI, CE (2.4 GHz)
DATA SECTION
Input RS-422/485 or RS-232
Output RS-422/485 or RS-232
I/O Data Rate Software selectable 1200-57600 bps
Mode Select 2-position slide switch
MECHANICAL
Dimensions 2.875” x 3.313” x 1.0”
Weight 7.2 oz
Connections Power supply, RS-232 DB9 & RS-422/485 terminal block
POWER
Power Requirements 6-20 VDC @ 200 mA
Reverse voltage protected
ENVIRONMENTAL
Humidity 95% non-condensing
Operating Temperature -10F to +180F
RANGES
3 Miles MiniLink Data 2400 – dipole to dipole
7 Miles MiniLink Data 900 – dipole to dipole
10 Miles MiniLink Data 2400 – dipole to 12” patch
20 Miles MiniLink Data 900 – dipole to 41.5” yagi
*Specifications subject to change without notice
- 8 -
Page 11

TROUBLESHOOTING
PROBLEM SUGGESTION
Camera does not respond
when PTZ control
functions are moved
Unit fails when Com Test
is run
There is a slight “blip” or
other type of interference
on the screen only when
the PTZ control functions
are accessed.
No wireless control should be the only problem that would be related
to the MiniLink Data transceivers. For all other problems, refer to
the operations manual for other equipment that is being used. Try the
following suggestions to obtain wireless control:
1. Verify mode selection switches are in the UP position for
RS-422/485 or in the DOWN position for RS-232.
2. Both transceivers must match parameters.
3. Transceivers’ parameters must match the system they are
communicating with.
4. If using RS-422/485 protocol, make sure it is wired into TX
+/- at the control panel and RX +/- at the camera.
5. Run a Com Test in RS-232 (in the CTU Software) to verify
that each radio is transmitting and receiving data.
6. One or both radios may need to be returned for testing and
repair under its 2-year limited warranty. Call MicroTek for
return for repair information.
1. Make sure that pins 2 and 3 of the DB9 connector (on the
unit not plugged into the PC) are grounded using a paper
clip.
2. Verify that both transceivers match all parameters.
3. Verify both units’ mode selection switch is in the RS-232
position.
4. Both transceivers should have their antenna connected to
work properly.
5. Make sure both units are powered up and their LED is on.
6. Switch radios so that the one previously connected to the PC
is now the transmitting unit with the grounded pins.
7. One or both radios may need to be returned for testing and
repair under its 2-year limited warranty. Call MicroTek for
return for repair information.
The MiniLink Data Transceivers should not interfere with any of the
MiniLink Video Transmit/Receive systems since the frequencies are
too far apart. The exception to that general rule is if you are using
the MiniLink Data 2400 Series alongside the MiniLink 2.4 GHz
Series for video. Otherwise, the problem may be a power issue.
Make sure that each data transceiver and each video transmitter (or
receiver) is powered by its own 12 VDC power supply.
- 9 -
Page 12

WARRANTY INFORMATION
MicroTek Electronics extends the following LIMITED WARRANTY to the
original owner/purchaser of this product:
1) If, within two years after date of initial sale, this product, or any part or
portion thereof, shall prove upon examination by MICROTEK, to be
defective in material or workmanship, MICROTEK will repair or replace
such part or portion at MICROTEK’s option. The warranty period on the
repaired or replaced part or portion of this product shall be limited to the
unexpired term of the original warranty. The buyer shall be responsible
for all shipping and transportation of the product to MICROTEK for any
performance under this warranty.
2) Conditions and Exceptions:
a) Any accident to this product, any misuse or abuse, alternation, use in
modified form, or any attempt to repair this product shall void this
warranty. These conditions to the warranty include, but are not
limited to, incorrect power connections, physical damage due to
mechanical shock, exposure to moisture, and circuit modification.
b) SHOULD THIS PRODUCT PROVE DEFECTIVE FOLLOWING
PURCHASE, THE BUYER, NOT THE MANUFACTURER,
DISTRIBUTOR, OR RETAILER, ASSUMES THE ENTIRE COST
OF ALL SERVICING OR REPAIR, EXCEPT AS OTHERWISE
PROVIDED BY THE TERMS OF THIS WARRANTY.
c) FOR BREACH OF ANY WRITTEN OR IMPLIED WARRANTY
ON THIS PRODUCT, THE BUYER IS LIMITED TO THE
FOLLOWING DAMAGES. (1) THE COST OF LABOR TO
REPAIR OR REPLACE DEFECTIVE PARTS OR PORTIONS OF
THIS PRODUCT, AND (2) THE COST OF THE REPAIRED OR
REPLACE PARTS OR PORTIONS OF THIS PRODUCT.
d) NO OTHER EXPRESSED OR IMPLIED WARRANTIES HAVE
BEEN MADE OR WILL BE MADE ON BEHALF OF MICROTEK
WITH RESPECT TO THE SALE, REPAIR, INSTALLATION,
OPERATION, OR REPLACEMENT OF THIS PRODUCT.
MICROTEK DISCLAIMS ANY IMPLIED WARRANTY OF
MERCHANTABILITY OF THIS PRODUCT OR ITS FITNESS
FOR ANY PURPOSE, AND THE BUYER AGREES THAT THIS
PRODUCT IS SOLD “AS IS” AND THAT THE ENTIRE RISK OF
QUALITY AND PERFORMANCE OF THIS PRODUCT IS WITH
THE BUYER, EXCEPT AS OTHERWISE PROVIDED BY THE
TERMS OF THIS WARRANTY.
e) Some states/jurisdictions do not allow exclusions or limitations of
incidental or consequential damages, or limitations on how long an
implied warranty lasts, so the above exclusions or limitations may not
apply to you.
3) Contact your dealer regarding return authorization for out of warranty
repairs and any further product information.
MICROTEK LIMITED WARRANTY
MicroTek Electronics, Inc.
25691 Atlantic Ocean Dr, Lake Forest, CA 92630
Technical Support: 888-366-4276
www.microtekelectronics.com
 Loading...