

Page 1
Xbox 360 Hard Drive
Thanks for choosing the Xbox 360 Hard Drive. The Xbox 360 Hard Drive lets you
save games, save music and create custom playlists, download new content from
Xbox Live®, and play original Xbox games. Your hard drive comes pre-loaded with
high-definition bonus content including Hexic® HD, a popular puzzle game. The Xbox
360 Hard Drive is for use exclusively with the Xbox 360™ video game and
entertainment system.
For an easy, portable way to take your saved games or Xbox Live membership with
you wherever you go, use the Xbox 360 Memory Unit (sold separately).
NOTE
Because the Xbox 360 system software uses some of the memory from the hard drive,
less than the stated storage capacity is available to the user.
Before using this product, read this manual and the Xbox 360 console manuals
for important safety and health information. Keep all manuals for future
reference. For replacement manuals, go to www.xbox.com/support or call Xbox
Customer Support (see ”If You Need More Help”).
The limited warranty covering this product is contained in the Xbox 360 Warranty
manual (Volume 2).
Dispose of this product in accordance with local and national disposal regulations (if
any), including those governing the recovery and recycling of waste electrical and
electronic equipment (WEEE).
ATTACH AND REMOVE YOUR HARD DRIVE
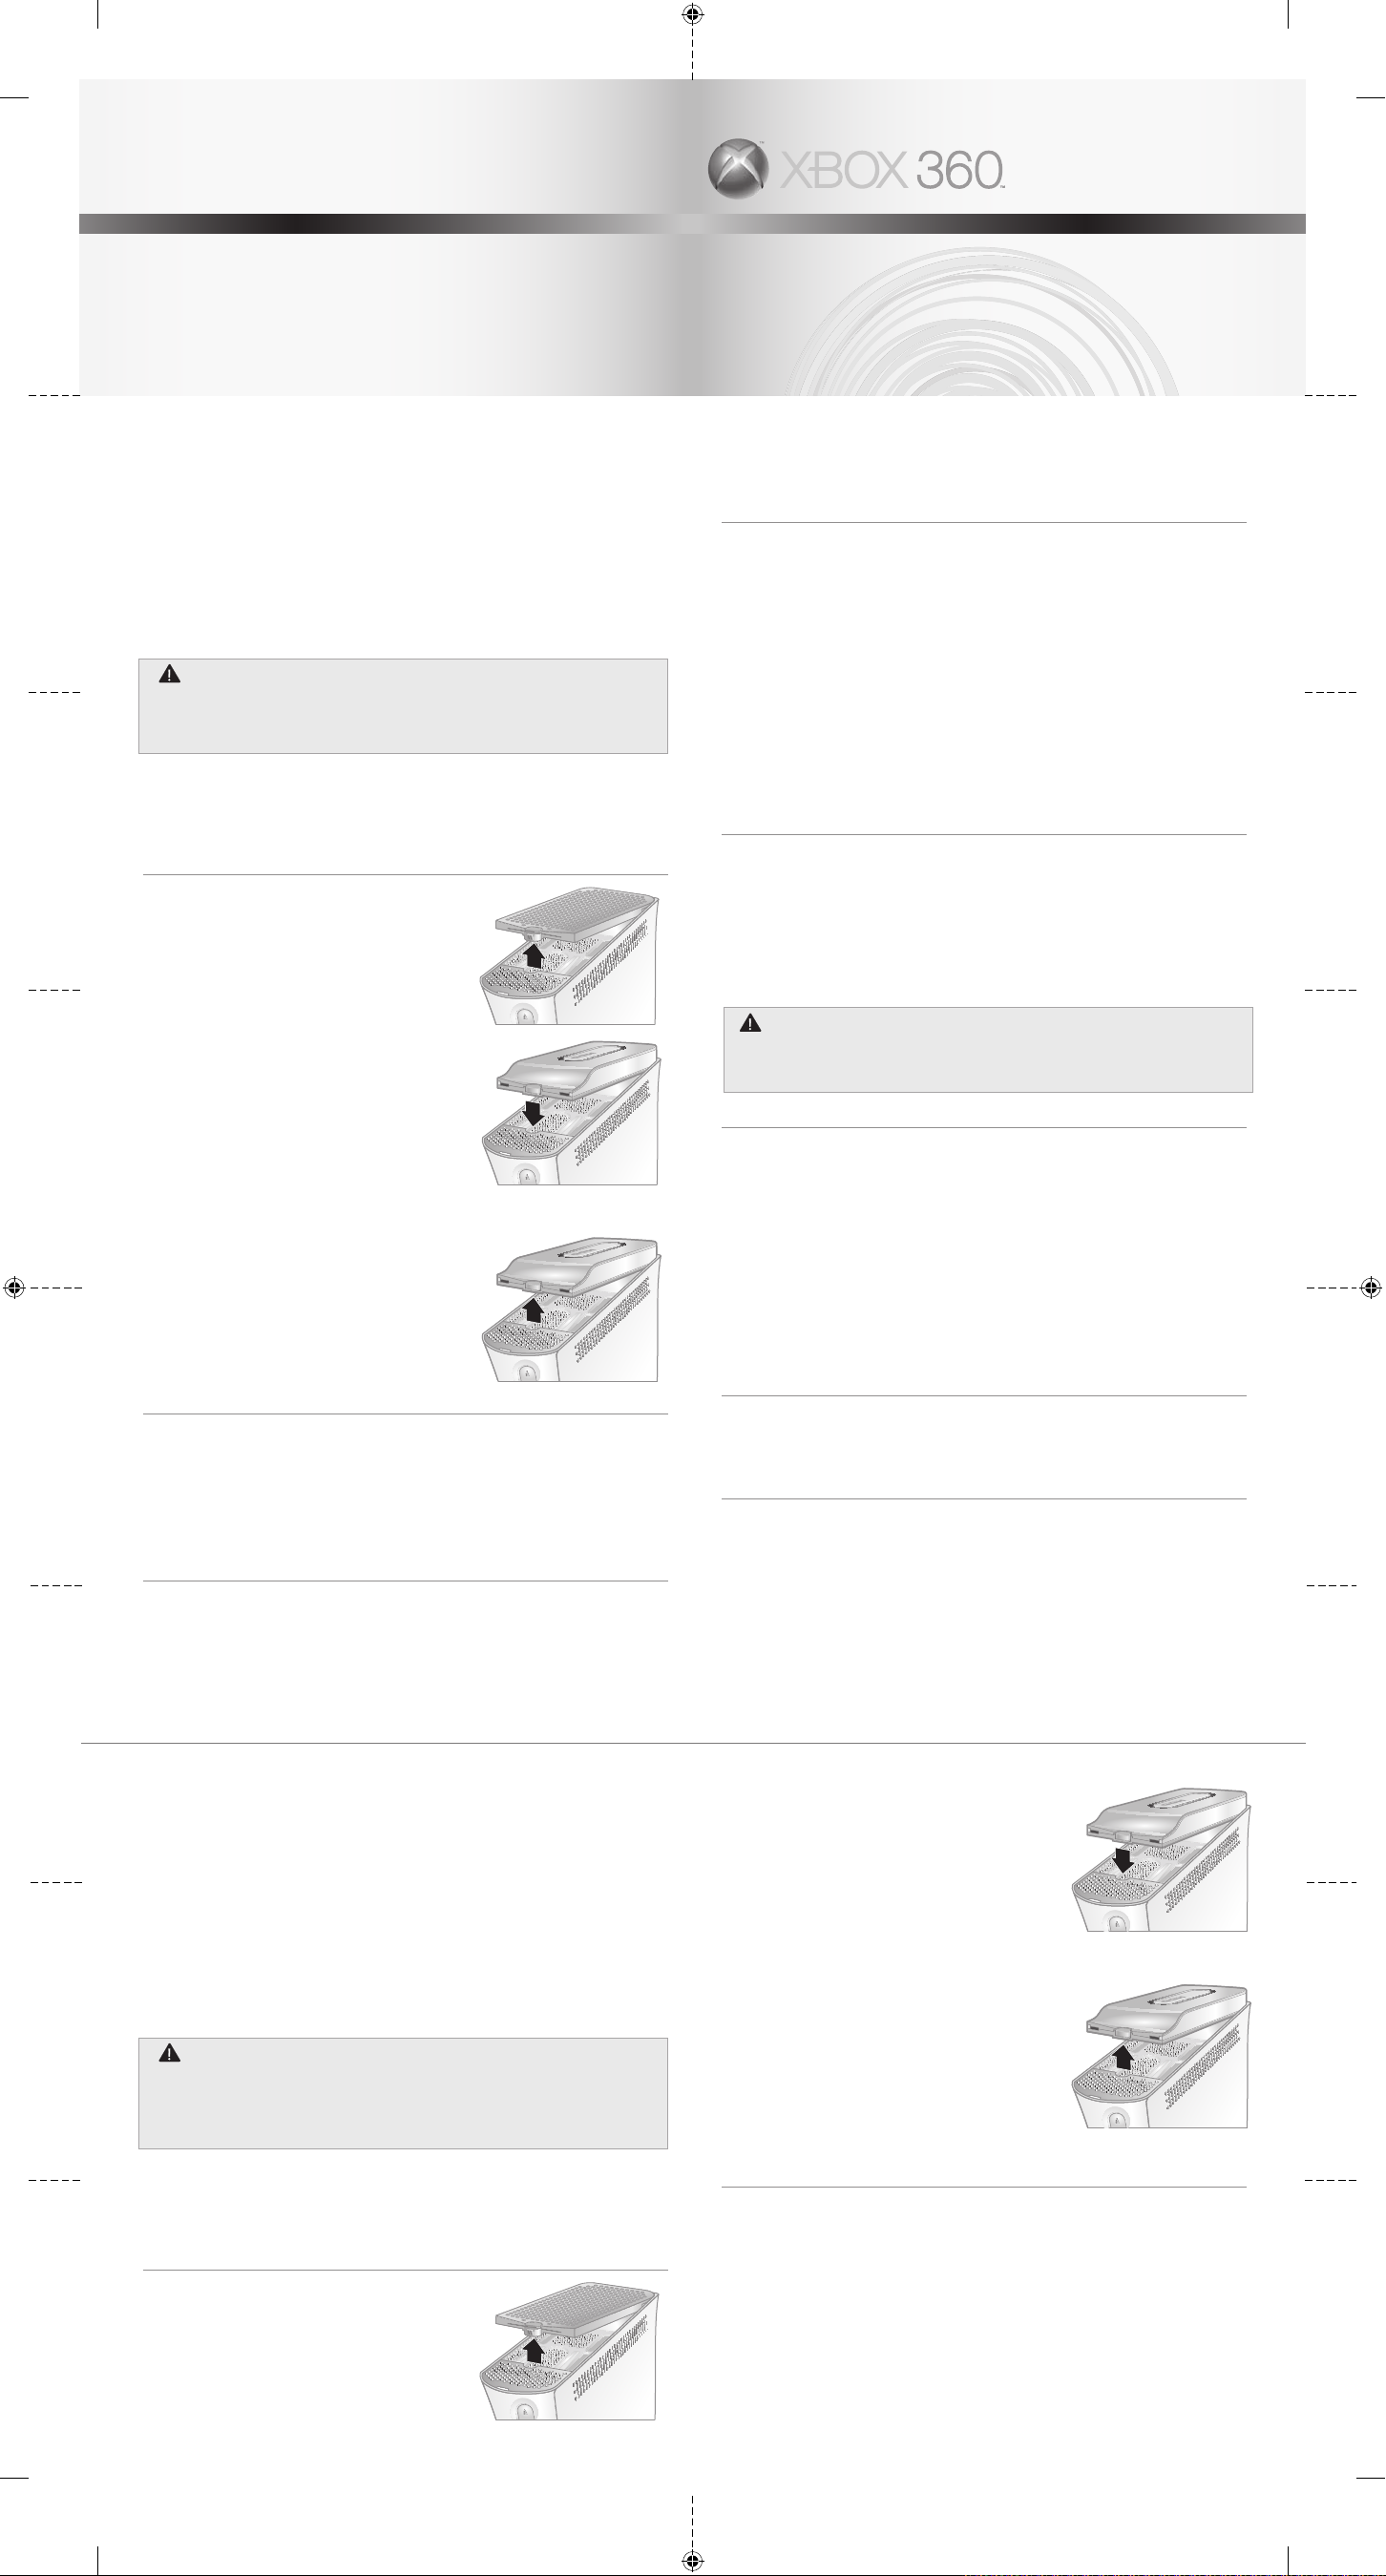
To attach your hard drive:
1 Turn off your console.
2 Remove the hard drive bay cover from
your console.
3 Position the hard drive over the hard
drive bay with the narrow end (the front)
pointed toward the front of the console
and the broad end (the back) pointed
toward the back of the console.
4 Place the back of the hard drive against
the back of the hard drive bay. Make sure
the ridge along the back of the hard drive
rests beneath the lip on the back of the
hard drive bay.
5 Push the front end of the hard drive
down until the tab clicks.
To remove your hard drive:
1 Turn off your console.
2 Press the tab on the front of the hard drive
and lift the unit from the console.
IMPORTANT
Avoid touching hard drive bay contacts or hard drive
connector contacts with fingers or metal objects.
PERSONALIZE YOUR HARD DRIVE
You can personalize your hard drive by giving it a name.
To give your hard drive a name:
1 With the hard drive attached to the Xbox 360 console, select System, Memory.
2 Select your hard drive.
3 From Options, rename your hard drive.
Once your hard drive has been personalized, you can identify it by its new name.
COPY OR DELETE SAVED ITEMS
You can copy items on your hard drive to a memory unit, connected PC, or a
connected USB device. You can also free space on your hard drive by deleting items.
To copy or delete an item from your hard drive:
1 With the hard drive attached to the Xbox 360 console, select System, Memory.
2 Select your hard drive.
3 From Options, select the item you want to copy to another location or delete
from the hard drive.
TROUBLESHOOTING
If you encounter problems, try the possible solutions provided below.
Hard Drive Not a Listed Storage Device
If your hard drive is not listed as a storage device, try the following troubleshooting
steps, in order.
1 Make sure the hard drive is fully inserted into the hard drive bay and looks level.
Turn the console off, then on again.
2 Turn the console off and remove the hard drive. Turn the console on and then off
again. Reattach the hard drive.
3 If available, try the hard drive on another console, or try another hard drive on your
console to pinpoint the problem.
NOTE
Damaged hard drives will not show up in the Xbox Dashboard and could harm your
Xbox 360 console. Hard drives that have been crushed, immersed in liquids, or
exposed to intense heat may be damaged beyond use and will not show up in your list
of storage devices.
IF YOU NEED MORE HELP
Go to www.xbox.com/support or call Xbox Customer Support:
United States and Canada: 1-800-4MY-XBOX (1-800-469-9269)
TTY users: 1-866-740-XBOX (1-866-742-9269)
Mexico: 001-866-745-83-12
TTY users: 001-886-251-26-21
Colombia: 01-800-912-1830
Do not take your Xbox 360 console or its peripherals to your retailer for repair or
service unless instructed to do so by an Xbox Customer Support representative.
Do Not Attempt Repairs
Do not attempt to take apart, service, or modify the Xbox 360 console, power
supply, or its peripherals in any way. Doing so could present the risk of serious
injury or death from electric shock or fire, and it will void your warranty.
FOR CUSTOMERS IN THE UNITED STATES
This device complies with Part 15 of the FCC Rules. Operation is subject to the
following two conditions:
(1) This device may not cause harmful interference, and (2) This device must accept
any interference received, including interference that may cause undesired operation.
Trade
Name:
Microsoft Corp. Responsible
Party:
Microsoft Corporation
Address: One Microsoft Way
Redmond, WA 98052 U.S.A.
Telephone No.: (800) 4MY-XBOX
NOTE
Any changes or modifications made on the system not expressly approved by the
manufacturer could void the user’s authority to operate the equipment.
FOR CUSTOMERS IN CANADA
This device complies with RSS 210 of Industry Canada (IC).
Operation is subject to the following two conditions: (1) this device may not cause
interference, and (2) this device must accept any interference, including interference
that may cause undesired operation of this device.
COPYRIGHT
Information in this document, including URL and other Internet Web site references, is subject to change without
notice. Unless otherwise noted, the example companies, organizations, products, domain names, e-mail addresses,
logos, people, places and events depicted herein are fictitious, and no association with any real company, organization,
product, domain name, e-mail address, logo, person, place or event is intended or should be inferred. Complying with
all applicable copyright laws is the responsibility of the user. Without limiting the rights under copyright, no part of this
document may be reproduced, stored in or introduced into a retrieval system, or transmitted in any form or by any
means (electronic, mechanical, photocopying, recording, or otherwise), or for any purpose, without the express written
permission of Microsoft Corporation.
Microsoft may have patents, patent applications, trademarks, copyrights, or other intellectual property rights covering
subject matter in this document. Except as expressly provided in any written license agreement from Microsoft, the
furnishing of this document does not give you any license to these patents, trademarks, copyrights, or other
intellectual property.
© 2005 Microsoft Corporation. All rights reserved.
Microsoft, Xbox, Xbox 360, Xbox Live, the Xbox logos, and the Xbox Live logo are either registered trademarks
or trademarks of Microsoft Corporation in the United States and/or other countries.
HARD DRIVE DISQUE DUR DISCO DURO
0805 Part Number: X11-297 75-01
Printed i n China
WARNING
Disque dur Xbox 360
Merci d’avoir choisi le disque dur Xbox 360™ de Microsoft. Le disque dur Xbox 360
vous permet d’enregistrer des parties et de la musique, de créer des sélections
personnalisées, de télécharger du nouveau contenu sur Xbox Live® et de jouer à des
jeux Xbox® originaux. Sur votre disque dur, vous trouverez un contenu en prime haute
définition téléchargé au préalable, qui comprend Hexic® HD, un jeu de casse-tête
populaire. Le disque dur Xbox 360 fonctionne exclusivement avec le système de jeu
vidéo et de divertissement Xbox 360.
Pour emporter facilement vos jeux enregistrés ou votre abonnement à Xbox Live
partout où vous allez, procurez-vous la carte mémoire Xbox 360 (vendue séparément).
REMARQUE
Puisque le logiciel du système Xbox 360 utilise une partie de la mémoire du disque
dur, l’utilisateur disposera d’une capacité de stockage inférieure à celle qui est
énoncée comme étant disponible.
Avant d’utiliser ce produit, lisez le présent guide et les guides de Xbox 360 pour
obtenir toute l’information relative à la sécurité et à la santé. Conservez tous les
guides pour consultation ultérieure. Pour obtenir des guides de remplacement, visitez
le site www.xbox.com/support ou composez le numéro du Service à la clientèle de
Xbox (voir la section « Si vous avez besoin d’une aide supplémentaire »).
La garantie limitée couvrant ce produit se trouve dans le Guide de garantie de Xbox
360 (Volume 2).
Éliminez ce produit conformément aux normes locales et nationales en matière de
gestion des déchets (s’il y a lieu), y compris celles qui régissent la récupération et le
recyclage des rebuts de matériel électrique et électronique.
INSTALLEZ ET RETIREZ VOTRE DISQUE DUR
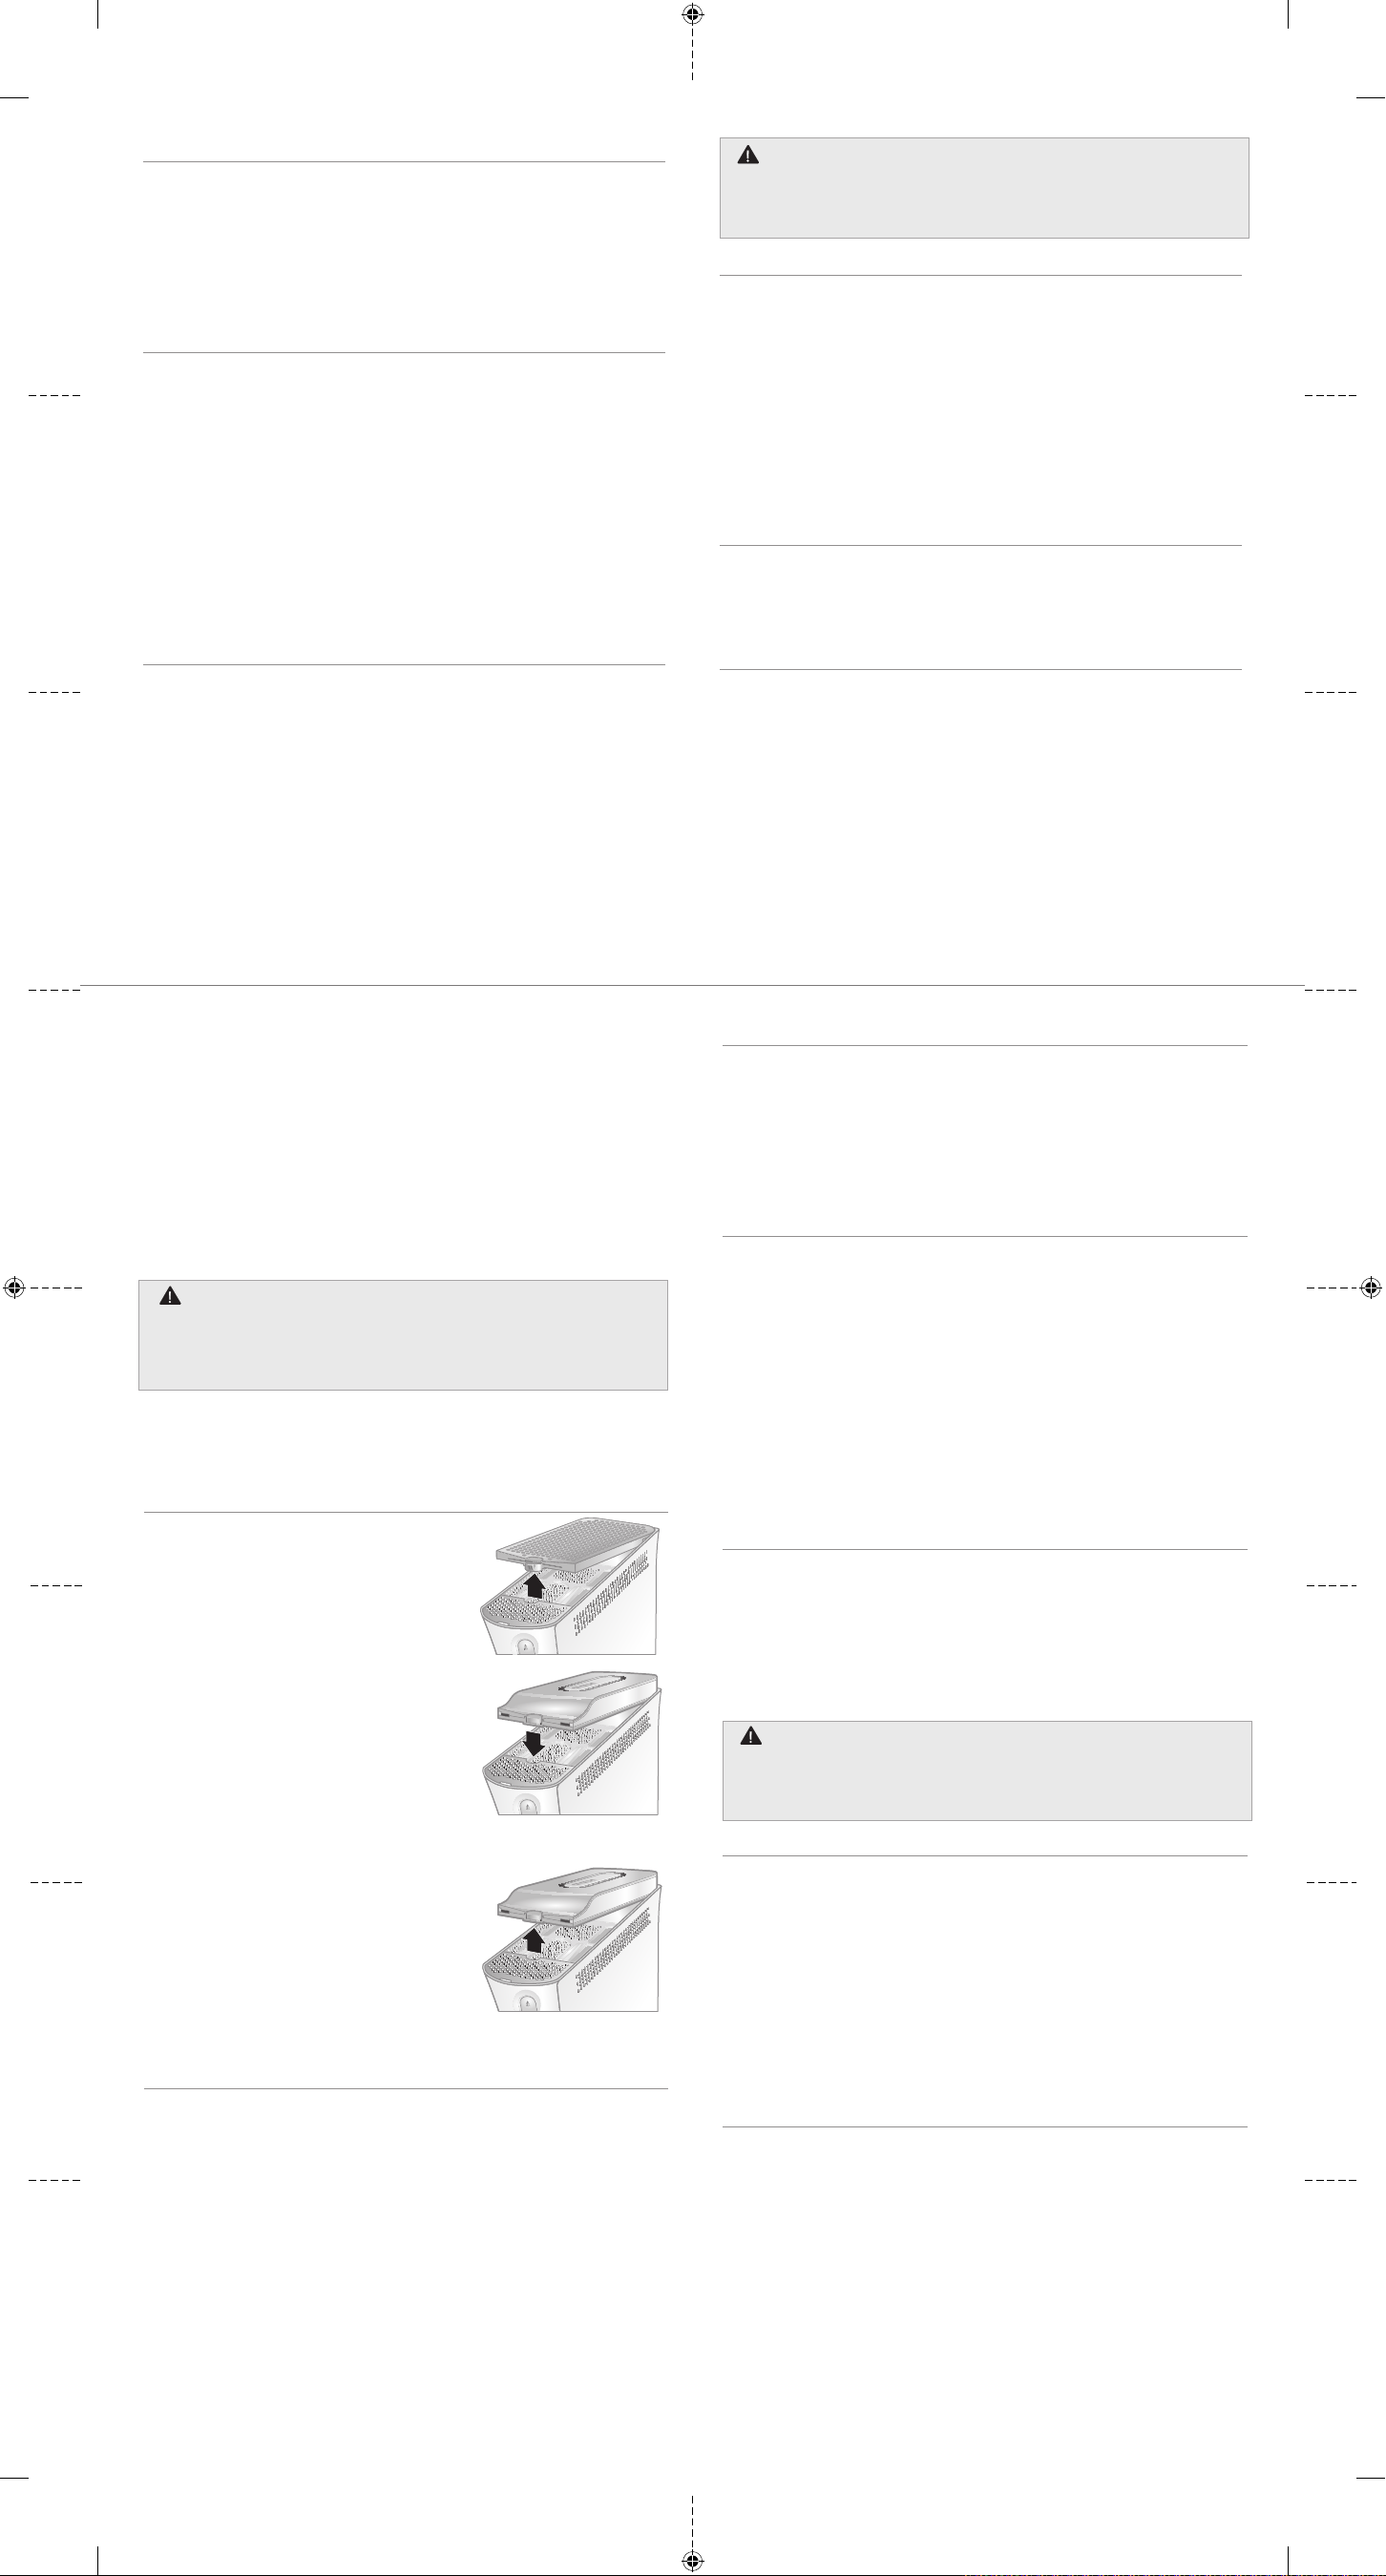
Pour installer votre disque dur :
1 Éteignez votre console.
2 Retirez le couvercle de baie de disque dur
de votre console.
3 Positionnez le disque dur sur la baie en
vous assurant que son extrémité étroite (le
devant) est dirigée vers l’avant de la
console et que son extrémité large
(l’arrière) est dirigée vers l’arrière de la
console.
4 Placez l’arrière du disque dur contre
l’arrière de la baie de disque dur. Assurezvous que l’arête à l’arrière du disque dur
s’appuie sous la lèvre à l’arrière de la baie.
5 Poussez le disque dur vers le bas jusqu’à
ce qu’il s’enclenche.
Pour retirer votre disque dur :
1 Éteignez votre console.
2 Appuyez sur le bouton situé sur le devant du disque
dur et retirez le dispositif de la console.
IMPORTANT
Évitez de toucher aux contacts de la baie ou du
connecteur de disque dur avec vos doigts ou un objet de métal.
PERSONNALISEZ VOTRE DISQUE DUR
Vous pouvez personnaliser votre disque dur en lui attribuant un nom.
Pour attribuer un nom à votre disque dur :
1 Avec le disque dur connecté à la console Xbox 360, sélectionnez System, Memory.
2 Sélectionnez votre disque dur.
3 À partir du menu Options, vous pouvez renommer votre disque dur.
Une fois votre disque dur personnalisé, vous pouvez l’identifier à l’aide de son
nouveau nom.
AVERTISSE MENT
X112977501_bro.indd 1 7/28/2005 3:14:10 PM
Page 2
COPIEZ OU SUPPRIMEZ LES ÉLÉMENTS ENREGISTRÉS
Vous pouvez copier des éléments de votre disque dur sur une carte mémoire, un PC
connecté ou un périphérique connecté à un port USB. Vous pouvez également libérer
de l’espace sur votre disque dur en supprimant des éléments.
Pour copier ou supprimer un élément de votre disque dur :
1 Avec le disque dur connecté à la console Xbox 360, sélectionnez System, Memory.
2 Sélectionnez votre disque dur.
3 À partir du menu Options, vous pouvez sélectionner l’élément que vous souhaitez
copier dans un autre emplacement ou le supprimer de votre disque dur.
DÉPANNAGE
Si vous éprouvez des problèmes, essayez les solutions possibles suivantes :
Le disque dur ne fait pas partie de la liste des périphériques de stockage
Si votre disque dur ne fait pas partie de la liste des périphériques de stockage,
essayez les étapes de dépannage suivantes, dans l’ordre :
1 Assurez-vous que le disque dur est correctement inséré dans la baie de disque dur
et qu’il est dans l’axe de la console. Éteignez la console et rallumez-la.
2 Éteignez la console et retirez le disque dur. Allumez la console et éteignez-la de
nouveau. Réinstallez le disque dur.
3 Si possible, essayez le disque dur sur une autre console ou essayez un autre
disque dur sur votre console pour situer le problème.
REMARQUE
Les disques durs endommagés ne s’afficheront pas dans l’interface Xbox et risquent
d’endommager votre console Xbox 360. Les disques durs qui ont été écrasés,
immergés ou exposés à une chaleur intense peuvent ne plus être réparables. Ils ne
s’afficheront pas dans votre liste de périphériques de stockage.
SI VOUS AVEZ BESOIN D’UNE AIDE SUPPLÉMENTAIRE
Visitez le site www.xbox.com/support ou appelez le service à la clientèle Xbox :
États-Unis et Canada : 1 800 4MY-XBOX (1 800 469-9269)
Utilisateurs de TTY : 1 866 740-XBOX (1 866 740-9269)
Mexique : 001-866-745-83-12
Utilisateurs de TTY : 001-866-251-26-21
Colombie : 01-800-912-1830
Ne confiez pas votre console Xbox 360 ou ses périphériques à votre détaillant pour
les réparations, à moins qu’un représentant du Service à la clientèle de Xbox ne vous
le demande.
Ne tentez pas d’effectuer des réparations
Ne tentez pas de démonter, de réparer ou de modifier la console Xbox 360, son
bloc d’alimentation ou l’un de ses périphériques de quelque façon que ce soit.
Vous risqueriez de subir des blessures ou de décéder des suites d’une commotion
ou d’un incendie électrique. En outre, votre garantie serait annulée.
POUR LES CLIENTS AUX ÉTATS-UNIS
Ce dispositif est conforme à la Partie 15 des règles de la FCC. L’utilisation de ce
dispositif est autorisée seulement aux deux conditions suivantes :
(1) Ce dispositif ne doit pas produire d’interférence nuisible, et
(2) Ce dispositif doit être prêt à accepter tout brouillage radioélectrique reçu, même si
ce brouillage est susceptible de compromettre le fonctionnement du dispositif.
Nom
commercial :
Microsoft Corp. Partie
responsable :
Microsoft Corporation
Adresse : One Microsoft Way
Redmond, WA 98052 U.S.A.
Nº de
téléphone :
(800) 4MY-XBOX
REMARQUE
Toute modification apportée à la console qui n’a pas été expressément approuvée par
le fabricant pourrait annuler le droit d’utiliser le matériel.
POUR LES CLIENTS AU CANADA
Cet équipement se conforme à la norme RSS 210 d’Industrie Canada (IC). L’utilisation
de ce dispositif est autorisée seulement aux deux conditions suivantes :
(1) il ne doit pas produire de brouillage et
(2) ce dispositif doit être prêt à accepter tout brouillage radioélectrique reçu, même si
ce brouillage est susceptible de compromettre le fonctionnement du dispositif.
COPYRIGHT
Les informations contenues dans le présent document, y compris les URL et autres références de sites Web Internet
peuvent être modifiées sans préavis. Sauf mention contraire, les sociétés, organisations, produits, noms de domaine,
adresses électroniques, logos, personnes, lieux et événements mentionnés ici à titre d’exemple sont purement fictifs
et aucune association à tout(e) société, organisation, produit, nom de domaine, adresse électronique, logo, personne,
lieu ou événement réel n’est intentionnelle ou volontaire. Il appartient à l’utilisateur de veiller au respect de toutes les
dispositions légales applicables en matière de copyright. En vertu des droits d’auteur, aucune partie de ce document
ne peut être reproduite, stockée ou introduite dans un système de recherche automatique, ni transmise sous quelque
forme ou par quelque moyen que ce soit (électronique, mécanique, photocopie, enregistrement ou autre), ou dans
n’importe quel but, sans l’autorisation écrite de Microsoft Corporation.
Selon les cas, Microsoft détient des brevets (ou a déposé des demandes de brevets), ainsi que des marques, des
copyrights ou autres droits de propriété intellectuelle sur les questions évoquées dans ce document. Sauf disposition
contraire expressément stipulée dans un accord de licence écrit concédé par Microsoft, la communication de ce
document ne confère au destinataire aucun droit sur les brevets, marques, copyrights et autres droits de propriété
intellectuelle.
© 2005 Microsoft Corporation. Tous droits réservés.
Microsoft, Xbox, Xbox Live, Xbox 360, et les logos Xbox, Xbox Live et Xbox 360 sont soit des marques de commerce de
Microsoft Corporation, soit des marques déposées de Microsoft Corporation, aux États-Unis et/ou dans d’autres pays.
Disco duro Xbox 360
Gracias por elegir el Disco duro Microsoft® Xbox 360™. El Disco duro Xbox 360 te
permite guardar partidas y música, crear listas de reproducción personalizadas,
descargar contenido nuevo de Xbox Live® y jugar a juegos Xbox® originales. El disco
duro incluye contenido especial de alta definición precargado como Hexic® HD, un
conocido rompecabezas. El Disco duro Xbox 360 es de uso exclusivo con el sistema de
videojuegos y entretenimiento Xbox 360.
Si necesitas un medio sencillo y transportable para llevar contigo tus partidas
guardadas o tu membresía a Xbox Live a cualquier parte, utiliza la Unidad de memoria
Xbox 360 (se vende por separado).
NOTA
Debido a que el software del sistema Xbox 360 utiliza parte de la memoria del
disco duro, no estará disponible para el usuario toda la capacidad de
almacenamiento indicada.
Antes de utilizar este producto, lee este manual y los manuales de Xbox 360 para
conocer información importante en materia de seguridad y salud. Conserva todos
los manuales para futuras consultas. Para obtener manuales de repuesto, visita
www.xbox.com/support o llama al Servicio de soporte técnico (consulta ”Si
necesitas ayuda”).
La garantía limitada que cubre este producto está incluida en el Manual de la garantía
de Xbox 360 (volumen 2).
Desecha este producto de acuerdo con las disposiciones locales y nacionales (en caso
de haberlas), incluyendo aquellas que regulan la recuperación y el reciclaje de
equipos eléctricos y electrónicos desechados (EEED).
CONECTAR Y EXTRAER EL DISCO DURO
Para conectar el disco duro:
1 Apaga la consola.
2 Extrae la tapa de la bahía de disco duro
de la consola.
3 Coloca el disco duro sobre la bahía de
disco duro con el lado delgado (frontal)
mirando hacia la parte delantera de la
consola y el lado grueso (trasero) hacia
la parte posterior de la consola.
4 Apoya la parte trasera del disco duro en
la parte trasera de la bahía de disco duro.
Asegúrate de que la parte saliente a lo
largo de la parte trasera del disco duro
queda por debajo del borde trasero de la
bahía de disco duro.
5 Presiona el extremo frontal del disco duro hacia
abajo hasta que oigas un clic en la pestaña.
Para extraer el disco duro:
1 Apaga la consola.
2 Presiona la pestaña de la parte frontal del disco
duro y separa la unidad de la consola.
IMPORTANTE
No toques ningún contacto de la bahía de disco duro o del conector de disco duro con
los dedos o con objetos metálicos.
PERSONALIZAR EL DISCO DURO
Puedes personalizar tu disco duro dándole un nombre.
Para asignar un nombre al disco duro:
1 Con el disco duro conectado a la consola Xbox 360, selecciona Sistema, Memoria.
2 Selecciona el disco duro.
3 Desde Opciones, puedes cambiar el nombre del disco duro.
Después de personalizar el disco duro, podrás identificarlo por su nuevo nombre.
COPIAR O ELIMINAR ELEMENTOS GUARDADOS
Puedes copiar elementos de tu disco duro en una unidad de memoria, una
computadora conectada o un dispositivo USB conectado. También puedes eliminar
elementos para liberar espacio en el disco duro.
Para copiar o eliminar un elemento del disco duro:
1 Con el disco duro conectado a la consola Xbox 360, selecciona Sistema, Memoria.
2 Selecciona el disco duro.
3 Desde Opciones, puedes seleccionar el elemento que quieras copiar a otra
ubicación, o bien eliminarlo del disco duro.
SOLUCIÓN DE PROBLEMAS
Si surgen problemas, prueba una de las soluciones siguientes.
El disco duro no aparece en la lista de dispositivos de almacenamiento
Si el disco duro no aparece en la lista como dispositivo de almacenamiento, prueba en
orden las soluciones siguientes.
1 Asegúrate de que el disco duro está insertado completamente en la bahía del disco
duro y que está nivelado. Apaga la consola y vuelve a encenderla.
2 Apaga la consola y extrae el disco duro. Enciende la consola y vuelve a apagarla.
Vuelve a colocar el disco duro.
3 Si tienes otra consola, prueba el disco duro en ella, o bien prueba otro disco duro
en la primera consola para ver dónde está el problema.
NOTA
Los discos duros dañados no aparecerán en la Interfaz Xbox y podrían provocar daños
a la consola Xbox 360. Los discos duros aplastados, sumergidos en líquidos o
expuestos a mucho calor podrían estar dañados e inutilizados. Estos discos no
aparecerán en la lista de dispositivos de almacenamiento.
SI NECESITAS MÁS AYUDA
Visita www.xbox.com/support o llama al número del Servicio de soporte al cliente de
Xbox 360:
Estados Unidos y Canadá: 1-800-4MY-XBOX (1-800-469-9269)
Usuarios TTY: 1-866-740-XBOX (1-866-740-9269)
México: 001-866-745-83-12
Usuarios TTY: 001-866-251-26-21
Colombia: 01-800-912-1830
No lleves la consola Xbox 360 ni los periféricos a tu distribuidor para que los repare o
mantenga a no ser que te lo diga un empleado del Servicio de soporte al cliente de Xbox.
No intentes realizar reparaciones
No intentes desmontar, reparar ni alterar la consola Xbox 360, la fuente de
alimentación ni sus periféricos en modo alguno. Al hacerlo existe riesgo de
lesiones graves o muerte por descarga eléctrica o fuego; además, la garantía
quedará cancelada.
PARA LOS CLIENTES DE ESTADOS UNIDOS
Este dispositivo cumple las normas FCC, parte 15. La operación está sujeta a las dos
condiciones siguientes:
(1) Este dispositivo no debe provocar interferencias perjudiciales.
(2) Este dispositivo debe poder soportar interferencias de cualquier tipo, incluidas las
que provoquen anomalías de funcionamiento.
Nombre
comercial:
Microsoft Corp. Parte
responsable:
Microsoft Corporation
Dirección: One Microsoft Way
Redmond, WA 98052 U.S.A.
Número de
teléfono:
(800) 4MY-XBOX
NOTA
Cualquier cambio o modificación del sistema que no tenga la aprobación expresa del
fabricante podría invalidar el permiso que tiene el usuario para utilizar el equipo.
COPYRIGHT
La información contenida en este documento, incluida la dirección URL y otras referencias a sitios Web, está sujeta a
cambios sin previo aviso. Siempre que no se indique lo contrario, las compañías, organizaciones, productos, nombres
de dominio, direcciones de correo electrónico, logotipos, personas, lugares y acontecimientos citados en los ejemplos
son ficticios y no se pretende hacer referencia ni debe deducirse referencia alguna a compañías, organizaciones,
productos, nombres de dominio, direcciones de correo electrónico, logotipos, personas, lugares o acontecimientos
reales. El usuario es responsable de cumplir todas las leyes de derechos de autor aplicables. Sin que ello limite los
derechos protegidos por los derechos de autor, queda prohibida la reproducción total o parcial de este documento, así
como su almacenamiento o introducción en un sistema de recuperación de datos, o su transmisión en cualquier forma
y por cualquier medio (electrónico, mecánico, fotocopia, grabación, etc.), sea cual sea el fin, sin la autorización expresa
por escrito de Microsoft Corporation.
Microsoft podría tener patentes, aplicaciones patentadas, marcas comerciales, derechos de autor o derechos de
propiedad intelectual sobre los temas incluidos en este documento. Salvo cuando se indique expresamente en el
contrato de licencia por escrito de Microsoft, la posesión de este documento no implica la licencia para dichas
patentes, marcas comerciales, derechos de autor o demás propiedad intelectual.
© 2005 Microsoft Corporation. Reservados todos los derechos.
Microsoft, Xbox, Xbox Live, Xbox 360 y los logotipos de Xbox, Xbox Live y Xbox 360 son marcas registradas o marcas
comerciales registradas de Microsoft Corporation en los Estados Unidos y/o en otros países.
ADVERTENCIA
X112977501_bro.indd 2 7/28/2005 3:14:24 PM
 Loading...