

Page 1
1 English
24 Français
47 Español
Page 2
English
Warning
Failure to properly set up, use, and care
for the Xbox 360 video game and
entertainment system can increase the
risk of serious injury or death, or damage
to the Xbox 360 video game and
entertainment system. Read this manual
and the manuals of any accessories for
important safety and health information.
Keep all manuals for future reference.
For replacement manuals, go to
www.xbox.com/support or call the Xbox
Customer Support number provided on
the back cover.
Before allowing children to use the Xbox
360 video game and entertainment system:
1 Determine how each child can use the
Xbox 360 console (playing games,
connecting to Xbox LIVE, replacing
batteries, making electrical, AV cable,
and network connections) and
whether they should be supervised
during these activities.
2 If you allow children to use the Xbox
360 console without supervision, be
sure to explain all relevant safety and
health information and instructions.
The Xbox 360 console will not play copied
or “pirated” games or other unauthorized
media. Attempting to defeat the Xbox 360
anti-piracy protection system may cause
your Xbox 360 console to stop working
permanently. It will also void your Limited
Warranty, and may make your Xbox 360
console ineligible for authorized repair,
even for a fee.
You must accept the terms and conditions
of the Limited Warranty and this manual to
use your Xbox 360 console. If you do not
accept these terms and conditions, do not
set up or use your Xbox 360 console and
return it to Microsoft for a refund.
2 Your Xbox 360 Arcade System
3 Select a Location for Your Console
4 Connect to Your TV and
Audio System
5 Connect the Console to Power
7 The Xbox 360 Wireless Controller
7 Set Up Your Wireless Controller
9 Xbox 360 Family Settings
10 Using the Disc Drive
11 Important Health Warnings About
Playing Video Games
12 Play Games
12 Connect to Xbox LIVE
16 Watch Movies
16 Play CDs
17 Share Media from an Audio Player
or Camera
18 Share Media from Your PC
19 Storage
20 Add Wireless Controllers
21 Connect Additional Accessories
22 Troubleshooting
73 Customer Support
english
This symbol identies safety and health
messages in this manual and Xbox 360
accessories manuals.
For your warranty and other important
information, see the Xbox 360 Warranty manual.
1
Page 3
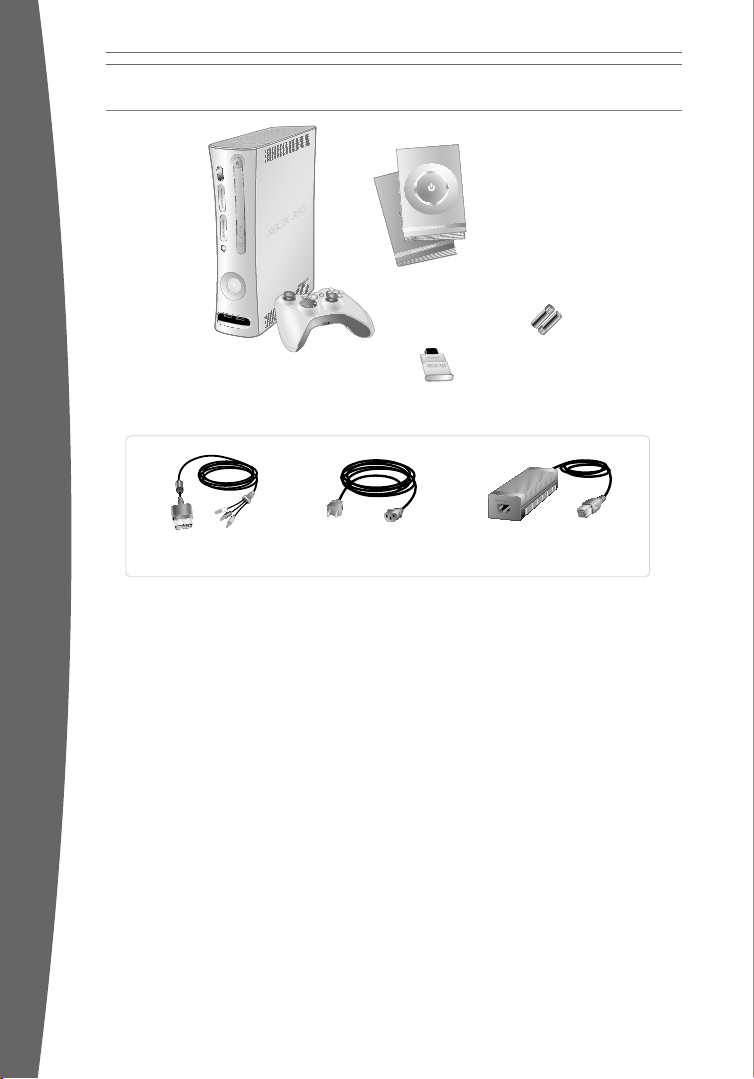
Instruction
Manual (2)
Xbox 360 Console
and Wireless Controller
AA batteries
Memory Unit
Composite
AV Cable
Power Cord
Power Supply
YOUR XBOX 360 ARCADE SYSTEM
english
Thanks for purchasing your Xbox 360™ Arcade
system from Microsoft. You’re now at the
center of a customizable experience that
brings your games, your friends, and your
digital entertainment together in one
powerful package.
• Xbox 360 Arcade lets you play Xbox 360
games, DVD movies, and audio CDs.
• With high-speed Internet service, connect
to millions of gamers on Xbox LIVE
Instantly be a part of a community where
you can play together, talk to your friends,
and download new content.
2
®.
• Stream pictures, music, and more to your
Xbox 360 console by connecting to your
Microsoft
® Windows®-based PC or other
devices such as digital cameras and
portable music players.
• Take your saved games and your Xbox LIVE
account everywhere you go. Even
download content from Xbox 360 demo
kiosks at participating retailers with your
Xbox 360 Memory Unit.
Page 4

SELECT A LOCATION FOR YOUR CONSOLE
Prevent the Console from Falling
If the Xbox 360 console falls and hits
someone, especially a small child, it could
cause serious injury. To reduce the risk of
such injuries and damage to the Xbox 360
console, set up the Xbox 360 console
according to these instructions. Place the
console on a surface that:
• Is at and level.
• Is stable and not likely to tip over.
• Allows all four feet of the console to
be in contact with the surface.
• Is not likely to allow the console to slip
or slide off.
• Is clean and free of dust and debris.
If the surface or console feet become dirty or
dusty, clean them with a dry cloth. If the
console is positioned vertically, put it on a
surface where it is not likely to fall if it tips
over.
Arrange all cables and cords so that people
and pets are not likely to trip over or
accidentally pull on them as they move
around or walk through the area. When the
console is not in use, you may need to
disconnect all cables and cords from the
front and rear of the console to keep them
out of the reach of children and pets. Do not
allow children to play with cables and cords.
Prevent the Console from Overheating
Do not block any ventilation openings on the
console or power supply. Do not place the
console or power supply on a bed, sofa, or
other soft surface that may block ventilation
openings. Do not place the console or power
supply in a conned space, such as a
bookcase, rack, or stereo cabinet, unless the
space is well ventilated.
Do not place the console or power supply
near any heat sources, such as radiators, heat
registers, stoves, or ampliers.
Avoid Smoke and Dust
Do not use the console in smoky or dusty
locations. Smoke and dust can damage the
console, particularly the DVD drive.
3
english
Page 5
CONNECT TO YOUR TV AND AUDIO SYSTEM
IMPORTANT
Stationary images in video games can “burn”
into some TV screens, creating a permanent
english
shadow. Consult your TV owner’s manual or
manufacturer before playing games.
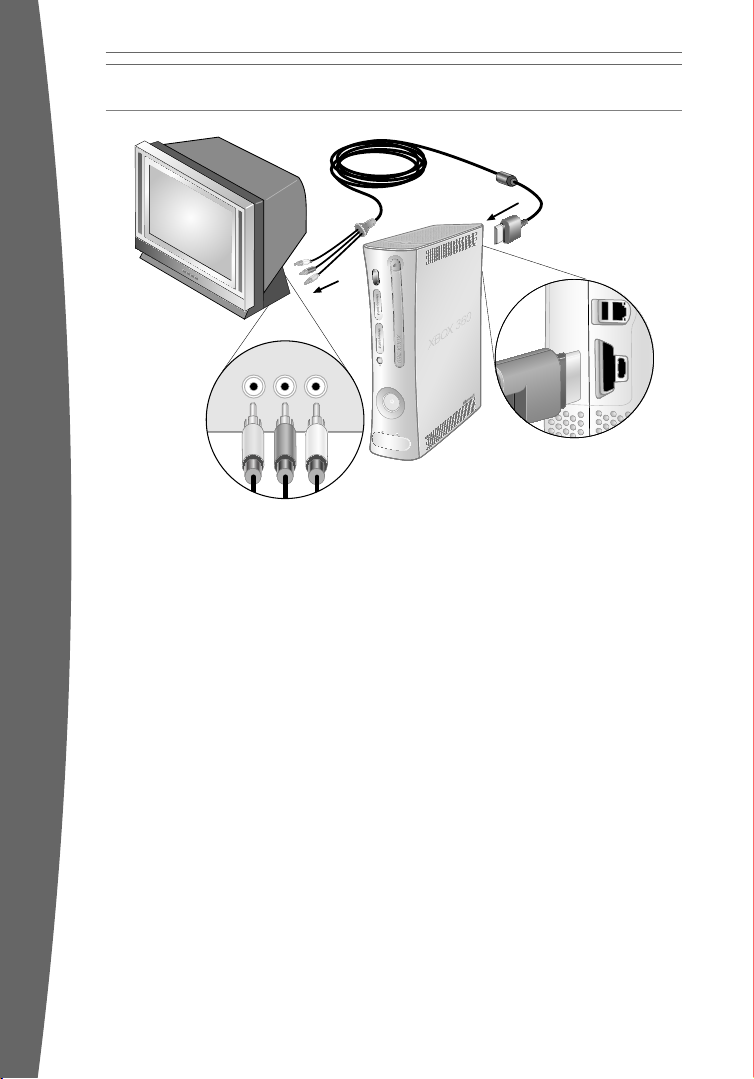
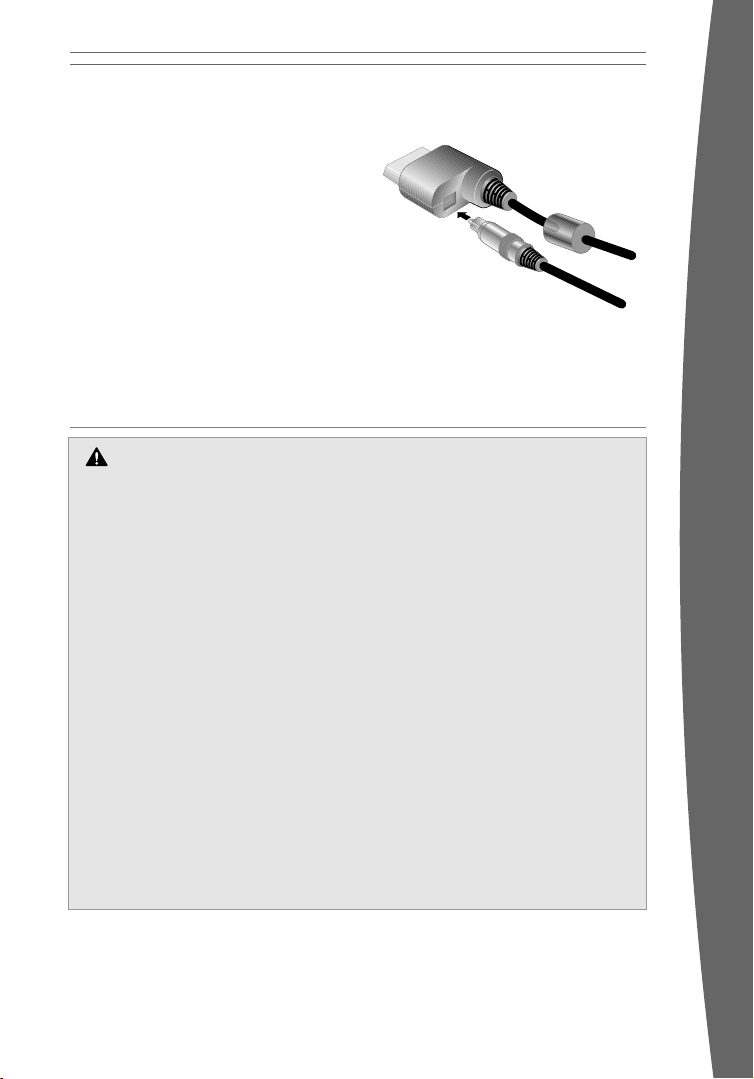
Connect the Composite AV Cable
Use your composite AV cable to connect your
console to your TV.
To connect to your st andard T V:
1 Connect the composite AV cable connector
to the AV port on the console.
2 Connect the color-coded connectors to the
corresponding inputs on the TV: yellow to
yellow (video), red to red (right audio), and
white to white (left audio). You can also
connect audio to a stereo receiver.
For monaural (mono) TVs, which have only
one audio input, connect either the right or
left audio connector to the audio input.
3 Select the appropriate video input on your
TV (see No Picture under “Troubleshooting”
for further information).
4
After you’ve set up your console, you can
congure additional console audio settings
and test your connection from the System
area of the Xbox Dashboard. But before doing
so, proceed through the steps in the following
pages for connecting to power, connecting
your controller, and other initial settings.
Other AV Input
You can also connect to additional TV input
types by using the Xbox 360 Component HD
AV cable, the Xbox 360 S-Video AV Cable, the
Xbox 360 VGA HD AV Cable, or the Xbox 360
HDMI AV Cable (all sold separately). For more
information, go to www.xbox.com/setup.
Page 6
Connect to a Digital Audio System
If your system (typically, a receiver or
amplier) supports digital audio input, you can
connect to digital audio rather than to the
standard left and right audio by using the
Xbox 360 Component HD AV Cable, the Xbox
360 S-Video AV cable, the Xbox 360 VGA HD
AV cable, or the Xbox 360 HDMI Cable (all sold
separately). Digital audio should produce
higher-quality sound. Follow the AV cable
instructions for connecting digital audio.
CONNECT THE CONSOLE TO POWER
Electrical Safety
As with many other electrical devices,
failure to take the following precautions
can result in serious injury or death from
electric shock or re or damage to the
Xbox 360 video game and entertainment
system.
Select an appropriate power source for
your Xbox 360 console:
• Use only the power supply unit and AC
power cord that came with your
console or that you received from an
authorized repair center. If you are not
sure if you have the correct power
supply unit, compare the model
number on the power supply unit with
the model number specied on your
console. If you need a replacement
power supply unit or AC power cord,
contact Xbox Customer Support.
• Conrm that your electrical outlet
provides the type of power indicated
on the power supply unit (in terms of
voltage [V] and frequency [Hz]). If you are
not sure of the type of power supplied to
your home, consult a qualied electrician.
• Do not use non-standard power sources,
such as generators or inverters, even if
the voltage and frequency appear
acceptable. Only use AC power provided
by a standard wall outlet.
• Do not overload your wall outlet,
extension cord, power strip, or other
electrical receptacle. Conrm that they
are rated to handle the total current (in
amps [A]) drawn by the Xbox 360 console
(indicated on the power supply unit) and
any other devices that are on the same
circuit.
• Do not connect any other devices
between the Xbox 360 power supply unit
and the Xbox 360 console or between the
power cord and the Xbox 360 power
supply unit.
5
english
Page 7
To avoid damaging the power cords and power supply:
• Protect the power cords from being
walked on.
• Protect cords from being pinched or
sharply bent, particularly where they
connect to the power outlet, the power
supply unit, and the console.
english
• Do not jerk, knot, sharply bend, or
otherwise abuse the power cords.
• Do not expose the power cords to
sources of heat.
• Do not wrap power cords around the
power supply unit.
• Keep children and pets away from the
power cords. Do not allow them to bite
or chew on them.
• When disconnecting the power cords,
pull on the plug—do not pull on the
cord.
• Do not let the power supply hang from
either power cord.
If a power cord or power supply becomes
damaged in any way, stop using it
immediately and contact Xbox Customer
Support for a replacement.
Unplug your Xbox 360 console during
lightning storms or when unused for long
periods of time.
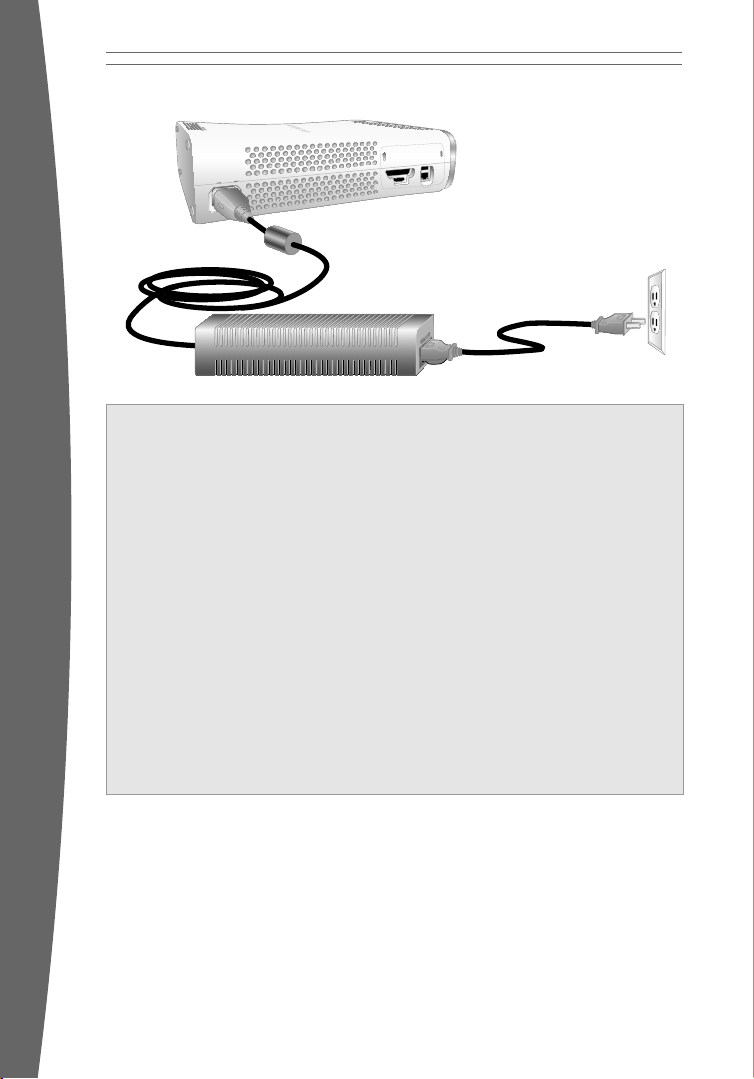
Always connect the power cords according to
the following instructions:
1 Fully insert the power supply cord into the
Xbox 360 console.
2 Plug the AC power cord into the power
supply until it stops.
3 Plug the other end of the AC power cord
into the wall outlet.
6
Page 8
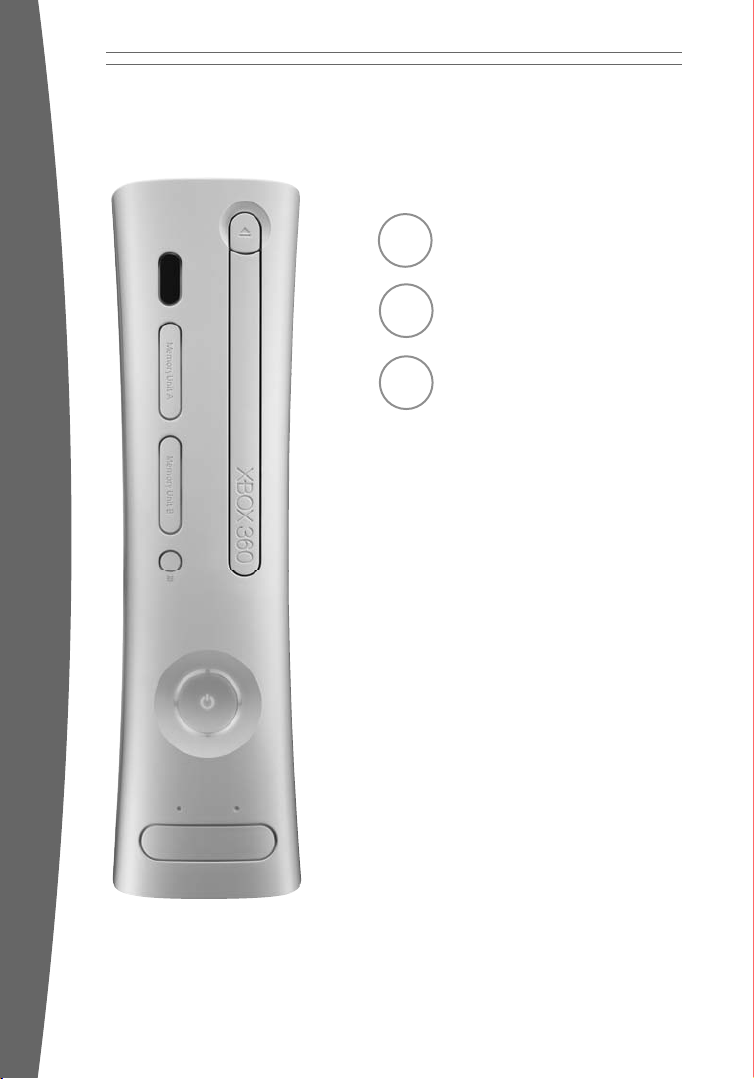
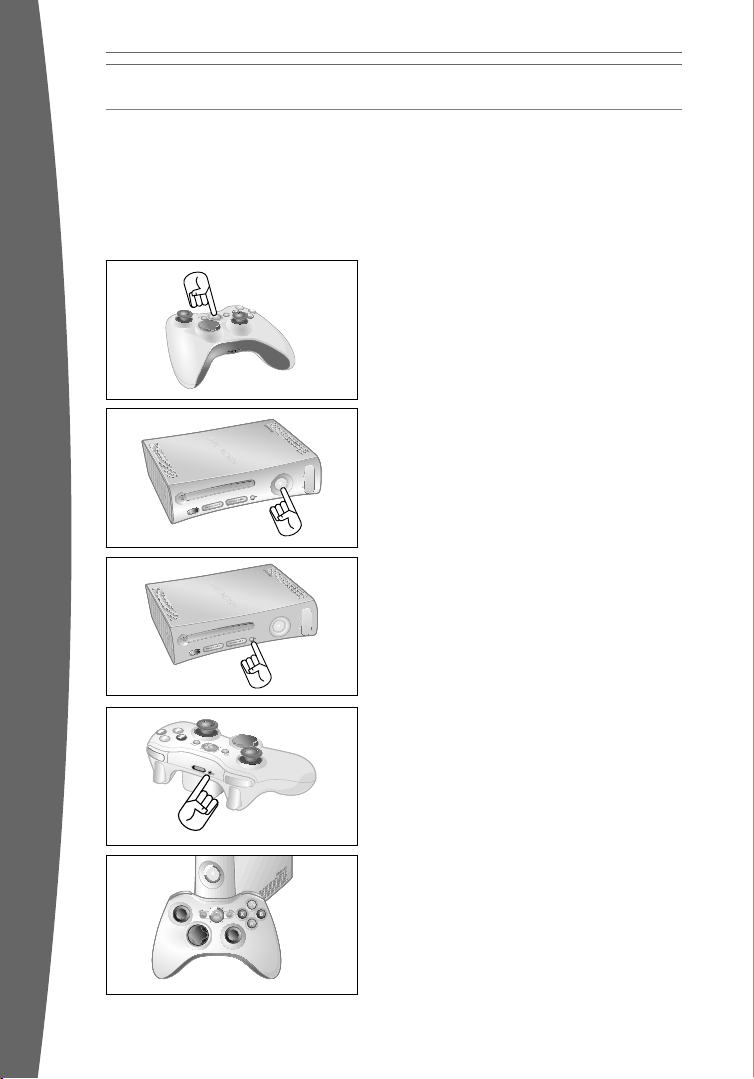
THE XBOX 360 WIRELESS CONTROLLER
Your wireless controller lets you experience
the ultimate in wireless freedom with the
same precision, speed, and accuracy as a
wired controller.
Xbox Guide Button
The Xbox Guide button in the center of your
controller puts the Xbox 360 experience at
your ngertips. Press the Xbox Guide button
to turn your console on. Once on, pressing the
Xbox Guide button gives you immediate
access to the Xbox Guide. To turn off your
console, press and hold the Xbox Guide button
for three seconds and conrm your selection.
Ring of Light
Composed of four quadrants, the Ring of Light
that surrounds the Xbox Guide button on the
controller and the Power button on the
console is the Xbox 360 status indicator.
When you connect a controller to your
console, it is assigned a specic quadrant,
SET UP YOUR WIRELESS CONTROLLER
Before you can use your Xbox 360 Wireless
Controller with your Xbox 360 console, you
need to insert a battery pack.
which glows green to indicate the controller’s
number and position. Each subsequent
controller connected to the console (up to
four) is assigned an additional quadrant.
If system problems should arise, the Ring of
Light on the console will ash combinations
of red. For more information, see
“Troubleshooting.”
Expansion Port
The expansion port (with 2.5-mm audio
connector) on your controller lets you connect
expansion devices like the Xbox 360 Headset
(sold separately) to your controller. For more
information, see the instruction manual for
your controller expansion device.
Charge Port
The charge port on the front of your controller
works exclusively with the Xbox 360 Play &
Charge Kit (sold separately).
english
Insert Batteries
The wireless controller uses disposable
batteries or the Xbox 360 Rechargeable
Battery Pack (sold separately). If you plan to
use disposable batteries, you should
familiarize yourself with the “Disposable
Battery Safety” section that follows.
Disposable Battery Safety
Improper use of batteries may result in
battery uid leakage, overheating, or
explosion. Risk of re if batteries are
replaced by an incorrect type. Released
battery uid is corrosive and may be toxic.
It can cause skin and eye burns, and is
harmful if swallowed. To reduce the risk of
injury:
• Keep batteries out of reach of children.
• Do not heat, open, puncture, mutilate,
or dispose of batteries in re.
• Use only alkaline batteries,
type AA (LR6).
• Do not mix new and old batteries.
• Remove the batteries if they are worn
out or before storing your controller
for an extended period of time. Do not
leave batteries in the AA battery pack
when it is not installed in the controller.
• If a battery leaks, remove all batteries,
taking care to keep the leaked uid
from touching your skin or clothes. If
uid from the battery comes into
contact with skin or clothes, ush skin
with water immediately. Before
inserting new batteries, thoroughly
clean the battery compartment with a
damp paper towel, or follow the
battery manufacturer’s
recommendations for cleanup.
• Dispose of batteries in accordance
with local and national disposal
regulations (if any).
7
Page 9
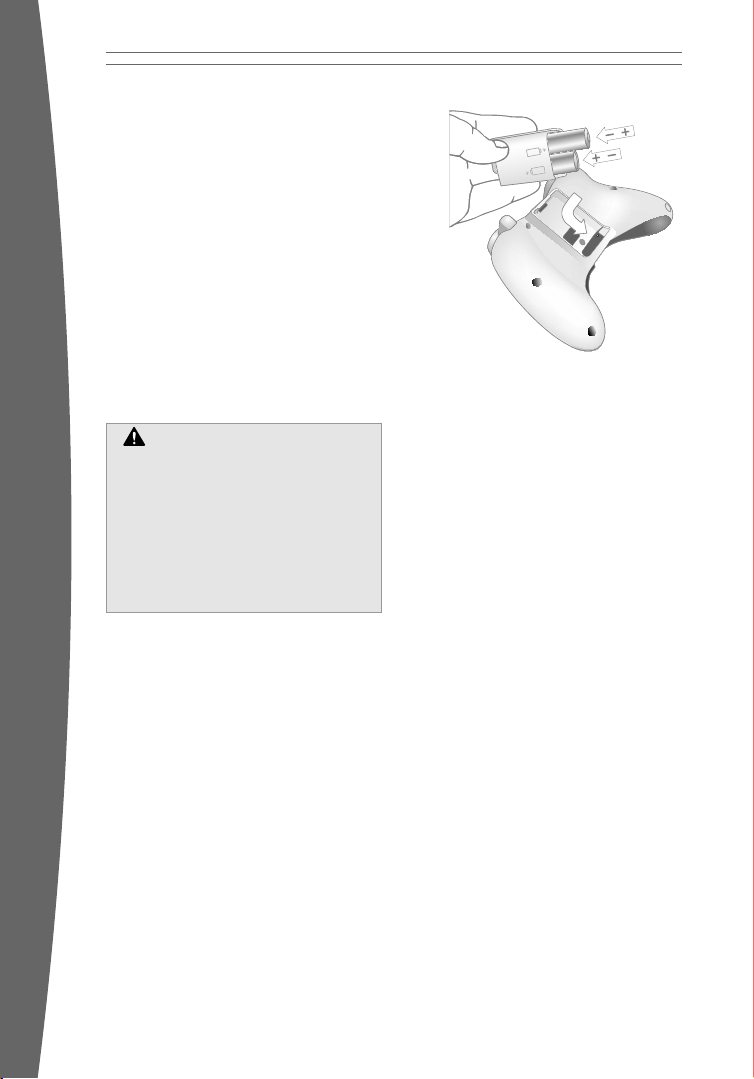
Insert batteries according to the following
instructions.
To insert batteries into the wireless controller
AA bat tery pack:
1 Press the tab on the top of the AA battery
pack and pull down to detach it from the
controller.
2 Insert two new AA (LR6) batteries with
their positive (+) and negative (–) ends as
shown on the underside of the battery
pack. For best performance, AA
rechargeable batteries are not
recommended.
3 Slide the AA battery pack back into place
on the controller and push it in to lock.
Remove Controller Batteries
Aboard Aircraft
Before boarding any aircraft or packing
the wireless controller in luggage that
will be checked, remove any batteries
from the wireless controller. The
wireless controller can transmit radio
english
frequency (RF) energy, much like a
cellular telephone, whenever batteries
are installed.
Connect Your Wireless Controller to
Your Console
Your Xbox 360 Wireless Controller comes
already wirelessly connected to your console,
right out of the box. Should you need to
reconnect your wireless controller to your
console or connect to a different console,
see “Add Wireless Controllers.”
Turn Your Console and Wireless
Controller On
To turn your console and controller on,
press and hold the Xbox Guide button
on your controller.
To turn on your console only, press the
Power button on your console. To turn
on your controller only, press the Start
button on your controller.
nOTE
To avoid pinching your ngers when inserting,
push only on the at surface of the
battery pack.
Turn Your Console and Wireless
Controller Off
To turn your console and controller off,
press and hold the Xbox Guide button on
your controller for three seconds. Then
select whether you want to turn off just
your controller or both your controller
and your console. (Selecting the console
will turn off both the console and all
connected controllers.)
Pressing the power button on your console
will turn off both the console and any
connected wireless controllers.
Select Language and Other Settings
The rst time you turn on your Xbox 360
console, you’ll be prompted to enter a
language. Follow the prompts to select a
language for your console.
You can change language and other console
settings in the System area of the Xbox
Dashboard, including time, audio, display, and
automatic turn-off after six hours of non-use.
8
Page 10

XBOX 360 FAMILY SETTINGS
The new Family Settings
feature for Xbox 360 gives
parents and caregivers the
ability to provide ageappropriate entertainment
through customized settings.
Console settings can limit the games and
movies that can be played on your console.
Xbox LIVE settings can customize the Xbox
LIVE experience for each child account, even
when playing away from home.
Apply Family Settings
To apply Family Settings for your games and
Xbox LIVE:
1 Select System, Family Settings.
2 Choose the settings you want to apply to
your console and your Xbox LIVE accounts.
In the U.S. and Canada, Xbox 360 Family
Settings for games are based on the ESRB
(Entertainment Software Rating Board) rating
system and movie settings are based on the
MPAA (Motion Picture Association of America)
rating system. By default, Xbox 360 Family
Settings are set to Allow All for games and
movies. For more information about game
ratings, see www.esrb.org.
Not all movies have the rating encoded on the
DVD. These DVD movies will play regardless
of your settings.
Xbox LIVE Settings
You can make sure that your family has a
positive experience on Xbox LIVE by setting
limits for each child account. Manage up to
eight settings for each account and set
different limits for each account. Your child’s
Xbox LIVE settings are pre-selected when
their Xbox LIVE account is created. You can
make changes at any time by selecting
System, Family Settings, Live Controls, and
choosing the child’s account.
Family Settings for Xbox LIVE includes these
features:
• Parental approval for adding individuals to
your child’s friends list.
• Limiting voice, video, and text chat to
individuals on your child’s friends list.
• Blocking or limiting the display of your
child’s pro le information and online
status.
• Blocking or limiting your child’s ability to
view content created by other gamers.
• Blocking access to Xbox LIVE multiplayer
games.
• Preventing your child from purchasing
items on Xbox LIVE Marketplace.
english
9
Page 11
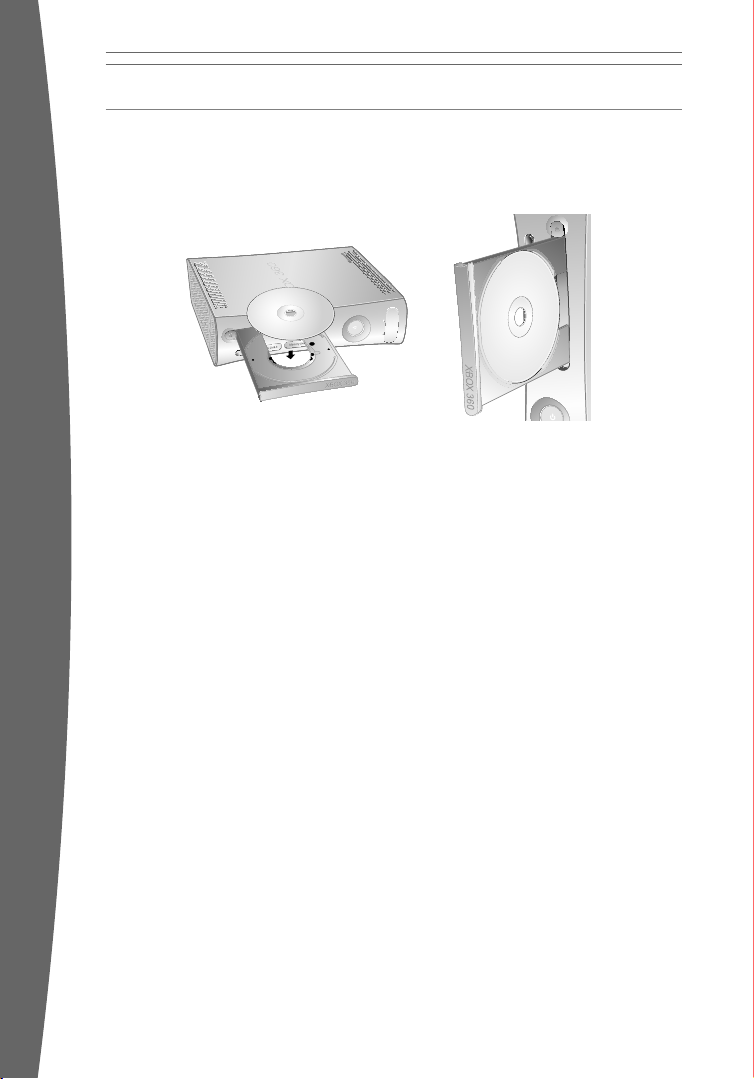
USING THE DISC DRIVE
To insert a disc:
1 Press the eject button to open the disc tray.
2 Place the Xbox 360 game disc, audio CD,
or DVD movie on the disc tray with the
label facing up (to the right if the console
is vertical).
To eject a disc:
1 Press the eject button to open the disc tray.
2 Remove the disc.
3 Press the eject button to close the disc
tray.
nOTE
english
When the console is oriented vertically, make
sure the disc is held in place by the tabs on
the disc tray so that it doesn’t fall.
iMPOrTanT
To avoid jamming the disc drive and damaging
discs or the console:
• Remove discs before moving the console
or tilting it between the horizontal and
vertical positions.
• Never use cracked discs. They can shatter
inside the console and jam or break
internal parts.
• When the console is vertical, do not
use discs that are smaller than standard
DVDs and CDs. If the disc drive jams or
is damaged, contact Xbox Customer
Support to have your console repaired
or exchanged.
10
Page 12

IMPORTANT HEALTH WARNINGS ABOUT PLAYING VIDEO GAMES
Photosensitive Seizures
A very small percentage of people may
experience a seizure when exposed to
certain visual images, including ashing
lights or patterns that may appear in
video games. Even people who have no
history of seizures or epilepsy may have
an undiagnosed condition that can cause
these “photosensitive epileptic seizures”
while watching video games.
These seizures may have a variety of
symptoms, including lightheadedness,
altered vision, eye or face twitching,
jerking or shaking of arms or legs,
disorientation, confusion, or momentary
loss of awareness. Seizures may also
cause loss of consciousness or
convulsions that can lead to injury from
falling down or striking nearby objects.
Immediately stop playing and consult a
doctor if you experience any of these
symptoms. Parents should watch for or
ask their children about the above
symptoms—children and teenagers are
more likely than adults to experience
these seizures. The risk of photosensitive
epileptic seizures may be reduced by
taking the following precautions:
• Sit farther from the TV screen.
• Use a smaller TV screen.
• Play in a well-lit room.
• Do not play when you are drowsy
or fatigued.
If you or any of your relatives have a
history of seizures or epilepsy, consult
a doctor before playing.
Musculoskeletal Disorders
Use of game controllers, keyboards,
mice, or other electronic input devices
may be linked to serious injuries
or disorders.
When playing video games, as with
many activities, you may experience
occasional discomfort in your hands,
arms, shoulders, neck, or other parts of
your body. However, if you experience
symptoms such as persistent or
recurring discomfort, pain, throbbing,
aching, tingling, numbness, burning
sensation, or stiffness, DO NOT IGNORE
THESE WARNING SIGNS. PROMPTLY SEE
A QUALIFIED HEALTH PROFESSIONAL,
even if symptoms occur when you are
not playing a video game. Symptoms
such as these can be associated with
painful and sometimes permanently
disabling injuries or disorders of the
nerves, muscles, tendons, blood vessels,
and other parts of the body. These
musculoskeletal disorders (MSDs)
include carpal tunnel syndrome,
tendonitis, tenosynovitis, vibration
syndromes, and other conditions.
While researchers are not yet able to
answer many questions about MSDs,
there is general agreement that many
factors may be linked to their
occurrence, including medical and
physical conditions, stress and how one
copes with it, overall health, and how a
person positions and uses their body
during work and other activities
(including playing a video game). Some
studies suggest that the amount of time
a person performs an activity may also
be a factor.
Some guidelines that may help you work
and play more comfortably and possibly
reduce your risk of experiencing an MSD
can be found in the Healthy Gaming
Guide at www.xbox.com. These
guidelines address topics such as:
• Positioning yourself to use
comfortable, not awkward, postures.
• Keeping your hands, ngers, and
other body parts relaxed.
• Taking breaks.
• Developing a healthy lifestyle.
If you have questions about how your
own lifestyle, activities, or medical or
physical condition may be related to
MSDs, see a qualied health
professional.
english
11
Page 13

PLAY GAMES
The Xbox 360 console can play only game
discs licensed by Microsoft for the Xbox 360
video game and entertainment system.
Licensed games bear this logo:
For the latest information about Xbox 360
games, go to www.xbox.com.
CONNECT TO XBOX LIVE
You can instantly become an Xbox LIVE Silver
member by simply connecting an Ethernet
cable (sold separately) to the Ethernet port on
the back of the console. You can create a
gamertag, access the Xbox LIVE Marketplace,
view gamer cards, participate in chats, get
voice messages, make friends, and use Xbox
LIVE Family Settings. Xbox LIVE Silver
members get limited-time gameplay through
special events like free Xbox LIVE Gold
weekend play, Xbox LIVE Game with Fame,
and Xbox LIVE Prime Time.
english
If you’re ready for the full Xbox LIVE
experience, sign up for an Xbox LIVE Gold
membership. Xbox LIVE Gold gives you all the
features of Xbox LIVE Silver, plus online
multiplayer gaming, enhanced matchmaking
and feedback tools, privileges and rewards on
Xbox LIVE Marketplace, and media features
such as music and photo sharing.
To start a game:
1 Press the eject button to open the disc tray.
2 Place the Xbox 360 game disc on the disc
tray with the label facing up (to the right if
the console is vertical).
3 Press the eject button to close the disc
tray. The game will start.
Set Up Your Connection
Set up your Xbox LIVE connection using one
of the following connection types. You can
also set up a wireless home network
connection using the Xbox 360 Wireless
Networking Adapter (sold separately). For
more information about setting up your
connection and further home networking
options, go to www.xbox.com/setup.
nOTE
You must have a high-speed (cable or DSL)
Internet connection to play on Xbox LIVE.
You must also have an Xbox 360 Hard Drive
(included with the standard Xbox 360 system;
sold separately for Xbox 360 Arcade) or Xbox
360 Memory Unit to store your Xbox LIVE
account information.
12
Page 14

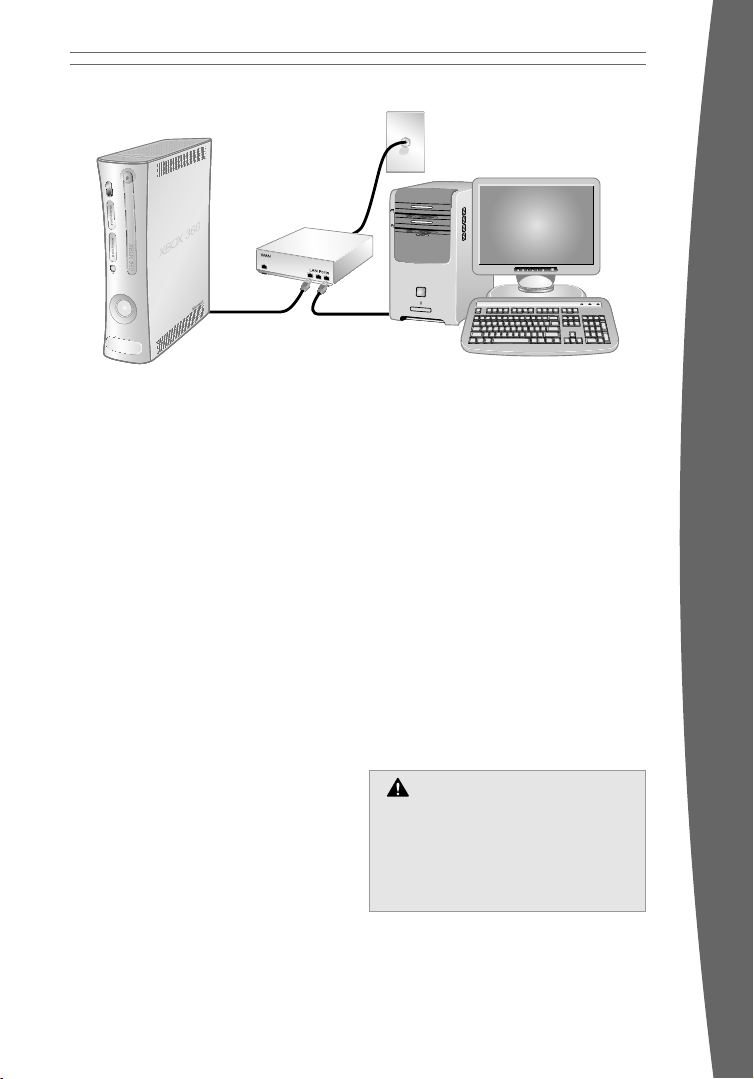
Cable/DSL Modem
Modem Connection
Choose a modem connection if you want the
easiest way to set up and play and you don’t
want to share your Internet connection with
your PC (or other device).
To set up a modem connection:
1 Connect one end of an Ethernet cable to
the Ethernet port on your high-speed
modem and the other end to the Ethernet
port on the back of your Xbox 360 console.
2 Follow the on-screen instructions. You
may need to enter information provided
by your ISP in the System area of the
Xbox Dashboard.
english
13
Page 15

Cable/DSL Modem
Router
PC
Router Connection
Choose a router connection if you want to
share your Internet connection with your PC
(or other device), your high-speed modem
supports an Ethernet connection, and you
want to be able to play on Xbox LIVE whether
your PC is on or off.
To set up a router connection:
1 Connect one end of an Ethernet cable to
english
the Ethernet port on your high-speed
modem and the other end to the WAN or
Uplink port on your router.
2 Connect one end of an Ethernet cable to
an Ethernet LAN port on your router and
the other end to the Ethernet port on your
PC (or other device). Follow the instructions
from your ISP to use your PC’s browser or
software to congure the router, then
verify that your PC is connected to the
Internet.
3 Connect one end of an Ethernet cable to an
Ethernet LAN port on your router and the
other end to the Ethernet port on the back
of your Xbox 360 console.
nOTE
Some modems and devices may require a
network hub instead of a router.
4 Follow the on-screen instructions. You may
need to enter information provided by your
ISP in the System area of the Xbox
Dashboard.
14
Page 16
Cable/DSL gateway
PC
Gateway Connection
Choose a gateway connection if your ISP
has supplied you with an Ethernet gateway
device. Like a router connection, you can
share your Internet connection with your
PC (or other device) and play on Xbox LIVE
whether your PC is on or off.
To set up a gateway connection:
1 Connect your high-speed Internet
connection to your gateway (using the
coaxial cable jack for cable providers or
telephone jack for DSL providers).
2 Connect one end of an Ethernet cable to
an Ethernet LAN port on your gateway and
the other end to the Ethernet port on your
PC (or other device). Follow the instructions
from your ISP to use your PC’s browser or
software to congure the gateway, then
verify that your PC is connected to the
Internet.
3 Connect one end of an Ethernet cable to an
Ethernet LAN port on your gateway and the
other end to the Ethernet port on the back
of your Xbox 360 console.
4 Follow the on-screen instructions. You
may need to enter information provided
by your ISP in the System area of the
Xbox Dashboard.
Troubleshoot Your Connection
If your Xbox 360 console cannot connect
automatically, you may need to manually
congure your network settings in the Xbox
Dashboard. Some Internet service providers
(ISPs) require specic settings, including host
name, MAC address, and ISP user name and
password (for PPPoE authentication). If you
are unsure about whether you need this
information, check with your ISP. For more
information, go to www.xbox.com/setup.
Sign Up for Xbox LIVE
To create your account, select Xbox LIVE
from the Xbox Dashboard and follow the
instructions on the screen.
Communicate on Xbox LIVE
Use the Xbox 360 Headset (sold separately) to
chat and communicate with your friends while
on Xbox LIVE.
Hearing Loss
Extended exposure to high volumes when
using a headset may result in temporary
or permanent hearing loss. Some
unapproved third-party headsets may
produce higher sound levels than
approved Xbox 360 Headsets.
english
15
Page 17

WATCH MOVIES
Your Xbox 360 console plays DVD movies. To
enhance your DVD movie playback experience,
consider using the Xbox 360 Universal Media
Remote (sold separately).
To play DVD movies:
1 Press the eject button to open the disc tray.
2 Place the DVD movie on the disc tray with
the label facing up (to the right if the
console is vertical).
3 Press the eject button to close the disc
tray. The DVD movie will begin playing.
PLAY CDs
The Xbox 360 console can play audio CDs that
have this logo:
english
4 Press any controller button other than the
Xbox Guide button to show the DVD onscreen controls. Use your controller to
control movie playback.
The Xbox 360 console can only play region 1
DVDs that have this logo:
To play audio CDs:
1 Press the eject button to open the disc tray.
2 Place the audio CD on the disc tray with
the label facing up (to the right if the
console is vertical).
3 Press the eject button to close the disc
tray. The CD will begin playing.
16
Page 18
Ethernet
USB
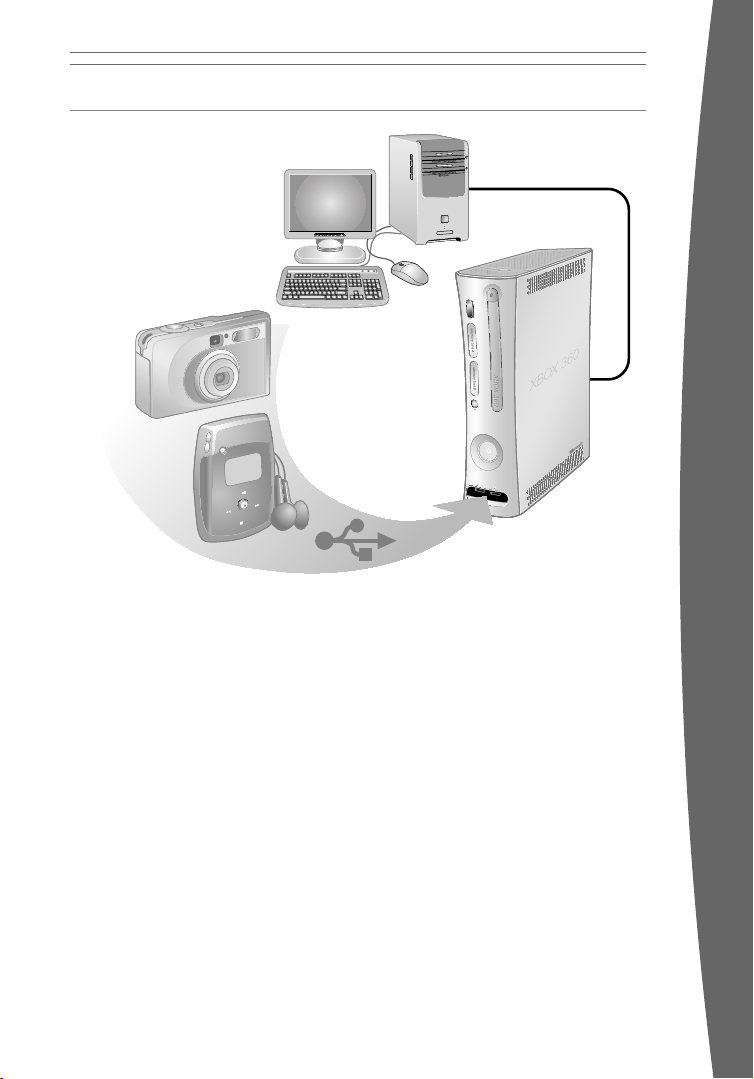
SHARE MEDIA FROM AN AUDIO PLAYER OR CAMERA
english
Use your Xbox 360 console to play music,
view pictures, and access media les from
other devices. You can connect USB devices
such as music players and digital cameras to
the Xbox 360 USB ports. You can also connect
your console to a Windows–based PC or a
Windows Media Center–based PC.
For a list of third-party devices supported by
Xbox 360, go to www.xbox.com/media.
Stream Music to Your Console
To stream music from a personal audio player
to your Xbox 360 console:
1 Connect a USB cable (not provided)
between the device and your console.
2 Congure the device to play through the
USB port.
3 Select Media, Music, Portable Device.
4 Select the music or playlist you want to
listen to.
17
View Your Pictures
You can create slideshows and view pictures
stored on your digital camera.
To connect your digital camera:
1 Set up your digital camera for viewing
2 With your console turned on, use a USB
3 The console will detect your digital camera.
pictures. See your camera instructions for
details about how to view pictures.
cable to connect your camera to a USB port
on the console.
Follow the on-screen instructions to access
your pictures.
Page 19

SHARE MEDIA FROM YOUR PC
To access media les, including video, audio,
and pictures, from a Windows XP–based PC,
you need a simple Ethernet connection from
the Ethernet port on the back of your Xbox
360 console to your PC. If your PC or home
network is also connected to high-speed
Internet, you can use this connection to
connect to Xbox LIVE. For more information
about home networking options, see
“Connect to Xbox LIVE” or go to
www.xbox.com/setup.
Windows Media Connect lets you connect
your Xbox 360 console to a PC running
Windows XP Service Pack 2 (SP2) or later.
If you have a Windows Media Center–based
PC, you can also use it with your connected
Xbox 360 console.
Along with normal DVD remote control
functions, the Xbox 360 Universal Media
Remote (sold separately) features a Windows
Media Center button that lets you access a
connected Windows Media Center–based PC.
Windows Media Connect
Windows Media Connect lets your Xbox 360
console stream music and pictures stored on
english
your Windows XP–based PC anywhere in your
home. View slide shows on your TV, and play
all your music through one sound system
connected to your console through a digital
audio receiver. To learn more about Windows
Media Connect, go to www.xbox.com/media.
To set up Windows Media Connect:
1 Go to www.xbox.com/pcsetup and
download the Windows Media Connect
software to a PC running Windows XP SP2
or later.
2 Connect your console to your PC using one
of the connection types described in
“Connect to Xbox LIVE.”
3 Select Media, and then select pictures or
music from your PC. Follow the on-screen
instructions to nish Windows Media
Connect setup.
Windows Media Center
Your Xbox 360 console can deliver the
ultimate integration of gaming and room-toroom entertainment—including watching or
recording TV shows, viewing your digital
photos, and listening to your digital music
library—from a Windows Media Center–based
PC to any TV in your home. When you connect
your console to the same network as your
Windows Media Center–based PC, the
experience is delivered to your Xbox 360 video
game and entertainment system. ( You can
connect up to ve consoles to a Windows
Media Center–based PC.)
To learn more about Windows
Media Center for Xbox 360, go to
www.microsoft.com/extender.
To set up Windows Media Center:
1 Go to www.xbox.com/pcsetup and
download the latest Windows Media
Center software update to your Windows
Media Center–based PC.
2 Connect your console to your Windows
Media Center–based PC using one of the
connection types described in “Connect to
Xbox LIVE.”
3 On your Xbox 360 console, go to Media,
then select Windows Media Center.
Follow the on-screen instructions to nish
Windows Media Center setup.
18
Page 20

STORAGE
If you’re going to connect to Xbox LIVE, you
need a place to store your prole information,
game information, and all of the great content
available on Xbox LIVE. The Xbox 360 video
game and entertainment system provides two
data storage options: the Xbox 360 Memory
Unit for portable storage and the Xbox 360
Hard Drive (sold separately) for all of your
storage needs.
Memory Units
You can connect up to two portable memory
units to the memory unit ports on the front
of your console for additional storage.
Memory units are smaller in capacity than the
Xbox 360 Hard Drive, but extremely portable,
letting you easily take your Xbox LIVE prole
or saved games to other Xbox 360 consoles.
You can also take your memory unit to
participating retailers and download content
from Xbox 360 demo kiosks.
With the Xbox 360 Memory Unit, you can take
your saved games everywhere you go. Just
save your game and transport your Xbox LIVE
account.
The Xbox 360 Memory Unit has the following
features:
• Support of Xbox LIVE downloadable
content.
• Use of two memory units for exible game
storage.
The storage size of your memory unit is
indicated on the front end of the unit.
It is for use exclusively with the Xbox 360
system. If you’re looking for more storage
space, consider the Xbox 360 Hard Drive
(sold separately).
nOTE
Because the Xbox 360 system software uses
some of the memory from the memory unit
when installed, less than the stated memory
will be available to the user.
Connect Your Memory Unit
To connect your memory unit, insert it into
either memory unit slot on the front of the
Xbox 360 console. To disconnect, pull the
memory unit out. Do not remove the memory
unit while your console is reading or saving
data, as data loss and other system issues
may occur.
nOTE
Avoid touching memory unit terminals with
ngers or metal objects.
Personalize Your Memory Unit
You can personalize your memory unit by
giving it a name.
To give your memory unit a name:
1 With the memory unit inserted, select
System, Memory.
2 Highlight the memory unit.
3 Choose Device Options and rename your
memory unit.
Once your memory unit has been
personalized, you can identify it by its
new name.
Copy or Delete Saved Items
You can copy any item on a memory unit to
another Xbox 360 Memory Unit or Hard Drive.
You can also free space on your memory unit
by deleting items.
To copy or delete an item from your
memory unit:
1 With the memory unit inserted, select
System, Memory.
2 Select the memory unit.
3 Choose the type of item, then the specic
item that you want to copy to another
location or delete from the memory unit.
nOTE
Some content, such as ripped music and
preloaded games, cannot be copied from
a hard drive to a memory unit.
Removable Hard Drive
You can also install the Xbox 360 Hard Drive
(sold separately), which provides extensive
storage for downloadable game content,
saved games, gamer proles, and Xbox LIVE
membership information. A hard drive is
required to play original Xbox games on
your Xbox 360 console.
english
19
Page 21
ADD WIRELESS CONTROLLERS
Up to four controllers, wired and wireless, can
be actively connected to a console at one
time. Each connected controller gets a
quadrant on the Ring of Light. Before you can
connect a wireless controller, at least one
quadrant must be free (unlit). To disconnect a
To connect your wireless controller to your console:
wireless controller, press and hold the
wireless controller Xbox Guide button for
three seconds, then choose to turn it off.
For a wired controller, disconnect the cable
connector.
1 Press and hold down the Xbox Guide
button until the controller turns on.
2 Make sure the console is turned on. If not,
press the Power button.
english
3 Press and release the Connect button on
the console.
4 Press and release the Connect button on
the controller.
5 After the Ring of Light on the controller and
console spin and ash once, the controller
is connected. The quadrant that remains lit
indicates the controller ’s position.
20
Page 22
nOTES
• When you turn off your console, your
controller will still be connected the next
time you turn it on.
• Your controller is connected to only one
console at a time. You can connect to a
new console at any time, but your
connection to the previously connected
console will be lost.
CONNECT ADDITIONAL ACCESSORIES
The Xbox 360 Arcade console is designed to
work with a variety of accessories, including:
• Up to four wired and wireless controllers
and other gameplay accessories (additional
controllers sold separately).
• AV connectors such as component video
cables and digital audio cables, including
the Xbox 360 Component HD AV Cable, the
Xbox 360 S-Video AV Cable, the Xbox 360
VGA HD AV Cable, and the Xbox 360 HDMI
Cable (sold separately).
• Ethernet and wireless home networking
devices such as the Xbox 360 Wireless
Networking Adapter (sold separately).
• Storage devices such as the Xbox 360 Hard
Drive (sold separately), Xbox 360 Memory
Units (additional units sold separately), and
USB-based storage devices.
• USB-based media devices such as music
players and digital cameras.
• Custom Xbox 360 Faceplates
(sold separately).
• The Xbox 360 Wireless Controller works
only within 33 feet (10 meters) of the
console. Objects between the controller
and the console can reduce this range.
Look for the Xbox Authentic Product logo for
gameplay accessories from Microsoft for use
with Xbox 360 Arcade.
For devices from other manufacturers, look
for one of the following logos, which indicate
that the device has been tested to meet
stringent compatibility requirements to
work with Xbox 360 or Xbox LIVE. For more
information about compatible devices, go to
www.xbox.com.
english
21
Page 23
TROUBLESHOOTING
Follow these steps to troubleshoot any
difculties you may have with the Xbox 360
video game and entertainment system.
If the steps in this troubleshooting section
do not solve your problem, go to
www.xbox.com/support or call the Xbox
Customer Support number provided
on the back cover.
Do not take your Xbox 360 console or its
accessories to your retailer for repair or
service unless instructed to do so by an
Xbox Customer Support representative.
Do Not Attempt Repairs
Do not attempt to take apart, open,
service, or modify the Xbox 360 console,
power supply, or accessories. Doing so
could present the risk of electric shock,
re, or damage to your Xbox 360 console.
Any evidence of any attempt to open and/
or modify the Xbox 360 console, including
any peeling, puncturing, or removal of any
of the labels, will void the Limited
Warranty and render the Xbox 360
console ineligible for authorized repair.
english
No Power
Conrm that you have an appropriate power
source and check all connections between
wall outlet and power supply, and power
supply and console (see “Connect the Console
to Power”). The power supply light should
glow green when it is working properly.
No Picture
Connect the appropriate AV cable (see
“Connect to Your TV and Audio System”). Turn
on the TV. Select the video input on the TV (or
VCR, if connected to a VCR) that displays the
Xbox 360 game. Common names for video
input include Input Select, AUX, Line In, Line,
In, Input, Source, and EXT, depending on your
TV or VCR type. For more information, see your
TV or VCR manual. Don’t connect both the
included AV cable and an HDMI AV cable (sold
separately) to the console at the same time.
No Sound
Check the AV connection (see “Connect to
Your TV and Audio System”). If you’re using
digital audio, make sure the receiver is turned
on and the output in your console’s audio
settings is set correctly. Don’t connect both
the included AV cable and an HDMI AV cable
(sold separately) to the console at the same
time.
Poor-Quality Sound
Clean the disc as shown in the Xbox 360
Warranty manual (Volume 2). Check the AV
connection (see “Connect to Your TV and
Audio System”). Play Dolby
on audio systems that support Dolby Digital.
Select the audio output that is supported by
your system or TV: stereo or Dolby
for stereo speakers, mono for monaural
speakers. If sound is coming from only one
speaker, check that all audio cables are
connected correctly.
® Digital audio only
® Surround
Disc Tray Does Not Open
Make sure the removable faceplate on the
front of the console is fully connected and
properly aligned. Check the connection to
power (see “Connect to Power”). Turn on the
console by pressing the Power button.
Game, Movie, or Music Does Not Start
Play only supported discs (Xbox 360 games,
audio CDs, DVD movies). Insert the disc as
instructed in this manual and close the disc
tray. Clean the disc as shown in the Xbox 360
Warranty manual (Volume 2).
Ring of Light Flashes
The lights in the console Ring of Light should
glow solid while the console is on and ash
when you press the eject button. If the Ring of
Light ashes differently during operation, the
console has an internal problem:
• Two left lights on console ash red: The
console is too hot and will not play games
until cooled down. Place the console in a
well-ventilated area away from other heat
sources. Once the console cools, the
ashing will stop and the Xbox 360
console can be played. For more
information, see “Select a Location for
the Console”.
22
Page 24

• Four lights on controller periodically ash
green: No Ring of Light quadrant
assignment. The controller is not
connected or all four quadrants are full.
• All other patterns: Internal problem
requires service. Contact Xbox Customer
Support at the phone number on the back
cover of this manual.
Wireless Controller Does Not Work
Turn on the wireless controller by pressing
the Xbox Guide Button and connect the
wireless controller to your console (see
“Add Wireless Controllers”).
If lights spin longer than 15 seconds when
connecting:
• Move the controller closer to the console.
• Make sure the batteries are fresh.
• Keep the console and controller at least
three feet away from large metal objects,
such as le cabinets and refrigerators.
• Metallic decorations or stickers on the
console or controller can interfere with
wireless controller performance. Remove
decorations and try connecting again.
• Make sure the front of the console is
positioned in the direction of the controller
and away from nearby walls.
• Cordless phones (2.4 GHz), wireless LANs,
wireless video transmitters, microwave
ovens, some mobile/cell phones, and
Bluetooth headsets can interfere with the
operation of the controller. Turn these off
or unplug them and retry connecting.
• If nothing else works, turn off your console,
remove and reinsert the AA batteries or
Xbox 360 Rechargeable Battery Pack into
the controller, and then repeat the steps
given in “Add Wireless Controllers.”
Accessory Does Not Work
Use Xbox 360-compatible gameplay
accessories that have this logo:
If an accessory is not supported by a specic
game, the game may not play.
Cannot Save Game
The Xbox 360 Hard Drive or Memory Unit
must have enough free space to save the
game. Delete unwanted items from storage or
attach an additional memory unit (sold
separately) for more space.
Memory Unit Not a Listed Storage
Device
Make sure the memory unit is fully inserted
into the memory unit slot on the front of the
console. Try the other memory unit slot to
make sure that it is not causing the problem.
If you have a second memory unit, try it out
as well to determine whether the original
memory unit is faulty.
nOTE
Damaged memory units will not appear in the
Xbox Dashboard and could harm your Xbox
360 console. Memory units that have been
crushed, immersed in liquids, or exposed to
intense heat may be damaged beyond use and
will not appear in your list of storage devices.
english
© 2007 Microsoft Corporation. All rights reserved.
Microsoft, Windows, Xbox, Xbox 360, Xbox LIVE, the
Xbox logos, and the Xbox LIVE logo are either
registered trademarks or trademarks of Microsoft
Corporation in the United States and/or other countries.
23
Page 25

Français
aVErTiSSEM EnT
Le défaut de bien installer, utiliser et
entretenir votre console de jeu et de loisirs
Xbox 360 peut augmenter les risques de
blessure grave ou de décès, ou bien de
dommages à votre console de jeu et de
loisirs Xbox 360. Lisez le présent guide ainsi
que les guides de tous les accessoires pour
obtenir toute l’information relative à la
sécurité et à la santé. Conservez tous les
guides pour consultation ultérieure. Pour
obtenir des guides de remplacement, visitez
la page www.xbox.com/support ou
composez le numéro du Service à la
clientèle de Xbox fourni sur la couverture
arrière.
Avant de permettre à des enfants d’utiliser
le système de jeu et de loisirs Xbox 360 :
1 Déterminez ce que chaque enfant peut
faire avec la console Xbox 360 (jouer
à des jeux, se connecter à Xbox LIVE,
remplacer des piles, effectuer des
connexions électriques, audio/vidéo
et réseau) et demandez-vous s’ils
devraient être supervisés durant ces
activités.
2 Si vous permettez à des enfants
français
d’utiliser la console Xbox 360 sans
supervision, assurez-vous de leur
donner toute l’information et les
instructions importantes relatives à la
sécurité et à la santé.
La console Xbox 360 ne lit pas les jeux
copiés ou « piratés » ou d’autres contenus
non autorisés. Si vous tentez de déjouer le
système de protection contre la copie de
Xbox 360, votre console Xbox 360 risque de
ne plus fonctionner de façon permanente.
La garantie limitée sera également annulée,
et votre console Xbox 360 ne sera pas
admissible à une réparation autorisée,
même en échange de frais.
Vous devez accepter les conditions de la
garantie limitée et du présent guide pour
utiliser votre console Xbox 360. Si vous
n’acceptez pas ces conditions, n’installez
pas et n’utilisez pas votre console Xbox 360;
retournez-la à Microsoft pour obtenir un
remboursement.
Ce symbole identie des messages relatifs à la
sécurité et à la santé dans le présent guide et les
guides des accessoires de Xbox 360.
Pour obtenir des renseignements importants concernant
entre autres votre garantie, consultez le guide Garantie
Xbox 360.
25 Votre console Xbox 360 Arcade
26 Choisissez un emplacement pour
votre console
27 Connectez la console à votre
téléviseur et à votre système
audio
28 Branchez la console à une source
d’alimentation
30 La manette sans l Xbox 360
30 Installation de votre manette
sans l
32 Paramètres de contrôle parental
de Xbox 360
33 Utilisation du lecteur de disque
34 Informations importantes
relatives à la sécurité lorsque
vous jouez à des jeux vidéo
35 Jeux
35 Connectez-vous à Xbox LIVE
39 Visionnez des lms
39 Lecture de CD
40 Partagez des chiers multimédias
d’un lecteur audio, appareil photo
ou caméra
41 Transmettez des chiers
multimédias à partir de votre
ordinateur
42 Stockage
43 Ajoutez des manettes sans l
44 Branchez des accessoires
supplémentaires
45 Dépannage
73 Service à la clientèle
24
Page 26

Instruction
Manual (2)
Xbox 360 Console
and Wireless Controller
AA batteries
Memory Unit
Composite
AV Cable
Power Cord
Power Supply
VOTRE SYSTÈME XBOX 360 ARCADE
Guides
d’utilisation (2)
AA Piles
Xbox 360 Console
Manette sans l
Câble
audio/vidéo
Cordon d’alimentation
Merci d’avoir acheté le système Xbox 360™
Arcade de Microsoft. Ce système vous permet
de personnaliser votre expérience et
rassemble vos jeux, vos amis et vos
divertissements numériques dans un seul
produit multifonctionnel.
• Le système Xbox 360 Arcade vous permet
de jouer à des jeux Xbox 360, de visionner
des lms sur DVD et d’écouter des CD
audio.
• Connectez-vous à des millions de joueurs
sur Xbox LIVE
® avec un service Internet
haute vitesse. Entrez instantanément dans
un monde où vous pouvez jouer avec
d’autres, parler à vos amis et télécharger
du nouveau contenu.
Carte mémoire
Alimentation
• Transmettez en continu des photos,
de la musique, et bien plus, vers votre
console Xbox 360 en la connectant à
votre ordinateur fonctionnant sous
Microsoft
® Windows® ou à d’autres
périphériques, comme des appareils photo
numériques et des lecteurs de musique
portatifs.
• Emportez vos jeux enregistrés et votre
compte Xbox LIVE partout où vous allez.
Téléchargez également du contenu des
stands de démonstration Xbox 360 chez
les détaillants participants avec votre carte
mémoire Xbox 360.
français
25
Page 27

CHOISISSEZ UN EMPLACEMENT POUR VOTRE CONSOLE
Empêchez la console de tomber
Si la console Xbox 360 tombe et heurte
quelqu’un, surtout un jeune enfant, elle
risquerait de causer de graves blessures.
Pour réduire le risque de blessures ou de
dommages à votre console Xbox 360,
installez-la en procédant comme suit.
Placez la console sur une surface :
• Plane et horizontale.
• Stable, qui ne risque pas de se
renverser.
• Qui permet un contact avec les quatre
pieds de la console.
• Sur laquelle la console ne risque pas
de glisser.
• Propre et exempte de poussière et
de débris.
Si la surface ou les pieds de la console
deviennent sales ou poussiéreux, nettoyezles avec un chiffon sec. Si la console est en
position verticale, déposez-la sur une surface
où elle ne risque pas de tomber si elle se
renverse.
Placez tous les câbles et les cordons de
façon à ce que les personnes et les animaux
qui se déplacent à cet endroit ne trébuchent
pas dessus ou ne les accrochent
accidentellement. Lorsque la console n’est
pas utilisée, pensez éventuellement à
débrancher tous les câbles et cordons à
l’avant et à l’arrière de la console pour les
garder hors de la portée des enfants et des
animaux. Ne laissez pas les enfants jouer
avec les câbles et les cordons.
Empêchez la console de surchauffer
N’obstruez aucune ouverture de ventilation
sur la console ou le bloc d’alimentation.
Ne déposez pas la console ou le bloc
français
d’alimentation sur un lit, un canapé ou une
autre surface molle qui risquerait d’obstruer
les ouvertures de ventilation. Ne placez pas la
console ou le bloc d’alimentation dans un
espace conné, par exemple une bibliothèque,
une étagère ou un meuble stéréo, sauf si cet
espace est bien ventilé.
Ne placez pas la console ou le bloc
d’alimentation à proximité de sources de
chaleur comme les radiateurs, les registres de
chaleur, les cuisinières ou les amplicateurs.
26
Évitez la fumée et la poussière
N’utilisez pas la console dans un endroit
enfumé ou poussiéreux. La fumée et la
poussière peuvent endommager la console,
particulièrement son lecteur DVD.
Page 28

CONNECTEZ LA CONSOLE À VOTRE TÉLÉVISEUR ET À VOTRE SYSTÈME AUDIO
français
IMPORTANT
Les images xes des jeux vidéo risquent de
se fondre avec certains écrans de télévision
et de créer une ombre permanente. Consultez
le guide d’utilisation ou le fabricant de votre
téléviseur avant de jouer à des jeux.
Branchement du câble audio/vidéo
composite
Pour connecter votre console à votre
téléviseur, utilisez le câble audio/vidéo
composite.
Pour connecter la console à votre téléviseur
standard :
1 Branchez le connecteur du câble audio/
vidéo composite dans le port A/V de la
console.
2 Branchez les connecteurs à bandes de
couleur dans les entrées correspondantes
du téléviseur : jaune à jaune (vidéo), rouge
à rouge (audio droit) et blanc à blanc (audio
gauche). Vous pouvez également connecter
l’audio à un ampli-syntonisateur.
Dans le cas d’un téléviseur monophonique
(mono), c’est-à-dire qui n’a qu’une seule
entrée audio, branchez le connecteur audio
droit ou gauche à l’entrée audio.
3 Sélectionnez la bonne entrée vidéo sur
votre téléviseur (pour obtenir de plus
amples renseignements, reportez-vous à
« Aucune image » dans la section
« Dépannage »).
Une fois votre console installée, vous pouvez
congurer des paramètres audio
supplémentaires sur la console et tester votre
connexion à partir de la zone System de
l’interface Xbox. Toutefois, avant de ce faire,
veuillez suivre les étapes des pages suivantes
pour alimenter la console, connecter votre
manette et régler d’autres paramètres initiaux.
Autre entrée audio/vidéo
Vous pouvez également brancher la console
à d’autres types d’entrées en utilisant le câble
audio/vidéo haute dénition Xbox 360, le
câble audio/vidéo S-Vidéo Xbox 360, le câble
audio/vidéo haute dénition VGA Xbox 360 ou
le câble audio/vidéo HDMI Xbox 360 (tous
vendus séparément). Pour obtenir de plus
amples renseignements, visitez la page
www.xbox.com/setup.
27
Page 29

Connexion à un système audio numérique
Si votre système (généralement un récepteur
ou un amplicateur) dispose d’une entrée
audio numérique, vous pouvez vous brancher
dans cette dernière plutôt que dans les
entrées audio gauche et droite standard en
utilisant le câble audio/vidéo haute dénition
Xbox 360, le câble audio/vidéo S-Vidéo Xbox
360, le câble audio/vidéo haute dénition VGA
Xbox 360 ou le câble HDMI Xbox 360 (tous
vendus séparément). L’audio numérique
devrait avoir une reproduction sonore de
qualité supérieure. Suivez les instructions du
câble audio/vidéo pour la connexion audio
numérique.
BRANCHEZ LA CONSOLE À UNE SOURCE D’ALIMENTATION
Sécurité concernant l’électricité
Comme dans le cas de nombreux autres
appareils électroniques, si vous ne prenez
pas les précautions suivantes, vous
risquez de subir des blessures graves ou
de décéder des suites d’une commotion
français
ou d’un incendie électrique. Vous pourriez
également endommager votre console
de jeu et de loisirs Xbox 360.
Sélectionnez une source d’alimentation
appropriée pour votre console Xbox 360 :
• N’utilisez que le bloc d’alimentation
et le cordon d’alimentation secteur
fournis avec votre console ou reçus
d’un centre de réparation autorisé.
Si vous n’êtes pas sûr d’avoir le bon
bloc d’alimentation, comparez le
numéro de modèle du bloc
d’alimentation au numéro de modèle
stipulé sur votre console. Si vous avez
besoin d’un bloc d’alimentation ou d’un
cordon d’alimentation secteur de
remplacement, communiquez avec
le Service à la clientèle de Xbox.
• Conrmez que votre prise de courant
fournit le type d’alimentation indiqué
sur le bloc d’alimentation (en termes
28
de tension [V] et de fréquence [Hz]).
Si vous n’êtes pas sûr du type de
courant qui alimente votre domicile,
consultez un électricien qualié.
• N’utilisez pas de sources d’alimentation
non standard, telles que des
génératrices ou des onduleurs, même
si la tension et la fréquence semblent
acceptables. N’utilisez que du courant
alternatif fourni par une prise murale
standard.
• Ne surchargez pas votre prise de
courant murale, rallonge électrique,
bande d’alimentation ou autre prise
électrique. Conrmez qu’elles sont
qualiées pour gérer le courant total
(en ampères [A]) nécessaire pour
alimenter la console Xbox 360
(indiqué sur le bloc d’alimentation)
et tout autre périphérique branché sur
le même circuit.
• Ne branchez aucun autre périphérique
entre le bloc d’alimentation Xbox 360
et la console Xbox 360 ou entre le
cordon d’alimentation et le bloc
d’alimentation Xbox 360.
Page 30

Pour éviter d’endommager les cordons d’alimentation et le bloc d’alimentation :
• Protégez les cordons d’alimentation
pour éviter qu’ils ne soient piétinés.
• Protégez les cordons pour éviter qu’ils
ne soient pincés ou pliés,
particulièrement aux endroits où ils se
connectent à la prise de courant, au
bloc d’alimentation et à la console.
• Évitez de tirer d’un coup sec sur les
cordons d’alimentation, de les nouer,
de les plier en deux et de les abîmer.
• N’exposez pas les cordons
d’alimentation à des sources de
chaleur.
• N’enroulez pas les cordons
d’alimentation autour du bloc
d’alimentation.
• Gardez les enfants et les animaux hors
de portée des cordons d’alimentation.
Ne les laissez pas mordre ou mastiquer
les cordons.
• Lorsque vous débranchez le cordon
d’alimentation, tirez sur la che et non
sur le cordon.
• Ne laissez pas le bloc d’alimentation
pendre de l’un des cordons
d’alimentation.
Si un cordon ou un bloc d’alimentation
est endommagé de quelque façon que ce
soit, cessez immédiatement de l’utiliser et
communiquez avec le Service à la clientèle
de Xbox pour le remplacer.
Débranchez votre console Xbox 360
pendant les orages électriques ou lorsque
vous comptez ne pas l’utiliser pendant une
longue période.
Branchez toujours les cordons
d’alimentation comme suit :
1 Insérez complètement le cordon du
bloc d’alimentation dans la console
Xbox 360.
2 Branchez le cordon d’alimentation
secteur au bloc d’alimentation jusqu’à
ce qu’il n’avance plus.
3 Branchez l’autre extrémité du cordon
d’alimentation secteur à la prise de
courant murale.
français
29
Page 31

LA MANETTE SANS FIL XBOX 360
Votre manette sans l vous permet de faire
l’expérience ultime en matière de liberté sans
l avec la même précision, vitesse et justesse
qu’une manette câblée.
Touche Guide Xbox
La touche Guide Xbox située au centre de votre
manette vous permet de vivre l’expérience
Xbox 360 d’un simple toucher du doigt.
Appuyez sur la touche Guide Xbox pour allumer
votre console. Lorsqu’elle est allumée, vous
pouvez accéder immédiatement au Guide Xbox
en appuyant sur la touche Guide Xbox. Pour
éteindre votre console, appuyez sur la touche
Guide Xbox et maintenez-la enfoncée pendant
trois secondes, puis conrmez votre sélection.
Anneau de lumière
L’Anneau de lumière composé de quatre
quadrants qui entoure la touche Guide Xbox
de la manette et le bouton d’alimentation de
la console constitue le voyant d’état Xbox 360.
Lorsque vous branchez une manette à votre
console, elle se voit affecter un quadrant qui
s’illumine en vert pour indiquer son numéro
et sa position. Chaque manette additionnelle
INSTALLATION DE VOTRE MANETTE SANS FIL
Avant de pouvoir utiliser votre manette sans
l Xbox 360 avec votre console Xbox 360,
vous devez y insérez une batterie.
français
Sécurité concernant les piles jetables
Une utilisation inappropriée des piles risque
de provoquer une fuite de liquide,
surchauffe ou explosion. Attention au risque
d’incendie si le type de piles utilisé est
incorrect. Le liquide de pile est corrosif,
voire toxique. Il peut provoquer des brûlures
aux yeux ou à la peau et est nocif s’il est
avalé. Pour réduire le risque de blessure :
• Gardez les piles hors de la portée des
enfants.
• Vous ne devez jamais chauffer, ouvrir,
perforer ou mutiler les piles ni les jeter
dans un feu.
• N’utilisez que des piles alcalines, de
type AA (LR6).
• Ne mélangez pas de nouvelles et
d’anciennes piles.
• Enlevez les piles si elles sont usées ou si
vous comptez ne pas utiliser votre
télécommande pendant une longue
branchée à la console (jusqu’à quatre) se voit
affecter un autre quadrant.
En cas de problème système, l’Anneau de
lumière de la console émettra une série
de lumières rouges. Pour de plus amples
renseignements, consultez la section
« Dépannage ».
Port d’extension
Le port d’extension de votre manette (doté
d’une prise audio de 2,5 mm) vous permet de
connecter des périphériques d’extension
comme le casque Xbox 360 (vendu séparément)
à votre manette. Pour obtenir de plus amples
renseignements, consultez le guide d’utilisation
du périphérique d’extension de la manette.
Port de recharge
Le port de recharge, situé sur le devant de votre
manette, fonctionne exclusivement avec le kit
de chargement Xbox 360 & (vendu séparément).
Insertion des piles
La manette sans l utilise des piles jetables
ou la batterie rechargeable Xbox 360 (vendue
séparément). Si vous prévoyez d’utiliser des
piles jetables, prenez connaissance de la
section « Sécurité concernant les piles
jetables » qui suit immédiatement.
période. Ne laissez pas les piles dans la
batterie LR6 lorsqu’elle n’est pas
installée dans la manette.
• En cas de fuite, retirez toutes les piles
immédiatement en prenant soin d’éviter
tout contact avec la peau ou les
vêtements. Si le liquide de la pile entre
en contact avec la peau ou les
vêtements, rincez immédiatement la
peau à eau vive. Avant d’insérer de
nouvelles piles, nettoyez à fond le
compartiment à piles à l’aide d’une
serviette de papier humide ou suivez les
recommandations du fabricant de la
pile.
• Jetez les piles conformément aux
normes locales et nationales en matière
de gestion des déchets (s’il y a lieu).
30
Page 32

Insérez les piles en respectant les instructions
suivantes.
Pour insérer les piles dans la batterie LR6 de
la manette sans l :
1 Enfoncez le bouton sur le dessus de la
batterie LR6 et tirez celle-ci vers le bas pour
la retirer de la manette.
2 Insérez deux piles AA (LR6) neuves en
respectant la polarité (+ et -) indiquée sur
le dessous de la batterie. Pour de meilleurs
résultats, les piles AA rechargeables sont
déconseillées.
3 Remettez la batterie LR6 dans la manette
et enfoncez-la pour l’immobiliser.
Retirez les piles de la manette
avant de monter à bord d’un
aéronef
Avant de monter à bord d’un avion ou
de ranger la manette sans l dans des
bagages qui seront enregistrés, retirez
les piles de la manette sans l. À l’instar
d’un téléphone cellulaire, la manette
sans l peut émettre de l’énergie
radiofréquence (RF) lorsque des piles
sont en place.
Connexion de votre manette sans l
à votre console
Lorsque vous sortez votre manette sans l
Xbox 360 de sa boîte, elle est déjà connectée
sans l à votre console. Si vous devez
reconnecter votre manette sans l à votre
console ou la connecter à une autre console,
reportez-vous à la section « Ajoutez des
manettes sans l ».
Allumez votre console et votre
manette sans l.
Pour allumer votre console et votre manette,
appuyez sur la touche Guide Xbox de votre
manette et maintenez-la enfoncée.
Pour allumer votre console uniquement,
appuyez sur le bouton d’alimentation de
la console. Pour allumer votre manette
uniquement, appuyez sur la touche Start
de la manette.
rEMarQUE
Pour éviter de pincer vos doigts lors de
l’insertion, ne poussez que sur la surface
plane de la pile.
Éteignez votre console et votre
manette sans l.
Pour éteindre votre console et votre manette,
appuyez sur la touche Guide Xbox de votre
manette et maintenez-la enfoncée pendant
trois secondes. Décidez ensuite si vous
souhaitez éteindre seulement votre manette
ou votre manette et votre console. (En
sélectionnant la console, vous éteignez la
console et toutes les manettes qui sont
branchées à cette dernière.)
Pour éteindre la console et toute manette
sans l connectée, appuyez sur le bouton
d’alimentation de la console.
Sélectionnez la langue et d’autres
paramètres
La première fois que vous allumez votre
console Xbox 360, on vous demande d’entrer
une langue (Language). Suivez les instructions
pour sélectionner une langue pour votre
console.
Vous pouvez changer la langue de la console
dans la section System de l’interface Xbox.
Vous pouvez également modier d’autres
paramètres comme l’heure, le son, l’afchage
et la commande qui éteint automatiquement
la console après six heures de non utilisation.
français
31
Page 33

PARAMÈTRES DE CONTRÔLE PARENTAL DE XBOX 360
La nouvelle fonctionnalité
de contrôle parental de
Xbox 360 permet aux parents
et aux gardiens d’assurer un
divertissement adapté à l’âge
personnalisés. Les paramètres de la console
peuvent limiter les jeux joués et les lms
visionnés sur votre console. Les paramètres
de Xbox LIVE peuvent personnaliser
l’expérience Xbox LIVE pour chaque compte
enfant, même lorsqu’il joue à l’extérieur du
domicile.
Appliquez le contrôle parental
Pour appliquer le contrôle parental à vos jeux
et à Xbox LIVE :
1 Sélectionnez System, Family Settings.
2 Choisissez les paramètres que vous
souhaitez exécuter pour votre console et
vos comptes Xbox LIVE.
Aux États-Unis et au Canada, les paramètres
de contrôle parental de Xbox 360 pour les
jeux se basent sur le système d’évaluation
(PEGI) et les paramètres des lms se basent
sur le système d’évaluation MPAA (Motion
français
Picture Association of America). Par défaut,
les paramètres de contrôle parental de
Xbox 360 sont réglés sur Allow All (aucune
restriction) pour les jeux et les lms. Pour
obtenir de plus amples renseignements sur le
classement des jeux, consultez www.esrb.org.
Parfois, le classement d’un lm n’est pas
encodé sur le DVD. Dans ce cas, le lm peut
être visionné peu importe les paramètres de
votre console.
par le biais de paramètres
Paramètres Xbox LIVE
Vous pouvez assurer une expérience positive
sur Xbox LIVE à votre famille en établissant
des limites pour chaque compte enfant.
Gérez jusqu’à huit paramètres pour chaque
compte et établissez différentes limites pour
chaque compte. Les paramètres Xbox LIVE de
votre enfant sont sélectionnés au préalable
au moment de la création de leur compte
Xbox LIVE. Vous pouvez apporter des
modi cations à tout moment en sélectionnant
System, Family Settings, Live Controls, et
en choisissant le compte de l’enfant.
Le contrôle parental de Xbox LIVE vous
permet de :
• Demander une autorisation parentale pour
ajouter des personnes à la liste d’amis de
votre enfant.
• Restreindre le chat vocal, vidéo et textuel
aux personnes gurant dans la liste d’amis
de votre enfant.
• Bloquer ou restreindre l’af chage du pro l
de votre enfant et de sa présence en ligne.
• Bloquer ou restreindre l’accès de votre
enfant à un contenu créé par d’autres
joueurs.
• Bloquer l’accès à des jeux multijoueur
Xbox LIVE.
• Empêcher votre enfant d’acheter des
articles sur le Marché Xbox LIVE.
32
Page 34

UTILISATION DU LECTEUR DE DISQUE
Pour insérer un disque :
1 Appuyez sur le bouton d’éjection pour
ouvrir le compartiment à disque.
2 Déposez le disque de jeu Xbox 360, le CD
audio ou le lm sur DVD dans le
compartiment à disque étiquette vers le
haut (ou vers la droite si la console est à
la verticale).
Pour éjecter un disque :
1 Appuyez sur le bouton d’éjection pour
ouvrir le compartiment à disque.
2 Enlevez le disque.
3 Appuyez sur le bouton d’éjection pour
fermer le compartiment à disque.
rEMarQUE
Lorsque la console est orientée vers le haut,
assurez-vous que le disque est maintenu en
place par les languettes du compartiment à
disque pour éviter qu’il ne tombe.
iMPOrTanT
Pour éviter de coincer le lecteur de disque et
d’endommager les disques ou la console :
• Retirez les disques avant de déplacer la
console ou de l’incliner entre les positions
horizontale et verticale.
• N’utilisez jamais des disques fêlés. Ils
peuvent se briser à l’intérieur de la console
et bloquer ou casser des pièces internes.
• Lorsque la console est en position
verticale, n’utilisez pas des disques de
taille inférieure aux DVD ou CD standard.
Si le lecteur de disque se coince ou est
endommagé, communiquez avec le Service
à la clientèle Xbox pour faire réparer ou
échanger votre console.
33
français
Page 35

INFORMATIONS IMPORTANTES RELATIVES À LA SÉCURITÉ
LORSQUE VOUS JOUEZ À DES JEUX VIDÉO
Crises d’épilepsie liées à la
photosensibilité
Pour un très faible pourcentage de
personnes, l’exposition à certaines images,
notamment aux lueurs ou motifs clignotants
pouvant apparaître dans les jeux vidéo,
risque de provoquer une crise d’épilepsie
liée à la photosensibilité, même chez des
personnes sans antécédent épileptique.
Les symptômes de ces crises peuvent varier;
ils comprennent généralement des
étourdissements, une altération de la vision,
des mouvements convulsifs des yeux ou du
visage, la crispation ou le tremblement des
bras ou des jambes, une désorientation, une
confusion ou une perte de connaissance
momentanée. Ces crises peuvent également
provoquer une perte de connaissance ou
des convulsions pouvant engendrer des
blessures dues à une chute sur le sol ou à
un choc avec des objets avoisinants.
Cessez immédiatement de jouer et consultez
un médecin si vous ressentez de tels
symptômes. Il est conseillé aux parents de
surveiller leurs enfants et de leur poser des
questions concernant les symptômes cidessus; les enfants et les adolescents sont
effectivement plus sujets à ce genre de crise
que les adultes. Les précautions suivantes
français
peuvent réduire le risque d’une crise
d’épilepsie photosensible :
• S’asseoir loin de l’écran de télévision.
• Utiliser un écran de télévision de petite
taille.
• Jouer dans une pièce bien éclairée.
• Éviter de jouer en cas d’envie de
dormir ou de fatigue.
Si vous ou un membre de votre famille avez
des antécédents de crises d’épilepsie,
consultez un médecin avant de jouer.
Troubles musculo-squelettiques
Il est possible que l’utilisation de manettes
de jeu, de claviers, de souris ou d’autres
périphériques d’entrée électroniques
entraîne de graves blessures ou troubles.
Comme pour de nombreuses activités, il est
possible que vous ressentiez
occasionnellement de l’inconfort dans vos
mains, vos bras, vos épaules, votre cou ou
d’autres parties de votre corps en jouant à
des jeux vidéo. Cependant, si vous ressentez
de façon persistante ou récurrente un
inconfort, une douleur, un élancement, des
picotements, un engourdissement, une
sensation de brûlure ou une raideur,
N’IGNOREZ PAS CES SIGNES AVANTCOUREURS. CONSULTEZ RAPIDEMENT UN
PROFESSIONNEL DE LA SANTÉ QUALIFIÉ,
même si les symptômes surviennent lorsque
vous ne jouez pas à un jeu vidéo. De tels
symptômes peuvent être associés à de
douloureux, et parfois permanents, troubles
et maladies affectant les nerfs, les muscles,
les tendons, les vaisseaux sanguins et
d’autres parties du corps. Ces troubles
musculo-squelettiques (TMS) comprennent,
entre autres, le syndrome du canal carpien,
la tendinite, la ténosynovite et le syndrome
vibratoire.
Les chercheurs ne sont pas encore en
mesure de répondre à de nombreuses
questions sur les TMS, mais ils s’entendent
généralement pour dire que de nombreux
facteurs peuvent contribuer à leur
apparition, y compris les maladies, la
condition physique, le stress et la façon de
le gérer, l’état de santé général, la position
du corps lors du travail et des autres
activités (comme les jeux vidéo). Certaines
études laissent croire que la durée d’une
activité est également un facteur.
Certaines directives peuvent vous aider à
travailler et à jouer confortablement et
possiblement à réduire le risque de souffrir
d’un TMS. Elles se trouvent dans le Guide sur
la façon saine de jouer, disponible sur
www.xbox.com. Parmi ces directives, notons
les suivantes :
• Adoptez des positions confortables.
• Assurez-vous de détendre vos mains,
vos doigts et les autres parties de
votre corps.
• Prenez des pauses.
• Adoptez un mode de vie sain.
Si vous avez des questions concernant un
possible lien entre votre mode de vie, vos
activités, votre état de santé ou votre
condition physique et les TMS, consultez un
professionnel de la santé qualié.
34
Page 36

JEUX
La console Xbox 360 ne peut lire que les
disques de jeu concédés sous licence par
Microsoft pour la console de jeu et de loisirs
Xbox 360. Les jeux concédés sous licence
arborent ce logo :
Pour les dernières informations sur les jeux
Xbox 360, visitez le site www.xbox.com.
CONNECTEZ-VOUS À XBOX LIVE
Vous pouvez devenir instantanément un
membre de niveau argent au Xbox LIVE en
branchant un câble Ethernet (vendu
séparément) au port Ethernet à l’arrière de
la console. Vous pouvez créer une identité,
accéder au Marché Xbox LIVE, consulter des
cartes de joueurs, participer à des
bavardages, obtenir des messages vocaux,
faire des amis et utiliser le contrôle parental
de Xbox LIVE. Les membres de niveau argent
au Xbox LIVE obtiennent un jeu de durée
limitée par le biais d’événements spéciaux
comme le jeu gratuit de niveau or au Xbox
LIVE pendant la n de semaine, Xbox LIVE
Game with Fame et Xbox LIVE Prime Time.
Si vous croyez être prêt pour la pleine
expérience Xbox LIVE, procurez-vous un
abonnement de niveau or au Xbox LIVE.
Le niveau or au Xbox LIVE vous donne accès
à toutes les fonctionnalités de l’abonnement
argent au Xbox LIVE en plus des jeux
multijoueur en ligne, de la création de parties
évoluées et des outils de commentaires, des
privilèges et récompenses du Marché Xbox
LIVE et des fonctions multimédias telles que
le partage de musique et de photos.
Pour lancer un jeu :
1 Appuyez sur le bouton d’éjection pour
ouvrir le compartiment à disque.
2 Déposez le disque de jeu Xbox 360 dans le
compartiment à disque étiquette vers le
haut (ou vers la droite si la console est à la
verticale).
3 Appuyez sur le bouton d’éjection pour
fermer le compartiment à disque. Le jeu
commence.
Établissez votre connexion
Connectez-vous à Xbox LIVE en utilisant l’un
des types de connexion suivants. Vous pouvez
également établir une connexion réseau sans
l en utilisant l’adaptateur réseau sans l
Xbox 360 (vendu séparément). Pour de plus
amples renseignements sur l’établissement
de votre connexion et sur d’autres options de
réseau à domicile, visitez la page
www.xbox.com/setup.
rEMarQUE
Pour jouer sur Xbox LIVE, vous devez disposer
d’une connexion Internet haute vitesse (câble
ou DSL). Vous devez également disposer d’un
disque dur Xbox 360 (vendu avec la console
Xbox 360 standard; vendu séparément avec
le système Xbox 360 Arcade) ou d’une carte
mémoire Xbox 360 pour stocker les
informations de votre compte Xbox LIVE.
français
35
Page 37

Modem câble/DSL
Connexion par modem
Choisissez une connexion modem si vous
voulez le moyen le plus facile d’établir une
connexion et de jouer et ne souhaitez pas
partager votre connexion Internet avec votre
ordinateur (ou autre appareil).
français
Pour établir une connexion par modem :
1 Branchez une extrémité d’un câble
Ethernet au port Ethernet de votre modem
haute vitesse et branchez l’autre extrémité
au port Ethernet situé à l’arrière de votre
console Xbox 360.
2 Suivez les instructions afchées à l’écran.
Vous devrez peut-être entrer des
renseignements fournis par votre FSI dans
la section « System » de l’interface Xbox.
36
Page 38

Modem câble/DSL
Routeur
PC
Connexion par routeur
Choisissez une connexion par routeur si vous
souhaitez partager votre connexion Internet
avec votre ordinateur (ou autre appareil), si
votre modem haute vitesse peut prendre en
charge une connexion Ethernet et si vous
voulez pouvoir jouer sur Xbox LIVE, que votre
ordinateur soit allumé ou éteint.
Pour établir une connexion par routeur :
1 Branchez une extrémité d’un câble
Ethernet au port Ethernet de votre modem
haute vitesse et branchez l’autre extrémité
au port WAN ou Uplink de votre routeur.
2 Branchez une extrémité d’un câble
Ethernet au port Ethernet LAN de votre
routeur et branchez l’autre extrémité au
port Ethernet de votre ordinateur (ou autre
appareil). Pour utiliser le navigateur ou le
logiciel de votre ordinateur an de
congurer le routeur, suivez les
instructions fournies par votre FSI, puis
assurez-vous que votre ordinateur est
connecté à Internet.
3 Branchez une extrémité d’un câble
Ethernet au port Ethernet LAN de votre
routeur et branchez l’autre extrémité au
port Ethernet à l’arrière de votre console
Xbox 360.
rEMa rQUE
Certains modems et appareils nécessitent
un concentrateur plutôt qu’un routeur.
4 Suivez les instructions afchées à l’écran.
Vous devrez peut-être entrer des
renseignements fournis par votre FSI dans
la section « System » de l’interface Xbox.
français
37
Page 39

Passerelle câble/DSL
PC
Connexion par passerelle
Choisissez une connexion par passerelle
si votre FSI vous a fourni une passerelle
Ethernet. À l’instar d’une connexion par
routeur, vous pouvez partager votre
connexion Internet avec votre ordinateur
(ou autre appareil) et jouer sur Xbox LIVE
que votre ordinateur soit allumé ou non.
Pour établir une connexion par passerelle :
français
1 Branchez votre connexion Internet haute
vitesse à votre passerelle (à l’aide d’une
prise de câble coaxial pour le service par
câble ou d’une prise téléphonique pour le
service DSL).
2 Branchez une extrémité d’un câble
Ethernet au port Ethernet LAN de votre
passerelle et branchez l’autre extrémité au
port Ethernet de votre ordinateur (ou autre
appareil). Pour utiliser le navigateur ou le
logiciel de votre ordinateur an de
congurer la passerelle, suivez les
instructions fournies par votre FSI, puis
assurez-vous que votre ordinateur est
connecté à Internet.
3 Branchez une extrémité d’un câble
Ethernet au port Ethernet LAN de votre
passerelle et branchez l’autre extrémité
au port Ethernet à l’arrière de votre
console Xbox 360.
4 Suivez les instructions afchées à l’écran.
Vous devrez peut-être entrer des
renseignements fournis par votre FSI dans
la section « System » de l’interface Xbox.
Dépannage relatif à votre connexion
Si votre console Xbox 360 ne se connecte pas
automatiquement, vous devrez peut-être
congurer manuellement vos paramètres
réseau dans l’interface Xbox. Certains
fournisseurs de service Internet (FSI) exigent
des paramètres spéciques, notamment un
nom d’hôte, une adresse MAC, un nom
d’utilisateur et un mot de passe FSI (pour
l’authentication PPPoE). Si vous n’êtes pas
certain d’avoir besoin de ces renseignements,
vériez auprès de votre FSI. Pour obtenir de
plus amples renseignements, visitez la page
www.xbox.com/setup.
Créez un compte Xbox LIVE
Pour créer votre compte, sélectionnez
Xbox LIVE à partir de l’interface Xbox et
suivez les instructions afchées à l’écran.
Communiquez sur Xbox LIVE
Utilisez le casque Xbox 360 (vendu
séparément) pour bavarder et communiquer
avec vos amis pendant que vous êtes sur
Xbox LIVE.
Perte auditive
Une exposition prolongée à des volumes
élevés lors du port d’un casque risque de
provoquer une perte auditive temporaire
ou permanente. Certains casques de tierce
partie non approuvés peuvent engendrer
des niveaux sonores plus élevés que les
casques Xbox 360 approuvés.
38
Page 40

VISIONNEZ DES FILMS
Votre console Xbox 360 vous permet de
visionner des lms sur DVD. Pour optimiser
votre expérience de visionnage de lm sur
DVD, procurez-vous la télécommande
multimédia universelle Xbox 360 (vendue
séparément).
Pour visionner des lms sur DVD :
1 Appuyez sur le bouton d’éjection pour
ouvrir le compartiment à disque.
2 Déposez le DVD dans le compartiment à
disque étiquette vers le haut (ou vers la
droite si la console est à la verticale).
3 Appuyez sur le bouton d’éjection pour
fermer le compartiment à disque. Le lm
débutera.
LECTURE DE CD
La console Xbox 360 peut lire des CD audio
arborant ce logo :
4 Pour afcher les commandes à l’écran du
DVD, appuyez sur n’importe quelle touche
de la manette à l’exception de la touche
Guide Xbox. Utilisez votre manette pour
contrôler la lecture du lm.
La console Xbox 360 ne peut lire que des DVD
de zone 1 arborant ce logo :
Pour écouter des CD audio :
1 Appuyez sur le bouton d’éjection pour
ouvrir le compartiment à disque.
2 Déposez le CD audio dans le compartiment
à disque étiquette vers le haut (ou vers la
droite si la console est à la verticale).
3 Appuyez sur le bouton d’éjection pour
fermer le compartiment à disque. Le CD
commencera à jouer.
français
39
Page 41

PARTAGEZ DES FICHIERS MULTIMÉDIAS D’UN LECTEUR AUDIO,
APPAREIL PHOTO OU CAMÉRA
français
Utilisez votre console Xbox 360 pour écouter de
la musique, regarder des photos et accéder à
d’autres chiers multimédias provenant d’autres
périphériques. Vous pouvez connecter des
périphériques USB tels que des lecteurs de
musique et des appareils photo numériques aux
ports USB de la console Xbox 360. Vous pouvez
également connecter votre console à un
ordinateur fonctionnant sous Windows ou
Windows Media Center.
Pour obtenir la liste des périphériques de tierce
partie pris en charge par la console Xbox 360,
visitez la page www.xbox.com/media.
Transmettez en continu de la musique
vers votre console
Pour transmettre en continu de la musique
vers votre console Xbox 360 à par tir d’un
lecteur audio personnel :
1 Branchez l’appareil à votre console à l’aide
d’un câble USB (non compris).
2 Congurez l’appareil pour qu’il transmette
des données par le port USB.
3 Sélectionnez Media, Music, Portable
Device.
4 Sélectionnez la musique ou la sélection
que vous désirez.
Regardez vos photos
Vous pouvez créer des diaporamas et afcher
des photos stockées sur votre appareil photo
numérique.
Pour connecter votre appareil photo
numérique :
1 Congurez votre appareil photo numérique
pour afcher des photos. Consultez les
instructions de votre appareil photo pour
savoir comment afcher des photos.
2 Lorsque votre console est allumée, utilisez
un câble USB pour connecter votre appareil
photo à un port USB de la console.
3 La console détectera votre appareil photo
numérique. Pour accéder à vos photos,
suivez les instructions afchées à l’écran.
Ethernet
USB
40
Page 42

TRANSMETTEZ DES FICHIERS MULTIMÉDIAS À PARTIR DE VOTRE ORDINATEUR
Pour accéder à des chiers multimédias,
notamment des chiers vidéo, des chiers
audio et des photos, à partir d’un ordinateur
fonctionnant sous Windows XP, il faut établir
une simple connexion Ethernet du port
Ethernet, situé à l’arrière de votre console
Xbox 360, à votre ordinateur. Si votre PC ou
réseau à domicile est également connecté à
Internet haute vitesse, vous pouvez utiliser
cette connexion pour accéder à Xbox LIVE.
Pour de plus amples renseignements sur ces
options de réseau à domicile, voir
« Connectez-vous à Xbox LIVE » ou rendezvous sur www.xbox.com/setup.
Windows Media Connect vous permet de
connecter votre console Xbox 360 à un
ordinateur fonctionnant sous Windows XP
Service Pack 2 (SP2) ou une version plus
récente. Si vous possédez un ordinateur
fonctionnant sous Windows Media Center,
vous pouvez également l’utiliser avec votre
console Xbox 360.
En plus d’assurer les fonctions normales d’une
télécommande DVD, la télécommande
multimédia universelle Xbox 360 (vendue
séparément) comprend une touche Windows
Media Center vous permettant d’accéder à un
ordinateur connecté à Windows Media Center.
Windows Media Connect
Avec Windows Media Connect, vous pouvez
transmettre en continu de la musique et des
photos stockées dans votre PC fonctionnant
sous Windows XP vers votre console Xbox
360, quel que soit son emplacement dans
votre domicile. Regardez des diaporamas avec
votre téléviseur et faites jouer toute votre
musique avec une chaîne audio connectée à
votre console à l’aide d’un récepteur audio
numérique. Pour en savoir plus sur Windows
Media Connect, visitez la page
www.xbox.com/media.
Pour installer Windows Media Connect :
1 Rendez-vous sur www.xbox.com/pcsetup
et téléchargez le logiciel Windows Media
Connect vers un ordinateur fonctionnant
sous Windows XP SP2 ou une version
ultérieure.
2 Connectez votre console à votre ordinateur
en utilisant l’une des connexions décrites
dans la section « Connectez-vous à
Xbox LIVE ».
3 Sélectionnez Media, puis choisissez des
photos ou de la musique stockées dans
votre ordinateur. Pour terminer
l’installation de Windows Media Connect,
suivez les instructions afchées à l’écran.
Windows Media Center
Votre console Xbox 360 intègre parfaitement
jeu et divertissement (par exemple : regarder
ou enregistrer des émissions de télévision,
regarder des photos numériques et écouter
de la musique numérique) et les transmet de
votre ordinateur fonctionnant sous Windows
Media Center jusqu’à n’importe quel téléviseur
de votre domicile. Lorsque vous connectez
votre console au même réseau que votre
ordinateur fonctionnant sous Windows Media
Center, votre système de jeu et de loisirs
Xbox 360 vous permet de vivre une
expérience incroyable. (Un ordinateur
fonctionnant sous Windows Media Center
peut prendre en charge jusqu’à cinq consoles.)
Pour en savoir plus sur Windows Media
Center pour Xbox 360, visitez la page
www.microsoft.com/extender.
Pour installer Windows Media Center :
1 Rendez-vous sur www.xbox.com/pcsetup
et téléchargez la dernière version du
logiciel Windows Media Center vers votre
ordinateur fonctionnant sous Windows
Media Center.
2 Connectez votre console à votre ordinateur
Windows Media Center en utilisant l’une
des connexions décrites dans la section
« Connectez-vous à Xbox LIVE ».
3 Sur votre console Xbox 360, sélectionnez
Media, puis Windows Media Center.
Pour terminer l’installation de Windows
Media Center, suivez les instructions
afchées à l’écran.
français
41
Page 43

STOCKAGE
Si vous prévoyez vous connecter à Xbox LIVE,
vous aurez besoin d’un emplacement où
stocker votre prol, les informations relatives à
vos jeux et tout le contenu exceptionnel trouvé
sur Xbox LIVE. La console de jeu et de loisirs
Xbox 360 offre deux options de stockage de
données : la carte mémoire Xbox 360 pour un
stockage mobile et le disque dur Xbox 360
(vendu séparément) pour combler tous vos
besoins de stockage.
Cartes mémoire
Vous pouvez connecter jusqu’à deux cartes
mémoire mobiles aux ports de carte mémoire
situés sur le devant de votre console pour
obtenir plus d’espace de stockage. La capacité
des cartes mémoire est inférieure à celle de
votre disque dur, mais elles sont portatives.
Vous pouvez donc facilement emporter votre
prol Xbox LIVE ou vos jeux enregistrés vers
d’autres consoles Xbox 360. Vous pouvez
également emporter votre carte mémoire chez
des détaillants participants et télécharger du
contenu des stands de démonstration Xbox 360.
La carte mémoire Xbox 360 vous permet
d’emporter vos jeux enregistrés partout où vous
allez. Enregistrez simplement votre partie et
transportez votre compte Xbox LIVE.
La carte mémoire Xbox 360 dispose des
caractéristiques suivantes :
• Une prise en charge du contenu
français
téléchargeable Xbox LIVE.
• L’utilisation de deux cartes mémoire pour
un stockage de jeu polyvalent.
La capacité de votre carte mémoire est
indiquée sur le devant de la carte. Elle
fonctionne exclusivement avec la console
Xbox 360. Pour plus d’espace de stockage,
procurez-vous le disque dur Xbox 360
(vendu séparément).
rEMarQUE
Puisque le logiciel de la console Xbox 360
utilise une partie de la mémoire de la carte
mémoire lors de son installation, l’utilisateur
disposera d’une mémoire inférieure à ce qui
est indiqué.
Branchez votre carte mémoire
Pour connecter votre carte mémoire, insérez-la
dans l’un des emplacements carte mémoire du
devant de la console Xbox 360. Pour la
déconnecter, retirez la carte mémoire. Ne
retirez pas la carte mémoire pendant que la
console lit ou enregistre des données; vous
risqueriez de perdre des données ou causer des
problèmes système.
rEMarQUE
Évitez de toucher aux bornes de la carte
mémoire avec vos doigts ou des pièces de
métal.
Personnalisez votre carte mémoire
Vous pouvez personnaliser votre carte mémoire
en lui attribuant un nom.
Pour attribuer un nom à votre carte mémoire :
1 Avec la carte mémoire insérée,
sélectionnez System, Memory.
2 Mettez en surbrillance la carte mémoire.
3 Sélectionnez Device Options et
renommez votre carte mémoire.
Une fois votre carte mémoire personnalisée,
vous pouvez l’identier à l’aide de son nouveau
nom.
Copiez ou supprimez les éléments
enregistrés
Vous pouvez copier n’importe quel élément
d’une carte mémoire Xbox 360 sur une autre
carte mémoire ou un disque dur. Vous pouvez
également libérer de l’espace sur votre carte
mémoire en supprimant des éléments.
Pour copier ou supprimer un élément de votre
carte mémoire :
1 Avec la carte mémoire insérée,
sélectionnez System, Memory.
2 Sélectionnez la carte mémoire.
3 Sélectionnez le type d’élément, puis
l’élément spécique que vous souhaitez
copier dans un autre emplacement ou
supprimer de votre carte mémoire.
rEMarQUE
Certains contenus, comme de la musique
extraite et des jeux préchargés, ne peuvent pas
être copiés d’un disque dur vers une carte
mémoire.
Disque dur amovible
Vous pouvez également installer le disque dur
Xbox 360 (vendu séparément), qui offre une
grande capacité de stockage d’éléments
téléchargeables : les contenus de jeux, les jeux
enregistrés, les prols des joueurs et les
données sur l’abonnement à Xbox LIVE. Le
disque dur est obligatoire pour jouer aux jeux
Xbox originaux sur votre console Xbox 360.
42
Page 44

AJOUTEZ DES MANETTES SANS FIL
Jusqu’à quatre manettes, câblées et sans l,
peuvent être connectées activement à une
console en même temps. Chaque manette
connectée se voit attribuer un quadrant sur
l’Anneau de lumière. Pour que vous puissiez
connecter une manette sans l, au moins un
des quadrants doit être libre (éteint).
Pour connecter votre manette sans l à votre console :
Pour débrancher une manette sans l, appuyez
sur la touche Guide Xbox de cette dernière,
maintenez-la enfoncée pendant trois secondes,
puis choisissez l’option permettant d’éteindre la
manette. Pour débrancher une manette câblée,
débranchez le connecteur de câble.
1 Appuyez sur la touche Guide Xbox et
2 Assurez-vous que la console est allumée.
3 Appuyez sur le bouton de connexion de
maintenez-la enfoncée jusqu’à ce que
la manette s’allume.
Si elle est éteinte, appuyez sur le bouton
d’alimentation.
français
la console et relâchez-le.
4 Appuyez sur le bouton de connexion de la
manette et relâchez-le.
5 Lorsque l’Anneau de lumière de la manette
et celui de la console tournoient et clignotent
une fois, la manette est connectée.
Le quadrant qui demeure allumé indique la
position de la manette.
43
Page 45

rEMarQUES
• Lorsque vous éteignez la console, votre
manette demeure connectée pour
utilisation future.
• Votre manette ne peut être connectée qu’à
une seule console à la fois. Vous pouvez
vous connecter à une nouvelle console à
tout moment, mais votre connexion à la
console connectée précédemment sera
perdue.
BRANCHEZ DES ACCESSOIRES SUPPLÉMENTAIRES
La console Xbox 360 Arcade fonctionne avec
plusieurs accessoires, notamment :
• Jusqu’à quatre manettes câblées et sans l
et d’autres accessoires de jeu (manettes
supplémentaires vendues séparément).
• Des connecteurs audio/vidéo, par exemple :
des câbles vidéo et des câbles audio
numériques, y compris le câble audio/vidéo
haute dé nition Xbox 360, le câble audio/
vidéo S-Vidéo Xbox 360, le câble audio/
vidéo haute dé nition VGA Xbox 360 et le
câble HDMI Xbox 360 (vendus séparément).
• Des périphériques de réseau Ethernet et de
français
réseaux sans l à domicile, par exemple
l’adaptateur réseau sans l Xbox 360
(vendu séparément).
• Des périphériques de stockage, par
exemple le disque dur Xbox 360 (vendu
séparément), les cartes mémoire Xbox 360
(cartes supplémentaires vendues
séparément) et les périphériques de
stockage USB.
• Des périphériques multimédias USB, par
exemple des lecteurs de musique et des
appareils photo numériques.
• Des façades Xbox 360 personnalisées
(vendues séparément).
• La manette sans l Xbox 360 fonctionne
seulement à une distance maximale de 10
mètres (33 pieds) de la console. Les objets
se trouvant entre la manette et la console
risquent de réduire cette portée.
Recherchez le logo Authentic Xbox Product
sur les accessoires de jeu Microsoft conçus
pour votre système Xbox 360 Arcade.
En ce qui concerne les périphériques d’autres
fabricants, recherchez l’un des logos suivants,
lesquels indiquent que le produit a été testé
et répond aux rigoureuses exigences de
compatibilité lui permettant de fonctionner
avec Xbox 360 ou Xbox LIVE. Pour de plus
amples renseignements sur les périphériques
compatibles, visitez la page www.xbox.com.
44
Page 46

DÉPANNAGE
Si vous éprouvez des difcultés, procédez
comme suit pour dépanner votre console de
jeu et de loisirs Xbox 360. Si les étapes de la
présente section ne règlent pas votre
problème, rendez-vous sur www.xbox.com/
support ou composez le numéro du Service à
la clientèle Xbox fourni sur la couverture
arrière.
Ne conez pas votre console Xbox 360 ou ses
accessoires à votre détaillant pour les
réparations, à moins qu’un représentant du
Service à la clientèle de Xbox ne vous y invite.
Ne tentez pas d’effectuer des
réparations
Ne tentez pas de démonter, d’ouvrir, de réparer
ou de modier la console Xbox 360, le bloc
d’alimentation ou l’un des accesoires de quelque
façon que ce soit. Vous risqueriez de subir un
choc électrique, de provoquer un incendie ou
d’endommager votre console Xbox 360.
Tout signe de tentative d’ouverture et/ou de
modication de la console Xbox 360, y compris
tout décollement, toute perforation ou tout
retrait des étiquettes, annulera la garantie
limitée et rendra la console Xbox 360
inadmissible à la réparation autorisée.
Aucune alimentation
Assurez-vous d’avoir une bonne source
d’alimentation et vériez toutes les connexions
entre la prise de courant murale et le bloc
d’alimentation, puis entre le bloc d’alimentation
et la console (voir « Branchez la console à une
source d’alimentation »). Le voyant du bloc
d’alimentation s’illumine en vert lorsqu’il
fonctionne correctement.
Aucune image
Branchez le câble A/V approprié (voir
« Connectez la console à votre téléviseur et à
votre système audio »). Allumez le téléviseur.
Sélectionnez l’entrée vidéo du téléviseur (ou du
magnétoscope, s’il y a lieu) qui afche le jeu
Xbox 360. L’entrée vidéo est communément
appelée Input Select, AUX, Line In, Line, In,
Input, Source ou EXT, selon votre type de
téléviseur ou de magnétoscope. Pour de plus
amples renseignements, consultez le guide de
votre téléviseur ou magnétoscope. Ne branchez
pas simultanément le câble audio/vidéo inclus
et un câble audio/vidéo HDMI (vendu
séparément) à la console.
Aucun son
Vériez la connexion du câble audio/vidéo (voir
« Connectez la console à votre téléviseur et à
votre système audio »). Si vous utilisez le mode
45
audio numérique, assurez-vous que le
récepteur est allumé et que la sortie (Digital
Output) est bien réglée dans les paramètres
audio de votre console. Ne branchez pas
simultanément le câble audio/vidéo inclus et
un câble audio/vidéo HDMI (vendu séparément)
à la console.
Mauvaise qualité sonore
Nettoyez le disque en suivant les instructions
du guide Garantie Xbox 360 (Volume 2). Vériez
la connexion du câble audio/vidéo (voir
« Connectez la console à votre téléviseur et à
votre système audio »). N’envoyez des signaux
audio Dolby® Digital qu’à des systèmes audio
qui prennent en charge le Dolby Digital.
Sélectionnez la sortie audio prise en charge par
votre système ou votre téléviseur : stéréo ou
Dolby® Surround pour haut-parleurs stéréo,
mono pour haut-parleurs monophoniques. Si le
son n’est émis que par un seul haut-parleur,
vériez si tous les câbles audio sont bien
connectés.
Le compartiment à disque ne s’ouvre
pas
Assurez-vous que la façade amovible du devant
de la console est bien installée et alignée.
Vériez la connexion à la source d’alimentation
(voir « Branchez la console à une source
d’alimentation »). Allumez la console en
appuyant sur le bouton d’alimentation.
Le jeu, le lm ou la musique ne
commence pas
La console ne joue que les disques pris en
charge (jeux Xbox 360, CD audio, DVD vidéo).
Insérez le disque à l’aide des directives du
présent guide, puis fermez le compartiment à
disque. Nettoyez le disque en suivant les
instructions du guide Garantie Xbox 360
(Volume 2).
L’Anneau de lumière clignote
Les voyants de l’Anneau de lumière de la
console doivent s’illuminer en continu lorsque
celle-ci est allumée, et clignoter lorsque vous
appuyez sur le bouton d’éjection. Si les voyants
de l’Anneau de lumière clignotent de façon
différente pendant le fonctionnement, la
console a un problème interne :
• Les deux voyants de gauche de la console
clignotent en rouge : La console surchauffe
et ne lira pas de jeu avant d’être refroidie.
Placez la console en un endroit bien ventilé
et éloigné d’autres sources de chaleur.
Une fois la console refroidie, le clignotement
cesse et la console Xbox 360 peut être
utilisée à nouveau. Pour obtenir de plus
amples renseignements, reportez-vous à
« Sélectionnez un emplacement pour la
console ».
français
Page 47

• Les quatre voyants sur la manette clignotent
en vert de façon périodique : Aucune
affectation de quadrant de l’Anneau de
lumière. La manette n’est pas branchée ou
les quatre quadrants sont occupés.
• Toutes les autres congurations : Un
problème interne nécessite une réparation.
Communiquez avec le Service à la clientèle
de Xbox en composant le numéro fourni sur
la couverture arrière du présent guide.
La manette sans l ne fonctionne pas
Allumez la manette sans l en appuyant sur la
touche Guide Xbox et connectez-la à votre
console (voir « Ajoutez des manettes sans l »).
Si les voyants tournoient pendant plus de 15
secondes lors de la connexion :
• Rapprochez la manette de la console.
• Assurez-vous que les piles sont bonnes.
• Gardez la console et la manette à une
distance minimale d’un mètre des gros
objets de métal comme les classeurs et les
réfrigérateurs.
• Des autocollants ou décorations métalliques
placés sur la console ou la manette peuvent
nuire au fonctionnement de la manette sans
l. Enlevez les décorations et tentez à
nouveau d’effectuer la connexion.
• Assurez-vous que le devant de la console est
dirigé vers la manette et éloigné des murs
français
avoisinants.
• Les téléphones sans l de 2,4 GHz, les
réseaux locaux sans l, les émetteurs vidéo
sans l, les fours à micro-ondes, certains
téléphones mobiles/cellulaires et les
casques d’écoute Bluetooth peuvent nuire
au fonctionnement de la manette. Éteignez
ou déconnectez ces appareils et réessayez
la connexion.
• Si aucune solution ne fonctionne, éteignez
votre console, retirez les piles LR6 ou la
batterie rechargeable Xbox 360 de la
manette et réinsérez-les, puis répétez les
étapes de la section
« Ajoutez des manettes sans l ».
L’accessoire ne fonctionne pas
N’utilisez que des accessoires de jeu
compatibles Xbox 360 qui arborent ce logo :
Si un accessoire n’est pas pris en charge par un
jeu spécique, il se peut que le jeu ne
fonctionne pas.
Impossible d’enregistrer la partie
Pour que vous puissiez enregistrer une partie,
le disque dur ou la carte mémoire de la console
Xbox 360 doit disposer de sufsamment
d’espace libre. Supprimez les éléments non
désirés de votre mémoire ou installez une carte
mémoire supplémentaire (vendue séparément)
pour obtenir plus d’espace.
La carte mémoire ne fait pas partie de
la liste des périphériques de stockage
Assurez-vous que la carte mémoire est bien
insérée dans l’emplacement carte mémoire sur
le devant de la console. Essayez l’autre
emplacement mémoire pour vérier que ce
n’est pas la source du problème. Si vous
disposez d’une seconde carte mémoire,
essayez-la également pour déterminer si la
carte mémoire d’origine est défectueuse.
rEMarQUE
Les cartes mémoire endommagées ne
s’afcheront pas dans l’interface Xbox 360 et
risquent d’endommager votre console Xbox
360. Les cartes mémoire qui ont été écrasées,
immergées ou exposées à une chaleur intense
peuvent ne plus être réparables. Elles ne
s’afcheront pas dans votre liste de
périphériques de stockage.
© 2007 Microsoft Corporation. Tous droits réservés.
Microsof t, Windows, Xbox, Xbox 360, Xbox LIVE, les
logos Xbox et les logos Xbox LIVE sont soit des
marques de commerce de Microsoft Corporation, soit
des marques déposées de Microsoft Corporation, aux
États-Unis et/ou dans d’autres pays.
46
Page 48

Español
aDVErTEnCia
Si no se congura, utiliza y cuida
adecuadamente el sistema de videojuegos
y entretenimiento Xbox 360 aumenta el
riesgo de lesión grave o de muerte, o bien
de daño al propio sistema de videojuegos
y entretenimiento Xbox 360. Lee este
manual y los manuales de cualquier
accesorio para obtener información
importante en materia de seguridad
y salud. Conserva todos los manuales para
futuras consultas. Para obtener manuales
de repuesto, visita www.xbox.com/support
o llama al número del Servicio de soporte
al cliente de Xbox que se proporciona en
la contraportada.
Antes de permitir a los niños utilizar el
sistema de videojuegos y entretenimiento
Xbox 360:
1 Averigua el uso que puede hacer cada
niño de la consola Xbox 360 (jugar,
conectarse a Xbox LIVE, sustituir
baterías, realizar conexiones eléctricas,
de cable audio/video y de red) y si
debería recibir supervisión durante
dichas actividades.
2 Si permites que tus hijos utilicen
la consola Xbox 360 sin supervisión,
asegúrate de explicarles toda la
información e instrucciones necesarias
en materia de seguridad y salud.
La consola Xbox 360 no aceptará juegos
copiados o “pirateados” ni otros medios no
autorizados. Los intentos de anular el
sistema de protección antipiratería pueden
dar lugar a que la consola Xbox 360 deje
de funcionar permanentemente. Además,
anularán la Garantía limitada, y pueden
dejar la consola Xbox 360 sin derecho a
reparaciones autorizadas, ni siquiera
pagando una cantidad.
Debe aceptar las condiciones y términos
de la Garantía limitada y de este manual
para utilizar la consola Xbox 360. Si no los
acepta, no instale ni utilice la consola Xbox
360 y devuélvala a Microsoft para que le
reembolsen el dinero pagado.
48 Tu consola Xbox 360 Arcade
49 Seleccionar una ubicación para la
consola
50 Conectar a la televisión y al
sistema de audio
51 Conectar la consola a la corriente
eléctrica
53 El control inalámbrico Xbox 360
53 Instalar el mando inalámbrico
55 El control parental de Xbox 360
56 Usar la unidad de disco
57 Advertencias de salud
importantes sobre el uso de
videojuegos
58 Jugar
58 Conectarse a Xbox LIVE
62 Ver películas
62 Reproducir CD
63 Reproducir archivos
multimedia de un reproductor
de audio o cámara
64 Reproducir archivos multimedia
con una computadora
65 Almacenamiento
66 Agregar controles inalámbricos
67 Conectar accesorios adicionales
español
Este símbolo identica los mensajes de
seguridad y salud de este manual y de los
manuales de los accesorios Xbox 360.
Para obtener tu garantía y otra información importante,
consulta el Manual de garantía de Xbox 360.
68 Solución de problemas
73 Servicio de soporte al cliente
47
Page 49

Instruction
Manual (2)
Xbox 360 Console
and Wireless Controller
AA batteries
Memory Unit
Composite
AV Cable
Power Cord
Power Supply
TU SISTEMA XBOX 360 ARCADE
Consola Xbox 360
y Control inalámbrico
Manuales
de instrucciones (2)
Unidad de Memoria
AA Baterías
Cable
AV Compuesto
español
Gracias por adquirir el sistema Xbox 360™
Arcade de Microsoft. Te encuentras frente a
un nuevo mundo de posibilidades que reúne
tus juegos, tus amigos y todo el
entretenimiento digital en un único y potente
conjunto.
• Xbox 360 Arcade te permite jugar a juegos
Xbox 360 y reproducir películas DVD y CD
audio.
• Si cuentas con servicio de Internet de
Banda Ancha, conéctate a millones de
jugadores en Xbox LIVE
parte de inmediato de una comunidad en
la que puedes jugar con otras personas,
hablar con tus amigos y descargar
contenido nuevo.
48
Cable de alimentación
®. Entra a formar
Fuente de alimentación
• Reproduce imágenes, música y mucho más
utilizando tu consola Xbox 360
conectándola a tu computadora con
Microsoft
® Windows XP® o a otros
dispositivos como cámaras digitales
y reproductores de música portátiles.
• Llévate tus juegos guardados y tu cuenta
Xbox LIVE adonde quiera que vayas. Incluso
descárgate contenido de los quioscos de
demostración Xbox 360 en distribuidores
participantes con tu Unidad de memoria
Xbox 360.
Page 50

SELECCIONAR UNA UBICACIÓN PARA LA CONSOLA
Evitar que la consola se caiga
Si la consola Xbox 360 se cae y golpea a
alguien, sobre todo a un niño pequeño,
podría provocarle lesiones graves. Para
reducir el riesgo de tales lesiones y daños
a la consola Xbox 360, instálala siguiendo
estas instrucciones. Coloca la consola en
una supercie que:
• Sea plana y nivelada.
• Sea estable y no pueda volcarse.
• Permita que todas las patas de la
consola estén en contacto con la
supercie.
• No permita que la consola se deslice
o resbale de su sitio.
• Esté limpia y no tenga polvo ni
suciedad.
Si las patas de la consola o su supercie se
ensucian o se llenan de polvo, límpialas con
un trapo seco. Si la consola está en posición
vertical, colócala en una supercie en la que
no pueda caerse si se vuelca.
Organiza todos los cables para que las
personas y animales de compañía no puedan
tropezarse o tirar de ellos accidentalmente
cuando se desplacen por la estancia o pasen
cerca. Cuando no se utilice la consola, es
posible que tengas que desconectar todos
los cables de la parte delantera y trasera de
la consola para mantenerlos fuera del
alcance de los niños y animales de
compañía. No permitas que los niños jueguen
con los cables.
español
Evitar que la consola se sobrecaliente
No bloquees las aberturas de ventilación de
la consola ni de la fuente de alimentación.
No coloques la consola ni la fuente de
alimentación en una cama, sofá u otra
supercie suave que pueda bloquear las
aberturas de ventilación. No coloques la
consola ni la fuente de alimentación en un
espacio connado, como una estantería,
estante o mueble de equipo de música, a no
ser que este espacio esté bien ventilado.
No coloques la consola ni la fuente de
alimentación cerca de alguna fuente de calor,
como radiadores, acumuladores de calor,
estufas o amplicadores.
Evitar el humo y el polvo
No utilices la consola en lugares llenos
de humo o polvo. El humo y el polvo pueden
dañar la consola, especialmente la unidad
de DVD.
49
Page 51

CONECTAR A LA TELEVISIÓN Y AL SISTEMA DE AUDIO
IMPORTANTE
Las imágenes estáticas de los videojuegos pueden
“quemar” algunas pantallas de televisión, creando
una sombra permanente. Consulta el manual del
español
propietario de tu televisión antes de utilizar juegos.
Conectar el Cable audio/video
compuesto
Utiliza el cable audio/video compuesto para
conectar la consola a la televisión.
Para conectar a la televisión estándar:
1 Conecta el conector del cable audio/video
compuesto al puerto audio/video de la
consola.
2 Conecta los cables con código de color a las
entradas correspondientes de la televisión:
amarillo con amarillo (video), rojo con rojo
(audio derecho) y blanco con blanco (audio
izquierdo). También puedes conectar audio
a un receptor estéreo.
Para televisiones monoaurales (mono), que
solamente disponen de una entrada de
audio, enchufa cualquier conector de audio,
el derecho o el izquierdo a la entrada de
audio.
3 Selecciona la entrada de video adecuada de
la televisión (consulta “No hay imagen” en
“Solución de problemas” para obtener más
información).
50
Una vez congurada la consola, puedes
congurar otros valores de audio de la
consola y probar la conexión en el área
Sistema de la Interfaz Xbox. Antes, sigue los
pasos que se describen en las páginas
siguientes sobre la conexión a la alimentación,
la conexión del control y otros valores de
conguración iniciales.
Otras entradas AV
También puedes conectar la consola a otros
tipos de entrada de televisión mediante el
Cable audio/video de alta denición por
componentes Xbox 360, el Cable audio/video
S-Video Xbox 360, el Cable audio/video de
alta denición VGA Xbox 360 o el Cable audio/
video HDMI Xbox 360 (se venden por
separado). Para obtener más información,
visita www.xbox.com/setup.
Page 52

Conectar a un sistema de audio digital
Si tu sistema (normalmente, un receptor o un
amplicador) admite la entrada de audio
digital, podrás conectar la consola al conector
de audio digital en lugar de utilizar los
conectores estándar de audio izquierdo
y derecho mediante el Cable audio/video de
alta denición por componentes Xbox 360, el
Cable audio/video S-Video Xbox 360, el
Cable de audio/video de alta denición VGA
Xbox 360 o el Cable HDMI Xbox 360
(se venden por separado). En teoría, el sonido
será mejor a través del audio digital. Sigue las
instrucciones del cable audio/video para
utilizar la conexión de audio digital.
CONECTAR LA CONSOLA A LA CORRIENTE ELÉCTRICA
Seguridad eléctrica
Como sucede con otros muchos
dispositivos eléctricos, si no se adoptan
las precauciones siguientes se pueden
producir lesiones graves o incluso la
muerte por descarga eléctrica, incendio
o daños al sistema de videojuegos
y entretenimiento Xbox 360.
Selecciona una fuente de alimentación
adecuada para la consola Xbox 360:
• Utiliza únicamente la unidad de
alimentación y el cable de
alimentación de CA suministrados con
la consola o recibidos de un centro de
reparaciones autorizado. Si no estás
seguro de tener la unidad de
alimentación correcta, compara el
número de modelo de la unidad con el
número de modelo especicado en la
consola. Si necesitas una unidad de
alimentación o un cable de
alimentación de CA de repuesto, ponte
en contacto con el Servicio de soporte
al cliente de Xbox.
• Asegúrate de que el enchufe al que vas
a conectar la consola proporciona el
tipo de corriente eléctrica indicada en
la unidad de alimentación (en cuanto a
voltaje [V] y frecuencia [Hz]). Si no
estás seguro del tipo de corriente
eléctrica disponible en tu casa,
consulta a un electricista cualicado.
• No utilices fuentes de alimentación no
estándar, como generadores o
inversores, incluso aunque el voltaje
y la frecuencia parezcan aceptables.
Utiliza solamente la alimentación de
CA proporcionada por un enchufe de
pared estándar.
• No sobrecargues el enchufe de la
pared, el cable de prolongación, la
regleta de enchufes u otro receptáculo
eléctrico. Conrma que pueden aceptar
la corriente total (en amperios [A]) de
la consola Xbox 360 (se indica en la
unidad de alimentación) y de otros
dispositivos que se encuentren en el
mismo circuito.
• No conectes ningún otro dispositivo
entre la fuente de alimentación de
Xbox 360 y la consola Xbox 360 o entre
el cable de alimentación y la unidad de
alimentación.
51
español
Page 53

Para evitar causar daños en los cables y la fuente de alimentación:
• Protege los cables de alimentación de
ser pisados.
• Protege los cables de ser apretados
o curvados de manera excesiva, sobre
todo por la parte que se conecta al
enchufe eléctrico, la unidad de la fuente
de alimentación y la consola.
• No sacudas, anudes ni dobles
español
excesivamente los cables de
alimentación ni los utilices de ninguna
otra forma inadecuada.
• No expongas los cables de alimentación
a fuentes de calor.
• No envuelvas los cables de alimentación
alrededor de la unidad de fuente de
alimentación.
• Mantén a los niños y animales de
compañía alejados de los cables de
alimentación. No permitas que los
muerdan o mastiquen.
• Al desconectar los cables de
alimentación, tira del enchufe, no del
cable.
• No dejes que la fuente de alimentación
cuelgue de cualquiera de los cables de
alimentación.
Si un cable o fuente de alimentación se daña de
alguna forma, deja de utilizarlo inmediatamente
y ponte en contacto con el Servicio de soporte al
cliente de Xbox 360 para su sustitución.
Desconecta la consola Xbox 360 durante las
tormentas eléctricas o cuando no vaya a ser
utilizada durante largos períodos de tiempo.
Conecta siempre los cables de alimentación
siguiendo estas instrucciones:
1 Inserta completamente el cable de
alimentación en la consola Xbox 360.
2 Conecta el cable de alimentación de CA
a la fuente de alimentación, insertándolo
hasta que se detenga su avance.
3 Conecta el otro extremo del cable de
alimentación de CA al enchufe de la pared.
52
Page 54

EL CONTROL INALÁMBRICO XBOX 360
El control inalámbrico te permite vivir la máxima
libertad sin cables con la misma precisión, velocidad
y exactitud que obtendrías de un control con cables.
Botón Guía Xbox
El botón Guía Xbox en el centro del control pone la
experiencia Xbox 360 al alcance de tu mano. Oprime
el botón Guía Xbox para encender la consola. Una
vez encendida, al oprimir el botón Guía Xbox tienes
acceso inmediato a la Guía Xbox. Para apagar tu
consola, oprimir el botón Guía Xbox, mantenlo
oprimido durante tres segundos y conrma la
selección.
Anillo de luz
Compuesto de cuatro cuadrantes, el Anillo de Luz
que rodea el botón Guía Xbox del control y el botón
de encendido de la consola es el indicador de estado
de Xbox 360. Cuando se conecta un control a la
consola, se le asigna un cuadrante. El cuadrante
asignado se iluminará en color verde para indicar
la posición del control. A cada control subsiguiente
conectado a la consola (máximo cuatro) se le asigna
un cuadrante adicional.
Si aparecen problemas en el sistema, el Anillo de luz
de la consola emitirá destellos de combinaciones de
rojo. Para obtener más información, consulta
“Solución de problemas”.
Puerto de expansión
El puerto de expansión (con conector de audio de
2,5 mm) del control permite conectar al control
dispositivos de expansión como los Audífonos
Xbox 360 (se venden por separado). Para más
información, consulta el manual de instrucciones
del dispositivo de expansión del control.
Puerto de carga
El puerto de carga situado en la parte frontal del
control funciona exclusivamente con el Kit Carga
y Juega Xbox 360 (se vende por separado).
INSTALAR EL CONTROL INALÁMBRICO
Antes de poder utilizar el control inalámbrico
Xbox 360 con la consola Xbox 360, tienes que
insertarle baterías.
Seguridad de las baterías desechables
El uso indebido de las baterías podría
provocar fugas de líquido, calentamiento
o explosiones. Existe el riesgo de incendio
si se sustituyen las baterías por otras de
tipo incorrecto. El líquido derramado es
corrosivo y podría ser tóxico. Puede
provocar quemaduras en la piel y en los
ojos, y resulta nocivo si se ingiere. Para
reducir el riesgo de lesiones:
• Mantén las baterías fuera del alcance
de los niños.
• No calientes, abras, perfores, deformes
ni arrojes las baterías al fuego.
• Utiliza únicamente baterías alcalinas, de
tipo AA (LR6).
• No mezcles baterías nuevas con viejas.
• Extrae las baterías si están gastadas
o antes de guardar el control durante
53
Insertar las baterías
El control inalámbrico usa baterías
desechables o la Batería recargable Xbox 360
(se vende por separado). Si tienes pensado
usar baterías desechables, debes
familiarizarte con la sección “Seguridad de las
baterías desechables”, a continuación.
mucho tiempo. No dejes baterías en el
compartimiento de baterías AA cuando
éste no esté colocado en el control.
• Si sale líquido de una batería, extráelas
todas procurando que el líquido
derramado no entre en contacto con
la piel ni con la ropa. Si el líquido de
la batería entra en contacto con la piel
o con la ropa, límpialo con agua
inmediatamente. Antes de colocar
baterías nuevas, limpia a fondo el
compartimento para baterías con una
toallita de papel húmeda o sigue las
recomendaciones de limpieza del
fabricante de las baterías.
• Desecha las baterías de acuerdo con
las disposiciones legales y nacionales
(si las hubiere).
español
Page 55

Inserta las baterías de acuerdo con las
siguientes instrucciones.
Para insertar las baterías en el paquete de
baterías AA del control inalámbrico:
1 Presiona la pestaña que hay en la parte
superior del paquete de baterías AA y tira
hacia abajo para separarlo del control.
2 Coloca dos baterías AA (LR6) nuevas con
los polos positivo (+) y negativo (–) como
se indica en la parte inferior del pack de
baterías. Para un desempeño óptimo, se
recomienda no utilizar baterías AA
recargables.
3 Coloca el pack de baterías AA en su sitio en
el control y presiona para que encaje.
Extraer las baterías de los
controles cuando se viaje en
avión
Antes de subir a un avión o de guardar el
control inalámbrico en la maleta, extrae
las baterías. El control inalámbrico
puede transmitir energía por
español
radiofrecuencia (RF) al igual que los
teléfonos móviles si tiene las baterías
puestas.
Conectar el control inalámbrico a la
consola
El control inalámbrico Xbox 360 ya viene
conectado de forma inalámbrica a tu consola
una vez desempaquetado. Si necesitas volver
a conectar el control inalámbrico a la consola
o conectarlo a otra consola, consulta “Agregar
controles inalámbricos”.
Encender la consola y el control
inalámbrico
Para encender la consola y el control, pulsa
el botón Guía Xbox del control y mantenlo
pulsado.
Para encender solamente la consola, oprime
el botón de encendido de la consola. Para
encender sólo el control, pulsa el botón Start
del control.
nOTa
Para no lastimarte los dedos durante la
colocación, haz presión solamente sobre
la supercie plana del paquete de baterías.
Apagar la consola y el control
inalámbrico
Para apagar la consola y el control, oprime
el botón Guía Xbox del control y mantenlo
oprimido durante tres segundos. Luego
selecciona si quieres apagar solamente
el control, o bien tanto el control como
la consola. (Si se selecciona la consola,
se apagarán tanto la consola como todos
los controles conectados).
Al pulsar el botón de encendido en tu consola,
se apagarán tanto la consola como cualquier
control inalámbrico conectado.
Seleccionar el idioma y otros valores
de conguración
La primera vez que enciendes la consola
Xbox 360, se te pedirá que indiques un Idioma.
Sigue las indicaciones para seleccionar un
idioma de la consola.
Puede modicar el idioma y otros valores de
conguración de la consola en el área
Sistema de la Interfaz Xbox, como la hora, el
tipo de audio, el modo de pantalla y si quieres
que la consola se apague automáticamente
después de seis horas sin utilizarla.
54
Page 56

EL CONTROL PARENTAL DE XBOX 360
La nueva característica
Control parental de la
Xbox 360 proporciona a los
padres y tutores la capacidad
de proporcionar
entretenimiento adecuado
para las distintas edades mediante
con guraciones personalizadas. Las opciones
de con guración de la consola pueden limitar
los juegos y las películas que se pueden
reproducir en la misma. Esta con guración
hace posible personalizar la experiencia de
Xbox LIVE para cada cuenta infantil, incluso
cuando los niños jueguen fuera de casa.
Aplicar el Control parental
Para aplicar el Control parental a los juegos
y a Xbox LIVE:
1 Selecciona Sistema, Control parental.
2 Elige la con guración que quieras aplicar
a la consola y a las cuentas de Xbox LIVE.
En los Estados Unidos y en Canadá, el control
parental para juegos se basa en el sistema de
clasi cación ESRB (Entertainment Software
Rating Board) y la con guración de películas
se basa en el sistema de clasi cación MPAA
(Motion Picture Association of America).
Inicialmente, el Control parental de Xbox 360
viene de nido como “Permitir todo” para
juegos y películas. Para más información
sobre sistemas de clasi cación, consulta
www.esrb.org.
No todas las películas poseen una
clasi cación codi cada en el DVD. Estas
películas de DVD se reproducirán sin tener
en cuenta tus valores de con guración.
Con guración de Xbox LIVE
Si estableces límites para cada cuenta infantil,
podrás asegurarte de que tu familia tenga una
experiencia positiva en Xbox LIVE. Puedes
administrar hasta ocho con guraciones por
cuenta y establecer niveles distintos para
cada una. La con guración de Xbox LIVE de
tus hijos se preselecciona al crear su cuenta
de Xbox LIVE. Puedes hacer cambios en
cualquier momento si seleccionas Sistema,
Control parental, Controles de Xbox Live
y eliges la cuenta del niño.
El Control parental para Xbox LIVE incluye las
siguientes características:
• Necesidad de la aprobación parental para
agregar personas a la lista de amigos de
tu hijo.
• Limitación de las charlas de voz, video y
texto a personas de la lista de amigos de
tu hijo.
• Bloqueo o limitación del modo en que se
muestra la información del per l de tu hijo
y su estado en línea.
• Bloqueo o límite de la capacidad de tu hijo
para ver contenido creado por otros
jugadores.
• Bloqueo del acceso a juegos multijugador
de Xbox LIVE.
• Evitar que tu hijo adquiera artículos en el
Mercado de Xbox LIVE.
español
55
Page 57

USAR LA UNIDAD DE DISCO
Para insertar un disco:
1 Pulsa el botón de expulsión para abrir
la bandeja de disco.
2 Coloca el disco del juego Xbox 360, CD
audio o película DVD en la bandeja de
disco con la etiqueta hacia arriba (hacia
la derecha si la consola está en posición
vertical).
Para expul sar un disco:
1 Pulsa el botón de expulsión para abrir
la bandeja de disco.
2 Extrae el disco.
3 Pulsa el botón de expulsión para cerrar
español
la bandeja de disco.
nOTa
Si la consola está orientada verticalmente,
comprueba que las pestañas de la bandeja
mantienen en su sitio el disco para evitar que
se caiga.
56
iMPOrTanTE
Para evitar que la unidad de disco se atasque
y se dañen los discos o la consola:
• Quita los discos antes de mover la consola
o inclinarla entre las posiciones horizontal
y vertical.
• No utilices discos agrietados. Pueden
romperse dentro de la consola y atascarla
o romper componentes internos.
• Cuando la consola esté en posición
vertical, no utilices discos de tamaño más
pequeño que los CD y DVD estándar. Si la
unidad de disco se atasca o se daña, ponte
en contacto con el Servicio de soporte al
cliente de Xbox para que reparen o
cambien la consola.
Page 58

ADVERTENCIAS DE SALUD IMPORTANTES SOBRE EL USO DE VIDEOJUEGOS
Crisis de fotosensibilidad
Un pequeñísimo porcentaje de personas
puede sufrir crisis de fotosensibilidad al
exponerse a determinadas imágenes
visuales, como destellos de luz o dibujos
que pueden mostrarse en los videojuegos.
Incluso la gente que no haya sufrido
nunca crisis ni epilepsia puede padecer un
trastorno que no se le haya diagnosticado
y que le provoque estas “crisis de
epilepsia fotosensible” mientras observa
un videojuego.
Estas crisis pueden presentar diversos
síntomas, como mareos, trastornos de la
visión, tics de los ojos o la cara, espasmos
o temblores de brazos o piernas,
desorientación, confusión o pérdida
temporal de la consciencia. Las crisis
pueden causar también la pérdida de la
consciencia o convulsiones que podrían
provocar lesiones debidas a caídas y al
impacto contra objetos cercanos.
Si notas alguno de estos síntomas, deja de
jugar de inmediato y coméntaselo a tu
médico. Los padres deberían comprobar
o preguntar a sus hijos si padecen estos
síntomas. Los niños y los adolescentes
tienen más probabilidades que los adultos
de sufrir estas crisis. El riesgo de crisis de
epilepsia por sensibilidad a la luz puede
reducirse si se observan las siguientes
precauciones:
• Siéntate a una mayor distancia de la
pantalla de televisión.
• Utiliza una pantalla de televisión más
pequeña.
• Juega en una habitación con buena
iluminación.
• No juegues cuando tengas sueño
o cansancio.
Si alguno de tus familiares o tú mismo han
sufrido crisis o epilepsia con anterioridad,
consulta a tu médico antes de jugar.
Afecciones músculoesqueletales
El uso de controles de juego, teclados,
ratones u otros dispositivos de entrada
electrónicos puede estar relacionado con
lesiones y afecciones graves.
Cuando utilices videojuegos, al igual que
sucede en muchas otras actividades,
es posible que experimentes molestias
ocasionales en las manos, brazos,
hombros, cuello u otras partes del cuerpo.
Sin embargo, si experimentas síntomas
como malestar persistente o repetido,
dolor, punzadas, hormigueos,
entumecimiento, sensación de quemazón
o rigidez NO PASES POR ALTO ESTAS
SEÑALES DE ADVERTENCIA. ACUDE DE
INMEDIATO A UN PROFESIONAL DE LA
SALUD CALIFICADO, aunque los síntomas
aparezcan cuando no estés jugando.
Este tipo de síntomas puede estar
asociado con lesiones o afecciones
dolorosas de los nervios, músculos,
tendones, vasos sanguíneos y otras partes
del cuerpo, que en ocasiones pueden
ocasionar incapacidad permanente. Entre
estas afecciones músculoesqueletales
(MSD) se encuentran el síndrome del
túnel metacarpiano, tendinitis,
tenosinovitis, síndromes vibratorios
y otras condiciones médicas.
Aunque los investigadores no han sido
aún capaces de responder a muchas
preguntas sobre las MSD, existe un
acuerdo generalizado en que muchos
factores pueden estar relacionados con
su aparición, entre ellos las condiciones
médicas y físicas, el estrés y la forma de
sobrellevarlo de cada persona, la salud
en general y la colocación y utilización
del cuerpo durante el trabajo y otras
actividades (como jugar a un videojuego).
Algunos estudios sugieren que la cantidad
de tiempo que una persona dedica a
realizar una actividad puede ser también
un factor.
Algunas directrices que pueden ayudarte
a trabajar y jugar de una forma más
cómoda, y posiblemente reducir el riesgo
de experimentar una MSD, se indican en
la Guía de juego saludable en
www.xbox.com. Estas directrices abordan
temas como:
• Colocación de tu cuerpo para utilizar
posturas cómodas y normales.
• Relajación de manos, dedos y otras
partes del cuerpo.
• Pausas entre juegos.
• Desarrollo de un estilo de vida
saludable.
Si tienes alguna pregunta sobre la
relación que pudieran tener tu estilo de
vida, actividades y condiciones médicas
o físicas con las MSD, acude a un
profesional de la salud calicado.
español
57
Page 59

JUGAR
La consola Xbox 360 sólo puede reproducir
discos de juegos autorizados por Microsoft
para el sistema de videojuegos
y entretenimiento Xbox 360. Los juegos con
licencia llevan este logotipo:
Para conocer la información más reciente
sobre los juegos Xbox 360, visita
www.xbox.com.
CONECTARSE A XBOX LIVE
Puedes ser inmediatamente miembro de
Xbox LIVE Silver con sólo conectar un cable
Ethernet (que se vende por separado) al
puerto Ethernet de la parte trasera de la
consola. Puedes crear un gamertag, accesar
al Mercado de Xbox LIVE, ver tarjetas de
jugador, participar en charlas, recibir
mensajes de voz, hacer amigos y utilizar el
Control parental de Xbox LIVE. Los miembros
español
de Xbox LIVE Silver obtienen juego de
duración limitada a través de eventos
especiales como el n de semana de juego
gratuito en Xbox LIVE Gold, Xbox LIVE Game
with Fame y Xbox LIVE Prime Time.
Si estás preparado para la mejor experiencia
de juego en Xbox LIVE, regístrate para
conseguir una membresía a Xbox LIVE Gold.
Xbox LIVE Gold te ofrece todas las
características de Xbox LIVE Silver, además
de juego multijugador en línea, herramientas
avanzadas de búsqueda de coincidencias
y de respuesta, privilegios y recompensas
en el Mercado de Xbox LIVE, y características
multimedia como el uso compartido de
música y fotografías.
Para iniciar un juego:
1 Pulsa el botón de expulsión para abrir la
bandeja de disco.
2 Coloca el disco del juego Xbox 360 en la
bandeja de disco con la etiqueta hacia
arriba (hacia la derecha si la consola está
en posición vertical).
3 Pulsa el botón de expulsión para cerrar la
bandeja de disco. Se iniciará el juego.
Con gurar la conexión
Con gura la conexión a Xbox LIVE mediante
uno de los tipos de conexión siguientes.
Además, puedes con gurar una conexión
de red en casa inalámbrica mediante el
Adaptador de red inalámbrico Xbox 360
(se vende por separado). Para obtener más
información sobre cómo con gurar tu
conexión y otras opciones de redes en casa,
visita www.xbox.com/setup.
nOTa
Debes tener una conexión a Internet de alta
velocidad (cable o ADSL) para poder jugar en
Xbox LIVE. También debes tener un Disco duro
Xbox 360 (incluido en el sistema Xbox 360
estándar; se vende por separado para
Xbox 360 Arcade) o una Unidad de memoria
Xbox 360 para almacenar la información de
la cuenta de Xbox LIVE.
58
Page 60

Módem ADSL/por cable
Conexión de módem
Elige una conexión de módem si quieres
seguir la forma más sencilla de congurar
y jugar, y si no quieres compartir la conexión
a Internet con una computadora
(u otro dispositivo).
Para congurar una conexión de módem:
1 Conecta un extremo del cable Ethernet
al puerto Ethernet del módem de alta
velocidad y el otro extremo al puerto
Ethernet de la parte trasera de la consola
Xbox 360.
2 Sigue las instrucciones en pantalla.
Es posible que tengas que indicar la
información proporcionada por tu ISP
en el área Sistema de la Interfaz Xbox.
español
59
Page 61

Módem ADSL/por cable
Ruteador
Computadora
Conexión de ruteador
Elige una conexión de ruteador si quieres
compartir tu conexión a Internet con tu
computadora (u otro dispositivo), si tu módem
de alta velocidad admite una conexión
Ethernet, y si quieres poder jugar en Xbox LIVE
tanto si tu computadora está encendida como
si está apagada.
Para congurar una conexión de ruteador:
1 Conecta un extremo de un cable de
español
conexión Ethernet al puerto Ethernet de tu
módem de alta velocidad y el otro extremo
al puerto WAN o Uplink de tu ruteador.
2 Conecta un extremo de un cable de
conexión Ethernet a un puerto LAN
Ethernet de tu ruteador y el otro extremo
al puerto Ethernet de tu computadora
(u otro dispositivo). Sigue las instrucciones
de tu ISP para utilizar el navegador o el
software de conguración del ruteador,
luego comprueba si la computadora está
conectada a Internet.
3 Conecta un extremo de un cable Ethernet
a un puerto LAN Ethernet de tu ruteador
y el otro extremo al puerto Ethernet de
la parte trasera de la consola Xbox 360.
nOTa
Algunos módems y dispositivos pueden
requerir un hub de red en lugar de un
ruteador.
4 Sigue las instrucciones en pantalla.
Es posible que tengas que indicar la
información proporcionada por tu ISP
en el área Sistema de la Interfaz Xbox.
60
Page 62

Cable/DSL gateway
Computadora
Conexión con gateway
Elige una conexión con gateway si tu ISP te
ha suministrado un dispositivo de gateway
Ethernet. Como con la conexión de ruteador,
puedes compartir tu conexión a Internet con
tu computadora (o con otro dispositivo)
y jugar con Xbox LIVE tanto si tu computadora
está encendida como si está apagada.
Para congurar una conexión con gateway:
1 Conecta tu conexión a Internet de alta
velocidad a tu gateway (utilizando la
entrada de cable coaxial, para los
proveedores de cable, o la entrada de
teléfono, para los proveedores de ADSL).
2 Conecta un extremo de un cable de
conexión Ethernet a un puerto LAN
Ethernet de tu gateway y el otro extremo al
puerto Ethernet de tu computadora (u otro
dispositivo). Sigue las instrucciones de tu
ISP para utilizar el navegador o el software
de conguración del gateway, luego
comprueba si la computadora está
conectada a Internet.
3 Conecta un extremo de un cable de
conexión Ethernet a un puerto LAN
Ethernet de tu gateway y el otro extremo
al puerto Ethernet de la parte trasera de
la consola Xbox 360.
4 Sigue las instrucciones en pantalla.
Es posible que tengas que indicar la
información proporcionada por tu ISP
en el área Sistema de la Interfaz Xbox.
Solucionar problemas con la conexión
Si la consola Xbox 360 no puede conectarse
automáticamente, es posible que necesites
congurar manualmente tu conguración de red
en la Interfaz Xbox. Algunos proveedores de servicios
de Internet (ISP) requieren una conguración
especíca, incluido el nombre de servidor, la
dirección MAC y el nombre de usuario y contraseña
del ISP (para la autenticación PPPoE). Si no estás
seguro de si necesitas esta información, consulta
a tu ISP. Para obtener más información, visita
www.xbox.com/setup.
Registro en Xbox LIVE
Para crear una cuenta, selecciona Xbox LIVE en la
Interfaz Xbox y sigue las instrucciones de la pantalla
Comunicarse en Xbox LIVE
Utiliza los Audífonos Xbox 360 (se venden por
separado) para charlar y comunicarte con tus amigos
en Xbox LIVE.
Pérdida de audición
La exposición prolongada a volúmenes
altos con audífonos puede provocar
pérdida de audición temporal o
permanente. Algunos audífonos de
terceros no autorizados podrían alcanzar
niveles de sonido superiores a los de los
audífonos Xbox 360 autorizados.
español
61
Page 63

VER PELÍCULAS
La consola Xbox 360 reproduce películas DVD.
Para mejorar tu experiencia de reproducción
de películas DVD, puedes utilizar el Control
multimedia universal Xbox 360 (se vende por
separado).
Para reproducir películas DVD:
1 Pulsa el botón de expulsión para abrir
la bandeja de disco.
2 Coloca la película de DVD en la bandeja
de disco con la etiqueta hacia arriba (hacia
la derecha si la consola está en posición
vertical).
3 Pulsa el botón de expulsión para cerrar
la bandeja de disco. Comenzará a
reproducirse la película DVD.
REPRODUCIR CD
La consola Xbox 360 puede reproducir CD de
audio con este logotipo:
español
4 Pulsa cualquier botón del control excepto
el botón Guía Xbox para mostrar los
controles en pantalla del DVD. Utiliza tu
control para controlar la reproducción de
la película.
La consola Xbox 360 solamente puede
reproducir DVD para el área geográca 1 que
tengan este logotipo:
Para reproducir discos CD audio:
1 Pulsa el botón de expulsión para abrir
la bandeja de disco.
2 Coloca el CD de audio en la bandeja de
disco con la etiqueta hacia arriba (hacia
la derecha si la consola está en posición
vertical).
3 Pulsa el botón de expulsión para cerrar
la bandeja de disco. Comenzará a
reproducirse el CD.
62
Page 64

REPRODUCIR ARCHIVOS MULTIMEDIA DE UN REPRODUCTOR DE AUDIO O CÁMARA
Ethernet
USB
español
Utiliza la consola Xbox 360 para reproducir música,
ver imágenes y obtener acceso a archivos multimedia
de otros dispositivos. Puedes conectar dispositivos
USB, como reproductores de música y cámaras
digitales, a los puertos USB de la Xbox 360. También
puedes conectar la consola a una computadora con
Windows o con Windows Media Center.
Para obtener una lista de los dispositivos de otros
fabricantes compatibles con Xbox 360, visita
www.xbox.com/media.
Transmitir música a la consola
Para transmitir música de un reproductor
de audio personal a la consola Xbox 360:
1 Conecta un cable USB (no incluido) entre
el dispositivo y la consola.
2 Congura el dispositivo para la
reproducción a través del puerto USB.
3 Selecciona Multimedia, Música,
Contempla tus imágenes
Puedes crear presentaciones con diapositivas
y ver imágenes almacenadas en tu cámara
digital.
Para conectar tu cámara digital:
1 Congura tu cámara digital para ver
imágenes. Consulta las instrucciones de
la cámara para conocer información acerca
de cómo ver imágenes.
2 Con la consola encendida, utiliza un cable
USB para conectar tu cámara a un puerto
USB de la consola.
3 La consola detectará la cámara digital.
Sigue las instrucciones en pantalla para
acceder a las imágenes.
Dispositivo por tátil.
4 Selecciona la música o lista de
reproducción que quieres escuchar.
63
Page 65

REPRODUCIR ARCHIVOS MULTIMEDIA DE UNA COMPUTADORA
Para accesar a archivos multimedia como video,
audio e imágenes desde una computadora con
Windows, necesitas una sencilla conexión Ethernet
del puerto Ethernet de la parte trasera de la consola
Xbox 360 a tu computadora. Si la computadora o red
doméstica utilizan también una conexión a Internet
de alta velocidad, puedes usar esta conexión para
conectarte a Xbox LIVE. Para obtener más
información acerca de las opciones de red en casa,
consulta “Conectarse a Xbox LIVE” o visita
www.xbox.com/setup.
Windows Media Connect permite conectar la consola
Xbox 360 a una computadora con Windows XP
Service Pack 2 (SP2) o posterior. Si tienes una
computadora con Windows Media Center, también
puedes utilizarlo con la consola Xbox 360 conectada.
Además de las funciones habituales de control
remoto de DVD, el Control remoto universal Xbox 360
(que se vende por separado) incluye un botón
Windows Media Center que te permite accesar a
una computadora conectada que utilice Windows
Media Center.
Windows Media Connect
Windows Media Connect permite a la consola Xbox
360 transmitir música e imágenes almacenadas en tu
computadora con Windows XP a cualquier rincón del
hogar. Contempla presentaciones con diapositivas en
la televisión y reproduce toda la música con el mismo
sistema de sonido conectado a la consola a través de
un receptor de audio digital. Para conocer más
información acerca de Windows Media Connect,
español
visita www.xbox.com/media.
Para instalar Windows Media Connect:
1 Visita www.xbox.com/pcsetup y descarga
el software Windows Media Connect en
una computadora con Windows XP SP2
o posterior.
2 Conecta la consola o la computadora
utilizando uno de los tipos de conexión
descritos en “Conectar a Xbox LIVE”.
3 Selecciona Multimedia y luego selecciona
las imágenes o la música desde tu
computadora. Sigue las instrucciones en
pantalla para nalizar la instalación de
Windows Media Connect.
Windows Media Center
La consola Xbox 360 puede suministrar
la máxima integración de juegos
y entretenimiento de una sala a otra (como
ver o grabar programas de televisión, ver
fotos digitales y escuchar tu biblioteca de
música digital) desde una computadora con
Windows Media Center a cualquier televisión
del hogar. Cuando conectas la consola a la
misma red que la computadora con Windows
Media Center, la experiencia pasa al sistema
de videojuegos y entretenimiento Xbox 360.
(Puedes conectar hasta cinco consolas a una
computadora con Windows Media Center).
Para obtener más información acerca de
Windows Media Center para Xbox 360, visita
www.microsoft.com/extender.
Para instalar Windows Media Center:
1 Visita www.xbox.com/pcsetup y descarga
la actualización más reciente del software
Windows Media Center en tu computadora
con Windows Media Center.
2 Conecta la consola o la computadora con
Windows Media Center utilizando uno de
los tipos de conexión descritos en
“Conectar a Xbox LIVE”.
3 En la consola Xbox 360, ve a Multimedia
y selecciona Windows Media Center.
Sigue las instrucciones en pantalla para
nalizar la instalación de Windows Media
Center.
64
Page 66

ALMACENAMIENTO
Si vas a conectarte a Xbox LIVE, necesitarás un lugar
para almacenar la información de perl, la
información de juegos y todo el excelente contenido
disponible en Xbox LIVE. El sistema de videojuegos
y entretenimiento Xbox 360 te ofrece dos opciones
de almacenamiento de datos: la Unidad de memoria
Xbox 360 para el almacenamiento portátil y el Disco
duro Xbox 360 (se vende por separado) para todas
tus necesidades de almacenamiento.
Unidades de memoria
Puedes conectar un total de dos unidades de
memoria portátiles en las ranuras de unidad
de memoria de la parte delantera de la consola
Xbox 360 para obtener espacio de almacenamiento
adicional. Las unidades de memoria son más
pequeñas en capacidad que el Disco duro Xbox 360,
pero se transportan con gran facilidad, para que
puedas pasar el perl de Xbox LIVE o las partidas
guardadas a otras consolas Xbox 360. También
puedes llevar la unidad de memoria a distribuidores
colaboradores y descargar contenido de los kioscos
interactivos de demostración Xbox 360.
Con la Unidad de memoria Xbox 360 puedes llevar
tus juegos guardados adonde quiera que vayas.
Solamente tienes que guardar el juego y transportar
tu cuenta de Xbox LIVE.
La Unidad de memoria Xbox 360 cuenta con las
siguientes características:
• Compatibilidad con la descarga de contenido
de Xbox LIVE.
• Uso de dos unidades de memoria para
guardar juegos de forma exible.
El tamaño de almacenamiento de la unidad de
memoria aparece indicado en el frente de la unidad.
De uso exclusivo con el sistema Xbox 360. Si
necesitas más espacio de almacenamiento, puedes
utilizar el Disco duro Xbox 360 (se vende por
separado).
nOTa
Debido a que el software del sistema Xbox 360 utiliza
parte de la memoria de la unidad de memoria cuando
se instala, no estará disponible para el usuario toda
la memoria indicada.
Conectar la unidad de memoria
Para conectar la unidad de memoria, insértala en
cualquier ranura de unidad de memoria de la parte
frontal de la consola Xbox 360. Para desconectarla,
saca la unidad de memoria. No extraigas la unidad
de memoria mientras la consola esté leyendo
o guardando datos, ya que esto podría provocar
la pérdida de datos u otros problemas con el sistema.
nOTa
No toques los terminales de la unidad de memoria
con los dedos ni con objetos metálicos.
Personalizar la unidad de memoria
Puedes personalizar tu unidad de memoria dándole
un nombre.
Para asignar un nombre a la unidad de
memoria:
1 Una vez insertada la unidad de memoria,
selecciona Sistema, Memoria.
2 Marca la unidad de memoria.
3 Elige Opciones del dispositivo y cambia el
nombre de tu unidad de memoria.
Después de personalizar la unidad de memoria,
podrás identicarla por su nuevo nombre.
Copiar o eliminar elementos
guardados
Puedes copiar cualquier elemento de una unidad de
memoria en otra Unidad de memoria Xbox 360 o en
el Disco duro Xbox 360. También puedes eliminar
elementos para liberar espacio en la unidad de
memoria.
Para copiar o eliminar un elemento de la
unidad de memoria:
1 Una vez insertada la unidad de memoria,
selecciona Sistema, Memoria.
2 Selecciona la unidad de memoria.
3 Selecciona el tipo de elemento, luego el
elemento concreto que deseas copiar a otra
ubicación o eliminar de la unidad de
memoria.
nOTa
Algún contenido, como música copiada o juegos
precargados, no pueden copiarse desde el disco duro
a la unidad de memoria.
Disco duro extraíble
También puedes instalar el Disco duro Xbox 360 (que
se vende por separado), el cual proporciona una
amplia capacidad de almacenamiento para
descargas de contenido de juegos, partidas
guardadas, perles de jugador e información de
membresías a Xbox LIVE. Se necesita un disco duro
para usar los juegos originales de Xbox en la consola
Xbox 360.
español
65
Page 67

AGREGAR CONTROLES INALÁMBRICOS
Puedes tener hasta cuatro controles,
inalámbricos o no, conectados
simultáneamente a una consola. Cada control
conectado obtiene un cuadrante en el Anillo
de luz. Para poder conectar un control
inalámbrico debe haber un cuadrante libre
Para conectar el control inalámbrico a la consola:
español
como mínimo (luz apagada). Para desconectar
un control inalámbrico, pulsa el botón Guía
Xbox del control inalámbrico, mantenlo
presionado durante tres segundos y luego
elige apagarlo. Para el control con cables,
desconecta el conector del cable.
1 Oprime y mantén oprimido el botón Guía
Xbox hasta que el control se encienda.
2 Comprueba que la consola está encendida.
De no ser así, pulsa el botón de encendido.
3 Pulsa y suelta el botón de conexión de la
consola.
66
4 Pulsa y suelta el botón de conexión del
control.
5 El control estará conectado cuando el Anillo
de luz del control y la consola gire y emita
un destello. El cuadrante que queda
encendido indica la posición del control.
Page 68

nOTaS
• Al apagar la consola, el control seguirá
conectado la próxima vez que la enciendas.
• El control solamente está conectado a una
consola a la vez. Puedes conectarlos a una
consola nueva en cualquier momento, pero
la conexión con la consola anterior se
perderá.
CONECTAR ACCESORIOS ADICIONALES
La consola Xbox 360 Arcade está diseñada
para funcionar con una serie de accesorios,
como:
• Hasta cuatro controles, inalámbricos o no,
y otros accesorios de juego (los controles
adicionales se venden por separado).
• Conectores audio/video, como cables de
video por componentes y cables de audio
digital, incluido el Cable audio/video de
alta de nición por componentes Xbox 360,
el Cable audio/video S-Video Xbox 360,
el Cable audio/video de alta de nición VGA
Xbox 360 o el Cable HDMI Xbox 360
(se venden por separado).
• Dispositivos Ethernet y de redes
domésticas inalámbricas como el
Adaptador de red inalámbrico Xbox 360
(se vende por separado).
• Dispositivos de almacenamiento, como
el Disco duro Xbox 360 (se vende por
separado), Unidades de memoria Xbox 360
(las partes adicionales se venden por
separado) y dispositivos de
almacenamiento basados en USB.
• Dispositivos multimedia USB como
reproductores de música y cámaras
digitales.
• Carátulas Xbox 360 personalizadas
(se venden por separado).
• El Control inalámbrico Xbox 360 solamente
funciona a una distancia de menos de
10 metros desde la consola. Si hay objetos
entre el control y la consola, el alcance
puede reducirse.
Busca el logotipo de Producto original Xbox
en los accesorios del juego de Microsoft para
Xbox 360 Arcade.
En el caso de dispositivos de otros fabricantes,
busca uno de los logotipos siguientes, que
indican que se ha probado el dispositivo para
cumplir los requisitos de compatibilidad más
exigentes en Xbox 360 y Xbox LIVE. Para
obtener más información acerca de los
dispositivos compatibles, visita
www.xbox.com.
español
67
Page 69

SOLUCIÓN DE PROBLEMAS
Sigue estos pasos para solucionar las
dicultades que se puedan producir con el
sistema de videojuegos y entretenimiento
Xbox 360. Si los pasos de la sección de solución
de problemas no resuelven el tuyo, visita
www.xbox.com/support o llama al número del
Servicio de soporte al cliente indicado en la
contraportada.
No lleves la consola Xbox 360 ni los accesorios
a tu distribuidor para que los repare o les dé
mantenimiento a no ser que te lo diga un
empleado del Servicio de soporte al cliente
de Xbox.
No intentar realizar reparaciones
No intentes desmontar, abrir, reparar ni
alterar la consola Xbox 360, la fuente de
alimentación ni los accesorios. Al hacerlo
existe el riesgo de descarga eléctrica,
incendio o daño para la consola Xbox 360.
Cualquier evidencia de que la consola
Xbox 360 se haya intentado abrir y/o
modicar, incluidas peladuras, perforaciones
o retirada de cualquiera de las etiquetas,
invalidará la Garantía limitada y hará que la
consola Xbox 360 no pueda optar a ser
reparada por un servicio autorizado.
No hay corriente eléctrica
Conrma que tienes un suministro de corriente
español
correcto y comprueba todas las conexiones
entre el enchufe de la pared y la fuente de
alimentación, y entre ésta y la consola
(consulta “Conectar la consola a la corriente
eléctrica”). La luz de la fuente de alimentación
debe iluminarse en verde para indicar que
funciona correctamente.
No hay imagen
Conecta el cable audio/video adecuado
(consulta “Conectar a la televisión y al sistema
de audio”). Enciende la televisión. Selecciona la
entrada de video en la televisión (o VCR, si se
ha conectado a una) que muestra el juego
Xbox 360. Algunos de los nombres habituales
de la entrada de video son Input Select, AUX,
Line In, Line, In, Input, Source y EXT, en función
del tipo de televisión o VCR. Para obtener más
información, consulta el manual de la televisión
o VCR. No conectes el cable audio/video
incluido y un cable audio/video HDMI (que se
vende por separado) a la consola al mismo
tiempo.
No hay sonido
Comprueba la conexión audio/video (consulta
“Conectar a la televisión y al sistema de audio”).
Si utilizas audio digital, comprueba que el
receptor está encendido y que la salida está
establecida correctamente en la conguración
de audio de la consola. No conectes el cable
audio/video incluido y un cable audio/video
HDMI (que se vende por separado) a la consola
al mismo tiempo.
Sonido con calidad insuciente
Limpia el disco como se indica en el Manual de
garantía de Xbox 360 (volumen 2). Comprueba
la conexión audio/video (consulta “Conectar a
la televisión y al sistema de audio”). Selecciona
audio Dolby
de audio compatibles con Dolby Digital.
Selecciona la salida de audio que admita el
sistema o televisión: estéreo o Dolby
para altavoces estéreo, mono para altavoces
monofónicos. Si el sonido procede
de un solo altavoz, comprueba que todos los
cables de audio están conectados
correctamente.
® Digital solamente en los sistemas
® Surround
La bandeja de disco no se abre
Asegúrate de que la carátula extraíble de la
parte delantera de la consola está
completamente conectada y adecuadamente
alineada. Comprueba la conexión con la
alimentación (consulta “Conectar la consola
a la corriente eléctrica”). Enciende la consola
pulsando el botón de encendido.
No se inicia el juego, la película o la
música
Utiliza solamente discos de los tipos admitidos
(juegos Xbox 360, CD audio, películas DVD).
Inserta el disco como se indica en este manual
y cierra la bandeja. Limpia el disco como se
indica en el Manual de garantía de Xbox 360
(volumen 2).
El Anillo de luz emite destellos
Las luces del Anillo de luz de la consola deben
mantenerse constantes cuando la consola esté
encendida y emitir destellos cuando pulses el
botón de expulsión. Si el Anillo de luz destella
de forma diferente durante el funcionamiento,
la consola tiene un problema interno:
• Dos luces a la izquierda de la consola
emiten destellos rojos: la consola está
demasiado caliente y no reproducirá ningún
juego hasta que baje su temperatura. Coloca
la consola en un área con buena ventilación
y que esté alejada de otras fuentes de calor.
Una vez que se enfríe la consola, los
destellos desaparecerán y se podrá volver
a utilizar la consola Xbox 360. Para obtener
más información, consulta “Seleccionar una
ubicación para la consola”.
68
Page 70

• Cuatro luces del control emiten destellos
verdes de forma periódica: no hay ninguna
asignación de cuadrantes del Anillo de luz.
El control no está conectado o los cuatro
cuadrantes están ocupados.
• Todas las demás combinaciones: problema
interno que requiere reparación. Llama al
número del Servicio de soporte al cliente de
Xbox que aparece en la parte trasera de este
manual.
El control inalámbrico no funciona
Apaga el control inalámbrico pulsando el botón Guía
Xbox y conéctalo a la consola (consulta “Agregar
controles inalámbricos”).
Si las luces siguen girando durante más de
15 segundos durante la conexión:
• Acerca el control a la consola.
• Comprueba que las baterías son nuevas.
• Mantén la consola y el control como mínimo
a 7,62 cm de distancia de cualquier objeto
metálico, como por ejemplo, archiveros
y refrigeradores.
• Las decoraciones metálicas o los adhesivos
de la consola o del control pueden interferir
con el desempeño del control inalámbrico.
Quita las decoraciones y vuelve a intentar
la conexión.
• Asegúrate de que la parte delantera de
la consola está dirigida hacia el control
y apartada de paredes cercanas.
• Los teléfonos inalámbricos (2,4 GHz), las
redes LAN inalámbricas, los transmisores
de video inalámbricos, los hornos de
microondas, algunos teléfonos móviles y los
audífonos Bluetooth pueden interferir en el
funcionamiento del control. Apágalos o
desconéctalos y vuelve a intentar conectar
el control.
• Si nada de esto funciona, apaga la consola,
quita las baterías AA o el pack de baterías
recargables Xbox 360 del control y vuelve
a colocarlo; después repite los pasos
descritos en “Agregar controles
inalámbricos”.
El accesorio no funciona
Utiliza accesorios de juego compatibles con Xbox 360
que tengan este logotipo:
Si un juego concreto no admite un accesorio,
es posible que el juego no se pueda utilizar.
No se puede guardar la partida
El Disco duro o Unidad de memoria Xbox 360 debe
tener suciente espacio para poder guardar la
partida. Elimina los elementos que no te interesen
del dispositivo de almacenamiento o conecta una
unidad de memoria adicional (se vende por separado)
para disponer de más espacio.
La unidad de memoria no aparece en
la lista de dispositivos de
almacenamiento
Asegúrate de que la unidad de memoria está
insertada completamente en la ranura de la unidad
de memoria de la parte frontal de la consola. Prueba
la otra ranura de la unidad de memoria para
asegurarte de que la ranura no es la causa del
problema. Si tienes otra unidad de memoria, pruébala
también para saber si la unidad de memoria original
está defectuosa.
nOTa
Las unidades de memoria dañadas no aparecerán en
la Interfaz Xbox y podrían provocar daños a la
consola Xbox 360. Las unidades de memoria
aplastadas, sumergidas en líquidos o expuestas a
mucho calor podrían estar dañadas e inutilizadas.
Estas unidades no aparecerán en la lista de
dispositivos de almacenamiento.
español
© 2007 Microsoft Corporation. Reservados todos los derechos.
Microsoft, Windows, Xbox, Xbox 360, Xbox LIVE, los logotipos
de Xbox y de Xbox LIVE son marcas registradas o marcas
comerciales de Microsoft Corporation en los Estados Unidos
y/o en otros países.
69
Page 71

70
Page 72

71
Page 73

72
Page 74

Customer Support
Go to www.xbox.com/support or call Xbox Customer Support:
• United States and Canada: 1-800-4MY-XBOX (1-800-469-9269)
• TTY users: 1-866-740-XBOX (1-866-740-9269)
Service à la clientèle
Visitez la page www.xbox.com/support ou appelez le Service à la
clientèle Xbox :
• États-Unis et Canada : 1-800-4MY-XBOX (1-800-469-9269)
• Utilisateurs de TTY : 1-866-740-XBOX (1-866-740-9269)
Servicio de soporte al cliente
Visita www.xbox.com/support o llama al número del servicio de
soporte técnico Xbox:
• Estados Unidos y Canadá: 1-800-4MY-XBOX (1-800-469-9269)
• Usuarios TTY: 1-866-740-XBOX (1-866-740-9269)
73
 Loading...