


Introducing Microsoft
®
Windows Vista
™
William R. Stanek

PUBLISHED BY
Microsoft Press
A Division of Microsoft Corporation
One Microsoft Way
Redmond, Washington 98052-6399
Copyright © 2006 by Microsoft Corporation
All rights reserved. No part of the contents of this book may be reproduced or transmitted in any form or by
any means without the written permission of the publisher.
ISBN-13: 978-0-7356-2284-5
ISBN-10: 0-7356-2284-1
Library of Congress Control Number 2006924470
Printed and bound in the United States of America.
1 2 3 4 5 6 7 8 9 QWE 1 0 9 8 7 6
Distributed in Canada by H.B. Fenn and Company Ltd.
A CIP catalogue record for this book is available from the British Library.
Microsoft Press books are available through booksellers and distributors worldwide. For further information
about international editions, contact your local Microsoft Corporation office or contact Microsoft Press International directly at fax (425) 936-7329. Visit our Web site at www.microsoft.com/mspress. Send comments
to mspinput@microsoft.com.
Microsoft, Active Directory, ActiveX, Aero, BitLocker, DirectX, Encarta, Excel, Internet Explorer, Microsoft
Press, MSDN, MS-DOS, MSN, Outlook, PowerPoint, SmartScreen, Windows, Windows Media, Windows
Server, and Windows Vista are either registered trademarks or trademarks of Microsoft Corporation in the
United States and/or other countries. Other product and company names mentioned herein may be the trademarks of their respective owners.
The example companies, organizations, products, domain names, e-mail addresses, logos, people, places, and
events depicted herein are fictitious. No association with any real company, organization, product, domain
name, e-mail address, logo, person, place, or event is intended or should be inferred.
This book expresses the author’s views and opinions. The information contained in this book is provided without any express, statutory, or implied warranties. Neither the authors, Microsoft Corporation, nor its resellers,
or distributors will be held liable for any damages caused or alleged to be caused either directly or indirectly
by this book.
Acquisitions Editor: Martin DelRe
Project Editor: Karen Szall
Technical Editor: L. J. Zacker
Copy Editor: Jennifer Harris
Indexer: Patricia Masserman
Body Part No. X12-41775

Table of Contents
Acknowledgments. . . . . . . . . . . . . . . . . . . . . . . . . . . . . . . . . . . . . . . . . . . . . . . . . . . . xiii
Introduction. . . . . . . . . . . . . . . . . . . . . . . . . . . . . . . . . . . . . . . . . . . . . . . . . . . . . . . . . . xv
Who Is This Book For?. . . . . . . . . . . . . . . . . . . . . . . . . . . . . . . . . . . . . . . . . . . . . . xv
How Is This Book Organized? . . . . . . . . . . . . . . . . . . . . . . . . . . . . . . . . . . . . . . xvi
Conventions Used in This Book . . . . . . . . . . . . . . . . . . . . . . . . . . . . . . . . . . . . . xvii
Support . . . . . . . . . . . . . . . . . . . . . . . . . . . . . . . . . . . . . . . . . . . . . . . . . . . . . . . . . xvii
Part I
Getting to Know Windows Vista
1 Introducing Windows Vista . . . . . . . . . . . . . . . . . . . . . . . . . . . . . . . . . . . . . .3
Introducing the Windows Vista Versions . . . . . . . . . . . . . . . . . . . . . . . . . . . . . . . . . . . . . . 4
Overview of the Windows Vista Versions . . . . . . . . . . . . . . . . . . . . . . . . . . . . . . . . 4
Upgrading the Windows Vista Versions . . . . . . . . . . . . . . . . . . . . . . . . . . . . . . . . . 4
Getting Started with Windows Vista . . . . . . . . . . . . . . . . . . . . . . . . . . . . . . . . . . . . . . . . . . 5
Working with the Welcome Center. . . . . . . . . . . . . . . . . . . . . . . . . . . . . . . . . . . . . 5
Getting Basic System Information . . . . . . . . . . . . . . . . . . . . . . . . . . . . . . . . . . . . . . 6
Activating Windows Vista and Changing Product Keys. . . . . . . . . . . . . . . . . . . . 7
Using Windows Vista in Workgroups and Domains . . . . . . . . . . . . . . . . . . . . . . . . . . . . . 8
Understanding Log On, User Switching, Locking, and Log Off
in Windows Vista . . . . . . . . . . . . . . . . . . . . . . . . . . . . . . . . . . . . . . . . . . . . . . . . . . . . 8
Understanding Windows Vista User Accounts and Windows Security
Permissions . . . . . . . . . . . . . . . . . . . . . . . . . . . . . . . . . . . . . . . . . . . . . . . . . . . . . . . . 11
Turning Off and Shutting Down Computers Running Windows Vista. . . . . . . . . . . . . 12
Turning Off Computers: What’s Changed. . . . . . . . . . . . . . . . . . . . . . . . . . . . . . . 12
Using the Power Button: What’s Changed . . . . . . . . . . . . . . . . . . . . . . . . . . . . . . 13
Shutting Down and Restarting Computers: What’s Changed. . . . . . . . . . . . . . 14
Part II
Essential Features in Windows Vista
2 Working with Windows Vista. . . . . . . . . . . . . . . . . . . . . . . . . . . . . . . . . . . 17
Getting Around in the Windows Vista Taskbar . . . . . . . . . . . . . . . . . . . . . . . . . . . . . . . . 18
Working with the Quick Launch Toolbar . . . . . . . . . . . . . . . . . . . . . . . . . . . . . . . 18
Using Taskbar Thumbnails, Windows Flip, and Windows Flip 3D. . . . . . . . . . . 18
Working with the Notification Area . . . . . . . . . . . . . . . . . . . . . . . . . . . . . . . . . . . 20
What do you think of this book?
We want to hear from you!
Microsoft is interested in hearing your feedback about this publication so we can
continually improve our books and learning resources for you. To participate in a brief
online survey, please visit: www.microsoft.com/learning/booksurvey/
v

vi Table of Contents
Navigating the Start Menu: What’s Changed . . . . . . . . . . . . . . . . . . . . . . . . . . . . . . . . . 22
Managing Programs List on the Start Menu. . . . . . . . . . . . . . . . . . . . . . . . . . . . 23
Using the Right Pane on the Start Menu. . . . . . . . . . . . . . . . . . . . . . . . . . . . . . . 23
Using the Search Box on the Start Menu. . . . . . . . . . . . . . . . . . . . . . . . . . . . . . . 26
Using the All Programs Menu: What’s Changed. . . . . . . . . . . . . . . . . . . . . . . . . . . . . . . 27
Navigating Control Panel: What’s Changed . . . . . . . . . . . . . . . . . . . . . . . . . . . . . . . . . . 28
3 Managing Information . . . . . . . . . . . . . . . . . . . . . . . . . . . . . . . . . . . . . . . . 31
Getting Around the Windows Vista Desktop . . . . . . . . . . . . . . . . . . . . . . . . . . . . . . . . . 31
Working with the Desktop . . . . . . . . . . . . . . . . . . . . . . . . . . . . . . . . . . . . . . . . . . . 32
Working with Windows Sidebar . . . . . . . . . . . . . . . . . . . . . . . . . . . . . . . . . . . . . . 33
Working with Windows Gadgets. . . . . . . . . . . . . . . . . . . . . . . . . . . . . . . . . . . . . . 34
Using Windows Explorer: What’s Changed . . . . . . . . . . . . . . . . . . . . . . . . . . . . . . . . . . . 36
Navigating the Windows Explorer Address Bar . . . . . . . . . . . . . . . . . . . . . . . . . 36
Working with the Windows Explorer Quick Search Box . . . . . . . . . . . . . . . . . . 39
Working with the Windows Explorer View Panes, Views, and
Organize Options. . . . . . . . . . . . . . . . . . . . . . . . . . . . . . . . . . . . . . . . . . . . . . . . . . . 40
Using Virtual Folders to Save Search Results. . . . . . . . . . . . . . . . . . . . . . . . . . . . 41
Managing File Properties and Metadata for Indexing and Searching . . . . . . 43
4 Using Internet Explorer 7 . . . . . . . . . . . . . . . . . . . . . . . . . . . . . . . . . . . . . . 45
Introducing Internet Explorer 7. . . . . . . . . . . . . . . . . . . . . . . . . . . . . . . . . . . . . . . . . . . . . 45
Getting Around in the Internet Explorer 7 Window. . . . . . . . . . . . . . . . . . . . . . 45
Working with the Internet Explorer Toolbars . . . . . . . . . . . . . . . . . . . . . . . . . . . 47
Using the Internet Explorer Safety and Security Features . . . . . . . . . . . . . . . . . . . . . . . 51
Understanding Internet Explorer Protected Mode. . . . . . . . . . . . . . . . . . . . . . . 51
Managing Cookies and Privacy Reporting . . . . . . . . . . . . . . . . . . . . . . . . . . . . . 55
Protecting Your Computer from Phishing . . . . . . . . . . . . . . . . . . . . . . . . . . . . . . 57
5 Collaborating, Connecting, and Sharing . . . . . . . . . . . . . . . . . . . . . . . . . 59
Messaging Essentials . . . . . . . . . . . . . . . . . . . . . . . . . . . . . . . . . . . . . . . . . . . . . . . . . . . . . . 59
Getting Started with Windows Mail . . . . . . . . . . . . . . . . . . . . . . . . . . . . . . . . . . . 59
Configuring Windows Mail . . . . . . . . . . . . . . . . . . . . . . . . . . . . . . . . . . . . . . . . . . 60
Accessing the Microsoft Help Newsgroups. . . . . . . . . . . . . . . . . . . . . . . . . . . . . 61
Searching Your Mail. . . . . . . . . . . . . . . . . . . . . . . . . . . . . . . . . . . . . . . . . . . . . . . . . 63
Working with Contacts . . . . . . . . . . . . . . . . . . . . . . . . . . . . . . . . . . . . . . . . . . . . . . 63
Using Windows Calendar . . . . . . . . . . . . . . . . . . . . . . . . . . . . . . . . . . . . . . . . . . . . . . . . . . 64
Getting Started with Windows Calendar . . . . . . . . . . . . . . . . . . . . . . . . . . . . . . . 64
Searching for Appointments and Tasks . . . . . . . . . . . . . . . . . . . . . . . . . . . . . . . . 65

Table of Contents vii
Performing Key Calendar Tasks . . . . . . . . . . . . . . . . . . . . . . . . . . . . . . . . . . . . . . . 66
Creating and Using Appointments . . . . . . . . . . . . . . . . . . . . . . . . . . . . . . . . . . . . 66
Creating and Using Tasks . . . . . . . . . . . . . . . . . . . . . . . . . . . . . . . . . . . . . . . . . . . . 68
Creating and Using Multiple Calendars . . . . . . . . . . . . . . . . . . . . . . . . . . . . . . . . 69
Publishing and Subscribing to Calendars. . . . . . . . . . . . . . . . . . . . . . . . . . . . . . . 70
Using Windows Shared View . . . . . . . . . . . . . . . . . . . . . . . . . . . . . . . . . . . . . . . . . . . . . . . 71
Getting Started with Windows Shared View . . . . . . . . . . . . . . . . . . . . . . . . . . . . 72
Starting a New Windows Shared View Session . . . . . . . . . . . . . . . . . . . . . . . . . . 72
Running a Windows Shared View Session . . . . . . . . . . . . . . . . . . . . . . . . . . . . . . 73
Joining a Windows Shared View Session . . . . . . . . . . . . . . . . . . . . . . . . . . . . . . . 74
Setting Your Participant Status. . . . . . . . . . . . . . . . . . . . . . . . . . . . . . . . . . . . . . . . 74
Sending Notes to Participants . . . . . . . . . . . . . . . . . . . . . . . . . . . . . . . . . . . . . . . . 74
Leaving a Session and Sharing Stored Files . . . . . . . . . . . . . . . . . . . . . . . . . . . . . 75
6 Managing Programs and Multimedia. . . . . . . . . . . . . . . . . . . . . . . . . . . . 77
Navigating Your Computer’s Startup, Running, and Network-Connected
Programs . . . . . . . . . . . . . . . . . . . . . . . . . . . . . . . . . . . . . . . . . . . . . . . . . . . . . . . . . . . . . . . . 78
Exploring Your Startup Programs. . . . . . . . . . . . . . . . . . . . . . . . . . . . . . . . . . . . . . 78
Determining Your Currently Running Programs . . . . . . . . . . . . . . . . . . . . . . . . . 80
Examining Network-Connected Programs. . . . . . . . . . . . . . . . . . . . . . . . . . . . . . 81
Working with Your Computer’s Programs . . . . . . . . . . . . . . . . . . . . . . . . . . . . . . . . . . . . 82
Viewing, Adding, Removing, and Repairing Installed Programs. . . . . . . . . . . . 82
Viewing and Checking for Installed Updates. . . . . . . . . . . . . . . . . . . . . . . . . . . . 83
Configuring Default Programs. . . . . . . . . . . . . . . . . . . . . . . . . . . . . . . . . . . . . . . . 83
Setting Advanced Options for Windows Features . . . . . . . . . . . . . . . . . . . . . . . 85
Getting into Your Multimedia. . . . . . . . . . . . . . . . . . . . . . . . . . . . . . . . . . . . . . . . . . . . . . . 86
Getting Started with Windows Media Player. . . . . . . . . . . . . . . . . . . . . . . . . . . . 86
Getting Started with Windows Movie Maker. . . . . . . . . . . . . . . . . . . . . . . . . . . . 90
Getting Started with Windows Photo Gallery . . . . . . . . . . . . . . . . . . . . . . . . . . . 91
7 Working with Laptops and Tablet PCs . . . . . . . . . . . . . . . . . . . . . . . . . . . 95
Optimizing Performance and Saving Energy. . . . . . . . . . . . . . . . . . . . . . . . . . . . . . . . . . 95
Getting to Know the Windows Vista Power Plans. . . . . . . . . . . . . . . . . . . . . . . . 96
Selecting and Configuring a Power Plan . . . . . . . . . . . . . . . . . . . . . . . . . . . . . . . 97
Understanding Your Computer’s Power Button and Password Protection
On Wakeup Options . . . . . . . . . . . . . . . . . . . . . . . . . . . . . . . . . . . . . . . . . . . . . . . . 99
Tapping and Flicking Your Tablet PC Pen . . . . . . . . . . . . . . . . . . . . . . . . . . . . . . . . . . . . 100
Tapping Your Pen . . . . . . . . . . . . . . . . . . . . . . . . . . . . . . . . . . . . . . . . . . . . . . . . . . 100
Flicking Your Pen . . . . . . . . . . . . . . . . . . . . . . . . . . . . . . . . . . . . . . . . . . . . . . . . . . 101
Using Windows Mobility Center . . . . . . . . . . . . . . . . . . . . . . . . . . . . . . . . . . . . . . . . . . . 103

viii Table of Contents
Getting Started with Windows Mobility Center . . . . . . . . . . . . . . . . . . . . . . . . 103
Configuring Your Mobile PC by Using Mobility Center. . . . . . . . . . . . . . . . . . 103
Connecting to Networked Projectors. . . . . . . . . . . . . . . . . . . . . . . . . . . . . . . . . . . . . . . 104
Getting Acquainted with the Tablet PC Extras . . . . . . . . . . . . . . . . . . . . . . . . . . . . . . . 106
Entering Text Using the Tablet PC Pen . . . . . . . . . . . . . . . . . . . . . . . . . . . . . . . . 106
Capturing Screen Snips. . . . . . . . . . . . . . . . . . . . . . . . . . . . . . . . . . . . . . . . . . . . . 108
Creating Sticky Notes . . . . . . . . . . . . . . . . . . . . . . . . . . . . . . . . . . . . . . . . . . . . . . 111
Using Windows Journal . . . . . . . . . . . . . . . . . . . . . . . . . . . . . . . . . . . . . . . . . . . . 112
8 Improving Accessibility. . . . . . . . . . . . . . . . . . . . . . . . . . . . . . . . . . . . . . . 115
Accessing the Ease of Access Features in Control Panel . . . . . . . . . . . . . . . . . . . . . . . 115
Using Magnifier . . . . . . . . . . . . . . . . . . . . . . . . . . . . . . . . . . . . . . . . . . . . . . . . . . . 116
Using the On-Screen Keyboard. . . . . . . . . . . . . . . . . . . . . . . . . . . . . . . . . . . . . . 118
Using Narrator . . . . . . . . . . . . . . . . . . . . . . . . . . . . . . . . . . . . . . . . . . . . . . . . . . . . 119
Using Sticky Keys, Filter Keys, and High Contrast. . . . . . . . . . . . . . . . . . . . . . . 119
Talking to Your Computer and Getting It to Listen by Using
Speech Recognition. . . . . . . . . . . . . . . . . . . . . . . . . . . . . . . . . . . . . . . . . . . . . . . . . . . . . . 120
Getting Started with Speech Recognition . . . . . . . . . . . . . . . . . . . . . . . . . . . . . 120
Configuring Speech Recognition for First Use . . . . . . . . . . . . . . . . . . . . . . . . . 121
Using Speech Recognition for Dictation . . . . . . . . . . . . . . . . . . . . . . . . . . . . . . 124
Part III
Securing Windows Vista
9 Protecting User Accounts and Using Parental Controls. . . . . . . . . . . . 129
Introducing User Account Control . . . . . . . . . . . . . . . . . . . . . . . . . . . . . . . . . . . . . . . . . 129
Reducing the Need for Administrator Privileges . . . . . . . . . . . . . . . . . . . . . . . 130
Defining the Standard User and Administrator User Modes . . . . . . . . . . . . . 130
Navigating the User Account Changes . . . . . . . . . . . . . . . . . . . . . . . . . . . . . . . . . . . . . 132
Understanding Standard User Privileges . . . . . . . . . . . . . . . . . . . . . . . . . . . . . . 132
Understanding File System and Registry Virtualization. . . . . . . . . . . . . . . . . . 134
Handling User Account Control. . . . . . . . . . . . . . . . . . . . . . . . . . . . . . . . . . . . . . . . . . . . 135
Understanding and Setting Run Levels . . . . . . . . . . . . . . . . . . . . . . . . . . . . . . . 135
Modifying User Account Control and Admin Approval Mode. . . . . . . . . . . . 137
Introducing Parental Controls . . . . . . . . . . . . . . . . . . . . . . . . . . . . . . . . . . . . . . . . . . . . . 139
Getting Started with Parental Controls . . . . . . . . . . . . . . . . . . . . . . . . . . . . . . . 139
Selecting a Games Rating System . . . . . . . . . . . . . . . . . . . . . . . . . . . . . . . . . . . . 141
Configuring Notifications for Parental Controls. . . . . . . . . . . . . . . . . . . . . . . . 142
Configuring Parental Controls for User Accounts. . . . . . . . . . . . . . . . . . . . . . . 142
Viewing and Using Activity Reports . . . . . . . . . . . . . . . . . . . . . . . . . . . . . . . . . . 146

Table of Contents ix
10 Protecting Your Computer . . . . . . . . . . . . . . . . . . . . . . . . . . . . . . . . . . . . 149
Safeguarding and Enhancing Computer Startup . . . . . . . . . . . . . . . . . . . . . . . . . . . . .149
Getting Started with the Windows Vista Boot Environment . . . . . . . . . . . . . .149
Modifying the Boot Environment . . . . . . . . . . . . . . . . . . . . . . . . . . . . . . . . . . . . 150
Safeguarding Your Computer. . . . . . . . . . . . . . . . . . . . . . . . . . . . . . . . . . . . . . . . . . . . . . 153
Getting to Know the Windows Vista Expanded Security Features . . . . . . . . . 153
Getting Started with Network Access Protection . . . . . . . . . . . . . . . . . . . . . . . 154
Understanding Windows Service Hardening . . . . . . . . . . . . . . . . . . . . . . . . . . . 157
Improving Computer Security . . . . . . . . . . . . . . . . . . . . . . . . . . . . . . . . . . . . . . . . . . . . . 158
Navigating Audit Policy Changes . . . . . . . . . . . . . . . . . . . . . . . . . . . . . . . . . . . . 158
Navigating User Rights Assignment Changes . . . . . . . . . . . . . . . . . . . . . . . . . . 159
Navigating Security Options Changes . . . . . . . . . . . . . . . . . . . . . . . . . . . . . . . . 163
11 Protecting Your Data . . . . . . . . . . . . . . . . . . . . . . . . . . . . . . . . . . . . . . . . . 169
Introducing Trusted Platforms . . . . . . . . . . . . . . . . . . . . . . . . . . . . . . . . . . . . . . . . . . . . . 169
Getting Started with TPM Management. . . . . . . . . . . . . . . . . . . . . . . . . . . . . . . . . . . . . 171
Managing the TPM . . . . . . . . . . . . . . . . . . . . . . . . . . . . . . . . . . . . . . . . . . . . . . . . . . . . . .172
Initializing a TPM for First Use . . . . . . . . . . . . . . . . . . . . . . . . . . . . . . . . . . . . . . . 173
Turning Off and Clearing the TPM . . . . . . . . . . . . . . . . . . . . . . . . . . . . . . . . . . . 174
Changing the TPM Owner Password. . . . . . . . . . . . . . . . . . . . . . . . . . . . . . . . . . 175
Using BitLocker Drive Encryption. . . . . . . . . . . . . . . . . . . . . . . . . . . . . . . . . . . . . . . . . . . 176
Introducing BitLocker Drive Encryption . . . . . . . . . . . . . . . . . . . . . . . . . . . . . . . 176
Preparing a Computer for BitLocker Drive Encryption. . . . . . . . . . . . . . . . . . . 177
Configuring and Enabling BitLocker Drive Encryption for a TPM . . . . . . . . .181
Recovering Data Protected by BitLocker Drive Encryption . . . . . . . . . . . . . . . 184
12 Networking Your Computer. . . . . . . . . . . . . . . . . . . . . . . . . . . . . . . . . . . 187
Introducing TCP/IP Networking for Windows Vista . . . . . . . . . . . . . . . . . . . . . . . . . . . 187
Getting to Know the Next Generation TCP/IP Stack. . . . . . . . . . . . . . . . . . . . . 187
Learning About the Dual Stack and the IP Management Enhancements. . . 189
Mapping Your Networking Capabilities and Infrastructure. . . . . . . . . . . . . . . . . . . . . 191
Using Network Center . . . . . . . . . . . . . . . . . . . . . . . . . . . . . . . . . . . . . . . . . . . . . . 191
Using Network List. . . . . . . . . . . . . . . . . . . . . . . . . . . . . . . . . . . . . . . . . . . . . . . . . 195
Using Network Map. . . . . . . . . . . . . . . . . . . . . . . . . . . . . . . . . . . . . . . . . . . . . . . . 197
Viewing and Managing Network Connections . . . . . . . . . . . . . . . . . . . . . . . . . 198
Introducing Wireless Networking for Windows Vista. . . . . . . . . . . . . . . . . . . . . . . . . . 199
Exploring Wireless Networking Changes . . . . . . . . . . . . . . . . . . . . . . . . . . . . . . 199
Learning New Ways to Connect to Wireless Networks . . . . . . . . . . . . . . . . . . 200
Using Fast Roaming and Auto Configuration with Wireless Connections. . . 201

x Table of Contents
Mapping Your Wireless Networking Capabilities and Infrastructure. . . . . . . . . . . . . 202
Listing and Connecting to Available Wireless Networks. . . . . . . . . . . . . . . . . 202
Connecting to Public Wireless Networks. . . . . . . . . . . . . . . . . . . . . . . . . . . . . . 202
Disconnecting a Wireless Connection . . . . . . . . . . . . . . . . . . . . . . . . . . . . . . . . 204
13 Securing Your Network Connection . . . . . . . . . . . . . . . . . . . . . . . . . . . . 205
Introducing Windows Security Center . . . . . . . . . . . . . . . . . . . . . . . . . . . . . . . . . . . . . . 205
Getting to Know Windows Firewall. . . . . . . . . . . . . . . . . . . . . . . . . . . . . . . . . . . . . . . . . 209
Using Windows Firewall . . . . . . . . . . . . . . . . . . . . . . . . . . . . . . . . . . . . . . . . . . . . 209
Using Windows Firewall With Advanced Security . . . . . . . . . . . . . . . . . . . . . . 213
Introducing Windows Defender . . . . . . . . . . . . . . . . . . . . . . . . . . . . . . . . . . . . . . . . . . . 225
Getting to Know Windows Defender . . . . . . . . . . . . . . . . . . . . . . . . . . . . . . . . . 226
Starting and Using Windows Defender . . . . . . . . . . . . . . . . . . . . . . . . . . . . . . . 226
Configuring General Settings . . . . . . . . . . . . . . . . . . . . . . . . . . . . . . . . . . . . . . . 228
Scanning the Computer for Spyware . . . . . . . . . . . . . . . . . . . . . . . . . . . . . . . . . 230
Checking for Updates . . . . . . . . . . . . . . . . . . . . . . . . . . . . . . . . . . . . . . . . . . . . . . 232
Viewing or Restoring Quarantined Items. . . . . . . . . . . . . . . . . . . . . . . . . . . . . . 232
Viewing or Changing Software Programs That You Allow . . . . . . . . . . . . . . . 232
Turning Windows Defender Off or On . . . . . . . . . . . . . . . . . . . . . . . . . . . . . . . . 233
Part IV
Supporting and Deploying Windows Vista
14 Supporting Windows Vista. . . . . . . . . . . . . . . . . . . . . . . . . . . . . . . . . . . . 237
Centrally Managing Computer Configuration . . . . . . . . . . . . . . . . . . . . . . . . . . . . . . . 237
Introducing the Group Policy Management Console . . . . . . . . . . . . . . . . . . . 238
Introducing Important Group Policy Changes . . . . . . . . . . . . . . . . . . . . . . . . . 238
Diagnosing and Resolving Problems . . . . . . . . . . . . . . . . . . . . . . . . . . . . . . . . . . . . . . . 239
Introducing Built-In Diagnostics . . . . . . . . . . . . . . . . . . . . . . . . . . . . . . . . . . . . . 240
Understanding Hardware, Performance, and Memory Diagnostics . . . . . . . 241
Understanding Network Diagnostics . . . . . . . . . . . . . . . . . . . . . . . . . . . . . . . . . 242
Introducing Problem Reporting and Assistance. . . . . . . . . . . . . . . . . . . . . . . . 243
Updating Windows Vista Computers: What’s Changed. . . . . . . . . . . . . . . . . . . . . . . . 246
Introducing Windows Update Improvements. . . . . . . . . . . . . . . . . . . . . . . . . . 246
Configuring Windows Update. . . . . . . . . . . . . . . . . . . . . . . . . . . . . . . . . . . . . . . 247
Checking for Updates . . . . . . . . . . . . . . . . . . . . . . . . . . . . . . . . . . . . . . . . . . . . . . 249
Viewing Update History and Installed Updates . . . . . . . . . . . . . . . . . . . . . . . . 249
Improving System Stability and Recovery . . . . . . . . . . . . . . . . . . . . . . . . . . . . . . . . . . . 250
Preventing Common Causes of Hangs and Crashes . . . . . . . . . . . . . . . . . . . . 250
Recovering Automatically from Failure . . . . . . . . . . . . . . . . . . . . . . . . . . . . . . . 251
Recovering Frozen Applications and Releasing Resources Automatically . . 252

Table of Contents xi
Introducing the New and Enhanced Windows Vista Management Tools . . . . . . . . .253
Introducing Event Viewer: What’s Changed. . . . . . . . . . . . . . . . . . . . . . . . . . . . 253
Introducing Task Scheduler: What’s Changed . . . . . . . . . . . . . . . . . . . . . . . . . . 256
Introducing Performance Rating and Monitoring: What’s New and
What’s Changed . . . . . . . . . . . . . . . . . . . . . . . . . . . . . . . . . . . . . . . . . . . . . . . . . . . 259
Introducing the Previous Versions Feature. . . . . . . . . . . . . . . . . . . . . . . . . . . . . 262
Backing Up and Recovering Windows Vista: What’s New and
What’s Changed . . . . . . . . . . . . . . . . . . . . . . . . . . . . . . . . . . . . . . . . . . . . . . . . . . . 263
15 Deploying Windows Vista. . . . . . . . . . . . . . . . . . . . . . . . . . . . . . . . . . . . . 267
Introducing Deployment Enhancements for Windows Vista. . . . . . . . . . . . . . . . . . . . 268
Introducing Modularization and Hardware-Independent Disk Imaging. . . . 268
Introducing the Customizable and Extensible Preinstallation
Environment . . . . . . . . . . . . . . . . . . . . . . . . . . . . . . . . . . . . . . . . . . . . . . . . . . . . . . 272
Introducing Standards-Based Single-Format Answer Files . . . . . . . . . . . . . . . 274
Upgrading Computers and Migrating to New Computers . . . . . . . . . . . . . . . . . . . . . 276
Deciding Whether to Upgrade or to Migrate . . . . . . . . . . . . . . . . . . . . . . . . . . 276
Introducing the User State Migration Tool. . . . . . . . . . . . . . . . . . . . . . . . . . . . . 277
Introducing Windows Easy Transfer . . . . . . . . . . . . . . . . . . . . . . . . . . . . . . . . . . 281
Starting and Copying the Windows Easy Transfer Software . . . . . . . . . . . . . . 282
Selecting and Transferring Files and Settings . . . . . . . . . . . . . . . . . . . . . . . . . . 284
Finalizing the Migration . . . . . . . . . . . . . . . . . . . . . . . . . . . . . . . . . . . . . . . . . . . . 284
Appendix: Installing Windows Vista . . . . . . . . . . . . . . . . . . . . . . . . . . . . 287
Index . . . . . . . . . . . . . . . . . . . . . . . . . . . . . . . . . . . . . . . . . . . . . . . . . . . . . . . . . . . . . . . . . . . 291
What do you think of this book?
We want to hear from you!
Microsoft is interested in hearing your feedback about this publication so we can
continually improve our books and learning resources for you. To participate in a brief
online survey, please visit: www.microsoft.com/learning/booksurvey/

Chapter 1
Introducing Windows Vista
In this chapter:
Introducing the Windows Vista Versions . . . . . . . . . . . . . . . . . . . . . . . . . . . . . . . . . . . 4
Getting Started with Windows Vista. . . . . . . . . . . . . . . . . . . . . . . . . . . . . . . . . . . . . . . 5
Using Windows Vista in Workgroups and Domains. . . . . . . . . . . . . . . . . . . . . . . . . . 8
Turning Off and Shutting Down Computers Running Windows Vista . . . . . . . . . 12
Microsoft Windows Vista is the latest workstation version of the Windows operating system
and is designed for both home and business users. MSN Encarta describes a vista as a scenic
or panoramic view, and that’s exactly what Windows Vista provides. Not only does Windows
Vista have an all-new look, complete with stylish graphical visualizations, easier-to-navigate
menus, and enhanced personalization capabilities, but the operating system is also the
first version of Windows in which the user experience scales to the hardware capabilities
of the computer on which Windows Vista is installed. Although the graphical bells and
whistles are excellent, many of the most powerful features in Windows Vista are those
that you won’t see at first glance, including the many enhancements for reliability, security,
usability, and mobility.
In this chapter, we’ll look at the issues and features you’ll need to know about to start using
Windows Vista effectively. The chapter begins with a look at the versions of Windows Vista
that are available and then continues with a discussion of getting started using Windows
Vista. Next, the chapter discusses using Windows Vista in workgroup and domain configurations, focusing on the differences between these environments and how permissions for user
accounts have changed between this and previous versions of Windows. Last, the chapter discusses the important procedure changes for turning off and shutting down computers running Windows Vista.
Note
to the operating system. More so than any other area of Windows Vista, the security features
discussed in this book are subject to change. Some of the features might not be included in
the final product, and some of the features might be changed substantially.
This book was written using the Windows Vista Beta to provide an early introduction
3
4 Part I: Getting to Know Windows Vista
Introducing the Windows Vista Versions
Microsoft provides multiple versions of Windows Vista. There are two versions for home users
and two versions for business users as well as an all-encompassing version for users who
want all available features. Unlike its predecessors, Windows Vista allows you to upgrade
between versions.
Note
way you work with the operating system are the same. Because of this consistency, this book
points out the differences between Windows Vista versions only where necessary.
Regardless of which Windows Vista version you are using, the core features and the
Overview of the Windows Vista Versions
The five versions of Microsoft Windows Vista are:
■ Windows Vista Home Basic
■ Windows Vista Home Premium
■ Windows Vista Business
■ Windows Vista Enterprise
■ Windows Vista Ultimate
The home versions of Windows Vista include entertainment features that aren’t found in the
business versions. The business versions include management features that aren’t found in
the home versions.
Windows Vista Ultimate combines the best of all the available features, giving you a complete
package for home and business use. When you use Windows Vista Ultimate, you can get additional programs and services as well as tips and tricks documentation from the Windows
Download Center by using the Windows Ultimate Extras utility in Control Panel.
Upgrading the Windows Vista Versions
Unlike its predecessors, you can easily upgrade Windows Vista versions by using the
Windows Anytime Upgrade utility or a Windows Anytime Upgrade disc. You can:
■ Upgrade from Windows Vista Home Basic to Windows Vista Home Premium or Win-
dows Vista Ultimate.
■ Upgrade from Windows Vista Home Premium to Windows Vista Ultimate.
■ Upgrade from Windows Vista Business to Windows Vista Enterprise or Windows Vista
Ultimate.
■ Upgrade from Windows Vista Enterprise to Windows Vista Ultimate.
Chapter 1: Introducing Windows Vista 5
Windows Anytime Upgrade (WindowsAnytimeUpgrade.exe) is stored in the
%SystemRoot%\System32 folder. You can start an upgrade by selecting Windows Anytime
Upgrade on the Start menu and then following the prompts. When the upgrade is complete,
you can search for “What’s New” in Windows Help And Support to learn about additional
features and enhancements that have been installed. You can access Windows Help And
Support by clicking Start and then clicking Help And Support.
Getting Started with Windows Vista
From the moment you start Windows Vista, you’ll know it’s a different kind of operating
system from its predecessors. During the installation of Windows Vista (described in the
appendix), Setup prompts you to create a local machine account. This account is created as a
computer administrator account. When the operating system starts, you can log on using the
account and password you specified during setup.
Working with the Welcome Center
By default, the operating system displays the Welcome Center at startup. You can access the
Welcome Center console, shown in Figure 1-1, from Control Panel.
Figure 1-1 The Welcome Center
The Welcome Center provides an overview of the system and quick access to perform tasks
that help you get started using Windows Vista. To display all the available options, click Show
All 12 Items. The available options include the following tasks:
■ Add New Users Configure user accounts for each person who will log on locally to the
computer. You can manage account settings and parental controls for accounts, as discussed in Chapter 9, “Protecting User Accounts and Using Parental Controls.” This
option isn’t available when you log on to a domain.
6 Part I: Getting to Know Windows Vista
■ Personalize Windows Control the appearance and sound effects used by Windows
Vista. You can manage settings for the display, visual appearance, desktop background,
screen saver, sound effects, mouse pointers, and themes.
■ Set Up Devices Check for devices that Setup did not install as part of the upgrade or
installation. If you elect to set up devices and new hardware is found, you’ll be guided
through the process of installing the device.
■ Windows Easy Transfer Run the Windows Easy Transfer Wizard, which can be used to
transfer user accounts, files and folders, program settings, Internet settings (including
favorites), and e-mail settings (including contacts and messages) from your old computer. For the transfer, you can use CDs, DVDs, a universal serial bus (USB) flash drive,
or exter nal hard drives, as well as network folders and a USB cable that connects to both
computers. To transfer settings, the old computer must be running Windows 2000,
Windows XP, or Windows Vista.
■ View Your Computer Details Display the default view for the Welcome Center, which
provides an overview of the system configuration. Use the More Details link to access
the System console and view additional information about the computer.
By default, the Welcome Center displays each time you start the computer. If you don’t want
the Welcome Center to be displayed the next time you start the computer, clear the Run At
Startup check box.
Getting Basic System Information
In the Welcome Center, you can click More Details to access the System console and view
additional information about the computer, as shown in Figure 1-2.
Figure 1-2 The System console

Chapter 1: Introducing Windows Vista 7
The System console is divided into four basic areas that provide links for performing common
tasks and a system overview:
■ Windows Edition Displays the operating system edition and version.
■ System Shows the processor, memory, and performance rating of the computer. If the
computer has not yet been rated for performance, you can click Performance under See
Also to access the Performance Rating And Tools console. In this console, click Rate This
Computer to start the performance rating process and then follow the prompts.
■ Computer Name, Domain, And Workgroup Settings Lists the computer name, descrip-
tion, domain, and workgroup details. If you want to change the computer’s name,
domain, or workgroup, click Change Settings, and then make changes in the Computer
Name Changes dialog box. In the System Properties dialog box, click the Network ID
button, and then make the necessary changes.
■ Windows Activation Shows whether you have activated the operating system and the
product key. If Windows Vista isn’t activated yet, click the link provided to start the activation process and then follow the prompts.
When you’re working in the System console, links in the left pane provide quick access to key
settings, including the following:
■ Device Manager
■ Remote Settings
■ System Protection
■ Advanced System Settings
If you prefer, you can view the classic-style System Properties dialog box at any time by clicking Change Settings under Computer Name, Domain, And Workgroup Settings.
Activating Windows Vista and Changing Product Keys
Volume-licensed versions of Windows Vista might not require activation or product keys. For
retail versions of Windows Vista, however, Windows Activation and product keys are just as
important as they are in Microsoft Windows XP. Retail versions of Windows Vista are validated by using Windows Activation and product keys. In the Welcome Center, the Activation
Status entry specifies whether you have activated the operating system. If Windows Vista has
not been activated, you can activate the operating system by clicking More Details to access
the System console and then selecting Click Here To Activate Windows Now under Windows
Activation.
Unlike in Windows XP, you can easily change the product key used by the operating system.
In the System console, click Change Product Key under Windows Activation. In the Windows
Activation window, shown in Figure 1-3, type the product key, and then click Next. As in
Setup, you do not need to type the dashes in the product key.

8 Part I: Getting to Know Windows Vista
Figure 1-3 Changing the product key
Using Windows Vista in Workgroups and Domains
You can use Windows Vista in workgroup configurations and domain configurations. Workgroups are loose associations of computers in which each computer is managed separately.
Domains are collections of computers that you can manage collectively by means of domain
controllers, which are servers running Windows that manage access to the network, to the
directory database, and to shared resources. Typically, home users will use Windows Vista in
workgroup configurations and businesses will use Windows Vista in domain configurations.
Although all versions can be used in workgroup configurations, you cannot use the home versions in domain configurations.
Understanding Log On, User Switching, Locking,
and Log Off in Windows Vista
In a workgroup configuration, Windows Vista displays the Log On screen at startup. All standard user and administrator accounts that you’ve created on the computer are listed on the
Log On screen. To log on, you click the account name. If the account is password protected,
you must click the account name, type the account password, and then click the arrow button.
In a domain configuration, Windows Vista displays a blank startup screen after initializing the
operating system. You must press Ctrl+Alt+Del to display the Log On screen. By default, the
last account to log on to the computer is listed in computer\username or domain\username format. To log on to this account, you type the account password and then click the arrow button. To log on to a different account, click the Switch User button, and then click Log On As
Chapter 1: Introducing Windows Vista 9
Another User. Type the user name and password, and then click the arrow button. Keep the
following in mind:
■ If the account is in the default domain, you don’t have to specify the domain name.
■ If the account is in another domain, you can specify the domain and the account name
using the format domain\username, such as cpandl\williams.
■ If you want to log on to the local machine, type .\username where username is the name
of the local account, such as .\williams.
Both the workgroup and the domain configurations of Windows Vista allow fast user switching. You can easily change passwords, lock a computer, and log off as well.
Switching Users
You can switch users by following these steps:
1. Press Ctrl+Alt+Del, and then click the Switch User button.
❑ In a workgroup configuration, the Log On screen is displayed as at startup.
❑ In a domain configuration, a screen appears with the message “Press Ctrl+Alt+Del
To Log On”. To display the Log On screen, you must press Ctrl+Alt+Del again.
2. Once the Log On screen appears, you can log on to another account using a technique
similar to logging on at startup.
Note
button to the right of the Power and Lock buttons, and then clicking Switch User.
You can also initiate the switch-user process by clicking Start, clicking the Options
Changing Passwords
You can change passwords by following these steps:
1. Press Ctrl+Alt+Del, and then click the Change Password option.
The account name for the current user is listed on the change password screen. In a
domain configuration, the user account name is listed in domain\username format. In a
workgroup configuration, the local user account name is listed.
By clicking in the User Name text box, you can change the account name. Specify
Tip
the domain and the account name using the format domain\username, such as
cpandl\williams. Type .\username where username is the name of the local account, such
as .\williams.
10 Part I: Getting to Know Windows Vista
2. Type the current password for the account in the Old Password text box.
3. Type and confirm the new password for the account in the New Password and the Con-
firm Password text boxes.
4. Click the arrow button to confirm the change.
Locking and Unlocking a Computer
You can lock and unlock the computer by following these steps:
1. Press Ctrl+Alt+Del, and then click the Lock This Computer option.
2. In a workgroup configuration, a lock screen is displayed with the name of the user who
is logged on. Clicking the account name or picture allows you to log on again as that
user. If a password is required for the account, you’ll need to enter the password before
logging on.
3. In a domain configuration, a lock screen is displayed with the name of the user who is
logged on. If you want to log on again as the user, you must press Ctrl+Alt+Del and then
type the user’s password.
4. You can click the Switch User button to log on as a different user.
Note
The Lock button is a blue button with a picture of a lock on it.
You can also lock the computer by clicking Start and then clicking the Lock button.
Logging Off a Computer
You can log off by pressing Ctrl+Alt+Del and then clicking the Log Off option. If there is a
problem logging off, the Log Off dialog box appears. This dialog box shows the programs currently running on the computer.
If one of the currently running programs is causing a problem with logoff, an explanation
of the problem is displayed below the program name. You can then cancel the logoff or
continue:
■ If you cancel the logoff, you can resolve the issue with the problem program—for exam-
ple, by saving your work and exiting the program.
■ If you continue logging off by clicking Log Off Now, Windows Vista will force the pro-
gram causing problems to close, and you might lose work as a result.
Note
Power and Lock buttons, and then clicking Log Off.
You can also log off by clicking Start, clicking the Options button to the right of the
Chapter 1: Introducing Windows Vista 11
Understanding Windows Vista User Accounts and
Windows Security Permissions
Windows Vista has two primary types of local user accounts:
■ Standard user Standard user accounts can use most software and can change system
settings that do not affect other users or the security of the computer.
■ Administrator Administrator accounts have complete access to the computer and can
make any desired changes.
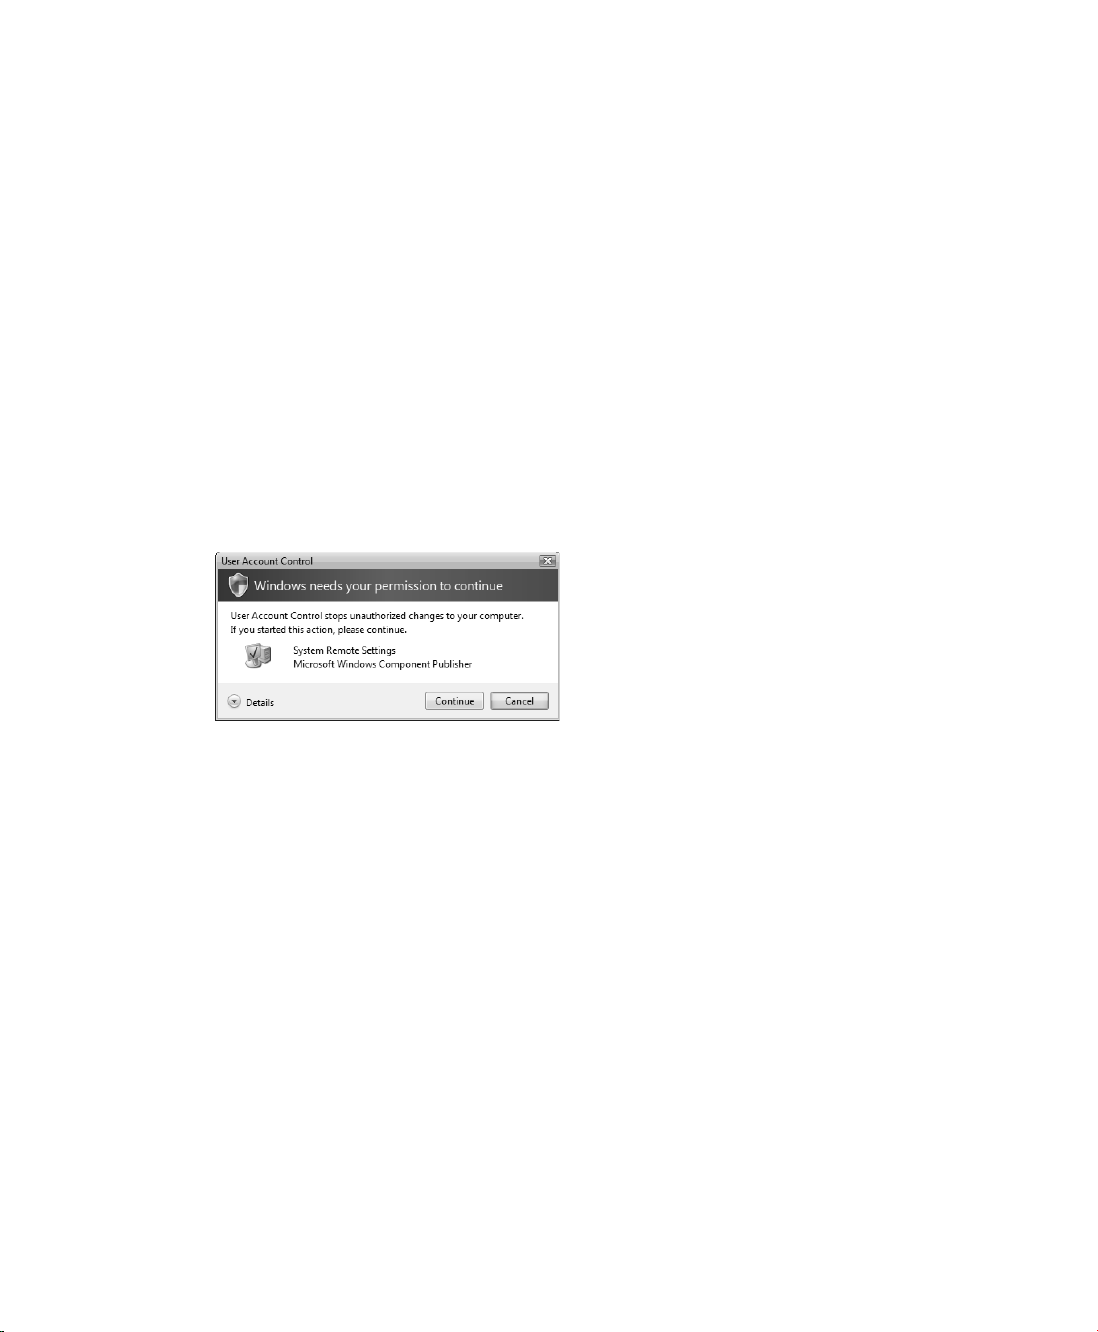
In Windows Vista, all applications run using either standard user or administrator permissions. As discussed in Chapter 9 under “Introducing User Account Control,” this change has
far-reaching effects on the operating system as well as how you work with user accounts and
manage applications. Because of User Account Control, whether a user logs on as an administrator or a standard user, the user sees a User Account Control dialog box containing a warning prompt stating, “Windows needs your permission to continue.” This dialog box is shown
in Figure 1-4.
Figure 1-4 The User Account Control dialog box
The way the prompt works depends on whether the user is logged on with an administrator
account or a standard user account. Users with administrator permissions are asked for confirmation. The user can click Allow to allow the task to be performed or Cancel to stop the task
from being performed. Clicking Details shows the full path to the program being executed.
Users with standard accounts are asked to provide a password for an administrator account.
In a workgroup configuration, each local computer administrator account is listed by name.
To allow the task to be performed, you must click an account, type the account’s password,
and then click Submit.
In a domain configuration, administrator accounts for users who have logged on to the
computer are listed. These accounts can be both domain administrator accounts and local
computer administrator accounts. You also have the option of choosing a different account.
To run the task using a different user’s permissions, click Use Another Account, type the user
account, and then type the account’s password. If the account is in the default domain,
you don’t have to specify the domain name. If the account is in another domain, you can
specify the domain and the account name using the format domain\username, such as
cpandl\williams.
12 Part I: Getting to Know Windows Vista
From the experts
Security must be easy to be effective
User Account Control is as much about usability as it is about security. Unlike earlier
versions of Windows, any user account can be used to run administrator programs. You
don’t need to know which programs require administrator permissions beforehand; you
simply run the program and respond as appropriate if you are prompted. This makes
it much easier to use a standard user account as your everyday user account—and it is
why Microsoft recommends this as a best practice as well.
Tony Northrup
Author, MCSE, and MVP—For more information, see http://www.northrup.org.
Turning Off and Shutting Down Computers Running
Windows Vista
When it comes to turning off and shutting down, Windows Vista isn’t like earlier versions of
Windows. In Windows Vista, turning off a computer and shutting down a computer are completely different operations. Turning off a computer doesn’t power it down; only shutting
down the computer powers it down completely.
Turning Off Computers: What’s Changed
By default, when you turn off a computer running Windows Vista, the computer enters the
sleep state. When entering the sleep state, the operating system:
■ Automatically saves all work.
■ Turns off the display.
■ Puts the computer in sleep mode.
In sleep mode, the computer’s fan stops, the computer’s hard disks stop, and the computer
enters a low-power consumption mode in which the state of the computer is maintained in
the computer’s memory. The next time you turn on the computer, the computer’s state will be
exactly as it was when you turned off the computer.
Note
and exit programs before turning off the computer. Because the computer is in a low-power
consumption state, the computer uses very little energy. For mobile computers, the sleep state
will use very little battery power. If, while in the sleep state, the mobile computer’s battery runs
low on power, the state of the computer is saved to the hard disk and then the computer is shut
down completely—this state is similar to the hibernate state used in Windows XP.
Because the operating system saves your work, you don’t need to save documents

Chapter 1: Introducing Windows Vista 13
You can turn off a computer and make it enter the sleep state by following these steps:
1. Click the Start button.
2. Click the Power button.
To wake the computer from the sleep state, you can do either of the following:
■ Press the power button on the computer’s case.
■ Press a key on the computer’s keyboard.
You can turn off and turn on mobile computers by closing or opening their lid. When you
close the lid, the laptop enters the sleep state. When you open the lid, the laptop wakes up
from the sleep state.
Using the Power Button: What’s Changed
Regardless of whether you are using a desktop computer or a mobile computer, the way
the Power button works depends on the system hardware, the system state, and the system
configuration:
■ If the computer hardware doesn’t support the sleep state, the computer can’t use the
sleep state, and turning off the computer powers it down completely.
■ If the computer has updates installed that require a restart or you’ve installed programs
that require a restart, the computer can’t use the sleep state, and turning off the computer powers it down completely.
■ If you or an administrator has reconfigured the power options on the computer and set
the Power button to the Shut Down action, the computer can’t use the sleep state, and
turning off the computer powers it down completely. See Chapter 7, “Working with
Laptops and Tablet PCs,” for more details on configuring power options.
To help differentiate between turning off and shutting down a computer, Windows Vista
displays two different views for the Power button:
■ An amber Power button, depicting a shield with a line through the top of it, indicates
that the computer will turn off and enter the low-power sleep state.
■ A red Power button, depicting a shield with a line through the middle of it, indicates that
the computer will shut down and completely power off.
Because the computer is still drawing power in the sleep state, you should never install hardware inside the computer or connect devices to the computer when it is in the sleep state. The
only exception is for external devices that use USB or IEEE 1394 (FireWire) ports. You can
connect USB and FireWire devices without shutting down the computer.
14 Part I: Getting to Know Windows Vista
Shutting Down and Restarting Computers: What’s Changed
As mentioned earlier, turning off a computer running Windows Vista puts the computer in a
low-power sleep state instead of completely powering down the computer. To completely
power down the computer, you must shut it down. Shutting down the computer ensures that
the power to the computer is turned off.
Because of possible confusion regarding the sleep state and the power-down state, be sure to
unplug a computer running Windows Vista before installing or connecting devices. To shut
down a computer running Windows Vista, use one of the following techniques:
■ Click Start, click the Options button to the right of the Power and Lock buttons, and
then click Shut Down.
■ Press Ctrl+Alt+Del. The red (Shut Down) Power button should be displayed in the
lower-right corner of the window. Click the Power button.
Caution
USB/non-FireWire devices without first ensuring that the computer is completely powered
down. If the computer’s Power button is red and shows a shield with a line through the middle
of it, the Power button shuts the computer off and completely powers it down. If the computer’s Power button is amber and shows a shield with a line through the top of it, the Power
button turns off the computer and puts it in the low-power sleep state.
Do not install hardware inside a computer running Windows Vista or connect non-
To shut down and then restart a computer running Windows Visa, you can use either of the
following techniques:
■ Click Start, click the Options button to the right of the Power and Lock buttons, and
then click Restart.
■ Press Ctrl+Alt+Del. Click the Options button to the right of the Power button, and then
click Restart.
A restart is sometimes required to complete the installation of programs and automatic
updates. A restart might also be required to finalize a system configuration change.

Chapter 2
Working with Windows Vista
In this chapter:
Getting Around in the Windows Vista Taskbar . . . . . . . . . . . . . . . . . . . . . . . . . . . . . 18
Navigating the Start Menu: What’s Changed . . . . . . . . . . . . . . . . . . . . . . . . . . . . . . 22
Using the All Programs Menu: What’s Changed. . . . . . . . . . . . . . . . . . . . . . . . . . . . 27
Navigating Control Panel: What’s Changed. . . . . . . . . . . . . . . . . . . . . . . . . . . . . . . . 28
As you learned in Chapter 1, “Introducing Windows Vista,” Microsoft Windows Vista is
different from earlier versions of Windows, especially when it comes to user accounts
and shutdown procedures. Prior to performing tasks that require administrator privileges, users are prompted for a password if they are using a standard user account or
confirmation if they are using a computer administrator account. When you turn off
a computer running Windows Vista, the computer typically enters a sleep state instead
of completely powering down. You must, in fact, shut down the computer to power
down completely. Beyond these important differences, you’ll find many other interface
differences between Windows Vista and earlier versions of Windows, and examining
these differences so that you can effectively work with Windows Vista is the subject of
this chapter.
The primary means of getting around in Windows Vista are the taskbar and the menu
system. The entryway to the menu system is the Start button on the taskbar. You use the
Start button to display the Start menu, which in turn allows you to run programs, open
folders, get help, and find the items you want to work with. From the Start menu, you can
access the All Programs menu, which provides access to all the programs and tools on the
computer and to Control Panel, which provides access to utilities for working with system
settings.
With all the new taskbar and menu features, you might want to finally stop using Classic View
for Control Panel, Classic Start menu, and double-click to open an item. Why? The answer is
twofold. First, it’s so much easier to get around in Windows Vista using the standard configuration, and going back to the classic configuration means losing some of the most powerful
features in Windows Vista. Second, it’s so much more intuitive to use single-clicking to open
items because Windows Vista makes extensive use of links in its consoles and dialog boxes,
and these links open items with single clicks.
17

18 Part II: Essential Features in Windows Vista
Note This book was written using the Windows Vista Beta to provide an early introduction
to the operating system. More so than any other area of Windows Vista, the security features
discussed in this book are subject to change. Some of the features might not be included in the
final product, and some of the features might be changed substantially.
Getting Around in the Windows Vista Taskbar
In Windows Vista, by default, the taskbar is locked so that it is always displayed, as shown in
Figure 2-1. The Start button, shown on the far left, is one of the key features on the taskbar.
Quick Launch items are displayed to the right of the Start button, followed by buttons for running programs, and then the notification area. Each of these areas has feature enhancements,
which are discussed in the sections that follow.
Figure 2-1 The taskbar in Windows Vista
Working with the Quick Launch Toolbar
By default, the Quick Launch toolbar displays a quick access button for the desktop. A new
feature in Windows Vista is the ability to add any program directly to the Quick Launch
toolbar from the Start menu. To do this, click the Start button, navigate to the program
on the Start menu that you want to be able to access quickly, and then right-click the
program name. Last, select Add To Quick Launch to add the program to the Quick Launch
toolbar.
The Quick Launch toolbar is displayed by default. If the Quick Launch toolbar isn’t displayed
and you want to display it, right-click the Start button, and then select Properties. In the Taskbar And Start Menu Properties dialog box, click the Taskbar tab, and then select the Show
Quick Launch check box.
Using Taskbar Thumbnails, Windows Flip, and
Windows Flip 3D
In earlier versions of Windows, the taskbar displayed a button for each running program.
Clicking the button allowed you to display the program window in front of all other
windows. Windows XP included an enhancement that grouped similar taskbar buttons.
For example, if you opened eight folders in Windows Explorer, these items would be
grouped together under one taskbar button. Clicking the taskbar button would then
display a dialog box with an entry for each folder window, allowing you to select which
folder window to display.

Chapter 2: Working with Windows Vista 19
Windows Vista significantly enhances the taskbar by modifying taskbar grouping and also
providing the following taskbar improvements:
■ Live taskbar thumbnails
■ Windows Flip
■ Windows Flip 3D
Using Live Taskbar Thumbnails
When you move the mouse pointer over a taskbar button, Windows Vista displays a live
thumbnail of the window, showing the content of that window. The thumbnail is displayed
regardless of whether the window is minimized and regardless of the type of content. If
the content in the window is being updated, such as with a running process or a video, the
thumbnail continuously updates to reflect the live state of the window. For grouped taskbar
buttons, Windows displays a thumbnail of the most recently opened window and makes
the thumbnail appear to include a group of windows.
Using Windows Flip
When you press Alt+Tab, Windows Vista displays a flip view containing live thumbnails of all
open windows, as shown in Figure 2-2. Holding down the Alt key keeps the flip view open.
Pressing Tab while holding down the Alt key allows you to cycle through the windows.
Because the thumbnails are live views, the thumbnails continuously update to reflect their
current state regardless of the type of content. When you release the Alt key, the currently
selected window is brought to the front. You can also select a window and bring it to the front
by clicking the thumbnail.
Figure 2-2 Working with Windows Flip view
Using Windows Flip 3D
When you press the Windows logo key and Tab, Windows Vista displays a 3D flip view. As
Figure 2-3 shows, the Flip 3D view provides a skewed 3D view of all open windows. Holding
down the Windows logo key keeps the Flip 3D view open. Pressing the Tab key while holding
down the Windows logo key allows you to cycle through the windows. Because the 3D window views are live, the windows continuously update to reflect their current state regardless

20 Part II: Essential Features in Windows Vista
of the type of content. When you release the Windows logo key, the currently selected window is brought to the front. You can also select a window and bring it to the front by clicking
the 3D window view.
Figure 2-3 Working with Windows Flip 3D view
Working with the Notification Area
The notification area is on the far right on the taskbar. By default, the notification area is
divided into two areas:
■ An area for standard notification icons, such as those used by programs you’ve
installed
■ An area for system notification icons, such as those for the clock, volume, network,
and power
Unlike earlier versions of Windows, notification area configuration in Windows Vista is controlled on a separate tab in the Taskbar And Start Menu Properties dialog box. To modify the
default settings, right-click the Start button, and then select Properties. In the Taskbar And
Start Menu Properties dialog box, click the Notification Area tab. You can then manage how
notification icons are used.
You can display the date and time by clicking the clock in the notification area. As Figure 2-4
shows, the system clock is significantly different from earlier versions of Windows. You can
use the date and time to view the current month’s calendar and browse a month-to-month

Chapter 2: Working with Windows Vista 21
calendar. Time can be shown with a traditional clock or a digital clock, and if you click the
Date And Time Settings link, you can add up to two additional clocks for other time zones.
Figure 2-4 The system clock
From the experts
New ways to change the system time
Getting multiple clocks to display different time zones simultaneously is definitely
pretty cool, and definitely something a lot of people have asked me about. If you use
the time display as a cheap calendar—like I often do—you’ll be happy to know that
Windows Vista includes a full-blown calendaring program called Windows Calendar,
which you can start by clicking Start, pointing to All Programs, and clicking Windows
Calendar. Changing the system time is more involved than it used to be, however,
and you still need to have administrator privileges.
To change the time, you must click the clock in the notification area on the taskbar
and then click the Date And Time Settings link. In the Date And Time Properties
dialog box, click the Change Date And Time button to change the date and time, or
click Change Time Zone to change the time zone. After you change the date and
time or the time zone and click OK twice, the time is updated to reflect your
changes.
By default, Windows Vista automatically synchronizes system time with an
Internet time server once a week. The goal of synchronization is to ensure that system
time is as accurate as possible. By default, the time server used for synchronization is
time.windows.com. Although other time servers can be selected, businesses with networks might prefer to have computers synchronize with internal time servers. For more
information about configuring time and using Internet time servers, refer to Microsoft
Windows Vista Administrator’s Pocket Consultant (Microsoft Press, 2006).
William Stanek
Author, MVP, and series editor for the Microsoft Press Administrator’s Pocket Consultants

22 Part II: Essential Features in Windows Vista
Navigating the Start Menu: What’s Changed
Clicking the Start button on the taskbar displays the Start menu. You can also display the
Start menu by pressing the Windows logo key. As with Windows XP, the Start menu in
Windows Vista has two views:
■ The Start menu (or Simple Start menu, as it is sometimes referred to) is the default view
which provides easy access to programs, folders, and search.
■ The Classic Start menu is an alternative view which provides the look and functionality
of the Start menu in Windows 2000 and earlier versions of Windows.
The Start menu, shown in Figure 2-5, has three key areas:
■ Programs list Displays recently used programs and programs that have been pinned to
the Start menu. By default, Internet Explorer and Windows Mail (previously called
Microsoft Outlook Express) are pinned to the Start menu, and up to eight recent programs are displayed as well.
■ Search box Allows you to search your entire computer for files, folders, or programs. To
use the Search box, open the Start menu, type your search text, and then press Enter.
The Clear button appears when you type your search text. Click the Clear button to clear
the search results and return to the normal view.
■ Right pane Provides access to commonly used folders and features. The right pane also
provides the Power button (puts the computer in sleep mode or shuts it down, depending
on the system configuration), the Lock button (locks the computer), and the Options button (displays the following options: Switch User, Log Off, Lock, Shut Down, and Restart).
Figure 2-5 The Start menu

Chapter 2: Working with Windows Vista 23
Managing Programs List on the Start Menu
The left pane on the Start menu displays recently used programs and programs that have
been pinned to the Start menu. By default, Internet Explorer and Windows Mail (previously
called Outlook Express) are pinned to the Start menu, and up to eight recent programs are
displayed as well.
When you are working with the standard Start menu, you can modify the programs list in several ways. To modify the default settings, right-click the Start button, and then select Properties. In the Taskbar And Start Menu Properties dialog box, the Start Menu tab is selected by
default. Click Customize, and then set the Number Of Recent Programs To Display option as
appropriate. By configuring the Show On Start Menu options, you can stop displaying links
for the Web browser and mail program or configure a different browser and mail program
to which you want to link.
If you want to provide quick access to programs, you can pin those programs to the Start
Tip
menu. To do this, click the Start button, navigate to the program you want to be able to quickly
access, and then right-click the program name. Select Pin To Start Menu to add the program
to the Start Menu.
Using the Right Pane on the Start Menu
The right pane on the Start menu provides access to commonly used folders and features. The
right pane also provides the Power button (puts the computer in sleep mode or shuts it down,
depending on the system configuration), the Lock button (locks the computer), and the
Options button (displays the following options: Switch User, Log Off, Lock, Restart, Sleep,
and Shut Down).
Important but subtle interface changes are reflected in the right pane of the Start menu. By
default, Windows XP and Windows Vista store user documents in different ways:
■ In Windows XP, user documents are stored by default in personal folders under
%SystemDrive%\Documents and Settings\%UserName%. A user’s personal folder
contains a My Documents folder, which in turn contains other folders, such as My
Pictures and My Music. Windows XP also has folders named My Computer and
My Recent Documents.
■ In Windows Vista, user documents are stored by default in personal folders under
%SystemDrive%\Users\%UserName%. A user’s personal folder contains separate
Contacts, Desktop, Documents, Pictures, Links, Downloads, and Favorites folders.
Windows Vista also has folders named Computer and Recent Documents.
Because of the different way that Windows Vista stores user documents, the My, My, My is gone,
gone, gone from the interface, which might be just as well. C:\Users\William\Documents is

24 Part II: Essential Features in Windows Vista
much easier to use and reference than C:\Documents and Settings\William\My Documents.
That said, however, Windows XP and Windows Vista both track the location of the currently
logged on user’s profile folder by using the %UserProfile% environment variable.
From the experts
Using the command line
The Windows Vista changes to where documents, pictures, and user profiles are located
also make it easier to navigate the file system from the command line. For example,
when you open a command prompt in Windows XP, your current directory is your user
profile directory %UserProfile%, which is C:\Documents and Settings\Mitch Tulloch
on my computer. If I want to change my current directory to where my pictures are
located, I have to type the following:
cd "My Documents\My Pictures"
Note the need to enclose the path in quotes—these are needed because of the spaces
present. In Vista however, I need to type only this:
cd Pictures
Less typing means more productivity. In fact, I might need to type only cd p and press
TAB a few times until
for the Windows XP example, but you’d have to do it in two steps. That is, type
(TAB, TAB, TAB… and press Enter) followed by cd m (TAB... and press Enter). The
bottom line, though, is that the fewer times you need to enclose paths in quotes, the
easier it becomes to navigate from the command line. Now if only they had changed
the Program Files directory into just Programs!
cd Pictures appears, and then press Enter. You can do the same
cd m
Mitch Tulloch
Author and MVP—For more information, see http://www.mtit.com.
Within the newly reorganized structure of personal folders, a user’s document and data folders are stored as top-level folders within a personal folder. Thus rather than the Documents
folder containing a number of subfolders for pictures, music, and so on, the Documents folder
is meant to contain only documents. Reorganizing the structure of personal folders should
make it easier to manage and back up a user’s personal data.
Other important changes are reflected in the right pane as well. To understand these changes,
let’s review the option buttons provided in the right pane. From top to bottom, the option
buttons are as follows:
■ Current user The name of the currently logged on user. Clicking this option opens the
user’s personal folder in Windows Explorer.
■ Documents Opens the %UserProfile%\Documents folder in Windows Explorer.
■ Pictures Opens the %UserProfile%\Pictures folder in Windows Explorer.

Chapter 2: Working with Windows Vista 25
■ Music Opens the %UserProfile%\Music folder in Windows Explorer.
■ Games Opens the %ProgramFiles\Microsoft Games folder in Windows Explorer. The
Games item is not listed in the Start menu for business editions of Windows Vista.
In Windows Vista Home Premium, games available include Chess Titans, Hearts,
Tip
Minesweeper, Solitaire, FreeCell, Mahjong Titans, Purble Place, and Spider Solitaire. Windows Vista Home Basic has all the games except Chess Titans and Mahjong Titans. Saved
data for games is stored in the %UserProfile%\Saved Games folder. Click the Options menu
to configure the Set Up Game Updates And Options dialog box options to keep games up
to date automatically, clear history details on the most recently played games, and unhide
games. Group Policy can be used to control the availability of the Games option.
■ Search Opens a local computer search in Windows Explorer. Use the Search In list to
select or specify an alternative search location.
■ Recent Items A menu view that lists recently opened files.
■ Computer Opens a window where you can access hard disk drives and devices with
removable storage.
The Computer window is the fastest way to open Windows Explorer and access a
Tip
computer’s disks. In the Computer window, double-click a disk to browse its contents. By
default, the Search box in Windows Explorer performs localized searches of the currently
open folder and its subfolders.
■ Network Opens a window where you can access the computers and devices on your net-
work. Also provides quick access to Network Center and the Connect To A Network wizard.
■ Connect To Displays the Connect To A Network dialog box for connecting to wireless
networks.
■ Control Panel Opens Control Panel, which provides access to system configuration
and management tools.
■ Default Programs Displays the Default Programs window, which lets you choose the
programs that Windows Vista uses by default for documents, pictures, and more. You
can also associate file types with programs and configure AutoPlay settings.
■ Help And Support Displays the Windows Help And Support console, which you can
use to browse or search help topics.
Several additional options can be added to the right pane, including:
■ Administrative Tools Clicking this option displays a list of system administration tools.
To display the Administrative Tools option on the Start menu, right-click the Start button, and then select Properties. In the Taskbar And Start Menu Properties dialog box,
click the Customize button on the Start Menu tab. In the Customize Start Menu dialog

26 Part II: Essential Features in Windows Vista
box, scroll to the end of the available options. For System Administration Tools, select
Display On The All Programs Menu And The Start Menu.
■ Printers Opens a Printers window, which lists and provides access to currently config-
ured printers.
■ Run Displays the Run dialog box, which can be used to run commands. To display
the Run option, right-click the Start button, and then select Properties. In the Taskbar
And Start Menu Properties dialog box, click the Customize button on the Start Menu
tab. In the Customize Start Menu dialog box, scroll down and then select the Run
Command check box.
Note
to use the Run option. For example, to open a Microsoft Management Console, you can click
the Start button, type MMC, and then press Enter. You don’t need to click in the Search box
before you begin typing. Pressing Enter opens the first item in the results list. If for some reason
MMC isn’t the first item, you would need to click MMC in the results list rather than pressing
Enter.
Because the Search box can be used to open and run commands, you might not need
Using the Search Box on the Start Menu
The Search box on the Start menu allows you to search your entire computer for files, folders,
or programs. To use the Search box, open the Start menu, type your search text. Search results
are displayed in the left pane of the Start menu. Clicking an item in the results list opens
that item. To clear the search results and return to normal view, click the Clear button to the
right of the Search box or press the Esc key.
Note
to click in the Search box before you begin typing. Just type your search text.
Computer searches are performed by Windows Search Service. Windows Search Service
searches the entire computer using the search text you’ve specified. The search proceeds on
several levels. Windows Search Service:
Because the Search box is the only text entry field on the Start menu, you don’t need
■ Matches the search text to words that appear in the title of any program, file, or folder
and then returns any matches found.
■ Matches the properties of programs, files, and folders as well as the contents of text-
based documents.
■ Looks in the Favorites and History folders for matches.
Because Windows Search Service indexes content and caches properties as part of its normal
processes, results typically are returned quickly. You can configure the types of items searched
in the Start Menu Properties dialog box.

Chapter 2: Working with Windows Vista 27
Tip Windows Search Service is the next generation of the Indexing Service included in
earlier versions of Windows. By default, the service indexes the documents contained in the
%SystemDrive%\Users folders. The Indexing And Search Options utility in Control Panel can be
used to view indexing status and to configure indexing options. By default, index data is stored
in the %SystemRoot%\ProgramData\Microsoft\USearch folder.
Windows Vista can perform several other types of searches as well:
■ Local Folder Search When you open a folder, you’ll find a Search text box in the upper-
right corner of the Windows Explorer window. By default, typing search text in this text
box and pressing Enter performs localized searches of the currently open folder and
its subfolders. Unlike the Search box on the Start menu, you must click in this Search
text box prior to entering your search text. You can use the Search In list to specify
alternative search locations.
■ Internet Search Click the Options button to the right of the Search text box, and
then select the Search The Internet option. Search The Internet uses the computer’s
default search provider to search the Internet using the search text you’ve provided.
The default search provider is MSN Search. You can set the default search provider
using the Internet Options utility in Control Panel.
Using the All Programs Menu: What’s Changed
As with earlier versions of Windows, when you want to work with programs installed on a
computer running Windows Vista, you’ll use the All Programs menu. Like many aspects of
Windows Vista, the All Programs menu has changed as well. When you click the Start button
and then point to All Programs, you’ll see a list of programs installed on the computer, followed by a list of folders.
Depending on the system configuration, the programs you’ll see include:
■ Contacts Allows you to manage personal and professional contacts.
■ Media Center Allows you to manage home entertainment options for pictures, videos,
movies, TV, and music.
■ Program Defaults Allows you to choose default programs for certain activities.
■ Windows Calendar Allows you to manage appointments and tasks by using a calendar.
You can publish your calendar to the Internet or to an organization’s intranet, and you
can subscribe to other people’s calendars as well.
■ Windows Collaboration Allows you to set up or join a Windows Collaboration session for
sharing ideas, presentations, and documents. Windows Collaboration uses the People Near
Me feature for sharing information. Windows Collaboration also requires that you enable
file synchronization and configure a Windows Firewall exception. You will be prompted to
automatically configure these options the first time you run Windows Collaboration.

28 Part II: Essential Features in Windows Vista
■ Windows Defender Allows you to protect the computer from malicious software (also
known as malware) by automatically blocking and locating spyware and other types of
malicious programs.
■ Windows Fax and Scan Allows you to manage incoming faxes and to send faxes. Faxes
can be received and sent over TCP/IP as well.
■ Windows Mail Allows you to send and manage e-mail. Windows Mail is the replace-
ment for Outlook Express.
■ Windows Media Player Allows you to play and manage music.
■ Windows Movie Maker Allows you to create and manage movies using still images and
videos.
■ Windows Photo Gallery Allows you to view and manage pictures and videos. You can
organize your media using folders, create slideshows, and add tags for quick searching.
■ Windows Update Allows you to manage the Windows Update feature.
The folders on the All Programs menu also have changed. The top-level folders are:
■ All Programs, Accessories Includes the most commonly used accessories, including
Calculator, Command Prompt, Connect To A Network Projector, Run, Sync Center,
Windows Explorer, and Windows Sidebar.
■ All Programs, Accessories, Ease Of Access Includes the accessibility tools, such as Mag-
nifier, Narrator, On-Screen Keyboard, and Speech Recognition.
■ All Programs, Accessories, System Tools Includes commonly used system tools, such as
Backup, Disk Cleanup, System Restore, and Windows Easy Transfer. Windows Easy
Transfer replaces the Files And Settings Transfer Wizard in Windows XP. This folder
also includes Internet Explorer (No Add-ons), which is a version of Internet Explorer
without browser extensions or other add-ons.
■ All Programs, Games Includes games that might be available, depending on the system
configuration.
■ All Programs, Maintenance Includes maintenance tools, such as Backup And Restore
Center, Problem Reports And Solutions, and Windows Remote Assistance.
■ All Programs, Startup Lists programs that are set to start up automatically.
It might take you a while to get used to the changes to the All Programs menu. But once you
get used to the changes, navigating the menus will seem like second nature.
Navigating Control Panel: What’s Changed
Clicking the Start button on the taskbar and then clicking Control Panel displays Control
Panel. You can also display Control Panel in any Windows Explorer view by clicking the
leftmost option button in the Address bar and then selecting Control Panel. As with

Chapter 2: Working with Windows Vista 29
Windows XP, Control Panel in Windows Vista has two views:
■ Category Control Panel, or simply Control Panel, is the default view and provides access
to system utilities by category and task.
■ Classic Control Panel is an alternative view that provides the look and functionality of
Control Panel in Windows 2000 and earlier versions of Windows.
With Windows Vista, Microsoft finally got the marriage of category, task, and utility access
right in the default Control Panel view—so much so, in fact, that you might want to say goodbye to Classic Control Panel forever. Here’s how the Category Control Panel works now:
■ Control Panel opens as a console in which 10 categories of utilities are listed. Each cate-
gory includes a top-level link, and under this link are several of the most frequently performed tasks for the category.
■ Clicking a category link provides a list of utilities in that category. Each utility listed
within a categor y includes a link to open the utility, and under this link are several of the
most frequently performed tasks for the utility.
■ In Category Control Panel view, all utilities and tasks run with a single click. When
you’re browsing a category, the left pane of the console includes a link to take you to the
Control Panel Home page, links for each category, and links for recently performed
tasks. It’s all very efficient, and very easy to use.
Figure 2-6 shows the Control Panel Home page. From any category page, you can access the
home page by clicking the Control Panel Home link in the upper-left corner of the Control
Panel console.
Figure 2-6 Control Panel

30 Part II: Essential Features in Windows Vista
Because menu options and Control Panel options open with a single click by default, you
might want to change the computer to use single-click to open items. This should avoid confusion over when you need to single-click or double-click.
To configure single-clicking for opening items, follow these steps:
1. Click the Start button, and then click Control Panel.
2. In Control Panel, click Appearance And Personalization.
3. Under Folder Options, click Specify Single- Or Double-Click To Open.
4. In the Folder Options dialog box, select Single-Click To Open An Item (Point To Select),
and then click OK.
Once you have everything set to open with a single click, you’ll find that working with Control
Panel and Windows Explorer is much more intuitive.

Chapter 9
Protecting User Accounts and
Using Parental Controls
In this chapter:
Introducing User Account Control . . . . . . . . . . . . . . . . . . . . . . . . . . . . . . . . . . . . . . 129
Navigating the User Account Changes. . . . . . . . . . . . . . . . . . . . . . . . . . . . . . . . . . . 132
Handling User Account Control . . . . . . . . . . . . . . . . . . . . . . . . . . . . . . . . . . . . . . . . 135
Introducing Parental Controls . . . . . . . . . . . . . . . . . . . . . . . . . . . . . . . . . . . . . . . . . . 139
Microsoft Windows Vista includes many features to help you maintain control over your computer in response to constantly evolving security threats. Traditionally, security threats have
been combated with software tools and operating system components, such as firewall and
spyware software, and for this reason, Windows Vista includes Windows Firewall, Windows
Defender, and many other security features. Beyond the traditional, Windows Vista also
provides a fundamental change in the way security is implemented and managed in the
form of User Account Control (UAC) and parental controls.
User Account Control dramatically changes the way user accounts are configured and used
and also changes the way applications and system components make use of system-level privileges. Parental controls provide features to help keep your family safe on the Internet. These
same features can be extended to organizations with youth volunteers and to organizations
that provides services for youths.
Note
to the operating system. More so than any other area of Windows Vista, the security features
discussed in this book are subject to change. Some of the features might not be included in
the final product, and some of the features might be changed substantially.
This book was written using the Windows Vista Beta to provide an early introduction
Introducing User Account Control
User Account Control (UAC) is designed to address the need for a solution that is resilient to
attack from an ever-growing array of malicious software (also called malware) programs.
For those who have installed and used an earlier version of Microsoft Windows, UAC
represents a significant change in the way user accounts are used and configured. It does this
by reducing the need for administrator privileges and by carefully defining the standard user
and administrator user modes.
129

130 Part III: Securing Windows Vista
Reducing the Need for Administrator Privileges
In earlier versions of Windows, most user accounts are configured as members of the local
administrator’s group to ensure that users can install, update, and run software applications
without conflicts and to perform common system-level tasks. In Windows XP and earlier versions of Windows, some of the most basic tasks, such as clicking the taskbar clock to view a
calendar, require administrator privileges, and this is why many user accounts are configured
as local administrators. Unfortunately, configuring user accounts as local administrators
makes individual computers and networks vulnerable to malicious software and also makes
maintaining computers more difficult, as users might be able to make unapproved system
changes.
Note
administrator. Not only does this allow malicious software to install itself, it also allows malicious software to damage files, change the system configuration, and steal your confidential
data. Some organizations try to combat malicious software by locking down computers and
requiring users to operate in standard user mode. While this can solve some problems with
malicious software, it can also seriously affect productivity, as many applications designed
for Windows XP will not function properly without local administrative rights. Why? Typically,
Windows XP applications use local administrative rights to write to system locations during
normal operations.
Malicious software programs exploit the system-level privileges provided to the local
Through User Account Control, Windows Vista provides the architecture for running user
accounts with standard user privileges while eliminating the need for using administrator
privileges to perform common tasks. This fundamental shift in computing serves to better
protect computers against malicious software while ensuring that users can perform their
day-to-day tasks.
User Account Control is an architecture that includes a set of infrastructure technologies.
These technologies require all users to run applications and tasks with a standard user
account, limiting administrator-level access to authorized processes. Because of UAC,
computers can be locked down to prevent unauthorized applications from installing and to
stop standard users from making inadvertent changes to system settings.
Defining the Standard User and Administrator User Modes
In Windows Vista, there are two levels of users:
■ Administrator users Administrator users run applications with an administrator account
and are members of the local Administrators group. When an administrator user starts
an application, her access token and its associated administrator privileges are applied to
the application at run time. This means that an application started by a member of the
local Administrators group runs with all the rights and privileges of a local administrator.

Chapter 9: Protecting User Accounts and Using Parental Controls 131
■ Standard users Standard users run applications with a user account and are members
of the Users group. When a user starts an application, her access token and its
associated privileges are applied to the application at run time. This means that an
application started by a member of the Users group runs with the rights and privileges
of a standard user.
In Windows Vista, many common tasks can be performed with a standard user account, and
users should log on using accounts with standard user privileges. Whenever a user attempts
to perform a task that requires administrator permissions, the user sees a Windows Security
dialog box containing a warning prompt. The way the prompt works depends on whether
the user is logged on with an administrator account or a standard user account:
■ Users with administrator permissions are asked for confirmation.
■ Users with standard accounts are asked to provide a password for an administrator
account.
Administrator users run as standard users until an application or system component that
requires administrative credentials requests permission to run. Windows Vista determines
whether a user needs elevated permissions to run a program by supplying most applications
and processes with a security token. Windows Vista uses the token as follows:
■ If an application or process has an “administrator” token, elevated privileges are
required to run the application or process, and Windows Vista will prompt the user for
permission confirmation prior to running the application.
■ If an application or process has a “standard” token or an application cannot be
identified as an administrator application, elevated privileges are not required to run the
application or process, and Windows Vista will start it as a standard application by default.
By requiring that all users run in standard user mode and by limiting administrator-level
access to authorized processes, UAC reduces the exposure and attack surface of the
operating system. The process of getting an administrator or standard user’s approval
prior to running an application in administrator mode and prior to performing actions that
change system-wide settings is known as elevation, and this feature is known as Admin
Approval Mode. Elevation enhances security and reduces the impact of malicious software by:
■ Ensuring that users are notified when they are about to perform an action that could
impact system settings, such as installing an application.
■ Eliminating the ability for malicious software to invoke administrator privileges without
a user’s knowledge.
■ Preventing users, and the applications they are running, from making unauthorized or
accidental system-wide changes to operating system settings.
■ Protecting administrator applications from attacks by standard applications and
processes.

132 Part III: Securing Windows Vista
Elevation is a new feature and a permanent change to the Windows operating system.
Elevation affects not only users and administrators, but developers as well. Developers
Tip
must design their programs so that everyday users can complete basic tasks without requiring
administrator privileges. A key part of this is determining which of the two levels of privilege
their applications need to complete specific procedures. If an application doesn’t need administrator privileges for a task, it should be written to require only standard user privileges. As an
example, a standard user–compliant application should write data files only to a nonsystem
location, such as the user profile folder.
Navigating the User Account Changes
User Account Control is designed to make it easier to protect computers while ensuring that
users can perform the tasks they need to perform. As part of the restructuring for UAC, many
changes have been made to user accounts and privileges. These changes are designed to
ensure that there is true separation of user and administrator tasks, and that any tasks that
have minimal system impact and potential for risk can be performed using standard user
accounts. Administrators also have the ability to restrict privileges if they prefer.
Understanding Standard User Privileges
In Windows Vista, standard user accounts can be used to perform some tasks that previously
required administrator privileges. New permissions for standard user accounts in Windows
Vista include:
■ Viewing the system clock and calendar and changing the time zone.
■ Changing the display settings and installing fonts.
■ Changing power management settings.
■ Adding printers and other devices (where the required drivers are installed on the com-
puter or are provided by an IT administrator).
■ Downloading and installing updates using User Account Control–compatible installers.
■ Creating and configuring virtual private network (VPN) connections. A VPN connection
helps you establish a secure connection to a private network over the public Internet.
■ Installing Wired Equivalent Privacy (WEP) to connect to secure wireless networks. WEP
is a security protocol that provides a wireless network with the same level of security
as a wired local area network (LAN).
Additionally, some maintenance tasks are now automatically scheduled processes, so users
will not have to initiate these processes manually. Processes that are scheduled to run
automatically include:
■ CareTaker Performs automated maintenance of the computer.

Chapter 9: Protecting User Accounts and Using Parental Controls 133
■ Consolidator Performs automated consolidation of the computer’s event logs.
■ AutomaticDefrag Performs automatic defragmentation of the computer’s hard disks.
■ AutomaticBackup Performs automatic backup of the computer (once configured).
In earlier versions of Windows, nonadministrators couldn’t easily tell whether they were
allowed to perform an action. To make it easier for users to determine whether they can perform a task, Windows Vista uses a shield icon to identify tasks that require administrator
privileges.
In Figure 9-1, two tasks are preceded by a shield icon: Change Settings and Change Product
Key. These tasks require administrator privileges.
Figure 9-1 The shield icon indicates tasks that require administrator privileges
From the experts
Only legacy applications need the Power Users group
The terms legacy application and legacy operating systems take on new meanings with the
introduction of Windows Vista. In Windows Vista, legacy application refers to an application developed for Windows XP or an earlier version of Windows, and legacy operating system refers to an operating system using Windows XP or an earlier version of
Windows.
In earlier versions of Windows, the Power Users group was designed to give users
specific administrator privileges to perform basic system tasks while running

134 Part III: Securing Windows Vista
applications. As standard user accounts can now perform most common configuration
tasks, Windows Vista does not require the use of the Power Users group.
Further, while Windows Vista maintains the Power Users group for legacy application
compatibility, applications written for Windows Vista do not require the use of the
Power User mode. Legacy applications that require administrative privileges use file and
registry virtualization; compliant applications use standard user mode and adminis
trator mode, as discussed previously. For more information about legacy application
compatibility, refer to the Microsoft Windows Vista Administrator’s Pocket Consultant
(Microsoft Press, 2006).
William Stanek
Author, MVP, and series editor for the Microsoft Press Administrator’s Pocket Consultants
Understanding File System and Registry Virtualization
Windows Vista uses application security tokens to determine whether elevated privileges are
required to run applications or processes. With applications written for Vista, applications
either have an “administrator” token or a “standard” token. If an application has an “administrator” token, it requires elevated privileges. If an application has a “standard” token, it doesn’t
require elevated privileges.
The token is a reflection of the required level of privileges. A standard user mode–compliant
application should write data files only to nonsystem locations. If the application requires
administrator privileges to perform a specific task, the application should request elevated
privileges to perform that task. For all other tasks, the application should not run using
elevated privileges.
Applications not written for the Windows Vista new user account architecture are considered
legacy applications. Windows Vista starts these applications as standard user applications by
default and uses file and registry virtualization to give legacy applications their own
“virtualized” views of resources they are attempting to change. When a legacy application
attempts to write a system location, Windows Vista gives the application its own private copy
of the file or registry value so that the application will function properly. All attempts to write
to protected areas are logged by default as well.
Note
port Windows Vista’s new user account architecture, the revised versions should be deployed to
ensure compliance with User Account Control and to safeguard the security of the computer.
Virtualization is not meant to be a long-term solution. As applications are revised to sup-

Chapter 9: Protecting User Accounts and Using Parental Controls 135
Handling User Account Control
Applications written for Windows Vista use User Account Control to reduce the attack surface
of the operating system. They do this by reducing the basic privileges granted to applications
and by helping to prevent unauthorized applications from running without the user’s consent. User Account Control makes it harder for malicious software to take over a computer by
ensuring that existing security measures are not unintentionally disabled by standard users
running in administrator mode. By helping to ensure that users do not accidentally change
settings, User Account Control reduces the cost of managing computers and provides a more
consistent environment that should also make troubleshooting easier. User Account Control
also helps to control access to sensitive files and data by securing the Documents folder so
that other users cannot change, read, or delete files created by other users of the same
computer.
Applications that have been certified as compliant with the new Windows Vista architecture
will have the Windows Vista–Compliant logo. Although the logo indicates that the program
has been written to take advantage of User Account Control, it doesn’t mean that the program
will run only in standard user mode. Compliant applications run in the mode appropriate for
the functions that they perform and elevate privileges to perform tasks as necessary. Administrators can modify the way User Account Control works as required.
Understanding and Setting Run Levels
In Windows Vista, an application can indicate the specific permission level it needs to function so that it will perform only authorized functions, making the code less vulnerable to
exploits by malicious users or malicious software. A new feature in Windows Vista, called
Windows Vista Trust Manager, can use this information prior to installing an application to
determine whether to allow the application to be installed. If the application’s required permissions are determined to pose no risk, the application can be installed without generating
security alerts. However, if the application’s installer writes to sensitive areas or performs
tasks that could potentially harm the computer, Windows Vista displays security alerts
describing the potential dangers of installing the application and asking for confirmation
before proceeding.
Application Manifests and Run Levels are used to help track required privileges. Application
Manifests allow administrators to define the application’s desired security credentials and to
specify when to prompt users for administrator authorization to elevate privileges. If privileges
other than those for standard users are required, the manifest should contain runLevel
designations. These runLevel designations identify the specific tasks that the application
needs to elevate with an “administrator” token.

136 Part III: Securing Windows Vista
With User Account Control and Admin Approval Mode, you are prompted for consent prior
to performing any task that requires elevated permission, and the Windows Security dialog
box allows you to run the application on a one-time basis using elevated credentials. In the
Windows Security dialog box, click Allow to start the application using an administrator
account, or click an account, type the account’s password, and then click Submit to start the
application using a standard account.
Another way to use elevation is to mark an application or process to always run using elevated
credentials without prompting the user for consent. To do this, follow these steps:
1. Log on to the computer as a member of the local Administrators group.
2. By using the Start menu, locate the program that you want to run always using elevated
credentials.
3. Right-click the application’s shortcut icon, and then click Properties.
4. In the Properties dialog box, select the Compatibility tab, as shown in Figure 9-2.
Figure 9-2 Marking an application to always run elevated
5. Under Privilege Level, select the Run This Program As An Administrator check box.
6. Click OK.
Note
application is blocked from always running elevated, the application does not require administrative credentials to run, or you are not logged on as an administrator.
If the Run This Program As An Administrator option is unavailable, it means that the

Chapter 9: Protecting User Accounts and Using Parental Controls 137
Modifying User Account Control and Admin Approval Mode
Administrators can change the way User Account Control and Admin Approval Mode work in
several different ways. They can:
■ Disable running all users as standard users.
■ Disable prompting for credentials to install applications.
■ Change the elevation prompt behavior.
Each of these tasks is configured through Group Policy and can be configured on a per-computer basis through Local Group Policy or on a per-domain, per-site, or per-organizational-unit
basis through Active Directory Group Policy. The sections that follow focus on configuring
the related settings by using Local Group Policy.
Disabling Admin Approval Mode
By default, Windows Vista uses Admin Approval Mode to run programs for all users, including administrators, as standard users. This approach serves to better safeguard the computer
from malicious software by ensuring that any time programs need administrator privileges,
they must prompt the user for approval. To bypass the safety and security settings, you can
modify this behavior so that administrators run programs as administrators and standard
users run programs as standard users.
You can use the following procedure to disable Admin Approval Mode:
1. Log on to the computer as a member of the local Administrators group.
2. Click Start, point to All Programs, Accessories, and then click Run.
3. Type secpol.msc in the Open text box, and then click OK.
4. In the console tree, under Security Settings, expand Local Policies, and then select Secu-
rity Options.
5. Double-click User Account Control: Run All Administrators In Admin Approval Mode.
6. Click Disabled, as shown in Figure 9-3, and then click OK.
Figure 9-3 Disabling Admin Approval Mode

138 Part III: Securing Windows Vista
Disabling Credential Prompting for Application Installation
By default, Windows Vista prompts users for consent or credentials prior to installing applications using elevated permissions. If you don’t want users to have access to this prompt, you
can disable User Account Control: Detect Application Installations And Prompt For Elevation
under Security Options, and in this way block users from using this feature to install applications as administrators. This doesn’t, however, block users from using other techniques to
install applications as administrators.
You can use the following procedure to disable the User Account Control: Detect Application
Installations And Prompt For Elevation feature:
1. Log on to the computer as a member of the local Administrators group.
2. Click Start, point to All Programs, Accessories, and then click Run.
3. Type secpol.msc in the Open text box, and then click OK.
4. In the console tree, under Security Settings, expand Local Policies, and then select Secu-
rity Options.
5. Double-click User Account Control: Detect Application Installations And Prompt For
Elevation.
6. Click Disabled, and then click OK.
Changing the Elevation Prompt Behavior
By default, Windows Vista handles security prompts for standard users and administrator
users in different ways. Standard users are prompted for credentials. Administrators are
prompted for consent. Using Group Policy, you can change this behavior in several ways:
■ If you don’t want standard users to have access to this prompt, you can specify that
users shouldn’t see the elevation prompt, and in this way block users from using this
feature to run applications with elevated privileges. However, this doesn’t block users
from using other techniques to run applications as administrators.
■ If you want to require administrators to enter credentials, you can specify that adminis-
trators should be prompted for credentials rather than consent.
■ If you don’t want administrators to have access to this prompt, you can specify that
administrators shouldn’t see the elevation prompt, and in this way block administrators
from using this feature to run applications with elevated privileges. This doesn’t,
however, block administrators from using other techniques to run applications with
elevated permissions.
You can use the following procedure to configure the elevation prompt for standard users:
1. Log on to the computer as a member of the local Administrators group.
2. Click Start, point to All Programs, Accessories, and then click Run.

Chapter 9: Protecting User Accounts and Using Parental Controls 139
3. Type secpol.msc in the Open text box, and then click OK.
4. In the console tree, under Security Settings, expand Local Policies, and then select Secu-
rity Options.
5. Double-click User Account Control: Behavior Of The Elevation Prompt For Standard
Users.
6. You can now:
❑ Block the elevation prompt by selecting No Prompt in the drop-down list.
❑ Enable the elevation prompt by selecting Prompt For Credentials in the drop-
down list. (The default setting is Prompt For Credentials.)
7. Click OK.
You can use the following procedure to configure the elevation prompt for administrators:
1. Log on to the computer as a member of the local Administrators group.
2. Click Start, point to All Programs, Accessories, and then click Run.
3. Type secpol.msc in the Open text box, and then click OK.
4. In the console tree, under Security Settings, expand Local Policies, and then select Secu-
rity Options.
5. Double-click User Account Control: Behavior Of The Elevation Prompt For Administra-
tors In Admin Approval Mode.
6. You can now:
❑ Block the elevation prompt by selecting No Prompt in the drop-down list.
❑ Enable the elevation prompt to use consent by selecting Prompt For Consent in
the drop-down list. (The default setting is Prompt For Consent.)
❑ Require the elevation prompt to obtain credentials by selecting Prompt For Cre-
dentials in the drop-down list.
7. Click OK.
Introducing Parental Controls
Computer and Internet safety are major concerns. Many parents don’t want their children to
play certain types of games or access certain types of materials on the Internet. To help with
this issue, Windows Vista includes parental controls. Parental controls help keep your family
safe whether they are using the computer to play games or browsing the Web.
Getting Started with Parental Controls
The term parental controls is somewhat of a misnomer. Children and young adults use com-
puters at home, in school, at the library, and elsewhere, and keeping them safe in all of these

140 Part III: Securing Windows Vista
environments is what parental controls are all about. If you don’t want children and young
adults to play certain types of games or access certain types of materials on the Internet, you
can use parental controls to help control their access to the computer and to mature content.
You can set parental controls for standard user accounts on the local computer only. You cannot set parental controls for administrators, and you cannot set parental controls for domain
user accounts. Any user designated as an administrator on the local computer can configure
parental controls and view activity reports for users subject to parental controls.
You can access parental controls by completing the following steps:
1. Click Start, and then click Control Panel.
2. In a workgroup setting, click Set Up Parental Controls under the User Accounts And
Family Safety heading. In a domain setting, click Set Up Parental Controls under
the User Accounts heading.
3. On the main Parental Controls page, shown in Figure 9-4, you can now set up parental
controls.
Figure 9-4 Accessing parental controls
Parental controls are configured using general settings for the computer as a whole as well as
specific settings for individual users. General computer settings:
■ Control whether activity reports are active for specific users and how often you are
reminded to read activity reports.
■ Determine whether an icon is displayed in the system tray when parental controls are
running.
■ Determine the games rating system to use on the computer.

Chapter 9: Protecting User Accounts and Using Parental Controls 141
Individual user settings:
■ Control allowed Web sites and allowed types of content.
■ Set time limits for when the computer can be used.
■ Determine the types of games that can be played according to rating, content, or title.
■ Block specific programs by name.
Selecting a Games Rating System
Games rating systems, such as those used by the Entertainment Software Ratings Board
(ESRB), are meant to help protect children and young adults from specific types of mature
content in computer games and on the Internet. You can learn more about the available rating
systems and configure a default rating system to use by following these steps:
1. Click Start, and then click Control Panel.
2. In Control Panel, click Set Up Parental Controls under the User Accounts And Family
Safety category heading.
3. In the left panel of the main Parental Controls page, click Select A Games Rating System.
4. As Figure 9-5 shows, you can now review the games rating systems available. The default
rating system used might depend on the country or region settings for the computer.
Figure 9-5 Viewing and setting the games rating system to use
Tip When you click one of the links provided, the home page for the designated orga-
nization appears in Microsoft Internet Explorer. If you have questions about a rating
system, the organization’s Web site can answer them.

142 Part III: Securing Windows Vista
5. If you want to change the default rating system, click the rating system you want to use,
and then click OK. Otherwise, click the Back button to go back to the Parental Controls
page in Control Panel.
Configuring Notifications for Parental Controls
By default, when you configure parental controls, you are reminded weekly to read activity
reports, and users subject to parental controls see an icon in the system tray when parental
controls are running. If you want to change the way notification is handled, follow these steps:
1. Click Start, and then click Control Panel.
2. In Control Panel, click Set Up Parental Controls under the User Accounts And Family
Safety category heading.
3. In the left panel of the main Parental Controls page, click Notifications.
4. As Figure 9-6 shows, you can now specify how often you would like to be reminded to
read activity reports. You can specify that you want to be notified weekly, every two
weeks, monthly, or never.
Figure 9-6 Setting general notifications
5. If you want to hide the parental controls icon rather than display it in the system tray,
clear the Display An Icon In The System Tray When Parental Controls Are Running
check box.
6. Click OK.
Configuring Parental Controls for User Accounts
Any standard user account can be configured to use parental controls. Parental controls can
be used to control allowed Web sites and allowed types of content, set time limits for when the

Chapter 9: Protecting User Accounts and Using Parental Controls 143
computer can be used, determine the types of games that can be played, and block specific
programs by name. Parental controls can also be used to collect information about
computer usage.
You can enable and configure parental controls by following these steps:
1. Click Start, and then click Control Panel.
2. In Control Panel, click Set Up Parental Controls under the User Accounts And Family
Safety category heading.
3. On the Parental Controls page, click the user account for which you are configuring
parental controls.
Note
configure parental controls for local administrators.
Only local administrators can set and manage parental controls. You cannot
4. To turn on parental controls and enforce settings, select On, Enforce Current Settings, as
shown in Figure 9-7.
Figure 9-7 Enabling and configuring parental controls
5. To turn on activity reporting, select On, Collect Information About Computer Usage.
6. Web Restrictions determine allowed Web sites and allowed types of content. If you want
to enforce Web Restrictions, click Web Restrictions. On the Web Restrictions page,
shown in Figure 9-8, you can specify which parts of the Internet the user can access:
❑ Enable blocking by setting Do You Want To Block Some Web Content to Yes.
❑ Under Filter Web Content, choose a Web restriction level, and then select the con-
tent that you want to block.

144 Part III: Securing Windows Vista
❑ Click OK when you have finished.
Figure 9-8 Setting Web restrictions
7. Time Limits specify the times when the computer can be used. If you want to enforce
Time Limits, click Time Limits on the User Controls page. On the Time Limits page,
shown in Figure 9-9, you can specify what times you allow and what times you block:
❑ Click and drag over allowed hours to change them to blocked hours.
❑ Click and drag over blocked hours to change them to allowed hours.
❑ Click OK when you have finished.
Figure 9-9 Setting time limits

Chapter 9: Protecting User Accounts and Using Parental Controls 145
8. Game Controls determine the types of games that can be played. If you want to control
the types of games that can be played, click Games on the User Controls page. On the
Game Controls page, shown in Figure 9-10, you can specify which types of games the
user can play:
❑ Block all game play by setting Can <…> Play Games? to No.
❑ Block or allow games by rating and content types by clicking Set Game Ratings,
choosing which game ratings are okay for the user to play, and then clicking OK.
❑ Block or allow specific games by clicking Block Or Allow Specific Games, choosing
allowed or blocked games, and then clicking OK.
❑ Click OK when you have finished.
Figure 9-10 Setting game controls
9. Application Restrictions determine which programs can be run by the user. If you want
to control application usage, click Block Specific Programs on the User Controls page.
On the Application Restrictions page, shown in Figure 9-11, you can specify which types
of applications can be run:
❑ Allow all programs to be run by selecting <…> Can Use All Programs.
❑ Restrict all programs except those specifically allowed by selecting <…> Can Only
Use The Programs I Allow In This List.
❑ Set allowed programs using the options provided. If a program you want to allow
isn’t listed, click Browse, and then use the Open dialog box to select that program
for use.
❑ Click OK when you have finished.

146 Part III: Securing Windows Vista
Figure 9-11 Setting application restrictions
10. On the User Controls page, click OK to save the settings.
Viewing and Using Activity Reports
An activity report for a user’s account provides complete details about the user’s computer
and instant messaging usage and also provides details about general system modifications
related to the account. Computer usage details include the following:
■ The top 10 Web sites visited in the reporting period
■ The most recent 10 Web sites blocked
■ File downloads
■ Logon times
■ Applications run and games played
■ E-mail messages sent and received
■ Media played in media players
■ Instant messaging
Instant messaging details include:
■ Conversation initiation
■ Link exchanges
■ Webcam usage

Chapter 9: Protecting User Accounts and Using Parental Controls 147
■ Audio usage
■ Game play
■ File exchanges
■ SMS messages
■ Contact list changes
General system details specify:
■ Whether anyone made changes to parental controls for the account and, if so, who made
those changes, how many changes he made, and when those changes were made.
■ Whether general changes were made to the account and, if so, what changes were made.
■ Whether system clock changes were made, such as in an attempt to circumvent time
controls.
■ Whether, for whom, and how many failed logon attempts were recorded in the security
event logs.
You can turn on activity reports for a standard user by following these steps:
1. Click Start, and then click Control Panel.
2. In Control Panel, click Set Up Parental Controls under the User Accounts And Family
Safety category heading.
3. On the Parental Controls page, click the user account for which you are configuring
activity reports.
4. Turn on activity reporting by selecting On, Collect Information About Computer
Usage.
5. Click OK to save the settings.
To view activity reports for a user, follow these steps:
1. Click Start, and then click Control Panel.
2. In Control Panel, click Set Up Parental Controls under the User Accounts And Family
Safety category heading.
3. On the Parental Controls page, click the user account you want to work with.
4. Select Activity Reports to access the Activity Viewer page, shown in Figure 9-12.

148 Part III: Securing Windows Vista
Figure 9-12 Viewing activity reports
By default, Activity Viewer provides summary details for all categories of information tracked.
Using the options provided in the left pane, you can access detailed information for each category, which typically includes the date and time of the activity as well as other important
details. For example, if you want to see a detailed list of Web sites visited, you can expand
Account Activity, expand Web Browsing, and then select Websites Visited.

Chapter 12
Networking Your Computer
In this chapter:
Introducing TCP/IP Networking for Windows Vista. . . . . . . . . . . . . . . . . . . . . . . . 187
Mapping Your Networking Capabilities and Infrastructure . . . . . . . . . . . . . . . . . 191
Introducing Wireless Networking for Windows Vista . . . . . . . . . . . . . . . . . . . . . . 199
Mapping Your Wireless Networking Capabilities and Infrastructure . . . . . . . . . 202
In our increasingly connected world, networking and communications are critically important. Microsoft Windows Vista ensures that you can connect to a network wherever you are
and from any device by giving you greater and more flexible options for accessing networks
and managing network infrastructure. Not only does Windows Vista enhance support for
standard networks, but it also fully supports the next generation of networks, whether you are
using wired or wireless technologies.
Note
to the operating system. More so than any other area of Windows Vista, the security features
discussed in this book are subject to change. Some of the features might not be included in the
final product, and some of the features might be changed substantially.
This book was written using the Windows Vista Beta to provide an early introduction
Introducing TCP/IP Networking for Windows Vista
The networking components in Windows Vista have been extensively reworked. In this
section, you’ll look at the changes to these components and how they are used to improve reliability while reducing transfer times. You’ll learn about:
■ The next generation of networking components.
■ The dual stack and the IP management enhancements.
Getting to Know the Next Generation TCP/IP Stack
Whether they are using wired or wireless technology, most networks use TCP/IP. TCP/IP is a
protocol suite consisting of Transmission Control Protocol (TCP) and Internet Protocol (IP).
TCP is a connection-oriented protocol designed for reliable end-to-end communications. IP is
187

188 Part III: Securing Windows Vista
an internetworking protocol that is used to route packets of data over a network. Two versions
of IP are in use:
■ IP version 4 (IPv4) IPv4 is the primary version of IP used today on networks, including
the Internet. IPv4 has 32-bit addresses.
■ IP version 6 (IPv6) IPv6 is the next-generation version of IP. IPv6 has 128-bit addresses.
While many computers use only IPv4, IPv6 is increasingly being used, and eventually IPv4
may be phased out in favor of IPv6. Why? IPv4 allows only 2^32 unique addresses to be used.
While 4,294,967,296 unique addresses might seem like a huge amount, it really isn’t when
you look at the number of computing devices in our connected world. This is why we need
IPv6, with its virtually unlimited address space, and why computers running Windows Vista
have both IPv4 and IPv6 configured by default.
Windows Vista includes many other changes to the core networking components as well.
Windows Vista provides a new implementation of the TCP/IP protocol stack known as the
Next Generation TCP/IP stack. This stack is a complete redesign of TCP/IP functionality for
both IPv4 and IPv6. The Next Generation TCP/IP stack supports:
■ Receive Window Auto Tuning Optimizes TCP transfers for the host receiving data by
automatically managing the size of the memory buffer (the receive windows) to use for
storing incoming data based on the current network conditions.
■ Compound TCP (CTCP) Optimizes TCP transfers for the sending host by aggressively
increasing the amount of data sent in a connection while ensuring that other TCP connections are not impacted.
■ Neighbor Unreachability Detection Determines when neighboring nodes, including
routers, are no longer reachable and reports the condition.
■ Automatic Dead Gateway Retry Ensures that an unreachable gateway is tried again peri-
odically to determine whether it has become available.
■ Automatic Black Hole Router Detection Prevents TCP connections from terminating
due to intermediate routers silently discarding large TCP segments, retransmissions, or
error messages.
■ Routing Compartments Prevents unwanted forwarding of traffic between interfaces by
associating an interface or a set of interfaces with a login session that has its own routing
tables.
■ Network Diagnostics Framework Provides an extensible architecture that helps users
recover from and troubleshoot problems with network connections.
■ TCP Extended Statistics Helps determine whether a performance bottleneck for a
connection is the sending application, the receiving application, or the network.
■ Windows Filtering Platform Provides application programming interfaces (APIs) for
extending the TCP/IP filtering architecture so that it can support additional features.

Chapter 12: Networking Your Computer 189
To optimize throughput in high-loss environments, the Next Generation TCP/IP stack supports industry standard Requests For Comments (RFCs) 2582, 2883, 3517, and 4138. These
changes allow the Next Generation TCP/IP stack to:
■ Modify how the TCP fast recovery algorithm is used. The new algorithm provides faster
throughput by changing the way that a sender can increase its sending rate when multiple segments in a window of data are lost and the sender receives an acknowledgement
stating that only part of the data has been successfully received. The old algorithm
worked well for single lost segments, but it did not perform well when multiple lost
segments were involved.
■ Extend the use of the Selective Acknowledgement (SACK) option for TCP. This option
now allows a receiver to indicate up to four noncontiguous blocks of received data
and to acknowledge duplicate packets. The sender can then determine when it has
retransmitted a segment unnecessarily and adjust its behavior to prevent future
retransmissions.
■ Introduce a conservative SACK-based loss recovery algorithm for TCP. This new algo-
rithm makes it possible to use SACK information to perform loss recovery when TCP
senders receive duplicate acknowledgements and to recover more effectively and
quickly when multiple segments are not received at the destination.
■ Detect spurious retransmission time-outs (RTOs) with TCP. This provides cor rection for
sudden, temporary increases in RTOs and prevents unnecessary retransmission of
segments.
Learning About the Dual Stack and the IP Management Enhancements
As mentioned earlier, computers running Windows Vista have both IPv4 and IPv6 configured
by default. This is a major change from earlier versions of Microsoft Windows, in which only
IPv4 is used by default.
Windows Vista supports IPv4 and IPv6 by using the dual-layer Next Generation TCP/IP stack.
This stack features an implementation of IP in which IPv4 and IPv6 share common transport
and framing layers. Because Windows Vista enables IPv4 and IPv6 by default, there is no need
to install a separate component to obtain IPv6 support.
To make IPv6 more dynamic, Windows Vista includes a number of enhancements. These
enhancements include support for:
■ Symmetric network address translators (NATs) A symmetric NAT maps the internal
(private) address and port number to different external (public) addresses and ports,
depending on the external destination address. This new behavior allows an IPv6 feature called Teredo to act as the go-between for a larger set of Internet-connected host
computers.

190 Part III: Securing Windows Vista
■ IP Security in IPv6 Windows Vista supports IP Security for IPv6 traffic in the same way
it supports IPv4 traffic. As a result, IPv6 can use Internet Key Exchange (IKE) and data
encryption in the same way as IPv4. This ensures IPv6 traffic can be as secured as IPv4
traffic. When you configure an IP filter as part of an IP filter list in the IP Security Policies
snap-in, you can now specify IPv6 addresses and address prefixes in IP Address or Subnet when specifying a specific source or destination IP address.
■ IPv6 over Point-to-Point Protocol (PPPv6) PPPv6 allows native IPv6 traffic to be sent
over PPP-based connections. This means that remote access clients can connect with an
IPv6-based Internet service provider (ISP) through dial-up or PPP over Ethernet
(PPPoE)–based connections.
■ Multicast Listener Discovery version 2 (MLDv2) IPv6 routers use MLDv2 to identify the
presence of multicast listeners and to provide support for source-specific multicast traffic. MLDv2 is equivalent to Internet Group Management Protocol version 3 (IGMPv3)
for IPv4. (Multicast listeners are nodes that are configured to receive multicast packets.)
■ Link-Local Multicast Name Resolution (LLMNR) LLMNR allows IPv6 hosts on a single
subnet without a DNS server to resolve each other’s names. This feature is useful for
single-subnet home networks and ad hoc wireless networks.
■ Random Interface IDs Random Interface IDs prevent address scanning of IPv6
addresses based on the known company IDs of network adapter manufacturers. By
default, Windows Vista generates Random Interface IDs for nontemporary autoconfigured IPv6 addresses, including public and local link addresses.
■ Dynamic Host Configuration Protocol version 6 (DHCPv6) Windows Vista includes a
DHCPv6-capable DHCP client. This client can use stateful address autoconfiguration
with a DHCPv6 server. Or, the client can use stateless address autoconfiguration when
a DHCPv6 server is not present.
From the experts
Configuring IPv4 and IPv6 settings
In Windows Vista, you can manually configure both IPv4 and IPv6 settings through a
set of dialog boxes accessible from the Network Connections console. Click Start, and
then click Control Panel. In Control Panel, under the Network And Internet heading,
click View Network Status And Tasks. In the left pane in Network Center, click Manage
Network Connections. Right-click a connection and then select Properties. In the connection’s Properties dialog box, double-click Internet Protocol Version 6 (TCP/IPv6) or
Internet Protocol Version 4 (TCP/IPv4) as appropriate.
You configure IPv4 settings through the Properties dialog box of the Internet Protocol
version 4 (TCP/IPv4) component and through commands in the Netsh Interface IPv4
context. You can disable IPv4 for connections by clearing the check box next to the
Internet Protocol version 4 (TCP/IPv4) component from the properties of a connection.

Chapter 12: Networking Your Computer 191
You configure IPv6 settings through the Properties dialog box of the Internet Protocol
version 6 (TCP/IPv6) component and through commands in the Netsh Interface IPv6
context. You can disable IPv6 for connections by clearing the check box next to the
Internet Protocol version 6 (TCP/IPv6) component from the properties of a connection.
For more information about configuring IPv4 and IPv6, refer to the Microsoft Windows
Vista Administrator’s Pocket Consultant (Microsoft Press, 2006).
William Stanek
Author, MVP, and series editor for the Microsoft Press Administrator’s Pocket Consultants
Mapping Your Networking Capabilities and Infrastructure
Windows Vista provides a whole new way to navigate and manage the networking features of
your computer. In this section, you’ll learn about these features, including Network Center,
Network List, Network Map, and Network Connections.
Using Network Center
When you want to work with the networking features of your computer, you’ll start with Network Center. You can access Network Center by following these steps:
1. Click Start, and then click Control Panel.
2. In Control Panel, under the Network And Internet heading, click View Network Status
And Tasks.
This displays Network Center, as shown in Figure 12-1.
Figure 12-1 Network Center shows that you are connected to a network that in turn has
connectivity to the Internet.

192 Part III: Securing Windows Vista
Once you’ve accessed Network Center, you can use it to manage your general network settings
and network status. When you are connected to a network, Network Center provides an overview of your networking configuration and allows you to determine your network status and
view or change settings.
The three main areas in Network Center are:
■ Status Provides a visual overview of the network infrastructure. The map depicts
whether you are connected to a network and whether you can access the Internet on
that network. Clicking View Full Map displays an expanded Network Map, as described
in the “Using Network Map” section later in this chapter.
■ Network Details Provides details about the network to which the computer is currently
connected. These details include the connections being used and whether the network
has Internet access. Using the links provided, you can manage the connections in use and
the networks to which those connections are linked, as described in the “Viewing and
Managing Your Networks” section later in this chapter.
■ General Provides a summary of the computer’s firewall, detection, and sharing set-
tings. Depending on the configuration, several options are provided, including Block,
Allow, and View Sharing Settings. You’ll learn how to manage general settings in the
next section, “Managing General Networking Settings.”
The sections that follow discuss using Network Center to manage settings, diagnose and
repair connectivity issues, and manage your network status.
Managing General Networking Settings
In Network Center, the settings in the General panel allow you to block or allow connections
to your computer. If you click Block, the computer’s firewall blocks all access to the network.
While access is blocked, you will be unable to access other computers on the network or on
the Internet, and other computers will be unable to access your computer.
To unblock the computer, you need to click Allow. Clicking Allow sets the computer’s firewall
to its normal configuration. In this configuration, you can access other computers on the network or on the Internet, and other computers can access your computer, if allowed by the
firewall configuration.
To configure Windows Firewall from Network Center, click View Sharing Settings. This
Tip
link opens the Windows Firewall dialog box, which you can use to manage the Windows
Firewall configuration.
Diagnosing and Resolving Network Connectivity Issues
When you are disconnected from a network, Network Center displays a modified view, as
shown in Figure 12-2. Based on this view of your network configuration, you know at a glance
that you are not connected to a network or the Internet.

Chapter 12: Networking Your Computer 193
Figure 12-2 Network Center shows that you are not connected to a network or the Internet.
To resolve this problem, you should check the network cable that connects to your computer
as well as any wireless adapters. If your network cable or wireless adapters are properly connected, you can click Diagnose Internet Connection in the left pane to start the new Windows
Networks Diagnostics Tool. This tool uses the Network Diagnostics Framework to help you
recover from and troubleshoot problems with network connections.
The Windows Networks Diagnostics Tool offers step-by-step advice on resolving your network connectivity problem. For example, in Figure 12-3, the tool advises that you should connect a network cable to the computer’s network adapter. When you plug in the cable and then
click the diagnostics box, the tool will validate the repair. If a problem is detected, the tool continues troubleshooting the connection. Otherwise, you’ll see a prompt confirming that the
problem has been repaired.
Figure 12-3 The Windows Networks Diagnostics Tool offers step-by-step advice.
Viewing and Managing Your Networks
In Network Center, you can browse computers and devices on the network by clicking Browse
The Network in the left pane. While browsing the network, you use Network view. In a domain,
options on the Network view toolbar allow you to search Active Directory, connect to a network,

194 Part III: Securing Windows Vista
or return to Network Center. In a workgroup, options on the Network view toolbar allow you
to connect to a network or return to Network Center. If you double-click a computer while
browsing, you’ll be able to see devices associated with the computer, such as printers.
In Network Center, you can create network connections by clicking Connect To in the left
pane and then clicking Create A New Connection in the Connect To A Network dialog box.
This opens the Connect To A Network Wizard, shown in Figure 12-4. You can use this wizard
to add a network, create a virtual private network (VPN) connection or create a dial-up
connection.
Figure 12-4 Connecting to a new network
When you connect to a network in a new location, a network profile is created. Windows can
save settings in this location and automatically use these settings the next time you connect to
this network. Sometimes, you can connect to one network in multiple ways. For example, you
might be able to connect to a network by plugging in a cable, by using a wireless connection,
or both. Or your computer might have multiple network adapters and those adapters might
be connected to different networks or to the same network. You can determine the devices
and connections associated with the current network by following these steps:
1. Click Start, and then click Control Panel.
2. In Control Panel, under the Network And Internet heading, click View Network Status
And Tasks.
3. If you have a valid connection to the network, click Personalize under Network Details.
4. The Personalize Settings dialog box, shown in Figure 12-5, provides details about the
network to which you are currently connected.

Chapter 12: Networking Your Computer 195
Figure 12-5 The Personalize Settings dialog box
5. The Network text box shows the name of the profile associated with the network. You
can change the profile name by typing a new name.
6. The Category text box shows the category of the network to which you are connected as
either private or public. You can switch the category from private to public or vice versa
by clicking Switch Category.
7. The Connections In Use list shows the connections being used to connect to the current
network.
8. You can manage connections by selecting them and then clicking one of these buttons:
■ Disconnect Allows you to disconnect a wireless connection from a network. This
button is available only when you are using a wireless connection.
■ Properties Displays the connection’s Status dialog box, which you use to get
details about the TCP/IP configuration and to manage the TCP/IP configuration.
■ Diagnose Starts the Windows Networks Diagnostics Tool for troubleshooting.
9. Click OK to close the Status dialog box.
Using Network List
Network List displays a list of all the networks you’ve accessed from the computer. Managed
and unmanaged networks are listed separately, as shown in Figure 12-6. You can access Network List by following these steps:
1. Click Start, and then click Control Panel.
2. In Control Panel, under the Network And Internet heading, click View Network Status
And Tasks.
3. In Network Center, click Network List under See Also in the left pane.

196 Part III: Securing Windows Vista
Figure 12-6 Using Network List
Network List has several different views. You can access these views by clicking the Views
button and then selecting the desired view. The view you’ll use most often is the Details view.
Using the Details view of the Network List, you can quickly determine the following information:
■ Name The name of the profile associated with the network.
■ Status The status of your connection to the network as either connected (and active) or
disconnected (and inactive).
■ Last Connected The data and time you last connected to the network.
■ Type The type of network, such as managed or unmanaged.
The Network List toolbar allows you to work with networks in several different ways. The
option buttons are used as follows:
■ Reorder Wireless Networks Click Reorder Wireless Networks to set the preference
order for using wireless networks. To change the order, drag a network entry up or
down the list. You can also add or remote network profiles.
■ View Status And Properties Click View Status And Properties to display a Status dialog
box for a selected network. As discussed in the “Viewing and Managing Your Networks”
section of this chapter, you can then manage the network’s profile name and connection
configuration.
■ Remove Network Click Remove Network to remove and delete the profile associated
with the network. When prompted, confirm that you want to delete this information by
clicking OK.

Note You can return to Network Center by clicking the Network Center button on the
toolbar. Right-clicking a network entry displays a shortcut menu with Properties, Delete, and
Rename options.
Using Network Map
Network Map uses the neighbor detection functionality built into the Next Generation TCP/IP
stack to display an expanded view of your network. As Figure 12-7 shows, the expanded
Network Map view includes your computer, the computers near your computer, and the
devices near your computer. You can access Network Map by following these steps:
1. Click Start, and then click Control Panel.
2. In Control Panel, under the Network And Internet heading, click View Network Status
And Tasks.
3. In Network Center, under Network Map, click View Full Map.
Chapter 12: Networking Your Computer 197
Figure 12-7 Using Network Map
If you have questions about your network infrastructure and have permission to browse the
network, you can use Network Map to get a better understanding of how you are connected to
the network and what devices are near you.
Note
able to place the devices on the map. If this happens, you’ll see a list of discovered but not
mapped devices in the lower portion of the Network Map window.
Sometimes Network Map will detect devices or computers near you but will not be

198 Part III: Securing Windows Vista
Viewing and Managing Network Connections
Network Connections displays a list of all network connections configured for use on the
computer, as shown in Figure 12-8. You can quickly obtain a list of open network connections
by completing the following steps:
1. Click Start, and then click Control Panel.
2. In Control Panel, under the Network And Internet heading, click View Network Status
And Tasks.
3. In the left pane in Network Center, click Manage Network Connections.
Figure 12-8 Using Network Connections
Network Connections has several different views. You can access these views by clicking
the Views button and then selecting the desired view. The view you’ll use most often is the
Details view.
Using the Details view of Network Connections, you can quickly determine the following
information:
■ Name The name of the network connection.
■ Type The type of connection, such as LAN or High-Speed Internet.
■ Status The status of the connection, such as Connected or Disabled.
■ Device Name The manufacturer and type of network adapter.
■ Phone # Or Host Address The phone number associated with a dial-up connection or
the host address associated with a remote access connection.
■ Owner The owner of the connection, such as System.
If you select a connection, the Network Connection toolbar allows you to work with connections in several different ways. The option buttons are used as follows:
■ Diagnose This Connection Starts the Windows Networks Diagnostics Tool for
troubleshooting.

Chapter 12: Networking Your Computer 199
■ View Status Of This Connection Displays the connection’s Status dialog box, which
can be used to get details about the TCP/IP configuration and to manage the TCP/IP
configuration.
■ Change Settings Of This Connection Displays the connection’s Properties dialog box,
which can be used to manage the TCP/IP configuration.
If you right-click a connection, a shortcut menu will provide an expanded set of options.
Tip
Introducing Wireless Networking for Windows Vista
The wireless components in Windows Vista have been extensively reworked. In this section,
you’ll look at the changes to these components and how they are used to improve flexibility
and security. You’ll learn about:
■ Wireless networking changes.
■ New ways of connecting to wireless networks.
■ Fast roaming and auto configuration.
Exploring Wireless Networking Changes
Wireless connections in earlier versions of Windows are designed to emulate Ethernet connections and can be extended only when using additional Extensible Authentication Protocol
(EAP) types for IEEE 802.1X authentication. Wireless connections in Windows Vista use a
software infrastructure for 802.11 wireless connections called the Native Wireless Fidelity
(Wi-Fi) architecture.
Native Wi-Fi architecture has many benefits. It allows:
■ Windows Vista to represent wireless (IEEE 802.11) as a media type separate from Ethernet
(IEEE 802.3). This increases flexibility by allowing hardware vendors to support
advanced features specific to IEEE 802.11 networks, such as larger frame sizes than
Ethernet.
■ Windows Vista to include the authentication, authorization, and management compo-
nents necessary for 802.11 connections. This streamlines the development of miniport
drivers that expose a native 802.11 interface and makes it easier for hardware vendors to
develop wireless network adapter drivers.
■ Hardware vendors to extend the built-in wireless client for additional wireless services
and custom capabilities. This allows vendors to create extensible components and
also makes it possible for vendors to provide customized configuration dialog boxes
and wizards.

200 Part III: Securing Windows Vista
You can configure wireless networking by using the Wireless Network Setup Wizard. This
wizard retrieves the security capabilities of the wireless network adapter and recommends the
strongest security setting that is supported by the wireless network adapter as the default configuration. For example, if a wireless network adapter supports both Wired Equivalent Privacy
(WEP) and Wi-Fi Protected Access (WPA), the Wireless Network Setup Wizard will configure
settings for WPA by default.
Learning New Ways to Connect to Wireless Networks
Wireless clients can connect to three different types of networks:
■ Secure Secure wireless networks transmit passwords and data securely. Typically, they
use some form of encryption, and the stronger the encryption, the more protection
offered.
■ Unsecured Unsecured wireless networks do not transmit passwords or data securely.
While they may require a password to establish a connection, they typically transmit all
data without encryption or protection.
■ Hidden Hidden wireless networks do not advertise their network names and can be
either secured or unsecured. You can connect to a hidden network only if you know its
network name.
Windows Vista works with hidden and unsecured networks in different ways than earlier versions of Windows. Because of the many changes, keep the following information in mind:
■ Wireless access points used by hidden wireless networks can be configured to use non-
broadcast Service Set Identifiers (SSIDs). In this configuration, the wireless access
points either do not send Beacon frames, which announce their network names, or they
send Beacon frames with an SSID set to NULL. Although earlier versions of Windows
do not allow you to mark a preferred wireless network as hidden, Windows Vista allows
you to indicate that a preferred wireless network is hidden by configuring it as a nonbroadcast network.
■ Wireless access points used by unsecured networks are at high risk of being compro-
mised. To help improve awareness about unsecured networks, Windows Vista displays
a prompt when you connect to an unsecured wireless network and allows you to confirm or cancel the connection attempt.
When connecting to wireless networks, if preferred wireless networks are not found or if connections to detected preferred wireless networks are not successful, the wireless client in earlier versions of Windows prompts you to connect to any detected wireless network. Wireless
clients running earlier versions of Windows cannot be configured to prompt you to connect
only to specific wireless networks or to never prompt you to connect to specific wireless
networks.

Chapter 12: Networking Your Computer 201
Group Policy settings in Windows Vista allow administrators to configure lists of allowed and
denied wireless network names. With an allow list, administrators can specify by name the set
of wireless networks to which wireless clients are allowed to connect, thereby limiting wireless
connections to a specific set of wireless networks. With a deny list, administrators can specify
by name the set of wireless networks to which wireless clients are not allowed to connect and
in this way prevent connections to known unsecured wireless networks as well as to any other
wireless networks that might be available but should not be used.
Using Fast Roaming and Auto Configuration
with Wireless Connections
Through Group Policy settings, administrators can also configure fast roaming and automatic
connections on preferred wireless networks. With fast roaming, wireless clients can more
quickly roam from one wireless access point to another by using preauthentication and Pairwise Master Key (PMK) caching. With automatic connections, wireless clients can establish
connections automatically when preferred networks are detected. If you don’t want to use
automatic connections, you can specify that manual connections should be used instead.
Wireless Auto Configuration is a service that dynamically selects the wireless network to
which the computer will automatically connect, based either on your preferences or on default
settings. This includes automatically selecting and connecting to a more preferred wireless
network when it becomes available.
Wireless Auto Configuration in Windows Vista helps to protect computers running Windows
Vista from attackers. As with earlier versions of Windows, a computer running Windows Vista
uses a randomly named wireless network if no preferred network is available and periodically
scans for a preferred network to become available. Unlike earlier versions of Windows, Windows Vista prevents a wireless connection to a wireless network matching the random wireless network name. Further, because Windows Vista attempts to connect preferred networks
in the order specified, you can connect to a hidden network before a nonhidden network if the
hidden network is higher in the preferred network list.
Wireless connections also support integration with Network Access Protection (NAP) when
using 802.1X authentication and Single Sign-On profiles. Using Network Access Protection
and 802.1X authentication, administrators can prevent wireless clients that do not comply
with system health requirements from gaining unlimited access to a private network. With
Single Sign-On profiles, administrators can ensure that only an appropriate user or device is
allowed on the protected network and that their data is secure when establishing the connection as well as once the connection is established.
When a Single Sign-On profile is configured, 802.1X authentication is used prior to the computer logon to the domain and users are prompted for credential information only if needed.
This ensures that the wireless connection is established prior to the computer domain logon,
which enables scenarios that require network connectivity prior to user logon such Group
Policy updates, wireless client domain joins, and execution of logon scripts.

202 Part III: Securing Windows Vista
Mapping Your Wireless Networking Capabilities
and Infrastructure
The same features that can be used to work with wired connections can be used to work with
wireless connections. This means that everything you’ve learned about Network Center, Network List, Network Map, and Network Connections can be used to help you work with wireless connections. Because Windows Vista represents wireless (IEEE 802.11) as a media type
separate from Ethernet (IEEE 802.3), there are a few differences that should be noted. These
differences are explored in the sections that follow.
Listing and Connecting to Available Wireless Networks
These days, most laptops and portable computers have wireless network adapters, and so do
some workstations. No matter where you are, you can get a list of available wireless networks
in your area and connect to one by using your wireless network adapter.
To view and connect to an available wireless network, follow these steps:
1. Click Start, and then click Connect To.
2. A list of the wireless networks currently available is displayed.
3. Select a network, and then click Connect.
The network list is available only if your computer has a wireless network adapter installed,
the adapter is turned on, and there are no policy settings blocking your computer from
browsing for available wireless networks. If you don’t see the network to which you want
to connect, click the I Don’t See The Networks I Am Looking For link. On the Select A
Connection Option page, select the Show All Connection Options check box. Select the
type of connection that you are trying to use, and then follow the prompts to configure the
connection.
Some networks are protected with a network security key. To connect to one of
Tip
these networks, you must obtain the key from your network administrator or the service
provider.
Connecting to Public Wireless Networks
When connecting to public networks, you might be asked to set up an account and save files
to your computer. Before you do this, however, make sure that you understand which files, if
any, are saved to your computer and what type of information the network provider collects
from your computer. Read the service provider’s privacy statement carefully, and keep in mind
that even if the service provider requires you to create an account, that doesn’t mean that the
connection you are using is secure.

Chapter 12: Networking Your Computer 203
Caution You should be wary of working on company-sensitive information or accessing
password-protected areas of your business network while you are connected to a public network. If you connect to a network that is not secure, anyone with the right tools can intercept
the data being transmitted from your computer, and they would see any user names and
passwords you use, the Web sites you visit, the documents you work on, and the messages
you send.
You can view and connect to a public wireless network in the same way as you can connect to
an available wireless network:
1. Click Start, and then click Connect To.
2. A list of the wireless networks currently available is displayed.
3. Select a network, and then click Connect.
When you connect to a wireless network that supports Wireless Provisioning Service (WPS)
technology, you are prompted to download provisioning files that will allow your computer to
connect to the network. While these files are generally safe to download, you should verify
that the Web site from which the files will be downloaded is one that you expected based on
your location or one that you trust to provide you with the information. If you choose to
download provisioning files, you download the files from the provider and then store them on
your computer for as long as you want to use the wireless network. The files do not contain
any personal information about you or your computer. Instead, they provide details on the
network configuration and on how you can access the network. If you choose not to download the files, you will not be able to connect to the wireless network.
When the provisioning files are downloaded, the Wireless Network Registration Wizard
requests additional information from you. At this point, you might have to enter your credit
card information to provide payment or you might simply have to acknowledge the service
provider’s usage policy. Follow the instructions in the Wireless Network Registration Wizard
to provide the appropriate information to the network provider.
After you have signed up with a wireless network that supports WPS, the provisioning files
stored on your computer can be updated automatically. If you choose this option, your computer will connect to the wireless network provider’s computers and update the information stored on your computer according to the schedule set by the wireless network
provider. Typically, the provider schedules an update once a week or once a month. The
update process will occur only while you are already connected to the Internet and will not
interfere with your use of your Internet connection. If you choose not to update the provisioning files automatically, the files will be updated the next time you connect to the wireless network. Updating the files is required to ensure that your computer has the correct
information for the network.

204 Part III: Securing Windows Vista
Disconnecting a Wireless Connection
When you no longer need a wireless connection, you should disconnect the connection. To
disconnect a wireless connection to the current network, follow these steps:
1. Click Start, and then click Control Panel.
2. In Control Panel, under the Network And Internet heading, click View Network Status
And Tasks.
3. If you have a valid connection to the network, click Personalize under Network Details.
The Status dialog box appears.
4. The Connections In Use list show the connections you are using. Click the wireless con-
nection, and then click Disconnect.
To disconnect an open wireless connection when your computer has multiple active connections, follow these steps:
1. Click Start, and then click Control Panel.
2. In Control Panel, under the Network And Internet heading, click View Network Status
And Tasks.
3. In the left pane in Network Center, click Open Connections.
4. Right-click the wireless connection, and then select Disable.
 Loading...