

Page 1
Pro 3
Silver
Page 2

1. Get ready
To set up your Surface Pro, we recommend you have:
• Wireless network access (and the password if it
is secured)
• A Microsoft account (use an existing account such
as Hotmail, Outlook.com or Xbox; or sign up during
setup)
1. Prepárese
Para congurar su tablet Surface Pro le recomendamos
que tenga:
• Acceso a una red inalámbrica (y la contraseña de la
misma si es segura)
• Una cuenta de Microsoft (use una cuenta actual,
como Hotmail, Outlook.com o Xbox; o regístrese
durante la conguración)
1. Préparation
Pour installer votre Surface Pro, nous vous
recommandons de disposer des éléments suivants :
• Accès réseau sans l (et le mot de passe s’il est
sécurisé)
• Un compte Microsoft (utilisez un compte existant
tel que Hotmail, Outlook.com ou Xbox ; ou
inscrivez-vous pendant l’installation)
Black
Page 3

Black
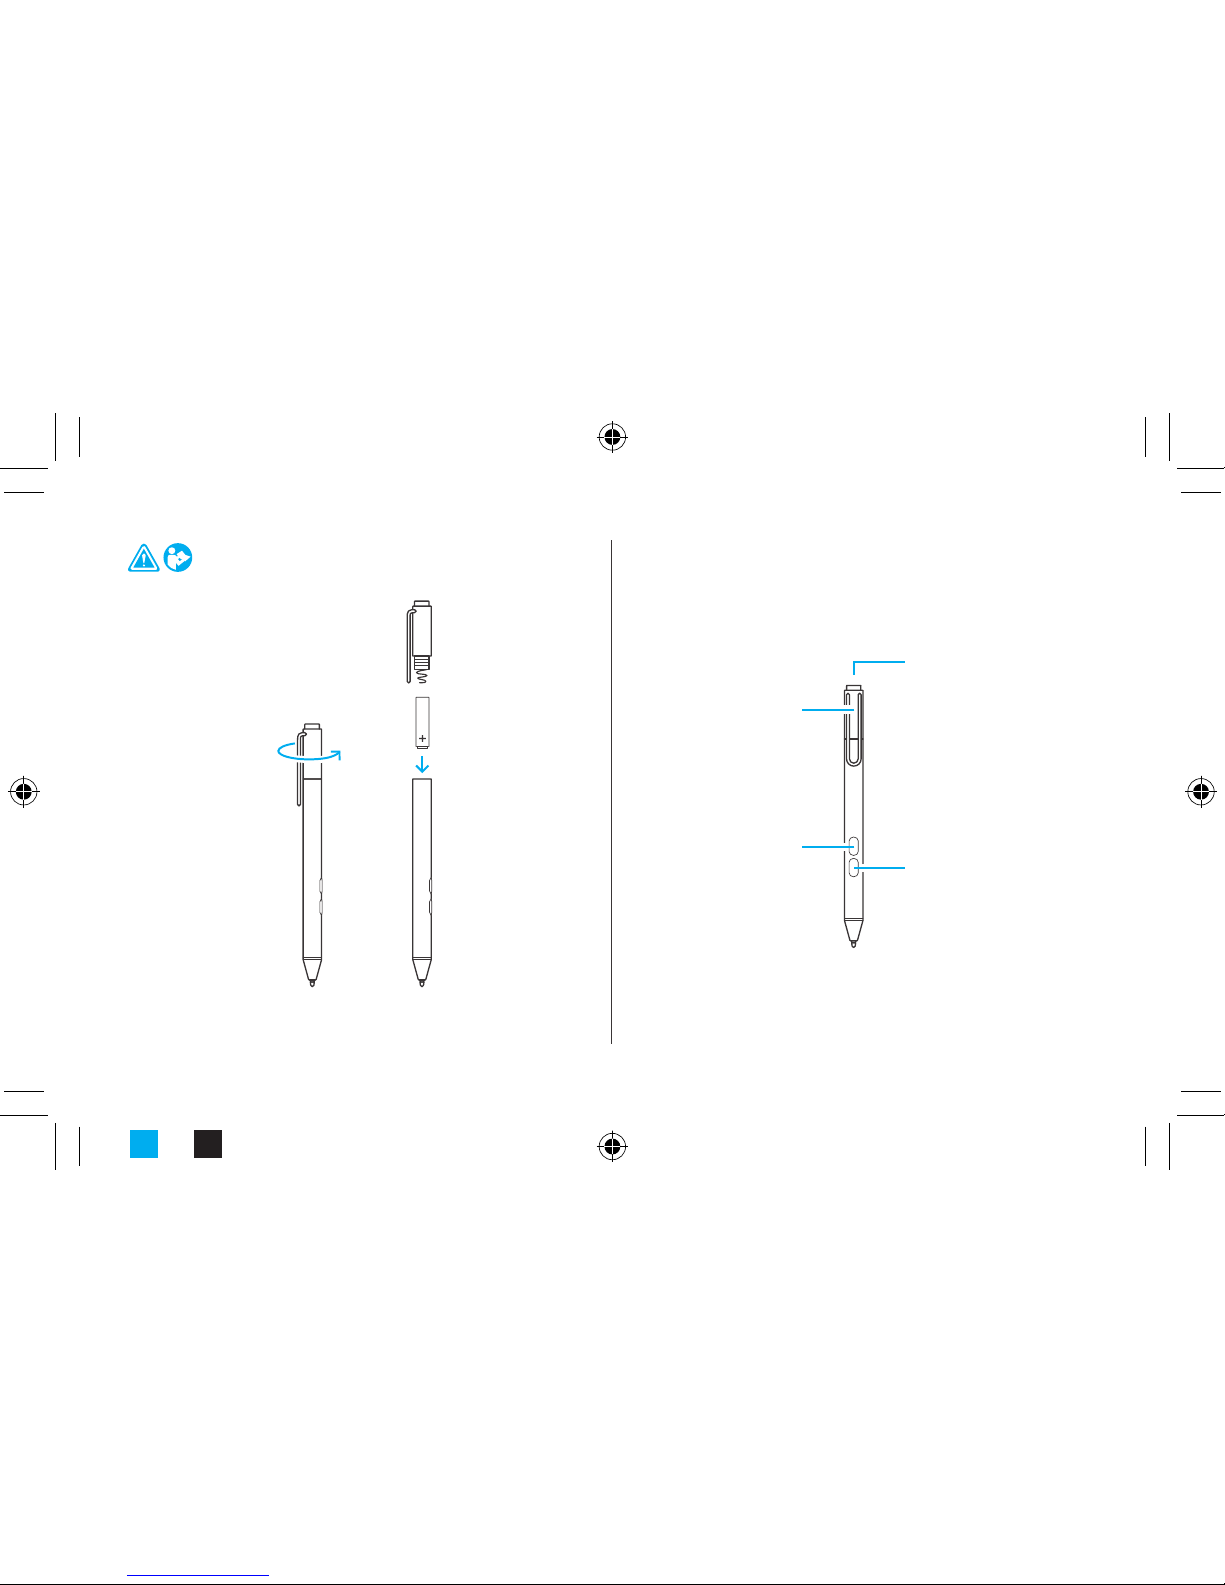
Get your Surface Pen ready
1. Unscrew the top of your Surface Pen.
2. Insert the included AAAA battery into Surface Pen.
3. Screw the top of Surface Pen back on.
Prepare su pluma para Surface
1. Desenrosque la parte superior de su pluma.
2. Insértele la batería AAAA incluida.
3. Enrosque de nuevo la parte superior de la pluma.
Préparez votre stylet Surface
1. Dévissez le haut de votre stylet Surface.
2. Insérez la pile AAAA incluse dans le stylet Surface.
3. Revissez le haut de votre stylet Surface.
Page 4
Cyan Black
Eraser button
Bouton gomme à effacer
Botón de borrador
Right-click button
Bouton clic droit
Clic en el botón
derecho del mouse
Top button
Bouton supérieur
Botón superior
LED
Témoin DEL
Page 5

2. Set up
Click in the optional Cover and ip out the Kickstand to
the position you want.
2. Conguración
Coloque la cubierta opcional y mueva el soporte
trasero a la posición que desee.
2. Installation
Enclenchez le clavier en option et déployez le support
intégré à la position souhaitée.
Black
Page 6

Cyan Black
Page 7

Cyan Black
Page 8

3. Sign in
a. Plug in the power supply and press the Power
button.
b. Follow the on-screen instructions and enter your
Microsoft account info when prompted.
3. Iniciar sesión
a. Conecte el sistema de alimentación y presione el
botón encender/apagar.
b. Siga las instrucciones en pantalla e ingrese la
información de su cuenta de Microsoft si se le pide.
3. Ouvrez une session
a. Branchez le bloc d’alimentation et appuyez sur le
bouton Marche/Arrêt.
b. Suivez les instructions à l’écran et entrez les
informations de votre compte Microsoft lorsque le
système vous y invite.
Black
Page 9

Power button
Bouton Marche/Arrêt
Botón de encender/apagar
Speaker
Haut-parleur
Altavoz
Microphone
Micrófono
Cover connectors
Connecteurs du clavier
Conectores de cubierta
Kickstand
Support intégré
Soporte trasero
Charging Port
Port de charge
Puerto de carga
Speaker
Haut-parleur
Altavoz
Headset jack
Prise casque
Conexión de auriculares
microSD™
Volume
Volumen
Mini DisplayPort
Minipuerto de pantalla
USB 3.0
Cyan Black
Page 10

Set up your Pen with Surface Pro
If you are unable to successfully pair during initial device
set up, follow the directions below to connect your Pen
manually.
1. Swipe in from the right edge of the screen, open the
Settings charm, and then tap Change PC settings at
the bottom of the screen.
2. Tap PC and devices > Bluetooth. Swipe Bluetooth to On.
3. Press and hold the top button on the Pen until the LED
light ashes to turn on Bluetooth wireless technology.
4. Tap Surface Pen in the list of Bluetooth devices.
Congurez votre stylet avec Surface Pro
Si vous ne pouvez pas coupler le stylet pendant la
conguration initiale, suivez les instructions ci-dessous
pour connecter votre stylet manuellement.
1. Balayez à partir du bord droit de l’écran, ouvrez l’icône
Paramètres, puis appuyez sur Modier les paramètres
du PC en bas de l’écran.
2. Appuyez sur PC et périphériques > Bluetooth. Faites
glisser Bluetooth sur Activé.
3. Maintenez enfoncé le bouton supérieur du Stylet
jusqu’à ce que le témoin DEL clignote pour activer la
technologie sans l Bluetooth.
4. Appuyez sur Stylet Surface dans la liste d’appareils
Bluetooth.
Black
Page 11

Congure su pluma con Surface Pro
Si no puede emparejarla con éxito durante la
conguración inicial del dispositivo, siga las instrucciones a
continuación para conectar su pluma de forma manual.
1. Deslice rápidamente desde el borde derecho de la
pantalla, abra el acceso a Conguración y después
toque Cambiar conguración de PC en la parte
inferior de la pantalla.
2. Toque PC y dispositivos > Bluetooth. Deslice Bluetooth
a Activado.
3. Presione y mantenga presionado el botón superior de
la Pluma hasta que la luz LED se encienda para activar
la tecnología inalámbrica Bluetooth.
4. Toque la opción Pluma para Surface en la lista de
dispositivos Bluetooth.
Black
Page 12

Use your Pen with OneNote
1. When your Surface is locked, click the top button on
the Pen to open a new note, then start writing or
drawing. Notes are automatically saved. Click the
button again to start a new note.
2. To view and edit notes in OneNote
, tap Unlock ,
and sign in to your Surface Pro.
3. When Surface Pro is unlocked, you can use the rightclick and eraser buttons on the Pen.
For more information on how to use OneNote
with your Surface Pen, visit
www.surface.com/support/onenote
Utilisez votre stylet avec OneNote
1. Lorsque la tablette Surface est verrouillée, cliquez sur le
bouton supérieur sur le Stylet pour ouvrir une nouvelle
note, puis commencez à écrire ou à dessiner. Les
notes sont automatiquement enregistrées. Cliquez de
nouveau le bouton pour démarrer une nouvelle note.
2. Pour afcher et modier des notes dans OneNote
,
appuyez sur Déverrouiller
, et ouvrez une session sur
votre Surface Pro.
3. Lorsque Surface Pro est déverrouillé, vous pouvez
utiliser les boutons clic droit et la gomme à effacer sur
le Stylet.
Pour plus d’informations sur l’utilisation d’OneNote
avec votre Stylet Surface, visite
www.surface.com/support/onenote
Black
Page 13

Use su pluma con OneNote
1. Cuando su tablet Surface esté bloqueada, haga clic
en el botón superior de la Pluma para abrir una nota
nueva, después comience a escribir o a dibujar. Las
notas se guardan de forma automática. Haga clic de
nuevo en el botón para comenzar una nota nueva.
2. Para ver y editar notas en OneNote
, toque
Desbloquear
, e inicie sesión en su tablet
Surface Pro.
3. Cuando Surface Pro está bloqueada, puede usar el
botón derecho del mouse y el botón de borrador en
la Pluma.
Para obtener más información sobre cómo usar
OneNote con su Pluma para Surface, visite
www.surface.com/support/onenote
Black
Page 14

Replace the top button batteries
• If there’s a problem pairing the Pen, try replacing
the two coin cell batteries (GP319) in the lid.
• Need help? Go to www.surface.com/support.
Reemplace las baterías de botón superiores
• Si tiene problemas para sincronizar la Pluma, intente
reemplazar las dos baterías planas (GP319) en la
tapa.
• ¿Necesita ayuda? Visite
www.surface.com/support.
Remplacer les piles du bouton supérieur
• En cas de problème de jumelage du Stylet, essayez
de remplacer les deux piles bouton (GP319) dans le
couvercle.
• Besoin d’aide? Accédez à la page
www.surface.com/support.
Black
Page 15

Cyan
Black
Page 16

;
surface.com/support
surface.com/userguides
© 2014 Microsoft Corporation
SilverBlack
 Loading...