

Microsoft SENSECAM V2.3B User Manual

Company confidential proprietary information. Do not distribute.
© 2009 Microsoft Corporation, all rights reserved.
SenseCam v2.3 User Guide Page 1 of 31 10/03/2009
SENSECAM V2.3B USER GUIDE
Steve Hodges
James Srinivasan
Alex Butler
Matthew Lee
Gavin Smyth
James Scott
Alban Rrustemi
Microsoft Research Cambridge
1. Introduction
1.1. Overview of v2 SenseCam
SenseCam is a small digital camera that is designed to take photographs automatically
without user intervention. Unlike a regular digital camera or a cameraphone, it does not
have a view finder or a display that can be used to frame photos. Instead, it is fitted with a
wide-angle (fish-eye) lens that maximises its field-of-view. This in turn means that nearly
everything in front of the camera is captured. In addition to the camera functionality, a
number of different sensors are built into the v2 SenseCam. These include a light intensity
and colour sensor, a passive infrared (body heat) detector, a temperature sensor and a triaxis accelerometer. These sensors are monitored by the camera‟s microcontroller, and
changes in sensor readings can be used to automatically trigger the camera shutter. For
example, a significant change in light level, or the detection of body heat in front of the
camera can be used as triggers. Additionally, an internal timer may be used to trigger the
shutter, for example causing an image to be captured automatically every 30 seconds. The
maximum possible rate is an average of around one photo every 5 seconds, i.e. 12 photos
per minute. SenseCam also has a manual trigger button that lets the wearer take pictures in
the more traditional fashion, albeit without the use of a viewfinder.
The VGA resolution images are stored as compressed .JPG files on an internal flash
memory card (currently 1Gbyte cards are fitted). The typical image size (around 30k bytes)
allows for over 30 thousand images to be stored in the camera. In addition to image data, the
memory card is used to store a log file, which records the sensor data each time the sensors
are read (every few seconds). The log file also records the reason for taking each photograph
(e.g. manual shutter press, timed capture or significant change in sensor readings). The log
file is in a comma-separated value format suitable for importing directly into Microsoft
Excel1 and many other data manipulation tools. The SenseCam has a built-in real time clock
that ensures the timestamps of all files on the storage card are accurate. Timestamp
information is also recorded in the log file along with each entry.
1
Note that Excel 2003 has a 32k row limit which can be exceeded by large sensor files.

Company confidential proprietary information. Do not distribute.
© 2009 Microsoft Corporation, all rights reserved.
SenseCam v2.3 User Guide Page 2 of 31 10/03/2009
Figure 1: Example images captured by SenseCam.
In trials to date, users have worn the camera on a cord around their neck, although it would
be possible to use a clip for pockets or belts. One advantage of using a neck-cord to wear the
camera is that it is reasonably stable when being worn, and it is also reasonably high-up
(closer to the wearer‟s eyeline) which generates more compelling images. The camera
contains a rechargeable lithium-ion battery that lets it run for a complete day on a full
charge. It takes around three hours to recharge using a mains power adaptor or a PC USB
connection. There is an on-off button on the camera, which can be used to save the battery
and prevent any sensor data logging/photograph capture. LEDs and an internal sounder are
used to give the wearer feedback.
The high speed USB interface used for recharging is also used to transfer the image and
sensor data to a PC. An expansion connector on the bottom of the camera may potentially be
used to connect a number of different add-on devices, such as an external battery, an
additional camera, wireless communications or additional sensors. The expansion connector
can also be used to update the firmware that controls the operation of the SenseCam, for
example to add new features or integrate add-on devices. A future enhancement will include
a microphone and audio recording and audio-level triggering circuitry (so that photos can be
taken automatically in response to noises).
1.2. This document
This document is a user guide for the v2.3b SenseCam. It describes the operation of the
camera and of the associated PC software that is used to display SenseCam image data. It
also describes in some detail various options available to the user of a SenseCam to alter the
default configuration of the unit using a PC and a USB cable. Unless specifically stated, the
descriptions herein are based on the most recent firmware build.
For a very quick overview of the v2.3b SenseCam and its operation, please refer to the
quick-start guide in Section 2.
1.3. Microsoft Limited Licence Agreement
Please note the terms and conditions of the Microsoft Limited Licence Agreement
associated with the use of the SenseCam hardware and software. This agreement has to be
signed by all SenseCam recipients external to Microsoft before they are supplied with the
SenseCam hardware and MSRC Viewer/Importer Software.
Company confidential proprietary information. Do not distribute.
© 2009 Microsoft Corporation, all rights reserved.
SenseCam v2.3 User Guide Page 3 of 31 10/03/2009
2. SenseCam quick-start guide
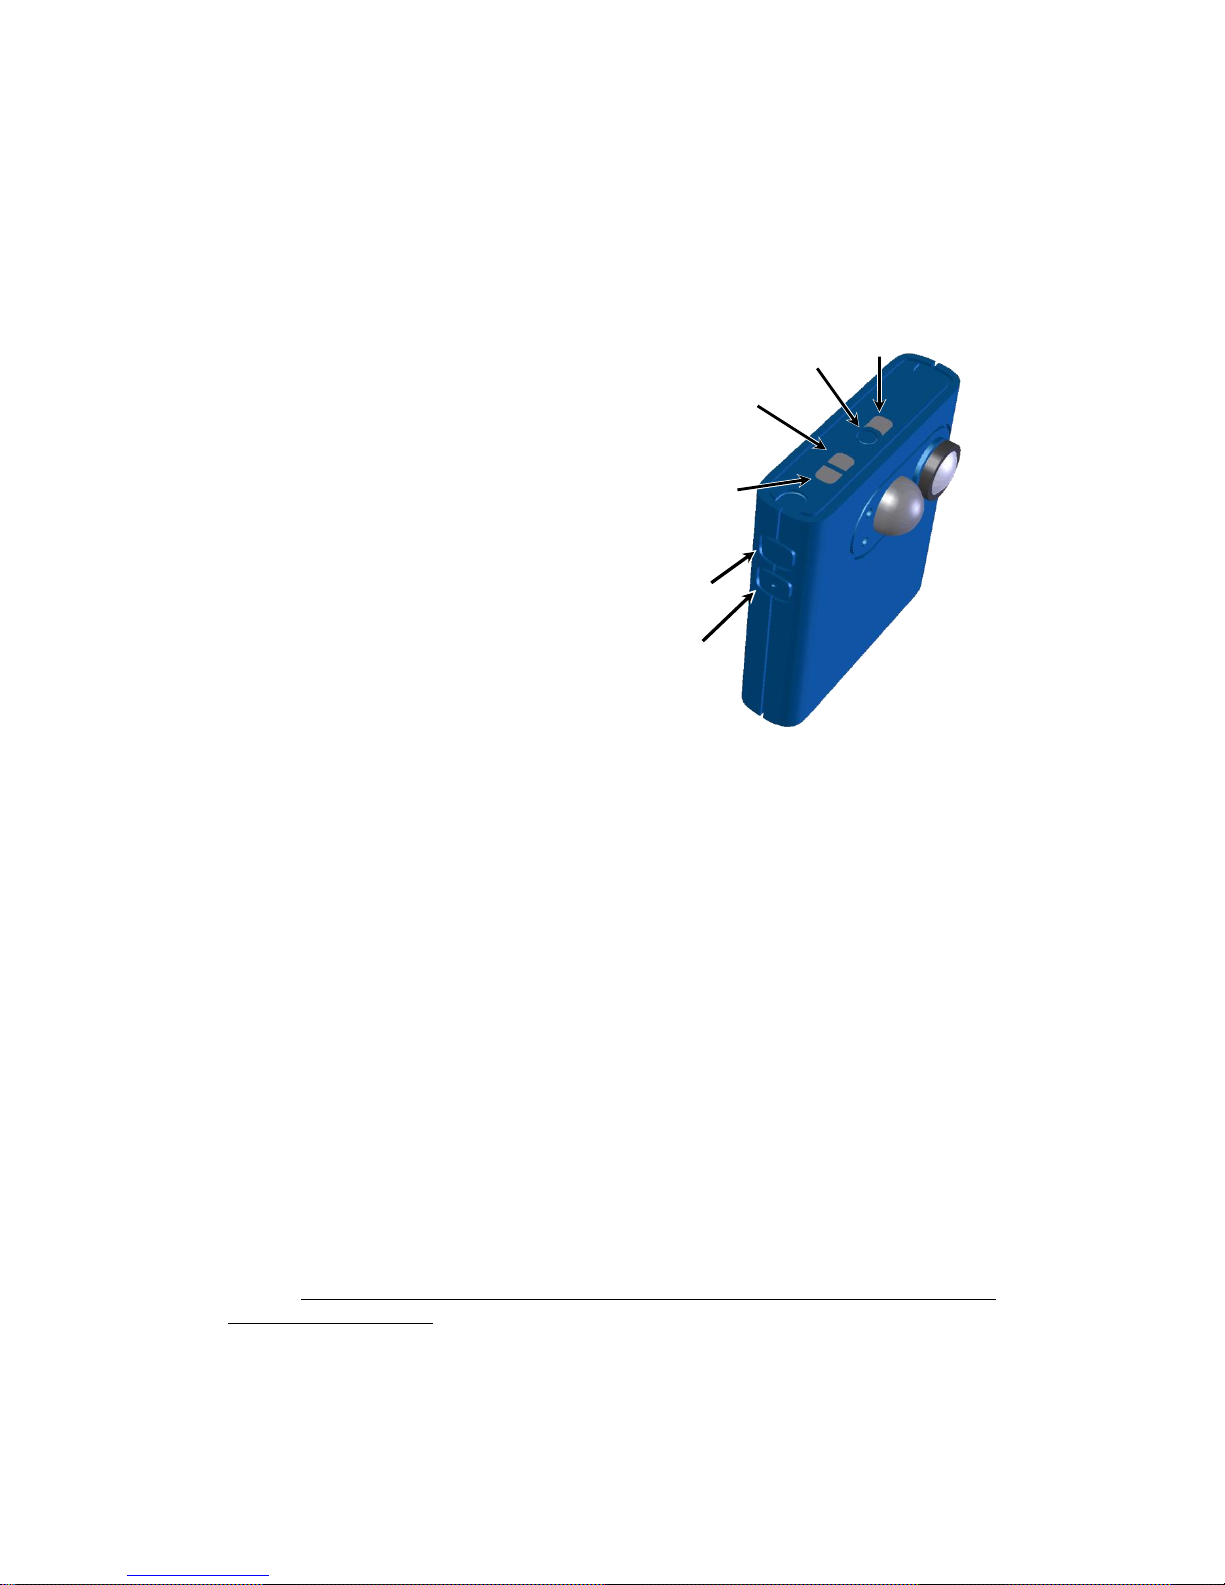
2.1. Turning the camera on and off
The SenseCam is turned on and off using the
small round button on the top of the unit. A
rising tones indicates that the camera is
switching on and a falling tone indicates that
the camera is switching off. The power
button must be pressed for several seconds
before the camera will respond and you will
hear the tone.
The SenseCam takes several seconds to
power up, during which time the yellow
light will be on. When ready for use, the
SenseCam will beep and the green power
light will come on instead.
If battery charge is very low, the SenseCam
will not switch on when the power button is
pressed, but will make a low-pitched
buzzing/warbling sound instead. If this
happens the camera must be charged up.
2.2. In use
During operation, the yellow light will blink whenever the SenseCam is busy recording a
photograph or sensor data. The green power light will be on continuously if the battery has
plenty of charge and it will blink occasionally if the battery is getting low.
In order to explicitly take a picture, press the manual shutter button (the bottom of the two
side buttons) at any time. Note that the camera takes several seconds to save the picture,
during which time further presses of the manual shutter will have no effect.
The top of the two side buttons is a do-not-disturb button which causes the SenseCam to
stop taking pictures for 7 minutes. During this time, the red LED will be on. Fifteen
seconds before pictures start again there will be a beep and the LED will flash. Pressing the
do-not-disturb button again resets the do-not-disturb timer back to 7 minutes. Pictures can
also be re-enabled using the manual shutter button.
Note that the SenseCam may be supplied with a black protective plastic cover fitted over the
glass lens, to protect it from damage during shipping. This can be removed by carefully
pulling it away from the body of the camera (it is a push fit and does not need to be
unscrewed). In day-to-day operation the lens cover is not likely to be needed.
2.3. Charging
The battery will charge whenever the SenseCam is connected to a computer or a mains
charger. Before connecting the camera to a charger or to a computer, please make sure that
the unit is switched on. If the unit will not switch on due to a flat battery (low-pitched
buzzing/warbling sound), please connect it to a charger or a computer for 15 minutes, then
Figure 2: SenseCam lights and buttons
On/off
button
Green
„power‟
light
Yellow
„busy‟
light
Do-not-
disturb
button
Red/green
„charging‟
and „do-notdisturb‟ light
Manual
shutter

Company confidential proprietary information. Do not distribute.
© 2009 Microsoft Corporation, all rights reserved.
SenseCam v2.3 User Guide Page 4 of 31 10/03/2009
disconnect it, turn it on and reconnect as usual. When plugged in, a flashing green light
indicates that the battery is charging; solid green indicates fully charged.
It takes around 3 hours to charge the battery from flat. It is not possible to „over-charge‟ the
battery, and it is safe to leave plugged in overnight. It is also OK to „top up‟ the battery by
re-charging it before it is fully exhausted. A fully-charged battery should allow up to 36
hours of operation although this varies with frequency of image capture and may be as low
as 12 hours.
Connecting it to a PC or charger while it is switched off may result in the unit appearing not
to respond as expected (for example, the charging light may not come on). If this happens, it
is recommended that you disconnect the camera, switch it on, and then re-connect.
2.4. Transferring data
Photographs and sensor data may be transferred from the camera to a computer using the
USB cable supplied. No special USB drivers are required; the camera will simply appear as
an external flash drive under Windows. It is possible to browse SenseCam images (which
will be recorded as a sequence of .JPG image files in various folders on the camera) directly
from Windows, and to load the sensor data into Microsoft Excel. However, it is
recommended to use the SenseCam Image Viewer software supplied to move the images
from the SenseCam onto the PC because this software performs additional operations, such
as tagging files and synchronising the SenseCam real-time clock. Transferring the images
may take many minutes; a status bar indicates progress.
2.5. SenseCam Image Viewer software
One way of copying and viewing SenseCam images and sensor data is to use the SenseCam
Image Viewer software supplied with the camera. This may be installed directly from the
camera – simply connect it to the PC via USB, and run setup.exe from the folder within the
\PCVIEWER folder. The software will also install the .NET framework 2.0 if required.
During installation select „Advanced Operation‟ if you want to be able to view sensor data.
Following installation, whenever the camera is subsequently connected to the PC the
„Import photos from SenseCam using SenseCam Import‟ option should be selected. Section
3 gives a lot more detail about the installation, use and configuration of the MSRC viewer
software.
Note that currently the software requires that the user is a local administrator of the machine
to run properly.
2.6. General
The SenseCam is a research prototype. Please bear in mind that it is not as robust as a
typical commercial product. It is not particularly waterproof so please be careful in the rain.
Documentation is supplied on the camera itself, in the \DOCS folder.
Please note the terms and conditions of the Limited Licence Agreement associated with the
use of the SenseCam hardware and software before you attempt to install or use the PC
software. This agreement has to be signed by all SenseCam recipients external to Microsoft
before they are supplied with the SenseCam hardware and MSRC Viewer/Importer
Software.

Company confidential proprietary information. Do not distribute.
© 2009 Microsoft Corporation, all rights reserved.
SenseCam v2.3 User Guide Page 5 of 31 10/03/2009
3. MSRC SenseCam PC viewer software
The SenseCam is supplied with PC software that has been developed by Microsoft Research
Cambridge. This software comprises two main applications: (1) the SenseCam Image
Importer, which can be used to transfer images and sensor data from the SenseCam to the
PC; and (2) the SenseCam Image Viewer, which can be used to view previously imported
data. The Image Viewer is started automatically following the import operation to allow the
user to review the image and sensor data that has just been transferred.
Even if you do not intend to use the SenseCam Image Viewer, it is highly recommended
that you do use the SenseCam Image Importer to transfer data from the SenseCam to the
PC. If you simply move files from the SenseCam to the PC using Windows Explorer (or a
similar application) you will not enjoy several benefits of using the Image Importer, such as
automatic synchronisation of the SenseCam real-time clock with the PC, image tagging with
EXIF data, or automatic image rotation.
Please note the terms and conditions of the Limited Licence Agreement associated with the
use of the SenseCam hardware and software before you attempt to install or use the PC
software.
3.1. Installing the MSRC software
The SenseCam Image Importer and Viewer software is supplied on the camera. Using
Windows Explorer, browse to the „\PCVIEWER‟ folder on the camera‟s flash disk. Inside
this folder there is another folder with a numeric name, such as „1.11.0‟. (The numeric name
indicates the version number of the SenseCam Image Importer supplied on the camera.
Later versions may be available from Microsoft Research.) Inside this folder, there is an
application called „setup.exe‟. Install the software by double-clicking on „setup.exe‟ to run
it.
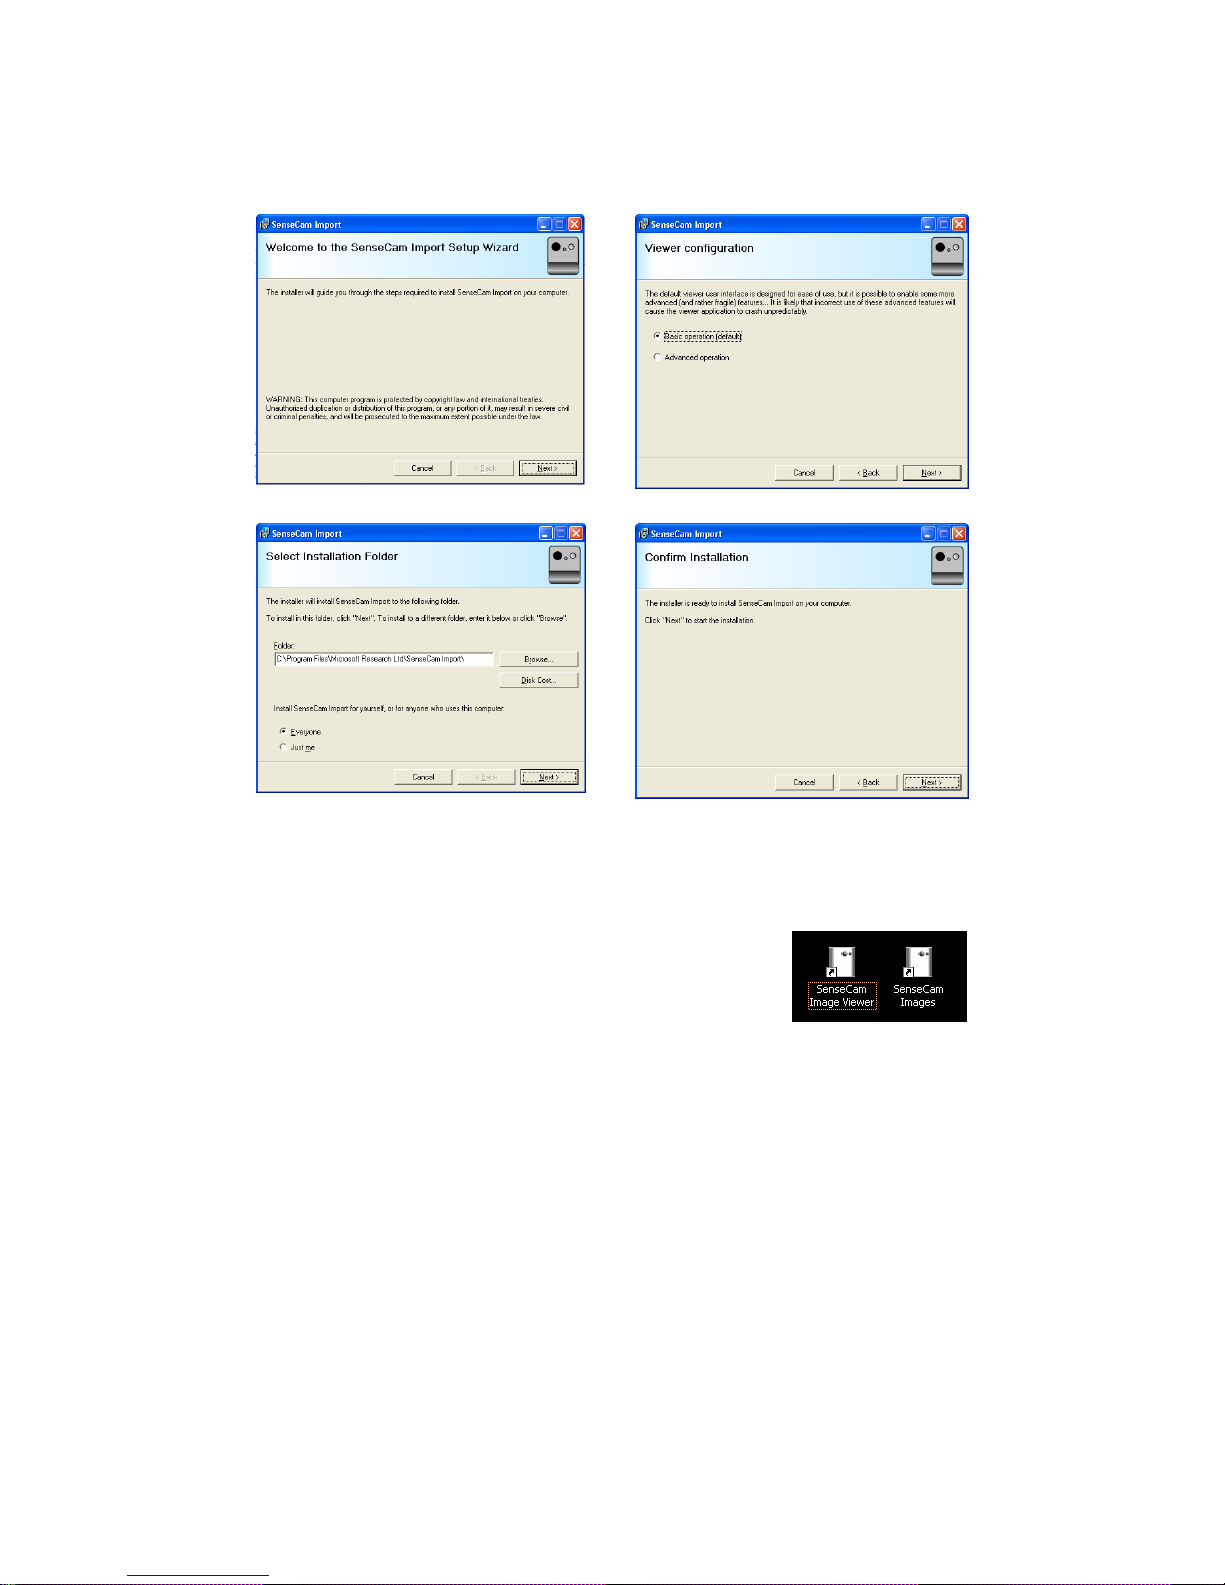
The SenseCam Image Viewer requires the .NET framework 2.0; the application installer
will first install the .NET framework if necessary. When this is complete, the application
itself will install. Installation is most straightforward if you accept the default options; in
this case you only need to click on the „Next‟ button at the bottom right of each of the four
installation dialog boxes.
In the second dialog box during installation there is an option to choose "Basic" or
"Advanced" operation. The “Basic” option exposes all the basic features of the viewer for
editing, bookmarking, and viewing the images. The “Advanced” option is a bit of a
misnomer – it simply exposes a number of miscellaneous experimental functions that are
not yet fully refined. This extra functionality is displayed as a toolbar at the top of the
application window. (You can change this setting retrospectively if necessary, see Section
3.6.) Note that if you want to be able to view sensor data, you should select „Advanced
operation‟.
Company confidential proprietary information. Do not distribute.
© 2009 Microsoft Corporation, all rights reserved.
SenseCam v2.3 User Guide Page 6 of 31 10/03/2009
Figure 3: When installing the SenseCam Image Viewer software it‟s easiest to use all the
default options and just click the „Next‟ button on each of the dialog boxes.
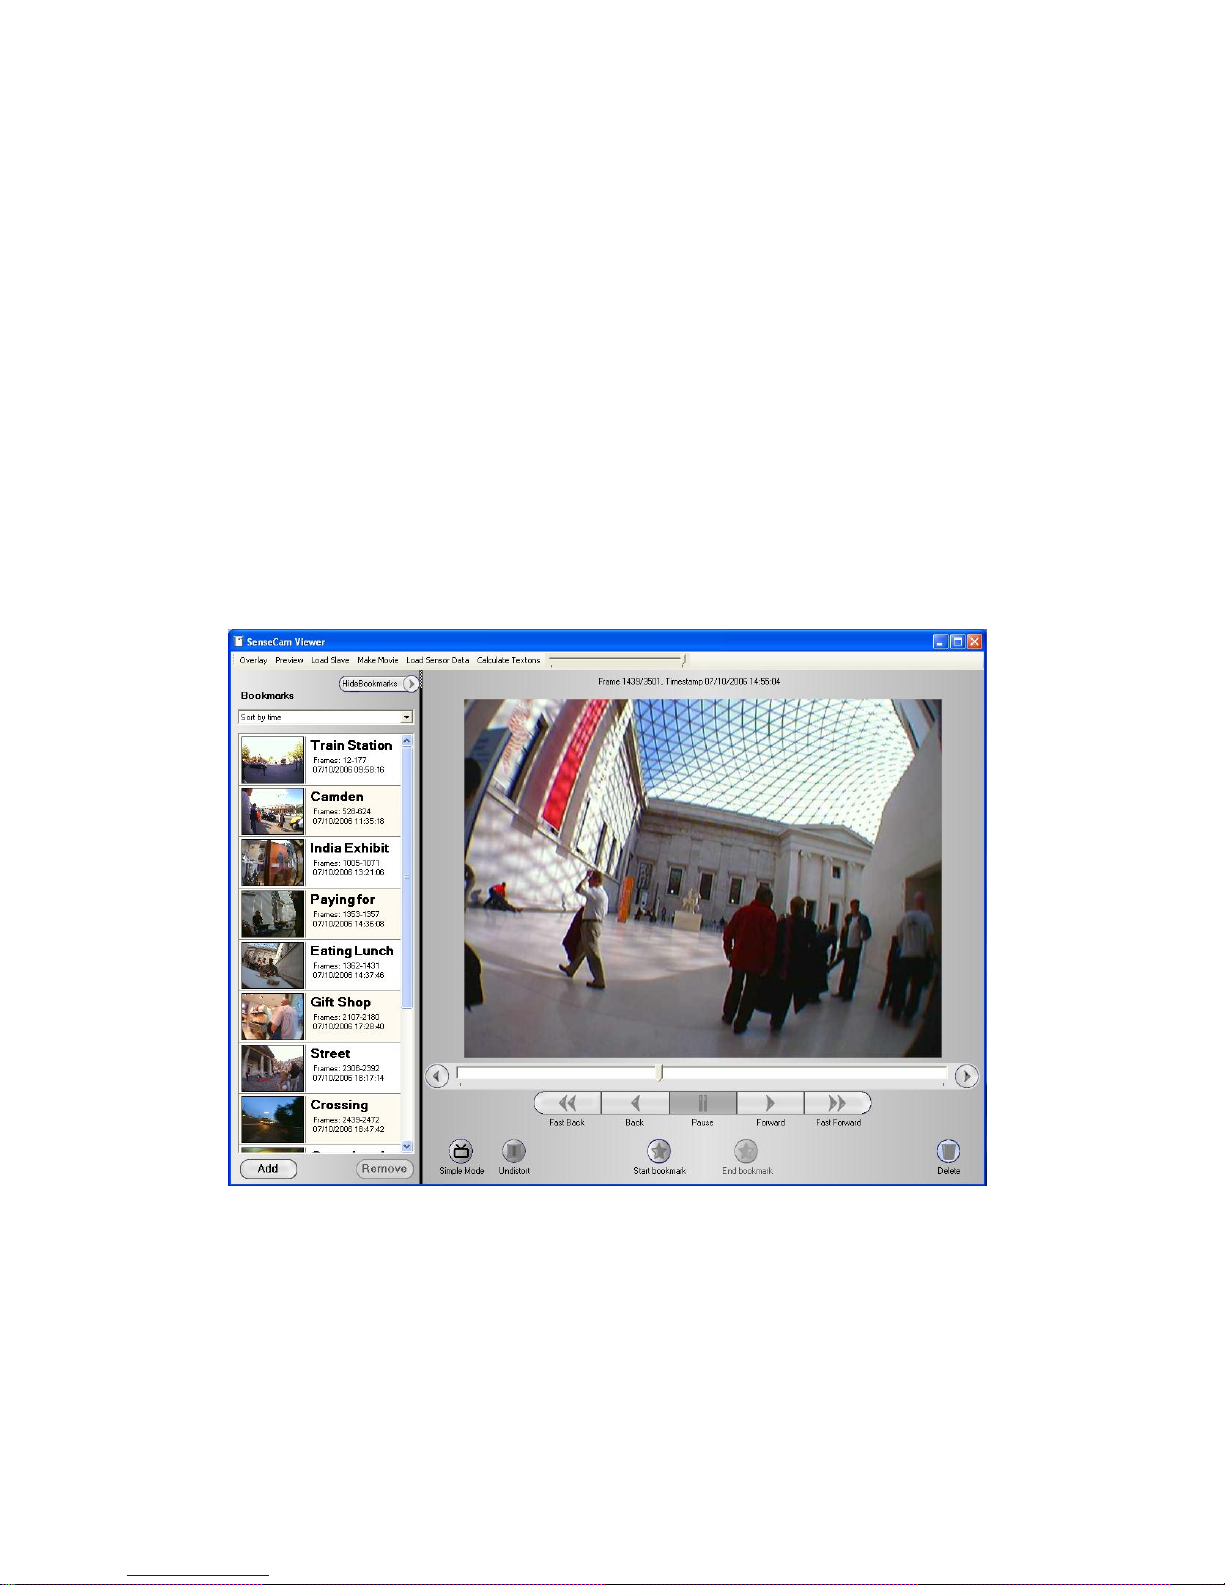
When the software installation is complete there will be
two new icons on the desktop. The „SenseCam Image
Viewer‟ icon can be used to run the Image Viewer
application, whilst the „SenseCam Images‟ icon is a
shortcut to the folder where the imported image
sequences are stored. It is also possible to use the
Windows Start menu instead of the desktop icons (select
„Start‟ then „All Programs‟ then „SenseCam‟ followed
by „SenseCam Image Viewer‟ or „SenseCam Images‟).
Figure 4: After installation there will be two
new desktop icons.
3.2. Using the SenseCam Image Importer
When you attach the SenseCam to a PC, Windows will bring up a dialog box asking you
what you want to do with the associated files. As long as the SenseCam Image Viewer
software has been installed, one of the options will be „Import photos from SenseCam using
SenseCam Import‟. Select this option whenever you dock the SenseCam.

Company confidential proprietary information. Do not distribute.
© 2009 Microsoft Corporation, all rights reserved.
SenseCam v2.3 User Guide Page 7 of 31 10/03/2009
It is possible to tell Windows to automatically use SenseCam Import every time a device
containing images is connected to your PC (check the „Always do the selected action‟ box).
However, this is not recommended if you are likely to plug other devices with images (such
as a regular digital camera) into the PC from time to time because these will also cause the
SenseCam Image Importer to run which is probably not desired behaviour. Also note that an
„empty‟ SenseCam will not result in the SenseCam Import option being displayed.
Prior to importing the images, the SenseCam Image Importer will show a dialog requesting
the user to enter a name for the set of images that are about to be imported. Though optional,
specifying a name here helps to keep the SenseCam images organised. When new images
are imported from the SenseCam, the SenseCam Image Importer creates a new folder on the
PC‟s local storage to store them in. This folder is named with the time and date of import
(which is not directly related to the times that the images and sensor data were collected)
and the name entered by the user into the dialog prior to importing. An example folder name
is “10-February-2006 10-40-43 # Visiting London”. An example without the album name
specified is “10-February-2006 10-40-43 #”.
The date-based folder names that have been created by default can be manually edited
afterwards using Windows Explorer. The viewer application assumes that folder names will
start in the default way in order to sort them chronologically. It is strongly advised to avoid
changing the part of the folder name before the „#‟ character. However, it is fine to change
the folder name after the „#‟ character by either appending text after the „#‟ character to
name the set of images or changing the text if a name was already specified during the
importing of images. Anything after the „#‟ will be ignored by the viewer application.
The easiest way to change the image folder names is to use the shortcut to „SenseCam
Images‟ which was created on the desktop/in the Start menu when the software was
installed. Selecting this shortcut starts up a new Explorer window with all the imported
folders displayed. By default, the location of this is “C:\Documents and
Settings\<username>\Local Settings\Application Data” folder. This location may be
changed by editing the Windows registry (see Section 3.7). If you want the viewer
application to use SenseCam (or other) images already stored on your machine, edit the
registry string to point to the directory containing image folders or copy/move those
directories into the image root directory.
3.3. Using the basic features of the SenseCam Image Viewer
When the SenseCam Import is complete, the SenseCam Image Viewer application will
automatically start and load in the new images. If the SenseCam Image Viewer is started via
the Windows Start menu (or via the shortcut on the desktop), it will present a list of all the
folders imported to date, and whichever is selected will be displayed in the viewer.
Having loaded up a set of images, the sequence can be replayed slowly using the „Play‟
button (labelled „>‟) or more quickly using the „Fast Forward‟ button (labelled „>>‟). As the
sequence plays, the slider underneath the image progresses from left to right. Playback can
be paused at any point with the „Pause‟ button. The mouse can be used to manually drag the
slider to a particular position and have playback continue from that point. It is also possible
to play the image sequence in reverse using the „Back‟ and „FastBack‟ buttons. Any images
in a sequence which are unwanted may be removed by using the „Delete‟ button: this does
not actually delete the files, but merely records (in a configuration file) that they are not to
be used as part of the playback sequence.
Company confidential proprietary information. Do not distribute.
© 2009 Microsoft Corporation, all rights reserved.
SenseCam v2.3 User Guide Page 8 of 31 10/03/2009
The wide-angle (or „fish-eye‟) lens fitted to SenseCam introduces distortion to the image –
lines which are straight in the real world will tend to be captured as curved lines. Clicking
on the „Undistort‟ button to the left of the „FastBack‟ button puts the Image Viewer into a
mode where it approximately corrects for this distortion. Clicking on the same button a
second time will restore the image to the original form. A side-effect of using the
undistortion option is a small black band at the top and bottom of the images.
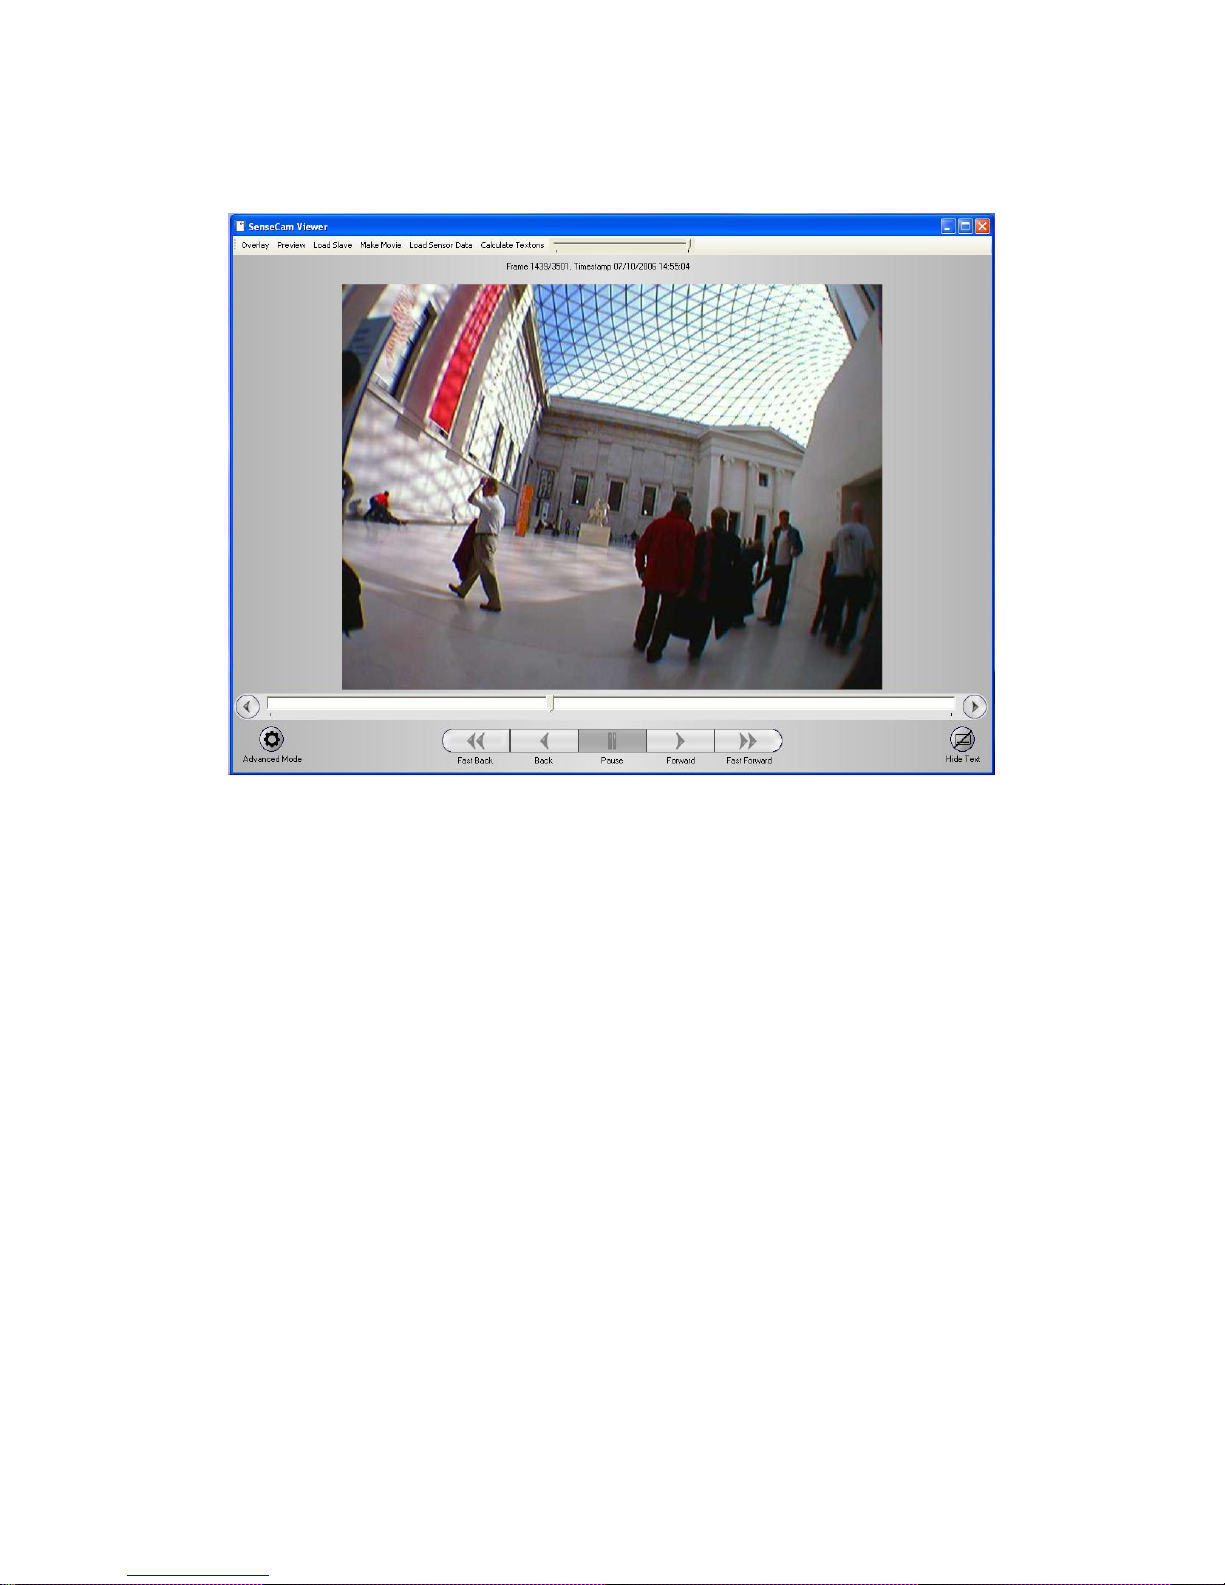
The viewer also has to modes: Advanced Mode and Simple Mode. Advanced Mode (Error!
Reference source not found.) reveals the editing features of the viewer such as image
deletion, bookmark creation, image (un)distortion and the list of bookmarks. Simple Mode
(Error! Reference source not found.) hides all the editing features of the viewer and
simply displays the image and playback controls. Simple Mode is useful for viewing the
images without the distractions and potential dangers of accidental deletion of images. Upon
start-up, the viewer application starts in Advanced Mode. To enter Simple Mode, click the
“Simple Mode” button located in the lower left-hand corner of the viewing pane. Once in
Simple Mode, clicking the “Advanced Mode” button switches the application back to
Advanced
Mode.
Figure 5: The SenseCam viewer application, allowing playback and review of SenseCam images.
Company confidential proprietary information. Do not distribute.
© 2009 Microsoft Corporation, all rights reserved.
SenseCam v2.3 User Guide Page 9 of 31 10/03/2009
Figure 6: The SenseCam viewer application in Simple Mode which hides editing functions.
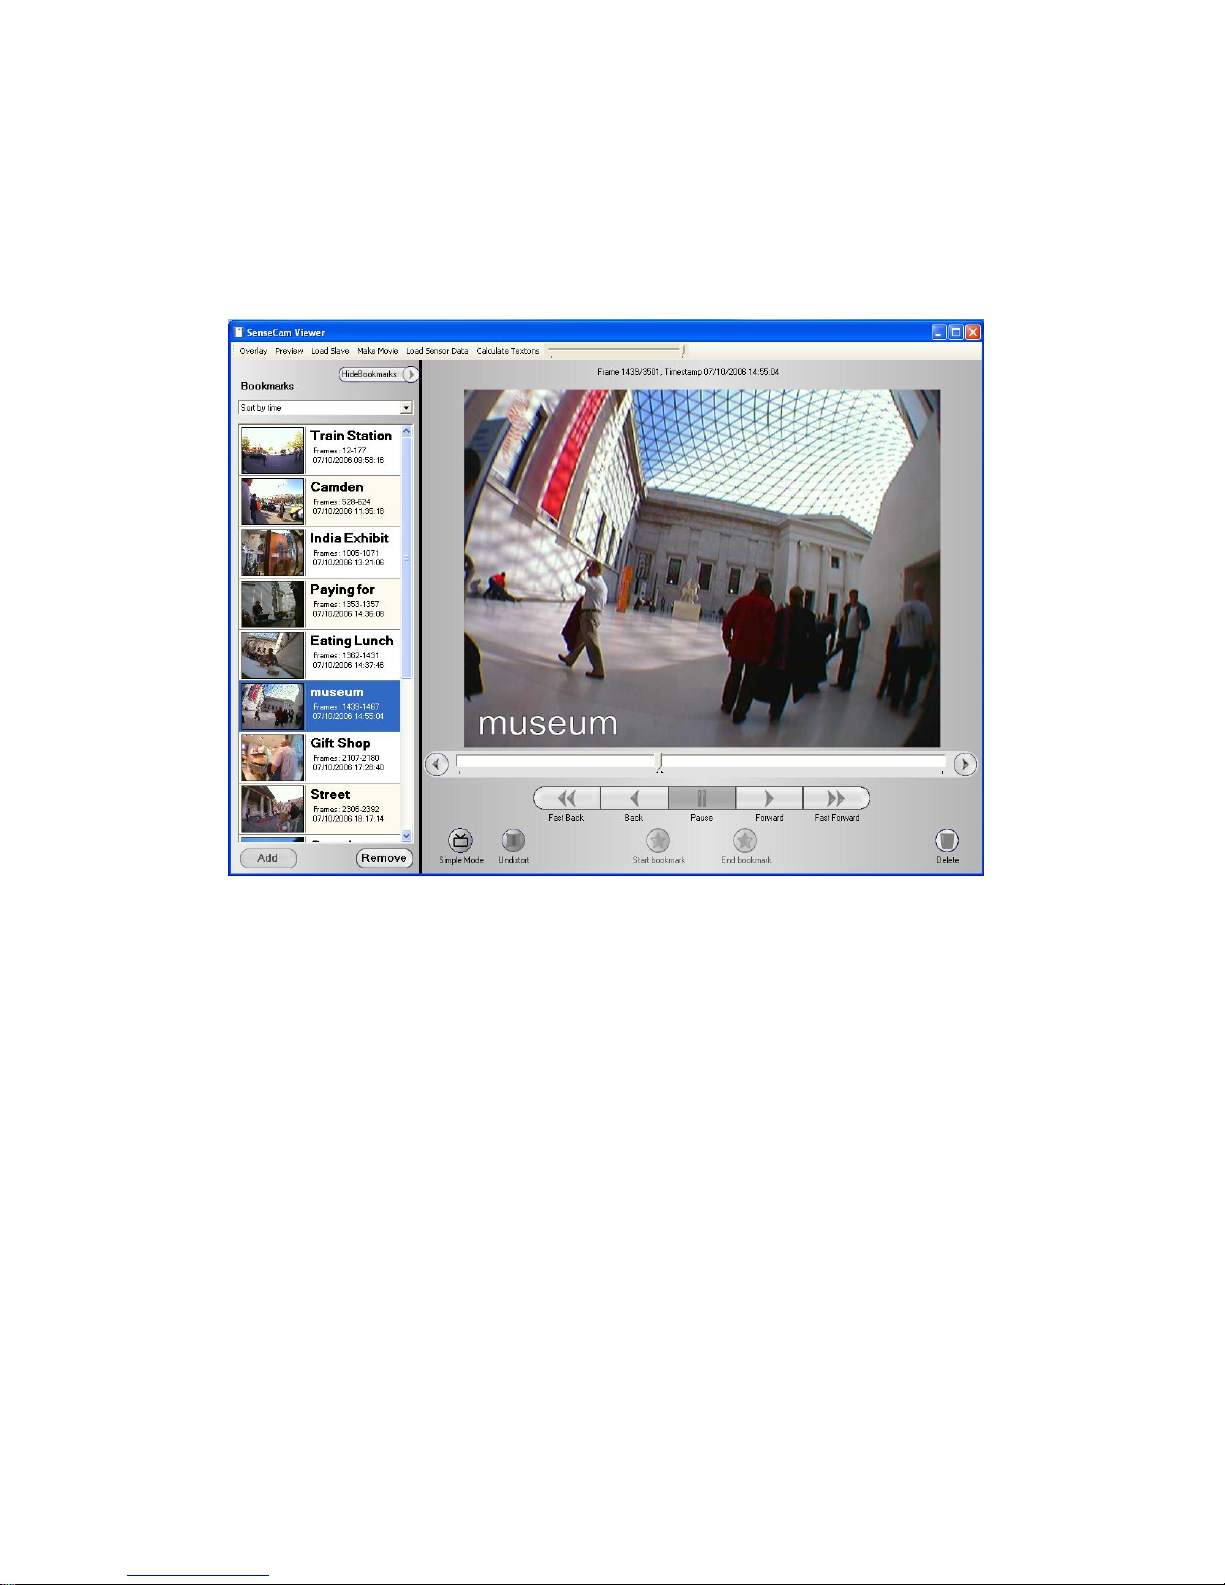
With long sequences of images, it can be useful to associate „Bookmarks‟ with certain
images. A bookmark is created by pausing playback on the image in question, and then
clicking on the „Add‟ button at the bottom left of the screen. The bookmark will appear as a
thumbnail on the left-hand side of the display; by clicking on the default the name of
„<bookmark>‟, a more meaningful name can be assigned. Once bookmark(s) have been
created, it is possible to return to the image associated with the bookmark simply by clicking
on the bookmark. The bookmark text is also shown as overlay text (Error! Reference
source not found.) on the images in the viewer. This overlay feature can be turned off by
pressing the “Hide Text” button (located in the lower-right corner) found in “Simple mode”.
Bookmarks can also be associated with a series of images. To create a bookmark that spans
a range of images, advance the viewer to the image for which you want the bookmark to
start. Click the “Start Bookmark” button (located under the playback controls). Then
advance the viewer to the image where you want the bookmark to end. Click the “End
Bookmark” button. A new window titled “Create a bookmark” will appear showing you a
preview of the images you selected to be bookmarked. If you selected to bookmark more
than 12 consecutive images, this window will select 12 representative images from the range
and display them. The image in the top left corner is always the first image in the range you
selected. The image in the bottom right corner is always the last image in the range you
selected. You can type in the text field the bookmark text. Press the “Make Bookmark”
button. The “Create a bookmark” window will close, and the bookmark will be added to the
range of images. The bookmark will show up in the bookmark list in the left hand side and
the bookmark text will be overlaid on the image accordingly.The list of bookmarks can be
Company confidential proprietary information. Do not distribute.
© 2009 Microsoft Corporation, all rights reserved.
SenseCam v2.3 User Guide Page 10 of 31 10/03/2009
sorted by bookmark name, or by the position of the bookmark within the image sequence
(i.e. by time). Bookmarks can be permanently deleted using the „Remove‟ button. The entire
list of bookmarks can be temporarily hidden with the „Hide Bookmarks‟ button at the top
left of the display.
Figure 7: Bookmarks are shown as overlay text on the image.
3.4. ‘Advanced’ operation of the SenseCam Image Viewer
If the SenseCam Image Viewer software is installed with „Advanced Operation‟ selected,
then there will be several additional options available at the top of the window. These
options are not available in the Basic installation.
Overlay: Displays an analogue clock face to the right of the image sequence indicating at
what time of day the image displayed was originally taken. The hands on the clock face spin
around as the movie is played. To enable the analogue display overlay, single click on the
option. To remove the display, click on the option again.
Preview: Opens the Windows picture preview window on the current image, thereby
providing access to printing and editing. Changing the currently selected image while the
preview window is still displayed is not recommended.
Load Slave: Allows additional SenseCam image sequences to be loaded in and displayed at
the same time as the main sequence. This is useful if you have sequences that were recorded
at the same time – for example if two or more people were wearing SenseCams at an event.
For each additional image sequence that is loaded in, a new viewing window is created.
Playback will result in the individual image sequences playing in their respective windows
in synchronisation with each other. This is also useful for playing back sequences where
 Loading...