

Page 1
ONE
USER GUIDE
KIN R1.0 - CDMA
Copyright © 2010 Microsoft Corporation.
Model OMPB10ZU
Page 2

CONTENTS
PHONE CONTROLS . . . . . . . . . . . . . . . . . . . . . . . . . . . . . . . . . . . . . . . . . . . . . . . . . . . . . . . . . . . . . . . 7
The outside of your phone . . . . . . . . . . . . . . . . . . . . . . . . . . . . . . . . . . . . . . . . . . . . . . . . . . . . . . . . 7
Turn your phone on/off . . . . . . . . . . . . . . . . . . . . . . . . . . . . . . . . . . . . . . . . . . . . . . . . . . . . . . . . . . 7
Control buttons . . . . . . . . . . . . . . . . . . . . . . . . . . . . . . . . . . . . . . . . . . . . . . . . . . . . . . . . . . . . . . . . . 8
Battery . . . . . . . . . . . . . . . . . . . . . . . . . . . . . . . . . . . . . . . . . . . . . . . . . . . . . . . . . . . . . . . . . . . . . . . . 9
Insert or remove your battery. . . . . . . . . . . . . . . . . . . . . . . . . . . . . . . . . . . . . . . . . . . . . . . . . . . 9
Charge using the USB power adapter . . . . . . . . . . . . . . . . . . . . . . . . . . . . . . . . . . . . . . . . . . . 10
Charge using your computer’s USB port . . . . . . . . . . . . . . . . . . . . . . . . . . . . . . . . . . . . . . . . . 10
Ways to conserve battery power. . . . . . . . . . . . . . . . . . . . . . . . . . . . . . . . . . . . . . . . . . . . . . . . .11
Headset jack . . . . . . . . . . . . . . . . . . . . . . . . . . . . . . . . . . . . . . . . . . . . . . . . . . . . . . . . . . . . . . . . . . .11
Screen lock . . . . . . . . . . . . . . . . . . . . . . . . . . . . . . . . . . . . . . . . . . . . . . . . . . . . . . . . . . . . . . . . . . . 12
Touch screen gestures. . . . . . . . . . . . . . . . . . . . . . . . . . . . . . . . . . . . . . . . . . . . . . . . . . . . . . . . . . . 12
Keyboard . . . . . . . . . . . . . . . . . . . . . . . . . . . . . . . . . . . . . . . . . . . . . . . . . . . . . . . . . . . . . . . . . . . . . 14
Typing and navigating in text boxes. . . . . . . . . . . . . . . . . . . . . . . . . . . . . . . . . . . . . . . . . . . . . 15
Lanyard . . . . . . . . . . . . . . . . . . . . . . . . . . . . . . . . . . . . . . . . . . . . . . . . . . . . . . . . . . . . . . . . . . . . . . .17
HOME . . . . . . . . . . . . . . . . . . . . . . . . . . . . . . . . . . . . . . . . . . . . . . . . . . . . . . . . . . . . . . . . . . . . . . . . .18
About Home . . . . . . . . . . . . . . . . . . . . . . . . . . . . . . . . . . . . . . . . . . . . . . . . . . . . . . . . . . . . . . . . . . 18
Manage Home . . . . . . . . . . . . . . . . . . . . . . . . . . . . . . . . . . . . . . . . . . . . . . . . . . . . . . . . . . . . . . . . . 21
Update your status on the Loop . . . . . . . . . . . . . . . . . . . . . . . . . . . . . . . . . . . . . . . . . . . . . . . . 21
Rearrange Apps and Favorites . . . . . . . . . . . . . . . . . . . . . . . . . . . . . . . . . . . . . . . . . . . . . . . . . 21
Add feeds to the Loop . . . . . . . . . . . . . . . . . . . . . . . . . . . . . . . . . . . . . . . . . . . . . . . . . . . . . . . . 21
Add contacts to Favorites . . . . . . . . . . . . . . . . . . . . . . . . . . . . . . . . . . . . . . . . . . . . . . . . . . . . . 22
Remove contacts from Favorites . . . . . . . . . . . . . . . . . . . . . . . . . . . . . . . . . . . . . . . . . . . . . . . 22
Share with the Spot. . . . . . . . . . . . . . . . . . . . . . . . . . . . . . . . . . . . . . . . . . . . . . . . . . . . . . . . . . . . . 23
About the Spot . . . . . . . . . . . . . . . . . . . . . . . . . . . . . . . . . . . . . . . . . . . . . . . . . . . . . . . . . . . . . 23
Share items with the Spot . . . . . . . . . . . . . . . . . . . . . . . . . . . . . . . . . . . . . . . . . . . . . . . . . . . . 23
Remove items from the Spot . . . . . . . . . . . . . . . . . . . . . . . . . . . . . . . . . . . . . . . . . . . . . . . . . . 24
Search . . . . . . . . . . . . . . . . . . . . . . . . . . . . . . . . . . . . . . . . . . . . . . . . . . . . . . . . . . . . . . . . . . . . . . . 24
Dashboard . . . . . . . . . . . . . . . . . . . . . . . . . . . . . . . . . . . . . . . . . . . . . . . . . . . . . . . . . . . . . . . . . . . . 26
Dashboard shortcuts. . . . . . . . . . . . . . . . . . . . . . . . . . . . . . . . . . . . . . . . . . . . . . . . . . . . . . . . . 26
Icons and indicators . . . . . . . . . . . . . . . . . . . . . . . . . . . . . . . . . . . . . . . . . . . . . . . . . . . . . . . . . 27
Sound profile. . . . . . . . . . . . . . . . . . . . . . . . . . . . . . . . . . . . . . . . . . . . . . . . . . . . . . . . . . . . . . . . . . 27
Recent apps and messages . . . . . . . . . . . . . . . . . . . . . . . . . . . . . . . . . . . . . . . . . . . . . . . . . . . . . . . 28
Online help . . . . . . . . . . . . . . . . . . . . . . . . . . . . . . . . . . . . . . . . . . . . . . . . . . . . . . . . . . . . . . . . . . . 28
ONE User Guide - R1.0 - April 21, 2010 2
Page 3

GLOBAL SETTINGS . . . . . . . . . . . . . . . . . . . . . . . . . . . . . . . . . . . . . . . . . . . . . . . . . . . . . . . . . . . . . .29
About global settings. . . . . . . . . . . . . . . . . . . . . . . . . . . . . . . . . . . . . . . . . . . . . . . . . . . . . . . . . . . . 29
Wireless controls . . . . . . . . . . . . . . . . . . . . . . . . . . . . . . . . . . . . . . . . . . . . . . . . . . . . . . . . . . . . . . .31
Airplane mode. . . . . . . . . . . . . . . . . . . . . . . . . . . . . . . . . . . . . . . . . . . . . . . . . . . . . . . . . . . . . . .31
Wi-Fi . . . . . . . . . . . . . . . . . . . . . . . . . . . . . . . . . . . . . . . . . . . . . . . . . . . . . . . . . . . . . . . . . . . . . .31
Bluetooth. . . . . . . . . . . . . . . . . . . . . . . . . . . . . . . . . . . . . . . . . . . . . . . . . . . . . . . . . . . . . . . . . . 32
Data roaming . . . . . . . . . . . . . . . . . . . . . . . . . . . . . . . . . . . . . . . . . . . . . . . . . . . . . . . . . . . . . . 33
Phone . . . . . . . . . . . . . . . . . . . . . . . . . . . . . . . . . . . . . . . . . . . . . . . . . . . . . . . . . . . . . . . . . . . . . . . 33
Themes . . . . . . . . . . . . . . . . . . . . . . . . . . . . . . . . . . . . . . . . . . . . . . . . . . . . . . . . . . . . . . . . . . . . . . 34
Sound . . . . . . . . . . . . . . . . . . . . . . . . . . . . . . . . . . . . . . . . . . . . . . . . . . . . . . . . . . . . . . . . . . . . . . . 35
About your phone . . . . . . . . . . . . . . . . . . . . . . . . . . . . . . . . . . . . . . . . . . . . . . . . . . . . . . . . . . . . . . 35
Date & time . . . . . . . . . . . . . . . . . . . . . . . . . . . . . . . . . . . . . . . . . . . . . . . . . . . . . . . . . . . . . . . . . . 36
Screen lock . . . . . . . . . . . . . . . . . . . . . . . . . . . . . . . . . . . . . . . . . . . . . . . . . . . . . . . . . . . . . . . . . . . 36
Location . . . . . . . . . . . . . . . . . . . . . . . . . . . . . . . . . . . . . . . . . . . . . . . . . . . . . . . . . . . . . . . . . . . . . 38
Language . . . . . . . . . . . . . . . . . . . . . . . . . . . . . . . . . . . . . . . . . . . . . . . . . . . . . . . . . . . . . . . . . . . . . 39
Account sync . . . . . . . . . . . . . . . . . . . . . . . . . . . . . . . . . . . . . . . . . . . . . . . . . . . . . . . . . . . . . . . . . 39
About the KIN Studio. . . . . . . . . . . . . . . . . . . . . . . . . . . . . . . . . . . . . . . . . . . . . . . . . . . . . . . . 39
Phone updates . . . . . . . . . . . . . . . . . . . . . . . . . . . . . . . . . . . . . . . . . . . . . . . . . . . . . . . . . . . . . . . . 40
CONTACTS. . . . . . . . . . . . . . . . . . . . . . . . . . . . . . . . . . . . . . . . . . . . . . . . . . . . . . . . . . . . . . . . . . . . . 41
About contacts. . . . . . . . . . . . . . . . . . . . . . . . . . . . . . . . . . . . . . . . . . . . . . . . . . . . . . . . . . . . . . . . . 41
Manage your contacts . . . . . . . . . . . . . . . . . . . . . . . . . . . . . . . . . . . . . . . . . . . . . . . . . . . . . . . . . . . 45
Add a contact . . . . . . . . . . . . . . . . . . . . . . . . . . . . . . . . . . . . . . . . . . . . . . . . . . . . . . . . . . . . . . 45
Edit a contact card . . . . . . . . . . . . . . . . . . . . . . . . . . . . . . . . . . . . . . . . . . . . . . . . . . . . . . . . . . 47
Delete a contact card . . . . . . . . . . . . . . . . . . . . . . . . . . . . . . . . . . . . . . . . . . . . . . . . . . . . . . . . 47
Link/unlink contact cards. . . . . . . . . . . . . . . . . . . . . . . . . . . . . . . . . . . . . . . . . . . . . . . . . . . . . 48
Favorite contacts . . . . . . . . . . . . . . . . . . . . . . . . . . . . . . . . . . . . . . . . . . . . . . . . . . . . . . . . . . . . . . . 49
Contact cards. . . . . . . . . . . . . . . . . . . . . . . . . . . . . . . . . . . . . . . . . . . . . . . . . . . . . . . . . . . . . . . . . . 50
Find a contact . . . . . . . . . . . . . . . . . . . . . . . . . . . . . . . . . . . . . . . . . . . . . . . . . . . . . . . . . . . . . . . . . 51
Find a contact from anywhere on your phone. . . . . . . . . . . . . . . . . . . . . . . . . . . . . . . . . . . . . 51
Find a contact from the Contacts app . . . . . . . . . . . . . . . . . . . . . . . . . . . . . . . . . . . . . . . . . . . 51
Syncing your contacts . . . . . . . . . . . . . . . . . . . . . . . . . . . . . . . . . . . . . . . . . . . . . . . . . . . . . . . . . . . 51
PHONE . . . . . . . . . . . . . . . . . . . . . . . . . . . . . . . . . . . . . . . . . . . . . . . . . . . . . . . . . . . . . . . . . . . . . . . . 52
About the phone . . . . . . . . . . . . . . . . . . . . . . . . . . . . . . . . . . . . . . . . . . . . . . . . . . . . . . . . . . . . . . . 52
Using a Bluetooth device . . . . . . . . . . . . . . . . . . . . . . . . . . . . . . . . . . . . . . . . . . . . . . . . . . . . . . . . 54
Calling . . . . . . . . . . . . . . . . . . . . . . . . . . . . . . . . . . . . . . . . . . . . . . . . . . . . . . . . . . . . . . . . . . . . . . . 55
Make a call . . . . . . . . . . . . . . . . . . . . . . . . . . . . . . . . . . . . . . . . . . . . . . . . . . . . . . . . . . . . . . . . 55
3 ONE User Guide - R1.0 - April 21, 2010
Page 4

Answer a call. . . . . . . . . . . . . . . . . . . . . . . . . . . . . . . . . . . . . . . . . . . . . . . . . . . . . . . . . . . . . . . 56
In-call options . . . . . . . . . . . . . . . . . . . . . . . . . . . . . . . . . . . . . . . . . . . . . . . . . . . . . . . . . . . . . . 56
Multiple calls . . . . . . . . . . . . . . . . . . . . . . . . . . . . . . . . . . . . . . . . . . . . . . . . . . . . . . . . . . . . . . 57
End a call. . . . . . . . . . . . . . . . . . . . . . . . . . . . . . . . . . . . . . . . . . . . . . . . . . . . . . . . . . . . . . . . . . 58
Voicemail. . . . . . . . . . . . . . . . . . . . . . . . . . . . . . . . . . . . . . . . . . . . . . . . . . . . . . . . . . . . . . . . . . . . . 58
Voicemail notifications. . . . . . . . . . . . . . . . . . . . . . . . . . . . . . . . . . . . . . . . . . . . . . . . . . . . . . . 58
Call voicemail from the Dialer . . . . . . . . . . . . . . . . . . . . . . . . . . . . . . . . . . . . . . . . . . . . . . . . . 58
Call Log . . . . . . . . . . . . . . . . . . . . . . . . . . . . . . . . . . . . . . . . . . . . . . . . . . . . . . . . . . . . . . . . . . . . . . 58
Phone settings . . . . . . . . . . . . . . . . . . . . . . . . . . . . . . . . . . . . . . . . . . . . . . . . . . . . . . . . . . . . . . . . . 59
FEED READER . . . . . . . . . . . . . . . . . . . . . . . . . . . . . . . . . . . . . . . . . . . . . . . . . . . . . . . . . . . . . . . . . .60
About Feed Reader . . . . . . . . . . . . . . . . . . . . . . . . . . . . . . . . . . . . . . . . . . . . . . . . . . . . . . . . . . . . . 60
All Feeds screen . . . . . . . . . . . . . . . . . . . . . . . . . . . . . . . . . . . . . . . . . . . . . . . . . . . . . . . . . . . . . . . 64
Favorites screen. . . . . . . . . . . . . . . . . . . . . . . . . . . . . . . . . . . . . . . . . . . . . . . . . . . . . . . . . . . . . . . . 65
Individual Feed screen . . . . . . . . . . . . . . . . . . . . . . . . . . . . . . . . . . . . . . . . . . . . . . . . . . . . . . . . . . 66
Individual Story screen . . . . . . . . . . . . . . . . . . . . . . . . . . . . . . . . . . . . . . . . . . . . . . . . . . . . . . . . . . 67
EMAIL. . . . . . . . . . . . . . . . . . . . . . . . . . . . . . . . . . . . . . . . . . . . . . . . . . . . . . . . . . . . . . . . . . . . . . . . .68
About Email. . . . . . . . . . . . . . . . . . . . . . . . . . . . . . . . . . . . . . . . . . . . . . . . . . . . . . . . . . . . . . . . . . . 68
Set up an email account . . . . . . . . . . . . . . . . . . . . . . . . . . . . . . . . . . . . . . . . . . . . . . . . . . . . . . . . . 69
Inbox screens. . . . . . . . . . . . . . . . . . . . . . . . . . . . . . . . . . . . . . . . . . . . . . . . . . . . . . . . . . . . . . . . . . 70
Read message screen. . . . . . . . . . . . . . . . . . . . . . . . . . . . . . . . . . . . . . . . . . . . . . . . . . . . . . . . . . . . 73
Email settings . . . . . . . . . . . . . . . . . . . . . . . . . . . . . . . . . . . . . . . . . . . . . . . . . . . . . . . . . . . . . . . . . 73
MESSAGES . . . . . . . . . . . . . . . . . . . . . . . . . . . . . . . . . . . . . . . . . . . . . . . . . . . . . . . . . . . . . . . . . . . . 75
About Messages. . . . . . . . . . . . . . . . . . . . . . . . . . . . . . . . . . . . . . . . . . . . . . . . . . . . . . . . . . . . . . . . 75
Messages inbox . . . . . . . . . . . . . . . . . . . . . . . . . . . . . . . . . . . . . . . . . . . . . . . . . . . . . . . . . . . . . . . . 77
Conversation cards . . . . . . . . . . . . . . . . . . . . . . . . . . . . . . . . . . . . . . . . . . . . . . . . . . . . . . . . . . . . . 78
MMS setting . . . . . . . . . . . . . . . . . . . . . . . . . . . . . . . . . . . . . . . . . . . . . . . . . . . . . . . . . . . . . . . . . . 79
CAMERA. . . . . . . . . . . . . . . . . . . . . . . . . . . . . . . . . . . . . . . . . . . . . . . . . . . . . . . . . . . . . . . . . . . . . . .80
About Camera . . . . . . . . . . . . . . . . . . . . . . . . . . . . . . . . . . . . . . . . . . . . . . . . . . . . . . . . . . . . . . . . . 80
Capture photos and videos . . . . . . . . . . . . . . . . . . . . . . . . . . . . . . . . . . . . . . . . . . . . . . . . . . . . . . . 82
Photo settings . . . . . . . . . . . . . . . . . . . . . . . . . . . . . . . . . . . . . . . . . . . . . . . . . . . . . . . . . . . . . . 85
Video settings . . . . . . . . . . . . . . . . . . . . . . . . . . . . . . . . . . . . . . . . . . . . . . . . . . . . . . . . . . . . . . 86
Full-screen photo viewer . . . . . . . . . . . . . . . . . . . . . . . . . . . . . . . . . . . . . . . . . . . . . . . . . . . . . . . . 87
Photo and video screens . . . . . . . . . . . . . . . . . . . . . . . . . . . . . . . . . . . . . . . . . . . . . . . . . . . . . . . . . 90
Captured screen . . . . . . . . . . . . . . . . . . . . . . . . . . . . . . . . . . . . . . . . . . . . . . . . . . . . . . . . . . . . 90
Favorites screen . . . . . . . . . . . . . . . . . . . . . . . . . . . . . . . . . . . . . . . . . . . . . . . . . . . . . . . . . . . . 91
ONE User Guide - R1.0 - April 21, 2010 4
Page 5

Albums screen. . . . . . . . . . . . . . . . . . . . . . . . . . . . . . . . . . . . . . . . . . . . . . . . . . . . . . . . . . . . . . 92
Online screen . . . . . . . . . . . . . . . . . . . . . . . . . . . . . . . . . . . . . . . . . . . . . . . . . . . . . . . . . . . . . . 93
Sync photos and videos to the Studio. . . . . . . . . . . . . . . . . . . . . . . . . . . . . . . . . . . . . . . . . . . . . . . 94
Copy photos and videos to/from your computer . . . . . . . . . . . . . . . . . . . . . . . . . . . . . . . . . . . . . . 94
BROWSER . . . . . . . . . . . . . . . . . . . . . . . . . . . . . . . . . . . . . . . . . . . . . . . . . . . . . . . . . . . . . . . . . . . . .96
About the Browser . . . . . . . . . . . . . . . . . . . . . . . . . . . . . . . . . . . . . . . . . . . . . . . . . . . . . . . . . . . . . 96
Webpage browse screen . . . . . . . . . . . . . . . . . . . . . . . . . . . . . . . . . . . . . . . . . . . . . . . . . . . . . . . . . 99
Favorite webpages. . . . . . . . . . . . . . . . . . . . . . . . . . . . . . . . . . . . . . . . . . . . . . . . . . . . . . . . . . . . . .101
Search . . . . . . . . . . . . . . . . . . . . . . . . . . . . . . . . . . . . . . . . . . . . . . . . . . . . . . . . . . . . . . . . . . . . . . .101
Browser settings . . . . . . . . . . . . . . . . . . . . . . . . . . . . . . . . . . . . . . . . . . . . . . . . . . . . . . . . . . . . . . 102
MUSIC & MORE . . . . . . . . . . . . . . . . . . . . . . . . . . . . . . . . . . . . . . . . . . . . . . . . . . . . . . . . . . . . . . . .103
About Music & More. . . . . . . . . . . . . . . . . . . . . . . . . . . . . . . . . . . . . . . . . . . . . . . . . . . . . . . . . . . 103
Sync media from your computer . . . . . . . . . . . . . . . . . . . . . . . . . . . . . . . . . . . . . . . . . . . . . . . . . 105
Media player . . . . . . . . . . . . . . . . . . . . . . . . . . . . . . . . . . . . . . . . . . . . . . . . . . . . . . . . . . . . . . . . . 106
Find a song, video, or podcast . . . . . . . . . . . . . . . . . . . . . . . . . . . . . . . . . . . . . . . . . . . . . . . . 106
Play an item. . . . . . . . . . . . . . . . . . . . . . . . . . . . . . . . . . . . . . . . . . . . . . . . . . . . . . . . . . . . . . . 107
Playlists . . . . . . . . . . . . . . . . . . . . . . . . . . . . . . . . . . . . . . . . . . . . . . . . . . . . . . . . . . . . . . . . . . 107
Now Playing screens. . . . . . . . . . . . . . . . . . . . . . . . . . . . . . . . . . . . . . . . . . . . . . . . . . . . . . . . 108
Control media play . . . . . . . . . . . . . . . . . . . . . . . . . . . . . . . . . . . . . . . . . . . . . . . . . . . . . . . . . .110
Delete an item. . . . . . . . . . . . . . . . . . . . . . . . . . . . . . . . . . . . . . . . . . . . . . . . . . . . . . . . . . . . . .110
FM radio screen . . . . . . . . . . . . . . . . . . . . . . . . . . . . . . . . . . . . . . . . . . . . . . . . . . . . . . . . . . . . . . .110
Listen to media with headset, headphones, or Bluetooth device . . . . . . . . . . . . . . . . . . . . . . . . .112
Zune Pass catalog . . . . . . . . . . . . . . . . . . . . . . . . . . . . . . . . . . . . . . . . . . . . . . . . . . . . . . . . . . . . . .113
Settings . . . . . . . . . . . . . . . . . . . . . . . . . . . . . . . . . . . . . . . . . . . . . . . . . . . . . . . . . . . . . . . . . . . . . .114
ALARM . . . . . . . . . . . . . . . . . . . . . . . . . . . . . . . . . . . . . . . . . . . . . . . . . . . . . . . . . . . . . . . . . . . . . . . 115
About Alarm . . . . . . . . . . . . . . . . . . . . . . . . . . . . . . . . . . . . . . . . . . . . . . . . . . . . . . . . . . . . . . . . . .115
Create an alarm . . . . . . . . . . . . . . . . . . . . . . . . . . . . . . . . . . . . . . . . . . . . . . . . . . . . . . . . . . . . . . . .117
Turn an alarm on and off . . . . . . . . . . . . . . . . . . . . . . . . . . . . . . . . . . . . . . . . . . . . . . . . . . . . . . . .117
Change an alarm’s settings . . . . . . . . . . . . . . . . . . . . . . . . . . . . . . . . . . . . . . . . . . . . . . . . . . . . . . .118
Delete an alarm . . . . . . . . . . . . . . . . . . . . . . . . . . . . . . . . . . . . . . . . . . . . . . . . . . . . . . . . . . . . . . . .118
Alarm notifications . . . . . . . . . . . . . . . . . . . . . . . . . . . . . . . . . . . . . . . . . . . . . . . . . . . . . . . . . . . . .118
SAFETY, REGULATORY, AND LEGAL INFORMATION . . . . . . . . . . . . . . . . . . . . . . . . . . . . . . . . . 120
Handling and safety precautions . . . . . . . . . . . . . . . . . . . . . . . . . . . . . . . . . . . . . . . . . . . . . . . . . 120
Battery handling . . . . . . . . . . . . . . . . . . . . . . . . . . . . . . . . . . . . . . . . . . . . . . . . . . . . . . . . . . . 120
Device handling and use. . . . . . . . . . . . . . . . . . . . . . . . . . . . . . . . . . . . . . . . . . . . . . . . . . . . . 120
5 ONE User Guide - R1.0 - April 21, 2010
Page 6

Battery charger handling . . . . . . . . . . . . . . . . . . . . . . . . . . . . . . . . . . . . . . . . . . . . . . . . . . . . 122
Device handling in potentially explosive atmospheres . . . . . . . . . . . . . . . . . . . . . . . . . . . . . 123
Guidelines for persons with pacemakers and implantable medical devices . . . . . . . . . . . . 123
Driving safety . . . . . . . . . . . . . . . . . . . . . . . . . . . . . . . . . . . . . . . . . . . . . . . . . . . . . . . . . . . . . 124
Additional safety information . . . . . . . . . . . . . . . . . . . . . . . . . . . . . . . . . . . . . . . . . . . . . . . . 124
Regulatory and compliance information . . . . . . . . . . . . . . . . . . . . . . . . . . . . . . . . . . . . . . . . . . . 129
FCC notice . . . . . . . . . . . . . . . . . . . . . . . . . . . . . . . . . . . . . . . . . . . . . . . . . . . . . . . . . . . . . . . 129
Exposure to Radio Frequency (RF) signals . . . . . . . . . . . . . . . . . . . . . . . . . . . . . . . . . . . . . . 129
Emergency calls . . . . . . . . . . . . . . . . . . . . . . . . . . . . . . . . . . . . . . . . . . . . . . . . . . . . . . . . . . . .131
FCC enhanced 911 (E911) rules . . . . . . . . . . . . . . . . . . . . . . . . . . . . . . . . . . . . . . . . . . . . . . . .131
Hearing aid compatibility with mobile phones . . . . . . . . . . . . . . . . . . . . . . . . . . . . . . . . . . . 132
Recycling Information . . . . . . . . . . . . . . . . . . . . . . . . . . . . . . . . . . . . . . . . . . . . . . . . . . . . . . 132
Compliance with additional FCC regulations . . . . . . . . . . . . . . . . . . . . . . . . . . . . . . . . . . . . .133
Legal information . . . . . . . . . . . . . . . . . . . . . . . . . . . . . . . . . . . . . . . . . . . . . . . . . . . . . . . . . . . . . 134
KIN terms of service . . . . . . . . . . . . . . . . . . . . . . . . . . . . . . . . . . . . . . . . . . . . . . . . . . . . . . . . 134
12-month limited warranty . . . . . . . . . . . . . . . . . . . . . . . . . . . . . . . . . . . . . . . . . . . . . . . . . . 138
INDEX. . . . . . . . . . . . . . . . . . . . . . . . . . . . . . . . . . . . . . . . . . . . . . . . . . . . . . . . . . . . . . . . . . . . . . . . 141
ONE User Guide - R1.0 - April 21, 2010 6
Page 7
PHONE CONTROLS
Microphone
Lanyard channel
BACK button
CAPTURE
Camera flash
Camera lens
Battery cover latch
USB power port
Proximity and
Headset jack
VOLUME buttons
+
_
Earpiece
light sensors
button
button
POWER
Speaker
POWER button
THE OUTSIDE OF YOUR PHONE
TURN YOUR PHONE ON/OFF
1 Press and hold the POWER button to turn your phone on.
2 Press and hold the POWER button again to turn your phone off. The phone will turn off after you
confirm.
Note: If you press the POWER button quickly while your phone is on, your phone will go into screen
lock. Screen lock prevents accidental actions if your phone’s buttons are pressed or if your screen is
touched. Read more in “Screen lock” on page 36.
7 ONE User Guide - R1.0 - April 21, 2010
Page 8

CONTROL BUTTONS
BACK button Use the BACK button to navigate back to where you came from. If you’re on a
screen and editing or adding information, pressing BACK will save your
information, or you’ll be asked if you want to save it.
Press and hold the BACK button to return to the Loop (the center Home
screen) at any time. Read more in “Loop” on page 19.
VOLUME buttons Use the + and - VOLUME buttons to adjust the volume on a call or when
you’re playing music, watching a video, or listening to a podcast. Press the +
VOLUME button to increase the volume; press the - VOLUME button to
lower the volume. To silence an incoming call’s ring, press any button or key.
If no sound is playing, pressing the VOLUME buttons will step through the
sound profiles.
CAPTURE button Use the CAPTURE button to capture photos and videos. When you press the
CAPTURE button, you’ll enter the Camera app > Capture screen. Read more
about capturing photos and videos in “Camera” on page 80.
POWER button Use the POWER button to put your phone into screen lock (press the POWER
button briefly) or turn your phone on/off (press and hold). Read more in
“Turn your phone on/off” above, “Screen lock” on page 12, and “Screen lock”
on page 36.
ONE User Guide - R1.0 - April 21, 2010 8
Page 9
BATTERY
Battery lift tab
Insert or remove your battery
1 Turn your phone over so you are looking at the battery cover.
2 Press the battery cover latch, then carefully lift the cover from your phone, lifting from the side
with the latch.
3 To remove the battery, lift the battery using the battery lift tab.
4 To insert the battery, match the gold-colored contacts on the battery with the gold-colored contacts
in the battery slot. Push the battery firmly into place.
5 Replace the cover, making sure the cover latch snaps back into position.
Battery notes:
• If you plan to leave your phone unattended for an extended period of time, the battery may
discharge if the phone is turned on and not attached to the charger.
• Battery charging times can vary and are dependent on the type of charger and remaining battery
charge. Battery performance will begin to degrade over time, so you may want to consider replacing
the battery if you notice your phone’s talk and standby times are noticeably shorter than normal.
• You may store your battery in the phone when it is not in use; however, the battery will slowly
discharge even if the phone is turned off. If you remove your battery from the phone, store the
battery in a cool, dark, dry place.
9 ONE User Guide - R1.0 - April 21, 2010
Page 10
• Battery life will vary depending on operating temperature, signal strength, phone feature settings,
network setup, and system use (calls, messaging, etc.).
• A shorter screen lock timeout setting will also improve battery life because the screen will go black
sooner.
Charge using the USB power adapter
When you first receive your phone it should be charged, but it’s advisable to bring it to a full charge.
The USB power adapter that came in the box with your phone lets you plug your phone into a power
outlet to charge the battery. To charge your phone, follow these steps:
1 Connect the USB power adapter to your phone’s USB/power port.
2 Plug the other end of the USB power adapter to a wall power outlet. While your phone is charging,
you’ll see the charging icon over the battery icon in the lower-right of the screen and in the
Dashboard. (Read more in “Dashboard” on page 26.)
3 When your phone is fully charged, the battery icon will be filled with color.
Charge using your computer’s USB port
1 Connect the USB cable to your phone’s USB/power port. (Your USB cable is also used to connect
your phone to the USB power adapter.)
2 Connect the other end of the adapter to your computer’s USB port.
Note: The first time you attach your phone to your PC via USB, you’ll be prompted to install
drivers.
3 While your phone is charging, you’ll see the charging icon over the battery icon in the lower-
right of the screen and in the Dashboard. (Read more in “Dashboard” on page 26.)
Read about importing media to your phone via USB in:
• “Copy photos and videos to/from your computer” on page 94.
• “Sync media from your computer” on page 105.
Note: Not all USB off-the-shelf car chargers provide enough power to adequately charge your phone.
A car charger must be rated at 500 mA to charge your phone properly.
ONE User Guide - R1.0 - April 21, 2010 10
Page 11
Ways to conserve battery power
Listed below are a few ways you can save your battery power, as well as some facts about battery
usage:
• Adjust wireless settings. If you will not be using your phone’s wireless functionality for a period of
time, you can save power by turning off Wi-Fi or by putting your phone in airplane mode, but
remember you will not be able to receive calls in airplane mode. Read more in “Airplane mode” on
page 31.
• If you are going to be in an area or building that has no cell coverage for a few hours, turn off
your phone or turn on airplane mode and connect to Wi-Fi to conserve power. When you are
out of range of a cell tower your phone will have a shorter standby time because your phone is
searching for a cell tower. This uses more power than if it were already registered with a tower and
simply monitoring.
• If you won’t be using your phone for a period of time, turn it off to save the most power. You
can leave your phone turned off and not connected to the battery charger for approximately two
days before the battery will completely discharge.
• Turn the Auto-brightness setting on. Auto-brightness is turned on by default. You’ll typically use
more battery power when it’s turned off, unless you manually set the brightness level to stay low.
Read more in “Auto-brightness” on page 37.
• Warm up. The battery capacity will be lower when the temperature is lower. If you think your
phone is suffering from the cold, bring it indoors or where the temperature is warmer.
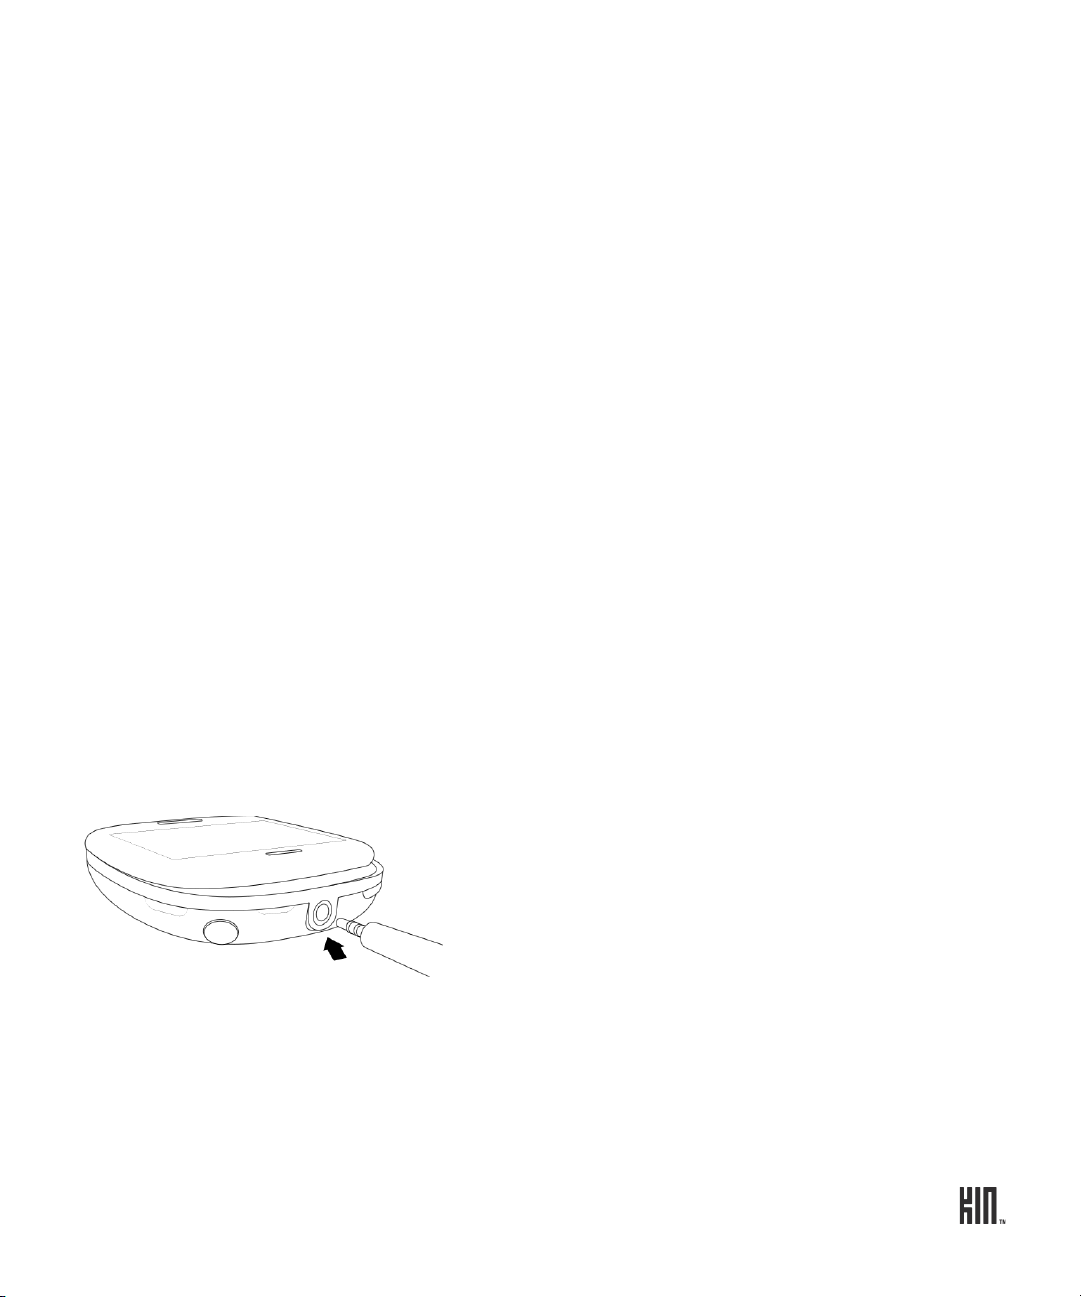
HEADSET JACK
Your phone is designed to use a stereo headset. To use a headset, insert the headset lead into the
headset jack. Be sure to press the headset lead in firmly to secure the connection.
Read about how to use the headset control button(s) in “Can I control a call with a headset?” on page
53 and “Listen to media with headset, headphones, or Bluetooth device” on page 112.
Note: In order to listen to the FM radio in Music & More, you must insert a wired headset or
headphone (the wire works as the antenna).
11 ONE User Guide - R1.0 - April 21, 2010
Page 12

SCREEN LOCK
To prevent accidental key presses or screen touches, lock your screen. While your phone is screen
locked, you’ll still be able to adjust the volume during phone calls and media playback. You’ll also still
receive incoming call and message notifications.
1 Lock your screen by doing one of the following:
• Press the POWER button quickly (the screen will also go dark).
• Simply wait for the screen lock timeout period to elapse. Read how to set the timeout period in
“Auto-lock” on page 37. After 10 seconds in the screen lock state, your phone screen will go black
and remain so until you unlock it, receive a new call, message, or other notification.
2 To unlock the phone, do one of the following:
• Slide the keyboard open.
• Press the BACK button, then flick your finger diagonally toward the upper-right corner.
3 If you’ve set a security PIN (required if you’ve set up an Exchange email account) and it has locked,
you’ll be prompted to type it.
Note: After eight incorrect attempts at typing your PIN, you’ll be prompted to type a specific
number to continue trying. If you type an incorrect PIN a total of ten times, the data on your phone
will be erased (but you will be warned after the ninth attempt).
Warning: Be careful of losing your data if children play with this screen; they may not be able to
understand the warnings.
TOUCH SCREEN GESTURES
Tap Touch your fingertip quickly and lightly on the screen. Use this gesture for
selecting items on the screen. You’ll know when you’ve selected an item because
its color changes.
In the Camera full-screen photo viewer, tap once to show the options.
ONE User Guide - R1.0 - April 21, 2010 12
Page 13
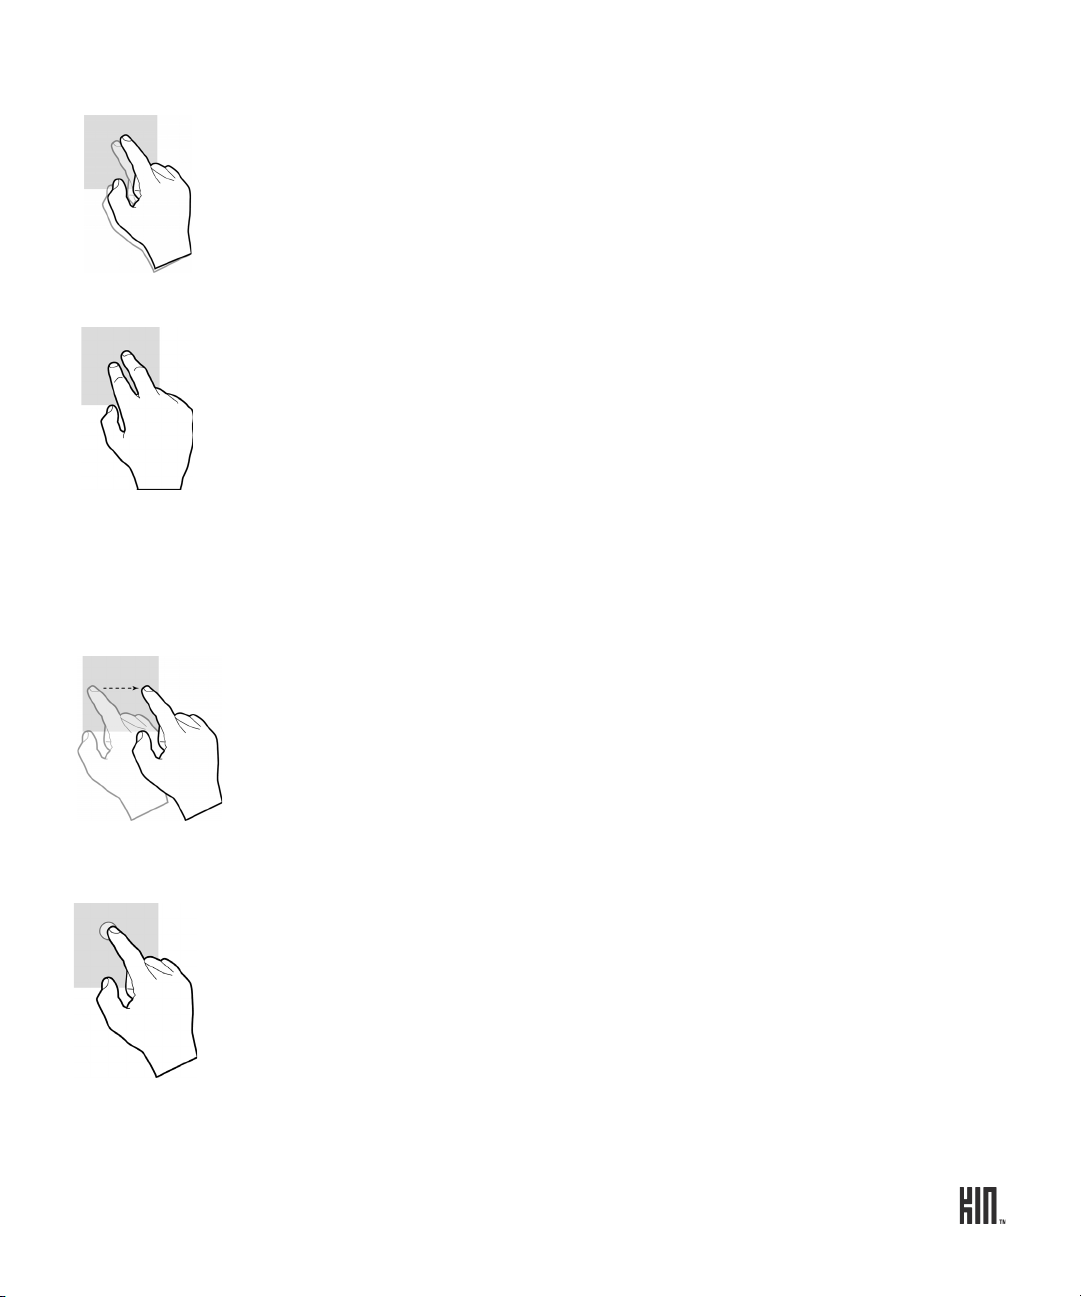
Double tap On some screens (webpages, Camera full-screen photo viewer) you can zoom in/
out by tapping the screen twice, quickly and in succession.
If you double tap an image on a webpage, you’ll show the Save image or Open
link options (if the image is also a link).
Note: If you double tap on a screen where there’s no special double tap action,
your double tap will be treated as a single tap.
Two-finger tap On some screens you can expose additional functions (such as delete or reorder
items) by quickly tapping the screen with two fingers (using your forefinger +
middle finger works well).
• Delete an item by first tapping the screen with two fingers to show the delete
icon X next to each item. Tap the X to delete the item(s). Two-finger tap again
to exit edit mode. When you two-finger tap to exit, be careful not to tap any of
the Xs.
• On the Apps and Favorites screens you can rearrange the contents by first
entering edit mode. Quickly tap the screen with two fingers and you’ll see all
the items on the screen shrink. Drag the item to its new location. Two-finger
tap again to exit edit mode.
Slide Slide your finger lightly on the screen in an up/down or left/right direction. This
gesture is primarily used for scrolling or panning.
• Slide your finger in an upward direction to scroll down; slide your finger in a
downward direction to scroll up.
• Slide your finger left to move to the right; slide your finger right to move to
the left.
To scroll up or down quickly, flick your fingertip quickly and repeatedly up or
down on the screen. Tap the screen to stop the scrolling.
Touch and hold Touch your finger to the screen and leave it there until the next action is
triggered. For example:
• Touch and hold an item until it “lifts” to drag it into the Spot.
• Touch and hold a text box to magnify it for positioning the cursor.
13 ONE User Guide - R1.0 - April 21, 2010
Page 14
Drag After you touch a movable item, if you hold your finger on the item and slide,
the item slides with your finger. This drag gesture is used to rearrange Apps or
Favorites.
To drag contacts, photos, feed stories, etc. into the Spot , first touch and hold
the item until it lifts slightly and the Spot expands , then drag it right into the
Spot, where it will disappear. Read more about the Spot in “Share with the Spot”
on page 23.
Pinch in or out
To zoom in to a webpage or photo, start with your thumb and forefinger together
in the middle of the screen then pull them apart.
To zoom out of a webpage or photo, reverse the motion. Start with your thumb
and forefinger at opposite ends of the screen and pull them together.
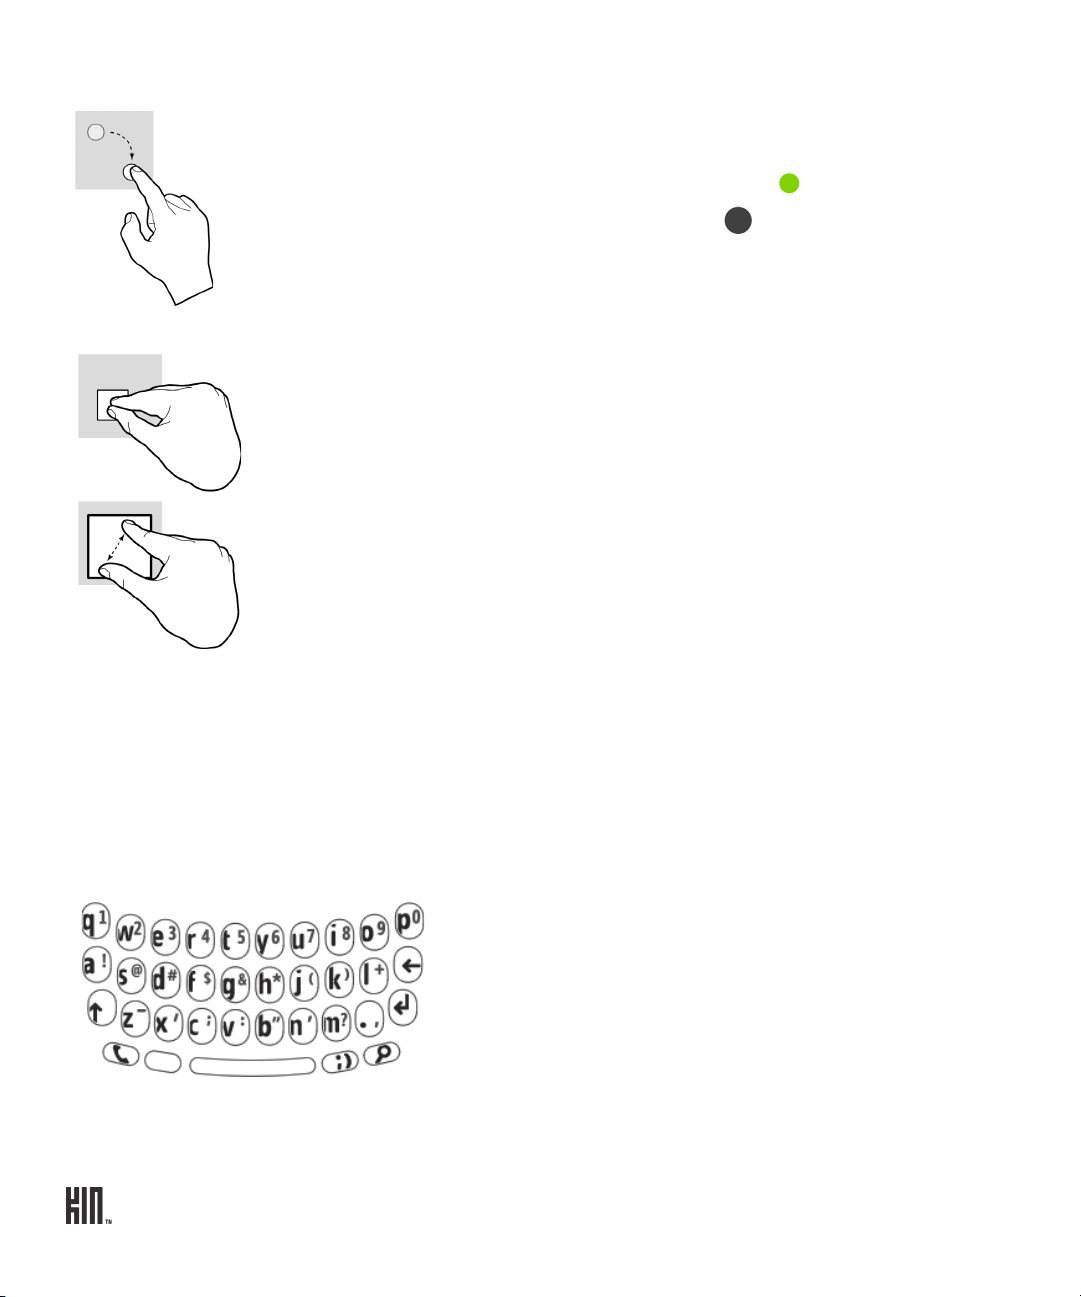
KEYBOARD
To open the phone’s keyboard, hold the phone with the BACK button on the bottom, then slide the
screen up using one or both of your thumbs.
The keyboard contains four rows of keys. The bottom row includes a PHONE key (opens the Dialer),
an ALT key, a SPACEBAR, a SYMBOL key, and a SEARCH key. The top row contains the numbers,
which you use in combination with the ALT key.
ONE User Guide - R1.0 - April 21, 2010 14
Page 15

PHONE key
Press the PHONE key to open the Phone app. You will go to either the Dialer or
the Call Log, whichever screen you visited last. From the Dialer you can make
outgoing calls. If you’ve navigated to another screen while in a call, press the
PHONE key to return to the in-call screen. Note that this key doesn’t send or
end a call.
ALT key
Press the ALT key before typing one of the special characters on the keys,
including the numbers on the top row. To type multiple characters, press and
hold the ALT key while typing, or lock the ALT key first by pressing it twice
(press again to unlock).
SHIFT key
Press the SHIFT key before typing an uppercase letter. To type multiple
uppercase letters, press and hold the SHIFT key while typing, or lock the
SHIFT key first by pressing it twice (press again to unlock).
SYMBOL key Press the SYMBOL key to open the emoticon and special character selector.
The first panel that opens contains special characters; tap the arrow on the
right to see the emoticons. Tap an emoticon or a special character to insert it in
your text at the cursor point.
ENTER key
Press the ENTER key to:
• Create a new line in a text box.
• Go to a webpage once you’ve typed an address in the Browser address bar.
• Capture a photo or video.
• Post a status update.
• Jump between the subject and message boxes when writing a message.
SEARCH key Press the SEARCH key to go to the start search screen. You can search your
phone, the web, or locations near you. Read more in “Search” on page 24.
Typing and navigating in text boxes
Type in a text box You can tell a text box is ready for typing when you see the cursor
blinking. If you don’t see a blinking cursor, tap the text box to focus it,
then start typing.
If you’ve previously typed text in the Search app text box, when you
return to the Search app, the text will be highlighted and ready for typing.
15 ONE User Guide - R1.0 - April 21, 2010
Page 16
Move the cursor in a text
box
After you’ve typed something, if you want to move the cursor, touch and
hold the text box to zoom in, then without lifting your finger, slide your
finger to place the cursor where you want it. Then lift your finger.
Type a special letter
character
Press and hold a key to show the special characters associated with that
key. For example, if you press and hold a key, the special characters
associated with the key appear along the bottom of the screen.
Tap a character to insert it.
Type special characters
on keys
Press the ALT key before typing one of the special characters on the keys,
including the numbers on the top row. To type multiple characters, lock
the ALT key by pressing and holding the key.
Lock ALT and SHIFT
keys
To lock these keys, press them twice or press and hold. Press again to
unlock.
Text cursor While you're typing, the text cursor shape reflects your current mode of
typing:
Regular typing mode
SHIFT mode
ALT mode
ONE User Guide - R1.0 - April 21, 2010 16
Page 17
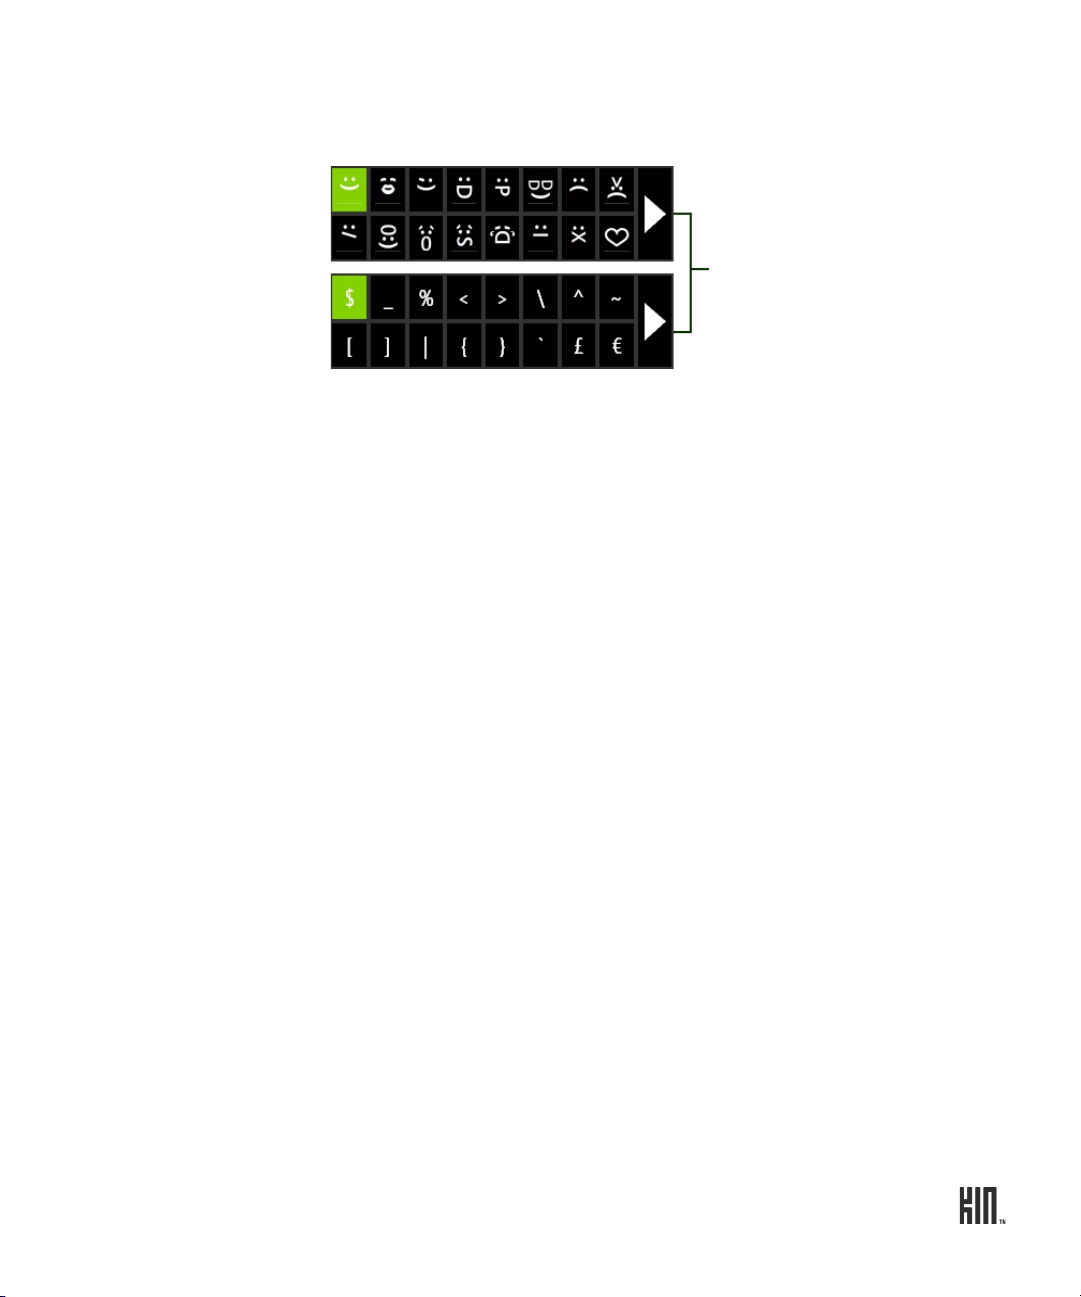
Type emoticon or special
Tap to toggle
between panels.
character
To type an emoticon or special character, press the SYMBOL key and tap
the emoticon or special character from the selector. There are two panels
in total; tap the arrow on the far right to switch.
LANYARD
You can attach a lanyard or phone charm to your phone by using the lanyard channel:
1 Remove the battery cover catch.
2 With the battery facing up, just to the left of the battery release button is the post for your lanyard
strap. Slip the lanyard strap over the post, then pull it down tight.
3 Replace the battery cover, making sure the lanyard strap feeds out the hole next to the battery cover
latch.
17 ONE User Guide - R1.0 - April 21, 2010
Page 18

HOME
APPS
LOOP
FAVORITES
ABOUT HOME
What is Home?
Your Home screen is really three screens. When you turn on your phone you’ll see the Home screen
that shows your name, status, and stories from your favorite feeds, called the KIN Loop, or “Loop” for
short.
Slide your finger left to view your favorite contacts, called “Favorites”, or right to view your
applications, or “Apps”.
Slide your finger up and down to scroll the contents of each screen. You can start typing a contact
name or app from any of the Home screens to open the Search app’s My Phone screen.
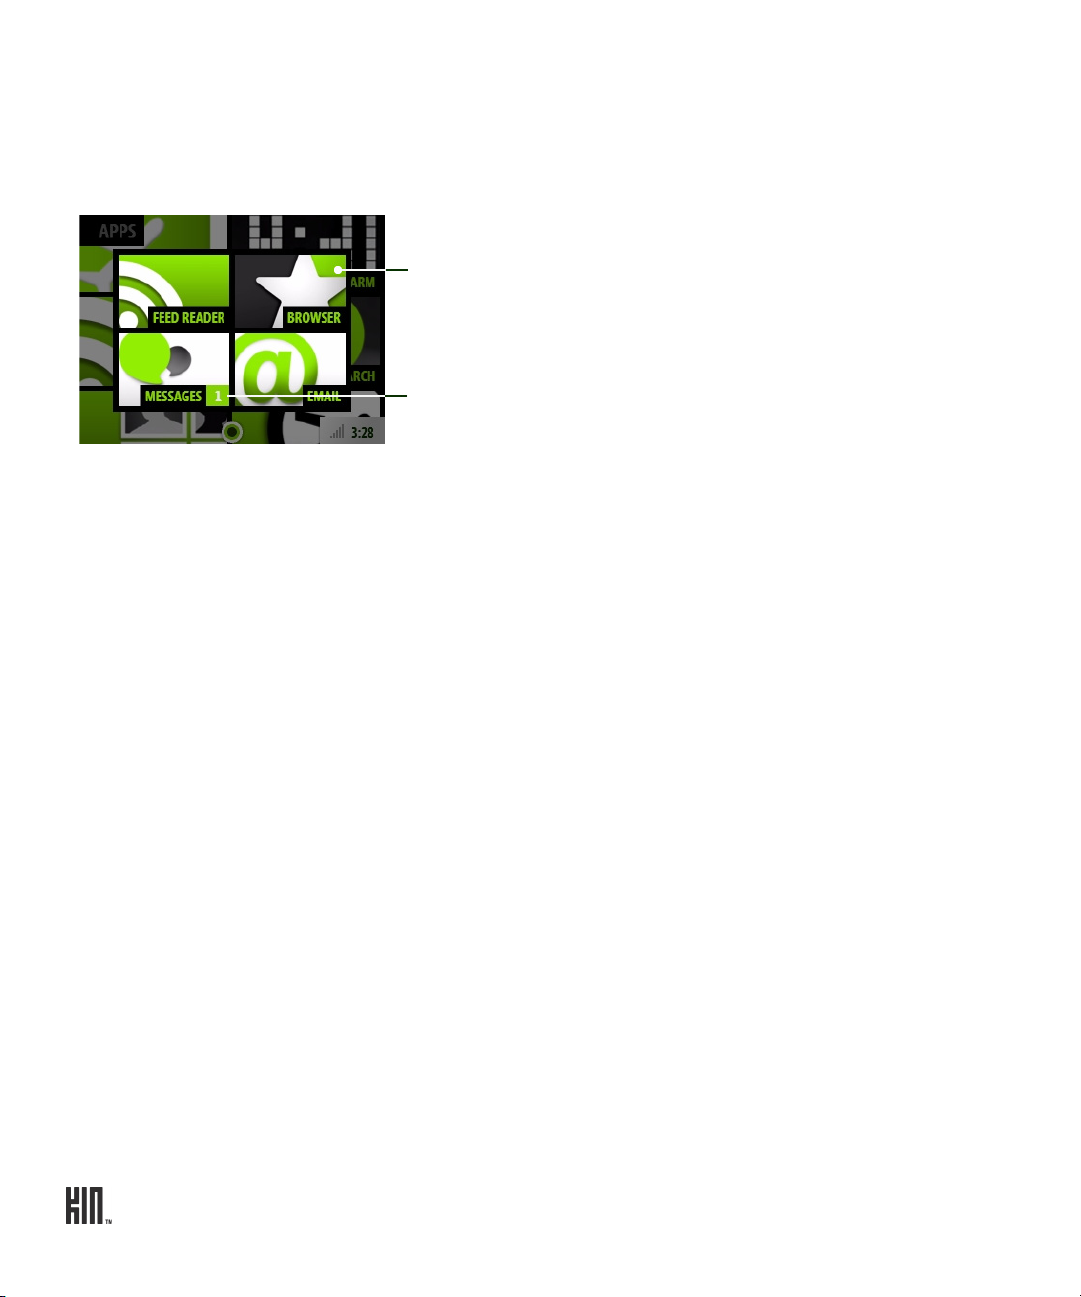
Apps
All the apps that are available on your phone are displayed on this screen. Tap an app to open it. You
can rearrange apps so they appear in the order you like. Read how in “Rearrange Apps and Favorites”
on page 21.
You can also add links to webpages to the Apps Home screen. Read how in “Can I put a link to a
webpage on my Home screen?” on page 98.
ONE User Guide - R1.0 - April 21, 2010 18
Page 19

Loop
Displays your name, status, and photo in the top section. Your photo comes from the social network
where you most recently updated your status. Tap your photo to open your contact card; tap your
status to update it.
Below your name and status are stories from your favorite feeds, refreshed as new feed information is
available.
The Loop includes updates from your social network friends and RSS/news feed stories that you’ve
tagged as “favorites”. Stories from friends who are part of your Favorite contacts will appear more
prominently. The stories that display in the Loop are selected for variety and freshness, as well as to
reflect your interests. In other words, not all your favorite feed stories will necessarily appear in the
Loop; to see them all, go to the Feed Reader and slide your finger left to view the Favorites screen.
Tap a feed story to read the entire story or (if supported by the social network) comment on a social
story. If you can comment on a feed, you’ll see this icon in the lower-left of the story: . If a feed
already has comments, you’ll see this icon: .
If you tap a story containing photos, up to three of the photos will display; to view more photos, go to
Camera and slide your finger left to view the Online screen, tap the photo story, then tap Album to
open the entire photo album in the Browser.
Read more in “Feed Reader” on page 60.
Note: If you don’t have a data connection, default feeds will appear.
Favorites
Displays your favorite contacts, plus a link to all your contacts. You can rearrange your favorite
contacts so they appear in the order you like. Read more in “Rearrange Apps and Favorites” on page
21.
Tap a favorite for quick communication. If your favorite has a phone number saved in their info, the
Call, Te xt , or Open options appear. Tapping Open will show the favorite’s contact card, where you’ll
see all the info you’ve saved for this contact. If you tap a favorite without a saved phone number, their
contact card opens. Read more in “Contacts” on page 41.
Can I comment on a social story?
Yes, if supported by the social network. Tap the story to open the Story screen, type your comment
(up to 8,000 characters), then tap Post.
19 ONE User Guide - R1.0 - April 21, 2010
Page 20

Where are my status icons?
The connectivity status icons, as well as your battery’s charge state, sound profile, and date and time
are available in the Dashboard. Open the Dashboard by tapping the mini Dashboard on the lower-
right of the screen: If any status needs your attention (for example, if your battery’s
getting low or if you’ve lost network connection), the associated status icon will display in the mini
Dashboard.
Find out what the icons mean and more in “Dashboard” on page 26.
What is the round circle at the bottom of the screen?
The circle is called the Spot and it provides a convenient way to share all kinds of things with your
friends. To use the Spot, drag and drop contacts, photos, videos, web links into the Spot, tap the Spot
to open it, then tap Upload to share via a social network website, or Send to share via Email or MMS
(multimedia messaging). Read more in “Share with the Spot” on page 23.
Is there a quick way to launch an app I recently used?
When you tap Recent (in the lower left of the screen), a window opens that displays the last four apps
you used. Tap one of the apps to open it. If you have an unread message, the Messages app will be
there, with an unread message count. The same applies to unread email messages.
Read more in “Recent apps and messages” on page 28.
Can I customize my Home screens?
Yes, you can customize your Home screens, and more:
• Rearrange the order of items on the Apps screen and Favorites screen. Read more in “Rearrange
Apps and Favorites” on page 21.
• Assign a wallpaper that will appear on the screen when locked. Read more in “Screen lock” on page
36.
ONE User Guide - R1.0 - April 21, 2010 20
Page 21

• Choose sounds to assign to individual contacts when they call. Read more in “Create a new contact
on your phone” on page 46.
• Choose sounds for incoming calls, notifications, and alerts. Read more in “Sound” on page 35.
• Choose a theme for your phone that changes the colors used on the screen. Read more in “Themes”
on page 34.
How do I search for a contact on my phone?
From any Home screen, start typing a contact name to open the Search box. Or, you can press the
SEARCH key on your keyboard. Read more in “SEARCH key” on page 15.
MANAGE HOME
Update your status on the Loop
To post a new status message:
1 From the Loop, tap the status box to open it for editing.
2 If you’re signed in to more than one social network, choose the network where you want the
posting to go.
3 When finished, tap Share to post or press the ENTER key .
Note: You can type two lines of status, at most 140 characters.
Rearrange Apps and Favorites
You can change the position of apps or favorite contacts on the Home screens:
1 From either the Apps or Favorites screen, two-finger tap the screen to enter edit mode. Each item
will shrink and favorite contacts will have an X in the corner.
2 Drag the app or contact you want to move to its new position, then lift your finger.
3 To exit edit mode, two-finger tap the screen again or press the BACK button.
Add feeds to the Loop
The feeds that are shown on the Loop are those tagged as “favorites” in the Feed Reader app. When
you add a feed from the Browser, it’s tagged as a favorite by default, as are your social network feeds.
1 Go the Apps screen, then tap Browser.
2 Navigate to the webpage with the feed you want to add.
21 ONE User Guide - R1.0 - April 21, 2010
Page 22

3 Tap the link to the feed you want to add, or tap to open the favorites menu where you can tap
Add to loop. (If you open the favorites menu, then you’ll also be able to select Pin to apps, which
will add a shortcut to the webpage on the Apps screen, or Add to favorites).
4 The feed stories will now appear on the Loop and also on the Feed Reader > Favorites screen.
To add social feeds to the Loop, you must be signed in to the social network. Read more in “Sign in to
a social network” on page 45.
To remove a feed from the Loop, unfavorite the feed in Feed Reader. Read more in “Favorite/
unfavorite feeds” on page 66.
To view/save photos in photo stories, start from the Apps > Camera > Online screen. Read more
in “Online screen” on page 93.
Add contacts to Favorites
To add a contact to the Favorites Home screen:
1 Go to the Favorites Home screen, then tap the plus sign (+) in an empty Favorites slot to open a list
showing all your contacts.
2 Tap a contact to make it a favorite and add it to the Favorites Home screen.
Read more in “Add contacts to Favorites” on page 49.
Note: You can also add a contact to Favorites by opening their contact card and tapping More >
Favorite.
Remove contacts from Favorites
To remove a contact from Favorites (but keep it in All Contacts):
1 Go to the Favorites Home screen, then two-finger tap the screen to enter edit mode. Each contact
will have an X in the corner.
2 Tap the X on the contact you want to remove from favorites.
3 To exit edit mode, two-finger tap the screen again or press the BACK button.
Note: You can also remove a contact from Favorites by opening their contact card and tapping More
> Unfavorite.
ONE User Guide - R1.0 - April 21, 2010 22
Page 23
SHARE WITH THE SPOT
About the Spot
Put everything you want to share in the Spot, including the contacts you want to share with. After you
drag contacts, photos, etc. into the Spot, then tap Send or Upload, to share.
You can add the following types of items to the Spot:
• Contacts - Drag in from Favorites Home screen or one of the Contacts screens.
• Photos - Drag in from the Camera app.
• Videos - Drag in from the Camera app and Send via email.
• Feed stories - Drag in from the Loop and the Feed Reader app; can only Send news and social
stories.
• Web clips - Can only Send web content.
• “Near me” search results.
• Web search results - Can only Send web content.
You can only drag items from their primary locations; you can’t drag them from places where they
may be embedded. For example, you can drag photos from the Camera screens, but not from an email
message attachment.
Share items with the Spot
To share any of the items listed above, do the following:
1 Touch and hold any item until it lifts and the Spot expands .
2 Drag the item into the Spot.
3 Drag the contacts you want to share it with into the Spot as well. You can tell if the Spot has any
contents from its appearance:
Spot with no content.
Spot with content.
4 Once you have items in the Spot to share, open the Spot by tapping it.
5 You can remove any item by tapping the X in the corner of the item.
6 Tap either Send (to send via Email or MMS) or Upload (to upload to a social network).
7 While sending, the Spot will change appearance and indicate activity .
Note: If you try to add the same item more than once, only one item will be placed in the Spot.
23 ONE User Guide - R1.0 - April 21, 2010
Page 24

Remove items from the Spot
You can remove one or more items from the Spot by first tapping the Spot to open it, then:
•Tap X on an individual item to remove it.
•Tap Empty to remove all items.
All items are removed after they are uploaded or sent.
SEARCH
From anywhere on your phone, press the SEARCH key to open the Search app. Search is divided
into three screens. On the My Phone screen you can search for contacts and apps that are on your
phone. Slide your finger left to search the web using Bing™. Slide your finger left again to search for
businesses and addresses “near me”.
ONE User Guide - R1.0 - April 21, 2010 24
Page 25
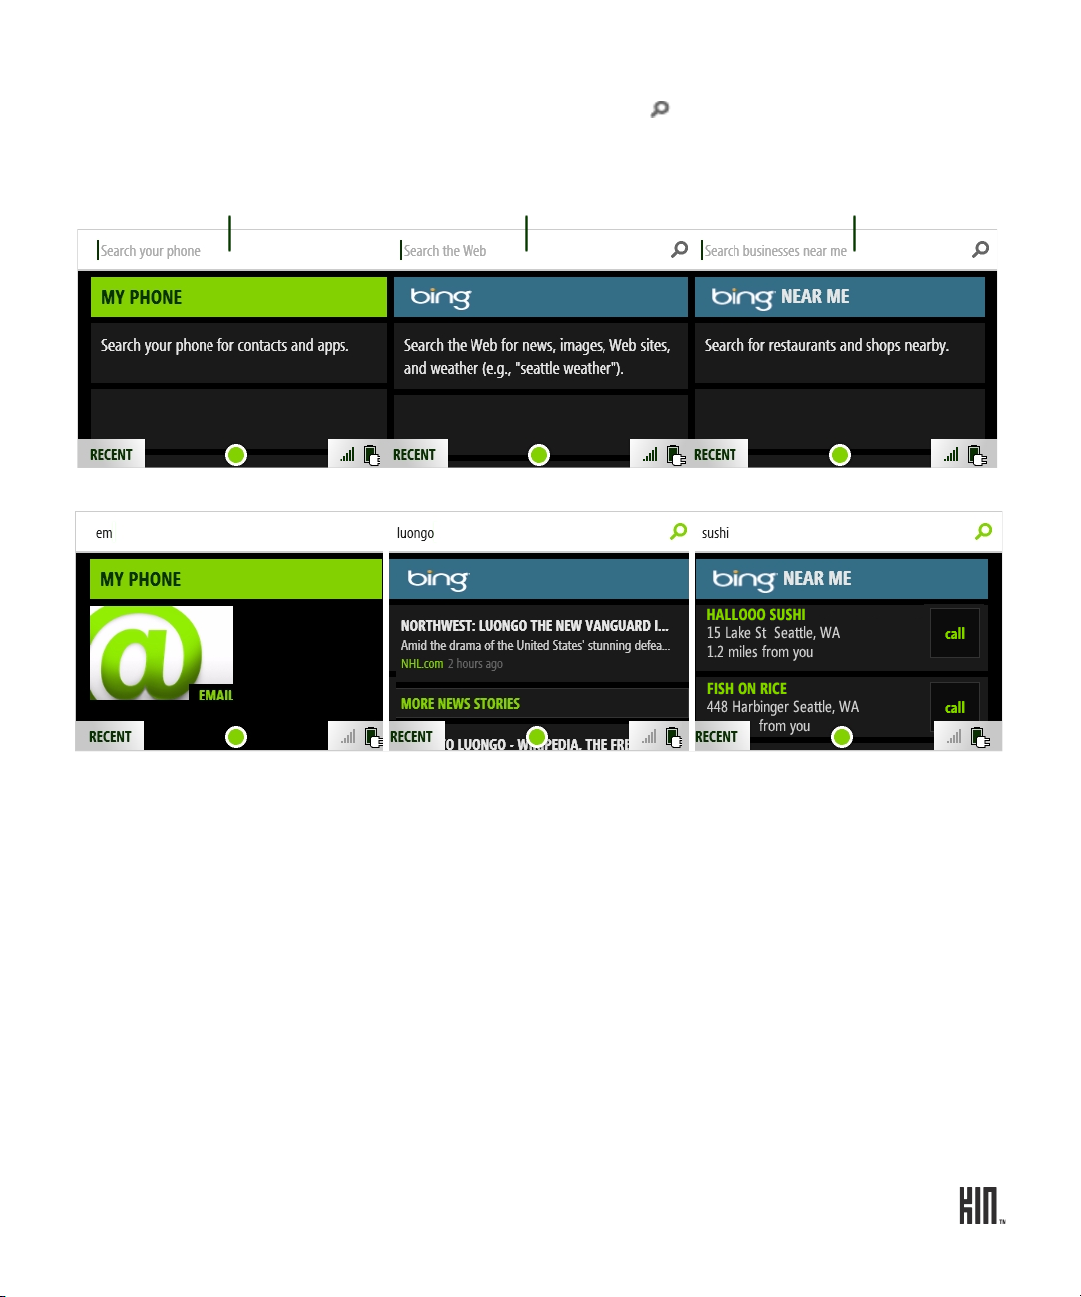
As soon as you start typing in the My Phone search box, matches will appear. For the Web and Near
Start typing the name of a contact or
an app you want to open.
Type search words to
find website with matches.
Type a business name or product
to find matching addresses.
Share contacts, plus Web and Near Me results by dragging them into the Spot.
Sample search results...
Me searches, type your search words, then tap the search icon to begin the search.
From the Web search screen, you can get the following “instant answers”:
• Weather - For example, type weather Atlanta
• Definitions - For example, type define petrichor
• Calculator - For example, type 2+2
• Conversions - For example, type 2km in miles
25 ONE User Guide - R1.0 - April 21, 2010
Page 26

DASHBOARD
Tap to open
Dashboard.
DASHBOARD
Tap to open Wireless controls.
Tap to open the Alarm app.
Tap to change your Sound profile.
The Dashboard gives you important status information about connectivity, battery charge, sound
profile, alarms, and date and time.
To open the Dashboard, tap the mini Dashboard in the lower-right corner of the screen.
The mini Dashboard always displays the most relevant status information, depending on what you’re
doing. For example, if you’re on a call, the mini Dashboard indicates whether you’re roaming and your
signal strength.
Dashboard shortcuts
Tap a section of the dashboard to open its associated wireless, alarm, or sound setting.
ONE User Guide - R1.0 - April 21, 2010 26
Page 27
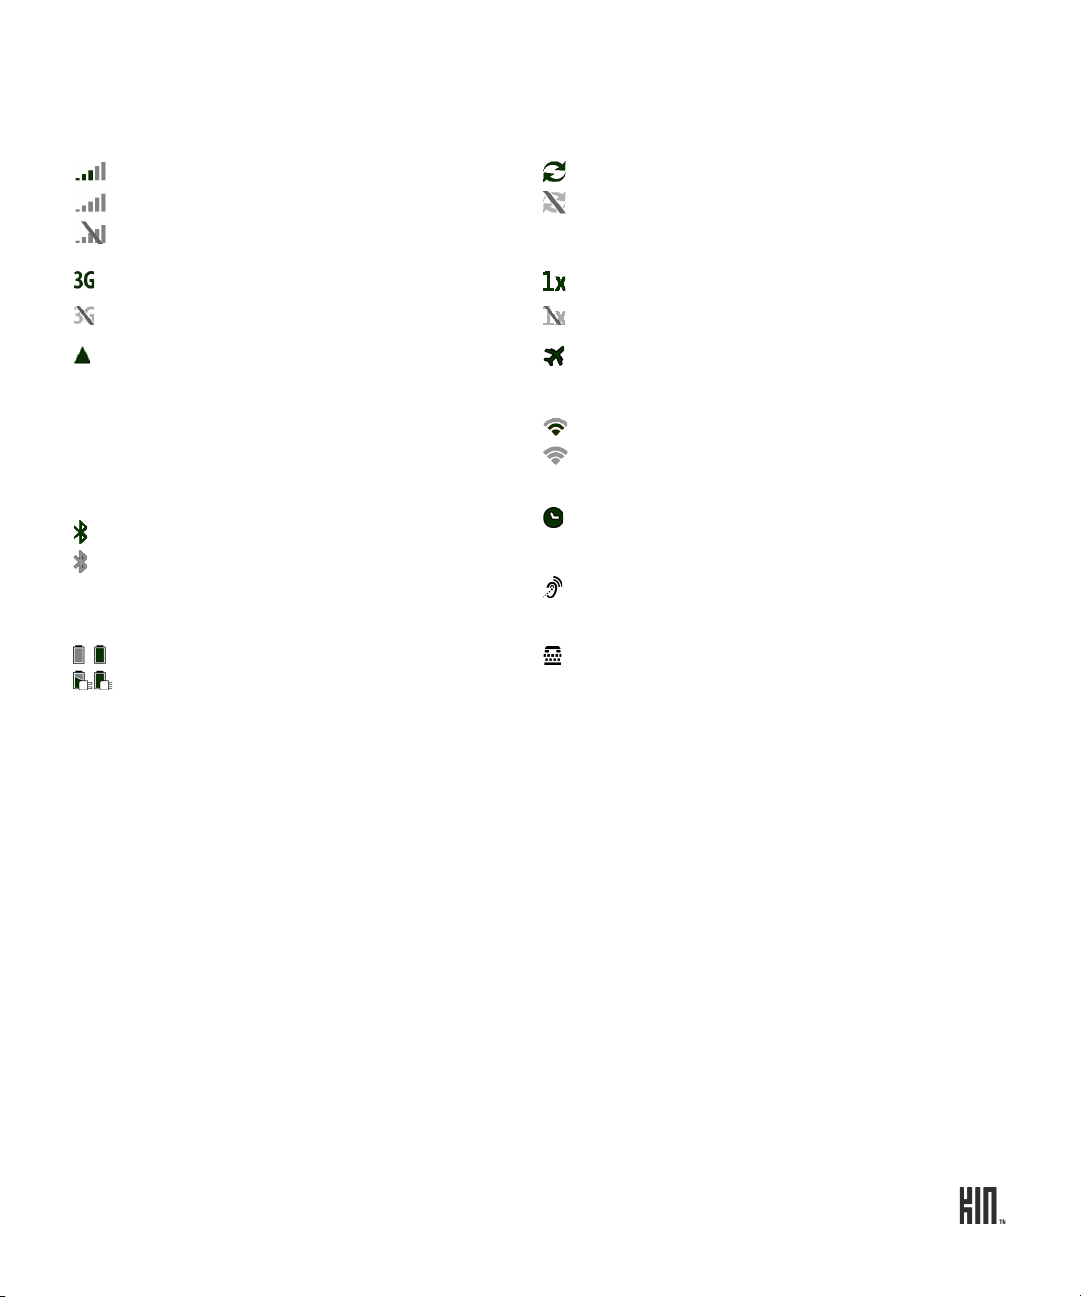
Icons and indicators
You’ll see the following icons, indicating connectivity, date and time, sound, and alarm status.
Network connection strength
Low network connection
No network connection
High-speed 3G data network available
3G not available
Roaming outside home network
• Solid icon: Roaming rates apply
• Flashing icon: Home airtime rates
apply (some features/services may
not be available)
Connected to Bluetooth device
Bluetooth services are on, but no
device is connected
Battery empty | battery full
Battery charging | battery charged
Connected to KIN Service
Not connected to KIN Service
Slower 1xRTT data network available
1xRTT not available
Airplane mode is on
Connected to Wi-Fi network
Wi-Fi is on, but no network is connected
Alarm is set
Telecoil (hearing aid coil) is ready to use.
Read more in “Telecoil” on page 34.
TTY (text telephone) is ready to use. Read
more in “TTY” on page 34.
SOUND PROFILE
Open the Dashboard, then tap the current sound profile for Ringer. Choose from Silent, Vibrate,
Soft, Normal, or Loud.
You can also step through the ringer profiles by pressing the VOLUME + or - buttons. To silence your
phone, press and hold the - VOLUME button.
Note: When you step through the sound profiles, the Vibrate profile will do a quick vibration.
27 ONE User Guide - R1.0 - April 21, 2010
Page 28
RECENT APPS AND MESSAGES
Tap to open a pp.
Number of unread messages.
To see the last four apps you’ve opened, tap Recent in the lower-left of the screen. To jump to one of
those apps, simply tap it. Note that if you have unread messages, that app will appear as well with the
number of unread messages noted.
To close the Recent window, tap outside the window or press the BACK button.
ONLINE HELP
Go to the Apps screen and tap Help to open online help in the Browser. Once you’re there:
• Navigate as you would any other webpage by tapping links.
• Double tap the page to zoom in; double tap again to return to original size.
• To zoom in continuously, start with your thumb and forefinger together in the middle of the screen
then pull them apart.
• To zoom out continuously, start with your thumb and forefinger at opposite ends of the screen and
pull them together.
• Pan around a page by sliding your finger on the screen.
ONE User Guide - R1.0 - April 21, 2010 28
Page 29
GLOBAL SETTINGS
This chapter describes the settings that are not specific to individual apps. App-specific settings are
described in the individual app chapters. Most settings toggle on and off. Tap the setting to toggle.
ABOUT GLOBAL SETTINGS
My screen is too dim. How can I brighten it up?
Go to the Apps > Settings > Screen lock screen. Scroll down to the Auto-brightness setting and
turn it off. Now you can adjust the screen brightness by sliding your finger between Min and Max on
the slider bar.
My phone’s screen locks too quickly. How can I adjust this?
Go to the Apps > Settings > Screen lock screen. Tap the Auto-lock timeout setting you prefer.
Note: Once your screen is locked, it will always go black after 30 seconds.
Can I protect my phone with a security PIN?
Yes. Go to the Apps > Settings > Screen lock screen. Scroll down and tap the PIN & security
setting, then tap PIN lock to turn it on and set your four-digit PIN.
Is there a way to answer a call by opening the keyboard?
Go to the Apps > Settings > Phone screen. Scroll down to the Open to answer setting and turn it
on.
Once this setting is on, open the keyboard to answer a call and close the keyboard to end the call.
How do I turn off my wireless while on an airplane?
Go to the Apps screen, then go to the Settings > Wireless controls screen. Turn Airplane mode on.
29 ONE User Guide - R1.0 - April 21, 2010
Page 30
My service plan allows me to roam when needed. How can I turn this on?
Tap to play sound.
You control your calling and text and MMS (multimedia) message roaming from the Apps > Settings
> Phone screen.
You control data roaming from the Apps > Settings > Wireless controls screen. Scroll down to the
Roaming setting and turn it on. You’ll be asked to confirm because extra roaming charges may apply.
How do I change my ringtone?
1 Go to the Apps > Settings > Sound screen.
2 Tap a sound category (Ringer, Voicemail, Messages) to open the Sound selector. Scroll down to see
all the sounds. You can listen to each sound by tapping the play icon.
3 Tap a sound to set it.
Can I assign different ringtones to different contacts?
Yes, you can do this from the individual contact cards. Read more in “Create a new contact on your
phone” on page 46. The sound set on the contact card overrides the global Ringer setting you choose
on the Sound settings screen.
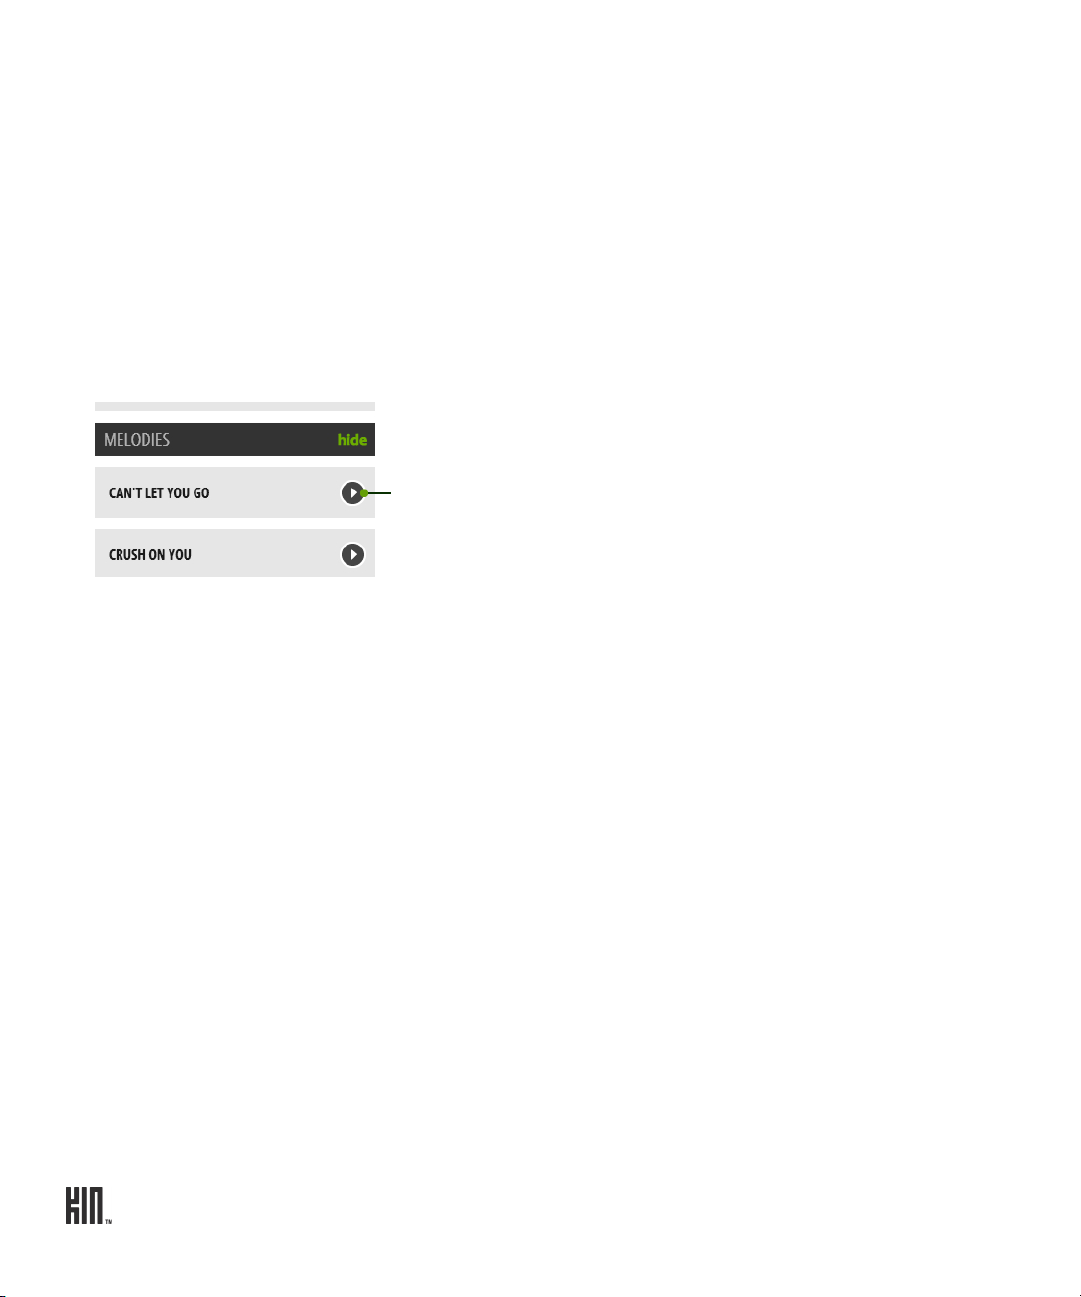
Can I import my own ringtones?
No, but you may be able to purchase ringtones from your mobile operator’s website using your
computer. Any ringtones you purchase will be delivered to your phone via MMS. To assign these
ringtones, go to Apps > Settings > Sound > Melodies on your phone.
Is there any way to customize the colors on my phone?
Go to the Apps > Settings > Themes screen. Tap a color theme from the list. You’ll be prompted to
restart your phone, which you must do before a new theme can be set.
ONE User Guide - R1.0 - April 21, 2010 30
Page 31

WIRELESS CONTROLS
Airplane mode
Turn airplane mode on if you are about to take a flight, or when otherwise required, such as in
hospitals.
When airplane mode is on:
• All radios on the phone except for FM radio are turned off, including Wi-Fi, phone, location
services, and Bluetooth. (When you later turn airplane mode off, the previous settings for all the
radios are restored.)
• If permitted, even with airplane mode on, you can turn Wi-Fi back on.
• You’ll see the airplane icon in the mini Dashboard and full Dashboard.
Wi-Fi
Turn Wi-Fi on to see a list of networks within range.
You can open the Dashboard and check the top row to see Wi-Fi status at any time:
displays when Wi-Fi is on, and the phone is connected to a network.
displays when Wi-Fi is on, but your phone isn’t connected to any network.
No icon displays in the Dashboard when Wi-Fi is off.
Connect to a network
1 Tap a network to connect to it.
2 If required, you’ll be prompted to type a password. Networks secured with passwords display a
padlock next to their signal strength.
3 You can manually connect to a network that’s not listed by tapping Other.
4 Once connected, you’ll see the connection status below the Wi-Fi setting name, and when you
open the Dashboard you’ll see the connected signal strength in the top row.
31 ONE User Guide - R1.0 - April 21, 2010
Page 32
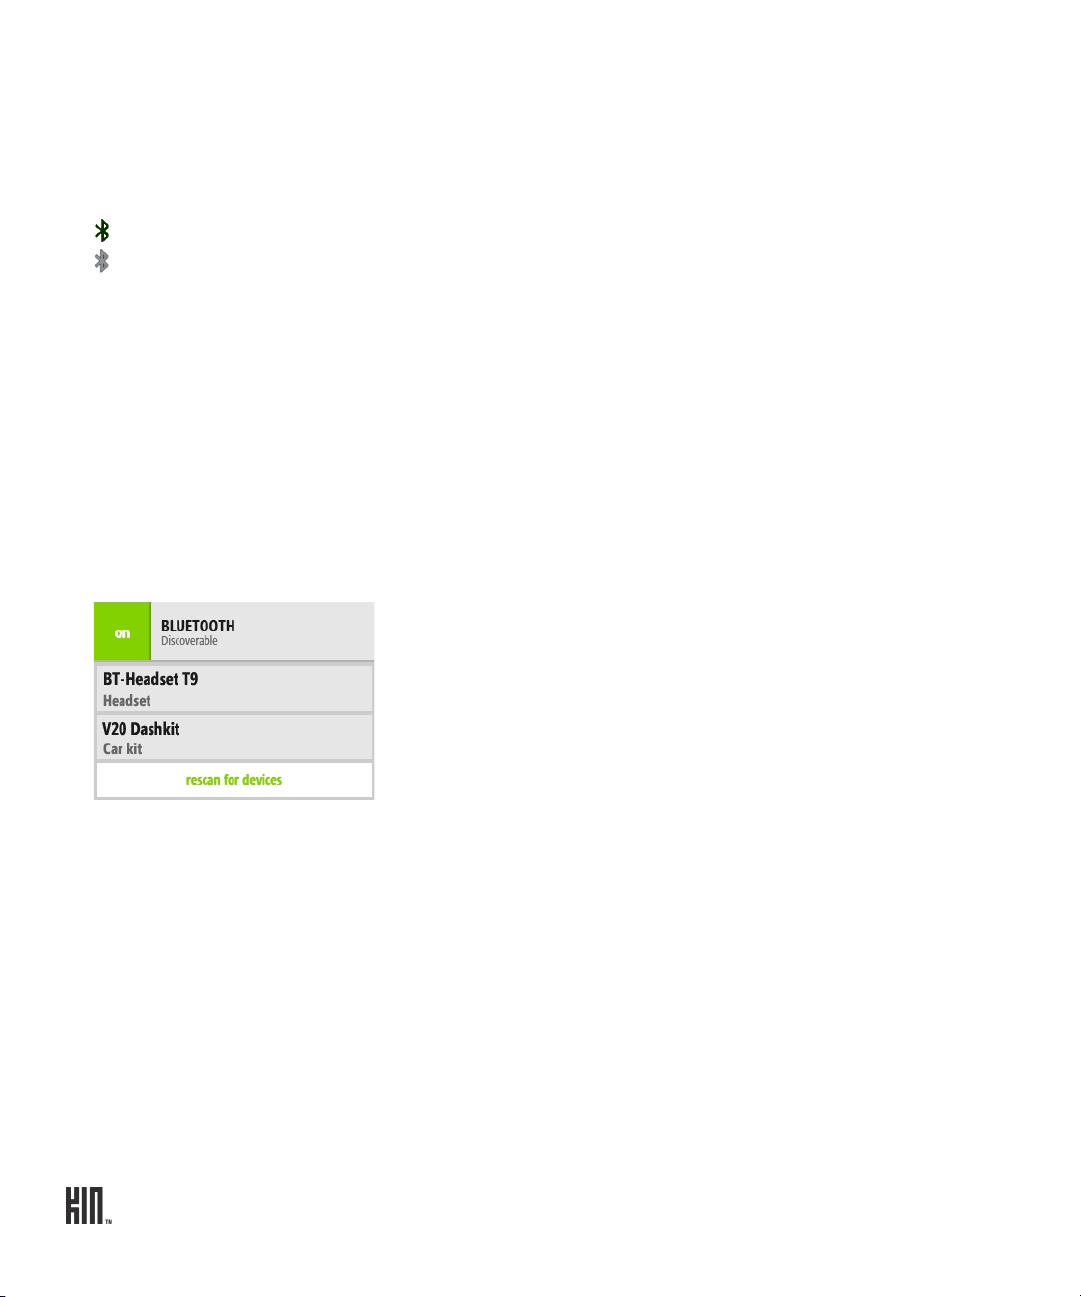
Bluetooth
Turn Bluetooth on to start Bluetooth services. Your phone is automatically “discoverable” when you
have the Wireless Controls screen open and Bluetooth services are on.
You can open the Dashboard and check the top row to see Bluetooth status at any time:
displays when Bluetooth services are on, and the phone is connected to a device.
displays when Bluetooth services are on, but your phone isn’t connected to a device.
No icon displays in the Dashboard when Bluetooth services are off.
Supported Bluetooth profiles
• HSP (Headset Profile) – Allows connections to Bluetooth headsets.
• HFP (Hands Free Profile) – Used by car kits to communicate with the phone while in the car and
by headsets.
• A2DP (Advanced Audio Distribution Profile) – Allows high quality audio to be streamed from the
phone to another Bluetooth device, such as a Bluetooth stereo headset.
Connect to a Bluetooth device
1 Turn Bluetooth services on. All supported devices within range are displayed.
Note: Previously-paired devices are shown at the top of the list and the closest previously-paired
device will start connecting automatically.
2 Make sure your Bluetooth device is on and discoverable before trying to connect. If your Bluetooth
device is ready and you don’t see it in the list, tap Rescan for devices.
3 Tap a device in the list to pair, then connect with your phone. Your phone will automatically try the
PIN 0000; but, if prompted, type the PIN provided by the manufacturer of the Bluetooth accessory,
then tap Pair. If you’re prompted to create a PIN, use at least four characters.
If you’ve previously paired with a device, it will try to connect immediately without prompting you
for a PIN.
ONE User Guide - R1.0 - April 21, 2010 32
Page 33

4 Once connected, you’ll see on the settings screen next to the device name, and when you open
the Dashboard will appear in the top row.
5 You can disconnect or unpair a Bluetooth device by tapping it. To switch from the Bluetooth
device to your phone’s speaker during a call, use the Source option on the in-call screen.
Notes:
• The phone does not support Bluetooth OBEX profiles, used to exchange contact information
between Bluetooth devices.
• The QDID issued by the Bluetooth SIG (Special Interest Group) for this phone is B014849. (This
number is provided for information only.)
Data roaming
Turn this setting on to allow your phone to roam outside your home network for data connections.
Note: If you turn on data roaming, you may be charged extra fees for roaming.
PHONE
You can control certain calling features on your phone from the Settings > Phone screen:
Roaming To allow your phone to roam for calls and text messages, turn this setting on.
Extra charges may apply when you’re roaming.
When roaming is on you can choose from the following specific options:
• Preferred networks only - When your mobile operator’s network isn’t
available, you can roam on one of the operator’s preferred networks.
• Available networks (channel a) - You can roam on any available network
in the channel.
• Available networks (channel b) - You can roam on any available network
in the channel.
Note: Check with your mobile operator if you don’t see all these options, and
to find out if you’ll be charged extra for roaming.
33 ONE User Guide - R1.0 - April 21, 2010
Page 34

Open to answer To answer a call by sliding your phone open, turn this setting on. With this
setting on, you can also close the phone to end a call.
Phone shortcuts To use phone keyboard shortcuts, turn this setting on. Keyboard shortcuts
are listed in “Can I use the keyboard to control my call?” on page 54.
Voicemail number The number currently stored to call voicemail is displayed below the setting
name. To set or change your voicemail number, tap the setting.
Auto-download
MMS
To have MMS messages downloaded automatically, turn this setting on. If
you turn this setting off, messages will download only when you open them
by tapping.
TTY If you plan to attach a TTY device to your phone for making and receiving
phone calls, turn this setting on. While this setting is on, you won’t be able to
hear any audio during a call, so if you want to make a regular call, with
audio, be sure to have this setting off!
With TTY on, you’ll see the TTY icon in the Dashboard.
Note: Cellular-ready TTY devices have a 2.5mm audio jack, but your phone’s
jack is 3.5mm, so you will need a cable adapter when using a TTY device
with the phone.
Telecoil If you plan to use a telecoil device with your phone, turn this setting on.
With telecoil on, you’ll see the telecoil icon in the Dashboard.
Note: Turning telecoil on uses extra battery power.
THEMES
You can customize the colors used on the screens from the Settings > Themes screen:
1 From Themes, tap a theme from the list.
2 Your phone must restart before a new theme can be set. Tap ok at the prompt to restart
immediately.
ONE User Guide - R1.0 - April 21, 2010 34
Page 35

SOUND
Control the sound volume or switch your sound profile by pressing the VOLUME + or - buttons.
Control which sounds play on your phone from the Settings > Sound screen:
Vibrate Turn this setting on to have your phone vibrate as well as play a sound when
signaling a call or new message. If you have ringer, voicemail, or messages set to
No sound, then your phone won’t vibrate even when this setting is on.
Ringer To set the default sound for an incoming call, tap Ringer and choose from the
Sound selector.
Note: If you’ve assigned a specific sound to a contact, that sound will play rather
than the default sound you choose in Sound settings.
Voicemail To set the sound for a new voicemail, tap Voicemail and choose from the Sound
selector.
Messages To set the ringtone for a new text or MMS message, tap Messages and choose from
the Sound selector.
System sounds Turn this setting on to hear a sound when you:
• Touch and hold an item to drag into the Spot - Makes a single water drop sound
when item “lifts”.
• Drag an item into the Spot - Makes a plunking sound when item lands in the
Spot.
• Lock your screen - Makes two knocking sounds when locked.
• Unlock your screen - Makes a swishing sound when unlocked.
• Dial phone numbers using the Dialer - Makes touch-tone DTMF sounds as you
touch each number.
• Attach/remove phone to USB charger or USB cable connected to computer Plays four ascending notes when attached; plays four descending notes when
removed.
ABOUT YOUR PHONE
You can view the following information about your phone and more from the Settings > About your
phone screen:
• Your phone number
• Version numbers of phone components
35 ONE User Guide - R1.0 - April 21, 2010
Page 36

• Phone model
There are also links to:
• Legal - Tap to read the KIN Terms of Service.
• Privacy - Tap to read the KIN Privacy Policy and turn Automatic reporting on or off. When the
Automatic reporting setting is on, reports are automatically sent to Microsoft if serious software
errors occur on your phone.
• Erase phone data - Tap to erase all your personal data from the phone. This is a drastic measure as
it erases all your sign-in information, settings, contacts, favorites, photos, videos, music, and
messages from your phone. You will be asked to confirm. Note that your contacts, photos, and
videos will still exist in your account on the KIN Service.
DATE & TIME
You can set the date and time displayed on your phone from the Settings > Date & time screen:
24-hour time Switch to 24-hour time display by turning on the 24-hour clock setting.
When you display the time in 24-hour time format, the day runs from midnight
to midnight and is divided into 24 hours, numbered from 0 to 23 (no AM or PM
is necessary). For example, 3:25 PM would be displayed as 15:25 in 24-hour
time format.
Auto-set By default, your phone will “auto-set” (get date and time from the network). If
you want to set your date and time manually, turn Auto-set off. Then you’ll be
able to set the time zone, date, and time manually.
SCREEN LOCK
Screen lock is a feature that prevents accidental actions if your phone’s buttons are pressed or if your
screen is touched. You can always control media volume while the screen is locked, however.
• To lock your screen, press the POWER button quickly. You can set an automatic screen lock
timeout by following the instructions below in “Auto-lock”.
• To unlock your screen, slide the screen open, or quickly press the BACK button then peel back the
lock screen wallpaper by sliding your finger toward the upper-right corner of the screen. If you just
want to check the time or see your wallpaper, press the BACK or POWER button.
ONE User Guide - R1.0 - April 21, 2010 36
Page 37

You can control the following screen lock and security settings from the Settings > Screen lock
screen:
Auto-lock If you want your screen to lock automatically after a set period of time, use this
setting. You can choose from: 1 min, 5 mins, 15 mins, and Never.
PIN & security PIN lock - For extra security, you can require that a PIN must be typed before the
screen unlocks. To set this up, tap the PIN & security setting, then turn PIN lock
on. You’ll be prompted to create a four-digit PIN. If you later turn PIN lock off,
your PIN will be forgotten.
Note: After you’ve set PIN lock on, if you can’t remember your PIN, you can still
place an emergency call by tapping Emergency call on the lock screen. After
eight incorrect attempts at typing your PIN, you’ll be prompted to type a specific
number to continue trying (this provides a fail-safe in case your phone is
bumped or if children are playing with it). You’ll have a total of ten attempts to
retry your PIN before your phone data is erased.
Set/change PIN - Once you turn PIN lock on, type a PIN at the prompt (must be
four digits). You’ll be asked to type it again to confirm. Once you’ve set a PIN,
you can change it from the PIN & security screen by tapping Change PIN. Note
that once you set a PIN, you’ll have to type the PIN before you can change any of
the PIN lock settings.
Message display - By default, new message notifications will pop up when your
screen is in PIN lock, showing new message text. If you want to hide the text in
new message notifications during screen lock, turn this setting off.
Time to pin-lock - If you’ve set PIN lock on, then you can choose a timeout that
starts once your screen has locked. Choose from:
• instant (default setting) - PIN lock will begin as soon as your screen locks.
• 1 min - PIN lock will begin 1 minute after your screen locks.
• 5 mins - PIN lock will begin 5 minutes after your screen locks.
• 15 mins - PIN lock will begin 15 minutes after your screen locks.
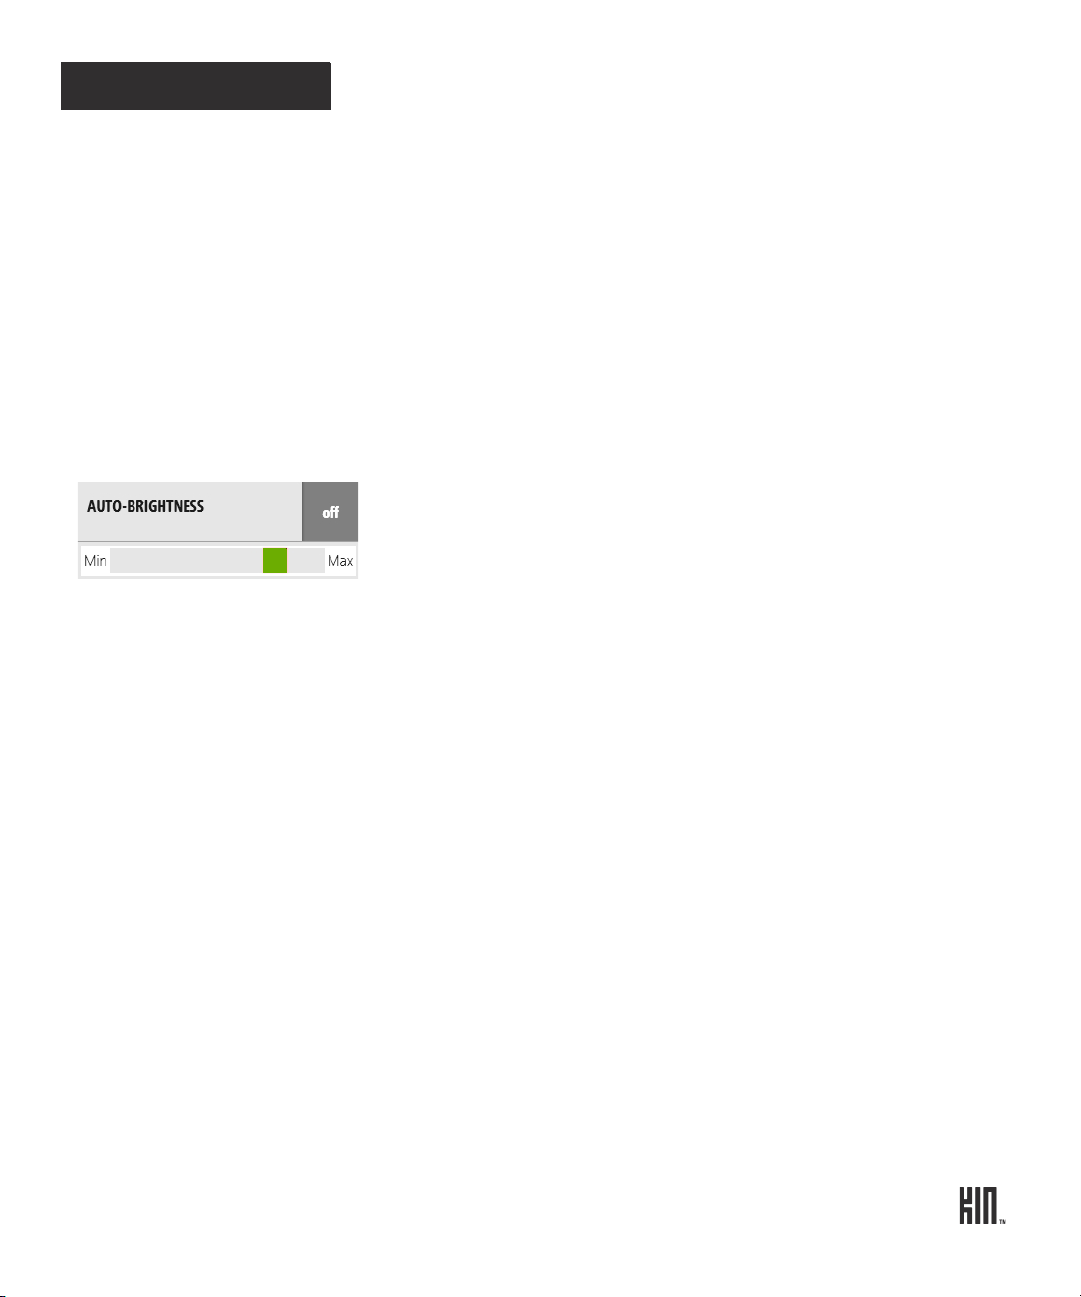
Auto-brightness Turn auto-brightness on to conserve battery power. When off, you can adjust the
brightness manually, from Min (dim) to Max (bright).
Note: The backlight on your screen will automatically dim after 30 seconds of
inactivity. (You can’t adjust this setting.)
37 ONE User Guide - R1.0 - April 21, 2010
Page 38

Wallpaper To set your lock screen background (wallpaper):
1 Tap Wall pa pe r to go to the Camera app.
2 Either capture a new photo or choose a photo from any of the Camera screens.
3 Once you’ve either captured or tapped a photo, you can crop it (drag and
stretch with your fingertips).
4 Tap Done.
You can also change your lock screen wallpaper by starting in the Camera app:
1 Go to the Apps screen and tap Camera.
2 Navigate to the screen that shows the photo you want to assign as wallpaper.
3 Tap the photo to view it full-screen, then tap More > Wall paper.
LOCATION
The Camera and Search apps will apply your physical location if you allow it. For example, the
Camera can add location information (geotags) to your captured photos and videos. (Read more
about geotagging in “What is a geotag?” on page 82.)
You can control the use of your location from the Settings > Location screen:
Location services Turn on if you want any of the apps to use your location. (You’ll still have to
allow each app to use it though.) Tap Learn more to read about location services
in detail.
Note: Even when you have location services turned off, if you call emergency
services, the operator will have access to your phone’s location.
App location
settings
Once you have location services turned on, you’ll be able to control individual
apps’ access to your location. Choose from:
• Allow - App will always have access to your location and use it when needed.
• Ask - Each time an app wants to use your location, you’ll first be asked for
permission. Choose from Always, Once, or Deny.
• Deny - Apps will not be able to use your location unless you come back to this
setting and tap either Allow or Ask.
ONE User Guide - R1.0 - April 21, 2010 38
Page 39

LANGUAGE
You can control the language that displays on your phone from the Settings > Language screen. All
the languages available to you are displayed on this screen.
1 On the Languages screen, tap the language you want to use.
2 Before a different language can be set, your phone must restart. Tap ok at the prompt.
ACCOUNT SYNC
If you’ve signed up for the service plan that includes the KIN Studio, the data you save on your phone
will be backed up and synced to the Studio at KIN.com. Read more below in “About the KIN Studio”.
Control how your data is backed up and synced from the Settings > Account sync screen:
Auto-sync Turn this setting on to sync your data automatically. If you turn auto-sync off,
then you will have to tap Sync now whenever you want to sync your data. This
setting is on by default.
Phone account If for some reason your KIN account password has been changed (outside the
phone, such as on the web), you may need to re-type your password in the
password box to authenticate your phone with the KIN Service. You’ll know you
need to type your password if it’s blank. After you type your password, tap Save
password.
About the KIN Studio
If you’ve signed up for the phone plan that includes the Studio, you’ll get these benefits:
• Sign in - To get to the Studio, go to KIN.com and sign in using your KIN account username and
password.
• At the Studio - You’ll be able to view and edit your contacts, read and subscribe to feeds, drag items
to share into the Spot, and write messages.
• Back up - All the photos and videos you capture on your phone will be backed up automatically to
the web in the Studio, except for videos captured using the High quality setting.
• Auto-archive - When your phone’s storage space for photos and videos fills up, older items are
removed from your phone and archived on the web automatically, leaving a thumbnail link on your
phone. Just tap the thumbnail and the photo or video will download and open on your phone.
39 ONE User Guide - R1.0 - April 21, 2010
Page 40

KIN Studio system requirements
• Silverlight 3+
• Broadband connection
• Windows PC
- Windows: 7, Vista, Server 2008 (+R2), XP (SP2, SP3), Server 2003
- Browser: Internet Explorer: 7, 8, Firefox: 2, 3
- Minimum: x86 or x64 CPU, 500 MHz+ processor, 128 MB RAM
- Recommended: 2GHz Core Duo (or equivalent), 1 GB RAM
• Apple Macintosh
- Macintosh OS: Mac OS 10.4.8+
- Browser: Firefox: 2, 3
- Safari: 3, 4
- Minimum: Intel-based Macintosh, 1.83GHz processor, 128MB RAM
- Recommended: 2GHz Core Duo (or equivalent), 1 GB RAM
For more detailed help on the Studio, go to KIN.com.
PHONE UPDATES
From time to time your phone’s software or firmware will require an update. Updates are delivered
over-the-air and require three steps: download, installation, and the restart of your phone.
You can control how your phone handles updates from the Settings > Updates screen:
Check for available
updates
Tap Check now to see if there are any updates available for your phone. If an
update is available, it will begin to download in the background. Once
downloaded, you’ll be prompted to install it. You can choose to install the
update right away or wait. (The installation requires a phone restart and will
interrupt what you’re doing.)
Auto-update Turn auto-update on if you want updates to download and install
automatically. This setting will already be on if you’ve opted to turn it on
during initial phone setup.
Note: When this setting is on, updates will download and install
automatically, but your phone will not restart without prompting you. You’ll
be able to restart right away, or choose to wait.
Note: To receive an update, you must be connected to the KIN Service via your mobile operator’s data
network or a Wi-Fi network.
ONE User Guide - R1.0 - April 21, 2010 40
Page 41

CONTACTS
ALL CONTACTS SCREEN
SOCIAL NETWORK CONTACTS SCREENS
ABOUT CONTACTS
How do I get contacts on my phone?
The contacts on your phone can come from the following sources:
• Phone contacts - Created on the phone or in the Studio.
• Exchange Server contacts - Associated with an Exchange account that you’ve set up on your
phone using the Email app. (Read more in “Set up an email account” on page 69.)
• Social network contacts - Social networks that you’re signed in to on your phone. (Read more in
“Sign in to a social network” on page 45.)
How do I find my contacts?
The contacts you’ve marked as “favorites” are on the Favorites Home screen, but you can find all your
contacts in a couple of ways:
• From any of the Home screens, start typing your contact’s name and the list of contacts will resolve
to the name you’re typing.
• Press and hold the BACK button, then slide your finger left to go to Favorites. Tap All Contacts.
• Press and hold the BACK button, then slide your finger right to go to Apps. Tap Contacts.
Once you’re on the All Contacts screen, you’ll see a list of all your contacts. (The contacts that you’ve
chosen to be “favorites” will display their latest status and photo on this screen.) Slide your finger left
to pan through the screens that display your social network contacts.
41 ONE User Guide - R1.0 - April 21, 2010
Page 42

Here’s an overview of how to use each of the Contacts screens.
All Contacts screen Find a contact fast.
• View all of your contacts quickly from this screen, which lists
everybody. To jump to a contact in the list, start typing the contact’s
name.
• Displays a photo thumbnail if contact is also one of your favorites.
This is the only screen to view Exchange contacts and those you
created on the phone or in the Studio.
• Displays contacts alphabetically (A-Z) by first name.
Social network contacts
screen
Catch up with friends.
• See what your friends are posting by using this screen. Each social
network you’re signed in to displays in a separate screen. View your
social network contacts’ latest status messages. Tap a contact to
publish to their profile.
You must be signed in to a social network to view these contacts. Read
more in “Sign in to a social network” on page 45.
• Displays favorite contacts first, by latest updated status message; then
other contacts by updated status time.
Can I import contacts from my computer or my social networks?
Yes. Contacts you store on your computer in Exchange will sync to your phone if you set up an
Exchange email account. Read more in “Set up an email account” on page 69.
Your social network contacts will be available on your phone once you sign in to the social network
from your phone. Read more in “Sign in to a social network” on page 45.
Can I import contacts from my email accounts?
Yes, but you must use the Windows Live account you used when first setting up your phone. Basically,
you export contacts from the email account, then you import the contacts to Windows Live:
1 On your phone, sign in to the Windows Live social network by going to the Favorites Home screen
and selecting All contacts. On the All Contacts screen, tap Accounts and then Windows Live to
sign in.
2 On your computer, sign in to your email client.
3 From the email client, export your contacts to a CSV (comma separated values) file. Pay attention
to where the exported .CSV file was saved on your hard drive.
ONE User Guide - R1.0 - April 21, 2010 42
Page 43

4 On your computer, sign in to your Windows Live account. Be sure to use the same username/
Tap Edit to
change or
info.
PHONE CONTACT CARD
EDIT CONTACT CARD
add contact
password you used when setting up your KIN account.
5 Click People in the upper navigation pane. Note that you don’t need to have a Hotmail account for
this step, you just need to go to Contacts.
6 Select Manage from your top navigation and select the Import option from the drop-down.
7 Select your email client and format (CSV).
8 Navigate to the location of the .csv file that you saved and select Import Contacts.
9 Your email contacts will be uploaded to your Windows Live contact list and so will sync to your
phone when you are connected to the KIN Service.
What are contact cards?
Each contact on your phone has at least one “card” that contains information about that person
(email address, phone numbers, photo, etc.).
Contacts can have more than one contact card. For example you might have a contact from a social
network site with an social network contact card; you might also have created a contact card for that
person. You can “link” the cards together so when you find one card for that person, you’ll find the
other. Read more in “What does it mean to link contact cards?” below.
Note: You can edit cards you’ve created on the phone or Studio, but you can’t edit social network
contact cards directly. When viewing a social network card, if you tap Edit, a new, linked card will be
created.
What does it mean to link contact cards?
If one of your contacts has more than one contact card (e.g., one created by signing in to a social
network, one that you’ve created on your phone, and one created using information from an
Exchange account), you can link the cards together so they’ll all appear when you view that contact.
43 ONE User Guide - R1.0 - April 21, 2010
Page 44

Each card appears in its own screen; just slide your finger to the left or right to view the linked cards.
Read more in “Link/unlink contact cards” on page 48.
How do I add more information to a social network contact card?
You can’t add or change information on a social network contact card because that card reflects the
read-only profile owned by the contact, but you can save information to your phone that will be
linked to this contact. To do this, start from the contact’s social network card, then tap Edit. A new
card will open for editing. Add the information you want, then tap Save; the card will be
automatically linked to the original social network contact card. Find this new card just to the left of
the contact’s social network card(s).
Read more in “Add a contact” on page 45 and “Link/unlink contact cards” on page 48.
Can I create a group of favorite contacts?
Yes. You can tag 51 contacts as favorites, which makes them part of your “Favorites”. These contacts
appear on the right-hand Home screen. Note that linked cards count as one favorite only.
Read more in “Favorite contacts” on page 49.
How do I back up my contacts?
• Social network contacts - All the information on a contact’s social network card is stored on and
backed up by the social network site.
• Phone contacts - Contact information you’ve created on your phone is automatically synced to the
Studio and saved there. This includes any information you’ve added to a social network contact that
has been saved to a new, linked contact card.
• Exchange Server - Exchange contact information is backed up to the Exchange server during sync.
Read more in “Syncing your contacts” on page 51.
ONE User Guide - R1.0 - April 21, 2010 44
Page 45

MANAGE YOUR CONTACTS
Add a contact
There’s several ways to add contacts to your phone. Note: When adding a contact or editing an
existing contact, be sure to tap Save before navigating away from the card, or you’ll lose your unsaved
additions or changes.
Sign in to a social
network
When you’re signed in to a social network on your phone, all your
contacts from that network are available in the Contacts app. View them
from either the All Contacts screen or one of the social network contacts
screens. These screens are displayed to the right of All Contacts; each
social network you’re signed in to will display on its own screen.
To sign in to a social network:
1 There’s a few ways to sign in:
• Go to the Favorites Home screen and tap All contacts > Accounts.
•Go to Apps > Contacts and tap Accounts.
•Go to Apps > Settings, then slide your finger left to view the App
setup screen. Tap Social networks.
2 The Social networks sign-in screen appears. Tap the social network you
want to sign in to.
3 Type your “username” and password. What you type in the username
field varies by social network:
• Facebook® - email address
• MySpace™ - email address
• Twitter™ - username
• Windows Live™ - Live ID (Sign in to Windows Live to get your
Hotmail and Live.com contacts on your phone.)
4 Tap Save to sign in.
Once you’ve signed in successfully, your contacts and/or feeds will
download to your phone, as applicable.
45 ONE User Guide - R1.0 - April 21, 2010
Page 46

Set up an Exchange
email account
To have your Exchange contacts appear on your phone, first go to the
Email app and set up your Exchange email account. Read more in “Set up
an email account” on page 69.
Once your Exchange email account is set up and your information has
synced, your contacts will appear on your phone in the All Contacts
screen.
Create a new contact on
your phone
Add a contact from the
Call Log
1 Go to the Favorites Home screen and tap All contacts. (Alternatively
you can go to the Apps screen and tap Contacts.)
2 Tap New to open a new contact card. If you’ve set up an Exchange
email account, a submenu will open and you’ll have the option to
create a Phone contact or an Exchange contact.
3 Add the contact’s information.
• Tap Choose photo to assign a photo using the Camera app.
• When you add phone numbers to a contact card, add the area code +
the 7-digit number.
• To associate a specific sound (ringtone) to this contact, tap Sound
then choose a sound from the selector that appears.
4 When finished, tap Save.
5 Your contact is added to the All Contacts screen. To have your contact
appear on Favorites, tap the contact to open their card, then tap
Favorite.
1 Go to the Apps screen.
2 Tap Phone.
3 Slide your finger left to view the Call Log.
4 Find the entry you want to save and tap Save.
5 Tap New contact, or tap an existing contact to add this number to
their info.
6 If you’re creating a new contact, complete the contact info.
7 When finished, tap Save.
ONE User Guide - R1.0 - April 21, 2010 46
Page 47

Add a contact from the
Dialer
1 Go to the Apps screen.
2 Tap Phone.
3 Type the new contact’s number in the number field.
4 Tap the + sign to the left of the number.
5 From the list that appears, tap either New contact or one of your
existing contacts.
6 The phone number’s added automatically. Type more information if
you want, then tap Save. You’re returned to the Dialer.
Add a contact after
making a call
Add a contact or phone
number from a
conversation card
1 After ending a call, tap Save contact.
2 From the list that appears, tap either New contact or one of your
current contacts.
3 The phone number is added automatically. Type more information if
you want.
4 When finished, tap Save.
If you’re having a conversation with someone from a number not saved to
Contacts, you can add the number from the conversation card. Read how
in “Save phone number or contact” on page 78.
Edit a contact card
1 Go to the Favorites Home screen and tap All contacts. (Alternatively you can go to the Apps screen
and tap Contacts.)
2 Tap the contact’s name from the screen to open their contact card. Find a contact quickly by typing
the name in the search box on the top of the screen.
3 Tap Edit to open the contact for editing and make your changes.
4 When finished, tap Save.
Note: Although you can’t edit a contact’s social network contact card directly, you can add info to
that contact by tapping Edit. This effectively creates a new card and, after you tap Save, the cards
will be linked.
Delete a contact card
You can only delete Exchange contacts, contacts you’ve added from your phone or the Studio.
Note: If you delete an Exchange contact, they are permanently deleted from Exchange as well.
47 ONE User Guide - R1.0 - April 21, 2010
Page 48

1 Go to the Favorites Home screen. If your contact is in Favorites, tap the contact. Otherwise, tap All
contacts, then tap the contact you want to delete to open their contact card. (Alternatively you can
find your contact by going to the Apps screen and tapping Contacts.)
2 Tap More > Delete.
3 You’ll be asked to confirm before your contact is deleted.
Link/unlink contact cards
If you have more than one contact card for the same person (e.g., a social network card plus a card you
created on the phone), you can link the cards. When you search for a contact, all their linked cards
will be found.
1 From any of the contact screens, open a contact card.
2 Tap More > Contact linking to open the Linked Contacts list.
3 Currently-linked contacts are shown at the top of the list.
• If you want to unlink any of the currently-linked contacts, tap Unlink.
•Tap Link another to open the list of contact cards.
• Contact cards with similarities are shown under Linking suggestions.
4 Tap the contact card you want to link, then tap Done.
When you search for and find a contact, each linked card will appear on its own screen. The first
screen will display any card you created on the phone, then any Exchange card, then any social
network cards.
Notes:
• You can’t link the same contact to more than one set of linked contacts.
• Each editable linked card will have its own edit menu; edits to one card won’t affect the other
linked cards. (Only phone and Exchange cards are editable.)
• When you add a card to Favorites, all its linked cards will be automatically added to Favorites as
well, but they will appear only once.
• Linked contacts appear only once on each contact screen.
• If you unfavorite a contact, all the associated contact cards will be removed from Favorites as well.
• If you delete a contact with linked cards, only the card you delete will be removed. The other linked
cards will remain on your phone.
ONE User Guide - R1.0 - April 21, 2010 48
Page 49

FAVORITE CONTACTS
You can add up to 51 contacts to Favorites. Favorites appear on the right-hand side of your Home
screen, labeled FAVORITES. Scroll down to view the full list of favorite contacts. Any feeds updated
by a contact who is part of Favorites will appear at the top of the Loop.
Here’s how to manage your favorite contacts:
Add contacts to Favorites From the Favorites Home screen:
1 Tap the plus sign (+) in an empty slot to open a list of all your
contacts.
2 Tap the contact you want to add as a favorite. To jump to a contact
in the list, start typing the contact’s name.
3 The contact now appears on the Favorites Home screen.
From the All Contacts list:
1 Tap the contact you want to add as a favorite.
2 Tap More > Favorite.
3 Your contact is added to Favorites. You can always reposition this
favorite contact. Read how in “Change a contact’s position on
Favorites” on page 50.
Remove contacts from
Favorites
49 ONE User Guide - R1.0 - April 21, 2010
1 From any contact screen, tap the contact you want to remove as a
favorite.
2 Tap More > Unfavorite.
3 Your contact is removed from Favorites.
Tip: To remove multiple contacts from Favorites, two-finger tap the
Favorites screen to enter edit mode and show the Xs. Tap an X to
unfavorite a contact. Two-finger tap the screen again to exit edit
mode.
Page 50

Change a contact’s position
on Favorites
1 From the Favorites screen, two-finger tap the screen to enter edit
mode.
2 Touch and hold a contact until the contact expands.
3 Without lifting your finger, drag the contact to the position you
want, then release.
4 Two-finger tap again to exit edit mode.
Note: You can drag a contact to an already-filled position; if you do,
the contact in that spot will move down the screen.
CONTACT CARDS
From a contact card, you can:
Update your status 1 From your own contact card, slide your finger left to view your social
network screen.
2 Tap the status text box and type your status.
3 Tap Share.
Note: You can also update your status directly from the Loop.
Call or text From the Favorites Home screen.
• If your contact is a favorite, they will appear on this screen. Tap the
contact to open their contact card, then tap Call at the top of the
screen, or scroll down and tap a different number. To text, scroll down
and tap Text , across from the number.
• If your contact is not part of Favorites, tap All contacts, select your
contact from the list, then tap Call <label>, or tap Tex t to the right
of the number to send a text message.
Write an email 1 Find the contact from either the Favorites screen or the All Contacts
screen (see above).
2 Tap the email address you want to send an email to. A compose screen
opens with that address in the To field.
Map address 1 Find the contact from either the Favorites screen or the All Contacts
screen (see above).
2 Tap a street address to map it using the Browser.
ONE User Guide - R1.0 - April 21, 2010 50
Page 51

Open website 1 Find the contact from either the Favorites screen or the All Contacts
screen (see above).
2 If your contact has a personal website, tap the URL to open it using
the Browser.
Write on contacts’ pages 1 Find the contact from either the Favorites screen or the All Contacts
screen (see above).
2 Go to your contact’s social network card.
3 Tap the text box and type your comment.
4 Tap Share.
FIND A CONTACT
Find a contact from anywhere on your phone
1 Press the SEARCH key on your phone’s keyboard.
2 Type the name or number of the contact you want to find.
3 As you type, the matches appear in the My Phone screen.
4 When the contact you’re searching for appears, tap the contact to open their contact card.
Find a contact from the Contacts app
1 You can search any of the contact screens: All Contacts or social network contacts. (From the All
Contacts screen, keep sliding your finger left to view other screens.) The search will be limited to
the screen you’re viewing.
2 Start typing the name (first, middle, or last) or the phone number of the contact you want to find.
The search box will appear as soon as you start typing.
3 The list of contacts resolves to the letters or numbers you’ve typed.
SYNCING YOUR CONTACTS
The contacts you create on the phone are automatically backed up (synced) to the Studio. Contacts
you create on the Studio are also synced to your phone. Read more in “About the KIN Studio” on page
39.
Your social network and Exchange contacts are backed up and synced to their respective websites and
servers.
51 ONE User Guide - R1.0 - April 21, 2010
Page 52

PHONE
Tap to add number
to Contacts.
Tap to erase a number.
Touch and hold to clear field.
Tap to ca ll.
Tap to ca ll.
Missed calls
display in
Tap to view only missed
calls or to clear log.
Tap to cal l
voicemail.
Tap to text
contact back.
Tap to add number
to Contacts.
color.
ABOUT THE PHONE
How do I use my phone for calls?
If you’ve stored a contact’s number on the phone, start a call from their contact card. (Read more in
“Contact cards” on page 50.) If you want to call someone not in your Contacts or if you want to use
the Call Log, go to the Phone app. The Phone app has two screens:
• Dialer - Go here to type a number. First press the keyboard’s PHONE key to open the Dialer,
then tap your number on the dial pad. There’s also a shortcut to call voicemail in the Dialer.
• Call Log - From the Dialer, slide your finger left to view the Call Log. Go to the Call Log to see a list
of your incoming, outgoing, and missed calls, with shortcuts to text or call the number back.
When I’m in a call, what does “flash” do?
Flash does a couple of things, depending on the context:
• Set up a conference call - When you’re in a call, add another call by tapping Add call. Once you’re
connected to the second call, tap Flash to merge the calls into one conference call.
• Switch between two calls - When you’re in a call and another call comes in, answering the
incoming call will place the first caller on hold. Tap Flash to switch between the calls.
ONE User Guide - R1.0 - April 21, 2010 52
Page 53

When my phone’s screen is locked, how will I answer a call?
If your screen is locked when you receive a call, you’ll see an incoming call notification on the screen.
• To answer the call - Peel back the lower-left corner of the screen (where Answer appears) by
sliding your finger diagonally on the screen, lower-left to upper-right.
• To text the caller back - Press any of the hardware buttons (POWER, BACK, VOLUME) once to
show the Text and Ignore options, then tap Tex t to open a compose screen addressed to the caller’s
number. The incoming call is ignored.
• To ignore the call - Press the POWER button twice to ignore the call directly; or press any
hardware button once to show the Tex t and Ignore options, then tap Ignore.
Can I control a call with a headset?
You can use the stereo headset that came in the box with your phone, which has a control button.
Pressing the control button will end a call.
If you’re using a premium headset with three control buttons, use the outer buttons to control
volume. Press the middle button to control calls:
• One press ends the active call.
• If a second call comes in, press once to answer the incoming call and put the active call on hold.
• While there is an active call and a call on hold, press once to end the active call.
Caution! If you think you’ll be using the phone while driving, insert the headset or pair your
Bluetooth headset before starting to drive.
Do I have to worry about touching the screen with my face during a call?
No. While you’re on a call, the phone detects the proximity of your face and “locks” the screen.
Specifically, when anything is detected within about three centimeters of the screen, the screen locks.
The screen automatically “unlocks” when you move the phone away from it.
53 ONE User Guide - R1.0 - April 21, 2010
Page 54

Can I use the keyboard to control my call?
Yes, but you must have Phone shortcuts turned on (go to Apps > Settings > Phone). With the
setting on, you can use the following keyboard shortcuts while in a call:
Answer call ENTER key, or open keyboard (set this up in Phone settings)
End call BACKSPACE key, or close keyboard (set this up in Phone
settings)
Place call ENTER key
Mute call m key
Toggle speaker x key
Flash call f key
USING A BLUETOOTH DEVICE
Your phone supports the following Bluetooth 2.0 devices and earlier:
• Hands-free headsets
• Hands-free car kits
To use a Bluetooth device to make a call, do the following:
1 Go to the Apps > Settings > Wireless controls screen.
2 Scroll down to the Bluetooth section. Make sure the setting is on.
3 Turn your Bluetooth device on and put it in pairing mode, per the instructions in the device
owner’s manual.
4 Tap Scan for devices, then tap the device you want to use.
5 If you’re prompted to enter a passkey, type it (refer to your device’s owner’s manual if necessary),
then tap Connect.
6 Once you’re paired, tap the device name and tap Connect.
7 Once your Bluetooth device reports it’s connected, you are ready to use it for calls. As soon as you
dial a call, tap Source to select your Bluetooth device. To switch to another sound source during
the call, tap Source.
Read more in “Connect to a Bluetooth device” on page 32.
ONE User Guide - R1.0 - April 21, 2010 54
Page 55

CALLING
Make a call
Call an existing contact • Start typing the contact’s name from any of the Home screens to
open a list of your contacts, then the call button to the right of the
contact’s name.
Alternatively, if the contact is a Favorite, simply tap their photo. If
the contact has a phone number saved, tap call. If the contact isn’t
a Favorite, tap All contacts and select the contact from the list.
8 From the contact card, tap Call <label>.
Use the Call Log 1 Press the PHONE button on the keyboard; or,
Go to the Apps screen and tap Phone to open the Dialer.
2 Slide your finger left to find the Call Log.
3 Tap a log entry to call the number.
Redial a number Redial any call from the Call Log. If a your call doesn’t go through for
any reason (the phone number is busy, you dialed an invalid number,
or there is no service), you can redial the number by tapping Call
back on the call ended screen.
Call someone not in
Contacts
Add a number to Contacts 1 Press the PHONE button on the keyboard; or,
55 ONE User Guide - R1.0 - April 21, 2010
1 Press the PHONE button on the keyboard; or,
Go to the Apps screen and tap Phone to open the Dialer.
2 Type the phone number, then press Call.
3 If your call doesn’t go through for any reason (the phone number is
busy, you dialed an invalid number, or there is no service), you can
redial the number by tapping Call back on the call ended screen.
Go to the Apps screen and tap Phone to open the Dialer.
2 Type the number in the number field.
3 Tap the + sign to the left of the number.
4 Tap an existing contact from the list, or tap New contact.
5 When you’ve finished editing the contact, tap Save. Their contact
card appears.
6 To call this contact, tap the phone number on their contact card.
Page 56

Answer a call
In-call dial pad Elapsed call time In-call option menu Contact card
When a call comes in, you’ll always receive a notification on the screen.
• To answer the call, peel back the lower-left corner of the screen (where Answer appears) by sliding
your finger diagonally on the screen, lower-left to upper-right.
• To ignore the call and route it using your Phone settings, tap Ignore or press the POWER button
twice.
• To ignore the call and reply by text message, tap Text .
• To silence the incoming ring, press any control button.
In-call options
While in a call, you’ll see your options in the on-screen menu. Slide your finger right to type numbers
while in a call; slide your finger left to see the contact card of the person you’re talking to.
Mute To mute your side of the conversation (mutes your microphone) tap Mute on
ONE User Guide - R1.0 - April 21, 2010 56
the in-call screen. The menu option background changes color when selected.
Page 57

Speaker To listen to your call using the speakerphone, tap Speaker on the in-call
screen. The menu option background changes color when selected.
Add a call Read about conference calling in “Multiple calls” on page 57.
Volume control While on a call, you can increase/decrease volume by pressing either the + or -
VOLUME buttons on the phone.
Swap calls When you’re in a call and another call comes in, answering the incoming call
will place the first caller on hold. Tap Flash to switch between the calls.
Dial numbers If you have to type some numbers while in a call (such as to select options),
slide your finger right to use the dial pad, or use the numbers on the keyboard.
Go to contact card To view the contact card of the person you’re talking to, slide your finger left.
Multiple calls
Conference calling You can set up a conference with two other callers:
1 Make your first call from the Dialer screen or a contact card.
2 Once your call has connected, tap Add call to open a list of your contacts
with phone numbers. Choose to Dial new number, or tap a contact from the
list.
3 Tap the contact you want to add, or type the number in the dial pad and tap
Call.
4 Once the call is connected, the in-call screen displays a Flash option. Tap it
to merge all the calls.
Once you’ve tapped Flash, the two calls are “merged” and treated as one call,
which means you can’t drop either of the calls. No Caller ID will be displayed;
you’ll see Connected at the top of the in-call screen.
Call waiting If a call comes in while you’re already on a call, you’ll receive an incoming call
notification. You can choose to Answer or Ignore the call, or Text the person
back.
If you choose to answer the new call, the active call will be put on hold.
Note: To use this feature, call waiting must be part of your service plan.
57 ONE User Guide - R1.0 - April 21, 2010
Page 58

End a call
To end a call, tap End on the in-call screen.
Tip: To add the number to your contacts, tap Save contact after the call ends.
VOICEMAIL
Before you can use the voicemail features described below, be sure you’ve set up voicemail with your
mobile operator.
Voicemail notifications
1 When someone has left you a voicemail, you’ll receive a notification on the screen.
2 To retrieve your message, simply tap the notification to dial your voicemail number, then follow the
voice prompts.
Call voicemail from the Dialer
1 Go to the Apps screen and tap Phone to open the Dialer.
2 Touch and hold the 1 key, then follow the audio prompts.
3 You can also slide left to view the Call Log and tap the Voicemail menu button.
Note: You can manually change your voicemail number from Apps > Settings > Phone. Read more
in “Voicemail number” on page 34.
CALL LOG
The Call Log shows all incoming, outgoing, and missed calls. Missed calls display in colored text;
incoming and outgoing calls display in white text.
To view the Call Log:
1 Go to the Apps screen and tap Phone to open the Dialer.
2 Slide your finger left to find the Call Log. From here you can do the following:
Call the number Tap the log entry to call the number.
ONE User Guide - R1.0 - April 21, 2010 58
Page 59

Send text to the number To send a text message to a number in the Call Log, the number must
already be saved on a contact card.
1 Tap Text next to the number or name to open a conversation card.
2 Type your message to compose, then tap Send.
Read more in “Create a new message” on page 77.
Clear log entries Tap More > Clear log. You’ll be asked to confirm.
View only missed calls Tap More > Missed calls.
To view All calls again, tap More > All calls.
Call voicemail Tap Voicemail to call your voicemail number. The number of voicemail
messages is displayed in the menu in parentheses.
Save a contact from the
log
1 Find the phone number you want to save.
2 Tap Save.
3 Tap an existing contact from the list, or tap New contact.
4 When you’ve finished editing the contact, tap Save. Their contact card
appears.
PHONE SETTINGS
To reach the Phone settings screen, go to Apps > Settings > Phone. From the Phone settings screen
you can:
• Set your roaming preference.
• Choose to open the phone display to answer a call and close the screen to end a call.
• Turn phone keyboard shortcuts on and off.
• Edit your voicemail number.
• Choose to automatically download MMS messages.
• Turn on TTY or telecoil functions.
Warning: When you have TTY turned on, no audio is routed through your phone. Be sure to turn
off TTY to make regular phone calls, with audio. Also note that turning telecoil on uses extra battery power.
Read more in “Phone” on page 33.
59 ONE User Guide - R1.0 - April 21, 2010
Page 60

FEED READER
ALL FEEDS SCREEN FAVORITES SCREEN
ABOUT FEED READER
What are feeds?
Feeds are website updates that you can subscribe to in order to receive frequently updated content.
The Feed Reader app on your phone, as well as the Loop, aggregates and displays this content in
individual stories.
What types of feeds can I view on my phone?
Feeds can give you updates on news websites, blogs, the weather, your friends’ status on social
networks, and more. You can subscribe to and view any kind of feed on your phone. Typically, feeds
are grouped into:
• News (RSS/Atom) feeds
• Social network feeds (including your friends’ status messages and photo stories)
The All Feeds screen displays the feeds that you’ve subscribed to. On the screen to the right, Favorites,
you can view stories from the feeds you’ve marked as favorites.
ONE User Guide - R1.0 - April 21, 2010 60
Page 61

From the All Feeds screen, tap a feed to open the individual feed, then tap a story to open the
INDIVIDUAL FEED SCREEN
Social network feed
INDIVIDUAL FEED SCREEN
News (RSS) feed
Tap a social story
to open it in the
story screen.
INDIVIDUAL STORY SCREEN
Tap a news story
to open it in the story
story screen.
INDIVIDUAL STORY SCREEN
Tap a photo story
to open it in the fullscreen photo viewer.
FULL-SCREEN
PHOTO VIEWER
individual story. The individual story screens differ depending on whether you’re viewing a social,
photo, or news story.
Read more in “How do I subscribe to a feed?” on page 62 and “All Feeds screen” on page 64.
61 ONE User Guide - R1.0 - April 21, 2010
Page 62

How do I subscribe to a feed?
There’s more than one way to subscribe to a feed. One method subscribes a single feed and the other
subscribes a group of feeds. Regardless of how you do it, newly-subscribed feeds are automatically
favorited and so updated stories from these stories will appear in the Loop.
When you’re signed in to a social network, the social feeds from your friends (including fan pages)
will automatically appear in the All Feeds and Favorites screens of your Feed Reader, as well as in the
Loop.
Subscribe to an individual feed
1 From the Feed Reader, tap Add to go to the Browser, or go to the Browser directly from the Apps
screen.
2 If you know the exact address to the feed, you can type that in the address bar and go to the feed
directly. Otherwise, find a webpage with at least one feed.
3 On the webpage, look for the web feed icon , and tap the icon or the link to subscribe. If you have
trouble selecting the icon, zoom in. Once you’ve gone to the feed (you’ll see the feed source code),
you’ll be asked to confirm.
4 Tap ok to subscribe. Once subscribed, you’ll be taken to the Feed screen, where the feed stories are
listed. The feed is automatically tagged as a favorite, so updated stories will appear in the Loop.
Subscribe to all feeds on a webpage
1 From the Feed Reader, tap Add to go to the Browser, or go to the Browser directly from the Apps
screen.
2 Find a webpage with at least one feed.
3 Tap the address bar. It will shift down slightly to show the website’s title and the favorites star .
ONE User Guide - R1.0 - April 21, 2010 62
Page 63

4 Tap the star to show the Favorites menu.
Tap the favorites star
Favorites menu
Address bar
to open the favorites menu.
5 Tap one of the following:
• Add to favorites - Adds the page to your favorite webpages, but doesn’t subscribe you to any
feeds on the page.
• Pin to apps - Adds a link to the page to your Apps screen. In addition, this option subscribes you
to all the feeds on the page, favorites them, so you’ll see updated stories from these feeds on the
Loop.
• Add to loop - Subscribes you to all the feeds on the webpage, favorites them, so you’ll see
updated stories from these feeds on the Loop.
If there are more than five feeds on the page you’ll be asked to confirm before you’re subscribed. If you
do add all feeds on a page, you can always unsubscribe from any you don’t want by going to the Feed
Reader. Read “How can I remove a feed from my phone?” below.
You can also subscribe to feeds from the Studio. Read more in “About the KIN Studio” on page 39.
How can I remove a feed from my phone?
You can unsubscribe from a feed while viewing it by tapping More > Unsubscribe. You can also
unsubscribe from one or more feeds from the All Feeds screen by two-finger tapping to enter edit
mode. Read more in “Unsubscribe from news feeds” on page 65.
Note: You can’t unsubscribe from social network feeds, but you can unfavorite them. Read more in
“Favorites screen” on page 65.
How do I make feed stories appear on my center Home screen?
Feed stories that appear on the center Home screen, the Loop, are all from feeds you’ve chosen to be
favorites. When you add (subscribe) to a feed, it’s favorited automatically, so updated stories from this
feed will appear on the Loop. Social network feeds are favorited automatically as well.
You can always unfavorite a feed to remove it from the Loop, in which case it will still appear in the
Feed Reader on the All Feeds screen. Read more in See “Favorite/unfavorite feeds” on page 66.
63 ONE User Guide - R1.0 - April 21, 2010
Page 64

Note: When you unfavorite a feed, those feed stories already in the Loop will remain until they’re
replaced with new favorite feed stories.
How can I tell if I have unread feeds?
On the All Feeds screen there will be a number indicator next to the feed source if you have any
unread feed stories. On the Feed screen, unread stories are indicated with a colored bar along the left.
How often are the feeds refreshed?
In general, every time you go to the Feed Reader, all your feeds are refreshed, but not more than every
five minutes. If you want to force a refresh, tap Refresh.
Individual feeds are refreshed when you tap a feed. Stories from your favorite feeds are refreshed
when you go to the Favorites screen. This means you may need to wait a short while for your favorite
feed stories to appear.
Can I share stories with my friends?
Yes. You can drag stories into the Spot from the Favorites, Feed, or Story screen. Read more in “Share
a story” on page 66. You can also share stories from the Favorites screen.
You can’t share feeds, only individual feed stories.
ALL FEEDS SCREEN
The All Feeds screen displays all feeds that you’re subscribed to. If there are unread stories in a feed,
the number unread is noted in the feed title. To open a specific feed, simply tap the feed.
From the All Feeds screen, you can:
Add a feed From the All Feeds screen, tap Add to go to the Browser. (You can
also start from the Browser.) From there, open websites that
contain feeds. Read how in “How do I subscribe to a feed?” on page
62.
When you sign in to a social network, all your social network feeds
will appear automatically on your phone. They will also appear in
the Favorites screen in Feed Reader. Read more in “Favorites
screen” on page 65.
ONE User Guide - R1.0 - April 21, 2010 64
Page 65

Open a feed To open a feed, tap it. Recent stories in the feed are displayed.
Unread stories display with a colored bar along the left. To read a
specific story, tap the story.
News stories - A summary of the story displays. To read the full
story, tap Open in browser.
Social stories - Photo stories open in the Camera full-screen photo
viewer. Non-photo social stories open in the Story screen. If
supported, you can post a comment from the Story screen. If the
author of the story is one of your contacts, tap their photo to open
their contact card.
Refresh feeds Tap Refresh to refresh all your feeds.
Unsubscribe from news
feeds
Two-finger tap the screen to enter edit mode and show the Xs on
each feed. Tap an X to delete the associated feed. When finished,
two-finger tap the screen again to exit edit mode.
FAVORITES SCREEN
The Favorites screen is located to the right of the All Feeds screen. When you subscribe to a news
feed, it’s automatically added as a favorite. If you’ve signed in to a social network, all your social feeds
are automatically listed as favorites.
All your favorite feed stories display on the Favorites screen and are refreshed when you go to the
screen. A subset of the favorite feed stories also appears on the Loop.
To remove a favorite from the Favorites screen or the Loop, you must “unfavorite” the feed on the All
Feeds screen. Read more in “Favorite/unfavorite feeds” on page 66.
From the Favorites screen you can:
Refresh a feed Ta p Refresh to refresh the feed.
Read a feed story Tap a social or news story to open the individual story screen or, if a photo
story, the Camera full-screen photo viewer.
Share a story To share a story with a contact, touch and hold the story until it “lifts”, then
drag it into the Spot. From there you can Send to contacts via Email or
MMS. Read more about sharing via the Spot in “Share with the Spot” on
page 23.
Note: From the Spot you can Send stories viewed in the Feed Reader via
Email or MMS, but you can’t upload them to social networks.
65 ONE User Guide - R1.0 - April 21, 2010
Page 66

INDIVIDUAL FEED SCREEN
Tap a feed on the All Feeds screen to open the individual Feed screen. From this screen you can:
Remove a feed You can remove (unsubscribe from) news feeds, but you can’t remove a
social network feed unless you sign out from that social network.
To remove a news feed, tap More > Unsubscribe.
Favorite/unfavorite
feeds
For news feeds, tap More > Favorite/Unfavorite to add/remove the web
feed from the Favorites screen. For social feeds, tap Favorite/Unfavorite. If
you unfavorite a feed, the stories from the feed will no longer appear on the
Loop or in the Favorite feeds screen.
Refresh a feed Ta p Refresh to refresh the feed.
Read a feed story Tap a feed story to open the individual story screen or, if a photo story, the
photo viewer.
If it’s a news story, open the full story in the Browser by tapping the Open in
browser link at the bottom of the story.
Share a story To share a story with a contact, touch and hold the story until it “lifts”, then
drag it into the Spot. From there you can Send to contacts via Email or
MMS. Read more about sharing via the Spot in “Share with the Spot” on
page 23.
Note: From the Spot you can Send stories viewed in the Feed Reader via
Email or MMS, but you can’t upload them to social networks.
Note: You can’t unfavorite a feed from the Favorites screen.
ONE User Guide - R1.0 - April 21, 2010 66
Page 67

INDIVIDUAL STORY SCREEN
When you tap a news or social story on the Feed screen, the story displays in the individual story
screen. Photo stories open in the Camera full-screen photo viewer. From the social story screen you
can read and comment on the story. From a news or social story you can:
Read more For news stories:
• Open the full story in the Browser by tapping the Open in browser link at the
bottom of the story.
For social stories:
• If the story is from a social network that supports comments, you can post a
comment.
• If the author of the story is one of your contacts, tap their photo to open their
contact card.
Share a news
story
To share a news story with a contact, touch and hold the story until it “lifts”, then
drag it into the Spot. From there you can Send to contacts via Email or MMS.
Read more about sharing via the Spot in “Share with the Spot” on page 23.
Note: From the Spot you can Send stories viewed in the Feed Reader via Email or
MMS, but you can’t upload them to social networks.
67 ONE User Guide - R1.0 - April 21, 2010
Page 68

EMAIL
ABOUT EMAIL
What email account types can I use on my phone?
You can use any type of email account, including:
• Branded POP/IMAP email accounts
• Other POP/IMAP email accounts
• Microsoft Exchange Server email accounts (Exchange contacts will also sync to your phone)
Read more in “Set up an email account” on page 69.
How many email accounts can I set up?
You can set up to ten email accounts total, but you’re limited to setting up one Exchange account.
That means, at most, you can have nine POP/IMAP accounts and one Exchange account.
What information do I need to set up an account?
You’ll need the following information if you have one of the branded accounts (Hotmail, Gmail,
Yahoo! Mail, AOL):
• Your username - The first part of your email address
• Your password - The password you use to sign in to your account.
For other POP/IMAP accounts you’ll also need:
• Incoming server name - This is typically “pop.domain.com”.
• Outgoing server name - This is typically “smtp.domain.com”.
For Exchange accounts you’ll also need:
• Server name- This is the Outlook Web Access (OWA) server name. Ask your company’s tech
support for help if you don’t know the name.
• Domain - Ask your company’s tech support for help if you don’t know your domain.
• SSL - Check with your company’s tech support to see if you need to turn on SSL (Secure Sockets
Layer) for your account.
ONE User Guide - R1.0 - April 21, 2010 68
Page 69

What’s the limit on attaching photos or videos to an email message?
You can attach up to 20 items, totaling no more than 10 MB.
After I set up an email account, where can I see my messages?
Each email account you set up will have its own screen. From the Email app, slide your finger left to
view each Inbox in turn. The first account you set up will display in the first screen, the next account
will display in the screen immediately to the right, and so on for each account you add.
After you set up an email account, the last seven days of messages (three days for Exchange accounts)
will download to your phone. You can view the messages in the account’s Inbox. To sync more than 3
days of messages, tap More > Settings and change the Days to sync setting.
What types of email attachments can I view on my phone?
You can open and save these types of files attached to email messages:
• JPG and PNG image files
• WMV, MP4, 3GP and 3G2 video files
Notes:
• You can’t open or save the following file types attached to email messages:
- BMP, GIF, or TIF images
- MP3 audio files
- PDF files
- Microsoft Office Word/Excel/PowerPoint/OneNote files.
• Attachments must be under 10 MB in size to view and open on your phone.
• You can forward any attachment, even if you can’t open it or save it to your phone.
SET UP AN EMAIL ACCOUNT
1 If you’ve never set up an account, start from:
• Apps > Email
• Apps > Settings > App setup > Email
If you’ve already set up at least one email account, start from:
• Apps > Email > More > Settings > Add account
• Apps > Settings > App setup >Email > Add account
69 ONE User Guide - R1.0 - April 21, 2010
Page 70

2 Tap the type of email account you want to add. Tap IMAP/POP account if you’re not adding a
branded account or an Exchange Server account.
3 On the screen that appears, type your account information.
Note on adding an Exchange server account:
• If you haven't already set up a PIN lock to secure your phone, you’ll be asked to create a PIN.
4 When finished, tap Done, then wait a moment while you’re signed in to the account.
5 Adjust days of messages that will sync, if you wish:
• For non-Exchange accounts - The last week of messages are downloaded to the account Inbox
by default. To change the sync period, tap More > Settings and change the Days to sync setting.
• For Exchange accounts - The last three days of messages are downloaded to the account Inbox
by default. To change this, scroll down the Settings screen to the heading Microsoft Exchange
Server. Tap Days to sync below the heading to choose a different sync period.
INBOX SCREENS
Every email account you’ve set up is displayed on its own screen. After going into the Email app, slide
your finger left or right to navigate the screens.
From any Inbox you can:
Read a message Tap a message to open it for reading. Tap the More menu to
Forward, Delete, or Mark read/unread. Tap Reply to open a new
message screen. Read more in “Read message screen” on page 73.
Delete a message Two-finger tap the screen to enter edit mode and show the Xs on
each message. Tap an X to delete the associated message. Two-finger
tap the screen again to exit edit mode.
Open folders To view messages in other folders, tap More > Folders. A list of your
account folders appears. Tap a folder to open it and view messages.
Tap a message to read it. From there you can do everything listed in
“Read message screen” on page 73.
Sync messages (refresh
Tap More > Sync.
Inbox)
Open Email settings Tap More > Settings. Read more about settings in “Email settings”
on page 73.
ONE User Guide - R1.0 - April 21, 2010 70
Page 71

Create a new message Ta p New to open a new message screen. Then:
1 Complete the To field using one of these methods:
• Tapping a contact from the list that appears, which is a list of all
your contacts that have email addresses saved to contact cards. If
you start typing a name or email address, the list will be limited
to matches.
• Typing a full email address if it’s not saved on any contact card.
2 Tap Type message to open the compose screen where you can type
your subject and message, and attach any files from the Camera
app.
Note: If you want to add more recipients after typing your
message, tap the To field.
3 Add attachments from your Camera screens by tapping Attach.
4 When ready to send, tap Send.
Note: The Send menu item only appears on the screen where you
type your message.
71 ONE User Guide - R1.0 - April 21, 2010
Page 72

CREATE A NEW MESSAGE
Tap New to address your message.
Attachment
indicator
If no email addresses are shown
start typing a name/email
Tap Type me ssage to open the compose screen.
Tap Attach to add photos or
Tap a contact from the list, or
address in the To field to limit
the list to matches.
for a contact, that contact has
more than one; tap the name
videos from Camera.
Tap Send when you’re finished
composing...
Type a Subject...
then tap the message area to
type your message.
to choose.
Save a message as draft While writing a message, press the BACK button and tap Save to save
Discard a message-inprogress
your message to the Drafts folder.
While writing a message, press the BACK button and tap Discard to
discard your message.
ONE User Guide - R1.0 - April 21, 2010 72
Page 73

READ MESSAGE SCREEN
Once you open an email message, you can also:
Open and save photo
attachments
Reply to a message Tap Reply to open a new message screen with the current message
Forward a message Tap More > Forward to open a new message screen with the current
Delete a message Tap More > Delete to delete the message. If you have the setting Ask
Mark a message read/
unread
Tap Open next to a photo attachment to preview it (or tap Open all
below the attachments if you have more than one). Once the
attachment is open, you can tap Save (or Save all) to save to your
Camera’s Captured screen.
Tap the preview image to open it in full-screen view. If you want, you
can save it to the Camera’s Captured screen by tapping Save.
attached.
message attached.
before deleting turned on, then you’ll be asked to confirm before the
message is permanently deleted. Read more in “Ask before deleting” on
page 74.
Tap More > Mark unread/Mark read to toggle the read state of the
message.
EMAIL SETTINGS
To open the Email settings screen, from any Inbox screen, tap More > Settings. Another way to open
Email settings is to go to Apps > Settings, then slide your finger left to view the App setup screen.
In addition to setting up email accounts for viewing on your phone, you can do the following from
Email settings:
Sync schedule Tap this setting to set a schedule for syncing (refreshing) your email
messages. The default setting is 30 minutes. You can choose a Sync
frequency from every 15 minutes, every 30 minutes, hourly, or
manually.
For Exchange accounts, you can turn on Auto-sync (messages appear
as they arrive).
73 ONE User Guide - R1.0 - April 21, 2010
Page 74

Ask before deleting Turn this setting on if you want to confirm before a message is deleted
while on the Read Message screen.
Note! Even with this setting turned on, if you delete one or more
messages from the Inbox, you will not be asked to confirm.
Default email account Tap this setting to choose a primary (or default) email account. This
setting only applies if you have set up more than one email account on
your phone.
Days to sync Choose how many days of messages you want synced to your phone.
Options are 1 day, 3 days, 1 week, 2 weeks, 1 month, all.
Note: This setting applies to all the email accounts you set up on your
phone, except for a Microsoft Exchange Server account, which has its
own Days to sync setting at the bottom of the screen.
Signature Tap this setting to set your desired signature, which will be
automatically added to the end of each email message you write. You
can type multiple lines by using the ENTER key.
If you’ve set a signature, it displays on the Settings screen as well.
ONE User Guide - R1.0 - April 21, 2010 74
Page 75

MESSAGES
MESSAGES INBOX
Conversation with
someone not
in your contacts.
Unread message
indicator.
Conversation with
one of
your contacts.
Tap to start new
conversation.
Tap to call back.
Tap message to
open conversation
card.
Type your response here,
then tap Send or press
the ENTER key.
Tap to add
attachments
or contacts
to conversation.
Name of contact
you’re having the
conversation with.
CONVERSATION CARD
ABOUT MESSAGES
What kinds of messages appear in the Messages app?
All your text (SMS), MMS, and voicemail messages appear in this one app, as well as missed,
incoming, and outgoing calls.
What’s a conversation card?
Every message in the Messages inbox is from a specific phone number. To see all the messages
between you and a specific contact, tap the message in the inbox. The screen that opens is called a
“conversation card”.
75 ONE User Guide - R1.0 - April 21, 2010
Page 76

How do I write a new message? Can I attach a photo or video?
Tap X to dism iss
notification.
Tap notification
to open the
conversation card.
Go to the Apps screen and tap Messages. Then tap New, type the phone number or name of the
contact you want to message, and then write your message. To add a photo or video attachment, tap
Attach. You’ll go to the Camera app where you can capture a new photo or video, or attach one
already saved. Read more in “Create a new message” on page 77.
Note: You can only share a video from the Messages app, not from the Spot.
Will I receive a notification when I get a new message?
Yes. No matter what you’re doing on your phone, a notification will pop up when you receive a new
message. Tap the notification to open the conversation and read the message.
What’s the limit on sending photos and videos via MMS?
If you want to send photos or videos to a phone number via MMS, you can attach up to five photos or
one video (you can’t combine media types). The total size of an MMS message is limited to 1.2 MB.
How do I decide whether to send something via text or MMS message?
You don’t have to worry about it. Just compose your message and add any attachments; your phone
will automatically select the right way to send. In general, when you send a message that’s just text, it
will be sent by text message; when you attach media to your message, it will be sent by MMS. If you
address your message to more than one person, the message will switch to MMS; you can switch it
back to text by tapping Switch > Text in the menu.
Note: Text messages are also known as SMS (Short Message Service) messages.
ONE User Guide - R1.0 - April 21, 2010 76
Page 77

MESSAGES INBOX
All your text, MMS, and voicemail messages appear in this one screen. Your messages are organized
by phone number into “conversations”. Conversations that have unread messages display in bold with
a colored bar along the left side of the conversation.
The last message you received or sent in the conversation is displayed in the inbox. To read all the
messages in a specific conversation, tap the message and the “conversation card” will open.
From the inbox you can:
Make a call If you have a conversation to or from a phone number, tap the photo
associated with the conversation to open the contact card, then tap Call
to dial the number.
Call voicemail Tap Voicemail to call your voicemail number.
Read a message Tap the conversation to open the conversation card and read the entire
message.
Create a new message 1 Tap New to start a new conversation.
2 Type the contact name or phone number in the To field. As you type,
contact matches display below the To field. Tap one of the contacts to
add that contact to the To field. To add more recipients, tap More and
tap Add contact.
3 To add a photo, video, or other attachment, tap Type message (at the
bottom of the screen), then tap Add and the attachment type. You can
continue adding attachments up to the limit for your message type.
Note: You can add an existing photo or video, or capture a new one.
Any new photos or videos you attach to a message are also saved to
your Captured screen.
4 Tap Type message to open the text box and type your message. You
can type up to 800 characters.
5 When you’re ready, tap Send.
Delete a conversation 1 Two-finger tap the screen to enter edit mode and show the Xs on each
conversation.
2 Tap an X to delete the associated conversation.
3 Two-finger tap the screen again to exit edit mode.
77 ONE User Guide - R1.0 - April 21, 2010
Page 78
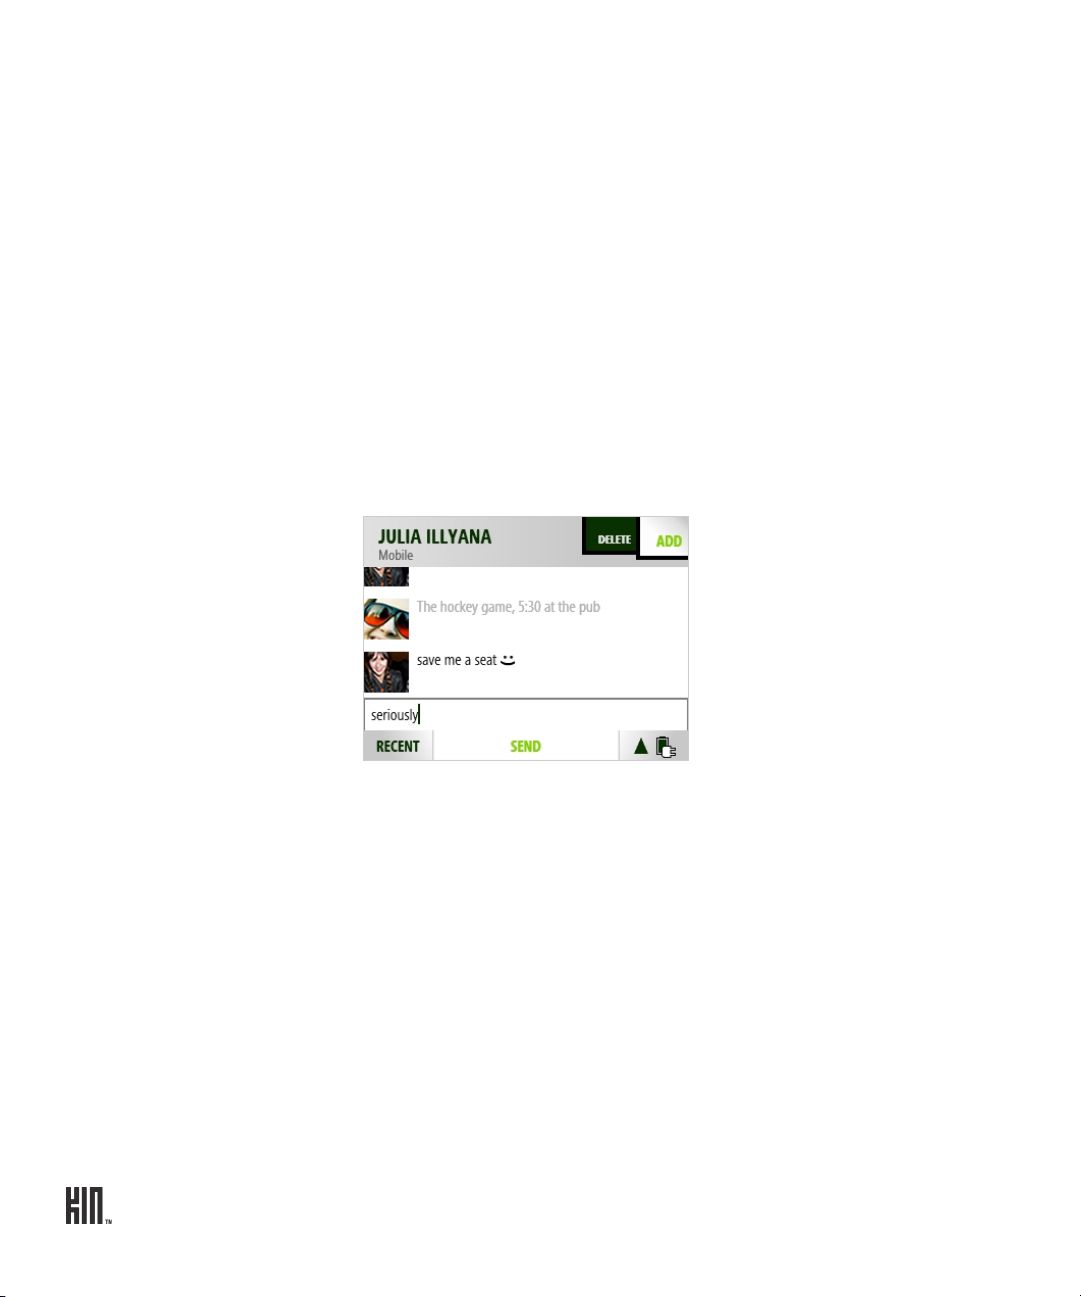
CONVERSATION CARDS
To open a conversation card, tap the latest message from the inbox. From a conversation card you can:
Save phone number or
contact
If you’re having a conversation with someone from a number not saved
to Contacts, you can add the number from the conversation card:
1 Tap the phone number at the top of the screen or tap Save contact
next to the conversation.
2 From the screen that opens, tap Save contact to open the contact
selector. Tap either New contact or tap an existing contact to add the
number to that contact’s info.
3 From the contact card that opens, you’ll see the phone number has
already been added. Type any additional info, then tap Save.
Reply to a message 1 The message box at the bottom of the screen is ready for you to start
typing your message. (You’ll see the blinking text cursor.)
Tip: To start a new line in a message, press the SHIFT key then the
ENTER key.
2 If you’re having a conversation with someone who has more than one
phone number, tap Switch to choose the number you want to use.
3 If you want to add another recipient or an attachment, tap either Add
or, if you have the Switch menu, More > Add and choose from the
submenu.
4 When finished, tap Send.
ONE User Guide - R1.0 - April 21, 2010 78
Page 79

Save photo attachments To save a photo attachment, tap the attachment to open it in full-screen
view, then tap Save. The photo is saved to the Camera > Captured
screen.
Notes:
• If a photo is protected by DRM (Digital Rights Management), you
will not be able to save or forward the photo.
• You can’t save video attachments to your phone.
Delete a conversation Tap either Delete or More > Delete conversation to delete all the
messages in the conversation. You’ll be asked to confirm.
MMS SETTING
You can choose to have MMS messages download automatically, or only when you open the message.
This setting is on by default (MMS messages will download automatically). To change this setting, go
to Apps > Settings > Phone. Read about it in “Auto-download MMS” on page 34.
79 ONE User Guide - R1.0 - April 21, 2010
Page 80

CAMERA
Tap to set
capture settings.
Tap to go to video
capture screen. Video item. Tap to delete items.
Tap to remov e
items from favorites.
Tap to capture.
Tap to sort by album
instead of by date.
Tap to view
photo story.
ABOUT CAMERA
Where can I see my photos and videos?
The Camera app is organized across multiple screens, from left to right:
• Capture - The screen where you take your photos and videos. Press the CAPTURE button to jump
to the Capture screen. See the location of the CAPTURE button in “The outside of your phone” on
page 7.
• Captured - The screen that stores the photos and videos you captured on the phone, plus any
images you’ve downloaded from the web or saved from message attachments.
• Favorites - The screen that displays all the photos and videos you’ve marked as favorites.
• Albums - The screen that displays all the photos and videos you’ve imported to your phone from
your computer, organized into albums, the same as on your computer.
• Online - The screen that displays photo stories from your social network contacts.
ONE User Guide - R1.0 - April 21, 2010 80
Page 81

Can I upload a photo I’ve taken to my social network?
Yes. After you capture a photo, a preview of the photo appears for you to delete or share. If you want
to share it, tap Share > Upload, choose your social network, and it’s posted.
You can also share a photo saved to your Captured screen. Read more in “Take a photo” on page 83
and “Upload a photo to a social network” on page 87.
Can I send a photo or video right after I capture it?
Yes, the preview screen will display relevant menu options to Delete, Send via Email or MMS, or
Upload to a social network.
Notes:
• You must have at least one email account set up to send via email. If you have more than one email
account set up, the Camera app will use your default email account when sending. Read more in
“Default email account” on page 74.
• You can’t send a video via MMS unless you capture from the Messaging app. Read more in “Create
a new message” on page 77.
What are the specs on this camera?
The built-in camera is 5 megapixels, with an LED flash, auto-focus, and anti-shake. The camera
supports the following resolutions and formats:
Photo - Large 5 MP 2608 x 1960 JPG
Photo - Medium 3 MP 2000 x 1502 JPG
Photo - Small 2 MP 1632 x 1224 JPG
Video - High quality VGA 640 x 480 MP4 2 Mbps
Video - Email VGA 640 x 480 MP4 1 Mbps (max 60 seconds)
Video - MMS qVGA 320 x 240 MP4 256 Kbps (max 30 seconds)
Are my photos and videos backed up?
Assuming your service plan includes the Studio, photos and non-HQ videos are synced to the Studio.
Although HQ videos are not synced, you can always add them to your Zune collection by connecting
your phone to your computer via USB. Read more in “Copy photos and videos to/from your
computer” on page 94.
Read more in “About the KIN Studio” on page 39.
81 ONE User Guide - R1.0 - April 21, 2010
Page 82

Does the camera record my location?
If you explicitly allow the use of your location, the camera will geotag your photos and videos. Read
more about your privacy options in “Location” on page 38. Read more about geotags below.
What is a geotag?
A geotag contains location information (longitude, latitude) that’s stored as metadata with your photo
or video. You must allow use of your location by the Camera app before geotags will be added to your
captured media. You can allow the use of your location from the Apps > Settings > Location screen.
Also, as long as you have location services turned on and you have ask selected on the Location
settings screen, each time an app wants to use your location, you’ll first be asked for permission. Read
more in “Location” on page 38.
How can I import photos and media on my computer to my phone?
You can import photos, music, and videos to your phone by attaching your phone to your computer
with the USB cable and using the Zune software. You can also download photos to your computer via
the Studio. Read more in “Copy photos and videos to/from your computer” on page 94.
What’s the format of my captured photos and videos?
Photos are captured to JPG format. Videos are captured to MP4 format.
Does the camera have auto-focus?
Yes. While capturing a photo, press the CAPTURE button half-way down to focus, then all the way
down to capture. To bypass auto-focus, either press the CAPTURE button all the way down without
pausing, or tap the camera icon on the screen.
Note: A few inches in front of the lens to infinity will be focused by default, so if you don’t have time
to use the auto-focus, it shouldn’t be a problem.
CAPTURE PHOTOS AND VIDEOS
To go directly to the Capture screen, press the CAPTURE button on the outside of your phone. You
can also capture from the Camera app:
1 Go to the Apps screen and tap Camera.
2 Slide your finger right to view the Capture screen.
ONE User Guide - R1.0 - April 21, 2010 82
Page 83

From the Capture screen, you can take photos (in photo mode) or record videos (in video mode) and
then share them:
Zoom during capture Digital zoom is supported in both photo and video modes to 8x actual
size. To zoom in, press the + VOLUME button; to zoom out, press the VOLUME button. You can also tap the screen to toggle the zoom from 1x
to 2x, or pinch in/out to zoom out/in continuously.
Take a photo
1 On the Capture screen, if you don’t see the camera icon , tap the
screen to show the menu, then tap To photo.
2 Frame your photo; when ready to capture, do one of:
• Press the CAPTURE button. To use auto-focus, press the CAPTURE
button half-way down and pause, then continue pressing all the way
down to capture.
• Tap the on-screen camera icon . Auto-focus is bypassed.
• Press the ENTER key . Auto-focus is bypassed.
3 Your photo appears on the preview screen; choose to Delete or Share
it. If you do nothing, your photo is automatically saved to the Captured
screen just to the right.
83 ONE User Guide - R1.0 - April 21, 2010
Page 84

Record a video 1 On the Capture screen, if you don’t see the recording icon on the
screen, tap the screen to show the menu, then tap To video.
2 When ready to record, do one of:
• Press the CAPTURE button.
• Tap the recording icon on the screen.
• Press the ENTER key .
3 To zoom during capture, use one of these methods:
• Tap the screen to toggle between 1x and 2x.
• Press the VOLUME buttons to zoom incrementally.
• Pinch in/out to zoom continuously.
4 To pause during recording, tap the pause icon . Tap it again to
resume recording.
5 To stop recording, do one of:
• Press the CAPTURE button.
• Tap the stop recording icon .
• Press the ENTER key .
6 Your video appears on the preview screen; choose to Delete or Share it.
If you do nothing, your video is automatically saved to the Captured
screen just to the right.
Send a photo or video After you capture a photo or video you can send it from the preview
screen by tapping Share > Send. Choose from MMS or Email to open a
compose screen with the photo or video attached. Note: You can’t send a
video via MMS unless you capture from the Messaging app.
Upload a photo After you capture a photo you can upload it to a social network from the
preview screen by tapping Share > Upload. The social networks you’re
signed in to will appear in the submenu for you to choose from.
Delete a photo or video After you capture a photo or video you can delete it from the preview
screen by tapping Delete.
You can reach the photo and video settings screens from the Camera capture screen menu. Read more
in “Photo settings” below.
ONE User Guide - R1.0 - April 21, 2010 84
Page 85

Photo settings
From the Capture photo screen, tap Settings. The Photo Capture settings screen opens, where you
can manually adjust these settings:
Resolution Choose from:
• Large - Full-size resolution, largest file size and best quality.
• Medium - A compromise between the best and lowest quality. Good for sending
and uploading.
• Small - The smallest file size, but lowest quality. Best for sending and uploading.
Note: The currently-set resolution doesn’t display on the capture screen, so if you
temporarily change the resolution for a capture session, be sure to change it back.
Mode Choose from:
• Auto - Automatically adjusts exposure based on scene.
• Night - Adjusts the exposure for night lighting.
• Burst - Raises the shutter speed, turns off the flash, and enables burst capture.
When you start capture in this mode, the camera will take three successive photos
without flash and preview the last image captured when finished.
Flash Choose from:
• Auto - Flashes when the camera senses the need.
• Off - Never flashes.
• Always on - Always flashes, except in Burst mode.
Geotags Choose from:
• Quick - The current cellular triangulated location is added to your photo when you
capture it. No overhead is added to the time to take a photo and your battery life
won’t be affected significantly.
• GPS -The current location is determined using the internal GPS and is added to
your photo when you capture it. With this setting, more battery is used.
Lighting Choose from:
• Auto - Automatically senses the ambient light and adjusts.
• Home - Adjusts to an incandescent light environment.
• Office - Adjusts to a fluorescent light environment.
• Sunny - Adjusts to a bright light environment.
• Cloudy - Adjusts to muted light environment.
85 ONE User Guide - R1.0 - April 21, 2010
Page 86

Video settings
From the Capture Video screen, tap Settings. The Video Settings screen opens, where you can
manually adjust these settings:
Resolution Choose from:
• High quality (HQ) - Videos you record with this setting are not synced to the KIN
Service, so they will not appear in the Studio. They will have the highest bitrate
and largest file size.
• Email quality - Default setting. This is the quality level that is synced to the KIN
Service, so they will appear in the Studio.
Mode Choose from:
• Auto - Automatically adjusts exposure and light based on scene.
• Night - Adjusts exposure and light for night. Turns on the flash.
Geotags Choose from:
• Quick - The current cellular triangulated location is added to your video when you
capture it. No overhead is added to the time to take a photo and your battery life
won’t be affected significantly.
• GPS -The current location is determined using the internal GPS and is added to
your video when you capture it. With this setting, more battery is used.
ONE User Guide - R1.0 - April 21, 2010 86
Page 87
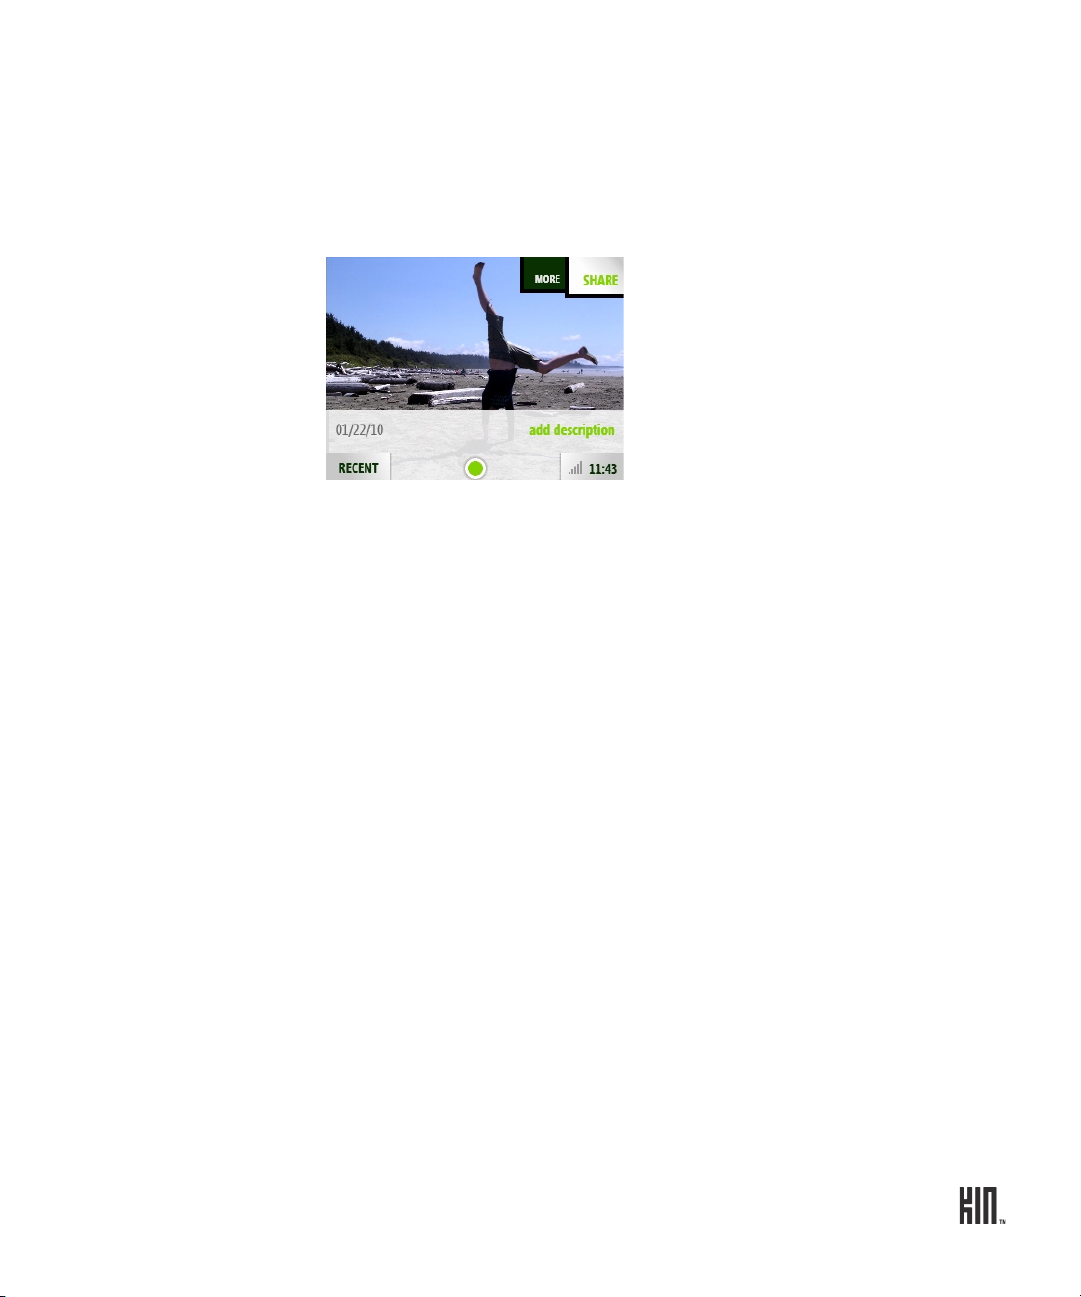
FULL-SCREEN PHOTO VIEWER
To view a photo full-screen, from any of the Camera screens, tap the photo thumbnail. To see the
menu and other options, tap the photo again. In the full-screen viewer, you can do the following:
Send a photo 1 On the Captured, Favorites, or Albums screen, find the photo you want to
send and tap it to open the full-screen photo viewer.
2 Tap Share > Send, then tap either Email or Text/MMS to open a
compose screen with the photo attached.
Tip: If the menu is hidden, tap the screen to show it.
Upload a photo to a
social network
Zoom and pan On the Captured, Favorites, or Albums screen, tap a photo to open the full-
1 On the Captured, Favorites, or Albums screen, find the photo you want to
upload and tap it to open the full-screen viewer.
2 Tap Share > Upload, then choose the social network website from the
submenu. The photo is uploaded.
screen viewer.
• To continuously zoom out from 3x to 1x (original size), pinch two
fingers together.
• To continuously zoom in from 1x to 3x, stretch two fingers apart. You
can also double tap to zoom in from 1x to 2x.
• To pan, touch and hold the screen and slide your finger left/right/up/
down.
• To skip to the next/previous photo, slide your finger left/right.
87 ONE User Guide - R1.0 - April 21, 2010
Page 88

Favorite/unfavorite a
photo
1 On the Captured or Albums screen, find the photo you want to favorite or
unfavorite and tap it to open the full-screen viewer.
2 Tap More > Favorite to copy it to the Favorites screen, or Unfavorite to
remove it from the Favorites screen. The menu item that appears depends
on whether your photo is already a favorite or not.
Note: You can also unfavorite a photo from the Favorites screen when in
edit mode. Read more in “Unfavorite” on page 92.
Set a photo as
wallpaper
You can customize the lock screen with one of your photos:
1 On the Captured, Favorites, or Albums screen, find the photo you want to
use as wallpaper and tap it to open the full-screen viewer.
2 Tap More > Wal lp ap er.
3 The photo appears in an edit window. Pinch to shrink the default crop
box; drag the crop box around to change the selection.
4 Tap Done to save the photo and assign it as your lock screen background.
Note: You can also set a photo as wallpaper from the Apps > Settings >
Screen Lock screen. Read more in “Wallpaper” on page 38.
ONE User Guide - R1.0 - April 21, 2010 88
Page 89

Assign a photo to a
contact
1 On the Captured, Favorites, or Albums screen, find the photo you want to
assign as a contact photo and tap it to open the full-screen viewer.
2 Tap More > Contact photo.
3 From the list that appears, tap the contact.
4 The photo appears in an edit window. Pinch to shrink the default crop
box; drag the crop box around to change the selection.
5 Tap Done to save the photo and assign it to your contact.
6 The photo now appears on the contact card and on the Favorites Home
screen if you’ve set this contact as a favorite.
Note: You can also assign a photo to a contact from the contact card. Read
more in “Create a new contact on your phone” on page 46.
Map photo location This option displays the location where a photo was captured, assuming the
photo has geotag information in its metadata. Read more in “Location” on
page 38 and “What is a geotag?” on page 82.
1 On the Captured, Favorites, or Albums screen, find the photo you want to
find on the map and tap it to open the full-screen viewer.
2 Tap More > Map.
Note: If the photo wasn’t captured with geotag information, then this
option won’t be available.
3 The Browser opens to a map, identifying the position defined in the
photo’s geotag.
Add/edit a photo
description
You can add or edit a description for a photo that you’ve captured. The
description is saved as metadata in the photo file.
1 On the Captured screen, find the photo you want to describe and tap it to
open the full-screen viewer.
2 Tap either Add description or the existing description to show the text
box.
3 Type or edit your description. Descriptions are limited to 100 characters.
4 Tap Done to save the description.
Note: Adding or editing a description does not affect the photo’s filename.
Add photo to the
Spot
89 ONE User Guide - R1.0 - April 21, 2010
In the full-screen viewer, the Spot isn’t immediately visible. It will appear
when you touch and hold a photo. Once you see the Spot, drag the item in.
Page 90

Delete a photo 1 On the Captured screen, find the photo you want to delete and tap it to
open the full-screen viewer.
2 Tap More > Delete. You’ll be asked to confirm.
Return to thumbnail
view
From the full-screen viewer, simply press the BACK button to go to
thumbnail view.
PHOTO AND VIDEO SCREENS
The photos and videos you can view in Camera are organized into different screens: Captured,
Favorites, Albums, and Online. Read more below.
Captured screen
The Captured screen holds all the photos and videos you’ve captured with your phone. They are
organized by date taken. To delete a photo or video quickly, two-finger tap the screen to enter edit
mode and show the Xs in the corner of each thumbnail. Tap an X to delete the photo or video. Twofinger tap the screen again to exit edit mode.
From this screen you can:
Play a video Tap the video thumbnail to begin play. During play, tap the screen to
show the controls. Read more in “Video Now Playing screen” on page
109.
Send a photo or video Read “Send a photo” on page 87. You can also send a video from the
Captured screen by dragging it into the Spot, as long as it’s not a HQ
video.
Upload a video or photo You can upload a video from the Captured screen by dragging it into the
Spot, as long as it’s not a HQ video. For photos read “Upload a photo to
a social network” on page 87.
Zoom and pan Read “Zoom and pan” on page 87.
Delete photos/videos 1 Tap Edit to enter edit mode and show the Xs.
2 Tap the X next to the photo or video you want to delete. You’ll be
asked to confirm.
3 When finished deleting, tap Done.
Favorite/unfavorite photo Read “Favorite/unfavorite a photo” on page 88.
ONE User Guide - R1.0 - April 21, 2010 90
Page 91

Set photo as wallpaper Read “Set a photo as wallpaper” on page 88.
Assign photo to contact Read “Assign a photo to a contact” on page 89.
Map photo location Read “Map photo location” on page 89.
Add description to a photo Read “Add/edit a photo description” on page 89
Add to Spot On the Captured screen, find the photo or video you want to add to the
Spot, touch and hold it, then drag it to the Spot.
Favorites screen
The Favorites screen holds all the photos and videos that you’ve marked as “favorites” on your phone.
You can have 100 favorites.
To view the Favorites screen, go to the Camera app and slide your finger left. (The Favorites screen is
immediately to the right of the Captured screen.) You can favorite a photo or video from the Captured
or Albums screen. Read how to add/remove a photo or video from Favorites in “Favorite/unfavorite a
photo” on page 88.
In addition, from this screen you can:
Add to Spot 1 Find the photo or video you want to add to the Spot.
2 Touch and hold the photo or video.
3 Drag it to the Spot.
91 ONE User Guide - R1.0 - April 21, 2010
Page 92

Unfavorite 1 Tap Edit to enter edit mode and show the Xs.
FAVORITES SCREEN
EDIT MODE
Tap Edit to
remove items
from favorites.
2 Tap the X next to the photo or video you want to unfavorite.
3 When finished, tap Done to exit edit mode.
You can also unfavorite a photo from the full-screen viewer:
1 Tap the photo you want to unfavorite to open the full-screen
viewer.
2 Tap More > Unfavorite.
Play a video Read “Play a video” on page 90.
Send a photo Read “Send a photo” on page 87.
Upload a photo Read “Upload a photo to a social network” on page 87.
Zoom and pan Read “Zoom and pan” on page 87.
Set photo as wallpaper Read “Set a photo as wallpaper” on page 88.
Assign photo to contact Read “Assign a photo to a contact” on page 89.
Map photo location Read “Map photo location” on page 89.
Add description to a photo Read “Add/edit a photo description” on page 89
Albums screen
The Albums screen contains photos you’ve imported from your computer to your phone. The photos
are organized as they were on your computer. Read how to import in “Copy photos and videos to/
from your computer” on page 94.
ONE User Guide - R1.0 - April 21, 2010 92
Page 93

From this screen you can:
Favorite/unfavorite photo To have any of the photos in your albums also appear in the
Favorites screen, you can favorite them. Read “Favorite/unfavorite a
photo” on page 88.
Sort by date or album You can change the sort by toggling the By date/By album menu
options.
Add to Spot On the Captured screen, find the photo or video you want to add to
the Spot, touch and hold it, then drag it to the Spot.
Online screen
The Online screen contains photos from social network photo feeds. Three types of photo feeds are
displayed:
• Posted photos
• Commented photos
•Tagged photos
From this screen you can:
Make/view comments 1 Tap the photo story to open the full-screen viewer.
2 Tap Comments to open the Comments card for the photo. On
this card, you can type a comment or read any other comments.
(Comments are limited to 255 characters.)
3 Press the BACK button to return to the full-screen viewer.
Open album 1 Tap the photo to open the full-screen viewer.
2 Tap Album to open the Browser and go to the website that
displays all the photos from this online album.
3 To save any of the photos, double tap the image, then from the
message box that opens, tap Save image. The image is saved to
your Camera > Captured screen.
93 ONE User Guide - R1.0 - April 21, 2010
Page 94

SYNC PHOTOS AND VIDEOS TO THE STUDIO
If you have the service plan that includes the Studio and if you’ve turned on auto-sync (per “Account
sync” on page 39), the photos and non-HQ videos you capture on the phone will be backed up
automatically to the Studio, where you can view and share them. Your favorites display as favorites in
the Studio as well. If a photo or video hasn’t synced to the Studio yet, this icon will display in the
thumbnail’s upper-left corner in your phone’s Captured screen.
You can also upload photos from your computer to the Studio. These photos will then automatically
sync to the Camera > Favorites screen on your phone.
When you start to run out of storage space on your phone, photos and videos will archive to the
Studio automatically, always leaving you enough space to capture more. A thumbnail of the original
photo or video will remain in the Captured screen.
Note: Although high quality (HQ) videos will not sync to the Studio, you can sync these larger files
with the Zune software. Read more below in “Copy photos and videos to/from your computer”.
COPY PHOTOS AND VIDEOS TO/FROM YOUR COMPUTER
To use the Zune software to copy photos and videos to your phone from your computer and vice versa,
follow these steps:
1 Install the Zune software on your computer. To download and install this software, go to
www.zune.net/setup on your computer and follow the instructions.
2 Once you’ve installed and set up Zune software on your computer, make sure the photos and videos
you want to import to your phone are in your Zune software Collection.
3 Connect your phone to your computer via USB.
4 Open the Zune software if it doesn’t open automatically.
5 From the Zune software on your computer:
• To copy photos and videos from your computer to your phone - Drag the photos and videos in
your Zune software Collection to the phone icon at the lower-left of the page. Progress is
displayed for you on the computer screen. The photos and videos you copy to your phone will
display in your phone’s Albums screen, where you can favorite them, share them, upload them,
etc. Read more in “Full-screen photo viewer” on page 87
• To copy photos and videos from your phone to your computer - Any photo or video that hasn’t
synced to the Studio will appear within the Zune software on the Device > Videos or Device >
Pictures page. (If you don’t have a plan that includes the Studio, then all the photos and videos
on your phone will appear on these Zune pages.) Drag the items you want to download to the
computer icon in the lower-left of the page. These photos and videos will then be part of your
ONE User Guide - R1.0 - April 21, 2010 94
Page 95

Zune Collection and will be stored on your computer in the location specified in the Zune
software Settings > Software page.
To jump to the Studio and see the photos and videos that have already synced, click the Studio
members link at the bottom of the Zune software Video or Pictures page. From there you can
open the item. Click More > Download to save it to a location on your computer.
6 When finished, disconnect your phone from your computer.
95 ONE User Guide - R1.0 - April 21, 2010
Page 96

BROWSER
ABOUT THE BROWSER
How do I open a webpage?
Open the Browser and start typing the web address. You can either type the top-level domain at the
end of the address (e.g., .com, .net, .org), or tap the appropriate auto-complete option.
If you auto-complete, you’ll be taken to the webpage immediately. Otherwise, tap the arrow to the
right of the address, or press the ENTER key to open the webpage.
How do I search for a webpage?
Type your search terms in the address bar, then tap the magnifying glass to the right of your search
terms.
Can I search a webpage for a specific word or phrase?
No, you can’t search for text within a webpage.
Can I save some pages as favorites?
You can save 50 pages as favorites. To favorite a webpage:
1 On an open webpage, tap the address bar.
2 The address bar will shift down slightly to show the website’s title and the favorites star .
3 Tap the star to show the Favorites menu.
4 Tap Add to favorites.
All your favorite (bookmarked) pages are stored in the Favorites pane above the address bar.
ONE User Guide - R1.0 - April 21, 2010 96
Page 97

Can I zoom in/out of a webpage?
Yes. On websites not specifically designed for mobile phones, double tap the page to zoom in; double
tap again to return to original size. On any webpage, zoom in/out continuously by pinching out/in
with your thumb and forefinger. Read more below in “What should happen when I double tap on a
webpage?”
What should happen when I double tap on a webpage?
It depends on the page and where you double tap.
On websites not specifically designed for mobile phones, double tap to zoom in; double tap again to
zoom out.
If you’re zoomed in on the page or if the page is a mobile site, double tap the following to take the
corresponding action:
Double tap this: To make this happen:
Plain text in a specific section Zooms into that section.
Plain text that is not a specific
Zooms out of that section.
section
Image Shows a context menu with the option to save the image.
Link Shows a context menu with options to:
• View the destination URL.
• Go to the page.
Image that is also a link Shows a context menu with options to:
• View the destination URL.
• Save the image.
• Go to the page.
tel: link Shows a context menu with options to:
• Call the number.
• Send a text message to the number.
• Save the number to contacts.
mailto: link Opens the Email app > new message screen.
97 ONE User Guide - R1.0 - April 21, 2010
Page 98

Can I set a page to use as a home page in the Browser?
No, there is no home webpage setting on the phone.
Can I do online banking or other secure transactions with my phone?
Yes. If a website’s connection is encrypted and the Browser certifies it’s secure, you’ll see “https” and
the padlock icon in the address bar. If you see the open padlock icon , the security certificate is
not valid for the site.
Can I share webpages or content within a webpage?
Yes, touch and hold the page to capture and “lift” the visible portion of the page (called a “web clip”).
Drag the lifted page content to the Spot. From the Spot, add one or more contacts, then tap Send to
share the webpage.
Note: From the Spot you can Send stories viewed in the Browser via Email or MMS, but you can’t
upload them to social networks.
Can I put a link to a webpage on my Home screen?
Yes, you can “pin” 50 webpages to your App Home screen. Here’s how:
1 With a webpage in view, tap the address bar.
2 The address bar will shift down slightly to show the website’s title and the favorites star .
3 Tap the star to show the Favorites menu options.
4 Tap Pin to apps. Now a link to this webpage will appear on your Apps Home screen. The webpage’s
title is used as the name of the link and it’s not editable. If there are any feeds on this page, they’ll be
favorited so you’ll see updated stories on the Loop.
5 To remove the link, tap Remove from apps in the Favorites menu.
If someone sends me a link in a message, will it open in the Browser if I tap the link?
Yes, if someone sends you a link to a webpage in an email or text message, all you need to do is tap the
link to open it in the Browser.
Can I have more than one webpage open at a time?
No, you can only have one webpage open at a time. Use the Favorites screen to return to webpages.
ONE User Guide - R1.0 - April 21, 2010 98
Page 99

WEBPAGE BROWSE SCREEN
Opening a webpage is very easy. Follow the instructions in “How do I open a webpage?” on page 96.
Once you’re on a webpage, you can:
Zoom Double tap to zoom in. Double tap again to zoom out. To zoom
in/out continuously, pinch out/in with your thumb and
forefinger.
Pan/scroll Slide your finger up/down or left/right to pan within a page. To
pan quickly, slide your finger in the opposite direction that you
want to pan.
Go back To go back one page, tap the back arrow in the address bar.
Continue tapping the arrow to step back through page history.
Stop loading a page
Pin a page to your Apps screen Learn how in “Can I put a link to a webpage on my Home
Refresh a webpage Tap the refresh icon in the address bar.
Favorite a webpage Learn how in “Can I save some pages as favorites?” on page 96.
Save an image on a webpage If you see an image on a webpage that you’d like to save to your
Choose values in drop-down
boxes
Tap the stop icon .
screen?” on page 98.
Camera’s Captured screen, zoom in to the webpage, double tap
the image, then from the message box that opens, tap Save
image.
Note: You can save the following image file types to your phone
from webpages: .JPG, .GIF, .PNG, .BMP.
1 Double tap the page to zoom in.
2 Tap the selection box; all the items in the box appear in a list.
3 Tap the item(s) you want to select.
99 ONE User Guide - R1.0 - April 21, 2010
Page 100

Type in text boxes 1 Double tap the page to zoom in.
Tap to open
text entry
box below.
2 Tap the text box to open a text entry box at the bottom of the
screen.
3 Type your text, then tap outside the text entry box to dismiss
it. Alternatively, after typing the text, you can press the
ENTER key to perform the default text box action (in the
example above, pressing Enter would begin the search).
Follow a link To follow a link, tap the link. If you’re having trouble tapping it,
zoom in.
If you’d like to know the link’s destination before you navigate,
double tap the link and see the URL in the message box that
opens. To navigate to that destination, tap Open link; to cancel,
tap elsewhere on the webpage.
Note: If you tap a “mailto:” link, the Email app opens. If you tap
a “tel:” link, you will be given the choice to dial, text, or save the
number.
Subscribe/unsubscribe to feeds
on a webpage
To subscribe to a feed on a webpage, simply tap the feed’s link.
You can also:
1 Open a webpage with feeds, then tap the address bar.
2 The address bar will shift down slightly to show the website’s
title and the favorites star .
3 Tap the star to show the Favorites menu.
4 Tap Add to feed or Remove from feed, as appropriate.
ONE User Guide - R1.0 - April 21, 2010 100
 Loading...