

Page 1

Microsoft Dynamics™ GP
Integration Manager Quick Start
Page 2

Copyright
Copyright © 2005 Microsoft Corporation. All rights reserved.
Complying with all applicable copyright laws is the responsibility of the user. Without
limiting the rights under copyright, no part of this document may be reproduced, stored in
or introduced into a retrieval system, or transmitted in any form or by any means
(electronic, mechanical, photocopying, recording, or otherwise), or for any purpose, without
the express written permission of Microsoft Corporation. Notwithstanding the foregoing,
the licensee of the software with which this document was provided may make a
reasonable number of copies of this document solely for internal use.
Trademarks
Intellectual property
Warranty disclaimer
Limitation of liability
License agreement
Microsoft, Microsoft Dynamics, and Windows are either registered trademarks or
trademarks of Microsoft Corporation or its affiliates in the United States and/or other
countries. FairCom and c-tree Plus are trademarks of FairCom Corporation and are
registered in the United States and other countries.
The names of actual companies and products mentioned herein may be trademarks or
registered marks - in the United States and/or other countries - of their respective owners.
Unless otherwise noted, the example companies, organizations, products, domain names,
e-mail addresses, logos, people, places, and events depicted herein are fictitious. No
association with any real company, organization, product, domain name, e-mail address,
logo, person, place, or event is intended or should be inferred.
Microsoft may have patents, patent applications, trademarks, copyrights, or other
intellectual property rights covering subject matter in this document. Except as expressly
provided in any written license agreement from Microsoft, the furnishing of this document
does not give you any license to these patents, trademarks, copyrights, or other intellectual
property.
Microsoft Corporation disclaims any warranty regarding the sample code contained in this
documentation, including the warranties of merchantability and fitness for a particular
purpose.
The content of this document is furnished for informational use only, is subject to change
without notice, and should not be construed as a commitment by Microsoft Corporation.
Microsoft Corporation assumes no responsibility or liability for any errors or inaccuracies
that may appear in this manual. Neither Microsoft Corporation nor anyone else who has
been involved in the creation, production or delivery of this documentation shall be liable
for any indirect, incidental, special, exemplary or consequential damages, including but not
limited to any loss of anticipated profit or benefits, resulting from the use of this
documentation or sample code.
Use of this product is covered by a license agreement provided with the software product. If
you have any questions, please call the Microsoft Dynamics GP Customer Assistance
Department at 800-456-0025 (in the U.S. or Canada) or +1-701-281-6500.
Publication date
October 2005
Page 3

Contents
Introduction................................................................................................................................. 2
What’s in this manual .................................................................................................................. 3
Prerequisites .................................................................................................................................. 4
Symbols and conventions............................................................................................................ 4
Resources available from the Help menu .................................................................................5
Printable manuals......................................................................................................................... 5
Send us your documentation comments...................................................................................6
Part 1: Getting Started................................................................................................. 8
Chapter 1: Starting Integration Manager....................................................... 9
Starting Integration Manager......................................................................................................9
Getting around the main window............................................................................................10
Understanding the Integration Manager toolbar................................................................... 11
Using the shortcut keys .............................................................................................................12
Understanding the Integration Manager menus ................................................................... 13
Chapter 2: Understanding the Terminology............................................. 17
Source ........................................................................................................................................... 17
Source adapters...........................................................................................................................17
Integration Manager engine......................................................................................................17
Destination................................................................................................................................... 18
Destination adapters ..................................................................................................................18
Destination mappings................................................................................................................ 18
Query............................................................................................................................................ 18
Query relationship...................................................................................................................... 18
Part 2: Building an Integration...................................................................... 20
Chapter 3: Creating Integrations........................................................................ 21
Creating a new integration........................................................................................................ 21
Removing duplicate sources .....................................................................................................23
INTEGRATION MANAGER QUICK START i
Page 4

CONTENTS
Chapter 4: Adding Sources....................................................................................... 25
Understanding sources.............................................................................................................. 25
Understanding the source files ................................................................................................ 27
Creating the GL Header query................................................................................................. 29
Previewing source data ............................................................................................................. 33
Creating the GL Line query......................................................................................................34
Chapter 5: Creating Query Relationships.................................................... 39
Relationship guidelines............................................................................................................. 39
Creating relationships ............................................................................................................... 39
Chapter 6: Adding a Destination......................................................................... 43
Understanding destinations ..................................................................................................... 43
Adding the Microsoft Dynamics GP destination .................................................................. 44
Chapter 7: Mapping Source Data to the Destination....................... 47
Understanding the Mapping window .................................................................................... 47
Mapping fields............................................................................................................................ 49
Mapping line items for the transaction................................................................................... 52
Setting options for the General Journal destination.............................................................. 56
Part 3: Running an Integration....................................................................... 60
Chapter 8: Running the Integration.................................................................. 61
Preparing to run the integration .............................................................................................. 61
Running the integration ............................................................................................................ 64
Chapter 9: Verifying the Results.......................................................................... 67
Verifying the integration results .............................................................................................. 67
What to do next .......................................................................................................................... 69
Glossary.........................................................................................................................................71
Index
ii INTEGRATION MANAGER QUICK START
................................................................................................................................................... 75
Page 5

INTRODUCTION
Page 6
Introduction
Integration Manager is a tool designed to help you move data quickly and
easily between applications—without the need for custom programming or
extensive knowledge of application databases.
In the Ingegration Manager Quick Start guide, you use simple tabdelimited text files as a data source and Microsoft Dynamics™ GP as the
destination, but Integration Manager does not limit you to this kind of
integration. You can combine its many source and destination adapters to
create integrations that meet your needs. No matter which combination of
sources and destinations you eventually use, the steps to building and
running integrations are basically the same.
Basic steps for creating integrations
Step 1 Open a new integration.
Step 2 Add a source.
Step 3 Set source properties or establish query relationships, depending on
which source adapter you are using.
Step 4 Add a destination (and provide destination settings if the adapter requires
them).
Step 5 Map the source data to the destination.
Step 6 Run the integration.
Whether you’ve used other integration tools or you’re new to integration
technology, use this manual to familiarize yourself with Integration
Manager, the integration tool that puts information at your
fingertips—checked, verified, and ready-to-use.
This introduction includes the following information:
• What’s in this manual
• Prerequisites
• Symbols and conventions
• Resources available from the Help menu
• Printable manuals
• Send us your documentation comments
2 INTEGRATION MANAGER QUICK START
Page 7

What’s in this manual
This manual is a hands-on learning tool to help you become familiar with
Integration Manager. If you have used other data integration tools, use this
manual to understand how Integration Manager handles integrations.
Specifically, this manual shows you how to create an integration that
extracts data from an ODBC/Text source and integrates it into Microsoft
Dynamics GP. Some features described in this documentation are optional
and can be purchased through your Microsoft Dynamics GP partner.
To view information about the release of Integration Manager that you’re
using and which adapters are installed, choose Help > About Integration
Manager.
The manual is divided into the following parts:
INTRODUCTION
• Part 1,
discusses the terminology used in the integration process.
• Part 2,
integration that extracts data from an ODBC/Text source and integrates
it into the General Ledger for Microsoft Dynamics GP. By working
through the steps, you gain a basic understanding of Integration
Manager.
• Part 3,
integration as well as how to run it and verify the results.
After you are familiar with the steps presented in this manual, you can
continue to the Integration Manager User’s Guide which provides detailed
information about Integration Manager and the adapters.
Getting Started, explains how to start Integration Manager and
Building an Integration, describes the steps used to create an
Running an Integration, explains how to prepare to run the
INTEGRATION MANAGER QUICK START 3
Page 8
INTRODUCTION
Prerequisites
This manual assumes you are familiar with the Microsoft Dynamics GP
family of financial applications. Knowledge of integration products and
experience working with data in tabular format is helpful, but it is not
essential to perform the tasks discussed in this manual.
This manual assumes you are using the Microsoft Dynamics GP test company. If
you are not using the test company, the sample data files may not be in the correct
format and may not work with your company without modification. You can
modify the structure in the text files by opening these files in Notepad.
Also, this manual assumes Integration Manager is already installed.
Because the tasks are arranged in sequential order, it’s important that you
perform the tasks in the order they are presented.
This manual uses the sample files GLHEADER.txt and GLLINE.txt. Before
you begin, make sure these files exist in the Samples folder, usually
C:\Program Files\Microsoft Dynamics\Integration Manager\Samples. If
you cannot locate the Sample files at this location, browse to the location
where Integration Manager was installed. If you cannot find these files,
contact your system administrator or Product Support.
General Ledger is included in the Microsoft Dynamics GP product. This manual
uses the term General Ledger to more fully describe the integration source and
destination.
Symbols and conventions
For definitions of unfamiliar terms, see the glossary in the manual or refer
to the glossary in Help.
Symbol Description
The light bulb symbol indicates helpful tips, shortcuts and
suggestions.
The warning symbol indicates situations you should be
especially aware of when completing tasks.
4 INTEGRATION MANAGER QUICK START
Page 9
INTRODUCTION
This manual uses the following conventions to refer to sections, navigation
and other information.
Convention Description
Creating a batch Italicized type indicates the name of a section or procedure.
File >> Print or File >
Print
TAB or ENTER All capital letters indicate a key or a key sequence.
The (>>) or (>) symbol indicates a sequence of actions, such as
selecting items from a menu or toolbar, or pressing buttons in
a window. This example directs you to go to the File menu and
choose Print.
Resources available from the Help menu
The Integration Manager Help menu gives you access to user assistance
resources on your computer.
Contents
Opens the Help file for Integration Manager, and displays the main
“contents” topic. To browse a more detailed table of contents, click the
Contents tab above the Help navigation pane.
To find information in Help by using the index or full-text search, click the
appropriate tab above the navigation pane, and type the keyword to find.
Index
Opens the Help file for Integration Manager, with the Index tab active. To
find information about a window that’s not currently displayed, type the
name of the window, and click Display.
About this window
Displays overview information about the current window. To view related
topics and descriptions of the fields, buttons, and menus for the window,
choose the appropriate link in the topic. You also can press F1 to display
Help about the current window.
Printable manuals
The Integration Manager manuals are available in Adobe Acrobat .pdf
format, which you can print or view. The default installation folder for the
documentation is C:\Program Files\Microsoft Dynamics\Integration
Manager\Help\Documentation.
INTEGRATION MANAGER QUICK START 5
Page 10

INTRODUCTION
Send us your documentation comments
We welcome comments regarding the usefulness of the Microsoft Dynamics
GP documentation. If you have specific suggestions or find any errors in
this manual, send your comments by e-mail to the following address:
bizdoc@microsoft.com
To send comments about specific topics from within Help, click the
Documentation Feedback link, which is located at the bottom of each Help
topic.
Note: By offering any suggestions to Microsoft, you give Microsoft full permission
to use them freely.
.
6 INTEGRATION MANAGER QUICK START
Page 11

PART 1: GETTING STARTED
Page 12

Part 1: Getting Started
This part explains how to start Integration Manager and discusses the basic
terminology used in the integration process.
The information is divided into the following chapters:
• Chapter 1, “
Integration Manager, discusses the Integration Manager main window,
and introduces the menu commands and toolbar buttons.
• Chapter 2, “
terminology used in Integration Manager.
Before you use Integration Manager, review the information in this part of
the manual. Understanding the basics of integrations makes learning the
product easier.
Starting Integration Manager,” describes how to start
Understanding the Terminology,” introduces the
8 INTEGRATION MANAGER QUICK START
Page 13

Chapter 1: Starting Integration Manager
As soon as you have installed Integration Manager, you can begin using it.
This chapter describes how to start Integration Manager and describes the
components that make up the Integration Manager main window.
This chapter includes the following information:
• Starting Integration Manager
• Getting around the main window
• Understanding the Integration Manager toolbar
• Using the shortcut keys
• Understanding the Integration Manager menus
Starting Integration Manager
You can start Integration Manager from the Start menu or from within
Microsoft Dynamics GP.
To start Integration Manager:
1. From the task bar, choose Start, choose Programs, and then choose
Microsoft Dynamics.
2. From the Integration Manager program group, choose Integration
Manager.
INTEGRATION MANAGER QUICK START 9
Page 14
PART 1 GETTING STARTED
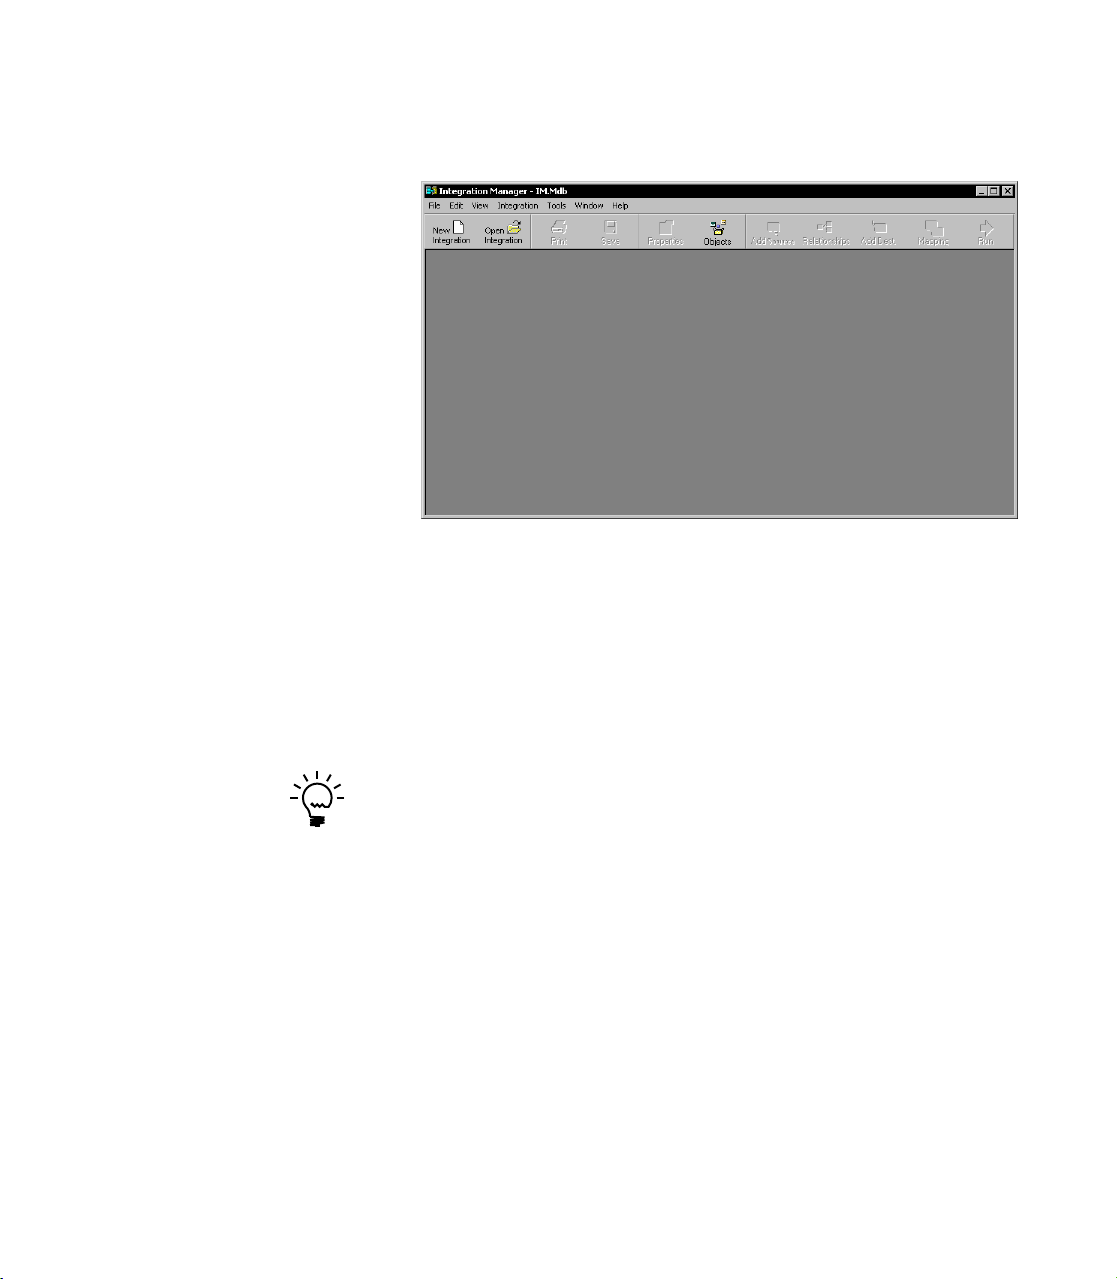
The main Integration Manager workspace opens.
– Or –
You also can start Integration Manager from within Microsoft
Dynamics GP. From the Tools menu, choose Integrate, and then choose
Integration Manager.
Buttons in the window become available only after you choose to create
a new integration or open an existing one.
If the Integration Manager registration window opens, you need to either
register Integration Manager or contact the Customer Assistance Department
for registration keys. You have the ability to sample some adapters without
registration keys; integrations, however, can be run only when Integration
Manager is registered.
You’re now ready to familiarize yourself with the features of Integration
Manager.
Getting around the main window
You perform all Integration Manager tasks in the main workspace. From
this workspace, you can access the following:
The Toolbar The Integration Manager toolbar consists of buttons for
commonly used commands in Integration Manager.
10 INTEGRATION MANAGER QUICK START
Page 15

CHAPTER 1 STARTING INTEGRATION MANAGER
The Menus The menus include the commands available in
Integration Manager.
Understanding the Integration Manager toolbar
The Integration Manager toolbar appears in the upper portion of the main
window. Each button that appears on the toolbar represents an action you
can perform in Integration Manager. The following table lists the buttons in
the toolbar:
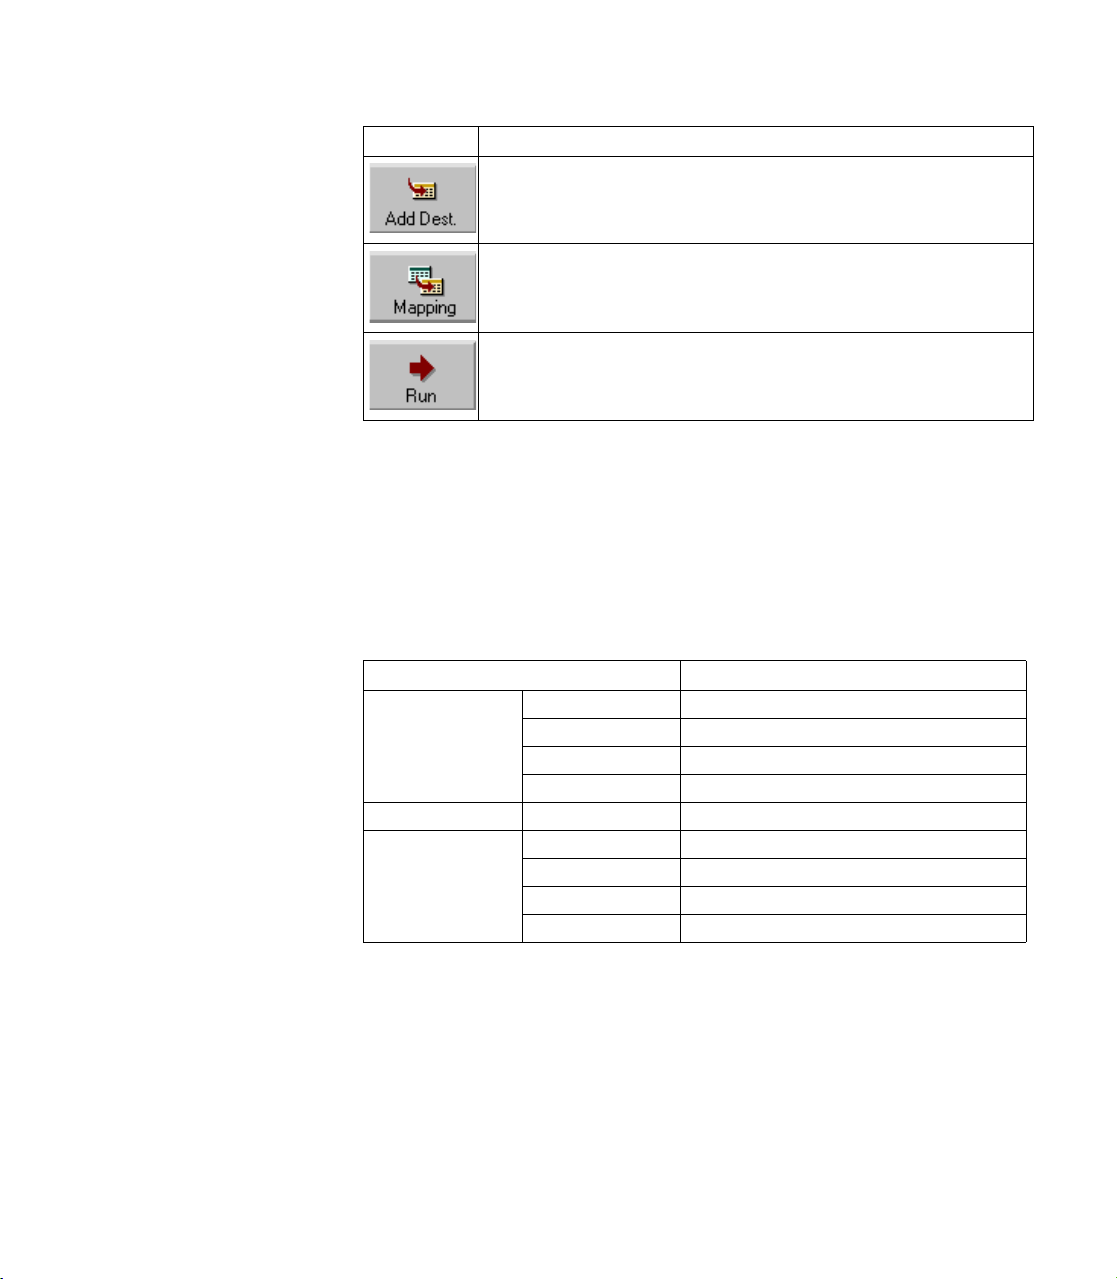
Button Description
Creates a new integration.
Opens an existing integration.
Prints information about the integration.
Saves the current integration.
Displays the properties for an integration, source, or destination.
Opens the Object Browser.
Opens the Add Source window, from which you select a source for the
current integration. The source you can add depends on the adapter you
have installed. If you do not have any adapters installed, you can still
add an ODBC or a text source.
Opens the Relationships window, where you create relationships
between Text or ODBC source queries.
INTEGRATION MANAGER QUICK START 11
Page 16
PART 1 GETTING STARTED
Button Description
Using the shortcut keys
Shortcut keys, also known as accelerator keys, are used with the CTRL key
for menu commands that are used often. Not all menu commands have an
accelerator key.
The following table contains a list of the shortcut keys for commonly used
menu commands.:
Opens the Add Destination window, from which you select the
destination for the current integration. The destination you can add
depends on which adapters you have installed.
Opens the Integration Mapping window.
Runs the current integration.
Menu command Shortcut key
File New Integration CTRL+N
Open Integration CTRL+O
Save Integration CTRL+S
Print CTRL+P
View Relationships CTRL+L
Integration Add Source CTRL+A
Add Destination CTRL+D
Mapping CTRL+M
Run CTRL+R
12 INTEGRATION MANAGER QUICK START
Page 17
CHAPTER 1 STARTING INTEGRATION MANAGER
Understanding the Integration Manager menus
The following table lists the commands that are available in Integration
Manager. It also lists the access keys corresponding to the commands.
In Microsoft
by default until you press the
Windows® 2000 and Microsoft Windows XP, access keys are hidden
ALT key.
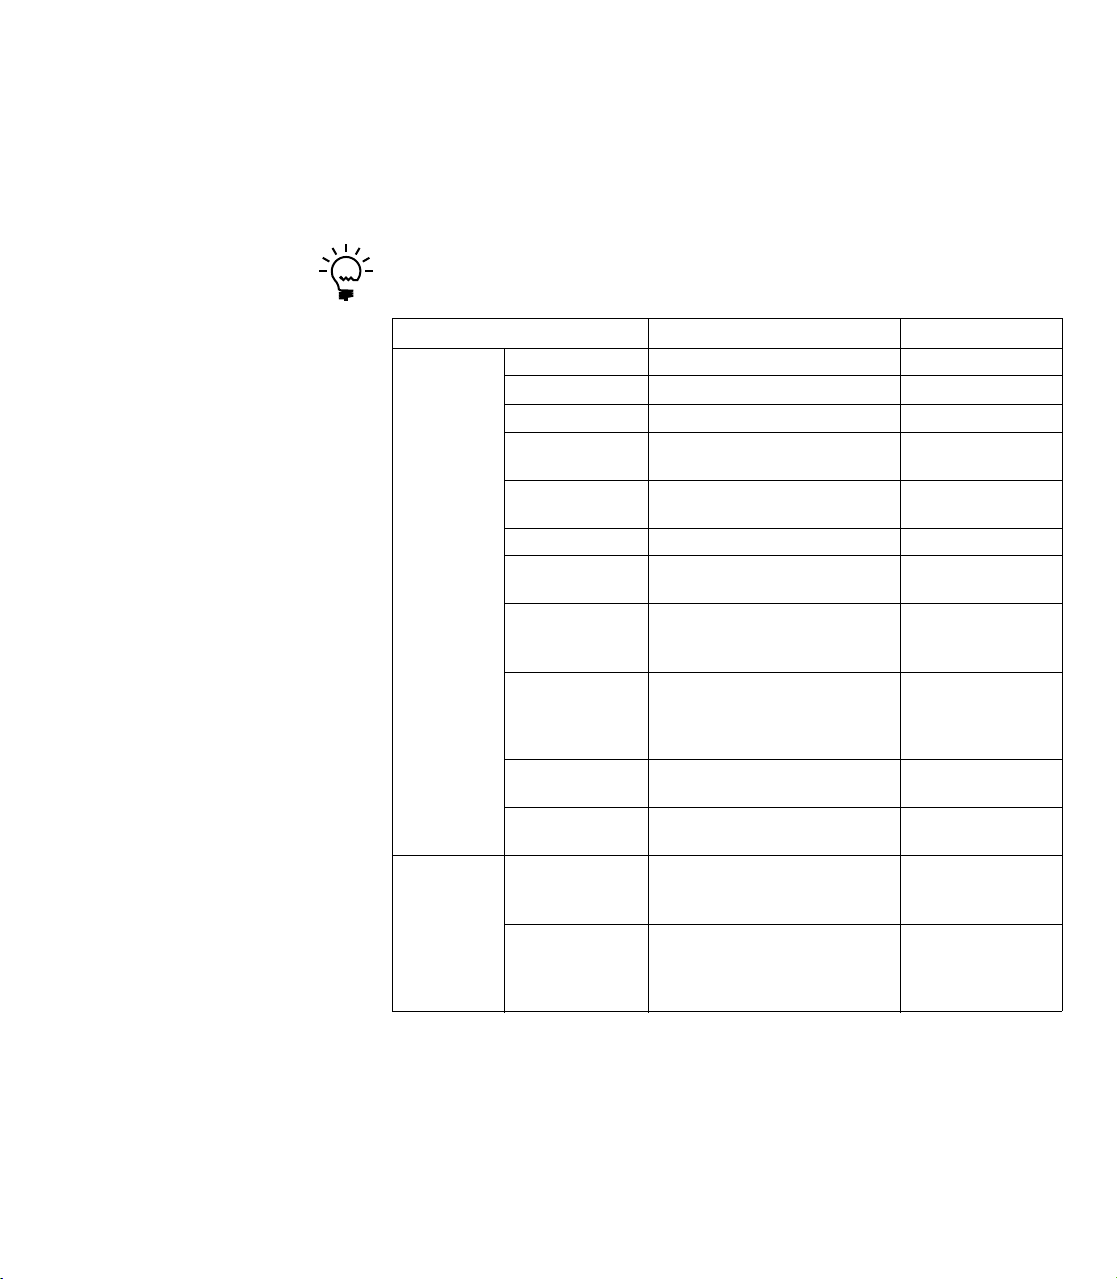
Menu commands Description Access key
File menu New Integration Creates a new integration. ALT+F+N
Open Integration Opens an existing integration. ALT+F+O
Close Integration Closes the current integration. ALT+F+C
New Integration
Group
Open Integration
Group
Save Integration Saves the current integration. ALT+F+S
Save Integration AsMakes a copy of the current
Import
Integrations
Export
Integrations
Print Prints a report of the
Exit Exits the current session of
Edit menu Remove Script In the Integration Mapping
Remove
Translation
Creates a new integration
group.
Opens an existing integration
group.
integration.
Imports integrations from other
Integration Manager databases
(usually IM.mdb files).
Exports integrations to existing
IM.mdb files. You also can
create a new IM.mdb file for the
integrations you export.
integration.
Integration Manager.
window, removes the script
associated with a field.
In the Integration Mapping
window, removes the
translation associated with a
field.
ALT+F+G
ALT+F+R
ALT+F+A
ALT+F+I
ALT+F+E
ALT+F+P
ALT+F+X
ALT+E+S
ALT+E+T
INTEGRATION MANAGER QUICK START 13
Page 18

PART 1 GETTING STARTED
Menu commands Description Access key
View menu Relationships Opens the Relationships
Integration Add Source Adds a source to the current
Tools menu Object Browser Opens the Object Browser
CTRL+L
windows, in which you create
the relationship between the
text or ODBC source queries
used for the current integration.
Properties Displays the properties of the
integration, selected source or
destination.
ALT+I+A
integration.
Add Destination Adds a destination for the
ALT+I+D
current integration.
Remove Removes the selected source or
destination from the current
integration.
Mapping Opens the Integration Mapping
ALT+I+M
window for the current
integration.
Source Settings Opens the Source Settings
ALT+I+U
window allowing you to specify
connection information for the
source adapters that require
these settings.
Destination
Settings
Opens the Destination Settings
window, allowing you to
ALT+I+S
specify connection information
for destination adapters that
require these settings.
Run Runs the current integration. ALT+I+R
Properties Displays the properties of the
ALT+I+E
integration.
ALT+T+O
window.
Registration Allows you to register
ALT+T+R
Integration Manager.
Options Opens a window from which
ALT+T+P
you can change options for
Integration Manager such as
the location of the Integration
Manager database (usually
called IM.mdb) or substitute
pathname translations.
14 INTEGRATION MANAGER QUICK START
Page 19
CHAPTER 1 STARTING INTEGRATION MANAGER
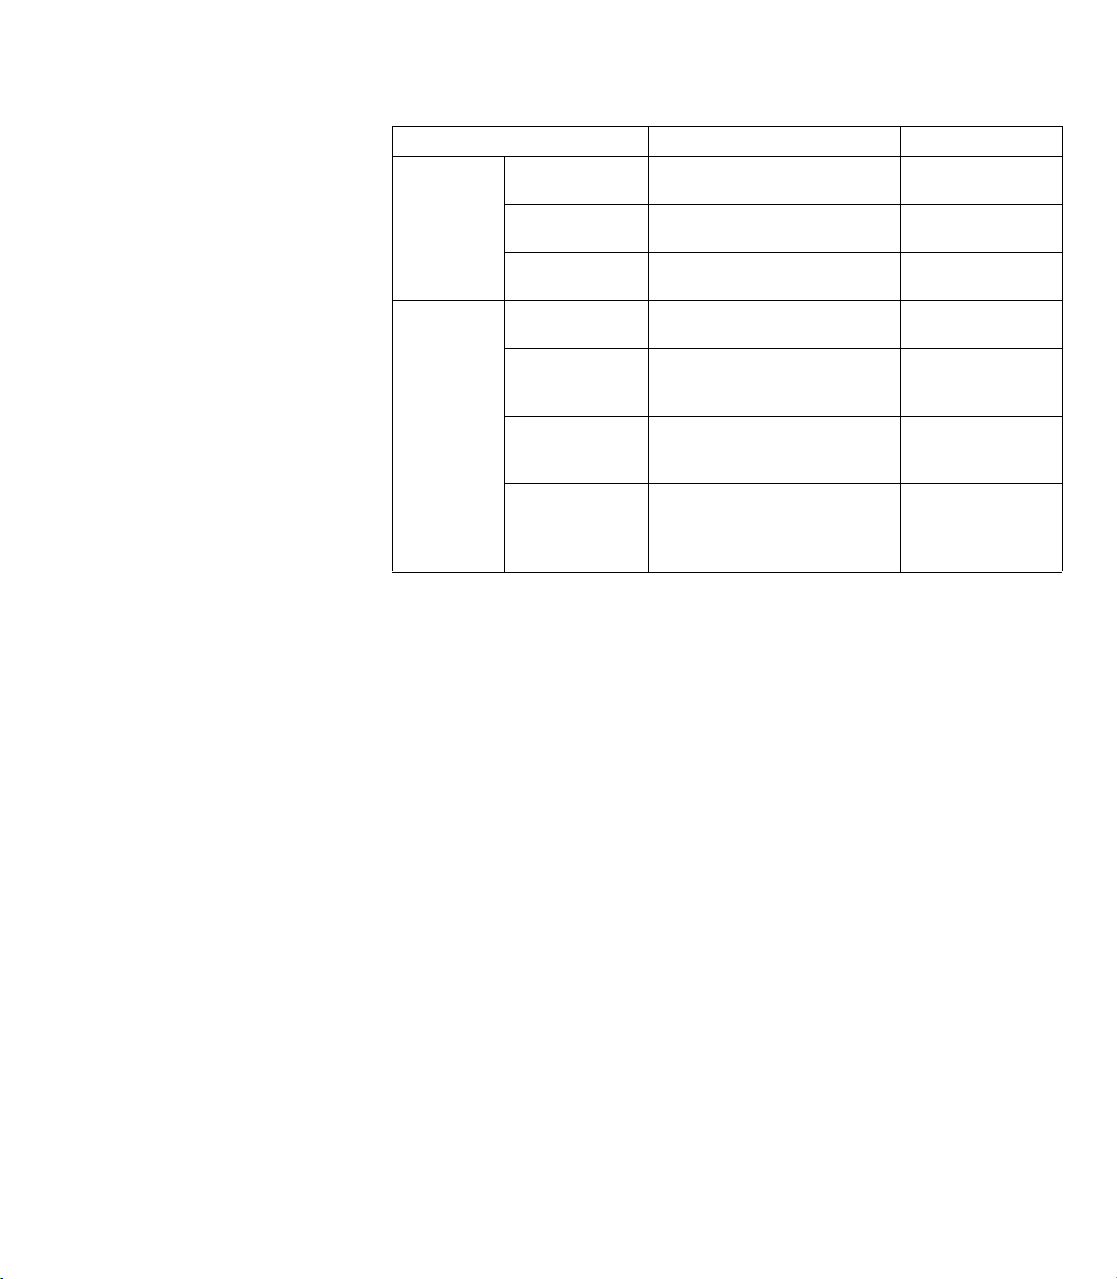
Menu commands Description Access key
Window
menu
Tile Horizontally Lists all open windows and
arranges them horizontally.
Tile Vertically Lists all open windows and
arranges them vertically.
Cascade Displays all open windows in
cascading order.
Help menu Contents Provides access to the online
help for Integration Manager.
Index Contains help topics from the
online help for Integration
Manager.
About this
Window
Contains help information
about the window displayed on
the screen.
About
Integration
Manager
Provides the version, location,
and description of the installed
Integration Manager and its
adapters.
ALT+W+H
ALT+W+V
ALT+W+C
ALT+H+C
ALT+H+I
ALT+H+W
ALT+H+A
INTEGRATION MANAGER QUICK START 15
Page 20

16 INTEGRATION MANAGER QUICK START
Page 21

Chapter 2: Understanding the Terminology
Before you begin using Integration Manager, you should familiarize
yourself with the terminology used throughout the product to have a better
understanding of the integration process.
This chapter includes definitions for the following terms:
• Source
• Source adapters
• Integration Manager engine
• Destination
• Destination adapters
• Destination mappings
• Query
• Query relationship
Source
A source indicates where the requested information to be integrated comes
from. In Integration Manager, a source can be anything from a comma- or
tab-delimited file, a database such as an Open Database Connectivity
source (ODBC), and Extensible Markup Language (XML) files. Sources
exist independently of the source adapters. However, which source you can
add to your integration depends on the source adapter you have installed.
Refer to Chapter 4, “
Adding Sources,” for more information.
Source adapters
Source adapters connect to sources, filter, and extract data. The data is then
passed on to the Integration Manager engine for processing. The type of
source adapter you install determines which source you can add to your
integration. If you do not have any source adapters installed, you can still
add an ODBC/Text source, which this manual explains how to use.
Integration Manager engine
Working with the source adapter and destination adapter, the Integration
Manager engine helps you map and transform the source data into the
destination.
INTEGRATION MANAGER QUICK START 17
Page 22

PART 1 GETTING STARTED
Destination
A destination indicates where you want the processed information to be
integrated. Destinations can be an application, a database, or an XML file.
Destinations also exist independently of the destination adapters. Examples
of destinations include Microsoft Dynamics GP, and XML files.
Destination adapters
Destination adapters validate data before integrating it to the destination
application, database, or file. If you do not have a destination adapter
installed, you won't be able to select any destination. This manual explains
how to integrate data from an ODBC/Text source through the Microsoft
Dynamics GP adapter into the Microsoft Dynamics GP General Ledger.
Destination mappings
Destination mappings define how source data is mapped to the destination.
Typically, the information comes from the source you specified, but it can
also come from a constant value or a default value in the destination. The
Integration Mapping includes several rules you can use when creating a
destination mapping.
Query
A query is a request for information. In Integration Manager, queries are
used to refer specifically to requests for information from a text file or
ODBC source. You can create several queries when using ODBC/Text as
your source.
Query relationship
When you specify more than one ODBC/Text source, you create several
queries as well. You need to create a query relationship between these
queries. Query relationships tell Integration Manager how the queries work
together during the integration. For more information on creating query
relationships, refer to Chapter 5, “
18 INTEGRATION MANAGER QUICK START
Creating Query Relationships.”
Page 23

PART 2: BUILDING AN INTEGRATION
Page 24

Part 2: Building an Integration
This part of the manual describes how to build an integration. Each chapter
contains a detailed step-by-step procedure that you can refer to later when
creating your own integrations.
This manual uses the sample files GLHEADER.txt and GLLINE.txt. Before you
begin, make sure these files exist in the Samples folder, usually C:\Program
Files\Microsoft Dynamics\Integration Manager\Samples. If the Samples folder
cannot be located at this location, browse to the location where Integration
Manager was installed. If you cannot find these files, contact your system
administrator or Product Support.
This manual is arranged in sequential order. Therefore, it’s important that
you go through the tasks in the order they are presented.
The information is divided into the following chapters:
• Chapter 3, “
create them.
• Chapter 4, “
retrieve information for the integration.
• Chapter 5, “
create query relationships and how to create them.
• Chapter 6, “
destination for the integration.
• Chapter 7, “
map the source data to the destination.
Creating Integrations,” discusses integrations and how you
Adding Sources,” explains how to add sources, which
Creating Query Relationships,” describes why you need to
Adding a Destination,” explains how to select the
Mapping Source Data to the Destination,” describes how to
20 INTEGRATION MANAGER QUICK START
Page 25
Chapter 3: Creating Integrations
The first step in building any integration is to create the integration. The
integration is the primary object that manages all the components necessary
to integrate data into a specified destination.
This chapter includes the following information:
• Creating a new integration
• Removing duplicate sources
Creating a new integration
To begin an integration, you can create a new integration or open an
existing integration. This guide shows you how to create a new integration.
To create a new integration:
1. Start Integration Manager.
2. From the File menu, choose New Integration.
– Or –
From the Integration Manager toolbar, choose New Integration.
The Integration window and then the Properties window opens.
INTEGRATION MANAGER QUICK START 21
Page 26

PART 2 BUILDING AN INTEGRATION
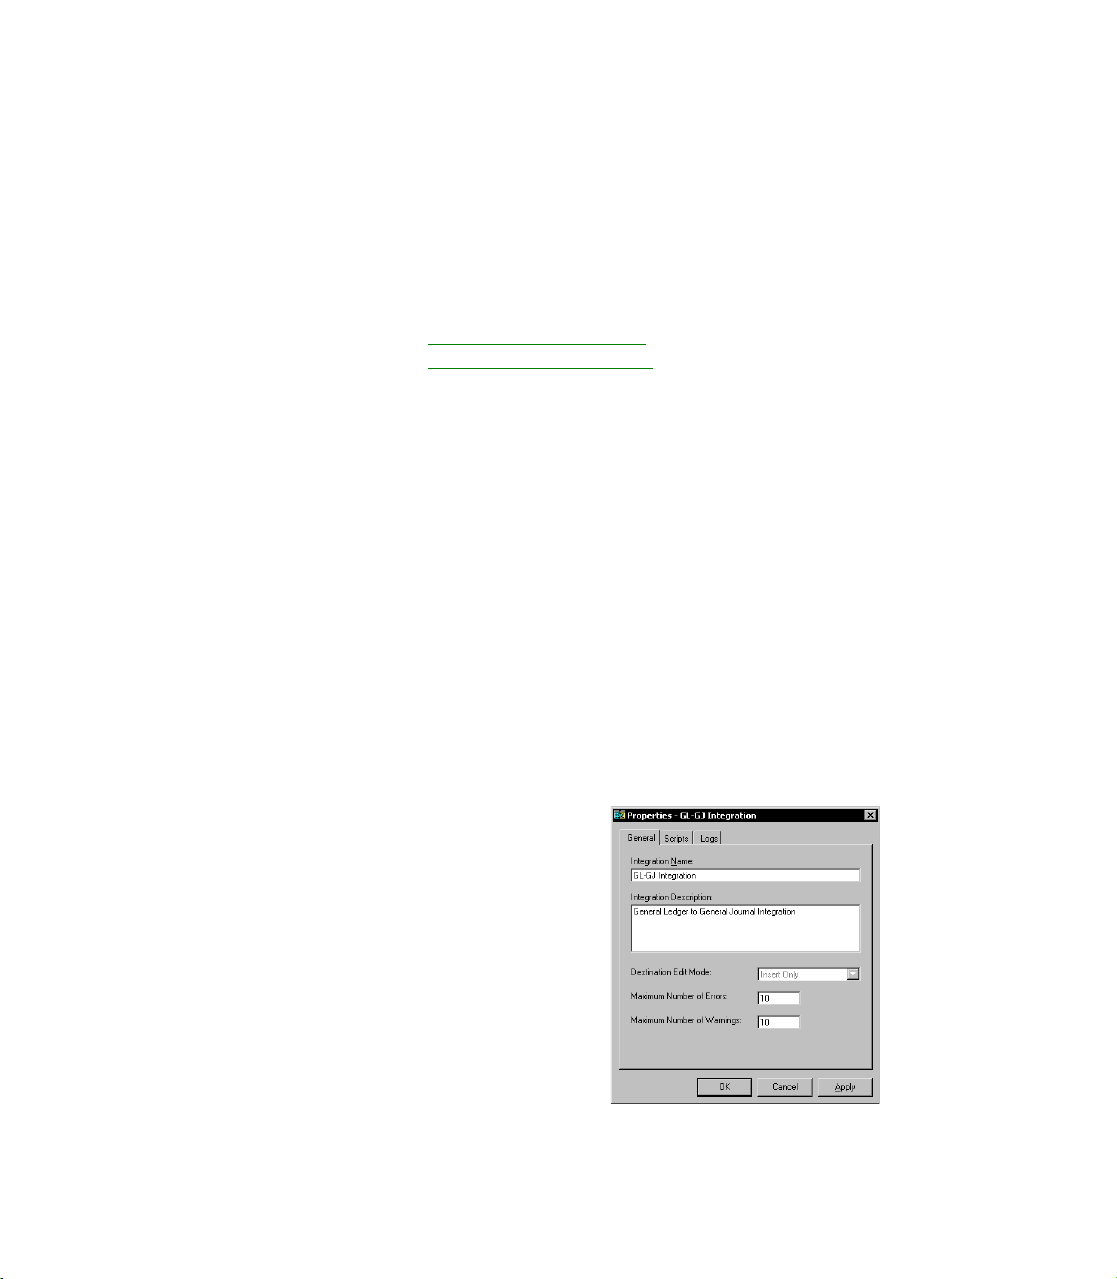
3. In the Properties window, enter an integration name.
For this tutorial, use GL-GJ Integration, which stands for General
Ledger to General Journal Integration.
For your own integrations, use any name that helps you identify the
integration easily.
4. Optionally, enter an integration description, such as General Ledger to
General Journal Integration.
For your own integrations, describe them so that you can easily recognize each
integration. Many people enter the source of the data and its destination, while
others include a date.
5. Choose OK to close the Properties window.
The name of your integration now appears in the Integration window.
6. From the File menu, choose Save Integration.
It is a good idea to save the integration immediately after you create it, as well
as whenever you make any changes to it.
Refer to Chapter 4, “
Adding Sources,” for information about adding
sources to the integration.
22 INTEGRATION MANAGER QUICK START
Page 27

CHAPTER 3 CREATING INTEGRATIONS
Removing duplicate sources
If someone on your team has already worked through this Quick Start
guide, then a message similar to the following might be displayed when
you add your sources:
You can use different names for the sources, or you can remove the sources
that were previously created.
Use the following procedure if you need to remove a duplicate source in
order to use this Quick Start guide.
To remove duplicate sources:
1. From the toolbar, choose Objects.
– Or –
From the Tools menu, choose Object Browser.
The Object Browser opens.
INTEGRATION MANAGER QUICK START 23
Page 28

PART 2 BUILDING AN INTEGRATION
2. From the Types pane, expand Source Adapters and then expand
ODBC/Text. Choose Text.
3. From the Objects pane, select GL Header (or GL Line) in this example,
and then choose Delete.
To select multiple sources that appear next to each other, hold down the
key as you select the sources. To select multiple sources that are not next to
each other, hold down the
4. When the confirmation message appears, asking if you want to delete
the selected item, choose Yes.
Repeat steps 3 and 4 for GL Line (or GL Header), and then close the
Object Browser.
24 INTEGRATION MANAGER QUICK START
SHIFT
CTRL key as you select the sources.
Page 29

Chapter 4: Adding Sources
This chapter describes how to add sources to your integration. Specifically,
it describes how to add sources that query text files. Therefore, before you
complete the tasks in this chapter, you must have already created the
integration using the procedure discussed in Chapter 3, “
Integrations.”
This chapter includes the following information:
• Understanding sources
• Understanding the source files
• Creating the GL Header query
• Previewing source data
• Creating the GL Line query
Understanding sources
A source indicates where the requested information you are integrating
originates. In Integration Manager, a source can be anything from a commaor tab-delimited file, a database such as an Open Database Connectivity
source (ODBC), and Extensible Markup Language (XML) files. Sources
exist independently of the source adapters. However, which source you can
add to your integration depends on the source adapters you have installed.
Creating
For more information on using the source adapters you have installed, refer
to the documentation installed with each source adapter (if available).
INTEGRATION MANAGER QUICK START 25
Page 30

PART 2 BUILDING AN INTEGRATION
The following table shows several available source adapters and the
supported functionality. The information in the table isn't exhaustive but is
meant to show Integration Manager’s ability to support different source
adapters.
Source adapter Supported
functionality
ODBC/Text Extracts data from
ODBC/Text sources.
XML Source Adapter Extracts data from
XML files.
Remarks
This adapter is always installed with
Integration Manager.
Integration Manager supports three
types of ODBC/Text Sources: Text, Simple
ODBC, and Advanced ODBC. Text
sources retrieve data from text files.
Simple ODBC sources retrieve data from
an ODBC data source. Advanced ODBC
sources issue SQL statements to retrieve
information from an ODBC data source.
Using this adapter, you can use
Integration Manager to create
integrations that use XML files as source
data and move them into applications
that may not support XML. Additionally,
you can create integrations that extract
data from applications and integrate it
into custom XML format, or create
integrations that transform XML data to
the XML format you prefer.
26 INTEGRATION MANAGER QUICK START
Page 31

CHAPTER 4 ADDING SOURCES
Understanding the source files
The integration in this Quick Start guide, the GL-GJ Integration, involves
importing two transactions into the General Ledger. The information for
these transactions is found in two files, GLHEADER.txt and GLLINE.txt.
These files are located in the Samples directory where you installed
Integration Manager. The following illustrations show how the files appear
in Notepad.
The first line contains
column names.
Tab characters separate
the items in each line.
The first line contains
column names.
Tab characters separate
the items in each line.
If you are not using the Microsoft Dynamics GP test company, or if your
account format structure does not match the account structure in the sample
files, the integration cannot successfully complete. It is possible to modify the
structure in the text files by opening these files in Notepad.
INTEGRATION MANAGER QUICK START 27
Page 32

PART 2 BUILDING AN INTEGRATION
The two text files actually contain the same information as the following
two transactions:
This information is contained in
the GLHEADER.txt file.
This information is contained in
the GLLINE.txt file.
This information is contained in
the GLHEADER.txt file.
This information is contained in
the GLLINE.txt file.
Note that the header information for both transactions is contained in the
GLHEADER.txt file, and that the line items for both transactions are
contained in the GLLINE.txt file.
You will create two queries that retrieve the information from these two text
files. These two queries are:
GL Header Query This query retrieves data from the GLHEADER.txt.
GL Line Query This query retrieves data from the GLLINE.txt.
Refer to Chapter 5, “
Creating Query Relationships,” for information about
how to create relationships between the two queries that “reassembles” the
information back into complete transactions. The complete transactions can
then be read by Integration Manager.
28 INTEGRATION MANAGER QUICK START
Page 33

CHAPTER 4 ADDING SOURCES
Creating the GL Header query
First, you are going to add a text source that queries the data in the
GLHEADER.txt file.
To create the GL Header query:
1. Open the GL-GJ Integration if it is not already open.
2. In the Integration window, right-click Sources and, from the menu that
appears, choose Add Source.
3. In the Adapters pane of the Add Source window, expand ODBC/Text
by clicking the plus sign.
INTEGRATION MANAGER QUICK START 29
Page 34

PART 2 BUILDING AN INTEGRATION
4. Choose Text, and in the Sources pane choose Define New Text. Then,
choose Open.
The Properties window for the Text query opens.
5. Enter a Name and Description for the source.
Name GL Header
Description GL Header Query
The Name should describe the type of information retrieved by the
source.
30 INTEGRATION MANAGER QUICK START
Page 35

CHAPTER 4 ADDING SOURCES
The source Description should describe the type of data contained in
the source. It must be descriptive enough so other Integration Manager
users can easily identify and use it.
6. Define the general properties for the query.
In the General tab:
• Select the source file to use for the query by clicking the Lookup (...)
button on the right side of the File field.
Browse to the Samples location where GLHEADER.txt file is
located, usually C:\Program Files\Microsoft Dynamics\
Integration Manager\Samples, and select GLHEADER.txt. Then
choose Open. The path and file name appear in the File field.
•For Delimiter, select Ta b.
As discussed earlier, the items in the GLHEADER.txt file are
separated or delimited by tab characters.
• Select First Row Contains Column Names.
When you select this option, Integration Manager uses the names in the text
file when referring to the columns. You can view these column names in the
next step.
INTEGRATION MANAGER QUICK START 31
Page 36

PART 2 BUILDING AN INTEGRATION
When you have finished, the window should look like the following
illustration:
7. Choose the Columns tab to view columns from the text file.
If you correctly specified the general properties, the Columns tab
displays three items under Column Name, as shown in the following
illustration:
If three items are not listed in the Column Name list, return to the
General tab and verify that you have specified the appropriate values.
Then return to the Columns tab and choose Refresh Columns.
32 INTEGRATION MANAGER QUICK START
Page 37

CHAPTER 4 ADDING SOURCES
If three column names are displayed, the query is set up properly.
8. Choose OK to close the Properties window. The source is added to the
integration.
9. Remember to save the integration. From the toolbar, choose Save.
Previewing source data
Preview the source to verify that the correct data is being returned.
To preview source data:
1. From the Integration window, right-click on the new source.
2. From the Shortcut menu, choose Preview <GL Header>.
The Data Viewer window opens.
INTEGRATION MANAGER QUICK START 33
Page 38

PART 2 BUILDING AN INTEGRATION
The following illustration shows the Data Viewer window with the
values returned by the query:
These values should look just like those in the GLHEADER.txt file.
3. Choose Close when you have finished viewing the query results.
Creating the GL Line query
Now that you have added one source that queries a text file
(GLHEADER.txt), add the second source that queries the text file
GLLINE.txt and then preview it.
To create the GL Line query:
1. Perform steps 1 through 4 exactly as specified in Creating the GL Header
query on page 29 to create another text source.
34 INTEGRATION MANAGER QUICK START
Page 39

CHAPTER 4 ADDING SOURCES
2. Enter a Name and Description for the source.
Name GL Line
Description GL Line Query
3. Specify the properties in the General tab.
In the General tab:
• Select the source file to use for the query by clicking the Lookup (...)
button on the right side of the File field.
Browse to the Samples location where GLLINE.txt file is located,
usually C:\Program Files\Microsoft Dynamics\
Integration Manager\Samples, and select GLLINE.txt. Then,
choose Open. The path and file name appears in the File field.
•For Delimiter, select Ta b.
As discussed earlier, the items in the GLLINE.txt file are separated
by tab characters.
• Select First Row Contains Column Names.
When you select this option, Integration Manager uses the names in the text
file when referring to the columns. You can view these column names in the
next step.
INTEGRATION MANAGER QUICK START 35
Page 40

PART 2 BUILDING AN INTEGRATION
When you have finished entering information, the window should look
like the following illustration:
4. Choose the Columns tab to view the columns from the text file.
If you specified the general properties correctly, the Columns tab
should show four items under Column Name as shown in the
following illustration. If it doesn't, go back to the General tab and
verify that you made the entries correctly.
If four column names are displayed, the query is set up properly.
36 INTEGRATION MANAGER QUICK START
Page 41

CHAPTER 4 ADDING SOURCES
5. Choose OK to close the Query Properties window and then choose
Save.
The source name appears in the Integration window.
A message appears, explaining that you need to create query relationships. You
will create query relationships in Chapter 5, “
Creating Query Relationships,”
so you can ignore this message for now.
6. Preview the source (optional).
The following Data Viewer window shows the values returned by the
query you have just created:
7. Close the Data Viewer window and save the integration.
You have added sources to your integration. You are now ready to create
query relationships in the next chapter.
INTEGRATION MANAGER QUICK START 37
Page 42

38 INTEGRATION MANAGER QUICK START
Page 43

Chapter 5: Creating Query Relationships
When you add more than one source that queries text files or ODBC
sources, then you need to create relationships between the sources.
Relationships tell Integration Manager how sources work together to
retrieve information for the integration. In this chapter, you create a
relationship between the two text sources you added to the GL-GJ
Integration.
This chapter includes the following information:
• Relationship guidelines
• Creating relationships
Relationship guidelines
When creating a query relationship, keep in mind the following guidelines:
• There must be only one “root” query that has no arrows pointing into
it. This is the main query that is executed. All other queries must be
related to the “root” query in some way.
• No query or group queries can be unconnected. All queries must be
somehow connected through a sequence of relationships.
• Circular relationships are not allowed. For example, if Source A has a
relationship to Source B, Source B can't have a relationship back to
Source A.
Creating relationships
The GL-GJ Integration uses two text sources; a query relationship,
therefore, needs to be established.
INTEGRATION MANAGER QUICK START 39
Page 44

PART 2 BUILDING AN INTEGRATION
To create a query relationship:
1. Open the GL-GJ Integration if it is not already open.
2. From the View menu, choose Relationships.
– Or –
In the Integration window, double-click Query Relationships.
The Relationships window opens showing you the GL Header query,
which retrieves information from the GLHEADER.txt file, and the GL
Line query, which retrieves information from the GLLINE.txt file.
3. Draw a line between the corresponding columns in the two queries to
define the relationship.
In the GL Header window (the master query), click and drag (while
holding down the left mouse button) from DocNum to DocNum in the
GL Line window. Release the button when the text icon appears on
40 INTEGRATION MANAGER QUICK START
Page 45

CHAPTER 5 CREATING QUERY RELATIONSHIPS
your mouse pointer. A line appears that connects these two queries,
indicating the relationship has been created.
The GL Header query is considered the master, and the GL Line query
is the child. Each time Integration Manager reads a row from the GL
Header query, it should read the corresponding line items from the GL
Line query.
4. Choose Close to close the Relationships window.
All relationships you create are verified. If problems exist, an error
message appears. If an error appears, open the Relationships window
and correct the problem.
You have completed adding sources to the integration and defined their
relationship. Refer to Chapter 6, “
Adding a Destination,” for information
on adding the destination to where this source data integrates.
INTEGRATION MANAGER QUICK START 41
Page 46

42 INTEGRATION MANAGER QUICK START
Page 47

Chapter 6: Adding a Destination
This chapter describes how to add a destination to your integration.
Specifically, it describes how to add a Microsoft Dynamics GP destination,
General Ledger. You can add a destination at any time when you build an
integration, but you might want to add it after you add the source so that
you’ve had a chance to become more familiar with the source data.
This chapter includes the following information:
• Understanding destinations
• Adding the Microsoft Dynamics GP destination
Understanding destinations
Destinations define where you want the source data to be integrated, and
they can be other applications, a database, or an XML file. Which
destination you can add to your integration depends on which destination
adapters you have installed.
For more information on using the destination adapters you have installed,
refer to the specific adapter guide, if available.
The following table describes several destination adapters. The information
in the table isn’t exhaustive. Instead, it is meant to show Integration
Manager’s ability to support different destinations.
Destination
adapter
XML Destination
Adapter
INTEGRATION MANAGER QUICK START 43
Supported
functionality
Integrates data into
XML files.
Remarks
The XML Destination Adapter can help
you transform just about any source to
any XML format. You define the
destination’s document definition, the
metadata that Integration Manager uses
to describe the structure and content of a
source or destination. Analogous to an
XML schema, the document definition
describes recordsets, hierarchical
relationships, fields, data types, field
lengths, and more.
Page 48

PART 2 BUILDING AN INTEGRATION
Destination
adapter
Great Plains Integrates data into
Great Plains SQL
Optimized
Direct-to-Table Integrates directly
Supported
functionality
already defined
destinations in
Microsoft Dynamics
GP.
Integrates data faster
than the Great Plains
adapter, but it
includes different
destinations.
into tables through
an ODBC data
source.
Remarks
The Great Plains adapter includes
predefined destinations for the following
Microsoft Dynamics GP modules:
Financial, Payables Management,
Receivables Management, Sales Order
Processing, Payroll, Inventory, and Setup.
The predefined destinations in the Great
Plains SQL Optimized adapter include:
Customer, Inventory Transaction,
Inventory Item, Purchase Order,
Receivings Transaction, Sales Order
Transaction, and GL Account, GL
Transaction, and Shipping Method.
Because this adapter integrates data into
tables, you can create integrations into
destinations not already defined by
Integration Manager (unlike the Great
Plains adapters). It also includes a
custom destination designer.
Adding the Microsoft Dynamics GP destination
This Quick Start explains how to integrate data from an ODBC/Text source
through the Great Plains adapter into the Microsoft Dynamics GP General
Ledger destination.
To add the Microsoft Dynamics GP destination
1. Open the GL-GJ Integration if it is not already open.
2. From the Integration menu, choose Add Destination.
– Or –
Right-click on Destination in the Integration window, and from the
menu that appears, choose Add Destination.
44 INTEGRATION MANAGER QUICK START
Page 49
CHAPTER 6 ADDING A DESTINATION
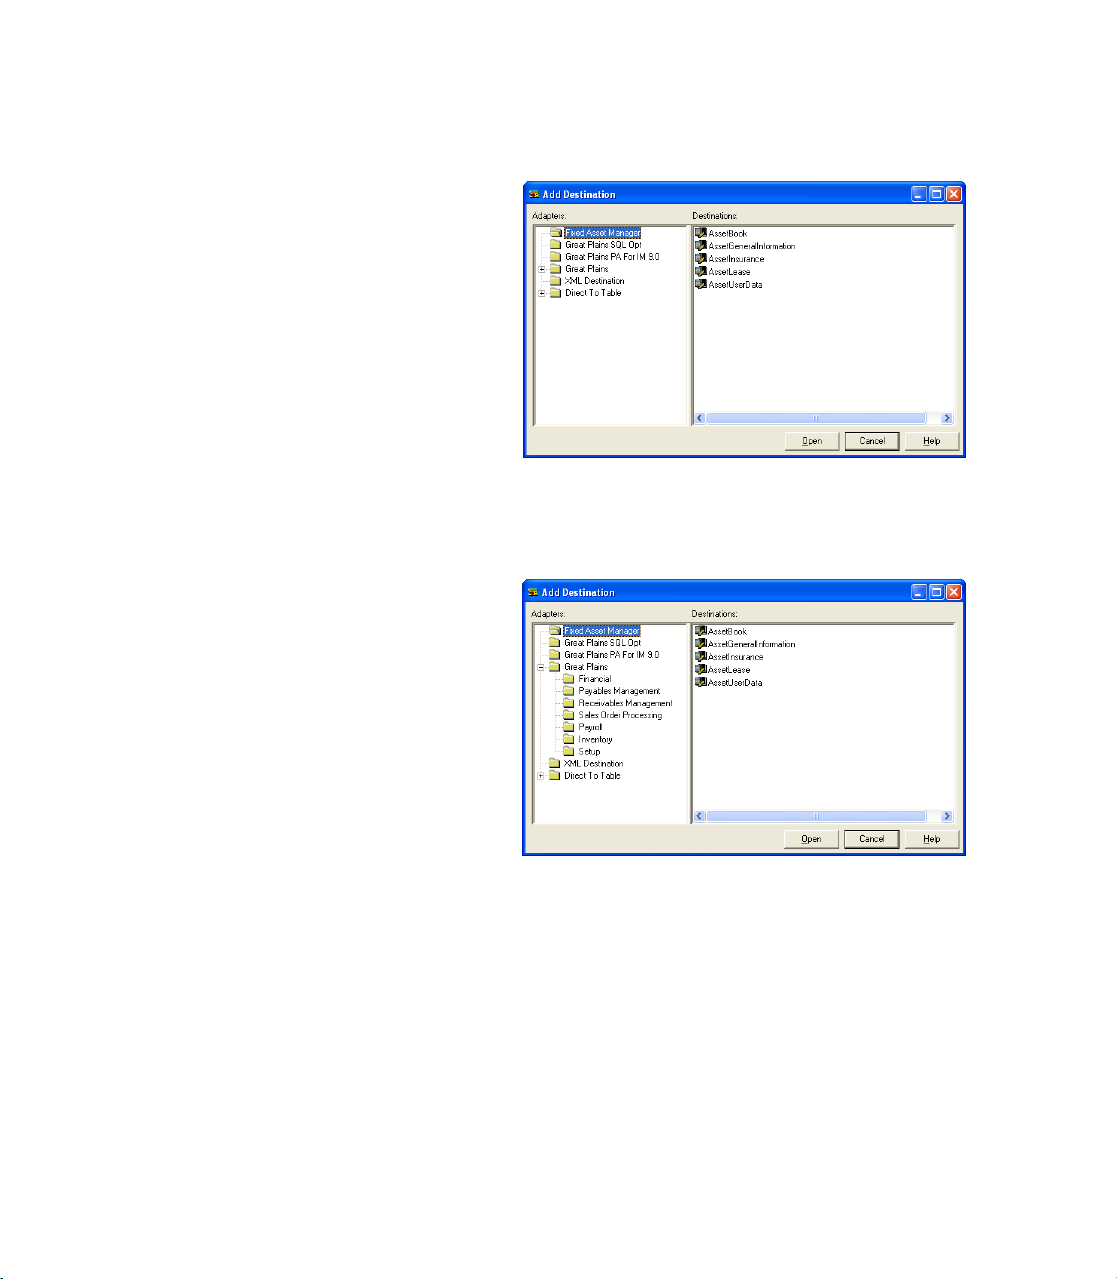
The Add Destination window opens.
3. In the Add Destination window, expand the Great Plains folder and
choose Financial.
INTEGRATION MANAGER QUICK START 45
Page 50

PART 2 BUILDING AN INTEGRATION
4. In the Destinations pane of the Add Destination window, choose
General Journal and then choose Open.
The General Journal is added as the destination of the integration.
5. From the File menu, choose Save Integration.
46 INTEGRATION MANAGER QUICK START
Page 51

Chapter 7: Mapping Source Data to the
Destination
Before completing the tasks presented in this chapter, be sure that you have
created the queries for the integration, set up the relationship between the
two queries, and selected General Journal as the integration destination.
These tasks are described in the preceding chapters.
This chapter includes the following information:
• Understanding the Mapping window
• Mapping fields
• Mapping line items for the transaction
• Setting options for the General Journal destination
Understanding the Mapping window
Destination mappings describe how Integration Manager should map
source data to the appropriate fields in the destination. Although many
values come from the source, values can come from constant values or
default values—all are defined in the Integration Mapping window.
To open the Mapping window:
1. Open the GL-GJ Integration if it is not already open.
2. From the Integration menu, choose Mapping.
– Or –
In the Integration window, double-click Destination Mapping.
INTEGRATION MANAGER QUICK START 47
Page 52

PART 2 BUILDING AN INTEGRATION
The Integration Mapping window opens.
A mapping is composed of rules, which define where the information
for an item in the destination originates. Several rules are available in
Integration Manager. For more information on rules, refer to the
Integration Manager User's Guide.
You will use the following rules for the GL-GJ Integration:
Use Source Field Information for the field comes from the source.
Use Constant Information for the field comes from a constant value.
Use Default The default or current value from the destination is
used.
Use Positive Source For debit fields, positive values are imported
as is. Negative values are imported as zero.
Use Negative Source For credit fields, negative values are
imported as the corresponding positive value. Positive values are
imported as zero.
48 INTEGRATION MANAGER QUICK START
Page 53

CHAPTER 7 MAPPING SOURCE DATA TO THE DESTINATION
Mapping fields
Based on the destination you select, Integration Manager maps and sets
rules for several fields, which you can change. In this Quick Start, you will
map the fields in the root recordset labeled General Journal. Specifically,
you will change the rules for and mapping of the Batch ID field, Reference
field, and Transaction field.
To map the Batch ID, Reference, and Transaction
fields:
1. For the Batch ID field, click in the Rule column. Then click the dropdown arrow and from the list that appears, choose Use Constant.
Click in the Rule
column to display a list
of rules for Batch ID.
Each transaction integrated into the destination is assigned to the batch
indicated by the value in the Batch ID field. For the GL-GJ Integration,
a constant value is being used for the batch ID.
2. To set the constant value for the Batch ID field, click in the Source
column and enter SAMPLE BATCH (in uppercase).
– Or –
INTEGRATION MANAGER QUICK START 49
Page 54

PART 2 BUILDING AN INTEGRATION
In the Rule Properties section of the window, click in the Value column
for Constant Value and enter SAMPLE BATCH (in uppercase).
Enter SAMPLE BATCH
as the constant value.
3. For the Reference field, note that Integration Manager sets the rule to
Use Source Field. This rule indicates that the information comes from
one of the text source files for the integration. This rule is appropriate
for this integration, so do not change it.
50 INTEGRATION MANAGER QUICK START
Page 55

CHAPTER 7 MAPPING SOURCE DATA TO THE DESTINATION
4. To map the Reference field, click in the Source column, and a Lookup
(...) button appears
. Click the Lookup button to open the Source Object
window.
Click the Lookup
button to select a field
from a query.
If the Lookup button does not appear, click in another field and then click in
the Source column for the Reference field again.
5. In the Source Object window, select the GL Header source from the
drop-down list. Then, choose Reference, and then Select.
Select the GL
Header source.
Choose the
Reference
column from
the query.
INTEGRATION MANAGER QUICK START 51
Page 56

PART 2 BUILDING AN INTEGRATION
In the Integration Mapping window, notice that “Reference” appears in
the Source column.
6. Now, set the rule for transaction date to Use Source Field, and then
click the Lookup button in the Source column.
7. Because the value for transaction date will come from the Date field in
the GL Header source file, make the following selections in the Source
Object window:
Source GL Header
Column Date
8. Choose Select.
The Integration Mapping window should look like the following:
Mapping line items for the transaction
In the upper left pane of the Integration Mapping window, the child
recordsets sit below the root recordset, which is General Journal for this
integration. To map the fields in the child recordsets, select the appropriate
child recordset in this left pane, and its fields appear to the right. For this
Quick Start, you will map the line items that are part of the Entries child
recordset.
52 INTEGRATION MANAGER QUICK START
Page 57

CHAPTER 7 MAPPING SOURCE DATA TO THE DESTINATION
To map the line items for the transaction:
1. Choose Entries in the upper-left corner of the Integration Mapping
window. The fields for this recordset appear.
Select Entries to view the
fields in the recordset.
2. For the Account Number field, make sure the rule is set to Use Source
Field and then click in the Source column. The, click the Lookup
button.
The Source Object window, opens.
3. In the Source Object window, make the following selections:
Query GL Line
Column Account Num
In order for the Lookup button to appear, you may need to click in the Rule
column and then in the Source column.
4. In the Source Object window, choose Select.
INTEGRATION MANAGER QUICK START 53
Page 58

PART 2 BUILDING AN INTEGRATION
The Integration Mapping window looks like the following:
5. For the Debit Amount field set the rule to Use Positive Source Field.
This means positive values are imported as they are, while any negative
values are imported as the value 0 (zero).
The line items for the GL-GJ Integration contain only one amount per
line. Some of the transaction amounts are positive, while others are
negative. Positive values are intended to be debit values, while negative
values are intended to be credit values.
Each entry in Integration Manager requires a debit entry and a credit
entry. Integration Manager is capable of using a single value for both
fields by using two special rules: Use Positive Source and Use
Negative Source.
6. For the Debit Amount field, click the Lookup button in the Source
column to display the Source Object window. Make the following
selections and then choose Select.
Query GL Line
Column Amount
54 INTEGRATION MANAGER QUICK START
Page 59

CHAPTER 7 MAPPING SOURCE DATA TO THE DESTINATION
The Integration Mapping window should look like the following:
7. For the Credit Amount field, set the Rule column to Use Negative
Source Field.
You are importing negative values which are designated as a corresponding
credit amount.
8. For the Credit Amount field, click the Lookup button in the Source
column to display the Source Object window. Make the following
selections and then choose Select and Close.
Query GL Line
Column Amount
9. Choose Select.
INTEGRATION MANAGER QUICK START 55
Page 60

PART 2 BUILDING AN INTEGRATION
The Integration Mapping window should now look similar to the
following:
Setting options for the General Journal destination
At the beginning of this lesson you specified that a constant value is used as
the batch ID for this set of transactions. Now you need to create the batch. A
special option for the General Journal destination allows you to do this.
56 INTEGRATION MANAGER QUICK START
Page 61

CHAPTER 7 MAPPING SOURCE DATA TO THE DESTINATION
To set the options for the General Journal
destination:
1. From the Integration Mapping window, select the General Journal item
in the upper-left corner of the window.
2. Choose the Options tab.
To view options, select
General Journal and then
choose the Options tab.
3. Set the rule for the Missing Batch option to Add New Batch.
The new batch is created based on the value you supplied for the Batch
ID field.
4. Close the Integration Mapping window.
5. From the File menu, choose Save Integration.
INTEGRATION MANAGER QUICK START 57
Page 62

58 INTEGRATION MANAGER QUICK START
Page 63

PART 3: RUNNING AN INTEGRATION
Page 64

Part 3: Running an Integration
This part of the manual describes how to run an integration, and how to
verify the results. Each chapter contains a step-by-step procedure that you
can refer to later when creating your own integrations.
The information is divided into the following chapters:
• Chapter 8, “
integration after it has been created.
• Chapter 9, “
the GL-GJ Integration after running it.
Running the Integration,” describes how to run an
Verifying the Results,” explains how to verify the results of
60 INTEGRATION MANAGER QUICK START
Page 65

Chapter 8: Running the Integration
This chapter describes how to run the GL-GJ Integration you created and
discusses the information you should be aware of before running an
integration.
This chapter includes the following information:
• Preparing to run the integration
• Running the integration
Preparing to run the integration
Before running the GL-GJ Integration you have created, you must specify
the remaining integration properties.
To prepare to run the Integration:
1. Open the GL-GJ Integration, if it is not already open.
2. From the Integration menu, choose GL-GJ Integration Properties.
– Or –
Right-click on the Integration, and from the menu that appears, choose
GL-GJ Integration Properties.
INTEGRATION MANAGER QUICK START 61
Page 66

PART 3 RUNNING AN INTEGRATION
3. In the Destination Edit Mode field, click the drop-down arrow and
select Insert Only, if it’s not already selected.
The Destination edit mode indicates how the source data will be
integrated into the Destination. Which mode you can select depends on
the Destination. When you first create an integration, the available
Destination edit mode is Insert Only, the default value.
The following table describes the Destination edit mode:
Mode Description
Insert Only Creates only new records during the integration.
Update Only Updates existing records during the integration. New
Insert and Update Creates new records and updates existing records
4. Enter 10 in the Maximum Number of Errors field and the Maximum
Number of Warnings field.
Existing records cannot be updated.
records cannot be created.
during the integration.
These settings represent the maximum number of errors and warnings
that occur before an integration is automatically stopped.
It is important to understand the difference between an error and a
warning in Integration Manager. When an error occurs, typically
because of a condition in the data that’s not valid, the document fails to
integrate. When a warning occurs, the document does integrate, but
Integration Manager provides information about the problem so that
you can resolve it.
Although this integration doesn’t use them, you can add VBScripts to an
integration by using the Scripts tab. The scripts are executed at various points
during the integration. For more information on adding scripts, refer to the
Integration Manager User's Guide.
62 INTEGRATION MANAGER QUICK START
Page 67

CHAPTER 8 RUNNING THE INTEGRATION
5. Choose the Logs tab to examine the level of detail to be shown for the
log and the location of the log files created by Integration Manager.
Logs can either be stored in a text file or in the same Access database
file that stores integrations. Storing the log in the Access database file
allows it to be available to users of Integration Manager in a network
environment. See the Integration Manager User’s Guide for more
information about removing log files and compacting the database.
If you store the log in a text file, you need to specify the directory that
will contain the log. By default, text file logs are stored in the Logs
directory located where you installed Integration Manager.
6. After examining the default settings, choose OK to save the log
properties. The Properties window closes.
For more information on logs, refer to the Integration Manager User's
Guide.
7. Choose Save.
INTEGRATION MANAGER QUICK START 63
Page 68

PART 3 RUNNING AN INTEGRATION
Running the integration
Now that you have made final preparations to the integration, you are
ready to run it.
To run the integration:
1. Because you are using the Great Plains adapter, you must open the
Microsoft Dynamics GP application.
2. Start Integration Manager and open the GL-GJ Integration if it’s not
already open.
Running an integration requires that Integration Manager is registered. If you
do not have registration keys, you can sample some adapters, but you cannot
run an integration. To register Integration Manager, see the Integration
Manager User’s Guide.
3. From the Integration menu, choose Run.
The integration begins. After a moment, the Progress window opens.
This window indicates progress as items are read by the integration.
64 INTEGRATION MANAGER QUICK START
Page 69

CHAPTER 8 RUNNING THE INTEGRATION
If you set up the integration properly, two documents should be
queried and successfully imported with no warnings or errors. If there
are any errors or warnings, check the following items:
• Be sure that the queries are set up and returning the proper data.
• Verify that the query relationship is set up correctly.
• Check the destination mapping to be sure that you have mapped all
of the fields correctly.
4. If the integration completed without any errors or warnings, choose
Close to close the Progress window and continue reading the next
chapter to learn more about verifying the results of an integration.
INTEGRATION MANAGER QUICK START 65
Page 70

66 INTEGRATION MANAGER QUICK START
Page 71

Chapter 9: Verifying the Results
After you have completed the GL-GJ Integration and it has successfully
run without any errors or warnings, you can verify if the data being
returned is valid. This chapter shows you how to verify the results of the
GL-GJ Integration.
This chapter includes the following information:
• Verifying the integration results
• What to do next
Verifying the integration results
The GL-GJ Integration you created uses the General Journal object in
Microsoft Dynamics GP as its destination.
To verify the integration results:
1. Open Microsoft Dynamics GP if is not already open.
2. From the Transactions menu, choose Financial, then choose Batches to
open the Batch Entry window.
INTEGRATION MANAGER QUICK START 67
Page 72

PART 3 RUNNING AN INTEGRATION
3. Click the Batch ID lookup button and then select the batch called
SAMPLE BATCH.
4. Choose Transactions to display the transactions that are part of the
new batch.
68 INTEGRATION MANAGER QUICK START
Page 73

CHAPTER 9 VERIFYING THE RESULTS
5. Click the Previous Record browse button twice to navigate to the first
record in the batch.
This should be the first record that was imported by Integration
Manager.
The Batch ID field, Transaction Data field, Reference field, and all the
line items should match the first sample transaction. Refer to the Source
section in Understanding the source files
6. Click the Next Record browse button to display the next record in the
batch.
This record should match the second sample transaction. If both
records match, you have successfully completed the GL-GJ
Integration.
What to do next
Now that you are familiar with the basics of Integration Manager, you can
begin creating your own integrations. For more information about how to
use Integration Manager, refer to the Integration Manager User's Guide.
You can also refer to the Integration Manager online help for descriptions of
each window. For more information about adapters, refer to the
appropriate adapter guide (if available).
INTEGRATION MANAGER QUICK START 69
on page 27
Page 74

PART 3 RUNNING AN INTEGRATION
If you want to continue to learn Integration Manager using samples, you
can use the sample files usually located in C:\Program Files\Microsoft
Dynamics\Integration Manager\Samples.
The steps you take using the samples may be different from the steps in this Quick
Start.
70 INTEGRATION MANAGER QUICK START
Page 75

Glossary
Adapter
An Integration Manager component that
connects to a destination or source
application or other data source such as
XML.
Advanced ODBC query
A query that issues a SQL statement to
retrieve information from an ODBC data
source. See also Simple ODBC query
Boolean
The logical value true or false.
Comma-delimited file
A text file that uses commas to separate
the individual data items in the text file.
Collections
See Recordset.
.CSV file
An acronym for Comma-Separated
Values. It indicates a text file that uses
commas to separate the individual data
items.
Currency
A data type that is intended to hold
monetary values. It can have up to four
decimal places and must be in the range –
922,337,203,685,477.5808 to
922,337,203,685,477.5807.
Data source
An ODBC data source from which you
want to retrieve data.
Data type
A data source setting that indicates what
type of data is contained in the column of
a data source. Common data types
include booleans, currencies, integers
and strings.
Delimiter
A character or characters that separate
the individual data items in a text file.
Commas and tab characters are often
used as delimiters.
Destination
Where data gathered by Integration
Manager is placed in Microsoft Dynamics
GP. Integration Manager provides
several common destinations, such as
customer information or receivables
transactions.
Destination adapter
A feature that validates data before
integrating it to the destination
application or database such as Microsoft
.
Dynamics GP, XML, and Microsoft SQL
Server.
Destination mapping
Where information for each item in the
integration destination originate. For
many items in the destination, the
destination mapping indicates that
information originates from a query. For
other items, the mapping indicates that a
constant value or a default value from
Microsoft Dynamics GP should be used.
Display name
In the XML Destination Properties
window, display name refers to the name
of the Root Recordset. You may use any
name that is appropriate for the source
you are defining. Typically, this is the
name of the object that theRoot Recordset
represents.
Document definition
The metadata that Integration Manager
uses to describe the structure and content
of a source or destination. It describes
recordsets, hierarchical relationships,
fields, data types, field lengths, and more.
It is analogous to an XML schema, but it
usually contains more information than
an XML schema.
Double
A data type that stores a double-precision
floating point number. The value can
have up to fifteen significant digits.
Negative values must be in the
range –1.79769313486232E308 to
–4.94065645841247E–324.
Positive values must be in the
range 4.94065645841247E–324 to
1.79769313486232E308.
Enumeration
A data type that is restricted to a fixed set
of named values. Enumeration fields in a
destination correspond to list boxes,
drop-down lists and other list controls in
Microsoft Dynamics GP. When you set
the value of an enumeration field, you
supply the integer value that corresponds
to one of the items in the enumeration.
See also Translation
.
Field
In the XML Destination Properties
window, field represents an XML
attribute or an XML element containing
only data. It also can represent part of a
mixed element.
Filter
Specifies the criteria for determining
precisely which documents you want to
extract from the source. You can define
filters only for those fields located in the
Root Recordset.
Import command
A command that approximates the
structure of an XML source that you
select and converts it into recordsets and
fields–a structure Integration Manager
can use.
Integer
A data type that stores integral numeric
values. It must be in the range –32,768 to
32,767.
Integration group
A set of integrations that are performed
in succession in a specified order.
INTEGRATION MANAGER QUICK START 71
Page 76

GLOSSARY
Integration Manager engine
An Integration Manager component that
receives data from the source adapter,
provides mapping and transformation
functionality, and passes data to a
destination adapter.
Join
A database operation that combines some
or all records from two or more tables.
Long integer
A data type that stores integral numeric
values. It must be in the range
–2,147,483,648 to 2,147,483,647.
LongVarChar
A data type that stores a sequence of up
to 65,535 characters.
Mixed element
Those elements that contain child
elements to attributes as well as data.
Null
A keyword that indicates a field or
variable does not contain valid data.
Numeric
A data type specific to Integration
Manager. It stores decimal values that
can have up to 19 digits with up to 5 of
the digits after the decimal point.
Query
A request for information. In Integration
Manager, a query can request
information from text files or from ODBC
data sources.
Query builder
A tool in Integration Manager to aid
writing a SQL statement to use for an
advanced ODBC query.
Query relationship
A relationship between two queries that
defines how they work together to
retrieve information.
Recordset
An element that is used to map items in
an integration destination. There are two
types of recordsets. One type of recordset
simply groups related fields in the
destination. The other type of recordset
indicates that several sets of fields in the
recordset can be associated with a single
instance of a record imported into the
destination. These recordsets are
represented by the folder icon.
Rejection file
A text file that contains records that were
rejected from text queries by Integration
Manager. Rejection files have the .rjt
extension.
Restriction
A set of criteria that allows you to specify
the rows that will be included in a query.
All rows that do not fit the criteria are
excluded.
Root recordset
In the XML Destination Properties
window, root recordset represents the
object that contains the entire source
document definition, including the Root
Recordset and its properties, all child
recordsets of the Root and their
properties, and all fields within all
recordsets and their properties.
Rule
Defines where the information for an
item in the destination mapping
originate.
Simple ODBC query
A query that retrieves data from an
ODBC data source. See also Adapter
Single
A data type that stores a single-precision
floating point number. The value can
have up to seven significant digits.
Negative values must be in the range
–3.402823E38 to –1.401298E–45.
Positive values must be in the range
1.401298E–45 to 3.402823E38.
Source
Indicates where the data to be integrated
comes from. A source can either be a text
file, a database, or an application
Source adapter
A feature that connects to a database, text
file or application source. It filters and
extracts the data from the source before
passing the information to the
Integration Manager engine.
Source data
Shows data from the source one
document at a time and in the structure
of the document definition.
Source name
The name of the source document
definition that you are setting up. This
name appears in the Add Source
window. You may use any name that
helps you easily identify this source
document definition.
Source settings
Source settings connect the source
document definition to an actual source
by having you specify certain
parameters. They are additional
properties relating to a source and are
associated with an individual integration.
They are not, however, automatically
inherited by other integrations that use
the same source document definition.
String
A data type that stores a sequence of up
to 255 characters.
Tab-delimited file
.
A text file that uses tab characters to
separate the individual data items in the
text file.
Text query
A query that retrieves data directly from
text files.
Tra ns la ti on
Allows you to define a relationship
between values in the source file and
corresponding values that are used for
the destination field.
72 INTEGRATION MANAGER QUICK START
Page 77

VBScript
A subset of the Microsoft Visual Basic
programming language that is embedded
into Integration Manager to provide
scripting capabilities.
XML
Extensible Markup Language (XML) is
the standard method of viewing data on
the Web. Rich, structured data from any
application can be easily described in a
standard and consistent manner through
the use of XML. It also is a
complementary format of HTML.
XML node type
The name of the XML node in the source
document that this Recordset represents.
This name must match the one in the
source.
XSLT
eXtensible Stylesheet Language for
Transformations (XSLT) is used as a part
of XSL, which functions as a stylesheet
language for XML. XSL includes an XML
vocabulary for specifying formatting;
XSL specifies the styling of an XML
document by using XSLT to describe how
the document is transformed into another
XML document that uses the formatting
vocabulary.
GLOSSARY
INTEGRATION MANAGER QUICK START 73
Page 78

74 INTEGRATION MANAGER QUICK START
Page 79

Index
A
About Integration Manager, command
15
About this Window, command 15
accelerator keys 11-13
access key
About Integration Manager 15
About this Window 15
Add Destination 14
Add Source 14
Cascade 15
Close Integration 13
Contents 15
Destination Settings 14
Exit 13
Export Integrations 13
Import integrations 13
Index 15
mapping 14
New Integration 13
New Integration Group 13
Object Browser 14
Open Integration 13
Open Integration Group 13
Options 14
Print 13
Properties 14
Registration 14
Remove Script 13
Remove Translation 13
Run 14
Save Integration As 13
Source Settings 14
Tile Hortizontally 15
Tile Vertically 15
adapters
destination adapters defined 18
source adapters defined 17
Add Destination
command 14
shortcut key 12
Add Destination button 12
Add Destination window, Financial
pane on 45
Add Source
command 14
shortcut key 12
Add Source button 11
Add Source window
Adapters pane on 29
Sources pane on 30
adding
a destination 44
a new source 25
available, sources 26
B
Batch Entry window, transactions on
68
button
Add Destination 12
Add Source 11
mapping 12
New Integration 11
Objects 11
Open Integration 11
Print 11
Properties 11
Relationships 11
Run 12
Save 11
C
Cascade, command 15
Child Recordset
Integration Mapping window for
53
Integration Mapping window for
completed 56
mapping Fields in the 52
Close Integration, commands 13
commands
About Integration Manager 15
About this Window 15
Add Destination 14
Add Source 14
Cascade 15
Close Integration 13
Contents 15
defined 10
Destination Settings 14
Exit 13
commands (continued)
Export Integrations 13
File 13
Help 15
Import Integrations 13
Index 15
Integration 14
keyboard shortcuts 13
mapping 14
New Integration 13
New Integration Group 13
Object Browser 14
Open Integration 13
Open Integration Group 13
Options 14
Print 13
Properties 14
Registration 14
Relationships 14
Remove 14
Remove Script 13
Remove Translation 13
Run 14
Save Integration As 13
Source Settings 14
Tile Horizontally 15
Tile Vertically 15
Tools 14
Constant value, entering on the
Integration Mapping window 50
Contents, command 15
creating
a new integration 21
a query relationship 39
steps to create an integration 2
the GL Header query 29
the GL Line query 34
D
Data Viewer window
for the GL Header query 34
for the GL Line query 37
destination
adding to an integration 44
defined 18
destination adapter
44
INTEGRATION MANAGER QUICK START 75
Page 80

INDEX
destination adapter (continued)
Direct-to-Table 44
SQL Optimized 44
XML 43
destination adapters, defined 18
Destination Edit Mode 62
destination mappings, defined 18
Destination Settings, command 14
destinations, understanding 43
Direct-to-Table, destination adapter
defined 44
documentation
printable manuals 5
symbols and conventions 4
E
engine, Integration Manager engine
defined 17
errors
Maximum Number of 62
when running integrations 65
Exit, command 13
Export Integrations, command 13
F
Field, specifying on the Integration
Mapping window 51
Fields
mapping 49
mapping in the Child Recordset 52
File, commands 13
G
GL Header query
Columns tab on Properties
window for 32
creating 29
defined 28
General tab on Properties window
for 31
Properties window for 30
GL Line query
Columns tab on Properties
window for 36
creating 34
defined 28
General tab on Properties window
for 36
GL Line query (continued)
Properties window for 35
GLHEADER.txt file
defined 28
displayed 27
GLLINE.txt file
defined 28
displayed 27
Great Plains, SQL optimized
destination adapter defined 44
Great Plains adapter defined 44
H
Help, command 15
help, displaying 5
Help menu, described 5
I
icons, used in manual 4
Import Integrations, command 13
Index, command 15
Integration, command 14
integration
creating a new 21
defined 21
preparing to run an integration 61
running an integration 64
steps to create 2
troubleshooting 65
Integration Manager Engine, defined
17
Integration Manager Main window 10
Integration Mapping window 48
Child Recordset on 53
completed 52
entering Constant value on 50
for the Child Recordset completed
56
mapping Fields on 49
opening 47
Options tab on 57
specifying a Field on 51
understanding 47
Integration Properties window 61
Integration window 22
L
logs, specifying settings 63
M
Main window, using 10
mapping
command 14
Fields 49
Fields in the Child Recordset 52
Fields on the Integration Mapping
window 49
shortcut key 12
mapping button 12
menus, defined 11
N
navigation, symbols used for 4
New Integration
button 11
commands 13
shortcut key 12
New Integration Group, commands 13
O
Object Browser
command 14
window, Types pane on 23
Object Browser window, Objects pane
on 24
Objects button 11
ODBC/Text
defined 26
sources types 26
Open Integration
commands 13
shortcut key 12
Open Integration button 11
Open Integration Group, commands 13
Options, command 14
options, specifying 56
P
preparing, to run an integration 61
prerequisites 4
previewing, source data 33
Print
command 13
shortcut key 12
Print button 11
76 INTEGRATION MANAGER QUICK START
Page 81

INDEX
Procedures
creating a new integration 21-22
creating GL Header query 29-33
creating GL Line query 34-37
creating query relationships 40-41
mapping fields 49-52
mapping Fields in the Child
Recordset 53-56
opening the destination
Integration Mapping window
47-48
preparing to run the integration
61-63
previewing source data 33-34
removing source queries 23-24
running an integration 64-65
starting Integration Manager 9-10
verifying results 67-69
Progress window 64
Properties
command 14
window 21
Properties button 11
Properties window
Columns tab on GL Header query
32
Columns tab on GL Line query 36
for GL Header query 30
General tab on GL Header query
31
General tab on GL Line query 36
GL Line query 35
Q
query
creating a relationship 39
defined 18
duplicate source query names 23
GL Header 29
GL Line 34
relationship defined 18
relationship guidelines 39
Relationships window 40, with
relationship defined 41
Remove, command 14
Remove Script, command 13
Remove Translation, command 13
resources, documentation 5
results, verifying 67
Rules
Use Constant Rule 48
Use Default Rule 48
Use Negative Source Rule 48
Use Positive Source Rule 48
Use Source Field Rule 48
Run
button 12
command 14
shortcut key 12
running, Integration Manager 9
S
Save button 11
Save Integration, shortcut key 12
Save integration As, command 13
shortcut keys 11-13
source
adding a new 25
defined 17, 25
duplicate query names 23
previewing data 33
understanding sample files 27
source adapters, defined 17
Source Object window 51
source sample files 27
Source Settings, command 14
specifying
a Field on the Integration
Mapping window 51
log settings 63
options 56
starting, Integration Manager 9
symbols, used in manual 4
symbols and conventions, defined 4
troubleshooting, integrations 65
U
Use Constant Rule 48
Use Default Rule 48
Use Negative Source Rule 48
Use Positive Source Rule 48
Use Source Field Rule 48
V
verifying, results 67
W
warnings
Maximum Number of 62
when running integrations 65
X
XML
destination adapter defined 43
Source Adapter defined 26
R
Registration, command 14
Relationship, command 14
Relationships, shortcut key 12
Relationships button 11
T
terminology 17
Tile Horizontally, command 15
Tile Vertically, command 15
Tools, command 14
INTEGRATION MANAGER QUICK START 77
Page 82

78 INTEGRATION MANAGER QUICK START
 Loading...