

Page 1
Getting Started Guide
For distribution only with a Windows Home Server
Contact your home server manufacturer for product support.
Page 2
Getting Started
Windows Home Server
Microsoft Corporation
Published: June 2007
Part No. X13- 88582
Page 3

Abstract
This document contains information about installing and configuring
Microsoft Windows Home Server.
For the latest information about installing, configuring, and
using Windows Home Server, see “Release Documentation for
Windows Home Server” at the Microsoft Web site (http://go.microsoft.com/
fwlink/?LinkID=84725).
Information in this document, including URL and other Internet Web site
references, is subject to change without notice. Unless otherwise noted,
the companies, organizations, products, domain names, e-mail addresses,
logos, people, places, and events depicted in examples herein are fictitious.
No association with any real company, organization, product, domain name,
e-mail address, logo, person, place, or event is intended or should be inferred.
Complying with all applicable copyright laws is the responsibility of the user.
Without limiting the rights under copyright, no part of this document may be
reproduced, stored in or introduced into a retrieval system, or transmitted in
any form or by any means (electronic, mechanical, photocopying, recording,
or otherwise), or for any purpose, without the express written permission of
Microsoft Corporation.
Microsoft may have patents, patent applications, trademarks, copyrights, or
other intellectual property rights covering subject matter in this document.
Except as expressly provided in any written license agreement from Microsoft,
the furnishing of this document does not give you any license to these patents,
trademarks, copyrights, or other intellectual property.
© 2007 Microsoft Corporation. All rights reserved.
Microsoft, Windows, Windows Server, and Windows Vista are either registered
trademarks or trademarks of Microsoft Corporation in the United States and/
or other countries.
All other trademarks are property of their respective owners.
Page 4

Contents
Windows Home Server Overview . . . . . . . . . . . . . . . . . . . . . . . . . 5
Before You Begin . . . . . . . . . . . . . . . . . . . . . . . . . . . . . . . . . . 7
Network Requirements . . . . . . . . . . . . . . . . . . . . . . . . . . . . . 7
Supported Operating Systems for Home Computers . . . . . . . . . . . . 8
Wireless Support . . . . . . . . . . . . . . . . . . . . . . . . . . . . . . . . 9
Setup . . . . . . . . . . . . . . . . . . . . . . . . . . . . . . . . . . . . . . . . . 11
Step 1: Connect and Power On . . . . . . . . . . . . . . . . . . . . . . . . . 11
Step 2: Install the Windows Home Server Connector Software . . . . . . . 12
Step 3: Complete Windows Home Server Setup . . . . . . . . . . . . . . . 13
Windows Home Server Quick Configuration . . . . . . . . . . . . . . . . . . . 17
User Accounts . . . . . . . . . . . . . . . . . . . . . . . . . . . . . . . . . . 18
Shared Folders . . . . . . . . . . . . . . . . . . . . . . . . . . . . . . . . . . 19
Computer Backups . . . . . . . . . . . . . . . . . . . . . . . . . . . . . . . 20
Server Storage . . . . . . . . . . . . . . . . . . . . . . . . . . . . . . . . . . 20
Windows Home Server Settings . . . . . . . . . . . . . . . . . . . . . . . . 21
More Information . . . . . . . . . . . . . . . . . . . . . . . . . . . . . . . . 23
Troubleshooting . . . . . . . . . . . . . . . . . . . . . . . . . . . . . . . . . . . 25
Product Support . . . . . . . . . . . . . . . . . . . . . . . . . . . . . . . . . . . 27
Windows Home Server Documentation . . . . . . . . . . . . . . . . . . . . 27
Technical Support Information . . . . . . . . . . . . . . . . . . . . . . . . . 27
Support Options . . . . . . . . . . . . . . . . . . . . . . . . . . . . . . . . 28
Page 5

Page 6
Windows Home Server
Overview
The Microsoft® Windows® Home Ser ver operating system helps you centralize
and connect your digital things, enabling you to share, store, access, and
automatically protect your most important pictures, videos, music, and files.
Windows Home Server provides the following:
•
Automated backup and simple restore of your home computers.
Windows Home Server provides you with the peace of mind you want by
automatically backing up your home computers and your important files
every night, making it easy to restore an entire home computer or just a
file to a previous point in time.
•
Access and share everything from anywhere.
Windows Home Server enables you to easily and more securely access your
files and home computers from inside and outside your home. You can use
Windows Home Server to store your important files in a central location,
for access anytime and anywhere.
•
A server that grows with you.
Windows Home Server grows with you to meet your needs, today and into
the future. It is incredibly easy to add hard drives as you need more space
for your pictures, videos, music, and files.
Windows Home Server is an easy-to-use, affordable solution that enables you
to unleash the power of your home network.
5
Page 7

Page 8
Before You Begin
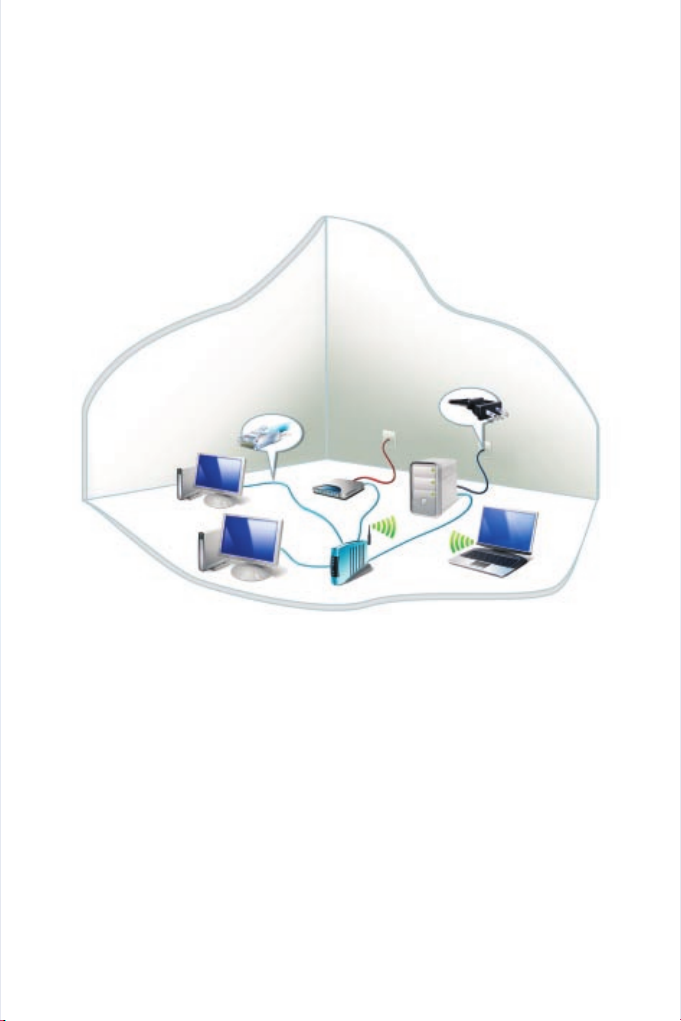
Find a suitable place to put your home server before you run
Windows Home Server Setup. The location you choose must have an available,
wired network connection either to your broadband router or to a switch that
is connected to your broadband router.
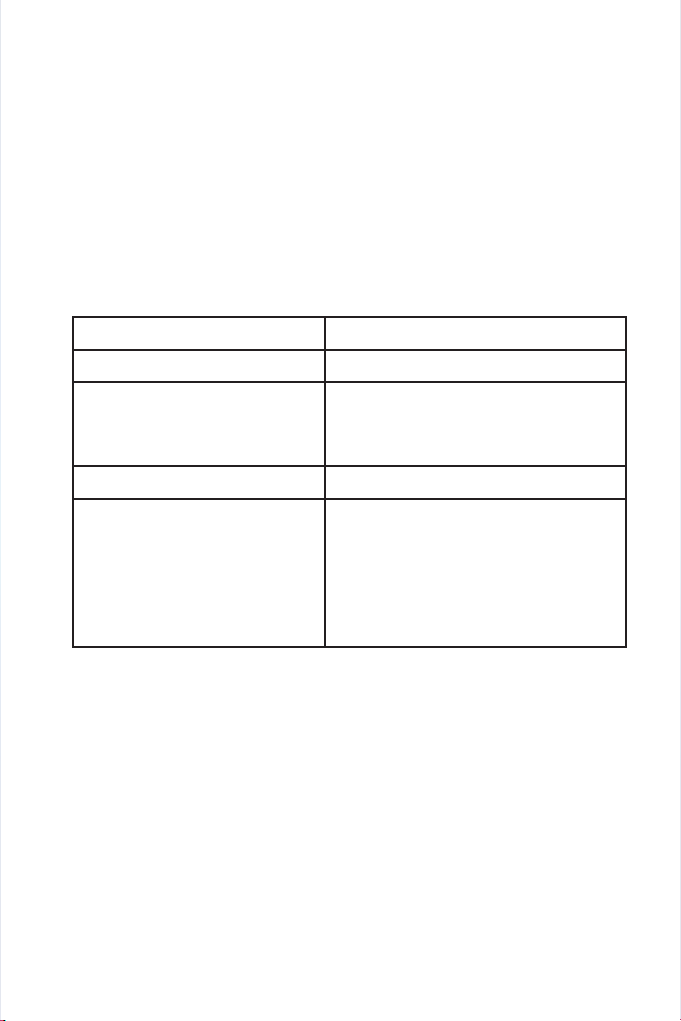
Network Requirements
To successfully use Windows Home Server, your home network must meet the
following requirements:
Requirement Minimum
Server connection 100 Mbps wired connection
Home computers One or more computers that are
Internet connection Broadband connection
Broadband router/firewall device An external Internet broadband router/
running a supported operating system,
with either a wired or a wireless network
connection.
firewall device with 100 Mbps wired
Ethernet connection.
Additionally, Windows Home Server
assumes that your home computers get
their IP address from the router/firewall
device on your home network.
7
Page 9

Supported Operating Systems for
Home Computers
The following operating systems for home computers are supported to work
with Windows Home Ser ver:
The Windows VistaTM Operating System
• Windows Vista Home Basic
• Windows Vista Home N (European Union only)
• Windows Vista Home Premium
• Windows Vista Business
• Windows Vista Business N (European Union only)
• Windows Vista Enterprise
• Windows Vista Ultimate
The Windows XP Operating System
• Windows XP Home with Service Pack 2 (SP2)
• Windows XP Professional with SP2
• Windows XP Media Center Edition 2005 with SP2 and Rollup 2
• Windows XP Media Center Edition 2005 with SP2
• Windows XP Media Center Edition 2004 with SP2
• Windows XP Tablet Edition with SP2
8
Page 10

Wireless Support
• You must use an Ethernet cable to connect your server to your
broadband router or switch. Wirelessly connecting your server to your
broadband router or switch is not supported.
• After you connect your ser ver to your home network, home computers
that are wirelessly connected to your home network can connect to your
server.
9
Page 11

Page 12

Setup
You can get Windows Home Server up and running in three easy steps:
Step 1: Connect and power on.
Step 2: Install the Windows Home Server Connector software.
Step 3: Complete Windows Home Server Setup.
Step 1: Connect and Power On
Use a wired connection to connect your home ser ver to your broadband
router or to a switch that is connected to your broadband router. Then
connect your home server to an electrical outlet.
Press the power button on your home server to turn it on.
11
Page 13

Step 2: Install the Windows Home Server
Connector Software
The Windows Home Server Connector software does the following:
• Connects your home computer to Windows Home Server.
• Automatically backs up your home computer nightly.
• Monitors the health of your home computer.
• Enables you to configure and remotely administer
Windows Home Server from your home computer.
To install the Windows Home Server Connector software
1. Insert the Windows Home Server Connector CD into a computer that is
connected to your home network. The Windows Home Server Connector
Wizard starts.
2. Complete the wizard to connect your computer to Windows Home Server.
12
Page 14
3. Windows Home Server Setup starts next if this is the first time you have
installed the Connector software.
After you complete Windows Home Server Setup, run the
Windows Home Server Connector Wizard on all of your other home
computers to connect them to Windows Home Server. Run the wizard on one
computer at a time.
Note
If you do not have your Connector CD, you can install the Connector software
from the Software shared folder on Windows Home Server.
Step 3: Complete Windows Home Server
Setup
Windows Home Server Setup runs only once, from the first computer where
you install the Windows Home Server Connector software. You must complete
this step successfully to ensure Windows Home Server functions properly.
13
Page 15

To complete Windows Home Server Setup
1. On the Welcome screen, click Next. Windows Home Server initializes.
Depending on where you purchased your home ser ver, you may see the
Type your product key page next. If you do not, skip to step 3 of this
procedure.
2. On the Type your product key page, type the Windows Home Server
product key that is provided by your system vendor, and then click Next.
3. On the Name your home server page, type a name for your home server,
and then click Next.
The default name is SERVER. The name you choose can contain the
following:
• 15 characters maximum, with no spaces
• Letters (at least one), numbers, and hyphens
4. On the Type a password for Windows Home Server page, type a
password, the password confirmation, and a password hint, and then click
Next.
This is the password that you use to manage your home server from the
Windows Home Server Console. The password is case-sensitive, and it must
be strong. A strong password must be at least seven characters long, and it
must contain at least three of the following four character categories:
• Uppercase characters
• Lowercase characters
• Numbers
• Symbols (such as !, @, #, etc.)
A password hint helps you remember the password. If you forget the
password, the password hint is displayed to help you remember it, so make
sure you provide a helpful hint. The password hint can be seen by anybody
who clicks on the link to display it. You will have to reset your server if you
forget the password and the password hint does not help you remember it.
5. On the Help protect Windows Home Server automatically page, click
On or Off to configure Automatic Windows Updates, and then click Next.
The recommended setting is On to keep Windows Home Server
up-to-date and to report problems to Microsoft.
6. On the Customer Experience Improvement Program page, determine
if you want to participate in this program, click Yes or No, and then click
Next.
14
Page 16

The Customer Experience Improvement Program helps improve Windows
Home Server by reporting information about your computer hardware
and how you use your home server. This information is collected without
interrupting you. No information collected is used to identify or contact
you.
7. On the Windows Error Reporting page, determine if you want to
automatically send error reports to Microsoft, click Yes or No, and then
click Next.
If you previously chose to install updates on the Help protect Windows
Home Server automatically page, you will see the Windows Home
Server Update page next. If you do not, skip to step 9 of this procedure.
8. On the Windows Home Server Update page, click Next to check for
critical updates.
Setup checks for critical updates and automatically installs them if there are
any. This may take a few minutes to complete. No other input is required
from you while the updates are installed.
9. On the final Setup page, click Start to start the Windows Home Server
Console so that you can configure Windows Home Server.
15
Page 17

Page 18

Windows Home Server
Quick Configuration
The following are tasks that you can do as soon as Windows Home Server is
set up and your home computers are connected.
From the Windows Home Server Console, configure the following items:
• User accounts
• Shared folders
• Computer backups
• Ser ver storage
• Windows Home Server Settings
To learn more about configuring Windows Home Server, click Help on the
console to open the Windows Home Server Console Help.
17
Page 19

User Accounts
After you complete Windows Home Server Setup and
install the Windows Home Server Connector software
on all of your home computers, you are ready to add
user accounts for the people in your household. User
accounts are required in order to control access to the
shared folders on Windows Home Server.
To add a user account
1. From a home computer, right-click the
Windows Home Server tray icon, and then click
Windows Home Server Console.
2. Type the Windows Home Server password, and then
click Next.
3. On the Windows Home Ser ver Console, click the
User Accounts tab.
4. Click Add, and then complete the Add User Account
Wizard.
5. Repeat for each user account that you want to add.
Note
When you create user accounts on
Windows Home Server, use logon names that match
the logon names of your existing user accounts on your
home computers. Also, use the same password that you
use for your existing user accounts. This makes it easier
to access shared folders on Windows Home Server. If
the user accounts and passwords do not match, you will
be prompted for a user name and a password when you
open Windows Home Server shared folders.
18
Page 20

Shared Folders
Shared folders are places for you to organize and store
files on Windows Home Server so that you can share
them with other people on your home network.
The following shared folders are created automatically
on Windows Home Server:
• Photos
• Music
• Videos
• Software
• Public
• A personal shared folder for each user account
You can easily add more shared folders to meet your
needs.
To add a shared folder
1. From the Windows Home Server Console, click the
Shared Folders tab.
2. Click Add.
3. Complete the Add a Shared Folder Wizard.
Note
A personal shared folder is created each time you add
a new user account by using the Add User Account
Wizard. By default, only this user account has access
to the personal shared folder. Users can store personal
files in this personal shared folder.
19
Page 21

20
Computer Backups
By default, all of the hard-drive volumes on each home
computer are backed up every night after you install
the Windows Home Ser ver Connector software.
You can customize the backup of each of your home
computers from the Windows Home Server Console.
To customize a home-computer backup
1. From the Windows Home Server Console, click the
Computers & Backup tab.
2. Right-click the computer that you want to customize,
and then click Customize Backup.
3. Complete the Backup Configuration Wizard to
choose hard-drive volumes to back up and to
exclude folders from the backup.
Server Storage
If you want to add more storage to
Windows Home Server, you can add external USB 2.0
hard drives, external FireWire (IEEE 1394) hard drives, or
internal hard drives by using the Server Storage tab on
the Windows Home Ser ver Console.
CautioN
Your hard drive will be formatted when it is added
to your server storage. Make sure that you copy any
files that you want to save from the hard drive before
adding it to your server storage.
importaNt
If you add an external USB hard drive, use a USB 2.0
hard drive. Both your computer hardware and your hard
drive must support USB 2.0 for optimal performance.
Using USB 1.1 devices can cause poor performance and
unpredictable results.
To add a hard drive
1. Connect or install the hard drive and power it on (if
necessary).
2. From the Windows Home Server Console, click the
Server Storage tab.
3. Under Non Storage Hard Drives, right-click the
new hard drive, and then click Add.
4. Complete the Add a Hard Drive Wizard to format
the hard drive and to add it to your server storage.
Page 22

CautioN
If you want to remove an external or internal hard
drive from your home server, use Remove on the
console Server Storage tab. Right-click the hard drive
that you want to remove, and then click Remove so
Windows Home Server can safely move all of the files
off of the hard drive before you disconnect it.
Windows Home Server Settings
Click Settings on the Windows Home Server Console to
open the Windows Home Server Settings dialog box:
You can use Windows Home Server Settings to
configure the following items:
General
• Configure the date and time.
• Configure the regional settings.
• Configure Windows Update.
• Configure Customer Experience Improvement
Program.
• Configure Windows error reporting.
21
Page 23

Backup
• Configure the Backup Time.
• Configure Automatic Backup Management.
• Run Backup Cleanup.
Passwords
• Change the Windows Home Server password.
• Configure the User Accounts Password Policy.
Media Sharing
Configure Media Library Sharing for the Music, Photos,
and Videos shared folders, so that you can stream
digital media from Windows Home Server to a device
that supports Windows Media Connect.
Remote Access
• Configure Web site connectivity.
• Configure your domain name.
• Configure your broadband router.
• Configure the settings for your
Windows Home Server Web site.
Add-ins
Install and uninstall Windows Home Server Add-ins.
Resources
• Activate Windows Home Ser ver.
• View hardware information about your home
server.
• View Windows Home Server version information.
• Learn more about Windows Home Server.
• Connect to the Windows Home Server
Community.
• Contact Product Support.
In addition, you can shut down Windows Home Server
from the Settings dialog box by clicking Shut Down.
For more information about Windows Home Server
Settings, click Help on the Settings dialog box.
22
Page 24

More Information
You can get more information about
Windows Home Server from the following locations:
• Click Help on the Windows Home Server Console
to open Windows Home Server Console Help.
• On a home computer, right-click the
Windows Home Server task tray icon, and then
click Help to open Windows Home Server Help.
• For more information about
Windows Home Server documentation, see the
Microsoft Web site (http://go.microsoft.com/
fwlink/?LinkID=85098).
• To share ideas and information with other
Windows Home Server enthusiasts, see the
Windows Home Server Community Forums
Web site (http://go.microsoft.com/fwlink/
?LinkId=83211).
• To research troubleshooting tips, see the
Microsoft Web site (http://go.microsoft.com/
fwlink/?Linkld=88097).
23
Page 25

Page 26

Troubleshooting
If you are having problems setting up Windows Home Server, make sure you
do the following:
• Plug in and power on your home server.
• Connect your home server with a wired network connection to your
broadband router or to a switch that is connected to your broadband
router.
If you are having problems setting up the Windows Home Server Connector
software on your home computers, make sure you check the following:
• Connect your home computer to your home network (using either a
wired or a wireless connection), and make sure the home computer is on
the same logical network as Windows Home Server.
• Make sure firewall software on your home computer is not blocking
access to Windows Home Server.
• If your computer has been joined to a corporate network (such as a
corporate laptop), check with the corporate network administrator about
the IPsec policy. This may block access from the corporate computer to
Windows Home Server.
For the latest information about Windows Home Server, see “Release
Documentation for Windows Home Server” at the Microsoft Web site
(http://go.microsoft.com/fwlink/?LinkID=84725).
25
Page 27

Page 28

Product Support
Windows Home Server Documentation
To download a copy of this guide and for self-help content specific to
Windows Home Server, see the Microsoft Web site at http://go.microsoft.com/
fwlink/?LinkId=89784.
Technical Support Information
Support Information Online http://go.microsoft.com/fwlink/
TTY Users Microsoft text telephone (TTY/TDD)
Worldwide The support options described in this
Conditions Microsoft’s support services are subject
Evaluation versions Evaluation versions of this product are
?LinkId=86561
services are available at (425) 635-4948
in Washington state or (800) 892-5234 in
the U.S. Call (866) 857-9850 in Canada.
guide are available in the United States
and Canada only. Support elsewhere
may vary. For regional contact details,
visit http://go.microsoft.com/fwlink/
?LinkId=62344. If there is no Microsoft
subsidiary office in your country or
region, please contact the establishment
from which you obtained your Microsoft
product to inquire about available
support.
to then-current prices, terms, and
conditions, which are subject to change
without notice.
not supported.
Visit the Windows Home Server
Community Forums Web site to
communicate online with others about
Windows Home Server at http://
go.microsoft.com/fwlink/?LinkID=83211.
27
Page 29

Support Options
Computer manufacturers, System Builders, and Microsoft offer customers of
the Windows® Home Server operating system a range of service and support
options. You can select the support level that best fits your particular needs.
Information about each service is briefly described below.
Support Option Benefits of Service
Computer Manufacturer or
System Builder Distributed
If your product came installed
with a new computer or device,
the hardware manufacturer or
system builder provides technical
support and assistance for
Windows Home Server. Please
contact them directly for support.
Self Support
For self-help tools and content
specific to Windows Home Server,
see the Microsoft Web site at
http://go.microsoft.com/fwlink/
?LinkID=85678.
Windows Home Server
Community Forums
Visit the Windows Home Server
Community Forums Web site to
communicate online with others
about Windows Home Server at
http://go.microsoft.com/fwlink/
?LinkID=83211.
Incident-based support
Assisted pay-per-incident
support from Microsoft.
Phone support:
User Support - (866) 234-6020
Developers - (800) 936-5800
Your hardware manufacturer or system
builder has the best information for
supporting Windows Home Server on
their hardware.
• Windows Home Server
documentation
• Other online resources
Information about:
• Announcements
• FAQ and Known Issues
• Software
• Hardware
• Suggestions
• Issues that cannot be resolved by
other support options
• Microsoft specific issues
28
Page 30

For more information on Windows Home Server, please visit:
www.microsoft.com/windowshomeserver
IS IT GENUINE? If you believe that the Certicate of Authenticity label or the
Microsoft software you obtained with your system is not legally licensed and/or
might be counterfeit, please send e-mail to Microsoft at piracy@microsoft.com,
or go to www.microsoft.com/howtotell.
©2007 Microsoft Corporation. All rights reserved.
Microsoft, the Windows logo, and Windows are either registered trademarks or trademarks of
Microsoft Corporation in the United States and/or other countries.
Part No. X13-88582
*X13-88582*
 Loading...