

Page 1
Windows® XP
Installation Guide
E3484
November 2007
15G06Q009000
Page 2

Copyright Information
No part of this manual, including the products and software
described in it, may be reproduced, transmitted, transcribed, stored
in a retrieval system, or translated into any language in any form
or by any means, except documentation kept by the purchaser
for backup purposes, without the express written permission of
ASUSTeK COMPUTER INC. (“ASUS”).
ASUS PROVIDES THIS MANUAL “AS IS” WITHOUT WARRANTY OF ANY
KIND, EITHER EXPRESS OR IMPLIED, INCLUDING BUT NOT LIMITED TO
THE IMPLIED WARRANTIES OR CONDITIONS OF MERCHANTABILITY
OR FITNESS FOR A PARTICULAR PURPOSE. IN NO EVENT SHALL ASUS,
ITS DIRECTORS, OFFICERS, EMPLOYEES OR AGENTS BE LIABLE FOR
ANY INDIRECT, SPECIAL, INCIDENTAL, OR CONSEQUENTIAL DAMAGES
(INCLUDING DAMAGES FOR LOSS OF PROFITS, LOSS OF BUSINESS,
LOSS OF USE OR DATA, INTERRUPTION OF BUSINESS AND THE LIKE),
EVEN IF ASUS HAS BEEN ADVISED OF THE POSSIBILITY OF SUCH
DAMAGES ARISING FROM ANY DEFECT OR ERROR IN THIS MANUAL
OR PRODUCT.
Products and corporate names appearing in this manual may or
may not be registered trademarks or copyrights of their respective
companies, and are used only for identification or explanation and to
the owners’ benefit, without intent to infringe.
SPECIFICATIONS AND INFORMATION CONTAINED IN THIS MANUAL
ARE FURNISHED FOR INFORMATIONAL USE ONLY, AND ARE SUBJECT
TO CHANGE AT ANY TIME WITHOUT NOTICE, AND SHOULD NOT
BE CONSTRUED AS A COMMITMENT BY ASUS. ASUS ASSUMES NO
RESPONSIBILITY OR LIABILITY FOR ANY ERRORS OR INACCURACIES
THAT MAY APPEAR IN THIS MANUAL, INCLUDING THE PRODUCTS
AND SOFTWARE DESCRIBED IN IT.
Copyright © 2007 ASUSTeK COMPUTER INC. All Rights Reserved.
Page 3

Limitation of Liability
Circumstances may arise where because of a default on ASUS’ part
or other liability, you are entitled to recover damages from ASUS.
In each such instance, regardless of the basis on which you are
entitled to claim damages from ASUS, ASUS is liable for no more
than damages for bodily injury (including death) and damage to real
property and tangible personal property; or any other actual and
direct damages resulted from omission or failure of performing legal
duties under this Warranty Statement, up to the listed contract price
of each product.
ASUS will only be responsible for or indemnify you for loss, damages
or claims based in contract, tort or infringement under this Warranty
Statement.
This limit also applies to ASUS’ suppliers and its reseller. It is the
maximum for which ASUS, its suppliers, and your reseller are
collectively responsible.
UNDER NO CIRCUMSTANCES IS ASUS LIABLE FOR ANY OF
THE FOLLOWING: (1) THIRD-PARTY CLAIMS AGAINST YOU FOR
DAMAGES; (2) LOSS OF, OR DAMAGE TO, YOUR RECORDS OR DATA;
OR (3) SPECIAL, INCIDENTAL, OR INDIRECT DAMAGES OR FOR ANY
ECONOMIC CONSEQUENTIAL DAMAGES (INCLUDING LOST PROFITS
OR SAVINGS), EVEN IF ASUS, ITS SUPPLIERS OR YOUR RESELLER IS
INFORMED OF THEIR POSSIBILITY.
Service and Support
Visit our multi-language web site at http://support.asus.com
Page 4

Table of Contents
Chapter 1: Installing & Optimizing Windows® XP
Preparing to install Windows® XP ............................................................. 1-2
Installing Windows® XP ................................................................................. 1-2
Adjusting the Display Resolution ............................................................. 1-5
Optimizing Windows® XP............................................................................. 1-6
Changing Virtual Memory ......................................................................... 1-6
Turning off System Restore ....................................................................... 1-7
Compressing Disk Drive ............................................................................. 1-8
Relocating Files................................................................................................18
Deleting unnecessary Windows Components .................................1-10
Clearing System Backup Data ................................................................1-10
Deleting unnecessary document files ................................................1-11
Chapter 2: Support CD & System Recovery
Support CD information .............................................................................. 2-2
Running the support CD ............................................................................ 2-2
Drivers menu .................................................................................................. 2-3
Utilities menu ................................................................................................. 2-5
Manual ........................................................................................................... 2-6
Contact ........................................................................................................... 2-6
Other information ........................................................................................2-7
System Recovery ............................................................................................ 2-7
Page 5

Preparing to Install Windows® XP
Installing Windows® XP
Adjusting the Display Resolution
Optimizing Windows® XP
Installing & Optimizing
1
Windows® XP
Chapter 1: Installing & Optimizing Windows® XP
1-1
Page 6

Preparing to install Windows® XP
Before installing Windows® XP operating system to your Eee PC, you
need the following items.
• A USB 2.0 CD/DVD-ROM
• The official Windows® XP Service Pack 2 disc from Microsoft®
• A USB flash disk (size larger than 1GB) or external hard disk drive
• ASUS Eee PC support CD from the package
The older version of Windows® OS does not support USB
CD/DVD-ROM. Ensure the disc you have is Windows® XP Service
Pack 2.
Installing
Follow the instructions below to install Windows® XP service pack 2:
1. Connect the power cord to your Eee PC.
2. Insert the Windows XP Service Pack 2 disc to the USB CD/DVDROM and connect the USB optical drive to your Eee PC.
3. Press <ESC> during the bootup screen.
Press F2 to run Setup, Press TAB to display BIOS POST Message
Windows® XP
1-2
ASUS Eee PC Windows® XP Installation Guide
Page 7

6. The Please select boot device screen appears. Select USB:
XXXXXX (may be labled as the ODD brand name) to boot from
the optical drive.
Please select boot device:
HDD:SM-SILICONMOTION SM223AC
USB:Slimtype DVD
and ↓ to move selection
↑
ENTER to select boot device
7. After the Windows® XP installation screen appears. Press <D> to
delete the existing partitions.
You will lose all your data after deleting all existing disk
partitions. Ensure to back up your important data before
installing Windows® XP to your Eee PC.
Windows XP Professional Setup
The following list shows the existing partitions and
unpartitioned space on this computer.
Use the UP and DOWN ARROW keys to select an item in the list.
• To set up Windows XP on the selected item, Press ENTER.
• To create a partition in the unpartitioned space, press C.
• To delete the selected partition , press D.
1907 MB Disk 0 at Id 0 on bus 0 on atai [MBR]
F: Partition1 [Unknown] 1490 MB ( 1490 MB free)
G: Partition2 [Unknown] 400 MB ( 400 MB free)
C: Partition3 (BIOS) [FAT] 8 MB ( 8 MB free)
H: Partition4 [Unknown] 8 MB ( 8 MB free)
Unknown Disk
(There is no disk in this drive.)
Enter=Install D=Delete Partition F3=Quit
Chapter 1: Installing & Optimizing Windows® XP
1-3
Page 8

8. After all the existing partitions are deleted, the unpartitioned
space appears.
Windows XP Professional Setup
The following list shows the existing partitions and
unpartitioned space on this computer.
Use the UP and DOWN ARROW keys to select an item in the list.
• To set up Windows XP on the selected item, Press ENTER.
• To create a partition in the unpartitioned space, press C.
• To delete the selected partition , press D.
1907 MB Disk 0 at Id 0 on bus 0 on atai [MBR]
Unpartitioned space 1906 MB
Unknown Disk
(There is no disk in this drive.)
Enter=Install C=Create Partition F3=Quit
9. Press <Enter> and select Format the partition using the NTFS
file system to start the Windows® XP OS setup.
10. Follow the on-screen instructions to complete the installation
process.
11. After the Windows® XP OS installation is completed. Restart the
system.
12. After entering Windows, insert the Support CD to the USB
CD/DVD-ROM and click InstAll - Drivers Installation Wizard to
install all drivers.
1-4
It may take some time to install Windows XP operating system
and reinstall all the drivers. If the screensaver starts, press any key
to bring back the installation screen.
ASUS Eee PC Windows® XP Installation Guide
Page 9

Adjusting the Display Resolution
If you need to adjust the display resolution of your Eee PC in Windows
XP environment, you can easily change it with ASUS Eee PC Utility that
comes within the Support CD.
To adjust the display resolution:
1. Ensure that you've installed the ASUS ACPI driver and utility.
Refer to the next chapter for details.
2. Right-click the ASUS Eee PC Utility icon on the OS taskbar to
adjust the display resolution. Select LCD 800 x 480 or LCD 800
x 600 based on your needs.
3. When you select LCD 800 x 600, move the cursor to scroll up
and down the screen.
Chapter 1: Installing & Optimizing Windows® XP
Scroll up to see the
top of the screen.
Scroll down to see the
bottom of the screen.
1-5
Page 10
Optimizing
For the best performance of your Eee PC with Windows XP operating
system, follow some quick steps below to make your Eee PC run
faster.
Refer to Mircrosoft website (http://www.microsoft.com) for more
information.
Windows® XP
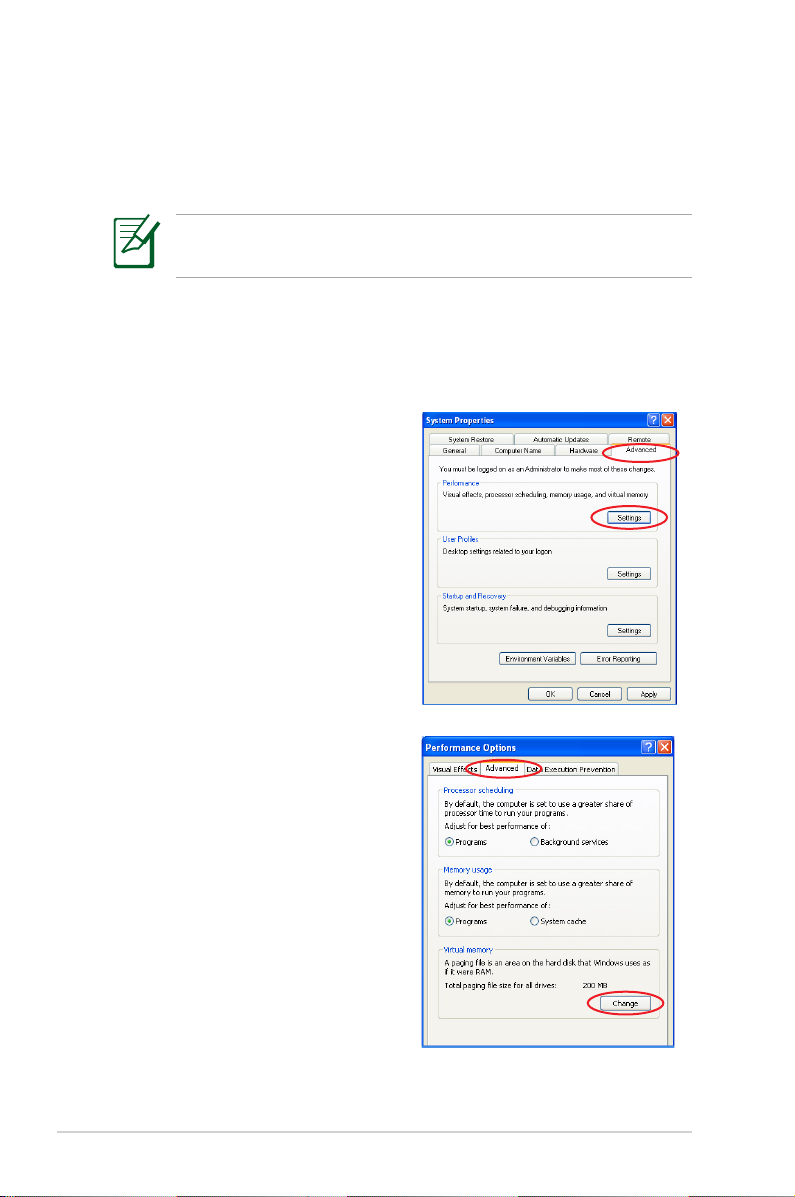
Changing Virtual Memory
Change the virtual memory based on your needs.
1. Go to Control Panel > System.
2. Click the Advanced tab on
the top and click the Settings
button in Performance area.
3. Click Advanced tab and the
Change button to change the
virtual memory.
1-6
ASUS Eee PC Windows® XP Installation Guide
Page 11

4. Enter the Initial size and the
Maximum size based on your
needs.
Set both Initial and
Maximum size to 100 MB.
Turning off System Restore
Though System Restore can track and reverse changes to your
computer, it consumes system resources. Follow the instructions to
turn off System Restore.
1. Go to Control Panel > System.
2. Click System Restore tab on
the top.
3. Click the box before Turn off
System Restore.
After turning off System
Restore, you cannot track
and reverse changes to
your computer.
Chapter 1: Installing & Optimizing Windows® XP
1-7
Page 12
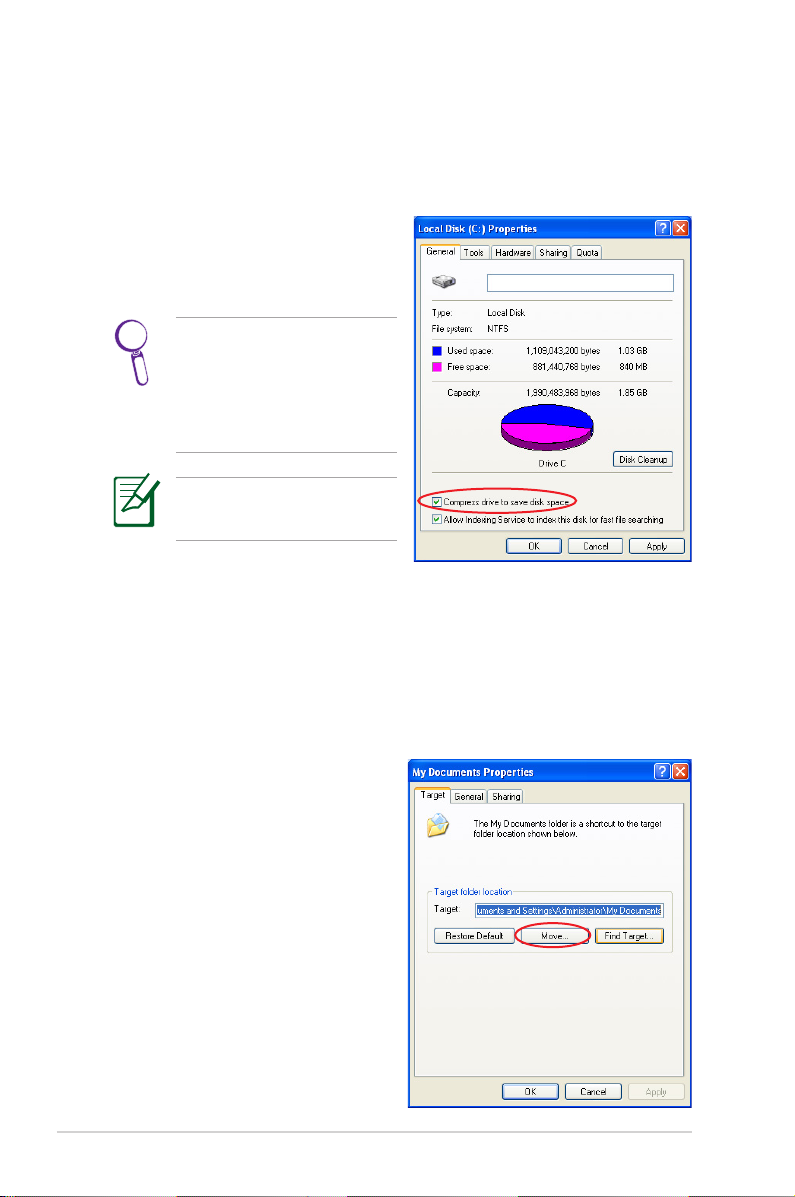
Compressing Disk Drive
1. Go to Control Panel > My Computer.
2. Right-click Local Disk (C:) and select Properties.
3. Check the box before
Compress drive to save disk
space.
This compression function
cannot apply to read-only
files. Select Skip to All to
skip the incompressible
files and continue.
The disk drive space varies
depending on model.
Relocating Files
My Documents
1. Prepare an external storage device such as an SD card or a USB
flash disk drive.
2. Click Start, right-click My
Documents and select
Properties.
2. Click Move and select a
destination in the connected
external storage device.
3. Click OK to relocate My
Documents.
1-8
ASUS Eee PC Windows® XP Installation Guide
Page 13
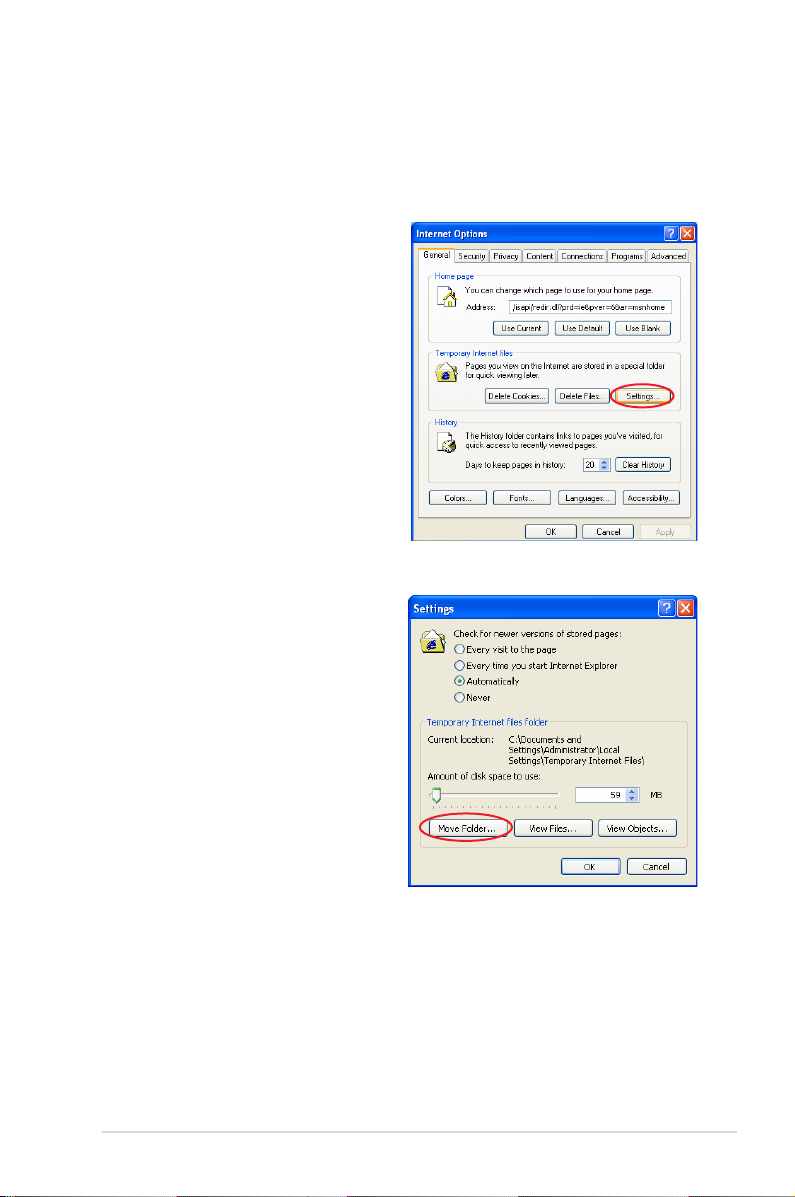
IE Temporary Internet Files
1. Prepare an external storage device such as an SD card or a USB
flash disk drive.
2. Launch Internet Explorer.
2. Click Tools on the top and
select Internet Options.
3. Click Settings in Temporary
Internet files area.
4. Click Move Folders and
select a destination in the
connected external storage
device.
5. Click OK to relocate
Temporary Internet Files.
Chapter 1: Installing & Optimizing Windows® XP
1-9
Page 14
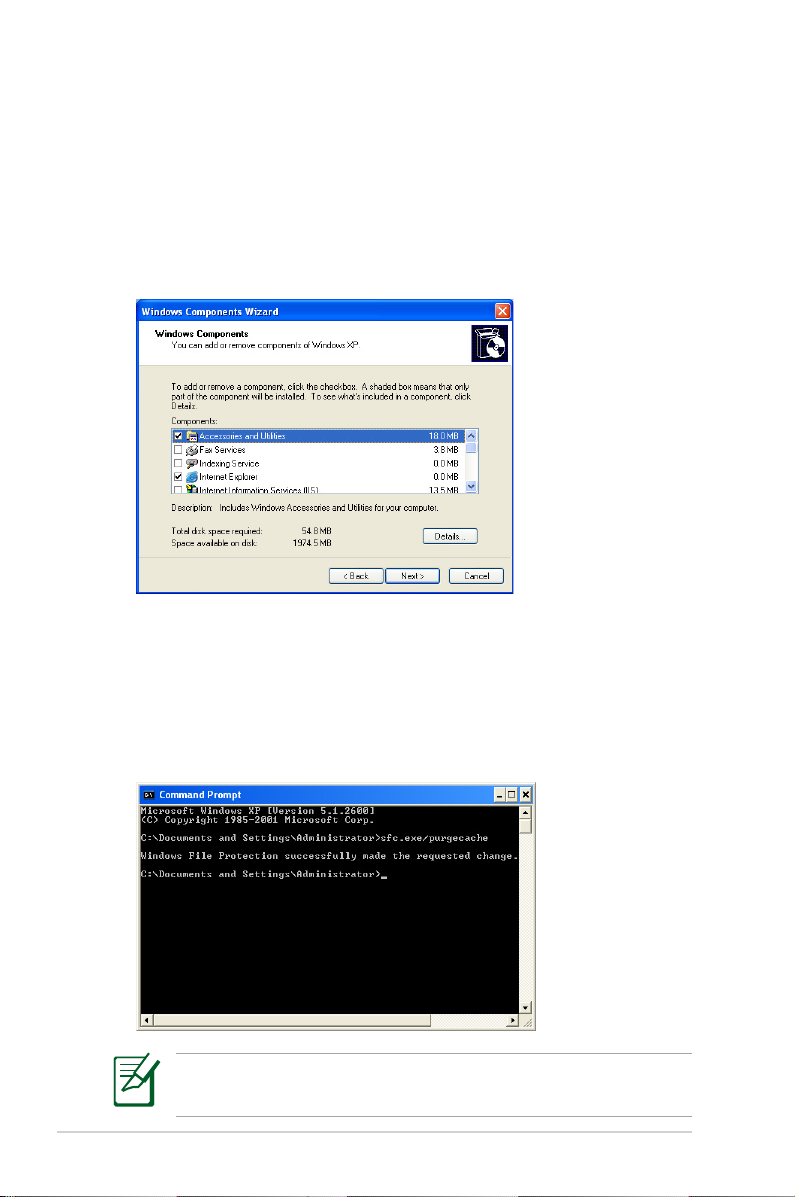
Deleting unnecessary Windows Components
1. Go to Control Panel > Add or Remove Programs.
2. Click Add/Remove Windows Components on the left to
display the component wizard.
3. Uncheck the boxes for the Windows components you do not
need and click Next.
Clearing System Backup Data
1. Go to All Programs > Accessories > Command Prompt.
2. Key in sfc.exe/purgecache.
3. Press <Enter> to clear the system backup data.
1-10
If you choose not to turn off the system restore function, DO NOT
perform the system backup data clearance.
ASUS Eee PC Windows® XP Installation Guide
Page 15

Deleting unnecessary document files
1. Go to Start > My Computer.
2. Click Tools on the top and select Folder Options.
3. Click the View tab. Toggle the option Show hidden files and
folders, and unselect Hide protected operating system files
(Recommended).
4. Connect a USB flash disk (size larger than 1GB) or a USB hard
disk drive to your Eee PC for to back up the files you want to
delete.
5. Refer to the table on the next page for the system files you can
delete. Open Local Disk (C:) and type the directories in the
address field to locate the files.
• If your Eee PC malfunctions after the system file removal, use
the backup disk you made in step 4 to restore the files.
• Ensure to keep you backup files carefully.
• After deleting the unnecessary document files, we
recommend you restore the default settings. Toggle the
option Do not show hidden files and folders and uncheck
to hide protected operating system files.
Chapter 1: Installing & Optimizing Windows® XP
1-11
Page 16

Directory File/Folder name Description
Media sample files
Windows\System32 Logon.scr and other *.scr files Built-in screensaver
Windows\Web\Wallpaper Ascent.jpg and other *.jpg
files
Documents and Settings\All
Users\Document
Windows Service Pack 2 and Hot Fix Files
Windows\ KB*.txt files Uninstall information
Windows\ SET*.tmp
Windows\ \$hf_mig$
Shared Music, Shared Pictures,
Shared Video
\$NtUninstallKB****$
Built-in wallpaper
Built-in samples
about SP2 or Hot Fix
Uninstall files of SP2 and
Hot Fix
• Connect an external storage device to you Eee PC. We
recommend you install applications to the external storage
device.
• It might take longer to install applications to the external
storage device.
1-12
ASUS Eee PC Windows® XP Installation Guide
Page 17

Support CD
System Recovery
Support CD &
System Recovery
Chapter 2: Support CD & System Recovery
2
2-1
Page 18

Support CD information
The support CD that comes with the Eee PC package contains the
drivers, software applications, and utilities that you can install to
avail all the features.
All the following screens appear only in the Windows® XP SP2
environment.
Running the support CD
Insert the support CD in the external optical drive. The CD
automatically displays the Drivers menu if Autorun is enabled in
your computer.
Click an icon to
display support CD/
Eee PC information
2-2
Click an item to install
If Autorun is NOT enabled in your computer, browse the
contents of the support CD to locate the file ASSETUP.EXE from
the BIN folder. Double-click the ASSETUP.EXE file to run the CD.
ASUS Eee PC Windows® XP Installation Guide
Page 19

Drivers menu
The Drivers menu shows available device drivers when the system
detects installed devices. Install the necessary drivers to activate the
devices.
Click to go to the
next page
InstAll - Drivers Installation Wizard
Installs all the drivers.
ASUS ACPI Driver and Utility
Installs ASUS ACPI driver before all the drivers if you are not using
InstAll Wizard.
Chipset Driver
Installs the chipset driver.
Graphic Driver
Installs the graphics driver.
Camera Driver (optional)
Installs the camera driver.
Audio Driver
Installs the audio driver.
Ethernet Adapter Driver (optional)
Installs the Ethernet adapter driver.
Chapter 2: Support CD & System Recovery
2-3
Page 20

Wireless LAN Driver (optional)
Installs the wireless LAN driver.
TouchPad Driver
Installs the touchpad driver.
Click to go to the
previous page
2-4
ASUS Eee PC Windows® XP Installation Guide
Page 21

Utilities menu
The Utilities menu shows the applications that the Eee PC supports.
InstAll - Installation Wizard for Utilities
Installs all the utilities.
ASUS Update
The ASUS Update utility allows you to update the Eee PC BIOS in the
Windows® environment. This utility requires an Internet connection
either through a network or an Internet Service Provider (ISP).
ASUS Linux USB Flash Utility
Makes a USB bootable disk with Linux system image for Eee PC
system recovery.
ADOBE Acrobat Reader V7.0
Installs the Adobe® Acrobat® Reader that allows you to open, view,
and print documents in Portable Document Format (PDF).
Chapter 2: Support CD & System Recovery
2-5
Page 22

Manual
The Manual menu contains a list of supplementary user manuals.
Click an item to open the folder of the user manual.
Most user manual files are in Portable Document Format (PDF).
Install the Adobe® Acrobat® Reader from the Utilities menu before
opening a user manual file.
Contact
Click the Contact tab to display the ASUS contact information. You
can also find this information on the inside front cover of this user
guide.
2-6
ASUS Eee PC Windows® XP Installation Guide
Page 23

Other information
The icons on the top right corner of the screen provide additional
information on the Eee PC and the contents of the support CD. Click
an icon to display the specified information.
System information
CD content
Technical support
File list
System Recovery
There are two ways to perform the system recovery, using the
support CD and using USB flask disk drive. Refer to the chapter 5
of the user manual for more information on restoring your systetm
from Windows XP back to factory default Linux.
The OS image file bundled in the support CD may be not the
latest version. After the system recovery, use the Add/Remove
Software in the Settings tab to update your OS.
Chapter 2: Support CD & System Recovery
2-7
Page 24

2-8
ASUS Eee PC Windows® XP Installation Guide
 Loading...