

Micron Electronics TRANSPORT XKE User Manual

2
TRANSPOR T XKE
MAS001412-02

3
Why read this manual?
This book, the User's Guide, contains technical information, SETUP
instructions, and detailed configuration settings. It also contains
instructions for upgrading your system.
Why read the other manuals?
We have pre-loaded a Microsoft® operating system on your computer.
For help using, customizing, configuring, or reinstalling this operating
system, see the appropriate Microsoft operating system guides.
For the latest information on your system, check the README file.
It lists the latest changes to your system, plus the latest clarifications
and corrections.
To look at README, select the README icon in the Online
Documentation program group, then press the <Enter> key on your
keyboard.
Trademarks
Pentium is a registered trademark, and MMX is a trademark of Intel
Corporation.
Microsoft, MS-DOS, Windows, and Windows NT are registered trademarks
of Microsoft Corporation.
TransPort is a registered trademark and Micron, MicronDock, FlexOpt,
Pick-a-Point, and MicronExec are trademarks of Micron Electronics, Inc.
All other brand or product names appearing in this publication are used
for identification purposes only and may be trademarks or registered
trademarks of their respective companies.
Warning:
1. Installation information in this document is for reference only.
All installation of internal optional devices or equipment including
third-party optional devices or equipment, should be performed
by an experienced and knowledgeable technician. All servicing or
upgrading of original or optional devices or equipment should
also be performed by an experienced and knowledgeable technician.
2. UNAUTHORIZED INSTALLATION, SERVICING, OR
UPGRADING MAY VOID YOUR WARRANTIES.
3. The socket-outlet shall be installed near the equipment and shall be
easily accessible.
Copyright 1997 MICRON Electronics, Inc.
All rights reserved. This document may not, in whole or in part, be copied,
photocopied, reproduced, translated, or reduced to any electronic medium
or machine readable form without prior consent, in writing, from MICRON.
With this document MICRON makes no warranties or representations,
either expressed or implied, with respect to the products described herein.
The information presented herein is being supplied on an “AS IS” basis and
is expressly subject to change without notice. The entire risk as to the use
of this information is assumed by the user.
IN NO EVENT WILL MICRON BE LIABLE FOR ANY DIRECT,
INDIRECT, INCIDENTAL, OR CONSEQUENTIAL DAMAGES
RESULTING FROM ANY CLAIM ARISING OUT OF THE
INFORMATION PRESENTED HEREIN, EVEN IF IT HAS BEEN ADVISED
OF THE POSSIBILITIES OF SUCH DAMAGES. SOME STATES DO
NOT ALLOW THE LIMITATION OF IMPLIED WARRANTIES OR
DAMAGES, SO THE ABOVE LIMITATIONS MAY NOT APPLY.

4
Contents
Contents
Welcome!................................................................... 4
1. Getting Started.................................................... 5
As you unpack... .......................................................................................... 5
Do I have everything? .................................................................................. 5
To get help ..................................................................................................... 5
What’s in the box? ........................................................................................ 6
Keep the box .................................................................................................. 6
RF suppressor ............................................................................................... 6
Let your computer acclimate itself .......................................................... 7
Beware heat, cold, humidity, and glare .................................................. 7
Where to work ............................................................................................... 7
System features ............................................................................................ 8
Front view ...................................................................................................... 9
Howling and Countermeasures .............................................................. 10
LED indicators ............................................................................................ 1 2
Mini-LCD control panel ............................................................................ 1 3
Internal pointing devices ........................................................................... 1 4
Keyboard ...................................................................................................... 1 5
Numeric keypad ......................................................................................... 1 5
Hot keys ....................................................................................................... 1 6
Right side view ............................................................................................ 1 7
Left side view ..............................................................................................1 8
Rear view ......................................................................................................1 9
Left Expansion Bay .................................................................................... 2 1
Right Expansion Bay ................................................................................. 2 1
PC card slots (PCMCIA) .......................................................................... 2 2
Disk drives ................................................................................................... 2 3
Infrared ports .............................................................................................. 2 4
Connecting to a modem or cellular phone ............................................ 2 5
CD-ROM drive ............................................................................................ 2 6
Optional MicronDockTM port replicator ................................................ 2 7
MicronDock features ................................................................................. 2 8
Connecting your TransPort XKE when it is powered off
to the MicronDock (Cold Docking) ............................................ 2 9
Connecting your TransPort XKE while it is in the Suspend Mode
to the MicronDock (Warm Docking) ......................................... 3 0
Connecting your TransPort XKE while it is running
to the MicronDock (Hot Docking) .............................................. 3 1
Powering down your TransPort XKE and undocking .......................... 3 2
TransPort XKE is running and undocking .............................................. 3 3
2. Powering Your Notebook ................................. 34
Recharging function for the MicronDock and the notebook
computer system ................................................................................ 3 4
Before using a new battery pack ............................................................. 3 5
Inserting and removing a battery pack ................................................. 3 6
Running on battery power ........................................................................ 3 7
Recharging the battery pack(s) ................................................................ 3 7
Recharging two battery packs ................................................................. 3 7
Extra battery pack ..................................................................................... 3 7
Discharging two battery packs ............................................................... 3 8
Checking a non-installed battery ............................................................ 3 8
Warm-swapping a battery pack ............................................................. 3 9
Low battery warnings ............................................................................... 3 9
What to do if you get a low-battery warning ...................................... 4 0
Running on external (AC) power ............................................................ 4 0
3. Hardware Setup ................................................ 4 1
Running the SETUP program .................................................................. 4 1
The Main menu ...........................................................................................4 1
Advanced menu .........................................................................................4 4
Security menu ............................................................................................. 4 6
Power Savings menu ................................................................................. 4 7
Boot menu .................................................................................................... 5 0
Exit menu ..................................................................................................... 5 0
4. Installing Accessories....................................... 5 1
Memory options .......................................................................................... 5 1
Adding RAM ............................................................................................... 5 1
Removing the internal hard drive............................................................ 5 2
Installing a modular hard drive or floppy drive ................................. 5 3
Removing a hard drive or floppy drive module .................................. 5 3
Installing and removing the CD-ROM drive ........................................5 4
NTSC and S-Video Setup ......................................................................... 5 5
5. System Software Options ................................ 5 7
Micron Customer Resource Center CD-ROM ...................................... 5 7
Windows 95 and Windows NT 4.0 Workstation ................................ 5 7
6. Embedded Modem Guide ................................. 6 0
Overview ...................................................................................................... 6 0
Using your modem .................................................................................... 6 1
Wireline connectivity .................................................................................. 62
Cellular connectivity .................................................................................. 6 3
Modem troubleshooting ............................................................................ 6 4
AT commands ............................................................................................6 6
Result code/Message definitions ............................................................ 6 9
S-Registers .................................................................................................... 7 0
7. System Care and Precautions ........................ 7 2
8. System Specifications...................................... 76
Quick Reference Sheet......................................... 7 9
Appendix A: Safety practices .......................................................................... 8 0
Appendix B: Micron PowerSM Warranty ......................................................... 8 1
Appendix C: Regulatory Specifications ......................................................... 8 4
Appendix D: Ergonomic notice ........................................................................ 8 6
Glossary ................................................................... 8 7
Index ........................................................................ 8 8

5
Welcome!
Welcome to the TransPort XKE User’s Guide! This guide is
designed to help you get the most out of your system and keep it
running trouble free, year after year.
This User’s Guide is divided into eight main chapters, plus some
useful information in back.
Chapter 1, Getting Started will introduce you to your
system’s features and accessories, then help you get up
and running. You’ll learn how to open and set up your
new computer, how to read the indicators, and how to
use the keyboard.
Chapter 2, Powering Your Notebook describes how to use
your battery, how to maintain and swap batteries, how
to connect the AC adapter, how to connect the
MicronDock port replicator and what precautions to
follow for AC operation.
Chapter 3, Hardware SETUP examines the built-in SETUP
utility that lets you customize your system’s internal
hardware. This will help you understand your system’s
internal features, set security options and control how
your machine uses power.
Chapter 4, Installing Accessories shows how you can add
more memory, remove the internal hard drive and add
or remove the modular drives.
Chapter 5, System Software Options describes some of the
additional software that Micron has installed on your
Windows 95 or Windows NT 4.0 system.
Chapter 6, Embedded Modem Guide describes the features
of the modem included with your system.
Welcome
Chapter 7, System Care and Precautions describes how to
care for your Transport XKE. It also gives you general
precautions for your notebook and its peripherals.
Chapter 8, System Specifications lists technical details about
your system and the MicronDock port replicator.
The Appendices describe safety practices, warranty
information, FCC notices, and ergonomics.
The Glossary gives definitions of common mobile computer
terms.
The Index provides a quick way to find important topics.

6
1. Getting Started
This chapter introduces you to the TransPort XKE system.
The following instructions should help you:
• Open your TransPort XKE
• Identify your TransPort’s features
• Turn your TransPort XKE on and off
• Use your keyboard
As you unpack your system, check each item in the box for
damage. Contact your dealer or Micron Electronics Customer
Service if you notice anything broken.
As you unpack...
Examine your new TransPort XKE carefully, matching each item
with the illustrations in this chapter. This Guide will help you
identify your TransPort’s components so you can use them to
your best advantage.
On the exterior of the machine you will find various items—buttons,
switches, connectors, expansion bays, PC card slots, and exterior
indicator lights. When you open the TransPort XKE you will see
the display panel, the keyboard with its numeric keypad, and
several interior features. The rest of this chapter will describe
what you see when you examine your TransPort XKE.
Do I have everything?
The packing slip is one of the last items sealed into your
computer box. It lists everything we shipped to you. As you
unpack the box, check the contents against the packing slip. If
an item is listed on your packing slip, but isn't in the box, it may
be installed in your system, or shipped inside one of the manuals
or accessory bags. If you're sure something is missing, call
Customer Service right away.
To get help
The following phone numbers and addresses should help you
get assistance for your computer.
Notebook Technical Support 800-393-8935
Micron Corporate Headquarters 800-828-0416
Customer Service 888-642-7662
Micron Sales 800-964-2766
Internet http://www.micronpc.com
Internet Email Support transport.support@micron.com
CompuServe go micron
Please have your computer’s serial number ready when
you contact Micron.
7
Your box contains the packing slip, this manual, your cables
and other manuals, a battery pack, your drive module(s), an AC
adapter, system backup software and your operating system
manual.
This book shows you how to set up your system and keep it
running.
During the operating system registration and setup
of either Windows 95 or Windows NT 4.0 please
MAKE SURE your system is NOT DOCKED to the
optional MicronDock Port Replicator. Once you
have completed initial system registration and setup
of either Windows 95 or Windows NT 4.0, then you
can use your optional MicronDock Port Replicator
normally.
Micron has loaded and tested the operating system
on your hard drive. You can skip the installation of
the operating system and system drivers.
If you ever need to reload your operating system, and or system
drivers, please refer to your Microsoft operating system manual.
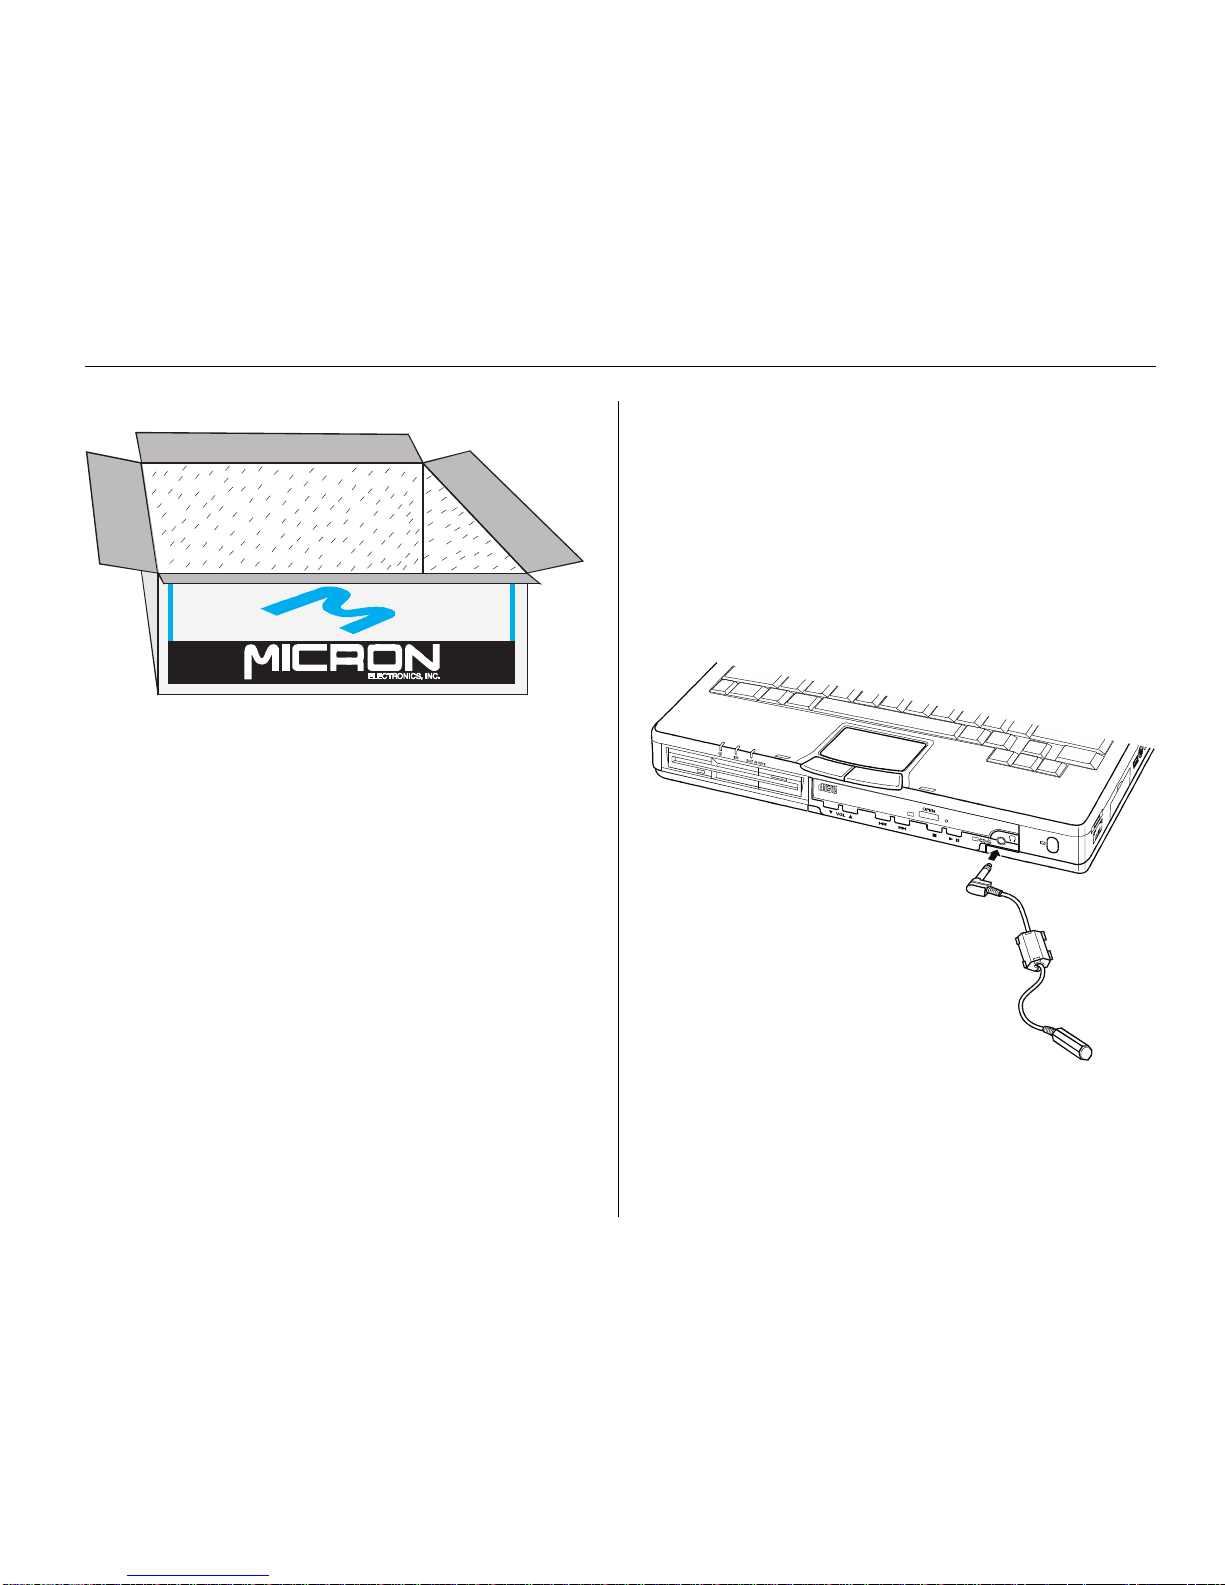
What’s in the box? Keep the box
It’s a good idea to keep your TransPort’s box and packing
materials. That way, if you ever have to store the system or
return it, your components will be well protected
RF suppressor
If your unit is equipped with a radio frequency (RF) noise
suppressor, it plugs into the headphone output jack (front or
rear), as shown below:
Figure 1. The RF suppressor contains an electronic filter that eliminates
excessive RF interference from your headphone output jack.
8
Let your computer acclimate itself
Although your TransPort XKE can easily stand
temperature extremes, it doesn’t like rapid changes
in temperature, especially going from the cold
outdoors to a warm office, or from a steamy jungle
mail drop to an air-conditioned villa. Rapid changes in
temperature can cause water droplets to condense inside your
case, threatening to damage the electronic parts inside. If it is
hot or cold outside when you receive your system, let the
computer gradually adjust to room temperature for 3 to 4 hours
before you power it up.
Caution:
The computer may not work properly if condensation
occurs. Wait approximately 3 to 4 hours before using
the unit. This will allow the internal parts to adjust to
the surrounding temperature.
Where to work
Your TransPort XKE generally will run well wherever you are
personally comfortable. Extremes of heat, cold, and humidity
can be challenging to your system's parts.
There are, however, some things you can tolerate that the
computer will not like at all; static electricity, dust, water, steam,
and oil. Whenever you decide to pull over for roadside
computing, choose a clean, comfortable work area for your
system.
When traveling, your system operates on an intelligent lithiumion battery pack.
Before you run your system for the first time on battery power,
remove the battery from its package and install it in the system,
then recharge the battery fully.
This prepares your lithium-ion battery pack for maximum
service.
Caution:
Except for PC cards and the Port Replicator, never
connect or disconnect any equipment or components
while the system power is on.
Beware of heat, cold, humidity, and glare
Pick a spot for your computer that’s not too hot, too cold, too
dark, or too bright. Glare can make it hard to read the screen.
Overheating can destroy computer components, so allow plenty
of room for air to circulate around the case. Do not place your
TransPort in direct sunlight.
Also, we strongly recommend using an external surge
suppressor. Your computer has its own electrical filters, fuses,
and protections, and even its own built-in surge suppressor,
but a high quality surge protector will shield your computer
from lightning strikes, surges, shorts, and other severe electrical
hazards. An external surge suppressor looks like an extension
cord with several grounded outlets.

9
• Universal Serial Bus (USB) port.
• 128 Bit PCI graphics accelerator with hardware MPEG1 and
2MB EDO memory.
• NTSC video output capability lets you display images on any
standard television. For better color fidelity, use the S-video
output provided.
• True SoundBlaster --compatible 16-bit stereo audio system
with 1MB hardware wavetable and 3D Spatializer sound for
optimal sound quality and convenience. The TransPort has a
pair of amplified speakers and a built-in microphone.
• You can use two cardbus, two Type II PC cards (PCMCIA),
one Type III card, or one ZV (zoomed video), giving you
virtually unlimited expansion.
• With Pick-a-Point you get two kinds of pointing devices to
choose from. You can use the pointing stick (the blue button
on the keyboard), or the touchpad below the space bar. You
also get large, customizable mouse buttons for right- or lefthanded users. You can select either the touchpad or pointing
stick with a simple keystroke command.
• Two Infrared transceivers let you swap data with a desktop
PC or send files to a printer, all without cables. Ports are
located at the front and rear of the notebook.
• Optional BIOS passwords safeguard your system.
• The Phoenix® PowerPanel™ utility lets you choose or create
your own software power management profiles all within the
operating system environment.
Note:
The above utility will overwrite your current BIOS settings.
• Just by connecting a joystick to the Game/MIDI port, you can
enjoy games with the same performance found in arcade
machines. You can also enjoy DTM (Desktop Music) simply
by connecting your own MIDI device.
• Custom-designed heat dispersion helps keep your unit running
coolly. Interior fan cooling is silent, efficient and more reliable.
System features
The TransPort XKE notebook computer contains sophisticated
features made possible only by the latest advances in computer
hardware and software.
The standard configurations include up to a 266 MHz Intel
Pentium processor with MMX technology, a 12.1” or 13.3” activematrix color display with a bright, clear image, a mini-LCD
control panel that reports feature status and an intelligent
lithium-ion battery.
In addition, the TransPort XKE has two FlexOpt expansion bays
on the front side of the case. The right bay can hold up to a 24Xspeed CD-ROM drive, a second hard drive, or a battery pack.
The left bay can hold a battery pack or a floppy drive. If you
want to change a module, you just shut your system off, change
the module, then turn your system on again. For batteries only,
you may put your system into suspend mode, change a battery,
then press any key to bring it out of suspend mode. This is
called “Warm-swapping.”
Other valuable features of the TransPort XKE:
• 166, 200, 233, or 266 MHz Intel Pentium processor, with MMX
technology.
• 32KB primary cache built into processor.
• 512KB secondary memory cache (pipeline burst SRAM) with
writeback for high-speed performance.
• High-performance Intel 430TX PCI chipset optimized for
notebook computers. This chipset exploits the full performance
of the Pentium processor. Its PCI bus improves system
integration with Plug-and-Play while boosting system
performance, achieving data transfer rates over 100MB per
second.
• High-speed EDO memory.
• 20 or 24X CD-ROM drive with AutoPlayTM.
• Internal 56 KB modem with full duplex and telephony, with
connectors for modem and cellular phone.
10
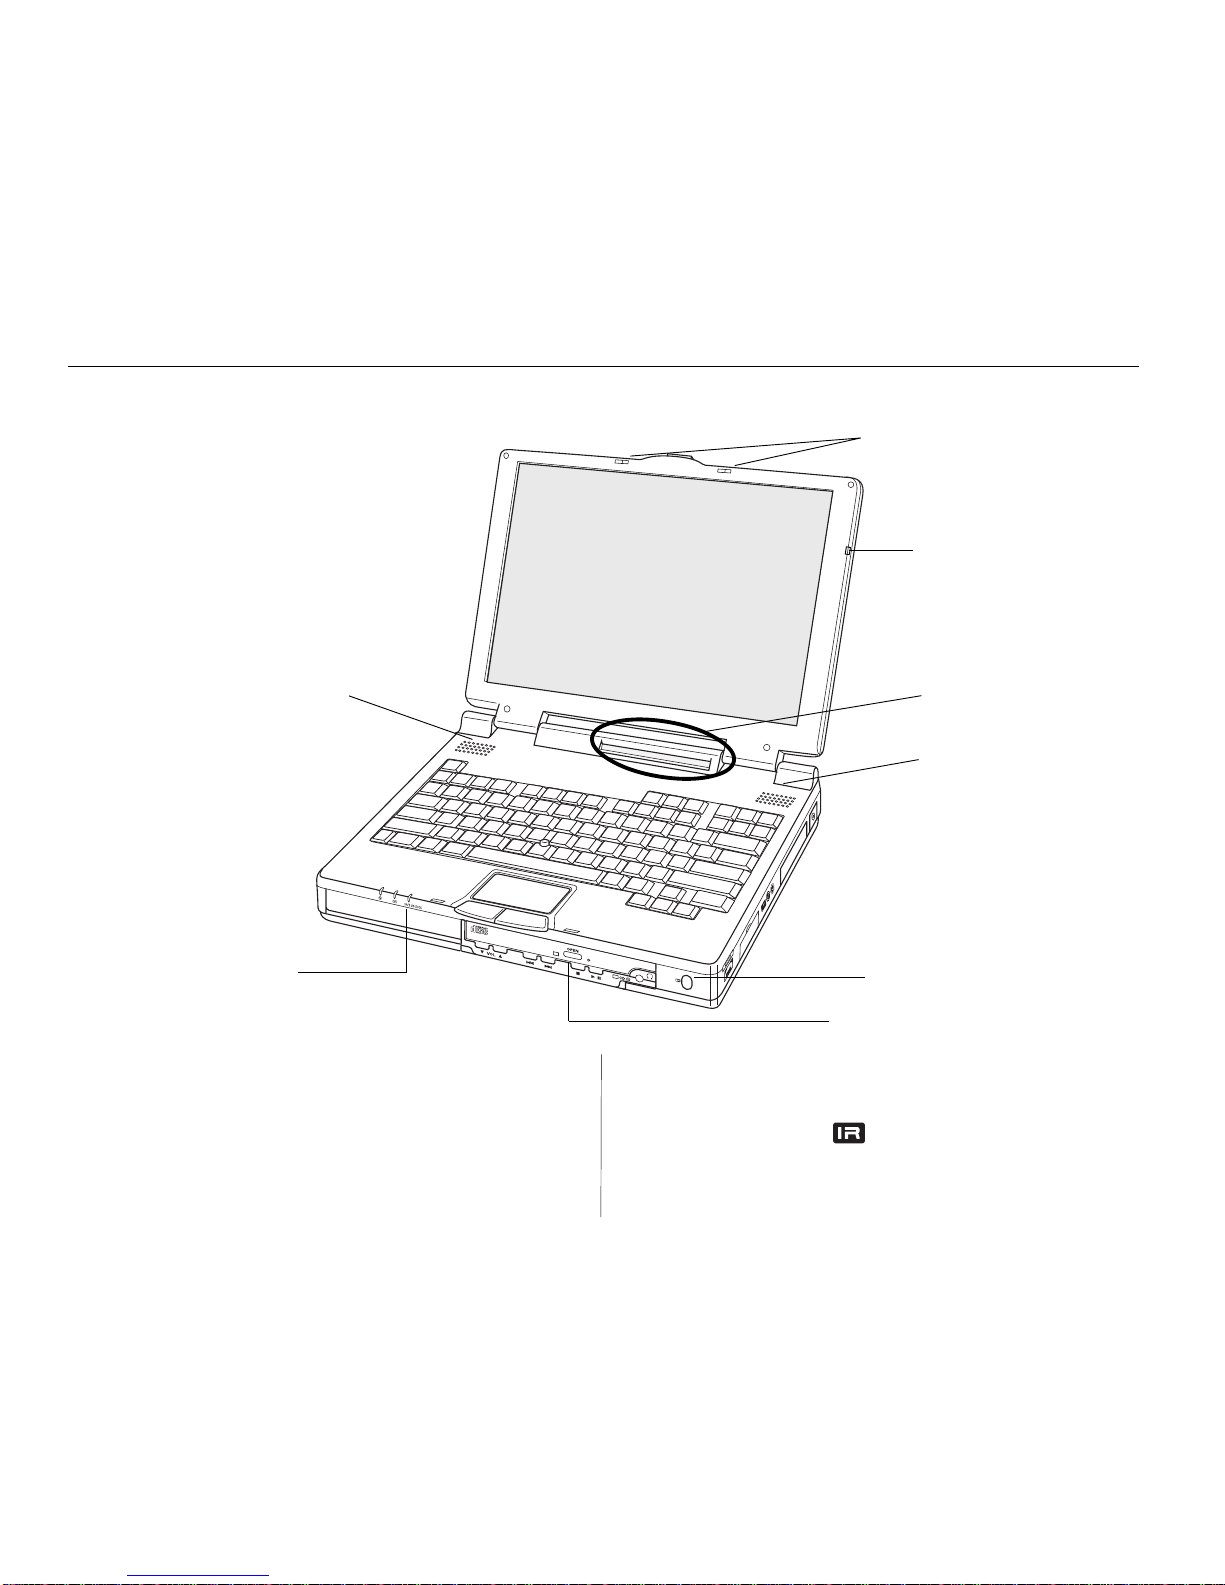
Latches slide to release the display
panel
Microphone
Mini-LCD Control Panel
Speaker
Front Infrared (IR) Port
Right Expansion Bay (CD-ROM Drive)
Left Expansion Bay
Speaker
Front View
Figure 1-1: Front features include the display panel,
indicator lamps, keyboard, two expansion bays, and
an infrared port.
To open the display panel:
Turn the front of the computer toward you. Slide the front latch
to the right, then lift the display panel with both hands. Tilt the
display panel to a comfortable viewing angle.
Left FlexOpt Expansion Bay
Holds either a floppy disk drive or lithium-ion battery.
Right FlexOpt Expansion Bay
Holds a CD-ROM drive, a battery, or an extra hard drive.
Front Infrared (IR) port
Transfers data between nearby computers without cables.

11
Howling
Howling is the high-pitched whining or shrieking that
is sometimes generated by the speaker when the
microphone input setting is on and the volume is at its
maximum setting. The default for the microphone
output setting is OFF, so howling will not occur.
However, sometimes a software application is shut
down with the microphone output setting left ON . When
using such applications, be sure to switch the
microphone output setting to OFF after use.
Countermeasures
If the Windows 95 desktop is displayed, set the volume
of the microphone output to minimum or off using the
software volume control.
If any other screen is displayed, press ,<Fn> and <F5>
reduce the volume.
12
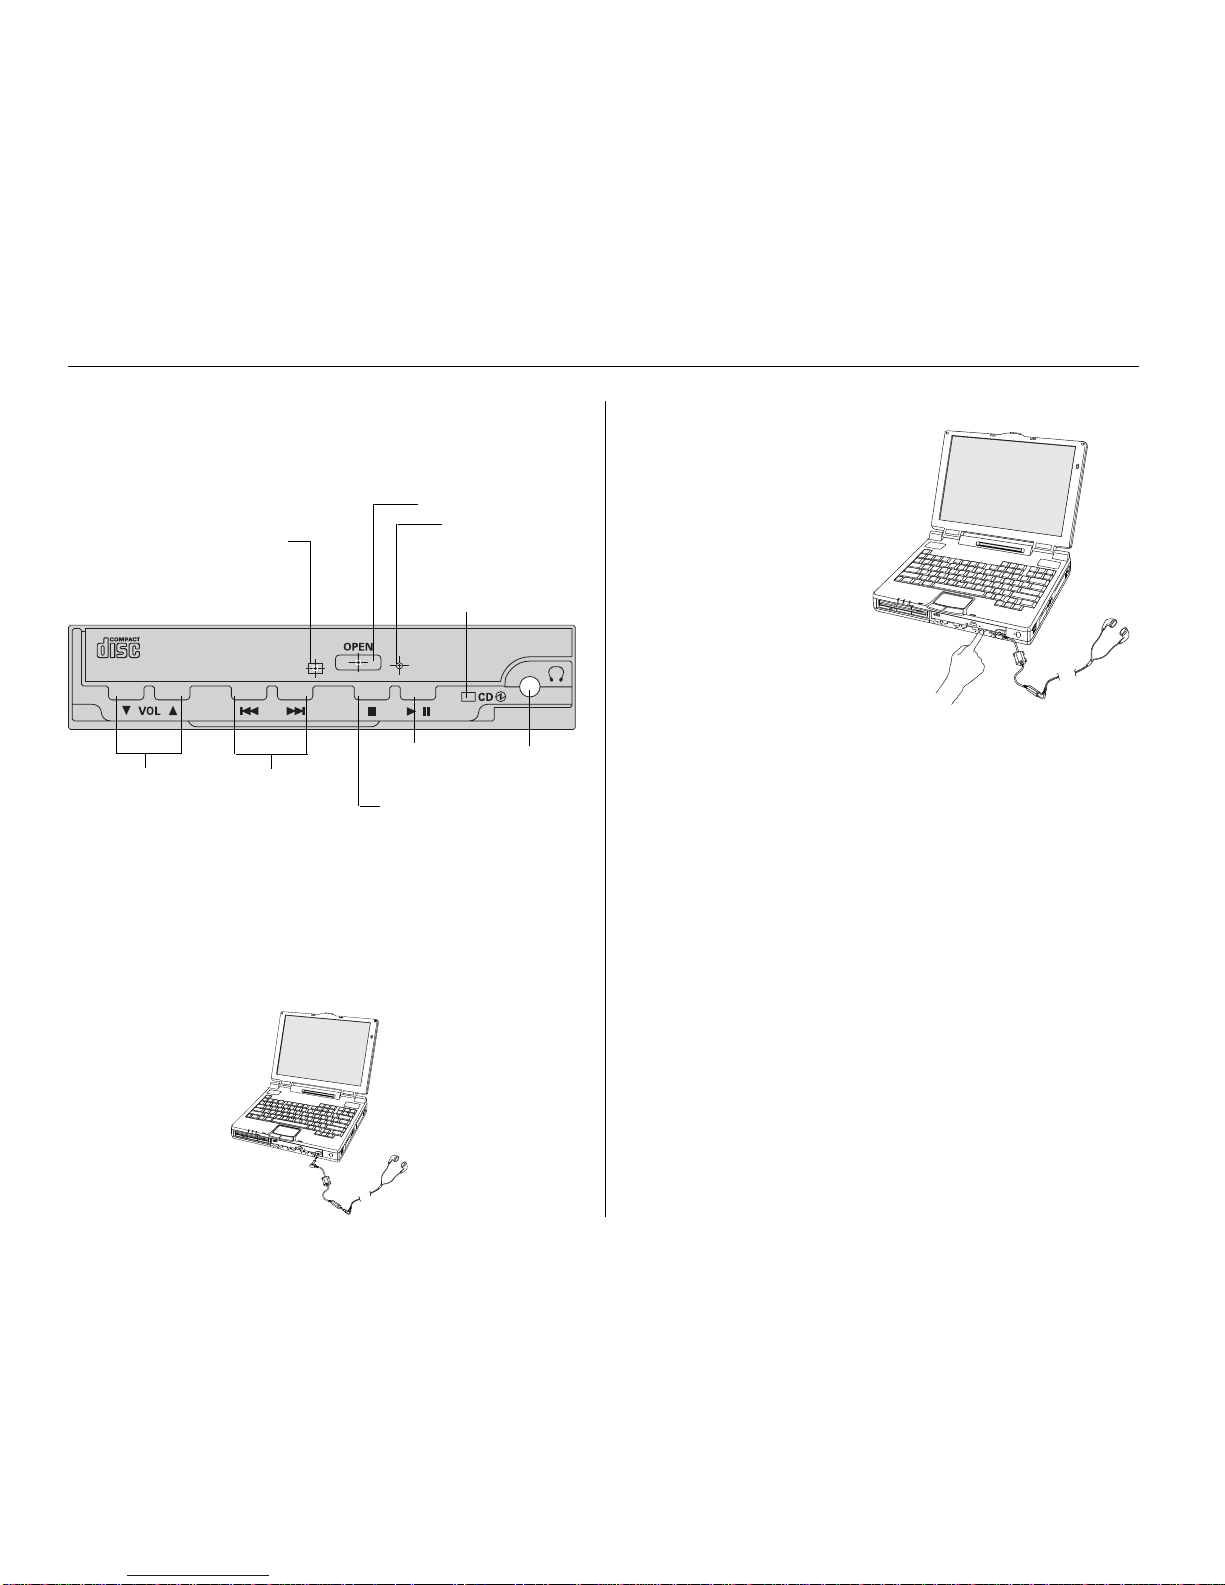
CD-ROM Drive
Drive Access Lamp
(Orange)
Open/Close Button
Emergency Eject
Pinhole
CD-ROM Drive Power
LED (Green)
Volume Control
Search
(Forward/Reverse)
Stop (Clear) Button
Play/Pause
Button
Stereo
Headphone
Jack
When the notebook computer is off or in
the
Suspend
state
After plugging a pair of headphones or powered speakers into
the headphone jack on the CD-ROM drive, just the CD-ROM
drive turns on. The CD-ROM drive power LED (green) lights,
and the CD-ROM drive can now be used as a CD player. This is
the AutoPlayTM function.
First, the Drive Access Lamp (orange) lights for about 10 seconds, and
then turns off.
Next, press the <Play> button
on the CD-ROM drive to start
playing the CD from the first
track.
Note:
To adjust the headphone controls, use the
various controls and
switches on the CD-ROM
drive.
The controls on the front of
the CD-ROM drive are functional whenever a pair of head
phones or speakers are connected through the headphone jack.
When the audio CD finishes playing, the notebook computer
enters Power Saver mode (if it was previously in the Suspend
state). The notebook computer still consumes a small amount of
power while it is in Power Saver mode.
The CD-ROM drive is reset if the notebook computer is turned
off or on while the headphone miniplug is plugged in.
When the notebook computer is on
The CD-ROM drive starts up normally. The various controls on
the CD-ROM drive are not functional, unless a pair of
headphones or speakers are connected through the headphone
jack.
Note:
If a pair of headphones or speakers are connected through the
headphone jack while the system is on, sound will continue to
play from the system’s speakers, as well as from the headphones .
13
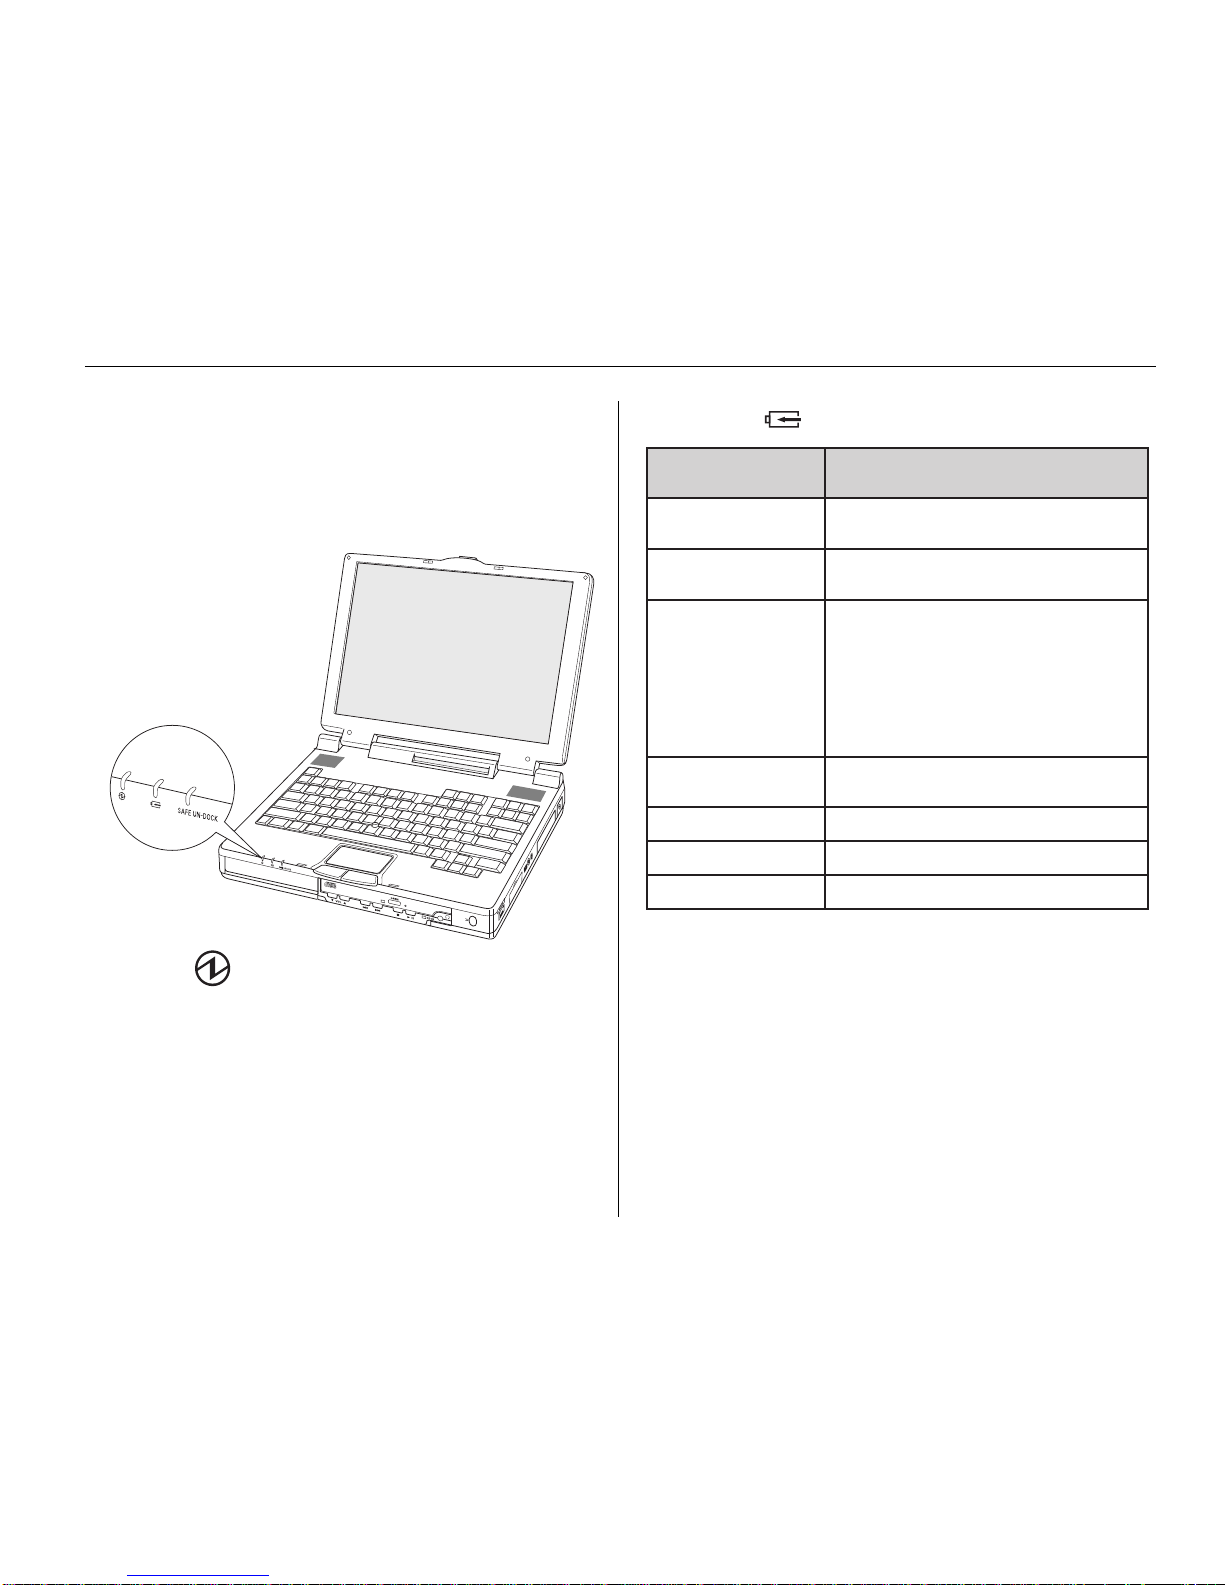
Power lamp
Glows a steady green after you press and hold down the Power
button for a second. Goes out after you press the Power button
again. It flashes green slowly when the computer is in lowpower Suspend mode.
SAFE UN-DOCK
Glows a steady green after you press <Fn+F10> or the undock
button on the optional Port Replicator. The light goes out after
you undock the TransPort from the port replicator.
LED Indicators
LED Indicators
These colored indicator lamps (below the display panel on the
right) tell you whether your system is on or off, and whether the
onboard battery(ies) are being charged. You can see them with
the display panel open or closed.
Charge lamp
Charge Lamp
No light
Orange glow
Slowly flashing
orange
Fast flashing orange
Green glow
Fast flashing green
Orange/Green
Battery operation or no battery installed.
Charging in progress.
Precharge mode:This is the state the
battery is in when it has not been used for a
long time or when it it is fully discharged.
Normally, this phase lasts only a few seconds, but in rare cases where the battery is
completely discharged, this phase may last
for up to two hours.
The battery has reached the end of its
operational life, and should be replaced.
Charging completed.
Charging cannot be accomplished properly.
Please contact Tech Support.
Meaning
14
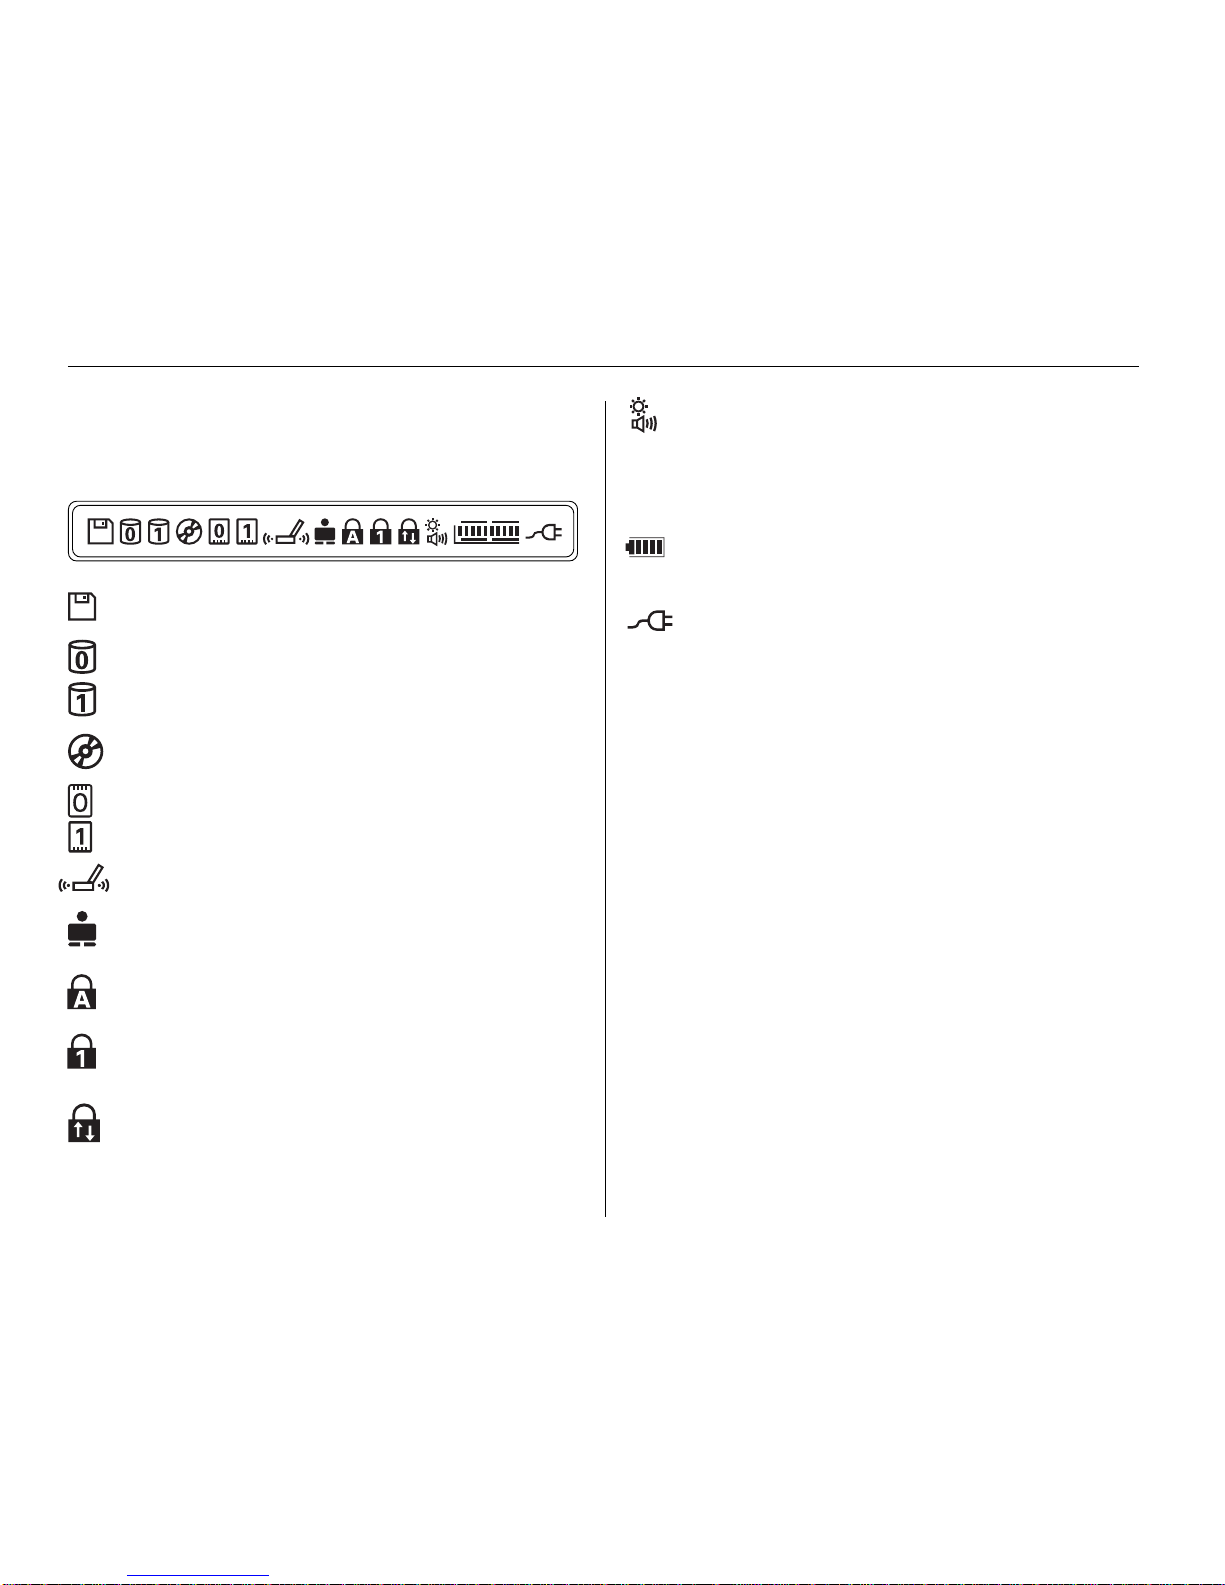
Mini-LCD control panel
Located just below the display panel. Each symbol displayed
indicates the status of a system feature.
Floppy disk in-use
Data is being written to or read from the floppy disk.
Hard disk in-use
Data is being written to or read from a hard disk drive. 0
is hard disk 0 (the boot drive), 1 is hard disk 1 (the modular
hard drive).
CD-ROM active
Data is being read from the CD-ROM player.
PC card present
A PC card is in slot 0 (the bottom slot) or slot 1.
Infrared Port
Choose front or rear infrared port.
Pointing Devices
Choose between pointing devices, point stick or touchpad.
Capitalization lock
Caps Lock makes subsequent typed letters UPPER CASE.
Number lock
<Fn> + <NumLk> activates the embedded numeric keypad
for convenient number entry.
Scroll lock
Press Scroll Lock to stop the screen from scrolling in DOS
mode.
Display Brightness/Stereo Speakers
Shows eleven levels of display brightness when you hold
down the <Fn> key and then press the <F7> or <F8> key.
Shows eleven volume levels of the onboard stereo
speakers when you hold down the <Fn> key and then
press the <F5> or <F6> key.
Battery Left- and Right-Side Level
Shows five levels of charge: 100%, 75%, 50%, 25%, 0%,
plus two visual Low Battery warnings.
AC power supplied
Computer is using power from the AC adapter.
15
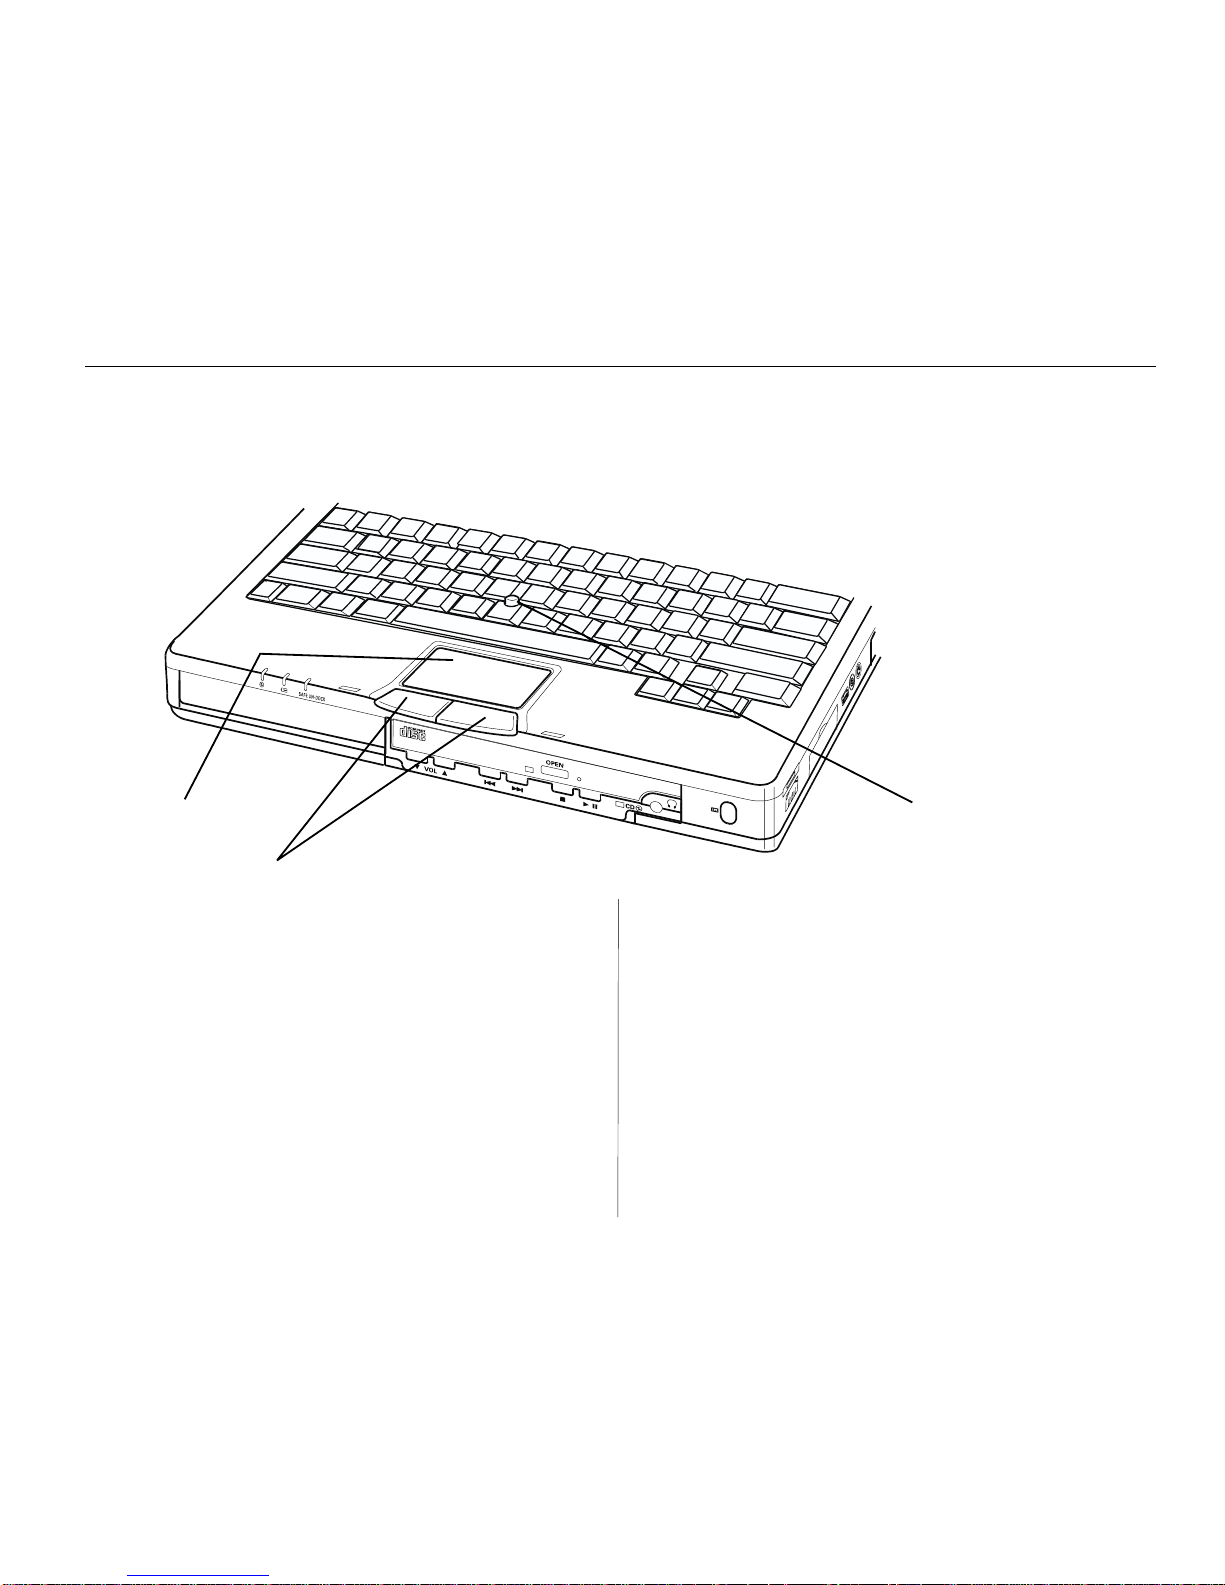
T ouch Pad
Dual Mouse Buttons
Your TransPort features the Pick-a-Point dual pointing system.
This lets you use either the pointing stick or touch pad to move
your mouse pointer. Either device will work with the two mouse
buttons at the front of the keyboard. Press <Fn + F3> to switch
between the pointing devices. The touch pad is the default
pointing device. Either device can also work simultaneously
when an external mini-DIN PS/2 mouse is attached. If a serial
mouse is attached both pointing devices and the external mini
din PS/2 mouse port are disabled.
Pointing Stick
Moves the mouse pointer when you tilt it in the desired direction.
Click on the mouse buttons to click on a screen object.
Touch Pad
The touchpad on the keyboard’s palm rest is tap-sensitive. Rest
a fingertip on the touch pad, then slide it across the pad to move
the mouse cursor. Tap on the pad to click or double-click on a
screen object. You can also use the mouse buttons instead of
tapping on the touch pad.
Internal pointing devices
Figure 1-2: You can choose your preferred pointing device with the
TransPort’s Pick-a-PointTM system.
Pointing Stick
16
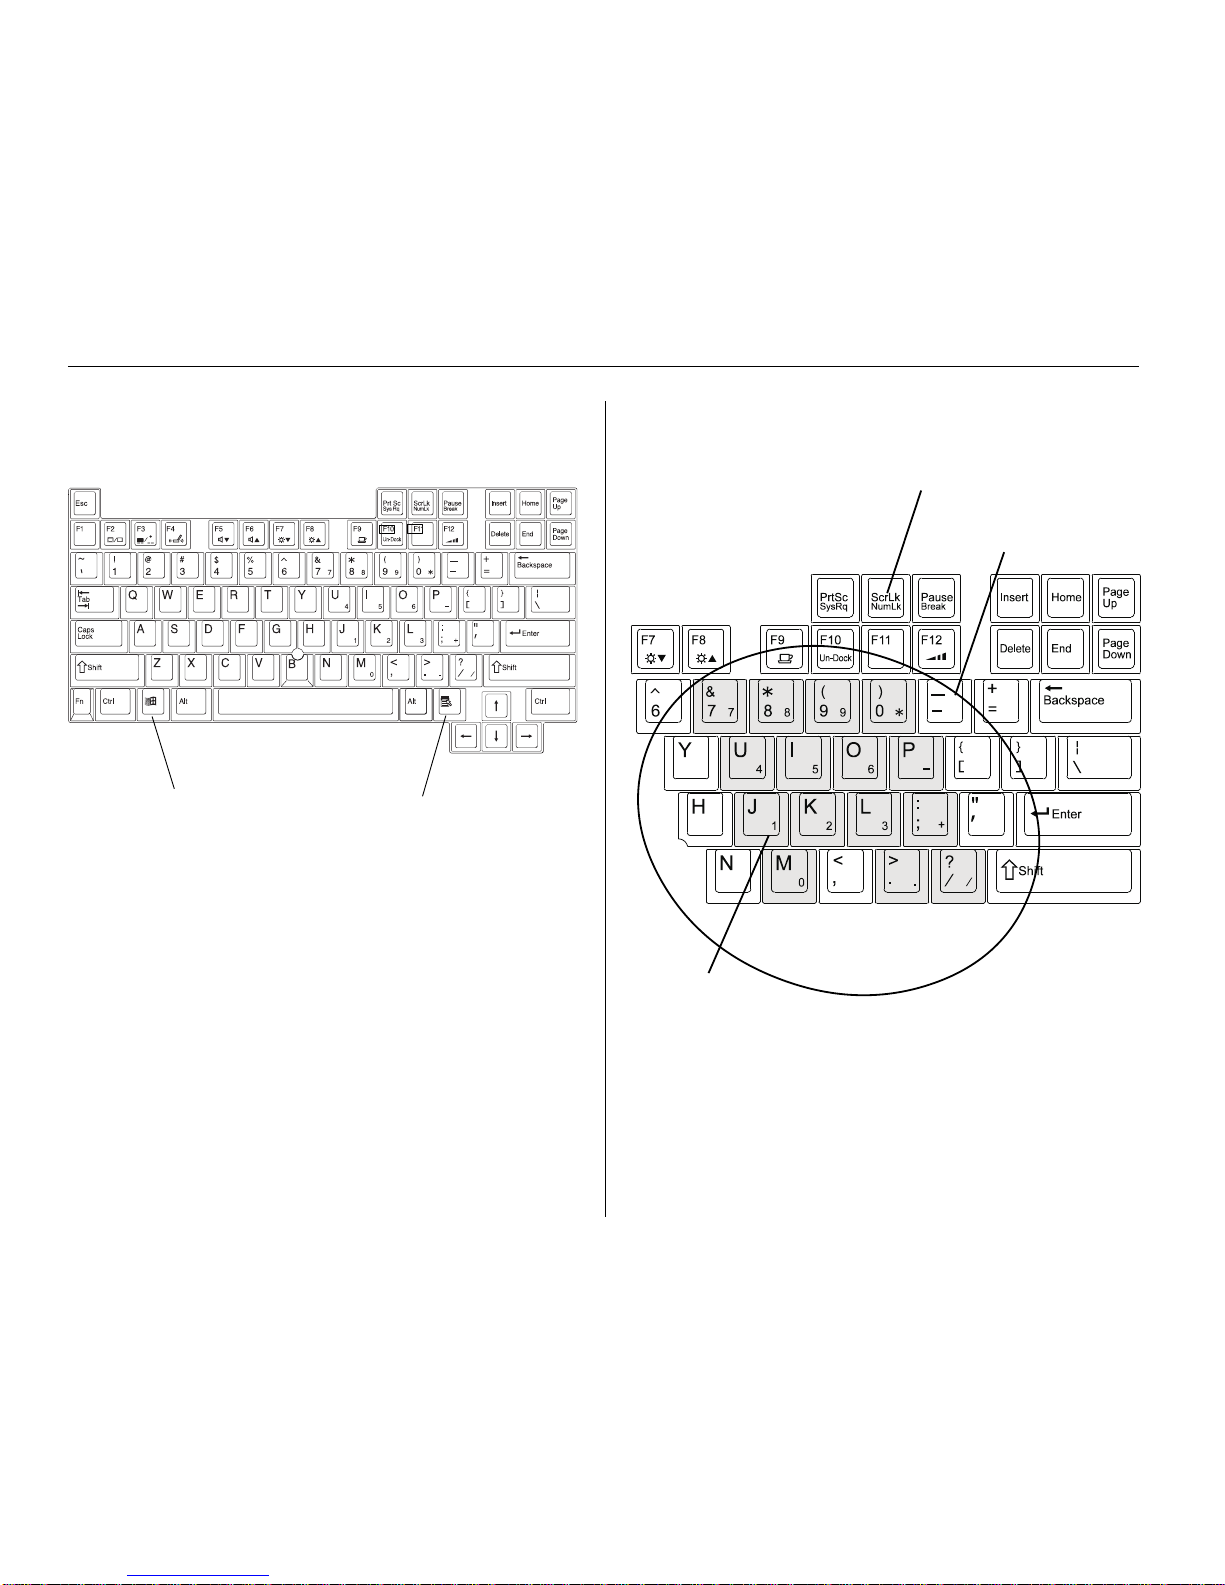
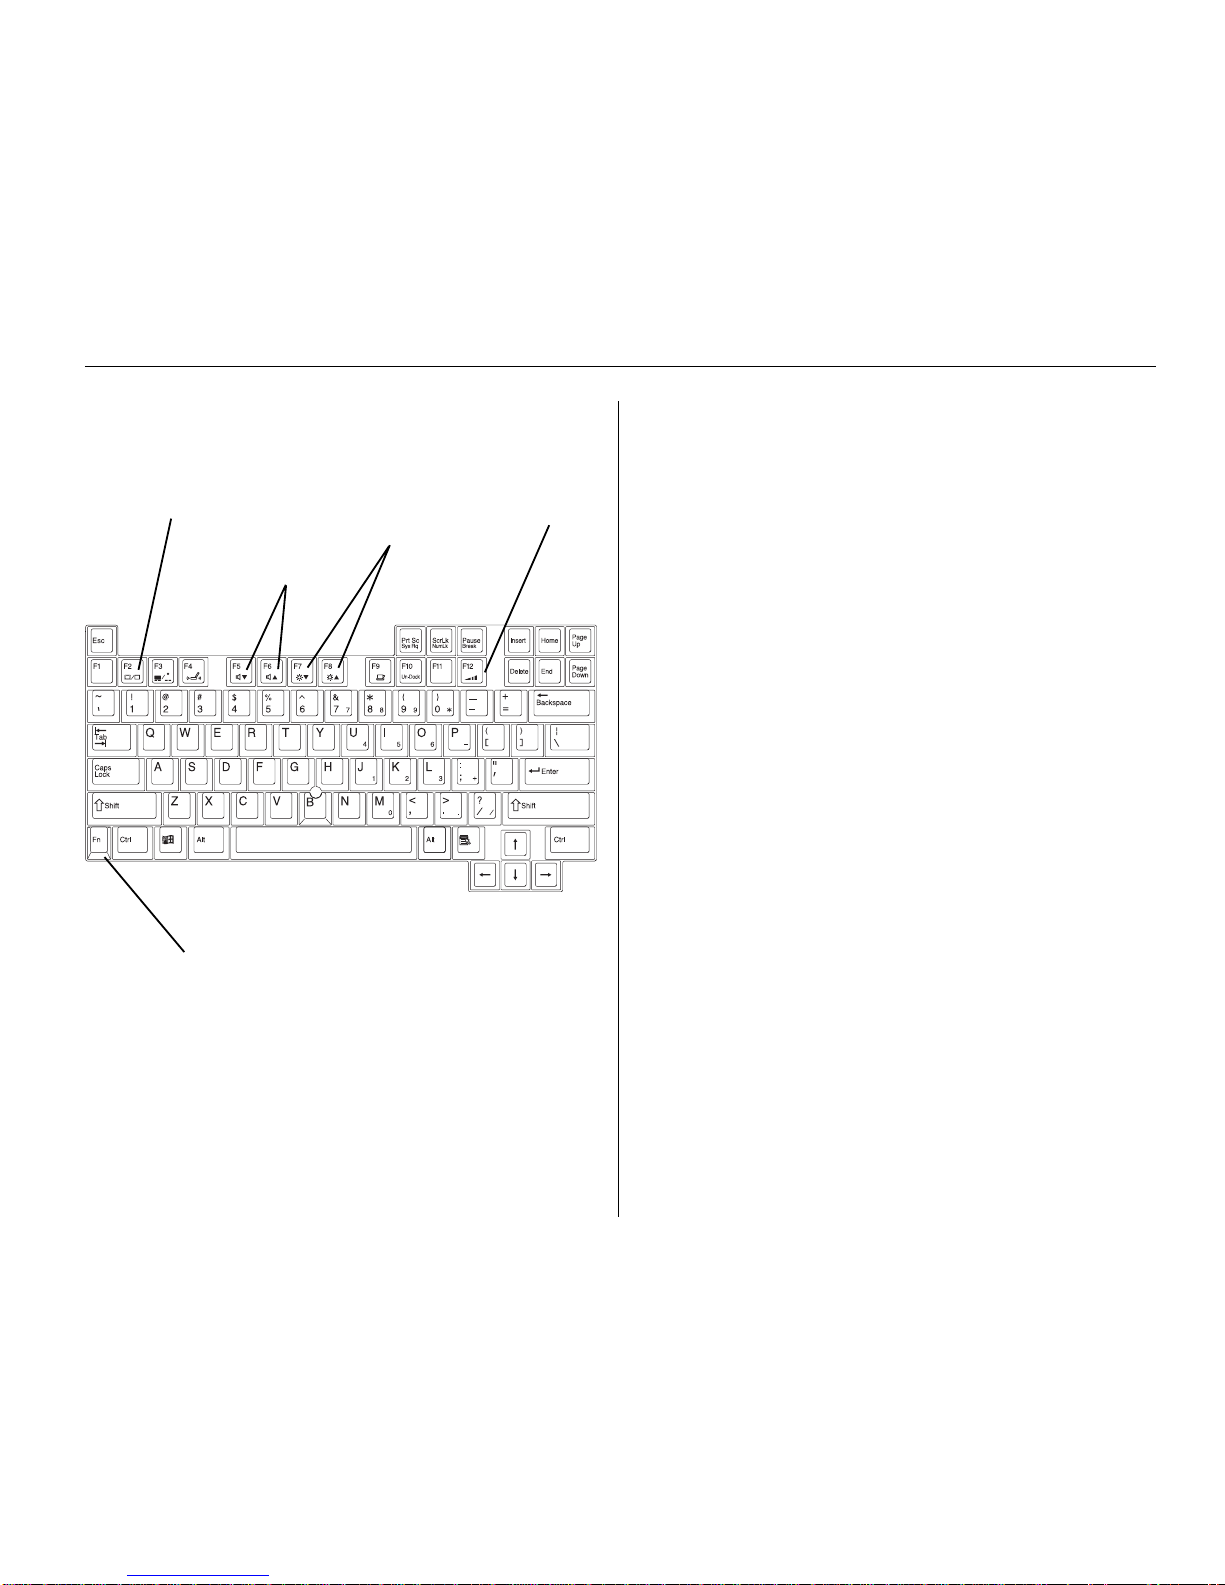
Keyboard
Figure 1-3: 87-Key keyboard.
TransPort XKE has a standard notebook keyboard with 87-keys,
an embedded numeric keypad, and twelve function keys. The
light blue pointing stick (between the <G> and the <H> keys)
provides dedicated cursor control as an alternative to the
touchpad or an external mini-DIN PS/2 mouse.
Windows key
Application key
Numeric keypad
Figure 1-4: Numeric keypad.
The numeric keypad lets you enter numbers rapidly.
To use the numeric keypad, press <Fn + NumLk> key.
Note:
If an external keyboard is attached, you cannot use embedded
numeric keypad.
A character in the lower right corner of a key identifies it as a numeral
in the embedded numeric keypad. Example: the “J” key is also the
number 1.
Embedded
Numeric
Keypad
<Fn + NumLk> key activates the
numeric keypad for easier number
entry.
17
Hot keys
Figure 1-5: Hot keys
Display Mode
Speaker
Volume
Brightness
Beep Volume
Function Key (Fn) must be held
down to adjust your display and
volume settings.
TransPort XKE uses special function keys to adjust your display
and volume. To make your adjustments, hold down the <Fn>
key, then press the following function keys:
Fn+F2 Toggles your screen’s display mode between
internal monitor (LCD), external monitor (CRT), and
simultaneous internal-external display.
Note:
If the position of the screen image shifts or is not the proper
size when the screen image is switched to an externally connect
monitor, adjust the screen on the external monitor.
Fn+F3 Alternates pointing devices, between pointing stick
and touchpad.
Fn+F4 Switches between the front and rear infrared ports.
Fn+F5 Decreases the volume of the onboard stereo speakers.
Fn+F6 Increases the volume of the onboard stereo speakers.
Fn+F7 Decreases display brightness.
Fn+F8 Increases display brightness.
Fn+F9 Suspend mode. Enter suspend mode to save power.
Note:
Press any key to resume from suspend.
Fn+F10 Undock. Prepares your TransPort XKE for undocking
from the optional MicronDock. Wait for the “Safe
Undock” light to appear.
Fn+F12 Sets beep volume for the internal PC speaker to
Maximum, Medium, Minimum, or Off.
Note:
1. Certain system events will enable the speaker even
when it is set to disabled.
2. Some applications may conflict with certain special key
combinations. If you press a key combination without
results, exit the application and try again.
18
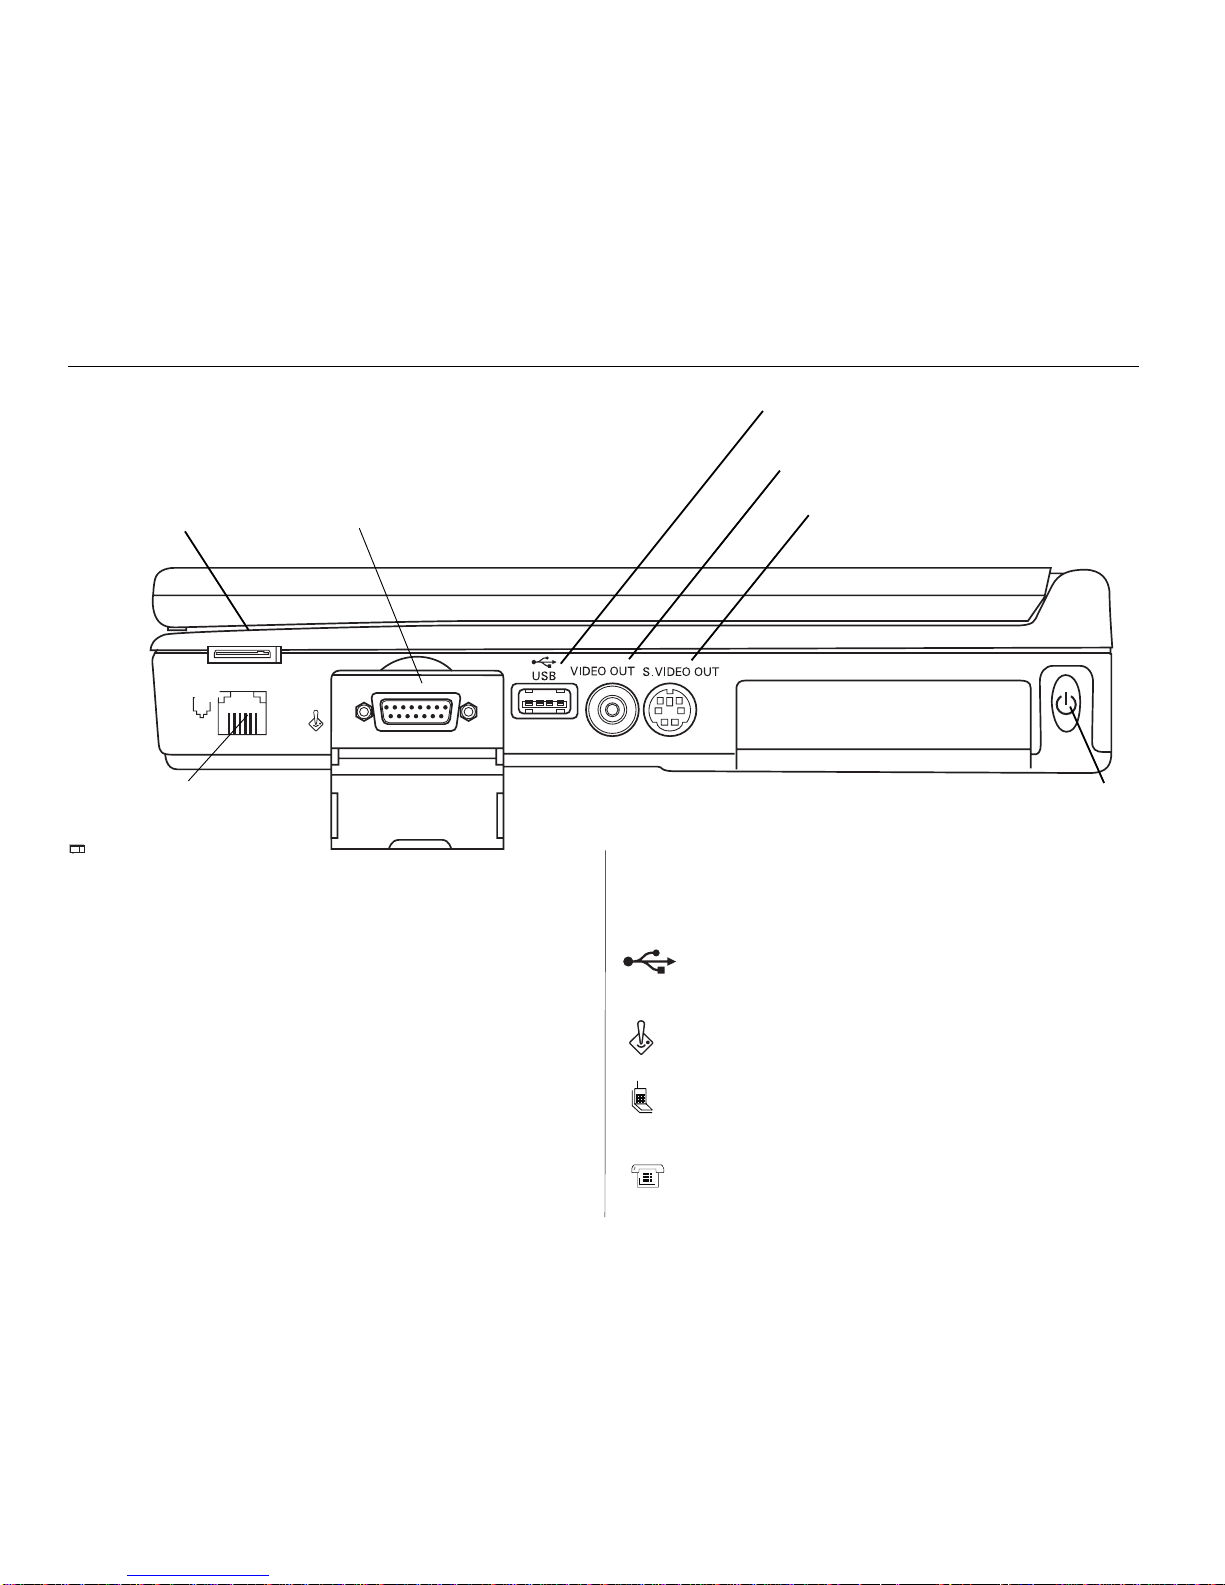
Right side view
Figure 1-6: Interior features (right side view).
Power button
Press and hold for one to two seconds to turn computer
ON or OFF.
Note:
Pressing the Power button has no effect while the computer
is in Suspend mode. Also, to prevent accidentally turning
on the computer when it is being carried, the Power button
does not function when the computer is being powered by
battery only and the display panel is closed. The power
button does not function when the computer is docked with
batteries installed and no AC adapter connected.
S-Video Out
Connects an S-video cable to a television. The S-video
terminal will provide better color fidelity than NTSC.
Video Output
Supplies an NTSC standard television signal (See NTSC
and S-Video setup in Chapter 4 for details).
Note:
1. Disconnect the external CRT display cable while
attached to the television.
2. When using NTSC Video out or S-Video out, you
cannot use the notebook screen or an external
monitor.
USB port
Connects expansion USB peripherals.
Game/MIDI port
Connects your TransPort to a joystick or MIDI device.
Cellular port
Connect your cellular phone. (See Chapter 6: “Embedded
Modem’s User’s Guide.”)
Fax/Modem port
Connects a phone jack. (See Chapter 6: “Embedded
Modem’s User’s Guide.”)
Removable EIDE Hard Drive (C:)
Cellular Port
Power Button
FAX/Modem
Game/MIDI Port
USB Port
NTSC Video
Output
S-Video Out
Phoenix BIOS Setup - Copyright 1985-95 Phoenix Technologies Ltd.
F1Help Select Item -/+ Change Values F9Setup Defaults
ESCExit Select MenuEnter Select Sub-MenuF10Previous Value
MainAdvanced SecurityPower Boot Exit
ItemSpecificHelp
Select Power Management
Mode.Choosing modes
changes system power
management settings.
Maximum Power Savings
conserves the greatest
amount of system power
while Maximum
Performance conserves
power but allows
greatest system
performance.To alter
these settings, choose
Customize.To turn off
power management,
choose Disable.
Power savings: [Customized]
Doze Mode: [On]
Standby Timeout: [8 Minutes]
Suspend Timeout: [10 Minutes]
Save To Disk: [Off]
Hard Disk Timeout:[4 Minutes]
Video Timeout: [6 Minutes]
Resume On Modem Ring:[On]
Resume On Time:[Off]
Resume Time: [00:00:00]
19
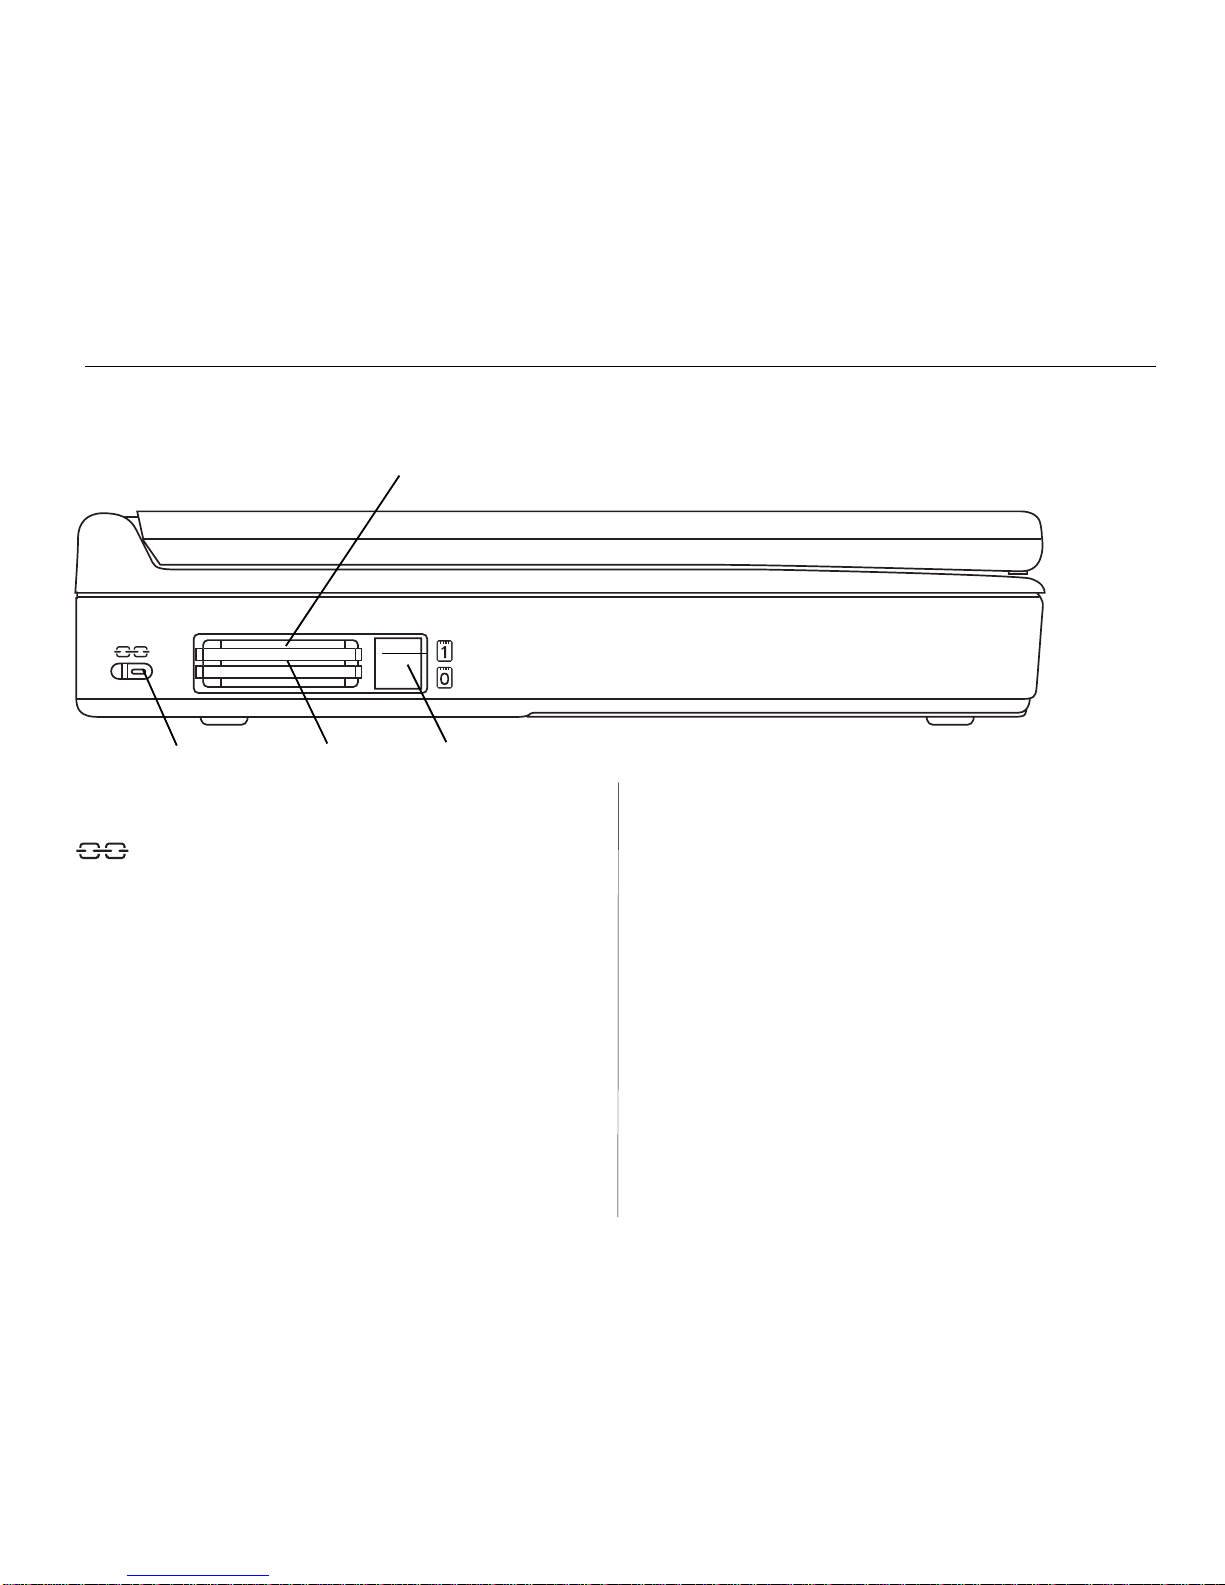
Left side view
Figure 1-7: Interior features (left side view).
PC Card
Eject Buttons
Kensington
TM
Security
Lock Slot
PC Card 0 Slot
PC Card 1 Slot
Kensington™ security lock slot
Your TransPort XKE Kensington™ security lock allows
you to attach a Kensington MicroSaver
™
Security
System cable to your computer. Use this cable to anchor
the computer to a desk or other large object to deter
theft.
Note:
Kensington Security System not included with
TransPort XKE.
Dual PC card slot can hold two Type I/II PC cards
(PCMCIA) or one Type III PC card.
The slots and eject buttons are recessed slightly to
protect your equipment.
Note:
ZV cards can only be used in the bottom slot (Slot 0).
20
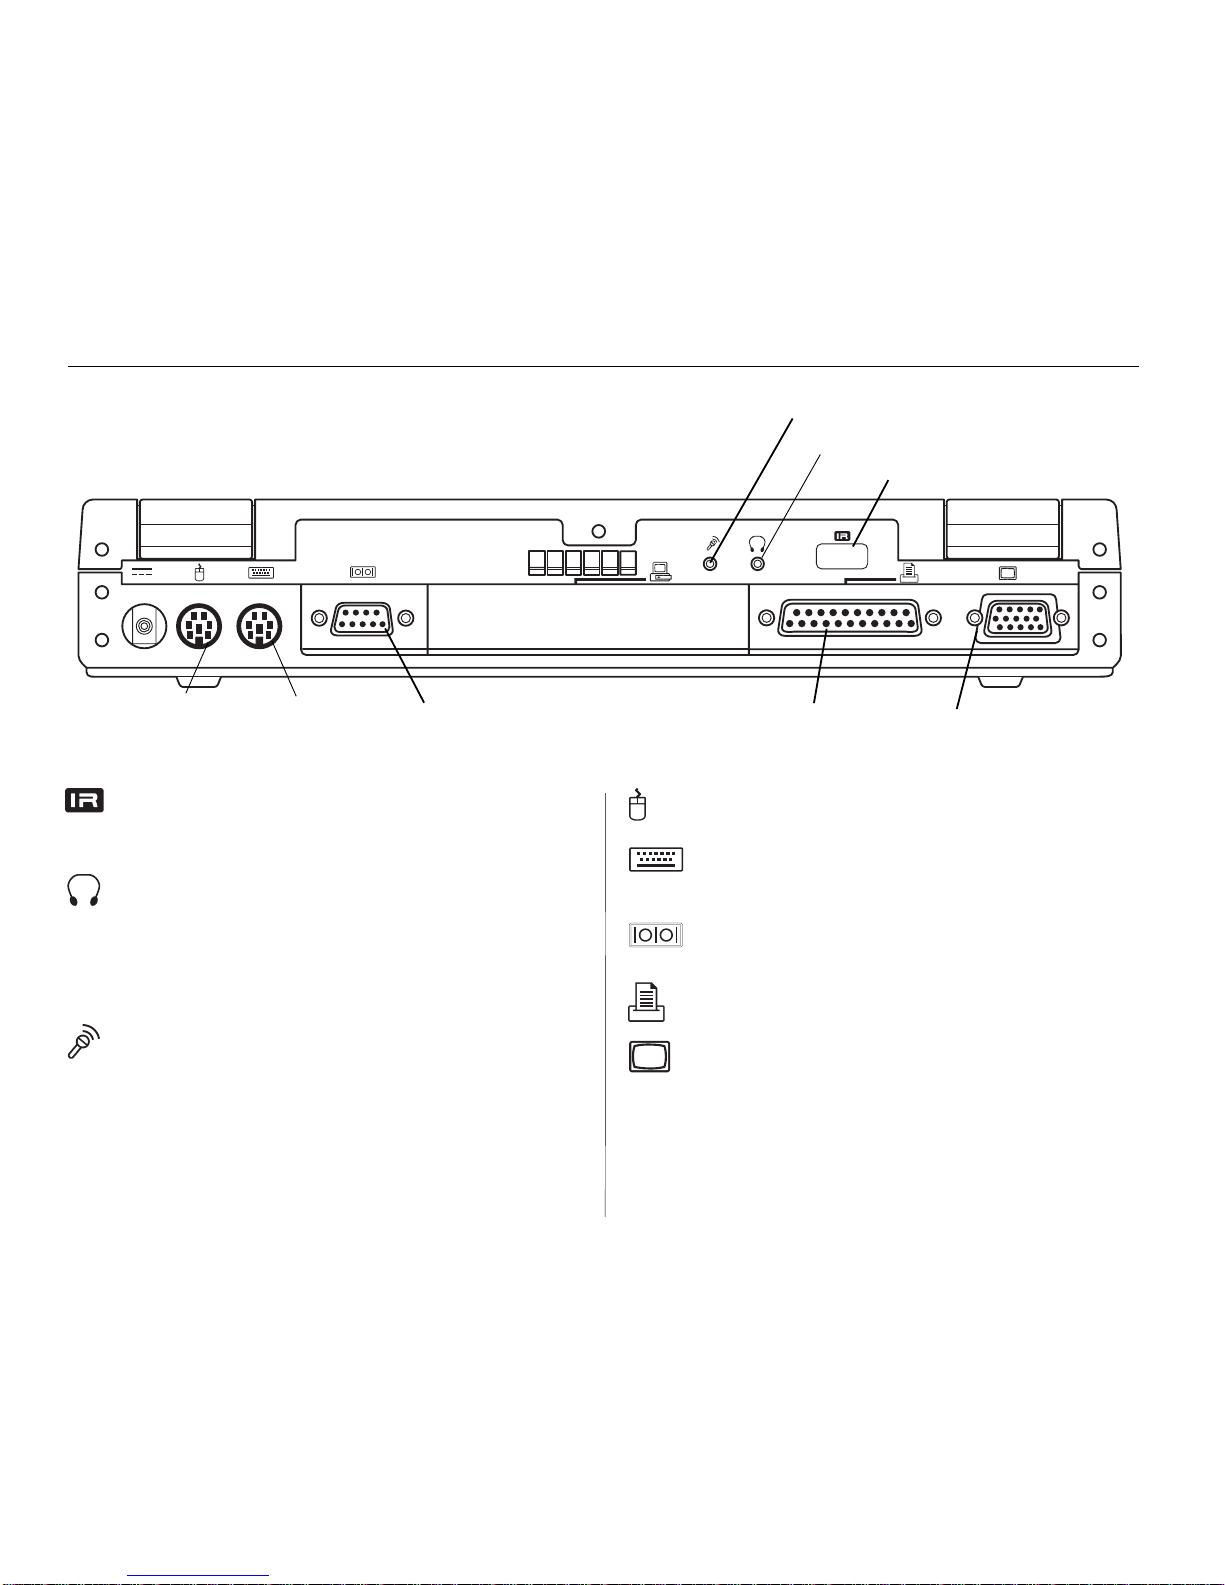
Rear infrared port
Transfers data between computers or peripherals without
cables.
Stereo Headphone jack
Connects a stereo headphone or amplified external
speakers to the computer.
Note:
For best sound, external speakers should be amplified.
Mono Microphone jack
Connects a dynamic or condenser microphone to the
computer.
Note:
When the microphone is not in use, mute the volume output for it
Mini-DIN PS/2 mouse port
Connects a PS/2 (or compatible) mouse.
Mini-DIN PS/2 external keyboard port
Connects an IBM-AT compatible 101/102-key external
keyboard.
Serial port
Connects a 9-pin, serial-device.
EPP/ECP parallel port
Connects a parallel-printer or other parallel device.
External video connector
Connects the signal cable of a video graphics array
(VGA), super video graphics array (SVGA), or
compatible display.
Rear view
Figure 1-8: System rear view 1.
External Video
Connector
EPP/ECP
Parallel Port
Serial Port
Mini-DIN
PS/2 External
Keyboard Port
Mini-DIN
PS/2 External
Mouse Port
Mono Microphone Jack
Stereo Headphone Jack
Rear Infrared Port
21
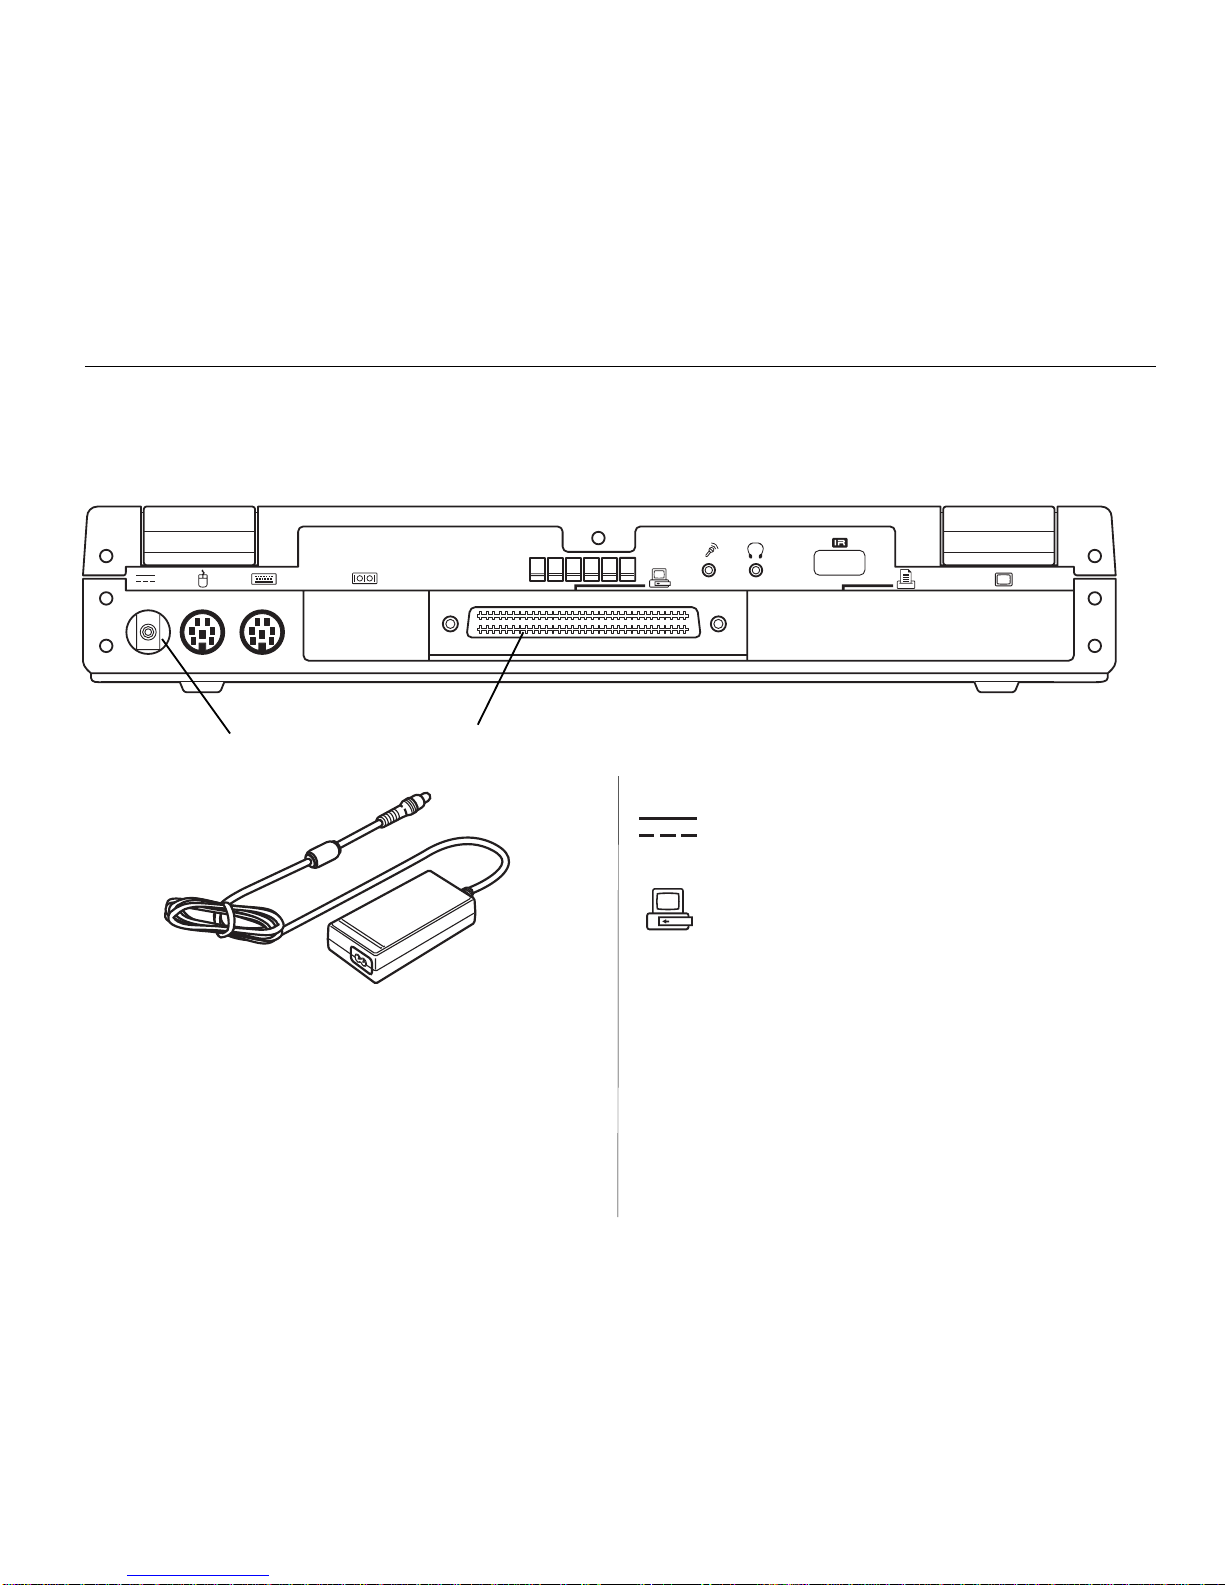
The included AC adapter plugs into the DC In connector. The
adapter powers your system and recharges your batteries at the
same time. Also, the AC power cord for the adapter can also be
plugged into the optional MicronDockTM port replicator, which
contains its own AC-to-DC converter.
DC In connector
Plugs into the AC adapter, which supplies DC voltage to
system.
System expansion connector
This 240-pin expansion port is used to connect the
MicronDock port replicator.
Figure 1-9: System rear view 2.
System Expansion
Connector
DC In Connector
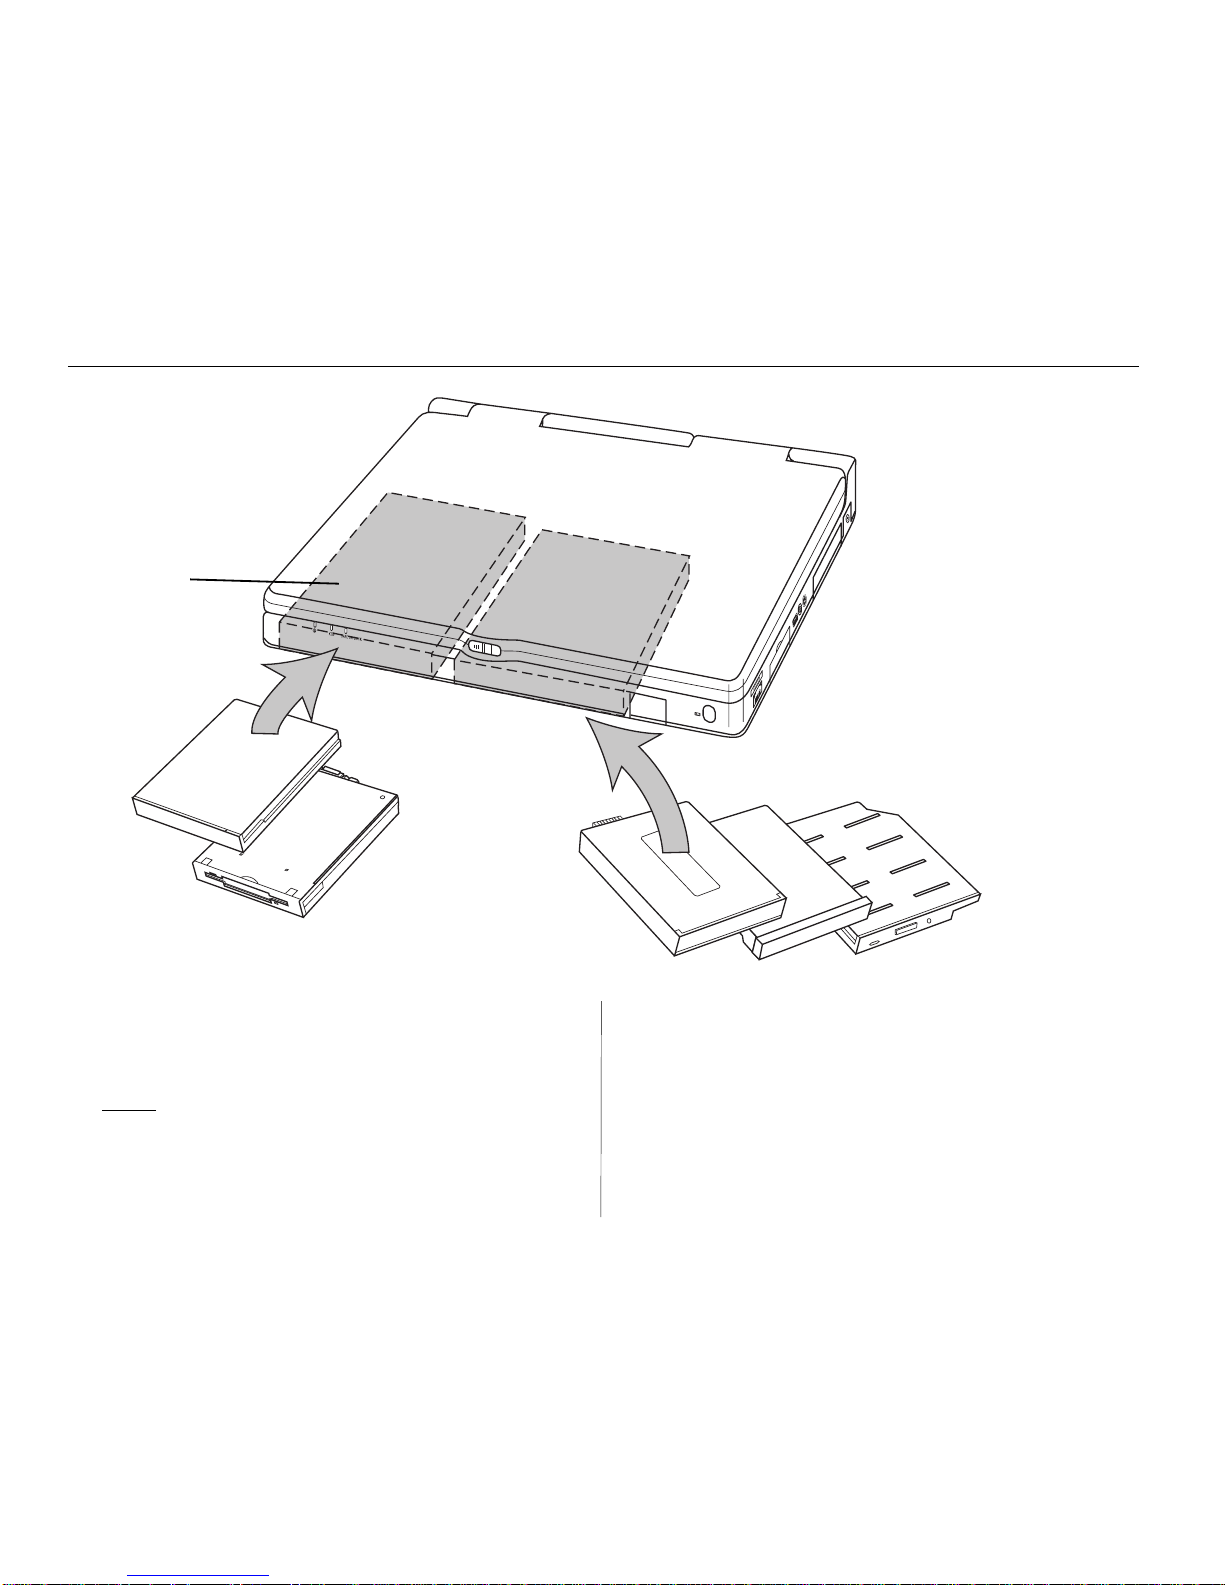
22
Note:
Modular hard disk drives do not operate in the left bay, only in
the right bay.
Left Expansion Bay
Left FlexOpt Bay can hold a
battery or a floppy drive.
TransPort XKE has a pair of
FlexOpt expansion bays that
offer great versatility. Together
they let you use several different
combinations of disk drives, or
you can use both bays to run
your system longer with a pair
of smart lithium-ion battery
packs. Additional battery packs
are available from Micron.
Warning:
Do not insert or remove the CD-ROM drive, floppy disk
drive or second hard disk drive when the system is
powered up. Always shut down the system completely
before removing or inserting these devices.
Right Expansion Bay
Right FlexOpt Bay can hold a
battery, the CD-ROM drive, or a
second IDE hard drive.
Left
Expansion Bay
Right
Expansion Bay
Figure 1-10: Right Expansion Bay
Floppy Disk
Drive
Battery Pack
Battery Pack
Hard Disk
Drive
CD-ROM Drive
Battery Pack or
Floppy Drive
Figure 1-11: Left Expansion Bay
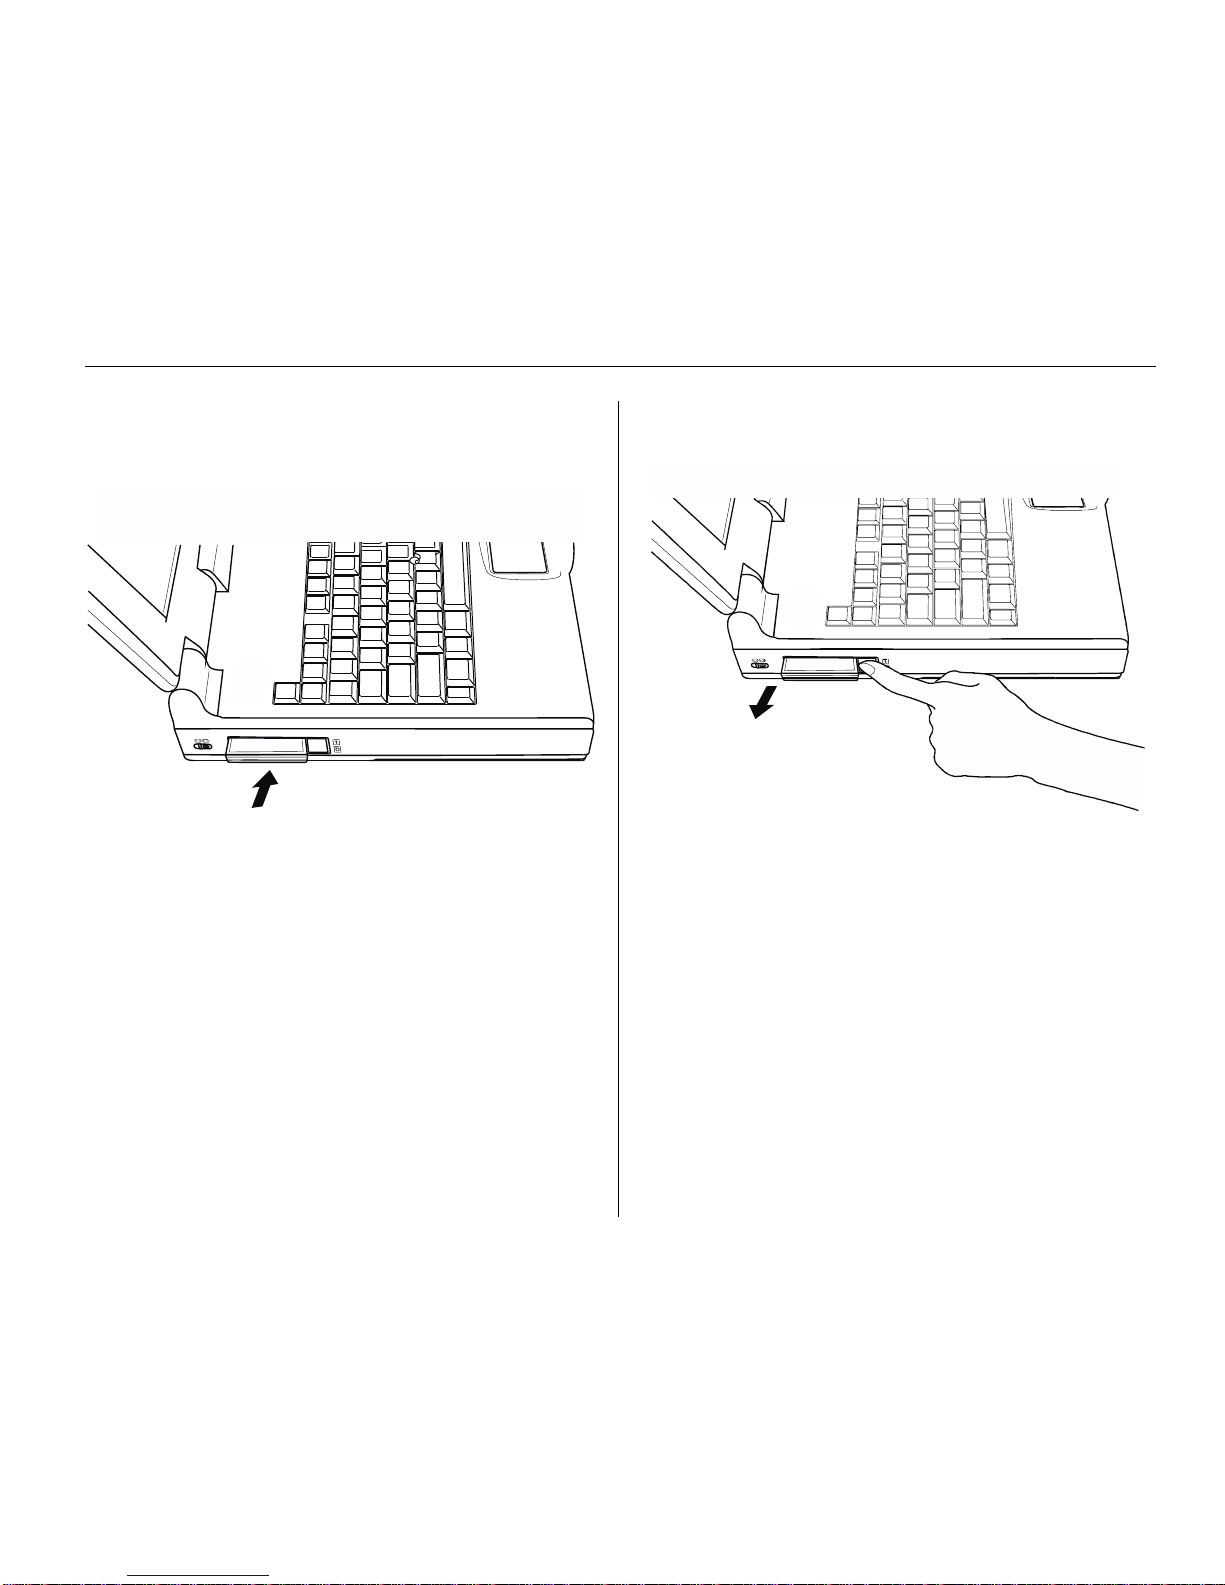
23
Your system comes with software that allows most PC cards to
be recognized when inserted or ejected. Some third-party cards
may require their own client software.
To remove a card, push the PC card eject button.
Note:
1. For safety, you should remove all PC cards from your
TransPort XKE before you prepare it for travel; however,
the computer does store PC cards fully inside the unit.
2. Some PC cards if left in your notebook could draw power
even when not used. This will decrease battery life.
Your TransPort’s PC card slot (left side) can hold two Type-I / II
PC cards, or one Type-III card. Your TransPort XKE can also
hold two Cardbus or one Zoomed Video (ZV) cards. To insert a
PC card, align the card label-up with the connector toward the
computer. Then carefully slide the card into the slot.
Push the card into the slot until it is completely seated.
Note:
1.Take care not to insert the cards incorrectly, as you might
damage the internal connector pins.
2.ZV cards can only be used in the bottom slot (slot 0).
PC card slots (PCMCIA)
Figure 1-12: When a PC card slides into Slot 0 or Slot 1, the slot’s eject
button pops out flush with the case.
Figure 1-13: Removing a PC card.
24
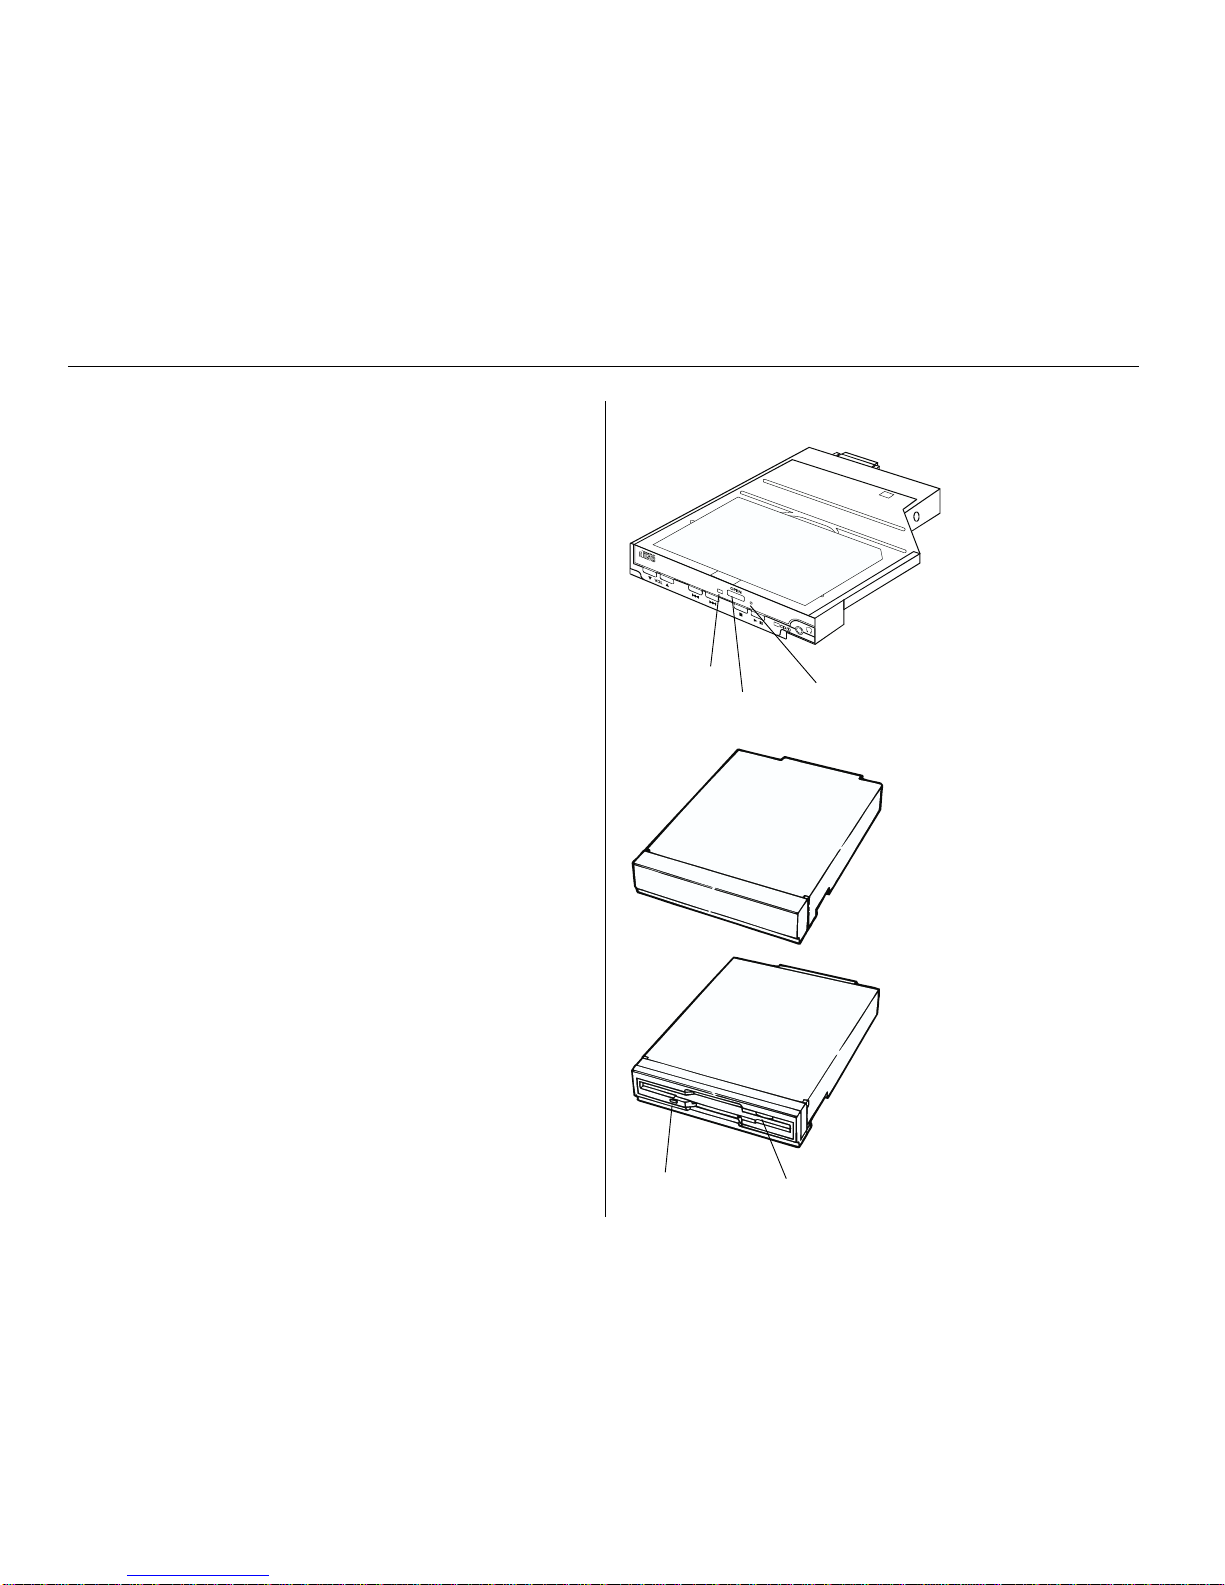
Disk drives
Your system comes with a removable internal hard disk drive, a
removable 3.5-inch floppy disk drive and a removable CD-ROM
drive. Following are some notes and precautions about using
these drives.
General disk drive precautions
• Always turn off your computer before you remove or
install a disk drive.
• Do not touch the metal connectors of a disk drive
pack.
• Protect disk drives from jarring or strong vibrations.
• Regularly back up your data on floppy disks, tape
backups, or other means.
• Always wait until the “hard disk in-use” or “floppy
disk in-use” icon has disappeared before turning off
the computer.
Floppy drive precautions
• Always turn off your computer before you remove or
install the floppy disk drive.
• Use only clean, dry, and undamaged floppy disks.
• Keep grit, dust, and dirt away from floppy disks and
from the insertion slot.
• Keep floppy disks away from magnetic sources.
• Protect floppy disks from excessive heat or cold
(above 60C/140°F, below 5C/41°F).
Floppy Drive module goes into
FlexOpt Left Bay.
Optional Modular Hard Disk Drive
goes into FlexOpt Right Bay .
Drive Access
Lamp
Disk Eject
Button
CD-ROM module goes into
FlexOpt Right Bay .
Emergency Eject
Pinhole
Drive Access
Lamp
T ray Open
Button
Figure 1-14: Disk drives for TransPort XKE.

25
The illustration above shows one way to place a TransPort XKE
for an infrared data exchange. For best results, keep the
computers within a meter of each other, and align their IR ports
within ten degrees.
Using the Infrared Communication
TransPort XKE is equipped with a fast infrared (FIR)
communication feature that lets you transfer data quickly and
easily. Its two FIR ports are located in front and in the rear of the
computer.
Place the devices to be used for infrared communication on top
of a table. The computers should be no farther than one meter
apart, with their infrared ports facing each other at no greater
than a 10 degree angle.
Note:
• For best transmission, point infrared ports directly at each
other. The infrared signal becomes unreliable if the angle
between IR ports is greater than 10 degrees.
• Do not move the computers or put anything between them
during data transfer.
• Do not touch infrared ports together.
• The data transfer speed may be lower if the computers are
located directly below a fluorescent light.
• Because the two infrared ports share a single IRQ, your
system can use only one IR port at a time. Pressing <Fn +
F4> lets you select front or back IR port.
Infrared ports
Infrared (IR) ports on the front and the back of your TransPort
XKE let you communicate with other IR-equipped devices without
connecting cables between them. This allows you to synchronize
files between two computers, print files to an IR-ready printer,
use an infrared mouse, even network IR devices, all without
cables.
Figure 1-15: Using TransPort’s infrared (IR) port.
26
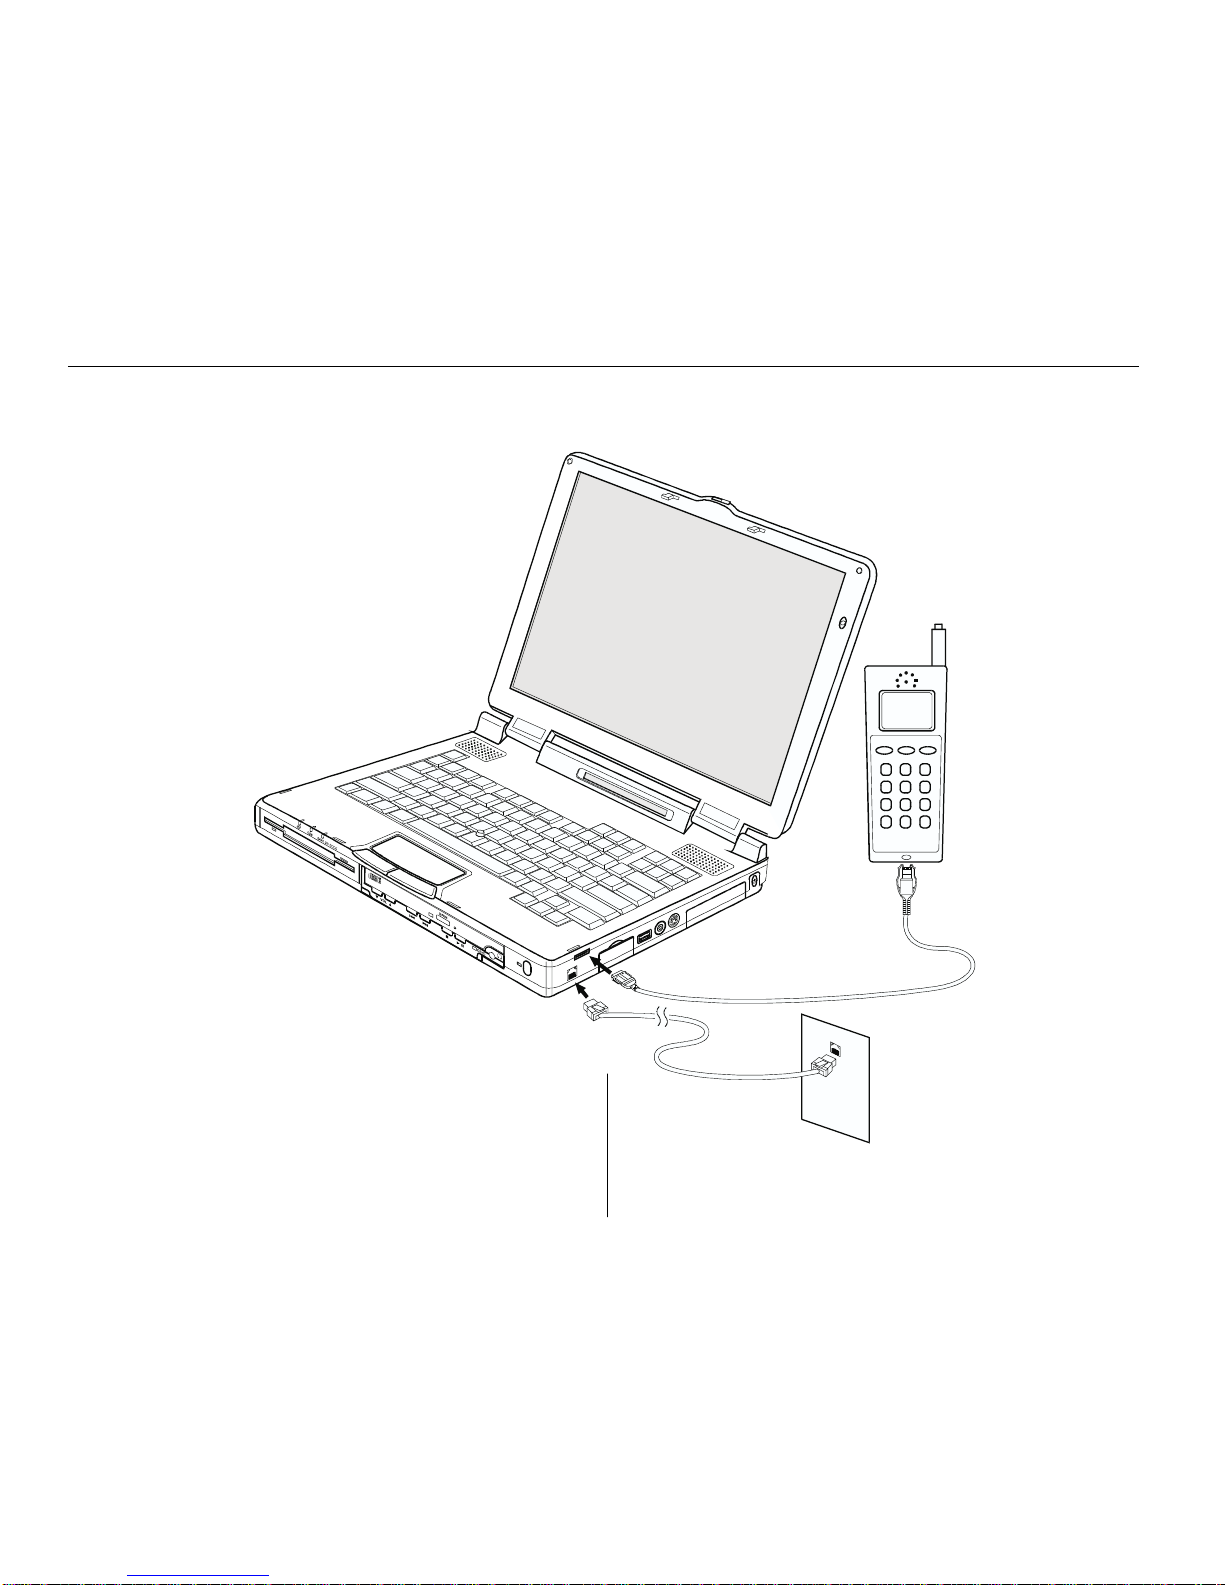
Connecting to a modem or cellular phone
• The modem uses a standard RJ-11 cable for
connecting to a phone line.
• Connectivity to certain data-ready cellular phones
for wireless data transfer.
• Refer to the “Embedded Modem’s User Guide” for
further information.
Note:
Most, but not all, Motorola phones are compatible with the
TransPort XKE. Some other brand names may be incompatible.

27
The manual eject pinhole is used only if the tray of the CDROM drive will not open. Turn off the unit, then insert an
unfolded paper clip into the hole in a horizontal direction. After
the tray’s internal latch disengages, carefully pull out the tray.
Note:
Pulling the tray out too hard can damage it.
Stop:
The laser beam used in the unit could harm your eyes.
Do not insert pins, etc., inside the unit. This drive is
equipped with a safety device which automatically
turns the laser beam off when the disk compartment
is opened. If a pin or other metal object should get
inside the unit, however, this safety device may be
defeated.
Restriction when using Suspend/Resume:
You cannot place the computer in Suspend mode while the CD is
being accessed.
Cleaning the pickup lens
Dust on the pickup lens can lead to erratic operation and
interruption of the sound during play. To clean the pickup lens,
open the disk compartment. Blow the dust off of the lens using a
camera lens blower (available at most camera stores). Do not
touch the surface of the lens.
CD-ROM drive
Figure 1-16: CD-ROM Identification label.
Caution:
Dirty, scratched, or warped disks may cause skipping
or noise. Please note the following precautions for CDROM disks:
• Handle the disk only by the edges. To keep the disk
clean, avoid touching its surface.
• Disks should be returned to their cases after use to avoid
serious scratches that could cause the laser pickup to skip.
• Do not expose disks to direct sunlight, high humidity,
or high temperatures for extended periods. Prolonged
exposure to high temperatures can warp the disk.
• Do not apply paper or write anything on either side of
the compact disk. Sharp writing instruments, or the
inks used in some felt-tip pens, may damage the surfaces
of the disk.
• Fingerprints should be carefully wiped from the surface
of the disk with a soft cloth. Unlike conventional records,
compact disks have no grooves to collect dust and
microscopic debris, so gently wiping them with a soft
cloth should remove most particles. Wipe in a straight
motion from the inside to the outside of the disk. Small
dust particles and light stains will have no effect on
reproduction quality.
• Never use such chemicals as record sprays, antistatic
sprays, benzene, or thinner to clean compact disks. Such
chemicals can damage the plastic surface of the disk.
28
Charge Lamp
No light
Orange glow
Slowly flashing
orange
Fast flashing orange
Green glow
Fast flashing green
Orange/Green
Battery operation or no battery installed.
Charging in progress.
Precharge mode:This is the state the
battery is in when it has not been used for a
long time or when it it is fully discharged.
Normally, this phase lasts only a few seconds, but in rare cases where the battery is
completely discharged, this phase may last
for up to two hours.
The battery has reached the end of its
operational life, and should be replaced.
Charging completed.
Charging cannot be accomplished properly.
Please contact Tech Support.
Meaning
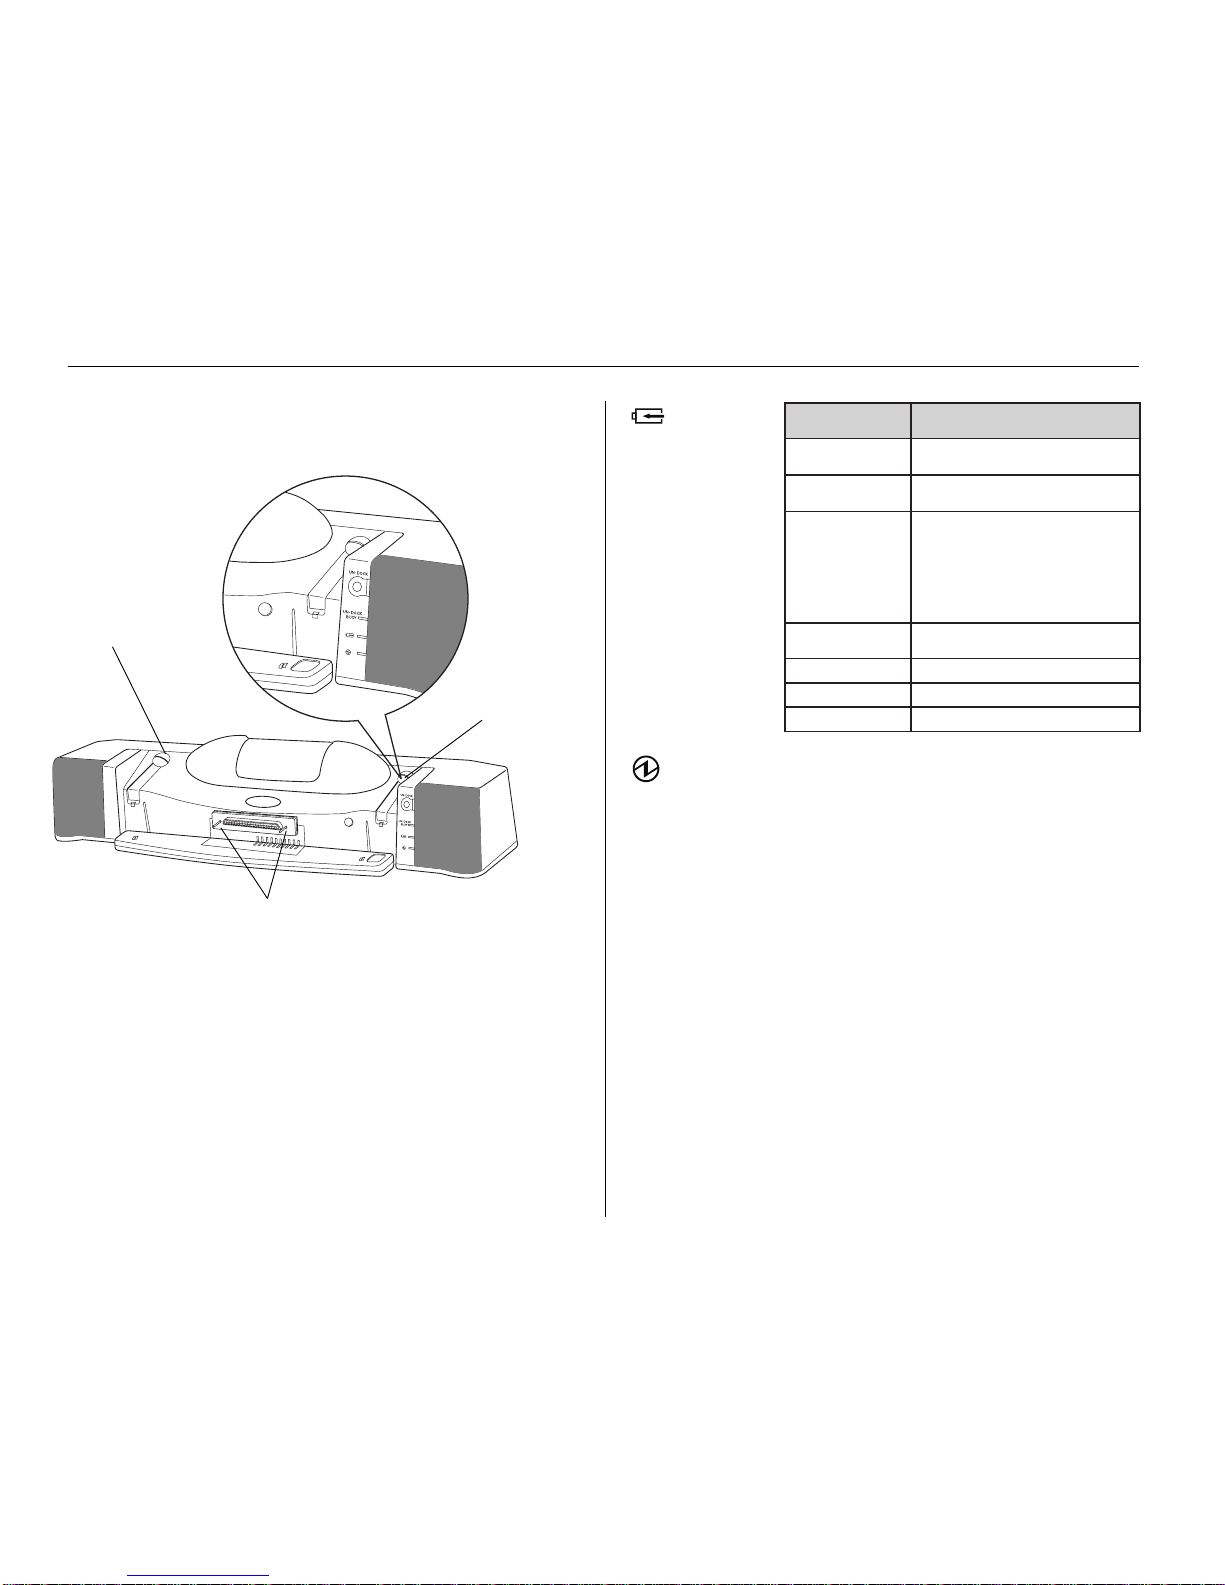
UN-DOCK button:
Press to undock.
LED:
DOCK BUSY: Glows orange while docking in progress.
Optional MicronDockTM port replicator
Figure 1-17: Port replicator front.
Release T ab
Release T ab
Guide Pins
Quick connections and multimedia features make the MicronDock
port replicator a convenient office accessory.
How do you provide the multimedia, network, and SCSI
capabilities of a desktop system with a portable computer?
TransPort XKE answers that question with the optional
MicronDock port replicator that mounts in back of your system.
This mini-docking station allows you to expand your
TransPort’s multimedia and interface capabilities without losing
any of your computer’s portability.
The add-on MicronDock unit uses a special 240-pin expansion
connector to provide several important features. You get a pair
of built-in stereo speakers, a 10/100 BaseT Ethernet connector,
and an external Ultra SCSI-2 connector that lets you attach a
wide range of SCSI devices to your machine. The unit meanwhile
transfers your usual connections (power, serial, parallel, etc.) to
the back of the unit, so you lose no features when you attach it.
Note:
The TransPort XKE will not power up on batteries when it
is attached to the MicronDock. The MicronDock must be
plugged in.
: Glows a steady green when TransPort XKE
and MicronDock system is in operation.
 Loading...