

Page 1

Promet I.S.
Process Moisture Analyzer
User’s Manual
C
t
c
le
e
S
u
n
e
M
2
L
E
N
N
A
H
C
t
c
e
el
S
u
n
e
M
I.S.
T
E
M
O
PR
4
3
2
1
s
m
r
a
l
A
lay
p
s
i
D
PR
A
y
a
l
p
is
D
HA
C
S.
T I.
E
OM
4
3
2
1
s
m
r
a
l
t
c
le
e
S
u
n
e
M
4
L
NE
N
t
c
e
el
S
u
n
e
M
I.S.
T
E
M
O
PR
4
3
2
1
s
m
r
a
l
A
lay
p
s
i
D
.
S
.
T I
E
OM
PR
4
3
2
1
s
m
r
a
l
A
y
a
l
p
is
D
3
NEL
N
A
H
C
1
EL
N
AN
H
Process Moisture Analyzer
Multi-Channel Control Unit
97221 Issue 5
March 2017
Page 2

Please fi ll out the form(s) below for each instrument that has been purchased.
Use this information when contacting Michell Instruments for service purposes.
Analyzer
Code
Serial Number
Invoice Date
Location of Instrument
Tag No
Analyzer
Code
Serial Number
Invoice Date
Location of Instrument
Tag No
Analyzer
Code
Serial Number
Invoice Date
Location of Instrument
Tag No
Page 3

Promet I.S.
Process Moisture Analyzer
For Michell Instruments' contact information please go to
www.michell.com
© 2017 Michell Instruments
This document is the property of Michell Instruments Ltd. and may not be copied or
otherwise reproduced, communicated in any way to third parties, nor stored in any Data
Processing System without the express written authorization of Michell Instruments Ltd.
Page 4

Promet I.S. User’s Manual
Contents
Safety ...............................................................................................................................vii
Electrical Safety ..........................................................................................................vii
Pressure Safety ........................................................................................................... vii
Toxic Materials ............................................................................................................vii
Repair and Maintenance ..............................................................................................vii
Calibration .................................................................................................................. vii
Safety Conformity .......................................................................................................vii
Abbreviations .................................................................................................................... viii
Warnings .......................................................................................................................... viii
1 INTRODUCTION ................................................................................................1
1.1 Performance Features ......................................................................................... 2
1.2 Applications ....................................................................................................... 2
1.3 Theory of Operation ........................................................................................... 3
1.4 System Components ........................................................................................... 4
1.4.1 User Interface ............................................................................................... 5
1.4.2 Power Supply and Input/Output Signal ........................................................... 7
1.5 Sampling System ................................................................................................ 8
2 INSTALLATION ..................................................................................................9
2.1 Unpacking the Analyzer ...................................................................................... 9
2.2 Operating Requirements ................................................................................... 10
2.2.1 Environmental Requirements ....................................................................... 10
2.2.2 Power Requirement ..................................................................................... 10
2.3 Mounting ......................................................................................................... 10
2.3.1 Control Unit Installation ............................................................................... 10
2.3.2 Mounting the Promet I.S. Sensor Assembly into the Sampling System ............. 12
2.3.3 Sampling System Installation ....................................................................... 14
2.4 Wiring ............................................................................................................. 15
2.4.1 Overall Wiring Arrangement ......................................................................... 15
2.4.2 Control Unit Wiring ...................................................................................... 16
2.4.2.1 Power Supply Input Connection.............................................................. 18
2.4.2.2 Sensor Signal Input Connection.............................................................. 20
2.4.2.3 Analog Output Connection ..................................................................... 21
2.4.2.4 Alarm Output Connection....................................................................... 22
2.4.2.5 RS485 Port Connection .......................................................................... 23
2.4.3 Sensor Assembly Wiring .............................................................................. 24
2.4.3.1 Dew-point Transmitter Wiring................................................................. 24
2.4.3.2 Optional Pressure Transmitter Wiring ...................................................... 27
3 OPERATION ....................................................................................................30
3.1 Preparation ...................................................................................................... 30
3.2 Start-Up ........................................................................................................... 30
3.2.1 Function Keys Activation .............................................................................. 30
3.2.2 Powering-up the Analyzer ............................................................................ 31
3.2.2.1 Change Units ........................................................................................ 31
3.2.2.2 Manual Set Pressure Value ..................................................................... 32
3.2.2.3 Display Brightness Adjustment ............................................................... 32
3.2.3 Sample Flow Start-Up .................................................................................. 32
3.3 Menu Structure ................................................................................................ 33
3.4 Main Reading Page ........................................................................................... 35
3.5 Display Set-Up ................................................................................................. 35
3.5.1 Pressure Unit Selection ................................................................................ 35
3.5.2 Settings for the PPMV I (Ideal Gas) Reading ................................................. 36
3.5.3 Setting the Scrolling Interval for a Unit’s Full Name ...................................... 36
3.6 Fault Alarm Set-Up ........................................................................................... 37
iv 97221 Issue 5, March 2017
Page 5

Promet I.S. User’s Manual
3.6.1 Minimum Dew-point Value for the Fault Alarm ............................................... 37
3.6.2 Maximum Dew-point Value for the Fault Alarm .............................................. 38
3.6.3 Minimum Pressure Value for the Fault Alarm ................................................. 38
3.6.4 Maximum Pressure Value for the Fault Alarm ................................................. 39
3.7 Output Set-Up .................................................................................................. 40
3.7.1 Output Source Selection .............................................................................. 40
3.7.2 Output Range ZERO Value Settings .............................................................. 41
3.7.3 Output Range SPAN Value Settings ............................................................... 41
3.8 Alarm Set-Up ................................................................................................... 42
3.8.1 Alarm Set-Point Adjustment ......................................................................... 42
3.8.2 Alarm Type Selection ................................................................................... 42
3.8.3 Alarm Source Selection ................................................................................ 43
Figures
Figure 1 Promet I.S. Control Unit ..............................................................................1
Figure 2 Structure of the Michell Ceramic Moisture Sensor ..........................................3
Figure 3 Major Components of the Promet I.S. ..........................................................4
Figure 4 User Interface ............................................................................................5
Figure 5 Dimensions of the Control Unit ..................................................................10
Figure 6 Rack Mounting Method .............................................................................11
Figure 7 Promet I.S. Sensor Assembly .....................................................................12
Figure 8 Overall Wiring Arrangement ......................................................................15
Figure 9 Control Unit Electrical Connections .............................................................17
Figure 10 POWER INPUT Socket ...............................................................................18
Figure 11 POWER INPUT Connector Block .................................................................19
Figure 12 SENSOR INPUTS Connector Block ..............................................................20
Figure 13 OUTPUT Connector Block .......................................................................... 21
Figure 14 ALARM Connector Block ............................................................................22
Figure 15 Crimped Wires .........................................................................................25
Figure 16 Cut to 5mm .............................................................................................25
Figure 17 Dew-point Transmitter Housing ................................................................25
Figure 18 Pin Assignment Drawing ...........................................................................26
Figure 19 Pressure Transmitter Connector .................................................................27
Figure 20 Removal of Terminal Block ........................................................................28
Figure 21 Pressure Transmitter Wiring Diagram .........................................................29
Figure 22 Units of Measurement Readings in Sequence ..............................................31
Figure 23 Menu Maps ..............................................................................................34
Figure 24 Dimensional Drawings...............................................................................47
Michell Instruments v
Page 6

Promet I.S. User’s Manual
Appendices
Appendix A Technical Specifi cations ..............................................................................46
A.1 Dimensional Drawings .................................................................. 47
Appendix B Serial Communications ............................................................................... 49
Appendix C Modbus RTU Comms .................................................................................54
Appendix D Hazardous Area Certifi cation ...................................................................... 57
D.1 Product Standards .......................................................................57
D.2 Product Certifi cation .................................................................... 57
D.3 Global Certifi cates/Approvals ........................................................ 57
D.4 Terminal Parameters .................................................................... 58
D.5 Special Conditions........................................................................ 58
D.6 Maintenance and Installation ........................................................ 58
Appendix E System Drawings ....................................................................................... 60
E.1 Baseefa Approved System Drawing ............................................... 60
E.2 FM Approved System Drawing ...................................................... 61
E.3 CSA Approved System Drawing ..................................................... 62
Appendix F Quality, Recycling & Warranty Information ...................................................64
Appendix G Return Document & Decontamination Declaration ........................................ 66
vi 97221 Issue 5, March 2017
Page 7

Promet I.S. User’s Manual
Safety
The manufacturer has designed this equipment to be safe when operated using the procedures
detailed in this manual. The user must not use this equipment for any other purpose than that
stated. Do not apply values greater than the maximum value stated.
This manual contains operating and safety instructions, which must be followed to ensure the safe
operation and to maintain the equipment in a safe condition. The safety instructions are either
warnings or cautions issued to protect the user and the equipment from injury or damage. Use
competent personnel using good engineering practice for all procedures in this manual.
Electrical Safety
The instrument is designed to be completely safe when used with options and accessories supplied
by the manufacturer for use with the instrument. The input power supply voltage is 85 to 265 V AC
or 10 to 72 V DC. Refer to labels on instrument or calibration certifi cate.
Pressure Safety
DO NOT permit pressures greater than the safe working pressure, as defi ned in the published
specifi cations. to be applied to the instrument.
Toxic Materials
The use of hazardous materials in the construction of this instrument has been minimized. During
normal operation it is not possible for the user to come into contact with any hazardous substance
which might be employed in the construction of the instrument. Care should, however, be exercised
during maintenance and the disposal of certain parts.
Long exposure to, or breathing of, the calibration gases may be dangerous.
Repair and Maintenance
The instrument must be maintained either by the manufacturer or an accredited service agent. Refer
to www.michell.com for details of Michell Instruments’ worldwide offi ces contact information.
Calibration
The recommended calibration interval for the analyzer is 12 months (6 months or less for agressive
gases) depending on the application in which the instrument is used. Please consult Michell
Instruments for the specifi c calibration interval (refer to www.michell.com for details of Michell
Instruments’ worldwide offi ces contact information).
Safety Conformity
This product meets the essential protection requirements of the relevant EU and US standards
and directives. Further details of applied standards may be found in the Technical Specifi cations in
Appendix A.
Michell Instruments vii
Page 8

Abbreviations
The following abbreviations are used in this manual:
A Ampere
AC alternating current
barg pressure in bar (gauge)
°C degrees Celsius
°F degrees Fahrenheit
DC direct current
dp dew point
Hz Hertz
lb/MMscf pounds per million standard cubic feet
lbf-ft pound force per foot
Promet I.S. User’s Manual
mA milliampere
mg/m
mm millimeters
Nl/min normal liters per minute
ppm
psig pressure in pound(s) per square inch (gauge)
scfh standard cubic feet per hour
T temperature
V Volts
W Watts
” inch(es)
Warnings
The following general warnings listed below are applicable to this instrument. They are
repeated in the text in the appropriate locations.
3
milligrams per cubic meter
parts per million by volume
V
Where this hazard warning symbol appears in the following
sections it is used to indicate areas where potentially hazardous
operations need to be carried out.
Where this symbol appears in the following sections it is used to
indicate areas of potential risk of electric shock.
viii 97221 Issue 5, March 2017
Page 9

Promet I.S. User’s Manual
1 INTRODUCTION
The Promet I.S. Process Moisture Analyzer is a continuous, on-line instrument for the
measurement of absolute moisture content in gas. It is designed to fulfi l a wide range
of applications and provide for the monitoring and/or control of moisture in gas. The
instrument consists of two component parts: the control unit and the sensors’ assembly
(moisture transmitters and optional pressure transmitter). They are individually calibrated
to a single standard allowing for total interchangeability between combinations of
sensors and control units.
The instrument covers the ranges –100 to +20°Cdp ( -148 to +68°Fdp), 0 to 9999
ppm
as well as 0 to 1000 lb/MMscf and g/m3 for natural gas. Selection of the displayed
V
moisture unit of measure is factory-set but may be easily changed by the user. Four
alarm relay contacts are provided which are user-confi gurable both in terms of set-point
and operating mode. Current output is factory set at 4-20 mA.
The Promet I.S. performs moisture content calculations based on the measured dew
point and the analysis pressure. The default setting of the monitor assumes atmospheric
pressure but the customer can set a fi xed value of elevated pressure - for this to be
a valid method, the sensor must be installed at a constant, known analysis pressure.
Alternatively, there is an active pressure compensation option providing a loop-powered
intrinsically-safe pressure transmitter connecting to the second input channel on the
control unit, for dynamic pressure compensation.
INTRODUCTION
The Promet I.S. Control Unit must be placed in a non-hazardous area suitable for
electronic analytical equipment. The moisture transmitter and optional pressure
transmitter can be positioned close to the process sample take-off point in Zone 0, Zone
1 or Zone 2 (Class I, Division 1, Groups A,B,C and D) hazardous area. The control unit
and transmitters are connected via a standard 2-wire instrumentation cable protected
by safety isolation interface units.
Figure 1
Promet I.S. Control Unit
Michell Instruments 1
Page 10

INTRODUCTION
1.1 Performance Features
• State-of-the-art ceramic moisture sensor with chemically inert materials
coupled with physical resilience provides long-term reliability in the most
arduous applications. Robust construction also enables measurement
directly at process / pipeline pressure up to 45 MPa (450 barg/5801 psig).
• High integrity moisture measurement from ambient to ppb level with an
exhaustive list of hygrometric units, including key parameters of natural
gas.
• Two 4-20 mA output with confi gurable units / ranges. RS485 Modbus RTU
communication. Four built-in user-adjustable alarm contacts.
• Assured measurement accuracy with each sensor calibrated across the
entire measurement range and certifi ed traceable to NPL (UK) and NIST
(USA).
• User-programmable or real-time active pressure compensation for
moisture content calculation.
Promet I.S. User’s Manual
• Certifi ed intrinsically safe.
• Replaceable sensor element with Michell Calibration Exchange Service for
professional, scheduled and low cost recalibration to minimize downtime
and cost.
• Up to four independent measurement channels with any combination of
moisture in gas and moisture in liquid measurement at low per-channel
cost.
• Customized sampling systems to meet even the most demanding
applications.
1.2 Applications
• Natural gas production and processing
• Pipeline drying
• Offshore export pipeline natural gas
• Transmission pipeline monitoring
• Fiscal metering/custody transfer of gas
• Gas storage facilities
• Refi nery recycle gas – reformer and platformer
• LNG production processing and receiving terminals
2 97221 Issue 5, March 2017
Page 11

Promet I.S. User’s Manual
1.3 Theory of Operation
The reliable and robust sensor design is fundamental to achieving accurate measurement
of moisture in process over a long period of time. Proprietary thick- and thin-fi lm
techniques are applied in the Michell Ceramic Moisture Sensor. The inert materials of
the sensor have a high resistance to aggressive media while the inherent strength of
the sensor and the thermal bonded connections to the active device ensures reliable
operation.
INTRODUCTION
Permeable Gold film
g
g
Hygroscopic Mono-layer
Base Electrode
g
Ceramic Substrate
g
Figure 2
Structure of the Michell Ceramic Moisture Sensor
The ceramic sensor responds to the partial pressure of water vapor in the gas being
measured, which is directly related to the dew-point temperature.
Calibration is certifi ed traceable to NPL (UK) and NIST (USA) through the use of dew-
point transfer standards.
The fi rmware of the Promet I.S. incorporates dew point/pressure to moisture content
conversion data for ideal gas and natural gas. The calculation for natural gas uses either
the long established IGT research Bulletin No.8 or the more recently published ISO
18453, depending on the customer’s preference.
Michell Instruments 3
Page 12
INTRODUCTION
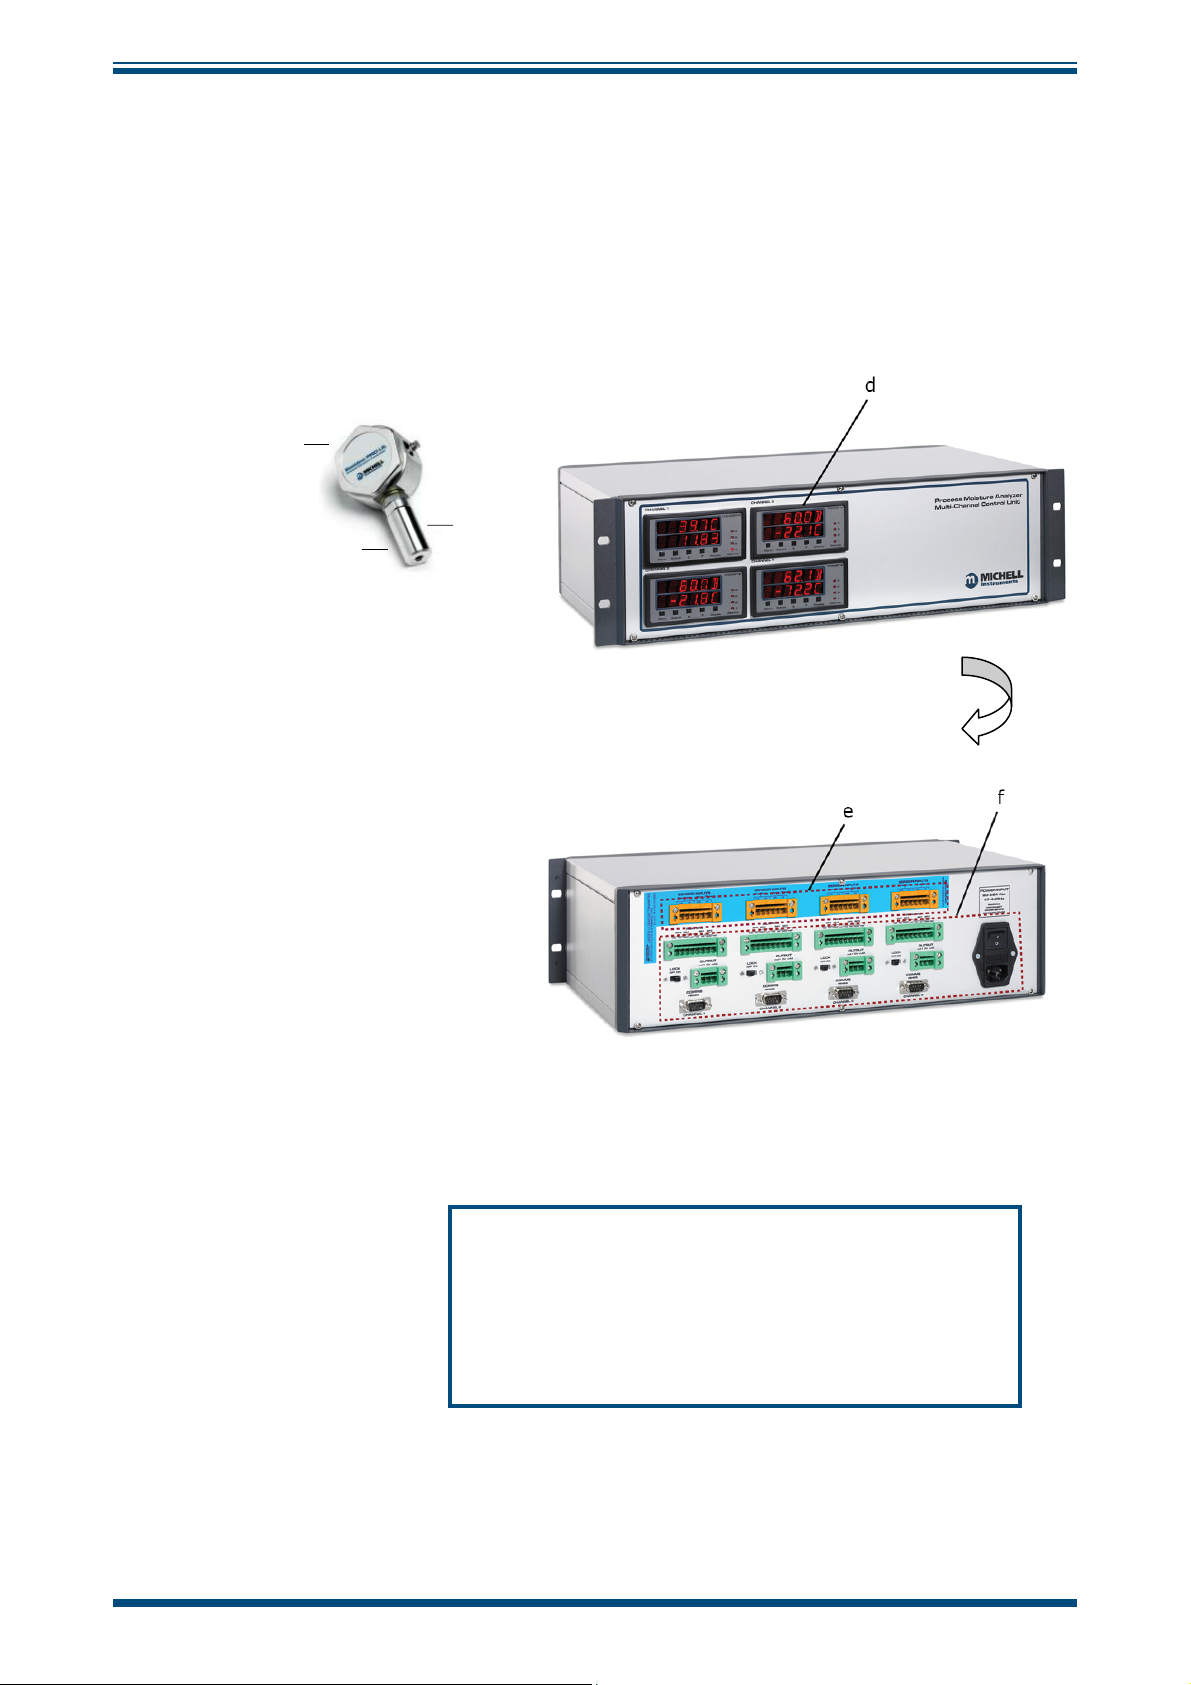
1.4 System Components
The Promet I.S. Process Moisture Analyzer consists of:
• the sensor assembly
• the control unit
c
b
Promet I.S. User’s Manual
a
Sensor Assembly
Control Unit
(Up to four channels can have any combination of Promet I.S. and Liquidew I.S.*)
a Port for optional pressure transmitter
b Sensor block
c Dew-point transmitter
d User interface
e Electrical connections - to hazardous area
f Electrical connections - to non-hazardous area
Figure 3
Major Components of the Promet I.S.
* Liquidew I.S. is a sister product of the Promet I.S. used for moisture in liquid
measurement
4 97221 Issue 5, March 2017
Page 13
Promet I.S. User’s Manual
Select
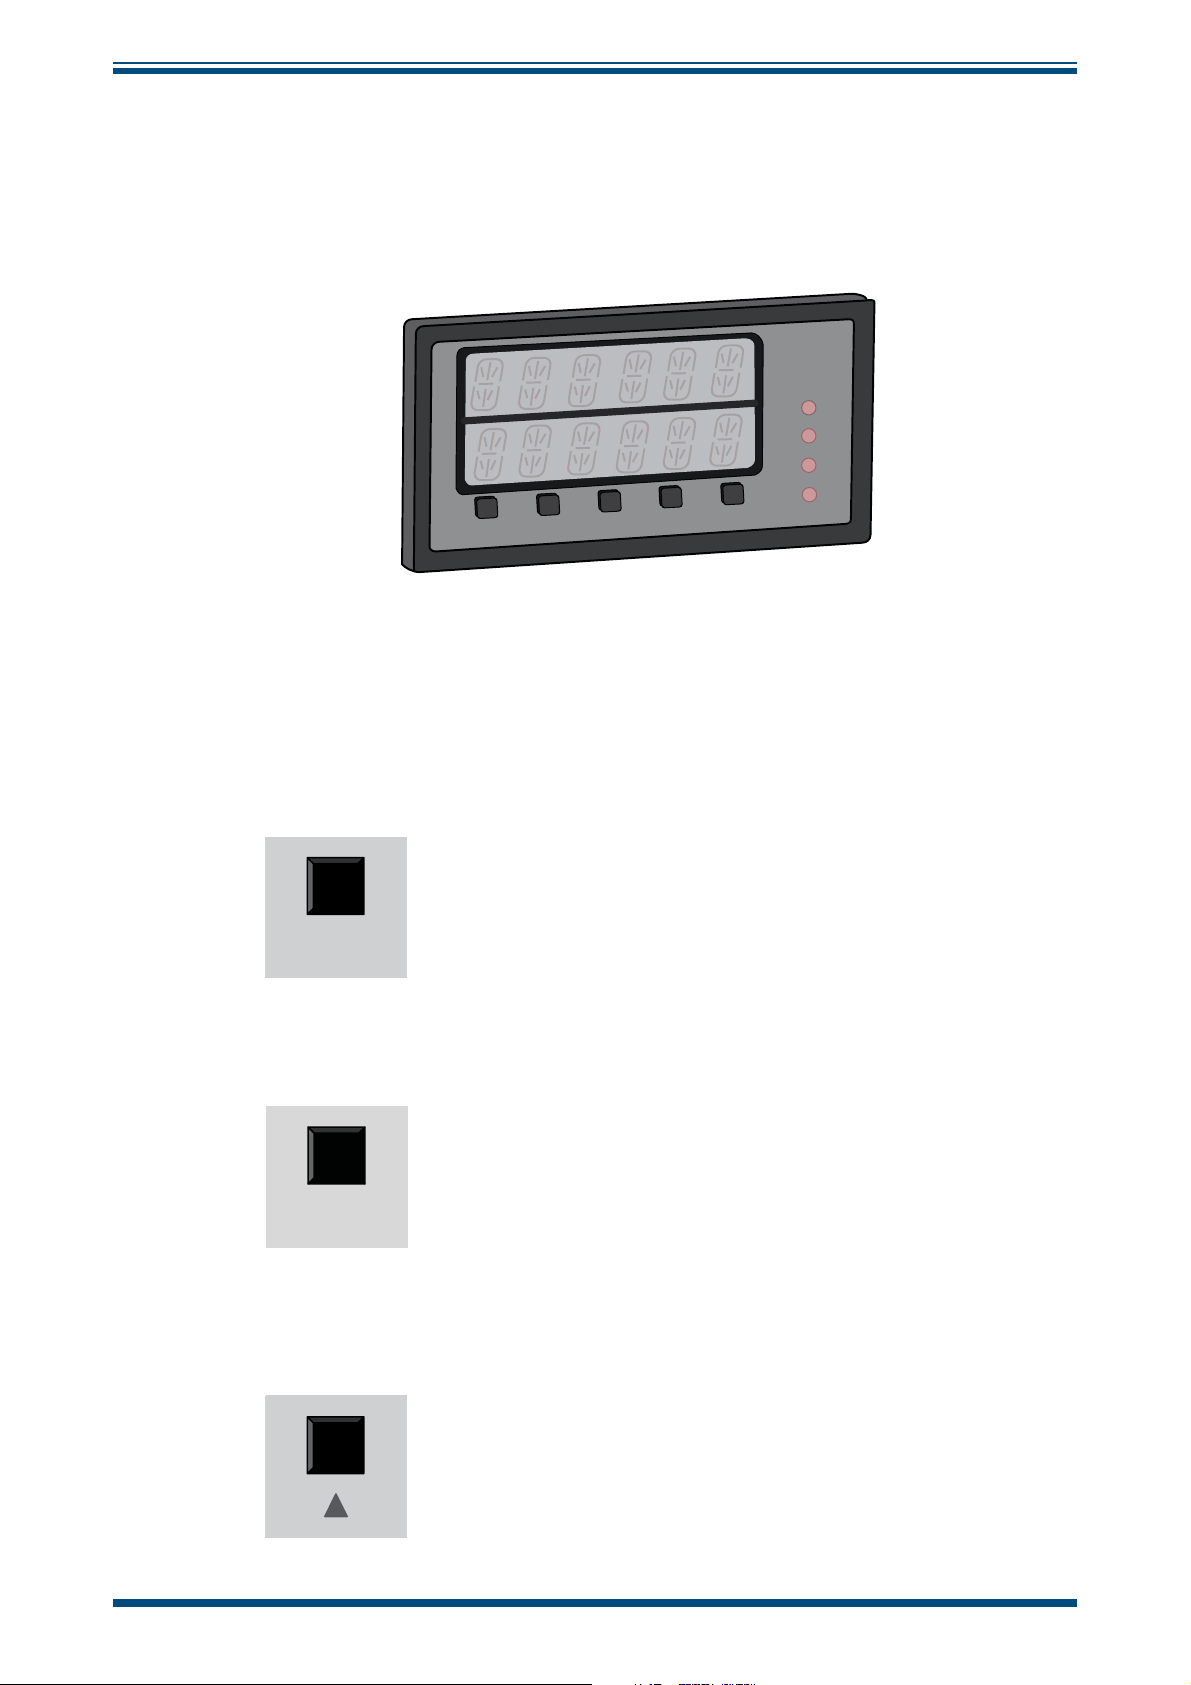
1.4.1 User Interface
The Promet I.S. user interface is located on the control unit. There is a two-line, six digit
(15 segment), LED display and four alarm indicators. Five push-button function keys
facilitate data display, parameter setting and system adjustment.
Me
INTRODUCTION
.
.S
W I
E
D
UI
IQ
L
C
4
.
9
3
C
9
.
1
-
splay
i
D
T
S
ect
el
S
u
n
4
3
2
1
s
rm
a
Al
Figure 4
User Interface
The operation of the function keys are shown below and more information can be found
in Section 3:
•
Menu key:
The Menu key is used to enter and exit the set-up menu.
Menu
•
Menu
Select key:
At any level within the set-up menu, press and hold the
key to return to the default screen.
The Select key is used to enter the sub-menu and to confi rm the
selection.
Michell Instruments 5
• key:
The key is used to scroll up through pages in the top and sublevel menus and to increase values in sub-level menus.
Page 14

INTRODUCTION
• key:
Promet I.S. User’s Manual
The key is used to scroll down through pages in the top and
sub-level menus and to decrease values in sub-level menus.
•
Display key
The Display key is used to change the display unit (see Section
3.2.2).
Display
The four LED alarm indicators will light up when the specifi c alarm relay is activated.
Settings for the alarm relays are explained in Section 3.8.
6 97221 Issue 5, March 2017
Page 15

Promet I.S. User’s Manual
1.4.2 Power Supply and Input/Output Signal
The terminal blocks for the power supply, signal input, signal output and alarm output
are located on the back panel of the control unit (as shown in
• Power Supply
The Promet I.S. requires either 85 to 265 V AC or 10 to 72 V DC power input,
depending on the model ordered.
• Signal Input
There are two 4-20 mA signal input channels from the dew-point and optional
pressure sensors to the control unit. Both input channels are isolated by
built-in galvanic type I.S. barriers.
INTRODUCTION
Figure 9)
.
• Signal Output
There are two 4-20 mA linear signal output channels. The output channel 1 is
used for the dew point, moisture or pressure signal, with confi gurable ranges.
Output channel 2 has a fi xed pressure signal and cannot be confi gured.
There is one RS485 Modbus RTU digital communication port. Refer to
Appendix B.
• Alarm Output
There are four alarm relays. Alarms 1 and 2 are Form C contacts rated 10A
/ 240 V AC or 8A / 24 V DC, non-inductive load. Alarms 3 and 4 are Form
A contacts rated 5A / 240 V AC or 4A / 24 V DC, non-inductive load. The
control actions and set points of these four alarms are user-programmable.
A fault alarm with adjustable set points is also included.
Michell Instruments 7
Page 16

INTRODUCTION
1.5 Sampling System
The Promet I.S. requires a clean sample of the gas mixture that meets the pressure and
fl ow requirements of the transmitter. The design of the sampling system will depend
on the specifi c application.
The requirements for the sample gas going into the sensor block are as follows:
• Temperature: -40 to +60°C (-40 to +140°F)
(-20 to +40°C (-4 to +104°F) recommended for optimum performance)
• Maximum pressure: 45 MPa (450 barg / 5801 psig)
Promet I.S. User’s Manual
• Flow rate: 1 to 5 Nl/min (2.1 to 10.6 scfh)
NOTE: Contact Michell Instruments if you wish to order a specifi c sampling
system.
Please refer to the Promet I.S. Premium Sampling System Instructions if a Michell
sampling system has been ordered with the Promet I.S.
8 97221 Issue 5, March 2017
Page 17

Promet I.S. User’s Manual
2 INSTALLATION
It is essential that the installation of the electrical and gas
supplies to this analyzer be undertaken by suitably qualifi ed
2.1 Unpacking the Analyzer
Unpack carefully as follows:
INSTALLATION
personnel.
a. Remove the accessories (if ordered).
b. If no accessories have been ordered the delivery should contain following
items:
• Promet I.S. control unit
• Promet I.S. sensor assembly (if a sampling system has been
ordered the sensor assembly should already be mounted in the
sampling system)
• User manual
• Certifi cates of calibration and conformity
• Power lead (only for 85 to 265 V AC version)
c. Remove the Promet I.S. sensor assembly from the box.
d. Lift out the control unit together with its end packing pieces.
e. Remove the end packing pieces and set the control unit down at the site
of installation. Save all the packing materials for the purpose of returning
the instrument to the manufacturer for service.
If ordered, the Promet I.S. Premium Sampling System will be shipped in a separate box.
Michell Instruments 9
Page 18

INSTALLATION
2.2 Operating Requirements
2.2.1 Environmental Requirements
The Promet I.S. sensor assembly is intrinsically safe and designed to be installed onsite, indoors or outdoors, directly at the point of measurement within a Hazardous
Area. The sensor assembly is ATEX and IECEx or CSA and FM certifi ed (to be specifi ed
at time of order). To operate correctly, the sensor assembly must be installed within
a suitable sampling system (Michell Instruments can supply standard and custom
designed sampling systems).
The Promet I.S. control unit is NOT designed for use in a Hazardous Area and should
only be installed in a safe area. The control unit is intended for indoor installation only
and operates within environmental limits of 0 to +50°C (+32 to +122°F) and <90%RH.
The control unit contains built-in isolation barriers permitting connection, direct from
the Hazardous Area, of the Promet I.S. sensor assembly.
2.2.2 Power Requirement
The Promet I.S. control unit can be ordered for either of the following electrical supplies:
Promet I.S. User’s Manual
• 85 TO 265 V AC, 47/63 Hz @ 4W max 10W
OR
• 10 to 72 V DC @ 4W max 10W
The Promet I.S. sensor assembly is powered through the 2-wire signal cable directly
from the control unit.
Please refer to the Promet I.S. Premium Sampling System Instructions for the power
requirement of the sampling system.
2.3 Mounting
2.3.1 Control Unit Installation
The Promet I.S. control unit is contained in a 19” sub-rack case (size 3U). It should
be installed in a 19” rack using the mounting holes provided. It should be placed in a
position free from any appreciable vibration and shaded from direct sunlight.
NOTE: The materials and construction of the control unit allow for operation
in an indoor, clean, non-hazardous only, control room environment.
375mm + 100mm for cable clearance
CHANNEL 1
CHANNEL 2
Figure 5
CHANNEL 3
CHANNEL 4
483mm
(19”)
Dimensions of the Control Unit
(14.75” + 3.9”)
132mm
(5.2”)
3U
10 97221 Issue 5, March 2017
Page 19
Promet I.S. User’s Manual
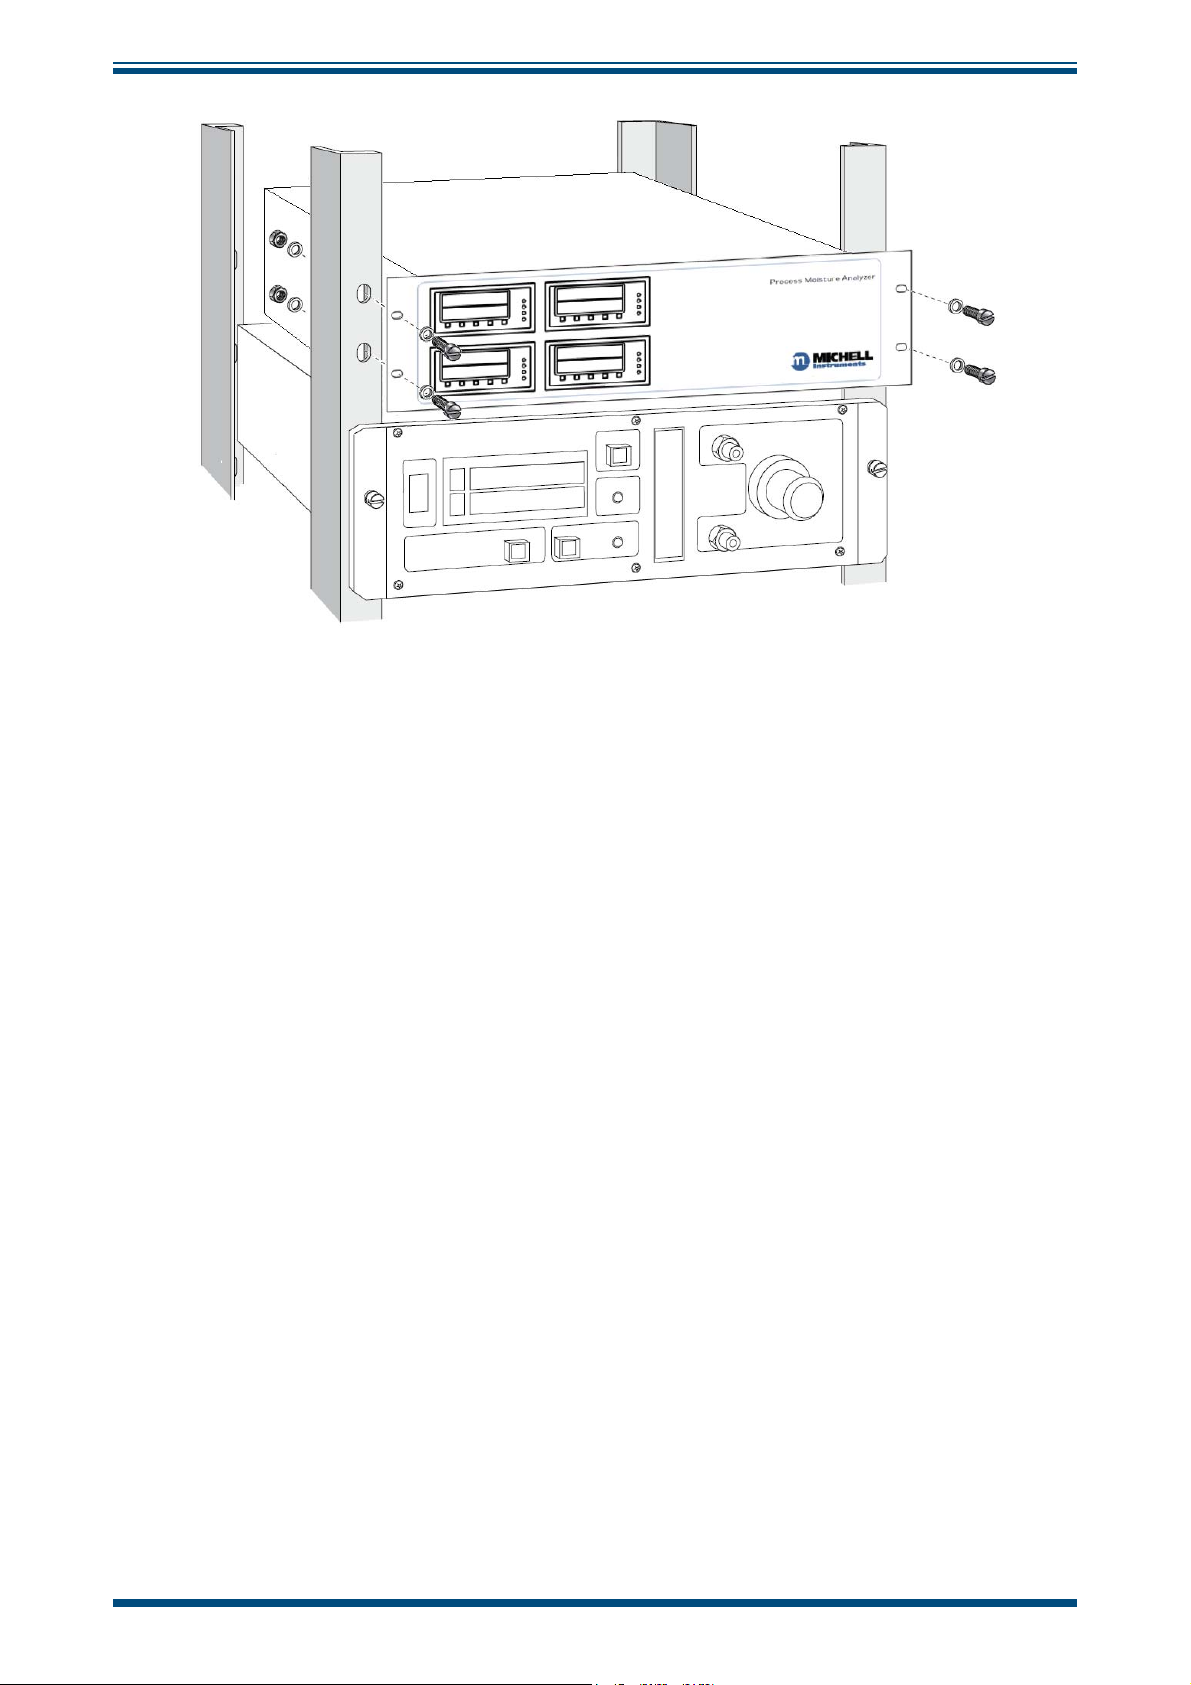
INSTALLATION
Figure 6
Figure 6
standard 19” rack. To fi t the unit proceed as follows:
a. Remove all terminal blocks for the electrical connections.
b. If necessary, remove any covers from the rack cabinet to gain access to
c. Connect up the sensor input, analog and alarm output terminal blocks
d. Slide the instrument into the rack and support its weight while the four
e. Ensure that the front panel of the instrument is fl ush and square with the
f. Insert the terminal blocks into their respective sockets on the rear of the
illustrates the general method for fitting a rack mount instrument into a
the rear and side.
to the internal rack wiring, ensuring that there is suffi cient free cable to
permit withdrawal of the instrument from the rack.
fi xing screws are inserted.
front of the rack and tighten the fi xing screws.
instrument.
Rack Mounting Method
g. Connect the power supply cable and switch the
h. Re-fi t any covers to the rack as necessary.
NOTE: Allow a minimum clearance depth of 100mm (4”) behind the instrument
housing for cables and vents.
ON/OFF switch to ON.
Michell Instruments 11
Page 20

INSTALLATION
2.3.2 Mounting the Promet I.S. Sensor Assembly into the Sampling System
HIGH PRESSURE! High pressure gases are potentially hazardous.
Energy stored in these gases can be released suddenly and with
extreme force. High pressure systems should be assembled and
operated only by people who have been trained in proper safety
practices.
NOTE: If the analyzer has been ordered with a sampling system, the Promet
I.S. sensor assembly will have been installed and tested in the factory. In
that case disregard the following section and go to Section 2.3.3.
Promet I.S. User’s Manual
Figure 7
The Promet I.S. sensor assembly consists of:
1
Dew-point transmitter - Easidew PRO I.S.
2
Pressure transmitter (optional)
Sensor block
3
To assemble, proceed as follows:
a. Remove the protective cap on the dew-point transmitter (Easidew PRO
I.S.) before installation and retain for future use. Take care to prevent any
contamination of the sensor before installation (do not touch or handle
the sintered guard - located on the tip of the Easidew PRO I.S.).
Promet I.S. Sensor Assembly
12 97221 Issue 5, March 2017
Page 21

Promet I.S. User’s Manual
b. The dew-point transmitter has a 5/8” UNF parallel mounting thread which
should be installed directly into the sampling block with the bonded
seal provided. The bonded seal provided should be placed over
the transmitter mounting thread before it is screwed into the
sampling block.
c. Finger tighten the dew-point transmitter by gripping the spanner/wrench
fl ats on the body - NOT the transmitter body cover. Completely tighten
using a spanner/wrench until the bonded seal is fully compressed to a
minimum torque of 30.5 Nm (22.5 lbf-ft).
INSTALLATION
d. The pressure transmitter has a 1/8” NPT thread. It can be installed into
the 1/8” NPTF port on the sensor block. Follow the standard Swagelok
installation instructions to make the connection.
To install the complete Promet I.S. sensor assembly into the sampling system, follow
these steps:
a. Select a location to mount the sensor assembly which has suffi cient
clearance for connecting and disconnecting the inlet/outlet tubing and
cable. The surface should be strong enough to hold the analyzer.
b. Mount the Promet I.S. sensor assembly into the sampling system via its
two mounting holes.
c. Sample gas connections are made via the gas inlet and gas outlet ports as
shown in
ports. Michell recommends using Swagelok® 6mm to 1/8” NPT (ordering
code SS-6M0-1-2) or 1/4” to 1/8” NPT (ordering code SS-400-1-2) male
connectors to connect these two ports to the 6mm or 1/4” sampling
system tubing. Follow standard Swagelok® installation instructions to
make the connections.
Figure 7
. Both the gas inlet and outlet port are 1/8” NPT female
®
d. The sensor assembly will then be supported by the tubings connecting
to it.
Although the operation of the Easidew PRO I.S. dew-point transmitter is not sample
fl ow-rate dependant, it is important to ensure that the fl ow velocity through the sample
line to the sampling block is high enough to avoid long time lags in response to changes
in moisture at the sample source. Michell recommends that a fl ow-rate of 1 to 5 Nl/min
(2.1 to 10.6 scfh) (or equivalent at pressure) be set and that the dew-point transmitter
is mounted as close as practicably possible to the sample source.
Michell Instruments 13
Page 22

INSTALLATION
2.3.3 Sampling System Installation
HIGH PRESSURE! High pressure gases are potentially hazardous.
Energy stored in these gases can be released suddenly and with
extreme force. High pressure systems should be assembled and
operated only by people who have been trained in proper safety
To install the sampling system follow the steps below:
a. Select a location close to the measurement point. The ambient temperature
should be within the range of -20 to 60°C (-4 to +140°F) (preferably 0
to +40°C (+32 to +104°F) for optimum performance). Consult Michell
for special heating or cooling options if the temperature is outside of this
range.
Promet I.S. User’s Manual
practices.
b. Fasten the sampling system to a vertical surface or instrument stand
using the four M8 size mounting holes at each corner.
c. Connect the sample inlet and outlet tubing to the fi ttings of the inlet/outlet
ports on the sampling system. If the sampling system has been ordered
from Michell, the fi tting is a 6mm or 1/4” Swagelok
Follow standard Swagelok® installation instructions for the connection
procedure.
NOTE: The sampling line between the process point and the sampling system
should be as short as possible to minimize the lag time.
®
bulkhead union.
14 97221 Issue 5, March 2017
Page 23
Promet I.S. User’s Manual
2.4 Wiring
These tasks are to be undertaken only by suitably qualifi ed
personnel. All the connections to the rear panel are electrical
connections. Exercise due caution, particularly when connecting
to external alarm circuits which could be at high potential.
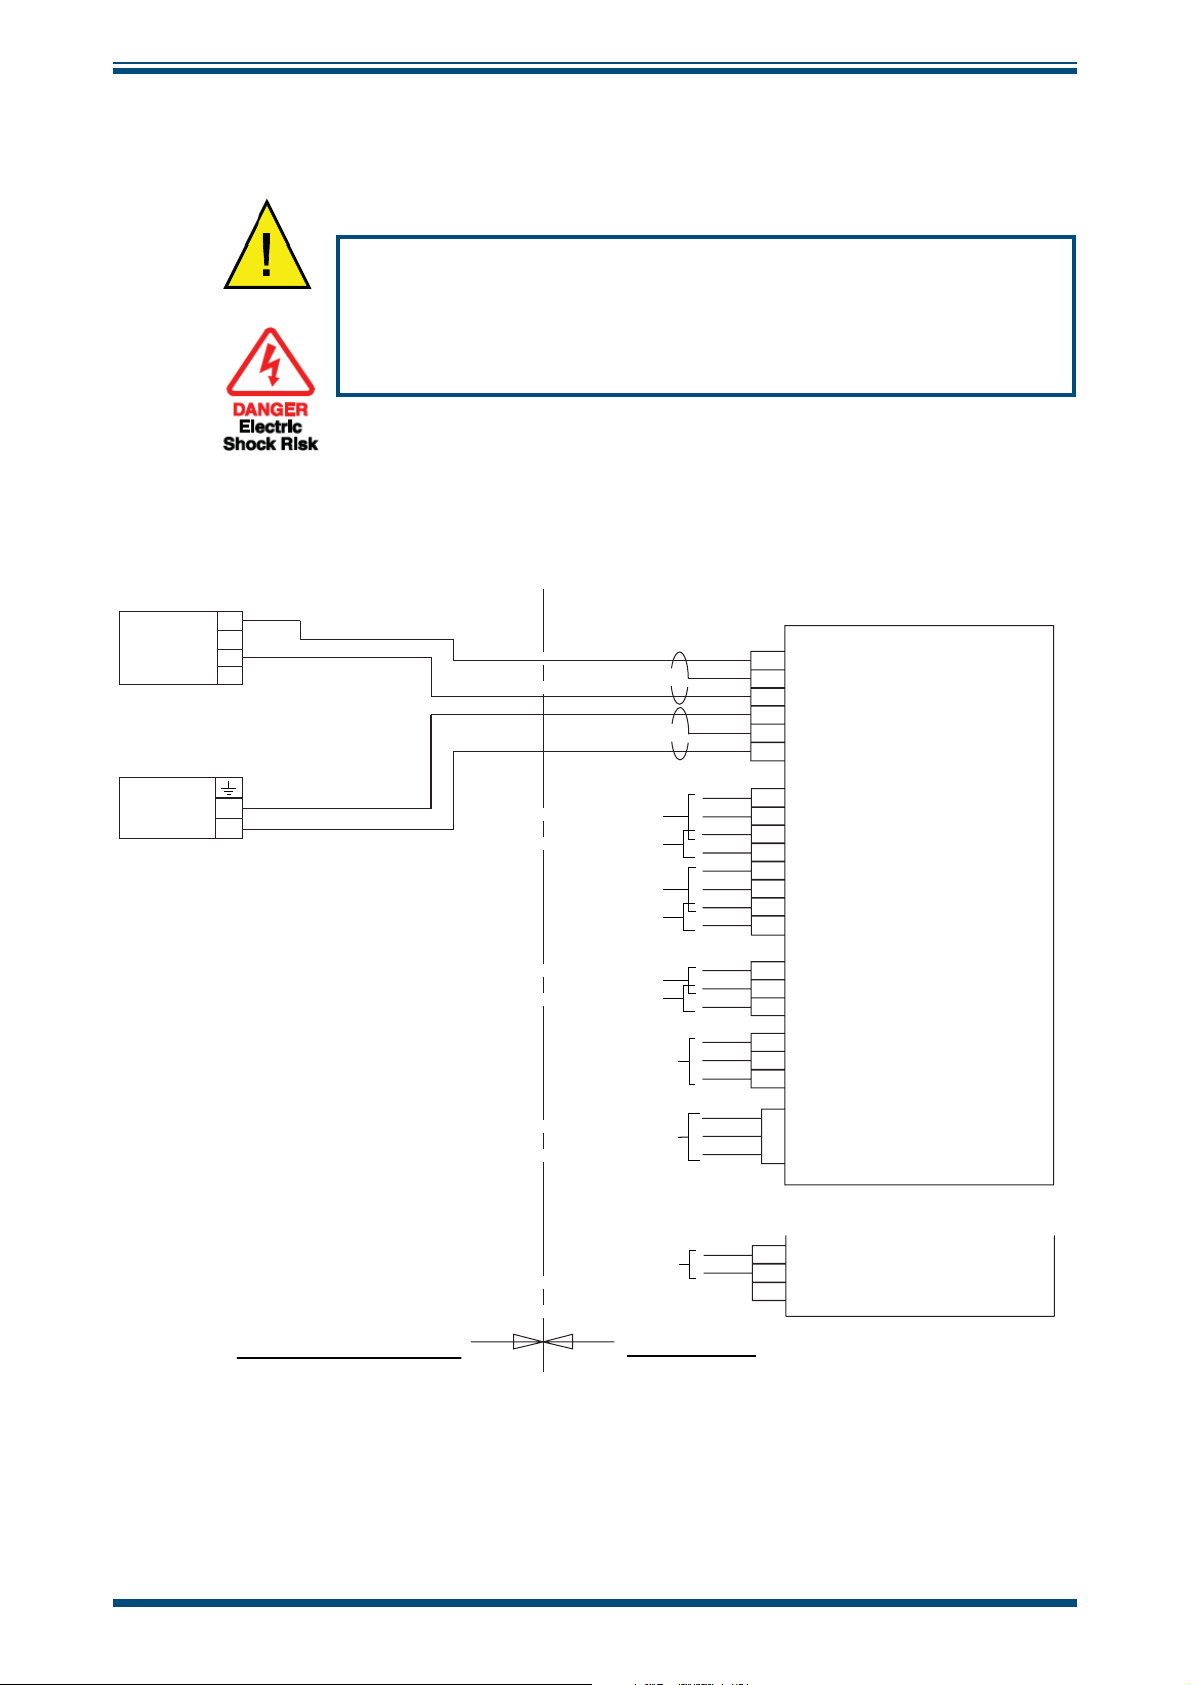
2.4.1 Overall Wiring Arrangement
EASIDEW PRO I.S.
DEW-POINT TX
4
3
2
1
PRESSURE TX
(optional)
CONTROL UNIT
mA
SCN
+V
SENSOR
mA
INPUTS
SCN
+V
INSTALLATION
-
+
HAZARDOUS AREA
ALARM 2
ALARM 4
ALARM 1
ALARM 3
OUTPUT 1
OUTPUT 2
RS 485
90-264 VAC
POWER SUPPLY
(BY OTHERS)
10-72 VDC
POWER SUPPLY
(BY OTHERS)
SAFE AREA
GND
L
N
E
+V
0V
NO
NC
COM
NO
ALARMS
NO
NC
COM
NO
mA
0V
OUTPUT
mA
5
A
B
COMMS
3
2
POWER
SOCKET
24V
POWER
0V
CONNECTOR
Gnd
or
Figure 8
Overall Wiring Arrangement
Michell Instruments 15
Page 24

INSTALLATION
2.4.2 Control Unit Wiring
The electrical connections are located at the rear panel of the control unit. There are
spaces for four individual channels.
The only connections on the control unit which can take cables
Promet I.S. User’s Manual
HAZARDOUS AREA INFORMATION:
from hazardous area are the connectors labelled
SENSOR INPUTS.
ALL OTHER CONNECTORS MUST NOT BE CONNECTED TO CABLES
FROM HAZARDOUS AREA
NOTE: Make sure channels are connected correctly.
Connections for each channel are identical.
The following text will only refer to one channel.
16 97221 Issue 5, March 2017
Page 25

Promet I.S. User’s Manual
SENSOR INPUTS
Dew Point Temp/Pres.
mA +V mA +V
INSTALLATION
Power input
socket and
switch
85 to 265 VAC version
OR
Power input
connector block
10 to 72 VDC version
e
Sensor signal
input
ALARMS
SP2 SP4 SP1 SP3
EASIDEW PRO I S DEWPOINT TRANSMITTER
SYSTEM CERTIFICATE No’s Baseefa07Y0027
Ex ia IIC T4 (-20C TO +60C)
NO NC COM NO NO NC COM NO
OUTPUT
e
COMMS
RS485
mA1 0V mA2
LOCK
OFF ON
Figure 9
HAZARDOUS AREA
CONNECTIONS
e
Alarm output
User interface
key lock
e
Analog
output
e
RS485 port
Control Unit Electrical Connections
Michell Instruments 17
Page 26

INSTALLATION
2.4.2.1 Power Supply Input Connection
85 to 265 V AC
Promet I.S. User’s Manual
The AC power supply connection is a push fi t socket labelled
below.
POWER INPUT
Figure 10
POWER INPUT Socket
Socket
IEC connector
POWER INPUT as shown
The method of connection is as follows:
a. Turn off the AC power. Ensure that both ends of the power cable are
potential free, i.e. not connected to an AC power supply.
b. Check that the
c. Push the IEC connector fi rmly into the
d. Connect the free end of the power cable to a suitable AC power supply
source (voltage range 85 to 265 V AC, 47/63 Hz) and switch on the
AC supply. The instrument may then be switched on, as required, by
pressing the
ON/OFF switch is switched to OFF.
POWER INPUT socket.
ON switch.
18 97221 Issue 5, March 2017
Page 27

Promet I.S. User’s Manual
10 to 72 V DC
If a DC power supply version is ordered it will come with a 3-way push fi t connector
block labelled
POWER INPUT as shown below.
INSTALLATION
POWER INPUT
e
socket
e
+v
Gnd
0V
Figure 11
The method of connection is as follows:
a. Turn off the power. Ensure that both ends of the power cable are potential
free i.e., not connected to a power supply.
b. Remove the terminal block from the
c. Strip back the wires of the power cable, exposing approximately 6mm
(0.2”) - the use of crimps/wire ferrules is recommended.
POWER INPUT Connector Block
POWER INPUT socket.
Terminal block
d. Insert the +24 V DC lead into the
and tighten the screw.
e. Insert the 0V lead into the
tighten the screw.
f. Check that the wiring has been completed correctly.
g. Push the terminal block fi rmly back into the
NOTE: There is no power switch for the DC power supply version;
the analyzer will be turned on automatically as soon as power is
supplied. Connect the free end of the power cable to a suitable DC power
supply source (voltage range 10 to 72 V DC). The instrument may then be
switched on, as required, by the power switch at the source.
+V terminal way on the terminal block
0V terminal way on the terminal block and
POWER INPUT socket.
Michell Instruments 19
Page 28

INSTALLATION
2.4.2.2 Sensor Signal Input Connection
HAZARDOUS AREA INFORMATION
Cables from transmitters mounted in hazardous areas can be
connected directly to the
are built-in Galvanic I.S. barriers for all connections made to this
Refer to ATEX/CSA/FM/IECEx certifi cates for the dew-point and
optional pressure transmitters’ connection cable requirements
which stipulate maximum permissible mutual capacitance and
All wiring procedures should be in accordance with local
Two input ports are provided for signals from the dew-point transmitter and the optional
pressure transmitter respectively. They are connected via a single 6-way push fi t
connector block labelled
SENSOR INPUTS as shown below.
Promet I.S. User’s Manual
SENSOR INPUTS connector block. There
connector block.
inductance to resistance ratio.
electrical codes.
Figure 12
The method of connection is as follows:
a. Remove the terminal block from the
b. Strip back the wires of the dew-point transmitter signal cable, exposing
approximately 6mm (0.2”) - the use of crimps/wire ferrules is recommended.
c. Insert the + 4-20 mA lead into the
terminal block and tighten the screw.
d. Insert the – 4-20 mA lead into
terminal block and tighten the screw.
e. Strip back the wires of the pressure transmitter signal cable, exposing
approximately 6mm (0.2”) - the use of crimps/wire ferrules is
recommended.
f. Insert the + 4-20 mA lead into the
the terminal block and tighten the screw.
g. Insert the – 4-20 mA lead into the
the terminal block and tighten the screw.
h. Check that the wiring has been completed correctly.
SENSOR INPUTS Connector Block
SENSOR INPUTS socket.
Dew Point +V terminal way on the
Dew Point mA terminal way on the
Temp./Press. +V terminal way on
Temp./Press. mA terminal way on
i. Push the terminal block fi rmly back into the
SENSOR INPUTS socket.
20 97221 Issue 5, March 2017
Page 29

Promet I.S. User’s Manual
2.4.2.3 Analog Output Connection
Two analog output ports are provided for moisture content signal and pressure signal
respectively. They are connected via a single 3-way push fi t connector block labelled
OUTPUT as shown below.
INSTALLATION
OUTPUT
e
socket
e
mA1
mA2
0V
Figure 13
The method of connection is as follows:
a. Remove the terminal block from the
b. Strip back the wires of the moisture content signal cable, exposing
approximately 6mm (0.2”) - the use of crimps/wire ferrules is recommended.
c. Insert the + 4-20 mA lead into the
block and tighten the screw.
d. Insert the – 4-20 mA lead into the
and tighten the screw.
e. Strip back the wires of the pressure signal cable, exposing approximately
6mm (0.2”) - the use of crimps/wire ferrules is recommended.
OUTPUT Connector Block
OUTPUT socket.
mA1 terminal way on the terminal
0V terminal way on the terminal block
Terminal block
f. Insert the + 4-20 mA lead into the
block and tighten the screw.
g. Insert the – 4-20 mA lead into the
and tighten the screw.
h. Check that the wiring has been completed correctly.
i. Push the terminal block fi rmly back into the
mA2 terminal way on the terminal
0V terminal way on the terminal block
OUTPUT socket.
Michell Instruments 21
Page 30

INSTALLATION
2.4.2.4 Alarm Output Connection
Four alarm output ports are provided and are connected to the instrument via a single
8-way push fi t connector block labelled
Promet I.S. User’s Manual
ALARMS as shown below.
e
e
NO
SP1
COM
NO
NC
SP3
ALARM Connector Block
COM
NC
NO
SP2
NO
SP4
Figure 14
Alarm 1 (connection labelled as SP1) and Alarm 2 (connection labelled as SP2) are Form
C (single pole, double throw) relays.
The method of connection is as follows:
a. Remove the terminal block from the ALARMS socket.
socket
Terminal block
ALARMS
b. Strip back the wires of the Alarm 1 cable, exposing approximately
6mm (0.2”) - the use of crimps/wire ferrules is recommended.
c. Insert the
N/O connection lead into the SP1 NO terminal
way on the terminal block and tighten the screw.
d. Insert the
N/C connection lead into the SP1 NC terminal way on the
terminal block and tighten the screw.
e. Insert the common lead into the
SP1 COM terminal way on the terminal
block and tighten the screw.
f. Repeat operations b. to e. for connecting the Alarm 2 cable to the SP2
terminals.
22 97221 Issue 5, March 2017
Page 31

Promet I.S. User’s Manual
Alarm 3 (connection labelled as SP3) and Alarm 4 (connection labelled as SP4) are Form
A (single pole, single throw, normally open) relays.
The method of connection is as follows:
INSTALLATION
a. Strip back the wires of the Alarm 3 cable, exposing approximately
6mm (0.2”) - the use of crimps/wire ferrules is recommended.
b. Insert the
on the terminal block and tighten the screw.
c. Insert the common lead into the
block and tighten the screw.
d. Repeat operations a. to c. for connecting the Alarm 4 cable to the SP4
terminals.
e. Check that the wiring has been completed correctly.
f. Push the terminal block fi rmly back into the
2.4.2.5 RS485 Port Connection
N/O connection lead into the SP3 NO terminal way
NOCOM
SP3 COM terminal way on the terminal
ALARMS socket.
The RS485 connection is a push-fi t socket labelled COMMS as shown in
The method of connection is as follows:
Pin Number Function
2B
3A
50V
a. Check the orientation of the RS485 connector and gently push it into the
socket.
b. Tighten the two screws on the connector.
Figure 9
.
Michell Instruments 23
Page 32

INSTALLATION
2.4.3 Sensor Assembly Wiring
NOTE: If the analyzer has been ordered with a sampling system, the Promet
I.S. sensor assembly will be wired-up in the factory to the junction box. In
that case disregard the following instructions and go to Section 3.
2.4.3.1 Dew-point Transmitter Wiring
HAZARDOUS AREA INFORMATION
The dew-point transmitter (Easidew PRO I.S.) is certifi ed
intrinsically safe for use in hazardous areas.
Before using the Easidew PRO I.S. in any hazardous environment
ensure that personnel are completely familiar with the above
standards relating to the certifi cation of this instrument and
also with the further information relating to intrinsically
safe apparatus to be found in standard EN60079-14:1997 or
equivalent, and up-to-date codes of practice in the country of
Installation of the Easidew PRO I.S. MUST be as per system
drawing in order to comply with the intrinsic safety regulations.
Promet I.S. User’s Manual
installation.
Refer to ATEX/CSA/FM/IECEx certifi cates for the dew-point and
optional pressure transmitters’ connection cable requirements
which stipulate maximum permissible mutual capacitance and
inductance to resistance ratio.
24 97221 Issue 5, March 2017
Page 33

Promet I.S. User’s Manual
Preparation of the Sensor Cable
In order to comply with hazardous area certifi cation of the
product it is essential that the crimps/wire ferrules supplied
must be attached on to any cable installed into the connector.
INSTALLATION
a. As shown in
Figure 15
below, the crimps/wire ferrules should be applied
so that there is no possibility of a conductor strand of a core becoming
free.
When the crimp/wire ferrules are applied they should have a minimum of
two positions of crimping. After the crimp/wire ferrules are applied they
should be trimmed to a length of 5mm (0.2”) (see
Figure 16)
.
10
Figure 15
Crimped Wires
Figure 16
mm
Cut to 5mm
b. Cable connection to the dew-point transmitter is made via the terminal
block (4) (see
4
Figure 17)
j
Figure 17
. Remove the terminal housing lid (2) to access.
1
j j
51
j
j
2
j
j
3
Dew-point Transmitter Housing
Michell Instruments 25
Page 34

INSTALLATION
c. Ensure that the outer diameter of the selected cable is matched to an EExe
M20 cable gland (5). Unscrew the cable gland (5) and slide the cable
through the cable gland (5) and into the terminal housing (1) through the
cable entry (3).
d. Remove the terminal block (4) from the PCB for easier operation. Connect
the signal cable leads with the crimps/wire ferrules to the screw terminals
on the terminal block (4) in accordance with the following pin-assignment
drawing.
Promet I.S. User’s Manual
HAZARDOUS AREA
1 2 3 4
NOTE: Connect cable screen to cable gland
Figure 18
12 V Min, 28 V max
+ 4-20mA lead
- 4-20mA lead
4-20mA
Pin Assignment Drawing
SENSOR INPUTS Block
Dew Point
mA
Temp
+V
Always connect the 4-20mA return signal to a suitable load (in
this case, back into the control unit) before the power is applied.
Without this connection the transmitter may be damaged if
allowed to operate for prolonged periods. The maximum load is
500 Ω at 24 V or 250 Ω at 12 V.
When the crimps/wire ferrules are installed into the connector
terminal block ensure that they are inserted completely. When
all wire connections are made, ensure that there is a minimum
clearance distance of 2mm (0.008”) between each terminal.
e. Press the terminal block (4) back into its socket fi rmly.
f. Tighten the cable gland (5) around the cable. Ensure that the sealing is
not damaged and that the cable gland and seals are assembled correctly
in order to ensure ingress protection.
g. Install and tighten the terminal housing lid (2).
26 97221 Issue 5, March 2017
Page 35

Promet I.S. User’s Manual
2.4.3.2 Optional Pressure Transmitter Wiring
HAZARDOUS AREA INFORMATION
The pressure transmitter is certifi ed intrinsically safe for use
in hazardous areas by Baseefa and is covered by EC-type
examination certifi cate BAS01ATEX1125X. The instrument
conforms to the standards specifi ed in EN 50014:1997 + Amds 1
& 2, EN 50020:1994 and EN 50284:1999 with certifi cation code
Ex ia IIB T4 (-20°C≤Ta≤75°C).
Before using the pressure transmitter in any hazardous
environment ensure that personnel are completely familiar
with the above standards relating to the certifi cation of
this instrument and also with the intrinsically safe system
information in the BAS01ATEX1125X certifi cate or equivalent
codes of practice in the country of installation.
If the pressure transmitter is not ordered together with the
analyzer, it is the user’s responsibility to make sure that the
pressure transmitter is compatible with the I.S. barrier in the
INSTALLATION
control unit.
Refer to ATEX/CSA/IECEx certifi cates for the dew-point and
optional pressure transmitters’ connection cable requirements
which stipulate maximum permissible mutual capacitance and
inductance to resistance ratio.
NOTE: A pressure transmitter will only be provided if the model with active
pressure compensation (order code:
active pressure compensation (order code:
a. The cable connection to the pressure transmitter is made via the removable
connector. Loosen the central screw (1) to remove the connector from the
transmitter.
P1/P2) is ordered. For the model without
G), skip this section.
Figure 19
Pressure Transmitter Connector
Michell Instruments 27
Page 36

INSTALLATION
b. When the connector is unplugged from the transmitter, remove the central
screw (1)
(Figure 19)
Promet I.S. User’s Manual
completely.
c. Remove the gasket (8)
d. Using a small screwdriver in the mounting hole (7), lever the terminal
block (6) out of the outer housing (5)
5
Figure 20
(Figure 19)
6
from the connector.
(Figure 20)
.
Removal of Terminal Block
7
e. Ensure that the outer diameter of the cable selected matches the outer
housing’s cable gland. To ensure that full ingress protection is achieved,
the sensor cable used must have a minimum diameter of 4.6mm (0.18”).
Slide the cable through the cable gland nut (2), washer (3), gland seal (4)
and outer housing (5)
f. Apply crimps/wire ferrules to the fl ying leads of the cable. Connect these
leads to the screw terminals on the terminal block (6) in accordance
with the following pin-assignment drawing. Pin designations are marked
adjacent to each pin.
CAUTION: In order to comply with Hazardous Area Certifi cation
of the product it is essential that the crimps/wire ferrules
supplied must be attached on to any cable installed into the
(Figure 19)
.
connector.
28 97221 Issue 5, March 2017
Page 37

Promet I.S. User’s Manual
pply
INSTALLATION
3
2
Figure 21
+ 4-20mA lead
– 4-20mA lead
1
Pressure Transmitter Wiring Diagram
Su
4-20 mA
CAUTION: Always connect the 4-20 mA return signal to a
suitable load (in this case, back into the control unit) before the
power is applied. Without this connection, the transmitter may
be damaged if allowed to operate for prolonged periods.
CAUTION: When the crimps/wire ferrules are installed into the
connector terminal block ensure they are completely inserted.
When all wire connections are made, ensure that there is a
minimum clearance distance of 2mm between each terminal.
g. Press the terminal block (6) back into the outer housing (5) fi rmly
20)
, until a ‘click’ sound is heard.
h. Tighten the cable gland (2)
(Figure 19)
around the cable. Ensure that the
(Figure
sealing is not damaged and that the cable gland and seals are assembled
correctly in order to ensure ingress protection.
i. Slide the terminal block (6) onto the connection pins on the transmitter.
NOTE: There is only one orientation by which the terminal block
can be plugged onto the transmitter.
Michell Instruments 29
Page 38

OPERATION
3 OPERATION
3.1 Preparation
Ensure that personnel are familiar with Sections 1, 2 and 3 of this manual in which the
equipment controls, indicators, elements of the display and overall menu structure are
described before starting operation.
Prior to operation, the instrument must be connected to the correct electrical power
supply, sensor signal input, relevant analog and alarm outputs as described in Section 2.
Promet I.S. User’s Manual
Before applying power and beginning sample fl ow ensure that
the system has been properly installed following the instructions
in Section 2 and that all sample connections are tight and leak
free. Check that the wiring has been correctly completed.
On delivery, the instrument will have been set-up with a standard set of default
parameters defi ning the operation of the analyzer. These parameters can be changed
as required by means of the Set-up menus.
3.2 Start-Up
3.2.1 Function Keys Activation
There are fi ve push-button function keys on the user interface of the control unit. They
can be locked to prevent unauthorized operation or accidental pressing. The lock switch
is located on the back panel of the control unit (see
OFF position to activate the function keys.
the
NOTE: Remember to lock the function keys after each operation.
Figure 9)
. It must be switched to
30 97221 Issue 5, March 2017
Page 39

Promet I.S. User’s Manual
3.2.2 Powering-up the Analyzer
For the AC power supply version of the Promet I.S., turning on the power switch on the
back panel of the control unit will power-up the control unit and the two transmitters
for each channel connected. There is no power switch for the DC power supply version.
It is turned on automatically once 24 V DC power source is applied.
After turning on the analyzer the display will be illuminated. The default Main Reading
Page displays sample dew point (°C) and sample pressure (barg).
NOTE. Depending on your order, the pressure value can be real-time readings
from the pressure transmitter if the model with active pressure compensation
(order code: P1/P2) is ordered, or manual set value if the model without active
pressure compensation (order code: G) is ordered (see Section 3.2.2.2).
3.2.2.1 Change Units
From the Main Reading Page, press the Display key to change the units of measurement
readings in sequence as shown below:
OPERATION
Default
DEG C
DEG F
PPMV I
LBMMCF
MG/M3
d
6 5. 0 B
- 2 2. 1 C
Display
d
6 5. 0 B
- 7. 9 F
Display
d
6 5. 0 B
1 2. 4 7
Display
d
6 5. 0 B
1. 1 5
Display
d
6 5. 0 B
1 9. 6 1
Pressure
Dew point oC
Pressure
Dew point o F
Pressure
ppm
ideal gas
V
Pressure
Lbmmscf natural gas
Pressure
mg/m3 natural gas
Display
d
PPMV N
Figure 22
6 5. 0 B
2 5. 7 4
Display
Pressure
ppmV natural gas
Units of Measurement Readings in Sequence
Michell Instruments 31
Page 40

OPERATION
At the Main Reading Page, the full description of the currently selected unit for the
moisture measurement will scroll across the display on the bottom line at set intervals
(set in the
Promet I.S. User’s Manual
DISP – display settings sub-menu).
NOTE: Unit for the sample pressure reading / set value can be set in the
– display settings sub-menu.
NOTE: After the display units are set, they will remain the same even after
the analyzer power is turned off and on again.
3.2.2.2 Manual Set Pressure Value
If the model without active pressure compensation (order code: G) is ordered, press
the and keys from the Main Reading Page to manually set the required pressure.
3.2.2.3 Display Brightness Adjustment
The brightness of the display can be adjusted. From the Main Reading Page, press and
hold the
Select key then press the key to enter the brightness adjustment page.
DISP
2
a. Use the and keys to adjust the display brightness.
b. Press the
return to the Main Reading Page.
3.2.3 Sample Flow Start-Up
Follow the Promet I.S. Premium Sampling System Instructions to establish the sample
fl ow of:
1 to 5 Nl/min (2.1 to 10.6 scfh).
Select key to confi rm the adjustment. The display will then
BRI
32 97221 Issue 5, March 2017
Page 41

Promet I.S. User’s Manual
DDIINN
3.3 Menu Structure
The Promet I.S. main menu has a two level menu structure. There are three sub-menus
DISP, FAU LT and OUTPUT. The ALARM SETTINGS are not in the main menu and are
accessed separately. These are described in detail in following sections. Below is the
complete menu structure:
OPERATION
NOTE:
Menu
h
Menu
h
Menu
h
represents the Main Reading Page
h
MAIN
READING
Display
Select
+
MANUAL SET PRESSURE VALUE
h
CHANGE DISPLAY BRIGHTNESS
h
PAGE
+
Menu
Select
h
CHANGE ALARM SETTINGS
h
Menu
Select
Pressure
h
Unit
PPMV I
Resolution
Scroll
Interval
Select
SKIP
DISP
h
h
ENTER
DISP
h
h
Menu
Select
h
Min
DP
Max
DP
Min
Pressure
Max
Pressure
Select
SKIP
FAULT
h
h
ENTER
FAULT
h
h
Menu
Select
h
Source
Zero
Span
OUTPUT
Select
SKIP
h
h
ENTER
OUTPUT
h
h
CHANGE UNITS
See Section 3.2.2.1
See Section 3.2.2.2
See Section 3.2.2.3
See Section 3.8
Menu
Select
h
h
h
h
h
h
h
Select
Select
Select
Select
Select
Select
Select
Select
Select
Menu
Menu
Menu
Menu
Menu
Menu
Menu
Menu
Menu
h
h
h
h
h
h
h
h
h
h
Michell Instruments 33
Page 42

OPERATION
IIN
N
Promet I.S. User’s Manual
MAIN
READING
PAGE
Menu
h
CHANGE
MAIN MENU
SETTINGS
Display
Select
Select
+
+
SP_1
SP_2
SP_3
SP_4
h
h
h
h
SPC_1
h
MANUAL SET PRESSURE VALUE
h
CHANGE UNITS
See Section 3.2.2.1
See Section 3.2.2.2
h
Select
Select
Select
Select
010
Select
ALARM SETTING MENU
h
h
h
BRI
See Section 3.8
Source
BRIGHTNESS ADJUSTMENT
See Section 3.2.2.3
Select
h
Select
000-high 100-low
Select Select
h
000-high 100-low
Select Select
h
000-high 100-low
Select Select
h
000-high 100-low
Select Select
h
h
SPC_2
h
SPC_3
h
SPC_4
h
010
h
010
h
010
h
Select
Select
Select
h
h
h
Source
Select
Source
Select
Source
Select
- Main Reading Page
Figure 23
Menu Maps
34 97221 Issue 5, March 2017
Page 43

Promet I.S. User’s Manual
3.4 Main Reading Page
The Main Reading Page is the default screen shown after turning the instrument on. It
will display the units of measurement selected by the user (see Section 3.2.2.1).
3.5 Display Set-Up
The display preference of the Main Reading Page can be confi gured under DISP –
display settings sub-menu.
OPERATION
From the Main Reading Page, press the
setting option is:
The top line shows the navigation command. Press the key to change the navigation
command from
Press the Select key to confi rm the navigation command and either skip to the next
sub-menu or enter this display setting sub-menu. The fi rst setting parameter under the
display settings sub-menu is the unit for pressure reading / set value.
3.5.1 Pressure Unit Selection
SKIP to ENTER.
Menu key to enter the main menu. The fi rst
SKI P
DI SP
ENTER
DI SP
BARG
PRESS
Either BARG or psiG can be selected as the unit for the pressure reading / set value.
a. Change the selection by scrolling through these two options using the
and keys.
b. When the desired unit is shown on the display, press the
confi rm. The display will then change to the next setting parameter which
PPMV I readings.
is for
NOTE: The pressure reading / set value at the Main Reading Page will then
change to the selected unit.
Select key to
Michell Instruments 35
Page 44

OPERATION
• For the model with active pressure compensation (P1/P2), the
pressure reading value will be automatically converted based on
the new unit selected.
Promet I.S. User’s Manual
• For the model without active pressure compensation (
manually set pressure value will NOT be automatically converted
based on the new unit selected. The value must be manually
changed. For example - if the pressure is set at 60 barg - when the
pressure unit is changed to
60 psig. This must be manually changed to 870 psig.
NOTE: The pressure fault alarm set point under
sub-menu - will also switch to the selected unit. The value will be automatically
converted based on the new unit selected.
3.5.2 Settings for the PPMV I (Ideal Gas) Reading
psiG, the value of the pressure setting will be
0. 1 2 3
PPM V_I
The resolution of PPMV I (ideal gas) readings can be adjusted between one decimal
point to three decimal points, based on the user’s preference. It will not change the
resolutions of readings with other units.
G), the
FAU LT – fault alarm settings
a. Increase or decrease the resolution by pressing the and keys.
b. When the desired resolution is on the display, press the
display will change to the next setting parameter which is for setting the
scrolling intervals of the unit’s full name on the Main Reading Page.
The PPMV I (ideal gas) readings at the Main Reading Page, if selected, will then
change to the set resolution.
3.5.3 Setting the Scrolling Interval for a Unit’s Full Name
At the Main Reading Page, the full description of the currently selected unit will scroll
across the display on the bottom line at set intervals. This interval can be set to the
user’s preference.
10.0
SCR OL L
a. Increase or decrease the scrolling interval (in seconds) by pressing the
and keys.
Select key. The
b. When the desired value is on the display, press the
will then change to the next sub-menu
FAU LT – fault alarm settings.
Select key. The display
36 97221 Issue 5, March 2017
Page 45

Promet I.S. User’s Manual
3.6 Fault Alarm Set-Up
There are four conditions for the system’s fault alarm which can be confi gured in the
FAU LT – fault alarm settings sub-menu.
OPERATION
From the Main Reading Page, press
to scroll to the
FAULT option.
Menu to enter the main menu. Use the Select key
SKI P
FAULT
The top line shows the navigation command. Press the key to change the navigation
command from
SKIP to ENTER.
ENTER
FAULT
Press the Select key to confi rm the navigation command and to either skip to the next
sub-menu or enter the
The fi rst setting parameter under this sub-menu is for the minimum dew-point fault
alarm set-point.
FAU LT – fault alarm settings sub-menu.
3.6.1 Minimum Dew-point Value for the Fault Alarm
-100.0C
MI N_ DP
This is the minimum dew point below which the fault alarm will be activated.
a. Increase or decrease the value by pressing the and keys.
b. When the desired set-point is on the display press the
confi rm. The display will then change to the next setting parameter - the
maximum dew-point fault alarm set-point.
NOTE: This fault alarm set-point can only be set in °Cdp, no matter what unit
has been selected for the Main Reading Page.
Select key to
Michell Instruments 37
Page 46

OPERATION
3.6.2 Maximum Dew-point Value for the Fault Alarm
20.0C
MAX_ DP
This is the maximum dew-point above which the fault alarm will be activated.
a. Increase or decrease the value by pressing the and keys.
Promet I.S. User’s Manual
b. When the desired set-point is on the display press the
confi rm. The display will then change to the next setting parameter - the
minimum pressure fault alarm set-point.
NOTE: This fault alarm set-point can only be set in °Cdp, no matter what unit
has been selected for the Main Reading Page.
3.6.3 Minimum Pressure Value for the Fault Alarm
0. 0 8
MI N_ B
This is the minimum pressure below which the fault alarm will be activated.
Select key to
a. Increase or decrease the value by pressing the and keys.
b. When the desired set-point is on the display press the
confi rm the choice. The display will then change to the next setting
parameter - the maximum pressure fault alarm set-point.
NOTE: The unit could be either barg (B) or psig (P), depending on the choice
of pressure unit in
The value will be automatically converted if a new unit is selected.
DISP – display settings sub-menu (refer to Section 3.5.1).
Select key to
38 97221 Issue 5, March 2017
Page 47

Promet I.S. User’s Manual
3.6.4 Maximum Pressure Value for the Fault Alarm
68.98
MAX_ B
This is the maximum pressure above which the fault alarm will be activated.
a. Increase or decrease the value by pressing the and keys.
OPERATION
b. When the desired set-point is on the display press the
confi rm. The display will then change to the next sub-menu
output settings.
NOTE: The unit could be either barg (B) or psig (P), depending on the choice
of pressure unit in
The value will be automatically converted if a new unit is selected.
DISP – display settings sub-menu (refer to Section 3.5.1).
Select key to
OUTPUT –
Michell Instruments 39
Page 48

OPERATION
3.7 Output Set-Up
The source and scale of the 4-20 mA output can be confi gured in OUTPUT – output
settings sub menu.
Promet I.S. User’s Manual
From the Main Reading Page, press
to scroll to the
The top line shows the navigation command. Press the key to change the navigation
command from
Press the Select key to confi rm the navigation command and either skip to the Main
Reading Page or enter the output settings sub-menu. The fi rst setting parameter under
this sub-menu is the output source selection.
3.7.1 Output Source Selection
OUTPUT option.
SKIP to ENTER.
Menu to enter the main menu. Use the Select key
SKI P
OUTPUT
ENTER
OUTPUT
MOI ST
SOURCE
The following list shows the options for the output source:
PPMV_N – moisture content in ppmV natural gas
MG/M3 – moisture content in mg/m3 natural gas
LBMMCF – moisture content in lb/MMscf natural gas
PPMV_I – moisture content in ppmV ideal gas
DP_F – °F dew point
psiG – pressure in psig
DP_C – °C dew point
BARG – pressure in barg
a. Change the selection by scrolling through these options using the and
keys.
b. When the desired source is on the display, press the
The 4-20 mA output will then switch to the selected source. The display
will change to the
ZERO value for the output range set-point.
Select key to confi rm.
40 97221 Issue 5, March 2017
Page 49

Promet I.S. User’s Manual
3.7.2 Output Range ZERO Value Settings
ZERO
a. Use the and keys to adjust the ZERO value.
OPERATION
0. 0 0
b. Press the
Select key to confi rm the input. The display will change to the
SPAN value of the output range set-point.
NOTE: The output range
the specifi c source selected in Section 3.7.1. The
range will not change accordingly when a new output source is selected. The
range should be checked and manually adjusted after changing the output
source.
3.7.3 Output Range SPAN Value Settings
ZERO value could be in different units, depending on
SPAN
ZERO value of the output
20.00
a. Use the and keys to adjust the SPAN value.
b. Press the
output settings sub-menu and return to the Main Reading Page.
NOTE: The output range
the specifi c source selected in Section 3.7.1. The
range will not change accordingly when a new output source selected. The
range should be checked and manually adjusted after changing the output
source.
Select key to confi rm the input. The display will leave the
SPAN value could be in different units, depending on
SPAN value of the output
Michell Instruments 41
Page 50

OPERATION
3.8 Alarm Set-Up
There are 4 built-in alarm relays. They can be confi gured independently in the menu.
From the Main Reading Page, press and hold the
enter the
3.8.1 Alarm Set-Point Adjustment
The fi rst page in ALARM is for adjusting the set-point of the Alarm Relay 1.
a. Use the and keys to adjust the set-point.
ALARM page.
Promet I.S. User’s Manual
Select key then press the key to
0. 0 C
SP _1
b. Press the
the alarm set-point for Alarm Relay 2.
c. Repeat the same operation to adjust the set-point for Alarm Relay 2, and
then Alarm Relay 3 and Alarm Relay 4 accordingly.
d. After Alarm Set Point SP_4 for Alarm Relay 4 has been set, press the
Select key to confi rm the input. The display will then change to
Select key to confi rm the input. The display will then change to the alarm
control setting page SPC_1 for Alarm Relay 1.
NOTE: The alarm set-point could be in different units depending on the source
selection for the specifi c alarm (set in the SPC function). How to change the
source of the alarm will be explained in Section 3.8.3. It will not be affected
by the unit selection at the Main Reading Page or at the source selection of
the 4-20 mA output under
3.8.2 Alarm Type Selection
The alarm type can be selected in the ALARM page.
OUTPUT – output settings sub-menu.
000
100
SPC_1
a. Use the and keys to adjust the control code.
• Code 000 : Alarm type high. Activates the alarm when the
measurement value is above the alarm set-point SP_1.
• Code 100 : Alarm type low. Activates the alarm when the
measurement value is below the alarm set-point SP_1.
b. Press the
the alarm control setting for Alarm Relay 2.
c. Repeat the same operation to adjust the type (high/low) for Alarm Relay
2, Alarm Relay 3 and Alarm Relay 4 accordingly.
Select key to confi rm the input. The display will then change to
SPC_1
42 97221 Issue 5, March 2017
Page 51

Promet I.S. User’s Manual
3.8.3 Alarm Source Selection
The alarm source can be selected in the ALARM page.
a. Use the and keys to adjust the control code to 010.
b. Press the Select key to confi rm this control code. The display will then
change to the Alarm source selection sub menu.
OPERATION
01 0
SPC_1
RESULT
SOURCE
c. Change the selection by scrolling through these options using the and
keys.
The following list shows the available alarm sources:
DISP – not in use
RESULT – pressure in barg
DP_C – °C dew point
psiG – pressure in psig
DP_F – °F dew point
PPMV_I – moisture content in ppm
TOT_1 – not in use
. . .
TARE – not in use
AUX_1 – moisture content in lb/MMscf natural gas
ideal gas
V
3
AUX_2 – moisture content in mg/m
AUX_3 – moisture content in ppm
AUX_4 – not in use
natural gas
natural gas
V
Michell Instruments 43
Page 52

OPERATION
d. When the desired source is on the display, press the Select key to confi rm.
The alarm will then switch to the selected source. The display will return
to the
e. Use the and keys to change the control code back to 000 or 100
depending on the alarm type (high/low).
Promet I.S. User’s Manual
ALARM page.
01 0
SPC_1
f. Press the
the
g. Repeat the same operation to adjust the set-point for Alarm Relay 2,
Alarm Relay 3 and Alarm Relay 4 accordingly.
h. After Alarm Relay 4 is confi gured press the
Main Reading Page.
CAUTION: The alarm set-point value will NOT be automatically converted
based on the new alarm source selected. In some cases the operation of
changing the alarm source may activate the alarm. For example - if the SP_1 is
set at 10°C dew point - when the alarm source is changed from DP_C (°C dp) to DP_F
(°F dp) under SPC_1, the value of SP_1 will be 10°F.
Select key to confi rm the input. The display will then change to
ALARM page for Alarm Relay 2.
Select key to return to the
44 97221 Issue 5, March 2017
Page 53

Promet I.S. User’s Manual
APPENDIX A
Appendix A
Technical Specifi cations
Michell Instruments 45
Page 54

APPENDIX A
Promet I.S. User’s Manual
Appendix A Technical Specifi cations
Sensors
Sensor Technology Michell Ceramic Moisture Sensor
Sensor Version Easidew PRO I.S.
Measurement Range -100 to +20°Cdp (-148 to +68°Fdp)
Calibration Range -100 to +20°Cdp (-148 to +68°Fdp)
Calibration
Accuracy
Resolution 0.1°C between +20 and -100°Cdp (+68 and-148°Fdp)
Analysis Pressure Up to 45 MPa (450 barg / 5801 psig)
Operating Temperature -40 to +60°C (-40 to +140°F)
Sample Flow Rate 1 to 5 Nl/min (2.1 to 10.6 scfh)
Optional Pressure Sensor 0–138 barg (other ranges available) Accuracy: ±0.25% FS
Traceable to British (NPL) and American (NIST) National Humidity
Standards
Dew point: ±1°C between –60 and +20°Cdp (-76 and +68°Fdp)
Moisture content: ±10% of reading
Dew point: ±2°C between –60.1 and -100°Cdp (-76.18 and -148°Fdp)
Control Unit
Display
Analog Output
Two line 6-digits LED, displaying moisture content / dew point (user
toggle) and analysis pressure
Two 4-20 mA (max load 500 Ω)
User confi gured for parameter, unit and range
Digital Output RS485 Modbus RTU
Display Mode
Moisture content (ppm
Moisture content in natural gas (ppmV, lb/MMscf, mg/m³)
Dew point (°C or °F)
)
V
Pressure (psig, barg)
Pressure Compensation
Display Resolution
Fixed value (user programmed) or dynamic input from optional
pressure sensor
0.1°Cdp, 0.1°Fdp, 0.1-0.001 ppm
ideal gas (adjustable), 0.01 ppmV
V
natural gas, 0.01 mg/m³, 0.01 lb/MMscf, 1 psig, 0.1 barg
Four alarm relays
Control action and set-point are user-programmable
Alarms
Two Form C contacts rated 10 A, 240 V AC or 8 A, 24 V DC Noninductive load
Two Form A contacts rated 5 A, 240 V AC or 4 A 24 V DC Noninductive load
I.S. Barriers Galvanic isolation type, integrated to Control Unit
Power Supply
85 to 265 V AC, 47/63 Hz or 10 to 72 V DC
10 W max power consumption
Operating Environment Indoor, safe area, 0 to +50°C (+32 to +122°F) < 90% RH
Interconnection Cable
General instrument type, twisted pair, screened, single pair (two pairs
with pressure sensor)
19” sub rack unit
Enclosure
Dimensions 132 x 483 x 375mm (5 x 19 x 14.75”) (h x w x d)
(100mm (4”) minimum rear clearance depth for cables and vents)
46 97221 Issue 5, March 2017
Page 55

Promet I.S. User’s Manual
Premium Sampling Systems
304 stainless steel (EN1.4301) enclosure
Option for complete enclosure in 316 stainless steel (EN1.4401)
Enclosure
Enclosure Mounting Stainless steel wall mounting brackets
Enclosure Ingress
Protection
Enclosure Temperature
Control
Heater Power Supply
Operating Environment
All fi xtures stainless steel
Galvanized steel internal mounting plate
Open panel version available for indoor installation
Dimensions 800 x 600 x 300mm (31.5 x 23.6 x 11.8”) (h x w x d)
IP66
Heater/thermostat options for fi xed set-point +20°C (+68°F) or
adjustable set-point range 0 to control 50°C (+32 to +122°F)
110/120 or 220/240/255 V AC, 47/63 Hz
Power consumption 100 W max
Shaded position, on or off shore, -20 to +50°C (-4 to +122°F)
(-40 to +60°C (-40 to +140°F) max transient)
Enclosure cooling option recommended for climatic ambient > +45°C
(+113°F)
APPENDIX A
Hazardous Area Certifi cation
ATEX II 1 G Ex ia IIC T4 Ga (–20°C to +70°C)
IECEx Ex ia IIC T4 Ga (–20°C to +70°C)
Certifi cation Codes
Pattern Approval GOST-R, GOST-K
A.1 Dimensional Drawings
Easidew PRO I.S.
TC TR 0Ex ia IIC T4 Ga (–20°C to +70°C)
FM Class I, Division 1, Groups A B C D, T4
cCSAus Class I, Division I Groups A B C D, T4
Process Dewpoint Transmitter
Sample port
1/8” NPT (F)
328mm
(12.9”)
20mm
(0.8”)
CHANNEL 1
CHANNEL 2
CHANNEL 3
CHANNEL 4
Figure 24
483mm
(19”)
Dimensional Drawings
375mm + 100mm for cable clearance
(14.75” + 3.9”)
132mm
(5.2”)
3U
Michell Instruments 47
Page 56

APPENDIX B
Promet I.S. User’s Manual
Appendix B
Serial Communications
48 97221 Issue 5, March 2017
Page 57

Promet I.S. User’s Manual
Appendix B Serial Communications
To communicate with the monitor:
• Connect to the serial port using the wiring defi ned below.
• Set the address of the monitor using the front panel.
• Set the desired communication protocol (ASCII or Modbus RTU) via the
front panel or over the serial interface.
• Determine the register number of the parameter to be read.
• Send the correct command to the monitor and decode the response.
RS485 Wiring
The Promet I.S. monitor uses a 2-wire RS485 connection.
APPENDIX B
Pin Name Promet DB9 Pin
A3
B2
GND 5
Pin numbers in the manual refer to standard pins on the DB9 D-Sub connector on the rear panel of
the MCU:
Male DB9 Pinout (Promet I.S. Monitor on MCU Panel)
B A GND
1
2 3 4 5
6 7 8 9
It will be necessary to match up the A/B (Differential data pair) and GND (0 V) pins with the wiring
of your own third party adaptor.
E.g. For the K3-ADE RS232->RS485 adaptor use the following wiring:
Pin Name Promet DB9 Pin K3-ADE DB9 Pin
A38
B23
GND 5 5
This wiring is the generally accepted standard for most 2-wire RS485 equipment.
Michell Instruments 49
Page 58

APPENDIX B
Setting the Address of the Monitor
This procedure needs to be done for either ASCII or MODBUS RTU protocols.
Promet I.S. User’s Manual
a. Press the
menu.
b. Press the
c. Use the and
d. Press the
e. Use the and
f. Press the
the CAL menu to
Setting the Communications Protocol
• If the instrument is set to ASCII send
• If the instrument is set to Modbus send
ASCII.
Select and keys simultaneously to display the BRI (brightness)
Select key again to display the CAL (calibration) menu.
keys to set the code in the CAL menu to 200.
Select key 3 times to display the address.
keys to set the address.
Select key again and use the and keys to set the code in
000.
sw132,1$ to set to Modbus.
0 to register 40132(132) to set to
Using the Front Panel
Firstly, follow the instructions in Appendix C to unlock the CODE settings on the monitor front panel.
a. Press the
menu.
b. Press the
using the and
back to ASCII.
c. Press the
NOTE: It is now recommended that the CODE settings are locked again using the
instructions in Appendix C, as accidental modifi cation of the CODEs can cause damage
to the monitor.
Select and keys simultaneously to display the BRI (brightness)
Select key until the CODE3 menu is displayed and set it to 001
keys. Setting CODE3 to 000 sets the communications
Select key to exit the menu.
50 97221 Issue 5, March 2017
Page 59

Promet I.S. User’s Manual
Register Map:
Function Register Name Texmate ASCII Modbus RTU
BARG RESULT 254 40515/40516
Dew point_C CH1 253 40517/40518
psiG CH2 252 40519/40520
Dew point_F CH3 251 40521/40522
PPMV_IDEAL CH4 250 40523/40524
LBMMSCF AUX1 244 40244
MG_M3 AUX2 243 40243
PPMV_NATURAL AUX3 242 40242
APPENDIX B
WVP (fl oating point) VARIABLE11 107 40619/40620
PRESSURE_IN_BARG USER_MEMORY_1 5121 45121
PRESSURE_INPUT USER_MEMORY_2 5122 45122
SCROLL_TIME USER_MEMORY_6 5126 45126
MIN_TEMP USER_MEMORY_10 5130 45130
MAX_TEMP USER_MEMORY_11 5131 45131
MIN_PRESSURE USER_MEMORY_12 5132 45132
MAX_PRESSURE USER_MEMORY_13 5133 45133
FAULT_OUTPUT USER_MEMORY_14 5134 45134
AOP1_SOURCE USER_MEMORY_15 5135 45135
ASCII Communications
Start
Character
s 0 to 255 r or w 1 to 65535 ,
Address
Read/
Write
Register
Address
Separator
Data
Value
-9999999
to 9999999
Message Terminator
$
• Reading the dew-point value from a meter that has an address of 2:
Send: s2r253$
• Reading the LBMMSCF from a meter that has an address of 5:
Send: s5r244$
Michell Instruments 51
Page 60

APPENDIX B
MODBUS RTU
Once the protocol has been set the monitor will communicate in accordance with the standard
Modbus RTU protocol.
Read Holding Registers command should be used to read the registers listed in the register
The
map. When two registers are listed in the table both registers must be read using a single command.
Note that the least signifi cant word is sent fi rst, for example - for dew point - register 40517 is the
least signifi cant word and 40518 is the most signifi cant word.
It should also be noted that the actual address is that stated, minus 40000, i.e. 40517 is physically
517.
Example: Getting the dew-point value using Modbus RTU
Register Numbers:
Function Register Name Texmate ASCII Modbus RTU
BARG RESULT 254 40515/40516
Dew Point_C CH1 253 40517/40518
psig CH2 252 40519/40520
Promet I.S. User’s Manual
There is often an offset of -1 for the register address, depending on your software/PLC system. To
read the dew-point value software, read holding registers 516-517:
The highlighted value 0xFFFFFDE2 is a 32 bit signed integer .. so -542
There is a scaling multiplier of 0.1, so -542 x 0.1 = -54.2°C which is the value shown on the monitor.
52 97221 Issue 5, March 2017
Page 61

Promet I.S. User’s Manual
APPENDIX C
Appendix C
Modbus RTU Comms
Michell Instruments 53
Page 62

APPENDIX C
Promet I.S. User’s Manual
Appendix C Modbus RTU Comms
Accessing locked codes on Promet I.S. monitor (turning off “code blanking”)
WARNING: It is recommended that “code blanking” is switched
back ON after making any required changes to the confi guration
codes. Adjusting confi guration codes without the express
written instruction of Michell Instruments may result in damage
to the monitor that is NOT covered under warranty.
54 97221 Issue 5, March 2017
Page 63

Promet I.S. User’s Manual
APPENDIX C
Michell Instruments 55
Page 64

APPENDIX D
Promet I.S. User’s Manual
Appendix D
Hazardous Area Certifi cation
56 97221 Issue 5, March 2017
Page 65

Promet I.S. User’s Manual
Appendix D Hazardous Area Certifi cation
The Promet I.S. Process Moisture Analyzer utilizes the
Easidew PRO I.S. dew-point transmitter
The Easidew PRO I.S is certifi ed compliant to the ATEX Directive (94/9/EC), and IECEx
for use within Zone 0, 1 and 2 hazardous areas and has been assessed so by Baseefa
Ltd (Notifi ed Body 1180).
The Easidew PRO I.S is certifi ed compliant to the North American Standards (USA and
Canada) for use within Class I, Division 1, Groups A, B, C & D hazardous locations and
has been assessed so by CSA and FM.
D.1 Product Standards
This product conforms to the Standards:
EN60079-0:2012 IEC60079-0:2011
EN60079-11:2012 IEC60079-11:2011
FM Class 3600:1998 CAN/CSA-C22.2 No. 0-10
FM Class 3610:2007 CAN/CSA-C22.2 No. 157-92
FM Class 3810:2005 C22.2 No 142-M1987
APPENDIX D
D.2 Product Certifi cation
This product is attributed with the product certifi cation codes:
ATEX & IECEx
II 1G Ex ia IIC T4 Ga (-20°C to +70°C)
North American
IS, Class I, Division 1, Groups A, B, C & D, T4
D.3 Global Certifi cates/Approvals
ATEX Baseefa 06ATEX0330X
ATEX System Baseefa 07Y0027
IECEx IECEx BAS 06.0090X
CSA 2013218
FM 3030238
TC TR Ex RU C-GB. ГБ05.B.00229
These certifi cates can be viewed or downloaded from our website at:
http://www.michell.com
Michell Instruments 57
Page 66

APPENDIX D
D.4 Terminal Parameters
Promet I.S. User’s Manual
Ui
li
Pi
Ci
Li
D.5 Special Conditions
1. The wiring connections to the free socket must be made via crimped
connectors in such a way that all the strands of the wire used are held
securely by the crimp.
2. The plastic plug and socket create a potential for electrostatic discharge
so must not be rubbed with a dry cloth or cleaned with solvents.
3. The Easidew PRO I.S Dew-Point Transmitter does not withstand the 500
V AC insulation test to frame. This must be taken into account when
installing the equipment.
= 28 V
= 93 mA
= 820 mW
= 37 nF
= 0
D.6 Maintenance and Installation
The Easidew PRO I.S. must only be installed by suitably qualifi ed personnel and in
accordance with the instructions provided and the terms of the applicable product
certifi cates.
Maintenance and servicing of the product must only be carried out by suitably trained
personnel or returned to an approved Michell Instruments’ Service Ce
58 97221 Issue 5, March 2017
Page 67

Promet I.S. User’s Manual
APPENDIX F
Appendix E
System Drawings
Michell Instruments 59
Page 68

APPENDIX F
T
Appendix E System Drawings
E.1 Baseefa Approved System Drawing
Pin 3 (-)
Pin 3 (-)
Pin 3 (-)
Pin 1 (-)
Pin 1 (-)
Pin 2 (-)
Pin 1 (+)
Channel 1 - Pin 1 (+)
Channel 1 - Pin 2 (-)
Pin 1 (+)
Pin 1 (+)
Pin 1 (+)
Pin 2 (+)
Channel 2 - Pin 5 (-)
Channel 2 - Pin 4 (+)
Connection to Easidew I.S.
Pin 4 (-)
Pin 2 (+)
Pin 5 (+)
Pin 2 (+)
Promet I.S. User’s Manual
IMA
IMA
IMA
10/08/11
16/12/13
11165
Pin 1 (-)
+VS (20 TO 35V DC)
LOAD
VS -
13395
05
04
SCALE
16/02/09
PRO
Variation
03
NTS
SIGN
DATE
MOD. No.ISSUE
02 08057 27/05/08 IMA
01 CERT ISS 26/01/07 MSB
DRAWING NUMBER
Ex90352
A3
SHEET 1 OF 1
TABLE A
4/20mA
-
Interface
KFD0-CS-Ex1.50P
KFD0-CS-Ex2.50P
BAS98ATEX7343
Certificate N u m ber
BAS98ATEX7343
Type
Dual Isolated
Isolated Repeater
ё
ё
54 μH/
217 μH/
4.2mH
12.6mH
KFD2-CR-Ex1.20200
KFD2-CR-Ex1.30200
BAS00ATEX7164
BAS00ATEX7164
Isolator
Repeater
Isolator
Transmitter Supply
Transmitter Supply
ё
435 μH/
33mH
MTL5041
MTL5040
KFD2-STC4-Ex1.H
BAS99ATEX7060
BAS01ATEX7155
BAS98ATEX2227
Supply
Power Supply
Repeater Power
Smart Transmitter
Dual Loop Isolator
MTL5541
BaseefaATEX0213
Supply
Repeater Power
GALVANIC ISOLATION INTERFACE
INSTALLATIONS
IIC
+
INTERFACE BARRIER
REFER TO TABLE ABOVE.
(-)
(+)
SAFE AREA
(+)
(RETURN)
2
HAZARDOUS AREA
EASIDEW
TRANSMITTER VERSION
TERMINAL NUMBER
EASIDEW
4
PRO I.S.
1
3
I.S.
UNITS
mm
DRAWING
+0.1
-0.0
ANGLES: ±0.5°
HOLE Ø:
5
FINISH
MICHELL INS TRUMENTS LTD. CAMBRIDGE ©
0 DEC. PLACE: ± 0.
1 DEC. PLACE: ± 0.2
2 DEC. PLACE: ± 0.1
UNLESS OTHERWISE STATED
DIMENSIONS:
TOLERANCES:
EASIDEW I.S. and EASIDEW PRO I.S.
DEWPOINT TRANSMITTER SYSTEM
DRAWING
3rd ANGLE
PROJECTION
MATERIAL
TITLE
WITHOUT T HE CONSENT OF MICHELL I NSTRUMENTS.
AND MUST NOT BE COPIED NOR DISC LOSED TO A THIRD PARTY
THIS DOCUMENT IS T HE PROPERTY OF MICHELL INSTRUMENT S LTD.
USED ON
APPROVEDCHECKED
DATEDATE
10/03/06
MSB
DRAWN
DATE
4 Inches
100mm
DEWP OINT
TRANSMITTER
CERTIFICATION No's:
Baseefa06ATEX0330X
IECEX BAS 06.0090X
40 nF
613 nF
2.11 μF
*
SEE NOTE 1
IIC
IIB
IIA
THE CAPACITANCE AND EITHER THE INDUCTANCE OR THE INDUCTANCE TO RESISTANCE RATIO
(L/R) OF THE CABLE MUST NOT EXCEED THE FOLLOWING VALUES:
GROUP CAPACITANCE INDUCTANCE OR L/R RATIO
(μF) (m H) (μH/o hm)
THE ISOLATION OF THE SIGNAL WIRES W ITH THE EASIDEW DISCONNECTED, MUST BE ABLE TO
AT INSTALLATION OF SYSTEM PERFORM A RISK ASSESSMENT IN ACCORDANCE WITH
EN60079-25:2004 cl.10 AND INSTALL LIGHTENING PROTECTION AS NECESSARY.
WITHSTAND A 500V AC INSULATION TEST.
THE SYSTEM MUST BE MARKED WITH A DURABLE LABEL. THE LABEL SHOULD APPEAR ON OR
ADJACENT TO THE PRINCIPAL ITEM OF ELECTRICAL APPARATUS IN THE SYSTEM OR AT THE
INTERFACE BETWEEN THE INTRINSICALLY SAFE AND NON-INTRINSICALLY SAFE CIRCUITS. THIS
MARKING SHALL INCLUDE THE FOLLOWING INFORMATION:
OT LISTED BELOW, BUT APPEARING IN TABLE A, ONLY 40nf
EASIDEW I.S. DEWPOINT TRANSMITTER
SYSTEM LABEL
L5541
. 46nF MAXIMUM CABLE CAPACITANCE IS ACCEPTABLE IN
Baseefa 07Y0027 AND THE WORD SYST OR SYSTEM.
MAXIMUM CABLE CAPACITANCE IS ACCEPTABLE.
KFD0-CS-Ex1.5 0P
KFD0-CS-Ex2.5 0P
KFD0-CR-Ex1.20 200
KFD0-CR-Ex1.30200
MTL5041
MTL5040
FOR THE INTRINSIC SAFETY ISOLATORS SHOWN I N THE LIST BELOW.
FOR ISOLATORS N
NOTE 1
M
SYSTEM CERTIFICATE No's: Baseefa07Y0027
Ex ia IIC T4 (-20C TO + 70C)
MICHELL INSTRUMENTS LTD. 01/11/05 DOF03
60 97221 Issue 5, March 2017
Page 69

Promet I.S. User’s Manual
E.2 FM Approved System Drawing
APPENDIX F
Michell Instruments 61
Page 70

APPENDIX F
E.3 CSA Approved System Drawing
Promet I.S. User’s Manual
SIGN
DATE
Pin 3 (-)
Pin 3 (-)
Pin 2 (-)
Pin 1 (+)
BAS98ATEX734 3
KFD0-CS-Ex1.50P
Isolated Repeater
Channel 1 - Pin 1 (+)
FD0-CS-Ex2.50P
K
UL Canada E106378CUL
ual Isolated
D
Connection to Easidew I.S.
CABLE
+ L
i
L
>
a
, L
CABLE
+ C
i
C
>
a
, C
MAX
I
<
SC
, I
max
V
<
CG
Ci = 37nF
Li = 0uH
4) WARNING: SUBSTIT UTION OF COMPONENTS MAY IMPARE
INTRINSIC SAFETY.
Transmitter entity parameters are as follows:
V max < 2.8Vdc
Intrinsically safe(entity), Class 1, Div1, Group A,B,C,D
Hazardous Location Installatio ns
1) Control room equipment may not use or generate over 250Vrms.
2) Wire all circuits for power supply per CEC Part 1.
3) Use only entity appro ved safety barrier or oth er associated
equipment that satisfy the following conditions:
V
I max < 93mA
5) Ex ia is defined as Intrinsically Safe.
Interface
Certificate Number
Type
EASIDEW I.S.
BAS98ATEX7343
Channel 1 - Pin 2 (-)
UL Canada
Repeate r
DEWPOINT
Pin 1 (+)
hannel 2 - Pin 4 (+)
Channel 2 - Pin 5 (-)
C
KFD2-CR-Ex1.20200
E106378CUL
BAS00ATEX7164
UL Canada E106378CUL
Isolator
Transmitter Supply
Vmax = 28V
Imax = 93mA
Pmax = 651mW
TRANSMITTER
Ci = 37nf
Pin 1 (+)
KFD2-CR-Ex1.30200
BAS00ATEX7164
UL Canada E106378CUL
Transmitter Sup ply
Li = 0
Pin 3 (-)
Pin 1 (+)
MOD. No.ISSUE
03 CERT ISS 16/06/08 IMA
06 11081 06/04/11 IMA
07 13395 16/12/13 IMA
04 CERT ISS 25/03/09 IMA
05 CERT ISS 15/06/09 IMA
SCALE
NTS
KFD2-STC4-Ex1.H
BAS99ATEX7060
UL Canada E106378CUL
Isolator
Power Supply
Smart Transmitter
UNITS
mm
DRAWING
+0.1
-0.0
ANGLES: ±0.5°
HOLE Ø:
5
1 DEC. PLACE: ± 0.2
2 DEC. PLACE: ± 0.1
0 DEC. PLACE: ± 0.
UNLESS OTHERWISE STATED
DIMENSIONS:
TOLERANCES:
3rd ANGLE
PROJECTION
DRAWING NUMBER
FINISH
MATERIAL
TITLE
Ex90385CSA
EASIDEW I.S. & EASIDEW PRO I.S.
DEWPOINT TRANSMITTER
A3
SHEET 1 OF 1
MICHELL INST RUMENTS LTD. CAMBRIDGE ©
SYSTEM DRAWIN. CSA
USED ON
3
EASIDEW
ȍ
ȍ
ȍ
ȝ
ȝ
ȝ
54 H/
217 H/
435 H/
HAZARDOUS LOCATION
EASIDEW
TRANSMITTER VERSION
TERMINAL NUMBER
CLASS 1, DIVISION 1,
Gps A,B,C, & D
1
I.S.
APPROVEDCHECKED
DATEDATE
4
2
PRO I.S.
(+)
(RETURN)
10/03/06
MSB
DRAWN
DATE
4 Inches
100mm
33mH
4.2mH
12.6 mH
(-)
(+)
CSA Certified
Barrier
-
ȝ
ȝȝ
46 nF
613 nF
2.11 F
+
NON-HAZARDOUS LOCATION
4/20mA
WITHOUT T HE CONSENT OF MICHELL I NSTRUMENTS.
ND MUST NOT BE COPIED NOR DISC LOSED TO A THIRD PARTY
A
THIS DOCUMENT IS THE PROPERTY OF MICHELL INSTRUMENTS LTD.
VS -
ABCD
THE CAPACITANCE AND EITHER THE INDUCTANCE OR THE INDUCTANCE TO RESISTANCE RATIO
(L/R) OF THE CABLE MUST NOT EXCEED THE FOLLOWING VALUES:
GROUP CAPACITANCE INDUCTANCE OR L/R RATIO
( F) (mH) ( H/ohm)
THE ISOLATION OF THE SIGNAL WIRES WIT H THE EASIDEW DISCONNECTED, MUST BE ABLE TO
WITHSTAND A 500V AC INSULATION TEST.
THE INSTALLATION MUST COMPLY WITH THE INSTALLATION PRACTICES OF THE COUNTRY OF
USE. i.e. ANSI/ISA RP12.6 (INSTALLATION OF INTRINSICALLY SAFE SYSTEMS FOR HAZARDOUS
[CLASSIFIED] LOCATIONS) AND THE NATIONAL ELECTRICAL CODE ANSI/NFPA 70.
THE CAPACITANCE AND THE INDUCTANCE OF THE HAZARDOUS AREA CABLES MUST NOT
EXCEED THE VALUES GIVEN IN TABLE 1
LOAD
S (20 TO 35V DC)
MICHELL INSTRUMENTS LTD. 01/11/05 DOF03
62 97221 Issue 5, March 2017
Page 71

Promet I.S. User’s Manual
APPENDIX F
Appendix F
Quality, Recycling
& Warranty
Information
Michell Instruments 63
Page 72

APPENDIX F
Promet I.S. User’s Manual
Appendix F Quality, Recycling & Warranty Information
Michell Instruments is dedicated to complying to all relevant legislation and directives.
Full information can be found on our website at:
www.michell.com/compliance
This page contains information on the following directives:
• ATEX Directive
• Calibration Facilities
• Confl ict Minerals
• FCC Statement
• Manufacturing Quality
• Modern Slavery Statement
• Pressure Equipment Directive
• REACH
• RoHS2
• WEEE2
• Recycling Policy
• Warranty and Returns
This information is also available in PDF format.
64 97221 Issue 5, March 2017
Page 73

Promet I.S. User’s Manual
APPENDIX G
Appendix G
Return Document &
Decontamination Declaration
Michell Instruments 65
Page 74

APPENDIX G
Promet I.S. User’s Manual
Appendix G Return Document & Decontamination Declaration
'HFRQWDPLQDWLRQ&HUWL¿FDWH
IMPORTANT NOTE: Please complete this form prior to this instrument, or any components, leaving your
site and being returned to us, or, where applicable, prior to any work being carried out by a Michell
engineer at your site.
Instrument Serial Number
Warranty Repair? YES NO Original PO #
Company Name Contact Name
Address
Telephone # E-mail address
Reason for Return /Description of Fault:
Has this equipment been exposed (internally or externally) to any of the following?
Please circle (YES/NO) as applicable and provide details below
Biohazards YES NO
Biological agents YES NO
Hazardous chemicals YES NO
Radioactive substances YES NO
Other hazards YES NO
Please provide details of any hazardous materials used with this equipment as indicated above (use continuation sheet
if necessary)
Your method of cleaning/decontamination
Has the equipment been cleaned and decontaminated? YES NOT NECESSARY
Michell Instruments will not accept instruments that have been exposed to toxins, radio-activity or bio-hazardous
PDWHULDOV)RUPRVWDSSOLFDWLRQVLQYROYLQJVROYHQWV DFLGLFEDVLFÀDPPDEOHRUWR[LFJDVHVDVLPSOHSXUJH ZLWKGU\
JDVGHZSRLQW&RYHUKRXUVVKRXOGEHVXI¿FLHQWWRGHFRQWDPLQDWHWKHXQLWSULRUWRUHWXUQ
Work will not be carried out on any unit that does not have a completed decontamination declaration.
Decontamination Declaration
I declare that the information above is true and complete to the best of my knowledge, and it is safe for Michell
personnel to service or repair the returned instrument.
Name (Print) Position
Signature Date
F0121, Issue 2, December 2011
66 97221 Issue 5, March 2017
Page 75

Promet I.S. User’s Manual
NOTES
Michell Instruments 67
Page 76

Page 77

Page 78

http://www.michell.com
 Loading...