

Page 1
HOME ENTERTAINMENT
Operating instructions
for all LCD-TV ML and
Puros sets
LCD-TV
07/11/12
606 47 2030.A1
Metz - always first class.
Page 2

Foreword
Contents
Dear customer,
thank you for selecting a Metz
LCD TV set.
We have equipped this TV set
with a menu system which uses
"file cards" and believe that this
will provide you with a user
interface that is easy to understand.
If you have any problems, you
can press the "INFO" key to
display a help function that will
assist you in setting up your TV
set.
However, you should read at
least sections 1 to 8 of the Operating Instructions before putting
your new TV set into service.
This LCD TV is HD-ready and
supports HDTV broadcasts.
The HD ready Logo is a
Trademark of EICTA.
Your METZ-WERKE
Metz-Werke GmbH & Co KG
Postfach 1267
D-90506 Zirndorf/Germany
Fon: +49 911/97060
Fax: +49 911/9706340
www.metz.de
info@metz.de
2
1 Installation . . . . . . . . . . . . . . . . . . . . . . . . . . 4
2. Safety notes . . . . . . . . . . . . . . . . . . . . . . . . . 5
3. The Remote Control . . . . . . . . . . . . . . . . . . . . 6
4. Daily Operation . . . . . . . . . . . . . . . . . . . . . . 8
5. Selecting the Operating Mode . . . . . . . . . . . . 8
6. Station Selection . . . . . . . . . . . . . . . . . . . . . . 9
7. User Help (Information) . . . . . . . . . . . . . . . . 10
8. Menu Control . . . . . . . . . . . . . . . . . . . . . . . 11
Basic functionsConfig.
9. Teletext . . . . . . . . . . . . . . . . . . . . . . . . . . . . 12
10. AV Playback . . . . . . . . . . . . . . . . . . . . . . . . 15
10.1 AV Playback VCR function . . . . . . . . . . . . . . 17
11. General Picture Settings. . . . . . . . . . . . . . . . 18
11.1 Picture Settings for Progr. via TV Menu . . . . . 22
11.2 Picture Settings for Progr. via Station Table . . 23
12. General Sound Settings . . . . . . . . . . . . . . . . 24
12.1 Sound Settings for Progr. via TV Menu . . . . . 28
Sound Settings for Prog. via the Stat. Table . . 31
13. Automatic zoom . . . . . . . . . . . . . . . . . . . . . 32
14. Childlock . . . . . . . . . . . . . . . . . . . . . . . . . . 33
15. Reminder . . . . . . . . . . . . . . . . . . . . . . . . . . 35
16. Timer Control . . . . . . . . . . . . . . . . . . . . . . . 36
16.1 Setting the Time and Date . . . . . . . . . . . . . . 37
16.2 Recording Control . . . . . . . . . . . . . . . . . . . . 38
17. Special Functions
- Picture-in-Picture . . . . . . . . . . . . . . . . . . . . 40
- Normal/Speech . . . . . . . . . . . . . . . . . . . . 41
- Timer Overview . . . . . . . . . . . . . . . . . . . . 41
Extended functions
- Direct Recording (OTR) . . . . . . . . . . . . . . . 43
- Picture format . . . . . . . . . . . . . . . . . . . . . . 44
- Picture Position . . . . . . . . . . . . . . . . . . . . . 46
18. Programming the Function Keys . . . . . . . . . . 47
19. Sound Settings Mute Function. . . . . . . . . . . . 48
19.1 Data Logic Settings (mode1 / mode2) . . . . . 49
20. EPG . . . . . . . . . . . . . . . . . . . . . . . . . . . . . . 50
20.1 Activating the EPG . . . . . . . . . . . . . . . . . . . 50
20.2 Collecting EPG Data . . . . . . . . . . . . . . . . . . 52
20.3 Using the EPG. . . . . . . . . . . . . . . . . . . . . . . 54
Using the EPG Recording a Programme . . . . 57
21. Setting the Country and Language . . . . . . . . 58
22. Setting Stations - Setting the reception mode . 59
22.1 TV-Standard
Analogue TV . . . . . . . . . . . . . . . . . . . . . . . 61
Colour standard for analogue stations . . . . . 62
22.2 Automatic DVB-T station search . . . . . . . . . . 63
Manual DVB-T station search . . . . . . . . . . . . 64
22.3 Automatic DVB-C station search. . . . . . . . . . 65
2)
for analogue stations . . . . . . . 60
Page 3

Contents
Manual DVB-C station search. . . . . . . . . . . . 66
23. Station Logo . . . . . . . . . . . . . . . . . . . . . . . . 67
24. Sorting Stations. . . . . . . . . . . . . . . . . . . . . . 68
25. Reg. AV Devices . . . . . . . . . . . . . . . . . . . . . 69
- Data Logic . . . . . . . . . . . . . . . . . . . . . . . . 70
- Setting the signal types RGB. . . . . . . . . . . . 72
- Setting the signal types DVI / HDMI . . . . . . 73
- Setting the signal types YUV. . . . . . . . . . . . 74
25.1 Removing AV Devices . . . . . . . . . . . . . . . . . 75
Configuration
26. Initial Programme Position . . . . . . . . . . . . . . 76
27. Sound via HiFi Amplifier HiFi output. . . . . . . 77
28. DVB Radio Mode . . . . . . . . . . . . . . . . . . . . 79
29. Scope of Operation. . . . . . . . . . . . . . . . . . . 80
30. Operation without the Remote Control . . . . . 82
31. Connecting Headphones . . . . . . . . . . . . . . . 83
32. Sound 1, Sound 2. . . . . . . . . . . . . . . . . . . . 83
33. Cleaning the TV Set. . . . . . . . . . . . . . . . . . . 84
34. Connections on the Left . . . . . . . . . . . . . . . . 85
35. Connections on the Rear of the Set . . . . . . . . 86
35.1 Connecting a Hifi Amplifier/AV Receiver . . . 87
36. Copying between AV Devices
Direct recording . . . . . . . . . . . . . . . . . . . . . 89
37. Setting the Picture Format . . . . . . . . . . . . . . 91
38. Glossary . . . . . . . . . . . . . . . . . . . . . . . . . . 92
Worth knowing
39. Technical Data . . . . . . . . . . . . . . . . . . . . . . 95
39.1 Upgrade Kits . . . . . . . . . . . . . . . . . . . . . . . 97
40. Inserting/Removing CA Modules . . . . . . . . . 98
41. Basic differences between
analog terrestrial reception and DVB-T . . . . . 99
Appendix for DVB satellite reception
(applicable only if a satellite tuner is installed)
A1. Setting up the Satellite Antenna System,
LNB Supply Voltage. . . . . . . . . . . . . . . . . . 101
A1.1 Setting up the Satellite Antenna System,
DiSEqC System . . . . . . . . . . . . . . . . . . . . . 102
A1.2 Setting up the Satellite Antenna System,
Selecting Satellites. . . . . . . . . . . . . . . . . . . 103
A.2 Setting Stations, Search Settings . . . . . . . . . 104
Setting Stations, Automatic Search . . . . . . . 105
Setting Stations, Manual Search . . . . . . . . . 106
Setting Stations, Updating the Data . . . . . . 107
Problems, Possible Causes, Remedies . . . . . . . . . . 108
Index . . . . . . . . . . . . . . . . . . . . . . . . . . . . . . . . 111
Connect a PC . . . . . . . . . . . . . . . . . . . . . . . . . . . 113
Portal stations . . . . . . . . . . . . . . . . . . . . . . . . . . . 114
3
Page 4

1. Installation
• Take care that no bright artificial light or sunshine falls directly on the screen. This could cause
reflections which have a negative effect on the
brilliance of the picture.
• The best viewing distance is three times the
screen diagonal, i.e.
- Approximately 2 m (6 ft) for 26" screens
- Approximately 2.4 m (8 ft) for 32" screens
- Approximately 2.8 m (10 ft) for 37" screens
• The antenna cable and any other components
(such as a video recorder) connected between
the antenna socket in the wall and the TV set
must comply with the European standard
EN 60966-2-4.
• The antenna cable used for connecting the TV
set must have a screening attenuation of at least
75 dB.
• The use of non-approved cables will invalidate
the operating permission for the TV set.
• For details of how to connect peripheral devices
such as video recorders, DVD players, etc. press
the „INFO“ key to call the help function, select
„Connecting AV devices“ with the cursor and
press „OK“ to display the information.
• Only use Metz bases as a stand for the LCD TV.
• Use the Metz wall bracket (item no. 604 99
0286.A1) or a suitable OmniMount wall bracket to hang the LCD TV on the wall. For an
OmniMount wall bracket, you also need the
Metz adapter plate 013ZM1091.
4
Page 5

2. Safety notes
• Always place the monitor on a solid,
stable surface.
• If a cold TV set is moved to a warm
room, always allow any condensation
on the screen to evaporate before switching it on.
• The TV set is intended for use in a dry
room. If, in exceptional circumstances,
you use it outdoors, take care that is
protected against moisture (rain, splashed water, dew).
• TV sets need adequate ventilation.
Never cover the openings on the rear
of the set with curtains, doilies, newspapers, etc. Also take care that the
slits in the bottom of the case are freely
accessible so that the intake of the
cooling air is not hindered.
• If you place the TV set in a wall unit,
leave sufficient space on all sides for
the circulation of cooling air.
• Do not place the TV set close to a radiator, since this would effect adequate
cooling.
• Do not place
- burning candles or
vessels containing liquids (vases, etc.)
on top of the TV set, since any hot wax
or water dripping into the set could
cause serious damage to the electronic
components and could also jeopardize
the electrical safety of the set.
• Lightning can damage electrical equipment. A lightning flash entering the
power cable or the aerial cable can
damage the TV set even if it is switched off. You should therefore disconnect the power cable and aerial cable
from their outlets or from the TV set in
the case of a thunderstorm.
• The monitor may be opened and
repaired only by a qualified person.
CAUTION! HIGH VOLTAGES CAN KILL !
If repairs should be necessary, consult
your local dealer.
• Always switch off the TV set before cleaning it.
• Do not hold the remote control directly
in front of your eyes and press a button. The remote control emits infrared
radiation!
• Do not place rechargeable batteries in
the battery compartment of the remote
control. Use only two 1.5 V dry batteries of the type LR03/AM4/AAA
(Micro).
• The TV set is intended only for the
reception and reproduction of picture
and sound signals.
• The TV set may be operated only from
a mains voltage of 230-240V VAC,
50 Hz. Australia: 240 VAC.
• For maintenance and repair work, the
power plug or the power-cord input of the
TV represents a means to disconnect the
device from the mains and must therefore
be kept in a usable state in line with applicable standards.
•
Lay the power cable so that nothing
stands on it and no-one can trip over it.
• Do not display still images, logos, 4:3
pictures with stripes etc. over an extended period. These still images can
result in marks on the screen.
5
Page 6
22
21
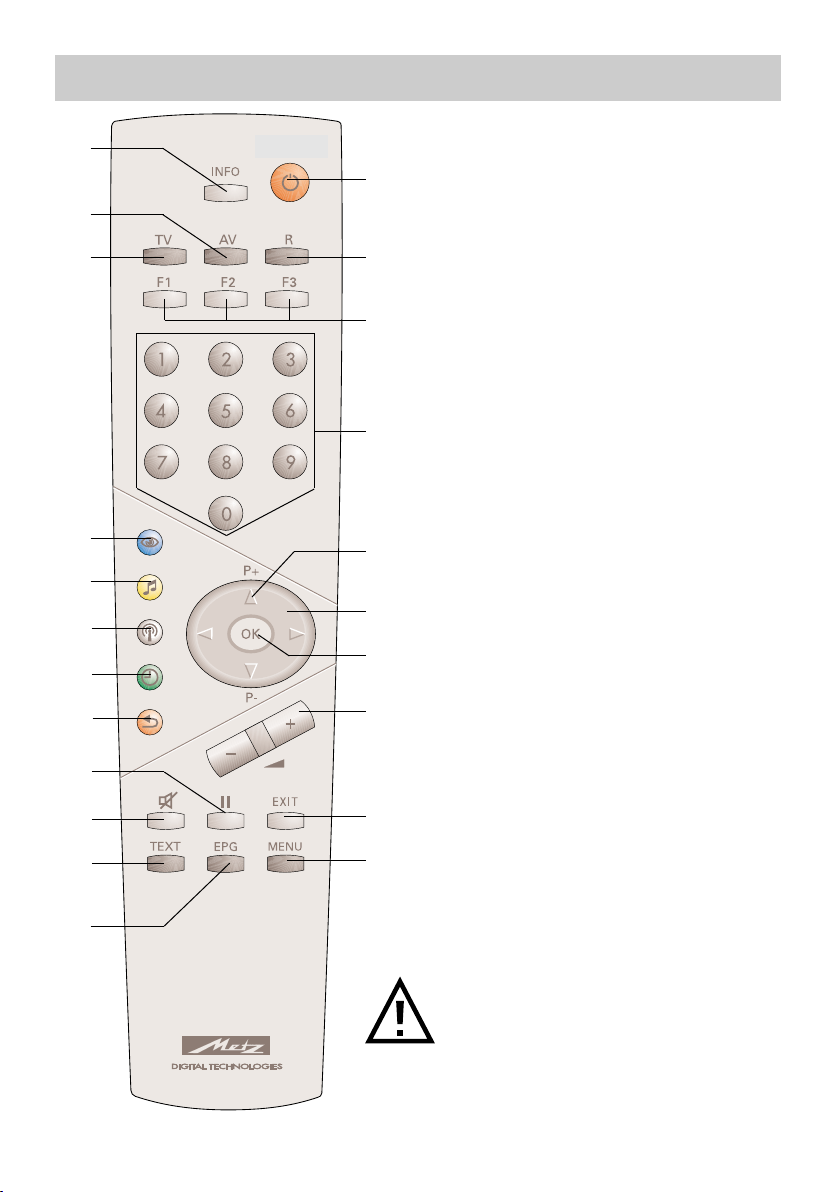
3. The Remote Control
The remote control sends commands to
the TV set by means of an infrared signal. You must point it towards the TV set
when using it. Note that the remote control may interfere with the operation of
other devices which use infrared signals
(such as infrared headphones).
Sunlight falling directly on the TV set
may interfere with the operation of the
remote control, since the TV set cannot
detect the infrared signals from the
remote control under these conditions.
The TV set must be switched on with the
main power switch before it can be controlled with the remote control.
The most important keys
for normal use
ON
Switches the TV set on with programme position 1 or the programmed
initial programme position selected,
or switches it OFF (to the standby state).
Numeric keys (direct station selection).
P+ /P- Selects the next/previous pro-
gramme position.
Ǽ
6
Volume control.
Setting can be changed in the menu.
Back to the previously selected
station.
Displays the station table.
Do not insert rechargeable batteries in
the battery compartment of the remote control.
Use only two dry batteries of the type
LR03/ AM4/AAA 1.5V.
Page 7

3. The Remote Control
Overview of the functions of the keys
Switch to DVB radio mode.
Switch on from the standby state into radio mode1).
Function keys:
F1/F2/F3: press briefly to call the functions set in the factory.
F1/F2/F3: press and hold to display a selection of special functions.
AV: press to select one of the previously configured AV devices.
Cursor control key in the "Information" window and the “TV menu”.
OK: confirmation key.
Volume control; values can be set in the TV menu.
Exit key: exit from the menu without saving any changes you have made.
Open the TV menu.
In the menu: back to the main menu.
Open the electronic programme guide (EPG).
Open the Teletext window.
Mute.
Freeze frame.
Back to the previously selected station.
In the TV menu: open the "Configuration" menu.
Display the date and time.
In the TV menu: open the "Timer" window.
Display the station table.
In the TV menu: open the station table or the station features window.
Display the sound functions.
In the TV menu: open the "AV devices" window.
Display the picture functions.
In the TV menu: open the "picture and sound" window.
Back to the TV picture.
Switch from radio mode
Switch on from standby mode into TV mode.
Display the AV menu "Replay/record".
21
Switch on from standby mode into AV mode.
Display the "Information" window. In the "Information" window:
22
back to the table of contents.
1)
to TV mode.
1)
Possible only in DVB mode !
7
Page 8

4. Daily Operation
Switching on
Switch on the TV set with the main
switch.
The TV set is now in standby mode and
the red standby indicator lights.
After about five seconds, the TV set switches to programme position 1 or to the
programmed initial programme position.
If you press no further keys on the remote control, a window requesting that you
do so is displayed after about 10 minutes. If you do not do this, the TV set switches back to the standby state.
Use the numeric keys to select any desired programme position. Pressing the
key selects programme position 1 or,
if it is programmed, the initial programme position (see page 76).
Switching off
Press the key to switch the TV set to
standby mode. If you do not intend to
use the TV set for a longer period, switch
it off with the main power switch.
Adjusting the volume
The volume can be adjusted with
+
the
key.
-
Adjusting the picture and sound
settings
Call the picture settings with the blue key
or the sound settings with the yellow
key . The setting box with the various
functions is then displayed at the bottom
left of the screen. Use the rocker key
"P+/P-" to select the desired function
and then use the
setting.
+
key to adjust the
-
TV AV R
1)
Possible only in DVB mode !
8
5. Selecting the Operating Mode
You can switch the TV set between its various operating modes with the keys "TV", "AV" and "R".
You can also switch from standby mode to the
desired operating mode with these keys.
TV = TV mode
AV = TV mode with input from AV devices
(e.g. video tape recorder, DVD player, etc.)
R = DVB Radio mode
1)
Page 9
6. Station Selection
Station selection and management of programme positions
The TV set can store the settings for up to
2000 TV stations and 2000 radio stations
in so-called programme positions. You
can select any of these programme positions with the numeric keys, with the oval
rocker key "P+/P-" or from the station
table.
If you use the numeric keys for station
mally the "thousands" digit. If less than
1000 programme positions are occupied,
it automatically becomes the "hundreds"
digit.
If less than ten programme positions are
occupied, the first digit you enter automatically becomes the "units" digit.
After pressing any numeric key, you have
three seconds to press further numeric
keys
selection, the first digit you enter is nor-
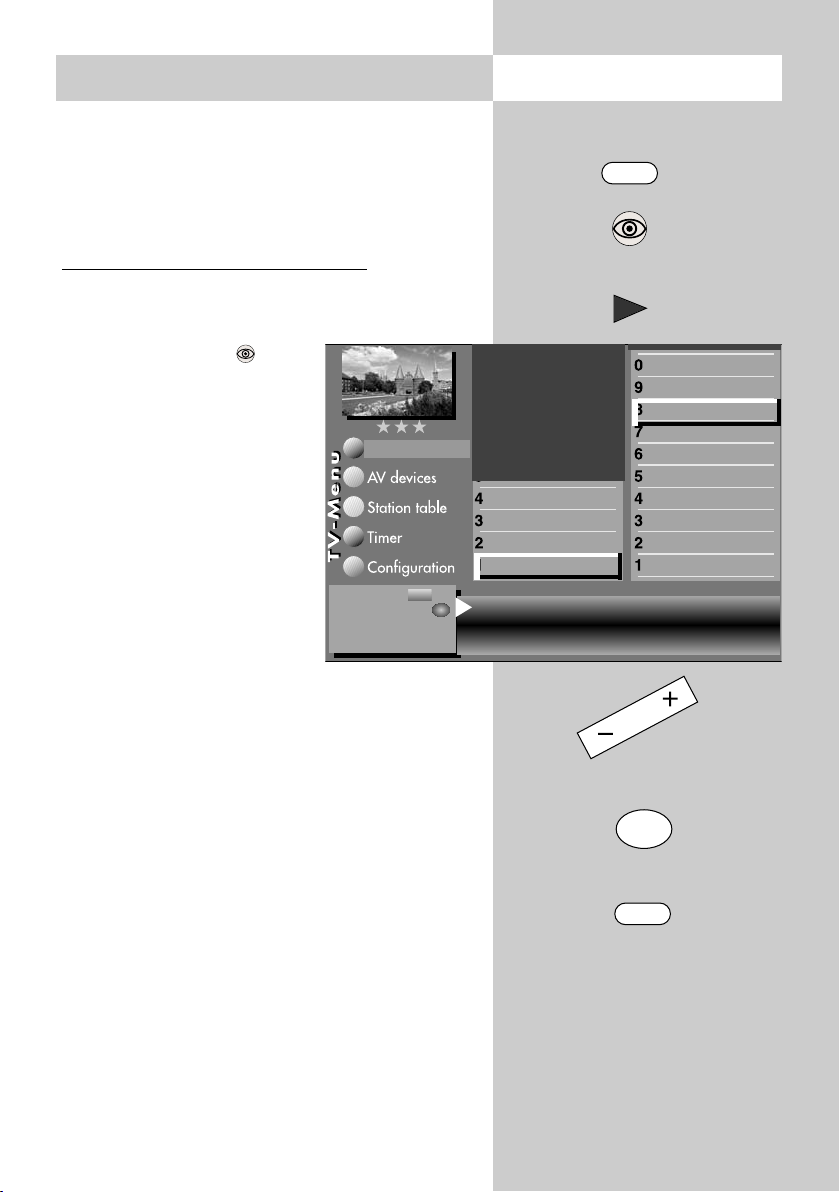
6. Station Selection
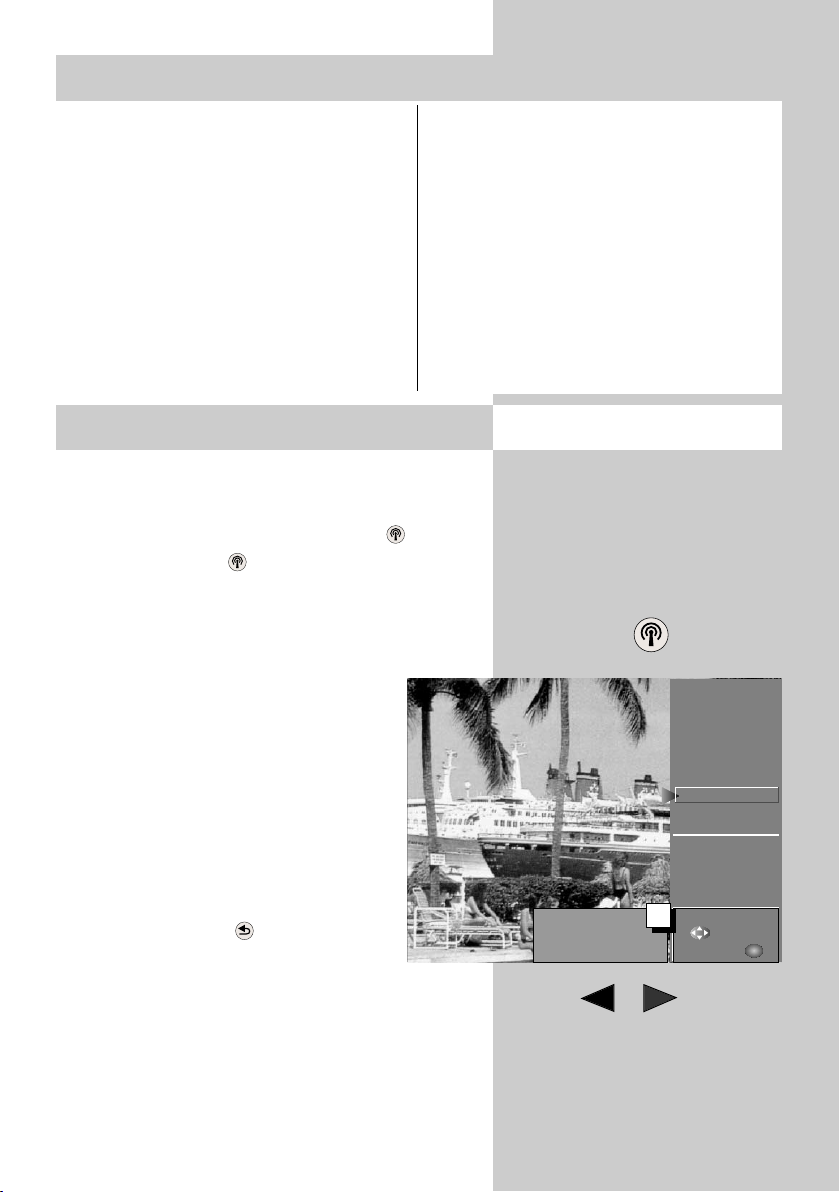
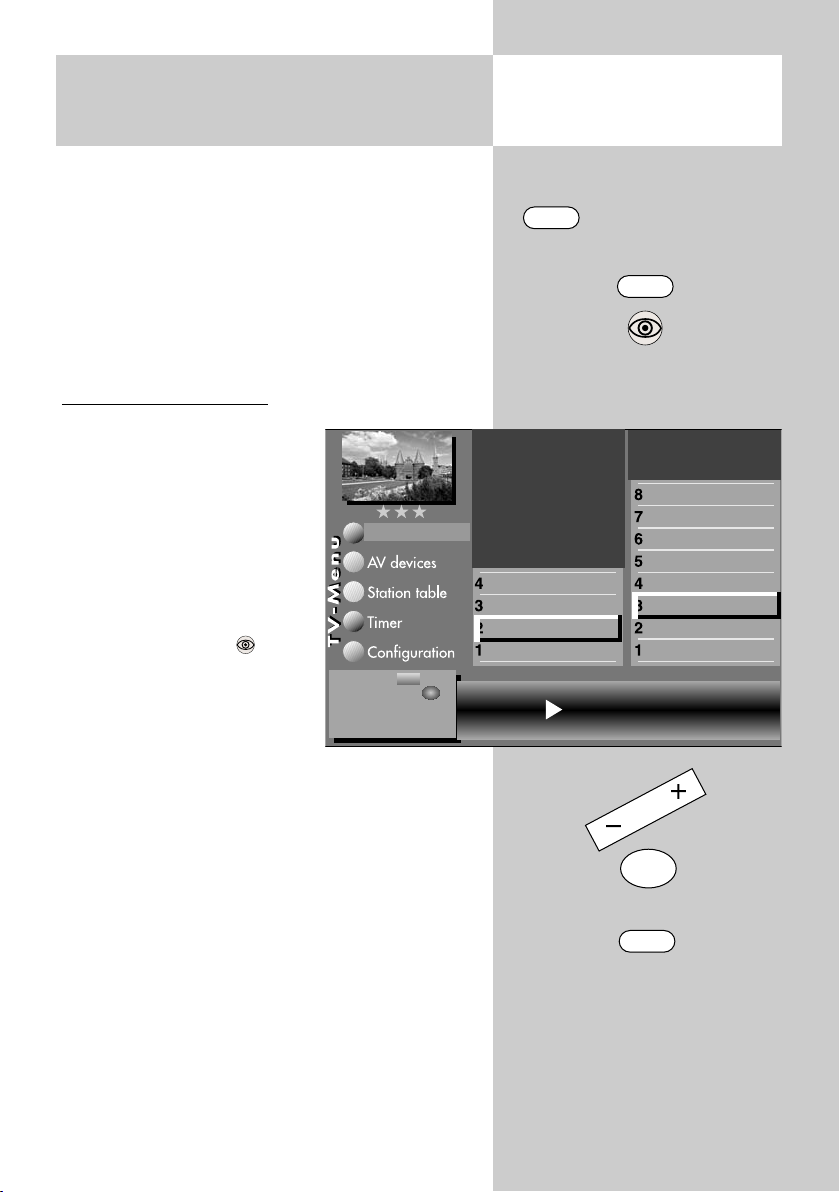
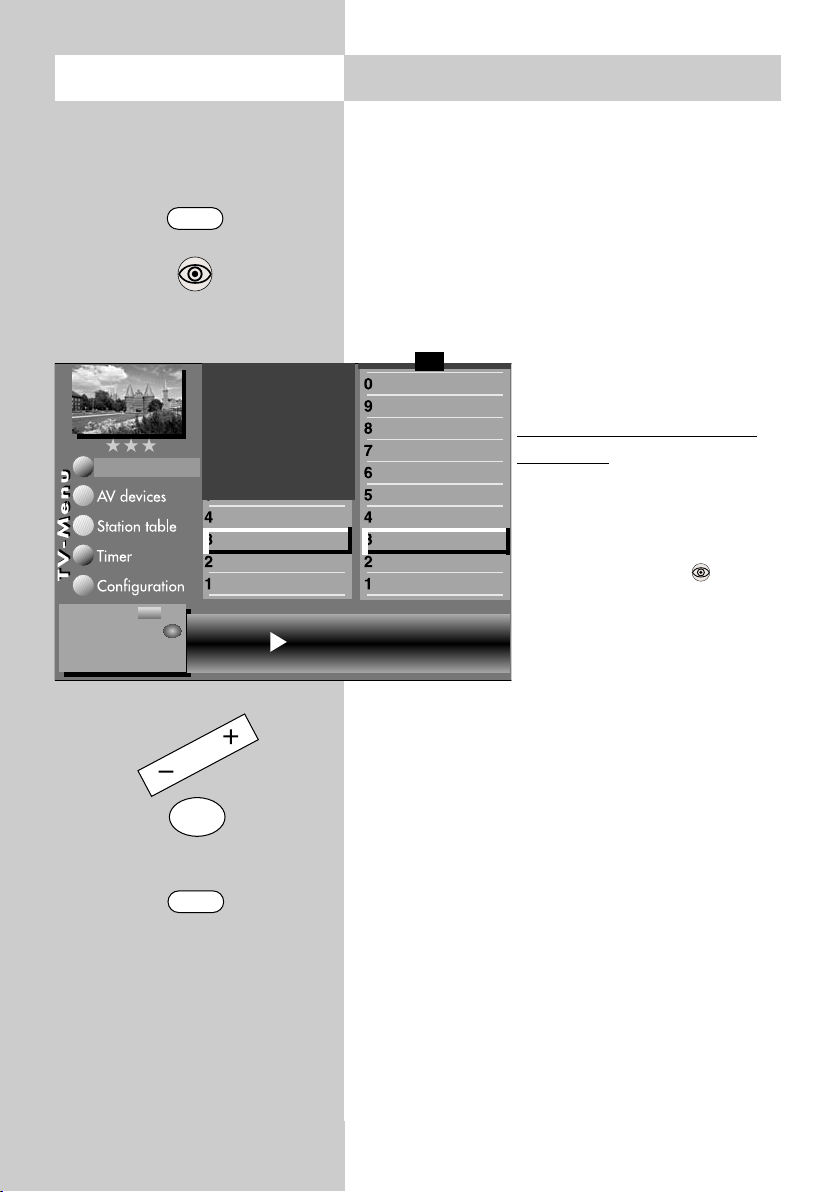
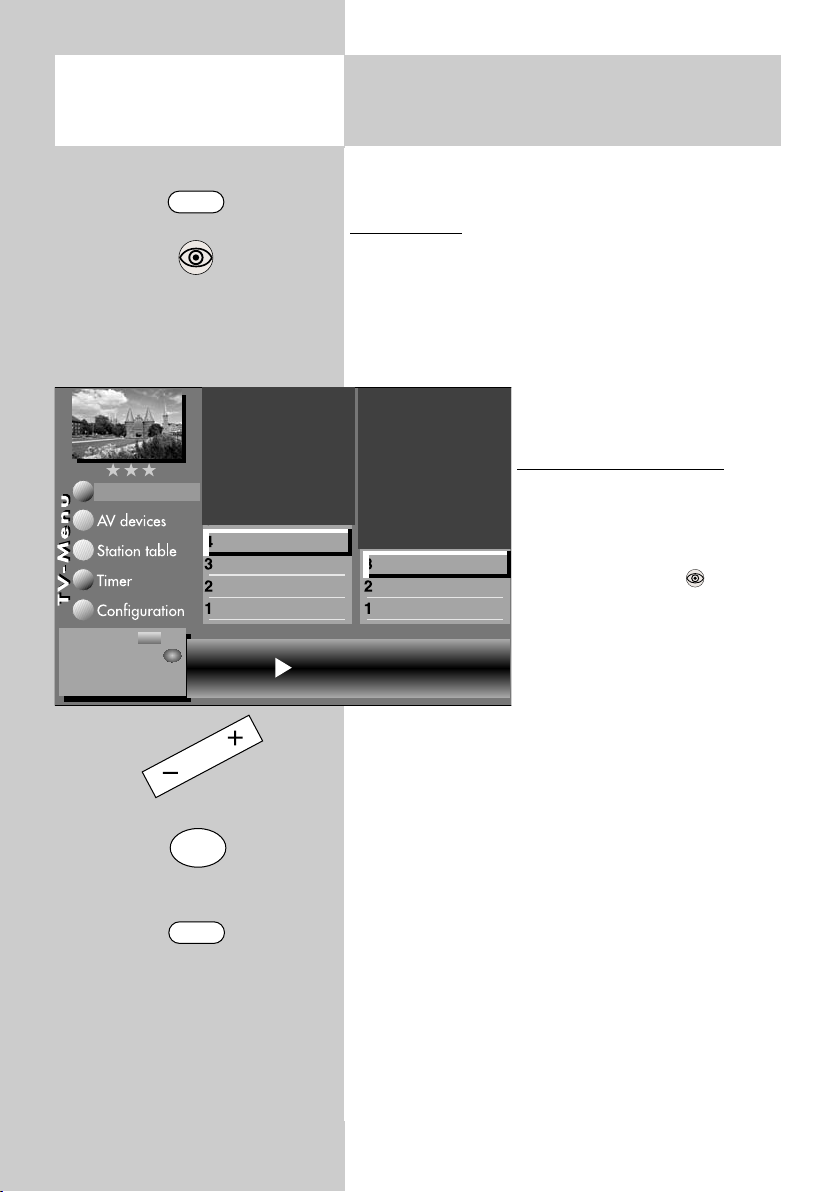
Selecting stations from the station table
In normal TV or radio 1)mode, you can display
the station table by pressing the white key.
Press the white key repeatedly to display a virtual keyboard. Use the respective key to sort the
station list alphanumerically.
In the table which is then displayed, you can use
the oval rocker key "P+/P-" or the
numeric keys to select the desired station
and then press the "OK" key to display
this station.
If the station table contains more than
20 stations, you can display the next 10
stations by pressing the oval cursor control key .
Back to the last station
You can use the red key to switch
back and forth between the last two stations you have selected.
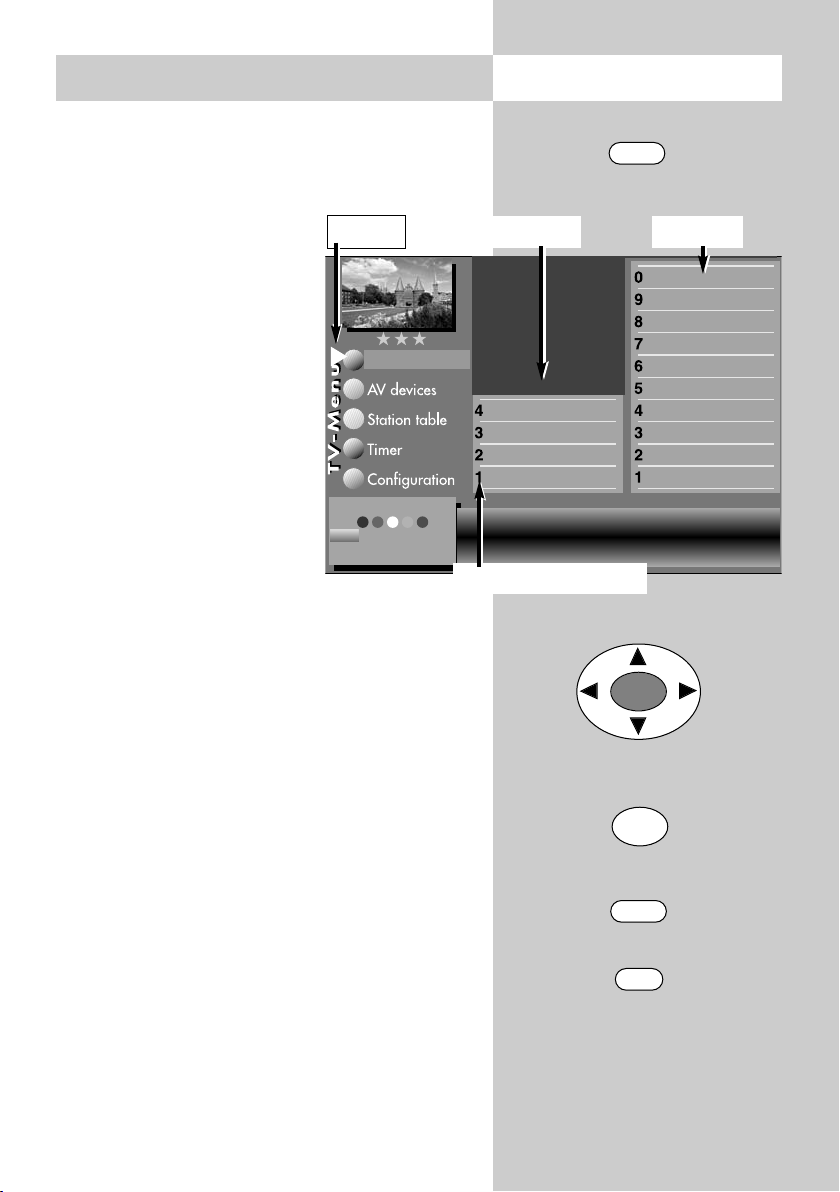
Opening the menu
2x
10 Kabel 1
9 Nord 3
8RTL
7 PRO 7
6 Nord 3
5 PRO 7
4SAT1
3 Bayern 3
2 ZDF
1 ARD
56 Hessen 3
55 SW-BW
54 N-TV
53 West 3
52 Phönix
Select with
ABC
DEF
GHIJKL
...
or .
Confirm with .
OK
1)
Possible only in DVB mode !
9
Page 10
Opening the Info
7. User Help (Information)
During the design of this TV set, we have made
every effort to make it as easy a possible for you
to use it and we hope that you will enjoy familiarising yourself with your new TV set.
With the "Information" menu, the TV set is able to
answer the many questions which may come up
during installation and setup.
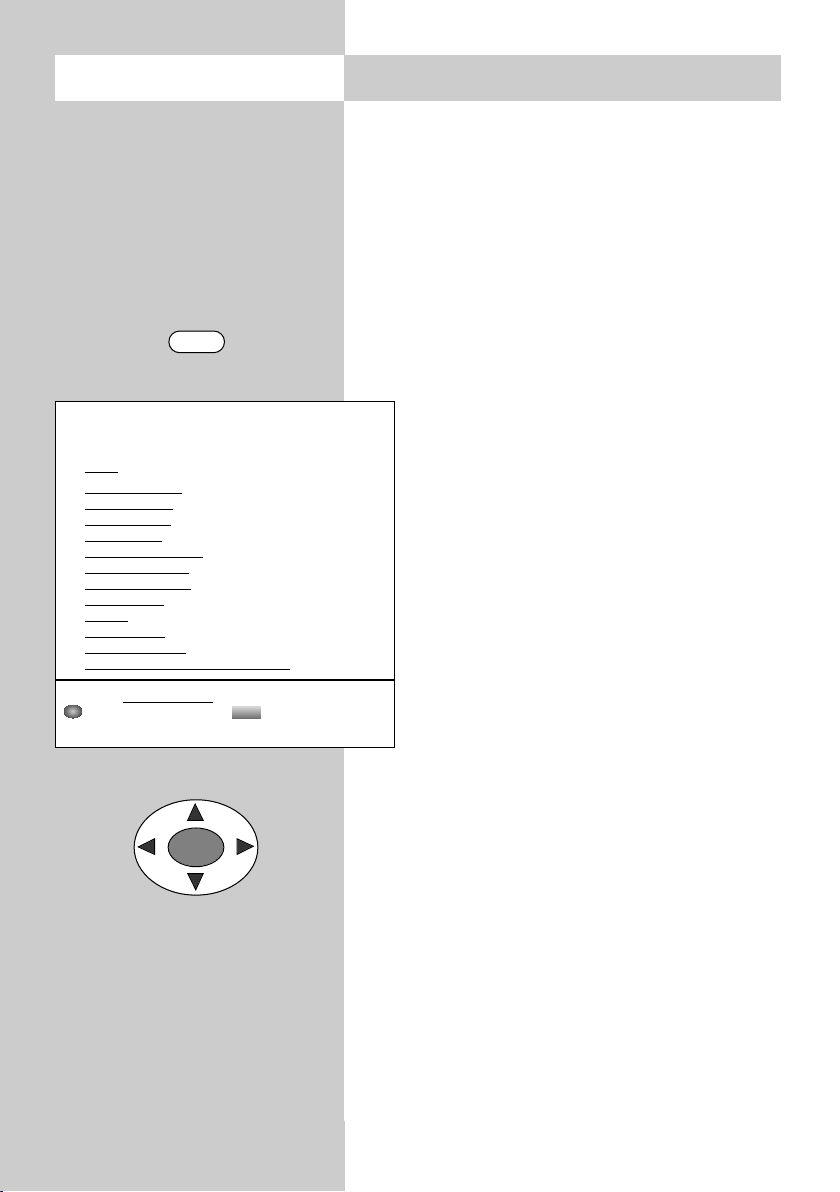
INFO
Information
Contents
Index
Station selection
Picture settings
Sound settings
AV playback
Recording facilities:
- Timer recording
- Direct recording
- AV copying
Teletext
Function keys
DVB radio mode
Electronic Programm Guide (EPG)
Select the underlined text with the cursor.
OK
: further information : table of contents
Visited pages: back forward
INFO
OK
To display this menu, simply press the "INFO" key
for the table of contents.
The "Information" menu (user help)
In the table of contents or the index, you
can select the item of interest with the cursor
control key.
Use the cursor-right key to scroll forwards through the contents or index ...
Use the cursor-left key to scroll backwards through the contents or index ...
Use the cursor-up key to select the last
underlined item ...
Use the cursor-down key to select the
menu lines...
... and then press the "OK" key to display
the explanation of the selected item.
You can select any underlined word in the table of
contents, the index or the explanation of a selected item with the cursor. Pressing the "OK" key
then displays the explanation for this word.
10
You can also scroll forwards and backwards
through previously displayed pages with the aid
of the red and green keys.
Page 11
8. Menu Control Opening the menu
With the "TV menu", we provide you with an
assistant to help you find your way through the
many possible settings of the TV set.
Don't be afraid to change any settings in the
various menus. No changes
Cursor
will be saved unless you press
the "OK" key to confirm them.
If you are not sure whether
you want to keep a changed
setting, you can exit from the
menu at any time, without
Picture-Volume
saving any changes, by pressing the "EXIT" key.
Within the TV menu, you can
return to the previous main
menu item at any time by
pressing the "MENU" key. If
you are not sure what a menu
item does, press the "INFO"
Open the menu
with
EXIT
: back
to TV picture
Related numeric keys
key for more information.
In order to return to the menu, press the "INFO"
key twice.
You can open each of the five main sections of the
menu with the key of the corresponding colour.
The "card file" which is then displayed is subdivided into Subjects (on the left) and Sections (on the
right), and you can select these by moving the
red, triangular cursor with the oval cursor control
key or with the numeric keys.
MENU
Sound set,.prog.posn
Sound settings, gen.
Pict.set.,prog.posn.
Picture settings, gen.
Setting window
Section*Subject*
Picture improvment
Factory settings
Zoom/Panorama
Noise reduction
Picture sharpness
Colour impr.
Colour intensity
Backlight control Con-
trast
Brightness
OK
OK
3)
When you press the "OK" key, the current setting
for the selected item is shown in the "Setting window" below the card file and can be adjusted
with the
+
key.
-
You can save the new setting by pressing the "OK"
key, which also returns you to the list of sections. If
you do not want to save the new setting, press the
"MENU" key to return to the corresponding main
menu item or press the "EXIT" key to close the menu.
You can delete any incorrect inputs with the II key.
EXIT
II
* The number of subjects and sections depends
on the selected scope of operation. Depending on the configuration of the TV set, the
various menu items may be displayed in a
different order and numbered differently.
11
Page 12
TEXT
9. TeletextOpening the menu
Teletext is an additional service provided free of
charge by many TV stations. It is an "electronic
i
magazine" through which you can browse in
various ways.
Opening Teletext:
100
Gehörlose
Börse
Service
BR-Intern
Hörfunk
Fernsehen
Sport
Bayern
Schlagzeilen
Übersicht
Impressum
A-Z
Controlling Teletext with pages
displayed:
100 ProSieben Datum Uhrzeit
09.56 talk talk talk. . . . . . . . . . . . . . . . . . . . . . 334
10.56 S.O.S.Style & Home. . . . . . . . . . . . . . . . 335
Aktuelle Meldungen. . . . . . . . . . . . . . . . . . . . . . . 112
Computer Wurm . . . . . . . . . . . . . . . . . . . . . . . . . 113
TED: Brauchen wir Schutz ? . . . . . . . . . . . . . . . . . 123
Weitere Meldungen. . . . . . . . . . . . . . . . . . . . . . . 135
Kartenlegen
Live
Gratis
458
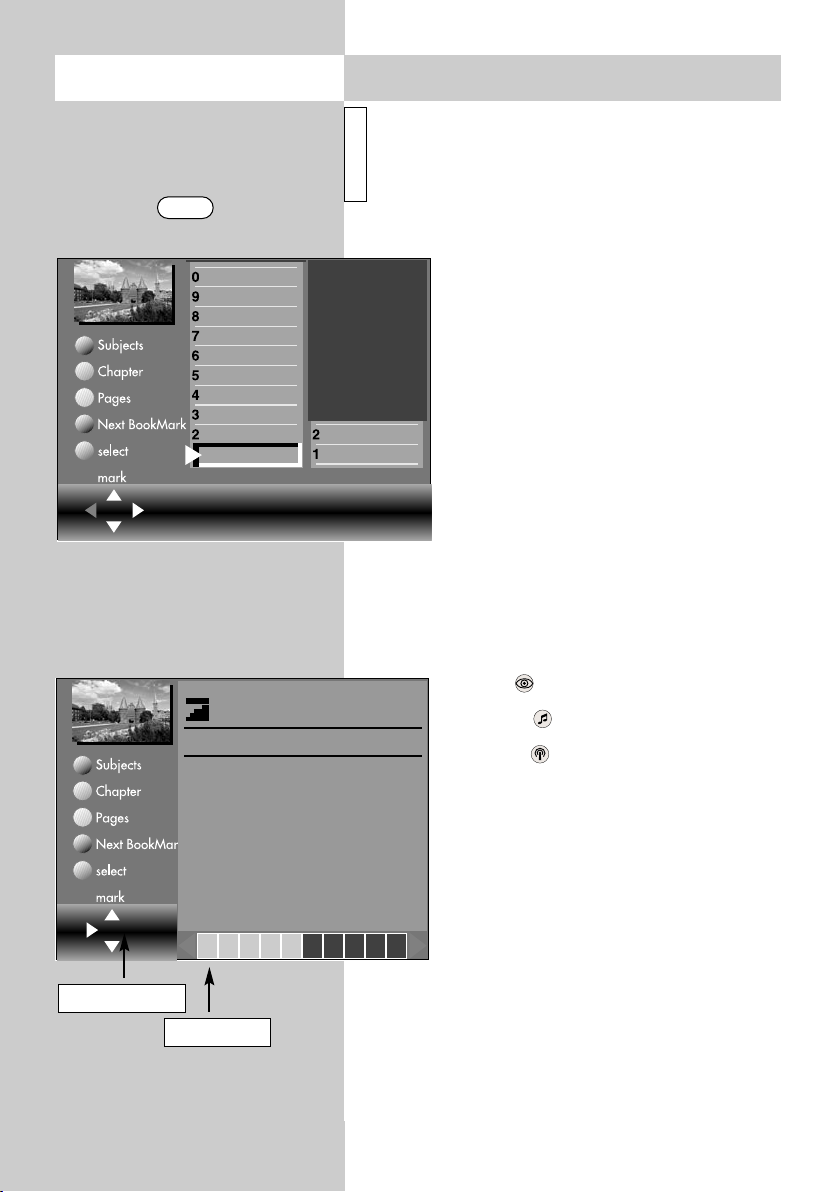
• Press the "TEXT" key. If the selected
station offers "TOP-Text", a "card
file" is displayed (see the picture on
the left).
If "TOP-Text" is not available, Teletext
page 100 is displayed (see the picture below).
• In the TOP-Text card file, you can
select the desired cards with the cursor control key or with the numeric
keys.
• Press the "OK" key to open the selec-
ted card.
Blue key – next subject.
Yellow key – next section.
White key – next page.
After pressing the coloured pre-selec-
tion key, you can step through the subjects, sections or pages with the cursor
control key or with the numeric keys.
100
Page number
12
00 01 02 03 04 05 06 07 08 09
Sub-pages
If you wish to select a specific page,
enter its page number on the numeric
keys.
If sub-pages exist for the selected page, the page
numbers are displayed in black. In the example
shown here, there are five sub-pages.
You can step through these sub-pages with the
cursor control key.
Page 13

9. Teletext
Double font size
You can double the size of the font used
for Teletext pages with the F1 key. Pres-
sing this key once displays an enlarged
picture of the upper third of the page.
Pressing it a second and third time displays the centre and lower thirds of the
page. Pressing a fourth time displays the
entire page again.
Riddle key (display hidden text)
Function key F2 is programmed in the
factory to display hidden text, such as
the answers to riddles.
Back to the last index page
You can return directly to the last index
page you have displayed by pressing
the numeric key .
Stop page scrolling
The II key or the "OK" key can be used
to stop the automatic scrolling executed
by some pages, and to enable this
again.
Page selection with the cursor
Press the "OK" key to stop page scrolling. The cursor is now positioned at
the top left corner of the page and you
can use the cursor control key
to position it anywhere on the displayed
page. This function is useful on index
pages (such as pages 100, 200, etc.) in
order to select a page you want to see.
After positioning the cursor on the desired page number, press the "OK" key to
display its contents.
Setting marks in Teletext
As a user of Teletext, you will probably
want to visit certain pages (such as
stock-market news, news pages or the
weather forecast) regularly.
In order to find these pages quickly, you
can set marks to suit your personal
requirements.
To do this, open a page for which you
want to set a mark.
• Press the red key for "Set" to place
a mark on this page. The number of
the mark you have just set is displayed
above the window containing the number of the Teletext page. In the case of
multiple pages, the mark is always set
and displayed for the currently displayed sub-page.
Up to 10 marks can be set for
☞
each programme position.
6)
Scrolling through marked
Teletext pages
With the Teletext window open, you can
step sequentially through the marked
pages with the green key.
An even easier method is by pressing the
"TEXT" key while the TV programme is
displayed. Each time you press this key,
the next marked page is displayed. After
the last marked page, the TV picture is
displayed again.
6)
6) Not possible with an external receiver !
13
Page 14

9. Teletext
Displaying all Teletext marks
If you have set marks for a programme position,
you can display an overview of these marks by
pressing the F3 key. The displayed list shows where the marks are set. Press F3 again to hide the
list.
You can select the individual marks in the list with
the numeric keys.
Clearing Teletext marks
Open the Teletext page whose mark is to be deleted and press the red key "Delete" to delete the
mark.
6)
6)
Subtitles in Teletext
Your TV set is capable of displaying subtitles.
When a programme for which subtitles exist
starts, the TV station displays a box showing the
Teletext page on which these can be found.
• Press the "TEXT" key to open Teletext.
• If this is a "TOP-Text" station, the card file is displayed. Press the "OK" key and open any available page.
6) Not possible with an external receiver !
14
• Use the numeric keys to enter the number of the
page containing the subtitles.
Page 15
10. AV Playback
Opening the menu
AV playback (devices with switching voltage)
Before they can be used, AV devices must
☞
be registered and assigned to the appropriate input sockets in the menu "AV devices".
Playing back a recording from a video cassette,
DVD, etc. on a connected AV device is called AV
playback.
In order to see the picture, you must programme
your TV set to execute an
automatic programme change
at the EURO socket to which
the AV device is connected.
Programming a programme
change
This menu item is not
☞
available in a 2 **
menu (see Section 30,
Scope of Operation).
The automatic program-
☞
me change is set in the
factory to "ON" for all
EURO sockets.
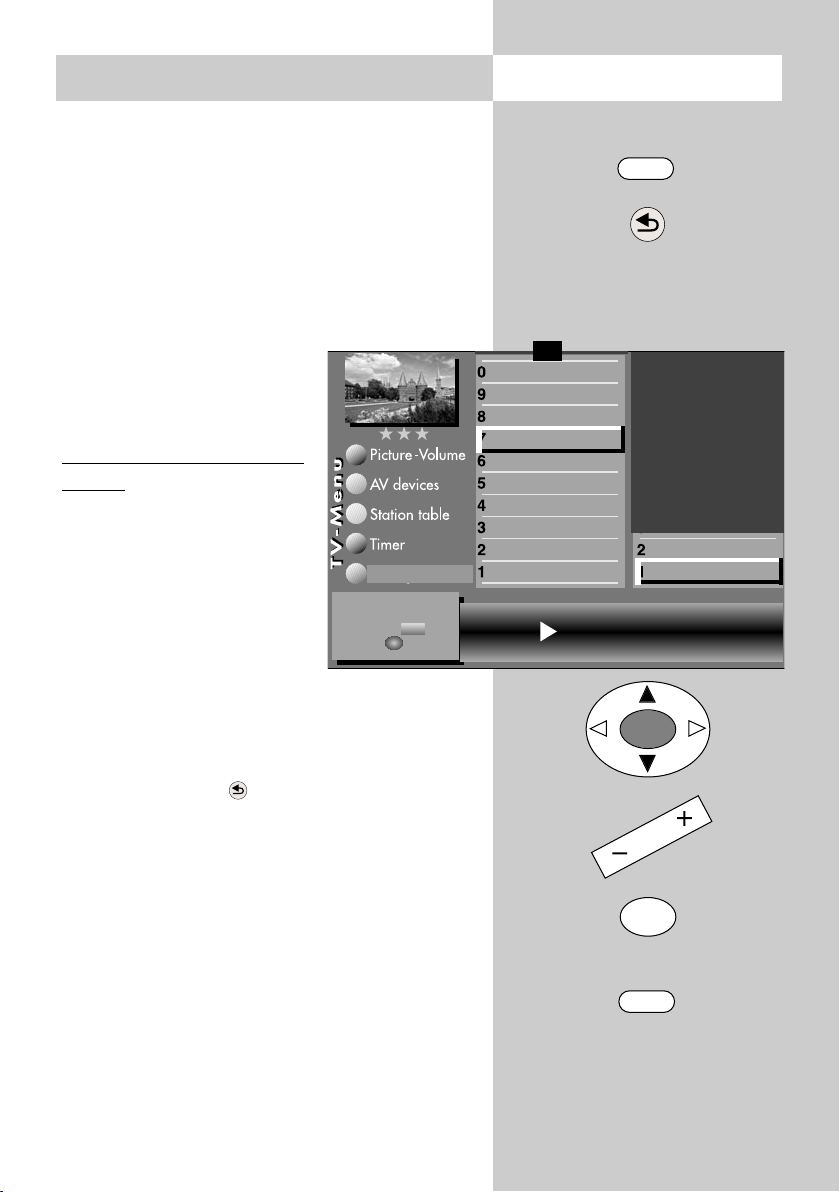
• Press the "MENU" key.
The TV menu appears on the screen.
Configuration
Programm change
of switching line.
Change with .
Save with .
– +
OK
F1
Function for F3
Function for F2
Function for F1
➔
EURO sockets
DVB-C
DVB-T
Analog-TV
Country
Language
Operating
Change stations on
MENU
EURO 2
EURO 1
OK
• Press the red key . The menu
"Configuration" is displayed.
• Use the corresponding numeric key
(in this example:
) to select the menu item
"EURO sockets".
• Use the cursor control key to select "EURO 1 or
"EURO 2".
• Press the "OK" key and then, in the setting win-
dow, use the
+
key to select "Programme chan-
-
ge on".
• Press the "OK" key to save the new setting.
• Press the "EXIT" key to close the TV menu.
OK
EXIT
The number of subjects and sections depends
on the selected scope of operation. Depending
on the configuration of the TV set, the various
menu items may be displayed in a different
order and numbered differently.
15
Page 16
AV
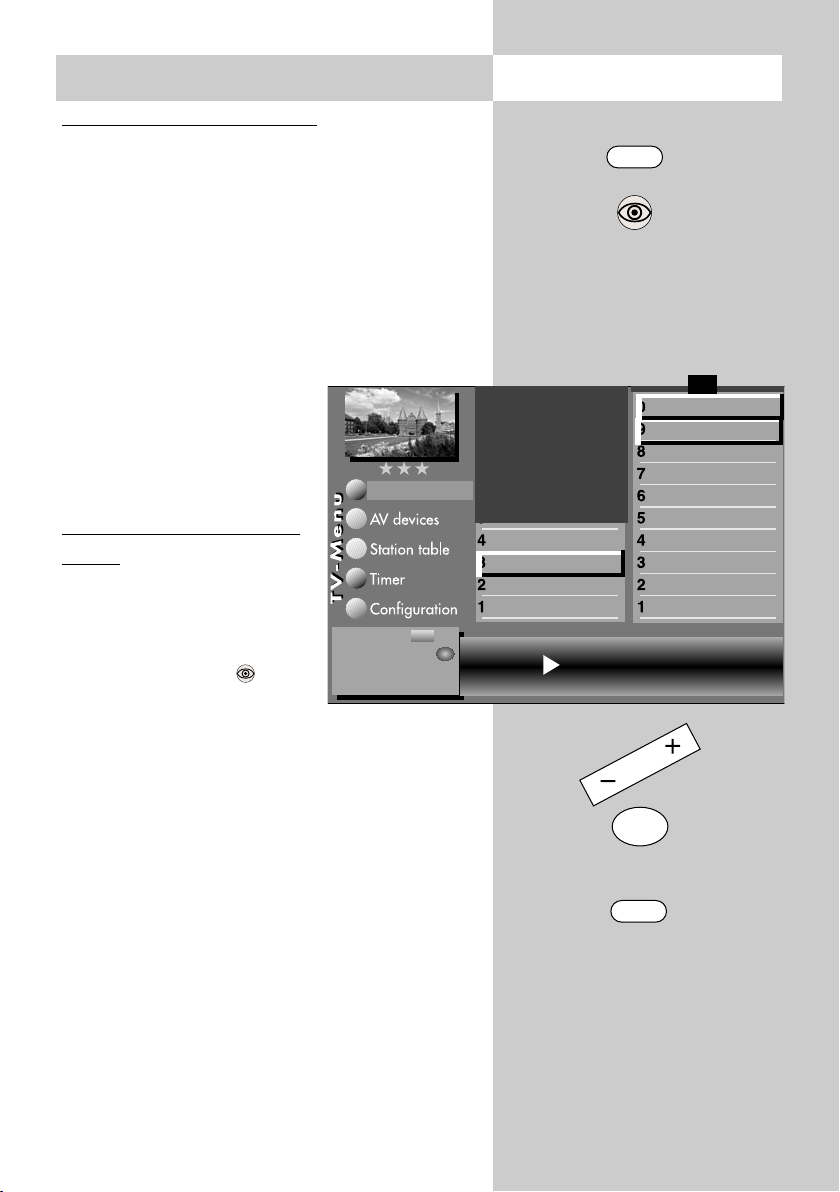
10. AV PlaybackOpening the menu
If you now start to play back a recording on the
connected AV device, the TV set changes automatically from any other programme position to the
playback mode.
AV playback
(devices without switching voltage)
Before they can be used, AV devi-
9 HDMI
8 DVI
5 Front
4 YCbCr
3 Foto
2 DVD Player 1
1 DVD/Videorec.1
Select with ...
or .
Confirm with .
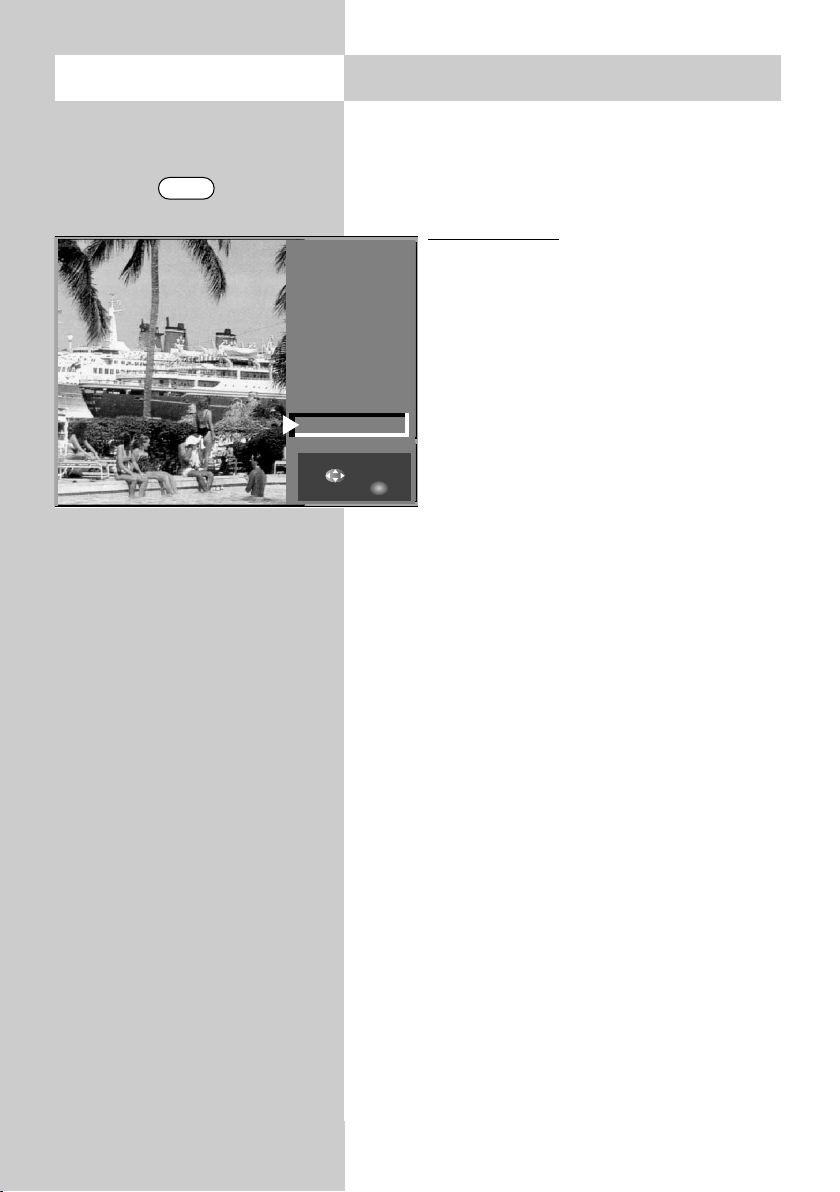
• Press the "AV " key.
• Use the corresponding numeric key to select the
AV device you want to use.
• The TV set now changes from the current programme to the selected playback device.
☞
ces must be registered and assigned to the appropriate input sokkets in the menu "AV devices".
In order to see the played back picture,
you must switch the TV set to playback
mode.
OK
• Select any programme position.
16
• Start the replay function on the AV device. This
AV selection remains active until you switch to
any other programme position.
• After watching the film from the AV device,
press the "TV" key to return to normal TV mode.
Page 17
10.1 AV Playback
VCR function
The menu item "VCR" is not available in a
☞
2 ** menu.
Picture quality when playing back from
tape devices
The VCR function ensures an optimum picture
quality when playing back recordings from tape
devices such as video cassette recorders or camcorders.
Setting the VCR function
• Select the appropriate AV
level by pressing the "AV "
key and using the numeric
keys to select the AV device
which is to supply the pictures.
• Press the "MENU" key to
open the TV menu.
• Press the blue key . The
menu
"Picture and sound" and
the menu item "General
picture settings" are preselected.
Picture-Volume
Change with
Accept value with
– +
OK
Opening the menu
AV
. . . .
MENU
Sound set,.prog.posn
Sound settings, gen.
Pict.set.,prog.posn.
Picture settings, gen.
VCR settings Opt.1
VCR
Picture format
Colour standard
Colour offset
Noise reduction
Picture sharpness
Colour intensity
Contrast
3)
5)
3) 7)
3) 7)
3)
• Use the corresponding numeric key (in the
example:
)
to select the menu item "Pict.set-
tings for Pr."
• Use the corresponding numeric key (in the
example:
• Use the
)
to select the menu item "VCR".
+
key to select "Opt.1". If this setting
-
does not produce a satisfactory result, you can
try using "Opt.2".
• Press the "OK" key to save the new setting.
• Press the "EXIT" key to close the TV menu.
OK
EXIT
The number of subjects and sections depends
on the selected scope of operation. Depending
on the configuration of the TV set, the various
menu items may be displayed in a different
order and numbered differently.
3) See glossary for an explanation.
5) Available only for DVB stations!
7) Available only for analogue stations!
17
Page 18
Opening the menu
MENU
The picture settings brightness, contrast, colour
intensity, sharpness and noise reduction can be set
generally for all programme positions and saved
as standard values which can be recalled at any
time by pressing the "OK" key.
OK
Picture-Volume
Sound set,.prog.posn
Sound settings, gen.
Pict.set.,prog.posn.
Picture settings, gen.
Change with
Accept current
value as default
value.
– +
Brightness
Standard value
Use as default value: Yes
OK
EXIT
The number of subjects and sections depends
on the selected scope of operation. Depending
on the configuration of the TV set, the various
menu items may be displayed in a different
order and numbered differently.
Opening the picture settings menu:
This example describes how the brightness is
61
50
• The various menu items can be selected with the
• In the setting window, use the
• Use the cursor control key to select the third
• If you wish to save the new setting, use the
• Press the "OK" key to save the changed setting
• Press the "EXIT" key to close the TV menu.
11. General Picture Settings
Some of the menu items are not available
☞
in a 2 ** menu.
adjusted. The other picture
Picture improvment
Factory settings
Zoom/Panorama
Noise reduction
Picture sharpness
Colour impr.
Colour intensity
Backlight control
Contrast
Brightness
aid of the numeric keys.
the setting.
line "Save as standard values".
+
key to select "Yes".
-
as a standard value.
If the standard values do not provide a satisfac-
☞
tory picture in some programme positions, you
can make settings for these positions which differ from the standard values. See the next sections. 11.1 and 11.2.
settings can be adjusted in a
similar manner.
• Press the "MENU" key.
3)7)
3)
The TV menu appears on
the screen.
• Press the blue key . The
menu "Picture and sound"
and the menu item "General picture settings" are preselected.
• Use the cursor control key
to select the menu item
"Brightness".
+
key to change
-
18
Page 19
11. General Picture Settings
Some of the menu items are not available
☞
in a 2 ** menu.
The backlight control (factory setting "off") can be
set to "dynamic" or "automatic". With "dynamic"
the backlight control is adjusted according to the
picture contents.
With "automatic" the backlight control is adjusted
according to the ambient brightness.
Opening the menu
MENU
The backlight control can be
set generally for all programs
and saved.
Set backlight control:
Picture-Volume
• Press the "MENU" key.
The TV menu appears on
the screen.
• Press the blue key . The
menu "Picture and sound"
and the menu item "Gene-
Change with
Accept value with .
– +
OK
ral picture settings" are preselected.
• Use the cursor control key to select the menu
item "Brihtness".
• Use the corresponding numeric keys (in this
example:
for the Bachlight control) to select
the desired menu items.
• Use the
+
key to change the settings for
—
"Backlight control".
• Press the "OK" key to save the changed setting
as a standard value.
Sound set,.prog.posn
Sound settings, gen.
Pict.set.,prog.posn.
Picture settings, gen.
Backlight control off
Picture improvment
Factory settings
Zoom/Panorama
Noise reduction
Picture sharpness
Colour impr.
Colour intensity
Backlight control
Contrast
Brightness
OK
EXIT
3) 7)
3)
• Press the "EXIT" key to close the TV menu.
Die Anzahl der Themen und Kapitel ist abhängig vom eingestellten Bedienumfang. Die
Anordnung der einzelnen Menüpunkte kann
sich, abhängig von der Geräteausstattung, in
der Reihenfolge und Nummerierung ändern.
19
Page 20
Opening the menu
MENU
11. General Picture Settings
Some of the menu items are not available
☞
in a 2 ** menu.
Depending on the brightness of the picture shown,
with the setting "Picture improvment on" there is
an extension of the bright area in the case of dark
picture contents.
As a result, dark pictures are reproduced with
greater accuracy of detail.
The picture improvement can be set to "on" or
"off".
Picture-Volume
Change with
Accept value with .
– +
OK
OK
EXIT
Sound set,.prog.posn
Sound settings, gen.
Pict.set.,prog.posn.
Picture settings, gen.
Picture improvment on
Picture improvment
Factory settings
Zoom/Panorama
Noise reduction
Picture sharpness
Colour impr.
Colour intensity
Backlight control
Contrast
Brightness
Setting the Picture improv
ment
3) 7)
• Press the "MENU" key.
3)
The TV menu appears on
the screen.
• Press the blue key . The
menu "Picture and sound"
and the menu item "General picture settings" are pre-
-
selected.
• Use the cursor control key
to select the menu item
"Brightness".
• The various menu items can be selected with the
aid of the numeric keys.
• Use the
+
key to change the settings for "Pictu-
-
re improvment".
• Press the "OK" key to save the new settings.
The picture shows the factory settings.
• Press the "EXIT" key to close the TV menu.
The number of subjects and sections depends
on the selected scope of operation. Depending
on the configuration of the TV set, the various
menu items may be displayed in a different
order and numbered differently.
20
Page 21
11. General Picture Settings
Some of the menu items are not available
☞
in a 2 ** menu.
The picture settings zoom, vertical position, automatic zoom and panorama can be set and saved
as general settings for all programme positions.
Setting the zoom/panorama mode:
• Press the "MENU" key.
The TV menu appears on the screen.
Opening the menu
MENU
• Press the blue key . The
menu
"Picture and sound" and
the menu item "General
picture settings" are pre-
Picture-Volume
selected.
• Use the cursor control key
to select the menu item
"Brightness".
• Press the corresponding
numeric key to select
Change with
Accept value with .
– +
"Zoom/Panorama".
• Use the cursor control key
to select the desired menu items.
• Use the
+
key to change the settings for
-
"Zoom/Panorama".
• Press the "OK" key to save the new settings.
The picture shows the factory settings.
• Press the "EXIT" key to close the TV menu.
The functions "Panorama" and "Zoom"
☞
can be combined with each other.
Picture improvment
Factory settings
Zoom/Panorama
Noise reduction
Picture sharpness
Colour impr.
Sound set,.prog.posn
Sound settings, gen.
Pict.set.,prog.posn.
Picture settings, gen.
OK
Zoom value 0 Panorama Yes
Picture pos., vert. 0% Pan. mode
Automatic zoom off
Colour intensity
Backlight control
Contrast
Brightness
OK
EXIT
3) 7)
3)
Non-linear
The number of subjects and sections depends
on the selected scope of operation. Depending
on the configuration of the TV set, the various
menu items may be displayed in a different
order and numbered differently.
3) See glossary for an explanation.
21
Page 22
Opening the menu
11.1 Picture Settings for
Programmes via TV Menu
Picture-Volume
Change with
Accept value with
– +
MENU
OK
OK
Sound set,.prog.posn
Sound settings, gen.
Pict.set.,prog.posn.
Picture settings, gen.
Picture settings for individual programme
☞
positions are not available in a 2 ** menu.
If the standard values do not provide a satisfactory picture in some programme positions, you can
make different settings for these positions which
override almost all of the general picture settings.
These individual settings apply only to the programme position for which they are made, and
they cannot be overwritten with the standard
Picture format
Colour standard
Colour offset
Noise reduction
Picture sharpness
Colour intensity
Contrast
Noise reduction light
• Press the blue key . The menu "Picture and
sound" and the menu item "General picture settings" are pre-selected.
VCR
values. In addition to the
general picture settings, the
3)
individual settings also include
the settings colour offset,
5)
colour standard and VCR.
3)7)
3)7)
Individual picture settings for
3)
programme position xy:
• Select the programme position whose picture settings
you wish to change.
• Press the "MENU" key.
The TV menu appears on
the screen.
OK
EXIT
2) Possible only on sets equipped with this
function.
3) See glossary for an explanation.
5) Available only for DVB stations!
7) Available only for analogue stations!
22
• Use the cursor control key to select the menu
item "Pic. settings for Pr." And press the "OK"
key.
• Use the corresponding numeric keys (in this
example:
for noise reduction) to select the
desired menu items.
• In the setting window, use the
+
key to change
-
the setting.
• Press the "OK" key to save the new setting.
• Press the "EXIT" key to close the TV menu.
Page 23
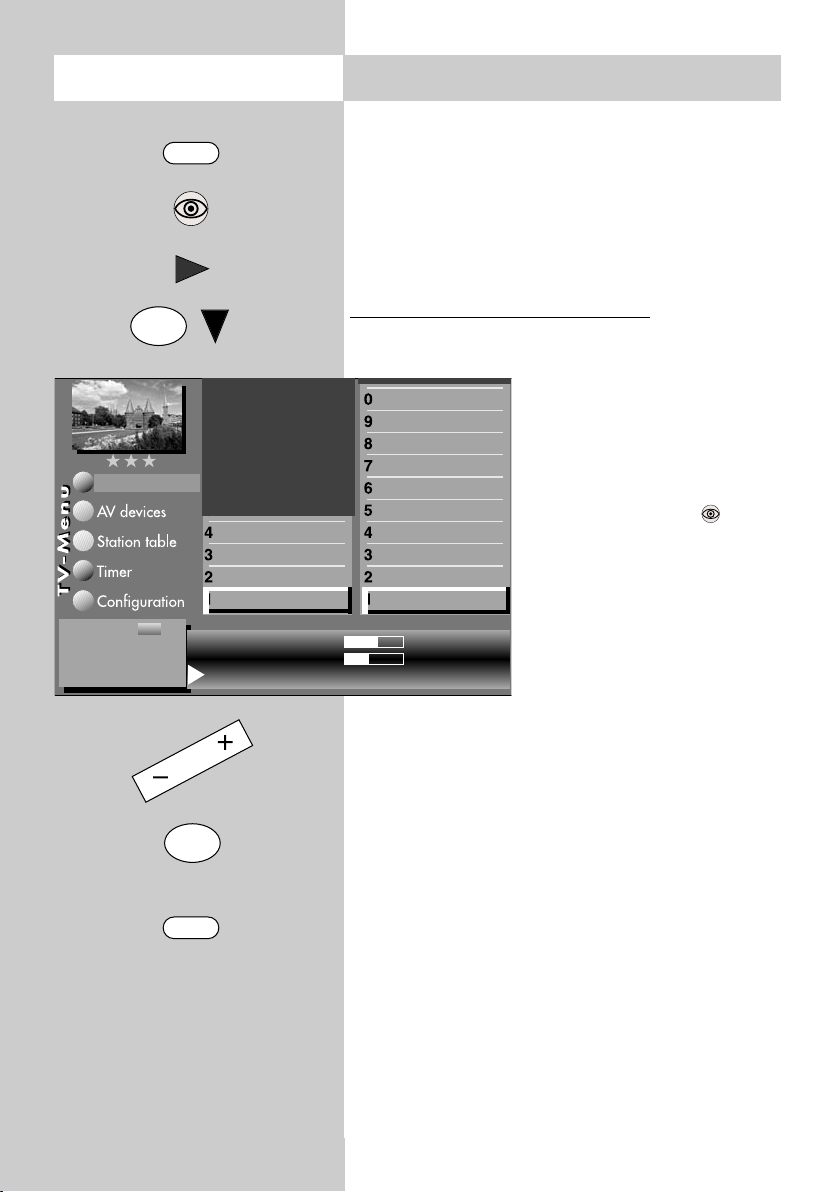
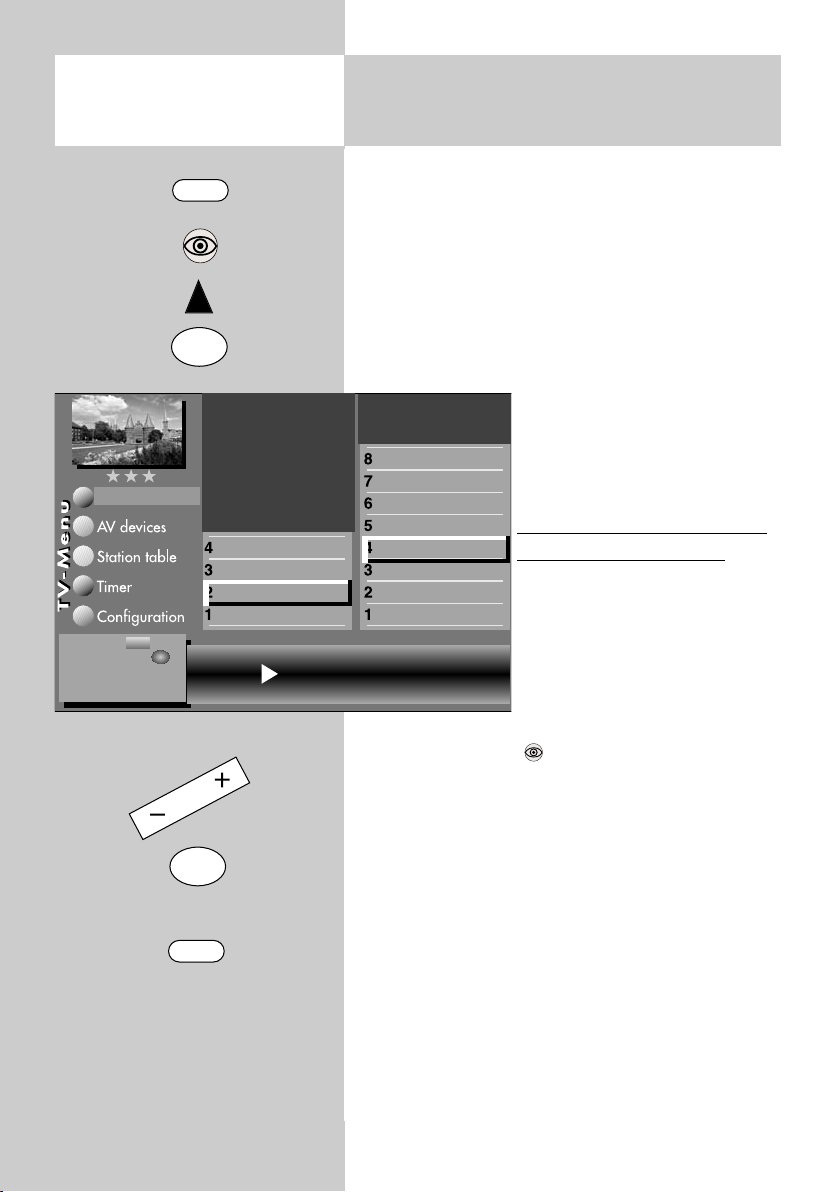
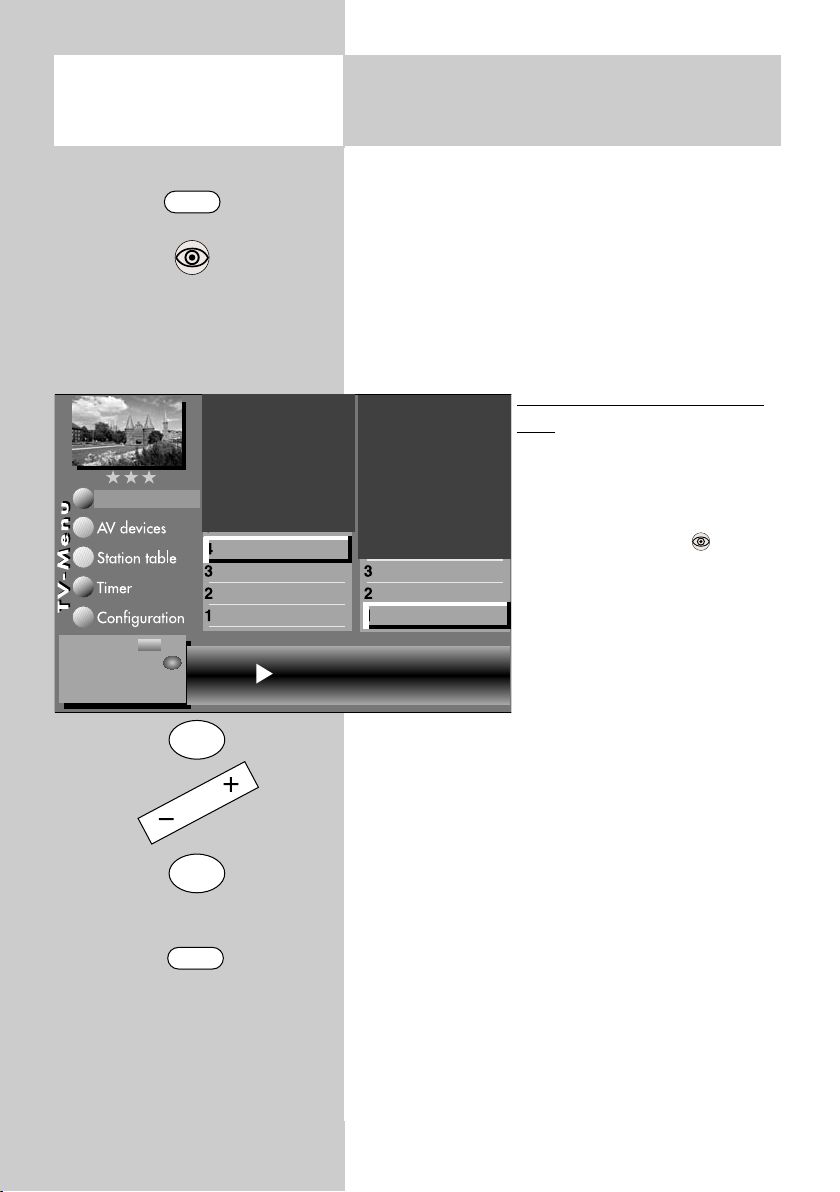
11.2 Picture Settings for
Programme via Station Table
Opening the menu
Individual picture settings for
programme position xy:
• Select the programme position whose picture
settings you wish to change.
• Press the "MENU" key.
The TV menu appears on the screen.
• Press the white key . The station table is displayed with the currently active programme
position highlighted.
• Press the F2 key to enable
editing of the station table.
• Press the cursor control key
to move to the subject
side.
• Use the corresponding
numeric keys (in this example:
for the picture quali-
Station table
ty) to select the desired
menu items.
Change with
Accept value with
– +
OK
• In the setting window, use
the cursor control key to
select the desired function.
• Use the
+
key to change the setting.
-
"gen." means here that the new setting will
overwrite the related general picture setting
(see pages 18).
The individual settings made here which
☞
differ from the general settings remain
saved.
MENU
F2
F1
0010 Hessen 3
0009 Südwest
0008 MDR
0007 PRO 7
0006 RTL 2
0005 RTL
0004 SAT 1
0003 Bayern 3
0002 ZDF
0001 ARD
Picture sharpness gen. Noise reduction gen.
VCR off
➔
Sound corrections
Colour standard
Picture quality
Picture correct.
Enter logo
✗
Station contained in EPG
CA module
Signal quality
DVB-prog. info
Frequency/channel
Colour offset 0
3) 7)
5)
5)
5)
7)
OK
EXIT
• Press the "OK" key to save the new settings.
• Press the "EXIT" key to close the TV menu.
The number of subjects and sections depends
on the selected scope of operation. Depending
on the configuration of the TV set, the various
menu items may be displayed in a different
order and numbered differently.
3) See glossary for an explanation.
5) Available only for DVB stations!
7) Available only for analogue stations!
23
Page 24

Opening the menu 12. General Sound Settings
Some of the menu items are not available
☞
MENU
in a 2 ** menu.
The sound settings volume, treble, bass, stereo
wide and spatial sound can be set generally for
all programme positions and saved as standard
values which can be recalled at any time by pressing the "OK" key.
Opening the sound settings menu:
• Press the "MENU" key.
61
50
Yes
Picture-Volume
Change with
Accept current
value as default
value.
– +
OK
Sound set,.prog.posn
Sound settings, gen.
Pict.set.,prog.posn.
Picture settings, gen.
Volume
Standard value
Use as default value:
• In the setting window, use the
OK
• Use the cursor control key to select the third
EXIT
• If you wish to save the new setting, use the
The number of subjects and sections depends
on the selected scope of operation. Depending
on the configuration of the TV set, the various
menu items may be displayed in a different
order and numbered differently.
2) Possible only on sets equipped with this
function.
3) See glossary for an explanation.
4) Available only if SRS WOW is switched off
• Press the "OK" key to save the new settings as
• Press the "EXIT" key to close the TV menu.
24
The TV menu appears on the screen.
F1
➔
Base width
Spatial sound
Balance
Tone setting
Volume headphones
Bass
Treble
Automatic volume control
SRS WOW
Volume
• Press the blue key . The
4)
menu
4)
"Picture and sound" and the
menu item "General picture
settings" are pre-selected.
• Use the corresponding
numeric key (in the exam-
) to select
ple:
3)
2) 3)
"General sound settings".
• Use the corresponding
numeric keys to select the
desired menu items in the
right-hand column.
• Press the "OK" key to open
the selected menu item for
editing.
+
key to change
-
the setting.
line "Save as standard value".
+
key to select "Yes".
-
standard values.
If the standard values do not provide satis-
☞
factory results for some programme positions, you can make different individual settings for these positions. See sections 12.1.
Page 25
12. General Sound Settings
Some of the menu items are not available
☞
in a 2 ** menu.
Setting SRS-WOW
• Press the "MENU" key.
The TV menu appears on the screen.
2)
Opening the menu
MENU
• Press the blue key . The menu "Picture and
sound" and the menu item "General picture settings" are pre-selected.
• Press the numeric key
to
select "General sound settings".
• Use the corresponding
Picture-Volume
numeric key
(in the example:
) to
select "SRS–WOW" 2).
• In the setting window, use
+
the
setting.
key to change the
-
Change with
Accept value with
– +
OK
• Press the "OK" key to save
the changed setting.
• „Press the "EXIT" key to close the
TV menu.
If the SRS-WOW function is
☞
active, the menu items "stereo wide" and
"spatial sound" are disabled.
Sound set,.prog.posn
Sound settings, gen.
Pict.set.,prog.posn.
Picture settings, gen.
SRS WOW
F1
➔
Base width
Spatial sound
Tone setting
Volume headphones
Automatic volume control
SRS WOW
2) 3)
on
OK
4)
4)
Balance
Bass
Treble
2) 3)
Volume
3)
EXIT
The number of subjects and sections depends
on the selected scope of operation. Depending
on the configuration of the TV set, the various
menu items may be displayed in a different
order and numbered differently.
2) Possible only on sets equipped with this
function.
3) See glossary for an explanation.
4) Available only if SRS WOW is switched off
25
Page 26
Opening the menu 12. General Sound Settings
Automatic volume correction
Some TV stations transmit their commercials at a
MENU
Picture-Volume
Change with
Accept value with
– +
OK
Sound set,.prog.posn
Sound settings, gen.
Pict.set.,prog.posn.
Picture settings, gen.
Volume control 3)on
higher sound volume than that for the normal programme. In order to save you from adjusting the
volume each time with the remote control, you can
activate automatic volume correction.
With this function active, there is little difference in
the volume levels for the normal programme and
the commercials.
F1
➔
Base width
Spatial sound
Balance
Tone setting
Volume headphones
Bass
Treble
Automatic volume control
SRS WOW
Volume
The setting made here applies
4)
to all programme positions.
4)
Opening the volume correc
tion menu:
• Press the "MENU" key.
The TV menu appears on
3)
2) 3)
the screen.
• Press the blue key . The
menu
"Picture and sound" and the
menu item "General picture
settings" are pre-selected.
-
• Use the corresponding numeric key (in the
• Use the corresponding numeric key (in the
OK
EXIT
• In the setting window, use the
• Press the "OK" key to save the new setting.
• Press the "EXIT" key to close the TV menu.
The number of subjects and sections depends
on the selected scope of operation. Depending
on the configuration of the TV set, the various
menu items may be displayed in a different
order and numbered differently.
2) Possible only on sets equipped with this
function.
3) See glossary for an explanation.
4) Available only if SRS WOW is switched off
26
example:
example:
) to select "General sound settings".
) to select "Volume correction".
+
key to change
-
the setting.
The function "Volume correction" in the
☞
menu "General sound settings" does not
overwrite the function "Volume correction"
in the menu "Sound settings for Pr...".
Page 27
12. General Sound Settings
Opening the menu
Base width and spatial sound
The menu points base width and spatial
☞
sound are only shown when the function
"SRR WOW" is turned off..
Base width
In the case of stereo transmissions, the base width
(= spatial distance between the loudspeakers) can
be artificially widened to achieve a larger stereo
triangle.
Spatial sound
In the case of mono transmissions, an artificial stereo effect
can be produced.
Picture-Volume
Activate base width/spatial
sound:
• Press the "MENU" key.
The TV menu appears on the
screen.
Change with
Accept value with
– +
OK
• Press the blue key . The
menu "Picture and sound"
and the menu item "General picture settings"
are pre-selected.
MENU
F1
➔
Base width
Spatial sound
Balance
Tone setting
Volume headphones
Bass
Sound set,.prog.posn
Sound settings, gen.
Pict.set.,prog.posn.
Picture settings, gen.
Spatial sound on
Treble
Automatic volume control
SRS WOW
Volume
4)
4)
3)
2) 3)
• Press the numeric key
to select "General
sound settings".
• Select "Spatial sound" or "Base width" with key
allocated, in the example
• In the setting window, use the
or .
+
key to change
-
the setting.
• Press the "OK" key to save the changed setting.
• „Press the "EXIT" key to close the
TV menu.
OK
EXIT
The number of subjects and sections depends
on the selected scope of operation. Depending
on the configuration of the TV set, the various
menu items may be displayed in a different
order and numbered differently.
2) Possible only on sets equipped with this
function.
3) See glossary for an explanation.
4) Available only if SRS WOW is switched off
27
Page 28
Opening the menu
MENU
Picture-Volume
12.1 Sound Settings for
Programmes via TV Menu
Some of the menu items are not available
☞
in a 2 ** menu.
Volume correction
Various TV stations broadcast their programmes
with different sound volumes. This volume difference can be minimised by correcting the volume.
This adjustment remains active even if the standard sound values are recalled.
Adjusting the volume correc
tion:
• Press the "MENU" key.
The TV menu appears on
the screen.
-
Sound set,.prog.posn
Sound settings, gen.
Pict.set.,prog.posn.
Picture settings, gen.
Change with
Accept value with
– +
OK
Volume correction -15
OK
• Press the "OK" key and then, in the setting
OK
• Press the "OK" key to save the new settings.
• Press the "EXIT" key to close the TV menu.
EXIT
The number of subjects and sections depends
on the selected scope of operation. Depending
on the configuration of the TV set, the various
menu items may be displayed in a different
order and numbered differently.
7) Available only for analogue stations!
☞
• Press the blue key . The
Forced mono
Tone settings
Volume correction
7)
menu
"Picture and sound" and the
menu item "General picture
settings" are
pre-selected.
• Use the corresponding
numeric key (in the example:
) to select "Sound
settings for Pr.".
widow, use the
+
key to change the setting.
-
Individual sound settings can also be made
in the station table.
28
Page 29
12.1 Sound Settings for
Programmes via TV Menu
Some of the menu items are not available
☞
in a 2 ** menu.
Tone setting
The tone setting can be set to "Normal" or
"Speech". The setting "Speech" should be used
primarily for stations which broadcast mainly programmes with a lot of speech, such as news stations. The setting "Normal" is better for music programmes.
Adjusting the
tone setting :
Opening the menu
MENU
• Press the "MENU" key.
The TV menu appears on
the screen.
• Press the blue key . The
menu
"Picture and sound" and the
menu item "General picture
settings" are pre-selected.
• Use the corresponding
numeric key (in the example:
) to select
"Sound settings for Pr.".
• Use the corresponding numeric key (in the
example:
"Tone settings".
• In the setting window, use the
the setting.
• Press the "OK" key to save the new settings.
• Press the "EXIT" key to close the TV menu.
☞
) to select
Individual sound settings can also be made
in the station table.
Picture-Volume
Change with
Accept value with
+
-
– +
key to change
Sound set,.prog.posn
Sound settings, gen.
Pict.set.,prog.posn.
Picture settings, gen.
OK
Forced mono
Tone settings
Volume correction
Tone settings Speech
OK
EXIT
The number of subjects and sections depends
on the selected scope of operation. Depending
on the configuration of the TV set, the various
menu items may be displayed in a different
order and numbered differently.
7) Available only for analogue stations!
7)
29
Page 30
Opening the menu
MENU
Picture-Volume
Change with
Accept value with
– +
OK
Sound set,.prog.posn
Sound settings, gen.
Pict.set.,prog.posn.
Picture settings, gen.
12.1 Sound Settings for
Programmes via TV Menu
Some of the menu items are not available
☞
in a 2 ** menu.
Forced mono
It may happen that your TV set switches from
mono to stereo in the middle of a programme, although no stereo sound is being transmitted. This is
generally caused by the local reception conditions. If you activate "Forced mono" for the selec-
ted programme position, all
programmes from this station
will be reproduced in mono.
Activating forced mono:
• Press the "MENU" key.
The TV menu appears on
Forced mono
Tone settings
Volume correction
Forced mono on
7)
the screen.
•Press the blue key . The
menu
"Picture and sound" and the
menu
item "General picture settings" are
pre-selected.
• Use the corresponding numeric key (in the
• Use the corresponding numeric key (in the
OK
• In the setting window, use the
EXIT
• Press the "OK" key to save the new settings.
• Press the "EXIT" key to close the TV menu.
The number of subjects and sections depends
on the selected scope of operation. Depending
on the configuration of the TV set, the various
menu items may be displayed in a different
order and numbered differently.
7) Available only for analogue stations!
30
☞
example:
example:
the setting.
) to select "Sound settings for Pr.".
) to select "Forced mono".
+
key to change
-
Individual sound settings can also be made
in the station table.
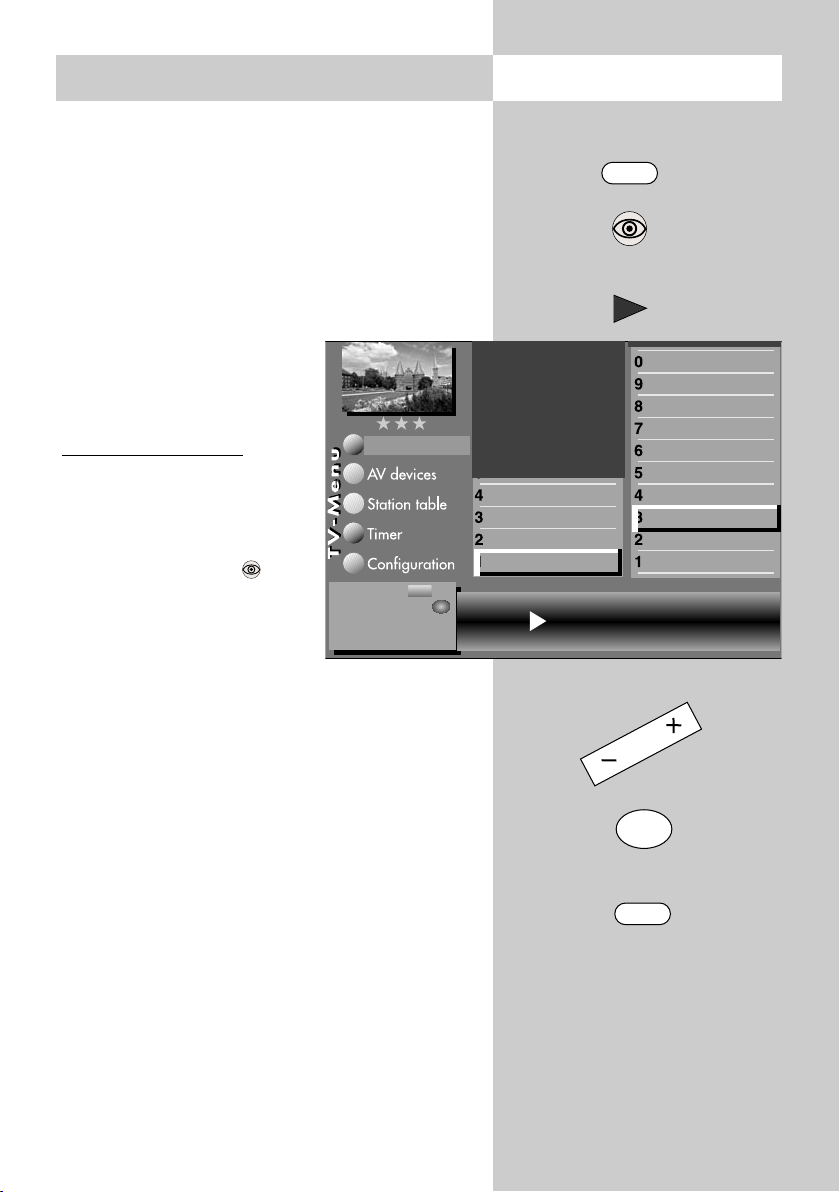
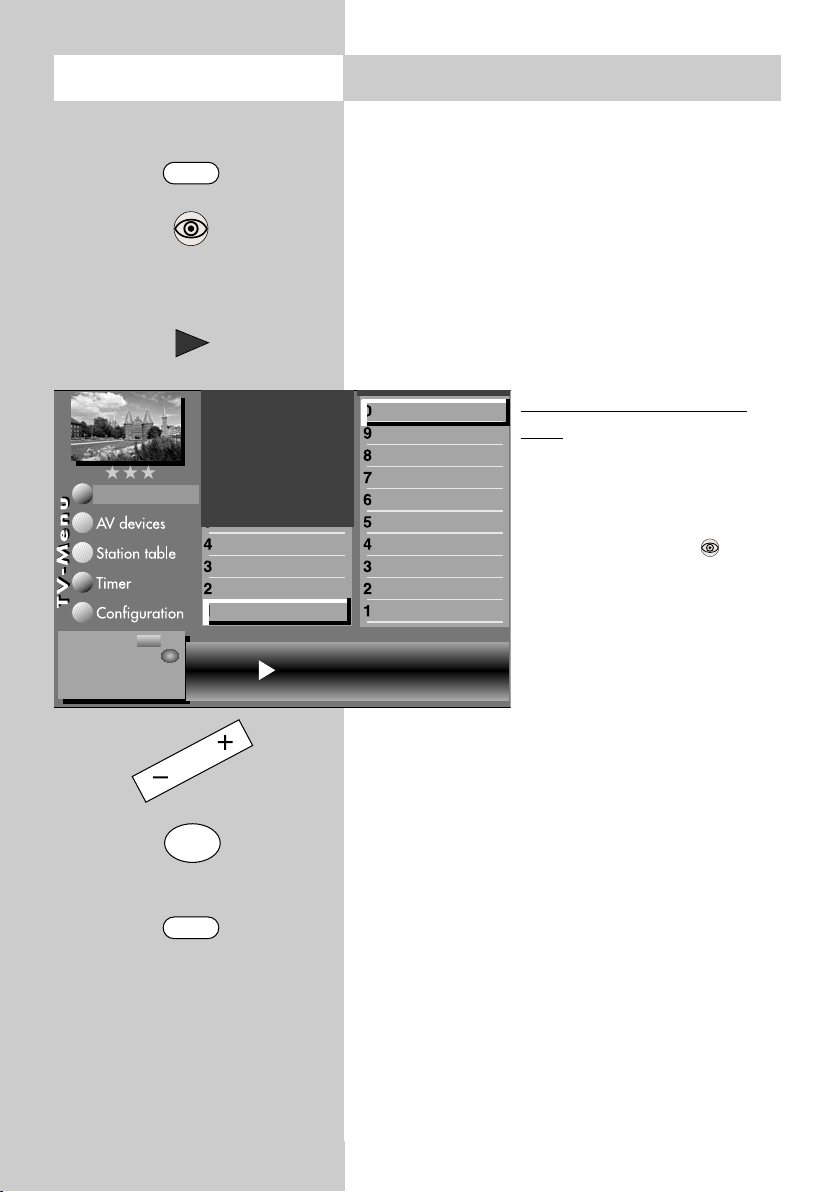
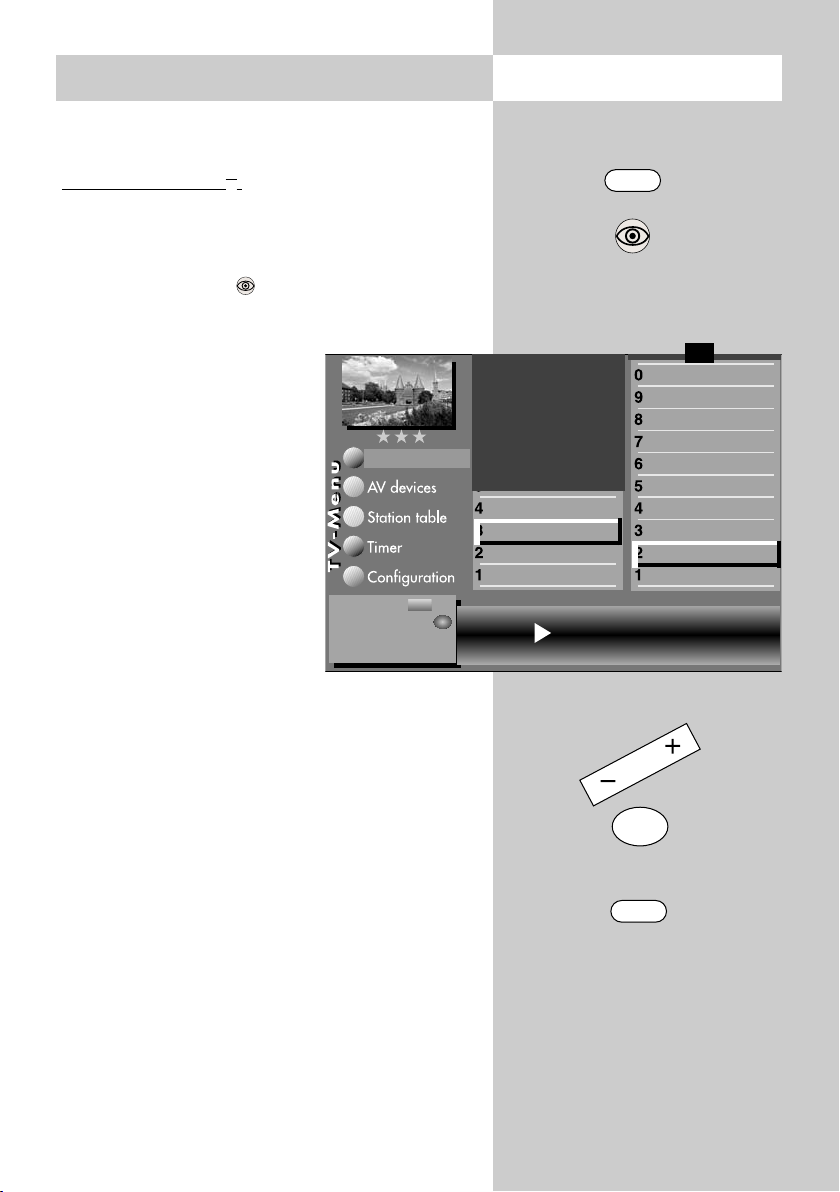
Page 31

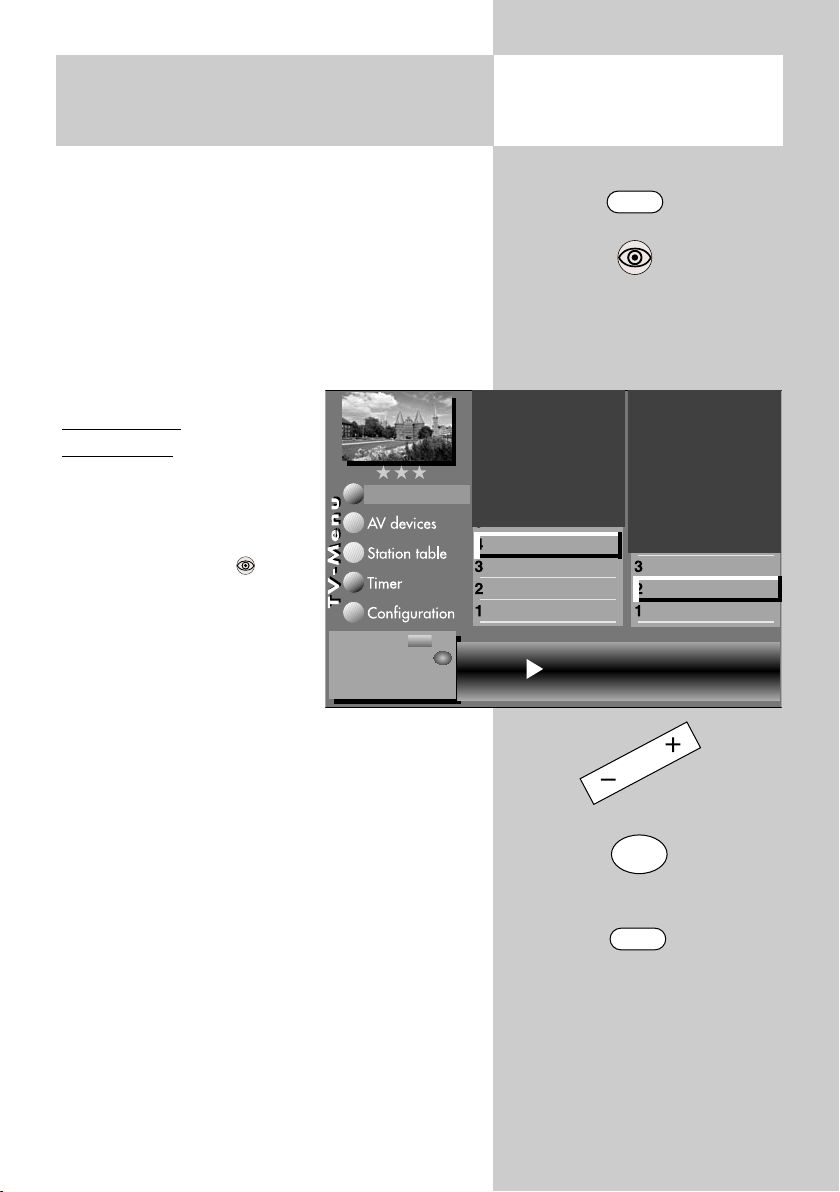
12.2 Sound Settings for Prog.
via the Station Table
Some of the menu items are not available
☞
in a 2 ** menu.
Making sound corrections:
• Select the programme position whose sound settings you wish to change.
• Press the "MENU" key.
The TV menu appears on the screen.
Opening the menu
MENU
F2
• Press the white key . The station table is displayed with the currently active programme
position highlighted.
• Press the F2 key to enable
editing of the station table.
• Use the cursor control key
to move to the subjects side.
• Use the corresponding
Station table
numeric keys (in this example:
) for sound correc-
tions) to select the desired
menu items.
Change with
Accept value with
– +
OK
• In the setting window, use
the cursor control key to
select the desired functions.
The use of the
+
key to change the selected set-
-
ting. "gen." means here that the new setting will
overwrite the general sound settings (see pages
24 and 26).
The individual settings made here, which
☞
differ from the standard values, remain
saved.
Press the "OK" key to save the new settings.
Press the "EXIT" key to close the TV menu.
F1
0010 Hessen 3
0009 Südwest
0008 MDR
0007 PRO 7
0006 RTL 2
0005 RTL
0004 SAT 1
0003 Bayern 3
0002 ZDF
0001 ARD
Volume correction 0 Tone settings gen.
Forced mono 7)off
➔
Sound corrections
Colour standard
Picture quality
Picture correct.
Enter logo
✗
Station contained in EPG
CA module
Signal quality
DVB-prog. info
Frequency/channel
3) 7)
5)
5)
5)
7)
OK
EXIT
The number of subjects and sections depends
on the selected scope of operation. Depending
on the configuration of the TV set, the various
menu items may be displayed in a different
order and numbered differently.
3) See glossary for an explanation.
5) Available only for DVB stations!
7) Available only for analogue stations!
31
Page 32

Opening the menu
MENU
13. Automatic zoom
The menu item "Automatic zoom" is not
☞
available in a 2 ** menu.
When the automatic zoom function is active, programmes in a "widescreen" format (such as programmes in 16:9) are expanded to fill as much of
the screen as possible.
If the function is inactive, the programmes are displayed in their original format.
Activating the automatic zoom
• Press the "MENU" key. The TV menu appears on
the screen.
2)
Picture-Volume
Change with
Accept value with .
– +
OK
OK
EXIT
Picture improvment
Factory settings
Zoom/Panorama
Noise reduction
Picture sharpness
Colour impr.
Sound set,.prog.posn
Sound settings, gen.
Pict.set.,prog.posn.
Picture settings, gen.
Zoom value 0 Panorama Yes
Picture pos., vert. 0% Pan. mode
Automatic zoom on
Colour intensity
Backlight control
Contrast
Brightness
• Use the
3) 7)
3)
Non-linear
+
key to change the setting.
-
• Press the "OK" key to save the new setting.
• Press the "EXIT" key to close the TV menu.
• Press the blue key . The
menu
"Picture and sound" and the
menu item "General picture
settings" are pre-selected.
• Use the cursor control key
to select the menu item
"Brightness".
• Use the corresponding
numeric key (in the example:
) to select the func-
tion "Zoom/Panorama".
• Use the cursor control key
to select the menu item
"Automatic zoom".
The number of subjects and sections depends
on the selected scope of operation. Depending
on the configuration of the TV set, the various
menu items may be displayed in a different
order and numbered differently.
32
Page 33

14. Childlock
With the aid of the childlock function, you can
determine whether or not the TV set can be switched on and which stations may be selected at
which times. The childlock can be set such that:
a) it is always active,
b) one to six TV, radio or AV programmes (Prog A
... Prog F) are exempted from the locking function (permitted programmes), or
c) all programmes, or programmes which are not
locked, may be viewed during a permitted time
period (TV start – TV end).
The childlock must be saved once with a 4-digit
"code" (password).
a) Activating the childlock
• Press the "MENU" key.
The TV menu appears on
the screen.
• Press the green key to
open the menu "Timer".
• Use the cursor control key
to select "Settings" and
press the "OK" key.
• In the setting window, use
the cursor control key to
select the menu item "Activate" and then use the
+
-
key to set the childlock to "Active".
• Use the cursor control key to select "Code"
and enter your personal 4-digit code with the
numeric keys.
Make a note of this code!
Timer
Change with
Accept value with .
– +
OK
Start viewing time --:-- End viewing time --:-Code **** Activation on
Opening the menu
MENU
OK
Recording control
Timer setting
Timer control
Reminder
Childlock
Permitted AV prog.
Permitted radio prog.
Permitted TV prog.
Settings
OK
EXIT
• Press the "OK" key to save the new setting.
• Press the "EXIT" key to close the TV menu.
The number of subjects and sections depends
on the selected scope of operation. Depending
on the configuration of the TV set, the various
menu items may be displayed in a different
order and numbered differently.
33
Page 34

Opening the menu 14. Childlock
b) Permitted programmes:
Activate the childlock as described in step a).
Use the corresponding numeric key to select the
menu item "Permitted xx progs." (xx = TV, radio
or AV). Press the "OK" key and, in the setting win-
Timer
Enter programme
position and save
OK
with .
II
: clear.
dow, enter the programme positions with the
numeric keys or use the
ired programme positions.
• Press the "OK" key to save the new settings.
c) TV start – TV end
Recording control
Timer setting
Timer control
Reminder
Childlock
Prog A Kabel 1 Prog B ----Prog C ----- Prog D ----Prog E ----- Prog F -----
Permitted AV prog.
Permitted radio prog.
Permitted TV prog.
Settings
+
key to select the des-
-
Activate the childlock as described in step a). In the setting
window, use the cursor control
key to select the start and end
times and enter the desired
times with the numeric keys.
Press the "OK" key to save the
settings.
Protecting the childlock
settings with your code
•
Use the cursor control key to
select "Code" and enter your
personal code (password)
with the numeric keys.
✂
É
Factory setting
Code: 0000
34
Make a note of this code, since the child
☞
lock can be deactivated only if the correct
code is entered !
• Press the "OK" key to save the settings.
• Press the "EXIT" key to close the TV menu.
• Switch off the TV set with the key.
The childlock is not fully activated until the
☞
TV set is switched off.
Deactivating the childlock
If the childlock is active, a window requesting your
personal code is displayed each time the TV set is
switched on. Entering the correct code enables the
TV set and it can then be used normally until it is
switched off again. To cancel the childlock function, proceed as described in step a), above, and
set the childlock to "Inactive".
Page 35

The menu item "Reminder" is not available
☞
in a 2 ** menu.
If you wish to be reminded of something while
watching TV, you can set a reminder for any desired time. At this time, a window with the reminder appears on the screen.
Setting the reminder time
• Press the "MENU" key to open the TV menu.
• Press the green key to open the "Timer"
menu.
Opening the menu15. Reminder
MENU
OK
• Press the numeric key
to
select "Reminder".
• Press the "OK" key and
then, in the setting window,
enter the desired time (four
digits) with the numeric
keys.
• Press the "OK" key to save
Timer
this setting.
• Press the "EXIT" key to close
the
Clear the time with
Save with
Abort with
OK
II
MENU
TV menu.
At the programmed time, a window with the
reminder is displayed on the screen. You can close
this window by pressing any key on the remote
control.
If you do not want the reminder
☞
to appear every day, you must clear the
time in the menu by pressing the ll key.
Recording control
Timer setting
Timer control
Reminder
Childlock
Time --:--
Reminder
OK
EXIT
The number of subjects and sections depends
on the selected scope of operation. Depending
on the configuration of the TV set, the various
menu items may be displayed in a different
order and numbered differently.
35
Page 36

16. Timer ControlOpening the menu
The menu items "On time" and "Off time"
☞
are not available in a 2 ** menu.
Timer
Clear the time with
Save with
Abort with
OK
MENU
II
MENU
OK
Recording control
Timer setting
Timer control
Reminder
Childlock
In the menu item "Timer control", you can programme a switch-on time, a switch-off time and a
sleep timer (switch off after ...).
The switch-on time is the time at which the TV set
is to be switched on automatically.
The switch-off time is the time at which the TV set
is to be switched off automatically.
The sleep timer (switch off after...) switches off the
TV set after a programmed delay (which can be
set in steps of 15 minutes).
Setting the on time and of
time
• Press the "MENU" key to
open the TV menu.
• Press the green key to
open the "Timer" menu.
Switch off after...
Switch-off time
Switch-on time
Time --:--
• Press the numeric key
select "Timer control".
•
Press the "OK" key and then,
in the setting window, enter
the desired time (four digits)
with the numeric keys.
f
to
• Press the "OK" key to save the setting.
OK
EXIT
• Press the "EXIT" key to close the TV menu.
At the programmed on time, the TV set is switched
on from the standby state (red LED lights). You
must confirm this automatic action by pressing
any key on the remote control. If this is not done,
the TV set will switch back to the standby state
after 10 minutes. This ensures that the TV set does
The number of subjects and sections depends
on the selected scope of operation. Depending
on the configuration of the TV set, the various
menu items may be displayed in a different
order and numbered differently.
not stay on if you are not at home.
☞
36
If you do not want to have the TV set switch
itself on each day, you must clear the on and
off times in the menu by pressing the ll key.
Page 37

16.1 Setting the Time and Date Opening the menu
Normally, the TV set will determine the current date and
time from the Teletext signals of the currently selected
station (providing this station sends Teletext).
Note: For this the device must be turned on with
the mains switch.
If this is not the case, or if an incorrect date or
time is displayed, you can set the date and time
manually.
In almost all cases, you will not need to do this.
Even the changeover between winter time and
summer time is executed automatically.
Setting the time and date manually:
• Press the "MENU" key to
open the TV menu.
• Press the green key to
open the "Timer" menu.
• Press the numeric key
to
select "Time settings".
• Press the "OK" key and
then, in the setting window,
enter the current time with
Timer
the numeric keys.
You can then start the internal
•
clock precisely by pressing
Save with
Abort with
OK
MENU
the "OK" key when the time
you have entered is reached.
• Press the numeric key to select
"Current date".
• In the setting window, enter the date with the
numeric keys.
• Press the "OK" key to save the settings.
• Press the "EXIT" key to close the TV menu.
The local time offset is the difference between
the local time where the TV set is installed and
Greenwich Mean Time (GMT). The TV set nor-
i
mally detects this time offset and also the additional changeover to summer time.
The time needs to be set manually only if it is
not detected automatically.
Recording control
Timer setting
Timer control
Reminder
Childlock
MENU
OK
Local time offset
Current date
Current lokal time
Time 20:00:00
OK
OK
EXIT
37
Page 38

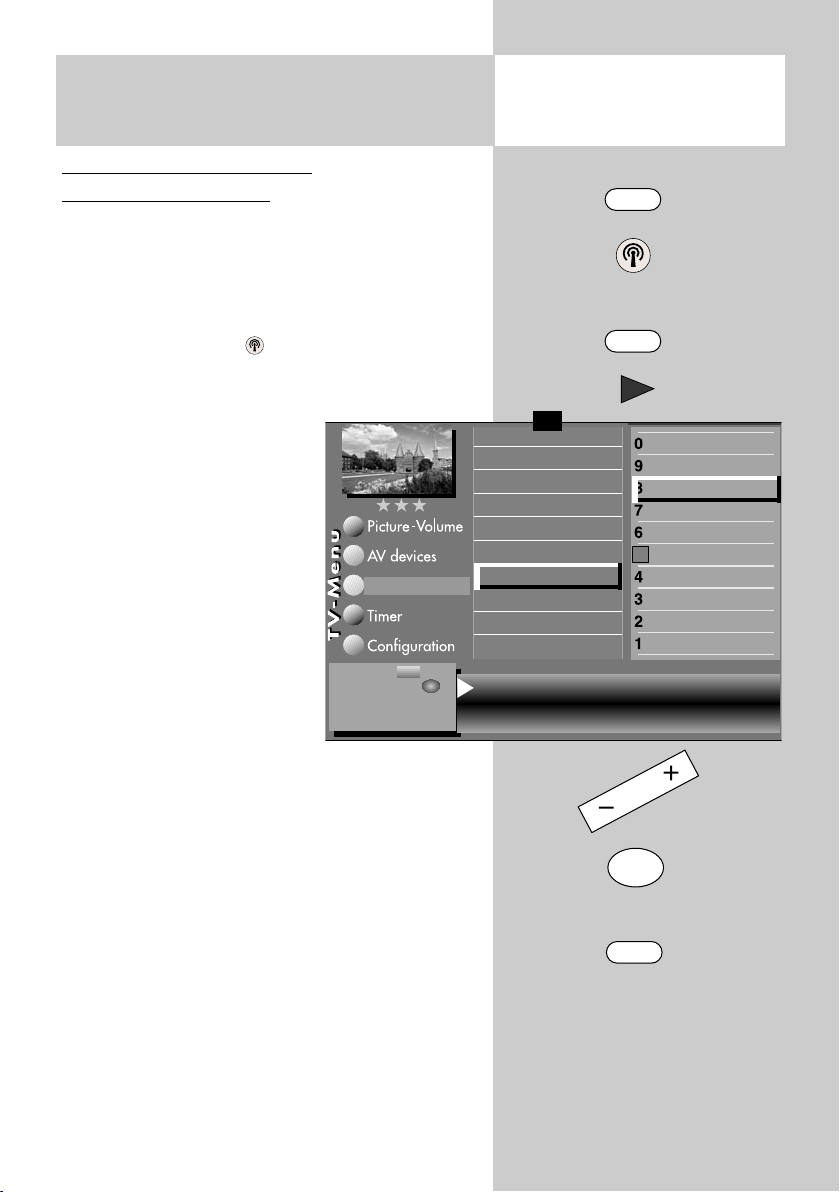
MENU
☞
In the menu item "Recording control", you can set a
lead time and an overrun time for timer recordings.
The TV set is automatically switched to the programme position from which the recording is to
be made at a time which is the number of minutes
programmed as the lead time before the pro-
grammed starting time for the recording.
At the end of the programmed recording time, the
OK
TV set remains set to this programme position for
the period programmed as the overrun time.
Recording control
Timer setting
Timer
Save with
Abort with
OK
MENU
Timer control
Reminder
Childlock
Lead time 5 min
time and overrun time
• Press the "MENU" key to open the TV menu.
• Press the green key to open the "Timer"
menu.
• Use the corresponding numeric key (in the
OK
EXIT
• Use the cursor control key to select the desired
• Press the "OK" key and then, in the setting win-
The number of subjects and sections depends
on the selected scope of operation. Depending
on the configuration of the TV set, the various
menu items may be displayed in a different
order and numbered differently.
• Press the "OK" key to save the settings.
• Press the "EXIT" key to close the TV menu.
16.2 Recording ControlOpening the menu
This menu item is not available in a 2 ** menu.
For VPS recordings, the TV set
is automatically switched to the
programme position from
which the recording is to be
made at a time which is the
number of minutes programmed as the VPS lead time before
Lead time with VPS
Overrun time
Lead time
example:
) to select the menu item "Recor-
ding control".
menu item.
dow, use the
overrun time.
the programmed starting time
for the recording. By default,
the TV set switches to this programme position about one
hour before the programmed
start time for a VPS recording.
Setting the lead time, VPS lead
+
key to set the desired lead or
-
38
Page 39

16.2 Recording Control
Application example:
You wish to record a programme received via
DVB-T. The programme starts at 22:45 hours,
ends at 23:40 hours and is broadcast on ITV.
Set up a "manual timer" as described in Section
17, "Special Functions 2" or set a timer with the
aid of the EPG as described in Section 20.3
“Using EPG, Recording a Programme". The timer
recording does not use VPS.
Set the lead time to 3 minutes and the overrun
time to 10 minutes.
At the programmed start time minus the programmed lead time of three minutes, the TV set is
either:
- switched on from the standby state (red LED
lights) with the programme position for ITV selected, whereby the screen remains dark but the
programme is sent via the EURO socket to your
recorder, or
- switched to the programme position for ITV if it is
already switched on.
At the programmed end of the recording (at
23:40 hours) the programme position for ITV
remains selected for the programmed overrun time
of 10 minutes.
It is not possible to switch to another pro-
☞
gramme position during the programmed
lead and overrun times.
39
Page 40

Opening the menu
F1
EXIT
17. Special Functions
Picture-in-Picture
In the case of TV sets with one front end, the picture in picture function (PIP) can only be used for
the superimposition of an AV set.
In this regard, the following superimposition
options are possible:
If an analogue TV station is displayed on the
screen, it is only possible to call up the picture of
an AV set, which is connected either to the
“HDMI” or the “DVI-D” socket.
If a digital TV station (DVB-C or DVBT) is display-
ed on the screen, it is possible to call up the picture of any AV set, regardless of the socket it is connected to.
Activating the PIP function
• The F1 key is pre-programmed with the picture-
in-picture function.
• You can use the cursor control keys
to move the PIP picture on the
screen. The last position to which this
picture was set is saved.
•
By pressing the "OK" key, you can set
the frame of the PIP picture to active
(red) or inactive (white).
• The contents of the PIP picture can
be changed only if its frame is active
(red).
If you wish to display the picture from
a connected AV device as a picture-inpicture, press the "AV " key and then use the
numeric keys to select the desired AV device.
• Pressing the red key swaps the contents of
the two pictures.
• Pressing the green key causes the PIP picture
to expand to fill the screen and terminates the
PIP function.
• To close the PIP picture, press the "EXIT" key.
40
Page 41

17. Special Functions
Opening the menu
Normal/Speech
Selection of "Normal" or "Speech" is described in Section 12.1, "Tone Settings".
In this menu, you can temporarily select
"Normal" or "Speech". The selection
remains active until you switch to another
programme position, switch to standby
mode or switch the TV set off completely.
This setting has no effect of the setting
described in Section 12.1, "Tone Settings".
17. Special Functions
Recording a programme with a timer
If you wish to record a programme which your
video recorder or DVD recorder cannot receive
directly because it does not have a suitable tuner
(such as DVB-T or DVB-C), you can use the "Timer
overview" to make such programmes available to
the recording device.
Setting a timer manually for a recording:
F2
Special functions 2
1 Normal/Speech
9 Timer-Overview
0 Direct recording
Opening the menu
F2
F1
• Press the F2 key. If you press F2 brie-
fly, the function programmed for F2
(see Section 18.1, "Programming the
Recording Yes
Reminder No
Pr ---
function keys") is executed.
If you hold down F2 for about two
seconds, all possible selections are
displayed.
• If all possible selections are displayed, press the corresponding numeric
key (in the example:
) to open the
Date --.--.
Start --:-End --:-VPS No
Timer
Recording device
Videorecorder
Change with .
OK
timer menu.
• If a timer already exists, press the F1
key.
• The cursor is located at the left of the first line
– +
:select.
:save the timer.
Preview 17:23
– +
Mon Tue Wed Thu Fri Sat Sun
The number of subjects and sections depends
on the selected scope of operation. Depending
on the configuration of the TV set, the various
menu items may be displayed in a different
order and numbered differently.
29.04.
41
Page 42

Opening the menu
Recording Yes
Reminder No
Pr 6
SAT 1
Date 01.05.
Start 22:45
End 23:40
VPS Yes
Timer
Recording device
Videorecorder
:select
0..9:set time
F1
:new timer
– +
:clear timer
:edit
42
Preview 17:23
– +
Mon Tue Wed Thu Fri Sat Sun
20:00 ✓✓ Das Erste -20:15
Tagesschau
22:45 ✓✓ SAT 1 -23:40
Planetopia
17. Special Functions
Recording a programme with a timer
"Record". The number of subjects and sections
depends on the selected scope of operation.
Depending on the configuration of the TV set,
the various menu items may be displayed in a
different order and numbered differently.
Use the
☞
• Press the cursor control key and use the
key to select the recording device connected to
the TV set which is to be used for the recording.
Press the "OK" key to save the programmed set-
•
tings. The settings are stored in the timer memory.
• Press the "EXIT" key to close the TV menu.
Clearing a timer:
• Press the F2 key.
• Press numeric key
• Use the cursor control key to select the timer you
wish to clear and press II to mark it for deletion. A
window is displayed on the screen, asking whether
you really want to clear this timer. Confirm the
intended action by pressing the appropriate key.
+
key to set this menu item to "Yes".
-
• If desired, press cursor control key
and use the - + key to activate the
29.04.
reminder function. If the reminder
function is active, a reminder window
is displayed on the screen one minute
before the start time programmed for
the timer.
Use the numeric keys to select the pro-
•
gramme position (see the station table
of the TV set) which is to make the programme available for recording.
• Press the cursor control key and
use the numeric keys to enter the
date, start time and end time of the
programme you want to record..
If you inadvertently enter a wrong time,
you can delete it with the II key or overwrite it with the numeric keys.
-
to open the timer menu.
+
Page 43

17. Special Functions
Direct recording of a programme
If you wish to record the programme you are currently watching, you can start a direct (one-touch)
recording to make the current programme available to a recording device connected to the EURO
sockets.
ting a direct recording:
Star
• Press the F2 key.
If you press F2 briefly, the function programmed
for F2 (see Section 18., "Programming the Function keys") is executed.
If you hold down F2 for about two seconds, all
possible selections are displayed.
• Press numeric key
timer menu window.
The timer menu window displays the
programme position, the date and
the EPG data for the current programme or for the next two hours.
• If there is more than one AV device
connected to your TV set, use the cursor control key to select the proposed recording device and use the
key to select the desired device.
to open the
+
-
Opening the menu
F2
Recording Yes
Reminder No
Pr 6
SAT 1
Date 01.05.
Start 22:45
End 23:40
VPS no
Recording device
Videorecorder
Change with
OK
– +
:select
:save the timer
• Press the "OK" key to save the settings.
On the recording device (e.g. video recor-
☞
der), select the AV programme position and
start the recording by pressing the appropriate button (REC, OTR, etc.).
43
Page 44

Opening the menu
F3
Special functions 3
1 Picture format
2 Pic. form., vertikal
17. Special Functions
Picture format
Adjusting the picture format:
• Press the F3 key.
If you press F3 briefly, the function programmed
for F3 (see Section 18., "Programming the Func-
tion keys") is executed.
If you hold down F3 for about two
seconds, all possible selections are displayed.
• Press numeric key
function "Picture format menu".
• Use the "P+/P-" rocker key to select the
desired function. After selection of a
picture format, you can also adjust the
zoom setting by pressing the
within five seconds.
• The settings made here (except for the
automatic zoom set in the TV menu)
remain active until you switch to a different programme position or switch off
the TV set.
to select the
+
-
key
16:9 full picture
Zoom
Standard 4:3 —
44
Zoom / Picture position
After selecting the function "Zoom", you
can adjust the zoom factor with the
key. In addition, you can move the picture
position 4)up and down on the screen in
order, for example, to keep the station
+
Standard 4:3
This is the standard setting for all programmes in
the 4:3 picture format.
logo or the subtitles visible. To change the
picture position, press and hold the F3 key
until the selection is displayed. Then press
numeric key and use the "P+/P-"
rocker key to move the picture.
+
-
Page 45

17. Special Functions
Picture format
Panorama
With the aid of the panorama function, you can
expand programmes broadcast in 4:3
format to fill the screen of a 16:9 TV set.
The picture is expanded uniformly in the
horizontal direction. You can also zoom
the picture. The panorama function can
be activated and deactivated in the menu
item "General picture settings" of the
menu "Picture and sound".
16:9 Full picture
This function serves to display pictures
from external devices (such as a 16:9 video recorder) with the correct aspect ratio.
Standard 4:3 +
Panorama
16:9 full picture
Panorama +
16:9 full picture
Zoom —
Opening the menu
—
45
Page 46

Opening the menu
17. Special Functions
Picture Position
F3
If desired, the picture can be shifted up or down in
order, for example, to make subtitles visible or to
hide "ticker" displays.
Adjusting the picture position:
• Press the F3 key.
If you press F3 briefly, the function programmed
Special functions 3
1 Picture format
2 Pic. form., vertikal
for F3 (see Section 18., "Programming
the Function keys") is executed.
• Press numeric key
function "Picture position vertical".
• You can now use the
the picture up and down on the screen
so that, for example, the station logo or
the subtitles are visible.
This setting is not saved. If you
☞
wish to save it as a global setting,
use the procedure described in
Section 11 to set it.
to select the
+
key to move
-
46
Page 47

18. Programming the Function Keys
Opening the menu
The remote control has four function keys: F1, F2,
F3 and AV. You can programme these function
keys with any of the available functions.
If you press and hold any function key, a
window with the available functions is displayed. The picture on the left shows the
functions available for the F2 key.
Programming function key F1, F2, F3 or
AV with a function
• Press the "MENU" key to open the TV
menu.
• Press the red key to open the "Configuration" menu.
• Press and hold the F1 key to display the available functions.
• Use the cursor control key or the correspon-
ding numeric keys to select the desired "Function for.." (in this example: F2).
• Press the "OK" key and then use the cursor con-
trol key to select one of the available functions.
• Press the "OK" key to assign this function to the
selected function key (the
selected function is marked
with "X").
• Press the "EXIT" key to close
the TV menu.
If a function key is pro-
☞
grammed with a func-
Station table
tion, this function can be
called by briefly pressing the function key.
Pressing and holding
the function key
Change with
Accept value with
– +
OK
displays a list of all
available functions.
F2
Special functions 2
1 Normal/Speech
9 Timer overview
0 Direct recording
MENU
F1
OK
F1
0010 Hessen 3
0009 Südwest
0008 MDR
0007 PRO 7
0006 RTL 2
0005 RTL
0004 SAT 1
0003 Bayern 3
0002 ZDF
0001 ARD
Volume correction 0 Tone settings gen.
Forced mono7)off
➔
Sound corrections
Colour standard
Picture quality
Picture correct.
Enter logo
✗
Station contained in EPG
CA module
Signal quality
DVB-prog. info
Frequency/channel
3) 7)
5)
5)
5)
7)
EXIT
47
Page 48

Opening the menu
MENU
OK
19. Sound Settings
Mute Function
In the menu "Sound settings", you can activate a
two-stage mute function.
When this function is active, the volume in TV
mode can be reduced in two stages with the mute
key .
Activating the mute function
• Press the "MENU" key to open the TV menu.
Configuration
Change with
Accept value with .
– +
OK
OK
EXIT
• Press the red key to open the "Configuration" menu.
F1
Function for F3
Function for F2
Function for F1
Mute (two-stage) on Sound via Loudsp.
➔
EURO sockets
DVB-C
DVB-T
Analog-TV
Country
Language
Operating
Data Logic adjustm.
CI dialogue via
EPG settings
Operating
Sound settings
HiFi output
Init. prog.position
2)
• Press the "EXIT" key to close the TV menu.
In normal TV mode, the mute key is used as
follows:
• Press it once to reduce the volume by 12 scale
divisions.
• Press it again within five seconds to reduce the
volume to "00".
• Press the "OK" key to move
to the right side of the menu.
• Use the cursor control key
or the corresponding numeric key (in the example:
)
to select the menu item
"Sound settings".
• In the setting window, use
+
the
key to set the func-
-
tion "Mute (2-stage)" to
"On".
• Press the "OK" key to save
the setting.
• Pressing the key once again restores the
The number of subjects and sections depends
on the selected scope of operation. Depending
on the configuration of the TV set, the various
menu items may be displayed in a different
order and numbered differently.
48
volume to its original level.
Page 49

19.1 Data Logic Settings
Data Logic Mode 1 / Mode 2
Factory setting is Mode 1.
If the recording is stopped by the Data Logic
Videorecorder (self-dependent, 5-10sec. after the
start of the recording), switching to Mode 2 could
solve this problem.
Configuration
Change with
Accept value with .
– +
OK
Opening the menu
MENU
OK
F1
Function for F3
Function for F2
Function for F1
➔
EURO sockets
DVB-C
DVB-T
Analog-TV
Country
Language
Operating
Data Logic mode 2
Data Logic adjustm.
CI dialogue via
EPG settings
Operating
Sound settings
HiFi output
Init. prog.position
2)
OK
EXIT
49
Page 50

EPG
20. EPG
EPG (Electronic Program Guide) is an electronic
TV guide covering all major channels. The guide
may be made up of details from NexTView
and/or DVB-SI.
The NexTView information is broadcast by various
channels and also includes information for other
broadcasting organizations.
DVB-SI (Digital Video Broadcasting-Service Information) is a service provided by different broadcasters. Programme details are broadcast digitally
by each broadcaster exclusively for those programmes it offers.
NexTView and DVB-SI are similar in principle,
but their content may differ in the detail offered.
20.1 Activating the EPG
The function is activated by pressing the button
marked “EPG”.
NexTView details
Before NexTView details can be received, a new
programme slot must be created in the menu. If
the menu does not contain a slot for NexTView,
the following text applies.
A message will appear for all slots programmed
to receive NexTView:
8) NexTView is transmitted by
the following broadcasting
organizations:
D and A: Kabel1,
CH . . . .SF1, TSR1, TSI1,
TV5
F: . . . . . .Canal+, M6, TV5
Status as of 18 Aug 2006
Not possible with an external receiver !
50
Accept this programme as an EPG programme ?
☞
Any other key close the window.
In this way, the TV asks whether this slot should be
used to compile the information for the EPG programme guide.
Yes
Page 51

20.1 Activating the EPG
Pressing the green key for yes activates the slot
in order to receive NexTView. The message will
not appear again.
If you know the NexTView slot, you can also enter
it using the numeric keys in the TV menu.
You can overwrite existing programme slot numbers or delete them with the II key.
Opening the menu
MENU
OK
DVB-SI details
To receive DVB-SI data, no slot in the TV menu is
needed.
Factory EPG settings:
• EPG NexTView & DVB-SI
• NexTView programme
slot - - - -
• DVB-SI selection TV
• Prog. selection in the channel table all free slots*)
Configuration
*) In the menu, “retain” is dis-
Change with
Accept value with .
– +
OK
played, i.e. when you make
an adjustment, this change
is displayed in plain text
after it is confirmed by
selecting “OK” in the menu.
“Retain” is then displayed in
the menu as an indication
that the previously confirmed setting has been retained.
In countries where NexTView
data is unavailable, the menu
setting should read “EPG
DVB-SI” as illustrated.
Configuration
Change with
Accept value with .
– +
OK
F1
Function for F3
Function for F2
Function for F1
EPG NextView & DVB-SI Pr selection in stationtable
NextView
DVB-SI selection TV
Function for F3
Function for F2
Function for F1
EPG DVB-SI Pr selection in stationtable
DVB-SI selection TV
➔
EURO sockets
DVB-C
DVB-T
Analog-TV
Country
Language
Operating
prog. Kabel 1 retain
F1
➔
EURO sockets
DVB-C
DVB-T
Analog-TV
Country
Language
Operating
Data Logic adjustm.
CI dialogue via
EPG settings
Operating
Sound settings
HiFi output
Init. prog.position
Data Logic adjustm.
CI dialogue via
EPG settings
Operating
Sound settings
HiFi output
Init. prog.position
2)
2)
retain
Not possible with an external receiver !
51
Page 52

20.2 Collecting EPG data
NexTView data8)is transmitted by
various broadcasting organizations.
DVB-SI data is broadcast by each chan-
nel corresponding to its own content.
Information may therefore correspondin-
gly vary.
Switch on your TV, so that EPG data can
be compiled and/or updated. While
data is being compiled the green LED is
lit.
TV sets with one receiver unit:
• If a NexTView slot8)has been set:
Switch the TV to standby mode, using
the mains key on your remote.
8)
• If no NexTView slot
only DVB-SI details can be received:
switch the set to standby.
After switching on the TV, data
☞
compilation will continue stop until
it is switched to standby again.
has been set and
Special notes:
The TV set’s channel table lists all available channels in the programme guide,
provided you do not make another
selection in the channel table menu.
Channels broadcasting on a time-shared
basis – e.g. arte/Kinderkanal – must be
saved in separate programme slots (see
24). If you include all channels in the
EPG, you won’t be able to see very far
ahead.
You can decide which channels should
appear in the EPG programme guide.
As a rule, the collection process gathers
data for all free channels. The following
options are available to exclude selected
channels from the EPG programme guide:
Solution 1:
• Press the MENU key. The TV menu
appears on the screen.
• Press the white key . The menu
channel table appears with the active
programme slot selected.
52
• Press F2 to permit editing of the channel list.
• Press to switch to the menu page.
• Using and select “Include channel
in EPG” and dedeselect rows marked
(x) with OK.
• To exclude other channels from the
EPG programme guide, use
and to select the channel and
repeatthe procedure.
Not possible with an external receiver !
Page 53

20.2 Collecting EPG data
Solution 2:
• Press the MENU key . The TV menu
appears on the screen.
• Press the white key. The menu channel
table appears with the active programme slot selected.
• Follow the steps described under “24.
Sort channels” to sort and save your
favourite channels so that they appear
at the top of the list, for example sort
1-50 and save them.
• Select “EPG Settings” from the Configuration menu and under “Prog.
select. in the channel table”, select
“Channels 1-50” using the -+ key and
save by pressing OK.
The collection process will be halted if:
- videotext is opened.
- a recording has been programmed
under AV Recording.
- a preset recording is running or will
begin in an hour.
- the videotext subtitle function is active.
If the TV is switched to standby during
the collection process, the green LED will
appear to indicate that the process is still
running.
Not possible with an external receiver !
53
Page 54

Opening the menu
EPG
20.3 Using the EPG
Once all of the EPG data have been collected,
briefly pressing the "EPG" key displays the EPG
with the current programme on the selected programme position highlighted.
The following keys have special functions in EPG
mode:
Select a programme.
OK
View the selected programme or set a
reminder for it.
Scroll to earlier or later programmes.
0-9 Enter a time for display of the
programmes starting at or after
this time.
F1
Back to the previous programme
of the selected station.
F2
Show all following programmes
of the selected station.
F3
Forward to the following programme of the selected station.
54
blue: Select all programmes.
yellow: Programme selection on the basis of the
selected user and his interests.
white: User can set interests.
green: Select user
(father, mother, teenager, child).
EXIT
red: Make the selected programme available
for recording (see page 57).
EXIT: Back to the TV picture.
– / +: Scroll by days trough the EPG
Not possible with an external receiver !
Page 55

20.3 Using the EPG
Selecting a programme and viewing
or setting a reminder
In the EPG, you can select a programme with the
cursor control key.
• Press the "OK" key in order to
- view the programme if it is already running, or
-
set a reminder for it if it has not yet started. A
green check mark is displayed after the start time.
• Press the "TEXT" key to display and hide a des-
cription of the programme.
This may not be possible for some programmes.
Setting a user profile
By pressing the green key several times, it is possible to set up the EPG for the current user (father,
mother, teenager, child).
Setting interests
Each user can set up the EPG to reflect
his or her special interests.
• Press the white key .
• Use the cursor control key or the corresponding numeric key to select one
of the subjects.
• Use the cursor control key to move
to the other side.
• Use the cursor control key or the corresponding
numeric keys to select one of the subjects and
mark X it by pressing the "OK" key.
Up to 9 subjects
can be selected.
Opening the menu
✗
winter sport
water sport
Arts
Education
Children/School
Sport
Leicure
Shows
Current affairs
Feature film
detectiv documentary football/soccer
comedy
magazine tourism/travel winter sports
game/quiz/contest
motor sport
athletics
✗
team sport
tennis/squash
✗
football/soccer
sports magazin
special events
sport (general)
motor sports
Up to nine subjects of interest can be mar-
☞
ked for each user.
• You can delete a mark X by pressing the "OK"
key again.
• Press the red key to save the selections.
Not possible with an external receiver !
55
Page 56

20.3 Using the EPGOpening the menu
Programme Information (Now Showing: ..)
After switching to a channel, a box is displayed at
the bottom of the screen as shown in
the picture.
This box contains the following information:
- Channel number (in this example:
Pr4).
- Audio mode (stereo/mono).
- Start/end time of the programme
Pr 4 Stereo 13:45 - 14:40
RTL Skispringen: Top 50
04.01.06 11:35:12 14:40 - 15:00 Skispringen: Die Entscheidung
Erster Durchgang des dritten Springens der Vierschanzentournee auf der Bergisel-Schanze in Innsbruck
Pr 4 Stereo 13:45 - 14:40
RTL Skispringen: Top 50
04.01.06 11:35:12 14:40 - 15:00 Skispringen: Die Entscheidung
This information can also be accessed while a
programme is running.
To hide the information, press "EXIT".
- The time bar shows the elapsed programme time.
- Broadcasting station
- Programme title
- Date and time
- Time details and title of the following
programme
Press the green key to view additional information about the programme
currently showing, provided the respective station broadcasts such information.
Repeatedly press the green key to
view additional information about the
following programme, provided the
respective station broadcasts such information.
56
EXIT
Not possible with an external receiver !
Page 57

20.3 Using the EPG
Recording a Programme
Selecting a programme for recording:
If you have a video recorder with the dialogue
system, the EPG permits you to start a recording
by pressing a single key.
• Press the "EPG" key to open the EPG.
• Use the cursor control key to select the programme you wish to record.
If a video recorder with dialogue system is connected (see also Section 25):
- Switch on the video recorder.
- Insert a cassette.
- Press the red key on the remote
control.
If a normal video recorder is connec-
ted:
- Switch on the video recorder.
- Insert a cassette.
Opening the menu
EPG
Recording Yes
Reminder No
Pr 1
Das Erste
Date 01.05.
Start 22:45
End 23:40
VPS no
Recording device
Videorecorder
Change with
OK
– +
:select
:save the timer
- Press the red key on the remote
control to programme the TV timer
(see also "Direct recording (OTR)").
- On the AV programme position of the video
recorder, programme a timer with the data and
time of the programme which will be provided
by the TV timer.
Not possible with an external receiver !
57
Page 58

Opening the menu
MENU
OK
F1
➔
EURO sockets
DVB-C
DVB-T
Analog-TV
Country
Language
Operating
Selected language English
Configuration
:select.
OK
:save
Function for F3
Function for F2
Function for F1
21. Setting the
Country and Language
The menu items "Language" and "Country"
☞
are not available in a 2 ** menu.
Selecting the language in the TV menu
You can select any of the available languages for
the TV menu. All texts in the menu and in the help
screen (Information) are then displayed in the
selected language.
✗
Dansk
Suomi
Norsk
Português
Español
Français
Italiano
Nederlands
English
Deutsch
Setting the country
After installation of the TV set,
you must enter the country in
which it is installed (such as
Great Britain) in order to
assign certain basic settings
(such as the channel assignments, the order in which the
stations are stored, etc.).
Setting language and
country:
F1
Function for F3
Function for F2
Function for F1
Configuration
:select.
OK
:save
The number of subjects and sections depends
on the selected scope of operation. Depending
on the configuration of the TV set, the various
menu items may be displayed in a different
order and numbered differently.
➔
EURO sockets
DVB-C
DVB-T
Analog-TV
Country
Language
Operating
Selected country
• Press the "EXIT" key to close the
58
Luxemburg
Italy
✗
Great Britan
France
Finland
Germany
Denmark
Belgiun
Baltic states
Australia
Great Britan
TV menu.
• Press the "MENU" key to
open the TV menu.
• Press the red key to open
the menu "Configuration".
• Use the corresponding
numeric keys to select
"Language" or "Country".
• Press the "OK" key and then
use the cursor control key to
select the desired language
or country.
• Press the "OK" key to con-
firm your selection.
Page 59

22. Setting Stations
Setting the reception mode
This TV set is capable of operating in three different reception modes:
Analogue TV:
The broadcasting technology which has been used
for many years. The signals can be received via a
rooftop antenna or a cable.
DVB-T:
The new digital broadcasting technology whose
signals can be received via an existing (analogue)
rooftop antenna or an indoor antenna (depending
on the strength of the available signal). For more
details, please consult your local TV dealer or
search for “DVB-T” in the Internet.
DVB-C:
The new digital broadcasting technology whose
signals are received via a cable connection. For
further details, please consult your local cable
provider or TV dealer or search for “DVB-C” in
the Internet.
Select the reception mode to
match the broadcasting technology available in your area.
Setting the reception mode
• Press the "MENU" key to
open the TV menu.
• Press the red key to open
the menu "Configuration".
• Use the corresponding
numeric key to select the
appropriate reception mode
"Analogue TV", "DVB-T" or
"DVB-C".
Configuration
Start station
search with .
OK
Opening the menu
MENU
F1
Function for F3
Function for F2
Function for F1
➔
EURO sockets
DVB-C
DVB-T
Analog-TV
Country
Language
Operating
Start station search
The number of subjects and sections depends
on the selected scope of operation. Depending
on the configuration of the TV set, the various
menu items may be displayed in a different
order and numbered differently.
General settings
Manual search
Automatic search
Search settings
Antenna
59
Page 60

Opening the menu
22.1 Setting Stations
TV-Standard 2)for analogue stations
MENU
Configuration
Change with
Accept value with .
– +
OK
OK
F1
Function for F3
Function for F2
Function for F1
➔
EURO sockets
DVB-C
DVB-T
Analog-TV
Country
Language
Operating
TV standard B/G
Various TV standards for picture and sound are
used in different countries. If the wrong TV standard is selected, you will not be able to hear the
sound, or it will be distorted. The TV standard "L"
also uses a different standard for transmission of
the picture. The TV standard must therefore be set
before you execute a station search.
The TV set is set in the factory to the TV standard
B/G.
Setting the TV standard
2)
• Press the "MENU" key to
open the
TV menu.
• Press the red key ® to open
the menu "Configuration".
• Use the corresponding
numeric key (in the example:
Terrestrial station search
Search settings
2)
) to select "Analogue
TV".
• The menu item "Search settings" is already selected.
• Press the "OK" key and, in
the setting window, use the
+
key to select the desired
-
TV standard.
EXIT
• Press the "OK" key to confirm your selection.
• Press the "EXIT" key to close the TV menu.
The number of subjects and sections depends
on the selected scope of operation. Depending
on the configuration of the TV set, the various
menu items may be displayed in a different
order and numbered differently.
2) Possible only on sets equipped with this
function.
60
Page 61

22.1 Setting Stations
Analogue TV
Terrestrial station search
Opening the menu
The terrestrial station search automatically searches
the entire range of available reception frequencies
for stations. All stations which are found are placed
in the station table which is displayed at the end of
the search operation. If you are not satisfied with the
order in which the stations are displayed, you can
move them to other positions or delete unwanted
stations (see Section 24., "Sorting stations".
Executing a terrestrial station search
• Press the "MENU" key to open the TV menu.
• Press the red key to open the
menu "Configuration".
• Use the corresponding numeric key (in the
example: (
) to select
"Analogue TV".
• Use the corresponding
numeric key (in the exam-
) to select
ple: (
"Terr. station search".
• Press the "OK" key and, in
the setting window, confirm
the menu item
"Start station search" by
pressing the "OK" key.
• The TV set starts to search
Configuration
Start station
search with .
OK
for available stations.
A station table with the newly found stations is displayed on the left half of
the screen. If a station table already existed
before the search, the newly found stations are
automatically appended after the last existing
station.
• After completion of the search, all stations which
have been found are sorted.
• You can delete any unwanted stations from the
station table by selecting them with the cursor
control key and pressing the II key.
MENU
OK
F1
Function for F3
Function for F2
Function for F1
➔
EURO sockets
DVB-C
DVB-T
Analog-TV
Country
Language
Operating
Start stadion search
The number of subjects and sections depends
on the selected scope of operation. Depending
on the configuration of the TV set, the various
menu items may be displayed in a different
order and numbered differently.
2) Possible only on sets equipped with this
function.
Terrestrial station search
Search settings
2)
61
Page 62

Opening the menu
MENU
F2
22.1 Setting Stations
Colour standard for analogue stations
The TV set will normally detect the colour standard
(PAL, SECAM, NTSC, NTSC44, PAL60, PAL M)
automatically.
If this automatic selection does not provide satisfactory results (which should happen only rarely),
you can select the colour standard manually for
each programme position.
The colour standard is set in the factory to "Automatic".
Setting the colour standard
Station table
Change with
Accept value with
– +
OK
OK
EXIT
0010 Hessen 3
F1
0009 Südwest
0008 MDR
0007 PRO 7
0006 RTL 2
0005 RTL
0004 SAT 1
0003 Bayern 3
0002 ZDF
0001 ARD
Colour standard SECAM
• Press the "MENU" key to open the TV menu.
• Press the white key to open the station table.
➔
Sound corrections
Colour standard
Picture quality
Picture correct.
Enter logo
✗
Station contained in EPG
CA module
Signal quality
DVB-prog. info
Frequency/channel
• Press the F2 key to enable
3) 7)
editing of the station table.
• Use the cursor control key to
select the programme position whose colour standard
5)
5)
you wish to change.
• Press the cursor control key
5)
to move to the left
7)
column.
• Use the corresponding
numeric key (in the example:
) to select
"Colour standard".
• Use the
+
key to select the desired colour stan-
-
dard, or to step through the available colour
standards until the picture is displayed clearly.
• Press the "OK" key to confirm your selection.
• Press the "EXIT" key to close the TV menu.
The number of subjects and sections depends
on the selected scope of operation. Depending
on the configuration of the TV set, the various
menu items may be displayed in a different
order and numbered differently.
62
3) See glossary for an explanation.
5) Available only for DVB stations!
7) Available only for analogue stations!
Page 63

22.2 Setting Stations
Automatic DVB-T* station search
Opening the menu
The DVB-T station search operation searches the
entire frequency band for TV and radio stations.
All stations which are found are placed in separate TV and radio station tables. See Section 28. for
details of DVB radio mode.
If you are not satisfied with the order in which the
stations are displayed, you can move them to
other positions or delete unwanted stations (see
Section 24., "Sorting stations".
Executing the automatic station search
• Press the "MENU" key to open the TV menu.
• Press the red key to open the menu "Configuration".
Use the corresponding nume-
•
ric key (in the example: )
to select " DVB-T".
•
In the setting window "Antenna", you can switch the supply voltage for an antenna on
or off with the
+
key.
-
Normal setting = Off !
The setting "On" may be used
only if you have an active
indoor antenna which needs
a supply voltage for its internal amplifier.
Configuration
Start station
search with .
OK
• Use the corresponding
numeric key (in the exam-
) to select "Search settings".
ple:
• In the setting window, use the
+
key to select
-
one of the following:
All = search for all stations.
FTA only = search for only unencrypted
(free-to-air) stations.
FTA +CICAM = search for FTA stations and sta-
tions which can be decoded with a
CI module (accessory).
• Press the "OK" key and use the corresponding
numeric key (in the example:
) to select
"Automatic search".
• Press the "OK" key to start the search. The TV
set now searches for available stations.
MENU
F1
Function for F3
Function for F2
Function for F1
➔
EURO sockets
DVB-C
DVB-T
Analog-TV
Country
Language
Operating
Start station search
General settings
Manual search
Automatic search
Search settings
Antenna
OK
The number of subjects and sections depends
on the selected scope of operation. Depending
on the configuration of the TV set, the various
menu items may be displayed in a different
order and numbered differently.
*depending on equipment
63
Page 64

Opening the menu
22.2 Setting Stations
Manual DVB-T*station search
Configuration
Start station
search with .
OK
MENU
channel number or the frequency of the station
you wish to find.
Executing the manual search
• Press the "MENU" key to open the TV menu.
• Press the red key to open the menu "Confi-
For a manual station search, you must know the
• Use the corresponding numeric key (in the
• In the setting window "Antenna", you can switch
F1
Function for F3
Function for F2
Function for F1
Channel 05 Frequency
Mod.-Parameter
➔
EURO sockets
DVB-C
DVB-T
Analog-TV
Country
Language
Operating
auto. Start station search
guration".
example:
) to select " DVB-T".
the supply voltage for an antenna on or off with
the - + key.
• Use the corresponding
numeric key (in the example:
) to select "search
settings".
• In the setting window, use
General settings
Manual search
Automatic search
Search settings
Antenna
177.500 Mhz
the - + key to select "All",
"FTA only" or "FTA +
CICAM" (see also page 63).
• Press the "OK" key and use
the corresponding numeric
key (in the example:
) to
select "Manual search".
Transmission 8k Mode Modulation64 QAM
Mod. Parameter manuell
Code rate 3/4 Start station search
Guard Intervall 1/8
and use the
"Manual". You can then enter further data.
The number of subjects and sections depends
on the selected scope of operation. Depending
on the configuration of the TV set, the various
menu items may be displayed in a different
order and numbered differently.
*depending on equipment
• After input of the station data, use the cursor control
64
• In the setting window, use
the numeric keys to enter the channel
number or the frequency.
If you know further data of the desired sta
tion, select the menu item "Mod. parameter"
+
key to change the setting there to
-
key to select the menu item "Station search" and press
the "OK" key to confirm your selection.
The station settings are saved.
Page 65

22.3 Setting Stations
Automatic DVB-C*station search
The DVB-C station search operation searches the
entire frequency band for TV and radio stations.
All stations which are found are placed in separate TV and radio station tables. See Section 28. for
details of DVB radio mode.
If you are not satisfied with the order in which the
stations are displayed, you can move them to
other positions or delete unwanted stations (see
Section 24., "Sorting stations".
Executing the automatic search
• Press the "MENU" key to
open the TV menu.
• Press the red key to open
the menu "Configuration".
• Press the numeric key
select "DVB-C".
• The cursor is now on the
menu line "Search settings".
•
Press the "OK" key and, in
the setting window, use the
+
key to select "All", "FTA
-
only" or "FTA +CICAM" (see
also page 63).
• Press the "OK" key and then press the corres-
ponding numeric key (in the example: ) to
select "Automatic search". The cursor is now on
the line "Symbol rate 1".
The most common symbol rates are already
☞
preset. Usually these settings do not need to
be modified. If the symbol-rate settings do
not yield the desired result, set other symbol rates and save them by pressing "OK".
Ask your cable operator for details.
• Press the cursor control key to select the menu
line "Start station search".
• Press the "OK" key to start the search. The TV
set now searches for available stations.
to
Configuration
Start station
search with .
OK
Opening the menu
MENU
F1
Function for F3
Function for F2
Function for F1
Symbol rate 13)6900 Precision search off
Symbol rate 2 6875 Start station search
Symbol rate 3
➔
EURO sockets
DVB-C
DVB-T
Analog-TV
Country
Language
Operating
General settings
Manual search
Automatic search
Search settings
OK
OK
The number of subjects and sections depends
on the selected scope of operation. Depending
on the configuration of the TV set, the various
menu items may be displayed in a different
order and numbered differently.
*depending on equipment
65
Page 66

Opening the menu
22.3 Setting Stations
Manual DVB-C*station search
Configuration
Start station
search with .
OK
MENU
channel number or the frequency of the station
you wish to find.
Executing the manual search
• Press the "MENU" key to open the TV menu.
• Press the red key to open the menu
For a manual station search, you must know the
"Configuration".
• Use the corresponding numeric key (in the
example:
"DVB-C".
F1
Function for F3
Function for F2
Function for F1
Channel 05 Cable channel -Frequency 64.500MHz
Madulation Auto.mode Start station search
OK
➔
EURO sockets
DVB-C
DVB-T
Analog-TV
Country
Language
Operating
General settings
Manual search
Automatic search
Search settings
Symbol rate 6900
• In the setting window, use the numeric keys to
enter the channel number (or special channel
number) or the frequency of the desired station.
If you know further data of the desired station,
select the menu items "Modulation" and "Symbol
rate" and use the
change the settings there.
) to select
• The cursor is on the menu
line "Search settings".
• Press the "OK" key and, in
the setting window, use the
+
only" or "FTA +CICAM"
(see also page 63).
• Press the "OK" key and use
the corresponding numeric
key (in the example:
select "Manual search".
• The cursor points to "Channel".
+
key or the numeric keys to
-
-
key to select "All", "FTA
) to
The number of subjects and sections depends
on the selected scope of operation. Depending
on the configuration of the TV set, the various
menu items may be displayed in a different
order and numbered differently.
*depending on equipment
• After input of the station data, use the cursor
66
control key to select the menu item "Station
search" and press the "OK" key to confirm your
selection.
The station settings are saved.
Page 67

23. Station Logo
With the aid of the VPS signal, a station logo with
a maximum length of 15 characters is automatically assigned to each station.
If this automatic assignment does not work, or if
you want to use a different logo, you can change
the setting manually.
Setting the station logo
• Press the "MENU" key.
• Press the white key to open the “station
table”.
• Press the F2 key to enable editing of the station
table.
• Select the programme position whose logo you
wish to change.
• Press the cursor control key
to move to the other
column.
• Use the corresponding
numeric key (in the example:
) to select
"Logo input".
• The various letters and
digits can be selected with
the aid of the cursor control
key .
• You can delete single characters with the red key or
the complete logo with the II key.
• Set the desired logo by repeatedly pressing the
various numeric keys. The lowercase letters are
displayed after the uppercase letters.
Station table
II
Alles löschen.
Zeichen löschen.
Position wählen.
OK
speichern
MENU
abbrechen
Opening the menu
MENU
F2
F1
➔
0076 TF3
0075 TF2
0074 TF1
0073 TV France
0072 RTL 2
0071 RTL
0070 SAT 1
0069 Bayern 3
0068 ZDF
0067 ARD
_ , ; ABC DEF
GHI JKL MNO RTL 2
PQRS
TUV WXYZ
Sound corrections
Colour standard
Picture quality
Picture correct.
Enter logo
Station contained in EPG
CA module
Signal quality
DVB-prog. info
Frequency/channel
OK
EXIT
3) 7)
5)
5)
5)
7)
• Press the "OK" key to save the new logo.
• Press the "EXIT" key to close the TV menu.
The number of subjects and sections depends
on the selected scope of operation. Depending
on the configuration of the TV set, the various
menu items may be displayed in a different
order and numbered differently.
67
Page 68

Opening the menu
MENU
24. Sorting Stations
You can move, copy and delete individual stations
or groups of stations within the station table.
Moving, copying and deleting stations
• Press the "MENU" key to open the TV menu.
• Press the white key to open the station table.
• Use the cursor control key to select the pro-
gramme position which is to be moved, copied
or deleted. You can also mark a contiguous
block of positions by moving the cursor to the
programme position at the end of the block.
Station table
: select
:edit
F2
programme
attributes or
station list.
OK
• Briefly press the OK key to mark the programme
position (in the example: position 0006). Press
and hold the OK key to mark all programme
F1
➔
0010 Hessen 3
0009 Südwest
0008 MDR
0007 PRO 7
0006 RTL 2
0005 RTL
0004 SAT 1
0003 Bayern 3
0002 ZDF
0001 ARD
Select station with (hold down to select a block). Select new position with
the cursor
– +
Delete all marks with .
➔
F3
OK
:move/copy, :delete.
II
positions in the previously selected block.
F1
➔
0020 BR alpha
0019 3 SAT
0018 Kinderkan.
0017 FRANKEN
0016 TELE-5
0015 9LIVE
0014 SuperRTL
0013 Kabel 1
0012 VOX
0011 West 3
➔
F3
• To copy this programme
position, use the cursor to
select the programme position before or after which
the selected station is to be
inserted. If the station(s)
you have selected were
previously in programme
positions with lower numbers than the insertion
position, they are inserted
before this position; if they
previously had higher
numbers, they are inserted
after this position.
• To move the selected station(s), select the programme position to which the station(s( is/are to
be moved.
+
key to copy (+) or move (-) the sta-
-
EXIT
• Use the
tion(s).
• To delete a station, press the ll key.
68
• Press the "EXIT" key to close the TV menu.
Page 69

25. Registering AV Devices Opening the menu
AV (audio/video) devices are external devices
which deliver video and/or audio signals (such
i
as video recorders, DVD players, DVD recorders,
etc.) and which can be connected to TV sets.
All commonly available AV devices are listed in
the menu "AV devices".
Note that you must always connect AV
☞
devices exactly as shown in the connection
diagram in the TV menu of your TV set !
SVHS/Hi8 and Data Logic video recorders must always
be connected to the EURO1 socket of the TV set.
In the factory, the EURO1 socket is programmed
for a video recorder and the EURO2 socket is programmed for a DVD player.
Registering an A
V device on
the TV set
• Press the "MENU" key to
open the TV menu.
•
Press the yellow key to
AV devices
open the menu "AV devices".
• Use the cursor control key
to select the AV device you
wish to register and press
the "OK" key.
• Press numeric key
use the
+
key to select the appropriate signal
-
and
select
OK
connect
and clear
Connect as follows:
types (OUT/IN) for this device and press "OK"
to confirm your selection. For details of the signal types, see page 66 and the operating
instructions for the AV device being connected.
MENU
OK
F1
➔
HiFi amplifier
AV-Receiver
Other device 2
Other device 1
PC
Satellit / set top
DVD Player 2
DVD Player 1
DVD/Videorec.2
DVD/Videorec.1
VCR
Videorecorder CVBS CVBS EURO1
➔
OK
EXIT
✗
DataLogic
Name
Signal types
connect
➔
• If desired, press numeric key
, enter a diffe-
rent name for this AV device and press "OK".
• Use the cursor control key to select "Connect"
and press the "OK" key. Then connect the AV
device to the corresponding EURO socket.
Caution! Connection of
☞
a new device may cause an existing connection diagram to be
changed. If so, you
must reconnect the AV
devices accordingly.
69
Page 70

Opening the menu
25. Registering AV Devices
Data Logic
This menu item is not avai-
☞
lable in a 2 ** menu.
MENU
OK
Data Logic video recorder
"Data Logic" is a system which provides a dialo-
i
gue between a TV set and a video recorder. This
"intelligent" system offers the features such as:
- Automatic transfer of the settings for terrestrial or
cable TV stations (not DVB) to the video recorder.
- Immediate recording - the video recorder
records the programme currently displayed on
the TV screen.
- Automatic switching to the AV programme position.
- Direct control of the video recorder from the
timer menu of the TV set.
- Automatic switching off of the video recorder
when the TV set is switched to the standby state.
In the menu "AV devices" check X to the left of the
field "Data Logic" for "Video recorder 1" and
connect the video recorder to the EURO1 socket.
Data Logic will function correctly only if the
☞
AV-1 socket on the video recorder is connected to the EURO 1 socket on the TV set.
AV devices
select
OK
connect
and clear
70
Comparable dialogue systems are: QLink (Pan-
F1
➔
HiFi amplifier
AV-Receiver
Other device 2
Other device 1
PC
Satellit / set top
DVD Player 2
DVD Player 1
DVD/Videorec.2
DVD/Videorec.1
Connect as follows:
Videorecorder CVBS CVBS EURO1
VCR
asonic), EasyLink (Philips), Megalogic (Grundig),
DataLogic
Name
Signal types
connect
✗
➔
➔
SMARTLINK (Sony).
Registering a Data Logic
video recorder on the TV set
• Press the "MENU" key to
open the TV menu.
•
Press the yellow key to
open the menu "AV devices".
• Use the cursor control key to
select the AV device to be
connected and press the
"OK" key.
Page 71

25. Registering AV Devices
Data Logic
• Press numeric key , use the - + key to select
the correct signal types (OUT/IN) and press the
"OK" key.
(See also the operating instructions of the
AV device.)
• If desired, press numeric key
name for the AV device and press the "OK" key.
• Use the cursor control key to select "Data
Logic" and press the "OK" key.
• Use the cursor control key to select "Connect"
and press the "OK" key. Then connect the AV
device to the corresponding EURO socket.
Note:
, enter a new
Opening the menu
OK
EXIT
MENU
In the menu "Configuration" in the menu point
"Data logic settings" "Mode1" is set. This factory
setting is valid for
most AV devices.
Should the AV device break off the recording after
about 5-10 secs, select the setting "Mode 2".
Data Logic: transferring the
station table
• Press the "MENU" key to
open the TV menu.
• Press the red key to
open the menu "Configuration".
• Press numeric key
select "Analogue TV".
• Press the "OK" key and
then press numeric key
to
Configuration
Change with
Start data transfer
with .
– +
OK
to select "Data Logic".
• Press the "OK" key to transfer the programme
positions from the TV set to the video recorder.
OK
F1
Function for F3
Function for F2
Function for F1
Start data transfer Programme position
➔
EURO sockets
DVB-C
DVB-T
Analog-TV
Country
Language
Operating
The number of subjects and sections depends
on the selected scope of operation. Depending
on the configuration of the TV set, the various
menu items may be displayed in a different
order and numbered differently.
DataLogic
Terrestrial station search
Search settings
2)
71
Page 72

Opening the menu
25. Registering AV Devices
Setting signal types RGB
The signal type always refers to the input
☞
and output of the AV device.
MENU
OK
AV devices
Change with
Accept value with .
– +
OK
Some AV devices may use a composite video signal (FBAS) for recording and playback operations
and an RGB signal for displaying their menus.
It is not possible to make a general statement in
this respect. The operating instructions of the AV
device concerned may provide some indication.
If you connect such an AV device with the signal
type "composite video" (FBAS) and recordings are
played back correctly, but you cannot see the
menu of the AV device, you must change the signal type in the menu "AV devices" to "RGB".
Setting the signal type
• Press the "MENU" key to open the TV menu.
F1
➔
HiFi amplifier
AV-Receiver
Other device 2
Other device 1
PC
Satellit / set top
DVD Player 2
DVD Player 1
DVD/Videorec.2
DVD/Videorec.1
Signal OUT RGB Signal IN CVBS
✗
DataLogic
Name
Signal types
connect
• Press the yellow key to
open the menu "AV devices".
• Use the cursor control key to
select the AV device whose
signal type you wish to
change and press the "OK"
key.
• Press numeric key
, use
the cursor control key to
select " Signal OUT", and
use the - + key to change
the setting to " RGB".
72
OK
• Press the "OK" key to confirm your selection.
• Press the "EXIT" key to close the TV menu.
EXIT
Caution ! This may cause an existing connection diagram to be
☞
modified. If so, you must reconnect the AV devices accordingly.
Page 73

25. Registering AV Devices
Setting signal types DVI/HDMI
The signal type always refers to the input
☞
and output of the AV device.
AV devices equipped with a DVI or HDMI socket
can be connected to the LCD TV with the aid of a
DVI or HDMI cable, respectively.
The connected device must be registered in the
menu "AV devices" with "Signal OUT" set to
"DVI" or "HDMI", as applicable. Connection via a
DVI or HDMI interface permits digital transfer of
the picture signal from the device to the TV set.
The sound signal must be connected with an additional Cinch or optical (Toslink) audio cable.
Setting the signal type DVI or HDMI
• Press the "MENU" key to open the TV menu.
Opening the menu
MENU
OK
• Press the yellow key to open the menu "AV
devices".
• Use the cursor control key
to select the AV device
whose signal type you wish
to change and press the
"OK" key.
• Press numeric key
, use
AV devices
the cursor control key to
select " Signal OUT", and
use the - + key to change
the setting to " RGB".
Change with
Accept value with .
– +
OK
F1
HiFi amplifier
AV-Receiver
Other device 2
Other device 1
PC
Satellit / set top
DVD Player 2
DVD Player 1
DVD/Videorec.2
DVD/Videorec.1
Signal OUT HDMI Signal IN no Signal
• Press the "OK" key to con-
firm your selection.
• Press the "EXIT" key to close the TV menu.
Caution ! This may cause an existing con-
☞
nection diagram to be modified. If so, you
must reconnect the AV devices accordingly.
Caution ! This may cause an existing connection diagram to be
☞
modified. If so, you must reconnect the AV devices accordingly.
➔
✗
OK
EXIT
DataLogic
Name
Signal types
connect
73
Page 74

Opening the menu
25. Registering AV Devices
Setting signal types YUV
Connection of external devices with YUV component output to the "COMPONENT IN" RCA jacks.
MENU
OK
AV devices
Change with
Accept value with .
– +
OK
The signal type always refers to the input
☞
and output of the AV device.
AV devices equipped with a YUV jack can be connected to the LCD TV by means of a YUV cable
(see page 86). In the "AV Devices" menu, the connected AV device must be registered with signal
OUT "YUV".
Setting
the YUV
Signal Type
- Enter the TV menu by pressing "MENU".
- Press the yellow key to open the "AV Devices"
menu.
- Use the cursor control to select the AV device
F1
➔
HiFi amplifier
AV-Receiver
Other device 2
Other device 1
PC
Satellit / set top
DVD Player 2
DVD Player 1
DVD/Videorec.2
DVD/Videorec.1
Signal OUT YUV Signal IN no Signal
✗
DataLogic
Name
Signal types
connect
whose signal type you want
to change and press "OK".
- Press numeric key
, use
the cursor control to select
"Signal OUT", and use the
- + key to set "YUV".
- Confirm the setting by pressing "OK".
- Exit the "TV Menu" by pressing "EXIT".
74
OK
EXIT
Caution ! This may cause an existing connection diagram to be
☞
modified. If so, you must reconnect the AV devices accordingly.
Page 75

25.1 Removing AV Devices Opening the menu
This menu item is not available in a 2 **
☞
menu.
If desired, you can change the factory settings for
AV devices (a video recorder on the EURO1
socket and a DVD player on the EURO2 socket).
Removing an A
V device from the TV set
MENU
• Press the "MENU" key to open the TV menu.
• Press the yellow key to open the menu "AV
devices".
• Use the cursor control key to select the device
you wish to remove and press the "OK" key.
The cursor is on the line "Connect".
• Press the "OK" key again.
A message is displayed,
asking if you really want to
change the connected device.
• Press the OK key again to
AV devices
remove the connected device.
• Press the "EXIT" key to clo-
se the TV menu.
select
OK
connect
and clear
F1
➔
HiFi amplifier
AV-Receiver
Other device 2
Other device 1
PC
Satellit / set top
DVD Player 2
DVD Player 1
DVD/Videorec.2
DVD/Videorec.1
Connect as follows:
VCR
DVD/Videorec.1
OK
OK
DataLogic
Name
Signal types
connect
EXIT
The number of subjects and sections depends
on the selected scope of operation. Depending
on the configuration of the TV set, the various
menu items may be displayed in a different
order and numbered differently.
75
Page 76

26. Initial Programme PositionOpening the menu
Configuration
Change with
Accept value with .
– +
OK
MENU
You can define an initial programme position in
this TV set. This initial programme position is used
primarily to select the AV programme position if
you use an external receiver.
Setting the initial programme position
This menu item is not available in a 2 **
☞
menu.
OK
F1
Function for F3
Function for F2
Function for F1
Betriebsart AV
Programm Satellit/set top
➔
EURO sockets
DVB-C
DVB-T
Analog-TV
Country
Language
Operating
Select a receiver (satellite or set-top box) in the
menu "AV devices" and connect the receiver to the
Data Logic adjustm.
CI dialogue via
EPG settings
Operating
Sound settings
HiFi output
Init. prog.position
2)
OK
TV set (see also Section 25,
Registering AV Devices").
• Press the "AV " key.
• Use the numeric keys to
select the position "Sat/Settop" in the AV menu.
• Press the "MENU" key to
open the TV menu.
• Press the red key to open
the menu "Configuration".
• Use the cursor control key to
select "Operation" and then
"Initial programme position".
• Press the "OK" key and, in the setting window,
• Press the "OK" key to save the new setting.
OK
• Press the "EXIT" key to close the TV menu.
EXIT
The number of subjects and sections depends
on the selected scope of operation. Depending
on the configuration of the TV set, the various
menu items may be displayed in a different
order and numbered differently.
2) Possible only on sets equipped with this
function.
76
use the
☞
+
key to select "Yes".
-
The AV programme position will now be
selected automatically when you switch on
the TV set with the main power switch.
Page 77

27. Sound via HiFi Amplifier
HiFi output
Opening the menu
On the rear of the TV set, you will find audio
sockets and a digital audio-out socket (see page
86) which can be used to connect the TV set to a
HiFi system (HiFi amplifier).
Settings need to be made in the menu items "HiFi
output" and "Sound settings" only if the TV set is
connected to a HiFi system.
If you want adjust the sound settings exclusively on
the HiFi system, you must set the HiFi output to
constant.
You can then no longer adjust
the volume and tone with the
Metz remote control. The mute
function remains active.
If you want to be able to change the sound settings with the
Metz remote control, you must
set the HiFi output to variable.
Setting the HiFi output
• Press the "MENU" key to
open the TV menu.
Configuration
Change with
Accept value with .
– +
OK
• Press the red key to open
the menu "Configuration".
MENU
F1
Function for F3
Function for F2
Function for F1
HiFi output constant
Output level 50%
➔
EURO sockets
DVB-C
DVB-T
Analog-TV
Country
Language
Operating
Data Logic adjustm.
CI dialogue via
EPG settings
Operating
Sound settings
HiFi output
Init. prog.position
2)
• Use the cursor control key to select
"Initial programme position".
• Use the corresponding numeric key (in the
example:
• In the setting window, use the
) to select " HiFi output".
+
key to set the
-
desired parameters.
• Press the "OK" key to save the new settings.
• Press the "EXIT" key to close the TV menu.
In normal TV Mode, the function "Sound via..."
can be activated temporarily by pressing the yellow key and using the
+
key.
-
OK
EXIT
The number of subjects and sections depends
on the selected scope of operation. Depending
on the configuration of the TV set, the various
menu items may be displayed in a different
order and numbered differently.
77
Page 78

Opening the menu
MENU
OK
27. Sound via HiFi Amplifier
HiFi output
On the rear of the TV set, you will find audio
sockets and a digital audio-out socket (see page
81) which can be used to connect the TV set to a
HiFi system (HiFi amplifier).
If you wish to play back the sound only via a HiFi
system (HiFi amplifier) which is connected with the
aid of a Cinch cable, you must select the function
"Sound via HiFi".
Configuration
Change with
Accept value with .
– +
OK
If you wish to play back the sound only via a HiFi
system (HiFi amplifier) which is connected with the
aid of an optical audio cable ("Toslink", available
F1
Function for F3
Function for F2
Function for F1
Mute (two-stage) on Sound via HiFi
➔
EURO sockets
DVB-C
DVB-T
Analog-TV
Country
Language
Operating
Data Logic adjustm.
CI dialogue via
EPG settings
Operating
Sound settings
HiFi output
Init. prog.position
2)
OK
• In the setting window, use the cursor control key
EXIT
to select the menu item "Sound via…".
• Use the
+
key to select "Sound via HiFi".
-
• Press the "OK" key to save the new setting.
as an accessory), the following settings should not be
made.
Setting sound via HiFi
• Press the "MENU" key to
open the TV menu.
• Press the red key to open
the menu "Configuration".
• Press the "OK" key to move
to the right-hand column.
• Use the cursor control key
or the corresponding numeric key (in the example:
)
to select "Sound settings".
The number of subjects and sections depends
on the selected scope of operation. Depending
on the configuration of the TV set, the various
menu items may be displayed in a different
order and numbered differently.
2) Possible only on sets equipped with this
function.
• Press the "EXIT" key to close the TV menu.
In normal TV Mode, the function "Sound via..."
can be activated temporarily by pressing the yellow key and using the
78
+
key.
-
Page 79

To switch from TV mode to DVB radio mode, press
the "R" key.
The screen is automatically blanked after about
30 seconds.
To switch from DVB radio mode to TV mode, press
the "TV" key.
Setting DVB radio stations
The available DVB radio stations are automatically detected during a station search (see Section
22) and stored in a separate station table at the
operating level for radio mode.
The radio station table can be sorted (see Section
24) and the station logos can be changed (see
Section 23).
DVB radio stations are administered in the
☞
same basic way as DVB TV stations.
The functions described in Sections 12,
12.1, 15 to 17.2 and 18 (Special functions,
Normal/speech, Timer overview and Direct
recording) are also available for radio stations.
Opening the menu28. DVB Radio Mode
R
TV
79
Page 80

29. Scope of Operation
The adjustable scope of operation for the TV set
can be a great help in finding your way around
the complex operating functions of the TV set.
The scope of operation can be set to various
levels, which are identified by asterisks.
1
- Zapping
- Selection of programme positions with the numeric keys, the oval "P+/P-" rocker key or the
white key .
- Opening Teletext.
- Displaying help information (INFO).
- Playing back films from a video recorder or DVD
player by pressing the "AV " key.
- Selecting "Special functions 1" by pressing the
F1 key.
- Selecting "Special functions 2" by pressing the
F2 key.
- Selecting "Special functions 3" by pressing the
F3 key.
- Selecting connected AV devices by pressing the
"AV " key.
- Calling the standard picture functions by pressing the blue key .
- Calling the standard sound functions by pressing
the yellow key .
- Calling the "EPG" function with the "EPG" key.
If the scope of operation is set to a 1menu and
you subsequently want to open a menu, then:
• Press and hold the "MENU" key for at least five
seconds to open the TV menu.
• The menu item "Operation" is automatically
selected.
"Just watching TV"- in other words, it is
not possible to open the TV menu and
only the functions available on the
remote control can be used:
80
Page 81

29. Scope of Operation
• Use the - + key to select the desired scope of
operation and press the "OK" key to save the
new setting.
2
- Childlock
- Timer control (sleep timer)
- Automatic station search
- Transfer of the TV station
table from the TV set to a
Data Logic video recorder.
- Editing functions in the sta-
tion table
3
Setting the scope of operation
• Press the "MENU" key to open the TV menu.
• Press the red key to open the menu "Configuration".
• Use the cursor control key to move to the
menu line "Initial programme position".
• Press the numeric key
operation".
• In the setting window, use the
the desired scope of operation.
Press the "OK" key to save the new setting.
Press the "EXIT" key to close the TV menu.
This menu permits you to configure the
use of the TV set to a certain degree.
All of the functions listed for the 1
menu are available and are supplemented by the following functions:
This is the operating scope for persons who are interested in technology
who want to be
Configuration
Change with
Accept value with .
– +
OK
able to use the full
range of functions
of the TV set.
to select "Scope of
+
key to select
-
Opening the menu
MENU
F1
Function for F3
Function for F2
Function for F1
Operating full
➔
EURO sockets
DVB-C
DVB-T
Analog-TV
Country
Language
Operating
Data Logic adjustm.
CI dialogue via
EPG settings
Operating
Sound settings
HiFi output
Init. prog.position
OK
EXIT
The number of subjects and sections depends
on the selected scope of operation. Depending
on the configuration of the TV set, the various
menu items may be displayed in a different
order and numbered differently.
2)
81
Page 82

30. Operation without the
Remote Control
Operation without the remote control is provided
as an emergency measure in case the batteries of
your remote control are exhausted or the remote
control is not readily available.
You will find the local control on the bottom of
the TV set on the left side (Milos) or behind a flap
(Puros, Talio), which is opened by pressing•••.
Switching on
Press the main power switch on the TV set. After
about five seconds, the TV set is switched on with
programme position 1 or the programmed initial
programme position selected.
You can also use the following functions directly
on the TV set, without a remote control. For functions which require further adjustments, the function remains preselected for ten seconds.
Programme selection
Press the -/+ buttons.
82
Volume
Press and hold the preselection key F until the bar
display for the volume appears on the screen. Then
press the "-" or "+" button to adjust the volume.
Contrast
Press and hold the preselection key F until the bar
display for the contrast appears on the screen. Then
press the "-" or "+" button to adjust the contrast.
Page 83

31. Connecting Headphones
The headphone socket is located behind a flap on
the left side of the TV set (see Section 35).
Tilt the flap on the Milos up with your fingernail.
On the Puros or Talio open the flap by
pressing •••.
See also ch. 35.
We recommend the use of headphones with an
impedance of at least 32 Ω. The use of headphones with a lower impedance will reduce the dynamic range of the sound.
You can save the headphone volume as a standard value.
32. Sound 1, Sound 2
When receiving a dual-language programme, you can switch between the
two sound channels.
In TV mode, press and hold the yellow
key until the sound function "Sound
mode" is selected.
Then use the
or Sound 2.
+
key to select Sound 1
-
Headph. Vol.
Sound mode Cannel 2
Spatial
Spatial
Sound mode Cannel 2
Balance
83
Page 84

33. Cleaning the TV Set
Before cleaning the set, always switch it off
☞
with the mains switch!
Incorrect treatment and cleaning of the screen surface can cause irreparable damage to it. You
should therefore always observe the following
instructions for treatment and cleaning of the set.
T
reatment:
Always treat the screen surface very carefully.
Take care not to damage it mechanically by
shocks, impact, scratching or scraping.
Keep sharp, pointed and hard objects away from
the surface of the screen.
Keep the surface of the screen clean.
For cleaning the case and the screen, use only a
soft, dry cloth. For removing stubborn marks, you
may moisten the cloth slightly.
Cleaning and care:
The surface of the screen may be cleaned only
with a soft, dry cloth (such as a microfleece
duster). If any marks cannot be removed with this
dry cloth, you may moisten the cloth slightly.
Take care that no water or other liquid can enter
the TV set, since this can cause serious damage to
the set.
If any liquid or other foreign object (pieces of
metal, etc.) enters the set, immediately disconnect
the mains plug from the wall outlet.
Never insert your hands or tools into the set, since
this may result in electric shocks.
84
Page 85

34. Connections on the Left
Milos, left side
Headphone socket, diameter 3.5 mm
FBAS/Video in (e.g. digital camera or camcorder)
Audio in R/L (e.g. camcorder)
S-VHS or. Y/C in (e.g. camcorder)
Puros, Talio, at the front under the flap
Service socket for
use by your dealer
Antenna socket
85
Page 86

35. Connections on the Rear of the Set
(covered by a flap)
Viewed from below
DVI-I connector
Power
supply
OUT
Digital
Audio
Audio IN
Audio
Video IN
YCbCr in
YUV in
IN
+
+
Video IN
DVI-I connector
Signal type DVI-YUV
EURO sockets for connection of
Video and audio IN/OUT
Signal type DVI-D
external AV devices
Video IN
DVI-I connector
HDMI connector
Signal type HDMI
OUT
Audio
With the aid of an optical audio cable ("Toslink" cable, available from your
☞
dealer), the digital audio signal (AC3) provided by the TV set can be extracted
for external processing.
86
Centre loudspeaker
IN
Page 87

35.1 Connecting a Hifi Amplifier/AV Receiver
Metz LCD-TV
HiFi-amplifier
AV-Receiver
87
Page 88

Opening the menu
35.1 Connecting a Hifi
Amplifier/AV Receiver
AV devices
select
OK
connect
and clear
MENU
OK OK
HiFi amplifier
AV-Receiver
Other device 2
Other device 1
Satellit / set top
DVD Player 2
DVD Player 1
DVD/Videorec.2
DVD/Videorec.1
Connect as follows:
HiFi amplifier Stereo no signal Cinch
OK
EXIT
Registering the AV Device with the TV
•
Enter the TV menu by pressing "MENU".
• Press the yellow key to open the "AV Devices"
menu.
• Use the cursor control key to select "Hifi
Amplifier" in the device selection.
• Press "OK" twice, use the cursor control key to
select "Signal Types", and press "OK"..
• For connection type , select the signal type
"Signal IN - SPDIF“.
For connection type , select the signal type
"Signal IN – Stereo".
F1
➔
Confirm the setting by pressing "OK"
• Press the "EXIT" key to close
the TV menu.
Sound:
PC
• To configure the sound settings of the LCD TV, press
the yellow key and use
✗
Name
Signal types
connect
the cursor control key to
select the menu item "Sound
via ...".
HiFi
➔
➔
• For connection type , use
+
the
via Hifi"
key to select "Sound
-
.
The speakers of the LCD TV are muted. The sound
(AC3 or stereo sound) is rendered over the speakers of the Hifi set.
+
• For connection type , use the
key to select
-
"Sound via surround".
The speakers of the LCD TV are used as the centre
box. The sound (AC3 or stereo sound) is rendered
over the speakers of the Hifi unit.
88
Page 89

36.
Copying between AV Devices
Direct recording
Opening the menu
If you wish to copy a recording from one of the
AV devices connected to your TV set (such as a
DVD player) to another connected AV device (such
as a video recorder), you must do this by means
of a direct recording operation. In this case, the
signal arriving at one of the EURO sockets is redirected to the other EURO socket, from where it
can be recorded.
Example: you have a DVD player and a
video recorder connected to
the EURO sockets of the TV set
(see Section 25).
Programming a direct recording for
copying:
• Press the "AV " key and use the corresponding numeric key to select the
DVD player (playback device).
• Press the F2 key.
Briefly pressing F2 executes the function which is programmed for this function key
(see Section 18., "Programming function keys").
Pressing and holding F2 for about three seconds
displays all functions available for this function
key.
AV
F2
2 DVD-Player
1 Videorecor-
der
Select with
...
or .
Confirm with .
OK
• Press numeric key
to open the
timer menu. The timer window displays the AV programme position
(DVD player), the current date and a
time window of two hours.
• If two hours is insufficient for the
copying operation, use the numeric
keys to enter a later end time.
Recording Yes
Reminder No
Pr 6
SAT 1
Date 01.05.
Start 22:45
End 23:40
VPS no
Recording device
Videorecorder
Change with
OK
– +
:select
:save the timer
89
Page 90

36.
Copying between AV Devices
Direct recording
• Use the cursor control key to select the line
"Recording device".
If only one such device exists, it is then displayed. If further recording devices exist, you can
select the desired device with the aid of
+
the
key.
-
• Press the "OK" key to save the settings.
• On the playback device (in this example, the
DVD player) start the film which is to be copied.
• On the recording device (in this example, the
video recorder), select the AV programme position (in most cases AV1).
• On the recording device, start a direct recording by pressing the appropriate button (REC or
OTR, etc.).
The TV set is now set up so that the signal coming
from the playback device is connected directly to
the recording device.
90
Page 91

37. Setting the Picture Format
Some of the following menu items are not
☞
available on a 2 ** menu.
Setting the picture for
• Select the AV programme position which delivers the picture by pressing the "AV " key and
then pressing the numeric key corresponding to
the device you want to use.
• Press the "MENU" key. The TV menu appears on
the screen.
mat:
Opening the menu
MENU
• Press the blue key to open the menu "Picture
and sound". The menu item "General picture
settings" is preselected.
• Press numeric key
to
select the menu item "Pict.
settings for Pr.".
Picture-Volume
• Use the corresponding
numeric key (in the example:
) to select the func-
tion "Picture format".
• Use the
picture format setting to
"Automatic".
+
key to set the
-
Change with
Accept value with
– +
OK
• Press the "OK" key to save
the new setting.
• Press the "EXIT" key to close the TV menu.
Sound set,.prog.posn
Sound settings, gen.
Pict.set.,prog.posn.
Picture settings, gen.
Picture format Auto. mode
OK
EXIT
3)
VCR
Picture format
Colour standard
Colour offset
Noise reduction
Picture sharpness
Colour intensity
Contrast
3)
3)
3)
The number of subjects and sections depends
on the selected scope of operation. Depending
on the configuration of the TV set, the various
menu items may be displayed in a different
order and numbered differently.
3) See glossary for an explanation.
91
Page 92

38. Glossary
AV programme position
AV devices have one or more connection sockets,
depending on the model. The designations of these sockets are marked on the device (e.g. AV1).
On the AV device, you can select which socket
you want to use. The selected socket is shown on
the display of the AV device (e.g. A1 for socket
AV1).
Code
The settings for the childlock function are protected by a four-digit code: you can enter any desired code, but you should note it for future use. If
you have forgotten your code, please consult your
local dealer.
Forced mono
It may happen that your TV set switches to stereo
mode although the programme you are watching
is not broadcast with stereo sound. This is normally due to the local reception conditions. If you set
the selected programme position to "forced mono"
all programmes received at this programme position are reproduced with mono sound.
92
Noise reduction
This function allows you to improve the picture
quality of "snowy" pictures which result from poor
reception conditions. Various levels of noise
reduction can be selected and the settings can be
made separately for each programme position.
Panorama
The panorama function can be used to expand
"normal" TV programmes broadcast in the 4:3
format to fill the full width of a 16:9 screen. This is
done by expanding the picture width accordingly.
Page 93

38. Glossary
Picture position, vertical
With widescreen films, subtitles are sometimes
transmitted in the black area at the bottom of the
screen. You can move the picture upwards on the
screen to ensure that these subtitles remain visible.
Standard values
The standard values are the settings (such as
brightness, sound volume, colour, etc.) which are
the same for all programme positions.
Spatial sound
This function can be used to create an artificial
stereo effect for programmes with sound in mono.
Stereo wide
For stereo broadcasts, the distance between the
speakers can be increased artificially in order to
achieve a wider stereo effect.
SRS-WOW
WOW is an audio system developed by SRS
Labs, Inc. which provides a unique listening experience. The sound becomes fuller and the bass is
deeper and more voluminous.
Activation of the WOW function allows you to
hear a lot of spatial and environmental audio
information which is lost in normal stereo mode.
In normal TV mode, the WOW function can be
preselected by pressing the yellow key and
then switched on and off with the
The SRS WOW technology is used by Metz under
a licence from SRS Labs, Inc.
2)
+
-
Is a registered trade mark
of SRS Labs, Inc.
key.
2) Possible only on sets equipped
with this function.
93
Page 94

38. Glossary
Tone settings
The tone can be set to either "Normal" or
"Speech". In the setting "Speech", the bass and
treble components of the sound signal are set to
make speech as easy to understand as possible.
The setting "Normal" is recommended for music
programmes.
VCR
The VCR function provides an optimal picture quality when playing back recordings from tape devices such as camcorders or video recorders.
Volume correction
The various stations broadcast their sound at different volumes. The TV set can automatically compensate for these differences in the volume. This
function remains active even if the standard sound
settings are recalled.
94
Page 95

39. Technical Data
Mains voltage:
230-240 VAC, 50Hz
Antenna input:
75 Ohms, unbalanced DIN 45325
Channel coverage:
Standard channels 2 - 12, 21 - 69
Special channels S1 - S20, S21 - S41,
S42 ... S46 (Belgium channels OIR)
Power
consumption
Milos 26 ML
Talio 26 ML
Milos 32 ML
Puros 32 ML
Milos 37 ML
Puros 37 ML
TC 59 X)
(to CENELEC /
Power consumption**
ca. 115 W
ca. 125 W
ca. 158 W
Music output power to
2 x 12 W*
(2 x 8 W)
2 x 20 W
(2 x 12,5 W)
2 x 20 W
(2 x 12,5 W)
DIN 45324
(sinusoidal power)
into 4Ω (at 1 kHz)
*) into 8Ω
** The power consumption was determined with
backlight control turned off (see p. 19). The
figure provided here can turn out to be lower
with backlight control "dynamic" and "automatic" - depending on the parameters set there and as a result lead to power saving.
Energy consumption per hour (Wh):
Multiply the power consumption in W by 1 hour
Stand-by: < 2 W
95
Page 96

39. Technical Data
Supported Signal Standards
Video HDMI
a) 720x480i/p 60Hz RGB
b) 720x480i/p 60Hz YCbCr 4:4:4 / 4:2:2
c) 720x576i/p 50Hz RGB
d) 720x576i/p 50Hz YCbCr 4:4:4 / 4:2:2
e) 1280x720p 50/60Hz RGB
f) 1280x720p 50/60Hz YCbCr 4:4:4 / 4:2:2
g) 1920x1080i 50/60Hz RGB
h)1920x1080i 50/60Hz YCbCr 4:4:4 / 4:2:2
i) 640x480p 60Hz RGB
Video DVI-D
a) ... h) from Video HDMI, and
640x480p 60Hz RGB (DVI-D, analog)
800x600p 60Hz RGB (DVI-D, analog)
1024x768p 60Hz RGB (DVI-D, analog)
1366x768p 60Hz RGB(DVI-D, analog)
1280x720p 50/60Hz YCbCr analog
1920x1080i 50/60Hz YCbCr analog
Video Scart (RGB):
720x576i 50 Hz
720x480i 60 Hz
Video Scart (Y/C, FBAS) / Front AV:
720x576i 50 Hz PAL / SECAM
720x480i 60Hz NTSC
Video Component IN:
720x576i/p 50 Hz
720x480i/p 60 Hz
1280x720p 50/60Hz
1920x1080i 50/60Hz
Audio HDMI:
Linear PCM Stereo 32 kHz
Linear PCM Stereo 44,1 kHz
Linear PCM Stereo 48 kHz
Audio S/PDIF:
Linear PCM Stereo 32 kHz
Linear PCM Stereo 44,1 kHz
Linear PCM Stereo 48 kHz
96
Page 97

39. Technical Data
Audio Scart / Front AV, Comp Audio, DVI Audio:
Analog Stereo
Audio Center IN:
Analog mono
39.1 Conversion possibilities
• DVB-S digital conversion set 029 NM 1119
for the reception of digital satellite stations for TV
and radio programs. The DVBD conversion set is
installed in the TV set and you do not need any
additional remote control for it.
• DVB-T/C/analogue conversion set
070 NM 1061
for the reception of digital terrestrial, digital cable
and analogue stations for TV and radio programs. The DVBD conversion kit is installed in the
TV set and you do not need any additional remote
control for it.
Ask your local dealer about any further upgrade
kits.
You can also find further information on our
homepage: www.metz.de.
97
Page 98

40. Inserting / Removing
CA Modules
The LCD TV has two slots (CI1 / CI2) for CA
modules at the top (card reader for
Chip
smartcards or decoder cards).
To insert the CA module, open the lid
on the top of the LCD TV and insert the
CA module in one of the slots as shown
in the pictures. Press the CA module
down until the unlocking bar is lifted
up.
Close the lid.
Front view
Back/top view (without lid)
Unlocking bar
The LCD TV is now ready to decode the
respective station.
98
Back view (without lid)
with inserted module
Page 99

41. Basic differences between analog terrestrial
reception and DVB-T
Information for our dealers and interested
customers.
In order to understand how the behaviour
of DVB-T receivers differs from that of the
analog terrestrial receivers used until
now, two things are important: digital
transmission and the simultaneous broadcasting network.
Digital transmission
A DVB transmitter does not transmit only
a single programme, but a set of programmes – normally six to eight. The
information for each programme – the
picture, the sound and teletext – is converted into a digital format, i.e. into
numerical values which are grouped
together in packets. The packets of the
various programmes are then transmitted
sequentially in a so-called transport stream.
Further information which permits the
receiver to detect and correct any errors
which occur during transmission is added
to this transport stream.
Example:
If the information 0 or 1 is to be transmitted, the 0 could be encoded as 000 and
the 1 as 111. If one of the three digits
numbers is falsified during transmission,
i.e. the receiver receives, for example,
010 instead of 000, the receiver can
decide that the presence of at least two
zeros indicates that the intended information value was 0 and, correspondingly,
that at least two ones indicates the information 1.
If two of the numbers in a block are changed, the receiver can detect that an error
has occurred, but any attempt to correct
this would have the wrong result.
Example:
If the information 0 is encoded as 000
and is received as 101, the receiver
would assume that this should have been
111 and will then decode it, incorrectly,
as 1.
To sum up:
several programmes are transmitted by a
single transmitter in the form of digital
packets. Additional information is transmitted to permit complete correction of a
certain number of transmission errors.
Simultaneous broadcasting
network
For DVB-T, the programmes are not transmitted on a modulated carrier frequency;
instead, one channel with a width of 8
MHz contains 8,192 individual carrier
frequencies.
Some of the signals reaching the receiver
come directly from the transmitter, others
are signals which have been reflected
from obstacles in the vicinity and some
are even those transmitted by other transmitters. Normally, these signals reinforce
each other. In extreme cases, however, if
they are out of phase and have the same
amplitude, the signals can cancel each
other out:
99
Page 100

41. Basic differences between analog terrestrial
reception and DVB-T
Addition
Cancellation
In most cases, only a few of the 8,192
carrier frequencies will be fully cancelled
out and the information which is lost can
be reconstructed by the error-correction
function of the receiver. Reception becomes impossible only if very strong reflections cause the loss of too many carrier
frequencies.
The phase relationship between two signals depends on the path taken by these
signals on their way to the receiver.
If a rooftop antenna is used, almost all of
the signals reach the receiver by the same
path.
The signals may also have come from a
different transmitter.
In such cases, the reception quality
depends not only on the actual signal
strength, but also on how many carrier
frequencies are cancelled out.
Such problems can often be corrected by
adjusting the position and the alignment
of the antenna. In general, moving the
antenna a few centimetres to one side, or
tilting or turning the antenna, can improve reception far more than the use of an
additional antenna amplifier.
Simply moving the antenna a few
☞
centimetres to one side can often
cause the signals to be added
together instead of cancelling each
other out.
If an indoor antenna is used, the signals
reaching the receiver may have been
reflected from
- objects outside the building,
- objects such as thermally insulated
windows (coated with metal films),
- reinforced-concrete parts of the
building,
- persons in the vicinity or
- the furnishings of the room.
100
 Loading...