

Page 1
MECABLITZ 28 CS-2 digital
Bedienungsanleitung Mode d’emploi
Gebruiksaanwijzing Operating instruction
Manuale istruzioni Manual de instrucciones
Page 2

Foreword
Congratulations on purchasing our
flash 28 CS-2 digital and thank you for the confidence in our products.
The following pages give useful instructions for
proper operation of the flash unit and a survey of
all its sophisticated functions.
Please read these operating instructions carefully,
even if one or the other point may not appear to
be very insteresting at first sight. Although our designers have attached great importance to making
the operation of the flash unit as simple as possible, the cameras with which it will eventually be
ķ
used often offer a great diversity of capabilities.
Please also fold open the illustrated page at the
end of these instructions.
We wish you great pleasure with this new flash
unit.
86
Contents:
1. Safety instructions 88
2. Preparations 89
2.1 Power supply 89
2.2 Loading and replacing the batteries 89
2.3 Mounting / Removing the flash unit 90
2.4 Switching the flash unit on and off 90
3. Flash coverage and reflector attachments 90
4. Slave mode 91
5. Switch on and shoot in EASY mode 91
6. Slave modes (SL) 93
6.1 Slave mode without preflash suppression 94
6.2 Slave mode with preflash suppression 95
6.3 Adapted slave mode 95
7. Settings for camera and flash unit 96
7.1 Cameras where operating mode, ISO
and aperture can be set 97
7.2 Cameras where operating mode, ISO
and aperture cannot be set 98
Page 3

8. Flash modes 99
8.1 Auto flash mode A 99
8.2 Manual flash mode M 100
8.3 Metz-Remote Flash Mode SL 100
8.4 EASY Mode 101
9. Flash parameters 102
9.1 Automatic f-stop 102
9.2 ISO speed 102
9.3 Reflector status 102
9.4 Flash exposure correction value EV 103
9.5 Manual partial light output 104
10. Displays 104
10.1 Flash readiness indication 104
10.2 Correct exposure confirmation 104
10.3 Maximum flash range indication 105
11. Special functions 106
11.1
Automatic switch-off function / AUTO-OFF
11.2 Meter-Feet changeover (m - ft) 106
106
11.3 Adapting the flash delay in slave mode
with preflash suppression 106
11.4 Re-establishing the flash unit settings 107
12. Troubleshooting, remedies and
after-sales service 108
13. Technical data 110
ķ
87
Page 4

1. Safety instructions
• The flash unit is intended and approved only for
photographical use.
• NEVER fire a flash from a very short distance
directly into the eyes of persons or animals. This
can cause damage to the retina and may even
lead to blindness.
• NEVER trigger a flash in the vicinity of flammable gases or liquids (petrol, solvents, etc.),
since this may cause EXPLOSIONS!
• NEVER shoot flash pictures of car or bus drivers,
cyclists or motorcyclists, or train drivers while the
vehicle is moving! This may dazzle the person
ķ
concerned and result in an accident.
• Only use the approved power sources specified
in these operating instructions.
• NEVER attempt to open or short-circuit batteries!
• NEVER expose batteries to excessive temperatures such as intensive sunlight or a fire!
• Remove exhausted batteries immediately from
the flash unit. Such batteries may leak, releasing
chemicals which can damage the flash unit.
88
• NEVER attempt to recharge dry batteries!
• Do not expose the flash unit to dripping or
splashing water.
• Do not expose your flash unit to high temperatures and humidity. Do not keep it in the glove
compartment of your car.
• Do not touch the diffuser after firing several
flashes at short intervals. Danger of burns!
• When taking flash shots at full light output and
in rapid succession observe an interval of at
least 3 minutes after 20 flashes.
• NEVER place material that is impervious to light
in front of, or directly on the reflector. If this is
not observed, the high energy of the flash light
may cause burning or bleaching of the material
or may damage the reflector.
• NEVER dismantle the flash unit! DANGER: HIGH
VOLTAGE! Repairs must only be completed by
an authorised repair service.
• Do not touch the contacts of the flash unit.
Page 5

• The flash unit must not be used if the case has
been so badly damaged that internal components are exposed. Remove the batteries!
• Do not use defective batteries!
2. Preparations
2.1 Power supply
The flash unit can be operated with any of the following batteries:
• 2 alkaline-manganese dry-cell batteries, type
IEC LR03 (size AAA). Maintenance-free power
source for moderate power requirements.
• 2 nickel-metal-hydride batteries, type IEC HR03
(size AAA). They have a significantly higher capacity than NiCad batteries and are less harmful to the environment (no cadmium). They permit very fast recycling and are economical in
use because they are rechargeable.
• 2 NiCad batteries, type IEC KR03 (size AAA).
☞
The batteries are exhausted if the recycling
time exceeds 60 seconds when firing flashes
at full light output. Remove the batteries from
the flash unit if you are not going to use it for
an extended period of time.
2.2 Loading and replacing the batteries
• Turn off the flash unit by its main switch.
• Slide the battery compartment cover to the outside of the flash unit.
• Insert the batteries as indicated by the symbols
in the battery compartment.
☞
When loading the batteries ensure that their
+ and - poles are aligned with the symbols.
Transposed poles can destroy the flash unit.
Always exchange both batteries, replacing
them with identical batteries of the same
capacity from the same manufacturer! Do not
dispose of spent batteries in the domestic
waste bin. Spent batteries should be handed
in to an appropriate collecting point.
• Close the battery compartment cover and slide it
towards the unit’s foot.
89
ķ
Page 6

2.3 Mounting / Removing the flash unit
Turn off the flash by their main switch!
☞
Fold down the flash unit’s pivoted camera bracket.
Secure the flash unit to the camera with the threaded tripod screw.
To dismantle release the threaded tripod screw
and remove the flash unit from the camera. Push
the camera bracket forwards at the hinge and simultaneously fold upwards.
2.4 Switching the flash unit on and off
To switch on set the main switch to “ON”. To
switch off push the main switch down.
Automatic switch-off function / AUTO-OFF
ķ
To save battery power and prevent inadvertent
battery discharge the flash unit is factory-set to
switch over to standby mode (AUTO OFF) approx.
8 minutes after:
- switch-on,
- a setting procedure,
- firing a flash.
The flash readiness signal and the indications on
90
the LC display go out. After automatic switch-off
the last used settings are retained and instantly
available when the flash unit is switched on again.
The flash unit is reactivated merely by depression
of any key (wake-up function).
☞
The flash unit should always be turned off by
its main switch if it is not going to be used
for an extended period of time.
The automatic switch-off function can be deactivated whenever required (see Chapter 11.1).
3. Flash coverage and reflector
attachments
If there is no attachment in front of the reflector,
the flash unit provides full lighting coverage for
normal 24x36 mm shots with lenses as of 35 mm
focal length. If a wide-angle diffuser (identified
by W) is used the flash will cover the image angle
of a 24 mm lens. When positioning the telephoto
attachment (identified by T) in front of the reflector
the flash unit will fully illuminate shots taken with a
telephoto lens of 85 mm focal length and longer.
Page 7

☞
Please note that the effective range of the
flash light is diminished by using a wideangle diffuser, and increased with a telephoto attachment . For digital cameras take
into account that the focal lengths are given
for the 35 mm format (see operating instructions of the individual camera).
4. Slave mode
The slave mode is intended for cordless, delay-free
triggering of one or more slave flash units. The
slave is triggered by the light pulse from the flash
unit built into the camera.
Some digital cameras fire one or more measuring
preflashes a fraction of a second before flash exposure. Normally, these measuring preflashes cannot be deactivated on the camera because they do
influence, for example, the flash exposure. Moreover, a preflash function can be activated on many
cameras to diminish the “red eye effect”.
☞
The internal photo cell sensor of the slave
must be able to perfectly capture the light of
the camera’s flash unit reflected by the sub-
ject so that it can be triggered. The working
range of the assembly depends on the intensity of the light pulse from the camera-integrated flash, the reflective properties of the
subject and the prevailing ambient light.
Please note that the working range is diminished
outdoors and with bright ambient light. Avoid
exposing the sensor to direct sunlight!
5. Switch on and shoot in EASY mode
The EASY mode permits easy use of the slave flash
unit for flash photography. Auto aperture, ISO
speed rating, etc. do not have to be set on the flash
unit.
The EASY mode is a simplified automatic flash
mode intended for digital cameras without setting
capabilities, or the “Program P” and full auto
modes.
Prior to its first use, the slave has to be adapted to
the technology of the flash unit built into the camera to find out if the camera-integrated flash unit
works with or without preflashes.
91
ķ
Page 8
Adapting the slave flash unit
• Activate the camera’s internal flash unit. If necessary, switch on the camera’s red-eye reducing preflash function.
• Turn on the slave flash unit by the main switch
and wait for the flash readiness indicator to
light up.
• Keep the “Mode” key on the flash unit depressed for approx. 5 s until the symbols
flash in an ascending sequence on the LC display. All other indications on the LC display and
the flash readiness signal go out.
☞
ķ
To terminate briefly depress the “Mode” key.
• Take a picture of an appropriate subject (e.g.
wall or ceiling of a room) at a distance of 2 m to
3 m with the camera’s internal flash. With the
aid of this shot the 28 CS-2 establishes the number of preflashes fired by the camera-integrated
flash unit and automatically stores the data.
• The flash readiness indicator on the flash unit
briefly lights up again to confirm the completed
adaptation.
92
• The LC display indicates the symbol “SL ”
for adapted slave mode, “EASY” flash mode
and the maximum flash range (see Chapter
10.3).
• The slave flash unit is now ready for operation.
☞
Flash unit adaptation only has to be completed
once because the stored settings are retained,
even when the flash mode is changed, the
flash unit is switched off and the batteries are
replaced. Adaptation must be renewed when
the settings of the camera’s flash unit, the preflash mode (e.g. red-eye reducing preflash
ON / OFF) or the camera are changed.
☞
The flash mode of cameras working with an
automatically changing number of preflashes
(e.g. Nikon 3D and D-TTL), as well as the
Metz Remote Flash Mode, is not supported!
Test shots
Take some test shots with flash: The subject must
be within the maximum flash range indicated on
the LC display (see Chapter 10.3)! Assess the exposure results, e.g. on the camera monitor.
Page 9

Depress the “+” key on the flash unit for a positive
correction value when the flash shots are too dark,
and the “-” key for a negative correction value
when the flash shots are too bright. The correction
value can be adjusted from +10 to -10. The setting
becomes immediately effective and is automatically stored. The set correction value is taken over as
the new zero value (“0”) for the next flash shot.
Maximum flash range indication is adapted to the
given correction value.
☞
If the slave unit is not triggered repeat the
flash unit adaptation procedure and take
another test shot.
Tip:
Carefully read the next chapters of these Operating Instructions to be able to make full use of all
the capabilities of this flash unit.
6. Slave modes (SL)
Selection of the slave mode suitable for your camera depends on the properties and technology of
the camera-integrated flash. The important point is
to know whether the flash unit built into your camera works with or without measuring preflashes.
Selection of the slave mode determines whether
the slave is triggered immediately after the first
flash pulse from the camera’s flash unit, or whether one or more preflashes have to be suppressed
before the slave is triggered together with the camera’s main flash.
Select one of the three different slave modes by
repeated combined depression of the “MODE”
and pre-select keys. The selected slave mode
flashes on the LC display of the flash unit.
Establishing the slave mode suitable for your
camera
☞
It is not necessary to establish the suitable
slave mode if you know whether or not your
camera operates with preflash measuring
technology!
Often it is rather difficult to establish whether or not
a digital camera operates with preflash measuring
technology. Proceed in the following manner to select the slave mode that is suitable for your camera:
93
ķ
Page 10

• Activate the camera’s internal flash unit.
• Deactivate the red-eye reducing preflash function on the camera.
• Select on the slave unit the “M” flash mode with
P 1/1 full light output (see Chapter 8.2).
• Then select the slave mode without preflash suppression on the slave unit (see Chapter 6.1).
• Take a test shot in which the reflector of the slave
unit can be seen, for example in a mirror.
☞
NEVER look directly into the flash unit’s reflector
from a short distance as this could blind or injure your eyes!
• Assess the test shot, e.g. on the camera monitor.
ķ
• If the slave unit’s reflector is brilliantly illuminated
in the test shot, then you have set the right slave
mode for your camera.
• If the slave unit’s reflector is not bright or is dark
on the test shot, then select on the slave unit a
slave mode with preflash suppression (see Chapter 6.2) and take another test shot.
• If this still proves to be unsuccessful, then select
the adapted slave mode. This enables you to
94
adapt the slave automatically to your camera’s
flash function (see Chapter 6.3).
6.1 Slave mode without preflash
suppression SL
This slave mode is suitable for all cameras working
without measuring preflash technology. The slave is
triggered at the same time as the flash unit incorporated in the camera. The light output of the slave
is controlled by the selected flash mode (EASY, auto
flash mode A or manual flash mode M).
☞
If your camera has a red-eye reducing preflash
function, this function must be switched off!
Otherwise it may be accidentally activated by
flashes of other photographers working within
the same action radius as the slave flash unit .
Settings on the slave flash unit
Repeatedly depress the pre-select and “MODE”
keys simultaneously until the symbol SL flashes on
the LC display. The setting instantly becomes effective
and is automatically stored after 5 s.
Page 11

6.2 Slave mode with
preflash suppression SL
This slave mode is specifically intended for digital
cameras working with preflash technology. In this
mode, the slave flash unit is not triggered by the
measuring preflash but only by the main flash
from the camera’s internal flash unit at the moment
of exposure. The light output of the slave is controlled by way of the set flash mode (EASY, automatic A or manual M mode).
☞
The red-eye reducing preflash function must
not be activated on the camera! The slave
flash unit will only react to light pulses from
the controller within a specific time (fractions
of a second) , thus making it almost insensitive
to the flash light of other photographers that
are not working with preflash technology.
Settings on the slave flash unit
Repeatedly depress the pre-select and
“MODE” keys simultaneously until the symbol
SL flashes on the LC display. The setting instantly
becomes effective and is automatically stored after
5s.
☞
If necessary, you can modify the suppression
of the preflash and reset the time between
preflash and main flash for manual adaptation to your camera; see also Chapter 11.3.
6.3 Adapted slave mode SL
This slave mode permits individual adaptation of
the slave to the technology of the camera’s internal
flash unit. It permits one or more red-eye reducing
preflashes and one or more measuring preflashes
of the integrated flash unit to be taken into account. The slave is triggered at the same time as
the camera-internal flash unit firing the main flash
for exposure. The light output of the slave unit is
controlled by the selected flash mode (EASY, automatic A or manual M mode).
Adapting the flash unit
•
Activate the integrated flash unit. If necessary,
switch on the camera’s red-eye reducing preflash function.
• Turn on the flash unit by the main switch and wait
for the flash readiness indicator to light up.
95
ķ
Page 12

•
Set the required flash mode on the flash unit (A,
M or EASY).
•
Keep the “Mode” and pre-select keys of the
flash unit simultaneously depressed for approx.
5 s until the symbols start to flash in
an ascending sequence on the LC display. All
other data on the LC display, and the flash readiness indicator go out.
☞
Briefly depress the “Mode” key to terminate.
• Take a shot of an appropriate subject (e.g. wall
or ceiling of a room) at a distance of 2 m to 3 m
with the camera’s internal flash unit. On the basis
of this shot the 28 CS-2 establishes the number of
preflashes fired by the camera’s internal flash unit
ķ
and automatically stores the data.
•
The flash readiness indicator on the flash unit
lights up again and “o.k.” is indicated to confirm the completed adaptation.
•
The LC display indicates the symbol “SL ”
for the adapted slave mode, together with the
flash mode ( “A”, “M” or “EASY”) and the maximum flash range (see Chapter 10.3).
96
•
The slave flash unit is now ready for operation.
☞
Flash unit adaptation only has to be completed once because the stored settings are
retained, even when the mode is changed,
the flash unit is switched off and the batteries
are replaced. If necessary, adaptation can be
renewed when the settings of the camera’s
flash unit, the preflash technology (e.g. redeye reducing preflash ON/OFF) or the camera are changed.
☞
The flash mode of cameras working with an
automatically changing number of preflashes
(e.g. Nikon 3D and D-TTL), as well as the
Metz Remote Flash Mode, is not supported!
7. Settings for camera and flash unit
The slave unit can be operated together with your
camera’s internal flash unit after the appropriate
slave mode has been established or set.
Page 13

7.1 Cameras where operating mode, ISO
and aperture can be set
Camera setting
Set on the camera the ISO speed rating. If possible
avoid the AUTO-ISO setting!
Set the camera’s operating mode to aperture priority A or Av or manual M (see the operating instructions for the given camera). Select the appropriate aperture manually in the aperture priority
mode. The camera will then automatically set the
corresponding shutter speed. Both the aperture
and shutter speed are set manually on the camera
when in manual mode.
Activate the camera’s internal flash unit (see the
operating instructions for the given camera).
☞
Use a tripod for slower shutter speeds (e.g.
slower than 1/30 s) to avoid camera shake blur.
Flash unit setting
Auto flash mode A of the slave
Set the same values for auto aperture and ISO on
the slave as set on the camera (see chapter 9.1
and 9.2). Set the closest possible value where the
exact value cannot be set.
Shoot some test pictures.
Set a negative flash exposure correction value on
the flash unit when the shots are too bright, and a
positive one when the shots are too dark (see Chapter 9.4). Compare the exposure results to establish
the optimal setting for your camera.
When shooting pictures take into account the
maximum flash range indicated on the flash unit’s
LC display (see Chapter 10.3)!
☞
For cameras fitted with a zoom lens different
flash exposure correction values may be necessary for the wide-angle and telephoto-range!
Manual flash mode M of the flash unit
Set the same values for aperture and ISO on the
flash unit as set on the camera. Set the closest possible value where the exact value cannot be set.
By selecting the full light output P 1/1 or a partial
light output (see Chapter 9.5), you can determine
the necessary camera-to-subject distance with the
97
ķ
Page 14

aid of the maximum flash range indicated on the
LC display (see Chapter 10.3).
EASY MODE of the flash unit
☞
Select the operating mode Program P or full
auto mode on the camera!
Please refer to Chapter 5 for the setting of the
EASY MODE.
7.2 Cameras where operating mode, ISO
and aperture cannot be set
Camera setting
Activate the camera’s internal flash unit (see the
operating instructions for the given camera).
ķ
Flash unit setting
Auto flash mode A of the flash unit
Set on the flash unit the value for the largest aper-
ture opening (smallest f-number) of the camera
lens and the camera’s ISO value (see Technical
Data for the given camera).
If this f-number and ISO value cannot be set on
the flash unit, then set the next closest value.
Take some test shots.
98
Set a negative flash correction value on the flash
unit when the shots are too bright, and a positive
one when the shots are too dark (see Chapter 9.4).
Compare the exposure results to establish the optimal setting for your camera.
When shooting pictures take into account the maximum flash range indicated on the flash unit’s LC
display (see Chapter 10.3)!
☞
For cameras fitted with a zoom lens different
flash exposure correction values may be
necessary for the wide-angle and telephotorange!
Manual flash mode M of the flash unit
Set on the flash unit the value for the largest aper-
ture opening (smallest f-number) of the camera
lens and the camera’s ISO value (see Technical
Data for the given camera).
If this f-number and ISO value of the camera cannot
be set on the flash unit, then set the next closest values.
By selecting the full light output P 1/1 or a partial
light output, the necessary camera-to-subject distance can be established by referring to the maxi-
Page 15

mum flash range indicated on the LC display (see
Chapter 10.3).
EASY
-MODE operation of the flash unit
Please refer to Chapter 5 for the setting of the
EASY MODE.
8. Flash modes
Depress the “MODE” key repeatedly to select between the different flash modes: Automatic “A”,
Manual “M”, Metz Remote Flash Mode “SL”
(SLave) and “EASY”. The selected flash mode will
flash on the LC display of the flash unit.
8.1 Auto flash mode A
In automatic flash mode the photo cell sensor of the
flash unit measures the light reflected by the subject. The flash unit interrupts light emission as soon
as the necessary amount of light for a correct exposure has been reached. This means that a new
aperture does not have to be calculated and set
when the distance is changed, provided that the
subject remains within the automatic flash range.
The sensor has a measuring angle of 25° and only
measures while the flash unit is emitting light. The
measurement takes into account the light of the
camera’s internal flash emitted at the same time as
the light from the slave flash.
☞
If the duration of the flash from the camera’s
internal flash unit exceeds that of the slave
(e.g. with close-ups), then this can result in
system-induced overexposure. For flash photography with digital cameras in slave mode it
has proved to be useful to set a flash exposure
correction value of approx -1 f-stop (-1 EV) for
the camera-integrated flash unit.
The correct exposure indicator will display “o.k.”
for approx. 3 seconds when the shot was correctly
exposed (see Chapter 10.2).
Setting procedure
Continue depressing the “MODE” key on the slave
until “A” flashes on the display. The setting instantly becomes effective and is automatically stored
after 5 s. Then set auto aperture, ISO and reflector
status as flash parameters (see Chapter 9).
☞
Avoid exposing the sensor to direct sunlight!
99
ķ
Page 16

8.2 Manual flash mode M
In this mode the flash unit emits an uncontrolled
flash at full light output (P 1/1) or partial light output (P 1/2, P 1/4, P 1/8 or P 1/16).
Adaptation to the photographic situation is achieved by selecting the corresponding aperture and
ISO setting on the camera and flash unit or by setting a partial light output (see Chapter 9.5). The
LC display will then indicate the flash-to-subject
distance to be maintained for a correct exposure
(see Chapter 10.3).
☞
For system-induced reasons the light emitted
simultaneously by the camera’s internal flash
ķ
unit is not taken into account. This may result
in overexposure if the camera’s flash light
dominates (e.g. with close-ups or small partial light output levels)!
Setting procedure
Continue depressing the “MODE” key on the slave
until “M” flashes on the display. The setting instantly
becomes effective and is automatically stored after
5 s. Then set aperture, ISO and reflector status as
flash parameters (see Chapter 9).
100
8.3 Metz-Remote Flash Mode SL
The Metz-Remote Flash Mode permits cordless remote triggering of one or more off-camera slaves
by a special on-camera master flash unit (controller). The slaves are controlled by the flash light from
the master flash unit. The on-camera “master” (controller) must be able to support the cordless Metz
Remote System (only with mecablitz 40 MZ-...,
50 MZ-5, 54 MZ-..., 70 MZ-...) and be switched to
the corresponding operating mode (see the operating instructions for the controller). The light output is
controlled by the camera (Metz-TTL-Remote Flash
Mode) or by a photo cell sensor in the master flash
unit (Metz Automatic Remote Flash Mode).
Setting procedure
Continue depressing the “MODE” key on the slave
until “SL” flashes on the display. Additionally, “Ad1”
is displayed to indicate the remote channel. The setting becomes instantly effective and is automatically
stored after 5 s. The flash parameters do not have to
be set on the slave.
☞
The slave flash unit only supports the Remote
Channel 1 (the LC display indicates”Ad1”).
Page 17

There is no maximum flash range indication
nor correct exposure confirmation given in
the Metz Remote Flash Mode.
Testing the cordless Metz-Remote Flash Mode
prior to exposure:
• Position the slave and controller (master flash
unit) as required for the intended shot.
• Wait for flash readiness of controller and slave
(flash ready indicator lights up).
• Depress the manual firing button on the control-
ler and fire a test flash.
• The slave responds with a briefly delayed flash
to indicate that it is ready for operation. When
several slave units are being used then all slaves
will acknowledge flash readiness simultaneously.
• If a slave does not respond with a time-delayed
flash, then this means that the unit’s sensor did
not receive the controller’s light pulse. Change
the slave’s position in such a manner that its sensor can capture the light pulse from the controller and repeat the test.
• The slave flash unit is ready for use after the test
has been successfully completed.
☞
Bright ambient light and/or a large aperture
opening can result in the slave’s sensor receiving only an incomplete light pulse because the electronic circuit of the controller
interrupts light emission prematurely. In this
case stop down the lens aperture or mount a
neutral density filter on the lens.
The slave will only react to a light pulse from the
controller. Flash units from other photographers
working within the same area will not trigger the
slave unit.
The slave will not indicate flash readiness and maximum flash range in the cordless Metz Remote
Flash Mode. Only the controller’s display is relevant for exposure indication.
8.4 EASY Mode
Please refer to EASY Mode flash in Chapter 5.
101
ķ
Page 18

9. Flash parameters
For correct performance of the flash unit in the auto
flash mode A and manual flash mode M it will be necessary to adapt the different flash parameters (f-stop,
ISO speed, diffuser) manually to the settings on the
camera. The adjusted flash parameters are retained
after the flash unit has been switched off and after the
flash mode has been changed.
☞
The flash parameter settings can only be
changed in automatic flash mode A and
manual flash mode M. Maximum flash range
indication is automatically adapted to the
adjusted flash parameters.
ķ
9.1 Automatic f-stop
Continue depressing the pre-select key on the
flash unit until “F” and the f-stop flash on the display. While the display is flashing depress the “+”
or “-” key to adapt the f-stop on the slave unit to
the camera’s aperture setting. F-stops of f/1.4 to
f/16 can be set in whole aperture increments. The
setting becomes instantly effective and is automatically stored after 5 s.
102
9.2 ISO speed
Continue depressing the pre-select key on the
flash unit until “ISO” and the ISO value flash on the
display. While the display is flashing depress the
“+” or “-” key to adapt the ISO value on the flash
unit to the camera’s ISO speed. ISO speeds from
50 to 3200 can be set. The setting becomes instantly effective and is automatically stored after 5 s.
9.3 Reflector status
☞
The reflector status cannot be set when in
EASY Mode and in “SL” Metz-Remote Mode.
To obtain correct indication of the maximum flash
range and distance on the LC display, it is necessary to set the reflector status on the flash unit. This
parameter indicates whether the flash unit is used
without an attachment in front of the reflector, or
with a wide-angle diffuser or telephoto attachment.
Use of the wide-angle diffuser (“WIDE”)
When using the 24 mm wide-angle diffuser
(2.5 mm height) in front of the reflector, continue
depressing the pre-select key until “WIDE or
Page 19

“TELE” flash on the LC display. Then press the “-”
key to set “WIDE”.
Use of the telephoto attachment (“TELE”)
When using the 85 mm telephoto attachment
(7 mm height) in front of the reflector, continue depressing the pre-select key until “TELE” and /
or “WIDE” flash on the LC display. Then press the
“+” key to set “TELE”.
W
orking without an attachment
When using the flash unit without an attachment
continue depressing the pre-select key until
“TELE” and / or “WIDE” flash on the LC display.
Then press the “-” and “+” keys until “TELE” and
“WIDE” are simultaneously displayed.
The setting becomes instantly effective and is automatically stored after 5 s. The display then indicates either “WIDE” or “TELE” depending on the
setting. “WIDE” and “TELE” are no longer displayed after storage if no reflector attachment is used.
Please refer to the instructions in Chapter 3.
9.4 Flash exposure correction value EV
In various exposure situations it may be necessary
to specifically influence the flash intensity of the
slave flash unit, i.e. increase or decrease the intensity. A corresponding flash exposure correction
value can be set on the flash unit for this purpose.
☞
A flash exposure correction value can only
be set in the auto flash mode A!
Continue depressing the pre-select key on the
flash unit until “EV” and the correction value flash on
the display. While the displays are flashing set the
desired correction value between -3 and +3 EV- in
one-third increments. The setting becomes instantly
effective and is automatically stored after 5 s. After
storage the LC display shows again the f-stop in place
of the correction value and “EV” flashes to indicate
that an exposure correction value has been set.
To delete the correction value, set the correction
value “0.0” on the flash unit. “EV” ceases to be
displayed after automatic storage.
ķ
103
Page 20

9.5 Manual partial light output
☞
Manual partial light output can only be set in
manual flash mode M.
Continue depressing the pre-select key of the
flash unit until “P 1/” and the partial light output
value flash on the display. While these data are
flashing use the “+” or “-” key to set the required
partial light output on the flash unit. Partial light
output values of P 1/1 (maximum light output) to
P 1/16 (minimum manual partial light output) can
be set. The setting becomes instantly effective and
is automatically stored after 5 s.
After storage the LC display indicates again the f-stop
instead of the partial light output.
ķ
10. Displays
10.1 Flash readiness indication
The flash readiness indicator on the slave flash
unit lights up when the flash capacitor is fully
charged to confirm that the slave is ready for
firing. The slave will not be triggered if a shot is
taken before the flash ready signal is lit.
104
When flash readiness is established a test flash
can be fired with the “TEST” button. In the auto
flash mode A and the manual flash mode M, this
test flash is based on the adjusted flash parameters. In the Metz-Remote Flash Mode, the test flash
has a low light output level. In the “EASY” mode a
controlled test flash is fired, in conformity with the
settings made.
10.2 Correct exposure confirmation
The “o.k.” correct exposure indicator lights up for
approx. 3 s when the shot was correctly exposed
in the auto flash mode A or EASY mode. When in
auto flash mode A this depends on the set flash
parameters (see Chapter 9), and in the EASY
mode on the selected light control.
This enables you, for example in the automatic
flash mode, to establish a suitable aperture by
manually triggering a test flash.
Fire a test flash with the manual firing button . If
the “o.k.” correct exposure indicator does not light
up then set the next smaller f- number, or reduce
the distance to the subject, and repeat the test flash.
Page 21

☞
For the test flash, set up the slave unit (with
incorporated sensor) in the same manner as
for the subsequent shot.
10.3 Maximum flash range indication
The maximum flash range is indicated on the LC
display of the flash unit when in automatic A, manual M or EASY mode. For correct indication in
automatic A and manual M mode it is necessary
to manually adapt the flash parameters - aperture,
ISO and reflector status - to the corresponding camera settings when a wide-angle diffuser or telephoto attachment is being used or when working
without an attachment (see Chapter 9).
☞
The maximum flash range indication can be
either in meters (m) or feet (ft) (see Chapter
11.2).
Maximum flash range indication in the auto flash
mode A and EASY MODE
The LC display of the flash unit indicates the maximum flash range. The indicated value relates to a
factor of 25% of light reflection by the subject,
which applies to most photographic situations.
Pronounced deviations from this reflection factor,
e.g. highly reflective or poorly reflecting objects,
can influence the maximum flash range of the
flash unit.
When shooting pictures, be sure to observe the
maximum flash range indicated on the flash unit’s
LC display. The subject should be within approx.
40% to 70% of the indicated value to give the electronic system sufficient leeway for compensation.
The minimum flash-to-subject distance should not
be less than 10% of the indicated value to avoid
overexposure. Adaptation to the given photographic situation is possible by changing the aperture
setting.
Maximum flash range indication in the manual
flash mode M
The LC display of the flash unit indicates the distance to be maintained for correct flash exposure
of the subject. Adaptation to the given photographic situation is achieved by changing the aperture setting and selecting between full light output
and partial light output levels “P 1/1 to P 1/16”
(see Chapter 9.5).
105
ķ
Page 22

Exceeding the display range
The LC display of the flash unit can indicate a ma-
ximum range of 199 m or 199 ft. The display
range of feet (ft) may be exceeded in the event of
high ISO values and large aperture openings. This
is signalized by the flashing of “199ft”.
11. Special functions
11.1 Automatic switch-off function
AUTO-OFF
The flash unit features a function to automatically
switch-off if not used for 8 minutes.
Deactivating AUTO-OFF
ķ
• Turn off the flash unit by its main switch.
• Keep the “MODE” key depressed.
• Turn on the flash unit by its main switch.
• Release the “MODE” key; “8m OFF” will briefly
appear on the LC display.
Activating AUTO-OFF
• Turn off the flash unit by its main switch.
• Keep the “MODE” key depressed.
106
• Turn on the flash unit by its main switch.
• Release the “MODE” key; “8m ON” will briefly
appear on the LC display.
11.2 Meter-Feet changeover (m - ft)
Proceed in the following manner to change between m / ft:
• Turn off the flash unit by its main switch.
• Keep the pre-select key depressed.
• Turn on the flash unit by its main switch.
• Release the pre-select key.
The display changes from “m” to “ft” or from “ft”
to “m”. The selected unit of measurement is retained after the flash has been switched off or the
batteries have been exchanged.
11.3 Adapting the flash delay in slave
mode with preflash suppression
The flash unit is factory-set to a delay period of
45 milliseconds (ms) between measuring preflash and
main flash. This means that the flash unit will only be
triggered if the time between the first measuring pre-
Page 23

flash and the main flash is longer than 45 ms. This setting applies to most digital cameras. Digital cameras
with different flash parameter settings usually offer the
possibility to adapt the flash delay time. This may require the testing of several different settings.
With some digital cameras the time between the
measuring preflash and the main flash is shorter
than 45 ms. To ensure that the slave flash unit can
also be used with such cameras, the flash delay time
has to be shortened. Other digital cameras operate
with two clearly differing preflashes. The flash delay
time of such cameras has to be lengthened.
Setting procedure to adapt flash delay
• Turn off the flash unit by its main switch.
• Simultaneously keep the “MODE” and preselect key depressed.
• Turn on the flash unit by its main switch. The
symbol flashes on the LC display and the
adjusted flash delay time is indicated in ms.
• The flash delay time can be reduced or lengthened with the “-” and “+” keys. The setting
range covers 5 ms to 255 ms.
• Depress the pre-select key to terminate the
setting.
Test the slave mode with the changed setting. If the
flash unit is not triggered at the desired time, then
set a different flash delay time.
☞
Please consult the technical support service of
the camera manufacturer if you have any
questions concerning the flash technology of
your camera.
11.4 Re-establishing the flash unit settings
• Turn on the flash unit by its main switch.
• Keep the pre-select key depressed for approx. 10 s.
The following settings are made:
• AUTO-OFF is turned on.
• The slave operating modes are returned to the
factory setting.
• The maximum flash range indication is adjusted
to “m” for meters.
• The correction values and partial light output settings
of the “EASY”, “A” and “M” flash modes are deleted.
107
ķ
Page 24

12. Troubleshooting, remedies and
after-sales service
Forming the flash capacitor
For technical reasons it is necessary to switch on the
flash unit for approx. 10 minutes every 3 months (the
capacitor incorporated in the flash unit undergoes a
physical change if the flash unit is not switched on for
prolonged periods).
The batteries must supply sufficient power for flash
readiness to be indicated within 1 minute after the
unit was switched on.
Please observe the following before contacting the
after-sales service:
ķ
Problem:
The slave flash unit does not fire a flash.
Question:
Is the flash readiness indicator illuminated?
• No:
- Has the flash unit been switched on?
- Has the flash unit automatically switched itself
off?
108
- Are the batteries correctly poled?
- Are the batteries fully charged?
• Yes:
- Has the camera’s internal flash been activated?
- Does the flash unit’s sensor receive the light pulse
from the camera’s internal flash unit (controller)?
Change the location or diminish the ambient
light. Reduce the flash-to-subject distance.
- Has the slave mode suitable for your camera
been selected?
Select the appropriate slave mode and adapt the
flash unit automatically to your camera.
- Have you selected the Metz Remote Mode SL?
Switch to “EASY”, “A” or “M” flash mode.
Problem:
All shots are underexposed.
Question:
Is the slave flash unit triggered at the correct time
(main flash)?
• No:
- Deactivate the red-eye reducing preflash function!
Page 25

- The slave mode set on the slave flash unit is not
suitable for your camera. Select a different slave
mode!
• Yes:
- Check the flash parameters set on the slave flash
unit!
Adapt the unit’s flash parameters to the camera
settings!
Set a positive correction value.
Problem:
All shots are overexposed.
Check the flash parameters set on the slave flash
unit!
Adapt the unit’s flash parameters to the camera
settings!
Set a negative correction value.
Unsuccessful troubleshooting
Turn off the flash unit by the main switch, wait for
a brief moment and then switch the unit on again.
If, in spite of all hints, the flash unit still does not
work, then please consult your local authorized
dealer.
ķ
109
Page 26

13. Technical data
Guide number at ISO 100 / 21°:
28 (with telephoto attachment , 7 mm height)
22 (without attachment)
16 (with wide-angle diffuser , 2.5 mm height)
Flash modes:
EASY, Automatic A, Manual M, Metz-Remote SL
Slave modes:
Without preflash suppression
With preflash suppression
Adapted slave mode
Automatic aper
f1.4 / f2 / f2.8 / f4 / f5.6 / f8 / f11 / f16
Manual light output settings:
P 1/1, P 1/2, P 1/4, P 1/8, P 1/16
Light sensitivity:
ISO 50 ... ISO 3200
Colour temperature:
Flash duration:
110ķ168
tures:
approx. 5600 K
1/300s ... 1/45000s
Recycling times with full-power flash:
With alkaline manganese batteries approx. 8s
With NiCad batteries approx. 6s
With NiMH batteries approx. 6s
Number of flashes with full light output:
With alkali-manganese batteries > 100
With NiCad batteries (250 mAh) > 35
With NiMH batteries (700 mAh) > 100
Light coverage:
Focal length
As of 24 mm with wide-angle diffuser
(horizontal 75°, vertical ca. 55°).
As of 35 mm without attachment
(horizontal approx. 56°, vertical approx. 40°).
As of 85 mm with telephoto attachment
(horizontal apporx. 25°, vertical approx. 18°).
W
eight: approx. 140g (without batteries)
Dimenions (w x h x d): 75.5 mm x 83 mm x 32.5 mm
Included:
Flash with telescopic bracket, attachments,
Operating Instructions
rectangular
in keeping with 35 mm format
Page 27
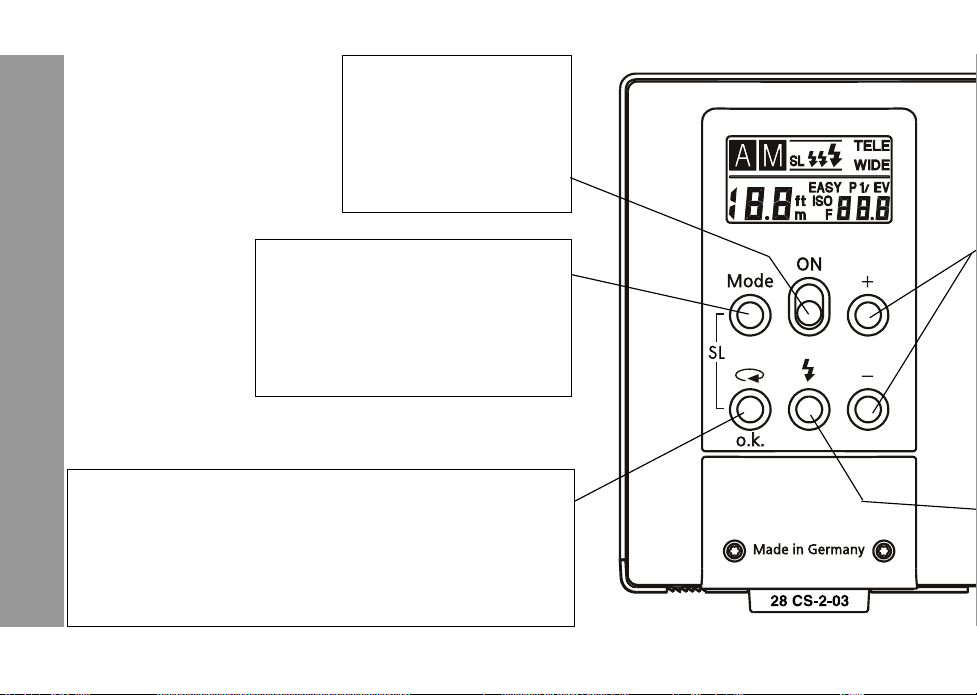
Hauptschalter
Ķ
ĸ
Betriebsartenwahl
ń
ķ
Vorwahltaste und Belichtung o.k.
ƴ
Présélection des fonctions et Exposition o.k.
Voorkeuzetoets Belichting o.k.-aanduiding
Preselector and exposure ok indicator
į
Tasto di preselezione e indicazione di corretta esposizione
Preselector del ajuste o indicación de exposición o.k.
Sélecteur de mode
Functieschakelaar
Mode selector
Selettore del modo di funzionamento
Selección de modos de funcionamiento
Interupteur général
Hoofdschakelaar
Main switch
Interruttore principale
Interruptor principal
Page 28

Tasten für Wertverstellung
Touches pour le réglage de la valeur
Toetsen voor instellen van waarden
Buttons for value adjustment
Pulanti per la regolazione del valori
Teclas para ajuste de valores
Handauslösetaste und
Blitzbereitschaftsanzeige
Bouton d’essai et témoin de recyclage
Ontspanknop voor handbediening en
flitsaparaat-aanduiding
Manual firing button and flash-ready
indicator
Pulsante test (emissione manuale del
lampo) e indicazione di “pronto lampo”
Tecla de disparo manual e indicación
de disposición de disparo
Ķ
ĸ
ń
ķ
ƴ
į
169
Page 29

Ķ
Standfuß, Pied, standvoet,
Foot, Base d‘appoggio, Pie
ĸ
ń
ķ
ƴ
į
schwenkbare Kameraschiene
Barrette pivotable
zwenkbare camerabeugel
Pivoted camera bracket
Staffa della camera
Regleta giratoria para la cámara
Kamera- und Stativschraube
Vis pour appareil photo et trépied
camera- en statiefmoer
Camera and tripod screw
Vite camera e stativo
Tornillo para cámara y trípode
Standfuß, Pied, standvoet,
Foot, Base d‘appoggio, Pie
170
Page 30

Fotosensor
Senseur
Fotosensor
Sensor
Sensore Foto
Nicht abdecken!
Ne pas masquer !
Niet afdeken
Do not cover!
Non coprire!
No cubrir!
Ķ
ĸ
ń
ķ
Sensor für drahtlosen Blitzbetrieb
Cellule pour le mode flash sans fil
Sensor voor draadloos flitsen
Sensor for cordless flash control
Sensore per il controlo flash distanza
Sensor para el funcionamiento sin cable
ƴ
į
171
Page 31

Ķ
ĸ
Batteriefachdeckel
Couvercle du compartiment des piles
Deksel batterijvak
Battery compartment lid
Coperchio del vano batteria
Tapa del compartimento de pilas
ń
ķ
ƴ
į
Servicebuchse - für den Fachhändler
Connecteur S:A:V: - pour le revendeur
Servicebus - voorde vakman
Service socket - for service-technician
Presa di servizio - per il revenditore specializzato
Toma para servicio - Para el distribuidor
172
Page 32

173
Page 33

Metz-Werke GmbH & Co KG
Postfach 1267 • D-90506 Zirndorf
Telefon (0911) 9706-0 • Telefax (0911) 9706-340
Internet: http://www.metz.de
E-Mail: info@metz.de
Änderungen und Irrtümer vorbehalten !
Sous réserve de modifications et d’erreus !
Onder voorbehoudvan wijzigingen
en vergissingen !
Errors excepted. Subject to changes!
Riserva di modifiche e disponibilità
di fornitura.
Con reserva de modificaciones y posibili-
dades de entrega.
mecablitz 28 CS-2 digital
für Digitalkameras mit eingebautem Blitzgerät
for digital cameras with internal flash unit
Metz. Always first class.
Art.-Nr. 002822008
Ķĸńķƴį
703 45 0165.A1
 Loading...