

Installation and operating instructions
MAI
This oven is a pre-production prototype model
intended for use in field trials only, it must not be sold
MENUKEY2
IMPORTANT INFORMATION
READ BEFORE USE
PLEASE SAVE THESE INSTRUCTIONS
Users are cautioned that maintenance and repairs should be performed by a Merrychef authorized service agent using
genuine Merrychef replacement parts. Merrychef will have no obligation with respect to any product that has been
improperly installed, adjusted, operated or not maintained in accordance with national and local codes or installation
instructions provided with the product, or any product that has its serial number defaced, obliterated or removed, or which
has been modified or repaired using unauthorized parts or by unauthorized service agents. For a list of authorized service
agents, please refer to the inside back page of this booklet. The information contained herein ( including design and parts
specifications ) may be superseded and is subject to change without notice.
1

PRECAUTIONS TO AVOID POSSIBLE EXPOSURE
a) Do not attempt to operate this oven with the
b) Do not place any object between the oven front
TO EXCESSIVE MICROWAVE ENERGY
door open since open-door operation can result
in harmful exposure to microwave energy. It is
important not to defeat or tamper with the
safety interlocks.
face and the door or allow soil or cleaner
residue to accumalate on sealing surfaces.
Safety instructions ............................................. 3
Installation instructions ...................................... 6
Introduction .......................................................8
Main features ................................................9-10
c) Do not operate the oven if it is damaged.
It is particularly important that the oven
door close properly and that there is no
damage to the (1) door ( bent )
(2) hinges and latches ( broken or
loosened ) (3) door seals and sealing
surfaces.
d) The oven should not be adjusted or
repaired by anyone except properly
qualified service personnel
Using the oven for the first time ....................... 11
Operating instructions: Manual mode ..............12
Operating instructions: Program mode ......13-17
MenuKey: Changing oven programs................18
Daily cleaning .............................................19-20
Technical specification..................................... 21
Merrychef USA
2227 Welbilt Boulevard
New Port Richey
FL 34655
Phone: 1-(727) 375-1944
Fax: 1-(727) 569-1574
e-mail: info@merrychefusa.com
PLEASE READ THE FOLLOWING
SAFETY INSTRUCTIONS CAREFULLY
2

IMPORTANT SAFETY INSTRUCTIONS
When using electrical appliances basic safety precautions should be followed, including the following:
WARNING To reduce the risk of burns, electric shock,
fire, injury to persons, or exposure to excessive
microwave energy:
1. Read all instructions before using the appliance.
2. Read and follow the specific “PRECAUTIONS TO
AVOID POSSIBLE EXPOSURE TO EXCESSIVE
MICROWAVE ENERGY” FOUND ON
PAGE 2.
3. This appliance must be grounded. Connect only to
a properly grounded outlet.
See “GROUNDING INSTRUCTIONS” found on page 4.
4. Install or locate this appliance only in accordance
with the provided installation instructions
5. Some products such as whole eggs and sealed
containers — for example, closed jars — may explode and should not be heated in this oven.
6. Use this appliance only for its intended use as
described in the manual. Do not use corrosive
chemicals or vapors in this appliance. This type of
oven is specifically designed to heat, cook or dry
food. It is not designed for industrial or laboratory use.
7. This appliance should not be used by children.
8. Do not operate this appliance if it has a damaged
cord or plug, if it is not working properly, or if it has
been damaged or dropped.
9. This appliance should be serviced only by qualified
service personnel. Contact the nearest authorized
service facility for examination, repair or adjustment.
10 Do not cover or block any openings on the appliance including air vents/filters and steam outlet.
11 Do not store this appliance outdoors. Do not use
this product near water —– for example, near a
kitchen sink, in a wet basement, or near a swimming
pool, and the like.
12. Do not immerse the cord or plug in water.
13. Keep the cord away from heated surfaces.
14. Do not let cord hang over edge of table or counter.
15. Either:
16. To reduce risk of fire in the cavity:
i)When cleaning surfaces of door and oven that
comes together on closing the door, use only
mild non-abrasive soaps, or detergents applied
with a sponge or soft cloth.
ii)When separate cleaning instructions are
provided, see door surface cleaning instructions
on page 19 & 20.
i) Do not overcook food. Carefully attend
appliance if paper, plastic or other
combustible materials are placed inside the
oven to facilitate cooking.
ii) Remove wire twist-ties from paper or plastic
bags before placing bag in oven.
iii) If materials inside the oven should ignite, keep
oven door closed, turn oven off, and disconnect
the power cord , or shut off power at the fuse or
circuit breaker panel.
iv) Do not use the cavity for storage purposes. Do
not leave paper products, cooking utensils or
food in the cavity when not in use.
17. DO NOT operate using microwave only or
combination function without food or liquid inside the
oven as this may result in overheating and may cause
damage.
18. NEVER remove the exterior of the oven.
19. NEVER remove any fixed internal parts of the
oven.
20. NEVER tamper with the control panel, door, seals,
or any other part oven.
21. DO NOT obstruct air vents/filters or steam outlet.
22. NEVER hang dish towels or cloths on any part of
the oven.
23. If the door seals are damaged, the oven must be
repaired by an approved Service Agent.
24. If the power cable is damaged in any way it MUST
be replaced by an approved Service Agent.
25. When handling hot liquids, foods, and containers,
care should be taken to avoid scalds and burns.
26. When heating liquids using microwave only or
combination function, the contents should be stirred
prior to heating to avoid eruptive boiling.
27. Feeding bottles and baby food jars should be
opened when heating, the contents stirred or shaken
and the temperature checked prior to consumption to
avoid burns.
28. Never use the oven to heat alcohol, e.g. brandy,
rum etc. Also, food containing alcohol can more easily
catch fire if overheated.
29. Never attempt to deep fry in the oven.
SAVE THESE INSTRUCTIONS
3

ELECTRICAL INSTALLATION
For all cord connected appliances:
GROUNDING INSTRUCTIONS
This appliance must be grounded. In the event of an electrical short circuit, grounding reduces the risk of
electric shock by providing an escape wire for the electric current. This appliance is equipped with a cord
having a grounding wire with a grounding plug. The plug must be plugged into an outlet that is properly
installed and grounded.
WARNING — Improper use of the grounding can result in the risk of electric shock.
Consult a qualified electrician or Serviceman if the grounding instructions are not completely understood or
if doubt exists as to whether the appliance is properly grounded.
Do not use an extension cord. If the power supply cord is too short, have a qualified electrician or
serviceman install an outlet near the appliance.
For a permanently connected appliance:
GROUNDING INSTRUCTIONS
This appliance must be connected to a grounded, metallic, permanent wiring system, or an equipment
grounding conductor should be run with the circuit conductors and connected to the equipment grounding
terminal or lead on the appliance.
In case of Radio or Television Interference
This equipment generates and uses radio frequency energy and if not
installed and operated correctly, in strict accordance with the manufacturer’s
instructions, may cause harmful interference to authorized radio
communication services.
It has been type tested and found to comply with the limits for Part 18.307
conducted emissions for non-consumer equipment and Part 18.305 radiated
emissions, which are designed to provide reasonable protection against
such interference. However, there is no guarantee that interference will not
occur in a particular installation. If this equipment does cause interference to
radio or television reception, which can be determined by turning the
equipment off and on, the user is encouraged to try and correct the
interference by one or more of the following measures:
1) Re-orientate the receiving antenna.
2) Relocate the microwave with respect to the receiver.
3) Plug the microwave into a different outlet so that the receiver and
microwave are on different branch circuits.
If necessary the user should consult the dealer or an experienced radio/
television technician for additional suggestions.
Note: Modifications should only be carried out by the manufacturer or
authorized representative to ensure continuing conformance.
4

PRECAUTIONS TO BE OBSERVED
1. Read this manual before using your oven.
2. As with all electrical appliances, it is wise to have the electrical connections
inspected periodically.
3. The oven interior and door seals should be cleaned frequently, following the
instructions described in the CLEANING section.
4. There is no need to switch off your oven after each function but remember to switch
off at the end of the day or period of operation.
5. Microwave energy should not be used to dry linen or warm plates.
6. As with any cooking appliance, care should be taken to avoid combustion of the
items within the oven.
If smoke is observed:
Switch off
Isolate from the electrical supply
Keep the door closed to stifle any flames
7. Ensure food is placed in the centre of the oven cavity for best results.
8. When using the microwave only function, cover the food to prevent splashing the
walls of the cavity.
9. Food in combustible plastic or paper containers should only be used in microwave
only function and checked frequently to avoid the possibility of ignition.
10. Items should be unwrapped when using convection and combination functions.
11. Eggs and whole hard-boiled eggs should not be heated using the microwave or
combination function as they may explode.
12. Food with a skin, e.g. potatoes, apples, sausages, etc. should be pierced before
heating.
13. Food should not be heated in a completely sealed container as the build-up of
steam may cause it to explode.
14. Excess fat should be removed during ‘roasting’ and before lifting heavy containers
from the oven.
15. In the event of glass breaking or shattering within the oven, ensure that food is
totally free of glass particles. If in doubt, dispose of any food that was in the oven at
the time of the breakage.
5
INSTALLATION
Remove packing material and protective film from the oven.
Included inside your oven:
Check for obvious signs of transit damage.
If necessary, inform the freight company IMMEDIATELY.
LOCATION AND POSITIONING
Choose a site away from major heat sources.
DO NOT position so that hot air is drawn in from fryers, grills,
griddles, etc.
A heat barrier to the height of the oven must be installed if sited next
to a burner, stove or range.
Note:
The air intake is located
under each side of the oven,
even with the clearance
specified below it is
important that airflow is as
cool as possible and not preheated by other appliances
such as fryers, grills and
griddles as this will
deteriorate the life and
performance of the oven.
WARNING:
Check that the
AIR FILTERS are in place
prior to operation
( see Main Features )
Place the oven on a flat surface that is LEVEL, STRONG and
STABLE.
Allow a minimum clearance of 2 inches (50mm) to the rear, top and
each side to allow air to circulate freely.
The air intake is located under each side of the oven, even with the
clearance specified above, it is important that airflow is as cool as
possible and not pre-heated by other appliances such as fryers, grills
or griddles.
Allow a minimum of 2 inches (50mm) clearance above the oven for
hot air to escape.
Allow sufficient clearance, 12 inches (305mm) in front of the oven for
the door to open fully
Do not affix labels/stickers to oven other than those applied by the
manufacturer
6
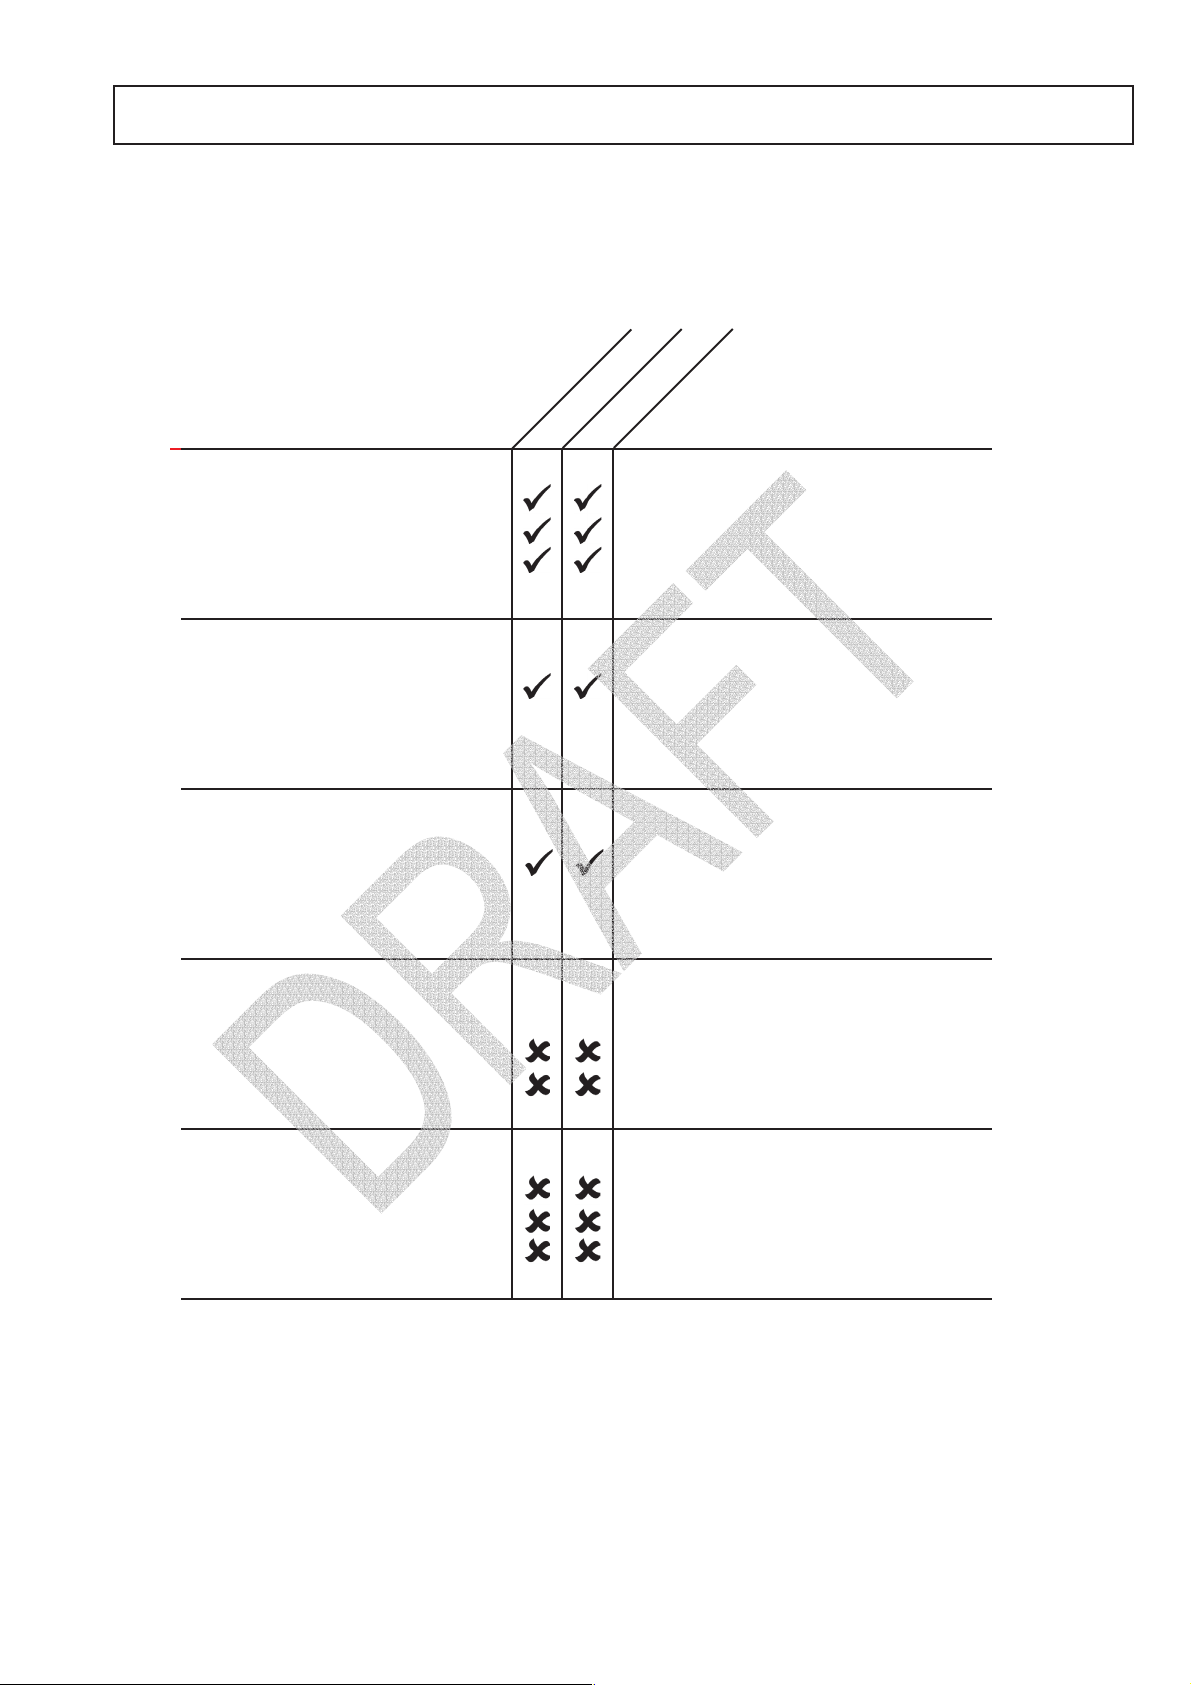
SUIT ABLE COOKING UTENSILS
Manufacturer’s instructions should be checked to determine the suitability of individual
containers or utensils using each of the cooking functions.
DO NOT place metal trays or containers on the BOTTOM of the oven as arcing may occur .
The following chart provides general guidelines:
combination
convection only
Heat resistant containers
T oughened glass
Vitreous ceramics
Earthenware
(porcelain, crockery, china etc.)
Metallic & Foil Trays
Metallic trays (on oven runners)
DO NOT USE ANY OTHER
MET AL OR FOIL CONT AINERS
Plastic containers
Rigid, boilable, plastic
containers
Disposables
DO NOT USE
Combustibles
Microwave-suitable cling film
(paper, card, etc)
Do not use items with metallic
decoration.
Metallic trays may only be used
when placed on the vitreous rack in
the oven cavity ( See note )
Dual-ovenable plastic containers
(up to certain temperatures) are now
available.
Check manufacturer’s instructions
before use
DO NOT USE disposable
packaging or metal foil containers
Other utensils
Tie tags
Cutlery
Temperature probes
IMPORTANT
The oven will accomodate ¼ size bun/sheet pans. Metal sheet pans may be used when
placed on the special vitreous enamel shelf rails ONL Y , either in ‘Convection only’ mode or
’Microwave/Convection’ mode.
No kitchen utensil should be left in
food while it is cooking
7

INTRODUCTION
This oven offers operators the flexibility of combination cooking with additional control over
fan speed and microwave power.
Combination cooking enables high quality results to be achieved in a fraction of the time
taken by conventional cooking, particularly when baking, browning, roasting, grilling or
producing gratinee dishes.
Once established, precise instructions for combination or convection cooking of selected
items may be programmed into the ovens memory so that they can be repeated easily and
accurately. Up to 100 programs can be stored and simply recalled by pressing a two digit
number ( 00- 99 ).
Multi-Stage Programming
The oven controls offer even greater flexibility by allowing multi-stage programming. This
enables the exact conditions required for quality results to be set according to the food type.
Programs can have up to 4 stages each with its own time, fan speed and microwave power
settings.
A simple 2-stage program is shown:
With the oven set to pre-heat at 500°F.
St age 1 The cooking stage begins by applying a gentle fan speed of 20% for 1 minute.
St age 2 The fan speed is increased to 80% for 30seconds to brown the food.
This is only one example of an infinite number of possible multi-stage programs that can be
created and stored.
The instructions outlined in this guide are intended to ensure the safety and long life of your Merrychef oven.
8

MAIN FEATURES
7
6
12
11
1
8
2
Rear view
3
4
5
9 10
1
AIR OUTLETS
These vents on the rear panels enable air which
has been used to cool internal components to
escape. It will not allow microwave energy to
escape into the environment. They must be kept
free from obstruction.
2
OVEN CAVITY
The cavity is constructed from stainless steel and
vitreous enamelled panels. It must be kept clean
(see CLEANING).
CONVECTION FAN and GREASE FIL TER
3
The fan draws air over the heating elements and
into the cavity over the edges of the rear grease
filter, producing perfect heat distribution for combination cooking. The metal grease filtergrill covering
the fan must be kept clean and free of debris (See
CLEANING)
AIR INLET FILTERS (LEFT & RIGHT)
4
Situated at the left and right hand side of the base at
the front. These are part of the ventilation system
and must be kept free of obstruction and cleaned
on a daily basis.
DOOR HANDLE
5
This is a rigid bar which is pulled downwards and
towards you to open.
6
CONTROL P ANEL
See page 10.
ON/OFF SWITCH
7
When switched ON, the control panel will illuminate.
The fan and ventilation system will also operate.
RA TING PLATE
8
Found on the rear panel, this states the serial
number, model type & electrical specifications.
DOOR
9
This is a precision-made energy barrier with three
microwave safety interlocks. It must be kept clean
(see CLEANING section). The door should NOT be
used to support heavy dishes.
DOOR SEALS
10
These ensure a tight seal around the door. They
should be kept clean and checked regularly for
signs of damage. At the first sign of wear they
should be replaced by a Merrychef approved Service
Agent.
STEAM VENT (on rear of oven)
11
This enables steam to escape and prevents build
up of condensation. It will not allow microwave
energy to escape.
MenuKey 2
12
Changes the programs on the oven.
9

CONTROL PANEL
PREHEAT P AD DISPLAY PANEL MenuKeY
ENTER
POWER PADS
The microwave power can be increased or decreased
adjusted in 10% steps. ( 0% to 100% )
The default setting is 50% microwave power.
FAN SPEED P ADS
The Fan speed can be increased and decreased in 5%
steps ( 10% to 100% )
TIME/ PROGRAM PADS
These pads are used for setting the cooking time in 1
second steps to a maximum of 30 minutes.
They are also used for storing and recalling programs
from 00-99
MenuKey
The MenuKey System automatically changes all the
cooking programs with an electronic key and allows
program names to be identified
FAN SPEED
PADS
ST ART P AD
SOCKET
POWER PADS
CANCEL P AD
Cancels all timed cooking cycles, pre-programmed
operations and stops the microwave energy. It does not
alter the oven temperature. If the oven is hot, food will
continue to cook and should be removed from the oven
immediately. This pad will also cancel any incorrect
operations. It will not erase programs.
PROGRAM
Activates program mode for storing programs in
memory
MAIN DISPLA Y P ANEL
Shows the principal functions of the oven.
When cooking, the time remaining counts down.
Also displays error messages and oven temperature.
(See PROBLEM SOLVING)
When storing and recalling a program the display
indicates the program number and details
ERROR DISPLA Y
See PROBLEM SOLVING.
FUNCTION P ADTIME/PROGRAM PADSPROGRAM
CANCEL PAD
10

USING THE OVEN FOR THE FIRST TIME
The MAI oven has a constant operating temperature for cooking.
When the PREHEA T pad is pressed the oven heats up to this temperature before
cooking can commence, this set initially at 480
T o change the PREHEA T temperature within range 212°F to 525°F:
Switch oven OFF
1
2
Press and hold PREHEA T pad and switch
the oven on
The oven serial no. information will appear,
continue to hold the PREHEA T button
until enter preheat temp is shown in the
display .
The current oven Preheat temperature is
displayed.
°F.
Serial No.
Model No.
Software
MK serial No.
ENTER PREHEAT TEMP
480°F
SAVE
3
T o enter a new Preheat temperature press
the number pads to overwrite the existing
setting.
Press the SA VE function key to save the
new setting.
for example enter 3,8,0 for 380
The oven returns to standby mode.
4
°F
SAVE
St art up sequence and oven specification
When the oven is switched on the Merrychef logo is displayed followed by
information about the oven:
Serial No.
Model No.
Software
MenuKey serial No.
The oven then displays the cold standby screen.
ENTER PREHEAT TEMP
380°F
SAVE
OVEN COLD
PRESS PREHEAT
Serial No.
Model No.
Software
MK serial No.
OVEN OFF
PRESS PREHEAT
11

OPERA TING INSTRUCTIONS: MANUAL MODE
The oven can be operated in manual or
programmed mode. It is important to
understand manual mode prior to
attempting program operation.
Switch the oven on
1
The Merrychef Logo and Oven data display
briefly followed by OVEN OFF standby .
Press PREHEA T PAD to heat the oven up to its
2
pre-set temperature this will take approximately
20 minutes.
The display will show the current oven cavity
temperature.
The display will show READY TO COOK when
cooking temperature is reached.
DO NOT APPL Y MICROW A VE ENERGY WHEN OVEN IS EMPTY
T o familiarize yourself with the controls place a heatproof bowl
containing approximately 2.5 pints of water in the oven.
WARNING:
DO NOT USE THE OVEN WITHOUT
CLEAN AIR FIL TERS IN POSITION
OVEN OFF
PRESS PREHEAT
READY
TO COOK AT 480
MANUAL
°F
RUN PROG
T o enter cook menu press manual function pad
3
T o enter the cooking TIME
Enter a time using the number pads
e.g. 2 minutes 35 seconds
T o change F AN SPEED
Increase or decrease the fan speed
( in 5% steps) using the up/down arrows
e.g press down arrow 3 times, 35%
T o change MICROW A VE POWER
Increase or decrease Microwave power
(in 10% steps) using the up/down arrows
e.g. press up arrow twice, 70%
T aking all the necessary precautions to
4
ensure you do not burn yourself, place the
food into the hot oven cavity and close the
door.
MANUAL
00.00
FAN: 50%
POWER: 50%
02.35
FAN: 50%
POWER: 50%
02.35
FAN: 35%
POWER: 50%
02.35
FAN: 35%
POWER: 70%
Press Start Pad to begin cooking
Always keep the period that the door is open
to a minimum.
The timer will now count down.
5
When the remaining time reaches
zero an audible signal will be given.
Open the door and remove the food
from the cavity .
COOKING
COMPLETE
12

AUDIBLE WARNING
At the end of every timed cycle an audible warning will
sound.
The audible warning stops when the door is opened.
On closing the door after interrupting the cycle the audible
warning sounds as a reminder to press ST ART
(see P AUSE FACILITY).
The audible warning can be stopped by touching the cancel
pad but it is important to remember that food in the oven will
continue to brown until removed.
P AUSE FACILITY
A cooking cycle may be interrupted by opening the door.
This facility is useful when stirring, repositioning or if temperature
readings are required during a heating cycle
On opening the door the timer will be held at this point and the
display shows door open.
TO CONTINUE
T o continue the cycle or program close the door
an audible warning sounds as a reminder to
press the ST ART PAD to restart the timer.
Hints and Tips for improved operation
• Care should be taken when defrosting in a hot oven.
For best results, defrost first thing in the morning when the oven is
still cold.
• Combination and convection only cooking may be carried out on a
rising temperature but extra attention must be given to timings.
• Convection only cooking can be carried out without setting a time.
• Microwave heating may be introduced part-way through a manually
set convection only cycle.
However, we strongly recommend that only the most experienced
microwave operator uses this facility as the microwave energy will
then be on a time set for convection cooking.
Cooking may be interrupted by opening the door. Close the door and
touch the start button to continue.
13

PROGRAMMING NUMBER P ADS 1
Pre-programming allows repetitive cooking procedures to be stored for ease of
use.
Each program can comprise up to four stages, allowing at each, independent
control of St age time, Microwave power level and Fan speed. However, programs
must be used with caution, since if the food to cook varies in weight or density ,
adequately cooked food may not be achieved. Therefore, it is vital that all food
prepared for service should be checked to ensure that core temperatures have
been achieved.
Some experimentation
will be required to
determine the correct
program for a particular
product.
From a hot oven in standby
READY
TO COOK AT 480°F
MANUAL
1
Press the PROGRAM P AD
the display shows program mode.
Enter a two digit number for the program from 00
2
to 99 using the NUMBER P ADS.
The display shows that no program is currently
stored
Press NEXT to move to the next stage.
3
Enter the cooking temperature by
pressing the NUMBER P ADS.
If a program is already in the memory the
temperature for this program will be displayed.
RUN PROG
e.g. 32
e.g. 380°F
From a cold oven in standby
OVEN OFF
PRESS PREHEAT
PROGRAM NUMBER _ _
PROGRAM NUMBER 32
NO PROGRAM AVAILABLE
BACK
ENTER PREHEAT TEMP
380°F
BACK
NEXT
NEXT
Press next to move to the next stage
Enter the cooking information for ST AGE 1
4
of the program:
If a program is already in the memory the cook
data for this program will be displayed
T o enter TIME
Enter a time using the number pads
e.g. 2 minutes 35 seconds
T o change F AN SPEED
Increase or decrease the fan speed
( in 5% steps) using the up/down arrows
e.g press down arrow 3 times, 35%
T o change MICROW A VE POWER
Increase or decrease Microwave power
(in 10% steps) using the up/down arrows
e.g. press up arrow twice, 70%
14
STAGE 1
TIME FAN POWER
00.00 50% 50%
BACK
STAGE 1
TIME FAN POWER
02.35 35% 70%
BACK
NEXT
NEXT

PROGRAMMING NUMBER P ADS 2
Press NEXT to move to the next stage.
Repeat step 4 for Program Stage 2, st age
5
3 and stage 4 as required.
T o skip a stage press NEXT.
On completing stage 4, to review the
6
program stages press the BACK function
button.
Press the NEXT function key .
7
Enter a Program Name (Optional)
STAGE 2
back
TIME FAN POWER
02.35 35% 70%
BACK
STAGE 4
TIME FAN POWER
02.35 35% 70%
BACK
STAGE 4
Time Power Fan
02.35 70% 35%
STAGE 3
back
Time Power Fan
02.35 70% 35%
NEXT
NEXT
NEXTt
NEXT
The Program name may be up to
a maximum of 20 characters in total
including spacesl.
SELECTING A CHARACTER
To scroll left through the character list
use FAN SPEED UP ARROW
:01234567 8 9_ ABCDEFG
Character list
Program name
PROGRAM 32
23456789_ A BCDEFGHIJ
- - - - - - - - - - - - - - - - - - -
ACCEPT
SAVE
T o scroll right through the character
list use POWER UP ARROW
GHIJKLMNO P QRSTUVWXY
T o select the flashing character
from the list
press the ACCEPT function pad
ACCEPT
PROGRAM 32
GHIJKLMNO P QRSTUVWXY
P - - - - - - - - - - - - - - - - - -
SAVE
15

PROGRAMMING NUMBER P ADS 3
TO EDIT THE PROGRAM NAME
Use the POWER DOWN ARROW to
move one space forward in the
program name.
Use the UP ARROWS to select a new
character from the list .
T o delete a character select
space from the list using the UP
ARROWS.
-- 7689 ABCD --
Select the new character by
pressing the ACCEPT function pad
space
PROGRAM 32
23456789_ A BCDEFGHIJ
IZZA 10” - - - - - - - - - -
ACCEPT
PROGRAM 32
“01234567 8 9ABCDEFGH
PIZZA ” - - - - - - - - - - -
ACCEPT
PROGRAM 32
“01234567 8 9ABCDEFGH
PIZZA 8” - - - - - - - - - - -
ACCEPT
SAVE
SAVE
SAVE
To backspace use the FAN SPEED
DOWN ARROW
example: Program 32, PIZZA 8”
When the name is correct press the
SAVE function key.
T o save the program to memory press the
8
SA VE function button.
The display confirms that the program has
been saved.
PROGRAM 32
23456789_ A BCDEFGHIJ
PIZZA 8” - - - - - - - - - - -
ACCEPT
SAVE
BACK
SAVE
PROGRAM 32
PIZZA 8”
SAVE
PROGRAM
SAVED
16

RUNNING A PROGRAM
Using number pad keys to run a program
Programs 00 to 99 can be recalled using the number pad keys.
The following procedure should be used to activate these programs.
Switch the oven on
1
Press Preheat Pad to heat the oven up to its pre-set
2
temperature this will take approximately 20 minutes.
The dispaly will show the current oven cavity
temperature
The display will show READY TO COOK when
cooking temperature is reached
3
T o enter cook menu press memory Hot key
Press the number pad key you wish to activate (00-99)
The program number and total cooking time appear on
the display .
example: Program 08
RUN PROG
OVEN COLD
Press Preheat
READY
TO COOK AT 480
MANUAL
RUN PROGRAM___
RUN PROGRAM 08
°F
RUN PROG
T aking all the necessary precautions to
4
ensure you do not burn yourself, place the
food into the hot oven cavity and close the
door.
Press Start Pad to begin cooking
Always keep the period that the door is open
to a minimum.
The program will now operate with the
total remaining time displayed counting
down on the display
(all stage time added together).
When the time reaches “00:00” the
display shows cooking completed and
audible signal will be given.
Remove the food from the oven and close the door.
Note:
When the cycle is interrupted or
stopped the oven will remain at
the pre-set temperature and the
food inside the oven will
continue to cook
02.35
PROGRAM NAME
example: 2minutes 35seconds
COOKING
COMPLETED
Programs can be halted and cancelled at
any time by pressing the CANCEL key.
17

MenuKey : CHANGING OVEN MENU PROGRAMS
The MenuKey System automatically changes all the cooking programs
with the turn of a key .
To change the menus on the oven:
1
Ensure the power switch is off.
Lift the MenuKey cover in the top
2
front panel of the oven and put
the key in the slot.
With the key still in place switch
3
the power switch on.
The oven will now go through the
program download sequence by
displaying the following:
The MenuKey Code.
The number of programs and
each program number on the
key.
MENUKEY2
example:
Key 02
example:
27 programs
The programs then count down
to 00.
When the display shows 00:00,
remove the MenuKey and close
the cover. The oven is now ready
to use with the new programs.
Ensure that the MenuKey is removed once the oven has been
programed.
T o confirm the download is successful
Switch off the oven.
Switch on and the display briefly will show the following:
1. Serial No., Model no. Software & MenuKey serial No.
2. The standby display
Serial No.
Model No.
Software
MK serial No.
OVEN COLD
PRESS PREHEAT
hold
18

CLEANING: 1
For the oven to operate at peak efficiency, the cavity, door and air filters must be kept clean.
A daily cleaning routine will ensure that you comply with the required hygiene standards and will help to
maintain and prolong the efficiency of your oven.
Follow the SAFETY INSTRUCTIONS at the beginning of this manual.
• ALW AYS switch off at the electrical supply and
allow oven to cool for at least 20 minutes before
cleaning
• Allow the oven and accessories to cool before
commencing cleaning
• As required wipe out spillages with disposable
paper wipes
• NEVER use steel wool, knives or harsh abrasives
on any part of the oven
As with all electrical appliances, it is wise to have the
electrical connections inspected periodically.
Cleaning the air filters
1. Remove the air filters from each side of the oven by
sliding the filter out from the front.
2. Wash in clean, warm soapy water , rinse and p at dry.
Slide back into position through slots.
DO NOT USE THE OVEN WITHOUT
CLEAN AIR FIL TERS IN POSITION
Hot surface
Hazard
Faults arising from neglect or
misuse including use without clean
filters in place are not covered by
the guarantee. Service visits as a
result of such faults will be
chargeable.
Cleaning the control panel and exterior surfaces
Wipe down regularly with a damp cloth.
19
DO NOT USE THE OVEN WITHOUT
CLEAN AIR FIL TERS IN POSITION

CLEANING: 2
• ALWAYS switch off at the electrical supply and allow oven to cool for at least
20 minutes before cleaning
• CAUTION: Allow the oven and accessories to cool before commencing cleaning
• CAUTION: Wear protective rubber gloves when cleaning the oven
Cleaning the oven cavity and door
1. Remove the oven rack and lift out
the bottom impinger plate from
between the retaining pins on each
side. T o remove the top impinger
plate undo the two thumb screws
and ease the plate forwards and
down.
T o remove the grease filter at the
back of the cavity undo the six
thumb screws and lift out
Wash in warm soapy water . Wash
off using a clean cloth and plenty of
clean, warm water.
Dry using a fresh, clean cloth.
topimpinger plate
rack
bottom
plate
Remove the rack and lift
out bottom impinger plate
Hot surface
hazard
fasteners
top
plate
rack
bottom
impinger
plate
Locating slot
DO NOT SPRAY OVEN CLEANER INTO
THE BACK OF THE CAVITY
2. Apply non-caustic oven cleaner to interior surfaces except door
seals. Leave for the recommended time. Wash off using a clean cloth
and plenty of clean, warm water. Dry using a fresh, clean cloth.
Wipe hinges with a clean, damp cloth.
DO NOT apply lubricating oil.
3. Wipe door seals carefully with a clean damp cloth.
Examine for signs of wear or damage.
grease
filter
Merrychef recommends the
use of approved Merrychef
Oven Cleaner and Merrychef
Oven Protector.
If the door seals are
damaged, the oven must be
repaired by an approved
Servicer.
20

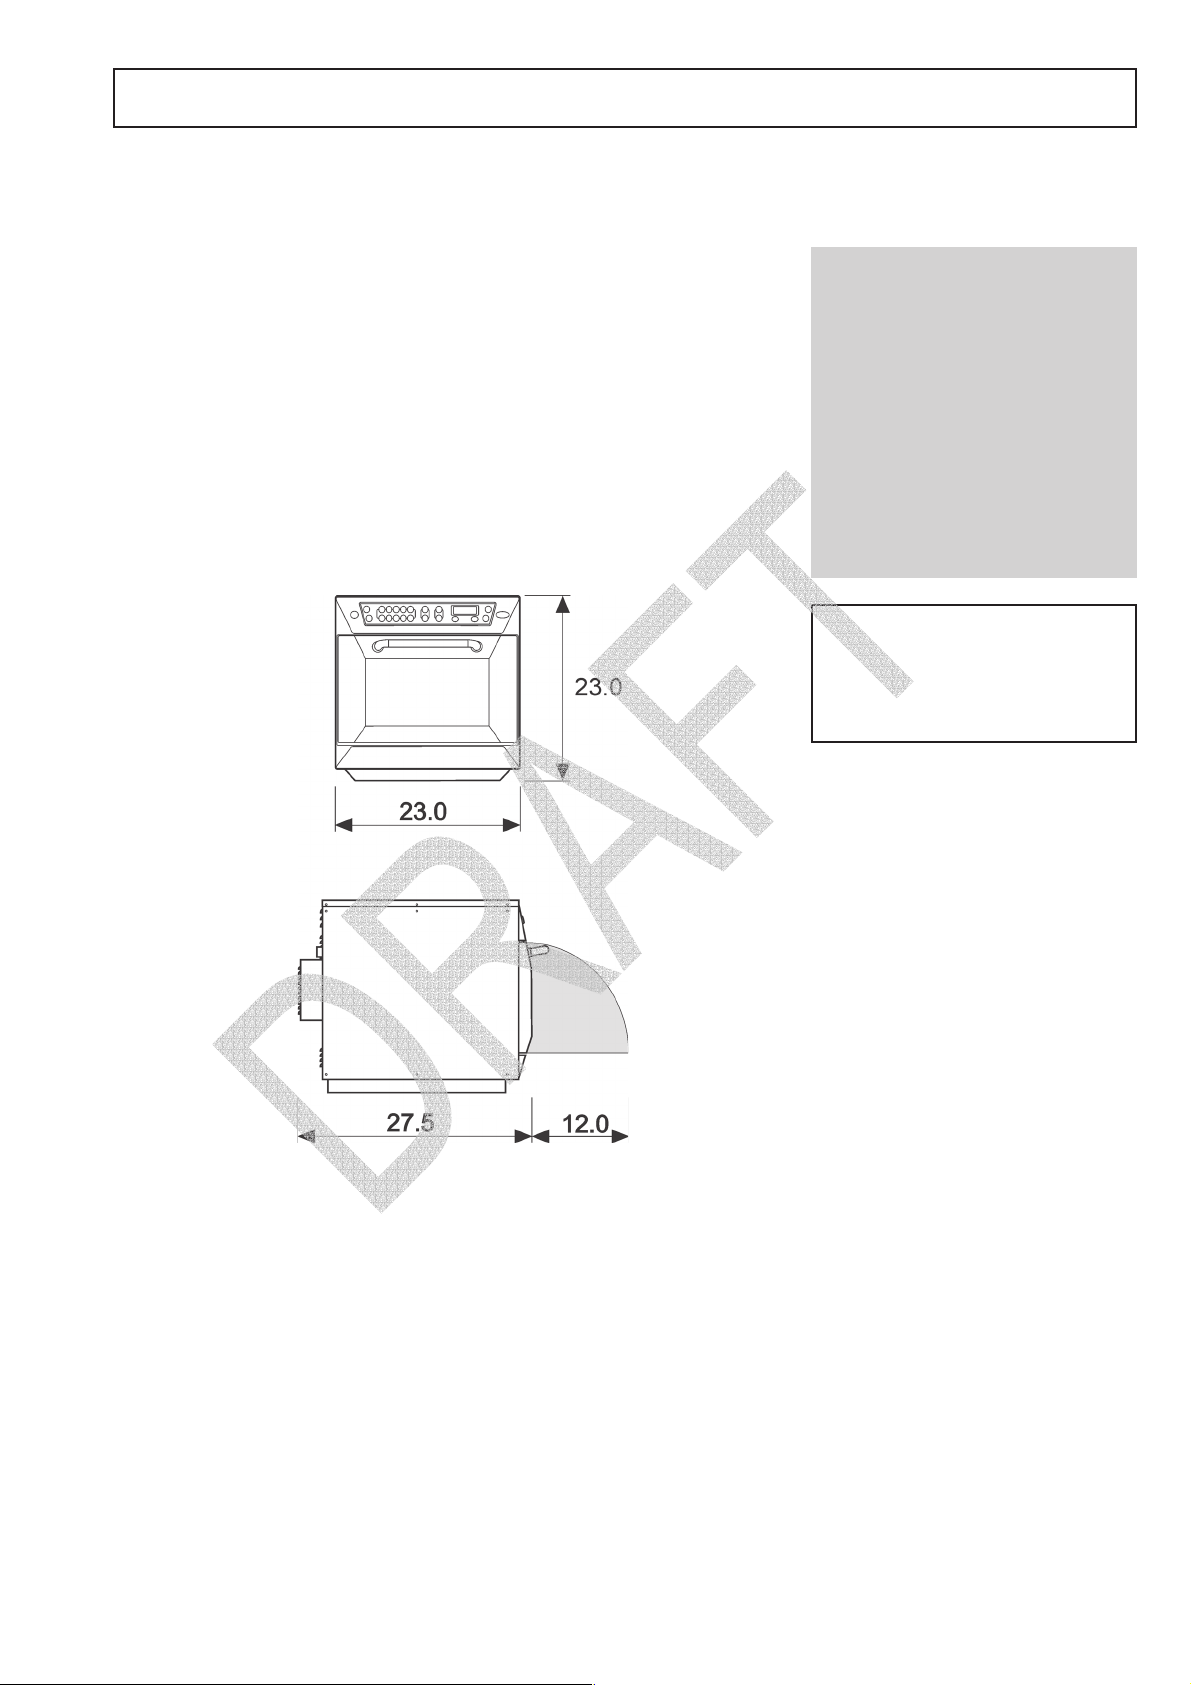
TECHNICAL SPECIFICATIONS
Height
Merrychef MAI
External Dimensions
Power supply ( See Product Rating Label )
( inches )
Width
( inches )
23.023.0 27.5
( inches )
Depth
Wt.
Power output
( lb.s)
187
Microwave
( watts )
1500 3250
Convection
Power output
( watts )
Approved Service Agent
Merrychef and Menukey are registered trademarks of Merrychef Ltd.
21
Pt No. 32Z3497 Issue 02a
 Loading...