

Page 1

www.resourcedm.com
PR0018
PR0018-PHI
Mercury Switch User Guide
UK OFFICE
Resource Data Management Ltd
80 Johnstone Avenue,
Hillington Industrial Estate,
Glasgow, Scotland, G52 4NZ, UK
+44(0)141 810 2828
sales@resourcedm.com
US OFFICE
Resource Data Management Inc
100 North Sixth Street,
Suite 820C,
Minneapolis, MN 55403, USA
Tel +1 612 354 2923
Fax +1 612 208 0922
usasales@resourcedm.com
Resource Data Management
Page 2

Revision 2.2 Page 2 of 14
www.resourcedm.com
Mercury Switch User Guide
Warning
Ensure that all power is
switched off before
installing or maintaining
this product
Table of Contents:
THE MERCURY SWITCH ................................................................................................................................... 3
Description ......................................................................................................................................................... 3
Front View .......................................................................................................................................................... 3
Rear View ............................................................................................................................................................ 3
Top View ............................................................................................................................................................. 3
Connection to Mercury Controllers: ................................................................................................................ 4
RS232 Lead Lengths ....................................................................................................................................... 4
Connection to other IP equipment ................................................................................................................... 4
Connection to another Mercury Hub/Switch or Other Ethernet Hub/switch ............................................... 4
Connection to a Data Manager/Director .......................................................................................................... 4
10/100 Base T connectors ................................................................................................................................ 4
Network ID .......................................................................................................................................................... 4
ID for equipment with rotary switches. ........................................................................................................... 4
PR0018-PHI USER GUIDE ................................................................................................................................. 5
Front Panel Features (PR0445) ........................................................................................................................ 5
Setup via Display ............................................................................................................................................... 5
Recommended set-up method ......................................................................................................................... 6
Set/View Type .................................................................................................................................................. 6
Set/View Parameters (This can also be achieved at the network front end) ................................................... 6
ID ...................................................................................................................................................................... 6
Network Configuration ..................................................................................................................................... 6
IP-L (Local IP Address) ................................................................................................................................ 7
IP-r (IP Address issued by the DHCP server) .............................................................................................. 7
Parameters ......................................................................................................................................................... 8
Parameters Description ................................................................................................................................... 9
Input/Output table ............................................................................................................................................ 10
EEV Control Operation .................................................................................................................................... 10
On board 4-20mA Suction Pressure Input Control Application ..................................................................... 10
Remote Suction Pressure Application ........................................................................................................... 10
To disable local transducer ............................................................................................................................ 10
Mercury Switch Type ....................................................................................................................................... 11
Transducer Connection .................................................................................................................................. 11
MOP – Maximum Operating Pressure ........................................................................................................... 11
Humidity Control Operation ........................................................................................................................... 12
GP Timer Set-up ............................................................................................................................................ 12
Trim Heater Control via Mercury Case Controller Range ............................................................................ 12
Network Alarms ............................................................................................................................................... 13
Setup via Webpages ........................................................................................................................................ 13
SPECIFICATION ............................................................................................................................................... 14
Mounting ........................................................................................................................................................... 14
RS232 Cable Lengths ...................................................................................................................................... 14
Ethernet Cable lengths ................................................................................................................................... 14
Disclaimer ......................................................................................................................................................... 14
REVISION HISTORY......................................................................................................................................... 14
Page 3
Revision 2.2 Page 3 of 14
www.resourcedm.com
Mercury Switch User Guide
Warning
Ensure that all power is
switched off before
installing or maintaining
this product
The Mercury Switch
From Resource Data Management
Description
The Mercury Switch (PR0018) is a device that allows up to 10 RDM Mercury controllers to be connected to an IP network, without the
need for individual IP Futura modules. There are 10 RS232 connections for linking to 10 Mercury controllers. There are 3 standard
Ethernet Switch (10/100baseT) connections for other network devices. The Ethernet ports are self configuring for uplinks and standard
10/100 Base T device connections.
As well as the Switch function there is the option for Island EEV control. This control can be achieved by using a transducer connected to
the Mercury Switch 4-20mA input or from a remote Suction pressure reading sent across an IP network from a Mercury Plant Pack
controller. Island trim heater control can also be achieved through the display port using a humidity temperature display (PR0445). To
utilise either of these features then the PR0018-PHI build option would be required.
Software version 2.2 and higher has the capability for CO2 Load shedding.
See RDM Data Manager User Guides for more information on CO2 Load Shedding
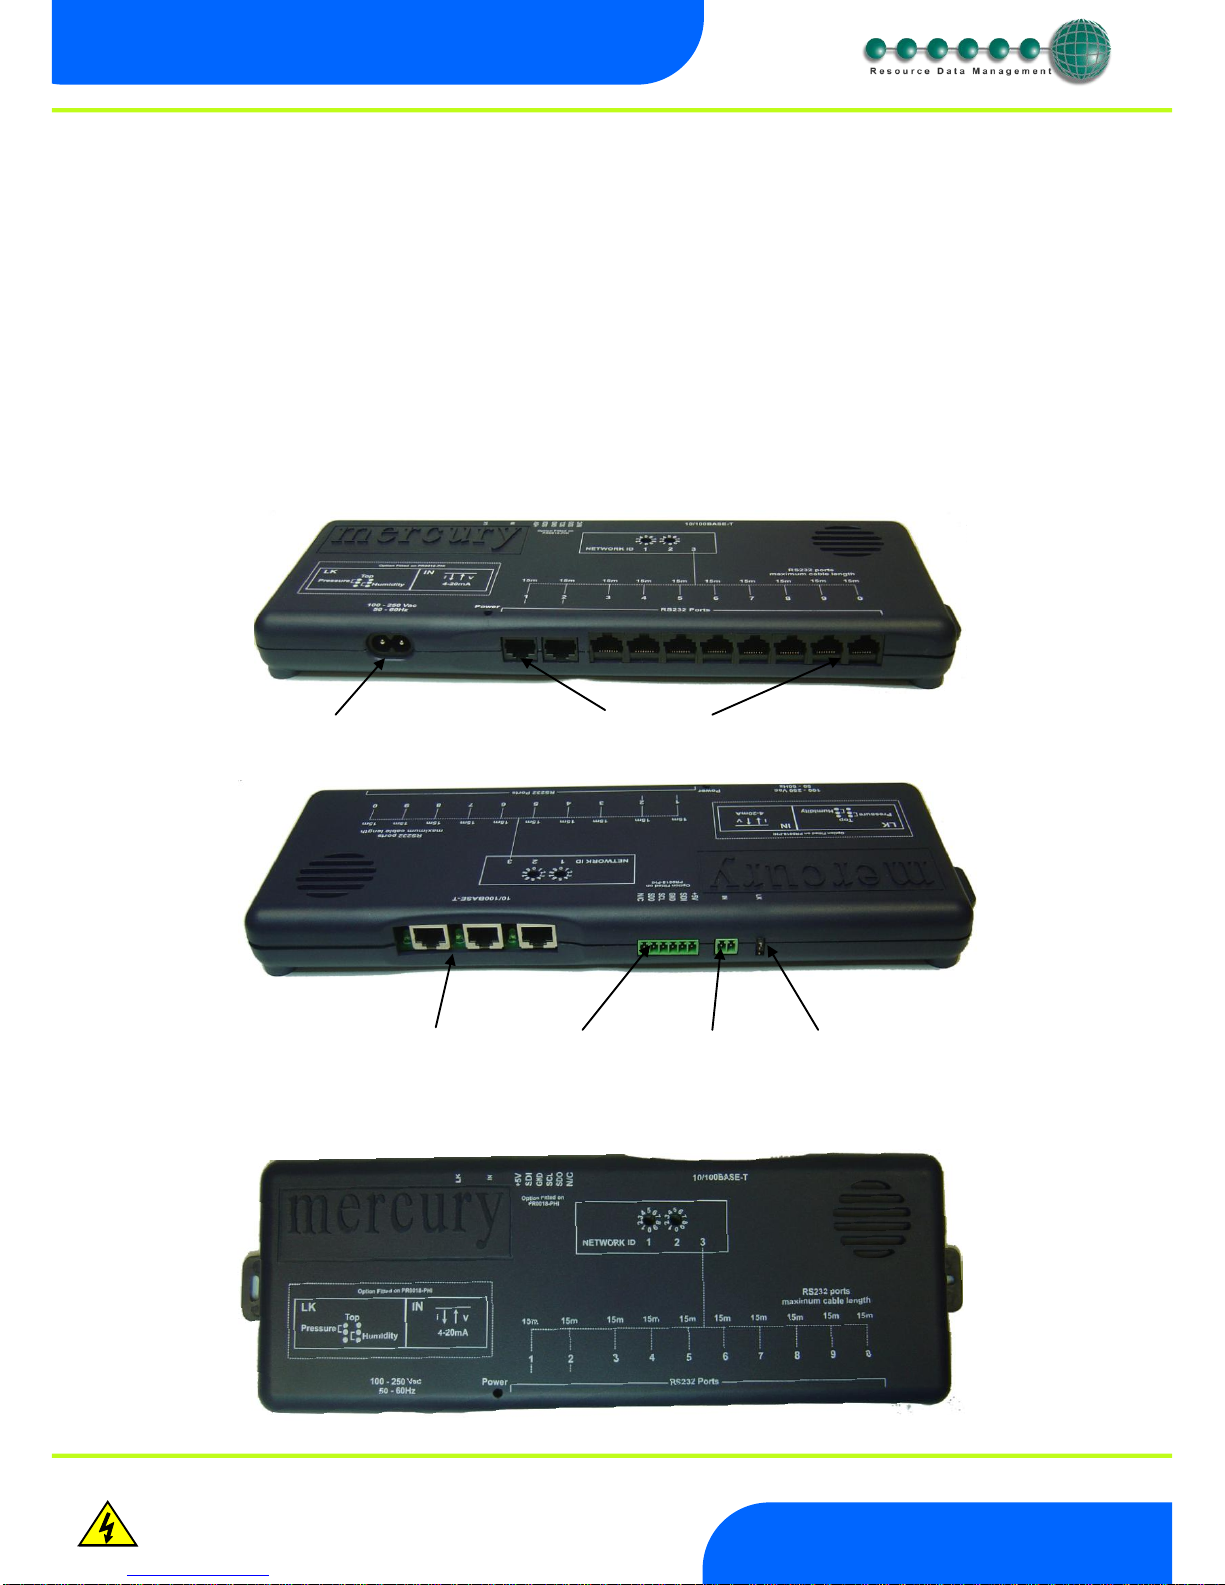
Front View
Rear View
Note:- The display port, mA input and mA input selector are fitted on the PR0018-PHI only.The mA input is available for Pressure
applications only, for Humidity please use a PR0445 connected to the display por
Top View
10 x RS232 Ports for direct connection to RDM controllers
Mains connector
3 x IP ports
mA Input
Display port
mA input selector
Page 4
Revision 2.2 Page 4 of 14
www.resourcedm.com
Mercury Switch User Guide
Warning
Ensure that all power is
switched off before
installing or maintaining
this product
Connection to Mercury Controllers:
Using a standard CAT5 patch lead, connect the serial output of the RDM Controller to one of the RS232 ports of the Mercury Switch.
RS232 Lead Lengths
RS232 patch lead maximum length must not exceed 15 metres. (Ports 1 - 10)
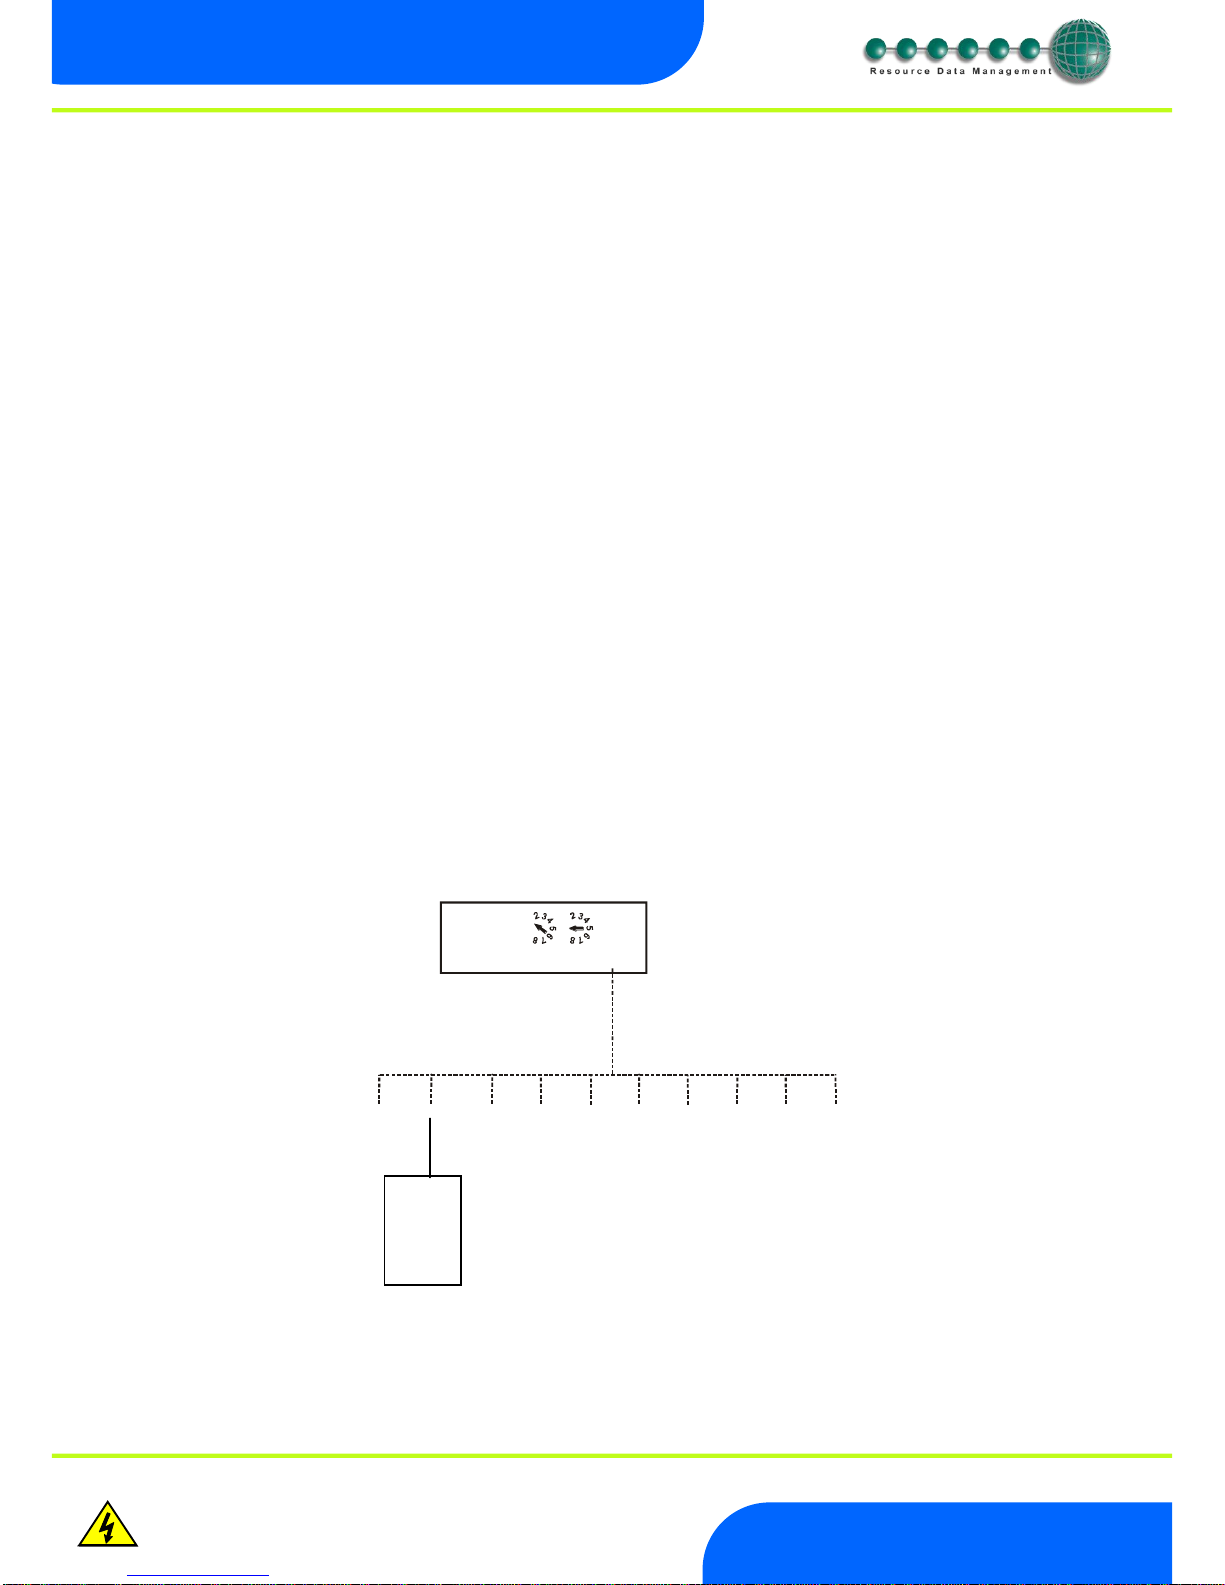
The 3-character address that will be seen on the system front end is determined by the position of the two Network ID rotary switches
and the port the controller has been connected to, unless the connected controller has its own network ID rotary switches, in which case
the controller ID will override the switch settings.
Connection to other IP equipment
Use a standard CAT5 patch lead to connect other IP equipment to the Mercury Switch (such as a Futura IP module) into the 10/100 Base
T ports 1, 2 or 3.
Connection to another Mercury Hub/Switch or Other Ethernet Hub/switch
Use a standard CAT5 patch lead from any of the 3 10/100 Base T ports into any of the 3 10/100 Base T ports on the upstream Mercury
Switch. The 3 10/100 Base T ports are all self configuring.
Connection to a Data Manager/Director
Use a standard CAT5 patch lead and connect the Data Manager or Data Director to one of the 3 10 Base T ports.
10/100 Base T connectors
The three 10/100 Base T connectors have 2 LED’s adjacent to them: The green LED; when static, indicates that the connection to the
device is good, the green LED then flickers when data is being transmitted.
When the amber LED is permanently on it indicates that the connection is full duplex and if there is an error or fault on that channel the
LED flickers.
Network ID
The 3-character network ID is made up from the positions of the 2 rotary switches and the RS232 connector number. We recommend
that the 2 rotary switches are set to the Bay number and that the case sections are plugged into their corresponding RS232 port
numbers.
E.g. Bay 10 case 2:
The 2 rotary switches set to "1" and "0", controller plugged into port 2. The ID then is seen as "102" at the system front end.
Note that case number 10 would plug into RS232 port 0 (right most port) and come through as "100".
ID for equipment with rotary switches.
For RDM products that use the 3 rotary switches for the network ID (such as Mercury Power tray), the ID will follow what is set on the
controller local switches and NOT the port position on the Switch.
1
9
0
1
9
0
NETWORK ID
1 2
3
Vdc
1 2 3 4 5 6 7 8 9 0
Controller
at position 2
Page 5
Revision 2.2 Page 5 of 14
www.resourcedm.com
Mercury Switch User Guide
Warning
Ensure that all power is
switched off before
installing or maintaining
this product
PR0018-PHI User Guide
The PR0018-PHI hardware version of the Mercury Switch allows for EEV Control on an island by island basis. It also allows for the use of
the energy feature Trim Control which pulses the trim relay of a Mercury case controller based on the actual shop floor humidity therefore
minimising energy usage.
Access to configure the Mercury Switch can be achieved by 2 ways.
Through the front mounted buttons on the display (PR0445)
Across an IP network
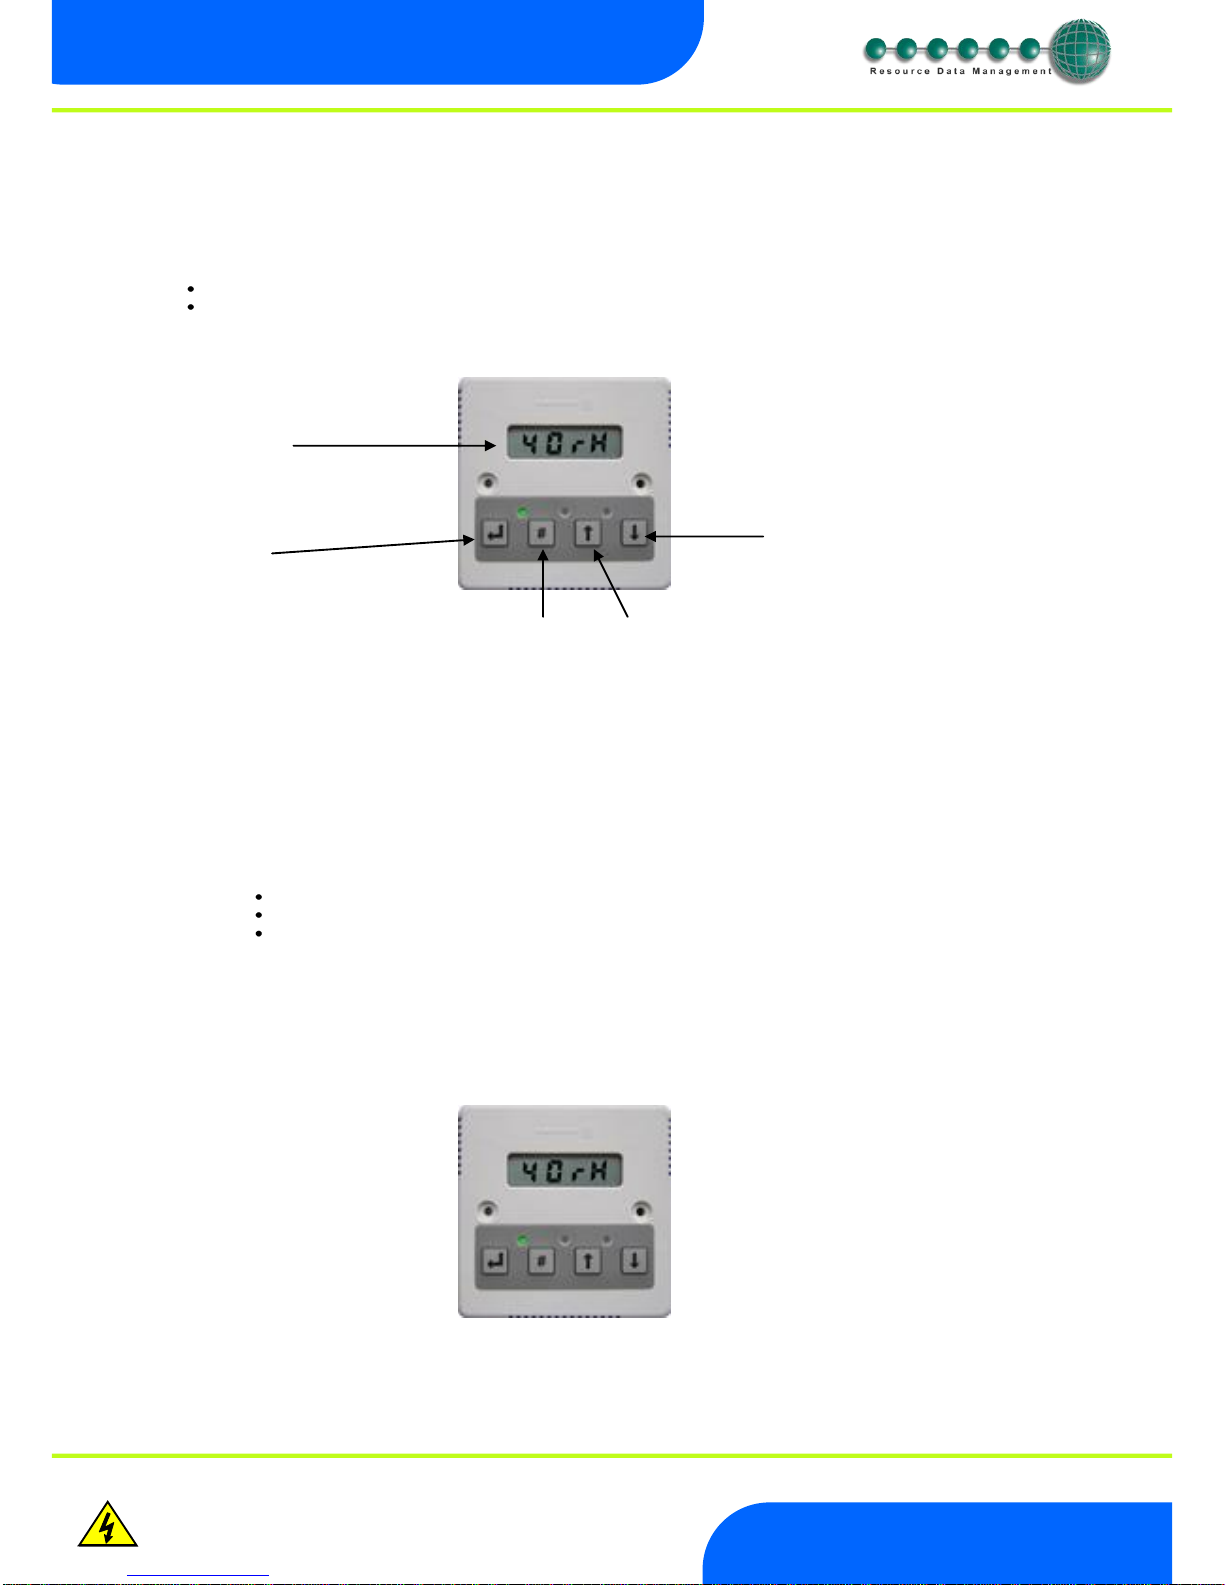
Front Panel Features (PR0445)
4 Character LCD
Down Button
Enter Button
# Button Up Button
Display: The display fits a standard UK single socket pattress.
Enter Button: Button used to enter/confirm values after a change.
Up Button: When in the software menu, the up button is used to scroll up through the menu items.
Down Button: When in the software menu, the down button is used to scroll down through the menu items
# Button: No function
Network LED:
Green LED used to indicate network Status:
Off No network attached
Flashing Attempting to Log on to network
Steady On-line
Amber LED: No function
Alarm LED: Red LED used to indicate an alarm status.
Setup via Display
To enter the software menu for setup mode, hold the Enter and Down buttons together for approximately 3 seconds until the message
“Ent” appears on the display. Release both buttons and now press the Enter button again to enter the software menu. IO is the first item
to be displayed. Scroll up or down to go through the menu items which are highlighted below.
Page 6
Revision 2.2 Page 6 of 14
www.resourcedm.com
Mercury Switch User Guide
Warning
Ensure that all power is
switched off before
installing or maintaining
this product
Setup Function Menu
Display
Option
Explained in Paragraph
IO
View Input and Output States
IO
PArA
View or change Parameters
PArA
ID
View or change ID
ID
tyPE
View or change Controller Type
type
nEt
View or change the Network Settings
Network Configuration
SoFt
View the Software version
ESC
Escape the menu
Recommended set-up method
Set/View Type
a. From the function menu scroll to select type and press enter
b. The current type is shown. Use the up/down buttons to scroll through the configuration types.
c. Select the desired number and press enter.
There are 4 types: -
Type
Description
1
Degree C/ Bar
2
Degree C/ PSI
3
Degree F/ Bar
4
Degree F/ PSI
Set/View Parameters (This can also be achieved at the network front end)
a. From the function menu scroll to select PArA
b. Pressing Enter while PArA is displayed will enter the parameter menu. The first parameter option will be displayed as P-
01. Pressing the Up or Down button will present the other parameter options P-02, P-03 etc. See the parameter table to
find what parameter number corresponds to which actual parameter. Pressing the Enter button will show the current
value of the selected parameter. Press Up or Down to modify the value and press Enter again to save the value. The
parameter list number will be displayed again. Two other options are present in the parameter menu – dFLt and ESC.
Selecting ESC will exit setup mode. Selecting dFLt will reset all parameters back to the default values for the current type
of controller.
ID
Allows the user to assign a unique three digit software address to the Mercury Switch. Note this is only required when the Mercury Switch
is in IP-L mode.
a. From the function menu scroll to select Id
b. The current id number will be shown. Use the up/down buttons to scroll through from 000 to 999.
c. Select the desired number and press enter to save.
Network Configuration
Unlike the PR0018 (Standard Mercury Switch version) when this product is used with a Data Manager/Data Director it is registered on
the system as a device. Once the Mercury Switch is on-line, the Switch type and parameters can be set up. The switch comes online with
the ID of the 2 rotary switch settings followed by the letter a. For example with the first rotary switch set to 4 and the second switch set to
8 then the switch would appear as device “48a”. If a DHCP server is present on the IP network set the 2 rotary network switches to an
appropriate setting, the Mercury Switch has an auto-initialise function, which will automatically log the device onto the site network. If the
wrong ID has been entered onto the network, you will have to reset the Switch ID by setting the ID to 0-0, power cycle and then re-enter
the correct ID.
This Switch does not require an external communications module.
Page 7
Revision 2.2 Page 7 of 14
www.resourcedm.com
Mercury Switch User Guide
Warning
Ensure that all power is
switched off before
installing or maintaining
this product
IP-L (Local IP Address)
To configure the Mercury Switch for IP-L, set both rotary switches to zero.
1. nEt. From the function menu you can now select nEt
Press enter and the display will show “IP-L”, press enter
You can now set the address using the table below
Display
Option
IP-1
IP Address byte 1
IP-2
IP Address byte 2
IP-3
IP Address byte 3
IP-4
IP Address byte 4
nL
Network Mask Length
gt-1
Gateway Address byte 1
gt-2
Gateway Address byte 2
gt-3
Gateway Address byte 3
gt-4
Gateway Address byte 4
ESC
Exit network menu. N.B. this option must be selected to save
any changes made in this menu
IP-r (IP Address issued by the DHCP server)
To configure the Mercury Switch for IP-r, set the two rotary switches to give each controller a unique identifier. The controller should then
be connected to the network.
2. nEt. From the function menu you can now select nEt
Press enter and the display will show “IP-r”, press enter
You can now view only the address given by the DHCP server
To ease setup, a single network mask length value is used. If the address has been specified with a network mask value in dotted IP
format e.g. 255.255.255.0 then the table below gives the conversion:
Mask
Length
Mask
Length
Mask
Length
255.255.254.0
23
255.254.0.0
15
255.255.255.252
30
255.255.252.0
22
255.252.0.0
14
255.255.255.248
29
255.255.248.0
21
255.248.0.0
13
255.255.255.240
28
255.255.240.0
20
255.240.0.0
12
255.255.255.224
27
255.255.224.0
19
255.224.0.0
11
255.255.255.192
26
255.255.192.0
18
255.192.0.0
10
255.255.255.128
25
255.255.128.0
17
255.128.0.0
09
255.255.255.0
24
255.255.0.0
16
255.0.0.0
08
Page 8

Revision 2.2 Page 8 of 14
www.resourcedm.com
Mercury Switch User Guide
Warning
Ensure that all power is
switched off before
installing or maintaining
this product
Parameters
No.
Parameter
Range Bar (psi)
Step
Units
Default Bar (Psi)
P-01
Refrigerant
None (0). R12 (1). R13 (2)
R13b1 (3). R22 (4). R23 (5)
R32 (6). R114 (7). R134a (8)
R142B (9). R227 (10). R401 (11)
R401A (12). R401B (13). R402 (14)
R402A (15). R402B (16). R404A (17)
R407A (18). R407B (19). R407C (20)
R500 (21). R502 (22). R503 (23)
R507 (24). R717 (25)
R290 (Propane) (26)
R744 (27). R407F (28). R410A (29)
N/A
None
P-02
Span
-3.4 to 180.0 (-49.3 to 2610)
0.1
Bar (Psi)
13.8 (200)
P-03
Offset
-3.4 to 180.0 (-49.3 to 2610)
0.1
Bar (Psi)
0.0 (0.0)
P-04
Glide
-15 to 15
0.1
o
C
0.0
P-05
Pressure Type
Absolute (0), Gauge (1)
1 0
P-11
Evap 1 offset
0.0 to 0.5 (0 to 7.2)
0.1
Bar (Psi)
0.1
P-12
Evap 2 offset
0.0 to 0.5 (0 to 7.2)
0.1
Bar (Psi)
0.1
P-13
Evap 3 offset
0.0 to 0.5 (0 to 7.2)
0.1
Bar (Psi)
0.1
P-14
Evap 4 offset
0.0 to 0.5 (0 to 7.2)
0.1
Bar (Psi)
0.1
P-15
Evap 5 offset
0.0 to 0.5 (0 to 7.2)
0.1
Bar (Psi)
0.1
P-16
Evap 6 offset
0.0 to 0.5 (0 to 7.2)
0.1
Bar (Psi)
0.1
P-17
Evap 7 offset
0.0 to 0.5 (0 to 7.2)
0.1
Bar (Psi)
0.1
P-18
Evap 8 offset
0.0 to 0.5 (0 to 7.2)
0.1
Bar (Psi)
0.1
P-19
Evap 9 offset
0.0 to 0.5 (0 to 7.2)
0.1
Bar (Psi)
0.1
P-20
Evap 10 offset
0.0 to 0.5 (0 to 7.2)
0.1
Bar/PSI
0.1
P-31
Transducer Fault Delay
00:00 to 99:00
01:00
Mins
01:00
P-32
Alarm Delay
00:00 to 99:00
01:00
Mins
01:00
P-33
HP Alarm
-3.4 to 180.0 (-49.3 to 2610)
0.1
Bar (Psi)
4.0 (58.0)
P-40
MOP
-3.4 to 180.0 (-49.3 to 2610)
0.1
Bar (Psi)
3.4 (50.0)
P-41
MOP Diff
-3.4 to 180.0 (-49.3 to 2610)
0.1
Bar (Psi)
0.3 (5.0)
P-42
Recovery Count
0 – 10
1 2
P-43
MOP Delay
00:00 to 02:00
00:01
min : sec
00:05
P-50
Humidity Low
0-100 1 rH
20
P-51
Humidity High
0-100 1 rH
60
P-52
Trim Low
0-100 1 %
30
P-53
Trim High
0-100 1 %
100
P-54
Trim Off Level
0-100 1 %
30
P-55
Trim Mode
0 = Off
1 = On
2 = Remote
1 On
P-56
Broadcast ID
0 - 999
1 0
P-57
Evaporator Type
0 = Local
1 = Remote 1
2 = Remote 2
3 = Remote 3
1 0
* Span and Offset allows for the full range of the transducer to be used by the Mercury Switch.
Span is the full range of the transducer
Offset is the value below zero.
An example Transducer setup is: - Danfoss AKS 33 with range: -1 Bar to 12 Bar
Span would be 190 (13 Bar)
Offset would be -15 (-1 Bar)
Page 9
Revision 2.2 Page 9 of 14
www.resourcedm.com
Mercury Switch User Guide
Warning
Ensure that all power is
switched off before
installing or maintaining
this product
Parameters Description
Number
Parameter
Description
P-01
Refrigerant
Select the gas type used within the refrigeration system.
P-02
Span
Total range of transducer. See: To Disable Local Transducer
P-03
Offset
Value below zero*
P-04
Glide
Allows the calculated temperature to be offset by subtracting the value at P-04
P-05
Pressure Type
Select between Absolute or Gauge pressure
P-11
Evap 1 offset
Pressure difference between suction transducer and evaporator 1
P-12
Evap 2 offset
Pressure difference between suction transducer and evaporator 2
P-13
Evap 3 offset
Pressure difference between suction transducer and evaporator 3
P-14
Evap 4 offset
Pressure difference between suction transducer and evaporator 4
P-15
Evap 5 offset
Pressure difference between suction transducer and evaporator 5
P-16
Evap 6 offset
Pressure difference between suction transducer and evaporator 6
P-17
Evap 7 offset
Pressure difference between suction transducer and evaporator 7
P-18
Evap 8 offset
Pressure difference between suction transducer and evaporator 8
P-19
Evap 9 offset
Pressure difference between suction transducer and evaporator 9
P-20
Evap 10 offset
Pressure difference between suction transducer and evaporator 10
P-31
Transducer Fault Delay
Alarm generated, once transducer fault delay expires, if the transducer fails.
P-32
Alarm Delay
Delay before the HP alarm is generated.
P-33
HP Alarm
If the pressure exceeds this value then a High Pressure alarm is generated once the alarm
delay expires.
P-40
MOP
If the pressure exceeds this value the valves on controllers connected to the Mercury Switch
will closed or be reduced to a predetermined percentage. A MOP alarm is also created. (See
MOP)
P-41
MOP Diff
When the pressure reduces below this value valves on controllers connected to the Switch will
recover to their normal operational
P-42
MOP Delay
Delay after the MOP value has been exceeded before the MOP actions and alarm occurs.
P-43
Recovery Count
When the Switch comes out of MOP, the valves will come on at 1 minute intervals and turn
“this” number of valves on per minute.
P-50
Humidity Low
Sets humidity low level.
P-51
Humidity High
Sets humidity high level.
P-52
Trim Low
Sets trim low level.
P-53
Trim High
Sets trim high level.
P-54
Trim Off Level
When the timer is in the off period the trims will be pulsed at this value. Note if the humidity
sensor fails the trim relays will be pulsed at this level.
P-55
Trim Mode
Off – Pulses the controller trim relays at the Trim Off Level.
On – trim control feature will continuously pulse the controller trim relays dependant
on the measured humidity.
Remote – Uses Data Manager GP Timer channel to determine when to control. See
GP Timer Setup
P-56
Broadcast ID
ID of Plant Controller being used to broadcast Suction Pressure
The Broadcast ID is derived from the Rotary Switch positions set on the Plant controller which
is providing the remote suction pressure.
Note: no two Plant controllers on a local area network can have the same rotary switches
positions set. This will have adverse affects on control.
P-57
Evaporator Type
Select one of the following to determine the source of the pressure value used to calculate the
remote evaporator temperature.
Local – Uses Mercury Switch on board 4-20mA Input
Remote 1 – Uses the Remote Plant controllers Transducer Input 1
Remote 2 – Uses the Remote Plant controllers Transducer Input 2
Remote 3 – Uses the Remote Plant controllers Transducer Input 3
Note: Mercury Switch pressure units must match that of the Plant Pack controller it is mapped
to e.g. both devices have to be set to Bar or PSI
See Note : EEV Control
Page 10

Revision 2.2 Page 10 of 14
www.resourcedm.com
Mercury Switch User Guide
Warning
Ensure that all power is
switched off before
installing or maintaining
this product
Input/Output table
Number
IO
Range Bar (Psi)
Units
I-01
Evap Press
-3.4 to 180.0 (-49.3 to 2610)
Bar (Psi)
I-02
Evap 1 Press
-3.4 to 180.0 (-49.3 to 2610)
Bar (Psi)
I-03
Evap 2 Press
-3.4 to 180.0 (-49.3 to 2610)
Bar (Psi)
I-04
Evap 3 Press
-3.4 to 180.0 (-49.3 to 2610)
Bar (Psi)
I-05
Evap 4 Press
-3.4 to 180.0 (-49.3 to 2610)
Bar (Psi)
I-06
Evap 5 Press
-3.4 to 180.0 (-49.3 to 2610)
Bar (Psi)
I-07
Evap 6 Press
-3.4 to 180.0 (-49.3 to 2610)
Bar (Psi)
I-08
Evap 7 Press
-3.4 to 180.0 (-49.3 to 2610)
Bar (Psi)
I-09
Evap 8 Press
-3.4 to 180.0 (-49.3 to 2610)
Bar (Psi)
I-10
Evap 9 Press
-3.4 to 180.0 (-49.3 to 2610)
Bar (Psi)
I-11
Evap 10 Press
-3.4 to 180.0 (-49.3 to 2610)
Bar (Psi)
I-12
Humidity
0 to 100
rH
I-13
Sensor Temp
-49.0 to 60 (-56.2 to 140.0)
o
C (o F)
I-14
Remote 1 Pressure
-3.4 to 180.0 (-49.3 to 2610)
Bar (Psi)
I-15
Remote 1 Pressure
-3.4 to 180.0 (-49.3 to 2610)
Bar (Psi)
I-16
Remote 1 Pressure
-3.4 to 180.0 (-49.3 to 2610)
Bar (Psi)
O-01
Evap Temp
-49.0 to 60 (-56.2 to 140.0)
o
C (o F)
O-02
Evap 1 Temp
-49.0 to 60 (-56.2 to 140.0)
o
C (o F)
O-03
Evap 2 Temp
-49.0 to 60 (-56.2 to 140.0)
o
C (o F)
O-04
Evap 3 Temp
-49.0 to 60 (-56.2 to 140.0)
o
C (o F)
O-05
Evap 4 Temp
-49.0 to 60 (-56.2 to 140.0)
o
C (o F)
O-06
Evap 5 Temp
-49.0 to 60 (-56.2 to 140.0)
o
C (o F)
O-07
Evap 6 Temp
-49.0 to 60 (-56.2 to 140.0)
o
C (o F)
O-08
Evap 7 Temp
-49.0 to 60 (-56.2 to 140.0)
o
C (o F)
O-09
Evap 8 Temp
-49.0 to 60 (-56.2 to 140.0)
o
C (o F)
O-10
Evap 9 Temp
-49.0 to 60 (-56.2 to 140.0)
o
C (o F)
O-11
Evap 10 Temp
-49.0 to 60 (-56.2 to 140.0)
o
C (o F)
O-21
MOP
Off ( 0 ) or On (1)
O-31
Trim Level
0 to 100 %
%
O-32
Remote Trim
Off ( 0 ) or On (1)
O-33
Remote 1 Temperature
-49.0 to 60 (-56.2 to 140.0)
o
C (o F)
O-34
Remote 2 Temperature
-49.0 to 60 (-56.2 to 140.0)
o
C (o F)
O-35
Remote 3 Temperature
-49.0 to 60 (-56.2 to 140.0)
o
C (o F)
EEV Control Operation
Product PR0018-PHI is intended for EEV control on an Island by island basis and can be implemented in two ways.
1. Using the on board 4-20mA Input to measure the suction pressure going to the island.
2. Using a remote suction pressure sent from Mercury Plant Controller (PR0600-PACK) on the same IP network. Note this remote
pressure can be shared by more than one Mercury Switch.
On board 4-20mA Suction Pressure Input Control Application
Ensure parameter P-57 is set to “Local”.
Configure the remaining parameters.
Connect the suction pressure transducer for the Island to the 4-20mA input on the Mercury Switch.
Ensure the transducer is correctly connected and the mA input selector jumper is in the Pressure position.
Ensure each Mercury case controller has been configured to accept the calculated remote evaporator temperature. See
Mercury user guide for further details.
Remote Suction Pressure Application
Ensure parameter P-57, Evaporator Type, is set to Remote 1 or Remote 2 or Remote 3.
Set parameter P-56, Broadcast ID, to match the ID of the desired Plant Pack Controller.
Configure the remaining parameters.
Configure the desired Plant Pack controller to broadcast the Suction pressure. See RDM Plant Controller PR0600 for further
information on how to broadcast pressure.
Note
If the Plant/Intuitive Pack Controller being read from is set to Bar then the Mercury Switch has to be set for Bar (Type 1 or 3)
If the Controller being read from is set to PSI then the Mercury Switch has to be set for PSI (Type 2 or 4).
To disable local transducer
To disable the local pressure input if it is not being used and stop it alarming transducer fault.
Set P-02 (Span) = 0. This only applies to software version 2.1 or higher.
Page 11

Revision 2.2 Page 11 of 14
www.resourcedm.com
Mercury Switch User Guide
Warning
Ensure that all power is
switched off before
installing or maintaining
this product
Operation
Once the Switch has been correctly setup, it will pass values to each of the controllers connected to ports 1 through 10. In an EEV
application the evaporator in temperature probe reading for a case controller can be obtained from the Mercury Switch on which the
controller is connected. A suction pressure transducer is connected from the case Island to the 4-20mA input of the Mercury Switch or
the pressure read from a remote plant controller. This pressure is then converted to a temperature based on the gas type being used by
the system. This temperature is transmitted to each controller connected to the switch and along with the suction temperature probe local
to the controller the superheat is calculated. Please see the Mercury Case controller user document from the RDM website for further
details. (P-51 Minimum valve opening) RDM recommend that this parameter be set to 0% when using Mercury Pressure Switch to
calculate Superheat. Please note that RDM recommend that the evaporator in temperature probe is fitted as the controller will use this to
calculate the superheat in the event of a communication loss with the Mercury Switch. (Or the remote Mercury Plant Controller) The
Mercury Case controllers require to have P17 (Evaporator control) set to 1 (Remote) for this feature to function.
Mercury Switch Type
There are 4 types: -
Type
Description
1
Degree C/ Bar
2
Degree C/ PSI
3
Degree F/ Bar
4
Degree F/ PSI
Transducer Connection
Note:- Pressure/Humidity Link. The mA input is available for Pressure applications only, for Humidity please use a PR0445 connected to
the display port.
MOP – Maximum Operating Pressure
When the MOP alarm is created a valve off command is sent to the 6-5E controllers connected to the Mercury Switch. The percentage
that the valve shuts down to is dependent on the “Div Value” parameter in the Mercury case controller. When the Mercury Switch
generates the MOP alarm the controller reduces the maximum valve opening to this percentage. For example if the Div Value” parameter
is set to 50% and the MOP alarm is generated then the maximum valve opening will be limited to 50%. Therefore as the controller pulses
the valve the maximum the valve will open to is 50%.
If Mercury 6-5M controllers are connected to the Switch then the LLV will be closed when the MOP alarm is created and return to normal
operation when the alarm clears. When the pressure reduces below the MOP diff the valves will revert to normal operation at 1 minute
intervals. The number of controller coming back to normal operation per minute depends on the “recovery count” value.
Link
Top
Pressure
Humididty
+12V loop feed
mA loop return
mA Input
Selector
Page 12

Revision 2.2 Page 12 of 14
www.resourcedm.com
Mercury Switch User Guide
Warning
Ensure that all power is
switched off before
installing or maintaining
this product
Humidity Control Operation
To utilise this feature a Humidity/Temperature Display is required (PR0445). Connect the Humidity/Temperature display to the display
port on the Mercury Switch. The control algorithm will use the humidity reading from the display in calculating the percentage at which the
trim relays are to be pulsed.
When the measured rH is below the “Humidity Low” parameter the Mercury Switch will pulse the Mercury case controller trim relays to
the duration set by the “Trim Low” parameter. When the measured rH is above the “Humidity Low” parameter but below the “Humidity
High” parameter the Mercury Switch will pulse the Mercury case controller trim relays in proportion to the line drawn between the low and
high levels. When rH goes above the “Humidity High” level the Mercury Switch will pulse the Mercury case controller trim relays at the
“Trim High” setting. Setting the trim high parameter to 70% will result in 30 % energy savings as the controller trim relays will never pulse
on for more than 70%. The trims are pulsed over a 5 minute period. Therefore if the Mercury Switch calculates the trim percentage as
50% then the trim relay will be on for 2 and a half minutes and then off for 2 and a half minutes.
GP Timer Set-up
It is possible to set the Mercury Switch humidity control to operate at specific times. For this operation to occur set the parameter “Trim
Mode” to “Remote”. A GP Timer channel must be set up to control the timer on/off periods of the Mercury Switch. For GP Timer set up
please refer to the Data Manager user guide found on the RDM website. The following settings should be followed in the GP setup.
Output Type – This should be set to “General”.
Output Mask – This should match the “Controller Name” e.g. “45a”
Output Channel – Set to “13”. This will allow the GP Timer to control the state of the timer.
When the parameter “Trim Mode” is set to “Remote” and the Data Manager GP timer channel directed to the Mercury Switch is in the on
period the humidity control will operate as described above. During the Data Manager GP timer channel off period the relay will pulse to
the preset “Trim Off Level” parameter. For example if the trim off level is zero then the trims will be completely off. Thus allowing the user
to save energy when the store isn’t trading and the trims are not required.
Note if you wish the Mercury controller trim relay to follow the Data Manager Trim Control feature and not the Mercury Switch settings
then please see the Mercury Controller user document (Parameter P-12).
Trim Heater Control via Mercury Case Controller Range
Energy savings via the Mercury controller range can be achieved in a number of ways. One of which is pulsing the trim heater relay off
for a given period of time. One way to pulse the trim heater relay in the Mercury case controller range is by setting the parameter “Trim
Level”. This sets a percentage level, of a 5-minute period, to pulse the trim heater relay off/on. Using this parameter pulses the trim relay
irrespective of the actual shop floor humidity. For greater energy savings the Data Manager energy feature trim control or the Mercury
Switch trim control feature can be used. These two options pulse the trim relay dependant on the actual shop floor humidity levels. Thus
if the shop floor humidity is relatively low the trim heaters can be pulsed off for longer durations. Please see the relevant user guides for
further details.
RDM recommend that the trim heater pulse module is used in all instances (PR0723). This module is fitted in between the trim heater of
the case and the relay output of the Mercury Controller which is pulsing the heater. The trim heater module output provides a smoother
power distribution, compared to using the relay output direct, as it switches at the zero voltage crossover point. Switching the trim heater
on and off via a normal relay, without using the RDM trim heater pulse module, may damage the trim heater and reduce the operational
life of the heater. Therefore RDM recommend the use of this module in every trim heater control application.
Humidity
Low
Humidity
High
Page 13

Revision 2.2 Page 13 of 14
www.resourcedm.com
Mercury Switch User Guide
Warning
Ensure that all power is
switched off before
installing or maintaining
this product
Network Alarms
The table below shows the text and associated type number that is sent to the system "front end". The type number is normally used to
provide different alarm actions.
Alarm text
Type # (Index)
Transducer Fault
6
High Pressure Alarm
8
MOP Alarm
3
Remote Pressure
6
Setup via Webpages
The Mercury Switch can be configured by navigating to the Mercury Switch WebPages. This can be achieved by using the Controller Info
page in the Data Manager/Data Director. Find the IP address assigned to the Mercury Switch in question from the list. Now connect a
laptop onto the IP network on which the Mercury Switch is connected. Using a web browser navigate to the IP address of the Mercury
Switch. The homepage of the Mercury Switch is shown below: -
Click on “Configure” to set the type: -
Then click “Type”
Use the drop-down selection to select the type required and then click “Set Type”. Parameters can be changed using the connection as
illustrated above or through the normal Data Manager/Director change parameter routes or through the display if fitted (PR0445).
Page 14

Revision 2.2 Page 14 of 14
www.resourcedm.com
Mercury Switch User Guide
Warning
Ensure that all power is
switched off before
installing or maintaining
this product
Specification
Details
Description
Power requirements
Supply Voltage Range
100 – 240 Vac ±10%
Supply Frequency
50 – 60 Hz
Typical Supply Current
<500mAmps
Maximum Supply Current
650mA
General
Operating Temperature Range
+50C to +500C
Operating Humidity
80% maximum
Storage Temperature Range
-200C to +650C
Environmental
Indoor use at altitudes up to 2000m, Pollution Degree II,
Installation Category II.
Size
300mm (L) x 35mm (H) x 110mm (W)
Weight
300 Grams
Safety
EN61010
EMC
EN 55022
EN 55024
EN 61000-3-2
EN 61000-3-3
Attention this is a Class A product. When used in a domestic environment this device may cause
radio interference, in which case the user may be required to take adequate measures.
Disposal
Please observe local legislation with regards to electrical products.
Origins
Product designed in the UK manufactured in Taiwan.
Ventilation
There is no requirement for forced cooling ventilation
Class 2 Insulation
No protective Earth is required and none should be fitted.
The host equipment must provide a suitable external over-current protection device such as: -
Fuse
1A 240 Vac Antisurge (T) HRC conforming to IEC 60127
Or MCB
1A, 240 VAC Type C conforming to BS EN 60898
Mounting
There is a fixing lug at each end of the Switch, with hole centres 317 mm apart. Use typically Number 6 x 1” Pan head screw with 6mm
washer, torque down to 1.5 Newton metres.
RS232 Cable Lengths
All RS232 connections must not exceed 15 metres/connection.
Ethernet Cable lengths
Port number
Main Powered Switch
1
Refer to Cat5 standard
2
Refer to Cat5 standard
3
Refer to Cat5 standard
Disclaimer
The specifications of the product detailed in this document may change without notice. RDM Ltd shall not be liable for errors or
omissions, for incidental or consequential damages, directly or indirectly, in connection with the furnishing, performance or misuse of this
product or document.
Revision History
Revision
Date
Changes
2.1D
21/02/2012
Current Release
2.2
10/07/2012
Gas type R410A added, Load Shedding feature added
 Loading...