

Order-No. DaimlerChrysler 6515 6642 13 Blaupunkt 8 622 403 018 Index E Parts-No. 215 584 45 82 Edition B 2002
Operator,s Manual COMAND
COMAND
Operator,s Manual

As a result of new improvements in equipment and components, some descriptions and illustrations in this operating
manual are approximate or may deviate from the features actually included in your COMAND operating unit.
As such, the information, illustrations and desriptions contained in this manual may not be reasonably relied upon in
making any claims with respect to the actual performance of the product.
If your COMAND operating unit is equipped with functions which are not described in this operating manual or if you
have any questions, please contact any Mercedes-Benz Center for further information.
We recommend that you keep the operating instructions in your vehicle so that you always have them available.
If you sell your vehicle, you should give the operating manual to the new owner.

How to use the COMAND operating manual
Before you take your first drive, please make yourself familiar with the COMAND operating unit and the functions it
supports. Read through these operating instructions carefully and, if necessary, refer to the operating instructions of
your vehicle.
The operating instructions are divided into 6 chapters:
• Introduction: An overview of the operating and display elements as well as explanation of the basic functions
• Audio: Information on the radio and CD equipment (CD drive and CD changer) as well as sound settings
• Telephone: Explanation of the telephone functions
• Navigation: How to enter your destination, selecting your route, route guidance, how to use the route memory, and
selecting a detour.
• Info Services and system settings: Information on how to request and display service informations, setting
language, date/time, tones and day/night display
• Index: Search items to help you find exactly what you are looking for
Explanation of symbols used:
Warning notices for the protection of yourself and others
are preceded by a symbol.
Introduction
1
AudioIntroduction Telephone Navigation Index
Audio
Info Services and
system settings

Introduction Telephone
Audio
Navigation
Info Services and
system settings
Index
Introduction
Operation – COMAND and telephone
COMAND supplies you with information to help you
select your route more easily and guides you conveniently and safely to your destination. For safety’s sake,
you should not use some of the functions, such as
entering the destination, unless your vehicle is stationary (electronic key in the ignition at position 1).
The navigation system does not supply any information on stop signs, yield signs, traffic regulations or
traffic safety rules. This always remains your
personal responsibility when you drive.
Warning!
In order to avoid distraction which could lead to an
accident, system settings should be entered with the
vehicle at standstill and system should be operated
by the driver only when traffic conditions permit.
Bear in mind that at a speed of just 30 mph (approximately 50 km/h), your car is covering a distance of
50 feet (approximately 14 m) every second.
2
Operating safety
Warning!
Any alterations made to electronic components
and the software can cause malfunctions.
The radio, amplifier, CD changer, telephone and
Voice recognition system are interconnected.
Therefore, when one of the components is
defective or has not been removed/replaced
properly this may impair the function of other
components.
These malfunctions might seriously impair the
operating safety of your vehicle.
We recommend that you have any service work or
alternations on electronic components done in an
authorized Mercedes-Benz Center.
1 Observe all legal requirements.

Contents
Introduction ........................................ 1
How to use the COMAND
operating manual ............................ 1
Operation – COMAND and
telephone .......................................... 2
Operating safety .............................. 2
Contents .............................................. 3
Quick reference – COMAND ......... 8
Multifunction steering wheel,
Multifunction display .....................11
Screen displays.............................. 12
Switch the COMAND
operating unit on and off ............. 13
Adjusting the volume ................... 15
Selecting beep tones ..................... 15
Switching the screen on and off . 15
Pop-up screen messages when
the battery gets low ...................... 16
Status window for
Tele Aid calls.................................. 16
Audio
Contents – Audio ............................. 17
Radio operation ................................ 18
Quick reference – Radio............... 18
Menu overview – Radio................ 20
Switching radio operation on ...... 22
Changing the Radio Band ............ 22
Selecting a station ......................... 24
Automatic Station Scan ................ 28
Memory functions ......................... 29
Radio playback mute .................... 38
Multifunction steering wheel,
Multifunction display ................... 39
Tape operation.................................. 40
Quick reference – Tape deck ....... 40
Menu overview – Tape deck ........ 42
Switching tape operation
on and off ........................................ 44
Changing sides .............................. 45
Seeking/Skipping tracks ............. 45
Fast forward/rewinding ............... 46
Scanning ......................................... 47
Repeating tracks............................ 48
Skip blanks .................................... 49
Dolby B, Dolby C
(noise reduction) ........................... 50
Tape playback mute ...................... 51
Alarm on serious malfunction ... 51
Notes on tape care......................... 52
Multifunction steering wheel,
Multifunction display ................... 55
CD operation..................................... 56
Quick reference for CD changer
operation (optional) ...................... 56
General information on CD
playback.......................................... 58
Loading CDs in the CD changer.. 59
Menu overview – CD operation .. 62
Switching on CD operation .......... 64
Track select .................................... 65
Selecting CD’s ................................ 67
Introduction
Contents
3
AudioIntroduction Telephone Navigation Index
Audio
Info Services and
system settings

Introduction Telephone
Audio
Navigation
Info Services and
system settings
Index
Introduction
Sound settings.................................. 83
Telephone
Contents – Telephone ..................... 91
Telephone.......................................... 92
Fast forward / fast backward ....... 69
CD track scan................................. 70
Entering, altering and
deleting CD names ........................ 71
Selecting playback mode ............. 74
CD playback mute ......................... 76
Error messages .............................. 77
Tips on caring for your CD’s........ 79
Multifunction steering wheel,
Multifunction display ................... 82
Adjust sound settings ................... 83
Before you use the telephone ...... 92
Multifunction steering wheel,
Multifunction display ................... 94
4Contents
Overview of the
Multifunction displays ................. 95
Quick reference – Telephone ....... 96
Menu overview – Telephone ....... 98
Switching telephone
operation on ................................. 100
Incoming calls.............................. 102
Outgoing calls .............................. 106
Dialing a telephone number ...... 106
Dialing a number from the
phone book ................................... 109
Redial ............................................. 116
Dialing from calls list ................. 120
Speed-dialing (only with
COMAND) ..................................... 121
Quick-dialing (for the first 10
memory locations) ...................... 123
Notebook ....................................... 124
Editing the phone book .............. 125
SMS function................................ 132
Emergency call ............................ 136
Service numbers ......................... 139
Navigation
Contents - Navigation.................... 142
Notes ................................................ 144
Before you use
the navigation system ................ 144
Navigation....................................... 146
Quick reference – Navigation .... 146
Switching the navigation
system on...................................... 148
Changing the Navigation CD..... 149
Destination entry ........................... 150
Menu overview –
Destination entry ........................ 150
Entering destination address .... 152
Continue destination input........ 160
Selecting a destination
via the map................................... 163
Destination entry via
coordinates ................................... 167
Entering points of interest......... 169

Selecting the last destinations .. 174
Selecting the route
calculation mode and
calculating the route ................... 175
Route guidance............................... 178
The principle
of route guidance......................... 178
Requesting destination and
route information ........................ 181
Beginning route guidance.......... 189
Turning onto a street .................. 191
Following the course
of the road .................................... 193
Driving through
an intersection ............................. 194
Changing to map display
during route guidance ................ 195
Route guidance with a mixture
of map and symbol display ........ 196
Altering the map scale ............... 197
Selecting map orientation.......... 198
Marking a way point................... 199
Selecting a detour during
route guidance .............................202
Resetting functions during
route guidance .............................206
Deviating from the
calculated route ........................... 206
Driving on a non-digitized
road................................................ 207
Interrupt route guidance during
a journey ....................................... 207
Reaching your destination ......... 209
Activating audio system ............. 210
Activating audio functions
during route guidance ................ 211
Canceling route guidance .......... 212
Destination memory...................... 213
Activating the main
destination memory menu ........ 213
Retrieving a destination from
the destination memory ............. 214
Saving the current destination
in the destination memory ........ 215
Saving the current vehicle
location in the destination
memory ......................................... 217
Sorting the destination
memory ......................................... 218
Deleting a destination in the
destination memory .................... 219
Entering the vehicle position....... 220
Calibration ...................................... 221
Info Services and system
settings
Info Services ................................... 224
Requesting and displaying
Info Services ................................ 224
System settings .............................. 227
Activating the main system
settings menu .............................. 227
Introduction
Contents
5
AudioIntroduction Telephone Navigation Index
Audio
Info Services and
system settings

Introduction Telephone
Contents
Introduction
Audio
6
Navigation
Info Services and
system settings
Index
Adjusting the brightness ........... 228
Activating Settings menu........... 229
Selecting the language ............... 230
Set the date and time .................. 231
Switching beep tones
on and off ...................................... 238
Reset all settings to the factory
settings..........................................239
Index
Index ................................................ 240

Introduction
7
AudioIntroduction Telephone Navigation Index
Audio
Info Services and
system settings

Introduction Telephone
Audio
Navigation
Info Services and
system settings
Index
Introduction
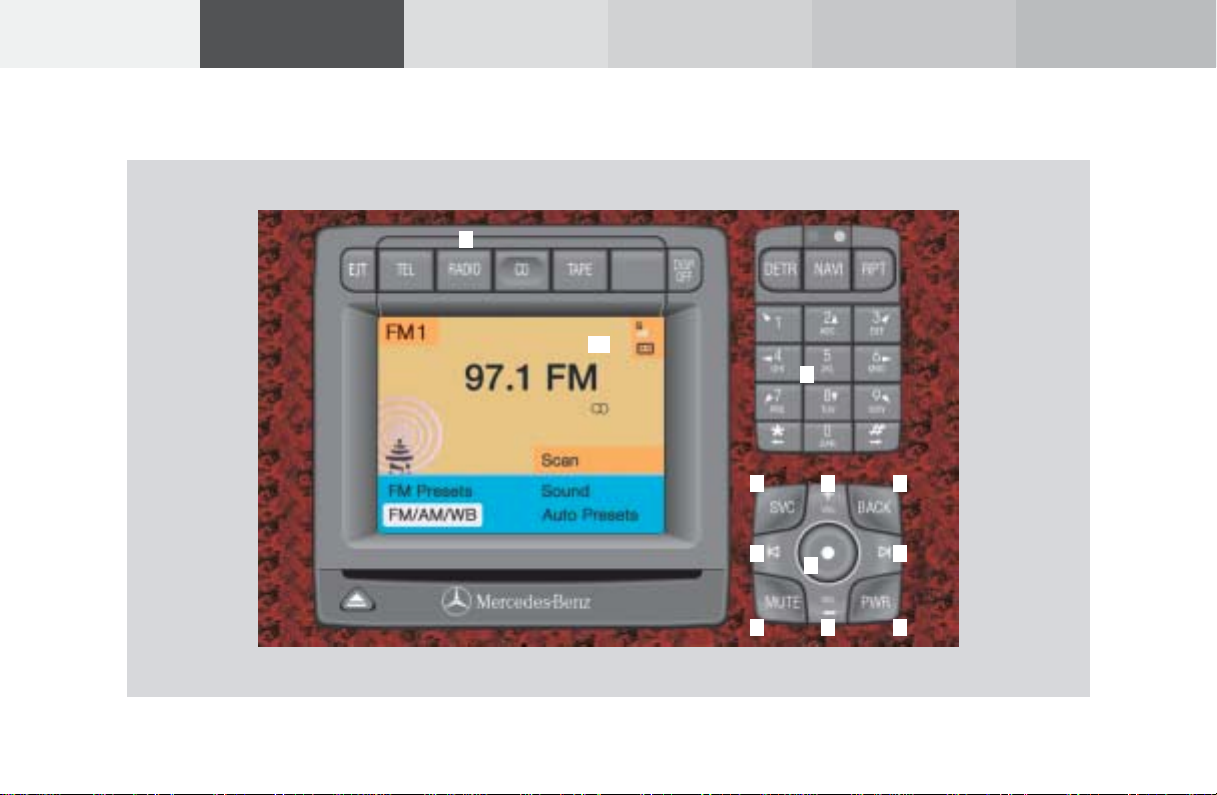
Quick reference – COMAND
22
8
1
21
52 3 4 6
20
7 8 9
10
11 12
13
16
18 14 19
14 15
17
16
P82.85-6115-29

1 Opens and closes the tape cover and ejects an
inserted tape
2 Switching telephone operation on,
Quick reference, page 100
3 Switching radio operation on,
Quick reference, page 18
Changing the radio band, page 22
4 Switching the CD operation on,
Quick reference, page 56
5 Switching the tape operation on,
Quick reference, page 44
6 Press to turn off the screen,
Press to switch the screen on again, page 13
7 Activating the main detour menu
Selecting a detour during route guidance, page 202
8 Switching the navigation system on/off, page 148
Quick reference, page 146
9 Repeats current (last) voice instruction
10 Radio:
Station selection via number keypad (presets),
page 26
Station selection via direct frequency entry,
page 27
CD operation:
Selecting tracks, page 65
Selecting CD’s, page 67
Telephone:
Entering the unlock code, page 100
Entering a telephone number, page 106
Navigation (Destination input):
Moving the cross hairs according to the
corresponding arrows, page 164
11 Altering the map scale, page 166 and 197
Subsequent dialing, page 108
12 Altering the map scale, page 166 and 197
Subsequent dialing, page 108
13 Requesting and displaying Info Services,
page 224
Adjust system settings (brightness, language,
clock), page 227
Introduction
9
AudioIntroduction Telephone Navigation Index
Audio
Info Services and
system settings

Introduction Telephone
Audio
Navigation
Info Services and
system settings
Index
Introduction
14 Raising or lowering the volume for
15 Return to the previous menu
16 Radio:
radio, tape and CD for the hands-free operation of
the telephone and the voice output during route
instruction
Ending a call, page 119
Automatic seek tuning, page 24
Manual tuning, page 25
Tape deck:
Seeking/Skipping tracks, page 45
Fast forward/rewinding, page 46
CD operation:
Next/previous track, page 65
Fast forward/backward, page 69
10
17 Turn to highlight a menu field, list entry or a
symbol
Press to activate a submenu, confirm an entry/
selection or start a function
18 Audio:
Press to mute audio source, press again to cancel
mute function
Navigation (voice output):
Press to mute current spoken recommendation,
Press longer than 2 seconds to mute the voice
output for the duration of route guidance, page 190
19 Switching the COMAND on/off, page 13
20 Color screen
21 Changing a navigation CD, page 149
22 Ejecting a navigation CD
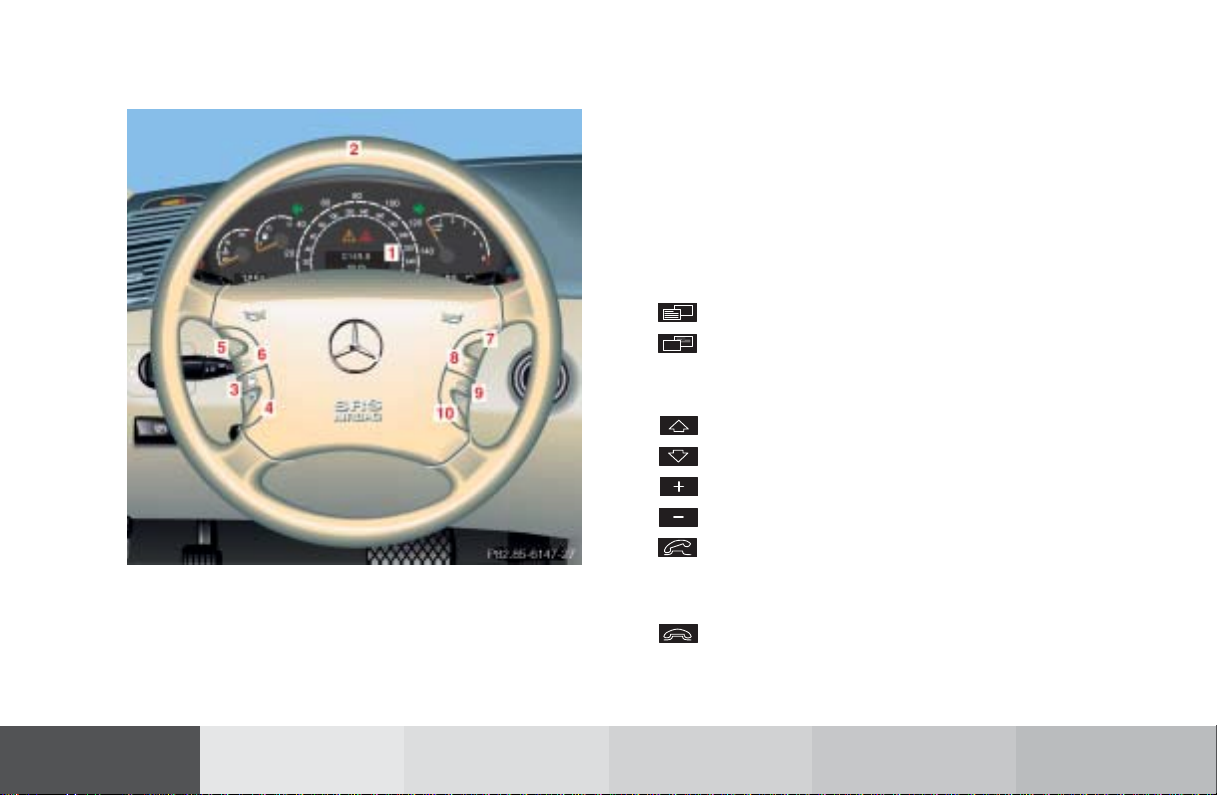
Multifunction steering wheel, Multifunction display
Turn the electronic key in the steering lock to position
1 or 2. See your vehicle’s operating instructions.
Introduction
1 Multifunction display
2 Multifunction steering wheel
The steering wheel buttons enable activation and
operation of the radio, CD and external audio source
(e.g. portable tape deck), the telephone, navigation and
Tele Aid. Information such as the radio frequency is
shown in the multifunction display.
For more detailed information, refer to “Multifunction
steering wheel, multifunction display” in the chapters
on the radio, CD, telephone and navigation systems.
Press key:
3 Next system
4 Previous system
Systems which can be activated refer to vehicle
operating instructions
5 Next display in the system
6 Previous display in the system
7 Raising the volume
8 Lowering the volume
9 Accept incoming telephone call, page 102
Starts dialing after the selection of a number,
page 110, 114
10 End telephone call, End Tele Aid info or
Roadside call, page 102
refuse telephone call, page 102
11
AudioIntroduction Telephone Navigation Index
Audio
Info Services and
system settings
Introduction Telephone
Audio
Navigation
Info Services and
system settings
Index
Introduction
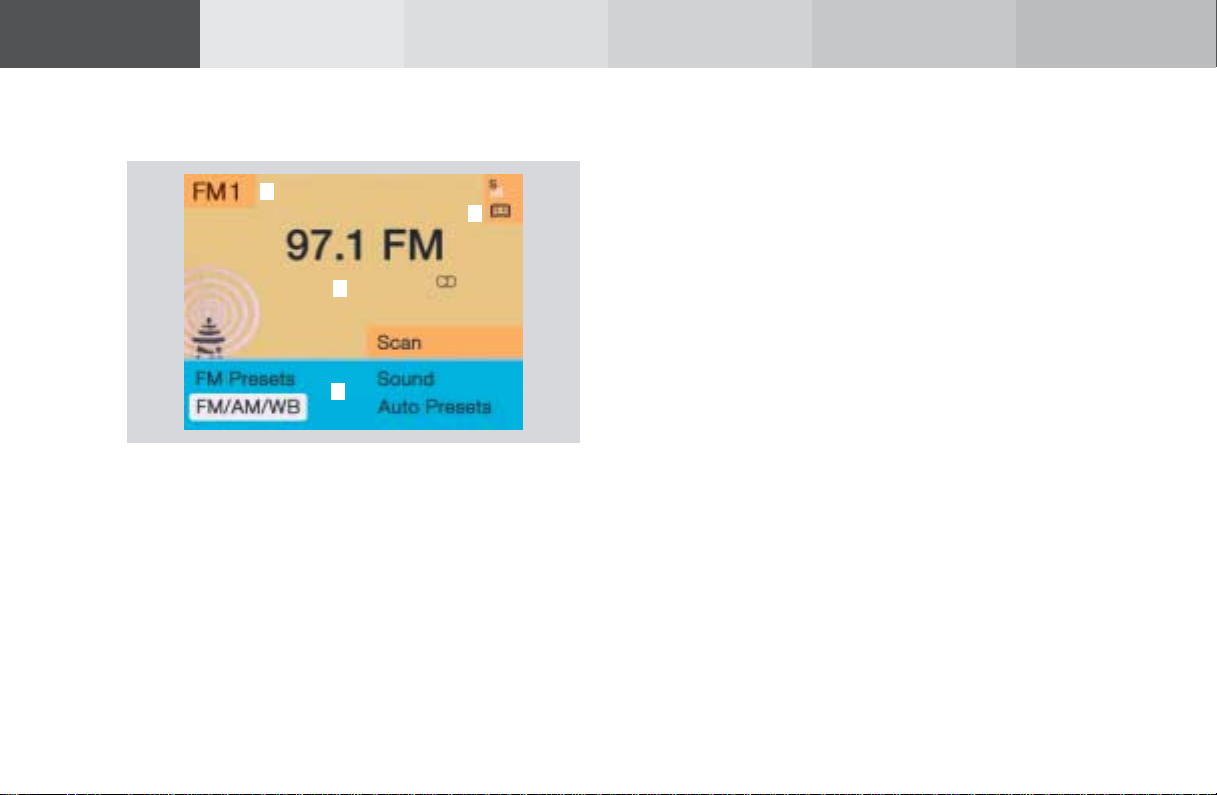
Screen displays Structure of, e.g. a radio main menu:
Screen displays include:
1
4
2
3
P82.85-2512-26
• Main menus, the radio main menu in the example
above
• Lists, e.g. CD names list, page 73
• Input menus, e.g. entering, changing and deleting
CD names, page 71
• Selection menus, e.g. selecting playback mode, page 74
• Symbol and map displays in navigation
• Pop-up windows, page 170
12
1 Information/status line
Display of the system switched on (FM) and
additional information, e.g. 1 (memory location 1)
or menu name, e.g. FM Memory
Other system displays:
AM – AM radio band
WB – Weather band
TAPE – Tape operation
CD – CD operation
TEL – Telephone
NAVI – Navigation
SVC – Info Services and system settings
2 Station frequency, activated functions
3 Menu fields which branch off to submenus
4 Symbol bar
Reception strength of the mobile phone
Note:
The symbol bar appears in all system main menus
as well as in the symbol and map displays in
navigation.
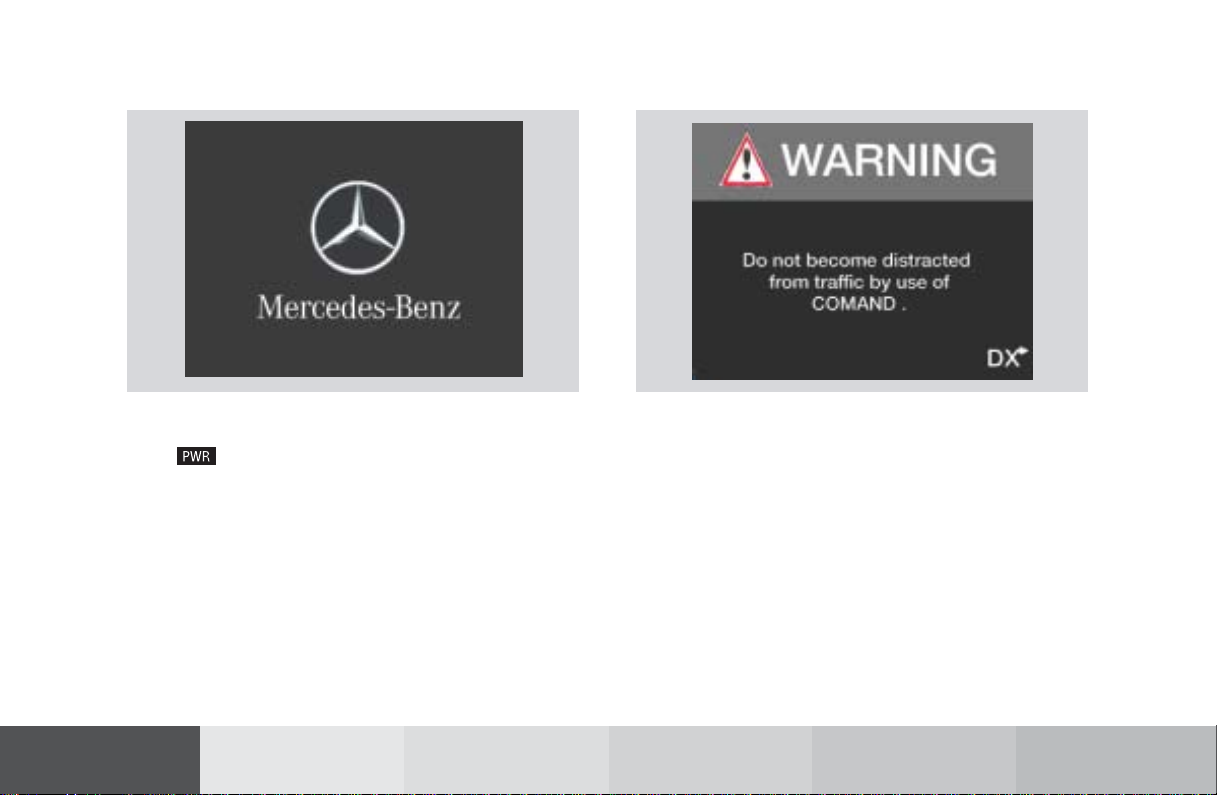
Switch the COMAND operating unit on and off
Switch on
Press .
The COMAND operating unit is switched on.
The graphic characters Mercedes-Benz, and the
Mercedes star will be displayed.
Introduction
P82.85-6444-26
P82.85-7736-26
The display changes, and an alert box will appear.
COMAND switches on with the system which was last
active and displays the corresponding menu.
13
AudioIntroduction Telephone Navigation Index
Audio
Info Services and
system settings

Introduction Telephone
Audio
Navigation
Info Services and
system settings
Index
Introduction
Press the button marked for the equipment you would
like to switch on (e.g. ).
Note:
If the navigation system was the last system used,
there are different screens which may appear,
depending on the last status.
Route guidance was active:
The route guidance was active and the COMAND
switched off for longer than 2 hours:
If COMAND is switched off for more than 30 minutes
during active route guidance, all manually entered
traffic jams and detours are deleted (see also
page 202).
14
Destination entry was active:
• the main destination input menu.
Switch off
Press .
The COMAND operating unit will switch off.
• the symbol display
• the map
• an inquiry menu

Adjusting the volume
Using buttons on the multifunction steering wheel:
Raising the volume – press steering wheel button
Lowering the volume – press steering wheel
button
On the COMAND operating unit:
Raising the volume – press rocker switch
Lowering the volume – press rocker switch
Audio functions for radio and CD operation (CD drive
and CD changer):
The volume selected applies to all of the audio functions.
For other audio sources:
Other audio sources are telephone, voice output during
route guidance and Voice Recognition System. Refer to
seperate operating instructions for telephone and voice
recognition system. The volume level for voice output
in navigation and voice recognition system is the same
(altering either affects the other). Telephone volume is
adjusted separately.
Altering the listening volume for the telephone affects
only the telephone and not navigation or voice
recognition system.
Selecting beep tones
To indicate operating steps or error messages acoustically, it is possible to select different beep tones. Beep
tones may be switched on and off, page 238.
Acknowledgement beep:
is heard when an entry is accepted
Info beep:
is heard when window displays warn that the battery
power is decreasing, page 16.
Alarm beep:
is heard on a serious malfunction (e.g. if the tape cover
sticks). This warning can only be switched off by
switching the COMAND off.
Switching the screen on and off
Press to turn off the screen. It is still possible to
operate all of the functions.
Press to switch the screen on again. Information
will reappear in the display.
Introduction
15
AudioIntroduction Telephone Navigation Index
Audio
Info Services and
system settings

Introduction Telephone
Audio
Navigation
Info Services and
system settings
Index
Introduction
Pop-up screen messages when the battery gets low
To prevent the car battery from running down, the
driver will receive two messages to start the engine
when battery power gets low. This warning will appear
in all of the displays.
It is possible to switch off the warning “Caution. Please
start engine. Otherwise COMAND will shut down in
3 minutes” by pressing the rotary/pushbutton .
Please, start the engine, refer to the operating
instructions of the vehicle.
You can then still operate COMAND.
The next two messages will not disappear until the
engine has been started or COMAND has been
switched off. It is not possible to operate COMAND
while they are on the screen.
First the following warning will appear on the screen:
“Caution. Please start engine. Otherwise COMAND will
shut down in 10 seconds”. Please, start the engine.
If the engine is not started, COMAND will switch off
after 10 seconds. The following message will appear in
the display: “Caution. COMAND will shut down now.”.
Please, start the engine.
16
Status window for Tele Aid calls
When the Tele Aid call system is in operation (refer to
operating instructions of the vehicle) a pop-up window
appears indicating the type of call and status.
During transmission of a Tele Aid call the audio source
will be muted until the Tele Aid call is ended.
The window can be cleared by manually by turning or
pressing the rotary/pushbutton . It will switch off
automatically when the emergency call is completed.

Audio
Contents – Audio ............................. 17
Radio operation ................................ 18
Quick reference – Radio............... 18
Menu overview – Radio................ 20
Switching radio operation on ...... 22
Changing the Radio Band ............ 22
Selecting a station ......................... 24
Automatic Station Scan ................ 28
Memory functions ......................... 29
Radio playback mute .................... 38
Multifunction steering wheel,
Multifunction display ................... 39
Tape operation.................................. 40
Quick reference – Tape deck ....... 40
Menu overview – Tape deck ........ 42
Switching tape operation
on and off ........................................ 44
Changing sides .............................. 45
Seeking/Skipping tracks ............. 45
Radio operation
Contents - Audio
Fast forward/rewinding ............... 46
Scanning ......................................... 47
Repeating tracks............................ 48
Skip blanks .................................... 49
Dolby B, Dolby C
(noise reduction) ........................... 50
Tape playback mute ...................... 51
Alarm on serious malfunction ... 51
Notes on tape care......................... 52
Multifunction steering wheel,
Multifunction display ................... 55
CD operation..................................... 56
Quick reference for CD changer
operation (optional) ...................... 56
General information on CD
playback.......................................... 58
Loading CDs in the
CD changer ..................................... 59
Menu overview – CD operation .. 62
17
Switching on CD operation .......... 64
Track select .................................... 65
Selecting CD’s ................................ 67
Fast forward / fast backward....... 69
CD track scan................................. 70
Entering, altering and
deleting CD names ........................ 71
Selecting playback mode ............. 74
CD playback mute ......................... 76
Error messages .............................. 77
Tips on caring for your CD’s........ 79
Multifunction steering wheel,
Multifunction display ................... 82
Sound settings.................................. 83
Adjust sound settings ................... 83
Introduction
Audio Telephone Navigation Index
Info Services and
system settings
Introduction
Audio Telephone Navigation
Info Services and
system settings
Index
Radio operation
Quick reference – Radio
18
1
10
2
6
4 4
3
5
3
7
98
P82.85-6116-29

1 Switching radio operation on and off, page 22
2 Station selection via number keypad (presets),
page 26
Station selection via direct frequency entry,
page 27
Saving stations, page 29
Selecting stations from the preset menu, FM/AM,
page 35
Selecting channels from the WB preset menu,
page 36
3 Raising or lowering the volume, page 15
4 Automatic seek tuning, page 24
Manual tuning, page 25
5 Turn to highlight a function or a menu field,
Press to perform a function or access a submenu
6 Requesting and displaying Info Services, page 224
Adjust system settings (brightness, language,
clock, beep tones), page 227
7 Return to previous menu
8 Press to mute radio audio, press again to cancel
mute function, page 38
9 Switching the COMAND on and off, page 13
10 Color screen with main radio menu
Radio operation
Introduction
19
Audio Telephone Navigation Index
Info Services and
system settings
Introduction
Audio Telephone Navigation
Info Services and
system settings
Index
Radio operation
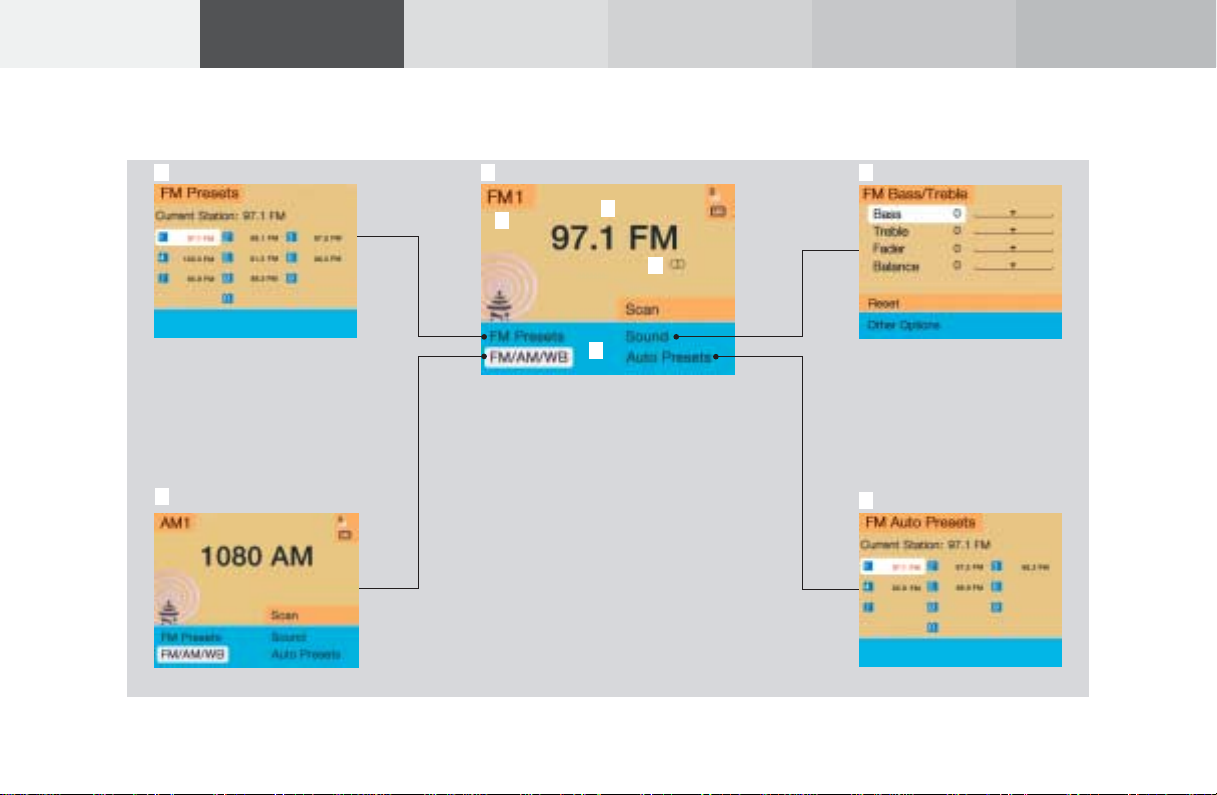
Menu overview – Radio
9
8
20
1
2
3
4
5
6
7
P82.85-4810-29

1 Main radio menu FM
2 Current band (FM) and memory preset selected (1)
are displayed
3 Current frequency
4 symbol indicates stereo reception
5 Menu fields to activate submenus
6 Main sound settings menu,
Adjust sound settings, page 83
7 Auto preset
Save stations automatically, FM/AM, page 32
Select a station, page 33
8 Main radio menu AM, page 23
Activate Weather band (WB), page 23
9 Preset menu
Save stations manually FM, page 29
Save stations manually AM, page 31
Select a station, page 35
Radio operation
Introduction
21
Audio Telephone Navigation Index
Info Services and
system settings
Introduction
Audio Telephone Navigation
Info Services and
system settings
Index
Radio operation
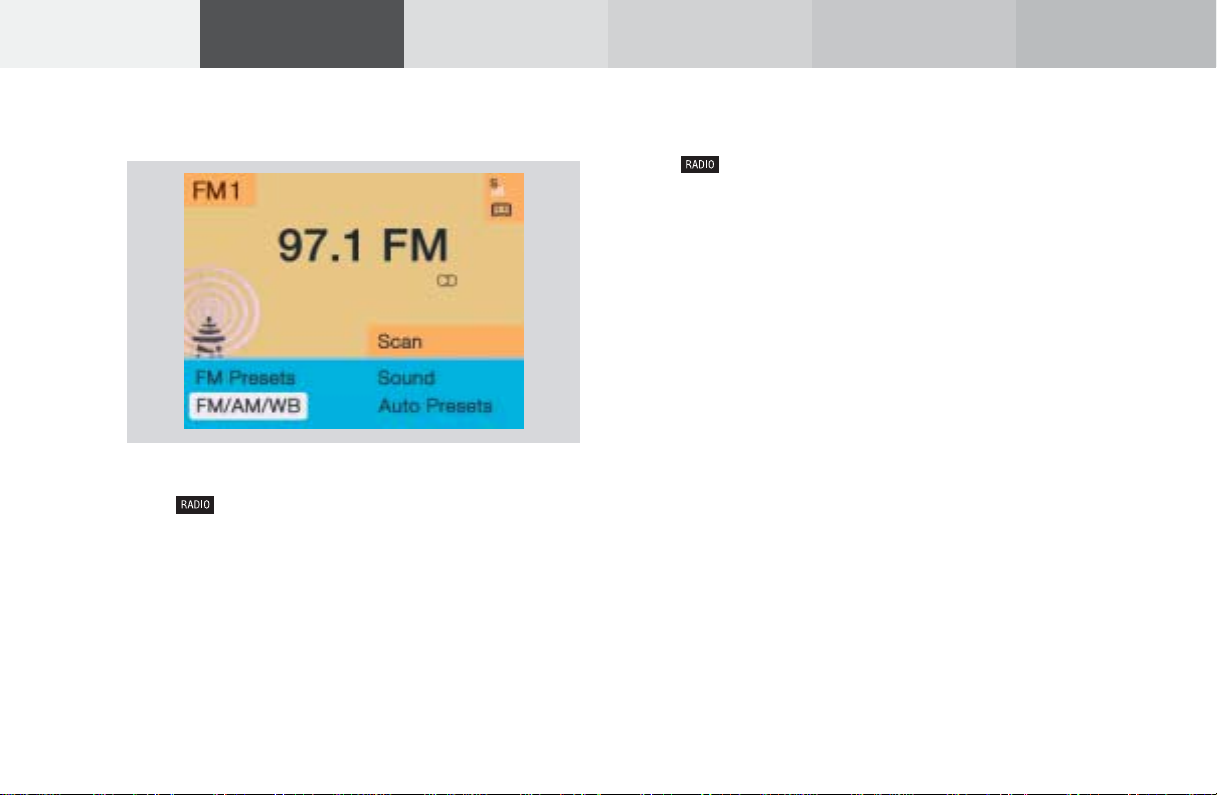
Switching radio operation on and off
Switching on the radio
Press . The radio will switch on.
The station last tuned to will begin to play. On FM and
AM frequency will appear in the display.
You can operate the telephone and navigation system
while the radio is on.
22
Switching off the radio
Press while the main radio menu is on the screen.
The following message will appear: “Radio off”.
To switch to another system, press the corresponding
button.
P82.85-2515-26
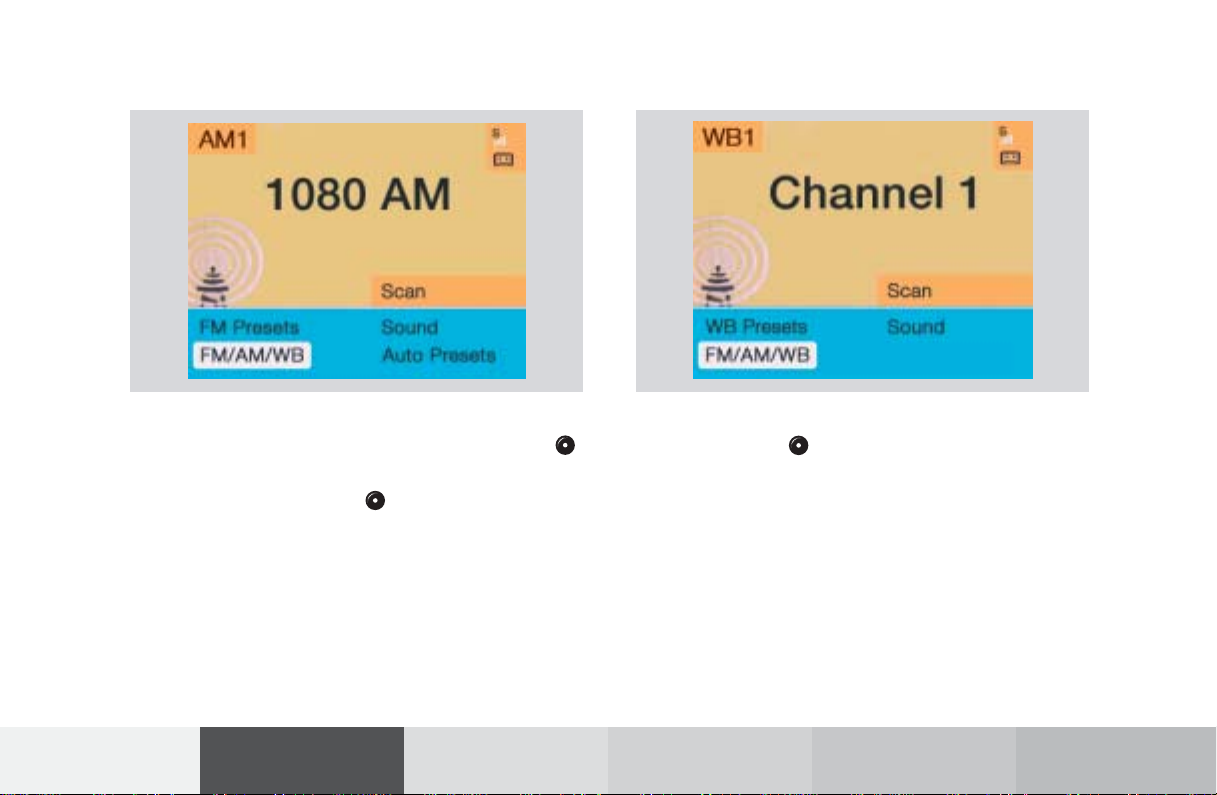
Changing the Radio Band
Weather Band (WB)
You can select the FM-, AM- and WB-band one after the
other by repeatedly pressing the rotary/pushbutton
while “FM/AM/WB” is highlighted.
Press the rotary/pushbutton to confirm the marked
menu field “FM/AM/WB”.
The station last tuned to will begin to play. The frequency will appear in the display.
Frequency ranges:
FM 87.9 – 107.9 FM
•
AM 530 –1710AM
•
Radio operation
Introduction
P82.85-2523-26
P82.85-2527-26
Highlight the “FM/AM/WB” menu field and press the
rotary/pushbutton repeatedly until “WB” is displayed in the upper left hand corner of the display.
The channel last tuned to will appear in the display.
If a weather band station cannot be received on this
channel an automatic search run of all 7 channels will
take place. As soon as a weather band station is received,
the search run stops and the channel appears in the
display. Two cycles through the 7 channels will be made.
If a weather band station cannot be received on any of
the 7 channels the screen message “No WB” appears.
23
Audio Telephone Navigation Index
Info Services and
system settings
Introduction
Audio Telephone Navigation
Info Services and
system settings
Index
Radio operation
Selecting a station
Different functions are available for selecting a station:
• Automatic seek tuning, page 24
• “Seek” tuning at the multifunction steering wheel,
page 25
• Manual tuning, page 25
• Station selection via number keypad (presets),
page 26
• Station selection via direct frequency entry, page 27
• Automatic Station Scan, page 28
• Station selection from the preset menu, page 35
24
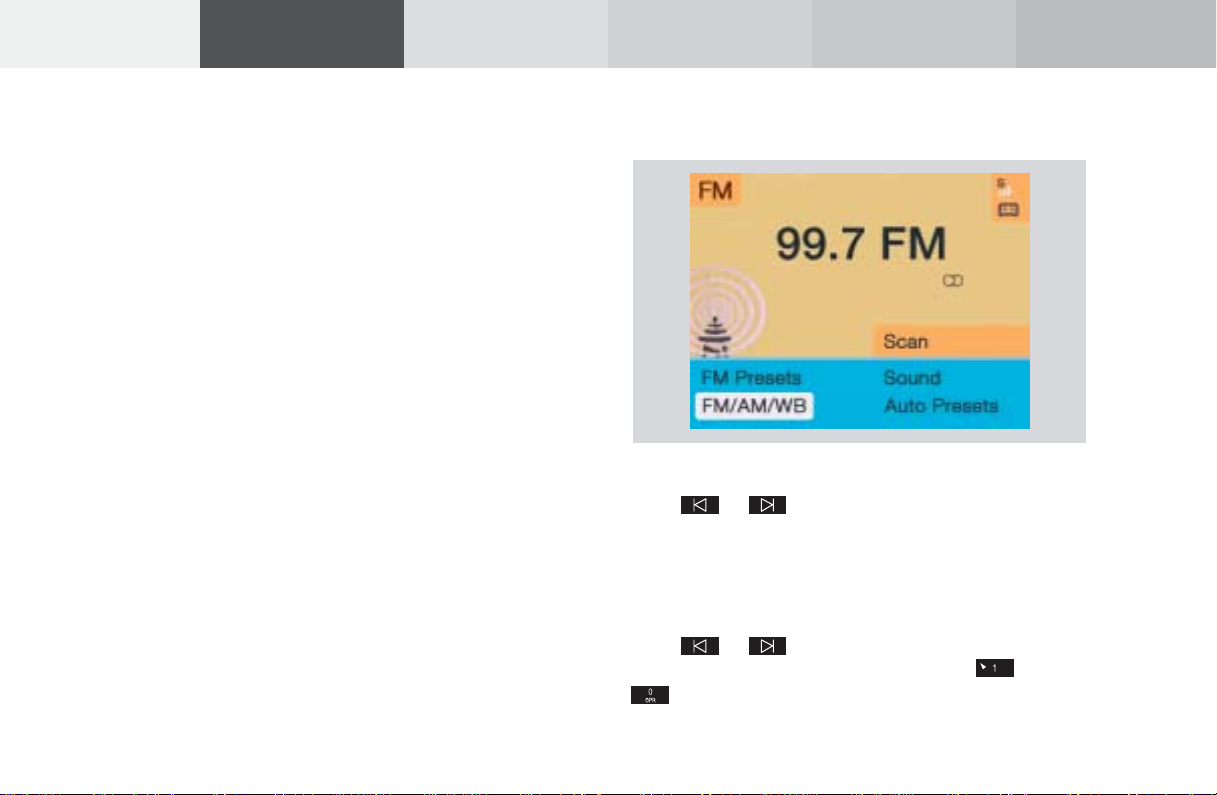
Automatic seek tuning
P82.85-2516-26
FM- and AM-Bands:
Press or on the rocker switch briefly.
The next receivable station in the direction of seek
(descending/ascending) will be tuned in and begin to
play. The station frequency will appear on the screen.
Weather Band (WB):
Press or briefly to select the next receivable
station. Alternatively press a number key through
and that station will be directly selected.
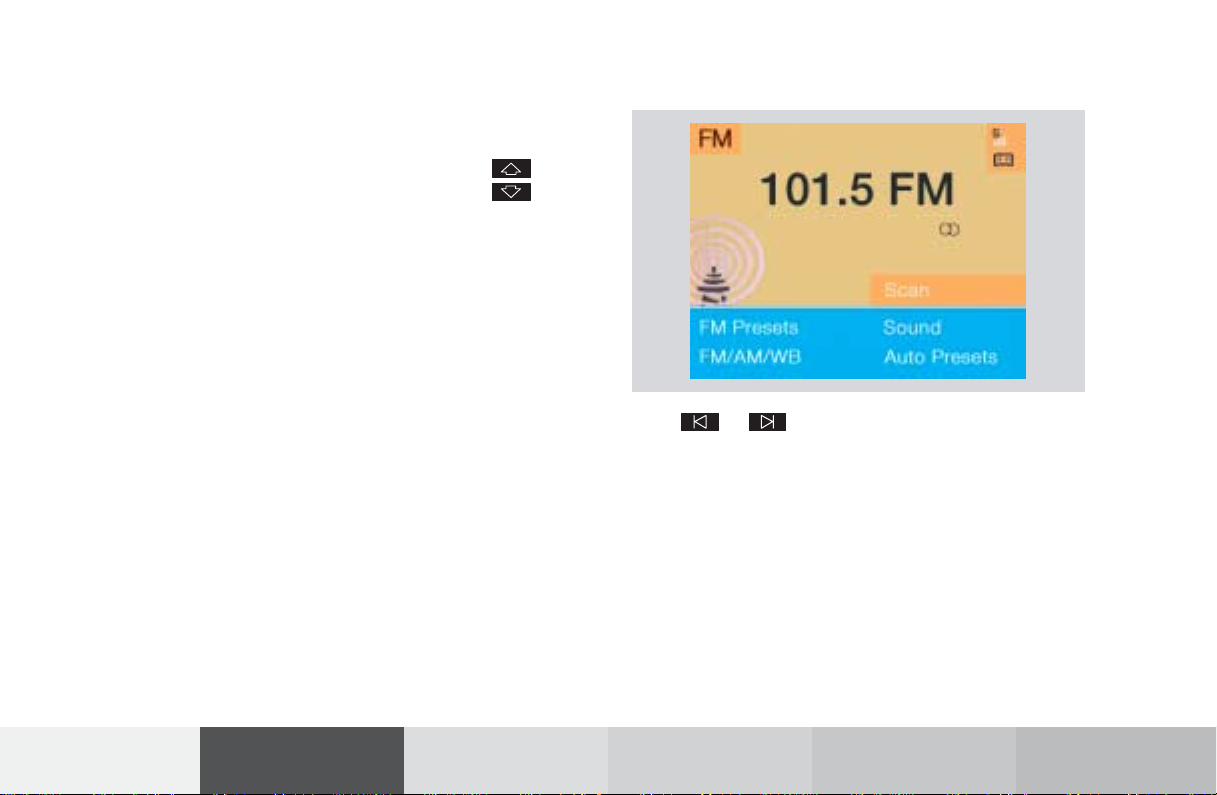
“Seek” tuning at multifunction steering wheel
With station frequency displayed in the multifunction
display:
Select next higher frequency preset – press
Select next lower frequency preset – switch
Note:
The up/down arrows have different functions depend-
ing on which made the seek function in the multifunction display is programmed to. The two available
options are Memory Scan or Frequency Scan. Refer to
the vehicle operator’s manual on how to program this
option.
Manual tuning (FM, AM)
P82.85-2517-26
Press or on the rocker switch for longer than
2 seconds. The menu fields will appear in light grey
lettering.
FM band:
The frequency displayed will change in the correspond-
ing direction in increments of 0.2 MHz.
AM band (activate via “FM/AM/WB” menu field):
Tuning will take place in increments of 10 kHz.
Radio operation
Introduction
25
Audio Telephone Navigation Index
Info Services and
system settings

Introduction
Audio Telephone Navigation
Info Services and
system settings
Index
Radio operation
Station selection via number keypad (presets)
Press one of the number keys, such as briefly.
The radio will tune to the frequency assigned to that
memory location. If none has been set by the user, a
default frequency will appear.
26
Note that FM and AM presets are independent and can
only be accessed while in the corresponding band.
For WB, tune the radio to the selected channel.
The memory preset number will appear in the status
line.
Saving stations (FM, AM), page 29 through 33.
The “XX Presets” (XX = FM, AM or WB) menu field
provides an overview of which stations have been
allocated to which memory presets, page 30.
P82.85-2518-26

Station selection via direct frequency entry
P82.85-2519-26
It is possible to set a station by entering the station
frequency directly via the number keypad.
Press (bottom left on the keypad). An input line
will appear in the main radio menu.
Use the number keys to enter the desired frequency,
e.g. for 102.7 FM (FM waveband).
The display in the main radio menu will now indicate
the new frequency. The station will begin to play.
Notes:
Frequencies can be entered only for FM and AM. If no
entry is completed within 8 seconds, the station last
tuned will resume play.
Enter in given frequency range.
Frequency ranges:
FM 87.9 – 107.9 FM
•
AM 530 – 1710 AM
•
If you enter a frequency that is outside the allowable
input range, you will see the display “Invalid input”.
Repeat entry with new frequency.
Radio operation
Introduction
27
Audio Telephone Navigation Index
Info Services and
system settings
Introduction
Audio Telephone Navigation
Info Services and
system settings
Index
Radio operation
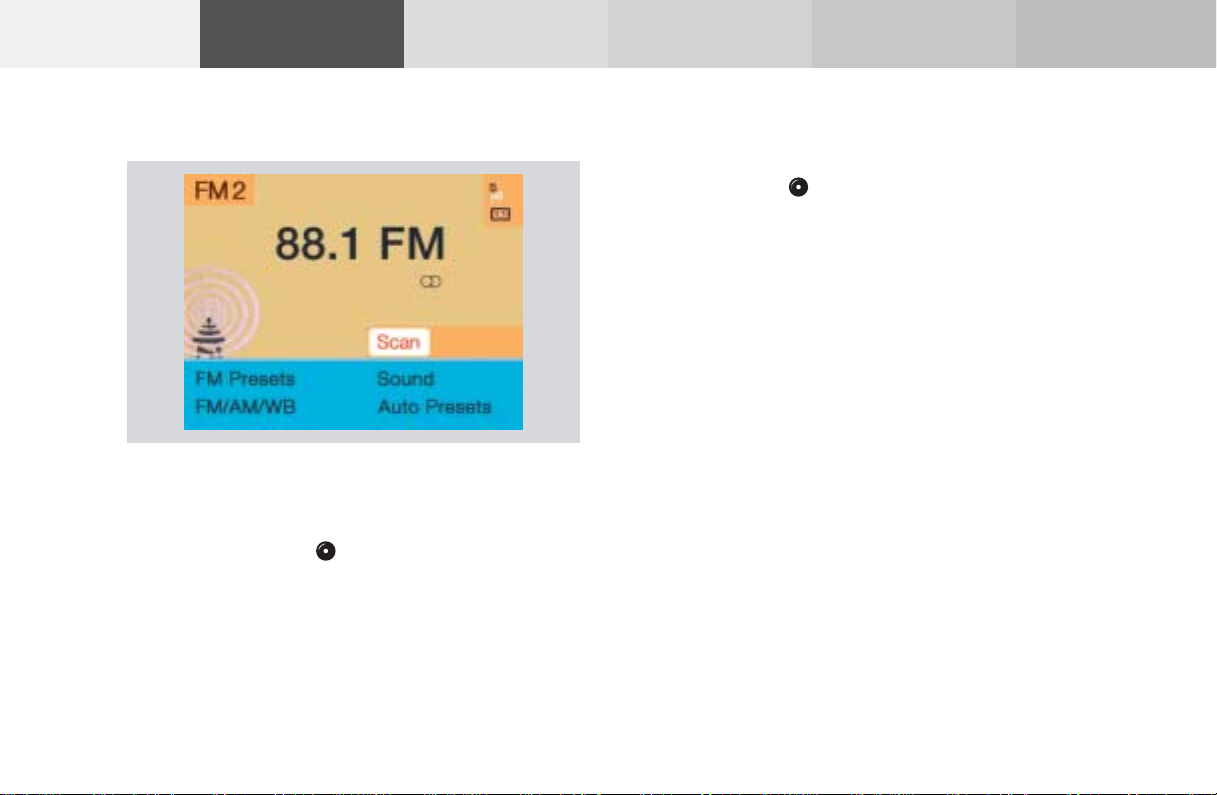
Automatic Station Scan
The stations on same band (FM/AM/WB) can be
scanned one after the other for 8 seconds each.
Once the “Scan” menu field has been selceted, press
the rotary/pushbutton to confirm it.
The scan function will begin, “Scan” will appear in red
lettering.
P82.85-2520-26
28
To play a station (end scan function):
If the station you want is being played, press the
rotary/pushbutton again.
The station selected will appear on the screen with the
frequency. “Scan” will appear in black lettering again.
Scanning Weather Band (WB)
With the scan function the individual weather stations
stored in the memory on 7 channels can be scanned
one after the other for 8 seconds each.
The scan function stops automatically when the first
station received has been scanned twice.

Memory functions
The following functions are available:
• Saving stations manually, FM, page 29
Saving stations manually, AM, page 31
• Saving stations automatically, FM/AM, page 32
• Selecting stations from the preset menu, FM/AM,
page 35
• Selecting channels from the WB preset menu,
page 36
• Selecting stations by entering the station frequency
in the presets, FM/AM, page 37
Note:
There are 2 memories for each of the FM and AM
waveband, standard FM/AM presets and the Auto
presets.
The standard FM/AM presets are not affected by the
automatic presets. This is a second possibility for
storing a station range you are currently receiving.
Radio operation
Saving stations manually, FM
In the main radio menu:
Press the corresponding number key, e.g. , for
longer than 2 seconds. You will hear a confirmation
beep if this was switched on before, page 14
The currently displayed station will be saved in the
memory corresponding to for that number key. There
are 10 memory presets available. The memory preset
selected (0 to 9) will appear in the status line.
Note:
An existing entry is overwritten in the memory list
when a new input is given.
29
P82.85-2521-26
.
Introduction
Audio Telephone Navigation Index
Info Services and
system settings

Introduction
Audio Telephone Navigation
Info Services and
system settings
Index
Radio operation
1 Preset of the station currently selected
2 Frequency of the station currently selected
3 Current frequency appears in red lettering,
4 Memory preset allocated
5 Memory preset available
1
2
3
5
cursor highlights memory preset no. 1
4
P82.85-2968-26
30
On the memory list:
Use the rotary/pushbutton to highlight the “FM
Presets” menu field in the main radio menu and
confirm it. The FM preset memory menu will appear on
the screen.
Use the rotary/pushbutton to move the cursor to the
desired memory location.
Press the rotary/pushbutton or corresponding
number key for longer than 2 seconds.
The main radio menu will appear, with the new
memory preset number, automatically after 3 seconds
or after you press the key .
Note:
The standard FM presets are not affected by the
automatic presets. This is a second possibility for
storing a station range you are currently receiving.

Saving stations manually, AM
Use the “FM/AM/WB” menu field in the main radio
menu to activate the AM band.
Use the “AM Presets” menu field to activate the corresponding memory.
Radio operation
Introduction
P82.85-2523-26
P82.85-2969-26
Save a station in the same way as described for the FM
band, page 29.
Note:
The standard AM presets are not affected by the
automatic ones. This is a second possibility for storing
a station range you are currently receiving.
31
Audio Telephone Navigation Index
Info Services and
system settings

Introduction
Audio Telephone Navigation
Info Services and
system settings
Index
Radio operation
Saving stations automatically, FM/AM
Use the “FM/AM/WB” menu field in the main radio
menu to activate the desired band.
32
Use the rotary/pushbutton to highlight the “Auto
Presets” menu field and press the knob for longer
than 2 seconds.
While the station is being saved “Searching...” will
appear on the screen.
P82.85-2970-26

P82.85-2971-26
The 10 strongest stations will be searched and stored.
The station frequencies available will appear in the
memory list.
Select other stations:
Use the rotary/pushbutton to highlight the memory
position and press to confirm.
The main radio menu will appear, for the frequency
selected, automatically after 3 seconds or after you
press the key .
Radio operation
Introduction
33
Audio Telephone Navigation Index
Info Services and
system settings

Introduction
Audio Telephone Navigation
Info Services and
system settings
Index
Radio operation
Weather band
Use the “WB Presets” menu field in the WB main menu
(page 23) to activate the WB Presets.
34
Use the rotary/pushbutton to highlight the “WB
Presets” menu field and press the knob to confirm. This
will activate the memory.
Channels 1 to 7 are listed in the memory.
The memory positions of the channels for weather band
are fixed and cannot be altered.
P82.85-2974-26

Selecting stations from the preset menu, FM/AM
P82.85-2525-26
Use one of the following two ways to select a station
from the FM/AM presets:
• Press the corresponding number key (e.g. ) to
select the desired station.
• Use the rotary/pushbutton to highlight a
memory preset in the preset list (FM/AM) and
press briefly to confirm.
In both cases, the main radio menu will then appear
automatically after 3 seconds, indicating the memory
preset number.
Radio operation
Introduction
35
Audio Telephone Navigation Index
Info Services and
system settings

Introduction
Audio Telephone Navigation
Info Services and
system settings
Index
Radio operation
Selecting channels from the WB preset menu
Use the “WB Presets” menu field in the WB main menu
(page 23) to activate the WB Presets.
36
Press the corresponding number key (e.g. ) or use
the rotary/pushbutton to select the desired channel
and press briefly to confirm.
The station on this channel will be received.
The main WB menu will then appear automatically
after 3 seconds, indicating the memory preset number.
P82.85-2530-26

Selecting stations by entering the station frequency
in the presets, FM/AM
P82.85-2526-26
The station frequency can be entered in FM and AM
bands in the corresponding presets list.
To activate the input mode:
Press .
An input line will appear on the top line in place of the
current station name.
Enter the frequency with the number keys.
The frequency is entered into the input line beginning
from the right. After 3 seconds at the most, the station
selected will begin to play.
Notes:
Enter in given frequency range.
Frequency ranges:
FM 87.9 – 107.9 FM
•
AM 530 – 1710 AM
•
If you enter a frequency which is not within the given
range, the following message will appear: “Invalid
input”.
Repeat enter with new frequency.
Radio operation
Introduction
37
Audio Telephone Navigation Index
Info Services and
system settings

Introduction
Audio Telephone Navigation
Info Services and
system settings
Index
Radio operation
Radio playback mute
Press while listening to the radio.
The radio will be muted and the symbol will appear
on the icon bar.
38
Cancel radio mute:
Press again.
The symbol will disappear from the icon bar and the
station last tuned to will begin to play.
Note:
The mute function will also be cancelled if you switch
to a different audio source (e.g. CD) use or to
select another radio station or use or to alter
the volume.

Multifunction steering wheel, Multifunction
display
P82.85-6114-27
1 No audio function has been switched on.
2 The radio is switched on.
3 Frequency selected as well as the memory preset, if
applicable.
4 Frequency of the station selected
5 Appears only if “Memory” has been selected
instead of “Frequency” in the “Individual settings”
menu in the instrument cluster.
See your vehicle’s operating instructions of the
instrument cluster.
Press on the COMAND and switch the radio on.
Press repeatedly, as necessary, until display (2)
appears.
Press or until the desired station name or
frequency appears.
or can also be used to select a station
frequency which has been saved. This depends on the
setting selected in the “Individual settings” menu.
See your vehicle’s operating instructions of the instrument cluster.
Press to display the next system.
Radio operation
Introduction
39
Audio Telephone Navigation Index
Info Services and
system settings

Introduction
Audio Telephone Navigation
Info Services and
system settings
Index
Tape operation
Quick reference – Tape deck
40
1
2
10
6
4 4
3
5
3
7
98
P82.85-6117-29

1 Opens and closes the tape cover and ejects an
inserted tape
2 Switching tape operation on and off, page 44
3 Raising or lowering the volume, page 14
4 Press briefly: next track, page 45
Press for longer than 2 seconds: fast forward,
page 46
Press briefly: previous track or beginning of
current track, page 45
Press for longer than 2 seconds: rewind,
page 46
5 Turn to highlight a function or menu field
Press to perform a function or activate a submenu
6 Requesting and displaying Info Services, page 224
Adjust system settings (brightness, language,
clock, beep tones), page 227
7 Recalls previous menu
8 Press to mute tape audio, press again to cancel the
mute function, page 51
9 Switching the COMAND on and off, page 13
10 Color screen with main tape menu
Tape operation
Introduction
41
Audio Telephone Navigation Index
Info Services and
system settings

Introduction
Audio Telephone Navigation
Info Services and
system settings
Index
Tape operation
Menu overview – Tape deck
42
5
4 3
21
P82.85-6441-29

1 Main tape menu
2 Scan function, scanning tracks, page 47
3 Main sound settings menu
Adjust sound settings, page 83
4 Tape settings
Repeating tracks, page 48
Skip blanks (fast forwards ignoring blanks),
page 49
Dolby B, Dolby C (noise reduction), page 50
5 Main tape menu after changing sides, page 45
Tape operation
Introduction
43
Audio Telephone Navigation Index
Info Services and
system settings

Introduction
Audio Telephone Navigation
Info Services and
system settings
Index
Tape operation
Switching tape operation on and off
1 Status line, tape system switched on
2 Side display
3 Settings selected, page 48 through 50
4 Tape symbol indicates that a tape is inserted in the
5 Menu fields
Inserting/Ejecting a tape
Press to open the cassette slot and then insert the
tape with the wider portion toward the right.
tape deck
44
Tape operation begins:
• automatically
1
4
• if you press when a tape is already inserted in
the system.
The side which is currently playing will be indicated in
2
3
the main tape menu with “Side 1” or “Side 2”. The tape
slot cover will close if you press or automatically
after approx. 30 seconds.
To eject a tape, press the button and the tape will
be presented for removal. After removing the tape, close
5
the opening by pressing .
Notes:
P82.85-2534-26
Message “No tape” – no tape is inserted. Please insert a
tape.
Message “Tape error” – malfunction during playback (e.g.
tape jammed). Press and remove the tape.
Tape side 1 is the side facing up in the cassette slot.
The telephone and navigation functions can be used
while a tape is playing.
Switch off tape playback
Press when the main tape menu is on the screen.
The message “Tape off” will appear on the screen.
To switch to another system, press the corresponding
system button.

Changing sides
Seeking/Skipping tracks
Use the rotary/pushbutton to highlight the
“Side 1-2” menu field and confirm your selection.
The other side will now begin to play.
The side will change automatically when the end of the
tape has been reached. The side currently playing will
appear in the main tape menu.
Tape operation
Introduction
P82.85-2535-26
P82.85-2536-26
Press briefly: next track
Press briefly: previous track or beginning of
current track (depending on
elapsed playing time)
The tape will wind to the next or previous track. “Seek”
will appear on the screen. Playback will then begin.
Note:
The seek tuning function will not work properly unless
there is enough blank tape (approx. 2 seconds)
separating the individual tracks.
45
Audio Telephone Navigation Index
Info Services and
system settings

Introduction
Audio Telephone Navigation
Info Services and
system settings
Index
Tape operation
Fast forward/rewinding
Press for longer than 2 seconds: fast forward
Press for longer than 2 seconds: rewind
One of the following messages will appear on the
screen:
“Forward ” (fast forward)
“ Rewind” (rewind).
46
To stop the function:
Press / on the rocker switch. Playback will
resume.
Note:
When the end/beginning of the tape is reached,
winding stops automatically and playback begins. The
tape switches automatically to the other side at the end
of a fast forward operation.
P82.85-2537-26

Scanning
P82.85-2538-26
The tracks on a tape can be scanned one after the other
for 8 seconds each if there is enough blank tape
separating the individual tracks (approx. 2 seconds).
Use the rotary/pushbutton to highlight and confirm
the “Scan” function. Scan will begin and “Scan” will
appear in red. The message “Seek” will appear on the
screen.
To end function:
Press / on the rocker switch or press the
rotary/pushbutton . Playback then starts.
Note:
At the end of the tape, the tape will automatically
switch to the other side and scan will continue.
Tape operation
Introduction
47
Audio Telephone Navigation Index
Info Services and
system settings

Introduction
Audio Telephone Navigation
Info Services and
system settings
Index
Tape operation
Repeating tracks
Use the rotary/pushbutton to highlight the
“Settings” menu field and press it to confirm your
selection. The Settings menu will now appear.
Press the rotary/pushbutton to highlight and
activate the “Repeat” function (a checkmark will
appear).
There are three ways to return to the tape menu:
• automatic return after 8 seconds
• press
P82.85-6224-26
48
• hold the rotary/pushbutton longer than
2 seconds
“RPT” will appear below the side display when this
function is active.
Notes:
The current track will be repeated continuously after it
has played through once.
The “Repeat” function may not work properly if:
• there is not enough blank tape between the individual tracks,
• there is interference noise on the blank tape
between the tracks,
• the system does not clearly recognize the end or
beginning of a track.
To switch off the function:
In the menu “TAPE Settings” highlight the function
“Repeat” with the rotary/pushbutton and confirm
by pressing (no checkmark).

Skip blanks
P82.85-6225-26
Turn the rotary/pushbutton to highlight the “Skip
blanks” function in the “Settings” menu field and press
it to confirm your selection (a checkmark will appear).
There are three ways to return to the tape menu:
• automatic return after 8 seconds
• press
• hold the rotary/pushbutton longer than
2 seconds
If the function is activated “SB” is displayed below the
track information.
Note:
If the tape deck does not detect a sound signal for
longer than 15 seconds, it will fast forward to the next
track. This function will continue after the tape has
reached the end and switched to the opposite track.
To switch off the function:
In the menu “TAPE Settings” highlight the function
“Skip Blanks” with the rotary/pushbutton and
confirm by pressing (no checkmark).
Tape operation
Introduction
49
Audio Telephone Navigation Index
Info Services and
system settings

Introduction
Audio Telephone Navigation
Info Services and
system settings
Index
Tape operation
Dolby B, Dolby C (noise reduction)
Turn the rotary/pushbutton to highlight the
“Dolby B” or “Dolby C” function and press it to confirm
your selection (a checkmark will appear).
There are three ways to return to the tape menu:
• automatic return after 8 seconds
• press
• hold the rotary/pushbutton longer than
50
The DB or DC symbol will appear below the side
display when this function is active.
Notes:
Dolby B and Dolby C cannot be selected simultaneously.
The functions serve the optimum playback of tapes
recorded with Dolby B or Dolby C.
The Dolby noise reduction system is manufactured
under licence by Dolby Laboratories Licensing Corporation. The word Dolby and the double-D symbol D are
trademarks of Dolby Laboratories Licensing Corporation.
P82.85-6226-26
Switching the function off:
In the menu “TAPE Settings” highlight the function
“Dolby B” or “Dolby C” with the rotary/pushbutton
and confirm by pressing (no checkmark).
2 seconds

Tape playback mute
Press .
The tape will stop playing and the symbol will
appear on the icon bar.
Cancel playback mute:
Press again.
The symbol will disappear from the icon bar and the
playback will start again.
Note:
The mute function will also be cancelled if you switch
to a different audio source (e.g. CD) use or to
select another radio station or use or to alter
the volume.
Note:
The note “Reminder. Please clean tape head.” appears
after 50 hours cassette player operating time. Erase the
screen message by pressing the rotary/pushbutton .
Insert cleaning cassette.
Alarm on serious malfunction
If, for example, a tape jams, you will hear a beep. You
can only switch the beep off by switching COMAND off.
Tape operation
Introduction
51
Audio Telephone Navigation Index
Info Services and
system settings

Introduction
Audio Telephone Navigation
Info Services and
system settings
Index
Tape operation
Notes on tape care
Do not expose the tapes to direct sunlight or high
temperatures.
P82.85-2078-26
52
P82.85-2079-26
Do not leave tapes near magnetic fields or magnets.

P82.85-2080-26
P82.85-2081-26
Ensure that the tape is adequately tightened before you
insert it into the tape slot.
Tape operation
Introduction
Do not insert a tape if its label is not stuck on properly.
53
Audio Telephone Navigation Index
Info Services and
system settings

Introduction
Audio Telephone Navigation
Info Services and
system settings
Index
Tape operation
Do not touch the tape.
Note:
It is not possible to use tapes with a playing time of
longer than 120 minutes.
54
The message “Caution. Please clean sound head.” is
displayed after 50 hours of playback.
Clear the screen message by pressing the rotary/
pushbutton . Insert a high quality cleaning tape.
Note:
For questions concerning the type of tape cleaner to
use, contact your Mercedes-Benz Center.
P82.85-2082-26

Multifunction steering wheel, Multifunction
display
1 No audio function has been switched on
2 The tape deck is switched on
3 Side currently playing
Press on COMAND and switch the tape deck on.
Press repeatedly necessary until display (2)
appears.
Press to fast forward to the next track.
Press to rewind to the beginning of the same
track, or to go back to the previous track.
Press to display the next system.
Tape operation
Introduction
55
Audio Telephone Navigation Index
Info Services and
system settings

Introduction
Audio Telephone Navigation
Info Services and
system settings
Index
CD operation
Quick reference - CD changer operation (optional)
56
1
10
2
6
4 4
3
5
3
7
98
P82.85-6118-29

1 Switching CD operation on and off, page 64
2 Track select, page 66
Selecting CD’s, page 67
3 Raising or lowering the volume, page 14
4 Press briefly: next track, page 65
Press longer than 2 seconds: fast forward,
page 69
Press briefly: previous track, page 65
Press longer than 2 seconds: fast backward,
page 69
5 Turn to highlight a function or menu field
Press to perform a function or activate a submenu
6 Requesting and displaying Info Services, page 224
Adjust system settings (brightness, language,
clock, beep tones), page 227
7 Return to previous menu
8 Press to mute CD audio, press again to cancel mute
function, page 76
9 Switching the COMAND on and off, page 13
10 Color screen with main CD menu
CD operation
Introduction
57
Audio Telephone Navigation Index
Info Services and
system settings

Introduction
Audio Telephone Navigation
Info Services and
system settings
Index
CD operation
General information on CD playback
The CD changer is a Class 1 laser product. There is
a danger of invisible laser radiation if the cover is
opened or damaged.
Do not remove the cover. The CD changer does not
contain any parts which can be serviced by the user.
For safety reasons, have any service work performed
only by qualified personnel.
Warning!
58
Notes:
An 8-cm CD adapter may cause damage to the CD
changer and should not be used.
Use only CDs which bear the label shown above. Load
the CD changer with 12-cm CDs only, do not use 8-cm
CDs.

Loading CDs in the CD changer
The CD changer is in the trunk. It can accommodate up
to 6 CDs.
Open the sliding door by pushing in the direction of the
arrow indicated above. Push the door completely open
until it locks in the open position.
CD operation
Introduction
P82.85-2086-26
P82.85-2087-26
Press the green eject button. The magazine will slide
upwards.
Note:
The magazine can be ejected even if COMAND is
switched off. However, the eject button will not function
if the battery is not connected or drained.
59
Audio Telephone Navigation Index
Info Services and
system settings

Introduction
Audio Telephone Navigation
Info Services and
system settings
Index
CD operation
Pull the disk tray forward until it stops.
Note:
Do not attempt to remove the tray from the magazine.
P82.85-2088-26
60
P82.85-2890-26
Place a CD in the tray. The CD should be inserted with
the label side up.

3
2
1
Push the CD magazine into the magazine completely.
CD operation
Introduction
1 Arrow tip on the rack wall
Audio Telephone Navigation Index
P82.85-2891-26
P82.85-2991-26
Slide the magazine into the CD changer until it clicks
into place (listen for the click). Close the sliding door
(3) by pressing gently down on the door release button.
Spring pressure gently closes the door.
Note:
Make sure that the tip of the arrow on the side of the
magazine (1) is pointing in the direction of the arrow
(2).
Do not force the magazine into the changer. If the
magazine does not enter smoothly, please, check for
proper orientation of the magazine.
61
Info Services and
system settings

Introduction
Audio Telephone Navigation
Info Services and
system settings
Index
CD operation
Menu overview - CD operation
62
5
4 3
21
P82.85-6442-29

1 Main CD menu
Number in the status line indicates the magazine
slot which contains a readable audio CD and has
been selected
2 Main sound settings menu
Adjust sound settings, page 83
3 CD Naming menu
Entering, altering and deleting CD names,
page 71
4 Settings menu
Selecting playback mode, page 74
5 CD select menu,
Track select, page 65
Selecting CD’s, page 67
CD operation
Introduction
63
Audio Telephone Navigation Index
Info Services and
system settings

Introduction
Audio Telephone Navigation
Info Services and
system settings
Index
CD operation
Switching on CD operation
1
2
3
P82.85-2978-26
1 CD function with the number of the magazine slot
currently playing:
CD changer: CD 1-6
2 Track number and elapsed playback time, the
name of the CD may appear above this information
if the playing CD has been previously named by the
user
3 Scan function and menu fields to activate menus
64
Press .
The main CD menu will appear on the screen.
When you switch to CD operation, he COMAND system
will check which component was used last (CD drive or
CD changer) and whether or not there are any CDs
inserted.
If there is no CD in the component last used, the
system will automatically switch to the other
component.
CD drive - playback will begin with the first track on
the CD
CD changer - playback will begin with the first track on
the first CD detected in the magazine
If the CD changer was used last, the following message
will appear: “CD loading” when the magazine is
changed.
Error messages, page 77.

Track select
P82.85-2979-26
There are 3 different ways in which you can select CD
tracks for CD changer.
Select a track by pressing / :
Press briefly: next track
Press briefly: previous track (if less than
9 seconds of playing time has
elapsed),
beginning of the current track
(if more than 9 seconds of playing
time has elapsed).
CD operation
Introduction
65
Audio Telephone Navigation Index
Info Services and
system settings

Introduction
Audio Telephone Navigation
Info Services and
system settings
Index
CD operation
Select a track using the number keypad:
Press and enter the number of the track you wish
to select, e.g. . The selected track will then begin to
play automatically after 3 seconds or immediately after
you press .
Note:
If you enter a two-digit number, you must enter the
second number within 3 seconds. Otherwise, the
function will switch off and the screen will return to
the previous display.
P82.85-2980-26
66
P82.85-2550-26
Select a track in the “CD Select” menu:
Activate the menu with the “CD Select” menu field.
Press and the number key for the track you wish
to select, e.g. .
The chosen track will be played automatically after
3 seconds or immediately after you press .

Selecting CD’s
P82.85-2982-26
Selecting a CD with a number key:
Press a number key, e.g. to select the correspond-
ing CD. The following message will appear on the
screen: “CD loading”. Playback will begin with track 1.
Number keys - : Magazine slots in the CD
changer
Messages: “Magazine empty”:
There are no audio CDs in a magazine slot in the CD
changer.
Other error messages, page 77.
CD operation
Introduction
67
Audio Telephone Navigation Index
Info Services and
system settings

Introduction
Audio Telephone Navigation
Info Services and
system settings
Index
CD operation
1
32
4
P82.85-2547-26
1 Current track and the name of the CD playing if
this was entered previously, page 71
2 Selected CD, current CD in red color
3 Magazine slot contains a CD
4 Magazine slot does not contain a CD
68
Selecting a CD in the “CD select” menu:
Use the rotary/pushbutton to highlight the “CD
Select” menu field in the main CD menu and confirm
your selection by pressing.
Use the rotary/pushbutton to highlight the desired
CD in the menu and confirm your selection by
pressing. “CD loading ...” will appear middle above the
selection places on the screen. Playback will then begin
with track 1 of the CD selected.
Note:
If magazine slots are empty, it is not possible to select
them with the rotary/pushbutton .
If you select an empty magazine slot with a number
key, e.g. the message “No CD” is displayed.

Fast forward/backward
P82.85-2984-26
Fast forward:
Press longer than 2 seconds.
Display message: “Forward ”, display shows the
current position via the time indicator display.
Fast backward:
Press longer than 2 seconds.
Display message: “ Reverse”, display shows the
current position via the time indicator display.
Release the on of the keys to stop the function. Playback will resume.
CD operation
Introduction
69
Audio Telephone Navigation Index
Info Services and
system settings

Introduction
Audio Telephone Navigation
Info Services and
system settings
Index
CD operation
CD track scan
The tracks on a CD can be scanned one after the other
for 8 seconds each.
Press the rotary/pushbutton to activate the “Scan”
function when it is highlighted.
Scan will begin and “Scan” will appear in red.
70
There are three ways to switch the function off:
• Press the rotary switch/pushbutton again
• Press /
• Switches off automatically when the starting track
is reached.
Note:
For the CD changer, it is also possible to scan all of the
CDs in the magazine slots 1-6 for 8 seconds each
(always track 1). Activate the function “CDs scan” in
the “Settings” menu, page 76.
P82.85-2985-26

Entering, altering and deleting CD names
1
3
2
Naming the CDs inserted in the magazine:
Use the rotary/pushbutton to highlight the “CD
Naming” menu field in the main CD menu and press to
confirm your selection.
The “CD Naming” menu will appear on the screen.
Use the rotary/pushbutton to highlight the desired
4
characters (letters, numbers) and press the knob
briefly to confirm. When you have selected a character,
it will appear in magnified form (4), and when
confirmed it will appear in the input line (1).
The input marker indicates the current position.
This function can be used to allocate a name to a CD (e.g.
CD title). The name will be recognized and displayed by
COMAND after removal and re-insertion of a CD.
CD operation
Introduction
5
P82.85-2553-26
1 Input line
2 Symbols list (letters, digits, special characters)
3 Delete symbol
4 Character selected appears magnified,
magnified “M” is starting point
5 “Delete Names” function
Audio Telephone Navigation Index
Delete the character entered last:
Use the rotary/pushbutton to highlight the delete
symbol (3), then confirm by pressing. The input marker
moves to the left as it deletes. Repeat this process as
often as desired, then enter the correct character.
Deleting a complete name:
Use the rotary/pushbutton to highlight the delete
symbol (3), then confirm by pressing longer than
2 seconds.
Altering a name:
Delete one character at a time or the entire name. Then
enter the new name.
71
Info Services and
system settings

Introduction
Audio Telephone Navigation
Info Services and
system settings
Index
CD operation
Press the rotary/pushbutton longer than 2 seconds
to confirm the name. The main CD menu will appear on
the screen.
The name of the CD currently playing will appear above
the track number.
The CD will retain this name even if it is inserted into a
different magazine slot.
72
Notes:
The CD names are saved in the names list in alphabeti-
cal order. If the name memory is full, the following
message will appear: “Attention, name memory is full;
new entry only possible after deleting old one”
Confirm the message by pressing the menu field
marked “OK”. The input menu will appear again.
Use the “Delete Names” menu field to clear the
memory, page 73.
P82.85-2987-26

Delete CD name
P82.85-2555-26
Use the rotary/pushbutton to highlight the “Delete
Names” menu field in the “CD Naming” menu and
confirm it.
The list of CD names will appear on the screen.
Use the rotary/pushbutton to highlight the name
you wish to delete.
Press the rotary/pushbutton briefly to delete the
name. The following entry will then move up one
position.
Press the rotary/pushbutton longer than 2 seconds
to return to the CD main menu.
Paging forward in the name memory:
• Highlight the symbol and confirm
• Move the cursor with the rotary/pushbutton
above the last page entry and past the symbol.
Paging backward in the name memory:
• Highlight the symbol and confirm
• Move the cursor with the rotary/pushbutton
above the first page entry and past the symbol.
CD operation
Introduction
73
Audio Telephone Navigation Index
Info Services and
system settings

Introduction
Audio Telephone Navigation
Info Services and
system settings
Index
CD operation
Selecting playback mode
Use the rotary/pushbutton to highlight the
“Settings” menu field in the main CD menu and
press to confirm.
The “Settings” menu will appear.
A checkmark indicates the active function.
74
The “Standard” function is active (CD playback in
ascending order). This function is automatically
selected when another CD has been selected.
Note:
It is only possible to select one playback mode at a
time.
P82.85-2556-26

Magazine Mix
Track repeat
Select the “Track Repeat” function to repeat the current
track until you switch the function off.
“Track Repeat” will appear in the main CD menu.
Play CD tracks in random order
Select the “Track-Mix” function to play back the tracks
on the CD currently selected in random order.
The message “Track-Mix” appears in the CD main
menu.
Select the “Magazine mix” function to play all of the
tracks of all of the CDs in the magazine slots 1-6 in
random order.
Use the rotary/pushbutton to highlight the “Magazine mix” function and press it to confirm. This function
will be marked with a checkmark.
Press to return to the main CD menu.
“Magazine mix” will appear in the main CD menu.
CD operation
Introduction
P82.85-2989-26
CD repeat
Select the “CD Repeat” function to repeat the current
CD until you switch the function off again.
“CD Repeat” will appear in the main CD menu.
75
Audio Telephone Navigation Index
Info Services and
system settings

Introduction
Audio Telephone Navigation
Info Services and
system settings
Index
CD operation
CD Scan Function
Select the “CDs scan” function to scan all of the CDs in
the magazine slots 1-6 for 8 seconds each (track 1).
The scan function will begin with the CD following the
CD currently playing. The scan function will end
automatically after all of the CDs have been scanned or
if you press / .
Switching off the function
Use the rotary/pushbutton to highlight the desired
function in the “CD settings” menu and press it to
confirm your selection (no checkmark).
The “Standard” function will be activated automatically
(checkmark).
76
CD playback mute
Press while a CD is being played.
CD operation will be muted and the symbol appears
in the symbol bar.
Cancel playback mute:
Press once again.
CD operation is switched on again and the symbol is
faded out of the symbol bar.
Note:
The mute function will also be cancelled if you switch
to a different audio source (e.g. radio) use or
to select another radio station or use or to
alter the volume.

Error messages
1 CD changer error messages
“No CD changer” – The system cannot detect the CD
changer; contact a Mercedes-Benz Center (1)
“No magazine” –There is no magazine inserted in the
CD changer; load CDs into the magazine and insert the
magazine into the CD changer (1)
1
“Magazine empty” –There are no CDs in the magazine;
load CDs into the magazine and insert the magazine
into the CD changer (1)
“Being activated” – The CD changer is not yet ready for
operation (1).
“Reading error” – The system cannot read the CD
P82.85-7746-26
which has been inserted (2), e.g. audio CD
CD operation
Introduction
77
Audio Telephone Navigation Index
Info Services and
system settings

Introduction
Audio Telephone Navigation
Info Services and
system settings
Index
CD operation
“Error” – an error other than those described here has
occurred (1, 2)
If an error occurs in the operation of the CD drive or
the CD changer, the system will automatically switch to
the other component after 3 seconds.
CD operation will resume when the error has been
corrected.
If it is not possible to play the CD which has been
selected in the CD changer (“Error” message), the
system will automatically select the next CD in the
magazine.
78
“Temperature for CD operation is too high” – CD
operation will switch off automatically after 3 seconds;
press the corresponding key to select a different audio
source (1, 2)

Tips on caring for your CDs
Handle CDs only as illustrated. Avoid touching the CD surface with your fingers!
CD operation
Introduction
P82.85-2106-26
P82.85-2108-26
79
Audio Telephone Navigation Index
Info Services and
system settings

Introduction
Audio Telephone Navigation
Info Services and
system settings
Index
CD operation
the inside to the outer edge. Never wipe the CD in a
circular motion.
P82.85-2107-26
80
P82.85-2109-26
Do not use rubbing alcohol or solvents to clean the CDs.Clean CDs with a dry, lint-free cloth. Wipe them from

P82.85-2110-26
P82.85-2111-26
Do not write or put stickers on CDs.
Note:
You can name a CD and then this name will be dis-
played on the screen when you play it, page 71.
CD operation
Introduction
Do not expose the CDs to heat or direct sunlight.
81
Audio Telephone Navigation Index
Info Services and
system settings

Introduction
Audio Telephone Navigation
Info Services and
system settings
Index
CD operation
Multifunction steering wheel, Multifunction
display
1
AUDIO
OFF
2
CD4
TRACK 5
82
1 No audio system has been switched on.
2 The CD unit is switched on.
3 The number of the CD currently playing will be
displayed.
4 Track number being played.
Press on COMAND to switch the CD unit on.
CD4
TRACK 6
3
4
Press or repeatedly if necessary until
display (2) appears.
Press or until the desired track number
appears.
Press or to display the next or previous
system.
CD4
TRACK 4
P82.85-3291-27

Adjust sound settings
The COMAND system is equipped with a BOSE
amplifier.
You can set the sound Bass/Treble and the soundcenter (fader and balance) individually or select sound
impressions.
See individual audio mode descriptions for instructions
on this feature.
Adjustments to the sound have a different effect on the
audio and service sources. The predefined sound
modes are available for the audio sources only.
The audio sources include:
• Radio (FM, AM, WB)
• Tape deck
• CD changer (optional)
The main menu for the sound is activated in the audio
sources through the menu field “Sound”.
Service sources include:
• Telephone
• Voice output in navigation
• Voice recognition system
The main menu for the sound is activated in the menu
“NAVI Settings” through the menu field “Sound”.
Audio
Telephone
83
Navigation
Info Services and
system settings
Index

Audio Telephone Navigation
84Sound settings
Info Services and
system settings
Index
Activate main Sound menu
1
2
3
5
6
For audio sources:
1 Status line, radio (FM) is switched on
Other messages:
AM band is active – “AM Bass/Treble”
WB band is active – “WB Bass/Treble”
CD drive or CD changer is switched on –
“CD Bass/Treble”
2 Actual sound settings (Bass/Treble)
4
P82.85-2558-26
3 Actual sound-center
Fader: front – back
Balance: left – right
4 Slide switch to alter the value
5 Reset bass and treble to “0”, and the fader/balance
to the middle
6 Activate predefined sound impressions, page 88
To activate the main sound menu for radio (FM/AM,
WB) or CD operation:
Use the rotary/pushbutton to highlight the main
menu field “Sound” and press it to confirm your
selection.
The actual settings for sound and fader/balance are
displayed. The “Bass” menu field is highlighted
whenever “Bass/Treble” menu (FM/AM, WB, TAPE or
CD) is first accessed.

The actual settings for sound and fader/balance are
displayed. The “Bass” menu field is highlighted
whenever the “Speech Bass/Treble” menu is first
accessed.
1 Volume difference
Set the volume difference between language during
route guidance and an active audio source.
1
“0” - The volume of the audio sources is not
affected during voice output
“10” - The audio source is set very low during
language playback.
P82.85-2559-26
Activate the main sound menu for setting the service
sources:
Use the rotary/pushbutton to highlight the
“Settings” menu field in the navigation menu and press
to confirm your selection. The menu “NAVI Settings”
will now appear.
Use the rotary/pushbutton to highlight the “Sound”
menu field and confirm by pressing.
Audio
Telephone
Notes:
• No sound impressions is provided for service
sources.
• During adjustment of Bass/Treble/Fader/Balance in
the “Speech Bass/Treble” menu, COMAND will
issue a repetative voice output of “Sample” to allow
you to set the settings as you prefer.
85
Navigation
Info Services and
system settings
Index

Audio Telephone Navigation
Setting Bass/Treble/Fader/Balance
1
Info Services and
system settings
Index
86Sound settings
P82.85-2560-26
1 Setting mode active
Use the rotary/pushbutton to move the cursor to the
parameter you want to alter and confirm by pressing.
The setting mode is activated.
The activated sound parameter is shown in red.
Turn the rotary/pushbutton to set the desired value
and confirm by pressing. The marked sound feature is
shown in black.
P82.85-2561-26
There are three ways to return to the main audio menu:
• Press
• Hold the rotary/pushbutton longer than
2 seconds
• Automatic activation after 15 seconds.
To reset the current alteration, set all values to “0”:
Use the rotary/pushbutton to highlight the menu
field “Reset” and confirm by pressing.

Notes:
The balance is adjusted to the same setting for the
radio (FM/AM, WB) and CD changer.
Adjustments which are made to the navigation system
will affect the Voice recognition system and the
telephone.
Use the “Reset” menu field to position the balance back
to the center of the vehicle, to set the sound linearly
and to reset at the same time the sound volume to a
defined value.
Audio
Telephone
87
Navigation
Info Services and
system settings
Index

Audio Telephone Navigation
Activating sound impressions
Info Services and
system settings
Index
88Sound settings
P82.85-2562-26
In the main sound settings menu, use the rotary/
pushbutton to highlight the menu field “Other
Options” and confirm by pressing.
The “Other Options” menu (FM/AM, WB, TAPE or CD)
is activated, the symbol for the actual sound impression
is shown.
P82.85-2563-26
Selecting a new sound impression:
Use the rotary/pushbutton to highlight the required
sound optimization and confirm by pressing
(checkmark appears).
Note:
It is only possible to select one sound optimization at a
time.

There are three ways to return to the main audio menu:
• Press
• Hold the rotary/pushbutton longer than
2 seconds
• Automatic activation after 8 seconds.
Note:
The main sound menu is activated through the “Bass/
Treble” menu field.
Available sound impressions:
• Standard – the sound is set linearly for the center
of the vehicle
• Speech – the emphasis is on the spoken word
• Driver optimiz. – the sound is optimized for the
driver’s position
• Ambience
Small – small rooms are simulated
Medium – medium-sized rooms are simulated
Large – large rooms are simulated
Note:
Sound impressions are not available for the service
sources.
Audio
Telephone
89
Navigation
Info Services and
system settings
Index

Introduction
Audio Telephone Navigation
90Telephone
Info Services and
system settings
Index

Telephone
Telephone.......................................... 92
Before you use the telephone ...... 92
Multifunction steering wheel,
Multifunction display ................... 94
Overview of the
Multifunction displays ................. 95
Quick reference – Telephone....... 96
Menu overview – Telephone ....... 98
Switching telephone
operation on ................................. 100
Telephone
Contents – Telephone
Telephone
Incoming calls.............................. 102
Outgoing calls .............................. 106
Dialing a telephone number ...... 106
Dialing a number from the
phone book ................................... 109
Redial ............................................. 116
Dialing from calls list ................. 120
Speed-dialing (only with
COMAND) ..................................... 121
91
Quick-dialing (for the first 10
memory locations) ...................... 123
Notebook ....................................... 124
Editing the phone book .............. 125
SMS function................................ 132
Emergency call ............................ 136
Service numbers ......................... 139
Introduction
Audio Telephone Navigation Index
Info Services and
system settings

Introduction
Audio Telephone Navigation
Info Services and
system settings
Index
Notes
Before you use the telephone
Warning!
Never operate radio transmitters equipped with a
built-in or attached antenna (i.e. without being
connected to an external antenna) from inside the
vehicle while the engine is running. Doing so
could lead to a malfunction of the vehicle’s electronic systems, possibly resulting in an accident
and personal injury.
Radio transmitters, such as a portable telephone or a
citizens band unit should only be used inside the
vehicle if they are connected to an antenna that is
installed on the outside of the vehicle.
• Please read this section first before attempting to
operate your telephone.
• Always drive with extreme caution when you
operate the telephone hands-free.
92Telephone
• Do not stop or park in no-parking areas to use the
telephone.
• Close the windows and reduce all outside noise as
much as possible when you use hands-free operation.
• If the signal strength is very weak (display in the
symbol field of all main menus) you should not
make telephone calls. Wait until reception improves.
• A brief disconnection from the cellular network
is not a malfunction, as this can occur when the
network switches areas.
• If you are required to enter the unlock code when
you switch the COMAND operating unit on, enter it
to be able to use all of the telephone functions.
Enter the unlock code, see page 100.
• If a telephone menu other than the telephone menu
is displayed on the COMAND screen, the display
will change if an outgoing call is sent out via the
multifunction steering wheel.

In the following situations, it is not possible or not yet
possible to use the telephone:
• The telephone is already unlocked but is not (yet)
registered in the network. The message “No
Service” is displayed. The telephone will try to
register into the network. If the network is available, the telephone will be ready for use. The above
message also appears if the network is no longer
available due to weak signals.
The message “No Service” is displayed for 8 seconds if you try to make a call.
• The message “Telephone is being activated. Please
wait” appears. The phone is being initialized for
use. Select other equipment functions by pressing
the corresponding button or wait until the phone is
active.
• The message “Error: Phone not connected” is
displayed. Please connect the telephone.
• The message “Error: Phone defective” appears. The
telephone cannot work because an error has
occured. Please contact a Mercedes-Benz Center.
Telephone
In the following situation, it is not yet possible to use
the functions “Dial number from phone book” or
“Speed-dial”.
• The mobile telephone has been plugged into its
holder correctly the COMAND operating unit has
been switched on and the telephone function
download function has been actuated (see
telephone section in operator’s manual).
In the following situations it is not possible to make a
call and following messages appear:
• “System busy, redial?” – dialing has failed because
system is busy.
• “No Service, redial?” – dialing has failed because
network cannot be received.
• “Phone off” – Tele Aid is active, the telephone
function will switch on automatically after Tele Aid
is ended.
Telephone
Notes
Introduction
93
Audio Telephone Navigation Index
Info Services and
system settings

Introduction
Audio Telephone Navigation
94Telephone
Info Services and
system settings
Index
Multifunction steering wheel, Multifunction display
1 Multifunction display
2 Multifunction steering wheel
Turn the electronic key in the steering lock to
position 1 or 2.
3 Activates next system
4 Activates previous system
5 Pages backwards through the phone book
6 Pages forwards through the phone book
7 Raises telephone volume of dial tone/idle
tone
8 Lowers telephone volume of dial tone/idle tone
9 Accepts incoming calls, page 102
Activates the redial memory, page 116
Starts dialing after the selection of a number,
page 110, 114
10 Ends telephone call, page 102
Refuse call, page 102
Interrupts dialing, the message READY will
appear, page 110
If the telephone menu is displayed on at the
multifunction display and the telephone operation is
switched on at COMAND, changes in COMAND affect
the multifunction display.

Overview of the Multifunction displays 1 The telephone is switched on,
Telephone operation is activated, page 100
2 The system is searching for the corresponding
telephone network
3 The telephone is ready for use
4 The vehicle is currently outside the transmission or
reception range
5 Phone book is empty and/or has not been loaded
into the COMAND telephone memory
6 A number selected from the phone book
7 Dialing begins
8 Dialing is completed and the number is displayed.
The display will remain until you end the call
9 Number of the memory location and the name
stored here
Telephone
Introduction
Telephone
P82.85-6148-27
95
Audio Telephone Navigation Index
Info Services and
system settings

Introduction
Quick reference – Telephone
Audio Telephone Navigation
96Telephone
1
9
Info Services and
system settings
2
43
Index
5
6
5
7
8
P82.85-6119-29

1 Switching the telephone on and off, page 100
2 Entering the unlock code, page 100
Entering a telephone number, page 106
Speed-dialing (only at COMAND):
Activates number stored in the phone book with a
maximum of 2 digits, page 121
Quick-dialing (for the first ten memory locations),
page 123
Enter the emergency call, page 123
3 Subsequent dialing, page 108
4 Subsequent dialing, page 108
5 Sets the volume for hands-free operation of the
telephone (during a call), page 104
6 Turn to highlight a menu field, a list entry, or a
symbol
Telephone
Press to activate a sub-menu,
Confirms an entry/selection,
Starts dialing when “Send” is highlighted,
Ends the call when “End” is highlighted,
Switches off the microphone of the hands-free
telephone when “Mute” is highlighted
7 Activates previous menu
Entering a telephone number:
Press briefly – the last digit will be deleted
Press for longer than two seconds – the whole
number will be deleted
8 Switching the COMAND on and off, page 13
9 Color screen with main telephone menu
Telephone
Introduction
97
Audio Telephone Navigation Index
Info Services and
system settings

Introduction
Menu overview - Telephone
Audio Telephone Navigation
98Telephone
Info Services and
system settings
Index
17
16
15
1
14 13
2
7
9
10
6
543
8
11
12
P82.85-6443-29
 Loading...