


Metris
Operator's Manual
Orderno. 6463730413 Partno. 447 584 23 02 Edition 10-15
Metris
4475842302

Publication details
Internet
Further information about Mercedes-Benzvehicles and about Daimler AG can be found on the
following websites:
http://www.mercedes-benz.com
http://www.mbusa.com (USA only)
http://www.mercedes-benz.ca (Canada only)
Editorial office
You are welcome to forward any queries or suggestions you may have regarding this Operator's
Manual to the technical documentation team at
the address on the inside of the front cover.
©
Mercedes-BenzUSA, LLC
©
Mercedes-BenzCanada, Inc.
Mercedes-BenzUSA, LLC and Mercedes-Benz
Canada Inc. are Daimler companies.
Not to be reprinted, translated, or otherwise
reproduced, in whole or in part, without written
permission.
Vehicle manufacturer
Daimler AG
Mercedesstraße 137
70327 Stuttgart
Germany
Symbols
G
WARNING
Warning notes make you aware of dangers
which could pose athreat to your health or
life, or to the health and life of others.
H
Environmental note
Environmental notes provide you with information on environmentally aware actions or
disposal.
!
Notes on material damage alert you to dangers that could lead to damage to your vehicle.
i
These symbols indicate useful instructions
or further information that could be helpful to
you.
X
This symbol designates an instruction you must follow.
X
Several consecutive symbols indicate an instruction with several
steps.
(Y page)
This symbol tells you where you can
find further information on atopic.
YY
This symbol indicates awarning or an
instruction that is continued on the
next page.
Display
This text indicates amessage on the
display.
Registered trademarks
ESP®is aregistered trademark of Daimler AG.
Vehicle distributor
Mercedes-Benz USA,LLC
One Mercedes Drive
Montvale, NJ 07645-0350
www.mbusa.com
Customer Assistance Center:
1-877-762-8267
Mercedes-Benz Canada, Inc.
98 Vanderhoof Avenue
Toronto, ON M4G 4C9
www.mercedes-benz.ca
Customer Relations Department:
1-800-387-0100
Mercedes-Benz USA,LLC and Mercedes-Benz
Canada Inc.are Daimler companies.
As at 03.02.2015

Welcome to the world of Mercedes-Benz
Before you first drive off, read the Operator's
Manual carefully and familiarize yourself with
yourvehicle. Please adhere to the information
and warning notes in this Operator's Manual for
yourown safety and to ensure alonger operating duration of the vehicle. Failure to observe
the instructions may leadtodamage to the vehicle or personal injury.
Vehicle damage caused by afailure to observe
the instructions is not covered by the New Vehicle Limited Warranty.
The equipment or model designation of your
vehiclemay differaccording to:
R
model
R
order
R
country specification
R
availability
The illustrations in this Operator's Manual show
aleft-hand-drive vehicle. The location of vehicle
parts and controls for right-hand drive vehicles
differaccordingly.
Mercedes-Benz is constantly updating its vehicles to the state of the art.
Mercedes-Benz reservesthe right to introduce
changes in:
R
design
R
equipment
R
technology
Therefore, the descriptions provided may occasionally differfrom yourown vehicle.
The following are integralparts of the vehicle:
R
Operator's Manual
R
Maintenance or Service Booklet
R
Equipment-dependent operating instructions
Keep these printed documents in the vehicleat
all times. Shouldyou sell the vehicle, always
passthe documents on to the new owner.
4475842302

2
Contents
Index ....................................................... 3
Introduction ......................................... 25
At aglance ........................................... 34
Safety ................................................... 43
Opening and closing ........................... 67
Seats,steering wheel and mirrors .... 83
Lights and windshield wipers ............ 92
Climatecontrol ................................. 107
Driving and parking .......................... 119
On-boardcomputer and displays .... 168
Stowing and features ....................... 228
Transportingloads ............................ 232
Maintenance and care ...................... 240
Breakdown assistance ..................... 260
Wheels and tires ............................... 267
Technicaldata ................................... 294

Index
3
1, 2, 3...
12 Vsocket ........................................ 231
A
ABS (anti-lock braking system)
Display message (vehicle with
steering wheel buttons) .................203
Display message (vehicle without
steering wheel buttons) ................. 189
Function/notes ................................ 62
Important safety notes .................... 62
Warning lamp ................................. 221
Acceleration
see Kickdown
Accident
Automatic measuresafter an acci-
dent ................................................. 56
Activating/deactivating cooling
with air dehumidification ................. 111
Active Parking Assist
Canceling/stopping active park-
ing assistance ................................ 158
Detecting parking spaces .............. 155
Display message ............................ 213
Exiting aparking space .................. 157
Function/notes .............................154
Important safety notes .................. 154
Parking .......................................... 156
Towing atrailer .............................. 154
Add-on equipment ............................... 30
Additional indicators
Replacing bulbs .............................100
Additional speedometer
On-board computer (vehicle with
steering wheel buttons) ................. 185
On-board computer (vehicle with-
out steering wheel buttons) ........... 174
Additives
Engine oil ....................................... 299
Gasoline ......................................... 297
Airbag
Display message (vehicle with
steering wheel buttons) ................. 204
Display message (vehicle without
steering wheel buttons) ................. 190
Airbags
Deployment ..................................... 54
Front airbag (driver, front
passenger)....................................... 49
Important safety notes .................... 48
Introduction ..................................... 47
Occupant Classification System
(OCS) ............................................... 50
PASSENGER AIR BAG OFF indica-
tor lamp ...........................................4
Sideimp
Window curtainair bag.................... 50
Airpressure
see Tire pressure
Airvents
Important safety notes .................. 116
Setting the center airvents ........... 117
Setting the rear-compartment air
vents .............................................. 117
Setting the sideair vents ............... 117
Airvents
see Air vents
Air-conditioning system
see Climate control
Alarm system
see ATA (Anti-Theft Alarm system)
Alertnessassistant
see ATTENTIONASSIST
Ambient lamp
Changing abulb(front door) ............ 97
Changing abulb(tailgate) ................ 97
Changing abulb(vanity mirror) ........ 97
Anti-lockBrakingSystem
see ABS (Anti-lock Braking System)
Anti-skid chains
see Snow chains
Anti-Theft Alarm system
see ATA (Anti-Theft Alarm system)
Armrests .............................................. 89
Ashtray ............................................... 230
ATA (Anti-TheftAlarm system) ........... 66
ATTENTIONASSIST
Activating/deactivating (vehicle
with steering wheelbuttons) ......... 184
Activating/deactivating (vehicle
withoutsteering wheelbuttons) .... 174
Displaymessages (vehicle with
steering wheelbuttons) ................. 213
act airbag .......................... 49
4

4
Index
Display messages(vehicle with-
outsteering wheelbuttons)........... 199
Function/notes............................. 149
Authorized workshop
see Qualifiedspecialist workshop
AUTO lamp
Displaymessages (vehicle with-
outsteering wheelbuttons) ........... 195
AUTO lights
Displaymessages (vehicle with
steering wheelbuttons) ................. 209
see Lights
Automatic car wash(care) ............... 254
Automatic climate control
see Climate control
Automatic engine start (ECO start/
stopfunction) .................................... 123
Automatic engine switch-off (ECO
start/stopfunction) .......................... 123
Automatic headlamp mode ................ 93
Automatic locking ............................... 72
Automatic transmission
Accelerator pedalposition ............. 129
Changing gear............................... 127
DIRECTSELECT lever ..................... 126
Displaymessage ............................ 217
Driving tips.................................... 129
Emergency running mode.............. 131
Engaging drive position .................. 126
Engaging neutral ............................ 126
Engaging reverse gear................... 126
Engaging the park position ............ 126
Gearshift recommendation ............ 130
Important safety notes .................. 125
Kickdown....................................... 129
Manualshifting .............................. 130
Overview ........................................ 125
Problem (malfunction) ................... 131
Programselector button ................ 129
Rocking the vehiclefree ................ 130
Shift ranges ................................... 128
Starting the engine ........................ 121
Steering wheelpaddleshifters ...... 130
Trailer towing ................................. 130
Transmission oilchange ................ 299
Transmission position display
(DIRECT SELECT lever) ................... 127
Transmission positions .................. 127
Transmission programdisplay .......
nsmission programs ................. 128
Tra
Automatic transmissionemer-
gencymode ....................................... 131
Axle load, permissible(trailertow-
ing) ...................................................... 305
127
B
Backup lamp
Displaymessages (vehicle with
steering wheelbuttons) ................. 210
Backup lamps
Displaymessages (vehicle with-
outsteering wheelbuttons) ........... 196
Replacing bulbs............................. 101
BAS (Brake Assist System)
Function/notes................................ 63
Battery (SmartKey)
Checking .......................................... 69
Important safety notes .................... 69
Replacing ......................................... 69
Battery (vehicle)
Care ............................................... 253
Charging ........................................ 253
Connecting and installing .............. 251
Disconnecting and removing ......... 250
Displaymessages (vehicle with
steering wheelbuttons) ................. 211
Displaymessages (vehicle with-
outsteering wheelbuttons) ........... 197
Important safety notes .................. 248
Jump starting ................................. 262
Location ......................................... 250
Before driving off
Important safety notes .................. 120
Belt
see Seatbelts
Bicycle rack ....................................... 238
Blind SpotAssist
Activating ....................................... 147
Activating/deactivating (vehicle
with steering wheelbuttons) ......... 184
Collision warning ........................... 147
Displaymessage ............................ 215
Important safety notes .................. 145
Monitoring rangeofthe sensors .... 146

Index
5
Notes/function .............................. 145
Trailer towing .................................147
Warning display............................. 146
Blower
see Climate control
®
Bluetooth
Audio ............................... 181
Brake
Displaymessage (vehicle without
steering wheelbuttons) ................. 189
Brake Assist
see BAS (Brake Assist System)
Brake assistance
see BAS (Brake Assist System)
Brake fluid
Checking the level ......................... 245
Displaymessage (vehicle with
steering wheelbuttons) ................. 206
Displaymessage (vehicle without
steering wheelbuttons) ................. 192
Notes............................................. 300
Brake forcedistribution
see EBD (electronicbrake force
distribution)
Brake lamps
Displaymessages (vehicle with
steering wheelbuttons) ................. 209
Displaymessages (vehicle with-
outsteering wheelbuttons) ........... 195
Replacing bulbs............................. 101
Trailer display messages (vehicle
with steering wheelbuttons) ......... 209
Trailer display messages (vehicle
withoutsteering wheelbuttons) .... 195
Brake pads/linings
New ............................................... 137
Brakes
ABS .................................................. 62
Adaptive Brake Assist .................... 144
Applying the parking brake ............ 133
BAS .................................................. 63
Brake fluid (notes) ......................... 300
Checking brake fluid level .............. 245
Displaymessage (vehicle with
steering wheelbuttons) ................. 203
EBD .................................................. 63
Hillstart assist............................... 122
Important safety notes .................. 136
New brake pads/linings ................ 137
Parking brake (notes) ..................... 137
Riding tips...................................... 136
Warning lamp ................................. 220
Breakdown
Vehicletool
see
Towing away
kit ............................... 260
Buttons
On the instrument cluster .............. 170
On the steering wheel.................... 175
C
California
Important notice for retail cus-
tomers and lessees .......................... 25
Camera
see Rear viewcamera
Car
see Vehicle
Car wash
see Care
Care
Carwash........................................ 254
Carpets .......................................... 259
Display........................................... 258
Exterior lights ................................ 257
Interior ........................................... 258
Notes............................................. 254
Paint .............................................. 255
Plastic trim .................................... 258
Power washer................................ 255
Rear viewcamera .......................... 257
Roof lining ...................................... 259
Seatbelt........................................ 259
Seatcover..................................... 259
Sensors ......................................... 257
Sliding door................................... 258
Steering wheel............................... 259
Trimpieces.................................... 259
Washing by hand ........................... 255
Washing the engine ....................... 255
Wheels........................................... 256
Windows........................................ 256
Wiperblades.................................. 256
Cargocompartment
Options .......................................... 234
Seating ............................................ 85

6
Index
Cargo compartment lamp
Changingbulbs ................................ 97
Cargo compartment lighting
Switching on centrally ...................... 96
Switching on locally .........................96
Cargo tie-down rings
Permissible tensile load .................304
Center console
Controls...........................................40
Centrallocking
Activating/deactivating the
acoustic lockingconfirmation (on-
board computer) ............................ 187
Automatic locking............................72
Automatic locking(on-board com-
puter) .............................................187
Emergency unlocking ....................... 68
Locking/unlocking (buttons) ........... 72
Locking/unlocking (SmartKey) ........67
Centrallocking system
see Central locking
Changing abulb
Ambientlamp in thefront door ........ 97
Halogen headlamps .........................98
Mirror lamp in the headliner ............ 97
Signal and ambient light in the tail-
gate .................................................98
Trunk lamp in the side trim panel ....97
Changing bulbs
Additional turnsignals ...................100
Ambient lamp in tailgate .................. 97
Backup lamps ................................ 101
Brake lamps ................................... 101
Cargo compartment lamp ................ 97
Daytime running la
High-b
eam headlamps ................... 100
mps .................. 100
Installing/removing arear lamp
cluster ...........................................101
Installing/removing the cover in
the wheel arch ................................. 99
Installing/removing the tail lamp ... 101
Interior light ..................................... 96
Interior lighting ................................ 96
Low-beam headlamps ......................99
Overview of lamp types (front
bulbs) ............................................... 99
Overview of lamp types (rear
bulbs) ............................................. 100
Parking lamps ................................ 100
Rear fog lamp ................................ 101
Rear interior light in the headliner ... 97
Standing lamps (front) ...................100
Standing lamps (rear) .................... 101
Taillamps ...................................... 101
Trunk lamp in the headliner ............. 96
Turn signals (front) ......................... 100
Turn signals (rear) .......................... 101
see Changing light bulbs
Changing bulbs
see Replacing bulbs
Child
Restraint system .............................. 58
Child seat
Forward-facing restraint system ...... 60
LATCH-type(ISOFIX) childseat
anchors ............................................ 59
On the front-passenger seat............ 60
Rearward-facing restraint system .... 60
Top Tether ....................................... 59
Child-proof locks
Important safety notes .................... 61
Sliding door..................................... 61
Children
Specialseatbeltretractor ............... 57
Cigarette lighter ................................ 230
Cleaning
Trailer tow hitch ............................. 258
Climate control
Air conditioning in the rearcom-
partment ........................................ 110
Control panel (dual-zone automaticclimate control).
ntrolling automatically............... 112
Co
................... 109
Cooling with airdehumidification .. 111
Defrosting the windows................. 115
Defrosting the windshield .............. 114
Important safety notes .................. 107
Information on automatic climate
control (dual-zone)......................... 109
Information on TEMPMATIC(air-
conditioning system)..................... 108
Overview of systems...................... 107
Problem with the rearwindow
defroster ........................................ 115
Rear-compartment aircondition-
ing ................................................. 110

Index
7
Refrigerant .....................................301
Refrigerant filling capacity ............. 302
Setting the airdistribution ............. 113
Setting the airvents ......................116
Setting the airflow ......................... 113
Setting the temperature ................ 112
Switching air-recirculation mode
on/off ............................................ 115
Switching on/off ........................... 110
Switching residualheaton/off ...... 116
Switching the rear window
defroster on/off ............................ 115
Switching the synchronization
function on and off ........................ 114
TEMPMATICcontrol panel(air
conditioning) .................................. 108
Clock
Setting (vehicle without steering
wheel buttons) ............................... 175
Cockpit
Instrument cluster (vehicle with
steering wheel buttons) ................... 37
Instrument cluster (vehicle with-
out steering wheel buttons) ............. 35
Overview .......................................... 34
see Instrument cluster
Coffee cup symbol
see ATTENTION ASSIST
COLLISIONPREVENTION ASSIST
Activating/deactivating the dis-
tance warning function .................. 184
Adaptive Brake Assist .................... 144
Display message ............................ 213
Distance warning function ............. 143
Operation/notes ............................ 143
Collisionwarning
see COLLISION PREVENTION ASSIST
COMAND display
Cleaning ......................................... 258
Combination switch ............................ 94
Communications equipment
Operation ....................................... 231
Typeapproval/frequency .............. 294
Consumptionstatistics
Fuel (vehicle with steering wheel
buttons) ......................................... 178
Fuel (vehicle without steering
wheel buttons) ............................... 171
Control panel
Above the windshield ....................... 41
Center console ................................ 40
Climate control ............................
Driver's
door ....................................41
.... 40
Convenience closing feature .............. 81
Convenience opening
Withthe SmartKey .........................116
Convenience opening feature ............ 81
Conversions/equipment .................... 30
Coolant(engine)
Adding ...........................................245
Checking the level......................... 244
Display messages (vehicle with
steering wheel buttons) ................. 212
Display messages (vehicle with-
out steering wheel buttons) ........... 197
Displaying the temperature (on-
board computer) ............................ 172
Filling capacity ............................... 301
Notes ............................................. 300
Temperature displayinthe instru-
ment cluster .................................. 169
Warning lamp ................................. 223
Cooling
see Climate control
Crosswind Assist ................................. 65
Cruisecontrol
Activating ....................................... 142
Activationconditions ..................... 141
Cruise control lever....................... 141
Deactivating ................................... 142
Display messages (vehicle with
steering wheel buttons) ................. 214
Display messages (vehicle with-
out steering wheel buttons) ........... 199
Displaying the speed..................... 141
Driving system ............................... 140
Function/notes............................. 140
Important safety notes .................. 141
Problem (malfunction) ................... 143
Resuming the storedspeed ........... 142
Setting aspeed .............................. 142
Storing and maintaining current
speed ............................................. 142
Cup holder ......................................... 230
Important safety notes .................. 229

8
Index
Customer Assistance Center
(CAC) .....................................................30
Customer RelationsDepartment .......30
D
Dashboard
see Cockpit
Dashboardlighting
see Instrumentcluster lighting
Data
see Technicaldata
Date
Setting(vehicle withsteering
wheelbuttons)...............................186
Setting (vehicle without steering
wheel buttons) ............................... 175
Daytime runninglamp mode
see Daytime running lamps
Daytime runninglamps
Changing bulbs .............................. 100
Display messages (vehicle with
steering wheel buttons) ................. 210
Display messages (vehicle with-
out steering wheel buttons) ........... 196
Switching on/off (switch) ................ 93
Dealership
see Qualified specialist workshop
Declarations of conformity ................. 29
Delayedswitch-off
Exterior lighting (on-board com-
puter) ............................................. 186
Interior lighting .............................. 187
Diagnosticsconnection
Operating safety and vehicle
approval ...........................................29
Digital speedometer
Displaying(vehicle withsteering
wheelbuttons)...............................178
Displaying (vehicle without steer-
ing wheel buttons) ......................... 172
DIRECT SELECTlever
Automatic transmission ................. 126
Display
Function/notes (vehicle with
steering wheel buttons) ................. 176
Function/notes (vehicle without
steering wheel buttons) ................. 170
Permanent display(vehicle with
steering wheel buttons) ................. 185
Permanent display(vehicle with-
out steering wheel buttons) ........... 174
see Warning and indicator lamps
Display message(vehicle with
steering wheel buttons)
Safety systems ..............................
Service
Display message(vehicle without
steering wheel buttons)
Safety systems .............................. 189
Service intervaldisplay.................. 247
Display messages (vehicle with
steering wheel buttons)
Calling up ....................................... 202
Driving systems .............................213
Engine ............................................ 211
Hiding ............................................ 201
Important safety notes .................. 201
Introduction ................................... 201
Key ................................................ 218
Lights ............................................. 208
Setting the language ......................185
Tires............................................... 216
Vehicle ...........................................217
Display messages (vehicle without
steering wheel buttons)
Calling up ....................................... 188
Driving systems .............................198
Engine ............................................ 197
Hiding ............................................ 188
Important safety notes .................. 188
Introduction ................................... 188
Key ................................................ 201
Lamps............................................ 194
Setting the language ......................173
Tires............................................... 199
Vehicle ...........................................200
Distancerecorder
Displaying (vehicle with steering
wheel buttons) ............................... 177
Displaying (vehicle without steer-
ing wheel buttons) ......................... 171
Setting the displayunit (vehicle
without steering wheel buttons) .... 174
Distancewarning (warning lamp) .... 225
Distancewarning function ...............143
intervaldisplay.................. 247
203

Index
9
Door
Changingbulbs (ambientlamp)....... 97
Displaymessages (vehicle with
steering wheelbuttons) ................. 218
Displaymessages (vehicle with-
outsteering wheelbuttons) ........... 201
Indicatorlamp................................ 227
Doors
Central locking/unlocking
(SmartKey)....................................... 67
Control panel ................................... 41
Emergency locking ........................... 69
Emergency unlocking ....................... 69
Drinking and driving ......................... 135
Drinks holder
see Bottle holder
Driver's doorand front-passenger
door ...................................................... 73
Driver's seat
see Seats
Drivingabroad
Fuel................................................ 136
Low-beamheadlamps.................... 136
Mercedes-Benz Service ................. 136
Drivingoff-road
see Off-road driving
Drivingonfloodedroads .................. 138
Drivingsafety systems
ABS (Anti-lock Braking System) ....... 62
BAS (Brake Assist System) .............. 63
EBD (electronicbrake force distri-
bution) ............................................. 63
®
ESP
(Electronic Stability Pro-
gram) ............................................... 64
Important safety information ........... 62
Overview .......................................... 62
Drivingsystem
COLLISION PREVENTION ASSIST .. 143
Displaymessages (vehicle with-
outsteering wheelbuttons) ........... 198
Drivingsystems
Active Parking Assist ..................... 154
ATTENTIONASSIST ........................ 149
Blind Spot Assist ............................ 145
Cruise control ................................ 140
Displaymessages (vehicle with
steering wheelbuttons) ................. 213
Lane Keeping Assist ...................... 147
PARKTRONIC ................................. 150
Rear viewcamera .......................... 158
Drivingtips
Automatictransmission ................. 129
Brakes ........................................... 136
Break-in period.............................. 119
Downhillgradient ........................... 136
Drinking and driving ....................... 135
Driving ab
Drivi
road............................... 136
ng in mountainousareas ........ 140
Driving in winter ............................. 138
Driving on floodedroads ................ 138
Driving on wetroads ...................... 137
Exhaustcheck ............................... 135
Fuel................................................ 135
General.......................................... 134
Hydroplaning ................................. 137
Icy roadsurfaces ........................... 138
Important safety notes .................. 119
Limitedbraking efficiency on sal-
ted roads ....................................... 137
New brake disks ............................ 137
New brake pads/linings ................ 137
Off-road driving .............................. 138
Overruncut-off .............................. 135
Snow chains .................................. 270
Speed limitation ............................. 135
Towing atrailer.............................. 162
Wet roadsurface ........................... 137
E
EBD (electronicbrake forcedistribution)
Displaymessage (vehicle with
steering wheelbuttons) ................. 206
Displaymessage (vehicle without
steering wheelbuttons) ................. 192
Function/notes................................ 63
ECOstart/stopfunction
Automaticengine start .................. 123
Automaticengine switch-off .......... 123
Deactivating/activating ................. 124
Generalinformation ....................... 122
Important safety notes .................. 123
Electric sliding door
Function ........................................... 74

10
Index
Important safety notes .................... 74
Obstacle detection ........................... 74
Opening/closing from the inside .....75
Problem (malfunction) ..................... 77
Programmingthe key button ........... 76
Resetting......................................... 77
Reversing feature ............................. 74
Electrical fuses
see Fuses
Electrical sliding door
Opening/closing from the out-
side .................................................. 75
Electronic brakeforce distribution
see EBD (electronic brake force
distribution)
Electronic Stability Program
®
see ESP
(Electronic Stability Program)
Emergency
Automatic measures after an acci-
dent .................................................56
Emergency braking
see BAS(Brake Assist System)
Emergency release
Vehicle .............................................69
Emergency Tensioning Devices
Activation......................................... 54
Emissionscontrol
Service and warranty information .... 25
Engine
Altitudelimit (diesel engine) .......... 140
Changing the power output............. 29
Check Engine warning lamp ........... 223
Cleaning instructions ..................... 255
Displaymessages (vehicle with
steering wheelbuttons) ................. 211
Displaymessages (vehicle with-
outsteering wheelbuttons) ........... 197
ECO start/stop function ................ 122
Engine number ............................... 295
Irregularrunning ............................ 125
Jump-starting ................................. 262
Operating safety .............................. 29
Starting .......................................... 121
Starting problems .......................... 125
Switching off .................................. 134
Tow-starting (vehicle)..................... 266
Engine electronics
Notes............................................. 294
Problem (malfunction) ................... 125
Engine
jump starting
e Jump starting (engine)
se
Engine oil
Adding ........................................... 243
Additives ........................................ 299
Checking the oillevel using the
dipstick .......................................... 242
Displaymessages (vehicle with
steering wheelbuttons) ................. 212
Displaymessages (vehicle with-
outsteering wheelbuttons) ........... 198
Filling capacity ............................... 298
Information aboutoil consump-
tion ................................................ 299
Notesabout oilgrades................... 298
Oil change ...................................... 299
Oil level (note)............................... 242
Viscosity ........................................ 299
ESC(ElectronicStability Control)
®
(Electronic Stability Program)
ESP
see ESP
®
(ElectronicStability Pro-
gram)
Activating/deactivating (vehicle
with steering wheelbuttons) ......... 183
Activating/deactivating (vehicle
withoutsteering wheelbuttons) .... 173
Crosswind Assist ............................. 65
Deactivating/activating ................... 64
Displaymessage (vehicle with
steering wheelbuttons) ................. 207
Displaymessage (vehicle without
steering wheelbuttons) ................. 193
Function/notes................................ 64
Important safety information ........... 64
Trailer stabilization ........................... 65
Warning lamp ................................. 221
Exhaustcheck ................................... 135
Exterior lighting
see Lights
Exterior mirrors
Adjusting ......................................... 91
Outofposition (troubleshooting)..... 91
Eyeglassescompartment ................. 228
F
First-aidkit ......................................... 262

Index
11
Flat tire
Changingawheel/mountingthe
sparewheel ...................................287
Fogged-up windows
see Climate control
Frequencies
Mobile phone ................................. 294
Two-way radio ................................ 294
Frontfog lamps
Changing bulbs ................................ 98
Display messages (vehicle with
steering wheel buttons) ................. 210
Display messages (vehicle with-
out steering wheel buttons) ........... 196
Switching on/off .............................. 93
Front-passenger seat
see Seats
Fuel
Additives (gasoline) ........................ 297
Consumption information .............. 297
Consumption statistics (vehicle
with steering wheel buttons) ......... 178
Consumption statistics (vehicle
without steering wheel buttons) .... 171
Displaying the current consumption (vehicle with steering wheel
buttons) ......................................... 177
Displaying the current consumption (vehicle without steering
wheel buttons) ............................... 172
Displaying the range (vehicle with
steering wheel buttons) ................. 177
Displaying the range (vehicle with-
out steering wheel buttons) ........... 172
Driving abroad ............................... 136
Driving tips ....................................135
Fuel content display(vehicle with-
out steering wheel buttons) ........... 170
Fuel gauge (vehicle with steering
wheel buttons) ................................. 37
Grade (gasoline) ............................ 296
Important safety notes .................. 296
Problem (malfunction) ................... 132
Refueling ........................................ 131
Tank content/reserve fuel ............. 296
Fuelcontent
Display (vehicle without steering
wheel buttons) ............................... 170
Fuellevel
Gauge (vehicle with steering
wheel buttons) ............................
..... 37
Fueltank
Probl
em (malfunction) ................... 132
Fueltank reserve level
Display messages (vehicle with
steering wheel buttons) ................. 212
Display messages (vehicle with-
out steering wheel buttons) ........... 198
Fuses ..................................................266
G
Gasoline ............................................. 296
Gearshift recommendation
Display (vehicle with steering
wheel buttons) ............................... 176
Display (vehicle without steering
wheel buttons) ............................... 170
Genuine parts ...................................... 31
Glove box ...........................................228
GTW (GrossTrailer Weight) (defini-
tion) .................................................... 284
Guide rail
Maximum tensilestrength ............. 304
H
Handbrake
see Parking brake
Handling control system
®
see ESP
(ElectronicStability Program)
Hazard warning lamps ........................ 94
Head restraints
Adjusting (manually)........................ 88
Important safety notes .................... 88
Removing/installing ........................ 88
Headlamps
Changing bulbs(halogen head-
lamps).............................................. 98
Fogging up ....................................... 95
see Automaticheadlamp mode
Heating
see Climate control
High-beam headlamps
Displaymessages (vehicle with
steering wheelbuttons) ................. 209

12
Index
Display messages(vehicle with-
outsteering wheelbuttons)........... 195
Replacing bulbs............................. 100
Switching on/off.............................. 94
Hillstart assist .................................. 122
Hood
Closing ........................................... 241
Displaymessages (vehicle with
steering wheelbuttons) ................. 218
Displaymessages (vehicle with-
outsteering wheelbuttons) ........... 201
Important safety notes .................. 240
Opening ......................................... 241
Hydroplaning ..................................... 137
I
Immobilizer .......................................... 66
Indicator lamps
see Warning and indicator lamps
Indicators
see Turn signals
Insect protection on the radiator ...... 31
Instrument cluster
Buttons (vehicle withoutsteering
wheelbuttons) ............................... 170
Overview (vehicle with steering
wheelbuttons) ................................. 37
Overview (vehicle withoutsteer-
ing wheelbuttons) ........................... 35
Warning and indicator lamps
(vehicle with steering wheelbut-
tons) ................................................ 38
Warning and indicator lamps
(vehicle withoutsteering wheel
buttons) ........................................... 36
Instrument clusterlighting .............. 168
Interior lighting
Automaticcontrol ............................ 95
Delayed switch-off (on-board
computer) ...................................... 187
Generalnotes .................................. 95
Manualcontrol ................................. 96
Notesonchanging bulbs................. 96
Overview .......................................... 95
Reading lamp ................................... 95
Rear interiorlight in the grabhan-
dle.................................................... 96
Replacing bulbs............................... 96
Switching the cargo compartment
lighting on/off(cargo compart-
ment) ............................................... 96
Switching the cargo compartment
lighting on/off(dashboard).............. 96
Switching the rearcompartment
lighting on centrally......................... 96
J
Jack
Holderinthe cargo compartment .. 262
Jacking points ................................ 287
Scopeoftire-changing tools.......... 260
Storage location ............................ 260
Stowagecompartment in the rear..260
Stowagespace in the cargo com-
partment ........................................ 261
Using ............................................. 287
Jump starting (engine) ......................262
K
Key
Display messages (vehicle with
steering wheel buttons) ................. 218
Display messages (vehicle with-
out steering wheel buttons) ........... 201
Position in the ignition lock ............ 120
Kickdown ...........................................129
L
Lamps
Display messages (vehicle with-
out steering wheel buttons) ........... 194
see Warning and indicator lamps
Lane detection (automatic)
see Lane Keeping Assist
Lane KeepingAssist
Activating/deactivating ................. 148
Display message ............................ 214
Function/information.................... 147
Setting sensitivity (on-board com-
puter) ............................................. 184
Setting the sensitivity .................... 148

Index
13
Language
Display (vehicle with steering
wheel buttons)...............................185
Display (vehicle without steering
wheel buttons) ............................... 173
Lashing points and tie downs
Permissible tensileload................. 304
Lashingstrap
Important safety notes .................. 235
Tensioning strap.................... 236,237
LATCH-type (ISOFIX)child seat
anchors ................................................ 59
License plate lamp
Changing bulbs................................ 98
License plate lamps
Displaymessages (vehicle with
steering wheelbuttons) ................. 209
Displaymessages (vehicle with-
outsteering wheelbuttons) ........... 195
Light sensor
Displaymessages (vehicle with
steering wheelbuttons) ................. 209
Displaymessages (vehicle with-
outsteering wheelbuttons) ........... 195
Lighting
see Lights
Lights
Activating/deactivating the inte-
riorlighting delayedswitch-off ....... 187
Automaticheadlamp mode.............. 93
Changing bulbs(halogen head-
lamps).............................................. 98
Changing bulbs(interior lights)........ 96
Displaymessages (vehicle with
steering wheelbuttons) ................. 208
Driving abroad............................... 136
Fog lamps ........................................ 93
Hazard warning lamps ..................... 94
Highbeamflasher............................ 94
High-beam headlamps..................... 94
Important safety notes .................... 92
Light switch ..................................... 92
Low-beamheadlamps...................... 93
Parking lamps .................................. 92
Rear fog lamp .................................. 93
Replacing bulbs(halogen head-
lamps).............................................. 98
Standing lamps ................................ 92
Switching the daytime running
lamps on/of
itching the exteriorlighting
Sw
delayedswitch-off on/off(on-
board computer) ............................ 186
Switching the surround lighting
on/off(on-board computer) .......... 186
Turn signals..................................... 94
LimitedWarranty ................................ 25
Load distribution ............................... 233
Load protection net ........................... 237
Loadingguidelines ............................ 232
Loadingrails
Maximumtensile strength ............. 304
Loads
Securing ........................................ 234
Transporting .................................. 232
Locking
see Central locking
Locking (doors)
Emergency locking ........................... 69
Locking centrally
see Central locking
Low-beam headlamps
Displaymessages (vehicle with
steering wheelbuttons) ................. 208
Displaymessages (vehicle with-
outsteering wheelbuttons) ........... 194
Driving abroad............................... 136
Replacing bulbs............................... 99
Switching on/off.............................. 93
Lumbar support ................................... 84
f(switch) ...................... 93
M
M+S tires ............................................ 269
Maintenance ...................................... 247
Maintenancepoints underthe
hood .................................................... 242
Maximum speed
Speed limitation ............................. 135
Mechanical key
Function/notes................................ 68
Inserting .......................................... 69
Locking vehicle................................ 69
Removing ......................................... 68
MediaInterface
Connections ..................................... 40

14
Index
Memory card (audio) ......................... 181
Mercedes-BenzService24h .............. 262
Message memory
On-board computer (vehicle with
steering wheelbuttons) ................. 202
On-board computer (vehicle with-
out steering wheelbuttons) ...........188
Messages
see Warning and indicator lamps
Mirrors
Exterior mirrors ................................ 91
Important safety notes .................... 90
Rear-view mirror .............................. 91
see Vanity mirror
Mobile phone
Typeapproval/frequency .............. 294
Model designation
see Vehicle identification plate
Modifying the programming
(SmartKey) ...........................................68
Motor oil additives
see Additives
Mountingwheels
Lowering the vehicle...................... 289
Mounting anew wheel................... 288
Preparing the vehicle.....................287
Raising the vehicle ......................... 287
Removing awheel .......................... 288
Removing and mounting the spare
wheel ............................................. 292
Securing the vehicle against roll-
ing away ........................................ 287
MP3
Operation ....................................... 181
N
Navigation
Menu (on-board computer) ............ 179
Notes on breaking-inanew vehi-
cle ....................................................... 119
O
Occupant Classification System
(OCS)
Conditions ....................................... 50
Faults ............................................... 54
Operation ......................................... 51
System self-test ............................... 52
Occupant safety
Automatic measuresafter an acci-
dent ................................................. 56
Childreninthe vehicle ..................... 56
Important safety notes .................... 43
Introduction to the restraint sys-
tem ..................................................43
Occupant Classification System
(OCS) ............................................... 50
PASSENGER AIR BAG indicator
lamps ............................................... 44
Pets in the vehicle ........................... 62
Restraint system warning lamp ........ 43
OCS
Conditions ....................................... 50
Faults ............................................... 54
Operation ......................................... 51
System self-test ...............................52
Odometer
Displaying (vehicle with steering
wheel buttons) ...............................177
Displaying (vehicle without steer-
ing wheel buttons) ......................... 171
Setting the displayunit (vehicle
with steering wheel but-
tons) .............................................. 185
Setting the displayunit (vehicle
without steering wheel buttons) .... 174
Off-road driving
Checklist after driving off-road...... 140
Important safety notes .................. 138
Rules for driving off-road...............139
Oil
see Engine oil
On-board computer (vehicle with
steering wheel buttons)
Assistance menu ........................... 182
Audiomenu ................................... 180
Date menu ..................................... 186
Display messages ..............
Factory
Important safety notes .................. 168
Instrument cluster menu ...............185
Lights menu ................................... 186
Menu overview .............................. 177
Message memory .......................... 202
settings .............................187
............ 201

Index
15
Navigation menu ............................ 179
Operating ....................................... 175
Permanent display .........................185
Service menu ................................. 184
Setting the date .............................186
Setting the display......................... 185
Setting the displaylanguage .......... 185
Setting the language ......................185
Setting the time .............................186
Settings menu ............................... 185
Standard display............................ 177
Telephone menu ............................ 181
Time menu ..................................... 186
Tripmenu ...................................... 177
Vehiclemenu ................................. 187
On-board computer (vehiclewithout steering wheelbuttons)
Coolant temperature display
menu ............................................. 172
Current fuelconsumption menu .... 172
Date menu ..................................... 175
Digital speedometer menu ............. 172
Displaymessages .......................... 188
Distance menu ............................... 171
Factory settings ............................. 173
Important safety notes .................. 168
Menu overview .............................. 171
Message memory .......................... 188
Operating ....................................... 170
Permanent display ......................... 174
Range menu ................................... 172
Setting the date ............................. 175
Setting the display ......................... 174
Setting the display language.......... 173
Setting the language...................... 173
Setting the time ............................. 175
Settingsmenu ............................... 173
Standard display menu .................. 171
Time menu ..................................... 175
Tripcomputermenu ...................... 171
On-board computer (vehicles with
steering wheelbuttons)
Displaying the service message ..... 248
On-board computer (vehicles without steering wheelbuttons)
Displaying the service message ..... 248
OperatingInstructions
Before the first journey .................... 25
LimitedWarranty ............................. 25
Operatingsafety
LimitedWarra
Operati
approval
Operatingsystem
Operator's Manual
Outside temperature display ........... 169
Overhead controlpanel ...................... 41
Overrevvingrange ............................. 169
Overrun cutoff ................................... 135
ngsafety and vehicle
Attachments and bodies.................. 30
Changing the engine power out-
put................................................... 29
Correct use...................................... 27
Declaration of conformity ................ 29
Equipment and conversions ............. 30
Important safety notes .................... 28
Information aboutbody/equip-
ment mounting directives ................ 30
Notesonoperating the vehicle........ 28
Qualifiedspecialist workshop.......... 29
Registering your vehicle................... 30
On-board computer(vehicle with
steering wheelbuttons) ................. 175
On-board computer(vehicle with-
outsteering wheelbuttons) ........... 170
Generalnotes .................................. 25
Vehicleequipment ........................... 25
nty ............................. 25
P
Paint code number ............................ 294
Paintwork (cleaning instructions) ... 255
Parking ............................................... 132
Important safety notes .................. 132
Parking brake ................................ 133
Rear viewcamera .......................... 158
see Active Parking Assist
see PARKTRONIC
Parking aid
Active Parking Assist ..................... 154
see PARKTRONIC
see Rear viewcamera
Parking assistance
see PARKTRONIC

16
Index
Parking brake
Display message (vehicle with
steering wheel buttons) ................. 207
Display message (vehicle without
steering wheel buttons) ................. 193
Notes/function .............................. 133
Warning lamp ................................. 133
Parking lamps
Changing bulbs .............................. 100
PARKTRONIC
Deactivating/activating ................. 152
Display messages .......................... 213
Driving system ...............................150
Function/notes .............................150
Important safety notes .................. 150
Problem (malfunction) ................... 154
Range of the sensors ..................... 151
Roll-back warning .......................... 152
Trailer towing ................................. 153
Warning display............................. 152
PASSENGER AIRBAG OFF
Indicatorlamp.................................. 44
Passenger compartmentair-conditioning system
see Climate control
Passenger compartmentheating
see Climate control
Pets in the vehicle ............................... 62
Plastictrim (cleaning instruc-
tions) .................................................. 258
Powerwashers .................................. 255
Powerwindows
see Sidewindows
Preparingfor ajourney
Checks in the vehicle..................... 120
Visualcheck of the vehicleexte-
rior................................................. 120
Program selectorbutton .................. 129
Protectionagainst theft
see ATA (Anti-Theft Alarm system)
Protectionofthe environment
Generalnotes .................................. 27
Pulling away
Automatictransmission................. 121
Hillstart assist............................... 122
Q
QR code
Rescuecard ..................................... 32
Qualified specialist workshop ........... 29
R
Radiatorcover ..................................... 31
Radio
Selecting astation ......................... 180
see separate operating instructions
Radio-wave reception/transmission in the vehicle
Declaration of conformity ................ 29
Rain sensor
Setting the sensitivity .................... 101
Setting the sensitivity (vehicle
with steering wheelbuttons) ......... 187
Setting the sensitivity (vehicle
withoutsteering wheelbuttons) .... 174
Reading lamp ....................................... 95
Rear benchseat
EASY-ENTRY/EXIT feature ............... 86
Generalnotes .................................. 85
Installation options .......................... 85
Removing/installing (standard
rearbench seat) ............................... 87
Seatanchorage ................................ 85
Seatrails .......................................... 85
Seating variants ............................... 85
Rear compartment
Activating/deactivating climate
control ........................................... 110
Seating variants ............................... 85
Setting the airvents ...................... 117
Setting the temperature ................ 112
Switching the interiorlighting on/
off .................................................... 96
Rear door
Displaymessages (vehicle with
steering wheelbuttons) ................. 218
Displaymessages (vehicle with-
outsteering wheelbuttons) ........... 200
Important safety notes .................... 78
Indicatorlamp................................ 227
Opening at an angle of 180° or
270° ................................................ 79

Index
17
Opening dimensions ......................303
Opening/closing from inside........... 79
Opening/closing from the out-
side..................................................78
Rear doors ............................................ 78
Rear fog lamp
Displaymessages (vehiclewith
steering wheel buttons) ................. 210
Displaymessages (vehiclewith-
outsteering wheel buttons) ........... 196
Replacing bulbs............................. 101
Switching on/off.............................. 93
Rear rack
Notes............................................. 238
Rear racks
Maximumpayload .......................... 304
Rear viewcamera
Cleaning instructions ..................... 257
Coupling up atrailerfunction ........ 162
Function/notes............................. 158
Generalnotes ................................ 158
Important safety notes .................. 158
Messages in the display ................. 160
Reverseparking ............................. 160
Switching on/off........................... 159
Rear windowdefroster
Problem (malfunction) ................... 115
Switching on/off........................... 115
Rear windowwiper
Replacing the wiperblade .............. 104
Switching on/off........................... 102
Rear-compartment air-conditioningsystem
see Climate control
Rear-compartment heating
see Climate control
Rear-viewmirror
Anti-glare (manual) .......................... 91
Recycling
see Protectionofthe environment
Refrigerant (air-conditioning system)
Important safety notes .................. 301
Refueling
Fuelfillerflap................................. 132
Fuelgauge (vehicle with steering
wheelbuttons) ................................. 37
Fuelgauge (vehicle withoutsteer-
ing wheelbuttons) ......................... 170
Refueling procedure (fuel)............. 132
see Fuel
Remote control
see Key
Replacing bulbs
Important safety notes .................... 98
Reporting safety defects .................... 30
Rescue
Res
Reserve fuel
Residual heat(climate control) ........ 116
Restraintsystem
Reversewarningfeature .................. 122
Reversingfeature
Roadside Assistance (breakdown) .... 26
Roofcarrier
Roofliningand carpets (cleaning
guidelines) ......................................... 259
Roofload(roof carrier) ..................... 304
card ......................................... 32
erve (fuel tank)
see Fuel
Displaymessages (vehicle with
steering wheelbuttons) ................. 212
Displaymessages (vehicle with-
outsteering wheelbuttons) ........... 198
Warning lamp ................................. 223
Displaymessage (vehicle with
steering wheelbuttons) ................. 208
Displaymessage (vehicle without
steering wheelbuttons) ................. 194
Introduction ..................................... 43
Warning lamp ................................. 222
Warning lamp (function) ................... 43
Electric sliding door......................... 74
Sidewindows................................... 80
Maximumpayload .......................... 304
Notes............................................. 238
S
Safety
Childreninthe vehicle..................... 56
Operating safety .............................. 28
Safety system
see Driving safety systems
Seat belts
Adjusting the height ......................... 46

18
Index
Cleaning .........................................259
Correct usage .................................. 45
Fastening ......................................... 46
Important safety guidelines ............. 45
Introduction ..................................... 44
Releasing ......................................... 47
Warning lamp ................................. 219
Warning lamp (function) ................... 47
Seats
Adjusting (manually)........................ 84
Adjusting lumbarsupport ................ 84
Adjusting the headrestraint ............ 88
Armrest ............................................ 89
Cleaning the cover......................... 259
Correct driver'sseatposition ........... 83
Important safety notes .................... 83
Seatheating .................................... 89
Selecting gear
see Automatictransmission
Selectorlever
Cleaning ......................................... 259
see Automatictransmission
Sensors (cleaning instructions) ....... 257
Servicecenter
see Qualifiedspecialist workshop
Serviceintervaldisplay
Calling up the service duedate...... 248
Hiding service messages ............... 248
Notes............................................. 247
Servicemenu(on-board com-
puter) .................................................. 184
Servicephonenumber ...................... 262
Serviceproducts
Brake fluid ..................................... 300
Coolant (engine) ............................ 300
Engine oil....................................... 298
Fuel................................................ 296
Important safety notes .................. 295
Power steering fluid ....................... 300
Refrigerant (air-conditioning sys-
tem) ............................................... 301
Transmission oil..................... 299,300
Washerfluid ................................... 302
Setting the air distribution ............... 113
Setting the airflow ............................ 113
Settings
Factory (vehicle with steering
wheelbuttons) ............................... 187
Factory (vehicle withoutsteering
eelbuttons) ............................... 173
wh
oard computer(vehicle with
On-b
steering wheelbuttons) ................. 185
On-board computer(vehicle with-
outsteering wheelbuttons) ........... 173
Side impactair bag ............................. 49
Side windows
Cleaning ......................................... 256
Convenience closing feature ............ 81
Convenience opening feature .......... 81
Hinged sidewindows....................... 80
Important safety information ........... 80
Opening/closing .............................. 81
Overview .......................................... 80
Problem (malfunction) ..................... 82
Resetting ......................................... 81
Signal and ambientlight
Changing abulb............................... 98
Sliding door
Child-prooflocks .............................. 61
Cleaning ......................................... 258
Important safety notes .................... 73
Indicatorlamp................................ 227
Opening/closing from the inside ..... 74
Opening/closing from the out-
side .................................................. 73
see Electric sliding door
SmartKey
Changing the battery ....................... 69
Changing the programming ............. 68
Checking the battery ....................... 69
Convenience closing fea-
ture .......................................... 81,116
Convenience opening feature .......... 81
Door centrallocking/unlocking ....... 67
Important safety notes .................... 67
Loss................................................. 71
Mechanical key ................................ 68
Problem (malfunction) ..................... 71
SmartKey positions(ignition lock) .. 120
Snowchains ...................................... 270
Sockets .............................................. 231
Spare wheel
Generalnotes ................................ 291

Index
19
Important safety notes .................. 291
Removing/mounting ...................... 292
Special seat beltretractor .................. 57
Specialist workshop ............................ 29
Speed, controlling
see Cruise control
Speedometer
Activating/deactivating the additional speedometer (vehicle with
steering wheelbuttons) .................185
Activating/deactivating the additional speedometer (vehicle with-
out steering wheel buttons) ........... 174
Digital(vehicle with steering
wheel buttons) ............................... 178
Digital(vehicle without steering
wheel buttons) ............................... 172
General notes ................................ 169
In the instrument cluster (vehicle
with steering wheel buttons) ............ 37
In the instrument cluster (vehicle
without steering wheel buttons) ...... 35
Setting the displayunit (vehicle
with steering wheel buttons) ......... 185
Setting the displayunit (vehicle
without steering wheel buttons) .... 174
Standinglamp
Display messages (vehicle with
steering wheel buttons) ................. 210
Standinglamps
Display messages (vehicle with-
out steering wheel buttons) ........... 196
Replacing bulbs (front) ................... 100
Replacing bulbs (rear) .................... 101
Switching on/off .............................. 92
Start/stop function
see ECO start/stop function
Starting
see Starting (engine)
Starting (engine) ................................ 121
Status overview (on-board com-
puter) ..................................................183
Steering
Display messages (vehicle with
steering wheel buttons) ................. 218
Display messages (vehicle with-
out steering wheel buttons) ........... 201
Warning lamps ............................... 227
Steering wheel
Adjusting ......................................... 90
Button overview ............................... 39
Buttons (on-board computer) ......... 175
Cleaning ...................................
dle shifters ............................... 130
Pad
Steering wheel paddle shifters ........130
Stickers
General safety notes ........................ 27
Stowage net ....................................... 229
Stowage spaces
see Stowagespaces and stowage
compartments
Stowage spacesand stowage compartments
Eyeglasses compartment ...............228
Glove box ....................................... 228
Important safety notes .................. 228
Stowagenet ................................... 229
Summer opening
see Convenience opening feature
Summer tires ..................................... 269
Sun visor
Changing abulb(mirror lamp) ......... 97
Overview ........................................ 229
Surround lighting (on-board com-
puter) ..................................................186
Switchingair-recirculation mode
on/off ................................................. 115
Switchingoff the alarm (ATA) ............ 66
...... 259
T
Tachometer ........................................ 169
Tail lamps
Display messages (vehicle with-
out steering wheel buttons) ........... 195
Replacing bulbs .............................101
Trailer displaymessages (vehicle
with steering wheel but-
tons) .............................................. 209
Trailer displaymessages (vehicle
without steering wheel buttons) .... 195
Tailgate
Changing bulbs (ambient lamp) ....... 97
Changing bulbs (signal and ambi-
ent light) .......................................... 98

20
Index
Display messages(vehicle with
steering wheelbuttons)................. 218
Display messages(vehicle with-
outsteering wheelbuttons)........... 200
Important safety notes.................... 77
Opening dimensions ...................... 303
Opening/closing from the out-
side.................................................. 77
Problem (malfunction) ..................... 77
Tank contents
Displaying the range(vehicle with
steering wheelbuttons) ................. 177
Displaying the range(vehicle with-
outsteering wheelbuttons) ........... 172
Technical data
Capacities ...................................... 295
Cargo tie-downpoints .................... 304
Guiderail....................................... 304
Loading rails .................................. 304
Rear racks ..................................... 304
Roof carrier.................................... 304
Tires/wheels ................................. 290
Trailer tow hitch ............................. 305
Vehicledata................................... 303
Vehicledimensions ........................ 303
Telephone
Accepting acall............................. 182
Displaymessage ............................ 218
Introduction ................................... 181
Numberfrom the phone book........ 182
Redialing ........................................ 182
Rejecting/ending acall................. 182
Temperature
Coolant (displayinthe instrument
cluster) .......................................... 169
Coolant (displayinthe on-board
computer) ...................................... 172
Outsidetemperature ...................... 169
Setting (climate control)................ 112
Theftdeterrentsystems
ATA (Anti-Theft Alarm system) ......... 66
Immobilizer ...................................... 66
Time
Setting (vehicle with steering
wheelbuttons) ............................... 186
Setting the time (vehicle with
steering wheelbuttons) ................. 186
Setting the time (vehicle without
steering wheelbuttons) ................. 175
Tire pressure
Calling up (on-board computer) ..... 274
Checki
Di
ng manually ........................ 274
splaymessages (vehicle with
steering wheelbuttons) ................. 216
Displaymessages (vehicle with-
outsteering wheelbuttons) ........... 199
Important safety notes .................. 274
Maximum....................................... 274
Notes............................................. 273
Recommended ............................... 270
Tables ............................................ 278
Tire label........................................ 271
Tire pressure monitor
Checking the tire pressure elec-
tronically ........................................ 276
Function/notes............................. 274
Generalnotes ................................ 274
Important safety notes .................. 275
Restarting ...................................... 277
Warning lamp ................................. 226
Warning message .......................... 276
Tire pressure table ............................ 278
Tiredness assistant
see ATTENTIONASSIST
Tires
Aspect ratio(definition) ................. 285
Average weight of the vehicle
occupants (definition) .................... 284
Bar (definition) ............................... 284
Changing awheel .......................... 286
Characteristics .............................. 284
Checking ........................................ 268
Curb weight (definition) ................. 285
Definition of terms ......................... 284
Directionofrotation ...................... 286
Displaymessages (vehicle with
steering wheelbuttons) ................. 216
Displaymessages (vehicle with-
outsteering wheelbuttons) ........... 199
Distribution of the vehicleoccu-
pants (definition) ............................ 286
DOT (Department of Transporta-
tion) (definition) ............................. 284
DOT, Tire Identification Number
(TIN) ............................................... 283

Index
21
GAWR(Gross Axle WeightRating)
(definition) .....................................284
GTW (Gross Trailer Weight) (defi-
nition) ............................................ 284
GVW (Gross Vehicle Weight) (def-
inition) ...........................................285
GVWR(Gross Vehicle Weight Rat-
ing) (definition) .............................. 285
Important safety notes .................. 267
Increasedvehicle weight due to
optional equipment (definition) ...... 284
Information on driving .................... 267
Kilopascal (kPa)(definition) ........... 285
Labeling (overview)........................ 281
Loadbearing index (definition) ...... 286
Loadindex ..................................... 283
Loadindex (definition) ................... 285
M+S tires....................................... 269
Maximumloadonatire (defini-
tion) ............................................... 285
Maximumloaded vehicleweight
(definition) ..................................... 285
Maximumpermissibletire pres-
sure (definition) ............................. 285
Maximumtire load ......................... 283
Maximumtire load (definition) ....... 285
Optionalequipment weight (defi-
nition) ............................................ 285
PSI (pounds persquare inch)(def-
inition) ........................................... 285
Replacing ....................................... 286
Service life ..................................... 268
Sidewall(definition) ....................... 285
Snow chains .................................. 270
Speed rating (definition) ................ 284
Storing ........................................... 286
Structure and characteristics
(definition) ..................................... 284
Summer tires................................. 269
TIN (Tire Identification Number)
(definition) ..................................... 286
Tire bead (definition) ...................... 285
Tire pressure (definition) ................ 285
Tire pressures (recommended)...... 284
Tire size (data)............................... 290
Tire size
ca
pacity, speed rating .................... 281
designation, load-bearing
Tire tread....................................... 268
Tire tread(definition) ..................... 285
Totalloadlimit (definition) ............. 286
Traction(definition) ....................... 286
TWR (permissibletrailerdrawbar
noseweight) (definition) ................. 286
Uniform Tire Quality Grading
Standards(definition) .................... 284
Wearindicator (definition) ............. 286
Wheel and tire combination ........... 291
Wheel rim (definition) .................... 284
Top Tether ............................................ 59
Tow-starting
Emergency engine starting ............ 266
Important safety notes .................. 264
Towing
If the vehicleisstuck ..................... 266
Installing/removing the towing
eye................................................. 265
Towingatrailer
Active Parking Assist ..................... 154
Axle load,permissible.................... 305
Cleaning the trailertow hitch ......... 258
Coupling up atrailer...................... 165
Decoupling atrailer....................... 166
Driving tips.................................... 162
Notesonretrofitting ...................... 305
Power supply ................................. 167
Trailer loads................................... 305
Towingaway
Important safety guidelines........... 264
With both axles on the ground ....... 266
With the rearaxleraised ................ 265
Towingeye ......................................... 260
Trailer coupling
see Towing atrailer
Trailer loads and drawbar nose-
weights ............................................... 166
Trailer operation
Lights display messages (vehicle
with steering wheelbuttons) ......... 208
Lights display messages (vehicle
withoutsteering wheelbuttons) .... 194
Trailer towing
Blind Spot Assist ............................ 147
®
ESP
................................................ 65
PARKTRONIC ................................. 153

22
Index
Permissible trailer loads and
drawbar noseweights ..................... 166
Transmission
see Automatic transmission
Transmission oil ........................ 299, 300
Transmission positions
Automatic transmission ................. 127
Display (DIRECT SELECT lever) ...... 127
Transmission programs
Automatic transmission ................. 128
Display (DIRECT SELECT lever) ...... 127
Transport
Lashing straps ...............................235
Loading guidelines ......................... 232
Stickers ......................................... 235
Vehicle ...........................................266
Transport by rail ................................ 136
Transportation
Rail ................................................ 136
Transportation aids
Load protectionnet ....................... 237
Transporting
Cargo compartment variations ...... 234
Load distribution ............................ 233
Securing aload.............................. 234
Trim pieces (cleaning instruc-
tions) ..................................................259
Trip computer
Displaying (vehicle with steering
wheel buttons) ............................... 178
Displaying (vehicle without steer-
ing wheel buttons) ......................... 171
Resetting (vehicle with steering
wheel buttons) ............................... 178
Resetting (vehicle without steer-
ing wheel buttons) ......................... 171
Selecting the displayunits (vehi-
cle with steering wheel buttons) .... 185
Selecting the displayunits (vehicle without steering wheel but-
tons) .............................................. 174
Trip odometer
Displaying (vehicle with steering
wheel buttons) ............................... 177
Displaying (vehicle without steer-
ing wheel buttons) ......................... 171
Resetting (vehicle with steering
wheel buttons) ............................... 178
Resetting (vehicle without steer-
ing wheel buttons) ......................... 171
Setting the displayunit (vehicle
th steering whe
wi
Setting the displayunit (vehicle
without steering wheel buttons) .... 174
Turn signal
Changing bulbs (additional turn
signals) .......................................... 100
Turn signals
Display messages (vehicle with
steering wheel buttons) ................. 209
Display messages (vehicle with-
out steering wheel buttons) ........... 195
Replacing bulbs (front) ................... 100
Replacing bulbs (rear) .................... 101
Switching on/off .............................. 94
Trailer displaymessages (vehicle
with steering wheel buttons) ......... 208
Trailer displaymessages (vehicle
without steering wheel buttons) .... 194
Two-way radios
Typeapproval/frequency .............. 294
TWR (Tongue Weight Rating) (defi-
nition) ................................................. 286
Type identification plate
see Vehicle identification plate
el buttons) ......... 185
U
Unlocking
Emergency unlocking ....................... 69
From insidethe vehicle (central
unlocking button) .............................72
With emergency key element ........... 68
USB (audio)
Playing ...........................................181
V
Vanity mirror
Changing abulb(mirror lamp) ......... 97
Sun visor........................................ 229
Vehicle
Data acquisition ............................... 32
Display messages (vehicle with
steering wheel buttons) ................. 217
Display messages (vehicle with-
out steering wheel buttons) ........... 200

Index
23
Electronics .....................................294
Emergency unlocking ....................... 68
Equipment ....................................... 25
Limited Warranty .............................25
Loading .......................................... 278
Locking (in an emergency) ............... 69
Locking (SmartKey) .......................... 67
Lowering ........................................ 289
Maintenance .................................... 26
Operating safety .............................. 28
Parking for along period................ 134
Pulling away................................... 121
Raising ........................................... 287
Registration ..................................... 30
Reporting problems ......................... 30
Securing from rolling away ............ 132
Towing away .................................. 264
Transporting .................................. 266
Unlocking (inanemergency) ........... 69
Unlocking (SmartKey)...................... 67
Vehiclebattery
see Battery (vehicle)
Vehiclebodies ..................................... 30
Body/equipment mounting direc-
tivesfor trucks ................................. 30
Vehiclecheck
see Preparing for ajourney
Vehicledata ....................................... 303
Vehicledimensions ........................... 303
Vehicleemergencylocking ................ 69
Vehicleidentificationnumber
see VIN
Vehicleidentificationplate .............. 294
Vehiclekey
see SmartKey
Vehicletoolkit
in the seatbase............................. 260
Scope............................................ 260
Storage location ............................ 260
Stowagecompartment in the rear..260
Stowagespace in the cargo com-
partment ........................................ 261
Ventilation
see Climate control
VIN
Engine compartment ..................... 295
Typeplate ...................................... 294
W
Warning
Stickers ...........................................27
Warning and indicator lamps
ABS ................................................ 221
Brakes ...........................................220
Check Engine ................................. 223
COLLISION PREVENTION ASSIST .. 225
Coolant .......................................... 223
Distance warning ........................... 225
Door ............................................... 227
®
ESP
ESP
.............................................. 221
®
OFF ....................................... 222
Fuel tank ........................................ 223
General notes ................................ 218
Overview (vehicle with steering
wheel buttons) ................................. 38
Overview (vehicle without steer-
ing wheel buttons) ........................... 36
Parking brake ................................ 133
PASSENGER AIR BAG OFF ...............44
Rear door....................................... 227
Reservefuel ................................... 223
Restraint system ............................ 222
Seat belt........................................ 219
Sliding door ................................... 227
Steering ......................................... 227
Tire pressure monitor .................... 226
Warranty .............................................. 25
Washer fluid
Adding ...........................................246
Capacities ...................................... 302
Display messages (vehicle with
steering wheel buttons) ................. 218
Display messages (vehicle with-
out steering wheel buttons) ........... 201
Notes ............................................. 302
Wheeland tire combination
see Tires
Wheelbolttightening torque ........... 289
Wheels
Changing awheel .......................... 286
Checking ........................................ 268
Cleaning ......................................... 256
Important safety notes .................. 267
Interchanging/changing ................ 286
Mounting anew wheel ................... 288

24
Index
Mounting awheel .......................... 287
Removing awheel .......................... 288
Removing and mounting the spare
wheel ............................................. 292
Snow chains ..................................270
Storing ...........................................286
Tightening torque........................... 289
Wheelsize/tire size ....................... 290
Windowcurtain air bag
Display message (vehicle with
steering wheel buttons) ................. 208
Display message (vehicle without
steering wheel buttons) ................. 194
Operation ......................................... 50
Windows
see Side windows
Windshield
Cleaning ......................................... 256
Defrosting ...................................... 114
Windshieldwasherfluid
Adding ...........................................246
Windshieldwiper
Setting the sensitivity of the rain
sensor (vehicle with steering
wheel buttons) ............................... 187
Setting the sensitivity of the rain
sensor (vehicle without steering
wheel buttons) ............................... 174
Windshieldwiper
see Windshield
Windshieldwipers
Problem (malfunction) ................... 106
Rearwindow wiper ........................ 102
Replacing the wiper blades ............ 103
Switching on/off ........................... 101
Winterdriving
Slippery road surfaces ................... 138
Snow chains .................................. 270
Winteroperation
General notes ................................ 269
Radiator cover ................................. 31
Wintertires
M+S tires ....................................... 269
Setting alimit speed......................135
Wiper blades
Cleaning ......................................... 256
Important safety notes .................. 103
Replacing (rearwindow) ................ 104
Replacing (windshield)................... 103
Service indica
shop
Work
tor ............................ 103
see Qualifiedspecialist workshop

Introduction
25
Operator'sManual
Beforethe first journey
These instructions, the Maintenance or Service
Booklet and the additional equipment-specific
instructions are integral parts of the vehicle.
Keep these documents in the vehicle at all
times. If you sell the vehicle, alwayspass on all
documents to the new owner.
Beforeyou first drive off, read these documents
carefully and familiarize yourself with your vehicle.
For your own safety and alonger vehicle life,
follow the instructions and warning notices in
these OperatingInstructions. Failure to observe
the instructions may lead to damage to the vehicle or personal injury.
Vehicle damage caused by afailure to observe
the instructions is not covered by the New Vehicle Limited Warranty.
Limited warranty
Follow the instructions in this manual about
!
the proper operation of your vehicle as well as
about possible vehicle damage. Damage to
your vehicle that arises from culpable contraventions against these instructions is not covered either by the Mercedes-Benz Limited
Warrantyorbythe New or Used-Vehicle Warranty.
Service and vehicle operation
Warranty
The Limited Warrantyfor your vehicle is in
accordance with the warrantytermsinthe Service and WarrantyInformation booklet.
Your Mercedes-Benz Commercial Van Center
will replace and repair all factory-installed parts
in accordance with the termsofthe following
warranties:
R
New Vehicle Limited Warranty
R
Exhaust System Warranty
R
Emission SystemsWarranty
R
California, Connecticut,Maine, Massachusetts, New York, Pennsylvania, Rhode Island
and VermontEmission Control System Warranty
R
State WarrantyEnforcement Laws ("Lemon
Laws")
Replacement parts and accessories are covered
by the Mercedes-Benz Parts and Accessories
Warranties. You can obtain these from any
Mercedes-Benz Commercial Van Center.
Should you lose your Service and Warranty
i
Information booklet,contact aMercedesBenz Commercial Van Center for areplacement.The new Service and WarrantyInformation booklet will be posted to you.
Customer information for California
Vehicle equipment
The OperatingInstructions describe all models
and standard and optional equipment of your
vehicle that were available at the time of going
to print.Country-specific variationsare possible. Note that your vehicle may not be equipped
with all of the described functions. This also
applies to systems and functionsrelevant to
safety. The equipment in your vehicle may therefore differ from that shown in the descriptions
and illustrations.
The original purchase contractdocumentation
for your vehicle contains alist of all of the systems in your vehicle.
Questionsconcerning equipment or operation
can be directed to any Mercedes-Benz Commercial Van Center.
In California you are entitled to demand that
your vehicle be exchanged or that the purchase
or leasing price be refunded if Mercedes-Benz
USA,LLC and/or authorized workshops or service centers are not able, after several justifiable
repairs, to rectify major damage to or malfunctionsofthe vehicle as covered by the contractual warrantyprovisions. Customers who purchase or lease avehicle can have the vehicle
repaired within aperiod of 18 months after
delivery or after amileage of up to 29,000km
(equals approx. 18,000miles), whichever
comes first,if:
(1) the same serious defect or damage which
could lead to fatal or serious injuries to the
occupantsofthe vehicle during driving has
been repaired at least twice and Mercedes-

26
Introduction
Benz, LLC has beeninformed in writing of
the necessity of such arepair.
(2) the samedefect or damage, although less
seriousthan described in (1),has been
repaired at least fourtimes and MercedesBenz has beeninformed of the necessity of
such arepairinwriting.
(3) the vehicle cannot be operatedfor more
than 30 calendardaysdue to repairs resulting from the sameorother majordefects or
damage.
Please send written notification to:
Mercedes-Benz USA, LLC
CustomerAssistance Center
One Mercedes Drive
Montreal,N07645-0350
Maintenance
The Service and Warranty Information booklet
describes allthe necessarymaintenance work
which should be performedatregularintervals.
Alwaysbring the Service and Warranty Information booklet with youwhentaking the vehicle to
aMercedes-Benz Commercial Van Center. Your
customer service advisorenters each service
into the Service and Warranty Information booklet for you.
Breakdown assistance
The Mercedes-Benz RoadsideAssistance Programprovides youwithtechnical assistance in
the case of abreakdown. Yourtoll-free calls to
the RoadsideAssistance Hotline are answered
by ourstaff around the clock. 365 days ayear.
1-800-FOR-MERCedes (1-800-367-6372)
(USA)
1-800-387-0100 (Canada)
Further information can be found in the
Mercedes-Benz RoadsideAssistance-Program
brochure (USA) or the "Roadside Assistance"
section of the Service and Warranty Information
booklet (Canada). Both are located in your vehicle document wallet.
Change of address or owner
booklet to informusofachangeofaddress, or
simplyphone the Mercedes-Benz Customer
Assistance Center (USA) on hotline number
1-800-FOR-MERCedes(1-800-367-6372) or
Customer Service(Canada)on
1-800-387-0100.Thisenables us,ifnecessary,
to contact youatany time.
If yousellyourMercedes, please leave allthe
literature in the vehiclesothatitisavailable for
the next owner.
If your vehiclewas purchased as ausedvehicle,
please send us the "Notice of Purchase of Used
Car" from the Service and Warranty Information
bookletorphone the Mercedes-Benz Customer
Assistance Center (USA) on hotline number
1-800-FOR-MERCedes (1-800-367-6372) or
Customer Service (Canada)on
1-800-387-0100.
Operatingthe vehicle outside of the
USA and Canada
Whentraveling abroadwithyourvehicle,
observe the following points:
R
Service facilities or replacement parts may
not be available immediately.
R
Unleadedfuelfor vehicles with acatalytic
converter may not be available.Leadedfuel
can cause damagetothe catalytic converter.
R
The fuelmay have aconsiderably lower
octane rating. Unsuitablefuelcan cause
engine damage.
CertainMercedes-Benz modelsare available in
Europe throughour European Delivery Program.
Please consult aMercedes-Benz Commercial
VanCenter for further information, or write to
one of the following addresses:
In the USA
Mercedes-Benz USA, LLC
European Delivery Department
One Mercedes Drive
Montreal, N07645-0350
In Canada
Mercedes-Benz Canada, Inc.
European Delivery Department
98 Vanderhoof Avenue
Toronto, Ontario M4G 4C9
Please use the "Notice of Change of Address"
form in the Service and Warranty Information

Introduction
27
Proper use
Observe the following information when operating your vehicle:
R
the safety notes in these operating instructions
R
the technical data in these Operating Instructions
R
traffic laws and regulations
R
motor vehicle laws and safety standards
There are various warning stickers affixed to the
vehicle. If you remove warning stickers, you and
others may fail to recognizethe dangers. Leave
the warning stickers in their original position.
WARNING
G
Modifications to electronic components, their
software as well as wiring can impair their
function and/or the function of other networked components. In particular, systems
relevant to safety could also be affected. As a
result, these may no longer function as intended and/or jeopardize the operating safety of
the vehicle. There is an increased risk of an
accident and injury.
Never tamper with the wiring as well as electronic components or their software. You
should have all work to electrical and electronic equipment carried out at aqualified
specialist workshop.
The general operating permit for your vehicle
could be rendered invalid if you carry out modifications to electronic components, their software as well as wiring.
WARNING
G
Gases and fluids from substances that constitute ahealth hazard or react aggressively
can escape even from securely closed containers. When transporting such substances
in the vehicle interior, your ability to concentrate or your health could be affected during
the journey. Malfunctions, short circuits or
electrical componentsystem failures may
also result. There is arisk of an accident and
fire.
Do not store or transport any substances in
the vehicle interior which are hazardous to
health or react aggressively.
These instructions must also be observed for
vehicles where the cargo compartmentisnot
fully separated from the driver's cab.
Partition with door/window: always keep the
door/window in the partition closed during
transport.
Examples of substances that are hazardous to
health and/or react aggressively:
R
Solvents
R
Fuel
R
Oil and grease
R
Cleaning agents
R
Acids
Protection of the environment
Economic and environmentally aware
driving
Environmental note
H
Daimler's declared policy is one of comprehensive environmental protection.
The objectives are for the natural resources
that form the basis of our existence on this
planet to be used sparingly and in amanner
that takes the requirements of both nature
and humanity into account.
You too can help to protect the environment
by operating your vehicle in an environmentally responsible manner.
Fuel consumption and the rate of engine,
transmission, brake and tire wear are affected
by these factors:
R
operating conditionsofyour vehicle
R
your personal driving style
You can influence both factors. You should
bear the following in mind:
Z

28
Introduction
Operating conditions:
R
avoid short trips as these increase fuel consumption.
R
always make sure that the tire pressures
are correct.
R
do not carry any unnecessary weight.
R
remove roof racks once you no longer need
them.
R
aregularly serviced vehicle will contribute
to environmental protection. You should
therefore adhere to the service intervals.
R
always have service work carried out at a
qualified specialist workshop.
Personal driving style:
R
do not depress the accelerator pedal when
starting the engine.
R
do not warm up the engine when the vehicle
is stationary.
R
drive carefully and maintain asafe distance
from the vehicle in front.
R
avoid frequent, sudden acceleration and
braking.
R
change gear in good time and use each gear
only up to Ô of its maximum engine speed.
R
switch off the engine in stationary traffic.
R
keep an eye on the vehicle's fuel consumption.
Environmental issues and recommendations
When prompted by this Operator's Manual to
dispose of materials, please try to regenerate
and recycle these materials. Observe all relevant environmental guidelines and regulations
when disposing of materials. This helps to protect the environment.
Operating safety and vehicleapproval
Important safety notes
WARNING
G
If you do not have the prescribed service/
maintenance work or any required repairs
carried out, this can result in malfunctions or
system failures. There is arisk of an accident.
Alwayshave the prescribed service/maintenance work as well as any required repairs
carried out at aqualified specialist workshop.
Air bags and pyrotechnic EmergencyTensioning
Devices (ETDs) contain perchlorate material,
which may require special handling and regard
for the environment.The guidelines must be
observed during disposal.
In California, you can find more information on
the Internet at www.dtsc.ca.gov.
Notes on operating the vehicle
There is arisk of damage to the vehicle if:
R
the vehicle makes contact with the ground,
e.g. on ahigh curb or aloose road surface
R
you drive too quickly over an obstacle, e.g. a
curb or apothole
R
aheavy object hits the underbody or chassis
component
In these or similarsituations, the vehicle body/
frame, the underbody,chassis components,
wheels or tires could be damaged even if this is
not visible from the outside. Components that
have been damaged in this way can unexpectedly fail or no longer be able to assimilate the
loads occurring in the event of an accident. If the
underbody paneling is damaged,flammable
material, such as leaves, grass or twigs, could
collect between the underbody and underbody
paneling. These materials could ignite if they
remain in contact with hot componentsofthe
exhaust system for an extended period.
WARNING
G
Flammable material such as leaves, grass or
twigs may ignite if they come into contact with
hot parts of the exhaust system. There is arisk
of fire.

Introduction
29
When driving off road or on unpaved roads,
check the vehicle's underside regularly. In
particular, remove parts of plants or other
flammable materials which have become
trapped. In the case of damage, contact a
qualified specialist workshop.
Have the vehicle checked and repaired immediately at aqualified specialist workshop. If you
become aware when continuing the journey that
driving safety has been effected, stop as soon as
possible in accordance with the traffic conditions.Insuch cases, consult aqualified specialist workshop.
Declaration of conformity
Radio-based vehicle components
USA: "The wireless devices of this vehicle com-
ply with Part 15 of the FCC Rules. Operation is
subject to the following two conditions: 1) These
devices may not cause harmful interference. 2.
This device must accept any interference
received, including interference that may cause
undesired operation. Changes or modifications
not expressly approved by the party responsible
for compliancecould void the user’s authority to
operate the equipment."
Canada: "The wireless devices of this vehicle
comply with Industry Canada license-exempt
RSS standard(s). Operation is subject to the following two conditions: 1) These devices may not
cause interference, and 2) these devices must
accept any interference received, including
interference that may cause undesired operation of the device".
Do not connect any equipment to adiagnostics connection in the vehicle.
Changing the engine power output
Increases in engine power can:
!
R
change the emission values
R
cause malfunctions
R
cause consequential damage
The operating reliability of the engine is not
guaranteed in all cases.
Anytamperingwith the engine management
system in order to increase the engine power
output will lead to the loss of the New Vehicle
Limited Warrantyand other warranty entitlements.
If you sell the vehicle, inform the purchaser
about the changes to the engine power output of
the vehicle. If you do not inform the buyer, this
may constituteapunishable offense under
national legislation.
Qualified specialist workshops
AMercedes-Benz Commercial Van Center is a
qualified specialist workshop.
Aqualified specialist workshop has the necessary specialist knowledge, tools and qualifications to correctly carry out the work required on
the vehicle.
This is especially the case for work relevant to
safety. Observe the notes in the Maintenance or
ServiceBooklet.
The following work should alwaysbecarried out
at qualified specialist workshop:
Diagnostics connection
The diagnosticsconnection is only intended for
the connection of diagnostic equipment at a
qualified specialist workshop.
WARNING
G
If you connect equipment to the diagnostics
connection in the vehicle, it may affect the
operation of the vehicle systems. As aresult,
the operating safety of the vehicle could be
affected. There is arisk of an accident.
R
work relevant to safety
R
service and maintenance work
R
repair work
R
modifications as well as installations and
alterations
R
work on electronic components
Mercedes-Benz recommends that you use a
Mercedes-Benz Commercial Van Center.
Only have work carried out on the engine
!
electronics and its associated parts, such as
control units, sensors, actuatingcomponents
and connectorleads, at aqualified specialist
workshop. Vehicle componentsmay other-
Z

30
Introduction
wise wear morequickly and thevehicle's
operatingpermit may be invalidated.
Problems with your vehicle
If you should experience problems with your
vehicle, particularly oneswhich may affect vehicle safety, please contactaMercedes-Benz
Commercial Van Center to have theproblem
diagnosed and rectified. If theproblem is not
dealt with to your satisfactionthere, please contactaMercedes-BenzCommercial Van Center
again or writetoone of thefollowing addresses.
In theUSA
Customer AssistanceCenter
Mercedes-BenzUSA,LLC
OneMercedes Drive
Montreal, N07645-0350
In Canada
Customer Relations Department
Mercedes-BenzCanada, Inc.
98 Vanderhoof Avenue
Toronto, Ontario M4G 4C9
NHTSA,400 SeventhStreet, SW., Washington,
DC 20590.
You can find more information on vehicle safety
at:
http://www.safercar.gov
Registering your vehicle
Mercedes-Benz may instruct its Mercedes-Benz
Commercial Van Center to carry out technical
inspections on certain vehicles. This is always
the case if the quality or safety of the vehicle is
improved as aresult of the inspection.
Mercedes-Benz can only inform you about vehicle checksifithas your registration data.
Your registration data is not stored if:
R
you did not purchase your vehicle at a
Mercedes-Benz Commercial Van Center
R
your vehicle was not inspected at a
Mercedes-Benz Commercial Van Center
It is advisable to register your vehicle with a
Mercedes-Benz Commercial Van Center. Inform
Mercedes-Benz as soon as possible about any
change of address or vehicle ownership.
Reporting malfunctionsrelevant to
safety
USA only:
The following textispublishedasrequired of all
manufacturersunder Title 49,Code of U.S.Federal Regulations,Part 575pursuanttothe
"National Traffic and Motor Vehicle Safety Actof
1966".
If you believethatyour vehicle has adefect
which could cause acrash or could cause injury
or death, you should immediately inform the
National Highway Traffic Safety Administration
(NHTSA)inaddition to notifyingMercedes-Benz
USA,LL.
If NHTSA receives similar complaints, it may
open an investigation, and if it finds that asafety
defectexists in agroup of vehicles, it may order
arecall and remedy campaign.However, NHTSA
cannot become involved in individual problems
between you, your dealer, or Mercedes-Benz
USA,LL.
To contactNHTSA,you may call theVehicle
Safety Hotline toll-free at 1-888-327-4236
(TTY: 1-800-424-9153); go to http://
www.safercar.gov;orwrite to: Administrator,
Attachments, bodies, equipment and
conversions
Information about body/equipment
mounting directives
For safety reasons, have bodies manufac-
!
tured and installed in accordancewith the
valid Mercedes-Benz body/equipment
mountingdirectives. These body/equipment
mountingdirectives guarantee that the chassis and add-on equipment form acohesive
whole and that the highest possible level of
operating and driving safety is reached.
For safety reasons, Mercedes-Benz recommends that:
R
no other modifications be made to the vehicle.
R
approval be obtained from Mercedes-Benz
in the event of deviations from approved
body/equipment mountingdirectives.
Approval by official testing centers or permission given by authorities do not eliminate
safety risks.

Introduction
31
Please observe the information concerning
Mercedes-Benz Genuine Parts (
Y page 31).
You can obtain further information from any
Mercedes-Benz Commercial Van Center.
WARNING
G
The function of systems or components can
be affected by conversions or modifications
to the vehicle. They might not function properly anymore and/or jeopardize the operational safety of the vehicle. There is an
increased risk of an accident and injury.
Conversionsormodificationsshould always
be carried out at qualified specialist workshop.
If you intendtomake modificationstoyour vehicle, we strongly recommend that you contact
the distributor named on the inside of the front
cover. There you will receive all the necessary
information and acharge may be levied.
You alone accept the responsibility if body manufacturers or dealers make modificationsthat
affect the final certification of the engine, the
vehicle or the equipment. This also applies to
the identification and documentation of modificationstothe affected vehicle components.
You are responsible for certification and confirmation that:
R
all the applicable standards and regulations
that are affected by the vehicle modification
are met
R
the modified vehicle fulfills the vehicle safety
standards and emissions laws and regulations
R
the modificationsorinstallation of accessories does not affect the safety of the vehicle
We are not responsible for the final certification,
product liability or warranty claims which result
from the modifications. This applies to:
R
the modified components,assemblies or systems
R
any resulting noncompliance with any of the
emissions laws and regulations or the motor
vehicle safety standards
R
any consequences arising from the changes
that make the vehicle less safe or even render
it defective
We do not assume responsibility as the finalstage manufacturer or for the consequential
product liability.
Notes on the radiator
Even seemingly small changes to the vehicle,
such as attaching aradiator trim for winter driving, is not permitted. Do not cover up the radiator. Do not use thermal mats, insect protection
covers or anything similar.
Otherwise, the values of the diagnostic system
may be affected. Some of these values are
legally prescribed and must alwaysbecorrect.
Genuine Mercedes-Benz parts
Air bags and Emergency TensioningDevi-
!
ces, as well as control units and sensors for
these restraint systems, may be installed in
the following areas of your vehicle:
R
doors
R
door pillars
R
door sills
R
seats
R
cockpit
R
instrument cluster
R
center console
Do not install accessories such as audio systems in these areas. Do not carry out repairs
or welding. You could impair the operating
efficiency of the restraint systems.
Have aftermarket accessories installed at a
qualified specialist workshop.
Environmentalnote
H
We supply reconditioned assemblies and
parts which are of the same quality as new
parts. The same New Vehicle Limited Warrantyapplies as for new parts.
The operating safety of the vehicle could be
jeopardized if you use parts, tires and wheels as
well as accessories relevant to safety which
have not been approved by Mercedes-Benz.This
could lead to malfunctions in safety-relevant
systems, e.g. the brake system. Only use genuine Mercedes-Benz parts or parts of equal quality. Only use tires, wheels and accessories that
have been specifically approved for your vehicle.
Z

32
Introduction
Mercedes-Benztests genuine Mercedes-Benz
parts, conversion parts and accessories that
have been specifically approved for the type of
vehicle for:
R
reliability
R
safety
R
suitability
Despite ongoing market research, MercedesBenz is unable to assess other parts. Even if an
independent or official approval has been provided in exceptional cases, Mercedes-Benz
accepts no responsibility for the use of such
parts in Mercedes-Benzvehicles.
In some countries, certain parts are only officially approved for installation or modification if
they comply with legal requirements. All genuine Mercedes-Benzparts satisfy these requirements.Make sure that all parts are suitable for
your vehicle.
Always specify the vehicle identification number
(VIN) (
Y page 294) and engine number when
ordering genuine Mercedes-Benzparts
Y page 295).
(
QR code for rescue card
The QR Code stickers are affixed to the B-pillar
on the driver's and front-passenger side.
In the event of an accident the rescue services
use the QR Code to quickly find the rescue card
for your vehicle. The current rescue card contains the most important information on your
vehicle, e.g. the electric cable routes, in acompact form.
Further information can be found under http://
portal.aftersales.i.daimler.com.
Data stored in the vehicle
Data Recording
Awide range of electronic components in your
vehicle contain data memories.
These data memories temporarily or permanently store technical information about:
R
the vehicle's operating state
R
events
R
faults
In general, this technical information documents the state of acomponent, amodule, a
system or the surroundings.
These include, for example:
R
operating conditionsofsystem components,
e.g. fluid levels
R
the vehicle's status messages and those of its
individual components, e.g. number of wheel
revolutions/speed, deceleration in movement, lateral acceleration, accelerator pedal
position
R
malfunctions and defects in important system
components, e.g. lights, brakes
R
vehicle reactions and operating conditionsin
special driving situations, e.g. airbag deployment, intervention of stability control systems
R
ambient conditions, e.g. outside temperature
This data is of an exclusively technical nature
and can be used to:
R
assist in detectingand rectifying faults and
defects
R
analyze vehicle functions, e.g. after an accident
R
optimize vehicle functions
The data cannot be used to trace the vehicle's
movements.
When your vehicle is serviced, technical information can be read from the event data memory
and fault data memory.
Services include, for example:
R
repair services
R
service processes
R
warranty events
R
quality assurance
The vehicle is read out by employees of the service network (including the manufacturer) using
special diagnostic testers.You can obtain more
information there, if required.
After afault has been rectified, the information
is deleted from the fault memory or is continually overwritten.
When operating the vehicle, situations are conceivable in which this technical data, in connection with other information (if necessary, after
consultation with an authorized expert), could
be traced to aperson.

Introduction
33
Examples include:
R
accident reports
R
damage to the vehicle
R
witnessstatements
Furtheradditional functions thathavebeencontractuallyagreeduponwiththe customerallow
certain vehicledatatobeconveyedbythe vehicle as well.The additional functions include, for
example, vehiclelocation in caseofanemergency.
EventDataRecorders
Thisvehicleisequippedwithanevent data
recorder(EDR). The main purpose of an EDR is
to record, in certain crash or nearcrash-like situations, such as an airbag deployment or hitting
aroadobstacle,datathatwillassistinunderstanding how avehicle’ssystemsperformed.
The EDR is designedtorecord data relatedto
vehicledynamics and safety systemsfor ashort
periodoftime,typically30secondsorless.
The EDR in thisvehicleisdesignedtorecord
such data as:
R
How various systemsinyourvehiclewere
operating;
R
Whether or not the driver and passenger
safety belts were buckled/fastened;
R
How far(if at all) the driver wasdepressing the
accelerator and/or brake pedal; and,
R
How fast the vehiclewas traveling.
These data can help provideabetter understanding of the circumstances in which crashes
and injuriesoccur. NOTE: EDR data arerecorded
by your vehicleonlyifanon-trivialcrash situationoccurs; no data arerecordedbythe EDR
under normal drivingconditions and no personal
data (e.g., name, gender, age, and crash location) arerecorded. However, otherparties, such
as lawenforcement cou
w
ith the typeofpersonally identifying data rou-
tinely acquired duringacrash investigation.
Accesstothe vehicleand/or the EDR is needed
to readdatathatisrecordedbyanEDR, and
special equipment is required.Inadditiontothe
vehiclemanufacturer,otherpartiesthathave
the special equipment, such as lawenforcement, can readthe informationbyaccessing the
vehicleorthe EDR.
EDR data maybeusedincivil and criminal matters as atool in accident reconstruction, acci-
ld combine the EDR data
dent claims,and vehiclesafety.Since the Crash
Data RetrievalCDR tool thatisusedtoextract
data fromthe EDR is commercially available,
Mercedes-Benz USA, LLC ("MBUSA") expressly
disclaims any and allliability arising fromthe
extractionofthisinformationbyunauthorized
Mercedes-Benz personnel.
MBUSA will not share EDR data with others
withoutthe consent of the vehicleowners or, if
the vehicleisleased, withoutthe consent of the
lessee. Exceptions to thisrepresentation
includeresponsestosubpoenas by lawenforcement; by federal, state or local government; in
connectionwithorarising outoflitigation involving MBUSA or its subsidiariesand affiliates; or,
as required by law.
arning: The EDR is acomponent of the
W
Restraint System Module. Tamperingwith, altering,modifying or removing the EDR component
mayresultinamalfunctionofthe Restraint System Moduleand othersystems.
State laws or regulations regarding EDRs that
conflict with federalregulation arepre-empted.
Thismeans thatinthe event of such conflict, the
federalregulation governs. As of February2013,
13 states have enacted laws relating to EDRs.
Z
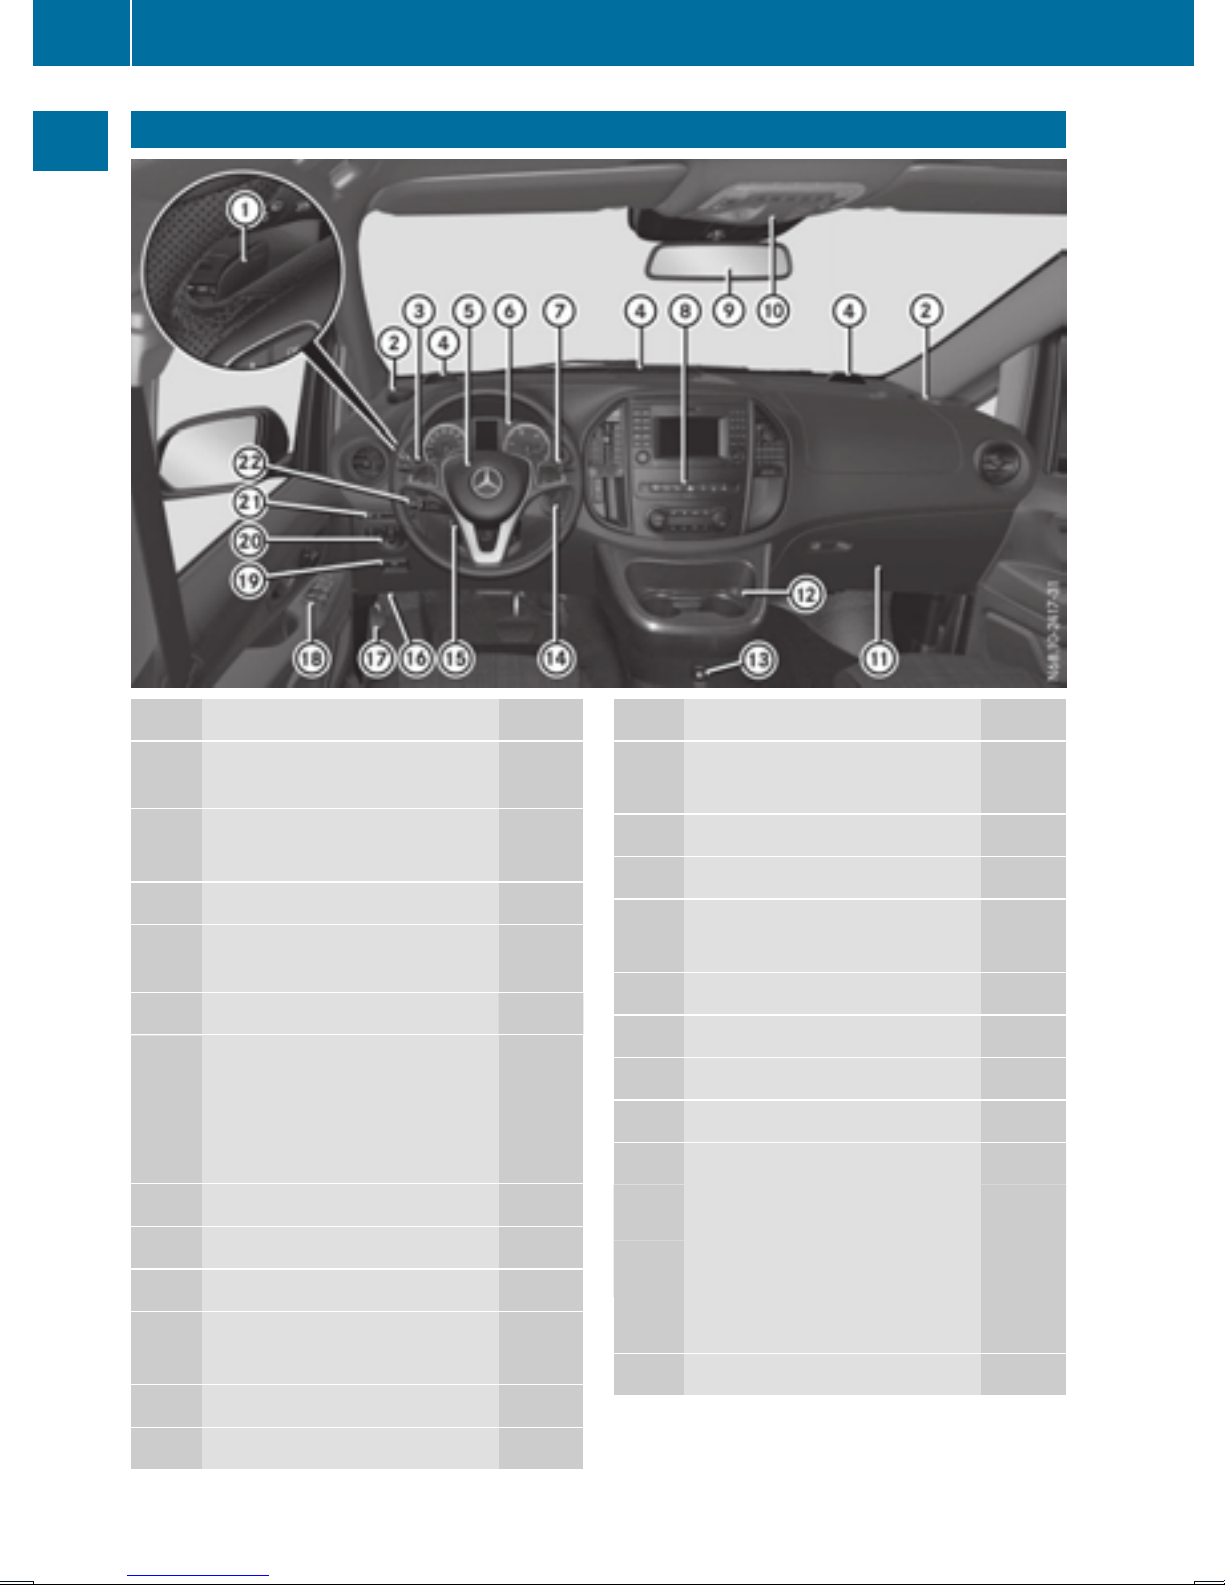
34
Cockpit
Cockpit
At aglance
Function Page
:
Steering wheel paddle shifters
;
•Cup holder 229
•Ashtray 230
=
Combination switch 94
?
PARKTRONIC warning indicators
A
Horn
B
•Instrumentcluster(vehicle
without steering wheel buttons)
•Instrumentcluster(vehicle
withsteering wheel buttons)
C
DIRECT SELECT lever 126
D
Centerconsole control panel 40
E
Rear-view mirror 90
F
•Overhead control panel 41
•Interior lamp 95
G
Glove box 228
130
150
35
37
Function Page
I
•12Vsocket 231
•Cigarettelighter 230
J
Ignition lock 120
K
Adjusts thesteering wheel 90
L
Diagnostics connection 29
Opensthe hood 241
M
Applies theparking brake 133
N
Door control panel 41
O
Releasesthe parking brake 133
P
Lightswitch 92
Q
•Coin/card holder
•Drivingsystem control
panel
Ç Deactivates/activates
LaneKeeping Assist
c Deactivates/activates
PARKTRONIC
R
Cruisecontrol lever 141
147
150
H
Cup holder 229

Instrumentcluster (vehicles without steering wheel buttons)
Instrumentcluster (vehicles without steering wheel buttons)
Displaysand controls
35
At aglance
Function Page
:
Speedometer 169
;
Display 170
=
Tachometer 169
?
f, g
Adjusts theinstrumentclus-
terlighting
Changes valuesorsettingsor
scrolls in lists
168
170
i You can findinformation about displaying
theoutside temperature or thecoolanttemperatureinthe display under:
R
"Outside temperature display"
Y page 169)
(
R
"Coolanttemperature gauge"
Y page 169)
(
Function Page
A 3
Selects asubmenuorreset
values
È
B
Selects themenuordisplay 170
170

36
At aglance
Instrumentcluster (vehicles without steering wheel buttons)
Indicator and warning lamps
Function Page
:
å ESP®OFF
;
K High-beam headlamps
=
÷ ESP
?
#! Turn signal
A
Parking brake 133
F (USAonly)
! (Canada only)
B
Brakes 220
$ (USAonly)
J (Canada only)
C
Ð Powersteering
D
ò ABS
E
# Battery
F
1 Doors
®
222
94
221
94
227
221
197
227
Function Page
G
6 Restraintsystem
H
ü Seat belt
I
; CheckEngine
J
? Coolant
K
R Rear fog lamp
L
O Frontfog lamps
M
h Tirepressuremonitor
N
À ATTENTION ASSIST
O
æ Reserve fuel
P
L Low-beam headlamps
Q
T Parking lampsand
license platelamp
43
219
223
223
93
93
226
149
223
93
92
Corresponding messagesmay also be
i
shown in thedisplay (
Y page 188).

Instrumentcluster (vehicles with steering wheel buttons)
Instrumentcluster (vehicles with steering wheel buttons)
Displaysand controls
37
At aglance
Function Page
:
Speedometer 169
;
Display 176
=
Tachometer 169
?
Coolanttemperature gauge 169
Information on theoutside temperature dis-
i
play can be foundunder "Outside temperaturedisplay" (
Y page 169).
Function Page
A
Fuellevel
Fuelfiller flap location indi-
cator t:the fuel filler cap
is on theleft-handside
B
Adjusts theinstrumentclusterlighting
168

38
At aglance
Instrumentcluster (vehicles with steering wheel buttons)
Indicator and warning lamps
Function Page
:
å ESP®OFF
;
K High-beam headlamps
=
#! Turn signal
?
Brakes 220
$ (USAonly)
J (Canada only)
A
Parking brake 133
F (USAonly)
! (Canada only)
B
1 Doors
C
ò ABS
D
ü Seat belt
E
; CheckEngine
Corresponding messagesmay also be
i
shown in thedisplay (
Y page 201).
222
94
94
227
221
219
223
Function Page
F
? Coolant
G
R Rear fog lamp
H
O Frontfog lamps
I
h Tirepressuremonitor
J
6 Restraintsystem
K
÷ ESP
L
· Distancewarning signal
M
æ Reserve fuel
N
L Low-beam headlamps
O
T Parking lampsand
license platelamp
®
223
93
93
226
43
221
225
223
93
92

Steering wheel buttons
Steering wheelbuttons
39
At aglance
Function Page
:
Display 176
; ~
Rejects or ends acall 181
Exitsthe telephone book/
redial memory
6
Makes or accepts acall 181
Switches to the redial mem-
ory
WX
Adjusts the volume
8
Mutes
ó
Vehicles with anavigation
system:switches on voiceoperated controlofthe navi-
Function Page
gationsystem;see the separate operating instructions
=
=;
Calls up themenubar in the
display and selectsmenus
9:
Selects asubmenu or function or scrolls through lists
a
Confirmsyourselection 175
Hides display messages 201
%
Back 175
Vehicles with anavigation
system: switches off voiceoperatedcontrol of the navigation system; see the separate operating instructions
175
175
The audiodevices, telephone and voice-
i
operatedcontrol using the steering wheel
buttons in the right control panel only function with aMercedes-Benz audioornavigation system. If youare using an audioornavigation system from another manufacturer,
the described functions may be restricted or
not available at all.

40
Center console
Center console
Control panel
At aglance
Function Page
:
Audiosystem (see separate
operatinginstructions)
;
Æ Opensand closes the
electric slidingdoor on the
rightside of thevehicle
=
è Activatesand deactivates theECO start/stop
function
?
£ Switches hazard warning lamps on and off
A
å Deactivates and activates ESP
The number and arrangement of thebuttons is
equipment-dependent.
®
75
122
94
64
Function Page
B
É Selectsthe transmission program
C
Å Opensand closes the
electric slidingdoor on the
left side of thevehicle
D
PASSENGER AIRBAG OFF
indicator lamp
E
Air-conditioning control
panel
F
Media Interface withAUX
jackand USBport
128
75
44
107

Overheadcontrol panel
Door control panel
41
At aglance
Example: luxury overhead control panel
Function Page
:
p Switches the left-hand
reading lamp on/off
;
| Switches the automatic
interior lighting control
on/off
=
c Switches the frontinterior lighting on/off
?
w Switches the rear interior lighting/cargo compartment lighting on/off
The number and arrangementofthe buttonsis
equipment-dependent.
95
95
96
96
Function Page
A
p Switches the righthand reading lamp on/off
B
ATA indicator lamp 66
C
Eyeglasses compartment 228
Door control panel
95
Function Page
:
Opens the door 73

42
Door controlpanel
Function Page
;
Í Seat heating
=
%&Unlocks/locks
the vehicle
?
7 Z\Adjusts the
exteriormirrors electrically
At aglance
A
W Opens/closesthe front
side windows
89
72
91
80

Occupant safety
43
Useful information
This Operator's Manual describes all models as
well as standard and optional equipment of your
vehicle that were available at the time of going
to print.Country-specific variationsare possible. Note that your vehicle may not be equipped
with all of the described functions. This also
applies to systemsand functionsrelevantto
safety.
Read the information on qualified specialist
workshops (
Y page 29).
Occupant safety
Restraint system introduction
The restraint system can reduce the risk of vehicle occupants comingintocontact with parts of
the vehicle'sinterior in the eventofanaccident.
Furthermore, the restraint system may also
reduce the forces exerted on the vehicle occupantswhen an accidentoccurs.
The restraint system includes:
R
Seat belt system
R
Air bags
R
Child restraint system
R
Child seat securingsystem
The components of the restraint system work in
conjunction with each other.They can only offer
the intended level of protection if all vehicle
occupants:
R
are correctly wearing their seat belts.
Y page 45)
(
R
adjust their seat and head restraint properly
Y page 83).
(
The driver is also responsible for ensuringthat
the steering wheel has been correctly positioned. Observethe information relatingtothe
correct driver'sseat position (
Always ensure the air bag can inflateproperly if
deployed (
Y page 48).
An air bag supplementsacorrectly fastened
seat belt. As an additional safetydevice, the air
bag increases the level of protection for vehicle
occupants in the eventofanaccident. For example, if the protection already provided by acorrectly fastened seat belt will suffice, the air bags
are not deployed. Furthermore, only the air bags
that would increase the degree of protection
afforded to the vehicle occupants in the eventof
Y page 83).
an accidentare deployed. Seat belts and air
bags generally do not protect against objects
penetratingthe vehicle from the outside.
Information on restraint system operationcan
be found under "TriggeringofEmergencyTensioningDevices and air bags" (
Y page 54).
See “Children in the vehicle” for information on
children traveling with you as well as vehicle
restraint systems(
Y page 56).
Important safetynotes
WARNING
G
If the restraint system is modified, it may no
longer work as intended. The restraint system
may then not performits intended protective
function by failing in an accidentortriggering
unexpectedly, for example. There is an
increased risk of injury, possibly even fatal.
Never modify parts of the restraint system.Do
not attempt to modify the wiring as well as
electronic components or their software.
If it is necessary to modify an air bag system to
accommodate aperson with disabilities, contact aMercedes-Benz Commercial Van Center for details. USA only: contact our
Mercedes-Benz Customer Assistance Center
at 1-877-762-8267 for details.
Restraint system warning lamp
The restraint systemsfunctionsare checked
after the ignition is switched on and at regular
intervals when the engineisrunning. This allows
malfunctionstobedetected in good time.
The 6 restraint system warninglamp in the
instrumentcluster lights up when the ignition is
switched on. It goes out no later than afew seconds after the vehicle is started. The components of the restraint system are on standby.
Amalfunction has occurred if the 6 restraint
system warninglamp:
R
does not light up after the ignition is switched
on.
R
does not go out after afew seconds when the
engineisrunning.
R
lights up again when the engineisrunning.
Safety
Z

44
Occupant safety
WARNING
G
If restraint system is malfunctioning, restraint
system components may be triggeredunintentionallyormight not be triggeredatall in
the event of an accident with ahigh rate of
vehicledeceleration. This can affect the Emergency Tensioning Device or air bag,for example.This poses an increased risk of injury or
Safety
even fatal injury.
Have the restraint system checked and
repaired in aqualified specialist workshopas
soon as possible.
PASSENGER AIRBAG OFF indicator
lamp
Depending on the personinthe front-passenger
seat, the front-passengerfront air bag must
either be deactivated or activated; see the following points. You must make sure of this both
before and during ajourney.
R
Childinthe childrestraint system:
whetherthe front-passengerair bag is activated or deactivated depends on the child
restraint system installed, as wellasthe age
and size of the child.Itisthus essentialto
comply with the instructions on the “Occupant Classification System (OCS)”
Y page50) and “Childreninthe vehicle”
(
Y page56). Information is alsoincluded
(
here on rearward or forward-facing child
restraint systems on the front-passenger
seat.
R
All other persons: depending on the person
classifiedasoccupying the front-passenger
seat, the front-passengerair bag must be
activated or deactivated (
Y page50). Be
sure to observe the notes on "Seatbelts"
Y page44) and "Air bags" (Y page47).
(
Information is alsoincluded here on the correct seating position.
PASSENGER AIR BAG OFF indicator lamp : is
part of the Occupant Classification System
(OCS).
The PASSENGER AIR BAG OFF indicator lamp
showsyou the status of the front-passenger
front air bag.
If the PASSENGER AIRBAG OFF indicator
lamp:
R
lights up,the front-passengerair bag is deactivated. It willnot be deployedinthe event of
an accident.
R
does not light up,the front-passengerair
bag is activated. If, in the case of an accident,
all deployment criteria are met, the frontpassenger front air bag is deployed.
Seat belts
Introduction
Acorrectly fastened seat beltisthe most effective means of restraining the movement of vehicle occupants in the event of an accident or the
vehiclerolling over. This reduces the risk of
vehicleoccupants coming into contact with
parts of the vehicleinterior or being thrown from
the vehicle. Furthermore,the seat belthelpsto
keep the vehicleoccupants in the best position
in relation to the air bag.
The seat beltsystem consists of:
R
Seat belts
R
Emergency Tensioning Devices for the front
seat belts
If the vehicleisequipped with afront air bag,
the seat beltsystem alsoincludes aseat belt
force limiter for the corresponding seat.
If the seat beltispulled quickly or suddenly from
the beltoutlet, the inertia reel locks. The belt
strap cannot be pulled out further.
Emergency Tensioning Devices tighten the seat
belts in an accident, pulling them close against

Occupant safety
45
the occupant's body.Theydonot, however, pull
vehicleoccupants back towards the backrest.
Emergency Tensioning Devices do not correct
an incorrect seat positionorincorrectly worn
seat belts.
When triggered,the seat belt force limiter
reducesthe force exerted by the seat belt on the
vehicleoccupant.
The seat belt force limiters for the front seats are
synchronizedwiththe front airbags, which
absorbpartofthe decelerationforce. This
makes it possibletoreduce the forces to which
vehicleoccupants aresubjected duringanaccident.
If the front-passengerseatisunoccupied,
!
do not insert the belt tongue into the buckle of
the front-passengerseat. Thismay otherwise
lead to the triggeringofthe Emergency Tensioning Device in the event of an accident,
which will thenneedtobereplaced.
Important safety notes
WARNING
G
If the seat belt is incorrectly fastened,itcannot protect as intended. Furthermore, an
incorrectly fastened seat belt can cause additional injury,for example, in an accident, during braking or when abruptlychanging direction. Thisposes an increasedriskofinjury or
evenfatal injury.
Make sure thatall vehicleoccupants are
seatedproperly with acorrectlyfastened seat
belt.
WARNING
G
The seat belt does not offer the intendedlevel
of protection if youhavenot moved the backresttoanalmostverticalposition. When braking or in the event of an accident, youcould
slideunderneath the seat belt and sustain
abdomen or neck injuries, for example. This
posesanincreasedriskofinjury or evenfatal
injury.
If achild younger thantwelve yearsold and
under 5ft(1.50 m) in height is traveling in the
vehicle:
R
always securethe child in achild restraint
systemsuitablefor thisMercedes-Benz vehicle.The child restraint systemmustbeappropriate to the age, weight and size of the child
R
always observe the instructions and safety
notesinthe "Children in the vehicle" section
of thisOperator'sManual(
Y page 56)in
additiontothe child restraint systemmanufacturer'sinstallationinstructions
R
be sure to observe the instructions and safety
notesonthe "Occupant classification system
Y page 50)
CS)"(
(O
WARNING
G
The seat belts maynot perform their intended
protective functionif:
R
theyare damaged, modified,extremely
dirty,bleachordyed
R
the seat belt buckle is damagedor
extremelydirty
R
the Emergency Tensioning Devices,belt
anchoragesorinertia reels have been modified
Seatbelts maysustain non-visibledamagein
an accident, e.g.due to glasssplinters.Modifiedordamaged seat belts maytearorfail,
e.g.inanaccident. Modified Emergency Tensioning Devices could accidentallytriggeror
fail to deploy when necessary.Thisposes an
increasedriskofinjury or evenfatal injury.
Never modify the seat belts,Emergency Tensioning Devices,beltanchoragesorinertia
reels.Makesurethatthe seat belts are
undamaged,not worn outand clean. Following an accident, have the seat belts checked
immediatelyataqualified specialistworkshop.
Onlyuse seat belts thathavebeenapproved for
your vehiclebyMercedes-Benz.
Safety
Adjust the seat properly beforebeginning
your journey.Alwaysensurethatthe backrest
is in an almostverticalpositionand thatthe
shouldersectionofyourseatbeltisrouted
across the centerofyourshoulder.
Proper use of the seat belts
Payattentiontothe safety notesabout the seat
Y page 45).
belt (
Z

46
Occupant safety
All vehicleoccupants must fasten the seatbelt
correctlybefore setting off. Make sure thatall
occupants arewearing theirseatbelts correctly
for the entire journey.
Whenfastening the seatbelt, make sure that:
R
The seatbelttongueisinsertedinto the belt
buckle thatbelongs to the seat.
R
The seatbeltistightenedacross your body.
Safety
Avoidwearing bulky clothing, e.g.awinter
coat.
R
The seatbeltisnot twisted.
Onlythen can the forces produced in the
event of an accident be evenly distributed
across the belt.
R
The shouldersectionofthe belt must always
be routed across the centerofthe shoulder.
The shouldersectionofthe belt shouldnot
come into contact with your neck and must
not be routed under the arm. Where possible,
adjustthe seatbelttothe appropriate height.
R
The lapbeltmustbetautand as lowaspossibleoveryourlap.
The lapbeltmustalwayspassacross your hip
joints and neveracross your stomach or
abdomen. Pregnant women must take particular care. If necessary,the lapbeltcan be
pusheddownacross the hipjoints and pulled
tight using the shouldersection.
R
The seatbeltisnot routed oversharp, pointed
or fragile objects.
If theseite
ms areonorinyourclothing, e.g.
eyeglasses,pens, keys, etc., stow theseitems
in amore suitablelocation.
R
Onlyone personshoulduse each seatbeltat
any one time.
On no account shouldbabiesorchildren
travel sitting on the lapofanother vehicle
occupant. During an accident, they could be
crushedbetween the occupant and seatbelt.
R
Objects arenot secured with aseatbeltifthe
seatbeltisbeing used by one of the vehicle’s
occupants.
Alsomakesurethatthereare no objects, e.g.
cushions, between the occupant and the seat.
Seatbelts aresolelyintendedfor the protection
and restraint of the vehicleoccupants. To
secureobjects, luggage or loads, always
observe the "Loading guidelines" (
Y page 232).
Fasteningand adjusting seat belts
Observethe safety notes on the seatbelt
Y page 45) and the notes on correct useofseat
(
Y page 45).
belts (
Basic illustration
X
Adjust the seat(Y page 83).
The seatbackrestmustbeinanalmostverticalposition.
X
Pull the seatbeltsmoothlyfrom belt outlet =
and engagebelttongue ; into belt
buckle :.
The shouldersectionofthe seatbeltmust
always be routed across the centerofthe
shoulder. Adjust the belt outletifnecessary.
X
If necessary,pullupwards on the shoulder
sectionofthe seatbelttotighten the belt
across your body.
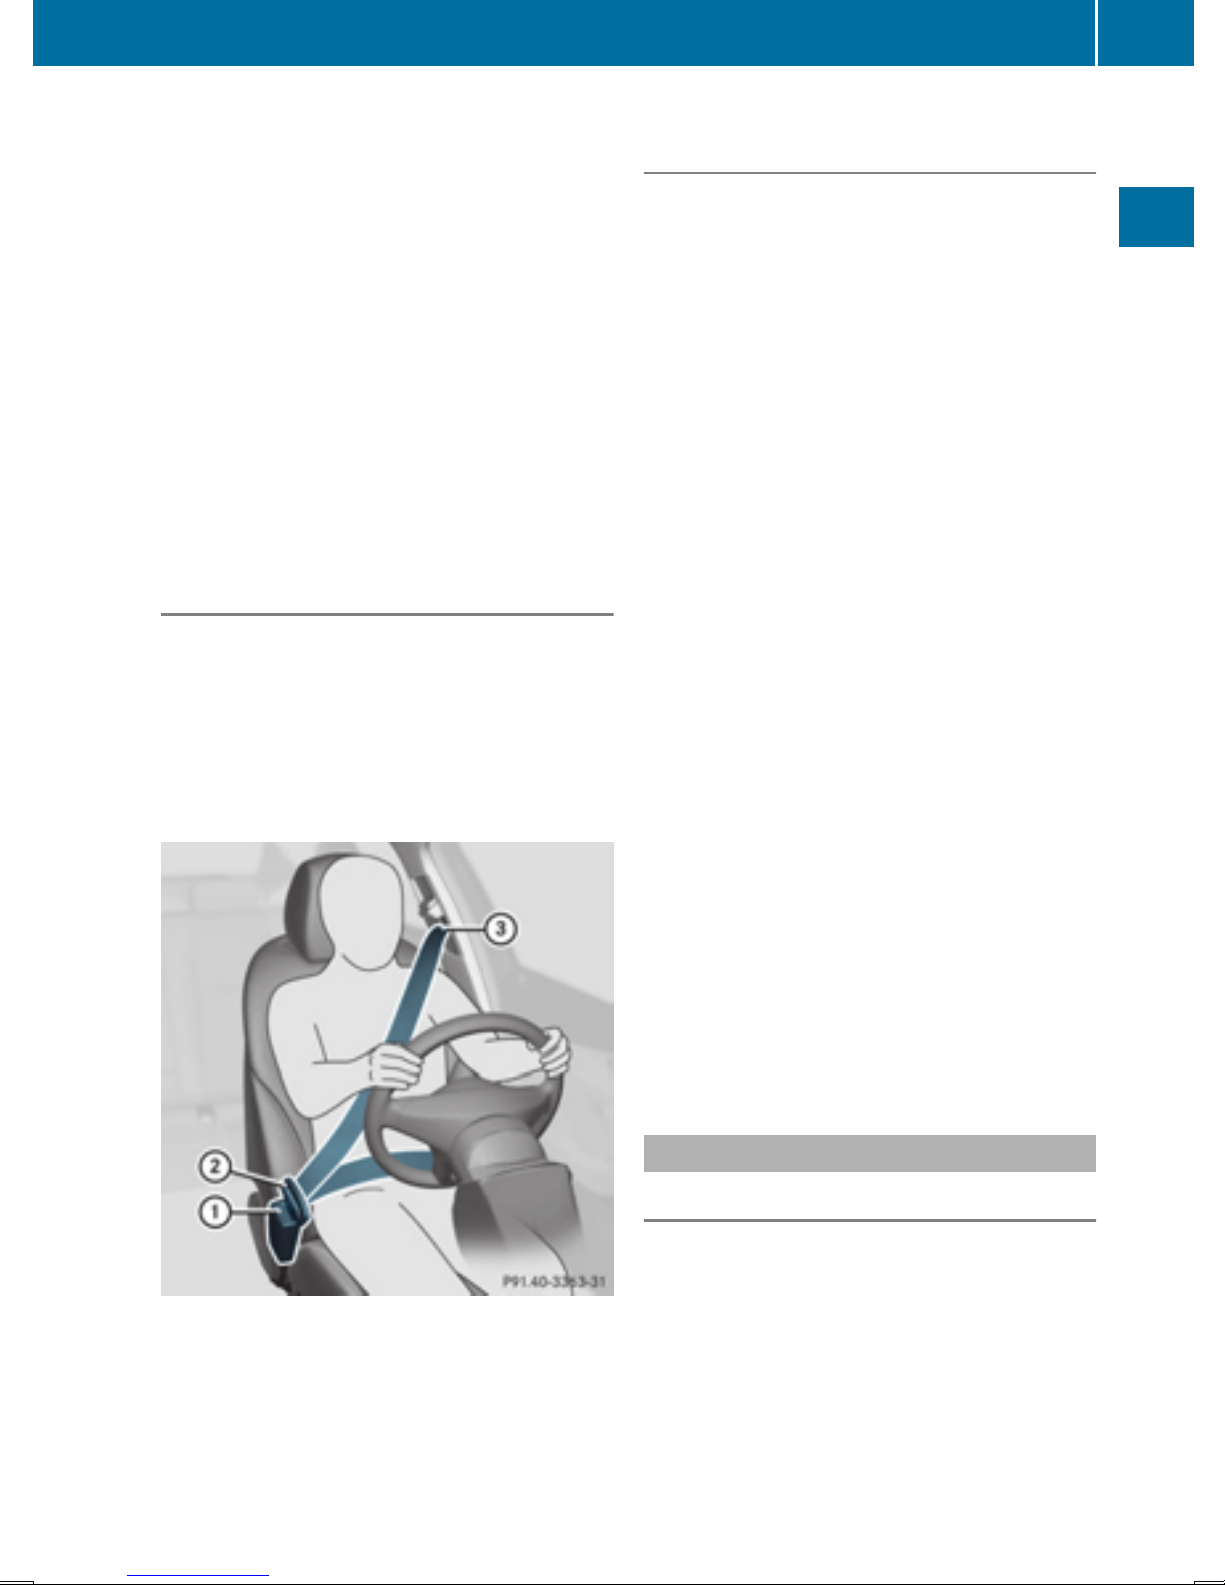
Occupant safety
47
The shoulder section of the seat belt must
alwaysberouted across the center of the shoulder. Adjust the belt outlet if necessary.
X
To raise: slide belt outlet = upwards.
The belt outlet will engage in various positions.
X
To lower: hold belt outlet release ? and slide
the belt outlet = downwards.
X
Let go of belt outlet release ? in the desired
position and make sure that the belt outlet
engages.
All seat belts except the driver's seat belt are
equipped with aspecial seat belt retractor to
securely fasten child restraint systems in the
vehicle. Further information can be found under
"Special seat belt retractor" (
Y page 57).
Releasing seat belts
Make sure that the seat belt is fully rolled up.
!
Otherwise, the seat belt or belt tongue will be
trapped in the door or in the seat mechanism.
This could damage the door, the door trim
panel and the seat belt. Damaged seat belts
can no longer fulfill their protective function
and must be replaced. Visit aqualified specialist workshop.
Belt warning for driversand front passengers
The 7 seat belt warning lamp in the instrument cluster is areminder that all vehicle occupants must wear their seat belts. It may light up
continuously or flash. In addition, there may be
awarning tone.
Regardless of whether the driver's seat belt has
already been fastened, the 7 seat belt warning lamp lights up for six seconds each time the
engine is started If the front doors are closed
and the driver or front-passenger seat belt has
not been fastened, the 7 seat belt warning
lamp lights up again after the six seconds. As
soon as the driver's and front-passenger seat
belts are fastened or afront door is opened
again, the 7 seat belt warning lamp goes out.
If the driver's seat belt is not fastened after the
engine is started, an additional warning tonewill
sound. This warning tonestops after amaximum
of six seconds or once the driver's seat belt is
fastened.
If the vehicle speed exceeds 15 mph (25km/h)
and thedriver'sorfront-passenger seat belt is
notfastened, awarning tone sounds again.The
warning tone sounds with increasing intensity
for amaximum of 60 seconds or until thedriver
or frontpassenger have fastenedtheir seat
belts.
If thedriver or frontpassenger unfasten their
seat belt while thevehicle is in motion,the belt
warning automatically reactivates.
Safety
Basic illustration
X
Press release button :,hold belt tongue ;
firmly and guide it back towards belt outlet
=.
For moreinformationonthe 7 seat belt
i
warning lamp, see "Warning and indicator
lamps in theinstrumentcluster, seat belts"
Y page 219).
(
Air bags
Introduction
The air bag installationpointisidentified by the
label AIRBAG.
An air bag supplements acorrectly fastened
seat belt.However,itisnot intended as asubstitutefor theseat belt.Air bags provide additional protection in theeventofanaccident.
Not all air bags are deployed in an accident. The
various air bag systems work independently of
each other (
Y page 54).
Z

48
Occupant safety
There is, however, no system availabletoday
that can completely rule out injury or death.
It is also not possible to rule out arisk of injury
caused by an air bag due to the high speed at
which the air bag must be deployed.
Important safety notes
WARNING
G
Safety
If you do not sit in the correctseat position,
the air bag cannot protectasintended and
could even cause additional injury when
deployed. This poses an increased risk of
injury or even fatal injury.
To avoid hazardous situations, alwaysmake
sure that all of the vehicle's occupants:
R
have fastened their seat belts correctly,
including pregnant women
R
are sittingcorrectly and maintain the greatest possible distance to the air bags
R
follow the following instructions
Always make sure that there are no objects
between the air bag and the vehicle's occupants.
R
Correctly adjust the seats before driving off.
Always make sure the seat backrestsare
positioned as close to the vertical as possible.
The center of the head restraints should support the back of the head at about eye level.
R
Move the driver's and front-passenger seat as
far back as possible. The driver's seat position
must be such that the vehicle can be driven
safely.
R
Keep hands on the outside of the steering
wheel rim. This allows the air bag to deploy
fully.
R
Always sit with your back against the seat
backrest when driving. Do not lean forward,
on the door or against the side window. Otherwise, you are in the air bag deployment
area.
R
Always keep your feet in the footwell in front
of the seat. Do not,for example, place your
feet on the dashboard. Otherwise, your feet
are in the air bag deployment area.
R
Suitable restraint systems must alwaysbe
used for persons under 5ft(1.50 m) in height.
The seat belt cannot be worn correctly by
persons who do not reach this height.
If children are also traveling in the vehicle,
please take note of the followingpoints.
R
Child restraint systems should preferably be
installed on the rear seats.
R
Only secure achild on the front-passenger
seat in arearward-facing child restraint system if the front-passenger front air bag is
deactivated. If the PASSENGER AIR BAG OFF
indicator lamp is permanently lit, the frontpassenger front air bag is deactivated
Y page 44).
(
R
Make sure you observe the instructions and
safety notes on "Occupant
tem (OCS)" (
vehicle" (
Y page 50) and "Children in the
Y page 56), as well as the child
Classification Sys-
restraint system manufacturer's installation
instructions.
Objects in the passenger compartment
could prevent an air bag from functioning
properly. To prevent risks due to the required
air bag speed after deployment, ensure the following before starting the journey:
R
there are no persons, animals or objects
between the vehicle occupantsand an air
bag.
R
there are no objectsbetween the seat, door
and B-pillar.
R
no hard objects, e.g. coat hangers, hang on
the grab handles or coat hooks.
R
no accessories, such as cup holders, are
attached to the vehicle within the deployment
area of an air bag, e.g. to doors or side windows.
R
there are no heavy, sharp or fragile objectsin
the pocketsofitems of clothing. Such items
should be suitably stowed elsewhere.
WARNING
G
If you modify the air bag cover or affix objects
such as stickers to it, the air bag can no longer
function correctly. There is an increased risk
of injury.
Never modify an air bag cover or affix objects
to it.
Vehicles with window curtain air bags for all
rows of seats:
WARNING
G
Sensorstocontrol the air bags are located in
the doors. Modifications or work not per-
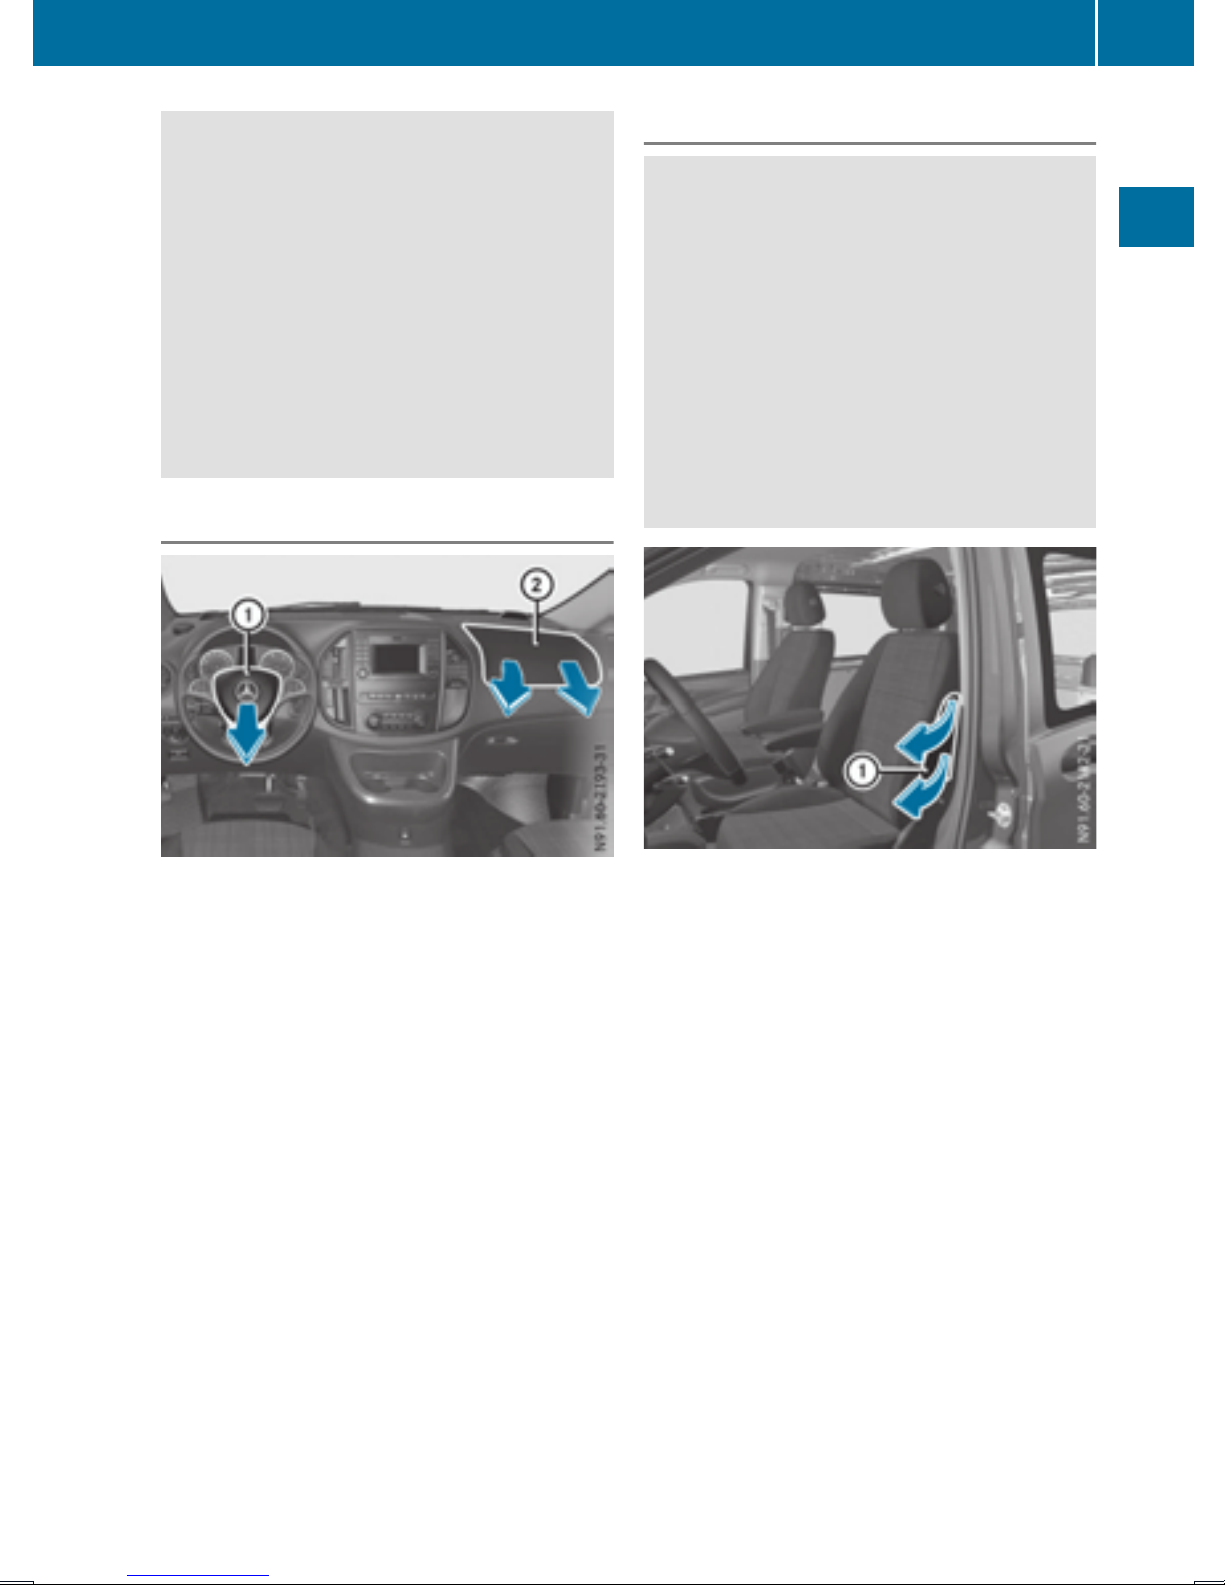
Occupant safety
49
formed correctly to the doors or door paneling, as wellasdamaged doors,can leadtothe
function of the sensors being impaired.The air
bagsmight therefore not function properly
anymore. Consequently, the air bagscannot
protect vehicleoccupants as they are
designed to do. There is an increased risk of
injury.
Never modify the doors or parts of the doors.
Always have work on the doors or door paneling carriedout at aqualified specialist workshop.
Frontair bags
Side impact air bags
WARNING
G
Unsuitableseatcovers couldrestrict or even
prevent the deployment of the air bagsintegrated into the seats. Consequently, the air
bagscannot protect vehicleoccupants as
they are designed to do. In addition, the function of the Occupant Classification System
(OCS) couldberestricted. This posesan
increased risk of injury or even fatal injury.
You should only use seatcovers that have
been approved for the respective seatby
Mercedes-Benz.
Safety
Driver's air bag : deploys in front of the steering wheel. Front-passenger air bag ; deploys in
front of and above the glove box and the center
console.
When deployed, the front air bagsoffer additional headand thorax protection on the front
seats.
The PASSENGER AIR BAG OFF indicator lamp
showsyou the status of the front-passenger
front air bag (
Y page44).
The front-passenger air bag willonly deploy if:
R
the Occupant Classification System (OCS)
has detected that the front-passenger seatis
occupied (
Y page50). The PASSENGER AIR
BAG OFF indicator lampisnot lit
Y page51)
(
R
the restraint system control unit predicts a
high accident severity
Side impact air bags : deploy next to the outer
cushions of the seatbackrest.
When deployed, the side impact air bag offers
additionalthorax and pelvis protection. However, it does not protect the:
R
head
R
neck
R
arms
In the event of aside impact, the side impact air
bag is deployedonthe side on which the impact
occurs.
The side impact air bag on the front-passenger
side deploys under the following conditions:
R
the OCS system detects that the frontpassenger seatisoccupied or
R
the belttongue has engaged in the beltbuckle
of the front-passenger seat.
If the belttongue has engaged in the beltbuckle,
the side impact air bag on the front-passenger
side deploys if the corresponding accident situation occurs. This is regardless of whetherthe
front-passenger seatisoccupied or not.
Z

50
Occupant safety
Windowcurtain air bags
Safety
Example:window curtainair bag above front door
Occupant ClassificationSystem
(OCS)
Introduction
The Occupant Classification System (OCS) categorizes the personinthe front-passenger seat.
Depending on that result, the front-passenger
front air bag is either enabled or deactivated.
The systemdoes not disable:
R
the side impact air bag
R
the window curtainair bag
R
the Emergency Tensioning Devices
Conditions
To be classified correctly,the front passenger
must sit:
R
with the seatbeltfastened correctly
R
in an almost upright position with their back
against the seatbackrest
R
with their feet resting on the floor, if possible
If the front passenger does not observe these
conditions, OCS may produce afalseclassification, e.g. because the front passenger:
Example:window curtainair bag for all rows of
seats
Windowcurtainair bags : or ; are integrated
into the side of the roof frame. Windowcurtain
air bagsfor all rows of seats ; deploy in the
area extending from the front door (A-pillar) to
the rear side window (D-pillar).
When deployed, the window curtainair bag
offers additionalheadprotection. However, it
does not protect the chest or arms.
In the event of aside impact, the window curtain
air bag is deployedonthe side on which the
impact occurs.
If the systemdetermines that it can offer additional protection to that provided by the seat
belt, awindow curtainair bag may be deployed
in other accident situations (
Y page54).
R
transfers their weight by supporting themselvesonavehiclearmrest
R
sits in such away that their weight is raised
from the seatcushion
If it is absolutely necessary to installachild
restraint systemonthe front-passenger seat, be
sure to observe the correct positioning of the
child restraint system. Never place objects
under or behind the child restraint system, e.g.
cushions. The entire baseofthe child restraint
systemmust alwaysrest on the seatcushion of
the front-passenger seat. The backrestofthe
forward-facing child restraint systemmust lie as
flat as possible against the backrestofthe frontpassenger seat.
The child restraint systemmust not touch the
roof or be subjected to aloadbythe head
restraint. Adjust the angleofthe seatbackrest
and the headrestraint position accordingly.
Only then can OCS be guaranteed to function
correctly.Always observe the child restraint system manufacturer's installation instructions.

Occupant safety
51
Occupant Classification System (OCS)
operation
PASSENGER AIR BAG OFF indicator lamp :
shows you whether the front-passenger frontair
bag is deactivated .
X
Turn the key to position 1 or 2 in the ignition
lock.
The system will carry out aself-test.
The PASSENGER AIR BAG OFF indicator lamp
must light up for approximately six seconds.
The PASSENGER AIR BAG OFF indicator lamp
then shows the status of the front-passenger
frontair bag. If the status of the front-passenger
frontair bag changes while the vehicle is in
motion,anair bag display message may appear
in the instrument cluster:
R
on vehicles without steering wheel buttons
Y page 190)
(
R
on vehicles with steering wheel buttons
Y page 204)
(
When the front-passenger seat is occupied,
alwayspay attention to the PASSENGER AIR
BAG OFF indicator lamp. Make sure the correct
status is displayed for the front-passenger air
bag before and during the journey.
If the PASSENGER AIR BAG OFF indicator
lamp:
R
lights up,the front-passenger air bag is deactivated. It will not be deployed in the event of
an accident.
R
does not light up,the front-passenger air
bag is activated. If, in the case of an accident,
all deployment criteria are met, the frontpassenger frontair bag is deployed.
WARNING
G
If the PASSENGER AIR BAG OFF indicator
lamp is lit, the front-passenger frontair bag is
disabled. It will not be deployed in the event of
an accidentand cannot perform its intended
protective function.Aperson in the frontpassenger seat could then,for example, come
into contact with the vehicle's interior, especially if the person is sitting too close to the
dashboard. This poses an increased risk of
injuryoreven fatal injury.
When the front-passenger seat is occupied,
alwaysensure that:
R
the classification of the person in the frontpassenger seat is correct and the frontpassenger frontair bag is enabled or disabled in accordance with the person in the
front-passenger seat
R
the front-passenger seat has been moved
back as far back as possible.
R
the person is seated correctly.
Make sure, both before and during the journey, that the status of the front-passenger
frontair bag is correct.
WARNING
G
If you secure achild in achild restraint system
on the front-passenger seat and the
PASSENGER AIR BAG OFF indicator lamp is
off, the front-passenger frontair bag can
deploy in the event of an accident. The child
could be struckbythe air bag. This poses an
increased risk of injuryoreven fatal injury.
Make sure that the front-passenger frontair
bag has been disabled. The PASSENGER AIR
BAG OFF indicator lamp must be lit.
WARNING
G
If you secure achild in aforward-facing child
restraint system on the front-passenger seat
and you position the front-passenger seat too
close to the dashboard, the child could, in the
event of an accident:
R
come into contact with the vehicle's interior if the PASSENGER AIR BAG OFF indicator lamp is lit, for example
R
be struck by the air bag if the PASSENGER
AIR BAG OFF indicator lamp is off
Safety
Z

52
Occupant safety
This poses an increased risk of injury or even
fatal injury.
Move the front-passenger seat as far back as
possible. Always make sure that the shoulder
belt strap is correctly routed from the vehicle
belt sash guide to the shoulder belt guide on
the child restraint system. The shoulder belt
strap must be routed forwards and down-
Safety
wards from the vehicle belt sash guide. If necessary, adjust the vehicle belt sash guide and
the front-passenger seat accordingly. Always
observe the child restraint system manufacturer's installation instructions.
If OCS determines that:
R
the front-passenger seat is unoccupied, the
PASSENGER AIR BAG OFF indicator lamp
lights up after the system self-test and
remains lit. This indicates that the frontpassenger air bag has been deactivated.
R
the front-passenger seat is occupied by a
child of up to 12 months old in astandard
child restraint system, the PASSENGER AIR
BAG OFF indicator lamp lights up after the
system self-test and remains lit. This indicates that the front-passenger air bag has
been deactivated.
But even in the case of a12-month-old child in
astandard child restraint system, the
PASSENGER AIR BAG OFF indicator lamp can
go out after the system self-test. This indicates that the front-passenger air bag has
been activated. The classification depends,
among other things, on the child restraint system and the size and weight of the child. In
this case, install the child restraint system on
asuitable rear seat.
R
the front-passenger seat is occupied by aperson of smaller stature (e.g. ateenager or
small adult), the PASSENGER AIR BAG OFF
indicator lamp lights up and remains lit after
the system self-test depending on the result
of the classification or, alternatively, goes out.
-
If the PASSENGER AIR BAG OFF indicator
lamp is not lit, move the front-passenger
seat as far back as possible. Alternatively, a
person of smaller stature can sit on arear
seat.
-
If the PASSENGER AIR BAG OFF indicator
lamp is lit, aperson of smaller stature
should not use the front-passenger seat.
R
the front-passenger seat is occupied by an
adult or aperson of astature corresponding
that of an adult, the PASSENGER AIR BAG
to
OFF indicator lamp goes out after the system
self-test. This indicates that the frontpassenger air bag has been activated.
If children are also traveling in the vehicle,
please observe the instructions about “Children
in the vehicle” (
Y page 56).
If OCS is malfunctioning, the red 6 restraint
system warning lamp in the instrument cluster
and the PASSENGER AIR BAG OFF indicator
lamp light up simultaneously. This signals that
the front-passenger air bag has been deactivated and will not be deployed in the event of an
accident.Have the system checked by aqualified technician as soon as possible. Consult a
Mercedes-Benz Commercial Van Center. The
front-passenger seat should only be repaired at
aMercedes-Benz Commercial Van Center.
If the front-passenger seat, the seat cover or the
upholstery is damaged, have the necessary
repair work carried out at aMercedes-Benz
Commercial Van Center.
For safety reasons, Mercedes-Benz recommends that you only use seating accessories
that have been specially approved for
Mercedes-Benz vehicles.
If the driver's air bag deploys, this does not
mean the front-passenger air bag must also
deploy. The Occupant Classification System
(OCS) classifies occupantsonthe frontpassenger seat. Dependingonthe outcome, the
front-passenger air bag is either activated or
deactivated.
System self-test
DANGER
G
If the PASSENGER AIR BAG OFF indicator
lamp does not light up during the system selftest,then the system is malfunctioning. The
front-passenger front air bag might be triggered unintentionally or might not be triggered at all in the event of an accident with
high deceleration. This poses an increased
risk of injury or even fatal injury.

Occupant safety
53
In this case the front-passenger seat may not
be used.Donot install achild restraint system
on the front-passenger seat. Have the Occupant Classification System (OCS) checked
and repaired immediately at aqualifiedspecialist workshop.
DANGER
G
If the PASSENGER AIR BAG OFF indicator
lamp remains lit after the system self-test, the
front-passenger front air bag is disabled.Itwill
not be deployed in the event of an accident. In
this case, the front-passenger front air bag
cannot perform its intended protective function, e.g. when aperson is seated in the frontpassenger seat.
That person could,for example,come into
contact with the vehicle's interior, especially
if the person is sitting too close to the dashboard.This poses an increased risk of injury or
even fatal injury.
accident. This poses an increased risk of
injury or even fatal injury.
Do not place any objects betweenthe seat
surface and the child restraint system. The
entire base of the child restraint system must
always rest on the seat cushionofthe frontpassenger seat. The backrest of the forwardfacing child restraint system must, as far as
possible, be resting on the backrest of the
front-passenger seat. Alwayscomply with the
child restraint system manufacturer's installation instructions.
After the system self-test, the PASSENGER AIR
BAG OFF indicator lamp then shows the status
of the front-passenger front air bag (
Y page 51).
For more information aboutthe OCS, see "Problems with the Occupant Classification System"
Y page 54).
(
Safety
When the front-passenger seat is occupied,
always ensure that:
R
the classification of the person in the frontpassenger seat is correct and the frontpassenger front air bag is enabledordisabled in accordance with the person in the
front-passenger seat
R
the person is seated properlywith acorrectly fastened seatbelt
R
the front-passenger seat has been moved
back as far back as possible
If the PASSENGER AIR BAG OFF indicator
lamp remains lit when it shouldnot, the frontpassenger seat may not be used.Donot
install achild restraint system on the frontpassenger seat. Have the Occupant Classification System (OCS) checked and repaired
immediately at aqualifiedspecialist workshop.
WARNING
G
Objects between the seat surface and the
child restraint system could affect OCS operation. This could resultinthe front-passenger
air bag not functioning as intended during an
Z

54
Occupant safety
Problems with the Occupant Classification System (OCS)
Be sure to observe the notes on "System self-test"(Y page 52).
Problem
The PASSENGER AIR
BAG OFF indicator lamp
lights up and remains lit,
even though the front-
Safety
passenger seat is occupied by an adult or aperson of astature corresponding to that of an
adult.
The PASSENGER AIR
BAG OFF indicator lamp
does not light up and/or
does not stay on.
The front-passenger seat
is:
R
unoccupied
R
occupied with the
weight of achild up to
twelve months old in a
child restraint system
Possible causes/consequences and M Solutions
The classification of the person on the front-passenger seat is incorrect.
X
Make sure the conditionsfor acorrect classification of the person
on the front-passenger seat are met (
X
If the PASSENGER AIR BAG OFF indicator lamp remains lit, the front-
Y page 50).
passenger seat may not be used.
X
Have OCS checked as soon as possible at aMercedes-Benz Commercial Van Center.
OCS is malfunctioning.
X
Make sure there is nothingbetween the seat cushion and the child
seat.
X
Make sure that the entire base of the child restraint system rests on
the seat cushion of the front-passenger seat. The backrest of the
forward-facing child restraint system must lie as flat as possible
against the backrest of the front-passenger seat. If necessary,
adjust the position of the front-passenger seat.
X
When installing the child restraint system, make sure that the seat
belt is tight. Do not pull the seat belt tight using the front-passenger
seat adjustment.This could result in the seat belt and the child
restraint system being pulled too tightly.
X
Check for correct installation of the child restraint system.
Make sure that the head restraint does not apply aload to the child
restraint system. If necessary, adjust the head restraint accordingly.
X
Make sure that no objectsare applying additional weight onto the
seat.
X
If the PASSENGER AIR BAG OFF indicator lamp remains off, do not
install achild restraint system on the front-passenger seat. It is
recommended that you install the child restraint system on asuitable rear seat.
X
Have OCS checked as soon as possible at aMercedes-Benz Commercial Van Center.
Deployment of Emergency Tensioning
Devices and air bags
Important safety notes
WARNING
G
The air bag parts are hot after an air bag has
been deployed. There is arisk of injury.
Do not touch the air bag parts. Have a
deployedair bag replaced at aqualified specialist workshop as soon as possible.
WARNING
G
Adeployedair bag no longer offers any protection and cannot provide the intended protection in an accident. There is an increased
risk of injury.

Occupantsafety
55
Have the vehicle towedtoaqualifiedspecialist workshop in ordertohaveadeployed air
bagreplaced.
It is important for your safety and that of any
passengers to havedeployed airbagsreplaced
and to haveany malfunctioning airbags
repaired. Thiswillhelptomake surethe airbags
continuetoperform theirprotective functionfor
the vehicle occupants in the event of acrash.
WARNING
G
PyrotechnicEmergency Tensioning Devices
that havebeendeployed are no longer operationaland are unable to perform theirintended protective function. Thisposes an
increased risk of injury or even fatalinjury.
Therefore, havepyrotechnicEmergency Tensioning Deviceswhich havebeentriggered
immediately replaced at aqualifiedspecialist
workshop.
If the Emergency Tensioning Devicesorair bags
are deployed, youwillhearabangand asmall
amount of powder may also be released.The
6 restraint system warning lamp will light up.
Only in rare caseswillthe bang affect your hearing. The powder released is generally not hazardous to health, it couldhowever cause shortterm breathing difficultiesinpeople with asthma
or other respiratory problems. If it is safe to do
so, youshould leave the vehicle immediately or
openawindow in ordertoprevent breathing
difficulties.
Air bags and pyrotechnicEmergency Tensioning
Devices(ETDs) containperchlorate material,
which may require specialhandling and regard
for the environment. Check with your localgovernment’sdisposal guidelines.California residents, see www.dtsc.ca.gov/
HazardousWaste/Perchlorate/index.cfm.
Methodofoperation
During the first stageofacollision, the restraint
system control unitevaluates important physical data relating to vehicle decelerationoracceleration, such as:
R
Duration
R
Direction
R
Intensity
Basedonthe evaluationofthis data, the
restraint system control unittriggers the Emergency Tensioning Devicesinthe event of afrontal or rear-end collision.
An Emergency Tensioning Device can only be
triggered if:
R
the ignition is switched on
R
the components of the restraint system are
operational.You can find furtherinformation
under"Restraint system warning lamp"
Y page 43)
(
R
the belttongueisinserted into the buckle on
the respective front seat
If the restraint system control unitdetects ahigh
accident severity,additional components of the
restraint system are deployed independently of
one anotherincertainfrontal collision situations:
R
Front airbags
R
Window curtain airbag,ifthe system determines that it can offer additional protection to
that provided by the seatbelt
Depending on the person occupying the frontpassenger seat, the front-passenger airbag is
activated or deactivated. The front-passenger
front airbag can only be deployed in an accident
if the PASSENGER AIR BAG OFF indicator lamp
is off. Observe the informationonthe
PASSENGER AIR BAG OFF indicator lamp
Y page 44).
(
Yourvehicle has dual-stage front airbags. Dur-
ing the first deployment stage, the front airbag
fills with propellant gas which reduces the risk of
injury.The second stageisthen triggered
mi
lliseconds, filling the front airbag with the
within
maximum amount of propellant gas.
The deployment thresholdsfor the Emergency
Tensioning Devicesand airbagsare calculated
on the basis of the vehicle decelerationoracceleration occurring at various points in the vehicle. Thisprocess is pre-emptiveinnature. The
airbag mustbedeployed on time, at the start of
the collision.
The rate of vehicle decelerationoracceleration
and the directionofthe force are essentially
determinedby:
R
distribution of the force during the impact
R
collision angle
R
deformation characteristics of the vehicle
R
characteristics of the object with which the
vehicle has collided
Safety
Z

56
Children in the vehicle
Factors which can only be seenand measured
afterthe collision has occurred do not playa
decisive roleinthe deployment of an airbag,nor
do they provide an indication of airbag deployment.
The vehicle may be considerably deformed withoutanair bagbeing deployed. Thisisthe case if
only relativelyeasilydeformable parts have
beenhit and ahighrate of deceleration has not
Safety
beenreached.Conversely,anair bagmay be
deployed even though the vehicle suffers only
minor deformation. Thisisthe case if, for example,very rigid vehicle parts such as the longitudinalbodymembers are hit in an accident and
the rate of deceleration is sufficient.
If the restraint system control unitdetects aside
impact or that the vehicle is rolling over,the relevant restraint system components are
deployed independently of one another depending on the anticipated typeofaccident.
R
Side impact airbag and pelvis airbag on the
sideonwhich an impact occurs, independently of the Emergency Tensioning Device and
seatbeltusage
The sideimpact airbag on the frontpassenger sidedeploysunder the following
conditions:
-
the OCS system detects that the frontpassenger seatisoccupied or
-
the belttonguehas engaged in the belt
buckle of the front-passenger seat.
R
Window curtain airbag on the sideofthe collision, regardless of seatbeltuse and whether
front-passeng
R
Emergency Tensioning Devices, if the system
er seati
soccupied
determinesthat they can offeradditional protection for the vehicle occupants in this situation
R
Window curtain airbagsonthe driver's and
front-passenger sides in certain rollover situations if the system determinesthat they
can offeradditional protection to that provided by the seatbelt
Not allair bags are deployed in an accident.
i
The variousair bagsystems workindependently of each other.
How the airbag system works is determined
by the severity of the accident detected,
especiallythe vehicle deceleration or acceleration, and the apparent typeofaccident:
R
frontalcollision
R
sideimpact
R
rollover
Automatic measures after an accident
Immediately afteranaccident, the following
measures are implemented,depending on the
typeand severity of the impact:
R
the hazard warning lamps are activated
R
the emergency lighting is activated
R
the vehicle doors are unlocked
R
the front sidewindowsare lowered
R
the engine is switched off and the fuelsupply
is cut off
Children in the vehicle
Important safety notes
Accident statistics show that childrensecured
in the rearseats are safer than childrensecured
in the front seats. For this reason, MercedesBenz stronglyadvisesthat youinstall achild
restraint system on arearseat. Children are
generally better protected there.
If achildyoungerthan twelve years and under
5ft(1.50 m) in height is traveling in the vehicle:
R
always securethischild in arestraint system
approved for Mercedes-Benz vehicles.The
child restraint systemmustbeappropriate to
the age, weight and size of the child.
R
be sure to observe the instructions and safety
notesinthissectioninadditiontothe child
restraint systemmanufacturer's installation
instructions.
R
always observe the instructions and safety
notesonthe "Occupant Classification System
(OCS)"(
Y page 50).

Children in the vehicle
57
WARNING
G
If you leave children unsupervised in the vehicle, they couldset it in motion by, for example:
R
release the parking brake.
R
shift the automatic transmission out of the
parking position P.
R
start the engine.
In addition, they may operate vehicleequipment and become trapped. There is arisk of
an accident and injury.
When leaving the vehicle, alwaystake the
SmartKey with you and lock the vehicle. Never
leave children unsupervised in the vehicle.
WARNING
G
If persons, particularlychildren are subjected
to prolonged exposure to extreme heator
cold, there is arisk of injury,possibly even
fatal.Never leave children unattended in the
vehicle.
WARNING
G
If the child restraint system is subjected to
direct sunlight, parts may get very hot. Children may burn themselves on these parts,
particularlyonthe metal parts of the child
restraint system. There is arisk of injury.
If you leave the vehicle, taking the child with
you,alwaysensure that the child restraint
system is not exposedtodirect sunlight. Protect it with ablanket, for example. If the child
restraint system has been exposedtodirect
sunlight, let it cool downbefore securing the
child in it. Never leave children unattended in
the vehicle.
Always make sure that all vehicleoccupants are
positioned properly in their seats and have correctly fastened their seat belts. Take particular
care with children.
Please take note of the safety notes on seat
belts (
Y page45) and the notes on their correct
Y page45).
use (
Abooster seat may be necessary to achieve
properseat beltpositioning for children over
41 lbs (18 kg)until they reach aheight where a
lap/shoulder beltcan be installed properly without abooster seat.
Special seat beltretractor
WARNING
G
If the seat beltisreleased while driving, the
child restraint system willnolonger be
securedproperly.The special seat beltretractor is disabledand the inertia real drawsina
portion of the seat belt. The seat beltcannot
be immediatelyrefastened. There is an
increased risk of injury,possibly even fatal.
Stop the vehicleimmediately, paying attention to road and traffic conditions. Reactivate
the special seat beltretractor and secure the
child restraint system properly.
All seat belts in the vehicle, except the driver's
seat belt, are equipped with aspecial seat belt
retractor. When activated, the special seat belt
retractor ensuresthat the seat beltcannot
slacken once the child seat is secured.
Installing achild restraint system:
X
Make sure you observe the child restraint
system manufacturer's installation instructions.
X
Pullthe seat beltsmoothly from the beltoutlet.
X
Engage seat belttongue in beltbuckle.
Activating the special seat beltretractor:
X
Pullthe seat beltout fullyand let the inertia
reel retract it again.
Whilethe seat beltisretracting, you should
hear aratcheting sound.The special seat belt
retractor is enabled.
X
Push the child restraint system downsothat
the seat beltistight and does not loosen.
Removing the child restraint system and deactivating the special seat beltretractor:
X
Make sure you observe the child restraint
system manufacturer's installation instructions.
X
Press the release button of the seat belt
buckle and guide the seat belttongue back
towardsthe beltsash guide.
The special seat beltretractor is deactivated.
Safety
Z

58
Children in thevehicle
Child restraint system
The use of seat beltsand infant and child
restraint systems is required by law in:
R
all 50 states
R
theU.S.territories
R
theDistrict of Columbia
R
all Canadian provinces
Safety
You can obtain further informationabout the
correctchild restraint system from any
Mercedes-BenzCommercial Van Center.
WARNING
G
If thechild restraint system is installed incorrectly on asuitable seat,itcannotprotect as
intended. The child cannotthenberestrained
in theevent of an accident, heavybraking or
suddenchanges of direction.Thereisan
increased riskofinjury, possibly evenfatal.
Makesure that you observethe child restraint
system manufacturer'sinstallationinstructions and thenotes on use. Pleaseensure,
that thebase of thechild restraint system is
always restingcompletely on theseat cushion.Never placeobjects, e.g.cushions, under
or behindthe child restraint system. Only use
child restraint systems withthe original cover
designedfor them. Only replace damaged
covers withgenuine covers.
suddenchangeindirection.The child
restraint system couldbethrown about,striking vehicle occupants.Thereisanincreased
riskofinjury, possibly evenfatal.
Always install child restraint systems properly, eveniftheyare notbeingused. Make
sure that you observethe child restraint systemmanufacturer'sinstallationinstructions.
You will findfurther informationonstowing
objects, luggageand loads securely under
"Loading guidelines" (
WARNING
G
Y page 232).
Child restraint systems or their securingsystems whichhave been damaged or subjected
to aload in an accidentcan no longer protect
as intended. The child cannotthenbe
restrainedinthe event of an accident, heavy
braking or suddenchanges of direction.There
is an increased riskofinjury, possibly even
fatal.
Replacechild restraint systems whichhave
been damaged or subjected to aload in an
accidentassoon as possible. Havethe securing systems on thechild restraint system
checked at aqualified specialist workshop,
before you install achild restraint system
again.
WARNING
G
If arearward facing child restraint system is
installed in thedirection of travel by mistake,
it cannotprotect as intended. This is thecase
if, for instance, you install arearward-facing
child restraint system on arear seat opposite
to thedirection of travel. In theevent of an
accident, achild mightnot be restrainedcorrectly. This posesanincreased riskofinjury or
evenfatal injury.
Always install therear seat in thedirection of
travel before you install therearward facing
child restraint system.
WARNING
G
If thechild restraint system is installed incorrectly or is notsecured, it can comeloosein
theevent of an accident, heavybraking or a
Securingsystems for child restraint systems
include:
R
theseat belt system
R
theLATCH-type (ISOFIX) securingrings
R
Top Tether anchorage points
If it is absolutely necessary to carry achild on
thefront-passenger seat,besure to observethe
instructionson“OccupantClassificationSystem(OCS)” (
Y page 50). This includes informa-
tionondeactivatingthe front-passenger air bag.
All child restraint systems must meetthe fol-
lowingstandards:
R
U.S. Federal Motor Vehicle SafetyStandards
213and 225
R
Canadian Motor Vehicle SafetyStandards
213and 210.2
Astatementbythe child restraint manufacturer
of compliance withthese standards can be
foundonthe instruction label on
thechild

restraint system. You willalsofind the statement in the instruction manualprovided with the
child restraint system.
Observe the warning labels in the vehicleinterior and on the child restraint system.
LATCH-type (ISOFIX) childseat securing system
WARNING
G
Children in the vehicle
59
Safety
LATCH-type (ISOFIX) child restraint systems
do not offer sufficient protective effect for
children whose weight is greater than 48 lbs
(22 kg)who are securedusing the safety belt
integrated in the child restraint system. In the
event of an accident, achild might not be
restrained correctly. This poses an increased
risk of injury or even fatal injury.
If the child weighs more than 48 lbs (22 kg),
only use LATCH-type (ISOFIX) child restraint
systems with which the child is alsosecured
with the vehicleseat belt. Also secure the
child restraint system with the Top Tether
belt, if available.
Make sure you observe the manufacturer's
installation and operating instructions of the
child restraint system used.
Before each journey,make sure that the LATCHtype (ISOFIX) child restraint system is properly
engagedinboth LATCH-type (ISOFIX) securing
rings.
When fitting the child restraint system in
!
vehicles with arear bench seat, make sure
that the seat belt for the center seat does not
get trapped. Otherwise, the seat belt could be
damaged.
:
LATCH-type (ISOFIX) securing rings (basic
illustration)
X
Install the LATCH-type (ISOFIX) child restraint
system on both LATCH-type (ISOFIX) securing
rings :.
LATCH-type (ISOFIX) is astandardized securing
system for specialchild restraint systems and
specificrear seats. LATCH-type (ISOFIX) securing rings : for aLATCH-type (ISOFIX) child
restraint system are installed between the seat
cushion and the seat backrest.
Secure child restraint systems withoutaLATCHtype (ISOFIX) child seat securing system using
the seat belts in the vehicle. Always comply with
the manufacturer's installation and operating
instructions for the child restraint system.
Top Tether
Introduction
Top Tether provides an additional connection
between the LATCH-type (ISOFIX) child restraint
system and the vehicle. This helpsreduce the
risk of injury even further. If the child restraint
system has aTop Tether belt, this should be
used at all times.
Z

60
Children in the vehicle
Top Tether anchorage points
Safety
Example: rearbench seat
TopTetheranchorage point ; is on the bottom
of the rearsideofthe rearseatonthe cross
brace between the seat/bench seatlegs.
X
Moveheadrestraint : upwards.
X
Install the LATCH-type (ISOFIX)child restraint
system with TopTether. Make sure you
observe the child restraint system manufacturer'sinstallationinstructions.
Childrestraintsystem on the frontpassengerseat
General notes
Accident statistics showthatchildren secured
in the rearseats aresafer thanchildren secured
in the front-passengerseat. For thisreason,
Mercedes-Benz stronglyadvises thatyou install
the child restraint system on arearseat.
If it is absolutely necessary to installachild
restraint system on the front-passengerseat,
always observe the instructions and safety
notesonthe "Occupant Classification System
(OCS)"(
Youcan thusavoid the risks thatcould ariseas
aresultof:
R
R
R
Y page 50).
an incorrectly categorizedpersoninthe frontpassengerseat
the unintentionaldeactivationofthe frontpassengerfront airbag
the unsuitable positioning of the child
restraint system,e.g.too close to the dashboard
X
Route TopTetherbelt ? under head
restraint : between the two head restraint
bars.
X
HookTop Tetherhook = of TopTether
belt ? into TopTetheranchorage ;.
Make sure thatTop Tetherbelt ? is not twisted.
X
Tension TopTetherbelt ?.Makesureyou
observe the child restraint system manufacturer'sinstallationinstructions.
X
If necessary,pushheadrestraint : back
down slightly(
Y page 88). Make sure that
youdonot interfere with the correct routing of
TopTetherbelt ?.
Rearward-facingchild restraintsystem
If it is absolutely necessary to installarearwardfacing child restraint system on the frontpassengerseat, always make sure thatthe
front-passengerfront airbag is deactivated.
Onlyifthe PASSENGER AIR BAG OFF indicator
lamp is permanentlylit (
Y page 44)isthe front-
passenger front air bag deactivated.
Always observe the child restraint system man-
ufacturer's installation and operating instructions.
Forward-facing child restraint system
If it is absolutely necessary to install aforwardfacing child restraint system on the frontpassenger seat, always move the frontpassenger seat as far back as possible.The
entire base of the child restraint system must
always rest on the seat cushion of the frontpassenger seat. The backrest of the child
restraint system must lie as flat as possible
against the backrest of the front-passenger
seat. The child restraint system must not touch
the roof or be subjected to aload by the head
restraint. Adjust the angle of the seat backrest
and the head restraint position accordingly.
Always make sure that the shoulderbelt strap is

Children in the vehicle
61
correctly routed from the vehicle beltoutlet to
the shoulder beltguide on the childrestraint
system. The shoulder beltstrapmustberouted
forwardsand downwards from the vehicle belt
outlet. If necessary, adjust the vehicle beltoutletand the front-passenger seataccordingly.
Alwaysobserve the childrestraint system manufacturer's installation and operating instructions.
Override features/Child-proof locks
Important safety notes
WARNING
G
If childrenare traveling in the vehicle,they
could:
R
opendoors, thus endangering otherpeople
or roadusers
R
exit the vehicle and be caught by oncoming
traffic
R
operate vehicle equipment and become
trapped
There is ariskofanaccident and injury.
WARNING
G
If persons, particularly childrenare subjected
to prolonged exposure to extremeheator
cold,there is ariskofinjury, possibly even
fatal. Neverleave childrenunattendedinthe
vehicle.
WARNING
G
If the childrestraint system is subjectedto
direct sunlight, parts may get very hot. Childrenmay burn themselves on these parts,
particularly on the metalparts of the child
restraint system. There is ariskofinjury.
If youleave the vehicle,taking the childwith
you, always ensure that the childrestraint
system is not exposed to direct sunlight. Protect it with ablanket, for example. If the child
restraint system hasbeenexposed to direct
sunlight, letitcool downbefore securing the
childinit. Neverleave childrenunattendedin
the vehicle.
Child-proof lock for sliding door
Safety
Alwaysactivate the child-proof locks and
overridefeature if childrenare traveling in the
vehicle.Whenleaving the vehicle,alwaystake
the key with youand lock the vehicle.Never
leave childrenunattendedinthe vehicle.
Child-proof lock/override feature for:
R
Sliding doors (Y page 61)
WARNING
G
If youleave childrenunsupervised in the vehicle,they could set it in motionby, for example:
R
release the parking brake.
R
shift the automatic transmission outofthe
parking position P.
R
startthe engine.
In addition, they may operate vehicle equipment and become trapped.There is ariskof
an accident and injury.
Whenleaving the vehicle,alwaystake the
SmartKey with youand lock the vehicle.Never
leave childrenunsupervised in the vehicle.
Sliding door(example: leftsideofthe vehicle)
:
Childsafety bolt
2
Sliding doorreleased
3
Sliding doorsecured –then make sure that
the child-proof locks are working properly.
You can secure each sliding doorindividually
with the child-proof locks on the sliding doors.
Asecured sliding doorcannot be opened from
inside the vehicle.Whenthe vehicle is unlocked,
the sliding doorcan be opened from the outside.
If the electricsliding doorissecured,only the
sliding doorrearcontrolsare deactivated. If the
electricsliding doorisunlocked,you can open
Z

62
Driving safetysystems
the electricslidingdoorusing the corresponding
Å or Æ sliding door button in the center
console(
Y page 75).
Pets in the vehicle
WARNING
G
Safety
If youleave animals unattended or unsecured
in the vehicle, theycould press buttons or
switches,for example.
As aresult, theycould:
R
activate vehicleequipment and become
trapped,for example
R
activate or deactivate systems, thereby
endangering otherroadusers
Unsecured animals could also be flung around
the vehicleinthe event of an accident or suddensteering or braking,therebyinjuringvehicle occupants. There is ariskofanaccident
and injury.
Never leaveanimals unattended in the vehicle.Alwayssecureanimals properly during
the journey,e.g.use asuitableanimaltransport box.
drivingstyle to the prevailing roadand weather
conditions and maintain asufficient, safe distance fromotherroadusers.Drive carefully.
Please note thatthe drivingsafety systems
describedonlyworkoptimally when:
R
there is adequate contact between the tires
and the roadsurface
R
youuse winter tires(M+Stires),withsnow
chains if necessary,whenthe roadconditions
arewintry
R
the speedinformation determinedbythe
vehicleiswithinthe legallyprescribeddisplay
accuracy
Payparticular attentiontothe information
regarding tires, coding of the wheelsizegroups,
tire treadand winter operationunder "Wheels
and tires" (
Y page 267).
ABS (Anti-lock Braking System)
General notes
ABS regulatesbrake pressure in such away that
the wheels do not lock when youbrake. This
allows youtocontinue steering the vehiclewhen
braking.
The ò warning lamp in the instrument cluster
lights up when the ignition is switched on. The
lamp goes outwhenthe engine starts running.
Driving safety systems
Overview
In thissection, youwillfindinformation about
the following drivingsafety systems:
R
EBD (Electronic Brake Force Distribution)
R
ABS (Anti-lock Braking System)
R
BAS (Brake Assist System)
R
ESP®(Electronic Stability Program)
Important safety notes
If youfailtoadapt your drivingstyle or if youare
inattentive, the drivingsafety systems can neitherreduce the riskofaccident nor override the
laws of physics.Drivingsafety systems are
merelyaidsdesignedtoassistdriving. Youare
responsiblefor the distance to the vehiclein
front, for vehiclespeed, braking in good time
and for staying in your lane. Alwaysadapt your
Important safety notes
Observe the important safety guidelinesfor the
drivingsafety system(
ABS works fromaspeed of about5mph
(8 km/h), regardlessofroad-surface conditions.
ABS works on slippery surfaces,evenwhenyou
onlybrake gently.
WARNING
G
If ABS is faulty, the wheels could lock when
braking.The steerability andbraking characteristics maybeseverelyimpaired. Additionally,furtherdrivingsafety systems aredeactivated.Thereisanincreaseddangerofskidding and accidents.
Drive on carefully. HaveABS checked immediately at aqualified specialistworkshop.
Y page 62).

Driving safety systems
63
If ABS is malfunctioning, the ò warning lamp
(
Y page 221) lights up whilethe engine is run-
ning and the display shows amessage:
R
on vehicleswithoutsteering wheel buttons
Y page 189)
(
R
on vehicleswith steering wheel buttons
Y page 203)
(
BAS, Hill Start Assist and ESP
®
and its driving
safety systems and other driving systems also
fail.Observe the notes on the ò warning
lamp and the display messages.
Braking
If ABS intervenes when braking, you willfeel a
pulsating in the brake pedal.
The pulsating brake pedalcan be an indication
of hazardous road conditions and functions as a
reminder to take extra care whiledriving.
X
If ABS intervenes: continue to depressthe
brake pedalwith force until the braking situationisover.
X
To make afull brake application: depress
the brake pedalwith full force.
BAS (Brake Assist System)
R
on vehicleswithoutsteering wheel buttons
Y page 193)
(
R
on vehicleswith steering wheel buttons
Y page 207)
(
Braking
X
Keep the brake pedalfirmly depressed until
the emergency braking situation is over.
ABS prevents the wheelsfrom locking.
The brakes willfunction as usual once you
release the brake pedal. BAS is deactivated.
EBD (electronicbrake force distribution)
General notes
EBD monitors and controls the brake pressure
to the rear wheels. This enables EBD to improve
handling during braking.
Important safety notes
Observe the important safety guidelines for the
driving safety system (
WARNING
G
Y page 62).
Safety
General notes
BAS operates in emergency braking situations.
If you depressthe brake pedalquickly, BAS
automatically boosts the braking force, thus
shortening the stopping distance.
Important safety notes
Observe the important safety guidelines for the
driving safety system (
WARNING
G
If BAS is malfunctioning, the braking distance
in an emergency braking situation is
increased.There is arisk of an accident.
In an emergency braking situation, depress
the brake pedalwith full force. ABS prevents
the wheelsfrom locking.
If BAS is malfunctioning, the ÷ warning lamp
lights up whilethe engine is running
(
Y page 221) and the display shows amessage:
Y page 62).
If EBD is malfunctioning, the rear wheelscan
lock, e.g. under full braking. This increases the
risk of skidding and an accident.
You shouldtherefore adapt yourdriving style
to the different handling characteristics. Have
the brake system checked at aqualifiedspecialist workshop.
If EBD is malfunctioning, the $ warning lamp
(
Y page 220) lights up whilethe engine is run-
ning and the display shows amessage.
R
on vehicleswithoutsteering wheel buttons
Y page 192)
(
R
on vehicleswith steering wheel buttons
Y page 206)
(
Other driving systems and driving safety systems then also fail.
Z

64
Driving safety systems
ESP®(Electronic Stability Program)
General notes
ESP®monitors driving stabilityand detectsa
tendencyofthe vehicle to understeer or over-
steer (skidding) in good time. If ESP
that thevehicle is deviatingfromthe direction
desired by thedriver, oneormorewheels are
Safety
braked to stabilizethe vehicle.The engine output is also modified to keep thevehicle on the
desired course within physical limits. ESP
also stabilizethe vehicle duringbraking.
®
also monitors traction,i.e.power trans-
ESP
mission between thetires and theroad surface.
The integratedtraction control supportsyou
when pullingaway or acceleratingonwet,slippery or slickroads. Should thedrivewheels spin,
traction control brakes them individually. In
addition,greaterdrivetorque is transmittedto
thewheel or wheels with traction.Iftraction on
theroad surface is notsufficient,even ESP
notallow you to pull away without difficulty. The
type of tires and total weightofthe vehicle as
well as thegradientofthe road also play acrucial role.Tractioncontrol remains active if you
®
deactivate ESP
.
If the h warning lamp in theinstrumentclustergoes out before beginningthe journey, ESP
is automaticallyactive.
The h warning lamp in theinstrumentcluster
®
flashes when ESP
X
Do notdeactivate ESP®underany circum-
intervenes:
stances.
X
when driving off,apply as little throttle as
possible.
X
adapt your speedand driving style to theprevailingroad conditions.
Important safety notes
Observethe important safety guidelines for the
driving safety system (
WARNING
G
®
If ESP
is malfunctioningitwill notprovide
any vehicle stabilization. Thereisanincreased
risk of skiddingorofanaccident.
Exercise caution when continuing to drive.
HaveESP
®
checked at aqualified specialist
workshop.
Y page 62).
®
detects
®
®
can
will
Do notrun thevehicle on aroller dynamom-
!
eter (e.g. for performancetests).Ifyou must
operate thevehicle on aroller dynamometer,
please consult aqualified specialist workshop
in advance. You couldotherwise damagethe
drivetrain or thebrakesystem.
®
If ESP
lamp (
is malfunctioning, the h warning
Y page 221) lightsupcontinuously while
theengine is runningand thedisplay showsa
message.
R
on vehicleswithout steering wheel buttons
Y page 193)
(
R
on vehicleswith steering wheel buttons
Y page 207)
(
®
ESP
is deactivatedifthe å warning lamp in
theinstrumentclusterislit when theengine is
running.
Only use wheels with therecommended tire
®
sizes. Only then will ESP
Deactivating/activatingESP
WARNING
G
If you deactivate ESP
function properly.
®
®
,ESP®no longer stabilizes thevehicle.Thereisanincreased risk
of skiddingand an accident.
®
Only deactivate ESP
®
in thesituations descri-
bed in thefollowing.
It may be best to deactivate ESP
®
in thefollow-
ing situations:
R
when usingsnowchains
R
in deep snow
R
on sandorgravel
Activate ESP
®
as soon as thesituations descri-
bed abovenolonger apply. Otherwise, ESP
assistance for stabilizing thevehicle will remain
significantly reduced, even if thevehicle starts
to skid.
®
If you deactivate ESP
R
the å warning lamp in theinstrumentclus-
:
terlightsup.
R
the ÷ warning lamp in theinstrumentclusterflashes if thewheels are spinning.
R
ESP®assistance for stabilizing thevehicle in
thelower speedrange up to approximately
37 mph (60 km/h) is significantly reduced.
R
engine torque is no longer limited and the
drivewheels are able to spin
®

Driving safety systems
65
The spinningofthe wheels results in acutting
action for better traction on loose surfaces.
R
Traction control is still activated
R
ESP®still provides support when you brake.
Dependingonthe equipment in the vehicle, you
®
can activate or deactivate ESP
when the
engine is runningbyusing the å button or by
using the on-board computer:
R
on vehicles without steeringwheel buttons
Y page 173)
(
R
on vehicles with steeringwheel buttons
Y page 183)
(
If the sensor system and evaluation logic detect
®
trailer swinging movements, ESP
trailer stabilization firstly brakes individual vehicle wheels in
atargeted manner.Itthus counteracts swinging
movements. If the swinging movements do not
stop, the vehicle is braked until the vehicle/
trailer combination is stabilized. If necessary,
the vehicle's engine output is limited.
If your vehicle with trailer (vehicle/trailer combination) startstoswerve, you will be able to
stabilize the vehicle/trailer combination only by
®
braking. ESP
trailer stabilization helps you to
stabilize the vehicle/trailer combination in this
situation.
®
trailer stabilization is activated above
ESP
speeds of about 40 mph (65 km/h).
®
If ESP
is switched off or deactivated because of
amalfunction, the trailer stabilization system
will not function.
Crosswind Assist
Safety
å button (equipment-dependent)
X
To activate/deactivate: when the engine is
running, press the å button.
The å warning lamp in the instrument
cluster lights up when ESP
®
is deactivated.
Trailer stabilization
Observe the important safety guidelines for the
driving safety system (
WARNING
G
If road and weather conditions are poor,
trailer stabilization will not be able to prevent
the vehicle/trailer combination from swerving. Trailers with ahigh center of gravity can
tip over before ESP
arisk of an accident.
Always adapt your driving style to the prevailing road and weather conditions.
®
ESP
trailer stabilization counteracts critical
driving situations in good time and thereby provides considerable assistance when driving with
atrailer. Trailer stabilization is part of ESP
Y page 62).
®
can detect this. There is
®
.
Observe the important safety guidelines for the
driving safety system (
Y page 62).
Strong crosswind gusts can impair the roadholding of your vehicle when driving straight
ahead. The Crosswind Assist function integra-
®
ted in ESP
reduces these impairments.
Dependingonthe direction and intensity of the
side wind, Crosswind Assist intervenes auto-
®
matically. ESP
intervenes with stabilizing braking to assist you in keeping the vehicle in the
lane. When Crosswind Assist intervenes, the
display shows the traffic sign for strongside
winds and the message Crosswind Assist
.
Crosswind Assist is activated automatically
above avehicle speed of approx. 50 mph
(80 km/h) when the vehicle is driving straight
ahead or cornering gently.
Crosswind Assist does not react:
R
in the event of severe jolts and vibrations, e.g.
when driving over uneven surfaces or potholes
R
when grip is reduced, e.g. on snow or ice or
when hydroplaning
®
Crosswind Assist does not work if ESP
is deac-
tivated or disabled because of amalfunction.
Z

66
Theftdeterrentlocking system
Theft deterrentlocking system
Immobilizer
X
To activate: remove the key fromthe ignition
lock.
X
To deactivate: turnthe key to position 2 in
the ignition lock.
The immobilizerprevents your vehiclefrom
Safety
being started withoutthe correct key.
Alwaystake the key with youand lock the vehi-
cle when leaving the vehicle. If youleave the key
in the vehicle, anyone can start the engine.
The immobilizerisalwaysdeactivated when
i
youstart the engine.
ATA (Anti-Theft Alarm system)
The alarmisnot switched off,evenifyou close
the open door thattriggered it, for example.
X
To arm: lock the vehiclewiththe key.
Indicatorlamp : in the overhead control
panel flashes.
X
To disarm: unlock the vehiclewiththe key.
or
X
Insert the key into the ignition lock.
If the alarmsystem is armed,avisualand audiblealarm is triggered when the following are
opened:
R
adoor
R
the vehiclewiththe mechanical key
R
the tailgate/reardoor
R
the hood
X
To stopthe alarm: press the % or &
button on the key.
or
X
Insert the key into the ignition lock.
The alarmstops.

Useful information
This Operator's Manual describes all models as
well as standard and optional equipment of your
vehicle that were available at the time of going
to print.Country-specific variationsare possible. Note that your vehicle may not be equipped
with all of the described functions. This also
applies to systemsand functionsrelevantto
safety.
Read the information on qualified specialist
workshops (
Y page 29).
Key
Keep the SmartKey away from strong mag-
!
netic fields. Otherwise, the remotecontrol
function could be affected.
Strongmagnetic fields can occur in the vicinity of powerful electrical installations.
Do not keep the key:
R
with electronic devices,e.g. amobile phone
or another key
R
with metallic objects, e.g. coinsormetal foil
R
in metallic objects, e.g. metal cases
This can affectthe key's functionality.
67
Key
Important safetynotes
WARNING
G
If children are left unsupervised in the vehicle,
they could:
R
open the doors, thus endangering other
people or road users.
R
get out and disrupt traffic.
R
operate the vehicle'sequipment.
Additionally, children could set the vehicle in
motion if, for example, they:
R
release the parkingbrake.
R
shifting the automatic transmission out of
park position P
R
Start the engine.
There is arisk of an accidentand injury.
When leaving the vehicle, always takethe
SmartKey with you and lock the vehicle. Never
leave children or animals unattended in the
vehicle. Always keep the SmartKey out of
reach of children.
WARNING
G
If you attach heavy or large objects to the
SmartKey, the SmartKey could be unintentionally turned in the ignition lock.This could
cause the enginetobeswitched off. There is a
risk of an accident.
Key functions
:
Battery checklamp
;
& To lock the vehicle centrally
=
5 To unlock the sliding doors and the
tailgate or rear door or to unlock and open or
close the electric sliding door
?
Mechanical key
A
% To unlock the vehicle centrally or
unlock the frontdoor(s) only
The vehicle’s equipment includes 2keys. There
is an mechanical key in each key.
The key can be used to unlock the vehicle from
some distance. To preventtheft, only use the
key in the immediatevicinity of the vehicle.
Change the batteries immediately if battery
checklamp : does not light up briefly with
every press of abutton (
X
To unlock centrally: press the % button.
The turn signals flash once.
Y page 69).
Opening and closing
Do not attach any heavy or large objects to the
SmartKey. Remove any bulky key rings before
insertingthe SmartKey intothe ignition lock.
Z

68
Key
To unlockthe sliding doors and the tail-
X
gate or rear dooronly:press the 5 but-
ton.
The turn signals flash once.
i If youdonot open the vehiclewithinapprox-
imately40seconds of unlocking:
R
the vehicleislocked again.
R
the anti-theftprotection is armed again.
X
To lock centrally: press the & button.
The indicator lamps flash threetimesif:
R
the anti-theftprotection is armed.
R
allthe doors and the tailgate or reardoor
are closed.
X
Check the locking knobs on allthe doors.
The locking knobs must allbeinthe lowered
position.
The key's factory setting enables youtocentrally lock and unlock the following:
Opening and closing
R
the driver's and the front-passenger door
R
the sliding doors
R
the tailgate or reardoor
In an emergency, the driver's door can also be
unlockedmanuallyusing the mechanical key
Y page 68).
(
Youcan also set an audiblesignaltoconfirm
thatthe vehiclehas been locked.The audible
locking-verification signalcan be switched on/
off:
R
using the on-board computeronvehicles with
steering wheelbuttons (
R
at aspecialist qualified workshop for vehicles
withoutsteering wheelbuttons
After unlocking using the remote control, the
surround lighting also goeso
hicles with steering wheelbuttons, the sur-
ve
round lighting can be activatedand deactivated
in the on-board computer(
Y page 187)
ninthe dark. For
Y page 186).
X
To changethe setting: press and holddown
the % and & buttons simultaneously
untilthe battery check lamp flashestwice.
(
Y page 67).
If the setting of the locking system is changed
withinthe signalrangeofthe vehicle, press the
& or % button to:
R
lock or
R
unlock the vehicle
The key now functions as follows:
To unlockthe driver'sdoororfrontdoors:
X
press the % button once.
X
To unlockcentrally: brieflypress the %
button twice.
X
To lock centrally: press the & button.
X
To restore factory settings: press and hold
down the % and & buttons simultaneouslyuntilthe battery check lamp flashes
twice (
Y page 67).
The key unlocks the vehiclecentrallyagain.
Mechanical key
General notes
If the vehiclecan no longer be locked or
unlockedwiththe key,use the mechanical key.
The anti-theftalarm system (ATA) is triggered
when youunlock and open the vehicleusing the
mechanical key (
Y page 66).
The alarm can be disabled in the following two
ways:
X
Press the % or & button on the key.
or
X
Insert the key into the ignition lock.
Removing the mechanical key
Changingthe settings of the locking
system
If youtravel alone alot,you maywishtochange
the settings of the locking system.Press
the % button to unlock:
R
the driver's and front-passenger door (Cargo
Van)
or
R
the driver's door (Passenger Van)

X
Slide release catch : in the direction of the
arrow and,atthe same time,remove mechanicalkey ; from the key completely.
Inserting the mechanical key
X
Push mechanical key ; completely into the
key untilitengages and release catch : is
back in its basic position.
Unlocking/locking the vehicle using
the mechanical key
The doorlockfor unlocking in an emergency is
on the driver’sdoor.
X
To unlockthe driver's door: insert the
mechanical key fully into the driver'sdoor
lock and turn it counter-clockwise.
The driver’sdoorisunlocked.
X
To lock the vehicle: lock alldoors exceptthe
driver'sdoorfrom the inside. To do this,press
downthe doorlocking buttons.
X
Insert the mechanical key fully into the driver's doorlockand turn it clockwise.
The driver'sdoorislocked.
Key
and recycledtoprotect the
environment.
Dispose of batteries in an
environmentally friendly
manner. Take discharged
batteries to aqualified specialist workshoporaspecial
collection point for used batteries.
Mercedes-Benz recommendsthat youhavethe
battery changed at aqualified specialist workshop.
Checking the battery
69
Opening and closing
Battery of the key
Important safety notes
WARNING
G
Batteriescontaintoxic and corrosivesubstances. If batteries are swallowed, it can result in
severe health problems.There is ariskoffatal
injury.
Keepbatteries outofthe reach of children. If
abattery is swallowed, seekmedicalattention
immediately.
Environmental note
H
Batteriescontaindangerous
substances. It is against the
lawtodispose of them with
the householdrubbish. They
mustbecollected separately
X
Press the & or % button.
If battery check lamp : lights up briefly, the
battery is sufficiently charged.
If battery check lamp : doesnot light up
briefly, the battery is empty.
X
Changethe battery (Y page 69).
If the key battery is checkedwithin the signal
rangeofthe vehicle, pressing the & or %
button results in:
R
lock or
R
unlock the vehicle
The battery may be obtainedatany qualified
i
specialist workshop.
Changing the battery
You need atypeCR2025 3Vcellbattery.
X
Pull outthe mechanical key from the key
Y page 68).
(
Z

70
Key
X
Push mechanical key ; into the opening in
the key in the direction of the arrow until battery compartment cover : opens. When
doing so, do not hold battery compartment
cover : shut.
X
Remove battery compartment cover :.
Opening and closing
X
Tap the key against the palm of your hand so
that battery = falls out of the battery compartment.
X
Insert the new battery into the battery tray
with the positive pole facing upwards. Use a
lint-free cloth to do so.
X
Install battery compartment cover : to the
key casing with the frontlugs first and push
closed.
X
Slide mechanical key ; back into the key
(
Y page 69).
X
Check the function of all key buttonsonthe
vehicle.

Problems with the key
Key
71
Problem
It is no longer possible to
lock the vehicle using
the key.
The turn signals do not
flash when the vehicle is
locked.
It is no longer possible to
lock or unlock the vehicle using the key.
Possible causes/consequences and M Solutions
The doors are not closed properly.
X
Close the doors properly and lock the vehicle again.
The central locking system has malfunctioned.
X
Lock the vehicle using the mechanical key (Y page 69) or press
down the locking knob and then close the doors.
X
Have the central locking system checked as soon as possible at a
qualified specialist workshop.
The key battery is weak or discharged.
X
Point the tip of the key at the driver's door handle from very close
range and press the % or & button.
If this does not work:
X
Replace the key battery (Y page 69).
or
X
Lock or unlock the vehicle using the mechanical key (Y page 69).
The key is faulty.
X
Lock the vehicle with the mechanical key (Y page 69).
X
Have the key checked at aqualified specialist workshop.
Opening and closing
The engine cannot be
started using the key.
You have lost akey.
You have lost the
mechanical key.
The on-board voltage is too low.
X
Switch off all non-essential consumers, such as interior lighting, and
try to start the engine again.
If this does not work:
X
Check the starter battery and charge it if necessary (Y page 253).
or
X
Jump-start the vehicle (Y page 262).
or
X
Consult aqualified specialist workshop.
X
Have the key deactivated at aqualified specialist workshop.
X
Report the loss immediately to the vehicle insurers.
X
If necessary, have the mechanical locks replaced.
X
Report the loss immediately to the vehicle insurers.
X
If necessary, have the mechanical locks replaced.
Z

72
Centrallocking
Centrallocking
Important safety notes
WARNING
G
If childrenare left unsupervised in thevehicle,
they could:
R
open thedoors, thus endangering other
peopleorroad users.
R
get out and disrupt traffic.
R
operate thevehicle's equipment.
Additionally, childrencouldset thevehicle in
motion if, for example,they:
R
release theparking brake.
R
shiftingthe automatic transmission out of
park position P
R
Opening and closing
Start theengine.
Thereisariskofanaccidentand injury.
When leaving thevehicle,always takethe
SmartKey withyou and lockthe vehicle.Never
leave childrenoranimals unattendedinthe
vehicle.Always keep theSmartKey out of
reachofchildren.
WARNING
G
If persons, particularly childrenare subjected
to prolonged exposuretoextremeheat or
cold, there is ariskofinjury, possibly even
fatal. Never leave childrenunattendedinthe
vehicle.
You can open alockeddoor from theinside at
any time. For theslidingdoors, thechild-proof
locks must be deactivated.
X
To unlock: pressthe % button.
X
To lock: pressthe & button.
If thedriver'sorfront-passenger door is open,
theopen door is notlocked.
All other doorsand thetailgate/rear doors
are locked.
If aslidingdoor or thetailgate/rear door is
open,onlythe driver'sand front-passenger
doorsare locked.
You cannotunlock thevehicle centrally from the
inside if thevehicle has been lockedwiththe
key.
If thevehicle has been lockedusingthe locking
buttonfor thecentral lockingand adoor is
opened from theinside, only thedoor that has
been opened is unlocked.
If thevehicle has previously been lockedwith
thekey,opening adoor from theinside will trigger theanti-theftalarm system. Switch off the
alarm (
Y page 66).
Automatic locking
Centrally lockingand unlocking the
vehicle from theinside
You can centrally lockand unlock thewhole
vehicle from theinside usingthe central locking
buttons on thedriver'sdoor.
X
To switch on: pressand hold the % button
until an acoustic tone sounds.
X
To switch on : pressand hold the & but-
tonuntil an acoustic tone sounds.

Sliding door
73
When the ignition is switched on, the vehicle will
lock automatically from aspeed of approximately 9mph (15 km/h).
You could therefore be locked out if:
R
the vehicle is being pushed.
R
the vehicle is being towed.
R
the vehicle is being tested on adynamometer.
If the vehicle has been automatically locked and
afrontdoor is opened from the interior while the
vehicle is stationary, the vehicle unlockscentrally.
Driver's door and front-passenger
door
WARNING
G
If the open sliding door is not engaged, it could
move on its own if the vehicle is on aslope.
This could trap you or other persons.There is
arisk of injury.
Always make sure that the open sliding door is
engaged.
Do not use the lower sliding door guide (car-
!
riage) as astep. Otherwise, you could damage
the paneling and/or the sliding door mechanism.
When you open the sliding door, first make
!
sure that:
R
the rear door is not opened to an angle of
270°.
R
the rear door is not clipped into the door
retainer.
The sliding door could otherwise collide with
the opened rear door and the doors could be
damaged.
Opening and closing
Door handle (example driver's door)
You can open the driver's or front-passenger
door from the inside at any time, even if it is
locked.
X
Pull door handle ;.
If afrontdoor is locked, lockingknob : pops
up. The door is unlocked and opens.
Sliding door
Important safety notes
WARNING
G
When you open the sliding door, the sliding
door could hit other people as it moves backwards. There is arisk of injury.
Only open the sliding door when traffic conditions permit.
Information on opening and closing the rear
doors can be found under "Rear doors"
Y page 78).
(
Opening/closing from the outside
The sliding door is equipped with an active
retainer,which engages the door at the end stop
when opened.
X
To open: pull door handle : in the direction
of the arrow.
The sliding door opens.
X
Push back the sliding door using door handle : until it engages.
X
Check the sliding door detent.
Z

74
Electric sliding door
X
To close: pull door handle : in the direction
of the arrow.
The sliding door is released from its lock.
X
Push the sliding door forwardsusing door
handle : and close.
Opening/closing from the inside
Opening and closing
The sliding door is equipped with an active
retainer, which engages the door at the end stop
when opened.
X
To open: pull back rockerswitch :.
If the door is locked,locking knob = pops up.
The sliding door unlocks and opens.
X
Push back the sliding door using door handle ; untilitengages
X
Check the sliding door detent.
X
To close: press rockerswitch : forwards.
The sliding door is released from its lock.
X
Push the sliding door forwardsusing door
handle ; and close.
Youmustreset the electricslidingdoorifthere
hasbeenamalfunctionoraninterruption in the
voltagesupply(
Please note, if the child-proof locks have
i
Y page 77).
been activated, youcannotopenthe sliding
door from the inside. Youcan onlyopena
sliding door from the insideifthe child-proof
locks have not been activated. Further informationcan be found under "Child-proof locks
for the sliding door" (
ing/closing from the inside" (
Y page 61)and "Open-
Y page 75).
Obstacle detection with reversing
feature
The sliding door is equipped with automatic
obstacle detection with reversing feature.Ifa
solid object blocks or restricts the sliding door
during the automatic closing process,the sliding door opens againautomatically. If the sliding
door is obstructed during the opening procedure, it movesbackafew centimeters in the
opposite direction and stops.
Automatic obstacle detection with reversing
feature is onlyanaid.Itisnot asubstitute for
your attentiveness when closing the electrical
sliding door.
If an obstacle is detected, the display shows,for
example, the Elektrische Schiebetür
links Hindernis erkannt(Left-hand
electric slidingdoorObstruction
detected) message and fivewarning tones
sound.
WARNING
G
Electric sliding door
Important safety notes
WARNING
G
Whenyou open the sliding door, the sliding
door could hitotherpeopleasitmovesbackwards.There is ariskofinjury.
Onlyopenthe sliding door when traffic conditions permit.
Do not usethe lowerslidingdoorguide (car-
!
riage) as astep.Otherwise, youcould damage
the paneling and/or the sliding door mechanism.
The reversing feature does not react:
R
to soft, light and thinobjects, e.g.small fingers
R
overthe last 8mmofthe closing movement
Thismeans thatthe reversing feature cannot
prevent someone being trappedinthesesituations. There is ariskofinjury.
Whenclosing, make sure thatno-one hasany
parts of the body withinthe closing area.
If someone is trapped:
R
press the 5 button on the key,or
R
pull the exteriordoorhandle, or

R
press the correspondingsliding door button in the center console, or
R
press the buttononthe door frame, or
R
pull the rocker switch on door handle
Opening/closing from the outside
Electric sliding door
In unfavorable operatingconditions, e.g.
i
frost,ice or heavy soiling, you can press and
hold the relevant sliding door button. The
electric sliding door moves with increased
force. Observe that,insuch circumstances,
the obstacle detection is less sensitive. To
stop the movement,release the sliding door
button.
Opening/closing from the inside
If the sliding door is unlocked, you can open and
close the sliding door from the inside with these
controls:
R
the Å or Æ sliding door buttoninthe
frontonthe lower center console
R
the sliding door buttononthe B-pillar nextto
the door sill
R
the rocker switch on the door handle
75
Opening and closing
The sliding door is equipped with an active
retainer, which engages the door at the end stop
when opened.
If the vehicle is equipped with two electric sliding doors; the 5 buttononthe key can only
be used to open or close one of the two sliding
doors (
X
Y page 76).
To open: pull door handle : in the direction
of the arrow.
or
X
Press the 5 buttononthe key for longer
than 0.5 seconds.
The sliding door unlocks, automatic operation
is started and the sliding door opens. In addition,you will hear two warning signals.
X
To close: pull door handle : in the direction
of the arrow.
or
X
Press the 5 buttononthe key for longer
than 0.5 seconds.
The sliding door is released from its lock and
automatic operation is started. The sliding
door closes.
If you press the 5 buttononthe key, you
will hear two warning signals while the doors
close.
X
To interrupt automatic operation: pull door
handle : again.
or
X
Press the 5 buttononthe key again.
:
Sliding door buttonfor the sliding door on
the left-hand side
;
Sliding door buttonfor the sliding door on
the right-handside
=
Rocker switch
?
Locking knob
A
Sliding door buttoninthe door frame
Z

76
Electric sliding door
You can only open asliding door from the inside
if the child-proof lockshave not been activated.
If the sliding door is locked, the sliding door
must firstbeunlocked.
The sliding door is equipped with an active
retainer, which engagesthe door at the end stop
when opened.
X
To open: briefly press the respective Å or
Æ sliding door button in the center con-
sole.
or
X
Briefly press sliding door button in the door
frame A.
or
X
Briefly pull back rocker switch =.
If the sliding door is unlocked, automatic
operation is started and the sliding door
opens.
If you use the Å or Æ sliding door but-
Opening and closing
ton in the center console you will hear two
warningsignals during the openingprocedure.
The indicator lamp in the Å or Æ sliding
door button in the center console flashes for
the durationofautomatic operation.
The indicator lamp in the Å or Æ sliding
door button in the center console is lit whenever the respectivesliding door is open.
Depending on the vehicle equipment, the display can also show the Sliding door open
message.
X
To close: briefly press the respective Å or
Æ sliding door button in the center con-
sole.
or
X
Briefly press sliding door button in the door
frame A.
or
X
Briefly press rocker switch = forwards.
The sliding door is released from its lock and
automatic operation is started. The sliding
door closes.
If you use the Å or Æ sliding door button in the center console you will hear two
warningsignals during the openingprocedure.
The indicator lamp in the respective Å or
Æ sliding door button in the center console
goes out whenever the sliding door is closed.
X
To interrupt automatic operation: press
the respective Å or Æ sliding door button in the center console again.
or
X
Press sliding door button in the door frame
A.
or
X
Briefly pull back rocker switch =.
In unfavorable operating conditions, e.g.
i
frost, ice or heavy soiling,you can press and
hold the relevantsliding door button. The
electric sliding door moveswith increased
force. Observe that,insuch circumstances,
the obstacle detection is less sensitive. To
stopthe movement, release the sliding door
button.
Programming thekey button for the
sliding door
If the vehicle is fitted with two electric sliding
doors,the 5 sliding door button on the key
can only be programmed for one of the two sliding doors.You can thenopen or close the selected sliding door with the 5 button on the key.
:
Slidingdoor button for sliding door on the
left-handside
;
Slidingdoor button for sliding door on the
right-handside
X
Make sure that the sliding door to be programmed is open.
X
Turn the key to position 2 in the ignition lock.
X
Press and hold the Å or Æ sliding door
button in the center console for the appropriate sliding door until the sliding door is closed
and four acoustic tones have sounded.
The display shows the Left-handElec‐
tric Sliding Door Key Programmed/
Right-hand Electric Sliding Door

Tailgate
77
Key Programmed or Lt. Slid. Door Pro‐
grammed/Rt. Slid. Door Programmed
message.
Resetting the sliding door
You must reset the sliding door if there has been
amalfunction or an interruption in the voltage
supply.
X
If the sliding door is open: close it by hand.
X
Using the Å or Æ sliding door button on
the center console, open the sliding door at
least 15.8 in (40 cm)and then close the sliding door completely.
X
When the sliding door is closed, open the sliding door fully using the Å or Æ sliding
door button on the center console.
The sliding door is reset and operational.
X
Close the sliding door if required.
Turn off the engine before opening the tailgate. Never drive with the tailgate open.
The tailgate swings upwards and to the rear
!
when opened. Therefore, make sure that
there is sufficient clearance above and behind
the tailgate.
You will find details of the tailgate opening
dimensions under "Technical data"
Y page 303).
(
Opening/closing
Opening and closing
Problems with the sliding door
The electric sliding door is locked in place.
Unfavorable operating conditions, e.g. frost, ice
or heavy soiling, may obstruct the sliding door.
X
Press and hold the sliding door button until
the sliding door has opened or closed.
The sliding door moves with increased force.
Observe that, in such circumstances, the
obstacle detection is less sensitive. To stop
the movement, release the sliding door button.
X
Remove the cause of the blockage at the earliest opportunity.
Tailgate
Important safety notes
WARNING
G
Combustion engines emit poisonous exhaust
gases such as carbon monoxide. If the tailgate
is open when the engine is running, particularly if the vehicle is moving, exhaust fumes
could enter the passenger compartment.
There is arisk of poisoning.
X
To open: press button : on the handle.
X
Raise the tailgate.
X
To close: pull the tailgate firmly downwards
by strap ; and close it from outside.
For service purposes the tailgate can also be
opened from the inside (
Y page 77).
Problems with the tailgate
The tailgate cannot be opened.
The voltage supplyhas been interrupted or the
battery charge is insufficient.
Z

78
Reardoors
Consult aqualified specialist workshopwhich
has thenecessary specialist knowledgeand
tools to carry out thework required.
In an emergency, you can open thetailgate
usingthe release catch for servicepurposes.
X
Pry off thecover on thelower part of thetailgatewithasuitable tool, e.g.the screwdriver
from thevehicle tool kit.
X
Insertthe screwdriver intothe opening and
movethe release leveruntil thetailgate
unlocksand opens.
X
Swingthe tailgateupwards.
Reardoors
Important safety notes
WARNING
G
Opening and closing
Combustion engines emit poisonous exhaust
gases suchascarbon monoxide. If therear
door is open when theengineisrunning, particularly if thevehicle is moving,exhaust
fumes could enterthe passenger compartment. Thereisariskofpoisoning.
You should thereforeensure in this and similar situations that thevehicle is visible from
therear in accordancewiththe relevant
national regulations, by usingthe warning triangle, for instance.
Makesure that there is sufficient clearance
!
when opening therear doors. You could otherwisedamagethe vehicle and objectsin
close range of therear doors.
You can lockthe rear doorsatanangle of
approx.90° and,ifnecessary, 180° or 270°.
Always makesure that theopen rear door is
correctly engaged in thedetent.
Opening/closing from theoutside
Opening theright-hand reardoor
Turn off theenginebefore opening therear
door.Never drivewiththe rear door open.
WARNING
G
If you open arear door,you could:
R
endanger other people or road users
R
be caught by oncomingtraffic
This is particularly thecaseifyou open the
rear door morethan90°.Thereisariskofan
accidentand injury.
Only open therear doorswhen traffic conditions permit.Always makesure that therear
doorsare properly locked.
WARNING
G
If you open therear doors90°,the rear lights
are no longer visible. The vehicle will then be
difficult for other road userstosee or will not
be seen by them at all, particularly if it is dark
or visibilityispoor.Thereisariskofanaccident.
X
Pull handle :.
X
Swingthe rear door to theside until it
engages.
The rear door can also be opened beyond90
degrees (
Y page 79).
Opening theleft-hand reardoor

Rear doors
79
X
Make sure that the right-hand rear door is
open and engaged.
X
Pull release handle : in the direction of the
arrow.
X
Swing the rear door to the side until it
engages.
The rear door can also be opened beyond 90
degrees (
Y page 79).
Closing the rear doors from the outside
X
If necessary, pull the rear door away from the
magnetic door retainer (
X
Close the left-hand rear door firmly from the
Y page 79).
outside.
X
Close the right-hand rear door firmly from the
outside.
Opening/closing from the inside
X
To close: make sure that the left-hand rear
door is closed.
X
Pull the rear door firmly by the door handle to
close it.
X
To lock: slide latch ; to the right.
The white section is no longer visible.
Opening at an angle of 180° or 270°
Depending on the vehicle equipment, you can
open the rear doors up to an angle of 180° or
270° (side wall).
When you open the sliding door, first make
!
sure that:
R
the rear door is not opened to an angle of
270°.
R
the rear door is not clipped into the door
retainer.
The sliding door could otherwise collide with
the opened rear door and the doors could be
damaged.
Opening and closing
Release the lever on the inside of the right rear door
Awhite section on latch ; indicates that the
rear door is unlocked.
You can only open the locked rear doors
i
from the inside if the child-proof locks have
not been activated.
X
To unlock: slide latch ; to the left.
You will see awhite marking.
X
To open: pull opening lever : up and open
the rear door.
X
Swing the rear door to the side until it
engages.
If you open alocked rear door from inside,
i
you only unlock the rear door. The other doors
remain locked.
The rear door can also be opened beyond 90
degrees (
Y page 79).
Door retainer (example: right rear door)
X
Open the rear door to about 45°.
X
Pull and hold door retainer : in the direction
of the arrow.
X
Open the rear door more than 90°, so that the
door retainer cannot engage.
X
Release the door retainer and open the door
to an angle of 180° or 270°.
Z

80
Side windows
Magnetic door retainer
X
With the rear door opened to an angle of 270°
push it against the magnetic door retainer =
on the side wall.
When the magnet on rear door ; is in contact
with magnetic door retainer =,the rear door
is held in this position.
Opening and closing
Side windows
Important safety notes
WARNING
G
While opening the side windows, body parts
could become trapped between the side window and the door frame as the side window
moves. There is arisk of injury.
Make sure that nobody touches the side window during the opening procedure. If somebody becomes trapped, release the switch or
pull the switch to close the side window again.
WARNING
G
While closing the side windows, body parts in
the closing area could become trapped. There
is arisk of injury.
When closing make sure that no parts of the
body are in the closing area. If somebody
becomes trapped, release the switch or press
the switch to open the side window again.
Activate the override feature for the rear side
windows. When leaving the vehicle, always
take the SmartKey with you and lock the vehicle. Never leave children unsupervised in the
vehicle.
WARNING
G
If persons, particularly children are subjected
to prolonged exposure to extremeheat or
cold, there is arisk of injury, possibly even
fatal. Never leave children unattended in the
vehicle.
Side window reversing feature
The front side windows are equipped with an
automatic reversing feature. If asolid object
blocks or restrictsaside window from moving
upwards during the automatic closing process,
the side window opens again automatically.During the manual closing process, the side window
only opens again automatically after the corresponding switch is released. The automatic
reversing feature is only an aid and is no substitute for your attention when closing aside window.
WARNING
G
The reversing feature does not react:
R
to soft, light and thin objects, e.g. small fingers
R
while resetting
This means that the reversing feature cannot
prevent someone being trapped in these situations. There is arisk of injury.
Make sure that no body parts are in close
proximity during the closing procedure. If
someone becomes trapped, press the switch
to open the side window again.
WARNING
G
If children operate the side windows they
could become trapped, particularly if they are
left unsupervised. There is arisk of injury.

Opens/closes the side window
:
Power window, left
;
Power window, right
The switches on the driver's door take precedence.
X
To open manually: press and hold the correspondingswitch.
X
To open fully: press the switch beyond the
point of resistance and release it.
Automatic operation is started.
X
To close manually: pull the corresponding
switch and hold it.
X
To close fully: pull the correspondingswitch
beyond the point of resistance and release it.
Automatic operation is started.
X
To interrupt automatic operation: press/
pull the correspondingswitch again.
You can continue to operate the side windows
after switchingoff the engine or removingthe
key. This function remains active for about
5minutes or until you open afrontdoor.
Side windows
X
Convenience opening: point the tip of the
key at the driver's door handle.
X
Press and hold the % button until the side
windows are in the desired position.
X
To interrupt convenience opening: release
the % button.
Convenienceclosing feature
WARNING
G
When using the convenience closing feature,
parts of the body could be trapped in the closing area when aside window is being closed.
There is arisk of injury.
Observe the completeclosing procedure
when the convenience closing feature is operating. Make sure that no body parts are in
close proximity during the closing procedure.
When you lock the vehicle, you can close the
side windows at the same time.
The key must be close to the driver's door handle.
Observe the notes on the automatic reversing
feature for the side windows (
X
Convenience closing feature: point the tip
of the key at the driver's door handle.
X
Keep the & button pressed until all side
windows are fully closed.
X
Make sure that all side windows are closed.
To interrupt convenience closing feature:
X
release the & button.
Y page 80).
81
Opening and closing
Convenienceopening feature
You can ventilate the vehicle before you start
driving. To do this, the key is used to carry out
the following functionssimultaneously:
R
to unlock the vehicle
R
to open the side windows
The convenience opening feature can only be
operated using the key. The key must be close to
the driver's door handle.
Resetting the side windows
You must reset the side windows if there has
been amalfunction or an interruption in the voltage supply.
X
Turn the key to position 2 in the ignition lock.
X
Pull the two power window switches and hold
for approximately 1secondafter closing the
side window.
X
If the side windows remain closed after the
button has been released, they have been
reset correctly. If this is not the case, repeat
the steps above for the open window.
Z

82
Side windows
Problems with the side windows
WARNING
G
If you close aside window again immediately
after it has been blocked or reset, the side
window closes with increased or maximum
force. The reversing feature is then not active.
Parts of the body could be trapped in the closing area in the process. This poses an
increased risk of injury or even fatal injury.
Make sure that no parts of the body are in the
closing area. To stop the closing process,
release the switch or push the switch again to
reopen the side window.
If you cannot completely open or close aside
window:
If there are no objectsorleaves in the window
Opening and closing
guide that prevent the sliding sunroof from closing, there has been amalfunction or the onboard voltage has been interrupted.
X
Reset the side window (Y page 81).

Seats
83
Useful information
This Operator's Manual describes all models as
well as standard and optional equipment of your
vehicle that were available at the time of going
to print.Country-specific variationsare possible. Note that your vehicle may not be equipped
with all of the described functions. This also
applies to systemsand functionsrelevantto
safety.
Read the information on qualified specialist
workshops (
Y page 29).
Seats
Driver'sand front-passenger seat
Important safetynotes
WARNING
G
Children could become trapped if they adjust
the seats, particularly when unattended.
There is arisk of injury.
When leaving the vehicle, always takethe
SmartKey with you and lock the vehicle. Never
leave children unsupervised in the vehicle.
WARNING
G
You could lose controlofyour vehicle if you do
the following while driving:
R
adjust the driver'sseat, head restraint,
steering wheel or mirrors
R
fastenthe seat belt
There is arisk of an accident.
Adjust the driver'sseat, head restraint,steering wheel and mirrorand fastenyour seat belt
before starting the engine.
WARNING
G
When you adjust aseat, you or other vehicle
occupants could become trapped, e.g. on the
seat guide rail. There is arisk of injury.
Make sure when adjusting aseat that no one
has any body parts in the sweep of the seat.
WARNING
G
If the driver'sseat is not engaged, it could
move unexpectedly while the vehicle is in
motion. This could cause you to lose controlof
the vehicle. There is arisk of an accident.
Always make sure that the driver'sseat is
engaged before starting the vehicle.
WARNING
G
The front-air bags for could also injure the
vehicle occupants in the frontIfthe front
seats are positioned too close to the dashboard or steering wheel. This poses an
increased risk of injury or even fatal injury.
Always adjust the frontseats so that they are
as far from the frontair bags as possible. Also
observethe notes on the correct adjustment
of the seats.
WARNING
G
The seat belt does not offer the intended level
of protection if you have not moved the backrest to an almost vertical position.When braking or in the eventofanaccident, you could
slide underneath the seat belt and sustain
abdomen or neckinjuries, for example. This
poses an increased risk of injury or even fatal
injury.
Adjust the seat properly before beginning
your journey. Always ensure that the backrest
is in an almost vertical position and that the
shoulder section of your seat belt is routed
across the center of your shoulder.
WARNING
G
If the head restraintsare not installed or not
adjusted correctly, they cannot provide protection as intended. There is an increased risk
of injury in the head and neckarea, e.g. in the
eventofanaccidentorwhen braking.
Always drive with the head restraintsinstalled. Beforedrivingoff, make sure for every
vehicle occupant that the center of the head
restraint supportsthe back of the head at
about eye level.
Seats, steering wheel and mirrors
Z

84
Seats
To avoid damage to the seats and the seat
!
heating, observe the following information:
R
keep liquids from spilling on the seats. If
liquid is spilledonthe seats, dry them as
soon as possible.
R
if the seat covers are damp or wet, do not
switch on the seat heating. The seat heating should also not be used to dry the seats.
R
clean the seat covers as recommended;
see the "Interior care" section.
R
do not transport heavy loads on the seats.
Do not place sharp objects on the seat
cushions, e.g. knives, nails or tools. The
seats should only be occupied by passengers, if possible.
R
when the seat heating is in operation, do
not cover the seats with insulating materials, e.g. blankets, coats, bags, seat covers,
child seats or booster seats.
Your seat must be adjusted in such away that
you can wear the seat belt correctly.
Observe the following points:
R
Position the backrest in an almost vertical
position so that you are sitting virtually
upright. Do not drive with the backrest
reclined too far back.
R
Your arms should be slightly bent when you
are holding the steering wheel.
R
Avoid seat positions that prevent the seat belt
Seats, steering wheeland mirrors
from being correctly routed. The shoulder
section of the belt must be routed over the
middle of your shoulderand be pulled tight
against your upper body. The lap belt must
always pass across your lap as low down as
possible,i.e. over your hip joints.
R
Adjust the head restraint so that it supports
the back of the head at eye level.
R
The distance from the pedalsshould be such
that you can depress them fully.
Please also observe the important safety notes
on "Air bags" (
Y page 45) and "Child restraint systems"
(
Y page 58).
(
Y page 48), "Seat belts"
Adjusting the seat manually
:
Seat fore-and-aft adjustment
;
Seat cushion angle adjustment
=
Seat height adjustment
?
Seat backrest adjustment
To adjust the seat fore-and-aft position:
X
pull lever : up.
X
Slide the seat forwards or back until you can
depress the pedals.
X
Release lever :.
X
Slide the seat forwards or back until you hear
it engage.
X
To adjust the seat height: press or pull lever
= repeatedly until you have reached the
desired seat height.
X
To adjust the backrest: turn handwheel ?
towards the front.
The seat backrest moves to avertical position.
X
Turn handwheel ? towards the rear.
The seat backrest tilts towards the rear.
X
To adjust the seat angle: turn handwheel ;
towards the front.
The front of the seat cushion tilts down.
X
Turn handwheel ; towards the rear.
The front of the seat cushion tilts up.
Adjusting lumbar support
To support the lumbarregion, you can set the
backrest contour of each front seat (4-way lumbar support) electrically.

Seats
Guiderails : of the seatrailsystem allowyou
to:
R
securerearbench seats in up to two rearseat
rows
The onlyway to ensure thatthe rearbench seats
will engagesecurelyistoalwayskeepthe seat
anchoragesclean and freeofforeignobjects.
Seatingvariants
WARNING
G
85
Electrically adjustable lumbarsupport
:
To raisethe backrestcontour
;
To soften the backrestcontour
=
To lowerthe backrestcontour
?
To hardenthe backrestcontour
Rear benchseats
General notes
For avariableconfigurationofthe vehicleinteriorinthe rear, youcan:
Rearbench seat:
R
remove the rearbench seatbyreleasing the
quick-locking mechanism (
Y page 87)
Bench seat anchorage
WARNING
G
If the rearbench seatisnot fullyengaged,it
maybethrown aboutwhile the vehicleismoving.There is ariskofanaccident and injury.
If the rearbench seats arenot installedas
described, the safety precautions integrated
into the rearbench seats cannotprotect as
intended. There is an increased riskofinjury.
Onlyinstallthe rearbench seats as described.
Onlyuse rearbench seats approved for the
vehicle.
Youcan installrearbench seats with two or
threeseats.
The seating variants shown areonlypermitted if
the conditions named belowfor safe rearseating aremet. Otherseating variants arenot permittedand can endanger the occupants.
Seats, steering wheel andmirrors
Alwaysmakesurethatthe rearbench seatis
fullyengaged as described.
Example: seatrailsystem with quick-locking mechanism
Seating variants facing forwards
EE
EASY-ENTRY/EXIT feature
If arearbench seatismarked with EE in the
illustrations, arearbench seatmustbefitted
with the EASY-ENTRY/EXIT featureinthe positionindicated.
If arearbench seatisnot marked,arearbench
seatmustbefittedwithoutanEASY-ENTRY/
EXIT sectioninthe positionindicated .
Z

86
Seats
Please observe the following conditions for safe
rear seating:
R
Only use rear bench seats approved for the
vehicle.
R
Arear bench seat with three seats without an
EASY-ENTRY/EXIT section may only be fitted
in there is no other row of rear seats behind it.
R
Passengers may only use the seats if the rear
bench seat has engaged correctly
Y page 87).
(
EASY-ENTRY/EXIT feature
WARNING
G
If the rear bench seat is not fully engaged, it
may be thrown about while the vehicle is moving. There is arisk of an accident and injury.
Always make sure that the rear bench seat is
fully engaged as described.
WARNING
G
When you adjust aseat, you or other vehicle
occupantscould become trapped, e.g. on the
seat guide rail. There is arisk of injury.
Make sure when adjusting aseat that no one
has any body parts in the sweep of the seat.
WARNING
G
Seats, steering wheel and mirrors
The rear bench seat will not engage when folded forward. The rear bench seat may inadvertently fold backward while accelerating,
braking, changingdirection suddenly or in the
event of an accident,for example. People
within the sweep of the rear bench seat may
become trapped. There is arisk of injury.
Before driving off, alwaysfold back the rear
bench seat if it is folded forward. Make sure
that the rear bench seat is fully engaged.
The only way to ensure that the rear bench seat
will engage securely is to alwayskeep the seat
anchorages clean and free of foreign objects.
The rear seat anchorage is only engaged when
the red indicator tab is no longer visible and is
fully retracted into the seat anchorage.
Rear bench seat with EASY-ENTRY
:
Handle
;
EASY-ENTRY release handle
=
Indicator tab for seat anchorage locking
mechanism
?
Release handle for frontseat anchorages
If you fold the EASY-ENTRY section of the rear
bench seat forwards, it is simpler and easier to
get into or out of the second row of seats.
To fold the EASY-ENTRY section forwards:
X
pull EASY-ENTRY release handle ; upwards.
X
Fold the easy-entrysection forwards with the
aid of release handle ;.
X
To fold the EASY-ENTRY section back: fold
the EASY-ENTRY section back until it engages
in the seat anchorages.
Indicator tab = is no longer visible.
The EASY-ENTRY section has engaged correctly if:
R
the seat anchorage engages audibly
R
indicator tab = is no longer visible and is
locked in place in the seat anchorage
X
To remove the EASY-ENTRY section: pull
EASY-ENTRY release handle ; upwards.
X
Fold the EASY-ENTRY section forwards.
X
Pull the release handle for frontseat anchorages ? upwards.
X
Fold the EASY-ENTRY section further forwards.
X
Lift the easy-entrysection up and out of the
anchorage.
X
To install the EASY-ENTRY section: place
frontseat leg of the EASY-ENTRY section on
the seat anchorages and engage.
X
Fold the EASY-ENTRY section back.
The rear seat leg of the EASY-ENTRY section
engages audibly.Indicator tab = on the seat
anchorage is no longer visible.

The EASY-ENTRY section has engaged correctly if:
R
the seat anchorage engages audibly
R
indicator tab = is no longer visible and is
fully retracted into the seat anchorage
If the EASY-ENTRY section has not engaged correctly:
X
Fold the EASY-ENTRY section forwards.
X
Fold the EASY-ENTRY section backwards
again and check the lockingmechanism.
Removing/installing the rear bench
seat
Standard rear bench seat:
WARNING
G
If the rear bench seat is not fully engaged, it
may be thrown about while the vehicle is moving. There is arisk of an accident and injury.
Seats
87
Always make sure that the rear bench seat is
fully engaged as described.
WARNING
G
If the rear bench seat is not installed as described or an unsuitable rear bench seat is installed, the seat belts may not provide protection
as intended. There is an increased risk of
injury.
Install the rear bench seat as described. Only
use rear bench seats that are approved for
your vehicle by the distributor named on the
inside cover page.
The only way to ensure that the rear bench seat
will engage securely is to alwayskeep the seat
anchorages clean and free of foreign objects.
Always observe the notes about the seating variants (
Y page 85).
:
Release handle for rear seat anchorage
;
Release handle for front seat anchorages
=
Seat anchorages
X
To remove: fold release handle for rear seat
anchorage : up.
X
Tilt the rear bench seat forward by the upper
edge of the seat backrest.
X
Pull release handle for front seat anchorages ; up.
X
Hold the rear bench seat by the lower edge of
the seat cushion.
X
Fold the rear bench seat forwards and pull it
out of seat anchorages =.
Seats, steering wheel and mirrors
Z
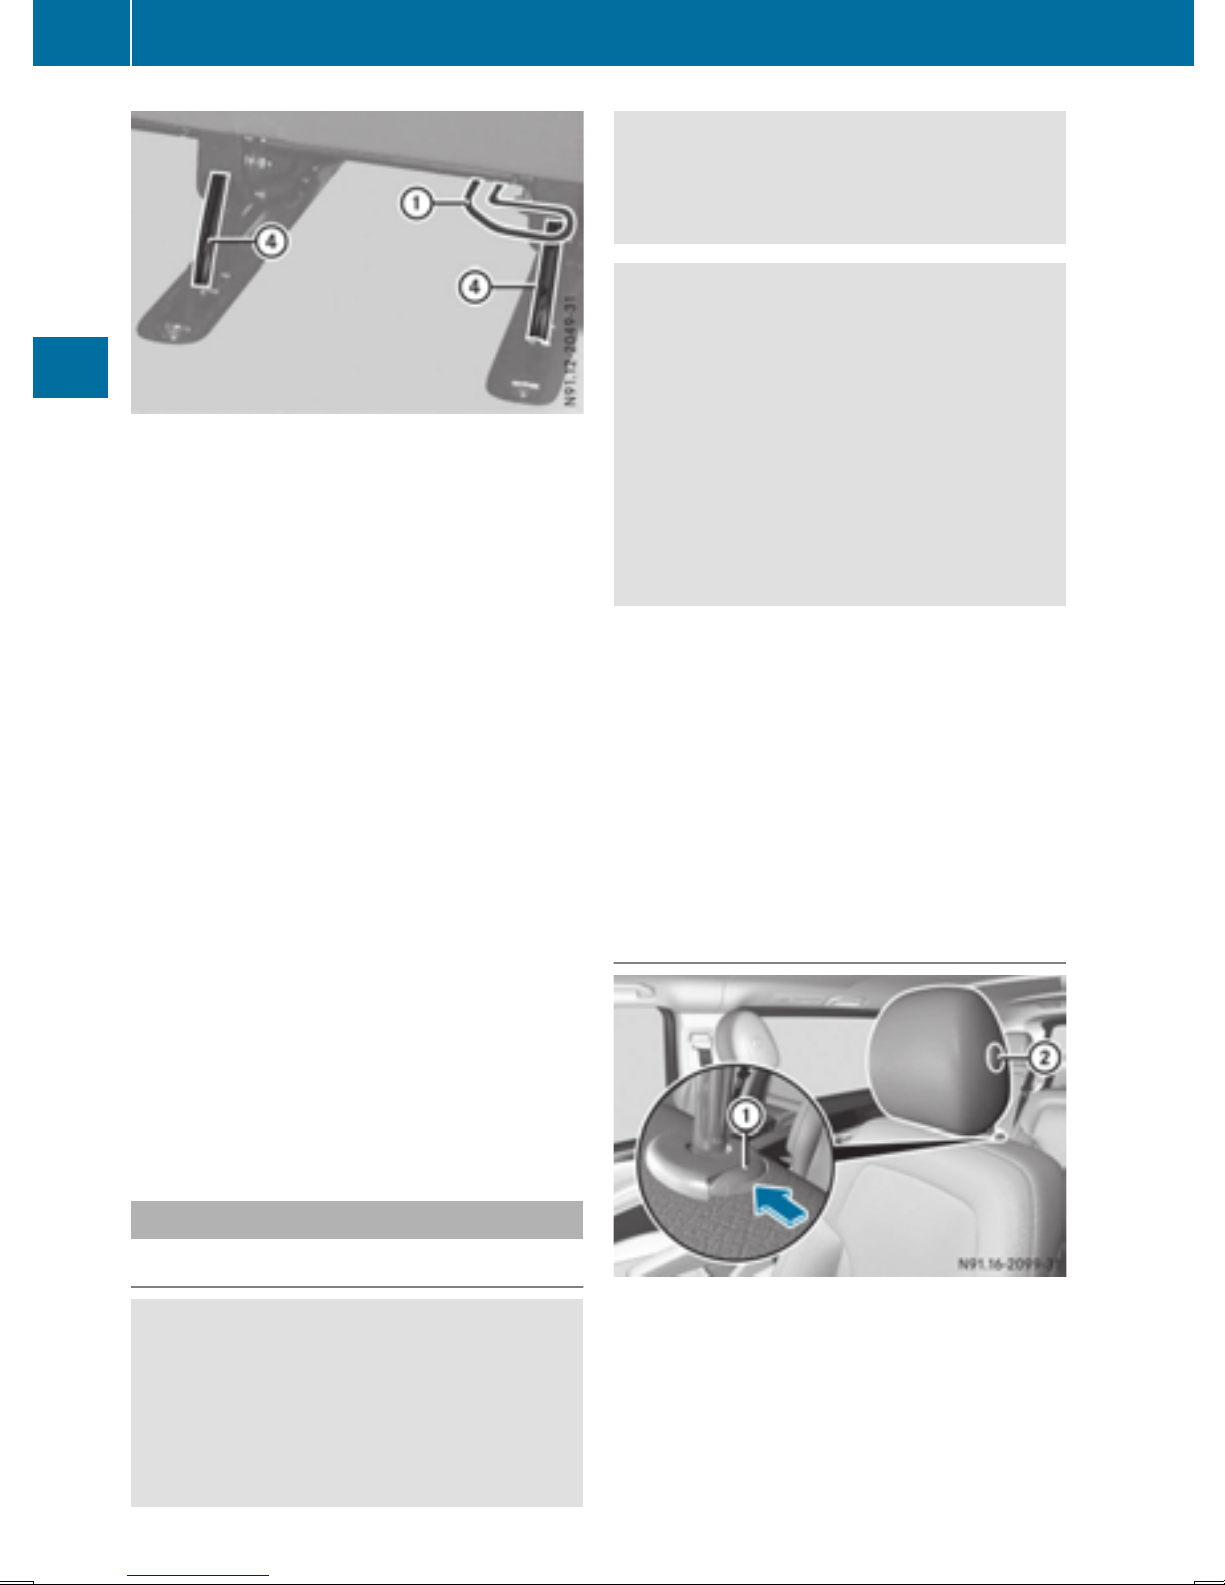
88
Seats
X
To install: holdthe rearbench seatbythe
loweredgeofthe seatcushion.
X
Guidethe rearbench seatfrom the front
downwardsinto front seatanchorages = and
allowittoengage.
X
Make sure thatrelease handles ; are folded
underneath in the direction of the floor of the
vehicle.
X
Foldthe rearbench seatbackinto the upright
position.
The rearseatanchorages of the rearbench seat
have engaged correctlyif:
R
the seatanchorages engage audibly
R
indicator tabs ? on the seatanchorages are
no longer visible and have retracted fully into
the seatanchorages
If the rearseatanchorages of the rearbench
Seats, steering wheel andmirrors
seathavenot engaged correctly:
X
Press release lever for rearseatlegs :
downwardsuntilindicator tabs ? have fully
retracted into the rearseatlegs.
There is ariskofanaccident.
Adjust the driver'sseat, headrestraint, steering wheeland mirror and fasten your seatbelt
before starting the engine.
WARNING
G
If the headrestraints are not installedornot
adjusted correctly, they cannotprovideprotection as intended. There is an increased risk
of injury in the headand neck area, e.g.inthe
event of an accident or when braking.
Alwaysdrive with the headrestraints installed. Before driving off, make sure for every
vehicleoccupant thatthe centerofthe head
restraint supports the back of the headat
abouteye level.
Adjust the headrestraint so that:
R
the centerofthe headrestraint supports the
back of the headateye level and the head
restraint is engaged
R
when your headisrelaxedthe back of your
headrests as close as possibletothe head
restraint
Use the headrestraint padtoadjustthe head
restraint so thatitisasclose as possibletothe
back of your head.
Adjustingthe headrestraints
If the rearseatanchorages of the rearbench
seathavenot engaged correctlyagain:
X
Foldthe rearbench seatbackagain with force
so thatthe seatanchorages engage correctly.
Headrestraints
Important safety notes
WARNING
G
Youcould lose controlofyourvehicleifyou do
the following whiledriving:
R
adjustthe driver's seat, headrestraint,
steering wheelormirrors
R
fasten the seatbelt
X
To raise: pull the headrestraint up to the
desired position.
X
To lower: press release button : and slide
headrestraint down to the desired position.
X
To moveforwards: pull the headrestraint
forwardsuntilitengages in the required position.

X
To movebackwards: press and holddown
release button ; (luxury headrestraints
only) and slidethe headrestraint back to the
desired position.
X
Let go of release button ; (luxury head
restraints only).
X
Ensure thatthe headrestraint hasengaged
properly.
The headrestraints for the front seats or for a
standard rearbench seatcan onlybeinstalledor
removedasdescribedbelow.
X
To remove: pull the headrestraint for the
front seatorstandard rearbench seatupas
far as it will go.
X
Press release button : and pull outthe head
restraint.
X
To install: insert the headrestraints for the
front seatorstandard rearbench seatsuch
thatthe rod with the detents is on the left
when viewedinthe direction of travel.
X
Push the headrestraint down untilitengages.
Seats
Seat heating
WARNING
G
Repeatedlyswitching on the seatheating can
cause the seatcushion and backrestpadsto
become very hot. The health of persons with
limitedtemperature sensitivity or alimited
ability to react to excessivelyhightemperaturesmay be affectedorthey mayevensuffer
burn-like injuries. There is ariskofinjury.
Therefore, do not switch the seatheating on
repeatedly.
Whenyou leave your seat, do not place any-
!
thing on the seatand switch off the seatheating.Donot switch the seatheating on when
the seatisnot occupied,e.g.whendriving
withoutafront passenger.The seatheating
mayotherwise overheat, causing damageto
the seat.
89
Armrests
X
To adjust the armrestangle: foldthe armrestupwards by more than45° to position
2.
The armrestisreleased.
X
Foldarmrest 3 forwardstothe stop.
X
Slowlyfoldthe armrestupwards to the
desired position.
X
To foldthe armrestup: if necessary,foldthe
armrestupwards by more than90° to position 1.
The threered indicator lamps in the Í button
showthe activatedheating level 1 to 3.
The seatheating automaticallyswitches down
from level 3 to level 2 afterapproximatelyseven
minutes.
The system automaticallyswitches down from
level 2 to level 1 afterapproximatelyten
minutes.
At level 1 the seatheating switches off automaticallyafterapproximately20minutes.
X
Make sure thatthe key is in position 1 or 2 in
the ignition lock.
X
To switchon: press the Í button repeat-
edly untilthe desired heating level hasbeen
set.
X
To switchoff: press the Í button repeat-
edly untilall indicator lamps go out.
Seats, steering wheel andmirrors
Z

90
Mirrors
If the on-board voltage is too low, the seat heating willeither switch itself off prematurely or not
come on at all.Inthis case, too many electrical
consumers are switched on or the battery
charge is not sufficient. The seat heating will
automatically switch back to the current heating
level when enough on-board voltage is available
again.
Steering wheel
WARNING
G
You could lose control of yourvehicle if you do
the following whiledriving:
R
adjust the driver's seat, head restraint,
steering wheel or mirrors
R
fasten the seat belt
There is arisk of an accident.
Adjust the driver's seat, head restraint, steering wheel and mirror and fasten yourseat belt
before starting the engine.
WARNING
G
If the steering wheel is unlocked whilethe
vehicle is in motion, it could change position
unexpectedly.This could cause you to lose
Seats, steeringwheel and mirrors
control of the vehicle.There is arisk of an
accident.
Before starting off, make sure the steering
wheel is locked. Never unlock the steering
wheel whilethe vehicle is in motion.
WARNING
G
Children could injure themselves if they
adjust the steering wheel.There is arisk of
injury.
When leaving the vehicle,always take the
SmartKey with you and lock the vehicle.Never
leave childrenunsupervised in the vehicle.
The steering wheel can still be adjusted if the
key has been removed.
Adjusting the steering wheel
:
Steering column height
;
Lever
X
To adjust the steering wheel: pulllever ;
up and hold it.
The steering wheel is unlocked.
X
Move the steering wheel to the desiredposition.
X
Let go of lever ;.
The steering wheel engages and is locked
again.
Mirrors
Important safety notes
WARNING
G
You could lose control of yourvehicle if you do
the following whiledriving:
R
adjust the driver's seat, head restraint,
steering wheel or mirrors
R
fasten the seat belt
There is arisk of an accident.
Adjust the driver's seat, head restraint, steering wheel and mirror and fasten yourseat belt
before starting the engine.
WARNING
G
The exterior mirror on the front-passenger
side reduces the size of the image.Visible
objects are actually closer than they appear.
This means that you could misjudge the distance from road users traveling behind, e.g.
when changing lane. There is arisk of an accident.

For this reason, always make sureofthe
actual distance from the roadusers traveling
behind by glancing over your shoulder.
Rear-view mirror
X
Anti-glare mode: push anti-glare lever :
forwardsorback.
Mirrors
X
Beforepulling away,turn the key to position 1
or 2 in the ignition lock.
X
Pressthe Z button for the leftexterior
mirrororthe \ button for the right exterior
mirror.
The indicator lamp for the button switches on
and the selected exterior mirrorcan be adjusted.
The indicator lamp goesout againaftersome
time.
X
If the indicator lamp for button Z or \
lights up,press adjustment button 7 up or
down, to the right or left.
Adjustthe exterior mirrors in such away that
youhaveagoodoverviewoftrafficconditions.
After the engine has beenstarted, the exterior
mirrors are automaticallyheated if the rearwindow defroster is switched on and the outside
temperature is low.
Disengaged exterior mirrors
91
Exterior mirrors
Adjusting manually
X
Beforestarting off, manually adjust the exteriormirrors in such away that youcan get a
goodoverviewofroadand trafficconditions.
Adjusting electrically
If an exterior mirrorhas beenpushedout of
position, proceed as follows:
X
Move the exterior mirrorinto the correct position manually.
The mirrorhousing engages againand the
exterior mirrors can be adjustedagain as
usual.
Seats, steering wheel and mirrors
Z

92
Exterior lighting
Useful information
This Operator's Manual describes all models as
well as standard and optional equipment of your
vehicle that were available at the time of going
to print.Country-specific variationsare possible. Note that your vehicle may not be equipped
with all of the described functions. This also
applies to systemsand functionsrelevantto
safety.
Read the information on qualified specialist
workshops (
Y page 29).
Exterior lighting
Important safetynotes
For reasonsofsafety, Mercedes-Benz recommends that you drive with the lights switched on
even during the daytime. There may be differences in operationdue to legal requirements
and voluntary recommendations in some countries.
Light switch
Operation
Lights and windshield wipers
1
W Left-handstanding lamps
2
X Right-hand standing lamps
3
T Parkinglamps, licenseplate and
instrumentcluster lighting
4
$ Lightsoff and daytime running lamps
à with light sensor: automatic headlamp
mode, controlled by the light sensor
5
L Low-beam or high-beam headlamps
B
N Frontfog lamp
C
R Rear fog lamp
If you hear awarningtonewhen you leave the
vehicle, the lights may still be switched on.
X
Turn the light switchto $ or Ã.
The exterior lighting(except the parkinglamps
and standing lamps) switches off automatically
if you:
R
removethe key from the ignition lock
R
open the driver'sdoor with the key in position
0 in the ignition lock

Low-beamheadlamps
When theignitionisswitchedonand thelight
switch is in the L position,the parking lamps
and low-beam headlamps are switchedoneven
if thelight sensor does not sense dark ambient
light.This is particularly useful when there is fog
or rain.
X
To switch on: turnthe key to position 2 in the
ignitionlockorstart theengine.
X
Turn thelight switch to position L.
The L indicator lamp in theinstrument
cluster lightsup.
Daytime running lamps
X
To switch on: turnthe light switch to the
$ or à position.
Automatic headlamp mode
WARNING
G
When thelight switch is set to Ã,the lowbeam headlamps may not be switchedon
automatically if there is fog,snoworother
causesofpoor visibilitydue to theweather
conditionssuch as spray. Thereisarisk of an
accident.
In such situations,turnthe light switch to
L.
Exterior lighting
To switch on automatic headlamp mode:
X
turnthe light switch to Ã.
Fog lamps/rear fog lamp
You can onlyswitch thefog lamps on or off
manually in vehicleswhichhave fog lamps
installed.
Front fog lamps help you to see and be seen in
conditionsofpoor visibilitydue to fog or precipitation. They can onlybeoperated together
with theparking lamps or with thelow-beam
headlamps.
The rear fog lamp improves visibilityofyour
vehicle for thetraffic behindinthe eventof
heavy fog.Observe thelegal requirements of the
countryyou are currently in when usingthe rear
fog lamp.
X
Turn thelight switch to L or Ã.
X
Turn thekey to position 2 in theignitionlock
or start theengine.
X
To switch thefront fog lamps on/off: press
the N button.
When thegreen N indicator lamp in the
instrumentcluster goes on, thefog lamps are
switchedon.
X
To switch therearfog lamps on/off: press
the R button.
When theyellow R indicator lamp in the
instrumentcluster goes on, therear fog lamp
is switchedon.
93
Lightsand windshield wipers
Automatic headlampmode is onlyadriving aid.
You are responsible for thevehicle lighting at all
times.
When theparking lamps and low-beam headlamps are switchedon, thegreen T (parking
lamps)and L (low-beam headlamps) indicatorlamps in theinstrumentcluster light up.
à is thepreferred light switch setting. The
light settingisautomatically selected according
to thebrightnessofthe ambientlight (exception: poor visibilitydue to weather conditions,
such as fog,snoworspray):
R
Key in position 1 in theignitionlock: theparking lamps are switchedon/off automatically
depending on thebrightnessofthe ambient
light.
R
When theengine is on: depending on the
ambientlight,the daytimerunninglamps or
theparking lamps and low-beam headlamps
are switchedon/off automatically.
Standing lamp
If thebattery charge is verylow, thestand-
!
ing lamps will switch off automatically to enable thenextengine start.Always park your
vehicle in accordance with legal regulations,
in asecure and adequately lit location.Avoid
leavingthe T parking lamps on for several
hours. If possible, switch on theright X or
left W standinglamp.
Switching on thestandinglamps ensures that
thecorresponding side of thevehicle is illuminated.
Z
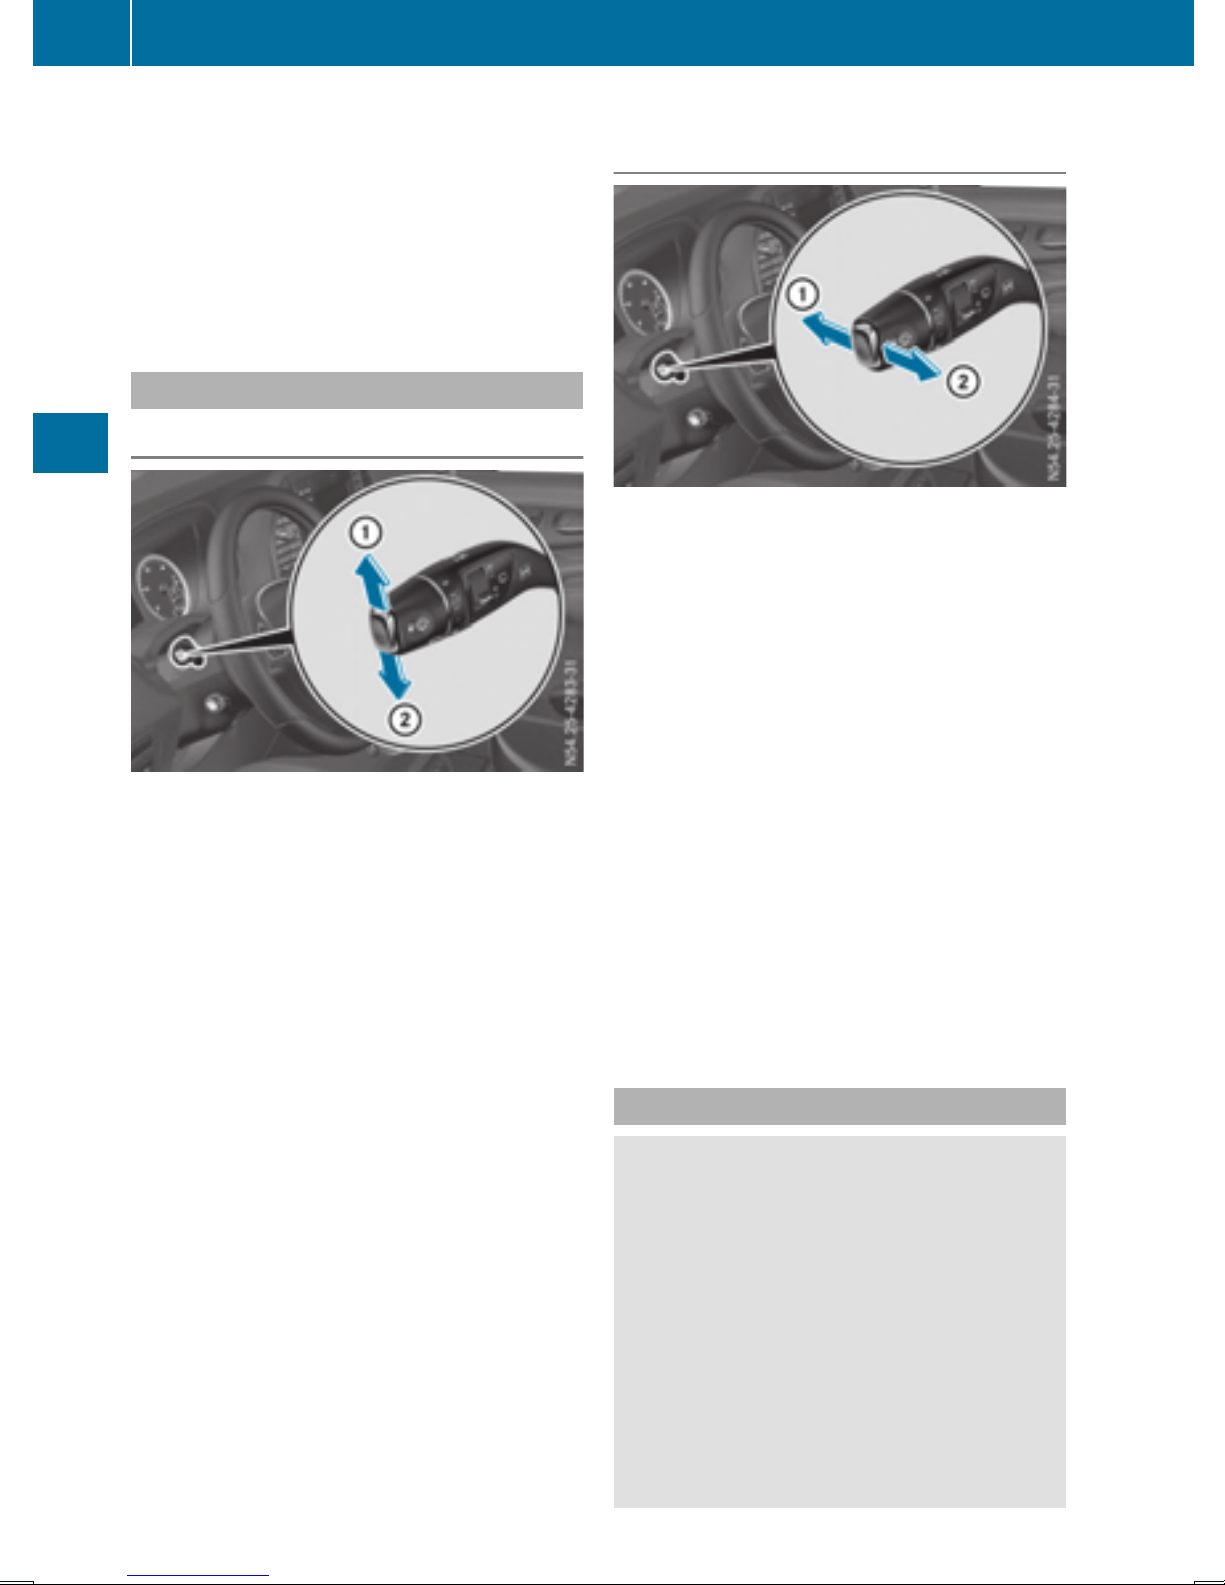
94
Exterior lighting
Switching on the standing lamps:
X
Turn the key to position 0 (Y page 120) in the
ignition lock or remove the key.
X
Right-hand standing lamp: turn the light
switch to position X.
X
Left-hand standing lamp: turn the light
switch to position W.
Combination switch
Turnsignal lamps
:
To indicate aright turn
;
To indicate aleft turn
X
To indicate: press the combination switch in
desired direction : or ; until it engages.
The combination switch automatically returns
Lights and windshield wipers
to its original position after large steering
movements.
X
To indicate briefly: press the combination
switch briefly in desired direction : or ;.
The correspondingturn signal flashes three
times.
High-beam headlamps and high-beam
flasher
:
High-beam headlamps
;
High-beam flasher
To switch on the high-beam headlamps:
X
turn the light switch to L or Ã.
X
Press combination switch : forwards.
The K indicator lamp in the instrument
cluster lights up.
In the à position, the high-beam head-
i
lamps are only switched on when it is dark and
the engine is running.
To switch off the high-beam headlamps:
X
move the combination switch back to its normal position.
The K indicator lamp in the instrument
cluster goes out.
X
To operate the high-beam flasher: turn the
key to position 1 or 2 in the ignition lock.
X
Pull the combination switch briefly in direction of arrow ;.
Hazard warning lamps
WARNING
G
If you open the rear doors 90°, the rear lights
are no longer visible. The vehicle will then be
difficult for other road users to see or will not
be seen by them at all, particularly if it is dark
or visibility is poor. There is arisk of an accident.
You should therefore ensure in this and similar situations that the vehicle is visible from
the rear in accordance with the relevant
national regulations, by using the warning triangle, for instance.
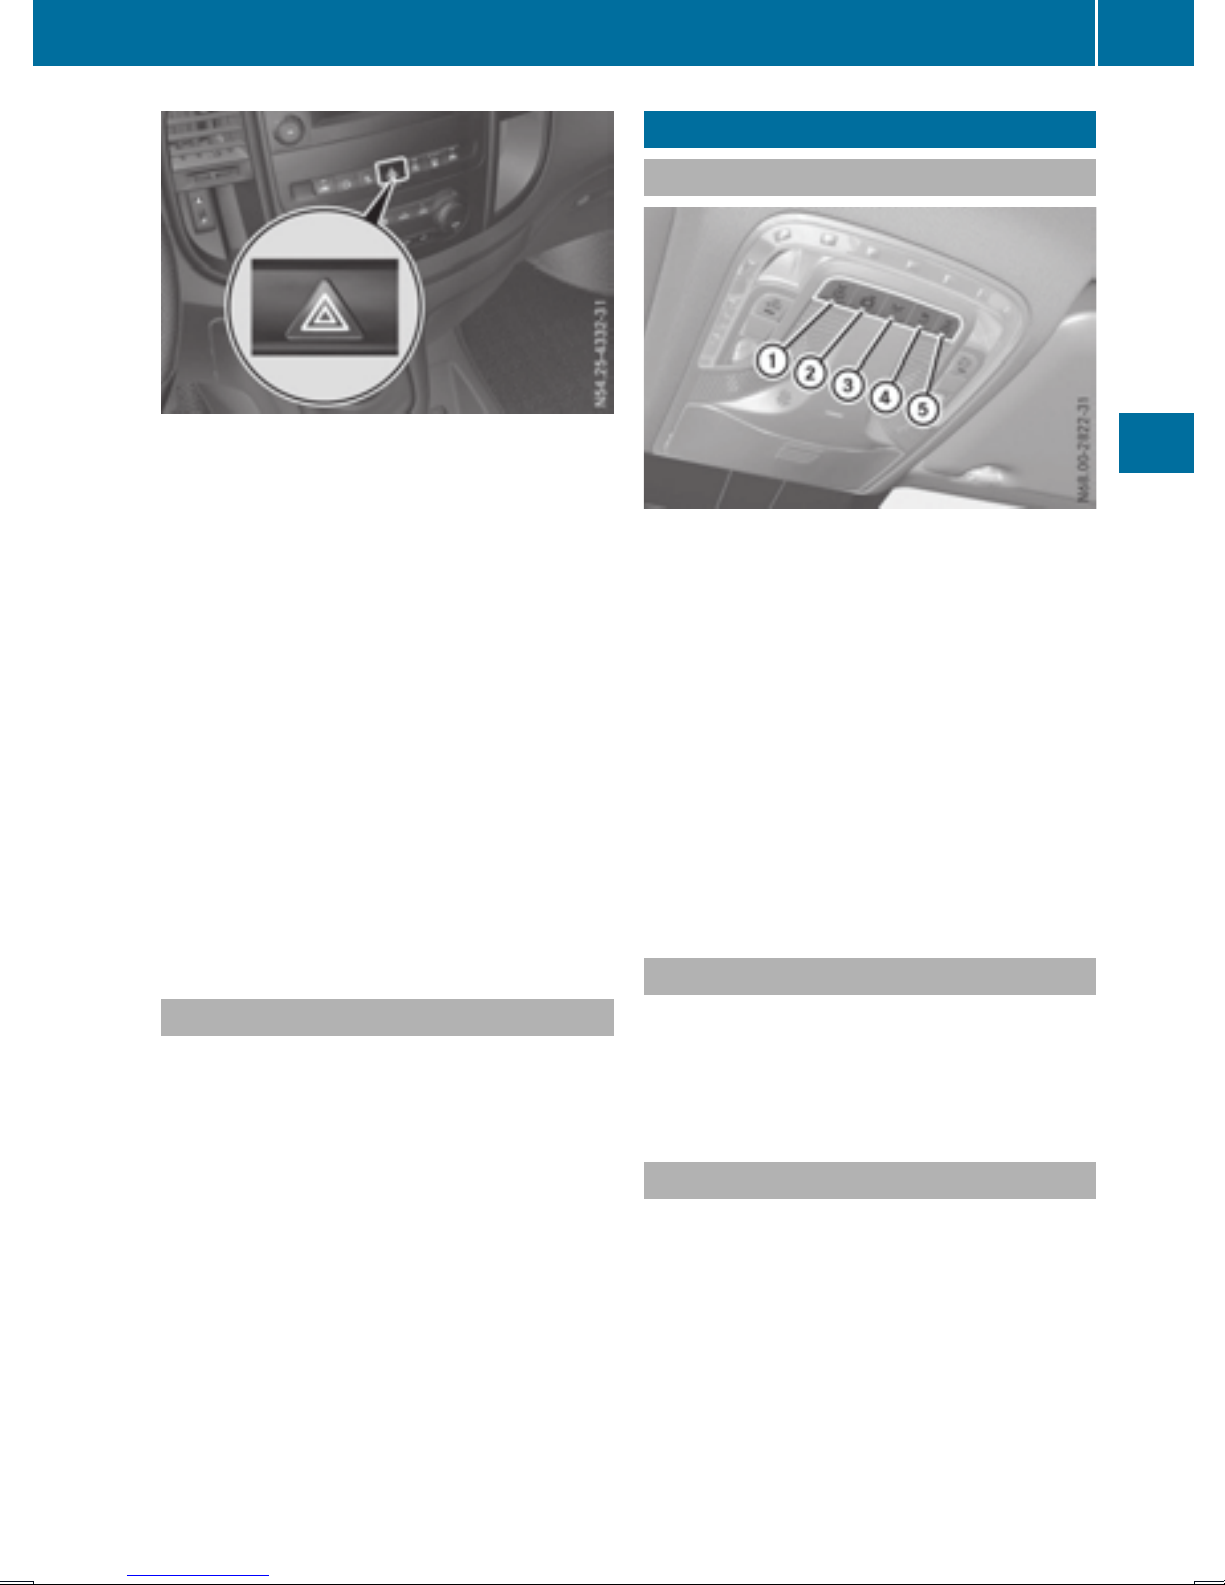
Hazard warning lamp switch
X
To switch on/off: pressthe £ hazard
warning lamp switch.
If youhave indicated aturn while the hazard
warning lamps are switched on, only the turn
signal lamps on the sideofthe vehicle selected
will light up.
The hazard warning lamps automatically switch
on if:
R
an airbag is deployed.
R
youbrake sharplyand bring the vehicle to a
haltfrom aspeed of more than 45 mph
(70 km/h).
The hazard warning lamps switch off automatically if the vehicle reaches aspeed of over 6mph
(10 km/h)again after afullbrake application.
The hazard warning lamps stilloperate even
i
if the ignition is switched off.
Interior lighting
Interiorlighting
Overview
Interiorlighting buttons (example: comfort overheadcontrol panel)
:
p Switchesthe front left-hand reading
lamp on/off
;
| Switchesthe automaticinterior lighting control on and off
=
c Switchesthe front interior lighting on
and off
?
w Switchesthe rearorcargo compartment lighting on/off
A
p Switchesthe front right-hand reading
lamp on and off
The number and arrangement of the buttons is
equipment-dependent.
95
Lights and windshield wipers
Headlamps foggeduponthe inside
The headlamps may fog up on the inside if there
is highatmospheric humidity.
X
Switch on the low-beamheadlamps and drive
off.
The levelofmoisture diminishes, depending
on the length of the journeyand the weather
conditions (humidity and temperature).
If the levelofmoisture doesnot diminish:
X
Have the headlamps checked at aqualified
specialist workshop.
General notes
In ordertoprevent the vehicle'sbattery from
discharging, the interior lighting functions are
automatically deactivatedafter some time,
unless the key is in position 2 in the ignition lock.
Automatic interior lighting control
The interior lighting is activated for about
20 secondswhenthe key is removedfromthe
ignition lock. For avehiclewithsteering wheel
buttons, the light delayfunctionfor the interior
lighting can be switched on and off using the onboardcomputer(
Y page 187).
Z

96
Replacingbulbs:interior lighting and ambientlamps
X
To switchonoroff: press the | button.
Whenthe automatic interiorlighting controlis
activated, the button is flush with the overheadcontrolpanel.
The interiorlighting switches on automaticallyif
you:
R
unlock the vehicle
R
open adoor
R
remove the key from the ignition lock
The cargo compartment lamp switches on automaticallyifyou:
R
unlock the vehicle
R
open the tailgate or reardoor
R
open aslidingdoor
The trunk lamp always switches on automatically when the tailgate is opened.
Manual interior lighting control
To switchthe frontinterior lighting on/
X
off: press the c button.
To switchthe rear or cargocompartment
X
lighting on/off: press the w button.
To switchthe frontreading lamps on/off:
X
press the p button.
Cargocompartmentlamp with button
Cargo compartment lamp with button
:
c Switches the cargo compartment
lighting on/off
If your vehicleisinstalledwithacargo compartment lamp with abutton, youcan switch allthe
cargo compartment lamps on/off using the
c button in thiscargo compartment lamp.
Regardless of the positionofthe switch,the
cargo compartment lighting can be switched
on/off centrallyusing the w button in the
overhead controlpanel (
Y page 95).
Replacing bulbs:interior lighting and
ambientlamps
Rear interior light with reading lamp
Lights and windshield wipers
in the handles
:
Rear interiorlight and reading lamp
;
Switching the reading light on and off
General notes
It is essential thatthe important safety notes on
changing light bulbsare observed
Y page 98).
(
Havethe bulbsofthe following interiorlights
replaced at aqualified specialist workshop only:
R
lights for the footwell lighting
R
lights for the overhead controlpanel in the
dashboard
R
lamps in the rearcompartment grabhandles
R
the trunk lamp in the headlinerinaPassenger
Van
R
LED light stripinthe cargo compartment in a
Cargo Van
Otherwise, the lamps,theirbrackets or the side
paneling and headlinermay be damaged.
If yourequire helpwhenchanging bulbsofother
interiorlights,pleasevisit aqualified specialist
workshop.

Replacing bulbs:interiorlighting and ambientlamps
Rear compartment and cargocompartment lamps
Youcannotchange the following bulbsyourself:
R
in aPassenger Van, the bulbsinthe trunk
lamp and thoseofthe rearinteriorlights in the
grabhandles
R
in aCargo VanwithanLED light stripinthe
cargocompartment, the LED light strip
Have thesebulbs or the LED light stripchanged
in aqualified specialist workshoponly.
Information on changing the trunk lamp bulb in
the sidetrim panel of vehicles with cargocompartment partitioning can be found under "Additionalinteriorand ambient lighting"
Y page 97).
(
X
For cargocompartment lamps with abutton,
alignlamplens : so that its opening is above
the button of lamp housing =.
X
Position lamp lens : on lamp housing = and
engage.
X
Position lamp lens : with lamp housing =
on the left and engage.
Additional interior lighting and surroundlighting
The scopeofthe additionalinteriorand ambient
lighting depends on your vehicleequipment. The
bulb change described hereisvalid for:
R
the mirror lamp in the sunvisor
R
the ambient lamp at the bottomofthe front
door
R
the ambient lamp inside the tailgate
Youcan find information on changing the bulb of
the signal and ambient lamp at the bottomofthe
tailgate under “Signaland ambient lamp in the
tailgate"(
Y page 98).
97
Rear interior and cargocompartment lamp in the
headlinerorsidetrim panel
Bulbtype: T10 6W Xenon
X
Switch off the interiorlighting.
X
Press in the spring catch of lamp lens : with
asuitableobject, e.g. ascrewdriver, and then
pry off lamp lens : with lamp housing =.
X
Press in spring catches ; and pull lamp
lens : off from lamp housing =.
X
Remove bulb ? from lamp housing =.
X
Insert new bulb ?.
Type of lamp: W5W
X
Press in the catch spring of lamp housing :
with asuitableobject, e.g. ascrewdriver, and
pry off lamp housing :.
X
Turn socket ; counter-clockwise and
remove it from lamp housing :.
X
Remove bulb = from socket ;.
X
Press new bulb = into socket ;.
X
Screw socket ; clockwise into lamp housing :.
X
Position lamp housing : on the left-hand
sideand engage.
Lights and windshield wipers
Z

98
Replacing bulbs
Signal and ambient light in the tailgate
Type of lamp: W5W
X
Press in the catch spring of the lamp housing
at the side of crystal clear lamp lens ; with a
suitable object,e.g. ascrewdriver, and pry off
the lamp housing.
X
Turn socket = counter-clockwise and
remove from the lamp housing.
X
Remove the bulb from socket =.
X
Press the new bulb into socket =.
X
Screw socket ; clockwise into the lamp
housing.
X
Position the lamp housing to the side of red
lamp lens : and engage.
Lights and windshieldwipers
Replacing bulbs
Important safety notes
WARNING
G
Bulbs, lamps and connectors can get very hot
when operating. If you change abulb, you
could burn yourself on these components.
There is arisk of injury.
Allow these components to cool down before
changing abulb.
Make sure the bulbs are always securely
!
installed.
The bulbs and lamps are an essential component of vehicle safety. You must therefore make
sure that these function correctly at all times.
Have the headlamp settingchecked regularly.
R
Always switch off the ignition before replacing
bulbs in the lighting system. This will prevent
ashort circuit.
R
Wear gloves and eye protection when changing abulb.
R
Do not use abulb that has been dropped or
that has scratches on its glass tube. The bulb
could may explode.
R
Abulb could explode if:
-
you touch it
-
it is hot
-
you drop it
-
you scratchorscore it
R
Marks on the glass tube shorten the operating
life of abulb. Do not touch the glass tube with
your bare hands. If necessary, clean the glass
tube when cold with alcohol or spirit. Then rub
off the glass tube with aclean, lint-free cloth.
R
Make sure that bulbs are protected from
moisture when operating and that they do not
come into contact with liquids. Make sure
that seals are seated correctly and replace
damaged seals.
R
Check the contacts for signs of corrosion and
clean these if required.
R
Only operate bulbs in closed lamps which
have been designed for this purpose.
R
Only use spare bulbs of the same type, with
the prescribed voltage and the correct wattage.
R
If the new bulb does not light up, consult a
qualified specialist workshop.
R
Have lamps with LED bulbs repaired at aqualified specialist workshop only.
R
Have the bulbs of the following lamps
replaced at aqualified specialist workshop
only:
-
the additional brake lamps
-
the license plate lighting
-
front fog lamps
-
side marker lamp
Please also observe the notes on the interior
lights (
Y page 96).
If you require assistance changing bulbs, consult aqualified specialist workshop.
 Loading...