

Page 1
COMAND
Operating Instructions
Order no.
6515 6876 13 Part no. 204 584 42 82 Edition A 2011
É2045844282uËÍ
2045844282
COMAND OperatingInstructions
ZA COMAND NTG4.0 BR204 USA Edition A 2011;1; 3, en-US
d2irenkl Version: 3.0.3.6
2010-05-31T09:26:14+02:00 - Seite 1
Page 2

Publication details
Internet
Further information on Mercedes-Benz
vehicles and Daimler AG can be found on the
Internet at the following websites:
http://www.mercedes-benz.com
http://www.daimler.com
Editorial office
You are welcome to forward any queries or
suggestions you may have about the
Operator's Manual to the technical
documentation team at the following
address:
Daimler AG, HPC: R822, D-70546 Stuttgart,
Germany
Not to be reprinted, translated or otherwise
reproduced, in whole or in part, without
written permission from Daimler AG.
Symbols
$
Warning
%
Environmental note
!
Possible damage to the vehicle
+
Tip
X
Instruction
YY
Continuation symbol
(Y page)
Page reference
Display
Displays in the multifunction
display/COMAND
As at 03.03.2010
ZA COMAND NTG4.0 BR204 USA Edition A 2011; 1; 3, en-US
d2irenkl Version: 3.0.3.6
2010-05-31T09:26:14+02:00 - Seite 2
Page 3

Welcome to the world of Mercedes-Benz
First of all, familiarize yourself with the
COMAND control panel and read the
Operator's Manual thoroughly before driving
off. This will help you to obtainthe maximum
pleasure from your COMAND control panel
and to avoid endangeringyourself and others.
Depending on the model and equipment level,
the functions and equipment of your
COMAND control panel may deviate from
some descriptions and illustrations.
Mercedes-Benzis constantly updating its
systems to the state-of-the art and reserves
the right to introduce changes to the design,
equipment and technical features.
You cannot, therefore, base any claims on the
data, illustrations or descriptions in this
Operator's Manual.
If you have any further questions, please
contact an authorized Mercedes-Benz
Center.
The Operator's Manual is an integral part of
the vehicle. You should always keep it in the
vehicle and pass it on to the new owner if you
sell the vehicle.
The technical documentation team at
Daimler AG wishes you safe and pleasant
motoring.
2045844282
É2045844282uËÍ
ZA COMAND NTG4.0 BR204 USA Edition A 2011; 1; 3, en-US
d2irenkl Version: 3.0.3.6
2010-05-31T09:21:57+02:00 - Seite 1
Page 4

ZA COMAND NTG4.0 BR204 USA Edition A 2011; 1; 3, en-US
d2irenkl Version: 3.0.3.6
2010-05-31T09:21:57+02:00 - Seite2
Page 5

Index ....................................................... 4
Introduction ......................................... 10
At aglance ........................................... 13
System settings .................................. 37
Navigation ........................................... 47
Telephone ............................................ 97
Audio .................................................. 119
Video .................................................. 151
Rear Seat System ............................. 159
mbrace ............................................... 183
Contents
3
ZA COMAND NTG4.0 BR204 USA Edition A 2011; 1; 3, en-US
d2irenkl Version: 3.0.3.6
2010-05-31T09:21:57+02:00 - Seite 3
Page 6

1, 2, 3 ...
911 emergency call .................... 99, 184
A
Active partition (USBdevices only)
Selecting ........................................ 147
Address book
Browsing........................................ 112
Calling up ....................................... 112
Changing an entry .......................... 114
Connecting acall ........................... 115
Creating an entry ........................... 113
Deleting an entry ........................... 113
Detailsabout an entry ................... 114
Searching for an entry ................... 112
Starting route guidance ................. 115
Voice tag ....................................... 116
Address bookentry
Adopting as a home address ............ 79
Showing the details ....................... 114
Address entry menu ............................ 51
Alternative route ................................. 71
Area
Avoiding ........................................... 88
Audio AUX jack .................................. 148
Audio CD/DVD or MP3 mode
Switching on .................................. 131
Audio DVD
Pause function ............................... 173
Stop function ................................. 133
Audio format
Setting (audio DVD mode)............. 136
Autostore ........................................... 122
AUX jacks
CD/DVD drive ............................... 163
B
Back button ......................................... 17
Bird's-eye view .................................... 85
Bluetooth
®
Activating/deactivating ................... 42
Authorizing a device ......................... 43
Connecting devices ......................... 42
Devices ............................................ 43
External authorization .............. 44, 101
General information ......................... 42
Interface .......................................... 99
Revoking authorization .................... 44
Settings ........................................... 42
Telephony ........................................ 99
Bluetooth®interface
Telephony ........................................ 98
Bluetooth®interface telephony
Conditions ....................................... 99
Bluetooth®telephone list ................. 100
C
Call
Accepting .............................. 103, 104
Connecting .................................... 104
Rejecting ............................... 103, 104
Call list
Opening and selecting an entry ..... 109
Saving an entry in the address
book .............................................. 110
Call lists ............................................. 109
Displaying details ........................... 110
Storing an entry which has not yet
beenstored................................... 110
Call waiting ........................................ 105
Category
Satellite radio ................................ 125
CD
Copyprotection ............................. 138
Data medium ................................. 138
General information ....................... 138
Multisession .................................. 137
Playback options ........................... 136
Selecting amedium ....................... 133
Selecting atrack ............................ 134
CD/audio DVD or MP3 mode
Switching to (Rear Seat
Entertainment System) .................. 170
CD/DVD
Ejecting (DVD drive) ....................... 129
Ejecting (Rear SeatEntertainment
System) ......................................... 170
Inserting (DVD changer) ................ 128
Inserting (Rear Seat
Entertainment System) .................. 170
4
Index
ZA COMAND NTG4.0 BR204 USA Edition A 2011; 1; 3, en-US
d2irenkl Version: 3.0.3.6
2010-05-31T09:21:57+02:00 - Seite 4
Page 7

Changing direction
Announcementphase ...................... 67
Change of direction phase ............... 67
Preparation phase ............................ 67
Channel presets ................................ 121
Character entry ................................... 27
Characters
Entering ..................................... 27, 29
City
Entering ........................................... 52
COMAND
Basicfunctions................................ 31
Components .................................... 14
Switching on/off .............................. 31
COMAND controller ............................. 16
COMAND control panel ....................... 15
COMAND display ................................. 18
Cleaning instructions ....................... 20
Folding in and swiveling ................... 20
Setting ............................................. 38
COMAND operating system ................ 14
Copy protection (CD/DVD) ............... 138
Crosshair position
Saving .............................................. 84
Customer Center
Calling ............................................ 185
D
Data carrier
MUSIC REGISTER ........................... 138
Data medium
AudioDVD ..................................... 137
CD/DVD ........................................ 138
MP3 ............................................... 137
Date format
Setting ............................................. 39
Delete button ....................................... 17
Deleting
Call lists ......................................... 111
Destination
Adopting from the listofprevious
destinations ..................................... 81
Destination entry
Point of interest ............................... 61
Destination information ..................... 71
Destination input ................................. 51
Address........................................... 51
Destination memory ........................ 57
Intermediate stop ............................ 59
Last destination ............................... 58
Map ................................................. 58
Destination memory ........................... 79
Deleting an entry ............................. 82
My address ...................................... 79
Storing a destination ........................ 80
Destinations
Search &Send ............................... 185
Digital map
Updating .......................................... 92
Directory assistance ......................... 185
Distance
see Route overview
DTMF tones
Sending ......................................... 105
DVD
Copyprotection ............................. 138
Data medium ................................. 138
Selecting atrack ............................ 134
DVD menu .................................. 156, 177
DVD playbackconditions ................. 153
DVD-Video
Picture settings .............................. 152
DVD-Video Operation
Automatic picture shutoff .............. 152
E
Emergency call
Activating ....................................... 184
Initiating ........................................ 184
Entering characters
In the address and the phone
book ................................................ 29
Using the numberpad ..................... 28
Entry
Deleting ........................................... 28
Saving .............................................. 30
Selecting ........................................ 107
Example: entering an address ............ 51
Example display
Audio CD mode .............................. 132
Example of operation .......................... 26
External authorization ........................ 44
Index
5
ZA COMAND NTG4.0 BR204 USA Edition A 2011; 1; 3, en-US
d2irenkl Version: 3.0.3.6
2010-05-31T09:21:57+02:00 - Seite 5
Page 8

F
Firstlist entry
Accepting .........................................28
Freewayinformation ........................... 91
Frequency input
Manual ...........................................121
Function restrictions
Telephone operation........................ 99
Video DVD mode ........................... 153
G
Google Maps®.................................... 185
Gracenote Media Database .............. 135
H
Hands-free microphone
Switching on/off ........................... 105
harman/kardon®Logic 7
®
Surround Sound system ..................... 33
Home address ...................................... 79
Entering and saving ......................... 54
Selecting from the destination
memory ........................................... 57
I
Incident (traffic report) ....................... 73
Indicator lamp
Remote control .............................. 165
Individualization
Activating/deactivating ................... 41
Intermediate stop
Deleting ........................................... 61
Intermediate top
Entering ........................................... 59
iPod
®
Alphabetic track selection ............. 146
Connecting to the Media
Interface ........................................ 143
Device version ............................... 142
Selecting a category/playlist......... 145
iTunes®............................................... 147
L
Lane recommendations ...................... 68
Explanation ...................................... 69
Presentation .................................... 69
Listas selection list
Calling up .........................................28
Load/eject button ............................. 128
Logic 7
®
see harman/kardon®Logic 7
®
Surround Sound system
M
Map
Arrival time/distance to
destination ....................................... 87
Calling up .........................................58
Map display..................................... 85
Moving ....................................... 59, 84
Showing geo-coordinates ................ 87
Showing road names ....................... 87
Map information .................................. 86
Map orientation ................................... 85
Map scale
Adjusting ......................................... 84
mbrace
Emergency call .............................. 184
Media Interface
Active partition .............................. 147
Connectionoptions....................... 142
iPod®............................................. 142
Metadata ....................................... 145
Mode ............................................. 142
MP3 player.................................... 142
Selecting categories ...................... 145
Selecting folders ............................ 145
Selecting musicfiles ...................... 144
Selecting playlists .......................... 145
Switching on .................................. 143
USB mass storagedevice .............. 142
Media list ........................................... 133
Menu
Exiting ........................................ 34, 50
Showing ........................... 49, 154, 175
System settings ............................... 19
Menu item
Selecting .......................................... 25
6
Index
ZA COMAND NTG4.0 BR204 USA Edition A 2011; 1; 3, en-US
d2irenkl Version: 3.0.3.6
2010-05-31T09:21:57+02:00 - Seite 6
Page 9

Menu overview
COMAND ......................................... 18
Mobile phone
Authorizing .................................... 101
Connecting (Bluetooth®interface) .100
De-authorizing ............................... 102
External authorization .................... 101
Registering (authorizing) ................ 100
MP3
Bit/sampling rates ......................... 138
Copyright ....................................... 138
Data medium ................................. 137
File systems ................................... 137
Formats ......................................... 137
Selecting amedium ....................... 133
Multifunction display .......................... 21
Multifunction steering wheel ............. 21
Multisession CDs ............................... 137
Music files
Recording ...................................... 139
MUSIC REGISTER
Deleting allmusic files................... 140
Memory space info ........................ 141
Playback options ........................... 142
Switching on .................................. 139
My address
see Home address
N
Navigation (also see route
guidance)
Trafficreport .................................... 73
Navigation announcements
Switching off .............................. 31, 70
Navigation menu
Showing/hiding ..................... 154, 175
Navigation mode
Switching on .................................... 49
North up orientation ........................... 85
O
Off-map ................................................ 72
Off-road ................................................ 72
Orientation in direction of travel ....... 85
P
Passcode
Entering ................................... 44, 101
Pause function ................................... 133
PCMCIA memory card
Ejecting .......................................... 131
Inserting ........................................ 131
Phone book
Adding a numberto an address
book entry..................................... 109
Calling up ....................................... 106
Creating anew entry ..................... 108
Deleting an entry ........................... 108
Phone bookentry
Searching ...................................... 106
Playback options .............. 136, 142, 147
Point of interest
Category .......................................... 62
Entering ........................................... 61
Entering aname ...............................62
Entering a phone number ................. 62
Entering using the map.................... 65
ZAGAT®rating service ..................... 65
Point of interest icon
Setting ............................................. 86
Point of interest list ............................ 64
With character bar ........................... 65
Previous destinations ......................... 82
R
Radio mode
Switching on .................................. 120
Radio station
Storing ........................................... 122
Read-aloud function ............................ 78
Read-aloud speed
Setting ............................................. 39
Real-time traffic reports ..................... 73
Rear-compartment screens .............. 161
Rear-compartment socket ................ 165
Rear Seat Entertainment System
Audio CD/DVD and MP3 mode ..... 169
AUX mode ...................................... 178
Severalusers ................................. 167
System settings ............................. 168
Using headphones ......................... 167
Index
7
ZA COMAND NTG4.0 BR204 USA Edition A 2011; 1; 3, en-US
d2irenkl Version: 3.0.3.6
2010-05-31T09:21:57+02:00 - Seite 7
Page 10

Using the main loudspeaker .......... 167
Video DVD mode ........................... 174
Wirelessheadphones ..................... 164
Redials ................................................ 104
Remote control
Rear Seat Entertainment System ... 162
Reset .................................................... 45
Roadside Assistance ......................... 184
Route
Calculating ....................................... 54
Estimated time of arrival .................. 71
Route overview ................................ 72
Route calculation
Starting ............................................ 54
Route guidance ....................................66
Cancel ............................................. 69
Continue.......................................... 69
Continuing ....................................... 69
Destination reached ......................... 69
Lane recommendations ................... 68
Off-road ........................................... 72
Trafficreports .................................. 73
Route options
Setting ............................................. 50
Route overview .................................... 72
Route type
Setting ............................................. 50
S
Safety notes
Audio CD/DVD and MP3
mode ..................................... 127, 169
Using the telephone ......................... 98
Video DVD mode ........................... 152
Satellite radio
Selecting acategory...................... 125
Switching to ................................... 124
SatRadio ............................................. 123
Displaying information ................... 127
Registering .................................... 124
Screen
Selecting for remote operation ...... 162
Search&Send ................................... 185
Skipping back
CD/DVD mode .............................. 134
Skipping forwards
CD/DVD mode .............................. 134
Sound
Switching on/off .............................. 31
Soundsettings .....................................32
State/province
Selecting.......................................... 52
Station
Selecting ........................................ 121
Storing ........................................... 122
Station search ................................... 121
Storage options
Selecting .......................................... 81
Summer and standard time
Switching ......................................... 39
Surround sound ................................... 33
Systemlanguage
Setting ............................................. 45
T
Tele Aid ............................................... 184
Emergency call .............................. 184
Telephone
Emergency call .............................. 184
Ending an active call ...................... 105
Entering phone numbers ................ 104
Incoming call ................................. 103
mbrace .......................................... 184
Outgoing call ................................. 104
redialing ......................................... 104
Sending DTMF tones ......................105
Single call ...................................... 105
Switching hands-free microphone
on/off ............................................ 105
TeleAid .......................................... 184
Telephone basic menu
Bluetooth®interface ...................... 103
Telephone number
Entering ......................................... 104
Time
Setting ............................................. 39
Time format
Setting ............................................. 39
Time zone
Setting ............................................. 39
Tone settings
Balance and fader............................ 32
Treble and bass............................... 32
8
Index
ZA COMAND NTG4.0 BR204 USA Edition A 2011; 1; 3, en-US
d2irenkl Version: 3.0.3.6
2010-05-31T09:21:57+02:00 - Seite 8
Page 11

Track
Selecting ........................................ 171
Track information .............................. 174
Traffic jam function ............................. 70
Traffic Program
Switching off .................................... 31
Traffic report read-aloud function ..... 78
Treble and bass
Adjusting ......................................... 32
U
Using the telephone .......................... 103
V
Video DVD
Fast forward/rewind ......................154
Operation ....................................... 152
Pause function ............................... 155
Selecting ........................................ 155
Selecting a film/title ......................156
Selecting a scene/chapter ............ 155
Stop function ................................. 155
Video DVD mode
Switching on .................................. 153
Voice Control System
Settings ........................................... 40
Volume
Adjusting ......................................... 31
Navigation announcements ............. 32
Phone calls...................................... 32
W
Waveband
Switching (radio)............................ 121
Y
Yahoo Local Maps®........................... 185
Z
ZAGAT®rating service ........................ 65
Index
9
ZA COMAND NTG4.0 BR204 USA Edition A 2011; 1; 3, en-US
d2irenkl Version: 3.0.3.6
2010-05-31T09:21:57+02:00 - Seite 9
Page 12

Operating safety
General notes
G
Warning
Any alterations of electronic components or
software can cause malfunctions.
Radio, satellite radio, amplifier, DVD changer,
navigation module, telephone and Voice
Control systems are interconnected.
Therefore, if one of the components is not
operational, or has not been removed/
replaced properly, the function of other
components could be impaired.
Such conditions might seriously impair the
operating safety of your vehicle.
We recommend to have any service work on
electronic components carried out by an
authorized Mercedes-Benz Center.
G
Warning
In order to avoid distraction which could lead
to an accident, the driver should enter system
settings while the vehicle is at a standstill, and
operate the system only when permitted by
road, weather and traffic conditions.
Bear in mind that at a speed of just 30 mph
(approximately 50 km/h), your car covers a
distance of 44feet (approximately 14m) every
second.
COMAND supplies you with information to
help you select your route more easily and
guide you conveniently and safely to your
destination. For safety reasons, we
encourage the driver to stop the vehicle in a
safe place before answering or placing a call,
or consulting the COMAND screen to read
navigational maps, instructions, or
downloaded information.
G
Warning
While the navigation system provides
directional assistance, the driver must remain
focused on safe driving behavior, especially
attention to traffic and street signs, and
should utilize the system’s audio cues while
driving.
The navigation system does not supply any
information on stop signs, yield signs, traffic
regulations or traffic safety rules. Their
observance always remains in the driver’s
personal responsibility. DVD maps do not
cover all areas nor all routes within an area.
This device complies with Part 15 of the FCC
Rules. Operation is subject to the following
two conditions:
1. This device may not cause harmful
interference, and
2. This device must accept any interference
received, including interference that may
cause undesired operation.
G
Warning
Change or modification not expressly
approved by the party responsible for
compliance could void the user's authority to
operate this equipment.
!
Note: This equipment has been tested
and found to comply with the limits for a
Class Adigital device, pursuantto Part 15
of the FCC Rules. These limits are designed
to provide reasonable protection against
harmful interference when the equipment
is operated in a commercial environment.
This equipment generates, uses and can
radiate radio frequency energy and, if not
installed and used in accordance with the
instruction manual, may cause harmful
interference to radio communications.
G
Warning
This equipment complies with FCC radiation
exposure limits set forth for uncontrolled
equipment and meets the FCC radio
frequency (RF) Exposure Guidelines in
Supplement C to OET65.
This equipment has very low levels of RF
energy that is deemed to comply without
maximum permissive exposure evaluation
(MPE). But it is desirable that it should be
10
Introduction
ZA COMAND NTG4.0 BR204 USA Edition A 2011; 1; 3, en-US
d2irenklVersion: 3.0.3.6
2010-05-31T09:21:57+02:00 - Seite 10
Page 13

installed and operated with at least 8inches
(20 cm) and more between the radiator and a
person's body (excluding extremities: hands,
wrists, feetand legs.)
Correctuse
Observe the following information when using
COMAND:
R
the safety notes in this manual
R
national road traffic regulations
i
Improper work on electronic components
or other systems (such as radio, DVD
changer) and their software may result in
malfunction or failure. Even systems that
have not been modified could be affected
because the electronic systems are
connected. Electronics malfunctions can
seriously compromise the operational
safety of your vehicle.
i
Only have repairs or changes to electronic
components carried out at a qualified
specialist workshop which has the
necessary specialist knowledge and tools
to carry out the work. Daimler recommends
that you use an authorized Mercedes-Benz
Center for this purpose. In particular, work
relevant to safety or on safety-related
systems must be carried out at a qualified
specialist workshop.
Components of this software are subject to
copyright according to©2005 The FreeType
Project http://www.freetype.org.All rights
reserved.
Vehicle equipment
These Operating Instructions describe all
standard and optional equipmentavailable
for your vehicle at the time of going to print.
Country-specificdifferences are possible.
Please note that your vehicle may not be
equipped with all features described. This
includes safety-related systems and
functions.The equipment in your vehicle may
therefore differ from some of the descriptions
or illustrations. The original purchase
agreement for your vehicle lists all systems
installed in your vehicle. Information on the
equipment or its operation is available at any
authorized Mercedes-BenzCenter.
Function restrictions
For safety reasons, some COMAND functions
are restricted or unavailable while the vehicle
is in motion.You will notice this, for example,
because you will either not be able to select
certain menu items or because COMAND will
display a message to this effect.
Introduction
11
ZA COMAND NTG4.0 BR204 USA Edition A 2011; 1; 3, en-US
d2irenklVersion: 3.0.3.6
2010-05-31T09:21:57+02:00 - Seite 11
Z
Page 14

12
ZA COMAND NTG4.0 BR204 USA Edition A 2011; 1; 3, en-US
d2irenkl Version: 3.0.3.6
2010-05-31T09:21:57+02:00 - Seite 12
Page 15

COMAND operating system ............... 14
Multifunction steering wheel ............. 21
Operating COMAND ............................ 24
Basic functions of COMAND ............... 31
Rear view camera ............................... 34
13
At a glance
ZA COMAND NTG4.0 BR204 USA Edition A 2011; 1; 3, en-US
d2irenkl Version: 3.0.3.6
2010-05-31T09:21:57+02:00 - Seite 13
Page 16
COMAND operating system
Overview
Example display: C-Class
Function Page
:
COMAND display 18
;
Swivels and folds in the
COMAND display 20
=
COMAND control panel
with DVD changer 15
?
COMAND controller 16
A
CLR button(right) 17
B
Back button (left) 17
Components of COMAND
COMAND consists of:
R
the COMAND display
R
the COMAND control panel with DVD
changer
R
the COMAND controller with back and
clear(CLR) buttons
You can use COMAND to operate the
following main functions:
R
the navigation system
R
the audio function in thefollowing modes:
radio and satellite radio mode, disc (audio
CD/DVD and MP3 mode), memory card
(MP3 mode), MUSIC REGISTER, Media
Interface and audio AUX
R
the telephone and the address book
R
the video function in video DVD and video
AUX modes
R
the system settings
You can call up the main functions:
R
using the corresponding function buttons
R
using the main function bar in the COMAND
display
14
COMAND operating system
At a glance
ZA COMAND NTG4.0 BR204 USA Edition A 2011; 1; 3, en-US
d2irenklVersion: 3.0.3.6
2010-05-31T09:21:57+02:00 - Seite 14
Page 17
COMAND control panel
Function Page
:
Switches to radio mode 120
Switches wavebands 121
Switches to satellite radio
mode 124
;
Switches to audio CD/DVD
or MP3 mode 131
Switches to video DVD
mode 153
=
Discslot
• Inserts CDs/DVDs 128
• Ejects CDs/DVDs 129
• Updates the digital map 92
?
Load/ejectbutton 128
A
CLR button
• Deletes characters 17
• Deletes an entry 17
Function Page
B
Number keypad
• Selects a station via the
station presets 121
• Stores stations manually 122
• Telephone number entry 104
• Sends DTMF tones 105
C
Selects stations using the
station search function 121
Fast forward 134
Selects the next track 134
D
Switches COMAND on/off 31
E
Adjusts the volume 31
F
PCMCIAmemory card slot 131
G
PCMCIA memory card eject
button 131
H
Selects stations using the
station search function 121
Rewind 134
Selects the previous track 134
COMAND operating system
15
At a glance
ZA COMAND NTG4.0 BR204 USA Edition A 2011; 1; 3, en-US
d2irenklVersion: 3.0.3.6
2010-05-31T09:21:57+02:00 - Seite 15
Page 18

Function Page
I
Accepts a call 103
Dials a number 104
Redials 104
J
Rejects a call 103
Ends an active call 105
K
Calls up the system menu 26
L
Mute 31
Switches off the navigation
announcements 31
Pause function
133
Function Page
M
Calls up the telephone
basic menu (Bluetooth
®
interface telephony)
103
N
Switches to navigation
mode 49
Shows the menu 49
COMAND controller
:
COMAND controller
You can use the COMAND controller to select
the menu items in the COMAND display.
You can call up menus and lists, scroll through
menus or lists and exit menus and lists.
Operating the COMAND controller
The COMAND controller can be:
R
pressed briefly or pressed and held W
R
turned clockwise or counter-clockwise
cVd
R
moved to the left or right XVY
R
moved forwards or back ZVÆ
R
moved diagonally aVb
In the instructions, operating sequences are
described as follows:
X
Radio mode is switched on.
X
Select Radio by sliding VÆ and turning
cVd the COMAND controller and press
W to confirm.
X
Confirm Station List by pressing W.
The stationlist appears.
16
COMAND operating system
At a glance
ZA COMAND NTG4.0 BR204 USA Edition A 2011; 1; 3, en-US
d2irenklVersion: 3.0.3.6
2010-05-31T09:21:57+02:00 - Seite 16
Page 19
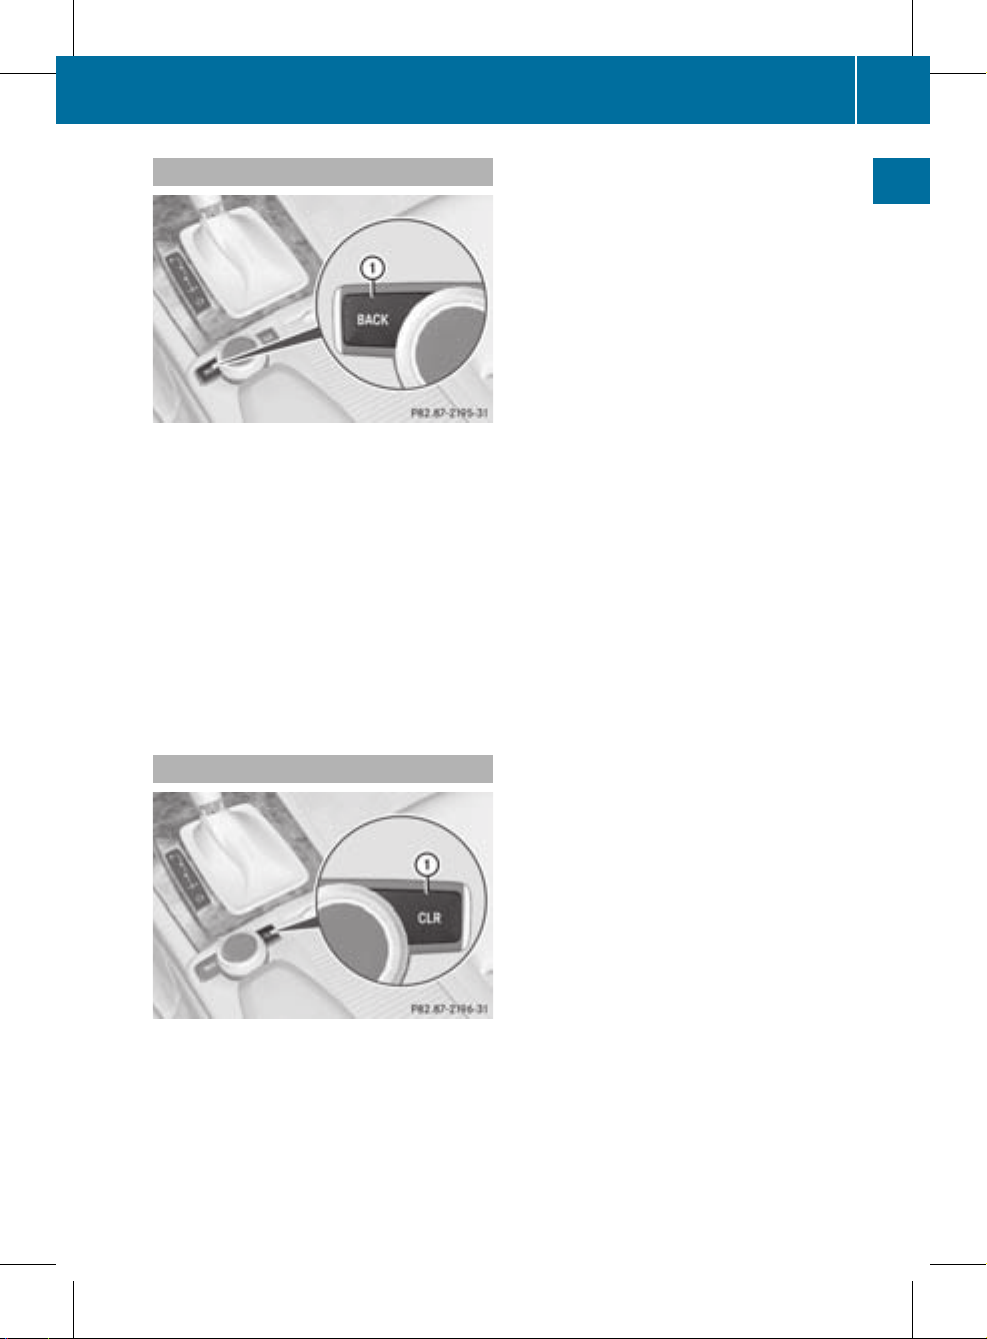
Back button
:
Back button
X
To exit the menu: press back button :
briefly.
COMAND changes to the next highermenu
level in the currentoperating mode.
i
You can also exit a menu by sliding the
COMAND controller XVY or ZVÆ.
X
To switch to the basic display: press and
hold back button :.
COMAND changes to the basic display of
the currentoperating mode.
CLR button
:
CLR button
X
To delete an individual character: press
CLR button : briefly.
X
To delete an entire entry: press and hold
CLR button :.
COMAND operating system
17
At a glance
ZA COMAND NTG4.0 BR204 USA Edition A 2011; 1; 3, en-US
d2irenkl Version: 3.0.3.6
2010-05-31T09:21:57+02:00 - Seite 17
Page 20
COMAND display
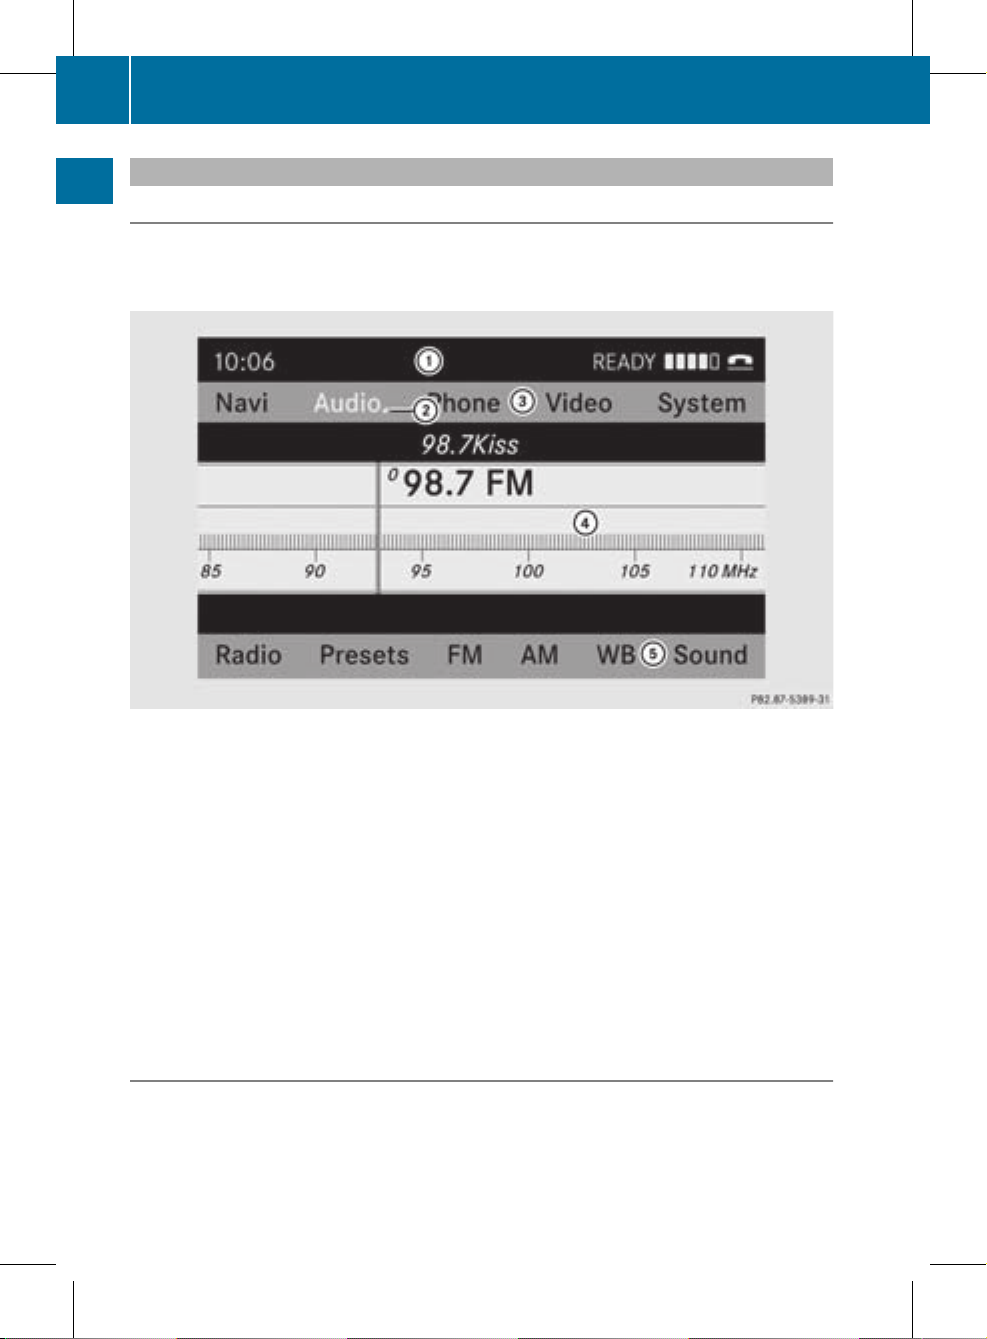
Display overview
The COMAND display shows the function currently selectedand its associated menus. The
COMAND display is divided into several areas.
The radio display is shown in the example.
:
Status bar
;
To call up the audio menu
=
Main functionbar
?
Display/selectionwindow
A
Radio menu bar
Status bar : shows the time and the current settings for radio and telephone operation.
The main navigation, audio and telephone functions feature additional menus. The following
table lists the available menuitems.
Main function bar = allows you to call up the desired main function.
In the example, the Audio main functionis set to radio mode and display/selection
window ? is active.
Radio menu bar A allows you to operate the radio functions.
Menu overview
The table lists the menus available after calling up the main navigation, audio, telephone, video
or system function in the main function bar.
18
COMAND operating system
At a glance
ZA COMAND NTG4.0 BR204 USA Edition A 2011; 1; 3, en-US
d2irenkl Version: 3.0.3.6
2010-05-31T09:21:57+02:00 - Seite 18
Page 21

Navi Audio Tel Video System
Map display FM/AM radio Telephone Video DVD Calls up the
systemmenu
Setting route
calculation mode
SatRadio Address book
Avoiding an area Disc
Recording the route Memory card
Traffic information on
map
MUSIC
REGISTER
Information on map Media
Interface
O Topographical
map on/off
Rear
O Switches freeway
information on/off
AUX
O Automatically
read aloud traffic
reports on/off
O Volume limiter
on/off
SIRIUS service
System menu overview
Settings Language
Display settings Setting the language
Time
Reading speed
Voice-operated control settings
Rear view camera
Activating/deactivating Bluetooth
®
COMAND operating system
19
At a glance
ZA COMAND NTG4.0 BR204 USA Edition A 2011; 1; 3, en-US
d2irenklVersion: 3.0.3.6
2010-05-31T09:21:57+02:00 - Seite 19
Page 22

Settings Language
Resetting COMAND
i
Delete your personal data using this function before
selling your vehicle, for example.
If the function is activated and COMAND is switched on, the image of the rear view camera
is automatically shown in the COMAND display when reverse gear is engaged.
Folding in and swiveling the COMAND
display
!
Do not place any objects in front of or
behind the COMAND display and/or do not
secure any objects to the COMAND
display.Movement could otherwise be
prevented when folding the display in/out.
You can pivot the COMAND display vertically
and fold it in behind the cover. The buttons
are located in the center, below the COMAND
display.
:
To swivel the display
;
To fold in the display
To swivel the display
X
Press button : once or twice.
The display swings up or down.
X
To move it back in the standard
position: press button : again.
To fold in the display
X
Press button ;.
The display folds in behind the cover. The
main function/mode currently selected
remains active.
Folding out the display
X
Press the button on top of the display.
The display folds out.
Cleaning instructions
!
Do not touch the COMAND display.The
display has a very sensitive high-gloss
surface; there is a risk of scratching. If you
have to clean the screen, however, use a
mild cleaning agent and a soft, lint-free
cloth.
20
COMAND operating system
At a glance
ZA COMAND NTG4.0 BR204 USA Edition A 2011; 1; 3, en-US
d2irenkl Version: 3.0.3.6
2010-05-31T09:21:57+02:00 - Seite 20
Page 23

Multifunction steering wheel
Function Page
:
Multifunction display (see
vehicle Operator's Manual)
;
6 Accepts a call
103
~ Rejects/ends a call
103
W Increases the volume
32
X Decreases the
volume 32
8 Mute
31
=
? Activates voice
control (see the separate
operating instructions)
?
%Press briefly: back,
cancels voice control and
hides display messages
(see the separate operating
instructions)
%Press and hold:
selects standard display
(see vehicle Operator's
Manual)
A
=; Calls up the
menu bar in the
multifunction display and
selects menus
21
Function Page
9: Selects
submenus in the
multifunction display or
scrolls through lists
21
a Confirms your
selection
Operating the multifunction display
G
Warning
A driver's attention to the road must always
be his/herprimary focus when driving. For
yoursafety and the safety of others, we
recommend that you pull overto a safe
location and stop before placing or taking a
telephone call. If you choose to use the
telephone while driving, please use the handsfree device and only use the telephone when
weather, road and traffic conditions permit.
Some jurisdictions prohibit the driver from
using a mobile phone while driving a vehicle.
Bear in mind that at a speed of just 30 mph
(approximately 50 km/h), your vehicle is
covering a distance of 44 feet (approximately
14 m) every second.
X
To select amenu: press the =
or ; button.
X
To select a submenu or scroll through
the list: press the 9 or : button.
X
To select the next menu up: press the
% button.
X
To call up standard displays: repeatedly
press the % button until the total
distance recorder and the trip meter
appear in the display.
or
X
Press and hold the % button until the
total distance recorder and the trip meter
appear in the display.
Multifunction steering wheel
21
At a glance
ZA COMAND NTG4.0 BR204 USA Edition A 2011; 1; 3, en-US
d2irenklVersion: 3.0.3.6
2010-05-31T09:21:57+02:00 - Seite 21
Z
Page 24

X
To confirm your selection: press button
a.
X
To confirm the message: press the
a or % button.
Menus and submenus
The numberofmenus depends on the vehicle
equipment.
Menu Functions and submenus
Navigation
system
Navigation system displays
Audio Selects a station
Operates the DVD changer,
memory card, MUSIC
REGISTER, Media Interface
Operates video DVD
Telephone Accepts/rejects a call
Makes/ends a call
Selects a phone book entry
Redials
Navigation system menu
Route guidance inactive
The display shows the road on which the
vehicle is currently traveling, provided the
digital map contains it.
Route guidance active
The display shows:
R
the distance to the destination
R
the distance to the nextchange of direction
R
current street
R
the travel direction arrow
If a change of direction is imminent, the
display shows:
R
the road you will be turning onto
R
the distance to the next change of direction
and a distance graphic
R
a right or left-turn arrow
Lane recommendations are also shown in the
display, provided the digital map contains the
necessary data. During achange of direction,
the number of lanes may increase. Lane
recommendations are shown in the display as
a line with an arrow.
Audio menu
Adjusting the volume
X
Press the W or X button.
Setting the station/channel
X
Switch on COMAND (Y page 31).
X
Switch on FM / AM radio (Y page 120) or
SatRadio (Y page 124).
X
In the multifunction display, select the
audio menu using the = or ; button.
X
To selectthe next/previous station/
channel from the memory: briefly press
the : or 9 button.
X
To selectthe next/previous station/
channel: press and hold the : or
9 button.
Operating the DVD changer/memory
card/MUSIC REGISTER/Media
Interface
X
Switch on COMAND (Y page 31).
X
Switch on Disc, Memory
Card (Y page 131), MUSIC
REGISTER (Y page 139) or Media
Int. (Y page 143).
X
In the multifunction display, select the
audio menu using the = or ; button.
22
Multifunction steering wheel
At a glance
ZA COMAND NTG4.0 BR204 USA Edition A 2011; 1; 3, en-US
d2irenkl Version: 3.0.3.6
2010-05-31T09:21:57+02:00 - Seite 22
Page 25

X
To select the next/previous track:
briefly press the : or 9 button.
X
To search for the next/previous track:
press and hold the : or 9 button.
i
Whenyou play a CD/DVD with track
information, the track name and number
are shown in the multifunction display.The
track name is displayed when an MP3 CD
is being played.
Operating video DVD
X
Switch on COMAND (Y page 31).
X
Switch on DVD-Video (Y page 153).
X
In the multifunction display, select the
audio menu with the = or ; button.
X
To selectthe next/previous scene:
briefly press the : or 9 button.
Telephone menu
G
Warning
A driver's attention to the road must always
be his/herprimary focus when driving. For
yoursafety and the safety of others, we
recommend that you pull overto a safe
location and stop before placing or taking a
telephone call. If you choose to use the mobile
phone while driving, please use the handsfree
device and only use the mobile phone when
weather, road, and traffic conditions permit.
Some jurisdictions prohibit the driver from
using a cellular mobile phone while driving a
vehicle.
Bear in mind that at a speed of just 30 mph
(approximately 50 km/h), your vehicle is
covering a distance of 44 feet (approximately
14 m) every second.
Operating the telephone
X
Switch on COMAND (Y page 31).
X
Call up the basic telephone menu
(Y page 103).
If the telephone has not yet been authorized,
the Bluetooth Ready message appears in
the multifunction display.
If the telephone is switched on and
authorized, the Phone Ready message
appears in the multifunction display.
Accepting acall
X
Press the 6 button.
If the telephone menu is displayed in the
multifunctiondisplay, the name or number of
the personcalling appears.
Rejecting or ending acall
X
Press the ~ button.
Calling a number from the phone book
If yourmobile phone can accept calls, you can
search for a number in the COMAND phone
book and call the number.
X
In the multifunction display, select the
Telephone menu using the = or ;
button.
The Phone Ready message appears in the
multifunction display.
X
Press the :, 9 or a button to
display the phone book.
X
Press the : or 9 button to select the
name you want.
The saved names are sorted alphabetically.
X
An exact phone number exists: press the
6 or a button to make the call.
The Connecting Call message and the
number dialed appear in the multifunction
display.The name also appears if it is
stored in the phone book. The phone
number dialed is stored in the Calls
Dialed call list (Y page 109).
The phone book entry appears in the
multifunction display when the call is
connected.
Multifunction steering wheel
23
At a glance
ZA COMAND NTG4.0 BR204 USA Edition A 2011; 1; 3, en-US
d2irenkl Version: 3.0.3.6
2010-05-31T09:21:57+02:00 - Seite 23
Z
Page 26
X
Several phone numbers exist: press the
6 or a button to display all the
phone numbers for the selected entry.
X
Press the : or 9 button to select the
phone number you want.
X
Press the 6 or a button to make the
call.
The Connecting Call message and the
number dialed appearinthe multifunction
display. The name also appears if it is
stored in the phone book. The phone
number dialed is stored in the Calls
Dialed call list (Y page 109).
The phone book entry appears in the
multifunction display when the call is
connected.
i
If you press the : or 9 button for
longer than a second, the on-board
computer shows the names in rapid scroll.
Rapid scroll speeds up after four seconds.
It stops when you release the button again
or the end of the list is reached.
i
If you do not want to make a call, you can
close the phone book by pressing the
~ button.
Redialing
COMAND saves the last phone numbers or
names dialed.
X
In the multifunction display, select the
phone menu using the = or ;
button.
The Phone Ready message appears in the
multifunction display.
X
Press the 6 button to display the list
with the last numbers or names dialed.
X
Press the : or 9 button to select a
phone number or name.
X
Press the 6 or a button to make the
call.
Operating COMAND
Selecting amain function
Initial situation
You would like to switch from navigation
mode (address entry menu) to the system
settings, for example.
X
To switch on navigation mode: press the
g function button.
X
To show the menu: press W the COMAND
controller.
X
Select Destination by sliding VÆ and
turning cVd the COMAND controller and
press W to confirm.
X
Select Address Entry and press W to
confirm.
The address entry menu appears.
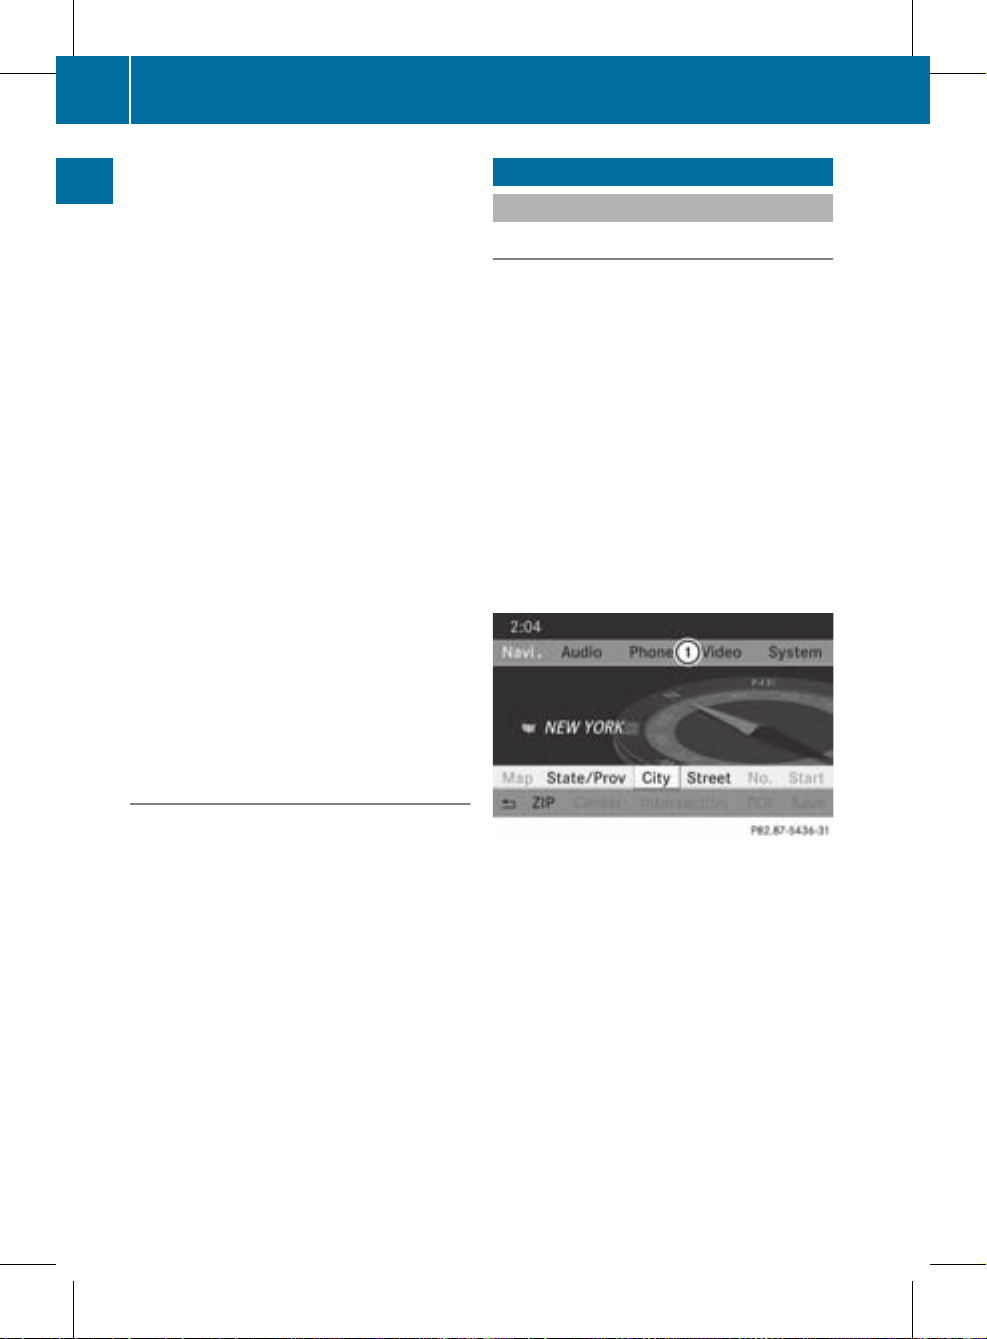
Address entry menu
:
Mainfunction bar
X
Slide the COMAND controller ZV and
switch to main function bar :.
X
Select System in the main function bar by
turning cVd the COMAND controller and
press W to confirm.
The system menu appears.
24
Operating COMAND
At a glance
ZA COMAND NTG4.0 BR204 USA Edition A 2011; 1; 3, en-US
d2irenkl Version: 3.0.3.6
2010-05-31T09:21:57+02:00 - Seite 24
Page 27
Calling up the menuofamain function
If one of the mainnavigation, audio, or
telephone functions is switched on,
triangle : appears next to the entry. You can
now selectanassociated menu.
The example describes how to call up the
audio menu from audio CD mode. Insert a
CD/DVD (Y page 128).
:
To call up the audio menu
;
Main function bar
X
Select Audio in the main function bar by
sliding ZV the COMAND controller and
press W to confirm.
The audio menu appears.
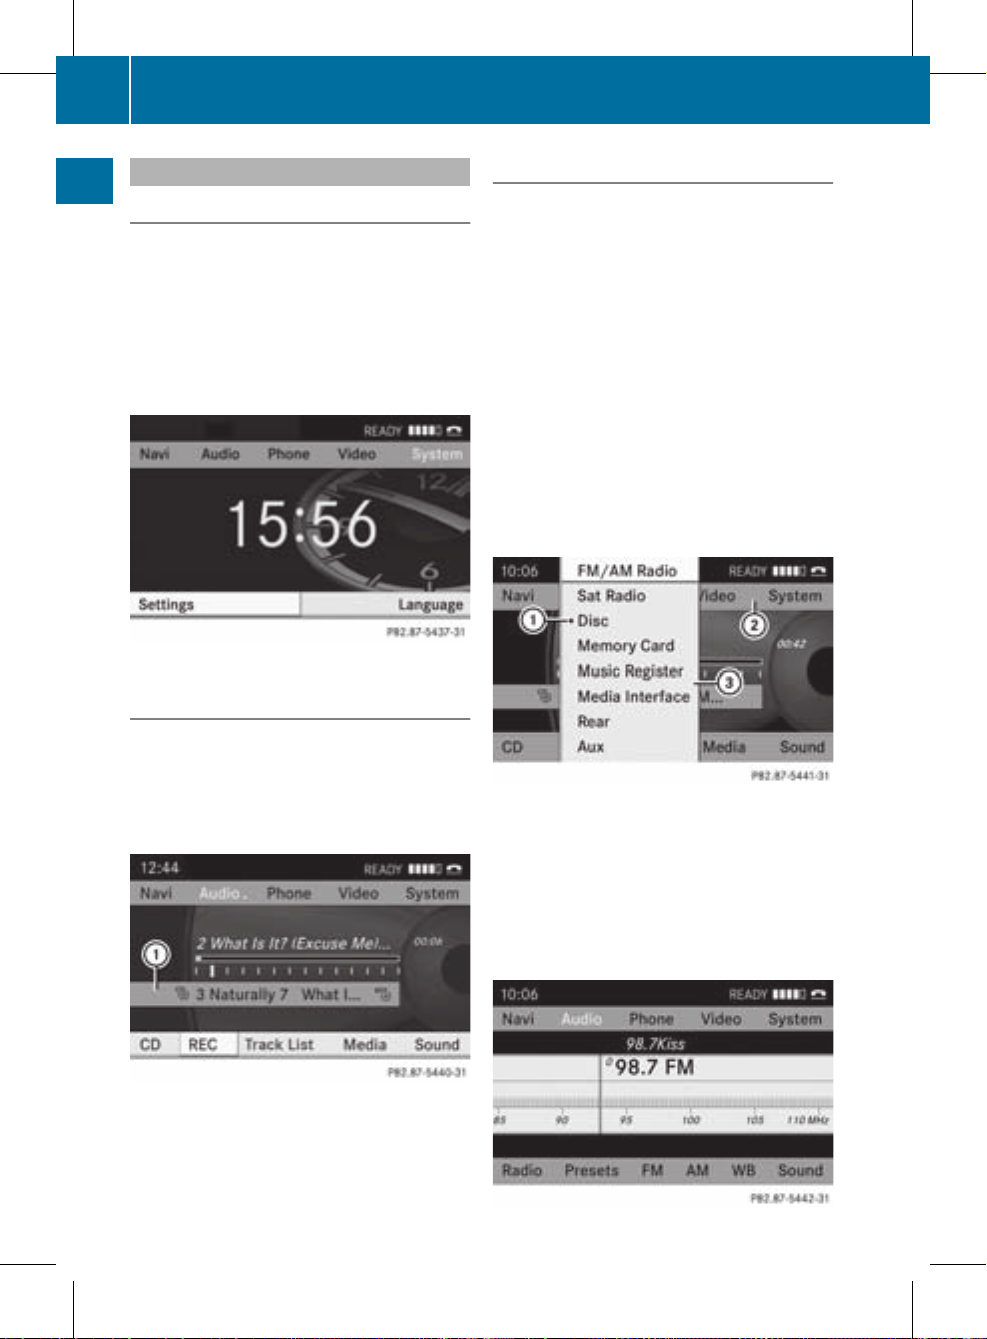
Audio menu
The # dot indicates the current audio mode.
X
Select another audio mode, e.g. Radio, by
turning cVd the COMAND controller and
press W to confirm.
Selecting amenu item
The example describes how to selectastation
from the station presets in radio mode.
X
Press the ó function button.
X
Select Presets by sliding VÆ and turning
cVd the COMAND controller and press
W to confirm.
The station preset menu appears.
:
Selection bar
X
Select the station by turning cVd the
COMAND controller and press W to
confirm.
The station is set.
Operating COMAND
25
At a glance
ZA COMAND NTG4.0 BR204 USA Edition A 2011; 1; 3, en-US
d2irenkl Version: 3.0.3.6
2010-05-31T09:21:57+02:00 - Seite 25
Z
Page 28
Example of operation
Initial situation
You would like to switch from the system
function to radio mode and selectastation,
for example.
The operating example describes how to:
R
call up the audio function
R
switch on radio mode
R
select a station
System menu
Calling up the audio function
X
Select Audio in the main function bar by
sliding ZV and turning cVd the COMAND
controller and press W to confirm.
The basic display of the current audio
operating mode, e.g. audio CD, appears.
:
Selection bar
Switching to radio mode
Option 1
X
Press the ó function button.
The radio display appears.
i
Repeatedly pressing this function button
switches between the FM, AM and WB
wavebands in that order and then calls up
SatRadio mode. Pressing the button again
takes you back to FM radio mode.
Option 2
X
Select Audio againby sliding ZV the
COMAND controller and press W to
confirm.
The audio menu appears. Radio is
highlighted.
:
Currentaudio operating mode
;
Main function bar
=
Audio menu
X
Press W the COMAND controller and
confirm Radio.
The radio basic display appears with the
waveband last selected.
26
Operating COMAND
At a glance
ZA COMAND NTG4.0 BR204 USA Edition A 2011; 1; 3, en-US
d2irenkl Version: 3.0.3.6
2010-05-31T09:21:57+02:00 - Seite 26
Page 29
X
To select astation: turn cVd or slide
XVY the COMAND controller while the
display/selectionwindow is active.
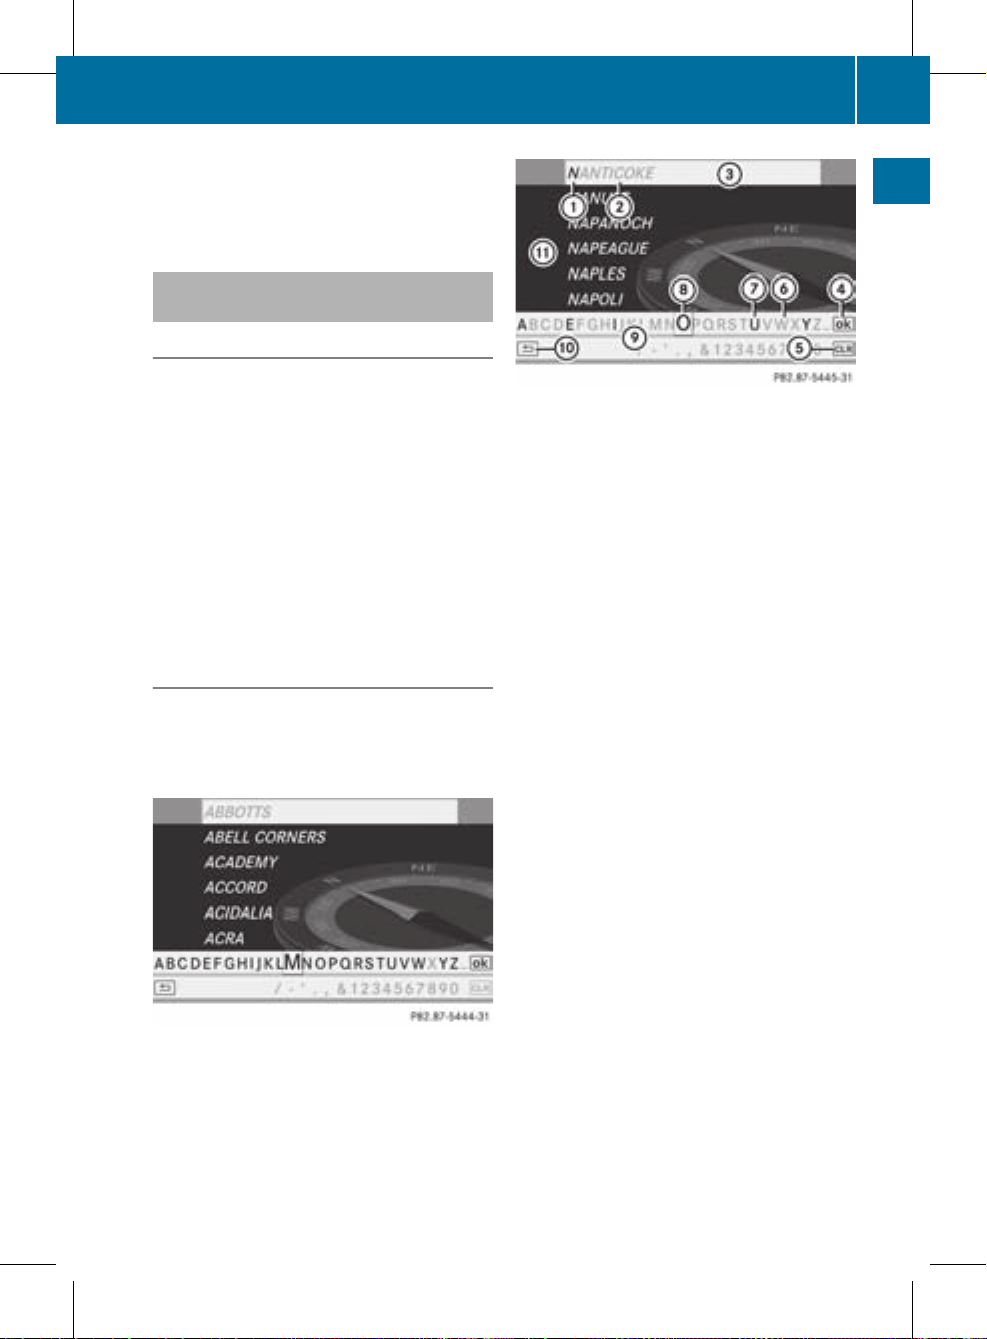
Entering characters in navigation
mode (entering acity)
General information
The following paragraphs describe how to
enter characters using city input for NEW
YORK as an example.
If you want to use the address entry menu
(Y page 51) to enter a city, a street or a
house number, for example, COMAND
provides either a list with a character bar
(option1) or a selection list (option 2).
You can enter the characters using either the
character bar or the number pad. In the
selection list, you select an entry to copy it to
the address entry menu.
Option 1: city list with character bar
X
Call up the city list with character bar
(Y page 52).
The alphabetically sorted citylist shows the
firstavailable entries.
Entering characters using the character
bar
X
Select N by turning cVd the COMAND
controller and press W to confirm.
:
Character entered by the user N
;
Characters automatically added by
COMAND ANTICOKE
=
List entry that most closely resembles the
current entry by the user
?
To switch to the selection list
A
To delete an entry
B
Characters not currently available for
selection
C
Characters currently available for
selection
D
Currently selected character
E
Character bar
F
To cancel an entry
G
List
List G shows all existing city names
beginning with an N. List entry = most
closely resembling the current entry by the
useris always highlighted at the top of the list
(NANTICOKE in the example).
All characters currently entered by the user
are shown in black (letter N : in the
example). Letters added by COMAND are
shown in gray ; (ANTICOKE in the example).
Character bar E shows the letters still
available for selection in black C.These can
be selected. In the example, the letter O is
highlighted D.Which characters remain
available depends on the characters already
entered by the user and on the data stored in
the digital map. Characters that are no longer
available are shown in gray B.
Operating COMAND
27
At a glance
ZA COMAND NTG4.0 BR204 USA Edition A 2011; 1; 3, en-US
d2irenkl Version: 3.0.3.6
2010-05-31T09:21:57+02:00 - Seite 27
Z
Page 30
X
Select E, W, space, Y in succession,
confirming each by pressing W.
Entering characters using the number
keypad
X
Press number key B twice in quick
successionto select the letter N.
Once a button has been pressed, the
character display appears at the bottom of
the display.The first available letter is
highlighted.
You see which characters you can enter with
that button. Each time the button is pressed,
the next character is selected.
Example number key B:
R
press once = M
R
press twice =N
R
press three times =O
X
Wait until the character display goes out.
The entries matching your input are shown
in the list.
X
Enter E, W, space, Y using the corresponding
keys.
i
Enter the space with number key 9.
Further functions in the list with
character bar
X
To delete characters: select 2 by
sliding VÆ and turning cVd the COMAND
controller and press W to confirm.
or
X
Press the 2 button next to the
COMAND controller.
X
To delete an entry: select the 2
symbol by sliding VÆ and turning cVd the
COMAND controller and hold W until the
entire entry has been deleted.
or
X
Press the 2 button next to the
COMAND controller and hold it until the
entire entry is deleted.
X
To switch the character set: select
B and press W to confirm.
X
To cancel an entry: select the k icon
in the bottom left of the character bar and
press W to confirm.
or
X
Press the k button.
The address entry menu appears.
X
To accept the first list entry: press and
hold the COMAND controller W until the
address entry menu appears.
The accepted list entry appears.
Calling up the list as aselection list
Select the desired city from the selectionlist.
If there are several entries for a city or if
several cities of the same name are stored,
then ¬ is highlighted in the character bar.
X
Press the W COMAND controller.
It is also possible to switch the list of cities to
the selection list at any time during character
input.
X
Slide the COMAND controller W
repeatedly until the city list appears as a
selection list.
or
X
Select ¬ in the character bar by turning
cVd the COMAND controller and press
W to confirm.
28
Operating COMAND
At a glance
ZA COMAND NTG4.0 BR204 USA Edition A 2011; 1; 3, en-US
d2irenklVersion: 3.0.3.6
2010-05-31T09:21:57+02:00 - Seite 28
Page 31

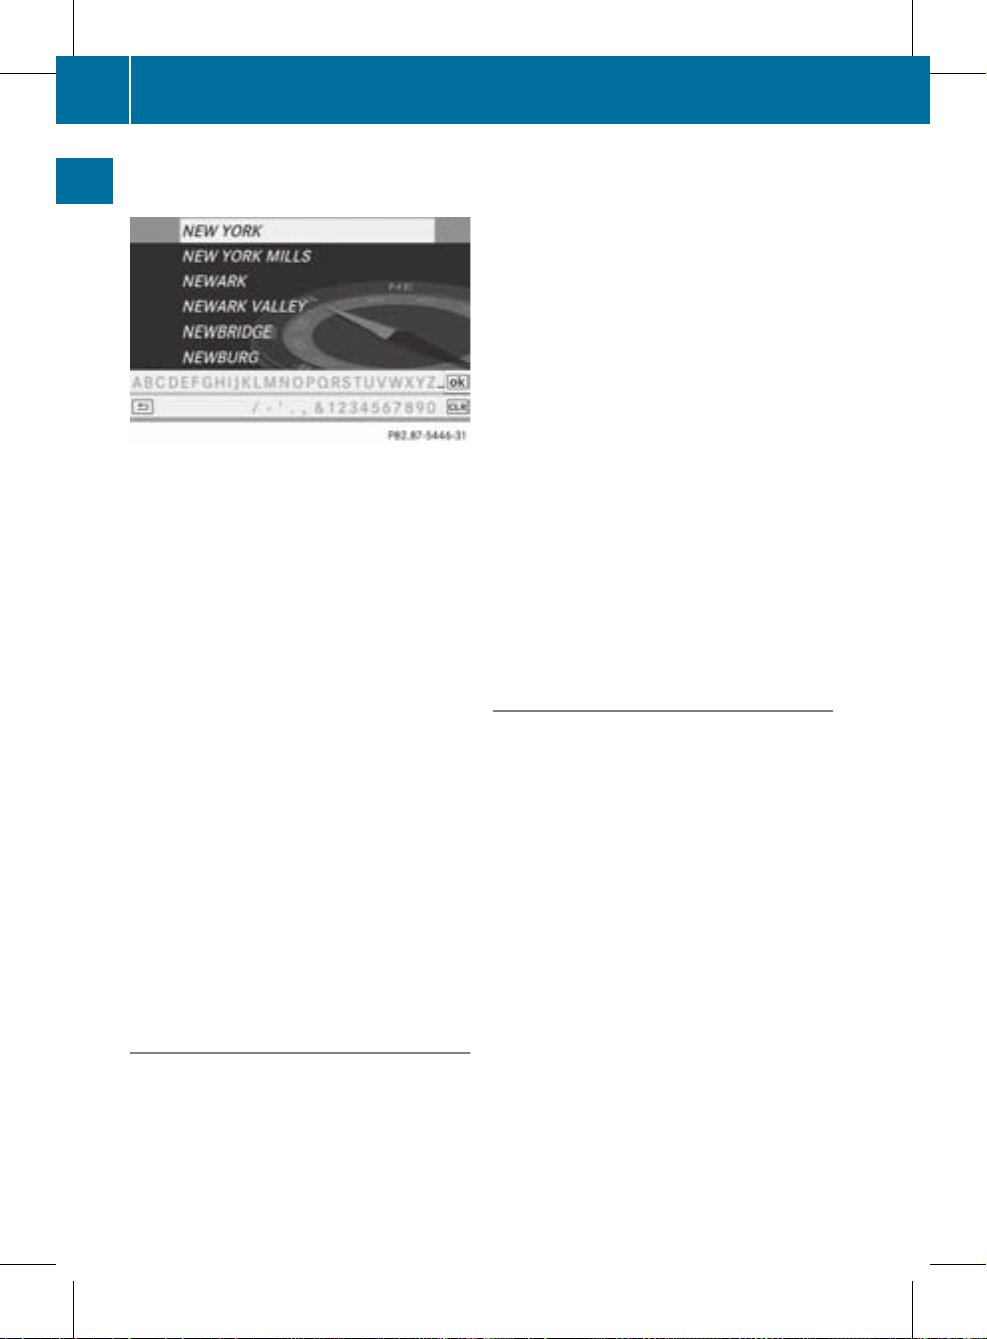
Option 2: city list as selection list
COMAND either shows the selection list
automatically or you can call up the selection
list from the list with character bar.
The example shows the selection list after the
city NEW YORK has been entered. The entry is
highlighted automatically.
X
Confirm NEW YORK by pressing W
COMAND controller.
The address entry menu appears. You can
now enter a street, for example.
i
You will find further information in the
"Destination entry" section (Y page 51).
Entering characters in the address
and the phone book
Introduction
The following section describes how to enter
characters in the phone book (Y page 106)
and the address book (Y page 113) when
creating a new entry.
Creating anew entryinthe phone book
X
Call up the inputmenu with data fields
(Y page 108).
Phone book: input menu with data fields
:
Selected data field with cursor
;
Character bar
Creating a new entry in the address
book
X
Call up the input menu with data fields
(Y page 113).
Input menu with data fields
:
Selected data field with cursor
;
Character bar
Entering characters
The example describes how to enter the
surname Schulz.
Operating COMAND
29
At a glance
ZA COMAND NTG4.0 BR204 USA Edition A 2011; 1; 3, en-US
d2irenklVersion: 3.0.3.6
2010-05-31T09:21:57+02:00 - Seite 29
Z
Page 32

X
Select S by turning cVd and sliding ZVÆ
the COMAND controllerand press W to
confirm.
S is entered into the data field.All
characters are shown in black and can
always be selected in the character bar.
The character bar offers characters
corresponding to the respective data field
(letters or digits).
:
To switch the character bar to uppercase/lower-case letters
;
To switch the character bar fromupper/
lower-case letters to digits
=
To change the language of the character
bar
?
To delete a character/an entry
X
Select c and confirm by pressing W the
COMAND controller.
The letter c is added to S in the data field.
X
Repeat the process until the name has
been entered in full.
X
To enter a phone number: select the
digits one by one in the corresponding data
field by turning cVd and sliding ZVÆ the
COMAND controller and press W to
confirm.
Switching the data field
If you want to enter a first name after you have
entered a surname, for example, proceed as
follows to switch between the data fields:
Option 1
X
Select 4 or 5 in the character bar and
press W to confirm.
The input menu displays the data field
selected.
:
Cursor in nextdata field
;
To save the entry
=
4 and 5 icons to selectadata field
Option 2
X
Slide COMAND controller ZV repeatedly
until the character bar disappears.
X
Select the data field by sliding ZVÆ and
press W to confirm.
Saving the entry
X
Select ¬ in the character bar by turning
cVd the COMAND controller and press
W to confirm.
The entry is stored in the address book.
Further functions available in the
character bar
X
To switch the character bar to upper/
lower-case characters: select * or
E and press W to confirm.
X
To switch the character set: select
p and press W to confirm.
The character set switches between
upper/lower-case letters and digits.
30
Operating COMAND
At a glance
ZA COMAND NTG4.0 BR204 USA Edition A 2011; 1; 3, en-US
d2irenkl Version: 3.0.3.6
2010-05-31T09:21:57+02:00 - Seite 30
Page 33

X
To change the language of the
character bar: select B and press W
to confirm.
X
Select the language by turning cVd the
COMAND controller and press W to
confirm.
X
To reposition the cursorwithin the data
field: select 2 or 3 and press W to
confirm.
:
Cursor (repositioned)
;
2 and 3 icon to reposition the cursor
X
Delete the character/entry(Ypage 28).
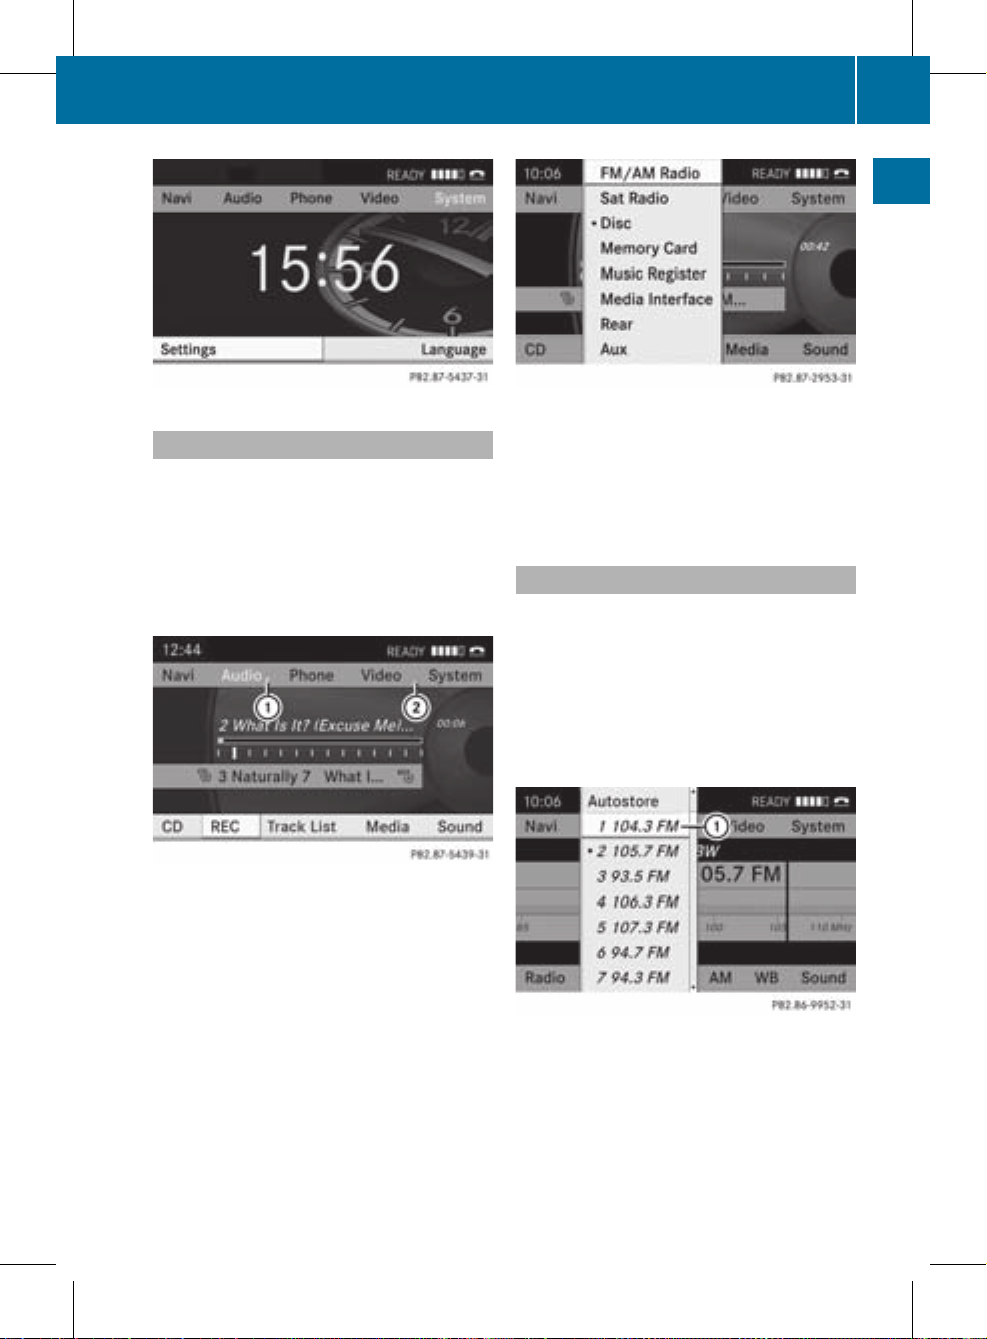
Basic functions of COMAND
Switching COMAND on/off
X
Press the q control knob.
The cover folds open and the COMAND
display extends. Awarning message
appears. COMAND calls up the previously
selected menu.
i
If you switch off COMAND, playbackof
the current audio or videosource will also
be switched off.
Muting
Switching an audio and video source
on/off
X
Press the B button on COMAND or on the
multifunction steering wheel.
The sound from the respective audio or
video source is switched on or muted.
i
When the sound is off, the system
displays the , symbol in the status line.
When you change the audio or video
source, or adjust the volume, the sound
automatically switches on again.
i
You will still hear traffic announcements
and navigation system announcements,
even if the sound is muted.
Switching off navigation
announcements completely
X
Navigation announcements: press the
B button during the announcement.
Switching navigation announcements
back on
X
Press the B button again.
i
The navigation announcementsare
switched on again if you start a new route
guidance or if COMAND is switched off and
on with the q control knob.
Adjusting the volume
Adjusting the volume for the audio or
video source
X
Turn the q control knob.
or
X
Press the W or X button on the
multifunction steering wheel.
The volume of the currently selected audio
or video source changes.
Basic functions of COMAND
31
At a glance
ZA COMAND NTG4.0 BR204 USA Edition A 2011; 1; 3, en-US
d2irenkl Version: 3.0.3.6
2010-05-31T09:21:57+02:00 - Seite 31
Z
Page 34

You can also adjust the volume for the
following:
R
navigation announcements
R
phone calls
R
the Voice Control System (see the separate
operating instructions)
Adjusting the volume for navigation
announcements
During a navigation announcement:
X
Turn the q control knob.
or
X
Press the W or X button on the
multifunction steering wheel.
Adjusting the volume for telephone
calls
You can adjust the volume for hands-free
mode during a telephone call.
X
Turn the q control knob.
or
X
Press the W or X button on the
multifunction steering wheel.
Adjusting the sound settings
Calling up the sound menu
You can make various sound settings for the
differentaudio and video sources.This means
that it is possible to set more bass for radio
mode than for audio CD mode, for example.
You can call up the respective sound menu
from the menu of the desired mode.
The example describes how to call up the
sound menu in radio mode.
X
Press the ó function button.
The radio display appears. You will hear the
last station played on the last waveband.
X
Select Sound by sliding VÆ and turning
cVd the COMAND controller and press
W to confirm.
You can now set the treble and bass or the
balance and fader for radio mode.
Adjusting treble and bass
X
Select Treble or Bass in the sound menu
by turning cVd the COMAND controller
and press W to confirm.
Asetting scale appears.
To adjust the bass
:
Last setting selected
;
Current setting
X
Select a setting by turning cVd the
COMAND controller and press W to
confirm.
The setting is stored and you exit the menu.
Adjusting balance and fader
With the balance function, you can control
whether the sound is louder on the driver’s or
front-passenger side.
32
Basic functions of COMAND
At a glance
ZA COMAND NTG4.0 BR204 USA Edition A 2011; 1; 3, en-US
d2irenklVersion: 3.0.3.6
2010-05-31T09:21:57+02:00 - Seite 32
Page 35

With the fader function, you can control
whether the sound is louder in the frontorthe
rear of the vehicle.
X
Select Bal/Fad (balance/fader) in the
sound menu by turning cVd the COMAND
controller and press W to confirm.
Adjusting balance and fader
:
Current setting
X
Select a setting by sliding ZVÆ or turning
XVY the COMAND controller and press
W to confirm.
The setting is stored and you exit the menu.
Surround sound
General notes
If your vehicle is equipped with the harman/
kardon®Logic 7®surround sound system,
you can set the optimum surround sound for
every passenger.
The harman/kardon®Logic 7®surround
sound system is available for the following
operating modes:
R
radio (FM only)
R
satellite radio
R
audio CD
R
audio DVD (MLP, dts, PCM and Dolby
Digital audio formats)
R
MP3 (including PCMCIA memory card)
R
Media Interface
R
video DVD (PCM, dts and Dolby Digital
audio formats)
R
AUX
Because many DVDs contain both stereo and
multi-channel audio formats, it may be
necessary to set the audio format
(Y page 136).
i
The Logic7®On function enables
playback of, e.g. stereo recordings with a
surround sound experience for every
passenger. It enables optimum playback of
music and films on CD, audio DVD or video
DVD with multichannel audioformats, such
as MLP, dts or Dolby Digital. The resulting
audio experience reflects that intended by
the sound engineer during the original
recording.
i
By selecting Logic7®Off, playback of all
playable formats is as it is on the medium.
Due to the design of the passenger
compartment, an optimum audio
experience cannot be guaranteed for all
passengers.
i
Discs which support the audio formats
mentioned have the following logos:
Dolby Digital
dts
Basic functions of COMAND
33
At a glance
ZA COMAND NTG4.0 BR204 USA Edition A 2011; 1; 3, en-US
d2irenklVersion: 3.0.3.6
2010-05-31T09:21:57+02:00 - Seite 33
Z
Page 36

MLP
Switching surround sound on/off
Example: switching on surround sound for
radio mode
X
Press the ó function button.
The radio display appears. You will hear the
last station played on the last waveband.
X
Select Sound by sliding VÆ and turning
cVd the COMAND controller and press
W to confirm.
X
Select Surround and press W to confirm.
X
Select Logic7®On or Logic7®Off by
turning cVd the COMAND controller and
press W to confirm.
Depending on your selection, surround
sound is switched on or off and the menu
is exited.
X
To exit the menu without saving: press
the k back button or slide XVY the
COMAND controller.
i
Please note the following: for the
optimum audio experience for all
passengers when Logic7®is switched on,
the balance and fade should be set to the
center of the passenger compartment.
You will achieve the best sound results by
playing high-quality audio and video DVDs.
MP3 tracks should have abit rate of at least
128 kbit/s.
Surround sound playback does not
function for mono signal sources, such as
the AM radio mode.
If radio receptionis poor, e.g. in a tunnel,
you should switch off Logic 7®, as it may
otherwise switch between stereo and
mono and cause temporary sound
distortions.
On some stereo recordings, the sound
characteristics may differ from
conventional stereo playback.
Rear view camera
G
Warning!
The rear view camera is merely an aid.
Please observe the corresponding notes in
your vehicle's Operator's Manual.
If your vehicle is equipped with a rear view
camera, its image is automatically relayed to
the COMAND display if the function is
activated and you shift into reverse gear.
If the function is activated, the COMAND
display will automatically switch back to the
34
Rear view camera
At a glance
ZA COMAND NTG4.0 BR204 USA Edition A 2011; 1; 3, en-US
d2irenkl Version: 3.0.3.6
2010-05-31T09:21:57+02:00 - Seite 34
Page 37

previously selected display as soon as you
shift out of reverse gear.
X
Press the S function button.
The system menu appears.
X
Select Settings by turning cVd the
COMAND controller and press W to
confirm.
X
Select Rear View Camera and press W to
confirm.
X
Select Activation by R gear and press
W to confirm.
The function is switched on O or off ª,
depending on the previous status.
Rear view camera
35
At a glance
ZA COMAND NTG4.0 BR204 USA Edition A 2011; 1; 3, en-US
d2irenkl Version: 3.0.3.6
2010-05-31T09:21:57+02:00 - Seite 35
Z
Page 38

36
ZA COMAND NTG4.0 BR204 USA Edition A 2011; 1; 3, en-US
d2irenkl Version: 3.0.3.6
2010-05-31T09:21:57+02:00 - Seite 36
Page 39

Vehicle equipment .............................. 38
Display settings .................................. 38
Time settings ....................................... 38
Read-aloud settings ............................ 39
Voice Control System settings .......... 40
Bluetooth®settings ............................ 42
System language settings .................. 45
Reset function ..................................... 45
37
System settings
ZA COMAND NTG4.0 BR204 USA Edition A 2011; 1; 3, en-US
d2irenkl Version: 3.0.3.6
2010-05-31T09:21:57+02:00 - Seite 37
Page 40

Vehicle equipment
i
These Operating Instructions describe all
standard and optional equipment available
for your vehicle at the time of purchase.
Please note thatyour vehicle may not be
equipped with all features described.
Display settings
Setting the brightness
The brightness detected by the COMAND
light sensor affects the setting options for this
function.
X
Press the S button.
X
Select Settings by turning cVd the
COMAND controller and press W to
confirm.
X
Select Display and press W to confirm.
X
Select Brightness and press W to
confirm.
:
The needle points to the current setting
X
Adjust the brightness by turning cVd the
COMAND controller and press W to
confirm.
Display design
Your COMAND display features optimized
designs for operation during daytime and
nighttime hours. You can customize the
design to suit your personal preferences by
manually selecting day or night design or opt
for an automatic setting.
X
Press the S button.
X
Select Settings by turning cVd the
COMAND controller and press W to
confirm.
X
Select Display and press W to confirm.
X
Select Day Mode, Night Mode or
Automatic by turning cVd the COMAND
controller and press W to confirm.
The ä icon indicates the current setting.
Design Explanation
Day Mode
The display is set
permanently to day
design.
Night Mode
The display is set
permanently to night
design.
Automatic
The display design
changes, depending on
the vehicle instrument
cluster illumination.
i
When the Automatic setting is selected,
COMAND evaluates the readings from the
automatic vehicle light sensor and
switches between the display designs
automatically.
Time settings
General information
If COMAND is equipped with a navigation
system and has GPS reception, COMAND
automatically sets the time and date. You can
also adjust the time yourself in 30-minute
increments, but the date cannot be changed.
i
If you set the time in 30-minute
increments, any time zone settings and
settings for changing between summer and
standard time are lost (Y page 39).
38
Time settings
System settings
ZA COMAND NTG4.0 BR204 USA Edition A 2011; 1; 3, en-US
d2irenklVersion: 3.0.3.6
2010-05-31T09:21:57+02:00 - Seite 38
Page 41

i The following navigation system functions
require the time, time zone and summer/
standard time to be set correctly in order
to work properly:
R
route guidance on routes with timedependent traffic guidance
R
calculation of expected time of arrival
Setting the time
X
Press the S button.
X
Select Settings by turning cVd the
COMAND controller and press W to
confirm.
X
Select Time by turning cVd the COMAND
controller and press W to confirm.
X
Select Set Time and press W to confirm.
:
To set the time
;
Current date (set automatically by
COMAND)
X
Set the time by turning cVd the COMAND
controller and press W to confirm.
Setting the time/date format
X
Press the S button.
X
Select Settings by turning cVd the
COMAND controller and press W to
confirm.
X
Select Time by turning cVd the COMAND
controller and press W to confirm.
X
Select Format and press W to confirm.
The # symbols show the currentsettings.
Abbreviation Meaning
DD/MM/YYYY
Day/Month/Year
(date format)
HH/MM
Hours/Minutes
(time format)
You can set the 24-hour or the AM/PM
format.
X
Set the format by turning cVd the
COMAND controller and press W to
confirm.
Setting the time zone and switching
between summer and standard time
X
Press the S button.
X
Select Settings by turning cVd the
COMAND controller and press W to
confirm.
X
Select Time by turning cVd the COMAND
controller and press W to confirm.
X
Select Time Zone and press W to confirm.
Atime zone list appears. The # dot
indicates the current setting.
X
Selectthe time zone and press W to
confirm.
X
To switch automatic changeover on/
off: select Auto. Daylight Saving
Time On or Auto. Daylight Saving
Time Off by turning cVd the COMAND
controller and press W to confirm.
The # dot indicates the current setting.
Read-aloud settings
Setting the read-aloud speed
X
Press the S button.
Read-aloud settings
39
System settings
ZA COMAND NTG4.0 BR204 USA Edition A 2011; 1; 3, en-US
d2irenkl Version: 3.0.3.6
2010-05-31T09:21:57+02:00 - Seite 39
Page 42

X
Select Settings by turning cVd the
COMAND controllerand press W to
confirm.
X
Select Text Reader Speed and press W
to confirm.
Alist appears. The # dot indicates the
current setting.
X
Select a setting by turning cVd the
COMAND controller and press W to
confirm.
Voice Control System settings
Activating/deactivating the help
window
In additionto the audible instructions, the
help window will show you other information
during voice control operation and the
individualization process.
X
Press the S button.
X
Select Settings by turning cVd the
COMAND controller and press W to
confirm.
X
Select Linguatronic and press W to
confirm.
X
Select Help Window and press W to
confirm.
You have switched the help window on
O or off ª.
Individualization
Introduction
You can use the individualization function to
fine tune the Voice Control System to your
voice and therefore improve voice
recognition. However, this will affect the
system's ability to recognize the voices of
other users. For this reason this function can
be switched off (Y page 41).
Individualization consists of two parts and
lasts about five minutes. It involves training
the system using a certain number of
numerical sequences and voice commands.
Starting new individualization
It is only possible to start individualization
when the vehicle is stationary. Before
starting, switch off all devices or functions
which could interfere, such as the radio or the
navigation system. After starting the session,
the system guides you through the training
with spoken instructions.
X
Press the S button.
X
Select Settings by turning cVd the
COMAND controller and press W to
confirm.
X
Select Linguatronic and press W to
confirm.
X
Select Start New Individualization
and press W to confirm.
You see and hear a prompt asking whether
you would like further information.
X
Select Yes or No and press W to confirm.
If you select No, the first part of
individualization begins. You hear a prompt
asking whether you would like to train the
system in numbers or in voice commands.
After selecting Yes, you see an information
display and hear information regarding the
individualization process. The first part of
individualization then begins automatically.
40
Voice Control System settings
System settings
ZA COMAND NTG4.0 BR204 USA Edition A 2011; 1; 3, en-US
d2irenklVersion: 3.0.3.6
2010-05-31T09:21:57+02:00 - Seite 40
Page 43

X
To close the display: press W the
COMAND controller.
You hearaprompt asking whether you
would like to train the system in numbers
or in voice commands.
At the end of the first part, you will see a
prompt asking whether you wish to begin the
second part.
X
Select Yes or No and press W to confirm.
If you select No, individualization will be
canceled. The data from the first part is
stored automatically.
If you select Yes, the second part will begin.
Individualization is completed at the end of
the second part. You will see a message to
this effect. The data from the second part is
stored automatically.
Canceling the first or second partof
individualization
X
Confirm Cancel by pressing W the
COMAND controller.
Aprompt appears asking whetheryou
really do wish to cancel.
X
Select Yes or No and press W to confirm.
If you select Yes, individualization will be
canceled. The data from the part canceled
is not stored.
If you select No, the current part begins
again.
Deleting existing individualization data
X
Press the S button.
X
Select Settings by turning cVd the
COMAND controller and press W to
confirm.
X
Select Linguatronic and press W to
confirm.
X
Select Delete Individualization and
press W to confirm.
Aprompt appears asking whetheryou
really wish to delete.
X
Select Yes or No and press W to confirm.
If you select No, the process will be aborted.
If you select Yes, the individualization is
deleted. You will see a message to this
effect.
Activating/deactivating
individualization
X
Press the S button.
X
Select Settings by turning cVd the
COMAND controller and press W to
confirm.
X
Select Linguatronic and press W to
confirm.
Voice Control System settings
41
System settings
ZA COMAND NTG4.0 BR204 USA Edition A 2011; 1; 3, en-US
d2irenklVersion: 3.0.3.6
2010-05-31T09:21:57+02:00 - Seite 41
Page 44

X
Select Individualization On and press
W to confirm.
You have switched individualization on O
or off ª.
Bluetooth®settings
General information about
Bluetooth
®
Bluetooth®-capable devices, e.g. mobile
phones, mustcomply with a certain profile in
order to be connected to COMAND. Every
Bluetooth®device has its own specific
Bluetooth®name.
Bluetooth®technology is the standard for
short-range wireless data transmission of up
to approximately 10 meters. Bluetooth®can
be used to exchange vCards, for example.
Bluetooth®is a registered trademark of the
Bluetooth Special Interest Group (SIG) Inc.
Conditions for aBluetooth
®
connection
You can connectmobile phones and laptops
with COMAND.
To do so, the following conditions need to be
met:
R
Bluetooth®-capable devices, e.g. mobile
phones, need to comply with a certain
profile (Y page 99) in order to be
connected to COMAND. Every Bluetooth
®
device has its own specific Bluetooth
®
name.
R
Bluetooth®must be activated in COMAND
and on the respective Bluetooth®device;
see the separate operating instructions.
R
the Bluetooth®device must be "visible" to
COMAND in order for COMAND to find and
display it. For the setting procedures,
please see the operating instructions for
the Bluetooth®device.
i
Once a mobile phone has been
connected, reception and transmission
volume may change.
Activating/deactivating Bluetooth
®
X
Press the S button.
The system menu appears.
X
Select Settings by turning cVd the
COMAND controller and press W to
confirm.
X
Select Bluetooth and press W to confirm.
X
Select Activate Bluetooth and press
W to confirm.
This switches Bluetooth®on O or off ª.
Connecting Bluetooth®devices
General information
Before using your Bluetooth®device with
COMAND for the first time, you will need to
connect it.
Connecting comprises:
R
searching for a Bluetooth®device
R
subsequently authorizing it
i
You can connect up to ten devices to
COMAND.
You can obtain more detailed information
about suitable mobile phones and about
connecting Bluetooth®-capable mobile
phones to COMAND on the Internet at
42
Bluetooth®settings
System settings
ZA COMAND NTG4.0 BR204 USA Edition A 2011; 1; 3, en-US
d2irenklVersion: 3.0.3.6
2010-05-31T09:21:57+02:00 - Seite 42
Page 45

http://www.mbusa-mobile.com. Or call
the Mercedes-Benz Customer Assistance
Center at 1-800-FOR-MERCedes
(1-800-367-6372) (for the USA) or Customer
Relations at 1-800-387-0100 (for Canada).
Searching for Bluetooth®devices
X
Activate Bluetooth®(Y page 42).
X
Select Settings in the system menu by
turning cVd the COMAND controller and
press W to confirm.
X
Select Bluetooth Phones and press W to
confirm.
X
Select Update and press W to confirm.
COMAND searches for Bluetooth®devices
withinrange. Afterashort while, the
Bluetooth®device list appears.
Example of display: Bluetooth®device list
:
Currently connected # and authorized
device (Y icon)
;
Device not within range but previously
authorized (L appears in gray)
=
Newly detected device within range but
not yet authorized (no Y icon)
The Bluetooth®device list shows all devices
within range and all previously authorized
devices, whether or not they are in range.
If the Bluetooth®device list is already full, you
will be requested to de-authorize a device
(Y page 44). If COMAND does not detect
your Bluetooth®device, external
authorization may be necessary
(Y page 44).
i
When called up again, the list may no
longer show all devices because, for
example, a device has been removed from
the vehicle in the meantime. In this case,
start a new search to update the device list.
Authorizing (registering) aBluetooth
®
device
X
In the Bluetooth®device list, selectnot yet
authorized device = by turning cVd the
COMAND controller.
X
Select Options by sliding VY the
COMAND controller and press W to
confirm.
X
Select Authorize and press W to confirm.
The passcode is any one to sixteen-digit
number combination which you can
determine yourself. You must enter the same
number combination in COMAND and in the
Bluetooth®device to be authorized (see
mobile phone operating instructions).
i
Some mobile phones require a four-digit
(or longer) passcode.
i
If you want to re-authorize a device
following de-authorization (Y page 44),
you can select a different passcode.
Bluetooth®settings
43
System settings
ZA COMAND NTG4.0 BR204 USA Edition A 2011; 1; 3, en-US
d2irenklVersion: 3.0.3.6
2010-05-31T09:21:57+02:00 - Seite 43
Page 46

X
To enter apasscode in COMAND: press
the numberkeys in sequence.
¬ is highlighted after the first number
has been entered.
or
X
Select the digits one by one by turning
cVd the COMAND controller and press
W to confirm.
X
To confirm an entry in COMAND: select
¬ using the COMAND controller and
press W to confirm.
X
Enter the same passcode into the
Bluetooth®device (see the operating
instructions for the respective device).
The device is authorized.
External authorization
If COMAND does not detect your
Bluetooth®device, this may be due to
particular security settings on your
Bluetooth®device. In this case, check
whether your Bluetooth®device can locate
the COMAND system. The Bluetooth®device
name of COMAND is "MB Bluetooth".
X
In the Bluetooth®device list, select the
desired device by turning cVd the
COMAND controller.
X
Select Options by sliding VY the
COMAND controller and press W to
confirm.
X
Select External Authorization and
press W to confirm.
X
Start the Bluetooth®scan process on the
Bluetooth®device (see operating
instructions of the respective device).
X
Select COMAND ("MB Bluetooth").
X
When prompted, enter the passcode on the
Bluetooth®device and then on COMAND.
Displaying the details of a
Bluetooth®device
X
In the Bluetooth®device list, select the
desired device by turning cVd the
COMAND controller.
X
Select Options by sliding VY and press
W to confirm.
X
Select Details and press W to confirm.
The detailed display for this device
appears.
X
To close the detailed view: turn cVd or
slide XVY the COMAND controller.
De-authorizing (de-registering) a
Bluetooth®device
Mercedes-Benz USA, LLC recommends that
you de-authorize devices, e.g. mobile phones,
both in COMAND and on the respective
Bluetooth®device itself. Subsequent
authorization may otherwise fail.
X
In the Bluetooth®device list, select the
authorized device by turning cVd the
COMAND controller.
X
Select Options by sliding VY the
COMAND controller and press W to
confirm.
X
Select De-Authorize and press W to
confirm.
Aprompt appears asking whetheryou
really wish to revoke authorization for this
device.
X
Select Yes or No and press W to confirm.
If you select Yes, the authorization for the
device will be revoked.
If you select No, the process will be aborted.
i
If a Bluetooth®device has been deauthorized and is no longer in range, it will
no longer be shown in the Bluetooth
®
device list after the next search.
44
Bluetooth®settings
System settings
ZA COMAND NTG4.0 BR204 USA Edition A 2011; 1; 3, en-US
d2irenklVersion: 3.0.3.6
2010-05-31T09:21:57+02:00 - Seite 44
Page 47

System language settings
This function allows you to determine the
language for the menu displaysand the
navigation messages. The selected language
affects the characters available for entry.
If you change the system language, the
language for the Voice Control System will be
also be changed. If the selected language is
not supported by the Voice Control System,
"English" will be selected.
X
Press the S button.
X
Select Language and press W to confirm.
The list of languages appears. The # dot
indicates the current setting.
X
Select the language by turning cVd the
COMAND controller and press W to
confirm.
COMAND loads the selected language and
sets it.
Reset function
You can reset COMAND to the factory
settings. Among otherthings, this will delete
all personal data (e.g. station presets,
address book entries, entries in the
destination memory and in the list of previous
destinations in the navigation system).
Resetting is recommended before selling or
transferring ownership of your vehicle, for
example.
Data on the internal hard drive, e.g. music
files in the MUSIC REGISTER, will not be
deleted. You can delete these music files
from the MUSIC REGISTER using the "Delete
all music files" (Y page 140) function.
X
Press the S function button.
X
Select Settings by turning cVd the
COMAND controller and press W to
confirm.
X
Select Reset and press W to confirm.
Aprompt appears asking whetheryou wish
to reset.
X
Select Yes or No and press W to confirm.
If you select No, the process will be aborted.
If you select Yes, a prompt will appear again
asking whether you really wish to reset.
X
Select Yes or No and press W to confirm.
If you select Yes, a message will be shown.
COMAND is reset and restarted.
If you select No, the process will be aborted.
Reset function
45
System settings
ZA COMAND NTG4.0 BR204 USA Edition A 2011; 1; 3, en-US
d2irenklVersion: 3.0.3.6
2010-05-31T09:21:57+02:00 - Seite 45
Page 48

46
ZA COMAND NTG4.0 BR204 USA Edition A 2011; 1; 3, en-US
d2irenkl Version: 3.0.3.6
2010-05-31T09:21:57+02:00 - Seite 46
Page 49

Vehicle equipment .............................. 48
Introduction ......................................... 48
Basic settings ...................................... 50
Entering destinations ......................... 51
Entering points of interest ................. 61
Route guidance ................................... 66
Traffic reports ..................................... 73
Destination memory ........................... 79
Last destinations ................................ 82
Map usage and settings ..................... 84
Other settings ..................................... 88
Problems with the navigation sys-
tem ....................................................... 94
47
Navigation
ZA COMAND NTG4.0 BR204 USA Edition A 2011; 1; 3, en-US
d2irenkl Version: 3.0.3.6
2010-05-31T09:21:57+02:00 - Seite 47
Page 50

Vehicle equipment
i
These Operating Instructions describe all
standard and optional equipment available
for your vehicle at the time of purchase.
Please note thatyour vehicle may not be
equipped with all features described.
Introduction
Safety notes
G
Warning
For safety reasons, only enter a destination
when the vehicle is stationary. When the
vehicle is in motion, apassenger should enter
the destination.Study manual and select
route before driving.
Bear in mind that at a speed of just 30 mph
(approximately 50 km/h), your vehicle is
covering a distance of 44 feet(approximately
14 m) every second.
COMAND calculates the routeto the
destination without taking account of the
following:
R
Traffic lights
R
Stop and right-of-way-signs
R
Lane merging
R
Parking or stopping prohibited areas
R
Other road and traffic rules and regulations
R
Narrow bridges
G
Warning
COMAND may give incorrect navigation
commands if the data in the digital map does
not correspond with the actual road/traffic
situation. Digital maps do not cover all areas
nor all routes within an area. For example, if
the traffic routing has been changed or the
direction of a one-way road has been
reversed.
For this reason, you must always observe
applicable road and traffic rules and
regulations during your journey. Road and
traffic rules and regulations always have
priority over the navigation commands
generated by the system.
G
Warning
Navigation announcements are intended to
direct you while driving without diverting your
attention from the road and driving.
Please always use this feature instead of
consulting the map display for directions.
Consulting the symbols or map display for
directions may cause you to divert your
attention from driving and increase your risk
of an accident.
General notes
Operational readiness of the navigation
system
The navigation system must determine the
position of the vehicle before first use or
whenever operational status is restored.
Therefore, you may have to drive for a while
before precise route guidance is possible.
GPS reception
Among other things, correct functioning of
the navigation system depends on GPS
reception.Incertain situations, GPS
reception may be impaired, there may be
interference or there may be no reception at
all, e.g. in tunnels or parking garages.
Input restriction
On vehicles for certain countries, there is a
restriction on entering data.
The restriction is active above a vehicle speed
of about 3mph. The restriction is deactivated
as soon as the vehicle speed drops below
about 2mph.
When the restriction is active, certain entries
cannot be made. This will be indicated by the
fact that certain menu items are grayed out
and cannot be selected.
48
Introduction
Navigation
ZA COMAND NTG4.0 BR204 USA Edition A 2011; 1; 3, en-US
d2irenkl Version: 3.0.3.6
2010-05-31T09:21:57+02:00 - Seite 48
Page 51

The following entries are not possible, for
example:
R
entering the destination city and street
R
entering a destination via the map
R
entering in the vicinity of a city or via a
name search
R
editing entries
R
direct entry using the number keypad
Other entries are still possible, such as
entering points of interest in the vicinity of the
destination or currentposition.
Switching to navigation mode
X
Press the g function button.
or
X
Select Navi in the main function bar by
sliding ZV and turning cVd the COMAND
controller and press W to confirm.
In both cases, you will see the map either
with or without the menu shown.
Map showing the menu; route guidance inactive
:
Status bar
;
Main function bar
=
Current vehicle position
?
Navigation menu bar
Map without the menu; route guidance inactive
:
Current vehicle position
;
Map orientation selected
=
Map scale selected
"Route guidance active" means that you have
entered a destination and that COMAND has
calculated the route. The display shows the
route, changes of direction and lane
recommendations. Navigation
announcements guide you to your
destination.
"Route guidance inactive" means that no
destination has been entered and that no
route has been calculated.
Showing/hiding the menu
X
To hide the menu: slide ZV the COMAND
controller and, when the Full Screen
menu item is shown, press W to confirm.
The map can be seen in the full-screen
display.
X
To show the menu: press W the COMAND
controller when the map is shown in fullscreen.
Introduction
49
Navigation
ZA COMAND NTG4.0 BR204 USA Edition A 2011; 1; 3, en-US
d2irenklVersion: 3.0.3.6
2010-05-31T09:21:57+02:00 - Seite 49
Z
Page 52

Basic settings
Route mode
Setting the route type and the route
options
You can select the following route types:
R
Short Route:COMAND calculates a route
with the shortest possible (minimized)
distance without taking traffic reports into
consideration.
R
Dynamic Route:same route type as Fast
Route. In addition, COMAND takes any
traffic reports received with regard to the
route into accountduringroute guidance.
The navigation system can help you avoid
a traffic jam, for example, by recalculating
the route.
R
Dynamic Route Only After Request:
same route type as Dynamic Route. After
recalculating the route, COMAND asks you
whether you wish to adopt the new route
or whether you would prefer to continue
along the original route.
R
Fast Route:COMAND calculates a route
with the shortest possible (minimized)
journey time without taking traffic reports
into consideration.
Select the route options Avoid Highways,
Avoid Toll Roads, Avoid Tunnels, Avoid
Ferries and Avoid Auto Trains.You can
select more than one route option.
X
To switch on navigation mode: press the
Ø function button.
X
To show the menu: press W the COMAND
controller.
X
Select Navi in the main function bar by
sliding ZV and turning cVd the COMAND
controller and press W to confirm.
X
Select Mode and press W to confirm.
:
To select the route type
;
To set route options
X
Select a route type and press W to confirm.
The ä icon indicates the current setting.
X
Select the route option(s) and press W to
confirm.
The route options are switched on O or off
ª, depending on the previous status.
i
If you change the route type and/or the
route options while route guidance is active
(the route has been calculated), COMAND
will calculate a new route.
If you change the route type and/or the
route options while route guidance is
inactive (no destination has been entered
yet), COMAND uses the new setting for the
next route guidance.
i
The route calculated may, for example,
include ferry connections, even if the
Avoid Ferries route option is switched
on.
In some cases, e.g. when calculating
particularly long routes, COMAND may not
be able to take all the selected route
options into account.
X
To exit the menu: slideXVY the COMAND
controller.
50
Basic settings
Navigation
ZA COMAND NTG4.0 BR204 USA Edition A 2011; 1; 3, en-US
d2irenklVersion: 3.0.3.6
2010-05-31T09:21:57+02:00 - Seite 50
Page 53

Entering destinations
Introduction to destination input
G
Warning!
For safety reasons, only enter a new
destination when the vehicle is stationary.
You could otherwise be distracted from the
traffic conditions, cause an accident and
injure yourself and others.
The following destination input options are
available:
R
entering a destination by address
R
entering a destination from the destination
memory
R
entering a destination from the list of last
destinations
R
entering a destination usingthe map
R
entering an intermediate stop
R
entering a point of interest
R
entering a destination using "Search &
Send" (Y page 185)
Entering adestination by address
Introduction
When entering an address as the destination,
you have the following options:
R
entering the state/province, city/ZIP code
and street
R
entering the state/province, city/ZIP code
and center
R
entering the state/province, city/ZIP code,
street and house number
R
entering the state/province, city/ZIP code,
street and intersection
R
entering the state/province, street, city
and house number
R
entering the state/province, street and
house number
R
entering the state/province, street and
intersection
i
You can only enter those cities, streets,
ZIP codes etc. that are stored in the digital
map. This means that for some countries
you cannotenter ZIP codes, for example.
Example:entering an address
The following is a step-by-step example of
how to enter an address. The destination
address is as follows:
New York (state)
New York (city)
40 Broadway
You can of course enter any country, city,
street and house number desired and enter,
for example, your home address (My
address).
Calling up the address entry menu
X
To switch on navigation mode: press the
g function button.
X
To show the menu: press W the COMAND
controller.
X
Select Destination by turning cVd the
COMAND controller and press W to
confirm.
X
Select Address Entry and press W to
confirm.
The address entry menu appears. If you
have previously entered a destination, this
will be shown in the display.
Address entry menu
Entering destinations
51
Navigation
ZA COMAND NTG4.0 BR204 USA Edition A 2011; 1; 3, en-US
d2irenklVersion: 3.0.3.6
2010-05-31T09:21:57+02:00 - Seite 51
Z
Page 54

Depending on the sequence in which you
enterthe address and on the data status of
the digital map, some menu items may not be
available at all or may not yet be available.
For example: after you have entered the
state/province, the No., Center,
Intersection, Save and Start menu items
are not yet available; the ZIP menu item is not
available if the digital map does not contain
ZIP codes.
Selecting astate/province
X
Select State/Prov in the address entry
menu by turning cVd the COMAND
controller and press W to confirm.
Amenu with the available lists appears:
R
Last States/Provinces
R
States (U.S.A.)
R
Provinces (Canada)
X
To select alist: turn cVd the COMAND
controller and press W to confirm.
The list of selected states/provinces
appears.
X
To select astate/province: turn cVd the
COMAND controller and press W to
confirm.
The address entry menu appears again. The
state/province selected has now been
entered.
Entering the city
X
Select City in the address entry menu by
turning cVd the COMAND controller and
press W to confirm.
You will see the city list either with the
character bar(option 1) or as a selection
list (option 2).
Option 1: city list with character bar
X
Enter NEW YORK. Instructions for entering
characters can be found in the "Entering
characters in navigation mode (entering a
city)" section (Y page 27).
Option 2: city list as selection list
List of cities
X
Select an entry by turning cVd the
COMAND controller.
X
Irrespective of the option, press W to
confirm your selection.
The address entry menu reappears. The
city has now been entered.
Entering a street name
X
Select Street in the address entry menu
by turning cVd and sliding ZVÆ the
COMAND controller and press W to
confirm.
You will see the street list either with the
character bar (option 1) or as a selection
list (option 2).
Option 1: street list with character bar
X
Enter BROADWAY. Instructionsfor entering
characters using city input as an example
can be found in the "Entering characters in
navigation mode (entering acity)" section
(Y page 27).
52
Entering destinations
Navigation
ZA COMAND NTG4.0 BR204 USA Edition A 2011; 1; 3, en-US
d2irenklVersion: 3.0.3.6
2010-05-31T09:21:57+02:00 - Seite 52
Page 55

Option 2: street list as selection list
List of street names
X
Select a street by turning cVd the
COMAND controller and press W to
confirm.
If an entry features the G icon, it cannot
be uniquely assigned and a selection list
will open, allowing you to select the desired
entry.
X
Select an entry by turning cVd the
COMAND controller.
X
Irrespective of the option, press W to
confirm your selection.
The address entry menu reappears. The
street has now been entered.
Entering the house number
It is not possible to enter a house number until
a street has been entered.
X
Select No. in the address entry menu by
turning cVd and sliding ZVÆ the
COMAND controller and press W to
confirm.
You will see the house number list either
with the character bar (option 1) or as a
selection list (option 2).
Option 1: house number list with
character bar
X
Enter 4 and 0. Instructions for entering
characters using city input as an example
can be found in the "Entering characters in
navigation mode (entering acity)" section
(Y page 27).
Option 2: house number list as selection
list
Entering destinations
53
Navigation
ZA COMAND NTG4.0 BR204 USA Edition A 2011; 1; 3, en-US
d2irenklVersion: 3.0.3.6
2010-05-31T09:21:57+02:00 - Seite 53
Z
Page 56

House number list
X
Select an entry by turning cVd the
COMAND controller.
X
Irrespective of the option, press W to
confirm your selection.
The address entry menu reappears. The
house number has now beenentered.
Starting route calculation
You can now have COMAND calculate the
route to the address entered or save the
address first, e.g.as your home address (My
address) (Y page 54).
Address entry menu with destination address
:
Destination address
;
Starting route calculation
X
In the address entry menu, confirm Start
by pressing W.
If no other route has been calculated, route
calculation starts immediately (Option 1). If
another route has already been calculated
(route guidance is active), a prompt
appears (option 2).
Option 1 –no route guidance active: route
calculationstarts. While route calculationis
in progress, an arrow will indicate the
direction to your destination. Below this, you
will see a message, e.g. Calculating Fast
Route....
Once the route has been calculated, route
guidance begins. If the vehicle is traveling on
a non-digitized road, the system displays the
linear distance to the destination, the
direction of the destination and the Off
Mapped Road message. In this case, the
display will be grayed out.
Option 2 – route guidance is already
active: if route guidance is already active, a
prompt will appear asking whether you wish
to terminate the currently active route
guidance.
X
Select Yes or No and press W to confirm.
If you select Yes, COMAND will stop route
guidance and start route calculation for the
new destination.
If you select No, COMAND will continue
with the active route guidance.
i
Route calculation takes a certain amount
of time. The time depends on the distance
fromthe destination, for example.
COMAND calculates the route using the
digital map data.
The calculated route may differ from the
ideal route, e.g. due to roadwork or
incomplete map data. Please also observe
the notes about the digital map
(Y page 92).
Entering and saving your home address
You can either enter your home address for
the first time (option 1) or edit a previously
stored home address (option 2).
X
Option 1: enter the address, e.g. a city,
street and house number (Y page 52).
X
Once you have entered the address, select
Save in the address entry menu by turning
54
Entering destinations
Navigation
ZA COMAND NTG4.0 BR204 USA Edition A 2011; 1; 3, en-US
d2irenkl Version: 3.0.3.6
2010-05-31T09:21:57+02:00 - Seite 54
Page 57

cVd and sliding ZVÆ the COMAND
controller and press W to confirm.
X
Select Save as "My Address" and press
W to confirm.
COMAND stores your home address as My
Address in the destination memory.
X
Option 2: proceed as described under
"Option 1".
Aprompt appears asking whetherthe
current home address should be
overwritten.
X
Select Yes and press W to confirm.
If you select Yes, the Saving Procedure
Successful message appears.
Entering aZIP code
Entering a ZIP code will delete a previously
entered city.
X
Select ZIP in the address entry menu by
turning cVd and sliding ZVÆ the
COMAND controller and press W to
confirm.
You will see the ZIP code list either with the
characterbar (option 1) or as a selection
list (option 2).
Option 1: ZIP code list with character bar
X
Enter a ZIP code. Instructions for entering
characters using city input as an example
can be found in the "Entering characters in
navigation mode (entering acity)" section
(Y page 27).
:
Digits entered by the user
;
Digits automatically added by the system
=
List entry most closely resembling the
characters entered so far
?
To switch to the list without the character
bar
A
To delete the entire entry, press and hold;
to delete the last character, press briefly
B
Available characters
C
Selected character
D
Unavailable characters
E
Character bar
F
To cancel an entry
G
List
Option 2: ZIP code list as selection list
ZIP code list
X
Selectthe desired ZIP code by turning
cVd the COMAND controller.
X
Irrespective of the option, press W to
confirm your selection.
If COMAND is able to assign the ZIP code
unambiguously to a specific address, the
Entering destinations
55
Navigation
ZA COMAND NTG4.0 BR204 USA Edition A 2011; 1; 3, en-US
d2irenkl Version: 3.0.3.6
2010-05-31T09:21:57+02:00 - Seite 55
Z
Page 58

address entry menu appears again.The ZIP
code appears in place of the city's name.
If COMAND cannot assign the ZIP code
unambiguously to a specific address, the
address entry menu also appears again.
The ZIP code is automatically entered. You
can now enter the street for a more precise
location. Only streets in the area covered
by the entered ZIP code are available.
X
Start route calculation (Y page 54).
Entering acenter
Entering a centerwill, for example, delete a
previously entered street.
X
Select Center (center) in the address entry
menu by turning cVd and sliding ZVÆ the
COMAND controller and press W to
confirm.
You will see the center list either with the
character bar (option 1) or as a selection
list (option 2).
Option 1: center list with character bar
X
Enter a center. Instructions for entering
characters using city input as an example
can be found in the "Entering characters in
navigation mode (entering acity)" section
(Y page 27).
Option 2: center list as selection list
X
Select a center by turning cVd the
COMAND controller.
X
Irrespective of the option, press W to
confirm your selection.
The address entry menu reappears. The
center selected has been entered.
X
Start route calculation (Y page 54).
Entering an intersection name
Entering an intersection will delete a
previously entered house number.
X
Select Intersection (intersection) in the
address entry menu by turning cVd and
sliding ZVÆ the COMAND controller and
press W to confirm.
You will see the intersection list either with
the character bar (option 1) or as a
selection list (option 2).
Option 1: intersection list with character
bar
X
Enter an intersection. Instructions for
entering characters using city input as an
example can be found in the "Entering
characters in navigation mode (entering a
city)" section (Y page 27).
56
Entering destinations
Navigation
ZA COMAND NTG4.0 BR204 USA Edition A 2011; 1; 3, en-US
d2irenklVersion: 3.0.3.6
2010-05-31T09:21:57+02:00 - Seite 56
Page 59

:
List entry most closely resembling the
characters entered so far
;
List
=
Character bar
Option 2: intersection list as selection list
X
Select an intersection by turning cVd the
COMAND controller.
X
Irrespective of the option, press W to
confirm yourselection.
The address entry menu reappears. The
intersection selected has been entered.
X
Start route calculation (Y page 54).
Selecting adestination from the
destination memory (e.g. My address)
Introduction
The destination memory always contains an
entry named "My address". You may wish to
assign your home address to this entry, for
example (Y page 54), and select it for route
guidance. This entry always appears at the
top of the list in the destination memory.
X
To switch on navigation mode: press the
g function button.
X
To show the menu: pressW the COMAND
controller.
X
Select Destination in the navigation
system menu bar by turning cVd the
COMAND controller and press W to
confirm.
X
Select From Memory and press W to
confirm.
You will see the destination memory list
either with the character bar (option 1) or
as a selectionlist (option 2).
Option 1: destination memory list with
character bar
X
Enteradestination, e.g. "My address".
Instructions for entering characters using
city input as an example can be found in the
"Entering characters in navigation mode
(entering a city)" section (Y page 27).
:
Character entered by the user
;
Characters automatically added by the
system
=
List entry most closely resembling the
characters entered so far
?
To switch to the selection list
A
To delete an entry
B
Characters not currently available for
selection
Entering destinations
57
Navigation
ZA COMAND NTG4.0 BR204 USA Edition A 2011; 1; 3, en-US
d2irenkl Version: 3.0.3.6
2010-05-31T09:21:57+02:00 - Seite 57
Z
Page 60

C
Characters currently available for
selection
D
Characterbar
E
Currently selected character
F
To cancel an entry
G
Destination memory list
Option 2: destination memory list as
selection list
Destination memory list
X
Select My Address by turning cVd the
COMAND controller.
X
Irrespective of the option, press W to
confirm your selection.
The address entry menu reappears."My
address" has been entered.
X
To start route calculation: select Start
and press W to confirm.
Entering adestination from the list of
last destinations
X
To switch on navigation mode: press the
g function button.
X
To show the menu: pressW the COMAND
controller.
X
Select Destination in the navigation
system menu bar by turning cVd the
COMAND controller and press W to
confirm.
X
Select From Last Destinations and
press W to confirm.
"Last destinations" list
:
Last destination
X
Select the desired destination by turning
cVd the COMAND controller and press
W to confirm.
The address entry menu reappears. The
destination address selected has been
entered.
X
To start route calculation: select Start
and press W to confirm.
Once the route has been calculated, route
guidance begins (Y page 66).
i
Further information on the "Last
destinations" memory can be found on
(Y page 82).
Entering adestination usingthe map
Calling up the map
X
To switch on navigation mode: press the
g function button.
X
To show the menu: press W the COMAND
controller.
X
Select Destination in the navigation
system menu bar by turning cVd the
COMAND controllerand press W to
confirm.
X
Select Using Map and press W to confirm.
You will see the map with acrosshair.
58
Entering destinations
Navigation
ZA COMAND NTG4.0 BR204 USA Edition A 2011; 1; 3, en-US
d2irenkl Version: 3.0.3.6
2010-05-31T09:21:57+02:00 - Seite 58
Page 61

:
Currentvehicle position
;
Crosshair
=
Details of the crosshair position
?
Map scale selected
Display = depends on the settings selected
in "Map information in the display"
(Y page 86). The current street name can
be shown, provided the digital map contains
the necessary data, or the coordinates of the
crosshair if the geo-coordinate display is
switched on and the GPS signal is strong
enough.
Moving the map and selecting the
destination
X
To scroll the map: slide the COMAND
controller XVY, ZVÆ or aVb.
X
To set the map scale: as soon as you turn
cVd the COMAND controller, the scale bar
appears.
X
Turn cVd until the desired scale is set.
Turning clockwise zooms out from the map,
turning counter-clockwise zooms in.
X
To select adestination: press W the
COMAND controller once or several times.
You will see either the address entry menu
with the destination address or, if COMAND
is unable to assign a unique address, a
selectionlist.
X
Selectadestination by turning cVd the
COMAND controller and press W to
confirm.
If the destination is within the limits of the
digital map, COMAND attempts to assign
the destination to the map.
If the destination can be assigned, you will
see the address entry menu with the
address of the destination. If not, you will
see the Destination From Map entry.
X
To start route calculation: select Start
and press W to confirm.
Entering an intermediate stop
Introduction
When route guidance is active, you can enter
an intermediate stop. Intermediate stops can
be predefined destinations from the following
categories that COMAND offers for selection:
R
ATM / CASH MACHINE
R
Hospital
R
Gas Station
R
Parking Lot
R
Restaurant
However, you can also enter destinations
other than the predefined ones. To do this,
select the Other menu item.
You can use the intermediate stop function to
influence route guidance to the main
destination. When you have reached your
intermediate stop, COMAND automatically
Entering destinations
59
Navigation
ZA COMAND NTG4.0 BR204 USA Edition A 2011; 1; 3, en-US
d2irenkl Version: 3.0.3.6
2010-05-31T09:21:57+02:00 - Seite 59
Z
Page 62

recalculates the route to the main
destination.
Entering predefineddestinations
X
To switch on navigation mode: press the
g function button.
X
To show the menu: pressW the COMAND
controller.
X
Select Destination in the navigation
system menu bar by turning cVd the
COMAND controller and press W to
confirm.
X
Select Stopover and press W to confirm.
Option 1: no intermediate stop has been
entered yet.
X
Select a category, see option 2.
Option 2: an intermediate stop has
alreadybeen entered.
X
Select Change Stopover and press W to
confirm.
X
To select acategory: select a category by
turning cVd the COMAND controller and
press W to confirm.
COMAND first searches in the selected
category for destinations along the route.
If there are no destinations available there,
COMAND searches for destinations within
a radius of up to 100 km of the vehicle
position.
If COMAND finds destinations, a list
appears on the right-hand side of the
display.
The intermediate stops are listed according
to increasing distance from the current
vehicle position. They are displayed in the
form of a name and their position in relation
to the route and your direction of travel.
i
For intermediate stops that are not
located along the calculated route, the
linear distance is shown.
If COMAND does not find any destinations,
you will see a message to this effect.
X
Confirm OK by pressing W.
X
Select a different category.
X
Select the intermediate stop by turning
cVd the COMAND controller and press
W to confirm.
The address entry menu appears, showing
the destination address.
X
To start route calculation: select Start
and press W to confirm.
Entering anotherdestination as an
intermediate stop
X
To switch on navigation mode: press the
g function button.
X
To show the menu: pressW the COMAND
controller.
X
Select Destination in the navigation
system menu bar by turning cVd the
COMAND controller and press W to
confirm.
X
Select Stopover and press W to confirm.
X
Select Other and press W to confirm.
X
Select Address Entry, From Memory,
From Last Destinations or From POIs.
Selection Step
Address Entry
X
Enter a
destination by
address
(Y page 51).
From Memory
X
Select a
destination from
the destination
memory
(Y page 57).
60
Entering destinations
Navigation
ZA COMAND NTG4.0 BR204 USA Edition A 2011; 1; 3, en-US
d2irenklVersion: 3.0.3.6
2010-05-31T09:21:57+02:00 - Seite 60
Page 63

Selection Step
From Last
Destinations
X
Select a
destination from
the list of last
destinations
(Y page 58).
From POIs
X
Enter a point of
interest
(Y page 61).
X
To start route calculation: once you have
entered a destination, select Start and
press W to confirm.
Deleting the intermediate stop
If an intermediate stop has already been
entered, you can delete it.
X
To switch on navigation mode: press the
g function button.
X
To show the menu: press W the COMAND
controller.
X
Select Destination in the navigation
system menu bar by turning cVd the
COMAND controller and press W to
confirm.
X
Select Stopover and press W to confirm.
X
Select Delete Stopover and press W to
confirm.
COMAND deletes the intermediate stop
and recalculates the route to the main
destination.
Entering points of interest
Initiating point of interest entry
X
To switch on navigation mode: press the
g function button.
X
To show the menu: press W the COMAND
controller.
X
Select Destination in the navigation
system menu bar by turning cVd the
COMAND controller and press W to
confirm.
X
Select From POIs and press W to confirm.
Amenu appears.
Entering apoint of interestin the
vicinity of the destination
Entering a point of interest in the vicinity of
the destination is only possible when route
guidance is active.
X
Select Near Destination from the menu
and press W to confirm.
X
Continue with assigning the point of
interest category (Y page 62).
Entering apoint of interestin the
vicinity of the current position
X
Select Current Position and press W to
confirm.
X
Continue with assigning the point of
interest category (Y page 62).
Entering apoint of interestin the
vicinity of acity
Option 1
X
Select Other City in the menu and press
W to confirm.
X
If desired, selectthe state/province
(Y page 52).
X
To enter a city: select City and press W
to confirm.
Proceed as described in the "Entering a
city" section (Y page 52).
X
After entering the city, determine the point
of interest category (Y page 62).
Entering points of interest
61
Navigation
ZA COMAND NTG4.0 BR204 USA Edition A 2011; 1; 3, en-US
d2irenkl Version: 3.0.3.6
2010-05-31T09:21:57+02:00 - Seite 61
Z
Page 64

Option 2
X
Enter an address in the address entry
menu, e.g. a city, street and house number
(Y page 51).
X
Select POI and press W to confirm.
X
Determine the point of interest category
(Y page 62).
Entering apoint of interestusing
name search
This function gives you access to all points of
interest available in the digital map.
X
Select Search By Name in the menu and
press W to confirm.
Alist of all points of interest in the digital
map appears.
X
Proceed as described in the "point of
interest list with character bar" section
(Y page 65).
Entering apoint of interestusing the
phone number search
This function gives you access to all points of
interest that have a phone number.
X
Select Search By Phone Number and
press W to confirm.
You will see a list of phone numbers.
X
Proceed as described in the "point of
interest list with character bar" section
(Y page 65).
Assigning apoint of interestcategory
Introduction
The categories and points of interest
available depend on the distance from the
vehicle position you have set for the point of
interest.
R
point of interest in the vicinity of the
destination:
Alphabetically sorted categories are
available, as well as points of interestinthe
vicinity of the destination position arranged
by distance.
R
point of interest in the vicinity of the current
position:
Alphabetically sorted categories are
available, as well as points of interest in the
vicinity of the vehicle position arranged by
distance.
R
point of interest within a given city:
If you have only entered the state/
province, alphabetically sorted categories
and alphabetically sorted points of interest
within the province are available.
If you have entered more than the state/
province, alphabetically sorted categories
and points of interest in the vicinity of the
address entered and arranged in order of
distance are available.
R
point of interest using name search:
An alphabetically sorted list of all points of
interest is available.
Selecting acategory
Depending on the numberofcategories
available, you will see the main category list
either with the characterbar (option 1) or as
a selectionlist (option 2).
Option 1: main category list with
character bar
X
Selectacategory. Proceed as described in
the "Entering characters" section
(Y page 27).
62
Entering points of interest
Navigation
ZA COMAND NTG4.0 BR204 USA Edition A 2011; 1; 3, en-US
d2irenkl Version: 3.0.3.6
2010-05-31T09:21:57+02:00 - Seite 62
Page 65

:
Icon for main category
;
Main category list
Option 2: main category list as selection
list
X
Select a main category by turning cVd the
COMAND controller.
Example display: main category list for points of
interest
:
Selected main category with the G icon
for subcategories
X
Irrespective of the option, press W to
confirm yourselection.
If the selected main category does not
contain any sub-categories, the point of
interest list appears.
If the selected main category contains subcategories, you will see the list of subcategories either with the character bar
(option 1) or as a selection list (option 2).
The following illustration shows the
RESTAURANT main category with available
sub-categories as an example.
:
To call up all entries in the RESTAURANT
main category
;
To call up all entries in the BREWPUB
subcategory
=
Character bar
X
Option 1: select a category. Proceed as
described in the "Searchingfor a phone
book entry" section (Y page 106).
X
Option 2: select a category by turning
cVd the COMAND controller.
X
Irrespective of the option, press W to
confirm your selection.
The point of interestlist appears. It
contains the points of interest that are
available in the subcategory and are within
the search radius.
i
Search radius means: COMAND searches
within a radius of approximately 100 km
and ceases searching when 50 points of
interest have been found.
If COMAND does not find any points of
interest within this radius, it extends its
search range to approximately 200 km. If
COMAND finds one point of interest within
this radius, it finishes the search.
i
If you selectthe ALL list item, the point of
interest list contains all points of interest
for all subcategories in the RESTAURANT
main category which lie within the search
radius.
If you select the OTHER RESTAURANTS list
item at the end of the list, the points of
interest contains all points of interest
which cannot be assigned to any
Entering points of interest
63
Navigation
ZA COMAND NTG4.0 BR204 USA Edition A 2011; 1; 3, en-US
d2irenkl Version: 3.0.3.6
2010-05-31T09:21:57+02:00 - Seite 63
Z
Page 66

subcategory of the RESTAURANT main
category and which lie within the search
radius.
Point of interest list
Introduction
The illustration below shows an example of
the points of interest list for the
RESTAURANT main category and BREWPUB
subcategory in the vicinity of the current
position.
:
Point of interest
;
Compass heading to the point of interest
=
Linear distance to the point of interest
?
Selected category or subcategory
i Depending on the point of interest
selected, COMAND uses different
reference points in determining the linear
distance to the destination:
R
vicinity of current position: the linear
distance is the distance of the point of
interest from the current vehicle
position.
R
vicinity of destination: the linear distance
is the distance of the point of interest
from the destination entered.
Selecting apoint of interest
X
Select a point of interest by turning cVd
the COMAND controller and press W to
confirm.
The full address of the pointofinterest
selected appears.
:
Point of interestwith address
;
To start route calculation
=
To store an address in the destination
memory
?
To display details
A
To make a call (when available)
B
To cancel selection
C
To show an address on the map
X
To start route calculation: select Start
and press W to confirm.
X
To store an address in the destination
memory: select Save and press W to
confirm. You can now select storage
options (Y page 81).
X
To show the detailed view: select
Details and press W to confirm.
X
To connect acall: select Call and press
W to confirm (available if the point of
interest entry contains a phone number).
COMAND switches to telephone mode
(Y page 105).
X
To call up the map: select Map and press
W to confirm.
X
You can move the map and select the
destination (Y page 59).
64
Entering points of interest
Navigation
ZA COMAND NTG4.0 BR204 USA Edition A 2011; 1; 3, en-US
d2irenkl Version: 3.0.3.6
2010-05-31T09:21:57+02:00 - Seite 64
Page 67

ZAGAT®Survey service
Entries with the Z icon contain additional
ZAGAT information. ZAGAT evaluates
restaurants, for example, in various ways with
regard to the quality of the food, facilities,
service and gives the average level of prices
as well as a general description.
X
Select the entry with the Z icon by turning
cVd the COMAND controller and press
W to confirm.
The ZAGAT evaluations appear.
1
ZAGAT evaluations
2
Displaying details
X
To show adescription: select Details
and press W to confirm.
ZAGAT example description
Point of interest list with character bar
If you have selected "Searching for a pointof
interest by name" (Y page 62) or "Searching
for a point of interest by phone number"
(Y page 62), the list of all points of interest
contained in the digital map appears.
Proceed as described in the "Searching for a
phone book entry" section (Y page 106).
i
If COMAND can unambiguously assign
the characters entered to one entry, the
address entry appears automatically.
X
To start route calculation: select Start
and press W to confirm.
Selecting apoint of interestusing the
map
You can select points of interest that are
available in the selected (visible) section of
the map.
X
To switch on navigation mode: press the
g function button.
X
To show the menu: press W the COMAND
controller.
X
Select Guide in the navigation system
menu bar by turning cVd the COMAND
controller and press W to confirm.
If points of interest are available:
Depending on the map scale selected,
point of interest icons appear on the map.
The scale at which the icons are displayed
Entering points of interest
65
Navigation
ZA COMAND NTG4.0 BR204 USA Edition A 2011; 1; 3, en-US
d2irenklVersion: 3.0.3.6
2010-05-31T09:21:57+02:00 - Seite 65
Z
Page 68

on the map varies according to the icon.
You can select the icons that COMAND will
display (Y page 86).
If there are points of interest, you will see
a message to this effect.
i
You also see this message if you have
selected the menu item No Symbols under
"Map display" (Y page 86).
X
To confirm the message: press W the
COMAND controller.
Point of interest on the map
:
Information about the highlighted point of
interest
;
Highlighted point of interest
X
To select apoint of interest: select
Next or Previous and press W to confirm.
X
To show details for the selection: select
Details and press W to confirm.
X
To start route calculation: select Start
and press W to confirm.
Aprompt appears asking whetherthe point
of interest should be used as the
destination.
X
Select Yes or No and press W to confirm.
If you select Yes, route guidance starts.
If you select No, you can choose a new point
of interest.
Route guidance
General notes
G
Warning
COMAND calculates the route to the
destination without taking into account the
following, for example:
R
Traffic lights
R
Stop and right-of-way signs
R
Lane merging
R
Parking or stopping prohibited areas
R
Other road and traffic rules and regulations
R
Narrow bridges
COMAND may give incorrect navigation
commands if the data in the digital map does
not correspond with the actual road/ traffic
situation. For example, if the traffic routing
has been changed or the direction of a oneway road has been reversed.
For this reason, you must always observe
applicable road and traffic rules and
regulations during your journey. Road and
traffic rules and regulations always have
priority over the navigation commands
generated by the system.
Route guidance begins once aroute has been
calculated (Y page 54).
COMAND guides you to your destination by
means of navigation commands in the form
of audible navigation announcements and
route guidance displays.
The route guidance displays can only be seen
if the display is switched to navigation mode.
If you do not follow the navigation
announcements or if you leave the calculated
route, COMAND automatically calculates a
new route to the destination.
If the digital map contains the corresponding
information, the following applies:
R
when selecting a route, COMAND tries to
avoid roads that only have limited access,
66
Route guidance
Navigation
ZA COMAND NTG4.0 BR204 USA Edition A 2011; 1; 3, en-US
d2irenklVersion: 3.0.3.6
2010-05-31T09:21:57+02:00 - Seite 66
Page 69

e.g. roads closed to through traffic and nonresidents.
R
roads that have time restrictions (e.g.
closed on Sundays and public holidays) are
avoided for route guidance.
Changing direction
Introduction
Changes of direction have three phases:
R
Preparation phase
R
Announcement phase
R
Change-of-direction phase
Preparation phase
COMAND prepares you for the upcoming
change of direction. Based on the example
display below, the change of direction is
announced with the Prepare to turn
right message. You see the full-screen map.
Example display: preparation phase
:
Next road
;
Point at which the change of direction
takes place (light blue dot)
=
Current vehicle position (the tip of the
triangle indicates the vehicle’s direction
of travel)
?
Current street
Display ? depends on the setting selected
for "Information in map" (Y page 86).
Announcement phase
COMAND announces the imminentchange of
direction. Based on the example display
below, the change of direction is announced
with the Please turn right in 900 ft.
and follow the <road name> message.
The announced distance to the next change
of direction depends on the type of road and
its permissible speed limit.
The display is now split into two sectors. In
the left half, you see the normal map view.
The right side shows an enlarged section of
the area around the intersection (Crossing
Zoom) or a 3D image of the road's course with
the route indicating the next maneuver.
Example display:announcement phase
:
Next road
;
Point at which the change of direction
takes place (light blue dot, shown in both
the left and right displays)
=
Visual representation of the distance to
the next change of direction
?
Change of direction (turn right here)
A
Distance to the next change of direction
B
Route (highlighted in blue, shown in both
the left and right displays)
i
The filled-insection of visual display for
distance = gets shorter, the nearer you
get to the announced change of direction.
Change-of-direction phase
COMAND announces the imminentchange of
direction. In the example, the Now turn
Route guidance
67
Navigation
ZA COMAND NTG4.0 BR204 USA Edition A 2011; 1; 3, en-US
d2irenkl Version: 3.0.3.6
2010-05-31T09:21:57+02:00 - Seite 67
Z
Page 70

right announcement is made 90 ft. before
the change of direction. The display is split
into two halves, as in the announcement
phase.
Example display: change-of-direction phase
:
Current vehicle position, the tip of the
triangle indicating the vehicle’s direction
of travel
;
Visual representation of the distance to
the next change of direction
=
Distance to the next change of direction
Once the change of direction is completed,
COMAND automatically switches back to fullscreen display.
Example of adisplaywithout changes
of direction
:
Route (shown in blue)
;
Currentvehicle position
=
Current street
?
Map orientation selected
A
Map scale selected
Lane recommendations
Overview
On multilane roads, COMAND can display
lane recommendations for the nextchange of
direction. The relevant data must be available
on the digital map.
COMAND displays lane recommendations
B, based on the next two changes of
direction. The number of lanes applies to the
point at which the next change of direction is
required.
Example display
:
Point of the next change in direction (light
blue circle)
;
Point of the change of direction after next
=
Next change of direction (in this case, turn
off to the right)
?
Visual representation of the distance to
the next change of direction
A
Distance to the next change of direction
B
Recommended lane (dark blue)
C
Possible lane (light blue)
D
Lane not recommended (gray)
E
Current vehicle position: the tip of the
triangle indicates the vehicle’s direction
of travel
68
Route guidance
Navigation
ZA COMAND NTG4.0 BR204 USA Edition A 2011; 1; 3, en-US
d2irenkl Version: 3.0.3.6
2010-05-31T09:21:57+02:00 - Seite 68
Page 71

Display anddescription of lane recommendations
The colors used in the lane recommendationdisplay vary, depending on whether day or night
design is switched on.
Lane Day design Nightdesign
Recommended lane B
In this lane, you will be able to complete the
nexttwo changes of directionwithout
changing lane.
Darkblue Light blue
Possible lane C
In this lane, you will only be able to complete
the nextchange of direction without
changing lanes.
Light blue Dark blue
Lane not recommended D
In this lane, you will not be able to complete
the next change of direction without
changing lane.
Gray Gray
Interrupting or continuing route
guidance
Interrupting route guidance
X
To switch on navigation mode: press the
g function button.
X
To show the menu: press W the COMAND
controller.
X
Select Destination in the navigation
system menu bar by turning cVd the
COMAND controller and press W to
confirm.
X
Select Cancel Route Guidance and press
W to confirm.
Continuing route guidance
X
To switch on navigation mode: press the
g function button.
X
To show the menu: press W the COMAND
controller.
X
Select Destination in the navigation
system menu bar by turning cVd the
COMAND controller and press W to
confirm.
X
Select Continue Route Guidance and
press W to confirm.
COMAND calculates the route.
Destination or area of destination
reached
When you reach your destination, COMAND
displays a checkered flag and route guidance
is automatically ended.
For certain points of interest (airports or
freeway intersections), you will see the Area
of destination reached message in
addition to the checkered flag.
Route guidance
69
Navigation
ZA COMAND NTG4.0 BR204 USA Edition A 2011; 1; 3, en-US
d2irenkl Version: 3.0.3.6
2010-05-31T09:21:57+02:00 - Seite 69
Z
Page 72

Navigation announcements
Repeating navigation announcements
G
Warning
Navigation announcements are intended to
directyou while driving without diverting your
attention from the road and driving.
Please always use this feature instead of
consulting the map display for directions.
Consulting the symbols or map display for
directions may cause you to divert your
attention from driving and increase your risk
of an accident.
i
Audible navigation announcements are
muted during a telephone call.
If you have missed an announcement, you can
call up the current announcement at any
time.
X
To show the menu: press W the COMAND
controller.
X
Select + in the navigation system menu
bar by turning cVd the COMAND
controller and press W to confirm.
Switching navigation announcements
on/off
X
To switch off: press the B button during
an announcement.
You will briefly see the message: The
guidance instructions have been
muted.
X
To switch on: press W the COMAND
controller.
X
Select + in the navigation system menu
bar by turning cVd the COMAND
controller and press W to confirm.
i COMAND automatically switches the
navigation announcements back on if:
R
you have a new route calculated.
R
you switch COMAND back on again or
start the engine.
Reducing volume during anavigation
announcement
The volume of an active radio of video source
can be automatically reduced during a
navigation announcement.
X
Select Navi in the main function bar by
sliding ZV and turning cVd the COMAND
controller and press W to confirm.
X
Select Audio Fadeout and press W to
confirm.
The function is switched on O or off ª,
depending on the previous status.
Setting the volume manually
X
Adjust the volume using the q control
knob during a navigation announcement.
or
X
Select + in the map view with the menu
shownand adjustthe volume using the
q control knob.
Blocking aroute section affected by a
traffic jam
This function blocks a sectionofthe route
ahead of you. The length of the section of
route to be blocked can be adjusted. If
possible, COMAND calculates a detour
around the blocked section of the route.
X
To switch on navigation mode: press the
g function button.
X
To show the menu: press W the COMAND
controller.
X
Select Route in the navigation system
menu bar by turning cVd the COMAND
controller and press W to confirm.
X
Select Detour and press W to confirm.
X
To block a section of the route: select
Longer or Shorter repeatedly and confirm
using W until the desired section has been
selected.
70
Route guidance
Navigation
ZA COMAND NTG4.0 BR204 USA Edition A 2011; 1; 3, en-US
d2irenkl Version: 3.0.3.6
2010-05-31T09:21:57+02:00 - Seite 70
Page 73

i
The length of the blockable route section
is predetermined by the digital map. The
menu items are available accordingly.
X
To start route calculation: select Start
and press W to confirm.
X
To delete the blocked section: select
Delete while the message is shown and
press W to confirm.
COMAND calculates the route without the
block.
Selecting an alternative route
With the "Alternative route" function, routes
other than the original one can be calculated.
X
To switch on navigation mode: press the
g function button.
X
To show the menu: press W the COMAND
controller.
X
Select Route in the navigation system
menu bar by turning cVd the COMAND
controller and press W to confirm.
X
Select Alternative Route and press W
to confirm.
You see the selected route. The display now
shows a split-screen view. On the left-hand
side, one or more alternative routes are
shown from start to destination. The
currentroute is highlighted dark blue; other
alternative routes appear light blue.
On the right-hand side, information on the
currently selected alternative route is
shown, e.g. length of route, estimated
driving time and estimated time of arrival.
X
To select the next or previous
alternative route: select Next or
Previous and press W to confirm.
The selected route is highlighted dark blue.
X
To select the original route: select Back
a corresponding number of times and press
W to confirm.
X
To start route guidance using the
selected alternative route: select Start
and press W to confirm.
COMAND calculates the alternative route.
Displaying destination information
You have entered a destination (Y page 51)
or a point of interest(Ypage 61) and possibly
an intermediate stop (Y page 59).
X
To switch on navigation mode: press the
g function button.
X
To show the menu: press W the COMAND
controller.
X
Select Route in the navigation system
menu bar by turning cVd the COMAND
controller and press W to confirm.
X
Select Destination Information and
press W to confirm.
Destination information is displayed.
Example display: destination information
:
Distance, estimated time of arrival and
estimated remaining driving time to
intermediate stop
;
Intermediate stop P
=
State and city
?
Destination O
A
Distance, estimated time of arrival and
estimated driving time to destination
X
To close the destination information:
slide XVY the COMAND controller or press
the k back button.
Route guidance
71
Navigation
ZA COMAND NTG4.0 BR204 USA Edition A 2011; 1; 3, en-US
d2irenkl Version: 3.0.3.6
2010-05-31T09:21:57+02:00 - Seite 71
Z
Page 74

Route overview
You can use the route overview to move along
the route section by section and view
information and details abouteach sectionof
the route.
You have entered a destination (Y page 51)
or a point of interest(Ypage 61) and possibly
an intermediate stop (Y page 59)).
X
To switch on navigation mode: press the
g function button.
X
To show the menu: press W the COMAND
controller.
X
Select Route in the navigation system
menu bar by turning cVd the COMAND
controller and press W to confirm.
X
Select Route Browser and press W to
confirm.
At the top of the display, you will see
information about the highlighted route
section, for example the distance to be driven
on the road and road designation. The
highlighted route section is marked in white
with a red border on the map.
X
To view the next or previous route
section: select Next or Previous and
press W to confirm.
i
If the first or last route section is
highlighted, you cannot select Previous or
Next.
X
To zoom in or out of the map: select N
or M and press W to confirm.
X
To close the route overview: select
Back and press W to confirm.
Off-road and off-map
Important safety guidelines
G
Warning
The COMAND navigation system may direct
you to off-road routes that your vehicle may
not be capable of traversing through without
damaging your tires, wheels or vehicle. It is
the driver’s sole responsibility to determine
the suitability of the route. Off-road routes
may be of varying conditions and their
appropriateness for use may be affected by
various factors such as time of day, time of
year and immediate weather conditions that
cannot be judged or takeninto consideration
by the COMAND system.
Route guidance to a destination that is
not on a digitized road
COMAND can guide you to destinations
which are withinthe area covered by the
digital map, but which are not themselves
recorded on the map.
These destinations are known as off-road
destinations, which you can enter using the
map, for example. In these cases, COMAND
guides you for as long as possible with
navigation announcements and displays on
roads known to the system.
Example display:route guidance to an off-road
destination
:
Off-road destination
;
Off-road route section (dashed blue)
=
Current vehicle position (the tip of the
triangle indicates the vehicle’s direction
of travel)
?
Off-road (no street names available)
Shortly before reaching the last known point
on the map, you will hear the announcement:
You will enter an area with
unreliable map data in xx miles.
72
Route guidance
Navigation
ZA COMAND NTG4.0 BR204 USA Edition A 2011; 1; 3, en-US
d2irenkl Version: 3.0.3.6
2010-05-31T09:21:57+02:00 - Seite 72
Page 75

If the vehicle reaches an area which is not part
of the digital map, the display appears as a
split-screen view. On the right-hand side, an
arrow appears which points to off-road
destination :.You will hear the
announcement:"Please follow the arrow on
the display".As the vehicle approaches the
destination, the Area of destination
reached message appears.
Route guidance from an off-road
location to adestination
If the vehicle position is within the area
covered by the digital map, but the map does
not contain any information about that
location, the vehicle is in an off-road location.
COMAND is also able to guide you to a
destination even from an off-road location.
At the start of the route guidance, you will see
the Off Mapped Road message, an arrow
and the distance to thedestination. The arrow
shows the compass heading to the actual
destination.
The route is highlighted blue, starting from
the last recognized street the vehicle was on
before it left the map.
As soon as the vehicle is back on a road
known to the system, route guidance
continues in the usual way.
Route guidance from an off-map
location to adestination
If the vehicle position is outside the area
covered by the digital map, then the vehicle
is in an off-map location.COMAND is also
able to guide you to a destination even from
an off-map location.
At the start of the route guidance, you will see
the Off Mapped Road message, an arrow
and the distance to the destination. The arrow
shows the compass heading to the road left
last.
The route is highlighted blue from the nearest
road known to the system.
As soon as the vehicle is back on a road
known to the system, route guidance
continues in the usual way.
Off-road during route guidance
Due to road construction work, for example,
there may be differences between the data
on the digital map and the actual course of
the road.
In such cases, the system will temporarily be
unable to locate the vehicle position on the
digital map and thus considers the vehicle to
be in an off-road position.
In the display, you will see the Off Mapped
Road message, an arrow and the distance to
the destination. The arrow shows the
compass heading to the actual destination.
As soon as the system can assign the vehicle
position to the map again, route guidance
continues in the usual way.
Traffic reports
Conditions
To receive real-time traffic reports via
satellite radio, you require:
R
optionally available satellite radio
equipment
R
a subscription to SIRIUS XM Satellite Radio
Traffic Message Service
Further information on satellite radio is
available in the "Satellite radio" section
(Y page 123).
COMAND can receive traffic reports via
satellite radio and take these into account for
route guidance in the navigation system.
Received traffic reports are displayed in the
map either as text or as icons.
Real-time traffic reports on the map
COMAND can show certain traffic incidents
on the map. Traffic reports are shown on the
map at scales of 0.05 mi to 20 mi.
Traffic reports
73
Navigation
ZA COMAND NTG4.0 BR204 USA Edition A 2011; 1; 3, en-US
d2irenkl Version: 3.0.3.6
2010-05-31T09:21:57+02:00 - Seite 73
Z
Page 76

X
To hide the menu: slide ZV the COMAND
controller and, when the Full Screen
menu itemis shown, press W to confirm.
The map can be seen in the full-screen
display.
X
Turn cVd the COMAND controller until the
desired map scale is set.
1
Icon delimiting the section of the route
affected
2
Icon indicating an incident on the route
(traffic flow)
3
Destination
4
Map scale
74
Traffic reports
Navigation
ZA COMAND NTG4.0 BR204 USA Edition A 2011; 1; 3, en-US
d2irenkl Version: 3.0.3.6
2010-05-31T09:21:57+02:00 - Seite 74
Page 77

Icon for real-time traffic reports
Icon Description Traffic reports in the map display List of
traffic
reports
Traffic
reports
Warning
(red)
This appears at the beginning of the
affected route section if route
guidance is active and the route leads
through an affected area.
Entry type:
warning
Entry
type:
warning
Traffic
incident
(yellow)
This appears at the beginning of the
affected route section if route
guidance is active and the route leads
through an area affected by a traffic
incident.
Entry type:
caution
Entry
type:
caution
Traffic jam
on route
(stop-and-go
traffic)
This appears at the beginning of a
traffic jam (average speed
25 – 45 mph) if route guidance is
active and the route leads through an
area of congested traffic.
Yellow car icons may appear in
conjunction with this icon.
Entry type:
traffic jam
on route
(stop-andgo traffic)
Entry
type:
traffic jam
on route
(stop-andgo traffic)
Traffic jam
on the route
This appears at the beginning of a
traffic jam (average speed
5–20mph) if route guidance is active
and the route leads through an area of
congested traffic.
Red car icons may appear in
conjunction with this icon.
Entry type:
traffic jam
on route
Entry
type:
traffic jam
on route
Blocked
route section
on route
Appears at the beginning of a blocked
route section if route guidance is
active and the route leads through the
blocked section.
The XXXX icons may appear in
conjunction with this icon.
Entry type:
blocked
route
section
Entry
type:
blocked
route
section
Yellow
line with
arrows
Traffic
incidents
Possible delays (e.g. roadwork)
Appears on the side of the road
affected (direction of travel)
(Not
available)
(Not
available)
Traffic reports
75
Navigation
ZA COMAND NTG4.0 BR204 USA Edition A 2011; 1; 3, en-US
d2irenkl Version: 3.0.3.6
2010-05-31T09:21:57+02:00 - Seite 75
Z
Page 78

Icon Description Traffic reports in the map display List of
traffic
reports
Traffic
reports
Green
line with
arrows
Unimpeded
traffic flow
No delays
Only appears on the side of the road
(direction of travel) on which traffic
flow is unimpeded
(Not
available)
(Not
available)
Red line
with
arrows
Warning
message
Incident on road
Appears on the side of theroad
affected (direction of travel)
(Not
available)
(Not
available)
Displaying real-time traffic reports
X
To switch on navigation mode: press the
Ø function button.
X
To show the menu: press W the COMAND
controller.
X
Select Traffic by turning cVd the
COMAND controller and press W to
confirm.
If the dialog field shows the No Traffic
Messages message, this means that:
R
no traffic reports have been received yet.
R
no traffic reports are available.
X
To cancel the search: select Cancel and
press W to confirm.
X
To close the report window: select OK
and press W to confirm.
If traffic reports exist, a list is shown.
The content of the list varies depending on
whether route guidance is active or not.
List when route guidance is not active
The list shows all the roads, areas or regions
for which reports are available.
A traffic report may refer to an area or a
region, e.g. if visibility is impaired due to fog.
X
To read a traffic report: select a road,
area or region by turning cVd the
COMAND controller and press W to
confirm.
List when route guidance is active
The first list shows the roads, areas and
regions that lie along the route and for which
traffic reports are available.
76
Traffic reports
Navigation
ZA COMAND NTG4.0 BR204 USA Edition A 2011; 1; 3, en-US
d2irenklVersion: 3.0.3.6
2010-05-31T09:21:57+02:00 - Seite 76
Page 79

X
To show all reports: select Display All
Messages by turning cVd the COMAND
controller and press W to confirm.
You see a list of all roads, areas and regions
for which traffic reports are available, even
if the reports do not affect your route.
X
To show a traffic report: select a road,
area or regionand press W to confirm.
X
To close the list: slide XVY the COMAND
controller.
Example: traffic report
1
Depending on your selection: Read out
all messages on route or All
Messages
2
Report 8 of 16 for the road affected
3
Text of report
4
Road, area or regionaffected by traffic
reports
5
Icon for state/province
6
Icon for report type, e.g. traffic flow
message
X
To scroll within areportorto access
the next report: turn cVd the COMAND
controller.
X
To return to the report: slide XVY the
COMAND controller.
Displaying traffic reports on the map
X
Select Traffic Symbol Information by
turning cVd the COMAND controller and
press W to confirm.
Traffic reports
77
Navigation
ZA COMAND NTG4.0 BR204 USA Edition A 2011; 1; 3, en-US
d2irenklVersion: 3.0.3.6
2010-05-31T09:21:57+02:00 - Seite 77
Z
Page 80

Example display
:
Road concerned
;
Icon for report type, e.g. traffic flow
message
X
Select Next or Previous by turning cVd
the COMAND controller and press W to
confirm in order to continue highlighting
traffic icons.
X
To change the map scale: select Map by
sliding ZV the COMAND controller and
press W to confirm.
You can now zoom in or out of the map.
X
To show the detailedview: select
Details and press W to confirm.
Example display: traffic icon information
X
To close the detailed view: slide XVY the
COMAND controller.
Having traffic reports on the route
read out
Introduction
The read-aloud function is only available while
route guidance is active. It reads out traffic
reports affecting the current route. You can
set the language (Y page 45) and the readaloud speed (Y page 39).
You can startthe read-aloud function
manually or set it to automatic.
Starting the read-aloud function
manually
X
To switch on navigation mode: press the
Ø function button.
X
To show the menu: press W the COMAND
controller.
X
Select Traffic by turning cVd the
COMAND controller and press W to
confirm.
X
Select Read out all messages on
route and press W to confirm.
COMAND reads out the reports in sequence.
i
If there are no reports for the route, the
Read out all messages on route menu
item is shown in gray and cannot be
selected.
X
To switch off the read-aloud function:
select Cancel read-aloud functionand
press W to confirm or press the 8
button.
COMAND reads the current report aloud
and then exits the read-aloud function.
Automatic read-aloud function
X
To switch on navigation mode: press the
Ø function button.
78
Traffic reports
Navigation
ZA COMAND NTG4.0 BR204 USA Edition A 2011; 1; 3, en-US
d2irenkl Version: 3.0.3.6
2010-05-31T09:21:57+02:00 - Seite 78
Page 81

X
To show the menu: press W the COMAND
controller.
X
Select Navi by sliding ZV and turning
cVd the COMAND controller and press
W to confirm.
X
Select Read Traffic Messages
Automatically and press W to confirm.
Depending on the previous state, switch
the optiononOor off ª.
Recalculating the route dynamically
If you have selected Dynamic Route, traffic
reports affecting the route are taken into
account for route calculation.
If you have selected Dynamic Route Only
After Request and COMAND recalculates
the route, a prompt will appear.
X
To accept the newly calculated route:
press W the COMAND controller.
X
To continue along the original route:
select Reject by turning cVd the
COMAND controller and press W to
confirm.
Destination memory
Home address (My address)
Entering the home address via address
entry
X
Enter the home address as a destination,
e.g. as a city, street and house number
(Y page 51). Then, save the home address
without starting route guidance
(Y page 54).
Adopting an address book entry as a
home address
X
To switch on navigation mode: press the
g function button.
X
To show the menu: press W the COMAND
controller.
X
Select Destination in the navigation
system menu bar by turning cVd the
COMAND controller and press W to
confirm.
X
Select From Memory and press W to
confirm.
You will see the destination memory list
either with the character bar (option 1) or
as a selection list (option 2).
Option 1: destination memorylist with
character bar
X
Slide ZV the COMAND controller
repeatedly until the destination memory
list appears as a selection list.
Option 2: destination memory list as
selection list
Destination memory
79
Navigation
ZA COMAND NTG4.0 BR204 USA Edition A 2011; 1; 3, en-US
d2irenklVersion: 3.0.3.6
2010-05-31T09:21:57+02:00 - Seite 79
Z
Page 82

The My Address entry is listed as the first
entry in the destination memory.
X
Select My Address by turning cVd the
COMAND controller and press W to
confirm.
i
If you have not yet entered any
characters, the My Address entry is
automatically highlighted in the selection
list.
If no home address has been stored yet, you
can now assign an address book entry. If a
home address already exists, it is displayed
and you can alter it.
i
If you select New Entry, you are also
offered the option of entering the home
address for the first time. You can then
save the home address without starting
route guidance.
X
To enter the home address for the first
time: select Assign to Address Book
Entry and press W to confirm.
X
Select Home or Work and press W to
confirm.
X
To change the home address: select
Change and press W to confirm.
X
Select Assign to Address Book Entry
and press W to confirm.
i
If you select New Entry, you are also
offered the option of changing the home
address by entering an address. You can
then save the home address without
starting route guidance.
X
Select Home or Work and press W to
confirm.
In both cases, you will see the address book
either with the character bar or as a
selection list.
X
To select an address book entry:
proceed as described in the "Searching for
an address book entry" section
(Y page 112).
X
To confirm the selection: press W the
COMAND controller.
If no home address has been stored,
COMAND saves the entry. You will see a
message and then the address menu with
the selected address. Start is highlighted
automatically.
If a home address has already been stored,
you will see a prompt asking you whether
the My Address entry should be
overwritten.
X
Select Yes or No and press W to confirm.
If you select Yes, COMAND overwrites the
destination. You will see a message and
then the address menu with the selected
address. Start is highlighted
automatically.
If you select No, the list will reappear.
Selecting the home address for route
guidance
X
Proceed as described in the "Selecting a
destination from the destination memory"
section (Y page 57).
Saving adestination in the
destination memory
Notes
This function also stores the destination in
the address book.
80
Destination memory
Navigation
ZA COMAND NTG4.0 BR204 USA Edition A 2011; 1; 3, en-US
d2irenklVersion: 3.0.3.6
2010-05-31T09:21:57+02:00 - Seite 80
Page 83

After destination entry
X
The destination has been entered and is
shown in the address entrymenu
(Y page 54).
X
Select Save by sliding VÆ and turning
cVd the COMAND controller and press
W to confirm.
You can now select storage options
(Y page 81).
During route guidance
X
To show the menu: press W the COMAND
controller.
X
Select Destination in the navigation
system menu bar by turning cVd the
COMAND controller and press W to
confirm.
X
Select Save Destination and press W to
confirm.
You can now select storage options
(Y page 81).
From the list of previous destinations
X
To show the menu: press W the COMAND
controller.
X
Select Destination in the navigation
system menu bar by turning cVd the
COMAND controller and press W to
confirm.
X
Select From Last Destinations and
press W to confirm.
The list of previous destinations appears.
X
Select a destination by turning cVd the
COMAND controller and press W to
confirm.
The destination address is shown.
X
Select Save and press W to confirm.
You can now select storage options.
Selecting storage options
X
To save the destination without a
name: select Save Without Name and
press W to confirm.
COMAND stores the destination in the
destination memory and uses the address
as the destination name.
X
To save the destination as My address:
select Save as "My Address" and press
W to confirm.
COMAND stores the destination in the
destination memory as My Address. If the
selected address book entry already
contains address data that can be used for
navigation (L icon), a prompt will appear
asking whether you wish to overwrite the
existing data.
X
Select Yes or No and press W to confirm.
If you select Yes, the entry is overwritten.
If you select No, the process will be aborted.
X
To save the destination with a name:
select Save With Name and press W to
confirm.
X
Select a category, e.g. Home, and press W
to confirm.
The input menu appears with data fields
and the character bar.
Example display: saving adestination with a name
:
Selected data field with cursor
;
Character bar
X
Proceed as described under "Entering
characters using the character bar" in the
Destination memory
81
Navigation
ZA COMAND NTG4.0 BR204 USA Edition A 2011; 1; 3, en-US
d2irenklVersion: 3.0.3.6
2010-05-31T09:21:57+02:00 - Seite 81
Z
Page 84

"Entering characters in navigation mode
(entering a city)" section (Y page 27).
X
Then, select ¬ and press W to confirm.
COMAND stores the destination under the
name entered.
Assigning adestination to an address
book entry
An address with complete address data that
is suitable for navigation can be assigned to
an already existing address book entry. You
can then later start route guidance to this
address straightfrom the address book
(Y page 115).
X
Select Assign to Address Book Entry
and press W to confirm.
X
Select a category, e.g. Home, and press W
to confirm.
You will see the address book either with
the character bar or as a selection list.
X
To select an address book entry:
proceed as described in the "Searching for
an address book entry" section
(Y page 112).
COMAND stores the data if the address
book entry selected does not yet contain
navigable address data.
If the selected address book entry already
contains navigable address data, a prompt
will appear asking whetheryou wish to
overwrite the existing data.
X
Select Yes or No and press W to confirm.
If you select Yes, COMAND stores the data.
Deleting adestination or the home
address from thedestination memory
X
To switch on navigation mode: press the
g function button.
X
To show the menu: pressW the COMAND
controller.
X
Select Destination in the navigation
system menu bar by turning cVd the
COMAND controller and press W to
confirm.
X
Select From Memory and press W to
confirm.
You will see the destination memory list
either with the character bar (option 1) or
as a selectionlist (option 2).
X
Option 1 –destination memory list with
character bar: proceed as described in the
"Entering characters using the character
bar" section(Ypage 27).
X
Option 2 – destination memory list as
selection list: select a destination by
turning cVd the COMAND controller and
press W to confirm.
The address data appears for the selected
entry.
X
Select Delete and press W to confirm.
Aprompt appears asking whetheryou wish
to delete the destination.
X
Select Yes or No and press W to confirm.
If you select Yes, COMAND deletes the
destination.You see a message to this
effect.
If you select No, the process will be aborted.
i
If the navigable address data for the
destination being deleted is also assigned
to an address book entry, COMAND will
also delete this data from there. If the
corresponding address book entry does
not contain any further data, such as
telephone numbers, COMAND deletes the
entire address book entry.
Last destinations
Introduction
COMAND automatically stores the previous
destinations for which the route calculation
was started. If the memory is full, COMAND
deletes the oldest destination.You can also
82
Last destinations
Navigation
ZA COMAND NTG4.0 BR204 USA Edition A 2011; 1; 3, en-US
d2irenklVersion: 3.0.3.6
2010-05-31T09:21:57+02:00 - Seite 82
Page 85

store one destination from the list of previous
destinations in the destination memory. It will
be stored there permanently.
Storing adestination permanently in
the destination memory
X
Proceed as described in the "From the list
of previous destinations" section
(Y page 81).
Storing the vehicle position in the list
of previous destinations
X
To switch on navigation mode: press the
g function button.
X
To show the menu: pressW the COMAND
controller.
X
Select Position in the navigation system
menu bar by turning cVd the COMAND
controller and press W to confirm.
X
Select Save Vehicle Position and press
W to confirm.
COMAND stores the current vehicle
position as a destination in the list of
previous destinations.
Storing the crosshair position in the
list of previous destinations
Route guidance not active
Acrosshair appears on the map if you have
moved the map manually.You can store the
crosshair position as a destination in the list
of previous destinations.
X
To show the menu: press W the COMAND
controller.
X
Select Position in the navigation system
menu bar by turning cVd the COMAND
controller and press W to confirm.
X
Select Save Crosshair Position and
press W to confirm.
Route guidance is active
X
To show the menu: press W the COMAND
controller.
X
Select Position in the navigation system
menu bar by turning cVd the COMAND
controller and press W to confirm.
X
Select Destination Position Map and
press W to confirm.
You will see the map with the crosshair at
the destination.
X
To show the menu: press W the COMAND
controller.
X
Select Position in the navigation system
menu bar by turning cVd the COMAND
controller and press W to confirm.
X
Select Save Crosshair Position and
press W to confirm.
COMAND stores the crosshair position as
a destination in the list of previous
destinations.
Deleting one of the previous
destinations
X
To switch on navigation mode: press the
g function button.
X
To show the menu: press W the COMAND
controller.
X
Select Destination in the navigation
system menu bar by turning cVd the
COMAND controller and press W to
confirm.
X
Select From Last Destinations and
press W to confirm.
The list of previous destinations appears.
X
Select the desired destination and press
W to confirm.
The destination address appears.
X
Select Delete and press W to confirm.
Aprompt appears, asking whetherthe
entry should be deleted.
Last destinations
83
Navigation
ZA COMAND NTG4.0 BR204 USA Edition A 2011; 1; 3, en-US
d2irenkl Version: 3.0.3.6
2010-05-31T09:21:57+02:00 - Seite 83
Z
Page 86

X
Select Yes or No and press W to confirm.
If you select Yes, the entry is deleted.
If you select No, the process will be aborted.
Map usage and settings
Notes
Company logos displayed on the map are
trademarks of the respective companies and
used solely for the purpose of indicating the
location of these companies. The use of such
logos for the map does not indicate approval,
support or advertisement of the navigation
system by the respective companies.
Adjusting the map scale
X
To hide the menu: slide ZV the COMAND
controllerand, when the Full Screen
menu itemis shown, press W.
X
To call up the scale bar: as soon as you
turn cVd the COMAND controller, scale
bar = appears.
X
Turn cVd until the desired scale is set.
:
Set map scale as a number with unit
;
Currently set map scale as indicated by
the needle on the scale bar
=
Map scale
Unit of measurement : in the COMAND
display depends on the selection made for the
instrument cluster (see the vehicle
Operator's Manual).
Moving the map
Showing the crosshair
X
To hide the menu: slide ZV the COMAND
controller and, when the Full Screen
menu item is shown, press W.
X
To scroll the map: slide the COMAND
controller XVY, ZVÆ or aVb.
Acrosshair appears on the map. If you slide
it again, the map moves in the
corresponding direction under the
crosshair.
Map with crosshair
:
Current vehicle position
;
Crosshair
=
Details of the crosshair position
?
Map scale selected
Display = may be the name of a street, for
example, provided the digital map contains
the necessary data.Itcan also show the geocoordinate positionofthe crosshair if the
Geo-coordinates display is switched on
(Y page 87).
Hiding the crosshair and centering the
map on the vehicle position or
destination
X
Press the k back button twice.
The crosshair disappears and the map is
set to the vehicle position.
or
X
Set the map to the vehicle position; see the
explanation below.
84
Map usage and settings
Navigation
ZA COMAND NTG4.0 BR204 USA Edition A 2011; 1; 3, en-US
d2irenkl Version: 3.0.3.6
2010-05-31T09:21:57+02:00 - Seite 84
Page 87

Centering the mapon the vehicle or
destination position
Centering the map on the vehicle
position
X
To show the menu: press W the COMAND
controller.
X
Select Position in the navigation system
menu bar by sliding VÆ and turning cVd
the COMAND controller and press W to
confirm.
X
Select Vehicle Position Map and press
W to confirm or, if the crosshair is shown,
press the k back button.
This hides the crosshair.
Centering on the destination
This function requires that a route to a
destination has been calculated.
X
To show the menu: press W the COMAND
controller.
X
Select Position in the navigation system
menu bar by sliding VÆ and turning cVd
the COMAND controller and press W to
confirm.
X
Select Destination Position Map and
press W to confirm.
The crosshair is centered on the
destination.
Map display
Setting the map orientation
Map orientation
:
Currently set map orientation
The following display modes are possible:
R
0 North orientation (the map view is
displayed so that north is always up).
R
¤ Orientation in the direction of travel (the
map is displayed so that the heading is
always up; the orange point of the icon
points north).
R
¤ Bird's-eye view (the map is displayed so
that the heading is always up, the map
projection reproduces the curvature of the
earth, the orange point of the icon points
north)
Example display: Bird's-eye view
:
Current crosshair position
;
Current map orientation
X
To show the menu: press W the COMAND
controller.
X
Select Navi in the main function bar by
sliding ZV and turning cVd the COMAND
controller and press W to confirm.
X
Select Map Display and press W to
confirm.
A # dot indicates the current setting.
Map usage and settings
85
Navigation
ZA COMAND NTG4.0 BR204 USA Edition A 2011; 1; 3, en-US
d2irenklVersion: 3.0.3.6
2010-05-31T09:21:57+02:00 - Seite 85
Z
Page 88

Map display menu
:
Map orientation options
;
To set point of interest icons
X
Select North Up, Heading Up or Bird'seye View by turning cVd the COMAND
controller and press W to confirm.
X
To exit the menu: slideXVY the COMAND
controller.
The map orientation changes accordingly.
Setting the point of interest icons in the
map
You can set the points of interest you wish to
have displayed as symbols on the map. points
of interest are, for example, gas stations,
hotels, cinemas and restaurants.
The following settings are possible:
R
Standard Symbols
Icon display determined by the factory
settings
R
Personal Symbols
You can determine the icons yourself
R
No Symbols
The map does not show any icons.
X
To show the menu: press W the COMAND
controller.
X
Select Navi in the main function bar by
sliding ZV and turning cVd the COMAND
controller and press W to confirm.
X
Select Map Display and press W to
confirm.
X
Select Standard Symbols, Personal
Symbols or No symbols.
If you select Personal Symbols, the list of
points of interest appears.
X
To switch the icon display on/off: select
a point of interest by turning cVd the
COMAND controller and press W to
confirm.
Depending on the previous setting, the
icons will be switched on O or off ª.You
can switch on the icon displays for more
than one point of interest.
i
The list shows all symbols that are
contained on the digital map across all
countries. However, not all points of
interest are available in all countries. As a
result, certain point of interest icons may
not be displayed on the map, even if the
symbol display is switched on.
X
To exit the menu: press the k back
button.
Map information in the display
Showing text information
During route guidance, you can have map
information displayed at the bottom edge of
the display.
X
To show the menu: press W the COMAND
controller.
X
Select Navi in the main function bar by
sliding ZV and turning cVd the COMAND
controller and press W to confirm.
X
Select Information on map and press
W to confirm.
A # dot indicates the current setting.
86
Map usage and settings
Navigation
ZA COMAND NTG4.0 BR204 USA Edition A 2011; 1; 3, en-US
d2irenklVersion: 3.0.3.6
2010-05-31T09:21:57+02:00 - Seite 86
Page 89

X
Select Arrival Time / Distance,
Current Street, Geo-coordinates or
None and press W to confirm.
X
To exit the menu: slideXVY the COMAND
controller.
Arrival time/distance to thedestination
Arrival time/distance display switched on
:
Icon for destination
;
Distance to the destination
=
Icon for estimated time of arrival
?
Estimated time of arrival
You can only see this display during route
guidance.While scrolling the map
(Y page 59), you will see data, e.g. road
names, depending on the crosshair position,
if the digital map supports this data.
i
During route calculation, or if the vehicle
is traveling on a non-digitized road, the
linear distance to the destination is shown.
In this case, the display will be grayed out.
Road display
Road display active
:
Road names or numbers, e.g. for
highways
Geo-coordinate display
Geo-coordinate display active
:
Current height above average sea level,
rounded
;
Current vehicle position: latitude
coordinates
=
Current vehicle position: longitude
coordinates
?
Number of GPS satellites currently being
used
There must be sufficient GPS reception for all
displays to be shown. If this is not the case,
the display will be grayed out. Height
display : may vary from the actual value
because the navigation system uses the GPS
signal for the calculation.
While scrolling the map (Y page 59), you will
see the geo-coordinates of the crosshair
position. Height display : and number of
satellites used ? are not displayed.
Map usage and settings
87
Navigation
ZA COMAND NTG4.0 BR204 USA Edition A 2011; 1; 3, en-US
d2irenkl Version: 3.0.3.6
2010-05-31T09:21:57+02:00 - Seite 87
Z
Page 90

"None" menu option
Display switched off
:
Currently set map orientation
i
During the "Move map" function you can
see additional information depending on
the position of the crosshair, such as a road
name, if the digital map supports this data.
Traffic information on the map
If you subscribe to the SIRIUS XM Satellite
Radio Traffic Message Service, traffic
information can be displayed on the map. You
can select three categories for the display.
X
To switch the displays on/off: press the
COMAND controller W to show the menu.
X
Select Navi in the main function bar by
sliding ZV and turning cVd the COMAND
controller and press W to confirm.
X
Select Traffic Information On Mapand
press W to confirm.
X
Select the category and press W to
confirm.
Depending on the previous state, switch
the option on O or off ª.
R
Incidents
Road sections are illustrated with a yellow
line and arrows =.
R
Speed &Flow
Road sections are illustrated with yellow or
red car icons :.
Yellow car icons: traffic jam, average speed
25 – 45 mph
Red car icons: traffic jam, average speed 5
– 20 mph
R
Free Flow
Road sections are illustrated with a green
line and arrows ;.
:
Speed &Flow
;
Free Flow
=
Incidents
Other settings
Avoiding an area
General information
COMAND makes it possible to avoid areas
you do not wish to drive through.
The calculated route may include an area to
be avoided if:
R
your destination is located in such an area.
R
the route uses roads that lead through an
area to be avoided.
i
Highways within blocked areas are always
taken into consideration in the route
calculation.
88
Other settings
Navigation
ZA COMAND NTG4.0 BR204 USA Edition A 2011; 1; 3, en-US
d2irenklVersion: 3.0.3.6
2010-05-31T09:21:57+02:00 - Seite 88
Page 91

X
To switchon navigation mode: press the
g function button.
X
To show the menu: press W the COMAND
controller.
X
Select Navi in the main function bar by
sliding ZV and turning cVd the COMAND
controller and press W to confirm.
X
Select Block Area and press W to
confirm.
If you have not yet set any area to be
avoided, you will see the map with the
crosshair (option 1).
If you have previously set one or more areas
to be avoided, you will see a list (option 2).
Option 1: the map
X
To scroll the map: slide the COMAND
controller XVY, ZVÆ or aVb.
X
To set the map scale: as soon as you turn
cVd the COMAND controller, the scale bar
appears. Turning clockwise zooms out from
the map, turning counter-clockwise zooms
in.
X
Turn cVd until the desired scale is set.
X
To apply a block: press W the COMAND
controller.
Ared square appears on the map.
X
To adjust the size of the square: turn
cVd the COMAND controller.
The square is enlarged or reduced.
X
To confirm the settings: press W.
The list appears. The previously selected
area to be avoided has been added and
activated.
X
Follow the instructions listed under "Option
2: the list".
Option 2: the list appears
X
Select Avoid New Area by turning cVd
the COMAND controller and press W to
confirm.
The map with the crosshair appears.
X
Proceed as described under "Option 1: the
map" if you wish to set a new area to be
avoided.
Switching an avoided area on/off
X
Select an entry in the list by turning cVd
the COMAND controller and press W to
confirm.
The avoided area is switched on O or off
ª, depending on the previous status.
Displaying and changing an avoided
area
X
Select an entry in the list by turning cVd
the COMAND controller.
X
Select Options by sliding VY the
COMAND controller and press W to
confirm.
Other settings
89
Navigation
ZA COMAND NTG4.0 BR204 USA Edition A 2011; 1; 3, en-US
d2irenklVersion: 3.0.3.6
2010-05-31T09:21:57+02:00 - Seite 89
Z
Page 92

X
Select Display / Change and press W to
confirm.
The area to be avoided is indicated in the
map.
X
To change the location of the area: slide
the COMAND controller XVY, ZVÆ or
aVb.
The area is moved on the map.
X
To adjust the size of the area: turn
cVd the COMAND controller.
The area is enlarged or reduced.
X
To confirm the change: press W the
COMAND controller.
The list appears and the change is entered.
Deleting aset area
X
Select an entry in the list by turning cVd
the COMAND controller.
X
Select Options by sliding VY the
COMAND controller and press W to
confirm.
X
Select Delete and press W to confirm.
Aquery appears asking whether the entry
should be deleted.
X
Select Yes or No.
If you select Yes, the entry is deleted.
If you select No, the process will be aborted.
Off-road route memory function
Switching the function on/off
While this function is switched on, an off-road
route is recorded and stored.
i
Off-road:the section of route is still within
the area covered by the digital map but
does not contain any suitable data, e.g.
because a road has not been digitized.
X
To switch on navigation mode: press the
g function button.
X
To show the menu: press W the COMAND
controller.
X
Select Navi in the main function bar by
sliding ZV and turning cVd the COMAND
controller and press W to confirm.
X
Select Save Off-road Route and press
W to confirm.
X
Select Save Off-road Route again and
press W to confirm.
Depending on the previous state, switch
the option on O or off ª.
X
To exit the menu: slideXVY the COMAND
controller.
Displaying memory usage
When the memory is 90% full, you see a
message to this effect.You will also see a
message when the memory is completely full.
X
To confirm the message: press W the
COMAND controller.
i
In order to be able to continue using the
"Record route" function, you should delete
the route memory afterwards.
X
To switch on navigation mode: press the
g function button.
X
To show the menu: press W the COMAND
controller.
X
Select Navi in the main function bar by
sliding ZV and turning cVd the COMAND
controller and press W to confirm.
X
Select Save Off-road Route and press
W to confirm.
90
Other settings
Navigation
ZA COMAND NTG4.0 BR204 USA Edition A 2011; 1; 3, en-US
d2irenklVersion: 3.0.3.6
2010-05-31T09:21:57+02:00 - Seite 90
Page 93

X
Select Off-road Route Memory Usedand
press W to confirm.
The memory used is shown as a
percentage. The display closes
automatically afterafew seconds.
Deleting the route memory
X
To switch on navigation mode: press the
g function button.
X
To show the menu: press W the COMAND
controller.
X
Select Navi in the main function bar by
sliding ZV and turning cVd the COMAND
controllerand press W to confirm.
X
Select Save Off-road Route and press
W to confirm.
X
Select Delete Off-road Route Memory
and press W to confirm.
Aquery appears asking whether the
memory should be deleted.
X
Select Yes or No.
If you select Yes, the routes recorded so far
are deleted.
If you select No, the process will be aborted.
Highway information
When driving on highways, you can have the
nearestgas stations, restareas, etc., as well
as yourcurrentdistancefrom them, shown
on the right-hand side of the display.
X
To switch on navigation mode: press the
g function button.
X
To show the menu: press W the COMAND
controller.
X
Select Navi in the main function bar by
sliding ZV and turning cVd the COMAND
controller and press W to confirm.
X
Select Highway Information and press
W to confirm.
Depending on the previous state, switch
the option on O or off ª.
Example display with function active
:
Icons for freeway service facilities
;
Name of service area or number of
highway exit
=
Distance from current vehicle position
SIRIUS XM service
Displaying SIRIUS XM service
information
You can display the SIRIUS XM service
information.
X
To show the menu: press W the COMAND
controller.
X
Select Navi in the main function bar by
sliding ZV and turning cVd the COMAND
controller and press W to confirm.
X
Select SIRIUS Service and press W to
confirm.
Other settings
91
Navigation
ZA COMAND NTG4.0 BR204 USA Edition A 2011; 1; 3, en-US
d2irenkl Version: 3.0.3.6
2010-05-31T09:21:57+02:00 - Seite 91
Z
Page 94

1
Provider's phone number (SIRIUS XM)
2
Serial number of your service module for
receiving traffic reports
Registering for the SIRIUS XM traffic
reportservice
X
Call the traffic report provider's phone
number shown on the screen.
i
You can also have the satellite service
activated online.To do so, visit the SIRIUS
XM Radio website at
http://www.sirius.com (USA) or
http://www.siriuscanada.com
(Canada).
Once the connection has been established:
X
Follow the instructions of the operator.
The activation process may take up to ten
minutes.
If registration is not included when
purchasing the system, your credit card
details will be required to activate your
account.
Compass function
In the compass view, you can see the current
direction of travel, the current height above
sea level and the coordinates of the vehicle
position, for example.
X
To switch on navigation mode: press the
g function button.
X
To show the menu: press W the COMAND
controller.
X
Select Position in the navigation system
menu bar by sliding VÆ and turning cVd
the COMAND controller and press W to
confirm.
X
Select Compass and press W to confirm.
Example display: compass
:
Current direction of travel
;
Current height above average sea level,
rounded
=
Current vehicle position: longitude
coordinates
?
Number of GPS satellites currently being
used
A
Current vehicle position: latitude
coordinates
B
Currently set steering angle of the front
wheels
i
To display current height ;, the system
must be able to receive at least four
satellites. Steering angle B can be a
maximum of 35° in both directions.
X
To exit the display: confirm Back by
pressing W or press the k button.
Updating the digital map
Introduction
The digital map becomes outdated in the
same way as conventional road maps.
Optimal route guidance can only be provided
by the navigation system in conjunction with
the most up-to-date map software.
92
Other settings
Navigation
ZA COMAND NTG4.0 BR204 USA Edition A 2011; 1; 3, en-US
d2irenklVersion: 3.0.3.6
2010-05-31T09:21:57+02:00 - Seite 92
Page 95

Information aboutnew versions of the digital
map can be obtained from an authorized
Mercedes-Benz Center. You can have the
digital map updated at the center with a DVD,
or you can update the map yourself.
i
The update process can take a long time
(over an hour), depending on the size of the
digital map. During this time, you will only
be able to switch on radio mode and to
accept incoming calls. The update will be
completed more quickly if the vehicle is
stationary.
If you carry out the update with the engine
switched off and the starter battery has
insufficient power, COMAND may
automatically switch off during the process
in order to protect the battery. If this
occurs, restart the update with the engine
running.
G
Warning
Never leave the engine running in an enclosed
space. The exhaust gases contain carbon
monoxide. Inhaling exhaust gases constitutes
a health hazard and could lead to loss of
consciousness or even death.
Updating process
X
Insert the DVD into the DVD changer
(Y page 128).
The update begins. COMAND checks
whether the digital map on the DVD is
compatible with the navigation system and
system software.
If this is the case and the DVD's map data
has not already been installed, COMAND
starts updating the digital map.
If the map data has already been installed,
the display shows version data and a
message to this effect.
X
To confirm the message: press W the
COMAND controller.
X
Take the DVD out of the slot.
While the update is running, you will see a
message to this effectand a progress bar. The
navigation system is not operational until the
update is complete.
i
You cannot eject the DVD during the
update. If you switch off COMAND during
the update, the update is interrupted. It
then continues from where it was
interrupted when the system is restarted.
COMAND may prompt you to change the DVD
during the update.
X
Press the 8 load/eject button.
X
Take the DVD out of the slot.
X
Insert the requested DVD.
Once the update has been successfully
completed, you will see a message to this
effect.
X
To confirm the message: press W the
COMAND controller.
X
Take the DVD out of the slot.
The update is complete.
If the update is not successfully completed,
you will see a message thatthe map update
is not possible.
X
To confirm the message: press W the
COMAND controller.
X
Take the DVD out of the slot.
Other settings
93
Navigation
ZA COMAND NTG4.0 BR204 USA Edition A 2011; 1; 3, en-US
d2irenkl Version: 3.0.3.6
2010-05-31T09:21:57+02:00 - Seite 93
Z
Page 96

Problems with the navigation system
Problem Possible causes/consequences and M Solutions
COMAND is unable to
continue route
guidance after the
journey has been
interrupted.
Route guidance is canceled if you interrupt the journey for more
than two hours.
"Interrupting the journey" refers to stopping the vehicle and
switching off COMAND.
"Continuing route guidance" refers to switching COMAND back on
and driving on.
X
Continue route guidance (Y page 69).
COMAND determines the vehicle's position. Depending on the
driving situation, this may take some time.
Route guidance may be restricted during the determination of
the vehicle's position.
When positioning is complete, route guidance is resumed with
navigation announcements and route guidance displays.
Problem Possible causes/consequences and M Solutions
COMAND is unable to
determine the vehicle's
position.
COMAND has to redetermine the position of the vehicle if the
vehicle has been transported (e.g. by ferry, by motorail or after
towing).
X
Start the vehicle and pull away.
COMAND determines the vehicle's position. Depending on the
driving situation, this may take some time.
Route guidance may be restricted during the determination of
the vehicle's position.
When positioning is complete, route guidance is resumed with
navigation announcements and route guidance displays.
94
Problems with the navigation system
Navigation
ZA COMAND NTG4.0 BR204 USA Edition A 2011; 1; 3, en-US
d2irenkl Version: 3.0.3.6
2010-05-31T09:21:57+02:00 - Seite 94
Page 97

Problem Possible causes/consequences and M Solutions
The Navigation
Unavailable message
appears.
COMAND has an integrated hard drive on which the digital map is
stored.
To protect the hard drive from damage, COMAND switches it off
in very high temperatures. The navigation system will then be
temporarily unavailable.
X
Let the vehicle and COMAND cool down.
X
To hide the message: switch COMAND off and then on again.
If an area of the hard disc has a malfunction, COMAND can no
longer access the map data in this area, for example when
calculating a route.
X
To hide the message: switch COMAND off and then on again.
The navigation system will be operational until it has to access
the faulty area of the hard drive again. The message will then
reappear.
X
Consult an authorized Mercedes-Benz Center.
Problem Possible causes/consequences and M Solutions
You will see a message
informing you that the
DVD containing the
digital map is
incompatible with the
system software.
The DVD containing the digital map cannot be used for the update.
X
To confirm the message: press W the COMAND controller.
X
Eject the DVD.
X
Have the system software updated at an authorized MercedesBenz Center.
Problem Possible causes/consequences and M Solutions
The map software
update has failed.
The DVD is dirty or scratched
X
Clean the DVD.
X
Restart the update.
There is overheating due to excessive temperatures in the vehicle
interior.
X
Wait until the vehicle interior has cooled down.
X
Restart the update.
COMAND's integral hard drive is faulty.
X
Consult an authorized Mercedes-Benz Center.
Problems with the navigation system
95
Navigation
ZA COMAND NTG4.0 BR204 USA Edition A 2011; 1; 3, en-US
d2irenkl Version: 3.0.3.6
2010-05-31T09:21:57+02:00 - Seite 95
Z
Page 98

96
ZA COMAND NTG4.0 BR204 USA Edition A 2011; 1; 3, en-US
d2irenkl Version: 3.0.3.6
2010-05-31T09:21:57+02:00 - Seite 96
Page 99

Vehicle equipment .............................. 98
General information ............................ 98
Telephony via the Bluetooth®inter-
face ....................................................... 99
Reception and transmission volume 103
Using the telephone ......................... 103
Using the phone book ...................... 106
Using call lists ................................... 109
Using the address book ................... 112
97
Telephone
ZA COMAND NTG4.0 BR204 USA Edition A 2011; 1; 3, en-US
d2irenkl Version: 3.0.3.6
2010-05-31T09:21:57+02:00 - Seite 97
Page 100

Vehicle equipment
i
These Operating Instructions describe all
standard and optional equipment available
for your vehicle at the time of purchase.
Please note thatyour vehicle may not be
equipped with all features described.
General information
Introduction
With a Bluetooth®-capable mobile phone, you
can make calls using the vehicle's
Bluetooth®telephony interface.
With a suitable mobile phone, you can use the
hands-free system via the Bluetooth
®
interface, import contacts from the mobile
phone via PBAP (Phone Book Access Profile)
and receive vCards.
You can obtain more detailed information
about suitable mobile phones and about
connecting Bluetooth®-capable mobile
phones to COMAND on the Internet at
http://www.mbusa-mobile.com. Or call
the Mercedes-Benz Customer Assistance
Center at
1-800-FOR-MERCedes (1-800-367-6372) for
the USA or at 1-800-387-0100 for Canada.
Safety notes
G
Warning
A driver's attention to the road must always
be his/herprimary focus when driving. For
yoursafety and the safety of others, we
recommend that you pull overto a safe
location and stop before placing or taking a
telephone call. If you choose to use the mobile
phone while driving, please use the handsfree
device and only use the mobile phone when
weather, road, and traffic conditions permit.
Some jurisdictions prohibit the driver from
using a cellular mobile phone while driving a
vehicle.
Bear in mind that at a speed of just 30 mph
(approximately 50 km/h), your vehicle is
covering a distance of 44 feet (approximately
14 m) every second.
G
Warning!
Excessive electromagnetic radiation may
constitute a health hazard to yourself and
others.
There is scientific discussion surrounding the
possible health risks posed by
electromagnetic fields.You can reduce this
risk by using an exterior aerial.
Therefore, only use mobile communication
equipment if it is connected to the exterior
aerial of the vehicle.
Calls disconnected while the vehicle
is in motion
Acall may be disconnected if:
R
there is notenough network coverage in
certain areas.
R
you change from one transmitting/
receiving station(cell) to another and it
does not have a free channel.
R
you use a SIM card which is not compatible
with the network available.
R
when using a mobile phone with
"Twincard", the second SIM card is
registered on the network at the same time.
Operating options
You can operate the telephone by:
R
using the COMAND controller
turning cVd
sliding XVY or ZVÆ
pressing W
R
pressing the K or I button and using the
telephone keypad on COMAND
98
General information
Telephone
ZA COMAND NTG4.0 BR204 USA Edition A 2011; 1; 3, en-US
d2irenkl Version: 3.0.3.6
2010-05-31T09:21:57+02:00 - Seite 98
 Loading...