

Mercedes-Benz E 300 1996 User Manual
Special Settings
(use only for short duration)
Defogging Windows
Rear Window Defroster
Turn electronic key in steering lock to
position 2.
Air Distribution
Switch off button.
Press left and right buttons.
Press button repeatedly until air is
directed upward.
Turn wheels (2) to position to
open left and right air outlets (5).
Defrosting
Turn wheels (2) to position to
open left and right air outlets (5).
Adjust air outlets upward. Press
button. Maximum heated and
automatically controlled amount of
air is directed to the windshield and
side windows.
Press button once again to return
to previous setting.
To select, press button.
To cancel, press button again.
Note:
Heavy accumulation of snow and ice
should be removed before activating
the defroster.
The rear window defroster consumes a
large amount of electrical power. To
keep the battery drain to a minimum,
turn off the defroster as soon as the
window is clear.
The defroster is automatically
turned off after a maximum of 12
minutes of operation.
If several power consumers are turned
on simultaneously, or the battery is
only partially charged, it is possible
that the defroster will automatically
turn itself off. When this happens, the
indicator lamp inside the switch starts
blinking.
As soon as the battery has sufficient
voltage, the defroster automatically
turns itself back on.
Press button repeatedly until the
requested symbol is displayed.
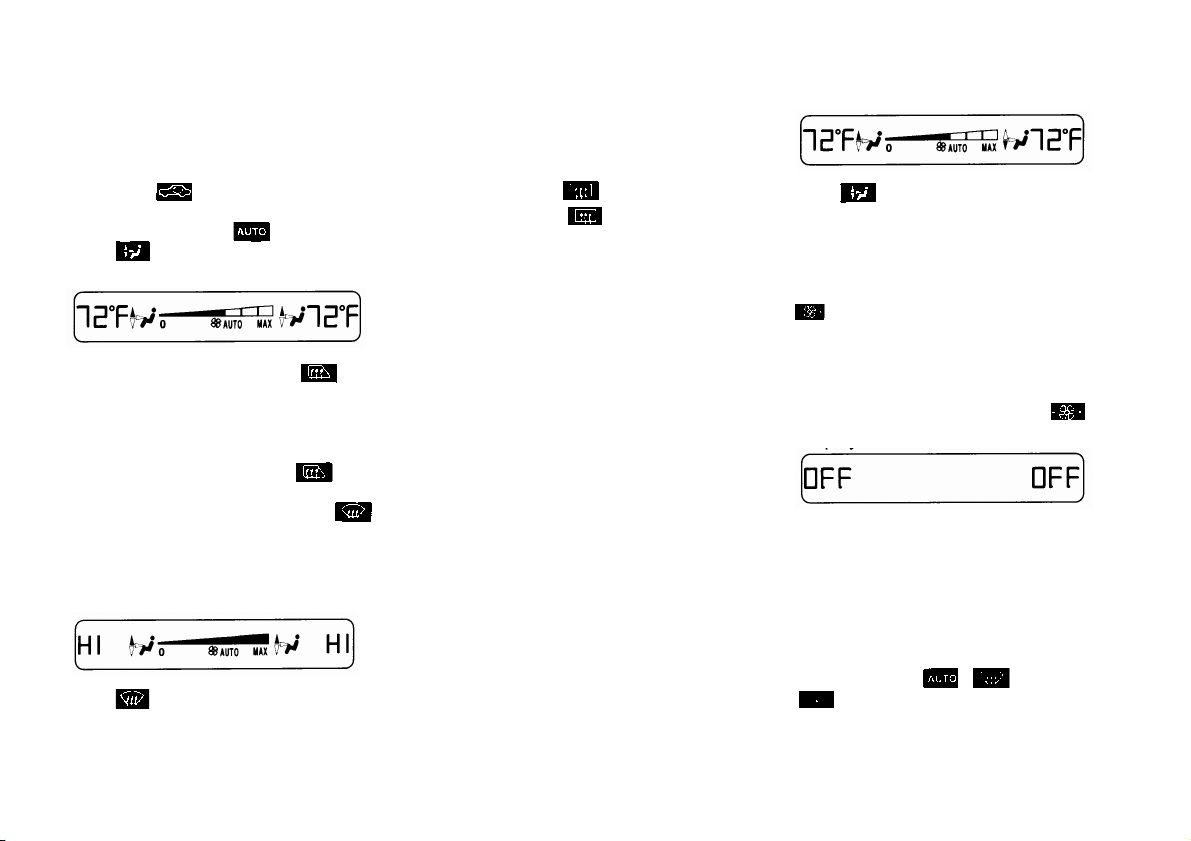
Air Volume
Press - or +side of rocker switch
until the requested blower
speed is attained. A choice of 7 blower
speeds is available.
To switch the automatic climate control
off, press -side of rocker switch
until symbol OFF is displayed.
The fresh air supply to the car interior
is shut off.
While driving, use this setting only
temporarily, otherwise the windshield
could fog up.
To switch the automatic climate control
on again, press , , or +side of
26

Air Recirculation
This mode can be selected to temporarily
At high outside temperatures, the system
Dust Filter
Activated Charcoal Filter
reduce the entry of annoying odors or
dust into the vehicle's interior.
Outside air is not supplied to the car's
interior.
To select, press button.
To cancel, press button again.
The system will automatically switch
from recirculated air to fresh air
• after approx. 5 minutes at outside
temperatures below approx. 40°F
(5°C),
• after approx. 30 minutes, at outside
temperatures above approx. 40°F
(5°C),
• after approx. 5 minutes, if button
is pressed.
If the windows should fog up from the
inside, switch from recirculated air back
to fresh air.
automatically engages the recirculated
air mode thereby increasing the cooling
capacity performance, switching to
partially fresh air within 20 minutes.
Nearly all dust particles and pollen are
filtered out before outside air enters the
passenger compartment through the air
distribution system.
Note:
Do not obstruct the air flow by keeping
the air intake grille in front of
windshield free of snow and debris.
Also keep the air intake grille in front of
windshield free of snow and debris.
To select, press button.
To cancel, press button again.
An activated charcoal filter markedly
reduces bad odors and re moves
pollutants from the air entering the
passenger compartment.
The blower speed is slightly increased
to supply a contant volume of air.
The system switches automatically to
the air recirculation mode, if the carbon
monoxide (CO) or nitric oxide (NO of
the outside air increases.
When pressing button or ‚
the filter is also switched oft.
Notes:
The automatic air recirculation does not
function when selecting the Economy
mode ‚ or the outside temperature
is below
45°F (7°C).
The activated charcoal filter should be
switched oft when windows fog up on
the inside, or if the passenger
compartment needs to be quickly heated
or cooled down.
27
Residual Engine Heat Utilization
With the engine switched off, it is
possible to continue heating the interior
for a short while.
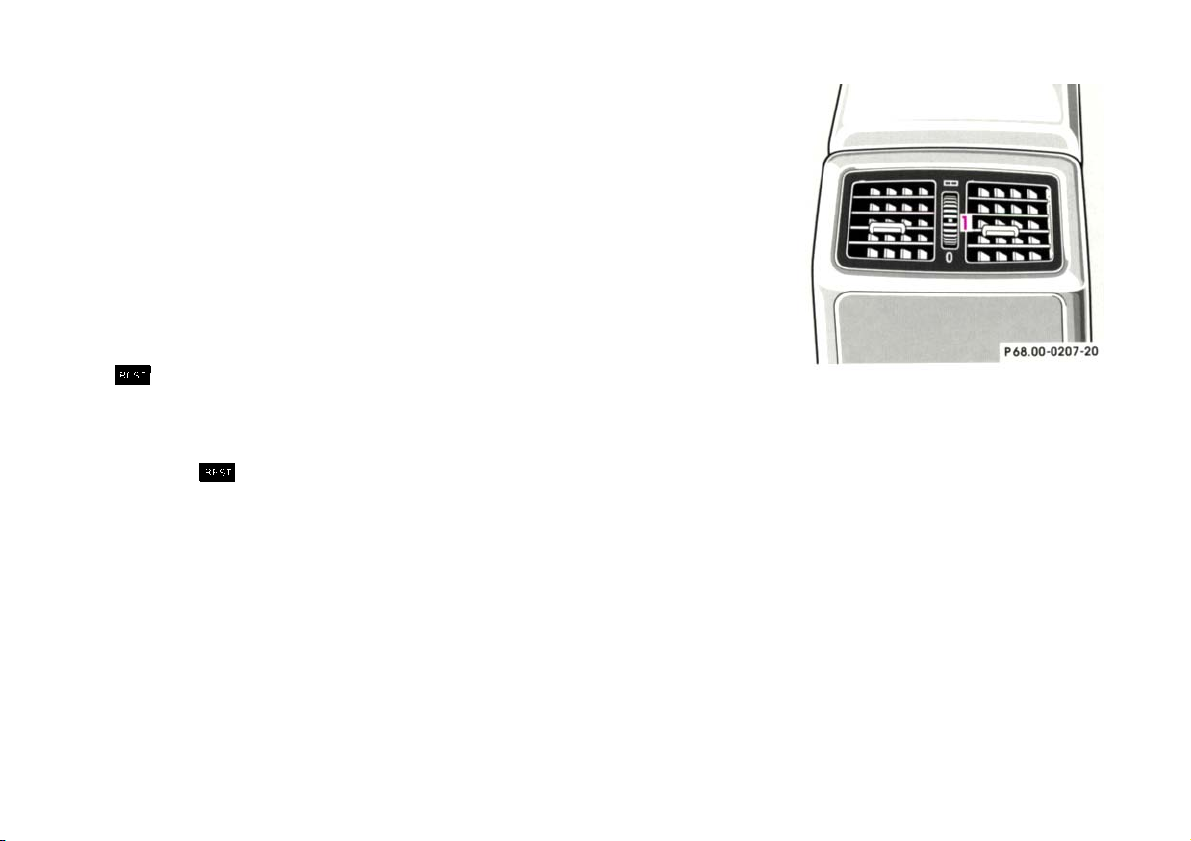
Front Center Console
Compartment Ventilation
The front center console compartment
has its own air outlet.
Air volume and distribution are
controlled automatically.
To select:
Turn electronic key in steering lock to
position 1 or 0 or remove key.
Press button.
This function selection will not activate
if the battery charge level is insufficient.
To cancel: Press button.
The system will automatically shut off
• if you turn electronic key in
steering lock to position 2,
• after approx. 30 minutes,
• if the battery voltage drops.
To open: Push lever down.
To close: Push lever up.
The air volume is dependent on the
setting of the
• air volume control
• air distribution control
• air outlets in the dashboard and
rear passenger compartment.
The air temperature is about the same
than that of the dashboard air outlets. It
cannot be regulated separately.
Note:
The compartment can get very warm
due to its confined space. When storing
heat sensitive objects in the
compartment, close the air outlet while
heating the passenger compartment.
Also, do not obstruct the air outlet.
Rear Passenger Compartment
Adjustable Air Outlet
To open air outlet, rotate wheel (1)
upward.
The air outlet is adjustable.
Important!
This vehicle is equipped with an air
conditioner system that uses R-134a
(HFC: ozone-friendly
hydrofluorocarbon) as a refrigerant.
Repairs should always be performed
by a qualified technician, and
refrigerant should be collected in a
recovery system for recycling.
28
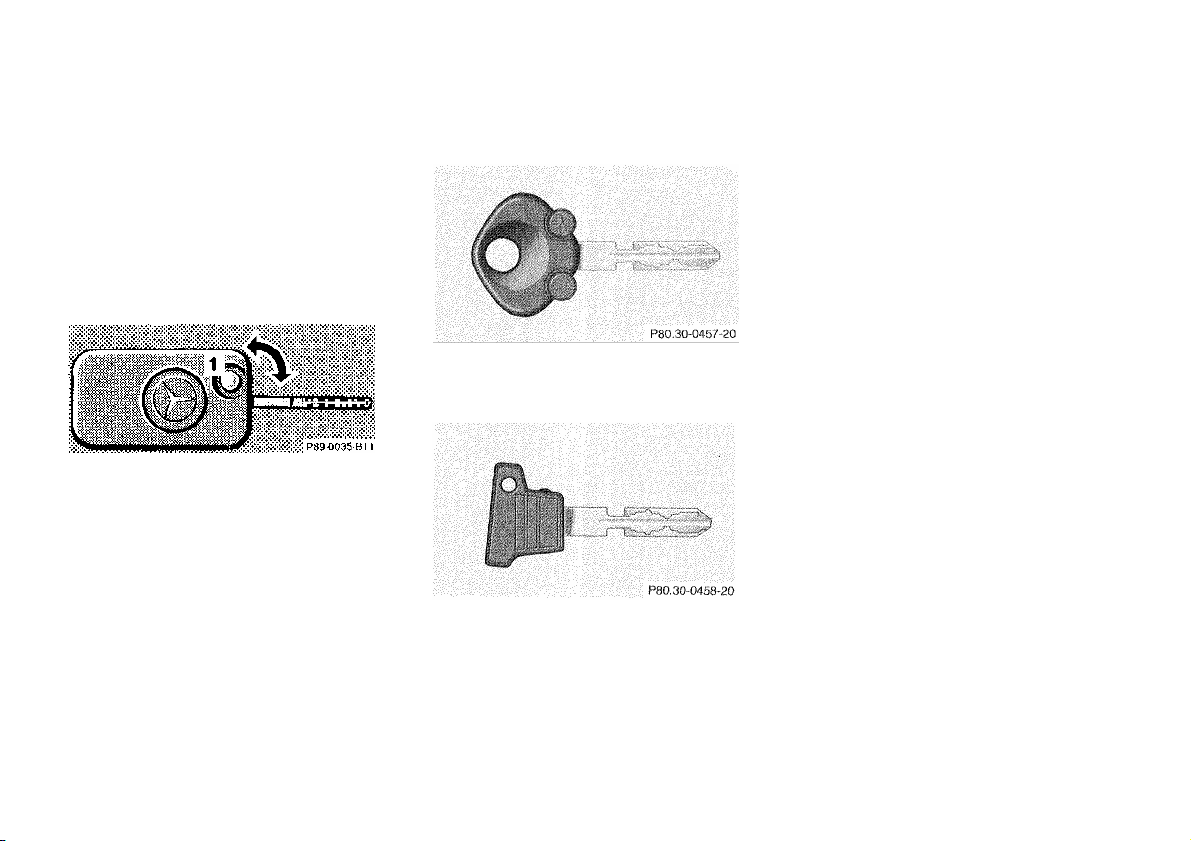
Car Keys
Included with your vehicle are:
• 2 Infrared remote controls
with folding master keys,
• 1 Valet key,
• 1 Flat key.
Infrared Remote Control with Folding
Master Key
The valet key works only in the front
passenger door lock and the steering
lock.
Notes:
Do not give the master key to an
unauthorized person.
We recommend that you carry the flat
key with you and keep it in a safe place
(e.g. your wallet) so that it is always
handy. Never leave the flat key in the
vehicle.
Warning!
The master key fits all locks on the car.
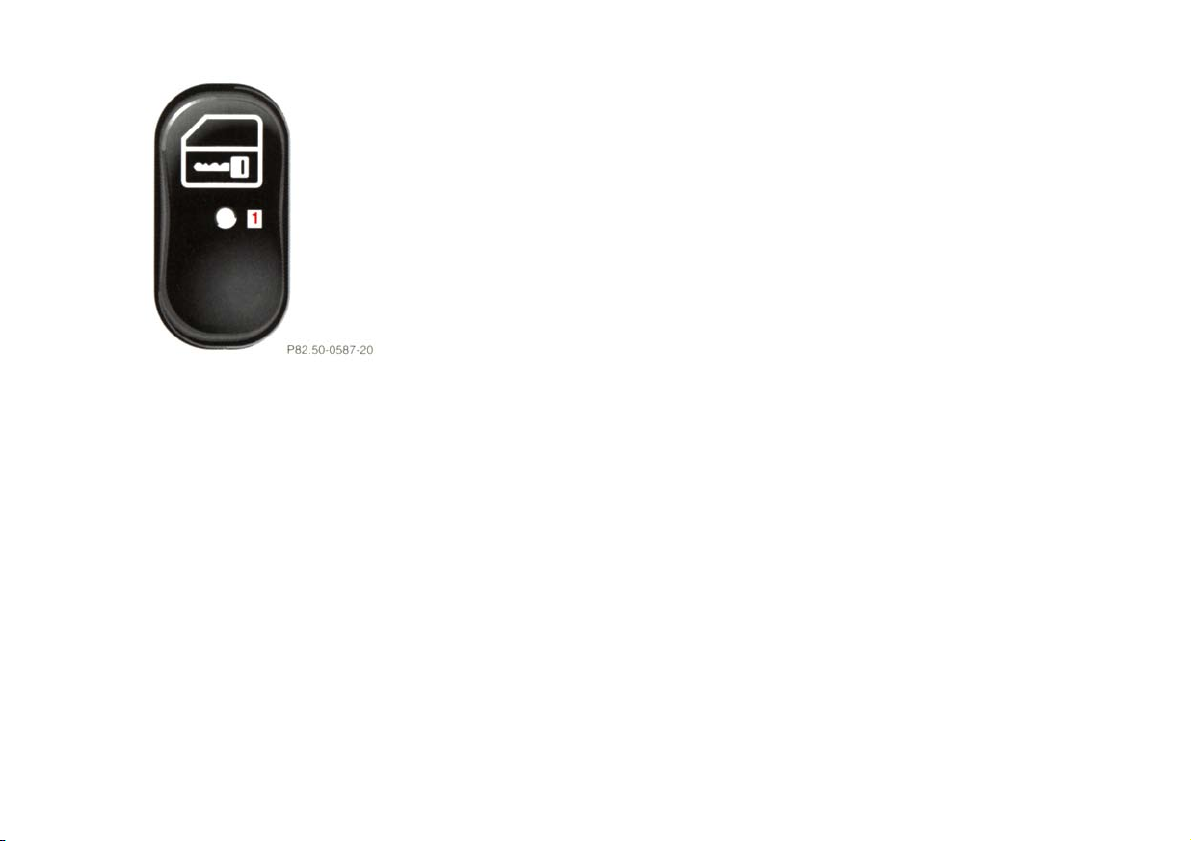
To release the key, press button (1).
The key unfolds from the holder by
itself.
The transmitter for the infrared remote
control is located in the key holder, the
receivers are located on the inside rear
view mirror, in the driver's door handle,
and next to the trunk lock.
The valet key will not work in the trunk
and storage compartments locks.
The flat key fits all locks on the car.
When leaving the vehicle always
remove the key from the steering
lock. Do not leave children
unattended in the vehicle.
Unsupervised use of vehicle
equipment may cause serious
personal injury.
Obtaining Replacement Keys
Your vehicle is equipped with a theft
deterrent locking system requiring a
special key manufacturing process. For
security reasons, replacement keys
can only be obtained from your
authorized Mercedes-Benz dealer.
29
Starter Lock-Out
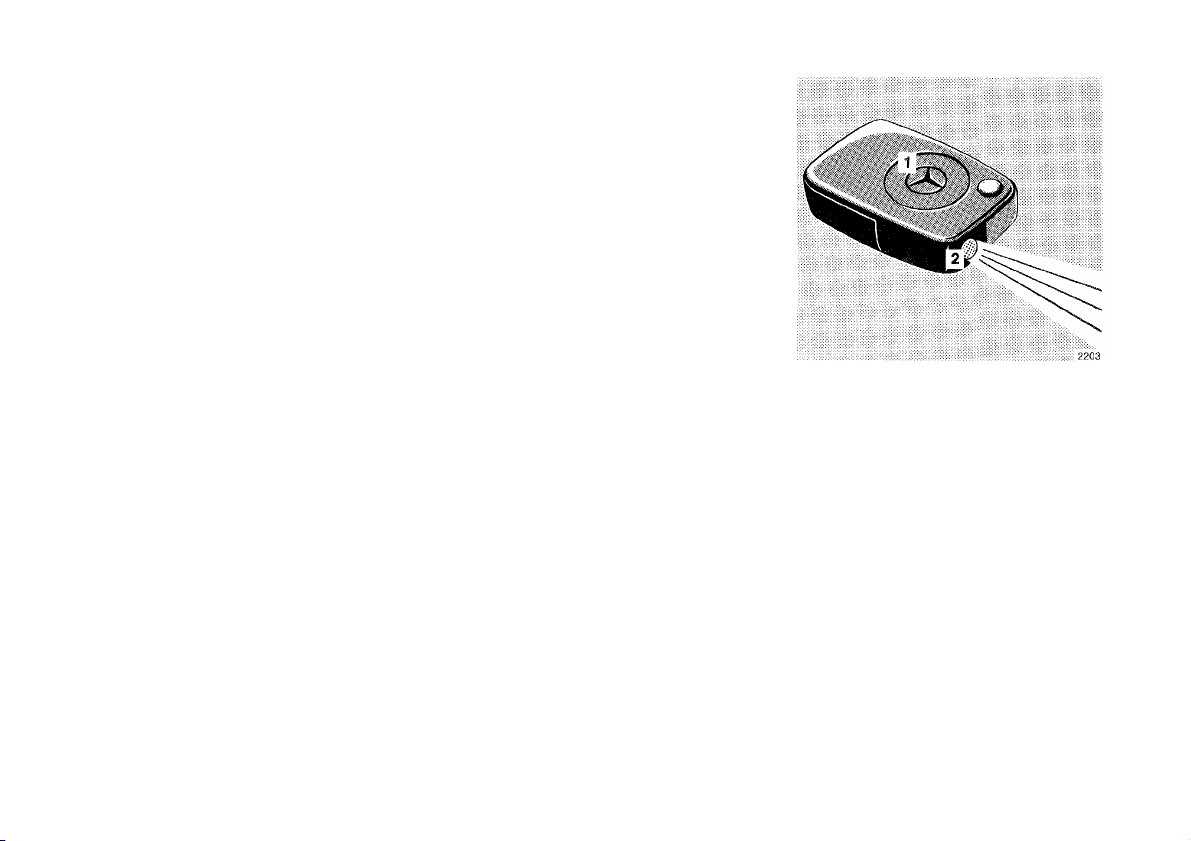
Infrared Remote Control
Important!
Removing the key from the steering
lock activates the start lock-out. The
engine cannot be started.
Turning the key in the steering lock to
position 2 deactivates the start lock-out.
The vehicle doors, trunk and fuel filler
flap can be centrally locked and
unlocked, as well as the windows and
sliding roof closed with infrared remote
control.
With vehicle centrally locked, the trunk
can also be opened by using the infrared
remote control. Aim transmitter eye at
receiver and press transmit button twice.
1 Transmit button
2 Transmitter eye and
battery check
3 Key release button
30
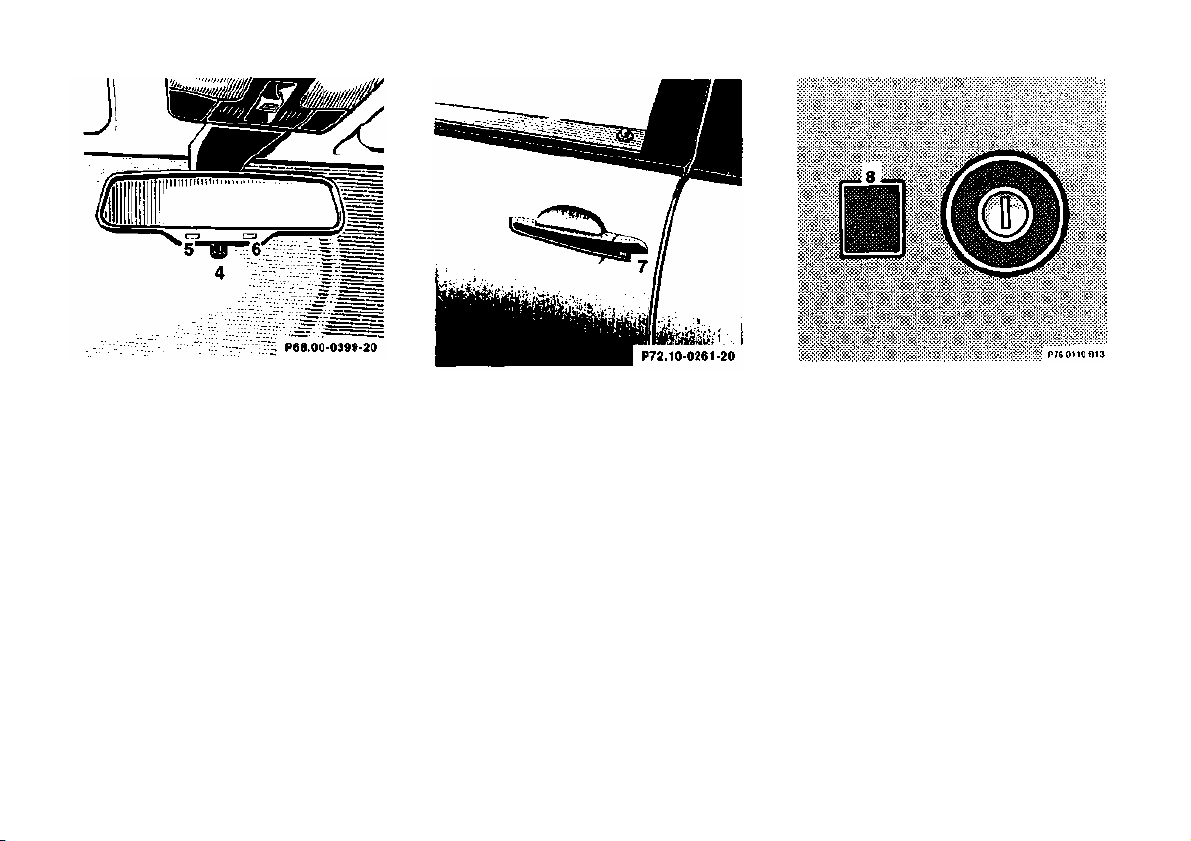
4 Receiver on inside rear view
mirror
5 Red indicator lamp
(locking)
6 Green indicator lamp
(unlocking)
7 Receiver, red indicator lamp
(locking) and green indicator lamp
(unlocking) in driver's door handle.
8 Receiver, red indicator lamp
(locking) and green indicator lamp
(unlocking) next to trunk lock.
31

Locking and Unlocking
Aim transmitter eye (2) at a
receiver (4, 7 or 8) and press
transmit button.
The red or green indicator lamp on the
receiver should blink. It stops blinking
when the vehicle is properly locked or
unlocked.
Notes:
If the trunk was previously locked
separately, it will remain locked (see
Index).
If the vehicle cannot be locked or
unlocked by pressing the transmit
button, then it may be necessary to
change the batteries in the transmitter
(if ok, battery indicator lamp in
transmitter will light briefly when
transmitting) or to synchronize the
system, see Remote Control, Infrared in
Index.
Closing Windows and Sliding/ PopUp Roof from Outside
Continue to press transmit button after
locking car.
The windows and sliding/pop-up roof
begin to close after approx. 2 seconds.
Warning!
Never close the windows or
sliding/ppp-up roof if there is the
possibility of anyone being harmed
by the closing procedure.
In case the closing procedure causes
potential danger, the closing
procedure can be immediately
reversed by releasing and pressing
the remote control button again until
the green indicator lamp at the
receiver blinks. The sliding/pop-up
roof and windows will open again.
The sliding/pop-up roof will only
open if it was not fully closed.
Note:
If the side windows and sliding/ popup roof cannot be closed automatically
by pressing the transmit button of the
infrared remote control then it may be
necessary to change the batteries in the
transmitter (if ok, battery indicator
lamp in transmitter will light briefly
when transmitting), or to synchronize
the system, see Remote Control,
Infrared in Index.
32
Central Locking System
The entire vehicle may be locked or
unlocked by either using the master key
in the door or trunk locks, or central
locking switch located in center
console. The central locking system also
locks or unlocks the fuel filler flap.
Note:
If the fuel filler flap cannot be opened,
refer to Fuel Filler Flap, Manual
Release (see Index).
Doors
1 Opening - pull handle
2 Unlocking
3 Locking
4 Individual door from inside:
• Push lock button down to lock.
• Pull lock button up to unlock.
When you lock the car, all door lock
buttons should move down. If any one
stays up, the respective door is not
properly closed.
You should then unlock the car, open
and reclose this door, and lock the car
again. Each individual door can be
locked with door lock button - the
driver's door can only be locked when it
is closed.
If the car has previously been locked
from the outside, only the door being
opened from the inside will unlock, and
the alarm will come on. The remaining
doors, the trunk lid and fuel filler flap
remain locked.
33
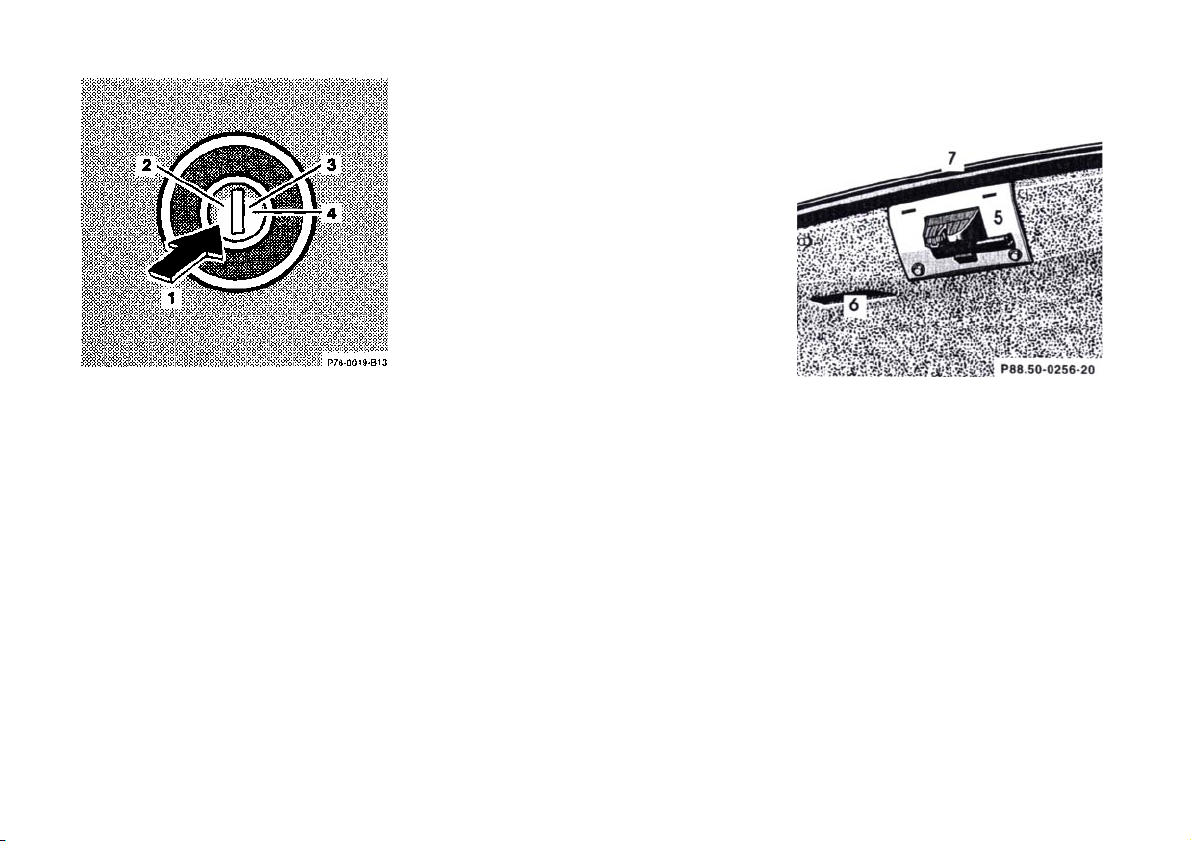
Central locking switch
1 Locking
2 Unlocking
The doors cannot be unlocked with the
central locking switch, if car was
previously locked with the remote
control.
The central locking switch is located on
the center console.
The doors can only be locked with the
central locking switch, if the front doors
are closed.
If the car has previously been locked
with the central locking switch, only the
opened door is unlocked.
34
Trunk
1 Neutral position - push to open
2 Unlocking
3 Locking (detent)
4 Separate locking of trunk -
remove key in this position.
When the trunk is separately locked,
it remains locked when unlocking any
door.
To deny any unauthorized person
access to the trunk, lock it separately.
Leave only the valet key with the
vehicle.
Notes:
In case of a malfunction in the central
locking system the doors and trunk can
be locked and unlocked individually.
To lock, turn key to position 3 or push
down lock buttons.
To unlock, turn key to position 2 or pull
up lock buttons.
If the fuel filler flap cannot be opened,
refer to Fuel Filler Flap, Manual Release
(see Index).
Lower trunk lid using handle (5) or
recessed grip (6), and close it with grip
molding (7).
35

Power Windows and Sliding/Pop-Up
Roof
1 Opening
2 Interrupting
3 Closing
When locking doors or trunk, turn
mechanical key in door lock or trunk
lock to position 3 and hold. The
windows begin to close automatically
after approximately 1 second.
To interrupt the closing procedure,
turn mechanical key to position 2.
Warning!
Never close the windows or
sliding/ppp-up roof if there is the
possiblity of anyone being harmed
by the closing procedure.
In case the closing procedure causes
potential danger, the closing
procedure can be immediately
reversed by turning the key to the
unlocking position (3) within 10
seconds. The sliding/pop-up roof and
windows will open again. The
sliding/pop-up roof will only open if
it was not fully closed.
Note:
If the closing procedure is interrupted, it
can only be continued by first turning
the key to the unlocked position (3) and
then again to the locking position (1) and
hold.
36
1 Indicator lamp in switch located in
center console
Antitheft Alarm System
The antitheft alarm is automatically
armed or disarmed with the remote
control or any of your vehicle's
mechanical keys by locking or
unlocking the driver's door or the
trunk.
A blinking lamp (1) indicates that
the alarm is armed.
The antitheft alarm is disarmed
when unlocking the front passenger
door or the trunk with any of your
vehicle's keys or infrared remote
control
Operation:
Once the alarm system has been armed,
the exterior vehicle lamps will flash and
an alarm will sound when someone:
• opens a door,
• opens the trunk,
• opens the hood,
• switches on or bridges the
ignition circuit,
• steps on the brake pedal.
The alarm will last approximately 21/
2
minutes in the form of flashing exterior
lamps. At the same time an alarm will
sound for 30 seconds. The alarm will
stay on even if the activating element
(a door, for example) is immediately
closed.
Note:
We recommend that you carry the
electronic reserve key plus mechanical
key with you and keep it in a safe place
(e.g. your wallet) so that it is always
handy. Never leave the electronic
reserve key in the vehicle.
37
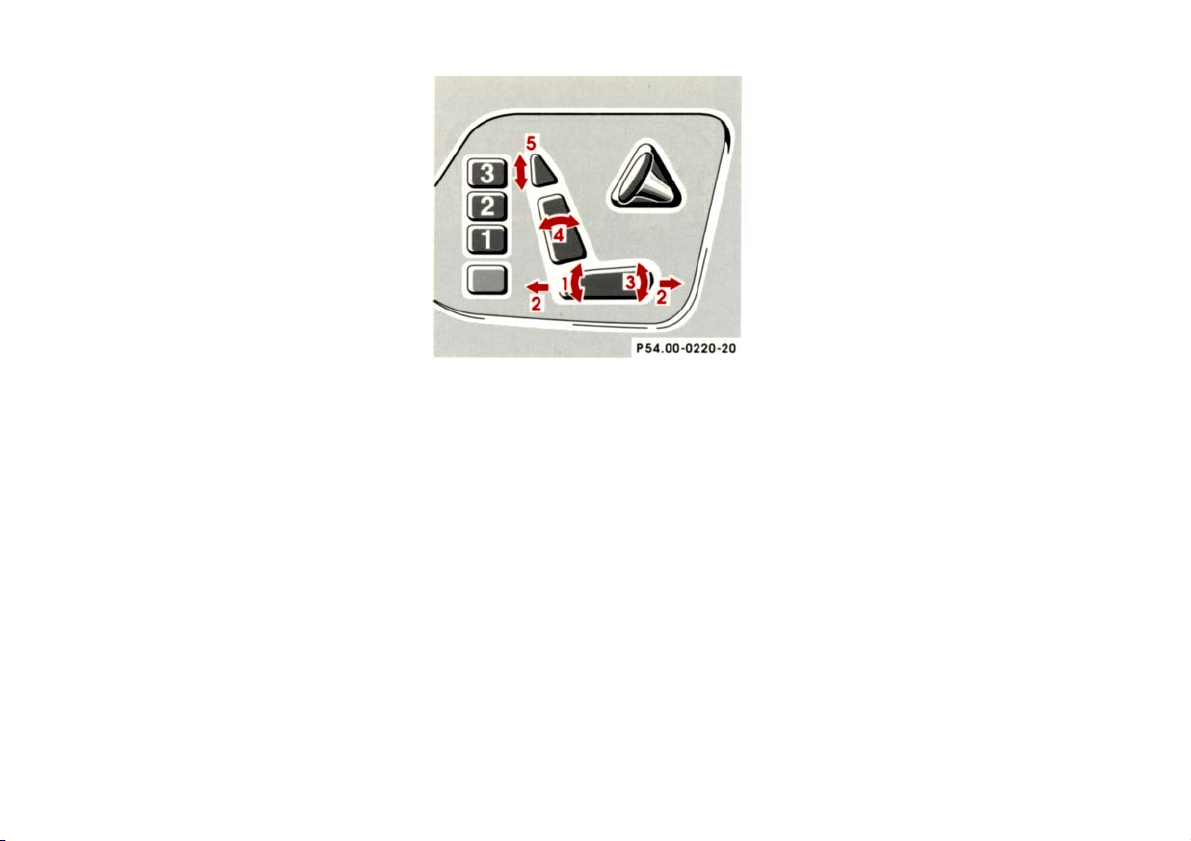
Power Seats, Front
equipment may cause serious personal
Warning!
Do not adjust the driver's seat while
driving. Adjusting the seat while
driving could cause the driver to lose
control of the vehicle.
Never ride in a moving vehicle with
the backrest reclined. Sitting in an
excessively reclined position can be
dangerous. You could slide under the
seat belt in a collision. If you slide
under it, the belt would apply force
at the abdomen or neck. That could
cause serious or even fatal injuries.
The backrest and seat belt provide
the best restraint when the wearer is
in an upright position and the belt is
properly positioned on the body.
Never place hands under seat or near
any moving parts while a seat is
being adjusted.
The slide switches are located in each
front door.
Warning!
When leaving the vehicle always
remove the electronic key from the
steering lock.
The power seats can also be operated
with the driver's or passenger door
open. Do not leave children
unattended in the vehicle or with
access to an unlocked vehicle.
Unsupervised use of vehicle
Turn electronic key in steering lock to
position 1 or 2 (with the driver's or
passenger's door open, the power seats
can also be operated with the electronic
key removed or in steering lock
position 0).
1 Seat, up/down
2 Seat, fore/aft
3 Seat cushion tilt
4 Backrest tilt
5 Head restraint
During seat adjustment, the head
restraint is automatically adjusted to
support the back of the head
approximately at ear level.
The head restraint angle can also be
adjusted manually.
Note:
Your vehicle is equipped with
power head restraints, do not try to
raise or lower them manually.
injury.
38
Synchronizing Head Restraints
If the power supply was interrupted
(battery disconnected or empty), the
power seats and head restraints are no
longer adjusted automatically.
rear view mirrors can be programmed
into memory by pushing first memory
button (6) and then "2", respectively
"3".
Note:
To resynchronize the adjustment
feature, move the seat completely
forward and the head restraint fully
down.
Caution!
Do not remove head restraints except
when mounting seat covers. For
removal refer to Head Restraints,
Front, see Index. Whenever restraints
have been removed be sure to reinstall
them before driving.
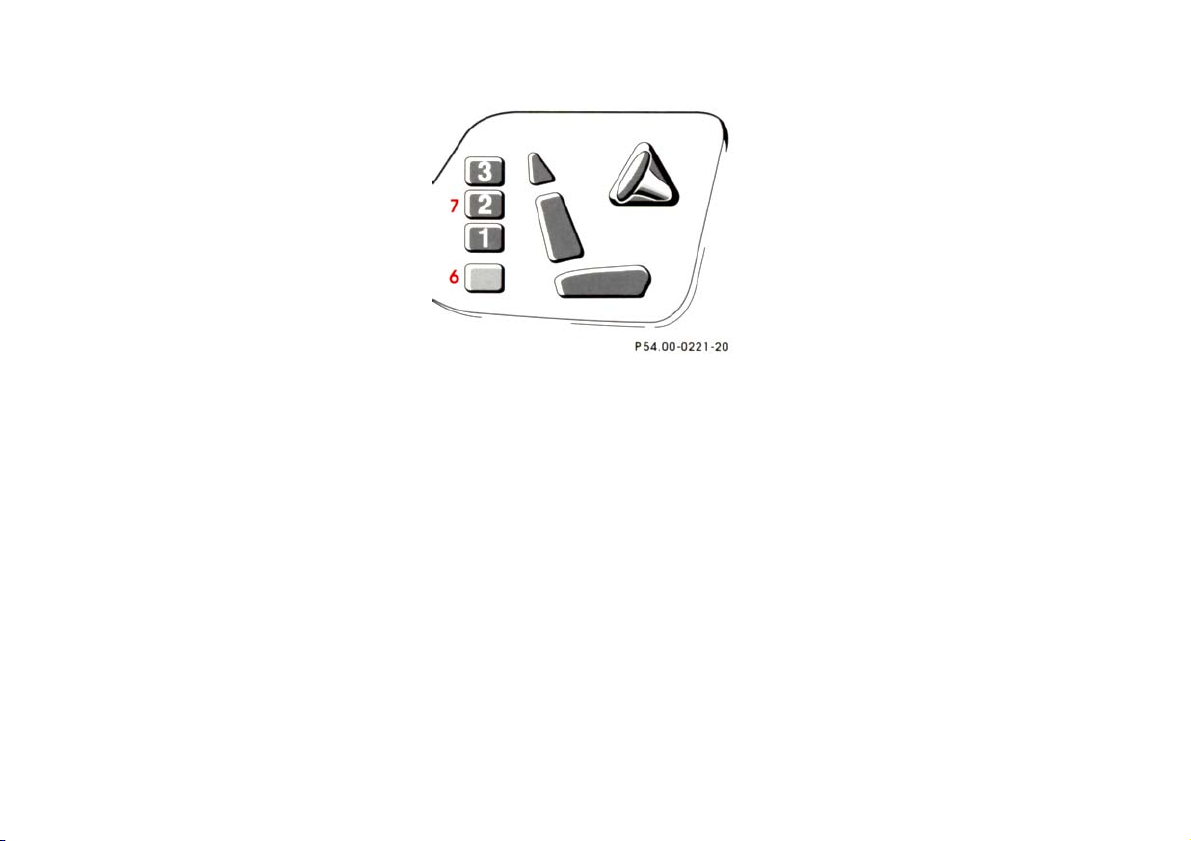
Memory Storing and Recalling
6 Memory button
7 Position buttons
Storing
Three sets of seat/head restraint and
exterior rear view mirror positions may
be programmed into memory. After the
seat/head restraint and exterior rear
view mirrors are positioned, push
memory button (6), release, and within
3 seconds push position button "1". A
second and third set of positions for the
same seat/head restraint and exterior
See Index for instructions on
adjustment of mirrors.
Recalling
To recall a seat/head restraint and
exterior rear view mirror position, push
and hold position button "1", "2" or "3"
until seat/head restraint and exterior
rear view mirror movement has
stopped. The seat/head restraint and
exterior rear view mirror movement
stops when the position button is
released.
Important!
Prior to operating the vehicle, the driver
should adjust the seat height for proper
vision as well as fore/aft placement and
seat back angle to insure adequate
control, reach, operation, and comfort.
The head restraint should also be
adjusted for proper height. See also
airbag section for proper seat
positioning.
39
head restraint should also be adjusted
movable seat cushions, and inflatable air
for proper height.
Both the inside and outside rear view
mirrors should be adjusted for adequate
rearward vision.
The seat cushion movement and
amount of backrest cushion height and
curvature can be continuously varied
with regulators (1, 2 and 3) after
turning the electronic key in steering
lock to position 2.
Fasten seat belts. Infants and small
children should be seated in a properly
secured restraint system that complies
with U.S. Federal Motor Vehicle
Safety Standard 213 and Canadian
Motor Vehicle Safety Standard 213.
All seat, head restraint, steering wheel,
and rear view mirror adjustments as
well as fastening of seat belts should be
done before the vehicle is put into
motion.
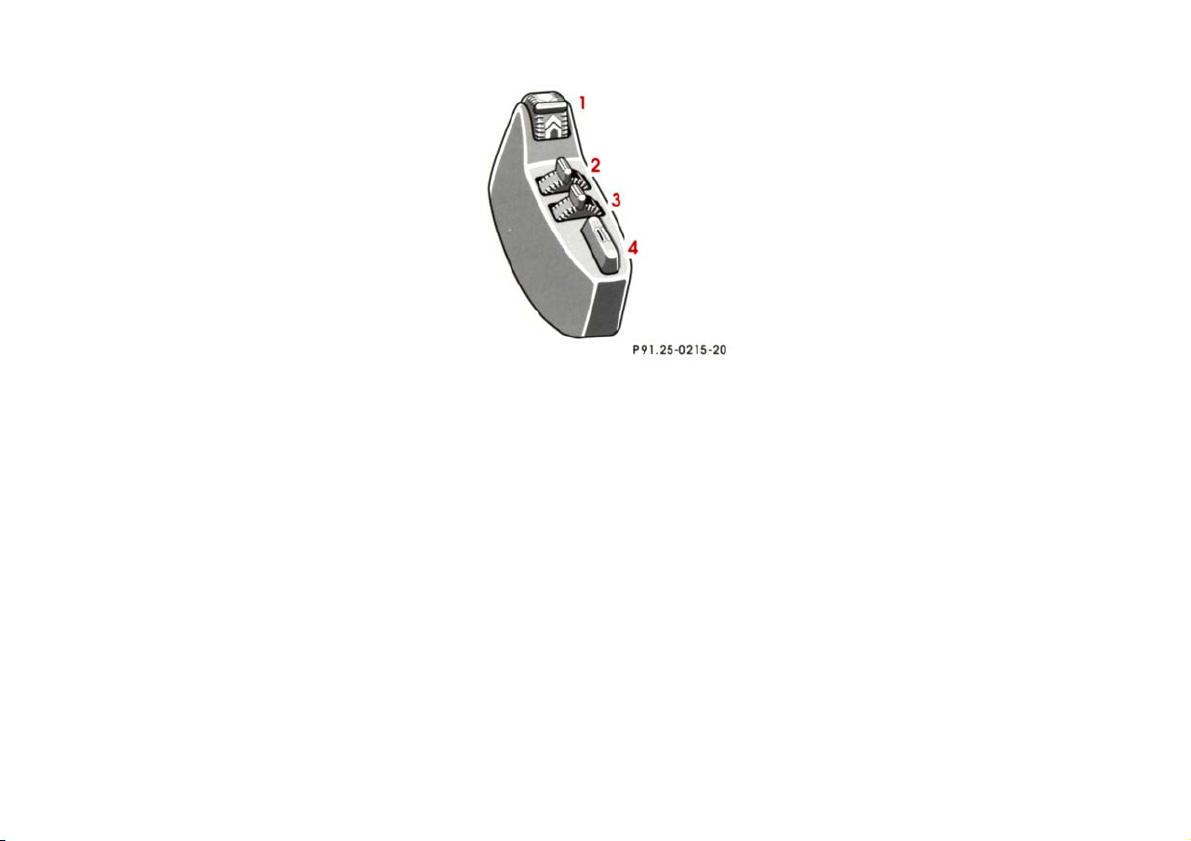
Multicontour Seat (optional)
1 Seat cushion depth
2 Backrest bottom
3 Backrest center
4 Side bolster adjustment
Some models may be equipped with
multicontour seats. These seats have
cushions built into the backrest to
provide additional lumbar and side
support.
The side bolsters of the backrest can be
adjusted with rocker switch (4):
• press down forward end increase side support,
• press down rearward end decrease side support.
If the engine is turned off, the last
cushion setting is retained in memory,
and automatically adjusts the cushion
to this setting when the engine is
restarted.
40
 Loading...