

Page 1
Grafik auf der Vorgabeseite in den Grafikrahmen importieren!
COMAND Operator’s Manual
Mercedes-Benz
Page 2

Order-No. DaimlerChrysler 6515 6644 13 Blaupunkt 8 622 403 128 Index C Parts-No. 203 584 33 96 US Edition C 05/02
Page 3

Welcome to COMAND!
Please make yourself familiar with your
COMAND control unit and read the instructions in this manual before operating the
COMAND system. This will help you derive
a greater benefit from the system. Please
also follow the instructions and warnings
contained in this manual. Ignoring them
could result in damage to the vehicle or
personal injury to you or others.
Your COMAND system may have some or
all of the equipment described in this manual. Therefore, you may find explanations
for optional equipment not installed in your
vehicle. If you have any questions about
the operation of any equipment, your authorized Mercedes-Benz Center will be
glad to demonstrate the proper procedures.
We continuously strive to improve our product and ask for your understanding that
we reserve the right to make changes in
design and equipment. Therefore, information, illustrations and descriptions in this
manual might differ from the equipment installed in your vehicle. As such, the information, illustrations and descriptions
contained in this manual may not be reasonably relied upon in making any claims
with respect to the actual performance of
the product.
These operating instructions form an integral part of the vehicle and should therefore always be kept inside the vehicle and
passed on to the new owner if the vehicle
is sold.
We extend our best wishes for many miles
of safe, pleasurable driving.
Mercedes-Benz USA, LLC
A DaimlerChrysler Company
Page 4

Page 5

Introduction . . . . . . . . . . . . . . . . . . . . . 1
Where to find it . . . . . . . . . . . . . . . . . . . 1
Symbols . . . . . . . . . . . . . . . . . . . . . . . . . 2
Operating safety. . . . . . . . . . . . . . . . . . . 3
At a glance . . . . . . . . . . . . . . . . . . . . . . 5
COMAND control unit . . . . . . . . . . . . . . 6
Screen displays . . . . . . . . . . . . . . . . 9
Multifunction display . . . . . . . . . . . . . . 11
Quick reference COMAND . . . . . . . . . . 12
Switching the COMAND control unit
on and off . . . . . . . . . . . . . . . . . . . . 12
Adjusting the volume . . . . . . . . . . . 14
Radio operation . . . . . . . . . . . . . . . 14
CD operation . . . . . . . . . . . . . . . . . 15
Telephone operation. . . . . . . . . . . . 16
Entering a destination and
calculating a route . . . . . . . . . . . . . 17
Selecting beeps . . . . . . . . . . . . . . . 21
Audio . . . . . . . . . . . . . . . . . . . . . . . . . . 23
Radio operation . . . . . . . . . . . . . . . . . . 24
Quick reference . . . . . . . . . . . . . . . 24
Switching on . . . . . . . . . . . . . . . . . . 28
Switching another system on . . . . . 28
Changing the Radio band . . . . . . . . 29
Selecting a station . . . . . . . . . . . . . 30
Memory functions. . . . . . . . . . . . . . 34
Multifunction display . . . . . . . . . . . 40
CD operation . . . . . . . . . . . . . . . . . . . . 42
Quick reference . . . . . . . . . . . . . . . 42
General information on
CD operation . . . . . . . . . . . . . . . . . 44
Menu overview . . . . . . . . . . . . . . . . 48
Switching on . . . . . . . . . . . . . . . . . . 50
Switching another system on . . . . . 50
Track select . . . . . . . . . . . . . . . . . . 51
Selecting a CD . . . . . . . . . . . . . . . . 53
Fast forward/reverse . . . . . . . . . . . 54
CD track scan . . . . . . . . . . . . . . . . . 55
Contents
Naming a CD . . . . . . . . . . . . . . . . . 55
Playback mode . . . . . . . . . . . . . . . . 58
Muting CD playback . . . . . . . . . . . . 60
Error messages. . . . . . . . . . . . . . . . 60
Multifunctional display . . . . . . . . . . 62
Sound settings . . . . . . . . . . . . . . . . . . . 63
Adjusting sound settings . . . . . . . . 63
Telephone . . . . . . . . . . . . . . . . . . . . . . 67
Important notes . . . . . . . . . . . . . . . . . . 68
Multifunction display . . . . . . . . . . . . . . 71
Display overview . . . . . . . . . . . . . . . 72
Telephone operation. . . . . . . . . . . . . . . 74
Quick reference . . . . . . . . . . . . . . . 74
Menu overview . . . . . . . . . . . . . . . . 76
Switching telephone operation on . 78
Switching telephone operation off . 79
Incoming call. . . . . . . . . . . . . . . . . . 79
Outgoing calls . . . . . . . . . . . . . . . . . 82
Notebook . . . . . . . . . . . . . . . . . . . . 97
Editing the phone book. . . . . . . . . . 98
Page 6

Contents
SMS function . . . . . . . . . . . . . . . . . . . 103
Activating . . . . . . . . . . . . . . . . . . . 103
Reading SMS messages received . 104
Emergency call . . . . . . . . . . . . . . . . . . 106
Telephone is ready for operation . 107
Service numbers. . . . . . . . . . . . . . . . . 108
Calling a service number . . . . . . . 108
Changing personal service
number . . . . . . . . . . . . . . . . . . . . . 109
Changing the number for
roadside assistance . . . . . . . . . . . 110
Navigation. . . . . . . . . . . . . . . . . . . . . 111
Important notes . . . . . . . . . . . . . . . . . 112
Quick reference . . . . . . . . . . . . . . . . . 116
Changing the navigation CD . . . . . 119
Destination input . . . . . . . . . . . . . . . . 120
Menu overview . . . . . . . . . . . . . . . 120
Switching the navigation system
on . . . . . . . . . . . . . . . . . . . . . . . . . 122
Entering destination address . . . . 123
Continue destination input . . . . . . 128
Selecting a destination
via the map . . . . . . . . . . . . . . . . . . 131
Entering Points of Interest . . . . . . 137
Selecting the last destinations . . . 141
Calculating a route . . . . . . . . . . . . 141
Route guidance. . . . . . . . . . . . . . . . . . 144
Route guidance principles. . . . . . . 144
Requesting destination and
route information . . . . . . . . . . . . . 147
Beginning route guidance . . . . . . . 152
Turning onto a street. . . . . . . . . . . 154
Following the course of the road . 155
Driving through an intersection. . . 155
Changing to map display. . . . . . . . 156
Mix of map and symbol display. . . 157
Altering the map scale . . . . . . . . . 158
Selecting map orientation. . . . . . . 159
Marking a way point . . . . . . . . . . . 160
Selecting a detour. . . . . . . . . . . . . 163
Resetting functions . . . . . . . . . . . . 167
Deviating from the calculated
route . . . . . . . . . . . . . . . . . . . . . . . 168
Page 7

Contents
Driving on a non-digitized road. . . 168
Interrupt route guidance during a jour-
ney . . . . . . . . . . . . . . . . . . . . . . . . 169
Arriving at destination . . . . . . . . . 170
Activating audio system . . . . . . . . 171
Activating audio functions . . . . . . 171
Canceling route guidance. . . . . . . 173
Destination memory. . . . . . . . . . . . . . 174
Retrieving a destination from the desti-
nation memory . . . . . . . . . . . . . . . 174
Saving the current destination . . . 175
Saving the current vehicle
location. . . . . . . . . . . . . . . . . . . . . 177
Sorting destination memory . . . . . 178
Deleting a destination. . . . . . . . . . 179
Settings . . . . . . . . . . . . . . . . . . . . . . . 180
Entering the vehicle location . . . . 180
Calibration . . . . . . . . . . . . . . . . . . 181
Info Services/System settings. . . . 183
Info Services*. . . . . . . . . . . . . . . . . . . 184
Requesting and displaying
Info Services . . . . . . . . . . . . . . . . . 184
System settings . . . . . . . . . . . . . . . . . 187
Activating the main settings menu 187
Adjusting the brightness. . . . . . . . 188
Activating settings menu . . . . . . . 188
Selecting the language . . . . . . . . . 189
Setting date and time . . . . . . . . . . 190
Switching beep tones on and off . 197
Setting the display dimming characteri-
stics (day and night display) . . . . . 198
Resetting all settings to the
factory settings. . . . . . . . . . . . . . . 199
Auxiliary audio source . . . . . . . . . . . . 200
Connecting . . . . . . . . . . . . . . . . . . 200
Switching auxiliary audio source
on . . . . . . . . . . . . . . . . . . . . . . . . . 200
Switching auxiliary audio source
off . . . . . . . . . . . . . . . . . . . . . . . . . 202
Glossary . . . . . . . . . . . . . . . . . . . . . . 203
Index . . . . . . . . . . . . . . . . . . . . . . . . . 205
Page 8

Contents
Page 9

Where to find it
This Operator’s Manual is designed to provide support information for you, the
COMAND operator. Each chapter has its
own guide color to provide fast access to
information.
At a glance
Here you will find an overview of
all COMAND control elements and system
components. If you are operating
COMAND for the first time or if you have
rented or borrowed the vehicle, this is the
chapter you should read first.
Audio
Here you will find all the information on
how to use the radio, cassette player*, CDplayer, CD changer and adjust the audio
system settings.
Telephone
Here you can learn in detail about the
many functions of the telephone, SMS,
how to initiate an emergency call and use
service numbers.
Navigation
This chapter provides detailed information
on the following topics:
앫 Destination input
앫 Route selection and calculation
앫 Route guidance including detour
Introduction
Where to find it
Info Services* and System settings
This chapter provides information on how
to:
앫 Request and display info services such
as news, weather, stocks and sports
앫 Adjust COMAND system settings
Directories
The glossary explains the most important
technical terms.
The table of contents and index directory
will help you quickly locate the information
you need.
앫 Destination memory
1
Page 10

Introduction
Symbols
Symbols
You will find the following symbols in these
operating instructions:
* The asterisk identifies optional
equipment. Since not all models
have the same standard equipment, your COMAND system equipment may deviate from some
descriptions and illustrations.
Warning G
A warning draws your attention to possible
dangers to your safety or the safety of
others.
!
Highlights hazards that may result in
damage to your COMAND.
i
Helpful hints or further information you
may find useful.
왘 This symbol points to instructions for
you to follow.
왘 A number of these symbols appearing
in succession indicates a multiple-step
procedure.
(
컄 page 3) This symbol tells you where
to look for further information on this subject.
컄컄
The continuation symbol
marks an interrupted procedure which will be continued
on the next page.
Display Words appearing in the muli-
function display are printed
in the type shown here.
2
Page 11

Operating safety
Introduction
Operating safety
Warning G
Any alterations made to electronic components and the software can cause malfunctions.
The radio, amplifier, CD changer and telephone* are interconnected. When one of the
components is not operational or has not
been removed/replaced properly, the function of other components may be impaired.
This condition might seriously impair the
operating safety of your vehicle.
We recommend that you have any service
work on electronic components carried out
by an authorized Mercedes-Benz Center.
Warning G
In order to avoid distraction, which could
lead to an accident, system settings should
be entered with the vehicle at a standstill.
The driver should only operate the system
when traffic conditions permit.
Bear in mind that at a speed of just
30 mp/h (approximately 50 km/h), your car
is covering a distance of 50 feet (approximately 14 m) every second.
COMAND supplies you with information to
help you select your route more easily and
guide you conveniently and safely to your
destination. For safety reasons, we encourage the driver to stop the vehicle in a safe
place before answering or placing a call, or
consulting the COMAND screen to read navigational maps, instructions, or downloaded information.
While the navigation system provides directional assistance, the driver must remain focused on safe driving behavior, including
attention to traffic and street signs, and
should utilize the system’s audio cues while
driving.
The navigation system does not supply any
information on stop signs, yield signs, traffic
regulations or traffic safety rules. This always remains your personal responsibility
when you drive. CD maps do not cover all
areas nor all routes within an area.
3
Page 12

Introduction
Operating safety
4
Page 13

At a glance
COMAND control unit
Multifunction display
Quick reference COMAND
5
Page 14
At a glance
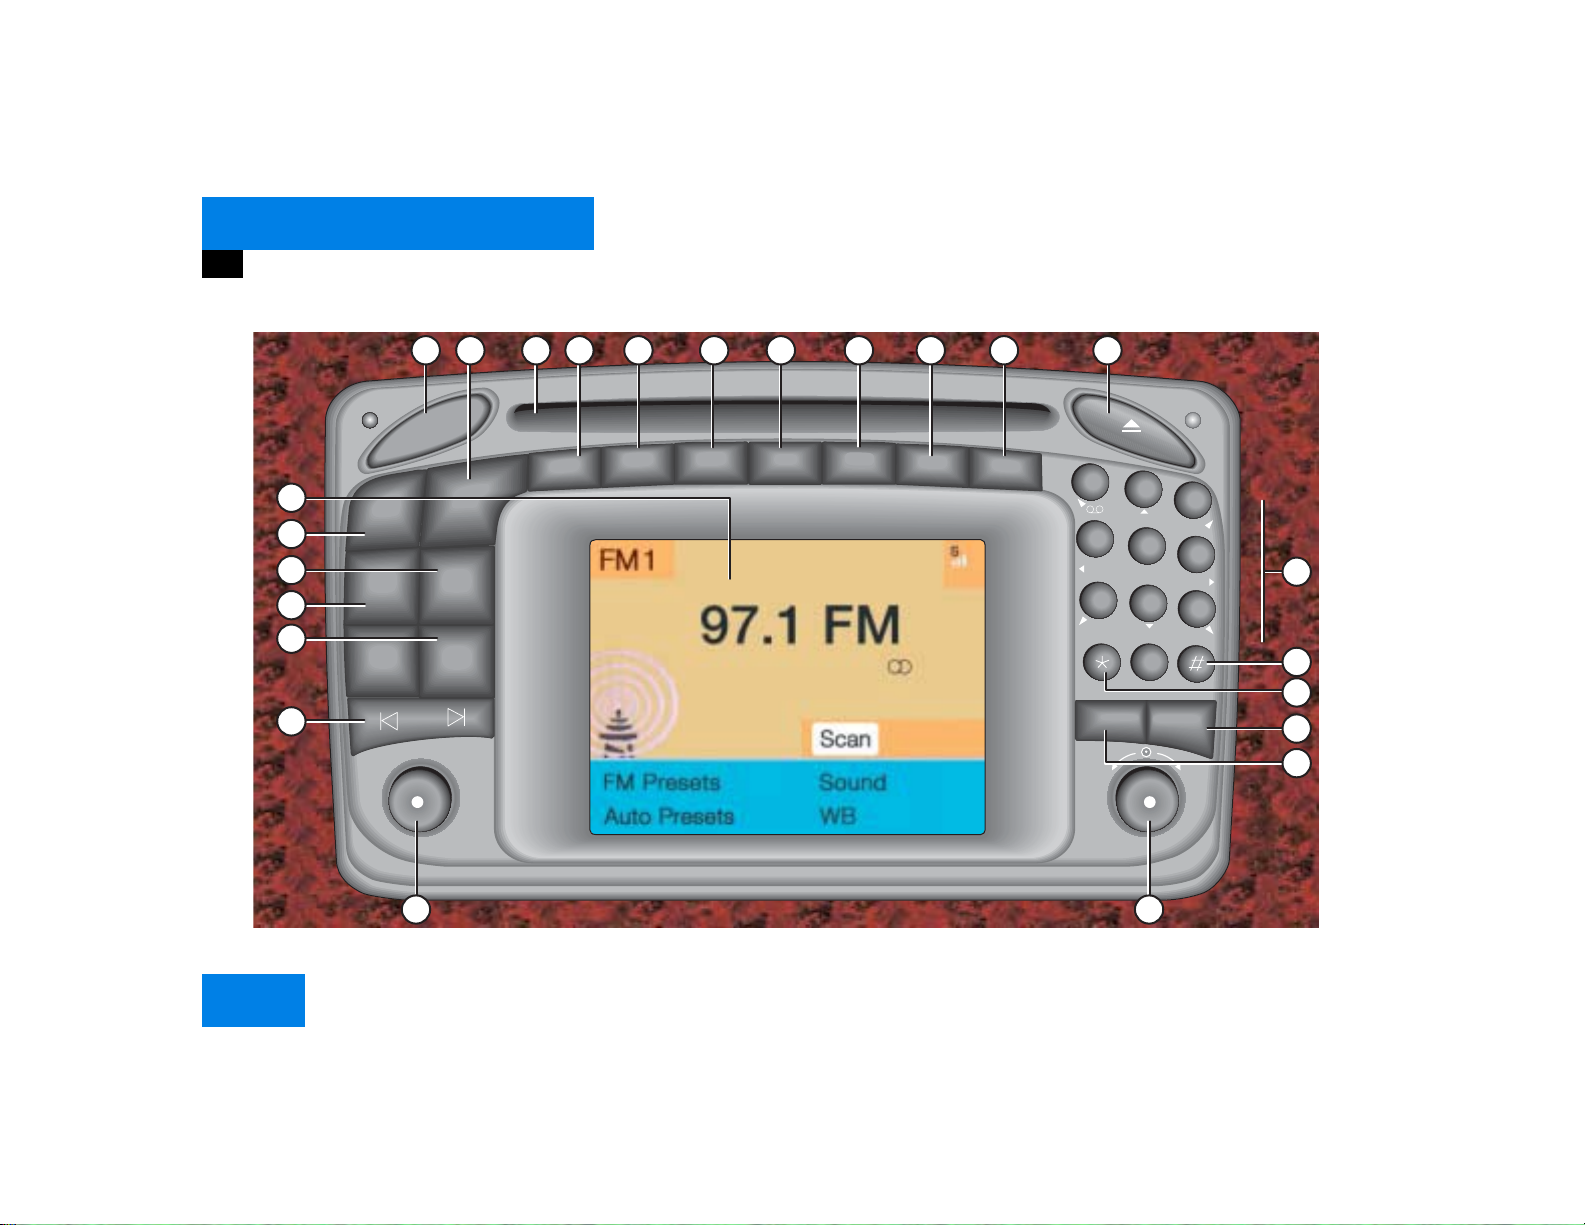
COMAND control unit
COMAND control unit
24
23
22
21
20
19
TEL
FM
AM
1
PWR
VOL-RPT
NAV
CD
SYS
2
4 5
+
Z
-
Z
63 7 8 9 10 11
MAP
DETR INFO
MUT
DISP
1
2
ABC
4
5
GHI
JKL
7
8
PQRS
TUV
0
OPR
+
DEL BACK
3
DEF
MNO
WXYZ
6
12
9
13
14
15
16
1718
P82.85-9058-31
6
Page 15

At a glance
COMAND control unit
/
Function Page
1 Switching COMAND on
and off
2 Switching the navigation
system on
Quick reference
3 CD drive for an audio or a
navigation CD
4 Zooming in for more de-
tailed map
5 Zooming out for less de-
tailed map
6 Route guidance is active:
Switching between map
and symbol display or activating the map
Route guidance is
not active:
Activating the location
map
7 Selecting a detour during
route guidance
12
122
116
158
158
156
149
163
Function Page
8 Requesting destination
and route information
9 Muting of:
앫 Audio source
앫 Voice output during
route guidance
10 Setting the display dim-
ming characteristics
(day and night display)
11 Ejecting an audio or a na-
vigation CD
12 Radio operation:
Selecting a station
Saving stations manually
CD operation:
Selecting a track or CDs
Telephone:
Entering the unlock code
Entering the telephone
number
147
28
153
198
45
30
34
51, 53
78
82
Function Page
Navigation (Destination
input):
Selecting destination via
131
the map
13 Subsequent dialing
Displaying a long list en-
84
127
try in full in a window
Removing a window
127
14 Subsequent dialing 84
15 From within a system:
Return to the previous
menu
Telephone:
Ending a call
81
7
Page 16

At a glance
COMAND control unit
Function Page
16 General:
Altering or deleting
entries
CD operation:
Deleting a CD name
Telephone:
Altering or deleting the
unlock code or a telephone number
17 Turn to highlight a func-
tion or a menu field
Press to start a function
or activate a submenu
18
57
83
Function Page
18 Turn to adjust the volu-
me of
앫 Audio source
앫 Hands-free operation
of the telephone
앫 Voice output during
route guidance
Press to repeat the current voice output
19 Radio operation:
Automatic seek tuning
Manual tuning
CD operation:
Track select
Fast forward/reverse
20 Requesting and dis-
playing Info Services
Adjusting system settings
14
30
31
51
53
184
187
Function Page
21 Switching radio operati-
on on
Quick reference
Changing the radio band
22 Switching CD operation
on
Quick reference
23 Switching telephone
operation on
Quick reference
24 Color screen, e.g. with
main radio menu
28
24
29
50
42
78
74
14
8
Page 17
At a glance
COMAND control unit
Screen displays
Screen displays include:
앫 Main system menus, e.g. the main ra-
dio menu
앫 Lists for the selection of entries,
e.g. the city list (
앫 Input menus, e.g. during destination
input (
컄 page 18)
앫 Selection menus, e.g. during route
calculation (
앫 Symbol display (컄 page 20) or map
(
컄 page 132) in navigation
앫 Pop-up windows (컄 page 171)
컄 page 19)
컄 page 20)
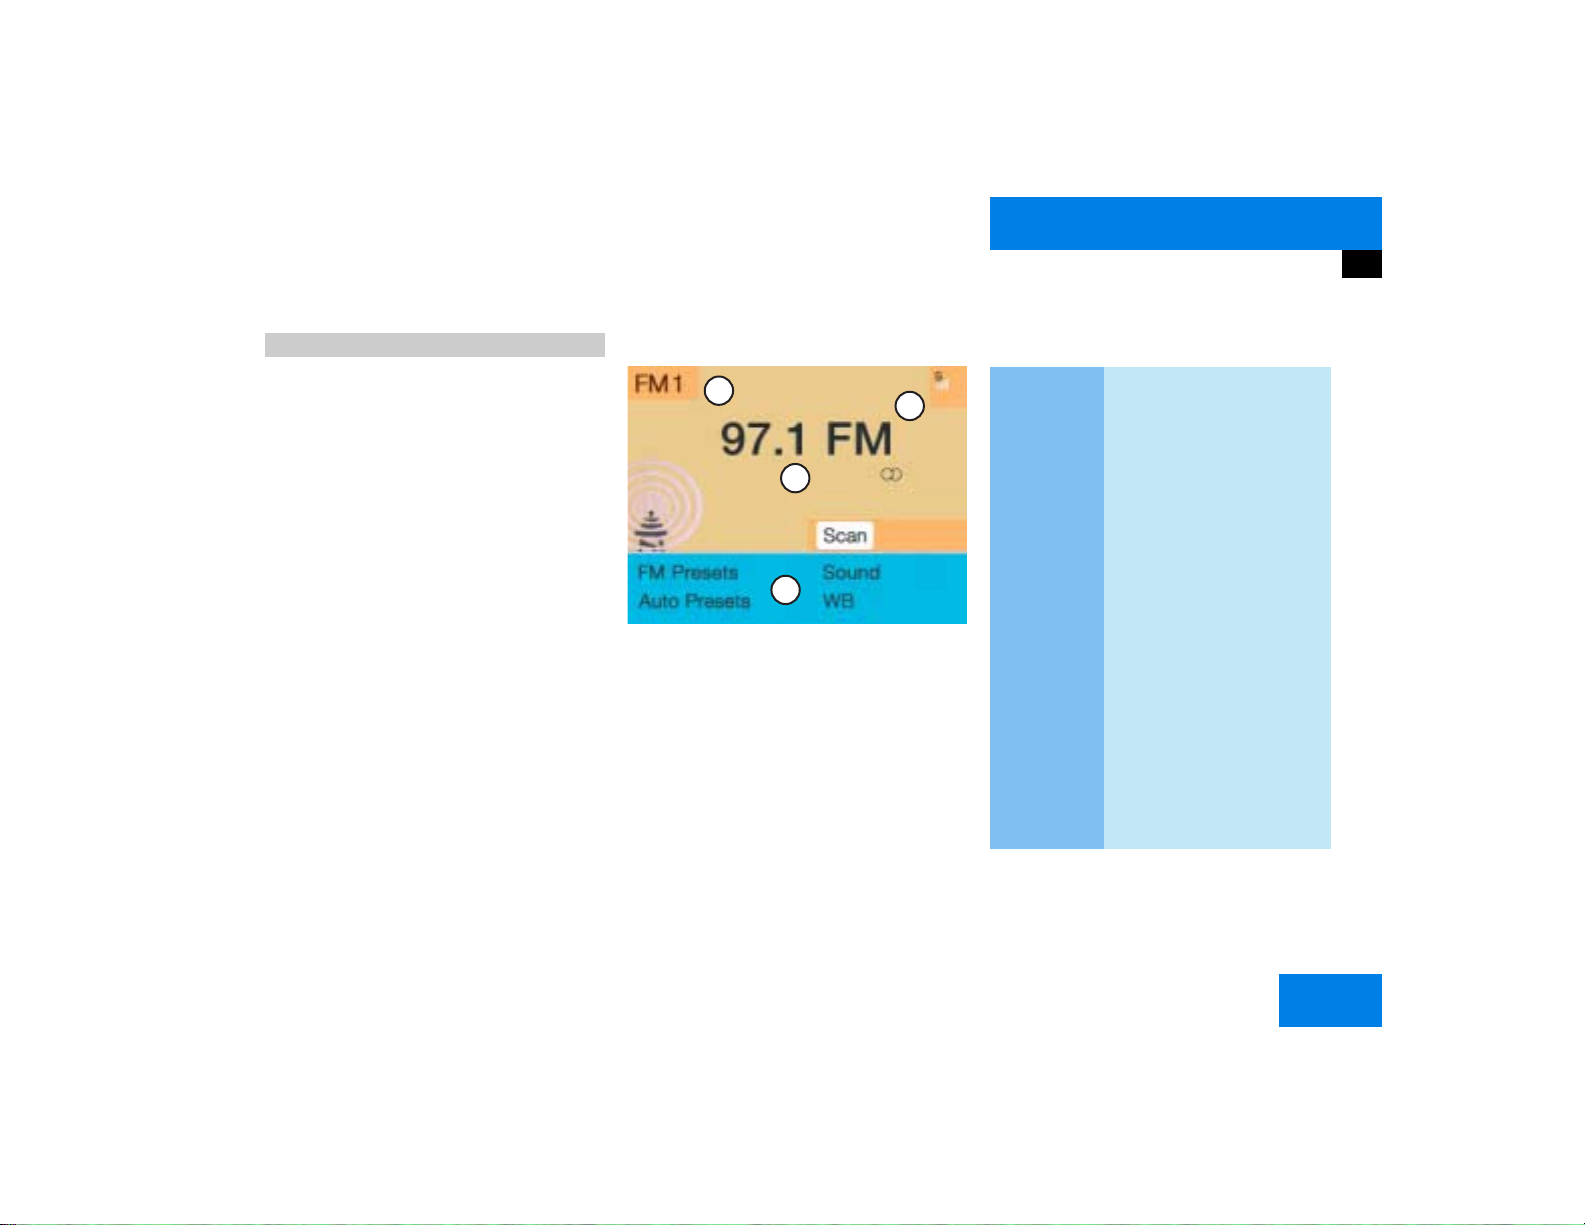
Main menu structure
1
4
2
3
P82.85-9059-31
Main radio menu
1 Status line, displays active system
2 Station frequency and function that
has been switched on
3 Menu fields to call further menus or
functions
4 Symbol bar
Status line and symbol bar
Symbols
Meaning
Status line
FM1
The radio is switched on in
FM Band; the current station has been saved in memory location 1 in the FM
preset menu
AM, WB
CD, TEL
NAV, SVC
AM or Weather Band WB
The corresponding system
is active
SYS, AUX
Symbol bar
>
Reception strength of the
mobile phone
M
Incoming SMS message
1 if available from carrier
1
9
Page 18

At a glance
COMAND control unit
i
The symbol bar appears in all system
main menus.
For symbol and map displays in navigation:
The symbol bar appears on the left hand
side of the display and shows different
symbols.
Pop-up screen messages
Battery voltage gets low
You can still operate COMAND without the
engine running.
!
To prevent the car battery from running
down, you will be receiving two messages asking you to start the engine
when battery power gets low.
You will see the message “Caution. Please
start engine. Otherwise COMAND will shut
down in 3 minutes”.
왘 Start the engine.
i
If you do not start the engine, you can
continue using COMAND until the next
message appears.
You will see the message “Caution. Please
start engine. Otherwise COMAND will shut
down in 10 seconds”.
왘 Start the engine.
You will see the message “Caution.
COMAND will shut down now”.
왘 Start the engine.
Transmitting an emergency call
via TELE AID*
Refer to the vehicle operating instructions
for information regarding the operation
TELE AID emergency call system and on
how to transmit an emergency call.
You will see the message “Tele Aid active”.
왘 Press the right-hand rotary/push-
button v to remove the window.
COMAND will mute an audio source or one
of the two service sources Voice output in
navigation or Voice recognition system.
10
Page 19

Multifunction display
The starter switch must be in position 1 or
2. Refer to vehicle operating instructions.
1
5
4
2
3
P82.85-9290-31
Function
1 Multifunction display in speedo-
meter
Operating the control system
2 Adjusting the volume
I lowers the volume
J raises the volume
3 Making a call
K Accept incoming call or
starts dialing
L End a call or end Tele Aid
4 Switching between menu sys-
tems
E next system
H previous system
At a glance
Multifunction display
Function
5 Moving within a menu system
F next display
G previous display
You can operate the following systems
with steering wheel buttons 4 and 5:
앫 Radio
앫 CD (CD changer and CD drive)
앫 Auxiliary audio source, e.g. tape recor-
der (
컄 page 200)
앫 Telephone
For more detailed information, refer to
“Multifunction display” in the chapters discussing the radio, CD, telephone operation.
11
Page 20
At a glance
Quick reference COMAND
Quick reference COMAND
The section “Quick reference COMAND”
summarizes information regarding the
main functions of your COMAND system.
You should read this section with particular care if you are operating COMAND for
the first time.
For detailed information, please refer to
the pages indicated and the respective
system chapters.
Switching the COMAND control unit
on and off
Switching on
P82.85-9061-31
COMAND switches on the last active
system and displays the corresponding
menu.
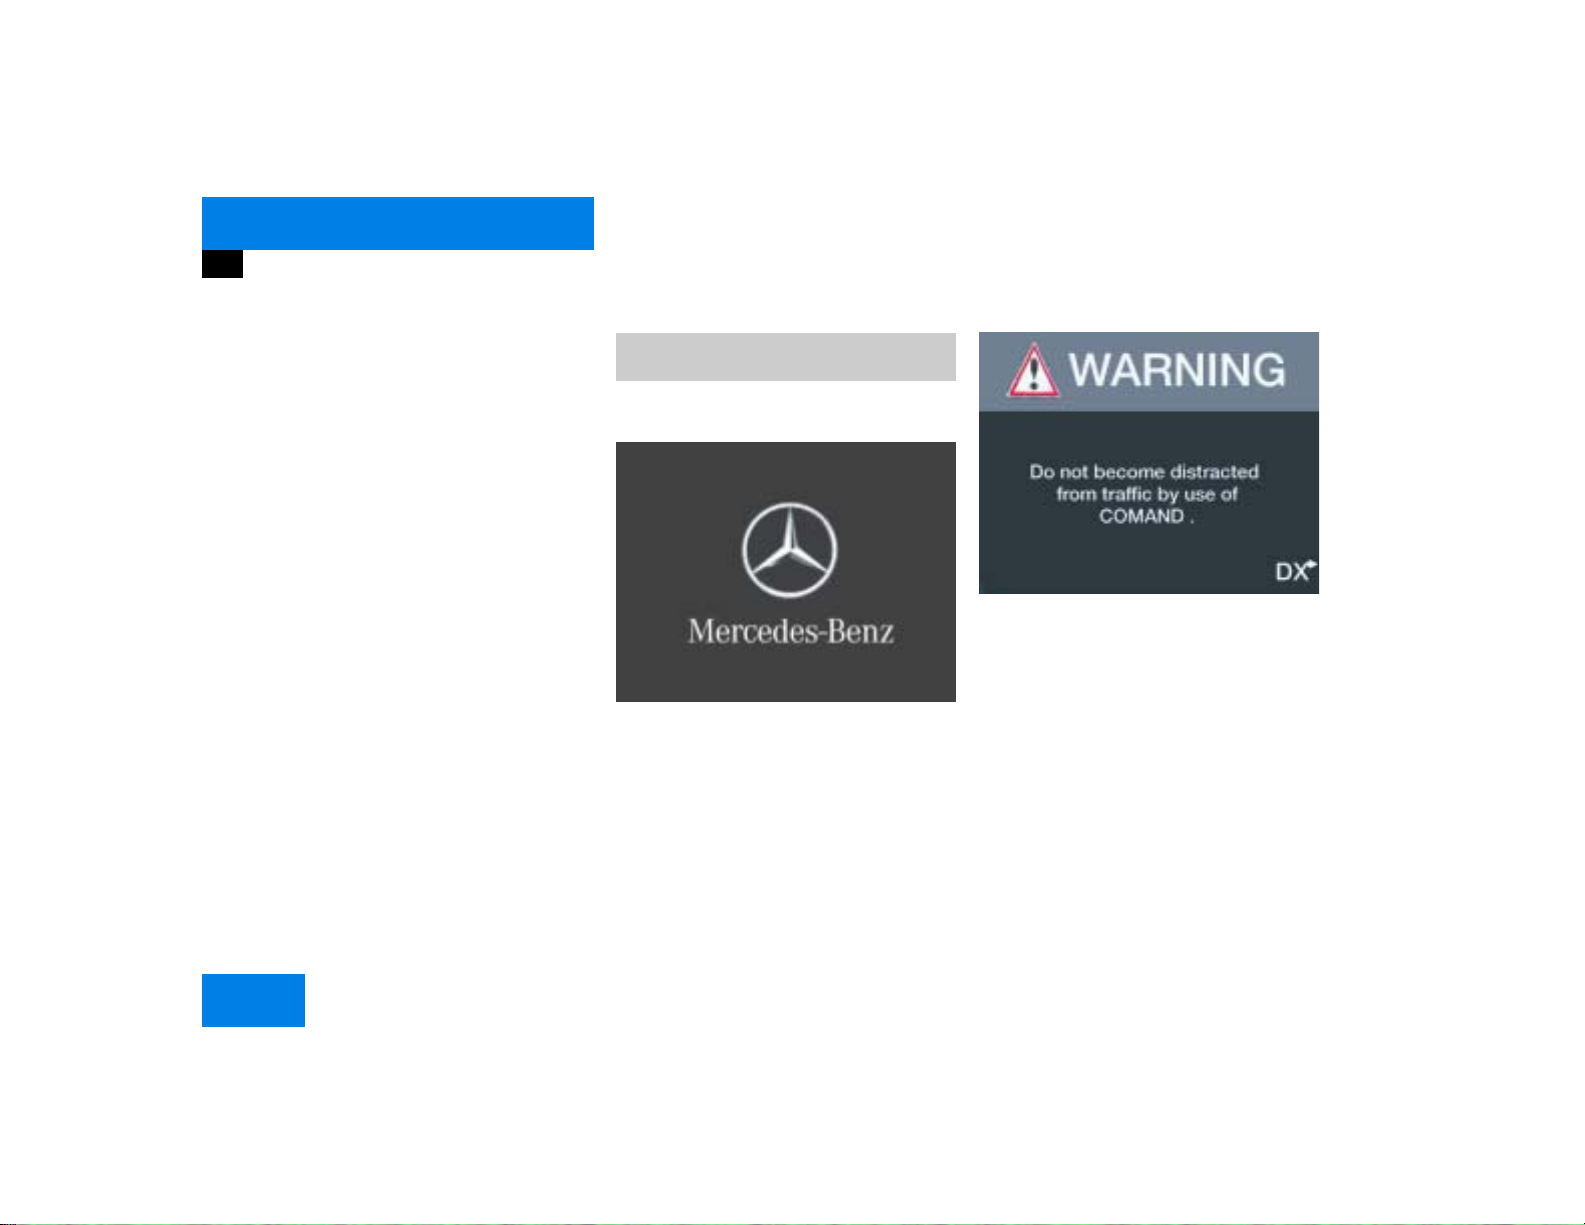
P82.85-9060-31
왘 Press #.
The Mercedes logo and the lettering
Mercedes-Benz will appear. The display
then changes and an alert box will appear.
12
Page 21

At a glance
Quick reference COMAND
The navigation system was the last system used
The menu displayed will vary according to
the last navigation function used.
If route guidance was active:
앫 the symbol display or
앫 the map
If route guidance was active and the
COMAND was switched off for more than
2hours:
앫 an inquiry menu (컄 page 169)
i
If COMAND is switched off for more
than 30 minutes during active route
guidance, all manually entered traffic
jams and detours are deleted. You will
see a corresponding message. Selecting a detour (
If destination input was active:
앫 the main destination input menu
컄 page 163).
Switching another system on
왘 Press a system key, e.g. d.
The main CD menu will appear.
Switching off
왘 Press #.
The COMAND control unit will switch
off.
13
Page 22
At a glance
Quick reference COMAND
Adjusting the volume Radio operation
At the multifunction steering wheel
To raise the volume
왘 Press J.
To lower the volume
왘 Press I.
For the service sources
앫 Voice output during route guidance
(navigation system)
and
앫 Voice Recognition System (refer to se-
parate operating instruction)
you can set the volume jointly.
For the service source
At the COMAND operating unit
왘 Turn the the left-hand rotary/push-
button v.
앫 Telephone
you can alter the listening volume for the
telephone only.
For the audio sources
앫 Radio
앫 CD (CD drive and CD changer)
you can set the volume jointly.
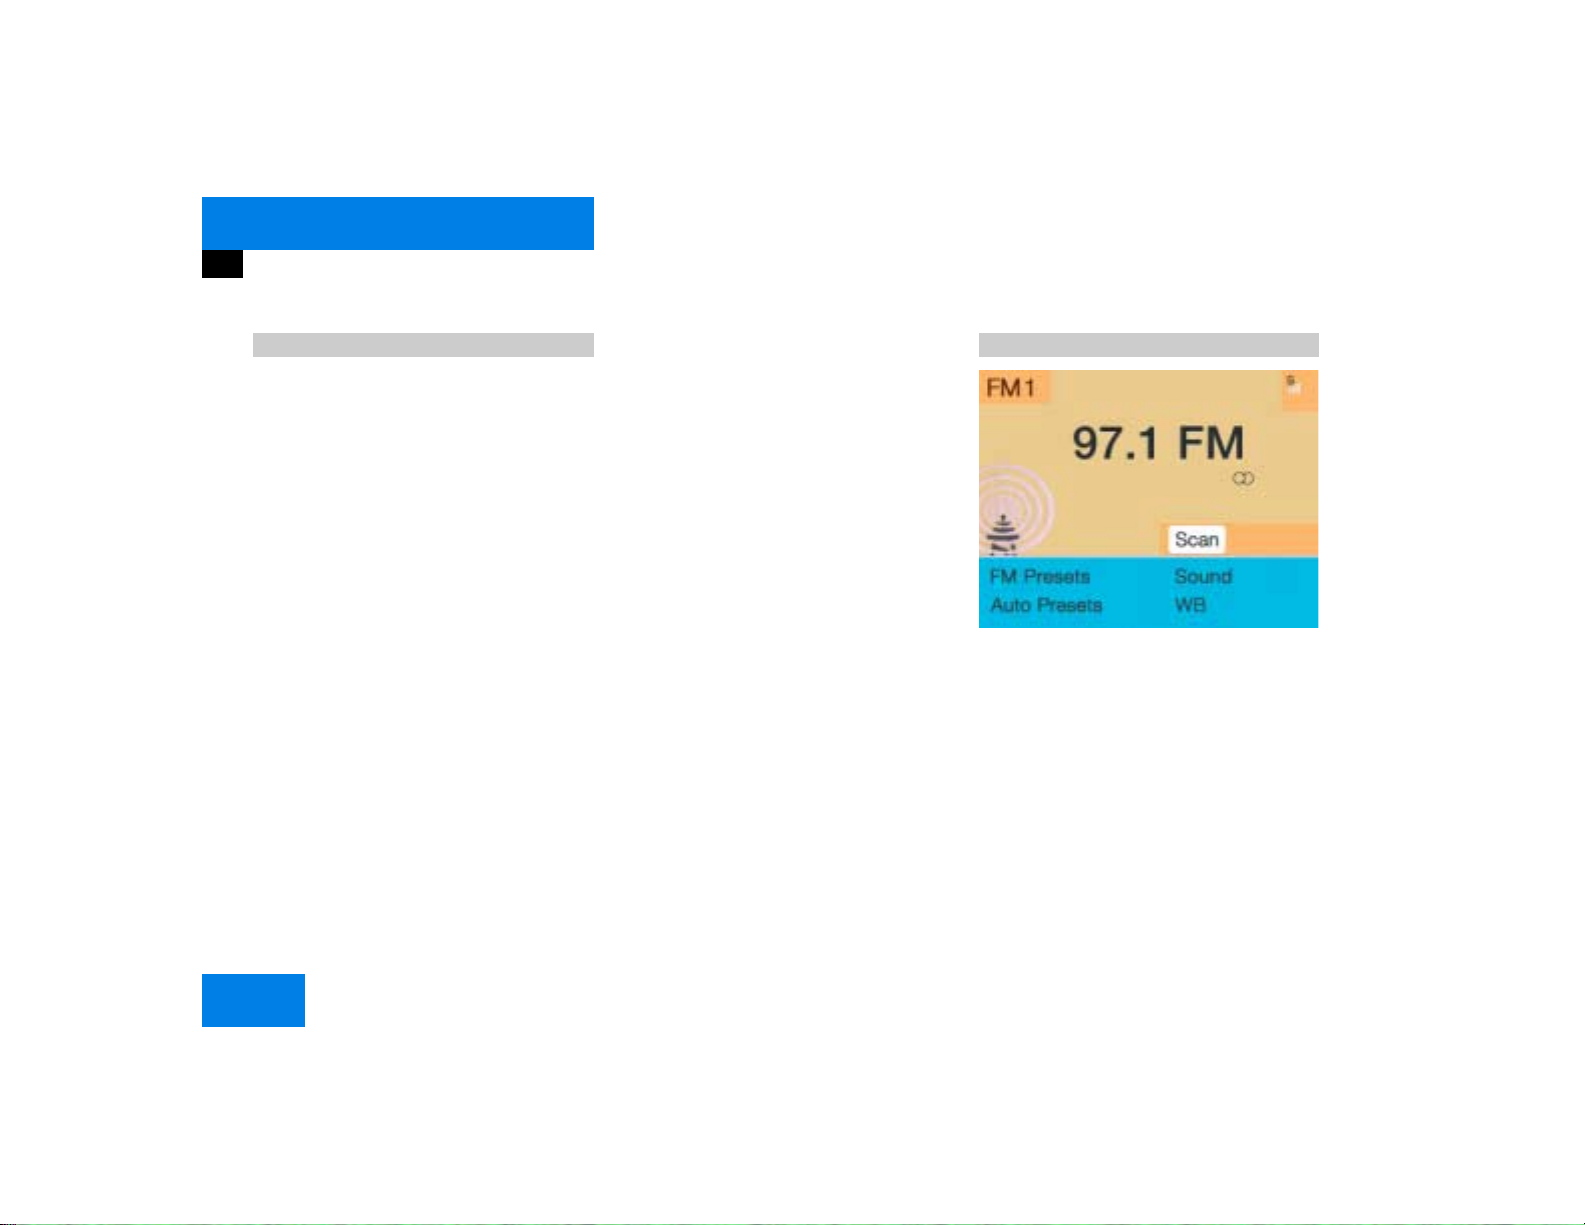
Switching on
왘 Press c.
The radio is switched on. The station
last tuned to will begin to play.
Changing the radio band
왘 Press c to switch between FM-,
AM- and WB-Band.
P82.85-6062-31
14
Page 23

At a glance
Quick reference COMAND
Selecting a station
Automatic seek tuning
왘 Press g or h on the rocker
switch briefly.
FM- and AM-Bands, Weather Band WB
The radio will tune in to the next recei-
vable station (FM/AM) or channel (WB)
with descending/ascending frequency.
Switching another system on
왘 Press any system key, e.g. d.
COMAND will switch to CD mode.
You will find more information regarding
this topic in section “Radio operation” in
chapter “Audio” (
컄 page 28).
CD operation
P82.85-9063-31
Switching on
왘 Press d.
The main CD menu will appear.
Playback will begin in
앫 CD drive with the first track on the
CD
앫 CD changer with the first track on
the first CD detected in the magazine.
Loading a CD into the CD drive and loading
CDs in the CD changer (
컄 page 45).
Track select
왘 Press the rocker switch g/h.
You will hear the previous or next track.
If more than 9 seconds of playing time
has elapsed, the CD changes back to
the start of the current track.
Selecting a CD
왘 Press one of the number keys
Key 0 select the CD drive
Keys 1 - 6 select the corresponding
magazine slot of the
CD changer
The message “Loading CD ...” appears
on the display. Playback then will begin
with track 1.
15
Page 24
At a glance
Quick reference COMAND
CD track scan
왘 Press the right-hand rotary/push-
button v to confirm “Scan”.
The tracks on the CD will be played one
after the other for 8 seconds each,
“Scan” will appear in red.
왘 Press the right-hand rotary/push-
button v again to end the function.
Switching another system on
왘 Press any system key, e.g a.
COMAND will switch to Telephone operation.
You will find more information in section
“CD operation” in chapter “Audio”
(
컄 page 50).
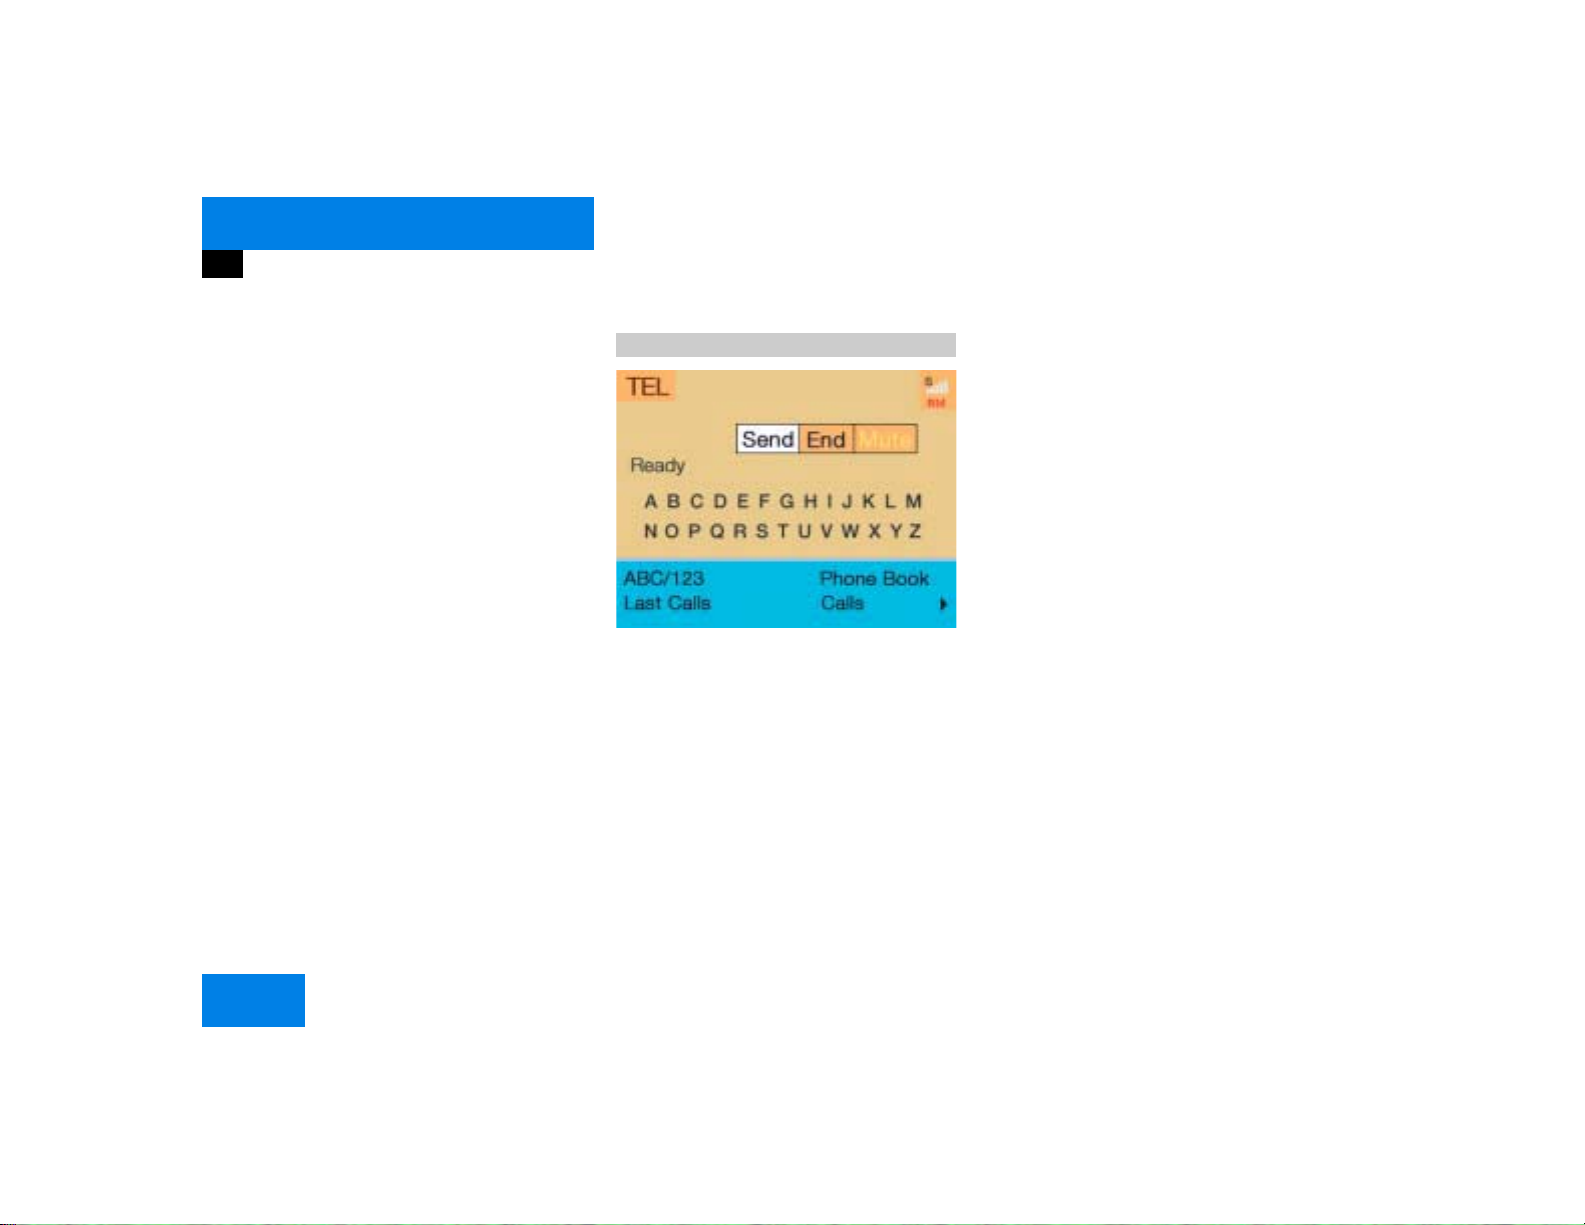
Telephone operation
P82.85-9064-31
Switching on
왘 Press a.
The menu to enter the unlock code will
appear.
Entering the unlock code
왘 Use the number keys 1 through 0 to
enter the unlock code.
Asterisks instead of digits will appear in
the input line.
왘 Press the right-hand rotary/push-
button v to confirm the entry.
If entered code is correct and the phone is registered in a network, the phone
is ready for use.
Outgoing call
Enter a telephone number
왘 Use the number keys 1 through 0 to
enter the telephone number.
The menu changes when the first digit
is entered.
16
Page 25

At a glance
Quick reference COMAND
Begin dialing
왘 When the “Send” button is highlighted,
press the right-hand rotary/push-
button v to confirm your input.
Dialing will begin. If the phone number
together with a name is stored in the
phone book, the name appears on the
screen.
Conducting a call
When the call is answered, the call time appears in the screen.
Ending a call
왘 Press the right-hand rotary/push-but-
ton v to confirm the “End” button.
Switching another system on
왘 Press any system key, e.g. b.
COMAND switches to the navigation
system.
You will find more information in chapter
“Telephone” (
컄 page 78).
Entering a destination and calculating a route
Switching the navigation system on
P82.85-9065-31
Main destination input menu
왘 Press b.
If the navigation system has not been
booted up, the message “Navigation
being activated. Please obey all traffic
rules” will appear.
The navigation menu displayed will vary
according to the last navigation function used (
컄 page 13).
If route guidance was switched off, the
main destination input menu will be
displayed.
17
Page 26
At a glance
Quick reference COMAND
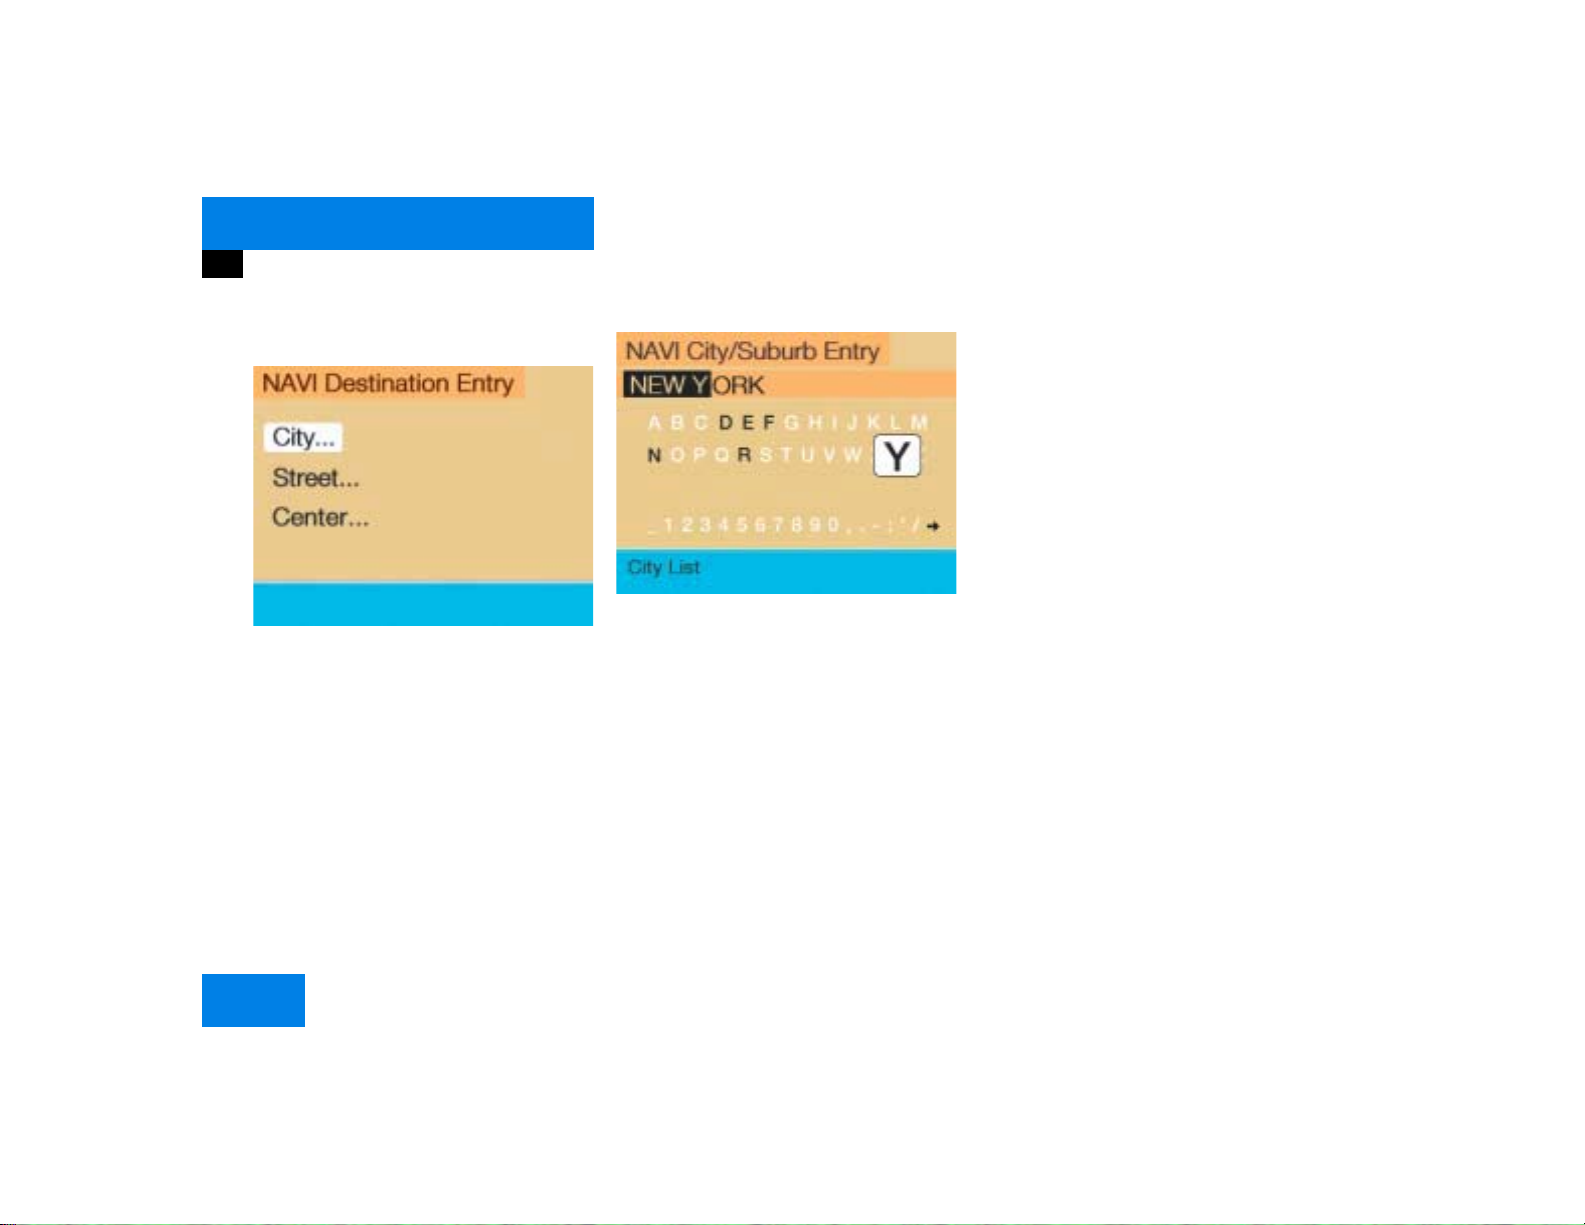
Entering destination address
P82.85-9066-31
왘 Press the right-hand rotary/push-
button v in the main destination input
menu and confirm “Address...”.
The main address menu will appear.
The entry behind “City...” is either
empty or the city you last entered will
appear.
P82.85-9067-31
“City/Suburb Entry” input menu
왘 Press the right-hand rotary/push-but-
ton v in the main address menu and
confirm “City...”.
The “City/Suburb Entry” input menu
will appear.
Adopting the city last selected
왘 Press the right-hand rotary/push-
button v longer than 2 seconds.
Entering a city
왘 Turn the right-hand rotary/push-
button v to highlight the first letter
and press to confirm.
왘 Enter other characters until the desired
city appears in the input line.
Correcting entry
앫 Last character
왘 Press r briefly.
앫 Complete entry
왘 Press r longer than 2 seconds.
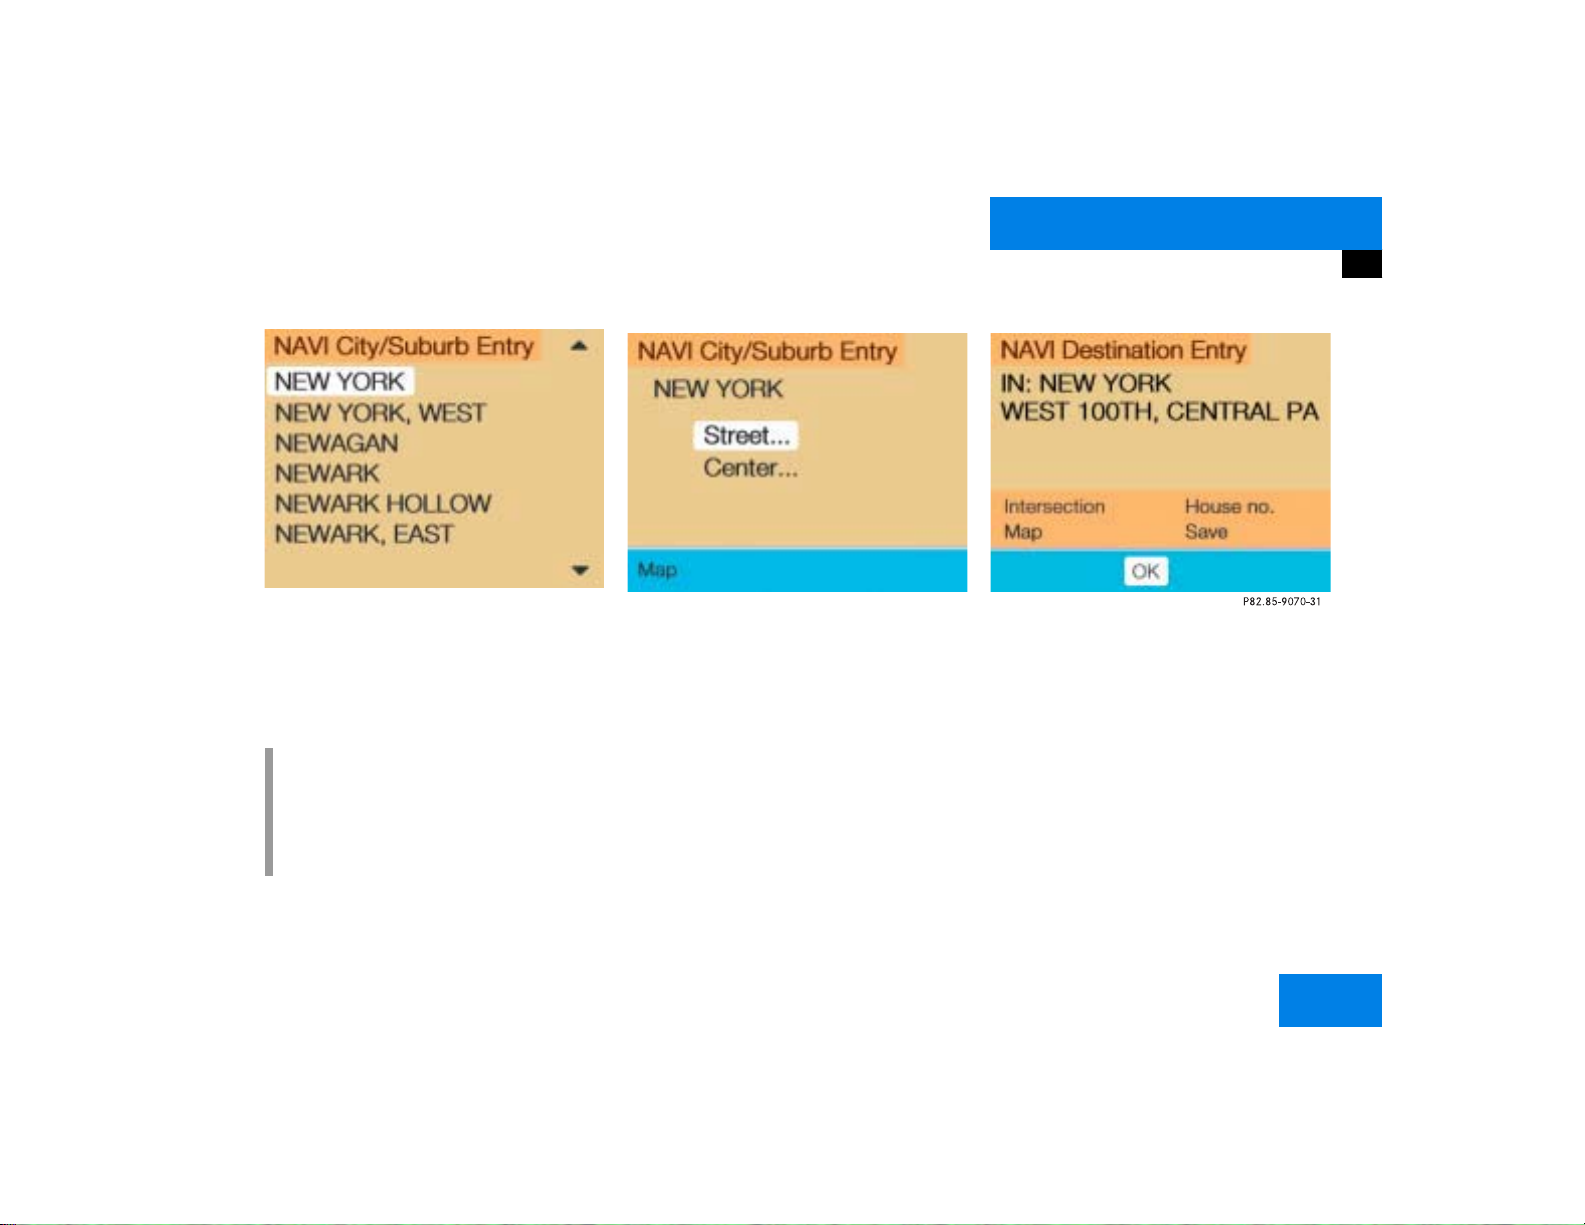
Activating the city list
왘 Press the right-hand rotary/push-
button v longer than 2 seconds until
the city list appears.
18
Page 27
At a glance
Quick reference COMAND
P82.85-9068-31
City list
왘 Press the right-hand rotary/push-
button v again to confirm the city.
A selection menu will appear.
i
If several options of a city/suburb are
available, another menu will appear
where you must make and confirm your
desired selection.
P82.85-9069-31
왘 Press the right-hand rotary/push-
button v to confirm “Street…”.
The input menu “Street Entry” will appear.
The further sequence corresponds to the
“Entering a city” section.
왘 Now enter the street and activate the
street list. Then confirm the street in
this list.
You have now selected the destination and
can calculate the route.
왘 Press the right-hand rotary/push-
button v to confirm “OK”.
The “Route Mode” selection menu will
appear.
19
Page 28
At a glance
Quick reference COMAND
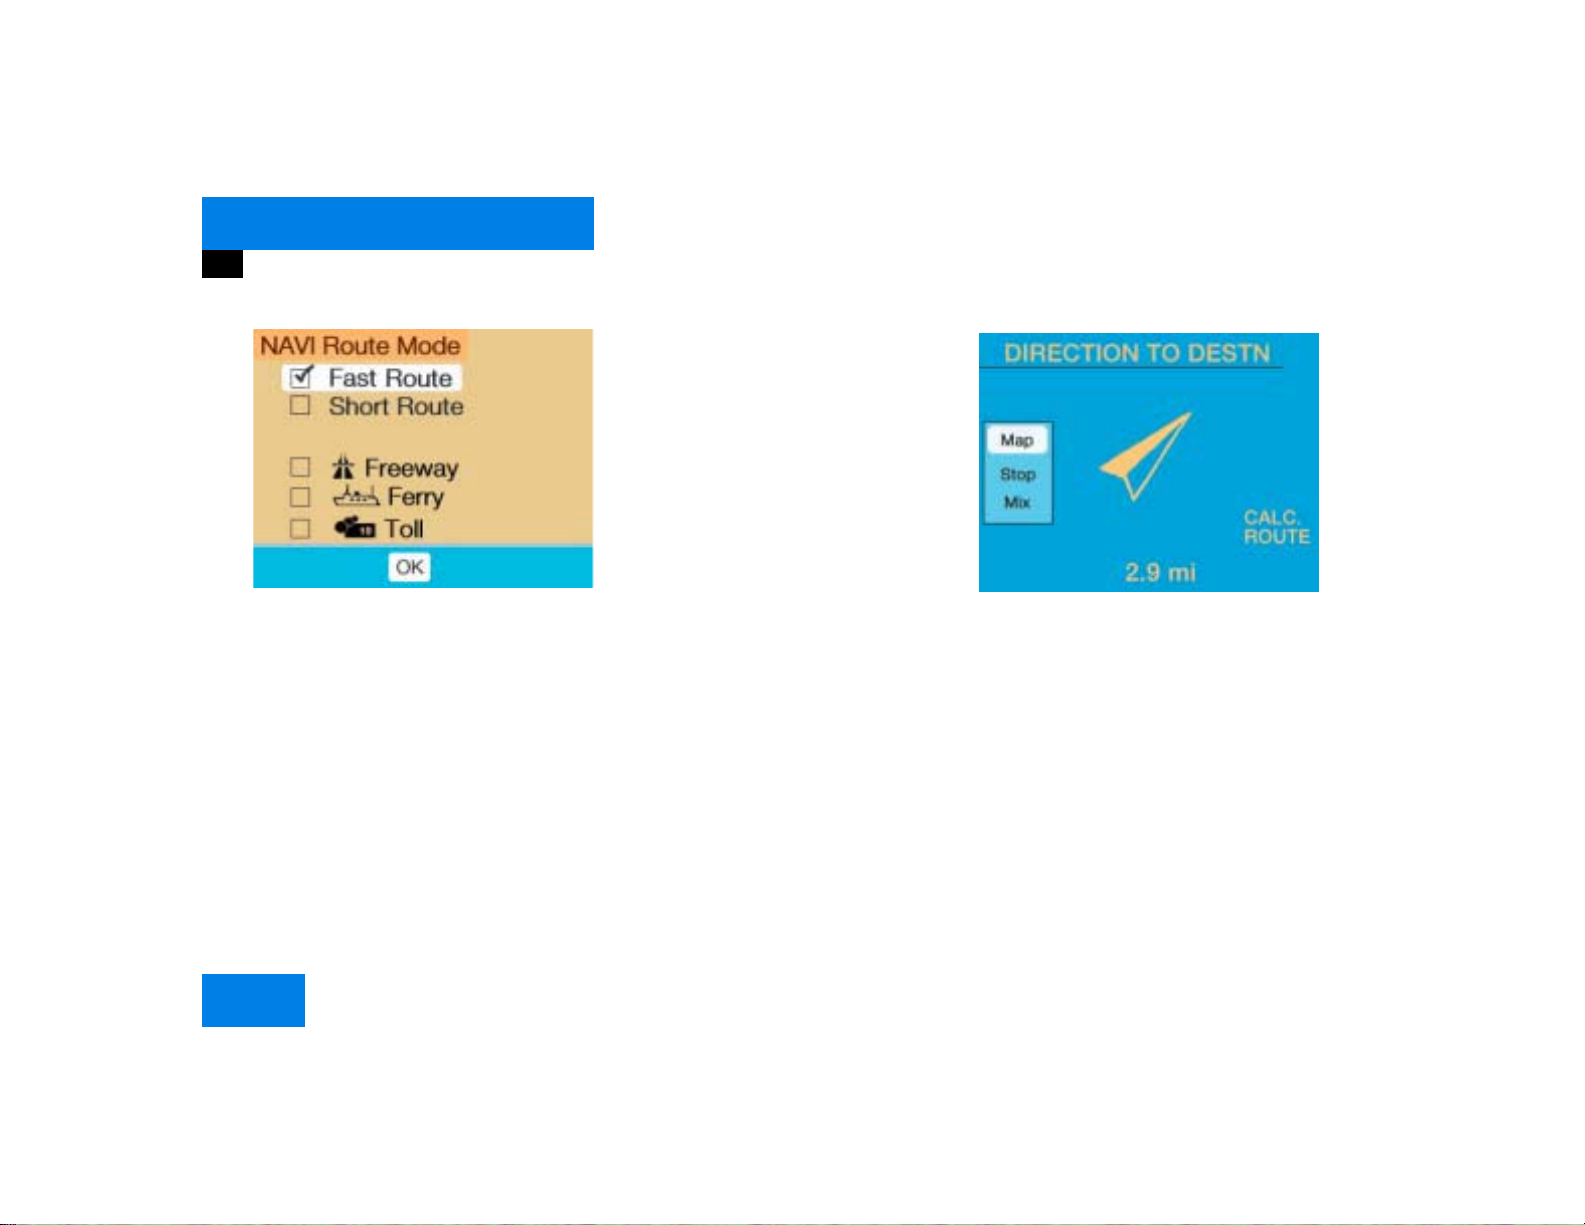
P82.85-9071-31
P82.85-7484-31
“Route mode” selection menu
Select a route and then a traffic route
왘 Turn the right-hand rotary/push-
button v to move the cursor on the
entry you want and press to confirm.
A checkmark appears P.
Route types available:
앫 Fast Route
앫 Short Route
Including P/avoiding traffic routes Q
앫 Freeway
앫 Ferry
앫 Toll
왘 Press the right-hand rotary/push-
button v to confirm “OK”.
The selected route and the destination
you have entered will appear on the
display.
You will hear the message “The route is
being calculated”.
P82.85-9072-31
Symbol display
After a few seconds, you will see the symbol display.
CALC. ROUTE Calculation of route
2.9 miles Distance to destination
(as the crow flies)
20
Page 29
At a glance
Quick reference COMAND
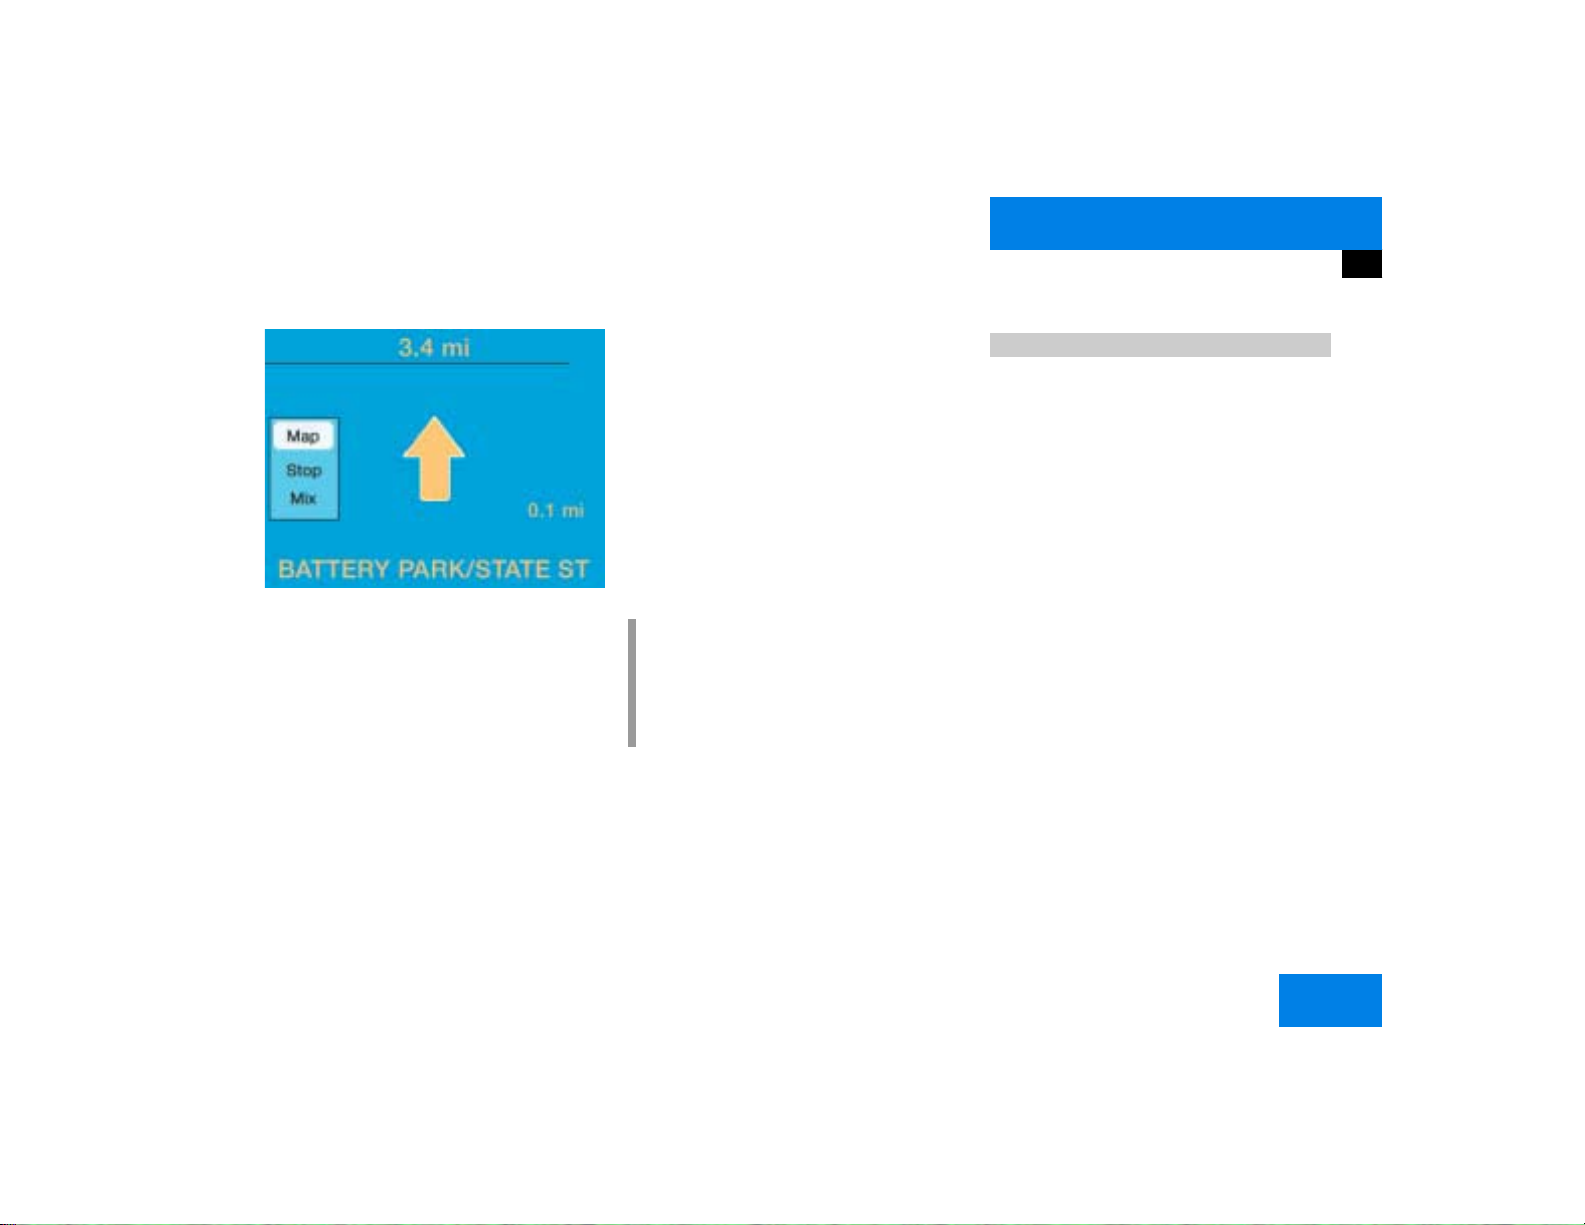
P82.85-9073-31
The route will be calculated. COMAND
identifies the road you are travelling on.
You will see the arrow indicating the direction of travel if COMAND recognizes the
road you are travelling on. You will e.g.
hear the message “Please turn right”. Route guidance will begin.
You will find more information in chapter
“Navigation” (
컄 page 123).
Day and night display, switching off
screen
왘 Press Ä repeatedly until the desired
display appears.
The display changes in this order:
앫 Day display
앫 Night display
앫 Screen off
앫 Day display
i
It is also possible to carry out the
change between day and night display
automatically via the headlight switch
(
컄 page 198).
Selecting beeps
You can switch different beeps on and off.
앫 Acknowledgement beep
Beeps when you accept an entry or enter a destination on the map
앫 Info beep
Beeps when you see the messages announcing a drop of battery voltage
(
컄 page 10)
앫 Alarm beep
Beeps if the device has a serious malfunction or if you are listening to a disaster announcement on the radio. You
can only switch off the beep if you also
switch off COMAND.
You will find more information in chapter
“System settings” (
컄 page 197).
21
Page 30

At a glance
Quick reference COMAND
22
Page 31

Audio
Radio operation
CD operation
Sound settings
23
Page 32

Audio
Radio operation
Radio operation
Quick reference
11
10
1
2
PWR
-
+
Z
TEL
FM
AM
9
NAV
CD
SVC
Z
MAP
8
VOL-RPT
7
DETR INFO
MUT
P82.85-7197-31
DISP
1
2
ABC
4
5
GHI
JKL
7
8
PQRS
TUV
0
OPR
+
DEL BACK
6
3
DEF
6
MNO
9
WXYZ
3
4
5
P82.85-9075-31
24
Page 33

Audio
Radio operation
Function Page
1 Switching COMAND on
and off
2 Muting the radio audio
(muting on/off)
3 Selecting a station via
number keypad (presets)
Selecting a station via direct frequency entry
Saving a station
Selecting a station from
the preset menu FM/AM
Selecting a station from
the WB preset menu
4 Activating the input
mode for station frequency
in the main radio menu
in the presets
5 Return to previous menu
12
28
32
32
34
38
38
32
39
Function Page
6 Turn to highlight a func-
tion or a menu field
Press to perform a function or access a submenu
7 Adjusting the volume 14
8 Automatic seek tuning
ascending/descending
Manual tuning ascending/descending
9 Requesting and dis-
playing Info Services
Adjusting system settings
10 Switching to radio opera-
tion
11 Color screen with main
radio menu
30
31
184
187
28
25
Page 34

Audio
Radio operation
Menu overview
26
Page 35

Audio
Radio operation
Function Page
1 Main radio menu FM
2 Current frequency band
(FM) and memory preset
selected (e.g. 1)
3 Current frequency
4 Symbol indicates stereo
reception
5 Menu fields
6 Main sound menu
Sound settings
7 Main Weather Band WB
menu
8 Auto preset
Saves 10 stations automatically
Select a station
63
29
36
38
Function Page
9 Preset menu
Save a station automatically FM, AM
Select a station
36
38
27
Page 36

Audio
Radio operation
In chapter “Audio” you will find detailed information regarding
앫 radio operation
앫 CD operation and
앫 sound adjustments
If you have not done so already, please familiarize yourself with these functions by
reading chapter “At a glance”.
Switching on
1
3
2
P82.85-9077-31
Main radio menu FM
1 Frequency band (FM, AM, WB) and me-
mory location of station, e.g. “1”
2 Station frequency
3 Symbol bar
왘 Press c to switch to radio operati-
on.
The station last tuned will begin to play.
i
You can operate the telephone and the
navigation system while the radio is on.
Muting
왘 Press Ö while listening to the radio.
The symbol R will appear in the symbol
bar.
왘 Press Ö again to resume listening to
the current station.
The symbol R will have disappeared.
i
Muting will also be canceled if you
switch to a different audio source, e.g.
CD, or if you alter the volume.
Switching another system on
왘 Press any system key, e.g. d.
COMAND will switch to CD mode.
28
Page 37

Audio
Radio operation
Changing the Radio band
You can select between FM-, AM- and WBBand.
AM Band
P82.85-9078-31
왘 Press c until “AM” is displayed in
the upper left hand corner of the display.
The AM station last tuned to will begin
to play. The frequency will appear in
the display.
Frequency band
FM
AM
Frequency range
87.7 - 107.9 FM
530 - 1710 AM
Weather Band WB
P82.85-9079-31
왘 In the AM or FM main radio menu, turn
the right-hand rotary/push-button v
to highlight WB and press to confirm.
The channel last tuned to will appear in
the display.
i
If a weather band station cannot be received on this channel, an automatic
search run of all 7 channels will take
place. As soon as a weather band station is received, the search stops and the
channel appears in the display. The automatic search will perform two cycles
through the 7 channels.
Message “No WB”
A weather band station cannot be received on any of the 7 channels.
29
Page 38

Audio
Radio operation
Selecting a station
You can use the following functions:
앫 Automatic seek tuning (컄 page 30)
앫 Seek tuning at the multifunction stee-
ring wheel (
앫 Manual tuning (컄 page 31)
앫 Station selection via number keypad
(presets) (
앫 Station selection via direct frequency
entry (
앫 Automatic station scan (컄 page 33)
앫 Station selection from the preset menu
(
컄 page 38)
컄 page 31)
컄 page 32)
컄 page 32)
Automatic seek tuning
P82.85-9080-31
왘 Press g or h on the rocker
switch briefly.
FM- and AM-Bands, Weather Band WB
The radio will tune in to the next receivable
station (FM, AM) or channel (WB) with descending/ascending frequency depending
on the direction of seek.
WB
Alternatively, you can select the channel
directly:
왘 Press a number key 1 through 7.
30
Page 39

Audio
Radio operation
Seek tuning at the multifunction steering wheel
If the multifunctional display shows the
station frequency, then:
왘 Press F or G to select a higher/
lower frequency preset.
i
The up/down arrows have different
functions depending on which mode the
seek function in the multifunction display is programmed to.
The two available options are Memory
Scan or Frequency Scan (Station
search). Refer to the vehicle operator’s
manual on how to program this option.
Manual tuning (FM, AM)
P82.85-9081-31
왘 Press g or h on the rocker
switch longer than 2 seconds.
The menu fields will appear in light grey
lettering.
FM Band
The frequency displayed will change in increments of 0.2 MHz.
AM Band
Tuning will take place in increments of
10 kHz.
i
Activating the AM Band (컄 page 29).
31
Page 40

Audio
Radio operation
Station selection via number keypad
(presets)
FM- and AM-Bands
P82.85-9082-31
왘 Press one of the number keys, such as
2 briefly.
The radio will tune to the frequency assigned to that memory location. If none
has been set by you, the radio will not
change the station.
F
i
FM and AM presets are independent
and can only be accessed while in the
corresponding band.
Saving stations for FM and AM
(
컄 page 34).
Weather Band WB
왘 Tune the radio to the selected channel.
The memory preset number will appear
in the status line.
i
The “XX Presets” (XX = FM, AM or WB)
menu field provides an overview of
which stations have been allocated to
which memory presets (
컄 page 35).
Station selection via direct frequency
entry (FM, AM)
1
P82.85-9083-31
1 Input line
왘 Press t.
Input line 1 will appear in the main radio menu.
왘 Enter the desired frequency with the
number keys within 8 seconds, e.g.
1027 for 102.7 FM.
The station you have selected will begin to play.
32
Page 41

Audio
Radio operation
i
If you do not make another entry within
8 seconds, the function will be canceled
and you will listen to the station last tuned to.
Frequency band
FM
AM
Frequency range
87.7 - 107.9 FM
530 - 1710 AM
i
If you enter a frequency that is outside
the allowable input range, the message
“Invalid input” appears. Enter a valid
frequency.
Automatic station scan
The stations on same band (FM/AM/WB)
can be scanned one after the other for 8
seconds each.
1
P82.85-9084-31
1 Scan function is active
왘 Press the right-hand rotary/push-
button v and confirm “Scan”.
The scan function will begin, “Scan”
will appear in red lettering.
Weather Band WB
The individual weather stations stored in
the memory on 7 channels will be scanned
one after the other.
The scan function stops automatically
when the first station received has been
scanned twice.
End scan function and play a station
왘 Press the right-hand rotary/push-
button v again if you hear the desired
station.
The station selected will appear with
the station frequency. “Scan” will appear in black lettering again.
33
Page 42

Audio
Radio operation
Memory functions
You can use the following functions:
앫 Saving stations manually FM
앫 Saving stations manually AM
(
컄 page 36)
앫 Saving stations automatically FM, AM
(
컄 page 36)
앫 Selecting a station from the FM/AM
preset menu (
앫 Selecting channels from the WB preset
menu (
앫 Selecting a station by entering the sta-
컄 page 38)
컄 page 38)
tions frequency in the FM/AM presets
(
컄 page 39)
Saving stations manually (FM)
In the main radio menu
P82.85-9085-31
왘 Press one of the number keys, e.g. 3,
longer than 2 seconds.
You will hear a confirmation beep if the
beep tones option was activated in the
system settings (
컄 page 197).
The radio saves the current station at
the memory preset selected. The memory preset selected will appear in the
status line, e.g. “FM3”.
i
There are 10 presets available (1 - 9,
0).
An existing entry is overwritten in the
memory list when a new input is given.
34
Page 43

Audio
Radio operation
On the memory list
1
2
3
4
5
P82.85-9086-31
1 Preset of the station currently selected
2 Frequency of the station currently se-
lected
3 Current frequency appears in red lette-
ring
4 Memory preset allocated
5 Memory preset available
왘 Turn the right-hand rotary/push-button
v to highlight “FM Presets” in the
main radio menu and press to confirm.
The FM preset memory will appear.
왘 Turn the right-hand rotary/push-button
v to highlight the desired memory
preset.
왘 Press the right-hand rotary/push-
button v or corresponding number
key longer than 2 seconds.
The current station will be saved at the
memory preset selected.
You will see the main radio menu
앫 automatically after 8 seconds
앫 if you press *.
i
There are 2 presets for each of the FM
and AM waveband, standard FM/AM
presets (saving stations manually) and
Auto presets (saving stations automatically).
The standard FM/AM presets are not
affected by the Auto presets. This is a
second option for storing a station range you are currently receiving.
35
Page 44

Audio
Radio operation
Saving stations manually (AM)
P82.85-9087-31
왘 Activate the AM Band (컄 page 29).
Save a station in the same way as described for the FM Band (
앫 in the AM main radio menu
앫 on the memory list
컄 page 34)
On the memory list
P82.85-9088-31
왘 Press the right-hand rotary/push-
button v to confirm “AM Presets”.
The AM preset memory will appear.
i
The standard AM presets are not affected by the Auto presets. This is a second option for storing a station range
you are currently receiving.
Saving stations automatically (FM, AM)
1
P82.85-9089-31
1 Function is active
If the FM/AM main radio menu is displayed
왘 Turn the right-hand rotary/push-button
v to highlight “Auto Presets” and
press the button longer than
2 seconds.
Message 1 will appear.
36
Page 45

Audio
Radio operation
P82.85-9090-31
The radio stores the 10 strongest stations.
The station frequencies available will appear in the memory list.
Select other station
왘 Turn the right-hand rotary/push-button
v to highlight the memory position
and press to confirm.
The main radio menu appears.
앫 automatically after 8 seconds
앫 if you press *.
Weather Band
P82.85-9091-31
왘 Activate the Weather Band WB.
왘 Turn the right-hand rotary/push-button
v to highlight “WB Presets” and press
to confirm.
The WB Presets will appear. Channels 1
to 7 are listed in the memory. The memory position of the channels are fixed
and cannot be altered.
37
Page 46

Audio
Radio operation
Selecting a station from the preset
menu (FM, AM)
P82.85-9092-31
왘 Activate the FM or AM memory
(
컄 page 35).
You can use one of the following two ways
to select a station from the FM/AM presets
왘 Press the corresponding number key
(e.g. 3) to select the desired station.
왘 Turn the right-hand rotary/push-button
v to highlight a memory preset in the
FM/AM preset list and press briefly to
confirm.
In both cases, the main radio menu will
then appear automatically after 8 seconds, indicating the memory preset
number.
Selecting a channel from the WB preset
menu
P82.85-9093-31
왘 Activate the WB Presets (컄 page 37).
왘 Use one of the two ways to select a
channel from the WB presets as described on the left.
The main WB menu will then appear automatically after 8 seconds, indicating
the memory preset number.
38
Page 47

Audio
Radio operation
Selecting a station by entering the station frequency in the presets (FM/AM)
The station frequency can be entered in
FM and AM Bands in the corresponding
presets list.
1
P82.85-9094-31
1 Input line
For both FM/AM Bands
왘 Press t.
An input line 1 will appear on the top
line in place of the current station name.
왘 Use the number keys to enter the fre-
quency.
The frequency is entered into 1 beginning from the right. After 8 seconds at
the most, the station selected will begin to play.
Frequency band
FM
AM
Frequency range
87.7 - 107.9 FM
530 - 1710 AM
i
If you enter a frequency which is not
within the given range, the message “Invalid input” will appear.
Enter a valid frequency.
39
Page 48

Audio
Radio operation
Multifunction display
1 No audio source has been switched on
2 The radio is switched on
3 Frequency band and the memory pre-
set, if applicable
4 Frequency of the station selected
40
5 “SP” (memory) - appears if “Memory”
instead of “Station search” or “Freq.”
(depending on model) has been selected in the “Vehicle” submenu. Refer to
“Control system” in chapter “Controls
in detail” in your vehicle's operating instructions for further information.
왘 Press # at the COMAND control
unit to switch on COMAND.
왘 Press c at the COMAND control
unit to switch to radio operation.
왘 Repeatedly press key E or H at
the multifunction steering wheel until
display 2 appears.
Page 49

Audio
Radio operation
왘 Repeatedly press F or G at the
multifunction steering wheel until the
desired station frequency appears.
왘 Press E or H at the multifunc-
tion steering wheel to display the next
or previous system.
41
Page 50

Audio
CD operation
CD operation
Quick reference
14
13
TEL
FM
AM
12
11
1
PWR
VOL-RPT
NAV
CD
SVC
r
1
4
GHI
7
PQRS
4
2
3
ABC
DEF
5
JKL
TUV
6
MNO
8
9
WXYZ
5
2
-
+
Z
Z
MAP
DETR
INFO
3
MUT
DISP
0
OPR
+
DEL BACK
6
7
8
42
910
P82.85-9096-31
Page 51

Audio
CD operation
Function Page
CD drive in the
control unit and
CD changer operation
Switching COMAND on
1
and off
2 CD drive for audio CD or
navigation CD
3 Muting CD playback (mu-
ting on/off)
4 Ejecting an audio CD or a
navigation CD
5 Selecting a CD
Selecting a track
12
45
60
45
53
51
Function Page
6 Track selection with the
number keypad
7 Return to previous menu
8 Press briefly:
Deletes the character
that has been entered
last
Press longer than
2 seconds:
Deletes a complete
name
9 Turn to highlight a func-
tion or a menu field
Press to perform a function or activate a submenu
51
55
55
Function Page
10 Turn to the right:
Raises the volume
Turn to the left:
Lowers the volume
11 Press briefly:
Previous track or start of
the track (depending on
playback time)/next
track
Press longer than
2 seconds:
Fast forward/fast reverse
12 Requesting and dis-
playing Info Services
Adjusting system settings
13 Switching on CD operati-
on (CD drive, CD changer)
14 Color screen with main
CD menu
51
54
184
187
50
43
Page 52

Audio
CD operation
General information on CD operation
Health hazard G
The CD drive and CD changer are Class 1 laser products. There is a danger of invisible
laser radiation when you open or damage
the cover.
Do not remove the cover. The CD drive and
the CD changer do not contain any parts
which can be serviced by the user. For safety reasons, have any necessary service work
performed by an authorized Mercedes-Benz
Center.
!
Use only CDs with a diameter of 12 cm,
do not use 8-cm CDs.
An 8-cm CD adapter may cause damage
to the CD changer and should not be
used.
CD playback locations are
앫 the CD drive in the COMAND operating
unit
You can play audio CDs or read data
from the navigation CD.
앫 the CD changer with 6 magazine slots.
The status line in the main CD menu
(
컄 page 50) indicates which component is
being used for CD playback.
Tips on caring for your CDs
앫 Only touch the CD on the sides.
앫 Avoid touching the CD surface with
your fingers.
앫 Clean the CD with a dry, lint-free cloth.
Wipe them from the inside to the outer
edge. Never wipe the CD in a circular
motion.
앫 Do not use rubbing alcohol or solvents
to clean the CDs.
앫 Do not expose the CDs to heat or direct
sunlight.
앫 Do not write or put stickers on CD.
i
You can name a CD (컄 page 55). This
name then will appear on the display
during CD playback.
44
Page 53

Audio
F
O
Y
3
6
9
S
CD operation
Loading a CD into the CD drive
2
B
MAP
E
S
-
+
V
A
N
D
C
S
Y
-RPT
OL
T
S
F
O
1 Eject button
2 CD drive
1
2
1
L
ABC
U
5
4
O
JK
I
H
G
8
7
U
T
S
R
Q
P
0
+
L
E
D
P82.85-7234-31
왘 Press 1 to eject any CD if necessary.
왘 Insert a CD as illustrated with the label
facing up into 2 until it is automatically
pulled in.
E
D
N
M
L
Changing the navigation CD
(
컄 page 119)
WX
V
!
T
E
R
After the navigation CD has been changed, the message “Program is being
loaded. Please wait.” and a progress indicator are displayed. This indicates
that COMAND is currently loading the
program stored on the navigation CD.
Do not interrupt the loading process.
Do not eject the navigation CD until the
loading process has been completed.
Loading CDs in the changer
The CD changer is located on the left side
of the cargo compartment (model 463) or
in the glove box (models 203 and 209). It
can accomodate up to 6 CDs.
P82.85-7235-31
왘 Open the sliding door by pushing in the
direction of the arrow above. Push the
door completely open until it locks in
the open position.
45
Page 54

Audio
CD operation
i
You can also slide out the magazine if
COMAND is switched off.
However, the eject button will not function if the battery is not connected or
drained.
왘 Press the green eject button.
The magazine will slide upwards.
46
P82.85-7236-31
P82.85-7237-31
왘 Pull the disk tray forward until it stops.
i
Do not attempt to remove the tray from
the magazine.
Page 55

Audio
CD operation
3
2
1
P82.85-7238-31 P82.85-7239-31
왘 Place a CD in the tray. The CD should
be inserted with the label side up.
1 Arrow tip on the rack wall
왘 Push the CD tray into the magazine
completely.
P82.85-9057-31
왘 Slide the magazine into the CD changer
until it clicks into place (listen for the
click).
왘 Press the button 3 to close the magazi-
ne compartment.
i
Make sure that 1 is pointing in the direction of the arrow 2.
47
Page 56

Audio
CD operation
Menu overview
48
Page 57

Function Page
1 Main CD menu 50
2 Status line
CD 0: The CD drive is in
operation
CD 1-6: The CD changer
is in operation
3 Main sound menu
Sound settings
4 “CD Naming” menu
Naming a CD
5 “Settings” menu
Selecting the playback
mode
6 “CD Select” menu
Selecting a CD
Track select
63
55
58
53
51
Audio
CD operation
49
Page 58

Audio
CD operation
Switching on
1
2
3
P82.85-9098-31
Main CD menu
1 CD function with the number of the ma-
gazine slot currently playing
2 Track number and elapsed playback
time will appear. Also, the name of the
CD will appear here, see “Naming a
CD” (
컄 page 55)
3 Scan function and menu fields
왘 Press d.
The main CD menu will appear.
Playback begins if a CD was inserted in
one of the playback locations.
Playback locations are
CD 0 CD drive
CD 1 - CD 6 magazine slot 1 to 6 in
the CD changer
앫 CD drive
Playback will begin with the first
track on the CD.
앫 CD changer
The CD changer searches for inserted CDs in magazine slots 1 to 6
and plays the first track on the first
CD detected.
i
If you switch on CD mode, COMAND will
check which playback unit (CD drive or
CD changer) was used last.
If there is no CD in one of the units,
COMAND automatically switches to the
unit with CD.
After the magazine was changed
The message “Loading CD ...” appears if
the CD changer was used last.
Error messages (
Switching another system on
왘 Press any system key, e.g. c.
COMAND will switch to radio operation.
컄 page 60).
50
Page 59

Audio
CD operation
Track select
P82.85-9099-31
You can select a track
앫 with the rocker switch g/h
앫 with the number keypad
앫 in the “CD Select” menu
With the rocker switch g/h
Next track
왘 Press h briefly.
Previous track or start of title (if more than
9 seconds of playing time has elapsed)
왘 Press g briefly.
Select any desired track
왘 Press g/h as often as necessa-
ry.
With the number keypad
P82.85-9100-31
왘 Press t and enter the number of the
track you wish to select, e.g. 2.
i
If you enter a two-digit number, you
must enter the second number within 3
seconds. Otherwise the system will
switch to the track of the first number
entered.
51
Page 60

Audio
CD operation
You will hear the selected track
앫 automatically after 3 seconds
앫 if you press t.
The new track number will appear in
the main CD menu.
In the “CD Select” menu
P82.85-9101-31
왘 Turn the right-hand rotary/push-button
v to highlight “CD Select” in the main
CD menu and press to confirm.
The “CD Select” menu will appear.
왘 Press t and the number key for the
track you wish to select, e.g. 2.
You will hear the track you have chosen
앫 automatically after 3 seconds
앫 if you press t.
The main CD menu with the new track
number will appear.
52
Page 61

Audio
CD operation
Selecting a CD
You can select a CD
앫 with the number keypad
앫 in the “CD Select” menu
P82.85-9102-31
With the number keypad
왘 Press a number key, e.g. 2 to select
the corresponding CD.
The message “Loading CD ...” will appear if the selected magazine slot is
loaded.
Key 0 CD drive
Keys 1 - 6 magazine slots 1 to 6 of
the CD changer
No CD has been inserted:
COMAND will show the messages
앫 “CD drive: No CD” or
앫 “CD changer: No CD”.
i
If it is not possible to play a CD selected
from the CD drive (message: “Error”),
COMAND will automatically load the
next CD in the magazine.
Other error messages (
컄 page 60).
In the “CD Select” menu
1
2
3
4
P82.85-9103-31
1 Current track and the name of the CD
playing if this was entered previously
(
컄 page 55)
2 Current CD in red color
3 Magazine slots contains a CD
Position 0: CD drive
Position 1-6: magazine slots in the CD
changer
4 Magazine slot does not contain a CD
53
Page 62

Audio
CD operation
왘 Turn the right-hand rotary/push-button
v to highlight “CD Select” in the main
CD menu and press to confirm.
The “CD Select” menu will appear.
왘 Turn the right-hand rotary/push-button
v to highlight the desired CD and
press to confirm.
The message “Loading CD ...” will appear in 1. Playback will then begin with
track 1, the main CD menu will appear.
i
If magazine slots are empty, it is not
possible to select them with the righthand rotary/push-button v.
If you select an empty magazine slot
with a number key, e.g. 4 the message
“No CD” is displayed.
Fast forward/reverse
P82.85-9104-31
Fast forward
왘 Press h longer than 2 seconds and
keep it depressed.
The message “Forward S” will appear.
The display shows the current position
via the time indicator display.
Fast reverse
왘 Press g longer than 2 seconds and
keep it depressed.
The message “T Reverse” will appear.
Ending the function
왘 Release g or h.
Playback will resume.
54
Page 63

Audio
CD operation
CD track scan
The tracks on a CD can be scanned one after the other for 8 seconds each.
P82.85-9105-31
왘 Press the right-hand rotary/push-
button v to activate “Scan” function.
Scan will begin and “Scan” will appear
in red.
Use one of these ways to switch off the
function
왘 Press the right-hand rotary/push-
button v again.
왘 Press g or h.
i
The function will switch off automatically when the starting track is reached.
Playback will resume with the desired
track.
i
For the CD changer, it is also possible to
scan all of the CDs in the magazine slots
1-6 for 8 seconds each (always track 1).
Activate the function “CDs Scan” in the
settings menu (
컄 page 58).
Naming a CD
1
2
3
4
P82.85-9106-31
1 Input line
2 Character set (letters, digits, special
characters)
3 Character selected appears magnified,
magnified “M” is starting point
4 “Delete Names” function
55
Page 64

Audio
CD operation
Naming the CDs inserted in the CD changer or CD drive
왘 Turn the right-hand rotary/push-button
v to highlight “CD Naming” in the
main CD menu and press to confirm.
The “CD Naming” menu will appear.
왘 Turn the right-hand rotary/push-button
v to highlight the desired character
and press to confirm.
The character is entered in 1.
왘 Repeat the last step to enter additional
characters.
Deleting the character that has been entered last
왘 Press r briefly.
The input marker moves to the left as it
deletes.
Deleting a complete name
왘 Press r longer than 2 seconds.
Altering an entered name
왘 Delete one character at a time or the
entire name.
왘 Then enter the new name.
P82.85-9107-31
왘 Press the right-hand rotary/push-
button v longer than 2 seconds.
The name of the CD currently playing
will appear in the main CD menu above
the track number.
i
The CD will retain this name even if you
later insert it in a different magazine
slot.
56
Page 65

Audio
CD operation
i
The CD names are stored in the names
list in alphabetical order. If the name
memory is full, the following message
will appear: “Attention, name memory
is full. New entry only possible after deleting old one”.
Confirm the message by confirming
“OK”. The input menu will appear again.
Use the “Delete Names” function to delete names from the memory.
Deleting a CD name
P82.85-9108-31
왘 Turn the right-hand rotary/push-button
v to highlight “Delete Names” in the
main CD menu and press to confirm.
The list of CD names will appear.
왘 Turn the right-hand rotary/push-button
v to highlight the name you wish to
delete and press to confirm.
The name is deleted, the following entry will then move up one position.
왘 Press the right-hand rotary/push-
button v longer than 2 seconds to return to the main CD menu.
Paging backward/forward in the name memory (if the : and ; symbols are shown)
왘 Turn the right-hand rotary/push-button
v to highlight the : or ; symbol and
press to confirm.
57
Page 66

Audio
CD operation
Playback mode
1
2
3
4
P82.85-9109-31
1 Current playback mode
2 up to 4 functions can be selected for
the CD changer only
P Playback mode active
Q Playback mode is not active
i
You can only select one playback mode
at a time.
왘 Turn the right-hand rotary/push-button
v to highlight “Settings” and press to
confirm.
The “CD Settings” menu will appear.
Activating playback mode
왘 Turn the right-hand rotary/push-button
v to highlight the desired function and
press to confirm.
Playback mode is active P.
Standard
This function is automatically active when
another CD has been selected. CD playback begins in ascending order.
Magazine Mix (CD changer only)
Select this function to play all of the tracks
of all of the CDs in the magazine slots 1-6
in random order.
i
When CDs are played in random order,
it is possible that several tracks from
the same CD are played in a row.
“Magazine Mix” appears in the main CD
menu.
Track Repeat
Select this function to repeat the current
track until you switch the function off.
“Track Repeat” appears in the main CD
menu.
Track-Mix
Select this function to play the tracks on
the CD currently selected in random order.
“Track-Mix” appears in the main CD menu.
CD Repeat (CD changer only)
Select this function to repeat the current
CD until you switch the function off.
“CD Repeat” appears in the main CD menu.
58
Page 67

Audio
CD operation
CDs Scan (CD changer only)
Select this function to scan all of the CDs
in the magazine slots 1-6 for 8 seconds
each (track 1).
i
This function will begin with the CD following the CD currently playing.
Scan function will end
앫 automatically after all CDs have
been scanned
앫 if you press g/h.
Switching off playback mode
왘 Turn the right-hand rotary/push-button
v to highlight the current playback
mode and press to confirm.
The checkmark disappears. Playback
automatically changes to “Standard”
P.
Return to the main CD menu
P82.85-9110-31
왘 Press *.
The playback mode selected appears in
the main CD menu below the track
number, e.g. “Magazine Mix”.
59
Page 68

Audio
CD operation
Muting CD playback
왘 Press Ö while a CD is being played.
CD operation is muted, the symbol R
will appear in the symbol bar.
왘 Press Ö once again if you wish to
continue playback. The symbol R is faded out of the symbol bar.
i
COMAND also cancels muting, if you
앫 select a different audio source,
e.g. radio
앫 alter the volume
앫 press g/h.
Error messages
1
2
P82.85-9111-31
1 CD changer error messages
2 CD drive error messages
“No CD changer”
COMAND is unable to activate the CD
changer.
왘 If necessary, contact an authorized
Mercedes-Benz Center.
“No Magazine”
There is no magazine inserted in the CD
changer.
왘 Load CDs into the magazine and insert
it into the CD changer.
“CD Magazine empty”
There are no CDs in the magazine.
왘 Load CDs into the magazine and insert
it into the CD changer.
“No CD”
앫 CD changer
There is no CD in the magazine slot selected.
왘 Select another magazine slot.
앫 CD drive
No CD is in the CD drive or the CD in
the drive is not ready to play.
60
Page 69

Audio
CD operation
“Being activated”
The CD changer is not yet ready for operation.
“Reading error”
The CD that has been inserted cannot be
read.
“Temperature is too high”
CD operation will switch off automatically
after 3 seconds.
왘 Press the corresponding key to select a
different audio source.
“Error”
Another error has occurred.
i
If an error occurs in the operation of the
CD drive or CD changer, COMAND automatically switches to the other device
after 3 seconds.
If it is not possible to play the CD selected in the CD changer, the system will
automatically select the next CD in the
magazine.
61
Page 70

Audio
CD operation
Multifunctional display
1 No audio source has been switched on
2 CD unit is switched on
3 If the CD changer is switched on, the
number of the CD currently playing appears
4 Track number
62
왘 Press d on COMAND.
CD unit is switched on.
왘 Press E or H repeatedly until
display 2 appears.
왘 Press F or G until the desired
track number 4 appears.
왘 Press E or H to display the next
or previous system.
Page 71

Sound settings
Adjusting sound settings
COMAND is equipped with a standard amplifier.
You can set
앫 the sound Bass/Treble individually
앫 the sound-center (Fader and Balance)
앫 select predefined sound optimization.
See individual audio mode descriptions for
instructions on this feature.
Adjustments to the sound have a different
effect on the audio and service sources.
The predefined sound optimizations are
available for the audio sources only.
Audio sources include:
앫 Radio FM, AM, WB
앫 CD (CD drive, CD changer)
앫 auxiliary audio source, e.g. tape deck (if
connected)
You can activate the main Sound menu in
the audio sources through the menu field
“Sound”.
Service sources include:
앫 Telephone
앫 Voice output in the navigation
앫 Voice recognition system
See separate operating instructions for telephone and voice recognition system.
You can activate the main Sound menu in
the “NAVI Settings” menu (
컄 page 181),
through the menu field “Sound”.
Audio
Sound settings
Activating the main sound menu
For audio sources
Main sound menu
1 Radio (FM) is switched on
2 Actual sound settings (Bass/Treble)
3 Actual sound-center (Fader and Balan-
ce)
4 Slider switch to alter the value
5 Reset Bass/Treble to “0”, and the Ba-
lance to the middle of the vehicle
6 Activate predefined sound optimizati-
ons
63
Page 72

Audio
Sound settings
왘 Turn the right-hand rotary/push-button
v to highlight “Sound“ in the main
menu for radio or CD operation and
press to confirm.
The main sound menu will appear displaying the actual settings.
i
It is also possible that “AM Bass/Treble”, “WB Bass/Treble”, “CD Bass/Treble” or “AUX Bass/Treble” are indicated
in 1.
Fader defines sound-center front/
back
Balance defines sound-center left/
right
For service sources
1 Volume difference
Set the difference between voice output during route guidance and an active audio source
“0” The volume of the audio source
is not affected during voice output.
“10” The audio source is set very low
during voice output.
왘 Turn the right-hand rotary/push-button
v to highlight “Settings” in the main
destination input menu (
컄 page 122)
and press to confirm.
The “NAVI Settings” menu will appear
(
컄 page 181).
왘 Turn the right-hand rotary/push-button
v to highlight “Sound” and press to
confirm.
The “Speech Bass/Treble” menu will
appear.
i
No predefined sound optimizations are
available for service sources.
During adjustment in the “Speech
Bass/Treble” menu, COMAND will issue a repetative voice output of “Sample” to allow you to set the settings as
you prefer.
64
Page 73

Audio
Sound settings
Setting Bass/Treble/Fader/Balance
1 Setting mode active
왘 Turn the right-hand rotary/push-button
v to move the cursor to the parameter
you want to adjust and press to confirm.
The setting mode is active. The activated sound parameter is shown in red.
왘 Turn the right-hand rotary/push-button
v to set the desired value.
왘 Press the button.
The value is set. The sound feature is
shown in black.
i
The sound-center adjustments affect
the settings for the radio (FM/AM/WB)
and CD operation.
Adjustments which are made to the navigation system will affect the voice recognition system and the telephone.
Reset the Settings to “0”
왘 Turn the right-hand rotary/push-button
v to highlight “Reset” and press to
confirm.
COMAND sets treble and bass to “0”
and sets the sound-center into the
middle of the vehicle.
Return to the main audio menu
왘 Press *.
65
Page 74

Audio
Sound settings
Activating sound optimization
P82.85-9116-31
왘 Turn the right-hand rotary/push-button
v to highlight “Other Options” in the
main sound settings menu and press to
confirm.
The “Other Options” (FM/AM, WB or
CD) menu will appear.
P - actual sound optimization
P82.85-9117-31
왘 Turn the right-hand rotary/push-
buttonv to highlight the desired
sound optimization and press to confirm.
The new sound optimization is
active P.
i
You can only select one sound optimization at a time.
Return to the main sound menu
왘 Turn the right-hand rotary/push-button
v to highlight “Bass/Treble” and
press to confirm.
Return to the main audio menu
왘 Press *.
Available sound optimizations
앫 Standard - COMAND set the sound li-
near for the center of the vehicle
앫 Speech - the emphasis is on the spo-
ken word
앫 Driver-optimized - COMAND optimizes
the sound for the driver’s seat position
앫 Ambience
Small, medium and large rooms are simulated
i
COMAND does not offer sound optimization for the service sources.
66
Page 75

Telephone
Important notes
Multifunction display
Telephone operation
SMS function
Emergency call
Service numbers
67
Page 76

Telephone
Important notes
Important notes
In chapter “Telephone”, you will find detailed information regarding the telephone*, including emergency call, SMS
function and service numbers.
Warning G
Some jurisdictions prohibit the driver from
using a cellular telephone while driving a vehicle. Whether or not prohibited by law, for
safety reasons, the driver should not use the
cellular telephone while the vehicle is in motion. Stop the vehicle in a safe location before answering or placing a call.
If you nonetheless choose to use the cellular
phone while driving, please be sure to pay
attention to the traffic situation at all times.
Use the cellular phone
situation allows.
Never operate radio transmitters equipped
with a built-in or attached antenna (i.e.
without beeing connected to an external antenna) from inside the vehicle while the engine is running. Doing so could lead to
malfunction of the vehicle’s electronic systems, possibly resulting in an accident and
personal injury.
1
only when the traffic
!
Radio transmitters, such as a portable
telephone or a citizens band unit
should only be used inside the vehicle
if they are connected to a separate exterior antenna that has been approved
by Mercedes-Benz.
Please read the chapter “Telephone”
앫
first before attempting to operate your
telephone.
앫 Always drive with extreme caution
when you operate the telephone
hands-free.
앫 For safety reasons, you should not use
the mobile telephone handset to make
a call while driving the vehicle.
If the signal strength is very weak (display in the symbol field of all menus):
Wait until reception improves before
making a call.
68
1 Observe all legal requirements
Page 77

Telephone
Important notes
앫 Close the windows and reduce all out-
side noise as much as possible when
you use hands-free operation.
앫 A brief disconnection from the cellular
network is not a malfunction, as this
can occur when the network switches
areas. The phone will automatically try
to sign on to a network again.
앫 If the message “Locked. Please enter
code” appears, enter the unlock code
to enable all telephone functions
(
컄 page 78).
앫 If a menu other than the telephone
menu is displayed on the COMAND
screen, the display will change if an
outgoing call is sent out via the multifunction steering wheel.
In the following situations, it is not possible
or not yet possible to use the telephone:
앫 The telephone is already unlocked but
is not or not yet registered in the network.
The message “No Service” appears.
The telephone will try to register into
an existing network. If the network is
available, the telephone will be ready
for use.
The above message also appears
앫 if the network is no longer available
due to weak signals
앫 if you try to make a call (message
appears for 8 seconds)
앫 The message “Telephone is being acti-
vated. Please wait.” appears.
COMAND prepares the telephone for
use. Select other system functions, e.g.
radio, by pressing the corresponding
button or wait until the telephone is active.
앫 One of the two messages “No telepho-
ne” or “Telephone not connected” appears.
Please connect the telephone.
앫 The message “Telephone defective”
appears.
Please contact an authorized
Mercedes-Benz Center.
69
Page 78

Telephone
Important notes
In the following situation, it is not yet possible to use the functions “Dial number
from phone book”, “Redial” and
“Speed-dial”:
앫 The mobile telephone has been
plugged into its holder correctly, the
COMAND operating unit has been switched on and the phone book download
function has been actuated (see telephone operation guide).
Once the download process has been
completed, the above functions become available.
It is not possible to make a call when one
of the following messages appears:
앫 “System busy, redial?”
Dialing has failed because system is
busy.
앫 “No service, redial?”
Dialing has failed because network
cannot received.
앫 “Phone off”
Tele Aid is active, the telephone function will switch on automatically after
Tele Aid is ended.
70
Page 79

Multifunction display
Telephone
Multifunction display
1
5
4
왘 Turn the electronic key in the steering
2
3
P82.85-9290-31
lock to position “1” or “2”, refer to vehicle operating instructions.
Function Page
1 Multifunction display on
the speedometer
Using the control system
2 Adjusting the dial/idle
tone volume during a call
I lowering
J raising
3 To make a call
K Accept an incoming
call
Start dialing operation
Activate the redial
memory
L End a call
Interrupt dialing
The message
READY appears
79
85
91
79
83
Function Page
4 Changing from system to
system, displaying network
provider
E next
H previous
5 Pages through the phone
book in alphabetical order
F forward
G backward
71
Page 80

Telephone
Multifunction display
Display overview
72
Page 81

Telephone
Multifunction display
Function Page
1 The telephone is switched off
Switching telephone operation on
2 Entering the unlock code 78
3 The system is searching for
the corresponding network
4 The telephone is ready for use 85
5 The vehicle is currently out-
side the transmission or reception range
78
78
Function Page
6 Phone book is empty and/or
has not been loaded into the
COMAND telephone memory
7 Name selected from the
phone book
8 Dialing begins 86
9 Dialing is completed and the
name is displayed.
The display will remain until
you end the call
85
85
86
Function Page
10 Reception strength is indica-
ted by up to 5 bars for a connected and functional
telephone.
11 Number of the memory locati-
on and the name stored here
12 Call time 86
79
85
73
Page 82

Telephone
Telephone operation
Telephone operation
Quick reference
74
Page 83

Telephone
Telephone operation
Function Page
1 Switching the COMAND
12
on/off
2 Entering the unlock code
Entering a telephone number
Speed-dialing (only with
78
82
95
COMAND)
Quick-dialing (for the first 10
97
memory locations)
Entering the
emergency call
107
“9-1-1”
3 Subsequent dialing 84
4 Subsequent dialing 84
5 Calls the previous menu, un-
less the main telephone menu
is displayed
6 Deletes the last digit or the
83
whole entry if the unlock code
or a phone number are entered
Function Page
7 Turning
Highlights a menu field, a list
entry, or a symbol
Pressing
Activates a sub-menu, confirms an entry/selection
앫 “Send” is highlighted
Begin dialing
앫 “End” is highlighted
Ends the call
앫 “Mute” is highlighted
Switches off the microphone of the hands-free
telephone
Function Page
8 Sets the volume for hands-
free operation of the telephone (during a call)
9 Switching the telephone
operation on/off
10 Color screen with main tele-
phone menu
80
78
75
Page 84

Telephone
Telephone operation
Menu overview
2
3
5
4
17
16
76
1
9
6
7
8
10
11
12131415
P82.85-9120-31
Page 85

Telephone
Telephone operation
Function Page
1 Main telephone menu 78
2 Telephone system is active 78
3 Accepting a call using
COMAND
Begin dialing
4 Ending a call 84
5 Microphone mute 80
6 Reception strength is indica-
ted by up to 5 bars for a connected and functional
telephone
M Incoming SMS mes-
sage
RM ROAM indicator
RM in black - using a
home type system
RM in red - using a non
home type system
80
83
103
103
Function Page
7 Input line
8 Alphabet to enter the name 99
9 Menu fields to activate sub-
menus
10 “Phone book” selection menu
is activated when the input
line 7 is empty
Phone book with names
is activated according to input
of up to 3 letters
11 Main telephone menu with
other menu fields is activated
via the symbol “V”
12 SMS list
Reading or deleting an SMS
message
13 “Service Number” menu
Selecting a service number
for an outgoing call or changing a service number
80
87
87
104
108
Function Page
14 Notebook, noting a telephone
number
Dialing from the notebook
15 “Calls” function
The last incoming calls are
stored
16 Redial memory, the last 10
numbers (L01-L10) dialed are
stored
L01 last number or
name dialed
L01-L10 numbers or names
dialed previously
17 Telephone menu for entering
telephone numbers
Switch back to the main telephone menu via the “ABC/
123” menu field
97
97
94
93
93
82
77
Page 86

Telephone
Telephone operation
Switching telephone operation on
1
2
P82.85-9121-31
1 Status line, telephone is not yet logged
onto network
2 Input line for unlock code
왘 Press a.
The menu to enter the unlock code will
appear.
Entering the unlock code
왘 Use the number keys 1 through 0 to
enter the unlock code.
Asterisks instead of digits will appear in
the input line.
If entered code is correct and the phone is registered in a network, the phone
is ready for use.
i
Your unlock code prevents unauthorized persons from using your telephone.
Be sure to memorize this code, a three
digit number, carefully.
Timeport phones use a three-digit code.
V60 phones use a four-digit code. The
head unit will unlock the phone using
the first three digits of the four-digit
V60 unlock code.
If you enter an incorrect code, the system returns to the menu for entering
the unlock code.
i
You must always enter the unlock code
when you switch on the telephone the
first time (if phone is in locked mode).
4
3
P82.85-9122-31
Ready for operation display
3 Telephone is ready for operation,
“Send” is highlighted
4 Reception strength, indicated by up to
5 bars
RM appears, if the telephone is not
using the home system
78
Page 87

Telephone
Telephone operation
If the phone memory has been downloaded to COMAND, the menu fields “Phone
Book”, “Last Calls” and “Calls” will be available.
If the memory was not downloaded, the
menu fields will be dimmed out.
Outgoing calls (
컄 page 82).
Switching telephone operation off
Use one of these ways
왘 When the telephone is connected to
the coiled cord, press a on the
COMAND control unit.
or
왘 When the telephone is in portable mo-
de, press # on the phone.
Incoming call
Accepting the call at the multifunction
steering wheel
1 CALL
The system detects an incoming call,
the phone rings
2 Reception strength
The more bars appear, the stronger the
signal of the cellular network
Accepting a call
왘 Press K.
Audio source is automatically muted.
i
You can also accept a call, if another
display, e.g. navigation, is shown on the
multifunction display.
Ending a call
왘 Press L.
The main telephone display appears.
i
Communication between the multifuntion display and the COMAND screen:
If different systems appear, the changes made to COMAND will have no effect on the driver information display.
앫 Press the COMAND key a to
switch to the telephone functions.
79
Page 88

Telephone
Telephone operation
Accepting a call using COMAND
1
P82.85-9123-31
1 “Call”
The system detects an incoming call,
the phone rings.
왘 Press the right-hand rotary/push-
button v to confirm the “Send” button.
The display will change to the
call menu. An active audio source will
be muted.
2
3
P82.85-9124-31
Call menu
2 “00:01:21 h”
The call time appears
3 Phone number
i
No telephone menu is shown on the
screen
앫 first press a
앫 then you can accept or refuse the
call.
Switching the microphone for the
hands-free telephone off
왘 Turn the right-hand rotary/push-button
v to highlight the “Mute” button and
press to confirm.
왘 Press the right-hand rotary/push-
button v again to cancel muting.
Setting the volume for hands-free operation
Raising the volume
왘 Turn the left-hand rotary/push-button
v to the right.
Lowering the volume
왘 Turn the left-hand rotary/push-button
v to the left.
80
Page 89

Telephone
Telephone operation
Refusing or ending a call
Use one of the three ways:
왘 Press the right-hand rotary/push-
button v to confirm the “End” button.
or
왘 Press a.
or
왘 Press *.
Accepting an incoming call using the
mobile telephone handset
The telephone is located in the storage
compartment under the armrest. See your
vehicle’s operating instructions.
왘 Press the right-hand rotary/push-
button v to confirm the “Send” button.
왘 Remove the telephone from its cradle
and conduct your call.
The hands-free operation will switch
off.
Ending a call
왘 Put the phone back in its cradle.
Warning G
Some jurisdictions prohibit the driver from
using a cellular telephone while driving a vehicle. Whether or not prohibited by law, for
safety reasons, the driver should not use the
cellular telephone while the vehicle is in motion. Stop the vehicle in a safe location before answering or placing a call. If you
nonetheless choose to use the cellular phone while driving, please be sure to pay attention to the traffic situation at all times. Use
the cellular phone
tuation allows.
1 Observe all legal requirements
1
only when the traffic si-
81
Page 90

Telephone
Telephone operation
Outgoing calls
You can use the following functions:
앫 Dialing a telephone number
(
컄 page 82)
앫 Dialing a number from the phone book
(
컄 page 85)
앫 Redial (컄 page 91)
앫 Dialing from calls list (컄 page 94)
앫 Speed-dialing (only with COMAND)
(
컄 page 95)
앫 Dialing a telephone number from
the notebook (
앫 Emergency call (컄 page 106)
컄 page 97)
Dialing a telephone number
Entering a telephone number
P82.85-9125-31
왘 Press a.
The main telephone menu will appear.
왘 Use the number keys 1 through 0 to
enter the telephone number.
The menu changes when the first digit
is entered.
82
Page 91

Telephone
Telephone operation
Correcting input
To correct only the last digit
왘 Press r briefly.
To correct the whole entry
왘 Press r longer than 2 seconds.
Begin dialing
P82.85-9126-31
왘 When the “Send” button is highlighted,
press the right-hand rotary/pushbutton v to confirm your input.
Dialing will begin. If a name is associated with the phone number stored in
the phone book, the name appears on
the screen.
COMAND will mute an active audio
source.
Interrupt dialing
Use one of the three ways:
왘 Press the right-hand rotary/push-
button v to confirm the “End” button.
or
왘 Press a.
or
왘 Press *.
83
Page 92

Telephone
Telephone operation
Conducting a call
When the call is initiated, the call time appears in the screen.
P82.85-9127-31
Ending a call, use one of the three ways:
왘 Press the right-hand rotary/push-
button v to confirm the “End” button
or call has been finished by the other
party.
or
왘 Press a.
or
왘 Press *.
Subsequent dialing
Transmitting other dial tones:
왘 During a call you can press the number
keys 1 through 0, u and t.
The numbers dialed will appear in the
menu for 10 seconds after the last key
is pressed (subsequent dialing display).
i
During a conversation, you can enter a
telephone number in the notebook or
edit an existing one (
컄 page 97).
84
Page 93

Telephone
Telephone operation
Dialing a number from the phone book
Dialing using the multifunction steering
wheel
In order to use this feature, the phone
book must have previously been downloaded to the COMAND memory. This is performed automatically each time the
portable phone is connected to the coiled
cord.
The telephone is ready for operation
(
컄 page 78).
왘 Press E or H as often as neces-
sary until the telephone mode appears
in the multifunction display.
If
ENTER CODE appears, enter your unlock
code first (
The message
컄 page 78).
NO ENTRY appears when the
portable phone has been put into the cradle and no entries are stored in the phone
book.
왘 Press F or G.
You are paging the phone book backwards or forwards in alphabetical order. Name and memory location
appear.
or
왘 Press F or G longer than 2 se-
conds.
You are scrolling through the phone
book very quickly.
The name that is selected appears in
the display.
i
If you do not wish to place a call, press
L. The process will be cancelled and
the message
READY appears again.
85
Page 94

Telephone
Telephone operation
왘 Press K when desired name ap-
pears in the display.
The telephone number is dialed.
The message
DIALING appears in the
display. COMAND will mute an active
audio source.
When the call is initiated, the call time
appears in the display. The name will
reappear.
왘 Press L to end the call.
The message
READY will reappear. The
audio source will switch on again.
.
i
Phone numbers are stored in the phone
book according to memory locations. A
memory location starts with “M”.
Memory locations available: M01 - M99
86
Page 95

Telephone
Telephone operation
Dialing with COMAND
Opening phone book with names
1
2
P82.85-9130-31
1 Input line
2 Activating “Phone book” selection
menu (no input in 1) or opening the
phone book page (
컄 page 88)
왘 Enter up to 3 letters by highlighting
them one by one with the right-hand rotary/push-button v and press to confirm.
The input appears in 1.
왘 Turn the right-hand rotary/push-button
v until 2 is highlighted and press to
confirm.
or
왘 Press the right-hand rotary/push-
button v longer than 2 seconds after
input of the last letter.
The relevant page of the phone book
will appear.
If the input line is empty
왘 Turn the right-hand rotary/push-button
v until 2 is highlighted and press to
confirm.
The “Phone book” selection menu will
appear.
3
P82.85-9131-31
“Phone Book” selection menu
3 Opens the first page of the phone book
(names)
왘 Press the right-hand rotary/push-
button v and confirm “Read phone
book...”.
The first page of the phone book will
appear.
87
Page 96

Telephone
Telephone operation
5
4
6
P82.85-9132-31
Phone Book page (names)
4 Highlighted entry, sorted alphabetically
5 Page back in the list
6 Page forward in the list
i
The phone book stored in the phone
memory is being downloaded.
왘 Turn the right-hand rotary/push-button
v to highlight the desired entry and
press to confirm.
The main telephone menu appears, indicating the selected name.
P82.85-9133-31
Begin dialing
왘 Press the right-hand rotary/push-
button v to confirm the “Send” button.
The “End” button is highlighted.
88
Page 97

Telephone
Telephone operation
Ending a call, use one of the three ways:
왘 Press the right-hand rotary/push-
button v to confirm the “End” button
or the call has been finished by the
other party.
or
왘 Press a.
or
왘 Press *.
Opening phone book (phone number)
1
2
P82.85-9134-31
1 Input line
2 Activates “Phone book” selection
menu (no input in 1) or opens the
relevant phone book page
왘 Turn the right-hand rotary/push-button
v to highlight “ABC/123” and press
to confirm.
The menu for entering the phone number will appear.
왘 Use the number keys 1 through 0 to
enter up to 2 digits one by one.
The input appears in 1.
왘 Turn the right-hand rotary/push-button
v until 2 is highlighted and press to
confirm.
or
왘 Press the right-hand rotary/push-
button v longer than 2 seconds after
input of the last digit.
The relevant page of the phone book
will appear.
89
Page 98

Telephone
Telephone operation
If the input line is empty
왘 Turn the right-hand rotary/push-button
v until 2 is highlighted and press the
button.
The “Phone book” selection menu will
appear (
컄 page 87).
4
3
5
P82.85-9135-31
Phone book page (phone numbers)
3 Phone book entries sorted according to
memory locations
Memory locations available:
M01 - M99
4 Page back in the list, if filled
5 Page forward in the list, if filled
왘 Turn the right-hand rotary/push-button
v to highlight the desired entry and
press to confirm.
The main telephone menu appears indicating the selected phone number and
memory location.
Begin dialing (
컄 page 88), then con-
ducting a call.
Ending a call (
컄 page 89).
i
If there is no entry in the numbers list,
the message “No entry in telephone
book” appears in the telephone menu.
90
Page 99

Redial
Dialing using the multifunction steering
wheel
Telephone
Telephone operation
1 The telephone is ready for operation.
2 Number in the redial memory
3 Number in the redial memory, dialing
has begun
4 Dialing is completed. Name or still the
dialed number (name has not been saved).
5 Reception strength - the more bars ap-
pear, the stronger the signal of the cellular network received
6 Memory location number, the last 10
dialed telephone numbers are stored
L01, number dialed last
L01 to L10, numbers dialed previously
7 Call time
91
Page 100

Telephone
Telephone operation
The telephone is switched on
왘 Press E or H repeatedly until the
corresponding telephone menu 1 appears in the display.
The telephone is ready for operation.
왘 Press K.
The redial memory appears with the
last number dialed.
왘 Press F or G.
This allows you to page forward or
backward through the redial memory.
The number selected will appear in the
display with the corresponding memory location.
i
If you do not wish to place a call, press
L. The telephone display 1 appears.
왘 Press K, when the desired number
or name appears in the display 2.
Dialing will begin 3. When the dialing
has been completed, the name 4 is displayed if the name has been stored in
the phone book, otherwise you will
continue to see the phone number.
The display is maintained for the duration of the call.
왘 Press L to end the call.
The telephone display 1 appears.
i
Press E or H to display the next
or previous system.
92
 Loading...